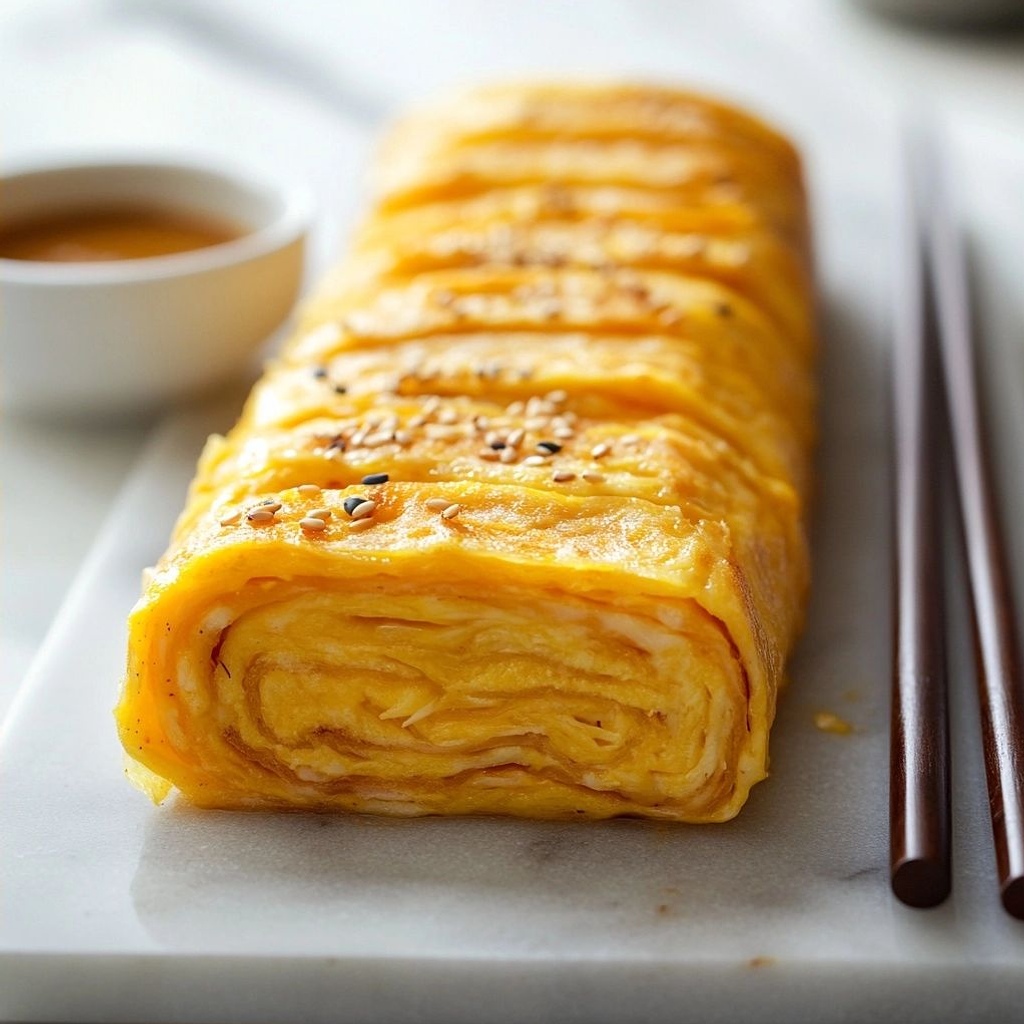
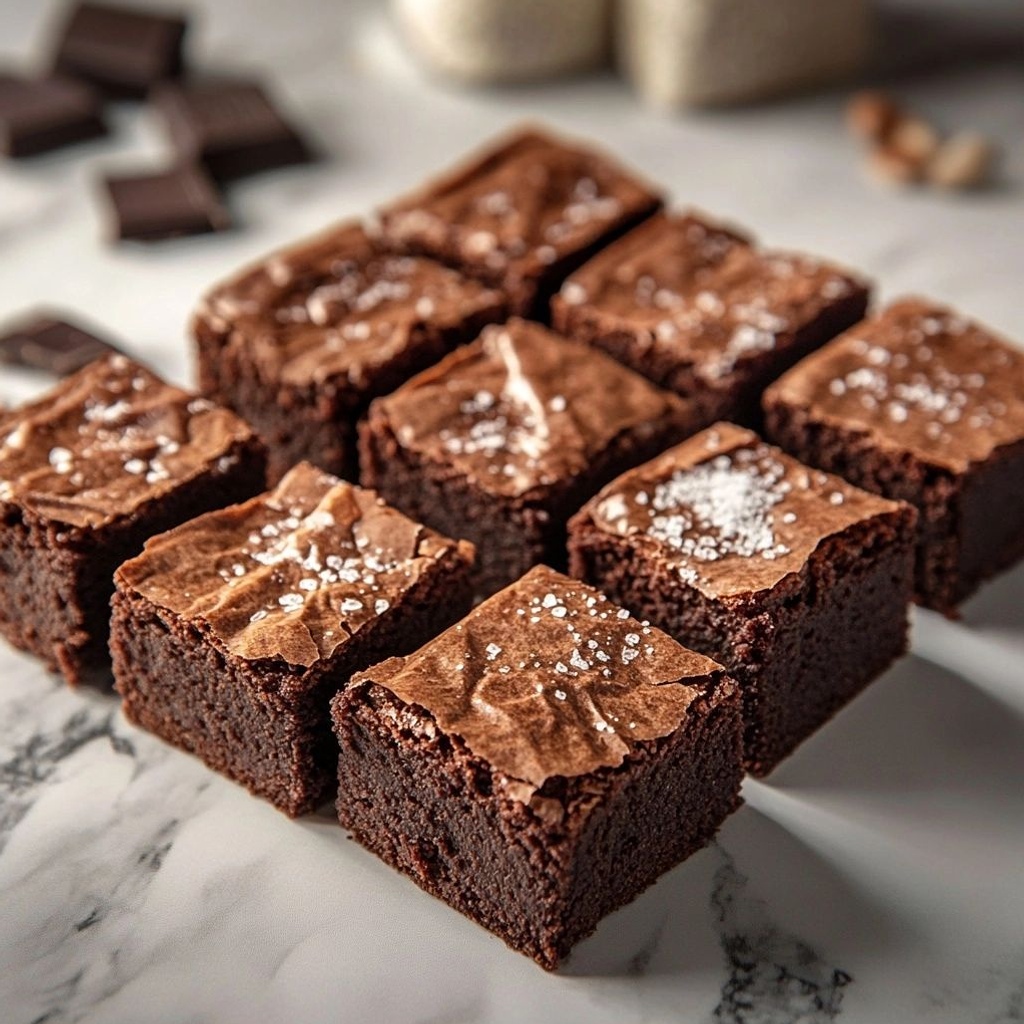
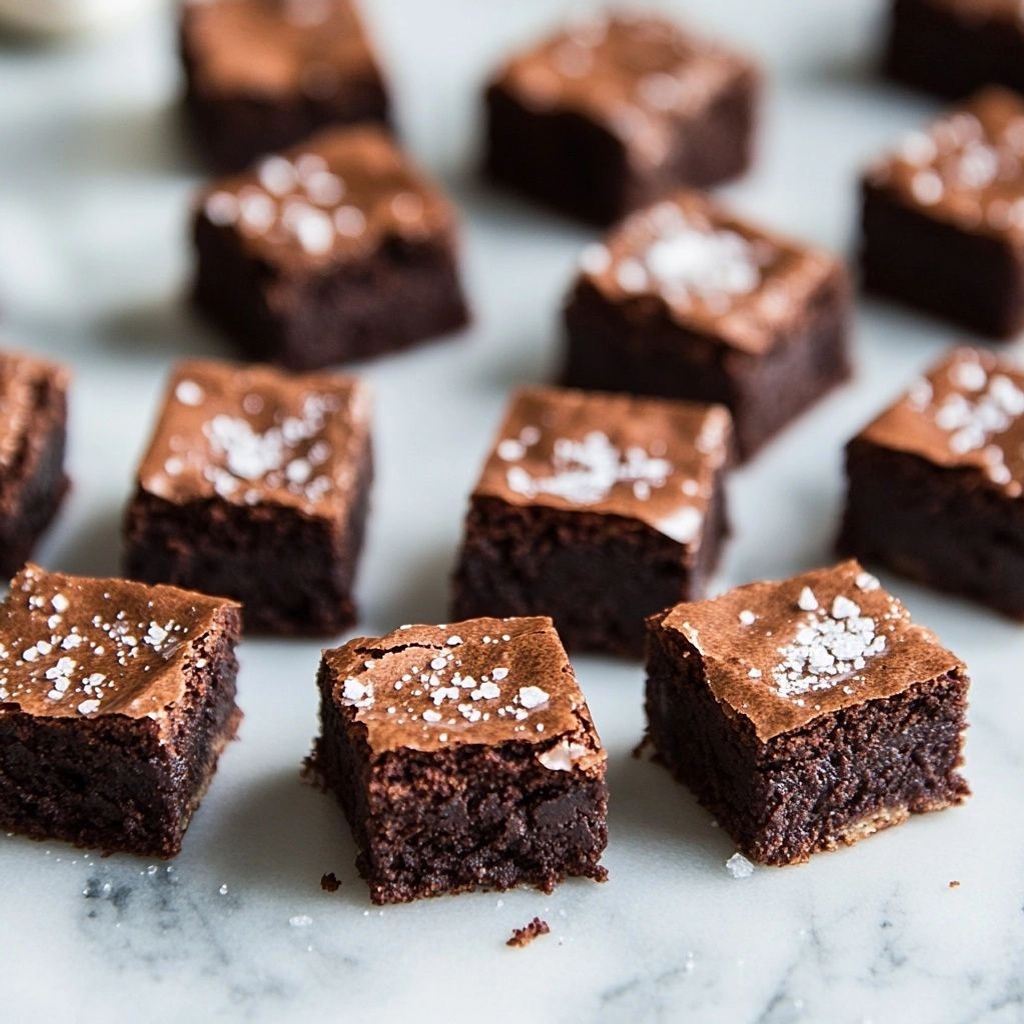
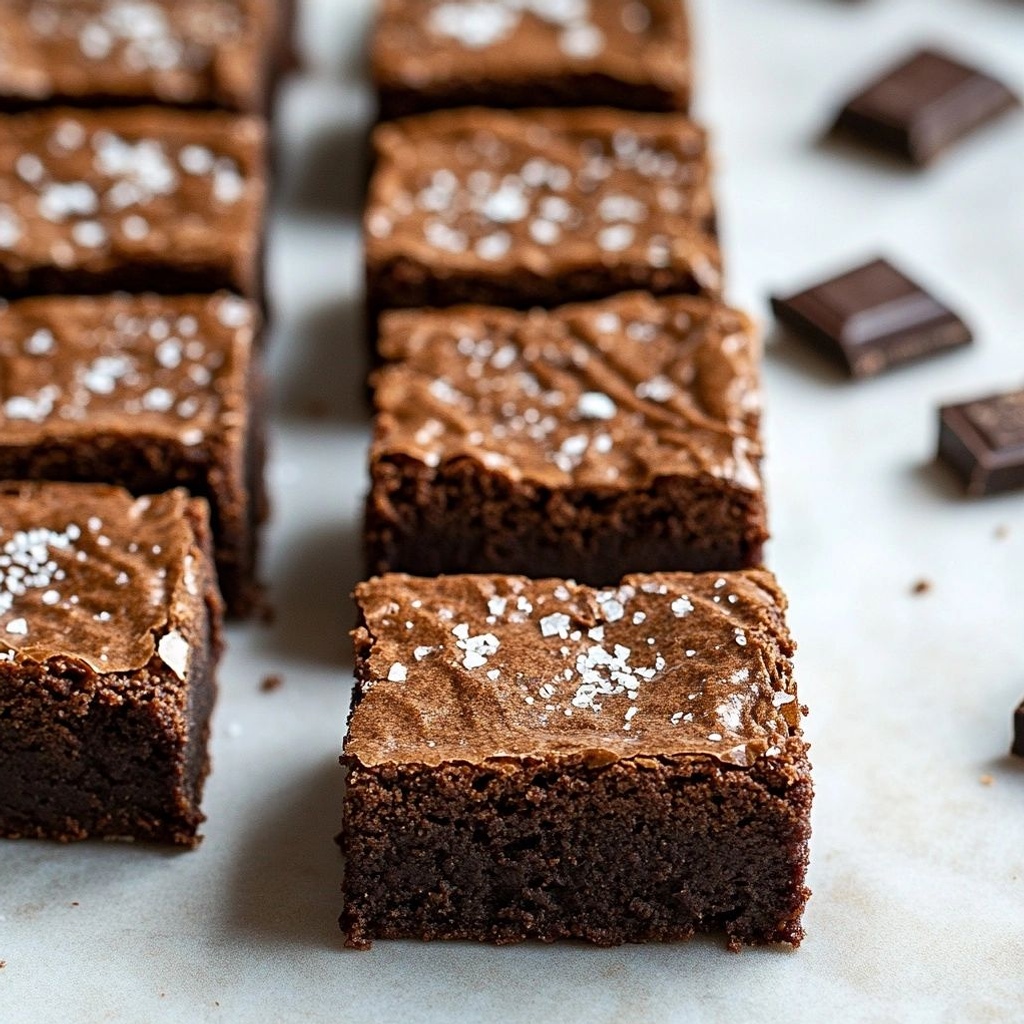
Author

Ocean Nightleaf

Browsing

Introduction / Hook

Imagine a sunlit Italian cucina where afternoons drift in with the scent of toasted almonds, a whisper of vanilla, and the bright sparkle of blueberries. Biscotti ai mirtilli is where classic Tuscan biscuit tradition meets the vivid charm of summer berries. Each bite is a delicate balance: the outer lattice is crisp and biscuit-like, giving way to a tender, almost cake-like interior that carries bursts of juicy blueberries and a kiss of citrus. It’s a dessert that feels celebratory yet cozy, elegant enough for a dinner party and approachable enough for a cozy weekend treat. When you dip these biscotti into a cup of coffee, a glass of dessert wine, or even a mug of hot tea, you’ll hear the crackle as the first bite gives way to a soft, fragrant crumb, releasing a chorus of flavors that tell a story of and beyond the pantry—fruit, nuts, sun, and a little sweetness that lingers on the palate. This is not just a biscotti; it’s a small holiday in every bite, a memory waiting to be shared with family and friends.

Blueberries bring a summer sun to the biscuit world—their gentle acidity brightens the almond-dusted sweetness, and their purple-blue flecks create a visual treat that makes the plate feel festive. The flavor is nuanced, not cloying: fruity notes that don’t overwhelm, complemented by a hint of vanilla and a subtle tang that makes you reach for a second bite before you know it. The texture is the star: a biscotti that’s sturdy enough to be dunked without crumbling, yet tender enough to melt on the tongue with a crumbly crumb that leaves a satisfying, nourishing finish. This recipe is all about balance—between crisp and soft, between orchard-fresh fruit and the toasty warmth of almonds, between the rustic charm of a traditional Italian cantuccino and the playful brightness of blueberries harvested at their peak.

Whether you’re planning a brunch, a teatime spread, or a dessert table that begs for a little Italian sunshine, biscotti ai mirtilli is a perfect bridge between casual and elegant. It’s a recipe that invites experimentation—swap in different berries, add a citrus twist, or fold in white chocolate for a decadent twist. Most of all, it invites sharing: crumble a few slices onto a cake plate and watch the conversations start as people pick up the first crumb and reveal the vibrant fruit inside. The beauty of this biscotti lies not only in its taste but in its versatility. It is a calling card for generosity: something you bake once and then give away to neighbors, friends, and family, each person discovering a tiny piece of your kitchen’s character in every bite.

The Story Behind the Dish

Biscotti, in its Tuscan form—often known as cantucci—has long been tied to slow, communal rituals. Traditionally baked twice, they earned their reputation as the ideal dunking companion for Vin Santo, the sweet dessert wine that cradles the flavors of toasted nuts and citrus. The idea of pairing a robust, storied biscotti with the bright, modern charm of blueberries feels like a natural evolution: a tribute to the past that welcomes the fruit-forward freshness demanded by contemporary palates. In many Italian kitchens, desserts are not merely sweet endings but conversations between seasons—harvested fruit, the scent of toasted nuts, and lingering aromas of vanilla and citrus zest that remind us of long summer days and sun-kissed mornings. Blueberries, though not native to the heart of Tuscany, embody a sense of seasonal optimism that resonates with cooks who want a snack that feels special yet approachable.

As with many beloved Italian recipes that travel, the story of biscotti ai mirtilli has grown through family kitchens, overseas communities, and food writers who love to play with tradition. The blueberries become a bridge between places: the Mediterranean pantry’s familiar almond, orange zest, and vanilla meeting berries that evoke North American summers. The result is a biscotti that honors its Tuscan heritage while wearing a fresh, vibrant coat. This dish has become a favorite during late-spring gatherings and summer picnics, a reminder that good baking can capture the moment when fruit is at its peak and the air itself seems sweet with possibility. It invites curiosity: what if you pair a centuries-old technique with a fruit that’s designed for outside warmth and bright color? The answer is a biscotti that tastes like a memory in the making—sunlight captured in a crisp, edible canvas.

Why You’ll Love This Recipe

  • Accessible yet elegant: A classic biscotti technique modernized with juicy blueberries for a fresh, contemporary twist.
  • Great for make-ahead moments: biscotti keep well and even improve with a day or two of rest, making them ideal for entertaining without last-minute stress.
  • Perfect dunkers: The biscotti’s sturdy, crisp exterior contrasted with a tender interior makes them ideal for coffee, tea, or dessert wine.
  • Color and aroma that brighten any table: the purple-blue flecks and fruity aroma add visual appeal as well as mood-lifting fragrance.
  • Versatile flavor base: vanilla, almond, and citrus zest provide a warm, comforting flavor while letting the blueberries shine.
  • Kid-friendly and crowd-pleasing: familiar flavors with a subtle twist that appeals to both young tasters and discerning palates.

Flavor Profile & Texture

The flavor profile of biscotti ai mirtilli is a delicate dance of contrasts. The blueberries contribute bright, tangy bursts that cut through the sweetness, leaving traces of their mild tartness on the palate. The almond-forward base provides a nutty, warm backbone—think toasted marcona almonds with a hint of buttery depth. Vanilla mirrors the fragrance of a sun-drenched kitchen, wrapping all the elements in a soft, creamy veil that lingers after the bite. A whisper of citrus zest—often lemon or orange—lifts the entire composition, adding a citrusy sparkle that keeps the flavor from feeling heavy.

Texture is key here. The biscotti offer a crisp, satisfying snap when broken, a quintessential trait that makes them ideal for dunking. Inside, the crumb is tender and slightly cake-like, a welcome softness that contrasts with the crunch of the outer layers. The blueberries stay surprisingly intact, their color mirroring a gentle jewel-toned speckle across the pale biscuit. Each slice reveals a mosaic of lightly sugared edges and chewy pockets where fruit has baked into the dough, creating pockets of juiciness that pop against the dry, brittle exterior. The experience is a long, slow dissolution of textures and flavors—from a crisp first bite to a moist, fruity finish that makes you want to reach for another slice before you’ve even finished the first.

In aroma, expect a warm orchestra: roasted almonds, a hint of vanilla bean, the citrus zests, and a subtle berry sweetness that evokes a sun-warmed summer morning. The combination is comforting yet lively, making the biscotti feel both familiar and novel at the same time. It’s a sensory invitation to slow down, savor the moment, and share a simple pleasure with someone you love.

Occasions & Pairings

This biscotti shines in many settings. It’s equally at home on a weekend brunch table as it is on a formal dessert spread. Serve it alongside:

  • Robust coffee or a frothy cappuccino for a classic Italian experience.
  • A dessert wine or a sparkling Prosecco to elevate a festive toast.
  • Plain yogurt or lemon mascarpone for a light, easy parfait option.
  • Aromatic black tea or green tea to bring out the berry brightness.
  • Fresh fruit or a simple berry compote to echo the blueberry theme.

Occasionally, biscotti ai mirtilli can take center stage at a summer party: place them on a tiered platter with other cookies and pastries, pair them with a citrusy punch or a minty lemonade, and let the vibrant color sparkle against a white plate. For a more intimate moment, bring them to a coffee-and-cookie afternoon with friends or family, where the crispness and depth prompt lingering conversations about favorite memories and new discoveries in the kitchen.

Tips, Variations & Substitutions

  • Berry variations: swap blueberries for blackberries, raspberries, or a mix of berries for different color and flavor notes.
  • Flavor boosters: a touch of orange zest or a hint of almond extract can amplify the nutty and citrus tones without overpowering the berry brightness.
  • Texture tweaks: for extra crunch, toast the nuts a bit longer or use a coarser sugar on top of the dough before shaping.
  • Vegan option: replace eggs with a flaxseed or chia seed “egg” mixture and use a plant-based butter substitute to maintain richness.
  • Gluten-free option: use a gluten-free all-purpose blend or finely ground almond flour to maintain a moist, dense crumb while keeping the biscotti structure intact.
  • Nut-free variation: if you need to avoid tree nuts, reduce the almond content and substitute with sunflower seeds or skimp on the nuts entirely, using extra berries for moisture and flavor.
  • Sweetness level: adjust sugar to taste; for a lighter version, dial back a little and rely on the natural sweetness of the fruit.
  • Texture variety: experiment with adding white chocolate chips or a dusting of powdered sugar for a different aesthetic and mouthfeel.
  • Regional twists: introduce a pinch of cinnamon or cardamom to evoke warm spice notes common in many Italian and Mediterranean desserts.

Storage & Make-Ahead Ideas

Biscotti are famously forgiving when it comes to storage, and biscotti ai mirtilli benefit even more from a little resting time. Once completely cool, store in an airtight container in a cool, dry place. They stay crisp and flavorful for about a week, and their flavor often deepens with a day or two of rest, giving you a chance to savor the evolving texture and aroma.

Make-ahead approach: bake the biscotti in advance, let them cool completely, and keep them airtight. When you’re ready to serve, slice and return them to a warm oven briefly to refresh the crispness. If you’re planning to freeze, freeze the un-sliced dough or the baked biscotti in a freezer-safe bag or container. Thaw at room temperature and, if needed, give them a quick re-dunk in a low-heat oven to restore their crispness.

Revisiting flavors: store-bought or homemade vanilla extract can be used to add a gentle aromatic lift between batches. A quick re-dunk in a cup of coffee right before serving can revitalize the aroma and bring the flavors back to life after a night of storage.

Fun Facts & Trivia (Optional)

Did you know that biscotti literally translates to “twice-baked” in Italian? This double-baking technique gives the cookies their characteristic crispness that makes them ideal for dunking. The tradition comes from a time when mdistribution to households lacked modern ovens streamlined the process—baking twice ensured the biscuits would last longer and endure long journeys, whether by boat or on the family table. Blueberries, while not a Tuscan staple, have a modern story of their own. When embraced by culinary explorers, they bring a sense of brightness and contemporary appeal to classic formats, creating an edible bridge between different culinary eras and geographies. The fusion of the old and the new is at the heart of biscotti ai mirtilli, a dessert that pays homage to heritage while inviting a fresh, vibrant spirit into the kitchen.

In many Italian households, the ritual of cutting biscotti with a gentle, decisive motion—then savoring the moment with a preferred beverage—becomes more than a recipe: it’s a shared ritual that signals hospitality, conversation, and time spent together. The blueberry accent adds a modern twist to this timeless practice, reminding us that even beloved classics thrive when touched by seasonal fruit and the playful curiosity of home cooks who love to experiment and share. This is food storytelling at its most delicious: a story you bake, slice, and savor with friends and family, a narrative that travels beyond borders and returns as a comforting taste of home.

Ingredients

Biscotti Base

  • 3 cups all-purpose flour
    → Provides the main structure and crumb of the biscotti dough. Measure the flour accurately (scoop with a spoon and level off) to avoid a dense, hard texture. If you need a gluten-free version, substitute with a 1:1 gluten-free blend designed for cookies and consider adding a binder like 1/4 teaspoon xanthan gum per cup of flour to help with structure.
  • 1 cup granulated sugar
    → Adds sweetness and helps with browning and a crisp exterior during the first bake. You can reduce to 3/4 cup for less sweetness, but keep in mind it will affect browning and chewiness. If substituting with honey or maple syrup, adjust the liquid slightly to maintain dough consistency.
  • 2 teaspoons baking powder
    → Provides a gentle lift and helps the dough become sliceable after the first bake. Whisk into the dry ingredients to distribute evenly and prevent pockets of leavening that could cause uneven texture.
  • 1/2 teaspoon salt
    → Enhances overall flavor and balances the sweetness. Dissolve evenly in the dry mix to avoid salty spots in the final biscotti. If using salted butter, reduce this by half a pinch.
  • 3 large eggs
    → Bind the dough, add moisture, and contribute to the structure after the second bake. Beat lightly and fold into the dough with the cooled melted butter and vanilla. For a richer crumb, you can use 2 whole eggs and 1 additional yolk; avoid overmixing to keep the dough tender.
  • 1/2 cup unsalted butter, melted and cooled
    → Adds richness, tenderness, and flavor. Incorporating melted, cooled butter helps the dough come together smoothly and contributes to a slightly crisper crust after the second bake. For a dairy-free version, substitute with an equal amount of neutral oil (e.g., canola) but note the flavor and texture will differ slightly.
  • 1 teaspoon vanilla extract
    → Enhances the overall flavor profile and complements the blueberries. Use high-quality pure vanilla for the best aroma; if you only have imitation vanilla, use only a small amount to avoid artificial aftertaste.
  • Zest of 1 lemon, finely grated
    → Adds bright citrus aroma that pairs beautifully with blueberries. Use a microplane to grate the zest without the bitter white pith; if you don’t have lemon, orange zest can be a close substitute with a similar fresh note.
  • 1 cup dried blueberries
    → The star fruit component; dried berries retain shape and flavor through baking. If using large freeze-dried blueberries, they’ll stay crisp; if using rehydrated or plump dried berries, they’ll impart more moisture, so adjust flour by a tablespoon or two if needed and fold evenly to distribute.
  • 1/2 cup chopped almonds
    → Adds crunch and a nutty depth that pairs well with the blueberries. Toast almonds lightly in a dry skillet or oven until fragrant, then cool completely and chop into even pieces to ensure even distribution and predictable bite throughout the biscotti.

Optional Add-ins

  • 1/4 teaspoon almond extract (optional)
    → Intensifies almond aroma that complements blueberries. Use sparingly to avoid overpowering the berries; add to the wet ingredients with eggs and vanilla for even distribution.
  • 1/2 cup white chocolate chips (optional)
    → Introduces pockets of creamy sweetness. Fold in with the dried blueberries to distribute evenly; if the chocolate seems very sweet, you may reduce the sugar slightly to maintain balance in the cookie’s overall flavor profile.

Optional Coating

  • 4 ounces dark chocolate, chopped, for dipping (optional)
    → Creates a glossy, crisp chocolate shell on the biscotti. Melt gently using a double boiler or in short bursts in a microwave, then dip biscotti halfway and set on parchment. Tempering the chocolate yields a smoother, shinier finish if you have the technique.
  • 1 teaspoon neutral oil (optional)
    → Helps thin the melted chocolate for a smoother coating and easier dipping. Use a neutral oil such as canola or sunflower; add a little at a time to reach the desired dipping consistency without making the chocolate too greasy.

Instructions

  • Preheat your oven to 350°F (175°C) and line a large baking sheet with parchment paper or a silicone baking mat.

    → This creates a nonstick surface for the dough and ensures even browning without sticking, which is essential for cleanly sliced biscotti later.
  • Whisk together the dry ingredients: 3 cups all-purpose flour, 2 teaspoons baking powder, and 1/2 teaspoon salt in a large bowl until evenly distributed.

    → Uniformly distributed leavening and salt prevent pockets of baking powder or salty bites, ensuring a balanced crumb and consistent texture throughout the biscotti.
  • Toast the chopped almonds: spread 1/2 cup almonds on a dry skillet over medium heat, stirring frequently, until lightly toasted and fragrant, about 4–6 minutes; transfer to a plate to cool and then coarsely chop.

    → Toasting concentrates nut oils for deeper aroma and flavor; cooling prevents melting into the dough and chopping ensures even crunch in each bite.
  • In a separate large bowl, whisk 3 large eggs with 1 cup granulated sugar until the mixture is pale and slightly thickened, 2–3 minutes; this aerates the batter and helps with structure.

    → Proper aeration creates tenderness and helps the dough hold together after baking; avoid overbeating once the flour is added to prevent toughness.
  • Whisk in 1/2 cup melted and cooled unsalted butter, 1 teaspoon vanilla extract, and zest of 1 lemon to the egg-sugar mixture.

    → The cooled butter adds richness and tenderness; vanilla and lemon zest brighten the flavor profile and aroma. Ensure the butter is cooled to prevent cooking the eggs.
  • Add the dry ingredients to the wet ingredients in two additions, mixing with a wooden spoon or silicone spatula just until a shaggy dough forms and no dry flour remains.

    → Gentle folding preserves a tender crumb and avoids developing gluten too much, which would make the biscotti denser and harder to slice.
  • Fold in 1 cup dried blueberries and 1/2 cup chopped almonds until evenly distributed; if using 1/2 cup white chocolate chips, fold them in with the berries.

    → Even distribution prevents clumping and ensures bursts of blueberry flavor in every bite while preserving the dough’s structure during slicing.
  • Optionally add 1/4 teaspoon almond extract to the wet ingredients with vanilla and lemon zest for a more pronounced almond aroma.

    → A small amount deepens the almond note without overpowering the blueberry and citrus fragrance; add sparingly to avoid masking the berries.
  • Cover the dough and refrigerate for 15–30 minutes to firm up, making it easier to shape into a loaf.

    → Chilling reduces stickiness and helps form a stable log that slices cleanly for the second bake.
  • Turn the dough out onto the prepared sheet and form into a rough 12-inch long by 3-inch wide log, tapering slightly at the ends; lightly wetting hands can prevent sticking.

    → A well-shaped log bakes evenly; smoothing the surface with wet hands prevents cracks and ensures uniform slicing after the first bake.
  • Bake the log at 350°F (175°C) until firm and lightly golden, about 25–30 minutes; the exterior should feel set but the inside remains pale.

    → This first bake sets the loaf so it can be sliced into biscotti without crumbling; a firm exterior helps hold the crumb together during subsequent slicing.
  • Remove from oven and let the loaf rest on the sheet for 10–15 minutes to rest and continue firming; then transfer to a rack to cool completely.

    → Resting allows starches to relax and retighten, making slicing cleaner and reducing crumb crumble during the second bake.
  • Reduce oven temperature to 325°F (165°C); once the loaf is completely cool, slice it diagonally into 1/2-inch thick slices using a sharp serrated knife; place slices on parchment-lined sheets with space between them.

    → A diagonal cut increases surface area for the second bake, promoting extra dryness and crunch while even spacing ensures uniform drying.
  • Return the sheets to the oven and bake the slices a second time until dry and crisp, about 10–15 minutes per side, flipping halfway; total time may vary with thickness.

    → The second bake dries out the interior and develops biscotti’s characteristic crunch; flipping ensures even crusting on all surfaces.
  • Remove from heat and cool completely on a rack; the biscotti will continue to crisp as they cool and become sturdier for dipping or enrobing.

    → Cooling finishes the drying process and sets the final texture, preventing soft spots that could cause breakage during storage or dipping.
  • Optional coating: Melt 4 ounces dark chocolate with 1 teaspoon neutral oil in a double boiler or in short bursts in the microwave, stirring until smooth; dip biscotti halfway, place on parchment, and let set at room temperature or refrigerate briefly.

    → The chocolate adds a glossy shell and additional sweetness; thinning the chocolate with oil ensures a smooth, even dip that clings without heavy pooling.
  • Store cooled biscotti in an airtight container at room temperature for up to 2 weeks, or freeze for longer storage; keep the chocolate-coated version in the same conditions once set.

    → Proper sealing prevents staleness and keeps biscotti crisp; freezing preserves flavor and texture for future indulgence.

Notes

These blueberry biscotti are a twice-baked, crisp-on-the-outside, tender-on-the-inside treat that brighten the afternoon with lemon zest and sweet dried blueberries mingling with toasted almonds. The base flour provides structure, while the butter adds richness and the vanilla lifts the overall aroma; they pair beautifully with coffee, tea, or dessert wine.

You can customize them by swapping the almonds for pistachios or adding white chocolate chips for pockets of creamy sweetness. If you prefer a stronger berry bite, you can increase the dried blueberries by a few tablespoons while keeping the dough balanced with a touch more flour if needed. They freeze well and make a great grab-and-go snack. For an extra boost, serve with a dollop of mascarpone or a light lemon glaze.

Gluten-free adaptation: substitute the all-purpose flour with a 1:1 gluten-free baking blend designed for cookies and consider adding 1/4 teaspoon xanthan gum per cup of flour to help with structure. If you have gluten intolerance, always ensure your flour blend and baking powder are certified gluten-free.

Tips for handling: whisk the baking powder and salt into the dry ingredients and fold in the eggs, cooled melted butter, vanilla, and lemon zest just until combined. Shape the dough into two logs before the first bake; bake until set, then cool, slice on a bias into biscotti, and return to the oven to dry out until crisp. If the dough feels sticky, chill for 20–30 minutes before slicing to minimize crumbling. When dipping in chocolate, temper for a smoother finish or dip only the ends for a lighter touch.

Tips

Tips for Biscotti ai mirtilli

  • Flour handling: For a light, tender crumb, measure flour correctly—scoop with a spoon into the cup and level off. When making a gluten-free version, use a 1:1 GF flour blend designed for cookies and consider adding 1/4 teaspoon xanthan gum per cup of flour to help with structure.
  • Sugar and browning: Sugar aids browning and crispness after the first bake. If you prefer less sweetness, reduce to 3/4 cup, but be aware it will slightly affect browning and texture. If substituting with honey or maple syrup, reduce or adjust the liquid to maintain dough consistency.
  • Dry ingredients distribution: Whisk or sift flour, baking powder, and salt together so leavening and salt are evenly distributed. This prevents uneven pockets of rise and improves texture.
  • Eggs and binders: Eggs bind the dough and contribute to the second-bake structure. Beat them lightly and fold into the dough with the cooled melted butter and vanilla. If you want a richer crumb, you can use 2 whole eggs and 1 additional yolk, but avoid overmixing to keep the dough tender.
  • Butter handling: Melted and cooled butter helps the dough come together smoothly and contributes to a crisper crust after the second bake. If dairy-free is needed, substitute with a neutral oil of equal measure, noting flavor and texture will differ slightly.
  • Flavor boosters: Use high-quality vanilla and lemon zest to brighten blueberries. Add zest before zesting lemon sections to avoid bitterness from the white pith. If you don’t have lemon, orange zest can be a good substitute for a similar citrus lift.
  • Fruit and nuts: Toast almonds lightly to intensify their aroma, then cool completely before chopping for even distribution. For the blueberries, ensure they’re evenly distributed so every bite has fruit. If using large freeze-dried blueberries, they stay crisp; if using rehydrated dried berries, they’ll add more moisture and may require a touch more flour.
  • Optional add-ins: If using almond extract, keep to 1/4 teaspoon and add to wet ingredients for even distribution. White chocolate chips fold well with the blueberries, but if they’re very sweet, consider reducing the sugar slightly to balance flavors.
  • Optional coating: If dipping in dark chocolate, melt gently using a double boiler or short microwave bursts. Dip biscotti halfway, then set on parchment. For a smoother finish, temper the chocolate or add 1 teaspoon neutral oil to thin it to your desired consistency.
  • First bake strategy: Shape the dough into two even logs on a parchment-lined tray. Bake until the logs are set and lightly golden around the edges; they should be firm to the touch but not hard. This stage firms the crumb for clean slicing.
  • Cooling between bakes: Cool the logs on the baking sheet for 10–15 minutes before slicing. A brief chill helps you slice cleanly and minimizes crumbling.
  • Slicing technique: Use a sharp serrated knife to cut biscotti on a diagonal into about 1/2-inch slices (roughly 1.3 cm). Cutting on a bias increases surface area for the second bake and improves crispness.
  • Second bake for crispness: Place slices cut-side down on the baking sheet and bake again until dry and crisp. Rotate trays halfway through to promote even drying. If you prefer chewier biscotti, shorten the second bake; for crisper results, extend it slightly.
  • Storage and keeping quality: Once completely cooled, store in an airtight container at room temperature. For longer storage, freeze the baked biscotti—they freeze well and thaw quickly. Keep chocolate-coated portions separate if you plan to store for an extended period, to prevent milk or cocoa bloom from transferring.
  • Troubleshooting tips: If the dough seems too sticky, chill the dough for 15–20 minutes before shaping. If the biscotti crumble after slicing, it may be overbaked or too dry; briefly misting the logs with water before the second bake can help them stay intact, but use sparingly. If using gluten-free flour, be mindful of structure—adding a binder or a touch more moisture may help.
  • Variations and serving ideas: Serve with tea or dessert wine, or pair with a fruit compote or yogurt for a lighter finish. The lemon zest and blueberries pair beautifully with a light vanilla bean or a drizzle of citrus glaze on the cooled biscotti.

FAQ

Biscotti ai mirtilli – FAQ

Domanda 1: Cosa sono i Biscotti ai mirtilli?

Risposta: Sono biscotti dolci preparati con una base di farina, zucchero, burro o olio, uova e lievito, arricchiti con mirtilli freschi o secchi. Grazie alla seconda cottura risultano croccanti all’esterno e teneri all’interno, con un piacevole tono di limone/vaniglia.

Domanda 2: Quali sono gli ingredienti principali?

Risposta: Per circa 40 biscotti serve una base di:

  • 250 g di farina 00
  • 150 g di zucchero
  • 100 g di burro morbido (o olio)
  • 1 uovo grande
  • 1 cucchiaino di lievito per dolci
  • 1 pizzico di sale
  • 150–180 g di mirtilli freschi o surgelati
  • Scorza grattugiata di 1 limone e 1 cucchiaino di estratto di vaniglia
Domanda 3: Come si prepara l’impasto?

Risposta: In una ciotola mescola gli ingredienti secchi (farina, lievito, sale). In un’altra, lavora burro e zucchero fino a ottenere una crema, aggiungi l’uovo, la scorza e la vaniglia. Unisci gli ingredienti liquidi a quelli secchi, aggiungi i mirtilli e amalgama delicatamente. Forma un cilindro di impasto su carta forno e procedi alla prima cottura.

Domanda 4: Temperatura e tempi di cottura?

Risposta: Preriscalda il forno a 180°C. Cuoci per 25–30 minuti finché la superficie è dorata. Lascia raffreddare 10 minuti, taglia a fette di circa 1 cm di spessore, poi rimetti in forno a 170°C per 8–12 minuti per lato, finché sono croccanti.

Domanda 5: Posso usare mirtilli freschi o surgelati?

Risposta: Sì. I mirtilli freschi danno un sapore vivace; i mirtilli surgelati vanno usati direttamente ancora congelati (senza scongelarli) per evitare che rilascino troppa umidità. In entrambi i casi, può essere utile infarinare leggermente i mirtilli per evitare che affondino troppo durante la lavorazione.

Domanda 6: Posso sostituire la farina o rendere la ricetta senza glutine?

Risposta: Si può sostituire con una farina integrale o una miscela senza glutine 1:1, tenendo presente che la consistenza cambia e potrebbe essere necessario aggiungere 1–2 cucchiai di liquido. Se vuoi una versione meno rustica, prova una miscela senza glutine specifica per torte, ma controlla i tempi di cottura.

Domanda 7: Si possono congelare l’impasto o i biscotti cotti?

Risposta: Entrambe le opzioni funzionano. Puoi congelare l’impasto già formato (avvolto bene) e tagliarlo a fette direttamente dal freezer. Puoi anche congelare i biscotti cotti, conservandoli in contenitore ermetico; riattivali in forno a bassa temperatura per qualche minuto se vuoi renderli nuovamente croccanti.

Domanda 8: Come conservarli al meglio?

Risposta: Conserva i biscotti ai mirtilli in un contenitore ermetico in luogo fresco e asciutto. Dovrebbero mantenersi bene per 3–5 giorni. Per prolungarne la freschezza, puoi congelarli sia crudi che cotti (vedi Q7).

Domanda 9: Quali varianti di sapore si possono provare?

Risposta: Alcune idee: aggiungere scorza di limone o scorza d’arancia in omaggio al limone; utilizzare vaniglia o una fiala di estratto di mandorla; sostituire parte dei mirtilli con gocce di cioccolato o mirtilli secchi. Per una versione più profumata, aggiungi un pizzico di cannella o zenzero in polvere.

Domanda 10: È possibile una versione vegana o senza allergeni?

Risposta: Sì. Per una versione vegana sostituisci il burro con olio di cocco o olio vegetale e utilizza latte vegetale al posto delle uova (ad es. 1 cucchiaio di semi di lino macinati mescolati con 3 cucchiai d’acqua come sostituto dell’uovo). Per evitare glutine, usa una miscela di farine senza glutine 1:1. Tieni presente che la textura potrebbe variare leggermente a seconda delle sostituzioni.

Introduction / Hook

Imagine a warm oven glowing with a swirl of cinnamon that perfumes the house the moment you open the door. A cake that carries the cozy nostalgia of a cinnamon roll but wears the tenderness of a day-brightened cake. Cinnamon roll cake is the delightful compromise your sweet-toothed self has been dreaming of—where buttery layers, sugar-kissed swirls, and cream-cheese glaze converge into a single, comforting slice. As you slice into it, you reveal ribbons of cinnamon-sugar goodness winding through a soft, tender crumb that sighs with vanilla and a hint of brown butter. The aroma wafts through the room, turning ordinary mornings into celebrations and casual afternoons into special occasions. It’s not just dessert; it’s a memory in the making—the kind of treat that makes your kitchen feel like the hub of a cozy home.

What makes this cinnamon roll cake so irresistibly magnetic is its ability to be both nostalgic and indulgent without feeling overpowering. It holds the familiar charm of a cinnamon roll—those spicy-sweet notes, the creamy tang of a glossy frosting—while presenting them in a cake form that’s lighter on the palate and easier to portion for gatherings. It’s the kind of recipe that welcomes experimentation, inviting you to play with the textures and flavors while still delivering that signature cinnamon warmth. Whether you’re baking for a weekend brunch, a celebratory gathering, or a simple “treat-yourself” moment, this cinnamon roll cake stands ready to deliver comfort in abundance. The first bite is a revelation: a soft crumb that cradles a cinnamon core, a satin glaze that glows like morning sun on a classroom desk, and a lingering sweetness that invites another slice without ever tipping into cloying. Welcome to a cake that tastes like a hug in a pan—rich, inviting, and absolutely addictive.

In this introduction to cinnamon roll cake, you’ll discover a dessert that bridges the best of two worlds: the homey, chewy joy of a cinnamon roll and the soft, even-keeled texture of a classic sheet cake. It’s a recipe that speaks to all ages—kids who love the swirl of cinnamon, adults who crave that velvet frosting, and friends who appreciate a dish that looks as inviting as it tastes. This isn’t just about following a recipe; it’s about creating a sensorial experience that starts with the scent of vanilla and cinnamon and ends with the glow of satisfied smiles around the table. So preheat your oven, let the butter soften to its creamy smile, and prepare to pour love into every layer. The journey to your most memorable slice begins now.

The Story Behind the Dish

The cinnamon roll, with its fragrant, spiraled layers of dough and cinnamon-sugar treasure, traces a lineage that winds through many kitchens and cultures. The version most of us recognize today is deeply rooted in Scandinavian baking traditions, where kanelbulle—literally cinnamon bun—has a devoted following and a storied place on festive tables and everyday breakfasts alike. Cinnamon has long enjoyed a role in sweet and savory dishes across Europe and the Middle East, traded along ancient routes that turned simple ingredients into shared rituals. The idea of marrying that iconic roll with a cake form isn’t just a clever fusion; it’s a celebration of how dessert can evolve while carrying its heart from generations past.

In many households, the aroma of cinnamon and vanilla rising from the oven conjures childhood memories—the morning rush before school, the ritual of helping Mom or Grandma dust powdered sugar on top, and the small shouts of delight when the first slice finds its way to a hungry plate. The cinnamon roll cake is a modern homage to those memories, a recipe that honors the spirit of a roll while embracing the ease and elegance of a cake. Bakers often approach it as a canvas: you can swirl cinnamon throughout a tender batter, then bathe the top in a creamy glaze that gleams like morning frost. The result feels timeless and new at once, a comfort piece that can anchor a weekend brunch, a birthday breakfast, or a holiday table with a whisper of nostalgia and a bold, comforting finish.

For many home bakers, this cake also represents a welcome invitation to creativity. Not everyone has the time to roll and proof dozens of dough layers, but almost everyone can celebrate with a cake that captures the essence of cinnamon rolls—without the extra steps. And there’s a storytelling aspect to it as well: you can tell guests that they’re enjoying a recipe that’s been reimagined for modern kitchens, one that nods to tradition while embracing a simple, reliable method that yields a crowd-pleasing result every time. The cinnamon roll cake is more than a dessert; it’s a conversation starter—a way to share warmth, memory, and a little bit of sweetness with the people you love.

Why You’ll Love This Recipe

  • Effort meets indulgence: A single cake that delivers the cinnamon-roll experience without requiring a full day of rolling and proofing. It’s a smart shortcut that still tastes deeply, warmly comforting.
  • Versatile texture: A soft, fluffy cake crumb with ribbon-like swirls of cinnamon throughout that create pockets of warmth in every bite. The surface glazes to a glossy finish that invites a fork and a bite.
  • Iconic flavor palette: The familiar harmony of butter, warm cinnamon, brown sugar, and vanilla, balanced by a tangy cream-cheese glaze that adds brightness and a luxurious mouthfeel.
  • Perfect for a crowd: Easy to slice into generous portions, making it ideal for brunches, potlucks, celebrations, or a simple sweet treat after dinner.
  • Make-ahead friendly: The cake and its glaze can be prepared ahead of time in stages, with refrigeration allowing flavors to settle and blend for a more cohesive finish.
  • Customizable: Adaptable to dietary needs or flavor twists—vegan, gluten-free, or nutty add-ins—without losing the core cinnamon-roll essence.
  • Simple elegance: This cake looks stunning on a table—frosted to a satin sheen, with cinnamon ribbons visible beneath the surface, making it a natural centerpiece for a seasonal table.

Flavor Profile & Texture

The flavor profile of this cinnamon roll cake centers on the warm, cozy notes you expect from a cinnamon roll, elevated by the light, tender crumb of a cake. On the first bite, you’re met with a gentle sweetness that isn’t cloying, paired with the aromatic spice of cinnamon that has been kissed by a touch of brown sugar, butter, and vanilla. The cinnamon-sugar core becomes a quiet, cinnamon-flavored core that distributes its warmth throughout the slice, providing little bursts of spice with each mouthful. The vanilla in the cake adds a soft, creamy sweetness that rounds out the edges of the cinnamon’s boldness, while hints of butter enrich the overall sensorial experience, making every bite feel rich and comforting.

As you move toward the frosting or glaze, a different pleasure unfolds. A cream cheese-based glaze delivers a tangy, velvety counterpoint to the cake’s sweetness. The glaze lands with a glossy sheen, a silky finish that lingers on the palate and invites you to chase another bite. The texture contrast is part of the magic: the crumb remains tender and light, while the glaze adds a luxurious, almost satin-like finish that remains just soft enough to melt on contact. If you listen closely while cutting a slice, you can hear the gentle sigh of the cake as the knife passes through the moist interior, a reminder of how well-balanced this dessert is—soft, not crumbly; sweet, but with enough tang to keep it sophisticated. The cinnamon ribbons, visible when you cut, provide little pockets of concentrated warmth that surprise the senses and remind you of the classic cinnamon roll experience in a cake form.

In terms of mouthfeel, think of a cake that carries a whisper of the buttered richness typical of a cinnamon roll, without the chewiness of a thick yeast-based dough. The cake should feel light on the tongue, yielding to a moist crumb rather than drying out, while the glaze adds a smooth, creamy finish that clings slightly to the surface and carries the lingering sweetness of vanilla and cream cheese. The combination is a cohesive symphony: the cake offers softness and comfort, the cinnamon swirls provide aromatic depth, and the glaze crowns the top with a glossy, tangy freshness. It’s a balance between the familiar and the refined—a slice that makes you feel both at home and indulged at the same time.

Occasions & Pairings

This cinnamon roll cake shines in many settings, from casual weekday mornings to festive weekend gatherings. Its approachable sweetness makes it a friendly offering for a brunch menu, a potluck, or a celebration that doesn’t require elaborate dessert setups. It’s also a wonderful option for holiday mornings—Christmas, Easter, or special family reunions—where a show-stopping, yet comforting, dessert can anchor the feast and spark conversation around the table. The cake’s visual appeal, with cinnamon swirls visible in cross-section slices, invites admiration and a sense of occasion without being fussy to serve. It pairs beautifully with warm beverages and seasonal accompaniments, enhancing the overall experience.

Suggested pairings:
– Beverages: fresh-bresh coffee, rich espresso, almond milk latté, chai tea, or a mug of hot cocoa for a cozy chocolate counterpoint.
– Side items: a light fruit compote (pear, apple, or berry), vanilla yogurt, or a dollop of whipped cream for extra richness.
– Desserts: a small scoop of vanilla bean ice cream or a bright lemon curd spooned alongside can offer a pleasing contrast.
– Seasonal accents: toasted pecans or walnuts for crunch and a hint of nuttiness; a dusting of powdered sugar or a thin drizzle of caramel to amplify the glaze’s sheen.
– Holiday menus: pair with a light brunch savory like herb frittata or smoked salmon and cucumber bites to provide balance between sweet and savory courses.

The versatility of cinnamon roll cake means you can adjust its presentation to suit the occasion. For a more casual setup, keep the glaze light and let the cinnamon ribbons speak for themselves. For a more formal brunch or dessert course, thicker frosting or a double-glazed top can elevate the dish and make it feel more like a centerpiece. In any setting, it’s the kind of dessert that invites conversations about family traditions, memories of grandmother’s kitchen, and plans for future gatherings—the kind of dish that creates anticipation and then delivers with every forkful.

Tips, Variations & Substitutions

  • Make it lighter: Use a portion of neutral oil or light yogurt in place of part of the fat to adjust richness without sacrificing moisture.
  • Flavor twists: Add a whisper of orange zest to the cake batter for a citrus note that brightens the cinnamon. A pinch of espresso powder can deepen the cinnamon flavor without making it taste like coffee.
  • Gluten-free option: Use a 1:1 gluten-free flour blend designed for baking, keeping an eye on moisture since some blends absorb more liquid. A touch of additional milk or yogurt may be needed to maintain a tender crumb.
  • Vegan adaptation: Swap dairy milk with a plant-based milk, use coconut or vegan butter, and replace the cream cheese glaze with a dairy-free version using vegan cream cheese and non-dairy butter. Ensure sweetener balance remains similar to maintain the glaze’s tangy sweetness.
  • Nutty twist: Toasted walnuts or pecans folded into the cinnamon swirl add a nice crunch and a toasty depth that complements the softness of the cake.
  • Caramel-kissed version: Drizzle a thin caramel glaze over the top or swirl a ribbon of caramel into the batter for an extra layer of luxury and depth.
  • Make-ahead hints: Bake the cake and cool completely. Store unfrosted, then frost just before serving to preserve the glaze’s gloss. This makes it ideal for entertaining when you want to prep parts of the dessert in advance.
  • Portion control: For a neater presentation, trim the outer edges to reveal a clean parlor-like cross-section. This also helps with even serving sizes for guests.
  • Terroir-inspired variation: Use brown sugar with a hint of maple syrup in the swirl for a more autumnal or rustic flavor profile.

Storage & Make-Ahead Ideas

Storage and make-ahead planning is a practical virtue for this cake. If you bake the cake in advance, allow it to cool completely before covering loosely with plastic wrap or a cake dome to avoid condensation that could soften the glaze. Here are practical guidelines to keep the cake fresh and delicious:

  • Room temperature: The cake can be kept covered at room temperature for up to 2 days, though it’s best enjoyed fresh or within 24 hours for maximum tenderness.
  • Refrigeration: Store in the refrigerator for up to 4 days. If the glaze seems to stiffen, let slices come to room temperature for a few minutes before serving to restore a silky mouthfeel.
  • Freezing: Individual slices freeze well for up to 2 months. Wrap tightly in plastic and place in a freezer bag. Thaw overnight in the fridge or at room temperature, then rewarm gently in the microwave or with a short stint in a low oven. If you’re freezing the whole cake, freeze before frosting for a clean reassembly; frost after reheating.
  • Make-ahead strategy: Bake the cake one day, cool completely, and refrigerate. The next day, bring to room temperature, drizzle with glaze, and finish with any toppings (nuts, zest, extra cinnamon) just before serving for a fresh, wow-worthy presentation.

Fun Facts & Trivia

  • Historical roots: Cinnamon has been traded and treasured since ancient times, often valued for its aromatic spice and potential medicinal qualities. Its journey from the Far East to European kitchens adds a sense of global connection to comforting desserts like this cake.
  • Swedish influence: The cinnamon bun, or kanelbulle, holds a special place in Swedish culture, with a dedicated day on the calendar to celebrate the beloved pastry. This cake is a nod to that tradition, translated into a cake form for modern bakers.
  • Texture storytelling: The name “cake” evokes a certain expectation of tenderness, which this dessert delivers by embracing a soft crumb and a glossy glaze, a textural contrast that keeps every bite intriguing.
  • Color psychology: The warm cinnamon tones paired with ivory frosting create a visual cue that feels comforting and inviting—colors that subconsciously suggest a cozy, homey experience even before the first bite.
  • Versatility in serving: Because the cake can be sliced and served with or without frosting, it adapts to different preferences and occasions, from sweet tooth-focused celebrations to lighter brunch menus.
  • Seasonal flexibility: While it shines in autumnal moods with its cinnamon warmth, it’s equally satisfying in spring mornings when paired with fresh berries or citrus zest.

Ingredients

Cake Base
  • 2 1/2 cups all-purpose flour
    → Structure and body form the cake crumb. This flour provides the main framework that supports the cinnamon swirl and tender crumb. To avoid a dense texture, measure by spooning the flour into the cup and leveling off with a knife (spoon-and-sweep method) rather than scooping directly from the bag. If you prefer a lighter crumb, you can substitute 1/4 cup of the flour with cake flour, but keep in mind it will slightly alter the texture.
  • 1 cup granulated sugar
    → Adds sweetness and assists in browning and moisture retention during baking. In a cinnamon roll cake, sugar helps develop a slightly caramelized edge around the swirl. If you want a slightly less sweet cake, you can reduce by 2–4 tablespoons, understanding it will affect moisture and crumb.
  • 1/2 cup unsalted butter, melted and cooled
    → Provides richness, moisture, and a tender crumb by coating flour particles and slowing gluten formation. Use cooled melted butter to prevent cooking the eggs when they are added. If you skip butter and use oil instead, the crumb will be tender but slightly different in mouthfeel; keep oil neutral-flavored for best cinnamon flavor.
  • 2 large eggs, room temperature
    → Bind and structure the batter; room-temperature eggs emulsify better with fats, resulting in a smoother crumb. If eggs are cold, warm them in a bowl of warm water for 5–10 minutes before measuring and adding to the mixture to avoid a lumpy batter.
  • 1 cup whole milk
    → Provides moisture and tenderness; whole milk adds flavor and a rich crumb. If using a non-dairy alternative, choose an unsweetened version with similar fat content and adjust with a teaspoon of melted butter if needed to maintain richness.
  • 1/2 cup sour cream or plain yogurt
    → Adds tenderness, moisture, and a slight tang that complements the cinnamon. Use full-fat for best texture and flavor. Whisk it into the wet ingredients until smooth to ensure even distribution and to prevent curdling when the batter comes together.
  • 2 teaspoons vanilla extract
    → Flavor foundation; vanilla enhances sweetness and rounds out spice flavors. Use high-quality vanilla or vanilla paste for a more pronounced aroma. If using vanilla extract, measure carefully to avoid overpowering the cinnamon.
  • 2 teaspoons baking powder
    → Primary leavening that helps the cake rise and stay light. Ensure freshness for optimal lift; whisk with dry ingredients to distribute evenly and avoid dense pockets in the batter.
  • 1/2 teaspoon baking soda
    → Additional leavening and helps neutralize acidity from the sour cream/yogurt, contributing to a tender crumb and even rise. Like baking powder, use fresh baking soda for best results.
  • 1/4 teaspoon salt
    → Balances sweetness and enhances flavor, as well as strengthening the gluten structure just enough to improve crumb without making it tough. If using salted butter, adjust salt downward accordingly.
  • 1 1/2 teaspoons ground cinnamon (for batter)
    → Infuses the cake with warmth that complements the cinnamon swirl. Whisk this with the dry ingredients to ensure an even distribution; for a stronger cinnamon note, you can increase slightly, but keep it balanced with sugar and dairy.
Filling
  • 3/4 cup light brown sugar, packed
    → Creates the cinnamon-sugar swirl that becomes gooey and caramelized during baking. Packed sugar ensures consistent sweetness and moisture. If your brown sugar is clumpy, break lumps with a fork before mixing with the cinnamon; you can also lightly loosen it with a teaspoon of water if needed.
  • 2 1/2 tablespoons ground cinnamon
    → The signature flavor of cinnamon rolls. Freshly ground cinnamon yields a stronger aroma; if using pre-ground, whisk with the brown sugar to distribute evenly and avoid clumps in the swirl.
  • 2 tablespoons unsalted butter, melted
    → Creates a paste to bind the cinnamon-sugar mix and helps it swirl smoothly through the batter. Allow the butter to cool slightly before mixing with sugar to prevent melting the sugar too much and making the swirl runny.
Cream Cheese Frosting
  • 8 oz cream cheese, softened
    → The tangy backbone of the frosting that complements the sweetness of the cake. Soften at room temperature for several hours or in a warm spot briefly to ensure a smooth, lump-free frosting. If you refrigerate, let it soften again before using.
  • 1/4 cup unsalted butter, softened
    → Adds richness and helps stabilize the frosting so it holds its shape on slices. Beat with the cream cheese until light and fluffy; avoid melted butter, which can make the frosting too loose.
  • 2 cups powdered sugar
    → Sweetens and creates a silky, spreadable texture. Sift before adding to the mixture to avoid grittiness. Adjust to taste if you prefer a thinner or thicker frosting.
  • 1/2 teaspoon vanilla extract
    → Adds depth and aroma to the creamy frosting. For an extra depth of flavor, use vanilla paste or bean scrapings in addition to extract.
  • Pinch of salt
    → Balances the sweetness and enhances the tanginess of the cream cheese. A small pinch is usually enough; omit only if you are using salted butter and find the frosting already balanced.
Optional Glaze
  • 1/2 cup powdered sugar
    → Gives a light, glossy finish that dries to a soft glaze on top of the frosting. Start with this amount and add more sugar if you want a thicker glaze, or a bit more milk for a thinner glaze.
  • 2–3 tablespoons milk or heavy cream
    → Adjusts glaze consistency; add gradually to avoid runs. Use heavy cream for a richer glaze that sets a bit firmer when chilled, or milk for a lighter finish.
  • 1/2 teaspoon vanilla extract
    → Boosts flavor in the glaze; optional, but it helps the glaze harmonize with the cinnamon and cream cheese flavors without adding extra sweetness.
Pan and Preparation Notes
  • Non-stick baking spray or melted butter, for greasing a 9×13 inch (approx. 23×33 cm) baking pan
    → Ensures easy release of the cake after baking and helps prevent sticking at the edges of the swirl. If you prefer, line the pan with parchment paper for clean edges and easy lift-out slices.
  • Parchment paper (optional), for lining the pan
    → Creates an easy lift-out and prevents sticking, making neat slicing possible. This is especially helpful if you want perfectly square pieces or plan to photograph the cake slices.

Instructions

  • Preheat your oven to 350°F (175°C) and prepare a 9×13 inch baking pan by greasing with non-stick spray or melted butter and lining with parchment if desired.
    → Ensures the cake releases cleanly from the pan and prevents sticking at the edges and corners; parchment aids in neat lift-out slices and easy cleanup.
  • Whisk together the dry ingredients for the cake base: 2 1/2 cups all-purpose flour, 1 cup granulated sugar, 2 teaspoons baking powder, 1/2 teaspoon baking soda, 1/4 teaspoon salt, and 1 1/2 teaspoons ground cinnamon.
    → Uniform distribution of leaveners and spice prevents uneven rising and hot spots; whisking also helps aerate the flour for a lighter crumb.
  • In a separate bowl, whisk the wet ingredients: 2 large eggs at room temperature, 1 cup whole milk, 1/2 cup sour cream or plain yogurt, 1/2 cup melted and cooled unsalted butter, and 2 teaspoons vanilla extract.
    → Room-temperature eggs emulsify with fats to create a smooth batter; cooled butter prevents cooking the eggs and ensures even incorporation.
  • Pour the wet ingredients into the dry ingredients and mix just until combined, stopping as soon as the batter comes together with a few small lumps remaining.
    → Overmixing develops gluten and yields a tougher crumb; mixing until moistened preserves tenderness and lightness.
  • Prepare the cinnamon-sugar filling by combining 3/4 cup light brown sugar, 2 1/2 tablespoons ground cinnamon, and 2 tablespoons melted butter in a small bowl; whisk to form a cohesive paste.
    → A thick, cohesive paste clings to the batter and swirls evenly without running too much, producing classic cinnamon-roll ribbons.
  • Spread half of the batter in an even layer across the prepared pan using an offset spatula, filling any gaps and smoothing the surface to the edges.
    → Establishes a uniform base for the swirl and prevents uncooked pockets; tapping the pan helps settle the batter and eliminate air bubbles.
  • Sprinkle half of the cinnamon-sugar filling evenly over the first batter layer, ensuring it covers the surface without clumping at the edges.
    → Distributes cinnamon flavor consistently in the swirl; even coverage avoids concentrated pockets that could burn or taste oversweet.
  • Dollop the remaining batter over the filling in spoonfuls across the pan; use a knife or skewer to swirl the batter through the filling to create ribboned marbling.
    → Swirling distributes the cinnamon in a visually appealing pattern while ensuring pockets of flavor in every bite.
  • Bake in the preheated oven at 350°F (175°C) for 30–40 minutes, or until a toothpick inserted into the center comes out with a few moist crumbs and the top springs back when gently pressed; if the top browns too quickly, tent with foil.
    → The crust should be set yet moist inside; testing with a toothpick confirms doneness without overbaking, which would dry the crumb.
  • While the cake bakes, prepare the cream cheese frosting by beating 8 oz cream cheese and 1/2 cup unsalted butter at medium speed until light and smooth, scraping the bowl as needed.
    → Proper aeration yields a creamy, lump-free frosting that spreads evenly and adheres to the cake slices.
  • Gradually add 2 cups powdered sugar to the cream cheese mixture on low speed, then increase to medium and beat until smooth; mix in 1/2 teaspoon vanilla extract and a pinch of salt, adjusting for taste.
    → Slow addition prevents gritty texture and ensures a glossy, spreadable frosting with balanced sweetness and tang.
  • Let the baked cake cool in the pan on a wire rack for 15–20 minutes, then spread the cream cheese frosting evenly over the top and allow a few minutes for the frosting to set before slicing.
    → Cooling helps the frosting set and prevents it from sliding off; a slightly warm cake with cooled frosting yields clean, neat slices.
  • Optionally, prepare a lightweight glaze by whisking 1/2 cup powdered sugar with 2–3 tablespoons milk or heavy cream and 1/2 teaspoon vanilla until smooth, then drizzle over the frosted cake for a shiny finish.
    → The glaze adds a delicate sweetness and a glossy appearance; adjust thickness by adding more sugar or liquid as needed.
  • Slice the cake into squares and serve; refrigerate leftovers in an airtight container for up to 3–4 days, letting individual portions come to room temperature or warm gently before serving for optimal softness.
    → Proper storage maintains moisture and flavor; gentle warming revives the tender crumb and cinnamon aroma.

Notes

These cinnamon roll cake notes help you achieve a tender, cinnamon-swirl cake crowned with a creamy cream cheese frosting. To maximize rise and an even crumb, measure flour using the spoon-and-sweep method and whisk dry ingredients (including baking powder and baking soda) so there are no clumps. Bring ingredients to room temperature so fats emulsify with liquids, and stir wet and dry just until combined to keep the crumb light. Cool melted butter completely before mixing with eggs to prevent curdling, and choose full-fat milk and sour cream or yogurt for tenderness and flavor. For the swirl, spread half of the batter in the pan, sprinkle the cinnamon-sugar filling, then drop in the remaining batter and gently swirl with a knife for an even ribbon. Bake until a toothpick tests with a few moist crumbs and let the cake cool completely before frosting. Cream cheese frosting should be creamy and spreadable: beat softened cream cheese and butter until smooth, add powdered sugar gradually, then vanilla and a pinch of salt; if the frosting sets too firm, beat in a splash of milk. If you want a glossy finish, whisk a glaze of powdered sugar with milk or cream and a touch of vanilla. Allow the cake to rest for at least 20 minutes after frosting to set before slicing. Make-ahead tips: you can bake the cake a day in advance, store wrapped at room temperature for up to 1–2 days or refrigerate for up to 5 days; slice and reheat gently to serve. For freezing, wrap slices tightly and freeze for up to 2–3 months; reheat in a low oven or microwave. Variations: add orange zest to the frosting for citrus notes, or sprinkle toasted pecans on top; for dairy-free versions, use dairy-free cream cheese and butter and a dairy-free yogurt or sour cream substitute, keeping in mind the texture may vary.

Tips

Cake Batter Tips
  • Measure the flour using the spoon-and-sweep method (scoop then level) to prevent a dense crumb. This helps keep the cake light and tender even with the cinnamon swirl.
  • Let cold ingredients come to room temperature (eggs, milk) before mixing. Room-temperature fats and dairy emulsify more smoothly, giving a silkier crumb and better rise.
  • Whisk the dry ingredients (including the cinnamon) separately from the wet ingredients to ensure even distribution of leaveners and spices, which helps you avoid streaks or dense pockets.
  • Mix until just combined after you add the wet to the dry. Overmixing develops gluten and can make the cake tough; a few streaks of flour are okay.
  • For a lighter crumb, you can substitute 1/4 cup of the flour with cake flour, but expect a slightly softer structure and a different mouthfeel.
  • Use cooled melted butter (not hot) to prevent cooking the eggs and to keep the batter uniform. If you switch to oil, use a neutral oil for the best cinnamon flavor and a tender texture.
  • Ensure the batter is smooth and even in color with no visible oil slicks or lumps before pouring into the pan.
  • Preheat the oven to a steady 350°F (175°C) and bake until a toothpick tests clean with a few moist crumbs. If the top browns too quickly, tent lightly with foil and continue baking.
  • Cool the cake in the pan on a rack for at least 10–15 minutes before frosting to set the structure and make slicing neater.
Filling Tips
  • Make the cinnamon-sugar filling into a paste by combining the melted butter with the brown sugar and cinnamon; this helps it swirl smoothly rather than bleed into the batter.
  • Spread the filling evenly over the batter and avoid pooling at the edges. An offset spatula works well for a uniform swirl.
  • If the swirl seems too runny, chill the filling for 10–15 minutes to thicken, which helps it stay where you want it during baking.
  • For a stronger cinnamon presence, you can increase the cinnamon by a teaspoon or two, but taste as you go to avoid overpowering the sweetness.
Cream Cheese Frosting Tips
  • Let the cream cheese and butter soften fully at room temperature; this prevents lumps and yields a smoother frosting.
  • Beat the cream cheese and butter together until light and fluffy, scraping the bowl halfway through to ensure even texture.
  • Sift the powdered sugar to avoid grittiness, then add gradually to reach the desired sweetness and spreadability.
  • Balance sweetness with a pinch of salt and a splash of vanilla. If the frosting seems too thick, beat in a teaspoon of milk or cream at a time until it holds its shape but spreads smoothly.
  • If you refrigerate the frosting, let it soften a bit before spreading to maintain a creamy texture on the cake.
Optional Glaze Tips
  • Start with 1/2 cup powdered sugar and add milk or cream gradually to reach your preferred consistency. A glaze that’s too thick won’t set nicely; too thin will run off the slices.
  • Use milk for a lighter glaze or heavy cream for a richer, shinier finish that sets a bit firmer when chilled.
  • A half-teaspoon of vanilla adds a subtle aroma that helps the glaze harmonize with the cinnamon and cream cheese flavors.
Pan and Preparation Tips
  • Grease a 9×13 inch pan well or line with parchment for easy removal of the cake slices and clean edges.
  • Line the pan with parchment for cleaner lifts and even slicing, especially if you’re photographing the cake or want perfectly square pieces.
  • Center the pan in the oven and consider rotating halfway through baking for even browning and consistent texture on all sides.
  • If the top starts to brown too quickly, loosely tent with foil to prevent over-browning while the interior finishes baking.
Make-Ahead, Storage, and Serving Tips
  • The cake base can be baked a day ahead; cool completely, wrap well, and store at room temperature if frosting will be added soon. Frost just before serving for best texture.
  • Frosted cake should be kept refrigerated and is best within 2–3 days. Bring to room temperature for easier slicing and fluffier frosting texture.
  • Leftover slices can be wrapped and frozen for up to 1 month; thaw in the refrigerator and bring to room temperature before serving for a softer crumb.
  • For clean slices, chill the frosted cake for 15–20 minutes before slicing, then wipe the knife between cuts for neat edges.
  • If you crave extra moistness, brush a light syrup over the top before applying frosting, but test first to avoid soggy edges.

FAQ

What is Cinnamon Roll Cake?

It’s a soft, tender cake swirled with cinnamon-sugar ribbons and finished with a creamy glaze, combining the cozy flavors of classic cinnamon rolls in a cake form.

What ingredients do I need?

Main batter: all-purpose flour, granulated sugar, baking powder, salt, milk, eggs, vanilla, and butter. Cinnamon swirl: brown sugar, cinnamon, melted butter. Glaze: powdered sugar, milk or cream, vanilla. Optional: a dash of nutmeg or cream cheese in the glaze.

How do you make the cinnamon swirl?

Whisk cinnamon with brown sugar and melted butter to form a paste. Swirl into the batter by spooning dollops of the cinnamon mixture and using a knife or skewer to create ribbons before baking.

What pan size and baking temperature/time should I use?

Use a 9×13-inch baking pan. Preheat to 350°F (175°C). Bake for 28–34 minutes, until a toothpick inserted into the center comes out with a few moist crumbs. Avoid overbaking for a tender cake.

How do I know the cake is done?

Begin checking at about 28 minutes. The center should spring back to a light touch, and a toothpick should come out with a few moist crumbs, not wet batter. If using a thermometer, aim for 210–212°F (99–100°C) at the center.

How do I glaze the cake and when should I apply it?

Whisk powdered sugar with milk or cream and vanilla until smooth. Drizzle over the cake while it’s warm so the glaze sinks in and forms a glossy finish. For a richer option, use a cream cheese glaze (softened cream cheese, butter, vanilla, and powdered sugar).

Can I make this ahead or freeze it?

Yes. You can bake, cool, and refrigerate up to 2–3 days. For longer storage, wrap the cooled cake and freeze up to 2–3 months. Thaw and reheat gently in the microwave or oven, and re-glaze if desired.

Are there dairy-free or gluten-free options?

Yes. Use dairy-free milk and butter substitutes. For gluten-free, use a 1:1 gluten-free flour blend (verify it works well in cakes). For dairy-free glaze, use plant-based milk and dairy-free powdered sugar. Check labels to avoid cross-contamination.

How many servings does this yield and any tips for even slices?

A 9×13-inch cake yields about 12–16 pieces. Chill the cake for 15–20 minutes before slicing, wipe the knife between cuts, and slice in clean, straight motions for even portions.

Serving ideas and flavor variations?

Serve warm with vanilla ice cream or whipped cream. For variations, swirl in chopped pecans or walnuts, or add a hint of orange zest to the glaze. You can also try a cream cheese glaze or a maple glaze for different flavor profiles.

Introduzione / Hook

Immagina una piccola balla dorata, brillante di zeste di limone e lucidata da una leggera crosta luminosa, che esplode in una morsa di sapore fresco non appena la addenti. Bocconcini proteici limone e mirtilli sono l’equivalente culinario di una promessa: leggeri ma sostanziosi, delicati ma decisi, capaci di accompagnarti dalle prime luci del mattino fino al crepuscolo senza mai perdere un grammo di carattere. Ogni boccone è una sinfonia di agrumi luminosi e frutti estivi, racchiusa in una dimensione tascabile che sembra pensata apposta per chi ha fretta ma non vuole rinunciare alla qualità. La magia sta nel contrappunto tra la nota acida del limone, la dolcezza mielata dei mirtilli e la completezza proteica che arriva dall’ingrediente giusto. È una piccola merenda, una coccola dopocena, un compagno di viaggio o una pausa salubre durante una giornata piena. Non è solo una ricetta: è una filosofia di snack che mette al centro gusto, energia e leggerezza, senza compromessi.

La versione “proteica” di questo bocconcino rende omaggio a chi cerca uno spuntino che sostenga l’attività fisica o semplicemente risulti saziante senza appesantire. È una celebrazione di sapori semplici ma raffinati, in cui limone e mirtillo si fanno protagonisti, mentre una base morbida ma ferrea ne sostiene la struttura. È come una carezza di campagna all’ora del tè, reinterpretata per chi vive tra lezioni, allenamenti, progetti e appuntamenti. La fragranza del limone si mescola con la freschezza del frutto di bosco, e tutto viene raccolto in consistenze che variano dal setoso al leggermente croccante, offrendo una sensazione multisensoriale ad ogni morso. Prepararla potrebbe diventare una piccola routine domestica: una routine che profuma di giovinezza, salute e gioia di condividere cibo che fa bene al corpo senza rinunciare al piacere.

La storia dietro il piatto

Questa creazione nasce dall’incontro tra la tradizione italiana degli spuntini leggeri e la modernità della cucina sportiva. In molte cucine mediterranee, la merenda o la piccola porzione di metà mattina è stata a lungo considerata sacra: qualcosa di sfizioso ma anche nutriente, capace di sostenere i ritmi di una giornata intensa. I bocconcini, per l’idea di piccole dimensioni e di facilità di consumo, richiamano l’immagine dei bocconcini di formaggio tipici della cucina italiana, ma qui si rinnova il concetto trasformandolo in una versione proteica e fresca. L’ingrediente protagonista, il limone, è un omaggio all’estate e all’energia vitale: la sua scorza profumata e il succo brillante donano vivacità, acidità controllata e schiariscono i profili gastrici. I mirtilli, piccoli ma potentemente aromatici, aggiungono una nota dolce-acidula che equilibra l’intero palato. Il risultato è una piccola porzione di felicità che pensa in grande: saziante, nutriente e adatta a essere gustata in qualunque contesto, dal piano di lavoro al cesto del picnic.

Secondo una leggenda metropolitana ma piacevole, la versione in formato bocconcino è nata quando una nutrizionista gourmande voleva offrire ai pazienti post-allenamento una merenda che fosse comoda da prendere al volo, ma che contenesse proteine, carboidrati leggeri e grassi confinati entro limiti ragionevoli. L’idea di racchiudere tutto in una piccola pepita ha poi trovato terreno fertile tra chef di casa, sportivi e genitori in cerca di alternative sane e sfiziose per i propri figli. Nel corso degli anni, si è affinata con l’uso di ingredienti che favoriscono la coesione, la structura e la morbidezza, senza necessariamente ricorrere a cotture complesse. Così, ogni boccone diventa una piccola storia da raccontare: di gusto, di salute e di quotidianità ritrovata attraverso una merenda che è entrata a far parte di molte routine moderne.

Perché amerai questa ricetta

  • Praticità e velocità: si prepara in fretta e non richiede cottura complessa, ideale per chi vive una vita frenetica ma non vuole rinunciare a un snack di qualità.
  • Equilibrio proteico: una base che fornisce proteine utili a sostenere i muscoli, a moderate carboidrati e a una piccola quota di grassi salutari.
  • Sapore bilanciato: la brillantezza del limone si fonde con la dolcezza dei mirtilli, creando un profilo gustativo fresco e invitante.
  • Portabilità: perfetto da prendere al lavoro, in palestra, a scuola o in viaggio. Si conserva bene in contenitori richiudibili e si gusta freddo o a temperatura ambiente.
  • Versatilità: può essere adattato a diverse preferenze alimentari senza perdere la sua identità, grazie a varianti senza lattosio, senza glutine o vegane.
  • Qualità nel dettaglio: l’esperienza è ricca di texture, con un nucleo morbido, una superficie leggera e una nota croccante che può arrivare da eventuali ingredienti aggiuntivi come noci o fiocchi d’avena.

Profilo di sapore e consistenza

Il profumo è luminoso e pulito, come una mattina di primavera. Il limone offre una scorza delicata e un aroma agrumato che si diffonde subito nell’aria, seguito da una nota fresca e succosa proveniente dai mirtilli maturi. All’assaggio, si prova una dolcezza equilibrata: i mirtilli introducono una punta di naturale succo che contrasta con la leggera acidità del limone, mantenendo il palato vivace e reattivo. La texture è studiata per offrire una doppia sensazione: da una parte una lieve aderenza della base che tiene insieme gli ingredienti proteici, dall’altra una morbidezza che fa scivolare delicatamente il boccone. In bocca, si percepisce una leggera componente cremosa che si fonde con una struttura ferma ma non rigida. Se aggiunta una componente croccante, come una spolverata di cereali integrali tostata o di semi, si ottiene una terza dimensione di reazione sensoriale: croccantezza che fa da contrappunto al cuore morbido. Complessivamente, il sapore è rinfrescante, energico e accattivante, capace di restare impresso nella memoria gustativa grazie al contrasto tra la fredda dolcezza dei mirtilli e la lucidità aromatica del limone.

Dal punto di vista delle sensazioni gustative, questo bocconcino è un invito a un’esperienza polifonica: l’acidità moderata del limone stimola l’apice della lingua, seguito da una dolcezza fruttata che allunga la persistenza aromatica. L’elemento proteico offre sazietà e corpo, evitando che l’assunzione di zuccheri possa creare picchi di fame poco dopo. L’insieme è pensato per rimanere equilibrato, non troppo dolce né invasivo, adatto anche a chi preferisce sapori puliti e non troppo lunghi al palato. L’accompagnamento ideale è una temperatura ottimale: fresco, ma non freddo eccessivo, per far emergere al meglio i profumi e la consistenza senza compromettere la fragranza. In accompagnamento, si presta a essere servito sia in contesti minimalisti sia in presentazioni più ricercate, dove la bellezza visiva del colore giallo pallido e del blu intenso dei mirtilli cattura l’occhio insieme al gusto.

Occasioni & Pairings

Questi bocconcini sono perfetti per una grande varietà di momenti, dall’energia di una mattinata al ritmo di una giornata lavorativa, alle pause tra una lezione e l’altra. Possono diventare un rituale di inizio giornata, una piccola ricompensa post-allenamento o una merenda da condividere con amici e familiari. Grazie alle loro dimensioni contenute, sono ideali per buffet, catering, cene informali o per accompagnare un aperitivo a base di frutta fresca e formaggi leggeri. Ecco alcune idee di abbinamenti e contesti in cui brillano:

  • Colazione al volo: accanto a una tazza di tè verde o un caffè leggermente amaro, per iniziare la giornata con un tocco di leggerezza e proteine.
  • Spuntino post-allenamento: una fonte rapida di proteine e carboidrati semplici per favorire il recupero muscolare.
  • Lunchbox nutritivo: una opzione elegante e sana per la merenda a scuola o in ufficio, facilmente trasportabile e poco ingombrante.
  • Aperitivo informale: serviti in piccoli pirottini con una punta di yogurt denso o una crema leggera al limone come salsa di accompagnamento.
  • Dolci pensieri per i bambini: la combinazione di colori vivaci e sapori familiari può trasformarsi in un piccolo rito quotidiano che incoraggia scelte alimentari sane.

Idee di pairing:

  • Bevande: tè alle erbe, limonata non troppo dolce, o una fettina di spremuta d’arancia per creare una sinergia fresca.
  • Dolci leggeri: una yogurtita naturale, semifreddo al limone o una fresca crema di ricotta light per un contrappunto cremoso.
  • Contorni: una mini selezione di frutta di stagione e una manciata di noci o semi per intensificare la texture e l’apporto proteico.

Sapori, texture e ingredienti chiave (senza ricetta passo-passo)

La ricetta si fonda su tre elementi chiave che lavorano sinergicamente per offrire un’esperienza gustativa completa. Il primo è la nota agrumata del limone: non troppo pungente, ma sufficiente a definire il profilo, con una scorza che sprigiona olio aromatico al primo contatto con gli odori della cucina. Il secondo è la dolcezza scintillante dei mirtilli, capaci di rilasciare un succo fragrante che rende ogni boccone limpido e rinfrescante. Il terzo elemento è la componente proteica: una base ricca ma leggera che tiene insieme le parti morbide, conferendo corpo e sostegno al palato. L’equilibrio fra queste parti crea una sensazione di completezza: non si tratta solo di una merenda fresca, ma di una piccola creazione che sa sostenere l’energia, calmare l’appetito e offrire piacere sensoriale in un formato pratico. Non è soltanto gusto; è un’esperienza che stimola la memoria olfattiva, il sorriso e la voglia di tornare a casa con una merenda pronta all’uso.

Per chi ama la cucina modulare, questa preparazione si presta a variazioni tematiche. Puoi pensare di sostituire i mirtilli con lamponi, more o pezzetti di pesca, oppure aggiungere una nota erbacea leggera (menta o basilico) per una sorpresa fresca. Per chi segue diete particolari, è facile immaginare versioni vegane utilizzando creme vegetali al posto di prodotti lattiero-caseari, sostituzioni di proteine in polvere prive di allergeni comuni o l’uso di fiocchi di avena senza glutine. L’interpretazione è elastica senza perdere l’anima: una base che trattiene gli ingredienti con una coesione delicata e una superficie lucida che trattiene i profumi aromatici.

Tips, Varianti & Sostituzioni

  • Varianti di gusto: prova a spruzzare una piccola quantità di succo di limone aggiuntivo o incorporare scorza di limone finemente grattugiata per un’impronta ancora più agrumata. Per una dolcezza più marcata, aggiungi una punta di miele o sciroppo d’acero nel giusto equilibrio.
  • Versione vegana: utilizza yogurt di soia o di mandorla come base cremosa, e scegli proteine vegetali o una miscela di noci macinate per dare corpo. Assicurati che i leganti siano compatibili con le alternative scelte.
  • Gluten-free: se l’eventuale base contiene fiocchi di avena, opta per avena certificata senza glutine per mantenere la ricetta accessibile a chi ha sensibilità o intolleranze.
  • Contenuto proteico: la quantità di proteine può essere aumentata o modulata a seconda delle preferenze personali integrando meglio la scelta proteica senza alterare troppo la texture.
  • Texture alternative: aggiungi una piccola vellutata di semi di chia o di lino per creare una micro-croccantezza o una micro-gelificazione che dia una nuova patina sulla superficie.
  • Armonie aromatiche: se vuoi una versione più esotica, puoi includere una puntina di zenzero grattugiato o una spolverata di cannella per un tocco speziato che si sposa bene con limone e mirtilli.

Conservazione & Idee per preparare in anticipo

Una delle grandi virtù di questi bocconcini è la capacità di resistere nel tempo senza perdere consistenza o sapore. Conservazione, preparazione in anticipo e facilità di trasporto sono virtù chiave di questo snack, che si presta bene a essere preparato in anticipo o in grandi lotti per l’intera settimana. Ecco alcuni consigli pratici per mantenere al meglio la freschezza e la consistenza:

  • Refrigerazione: riponi i bocconcini in contenitori ermetici o in vaschette singole, separandoli se vuoi evitare che si appallottolino. Conservano la loro integrità per 3-5 giorni in frigorifero.
  • Congelamento: per una preparazione ancora più lunga, è possibile congelarli singolarmente; durante la scongelamento lento in frigorifero, possono riacquistare una parte della loro morbidezza originale. Evita di scongelarli a temperatura ambiente se vuoi mantenere al massimo la texture.
  • Riscaldamento leggero: se preferisci una consistenza più morbida e una fragranza rinvigorita, scalda leggermente in forno a bassa temperatura o in microonde a intervalli brevi. Tuttavia, la maggior parte del gusto si gusta perfettamente fredda o a temperatura ambiente.
  • Make-ahead: una versione preparata la sera prima per l’indomani mattina può partire con una nota fresca, pronta da gustare appena si arriva in cucina. Puoi anche conservare gli ingredienti base e assemblare i bocconcini al momento.

Curiosità & Trivia

Lo sguardo curioso dei buongustai a volte coglie dettagli sorprendenti dietro una preparazione apparentemente semplice. Ecco alcune curiosità interessanti che si collegano a questa ricetta:

  • I bocconcini di formaggio, ispirazione del nome, hanno una lunga tradizione italiana, ma qui sono reinterpretati in chiave proteica, offrendo una versione moderna di uno snack classico.
  • Il limone è una delle frutte più amate in cucina per la sua capacità di elevare tutto ciò che tocca senza sovrastarlo. La combinazione limone-mirtillo è una quindi una coppia intramontabile in molte cucine del mondo, rinforzata qui da una base proteica.
  • La popolarità degli snack proteici ha spinto i cuochi casalinghi a cercare soluzioni creative che non sacrificano sapore e texture. Questa ricetta è un esempio di come si possa coniugare gusto, salute e praticità in un unico, grazioso boccone.
  • La filosofia di “no-bake” o di preparazioni senza cottura è molto apprezzata in ambienti dinamici, perché riduce i tempi di preparazione e minimizza l’uso di calore. La freschezza degli ingredienti crudi o leggeri diventa un valore aggiunto in molte cucine moderne.

Ingredients

Bocconcini Base

  • – 200 g bocconcini (fresh mozzarella pearls), drained and finely chopped
    → The mozzarella provides a protein-rich, creamy base for the bites. Chop finely so it blends evenly into the dough and do not skip patting dry to remove excess brine moisture, which can otherwise make the dough too loose. If very watery, press gently to extract more liquid before mixing.
  • – 1/2 cup plain Greek yogurt (unsweetened), thick and well-drained
    → Adds moisture and creaminess while acting as a binder with the mozzarella. Use thick yogurt for better structure; stir in gradually until the dough comes together without becoming too sticky. If your yogurt is very thick, loosen with 1–2 teaspoons water or lemon juice.
  • – 1 scoop unflavored whey or plant-based protein powder (≈25–30 g)
    → Boosts the protein content and helps the bites hold their shape during baking. Sift to avoid lumps; if using a dairy-free protein, choose a smooth powder and adjust moisture as needed. If skipping, substitute with an extra 2–3 tablespoons Greek yogurt and a pinch more almond flour.
  • – 1/3 cup almond flour (finely ground almonds)
    → Provides structure and absorbs extra moisture from the dairy while keeping the bites tender. If you don’t have almond flour, grind blanched almonds in a processor until very fine.
  • – 1 large egg, lightly beaten (optional)
    → Acts as a binder and helps the dough set during baking, giving a firmer bite. If you prefer a dairy-free or egg-free version, increase Greek yogurt to 2–3 tablespoons and add an extra 1 tablespoon almond flour instead.
  • – Zest of 1 lemon
    → Adds bright citrus aroma that pairs beautifully with blueberries and the mozzarella’s mild flavor. Zest the lemon before juicing to capture the essential oils; avoid the white pith. Use freshly grated zest for the most vibrant flavor.
  • – 1 tablespoon lemon juice
    → Brightens the dough and balances the richness; add gradually and stop when the dough has a cohesive, scoopable texture. If using very large lemons, adjust to taste as acidity can vary.
  • – 2 tablespoons honey or maple syrup
    → Natural sweetness to harmonize with lemon and dairy while contributing a touch of moisture. Warm the honey slightly if it’s thick so it distributes evenly; you can reduce by 1–2 teaspoons if you prefer a less sweet bite.
  • – 1 cup fresh blueberries, gently folded into the mixture (or thawed frozen, well-drained)
    → Imparts juicy bursts of fruit and color; fold in carefully to minimize bursting and staining the dough. If using frozen berries, pat dry to limit extra moisture and keep the bites from becoming soggy.
  • – 1/4 teaspoon fine sea salt
    → Enhances the dairy and lemon flavors and balances sweetness; salt level can be adjusted to taste, especially if your yogurt is slightly salted or your cheese brings extra saltiness.

Optional Add-ins

  • – 2 tablespoons chopped pistachios or almonds (for crunch)
    → Adds texture and a nutty contrast to the soft mozzarella core. Chop finely for even distribution; toast lightly to deepen flavor and keep them crisp during baking.
  • – 1 tablespoon chia seeds or ground flax seeds (optional)
    → Provides extra fiber, omega-3s and a slight gel-like binding that can help the dough cohesion. If using whole seeds, crush slightly so they mix well; increase yogurt by 1 teaspoon if the mixture feels dry.
  • – 1/4 cup shredded coconut (optional)
    → Introduces a gentle sweetness and a subtle tropical note; lightly toast before mixing to amplify flavor and prevent moisture absorption. Fold in at the end to preserve texture.
  • – 1 tablespoon poppy seeds (optional)
    → Adds delicate crunch and a pretty speckled appearance; sprinkle on top before baking for visual appeal and a crisp bite.

Instructions

  • Preheat your oven to 350°F (175°C) and line two standard 12-cup muffin tins with paper liners or grease them well.
    → This ensures the bites release cleanly from the cups and promotes even browning without sticking.
  • Pat the bocconcini dry with paper towels and finely chop until uniform small pieces; this step prevents excess brine moisture from making the dough loose and helps it hold its shape during baking.
    → Finely chopped mozzarella distributes evenly, creating a creamy core without watery pockets.
  • In a large mixing bowl, whisk together the thick Greek yogurt, lemon zest, and lemon juice with the honey until completely combined and smooth; this builds a bright, moist foundation and helps the flavors marry.
    → Fresh lemon zest oils intensify aroma and brighten the dough; warm honey slightly if thick to aid even blending.
  • Sift the unflavored whey or plant-based protein powder into the yogurt mixture and stir until just incorporated and free of lumps; this boosts protein content and ensures the dough binds without grittiness.
    → Sifting prevents clumps that could create pockets of dry protein and disrupt texture.
  • Stir in the almond flour and the fine sea salt until the dough begins to come together; if the mixture seems too wet, sprinkle in an extra teaspoon of almond flour gradually; if too dry, whisk in a teaspoon of yogurt.
    → This balance establishes structure while keeping the bites tender; almond flour provides absorption and crumb.
  • Lightly beat the egg and fold it into the dough; this binding layer helps the bites set firmly during baking; if you prefer dairy-free or egg-free, omit the egg and increase yogurt by 2–3 tablespoons plus 1 tablespoon extra almond flour instead.
    → The egg adds cohesion and a firmer texture; omitting it changes moisture and structure, so adjust accordingly.
  • Gently fold in the chopped bocconcini and the blueberries until evenly distributed but not crushed; use a rubber spatula and fold with a sweeping motion to minimize berry bursting and color bleed.
    → Even distribution ensures each bite has cheese and fruit, while careful handling preserves fruit integrity and prevents purple staining.
  • If using optional add-ins (2 tablespoons chopped pistachios or almonds, 1 tablespoon chia or flax seeds, 1/4 cup shredded coconut, or 1 tablespoon poppy seeds), fold them in now or sprinkle seeds on top before baking for texture and visual appeal; toast nuts first to deepen flavor and maintain crunch.
    → Toasting draws out fats and intensifies the nutty flavor, helping add-ins stay crisp during baking.
  • Use a 1 tablespoon scoop or two spoons to portion the dough into the prepared muffin cups, filling about 2/3 full; press down lightly to compact each mound so the bites bake evenly and hold their shape.
    → Uniform portions ensure consistent cooking and a cohesive bite across all pieces.
  • Bake in the preheated oven for 16–20 minutes, rotating the tins halfway through; bake until the edges are lightly golden and the centers are set to a gentle spring when touched, with a toothpick coming out with a few moist crumbs.
    → Proper doneness yields a tender crumb without becoming dry or crumbly, while rotation promotes even browning.
  • Let the bites rest in the pans for 5–7 minutes after removing from the oven, then transfer to a wire rack to cool completely; this cooling period allows the structure to finish setting and prevents crumbling when handling.
    → Resting stabilizes moisture distribution and preserves the delicate texture.
  • Serve immediately or refrigerate in an airtight container for up to 3–4 days; for longer storage, freeze unbaked or fully cooled bites and reheat from frozen as needed; this preserves freshness and safety of the dairy components.
    → Proper cooling and storage maintain texture, moisture, and bright lemon notes for convenient snacking.

Notes

These gluten-free bocconcini lemon and blueberry bites are protein-packed and naturally sweetened by the delicate combination of mozzarella and yogurt, with bright lemon zest and juicy blueberries for a refreshing bite. The texture should be tender with a subtle creaminess from the cheese and yogurt, balanced by almond flour for structure. They make an elegant snack or appetizer that holds well in the fridge or freezer.

  • Pat the chopped bocconcini dry after draining to remove excess brine moisture; moisture can make the dough too loose. If very watery, press gently to extract more liquid before mixing.
  • Use thick, well-drained Greek yogurt to provide moisture and bind the bites. If the yogurt is very thick, whisk in 1–2 teaspoons water or lemon juice to reach a scoopable consistency.
  • Sift or whisk the protein powder to avoid lumps; if you’re dairy-free, choose a smooth plant-based powder and adjust moisture as needed. If skipping the powder, substitute with an extra 2–3 tablespoons Greek yogurt and a pinch more almond flour.
  • Almond flour adds structure and helps absorb extra moisture from the dairy. If you don’t have almond flour, grind blanched almonds in a processor until very fine.
  • The lemon zest and juice brighten the dough; zest the lemon before juicing to capture the essential oils. Add lemon juice gradually and stop when the dough is cohesive and scoopable.
  • Honey or maple syrup provides a natural, balanced sweetness. Warm honey slightly if thick to distribute evenly; you can reduce by 1–2 teaspoons if you prefer a less sweet bite.
  • Fold in fresh blueberries gently to avoid bursting and staining the dough. If using frozen berries, pat them dry to limit extra moisture.
  • Optional add-ins like chopped pistachios or almonds give pleasant crunch; chia seeds or ground flax seeds add fiber and a touch of binding. Toast nuts lightly for deeper flavor.
  • For dairy-free or gluten-free adaptations, substitute with certified gluten-free and dairy-free ingredients (e.g., dairy-free yogurt and protein powder). If needed, increase yogurt by a bit and adjust almond flour to maintain scoopable dough.
  • Make-ahead and storage: form and refrigerate the bites up to 24 hours before baking. Bake as directed and store leftovers in the fridge for 3–4 days, or freeze for 1–2 months. Reheat gently to preserve moisture and texture.

Tips

Consigli per l’impasto e l’aroma

  • Assicurati che i bocconcini siano ben asciugati: tampona i bocconcini tagliati con carta assorbente per eliminare l’umidità in eccesso; troppa acqua rende l’impasto troppo morbido e difficile da modellare.
  • Setaccia la proteina in polvere prima di aggiungerla per evitare grumi; se l’impasto risulta ancora appiccicoso, incorpora un cucchiaio alla volta di farina di mandorle.
  • Usa yogurt greco denso e ben scolato; se è molto spesso, allunga con 1–2 cucchiaini di acqua o succo di limone per una consistenza lavorabile.
  • Grattugia la scorza di limone prima di spremere il succo per trattenere gli oli essenziali; evita la parte bianca (pith) poiché può risultare amara.
  • Se vuoi una versione senza uova, aumenta lo yogurt a 2–3 cucchiai e aggiungi 1 cucchiaio di farina di mandorle in più per la stabilità.

Incorporazione di mirtilli e sapori

  • Mescola i mirtilli con cautela per evitare che scoppino; asciugali bene prima di unirli per limitare l’umidità extra nell’impasto.
  • Se usi mirtilli congelati, asciugali e lasciali sgocciolare bene per evitare che rendano umido l’impasto.
  • Per un aroma ancora più vivace, includi un pizzico in più di scorza di limone durante l’incorporazione.

Formazione, cottura e texture

  • Usa una cucchiaia da gelato o un dosatore per porzionare l’impasto in palline di dimensioni uguali; questo assicura cottura uniforme e una presentazione gradevole.
  • Se l’impasto è troppo morbido, raffreddalo 10–15 minuti in frigorifero prima di modellarlo; il raffreddamento aiuta a mantenere la forma durante la cottura.
  • Rivesti la teglia con carta forno o utilizza un tappetino siliconico per evitare che i bocconcini si attacchino.
  • Controlla la doratura: dovrebbero essere leggermente dorati ai bordi e compatti al tatto; se risultano morbidi, prosegui la cottura 2–3 minuti in più.
  • Per una crosticina leggermente più evidente, spruzza leggermente con olio o spennella con una minima quantità di olio EVO a metà cottura.

Sostituzioni, varianti e note di gusto

  • Per una versione senza latticini, sostituisci la mozzarella con formaggio vegano a sapore neutro e mantieni lo yogurt vegetale; potresti aumentare la farina di mandorle di 1–2 cucchiai per la coesione.
  • Se non hai proteine in polvere, aggiungi 2–3 cucchiai extra di yogurt e 1 cucchiaio in più di farina di mandorle per mantenere la struttura.
  • Per un profilo di limone più intenso, aumenta leggermente la scorza e aggiungi qualche goccia di succo extra, controllando l’acidità per non eccedere.
  • Aggiunte croccanti: 2 cucchiai di pistacchi o mandorle tritate; tostali leggermente per intensificare il sapore e mantenerli croccanti durante la cottura.
  • Per un apporto di fibre extra, aggiungi 1–2 cucchiaini di semi di chia o di lino; se usi semi interi, schiacciali leggermente per favorire l’emulsione.

Stoccaggio, preparazione anticipata e presentazione

  • Conserva le palline cotte in un contenitore ermetico in frigorifero fino a 2 giorni; riscaldale brevemente in forno o al microonde a bassa potenza per ritrovare la morbidezza.
  • Per prepararle in anticipo, forma le palline e congela su un vassoio; una volta congelate, trasferiscile in sacchetti. Cuoci direttamente da surgelate, aggiungendo 3–5 minuti al tempo di cottura.

Presentazione e abbinamenti

  • Servile con una salsa leggera al limone o yogurt al limone per una dip fresca.
  • Guarnisci con scorza di limone grattugiata o foglioline di menta per un tocco di freschezza.
  • Per una nota di dolcezza, aggiungi un filo di miele o sciroppo d’acero al piatto finale, senza mescolare nell’impasto.

FAQ

Che cosa sono i Bocconcini proteici limone e mirtilli?

Piccoli snack proteici della grandezza di bite, preparati con yogurt o yogurt vegetale, proteine in polvere, avena e mirtilli, aromatizzati al limone. Sono facili da portare con te e ideali come spuntino post-allenamento o merenda nutriente.

Quali sono gli ingredienti principali?
  • Proteine in polvere (gusto neutro o limone)
  • Yogurt greco o yogurt vegetale
  • Avena macinata o fiocchi finemente tritati
  • Miele o sciroppo d’agave
  • Scorza e succo di limone
  • Mirtilli freschi o congelati
  • Un pizzico di sale
  • Facoltativi: olio di cocco, burro di mandorle/neve di cocco
Come si preparano i bocconcini proteici limone e mirtilli?

Mescola in una ciotola gli ingredienti secchi (proteine, avena, sale). A parte unisci yogurt, miele, scorza e succo di limone. Combina gli elementi liquidi con quelli secchi fino a ottenere un impasto compatto, aggiungi i mirtilli. Forma bocconcini delle dimensioni di una noce, disponili su carta forno e lasciali rassodare in frigorifero per almeno 30–60 minuti. Conserva in un contenitore ermetico.

Tempo di preparazione e tempo di riposo?

Tempo di preparazione: circa 15–25 minuti. Tempo di riposo in frigorifero: 30–60 minuti (o più, per una consistenza più soda).

Posso adattarli a diverse diete (senza lattosio, vegane, senza glutine)?

Sì. Alcune varianti:

  • Senza lattosio: yogurt di soia o di cocco; proteine in polvere a base vegetale.
  • Vegani: usare yogurt vegetale e proteine in polvere vegan; escludere eventuali ingredienti di origine animale.
  • Senza glutine: usare avena certificata gluten-free.
  • Per ridurre zuccheri: scegliere miele o sciroppo d’agave con moderazione e frutta meno dolce.
Come conservarli?

Conserva i bocconcini in un contenitore ermetico in frigorifero fino a 4–5 giorni. Possono anche essere conservati nel freezer per 1–2 mesi; cuoc (non cotti) o scongela in frigorifero prima di consumarli.

Posso congelarli?

Sì. Disponili su una teglia per un’ora per rapida congelazione, poi trasferiscili in un sacchetto o contenitore adatto al freezer. Per consumarli, lasciali scongelare in frigorifero o a temperatura ambiente per alcuni minuti.

Posso usare altri frutti oltre ai mirtilli?

Assolutamente. Puoi sostituire con fragole a cubetti, lamponi, more o piccole quantità di frutta secca tritata. È possibile anche aggiungere scorza d’arancia o lime per variare il profumo.

Come migliorare la consistenza e il gusto?

Se l’impasto è troppo morbido, aggiungi un po’ di avena macinata. Se è troppo secco, aggiungi yogurt o un cucchiaino di succo di limone. Per una nota extra, aggiungi un tocco di vaniglia, una manciata di scorze di limone o una collo di cioccolato fondente spezzettato.

Qual è l’apporto proteico approssimativo per porzione?

Gli apporti variano in base agli ingredienti scelti. In genere una porzione di bocconcini (circa 8–12 pezzi) può fornire indicativamente tra ~6 e ~12 g di proteine per pezzo, con carboidrati variabili e grassi moderati. Per una stima più accurata, controlla le etichette degli ingredienti che usi e suddividi per porzioni.

Introduction / Hook

Imagine a slice that feels like a velvet cloud on your tongue, a cheesecake that carries the warm, indulgent kiss of caramel in every bite. Cheesecake al dulce de leche is not just a dessert; it’s a celebration of two beloved classics coming together in perfect harmony. The moment you release the first forkful, you’ll hear the soft sigh of a creamy center giving way to a ribbon of luscious dulce de leche that threads through the surface like caramel sunlight. The crust, subtly sweet and wonderfully crunchy, cradles the creamy filling as if it were a tiny golden shoreline. And the aroma—oh, the aroma—a slow, caramelized sugar scent that swirls through the room, inviting everyone to gather around the table with spoons poised and smiles ready. This dessert is a bridge between cultures, a nod to nostalgia, and a modern, irresistible indulgence that shines at celebrations and quiet weekends alike. It’s the kind of recipe you want to cook because you know it will make ordinary moments feel extraordinary, turning a simple slice into a shared memory that lingers long after the last bite.

In every spoonful, you’ll taste the delicate tang of cream cheese balanced by the toffee-like sweetness of dulce de leche, with a hint of vanilla and a whisper of salt to keep the flavors bright and honest. The first bite feels fine and smooth, then gradually reveals more depth as the caramel folds through the center. It’s comfort with a touch of sophistication, familiar enough to earn a place in your family repertoire, but special enough to feel like a treat you’d serve to guests who deserve something memorable. If you’ve ever loved a classic cheesecake and also fallen for the irresistible richness of dulce de leche, you’re about to discover a dessert that respects both loves while elevating them to a new, irresistible peak.

The Story Behind the Dish

Dulce de leche is a whisper of culinary history—one of those comforting legends that has traveled across generations and borders. Though its exact origin is the subject of affectionate debate among cooks and historians, most stories agree on a simple, patient method: milk and sugar simmered together until they transform into a thick, amber-sweet confection with a magical, glossy sheen. In Argentina, Uruguay, and much of Latin America, dulce de leche is more than a sauce—it’s a cultural staple, a pantry treasure, and a companion to countless desserts, from ice cream to pastries to pastries stuffed with fruit. The scent of slowly caramelizing milk evokes sunlit kitchens and long conversations, a reminder that good things often come from patient preparation and a gentle touch.

Cheesecake, meanwhile, has its roots in European cheesecakes that migrated across oceans and evolved into the modern, creamy form we love today. The marriage of cheesecake and dulce de leche feels almost natural: a silky, tangy filling that aligns beautifully with the deep caramel notes of dulce de leche. When you swirl or ribbon the caramel through the batter or lay it as a gleaming top, you create a dessert that looks as luxurious as it tastes. The result is a hybrid that honors both traditions—the Latin American beloved dulce de leche and the classic New World cheesecake—while offering a contemporary celebration of texture and flavor. The idea of combining these two treasures isn’t just about indulgence; it’s about storytelling through taste. Each bite becomes a page in a delicious diary, a reminder that food can connect cultures, memories, and the people you share it with.

As families pass down recipes and reinterpret them for modern kitchens, Cheesecake al dulce de leche becomes a canvas for personal touch: you can tuck in a touch of citrus zest for brightness, a splash of espresso for depth, or a sprinkle of sea salt to punctuate the sweetness. It’s the kind of dish that invites improvisation without losing its essence—a creamy core, a caramel kiss, and a crust that offers a satisfying counterpoint to the luxurious filling. If you’ve ever pursued a dessert that feels both timeless and contemporary, you’ve found it in this cheesecake, a treat that travels well from a cozy Sunday supper to a festive soirée.

Why You’ll Love This Recipe

  • Luxuriously creamy, with a caramel-kissed center: The dulcet undertones of dulce de leche melt into the velvety cheesecake for a smooth, indulgent mouthfeel.
  • Balanced sweetness: The tang from cream cheese and a hint of vanilla keep the richness in check, so every bite feels refined rather than heavy.
  • Effortful-looking, you-can-do-it results: It’s an impressive dessert that rewards patience but doesn’t require pastry-chef precision to succeed.
  • Versatile in presentation: Whether you drizzle more dulce de leche on top, swirl it through the batter, or finish with a salted caramel layer, it’s easy to customize.
  • Crowd-pleasing for celebrations and weeknights alike: Elegant enough for guests, comforting enough for family gatherings.
  • Textural harmony: A crisp, buttery crust grounds the creamy filling, while the dulce de leche introduces a glossy, luscious ribbon that surprises with every slice.
  • Make-ahead friendly: This dessert is forgiving when it comes to timing, making it ideal for parties and meal planning.

Flavor Profile & Texture

The flavor profile of Cheesecake al dulce de leche is a careful composition of contrasts that come together in a single, unforgettable bite. The filling presents a gentle tang from cream cheese, which acts as a counterpoint to the deep sweetness of dulce de leche. Vanilla adds a soft, seductively aromatic warmth, while a delicate pinch of salt elevates every caramel note, helping it sing rather than overpower. You’ll notice a light, creamy silkiness in the texture, which glides across the palate and lingers with a faint, luxurious glow of caramel at the finish.

The crust offers its own character—a crisp, buttery base that provides a satisfying crunch and a caramelized edge of toasty flavor. Depending on your choice of crackers or cookies, the crust might carry a subtle toffee-like nuance that plays beautifully with the dulce de leche. When dulce de leche is swirled through the batter or layered on top, it creates a ribbon of decadence that catches the light and reveals itself slice after slice. The interplay of these components—tangy, creamy, caramel-rich, and a touch salty—creates a multi-dimensional experience that keeps the palate intrigued from first bite to last crumb.

Texture-wise, think: a firm yet yielding slice, a crust that gives under a gentle press, a filling that holds its shape but dissolves smoothly on the tongue, and a caramel layer that remains glossy and luscious. The contrast between the cool, creamy center and the slightly caramelized surface can be accentuated by a quick refrigerate before serving, ensuring the flavors settle and the slice holds its structure for an elegant presentation. If you prefer a touch more texture, you can optionally finish with a salted caramel drizzle that adds a brief crunch and a wave of salt-tinged sweetness at the end of each bite.

Occasions & Pairings

This cheesecake shines at every kind of gathering—from intimate family dinners to festive celebrations. It’s particularly fitting for holidays, birthdays, or any event that calls for something a little extra special without requiring an elaborate set-up. Its classic yet indulgent character makes it a reliable centerpiece for dinner parties, potlucks, or as a show-stopping weekend dessert to cap off a meals-with-friends night.

Pairing ideas to elevate the experience:

  • Beverages: A robust espresso, a dark roast coffee, or a glass of aged port or sherry can complement the caramel notes without overwhelming the cheesecake’s delicate tang.
  • Fruit & freshness: Fresh berries (strawberries, raspberries, or blueberries) offer a bright contrast that cuts through the sweetness. A light citrus zest over the plate can awaken the palate between bites.
  • Side options: A dollop of whipped cream or a spoonful of lightly whipped mascarpone can add a cloudlike counterpoint to the dense filling.
  • Dessert pairings: Dark chocolate shards, a quiet almond biscotti, or a pinch of flaky sea salt on top can provide textural and flavor accents that enhance the overall experience.

Tips, Variations & Substitutions

Tips for a flawless cheesecake al dulce de leche

– Temperature matters: Use room-temperature cream cheese to avoid lumps and achieve a silky filling. Gently blend the filling until smooth, avoiding over-mixing which can introduce air pockets.

– Gentle water bath environment: If you bake, a water bath helps prevent cracks and ensures even heat. If you skip it, monitor the edges to prevent over-baking.

– Dulce de leche placement: For a dramatic look, swirl dulce de leche through the batter with a skewer before baking or chilling. For a more uniform top, reserve a portion to drizzle after chilling.

– Chilling time: A longer chill (overnight if possible) helps the flavors meld and makes slicing neat, clean edges easier.

Variations

  • Use a crumbled biscuit crust with melted butter and a filling of cream cheese blended with dulce de leche and a touch of lemon juice; refrigerate until set for a creamy, no-oven alternative.
  • Add a teaspoon of finely ground espresso or a shot of espresso to the filling for a mocha-inspired twist that deepens the caramel notes.
  • Incorporate a teaspoon of orange or lemon zest to brighten the profile; the zest brings a fresh counterpoint to the sweetness.
  • Finish with a final sprinkle of flaky sea salt or a light salt sprinkle on top right before serving to enhance the caramel’s complexity.
  • Use crushed almonds, hazelnuts, or macadamias in the crust for added texture and an extra layer of flavor that pairs beautifully with dulce de leche.
  • Swirl in finely ground almonds or gluten-free cookies for a crust that remains crisp and satisfying for gluten-sensitive guests.
  • Use a plant-based cream cheese and vegan butter in the crust; pair with a dairy-free dulce de leche alternative if available, keeping in mind texture may shift slightly.

Substitutions

  • If you don’t have homemade dulce de leche on hand, good-quality store-bought varieties work beautifully. For a lighter touch, use half dulce de leche and half plain caramel sauce with a touch of salt.
  • For dairy-free or lactose-free versions, choose a high-quality dairy-free cream cheese and adjust sweetness to taste, ensuring the texture remains creamy.
  • If you’re avoiding dairy entirely, choose a vegan butter or coconut oil-based crust, ensuring the ratio of butter to cookies yields a sturdy, crisp base.

Storage & Make-Ahead Ideas

One of the greatest strengths of this cheesecake is how well it travels from the kitchen to the table and how forgiving it is in terms of timing. You can prepare it a day ahead or stash slices in the freezer for impromptu gatherings.

Refrigeration: Once set, store the cheesecake tightly covered in the refrigerator for up to 4-5 days. This makes it an excellent candidate for weekend meal planning or a make-ahead dessert for a dinner party.

Freezing: Slice the cheesecake and wrap individual portions tightly in plastic wrap, then place in an airtight container or zip-top bag. Freeze for up to 2-3 months. Thaw overnight in the refrigerator before serving. The filling remains creamy, though the texture may become slightly denser after freezing; a light whipping of the surface before serving can refresh its appearance.

Make-ahead strategies: If you’re hosting, you can prepare the crust and filling separately a day in advance, keeping them refrigerated. Assemble and bake (or set) just before serving, or opt for the no-bake version if you’re short on oven time. For a busy weekend, consider portioning the filling into mini cheesecakes in muffin tins; this makes individual servings easier to portion and serve at a party.

Fun Facts & Trivia (Optional)

Did you know that dulce de leche literally translates to “candy of milk”? It’s a name that hints at the beloved caramel-like sweetness that has charmed kitchens across Latin America and beyond. The exact technique—whether milk is simmered, baked, or slow-cooked to coax out its caramel color—has inspired generations of cooks to experiment, share, and improvise. In some regions, dulce de leche is a pantry staple as essential as flour or sugar, used to fill pastries, spread on toast, or elevate coffee and chocolate desserts to something closer to a ritual. The cultural resonance of this ingredient is matched by its adaptability: it’s wonderful in simple cookies, luxurious in cheesecakes, and endlessly creative in layered desserts and toppings. If you’ve ever tasted a spoonful of dulce de leche straight from the jar, you know the allure of its glossy, melt-in-your-mouth texture and caramel-forward flavor profile—an irresistible foundation for a cheesecake that feels both familiar and novel.

From a culinary perspective, this dessert showcases a global palate: the creamy, tangy backbone of a classic cheesecake meets the deeply nostalgic sweetness of dulce de leche. It’s a reminder that desserts aren’t just about sugar; they’re about memory, texture, and the way a single bite can conjure a memory of a childhood kitchen or a festive gathering with friends. Whether you’re revisiting a family recipe or crafting a new tradition, Cheesecake al dulce de leche invites you to slow down, savor, and share. It’s the kind of dessert that makes conversations linger, cameras flourish, and spoons disappear—one luscious slice at a time.

Ingredients

    Crust
    – 1 3/4 cups graham cracker crumbs (or digestive biscuits)
    → To form the crust: crush crackers into fine crumbs, then mix with sugar and melted butter until the texture resembles wet sand. Press firmly into the bottom and slightly up the sides of a 9-inch springform pan. Chill briefly before filling to help the crust set and stay crisp during baking.
    – 1/4 cup granulated sugar (optional, for crust)
    → Adds gentle sweetness to the crust; adjust based on the sweetness of your crackers. Mix with crumbs and butter, then press into pan.
    – 6 tablespoons unsalted butter, melted (85 g)
    → Binds the crust; use melted, cooled butter to evenly moisten the crumbs. If the crust seems dry, add a touch more butter, then press evenly, and chill to set before filling.

    Filling
    – 4 (8 oz) packages cream cheese, softened to room temperature (about 900 g)
    → The creamy base of the cheesecake; soften completely to avoid lumps and beat until smooth. Scrape the bowl often for a silky batter that sets evenly.
    – 1 cup granulated sugar (200 g)
    → Sweetens the filling; beat with the cream cheese until light and fluffy, dissolving sugar for a smooth texture. Adjust to taste if you prefer less sweetness.
    – 4 large eggs, room temperature
    → Provide structure and setting for the baked cheesecake. Add one at a time on low speed, mixing just until combined to prevent overbeating and cracks.
    – 1/2 cup sour cream, at room temperature (120 g)
    → Adds moisture and tang, yielding a creamier texture. Blend in after the cheese is smooth to avoid curdling; keep batter glossy.
    – 1/4 cup heavy cream (60 ml)
    → Increases richness and silkiness of the filling. Add gradually to reach the desired consistency without thinning the batter too much.
    – 1 teaspoon vanilla extract
    → Provides classic vanilla aroma; use pure vanilla extract or vanilla bean paste for best flavor. Avoid imitation vanilla for a richer note.
    – 2 tablespoons all-purpose flour or 2 tablespoons cornstarch (for stabilization)
    → Helps the filling set and reduces cracking. If gluten-free, use a gluten-free flour blend; mix thoroughly to avoid lumps in the batter.
    – 1/4 teaspoon fine salt
    → Enhances overall flavor balance and prevents the filling from tasting flat. Even with cream cheese, a pinch of salt lifts sweetness.
    – Optional: 1 teaspoon lemon zest (zest of 1 lemon)
    → A hint of brightness to cut through richness; distribute evenly to avoid large specks of zest. Use fresh zest for best aroma.

    Dulce de Leche Swirl
    – 1/2 to 1 cup dulce de leche, warmed to pourable consistency (120–250 g)
    → The signature caramel-like swirl; warming makes it easier to pipe or swirl through the batter. Drizzle or ripple through the filling after a portion is poured into the pan for even distribution.
    – Optional extra dulce de leche for topping after bake
    → If you want a very pronounced swirl or surface layer, dollop and swirl more dulce de leche on top after baking and before chilling; it will set as it cools.

    Finish and serving
    – flaky sea salt for finishing (pinch)
    → Finishing salt enhances the dulce de leche sweetness and adds a subtle crunch. Sprinkle just before serving for best texture.
    – fresh berries or whipped cream for serving (optional)
    → Classic accompaniments that balance richness; add just before serving to preserve texture and presentation.

Instructions

  • Preheat your oven to 350°F (175°C) and grease a 9-inch springform pan; if desired, line the bottom with parchment to ensure clean release, then set aside while you prepare the crust.
    → Proper pan preparation prevents sticking and ensures clean slices when the cheesecake is unmolded after chilling.
  • Crumble graham crackers (or digestive biscuits) into a fine, uniform crumb and transfer to a mixing bowl; add granulated sugar (optional) and pour in melted butter; stir until the mixture resembles wet sand and holds together when pressed; this creates a cohesive, flavorful crust that bakes evenly.
    → Uniform crumbs and even moisture distribution prevent crust gaps and ensure a sturdy base.
  • Press the crumb mixture firmly into the bottom and slightly up the sides of the prepared pan using the flat bottom of a measuring cup or a small flat-bottomed tool; chill for 15 minutes to set the crust so it does not crumble when filling is added.
    → A compact, chilled crust acts as a stable foundation for the creamy filling and resists shifting during baking.
  • Bake the crust in the preheated oven for 8 to 10 minutes until it is set and lightly golden; remove and cool completely on a rack before adding the filling to prevent soggy edges from steam and moisture.
    → Par-baking seals the crust, enhances flavor, and keeps it crisp under a moist cheesecake filling.
  • Reduce the oven temperature to 325°F (165°C) in preparation for baking the filling; this gentler heat helps the cheesecake set slowly and reduces the risk of cracks.
    → A stable, slow bake yields a smoother, creamier interior without overcooking the edges.
  • In a large mixing bowl, beat the softened cream cheese on medium speed until smooth and creamy, about 2 to 3 minutes, scraping the bowl halfway to ensure no lumps remain; this yields a velvet texture free of clumps.
    → Lumps can cause an uneven texture and uneven rise during baking, so thorough smoothing is essential.
  • Gradually add the granulated sugar to the cream cheese while continuing to beat on medium speed until the mixture is light, fluffy, and fully incorporated; this dissolves the sugar and contributes to a tender filling.
    → Proper sugar incorporation prevents gritty pockets and ensures a silky batter.
  • With the mixer on low speed, add the eggs one at a time, beating just until each is combined before adding the next; overmixing at this stage can overdevelop gluten or incorporate too much air, leading to cracks.
    → Gentle incorporation preserves density and a smooth, crack-free center.
  • Beat in the sour cream, heavy cream, and vanilla extract until the batter is smooth and glossy; this step adds moisture, tang, and a luxurious mouthfeel; avoid overbeating to prevent incorporate air bubbles that may surface as cracks.
    → Dairy enriches the texture and flavor, producing a creamy, balanced cheesecake.
  • Sprinkle in the all-purpose flour or cornstarch and the fine salt, then mix on low speed just until the batter comes together and no lumps remain; the stabilizer helps the cheesecake set firmly and minimizes cracking during cooling.
    → Stabilizers create a more uniform set and reduce surface cracking without altering the flavor.
  • If using lemon zest, fold in the zest at this stage to distribute bright citrus aroma evenly without large specks; zest should be added with the last mix to avoid overheating the surface and dulling its fragrance.
    → A touch of lemon heightens flavor without overpowering the dulce de leche.
  • Warm the dulce de leche to a pourable consistency by microwaving in short bursts or placing the container in a warm bath; stir until smooth and free of thick ribbons so it swirls beautifully into the batter without breaking apart.
    → A pourable consistency ensures clean, even swirls that bake into the cheesecake rather than sinking to the bottom.
  • Pour half of the cheesecake filling into the cooled crust, then drizzle one-third of the warmed dulce de leche over this layer; use a knife or skewer to gently swirl the dulce de leche through the batter to create marbled ribbons, ensuring some pockets for flavor distribution later.
    → Swirling distributes dulce de leche flavor and creates an appealing visual pattern without overpowering the texture.
  • Pour the remaining filling over the swirled layer and smooth the top with an offset spatula to an even surface; this ensures uniform baking and an attractive finish when sliced.
    → A level top helps the cheesecake set evenly and slices cleanly for presentation.
  • Wrap the bottom and sides of the springform pan tightly with heavy-duty aluminum foil to seal out water, then set the pan in a larger high-sided baking dish; pour hot water into the outer dish until it reaches halfway up the springform to form a water bath that cushions the bake and reduces cracking.
    → The water bath provides a humid, gentle environment that prevents shrinking and cracking, yielding a creamy center.
  • Bake the cheesecake in the water bath at 325°F (165°C) for 60 to 70 minutes, or until the center wobbles slightly when the pan is gently jiggled; if the top becomes too browned, tent with foil and continue baking until the edges are set but the center remains just shy of firm.
    → A barely-set center yields a creamy interior as the cheesecake cools and chills, while the edges are fully set.
  • Turn off the oven, crack the door, and let the cheesecake cool in the oven for about 1 hour to gradually drop the temperature and minimize cracking from sudden heat loss; this slow cooling stabilizes the structure.
    → Gradual cooling prevents rapid moisture migration and keeps the surface smooth.
  • Carefully remove the cheesecake from the water bath and outer foil; place on a rack to cool completely before refrigerating; once cool, cover loosely and refrigerate for at least 4 hours or ideally overnight to ensure full set and clean slices.
    → Chilling tightens the filling, enhances flavor melding, and makes slicing effortless.
  • Just before serving, optionally drizzle a final delicate swirl of dulce de leche on top or dollop with extra, and finish with a pinch of flaky sea salt; serve with fresh berries or lightly whipped cream if desired for contrast and balance.
    → Sea salt accents sweetness and enhances caramel notes, while berries or whipped cream provide brightness and texture.

Notes

This cheesecake al dulce de leche is a decadent, creamy dessert with a buttery crust and ribbons of caramel-like dulce de leche swirled through the filling. For a gluten-free option, use gluten-free graham crackers or digestive biscuits (or a nut-based crust) and ensure all substitutes are certified gluten-free. Crush the crackers into fine crumbs, then mix with a little sugar and melted butter until the texture resembles wet sand; press firmly into a 9-inch springform pan and chill briefly to help set the crust before filling.

Keep ingredients at room temperature for a smoother batter: soften the cream cheese completely, beat with the sugar until light and fluffy, and scrape the bowl often. Add eggs one at a time on low speed to avoid overmixing, which can cause cracks. Blend in sour cream, heavy cream, vanilla, and a pinch of salt until the mixture is glossy.

To bake with minimal cracking, use a water bath: wrap the pan in foil to seal and place it in a larger roasting pan filled with hot water. Bake until the center barely jiggles, then gradually cool in the oven with the door ajar to prevent sudden temperature changes. If you don’t use a water bath, bake at a slightly lower temperature and monitor closely, cooling slowly on the counter before refrigerating.

For the dulce de leche swirl, warm the dulce de leche to a pourable consistency and drizzle or ripple through the batter after the first pour into the pan, then swirl gently with a knife for a marbled look. Reserve extra dulce de leche for topping after chilling if you want a more pronounced finish.

Finish and serving: a light sprinkle of flaky sea salt enhances the dulce caramel flavor and provides a nice contrast. Serve with fresh berries or a dollop of whipped cream. The cake needs to chill at least 6 hours, preferably overnight, for clean slices. It freezes well—wrap tightly and freeze, then thaw in the fridge before serving. For tidy slices, wipe the knife between cuts and slice through a fully chilled cake.

Tips

Consejos prácticos para Cheesecake al Dulce de Leche

  • Crust duro y crujiente: asegúrate de triturar las galletas hasta obtener migas finas. Mezcla con el azúcar (si lo usas) y la mantequilla derretida hasta que la textura parezca arena mojada. Presiona firmemente en el fondo y ligeramente por los bordes de un molde desmontable de 23 cm. Refrigera 10–15 minutos antes de rellenar para que la base se asiente.
  • Consistencia de la base: si la mezcla de galleta parece seca, añade un poco más de mantequilla derretida, una cucharadita a la vez, y vuelve a mezclar hasta que tenga una textura que se adhiera al molde sin desmenuzarse.
  • Para opciones sin gluten: usa galletas sin gluten y, si lo prefieres, añade una pizca de sal en la corteza para equilibrar sabores.
  • Crema bien suave: deja el queso crema a temperatura ambiente hasta que esté muy blando y sin grumos. Bate a velocidad media hasta lograr una mezcla suave y esponjosa; raspa el bol con espátula varias veces para incorporar bien.
  • Azúcar y batido: incorpora el azúcar con la crema de queso hasta que la mezcla esté ligera y esponjosa. Un batido insuficiente puede dejar sabor a queso y una textura menos suave.
  • Huevos con cuidado: añade los huevos uno a la vez a baja velocidad, mezclando apenas hasta que se integren. Evita batir en exceso para prevenir burbujas de aire y grietas.
  • Hidratación y acidez: añade la crema agria y la nata lentamente, procurando que la mezcla quede brillante. Estos ingredientes aportan humedad y suavidad, así que no los añadas en frío del todo.
  • Vainilla y aroma: usa vainilla de buena calidad (extracto puro) para un aroma más rico. Si usas vainilla en pasta, evita excederte para no aportar amargor.
  • Opción de estabilizante: si decides usar harina o maicena, mézclalos bien con los otros ingredientes secos para evitar grumos y asegurar que el relleno no se agriete al hornearse.
  • Ralladura de limón (opcional): si te gusta un toque cítrico, añade solo 1 cucharadita de ralladura de limón para dar frescura sin sobrecargar el sabor.
  • Dulce de leche templado para el remolino: calienta el dulce de leche hasta que tenga consistencia de vertido para facilitar su merodeo en la masa. Si está muy espeso, añade un chorrito de leche o crema para aligerarlo.
  • Cómo hacer el remolino: añade una capa de masa, vierte hilos de dulce de leche templado en diferentes puntos y usa un palillo para hacer remolinos suaves. Evita verter todo en un solo lugar para una distribución uniforme.
  • Más dulce de leche para la superficie: si quieres un sabor más marcado, añade más dulce de leche al final, justo antes de hornear o tras enfriar ligeramente. Ten en cuenta que endurecerá al enfriar.
  • Horneado seguro: hornea a 325–350°F (160–175°C). Si horneas sin baño María, envuelve el exterior del molde con varias capas de papel aluminio para evitar filtraciones de agua y para mantener la cocción uniforme.
  • Prevención de grietas: para evitar grietas, hornea a baño María y deja que el pastel enfríe lentamente dentro del horno con la puerta entreabierta tras apagar el calor. Esto reduce el choque de temperatura.
  • Enfriado y reposo: deja enfriar completamente el cheesecake a temperatura ambiente, luego refrigéralo al menos 4 horas o idealmente toda la noche para que tome cuerpo y quede suave al cortar.
  • Finishing y servicio: espolvorea una pizca de sal marina justo antes de servir para realzar el dulce; acompáñalo con frutos rojos o crema batida para contrarrestar la riqueza.
  • Almacenamiento: guarda las porciones cubiertas en el refrigerador hasta 3–4 días. También puedes congelar porciones individuales envueltas; descongélalas en refrigeración antes de servir.

FAQ

Cheesecake al dulce de leche — Preguntas frecuentes

¿Qué es la Cheesecake al dulce de leche?

Es un pastel de queso cremoso con un toque de dulce de leche, que puede llevar una base crujiente de galleta y, a veces, una capa o remolino de dulce de leche por encima o dentro del relleno.

¿Qué necesito para la base?

Galletas trituradas (tipo digestive o vainilla), mantequilla sin sal derretida y una pizca de sal. Opcional: una cucharada de azúcar si las galletas no son dulces.

¿Qué necesito para el relleno?

Queso crema a temperatura ambiente, azúcar, huevos, vainilla y crema espesa. También dulce de leche para el remolino o capa. Opcional: una yema extra para mayor riqueza.

¿Qué tamaño de molde es ideal?

Un molde redondo de 20–23 cm (8–9 pulgadas) funciona perfecto. Si usas un molde más grande, el relleno quedará más delgado; para porciones más gruesas, usa un molde de 18 cm.

¿Se hornea al baño María?

Sí, es recomendado hornear al baño María para evitar grietas y cocción desigual. Envuelve la base del molde en papel aluminio y coloca el molde en una bandeja con agua caliente.

¿A qué temperatura y por cuánto tiempo hornear?

Hornear a 160–165 °C (325–330 °F) durante 60–70 minutos, o hasta que el centro esté apenas tembloroso al mover ligeramente el molde. Apaga el horno y deja que termine de cocerse con el calor residual.

¿Cómo evitar que se agriete o se parta?

Usa baño María, no abras la puerta del horno durante la cocción y permite que el relleno se cocine suavemente. Deja reposar el cheesecake dentro del horno con la puerta entreabierta unos minutos al terminar.

¿Cómo enfriar y desmoldar correctamente?

Retira el baño María y deja enfriar a temperatura ambiente, luego refrigera mínimo 4–6 horas o toda la noche. Desmolda pasando un cuchillo fino por los bordes y retirando con cuidado el aro del molde.

¿Cómo decorar o hacer un remolino de dulce de leche?

Una vez frío, añade una capa de dulce de leche por encima y crea remolinos con un tenedor o cuchillo. Puedes espolvorear con sal marina y decorar con nueces picadas o trocitos de chocolate.

¿Se puede adaptar para dietas o sustituciones?

Sí. Para versión sin gluten, usa galletas sin gluten. Para reducir azúcares, utiliza un edulcorante apto para repostería y ajusta la cantidad de dulce de leche. Si no quieres crema espesa, puedes usar yogur griego espeso mezclado con un poco de crema, aunque la textura será menos firme.

¿Cómo conservar y cuánto dura?

Conservar refrigerado: 4–5 días. También se puede congelar por porciones durante 1–2 meses; descongélalo en el refrigerador durante la noche antes de servir.

¿Cuántas porciones rende?

Con un molde de 20–23 cm suele rendir 8–12 porciones, dependiendo del tamaño de las rebanadas.

Introduction / Hook

Imagine a dessert that greets you with the crisp snap of biscotti, the warm, cozy aroma of cinnamon, and a cloud of velvety cheesecake that feels like a hug in every bite. Biscotti cheesecake al cinnamon roll is not just a dessert; it’s a story of textures dancing together—crunch meeting creaminess, spice flirting with sweetness, and tradition meeting indulgence. As you cut into it, the edges offer a satisfying chew from biscotti shards that crumble softly, while the center stays luxuriously smooth, radiating the comforting scent of cinnamon-sugar swirls that evoke early mornings and holiday gatherings. This creation invites you to pause, take a breath, and let your senses glide through layers of flavor that feel both familiar and intriguingly playful. It’s the type of dessert that makes you linger at the table, share a few smiles, and linger a while longer over the last forkful, savoring how each mouthful reveals a new harmony of taste and texture.

What makes this biscotti cheesecake al cinnamon roll so irresistible is its ability to fuse two beloved classics into one unforgettable experience. The biscotti provides a crisp, golden backbone that stands up to the creamy, tangy richness of cheesecake, while a cinnamon roll-inspired twist threads through the center, bringing warmth, softness, and a hint of caramelized sweetness. It’s like a bakery tour in a single slice: the first bite gives you a toasty snap, the middle reveals a cloudlike creaminess, and the finish lingers with a gentle spice and a whisper of vanilla. If you’ve ever enjoyed a warm cinnamon roll and a slice of cheesecake separately, you’ll recognize the magic in this hybrid—where every element has room to shine, yet nothing overpowers the others.

For anyone with a soft spot for comforting desserts, this dish is a celebration of small, thoughtful contrasts. The biscotti’s bite invites you to slow down and savor, the cheesecake’s silkiness invites mouthfuls that melt into happiness, and the cinnamon roll influence adds a kiss of warmth that makes you feel instantly at home. It’s a dessert that doesn’t demand ceremony or fuss; it invites you to gather around and share, to dip a spoon and let conversation mingle with the lingering aroma of spice and dairy. Whether you’re baking for a weekend brunch, a festive celebration, or a quiet evening with a loved one, this biscotti cheesecake al cinnamon roll promises a memorable moment—one that lingers long after the last crumb has disappeared.

From a culinary standpoint, this dish is a love letter to textures and contrasts. The biscotti’s sturdy bite contrasts with the silkiness of the cheesecake, delivering a satisfying mouthfeel that keeps you intrigued from the first slice to the last. The cinnamon roll influence adds a warm, caramel-tinged sweetness that rounds out the profile without tipping into cloying sweetness, ensuring that each bite remains balanced and refined. The result is a dessert that feels elegant enough for special occasions, yet approachable enough to bake for a family Sunday dinner or a spontaneous tea-time treat. If you’re a fan of cross-cultural sweets that tell a story with every bite, you’ll find that this biscotti cheesecake al cinnamon roll has a magnetic charm that’s hard to resist.

The Story Behind the Dish

Every great dessert has a genesis, and this one is no exception. It began as a playful experiment in a sunlit kitchen, where the aromas of a classic Italian biscotti recipe mingled with the creamy promise of a traditional American cheesecake and the cozy spice of a cinnamon roll—three familiar favorites meeting at the same table. The idea was simple: honor the crunch and coffee-shop nostalgia of biscotti while letting the cheesecake’s tangy richness and the cinnamon roll’s comforting sweetness weave a narrative of indulgence without surrendering balance. The result is a dessert that feels both rooted and adventurous, a tribute to the way culinary borders blur when people cook with curiosity and affection.

In many Italian households, biscotti are a symbol of friendship and celebration—cookies baked twice for a guaranteed crispness that stands up to dunking in coffee or dessert wine. The cinnamon roll, meanwhile, carries the memory of a morning ritual: soft dough swirled with cinnamon, sugar, and a glaze that gleams with promise. Cheesecake has its own universal appeal—a creamy, lush canvas that can be dressed in countless ways. Combining these elements wasn’t about replicating a single iconic recipe; it was about crafting a new memory that draws upon the best parts of each heritage. The baking process, too, tells a little anecdote: as the mixture settles and cools, you’re reminded of patience, the patience that lightens up a gathering and invites stories to unfold as the scent travels through the house.

As with many beloved desserts, there are countless regional variations and family twists that could influence the final result. Some cooks might introduce espresso notes to mirror the coffee compatibility of biscotti, while others might weave in a touch of orange zest to lift the spice with a citrus whisper. The warmth of cinnamon is a universal language, yet it can be tuned to be bold or delicate depending on preference. The beauty of this dish is that it invites storytelling—home cooks can adapt, improvise, and make it their own, while still preserving the heart of what makes it so comforting and festive at the same time.

Why You’ll Love This Recipe

  • Triple-comfort flavor profile: the crisp biscotti bite, the lush cheesecake creaminess, and the cinnamon-sugar warmth all in one harmonious bite.
  • Textural drama without fuss: a sturdy crust or crust-like crunch followed by a smooth, melt-in-your-mouth center.
  • Versatile for occasions: perfect for holiday gatherings, weekend gatherings, brunches, or a special date night at home.
  • Make-ahead friendly: can be prepared in advance and served chilled or at room temperature for easy entertaining.
  • Gourmet vibe with approachable execution: it feels luxurious and sophisticated, yet is approachable for home cooks who love comforting flavors.
  • Customizable sweetness and spice: the balance between cinnamon, vanilla, and dairy can be tuned to taste, allowing for a personalized finish.
  • Transforms everyday ingredients into something memorable: biscotti and cheesecake are accessible, but together they become an impressive showpiece.

Flavor Profile & Texture

Aroma and First Impression

From the moment you lift the lid or slice into the dessert, you’re met with an inviting fragrance that seems to wrap around you like a cozy shawl. The cinnamon note rises first, warm and comforting, followed by a delicate tang from the cheesecake’s creaminess. If you peeled back the top layer a little, you’d catch a hint of vanilla—soft, creamy, almost custard-like in its impression. The biscotti component offers a faint roasted, nutty facet that hints at coffee and almond, depending on the exact biscotti variety used. Together, these aromas create a sensory invitation that makes the mouth water before the first bite is even taken.

Taste Journey

The taste unfolds in a balanced progression. The initial bite delivers a crisp, slightly sweet snap from the biscotti shards embedded in the crust or almond-hinted crumble. It’s not only textural; it also introduces a toasty, caramelized character that harmonizes with the next layer—a silken, subtly tangy cheesecake that provides richness without heaviness. The cinnamon roll influence introduces a gentle spice and a caramelized sweetness that lingers on the palate, echoing in the fade-out with a soft, comforting warmth. In some iterations, a whisper of citrus or vanilla can surface, brightening the profile and preventing the sweetness from becoming too cloying. The overall impression is one of refined indulgence: familiar flavors reimagined into a sophisticated, celebratory dessert that remains inviting to the everyday palate.

Texture Symphony

Texture is at the heart of the experience. The biscotti pieces deliver a controlled crunch that resists melting away too quickly, ensuring contrast with the cheesecake’s ultra-smooth, airy creaminess. The cinnamon roll element adds a cloud-like softness in the center, which can feel almost souffle-like if the dessert is well-chilled and softly set. The combination yields a mouthfeel that is dynamic but cohesive, with each bite revealing a new note—crackly edge, dreamy center, and a waxing spice that lingers long after the bite is gone. The temperature plays a subtle role too: serving slightly chilled maintains the crispness of the biscotti while keeping the cheesecake luxuriously soft, creating a harmonious interplay between temperature, texture, and flavor.

Occasions & Pairings

This biscotti cheesecake thrives in social settings and quiet moments alike. Its elegance makes it suitable for special occasions, while its comforting familiarity ensures it’s never out of place at a casual gathering or weeknight dessert run.

  • Holidays and celebrations: a show-stopping centerpiece for Christmas dessert tables, Easter brunches, or birthday gatherings where guests expect a little something memorable.
  • Brunch or afternoon tea: pairs beautifully with coffee, espresso, or a tempting dessert wine that brings out the cheesecake’s creaminess.
  • Romantic evenings: a refined yet cozy dessert that pairs well with a mug of hot cocoa, an aged whiskey, or a sweet vermouth for a comforting closer to the meal.
  • Potlucks and family dinners: easy to slice into generous portions and transport without losing its integrity.

Pairings to consider, based on the mood and season:

  • Beverages: a robust coffee, a glass of dessert wine, or a lightly sweet sparkling drink can enhance the cinnamon notes and balance the richness.
  • Side accompaniments: a scoop of vanilla bean ice cream, a dollop of whipped cream, or a few fresh berries to bring brightness and a pop of color.
  • Storage-friendly companions: citrus zest or a dusting of cocoa powder can be added right before serving to alter the aroma and finish.

Tips, Variations & Substitutions

Tips for Perfection

To maximize texture and flavor, consider these gentle refinements. Choose biscotti that are crisp and toasted to bring a pronounced crunch that won’t crumble too easily. If your biscotti is softer than ideal, a quick light bake will restore its firmness. Keep the dessert slightly chilled to maintain a contrast between the crunchy edges and the creamy center. For a more intense cinnamon experience, you can increase the cinnamon ratio in the swirl or dust the top with a fine, warm cinnamon-sugar mix just before serving. If you want a cleaner, neater look when slicing, chill the assembled dessert until the center is firm, then cut sharp, clean slices with a warm knife between each cut.

Variations

There are many ways to twist this dessert while preserving its essence. Consider these ideas to tailor the dish to your preferences or the occasion:

  • Espresso-kissed version: incorporate a hint of espresso powder into the cheesecake filling or dust the top with a cocoa-espresso dust for a mocha twist that complements the biscotti’s coffee-friendly profile.
  • Orange-Cennamella note: add a touch of orange zest to brighten the cinnamon warmth. The citrus notes lift the overall profile and pair nicely with vanilla and the creaminess of the filling.
  • Nut-forward variation: use biscotti with almond or hazelnut flavors to amplify the nuttiness and add a gentle toasty aroma that works beautifully with the cinnamon.
  • Vegan-friendly approach: swap traditional dairy components for high-quality plant-based alternatives to achieve a similarly lush mouthfeel while accommodating dietary preferences.
  • Gluten-free option: use gluten-free biscotti and ensure that all other components are gluten-free to maintain the desired texture and flavor balance.
  • Fruit-inspired twist: fold in a light fruit compote or layer with a fruit glaze to add brightness and color contrast that complements the spice notes.

Substitutions

If you’re working with pantry constraints, you can adapt the components in thoughtful ways. For example, a dense, creamy base can be achieved with a smooth ricotta-cheese blend or a lighter mascarpone alternative, depending on what you have on hand. The spice profile can be adjusted to taste—more cinnamon for warmth, or a hint of nutmeg and cloves to evoke a holiday sense of depth. In some kitchens, a portion of the biscotti can be replaced with a similar crunchy texture like teething biscuits or nutty cookies, as long as they bring that crisp element that anchors the dessert’s structure.

Storage & Make-Ahead Ideas

One of the practical delights of this dessert is its adaptability for ahead-of-time planning. It firms up nicely after chilling, which makes it ideal for entertaining when you want to spend more time with guests and less time in the kitchen during the event.

  • Make-ahead: prepare the dessert up to the point of serving, then refrigerate or chill until ready to slice. Since the flavors mellow with time, the cinnamon warmth can become even more integrated the next day.
  • Storage: wrap tightly and store in the refrigerator for several days. If you prefer longer storage, it freezes well; wrap slices individually and freeze for up to a couple of months. Thaw in the refrigerator or at room temperature, and if desired, re-briefly chill to restore a clean slice.
  • Reheating and serving tips: if you like the center to feel warmer and more indulgent, you can briefly warm slices in a low oven or gentle microwave, making sure not to melt the texture into something too soft. A cold, fresh dollop of whipped cream or a scoop of vanilla ice cream can elevate the experience when served warm or at room temperature.
  • Make-ahead flavor alignment: if you’re planning a multi-course menu, consider preparing the base and the swirl ahead of time, then assemble and chill just before serving to maintain the crispiness of the biscotti and the integrity of the cheesecake center.

Fun Facts & Trivia (Optional)

  • Biscotti, literally meaning “twice-baked” in Italian, were originally developed as a way to preserve cookies for longer journeys and were famously dunked in coffee or wine to soften them before eating.
  • Cheesecake’s origins stretch back to ancient civilizations, with early versions found in places like Greece and Rome. Modern cheesecakes often feature a mix of cream cheese and other dairy, creating a smooth, luxurious texture that has worldwide appeal.
  • Cinnamon has been prized for its warm, comforting aroma for centuries and was once considered a valuable spice in ancient trade routes. Today, its familiar scent is a universal cue for dessert and homey baking moments.
  • Combining biscotti with cheesecake is a celebration of texture and tradition—an inventive marriage of a cookie meant for dunking and a dessert designed for indulgence, each bringing its own history into a single, delicious slice.

Ingredients

Crust and Base

  • 1 1/2 cups finely crushed biscotti (about 180 g)
    → This crust forms the base for the cheesecake, adding crunch and biscotti flavor. Grind biscotti into fine crumbs in a food processor until powdery, then measure 1 1/2 cups. Mix with melted butter until the mixture resembles wet sand and holds together when pressed into the pan. Chill briefly before filling to set.
  • 4 tablespoons unsalted butter, melted (60 g)
    → The butter binds the crust crumbs into a cohesive shell that bakes into a sturdy foundation. Use unsalted butter to control salt level; whisk with the crumbs, then press into a 9-inch springform pan. Chill for 10 minutes to set before filling.

Cheesecake Filling

  • 24 oz (680 g) cream cheese, softened to room temperature
    → Cream cheese provides the creamy, tangy base of the cheesecake. For a smooth filling, ensure it is fully softened to avoid lumps; beat with sugar until light and fluffy, but do not overbeat to prevent cracks. Room-temperature cheese blends evenly with other ingredients.
  • 3/4 cup granulated sugar (150 g)
    → Sugar sweetens to balance tang; beat with cheese until smooth; add gradually to avoid graininess. If crystals remain, ensure the cheese is soft and not cold.
  • 3 large eggs, room temperature
    → Eggs provide structure and moisture to the filling. Add eggs one at a time on low speed to minimize air pockets; keep even temperature to prevent cracks.
  • 1/2 cup sour cream or full-fat Greek yogurt, at room temperature
    → Adds moisture, tenderness, and a slight tang; use full-fat for richness. Whisk until smooth before folding into the filling to avoid lumps.
  • 1 teaspoon vanilla extract (or 1/2 vanilla bean)
    → Vanilla enhances depth of flavor; real vanilla provides more aroma. If using vanilla bean, scrape seeds and whisk with the cream cheese until evenly dispersed.
  • 1 tablespoon all-purpose flour
    → A touch of flour helps stabilize the batter, preventing cracks and shrinking as it bakes and chills. Sift and whisk into the filling with the cream cheese before adding eggs.

Cinnamon Swirl

  • 2 tablespoons unsalted butter, melted
    → Creates the cinnamon-sugar swirl that mimics cinnamon roll filling. This fat helps the swirl spread evenly through the batter when marbled, and keep it from sinking. Keep the mixture warm but not hot to avoid cooking the batter.
  • 2 tablespoons brown sugar
    → Provides moisture and a rich caramel note that pairs with cinnamon. Mix with the melted butter and 1 teaspoon cinnamon for a thick, spreadable swirl. If you prefer milder sweetness, use 1 tablespoon.
  • 1 teaspoon ground cinnamon
    → Signature spice for cinnamon rolls; a strong aroma without overpowering the cheesecake. Adjust up to 1 1/2 teaspoons if you love cinnamon, and marble through the filling in generous ribbons for visible swirls.
  • 1/4 teaspoon salt (optional)
    → A small pinch to balance sweetness; omit if using salted butter or if you prefer a milder swirl.

Toppings

  • 1/2 cup powdered sugar
    → Use for glaze or light dusting of the cooled cheesecake. If making a glaze, whisk with 2 tablespoons milk and a splash of vanilla to a pourable consistency. You can also dust a light layer after glazing for a decorative finish.
  • 2 tablespoons milk or heavy cream
    → Liquid to thin the glaze; start with 1 tablespoon and add more until you reach your desired pourable consistency. For dairy-free options, use almond milk or coconut milk, keeping the glaze thick enough to coat a spoon.
  • 1/4 teaspoon vanilla extract
    → Adds aroma to the glaze; balances the sweetness and cinnamon notes. Stir the vanilla into the glaze after the sugar and milk are combined for even distribution.

Instructions

  • Preheat your oven to 325°F (165°C) and position a rack in the center of the oven; set a 9-inch springform pan on a baking sheet for stability; line the interior with a parchment round and lightly grease the sides with butter or nonstick spray.

    → A steady oven temperature ensures even baking and prevents cracks; parchment prevents sticking and makes unmolding easier.
  • Grind the biscotti into very fine crumbs using a food processor or place them in a resealable bag and crush with a rolling pin until they resemble powdery sand.

    → Uniformly fine crumbs create a cohesive crust that bakes evenly and supports the cheesecake without crumbling.
  • Measure 1 1/2 cups of the biscotti crumbs after grinding, then transfer to a bowl and whisk in the melted butter until the mixture resembles wet sand and holds its shape when pressed.

    → The butter binds the crumbs into a compact, sliceable crust; too little butter will crumble, too much will be greasy.
  • Press the crust mixture into the bottom and lightly up the sides of the prepared 9-inch springform pan, applying even weight with the flat bottom of a measuring cup or a small glass; chill the crust for 10 minutes to set.

    → A cooled, firm crust holds its shape during filling and slicing, preventing leakage and sogginess.
  • In a large mixing bowl, beat softened cream cheese with granulated sugar on medium-low speed until the mixture is completely smooth and free of lumps; scrape the bowl as needed to ensure even texture.

    → Softened cream cheese blends more uniformly with sugar, creating a silky filling; beating on low avoids incorporating air that can lead to cracks later.
  • Sprinkle in the all-purpose flour and mix on low speed just until combined; do not overbeat after the flour is added to maintain a tender texture.

    → A small amount of flour stabilizes the batter, reducing cracking as it sets during chilling and baking, while keeping the batter smooth.
  • Beat in the sour cream (or Greek yogurt) and vanilla extract until the batter is creamy and homogeneous; scrape the sides and fold in any stray lumps with a spatula.

    → Sour cream adds moisture and tenderness with a subtle tang; bringing it to-room temperature avoids curdling and ensures smooth integration.
  • With the mixer on low, add the eggs one at a time, fully incorporating each before adding the next; stop as soon as the last egg is blended to avoid over-aerating the batter.

    → Adding eggs gradually on low speed minimizes air pockets that can cause cracks and helps the cheesecake set evenly.
  • In a separate small bowl, whisk the melted butter, brown sugar, 1 teaspoon ground cinnamon and salt until the sugar is dissolved and the mixture is smooth; keep this cinnamon swirl mixture warm but not hot.

    → A warm swirl will distribute evenly when marbling without cooking the batter; cinnamon aroma should be strong but not scorched.
  • Pour half of the cheesecake batter onto the chilled crust and spread evenly to the edges; drizzle or spoon the cinnamon swirl across the surface in a loose lattice or ribbon pattern; use a knife or skewer to marble the swirl into the batter in broad, decorative swirls.

    → Marbling creates the signature cinnamon roll look and distributes cinnamon flavor without overpowering the cheesecake; avoid over-swirling which can blend the layers too much.
  • Carefully spoon the remaining batter atop the swirled layer and smooth the surface with an offset spatula; the top should be level to ensure even baking and slicing.

    → A uniform top prevents uneven browning and helps the cheesecake slice cleanly after chilling.
  • Wrap the outside of the springform pan securely with two layers of heavy-duty aluminum foil to seal, then place the pan in a larger roasting pan; pour hot water into the roasting pan until it reaches about halfway up the sides of the cheesecake (a water bath).

    → The water bath provides gentle, even heat that reduces cracking and keeps the center creamy by insulating the cake during baking.
  • Bake the cheesecake at 325°F (165°C) for about 55–70 minutes, or until the outer edges are set and the center still has a slight wobble when the pan is gently nudged.

    → The center should appear a bit jiggly because it will continue to set as it cools; overbaking dries the filling and increases cracking risk.
  • Turn off the oven and leave the cheesecake inside with the door cracked about 4 inches for 1 hour to gradually cool and minimize sudden temperature changes that can cause cracking.

    → Slow cooling helps the structure set evenly and reduces cracks caused by rapid cooling.
  • Remove the cheesecake from the water bath, carefully unwrap, and refrigerate uncovered for at least 4 hours or overnight to finish firming and to allow flavors to meld.

    → Chilling solidifies the texture for clean slicing and enhances flavor depth; do not skip this step for the best results.
  • Prepare the glaze by whisking 1/2 cup powdered sugar with 2 tablespoons milk and 1/4 teaspoon vanilla until smooth and pourable; adjust with more milk or sugar to reach a thick but pourable consistency.

    → A well-balanced glaze adds a glossy finish and a touch of sweetness without overpowering the cheesecake; a proper consistency coats the slice without pooling.
  • When the cheesecake is fully chilled, spoon or drizzle the glaze over the top in a thin, even layer and allow it to set for about 15 minutes before slicing.

    → A thin glaze sets quickly and helps keep the surface from becoming sticky when cut; it also adds a visually appealing finish.
  • Dust with a light sprinkle of additional cinnamon powder or powdered sugar if desired for an extra cinnamon roll-inspired presentation; serve chilled or at room temperature in clean, neat slices.

    → Finishing touches enhance aroma and appearance; slight warming to room temperature improves aroma and flavor release in each bite.

Notes

These biscotti cheesecake al cinnamon roll is a decadent twist on the classic cheesecake, featuring a crisp biscotti crust and a cinnamon-roll inspired swirl. To ensure a creamy filling and clean slices, prep the crust and filling in stages and avoid overmixing. The notes below will help you achieve a stable bake, visible swirls, and a glossy glaze.

  • Crust and base: Grind biscotti into a fine crumb (about 1 1/2 cups). Combine with 4 tablespoons melted butter until the mixture resembles wet sand and holds when pressed. Press firmly into a 9-inch springform pan to form an even crust, then chill for 10–15 minutes to set before filling.
  • Cheesecake filling: Soften 24 oz (680 g) cream cheese to room temperature to avoid lumps. Beat with 3/4 cup granulated sugar until smooth and fluffy, then add 3 large eggs one at a time on low speed. Fold in 1/2 cup sour cream or full-fat Greek yogurt and 1 teaspoon vanilla. Add 1 tablespoon all-purpose flour and whisk just until incorporated. Avoid overmixing to prevent cracks. Bake until the edges are set and the center wobbles slightly; cool gradually on a rack before refrigerating to firm up.
  • Cinnamon swirl: Keep the swirl mixture warm but not hot. Combine 2 tablespoons melted butter, 2 tablespoons brown sugar, 1 teaspoon ground cinnamon, and 1/4 teaspoon salt (optional) until smooth. Dollop and swirl through the batter with a knife or skewer to create generous ribbons that marble through without sinking.
  • Toppings and finish: For a glaze, whisk 1/2 cup powdered sugar with 2 tablespoons milk (or dairy-free alternative) and 1/4 teaspoon vanilla until smooth. Drizzle over cooled cheesecake or dust lightly with sugar. Adjust the glaze thickness by adding more milk a teaspoon at a time if needed. The glaze hardens slightly as the cheesecake chills, giving a polished finish.
  • Make-ahead and storage: Bake the cheesecake a day ahead and chill overnight for cleaner slicing. It keeps well in the refrigerator for up to 4–5 days. Slice and serve chilled or slightly at room temperature. You can freeze baked slices wrapped tightly for 1–2 months; thaw overnight in the fridge before serving.

Tips

Tips for making Biscotti cheesecake al cinnamon roll

  • Crust consistency and handling

    Grind biscotti to a fine crumb and measure exactly 1 1/2 cups. The crust should resemble wet sand when mixed with melted butter and should hold together when pressed into the pan. If the mixture feels too dry, you can add a teaspoon or two of extra melted butter, but avoid making it soggy. After pressing into a 9-inch springform, chill for at least 10 minutes to set before filling.

  • Softening and beating cream cheese

    Let the cream cheese sit at room temperature until soft and pliable to avoid lumps. Beat with the sugar until the mixture is smooth and pale, but don’t overbeat once the eggs are added, or you risk cracks in the finished cake. Keep everything at room temperature for the best texture.

  • Eggs and temperature

    Add eggs one at a time on low speed to minimize air pockets. Keeping ingredients at room temperature helps them emulsify more evenly, resulting in a silkier filling with fewer cracks.

  • Sour cream or Greek yogurt

    Use full-fat for the richest texture and a tangy note. Whisk the sour cream or yogurt until smooth before folding into the filling to avoid lumps and streaks in the batter.

  • Vanilla and flour

    If using vanilla bean, scrape the seeds and whisk them through the cheese mixture for deeper aroma. Sift the flour and whisk it in with the cream cheese before adding eggs to help stabilize the batter and prevent graininess.

  • Cinnamon swirl components

    Keep the melted butter mixture warm but not hot so it blends evenly into the swirl. Brown sugar adds moisture and a caramel note; if you prefer a milder swirl, reduce to 1 tablespoon. Use 1 teaspoon cinnamon (or up to 1 1/2 teaspoons for a stronger cinnamon aroma) to balance sweetness without overpowering the filling.

  • Swirl technique

    Spread half of the filling in the pan, dollop the cinnamon swirl over it, then cover with the remaining filling. Use a knife or skewer to marble the batter in loose ribbons—don’t over-mix—so the cinnamon design remains visible after baking.

  • Preventing cracks and ensuring a smooth bake

    Consider baking the cheesecake in a water bath or at least wrap the pan well and place it in a larger pan with hot water. The moisture helps prevent cracks and keeps the surface glossy. Do not overbake; the center should still jiggle slightly when you move the pan. Let it cool gradually on a rack before refrigerating.

  • Glaze and topping tips

    For the glaze, start with the powdered sugar and milk, then add vanilla and whisk until you reach a pourable but thick consistency. If it’s too thin, add a bit more sugar; if too thick, add a touch more milk. Apply glaze to cooled cake or dust with a light veil of powdered sugar for a decorative finish.

  • Make-ahead and storage

    The crust and filling can be prepared ahead: keep the crust pressed and chilled, and you can even prepare the filling and swirl up to a day in advance (store covered in the fridge). Slices refrigerate well for up to 4–5 days and freeze beautifully for 1–2 months. Thaw overnight in the fridge before serving for best texture.

FAQ

Che cos’è Biscotti cheesecake al cinnamon roll?

È un dessert a stratificazione che combina una base croccante di biscotti, una crema di formaggio soffice e un swirl dolce ispirato al cinnamon roll. Si può gustare freddo o a temperatura ambiente, offrendo una piacevole fusione di texture tra croccante e cremosa.

Quali sono gli ingredienti principali?

Base: biscotti sbriciolati (tipo digestive/biscotti secchi) mescolati con burro fuso. Ripieno: formaggio cremoso, zucchero, uova, vaniglia, un pizzico di sale e panna acida (opzionale). Swirl cinnamon roll: zucchero, cannella e burro per creare l’effetto swirl; topping opzionale di glassa di zucchero.

Come si prepara la base di biscotti?

1) Macina i biscotti fino a ottenere una consistenza sabbiosa. 2) Mescola con burro fuso finché il composto è omogeneo. 3) Premi bene sul fondo di una teglia a cerniera rivestita con carta forno. 4) Metti in frigo per 15-20 minuti per rassodare prima di riempire.

Come si crea il swirl al cinnamon roll all’interno della cheesecake?

Prepara un mix di zucchero e cannella con una piccola quantità di burro fuso. Se usi rotoli di cinnamon roll già pronti, tagliali a pezzetti piccoli e spennellali con la miscela cannella-zucchero, da distribuire sulla crema di formaggio a metà cottura per creare l’effetto swirl. In alternativa, mescola un po’ di impasto di cinnamon roll (già lievitato) con zucchero e cannella e agguanta in cucchiaiate durante la preparazione.

Qual è la temperatura e il tempo di cottura consigliati?

Cuoci a 170°C (340-350°F) per 45-60 minuti, o finché i bordi si sono rassodati e il centro è appena tremolante. Se la superficie marrone troppo rapidamente, copri con carta stagnola negli ultimi 10-15 minuti. Per una consistenza uniforme, considera la cottura in bagno-maria.

È necessario utilizzare un bagno-maria?

È consigliato per evitare crepe e ottenere una crema più liscia. Se non hai una grande teglia adatta al bagno-maria, avvolgi la teglia in alluminio resistente e posizionala in una teglia più grande riempita di acqua calda per metà durante la cottura.

Come si raffredda e si conserva la cheesecake?

Lascia raffreddare completamente a temperatura ambiente, quindi trasferisci in frigorifero per almeno 4-6 ore o preferibilmente durante la notte. Conserva ben chiuso in frigorifero fino a 3-4 giorni. Puoi anche congelarla: avvolgila bene e durare fino a 1-2 mesi; scongelala in frigorifero prima di servire.

Posso prepararla in anticipo?

Sì. Puoi preparare la base e la crema in anticipo. Assemblala una volta che la base è fredda, poi cuoci e raffredda. Se vuoi, congela la cheesecake non cotta in porzioni singole per agevolare la preparazione futura.

Come adattare la ricetta per diverse esigenze (gluten-free, dairy-free, ecc.)?

Varianti:
– Gluten-free: usa biscotti gluten-free per la base; assicurati che il cinnamon roll sia adatto a una versione gluten-free o prepara una schermatura con impasto senza glutine.
– Dairy-free: usa formaggio cremoso vegano o crema di formaggio a base di mandorle, burro vegetale al posto del burro tradizionale e panna acida vegetale (opzionale).
– Senza zucchero o a ridotto contenuto zuccheri: sostituisci con dolcificanti adatti e riduci la quantità di zucchero nella crema e nel swirl.
– Senza uova: sostituisci con chia/flax eggs o miscele commerciali per cheesecake vegane (il risultato potrebbe essere leggermente diverso in consistenza).

Quali abbinamenti o toppings consigliate per servire?

Caramello salato, glassa di zucchero a velo, scaglie di cioccolato, salsa al cioccolato bianco, una spolverata di cannella extra o granella di noci. Per un tocco fresco, aggiungi scorza di arancia o limone grattugiata sulla crema prima che si rapprenda.

Quali errori comuni evitare?

Evitare di sovrassbitare la crema durante l’impasto, che può portare a una cheesecake dura. Assicurarsi che gli ingredienti siano a temperatura ambiente, utilizzare un bagno-maria per una superficie liscia, non aprire troppo spesso il forno durante la cottura e lasciare raffreddare lentamente per prevenire crepe.

Introduction / Hook

Immagina una dolce tentazione che si scioglie lentamente in bocca, dove la croccantezza scura dell’Oreo incontra la lucentezza cremosa di una cheesecake vellutata, e dove una vibrante freschezza di fragole danza all’aria aperta di un’estate italiana. Barrette cheesecake Oreo alle fragole è quel tipo di dessert che conquista subito: una presentazione elegante a barre che si tagliano facilmente, perfette per rinfrescare le serate, allietare i pranzi di festa o accompagnare un caffè al pomeriggio. Ogni morso è un viaggio sensoriale. La base, robusta e leggermente croccante, si presenta come una fonduta di cacao che mette in risalto la dolcezza lattiginosa del ripieno. Le fragole, fresche o ridotte in una salsa leggera, regalano un tocco fruttato che contrasta con la crema al formaggio, creando un equilibrio irresistibile tra comfort e sorpresa. Questo dessert è una dichiarazione di semplicità ed eleganza: non servono presentazioni elaborate, basta una teglia ben preparata, una finitura lucida e una nota di freschezza che rimane impressa nella memoria di chi assaggia.

Barrette cheesecake Oreo alle fragole non è solo una ricetta: è un piccolo momento di pura gioia condivisa. È un modo per celebrare la stagione delle fragole senza complicazioni, ma con una cura artigianale che fa sentire chi cucina come se stesse offrendo un abbraccio. La magia sta nella sincerità dei sapori: cioccolato e crema che si fondono, fragole che brillano, e una consistenza che convince anche i palati più esigenti. Se vuoi sorprendere amici e familiari con qualcosa di classico ma contemporaneo, questa è la scelta giusta. È una ricetta che parla di convivialità, di tavolate che si allungano, di risate che riempiono la casa, e di momenti in cui un dessert diventa ricordo. Quando prepari questa barretta, stai narrando una piccola storia di comfort food aggiornata per il presente, una storia che si racconta senza parlare troppo: basta assaggiarla.

The Story Behind the Dish

La combinazione di Oreo e fragole nasce dall’incontro tra due universi golosi: l’iconica dolcezza al cacao degli Oreo, amata in tutto il mondo, e la freschezza pungente delle fragole, simbolo di stagione e di convivialità nei paesi mediterranei. In molte cucine, i biscotti al cacao diventano la base di crostate, cheesecake e barre dessert che viaggiano tra tradizione e innovazione. L’idea di trasformare questa combinazione in “barrette” nasce dalla voglia di creare qualcosa di pratico da tagliare e servire in ogni occasione: una piccola porzione di torta, ma realizzata in formato da condividere, più comodo da trasportare e da gustare in movimento. Le barrette hanno una storia di viaggio: portano con sé la praticità delle merende fatte in casa ma con un tocco di eleganza, come se ogni fetta contenesse un piccolo segreto di festa.

In molte culture, la cheesecake è diventata un simbolo di hospitalità. Il formaggio morbido, la vaniglia, lo zucchero e una leggera nota di limone creano una crema che si abbina perfettamente a una base solida. Quando si aggiungono le fragole, si accende una memoria sensoriale: il profumo fruttato che invade la cucina, la luce rossa delle fragole tagliate e quel gusto aspro-dolce che equilibria la dolcezza della crema. Trasformare questo mix in barre rende il tutto ancora più accessibile: è possibile prepararlo in anticipo, conservarlo in frigo, e servire porzioni perfette che mantengono la loro forma e consistenza. È una storia di audacia moderata: non servono troppe stranezze culinarie, ma una chiara idea di sapore e texture che si completano a vicenda, giorno dopo giorno.

Nella tradizione italiana, i dessert spesso si raccontano come momenti di condivisione: una tavola imbandita, una famiglia riunita, una risata che nasce intorno a una fetta da gustare. Questa ricetta incarna quel sentimento, offrendo una versione moderna e accessibile di un classico americano. Non è una ricetta “alla lettera”: è un invito a personalizzare, a giocare con le fragole di stagione, a scegliere creme più o meno dense, a sperimentare con piccole varianti che regalano nuove sfumature. Così nasce Barrette cheesecake Oreo alle fragole: una piccola storia di gusto, pronta a essere scritta dal tuo palato, con la tua firma.

Why You’ll Love This Recipe

  • Preparazione pratica: una base di Oreo croccante, una crema setosa e un soffio di fragola che completa il quadro, tutto in barre facilmente tagliabili.
  • Versatilità: si presta a versioni no-bake o leggermente cotte, a seconda del tempo e della preferenza per la texture. Puoi adattarla alle stagioni e agli ingredienti disponibili.
  • Bilancio di sapori: l’amaro-delicato del cacao delle Biscotti Oreo si confronta con la dolcezza cremosa del formaggio e la brillante acidità delle fragole, creando un equilibrio che soddisfa sia chi ama i profumi intensi sia chi cerca leggerezza.
  • Texture coinvolgente: croccantezza iniziale, crema vellutata e un tocco di succo di fragola che rende ogni morso curioso e stimolante.
  • Condivisione facilitata: le barre si preparano in anticipo, si conservano facilmente e si tagliano in porzioni uniformi, perfette per feste, pic-nic e merende da portare a scuola o in ufficio.
  • Estetica invitante: la striatura di fragole e la lucentezza del rivestimento creano un dessert che è quasi troppo bello per essere mangiato, ma troppo buono per resistere.
  • Adattabilità dietetica: è possibile realizzare versioni vegetariane o vegane con alternative al formaggio cremoso e al rivestimento, mantenendo sempre la sensazione di una barretta indulgente.

Flavor Profile & Texture

Il sapore di Barrette cheesecake Oreo alle fragole è una sinfonia ben bilanciata. La base di Oreo, con il suo sapore di cioccolato e burro, offre una nota di cacao ricca ma non troppo amara, che funge da fondazione stabile per tutto il resto. La crema al formaggio aggiunge una dolcezza morbida e una leggera acidità che pulisce il palato ad ogni morso, impedendo che la dolcezza diventi stucchevole. Le fragole, a seconda della stagione, possono essere sul campo o presentarsi come una delicata coulis: entrambe le varianti introducono una brillante freschezza, una leggera nota acida che equilibra la crema e lascia una sensazione di pulizia dopo ogni pezzo. Testurali giocose: la prima crunchera dell’Oreo, la seducente creaminess della crema e il succo delle fragole che si scioglie in bocca, creando un finale morbido ma mai svanito. Nel retrogusto, una lieve vaniglia e una traccia di limone donano una luminosità che invita al prossimo morso.

In termini di consistenze, la barretta offre una progressione: la crosta si rompe facilmente sotto la lama, rilasciando un profumo invitante; poi la crema si aggiusta, dando una densità vellutata che resta stabile una volta tagliata; infine, le fragole o la loro salsa lasciano una nota fresca e leggermente aspra che allontana la sonnolenza zuccherina tipica di dessert molto dolci.

Occasions & Pairings

Queste barrette sono perfette in molte occasioni. Una tavola di dessert per feste estive, un post pranzo domenicale in famiglia, una merenda elegante da servire a un tea party, o un dolce di fine cena per una cena tra amici. La loro forma a barre le rende facili da afferrare tra una chiacchiera e l’altra, senza dover utilizzare piatti e posate elaborate. Inoltre, si sposano con una serie di abbinamenti che valorizzano il profilo di sapore:

  • Bevande: Moscato d’Asti leggero, spumante brut, rosé fruttato o un tè freddo al limone con una spruzzata di menta fresca.
  • Contorni: una pallina di gelato alla vaniglia o alla crema, fragole fresche a fettine, una leggera spolverata di scorza di limone.
  • Altri dessert: una nuvola di panna montata leggera o una quenelle di yogurt greco dolcificato leggermente per un contrasto fresco.
  • Occasioni speciali: matrimoni, anniversari, o cene a tema estivo che richiedono un dessert che sia al tempo stesso chic e pratico.

Tips, Variations & Substitutions

La bellezza di Barrette cheesecake Oreo alle fragole risiede anche nella possibilità di personalizzazione. Ecco alcune idee utili per adattarla ai gusti, alle esigenze alimentari e alle occasioni:

Tips per la preparazione

  • Premi la base di Oreo in modo uniforme sul fondo della teglia: una pressione costante aiuterà a ottenere una barretta che si taglia facilmente e resta compatta.
  • Lascia raffreddare completamente la crema prima di versarla sulla base: una crema troppo calda può sciogliere la base e compromettere la consistenza finale.
  • Per una finitura lucida, puoi preparare una gelatina di fragola da stendere sottilmente sulla superficie una volta rassata, creando un aspetto professionale e un ulteriore tocco di brillantezza.

Varianti senza glutine, vegane o light

  • Gluten-free: usa Oreo senza glutine o altre marche di biscotti al cacao senza glutine per la base. Assicurati che la crema contenga burro o olio certificato senza glutine.
  • Vegane: sostituisci il formaggio cremoso con una crema di anacardi o di caviale di cocco, e usa una versione vegana degli Oreo o un’alternativa di biscotti vegani. Per la dolcezza, scegli sciroppo d’agave o zucchero di canna non raffinato.
  • Leggero: scegli una crema con una percentuale di grassi ridotta o sostituisci parte del formaggio con yogurt greco scremato, ottenendo una consistenza meno densa senza rinunciare al gusto.

Twist internazionali e regionali

  • Twist agrumato: aggiungi scorza di limone o arancia all’impasto della crema per una nota agrumata fresca.
  • Twist cacao: integra una piccola quantità di cioccolato fondente fuso nella crema per aumentare la profondità del sapore.
  • Frutti di bosco: sostituisci parzialmente le fragole con lamponi o more per una variazione di colore e acidità.

Storage & Make-Ahead Ideas

Una delle grandi virtù delle barrette cheesecake è la loro praticità di conservazione. Preparale con anticipo e conserva correttamente per massimizzare gusto e consistenza:

  • Conservazione: copri bene la teglia o taglia le barre e riponile in contenitori ermetici. Mantengono la loro consistenza per 3-5 giorni in frigorifero.
  • Congelamento: puoi congelare le barre già tagliate, avvolgendole singolarmente in carta stagnola o pellicola, per 1-2 mesi. Per gustarle, lascia scongelare in frigorifero per diverse ore o durante la notte.
  • Make-ahead: la preparazione può essere fatta 1 giorno prima. Se prepari la versione no-bake, lascia rassodare in frigorifero per almeno 4-6 ore o durante la notte per una consistenza più ferma. Se opti per una leggera cottura, lascia raffreddare completamente prima di tagliare e conservare in frigorifero.

Fun Facts & Trivia (Optional)

Una veloce curiosità per aggiungere un tocco di teatro al tuo piatto:

  • Gli Oreo sono stati creati nel 1912 da Sam prone e put: l’uso del biscotto doppio con crema all’interno è diventato un classico globale, protagonista di ricette infinite, dalle torte ai milkshake, fino alle barrette come questa versione alle fragole.
  • La fragola è uno dei simboli della estate e della convivialità: la sua forma, il profumo e la vivacità del colore la rendono un ingrediente perfetto per dessert che vogliono celebrare la stagione.
  • Le barrette come formato “da portare” sono nate dall’esigenza di creare dessert facili da condividere, ma soprattutto facili da trasportare in picnic, pranzi all’aperto e cene tra amici.
  • Questo tipo di dessert dimostra come una base semplice possa sostenere una crema cremosa e una nota di frutta in modo equilibrato, trasformando un piatto familiare in un’esperienza estetica e gustativa gratificante.

In conclusione, Barrette cheesecake Oreo alle fragole è una ricetta che celebra la semplicità raffinata: pochi ingredienti amati, lavorazione gentile e una presentazione che invita a tagliare, condividere e tornare per un altro pezzo. È la prova che la cucina non deve essere complicata per essere memorabile: a volte basta un biscotto al cacao, una crema vellutata, e la freschezza di fragole perfette per creare qualcosa di speciale, capace di trasformare una semplice merenda in un piccolo rituale di gioia quotidiana. Se stai cercando un dessert che sia al contempo confortante e moderno, familiare e sorprendente, questa barretta potrebbe diventare il tuo nuovo cavallo di battaglia, pronto a ripetersi nelle stagioni e a evolversi con i tuoi gusti, anno dopo anno.

Ingredients

  • Barrette Cheesecake Oreo alle Fragole
  • 24 Oreo cookies, crushed (filling removed) to about 2 cups
    → The cookies form a rich, chocolatey crust. Removing the cream filling prevents extra moisture and a soggy crust. Crush until fine, then mix with melted butter to create a cohesive, pressable base. Use a food processor for even texture or place cookies in a sealed bag and roll with a rolling pin.
  • 6 tablespoons unsalted butter, melted
    → Binds the crust together. Ensure the butter is fully melted and slightly cooled before mixing with the crumbs to avoid greasy lumps. Press the mixture firmly into the pan and bake for a few minutes or chill until set, depending on your recipe approach.
  • Filling
  • 2 (8-ounce) blocks cream cheese, softened to room temperature (total 16 oz / 450 g)
    → The creamy base of the cheesecake layer. Softening is essential to achieve a smooth, lump-free mixture when beaten with sugar and eggs. If lumps remain, beat longer at medium speed and scrape the bowl.
  • 1 cup granulated sugar
    → Sweetens the filling and helps achieve a creamier texture when beaten with the cream cheese. If you prefer a less sweet version, reduce by 2–3 tablespoons, but note this can slightly affect the final texture and color.
  • 2 large eggs
    → Eggs help set the cheesecake during baking and contribute to a smooth, custard-like interior. Add one at a time to avoid curdling; mix until just combined to maintain a creamy texture without overwhipping which can cause cracks.
  • 1/2 cup sour cream
    → Adds moisture, tenderness, and a subtle tang that complements the creamy cheese and contrasts with the Oreo crust. For a lighter version, substitute plain Greek yogurt, but expect a slightly different mouthfeel and tang.
  • 1 teaspoon pure vanilla extract
    → Enhances the overall flavor with warm vanilla notes. Use high-quality vanilla extract for depth. If you have vanilla bean paste or seeds, you can add 1/2 teaspoon for extra aroma and specks.
  • 1 teaspoon fresh lemon juice or lemon zest
    → Provides brightness that cuts richness and pairs well with strawberry. Use juice sparingly to avoid overpowering the cheesecake; if using zest, grate finely and avoid the white pith.
  • Pinch of salt
    → Heightens sweetness and flavors, balancing the richness of cream cheese. A tiny pinch goes a long way; adjust to taste based on sweetener and fruit swirl.
  • Strawberry Swirl
  • 1/2 cup strawberry puree
    → Adds a fruity pink swirl and strawberry aroma to the filling. Purée fresh strawberries until smooth, then strain if you prefer a seed-free texture. Gently swirl into the batter before baking to create attractive marbling.
  • 1 tablespoon granulated sugar (optional)
    → If your strawberries are not very ripe, a touch more sugar helps the puree taste fruity and vibrant. Taste the puree before adding sweetness and adjust accordingly.
  • 1 teaspoon lemon juice (optional)
    → A hint of lemon brightens the strawberry flavor and helps balance sweetness. Use sparingly to avoid overpowering the strawberry profile.
  • Fresh Strawberry Topping
  • 1 cup fresh strawberries, hulled and diced
    → Provides a bright, juicy finish and color contrast when the bars are chilled and served. Dice evenly for a neat appearance; if desired, toss with a teaspoon of sugar and a squeeze of lemon juice to release juices before serving.
  • Optional Add-ins
  • 1/4 cup mini chocolate chips (optional)
    → Small chocolate chips add pockets of sweetness and textural contrast. Fold into the batter at the end of mixing, being careful not to overmix; keep chips evenly distributed by lightly coating them in a teaspoon of flour before adding.
  • 1/4 cup chopped almonds or pistachios (optional)
    → Adds crunch and nuttiness to contrast the creamy layer. Toast the nuts briefly to intensify flavor, then sprinkle on top or fold gently into batter; use finely chopped pieces for even distribution.
  • Optional Garnish
  • Powdered sugar, for dusting
    → Finishing touch that adds a delicate sweetness and professional look. Dust lightly just before serving to avoid clumping; you can also dust with a strawberry-themed edible shimmer for presentation.
  • Fresh mint leaves or lemon zest, for garnish
    → Adds a fresh aroma and color contrast to the plate. Mint pairs nicely with strawberry notes; a touch of zest brightens the dish when served.

Instructions

  • Preheat your oven to 350°F (175°C) and line a 9×13-inch baking pan with parchment paper, leaving an overhang on the sides to lift the bars when finished.
    → This ensures even heat distribution, prevents sticking, and allows you to lift the entire cheesecake cleanly for neat slices.
  • Prepare the Oreo crust by crushing the cookies (filling removed) to about 2 cups and melting the butter until smooth; whisk the butter into the crumbs until evenly moistened. Press the mixture firmly across the bottom of the prepared pan in a uniform, compact layer.
    → A tight, cohesive crust provides structure and prevents crumbling when cutting, while the butter adds richness and helps the crust set.
  • Bake the crust for about 8 minutes at 350°F (175°C) or chill until set, then cool completely before filling.
    → Briefly baking sets the crust, minimizes sogginess from the filling, and cooling prevents warping or shifting under the batter.
  • In a large mixer bowl, beat the softened cream cheese and granulated sugar on medium speed until completely smooth, light, and free of lumps, usually 2–3 minutes; scrape the bowl halfway to ensure even texture.
    → Softened cream cheese blends smoothly with sugar to form a creamy, stable base for the cheesecake; scraping prevents stubborn lumps from remaining.
  • With the mixer on low, add the eggs one at a time, beating after each addition only until incorporated; avoid overmixing to prevent incorporate too much air and potential cracks.
    → Gentle incorporation preserves a velvety interior and minimizes cracking during baking and cooling.
  • Beat in the sour cream, vanilla extract, fresh lemon juice, and a pinch of salt on low speed until just combined; stop as soon as the mixture comes together.
    → Sour cream adds moisture and tenderness, vanilla enhances depth, lemon brightens the flavor, and salt balances sweetness.
  • Prepare the strawberry swirl by puréeing 1/2 cup fresh strawberries until smooth; if you prefer a silkier texture, strain the purée to remove seeds, then whisk in optional 1 teaspoon lemon juice and up to 1 tablespoon sugar, setting aside.
    → Strawberry purée provides color, aroma, and a fruity ribbon through the cheesecake; straining yields a smoother swirl.
  • If using optional add-ins, toss 1/4 cup mini chocolate chips or 1/4 cup chopped almonds/pistachios with 1 teaspoon all-purpose flour to coat lightly, then fold into the filling at the end to distribute evenly without sinking.
    → Coating prevents sinking and promotes even distribution of additions for texture and flavor balance.
  • Pour the cheesecake filling over the cooled crust in an even layer; drop spoonfuls of the strawberry purée onto the surface and gently swirl with a knife or skewer to create a marbled pattern without blending completely.
    → Marbling visual appeal and a balanced strawberry aroma; avoid over-swirl to keep distinct pink ribbons.
  • Bake the assembled cheesecake at 350°F (175°C) until the center is slightly jiggly and the edges are set, typically 45–55 minutes; if the top browns too quickly, tent loosely with foil to prevent scorching.
    → A gently set center yields a creamy interior after chilling; tenting preserves color and texture without drying the top.
  • Cool the cheesecake in the pan on a wire rack for 1 hour, then refrigerate for at least 4 hours or overnight until fully chilled and firm for clean slicing.
    → Chilling allows the proteins to fully resettle, enhances flavor, and makes cutting into neat bars easy.
  • Prepare the fresh strawberry topping by dicing 1 cup strawberries into uniform pieces and, if desired, tossing with 1 teaspoon sugar and a squeeze of lemon juice; let macerate for 10–15 minutes to release juices.
    → Maceration softens fruit and intensifies sweetness and brightness for a glossy topping.
  • Just before serving, dust the bars lightly with powdered sugar and garnish with fresh mint leaves or a hint of lemon zest for color and aroma; slice into neat bars using a warmed knife for clean edges.
    → Finishing touches elevate presentation and provide a fresh aroma that complements the strawberry cheesecake flavor.

Notes

These Barrette Cheesecake Oreo alle Fragole bars are a decadent dessert that layers a chocolate Oreo crust with a velvety strawberry cheesecake filling and a bright fresh-strawberry topping. For best results, bring ingredients to room temperature and beat the filling at low speed until smooth, adding eggs one at a time to avoid curdling. Gentle handling prevents cracks and airy pockets in the cheesecake.

Crust tips: Crush the Oreo cookies to about 2 cups (filling removed) and mix with 6 tablespoons melted butter until the mixture resembles wet sand. Press firmly into the prepared pan to create a dense, even crust. Bake for 8–10 minutes to set, or chill the crust until firm if you plan a no-bake finish.

Filling: In a bowl, beat 2 (8-ounce) blocks of cream cheese with 1 cup granulated sugar until smooth and fluffy. Add 2 large eggs, one at a time, mixing on low until just combined. Stir in 1/2 cup sour cream, 1 teaspoon vanilla extract, 1 teaspoon fresh lemon juice or zest, and a pinch of salt until the batter is glossy. Strawberry swirl: purée 1/2 cup strawberries until smooth, then swirl into the filling by dolloping and using a knife to create marbling. If you like, add 1 teaspoon lemon juice to the puree to brighten the flavor.

Assemble and bake: Pour the filling over the crust, then dollop the strawberry puree and swirl with a knife to create marbling. If using optional add-ins like mini chocolate chips or chopped almonds/pistachios, fold them in or sprinkle on top after halfway mixing to keep distribution even.

Fresh strawberry topping: Scatter 1 cup diced fresh strawberries on top of the filling after baking for a bright finish. If desired, macerate the berries with a teaspoon of sugar and a squeeze of lemon juice to release juices before serving.

Chill and serve: Bake at 325°F (163°C) until the center is just set and the edges are slightly puffed, about 40–50 minutes. Cool completely on a rack, then refrigerate at least 4 hours or overnight to let the bars firm up and flavors meld. Slice with a clean knife for neat portions and serve chilled.

Storage and variations: These bars keep well in the refrigerator for up to 5 days and freeze for 2–3 months—wrap individually or freeze as a whole. Gluten-free option: to make gluten-free Barrette bars, use gluten-free chocolate cookies for the crust (and verify any added ingredients are gluten-free). For a lighter version, you can substitute part of the cream cheese with Greek yogurt, though this may soften the texture and reduce tang.

Tips

  • Crust tips: Crush Oreo cookies with the cream removed until fine for a dense, chocolatey base. Melted butter should be fully incorporated and slightly cooled before mixing with the crumbs to avoid greasy clumps. Press the crust firmly into the pan using the bottom of a glass or measuring cup for an even, compact layer. For a quicker setting, chill the crust in the fridge for 15–20 minutes; if you prefer a firmer bake-set, bake briefly before filling. Line the pan with parchment for easy removal if needed.
  • Filling consistency tips: Let the cream cheese soften to room temperature to prevent lumps. Beat with sugar until smooth and creamy, then add eggs one at a time on medium speed to avoid curdling. Mix just until combined after the eggs; overmixing can introduce too much air and cause cracks. Stir in sour cream, vanilla, lemon juice or zest, and a pinch of salt until everything is evenly incorporated. If the batter looks a bit lumpy, a quick scrape of the bowl and a few more seconds of mixing will help achieve a silky texture.
  • Strawberry swirl technique: Purée fresh strawberries until smooth and strain if you want a seed-free swirl. Taste the puree and add optional sugar only if needed. Gently dollop the swirl onto the batter and use a knife or skewer to create pretty marbling—don’t over-swirl, or the colors may blend too much and look muddy.
  • Fresh strawberry topping tips: Dice strawberries into uniform pieces for a neat appearance. To deepen flavor, toss with a teaspoon of sugar and a squeeze of lemon juice and let stand briefly to draw out juices. Drain excess liquid before spooning over set bars to prevent a soggy topping; scatter just before serving for best texture.
  • Optional add-ins: If using mini chocolate chips, toss them in a teaspoon of flour to help distribute evenly and prevent sinking. Toast chopped almonds or pistachios for a crunchier texture, then fold lightly into the batter or sprinkle on top. Keep add-ins to small amounts so they don’t overwhelm the creamy filling.
  • Optional garnish tips: A light dusting of powdered sugar gives a professional finish; garnish with fresh mint leaves or a touch of lemon zest for color and aroma. For a festive look, consider a strawberry-themed edible shimmer or a few whole berries on the side when serving chilled.
  • Make-ahead and storage tips: Chill the bars in the refrigerator for at least 4 hours (or overnight) to ensure clean cuts. Store leftovers covered in the fridge for up to 3–4 days. If freezing, wrap slices individually and freeze for up to 2–3 months; thaw in the refrigerator before serving to maintain texture.

FAQ

Che cosa sono le Barrette cheesecake Oreo alle fragole?

Sono barre dessert a base di biscotti Oreo croccanti e una crema di formaggio cremosa con fragole, tagliate a porzioni rettangolari perfette da offrire come dessert freddo o snack estivo.

Quali ingredienti servono?

Per circa 12–16 barrette:

  • 200 g di Oreo
  • 60 g di burro fuso
  • 400 g di formaggio spalmabile tipo Philadelphia
  • 100 g di zucchero a velo
  • 200 ml di panna fresca da montare
  • 180–200 g di fragole fresche (più alcune per guarnire)
  • 1 cucchiaino di estratto di vaniglia
  • un pizzico di sale
  • facoltativo: 2 fogli di gelatina o agar-agar per una migliore presa
Quante porzioni rende?

Con una teglia rettangolare di circa 23 x 33 cm, otterrai circa 12–16 barrette, a seconda delle dimensioni con cui taglierai.

Come preparo la base delle barrette?

Procedura:

  1. Sminuzza finemente gli Oreo (con o senza crema) in una ciotola.
  2. Mescola i biscotti sbriciolati con il burro fuso finché il composto è umido e compatto.
  3. Stendi l’impasto sul fondo di una teglia rivestita con carta forno, premendo bene per ottenere uno strato uniforme di circa 1 cm di spessore.
  4. Metti in frigorifero per circa 15–20 minuti per rapprendere.
Come preparo la crema al formaggio e fragole?

Procedura:

  1. Frulla 180–200 g di fragole per ottenere una purea; passa al setaccio se vuoi una crema più liscia.
  2. In una ciotola, monta la panna fredda fino a renderla soffice.
  3. In un’altra ciotola, lavora il formaggio spalmabile con lo zucchero a velo, l’estratto di vaniglia e il pizzico di sale fino a ottenere una crema liscia.
  4. Incorpora delicatamente la panna montata alla crema di formaggio, poi aggiungi la purea di fragole. Se vuoi una consistenza più ferma, aggiungi 2 fogli di gelatina precedentemente ammollati e sciolti (opzionale).
  5. Aggiungi pezzetti di fragola fresca per una nota croccante, se preferisci.
Come si assembla e si raffredda?

Procedura:

  1. Versa la crema alle fragole sulla base di Oreo già rassodata, livellando la superficie.
  2. Copri con un foglio di carta forno, senza sigillare troppo, e metti in frigorifero per almeno 4–6 ore (meglio tutta la notte) per far prendere consistenza.
  3. Una volta rassodata, taglia in barre rettangolari della dimensione desiderata e decora con fragole fresche tagliate.
Come conservare le barrette?

Conservazione:

  • In frigorifero, ben coperte, per 3–5 giorni.
  • Si possono anche congelare per 1–2 mesi ben sigillate; lascia scongelare in frigo prima di servire e, se possibile, aggiungi una fetta di fragola fresca al momento di servire.
Quali varianti posso provare?

Idee e sostituzioni:

  • Sostituisci le fragole con lamponi, pesche o mango per versioni diverse.
  • Aggiungi scaglie di cioccolato fondente o bianco nell’impasto per un tocco extra di dolcezza.
  • Per una versione senza lattosio, usa formaggio cremoso senza lattosio e panna vegetale.
  • Per una base diversa, utilizza Oreo al cioccolato bianco o altre varianti di biscotti al cioccolato.
Posso prepararlo senza gelatina?

Sì. Se vuoi evitare la gelatina, lavora la crema con panna montata ferma e lascia raffreddare in frigorifero per ottenere una buona presa. Per una maggiore stabilità senza gelatina, puoi utilizzare 2 fogli di gelatina ammollati come descritto nella crema, oppure agar-agar seguendo le istruzioni sulla confezione.

Consigli utili per una presentazione perfetta?

Consigli:

  • Usa una teglia con bordo lungo e rivestita con carta forno per facilitare lo stacco delle barrette.
  • Raffreddare bene prima di tagliare per ottenere barre nette e facili da maneggiare.
  • Guarnisci con fettine di fragola fresca o con piccoli ciuffi di panna montata per un tocco elegante.

Introduzione / Hook

Immagina una cheesecake che non è solo dolce, ma una carezza leggera come una nuvola d’agosto. Immagina un ripieno soffice, spumoso, quasi turbato al punto giusto, che si scioglie in bocca rivelando una freschezza di fragole appena colte. Benvenuto nella Cheesecake Turbinata alle Fragole: un dessert che conquista con la sua eleganza semplice e la sua anima vivace. Qui la tradizione incontra l’aria: il ripieno è lavorato finemente per essere incredibilmente morbido e setoso, ma la magia sta nella turbinata—una tecnica che mette in moto una vorticosa leggerezza, come se una brezza di panna e formaggio avesse deciso di ballare con le fragole. Il risultato è una torta fredda che profuma di estate, in cui la crosticina croccante sul fondo contrasta con la cremosità vellutata e la salsa di fragola che sembra scivolare in strati di colore e gusto. Ogni fetta è una piccola esperienza sensoriale: l’olfatto viene accolto da note burrose e zuccherine, l’occhio è catturato dalla lucentezza del topping cremisi, e il palato riceve un equilibrio tra dolcezza, acido fruttato e una leggera acidità lattica. Questa non è una torta qualunque: è una celebrazione della semplicità ben fatta, un dessert che alleva e gioca con le consistenze, senza pesare, pronto per essere condiviso in momenti speciali o semplicemente in un pomeriggio di weekend.

Ciò che rende questa versione davvero speciale è la sua versatilità. Puoi gustarla come chiusura elegante di una cena informale con amici, o trasformarla in un dessert di festa per celebrare una ricorrenza. La fragola, in tutto il suo splendore rosso rubino, dona freschezza e brillantezza, ma è accompagnata da una base ferma e croccante che dà sostanza. L’elemento turbinato non è solo un vezzo: è la chiave che rende la texture soave e quasi spumosa, un aspetto che rende ogni boccone una piccola sorpresa. Non servono trucchi complicati: è un dessert che si presta a essere realizzato con ingredienti semplici, selezionati con cura, e che premia chi lo gusta con una ricompensa di conforto e raffinatezza allo stesso tempo.

La storia dietro il piatto

La Cheesecake Turbinata alle Fragole nasce dall’incontro tra due mondi apparentemente diversi: la tradizione delle torte fredde italiane e la tecnica contemporanea che privilegia leggerezza e aerazione. In molte regioni italiane, la cultura dolciaria ha una forte memoria di dessert freddi o al cucchiaio, pensati per le calde estati o per celebrazioni familiari. Le fragole, invece, hanno un posto di rilievo nel calendario gastronomico italiano ed europeo: protagoniste di mercati contadini, di dessert domestici e di ricette che esaltano la loro dolcezza profonda con un tocco di acidità tipico della stagione estiva. Abbinare fragola e crema è una scommessa di equilibrio che la tradizione ha sostenuto con paste biscottate, formaggi freschi e aromi delicati. In questo piatto, la parola chiave è turbinare: un gesto di cucina che richiama la rapidità del mixer, l’aria che si prende dal latte e dal formaggio, e la volontà di ottenere una consistenza leggera ma ricca di gusto.
Con una pennellata di creatività, la ricetta racconta una storia di cucine familiari che si rinnovano: una nonna che insegnava a mescolare con pazienza, un giovane chef che ha portato la tecnica della turbina in una versione dolce a base di fragole, e una casa che respira di profumi di burro, vaniglia e frutti di bosco. In questa narrazione, il piatto diventa un simbolo di condivisione: una torta che invita a sedersi insieme, a conversare tra un cucchiaio e l’altro, a fermare il tempo per assaporare un momento di dolcezza semplice ma accurata.

La storia dietro la cheesecake turbinata è anche una storia di stagioni: la fragola, ideale in primavera ed estate, rappresenta rinascita e gioia, mentre la crema di formaggio ricorda la ricchezza di una tradizione che celebra la convivialità. Il connubio è riuscito perché unisce la rusticità di una base croccante, la leggiadria di un ripieno montato, e la vivacità di una salsa di fragola che accende il piatto. Ogni tradizione locale può offrire una piccola variazione: un tocco di limone, una vaniglia più marcata, o una nota di alcol aromatizzato per dare profondità al sapore. In Italia, come altrove, i dessert non sono solo una chiusura: sono un gesto d’amore e di attenzione verso chi osserva e assapora.

Perché amerai questa ricetta

  • Texture incredibilmente leggera: grazie al processo di turbinazione, il ripieno risulta setoso e soffice, senza risultare pesante.
  • Freschezza estiva: le fragole aggiungono un carattere fruttato brillante e una vivacità che bilancia la dolcezza della crema.
  • Versatilità: perfetta per occasioni casuali o per dessert di festa, facilmente adattabile a diverse diete e preferenze.
  • Preparazione non troppo complicata: si parte da una base croccante, un ripieno soffice e una salsa di accompagnamento, ma senza tecnicismi proibitivi.
  • Equilibrio di sapori: dolcezza morbida, acidità leggera della frutta, e una leggera nota di vaniglia o agrumi che ne elevano il profilo aromatico.
  • Potenziale di personalizzazione: puoi giocare con la consistenza della crema, intensificare la fragola con un coulis extra, o introdurre varianti di ricco contrasto come cioccolato bianco o scorza di limone.
  • Ideale per la condivisione: una fetta di cheesecake turbinata è un invito al dialogo, una scusa per riunirsi, una dolce parentesi in una giornata piena.

Profilo di sapore e texture

Questo dessert racconta una storia di contrasti controllati. Il fondo croccante è come un piccolo decoro di terra che sostiene una nuvola di crema: una base che contrasta la morbidezza con una nota di burro fragrante e una leggera salinità che rende la dolcezza ancora più definita. Il ripieno turbinato è la star: una crema liscia, aerata e soffice, che scivola delicatamente lungo la lingua, lasciando una traccia cremosa ma non pesante. La fragola, presente sia come elemento fresco sia come salsa lucida, taglia la dolcezza con una vibrante acidità fruttata, equilibrando il tutto in un’armonia di gusto che si percepisce ad ogni boccone. Le fragole non sono solo decorazione: la loro brillantezza e il loro sapore pepato di primavera aprono il palato, mentre la vaniglia, la scorza di agrumi o un pizzico di sale marino in minime quantità possono accendere o modulare l’aroma complessivo. Se si desidera una texture ancora più leggera, è possibile aumentare l’aria del ripieno con una leggera montatura o inserire una piccola quantità di crema di latte montata per creare un contrasto tra densità e leggerezza. Il risultato è una torta che brinda alla stagione: una esperienza sensoriale completa che incontra la dolcezza classica del cheesecake con una freschezza di fragola che resta sul palato, invitando a una seconda fetta senza alcuna remora.

In termini di ricchezza aromatica, ci sono note burrose e lattiche che sostengono la fragranza del croccante e la compostezza della crema. L’equilibrio tra crema e frutta è essenziale: la crema deve restare morbida e setosa, ma non troppo delicata da non reggere la salsa; la salsa di fragola deve essere visibile, brillante e profumata, ma non dominare il sapore del formaggio. L’effetto turbina è ciò che dà al dessert la sua identità: una crema che sembra chiudersi su se stessa in un soffio, pronta a riaprirsi al contatto con una nuova cucchiaiata. In conclusione, la Cheesecake Turbinata alle Fragole è una danza di texture: croccante, cremosa, vellutata, lucida e fruttata—un’esperienza che cambia leggermente ad ogni boccone e invita all’eco di un sorriso soddisfatto.

Occasioni & Abbinamenti

Questo dessert è una compagna versatile per numerose occasioni. Puoi servirlo durante una cena estiva tra amici, accompagnato da una bottiglia di spumante leggero o di Moscato d’Asti per esaltare la frizzantezza del drink e la dolcezza della fragola. Per una festa di compleanno o per un brunch domenicale, è perfetto come chiusura elegante ma non troppo formale. E se vuoi trasformarlo in una tentazione da tavola delle feste, aggiungi una decorazione di fragole fresche, foglie di menta e una spolverata molto leggera di scorza di limone per una nota aromatica rinfrescante. In abbinamento, oltre al vino spumante, puoi pregustare opzioni come un Prosecco DOC, un vino passito leggero o persino un dessert wine non troppo dolce. Per chi preferisce una bevanda calda, un espresso intenso o un caffè moka può bilanciare la dolcezza con un tocco di amaro. Se vuoi proporre una versione non alcolica, una limonata fresca con una punta di vaniglia può rinfrescare il palato tra una fetta e l’altra. Allo stesso tempo, la cheesecake si sposa bene con dessert leggeri come un sorbetto al limone o una coulis di frutti di bosco che amplifica la freschezza fruttata senza competere con la crema.

Ideale anche per occasioni speciali: matrimoni all’aperto, anniversari, cene di festa o semplicemente un pomeriggio di lago o montagna. Il ritmo scenografico della presentazione—una fetta porzionata su un piatto elegante, la salsa che decora l’anello del bordo, un ciuffetto di panna o una fogliolina di menta—crea un momento memorabile senza richiedere una presentazione troppo elaborata. In contesti dove la cucina è discussa quanto la tavola, questa torta diventa un simbolo di cura e di attenzione, una piccola opera che racconta una storia di gusto e di convivialità.

Consigli, Varianti & Sostituzioni

  • Vegan o dairy-free: sostituisci la crema di formaggio con una base di anacardi ammollati e frullati, un po’ di latte di mandorla e una leggera quantità di olio di cocco per rendere la crema sufficiently vellutata. Per la base, usa burro vegetale o olio di cocco insieme a una miscela di biscotti vegani tritati.
  • Gluten-free: scegli biscotti senza glutine per la base o prepara una base di noci tritate e datteri per una versione ancora più rustica.
  • Varianti di frutta: se non trovi fragole fresche, puoi usare lamponi, mirtilli o una miscela di frutti di bosco per la salsa e una variante di ripieno che richiami quel gusto fruttato.
  • Scorza e aromi: l’aggiunta di scorza di limone o di arancia può ravvivare le note agrumate e offrire una leggera freschezza che bilancia la dolcezza
  • Intensità di dolcezza: se preferisci una versione meno dolce, usa un dolcificante alternativo come miele d’acacia o sciroppo d’acero in piccole quantità, oppure riduci una parte dello zucchero nella crema.
  • Texture extra leggera: se vuoi una consistenza ancora più ariosa, incorpora una piccola quantità di tuorlo montato o una leggera montatura di panna in equivalente proporzione per ottenere una crema più soffice.
  • Later adaptations: per una versione al cucchiaio, puoi presentare la crema in bicchierini con la salsa di fragola sul fondo e una decorazione singola di fragole per un dessert dall’effetto bistrot.

Storage & Make-Ahead Ideas

La cheesecake turbinata è fatta per essere preparata in anticipo, il che la rende perfetta per eventi o cene in cui vuoi liberarti dallo stress dell’ultimo minuto. Conservata in frigorifero, la torta si mantiene fresca per alcuni giorni, purché sia coperta in modo da evitare assorbire odori e umidità indesiderati. Se hai intenzione di congelarla, è preferibile congelare solo la parte di crema pure e assemblare la salsa al momento del servizio, oppure congelare porzioni singole con una base già solida e il ripieno leggermente più compatto. Per scongelarla, lasciala riposare in frigorifero lentamente durante la notte e poi portala a temperatura ambiente giusto prima di servire per riscoprire l’elasticità della crema turbinata. Se vuoi preparare un abbellimento a tempo, puoi tranquillamente preparare la salsa di fragole in anticipo e conservarla in frigorifero in un contenitore a chiusura ermetica: quando sarai pronto per servire, distribuisci un filo di salsa sul bordo della fetta per creare un effetto “anello rosso” molto elegante. Ciò che resta della base e della crema può essere riutilizzato in altre preparazioni creative: una versione a cucchiaio per cocktail dessert, o una base per una torta fredda ancora più ricca con l’aggiunta di piccoli tocchetti di frutta.

Make-ahead tips: se hai poco tempo, prepara la base e la crema in anticipo e lascia che la turbinata si stabilizzi in frigorifero. L’assemblaggio finale, con la salsa e la decorazione, è la parte che rende la presentazione spettacolare, ma l’illusione di leggerezza è già data dal ripieno e dalla qualità degli ingredienti scelti. In breve, questa cheesecake è una promessa di comfort fatto in casa, pronta a essere realizzata quando la voglia di stupire incontra la voglia di gustare qualcosa di semplice ma sorprendente.

Curiosità & Aneddoti (Opzionale)

La cultura del cheesecake ha molte radici nel mondo, da ricette europee a varianti americane, ciascuna con la sua identità. In molte tradizioni italiane, i dolci freddi a base di formaggio rappresentano una semplicità raffinata, spesso accompagnata da una salsa di frutta o da una spruzzata di agrumi che ne esalta la freschezza. L’uso della frutta fresca come fragola per accompagnare una crema ricca è un richiamo diretto a pratiche culinarie che celebrano la stagione e la spontaneità della preparazione casalinga. Un tratto affascinante di questa ricetta è la fusione di tecniche moderne—come la turbinatura per aerare la crema—with l’essenza rustica delle fragole e della base croccante. È un esempio di come la cucina contemporanea possa rendere omaggio alle tradizioni senza rinunciare all’innovazione.

Un piccolo trucco storico: le fragole hanno avuto ruoli simbolici in molte culture, rappresentando purezza, rinnovamento e piacere. Nella gastronomia europea, la fragola è stata sin dal XVIII secolo un ingrediente preferito per dessert vivaci e colorati, spesso accoppiata con formaggi freschi o creme delicate. Abbinare fragola a crema di formaggio in una versione turbata è una how-to modernista che rispetta la tradizione pur offrendo una presentazione visiva di grande impatto. Se ti piace esplorare, potresti provare una reinterpretazione di questa torta con una base di biscotti integrali e una crema leggermente meno dolce, per scoprire nuove profondità di gusto—ma senza rinunciare al fascino di quel vortice di fragole che rende subito riconoscibile la cheesecake turbinata.

Ingredients

Crust

  • 1 1/2 cups graham cracker crumbs (or gluten-free graham crackers, finely crushed)
    → Provides the base and flavor for the cheesecake. Crumble the cookies into a fine, even texture using a processor or by crushing in a bag with a rolling pin, then mix with 1/4 cup granulated sugar and 5 tablespoons melted unsalted butter. Press firmly into the bottom (and a little up the sides) of a 9-inch springform pan. Pre-bake for 8–10 minutes to set the crust and help prevent sogginess; cool before filling.
  • 1/4 cup granulated sugar
    → Adds gentle sweetness to the crust and helps bind the crumbs with the butter. Mix this sugar into the crumb mixture before pressing into the pan; adjust amount if your crackers are already sweet. Evenly distribute so the crust bakes uniformly.
  • 5 tablespoons unsalted butter, melted
    → Acts as the binder that holds the crust together and contributes richness. Let the melted butter cool slightly before mixing with the crumbs to prevent soft, greasy dough; press mixture evenly into the pan and chill briefly before adding the filling to ensure clean edges and a neat slice.

Filling

  • 24 oz (3 cups) cream cheese, softened to room temperature
    → The creamy backbone of the cheesecake, providing structure and silken texture. Use block cream cheese (not whipped) and ensure it is fully softened to avoid lumps; beat with sugar until smooth and creamy, then proceed with adding eggs one by one at low speed to maintain a luscious batter.
  • 1 cup granulated sugar
    → Sweetens the filling and helps achieve a smooth, airy texture. Add gradually in stages to avoid gritty pockets; do not overbeat after eggs are introduced to minimize cracks in the final bake.
  • 3 large eggs
    → Provide structure and lift to the cheesecake as it bakes. Add eggs one at a time on low speed to minimize air incorporation; overmixing after adding eggs can create cracks, so mix just until combined.
  • 1/2 cup sour cream
    → Contributes tanginess, moisture, and a velvety finish. Use full-fat sour cream, and whisk it with the cream cheese to keep the batter smooth; bring to room temperature to prevent curdling during mixing.
  • 1/2 cup heavy cream
    → Adds richness and helps create a silky, creamy mouthfeel. Incorporate with the other liquids at the appropriate stage; for a lighter texture, you can whisk lightly before folding in, but avoid overmixing to maintain tenderness.
  • 1 teaspoon pure vanilla extract
    → Enhances depth of flavor and complements the strawberry swirl. Use high-quality vanilla extract (preferably real vanilla) for a more pronounced aroma; add with the dairy liquids for even distribution.
  • 1 tablespoon lemon juice or lemon zest (optional)
    → Brightens the filling and balances sweetness with a citrusy note. Zest provides fragrance, while juice adds acidity that can help with set; if using juice, add with other liquids and avoid too much acidity which could curdle the mixture.
  • 1 tablespoon all-purpose flour or cornstarch (to stabilize)
    → Helps the filling set and reduces cracking, especially if using very soft cream cheese. Use cornstarch for gluten-free versions; whisk thoroughly to dissolve and avoid lumps before adding to the batter.
  • 1/4 teaspoon salt
    → Elevates and balances the flavors, counteracting sweetness and brightening the overall profile. Distribute evenly into the filling to prevent concentrated salty spots.

Swirl

  • 1 cup fresh strawberries, hulled and chopped
    → The star of the swirl, providing vibrant color and fruity flavor. Hull and chop strawberries into small pieces; macerate with a little sugar and lemon juice to release juices and soften so they swirl smoothly through the batter. If berries are very ripe, adjust sugar accordingly.
  • 2 tablespoons granulated sugar
    → Draws out juice from the berries to create a glossy, flavorful swirl. Toss the chopped berries with sugar and let sit 10–15 minutes to macerate; drain any excess liquid if you prefer a thicker swirl.
  • 1 teaspoon fresh lemon juice
    → Brightens the strawberry flavor and helps prevent color loss during baking. Combine with berries during maceration; use freshly squeezed juice for best flavor and stability.
  • 1 teaspoon cornstarch or arrowroot powder (optional)
    → Thicken the strawberry juices into a defined ribbon rather than a thin sauce. Dissolve in a small amount of water and stir into the macerated berries just before layering; adjust thickness by the amount used; omit if you prefer a looser swirl.

Toppings

  • 1/2 cup fresh strawberries, sliced (optional)
    → Extra berry flavor and a decorative touch. Slice evenly and arrange on top or around the edge after baking for visual appeal; wash and pat dry to keep the surface free of moisture that could affect the crust.
  • 1 cup whipped cream (optional)
    → A light, creamy finish that pairs beautifully with the dense cheesecake. Whip cold heavy cream with a pinch of sugar and a splash of vanilla to soft peaks; dollop or pipe around the slice just before serving. Keep whipped cream chilled until serving to retain structure.

Instructions

  • Preheat your oven to 350°F (175°C) and line a 9-inch springform pan with parchment or grease the bottom and sides well.
    → This ensures the crust releases cleanly and prevents sticking that could ruin slices.
  • Combine graham cracker crumbs with 1/4 cup granulated sugar and 5 tablespoons melted unsalted butter until the mixture resembles wet sand.
    → The sugar aids binding and the melted butter coats the crumbs, creating a cohesive crust that bakes evenly.
  • Press the crust firmly into the bottom and 1/4 inch up the sides of the pan using the flat bottom of a glass or measuring cup to create an even, compact layer.
    → A snug press prevents gaps and ensures a stable base for clean slicing.
  • Bake the crust in the preheated oven for 8–10 minutes to set the structure, then remove and cool completely before filling.
    → Partial baking reduces sogginess and helps the crust hold together once filled.
  • In a large bowl, beat softened cream cheese with 1 cup sugar on medium-low speed until completely smooth and creamy, stopping to scrape the bowl as needed.
    → Fully softened cheese mixes without lumps, producing a velvet texture; avoid higher speed to prevent air pockets.
  • With the mixer on low, add eggs one at a time, mixing until each is just incorporated before adding the next; do not overbeat after eggs are added.
    → Low-speed incorporation minimizes air bubbles that can cause cracks and keeps the batter silky.
  • Beat in 1/2 cup sour cream until fully smooth, ensuring even distribution for moisture and tang.
    → Sour cream adds moisture and a gentle tang that balances sweetness when evenly integrated.
  • Pour in 1/2 cup heavy cream and 1 teaspoon pure vanilla extract, mixing on low until just combined.
    → Liquids hydrate the batter and enrich flavor; combine gently to maintain a creamy texture.
  • Stir in 1 tablespoon lemon juice or zest (optional) and 1 tablespoon all-purpose flour or cornstarch plus 1/4 teaspoon salt; mix on low until just incorporated.
    → Lemon adds brightness; starch stabilizes the batter and salt sharpens overall flavor.
  • Prepare the strawberry swirl by tossing 1 cup fresh strawberries, hulled and chopped, with 2 tablespoons granulated sugar and 1 teaspoon fresh lemon juice; let macerate 10–15 minutes.
    → Maceration softens fruit, releases juice, and creates glossy ribbons in the bake.
  • If a thicker swirl is desired, dissolve 1 teaspoon cornstarch or arrowroot powder in 1 teaspoon water and stir into the macerated berries just before use.
    → The starch helps set the juices into defined ribbons rather than a thin syrup.
  • Pour the prepared filling over the cooled crust in the pan, then spoon dollops of the strawberry mixture on top in several generous spots.
    → This distributes berry flavor and color for a Turbinata pattern once swirled.
  • Gently swirl the strawberry dollops through the batter using a thin knife or skewer in broad, figure-eight motions to create a turbinata design; avoid over-swirl to preserve the creamy texture.
    → Controlled swirling yields a striking pattern without deflating the filling.
  • Wrap the exterior of the springform pan tightly with 2–3 layers of heavy-duty foil to prevent water intrusion during baking.
    → A secure foil barrier protects the cheesecake and keeps the crust dry in a water bath.
  • Place the wrapped pan in a larger roasting pan and pour hot water into the outer pan until it reaches halfway up the sides of the springform pan.
    → The water bath creates gentle, uniform heat that reduces cracking and produces a smoother surface.
  • Bake in the center of the oven until the center barely jiggles when nudged, about 60–70 minutes; the edges should be set and the center slightly wobbly.
    → The gentle jiggle indicates proper set without overbaking, which can cause cracks and dryness.
  • Turn off the oven and crack the door; let the cheesecake cool in the oven for 1 hour to gradually reduce heat and minimize surface cracking.
    → Slow cooling prevents sudden temperature changes that cause fissures in the filling.
  • Remove the cake from the water bath, discard the foil, and refrigerate for at least 6 hours or overnight until completely chilled and set.
    → Cold set enhances sliceability and flavor development as the filling firms.
  • Before serving, optionally top with 1/2 cup sliced fresh strawberries and/or pipe or dollop 1 cup whipped cream around the edges for a bright, decorative finish.
    → Fresh toppings add contrast and lift; keep whipped cream cold until serving to maintain structure.
  • Slice with a warm, clean knife, wiping it between cuts to achieve neat portions and prevent smearing of the creamy filling.
    → A hot knife cleanly cuts through dense cheesecake, producing tidy, elegant slices.

Notes

These Cheesecake Turbinata alle Fragole are creamy and tangy, with a buttery crust and a bright strawberry swirl that makes each slice feel special. For the best texture, use room-temperature dairy and slowly integrate the eggs to avoid cracks. For a gluten-free version, substitute gluten-free graham crackers for the crust (or crushed nuts with a touch of sugar and melted butter) and ensure all other ingredients are gluten-free. This dessert benefits from gentle mixing, a controlled bake, and a water bath to prevent cracking. You can customize the swirl by adjusting the strawberry amount or adding a splash of lemon juice for extra brightness.

  • Crust tips: Pre-bake the crust for 8–10 minutes to set the base and prevent sogginess; press the crumb mixture firmly into the pan and chill briefly before adding the filling. If using gluten-free crackers, grind to a fine, even texture and mix with sugar and melted butter as directed.
  • Filling tips: Beat the softened cream cheese with sugar until smooth and creamy, then add eggs one at a time on low speed. Do not overmix after the eggs go in, or you risk cracks. Whisk sour cream and heavy cream in gently with the vanilla (and optional lemon zest) until just combined.
  • Swirl tips: Macerate the chopped strawberries with a pinch of sugar and lemon juice to release juice; drain excess liquid if making a dense swirl, and optionally thicken a portion of the juices with a small amount of cornstarch before layering.
  • Baking and chilling tips: Bake the cheesecake in a shallow water bath (wrap the pan in foil to seal and place in a larger pan with hot water). Bake until the center is just set, then let cool gradually at room temperature and refrigerate for at least 4 hours or overnight for clean slicing.
  • Serving and storage tips: Add fresh strawberries or whipped cream just before serving for a fresh finish. The cheesecake can be frozen: wrap tightly and freeze; thaw in the fridge overnight before serving.
  • Gluten-free note: If you have gluten intolerance, ensure your crust and all ingredients are certified gluten-free; use gluten-free crackers or alternative crust options and check labels on dairy products for gluten-containing additives.

Tips

Tips for the crust

Tips for the filling

Tips for the strawberry swirl

Tips for toppings and serving

FAQ

Che cos’è Cheesecake turbinata alle fragole?

È una cheesecake cremosa con un effetto turbinata creato dal swirl di purea di fragole sulla superficie. Ha una base croccante di biscotti, una crema ricca di formaggio e panna, e una dolce fusione di fragole che la rende visivamente accattivante e gustosa.

Quali sono gli ingredienti principali e le porzioni indicative?

Per circa 8 porzioni:

Base: 200 g di biscotti digestive (o biscotti secchi simili), 80 g di burro fuso. Crema: 600 g di formaggio cremoso (tipo philadelphia), 150 g di zucchero, 3 uova, 200 ml di panna fresca, 1 cucchiaino di estratto di vaniglia. Purea di fragole: 250 g di fragole frullate con 40 g di zucchero. Opzionale: scorza grattugiata di limone per un leggero aroma.

Quali strumenti servono per prepararla?

Stampo a cerniera da 24–26 cm, carta forno, mixer o frullatore, ciotole, frusta o spatola, cucchiaio per distribuire la base, stuzzicadenti o bastoncino per creare il turbinio, spatola per livellare, forno con funzione statica e opzionalmente una teglia alta per bagno-maria.

Come si prepara la base di biscotti?

Trita i biscotti fino a ottenere una granella fine. Mescola con burro fuso fino ad avere un composto umido e compatto. Versa nel fondo dello stampo rivestito di carta forno e premi con il dorso di un cucchiaio per ottenere una base uniforme. Raffredda in fridge per almeno 15–20 minuti prima di aggiungere la crema.

Come si prepara la crema al formaggio?

In una ciotola, monta il formaggio cremoso con lo zucchero fino a ottenere una crema liscia. Aggiungi le uova, una per volta, mescolando delicatamente per non incorporare aria. Unisci la panna fresca e la vaniglia, mescolando fino a renderla omogenea. Versa sulla base fredda e livella.

Come si ottiene l’effetto turbinata delle fragole?

Prepara la purea di fragole: frulla fragole con un po’ di zucchero. Versa delicatamente la purea sulla crema a cucchiaiate sparse, poi con uno stuzzicadenti o una forchetta fai dei movimenti circolari dalla superficie verso l’interno per creare l’effetto swirl tipo turbina. Non mescolare troppo; resta una quantità di purea a vortice. Puoi anche lasciare alcune gocce di purea al centro per un effetto visivo più accentuato.

Qual è la procedura di cottura e raffreddamento?

Cuoci in forno preriscaldato a 160°C, preferibilmente su forno statico, per circa 50–60 minuti. Se utilizzi bagno-maria, metti lo stampo in una teglia più grande con acqua bollente. Dopo la cottura, spegni il forno e lascia raffreddare nel forno socchiuso per circa 1 ora per evitare crepe. Poi trasferisci in frigorifero minimo 4 ore, meglio tutta la notte, prima di servire.

Come si conserva e per quanto tempo?

Conserva la Cheesecake turbinata alle fragole in frigorifero, coperta con pellicola o in contenitore ermetico, fino a 3–4 giorni. Puoi anche congelarla porzionata; toglila dal freezer la sera prima per gustarla al meglio (lo swirl può apparire meno definito una volta scongelata).

Quali varianti o sostituzioni sono possibili?

Varianti e sostituzioni utili:

– Senza glutine: usa biscotti senza glutine per la base e burro. – Senza lattosio: utilizza formaggio cremoso senza lattosio e panna senza lattosio. – Versione leggera: riduci lo zucchero nella crema e nella purea di fragole; aggiungi un po’ di succo di limone per equilibrare. – Per una cheesecake vegana: sostituisci formaggio cremoso con crema di anacardi, aggiungi agar-agar o gelatinante vegetale e usa una base di biscotti vegani. – Altri frutti: sostituisci le fragole con lamponi o more per una variante di sapore e colore diversi. – Decorazione: decora con fragole fresche a fette, scorzette di limone o una spolverata di pistacchi tritati.

Introduction / Hook

Imagine a bite-size treasure that instantly conjures cozy evenings, laughter around a sunlit table, and the irresistible aroma of garlic dancing in melted cheese. Crocchette aglio e formaggio are small, golden orbs that promise a symphony of warmth with every crunch. The exterior shimmers with a light, crisp coating that gives way to a velvety interior—a creamy, savory center perfumed with garlic and enriched by rich cheese. It’s the kind of dish that makes a simple gathering feel festive, the kind of snack you crave when the day has been long and your senses deserve a treat. The scent alone can coax smiles from a roomful of hungry people, and the first bite is a revelation: a crisp outer shell giving way to a soft, indulgent core that clings to your memory long after the plate is emptied.

This is more than a snack; it’s a small celebration of comforting flavors performed with confidence and a touch of street-food charm. The garlic isn’t sharp or overpowering; it’s mellowed by the gentleness of the cheese and the tenderness of the interior, creating a balanced, inviting warmth. The cheese adds a lush, indulgent pull, a way to feel pampered without fuss. And the crust—golden, lightly salted, and crackling sotto punta—provides that satisfying snap that makes croquettes so addictive. Whether served with a simple dipping sauce, a bright herb aioli, or a tangy tomato glaze, these crocchette become a crowd-pleaser that looks elegant on a platter and disappears faster than you’d expect.

In a world of quick bites and fast-food shortcuts, these crocchette feel like a small triumph of technique: a delicate balance between a soft, creamy center and a crisp, aromatic crust. They’re forgiving enough for a weeknight treat, yet special enough to star at a party, a tapas night, or a family gathering. The beauty lies in how approachable they are: you can coax the base to a creamy harmony, roll them gently into a coat of breadcrumbs, and watch them transform into little golden crescents of happiness. It’s a dish that invites sharing, conversation, and the comfort of a kitchen well-loved—garlic-scented joy that warms both hands and hearts.

Ready to embark on a little culinary joy ride? This recipe is designed to feel approachable, yet offer an experience that feels luxurious. You’ll notice how the simple combination of garlic and cheese, wrapped in a delicate crust, can turn an ordinary moment into something memorable. The technique is versatile, the flavors versatile, and the result universally appealing—crisp, creamy, and utterly satisfying from the very first bite to the last crumb on the plate.

The Story Behind the Dish

Crocchette, in their various regional guises, have long held a place at the heart of Italian comfort food. These small, fried delights borrow from the country’s love affair with potatoes, breading, and the gentle magic of slow flavor development. The term “crocchette” itself speaks to that signature crunch—the word evoking the satisfying crackle you hear the moment a croquette meets heat and air. While many regions have their own spin, the core idea remains the same: a tender, flavorful interior encased in a crisp exterior that delivers a multisensory experience with every bite.

The version centered on garlic and cheese taps into a timeless culinary impulse: pairing a fragrant aromatic with a luscious, melty cheese to create something both indulgent and deeply comforting. Garlic has long been a workhorse in Italian kitchens, its aroma weaving through sauces, roasted vegetables, and bread as a message from the pan that something wonderful is about to unfold. When garlic meets cheese—whether it’s a nuance of parmesan, pecorino, or a smooth, melting variety—the flavors become creamy, savory, and almost nostalgic, inviting you to slow down and savor the moment. The crocchette become a portable, shareable form of that magic: little golden pillows that travel well from pan to plate, perfect for dipping and pairing with something bright and fresh to cut through the richness.

In many households, crocchette emerge from a simple, almost ritual kitchen practice: mash a starchy base, fold in aromatics and cheese, shape with care, and roll in breadcrumbs before a quick, precise fry. The ritual is less about complexity and more about concentration—the kind of cooking where patience and attention transform humble ingredients into something memorable. It’s a dish that has traveled and evolved: a reminder that great flavors often hide in small, perfect bites—tiny moments of joy that can turn a meal into a celebration. Whether you first tasted them at a bustling street corner, in a family kitchen, or as part of an intimate gathering, crocchette aglio e formaggio carry with them the spirit of sharing, warmth, and the quiet happiness of something savory, crisp, and incredibly satisfying.

While the seeds of this dish can be traced to broader Italian comfort-food traditions, the beauty of crocchette is how adaptable they are. You can tailor the texture with different coatings, experiment with cheese varieties to suit your pantry, or pair them with sauces that reflect your mood or occasion. They bridge rustic, homey flavors with a touch of refined indulgence, and that balance is what keeps them timeless. Today, they stand as a testament to how a few well-chosen ingredients—garlic’s perfume, cheese’s melt, and a crust that crackles—can become a signature bite that’s both familiar and exciting.

Why You’ll Love This Recipe

  • Quick to make, impressive to serve: These crocchette come together with ease, yet their appearance and aroma feel special enough for guests or a weekend treat.
  • Comforting and indulgent: A creamy interior enriched with melted cheese contrasts with a crisp, golden crust for a satisfying texture experience.
  • Versatile pairing: They pair beautifully with bright dips, zesty sauces, and fresh greens, making them suitable for antipasto platters or a light weeknight bite.
  • Aromatics that sing: The scent of garlic, just warmed and mellowed, infuses the entire dish, making it irresistible even before the first bite.
  • Crowd-pleasing and shareable: Perfect as an appetizer at parties, a tapas-style spread, or a cozy family snack that invites dipping and conversation.
  • Evidence of technique, not fuss: Achieve a crisp outer crust without overworking the interior; a few precise steps create a texture that feels luxurious without being precious.
  • Adaptable to dietary needs: With the right cheese choices and crust options, you can craft versions that suit vegan or gluten-free preferences while keeping the spirit of the dish intact.

Flavor Profile & Texture

The flavor profile is a balanced love letter to comfort foods. The garlic introduces a warm, fragrant note that doesn’t overwhelm; it’s the perfume that lingers in the air as the crocchette fry to a golden finish. The interior retains a gentle creaminess, reminiscent of a soft, well-panned mashed potate-like center, enriched by melted cheese that lends a luxurious, silky mouthfeel. The cheese contributes not only richness but a savory depth that harmonizes with the garlic rather than competing with it. Some cheese varieties offer a sharp tang, others a mellow, creamy stretch; the result is a flexible flavor canvas that can be tailored to your pantry and preference.

The crust provides the all-important texture contrast. A light, airy breadcrumb coating—possibly with a hint of herbs or parmesan for extra savoriness—crisp to a delicate crackle. This outer shell acts as a boundary that locks in the interior’s tenderness while offering a satisfying resistance with each bite. The overall sensation is a dance between heat, scent, and texture: the crunch first, then the creamy interior, finished with a gentle, lingering savor from the cheese and garlic.

In aroma terms, think of an inviting mélange: toasty breadcrumbs, warm garlic, and a hint of melted, aromatic cheese escaping into the air as they fry. The palate experiences layers—initial crispness, a gentle umami from the cheese, and a lingering mellow garlic that leaves you wanting another bite. The balance is essential; too much garlic can dominate, so achieving a soft, rounded garlic presence is key to capturing the dish’s comforting charm. The result is a harmonious, crowd-pleasing bite that feels indulgent without being heavy, elegant without being fussy, and always inviting another round.

Occasions & Pairings

These crocchette are incredibly versatile, making them an ideal choice across a spectrum of occasions. They shine as a bright antipasto at a holiday gathering, a tempting tapas addition for a casual evening with friends, or a comforting starter before a Sunday family meal. Their compact size makes them perfect for potlucks, birthday parties, or any occasion where guests relish shareable bites they can scoop up with ease. They also work beautifully as a quick weeknight treat when you crave something a touch more special than everyday snacks.

Pairing ideas to elevate the experience:

  • Dips and sauces: A bright tomato-garlic sauce, a peppery aioli, a lemony herb yogurt dip, or a simple marinara can provide a tangy counterpoint to the richness. The contrast enhances the aromatic garlicky notes while offering a fresh brightness.
  • Green salads and vegetables: A crisp arugula salad with lemon vinaigrette or a lightly dressed cucumber and fennel salad adds a verdant balance and refreshing bite to cut through the richness.
  • Wine and beverages: A chilled white with good acidity, such as a Pinot Grigio or Sauvignon Blanc, harmonizes with the garlic and cheese. For those who prefer beer, a light, hoppy pale ale or a pilsner can be a fantastic match. For a non-alcoholic option, a sparkling mineral water with a twist of lemon or a citrusy iced tea works very well.
  • Side dishes: A simple caprese-inspired platter, roasted vegetables, or a light antipasti assortment provides a well-rounded spread that complements the crocchette without competing for attention.

Tips, Variations & Substitutions

Core technique tips

To achieve that perfect balance of crisp exterior and creamy interior, keep these practical tips in mind. Maintain consistent shaping so each piece cooks evenly. If you’re pan-frying, use a moderate heat and a shallow layer of oil to encourage even browning without scorching. When baking or air-frying, give space between pieces to avoid steaming them together, which can soften the coating. For the interior, aim for a cooperative texture—soft, smooth, and cohesive rather than crumbly—so it binds well when formed into croquettes. If you’re reworking a soft base, a touch of light binding agent can help maintain shape without turning the center heavy.

Variations

  • Cheese varieties: For a mellower profile, use a creamy white cheese; for a bolder bite, mix in a sharper aged cheese. You can also blend cheeses for depth—parmesan or pecorino with a milder mozzarella or fontina creates a pleasing contrast.
  • Herbs and aromatics: Add chopped parsley, chives, or thyme to lift the flavors. A hint of black pepper or red pepper flakes can introduce a subtle warmth that pairs nicely with garlic.
  • Coatings: Experiment with panko for an extra-crisp finish, or a seasoned flour mix for a more robust crust. A light dusting of grated parmesan on the crust can enhance savoriness and aroma.
  • Diet-friendly options: Vegan version: use a plant-based meltable cheese and a dairy-free base, ensuring the texture remains creamy. Gluten-free option: use gluten-free breadcrumbs or almond flour-based crust for crunch without gluten. Low-carb approach: shape croquettes with riced cauliflower or a potato substitute and use a crispy nut or seed crumb coating.
  • Regional twists: Add a pinch of smoked paprika or a dash of Italian seasoning to evoke different regional profiles. A squeeze of lemon zest just before serving brightens the dish and foregrounds the garlic and cheese.

Make-ahead ideas

Shape the croquettes and refrigerate on a parchment-lined tray for up to 24 hours before frying or baking. If you want to freeze them, lightly pre-freeze on a tray, then transfer to an airtight container. They can be baked or air-fried directly from the freezer, but you’ll want to add a few extra minutes to the cooking time. When reheating, a short fry or a hot oven return will help regain the crust’s crispiness after storage.

Storage & Make-Ahead Ideas

Leftovers, if any, deserve a place in your fridge rather than the back of the kitchen cabinet. Store cooked crocchette in an airtight container in the refrigerator for up to 2 days. When reheating, aim for a method that preserves crispness. A quick fry in a shallow pan, or a high-heat finish in the oven or air fryer, can bring back the crunch that might soften after resting. If you’ve prepared a batch ahead of time, consider cradling the crocchette on a wire rack over a sheet pan while reheating to avoid soggy bottoms. For longer-term planning, freezing before or after coating is a reliable way to extend their life. If frozen before cooking, simply place on a parchment-lined tray to flash-freeze, then transfer to a freezer bag; cook directly from frozen, adding extra minutes as needed. If frozen after coating, bake or fry from frozen, but allow a few additional minutes for the interior to heat through evenly.

Make-ahead ideas can also extend to dipping sauces or accompaniments. A bright, zesty dip can be prepared in advance and stored in the refrigerator for a couple of days, ready to re-emerge alongside a hot plate of crocchette. The combination of a make-ahead plan with a quick finish just before serving is a smart way to provide a restaurant-like experience at home without turning the kitchen into a last-minute rush.

Fun Facts & Trivia (Optional)

Did you know crocchette as a concept exist in many culinary traditions around the world? While the Italian crocchette celebrate a harmonious blend of aromatic garlic and cheese, other cultures have their own beloved bite-sized fried treats that share the same spirit of comfort and portability. The technique—creating a cohesive interior that stays tender while the outside becomes crisp—has universal appeal and has inspired countless regional adaptations. The name itself, with its emphasis on “crunch” and “crocc” in several Romance languages, hints at the universal love for a satisfying crackle that signals a well-executed fry. Garlic, a staple across cuisines, has a storied history of bringing warmth and depth to dishes, and its pairing with cheese is a timeless classic that appears in many regional specialties. The story of crocchette is a reminder that the simplest combinations—humble ingredients treated with care—can deliver moments of culinary delight that feel both familiar and novel.

In some kitchens, crocchette are more than food; they’re a memory-making ritual. They appear at family gatherings, festive celebrations, and casual evenings alike, always inviting hands to gather and noses to follow the irresistible scent to the platter. The crispy shell and warm center create a sensory moment that lingers, a tiny celebration you can share again and again. And while today’s version features garlic and cheese, the heart of the dish remains the same: a commitment to texture, balance, and a moment of pure, delicious comfort.

Ingredients

Crocchette Base

  • 4 medium russet potatoes, peeled and cut into chunks
    → Boil or steam until fork-tender. Mashing hot potatoes yields a smooth, cohesive base; russet potatoes provide a light, fluffy interior with enough starch to bind without becoming gummy. Peel to avoid a muddy texture; drain well and return to heat briefly to dry out excess moisture before mashing.
  • 2 tablespoons unsalted butter, melted
    → Adds richness and helps create a silky, cohesive mash when stirred into the hot potatoes. Melt and whisk in so it emulsifies with the potato starch; use unsalted to control the salt level. For dairy-free, substitute with a neutral oil, though flavor will shift.
  • 1/4 cup milk
    → Adds creaminess and helps achieve a light, fluffy texture. Warm the milk slightly before mixing to prevent cooling the potatoes; adjust quantity to reach a batch that holds its shape but isn’t too wet. If you prefer dairy-free, use a lightly seasoned plant-based milk alternative.
  • 1 teaspoon fine sea salt
    → Essential for flavor; potatoes taste bland if under-seasoned. Taste the mash before adding cheese and herbs and adjust accordingly. If you plan to add salty cheese, you may reduce this a touch.
  • 1/4 teaspoon white pepper (or black pepper)
    → Provides a subtle kick and aroma. White pepper yields a cleaner appearance in the mash, while black pepper adds a bit more bite. Freshly grind just before using for maximum aroma.

Garlic & Cheese

  • 1 tablespoon extra-virgin olive oil
    → Used to gently sauté the garlic to release its aroma without burning; olive oil adds a fruity note that complements the potatoes and cheese. Heat gently and add the minced garlic until just fragrant, then remove from heat and let cool slightly before mixing to avoid cooking the eggs.
  • 2 garlic cloves, minced
    → Garlic provides the signature aroma. Mince finely so it distributes evenly throughout the mash. Sauté in the olive oil until fragrant (about 30–60 seconds) and avoid browning to prevent bitterness; incorporate into the warm potato base so its flavor infuses evenly.
  • 100 g grated Parmigiano-Reggiano
    → Delivers sharp, savory umami and helps with binding while enriching the overall flavor. Use freshly grated cheese for the best aroma and texture; fold into the warm mash so it melts smoothly and disperses evenly through the mixture.
  • 150 g shredded mozzarella (optional)
    → Adds a creamy, melty center when fried. Choose a mozzarella with good melt; drain excess whey or moisture before mixing to avoid soggy croquettes. If you prefer firmer croquettes, reduce or omit this cheese.
  • 2 large eggs, beaten and divided
    → 1 egg is used in the potato-cheese mixture as a binder to help the croquettes hold their shape; the remaining egg is reserved for dredging the formed croquettes so the breadcrumbs adhere well. If the mixture feels too wet, chill it 15–20 minutes to firm up for easier shaping.

Coating & Finish

  • 1.5 cups breadcrumbs (Italian-style or panko)
    → Creates the crisp outer crust. For extra flavor, mix in 1 tablespoon grated Parmigiano-Reggiano or a pinch of salt and black pepper. Press the crumbs onto each croquette firmly to ensure even coverage and a uniform crust.
  • 2 tablespoons finely chopped fresh parsley (optional)
    → Adds color and a fresh herbal note. You can mix parsley into the mash for even distribution or press additional parsley into the breadcrumb coating for a brighter finish. If using dried parsley, use 1 teaspoon as a substitute.

Frying

  • Neutral oil for frying (vegetable or canola), about 1 liter (4 cups)
    → Use a high-smoke-point oil suitable for frying. Heat to approximately 180°C (350°F) and maintain temperature between batches. Fry croquettes in batches to avoid crowding, which can lower the oil temperature and result in greasy crusts. Drain on paper towels after frying and serve hot for best texture and flavor.

Instructions

  • Rinse and peel the potatoes, then cut them into evenly sized chunks for uniform cooking.
    → Uniform pieces cook at the same rate, yielding a smoother mash without overcooked edges.
  • Place the potato chunks in a large pot and cover with cold water; bring to a boil over medium-high heat and simmer until fork-tender, about 15–20 minutes.
    → Starting in cold water ensures gradual, even heat penetration and prevents mealy outsides with undercooked centers.
  • Drain the potatoes thoroughly in a colander and return them to the warm pot; set over low heat for 1–2 minutes to dry surface moisture.
    → Removing excess moisture helps the mash bind properly and prevents a soggy croquette interior.
  • Mash the potatoes using a ricer or masher until completely smooth with no lumps.
    → A smooth base binds with the cheese and eggs to form cohesive croquettes that hold their shape during frying.
  • Stir in the melted unsalted butter into the hot mash until fully emulsified and integrated.
    → Butter adds richness and helps loosen the starch, creating a creamy, cohesive base that folds easily with cheese.
  • Warm the 1/4 cup of milk briefly (do not scald) and gradually fold it into the mash, mixing until the mixture is creamy and holds its shape but is not overly wet.
    → Warm liquid integrates smoothly with hot potatoes, preventing a cool, tacky mash that would hinder binding.
  • Season the mash with 1 teaspoon fine sea salt and 1/4 teaspoon white pepper; taste and adjust so the base is seasoned before adding cheese and herbs.
    → Potatoes need salt to shine; remember cheese will contribute additional saltiness, so balance carefully.
  • In a small skillet, heat 1 tablespoon extra-virgin olive oil over gentle heat and add the minced garlic; sauté just until fragrant, 30–60 seconds, then remove from heat and allow to cool slightly.
    → Gentle heating releases aroma without browning or bitterness, ensuring a clean garlic flavor in the final mash.
  • Stir the cooled garlic and its oil into the warm potato mixture along with the grated Parmigiano-Reggiano; mix until evenly distributed.
    → The cheese melts into the warmth of the mash, imparting umami and helping the mixture bind together.
  • If using mozzarella, fold in the shredded mozzarella and distribute evenly throughout the mash.
    → Mozzarella creates a creamy, molten center; distribute evenly to prevent pockets of moisture that can weaken binding.
  • Beat one large egg and fold it into the potato–cheese mixture as a binder; the mixture should become cohesive and easier to shape; if it feels too soft, chill for 15–20 minutes.
    → The egg acts as a glue that helps croquettes keep their form during frying; chilling firms the texture for easier handling.
  • Cover and refrigerate the mixture for 15–20 minutes if it feels too wet or sticky, allowing the starch to hydrate and the fats to settle for easier shaping.
    → Chilling firms the texture so croquettes hold their shape when formed and breaded.
  • Stir in 2 tablespoons finely chopped fresh parsley into the potato–cheese mixture for a bright, herbal note (optional); alternatively, reserve parsley to press into the breadcrumb coating.
    → Parsley adds color and fresh aroma; distributing it in the mash ensures even flavor throughout each croquette.
  • Shape the croquettes: using a spoon or small ice-cream scoop, portion the mixture and roll into evenly sized cylinders or ovals; place them on a parchment-lined tray.
    → Even sizing ensures uniform frying time and a consistent crust per piece.
  • Beat the remaining egg in a shallow dish; dip each shaped croquette into the egg to lightly coat, then roll in the 1.5 cups breadcrumbs (Italian-style or panko) until fully coated; press the crumbs firmly to adhere.
    → The egg wash helps breadcrumbs cling, while pressing ensures a thick, even crust that crisps nicely in hot oil.
  • If desired, mix 1 tablespoon grated Parmigiano-Reggiano into the breadcrumbs or sprinkle with salt and pepper for extra crust flavor; press again to set the coating.
    → A flavorful crust adds contrast to the tender interior and enhances aroma on frying.
  • Optionally chill the breaded croquettes for 10–15 minutes to firm the coating and reduce crumbs shedding during frying.
    → A settled crust fries more evenly and stays intact when submerged in hot oil.
  • Pour neutral oil (vegetable or canola) into a deep pot to a depth of about 4 inches (1 liter) and heat to 180°C (350°F); monitor with a thermometer to maintain steady temperature.
    → Maintaining the correct frying temperature yields a crisp crust without excessive greasiness or undercooked centers.
  • Fry the croquettes in batches for 2–3 minutes, turning as needed, until evenly golden brown and the cheese inside is melted; do not overcrowd the pan to avoid temperature drop.
    → Frying in batches preserves oil temperature, ensuring a crisp crust and a molten interior.
  • Transfer fried croquettes to paper towels to drain, then keep warm in a low oven if not serving immediately.
    → Draining prevents sogginess and resting briefly helps set the crust; a low oven keeps them hot without continuing to cook the interior.
  • Serve crocchette aglio e formaggio hot, optionally sprinkled with extra chopped parsley for color and a fresh aroma.
    → Crisp exterior, creamy cheesy interior, and bright herb notes make the dish balanced and inviting straight from the fryer.

Notes

These garlic and cheese croquettes are a comforting savory bite with a crisp outer crust and a creamy, cheesy interior. The potatoes provide the binding, while Parmigiano-Reggiano and mozzarella add depth and melt for a luscious center. For best texture, fold the cheese into the warm mashed potatoes so it dissolves evenly, then shape into uniform cylinders or ovals so they fry consistently. You can customize them by swapping Parmigiano-Reggiano with Pecorino Romano or Asiago, adding finely chopped fresh parsley, chives, or oregano, or a pinch of red pepper flakes for a subtle kick. To keep the dish gluten-free, use gluten-free breadcrumbs (or crushed gluten-free cornmeal) and ensure all other ingredients are certified gluten-free; press the crumbs firmly onto each croquette to form a thick, even crust. If dairy-free is preferred, omit or replace the cheese with a plant-based alternative and use a dairy-free butter substitute, understanding that melt and flavor will differ. If the mash seems too wet, chill it 15–20 minutes to firm up for easier shaping; if it’s too stiff, warm briefly and rehydrate with a splash of milk. Fry in neutral oil heated to about 180°C (350°F), in batches to maintain temperature and prevent soggy crusts; drain on paper towels and serve immediately for the best texture. For a lighter approach, bake on a parchment-lined tray at 200°C (400°F) for 12–15 minutes, turning once for even color. You can freeze shaped croquettes on a tray, then transfer to a bag for up to 1 month; cook from frozen, adding 1–2 minutes to frying or baking time. Serve with marinara, aioli, or a garlicky yogurt dip and a simple green salad for balance.

Tips

Tips for Crocchette aglio e formaggio

  • Potato base: Use russet potatoes for a light, fluffy interior. After boiling or steaming until fork-tender, drain thoroughly and return to the pot on low heat for 1–2 minutes to evaporate excess moisture before mashing. For an ultra-smooth texture, pass the hot potatoes through a ricer.
  • Mash and binding: Mash while very hot and whisk in the melted butter first, then gradually mix in warm milk. This helps emulsify the fat with the potato starch for a silkier base. Avoid over-mixing, which can make the texture gummy.
  • Seasoning: Salt the mash before adding cheese and herbs; taste and adjust. If you plan to use very salty cheese, you may reduce the initial salt a touch.
  • Garlic handling: Sauté minced garlic gently in olive oil until just fragrant—do not let it brown, which can introduce bitterness. Cool slightly before mixing to prevent cooking the eggs.
  • Olive oil note: Use extra-virgin olive oil for a fruity, aromad note. Warm the oil and garlic briefly, then remove from heat to prevent overheating the mixture.
  • Cheese strategy: Fold in freshly grated Parmigiano-Reggiano into the warm mash for sharp flavor and binding. If using mozzarella, drain excess moisture and fold in small portions so it melts evenly without making the mixture soggy.
  • Eggs as binders: Use 1 beaten egg in the potato-cheese base to help the croquettes hold together; reserve the remaining egg for dredging. If the mixture feels too wet, chill 15–20 minutes to firm up for easier shaping.
  • Coating texture: For a crisp crust, use 1.5 cups breadcrumbs (Italian-style or panko). Mix in a little Parmigiano-Reggiano or a pinch of salt and pepper for extra flavor, then press crumbs firmly onto each croquette to ensure even coverage.
  • Herbs and color: Fresh parsley adds color and brightness; mix some into the mash or press into the breadcrumb coating. If using dried parsley, substitute 1 teaspoon.
  • Shaping and chilling: Keep the potato mixture cool while shaping to help it hold form. If the dough is too soft, refrigerate 15–20 minutes before coating and frying.
  • Frying technique: Fry in neutral oil (vegetable or canola) heated to about 180°C (350°F). Do not crowd the pan; fry in batches to maintain oil temperature for a crispy crust. Drain on paper towels and serve immediately while hot and crisp.
  • Cooking from frozen: For make-ahead croquettes, freeze shaped croquettes on a baking sheet, then transfer to a bag. Fry or bake from frozen—add a minute or two to the frying or baking time.
  • Healthier option: If you prefer to bake, preheat to 200°C (400°F). Lightly oil a baking sheet, place croquettes, brush or spray with a little oil, and bake about 15–20 minutes, flipping halfway, until golden and crisp.
  • Dairy-free adaptation: Substitute dairy with a neutral oil in the mash and use a dairy-free cheese substitute. Keep in mind the flavor and melt will differ from the dairy version.

FAQ

Che cosa sono le Crocchette aglio e formaggio?

Sono bocconcini croccanti preparati con purè di patate arricchito con aglio e formaggi, panati e cotti al forno o fritti. Sono ideali come antipasto, stuzzichino o contorno.

Quali sono gli ingredienti base?

Patate lesse schiacciate, aglio (facoltativo o soffritto), formaggi grattugiati (parmigiano o pecorino) e formaggio filante (mozzarella o fontina), uovo, pangrattato, prezzemolo, sale e pepe. Opzionale: latte o panna per rendere l’impasto più morbido.

Posso cuocerle al forno invece di friggerle?

Sì. Preriscalda il forno a 200°C (con forno statico; 180°C se ventilato). Disponi le crocchette su una teglia rivestita di carta forno, spennella leggermente con olio e cuoci 20–25 minuti, girandole a metà cottura per dorarle in modo uniforme.

Come si prepara l’impasto?

Lessa le patate, falle intiepidire e schiacciale. Mescola con aglio soffritto, formaggi tagliati o grattugiati, l’uovo, prezzemolo, sale e pepe. Se l’impasto risulta troppo morbido, aggiungi un po’ di pangrattato. Forma delle crocchette o bastoncini e passale nel pangrattato (mescolato con parmigiano, se vuoi).

Qual è la temperatura e i tempi di cottura?

In olio: 170–180°C, circa 2–3 minuti per lato finché dorate. In forno: 200°C per 20–25 minuti, girandole a metà cottura per una doratura uniforme.

Posso prepararle in anticipo?

Sì. Si possono formare e conservare in frigorifero fino a 24 ore prima della cottura. Per una conservazione più lunga, surgelale: impanate e sistemate su vassoi, poi trasferitele in sacchetti. Da congelate, friggi o cuoci in forno aggiungendo qualche minuto al tempo normale.

Come conservarle e come congelarle?

Conservazione: in frigorifero si mantengono 1–2 giorni. Congelamento: si possono congelare crude o cotte. Per congelarle crude, disponile su un vassoio e congela; poi trasferiscile in sacchetti. Da congelate, friggi 3–4 minuti o cuoci in forno a 200°C per 25–30 minuti. Se sono già cotte, riscalale in forno a 180–190°C per 8–12 minuti.

Quali alternative per allergie/intolleranze?

Glutine: utilizza pangrattato senza glutine o una panatura di mais. Lattosio: scegli formaggi stagionati o formaggi senza lattosio. Vegane: sostituisci i formaggi con formaggi vegetali e legante vegetale (ad es. purè di patate arricchito con olio) e usa un sostituto dell’uovo (una miscela di acqua e amido di mais o purea di ceci) per legare. Puoi anche omettere l’aglio se preferisci una versione meno pungente.

Quali formaggi consigliate e come variare il sapore?

Consigli comuni: parmigiano reggiano e/o pecorino per sapidità, mozzarella o fontina per cremosità. Per un gusto più deciso, aggiungi cheddar o gorgonzola piccante in piccole quantità, oppure arricchisci con erbe come prezzemolo, origano o scorza di limone. Puoi anche alternare i formaggi a tuo gusto per diverse versioni.

Come ottenere una croccantezza extra?

Usa pangrattato regolato con parmigiano o pangrattato panko per una crosta più leggera e croccante. Impana bene le crocchette e asciugale leggermente prima di passarle nel pangrattato. Se le friggi, mantieni la temperatura dell’olio costante (170–180°C) e lavora poche pezzi alla volta per evitare che si abbassino la temperatura. Se le cuoci al forno, spennella con olio prima di infornarle e, se vuoi, usa una grata o una teglia che permetta una migliore circolazione dell’aria.

Introduzione / Hook

Immagina una nuvola dorata che danza leggera sulla tavola, una nuvola che sembra sfiorare il cielo con la sua delicatezza. Lo senti il soffio sottile di una promessa di dolcezza? Il soufflé giapponese soffice è esattamente questo: una meraviglia di leggerezza, un equilibrio tra umami gentile e dolcezza soffice che si scioglie al primo assaggio. Non è solo un dessert; è un viaggio sensoriale che mette insieme precisione tecnica e poesia culinaria. Ogni boccone racconta una storia di cura, di pazienza e di equilibrio tra aria e crema, tra cremosità vellutata e sofficità che sembra custodire un piccolo segreto all’interno. Prepararlo significa concedersi un momento di calma, come se la cucina diventasse una piccola universo in cui la gestualità conta quanto la ricetta stessa. Se hai mai desiderato un dessert che sorprenda senza essere eccessivo, che renda una semplice cena un’occasione speciale, allora questo soufflé è la chiave: una porta sottile tra l’ingegno della cucina giapponese e la tradizione francese del soufflé, reinterpretata con delicatezza, raffinatezza e una particolare attenzione al respiro dell’impasto.

La bellezza di questo piatto sta nella sua semplicità apparente. Non servono ingredienti pomposi o tecniche arditamente complesse: è la maestria nel mantenere l’aria, la luce e l’umidità giuste che fa la differenza. Eppure non è una ricetta da improvvisare in una fretta: richiede un po’ di organizzazione, una mente calma e una sensibilità per capire quando la crema ha raggiunto la giusta consistenza, quanto è pronta la montata d’albume, o quando la piastra o lo stampo hanno raggiunto la temperatura ideale. È un dessert che invita alla mindfulness, a una respirazione lenta tra una preparazione e l’altra, trasformando l’atto di cucinare in un rituale di piacere puro. Se vuoi stupire con qualcosa di diverso senza rinunciare all’eleganza, al gusto e a una presentazione che cattura l’occhio, questo soufflé giapponese soffice sarà la tua compagna ideale.

La storia dietro il piatto

Il soufflé è, per definizione, una creazione europea nata dall’incontro tra tradizioni culinarie francesi e l’arte di lavorare gli albumi a neve. Nel tempo, diverse culture hanno reinterpretato questa idea, giocando con pesi, protrezioni di sapori e tecniche di incorporazione dell’aria. Il soufflé giapponese soffice rappresenta una fusione affascinante tra l’estetica estremamente pulita e la sensibilità all’umidità tipica della cucina nipponica, unita a una tecnica che privilegia l’areazione delicata. In Giappone, spesso i dolci fanno leva sull’equilibrio tra dolcezza e leggerezza, tra sapori che non sovrastano il palato ma lo invitano a scoprire nuove sfumature. In questa versione, la leggerezza non è un semplice obiettivo tessuto dall’aria, ma una filosofia: c’è una grande attenzione al controllo della temperatura, al bilanciamento tra crema e aria, e a una presentazione minimale ma estremamente raffinata.

Molti appassionati hanno raccontato di come, quando provano questo dessert, la casa si riempie di un profumo caldo e avvolgente: una fragranza lattiginosa, leggermente vanigliata o agrumata a seconda delle varianti, che anticipa la morbidezza che seguirà. È come se la cucina si trasformasse in un piccolo teatro in cui la scena principale è la consistenza: una massa soffice che si mantiene compatta ma che, al contatto con il cucchiaio o con la lingua, evapora, rilasciando una sensazione di leggerezza che non è vana, ma strutturata e ricercata. La versione giapponese di questa delizia spesso porta con sé un tocco di delicatezza in più: potrebbe includere una nota di yuzu, matcha o una punta di latte condensato, creando un profilo aromatico che è allo stesso tempo familiare e sorprendente.

Perché lo adorerai

  • Leggerezza senza pesi: la struttura interna è morbida, ma stabile, un perfetto equilibrio tra celebre sofficezza e sostanza necessaria per non crollare subito a tavola.
  • Esperienza multisensoriale: profumo invitante, texture che si disintegra al primo morso, sapore delicato ma presente, con note che possono variare dal dolce al leggermente agrumato o vanigliato.
  • Eleganza e semplicità: una presentazione pulita che si presta a una tavola raffinata o a una cena informale ma curate in ogni dettaglio.
  • Versatilità aromatica: si presta a piccole variazioni tra latte, vaniglia, agrumi o crema, offrendo la possibilità di personalizzarlo a seconda della stagione o del tema della serata.
  • Esperienza educativa in cucina: per chi ama imparare tecniche di montatura, controllo della temperatura e gestione dell’aria, questa ricetta offre una lezione pratica e gratificante senza essere intimidatoria.
  • Porta a tavola una sensazione di comfort: nella sua morbidezza c’è una sensazione di coccole che ricorda un abbraccio dolce, perfetta per chiudere una cena o per celebrare un momento speciale.

Profilo di sapore e consistenza

Questo soufflé si distingue per una leggerezza volutamente controllata: l’aria incorporata è parte integrante della struttura, non un semplice tocco finale. La base cremosa fornisce una ricchezza delicata che sostiene la nuvola soffice. In termini di gusto, si può immaginare una dolcezza equilibrata, capace di accogliere note di vaniglia, limone o yuzu, a seconda degli aromi scelti. La texture è una sinfonia di morbidezza: quando si taglia una fetta o si serve un cucchiaio, la crema interna resta soffice e umida, mentre la superficie, leggermente dorata, forma una crosticina sottile che aggiunge una lieve croccantezza. È una danza di contrasti che non sfiora mai l’eccesso: la delicatezza è la protagonista, la potenza resta sottile, pronta a emergere solo al contatto con la lingua.

La sensazione in bocca è a metà strada tra una meringa soffice e una crema leggera. Il sapore è spesso composto e neutro all’inizio, ma subito si aprono sottili note aromatiche che ricordano la vaniglia o i profumi citrus. Se si aggiunge un tocco di yuzu o di scorza di limone, si ottiene una presentazione fresca e vibrante che rompe la dolcezza senza sovrastarla. Alcune versioni includono una punta di latte o ricotta leggera per una cremosità extra, mantenendo comunque la leggerezza dall’interno; altre preferiscono una base di crema pasticcera molto fine, che funge da rete di sostegno per la spatola di aria. Qualunque sia la strada scelta, l’equilibrio tra dolcezza, acidità e aromaticità è la chiave: un assaggio dopo l’altro, l’elemento sorpresa risiede proprio nelle sfumature di sapore che si sviluppano man mano che la temperatura del dessert cambia con il contatto della lingua.

Occasioni & Abbinamenti

Questo dessert eleva qualsiasi occasione, dal pasto quotidiano a una serata speciale. Ecco alcune idee su quando e come proporlo:

  • Fine pasto raffinato: servito con una leggera spolverata di zucchero a velo o una goccia di sciroppo di agrumi, per chiudere la cena con una nota delicata e memorabile.
  • Dolce per celebrare: perfetto per anniversari, compleanni o momenti di festa, soprattutto se accompagnato da un vino dolce o da uno spumante brut che pulisce il palato tra un boccone e l’altro.
  • Dolce da tè pomeridiano: una versione più leggera, ideale da gustare con tè verde o tè all’angolo, per un momento di coccole in contemplazione.
  • Serate intime: una piccola porzione presentata in tazze o bicchierini trasparenti, per una tavola minimale ma estremamente chic.

Abbinamenti ideali:

  • Bevande: tè verde delicato, sake dolce leggero, o un vino passito che non sovrasti la leggerezza del soufflé.
  • Contorni: una piccola insalata di agrumi o una salsa di frutta leggera può fornire una nota fresca che contrasta con la dolcezza soffice.
  • Dessert complementari: frutta fresca a pezzi, come fragole o mango, per un accento di acidità e colore.

Consigli, Varianti & Sostituzioni

La bellezza del soufflé giapponese soffice è la sua flessibilità e la possibilità di personalizzarne la ricetta senza compromettere la sua identità. Ecco alcune idee pratiche per adattarlo a gusti diversi, necessità dietetiche o stagioni:

  • Varianti aromatiche: aggiungi una punta di scorza di agrumi (limone, yuzu), una goccia di estratto di vaniglia o di mandorla, oppure una leggera nota di matcha in polvere per un retrogusto erbaceo e originale.
  • Versione vegana: sostituisci le uova con una combinazione di aquafaba (l’acqua di ceci) montata a neve ferma e una base cremosa vegetale (latte di mandorla o di soia) arricchita con amidi per addensare. Esalta la stabilità dell’impasto con una piccola quantità di crema di riso o di tapioca.
  • Gluten-free: la ricetta originale non è una ricetta di gluten, ma è bene utilizzare stampi ben puliti e una base cremosa ben bilanciata per evitare che l’impasto si disgreghi. L’uso di amidi come maizena aiuta a mantenere compattezza senza appesantire.
  • Aromi stagionali: in primavera si può aggiungere scorza di limone o arancia e una nota di fragole schiacciate, in autunno una leggera punta di cannella o noce moscata e una purea di zucca light può dare una tonalità autunnale interessante.
  • Versione al cioccolato: potresti incorporare una piccola quantità di cioccolato fondente fuso nella crema base per un tocco di cacao che si sposa bene con note di vaniglia.

Stoccaggio & Idee per preparare in anticipo

Una delle sfide di un dessert così delicato è la gestione della freschezza. La consistenza soffice non è destinata a resistere come una torta compatta, ma con le giuste precauzioni puoi organizzarti per gustarlo al meglio anche in seguito:

  • Preparazione anticipata: la crema base (senza montare l’albume) può essere preparata in anticipo e conservata in frigorifero per 24 ore. Montare gli albumi all’ultimo momento e unirli all’impasto solo prima della cottura per mantenere l’aria integrale.
  • Conservazione delle porzioni: se restano porzioni, coprirle con un foglio di carta fornito di umidità o in un contenitore ermetico dopo la freddatura e conservare in frigorifero per 1 giorno al massimo. Riscaldare delicatamente a bagnomaria o nel forno a bassa temperatura per ristabilire una parte della nuvolosità.
  • Congelazione: in genere non è consigliata per mantenere la texture originale, poiché l’aria incorporata perde la sua leggerezza una volta scongelata. Se decidi di congelare, fai una piccola prova con una porzione singola per valutare la resa al nuovo riscaldamento.
  • Riscaldamento & servizio: il soffice è meglio se servito immediatamente dopo la cottura. Se devi rifare una porzione, riscaldala delicatamente in forno per pochi minuti, fino a che la superficie non ritrovi una lieve doratura e una consistenza morbida.

Fatti curiosi e trivia (opzionali)

Curiosità che rendono ancora più affascinante questo dessert:

  • Il termine “soufflé” deriva dal francese “souffler”, che significa sprigionare aria, soffiare. È una promessa che la ricetta mantiene: aria, leggerezza e delicatezza sono le sue parole chiave.
  • La versione giapponese di questa soffice dolce ha spesso una presentazione minimalista, ma non per questo meno golosa: la semplicità è un’arte in sé, e la pulizia del piatto contrasta magnificamente con la complessità della texture interna.
  • La temperature giusta è la vera arma segreta: una volta in forno, l’aria si espande, ma è la velocità di cottura e il controllo termico che impediscono il crollo improvviso, donando all’esterno una leggera crosticina mentre l’interno resta soffice e umido.
  • Molti chef giapponesi adorano includere un accenno di agrume nelle loro preparazioni dolci: una nota di yuzu o di pompelmo rosa non è solo una scelta di aromatizzazione, ma una dichiarazione di freschezza e modernità.

Conclusione

In conclusione, il soufflé giapponese soffice è molto più di un dessert: è una dichiarazione di grazia culinaria, un modo di celebrare la leggerezza senza rinunciare al gusto, una piccola opera d’arte che richiede pazienza, calma e attenzione ai dettagli. Se cerchi un’esperienza che sorprenda in modo sottile ma memorabile, se vuoi regalarti un momento di puro piacere, o se vuoi offrire una coppia di momenti di gioia ai tuoi ospiti, questa ricetta è la candidata ideale. Con la sua leggerezza, la sua eleganza e le sue sfumature di sapore, ti invita a prendere fiato, a sorridere e a godere del modo in cui la cucina può trasformarsi in poesia commestibile. Prepararlo significa anche accendere una piccola lampada di curiosità in cucina: ogni step è una scoperta, ogni boccone una nuova sensazione, ogni presentazione una promessa di gioia che lascia il segno nella memoria gustativa. Se sei pronto a lasciare che la tua cucina diventi un luogo dove l’aria conta quanto la sostanza, dove la tecnica incontra l’emozione, allora togli il grembiule, accendi il forno e lascia che questo soufflé giapponese soffice prenda vita davanti ai tuoi occhi. Buon viaggio culinario.

Ingredients

  • Base
    • 2 large eggs, separated
      → The yolks provide the rich, silky foundation of the soufflé base, while the whites will be whipped separately to create the airy lift. Separate eggs when cold for clean separation; bring the whites to room temperature before whipping for maximum volume.
    • 1/2 cup (120 ml) whole milk
      → Use fresh whole milk for a creamy, delicate texture. Warm the milk just until it’s warm to the touch, then gently whisk with the yolks to avoid curdling. Do not boil.
    • 2 tablespoons granulated sugar (for the yolk base)
      → Adds gentle sweetness and helps create a tender custard; whisk until the yolks are pale and smooth so the sugar dissolves completely.
    • 1 tablespoon all-purpose flour
      → Acts as a light thickener to give the custard body without weighing it down; whisk with a little milk to make a smooth slurry before stirring into the yolk mixture.
    • 1 tablespoon unsalted butter, melted
      → Adds richness and a glossy texture to the base. Let it cool slightly before whisking into the yolk mixture to avoid cooking the eggs.
    • 1/2 teaspoon vanilla extract
      → Provides a warm, aromatic note that complements the delicate egg flavor. Use pure vanilla for best aroma rather than artificial flavorings.
    • Pinch of salt
      → Enhances overall flavor; balances sweetness; incorporate into the yolk mixture.
  • Meringue
    • 2 large egg whites
      → The whites are whipped into a light foam that will inflate the soufflé. Bring whites to room temperature for best volume; ensure bowls and utensils are impeccably clean and free of fat or yolk.
    • 2 tablespoons granulated sugar
      → Added gradually while whipping to create a strong, glossy meringue that holds air and stabilizes the lift. Prefer superfine sugar for faster dissolution.
    • Pinch cream of tartar (optional)
      → Stabilizes the foam, helping it to hold stiff peaks during folding and baking; omit if not available, but it improves volume and stability.
  • Ramekins and Assembly
    • Butter for greasing ramekins
      → A light coat prevents sticking and helps the soufflé rise evenly. For extra release, you can dust the inside with a thin layer of granulated sugar after buttering.
    • 1 teaspoon granulated sugar per ramekin for coating
      → After buttering, sprinkle and rotate to create a uniform sugared lining; this not only aids release but also adds a touch of sweetness to the outer crust.
  • Optional Toppings
    • Powdered sugar for dusting
      → Finishing touch that adds a delicate sweetness and a pretty presentation when serving. Dust just before serving for the best effect.
    • Fresh berries or fruit coulis
      → A tart counterpoint to the sweet, airy soufflé; add upon serving to balance richness and provide color and brightness.
    • Whipped cream (optional)
      → Lightly sweetened whipped cream adds extra creaminess and helps anchor the soufflé’s delicate texture if desired.

Instructions

  • Preheat your oven to 350°F (175°C) and prepare the ramekins: line a baking sheet with parchment, then lightly grease four 1/2-cup ramekins with unsalted butter and dust the insides with granulated sugar.
    → The parchment protects from sticking and makes transport easy, while the butter-sugar coating ensures a clean release and a delicate crust as the soufflé rises.
  • Separate the eggs while they are cold, placing the yolks in a small bowl and the whites in a large, clean mixing bowl, then let the whites come to room temperature before whipping.
    → Clean separation prevents yolk contamination, and room-temperature whites whip to greater volume, giving the soufflé the lift it needs.
  • Gently warm the 1/2 cup milk in a small saucepan over low heat until it is warm to the touch (approximately 110–120°F / 43–49°C), then remove from heat.
    → Warm milk blends smoothly with the yolk base and helps create a silky custard without curdling the eggs.
  • Whisk the egg yolks with 2 tablespoons granulated sugar in a medium bowl until the mixture is pale, thick, and ribbons form when the whisk is lifted.
    → This aeration dissolves the sugar and lightens the yolk mixture, forming a creamy foundation for the soufflé.
  • Stir 1 tablespoon all-purpose flour with a splash of the warmed milk to make a smooth slurry, then whisk the slurry into the yolk mixture until completely incorporated and lump-free.
    → The slurry prevents flour lumps and ensures the custard thickens evenly for a stable base.
  • Gradually whisk the warm milk into the yolk mixture in a thin, steady stream to temper the yolks, then whisk in 1 tablespoon melted unsalted butter (cooled to just warm), 1/2 teaspoon vanilla, and a pinch of salt until the mixture is glossy and uniform.
    → Tempering prevents scrambling the eggs, while the butter enriches texture and the vanilla adds aromatic depth.
  • In a separate clean bowl, beat the egg whites with a pinch of cream of tartar (if using) until foamy, then gradually add 2 tablespoons granulated sugar and continue beating to stiff, glossy peaks.
    → A stable, glossy meringue traps air for lift; ensure no yolk or fat contaminates the whites for maximum volume.
  • Fold a spoonful of the meringue into the yolk base to lighten the mixture, then fold in the remaining meringue in two or three gentle additions using a sweeping motion from the bottom of the bowl to the top, until just incorporated and no white streaks remain.
    → Gentle folding preserves the air in the meringue, which is essential for a lofty soufflé; avoid overmixing which deflates the batter.
  • Divide the batter evenly among the prepared ramekins, filling about three-quarters full, then wipe any batter from the inner rim with a clean fingertip or paper towel to ensure a clean seal and even rise; lightly tap the ramekins on the counter to settle the batter.
    → Proper filling gives room for expansion; a clean edge helps the batter climb the sides without sticking and deflating.
  • Bake the soufflés in the center of the preheated oven for 12–14 minutes, until puffed and just set in the center; avoid opening the oven door during the first 8–10 minutes to prevent sudden temperature drop and collapse.
    → Quick, even heat sets the outer shell while the interior remains creamy and airy; sudden cold air can cause deflation.
  • Remove from the oven and immediately finish with optional toppings: a light dusting of powdered sugar or a dollop of whipped cream, and serve with fresh berries or a fruit coulis if desired.
    → Soufflés begin to deflate as they cool, so presenting and serving promptly preserves the dramatic lift and delicate texture for the best experience.

Notes

These airy Japanese soufflés are delicate, cloud-light treats built on a silky yolk custard and a generous lift from whipped egg whites. For best results, bring the whites and milk to room temperature, whip the whites in a clean, fat-free bowl until they form glossy stiff peaks, and fold them into the yolk mixture in thirds to preserve volume. The base comes together with warm milk, sugar, flour, melted butter, and vanilla, with a pinch of salt to balance sweetness. Butter and a light dusting of sugar inside the ramekins help the soufflés rise evenly and release cleanly. Fill the ramekins about three-quarters full and bake in a hot oven without opening the door early, so the soufflé can puff to its full height. Serve immediately for the most delicate texture; finish with a light dusting of powdered sugar and optional fresh berries or a simple fruit coulis to cut the richness. For flavor variations, add a touch of vanilla, lemon zest, or matcha to give a Japanese twist. If you need a gluten-free version, substitute the all-purpose flour with a gluten-free all-purpose blend or cornstarch; expect a slightly different texture but still a refined lift. They are best enjoyed fresh, but a gentle reheat in a warm oven can revive a leftover soufflé. Always use high-quality butter and pure vanilla extract for depth of flavor, and ensure all equipment is impeccably clean to maximize volume.

Tips

Consigli pratici per un Soufflé giapponese soffice

  • Separazione e temperatura: porta le uova a temperatura ambiente e separa tuorli e albumi in ciotole pulite e asciutte. Anche una minima traccia di tuorlo o grasso impedirà agli albumi di montare bene. Usa una frusta e una spatola pulite per evitare residui di olio.
  • Base cremosa: scalda il latte solo fino a quando è tiepido e incorporatelo poco per volta ai tuorli mescolando costantemente per evitare la cottura. Una massa liscia e lucida aiuta a dare ricchezza senza grumi.
  • Farina e burro: sciogli la farina con un po’ di latte per creare una pastella liscia, quindi aggiungi burro fuso raffreddato e vaniglia. Lascia raffreddare leggermente prima di unire ai tuorli per evitare la cottura immediata delle uova.
  • Zucco di zucchero: lo zucchero nei tuorli aiuta a ottenere una base leggermente dolce e morbida; assicurati che si sciolga completamente durante la lavorazione.
  • Meringa ferma: per una meringa consistente monta albumi a temperatura ambiente con lo zucchero aggiunto in 2–3 volte. Un pizzico di cremor tartaro aiuta a stabilizzare i picchi; verifica che il recipiente sia completamente pulito e privo di tracce di grasso.
  • Incorporare la meringa: aggiungi la meringa alla base in più volte, mescolando dal basso verso l’alto con una spatola per mantenere l’aria. Evita movimenti circolari troppo energici che sgonfierebbero l’impasto.
  • Ramekins pronti: spennella i bordi interni con burro e, se vuoi, spolvera con zucchero per favorire l’assoluta liberazione e creare una crosticina piacevole. Riempi i stampi per circa 3/4 della loro altezza per permettere la crescita.
  • Cuocere senza aprire lo sportello: inforna in forno già caldo a circa 190°C e cuoci per 12–15 minuti, finché il soufflé è ben gonfio e dorato sui bordi. Evita di aprire lo sportello durante i primi minuti per non far collassare l’aria.
  • Servire subito: i soufflé giapponesi sono migliori appena sfornati; servili immediatamente per apprezzarne la delicatezza. Spolvera con zucchero a velo e accompagna con frutti freschi o coulis se ti piace un contrasto agrumato o acidulo.
  • Varianti facili: se vuoi cambiare aromi, aggiungi una punta di scorza di limone o arancia al composto di tuorli, oppure sostituisci una parte di latte con una cucchiaiata di panna per una maggiore ricchezza. Per una nota giapponese, puoi sperimentare con una piccola quantità di matcha in polvere sciolta in latte prima di unirlo al tuorlo.
  • Soluzioni ai problemi comuni: se l’impasto non gonfia, controlla che non ci sia traccia di tuorlo nell’albume, che la meringa sia ben ferma, e che tu stia operando con movimenti delicati durante l’incorporazione. Se si affloscia dopo la cottura, assicurati di non aver aperto lo sportello troppo presto e di aver riempito gli stampi correttamente (troppo pieno può impedire la crescita).

FAQ

Che cosa è il Soufflé giapponese soffice?

È una versione leggera e spumosa del soufflé tradizionale, ispirata allo stile giapponese: una base cremosa arricchita da albumi montati che le conferiscono una texture morbida e vellutata. Viene cotto in stampi singoli e va gustato subito per apprezzarne la leggerezza.

Quali ingredienti servono per 4 porzioni?

Ingredienti principali:

  • 4 uova grandi (4 tuorli e 4 albumi separati)
  • Burro: 30 g (più un filo per ungere gli stampi)
  • Farina: 25 g
  • Latte intero: 250 ml
  • Zucchero: 40 g (20 g per la base, 20 g per gli albumi)
  • Sale: un pizzico
  • Scorza di limone o estratto di vaniglia: a piacere
  • Varianti facoltative: cacao amaro in polvere (1-2 cucchiai) per versione al cacao; matcha in polvere (1 cucchiaino) per una versione verde
Quali strumenti sono necessari?

Strumenti utili:

  • Stampi da soufflé o ramequins di almeno 7–8 cm di diametro, ben imburrati e leggermente zuccherati
  • Sbattitore elettrico o frusta a mano
  • Ciotole capienti e spatola in silicone
  • Pentolino per la base (roux)
  • Forno preriscaldato
  • Teglia poco profonda per contenere gli stampi in forno (opzionale, facilita la cottura uniforme)
Come si prepara la base del soufflé (roux)?

Procedura:

  • In un pentolino, sciogli il burro a fuoco medio.
  • Aggiungi la farina e mescola bene per 1–2 minuti per eliminare il gusto crudo della farina.
  • Versa lentamente il latte, mescolando continuamente fino a ottenere una crema liscia e leggermente spessa (bechamel leggera).
  • Spegnì il fuoco, aggiungi zucchero, pizzico di sale e la scorza di limone o l’estratto di vaniglia. Lascia intiepidire o raffreddare leggermente.
Come si montano gli albumi?

Procedura:

  • In una ciotola pulita, monta gli albumi con un pizzico di sale a neve ferma.
  • Quando iniziano a formarsi i picchi, aggiungi gradualmente 20 g di zucchero (a pioggia) e continua a montare fino a ottenere picchi lucidi e stabili.
Come si uniscono la base e gli albumi senza smontare l’impasto?

Procedura:

  • Aggiungi i tuorli al roux raffreddato e mescola fino a incorporarli bene.
  • Prendi un terzo degli albumi e incorporalo delicatamente per rendere l’impasto più morbido.
  • Unisci poi gli albumi rimanenti con movimenti delicati dal basso verso l’alto (fold) per non smontare l’aria.
Qual è la temperatura e il tempo di cottura?

Si consiglia:

  • forno preriscaldato a 180°C
  • cottura di circa 12–15 minuti, a seconda delle dimensioni degli stampi
  • non aprire lo sportello del forno durante la cottura per evitare che l’aria esca e il soufflé crolli
Come evitare che il soufflé crolli subito?

Consigli pratici:

  • Usa stampi alti e imburrati, eventualmente passati nello zucchero per una crosta esterna leggera
  • Accendi il forno in anticipo e mantienilo stabile durante tutta la cottura
  • Non mescolare troppo una volta uniti tuboli e albumi; mantieni le pieghe delicate
  • Servi subito appena sfornato: il guscio si gonfia, ma tende a rivelarsi subito una volta raffreddato
Quali varianti posso provare (al cacao, limone, matcha)?

Varianti popolari:

  • Versione al cacao: aggiungi 1–2 cucchiai di cacao amaro setacciato al roux e, se vuoi, un pizzico di zucchero in più per bilanciare l’acidità
  • Versione al limone: aggiungi scorza grattugiata di limone e qualche goccia di succo di limone per una nota fresca
  • Versione matcha: incorpora 1 cucchiaino di matcha in polvere al roux e riduci leggermente il latte se necessario
Come servire al meglio il Soufflé giapponese soffice?

Servizio consigliato:

  • Servi immediatamente, magari con una crema leggera o una salsa di frutti di bosco
  • Accompagna con panna montata, salsa al cioccolato bianco o sciroppo di yuzu per un tocco giapponese
  • Una spolverata leggera di zucchero a velo può completare la presentazione
Posso prepararlo in anticipo o conservarlo?

Note sulla conservazione:

  • Il soufflé perde subito la sua consistenza soffice se tenuto troppo tempo; è ideale gustarlo appena sfornato
  • È possibile preparare in anticipo la base (roux) e raffreddarla in frigorifero; montare gli albumi all’ultimo momento e unire, poi cuocere
  • Non si congela bene: la struttura potrebbe degradarsi dopo scongelamento

Introduzione / Gancio

Immagina una nuvola cremosa di formaggio che si sgrana dolcemente al primo morso, avvolta in una base croccante di biscotti burrosi. Poi arriva un soffio di fragole fresche, lucide e profumate, che esplodono di sapore al contatto con una leggera dolcezza vanigliata. Questo è Cheesecake dump alle fragole: un dessert che unisce la ricchezza vellutata della cheesecake a una magia di fragole estive, in una presentazione semplice, pratica e quasi ‘duttile’ come una ricetta di famiglia. Non serve essere una pastry chef per avere successo: si prepara in pochi gesti, si serve freddo o leggermente intiepidito, e conquista chiunque con la sua eleganza sobria e il gusto irresistibile. Se stai cercando un dolce che sia un vero colpo di scena senza complicazioni, questo è il tuo biglietto da visita: una duchessa delicata di crema, una pioggia di fragole lucenti e un cuore croccante che resta insolito, ma familiare al tempo stesso.

La storia dietro il piatto

Cheesecake dump alle fragole è una creazione che sembra nascere da due mondi: la tradizione americana della cheesecake, ricca di crema al formaggio e vaniglia, e la freschezza mediterranea delle fragole di stagione. L’idea di un “dump cake” è nata come risposta pratica alle vite frenetiche: si mette tutto in una teglia e si lascia che gli ingredienti si assorbano a contatto, senza lunghe lavorazioni. Nel nostro contesto, la versione alle fragole si è evoluta grazie alla disponibilità di fragole succose e profumate: una frutta che sa di giardino, di risveglio primaverile e di estati in riva al mare. Nel racconto di molte cucine casalinghe, questo dolce è diventato un simbolo di convivialità: le fragole vengono lavate rapidamente, il formaggio cremoso viene aromatizzato con scorza di limone o di arancia per un tocco di freschezza, e il tutto trova la sua casa tra una base di biscotti sbriciolati e una rifinitura di crema montata o yogurt dolce. In molte famiglie, questa torta è associata a piccoli momenti di festa: una merenda del pomeriggio, un dessert dopo una cena informale o una sorpresa per amici durante una calda serata estiva. La bellezza di questa ricetta sta proprio nel suo essere versatile: può essere ironica e leggera o ricca e sorprendente, a seconda di come la si personalizza e di quali fragole si scelgono.

Perché ti innamorerai di questa ricetta

  • Facilità d’esecuzione: poco tempo, pochi passaggi e una lavorazione che non richiede abilità da pasticcere.
  • Preparazione versatile: può essere realizzata in versione classica o adattata a esigenze alimentari diverse (senza lattosio, vegetariana, con alternative vegan, ecc.).
  • Profilo di gusto bilanciato: la cremosità del formaggio si sposa con la succosità delle fragole, mentre la base croccante aggiunge una nota di anti-ricotta che rende ogni morso completo.
  • Incredibilmente rinfrescante: servita fredda, è un dessert che si gusta anche come dolce di fine pasto in una calda giornata estiva.
  • Adatta a molte occasioni: feste, brunch, dessert per cena romantica o riunioni familiari.
  • Trasparenza di ingredienti: si sente la qualità delle fragole e l’aroma di vaniglia; non c’è bisogno di tutto quel fronzolo per ottenere un grande effetto.

Profilo di gusto e texture

La cheesecake dump alle fragole è una sinfonia di texture contrastanti che lavora come una coreografia sensoriale. All’assaggio si vive prima un leggero croccante della base, evocato da biscotti sbriciolati mischiati con burro fuso, che si rifugiano sul fondo creando una fondina solida ma friabile. Sopra, la crema al formaggio arriva setosa, morbida e vellutata: una nuvola che si scioglie quasi sul palato, grazie a una leggera montatura o a una mousse a base di formaggio cremoso e zucchero. L’elemento profondo è la fragola: fragole fresche o una salsa/gelatina di fragole a seconda della versione, che introduce una dolcezza vivace, una brillante acidità e una vigorosa saturazione di aroma estivo. Il mix tra la dolcezza delicata e la nota agrumata della scorza di limone o di arancia, se presente, crea un equilibrio che evita la pesantezza tipica di alcuni dessert al formaggio. Il finale è spesso un retrogusto di fragola fresca o una leggera nota vanigliata che resta a lungo sul palato, invitando a un altro boccone. La texture è cremosa senza essere pesante, con una base croccante che offre una piccola resistenza al morso e una parte finale morbida che invita all’assaggio successivo. È un dessert che celebra la semplicità, ma con una seduzione sensoriale che lo rende memorabile.

Occasioni & Abbinamenti

Questo dolce è una compagna perfetta per una varietà di momenti:

  • Estate e barbecue: fresco, fresco e facile da preparare in anticipo.
  • Brunch domenicale: un dessert leggero che non appesantisce la tavola.
  • Feste e portate condivise: la struttura “dump” permette di realizzarlo in grandi quantità con poco sforzo.
  • Dolce di fine pasto elegante: una chiusura raffinata ma non troppo formale.

Abbinamenti consigliati:

  • Bevande: un bicchiere di Moscato, un Prosecco leggero, o un rosé frizzante per enfatizzare la freschezza della frutta.
  • Contorni: una pallina di gelato alla vaniglia o uno yogurt naturale per bilanciare la dolcezza; frutti di bosco freschi come guarnizione per intensificare la nota fruttata.
  • Dolci complementari: una salsa di fragole ridotta al cucchiaio, una leggera crema al mascarpone sul lato o una spolverata di scorza di limone grattugiata per un tocco agrumato.

Suggerimenti & Varianti

Per rendere questa cheesecake dump alle fragole ancora più interessante o adatta a diverse esigenze, prova alcune di queste varianti e idee:

  • Versione vegan: usa crema vegana a base di anacardi o formaggi cremosi vegetali, e una base di biscotti vegan. Sostituisci il latte con latte di mandorla o di soia e usa un dolcificante a piacere.
  • Base senza glutine: opta per biscotti gluten-free o una base di noci macinate finemente mescolate con olio di cocco per legare.
  • Versione light: riduci lo zucchero, utilizza yogurt greco naturale al posto di parte del formaggio cremoso e aggiungi purea di fragole senza zuccheri aggiunti.
  • Frutti di bosco misti: aggiungi lamponi o more per una profondità di gusto e un colore ancora più vivace.
  • Glassa o topping: una glassa leggera di fragole triturate e succo di limone, oppure una leggera salsa di fragola per conferire brillantezza al topping.
  • Texture alternate: se vuoi una versione più “crunch”, aggiungi uno strato di croccante di mandorle o nocciole tostate sul fondo o tra gli strati.
  • Profumo di agrumi: aggiungi scorza di limone o arancia nella crema per una nota fresca e aromatica.

Conservazione & Idee per preparare in anticipo

La bellezza di una cheesecake dump alle fragole è la sua comodità anche per la pianificazione del menù. Ecco alcuni consigli pratici per rendere il dessert perfetto al momento di servirlo:

  • Raffreddamento: lascia raffreddare completamente la cheesecake in frigorifero per almeno 4 ore, idealmente tutta la notte, affinché gli strati si compattino e i sapori si armonizzino.
  • Conservazione: copri bene la teglia o trasferisci la cheesecake in un contenitore ermeticamente chiuso; si conserva bene in frigorifero fino a 3-4 giorni.
  • Congelamento: può essere congelata una volta pronta; parti in porzioni e avvolgi ciascuna porzione in pellicola. Si conserva fino a 2-3 mesi. Per servire, scongelare in frigorifero durante la notte e, se necessario, lucidare con una leggera salsa di fragole prima di servire.
  • Preparazione in anticipo: per un evento, puoi preparare la base e la crema un giorno prima, conservandole separatamente; al momento di servire, assembla velocemente e aggiungi le fragole e la decorazione finale.

Curiosità & trivia (Opzionale)

La cheesecake, nella sua forma moderna, affonda le radici nell’antica Grecia, dove veniva celebrata come un dolce semplice fatto di formaggio fresco, miele e farina. L’idea di un dolce freddo e setoso ha viaggiato attraverso continenti, trasformandosi in una gamma di varianti che includono basi di biscotti, crema al formaggio arricchita con vaniglia e gelatine di frutta. Il termine “dump” in pastecceria è un richiamo alla tecnica semplice di “scuotere” o “sbattere” gli ingredienti insieme e versarli direttamente in una teglia, senza impasti complessi o tecniche elaborate. La versione alle fragole celebra la stagione estiva di questa frutta, quando le fragole sono al loro massimo sapore: dolci ma con una leggera acidità, rosse come piccoli soli, profumate e capaci di dare a qualsiasi dessert una scintilla di freschezza.

Conclusione

Cheesecake dump alle fragole è più di un dessert: è un invito a riunirsi, a condividere momenti pieni di gusto e semplicità, a trasformare una piccola idea in un grande sorriso. È la promessa di una serata in cui tutto ciò che serve è una teglia, una frigorifera, fragole fresche e una voglia di dolcezza pulita. In un mondo che corre, questa ricetta ci ricorda che la cucina di casa può essere una splendida espressione di cura e creatività, senza bisogno di complicazioni. Se vuoi sorprendere i tuoi commensali con qualcosa di elegante ma immediato, se desideri un dessert che possa adattarsi a molte occasioni, se vuoi una dolce meraviglia che sia al tempo stesso confortante e fresca, allora Cheesecake dump alle fragole è la scelta giusta. Preparala, lasciala riposare, e assapora l’equilibrio perfetto tra la creaminess del formaggio, la brillantezza delle fragole e la croccantezza della base: un piccolo capolavoro di semplicità che conquista al primo morso e resta impresso nella memoria.

Ingredients

Crust

  • 1 1/2 cups graham cracker crumbs (about 150 g)
    → These crumbs form the base crust; crush crackers until fine, then mix with sugar and melted butter. The goal is a cohesive, crisp crust that presses evenly into the pan. Bake briefly if you like a firmer crust, then cool before filling.
  • 1/4 cup granulated sugar
    → Adds subtle sweetness to the crust; helps with moisture distribution and flavor balance. Mix with the crumbs and melted butter before pressing into the pan to ensure an even texture.
  • 6 tablespoons unsalted butter, melted
    → Binds the crust and adds richness; the butter should be warm but not hot when mixing with crumbs. Press firmly into the bottom and a touch up the sides for a sturdy base.
  • 1/4 teaspoon fine sea salt (optional)
    → Enhances overall flavor and counteracts sweetness; omit if using salted crackers or if you prefer a sweeter crust. Sprinkle into the crust mix and combine thoroughly before pressing.

Cheesecake Filling

  • 24 oz (680 g) cream cheese, softened to room temperature
    → The creamy foundation of the cheesecake; softening prevents lumps and ensures a smooth batter. Cut into chunks and let sit at room temperature 30–60 minutes, then beat until completely smooth.
  • 1 cup granulated sugar
    → Provides sweetness and helps balance the tang of the cream cheese. Beat with the cream cheese until light and airy and fully dissolved for a silky filling.
  • 3 large eggs
    → Add structure and richness; add one at a time to avoid curdling. Keep eggs at room temperature to help the mixture emulsify; avoid overmixing after adding eggs to prevent cracks.
  • 1/2 cup sour cream
    → Adds moisture, tenderness, and a slight tang; use full-fat for best texture. Fold in gently after the main batter is smooth to maintain a creamy consistency.
  • 1 teaspoon vanilla extract
    → Depth of flavor; vanilla enhances the overall aroma of the cheesecake. Use pure vanilla for best results; vanilla bean paste can be used for a more intense flavor.
  • 1 tablespoon lemon juice (optional)
    → Brightens the filling and helps balance richness; use freshly squeezed lemon juice. Add sparingly to avoid tipping the batter toward curdling.
  • 1 tablespoon all-purpose flour (optional)
    → Stabilizes the batter and helps prevent cracking in baked cheesecake. If avoiding gluten, substitute with 1 teaspoon cornstarch or 1 teaspoon potato starch. Whisk into the filling with the other ingredients for a smoother finish.

Strawberry Topping

  • 2 cups fresh strawberries, hulled and sliced (about 300 g)
    → The star topping providing bright color and natural sweetness. Slice evenly so they cook uniformly; reserve a few larger pieces for texture, or fold some in after cooking for added bits of fruit.
  • 1/4 cup granulated sugar
    → Helps draw out juices and creates a glossy strawberry sauce. Adjust to taste based on the sweetness of the berries and desired sauce thickness.
  • 1 tablespoon lemon juice
    → Brightens the sauce and helps preserve color; use fresh juice for best aroma. Taste and adjust sweetness after simmering.
  • 1 teaspoon cornstarch (optional)
    → Thickens the strawberry sauce to a glaze-like consistency; mix with 1 tablespoon cold water to form a slurry before adding to the berries. Simmer until thickened and glossy.

Optional Toppings

  • 1 cup heavy whipping cream, chilled
    → For a luscious whipped topping to dollop on each slice. Chill the bowl and beaters, whip to soft or stiff peaks as desired, then sweeten with powdered sugar and a touch of vanilla. Keep refrigerated until serving and re-whip if needed just before serving.
  • 2–3 tablespoons powdered sugar (to taste)
    → Sweetens the whipped cream; sift to avoid lumps and adjust to your preferred sweetness. Start with two tablespoons and add more as desired.
  • 1/2 teaspoon vanilla extract (optional)
    → Adds a warm vanilla note to the whipped cream; use vanilla bean paste for extra aroma if available.
  • Fresh strawberries for garnish (optional)
    → Extra color and freshness when serving; rinse and pat dry just before slicing and arrange around the edge or on top for a polished look.

Instructions

  • Preheat your oven to 325°F (165°C) and wrap the outside of a 9-inch (23 cm) springform pan with two layers of heavy-duty foil; place the pan on a rimmed baking sheet to catch any spills.
    → The foil keeps water from seeping in during baking and makes cleanup easier, while the sheet catches any leaks from the water bath.
  • Crush the graham crackers to a fine, uniform crumb using a food processor or by sealing the crackers in a zip-top bag and pounding with a rolling pin until there are no large shards.
    → Uniform crumbs bake evenly and form a cohesive crust that holds together when sliced.
  • In a medium bowl, whisk together the graham cracker crumbs, granulated sugar, and fine sea salt (if using) until evenly distributed.
    → Even distribution guarantees consistent sweetness and flavor across the crust without pockets of salt or sugar.
  • Stir in the melted unsalted butter until every crumb is moistened and resembles damp sand that clumps together when pressed.
    → Proper moisture ensures the crust binds firmly and bakes into a sturdy, sliceable base rather than a crumbly mess.
  • Press the crust firmly into the bottom and slightly up the sides of the prepared pan using the flat bottom of a measuring cup or a small glass to achieve an even, compact layer.
    → A dense, evenly distributed crust prevents sogginess and helps support the filling during baking.
  • Chill the crust in the freezer for about 15 minutes or until firm to set its shape before filling.
    → A cold crust resists shifting when the hot filling is added, reducing the chance of cracks and uneven edges.
  • Bake the crust for 8–10 minutes at 350°F (175°C), then remove from the oven and let it cool completely on a rack before filling.
    → A brief bake sets the crust’s structure; cooling fully prevents it from crumbling or warping when the hot batter is poured in.
  • In a large mixer bowl, beat the softened cream cheese and granulated sugar on medium speed until the mixture is smooth, creamy, and free of lumps, about 2–3 minutes; stop to scrape the bowl halfway through.
    → Fully smoothing the base eliminates lumps that would mar texture and appearance later.
  • With the mixer on low, add the eggs one at a time, mixing after each addition just until incorporated and stopping before the batter looks glossy or overmixed.
    → Adding eggs gradually and on low prevents curdling and a tough, dense cheesecake; overmixing introduces too much air that can cause cracks.
  • Beat in the sour cream, vanilla extract, and lemon juice (if using) until just combined; if you include flour, whisk it in now on low speed until evenly integrated.
    → Sour cream adds moisture and tenderness; vanilla enhances aroma; lemon brightens the rich filling; flour helps stabilize the batter to reduce cracking.
  • Pour the filling over the cooled crust and smooth the surface with an offset spatula to ensure an even top for uniform baking.
    → A level surface promotes even heat distribution, preventing a domed top and facilitating clean slicing.
  • Set the filled pan in a larger baking dish and pour hot water into the dish until it reaches halfway up the sides of the springform pan to create a gentle water bath; bake at 325°F (165°C) for about 55–70 minutes, or until the edges are set and the center yields a slight wobble.
    → The water bath provides humidity and slow, even cooking, which minimizes cracking and yields a custard-like center.
  • Turn off the oven, crack the door slightly, and let the cheesecake cool in the oven for 1 hour to gradually reduce the temperature without shocking the batter.
    → Slow cooling prevents surface cracking and helps the center settle evenly.
  • Remove the cheesecake from the water bath, take off the foil, and refrigerate, wrapped, for at least 6 hours or overnight to finish setting and chill completely before topping.
    → Thorough chilling firms the filling and enhances flavor and texture; overnight chilling yields the best sliceability.
  • Prepare the strawberry topping by combining sliced fresh strawberries, granulated sugar, and lemon juice in a saucepan and simmering over medium heat until the berries release juice and the mixture thickens to a gloss; stir gently and occasionally to avoid breaking all the fruit.
    → Gentle simmer concentrates sweetness and creates a vibrant, pourable sauce that clings to the cheesecake without becoming syrupy.
  • If you desire a thicker sauce, whisk in a slurry of cornstarch mixed with 1 tablespoon cold water and simmer a few minutes until glossy and thickened; remove from heat and cool to room temperature before serving.
    → The cornstarch slurry quickly thickens the sauce without scorching, creating a stable glaze that coats the cake beautifully.
  • Meanwhile, for optional whipped cream, chill a mixing bowl and beaters, then whip heavy cream with powdered sugar and vanilla to soft or stiff peaks as desired; refrigerate until ready to serve and re-whip briefly if needed just before serving.
    → Properly chilled equipment and controlled whipping yield a light, stable whipped cream that complements the cheesecake without melting too quickly.
  • When ready to serve, unmold the cheesecake by running a warm knife around the inner edge, release the springform, and slice; top each piece with strawberry sauce and a dollop of whipped cream if desired.
    → A clean release and neatly cut slices present the dessert attractively and ensure each portion holds together for serving.
  • Garnish with extra fresh strawberries if desired and refrigerate any leftovers promptly to maintain texture and safety.
    → Fresh garnish elevates presentation; prompt refrigeration preserves flavor and prevents spoilage.

Notes

These cheesecake dump alle fragole are a crowd-pleasing classic featuring a crisp, buttery graham cracker crust, a creamy tangy filling, and a glossy strawberry topping. For gluten-free versions, substitute gluten-free graham crackers (or cookies) for the crust and replace the optional 1 tablespoon all-purpose flour in the filling with 1 teaspoon cornstarch or potato starch; confirm all other ingredients are gluten-free. Useful prep tips: ensure the cream cheese is fully softened to room temperature and beat with the sugar until completely smooth and light; add eggs one at a time, beating briefly after each until just incorporated to avoid curdling or overmixing; fold in sour cream and vanilla gently, and add lemon juice gradually if using to brighten without tipping to curdle. If using flour, whisk it in with the other dry ingredients to help stabilization. Bake in a moderate oven; for best crack-free results you can bake the cheesecake in a water bath and let it cool gradually in the oven with the door slightly ajar. Chill the finished cake for at least 4 hours or overnight so it slices cleanly. For the topping, simmer sliced strawberries with sugar and lemon juice until the juices release and the mixture thickens to a glossy sauce; thicken with a quick cornstarch slurry if you prefer a glaze. To serve, top with a dollop of whipped cream and extra fresh berries if desired. Store leftovers refrigerated for 3–4 days; the cheesecake can also be frozen in slices for longer storage.

Tips

Consigli pratici per Cheesecake dump alle fragole

  • Preparazione della crosta: per una base uniforme, usa una teglia a cerchio apribile da 23 cm. Fodera il fondo con carta forno e spennella appena i bordi con burro per facilitare la rimozione. Dopo aver mescolato i biscotti con zucchero e burro fuso, premi bene con il dorso di un cucchiaio o con un fondo piatto per ottenere uno strato compatto e livellato. Se vuoi una crosta più solida, fai una breve cottura di 8–10 minuti e lascia raffreddare completamente prima di riempire.
  • Burro e temperatura: assicurati che il burro sia caldo ma non bollente quando lo incorpori ai biscotti. Un burro troppo caldo può rendere la crosta troppo lucida o friabile; al contrario, burro freddo non si amalgama bene.
  • Massima lisciatura del formaggio: lascia il formaggio cremoso a temperatura ambiente 30–60 minuti e taglialo a pezzi piccoli. Sbatti fino a renderlo completamente liscio prima di aggiungere lo zucchero, in modo da evitare grumi nel ripieno.
  • Incorporazione dello zucchero: aggiungi lo zucchero al formaggio e lavora fino a ottenere una crema chiara e spumosa. Raschia i bordi della ciotola durante la lavorazione per una consistenza uniforme.
  • Uova: aggiungi le uova una per volta a velocità moderata. Evita di mescolare troppo una volta unite le uova, altrimenti potresti incorrere in una consistenza elastica o crepe.
  • Sour cream e aroma: incorpora delicatamente la panna acida e la vaniglia fino a ottenere una crema lucida. Se usi estratto di vaniglia, opta per quello puro; l’aroma resta più intenso e morbido.
  • Limone e farina (opzionali): se vuoi una nota di freschezza, aggiungi limone fresco a piccole dosi. Se usi la farina (o amido di mais come alternativa), scioglila bene nel composto per aiutare a ridurre le crepe, ma non esagerare per non appesantire la texture.
  • Prevenire crepe durante la cottura: cuoci la torta in forno preriscaldato a circa 165–170°C (325–350°F). Per una superficie più uniforme e meno crepe, cuoci a bagnomaria proteggendo la teglia con un doppio strato di carta stagnola per evitare infiltrazioni d’acqua. Il bordo dovrebbe essere rassodato e al centro leggermente tremolante.
  • Raffreddamento e stabilizzazione: una volta cotta, spegni il forno, lascia la torta nel forno con lo sportello leggermente socchiuso per 1 ora per evitare contraccolpi termici, quindi trasferiscila in frigorifero minimo 4 ore o meglio durante la notte. Non sformarla subito; la gelificazione richiede tempo.
  • Riferimenti della teglia: se usi una teglia a foro removibile, proteggi l’esterno con foglio di alluminio per evitare infiltrazioni d’acqua se fai la cottura a bagnomaria. Una base ben sigillata facilita la rimozione senza rovinare la crosta.
  • Preparazione della salsa di fragole: per una salsa lucida, lascia macerare le fragole affettate con zucchero e succo di limone per 20–30 minuti. Se vuoi una salsa più spessa, sciogli un cucchiaino di amido di mais in un cucchiaio d’acqua fredda e aggiungilo alla salsa, quindi riscalda finché non vela il cucchiaio. lascia raffreddare prima di usarla come topping.
  • Stoccaggio e servizio: copri la torta e conservala in frigorifero per 3–4 giorni. Per porzioni ideale, taglia le fette freddandole leggermente in salotto; una volta tagliate, la torta tende a scaldarsi rapidamente. Puoi anche congelare porzioni coperte per un paio di mesi, ma la consistenza della crema potrebbe cambiare leggermente.
  • Montare la panna opzionale: per una nuvola di panna, monta 1 tazza di panna fredda con 2–3 cucchiai di zucchero a velo e una punta di vaniglia fino a raggiungere i picchi desiderati. Mantieni in frigorifero e aggiungi poco prima di servire. Se vuoi una stabilità maggiore, includi un pizzico di crema di tartaro o una bustina di pectina per creme.
  • Decorazione finale: guarnisci con fragole fresche e un filo di salsa di fragole appena prima di servire per un effetto lucente e invitante. Evita l’eccesso di liquido sulla superficie per non ammorbidire la crema.

FAQ

Domanda 1: Che cos’è Cheesecake dump alle fragole?

È una cheesecake fredda, a strati, senza cottura in forno. Si parte da una base di biscotti, si aggiunge una crema al formaggio e panna, e si conclude con fragole fresche o una salsa di fragole. Si lascia rassodare in frigorifero per diverse ore prima di servire.

Domanda 2: Quali ingredienti servono?

Base: biscotti digestive o graham (circa 180 g) e burro fuso (70 g). Crema: formaggio cremoso tipo Philadelphia o mascarpone (600 g), zucchero a velo (100 g), vaniglia, panna fresca montata (200 ml). Gelatina o colla di pesce (6 g, opzionale per maggiore stabilità). Fragole fresche per topping o per salsa. Un pizzico di scorza di limone e qualche goccia di succo di limone.

Domanda 3: Che tipo di formaggio è migliore?

Preferisci formaggio cremoso non acidulo: Philadelphia o mascarpone. Per una versione più leggera puoi usare una crema a base di formaggio spalmabile mischiato con mascarpone in percentuale equilibrata. Se vuoi un sapore più intenso, aggiungi un cucchiaio di mascarpone extra.

Domanda 4: Come preparo la base?

Sbriciola i biscotti fino a polvere fine. Mescola con burro fuso e distribuisci sul fondo di una teglia a cerchio apribile rivestita con carta forno. Premi bene per creare una base compatta e metti in frigorifero per 15–20 minuti per farla rassodare.

Domanda 5: Come preparo la crema al formaggio?

In una ciotola lavora il formaggio con lo zucchero, la vaniglia e la scorza di limone finché è liscio. In un’altra ciotola monta la panna e incorpora delicatamente al composto di formaggio. Se vuoi una crema più ferma, sciogli la gelatina in pochissima acqua calda e aggiungila al mix prima di unire la panna. Versa sulla base e livella. Riponi in frigorifero per 4–6 ore o tutta la notte.

Domanda 6: Come si aggiungono le fragole?

Taglia le fragole a fettine e disponile sulla crema in modo ordinato, oppure prepara una salsa di fragole scaldando fragole con un cucchiaio di zucchero e qualche goccia di limone, e versa a filo sopra la cheesecake. Lascia che la salsa si raffreddi prima di servire se l’hai preparata.

Domanda 7: Devo cuocere la cheesecake?

No. Si tratta di una versione senza forno. La struttura si ottiene mediante raffreddamento in frigorifero (o in parte in freezer) fino a rassodare.

Domanda 8: Quanto tempo serve e quante porzioni ottengo?

Tempo di preparazione circa 30–40 minuti. Raffreddamento consigliato: 4–6 ore, meglio tutta la notte. In una teglia da 20–22 cm si ottengono circa 8–10 fette, a seconda dello spessore.

Domanda 9: Come posso conservarla e posso congelarla?

Conserva in frigorifero, coperta, fino a 3–4 giorni. Puoi congelare fette singole, ben avvolte, per 1–2 mesi; scongelale in frigorifero prima di servire. Se hai usato fragole fresche, è preferibile aggiungere le fragole fresche al momento di servire per mantenere la consistenza e il sapore.

Domanda 10: Quali varianti o consigli extra posso provare?

Varianti: versione senza glutine usando biscotti senza glutine; versione vegana usando formaggio cremoso vegano, panna vegetale e agar-agar al posto della gelatina. Per una nota di sapore diversa, aggiungi scorza di limone extra o sciroppo di fragola nella crema. Decora con foglie di menta o pezzi di fragola per un tocco finale.