Introduction / Hook
Imagine biting into a dessert that feels like a celebration in every mouthful: a softly baked cake base, a lush, in-season centerpiece of cheesecake that glides on your tongue, and a golden, crackling honeycomb crunch that creates a symphony of texture with each bite. The Honeycomb Cheesecake Cake is the dessert equivalent of a standing ovation—showy, comforting, and deeply satisfying all at once. From the moment you present it at the table, the gleam of its honey-dusted surface and the promise of a creamy, tangy interior draws everyone in. It’s a cake that tells a story with its layers, its delicate sweetness, and the irresistible snap of candy shards within. This is not just a dessert; it’s an experience—one that evokes cozy gatherings, sunny celebrations, and those rare moments when you want to make something truly memorable without saying a word. Let your senses lead the way as you explore the magic of honeycomb, vanilla warmth, and the timeless allure of a perfectly balanced cheesecake cake.
The Story Behind the Dish
Desserts that fuse texture and drama have a way of becoming family legends, and the Honeycomb Cheesecake Cake is no exception. Its origin story is less about one single kitchen and more about the universal crave for contrast: the desire to pair a creamy, tangy center with a crisp, crackling shell that echoes the honeyed glow of late-afternoon sun. Honeycomb toffee—a candy that crackles and dissolves at the touch of warmth—has long held a cherished place in British and Commonwealth candy lore, known by several names across regions: hokey pokey in some corners, Cinder toffee in others, but universally recognized for its irresistible peppery crunch and caramelized sweetness. Cheesecake, meanwhile, boasts a global journey of its own. From rustic European cheese-based desserts to the refined, velvety cakes celebrated in bakeries worldwide, cheesecake embodies the marriage between richness and brightness—the tang of dairy tempered by sweetness and a whisper of vanilla or citrus. When you blend these two ideas, you don’t merely combine flavors; you create a narrative cake that invites conversation. You’ll see this dish rise from a clever kitchen experiment into a beloved centerpiece because it captures two beloved ideas in one elegant package: the smooth sophistication of cheesecake and the joyful, almost playful crackle of honeycomb candy.
Beyond its culinary lineage, this cake often carries a personal thread. It’s the kind of dessert that appears at anniversaries, milestone birthdays, or lazy Sunday gatherings where friends linger over coffee and a slice that seems to melt the minutes away. For many home bakers, the Honeycomb Cheesecake Cake becomes a canvas for storytelling—layer by layer telling stories of family trips to markets where honey products shimmer in light, of late-night improvisations where a craving for something both crunchy and creamy sparked a new favorite, and of the comforting rituals that accompany the preparation of a dessert that looks as spectacular as it tastes. The result is not just a dessert; it’s a memory in the making, ready to be shared, photographed, and whispered about for months to come.
Why You’ll Love This Recipe
- Impressive centerpiece: A cake that looks stunning on display, with a glossy surface and visible honeycomb crunch embedded in its creamy interior.
- Texture symphony: Crystalline snap from the honeycomb, silky cheesecake layers, and tender cake beneath—three textures in harmonious balance.
- Balanced flavor: A gentle sweetness that highlights sweetness and tang without overpowering, allowing the caramel notes of honeycomb to shine.
- Make-ahead friendly: Components can be prepared in stages, making it easier to assemble for special occasions or busy weekends.
- Versatile presentation: Works well with a minimalist finish for elegant dinners or a playful drizzle of chocolate, citrus, or berry sauces for parties.
- Family-friendly aura: Rich and comforting without feeling heavy, suitable for gatherings of all ages who appreciate a dessert with “wow.”
- Gorgeous aroma: The moment the cake is cut, a warm, honeyed fragrance fills the room, inviting guests to linger at the table.
Flavor Profile & Texture
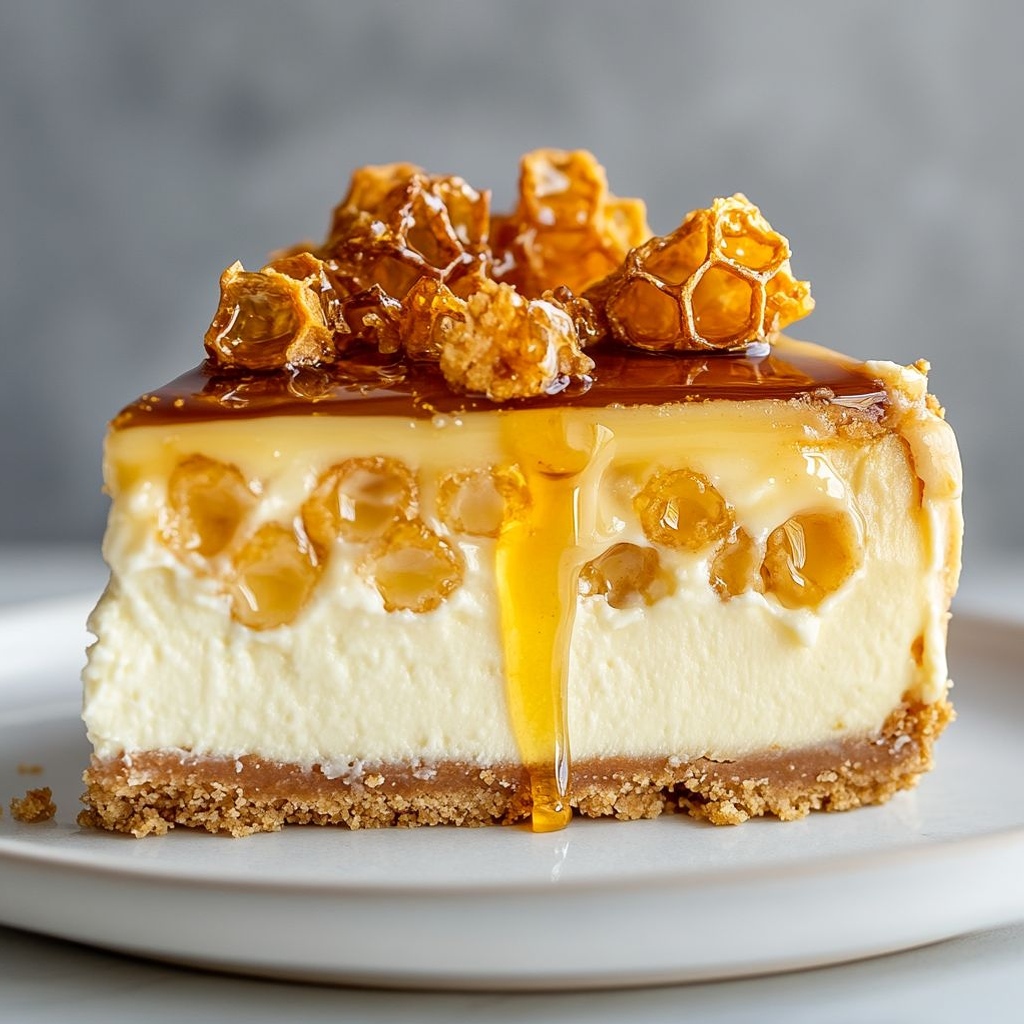
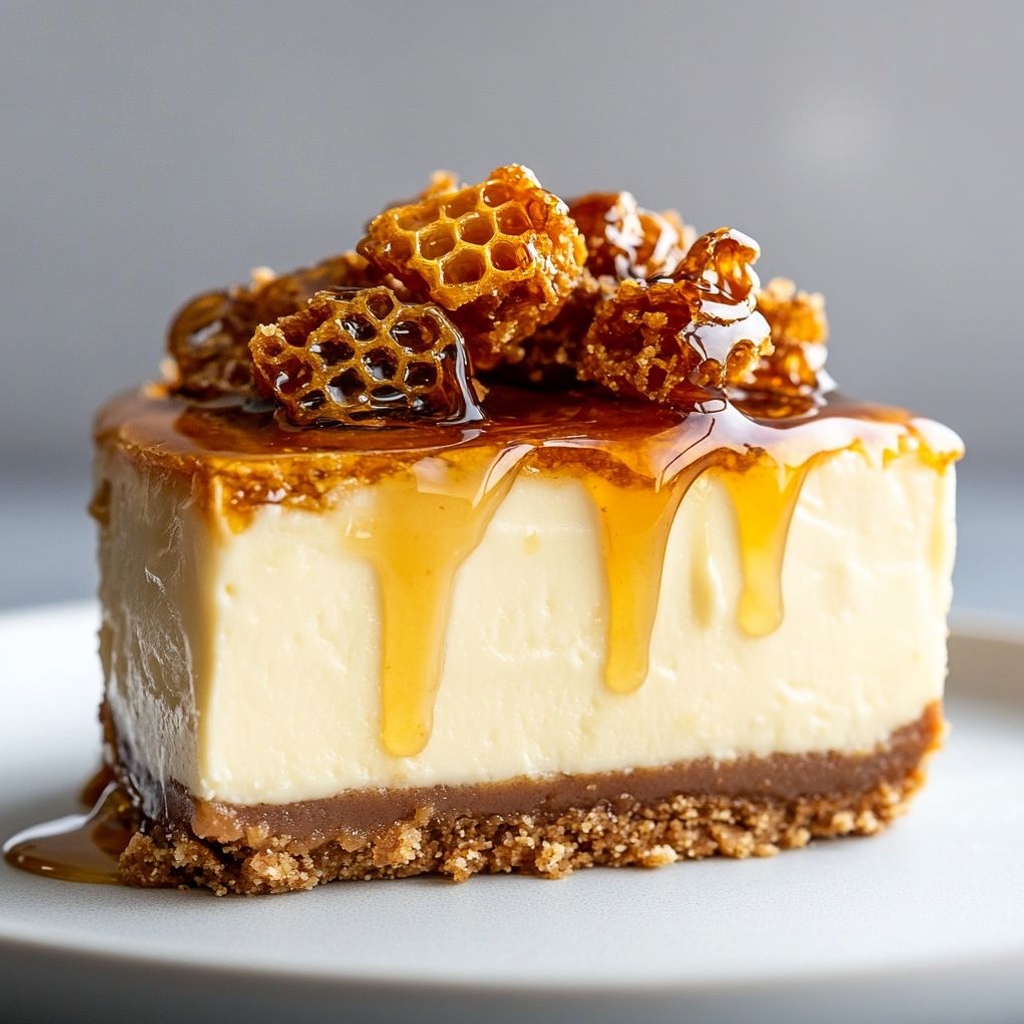
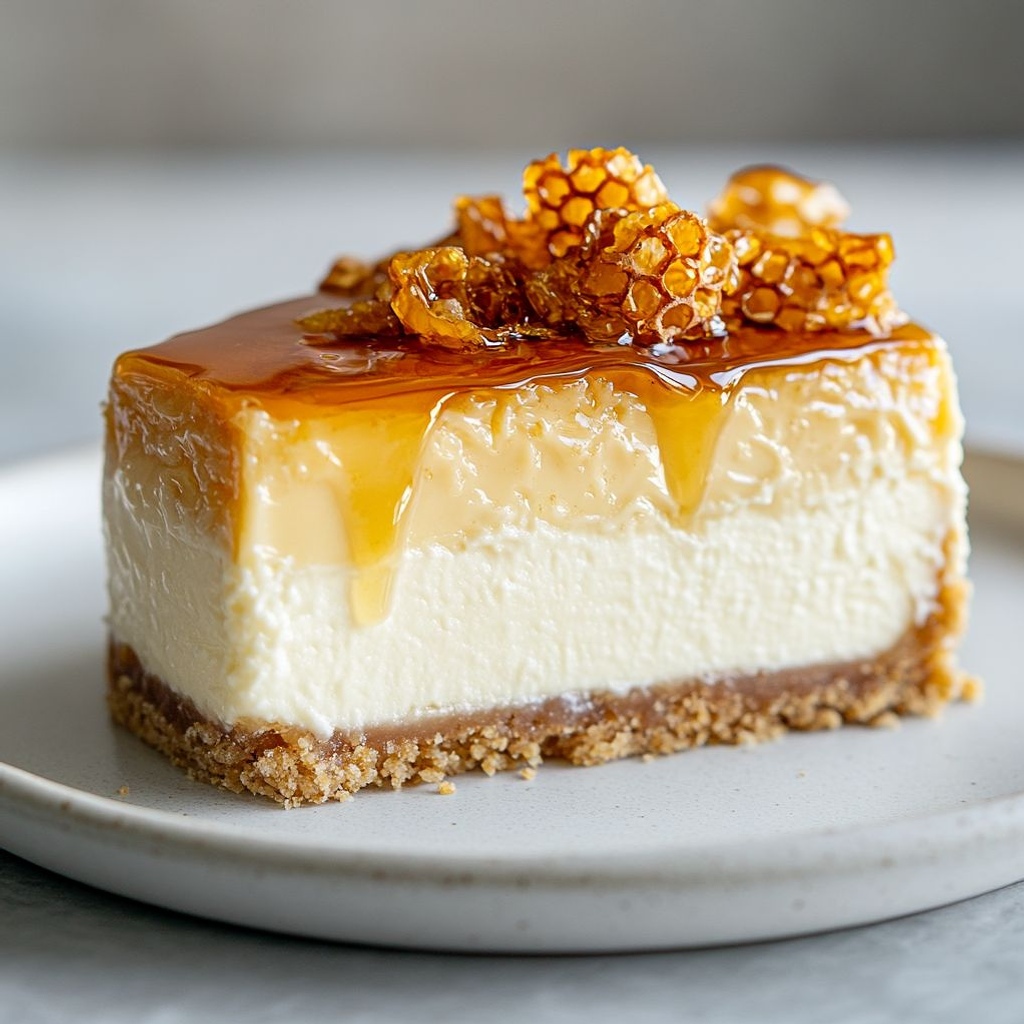
The Honeycomb Cheesecake Cake is a study in contrast—soft and crisp, bright and deep, light and indulgent. At first glance, the surface gleams with a gentle caramel sheen, a hint of honey-toned warmth that promises sweetness without cloying heaviness. As you cut into the cake, the outer layers reveal themselves with a delicate crumb that supports a thick, velvety cheesecake filling. The real magic, however, lies in the honeycomb pockets dispersed throughout or perched in delicate shards within the layers. Each bite delivers a crisp, crackling bite, a tiny spark of toffee that instantly brightens the palate and punctuates the creamy interior.
In the inner realm, the cheesecake layer contributes a luxuriously smooth, tangy touch that balances the sweetness of the honeycomb. If you’re a fan of vanilla, you’ll notice a soft, aromatic accent that lifts the entire cake, carrying flowers of warmth through the air as it’s served. The cake part beneath the cheesecake adds a gentle, airy crumb—like a whisper of a sponge—that keeps the dessert buoyant rather than dense. The texture journey continues with the last hold: a subtle resonance of caramelized sugar from the honeycomb that lingers on the finish, pairing surprisingly well with a final sip of coffee or a glass of sparkling wine. The overall mouthfeel is one of elegance and comfort—a cake that feels celebratory yet inviting, suitable for quiet Sunday rituals or grand festive occasions alike.
Occasions & Pairings
This cake is at home on a festive table, yet it doesn’t demand a holiday to shine. It’s a reliable showstopper for multiple occasions and can adapt to different atmospheres with small adjustments in plating and presentation.
- Celebrations and milestones: anniversaries, birthdays, graduates, and family reunions benefit from its dramatic presence and crowd-pleasing flavors.
- Holiday gatherings: it pairs beautifully with seasonal fruits and warm beverages, becoming a focal point of dessert platters.
- Weeknight elegance: a special dessert for a romantic dinner or a dinner party where you want to offer something memorable without requiring a full dessert menu.
- Pairings: a glass of late-harvest or off-dry dessert wine, a bold espresso, or a silky chai complements the honeyed sweetness and tangy notes. Fresh berries or a citrus-cavored coulis can brighten the plate, while a light dusting of cocoa or a swirl of chocolate sauce can add depth for chocolate lovers.
Tips, Variations & Substitutions
There are many ways to tailor the Honeycomb Cheesecake Cake to fit dietary needs, flavor preferences, or seasonal ingredients. Here are ideas and considerations to keep the concept flexible while preserving its signature charm.
Tips for Best Results
- Plan ahead to allow for chilling time; the cheesecake layers need time to set so the cake slices neatly and the honeycomb stays crisp rather than soggy.
- If you’re purchasing honeycomb candy, choose pieces that are sturdy and evenly colored; uneven or soft sections may become gummy in the cake.
- Consider a gentle glaze or top finish that doesn’t overwhelm the honeycomb; something light like a gloss of warm caramel or a delicate citrus zest dust can elevate without masking textures.
Variations
- Vegan option: use a dairy-free, plant-based cheesecake layer substitute and a vegan-friendly honeycomb candy; you can also layer with a dairy-free cream alternative to maintain a lush texture.
- Gluten-free version: ensure all components use gluten-free cake and any candy or crunchy elements comply with gluten-free standards; many store-bought honeycomb products are gluten-free, but check labels.
- Nut-free adaptation: use nut-free ingredients and a clean workspace to avoid cross-contamination; avoid added nut toppings if allergies are a concern.
- Regional twists: swap vanilla for citrus zest (lemon or orange) to brighten the profile, or infuse the cake with warm spices like cinnamon, cardamom, or a whisper of ginger for an autumnal edge.
- Mini versions: bake in mini pans or muffin molds for individual servings, which emphasizes the honeycomb crunch at a more approachable scale.
Substitutions
- Instead of a traditional cheesecake layer, you can create a lighter, mousse-like layer using stabilized whipped cream folded with a gentle tang, then layered with sponge and candy for a lighter bite.
- To emphasize chocolate lovers, a light chocolate drizzle or a thin cocoa glaze can be added to the top, providing a subtle bitter edge that contrasts with the honeyed sweetness.
- If you’d like more contrast, incorporate a berry or citrus layer between the cake and cheesecake; a bright fruit layer can cut through the richness with a refreshing burst.
Storage & Make-Ahead Ideas
One of the practical joys of this cake is its versatility for make-ahead preparation. You can assemble the components ahead of time and finish assembly close to serving, ensuring maximum freshness and texture integrity for your guests.
- Make-ahead components: bake and cool the cake layers in advance, and prepare the cheesecake layer the day before. Store each component separately in the refrigerator, wrapped well to prevent drying.
- Storage: once assembled, refrigerate slices in airtight containers for up to 3–4 days. The texture of the honeycomb remains best within the first 24–48 hours; beyond that, it may soften slightly but still taste luscious.
- Freezing: carefully freeze whole slices or the fully assembled cake for longer storage; thaw overnight in the refrigerator. Note that the honeycomb can lose some of its crispness after freezing, though the overall experience remains delicious.
- Reheating and serving: for the best texture after refrigeration or freezing, let slices come to near room temperature and re-finish with a light, fresh finish—such as a quick dusting of zest or a tiny drizzle of sauce that complements the honey notes.
Fun Facts & Trivia (Optional)
- Honeycomb candy, also known as cinder toffee or hokey pokey in various locales, gets its signature crackle from the rapid foaming of baking soda reacting with glucose or another syrup during the hot cooking process.
- Cheesecake as a concept traces back centuries and many cultures have versions that range from dense, baked varieties to lighter, no-bake textures. The fusion with honeycomb offers a modern twist that bridges classic and contemporary desserts.
- The visual appeal of honeycomb’s hexagonal pattern has inspired countless cake designs, from intricate sugar work to compact, candy-inlaid decorations that celebrate geometric beauty in dessert form.
- Honey has a long history of being paired with dairy in desserts because its sweetness can be tempered by the slight tang of cultured dairy products, creating a balanced flavor that feels both luxurious and comforting.
- In many culinary traditions, honey is associated with warmth, hospitality, and celebration—qualities that this cake embodies in both presentation and taste.
Ingredients
Honeycomb Cheesecake Cake
Vanilla Sponge Cake Layers
- 3 cups all-purpose flour
→ Provides the structure for the cake layers. All-purpose flour forms the crumb that supports the leavening and keeps the cake from collapsing. Sift the flour before measuring to avoid packed clumps, then whisk with the baking powder and salt to distribute evenly. If you want a lighter crumb, you can substitute up to 1/2 cup with cake flour. - 1 1/2 cups granulated sugar
→ Adds sweetness and helps with browning during baking. Creaming sugar with butter creates air pockets for a lighter texture. Ensure the butter is soft and creamed thoroughly with the sugar until pale and fluffy for best volume; you can reduce sugar slightly if you prefer a less sweet cake. - 1 cup unsalted butter, softened
→ Provides moisture, tenderness, and flavor. Butter should be softened to room temperature to cream smoothly with sugar. Beat until light and fluffy to maximize tenderness; if you substitute with oil, use a neutral-tavored oil and reduce some liquid to maintain balance. - 4 large eggs, room temperature
→ Contribute structure, moisture, and color. Eggs help emulsify the batter and trap air for lift. Add eggs one at a time and beat after each addition to maintain a smooth batter; using room-temperature eggs helps achieve even mixing and a tender crumb. - 1 cup whole milk, room temperature
→ Adds moisture and tenderness with a rich mouthfeel. Whole milk yields a more flavorful crumb; if using a dairy-free option, choose a fortified non-dairy milk and adjust fat content slightly to avoid a dry texture. Allow milk to come to room temperature for even incorporation. - 2 tsp baking powder
→ Leavening that creates lift and a light crumb. Distribute evenly by whisking with the dry ingredients to prevent dense patches. Check that the powder is fresh for reliable rise. - 1/2 tsp salt
→ Enhances overall flavor and strengthens crumb structure. Balance sweetness by keeping salt small but present; if you’re using salted butter, adjust or omit the extra salt accordingly. - 2 tsp vanilla extract
→ Adds warm, aromatic flavor. Use pure vanilla for the richest taste; for extra depth, you can scrape vanilla bean seeds into the wet ingredients in addition to the extract.
Cheesecake Filling
- 4 (8 oz) packages cream cheese, softened
→ The creamy base of the cheesecake. Softened cream cheese prevents lumps and yields a silky filling. For best results, ensure all blocks are at room temperature and beat on low speed until smooth, then increase speed gradually to incorporate air without adding bubbles. - 1 1/4 cups granulated sugar
→ Sweetens the filling and helps balance the tang of cream cheese. Add gradually to the softened cheese, scraping the bowl as needed to maintain a smooth texture. For a lighter cheesecake, reduce slightly or substitute with part powdered sugar for a silkier texture. - 4 large eggs
→ Bind and set the filling. Add eggs one at a time on low speed to avoid overbeating, which can incorporate too much air and cause cracks. Ensure eggs are at room temperature to prevent curdling and clumping. - 1/2 cup sour cream
→ Adds tang, creaminess, and moisture. Sour cream contributes a luscious, smooth crumb; whisk it in after the cream cheese and sugar are combined to prevent separation. If you’re dairy-free, you can substitute full-fat coconut yogurt, but it will alter flavor and texture slightly. - 2 tsp vanilla extract
→ Enhances flavor with a smooth vanilla note that pairs well with honey. Use pure vanilla; you can also add a touch of lemon zest (1 tsp) for brightness if desired. - 2 tbsp lemon zest or juice (optional)
→ Brightens the filling and cuts the richness with a hint of citrus. Use zest for aroma rather than juice to avoid thinning the batter; lemon works beautifully with honey flavors. - 2 tbsp all-purpose flour or cornstarch
→ Stabilizes the filling to help prevent cracking and leaking when baked or chilled. This small amount tightens the texture without making it starchy. If you prefer a purer cheesecake texture, you can omit but expect a looser set.
Honeycomb Candy
- 1 cup granulated sugar
→ Forms the brittle candy base that creates the honeycomb texture. Keep the sugar syrup on a steady, medium heat; avoid stirring once it begins to melt to prevent crystallization. Prepare the baking soda ready before the sugar reaches the proper stage for quick incorporation. - 1/4 cup light corn syrup or glucose syrup
→ Prevents crystallization and yields a glossy, elastic candy. Syrup also helps create the characteristic honeycomb texture when baked. If using glucose, you can substitute an equivalent amount of corn syrup with similar results. - 1/4 cup water
→ Helps dissolve the sugar and regulate the syrup’s consistency. Do not add cold water at the end; keep the syrup hot until you add the baking soda. - 1 tsp baking soda, sifted
→ Causes a rapid reaction that aerates the sugar syrup, creating the characteristic honeycomb holes. Sprinkle in off heat and whisk briskly to evenly distribute; too much agitation while hot can cause an uneven structure. - Pinch of sea salt
→ Balances the sweetness and enhances the honey flavor in the finished candy. A small pinch is enough to boost depth without making the candy taste salty. - Optional: 1/2 tsp vanilla extract
→ Adds a subtle note that echoes the cake and frosting; flavor is delicate, so add only if you want the candy to carry vanilla aroma.
Cream Cheese Frosting
- 16 oz cream cheese, softened
→ Provides the creamy, tangy coating that pairs with the sponge and cheesecake layers. Softened cheese avoids lumps; beat on low speed first, then on higher speed once smooth to get a silky texture. - 1/2 cup unsalted butter, softened
→ Adds richness and helps structure the frosting. Cream until pale and fluffy to introduce air and a light mouthfeel; if you prefer a firmer frosting, chill slightly before frosting the cake. - 4 cups powdered sugar
→ Thickens the frosting and sweetens to a balanced level. Sift the sugar to remove lumps and beat with the fats until smooth; add gradually to control sweetness and texture. - 2 tsp vanilla extract
→ Flavor depth that complements the cheesecake and honeycomb flavors. Use pure vanilla for best aroma; for extra nuance, replace part with vanilla bean seeds. - Pinch of salt
→ Balances sweetness and enhances the overall flavor. If your butter is salted, adjust accordingly. - 1-2 tbsp heavy cream or milk to loosen
→ Adjusts consistency for spreading. Add a little at a time until you reach a smooth, pipeable or spreadable texture; use cream for a slightly richer finish.
Toppings
- 1 cup heavy whipping cream, chilled
→ Whipped cream creates a light, airy topping that contrasts with the dense cheesecake layers. Whip to soft peaks and fold in a touch of vanilla or powdered sugar if desired for extra sweetness. - 1/2 cup crushed honeycomb candy shards
→ Adds crunchy texture and bursts of honey flavor between and on top of the layers. Crush the shards into varying sizes for visual interest and even distribution. - Fresh berries or edible garnish (optional) – 1 cup mixed berries
→ Brighten the dessert with acidity to balance richness and provide color contrast. Berries also pair well with honey and vanilla flavors.
Instructions
- Preheat your oven to 350°F (175°C) and grease two 9-inch round cake pans, then line the bottoms with parchment circles for easy release.
→ This ensures even heat distribution, prevents sticking, and makes unmolding the cooled cakes effortless without damaging their shape. - Sift together 3 cups all-purpose flour, 2 tsp baking powder, and 1/2 tsp salt in a large bowl, then whisk to distribute evenly.
→ Sifting breaks up clumps, aerates the dry mix, and ensures uniform rise by eliminating pockets of dense flour. - In a separate bowl, cream 1 1/2 cups granulated sugar and 1 cup softened unsalted butter on medium-high speed until pale, fluffy, and light; scrape the bowl as needed.
→ Proper creaming builds air pockets that become the cake’s tender crumb and helps with even browning. - Beat in 4 large eggs, adding them one at a time on medium speed and allowing each to emulsify fully before adding the next.
→ This prevents curdling and ensures a smooth, cohesive batter with good volume. - With the mixer on low, alternate adding the dry ingredients and 1 cup whole milk, beginning and ending with the dry ingredients, until the batter is smooth and homogenous.
→ Alternating prevents overmixing and yields a tender crumb by keeping fat and liquid well emulsified. - Stir in 2 tsp vanilla extract until evenly distributed through the batter.
→ Vanilla enhances the sweetness and aroma, contributing to a balanced, cake-like flavor. - Divide the batter evenly between the prepared pans and smooth the tops with a spatula for uniform baking.
→ Level batter assures even rising and prevents domed tops that complicate stacking later. - Bake the sponge layers for 25–30 minutes, or until the centers spring back lightly and a tester comes out with a few moist crumbs.
→ Proper doneness prevents a gummy center and ensures sturdy layers that can support filling and frosting. - Cool the cake layers in the pans for 10 minutes, then invert onto a wire rack and remove parchment; allow to cool completely before assembly.
→ Cooling sets the crumb and makes handling easier, preventing crumbling and moisture loss. - Level the cooled sponge layers with a serrated knife or cake leveler to create even, flat surfaces for stacking.
→ Flat surfaces ensure stable stacking and clean frosting lines. - Prepare the cheesecake filling by beating 4 (8 oz) packages cream cheese at low speed until smooth and free of lumps.
→ Softened cream cheese blends without lumps when beaten on low, producing a silky, uniform filling. - Gradually add 1 1/4 cups granulated sugar while continuing to beat on low, scraping the bowl as needed to maintain a smooth texture.
→ Adding sugar gradually prevents gritty pockets and ensures even sweetness throughout the filling. - With the mixer on low, add 4 large eggs one at a time, letting each video-layered addition incorporate before adding the next.
→ Adding eggs slowly controls air incorporation, reducing the risk of cracks during baking and chilling. - Beat in 1/2 cup sour cream and 2 tsp vanilla extract until fully integrated; fold in 2 tbsp lemon zest or juice if desired.
→ Sour cream adds moisture and tang; lemon brightens the richness and echoes the honeyed notes nicely. - Sprinkle in 2 tbsp all-purpose flour or cornstarch and mix on low until just combined.
→ The starch helps stabilize the filling to resist cracking and leaking while chilling. - Set aside the cheesecake filling and prepare the honeycomb candy by combining 1 cup granulated sugar, 1/4 cup light corn syrup, and 1/4 cup water in a heavy saucepan.
→ These ingredients create a smooth, glassy syrup that will yield the signature honeycomb texture when aerated with baking soda. - Place a candy thermometer in the saucepan and bring to a boil over medium-high heat without stirring; brush down the sides with a damp pastry brush to dissolve sugar crystals.
→ Gentle, even heating prevents crystallization and ensures the syrup reaches the correct hard-crack stage for crisp candy. - Cook the syrup to 300–305°F (149–154°C), the hard-crack stage, then immediately remove from heat.
→ At this temperature, the candy will harden into crisp honeycomb with characteristic holes when aerated. - Quickly whisk in 1 tsp baking soda and a pinch of sea salt (and optional 1/2 tsp vanilla) off the heat to induce rapid foaming; stir just until evenly foamed.
→ Baking soda creates the porous structure; over-stirring or prolonged agitation can break the foam or deflate the candy. - Pour the foamy candy onto a parchment-lined sheet and spread as thinly as possible for a clean break; let it cool completely and then break into irregular shards.
→ A thin, even layer yields shards that break cleanly and provide dramatic texture when applied to the cake. - Make the cream cheese frosting by beating 16 oz cream cheese and 1/2 cup softened butter on medium speed until smooth and creamy.
→ Properly softened fats blend with the cheese to create a glossy, spreadable frosting without lumps. - Gradually sift in 4 cups powdered sugar while beating on low, then increase speed to medium and mix until light and fluffy.
→ Sifted sugar prevents grittiness and a pale, airy frosting that crusts nicely for a smooth finish. - Beat in 2 tsp vanilla extract and a pinch of salt, then stream in 1–2 tbsp heavy cream or milk to loosen to a spreadable consistency.
→ The dairy fat improves mouthfeel and ensures the frosting spreads without tearing the cake crumb. - Prepare toppings: whip 1 cup heavy cream to soft peaks, optionally sweeten lightly, and refrigerate until ready to use.
→ Whipped cream provides a light contrast to the dense cheesecake layers when folded or piped atop the cake. - Assemble the honeycomb cheesecake cake by placing one sponge layer on a serving plate, applying a generous, even layer of cheesecake filling, and sprinkling a portion of honeycomb shards over the filling.
→ Layering with a cheesecake center and candy shards creates contrast in texture and a balanced honeyed flavor throughout the cake. - Top with the second sponge layer, press gently to secure, and apply a thin crumb coat of the cream cheese frosting to seal crumbs.
→ The crumb coat locks in crumbs and yields a clean, professional final appearance after the final frosting pass. - Chill the cake for 15–20 minutes to set the crumb coat and firm the cheesecake filling for clean slicing.
→ A brief chill prevents sliding layers and helps frosting stay put when finishing the cake. - Apply a final, smooth layer of the cream cheese frosting over the cake using an offset spatula, detailing clean edges and creating a poised surface for toppings.
→ A smooth finish showcases the layers and makes subsequent decoration easier and neater. - Pipe or spoon the whipped cream around the top edge or in decorative dollops, then scatter remaining honeycomb shards and optional fresh berries over the surface.
→ The whipped cream adds lightness, while candy shards and berries provide color, crunch, and acidity to balance the sweetness. - refrigerate the finished cake for at least 1 hour before serving to allow the flavors to meld and the layers to set for clean, neat slices.
→ A rest time ensures stable slices and a cohesive texture throughout every bite. - Keep leftovers refrigerated in an airtight container for up to 3–4 days; bring to room temperature briefly before serving for the best texture and aroma.
→ Refrigeration slows spoilage of the dairy components and maintains the structure of the honeycomb candy and frosting.
Notes
These Honeycomb Cheesecake Cake is a show-stopping dessert that layers light vanilla sponge, a creamy cheesecake filling, crunchy honeycomb candy, and a silky cream cheese frosting. For best results, make sure all cold ingredients are at room temperature (cream cheese, eggs, milk) and that butter and cream cheese are softened before mixing to avoid lumps in the fillings and frosting. Prepare the honeycomb candy first and let it cool completely; crush into shards just before assembling to keep texture crisp and prevent soggy layers, and have baking soda ready so you can whisk in quickly off heat. The sponge batter benefits from room-temperature eggs and milk and should be baked in evenly sized pans; level the tops to help stacking, and cool completely before layering to prevent sliding. The cheesecake filling should be mixed on low speed and not overworked to avoid cracks; add sour cream and vanilla to deepen flavor and loosen with a touch of lemon zest if desired. Assemble with a generous frosting layer, scatter honeycomb shards between layers for crunch, then chill the assembled cake for several hours or overnight so the slices cut cleanly. To store, keep refrigerated and covered; leftovers freeze well if wrapped airtight and thaw in the fridge. For gluten-free adaptation, use a certified gluten-free all-purpose flour blend and ensure the baking powder is gluten-free; dairy-free options can be used with dairy-free cream cheese and coconut cream in the frosting, though texture and flavor will change slightly. Finish with a dollop of whipped cream and fresh berries if desired.
Tips
Tips for Perfect Honeycomb Cheesecake Cake
- Ingredient prep and temperature: Have all ingredients at room temperature before you start. If you’re short on time, place eggs in warm water for 5–10 minutes to take the chill off.
- Sponge cake technique: Sift the dry ingredients (flour, baking powder, salt) together, then whisk to distribute evenly. Cream butter and sugar until pale and fluffy for a light crumb. Add eggs one at a time, beating after each addition for a smooth batter.
- Measuring and mixing: Use a kitchen scale for precise measurements. If using cups, scoop flour gently and level off to avoid a dense batter. Don’t overmix once the wet and dry ingredients are combined to keep the crumb tender.
- Milk and fat: Use whole milk for richer flavor. If dairy-free, choose a fortified non-dairy milk with a bit of added fat to prevent a dry crumb.
- Leavening and salt: Fresh baking powder ensures reliable lift. A pinch of salt balances sweetness; adjust if using salted butter.
- Vanilla flavor: Use pure vanilla extract (and optional vanilla bean seeds) for depth of flavor.
- Cheesecake filling technique: Soften cream cheese completely and beat on low speed to prevent lumps, then increase to medium until smooth. Add eggs one at a time on low speed to avoid overbeating and cracking. Fold in sour cream and vanilla gently.
- Stabilizers in filling: The small amount of flour or cornstarch helps prevent cracking and leaking. If omitted, the filling may be looser.
- Lemon brightness: Use lemon zest (not too much juice) to brighten the filling without thinning it. If you use juice, compensate by reducing other liquids slightly.
- Honeycomb candy tips: Have the baking soda sifted and ready. Cook sugar syrup to the firm-ball/hard-crack stage (about 300–305°F / 149–152°C). Remove from heat before adding baking soda and whisk briskly to aerate. Do not overwork hot sugar, which can create uneven holes.
- Crystallization prevention: Do not stir once the sugar begins to melt. Keep the pan clean and dry; wipe the sides if crystals form.
- Candy cooling: Pour candy onto a parchment-lined surface and let it cool completely before breaking into shards. Store shards in a dry place until assembly.
- Frosting consistency: Soften cream cheese and butter fully; sift powdered sugar to avoid grittiness. If frosting is too soft, refrigerate briefly to firm up; if too stiff, loosen with a splash of cream or milk.
- Layer assembly: Chill each cake layer before stacking to prevent sliding. A thin crumb coat between layers helps seal moisture and keep slices neat.
- Chilling and serving: Refrigerate the assembled cake for several hours or overnight to let flavors meld and the filling set. Slice with a sharp, clean knife for neat portions.
- Storage and variations: Store leftovers in the fridge for up to 4 days; freeze individual slices for longer storage. For variation, try almond or honeyed frosting, or add extra lemon zest for brightness.
FAQ
What is Honeycomb Cheesecake Cake?
A decadent multi-layer dessert consisting of a crunchy biscuit crust, a creamy cheesecake filling that’s swirled with honeycomb candy pieces, and a sweet honey glaze on top. It’s a showstopper for celebrations and a crowd-pleaser any time.
What ingredients do I need?
Keep these components in mind:
- Crust: 200 g digestive biscuits (or graham crackers), 100 g unsalted butter (melted), 1–2 tbsp sugar (optional), pinch of salt.
- Cheesecake filling: 900 g cream cheese (softened), 200 g granulated sugar, 2 tsp vanilla extract, 3 large eggs + 2 yolks, 120 g sour cream (or Greek yogurt), 120 ml heavy cream.
- Honeycomb candy: 200 g granulated sugar, 60 ml golden syrup (or light corn syrup), 1–1.5 tsp baking soda.
- Honey glaze: 120 ml honey, 2–3 tbsp water or lemon juice, optional extra powdered sugar for thickness.
How do I make the honeycomb candy?
Honeycomb is made separately for crunch.
- In a heavy saucepan, combine sugar and golden syrup. Cook over medium heat without stirring until the mixture reaches a deep amber color (hard crack stage, about 149–154°C / 300–310°F).
- Remove from heat and quickly whisk in baking soda. The mixture will foam up; stir just to combine.
- Pour onto parchment-lined baking sheet and spread evenly. Let cool completely, then break into pieces to mix into the cheesecake or to press on top.
Should I bake this cheesecake in a water bath?
Yes. Baking in a water bath helps prevent cracks and keeps the center smooth.
- Wrap the outside of the springform pan tightly with heavy-duty foil to keep water out.
- Place the wrapped pan in a larger baking dish and pour hot water around it halfway up the sides.
- Bake at about 160°C (325°F) for 55–65 minutes until the edges are set and the center has a slight wobble.
- Turn off the oven and leave the pan inside with the door slightly ajar for 1 hour, then remove and cool completely.
How do I assemble and bake the cake?
Step-by-step guide for a clean assembly:
- Crust: Crush the biscuits and mix with melted butter (and sugar if using). Press firmly into a 9-inch springform pan. Bake 8–10 minutes, then cool.
- Filling: Beat cream cheese until smooth. Add sugar and vanilla, then add eggs one at a time, mixing just until combined. Beat in sour cream and heavy cream until velvety.
- Honeycomb: Chop or crumble some honeycomb candy. Fold a portion into the filling (optional) or reserve to sprinkle on top after baking.
- Assemble: Pour filling over the cooled crust. If desired, sprinkle chopped honeycomb into the filling for swirls. Place the pan in the prepared water bath and bake as directed above.
- Cool completely, then refrigerate for at least 6–8 hours or overnight to set.
- Glaze and decorate: Warm honey with a little water/lemon juice until liquidy, then drizzle over the chilled cake. Top with additional honeycomb pieces for texture.
How long does it take to bake and chill?
Typical timeline:
- Crust bake: 8–10 minutes, plus cooling.
- Cheesecake bake: 55–65 minutes in a water bath.
- Initial cooling: 1 hour in the oven with the door ajar, then cool completely at room temperature.
- Chill time: at least 6–8 hours, preferably overnight, for a clean slice and full set.
Can I make this in advance or freeze it?
Yes to both with some care:
- Make-ahead: You can bake and chill the cake a day or two in advance; keep it refrigerated until serving.
- Freezing: Wrap the whole cake tightly in plastic wrap and foil, and freeze up to 1–2 months. Thaw overnight in the fridge before serving.
Can I adapt this for dietary needs (gluten-free, dairy-free, vegan)?
Yes, with substitutions:
- Gluten-free crust: Use gluten-free biscuits or cookies (and ensure any added sugar is gluten-free).
- Dairy-free/vegan filling: Use dairy-free cream cheese alternatives and coconut cream or almond milk yogurt in place of sour cream and heavy cream; use flax or aquafaba as an egg substitute if needed.
- Honeycomb: The candy itself uses sugar and syrup and can be kept; check packaging if you need a vegan maple syrup alternative.
How should I store leftovers?
Keep refrigerated in an airtight container or wrapped loaf-style for up to 4–5 days. For longer storage, freeze slices or the whole cake as described above.
How can I decorate or customize the cake for a party?
Suggestions to elevate presentation:
- Drizzle extra honey glaze in a decorative pattern on top.
- Sprinkle more broken honeycomb shards around the edge or place shards upright for a dramatic look.
- Add edible flowers, citrus zest, or a dusting of cocoa powder for contrast.
What if the cheesecake cracks or the center is too wobbly?
Common fixes:
- Cracks: Bake in a water bath to reduce temperature fluctuations, avoid overmixing, and allow gradual cooling.
- Too wobbly center: Ensure the cake is fully baked but not overdone; give it extra time in the oven with the door closed, then chill thoroughly. If needed, you can shave off the top slightly and re-glaze for a smooth look.