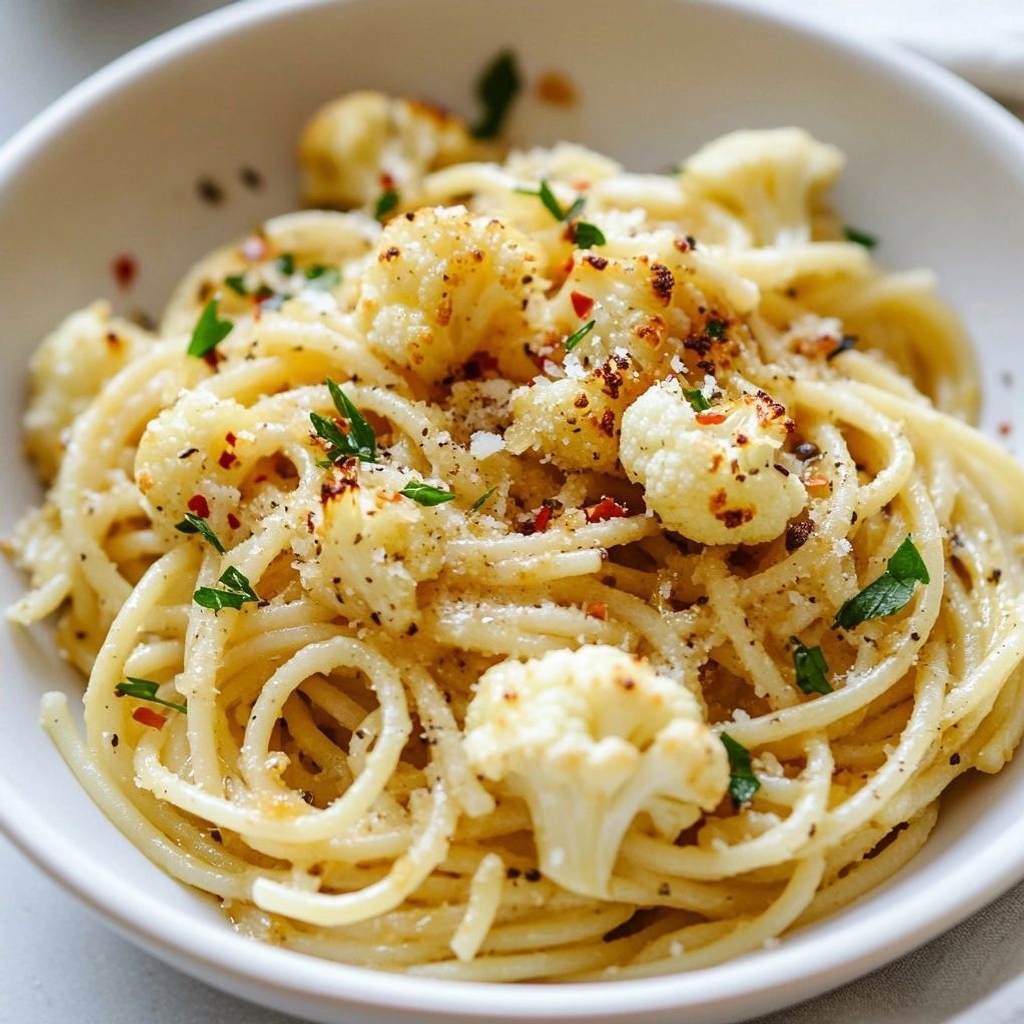
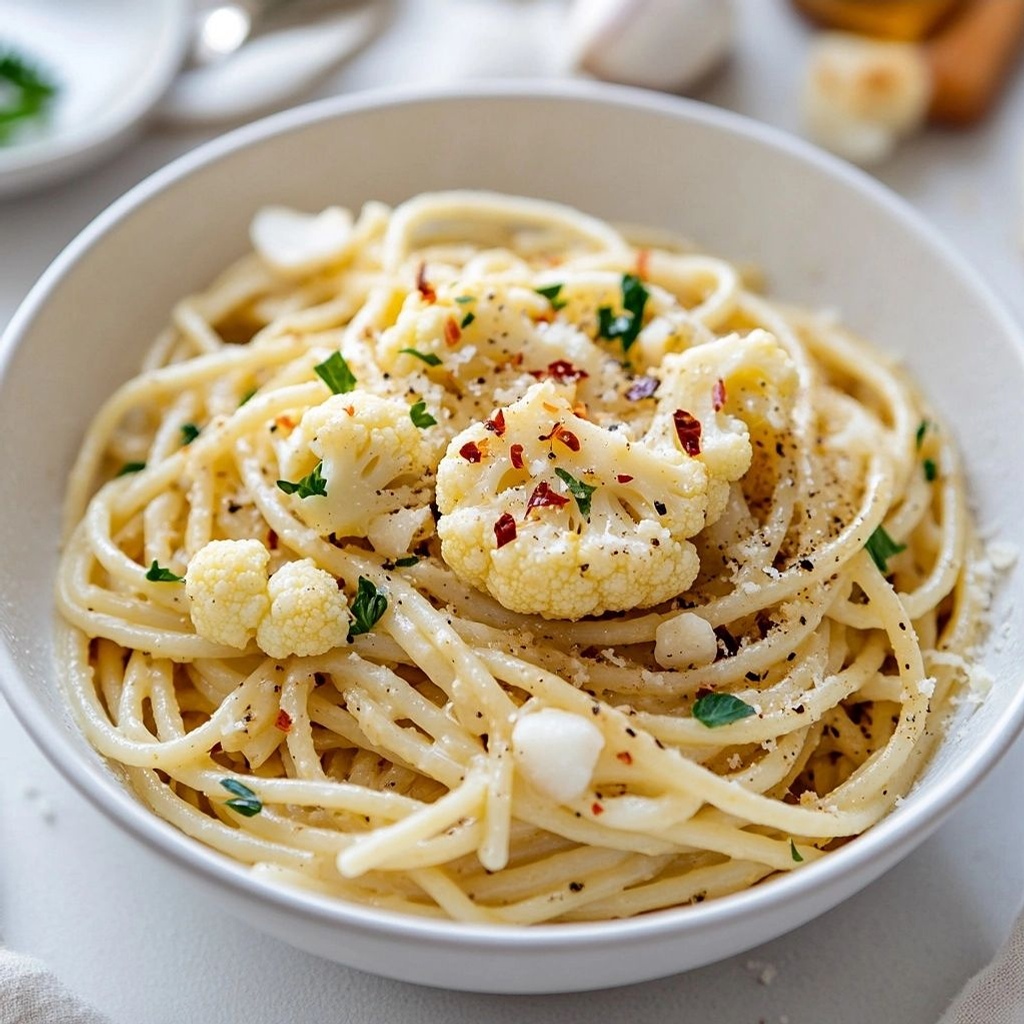
")
Introduction / Hook
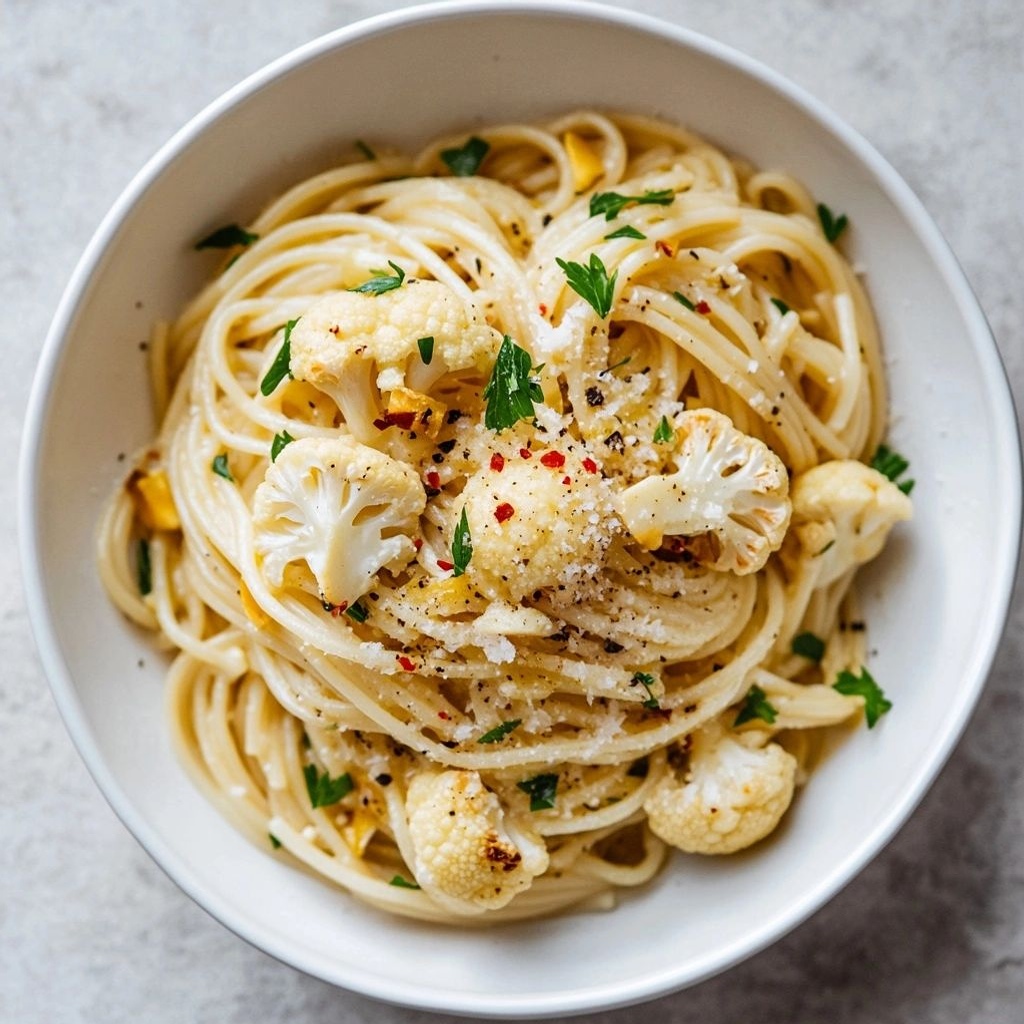
Imagine a plate that is both comforting and bright, simple enough for a busy weeknight but refined enough to make dinner feel like a small celebration. Aglio e Olio Pasta with Cauliflower takes the beloved Italian pantry staple—garlic, olive oil, and chili—into a lighter, vegetable-forward territory that’s as satisfying as it is mindful. The aroma alone is enough to slow your evening into a pleasant pause: the sizzle of garlic kissing hot oil, the wall of steam releasing a whisper of chili heat, and the faint sweetness of roasted cauliflower balancing the intensity with quiet confidence. This dish proves that you don’t always need a long list of ingredients to create something memorable. With a nudge from the cruciferous bite of cauliflower, the classic spaghetti aglio e olio becomes a modern, vegetable-forward dinner idea that fits into any schedule, any season, and any appetite for something a little special without demanding a lot of time.
The Story Behind the Dish
Cauliflower has traveled far from its humble roots as a winter staple to become a versatile canvas for creative cooking across many cuisines. In recent years, chefs and home cooks alike have rediscovered cauliflower as a chameleon that soaks up flavor and brings texture to a dish without weighing it down. Aglio e olio, on the other hand, is a masterclass in simplicity—a few ingredients, prepared with care, yielding something extraordinary. By pairing a classic oil-and-garlic pasta with roasted cauliflower florets, you’re paying homage to two culinary traditions at once: the Italian pantry’s confidence in olive oil and garlic, and the contemporary kitchen’s love for vegetable-forward mains that satisfy the heart just as much as the stomach. This version bridges generations of cooking—from the pantry staples of grandmothers to the modern, health-conscious dinner routine—creating a dish that feels both familiar and refreshingly new. Historically, both garlic and olive oil have been celebrated across Mediterranean kitchens for their depth, resilience, and ability to elevate humble ingredients. When you add roasted cauliflower, you invite a subtle caramelization and a nutty note that blooms as it mingles with the olive oil’s fruitiness, the chili’s spark, and a touch of lemon or herb to brighten the plate. It’s a small revelation—an everyday weeknight turned into a gastronomic moment, all from a few simple steps and ingredients you likely already have on hand.
Why You’ll Love This Recipe
- One-pan convenience, two-pan versatility: The cauliflower can be roasted in advance while you cook the garlic oil, or you can crisp it right in the same pan for a streamlined, weeknight-friendly workflow.
- Vegetable-forward comfort: It’s a satisfying, veggie-packed alternative to traditional pasta dishes, offering texture and depth without heavy sauces.
- Light yet deeply flavorful: Olive oil, garlic, and a whisper of chili deliver bold flavor while keeping the dish bright and fresh.
- Easy customization: Easily adaptable to vegan, dairy-free, gluten-free, or low-carb preferences with simple swaps and substitutions.
- Weeknight-friendly and budget-smart: Uses pantry staples and inexpensive produce, yet feels indulgent enough to share with friends or family.
- Texture contrast: The crisp-edged cauliflower adds a delightful bite to contrast the silky sauce and soft pasta (or faux pasta) textures.
Flavor Profile & Texture
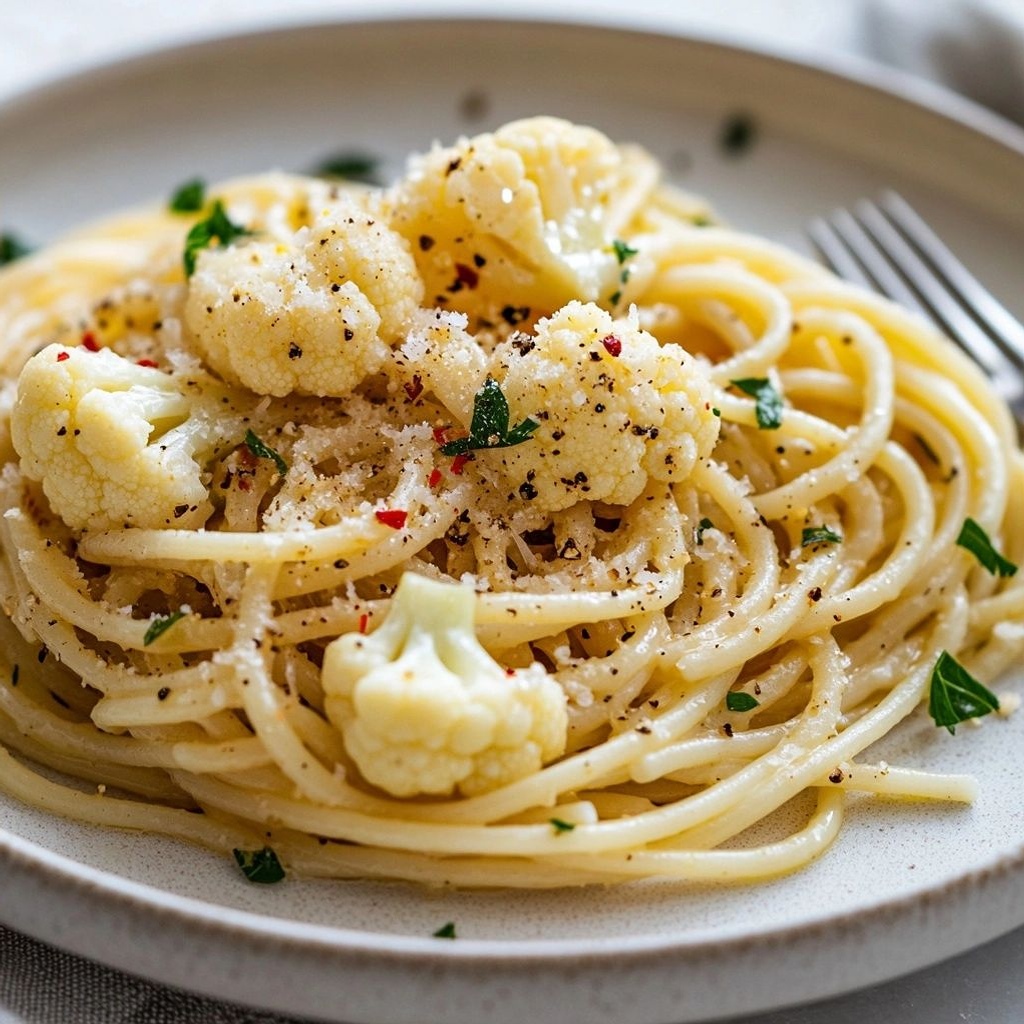
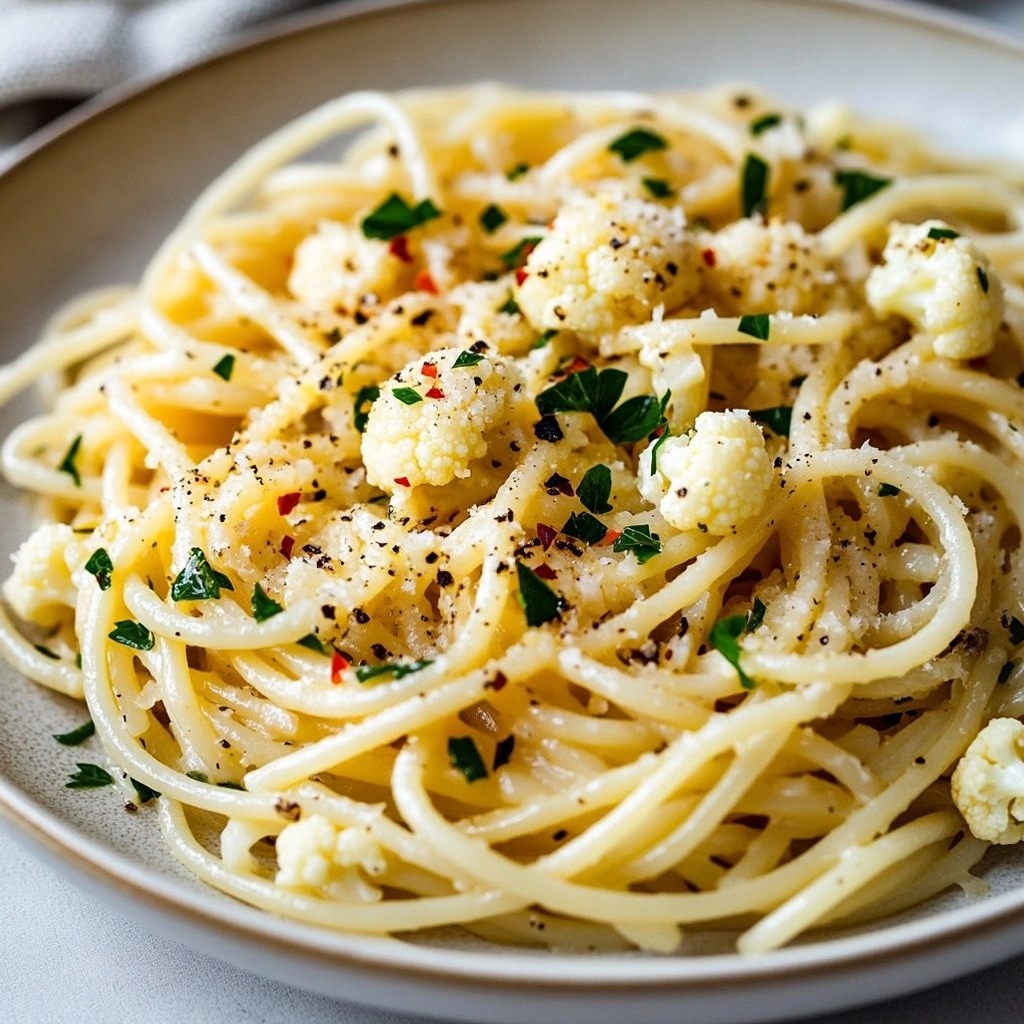
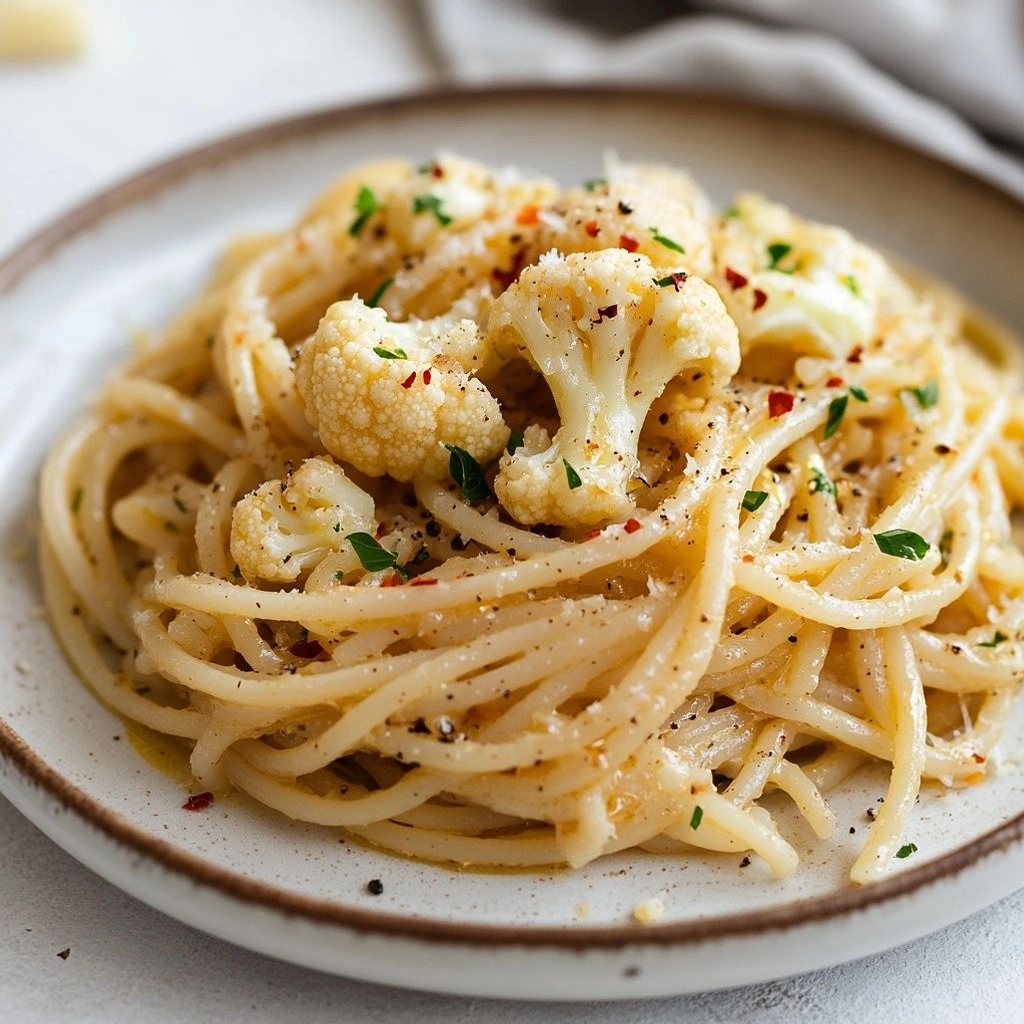
At its core, this dish is a delicate dance between a glossy, fragrant olive oil sauce and the crisp, caramelized cauliflower. The garlic—thinly sliced or minced—sizzles in the olive oil until it releases a sweet, toasty aroma that fills the kitchen and invites lingering at the table. A touch of red pepper flakes or cracked black pepper introduces a gentle, warming heat that lingers on the palate, rather than overpowers it. The cauliflower brings a roasted, nutty sweetness that perfectly counters the oil’s fruitiness and the garlic’s savoriness. The overall flavor is bright and savory, with a hint of citrus or herb lift if you choose to add lemon zest or fresh parsley. Texturally, you’ll experience a pleasing contrast: the soft, silky coating of the sauce on whatever you serve it with, punctuated by the satisfying bite of cauliflower pieces and the slight chew of the pasta—or, if you opt for a low-carb alternative, the al dente chew of zucchini ribbons or shirataki-style noodles. The result is a dish that tastes rich and comforting, yet feels light enough to enjoy without heaviness. It’s the perfect example of how a few well-chosen ingredients, treated with attention, can yield a complex, deeply satisfying flavor profile.
Occasions & Pairings
This Aglio e Olio Pasta with Cauliflower shines in many settings. It makes a fantastic weeknight dinner when you want something comforting without spending hours in the kitchen. It also works beautifully for casual gatherings, where a simple yet impressive dish can anchor a menu. For special occasions, it’s a refined option that doesn’t scream “fuss,” but delivers a dinner-party-worthy impression when plated with care.
Pairings to Consider
- Proteins: Grilled chicken, seared shrimp, or crispy artichoke crostini for a vegetarian option. The lightness of the dish means you can add a small protein without crowding flavors.
- Vegetables & Sides: A simple green salad with lemon vinaigrette, blistered cherry tomatoes, or sautéed spinach provide color and balance.
- Drinks: A crisp white wine such as Pinot Grigio or Sauvignon Blanc; or a sparkling water with a squeeze of lemon for a refreshing non-alcoholic pairing.
- Desserts: A light citrusy dessert, like lemon sorbet or a yogurt-based panna cotta, to finish with brightness.
Tips, Variations & Substitutions
Here are practical ideas to tailor this dish to your tastes, dietary needs, or what’s in your pantry today:
- Make-ahead and meal prep: Roast the cauliflower florets ahead of time and reheat gently in warm olive oil with a touch of garlic once you’re ready to serve.
- Cheat the crunch: Add toasted breadcrumbs mixed with a little lemon zest for a crisp topping that contrasts with the soft sauce.
- Vegan and dairy-free: This dish is naturally vegan if you use a plant-based oil and omit any cheese toppings. Add a splash of nutritional yeast for a cheese-like savoriness if desired.
- Gluten-free: Use gluten-free pasta or opt for zucchini ribbons or hearts of palm noodles for a lighter version that still holds onto the olive oil-garlic coating beautifully.
- Herbaceous lift: Fresh parsley, basil, or chives add a bright green note. A pinch of chopped thyme or oregano can bring a Mediterranean nuance.
- Acidity accents: A squeeze of lemon juice or a splash of aged balsamic vinegar can brighten the dish and balance the oil sweetness.
- Texture tweaks: If you love more bite, lightly roast the cauliflower longer to achieve a deeper caramelization. For a softer version, slightly steam the florets before tossing with the sauce.
- Heat level: Adjust the chili to your tolerance; smoked paprika or a pinch of red pepper flakes can offer a different flavor without much heat.
Storage & Make-Ahead Ideas
Leftovers can be a gift, not a burden, if stored and reheated properly. The olive oil-based sauce can sometimes thicken as it rests, so keep a small splash of hot water or vegetable stock on hand to loosen the sauce when reheating. Store any leftovers in an airtight container in the refrigerator for up to 3 days. If you anticipate making this ahead for a weeknight, consider roasting extra cauliflower or pre-dicing it so everything is ready to toss into the pan with garlic oil in a matter of minutes. For freezing, the cauliflower and oil-based sauce can separate slightly upon thawing, so it’s best enjoyed fresh, but you can rewarm gently on the stove, stirring in a little water or broth to restore emulsification. If you do freeze, freeze in individual portions to reduce reheating time and minimize texture loss. Reheat over low to medium heat, stirring frequently until the sauce emulsifies again and the cauliflower regains some of its initial bite. If you crave a more robust sauce after reheating, whisk in a little extra olive oil and a pinch of salt to restore the sheen and depth.
Fun Facts & Trivia (Optional)
Did you know that garlic and olive oil have long been celebrated as the culinary dynamic duo of the Mediterranean? Garlic, with its pungent aroma, has historically been used not only for flavor but for its believed health benefits and medicinal properties. Olive oil, especially extra virgin, is celebrated for its fruity aroma, peppery finish, and the way it binds flavors, creating a glossy, cohesive sauce. The combination is timeless, capable of transforming simple ingredients into a memorable dish—the culinary magic of a well-made aglio e olio. cauliflower’s rise in modern kitchens as a versatile stand-in for more starchy ingredients is part of a broader trend toward vegetable-forward eating that doesn’t sacrifice satisfaction. By pairing these elements, you’re tapping into a culinary lineage that honors tradition while embracing contemporary health-conscious cooking. Fun fact: many traditional aglio e olio recipes rely on a handful of simple pantry staples to achieve depth, and adding roasted cauliflower is a delightful modern twist that preserves those essential flavors while introducing a nuanced texture and sweetness that can surprise and delight even seasoned palates.
Conclusion: A Comforting Classic Reimagined
This Aglio e Olio Pasta with Cauliflower is more than a recipe; it’s a conversation between tradition and modern cooking values. It speaks to the time-crunched cook who still wants to nourish with flavor, the vegetable-forward eater who seeks satisfying meals without heavy sauces, and the curious cook looking for a small culinary experiment that yields big results. With its mingling of roasted cauliflower’s nutty sweetness, garlic’s comforting aroma, olive oil’s lush silk, and a hint of heat, this dish invites you to slow down for a moment, plate with care, and savor every forkful. It’s the kind of dinner that earns compliments without demanding them, the kind of recipe you’ll return to on busy weeknights or when you want to treat yourself to something both simple and extraordinary. Whether you’re cooking for one or feeding a family, this dish proves that a little creativity and a handful of pantry staples can create harmony on a plate—a bright, satisfying, and deeply delicious experience that leaves you feeling nourished, energized, and inspired to cook again soon.
Ingredients
-
Pasta (spaghetti or linguine) – 12 oz (340 g)
→ The starch from the pasta is what carries and thickens the sauce, giving a silky, cohesive coating to every strand. Cook the pasta in well-salted water until just al dente; this provides a chewy bite that remains firm after tossing with the quick oil-based sauce. Reserve about 1/2 cup of cooking water before draining to loosen the sauce if needed. -
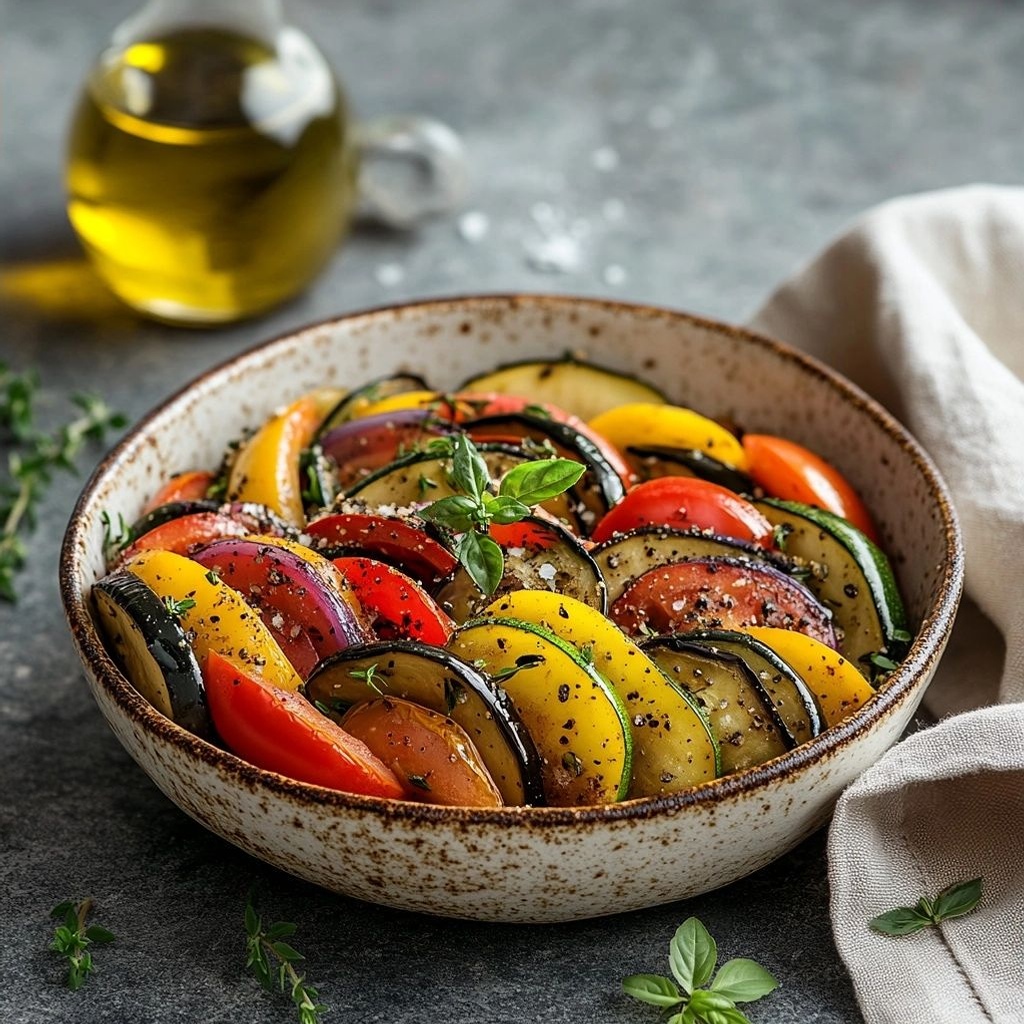
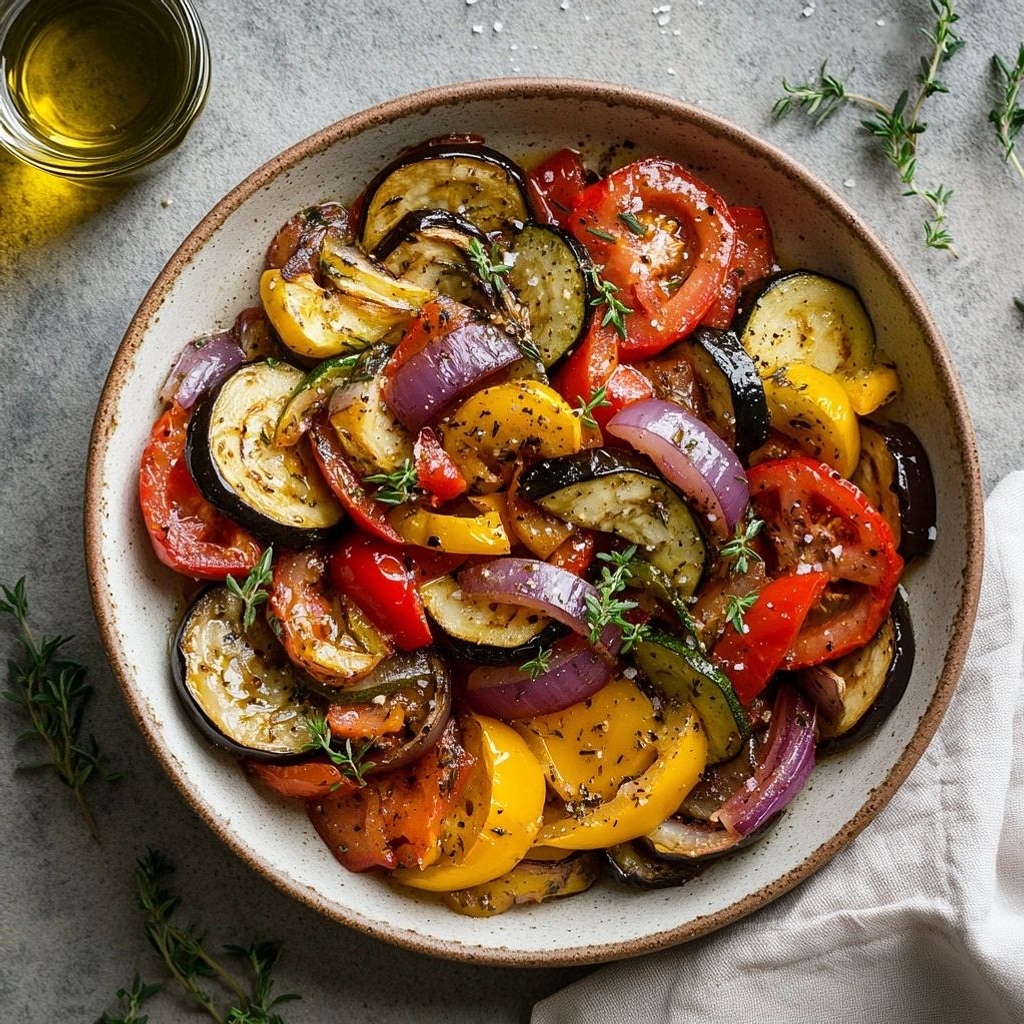
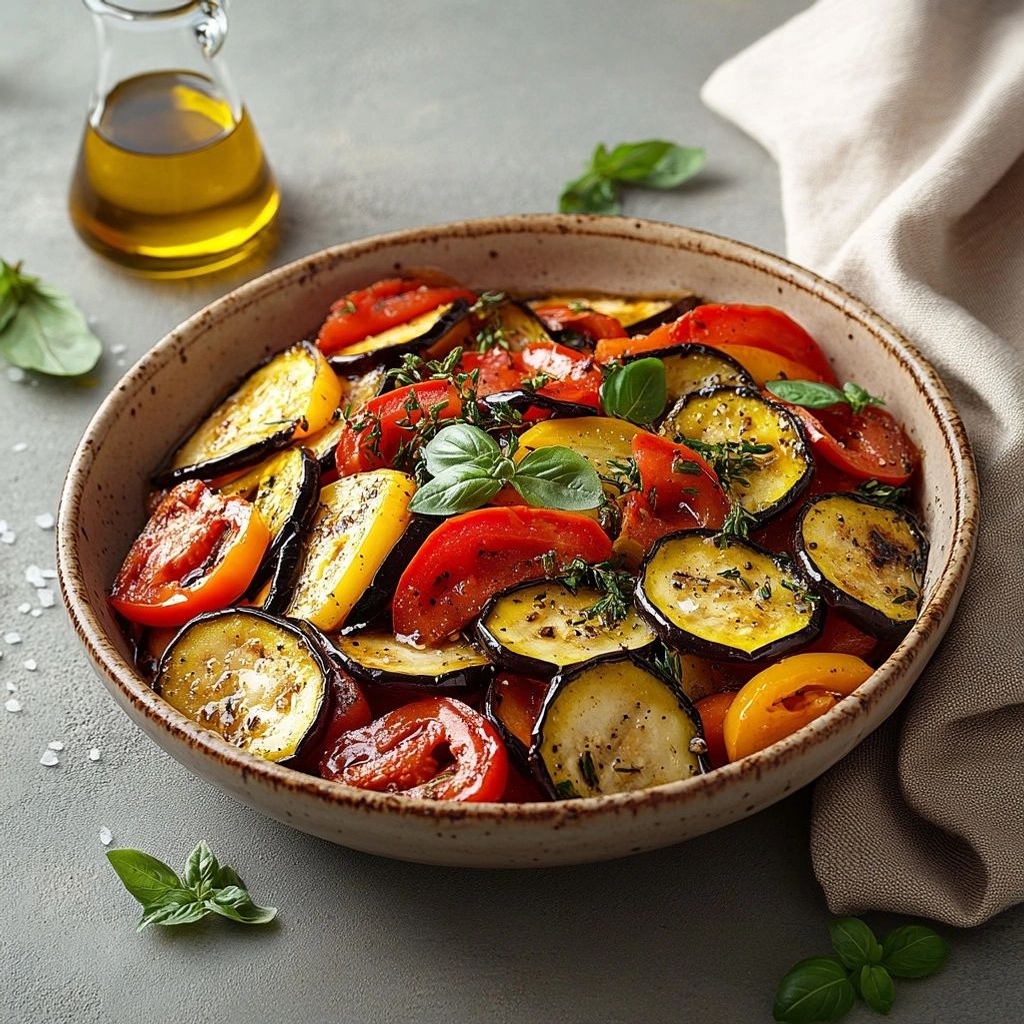
Cauliflower florets – about 1 medium head (3–4 cups florets)
→ Cauliflower adds a light, wholesome body and a subtle nutty flavor that pairs surprisingly well with garlic and olive oil. Cut into bite-sized florets; you can roast them briefly in the pan for extra caramelization or steam/blanch until tender but still crisp. If desired, pulse a few florets in a processor to rice-size bits to mimic a more cohesive “pasta with cauliflower” texture. -
Garlic cloves – 4 to 6 cloves, thinly sliced or minced
→ Garlic is the aromatic backbone of this dish, delivering bright and savory notes without heaviness. Slice thinly or mince finely so it distributes evenly and releases flavor quickly in the oil. Be mindful of heat—cook over low to medium heat to prevent browning or bitterness. -
Extra-virgin olive oil – 1/3 to 1/2 cup
→ The olive oil creates the emulsified coating that carries the garlic and cauliflower, forming the sauce base that clings to the pasta. Use a good-quality extra-virgin oil for depth of flavor. Heat gently to infuse the garlic without smoking; you want silky smoothness, not burnt notes. -
Red pepper flakes – 1/2 to 1 teaspoon (adjust to heat preference)
→ Adds a gentle heat that brightens the dish and balances the richness of the oil. Start with 1/2 tsp and increase if desired. Sprinkle in when the oil is warm so the flakes bloom and release their aroma into the fat. -
Salt – to taste, plus additional for pasta water
→ Salt seasons both the pasta and the oil-based sauce, ensuring the flavors are balanced. Salt the pasta water generously (it’s your main chance to season the pasta itself). Finish with a light final sprinkle to taste before serving. -
Freshly ground black pepper – to taste
→ Adds a sharp, peppery counterpoint to the garlic’s sweetness and cauliflower’s mildness. Grind just before serving for maximum aroma and bite. -
Lemon juice and/or zest – 1 tablespoon lemon juice and/or 1 teaspoon lemon zest (optional)
→ A touch of citrus brightens the dish, cutting through the richness of the oil and giving a fresh finish. Add zest early for aroma and squeeze in juice just before tossing with the pasta to preserve acidity and brightness. -
Parmigiano-Reggiano or Pecorino cheese – 1/2 cup finely grated (optional)
→ Aged cheese adds a savory umami depth and helps create a slightly creamy coating when mixed with reserved pasta water. Grate fresh over the hot pasta just before serving for best flavor; omit if dairy-free is preferred. -
Fresh parsley – 2 tablespoons chopped (optional)
→ Parsley provides a clean herbal note and a touch of color. Add after cooking for a fresh, vibrant finish and a mild peppery contrast to the oil-rich sauce. Chop finely to distribute evenly. -
Breadcrumbs (optional) – 2 tablespoons toasted (optional)
→ Toasted breadcrumbs add a pleasant crunch that contrasts with the tender cauliflower and pasta. Toast in a skillet with a splash of oil until golden, then sprinkle on top just before serving.
Instructions
- Bring a large pot of salted water to a rolling boil and add the pasta, cooking it until just al dente according to package instructions; reserve about 1/2 cup of the starchy pasta water before draining to loosen the sauce later.
→ Salting the water seasons the pasta from the inside out, and saving pasta water provides natural starch to emulsify the oil later for a silky sauce. - Cut the cauliflower into bite-sized florets and pat them dry; set aside while you prepare the sauce to ensure even browning or steaming without excess moisture.
→ Dry florets prevent soggy pockets and help achieve better flavor development whether you choose to sear them briefly in the pan or steam until just tender. - Warm a large skillet over medium-low heat and add the olive oil, allowing it to shimmer gently without smoking; this base will carry the garlic and infuse the oil with flavor.
→ Heating oil slowly preserves the delicate aroma of garlic and prevents bitter notes from burnt fat. - Add the sliced or minced garlic to the warm oil and cook slowly, stirring often, until the edges just begin to turn translucent and fragrant (about 1–2 minutes); do not brown.
→ Gentle cooking releases garlic flavor evenly and keeps the sauce bright, avoiding a harsh, burnt taste. - Sprinkle in the red pepper flakes and stir to bloom the spice in the hot oil for about 30 seconds; adjust the amount to your heat tolerance.
→ Blooming the flakes releases capsaicin and aromatic oils, evenly distributing heat throughout the dish without overcooking the garlic. - Carefully add the cauliflower florets to the pan and toss to coat with the garlicky oil; cook until the florets are tender-crisp and lightly caramelized, about 5–7 minutes.
→ Searing the cauliflower builds depth of flavor and a pleasant texture contrast with the pasta, while staying succulent inside. - Optionally drizzle in a splash of water or stock if the pan becomes too dry; continue cooking until the cauliflower is tender but not mushy and the flavors meld.
→ A small amount of liquid helps deglaze the pan and lifts the browned bits, intensifying the sauce without thinning it too much. - With the pasta cooked and drained, return it to the pot or a large mixing bowl and add the cauliflower and garlicky oil; toss gently to distribute, adding reserved pasta water a splash at a time to reach a silky, cohesive coating.
→ Taming the sauce with starch-rich water helps emulsify the olive oil and evenly coat each strand of pasta for a balanced finish. - Stir in lemon juice and/or zest; fold in quickly to prevent the citrus from cooking or losing its bright aroma, and adjust seasoning with salt to taste.
→ Citrus brightness cuts richness, refreshes the dish, and the zest oils release immediately if added early while juice should be added just before tossing to maximize aroma. - If using cheese, scatter the Parmigiano-Reggiano or Pecorino over the hot pasta and toss vigorously with the reserved pasta water to create a glossy, slightly creamy emulsion; taste and adjust salt if needed.
→ Freshly grated cheese adds umami and helps thicken the sauce when combined with a small amount of starchy water, finishing the dish with a silky mouthfeel. - Finish with chopped fresh parsley for a bright, herbal contrast and a final light crack of black pepper; toss to distribute evenly.
→ Parsley adds color and a clean note that elevates the garlic-oil base, while pepper provides a sharp counterpoint to the richness. - Optionally sprinkle toasted breadcrumbs over the finished dish just before serving for a tactile crunch, tossing lightly to keep the texture from overpowering the pasta.
→ Toasted crumbs introduce a pleasant resonance between soft cauliflower and al dente pasta, adding texture and aroma without making the dish heavy.
Notes
“This Aglio e Olio Pasta with Cauliflower is a quick, comforting dinner built on a punchy garlic-olive oil base with a light, nutty cauliflower bite. You can customize it by adding red pepper flakes for more heat, a splash of lemon juice or zest for brightness, or a dusting of Parmigiano-Reggiano or Pecorino for savory depth; finish with fresh parsley for color and freshness. For extra texture, sprinkle toasted breadcrumbs just before serving. If you prefer a lighter version, reduce the olive oil slightly and rely on the pasta starch to help emulsify the sauce. Reserve a little pasta water to loosen the sauce if needed, and always salt the pasta water generously to season the strands from the inside out. Dairy-free option: omit cheese and use nutritional yeast or a dairy-free parmesan substitute. For best aroma and flavor, cook the garlic gently in the oil until fragrant but not browned, then toss with cauliflower and pasta off the heat to prevent bitterness. Pair with a simple green salad or a glass of white wine to complement the bright, oil-based sauce.”
Tips
Tips for Perfect Aglio e Olio with Cauliflower
- Use the pasta water strategically: reserve 1/2 cup (or more) of the starchy water. It helps loosen the sauce and create a silky emulsion when tossing with the pasta and cauliflower.
- Managing the garlic: cook garlic slowly in the olive oil over low to medium heat until just fragrant. If it starts to brown, remove the pan from the heat briefly to prevent bitterness, then return to finish the dish.
- Cauliflower texture options: for more chew and heft, sauté the florets in the oil to lightly caramelize. For a lighter bite, steam or blanch until tender-crisp and then toss with the garlic oil.
- Flavor boost ideas: a squeeze of lemon juice at the end enhances brightness and helps cut the richness. If using zest, add it early to bloom aroma.
- Cheese timing: add grated Parmigiano-Reggiano or Pecorino just before tossing with pasta or right after plating. If dairy-free, skip cheese or use a nutritional yeast substitute for umami.
- Chili customization: for a milder version, use crushed red pepper flakes sparingly or omit entirely. For extra heat, bloom a pinch of chili in the oil before adding the garlic.
- Texture contrast: toasted breadcrumbs add a welcome crunch. Toast in a dry skillet with a tiny oil until golden; sprinkle on top while the dish is hot.
- Herb finishing: fresh parsley brightens the dish and adds color. If you’re serving later, keep herbs separate and mix in just before eating to preserve color and aroma.
- Salt balance: taste and adjust salt after combining the pasta with the sauce. The pasta water is salty; start with a modest amount and adjust as needed.
- Make ahead option: briefly blanch the cauliflower and store separate from the oil-garlic base. Reheat gently in the pan with a little oil, then toss with freshly cooked pasta.
FAQ
What is Aglio e Olio Pasta with Cauliflower?
Aglio e Olio is a classic Italian dish made with garlic (aglio) and olive oil (olio) tossed with pasta. This version adds roasted or sautéed cauliflower for a hearty veggie boost, creating a simple, flavorful weeknight dinner.
What ingredients do I need?
Core: spaghetti or your favorite pasta, cauliflower florets, garlic, extra-virgin olive oil, red pepper flakes, salt, black pepper. Optional: lemon zest, parsley, grated parmesan or vegan parmesan, and a small amount of pasta water to emulsify the sauce.
Is this dish vegan or vegetarian?
It can be fully vegan if you use plant-based parmesan or omit cheese. Traditional versions are vegetarian unless you add cheese. Check any cheese choices to keep it vegan if needed.
How do I prepare the cauliflower?
Chop cauliflower into small florets. You can steam briefly, then toss in the pan with garlic, or roast at 425°F (220°C) for 15–20 minutes until golden for extra flavor and texture.
Can I use frozen cauliflower?
Yes, but thaw and pat dry to remove excess moisture. Sauté longer or roast a bit longer to get some browning.
How do I cook the pasta?
Boil in salted water according to package instructions until al dente. Reserve 1/2 cup of pasta water before draining to help emulsify the sauce.
How do I make the garlic sauce?
In a skillet, heat olive oil over medium-low. Add thinly sliced garlic and a pinch of red pepper flakes. Sauté gently until fragrant and just lightly golden—do not burn the garlic. Remove from heat and toss with pasta and cauliflower, using reserved pasta water to create a glossy sauce.
What are good variations or add-ins?
Try lemon zest or juice for brightness, chopped parsley for color, toasted breadcrumbs for crunch, or grated parmesan/vegan cheese. You can also add chopped olives, capers, or a handful of sautéed spinach or kale.
How do I store leftovers?
Store cooled leftovers in an airtight container in the refrigerator for up to 3–4 days. Reheat in a skillet with a splash of olive oil or water, stirring until warmed through. The cauliflower may soften further, so reheat gently.
Is this dish spicy?
Traditional recipe uses a pinch of red pepper flakes. You can adjust the amount to your taste or omit them for a milder version.