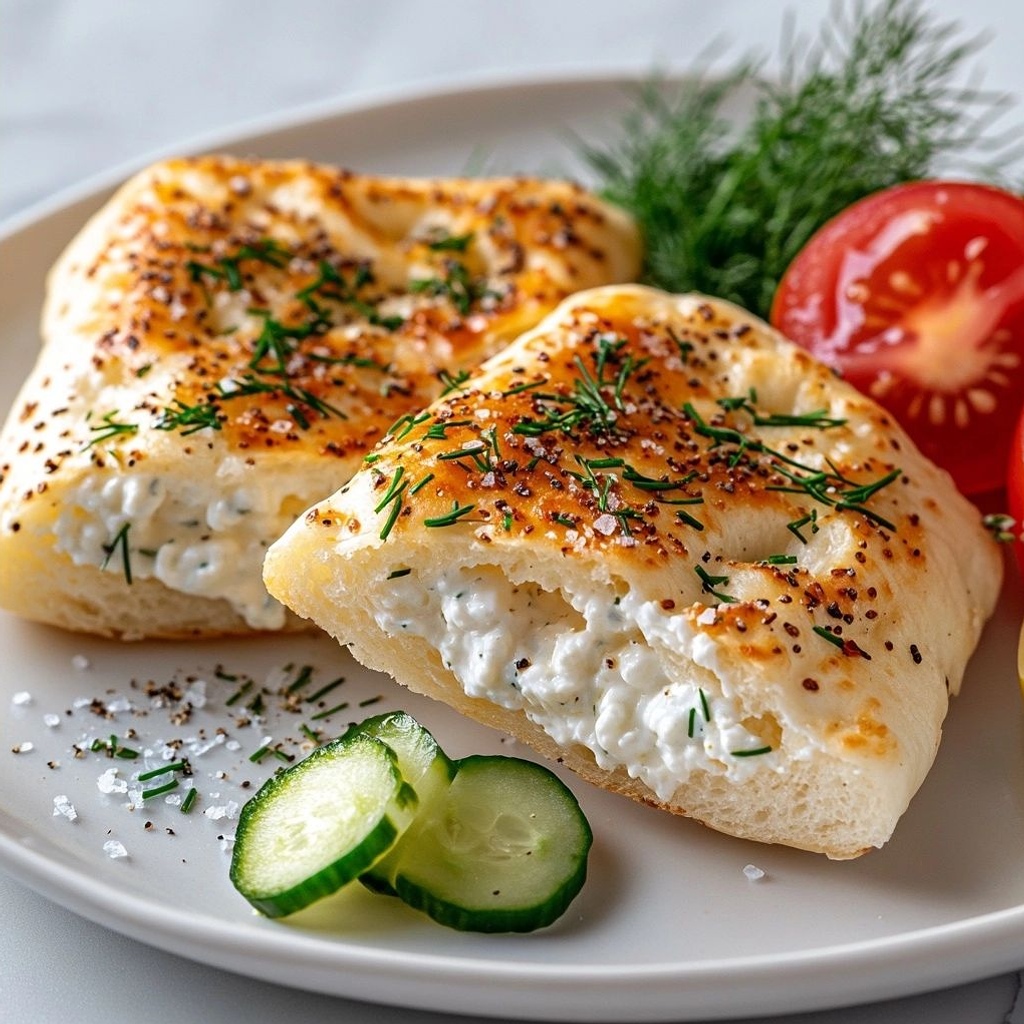
Introduction / Hook
Imagine waking up to the sun-dappled crust of toast, the comforting tang of ripe avocado, and a whisper of creaminess that turns a simple breakfast into a small, luxurious ritual. Creamy Breakfast Guacamole Toast is not just a dish; it’s a morning hug you can hold in your hands. The moment you slice into thick sourdough or hearty whole-grain bread, you’ll be greeted by a lush, velvety avocado base elevated with a smooth, yogurt-like creaminess that feels almost indulgent yet remains bright and fresh. Aromas of lime, cilantro, and a subtle kick of chili wake the senses, while a touch of saltiness from feta or cotija (if you choose) or a sprinkle of sesame seeds adds curiosity with every bite. This toast is the bridge between breakfast and brunch, between healthy and comforting, between routine and a tiny escape. It’s the kind of recipe that makes you pause, inhale, and say, “Yes, I’m treating myself—and it’s worth it.”
The Story Behind the Dish
Guacamole is a beloved symbol of vibrant Mexican flavors, traditionally celebrated with tortilla chips, fresh salsa, and a rush of lime. This recipe reimagines guacamole with a breakfast-forward twist, embracing the same green, creamy soul while making it the star topping for toast. The idea sprouted during a weekend kitchen experiment when someone craved the brightness of guac but desired a more indulgent morning texture—something that could stand up to toasted bread and still feel appropriate for the first meal of the day. The result was a creamy, spoonable guacamole that softens into a luxurious spread on warm toast, enriched with yogurt or cultured dairy to lend a cloud-like silkiness. Over time, friends added their own twists: a poached egg perched on top, a drizzle of hot honey for contrast, or a shower of crumbled cheese that echoes a breakfast skillet. The dish that began as a playful mash-up became a comforting ritual—one that travels well, scales with appetite, and carries a story of sunlit markets, coastal herbs, and the joy of turning simple ingredients into something memorable.
Why You’ll Love This Recipe
- Fast and flexible: Ready in 10–15 minutes, perfect for busy mornings or lazy weekends.
- Creamy, bright, and balanced: The avocado’s richness meets tangy lime and a whisper of yogurt creaminess—so satisfying without heaviness.
- Customizable: Swap in feta, cotija, or vegan cheese; add a poached egg, smoked salmon, or roasted veggies to tailor the dish.
- Healthy and nourishing: Avocado provides healthy fats, fiber, and potassium; the recipe can be made lighter with dairy-free substitutions.
- Textural delight: The contrast of creamy spread with crunchy toast, plus optional toppings, keeps every bite engaging.
- Brings brightness to any meal: A breakfast that feels celebratory yet approachable, ideal for brunch with friends or a special weekday treat.
Flavor Profile & Texture
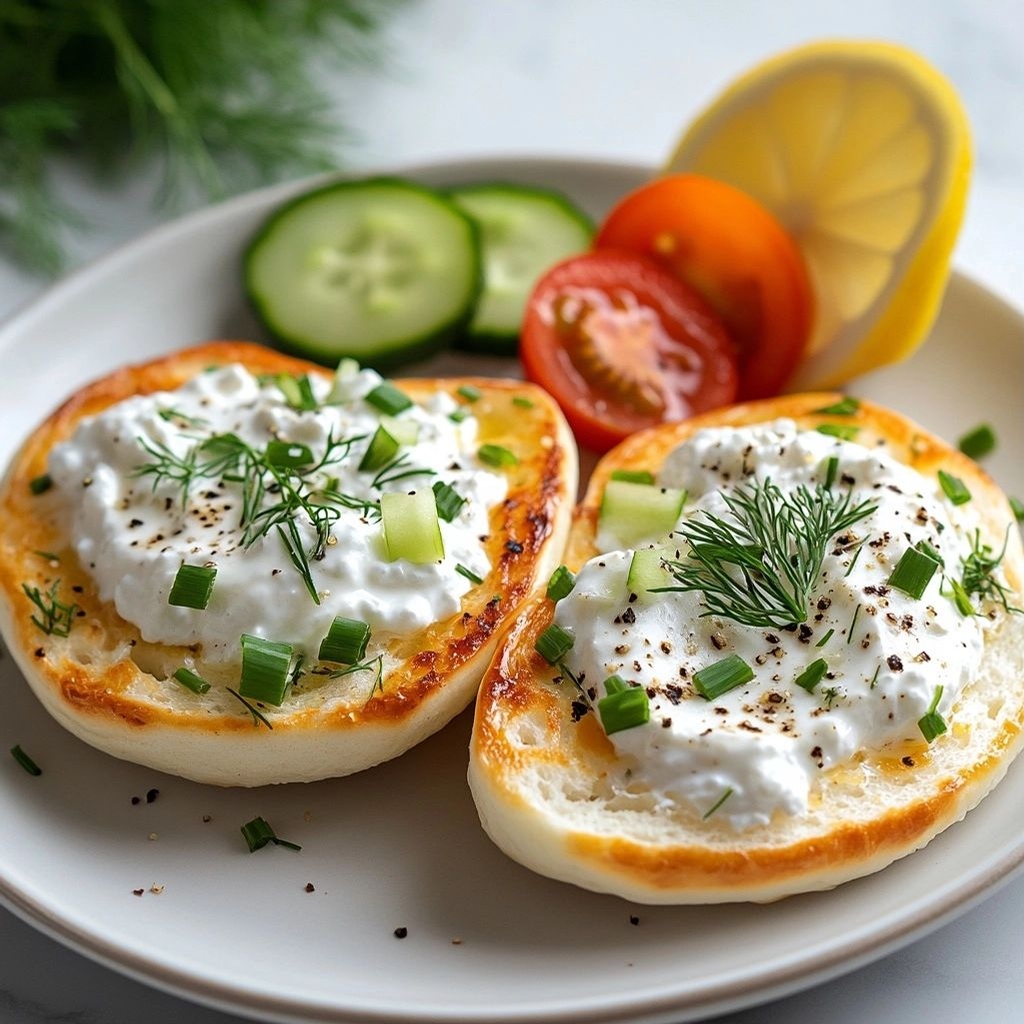
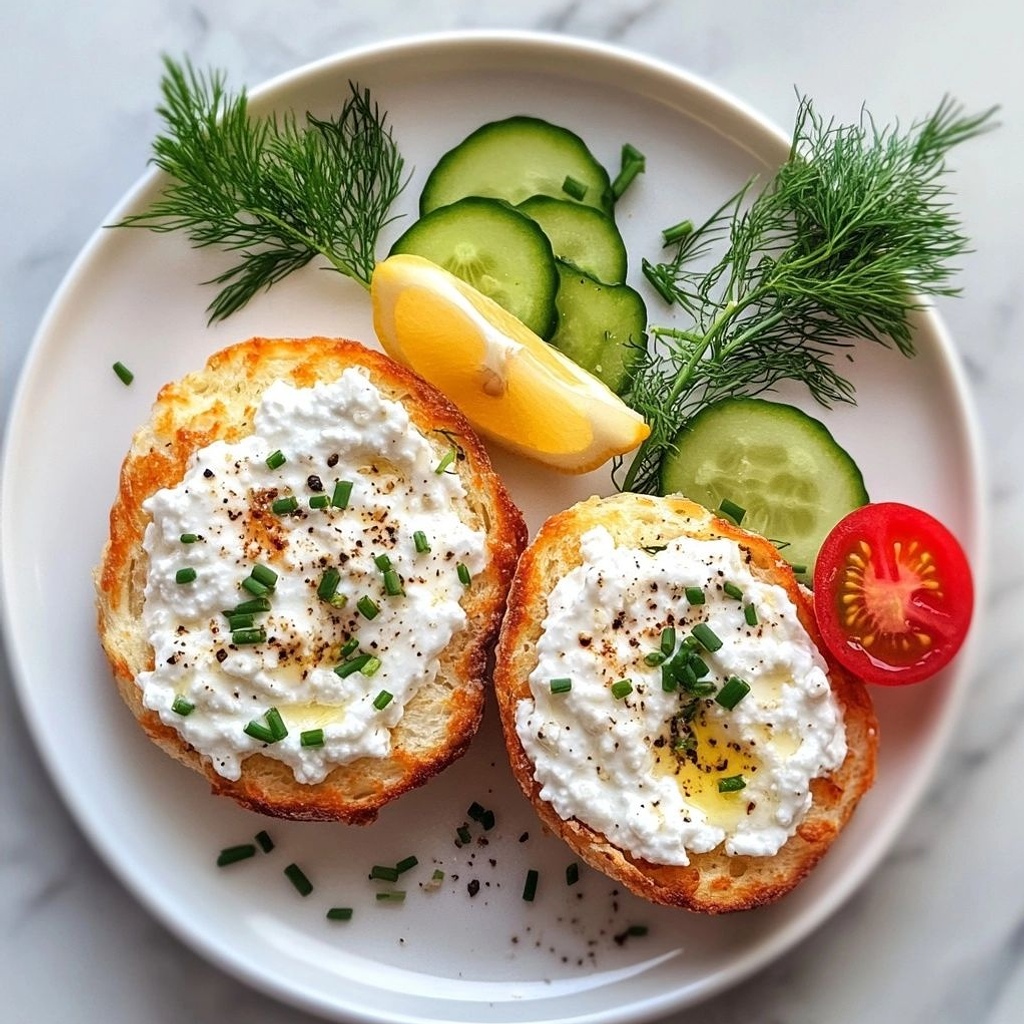
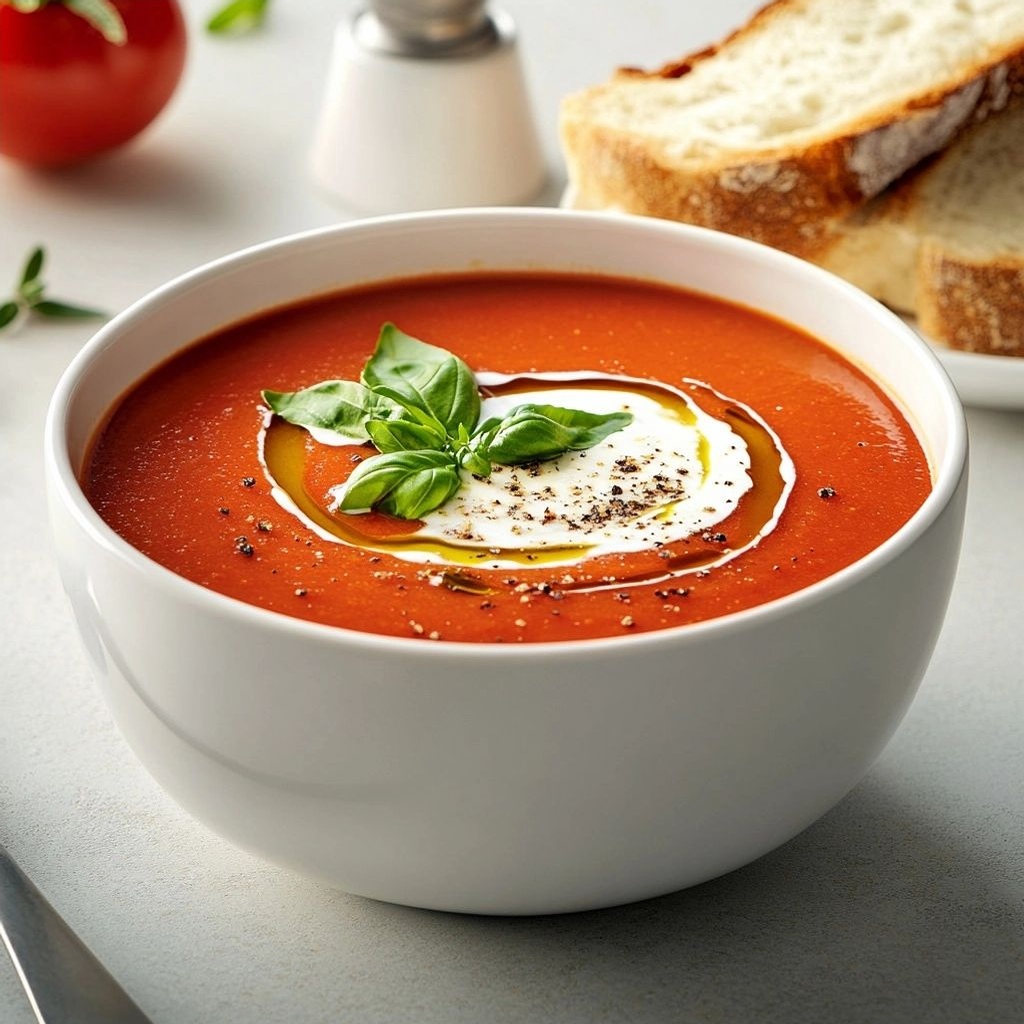
This Creamy Breakfast Guacamole Toast delivers a layered flavor experience that sings with freshness and comfort. At its core is the avocado—velvety, rich, and almost buttery in texture. It’s brightened by fresh lime juice that enlivens the palate without overpowering the subtle sweetness of the avocado itself. The yogurt or cream cheese introduces a silky, tangy undertone, creating a luxurious mouthfeel that makes the toast feel indulgent while staying light enough for morning eating. Finely chopped cilantro or chives contributes a clean, herbaceous note, while a hint of minced shallot or onion can provide a gentle bite that echoes traditional guacamole’s vibrant profile. A whisper of jalapeño, serrano, or crushed red pepper flakes introduces warmth and a touch of heat, balancing the creaminess with a ring of brightness.
Texture-wise, you’ll experience a soft, scoopable spread that smooths over the toasted surface, followed by the satisfying bite of the toast itself. If you choose to add toppings—think a runny-yolked egg, grilled corn, cherry tomatoes, or a sprinkle of sesame seeds—you introduce delightful variations in texture: creamy, oozy, crisp, and juicy in one bite. The optional cheese establishes a salt-laced contrast that resonates with guacamole’s natural saltiness, while a drizzle of extra virgin olive oil adds a glossy finish and a luscious mouthfeel. The overall balance is creamy and lush, tangy but not sour, with a gentle savoriness that makes every mouthful feel both comforting and vibrant. This is a toast that tastes like sunshine with a hint of grocery-store-green leaves and a hint of Mediterranean warmth.
Occasions & Pairings
This recipe shines in several scenarios, making it a versatile addition to your cooking repertoire:
- Weekend brunch centerpiece: Serve with a side of fresh fruit, a green salad, or some buttery croissants for a complete spread.
- Weekday breakfasts: A simple, fulfilling option when time is tight—pair with a cup of coffee or a herbal tea and you’re ready to tackle the day.
- Brunch gatherings: A crowd-pleaser that scales well; set up a toppings bar to let guests customize their own guacamole toast creations.
- Light lunches: Turn the toast into a meal by adding extra protein like a poached egg, smoked salmon, or black beans and corn for a vegetarian protein boost.
- Picnics or potlucks: A portable, no-fuss dish that travels well in airtight containers and reheats or remains fresh for a short window.
Pairing ideas to elevate the experience:
- Drinks: A sparkling mineral water with a squeeze of lime, a light, citrusy white wine like Albariño, or a simple Bloody Mary for brunch vibes.
- Side dishes: A citrusy arugula salad, roasted grape tomatoes, or a quinoa tabbouleh provide textural variety and brightness.
- Desserts: A light fruit sorbet or yogurt-with-honey serves as a gentle post-meal finish that echoes the meal’s tangy notes.
Tips, Variations & Substitutions
Here are practical ideas to tailor this dish to your preferences, dietary needs, or what you have on hand:
- Vegan or dairy-free: Use mashed avocado with lime, cilantro, and a dairy-free yogurt (coconut or almond yogurt) or a touch of vegan cream cheese substitute for the creamy texture.
- Gluten-free: Use your favorite gluten-free bread and toast until deeply golden for that satisfying crunch.
- Spice level: For a milder version, omit the chili or use a pinch of milder jalapeño seeds; for more heat, add finely minced jalapeño or drizzle of hot sauce.
- Herbal variations: Swap cilantro for fresh parsley or mint for a different aromatic profile; add a few finely chopped scallions for bite.
- Protein boost: Top with a poached egg, a fried egg, or shredded grilled chicken to turn breakfast into a hearty, protein-forward meal.
- Cheese options: Crumbled feta, cotija, or queso fresco add a tangy saltiness; for a dairy-free version, sprinkle with toasted hemp seeds or nutritional yeast for a cheesy hint.
- Texture tweaks: If you prefer a chunkier texture, leave some avocado lumps intact; for a smoother spread, blend the avocado with lime and yogurt until very creamy.
- Regional twists: Fold in roasted corn kernels or charred poblano peppers for a smoky, summery vibe; add a dash of ground cumin and smoked paprika for a Mexican-inspired depth.
Storage & Make-Ahead Ideas
If you’re planning to prepare ahead, a few tricks help preserve flavor and texture. Avocado tends to oxidize quickly, turning brown, but you can counter this with some simple steps:
- Make the creamy guacamole base in advance and store it with a thin film of lime juice on the surface to slow browning. Cover tightly with plastic wrap or store in an airtight container in the fridge for up to 1 day.
- Add textures at the last moment: Toast the bread fresh, and add crunchy toppings like seeds or herbs just before serving to maintain crispness.
- Freeze the avocado mixture if you need to store longer, but know that texture may change slightly. Thaw in the fridge and whisk to restore creaminess before use.
- Assemble-ahead option: Prepare the base (guacamole-y concoction) and refrigerate; set out toasted bread and toppings for guests to assemble themselves—this is especially handy for brunches or gatherings.
Fun Facts & Trivia (Optional)
Did you know that avocados have a long culinary history that spans continents? From ancient Mesoamerican cultures to modern cafés, avocados have been celebrated for their creamy texture and nutritional benefits for thousands of years. The avocado is botanically a berry with a single large seed, and its buttery richness comes from a unique balance of monounsaturated fats and fiber. Lime, a zesty ally, not only brightens flavor but helps slow browning, preserving the avocado’s vibrant green hue. Cilantro’s herbaceous brightness is a marker of many Latin American and Southeast Asian dishes, adding a fresh lift that complements the avocado’s creaminess. When you top toast with this guacamole, you’re participating in a culinary tradition that honors simplicity, quality ingredients, and the joy of transforming a humble slice of bread into something memorable.
From Pantry to Plate: A Quick Narrative
In many kitchens, breakfast can feel rushed, a hurried routine that leaves little room for celebration. This Creamy Breakfast Guacamole Toast flips that script by transforming everyday staples into something you’ll eagerly anticipate. The bread provides warmth and structure, the avocado offers indulgent creaminess, and the tangy lime plus subtle herbs awaken the senses in a single bite. It’s a dish that encourages mindfulness: selecting ripe avocados, choosing a good loaf, and tasting as you go to balance acid, creaminess, and salt. The interplay between smooth and crisp textures mirrors the balance we seek in a balanced morning: nourishment with a touch of delight. It’s not just a meal; it’s a small, delicious celebration of morning potential.
Chef’s Notes & Personal Touches
While this recipe is quite forgiving, a few personal touches can amplify its charm. Consider crisping the bread a touch longer for extra crunch, or finishing with a light drizzle of high-quality olive oil to amplify the toast’s sheen. A soft-cooked egg atop the toast can add a luxurious, protein-rich layer, while a few crumbles of feta or cotija introduce a savory bite that plays beautifully with the lime and avocado. If you’re entertaining a crowd, setting out a toppings bar—poached eggs, chopped radishes, cherry tomatoes, corn kernels, black beans, queso fresco, and hot sauce—lets guests build their own breakfast guacamole toast masterpieces. The dish is as much an experience as it is a recipe: a canvas for creativity, a blueprint for comfort, and a reminder that breakfast can be both nourishing and joyful.
Closing Thoughts
Creamy Breakfast Guacamole Toast is more than a stylish breakfast idea; it’s a versatile, modern-ascent to a more adventurous morning routine. It invites you to slow down long enough to savor a well-balanced combination of flavors and textures, to enjoy the satisfaction of a meal that feels special without demanding hours in the kitchen. Whether you’re feeding a family on a busy weekday, hosting a weekend brunch, or treating yourself to a personal culinary moment, this toast delivers. It’s a celebration of avocado’s creaminess, lime’s brightness, and the comforting warmth of toasted bread—an uncomplicated luxury that proves spectacular breakfasts don’t need to be complicated. So, grab your bread, ripen your avocados, and let your morning begin with a bite that feels like a sunlit invitation to create, to share, and to savor the day ahead.
Ingredients
-
Creamy Breakfast Guacamole Toast Base
– 2 ripe avocados, halved, pitted, and mashed
→ The avocado forms the creamy, rich spread foundation of the toast. Mashing to a chunky-smooth texture gives pockets of avocado that spread easily over toast while still remaining slightly tactile. Season with salt to draw out flavor and balance the natural fat. -
Creamy Brightness & Flavor
– 1 tablespoon extra-virgin olive oil
→ Adds a silky mouthfeel and carries fat-soluble flavors from the guacamole. Drizzle or whisk into the mashed avocado for a smoother finish, or keep as a light drizzle on top for a touch of sheen. -
Tangy Freshness
– 1 medium lime, juiced (about 2–3 tablespoons)
→ Lime juice brightens the avocado, prevents browning, and provides the essential acidic balance to offset the richness. Squeeze just before mixing to maximize brightness; strain if you want a cleaner juice without pulp. -
Seasoning Base
– 1/2 teaspoon flaky salt (or to taste)
→ Enhances avocado sweetness and brings out all other flavors. If using table salt, start with 1/4 teaspoon and adjust. -
– 1/4 teaspoon freshly ground black pepper
→ Adds a mild kick and aroma that complements the avocado without overpowering its delicate flavor. Freshly ground is preferred for its stronger aroma. -
Complementary Veggie & Herb Mix
– 1/4 cup finely diced tomato
→ Tomato adds brightness, juiciness, and a pop of color. Remove some seeds if you prefer a less watery guacamole. -
– 1/4 cup finely chopped red onion
→ Red onion provides sharp sweetness and crunch that contrast the creaminess. Rinse quickly under cold water if you want to soften its bite. -
– 2 tablespoons chopped fresh cilantro
→ Cilantro contributes a fresh, herbal aroma that brightens the overall profile. If you dislike cilantro, substitute with parsley or chives for a milder note. -
Creaminess & Binding
– 1/4 cup Greek yogurt (plain, full-fat or 2% works well) or sour cream
→ Adds extra creaminess and a lighter tang, helping to bind the chunky components for easy spreading. If dairy-free, substitute with a dairy-free yogurt or silken tofu blended until smooth. -
Texture Enhancers (Optional But Recommended)
– 1 tablespoon finely minced jalapeño or serrano (seeds removed for less heat)
→ Introduces a gentle heat and freshness. Adjust quantity to taste, and remove seeds to tame spiciness. -
Optional Protein Boost
– 2–4 slices of cooked bacon crumbles or crumbled feta/cotija cheese (optional)
→ Bacon adds smoky richness; cheese adds a salty, creamy counterpoint. Use sparingly to keep the avocado flavor dominant. -
Toast Base
– 4 slices crusty bread, sturdy enough to hold toppings (sourdough, multigrain, or whole-grain)
→ The toast acts as the vehicle for the creamy layer. Toast until the edges are crisp and the surface is lightly golden to provide a crunchy contrast to the toppings. For extra crackle, brush with a little olive oil before toasting. -
Optional Finish
– 4 large eggs (for sunny-side-up or poached tops)
→ A breakfast version benefits from a runny yolk that ooze into the guacamole as you cut into the toast. If adding eggs, cook until the yolk reaches your preferred doneness. -
Garnish & Finish (Optional)
– Crumbled feta or cotija cheese (to taste)
→ Adds a salty, creamy contrast and a nice salt-crystal bite. Add just before serving to keep texture intact. -
Sauce & Heat (Optional)
– Hot sauce or red pepper flakes (to taste)
→ A hint of heat can elevate the dish. Add sparingly and adjust to guest tolerance.
Instructions
- Toast the four slices of crusty bread until the edges are crisp and the surface is lightly golden, using medium heat on a skillet or a toaster oven to create a sturdy base that resists sogginess; brush lightly with olive oil if you want extra sheen and a subtle nutty flavor.
→ A well-toasted foundation prevents the creamy guacamole from becoming watery and ensures a satisfying crunch in every bite. - Scoop the flesh from the two ripe avocados into a bowl and mash to a chunky-smooth texture using a fork or a potato masher, leaving small lumps for mouthfeel; this balance between creaminess and texture helps the spread stay spreadable without turning mushy.
→ The mash should be cohesive enough to hold on the toast but not so pureed that it lacks character or bite. - Season the mashed avocado with 1/2 teaspoon flaky salt and 1/4 teaspoon freshly ground black pepper, then fold gently to distribute the seasoning evenly without overworking the puree; proper seasoning amplifies the natural avocado sweetness and fat.
→ Even distribution ensures every bite is balanced, not one-note. - Whisk in 1 tablespoon extra-virgin olive oil into the avocado mash or drizzle it over the top and fold just enough to emulsify the mixture for a silky mouthfeel; this also helps carry the bright flavors of lime and cilantro.
→ The oil adds a luxurious coating and prevents the guacamole from feeling heavy or dry on the toast. - Juice the 1 medium lime and whisk in about 2–3 tablespoons of lime juice to the avocado, straining out pulp if you want a cleaner finish; the acidity brightens the richness and helps slow browning.
→ Fresh lime juice actively preserves color and provides a zippy contrast to the creamy base. - Stir in 1/4 cup Greek yogurt or sour cream to bind the components and add tang, mixing until the mixture is cohesive but still spreadable; if dairy-free, use a dairy-free yogurt or a smooth silken tofu blended until creamy.
→ The dairy adds body and helps the toppings adhere to the toast without sliding off. - Fold in 1/4 cup finely diced tomato, 1/4 cup finely chopped red onion, and 2 tablespoons chopped fresh cilantro, mixing just until evenly distributed to avoid breaking down the tomato into mush and to preserve color and crunch.
→ Vegetables provide brightness, texture contrast, and aroma that elevate the guacamole toast. - Add 1 tablespoon finely minced jalapeño or serrano (seeds removed) to the mixture and stir, adjusting to taste for heat; for a milder version, omit or reduce the pepper and increase cilantro for freshness.
→ The mild heat enlivens the dish without masking the avocado’s flavor.\ - Optionally scatter 2–4 tablespoons of bacon crumbles or crumble feta/cotija cheese over the guacamole now or at final assembly to introduce a savory, salty counterpoint; use sparingly so the avocado remains the star.
→ The protein or cheese adds depth and a savory bite that complements the creaminess. - If employing eggs for a breakfast version, cook 4 eggs to your preferred doneness (sunny-side-up or gently poached) while the toast finishes, ensuring yolks are still runny for rich yolk integration; keep warm until ready to plate.
→ A runny yolk drips into the guacamole, enriching flavor and providing a luxurious texture contrast. - Spread a generous layer of the creamy breakfast guacamole onto each warm toast, smoothing the surface with the back of a spoon to create an even, inviting base; ensure edges are neat to prevent toppings from sliding.
→ A smooth, even spread guarantees consistent flavor in every bite and makes stacking toppings easier. - Top each avocado spread with the optional sunny-side-up or poached egg if using, gently placing the egg to center for visual appeal, and let the yolk rest on the guacamole so cutting into the toast releases a silky richness.
→ The egg yolk creates a luscious sauce that binds the components and elevates the dish to a breakfast–brunch staple. - Finish with a light sprinkle of crumbled feta or cotija, plus a final drizzle of hot sauce or scatter of red pepper flakes if desired, to add a final salt-bright note and a hint of heat; serve immediately for optimal texture.
→ Fresh finishing salts and heat provide a burst of flavor that lifts the whole composition without overpowering the avocado.
Notes
These creamy breakfast guacamole toast are a vibrant, protein-packed open-faced option that leverages a velvety avocado spread with bright lime and a tangy dairy kick from yogurt or sour cream. You can customize them by swapping in gluten-free bread for a gluten-sensitive breakfast or using dairy-free yogurt for a vegan version. To keep the avocado from browning, add lime juice just before mixing and serve soon after assembly, or press plastic wrap directly onto the surface if you need a brief hold. For a heartier bite, top with eggs—sunny-side-up or poached—and a sprinkle of crumbled feta or cotija, or keep it dairy-free with extra herbs and a light drizzle of olive oil. If you’d like more heat, fold in minced jalapeño or finish with hot sauce to taste. Always taste and adjust salt, pepper, and lime for a balanced, creamy spread that anchors the crunchy toast.
Tips
Tip: For the Creamy Breakfast Guacamole Toast base, mash the avocados until you have a texture that’s chunky-smooth. This creates creamy spread with pleasant avocado pockets that spread evenly on toasted bread without turning into a puree.
Tip: Salt gradually. Start with a small pinch and taste as you go. The avocado’s richness will bloom as you season, so adjust in small increments to avoid oversalting.
Tip: When adding lime juice, squeeze just before mixing the guacamole to maximize brightness. If you’re worried about browning, toss the mashed avocado with a bit of lime juice and a light coating of olive oil.
Tip: Strain lime juice for a cleaner, crisper finish if you prefer a less pulpy guacamole. This helps keep the texture uniformly smooth when folded with the yogurt or sour cream.
Tip: For the mix-ins (tomato, red onion, cilantro), pat vegetables dry after chopping if they appear watery. This prevents the guacamole from becoming too wet and helps it stay spreadable on toast.
Tip: If you’re sensitive to cilantro, substitute with chopped parsley or chives to maintain a fresh herbal note without the distinct cilantro flavor.
Tip: The dairy binder (Greek yogurt or sour cream) not only adds creaminess but also helps hold the chunky components together. If you’re dairy-free, blend silken tofu with a splash of lime and a touch of olive oil to mimic that silkiness.
Tip: For a gentle heat, start with 1 tablespoon of minced jalapeño or serrano and adjust to taste. Remove seeds to keep the heat approachable while still adding brightness.
Tip: If you’re adding optional proteins like bacon or crumbled cheese, sprinkle them sparingly on top or fold in a small amount to keep the avocado flavor dominant. They’re best added just before serving to preserve texture.
Tip: Choose a sturdy toast that can support toppings without becoming soggy. Toast until the edges are crisp and a light golden color. Brushing the bread with a little olive oil before toasting adds extra crunch and flavor.
Tip: If finishing with eggs, cook to a runny yolk for a luxurious, sauce-like effect as it mingles with the guacamole. Plan the egg timing to align with your toast-to-plate workflow.
Tip: Assemble in layers for the best texture: spread the base on the toast, then top with the tomato, onion, and cilantro mix, followed by the yogurt/sour cream binding. Add cheese or bacon after assembly if using.
Tip: To prepare ahead, refrigerate the mashed avocado with a thin layer of lime juice and a smear of olive oil to slow oxidation. Mix in the chopped veggies and yogurt just before serving to keep colors vibrant and textures crisp.
FAQ
What is Creamy Breakfast Guacamole Toast?
A quick, flavorful toast made with creamy guacamole topped on toasted bread, finished with breakfast-friendly add-ins for a balanced morning meal.
What ingredients do I need?
For 2 servings: ripe avocados, lime juice, plain Greek yogurt, salt, pepper, chopped cilantro (optional), salt, and your choice of bread. Optional toppings: fried egg, cherry tomatoes, radishes, microgreens, hot sauce.
How do I make it step by step?
Toast bread to your liking. In a bowl, mash avocados with lime juice, Greek yogurt, salt, and pepper until creamy. Spread onto toast and top with desired toppings (egg, tomatoes, herbs).
How long does it take to prepare?
About 10 minutes total: 3–4 minutes to toast bread and 5–6 minutes to prepare the creamy guacamole and toppings.
Can I customize the flavor?
Absolutely. Swap lime for lemon, add minced garlic, swap Greek yogurt for sour cream or a dairy-free yogurt, or toss in diced jalapeño for extra kick.
Is it suitable for dairy-free or vegan diets?
Guacamole itself is dairy-free, but traditional recipes include Greek yogurt. Use dairy-free yogurt or omit it, and add a splash of olive oil or a dairy-free mayo substitute for creaminess.
What type of bread works best?
Thick-cut whole-grain, sourdough, or a sturdy baguette toast well and hold toppings without getting soggy. For a lighter option, use English muffins or rice cakes.
Can I make it ahead for breakfast?
Prepare the guacamole base and store it in an airtight container with a thin layer of lime juice on top to prevent browning (press plastic wrap onto surface). Toast and add toppings just before serving.
What are some tasty topping ideas?
Fried or poached egg, sliced cherry tomatoes, radish coins, microgreens, chopped cilantro, feta or queso fresco, hot sauce, or a sprinkle of smoked paprika.


")