Introduction / Hook
Imagine a dessert that crackles with the satisfying snap of a perfectly fried shell, then gives way to a velvety, imagining-cloud-soft filling that tastes like a cloud of creamy vanilla dream with a bright kiss of citrus. Cheesecake cannoli is that glorious paradox: a bite-sized luxury that starts with the playful crunch of a classic cannoli shell and ends with the lush, tangy-sweet embrace of cheesecake filling. It’s a dessert that feels both familiar and inventive, a celebration of contrasts that somehow harmonize into one irresistible treat.
This isn’t just a dessert; it’s a mood—an edible memory you can share with loved ones at the end of a long week or during a festive gathering. The shells provide the nostalgic, carnival-like scent of fried dough and almond, while the filling brings the refined, restaurant-quality creaminess you expect from cheesecake. The result is versatile enough for elegant dinner parties, cousin’s birthdays, or a Saturday night you want to make feel special. Each bite is a whisper of tradition and a wink at novelty, a mini dessert experience that invites you to savor texture, aroma, and balance in one compact package.
As you approach cheesecake cannoli, you’ll notice the sensory journey begins even before the first bite: the aroma of fried pastry mingling with vanilla, lemon zest, and a touch of cinnamon or almond—depending on how you season the shells—floods the room. Then comes the whispered crack of the shell as you bite, revealing the cool, creamy filling inside. You’ll taste the citrus notes that brighten the cheese blend, the gentle sweetness that never feels heavy, and the subtle crunch of finely chopped nuts or crisp pastry that adds a playful texture contrast. It’s a dessert that invites conversation, because every bite seems to tell a small story of careful technique, joyful improvisation, and the shared delight of a crowd gathered around a dessert table.
In short, cheesecake cannoli is more than a mashup; it’s a celebration of texture, technique, and culture. It honors the crisp tradition of cannoli while embracing the creamy, modern allure of cheesecake. The result is a showpiece that fits on a celebratory platter or a casual grazing board, a confection that feels special without being fussy. If you’re looking for a dessert that delivers theater in a single bite and comfort in every mouthful, this is your new go-to, ready to bring a touch of Italian-American charm to any occasion.
The Story Behind the Dish
Cannoli have long stood as a symbol of Sicilian pastry artistry. Their shells—delicate, fried crescents with a sheen of glossy oil and a whisper of almond and citrus—carry centuries of street-food charm and family tradition. In Sicily, cannoli were often part of festive tables, filled to order with a ricotta-based filling that could be sweetened with sugar, accented with candied fruit, chocolate chips, or pistachio. The technique—rolling dough into thin cylinders, frying to a crackly, lacquered finish, and piping a lavish filling into the hollow shell—relies on a careful balance between heat, texture, and timing. The result is a dessert that feels celebratory, almost ceremonial, yet intimate, because a forkful of cannoli suggests you’re sharing something special with someone you care about.
Meanwhile, cheesecake has its own distinct lineage, with roots stretching toward both ancient Mediterranean cheeses and the modern American dessert culture that popularized dense, creamy cheesecakes. In the United States, cheesecake evolved into a toast to dairy goodness and culinary ingenuity, with cream cheese and ricotta creating a lush texture that’s both indulgent and comforting. New York-style cheesecake, with its rich, velvety body, became a cultural icon, while other regional variations leaned into citrusy brightness, chocolate, or fruit layers. The beauty of cheesecake is its adaptability: it pairs well with vanilla, lemon, almond, and a host of textures—from smooth to grainy to silky—depending on the dairy blend and flavoring.
Conceiving cheesecake cannoli is a playful homage to these two cherished traditions. It borrows the cannoli’s crisp shell, a vessel for carrying and presenting a lighter, more buoyant filling that hints at cheesecake without becoming a heavy slice. It’s a bridge between the Italian-American street-food joy of cannoli and the refined indulgence of cheesecake. The result is a dessert that feels both nostalgic and contemporary, familiar enough to welcome guests who crave classic flavors, yet novel enough to spark conversation and appreciation for culinary invention.
The fusion also invites a mood of experimentation. You can shape the shells into tight tubes or rustic crescents, dip the ends in chocolate or pistachio, or leave them plain to let the filling speak. You can infuse the cheesecake filling with citrus zest, vanilla bean, or a whisper of liqueur to lift its perfume. You can garnish with chopped pistachios, chocolate shavings, candied citrus, or a dusting of powdered sugar. Each choice you make becomes a little signature, a way to imprint your personal touch onto a beloved classic.
Why You’ll Love This Recipe
- Texture contrast: crisp, delicate shells meet a luscious, creamy filling for a satisfying bite every time.
- Versatility: easily adaptable to a range of flavors—vanilla, lemon, orange, chocolate, pistachio—without losing balance.
- Show-stopping yet approachable: elegant enough for guests, simple enough to assemble with a little planning.
- Date-night-friendly dessert: quick to put together for a special end to a weeknight meal, with light, refreshing flavors.
- Perfect for sharing: individual shells make serving easy at parties and gatherings, while still feeling indulgent.
- Make-ahead potential: both shells and filling can be prepared ahead of time and assembled close to serving for maximum crunch and freshness.
- Diet-friendly tweaks: the concept can be adapted for vegan, gluten-free, or dairy-free audiences with thoughtful substitutions.
Flavor Profile & Texture
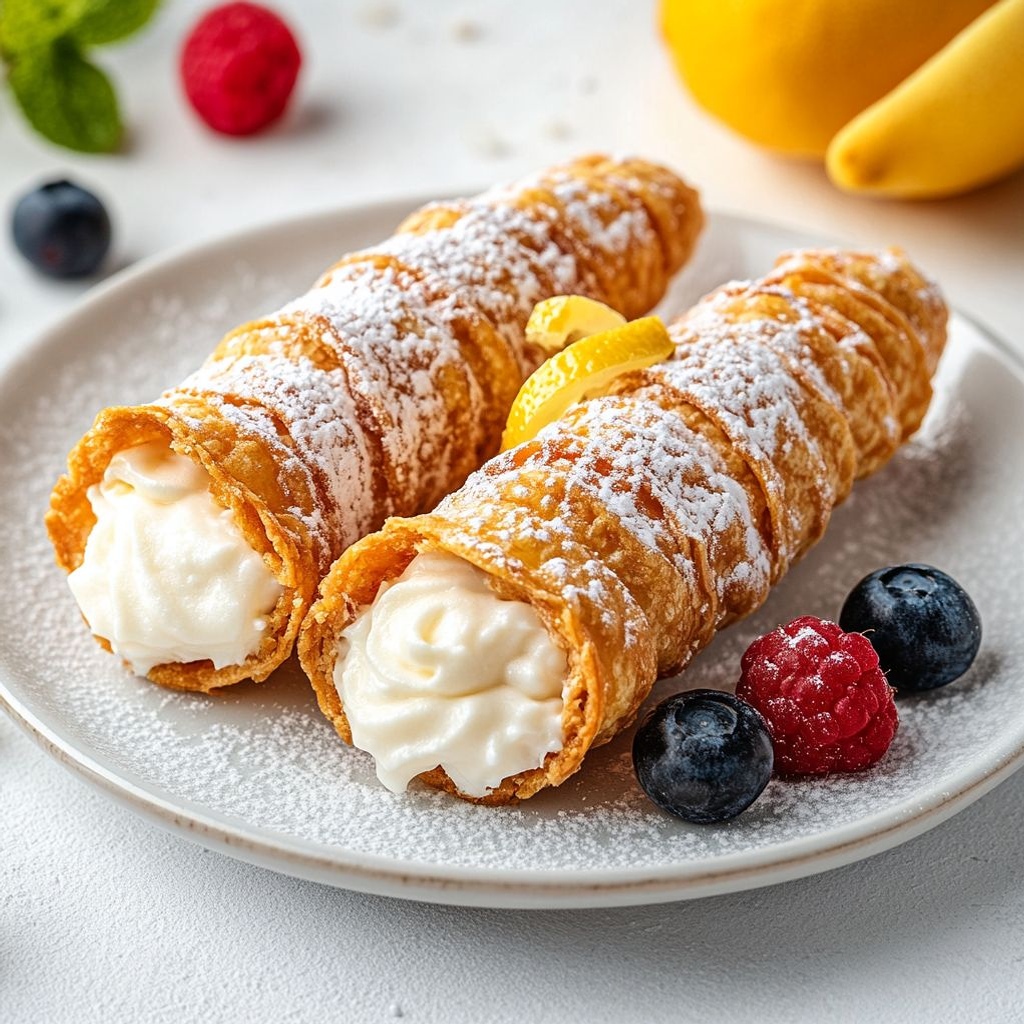
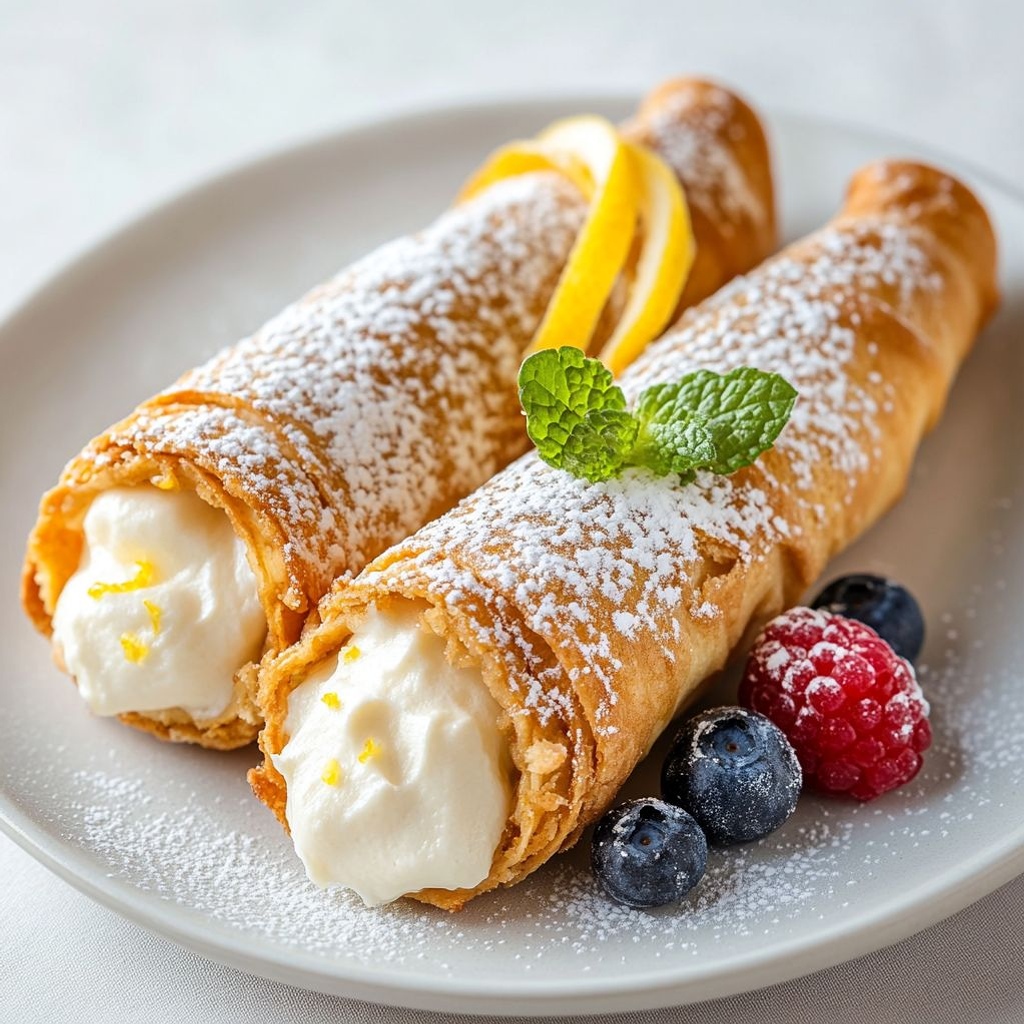
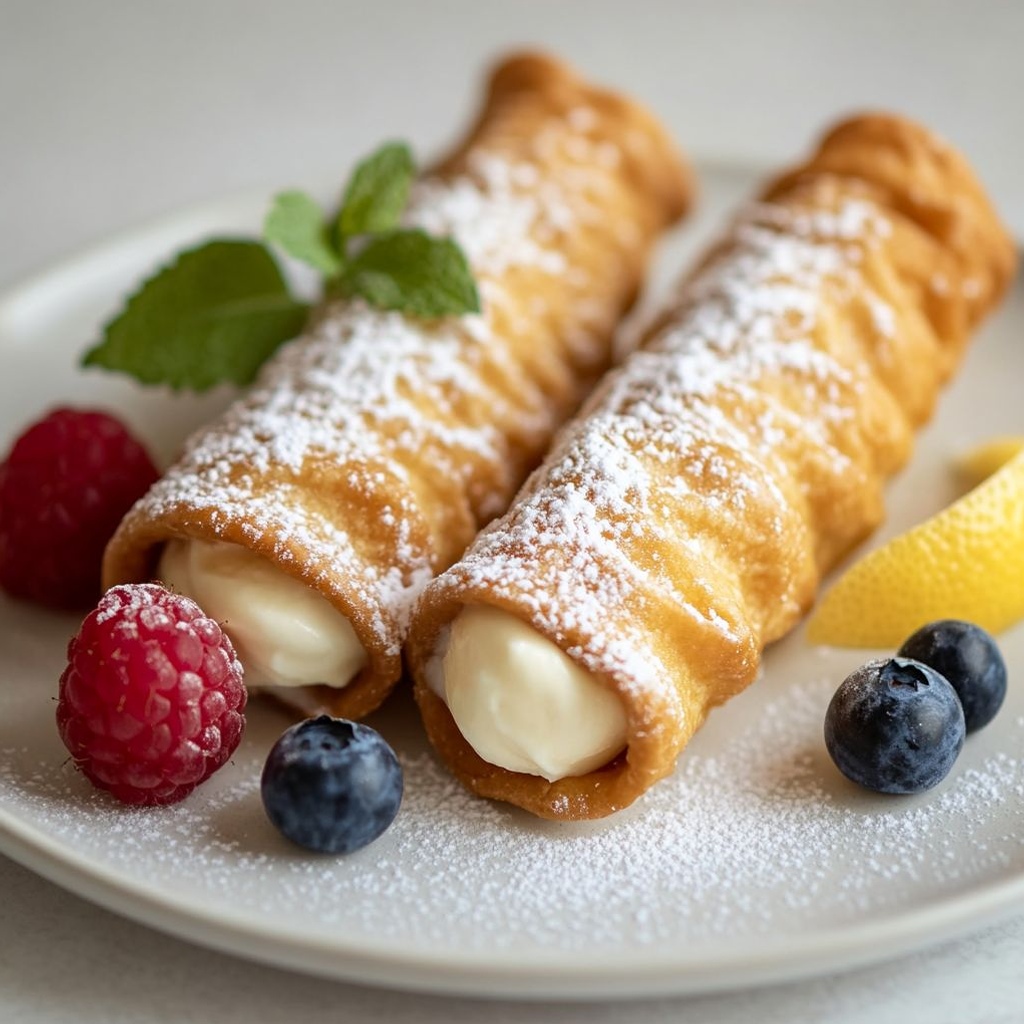
The hallmark of cheesecake cannoli is the interplay of sensations. The shell—thin, crisp, and fried to a glossy, light-golden finish—delivers a moment of crack and a wafer-thin bite that dissolves at the edges, releasing a whisper of almond, vanilla, or citrus oils. It provides a crisp base that holds up to the softness of the filling without wilting, ensuring every bite remains lively and structured. The filling, on the other hand, is a velvet dance: tangy and creamy, with the familiar comfort of cheesecake but lightened with smooth cream cheese, ricotta or a soft cheese base, and a touch of sugar to balance its brightness. A hint of vanilla and citrus zest lifts the profile, like sunlight on a creamy fog.
Texture-wise, you’ll notice a delicate balance between the shell’s crunch and the filling’s silkiness. The filling can be infused with a tiny amount of lemon or orange zest to sharpen the cheesecake notes, while a small sprinkle of finely chopped pistachios or chocolate chips introduces subtle crunch and color. When chocolate-dipped ends are used, they add a glossy finish and an extra layer of flavor that pairs beautifully with the vanilla-cream baseline. The aroma is equally compelling: the scent of fried dough, butter, and almond, mingling with vanilla and citrus—the perfume of celebration.
Flavor-wise, the dish sings with contrasts that somehow converge. The filling maintains cheesecake’s characteristic richness without heaviness, thanks to the potential inclusion of ricotta for a lighter texture or a higher ratio of cream cheese for indulgence. The citrus zest brightens the dairy, providing a refreshing lift that makes the dessert feel lighter and more balanced. The optional pistachios lend a nutty, earthy note that complements the sweetness while adding visual appeal and a pop of color. When you savor it, you will notice how each component amplifies the other: the shell enhances texture; the filling heightens aroma and creaminess; together they create a dessert that feels both special and approachable.
Occasions & Pairings
Cheesecake cannoli shines in moments when you want to celebrate with flair but keep things intimate and approachable. It’s a superb choice for:
- Holiday gatherings and family celebrations, where everyone loves a dessert that feels nostalgic yet modern.
- Dinner parties as a show-stopper that travels well on a platter and looks stunning when plated individually.
- Casual weekend gatherings or potlucks, where the bite-sized dessert encourages sampling and conversation.
- Romantic dinners or date nights, offering an elegant finale without being overly indulgent.
Pairing ideas to elevate the experience:
- Drinks: a glass of dessert wine, like Moscato d’Asti, or a creamy espresso martini can echo the coffeehouse charm of cannoli. For a non-alcoholic option, a lightly sweetened iced coffee or a citrus-forward sparkling lemonade pairs beautifully.
- Sides: a small plate of fresh fruit—pomegranate seeds, orange segments, or berries—adds brightness and a contrasting lightness to the richness of the filling.
- Garnishes: pistachios, finely grated lemon zest, shaved dark chocolate, or a dusting of powdered sugar. A drizzle of honey or orange blossom syrup can add a touch of floral sweetness if desired.
- Decor: serve on a neutral platter with a few mint leaves for color, or align the cannoli ends in a row for a celebratory display that looks as good as it tastes.
Tips, Variations & Substitutions
Even though you’re reading about a dessert that seems simple, there are countless ways to personalize cheesecake cannoli to suit your preferences, dietary needs, or seasonal ingredients. Here are some ideas to help you tailor the concept.
- Shell variations: Use traditional cannoli shells, or try baked almond shells for a lighter, less fatty alternative. For gluten-free audiences, explore shells made from almond flour or a gluten-free pastry dough that crisps up nicely.
- Filling base: The classic is a cheesecake-inspired filling that blends cream cheese with a ricotta backbone. To soften the richness, consider a higher ricotta ratio or fold in whipped cream for airiness. For a dairy-free version, use full-fat coconut cream or a refined cashew cream as the base, seasoned with vanilla and a touch of citrus zest.
- Flavor twists: Add citrus zest (lemon, orange, or blood orange) to brighten the filling. A splash of almond extract or a hint of cinnamon can deepen the flavor. For chocolate lovers, fold in mini chocolate chips or dust the filling with cocoa powder.
- Nuts and accents: Finely chopped pistachios on the filling or the shell’s rim offer a classic cannoli touch. Toasted almond slivers or candied orange peel can bring additional aroma and crunch.
- Vegan adaptations: Use vegan cream cheese and a plant-based ricotta substitute, ensuring the filling remains silky and smooth. The shells can be prepared with vegan-friendly dough or baked to replicate the crisp texture.
- Low-sugar options: Reduce sugar in the filling slightly and rely on the natural sweetness of vanilla and citrus. Use sugar substitutes thoughtfully to preserve the creamy texture without adding excessive sweetness.
- Regional twists: Incorporate regional flavors such as espresso powder for a coffee-kissed filling, or a drizzle of raspberry coulis on the plate to complement the vanilla and citrus notes.
- Make-ahead strategy: Fry shells a day ahead and store in an airtight container to maintain crunch. Prepare the filling a day ahead and refrigerate; bring to room temperature and whisk briefly before piping into the shells to regain smoothness.
Storage & Make-Ahead Ideas
If you’re planning ahead for a party or holiday spread, you’ll appreciate how forgiving cheesecake cannoli can be. The shells, once cooled, retain their crispness best when stored in an airtight container in a cool, dry place. They may lose some crunch over time, so plan to fill close to serving for the most dramatic texture. The filling, on the other hand, benefits from chilling, which helps it hold shape and firm up slightly, making piping easier.
To maximize make-ahead potential:
- Prepare shells a day or two ahead and keep them uncovered or in a breathable container to avoid moisture buildup. If you’re using pre-made shells, ensure they’re completely cooled before storage to prevent sogginess.
- Whisk or beat the filling until it’s lump-free and silky, then refrigerate in an airtight container. Bring it to room temperature briefly and give it one final whisk before piping for the best texture.
- Assemble just before serving to preserve shell integrity. If you must assemble in advance, place the filling in a piping bag and refrigerate; fill shells just before presenting.
- Leftover fillings can be repurposed in other desserts, such as topping for waffles, folding into a cheesecake dip, or using as frosting with a lighter texture when thinned with a bit of cream or non-dairy alternative.
Fun Facts & Trivia
- The term “cannoli” comes from the Italian word for “tubes” or “reed” (cannā), reflecting the classic cylindrical shape of the shell.
- In traditional Sicilian cannoli, the filling is usually ricotta-based, often with zest of citrus and a hint of vanilla, sometimes with small pieces of candied fruit. The cheesecake cannoli adaptation replaces or complements ricotta with cream cheese or a blended cheese base to evoke cheesecake flavor.
- American Italian communities during the 20th century embraced cannoli as a festive dessert, turning it into a beloved staple at family celebrations, fairs, and holiday feasts. Cheesecake cannoli is a modern homage to that memory—the invention of new generations honoring old-world technique with contemporary filling aesthetics.
- Texture plays a starring role in cannoli—the shell’s crispness is essential, and achieving shell integrity often hinges on proper drying and storage. The best shells stay crisp for longer and crack at just the right moment when bitten, revealing the creamy interior.
- Pairing cannoli-inspired desserts with wine or coffee is a tradition in many Italian-American households, where small, bite-sized treats punctuate an evening with warmth and conversation.
Closing Thoughts
Cheesecake cannoli is a celebration of contrasts: crisp shell against velvet filling, familiar comfort against modern whimsy, and Italian heritage meeting American dessert innovation. It’s a flexible, crowd-pleasing dessert that invites creative interpretation while delivering a guaranteed moment of delight with every bite. Whether you’re serving a dozen guests or an intimate family dinner, this dessert promises a memorable finale, one that lingers in the memory long after the plates are cleared. So gather your favorite ingredients, prepare your shells with care, and let the creamy cheesecake kiss of vanilla and citrus lead your palate into a sweet, satisfying finish.
Ingredients
Cannoli Shells
- 12 cannoli shells, store-bought and crispy
→ Crisp, dry cannoli shells create a sturdy edible container for the creamy filling. They should be hollow and firm enough to hold piped cheesecake filling without cracking. If shells feel stale, re-crisp them briefly in a 350°F (175°C) oven for 3–5 minutes or toast in a dry skillet. Store in an airtight container away from humidity to preserve their crunch until ready to fill.
Cheesecake Filling
- 8 oz cream cheese, softened to room temperature
→ Cream cheese provides the rich, tangy base typical of cheesecake fillings and helps create a smooth, pipe-able texture when beaten with other ingredients. Soften fully to prevent lumps; beat until creamy and free of curdled bits, but avoid over-whipping to prevent air pockets in the finished filling. - 8 oz ricotta cheese, well-drained
→ Ricotta lightens the filling with a creamy texture and subtle crumb. Drain well (even overnight in a cheesecloth or fine sieve) to remove excess moisture; if not well drained, the filling may be too loose or runny, causing the shells to sog. - 1/2 cup powdered sugar
→ Powdered sugar dissolves smoothly into the filling, giving sweetness without gritty texture. Sift before adding to avoid lumps, then blend until the mixture is uniform and fluffy. Adjust to taste, bearing in mind the shells are not very sweet on their own. - 1 teaspoon vanilla extract
→ Pure vanilla intensifies the creamy cheesecake flavor; use high-quality vanilla for best aroma and depth. If you have vanilla bean, you can scrape the seeds for a more intense vanilla note. - 1/4 teaspoon salt
→ A small pinch of salt enhances sweetness and balances the richness of the dairy. Do not omit entirely, as it sharpens flavors and prevents the filling from tasting flat. - 1 tablespoon lemon zest (optional)
→ Adds a bright citrus lift that pairs beautifully with creamy filling. Use finely grated zest and not the white pith; start with a smaller amount and increase if desired, but avoid overpowering the dairy flavors. - 1–2 tablespoons heavy cream (optional, to adjust consistency)
→ If the filling is too thick for piping, whisk in a little cream to loosen it to a smooth, pipe-able consistency. Add gradually and test by piping a small amount into a shell; stop once it holds shape but isn’t stiff.
Optional Add-ins
- 1/4 cup mini chocolate chips (optional)
→ Fold in chopped or mini chocolate chips to create pockets of sweetness that contrast with the creamy filling. Use micro-chips to avoid tearing the shells and to ensure even distribution when piping. Do not overmix; a gentle fold will keep chips intact. - 1/3 cup chopped pistachios (optional)
→ Toast pistachios lightly to deepen flavor, then chop finely. They add color, texture, and a nutty note that complements the ricotta-cream cheese filling. Sprinkle into filling or press into the ends after filling for a decorative touch. - 2 tablespoons candied orange peel, finely chopped (optional)
→ Provides a citrusy brightness that harmonizes with the creamy filling. Chop finely to distribute flavor evenly; consider a light sprinkling on top for a citrusy finish. Store any leftovers in an airtight container to maintain moisture. - Powdered sugar for dusting (optional)
→ A delicate dusting of powdered sugar just before serving adds a festive look and a touch more sweetness. Use a fine-mesh sieve for an even, light coating.
Instructions
- Refresh any stale cannoli shells by warming them briefly in a 350°F (175°C) oven for 3–5 minutes or toasting in a dry skillet, then let cool completely before filling to restore crispness and prevent soggy filling.
→ Crisp shells provide durable housing for the filling and prevent breakage; re-crisping ensures the shells stay crunchy even after being filled. - Soften the cream cheese to room temperature by removing 8 oz from the fridge and letting it sit in a bowl for 30–60 minutes, then cut into smaller pieces to accelerate even softening and avoid lumps.
→ Softening prevents lumps and creates a smooth base for a creamy, pipe-able filling while avoiding over-whipping later. - Drain the ricotta cheese well by lining a fine sieve or cheesecloth over a bowl and letting it drain for 1–2 hours (or overnight in the refrigerator) to remove excess moisture, then press gently to extract more liquid without forcing curds.
→ Excess moisture makes the filling loose and can cause soggy shells; thorough draining yields a stable, cohesive cream. - Beat the softened cream cheese in a large bowl with a mixer on medium speed until creamy and smooth, about 2–3 minutes, stopping to scrape the bowl as needed for even texture.
→ Proper creaming creates a light, uniform base free of lumps and reduces the risk of curdling when sugar is added. - Add the well-drained ricotta to the creamed cheese and beat on low to combine, then increase to medium and mix until the mixture is completely smooth and homogeneous.
→ Incorporating ricotta lightens the filling while maintaining richness; thorough blending prevents graininess from the ricotta. - Sift the powdered sugar, then add 1/2 cup to the cheese mixture with 1 teaspoon vanilla extract and 1/4 teaspoon salt; beat on medium until the filling is glossy and uniform.
→ Sifting prevents gritty pockets, while vanilla and salt balance sweetness and enhance depth of flavor. - Stir in 1 tablespoon lemon zest (optional) using a light hand to distribute zest evenly without clumping or introducing bitterness from the white pith.
→ Lemon zest provides a bright citrus aromatics that complements the dairy richness without overpowering it. - If the mixture seems too thick for piping, whisk in 1–2 tablespoons heavy cream, adding gradually while testing the pipeability until the filling holds its shape but pours smoothly.
→ A softer, pipe-able consistency makes filling easier and prevents excessive pressure on the shells. - Fold in optional add-ins, such as 1/4 cup mini chocolate chips or 1/3 cup finely chopped pistachios, using a gentle fold to distribute evenly without breaking down the cream.
→ Adds texture and flavor contrasts; folding gently preserves the smooth filling and prevents tearing of the shells. - Chill the filling for 15–30 minutes to firm slightly, which makes piping easier and helps the filling stay put inside the shells.
→ Chilled filling reduces air pockets and helps maintain clean, neat cannoli ends when filled. - Transfer the filling to a piping bag fitted with a large round or star tip and pipe into each cannoli shell from one open end, filling until full but not overflowing; if shells are delicate, pipe from both ends toward the center for stability.
→ Piping from the ends distributes filling evenly and minimizes shell stress; controlling the amount prevents leakage and keeps presentation tidy. - Alternatively, use a small spoon to press a line of filling into the center of the shell and gently roll or press to seal, which can be helpful for shells that crack easily or when piping tools are unavailable.
→ This method preserves shell integrity while delivering a satisfying, uniform filling profile. - Decorate and finish by dipping the exposed ends in 1) chopped pistachios or micro-chocolate chips, 2) finely chopped candied orange peel, or 3) a light dusting of powdered sugar just before serving.
→ Textural contrasts and aromatic notes enhance flavor, color, and visual appeal without masking the filling’s richness. - Refrigerate the assembled cannoli on a tray for 10–15 minutes to set the filling a little more and help shells stay crisp; serve within a few hours for best texture and contrast.
→ A short chill helps the filling firm enough to slice cleanly when eaten and maintains the shell’s crunch for a more satisfying bite.
Notes
These cheesecake cannoli deliver a creamy, tangy cheesecake filling tucked inside crisp store-bought cannoli shells. The filling combines softened cream cheese and well-drained ricotta for a light, velvety texture, brightened with vanilla, lemon zest, and a touch of powdered sugar. You can customize them by folding in mini chocolate chips, chopped pistachios, or finely chopped candied orange peel for pockets of sweetness and color. For the best finish, pipe the filling into the shells just before serving to keep the shells crisp and the filling smooth. If you prefer a thicker filling, chill it for 15–20 minutes to set slightly before piping.
Make-ahead tips: the filling can be made up to 1 day ahead and refrigerated; drain ricotta thoroughly and soften the cheeses before mixing. If the filling seems too thick for piping, whisk in a teaspoon at a time of heavy cream until you reach a pipeable consistency. Store unfilled shells in an airtight container to preserve crunch; you can re-crisp softened shells in a 350°F (175°C) oven for 3–5 minutes. Assemble and refrigerate filled cannoli for up to 24 hours; dust with a light snowfall of powdered sugar just before serving. For gluten-free notes, ensure your cannoli shells are certified gluten-free; otherwise use gluten-containing shells as desired.
Tips
Tips for Cheesecake Cannoli
-
Shell crispening and handling
Store-bought cannoli shells should be crisp. If they feel stale, re-crisp: 350°F (175°C) for 3–5 minutes or dry-sauté in a skillet. Let cool completely before piping. Keep shells in an airtight container away from humidity; avoid stacking to prevent bending.
-
Preparing the cheeses
Let cream cheese and ricotta come to room temperature for a smooth, lump-free filling. If ricotta is very wet, drain well overnight or press through a sieve to remove extra moisture; moisture can soften shells and affect texture.
-
Mixing order for smooth filling
Beat cream cheese and ricotta together on medium speed until smooth, then add powdered sugar gradually. Add vanilla, salt, and optional lemon zest; mix just until combined. Over-whipping can introduce air pockets that collapse when filling shells.
-
Flavor balance
Add lemon zest gradually; start with 1 teaspoon and taste. A pinch of salt enhances sweetness and depth. If using add-ins like chocolate, fold in gently to avoid tearing the filling.
-
Consistency adjustments
If the filling is too stiff, whisk in 1 tablespoon of heavy cream at a time until pipe-able. If too loose, chill 15–20 minutes and/or add a bit more cream cheese and ricotta (in equal parts) and re-whip until smooth.
-
Incorporating add-ins
Gently fold in mini chocolate chips or chopped pistachios. Toast pistachios lightly to deepen flavor, then chop finely. Fold-ins should be evenly distributed without deflating the filling or tearing shells.
-
Assembly technique
Fill a piping bag fitted with a medium round or small star tip. Stand shells upright or place in a muffin tin to stabilize while filling. Pipe filling into the center to fill the hollow, then seal with a gentle twist so the filling doesn’t ooze out the ends.
-
Flavor finishes and garnishes
Dust just before serving with powdered sugar for a festive look. You can also garnish the open ends with chopped pistachios or candied orange zest; keep add-ins to the ends to avoid soggy shells.
-
Make-ahead and storage
Keep shells crisp at room temperature in an airtight container until ready to fill. The filling can be prepared a day ahead and refrigerated; pipe just before serving for best texture. Filled cannoli should be refrigerated and consumed within 1–2 days for optimal crispness.
-
Alternative flavor ideas
For a lighter cheesecake note, substitute part of the ricotta with mascarpone or add a touch more cream cheese. If you prefer citrus, swap lemon zest for orange zest or add a tiny drop of orange extract. Balance to taste so the dairy flavors remain prominent.
FAQ
What is Cheesecake Cannoli?
Cheesecake cannoli are a dessert that combines crispy cannoli shells with a creamy cheesecake-flavored filling. The filling is usually a blend of cream cheese (and sometimes ricotta), sugar, vanilla, and a hint of lemon or orange zest, piped into shells and often finished with a dusting of powdered sugar or chocolate.
What ingredients are needed for the filling?
Common filling ingredients include: cream cheese (softened), powdered sugar or granulated sugar, vanilla extract, lemon or orange zest, and optional ricotta for a lighter texture. You can also fold in mini chocolate chips or chopped nuts for texture. For leftovers or dietary tweaks, dairy-free cream cheese or mascarpone can be used as substitutes.
What are the shell options for cheesecakes cannoli?
You can use store-bought cannoli shells for convenience, which are already crisp. If you prefer homemade, you can fry fresh cannoli shells from dough or bake them. Some bakers also use pre-baked mini tart shells filled with the cheesecake mixture, though traditional cannoli shells are tube-shaped pastry.
How do you prepare the cheesecake filling?
Beat softened cream cheese with sugar until smooth, then mix in vanilla and citrus zest. If desired, fold in ricotta for extra creaminess and lightness. Chill the filling briefly to help it firm up before piping. For a richer bite, you can add a small amount of mascarpone or a splash of lemon juice for brightness.
How do you fill the cannoli shells without breaking them?
Fill a piping bag fitted with a medium round or star tip with the chilled filling. Pipe from one end to the other to create a generous filling. If shells are delicate, insert a small amount of filling first at one end, then gradually fill to avoid cracking. Chill the filled cannoli briefly to help the filling set and reduce leakage.
How long does it take to make Cheesecake Cannoli?
Plan about 30–40 minutes of active prep time to make the filling and fill the shells, plus 1–2 hours of chilling if you want a firmer filling. If you’re making shells from scratch, add extra time for frying or baking. Overall, it’s a quick, make-ahead dessert.
How should I store and serve cheesecakes cannoli?
Store filled cannoli in the refrigerator, ideally the shells and filling assembled just before serving. If you must prep ahead, keep the filling refrigerated and shells stored in an airtight container at room temperature or in a cool place, then fill just before serving to maintain crispness. Dust with powdered sugar or drizzle with melted chocolate just before serving.
Can I make this ahead for a party or potluck?
Yes. You can make the filling a day ahead and refrigerate. Shells can be prepared or purchased beforehand and stored in an airtight container. Assemble the cannoli shortly before serving to keep the shells crisp. For best results, do not fill all shells too far in advance.
What are some variations or substitutions?
Variations include using mascarpone or a mix of cream cheese and ricotta, adding lemon or orange zest for brightness, or folding in chocolate chips, pistachios, or candied orange peel. For dairy-free versions, use dairy-free cream cheese and coconut cream or whipped coconut milk in place of dairy fillings, and choose shell options that are gluten-free if needed.
Any tips for perfect texture and flavor?
Use softened cream cheese to avoid lumps, sift powdered sugar for a smoother filling, and chill the filling before piping. Balance sweetness with a touch of lemon zest, and avoid overmixing once you add the zest to prevent a dense texture. If shells feel stale, crisp them briefly in a 350°F (175°C) oven for a minute or two (watch closely) before filling.
How many cannoli servings does this yield?
Typically, one batch fills about 12–16 small cannoli shells, depending on shell size and how generously you pipe the filling. You can scale the recipe by adjusting the filling quantity and the number of shells you have on hand.