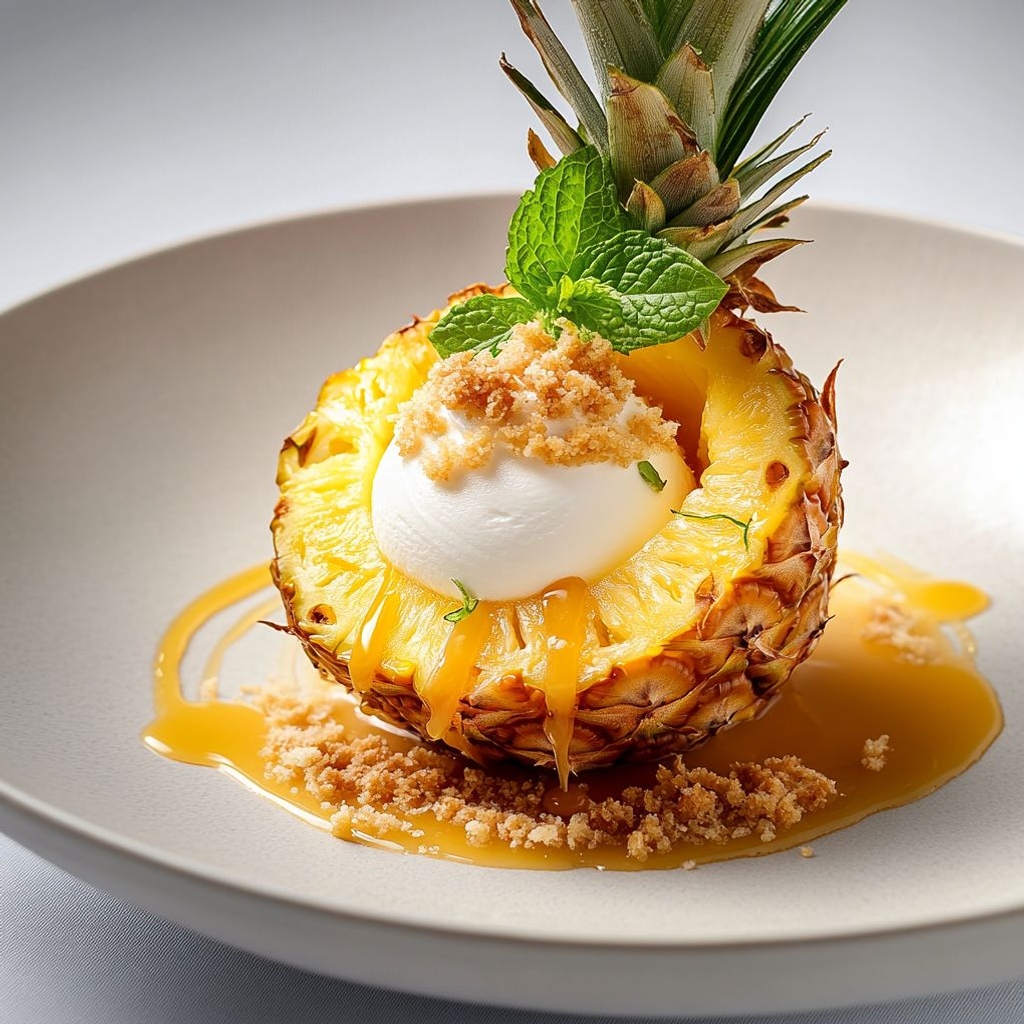
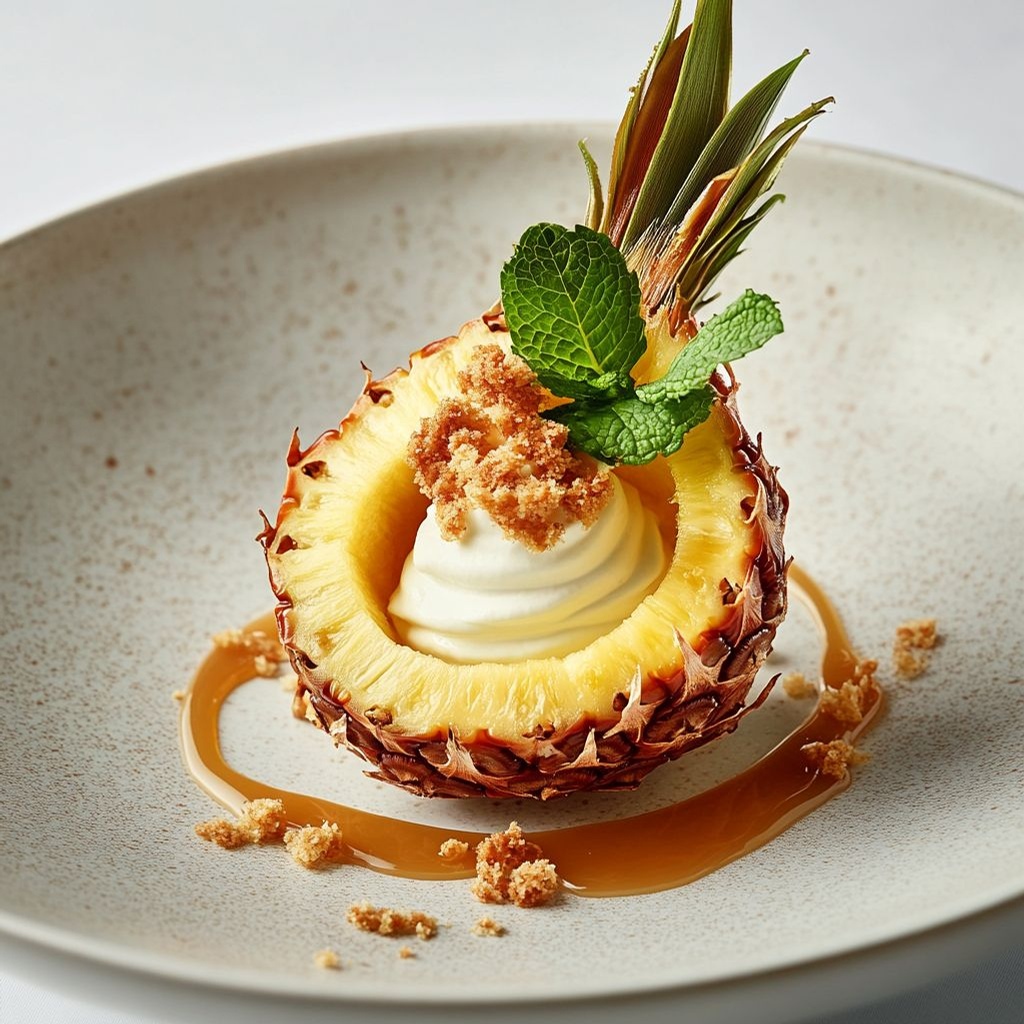
Author

Ocean Nightleaf

Browsing

Introduzione / Hook

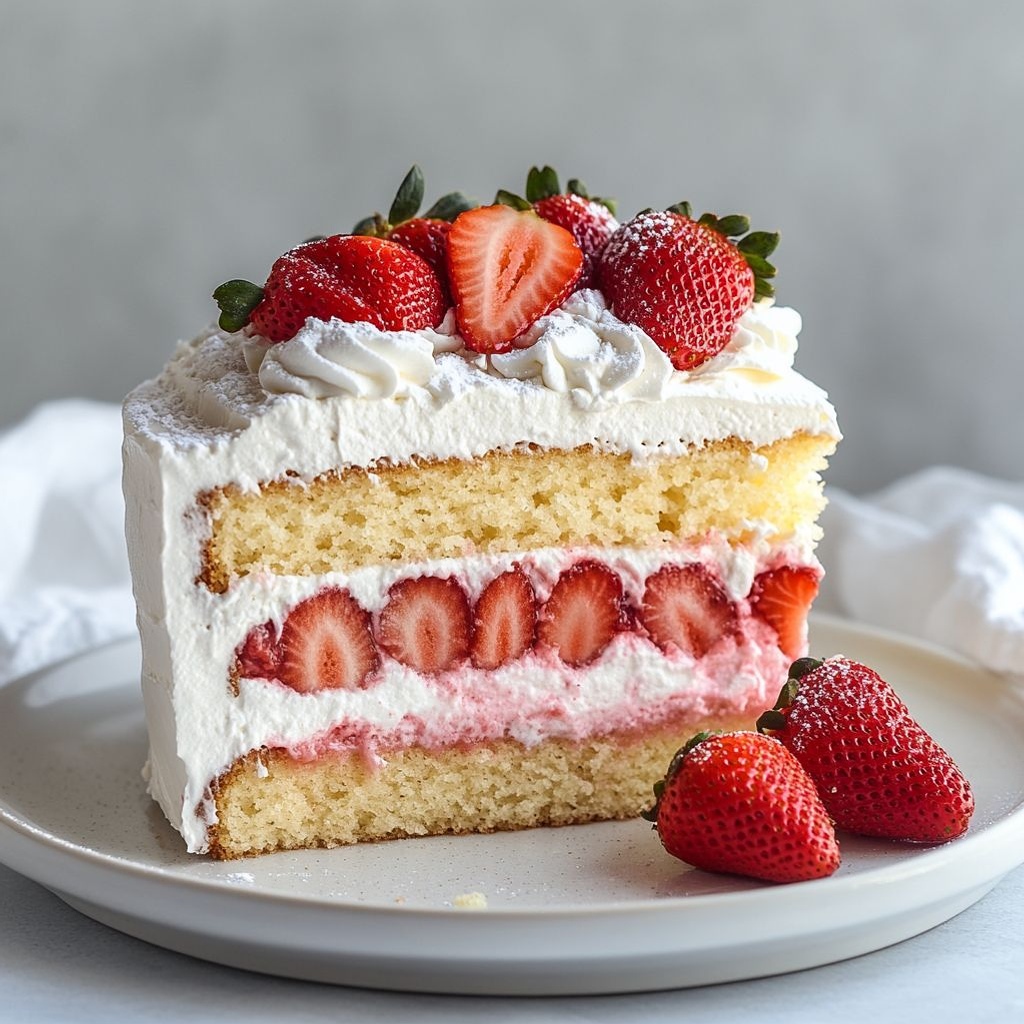
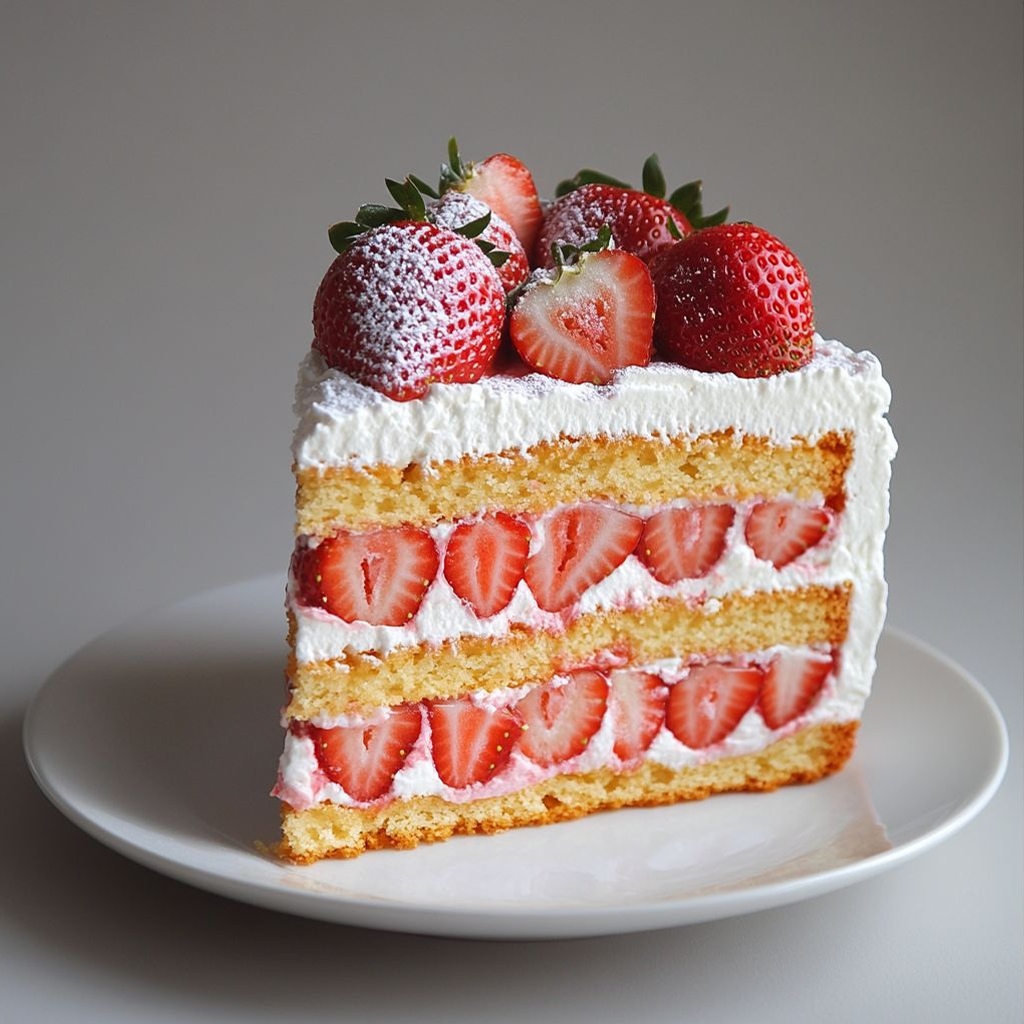
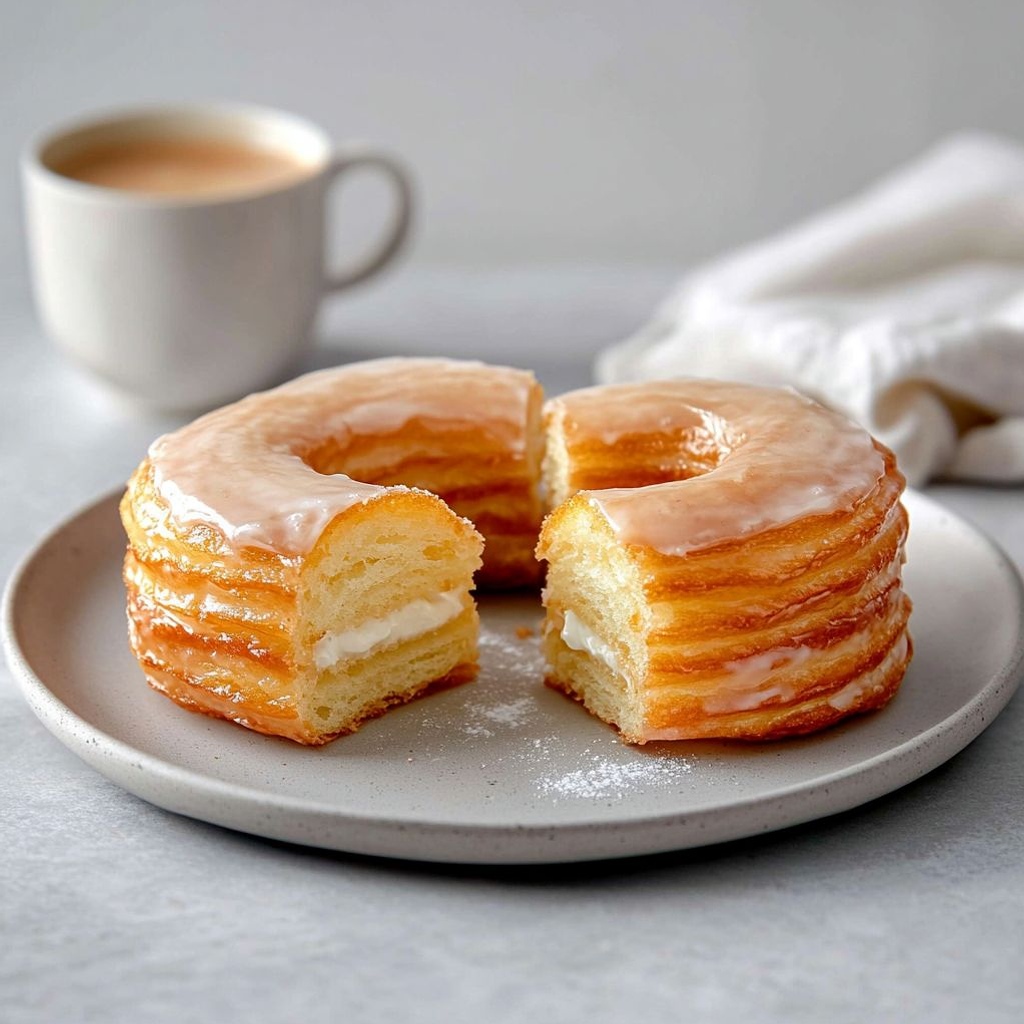
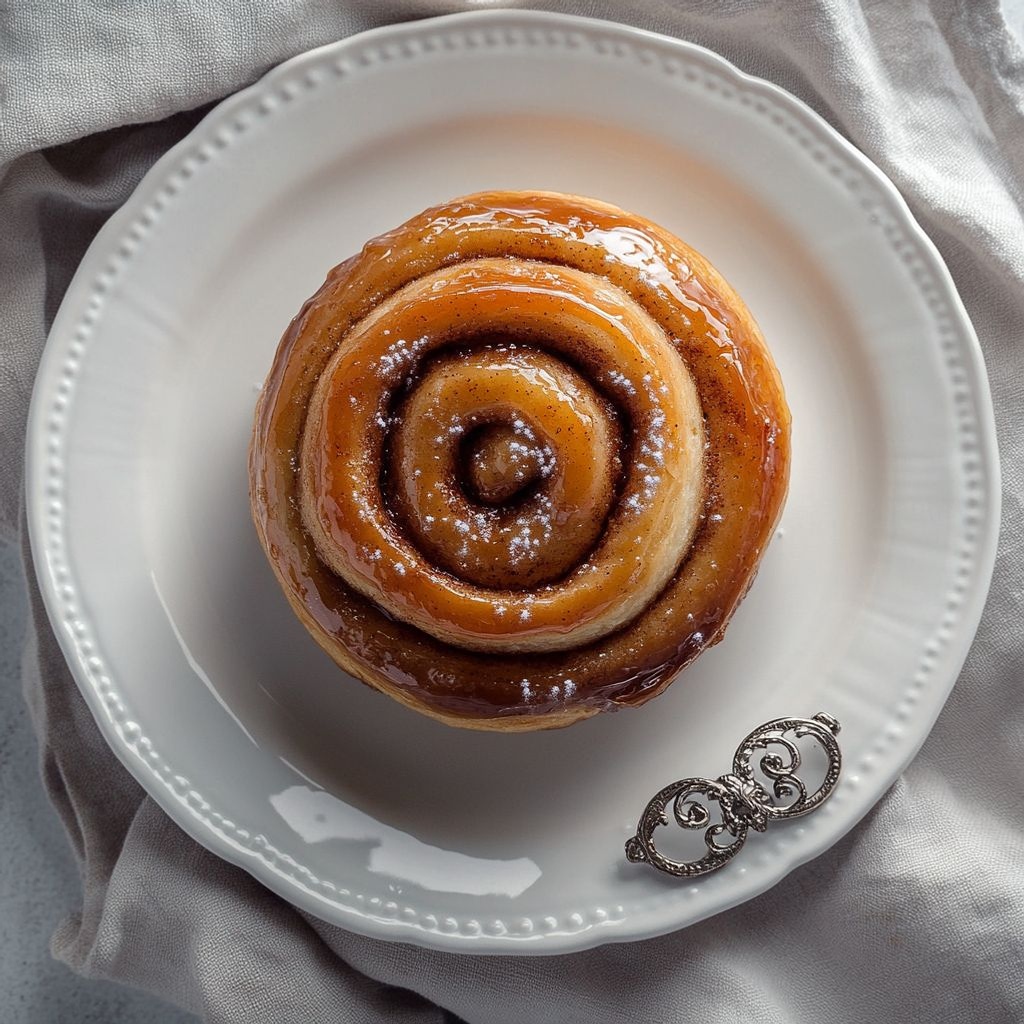
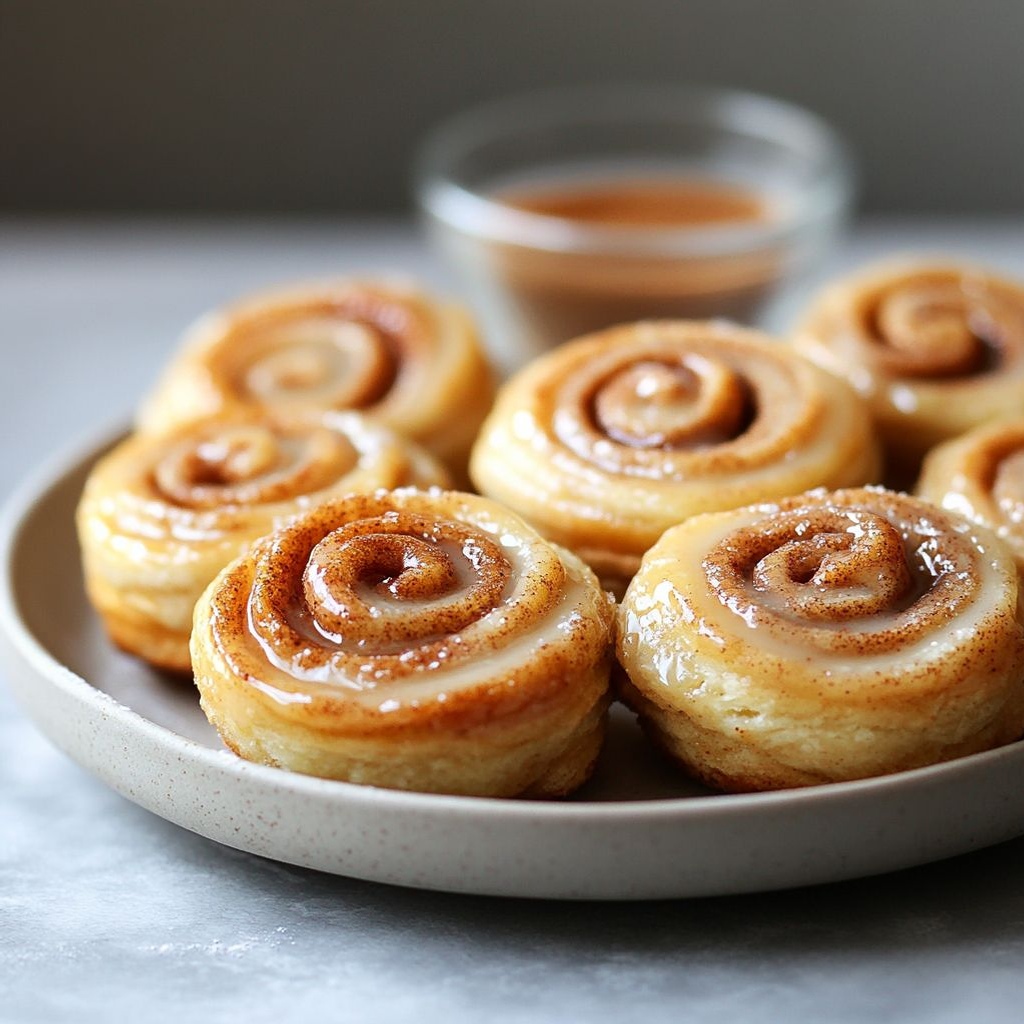
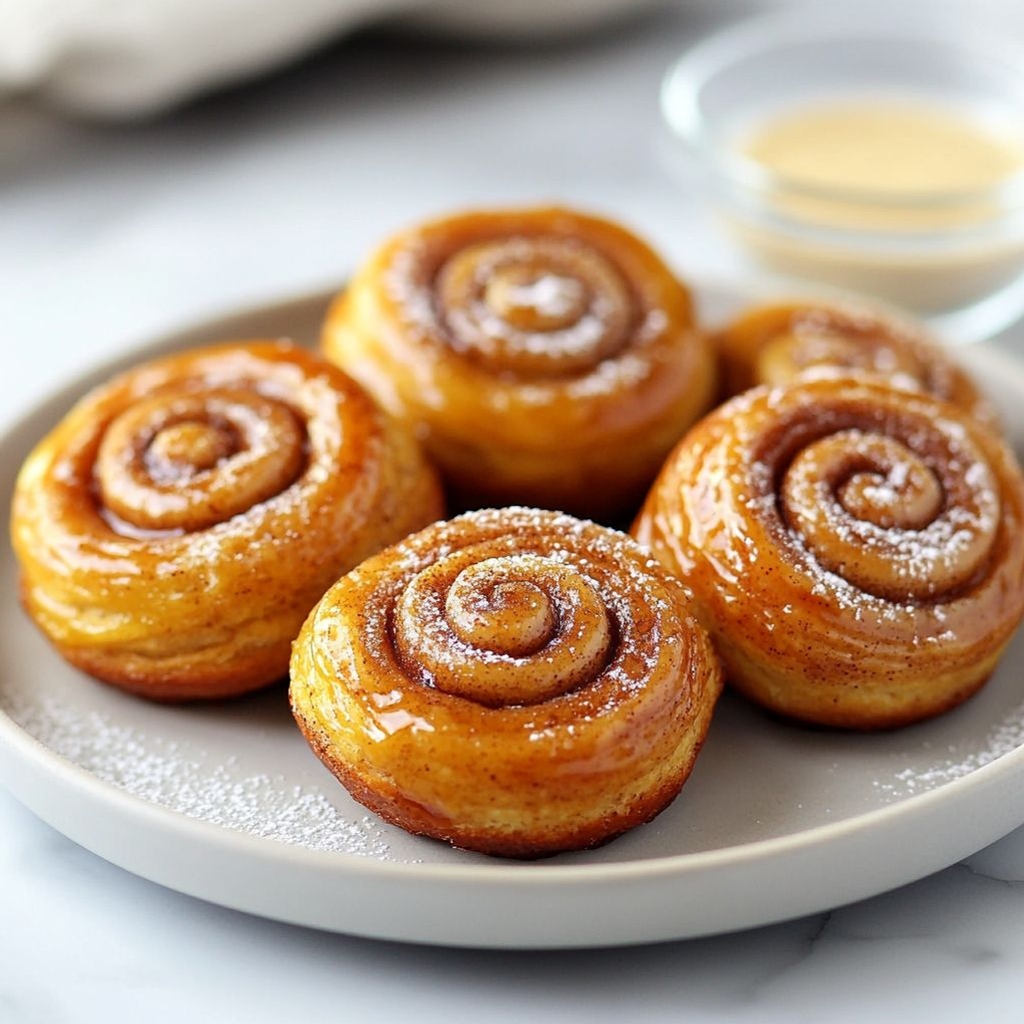
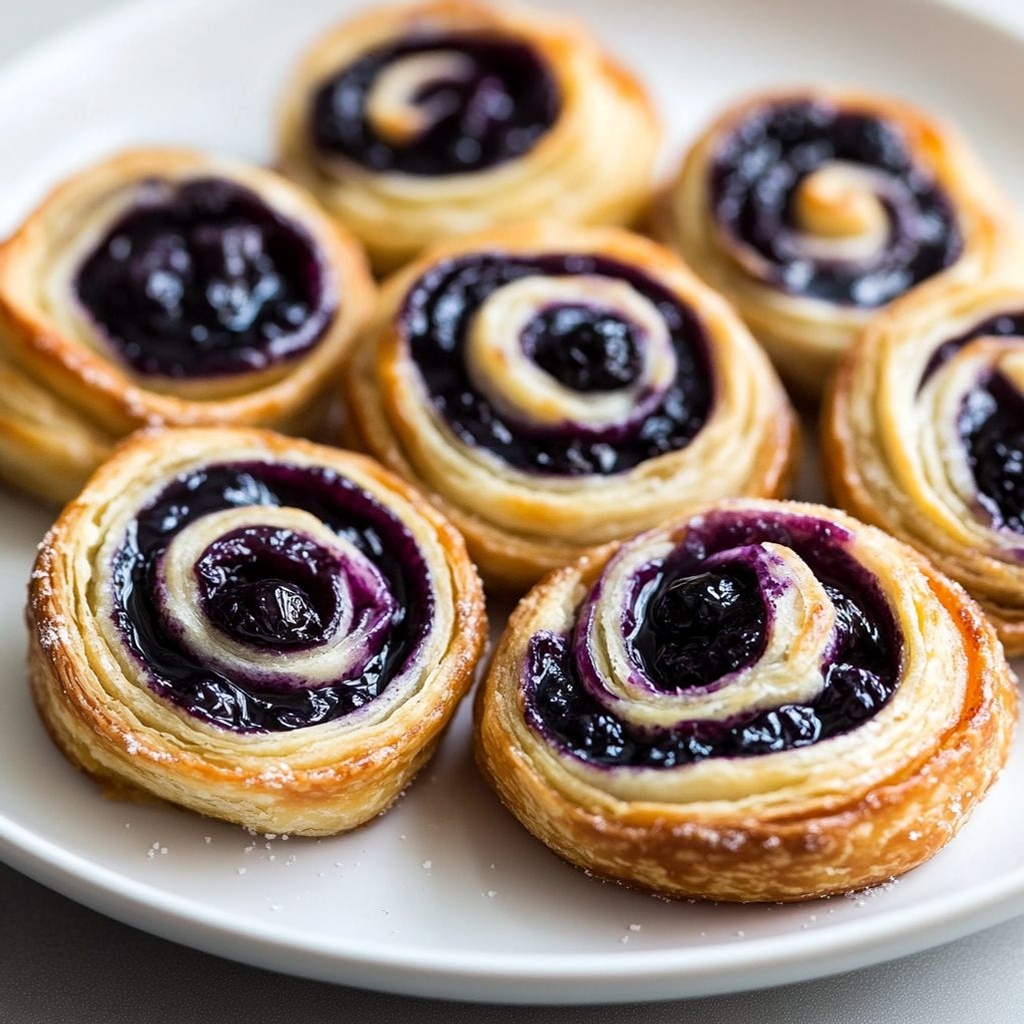
Immagina una mattina luminosa, la cucina che si riempie di una fragranza avvolgente: una dolce promessa di comfort che si scioglie sulle labbra e scalda il cuore. Le Girelle ai mirtilli sono molto più di un semplice dolce: sono un viaggio sensoriale che unisce la delicatezza della pasta, la vivacità di un succoso mirtillo e una nota sottile di agrumi che danza tra dolce e fresco. Ogni morso è una piccola sorpresa: una spirale di sapore che srotola lentamente, rivelando strati morbidi e una punta di brillantezza fruttata al centro. È una ricetta che celebra la stagione estiva, la convivialità della colazione o del tè pomeridiano, e quel senso di casa che resta a lungo nella memoria. In poche parole, le Girelle ai mirtilli sono un abbraccio che profuma di festa semplice, come se il buongiorno si trasformasse in un dessert elegante senza perdere la spontaneità di una merenda tra amici. Se sei alla ricerca di una coccola raffinata ma accessibile, di una ricetta che faccia sorridere grandi e piccini, di una preparazione che possa trasformarsi in un rituale domenicale, sei nel posto giusto. Lasciati guidare dalla magia delle spirali: una volta assaporate, vorrai rifarle ancora e ancora, magari adattandole alle stagioni e ai tuoi gusti, senza mai perdere quel tocco di carattere che le rende uniche.

La storia Dietro il Piatto

Le Girelle ai mirtilli hanno origini che sembrano intrecciarsi tra tradizione e modernità. Da una parte, l’immaginario delle sfogliature fragranti e delle paste lievitate, amate in molte cucine d’Europa, dall’altra la gioia estiva di raccogliere mirtilli freschi, quel piccolo tesoro blu che sa di bosco e di sole. In molte famiglie italiane, la cucina domenicale è una scatola magica dove si fondono vecchie ricette tramandate e nuove intuizioni. Le girelle diventano qui una tela perfetta per raccontare storie: un nonno che ricorda i mercati di una città di confine, una nonna che sorride al profumo che invade la casa, una giovane cuoca che sperimenta abbinamenti freschi per colpire al cuore degli amici. Il nome stesso, “girelle”, richiama l’idea di movimento, di trasformazione: una pasta che si avvolge su se stessa, come una chiacchiera che si allunga tra le mani e si intreccia con i ricordi. I mirtilli, piccole gemme di colore intenso, portano con sé una memoria di bosco, di sentieri umidi di rugiada e di merende estive ancora incontaminate. In questa fusione di estetica e gusto nasce una ricetta che ha l’aria di una tradizione rinnovata, capace di adattarsi alle esigenze moderne: una merenda elegante ma immediata, una colazione che sa di festa, una dolcezza che accompagna una chiacchierata tra amici.

Perché Ti Piacerà Questa Ricetta

  • Velocità e semplicità: una preparazione che si adatta a ritmi di casa senza rinunciare all’eleganza.
  • Confortevole ma fresca: la dolcezza della pasta dialoga con l’acidità tipica dei mirtilli, creando un equilibrio che solletica il palato.
  • Versatilità stagionale: perfette in estate con mirtilli freschi, ma anche deliziose con altri frutti di bosco o pesche leggere in una versione di mezzo stagione.
  • Colazione o dessert: si presta a essere gustata tiepida, a temperatura ambiente o fredda, accompagnata da una crema leggera o da una pallina di gelato alla vaniglia.
  • Ora social: una presentazione scenografica che fa sempre colpo, ideale per brunch, party informali o incontri tra amici.
  • Adatta a diverse diete: con opportuni sostituti può diventare vegan-friendly o gluten-free, mantenendo la stessa magia gustativa.

Profilo di Gusto e Texture

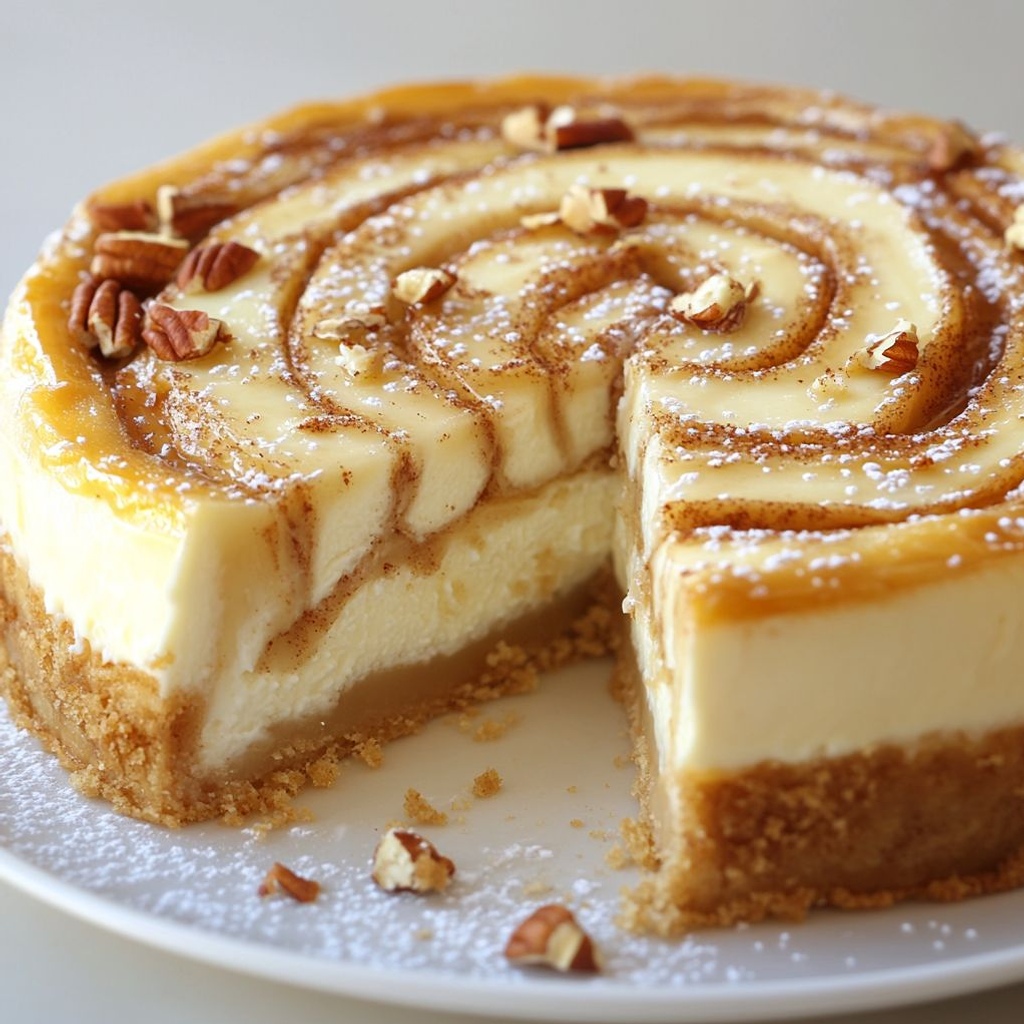
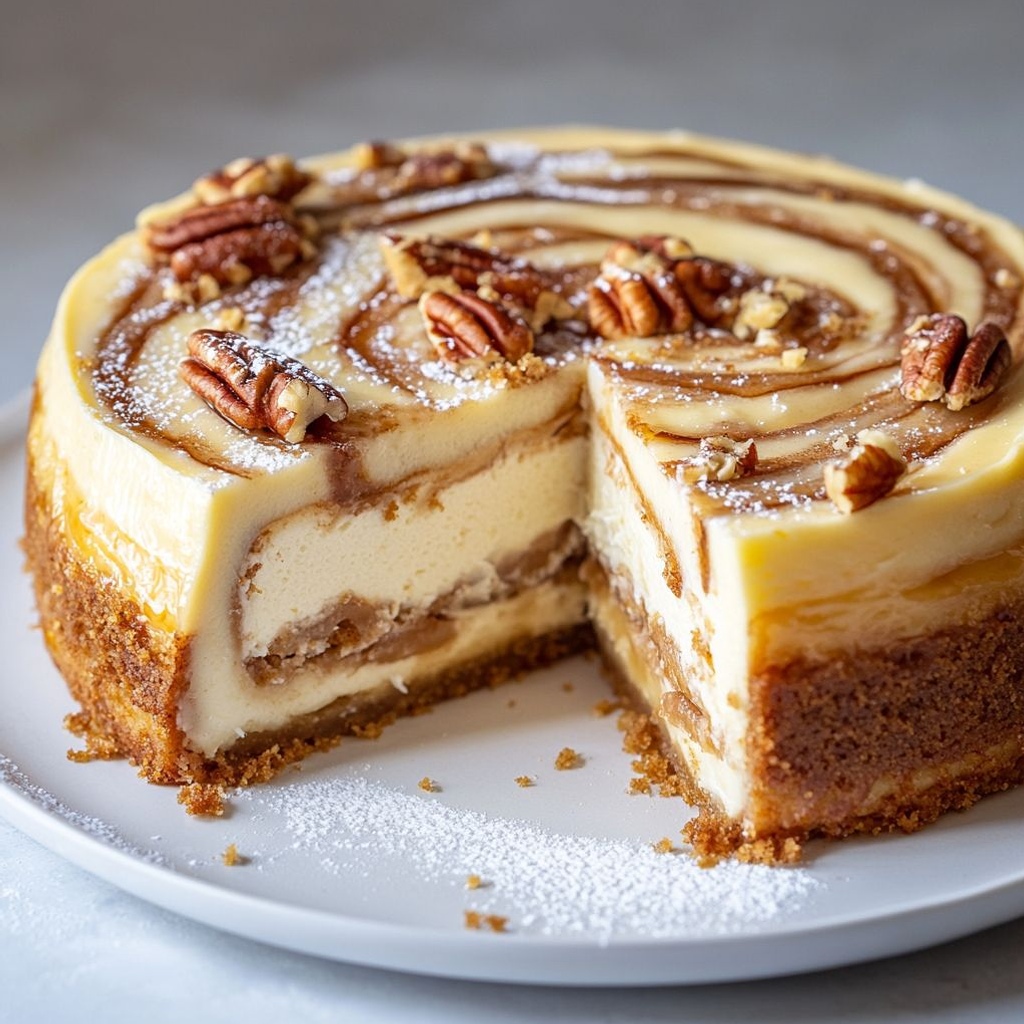
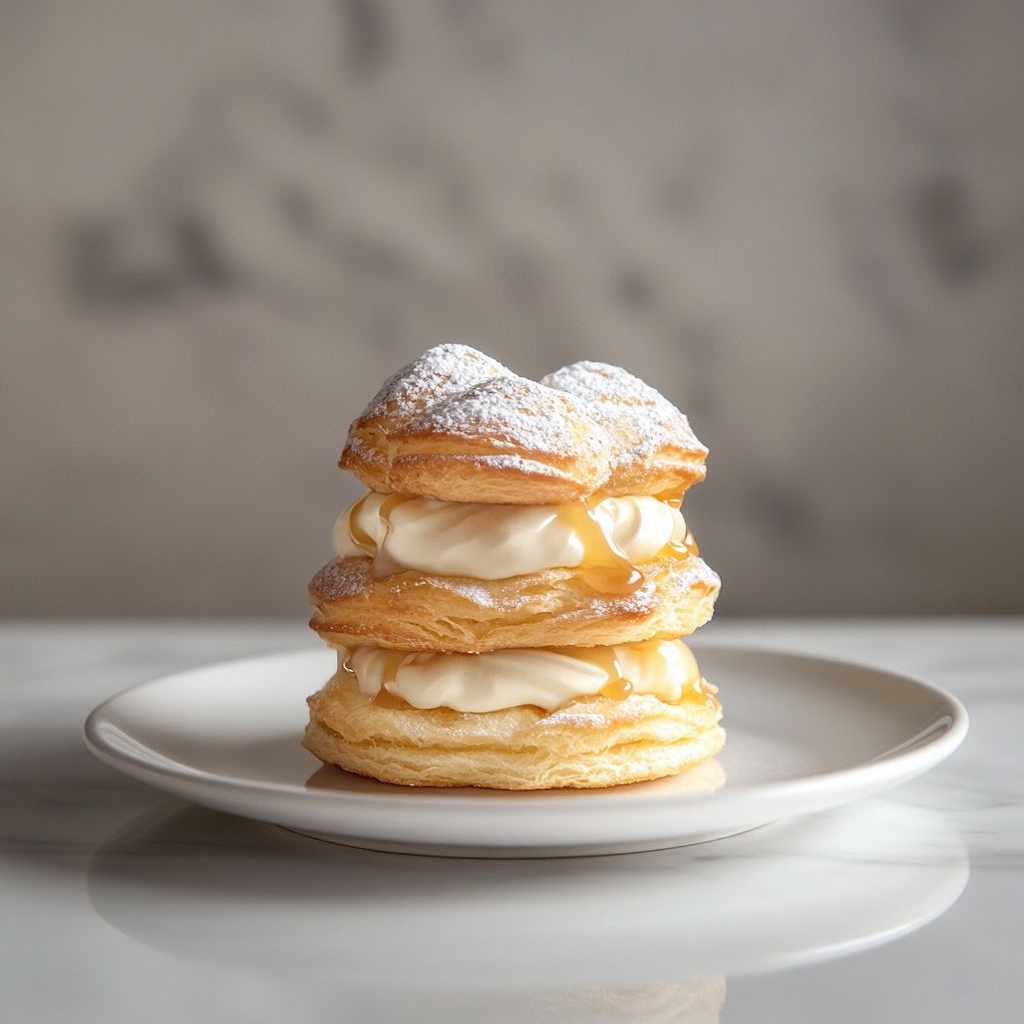
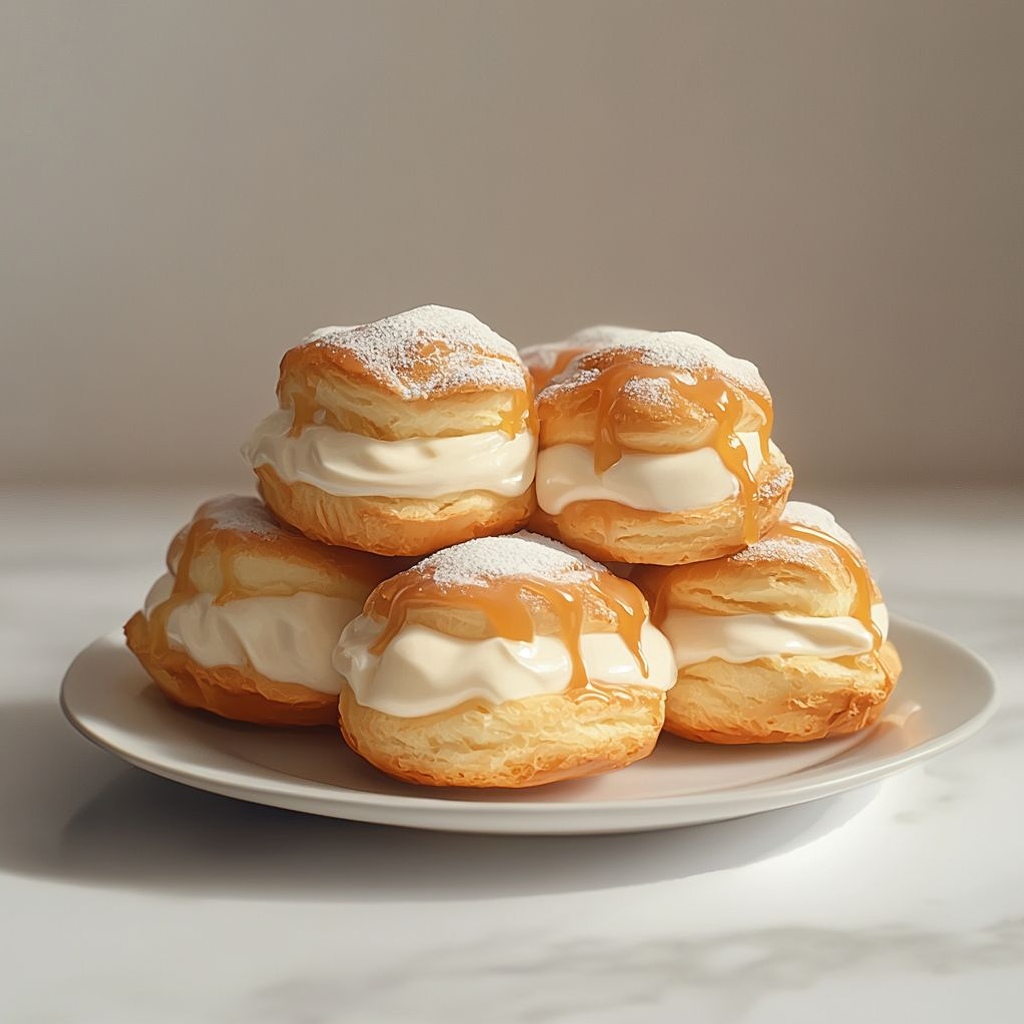
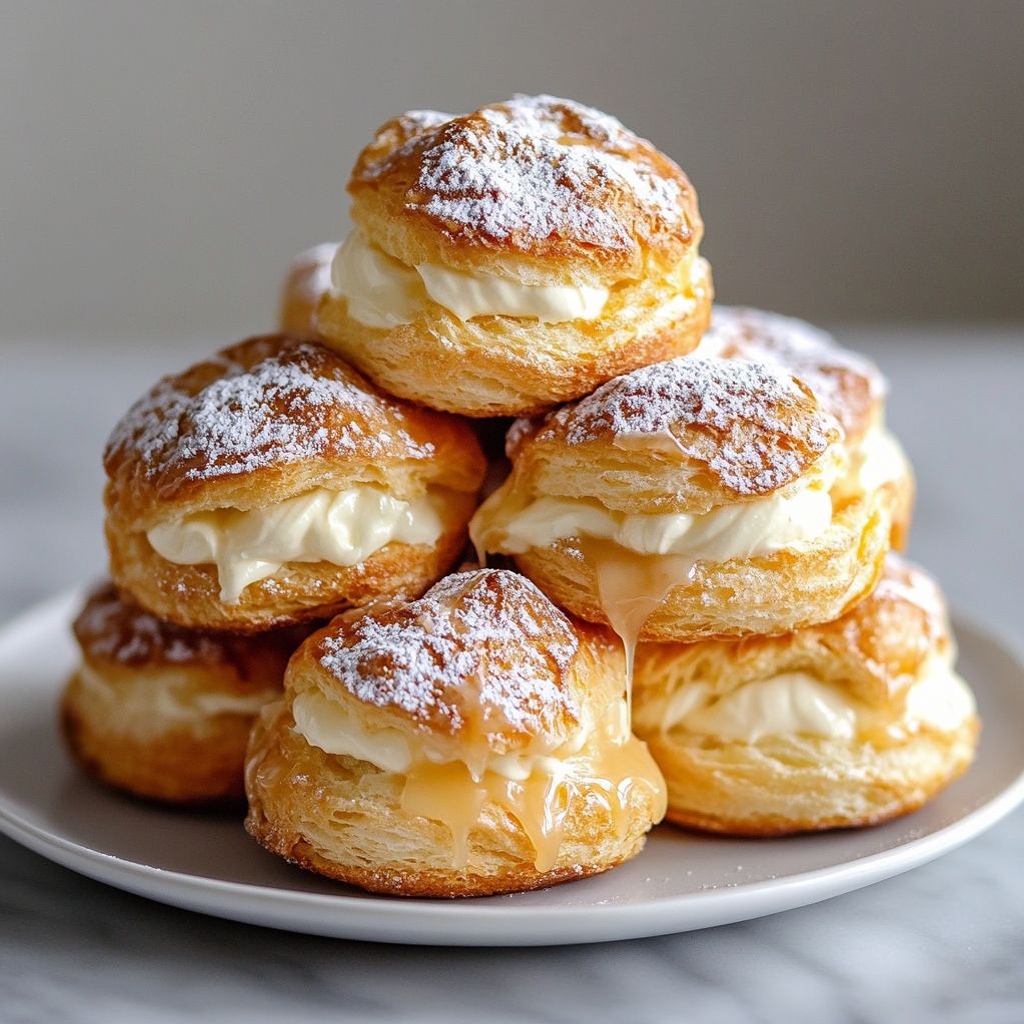
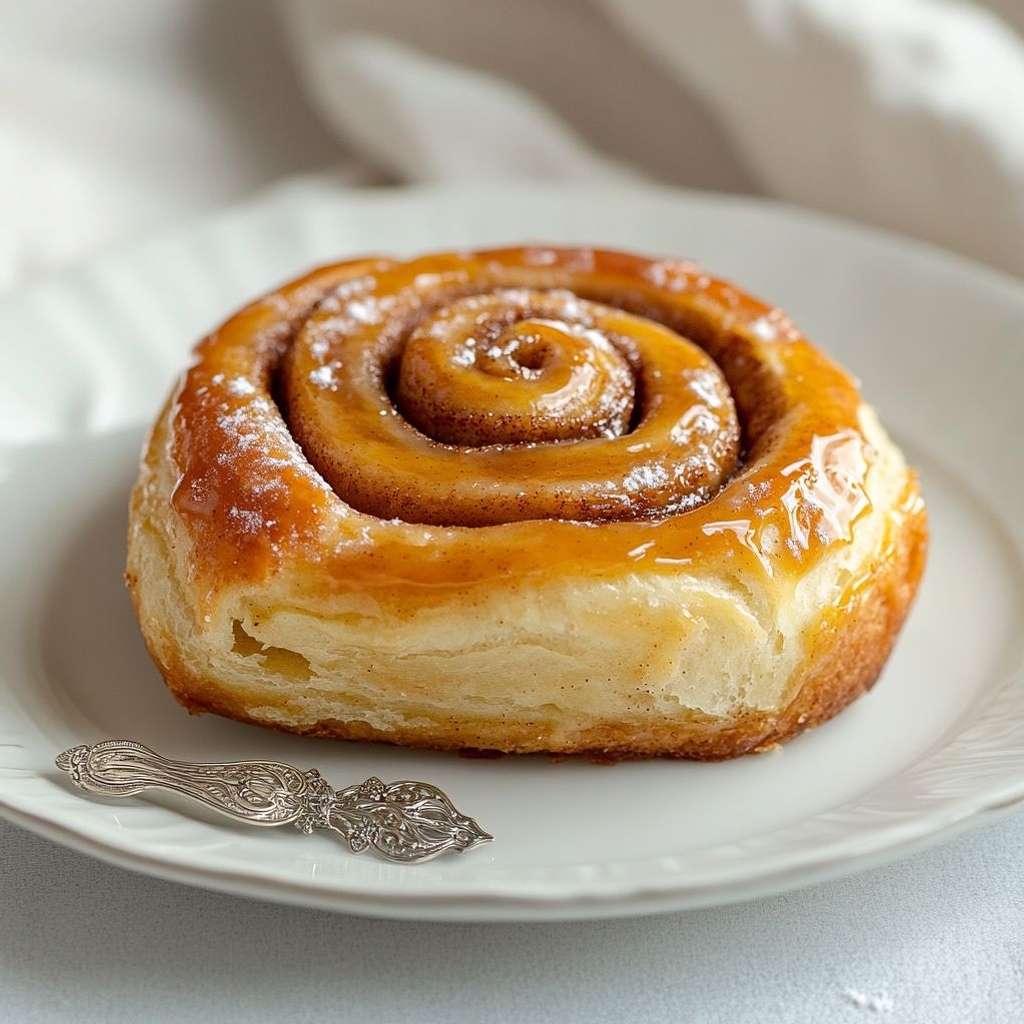
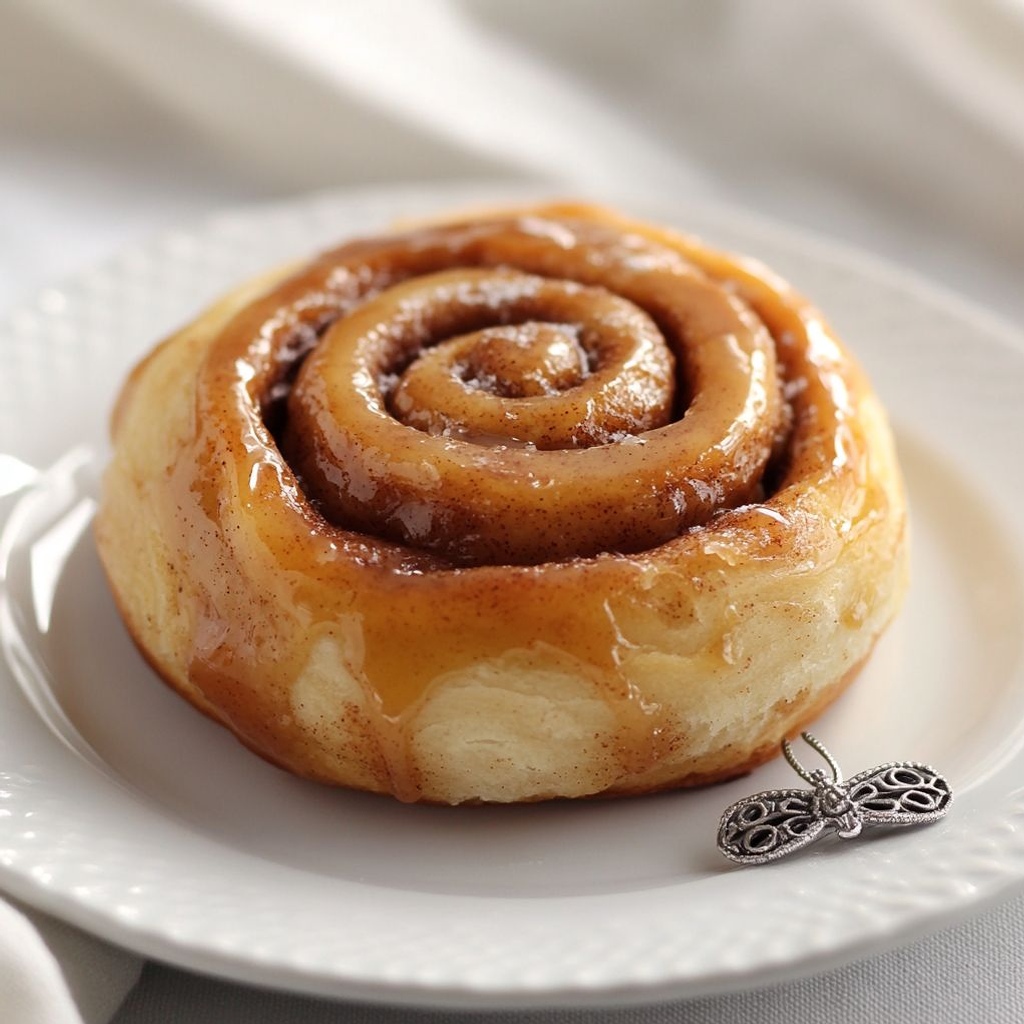
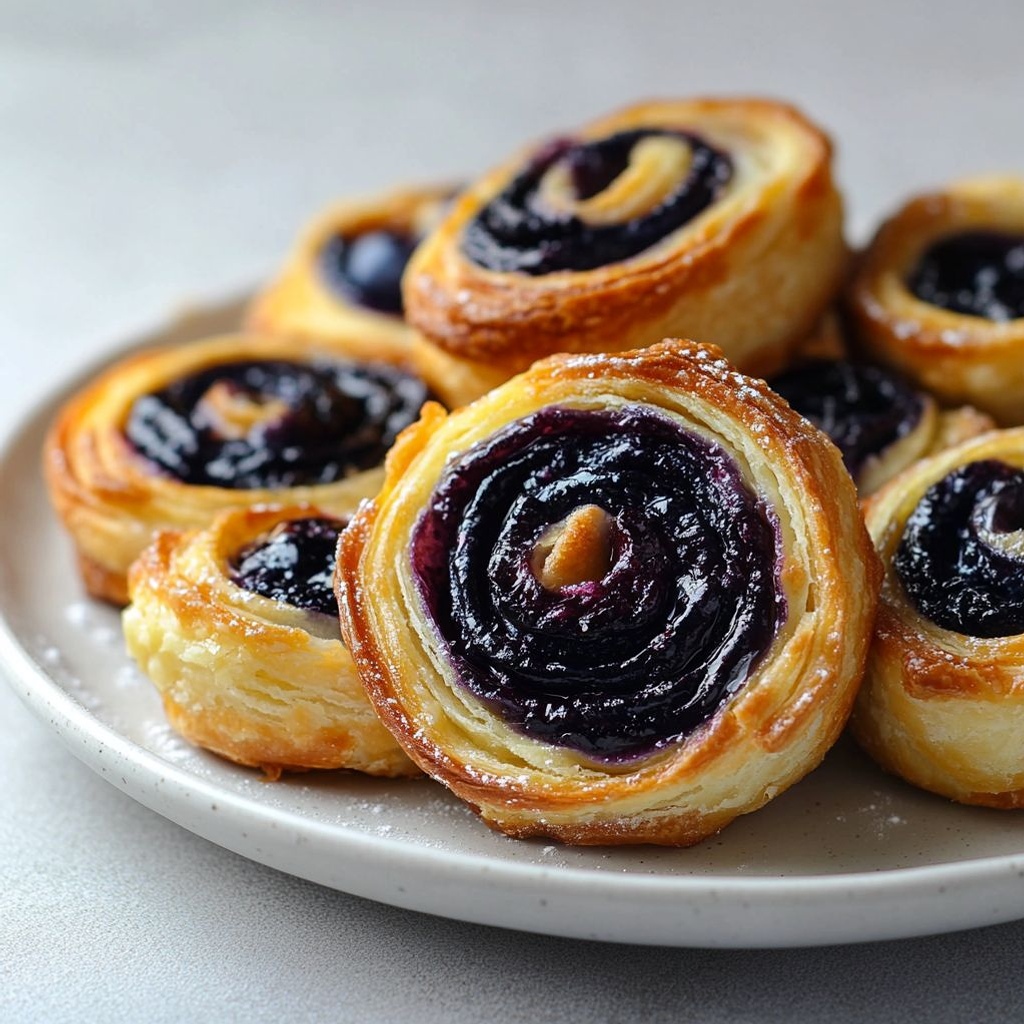
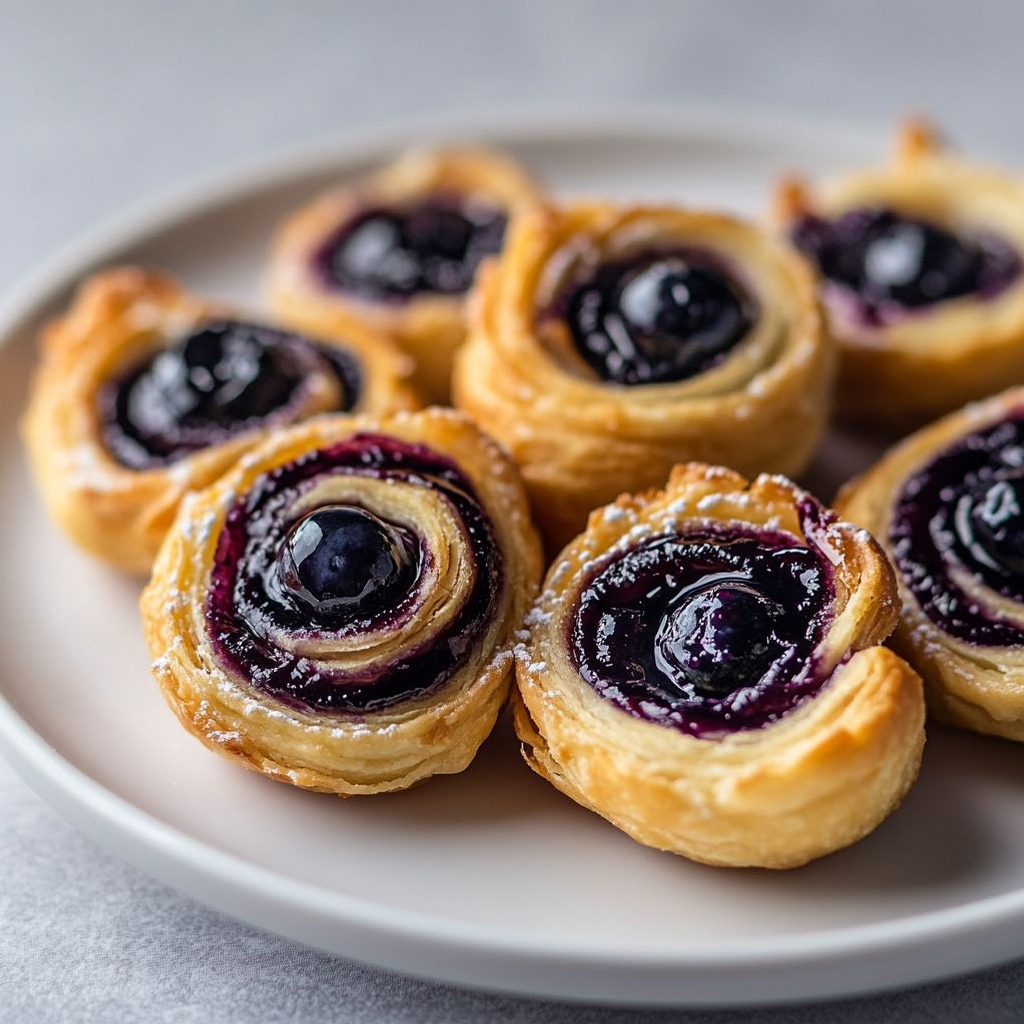
Il profilo aromatico delle Girelle ai mirtilli è una sinfonia bilanciata di dolcezza, acidità e nota fresca. L’esterno della pasta, quando è ben dorato, offre una croccantezza lieve che si scioglie all’interno in una morbida nuvola di impasto. L’interno, invece, custodisce la sorpresa: un cuore fruttato di mirtilli che rilascia una leggera succosità, accompagnato da una fragranza agrumata che arriva con una punta di scorza o di limone, se presente, capace di risvegliare il gusto con una scintilla di freschezza. Le note di burro o di olio di oliva, a seconda della versione, aggiungono una coda vellutata che lega la dolcezza della massa al carattere intenso dei mirtilli. La consistenza è quella che fa tornare all’istante: una spirale che si srotola, con strati sottili e delicati che si separano con facilità, lasciando una texture uniforme ma intrigante. L’armonia tra croccantezza esterna e turgore interna crea un’esperienza di farcitura leggera ma soddisfacente, che invita a un secondo morso senza fretta. In un abbinamento tipico, l’acidità dei mirtilli controbilancia la dolcezza, mentre una nota di scorza o vaniglia aggiunge profondità. È una ricetta che celebra la semplicità ben eseguita: pochi ingredienti di qualità, una tecnica giusta e un risultato che appare raffinato senza essere complicato.

Occasioni e Abbinamenti

Questa dolcezza si presta a molte occasioni, dalle mattine passeggiate alle serate di festa più informali. È perfetta per un brunch domenicale, accompagnata da yogurt, crema leggera o una pallina di gelato alla vaniglia, per un tocco di raffinatezza senza sforzo. Può diventare un dessert emozionante da proporre a seguito di una cena leggera, soprattutto quando si desidera offrire qualcosa di visivamente invitante ma non troppo pesante. Se la vuoi trasformare in un’esperienza da tè pomeridiano, servila in spicchi con una tazza di tè nero o una tisana floreale; l’insieme risulta elegante e confortante. Per i momenti di festa, le girelle si prestano a essere presentate intere o tagliate a fette, come mini-sorprese su un piatto da antipasto dolce, con una decorazione di zucchero a velo o una spruzzata di limone. Abbinamenti ideali includono: una crema di mascarpone leggera, una pallina di gelato alla vaniglia o al limone, panna montata delicata, o una salsa di yogurt naturale leggermente matura con una punta di miele. Per chi cerca una versione salata, si potrebbe immaginare una versione con una crema di formaggio spalmabile e mirtilli in una spirale, ma qui la tradizione resta fedele al sapore dolce e ai profumi primaverili/estivi.

Tips, Varianti & Sostituzioni

  • Scegli frutti di bosco maturi e profumati: la scelta della frutta determina la profondità del sapore. Se i mirtilli non sono al massimo, una mescolanza di mirtilli e lamponi può offrire un’interessante detonazione di sapori.
  • Varianti di farcitura: aggiungi un tocco di scorza di limone o arancia per una nota agrumata più accentuata; una punta di vaniglia o cannella può trasformare l’aroma in una versione ancora più accattivante.
  • Versione vegana: sostituisci eventuali componenti di origine animale con alternative vegetali di pari effetto; la texture rimane soffice e gradevole.
  • Opzioni senza glutine: è possibile utilizzare una base di pasta sfoglia o impasti a base di farine prive di glutine, mantenendo la friabilità e la fragranza.
  • Uso di altri frutti: in stagione, sostituisci i mirtilli con more, ribes o pesche a fettine sottili per una variazione giocosa di sapori e colori.
  • Dolcezza controllata: se preferisci una versione meno dolce, riduci una parte dello zucchero presente nell’impasto o scegli varietà di mirtilli naturalmente dolci ma nonastre, mantenendo l’equilibrio.
  • Metodi di cottura alternativi: se si dispone di un forno piccolo o di un microonde con funzione forno, si può adattare la cottura a seconda delle dimensioni e della potenza disponibile, sempre rispettando il bilanciamento tra esterno croccante e interno tenero.

Stoccaggio & Idee per Preparare in Anticipo

Le Girelle ai mirtilli possono essere gustate subito, ma sono anche una magnifica opportunità per preparare in anticipo. Se intendi conservarle, lasciale raffreddare completamente e trasferiscile in contenitori ermetici a temperatura ambiente per un massimo di 2 giorni. Per una conservazione più lunga, è possibile congelare sia la porzione già tagliata sia l’intera girella prima di qualsiasi evento di cottura; al momento della degustazione, scongelale lentamente e riaccendile leggermente al forno o nel microonde per ravvivare la croccantezza della scorza esterna e la morbidezza interna. Per un make-ahead completo, puoi preparare l’impasto e conservarlo in frigorifero per 24 ore prima di stenderlo e formare le girelle al momento dell’aroma pieno, così da preservare la freschezza dei sapori e la lucentezza della glassa, se presente. Se si preferisce una versione express, si può tagliare una girella fresca e gustarla entro poche ore, così da mantenere intatta la magia di una colazione o di una merenda immediata.

Curiosità & Trivia (Opzionale)

Il nome “girelle” richiama una cifra poetica di movimento e luce. In molte cucine europee, i dolci a base di pasta sfoglia o lievitata, arrotolati in forme spiralate, hanno accompagnato momenti di incontro e celebrazione. I mirtilli, oltre al loro inconfondibile colore, hanno una storia antica legata a molte tradizioni culinarie: in alcune culture sono considerati simboli di fortuna e salute, grazie alle loro proprietà antiossidanti e al loro profumo che richiama la natura selvaggia. L’uso di scorza di limone o di agrumi per dare freschezza è una pratica comune in molte ricette di dolci lievitati, poiché l’acidità bilancia la dolcezza e rinvigorisce i sensi. Se vuoi un tocco ancora più romantico, presenta le girelle in una teglia rotonda, tagliate a spicchi come una ruota di fortuna: un modo elegante per condividere una deliziosa esperienza con chi ami.

Conclusione

Le Girelle ai mirtilli sono una celebrazione della semplicità che affascina per la sua eleganza. Non servono longhe preparazioni o ingredienti complessi: basta una base soffice, una nota fruttata che cattura la luce, e la magia di una presentazione che sprigiona colore e profumo. Sono una promessa di comfort in qualsiasi momento della giornata, una ricetta che risveglia ricordi, crea nuovi momenti da custodire e si presta a infinite personalizzazioni. Se stai cercando un dolce che combini estetica e gusto senza sforzo, che possa adornare una tavola di festa o semplicemente rallegrare una giornata qualunque, le Girelle ai mirtilli ti invitano a metterti ai fornelli con serenità e curiosità. Ogni boccone è un invito a rallentare, a sorridere e a godere della bellezza di una piccola spirale che nasce dall’amore per la cucina casalinga e per i frutti di bosco che fanno cantare l’estate anche nei giorni più ordinari.

Ingredients

Dough

  • – 3 1/2 cups all-purpose flour (or bread flour)
    → Purpose: provides the structure and crumb of the rolls through gluten development. Prepare: measure by spooning into a cup and leveling, or weigh about 440 g for accuracy. Tips: if the dough feels too stiff, you can add a tablespoon or two of milk; if it’s too sticky, sprinkle in a little flour as you knead until it becomes smooth and elastic.
  • – 1/4 cup granulated sugar
    → Purpose: adds a touch of sweetness and helps feed the yeast a bit during the first rise, contributing to browning. Prepare: simply measure; no further prep. Tips: keep sugar modest to avoid overly sweet rolls; sugar also enhances crust color as the dough bakes.
  • – 1 teaspoon salt
    → Purpose: balances sweetness, strengthens dough flavor, and helps control yeast fermentation. Prepare: distribute evenly by whisking with flour. Tips: do not mix salt directly with warm liquid before adding yeast, as it can slow or kill yeast activity.
  • – 2 1/4 teaspoons active dry yeast
    → Purpose: leavening agent to produce the soft, tender rise characteristic of rolls. Prepare: proof in 3/4 cup warm milk (about 110°F/43°C) with a pinch of sugar until foamy (5–10 minutes). Tips: if using instant yeast, you can mix it with dry ingredients and skip the foaming step, adjusting rising times accordingly.
  • – 3/4 cup warm milk (about 110°F/43°C)
    → Purpose: hydrates the dough and activates the yeast; contributes to a tender crumb. Prepare: use a thermometer to ensure warmth; too hot will kill the yeast. Tips: if dairy-free, use an unsweetened plant milk; you may need a touch more flour or liquid depending on the absorption.
  • – 2 tablespoons unsalted butter, melted
    → Purpose: enriches the dough, adds flavor, and helps with a soft, moist crumb. Prepare: melt and cool slightly before mixing to avoid killing yeast. Tips: for dairy-free versions, substitute with neutral oil (like light olive oil) in equal amount.
  • – 1 large egg, room temperature
    → Purpose: enriches dough, contributes to tender crumb and color. Prepare: bring to room temperature before mixing to ensure they incorporate smoothly. Tips: if you prefer a dairy-free dough, you can replace the egg with 1/4 cup of applesauce plus 1 tablespoon oil, though texture will differ slightly.
  • – 1 teaspoon vanilla extract (optional)
    → Purpose: adds aroma and depth of flavor to the dough. Prepare: add with wet ingredients. Tips: use pure vanilla for best flavor; can be omitted if you want a more neutral roll.

Filling

  • – 1 1/2 cups blueberries (fresh or thawed frozen berries)
    → Purpose: the star filling; provides color, sweetness, and tang. Prepare: if using frozen, thaw and drain thoroughly; pat dry to avoid extra moisture seeping into dough. Tips: select ripe, juicy berries for best flavor; do not crush them too much when mixing into the filling.
  • – 1/4 cup granulated sugar
    → Purpose: sweetens the berry filling and helps draw out juices for a glossy swirl. Prepare: measure and mix with berries. Tips: adjust to taste; less sugar yields a tarter filling, more sugar yields a sweeter roll.
  • – 2 tablespoons cornstarch
    → Purpose: thickens the berry juices to create a stable filling that won’t leak through the dough. Prepare: whisk with sugar before adding to the berries or sprinkle over thawed berries as you mix. Tips: use more cornstarch if using a lot of watery berries; dissolve in a tablespoon of water before adding to berries to avoid lumps.
  • – 1 tablespoon fresh lemon juice
    → Purpose: brightens the berry flavor and helps balance sweetness. Prepare: squeeze fresh; strain to remove seeds. Tips: add lemon zest for extra perfume if desired.
  • – 1 teaspoon lemon zest
    → Purpose: enhances aroma and adds a subtle citrus note to the filling. Prepare: finely grate the zest, avoiding the white pith. Tips: fresh zest provides the best fragrance; if you don’t have lemons, use a small amount of orange zest for a different twist.
  • – 1/2 teaspoon vanilla extract (optional)
    → Purpose: deepens the berry filling flavor. Prepare: add to the berry mixture during mixing. Tips: works well with vanilla or almond extract for a richer profile; omit if preferred.
  • – 1/4 teaspoon ground cinnamon (optional)
    → Purpose: adds warmth and depth that pairs nicely with blueberries. Prepare: whisk into the filling with other dry ingredients. Tips: use sparingly; cinnamon can overpower the delicate fruit if used in excess.

Finish

  • – 1 large egg, beaten with 1 tablespoon water (egg wash)
    → Purpose: gives the baked rolls a glossy, golden crust. Prepare: brush on after shaping and before baking. Tips: if avoiding eggs, brush with milk or a dairy-free milk; for a crisper crust, bake on a preheated stone or steel.
  • – 1/2 cup powdered sugar
    → Purpose: forms a smooth glaze to finish the rolls with a gentle sweetness. Prepare: sift to remove lumps, then whisk with liquid. Tips: start with 2 tablespoons of milk and add more as needed to reach a pourable consistency; lemon juice can brighten the glaze if desired.
  • – 2–3 tablespoons milk (dairy or non-dairy)
    → Purpose: adjusts glaze consistency for pourable or drizzleable finish. Prepare: add gradually to achieve your desired thickness. Tips: use a dairy-free milk for a fully dairy-free recipe; warm milk can help dissolve the sugar faster.
  • – 1/2 teaspoon vanilla extract
    → Purpose: enhances glaze flavor with a hint of vanilla. Prepare: mix into the glaze until fully incorporated. Tips: optional; can be replaced with a pinch of lemon juice for brightness.
  • – Optional: 1 teaspoon lemon juice (in glaze) or a few drops of lemon zest
    → Purpose: adds bright citrus note to the glaze. Prepare: whisk into glaze. Tips: use sparingly to avoid overpowering the sugar glaze.
  • – Coarse sugar for sprinkling (optional)
    → Purpose: provides a subtle crunch and decorative sparkle on top. Prepare: sprinkle over the glaze while it’s still tacky. Tips: use toasting sugar or sanding sugar for extra crunch and sparkle.

Instructions

  • Proof the yeast in 1/4 cup warm milk with a pinch of sugar until foamy, about 5–10 minutes.
    → Temperature should be around 110°F/43°C; foaming confirms active yeast and proper hydration. If there is no foam after 10 minutes, discard and start with fresh yeast to ensure the dough rises correctly.
  • Whisk together 3 1/2 cups all-purpose flour (or bread flour), 1/4 cup granulated sugar, and 1 teaspoon salt in a large bowl until evenly combined.
    → Even distribution of salt and sugar ensures uniform fermentation and flavor; using a whisk aerates the flour slightly and prevents clumps. If you use bread flour, expect a chewier crumb and you may adjust hydration slightly.
  • Stir in the proofed yeast mixture, 2 tablespoons melted unsalted butter, 1 large egg, and 1 teaspoon vanilla extract into the wet ingredients until combined.
    → The wet ingredients hydrate the flour and the vanilla adds aroma; ensure the butter is cooled slightly so it doesn’t scramble the egg.
  • Add wet ingredients to the dry and mix to form a shaggy dough, then switch to a lightly floured surface to begin kneading.
    → This initial mixing distributes moisture evenly and builds structure; if using a stand mixer, attach a dough hook and mix on low until a cohesive mass forms.
  • Knead the dough on a lightly floured surface until it becomes smooth and elastic, about 8–10 minutes, testing with the windowpane method by stretching a small piece until it becomes translucent without tearing.
    → Gluten development is essential for a soft, tender roll with a good bite; if the dough tears, knead a few minutes longer and re-test the gluten window.
  • Place the dough in a lightly oiled bowl, turn to coat the surface with oil, cover with plastic wrap or a damp towel, and let rise in a warm, draft-free spot until doubled in size, 60–90 minutes.
    → The first rise develops flavor and lightness; avoid placing in direct heat or in a cold area, which slows or halts fermentation.
  • Meanwhile, prepare the blueberry filling by tossing 1 1/2 cups blueberries (fresh or thawed frozen, thoroughly drained) with 1/4 cup granulated sugar, 2 tablespoons cornstarch, 1 tablespoon fresh lemon juice, 1 teaspoon lemon zest, 1/2 teaspoon vanilla extract, and 1/4 teaspoon ground cinnamon (optional); let rest 10–15 minutes.
    → The cornstarch thickens the berry juices so the swirl stays intact during baking; lemon zest and juice brighten the filling while vanilla deepens the fruit flavor.
  • Punch down the risen dough, turn it out onto a lightly floured surface, and roll it into a rectangle about 14×20 inches (36×50 cm) with an even thickness of roughly 1/4 inch.
    → Even thickness ensures uniform baking and neat spirals; rotate the dough as you roll to maintain a straight, rectangular shape and prevent curling edges.
  • Spread the blueberry filling in an even layer over the dough, leaving a 1/2 inch border all around to allow for sealing; avoid pooling juices at the edges.
    → A generous, even layer yields consistent swirls and prevents filling from seeping out during bake; keep the border dry to help seal the seam.
  • Roll the dough tightly from the long edge into a log, pinch the seam to seal, and trim the uneven ends to create a neat roll.
    → A tight roll ensures clean, uniform slices and prevents the filling from leaking; trimming ends removes fragile dough that can crack during slicing.
  • Slice the log into 12 equal pieces and arrange them cut-side up in a greased 9×13 inch pan or on a parchment-lined sheet, leaving about 1 inch of space between rolls for expansion.
    → Even spacing allows air to circulate for even browning; prep the pan with grease or parchment to prevent sticking.
  • Cover loosely and let the rolls rise for a second time until they are puffed and about 1.5 times their original size, 30–45 minutes.
    → The second rise finalizes the crumb structure and ensures soft, lofty rolls; if they resist rising, place them in a warmer spot for a bit longer.
  • Preheat your oven to 350°F (175°C) and position a rack in the middle of the oven.
    → Even heat distribution produces uniform browning and prevents underbaked centers or overly dark tops.
  • Bake the rolls for 25–30 minutes, or until they are golden brown and the centers feel set when pressed gently; if the tops brown too quickly, loosely tent with foil.
    → Proper bake time yields a tender crumb with a crisp, glossy crust; use an internal thermometer (around 190°F/88°C) for precise doneness if desired.
  • While the rolls bake, prepare the glaze by whisking 1/2 cup powdered sugar with 2–3 tablespoons milk and 1/2 teaspoon vanilla extract until smooth; sift the sugar first to remove lumps.
    → A smooth glaze clings nicely to the warm rolls and provides a balanced sweetness; adjust thickness with more milk or sugar as needed.
  • Optionally whisk in 1 teaspoon lemon juice or a pinch of lemon zest to brighten the glaze; this adds a fresh citrus note that complements blueberries.
    → A touch of acidity lifts the glaze and echoes the lemon in the filling without making it sour.
  • Remove the baked rolls from the oven and brush or drizzle the warm rolls with the prepared glaze; allow the glaze to set for 10–15 minutes before serving.
    → Glaze adheres best to warm surfaces and creates a glossy finish; the wait time helps the glaze set for clean slices.
  • Finish with a light sprinkle of coarse sugar if desired for a subtle crunch and decorative sparkle.
    → Coarse sugar adds texture and a festive look; apply while the glaze is still tacky so it adheres well.
  • Serve the blueberry swirl rolls warm or at room temperature; store leftovers wrapped tightly in the refrigerator for up to 3 days and rewarm gently before serving.
    → Gentle reheating preserves moistness and prevents the filling from drying out; reheat in a low oven (about 300°F/150°C) for 8–10 minutes or cover and warm in the microwave in short bursts.

Notes

These blueberry swirl girelle are a comforting, golden-brown treat with a soft, buttery crumb and a juicy blueberry filling. For best results, ensure the dough is properly proofed until doubled and roll it gently to keep neat swirls; cook the berries with sugar, lemon juice, and cornstarch until thickened and let the filling cool before spreading to avoid soggy dough. You can customize them by adding lemon zest to the filling, substituting with other berries, or adding a pinch of cinnamon for warmth. They freeze well—slice the rolls after baking, cool completely, then freeze on a tray before transferring to a bag for easy, portion-controlled baking. Reheat gently in a 350°F (175°C) oven until warmed through and glaze if desired for a glossy finish. Always ensure your yeast is fresh and your dough is not overworked to maintain a tender, fluffy crumb.

Tips

Consigli utili per Girelle ai mirtilli

  • Preparare gli ingredienti a temperatura ambiente: uova, latte e burro devono essere morbidi. Questo aiuta a incorporare meglio gli ingredienti e a una lievitazione più uniforme.
  • Misura accuratamente la farina: preferisci la bilancia (circa 440 g) o la tecnica del cucchiaio e livellamento. Una quantità errata può rendere l’impasto troppo secco o troppo appiccicoso.
  • Gestione del lievito: sciogli il lievito di birra attivo nel latte tiepido con un pizzico di zucchero finché non diventa spumoso. Se usi lievito istantaneo, mescolalo direttamente con gli ingredienti secchi e riduci i tempi di lievitazione.
  • Controllo temperatura latte e burro: il latte non deve superare circa 43°C, altrimenti uccide il lievito. Lascia raffreddare il burro fuso prima di aggiungerlo all’impasto.
  • Test di lavorazione: l’impasto è pronto quando è elastico e liscio. Puoi fare il test della finestra: se l’impasto si stende senza spezzarsi, è pronto per la prima lievitazione.
  • Lievitazione: posiziona l’impasto in una ciotola pulita, copri, e lascia lievitare in luogo caldo e privo di correnti fino al raddoppio. In una cucina molto calda i tempi possono essere circa 60-75 minuti; in ambienti freddi può richiedere più tempo.
  • Stendere e farcire: stendi l’impasto in un rettangolo uniforme e non troppo sottile. Se i mirtilli rilasciano molto liquido, mescolali con scorza e succo di limone e con un po’ di amido di mais per addensare; asciugali bene prima di usarli. Raffreddare leggermente l’impasto prima di farcire aiuta a evitare che la farcitura fuoriesca.
  • Farcitura mirtilli: mescola mirtilli, zucchero, amido di mais, succo di limone e scorza di limone; aggiungi la vaniglia se vuoi. Evita di schiacciare troppo i mirtilli durante l’assemblaggio per mantenere i pezzi interi.
  • Arrotolamento: arrotola dal lato lungo per formare un cilindro uniforme; sigilla bene l’unione e procedi a tagliare in fette di circa 2–3 cm. Lascia spazio tra le girelle sulla teglia per la lievitazione finale.
  • Seconda lievitazione: lascia lievitare le girelle già tagliate nello stampo finché non raddoppiano. Copri e mantieni in luogo caldo. Non gonfiarle eccessivamente, altrimenti potrebbero aprirsi in cottura.
  • Uovo lucido e glassa: spennella con uovo per una crosta dorata. Se vuoi una versione senza uova, usa latte per spennellare. Per la glassa, regola la consistenza con latte o succo di limone; aggiungi più zucchero a velo se vuoi una glassa più densa.
  • Decorazione finale: zucchero grosso o di canna per un tocco croccante. Applica mentre la glassa è ancora leggermente umida.
  • Varianti: aggiungi una leggera spolverata di cannella al ripieno per un tocco speziato, oppure sostituisci una parte di scorza di limone con scorza d’arancia per un aroma agrumato diverso.
  • Conservazione: se non le consumi subito, conservale in contenitore chiuso a temperatura ambiente per 1–2 giorni o in frigorifero più a lungo; riscaldale brevemente in forno per ravvivare.
  • Congelamento: puoi congelare le girelle prima della lievitazione finale; una volta formate e tagliate, congela su una teglia e poi trasferiscile in sacchetto. Cuocile da congelate, aggiungendo qualche minuto di cottura rispetto al tempo standard.

FAQ

Che cosa sono le Girelle ai mirtilli?

Le Girelle ai mirtilli sono dolci a base di pasta lievitata arrotolata e farcita con mirtilli, tagliate a fette per ottenere rotolini dolci e morbidi. Sono ideali per la colazione, la merenda o un dessert leggero.

Quali ingredienti servono per l’impasto e la farcitura?

Per circa 6-8 girelle, servono:

  • Farina 00 o 550 – 250 g
  • Lievito di birra fresco (oppure lievito secco attivo) – circa 7 g
  • Zucchero – 40 g
  • Latte tiepido – 120-140 ml
  • Uovo – 1 grande
  • Burro morbido – 40-60 g
  • Sale – un pizzico
  • Scorza di limone grattugiata (opzionale)
  • Mirtilli freschi o surgelati – 200-250 g
  • Zucchero extra per la farcitura (opzionale) e succo di limone
  • Amido di mais (facoltativo, per addensare la salsa di mirtilli)
È possibile utilizzare lievito istantaneo o è obbligatorio il lievito di birra?

Per una consistenza simile a una brioche, è consigliato usare lievito di birra (fresco o secco attivo) e prevedere una lievitazione. Il lievito istantaneo permette una preparazione più rapida, ma l’impasto risulterà meno soffice. In alternativa, si può utilizzare una pasta pronta come la pasta sfoglia, ma il risultato sarà diverso in texture e sapore.

Come si prepara l’impasto delle girelle ai mirtilli?

Procedura di base:

  1. Sciogli il lievito in latte tiepido con un cucchiaino di zucchero e lascia riposare 5-10 minuti finché fa schiuma.
  2. In una ciotola grande, mescola la farina con lo zucchero e un pizzico di sale.
  3. Aggiungi l’uovo, il latte restante e il lievito sciolto. Impasta fino a ottenere un composto omogeneo.
  4. Aggiungi il burro morbido poco alla volta e continua ad impastare finché l’impasto è liscio ed elastico.
  5. Lascia lievitare in un luogo tiepido coperto con un canovaccio finché raddoppia di volume (in genere 60-90 minuti).
  6. Stendi l’impasto in un rettangolo di circa 0,5 cm di spessore.

Nel frattempo prepara la farcitura (vedi Q5).

Come si prepara la farcitura ai mirtilli?

Puoi preparare una salsa/farcitura semplice: cuoci 200-250 g di mirtilli con 2-3 cucchiai di zucchero, un filo di succo di limone e, se ti piace, 1 cucchiaino di amido di mais sciolto in poca acqua. Cuoci finché i mirtilli si spezzano e la salsa si addensa. Lascia raffreddare leggermente prima di spalmarla sull’impasto. In alternativa usa mirtilli freschi/in orzi non cotti e aggiungi zucchero e succo di limone.

Come si arrotolano le girelle e come si tagliano?

Distribuisci la farcitura in modo uniforme sul rettangolo di impasto, poi arrotola dal lato lungo formando un cilindro stretto. Sigilla bene il bordo. Taglia il rotolo in fette di circa 2,5-3 cm e disponile su una teglia foderata con carta forno, lasciando spazio tra una le altre per la lievitazione. Copri e lascia riposare 15-20 minuti prima di infornare.

Tempo di cottura e temperatura del forno?

Cuoci in forno preriscaldato a 180°C per circa 15-20 minuti, o finché le girelle risultano dorate in superficie. I tempi possono variare a seconda del forno, quindi controlla visivamente. Lascia raffreddare su una griglia prima di servire e spolvera con zucchero a velo se desideri.

Posso prepararle in anticipo o congelarle?

Sì. Puoi:

  • Preparare l’impasto e lasciarlo lievitare in frigorifero per tutta la notte; al mattino stendi, farcisci, taglia e cuoci come indicato.
  • Conservare le girelle crude surgelate su una teglia per 1-2 ore, poi trasferirle in un sacchetto adatto al freezer. Cuoci direttamente dal congelatore aggiungendo qualche minuto al tempo di cottura.
  • Le girelle cotte si conservaranno in frigorifero per 2-3 giorni; è possibile anche congelarle una volta cotte (1-2 mesi) e ri-scaldarle al microonde o in forno.
Quali varianti e trucchi posso provare?

Varianti e consigli utili:

  • Aromi: aggiungi scorza di limone o arancia all’impasto per un profumo più fresco; un pizzico di cannella si sposa bene con i mirtilli.
  • Farcitura alternativa: crema di ricotta, panna montata leggera o marmellata di mirtilli al posto della salsa fresca.
  • Versione senza glutine: usa una miscela di farine senza glutine e aggiungi un po’ di xantano per migliorare l’elasticità dell’impasto.
  • Per una versione più ricca: aggiungi un tocco di vaniglia all’impasto o un cucchiaio di yogurt nell’impasto per una morbidezza extra.
Come conservarle e quali sono i consigli di presentazione?

Conservazione:

  • In luogo fresco, in contenitore ermetico, 2-3 giorni.
  • Per tempi più lunghi, congelale crude o cotte come descritto sopra.
  • Per la presentazione, servi a temperatura ambiente o tiepide, spolverando con zucchero a velo. Aggiungere una crema leggera o una salsa di mirtilli al piatto valorizza il sapore.

Introduction — A Whisper of Warm Cinnamon and Velvet Cream

Imagine a dessert that greets you with the soft, cozy aroma of cinnamon-sugar swirls, then welcomes your palate with the cool, creamy kiss of cheesecake. Cheesecake al cinnamon roll is where two classics fuse into a single, irresistible indulgence: a cheesecake whose surface carries ribbons of cinnamon roll sweetness, and a crust that offers both crunch and comfort. From the first fragrant inhale to the last lingering spoonful, this dessert feels like a celebration in a single slice—the kind of treat you save for moments that deserve a little grandeur, yet it’s surprisingly approachable enough for a casual weekend gathering. The experience is sensory on every level: the sound of a knife slicing through a glossy, pale surface; the scent of vanilla, butter, and cinnamon rising like a warm wave; and the balance of tangy, velvety cheese with the toasty, caramelly notes of a cinnamon roll. It’s not simply a dessert; it’s a memory in the making, an invitation to linger at the table a little longer, and a shared joy that turns ordinary evenings into something memorable.

The Story Behind the Dish

Cheesecake al cinnamon roll tells a story of culinary conversation—two beloved traditions meeting at a crossroads of texture and aroma. Cheesecake has ancient roots in many cultures, evolving from the dense, rustic versions of the past into the refined, silken modern iterations that glisten with a glossy finish. Cinnamon rolls, on the other hand, owe their warm, comforting personality to generations of bakers who perfected the art of spiraling sweetness—soft dough, pockets of cinnamon-sugar, and a glaze or glaze-like finish that brings a final touch of gloss and indulgence. Blending these two classics is a natural encounter between tangy, creamy smoothness and the cozy, caramelized warmth of cinnamon spice. The result is not merely a flavor mash; it’s a narrative on a plate: the cheesecake speaks of refined, refined elegance, while the cinnamon roll whispers of Sunday mornings, shared stories, and the comforting joy of a kitchen filled with the scent of butter and brown sugar. In many homes, Christmas gatherings and weekend brunches become the perfect stage for this hybrid—it’s a dessert that respects tradition while inviting a playful, contemporary riff. If you close your eyes, you can almost hear the soft whirr of the mixer, the crackle of sugar meeting a hot skillet, and the soft hush of guests savoring the first bite together.

Why You’ll Love This Recipe

  • Versatile elegance: It elevates any dessert table without requiring complicated techniques.
  • Texture harmony: A crisp, lightly browned crust pairs with a luscious, creamy center and delicate cinnamon swirl ribbons.
  • Flavor balance: Tangy cream cheese tempering meets warm, cozy cinnamon-brown sugar notes for a sophisticated yet comforting bite.
  • Make-ahead friendliness: The flavors mature with a little time, making it ideal for ahead-of-time planning for gatherings.
  • Visual appeal: The marbled cinnamon swirl across a pale cheesecake creates a stunning, irresistible presentation.
  • Adaptable for different diets: The concept easily adapts to gluten-free, dairy-free, or vegan versions with thoughtful substitutions.
  • Perfect for many occasions: Brunch, holidays, birthdays, dinner parties, or a simple weeknight dessert that feels special.

Flavor Profile & Texture

The Cheesecake al cinnamon roll offers a layered sensory journey. The base is a crust that provides a gentle, nutty crunch, subtly echoing the texture you might expect from a delicate biscuit or cookie crust without overpowering the filling. The filling itself is a two-layer affair—an exquisitely smooth, velvety cheesecake anchored by a tangy brightness that keeps sweetness honest and lively. Through the center and across the top, ribbons of cinnamon-sugar swirl weave cinnamon-browned pockets of caramelized sugar into the creamy canvas, delivering bursts of warmth with every forkful. The cinnamon notes are not cloying but cozily aromatic, like a favorite sweater that has been worn in just enough to soften its edges. The finish is a gentle, lingering sweetness, lightly echoing notes of vanilla, cream, and a whisper of cloves or nutmeg depending on how you season. The overall texture is a dance: crisp at the edge, wobbly and lush in the middle, with the cinnamon swirls providing little chewy pearls of taste that catch the palate just so. The sensory experience is both comforting and sophisticated, bridging the familiar familiarity of a cinnamon roll with the refined elegance of a cheesecake. It’s dessert that respects both forms and emerges as something greater than the sum of its parts.

Occasions & Pairings

Because of its dual identity, this dessert shines in a variety of settings. It makes a spectacular centerpiece for a holiday dessert table, a show-stopping finish to a celebratory meal, or a refined treat to share after a long week. For weekend gatherings, it pairs beautifully with coffee, espresso, or a velvety hot chocolate. If you’re hosting a brunch, consider serving it alongside fruit compotes, yogurt parfaits, and a light sparkling wine or a gently sweet dessert wine. For a more casual night, a slice alongside a cup of tea can feel like a comforting ritual, a pause in the day to savor something special. In terms of pairings, consider the following ideas:

  • Drinks: A robust espresso, a fresh-pulled latte, or a glass of late-harvest Riesling or Moscato for a touch of brightness that complements the cinnamon sweetness.
  • Side options: Fresh berries or a light citrus coulis to cut through richness; a dollop of lightly whipped cream or mascarpone for extra creaminess.
  • Occasions: Christmas morning, Easter brunch, birthdays, dinner parties, or a celebratory dessert after a comforting family dinner.

Tips, Variations & Substitutions

  • Make-ahead note: Cheesecake flavors typically deepen after chilling, so plan to prepare a day ahead for the best flavor integration. Chill overnight in the refrigerator to allow the cinnamon swirls and filling to set fully.
  • Texture tweaks: If you prefer a denser cheesecake, opt for a thicker batter and a slightly shorter bake time. For a lighter, souffle-like center, introduce a touch more air by whisking the filling until very smooth and light.
  • Vegan option: Use a high-quality vegan cream cheese substitute, full-fat coconut milk or almond milk for creaminess, and a neutral oil or dairy-free butter for the crust. Sweeten with a plant-based sugar and add a touch of almond or vanilla extract for depth.
  • Gluten-free version: Replace traditional crust with finely ground almonds, gluten-free cookies, or a gluten-free graham cracker alternative, mixed with butter and a pinch of salt. Ensure all components are certified gluten-free if needed.
  • Low-sugar approach: Reduce the cinnamon-sugar swirl by half or swap some of the sugar for a maple or agave note. Add a touch of cooling citrus zest (orange or lemon) to brighten the filling without increasing sweetness.
  • Flavor twists: Introduce a hint of vanilla bean paste, orange zest, or even a pinch of cardamom to complement the cinnamon without overpowering the core flavors.
  • Regional takes: Use a brown-butter crust for a deeper nutty profile, or fold in finely chopped pecans or walnuts for crunch and a subtle toasty flavor.
  • All-in-one swirl technique: For a more dramatic visual, layer a cinnamon-sugar mixture into the middle of the batter before the final swirl, creating a marbled effect that cooks into the center in beautiful ribbons.
  • Allergen-conscious options: If dairy is a concern, explore lactose-free cream cheese varieties and dairy-free butter substitutes. For nut allergies, avoid crusts that rely on ground nuts and use a robust gluten-free biscuit alternative instead.

Storage & Make-Ahead Ideas

This cheesecake keeps beautifully when properly stored. If you plan to serve it over a couple of days, cover tightly and refrigerate. The flavors deepen and the texture firms up as it rests in the fridge. For longer storage, this dessert freezes well—wrap slices individually in parchment and place in an airtight container. Thaw in the refrigerator overnight before serving to maintain the creamy texture and prevent condensation from marring the surface. If you prefer to bake in advance and serve chilled the next day, simply allow the cheesecake to cool completely, then refrigerate; the chill time helps set the cinnamon swirls more distinctly, enhancing each bite. When serving, consider warming slices slightly (a few seconds in a microwave or a brief reheat in a low oven) to recapture the soft, bakery-fresh feel of the cinnamon roll while preserving the cheesecake’s creaminess. For parties or buffet settings, pre-slice the cheesecake and arrange the pieces on a platter with a dollop of whipped cream or a light fruit coulis for a polished presentation that’s easy for guests to grab.

Fun Facts & Trivia (Optional)

Cheesecake is a dish with deep historical footprints across various cultures, and cinnamon has traveled with humans for thousands of years as a symbol of warmth and prosperity. The combination of creamy tang and cinnamon sweetness touches on a universal comfort food spectrum—the sort of flavor profile that transcends trends and evokes memories of family kitchens and shared stories. The cinnamon roll itself has a storied path, with roots in Northern Europe and later becoming a staple in Nordic and American bakery traditions. When you bring these two culinary families together, you’re tapping into a cross-cultural dessert that invites interpretation and personalization. Some bakers like to finish the cheesecake with a light glaze or a dusting of powdered sugar, while others prefer to present it as a pure swirl of cinnamon with the cheesecake for a more dramatic, dessert-plate-ready look. The idea is to honor both sides of the dessert’s heritage: the elegant, smooth tang of cheesecake and the nostalgic, cinnamon-kissed warmth of a roll that invites seconds and smiles around the table.

Closing Thoughts: Crafting Comfort with a Twist

Cheesecake al cinnamon roll is more than a recipe; it’s a storytelling dessert. It invites sweetness with a confident, contemporary voice and offers a harmonious bridging of two beloved traditions. In crafting this treat, you’re not just assembling ingredients—you’re curating an experience: the way a knife glides through, the way a spoon coats the tongue with a perfect balance of tang and sweetness, the way the room fills with that unmistakable scent of cinnamon and vanilla that makes every mouthful feel like a warm welcome home. Whether you’re serving it to a crowd or savoring it in quiet company, this dessert stands as a reminder that great flavors don’t have to be complicated to feel special. They simply need to be thoughtful, well-balanced, and offered with a sense of generosity. This is dessert-making at its most generous: a kiss of cinnamon, a whisper of vanilla, and a cheesecake so lush that it lingers in memory long after the last bite. Enjoy the process as much as the result, and let Cheesecake al cinnamon roll become a new tradition in your kitchen—the kind of dish that earns a place on your recipe rotation for years to come.

Ingredients

Crust

  • – 1 1/2 cups gluten-free graham cracker crumbs (or gluten-free cinnamon cookies)
    → Crushed to a fine, sand-like texture to form a sturdy base that adheres well to the cheesecake filling. Using gluten-free crumbs keeps the recipe accessible for those with gluten sensitivity. If you desire extra flavor, whisk a pinch of salt and a little extra cinnamon into the crumbs before mixing with butter.
  • – 1/4 cup granulated sugar
    → Adds a subtle sweetness to the crust and helps the crumb mixture brown slightly during baking. Use fine granulated sugar for even distribution; avoid coarse crystals which can create a gritty crust.
  • – 1 teaspoon ground cinnamon
    → Infuses the crust with warm cinnamon flavor that echoes the cinnamon roll theme. Evenly combine with crumbs to prevent cinnamon pockets; for a stronger aroma, toast the crumbs lightly with cinnamon in a dry pan before mixing with butter.
  • – 1/4 cup unsalted butter, melted
    → Binds the crust and contributes richness; the butter should be fully melted and slightly cooled to prevent cooking the crumbs. If the crust seems dry, add a teaspoon of water or a drizzle more melted butter until the mixture clumps together.
  • – Pinch of salt (optional)
    → Enhances the overall flavor and helps balance sweetness; use a fine salt to avoid a salty crust. If using salted butter, reduce or omit this pinch.

Filling

  • – 4 (8 oz) packages cream cheese, softened to room temperature (32 oz total)
    → The creamy, tangy base of the cheesecake; softened cream cheese blends smoothly with sugar and eggs to create a luscious texture. Allow blocks to sit at room temperature for 30-40 minutes before mixing; cut into cubes to speed up softening.
  • – 1 cup granulated sugar
    → Sweetens the filling and aids in a silky, glossy batter. Mix with the cream cheese on medium speed until completely smooth; avoid whipping too long after the sugar is added to prevent air bubbles.
  • – 3 large eggs
    → Provide structure and stability to the cheesecake. Use at room temperature and add one at a time, mixing just until incorporated to maintain a creamy texture without overworking the batter.
  • – 1 cup sour cream
    → Adds moisture, tenderness, and a slight tang that balances richness. Beat in until just combined to keep the batter smooth and prevent it from curdling.
  • – 1 teaspoon pure vanilla extract
    → Enhances overall flavor with a warm aroma. Use pure vanilla for best depth; if using vanilla bean, scrape in the seeds for extra fragrance.
  • – 2 tablespoons all-purpose flour (or 1/4 cup cornstarch for gluten-free)
    → Stabilizes the filling and helps prevent cracking while keeping the texture soft. If making GF, cornstarch yields a smoother batter and should be whisked in thoroughly to avoid lumps.

Cinnamon Swirl

  • – 1/2 cup light brown sugar
    → Creates a cinnamon-sugar ribbon that mimics a cinnamon roll filling. Pack the sugar gently for a balanced swirl; too much sugar can sink and cause streaks rather than a uniform swirl.
  • – 1 tablespoon ground cinnamon
    → Delivers the signature cinnamon roll spice. Sift with the brown sugar to remove clumps and ensure an even swirl distribution throughout the batter.
  • – 2 tablespoons unsalted butter, melted
    → Helps bind the cinnamon-sugar into a paste that can be layered into the filling. Let the butter cool slightly before mixing so it won’t thin the batter prematurely and cause the swirl to disappear during baking.

Glaze (optional topping)

  • – 1/2 cup powdered sugar
    → Provides a sweet, glossy drizzle once the cheesecake has cooled. Powdered sugar dissolves smoothly into milk; adjust quantity if you prefer a thicker or thinner glaze.
  • – 2-3 tablespoons milk (or heavy cream)
    → Adjusts glaze consistency; start with 2 tablespoons and add more as needed to reach a drizzling consistency. For dairy-free, substitute with almond, soy, or coconut milk.
  • – 1/2 teaspoon vanilla extract
    → Adds aroma and depth to the glaze; use pure vanilla for best flavor. If you like a stronger vanilla presence, increase to 3/4 teaspoon.

Optional Add-ins

  • – 1/2 cup chopped walnuts (optional)
    → Adds a crunchy contrast and nutty warmth. Toast walnuts in a dry skillet until fragrant, then chop coarsely and fold into the swirl or sprinkle on top before baking to lock in crunch.
  • – 1/4 cup mini chocolate chips or chopped pecans (optional)
    → Provides pockets of sweetness and texture; if using chips, fold them with the swirl or scatter on top to prevent sinking during baking.

Instructions

  • Preheat your oven to 325°F (163°C) and prepare a 9-inch springform pan by lining the bottom with parchment and greasing the sides well.
    → A steady, moderate bake prevents cracking and ensures easy release of the finished cheesecake from the pan.
  • In a medium bowl, combine gluten-free graham cracker crumbs (or gluten-free cinnamon cookies), granulated sugar, ground cinnamon, and a pinch of salt if using; whisk until evenly mixed.
    → Even distribution of spices and sugar ensures a uniform crust flavor and prevents cinnamon pockets in the base.
  • Pour in the melted butter and mix with a spatula or fork until the mixture resembles wet sand and just holds together when pressed.
    → Properly moistened crumbs form a cohesive crust that bakes up firm rather than crumbly, supporting the filling later.
  • Transfer the crust mixture to the prepared pan and press it into an even, compact layer on the bottom and about 1/2 inch up the sides using the flat bottom of a measuring cup or your fingers.
    → A uniform crust ensures steady support for the filling and prevents cracking at the edges.
  • Chill the crust in the freezer or refrigerator for 15–20 minutes while you make the filling.
    → Chilling helps the crust set and hold its shape during the hot filling and baking process.
  • In a large mixer bowl, beat softened cream cheese on medium speed until smooth and free of lumps, about 2–3 minutes.
    → Smoothing the cream cheese creates a silkier filling and helps prevent graininess in the final cake.
  • Add granulated sugar to the cream cheese and continue to beat on medium speed until completely incorporated and glossy, about 1–2 minutes.
    → Proper sugar incorporation yields a silky, shiny batter and balances tangy dairy notes without gritty texture.
  • With the mixer on low, add eggs one at a time, mixing just until each is integrated before adding the next.
    → Limited mixing prevents excessive air incorporation, which can cause cracks as the cheesecake bakes and cools.
  • Beat in sour cream and vanilla extract until the mixture is evenly combined and smooth.
    → Sour cream adds moisture and tenderness; overmixing can cause a runnier batter, so keep mixing gentle.
  • Sprinkle in the flour (or cornstarch for gluten-free), and mix on low until fully incorporated; the batter should be thick and velvety.
    → The starch stabilizes the cheesecake, helping prevent cracking while keeping a creamy texture.
  • In a small bowl, stir together light brown sugar, ground cinnamon, and melted butter to form a thick cinnamon swirl paste; let it rest briefly.
    → This paste will create ribboned cinnamon flavor within the cheesecake; a brief rest prevents the swirl from splitting during layering.
  • Pour the cream cheese batter into the crust and spread into an even layer; drop spoonfuls of the cinnamon swirl across the surface and use a knife to swirl gently to create ripples.
    → Gentle swirls distribute the cinnamon flavor without overmixing, producing an attractive marbled effect.
  • If using a water bath, wrap the outside of the springform pan with a double layer of heavy-duty foil to seal and prevent water leaks, then set the pan inside a larger roasting pan. Pour hot water into the outer pan to come halfway up the sides of the springform.
    → The water bath provides gentle, even heat that minimizes cracking and helps the cheesecake bake evenly.
  • Bake in the preheated oven at 325°F (163°C) for 60–75 minutes, or until the center is barely set and the edges are slightly puffed; the center should still have a gentle jiggle.
    → The jiggle indicates a custardy center that will firm up as it cools; overbaking leads to a dry, dense texture.
  • Turn off the oven and leave the cheesecake inside with the door slightly ajar for 60 minutes to cool gradually; then remove to a rack to cool completely.
    → Slow cooling minimizes sudden temperature changes that can cause cracks and preserves a creamy interior.
  • Once cooled to room temperature, refrigerate the cheesecake, at minimum 4 hours or preferably overnight, to ensure full set and slicing ease.
    → Chilling firms the texture, making clean, neat slices and intensifying flavors.
  • If you choose a glaze, whisk powdered sugar with 2–3 tablespoons milk (or heavy cream) and the vanilla until smooth and pourable; adjust thickness with more sugar or milk as needed. Drizzle over the chilled cheesecake just before serving.
    → The glaze adds a touch of sweetness and a glossy finish without overpowering the cinnamon notes.
  • Optional add-ins: if using chopped walnuts, toast them in a dry skillet until fragrant, then fold into the swirl batter or sprinkle on top before baking for extra crunch.
    → Toasting concentrates flavor and adds textural contrast that complements the creamy filling.
  • Optional add-ins: if using mini chocolate chips or chopped pecans, fold them into the batter or distribute across the top to create pockets of sweetness or crunch without causing excessive sinking.
    → Small bits provide pops of flavor and texture without compromising the cheesecake’s delicate structure.
  • To serve, run a warm knife blade (held under hot water and wiped dry) around the inside edge of the pan before unclipping and removing the springform; slice with clean, even strokes.
    → Warming the knife minimizes sticking and yields neat, professional-looking slices.
  • Store leftover slices in an airtight container in the refrigerator for up to 4–5 days or freeze individual portions for longer storage.
    → Proper refrigeration preserves texture and prevents the crust from softening or the topping from weeping.

Notes

These gluten-free cinnamon roll cheesecake is a decadent dessert that blends the creamy richness of a cheesecake with the warm, swirled flavors of cinnamon rolls. For best texture, ensure all dairy products are at room temperature before mixing: soften the cream cheese for 30-40 minutes, and let sour cream come to room temp as well; beating until completely smooth will help achieve a glossy filling. Add sugar gradually and mix on medium speed until smooth, then incorporate eggs one at a time, mixing just until blended to keep the batter creamy and to avoid cracks. The crust, made from gluten-free graham crackers or gluten-free cinnamon cookies, should be crushed to a fine, sand-like texture and combined with the granulated sugar, ground cinnamon, melted butter and optional pinch of salt; press firmly into the pan and prebake until set for extra sturdiness. For the cinnamon swirl, combine light brown sugar, cinnamon and melted butter into a thick paste so it holds its shape during baking; gently swirl into the filling in layers rather than dumping all of it in one spot to achieve an even ribbon. The filling can be stabilized with 2 tablespoons all-purpose flour or 1/4 cup cornstarch if you prefer a gluten-free option; whisk the starch in thoroughly to avoid lumps. To prevent cracks, bake the cheesecake in a water bath: wrap the pan securely in double foil and place in a larger baking dish with hot water; this also helps maintain moisture in the center. Bake until the edges are set but the center still has a gentle jiggle, then cool gradually at room temperature before chilling in the fridge for at least 4 hours or overnight for clean slices. If using the optional glaze, whisk powdered sugar with milk and vanilla until smooth and drizzle just before serving. Optional add-ins like toasted walnuts or mini chocolate chips can be folded into the swirl or sprinkled on top for extra texture; toast nuts first to maximize flavor. Store leftovers covered in the refrigerator and bring to room temperature for the richest texture before serving. Always verify that your gluten-free ingredients are certified if you have celiac disease or gluten sensitivity.

Tips

Tips for Cheesecake al Cinnamon Roll

  • Bring all dairy and eggs to room temperature before mixing. Soft ingredients blend smoothly, reduce lumps, and help the filling set evenly.
  • Use a high-quality springform pan and wrap the base with heavy-duty foil to prevent leaks if you’re using a water bath. This also helps keep the crust crisp and the filling uniform.
  • Prepare and measure all ingredients before you start. Sift the flour or cornstarch with the sugar in the filling to prevent clumps and ensure a silky batter.
  • Avoid overmixing once the sugar is added to the filling. Mix on medium-low just until smooth to prevent air bubbles that can cause cracking or a pale, grainy texture.
  • For a traditional cheesecake texture, bake at a steady, moderate heat and avoid opening the oven door frequently. Sudden temperature changes can cause cracks.
  • Let the cheesecake cool gradually in the oven with the door slightly open after baking to minimize cracking caused by rapid temperature changes.
  • Chill the crust before adding the filling to help it hold together and prevent sogginess.

Crust tips

  • If using gluten-free graham cracker crumbs or gluten-free cinnamon cookies, process until a fine, sand-like texture for a sturdy base that adheres well to the filling.
  • Toast the crumbs lightly in a dry pan with the cinnamon to boost aroma, then cool before mixing with melted butter for deeper flavor.
  • Press the crust firmly into the pan with the flat bottom of a glass or measuring cup to ensure an even, compact base. Chill for 10–15 minutes before filling.
  • If the crust feels dry or crumbly, mix in a teaspoon of water or a splash more melted butter until the mixture clumps.
  • For extra flavor, you can add a pinch of salt to the crust mixture, especially if using unsalted butter. If you use salted butter, omit the pinch.

Filling tips

  • Use cream cheese softened to room temperature. Cut blocks into cubes to speed softening and achieve a smoother batter.
  • Beat the cream cheese with sugar on medium speed until completely smooth, then add eggs one at a time, mixing just until incorporated to maintain a creamy texture.
  • Beat in sour cream until just combined to keep moisture and tenderness without curdling. Do not overmix after this step.
  • Scrape down the sides of the bowl frequently to ensure even mixing and a uniform texture.
  • When using flour (or cornstarch for gluten-free), whisk it with the sugar before adding to the batter to prevent lumps and help stabilize the filling.
  • Evenly pour the filling over the crust, then drizzle or sprinkle the cinnamon swirl on top in a few lines. Avoid fully blending the swirl into the batter to preserve distinct ribbons.

Cinnamon Swirl tips

  • Whisk the light brown sugar with the ground cinnamon and melted butter until smooth. Let it cool slightly so it won’t thin the batter too much when swirled.
  • Scatter the swirl in several parallel lines or in a loose zigzag pattern over the filling, then use a knife or skewer to gently swirl in a figure-eight motion. Don’t over-swirl, or the pattern may disappear.
  • To prevent the swirl from sinking, keep the swirl thick enough by not adding too much melted butter. If the swirl is too liquid, chill it for 5–10 minutes before using.
  • Optional add-ins like chopped nuts can be folded into the swirl for extra texture, but keep them moderate so they don’t sink.

Glaze tips

  • Sift powdered sugar for a smooth glaze, then whisk in milk or heavy cream gradually. Adjust the amount to reach your preferred drizzle consistency.
  • Add vanilla extract for depth of flavor. If you prefer a stronger vanilla presence, increase to 3/4 teaspoon.
  • Let the cheesecake cool completely before glazing to prevent the glaze from melting or sliding off.

Optional add-ins tips

  • Toast walnuts in a dry skillet until fragrant, then chop and fold into the swirl or sprinkle on top before baking for extra crunch and warmth.
  • If using mini chocolate chips or chopped pecans, toss the chips with a tablespoon of flour to help prevent sinking and even distribution within the swirl.

Make-ahead, storage and serving tips

  • Chill the cheesecake for at least 4 hours, preferably overnight, to slice cleanly and develop flavor.
  • Run a warm knife (dip and wipe between cuts) to get neat, even slices.
  • Store covered in the refrigerator for up to 4–5 days. For longer storage, wrap tightly and freeze for up to 2 months; thaw overnight in the fridge before serving.

FAQ

Cheesecake al cinnamon roll – Domande frequenti

Che cos’è Cheesecake al cinnamon roll?

È una cheesecake cremosa ispirata ai classici cinnamon rolls: una base di biscotti al burro, una crema di formaggio vellutata e un vortice di ripieno cannella che richiama l’aroma dei cinnamon rolls.

Quali ingredienti servono?

Per la base: biscotti Digestive o graham crackers, burro fuso, un pizzico di sale. Per la crema: formaggio cremoso, zucchero, uova, vaniglia, panna acida o yogurt greco. Per il ripieno cannella: burro, zucchero di canna, cannella. Opzionale scorza di limone e un pizzico di sale.

Come si prepara la base?

Sbriciola i biscotti fino a polvere fine, mescola con burro fuso e un pizzico di sale. Pressa uniformemente sul fondo di una tortiera a cerchio apribile foderata con carta forno. Metti in frigorifero mentre prepari la crema.

Come si prepara la crema dal formaggio?

Assicurati che il formaggio sia morbido. Sbatti il formaggio con lo zucchero fino a crema, aggiungi la vaniglia, incorpora le uova una alla volta e poi la panna acida o lo yogurt. Se vuoi, aggiungi scorza di limone. Mescola fino a ottenere una crema liscia senza mescolare troppo.

Come ottenere l’effetto swirl cannella?

Prepara un ripieno di cannella mescolando burro fuso, zucchero di canna e cannella. Distribuisci a cucchiaiate sull’impasto cremoso e con una spatola o uno stuzzicadenti crea delle spirali per richiamare l’aspetto dei cinnamon rolls.

Come si cuoce e si raffredda?

Cuoci in forno preriscaldato a circa 160°C per 50–60 minuti, finché i bordi sono solidi e il centro resta leggermente tremolante. Per evitare crepe, spegni il forno e lascia raffreddare lo sformato dentro con lo sportello leggermente aperto, poi mettilo in frigorifero per almeno 4 ore o tutta la notte. L’uso di un bagno Maria può dare risultati migliori e prevenire crepe.

Posso prepararla in anticipo?

Sì. Si può preparare e raffreddare in frigorifero per 1–2 giorni prima di servire. Puoi anche congelarla ben avvolta per 1–2 mesi; scongelala in frigorifero durante la notte prima di gustarla.

Quali varianti puoi proporre (gluten-free o vegan)?

Per una versione gluten-free, usa biscotti senza glutine o una base di nocciole/macadamia; per una versione vegana, usa formaggio cremoso vegano, panna vegetale, uova o un sostituto come latte vegetale e agar-agar, e burro o olio di cocco per la base. Mantieni cannella e ripieno swirl per il sapore tipico.

Come si conserva e come si serve al meglio?

Conserva in frigorifero, coperto, per 3–4 giorni. Per una consistenza più rigida, servila fredda. Puoi congelarla ben avvolta per 1–2 mesi; scongelala in frigorifero prima di servire. Decorala con zucchero a velo, glassa di formaggio o sciroppo di caramello.

Qualche consiglio finale per un successo assicurato?

Usa ingredienti a temperatura ambiente, evita di mescolare eccessivamente la crema, e preferisci la cottura lenta con bagno Maria per prevenire crepe. Un swirl ben riuscito esalta sia l’aroma che l’aspetto del dolce.

Introduction / Hook

Imagine a soft, sun-warmed sponge embracing a cloud of velvety cream, crowned with jewels of ruby-red strawberries that burst with bright summer sweetness in every bite. Torta fragole e panna is the kind of dessert that makes a kitchen feel like a tiny, festive bakery—a cake that looks elegant enough for a celebration, yet humble enough to be whipped together for a casual weekend treat. The aroma alone can transport you to a sunny Italian villa: vanilla whispers from the sponge, the cool breeze of fresh cream, and the playful tang of bright berries that echo the orchard in full bloom. This cake isn’t just a dessert; it’s a celebration of seasonal fruit and the comforting creamily good moments we share with family and friends. It’s a cake that invites you to slow down, slice a piece, and savor the glow of summer in every mouthful.

What makes Torta fragole e panna especially appealing is its balance: tender sponge that soaks up a hint of sweetness, a generous bed of whipped cream that adds airiness without heaviness, and the strawberries that provide both vivid color and a refreshing, zippy finish. It’s a dessert that feels fancy enough for guests yet approachable enough to make on a weekday night when you crave something special. The textures dance together—soft, airy, creamy, and juicy—creating a harmony that lingers long after the last bite. And because strawberries are at their best in their peak season, this cake becomes a celebration of that fleeting time when everything tastes like sunshine and possibility.

With every slice you’ll notice how the flavors evolve: the first bite is gently sweet, almost dessert-chef elegant; the middle reveals a lush creaminess that glides across the palate; and the finish is bright and clean, a kiss of fruit that lingers without cloying sweetness. It’s a cake that pairs beautifully with a cup of espresso or a flute of something sparkling, making it equally at home on a leisurely Sunday morning brunch or a festive evening gathering. If you’ve ever wanted to bake something that feels both timeless and modern, comforting and refined, Torta fragole e panna offers that delightful paradox in one. Allow this dessert to become a new go-to, one that turns any ordinary moment into something worth remembering.

The Story Behind the Dish

The name itself—Torta fragole e panna—speaks of two beloved, simple ingredients that have traveled the world with centuries of affection: fresh strawberries and whipped cream. In Italian kitchens, desserts that celebrate fruit in their purest form are a testament to seasonality, farmers’ markets, and the everyday joy of gathering around a table with loved ones. This cake embodies that philosophy: a light, airy sponge built to cradle and showcase ripe berries, with whipped cream acting as a suave, creamy counterpoint rather than a heavy layer of richness. It’s the kind of dessert that could have its roots in a small, sunlit kitchen in Tuscany, where seasonal fruit is treated with reverence and every layer is crafted to highlight natural sweetness rather than overwhelm it.

There’s a charming lineage to this cake’s spirit. In many Italian homes, birthdays, anniversaries, and Sunday gatherings call for cakes that are elegant yet unfussy—cakes that feel personal, not intimidating. A strawberry-topped cake like this one is a modern nod to the classic “dolce della casa,” a dessert passed down from one generation to the next, often revised with a contemporary touch. The beauty of Torta fragole e panna lies in its adaptability: you can celebrate with a standard, classic version or infuse it with regional flair—adding a touch of liqueur for depth, a hint of lemon zest for brightness, or swapping in a softer sponge to achieve an even lighter bite. The result remains the same—a dessert that invites conversation, smiles, and that satisfying, “I need another slice” feeling.

Historically, whipped cream has long held a place in celebratory Italian desserts, where dairy, fresh fruit, and a touch of vanilla or citrus come together harmoniously. This cake sits comfortably within that tradition, offering a modern articulation of a timeless concept: a simple sponge cake that becomes special through the company of fruit and cream. The strawberries, often at their best during late spring and early summer, give the cake a seasonal heartbeat, turning every gathering into a small festival of color and aroma. Whether you’re recreating a Sunday ritual or presenting a dessert for guests with diverse tastes, this cake communicates warmth, hospitality, and a little bit of culinary poetry in every slice.

Why You’ll Love This Recipe

  • Quick to assemble with a light, airy texture that feels indulgent without being heavy.
  • Celebrates seasonal strawberries in a way that enhances their natural sweetness and tang.
  • Versatile for a range of occasions—from everyday weeknights to special celebrations.
  • Visually striking with its pink-tinged cream and ruby fruit, making it a crowd-pleasing centerpiece.
  • Captures a balance of textures: delicate sponge, lush cream, and juicy strawberry bites.
  • Adaptable to dietary needs with simple substitutions (vegan, gluten-free, etc.) without sacrificing charm.
  • Delightful aroma that fills the kitchen as it comes together, creating anticipation and joy.
  • Pairs beautifully with coffee, sparkling wine, or a light, citrusy dessert wine to elevate the experience.

Flavor Profile & Texture

The flavor profile of Torta fragole e panna is a study in balance and contrast. The sponge cake offers a gentle sweetness, with a soft, almost pillow-like crumb that yields easily under a fork. Its mild vanilla undertone acts as a blank canvas, allowing the strawberries and cream to take center stage. When you bite into the cake, the first sensation is the fresh fruit’s bright orchard aroma and the crisp note of the berries’ natural acidity. That acidity brightens the palate, cleansing the sweetness just enough to keep the cake lively rather than cloying.

The whipped cream is the cake’s creamy backbone: light, airy, and luxurious, it coats the tongue in a smooth, cool veil that contrasts beautifully with the slightly bouncy sponge. The cream’s tenderness enhances the strawberries’ juiciness, so each mouthful offers a chorus of textures: soft cake, cloud-like cream, and bursts of strawberry juice. The strawberries themselves contribute both color and flavor—risking that familiar “summer fruit” note without overpowering the other components, ensuring each bite remains balanced and refreshing. If you desire a touch of tang, a whisper of lemon zest or a splash of vanilla can be introduced to the cream to brighten the overall profile. The end result is a cake that feels elegant and refined, yet incredibly comforting and familiar—like a warm embrace from a beloved family recipe.

In terms of mouthfeel, expect a tender crumb that dissolves gently on the tongue, followed by the cool, creamy texture that lingers pleasantly. The strawberries contribute a slight juiciness that prevents the cake from tasting dry, ensuring that every slice remains vibrant and juicy. The overall harmony makes this dessert particularly well-suited to warm days when something cool and refreshing is a welcome respite, and to festive evenings when a dessert should feel celebratory without being fussy.

Occasions & Pairings

This strawberry and cream cake is a versatile guest at many occasions. It shines on birthday tables as a breezy alternative to a heavier celebration cake. It’s equally comfortable at a weekend brunch, a bridal shower, a casual anniversary dinner, or a backyard summer party where a light, elegant dessert can be served with sparkling beverages and lots of smiles. Its simple charm makes it approachable for home cooks, yet its presentation still feels special enough to impress guests who value both taste and aesthetics.

Pairing ideas to enhance the experience:

  • Drinks: Prosecco or a sparkling rosé for a celebratory feel; a bright, chilled Moscato for a fruity finish; or black coffee for a sophisticated contrast.
  • Side options: a dollop of extra whipped cream on the side for those who love it, or a light dusting of powdered sugar for a delicate finish.
  • Complementary desserts: a tangy citrus sorbet or a light vanilla custard can provide a refreshing counterpoint if you’re serving multiple desserts.
  • Garnishes: a few mint leaves for a color pop, or a delicate drizzle of strawberry coulis to intensify the fruitiness.

Seasonal notes can also guide your serving: in peak strawberry season, keep the fruit as fresh and vibrant as possible for maximal flavor; in off-season times, you can use high-quality preserved or frozen berries as a reminder of summer, while ensuring the cream remains the star of the show.

Tips, Variations & Substitutions

Vegan & Dairy-Free Options

To make a vegan-friendly version, swap the sponge with a plant-based recipe that yields a light, airy crumb; use coconut cream or almond-based whipped cream, lightly sweetened, in place of dairy cream. For the strawberries, ensure they’re fresh and ripe, as their natural sweetness will carry much of the cake. If you want to maintain a similar mouthfeel to traditional whipped cream, consider whipping chilled coconut cream with a touch of vanilla and a pinch of sugar until fluffy. The aroma and texture will still be irresistibly creamy, while accommodating dietary choices.

Gluten-Free & Nut-Free Options

A gluten-free version can be achieved with almond flour or a certified gluten-free cake mix designed for a light crumble. If you’re avoiding nuts, choose a gluten-free base that doesn’t rely on nut flours, and ensure your whipped cream and fruit remain free from nut-based additives. The aim is to preserve the cake’s tenderness and the whipped-cream-and-berries balance while staying mindful of dietary needs.

Regional Twists

Cornflower-tinged vanilla sponge with a kiss of lemon zest can brighten the cake in a distinctly Mediterranean manner. A splash of Limoncello or a few drops of orange blossom water in the whipped cream adds a fragrant, citrus-forward twist that complements the berries beautifully. For a classic Italian touch, layer a light dusting of fine sugar between layers or brush the sponge with a mild syrup that uses a hint of vanilla or citrus to create subtle depth without heavy sweetness.

Make-Ahead & Make-Ahead Storage

To streamline entertaining, you can bake the sponge a day or two in advance and store it wrapped in a clean kitchen towel or parchment in a cool place. Whip the cream and refrigerate it, and slice the strawberries closer to serving time to keep them fresh and bright. When you’re ready to assemble, you can stack the layers, spread the cream, and decorate with fresh berries just before serving. If you plan to assemble ahead, consider constructing the cake a few hours before serving and chilling it in the refrigerator so the flavors mingle while maintaining the cake’s structure.

Storage & Make-Ahead Ideas

Leftovers can be kept in the refrigerator for a couple of days, though the best experience is often enjoyed within 24 hours of assembly when the sponge remains soft and the cream at its freshest. Cover the cake loosely to protect it from absorbing other odors in the fridge, and keep it chilled until ready to serve. If you need to freeze portions, wrap individual slices tightly in plastic wrap and place in an airtight container; this can preserve texture and flavor for a few weeks, though the slightly soft sponge may become more dense upon thawing. Thaw slowly in the refrigerator and reassemble with a fresh topping of whipped cream and berries if desired to restore vibrancy.

For events or large gatherings, consider preparing the cake in a rectangular or square pan and serving it in party-sized slices. This approach can also make it easier to transport and portion for guests, while still delivering the same delightful experience.

Fun Facts & Trivia (Optional)

  • Strawberries are one of the few fruits that contain seeds on the outside, and they pack a surprising amount of aroma and flavor into every bite.
  • Whipped cream’s history as a dessert topping stretches back centuries, and it remains a timeless partner for fruit-based desserts around the world.
  • In Italian culture, desserts that highlight fresh fruit are often prepared with care to emphasize simplicity, balance, and the celebration of seasonal produce.
  • Fruit-forward cakes like this one are perfect for hot days because they rely on creamy textures and cold components to provide a refreshing finish without heaviness.
  • Regional variations of this concept exist across Europe, where different berries, creams, and flavorings are used to tailor the dessert to local tastes and availability.

Ingredients

Cake Base

  • 2 cups all-purpose flour (240 g)
    → The flour provides the cake’s structure and crumb. Sift before measuring to avoid dense pockets and ensure a light, even rise. For a lighter crumb, you can substitute part of the flour with cake flour or use a 1:1 gluten-free blend if needed, but keep the leavening amount consistent to prevent heavy texture.
  • 1 1/2 cups granulated sugar (300 g)
    → Sugar sweetens the batter and helps tenderize the gluten, contributing to a soft, cake-like crumb. Creaming sugar with butter (if your method uses this) adds air for volume. If you prefer a less sweet cake, reduce by up to 1/4 cup, keeping flavor balanced with the strawberries and whipped cream.
  • 1/2 cup unsalted butter, softened (115 g)
    → Butter adds moisture, flavor, and tenderness. Cream it with sugar (if your method includes creaming) to incorporate air for a lighter texture. If you must substitute, you can use neutral oil (1/2 cup) but expect a slightly different crumb and mouthfeel.
  • 3 large eggs, room temperature
    → Eggs provide structure, moisture, and richness. Room-temperature eggs blend more evenly with the batter and help achieve a smoother emulsion for a tender crumb. If using cold eggs, gently warm in warm water for a few minutes before beating.
  • 3/4 cup milk, room temperature (180 ml)
    → Milk hydrates the dry ingredients and activates the leavening; whole milk yields a richer crumb, while skim or non-dairy alternatives will yield a lighter finish. Keep at room temperature to maintain emulsification during mixing.
  • 2 tsp baking powder
    → The primary leavening for lift and a soft rise. Use fresh baking powder for best results; whisk with the dry ingredients to distribute evenly and avoid dense patches in the batter.
  • 1/2 tsp salt
    → Enhances overall flavor and tightens crumb, balancing sweetness and the strawberries’ acidity. If using salted butter, adjust or omit additional salt accordingly to avoid oversalting.
  • 2 tsp vanilla extract
    → Adds depth and aroma to the cake. Use pure vanilla extract for the most robust flavor; if you have vanilla paste, you can substitute half of the extract for a more intense vanilla character with visible vanilla specks.
  • 1 tablespoon unsalted butter, melted (for greasing the pan)
    → A thin film of melted butter helps the batter release cleanly from the pan. Brush the entire interior and, if desired, line with parchment paper to ensure easy removal and even browning.

Strawberry Layer

  • 2 cups fresh strawberries, hulled and sliced (about 300 g)
    → Use ripe, fragrant berries for the best flavor; slice evenly to ensure uniform layering. Strawberries contribute sweetness, brightness, and juiciness to the filling and topping. If you prefer a more pronounced strawberry syrup, macerate with sugar and lemon juice, then drain before layering to avoid soggy crumbs.
  • 2 tablespoons granulated sugar
    → Used to macerate the strawberries, drawing out juices and creating a glossy syrup that enriches the filling. If berries are very ripe and juicy, you can reduce this to 1 tablespoon or omit entirely, depending on sweetness preference.
  • 1 teaspoon lemon juice
    → Brightens the strawberry flavor and helps preserve color; use freshly squeezed juice for the best brightness. Combine with sugar to macerate the berries for 15 minutes, then gently pat dry if you want firmer slices in the layers.

Whipped Cream

  • 2 cups heavy cream, chilled (480 ml)
    → The whipped cream forms the creamy filling and topping. Chilling the cream, bowl, and beaters helps achieve stable, fluffy peaks. Beat just until you reach the desired peak (soft for filling, stiff for frosting) to avoid overbeating into butter.
  • 3-4 tablespoons powdered sugar
    → Adds sweetness and helps stabilize the whipped cream, reducing graininess and melt-in-the-mouth softness. Sift the powdered sugar before adding to prevent lumps. Adjust to taste, especially if your berries are very sweet or if you prefer a less sweet cake.
  • 1 teaspoon vanilla extract
    → Provides aroma and depth to the whipped cream. Use pure vanilla extract for best flavor; if you have vanilla bean paste, you can add a small amount for a richer vanilla presence and visible vanilla specks.

Toppings

  • Extra strawberries, sliced (about 1 cup / 150 g)
    → For decorating the top and between layers. Uniform slices create a tidy, bakery-style finish. Arrange in a decorative pattern or fan along the edge for a professional look.
  • Powdered sugar, for dusting (optional)
    → Finishing touch to mimic bakery presentation. Dust lightly just before serving to keep the delicate surface intact and prevent dissolving into the whipped cream too soon.
  • Fresh mint leaves (optional)
    → A few small leaves add color contrast and a hint of fresh aroma. Rinse and pat dry; place sparingly around the cake or atop the strawberries for a vibrant finish.

Instructions

  • Preheat your oven to 350°F (175°C) and prepare a 9-inch (23 cm) round cake pan by brushing the interior with the melted butter and lining the bottom with parchment paper, then dusting with a light coating of flour or using non-stick spray.
    → This creates a neutral, non-stick surface for clean release and even browning across the cake.
  • Sift together the dry ingredients: 2 cups all-purpose flour, 2 teaspoons baking powder, and 1/2 teaspoon salt, then whisk to ensure even distribution.
    → Sifting removes lumps and distributes leavening evenly, which prevents dense patches and promotes a uniform rise.
  • Cream the 1/2 cup (115 g) softened unsalted butter with the 1 1/2 cups (300 g) granulated sugar on medium-high speed until pale, fluffy, and the mixture holds slight trails, about 3–4 minutes.
    → Creaming incorporates air into the batter, contributing to a light, tender crumb and better volume as the cake bakes.
  • Add the 3 large eggs, one at a time, beating well after each addition to create a smooth emulsion, then mix in 2 teaspoons vanilla extract.
    → Adding eggs individually helps maintain a stable emulsion, preventing curdling and ensuring an even texture with rich flavor from the vanilla.
  • Add the dry ingredients in three additions interleaved with the 3/4 cup (180 ml) milk in two additions: begin with one-third of the flour, then half the milk, then another third of flour, the remaining milk, and finish with the last third of flour, mixing just until each addition is incorporated.
    → Alternating dry and wet ingredients prevents overmixing, minimizes gluten development, and yields a tender crumb.
  • Pour the batter into the prepared pan and smooth the surface with a spatula, then tap the pan firmly on the counter a few times to release any trapped air bubbles.
    → Leveling ensures even baking and tapping releases air pockets that can create holes or unevenness in the crumb.
  • Bake in the preheated oven for about 30–35 minutes, rotating the pan halfway through, until a toothpick inserted into the center comes out with a few moist crumbs and the top is lightly golden.
    → The toothpick test confirms doneness without overbaking, while rotation promotes even browning on all sides.
  • Cool the cake in the pan for 10 minutes, then invert onto a wire rack to cool completely before assembling.
    → Allowing the cake to cool fully sets the crumb and prevents the layers from sliding or tearing during ganache-like filling assembly.
  • Meanwhile, macerate the 2 cups fresh strawberries (hulled and sliced) with 2 tablespoons granulated sugar and 1 teaspoon lemon juice for 15 minutes, stirring gently once or twice, then pat the berries dry to remove excess juice.
    → Maceration draws out bright juice and intensifies strawberry flavor; patting dry prevents soggy layers and helps maintain structural integrity in the filling.
  • Chill a large mixing bowl and whisk or a stand mixer attachment in the freezer for 10 minutes, then whip the 2 cups heavy cream with 3–4 tablespoons powdered sugar and 1 teaspoon vanilla extract to stiff peaks; chill the whisk or beaters briefly if needed to maintain stability.
    → Cold equipment helps achieve stable, airy peaks quickly, ensuring the cream holds shape for filling and topping without weeping.
  • Carefully level the cooled cake with a serrated knife if domed, then cut it horizontally into two even layers using a gentle sawing motion and keeping the knife perpendicular to the work surface.
    → A level cut ensures a clean, professional-looking sandwich layer and an even distribution of filling.
  • Place the bottom cake layer on a serving plate, spread an even layer of whipped cream over the surface, then spoon and spread the macerated strawberries in a uniform layer on top.
    → The cream provides moisture and acts as a binding layer for the strawberry filling, while the strawberry layer adds brightness and juiciness between the cake layers.
  • Top the strawberry layer with the second cake layer, pressing lightly to secure, and apply a generous coat of whipped cream over the top and around the sides to create a smooth, velvety finish.
    → A thorough crumb coat and final smoothing create a bakery-finish appearance and help the cake hold its shape when sliced.
  • Decorate the top with the extra sliced strawberries arranged in a pattern, dust lightly with powdered sugar if desired, and garnish with fresh mint leaves for color and aroma.
    → Fresh fruit and mint elevate presentation, offer a contrast of color, and provide a refreshing aroma that complements the cream and cake.
  • Chill the assembled cake for at least 30 minutes before slicing to set the layers and improve neatness when serving.
    → A short chill helps the whipped cream stabilize, making clean slices easier and reducing the risk of filling from oozing out.
  • Slice and serve portions with an additional small spoon of whipped cream on the side if desired, and refrigerate any leftovers in an airtight container for up to 2 days.
    → Chilled slices hold their shape longer, and refrigeration preserves the whipped cream and strawberry flavors without drying the cake.

Notes

These strawberry and cream cake layers are a classic dessert featuring a tender vanilla sponge, juicy macerated strawberries, and light whipped cream. You can customize them by using a 1:1 gluten-free flour blend in place of all-purpose flour (adding a touch of cornstarch can help mimic cake flour for a lighter crumb) and making sure your baking powder is fresh and gluten-free if needed. For a lighter crumb, substitute half the butter with neutral oil, though the texture will be a touch denser. Add a teaspoon of lemon zest to the batter for a bright citrus note that pairs beautifully with the berries. Macerate the strawberries with sugar and lemon juice as directed, then drain before layering to avoid soggy crumbs. Chill the whipped cream well and whip to stiff peaks for clean, sliceable layers; stabilizers such as a tiny amount of cream of tartar or a pinch of gelatin are optional if you’re making ahead. Assemble with cake base, strawberry filling, and whipped cream, finishing with extra strawberries on top and a dusting of powdered sugar or fresh mint. The cake is best served chilled and will keep for 2–3 days in the fridge; it can be frozen in portions after assembly for longer storage. If you have dairy restrictions, substitute whipped cream with coconut cream and use a dairy-free butter substitute. Always choose gluten-free ingredients if you have a gluten intolerance.

Tips

Tips for the Cake Base

  • Measure flour by weight when possible. Sift the flour first, then measure to ensure a light, even crumb. If you don’t have cake flour, you can replace part of the all-purpose flour with cake flour or a 1:1 gluten-free blend, but keep the same leavening amount to avoid a dense texture.
  • Room-temperature ingredients mix more evenly. Take the eggs and milk out about 30 minutes before you start. If you’re short on time, warm the eggs in warm water for a few minutes, then dry them before adding to the batter.
  • For a tender crumb, cream butter and sugar until light and fluffy (if your method uses creaming). Scrape the bowl often to incorporate air and prevent dense pockets.
  • Fresh leavening matters. Use fresh baking powder and whisk it with the dry ingredients so the lift is even. Old powder can lead to a cake that doesn’t rise well.
  • Balance flavor with vanilla and a touch of salt. Pure vanilla extract deepens the crumb, and a pinch of salt enhances sweetness and fruit brightness. If using salted butter, taste before adding extra salt.
  • Pan prep matters. Grease the pan and dust with flour or line the bottom with parchment for easy release. A thin film of melted butter followed by parchment ensures clean edges and even browning.
  • A gentle bake yields better texture. Bake until a toothpick comes out clean with a few moist crumbs; if the top browns too quickly, tent with foil to prevent over-browning while the center finishes cooking.
  • Cool properly before filling. Let the cake cool in the pan for 10–15 minutes, then transfer to a rack to cool completely. A fully cooled base prevents the whipped cream from melting and the strawberry layer from sliding.

Tips for the Strawberry Layer

  • Choose ripe, fragrant berries for maximum flavor. Uniformly slice to ensure even layering and texture in every bite.
  • Macerate with care. Macerating strawberries with sugar and lemon juice enhances sweetness and creates a glossy syrup. Drain gently to avoid making the layers soggy.
  • Brighten with lemon juice, but don’t overdo it. Fresh lemon juice highlights strawberry flavor and helps preserve color during assembly.
  • Consistency matters for layering. If liquid is too runny, pat the berries dry with a clean towel before spreading to keep the layers distinct.
  • Consider a syrup alternative. If you prefer a stronger strawberry presence, reduce the sugar by 1 tablespoon and reserve extra macerated juice to brush lightly on the top of the cake just before serving for a subtle glaze.

Tips for the Whipped Cream

  • Chill everything. Chill the heavy cream, bowl, and beaters for at least 15–20 minutes before whipping to help achieve stable, fluffy peaks.
  • Whip to the right stiffness. For filling, soft to medium peaks are ideal; for frosting or a clean top, aim for stiff peaks. Stop whipping as soon as the desired texture forms to avoid overbeating into butter.
  • Balance sweetness. Add 3–4 tablespoons of powdered sugar and 1 teaspoon vanilla, then taste and adjust. Sift the powdered sugar to prevent lumps and graininess.
  • Stabilize if you’ll assemble in advance. If you’re making ahead, you can stabilize the whipped cream with a small amount of gelatin (1 teaspoon gelatin dissolved in 2 tablespoons hot water, cooled) folded in after whipping, or use a pinch of cream of tartar and chill well.
  • Keep it cold during assembly. Refrigerate the whipped cream while you prepare the other components to help it hold its shape when spreading and layering.
  • Flavor variety. If desired, swap a portion of the vanilla for a touch of almond extract or add a hint of citrus zest for a bright note that complements strawberries.

Tips for Assembly and Presentation

  • Layer thoughtfully. Start with the cake base, spread a smooth, even layer of whipped cream, then add the strawberry layer. Repeat with a final whipped-cream topping if desired.
  • Keep layers even. Use an offset spatula to level each layer and prevent bulging or uneven slices. A clean edge makes for a bakery-like finish.
  • Chill between steps. If you’re making ahead, refrigerate the assembled cake for at least 1–2 hours to help the layers set and easier to slice.
  • Slice like a pro. Clean cuts come from a warmed knife. Dip a sharp knife in hot water, wipe dry, and slice, wiping the blade between cuts for crisp edges.
  • Garnish wisely. Decorate with extra strawberry slices and mint leaves just before serving. A light dusting of powdered sugar adds a delicate bakery touch without dissolving into the whipped cream too quickly.

Substitutions and Variations

  • Gluten-free option. Use a 1:1 gluten-free flour blend that includes xanthan or another binder, and keep leavening the same. You may notice a slightly different crumb—let it cool fully before filling to relax the structure.
  • Dairy-free version. For the cake, substitute a neutral oil (instead of butter) and consider a dairy-free milk. Whipped cream can be replaced with canned coconut cream whipped with a bit of sugar and vanilla, kept very cold.
  • Fruit variations. Swap strawberries for other berries or stone fruits in season, but adjust maceration and sugar to taste since sweetness and juiciness vary by fruit.
  • Sweetness control. If berries are very ripe, you can reduce the sugar in the macerating stage and balance with the whipped cream sweetness.

Troubleshooting Quick Fixes

  • Dense cake batter. Ensure you measured flour correctly, didn’t overmix after adding dry ingredients, and used fresh baking powder. Consider a quick test bake of one cupcake to check rise before baking the whole cake.
  • Juicy, soggy layers. Drain macerated berries well and pat dry. If juices still pool, gently brush the top of the base with a light glaze of whipped cream to seal before adding the berry layer.
  • Whipped cream losing shape. Keep everything cold, avoid overwhipping, and consider stabilizing if you’ll assemble far in advance.
  • Cracks on top. This often indicates oven temperature too high or overbaking. Tent with foil and lower oven temperature slightly if needed.

FAQ

Domande frequenti – Torta fragole e panna

Quali sono gli ingredienti principali per una torta fragole e panna classica?

Ingredienti tipici: pan di Spagna soffice, panna fresca da montare, fragole fresche, zucchero a velo e vaniglia. Puoi aggiungere un poco di succo di limone per esaltare la frutta. Opzionalmente si utilizza una piccola quantità di gelatina alimentare per stabilizzare la panna se la torta deve restare ferma a temperatura ambiente per qualche ora.

Come preparo la base di pan di Spagna?

Sbatti le uova con lo zucchero finché diventano chiare e spumose, aggiungi la farina setacciata e un pizzico di sale, mescola delicatamente. Versa l’impasto in una teglia imburrata e inforna a 170–180°C per circa 20–25 minuti. Lascia raffreddare completamente prima di tagliare in strati.

Come si prepara la crema di panna (chantilly)?

Montare la panna fredda con zucchero a velo e un pizzico di vaniglia fino a ottenere una consistenza ferma. Se vuoi una crema più stabile, aggiungi qualche cucchiaio di mascarpone o formaggio cremoso. Per una versione senza panna, puoi usare crema pasticcera leggera o crema yogurt (verifica che si mantenga bene in frigorifero).

Come si assemblano gli strati della torta?

Taglia il pan di Spagna in 2 o 3 strati sottili. Bagna ogni strato con pochissimo sciroppo di fragola o limone (opzionale). Spalma uno strato di crema tra gli strati e distribuisci pezzetti di fragola fresca. Ripeti fino a riempire i strati, poi copri l’intera torta con la crema rimasta e decora con fragole.

Posso preparare la torta in anticipo?

Sì. Puoi preparare i pan di Spagna e la crema in anticipo e conservarli in frigorifero. Assemblare e decorare poco prima di servire è consigliato per mantene la freschezza delle fragole. Se vuoi, puoi anche congelare i pan di Spagna già cotti, una volta raffreddati.

Come conservare la torta fragole e panna?

Conserva la torta in frigorifero, coperta o in contenitore ermetico, preferibilmente entro 2-3 giorni. Evita di esporla a temperature troppo alte per non far sciogliere la panna. Le fragole tendono a rilasciare liquido se restano a lungo tagliate in superficie, quindi è meglio decorare poco prima di servire.

Quali varianti posso provare?

Varianti comuni includono: crema al mascarpone al posto della panna, crema diplomate, o una crema al cioccolato. Puoi anche aggiungere uno strato di gelatina di fragola tra gli strati o completare con una glassa lucida. Per una versione leggera, riduci lo zucchero o usa una crema di yogurt.

Come rendere la torta adatta a persone con allergie o intolleranze?

Allergie/Glutine: usa pan di Spagna senza glutine. Lattosio/intolleranza: monta panna vegetale (soia, cocco) al posto della panna fresca. Vegana: usa pan di Spagna vegano (senza uova) e crema vegetale. Sempre controlla le etichette degli ingredienti per evitare tracce di allergeni.

Quali strumenti sono utili per prepararla?

Stampo rotondo o quadrato per torta, fruste elettriche o planetaria, spatola per farcire, coltello affilato per tagliare i pan di Spagna, ciotole, eventuale pennello da cucina per lo sciroppo di bagna, e un supporto/torta per decorare.

Quali errori comuni evitare?

Pan di Spagna troppo asciutto o secco può compromettere la morbidezza. Evita di bagnare eccessivamente gli strati, che rendono la torta molle. Taglia strati uniformi per evitare dislivelli e assicurati che la panna sia ben fredda quando monti. Asciuga le fragole se lente a rilasciare liquido per evitare scivolamenti della crema.

Introduction / Hook

Picture a delicate cloud of pastry that gleams with a whisper of gloss, perched atop a velvet-soft bed of custard-like cream, and crowned with a light dusting of powdered sweetness. Cream puff cake isn’t just a dessert; it’s an experience that dances on the palate and lingers in the memory. It begins with the crackle of a perfect crust giving way to a sigh of tender crumb, followed by a creamy, creamy center that melts as it meets your tongue. The aroma alone has a way of turning an ordinary afternoon into a small celebration—like stepping into a bakery at dawn, where the day’s first batch is still warm and the air carries a hint of vanilla and toasted sugar. This dessert is for dreamers who believe that dessert should be an event, not merely a finish to a meal. It’s for gatherings that crave a showstopper with a storytelling quality—an edible centerpiece that looks as elegant as it tastes.

What makes cream puff cake especially captivating is how it marries two classic textures into one, seamless bite. The exterior offers that quintessential choux-crack—airy, blistered, and delicate—while the interior reveals a luscious, creamy milieu that feels indulgent yet surprisingly light. There’s a chorus of sensations in every mouthful: the initial snap of the outer shell, the soft cushion of the filling, the faint vanilla warmth, and a clean finish that invites the next bite. It’s a dessert that invites conversation, admiration, and perhaps a gentle sigh of contentment—proof that dessert can be both theatre and solace at the same time.

In the cinematic arc of a dinner party, cream puff cake plays the role of the quiet hero that appears just as the room begins to hum with conversation. It doesn’t shout for attention; it earns it with its elegant silhouette and its capacity to be both refined enough for a formal finale and forgiving enough for a casual weekend gathering. The beauty of this dessert lies not just in its taste, but in the way it can be adapted to suit different moods, seasons, and tables. Whether served as a towering showpiece for a special occasion or sliced into intimate portions for a cozy weeknight treat, cream puff cake offers a culinary moment that feels luxurious without being pretentious.

As you prepare to read on about the origins, the variations, and the best ways to present this dessert, you’ll notice a thread that runs through every version: balance. The sweet with the subtle, the light with the lush, the simple with the sophisticated. Cream puff cake invites you to savor the journey as much as the destination, elevating everyday desserts into something that feels newly invented each time you slice through its airy layers.

The Story Behind the Dish

Origins of the Cream Puff and the Birth of a Cake

To understand cream puff cake, you first meet its ingredients in spirit: choux pastry, the venerable French creation that has delighted bakers for centuries. Choux is a genius of restraint and technique, relying on a simple assembly of flour, water, butter, and eggs to create a dough that puffs into lightness with oven heat. When baked, the dough leaves a hollow interior perfect for filling with creams, mousses, or custards. The name “choux” itself evokes a lightness of being, a delicate puff that seems to float just above the plate.

The idea of pairing airy pastry with a generous filling is equally grounded in European patisserie, where the most memorable desserts trade on contrast: crisp exteriors giving way to creamy centers. Cream puff cake unifies two beloved forms—the classic cream puff and the celebratory cake—into a single, spectacular creation. It’s a hybrid that respects the discipline of precise pastry technique while inviting playful variation, as bakers across regions adapt the filling to local tastes and seasonal ingredients. In many ways, this dessert embodies the spirit of culinary evolution: a homage to tradition that remains deliciously open to reinterpretation.

Historically, puffed pastries appeared in various forms across Europe, evolving as bakers experimented with doughs and fillings. The cream-filled version became especially iconic because it offered a practical elegance: an impressive, crowd-pleasing treat that could be scaled up for gatherings or pared down for intimate dinners. The cake variation—where the lightness of a puffed shell is harnessed within a multi-layered or tiered presentation—emerged as an indulgent centerpiece, ideal for birthdays, holidays, and milestone celebrations. The result is a dessert that tells a story with its silhouette: a rounded, almost sculptural form that invites the eye as much as the palate.

In modern kitchens, cream puff cake is often a love letter to technique and texture. Bakers who approach it with curiosity discover that the magic lies in controlling moisture, air, and sweetness so that the outer crust remains crisp while the interior stays supple and creamy. Whether you’re recreating a family recipe passed down through generations or exploring a contemporary riff that adds a twist like citrus zest, espresso glaze, or a seasonal berry compote, the dessert remains a canvas—one that invites both tradition and invention to share the stage.

Why You’ll Love This Recipe

Benefits at a Glance

  • Impressive presentation with minimal staging. Cream puff cake looks sophisticated on a dessert stand or a family-style platter, yet it’s approachable enough for home bakers with advanced basic skills.
  • Versatility that adapts to seasons and tastes. The filling can be classic vanilla, chocolate, citrus, or a rich pastry cream with a hint of liqueur for an adult twist, making it suitable for any celebration or weeknight indulgence.
  • Texture contrast that delights. The outer shell offers a crisp, delicate bite, then yields to a lush, creamy interior that feels luxurious without being heavy.
  • Make-ahead friendly for entertaining. With proper planning, components can be prepared in advance and assembled closer to serving, freeing you to mingle with guests rather than being tethered to the kitchen.
  • Elegance with simplicity. You don’t need complex equipment or theatrical skills to achieve a dessert that looks refined and tastes unforgettable.
  • Every bite tells a story. The dessert invites conversation about technique, history, and regional twists, turning your table into a small culinary salon.
  • Comforting yet festive. It strikes a balance between cozy familiarity and celebratory luxury, making it a smart choice for holidays, birthdays, or any time you want to mark the moment with something special.

Flavor Profile & Texture

Imagine a crust that crackles softly as you cut through it, releasing a whisper of steam that hints at the tender interior to come. The shell—characteristic of the choux family—delivers a light, airy bite with a faint caramelized note from the oven’s heat. Its thinness allows the accompanying cream to shine without overwhelming the palate, creating a delicate textural dialogue between crisp exterior and velvety center.

The filling is where the dessert becomes irresistibly comforting. It tends to lean toward a smooth, luscious texture that coats the palate with a gentle embrace. The flavor is lush but not cloying, often enriched by vanilla, a touch of sugar, and a whisper of dairy fat that lends fullness without heaviness. When a citrus or berry component is woven in, it introduces a bright counterpoint—acidity that cleanses the sweetness and awakens the senses without overpowering the pastry’s inherent delicacy.

In the best iterations, there’s a subtle interplay of sweetness levels. The shell’s mild savoriness—owing to the eggs and pastry butter—provides a savory-edge that balances the sweet cream, creating a chorus rather than a solo. The overall sensation evolves with temperature: a just-warmed slice offers more body and richness, while a cooler slice highlights the shell’s crispness and the filling’s silkiness. Aromas of vanilla, almond (if used in the shell), and a whisper of caramelization from baking join the tasting notes, making each bite a small, multi-sensory celebration.

Occasions & Pairings

When to Serve and What to Pair

Ceremonial celebrations and intimate evenings alike benefit from the grace of cream puff cake. It shines as a finale for a formal dinner, a showpiece at a milestone party, or a centerpiece for a Sunday family gathering. Its visual impact makes it a natural candidate for birthday desserts, wedding receptions, or holiday menus where you want something that reads as thoughtfully crafted without requiring a banquet kitchen to produce.

Pairing ideas to complement and elevate the dessert include:

  • Fresh fruit accents such as berries or citrus segments that offer brightness and color contrast.
  • A light dusting of citrus zest or a delicate glaze to add a glimmering finish and a fragrant lift.
  • A sparkling beverage or dessert wine that mirrors the dessert’s elegance without overwhelming its delicate balance.
  • Complementary textures from a simple almond tuile or pistachio brittle for crunch that plays with the cream’s creaminess.
  • Seasonal twists like a warm berry compote for autumn or a mango-passion fruit profile for a tropical-inspired variation.

Tips, Variations & Substitutions

Creative Approaches to Personalize the Dessert

  • Vegan adaptation: Explore dairy-free fillings and shells that rely on plant-based fats and emulsions while preserving the lightness of the pastry. The key is to maintain the airiness of the shell and a creamy, dairy-free center that remains smooth and indulgent.
  • Gluten-free approach: Use a gluten-free flour blend that behaves similarly to wheat for the shell, focusing on achieving the same puff and crispness without compromising texture.
  • Flavors within the filling: Introduce subtle notes like vanilla bean, espresso, citrus zest, or almond extract to tailor the cream to your preference. A light liqueur can add warmth and depth for adult gatherings.
  • Shell texture variations: Adjust the baking temperature and time to influence the blistered surface and internal dryness. A slightly drier interior can balance exceptionally well with a rich filling.
  • Seasonal twists: For a summery version, fold in seasonal fruit purées or swirl in a ribbon of berry coulis within the filling for a marbled effect and a burst of brightness in every bite.
  • Texture-forward variants: Add a delicate crunch by incorporating toasted nuts or crisped sugar shards as a topping or interlayer, creating a satisfying contrast with the smooth filling.
  • Decorative presentation: Build the dessert into a towering confection for events or slice into individual portions for elegant plated desserts. A thin glaze or a light dusting of confectioners’ sugar can finish the look beautifully.
  • Make-ahead strategies: Prepare the shell in advance and fill closer to serving time, or assemble complete mini portions a day ahead and keep refrigerated until service to maintain freshness and form.

Storage & Make-Ahead Ideas

Storage approaches depend on how you assemble the dessert. If you’ve prepared shells ahead of time, keep them in a dry, airtight container to preserve crispness. Fillings are best stored separately and assembled near serving time to retain the shell’s delicate texture. For smaller, individual portions, you can refrigerate assembled pieces for a day or two, though the shell may soften slightly with time. If you need to keep everything longer, a gentle freezing method can preserve the components; thaw slowly in the refrigerator to maintain texture before the final assembly. Reheating is gentle and short—enough to awaken aromas and soften the filling without making the shell soggy.

Make-ahead strategies can favor hosting ease. You might prepare a base shell batch a day or two in advance and store in a cool, dry place. The filling can be whisked and stabilized in advance so that the final dessert comes together with minimal effort. For elaborate gatherings, consider preparing a stand or tiered display in advance and performing the final touches, such as a light dusting of sugar or a drizzle of glaze, just before guests arrive. This approach allows you to focus on connection and conversation rather than being tethered to the oven while everyone awaits the grand reveal.

Fun Facts & Trivia (Optional)

Did you know that choux pastry is believed to have originated as a practical solution for cooks who needed a dough that could be cooked in the same pot as the filling? Its resilience and versatility made it a beloved staple in pastry kitchens across Europe. The name “cream puff” evokes the airy nature of the finished product, a dessert that seems to puff up with the energy of air and the warmth of the oven, only to reveal a hidden treasure inside. Across cultures, variations have flourished: some traditions emphasize rich custards; others highlight whipped creams with delicate flavorings. The result is a family of desserts that share a common ancestry but celebrate distinct regional personalities.

From a culinary perspective, cream puff cake illustrates a fundamental principle: texture is as important as flavor. The play between crisp outer layers and creamy interiors exemplifies how technique shapes enjoyment. Even within the same recipe, small adjustments—like the intensity of the glaze, the balance of sweetness, or the aromatics used—can transform the experience from comforting nostalgia to refined elegance. In any case, the dessert invites a careful, mindful tasting that rewards curiosity and patience, turning a simple plate into a sensory meditation.

Ingredients

Cream Puff Cake
Choux Base
– 1 cup water (240 ml)
→ Water is the primary liquid that steams away during baking to push the dough upward and create the signature hollow choux shells. It helps dissolve the butter as the dough comes together, forming a cohesive paste when flour is added. Use cold to room-temperature water for consistent texture; if you use milk instead, the shells will be richer but denser. Ensure the mixture comes to a boil briefly before adding the flour for best puff.
– 1/2 cup unsalted butter (115 g)
→ Butter provides fat for tenderness and flavor, and it helps create a smooth, cohesive dough as it melts into the water. Melt the butter completely with the water before introducing the flour to ensure even distribution. Use unsalted butter to control the salt level in the dough, essential for proper rise.
– 1/4 teaspoon salt
→ Salt enhances the dough flavor and helps strengthen the structure as the shells bake. Fine-grain salt mixes more evenly into the warm liquid, preventing uneven pockets. Do not omit entirely if you want the choux to have depth of flavor.
– 1 tablespoon granulated sugar (optional)
→ A touch of sugar aids browning and a slight sweet balance typical of cream puffs. If you prefer a more neutral pastry, you can omit it. When included, it contributes to a light, golden crust during baking.
– 1 cup all-purpose flour (120 g)
→ The flour provides the starch and structure that, when hydrated and heated, forms the sturdy walls of the choux shells. Sift the flour before adding it to the hot mixture to prevent lumps and to ensure even absorption. Add the flour all at once after boiling the water mixture, then stir vigorously to evaporate excess moisture and create a cohesive dough.
– 4 large eggs, room temperature
→ Eggs supply structure, moisture, and lift. They are added one at a time to achieve a thick, shiny, pipeable dough that holds its shape when baked. If the dough looks too thick after adding the first few eggs, you can beat in small increments until it just loosens to a glossy ribbon that slowly cascades off a spoon. Do not overmix once the eggs are added, or the shells may not puff properly.

Pastry Cream Filling
– 2 cups whole milk
→ The milk forms the base of the classic crème pâtissière, providing richness and body to the filling. For best results, warm the milk gently (not boiling) with half of the sugar and the vanilla to infuse flavor before combining with the yolks. If you prefer a lighter texture, you can use 1.5 cups milk and 0.5 cup cream, but traditional cream puffs use milk for a stable custard.
– 1/2 cup granulated sugar
→ Sugar sweetens the custard and helps create a smooth, silky texture during cooking. Adjust to taste, but avoid over-sweetening which can mask the vanilla and custard notes. Whisk with the yolks until pale and slightly thickened before tempering with hot milk for a smooth custard.
– 4 large egg yolks
→ Egg yolks provide richness and form the custard’s thickening base. They also contribute to the creamy, glossy mouthfeel of the pastry cream. To prevent curdling, temper the yolks by gradually whisking in hot milk before returning everything to the stove for thickening. For best texture, strain the mixture to remove any cooked bits.
– 3 tablespoons cornstarch (or 25 g)
→ Cornstarch is the primary thickening agent that gives the pastry cream its smooth, custard-like consistency without mushrooms or lumps. Sift to remove clumps and whisk with a small amount of cold milk to make a slurry before adding to the hot milk. If you prefer a lighter texture, you can use 2 tablespoons, but expect a softer filling.
– 1 teaspoon vanilla extract or 1/2 vanilla bean (scraped)
→ Vanilla provides depth and aroma that defines pastry cream. Using a real vanilla bean will give a stronger, more fragrant custard; if using extract, add at the end of cooking to preserve aroma. For best flavor, allow the custard to cool with the vanilla in it, then strain before filling the puffs.
– 2 tablespoons unsalted butter (optional)
→ Butter added at the end while the custard is hot yields a silky, glossy finish and extra richness. Remove from heat before incorporating to avoid glare or separation. If you skip this, the filling will still be delicious but slightly less luscious.
– Pinch of salt
→ A tiny salt balance amplifies sweetness and enhances the custard’s overall flavor. It also helps suppress any eggy taste. A pinch is sufficient; avoid adding more than a pinch unless you’re aiming for a more pronounced savory note.

Optional Whipped Cream Filling
– 1 cup heavy cream
→ Light, airy filling that contrasts with the rich custard. Whip until soft to stiff peaks to create a stable cream that holds its shape when layered. Chill the bowl and whisk to maximize volume and stability. If you want only a light filling, you can skip the custard and use this alone.
– 2 tablespoons powdered sugar
→ Powdered sugar dissolves quickly and provides a smooth sweetness without graininess. Adjust to taste; sift the sugar if you see any lumps. For a less sweet version, reduce the sugar by a tablespoon or two.
– 1/2 teaspoon vanilla extract
→ Adds a pleasant aroma that brightens the whipped cream. A little goes a long way; using vanilla paste can intensify flavor and give little specks of vanilla in the cream for a more classic look.

Optional Toppings and Finishes
– Powdered sugar for dusting
→ Finishes the cake with a delicate sweetness and a clean, classic appearance. Dust just before serving to prevent moisture from dissolving the light snow-like topping. For a more rustic look, you can skip this or dust with cocoa powder instead.
– Chocolate glaze (optional)
– 3/4 cup semisweet chocolate chips or chopped chocolate
→ Provides a rich, glossy finish that anchors the puffs and adds a decadent chocolate contrast. Use chopped chocolate for a smoother glaze, or chips for convenience. Melt gently to avoid scorching and whisk until smooth.
– 2 tablespoons unsalted butter
→ The fat helps create a silky, shiny glaze that clings to the chilled puffs. Add butter after melting the chocolate to emulsify the glaze for a velvety finish. Do not overheat once butter is added, or the glaze may break.
– 2 tablespoons heavy cream or milk
→ Adds fluidity to the glaze, ensuring a pourable consistency that coats the shells evenly. Increase by a tablespoon if you want a thicker glaze; use less if you prefer a thinner coat. Keep glaze warm but not scorching hot to avoid melting the puffs.

Instructions

  • Preheat your oven to 425°F (220°C) and line two baking sheets with parchment paper or silicone mats, spacing for puffing.
    → A hot oven creates steam-driven rise in choux; parchment prevents sticking and allows easy removal of the delicate shells after baking.
  • Combine the choux base ingredients in a heavy saucepan: water (1 cup), unsalted butter (1/2 cup), salt (1/4 teaspoon), and optional sugar (1 tablespoon); place over medium-high heat and bring to a vigorous boil.
    → The butter must melt completely and the liquid must reach a full boil to gelatinize the starch when the flour is added, forming a smooth, cohesive dough.
  • Remove from heat and add the all-purpose flour (1 cup) in one shot; stir vigorously with a wooden spoon until the dough pulls away from the sides and forms a smooth ball, then return the pan to low heat and cook, stirring, for 1-2 minutes to dry out excess moisture.
    → Drying the dough is essential for structure that will hold the eggs and create hollow shells that can be filled later.
  • Transfer the dough to a warm bowl and let it cool for 5 minutes; then beat in the eggs one at a time (4 large eggs, room temperature), fully incorporating each egg before adding the next; the dough should become thick, glossy, and pipeable; if it seems too stiff after the first few eggs, add a teaspoon of water at a time until the correct consistency is reached.
    → Adding eggs gradually prevents overbinding and ensures the dough traps air for lift; the dough should flow slowly off a spoon in a thick ribbon.
  • Fit a piping bag with a large round tip and pipe approximately 3-inch (7.5 cm) rounds on the prepared sheets, spacing rounds about 2 inches (5 cm) apart; gently smooth any peaks with a damp fingertip to encourage uniform shapes.
    → Uniform discs bake evenly and stack neatly as a cream puff cake; spacing prevents shells from merging into one another as they puff.
  • Bake the shells at 425°F (220°C) for 15-20 minutes until deeply puffed and golden; avoid opening the oven early to prevent deflation; then reduce the oven temperature to 375°F (190°C) and bake for an additional 10-15 minutes until the shells are dry inside and sound hollow when tapped.
    → The initial high heat activates steam for rapid expansion; lowering the heat dries the shells through and prevents sogginess or collapsing due to moisture.
  • Turn off the oven, crack the door slightly, and let the shells dry in the warm oven for 10-15 minutes; then remove and transfer to a wire rack to cool completely before filling.
    → Drying in the oven reduces internal moisture that can soften the shells; cooling completely makes filling easier and prevents tearing.
  • Make the pastry cream: warm the whole milk (2 cups) with half of the sugar (1/2 cup) and vanilla (1 teaspoon extract or 1/2 vanilla bean, scraped) in a saucepan until steaming; do not let it boil.
    → Heating the milk with vanilla infuses flavor throughout the custard and ensures even thickening when combined with the yolk mixture.
  • Whisk egg yolks (4 large) with the remaining sugar (1/2 cup) until pale and slightly thickened, then whisk in cornstarch (3 tablespoons) to create a smooth paste with no lumps.
    → Whipping in sugar and cornstarch prepares the yolks for even thickening and prevents eggs from curdling when hot milk is added.
  • Gradually temper the yolks by whisking about a cup of hot milk into them, then whisk the warmed yolk mixture back into the pot with the remaining milk and cook over medium heat, whisking constantly, until the mixture thickens to a custard that just comes to a boil; cook 1-2 minutes more, then remove from heat and stir in unsalted butter (2 tablespoons) and a pinch of salt, if using.
    → Tempering prevents curdling; continuing to cook activates the cornstarch thickener and yields a glossy pastry cream.
  • Strain the pastry cream through a fine-mesh sieve into a clean bowl, cover with plastic wrap directly on the surface to prevent a skin, and cool completely in the refrigerator until it is thick but pipeable.
    → Straining removes any cooked bits and chilling helps achieve a stable filling that holds its shape in the puffs.
  • Optional: whisk the whipped cream filling (if using) by chilling a mixing bowl and beaters, then whipping heavy cream (1 cup) with powdered sugar (2 tablespoons) and vanilla (1/2 teaspoon) to soft or stiff peaks as desired; refrigerate until ready to fill.
    → Whipped cream provides a lighter contrast to the rich pastry cream and should be used promptly to prevent collapse.
  • Fit a piping bag with a small round or slit tip and fill with pastry cream; for each choux round, poke a small hole in the base with a skewer or the tip of a small knife and pipe pastry cream into the cavity until it feels full but not oozing; reserve some cream for the cake assembly.
    → Filling through the base ensures even distribution inside the hollow shell and prevents tearing the delicate pastry.
  • If using whipped cream filling, pipe a layer of whipped cream over the pastry cream or fold it into a portioned amount to create alternating layers as you build the cake; keep the filled shells chilled while assembling.
    → Layering with whipped cream adds lightness and a creamy texture that complements the custard without overpowering it.
  • Assemble the cream puff cake by placing a filled disc on a serving plate, then stacking additional filled discs on top, pressing gently to compact; trim any domed tops to create a flat cake surface for neat slicing.
    → Uniform discs create a stable, visually appealing cake; trimming ensures clean edges for neat slicing.
  • If desired, prepare a chocolate glaze by melting semisweet chocolate chips with butter and heavy cream until glossy; pour gently over the top of the assembled cake, tilting to coat evenly, and let it set at room temperature or refrigerate briefly.
    → A glossy glaze adds flavor contrast and a professional finish; avoid overheating the glaze after adding butter to prevent separation.
  • Dust the finished cake with powdered sugar just before serving; refrigerate the cake until ready to slice, then cut with a hot, sharp knife, wiping the blade between cuts for clean slices.
    → Powdered sugar gives a delicate finish without weighing down the cake; a sharp blade yields clean slices and preserves the layers.

Notes

This cream puff cake is a dramatic dessert that pairs airy choux pastry with silky pastry cream and optional whipped cream, finished with a glossy chocolate glaze or a light dusting of powdered sugar. You can customize it by using vanilla, citrus, or coffee-flavored pastry creams, layering the components for contrast, or swapping in whipped cream for a lighter filling between the shells. To accommodate gluten-free diets, substitute a proven gluten-free all-purpose flour blend for the regular flour and add an extra tablespoon or two of cornstarch to help mimic the structure; always check that your flavorings and chocolate glaze are certified gluten-free. For best results, bake the choux shells until they are deeply puffed and golden, then resist opening the oven during the first 15–20 minutes to avoid collapse. The pastry cream should be thick and cooled before filling; whisk in the butter off the heat for extra silkiness and strain if desired to remove any cooked bits. If you prefer a lighter filling, whip cream with a touch of vanilla and fold it gently into the custard or fill half the shells with custard and half with whipped cream for contrast. The assembled cake benefits from a chill of at least 2 hours (or overnight) so the filling sets and the flavors meld; unfilled shells can be prepared and frozen for up to 2 months, then filled just before serving. To finish, glaze with the chocolate glaze for a rich, glossy surface or dust with powdered sugar for a classic finish; serve with berries or a small dollop of whipped cream for elegance. Always ensure your flour, vanilla, and chocolate are fresh and gluten-free if needed, and measure ingredients accurately for reliable puff and a smooth custard.

Tips

Choux pastry tips

  • Use a precise mise en place: measure water, butter, salt, sugar, flour, and eggs before you start. Have your eggs at room temperature to encourage a smooth, cohesive dough that will rise well.
  • Heat the water and butter together until the mixture boils briefly, then add the flour all at once. Stir vigorously over heat until the dough pulls away from the sides and forms a cohesive ball that looks matte and dry. This creates the hollow shells that puff properly.
  • After the flour is incorporated, continue cooking the dough for 1–2 minutes to drive off excess moisture. This drying step is crucial for a strong structure.
  • Cool the dough slightly before adding eggs. Add eggs one at a time, mixing well after each addition. The dough should be thick, shiny, and pipeable; if it looks too stiff after the first few eggs, whisk in small increments until it reaches a glossy ribbon that slowly falls from a spatula.
  • Pipe or scoop the dough evenly on the baking sheet. For uniform puff, keep shells roughly the same size and distance between them. If you see any cracks, it usually means the dough was too dry or not evenly mixed.
  • Bake in a hot oven until the puffs are deeply golden and firm to the touch, then reduce the heat and let them dry out inside the oven. Do not rush the bake by opening the door early; sudden drops in heat can cause collapse.
  • When the puffs are golden and risen, prop the oven door open slightly for a few minutes to vent steam, then remove to a rack to cool completely. Poking a small hole in each shell after baking helps prevent sogginess from trapped moisture.

Pastry cream filling tips

  • Warm the milk with half the sugar and the vanilla to infuse flavor. Do not boil. This helps the custard set with a smooth texture.
  • Whisk yolks with the remaining sugar until pale and slightly thickened, then whisk in the cornstarch to make a smooth slurry. Gradually temper the yolks with hot milk to avoid curdling.
  • Return the custard to the stove and cook over medium heat, whisking constantly until it thickens to a coating consistency. Do not let it boil. If lumps form, strain the custard while hot for a silkier texture.
  • Once thickened, remove from heat and whisk in the butter (if using) and vanilla (or vanilla bean). A pinch of salt enhances flavor and prevents any eggy taste. Press plastic wrap directly onto the surface to prevent a skin from forming and chill until cold before filling.
  • For the best texture, chill the pastry cream thoroughly (at least 2 hours or overnight). It should be thick and scoopable but not runny when filling the puffs.

Optional whipped cream filling tips

  • Chill the mixing bowl and beaters before whipping the cream. Cold equipment helps achieve stable peaks.
  • Whip the heavy cream with the powdered sugar and vanilla to soft or stiff peaks, depending on how firm you want the filling. For a lighter contrast to the rich custard, use softly whipped cream or fold into the pastry cream in a light mousse-like texture.
  • If you want extra stability, whisk in a small amount of stabilized whipped cream (or a pinch of cream of tartar) toward the end.

Assembly and finishing tips

  • Cool the choux shells completely before filling to avoid melting the filling. Use a piping bag with a small round or star tip to fill through the side or from the bottom of each puff.
  • When layering puff with pastry cream, alternate fillings (pastry cream and whipped cream) for texture and flavor contrasts.
  • Dust with powdered sugar just before serving to maintain a light crisp shell and prevent the sugar from dissolving on contact with moisture.

Toppings, finishes, and glaze tips

  • Chocolate glaze: Melt chocolate with butter and a splash of cream or milk over low heat, whisking until smooth. Keep the glaze warm but not hot to prevent softening the shells. Drizzle or dip the tops for a glossy finish.
  • For a smoother glaze, strain it after melting to remove any unmelted bits. If the glaze thickens, whisk in a little warm cream to reach desired consistency.
  • Glazes and fillings are best used on the day of assembly. If making ahead, keep shells unfilled in a dry, airtight container and fill just before serving.

Storage and troubleshooting tips

  • Unfilled choux shells store well, tightly closed, at room temperature for 1–2 days or frozen for up to 1 month. Thaw and re-crisp in a low oven before filling.
  • Filled cream puffs are best chilled and consumed within 1–2 days. Keep refrigerated and cover to prevent drying out.
  • If the shells don’t puff properly (they’re dense or flat), check oven temperature (too cool or the oven heated unevenly), ensure you dried the dough sufficiently, and avoid opening the oven during the initial bake.
  • If the pastry cream thickens too much while cooling, whisk in a splash of milk or cream to loosen to a creamy consistency just before filling.

FAQ

What is Cream Puff Cake?

A Cream Puff Cake is a dessert built from light choux pastry puffs stacked or layered with creamy fillings, typically pastry cream and whipped cream, and finished with a glaze or dusting of sugar.

What are the main components of this cake?

The main parts are:

  • Choux pastry puffs (the cake layers)
  • Pastry cream or custard filling
  • Whipped cream or stabilized whipped cream
  • Optional glaze (chocolate, caramel, or a simple sugar glaze)
Do I need special equipment?

Basic equipment works well: a piping bag or two, a large baking sheet lined with parchment, a mixer or whisk, a saucepan for the pastry cream, and a cooling rack. A small round cutter can help shape uniform puffs if desired.

How do I make the choux pastry for the cake?

Key steps:

  1. Preheat oven to about 375°F (190°C). Line baking sheets with parchment.
  2. Heat 1 cup water with 4 tbsp butter and a pinch of salt until butter melts and mixture boils.
  3. Stir in 1 cup all-purpose flour all at once; cook, stirring, until the dough pulls away from the sides and forms a smooth ball.
  4. Cool 5–10 minutes, then beat in eggs one at a time until glossy and smooth.
  5. Pipe small mounds or drop spoonfuls onto the sheets. Bake until puffed and dry inside, about 20–25 minutes, without opening the oven early.
How do I bake and dry the cream puffs properly?

Important tips: bake on parchment, avoid crowding, and don’t open the oven during the first half of baking to prevent collapsing. If puffs look pale or soft in the middle, they may need a few extra minutes and a cool, dry environment to finish drying.

How do I make the fillings?

Two classic fillings:

  • Pastry cream: 2 cups milk, 1–2 tsp vanilla, 4 egg yolks, 1/2 cup sugar, 3–4 tbsp cornstarch. Cook milk with vanilla; whisk yolks, sugar, and cornstarch; temper with hot milk, then cook until thick. Chill before use.
  • Whipped cream: 1–2 cups cold heavy cream, 2–3 tbsp sugar, 1 tsp vanilla; whip to soft or stiff peaks depending on preference.

You can also fold lightly whipped cream into pastry cream for a lighter filling.

How do I assemble the Cream Puff Cake?

Assembly idea:

  • Slice cooled puffs in half like little sandwich buns.
  • Fill the bottom half with pastry cream, top with a dollop of whipped cream, then place the top half back on.
  • Stack several filled puffs in a layered arrangement on a platter or use a tall cake ring to form a stacked “cake.”
  • Finish with a whipped cream layer on top and chocolate or caramel glaze if desired. Chill well before serving.
How should I store and serve the cake?

Store, well covered, in the refrigerator. Best within 2–3 days for freshness. Serve cold; the pastry cream holds together best when chilled. If making ahead, you can assemble the puffs and fillings, then refrigerate assembled cake just before serving.

Can I make this ahead or freeze it?

Yes, you can bake and cool the choux shells in advance and freeze them in an airtight container. Thaw and fill just before serving. Pastry cream can also be made a day ahead; keep it chilled. Freezing a fully assembled cake is not ideal as textures may change.

Can this be made dairy-free or gluten-free?

Dairy-free: use dairy-free butter and plant-based milk in the pastry cream, and top with dairy-free whipped cream or coconut cream. For the filling, dairy-free whipped cream works well (coconut or almond-based). Gluten-free: use a gluten-free flour blend in the choux pastry and pastry cream; note that results can vary, as choux behavior changes with different flours.

Are there common problems and how do I fix them?

Common issues and fixes:

  • Puffs collapse after baking: ensure the dough is fully dry before eggs, bake at a steady temperature, and avoid opening the door too soon.
  • Pastry cream is runny: cook longer or whisk more vigorously to activate the starch; chill thoroughly before filling.
  • Puffs are hard or hollow: oven may be too hot; reduce heat slightly next time and bake longer to dry out.
  • Puffs are too small: pipe or scoop larger mounds, or increase the hydration just a touch by adjusting flour slightly.
Can I add flavors or variations to the Cream Puff Cake?

Yes. Flavor ideas include:

  • Flavor the pastry cream with vanilla, lemon zest, or liqueur.
  • Fold a fruit puree (strawberry, passion fruit) into the whipped cream for a fruity layer.
  • Add cocoa powder or espresso to the choux dough for a chocolate or coffee-ch flavored version.
Is there a quick chocolate version of this cake?

Yes. Add 1–2 tablespoons of cocoa powder to the choux dough and the pastry cream for a chocolate twist, and finish with a chocolate glaze or ganache on top. You can also layer with chocolate pastry cream and chocolate whipped cream for a richer dessert.

Introduction / Hook

Imagine waking up to the soft glow of morning light, only to realize your dinner is already halfway to perfection. A slow cooker hums in the background, releasing a warm, savory perfume that feels like a hug from a cozy kitchen. Pollo Angel Crockpot is the kind of dish that turns an ordinary weeknight into a comforting ritual. It’s not flashy or complicated; it’s honest, indulgent, and incredibly forgiving—the kind of recipe that makes you smile before you even take a bite. Picture tender pieces of chicken that have surrendered to the gentle heat, bathed in a velvety, buttery-smooth sauce that clings to every noodle, grain, or forkful you pair with it. The aroma itself promises a table full of conversation, laughter, and lingering satisfaction. This isn’t just dinner; it’s a memory in the making, a dish that invites you to slow down, savor the moment, and let the warmth of home do the talking.

Pollo Angel Crockpot captures the comforting essence of a family favorite with all the ease and hands-off magic of slow cooking. It’s the kind of recipe you can assemble in the morning, set to low, and return to at the end of a long day to find a dish that tastes like you cooked for hours—without the stress. In every spoonful you’ll taste a gentle balance of richness and brightness, a harmony of textures that feels both elegant and approachable. Whether you’re feeding a hungry crew after a busy day, hosting a casual dinner with friends, or simply treating yourself to a little culinary self-care, this dish delivers warmth, depth, and a touch of indulgence—every time.

As you read on, you’ll discover not just how this dish tastes, but why it works so well in a slow cooker, what makes it a timeless comfort, and how you can tailor it to your kitchen, your schedule, and your dietary preferences. The story behind Pollo Angel Crockpot is as much about the memory of home as it is about the recipe itself—a reminder that simple ingredients, prepared with patience and love, can become something truly special.

The Story Behind the Dish

Every family has a dish that feels like a soft-edged invitation—perhaps it’s the scent that lingers on the curtains after a Sunday meal, or the way the old family cookbook’s margins are smudged with sauce and laughter. Pollo Angel Crockpot sits in that cherished category for many home cooks: a dish born of practical weeknight cooking that somehow achieves a sense of indulgence without feeling extravagant. The name itself evokes a sense of lightness and comfort, as if the dish carries a little halo of warmth that makes everyone want to gather around the table. The “angel” label isn’t about heavenly ingredients so much as it is about the gentle transformation that happens when comfort foods meet modern convenience.

Legend has it that this kind of recipe traveled across kitchens with the advent of the slow cooker—an appliance that made the long-simmered flavors of home cooking accessible to busy families. Think of a busy mom or dad swapping a pot on the stove for a countertop miracle that does the heavy lifting while you focus on setting the table, playing with kids, or simply taking a moment to breathe. In many households, a version of this dish became a Friday staple or a Sunday fallback—proof that the simplest ideas, when treated with care, can become treasured traditions. The name “angel” often carries with it a wink of playful nostalgia: a reminder that good food can feel like a blessing when the kitchen clock slows down just enough to let flavor blossom.

Culturally, the dish nods to universal comfort food principles—creaminess, gentle herb notes, and a protein that remains succulent through low and slow heat. While the exact flavor profile can vary from family to family, the core idea remains the same: a crowd-pleasing, hearty dish that nourishes both body and spirit. Over the years, home cooks have riffed on the traditional concept, adding their own twists—extra greens for color, a splash of citrus for brightness, or a pinch of heat to spark conversation. What endures is a sense of hospitality: you invite people into your kitchen, you offer a warm plate, and you watch as dinner becomes the anchor for stories told around the table.

If you’re seeking a dish with memoir-status in your kitchen, this is a strong candidate. It carries the warmth of memories and the practicality of a chef’s favorite weeknight approach. It’s the kind of recipe that becomes more than a set of steps; it becomes a ritual—one where the anticipation of tasting those first creamy, savory bites makes the wait worthwhile. And when you finally lift the lid and reveal the finished dish, you’re not just serving food—you’re serving gratitude, the unspoken appreciation that good meals deserve to be shared and cherished.

Why You’ll Love This Recipe

  • Ease and reliability: The slow cooker does the heavy lifting, letting you start in the morning and come home to a finished, comforting meal with minimal effort.
  • Creamy, comforting flavor: A luscious sauce that feels indulgent without requiring last-minute stirring or multiple pans.
  • Versatility by design: The base idea adapts to your pantry, preferences, and dietary needs without losing its soul.
  • Family-friendly appeal: Tender chicken that pulls apart with a fork and a sauce that coats every bite—perfect for feeding a crowd or a quick weeknight dinner.
  • Low-stress planning: A one-pot wonder that minimizes cleanup and maximizes flavor, letting you focus on what matters most—enjoying the company around the table.
  • Make-ahead potential: You can prep ingredients ahead of time or even set the cooker to start while you’re out, turning your day into a seamless, delicious experience.
  • Leftovers that shine: The creamy sauce often tastes even better reheated, making lunch or a new dinner plan simple and satisfying.

Flavor Profile & Texture

Pollo Angel Crockpot is built around contrasts that feel luxurious yet approachable. The chicken emerges from the slow cooker moist and tender, its natural juices amplified by the surrounding sauce. Each bite offers a balance of richness and brightness—the depth of slow-cooked dairy-based sauce mingled with subtle aromatics, a whisper of salt and fat that melt into the meat without overpowering it. The texture is a study in contrast: the chicken is soft, almost shreds at the touch of a fork, while the sauce remains silky and coats the surface of the chicken and any accompanying starch with a glossy, comforting sheen.

The flavor palate is savory and gently buttery, with a hint of tang that keeps things lively rather than heavy. There is often a soft background note of garlic or onion, a kiss of herbs, and a creamy roundness that ties everything together. The dish does not rely on sharp heat or bright acidity to excite the palate; instead, it engages in a slow, satisfying comfort—the kind that lingers on the tongue and invites another spoonful. When served over a bed of pasta, rice, or with crusty bread, the creamy sauce is the star that brings everything together, making even simple sides feel like a completion to a well-composed plate.

Texture-wise, expect juiciness from the chicken and a velvety sauce that clings to every surface. If you choose to add greens or mushrooms as a variation, you’ll introduce a tender bite or a soft chew that creates pleasing diversity within each mouthful. The overall experience is one of warmth and ease—an edible reminder that some of the best meals come from letting time and gentle heat do the work.

Occasions & Pairings

This dish shines in many settings, from hectic weeknights to leisurely weekend gatherings. Its forgiving nature means you can scale up for a crowd without sacrificing flavor or texture. It’s equally at home as a simple family dinner or a centerpiece for a casual dinner party where guests mingle and the kitchen remains a quiet, comforting backdrop.

  • A reliable, soothing option for busy days when you want something cozy but not fussy.
  • Family gatherings: A one-pot wonder that pleases a wide range of tastes and ages, leaving you free to entertain rather than orchestrate a complex kitchen dance.
  • Potluck-friendly: The creamy sauce travels well when kept warm, making it an excellent choice for sharing at gatherings or potlucks.
  • Holiday meals with a casual twist: Serve alongside a crisp salad or roasted vegetables for a laid-back, comforting approach to holiday dining.

Pairing suggestions help to elevate the experience without complicating it. Consider these ideas:

  • Starchy bases: al dente pasta, buttery mashed potatoes, or a fluffy bed of rice to soak up the sauce.
  • Vegetable accompaniments: roasted asparagus, green beans almondine, or sautéed spinach add color and freshness to balance the richness.
  • Crusty bread: a warm baguette or focaccia for sopping up every last bit of sauce.
  • Bright beverages: a chilled white wine with clean acidity, like a Sauvignon Blanc, or a lightly sparkling water with a squeeze of lemon for a non-alcoholic option.

For dessert, consider something light and citrusy or a softly baked pastry that won’t overwhelm the palate after a creamy main course. A fresh fruit sorbet or a lemon yogurt cake can be perfect close notes to close out the meal with a sense of balance and brightness.

Tips, Variations & Substitutions

Every cook has a preferred method, and Pollo Angel Crockpot is especially tolerant of tweaks. Here are ideas to tailor the dish to your kitchen, dietary needs, or mood:

  • Protein options: While chicken breasts are a common choice for this dish, thighs stay exceptionally moist in slow-cooked preparations. You can use bone-in or boneless breast cuts, depending on your preference for texture and cooking time.
  • Diet-friendly tweaks: To make a dairy-light version, substitute a plant-based cream or coconut cream and use a dairy-free butter alternative for the sauce’s richness. For a lower-fat option, use a portion of liquid stock and a splash of dairy-free yogurt to maintain creaminess without heaviness.
  • Flavor elevation: Add a bright note with a squeeze of citrus at the end, or finish with fresh herbs like parsley, dill, or chives to introduce a garden-fresh aroma that lifts the dish.
  • Texture twists: For more texture, sauté some mushrooms, peppers, or spinach and fold them into the sauce toward the end of cooking. This introduces color, bite, and additional nutrition without complicating the dish.
  • Herb and spice play: If you enjoy a little more aroma, introduce a touch of aromatic herbs such as thyme, oregano, or basil. A pinch of paprika or white pepper can add subtle warmth without dulling the dish’s gentle profile.
  • Gluten-free adaptation: The base concept works with gluten-free starches and thickeners. If a thicker sauce is desired, a small amount of gluten-free thickener can be whisked into the sauce toward the end of cooking, allowing you to customize the texture to your liking.
  • Make-ahead enhancements: Prep the chicken and the creamy base in advance. Store in the refrigerator overnight and combine in the slow cooker to reduce evening prep time.

Storage & Make-Ahead Ideas

One of the standout features of slow-cooker meals is their flexibility in planning. Here are practical tips to maximize leftovers and simplify future meals without sacrificing flavor or texture:

  • Refrigeration: Leftovers can be stored in an airtight container in the refrigerator for up to 3–4 days. Reheating gently on the stove or in a microwave helps preserve the sauce’s creaminess and the chicken’s tenderness.
  • Freezing: If you anticipate a longer storage window, freeze the cooked chicken and sauce in a freezer-safe container for up to 2–3 months. Thaw in the fridge overnight and reheat slowly on the stovetop with a splash of stock or water to loosen the sauce as needed.
  • Make-ahead strategy: Chop aromatics, prep the protein, and measure any dairy components ahead of time. Store them separately in the fridge, then assemble in the slow cooker in the morning for a ready-to-go dinner.
  • Reheating tips: When reheating, stir gently to restore the sauce’s smooth texture. If it looks slightly separated, a quick whisk or a splash of stock can bring it back together.
  • Meal-prep ideas: Slice excess chicken and serve over a ready-to-c boil grain or a quick pilaf for a fast lunch option. The sauce can be repurposed as a topping for roasted vegetables or stirred into a noodle dish for a comforting twist.

Fun Facts & Trivia (Optional)

Delightful little tidbits that celebrate food, memory, and culture can add a layer of charm to your cooking journey. Here are a few light, snackable facts that connect to the spirit of Pollo Angel Crockpot:

  • Slow cooking didn’t just save time—it changed how flavors mingle. The steady low heat allows fats and aromatics to blend more deeply, creating a sauce that tastes like it spent hours coaxing flavors together, even if it was prepared in a fraction of that time.
  • The idea of “angel” in food often connotes lightness, comfort, and a sense of care. It’s a charming naming convention that signals the dish is meant to feel indulgent without being heavy—an edible embrace for your senses.
  • Cream-based sauces have a long, global history in comfort foods, from rustic stews to plated meals. The safety and convenience of the slow cooker modernize this tradition, allowing home cooks to achieve restaurant-like creaminess with minimal effort.
  • Peoples’ favorite variations often reflect regional ingredients. A squeeze of citrus, a handful of greens, or a dash of spice can reflect local tastes while keeping the dish’s core comforting identity intact.

Pollo Angel Crockpot is more than a recipe; it’s a comforting space you create in your home. It invites slow cooking as a form of care—care for yourself, for your family, and for the simple, powerful pleasure of a meal that feels like a warm embrace. With its forgiving nature and adaptable framework, this dish is ready to become a staple in your culinary repertoire. So gather your ingredients, set your timer, and let the slow-cooked magic do the rest—the kitchen will fill with a scent that makes everyone pause, smile, and anticipate the first bite. As the lid lifts and that creamy, tender sauce meets the table, you’ll feel the true heart of home cooking: accessible, comforting, and deeply satisfying.

Ingredients

Pollo angel crockpot

    – 4 boneless skinless chicken breasts (about 2 lb)
    → The chicken breasts are the main protein and foundation of this slow‑cooker dish. When cooked in the rich, creamy sauce they become tender and juicy, absorbing the garlic, ranch and cheese flavors. For best results, choose evenly sized breasts or gently pound them to an even thickness so they cook uniformly. If needed, layer in a single layer in the crockpot to maximize sauce coating; after cooking, you can shred with forks or leave whole, depending on preference.
    – 8 oz cream cheese, softened
    → The cream cheese is essential for creating the signature silky, luscious sauce that coats the chicken. Softening ensures it blends smoothly with the sour cream and broth without lumps. Let it come to room temperature for 30–45 minutes, or microwave in short bursts until soft, then whisk to remove any remaining lumps before adding to the crockpot.
    – 1 cup sour cream
    → Adds tang and extra richness to the sauce; full‑fat sour cream yields a creamier texture, while light versions reduce calories. For smoother results, let it come to room temperature and whisk with the cream cheese before combining with the other ingredients; if you prefer a thicker sauce, use slightly less sour cream or blend with a teaspoon of cornstarch slurry at the end.
    – 1 packet (about 1 oz) dry ranch dressing mix
    → Provides the primary flavor foundation (herbs, garlic, onion) that flavors the sauce. If you can’t find a packet, substitute with 2 tablespoons homemade ranch seasoning (dried dill, parsley, garlic powder, onion powder, salt, pepper). Don’t oversalt; taste after adding broth and adjust accordingly.
    – 1/2 cup chicken broth (low‑sodium)
    → Adds moisture to help the sauce emulsify and prevents scorching in the slow cooker. A low‑sodium option helps control overall salt level since the ranch mix and cheese contribute salt. If you prefer a thicker sauce, you can reduce the broth slightly or simmer the sauce on the stovetop later to thicken.
    – 2 cloves garlic, minced
    → Adds aromatic depth that blooms during slow cooking; mince finely so it distributes evenly. If you’re short on time, you can substitute with 1/2 teaspoon garlic powder, but fresh minced garlic delivers the best fragrance.
    – 1 teaspoon Italian seasoning (or 1/2 teaspoon dried thyme + 1/2 teaspoon dried oregano)
    → Provides a balanced herb note that harmonizes with the ranch and cheese. Dry blends work well in a Crockpot; crush briefly between your fingers to release essential oils before adding for maximum aroma.
    – 1/4 cup grated Parmesan cheese (optional)
    → Adds savory umami and a touch of sharpness; stir into the sauce during the last 15 minutes for a richer finish or sprinkle on top when serving. Freshly grated parmesan yields the best flavor and texture.
    – Salt and black pepper to taste
    → Essential for balancing flavors; the ranch mix and cheese contribute salt, so start light and adjust after the sauce comes together. Pepper adds a gentle warmth; taste the sauce and then season accordingly before serving.

Optional Add-ins

    – 1/2 cup sliced mushrooms (optional)
    → Mushrooms add an earthy depth and extra texture. To avoid a watery sauce, quickly sauté the mushrooms in a little butter or oil until lightly browned before adding to the crockpot. They’ll release moisture as they cook, enriching the sauce.
    – 1 cup baby spinach (optional)
    → Adds color and nutrition. Spinach wilts quickly in the warm sauce; add it during the last 10 minutes of cooking to keep some brightness and texture.

Garnish

    – Fresh parsley, chopped
    → Finishing touch that adds color and a fresh aroma. Sprinkle just before serving to maintain vibrant green color, and consider a light squeeze of lemon for extra brightness if desired.
    – Cracked black pepper to taste
    → Finishing spice; grind fresh over the dish after tasting to wake up the flavors. Use sparingly if you’ve already salted the sauce.

Instructions

  • Prepare the chicken and season: Pat the chicken breasts dry with paper towels to remove surface moisture, then season lightly on both sides with salt and black pepper to create a balanced flavor base.
    → Dry surfaces help the flavors adhere and promote even seasoning; this base step ensures consistent cooking in the crockpot and prevents a watery sauce from the surface moisture.
  • Optional: Sear the chicken for color and depth: Heat a tablespoon of neutral oil in a heavy skillet over medium-high heat until shimmering, then sear the seasoned breasts 1–2 minutes per side until a light golden crust forms.
    → Searing develops Maillard flavors and gives the finished dish extra color; skip if you want a quicker, hands-off method.
  • Softening dairy: Place the softened cream cheese (let it sit at room temperature for 30–45 minutes) and the sour cream in a medium bowl; whisk until completely smooth with no lumps.
    → Softened dairy emulsifies more easily, preventing lumps and ensuring a silky sauce that coats the chicken evenly.
  • Make the sauce base: In a separate bowl, whisk together the cream cheese–sour cream mixture, ranch dressing mix, minced garlic, Italian seasoning, and 1/2 cup chicken broth until the mixture is smooth and cohesive.
    → Fully blending ensures the ranch herbs and garlic distribute evenly through the sauce, helping prevent clumps and giving you a consistent flavor from edge to edge.
  • Mushrooms (optional): If using mushrooms, quickly sauté sliced mushrooms in 1 tablespoon butter or oil over medium-high heat until they release moisture and turn lightly brown, about 4–6 minutes; transfer to the crockpot now to integrate their savor without over-watering the sauce later.
    → Sautéing concentrates flavor and reduces extra moisture that could dilute the sauce in the slow cooker.
  • Assemble in the crockpot: Place the chicken breasts in a single layer in the slow cooker; pour the prepared sauce over the chicken until it is evenly coated; if you added mushrooms, scatter them on top; avoid stirring vigorously to preserve the emulsified appearance of the sauce.
    → Even coverage ensures every piece cooks in rich, cohesive flavor, and gentle handling preserves the sauce’s texture.
  • Spinach (optional): If using baby spinach, add it during the last 10 minutes of cooking so it wilts just enough while retaining color and some texture.
    → Spinach integrates quickly and contributes color and nutrition without overcooking into a limp mass.
  • Cook: Cover and cook on low for 4–6 hours or on high for 2–3 hours until the chicken reaches 165°F (74°C) and the sauce is hot and bubbling; use a meat thermometer to verify doneness and avoid overcooking the chicken, which can dry it out in long cooks.
    → Correct internal temperature ensures safety and juiciness; the slow cooker time depends on your appliance and the breast thickness.
  • Finish with Parmesan and adjust seasoning: In the last 15 minutes of cooking, stir in the grated Parmesan cheese until melted and integrated; then taste and adjust salt and pepper as needed since ranch mix and cheese contribute salt.
    → Parmesan adds a savory, umami finish; salting guideline helps you avoid oversalting the dish.
  • Thicken the sauce if desired: If you prefer a thicker sauce, whisk 1 tablespoon cornstarch dissolved in 2 tablespoons cold water to make a slurry, then stir it into the hot sauce and cook on high for 10–15 minutes until it reaches the desired consistency.
    → The cornstarch slurry rapidly thickens without lumping; heat activates the starch and yields a glossy, nappe-like coating.
  • Serve and garnish: Spoon the chicken and creamy sauce onto plates or over rice or pasta, then sprinkle chopped fresh parsley and cracked black pepper on top; a light squeeze of lemon is optional for brightness.
    → Fresh herbs add aroma and color; pepper wakes the palate, and citrus brightness can brighten the richness if desired.

Notes

These Pollo Angel Crockpot chicken breasts cook low and slow in a creamy garlic ranch sauce, becoming tender and juicy with every bite. The tangy cream cheese‑sour cream embrace coats the meat, while the ranch seasoning delivers the signature flavor. You can shred the chicken after cooking or serve the breasts whole, depending on your preference. For the best results, choose evenly sized breasts or lightly pound them to equal thickness, and aim for a single layer in the crockpot to ensure even coating.

  • Make it gluten-free and pantry-friendly: Use a gluten-free ranch dressing mix or a homemade ranch seasoning (dried dill, parsley, garlic powder, onion powder, salt, pepper). If you’re avoiding gluten, check all ingredient labels and opt for a gluten-free broth.
  • Creamy, velvety sauce tips: Let the cream cheese and sour cream come to room temperature before mixing so the sauce stays silky. If your sauce seems too thin, reduce the chicken broth a bit or whisk in a small cornstarch slurry (1 teaspoon cornstarch mixed with 1 tablespoon cold water) at the end to thicken.
  • Cook time and doneness: Cook on low for 6–7 hours or on high for 3–4 hours, or until the chicken reaches 165°F (74°C). If you prefer shredded chicken, shred with two forks and return to the crockpot to soak up more sauce for 10–15 minutes before serving.
  • Optional add-ins: Mushrooms can be added (see note in ingredients) – sauté them first to reduce moisture and intensity; spinach can be stirred in during the last 10 minutes to wilt without losing color.
  • Serving ideas: Spoon the creamy chicken over cooked pasta, rice, mashed potatoes, or cauliflower rice. Garnish with fresh parsley and a squeeze of lemon for brightness. A light dusting of extra grated Parmesan at the end adds a salty finish if you like.
  • Make-ahead and storage: Assemble ingredients in the crockpot insert or a freezer bag to refrigerate for up to 24 hours before cooking, or freeze for up to 3 months (note dairy-based sauces may separate when frozen). Thaw overnight in the fridge, then cook as directed. Refrigerate leftovers for 3–4 days; reheat gently on the stove or in the microwave, stirring to recombine the sauce.

Tips

Tips for Pollo Angel Crockpot

  • Prep dairy components properly: soften cream cheese and bring sour cream to room temperature before mixing to prevent lumps. Whisk together first to create a smooth base for the sauce.
  • Use evenly sized chicken breasts: If they vary in thickness, gently pound to uniform thickness so they cook evenly and stay juicy.
  • Layer or arrange strategically: Place chicken in a single layer if possible, with sauce partially covering them. If you must stack, ensure there’s enough sauce to coat all surfaces to prevent dry spots.
  • Browning is optional but flavorful: Sear the chicken breasts in a skillet for 1–2 minutes per side before adding to the crockpot for deeper flavor (optional for a hands-off approach).
  • Ranch mix alternatives: If you don’t have a packet, substitute with 2 tablespoons homemade ranch seasoning (dried dill, parsley, garlic powder, onion powder, salt, pepper) and adjust salt accordingly.
  • Watch the salt: Ranch mix and cheese add salt, so start with low-sodium broth and taste after the sauce comes together before final seasoning.
  • Creaminess matters: For a richer sauce, use full-fat cream cheese and sour cream. Light versions will work but may yield a thinner sauce.
  • Thickening tips: If the sauce is too thin, whisk 1–2 teaspoons cornstarch with an equal amount cold water to make a slurry, stir into the sauce, and cook on high for 5–10 minutes until thickened. Alternatively, remove the chicken and simmer the sauce uncovered on high to reduce.
  • Parmesan timing: Stir in 1/4 cup grated Parmesan during the last 15 minutes for extra depth, or sprinkle on top when serving.
  • Seasoning boost: If you like a bolder herb profile, increase Italian seasoning to 1 1/2 teaspoons or add a pinch of red pepper flakes for warmth.
  • Optional vegetables: Mushrooms add depth if sautéed first to reduce moisture; spinach should be added in the last 10 minutes to retain color and texture.
  • Temperature and safety: Cook on low 4–6 hours or high 2–3 hours for boneless breasts; ensure the internal temperature reaches 165°F (74°C) before serving.
  • Storage and reheating: Refrigerate leftovers within 2 hours of cooking. Reheat gently on the stove or in the microwave; add a splash of broth or milk if the sauce thickens too much.
  • Serving ideas: Spoon over steamed rice, buttered egg noodles, or mashed potatoes to soak up the creamy sauce; pair with steamed greens for balance.

FAQ

What is Pollo angel crockpot?

Pollo angel crockpot is a creamy slow-cooked chicken dish where chicken breasts are simmered in a luscious sauce made with cream cheese, ranch seasoning, butter, and usually a condensed cream soup. The result is tender, flavorful chicken with a rich, comforting sauce.

What ingredients do I need?

Typical ingredients (adjust for dietary needs): boneless, skinless chicken breasts; cream cheese; condensed cream soup (mushroom or chicken); ranch seasoning mix; butter. Optional additions: garlic, onions or peppers, fresh herbs. For serving: pasta, rice, mashed potatoes, or crusty bread.

How do I cook it in the crockpot and how long?

Place the chicken in the slow cooker. Add softened cream cheese, the condensed soup, ranch seasoning, and butter. Cook on low for about 6–8 hours or on high for 3–4 hours, until the chicken reaches 165°F (74°C). Stir toward the end to blend the sauce.

Can I use chicken thighs instead of breasts?

Yes. Chicken thighs stay juicier and more forgiving. You can use boneless, skinless thighs or bone-in thighs. If using bone-in, plan on a slightly longer cook time or remove the bones before serving.

Is there a dairy-free or gluten-free version?

Yes. For dairy-free, substitute dairy-free cream cheese and a dairy-free condensed soup (or a dairy-free milk-thickened sauce). For gluten-free, use gluten-free condensed soup and gluten-free ranch seasoning. Always check labels for hidden gluten or dairy ingredients.

Do I need to brown the chicken first?

Not required. Browning the chicken adds color and depth of flavor, but you can skip it to save time. If you do brown, deglaze the pan with a splash of broth and add it to the slow cooker.

How can I thicken or adjust the sauce?

If the sauce is thin, whisk a teaspoon of cornstarch or a slurry of cornstarch and water into the sauce and cook on high for 10–15 minutes to thicken. You can also mash a bit of cream cheese into the sauce for extra richness. Be careful not to overcook to prevent separation.

How should I serve Pollo angel crockpot?

Serve over pasta, rice, mashed potatoes, or with crusty bread. Garnish with chopped parsley or green onions. A side of steamed vegetables or a simple salad pairs nicely.

How long do leftovers keep and how should I store them?

Let leftovers cool, then store in an airtight container in the refrigerator for 3–4 days. You can freeze the cooked chicken and sauce separately for 2–3 months. Thaw in the fridge overnight and reheat gently on the stove or microwave.

Tips for making this recipe even better?

Tips: line the slow cooker for easy cleanup, cut chicken into similar-sized pieces for even cooking, add garlic for extra flavor, and taste the sauce before serving—adjust salt as needed. If you prefer a lighter sauce, use less cream cheese and more broth or milk, or add vegetables for extra texture.

Introduction / Hook

Imagine a pastry that treats morning like a celebration: the crack of a delicate sugar crust gives way to a tender, laminated interior that unfurls with every bite. The Cronut is a fusion of two beloved worlds—the flaky, butter-kissed goodness of a croissant and the comforting, nostalgic sweetness of a doughnut—assembled into a single, show-stopping pastry. When you bite into one, you’re greeted by a dance of textures: a crisp, caramelized exterior that shatters and a pillow-soft, airy center that melts on the tongue. The aroma alone—warm butter, vanilla, a hint of citrus glaze—pulls you in, long before you even glimpse the glossy finish or the sugar dusting. It’s no wonder Cronuts became a global sensation the moment they appeared, turning bakeries into pilgrimage sites and conversations into locked-in plans for weekend brunches. This is not just a pastry; it’s an experience that invites curiosity, a touch of indulgence, and a sense that anything is possible in a kitchen when pastry technique meets culinary imagination. If you’ve ever stood in line for a limited-edition treat, you know the thrill—the anticipation, the shared stories of fellow pastry enthusiasts, the instant verdict as the first bite lands. The Cronut captures all of that and more, offering both a story and a sensation you can recreate in your own home with reverence for technique and a playful spirit in flavor exploration.

The Story Behind the Dish

The Cronut arrived in the culinary spotlight in 2013, a dazzling invention that would reshape how many people think about pastry. It was born in New York City, in the bustling kitchens and storefronts of Dominique Ansel Bakery in SoHo, where a single, audacious experiment sparked a phenomenon. The idea was simple in concept but revolutionary in execution: take the lamination technique that creates the signature layers of a croissant and pair it with the comforting, familiar form of a doughnut. The result is a pastry that carries the best of both worlds—crisp, layered, buttery complexity on the outside with a soft, melt-in-the-mouth interior that carries subtle notes of vanilla and dairy, wrapped in a glaze or dusted with sugar.

The reception was electric. On any given day, customers waited in lines that snaked around blocks, eager to be among the first to sample the latest creation from the pastry shop that had already earned a reputation for pushing culinary boundaries. The Cronut became more than a pastry; it became a social event, a cultural moment, and a case study in how the food world can respond to novelty with both enthusiasm and reverence. The pastry’s name itself—Cronut—emerges from a clever blend: croissant + donut. It’s a linguistic snapshot of culinary hybridity, inviting curiosity and play. And while many chefs and bakers have since attempted their own versions, the Cronut remains a symbol of inventive pastry-making at its most daring and most delightful.

Behind the gloss, there are broader stories about technique, patience, and artistry. Laminated dough requires careful handling—the resting times, the precise folds, the temperature control—yet the results reward the baker with layers that unfurl like pages of a well-loved book. The glaze or sugar finish, often shimmering with a glossy coat or a gentle dusting, adds another layer of texture and flavor that punctuates the experience. The Cronut has also spawned a family of imitators, interpretations, and regional twists, each bringing their own twist while paying homage to the original concept. It’s a reminder that culinary history is not just a single line of invention but a living conversation in which tradition and invention mingle to create something that feels timeless yet incredibly contemporary.

Why You’ll Love This Recipe

  • Hybrid Brilliance: A pastry that fuses croissant lamination with doughnut nostalgia, delivering a texture and experience that are greater than the sum of their parts.
  • Texture Triumph: The exterior offers a delicate, almost glassy sugar crust that yields to a soft, airy, multi-layered interior—like a croissant waltzing with a doughnut.
  • Impressive Yet Accessible: While the technique is advanced, the end result feels approachable and celebratory—perfect for brunches, special occasions, or a weekend treat that feels like a party in your kitchen.
  • Flavor Versatility: The classic glaze or sugar finish is just the beginning. A Cronut welcomes a range of fillings and glazes that can reflect seasons, moods, or personal preferences.
  • Shareable Experience: Cronuts spark conversations, photo-worthy moments, and a shared sense of indulgence that’s hard to resist in a social setting.
  • Customizable Platform: Whether you’re into citrus-bright glazes, chocolate decadence, berry fillings, or creamy pastry creams, the Cronut serves as a canvas for your creativity.
  • Celebrates Craft: The pastry invites appreciation for layering, temperature control, and the patience that good lamination demands, making every bite a reward for careful technique.

Flavor Profile & Texture

The flavor narrative of a Cronut begins with butter—rich, mellow, and unmistakably present. The laminated dough captures a gentle tang from fermentation, a whisper of yeast, and a deep, toasty note that emerges as the pastry bakes. As you bite through the crisp sugar crust, you hear a faint crackle, a sound that promises a soft interior beneath. Inside, the layers behave like a delicate stack of ultra-thin pastry sheets, each one thin and feather-light, releasing a warm, almost imperceptible steam that carries the perfume of butter and vanilla. The result is a mouthfeel that is simultaneously crisp, flaky, and almost cloud-like in its tenderness.

The glaze or dusting that finishes a Cronut adds a final layer of personality. A vanilla glaze delivers a soft sweet kiss that doesn’t overpower the pastry’s natural butteriness; citrusy notes add brightness and balance; chocolate or coffee tones provide a more indulgent counterpoint. Some versions opt for a simple sugar glaze, letting the crust do the talking, while others embrace a glossy, almost lacquered sheen that catches the light and invites a closer look. The texture is the star, but the flavor journey—where sweet meets dairy-forward depth and a whisper of yeast—keeps you coming back for another bite.

In terms of balance, Cronuts often walk the line between pastry refinement and comforting indulgence. The exterior sweetness is carefully calibrated so that it never drowns out the nuanced flavors inside. The filling, when used, can elevate the experience—creamy vanilla custard, tangy lemon curd, or a silky pastry cream that contrasts with the flaky, buttery layers. The result is a symphony of contrasts: a crisp surface against a tender core, a lightly sweet finish against a richer, more savory butter-forward baseline, and a glaze that gleams with promise on the outside while delivering a gentle sweetness on the palate.

Occasions & Pairings

Cronuts are at their best when they’re shared, celebrated, and paired with drinks that echo their elegance and whimsy. They shine as a standout centerpiece for weekend brunches, shower celebrations, and casual get-togethers where a sense of occasion elevates the mood. They also work beautifully as a giftable pastry—wrapped carefully, tied with a ribbon, and delivered with a note of indulgence. For those seeking everyday joy, a Cronut can transform an ordinary morning into something memorable, making waking up a little sweeter and more purposeful.

Pairing-wise, consider beverages that complement the pastry’s richness and brightness without competing for attention:

  • Coffee accompaniments: a bold espresso, a creamy cortado, or a lightly sweetened latte to echo the pastry’s buttered depth.
  • Tea pairings: robust black teas, late harvest oolongs, or a citrusy green tea to brighten the glaze notes.
  • Cold beverages: a glass of sparkling water with a splash of lemon, or a light, fruity juice that can contrast the pastry’s richness.
  • Complementary desserts: serve Cronuts with fresh berries, a dollop of vanilla pastry cream, or a small terrine of citrus curd to highlight the glaze and balance sweetness.

Seasonal variations can also shape how you present Cronuts. For spring, consider a lemon-vanilla glaze with a light dusting of powdered sugar and a citrus zest twist. For fall, a maple glaze or a cinnamon-spiced finish pairs beautifully with the deep, nutty butter notes. During holiday gatherings, you can craft a celebratory glaze—gold-dusted, perhaps, or layered with a fruit compote that adds color and brightness to the plate. No matter the occasion, Cronuts lend themselves to a sense of theater and delight, inviting guests to slow down, notice details, and savor a moment that feels just a touch magical.

Tips, Variations & Substitutions

While Cronuts are a celebration of technique, they also invite flexibility and creativity. Here are ideas to tailor the experience to your kitchen, dietary needs, or taste preferences.

Vibrant Fillings & Glazes

  • Fillings: vanilla pastry cream, chocolate hazelnut spread, lemon curd, raspberry jam, or salted caramel cream. For a lighter touch, whipped vanilla cream or mascarpone with a hint of vanilla is wonderful.
  • Glazes: classic vanilla glaze, chocolate glaze, citrus glaze (orange or lemon), or a berry glaze that introduces a fruity brightness. You can finish with a light dusting of dried fruit zest, edible glitter, or a thin layer of powdered sugar for that photogenic finish.

Dietary Alternatives

  • Vegan version: use a high-fat plant-based butter substitute with a plant-based milk; be prepared for subtle differences in layering and lift, as vegan doughs can behave differently in lamination. You may need to adjust rolling and resting times accordingly.
  • Gluten-conscious option: while traditional laminated dough relies on gluten for structure, some bakers experiment with gluten-free puff pastry styles or blends; note that the exact texture of a Cronut will differ from the classic version.
  • Lower-sugar finish: if you’d like a lighter glaze or only a dusting of sugar, you can skip the thick glaze and rely on a simple sugar shower and a touch of vanilla to let the pastry shine through.

Creative Twists

  • Seasonal fruit fillings that pair with light glazes—strawberry-rhubarb in spring, blueberry-lemon in summer, fig and apple in autumn.
  • Spice accents inside the dough—tiny pinches of cinnamon, cardamom, or nutmeg—can add warmth without overpowering the pastry’s natural butter notes.
  • Regional notes: a matcha glaze for an East-meets-West twist, or a miso-sweet glaze that plays with savory-sweet contrasts (for adventurous palates).

Technique Notes

  • Temperature matters: keep butter and dough cool during lamination to preserve distinct layers and prevent the butter from seeping, which can weaken the puff.
  • Resting and chilling times are essential to achieving the signature flakiness; don’t rush the dough or skip the cold folds.
  • Frying vs. baking: classic Cronuts are fried, creating an unmistakably crisp crust and airy interior. If you prefer a lighter or oven-fried approach, you can explore air-frying or baking variants, but be aware of texture differences.

Storage & Make-Ahead Ideas

Fresh Cronuts are best enjoyed on the day they are made, when the crust remains crisp and the interior is at its most tender. If you need to plan ahead or have leftovers, consider these approaches to maintain quality and flavor.

  • Room temperature: store in a single layer in an airtight container for up to 24 hours. Avoid stacking, which can crush the delicate layers.
  • Refrigeration: refrigeration can dry the pastry and dull the texture, so if you must refrigerate, rewarm gently before serving to restore some of the crispness.
  • Freezing: unfilled Cronuts (or the dough components after chilling) can be frozen for longer storage. For best results, seal tightly and thaw slowly in the refrigerator, then reheat gently to reactivate the layers. If you’ve filled them, consider freezing unfilled Cronuts and adding fillings and glazes after reheating for a fresh finish.
  • Reheating: warm in a 325–350°F (165–175°C) oven for about 5–8 minutes, or until the exterior regains a light crackle. If you’ve filled them, reheat gently and apply fillings or glazes after warming.
  • Make-ahead strategy: prepare dough portions ahead of time, refrigerate them, and bake or fry fresh when you’re ready to serve. This approach preserves a sense of freshness while letting you plan indulgence around busy days.

Fun Facts & Trivia (Optional)

The Cronut’s rise from a daring pastry experiment to a global sensation is a modern culinary legend with a few charming footnotes. Here are some quick bites of trivia to savor:

  • The term Cronut became a registered trademark in some jurisdictions, underscoring its status not just as a pastry but as a culinary brand phenomenon.
  • The release of Cronuts sparked a worldwide wave of imitation and invention, with bakeries around the world offering their own croissant-doughnut hybrids, each putting a personal stamp on the concept.
  • In its early days, Cronuts inspired a kind of passport-style tourism—pastry lovers traveled to major cities specifically to try the original at Dominique Ansel Bakery, sharing experiences across social media and food blogs.
  • Beyond the hype, the Cronut stands as a testament to the possibilities of laminated dough when paired with different formats, inviting a broader audience to appreciate the craft of pastry making and the pleasures of texture, contrast, and glaze.
  • As with many iconic pastries, the Cronut’s narrative continues to evolve, with bakers around the world experimenting with fillings, glazes, and shapes, turning a single invention into a living tradition of creative pastry expression.

Closing thoughts

The Cronut is more than a pastry; it’s a celebration of technique, curiosity, and indulgence that invites you to slow down and savor a moment of pastry artistry. It combines time-honored methods—lamination, careful temperature control, patient resting—with modern whimsy and a sense of playful luxury. Whether you’re recreating a memory, introducing someone to a show-stopping dessert, or simply treating yourself to a moment of bliss, the Cronut offers a bridge between comforting familiarity and innovative charm. Embrace the process, respect the butter, and let the layers reveal themselves—one flaky, sugary, glistening bite at a time. Your kitchen can become a stage for this iconic pastry’s story, inviting friends and family to share in the wonder of a treat that feels both timeless and utterly contemporary.

Ingredients

Cronuts
Croissant Dough

    – 3 cups all-purpose flour (unbleached)
    → Provides the gluten framework that gives structure to laminated dough while allowing the many folds to create flaky layers. Use unbleached all-purpose flour for best texture and flavor. Measure accurately (scoop and level or weigh) and avoid packing down the flour; rest the dough briefly after mixing to hydrate, which helps gluten form without toughness.
    – 1/4 cup granulated sugar
    → Adds a touch of sweetness and assists with browning and flavor balance in the croissant dough. Keep to this amount to avoid weighing down the dough and hindering lift; sugar also interacts with butter to influence tenderness. If you like a hint more sweetness, you can increase by 1–2 tablespoons, but be mindful of lamination.
    – 2 tsp instant yeast
    → Leavening agent that activates fermentation and helps give lift to the laminated dough; instant yeast can be mixed directly with dry ingredients. If using active dry yeast, proof in warm milk for 5–10 minutes until foamy before mixing; ensure the mixture isn’t too warm to avoid killing the yeast.
    – 1 1/4 tsp salt
    → Flavor enhancer that also controls yeast activity and strengthens gluten. Use fine sea salt and mix evenly into the dry ingredients to prevent salty pockets.
    – 1 cup cold whole milk
    → Adds moisture, tenderness, and helps create a tender crumb; keep cold to slow melting of the laminated butter and maintain dough temperature during rolling. Sub dairy-free if needed, but expect slight changes in texture; not hot milk here.
    – 2 tbsp unsalted butter, melted and cooled
    → Enriches the dough with fat to improve tenderness and flavor; melted into the dough aids extensibility. Ensure butter is cooled to below around 60–70°F (15–21°C) before mixing so it doesn’t melt the laminated butter prematurely.
    – 1 large egg
    → Enriches dough, adds structure and color; use room-temperature egg for better emulsification and even distribution. If you want a vegan version, you can use 1/4 cup unsweetened applesauce plus 1 tablespoon oil as a substitute, but the texture will be different.

Lamination Butter Block

    – 1 1/2 cups unsalted butter, very cold (340 g)
    → The laminated fat used to create flaky layers; keep it cold but pliable and shape it into a rectangular block between parchment paper. Chill until firm but not rock-hard; encase in the dough with a strict butter-to-dough ratio to ensure clean lamination and distinct flaky layers; avoid exposure to heat when rolling.

Frying

    – 6 cups neutral oil (vegetable, canola, or peanut)
    → For deep-frying cronuts; choose a neutral-tasting oil with a high smoke point. Heat to 350–360°F (175–180°C) and monitor carefully with a thermometer. Do not fill pot more than halfway to avoid overflow; fry in batches for even cooking; pat dry on paper towels before coating or glazing to prevent splatter.

Pastry Cream Filling (optional)

    – 1 cup whole milk
    → Base for pastry cream; heat until just steaming, whisk in sugar and cornstarch slurry, then temper egg yolk. Use full-fat milk for a silkier cream; strain if lumps form for a ultra-smooth filling.
    – 2 tbsp cornstarch
    → Thickening agent that sets pastry cream; whisk with a small amount of cold milk to form a smooth slurry before stirring into hot milk. Cook until the mixture thickens and coats the back of a spoon; avoid scorching.
    – 2 tbsp granulated sugar
    → Sweetens the pastry cream; adjust to taste. Dissolve in the milk at the start to prevent gritty texture; if a milder center is desired, reduce slightly.
    – 1 large egg yolk
    → Adds richness and helps set the pastry cream; temper by streaming a little hot milk into the yolk while whisking then whisk yolk mixture back into the rest of the milk. Do not scramble.
    – 1/2 tsp vanilla extract
    → Infuses classic vanilla flavor; use pure vanilla for best aroma. Add after removing from heat to preserve fragrance; if using vanilla bean, scrape seeds for depth.

Glaze

    – 1 cup powdered sugar
    → Base for glaze; sift to remove lumps; adjust consistency with milk to make a glaze that clings to warm cronuts. A thicker glaze sets quicker, while a thinner glaze yields a drizzle.
    – 2-3 tbsp milk
    → Helps reach the desired glaze consistency; use dairy milk for a richer glaze or non-dairy as needed. Add gradually to avoid a runny glaze; warm glaze will spread more evenly.
    – 1/2 tsp vanilla extract
    → Adds aroma and depth to the glaze; use real vanilla for best flavor; optional citrus zest can brighten the finish if desired.

Optional Chocolate Glaze

    – 3 oz semisweet chocolate, chopped or chips, melted
    → Creates a glossy chocolate glaze alternative or addition; melt gently in a heatproof bowl over simmering water or short microwave bursts, stirring between to prevent scorching. Stir in 1 tbsp light corn syrup if you want extra shine; thin with 1–2 tbsp milk to reach drizzle consistency.
    – 1 tbsp light corn syrup
    → Adds shine and helps the glaze set smoothly; optional but recommended for a professional-looking finish. If avoiding corn syrup, substitute with an extra teaspoon of milk or a touch of honey if not vegan.
    – 1-2 tbsp milk
    → Adjusts the thickness of the chocolate glaze; add gradually until you reach drizzle or pourable consistency; use dairy or non-dairy milk to suit dietary needs.

Finish/Toppings

    – 1/2 cup granulated sugar for coating after frying (optional)
    → Provides an extra crunch and sweetness when the cronuts are finished; apply while warm to help sugar adhere; you can roll in sugar or dust lightly for a subtle finish, depending on glaze choice.
    – 1/4 cup coarse decorating sugar or pearl sugar (optional)
    → Adds decorative texture and sparkle; press onto glaze while tacky for best adhesion; choose colors to match the glaze or the occasion.

Instructions

  • Whisk together the dry ingredients: 3 cups all-purpose flour (unbleached), 1/4 cup granulated sugar, 2 tsp instant yeast, and 1 1/4 tsp salt in a large mixing bowl until evenly distributed.
    → Even distribution ensures uniform gluten development and consistent yeast activity, preventing pockets of sweetness or salt that could skew flavor and rise.
  • Stir the wet ingredients: 1 cup cold whole milk, 2 tbsp unsalted butter melted and cooled, and 1 large egg, then pour them into the dry ingredients and mix to form a shaggy dough.
    → Cold milk slows butter melt so the dough stays cohesive for lamination; the egg adds richness and helps emulsify the dough for better texture.
  • Knead gently until cohesive and smooth, then wrap the dough and rest for 20–30 minutes at room temperature to hydrate the flour and relax the gluten fibers.
    → Resting prevents tearing during rolling and promotes even lamination by allowing flour to hydrate without overdeveloping gluten.
  • Prepare the lamination butter block by placing the 1 1/2 cups unsalted butter between two sheets of parchment and pounding it into a rectangular block about 1/4 inch thick, keeping it cold but pliable.
    → A firm, pliable butter block is essential for clean lamination; too warm and it will smear into the dough, too cold and it will crack the dough during rolling.
  • Roll the chilled dough into a rectangle large enough to enclose the butter block, about 8 by 12 inches, and about 1/8 inch thick. Then place the butter block on one half of the dough, fold the other half over to enclose, pinch edges to seal, and chill for 30–45 minutes.
    → Enclosing the butter creates distinct laminated layers; keeping it cold during enclosure prevents the butter from leaking and ensures even layering.
  • Roll the sealed dough into a long rectangle about 1/4 inch thick and perform the first turn by folding the rectangle into thirds (like a letter) and then chill for 20–30 minutes.
    → The turn initiates lamination, creating alternating fat and dough layers that puff into flaky cronuts when fried.
  • Rotate the dough 90 degrees, roll again to 1/4 inch thickness, and perform the second turn; chill 20–30 minutes.
    → Repeating the turn builds more layers and improves flakiness; keeping the dough cold between turns preserves the integrity of the butter layers.
  • Roll again to 1/4 inch thickness and perform the third turn; wrap and chill for 30–45 minutes.
    → The third turn compounds the laminated structure, yielding a crisp, airy crumb once fried.
  • Roll the laminated dough to about 1/4 inch thickness on a lightly floured surface and cut outer circles with a 3-inch round cutter and inner holes with a 1-inch round cutter to form cronuts; space them on parchment-lined sheets and chill for 15–20 minutes to firm their shape for frying.
    → Cutting with sharp, consistent edges produces even rings; chilling prevents deformation and oil splatter during frying.
  • Proof the cut cronuts at 75–85°F (24–29°C) for 45–60 minutes or until they appear puffy and slightly domed; keep them away from drafts and cover loosely if needed.
    → A gentle proof gains extra lift from the yeast, creating a tender, airy interior once fried while still preserving the dough’s structure.
  • Heat 6 cups neutral oil (vegetable, canola, or peanut) in a heavy pot to 350–360°F (175–180°C) on a candy thermometer or deep-fry thermometer, and maintain temperature throughout frying.
    → A controlled, high temperature ensures a crisp exterior without absorbing excessive oil; too cold and the cronuts will be greasy; too hot and they will burn before cooking through.
  • Fry cronuts in batches, turning once, for 1–2 minutes per side until golden brown and crisp; remove with a slotted spoon and drain on a rack lined with paper towels.
    → Short frying times at steady temperature produce a light, layered texture; draining prevents sogginess and helps glaze adhere evenly.
  • Prepare the pastry cream filling if using: in a saucepan, heat 1 cup whole milk until steaming; whisk 2 tbsp cornstarch and 2 tbsp sugar with a small amount of cold milk to form a slurry, then whisk into the hot milk and cook, stirring constantly, until thick and coats the back of a spoon; temper 1 large egg yolk with a little hot milk, whisk, then whisk yolk mixture back into the pot, remove from heat, add 1/2 tsp vanilla, and strain; chill thoroughly.
    → This yields a silky center for injecting into cronuts; tempering the yolk prevents scrambling and the vanilla provides classic flavor depth.
  • Fill the warm cronuts with pastry cream using a piping bag fitted with a small tip, inserting into the side or through the center hole until the filling is visible or slightly milled through.
    → Injecting the cream ensures a luscious, creamy center that contrasts with the flaky exterior; avoid overfilling to prevent bursting.
  • Prepare the glaze by whisking 1 cup powdered sugar with 2–3 tbsp milk and 1/2 tsp vanilla until smooth and glossy, adjusting thickness with more sugar or milk to reach a pourable but clingy consistency.
    → A well-balanced glaze adheres to the warm cronuts, creates a shiny finish, and prevents a gummy texture by avoiding excessive moisture.
  • Dip or brush the tops of the fried cronuts with the glaze while they are still warm and allow the glaze to set for a glossy exterior; for a richer finish, drizzle rather than dip.
    → Glazing on warm pastries helps the sugar melt and spread evenly, creating a smooth surface that seals in moisture and flavor.
  • Melt 3 oz semisweet chocolate gently and stir in 1 tbsp light corn syrup; thin with 1–2 tbsp milk to reach a pourable glaze, then apply over the cronuts for a chocolate finish if desired.
    → The chocolate glaze adds a decadent alternate finish with a professional sheen; optional but highly appealing.
  • Finish with optional toppings: while still warm, roll cronuts in 1/2 cup granulated sugar for extra crunch or press on 1/4 cup coarse decorating sugar for sparkle and texture.
    → Sugar coatings provide contrast in texture and a festive appearance, enhancing the overall eating experience.
  • Serve cronuts once the glaze has set, arranged on a platter or stacked for presentation, and enjoy while the interior remains tender and the exterior crisp.
    → Freshly fried, filled, and glazed cronuts offer the best balance of flaky layers, creamy filling, and glossy finish; timing maximizes texture and flavor.

Notes

These cronuts are a decadent fusion of flaky laminated pastry and a light donut-like interior, best enjoyed fresh when the layers are crisp and the crumb is tender. Because croissant dough relies on very cold ingredients and careful rolling, plan ahead and keep the lamination butter block cold and the dough chilled between turns to maintain distinct, visible lamination. Use unbleached all-purpose flour and measure accurately; let the dough rest after mixing to hydrate the gluten without developing toughness. When frying, maintain a steady oil temperature of 350–360°F (175–180°C), fry in small batches to avoid crowding, and pat dry with paper towels before coating or glazing to prevent soggy crust. After frying, you can finish cronuts with a simple vanilla glaze or the optional chocolate glaze; for a glaze, whisk powdered sugar with milk and vanilla until smooth and brush on while the cronuts are still warm enough to set quickly. If you choose the pastry cream filling, prepare a silky custard-like cream and chill it; fill the cronuts after they cool slightly to avoid bursting. For added texture and shine, you can add a sugar coating or decorative sugar while the glaze is tacky. The cronuts are best eaten the day they’re made, but they can be stored in an airtight container for up to 2 days and refreshed briefly in a warm oven. To customize, try a citrus zest in the glaze, a pinch of cinnamon in the sugar coating, or a thin ring of pastry cream for a flavored center. Always ensure your ingredients are fresh and handle the dough with cold hands to preserve the butter’s layers, which is essential for the signature flakiness.

Tips

Dough and lamination essentials

    Keep the butter block very cold and evenly shaped, then envelope it in the dough with a strict butter-to-dough ratio to ensure clean, distinct lamination without butter leaking into the dough.
  • Chill all components between folds. Rest the dough in the fridge for 20–40 minutes between turns to maintain a firm, workable surface and prevent the butter from becoming too soft.
  • Roll dough on a lightly floured surface and use gentle, steady pressure. If the dough sticks, chill briefly rather than adding more flour, which can harden the dough and dull lamination.
  • Aim for uniform thickness across the sheet (roughly 1/8–1/4 inch). Uneven thickness causes uneven layers and uneven browning during frying.
  • Work with a cool workspace and cool hands. Warm hands or air can soften the butter too quickly, causing the layers to fuse.
  • Don’t overwork the dough. Frequent rest periods help hydrate the gluten without developing toughness, preserving tender, flaky layers.
  • Check that the dough seams are sealed well after each fold to prevent butter leakage during rolling and frying.

Shaping, proofing and timing

  • Chill the laminated block before cutting to keep the butter solid. This helps maintain the lamination during proofing and frying.
  • Cut cronuts with a sharp, clean cutter to prevent ragged edges that tear easily during frying.
  • Proof until the dough looks puffy and slightly domed but not overly risen. Overproofing can cause structure collapse during frying.
  • Use a gentle poke test: a slight indentation should fill back slowly. If it springs back immediately, give it a bit more time.

Frying like a pro

  • Maintain a steady frying temperature of 350–360°F (175–180°C) with a reliable thermometer. Temperature swings lead to greasy texture or undercooked centers.
  • Fry in batches to avoid overheating the oil and to keep the oil clean. Overcrowding drops the oil temperature and softens the texture.
  • Pat the cronuts dry with paper towels after frying to remove surface moisture that can prevent even glazing.
  • Let fried cronuts rest on a rack briefly before glazing; this helps the glaze adhere and prevents soggy bottoms from steam.

Pastry cream filling (optional) tips

  • Heat the milk to just steaming, not boiling. A gentle simmer prevents scalding and preserves smooth texture.
  • Whisk the cornstarch slurry well to avoid lumps; temper the yolk by adding a little hot milk before whisking back into the pot.
  • Cook until the cream thickens to coat the back of a spoon, then strain to remove any lumps before chilling.
  • Chill the pastry cream completely before filling; a cold filling helps maintain structure inside the cronuts and prevents sogginess.

Glazes and finishes

  • Sift powdered sugar to avoid gritty clumps in the glaze. Add milk gradually to reach the desired thickness.
  • Warm glazes slightly before dipping for smoother coverage, then let the glaze set completely for a glossy finish.
  • For a chocolate glaze, melt gently and whisk until smooth. Add corn syrup if you want extra shine; thin with milk to reach drizzle consistency.
  • Apply the glaze while cronuts are still warm but not dripping hot to ensure the coating adheres and sets evenly.
  • If you want a dual finish, set one batch with a plain sugar glaze and another with a chocolate glaze for contrast.

Topping and storage tips

  • Coat with granulated sugar while the cronuts are warm for a crisp, sugary crust that adheres well. Darker surfaces may require a lighter coating.
  • Decorate with coarse or pearl sugar for texture; press gently onto the glaze while it’s still tacky for best adhesion.
  • Fresh cronuts are best on the day they’re fried. If you must store, keep in a sealed container at room temperature for up to 1 day or re-crisp in a warm oven (not microwave) to restore texture.
  • To reheat, warm gently in a 350°F (175°C) oven for 5–7 minutes to restore flakiness and aroma without drying them out.

Troubleshooting quick notes

  • If the dough tears, chill it longer and roll with shorter, steady strokes; avoid forcing the dough through the rolling pin.
  • If lamination butter leaks, ensure the butter is cold and the dough is cold; adjust rolling speed and avoid rolling across warm surfaces.
  • If oil foams excessively, skim the foam and reduce heat if needed to maintain target temperature.
  • If shells collapse after frying, check proofing level and ensure oil is hot enough before frying; underheated oil causes soggy centers.

FAQ

What is a cronut?

A cronut is a pastry hybrid that combines croissant‑style laminated dough with a doughnut’s shape and frying method. It’s flaky and buttery on the inside, with a slightly crispy exterior and usually a sweet glaze or topping.

Where did cronuts originate?

The cronut was created by Dominique Ansel Bakery in New York City and debuted in 2013. It sparked a worldwide craze with limited daily releases and long lines, inspiring many imitators.

What is the difference between a cronut, a croissant, and a doughnut?

A cronut uses laminated dough like a croissant but is shaped and fried like a doughnut, then glazed. A croissant is baked, flaky, and not usually fried; a doughnut is fried but typically not laminated. The cronut blends aspects of both for a flaky, ring‑shaped pastry.

What ingredients are used in a traditional cronut?

Core dough ingredients: flour, water, milk, butter, sugar, salt, yeast, and eggs. For frying: neutral oil. For glaze: sugar (or powdered sugar), water or milk, vanilla or other flavorings; optional toppings like sprinkles or chocolate.

How is a cronut made? (high‑level steps)

Typical steps: prepare a laminated dough (like croissant dough) and encase a butter block; perform folds and chilling to create flaky layers; roll out and cut into a ring; proof until slightly puffed; fry in hot oil until golden; drain; glaze and decorate while warm. Some versions may include fillings after frying.

Are cronuts vegan or gluten‑free?

Traditional cronuts contain gluten and dairy (and eggs), so they are not vegan or gluten‑free. Gluten‑free or vegan variants exist in some bakeries, but they’re typically special-order or experimental. Always check label or ask the bakery about ingredients and cross‑contamination risks.

How should cronuts be stored and reheated?

Best enjoyed fresh the day they’re made. Store loosely in an airtight container at room temperature for up to 1 day. To refresh, reheat in a preheated oven at about 350°F (175°C) for 5–8 minutes to restore crispiness; avoid microwaving if you want a flaky texture. You can freeze unglazed cronuts and reheat later, though texture may diminish slightly.

Can I make cronuts at home? Is it hard?

Yes, but it’s an advanced bake due to laminated dough and precise frying control. You’ll need cold ingredients, a rolling pin or dough sheeter, a donut cutter or ring molds, a thermometer to monitor oil temperature, and a stable work surface. If you’re unsure about lamination, you can start with a simpler laminated dough recipe and then experiment with a basic donut approach, but authentic cronut texture comes from proper lamination and frying.

What flavors or fillings are common for cronuts?

Common options include vanilla glaze, white or dark chocolate glaze, strawberry, lemon, or maple toppings. Fillings often involve pastry cream, custard, jam, or flavored cream squeezed into the center after frying. Seasonal flavors and decorations vary by bakery.

Introduzione: un hook seducente per un dessert che sembra una festa per i sensi

Immagina una cheesecake che si presenta come una piccola nuvola cremosa, avvolta in una crosta di biscotti delicatamente burrosi, e striata da un intenso mirtillo che firma il primo morso con una nota fruttata e luminosa. Cheesecake ai mirtilli non è solo un dolce: è un’esperienza che unisce la dolcezza vellutata del formaggio a una tartità frizzante, la profumata vaniglia e un tocco di scorza di limone che tiepisce la ricchezza, come una brezza fresca in una giornata di sole estivo. È un invito a fermarsi un attimo, a chiudere gli occhi e a immaginare una cucina profumata di burro tostato, zucchero caramellato e bacche che brillano come piccoli rubini blu. Questo dessert ha la capacità di trasformare un semplice momento di fine pasto in un piccolo rituale di piacere: una fetta, un sorso di gelato alla vaniglia o un bicchiere di Moscato ghiacciato, e la tavola sembra illuminarsi di una gioia calorosa e familiare. È, in fondo, una dichiarazione d’amore per la condivisione: una torta che nasce per esser gustata al centro della tavola, in famiglia o tra amici, accompagnata da chiacchiere, risate e la promessa di una ricarica di buone energie per il giorno che verrà.

La storia dietro il piatto

La cheesecake, nelle sue forme moderne, è una protagonista globale: nata in versioni antiche dove il formaggio veniva mescolato con zucchero e ingredienti semplici, ha saputo attraversare continenti trasformandosi in un simbolo di convivialità. In molti paesi, la cheesecake “ai mirtilli” richiama l’uso di frutti di bosco di stagione come simbolo di freschezza e di colore, ma qui la nostra storia si veste di un tocco italiano: una fusione tra la dolcezza cremosa tipica della tradizione anglosassone e la passione mediterranea per la pasticceria semplice ma di carattere. Si racconta in alcune cucine italiane di nonne che, durante l’estate, preparavano torte fredde con formaggio dolce, biscotti sbriciolati e una cascata di bacche raccolte al mattino presto. La versione contemporanea, quella che trovi in questo testo, porta con sé due fili intrecciati: la tecnica della cheesecake classica, che richiede una cottura attenta e una crema uniforme, e la scelta audace di utilizzare mirtilli freschi o una salsa di mirtilli come accompagnamento, in grado di donare vivacità e colore. I mirtilli, con il loro equilibrio tra dolce e acidulo, hanno una storia di boschi e di raccolti che risale a tempi antichi, quando l’uso delle bacche era strettamente legato alle stagioni, ai cicli della natura e alle ricette di famiglia. In questo piatto, l’origine diventa una storia di memoria: una torta che racconta come la semplicità può trasformarsi in qualcosa di speciale, se accompagnata da una nota di vaniglia, da una scorza di limone grattugiata e da una crosta leggermente dorata che resiste al primo morso senza cedere. È, insomma, una piccola storia di viaggio, capace di evocare luoghi lontani pur restando ancorata al calore della cucina di casa.

Perché vi innamorerete di questa ricetta

  • Equilibrio perfetto: crema vellutata che si scioglie in bocca, bilanciata dalla crosta croccante e da una salsa di mirtilli vivace.
  • Profumo avvolgente: note di vaniglia e scorza di limone che aprono le porte a un profumo invitante fin dal primo taglio della fetta.
  • Versatilità tutto l’anno: perfetta come dessert di fine pasto, ma anche come dolce da celebrare durante una festa estiva di famiglia o un brunch domenicale.
  • Ingredienti accessibili: pochi elementi comuni, ma di qualità, permettono di ottenere una torta dall’impatto visivo e gustativo notevole senza complicazioni.
  • Compatibile con vari stili di dieta: può essere adattata in versioni vegane o senza glutine, pur mantenendo la sua anima cremosa e avvolgente.
  • Impatto visivo: il rosso-violaceo intenso del coulis di mirtilli e il bianco candido della crema creano un contrasto che fa salivare gli occhi prima ancora di assaggiarla.
  • Facilità di preparazione: non richiede una tecnica estremamente complessa; è una ricetta accessibile anche a chi sta iniziando a esplorare il mondo della pasticceria.

Profilo di sapore e consistenza

All’assaggio, la cheesecake ai mirtilli racconta una storia in tre strati di gusto e di consistenza. Primo strato, la crosta: friabile, burrosa e molto leggermente dolce, realizzata con biscotti sbriciolati mescolati a burro fuso. Ogni morso rilascia una leggera sensazione croccante che anticipa la cremosità della crema sottostante. Secondo strato, la crema: una nuvola setosa, morbida ma non pesante, che avvolge il palato con un equilibrio di dolcezza delicata e una lieve acidità proveniente dal formaggio cremoso e dalla scorza di limone. Il profilo aromatico è arricchito da una punta di vaniglia che parla di soffici dessert domestici e di chiudere gli occhi per ricordare la casa. Terzo strato, la nota di mirtilli: un coulis o una salsa di mirtilli che viene sparsa o fatta cadere a filo, offrendo un contrappunto di dolce-acidulo. I mirtilli aggiungono una freschezza agrumata, con un tocco leggermente resinoso che richiama le erbe del giardino e la stagionalità. L’insieme è bilanciato: la crema non è mai troppo dolce, e la componente agrumata spezza la ricchezza con leggera acidità, rendendo ogni boccone equilibrato e pulito al palato. La texture, infine, è un’armonia tra morbidezza e setosità: la crema scende liscia, mentre la crosta resta un ricordo di crunch che persiste, lasciando una sensazione di completezza. Nel sorseggiare una tazza di tè o di caffè leggero dopo il dessert, l’insieme si visualizza perfettamente: una fine perfetta che chiude con eleganza una cena, senza appesantire ma lasciando una memoria gustativa memorabile.

Occasioni e abbinamenti

Questo cheesecake si presta a molte occasioni. È ideale per chiudere un pasto estivo in una casa di campagna, per una celebrazione di compleanno informale, o come dessert elegante per una cena tra amici. Puoi presentarlo al centro del tavolo, tagliato a spicchi perfetti, accompagnato da un cucchiaino di salsa di mirtilli e magari una cucchiaiata di panna montata leggera o di yogurt bianco per una nota fresca. Per gli abbinamenti, ecco alcune idee:

  • Bevande: Moscato d’Asti freddo, Prosecco brut, o un vino passito delicato si sposano bene con la dolcezza cremosa e la fruttualità dei mirtilli. Se preferisci una versione analcolica, un tè freddo alle erbe o un tisana di ibisco possono amplificare l’acidità dei mirtilli senza sovrastare la crema.
  • Contorni: una leggera coulis di mirtilli extra per decorare, accompagnata da lamelle di limone candito o scorza di limone fresca, aggiunge vivacità. Una cucchiaiata di crème fraîche o di yogurt greco può dare una nota cremosa contrastante.
  • Dessert partner: una torta di mandorle o una gelatina di agrumi leggera si equilibrano bene, offrendo una finezza entrambe le scelte.
  • Menu di festa: se servito durante le festività estive, puoi aggiungere un filo di aceto balsamico ridotto sui mirtilli per un tocco sorprendente di profondità aromatica.

Tips, varianti & sostituzioni

  • Versione classica: mantieni la base tradizionale di biscotti sbriciolati mescolati con burro fuso, pressa bene per creare una crosta compatta, poi aggiungi una crema a base di formaggio cremoso, zucchero, uova, vaniglia e una punta di limone.
  • Versione senza glutine: sostituisci i biscotti tradizionali con biscotti senza glutine o con una base di mandorle macinate mescolate a burro fuso. Assicura una pressatura uniforme.
  • Versione vegana: usa una crema a base di formaggio cremoso vegano (a base di anacardi o tofu setoso) mescolato con panna vegetale, succo di limone e vaniglia; per la base, mantieni burro vegetale al posto del burro animale.
  • Dolcezza controllata: riduci lo zucchero nella crema e bilancia con una salsa di mirtilli più intensa o con l’aggiunta di una leggera scorza di limone per mantenere la freschezza senza appesantire.
  • Varianti di frutta: se non trovi i mirtilli, puoi utilizzare lamponi, mirtilli neri o una miscela di bacche per un effetto visivo diverso e altrettanto gustoso. L’abbinamento agrume-fragranza si mantiene efficace.
  • Texture di contorno: se preferisci una salsa più densa, cuoci lentamente un po’ di mirtilli con zucchero e limone finché non si addensa leggermente prima di servirla.
  • Versione light: per una versione meno calorica ma gustosissima, riduci il grasso della crema usando formaggio meno grasso o una combinazione di formaggio leggero e yogurt greco scremato, mantenendo la stabilità della crema con una piccola quantità di amido di mais o maizena.

Conservazione, preparazione anticipata e consigli pratici

Questo dessert si presta bene a preparazioni anticipate, offrendo la possibilità di guadagnare tempo prezioso durante una giornata di festa. Ecco come gestire al meglio la cheesecake ai mirtilli:

  • Prima della preparazione: lascia che tutti gli ingredienti raggiungano la temperatura ambiente per una crema più uniforme e liscia. Il formaggio cremoso freddo tende a formare grumi difficili da incorporare.
  • Congelamento: la cheesecake si congela bene se avvolta a strati in modo protettivo. Puoi congelare intera o in singole porzioni. Per scongelarla, lasciala in frigorifero per 8-12 ore o a temperatura ambiente per 2-4 ore, a seconda delle dimensioni.
  • Conservazione in frigorifero: una volta tagliata, conserva la torta in frigorifero coperta bene per un massimo di 3-4 giorni. Se hai intenzione di tenerla più a lungo, è consigliabile congelarla e poi scongelarla lentamente in frigorifero prima di servirla.
  • Make-ahead: puoi preparare la base e la crema separatamente con un giorno di anticipo, conservando la crema in frigorifero in un contenitore ermetico. Montare e completare con la salsa di mirtilli poco prima di servire per mantenere la freschezza.
  • Riscaldamento: questa torta è tipicamente servita fredda o a temperatura ambiente. Evita di riscaldarla; la crema potrebbe perdere la sua consistenza soffice.

Curiosità e trivia (Opzionale)

La parola cheesecake deriva dall’antico tedesco “Käsekuchen,” che letteralmente significa torta di formaggio. Nel corso dei secoli, le varianti regionali hanno arricchito le tradizioni con ingredienti locali, creando un ventaglio di versioni che vanno dalla versione “New York style” a interpretazioni più dolci, leggere o rustiche. I mirtilli, dal canto loro, sono frutti piccoli ma potenti: ricchi di antiossidanti, vitamina C e fibre, hanno accompagnato l’uomo in molte cucine fin dall’antichità. In molte culture, i fasti dei raccolti estivi sono legati all’uso di mirtilli freschi come simbolo di abbondanza e prosperità. L’unione di crema vellutata e bacche tese al gusto è quindi ben radicata sia nella tradizione che nella modernità, offrendo un dessert che è al tempo stesso familiare e sorprendente. Un’ultima curiosità: in alcune regioni italiane, l’uso della scorza di limone è considerato essenziale per bilanciare la ricchezza della crema, una piccola tecnica che fa la differenza tra una torta buona e una torta memorabile.

Conclusione: una torta che invita a celebrare la semplicità

Cheesecake ai mirtilli è un dessert capace di trasformare una semplice merenda in un momento di gioia condivisa. È una ricetta che parla di stagione, di casa, di cura e di un pizzico di creatività: potete giocare con le consistenze, regolare la dolcezza e scegliere abbinamenti di bevande che accendano i sensi. Ogni fetta racconta una piccola storia di equilibrio: l’amore per la tradizione, la curiosità per l’innovazione, la bellezza di un dessert che è tanto visivamente irresistibile quanto profondamente soddisfacente al palato. E quando arriva il momento di servirla, lasciate che l’occhio si soffermi sul contrasto tra la crema candida e la salsa di mirtilli, tra la crosta dorata e la lucentezza delle bacche. È una torta che invita a fermarsi, a respirare e a gustare. E, soprattutto, è una promessa: che a casa, con le mani sporche di biscotti e le guance profumate di vaniglia, si possa creare qualcosa di speciale insieme agli altri, un piccolo momento di felicità che vale un ricordo.

Ingredients

Crust
  • 1 1/2 cups graham cracker crumbs (or digestive biscuits)
    → The crust provides the structural foundation and a contrast of texture to the creamy filling. Crush the crackers into fine crumbs, then mix with the granulated sugar and a pinch of salt, stir in the melted butter until evenly moistened, and press firmly into the bottom of a 9-inch springform pan (and slightly up the sides). Bake for 8–10 minutes at 175°C (350°F) to set the crust, then cool completely before filling, or chill if you prefer a no-bake-friendly base.
  • 2 tablespoons granulated sugar
    → Adds subtle sweetness to the crust and helps balance the tang of the filling. Mix with the crumbs before adding butter for an evenly sweet crust. If you prefer a less sweet crust, reduce or omit.
  • 1/4 teaspoon fine sea salt
    → Enhances overall flavor and helps counterbalance the sweetness. A small amount is enough to lift the crust without making it salty. If using salted butter, adjust or omit accordingly.
  • 1/4 cup unsalted butter, melted and cooled
    → Binds the crumb mixture and gives the crust its cohesive, crisp structure. Use cooled melted butter to prevent the crust from becoming greasy; the amount can be adjusted slightly for a denser or crisper crust depending on your cracker type.
Filling
  • 32 oz (900 g) cream cheese, softened to room temperature
    → The creamy base of the cheesecake; softened cream cheese yields a smooth, lump-free batter. Beat gradually with sugar to avoid introducing too much air, which can cause cracks. If any lumps remain, scrape sides and beat again at low speed until silky.
  • 1 cup granulated sugar
    → Provides sweetness and helps achieve a balanced, luscious mouthfeel. Beating with the cream cheese creates a creamy, glossy batter. Avoid overmixing after eggs are added to minimize cracks.
  • 4 large eggs, at room temperature
    → Contribute moisture, structure, and stability to the cheesecake as it bakes. Add eggs one at a time, mixing gently after each addition to prevent curdling and to maintain a smooth texture.
  • 1/2 cup sour cream
    → Adds tanginess and extra creaminess, reducing density and enhancing the silkiness of the filling. Fold in after the cheese and sugar are smooth to avoid curdling.
  • 1/4 cup heavy cream
    → Lightens the batter and adds richness. Incorporate slowly to maintain a velvety texture; use cold or room-temperature depending on your kitchen temperature to keep emulsification even.
  • 1 teaspoon pure vanilla extract
    → Classic flavor that rounds out the richness of the cheese. Use high-quality vanilla or vanilla bean paste for deeper aroma. If using vanilla bean, scrape the seeds for extra depth.
  • 1 teaspoon lemon zest (optional) or 1 tablespoon lemon juice
    → Brightens the filling with a hint of citrus that pairs beautifully with blueberries. Zest first to avoid bitterness from the pith; if using juice, add gradually to reach the desired level of acidity without thinning the batter.
  • 1/4 teaspoon fine sea salt
    → Helps balance sweetness and enhances overall flavor. If your cream cheese is salted, adjust or omit this amount.
Blueberry topping (Blueberry compote)
  • 2 cups fresh blueberries
    → The star topping that provides vibrant color and a fresh berry flavor. Choose ripe, firm berries for best sweetness and shape. Rinse gently and pat dry to avoid bruising; you can simmer them with sugar to release juices for a glossy sauce.
  • 1/3 cup granulated sugar
    → Sweetens the blueberries and helps draw out juices to form a glossy compote. Adjust to taste depending on the sweetness of the berries and personal preference.
  • 1 tablespoon lemon juice
    → Adds brightness and a slight acidity to balance the richness of the filling. Freshly squeezed juice is best; adjust to taste, keeping in mind it will intensify as the sauce reduces.
  • 1 tablespoon cornstarch, dissolved in 1 tablespoon cold water
    → Thickens the blueberry sauce so it coats the cheesecake nicely and holds its shape when chilled. Whisk the slurry into the simmering blueberries until the sauce thickens to a coatable consistency; avoid lumps by whisking thoroughly.
Optional Toppings
  • Whipped cream, for serving (optional)
    → Adds a light, creamy touch that complements the dense cheesecake and fruity topping. Whip cold heavy cream with a touch of powdered sugar and a splash of vanilla to soft peaks; refrigerate until ready to serve and add just before slicing.
  • Additional fresh blueberries or lemon zest, for garnish (optional)
    → Enhances presentation and freshness. Scatter extra berries over the top or grate a touch of lemon zest for a bright finish just before serving.

Instructions

  • Preheat your oven to 350°F (175°C) and line a 9-inch springform pan with paper liners or grease it well.
    → This ensures the crust releases cleanly and the cheesecake doesn’t stick or tear when unmolded; lining or greasing the pan creates a nonstick surface for easy slicing.
  • Crush the graham crackers into fine, even crumbs using a food processor or by sealing them in a bag and pulsing with a rolling pin until no large pieces remain.
    → Uniform crumbs give a consistent crust texture and even baking; smaller pieces pack together better for a stable base.
  • Whisk 2 tablespoons granulated sugar and 1/4 teaspoon fine sea salt into the crumbs until evenly distributed.
    → Salt balances the sweetness and enhances overall flavor; even distribution prevents salty pockets in the crust.
  • Stir in 1/4 cup melted and cooled unsalted butter until the crumbs are uniformly moistened and hold together when pressed.
    → The butter binds the crust; using cooled butter prevents greasiness and helps the crust crisp up as it bakes.
  • Press the crumb mixture firmly into the bottom of the prepared pan and up the sides to form a compact, even shell using the flat bottom of a measuring cup or small glass.
    → A tight press creates a stable base that supports the filling and prevents crack formation at the edges during baking.
  • Bake the crust for 8–10 minutes at 350°F (175°C) until it is set and lightly golden, then transfer to a rack and cool completely before filling.
    → The brief bake sets the crust, removing raw flour taste and helping it hold together when the filling is added; cooling prevents the hot crust from cooking the filling.
  • Beat the softened 32 oz (900 g) cream cheese in a large bowl with an electric mixer on medium speed until smooth and free of lumps.
    → Softened cream cheese yields a silky base; beating helps dissolve any lumps and creates a cohesive batter.
  • Gradually add 1 cup granulated sugar to the cream cheese while continuing to beat on medium-low speed until the mixture is light and fluffy, scraping the bowl as needed.
    → Incorporating sugar gradually creates a smooth, glossy texture and ensures the sweetness is evenly distributed through the filling.
  • With the mixer on low speed, add eggs one at a time, mixing just until each is incorporated before adding the next; avoid overmixing to minimize cracks.
    → Adding eggs one by one maintains emulsion and prevents curdling, producing a uniform, tender texture in the finished cheesecake.
  • Stir in 1/2 cup sour cream and 1/4 cup heavy cream, then mix in 1 teaspoon pure vanilla extract and, if using, 1 teaspoon lemon zest or 1 tablespoon lemon juice along with 1/4 teaspoon fine sea salt until the batter is smooth and cohesive.
    → Dairy enriches the filling and lemon adds brightness; keep mixing to just combined to avoid incorporating excess air that can cause cracking.
  • Pour the filling onto the cooled crust, gentle tap the pan on the counter to release trapped air, and smooth the surface with a spatula.
    → A level surface ensures even baking and clean slices; tapping helps expel air pockets for a uniform texture.
  • Bake the cheesecake at 325–350°F (165–175°C) in a water bath, or in a larger pan with hot water halfway up the sides, until the edges are set and the center still wobbles slightly, about 55–70 minutes.
    → The water bath cushions the cake from direct heat, reducing cracks and promoting an creamy, even set; don’t overbake so the center remains creamy rather than dry.
  • Turn off the oven, crack the door open, and let the cheesecake cool in the oven for about 1 hour to gradually reduce the temperature; then remove from the oven and continue cooling on a rack to room temperature.
    → Gradual cooling minimizes rapid temperature shifts that cause cracks and helps the filling set evenly.
  • Refrigerate the cheesecake uncovered for at least 4 hours, or ideally overnight, to allow the filling to fully set and flavors to meld.
    → Chilling improves sliceability and intensifies the cheesecake’s creamy texture and flavor.
  • For the blueberry topping, simmer 2 cups fresh blueberries with 1/3 cup granulated sugar and 1 tablespoon lemon juice in a saucepan over medium heat, mashing a few berries to release juice.
    → Heating draws out the berry juices and concentrates flavor; mashing a portion of the berries helps achieve a thick, glossy sauce.
  • In a small bowl whisk 1 tablespoon cornstarch with 1 tablespoon cold water to make a slurry, then whisk the slurry into the simmering blueberries and cook until the mixture thickens to a coatable sauce.
    → The cornstarch slurry activates thickening at a moderate temperature, producing a sauce that clings to the cheesecake without being runny.
  • Remove the blueberry topping from heat and let it cool to room temperature, then spoon it over the chilled cheesecake and spread evenly.
    → A cool sauce will set nicely atop the cold cheesecake, ensuring clean slices and preventing runny leakage.
  • Serve the cheesecake chilled with optional toppings such as whipped cream, extra blueberries, or a light lemon zest garnish.
    → Whipped cream adds a creamy contrast, berries amplify freshness, and lemon zest provides a bright aroma to finish the dish.

Notes

These blueberry cheesecake notes guide you through assembling a creamy filling and glossy blueberry topping on a crisp crust. The crust uses graham cracker crumbs or digestive biscuits; for a gluten-free version substitute with certified gluten-free crackers and ensure your baking powder is gluten-free. Bake the crust 8–10 minutes at 175°C (350°F) to set, then cool completely before filling, or chill if you prefer a no-bake base. For the filling, soften the cream cheese to room temperature and beat with sugar until smooth; add eggs one at a time on low speed to avoid air bubbles and cracks, then fold in sour cream, heavy cream, vanilla, and optional lemon zest or lemon juice. A pinch of fine sea salt helps balance sweetness. For the blueberry topping, simmer 2 cups fresh blueberries with 1/3 cup sugar and 1 tablespoon lemon juice until the berries release juice, then thicken with a slurry of 1 tablespoon cornstarch dissolved in 1 tablespoon cold water; cool the sauce before spooning over the chilled cake. Chill the assembled cheesecake for several hours or overnight to ensure clean slices. Optional toppings: whipped cream and extra blueberries or lemon zest for garnish. If you prefer a lighter style, you can omit the lemon juice/zest or adjust sugar to taste. Always check ingredient labels for gluten-free compliance if you have gluten intolerance.

Tips

  • Base croccante uniforme: trita i biscotti (graham cracker o digestive) fino a ottenere briciole fini, mescolale con lo zucchero e un pizzico di sale, quindi aggiungi burro fuso raffreddato finché il composto è uniformemente umido. Premi saldamente sul fondo e leggermente sui lati di una teglia a cerniera da 23 cm. Per una base più croccante, compatta bene usando il basso di un bicchiere. Cuoci 8–10 minuti a 175°C (350°F) finché è set e profuma, poi lascia raffreddare completamente prima di riempire. Se preferisci una base senza cottura, semplicemente raffredda bene prima di utilizzare.
  • Farcitura morbida e lucida: lascia il formaggio cremoso ammorbidire a temperatura ambiente (circa 1–2 ore). Sbattilo con lo zucchero a velocità bassa o media finché è liscio e senza grumi. Aggiungi le uova una alla volta, mescolando dopo ogni aggiunta per evitare screpolature. Incorpora delicatamente la sour cream, la panna e la vaniglia; se usi scorza o succo di limone, aggiungilo ora. Aggiungi un pizzico di sale. Evita di mescolare troppo una volta inseriti gli altri liquidi per mantenere una texture setosa.
  • Bagnomaria o cottura uniforme per evitare crepe: per ridurre il rischio di crepe, considera la cottura in bagno-maria: avvolgi la teglia in foglio di alluminio, posizionala in una teglia più grande e riempi d’acqua fino a metà altezza. Cuoci finché il centro è leggermente tremolante. Spegni il forno e lascia la porta socchiusa per circa 60 minuti, poi trasferisci in frigorifero per almeno 4 ore o tutta la notte.
  • Raffreddamento mirato: non saltare il tempo di riposo in frigo; una riposo prolungato permette al centro di settarsi e riduce il rischio di crepe. Se noti crepe sottili, una guarnizione di topping ai mirtilli o panna montata la nasconderà bene.
  • Topping di mirtilli lucido: in una casseruola cuoci 2 tazze di mirtilli freschi con 1/3 tazza di zucchero e 1 cucchiaio di succo di limone finché i succhi si rilasciano. Sciogli una miscela di 1 cucchiaio di maizena in 1 cucchiaio di acqua fredda e uniscila ai mirtilli; lascia sobbollire finché la salsa si addensa a consistenza da coating. Lascia raffreddare leggermente prima di versarla sul cheesecake freddo; una salsa ancora calda potrebbe scorrere troppo e ammorbidire la crema.
  • Guarnizioni e servizio: panna montata fredda è un complemento classico. Per un finish ancora più luminoso, aggiungi scorza di limone grattugiata fresca o qualche mirtillo extra sul lato. Conserva in frigorifero fino al momento di servire.
  • Preparazione in anticipo e conservazione: il cheesecake si mantiene bene in frigorifero per 4–5 giorni; può essere preparato un giorno prima. Puoi anche tagliarlo a fette e congelarle up to 1–2 mesi; scongelale in frigorifero durante la notte prima di servire.
  • Sostituzioni e varianti: se non hai graham cracker, usa digestive o altri biscotti croccanti. Per una base meno dolce, riduci o ometti lo zucchero della base. Per un aroma più intenso, usa vaniglia in bacche o paste di vaniglia di alta qualità e aggiungi una leggera scorza di limone all’impasto.
  • Consigli di strumenti e presentazione: usa una teglia a cerniera da 23 cm e, se fai bagno-maria, avvolgi bene la base in cartaforno o stagnola per evitare infiltrazioni d’acqua. Prendi cura di raschiare i bordi della ciotola durante la preparazione per ottenere una crema liscia e senza grumi, e raschia i lati della ciotola tra un ingrediente e l’altro.

FAQ

Cos’è la Cheesecake ai mirtilli?

È un dolce al formaggio con base di biscotti, crema vellutata e uova, arricchito da mirtilli freschi o in salsa. Viene cotto al forno e raffreddato in frigorifero per ottenere una consistenza cremosa e stabile.

Quali ingredienti servono per la Cheesecake ai mirtilli?

Base: biscotti (200 g) sbriciolati + burro fuso (90 g). Ripieno: formaggio cremoso a temperatura ambiente (600 g), zucchero (150 g), uova (2 grandi) + tuorlo (1), estratto di vaniglia (1 cucchiaino), scorza di limone, panna acida o yogurt greco (200 g). Mirtilli: 250–300 g (freschi o surgelati). Per la salsa: amido di mais (2 cucchiai) mescolato a poca acqua e succo di limone. Altre varianti: pizzico di sale.

Posso fare una versione senza glutine?

Sì. Sostituisci i biscotti normali con biscotti senza glutine oppure crea una base a base di mandorle tritate e burro. Assicurati che tutti gli ingredienti siano certificati senza glutine.

Come preparo la base croccante?

Frulla i biscotti fino a ottenere briciole fini, mescola con burro fuso, poi pressa uniformemente sul fondo di una teglia a bordi amovibili da 22–24 cm. Raffredda in frigo per 20–30 minuti. Per una base extra croccante, cuoci 8–10 minuti a 180°C prima di aggiungere il ripieno.

È necessario usare una teglia a bordi amovibili e una water bath?

Una teglia a bordi amovibili facilita la sformatura. Per ridurre al minimo le crepe, è consigliabile una water bath: avvolgi la teglia in fogli di alluminio e posizionala in una pirofila più grande riempita d’acqua a metà altezza durante la cottura.

Come evitare che la cheesecake si crepi o si sformi male?

Lascia il formaggio a temperatura ambiente, non mescolare eccessivamente, e evita di aprire spesso il forno. Cuoci a temperatura moderata, poi spegni il forno e lascia la torta dentro con lo sportello socchiuso per circa 1 ora. Trasferisci in frigorifero per rassodare completamente.

A quale temperatura e per quanto tempo va cotta?

Cotta a 160–170°C per 50–60 minuti. Il centro sarà ancora leggermente tremolante. Spegni il forno e lascia raffreddare con lo sportello socchiuso per 1 ora, quindi raffredda completamente in frigorifero per almeno 4–6 ore (meglio tutta la notte).

Come si prepara la salsa o la guarnizione ai mirtilli?

In un pentolino cuoci 250–300 g di mirtilli con 60–80 g di zucchero e 1 cucchiaio di succo di limone finché si ammorbidiscono. Per addensare, unisci 1–2 cucchiai di amido di mais sciolto in poca acqua e cuoci finché la salsa diventa lucida e leggermente densa. Lascia raffreddare e servi sopra la cheesecake o falli aggiungere la salsa al momento del servizio.

Come si conserva e si congela?

Conserva in frigorifero, coperta, per 4–5 giorni. Puoi congelare la cheesecake intera o a fette per 2–3 mesi. Avvolgi bene e conserva in un contenitore ermetico. Scongela in frigorifero per una notte e aggiungi la salsa di mirtilli al momento di servire.

Qualche consiglio per varianti e presentazione?

Aggiungi scorza di limone o arancia all’impasto per un aroma agrumato. Puoi fare una “swirl” di salsa ai mirtilli nell’impasto prima di infornare per un effetto marmorizzato. Servi fredda, con panna montata o gelato alla vaniglia per un tocco extra. Per una versione più leggera, usa formaggio cremoso light e meno zucchero.

Introduction / Hook

Imagine waking up to a scent that feels like a warm sunrise—sweet cinnamon, molten butter, and vanilla, all spiraling through the air in a graceful curve. The Barrette cinnamon roll isn’t just a pastry; it’s a tiny edible jewel, shaped to resemble a delicate clasp that would secure a bridal veil or a favorite memory in place. When you slice into it, you reveal a glossy, honeyed ribbon of cinnamon-sugar that winds through tender dough as if threads of light are braided within. The aroma unfurls before you, inviting family and friends to gather around the table, where chatter softens into delighted exclamations and mugs clink softly in celebration of comfort and connection. This is the kind of treat that turns a simple weekend morning into an occasion, a quiet act of indulgence that feels both luxurious and utterly approachable.

The Story Behind the Dish

The Barrette cinnamon roll draws inspiration from the artful elegance of vintage accoutrements—the way a well-made barrette can hold a moment in place, securing a hairstyle with a single, gleaming curve. It’s a playful nod to tradition and craft, where culinary technique meets design. The idea began in a sunlit kitchen where a baker, tired of the usual roll, folded the dough into a crescent that could clasp a morning with a touch of refinement. The result was a pastry that maintains the comforting familiarity of a cinnamon roll while presenting itself like a tiny piece of wearable art. In many cultures, cinnamon rolls are more than a breakfast treat; they embody hospitality, the ritual of sharing warmth, and the joy of adding a little drama to the daily routine. The Barrette version honors that heritage by marrying the classic swirls with a shape that feels intentional and elegant—almost as if the roll itself is telling a story about warmth, memory, and the small luxuries we reserve for special mornings.

There’s a sense of place in this recipe, too. The cinnamon’s peppery snap, the glaze’s sunlit sheen, and the dough’s tender crumb speak of kitchens that wake early to light the day. Some bakers will tell you that shaping dough into a barrette-like crescent encourages even caramelization and a refined crust; others will simply say it looks irresistibly pretty on a plate. Either way, the Barrette cinnamon roll invites you to linger a moment longer, to inhale the sweet steam, and to savor the transition from sleep to a small, shared celebration of taste and scent.

Why You’ll Love This Recipe

  • Visual impact: The barrette-inspired shape offers a striking, elegant presentation that elevates weekend brunch or special-occasion breakfasts.
  • Comforting familiarity with a twist: It’s unmistakably cinnamon roll, but with a design that feels fresh and modern.
  • Airy, tender crumb: The dough aims for a delicate balance between softness and structure, yielding a bite that glides and melts in your mouth.
  • Balanced sweetness: The cinnamon-sugar interior is complemented by a glossy glaze that adds just the right kiss of sweetness without overpowering the dough flavor.
  • Approachable luxury: There’s a sense of indulgence without the fuss—perfect for both ambitious weekend bakers and those new to yeast-based pastries.
  • Make-ahead friendly: The dough can be prepared in advance, making it easier to host a morning gathering with minimal morning prep.
  • Versatile for dietary tweaks: The concept readily adapts to vegan or gluten-free variations without losing its character or charm.

Flavor Profile & Texture

The Barrette cinnamon roll is a study in contrast and harmony. The dough offers a soft, pillowy interior with a gentle chew that comes from a well-balanced rise. It carries a mild, yeasty aroma that is warmed by a cascade of butter and sugar spirals—an olfactory invitation before you even bite. The cinnamon layer plays a starring role, with a ribbon of brown-sugar sweetness that becomes caramelized at the edges, creating pockets of toasty depth within the roll. When you bite in, you experience a symphony of textures: the exterior yields a faint crackle of crust, the interior unfurls into a tender, moist crumb, and the cinnamon filling delivers a fragrant, slightly resinous warmth that makes the senses do a little happy dance.

Across the palate, you’ll notice nuanced notes—vanilla’s creamy roundness, a whisper of orange or lemon zest in some iterations to lift the sweetness, and a subtle saltiness that balances the richness. The glaze—bright, silky, and just thick enough—catches the light as you pass the plate, adding a gloss that makes the roll feel almost jewel-like. Together, these elements create a comforting, homey experience with a refined finish that still feels approachable and cozy. The texture story continues with the shape itself: the crescent curves hug the filling, ensuring every bite reveals a new whisper of cinnamon and sweet pastry at just the right ratio. It’s a pastry about balance—soft and crisp, sweet and slightly savory, simple and slightly couture.

Occasions & Pairings

The Barrette cinnamon roll shines at a range of moments, from quiet weekend mornings to festive celebrations. It’s equally at home on a family breakfast table as it is on a brunch buffet at a small gathering. Consider these occasions for maximum impact:

  • Brunch parties: Set the rolls on a warmed platter for a centerpiece with effortless elegance.
  • Holiday mornings: Pair with coffee, a citrus-forward tea, or a glass of milk for a nostalgic, comforting spread.
  • Mother’s or Father’s Day breakfasts: A small ritual of slicing and sharing mirrors the care you’ve put into the bake.
  • Weekday indulgence: When you want a little luxury with your coffee, this roll turns a routine morning into something special.

Pairings that complement the Barrette cinnamon roll include:

  • Hot beverages: Bold coffee with a touch of cream, chai latte, or a citrusy tea that brightens the palate.
  • Fresh fruit: Slices of orange, apple, or pear add a bright counterpoint to the cinnamon sweetness.
  • Yogurt or creme fraiche: A dollop on the side can introduce a tangy balance to the glaze.
  • Preserves and compotes: A spoonful of tart cherry or orange marmalade can be swirled alongside for a fruit-forward contrast.

Tips, Variations & Substitutions

Here are some ideas to customize the Barrette cinnamon roll while preserving its distinctive charm and texture. Consider these options before you begin, or mix and match to suit your preference and dietary needs.

  • Vegan version: Use plant-based butter and a dairy-free milk in the dough and glaze. Choose a light coconut milk or almond milk to maintain moisture, and select a vegan sugar for the glaze that keeps the glossy finish.
  • Gluten-free adaptation: Replace the standard flour with a certified gluten-free blend that’s designed for yeast doughs. Expect slightly denser results, but with careful handling, you’ll still achieve a tender crumb and a satisfying chew.
  • Flavor twists: Add a touch of orange or lemon zest to the filling for a bright citrus note. A pinch of cardamom can lend a warm, fragrant edge reminiscent of Scandinavian pastries.
  • Nutty crunch: Sprinkle finely chopped toasted nuts (walnuts, pecans, or almonds) into the filling or scatter toasted nuts on top of the glaze for textural contrast.
  • Spice spectrum: A hint of ground cloves or allspice can deepen the cinnamon profile for a more wintery profile.
  • Shape variations: While the classic Barrette form remains elegant, you can also shape the dough into two parallel ribbons that meet like a clasp, or form individual mini crescents for bite-sized treats.
  • Whole grain option: Use a portion of whole-wheat flour blended with all-purpose flour to create a rustic crumb while maintaining tenderness. Hydration tweaks may be needed, so listen to the dough as you mix.

Storage & Make-Ahead Ideas

One of the practical joys of the Barrette cinnamon roll is its flexibility with timing. You can plan ahead with a few reliable methods to ensure you wake up to breakfast that feels almost ceremonial.

  • Make-ahead dough: Prepare the dough and let it rise once, then refrigerate it overnight. In the morning, roll, fill, shape, and bake with minimal effort, letting the cold dough wake up in a warm oven for a slow, even rise.
  • Leftovers: Store cooled rolls in an airtight container at room temperature for up to two days, or refrigerate for longer shelf life. Reheat gently in a low oven or microwave with a splash of glaze to restore softness.
  • Freezing: Freeze baked rolls in an airtight container for up to 2 months. Reheat in a low oven and re-glaze just before serving to revive gloss and moisture.
  • Glaze storage: If you prefer to apply the glaze after reheating, keep glaze separate and whisk in a splash of hot water or milk to return it to a pourable consistency just before serving.

Fun Facts & Trivia (Optional)

Curiosities often accompany pastries as a way to enrich the experience. Here are a few tidbits you might enjoy while you bake or savor the Barrette cinnamon roll:

  • The cinnamon used in classic cinnamon rolls traces its spicy-sweet lineage to spice routes that connected Asia, Africa, and Europe for centuries, turning humble dough into a symbol of warmth and hospitality.
  • The term “barrette” evokes images of delicate, clasp-like jewelry. In pastry design, using a curved shape can create a visual impression of elegance and precision, much like a refined hair accessory.
  • In some traditions, cinnamon rolls are baked for special mornings or religious feasts as a sign of celebration and generosity—an edible way to share sunshine with friends and family.
  • A good cinnamon roll balances sweetness with a touch of saltiness in the dough. The salt helps the flavors pop and prevents the glaze from tasting flat, a small but essential detail that makes the barrette-shaped pastry feel polished.

Ingredients

Dough

  • 4 cups all-purpose flour (or bread flour)
    → This flour provides the gluten structure that gives cinnamon rolls their chewy, tender crumb. Use all-purpose for a softer bite or bread flour for more chew. Measure by scooping into a cup and leveling, or weigh for accuracy. If the dough feels too stiff, add a tablespoon or two of milk at a time during kneading.
  • 1 cup warm milk (about 110°F/43°C)
    → Provides moisture to hydrate the flour and activates the yeast. Keep the liquid at a warm but not hot temperature to prevent killing the yeast. For dairy-free versions, substitute with a plant-based milk fortified with a small amount of fat; adjust liquid if needed to maintain a soft dough.
  • 1/3 cup granulated sugar
    → Feeds the yeast to help the dough rise and contributes a gentle sweetness. Dissolve in the warm milk if possible for even distribution. If you prefer a richer flavor, you can substitute part with light brown sugar for a hint of molasses.
  • 2 1/4 teaspoons active dry yeast (1 standard packet)
    → The leavening agent that creates the roll’s lift and airy crumb. Proof the yeast in the warm milk with a pinch of sugar for 5–10 minutes until foamy; if it doesn’t foam, discard and try fresh yeast. Instant yeast can be mixed with dry ingredients and requires a shorter rise.
  • 2 large eggs, room temperature
    → Adds richness, moisture, and structure. Eggs at room temperature incorporate more evenly and contribute to a tender crumb. To bring cold eggs to room temperature quickly, place them in warm water for about 10 minutes before using.
  • 1/3 cup unsalted butter, melted and cooled
    → Imparts rich flavor and a soft texture; helps keep the dough tender. Ensure the butter is fully melted and cooled before adding to the mixture so it doesn’t kill the yeast. For dairy-free, substitute with a neutral oil and adjust with a touch more milk if needed.
  • 1 1/2 teaspoons salt
    → Enhances flavor and helps regulate fermentation for a balanced rise. Distribute evenly with the flour before combining with wet ingredients. Do not add directly to hot liquids; keep salt away from direct contact with the yeast at first.
  • 1 teaspoon vanilla extract (optional)
    → Adds a warm aroma that complements the cinnamon. If using vanilla bean paste, you’ll get a stronger vanilla flavor. For a dairy-free version, vanilla remains a good flavor anchor.

Filling

  • 1 cup light brown sugar, packed
    → Forms the sweet, caramelized layer inside the roll when swirled with cinnamon. Packing ensures an even distribution. If you prefer less sweetness, reduce to 3/4 cup. For a deeper molasses note, use dark brown sugar.
  • 3 tablespoons ground cinnamon
    → The iconic spice that defines cinnamon rolls. Use fresh ground cinnamon if possible for a stronger aroma; measure accurately since spices can vary in potency. If you only have pre-ground, ensure you pack the correct amount for consistent flavor. Toasting the cinnamon briefly in a dry pan for 10–20 seconds can intensify its aroma before mixing with sugar.
  • 1/3 cup unsalted butter, softened to spreadable
    → Creates a cohesive paste that can be evenly spread across the dough to form a uniform swirl. Softened to spread easily; if the butter is too hard, it won’t incorporate smoothly, and if melted, it can run and pool. For a lighter filling, you can reduce the butter a little or use a spreadable margarine.

Glaze

  • 1 1/2 cups confectioners sugar (powdered sugar)
    → Gives the glossy, sweet finish to the rolls. Sift to remove lumps for a smooth glaze, or whisk vigorously. The glaze thickens as it sits, so adjust with milk to reach your desired drizzle or pourable consistency.
  • 3–4 tablespoons milk or cream (adjust to desired consistency)
    → The liquid that loosens the glaze. Start with 3 tablespoons and add more as needed to reach the desired thickness. For dairy-free options, use almond, soy, or oat milk; use a touch more sugar if you want a thicker glaze.
  • 1/2 teaspoon vanilla extract
    → Enhances the glaze with a soft vanilla note. If you used vanilla in the dough, you can skip here or increase slightly for a stronger glaze aroma.

Optional Add-ins

  • 1/2 cup chopped nuts (walnuts or pecans)
    → Adds crunch and depth of flavor. Lightly toast the nuts to heighten their aroma, then chop into medium-small pieces to distribute evenly. Omit if serving to someone with nut allergies, or substitute with toasted seeds for crunch.
  • 1/2 cup raisins or chopped dates
    → Provides bursts of sweetness and chewy texture. Chop dates finely for even distribution and soak briefly in warm water if they’re very dry to plump them before adding. Drain well before including in the filling to avoid soggy swirls.

Instructions

  • Preheat your oven to 350°F (175°C) and line a 12-c cup muffin tin with paper liners or grease it well.
    → This ensures the rolls do not stick to the tin and makes them easier to remove after baking; liners also help with clean presentation and even browning in the cups.
  • Proof the yeast: Warm 1 cup of milk to about 110°F (43°C) and whisk in 1/3 cup granulated sugar until dissolved. Sprinkle 2 1/4 teaspoons active dry yeast over the surface and let it rest 5–10 minutes until the mixture is foamy.
    → Foam indicates active yeast that will leaven the dough. If there is no foam after 10 minutes, discard and start with fresh yeast to ensure proper rise.
  • In a large bowl, whisk together 4 cups flour and 1 1/2 teaspoons salt until evenly distributed.
    → Even distribution of salt within the flour helps regulate fermentation and flavor; it also prevents hot spots that could kill yeast if it comes into direct contact with it.
  • Whisk the 2 large eggs and 1/3 cup melted and cooled butter into the foaming yeast-milk mixture, then add 1 teaspoon vanilla (optional). Pour this wet mixture into the dry ingredients and stir until a shaggy dough forms.
    → Combining wet and dry early prevents overmixing and ensures even hydration; the dough should be cohesive but not dry or overly wet.
  • Knead the dough on a lightly floured surface or with a stand mixer fitted with a dough hook until smooth and elastic, about 8–10 minutes by hand or 6–8 minutes with a mixer.
    → Proper kneading develops gluten for structure and a tender crumb; perform the windowpane test by gently stretching a small piece to see if it becomes translucent without tearing.
  • Place the dough in a lightly oiled bowl, cover with plastic wrap or a damp towel, and let it rise in a warm spot until doubled in size, about 60–90 minutes.
    → A full rise creates the airy, soft interior characteristic of cinnamon rolls. If your kitchen is cool, you can place the bowl in a turned-off oven with the light on to create warmth.
  • While the dough rises, prepare the filling by mixing 1 cup light brown sugar and 3 tablespoons ground cinnamon into a uniform, textured powder, then beat in 1/3 cup softened butter to form a spreadable paste.
    → The paste should hold its shape when spread; soft butter ensures even distribution and prevents tearing of the dough when rolling. If using harder butter, give it a few seconds in the microwave to soften, but do not melt entirely.
  • If you plan to include optional add-ins, toast 1/2 cup chopped nuts in a dry pan for 2–3 minutes until fragrant, then cool and coarsely chop and set aside for mixing into the filling or scattering on the rolls.
    → Toasting nuts heightens aroma and flavor, and chopped pieces distribute evenly in the swirls for crunch.
  • On a lightly floured surface, roll the dough into a rectangle about 16 inches by 12 inches and roughly 1/4 inch thick.
    → A uniform thickness ensures even cinnamon distribution and consistent roll formation; precise dimensions help achieve consistent slice width and bake evenness.
  • Spread the filling evenly over the dough, leaving a small 1/2-inch margin along the far edge; use an offset spatula to apply a thin, even layer so the rolls hold their shape.
    → Even coverage prevents gaps in flavor and helps keep the roll from tearing when rolled; the margin allows sealing without squeezing out filling.
  • Roll the dough away from you into a tight log along the long edge, applying steady pressure to create a uniform cylinder; pinch the seam closed and wrap the log tightly in plastic wrap, then refrigerate for 15–20 minutes to firm the butter for clean slicing.
    → A chilled log slices cleanly and maintains even thickness, reducing butter leakage during cutting and baking.
  • Using a sharp knife or bench scraper, cut the chilled log into 1.25–1.5 inch thick slices and arrange them seam-side down.
    → Clean, even slices ensure consistent baking and uniform spiral rings; wiping the blade between cuts prevents sticking and tearing.
  • Distribute the slices into the prepared muffin tin cups, placing 1–2 slices per cup depending on the width, or use a greased 9×13-inch pan if you prefer one big sheet; ensure some space for expansion.
    → Crowding can cause uneven rise and undercooking; giving room allows steam to circulate and the rolls to bake evenly.
  • Cover the pan loosely and let the rolls undergo a secondary rise in a warm place until puffy and nearly doubled, about 30–45 minutes.
    → The second rise develops the light, airy crumb and ensures the rolls reach the soft, tender texture expected of cinnamon rolls; do not overproof or they may collapse in the oven.
  • Bake in the preheated oven at 350°F (175°C) for 22–28 minutes, or until the tops are golden brown and the centers spring back when pressed.
    → Proper browning indicates caramelization of sugar and fully cooked centers; testing with a gentle press confirms doneness beyond color alone.
  • While the rolls bake, whisk together 1 1/2 cups confectioners sugar, 3–4 tablespoons milk or cream, and 1/2 teaspoon vanilla to form a smooth glaze; adjust with more liquid for pourable consistency or more sugar for a thicker glaze.
    → A glossy glaze evenly coats the surface and sets as the rolls cool, providing sweetness and moisture without making the rolls feel heavy.
  • Remove the rolls from the oven and allow them to cool in the pan for about 5–10 minutes before drizzling with glaze; spoon or drizzle gradually to control thickness and avoid soggy bottoms.
    → Resting lets the structure set slightly so the glaze adheres instead of sliding off, creating an attractive finish.
  • Transfer the rolls to a wire rack and finish with an even glaze; if desired, apply a second light drizzle once the first coat sets to achieve a uniform sheen.
    → The glaze thickens as it sits; a second pass ensures all surfaces gleam and flavor is balanced across the rolls.

Notes

These Barrette cinnamon rolls are a classic pull-apart treat with a soft, tender crumb and a fragrant cinnamon-sugar swirl. You can customize them by adding chopped nuts (walnuts or pecans) or raisins or chopped dates for extra texture and sweetness. They freeze well—unbaked rolls can be frozen after shaping and then baked from frozen, or baked rolls can be cooled, wrapped, and frozen for quick weekend breakfasts. For an extra glossy finish, glaze while the rolls are warm and whisk in a pinch more vanilla or a pinch of salt to balance the sweetness. Always proof the yeast in warm milk (about 110°F/43°C) with a little sugar; if it doesn’t foam, discard and start with fresh yeast. When making the dough, ensure the melted butter is cooled before mixing so it doesn’t kill the yeast. If you need a dairy-free version, substitute with a neutral oil and adjust the milk amount to keep the dough soft. Roll the dough into a large rectangle, spread the cinnamon-sugar filling evenly, roll tightly, seal the seam, and cut into evenly sized rolls for uniform baking. Let the formed rolls rise again in a warm place until puffy before baking to achieve a lofty, airy crumb. For the glaze, sift the confectioners’ sugar and whisk in milk or cream and vanilla until smooth, adding more liquid or sugar to reach your desired drizzle; a dairy-free glaze can use almond, soy, or oat milk. Enjoy these rolls fresh for the best texture, or reheat gently to revive their softness; leftovers can be stored covered in the fridge for a few days or frozen for longer storage.

Tips

Tips for Barrette Cinnamon Roll

Dough and yeast tips
  • Keep the milk at a warm temperature (about 110°F/43°C). If you don’t have a thermometer, it should feel like a warm bath—not hot. Too hot will kill the yeast.
  • Proof the yeast in the warm milk with a pinch of sugar for 5–10 minutes until foamy. If it doesn’t foam, discard and start with fresh yeast. Instant yeast can be mixed directly with dry ingredients and requires a shorter rise.
  • Measure flour accurately. If your environment is humid, you may need a touch less flour; if dry, a little more. Consider weighing flour for best consistency.
  • For a softer, airier crumb, knead until the dough is smooth and elastic (windowpane stage). This typically takes 8–10 minutes by hand or 5–6 minutes with a stand mixer on medium.
  • If the dough feels too stiff, add milk a tablespoon at a time during kneading. If it’s too sticky, lightly flour the surface but avoid over-flouring, which can make the rolls dense.
  • Eggs at room temperature incorporate more evenly. To warm cold eggs quickly, place them in warm (not hot) water for about 10 minutes before using.
  • Keep salted dough away from direct contact with active yeast at the start. Dissolve salt with the flour first, then combine with wet ingredients.
  • If you’re dairy-free, substitute with a plant-based milk fortified with a little fat and consider a neutral oil in place of butter. Adjust hydration as needed to maintain a soft dough.
Rolling, filling and shaping tips
  • Roll the dough to an even thickness, about 1/4 inch (6 mm). An even thickness ensures uniform swirls and even baking.
  • Spread the filling evenly. If the butter is too soft, it will run; if too cold, it won’t spread. A spreadable, softened butter is ideal for a cohesive swirl.
  • For a deeper aroma, toast the cinnamon in a dry skillet for 10–20 seconds before mixing with the sugar. This intensifies the spice without added liquid.
  • Keep the filling layer moderate to prevent overflow when cutting and baking. A generous but controlled layer helps create cleaner swirls.
  • Chill the rolled dough briefly if it’s very sticky; this makes slicing easier and results in cleaner edges.
  • Use a sharp knife or dental floss to cut the rolls cleanly. A quick slice with floss or a sharp knife helps keep the swirl intact without squashing the roll.
  • Place the cut rolls with a little space in a greased or parchment-lined pan to allow even rising and prevent sticking.
Glaze and finish tips
  • Sift confectioners’ sugar to remove lumps for a smooth glaze. The glaze will thicken as it sits, so whisk in a little milk to reach your desired drizzle or pourable consistency.
  • Start with 3 tablespoons of milk and add gradually until you reach the desired thickness. For a dairy-free glaze, use almond, soy, or oat milk.
  • Add vanilla to the glaze for a gentle aroma. If you flavored the dough with vanilla, you can skip or lightly adjust in the glaze for balance.
  • Warm the glaze slightly before applying for a glossy finish, but avoid pouring hot glaze on very hot rolls, which can soften the crust too much.
Make-ahead, storage and variations
  • Make-ahead option: after shaping and cutting the rolls, cover and refrigerate overnight. Bring to room temperature and bake as directed the next day for fresh-taste rolls with less morning prep.
  • Freezing: freeze unbaked rolls in the pan (covered tightly) for up to 2–3 months. Bake from frozen, adding 5–10 minutes to the bake time.
  • Storage: baked cinnamon rolls can be kept covered at room temperature for 1–2 days. For longer storage, refrigerate and rewarm gently in the oven.
  • Nut and raisin options: toast nuts lightly to heighten flavor, then chop; soak raisins or dates briefly to plump them before adding to the filling. Omit nuts for nut allergies or substitute with seeds for crunch.
  • Flavor variations: for a dairy-free version, use plant-based milk and dairy-free butter or oil. You can also experiment with a pinch of ground cardamom or a splash of vanilla bean paste in the dough for a different aroma profile.

FAQ

Barrette cinnamon roll FAQ

What is a Barrette cinnamon roll?

A Barrette cinnamon roll is a soft, enriched yeast pastry filled with cinnamon-sugar, rolled into a ribbons-like shape, and finished with a creamy glaze. It’s designed to be sliced evenly to resemble a neat barrette when plated.

What ingredients do I need for the dough and filling?

For the dough: all-purpose flour, active dry yeast, warm milk, unsalted butter, granulated sugar, eggs, and a pinch of salt. For the filling: light brown sugar, ground cinnamon, and softened butter. For the glaze: cream cheese, powdered sugar, vanilla extract, and a little milk or cream to reach the desired consistency.

Can I make the dough ahead of time?

Yes. You can let the dough rise once, then refrigerate the shaped rolls overnight before the final rise and bake. If you prefer to refrigerate unshaped dough, you can chill it after mixing and let it rise slowly in the fridge for up to 24 hours, then roll, cut, and bake as directed.

Can I freeze unbaked rolls?

Yes. After shaping the rolls in the pan (before the final rise), wrap the pan tightly or freeze the rolls individually on a tray and transfer to a bag. Bake from frozen, adding about 6–8 minutes to the bake time, or thaw overnight in the fridge and let them complete a final rise before baking.

How long and at what temperature should I bake the rolls?

Bake at 350°F (175°C) for about 22–28 minutes, or until the edges are golden and the center is set. If the tops brown too quickly, loosely tent with foil during the last 5–7 minutes. Let the rolls cool slightly before glazing.

How do I roll and cut the dough to get a barrette shape?

Roll the dough into a rectangle about 12 by 18 inches (30 by 46 cm). Brush with filling, roll tightly along the long edge, seal the seam, and cut into 12–15 even slices. Place the slices in a greased 9×13 inch pan (or a larger pan if needed). The even slices create a neat, ribbon-like appearance similar to a barrette when baked.

What glaze or icing goes with Barrette cinnamon rolls?

A classic cream cheese glaze works well: beat 4 oz (115 g) cream cheese with ¼ cup (60 g) unsalted butter, 1 cup (120 g) powdered sugar, 1 tsp vanilla, and 1–2 tbsp milk until smooth. Drizzle warm rolls with the glaze for a glossy finish. You can adjust sweetness or add a splash of lemon zest for brightness.

Are there vegan or dairy-free versions?

Yes. Use plant-based milk (such as almond, soy, or oat) and dairy-free butter in the dough. Replace eggs with a flaxseed or chia egg or a commercial egg replacer. For the glaze, use dairy-free cream cheese and a non-dairy butter substitute, and adjust with non-dairy milk as needed.

How should I store leftovers?

Store cooled rolls in an airtight container at room temperature for up to 2 days, or refrigerate for up to 5 days. For longer storage, wrap well and freeze. Reheat gently in a 300°F (150°C) oven for 8–10 minutes or briefly in the microwave.

Can I customize the filling or toppings?

Absolutely. Try adding chopped nuts, raisins, or a thin layer of chocolate. You can swap part of the cinnamon filling with a pecan or walnut streusel, or drizzle with caramel or maple icing for a different flavor profile.

Introduction / Hook

Imagine a sunny plaza where the scent of tropical fruit mingles with the faint sweetness of vanilla and cream. Now imagine that scent carried into a single, pale cloud that melts on the tongue, leaving behind a bright whisper of citrus and sunshine. This is Ananas montato—a dessert that feels both timeless and modern, a whisper-soft homage to pineapple that elevates fruit into something airy, elegant, and irresistibly inviting. It is not merely a dish; it is an experience. Each spoonful carries the memory of summer markets, of palm shade, of a breeze carrying the distant notes of vanilla and coconut. This is dessert storytelling you can taste—light, colorful, and dignified enough for a celebration, yet simple enough to make on a weeknight. If you’ve ever wanted to turn a humble can of pineapple into a cloud of happiness, you’re about to discover how to do it with grace, balance, and a touch of Italian charm.

At its heart, Ananas montato is a celebration of contrasts that complement one another rather than overpower. The pineapple brings a sunny acidity and tropical brightness. The montato part—think whipped cream, velvety yogurt, or a dairy-free alternative—adds richness and lift, transforming fruit into something buoyant and cloud-like. The result is a dessert that feels indulgent without being heavy, festive without being fussy, and deeply satisfying in a quiet, lingering way. It invites you to slow down, to savor, to share with friends and family, and to let the flavors unfold in your mouth like a small vacation you can relive with every spoonful.

What makes Ananas montato especially appealing is its versatility. It can be plated as elegant individual servings that look almost archival in their clean, pale presentation, or served as a more rustic, whipped-tine finale that suits a casual dinner party. It sings with texture—airy foam giving way to tender pineapple bits, a hint of citrus zest, and a smooth, creamy backbone that ties everything together. You’ll notice a delicate balance: the pineapple’s tang is tempered by creaminess, while a whisper of vanilla or a kiss of citrus brightens and lifts the entire experience. This is a dessert that rewards restraint and precision in execution, ensuring the pineapple remains the star while the montato provides a soft, supportive chorus rather than a heavy overtone.

For cooks who love a recipe with a story and a clear technique, Ananas montato offers both. It speaks to the Italian culinary tradition of elevating seasonal ingredients with simple methods, presenting fruit in forms that honor its natural character while enhancing it with texture and aroma. It also nods to the modern kitchen’s love of play—layered textures, subtle contrasts, and the opportunity to customize with pantry staples you already adore. Whether you’re a home cook seeking a flourish for a weeknight dinner or a seasoned host planning a refined dessert course, Ananas montato provides a welcoming stage for creativity and a delightfully memorable finish to any meal.

The Story Behind the Dish

The pineapple, or ananas as it is known in Italian, has a storytelling power that travels across continents. Introduced to European taste palettes in the late 15th century, this sun-bright fruit soon found a home in many kitchens, where its exotic aura simmered into everyday desserts and festive treats. In Italy, the fruit’s presence in dessert repertoires grew with the rise of global trade, the expansion of colonial routes, and the postwar era’s appetite for both novelty and comfort. It’s in this cultural cross-pollination that Ananas montato finds its voice: a dessert rooted in the notion that fruit can be a luxurious dessert protagonist when given the right partner.

The concept of montato—literally “whipped” or “beaten”—echoes classic Italian technique: whips of cream, aerated custards, or whipped egg-based creams that transform simple ingredients into something light and luminous. The marriage of pineapple with montato is a natural extension of that tradition. Pineapple’s natural acidity and tropical perfume demand a gentle, supporting sweetness that doesn’t overwhelm. The montato acts as a soft, airy counterpoint, lifting the pineapple into a dessert that feels special without turning heavy. Some cooks lean into a more dairy-forward approach—cream, mascarpone, or Greek yogurt provide structure and gloss—while others embrace dairy-free routes with coconut cream or almond milk foams that still deliver that ethereal lift.

In many homes, Ananas montato evolved from improvised fruit salads and simple whipped desserts into a refined centerpiece for warm-weather gatherings. It’s the kind of dish that travels well from a family kitchen to a casual dinner party because its technique is forgiving and its flavor profile broadly appealing: bright fruit, gentle sweetness, and a whisper of vanilla or citrus that makes everything feel polished. The dish also embodies a spirit of hospitality. Pineapple, with its crown of leaves, has long symbolized warmth and welcome in many cultures; presenting it montato-style feels like extending a warm invitation to your table—an invitation to slow down, breathe in the aroma, and share a plate of something both sunny and delicate.

Why You’ll Love This Recipe

  • Quick to assemble: the core components come together with simple whisking and folding, making it feasible for a weeknight treat or a last-minute dinner party finale.
  • Light yet luxurious: the airy montato provides a cloud-like texture that feels indulgent without weighing you down.
  • Versatile in presentation: serve in individual cups for a refined look or in a single, rustic trifle-style bowl for a family-style dessert.
  • Flavor-balanced: pineapple’s sweetness is tempered by creaminess and a touch of citrus or vanilla, creating a harmonious tropical profile.
  • Adaptable for dietary needs: dairy-forward versions are easy to adapt to dairy-free montatos using coconut, almond, or oat creams; the core technique remains the same.
  • Seasonal and inclusive: a dessert that can feel glamorous for holidays or light and breezy for summer nights, appealing to a wide range of palates and ages.
  • Impressive with minimal fuss: the dish looks sophisticated on the plate, yet its execution relies on fundamentals—whipping, folding, and balancing flavors—that cooks of all levels can master with confidence.
  • Great memory-maker: sweet, bright, and slightly exotic flavors tend to linger in memory, making this dessert a repeat request at gatherings and celebrations.

Flavor Profile & Texture

Ananas montato is a study in contrasts that come together to sing as a single, cohesive experience. The pineapple provides an upfront brightness—the tangy snap of acid that cuts through a soft blanket of cream. Depending on the method you choose, this tang can be accompanied by a whisper of citrus zest, a kiss of vanilla, or a light dusting of sugar to lengthen the finish. The montato component adds the other dimension: airiness, smoothness, and a creamy body that feels almost like a delicate cloud. When you bite into a spoonful, you should first sense a cool, creamy fur that glides across the tongue, then a faint tropical sweetness and a refreshing acid bite that keeps the palate awake. If you’re using coconut cream or yogurt as your montato base, you’ll also notice a gentle coconut or dairy-flavored note that complements the pineapple rather than competing with it.

Texture play is central here. The pineapple—whether diced into tiny pearls or blitzed to a very soft purée—adds a crisp, chewy bite or a smooth, melting interior, depending on how you present it. This contrast with the whipped component is what makes the dessert feel sophisticated: the intersection of texture, temperature, and aroma creates a sensation that’s much more layered than a single-note fruit dish. Visually, the pale, airy montato against the bright, sunlit yellow of pineapple creates an inviting plate that reads as fresh and celebratory. Aromas of vanilla, citrus zest, and a hint of cream rise first, then the pineapple’s tropical perfume completes the sensory arc. In the best version, each spoonful offers a micro-journey: cool cream, a small pineapple bite, a gentle sweetness, and a lingering finish with a clean citrus lift.

Occasions & Pairings

This dessert shines in a wide array of settings. It’s perfect for summer picnics and sunset dinners where you want something elegant yet unpretentious. It also works beautifully as a finale for a holiday meal when you crave something that feels special but not heavy. The lightness of Ananas montato makes it an ideal palate cleanser or finale after a spiced main course, and its bright flavors pair nicely with drinks that echo the same citrus-vanilla-tropical notes.

Pairings to consider (drinks and bites that echo or complement the dish):

  • Dry sparkling wines or a light Prosecco to echo the celebratory mood and cut through the creaminess.
  • A glass of Moscato d’Asti or a late-harvest Riesling for a touch of sweetness that harmonizes with the fruit’s brightness.
  • Cold brew coffee or a small dessert wine for a post-dinner pairing that deepens the vanilla-toned notes.
  • Crunchy biscotti, almond cookies, or pistachio tuile on the side for textural contrast.
  • A citrusy sorbet or a mint-infused granita served alongside to heighten the tropical perception and provide a refreshing counterpoint.

Occasionally, Ananas montato is staged as a course of its own in a light, elegant dessert sequence. In more casual settings, serve it in clear glass cups to showcase its airy layers and pale hues, or spoon it into small glass compotes garnished with a sliver of pineapple, a mint leaf, and a tiny lemon zest curl for a visually striking finish that invites conversation.

Tips, Variations & Substitutions

Here are practical ideas to tailor Ananas montato to your pantry, dietary needs, and flavor preferences:

  • Choosing the montato base: If you want a dairy-forward version, whip heavy cream with a touch of sugar and a splash of vanilla. For a lighter, dairy-free option, whip coconut cream chilled overnight, optionally beating with a little maple syrup and vanilla. Greek yogurt whisked with a small amount of cream-cheese can also provide body and tang for a mid-range texture.
  • Texture control for the pineapple: Use fresh pineapple when possible for a brisk bite and aroma; if using canned pineapple, drain thoroughly and pat dry to avoid a soggy texture. For a more luxurious feel, add a tiny amount of pineapple juice to the montato base to reinforce the fruit’s flavor without making it watery.
  • Flavor boosters: A whisper of vanilla is classic, but you can experiment with lime zest for a sharper citrus note, or a pinch of ginger powder for a warm, tropical edge. A splash of light rum or pineapple liqueur can deepen the fruit’s resonance for adults, but keep it subtle so the pineapple remains the star.
  • Texture variety: For a layered presentation, alternate scoops of montato with pineapple chunks and a delicate vanilla custard ribbon. You can also fold in a small amount of crushed macadamia nuts or toasted coconut for extra crunch and aroma.
  • Vegan and gluten-free adaptations: Coconut cream montato plus finely chopped pineapple create a lush vegan version. Ensure any thickeners or stabilizers used are gluten-free if needed.
  • Make-ahead considerations: Whipped montato can be prepared a few hours ahead and kept chilled; fold in pineapple at the last moment to preserve the light, billowy texture. If you plan to layer, assemble components separately and chill to set before serving.
  • Presentational twists: Serve in tall champagne flutes for a dramatic, layered look; or in vintage dessert cups with a pineapple leaf as a playful garnish.

Storage & Make-Ahead Ideas

To maintain the freshest texture and flavor, store and assemble with care. The montato component tends to hold its form longer when kept cold and undisturbed. Pineapple, particularly if fresh, can release moisture over time, so it’s best added just before serving if you’ve prepared the pineapple in advance.

Storage tips:

  • Whipped montato: Store in an airtight container in the refrigerator for up to 24 hours. If it begins to separate, a quick re-whip or a gentle fold will restore the texture.
  • Pineapple: If you’ve prepared chopped pineapple in advance, store it separately in an airtight container in the fridge for up to 2 days. Drain any excess liquid before serving to keep the montato from becoming watery.
  • Make-ahead strategy: If you’re planning a multi-course dessert, you can assemble the pineapple components a few hours ahead and whisk the montato shortly before serving. Layer or mound the montato on top of the pineapple for a visually striking finish just before guests arrive.
  • Freezer notes: Freezing is generally not recommended for the montato because it can alter texture, but if you’re considering make-ahead in bulk, you can freeze pineapple purée in ice cube trays and grate or thaw as needed to fold into the montato for a slightly different, yet still delightful, texture.

Fun Facts & Trivia

Did you know that pineapple has a long history as a symbol of hospitality and luxury in many cultures? In colonial and postcolonial societies, presenting pineapple at the table was a gesture of welcome and generosity. The fruit’s bright aroma and vibrant appearance make it a perfect centerpiece and dessert ingredient for celebrations that want to feel both festive and refined. The term montato is a nod to classic Italian culinary language for whipped or aerated preparations, a reminder that Italian cuisine often elevates simple ingredients through technique and balance. In Italian households and trattorias alike, desserts that rely on whipped textures—whether with cream, yogurt, or foams—are seen as a showcase of craftsmanship in the kitchen, where airiness is not just an effect but a deliberate style choice that conveys care and attention.

Historically, pineapple’s journey from the tropics to European markets is a story of curiosity, trade, and adaptation. The fruit’s distinct flavor profile—bright, slightly acidic, and unmistakably tropical—has inspired countless iterations in desserts, drinks, and sauces. Ananas montato sits within this tapestry as a modern interpretation that respects tradition while inviting contemporary twists. It is a dessert that can be adapted to regional tastes and seasonal fruits beyond pineapple, offering a blueprint for playful, elegant finishes that delight both the eye and the palate.

Closing Thoughts

Ananas montato is a celebration of contrast and cohesion—airiness meeting brightness, tropical fruit meeting creamy tenderness, and simple technique meeting joyful presentation. It invites you to play with texture, to experiment with flavor accents, and to share something luminous and memorable with the people you love. Whether you’re planning a carefree summer supper, a refined dinner party, or a cozy family dessert, this dish offers a canvas on which your creativity can flourish. In the end, what you taste is a harmonious balance: the pineapple’s sunny character, the montato’s velvet lift, and the lingering fragrance of citrus and vanilla. It is dessert that feels like vacation, memory, and home all at once. Enjoy crafting this Tuscan-touched, tropical-inspired delight, and let Ananas montato become a signature finish that your guests will remember long after the last bite.

Ingredients

  • Pineapple Montato Base
    • – 1 1/2 cups fresh pineapple purée (blended until smooth)
      → Purée ripe pineapple until completely smooth. Strain through a fine-mesh sieve if you want an ultra-smooth mousse and to remove fibrous bits. The purée provides the fruity foundation and natural sweetness.
    • – 2 tablespoons granulated sugar (adjust to taste)
      → Added to balance tartness; if the pineapple is very ripe and sweet, you may reduce or omit. Dissolve into the purée while warm to help it blend evenly.
    • – 2 teaspoons lemon juice (or lime)
      → Brightens the pineapple flavor and helps prevent the purée from tasting flat. Add gradually and taste before chilling.
    • – 1 teaspoon vanilla extract (optional)
      → Adds warmth; if using vanilla in the base, adjust to avoid overpowering pineapple.
    • – 1 envelope (2 1/2 teaspoons) powdered gelatin, bloomed in 2 tablespoons cold water
      → Gelatin gives the mousse its delicate set; bloom in cold water for about 5 minutes, then gently warm to dissolve before whisking into the warm purée. For a vegan option, substitute with 1 1/2 teaspoons agar-agar powder dissolved in 1/4 cup hot water and simmer briefly to activate.
  • Whipped Cream Layer
    • – 1 cup heavy cream, very cold
      → Chill the cream, bowl, and whisk beforehand for best volume. Cold cream whips to a light, stable foam that folds smoothly into the pineapple purée.
    • – 2 tablespoons powdered sugar (adjust to taste)
      → Powdered sugar dissolves quickly and yields a smooth texture; adjust sweetness to your preference. If avoiding sugar, use a small amount of sweetener suitable for whipped cream.
    • – 1/2 teaspoon vanilla extract (optional)
      → Enhances the creamy flavor; skip if you prefer a purer pineapple profile.
  • Optional Garnishes
    • – Fresh pineapple chunks or ribbons for garnish (optional)
      → Dice into small pieces or cut into ribbons for texture and color. Chill before serving to maintain crisp texture.
    • – Fresh mint leaves for garnish (optional)
      → Adds a refreshing aroma and color contrast; use sparingly to keep plating clean and vibrant.
    • – Toasted coconut flakes (optional)
      → Provide a tropical, crunchy contrast; lightly toast to avoid bitterness and sprinkle just before serving.

Instructions

  • Bloom the gelatin in 2 tablespoons cold water for about 5 minutes until the granules swell and become translucent.
    → Hydration ensures the gelatin dissolves evenly and yields a silky, uniform set without graininess in the pineapple base.
  • Purée the fresh pineapple until completely smooth, measuring about 1 1/2 cups of purée; blend until even and glossy, then scrape the sides of the blender for a consistent texture. If you desire an ultra-smooth mousse, pass the purée through a fine-mesh sieve to remove any fibrous bits.
    → A perfectly smooth base prevents texture interruptions in the mousse and helps the gelatin incorporate smoothly.
  • Warm the pineapple purée gently in a small saucepan over low heat just until it’s warm to the touch, taking care not to boil.
    → Gentle warming helps dissolve the sugar evenly and makes it easier to whisk the gelatin into the purée without shocking the gelatin’s structure.
  • Stir in 2 tablespoons granulated sugar while the purée remains warm, letting it dissolve completely for an evenly sweetened base. Taste and adjust if necessary.
    → Dissolving sugar in a warm base ensures a uniform sweetness and prevents granules from sinking or graininess in the final mousse.
  • Whisk in 2 teaspoons lemon juice (or lime) in small additions, tasting after each addition to brighten the pineapple without overpowering it.
    → The citrus accent heightens aroma and prevents the purée from tasting flat, balancing sweetness and acidity.
  • Add 1 teaspoon vanilla extract if using it, whisking briefly to distribute the aroma evenly through the warm purée.
    → Vanilla adds warmth and depth, but use sparingly so it doesn’t mask the pineapple’s brightness.
  • Squeeze out the excess water from the bloomed gelatin and whisk the gelatin into the warm purée until completely dissolved, ensuring there are no lumps. Remove from heat if necessary.
    → Dissolved gelatin will set evenly as the base chills, creating a delicate mousse texture.
  • Pour the warm pineapple mixture into serving glasses or small silicone molds and refrigerate for 2–4 hours until the base is softly set but still glossy to the touch.
    → A gently set base provides a stable foundation for the whipped cream layer and keeps the two textures distinct.
  • Chill a mixing bowl and whisk in the freezer for about 10 minutes, then pour in 1 cup very cold heavy cream. Begin beating on medium speed.
    → Chilled equipment helps the cream whip faster and to a stable volume, essential for a light, airy texture.
  • Add 2 tablespoons powdered sugar and 1/2 teaspoon vanilla extract (optional) and continue to whip until stiff, glossy peaks form without overbeating.
    → Properly whipped cream folds smoothly into the purée and holds its shape, creating a lush top layer.
  • Spoon or pipe the whipped cream layer onto the set pineapple base in an even, level coat to form a distinct second layer. Chill for 15–30 minutes to let the cream settle and hold its shape.
    → A firm top layer enhances presentation and ensures clean, clean-cut portions when plated.
  • Garnish with fresh pineapple chunks or ribbons, mint leaves, or toasted coconut flakes as desired, placing each element with care to maintain a balanced visual and texture contrast.
    → Garnishes add aroma, color, and texture, elevating the dish’s tropical feel and ensuring a polished presentation.

Notes

These pineapple montato layers are a tropical two-tone mousse featuring a bright pineapple purée set with gelatin and a fluffy whipped cream topping. For best results, purée ripe pineapple until smooth, then strain through a fine-mesh sieve if you want an ultra-smooth texture and to remove any fibrous bits. Warm the purée slightly to dissolve the sugar, then whisk in lemon juice and vanilla if using. Bloom the gelatin in cold water for about 5 minutes, then gently warm to dissolve before whisking into the warm purée. For a vegan option, substitute with 1 1/2 teaspoons agar-agar powder dissolved in 1/4 cup hot water and simmer briefly to activate. Chill the purée base until just set, then fold into whipped cream to create a light, airy mousse. For the whipped cream, chill the heavy cream, bowl, and whisk well; whip to soft peaks, add powdered sugar and vanilla, then whip to stiff peaks. Gently fold into the pineapple purée to maintain volume. Assemble in serving glasses or a dessert dish, layering purée and whipped cream for a pretty striped effect, and garnish with fresh pineapple chunks, mint leaves, or toasted coconut flakes. You can make the components a day ahead and assemble just before serving; keep everything well chilled until serving. If the pineapple is very ripe and sweet, taste and adjust by reducing or omitting the sugar. To brighten the pineapple further without overpowering it, consider a tiny touch of citrus zest folded into the purée base, added sparingly to taste.

Tips

Tips for preparing Ananas montato

Preparing the pineapple base

  • Choose ripe, fragrant pineapple for natural sweetness; the purée will taste better and require less added sugar.
  • Purée the pineapple until completely smooth. For an ultra-smooth mousse, strain the purée through a fine-mesh sieve to remove fibrous bits.
  • Balance tartness with sugar, but start with less and adjust to taste. Dissolve sugar into the warm purée to ensure even sweetness distribution.
  • Brighten the flavor with lemon (or lime) juice—add gradually and taste. Too much acid can dull the pineapple flavor, so go slow.
  • If using vanilla, add a small amount to avoid overpowering the pineapple..

Gelatin and stabilization

  • Bloom gelatin in cold water as directed; this hydrates the powder and prevents lumps. After blooming, warm gently until fully dissolved before whisking into the warm purée.
  • Keep the purée warm enough to dissolve gelatin but not so hot that it curdles or loses fragrance. A gentle warmth helps the gelatin dissolve smoothly.
  • For a vegan option, substitute with agar-agar powder (1 1/2 teaspoons) dissolved in 1/4 cup hot water and simmer briefly to activate. Note that agar sets differently, so you may need to adjust chilling time and texture.

Whipped cream layer tips

  • Chill the heavy cream, bowl, and whisk thoroughly; cold cream whips to a lighter, more stable foam that folds smoothly into the purée.
  • Use powdered sugar for smooth sweetness and quick dissolution; you can reduce or omit sugar if you prefer a lighter taste. If you’re avoiding sugar, choose a small amount of a suitable sweetener for whipped cream.
  • Better texture comes from folding the whipped cream into the pineapple purée in stages with a gentle motion—this preserves the air and keeps the mousse light.
  • Optionally add 1/2 teaspoon vanilla to the whipped cream for a subtle creamy aroma that complements pineapple without overpowering it.

Assembling and chilling

  • Cool the pineapple purée to a warm-to-room temperature before folding in the whipped cream to avoid melting the foam.
  • When assembling, consider letting the base set slightly in the fridge (10–20 minutes) before layering the whipped cream for cleaner, distinct layers.
  • Store assembled portions in the refrigerator and serve within 1–2 days for best texture; avoid long exposure to air to prevent the top from weeping.

Garnishes and finishing touches

  • Fresh pineapple chunks or ribbons add color and texture; chill them to maintain crispness.
  • Mint leaves give a refreshing aroma and visual contrast; use sparingly so they don’t overpower the dessert.
  • Toasted coconut flakes provide a tropical crunch—toast lightly just until fragrant to avoid bitterness. Sprinkle right before serving to keep them crisp.

Variations and troubleshooting

  • If the mousse seems too loose, chill longer or slightly increase the gelatin amount (or agar-agar for vegan version) in a small test batch, then adjust accordingly.
  • For a dairy-free option, use whipped coconut cream or a well-chilled almond or cashew cream; fold with the pineapple purée and stabilize with vegan gelatin/agar-agar as directed.
  • If you notice separation between purée and cream, gently fold a tablespoon of the whipped cream back into the purée to rebind before serving.

FAQ

Cos’è Ananas montato?

È un dessert fresco a base di ananas tagliata a pezzi, strati di crema montata e, a scelta, biscotti o meringhe sbriciolate. Viene servito freddo ed è perfetto come dolce leggero dopo pranzo o cena.

Quali ingredienti servono per una porzione classica?

Ingredienti base per circa 4 porzioni:

  • 1 grande ananas maturo, sbucciata e tagliata a cubetti
  • 250 ml panna fresca da montare
  • 2-3 cucchiai zucchero a velo (regola a gusto)
  • 1 cucchiaino estratto di vaniglia
  • 4-6 biscotti secchi o savoiardi, oppure meringhe sbriciolate
  • Succo di mezzo limone o lime
  • Facoltativi: cocco grattugiato, scorza di limone, rum o liquore all’arancia
Quali utensili sono utili per prepararlo?

Utensili consigliati:

  • Ciotola grande e fruste elettriche
  • Coltello affilato e tagliere
  • Spatola
  • Stampi o coppette individuali per il servizio
  • Colino o cucchiaio per distribuire gli scarti dei biscotti
Come preparo la crema montata?

Istruzioni:

  • Raffredda la ciotola e le fruste in frigorifero per 10 minuti.
  • Versa la panna fredda in una ciotola, aggiungi lo zucchero a velo e la vaniglia.
  • Montala fino a picchi soffici e ben fermi, facendo attenzione a non superare il punto di montatura per non fare burro.
  • Se vuoi una crema più stabile, puoi incorporare delicatamente 1 cucchiaio di mascarpone o formaggio cremoso montato.
Come preparo l’ananas per il dolce?

Istruzioni:

  • Sbuccia l’ananas e togli il torsolo centrale.
  • Tagliala a cubetti o a fettine, a seconda della presentazione desiderata.
  • Spruzza con succo di limone o lime per prevenire l’ossidazione e mantenere il sapore fresco.
Come assemblare il dolce a strati?

Procedimento tipico:

  • Distribuisci uno strato sottile di biscotti sbriciolati sul fondo di ogni coppetta o stampo.
  • Aggiungi uno strato di ananas, poi copri con crema montata.
  • Continua a strati mantenendo l’ordine biscotti – ananas – crema.
  • Termina con uno strato di crema e decora con pezzi di ananas o scorza di limone.
Quanto tempo è necessario e come conservarlo?

Tempo indicativo:

  • Preparazione attiva: circa 30-40 minuti
  • Raffreddamento in frigorifero: 2-4 ore (preferibile, per compattare i sapori)

Conservazione: si conserva in frigorifero per 1-2 giorni al massimo; coprirlo o conservarlo in contenitore ermetico per evitare assorbimento di odori in frigo.

Posso realizzare una versione senza latticini?

Sì. Sostituisci la panna tradizionale con panna di soia o latte di cocco montato non zuccherato, e usa zucchero a velo come dolcificante. Puoi aggiungere una punta di vaniglia o scorza di limone per aromatizzare.

Quali varianti di gusto posso provare?

Proposte gustose:

  • Aggiunta di cocco grattugiato tra gli strati
  • Scorza di lime o limone nelle fette di ananas
  • Un tocco di rum, liquore all’arancia o liquore al cocco per un effetto “tropicale”
  • Usare biscotti al limone o savoiardi aromatizzati
  • Aggiungere frutti di bosco tra gli strati
Quali sono i problemi comuni e come risolverli?

Soluzioni rapide:

  • Crema troppo liquida: raffreddare la panna e montarla nuovamente, oppure aggiungere un cucchiaino di mascarpone/crema stabile.
  • Strati staccati o afflosciati: utilizzare una crema più soda e non esagerare con l’ananas rilascia molta Liquido; asciugare l’ananas prima di usarla.
  • Profumo mancante: aggiungere una punta di scorza di limone o una goccia di liquore per intensificare aroma.
Come presentarlo al meglio?

Suggerimenti di servizio:

  • Servire freddo direttamente in coppette trasparenti per mostrare gli strati.
  • Guarnire con fette o cubetti di ananas, foglie di menta o una spolverata leggera di cocco.
  • Passare delicatamente la lama di un coltello tra bordi per pulire eventuali residui e rendere il piatto pulito.

Introduction / Hook

Picture this: a kitchen perfumed with the soft fragrance of vanilla, citrus zest, and warm, toasted butter. A sheet of dough, pale and velvety, is rolled into ribbons of golden spirals, each slice revealing a delicate pattern like sunlit origami. The glaze gleams on top—clear, glassy, and just-set—as if you could glimpse a small, sweet sunrise through every bite. Girelle glassate is not merely a dessert; it’s a memory in edible form. It’s the kind of treat that makes a Sunday morning feel like a celebration and a quiet afternoon feel like a warm hug. The beauty of these glazed rolls lies in their balance: a tender, fluffy crumb, a whisper of sweetness that hints at vanilla and citrus, and a lacquered finish that catches the light and invites you in for another, slower bite. Whether you’re baking for a holiday brunch, a weekend family gathering, or a simple moment when you want to treat your own senses to something comforting and refined, these rolls deliver with a soft charm that stays with you long after the last crumb has disappeared.

Girelle glassate are more than pastries; they are a small voyage to a sunlit Italian bakery, where every swirl tells a story of doughs perfected through patience, fillings chosen with care, and glazes crafted to gleam with a quiet, irresistible sheen. The experience begins at the counter with a warm, slightly sweet aroma that swirls through the air as you cut into the loaf-shaped log, revealing ribboned layers that hint at vanilla, almond, and citrus. The first bite offers a playful contrast: a soft, almost cloud-like interior with a faint chew at the edges, the glaze providing a glossy, crisp kiss that makes the roll feel both elegant and approachable. It’s the kind of dish that begs to be shared, photographed for a lingering Instagram moment, and enjoyed slowly with a strong cup of coffee or a small glass of something sparkling. In short, these glazed spirals invite you to savor not just a dessert, but a mood—a sensation of warmth, hospitality, and the timeless joy of good pastry.

The Story Behind the Dish

Girelle glassate belong to a family of rolled pastries that have long delighted Italian households and bakeries alike. “Girelle” translates to “spirals” or “little helices,” a playful nod to the way these doughs are rolled and sliced to reveal elegant, concentric layers. The concept of a rolled, glazed sweet has roots that wander through Europe, but what makes the Italian name truly special is the way it marries technique from lamination, the tenderness of brioche-like doughs, and the bright simplicity of a sugar glaze. In many coastal towns and inland villages, pastry counter favorites were born from a blend of local ingredients: eggs from farmsteads, butter churned from nearby dairies, citrus zest from groves along the shore, and almonds that traveled along trade routes to lend their gentle sweetness to desserts. Over generations, bakers refined the method: they would roll a soft, enriched dough with a sweet filling, let it rest so the layers relaxed into one another, and finally bake until the edges bronzed and the center stayed melt-in-your-mouth soft. The glaze—shimmering and clear—became the signature finish, a modern flourish that’s both visually striking and deliciously satisfying. The result is a pastry that feels both timeless and contemporary: familiar enough to comfort, yet refined enough to feel special for a celebration or a leisurely weekend morning.

There’s a personal note to this dish as well. Many families have their own “signature glaze,” often a family secret passed down with a wink and a recipe card taped to the linen cupboard. In the kitchens where I gathered stories for this dish, grandmothers and aunts spoke of Sunday mornings when the dough rested in a bowl until it looked satin-smooth, while the glaze was whisked with a careful hand to achieve the perfect gloss—neither too thick nor too runny, just enough to cling to the spirals and highlight their delicate ridges. The beauty of Girelle glassate is that it can be a delicacy you serve for a special occasion, or a comforting everyday indulgence that feels like a small luxury. It wears its Italian soul in the softness of the crumb, the brightness of citrus, and the clarity of its glaze, inviting you to slow down, breathe in the sweet scent, and savor the moment as if it were a gentle festival in your own home.

Why You’ll Love This Recipe

  • Elevated comfort: A brioche-like dough that’s tender, fluffy, and satisfyingly soft, with a whisper of butter that lingers on the palate.
  • Elegant presentation: The spiral technique reveals beautiful concentric layers when sliced, making every portion feel like a little pastry art piece.
  • Glazed perfection: A glossy, gently sweet glaze that adds a refined finish without overpowering the dough’s delicate flavor.
  • Versatile flavor notes: Subtle vanilla, a citrus zing from lemon or orange zest, and a hint of almond create a bright, memorable profile.
  • Make-ahead potential: The dough and shaping steps can be prepared in stages, giving you flexibility for busy weekends or entertaining.
  • Family-friendly treat: Sweet but not cloying, these rolls are appealing to both kids and adults and pair beautifully with coffee, tea, or dessert wines.
  • Customizable textures: The glaze adds a crisp gloss that contrasts with the softness of the roll, creating a delightful bite every time.

Flavor Profile & Texture

The essence of Girelle glassate rests in the harmony between a soft, airy interior and a slightly firm, glossy exterior. The dough itself is a cradle of tenderness, enriched with eggs and a touch of butter to yield a crumb that feels luxurious without being heavy. When baked, the outer edge turns a delicate golden bronze, offering a faint, almost caramel-like note that enhances the overall sweetness without shouting over the filling. Inside, you’ll find wisps of aroma—a gentle whisper of vanilla, the brightness of citrus zest, and a suggestion of almond that lingers on the tongue like a soft aftertaste.

The filling, though not specified here, typically contributes a complementary sweetness and aroma. The swirl pattern invites a moment of anticipation as you cut into the log, and each subsequent slice reveals more of the concentric rings, a visual treat that makes the eating experience feel ceremonial. The glaze is where the magic concentrates: a glassy, pliable coat that sets to a sheen, catching the light with a quiet gleam. It adds just the right amount of sweetness and a subtle tang, which balances the richness of the dough and the softness of the interior. The overall result is a pastry with a delicate chew, a lingering fragrance of citrus and vanilla, and a finish that is crisp, not sticky, and glasslike in its gloss. It’s a texture journey as much as a flavor journey, inviting you to explore the layers and savor the interplay between soft crumb, fragrant zest, and the delicate snap of the glaze on the first bite.

Occasions & Pairings

Girelle glassate shine in moments when you want to elevate a simple gathering into something a touch more memorable. They are ideal for:

  • Brunch with friends or family, pairing beautifully with coffee, cappuccino, or a glass of Prosecco for a celebratory note.
  • Sunday slow breakfasts, where the ritual of slicing, glazing, and savoring becomes a comforting centerpiece of the day.
  • Holiday mornings, Easter celebrations, or birthdays when you want a pastry with an elegant, festive air without being overly fussy.
  • Afternoon teatime treats, alongside berries, a light yogurt or ricotta spread, and a hot pot of tea or espresso.

Pairing ideas to complement the glaze and the citrus notes include:

  • Creshing citrus: a dollop of mascarpone with a zest sprinkle or a light lemon curd to echo the zest in the dough.
  • Complementary beverages: a small glass of sweet vermouth on the rocks, a glass of Vin Santo, or a sparkling Moscato for a festive touch; for non-alcoholic options, a frothy vanilla chai or a citrusy iced tea works beautifully.
  • Side bites: fresh berries (raspberries or blueberries) or a light yogurt parfait with sesame crunch add contrast without overpowering the pastry.

Tips, Variations & Substitutions

Here are ideas to tailor Girelle glassate to your preferences, dietary needs, or the ingredients you have on hand. Each variation keeps the spirit of the pastry intact while exploring new directions.

Variations by Flavor

Enhance or switch up the aroma by changing the zest or adding a subtle filling variation. Consider:

  • Lemon zest with a light lemon glaze for a bright, citrus-forward profile.
  • Orange zest and a small amount of orange blossom water for a more floral note.
  • Aromatics like vanilla bean paste, almond extract, or a touch of amaretto for a nutty, aromatic finish.

Vegan & Plant-Based Option

Make a vegan version by using plant-based milk (such as almond or oat milk) and a vegan butter substitute. You can keep the dough enriched with a flax or chia egg, or use an egg replacer designed for enriched doughs. For the glaze, a dairy-free powdered sugar glaze with lemon or vanilla will still deliver the glossy finish without compromising the bright sweetness. The texture remains tender and approachable, ensuring that even without butter or eggs, the rolls stay light and fluffy.

Gluten-Free & Allergen-Friendly

Gluten-free adaptations can be surprisingly successful if you choose a robust all-purpose gluten-free flour blend and add a touch of xanthan gum if your blend lacks it. The result should retain a soft crumb and excellent rise, though the aroma may shift slightly depending on the blend. For the filling and glaze, you can lean into almond milk and a dairy-free butter substitute, and still achieve that signature glossy finish.

Regional Twists

Different Italian regions offer their own take on similar pastries. Consider these subtle twists to honor regional flavors:

  • Naples-inspired: a touch of ricotta mixed into the filling for a mild creamy depth, with a lemon-vanilla glaze.
  • Sicilian influence: a hint of almond paste or crushed pistachios folded into the filling and a glaze tinted with a whisper of orange.
  • Coastal Amalfi: use lemon zest and a glaze brushed with lemon juice and a pinch of limoncello (or its non-alcoholic equivalent) for a bright, coastal aroma.

Make-Ahead & Freezing Options

One of the beauties of this pastry is that you can prepare it in stages, making it friendlier for entertaining or busy weekends:

  • Make the dough and refrigerate it overnight to slow-ferment and deepen flavor. Roll and fill the next day, then bake when ready.
  • Prepare the rolls, slice into individual portions, and freeze them on a parchment-lined tray. Transfer to a bag once firm; bake from frozen, adding a few extra minutes to the bake time.
  • Alternatively, bake fully, cool completely, and freeze. Reheat gently in a low oven, then glaze the rolls just before serving to preserve that glossy finish.

Storage & Make-Ahead Ideas

The life of these glazed spirals can extend beyond a single serving if you store them properly. To maintain their tenderness and gloss, follow these tips:

  • At room temperature: Store in a covered container for up to 2–3 days. If you’re in a warm climate, refrigerating can help preserve the glaze, but re-warm before serving to recapture softness.
  • Refrigeration: They’ll keep 4–5 days in an airtight container. Reheat briefly in a 325–350°F (165–175°C) oven to revive the crumb and shine of the glaze.
  • Freezing: Freeze baked rolls up to 1–2 months. Reheat in a low oven and glaze again if the finish has dulled.
  • Make-ahead dough: The dough can be prepared, refrigerated, and then rolled, filled, and sliced the following day for a quick bake that still delivers the same comforting aroma and texture.

Fun Facts & Trivia (Optional)

– The term “girelle” evokes the playful spirals characteristic of many European pastries, from cinnamon rolls to Swiss rosettes. The spiral motif is not only visually pleasing but also a reminder of the careful layering that creates a tender, laminated-like crumb, even in enriched doughs that aren’t true laminated pastry.

– Glazing pastries has a long culinary tradition across Europe, serving both functional and aesthetic purposes. A glaze adds moisture, shine, and a guarded sweetness that invites diners to taste, linger, and smile. The term “glassate” in Italian highlights this glossy finish, signaling to the eater that what they are about to enjoy has a refined, glass-like sheen that is as much about appearance as about texture.

– The combination of vanilla, citrus, and almond in a single bite is a classic flavor alliance that appears in many Italian and Mediterranean sweet pastries. Each ingredient plays a specific role: vanilla for warmth, citrus for brightness, and almond for a delicate depth that lingers pleasantly after the last bite.

– Pastry traditions across Italy often emphasize the social aspects of baking—sharing a warm, sliced treat with family, friends, and neighbors. The ritual of cutting, glazing, and serving these rolls fosters connection, conversation, and a sense of hospitality that is central to Italian culinary culture.

As you prepare to bake your own Girelle glassate, remember that the joy of this pastry lies not only in the final slice but in the process: the soft rise of the dough, the satisfying roll of the filling, the patient wait as the glaze sets to a glossy finish, and the moment you present a platter of spiraled, gleaming treats to those you love. It’s a recipe that invites you to slow down, savor the aroma, and revel in the comforting textures and bright flavors that make every bite feel like a small celebration. When you finally lift a slice to your lips, you’ll discover why this humble Italian-inspired pastry has endured: it blends simple ingredients into something gracefully indulgent, universally appealing, and utterly irresistible. Enjoy the anticipation, the first bite, and the lingering glow of a glaze that catches the light and your heart in equal measure.

Ingredients

  • Girelle Glassate
    • Dough
      • 2 1/2 cups all-purpose flour (300 g)
        → Provides the structure and body for the rolled cookie dough. Sift the flour before measuring to ensure an even crumb and prevent dense spots; if you are avoiding gluten, substitute with a 1:1 gluten-free flour blend plus 1/2 teaspoon xanthan gum and adjust moisture as needed so the dough remains pliable for rolling.
      • 1/2 cup granulated sugar (100 g)
        → Adds sweetness and helps create a slightly crisp edge as the dough bakes. For a less sweet version, reduce to 1/3 cup; ensure sugar is evenly incorporated with the butter to avoid graininess in the final texture; superfine sugar can help dissolve quickly for a smoother dough.
      • 1/4 cup unsweetened cocoa powder (20 g)
        → Gives the chocolate flavor and color to the dough. Sift to remove lumps for an even swirl; you can use Dutch-processed cocoa for a milder, more uniform color, but natural cocoa will yield a more intense chocolate note—adjust sweetness if using sweeter cocoa.
      • 1/2 teaspoon baking powder
        → Aids a gentle lift and helps keep the dough tender and rollable. Do not substitute with baking soda here; ensure the powder is evenly distributed by whisking with the flour to prevent uneven rise during baking.
      • 1/4 teaspoon salt
        → Enhances overall flavor and balances the sweetness. If using salted butter, reduce added salt to 1/8 teaspoon to avoid salting out the chocolate flavor; distribute salt evenly by whisking with dry ingredients.
      • 1/2 cup unsalted butter, softened (113 g)
        → The fat that yields a tender, flake-friendly dough and helps create the roll’s smooth, melt-in-the-mouth texture. Soften completely but do not melt; cream with sugar for better aeration, and cut butter into small pieces to ensure even incorporation. For dairy-free options, substitute with a neutral-tasting plant butter and adjust moisture if needed.
      • 2 large eggs
        → Bind the dough and add structure to hold the rolled form. Use eggs at room temperature for better emulsification; whisk lightly with the milk to prevent curdling and ensure an even batter that rolls smoothly.
      • 1/4 cup milk (60 ml)
        → Hydrates the dough and improves rollability. Use whole milk for richness; dairy-free milks are acceptable but may affect texture slightly—start with 1/4 cup and add a teaspoon at a time if the dough seems too dry or too crumbly.
      • 1 teaspoon vanilla extract
        → Adds depth of flavor to the dough. Use pure vanilla for the best aroma; if you prefer a different profile, almond extract is a good alternative but use a small amount (about 1/4 teaspoon) to avoid overpowering the chocolate.
    • Filling
      • 3/4 cup seedless jam (apricot or raspberry)
        → Provides a fruity, sweet layer that becomes a swirl inside the bake. Warm the jam slightly to loosen it so it spreads evenly without tearing the dough; strain if seeds are a concern, and apply in a thin, even layer to prevent the roll from bursting during rolling.
      • 2 tablespoons hazelnut cream (optional)
        → Adds creamy richness and a nutty contrast to the chocolate dough. Keep the layer thin to avoid oozing when sliced; if using a Nutella-style spread, warm slightly to ease spreading and distribute evenly over the dough.
    • Glaze
      • 1 cup powdered sugar (120 g)
        → Base for a glossy glaze that coats the slices. Sift to remove lumps for a smooth finish; you can thicken the glaze with more sugar or thin it with milk if you prefer a drizzly top.
      • 2-3 tablespoons milk
        → Adjusts glaze consistency to your preference. Start with 2 tablespoons and add more gradually; use water or dairy-free milk if needed, and consider adding a pinch of vanilla or lemon juice for brightness.
      • 1/2 teaspoon vanilla extract (optional)
        → Enhances the glaze flavor; omit if you want a neutral sugar glaze, or substitute with a little lemon or orange zest for a citrusy accent that complements the chocolate.
    • Optional Add-ins
      • 1/4 cup finely chopped toasted hazelnuts (optional)
        → Adds a satisfying crunch and a toasty aroma. Toast nuts in a dry skillet or oven until fragrant (about 5–7 minutes at 175°C/350°F), cool completely, then chop finely to distribute evenly through or on the surface for contrast.
      • Zest of 1 orange (optional)
        → Provides bright citrus aroma that pairs beautifully with chocolate. Zest finely to avoid including pith; use sparingly if you’re sensitive to strong citrus oils.
      • 2 tablespoons mini chocolate chips (optional)
        → Create pockets of melted chocolate throughout the roll for bursts of sweetness. Fold into dough after initial mixing or sprinkle on the surface before rolling; chill dough slightly if chips begin to melt.
      • 1 tablespoon orange blossom water (optional)
        → Adds a delicate floral note that complements the chocolate and citrus. Use sparingly, as it can be overpowering; omit if you prefer a straightforward chocolate flavor.

Instructions

  • Preheat your oven to 350°F (175°C) and line a large baking sheet with parchment paper to prevent sticking and promote even browning.
    → A hot, well-prepared surface ensures the rolled cookies bake evenly and release cleanly when cooled.
  • Sift together the dry dough ingredients: 2 1/2 cups all-purpose flour (300 g), 1/4 cup unsweetened cocoa powder (20 g), 1/2 teaspoon baking powder, and 1/4 teaspoon salt in a medium bowl, then whisk until uniformly distributed.
    → Sifting breaks up lumps and distributes leavening and salt evenly, preventing dense pockets and uneven color in the final cookies.
  • In a large mixer bowl, beat 1/2 cup unsalted butter (113 g) with 1/2 cup granulated sugar (100 g) on medium speed until pale, fluffy, and fully combined, about 2–3 minutes.
    → Creaming introduces air into the dough, yielding a tender texture and smoother rolling as the fat traps air that expands during baking.
  • Beat in 2 large eggs, adding them one at a time, then whisk in 1/4 cup milk (60 ml) and 1 teaspoon vanilla extract until the mixture is smooth and homogeneous.
    → Room-temperature eggs emulsify better for cohesive dough; milk provides moisture and helps achieve a rollable consistency without cracking.
  • With the mixer on low or using a spatula, gradually fold the dry ingredients into the wet until a soft, pliable dough forms; if the dough seems dry, add milk one teaspoon at a time and knead briefly until cohesive.
    → Gentle incorporation prevents gluten overdevelopment, producing a dough that rolls smoothly and holds shape without toughness.
  • If using optional add-ins, fold in 2 tablespoons finely chopped toasted hazelnuts, or 1/4 cup mini chocolate chips, or 1 teaspoon orange zest, distributing them evenly without overloading the dough.
    → Add-ins build texture and flavor layers; fold gently to avoid tearing and ensure even distribution within the dough.
  • Divide the dough into two equal portions and place each on a sheet of parchment; cover with another sheet of parchment and roll each portion into a rectangle about 12 by 7 inches (30 by 18 cm) and roughly 1/8 inch (3 mm) thick.
    → Rolling between parchment prevents sticking and yields a thin, uniform sheet that curls neatly into a tight log when filled.
  • Warm 3/4 cup seedless jam in a small saucepan or in short bursts in the microwave until loosened, then strain if desired to remove seeds; spread a thin, even layer of jam over each dough rectangle, leaving a 1/2 inch (1 cm) border.
    → Warm jam spreads more evenly and adheres to the dough; removing seeds yields a silkier swirl and prevents specks in the baked cookies.
  • If using hazelnut cream, warm it slightly and spread a thin layer over the jam, taking care not to overfill so the roll remains firm during baking.
    → A thin layer provides creamy richness without causing ooze or cracking during slicing.
  • Roll each rectangle away from you, using the parchment to help form a tight log; pinch the seam to seal and wrap the logs tightly in parchment; refrigerate for at least 60 minutes or until firm.
    → Chilling firms the dough and filling, making clean, even slices and preventing spreading in the oven.
  • Unwrap the logs and cut into slices about 1/2 inch (12–13 mm) thick; place the slices cut-side up on the prepared baking sheets with at least 1 inch (2.5 cm) of space between each.
    → Even spacing ensures uniform heat exposure and prevents sticking as the cookies spread slightly during baking.
  • Bake the cookies at 350°F (175°C) for 12–16 minutes, or until the edges are just set and the centers look slightly soft; rotate the sheets halfway through for even browning.
    → Proper bake time yields a tender, melt-in-the-mouth texture and avoids overly dry edges.
  • Remove from the oven and let the cookies cool on the sheets for 5–10 minutes, then transfer to a wire rack to cool completely before glazing.
    → Cooling stabilizes the crumb and makes glaze application neater and less likely to run.
  • In a small bowl, whisk 1 cup powdered sugar (120 g) with 2–3 tablespoons milk and 1/2 teaspoon vanilla extract until smooth and glossy; add more milk or sugar to reach your desired glaze consistency.
    → A well-balanced glaze provides a glossy finish without being too runny or too thick, and vanilla enhances the chocolate-jam profile.
  • Drizzle or brush the glaze over the cooled girelle slices in an even, thin layer and allow the glaze to set at room temperature for about 20 minutes; if desired, garnish with a dusting of zest or chopped hazelnuts once the glaze is tacky.
    → The glaze seals moisture, adds sweetness and a polished look, while toppings provide texture and aroma without overpowering the chocolate and jam flavors.
  • Store the finished girelle glassate in an airtight container at room temperature for up to 3 days or refrigerate for up to 1 week; allow to come to room temperature before serving to recrisp slightly if chilled.
    → Proper storage preserves texture and glaze integrity, keeping the cookies fresh and visually appealing.

Notes

These Girelle glassate are chocolate roll cookies with a silky jam swirl and a glossy glaze, making them a decadent yet approachable dessert for any occasion. You can customize the filling by using apricot or raspberry jam, or adding a thin layer of hazelnut cream for extra richness—just keep the spread light so the roll stays neat when sliced. For best results, chill the dough before rolling and roll tightly between parchment to prevent gaps; warm the jam slightly to spread evenly and avoid tearing during rolling. The glaze should be whisked smooth and poured over cooled slices for a shiny finish; adjust the thickness by adding more sugar or milk to taste. They store well in an airtight container for several days and can be frozen sliced (un-glazed) for longer storage, then glazed when needed. If gluten-free is required, substitute with a 1:1 gluten-free flour blend plus 1/2 teaspoon xanthan gum and adjust moisture as needed. For dairy-free versions, use a neutral plant butter and dairy-free milk. Always check that all fillings and add-ins are gluten-free if you have gluten intolerance.

Tips

Dough preparation tips

  • For a lighter texture, cream the softened butter with the sugar until pale and fluffy before adding eggs. This helps create a tender crumb that rolls smoothly.
  • To ensure an even roller, sift flour and cocoa powder together with the baking powder and salt. This prevents lumps and promotes uniform color in the swirl.
  • Keep ingredients cool but not cold. If your kitchen is warm, chill the dough after mixing for 20–30 minutes to make rolling and shaping easier.
  • When substituting gluten-free flour, use a 1:1 blend with 1/2 teaspoon xanthan gum per 300 g flour, and adjust moisture as needed so the dough remains pliable and rolls without cracking.
  • If the dough feels dry, add milk sparingly — a teaspoon at a time — just until it comes together. If it’s too sticky, refrigerate briefly to firm up before rolling.

Rolling and shaping tips

  • Roll the dough between two sheets of parchment to prevent sticking and to keep the surface even. Chill between rollings if it resists stretching.
  • Aim for an even rectangle with a uniform thickness. This helps the filling layer sit evenly and results in tidy slices.
  • Lightly flour the parchment or dust with cocoa powder to keep the dough from sticking without drying it out. Avoid using too much flour, which can make the roll dense.
  • If the dough cracks while rolling, rest it in the fridge 10–15 minutes, then resume. Gentle, steady pressure prevents tearing.

Filling tips

  • Warm jam slightly to loosen it, then strain to remove seeds if you prefer a silkier swirl. Apply in a thin, even layer to prevent the roll from bursting during rolling.
  • Keep the hazelnut cream in a thin, uniform layer. A thick layer can ooze when sliced; if using a Nutella-style spread, warm and spread it evenly but don’t overfill.
  • When using optional add-ins like orange zest or orange blossom water, add them sparingly so they enhance rather than overpower the chocolate base.

Baking tips

  • Chill the assembled roll briefly before slicing to minimize filling leakage and to achieve clean, even slices.
  • Use a sharp serrated knife and wipe the blade between cuts to prevent the filling from sticking and tearing the roll.
  • Place slices on a parchment-lined sheet or in a shallow pan to bake; this helps prevent the bottoms from browning too quickly.
  • Watch the bake time closely; the dough should be set with a slightly tender crumb. If the edges brown too fast, tent with foil halfway through bake time.

Glaze tips

  • Sift powdered sugar to remove lumps for a glossy, smooth glaze. If you want a drizzled finish, start with 2 tablespoons milk and add more gradually.
  • Choose your dairy or non-dairy milk based on desired gloss and thickness. For a thicker glaze, use less liquid; for a runnier glaze, add a bit more liquid.
  • A pinch of vanilla (or a splash of citrus zest) can brighten the glaze. If you prefer a neutral finish, skip the flavoring.
  • Let the glaze set at room temperature before storing; this helps prevent smearing when slicing.

Variations and add-ins tips

  • To add crunch, toast finely chopped hazelnuts and fold them into the surface after rolling or sprinkle over the glaze once set.
  • Orange zest provides a lively contrast to chocolate — grate finely and use sparingly to avoid overpowering the chocolate flavor.
  • Mini chocolate chips create pockets of chocolate; chill the dough slightly before folding them in to prevent melting.
  • Orange blossom water is delicate—use about 1 teaspoon or less. If you’re uncertain, omit and rely on vanilla or citrus zest for aroma.

Storage and make-ahead tips

  • Wrap baked rolls tightly in plastic wrap and refrigerate for up to 3–4 days. Bring to room temperature before glazing for best shine.
  • Unbaked rolls can be prepared up to the point of slicing, wrapped, and frozen for up to 1 month. Thaw in the fridge, slice, then bake as directed (you may need a minute or two extra).
  • Glazed slices are best eaten within 2–3 days for optimal texture; if stacking, place a sheet of parchment between layers to prevent sticking.

FAQ

FAQ – Girelle glassate

Che cosa sono le Girelle glassate?

Le girelle glassate sono dolci a base di pasta lievitata spennellata con un ripieno (come confettura o crema), arrotolata a cilindro, tagliata a fette e glassata con una dolce copertura. Il risultato è una serie di rotolini a spirale teneri e lucidi.

Quali ingredienti servono?

Per l’impasto: 300 g di farina, 50 g di zucchero, 7 g di lievito di birra secco, 120 ml di latte tiepido, 50 g di burro morbido, 1 uovo, una presa di sale. Per il ripieno: confettura, Nutella o crema di formaggio dolce. Per la glassa: zucchero a velo e succo di limone o latte. Optionale scorza grattugiata di limone o arancia.

Si possono preparare senza latticini o senza glutine?

Sì, con modifiche: per latticini usa latte vegetale (mandorla, soia) e burro vegetale oppure olio. Per glutine puoi utilizzare una farina senza glutine 1:1 apposita per pane e aggiungere una piccola quantità di gomma xantana; i tempi di lievitazione e la consistenza possono variare rispetto all’impasto tradizionale.

Come si prepara l’impasto delle girelle?

Attiva il lievito sciogliendolo nel latte tiepido con un cucchiaino di zucchero. Mescola farina, zucchero, sale, aggiungi uovo e burro fuso, poi il latte con lievito. Impasta finché l’impasto è liscio ed elastico. Lascia lievitare finché raddoppia, circa 1 ora in luogo caldo.

Qual è la temperatura e il tempo di cottura?

Cuoci in forno preriscaldato a 180°C per 20-25 minuti, finché le girelle sono dorate. Controlla a partire dai 20 minuti per evitare bruciature.

Come si prepara la glassa?

Mescola zucchero a velo con 1-2 cucchiai di succo di limone o latte finché ottieni una consistenza liscia e lucida. Per una glassa al cioccolato, sciogli cioccolato fondente e aggiungi latte a poco a poco fino a ottenere la consistenza desiderata.

Come si conservano?

Conserva le girelle glassate in un contenitore ermetico a temperatura ambiente per 2-3 giorni, oppure in frigorifero per 4-5 giorni. Puoi anche congelarle: una volta cotte e raffreddate, avvolgile singolarmente e congelale; riporta a temperatura prima di servirle.

Come riscaldarle prima di servirle?

Riscaldale in forno a 150°C per 5-7 minuti oppure nel microonde per 15-20 secondi per porzione. Se vuoi, aggiungi un filo di glassa fresca dopo il riscaldo.

Possono essere farcire con altre creme o ripieni?

Sì. Alcune idee: crema al mascarpone, crema di nocciole, confettura di frutta, crema di formaggio dolce, limone o arancia canditi. Adegua la dolcezza del ripieno in modo che non sovrasti l’impasto.

Quali sono i problemi comuni e come risolverli?

Se l’impasto non lievita: controlla la temperatura del liquido (non troppo caldo) e la vitalità del lievito. Se l’impasto è appiccicoso: aggiungi piccole quantità di farina. Se le girelle si sfaldano: lascia lievitare bene e non tagliare fette troppo sottili. Se la glassa è troppo liquida: aggiungi altro zucchero a velo; se è troppo dura: aggiungi un po’ di liquido e mescola.