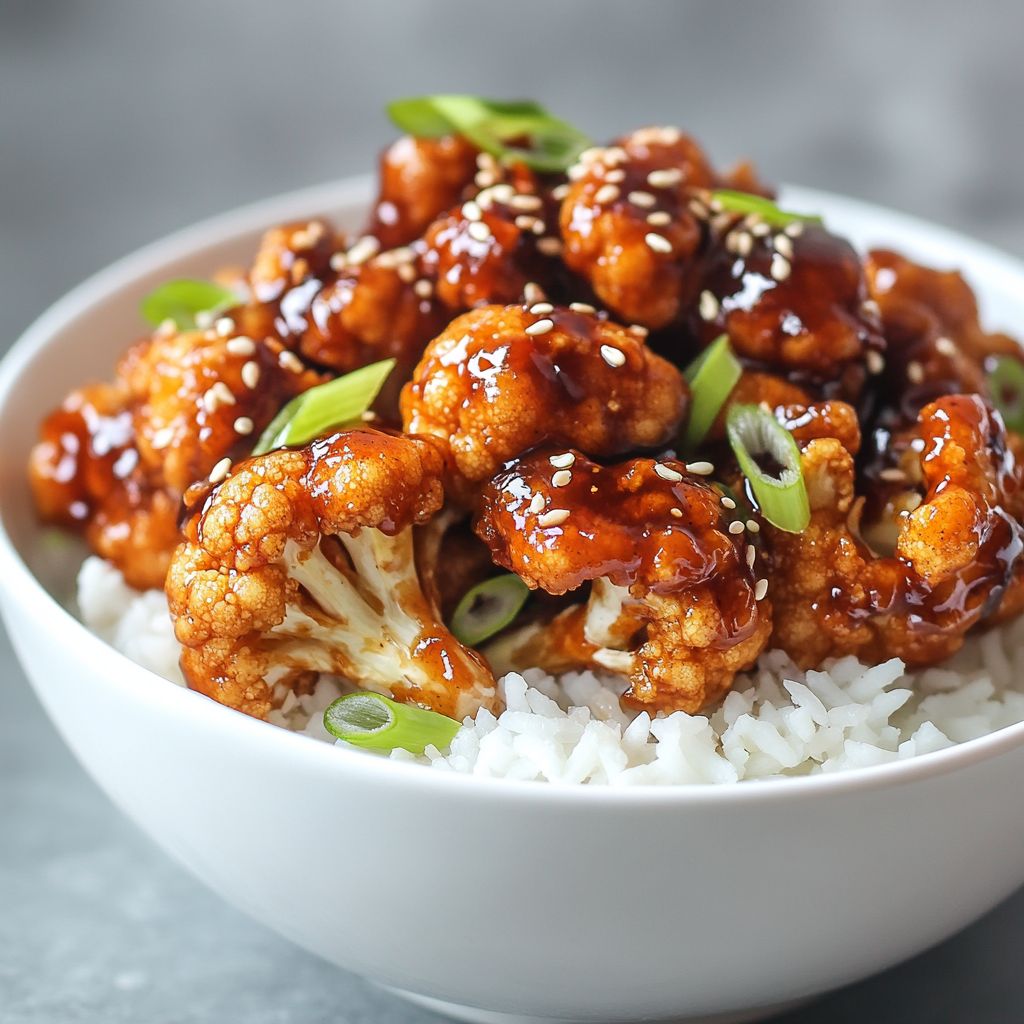
Author

Ocean Nightleaf

Browsing

Introduction / Hook

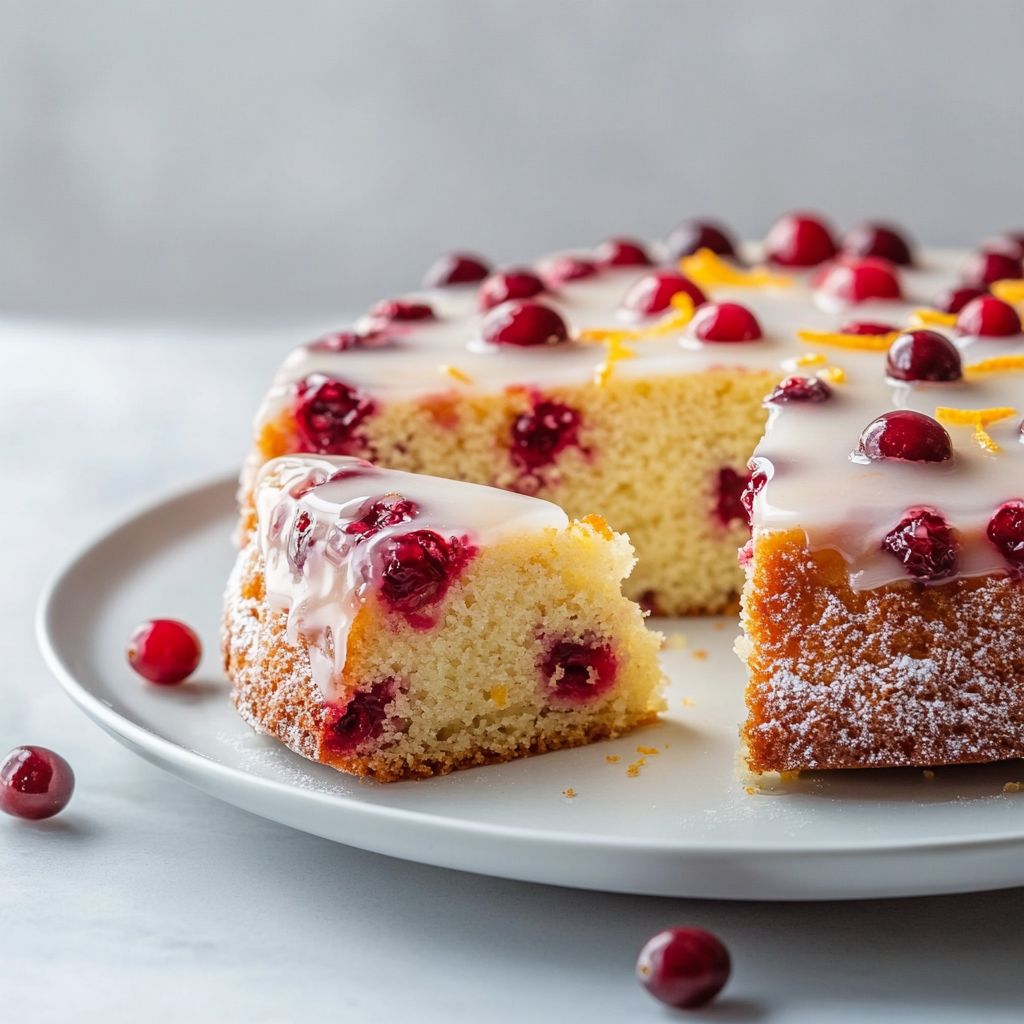
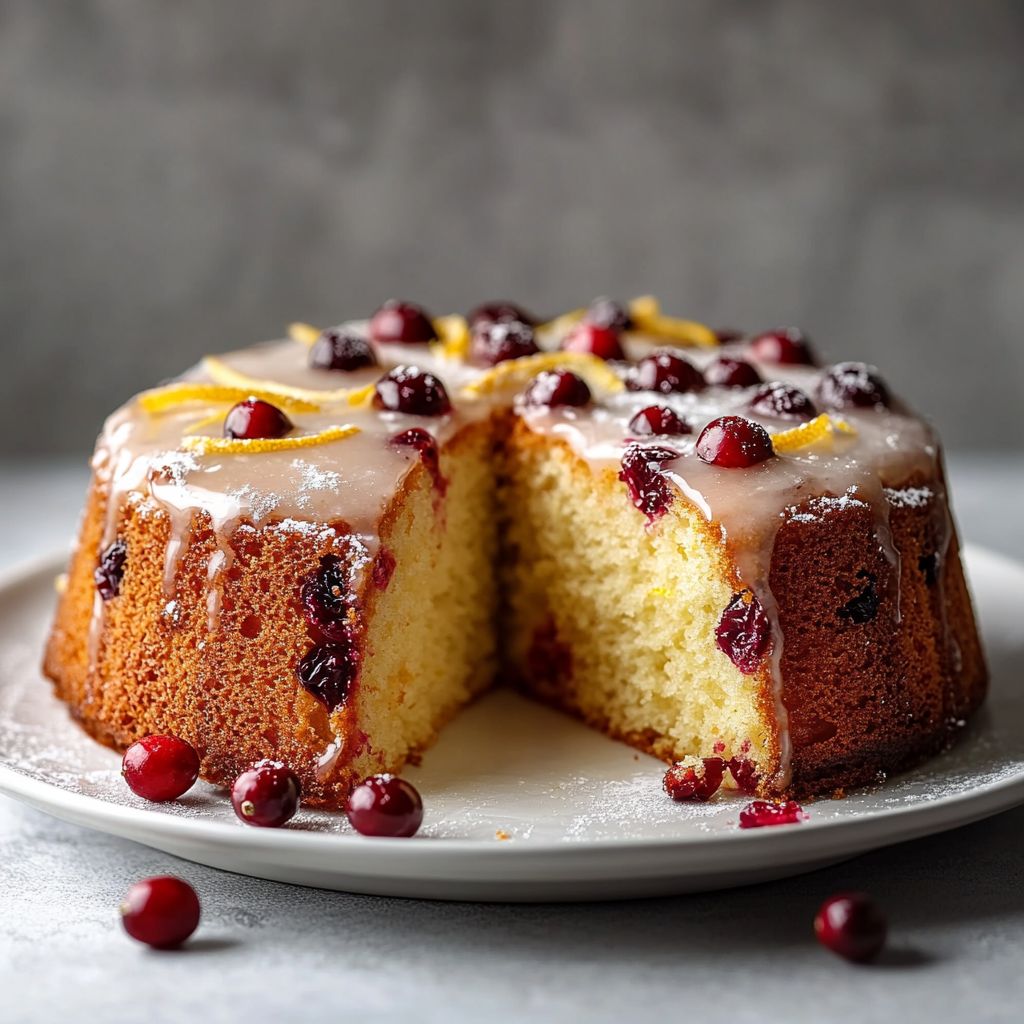
Imagine a warm, flaky pastry kissed by a delicate caramel sheen, revealing a sunlit strawberry glow in every bite. Picture a handheld treat that tastes like a retro breakfast joy but functions like a modern, protein-packed powerhouse. Homemade Protein Pop Tarts with Strawberry are not merely a snack; they’re an edible invitation to slow down the morning, savor the moment, and fuel your day with balance. The first bite delivers a buttery crackle that gives way to a tender, pillow-soft interior, where tart-sweet strawberry goodness meets a creamy, protein-forward fill. The aroma alone—vanilla, toasted pastry, and ripe fruit—creates an instant mood-lifter, turning a routine morning into a small celebration. And the best part? You know exactly what’s in them, you tailor the sweetness, and you can enjoy them fresh from the oven or stored for a grab-and-go moment that’s both satisfying and nourishing. Welcome to a homemade twist on an old favorite that respects your taste buds and your body.

The Story Behind the Dish

The classic toaster pastry has a storied place in breakfast culture, born from the mid-century rush of convenience and the modern appetite for easy, speedy mornings. Pop Tarts entered many kitchens as a quick, no-fuss solution—an emblem of home convenience that could be enjoyed cold, toasted, or reheated. But as nutrition trends shifted toward balanced indulgence, home cooks began reimagining these pastries with a focus on quality ingredients, better protein content, and smarter sweetness. The result is a graceful fusion of nostalgia and nutrition: a treat that honors memory and tradition while embracing contemporary dietary sensibilities.

My own journey with these little pastries began on a bustling weekday when I craved something comforting yet protein-smart after a workout. The store-bought versions felt convenient but left me craving more transparency about what exactly I was eating. So I turned to the kitchen, experimenting with a flexible pastry dough that could hold up to a jammy, strawberry-forward filling and a protein-enriched center that wouldn’t trade texture for nutrition. The strawberry variety kept calling me back—a bright, inviting fruit that sings with tart-sweet notes, especially when enveloped in a flaky crust and a glossy, just-right glaze. What started as a simple experiment became a weekly ritual: a batch prepped ahead, warmed in minutes, and shared with friends, family, and teammates who appreciated a satisfying, balanced morning that still felt special. The dish isn’t just about a flavor—it’s about crafting a moment of care in a hectic week, a little ritual that says you deserve something delicious, and you deserve it to be good for you as well.

Why You’ll Love This Recipe

  • Quick, convenient, and surprisingly flexible for busy mornings or weekend brunches.
  • Protein-forward and satisfying without sacrificing the joy of a pastry treat.
  • Customizable flavor and texture with room to adapt fillings and sweeteners to your preferences.
  • Kid-friendly appeal with a balance of familiar taste and a healthier angle.
  • Make-ahead friendly—bake, freeze, and reheat for effortless breakfasts all week.
  • Better-for-you sweetness that doesn’t rely on heavy syrups or artificial additives.
  • Great as a snack, post-workout bite, or a portable option for school or office lunches.
  • Gluten-free or vegan adaptations are achievable with thoughtful substitutions, keeping the core concept intact.

Flavor Profile & Texture

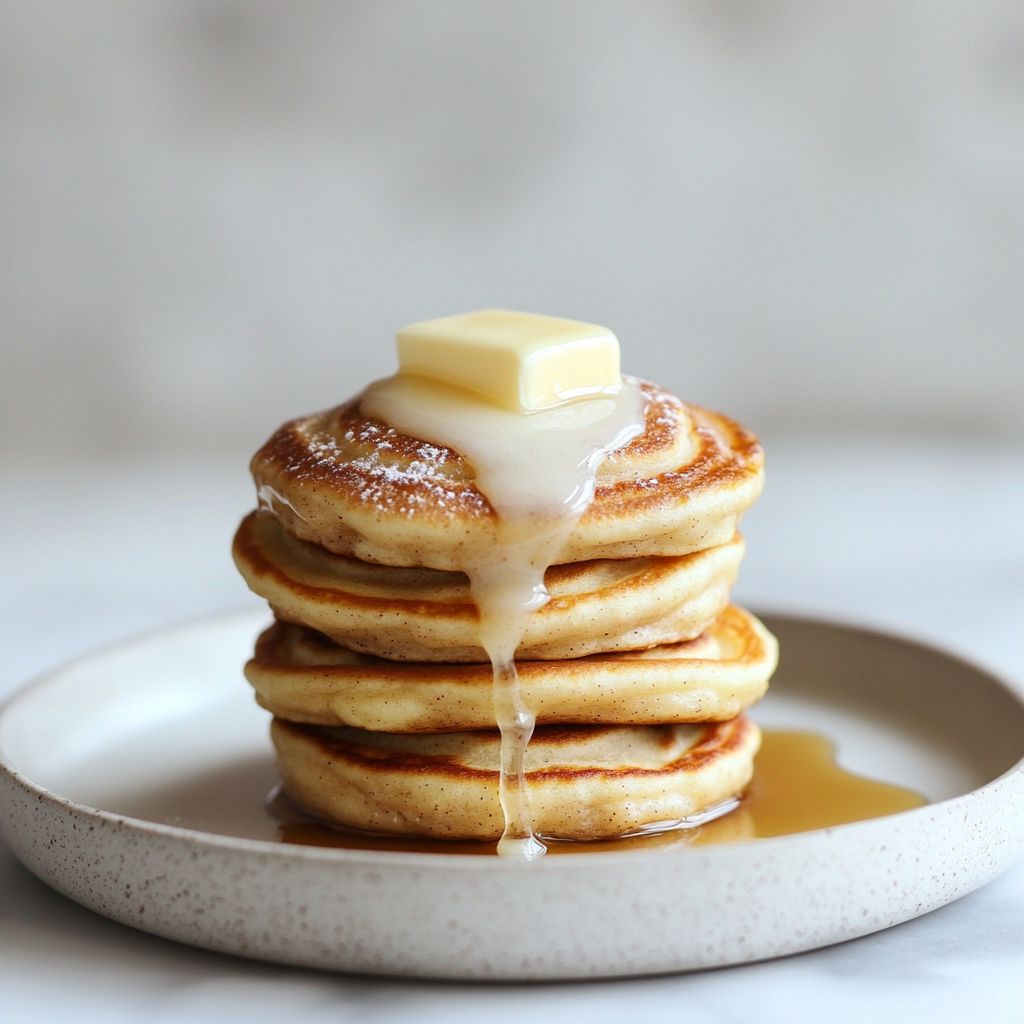
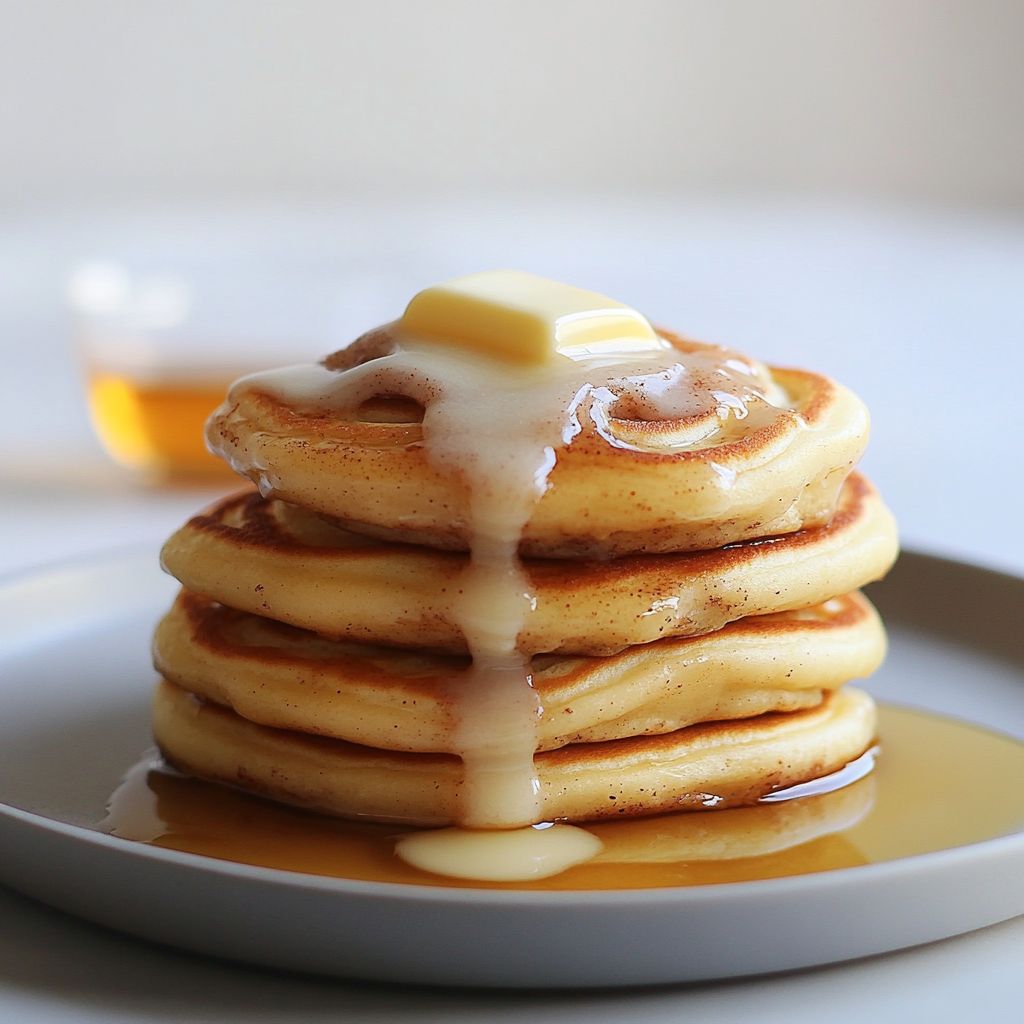
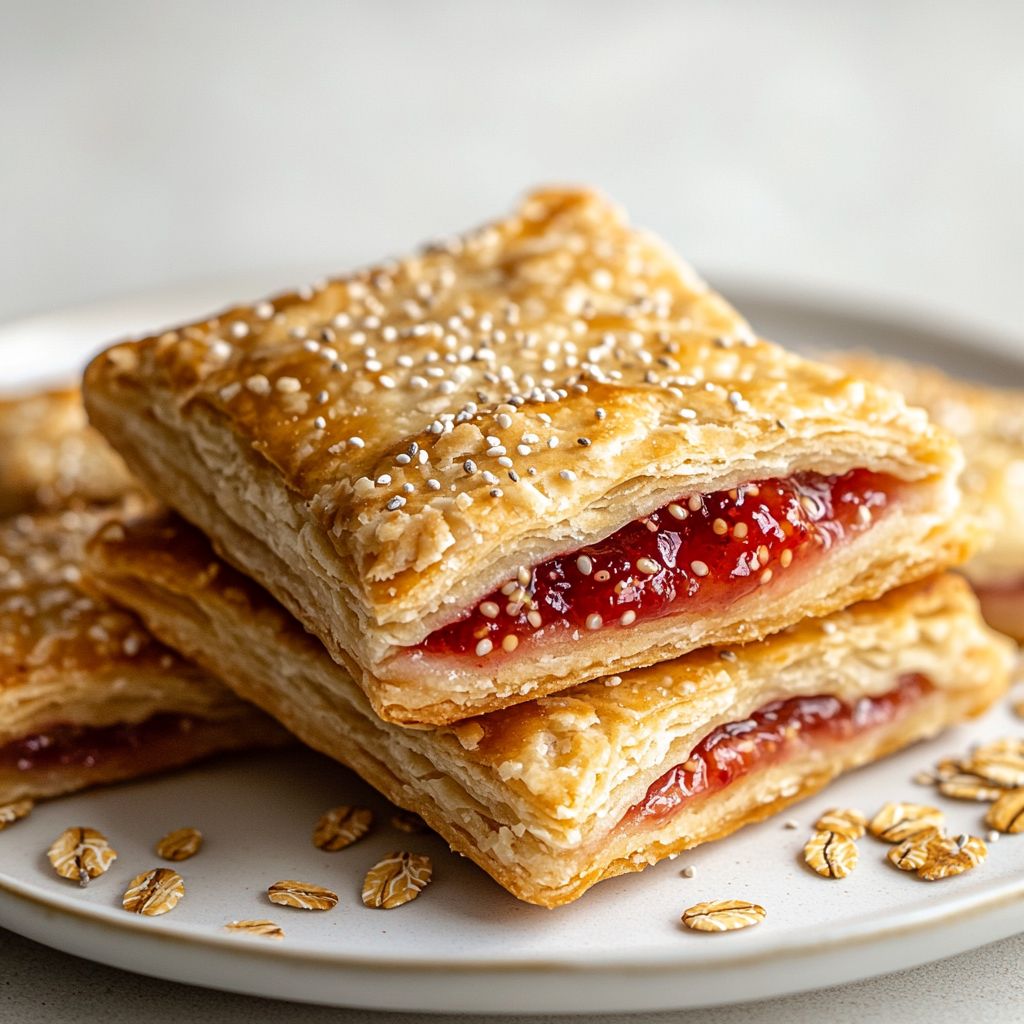
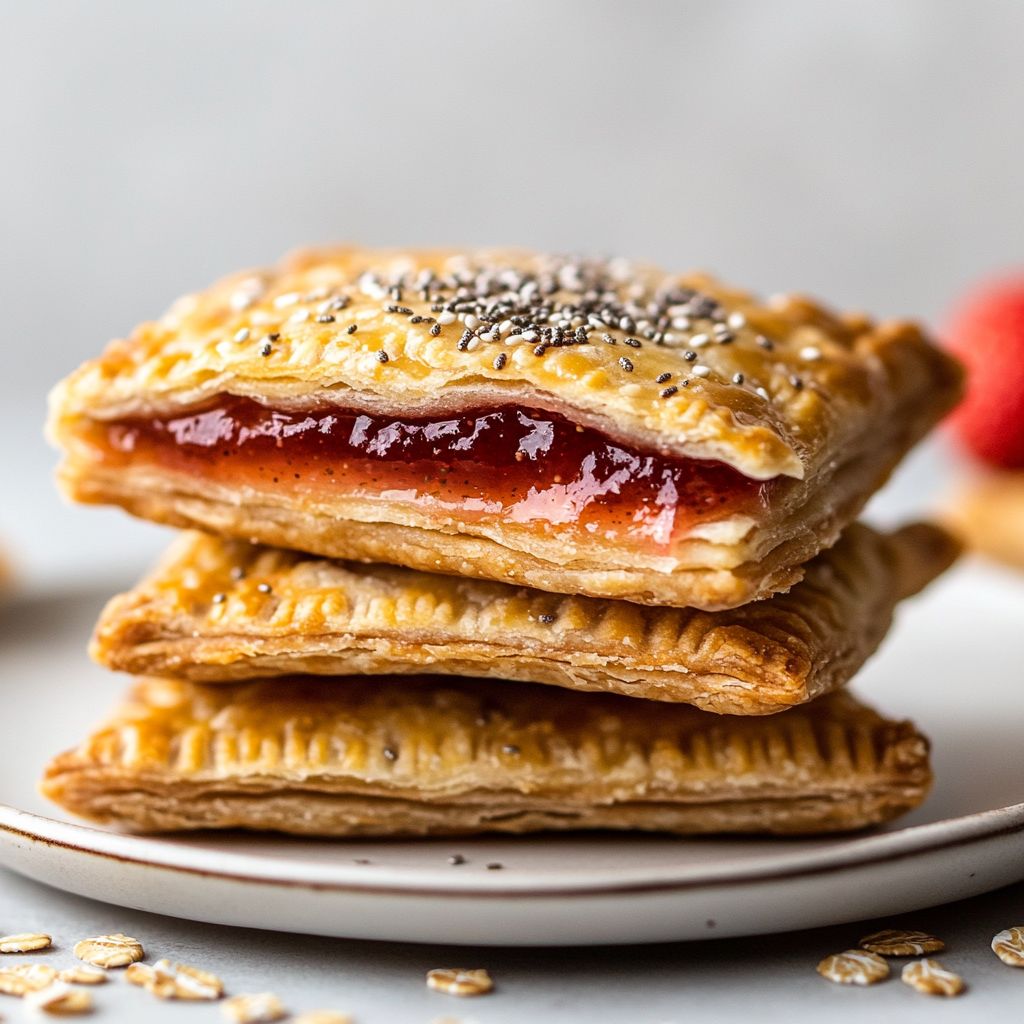
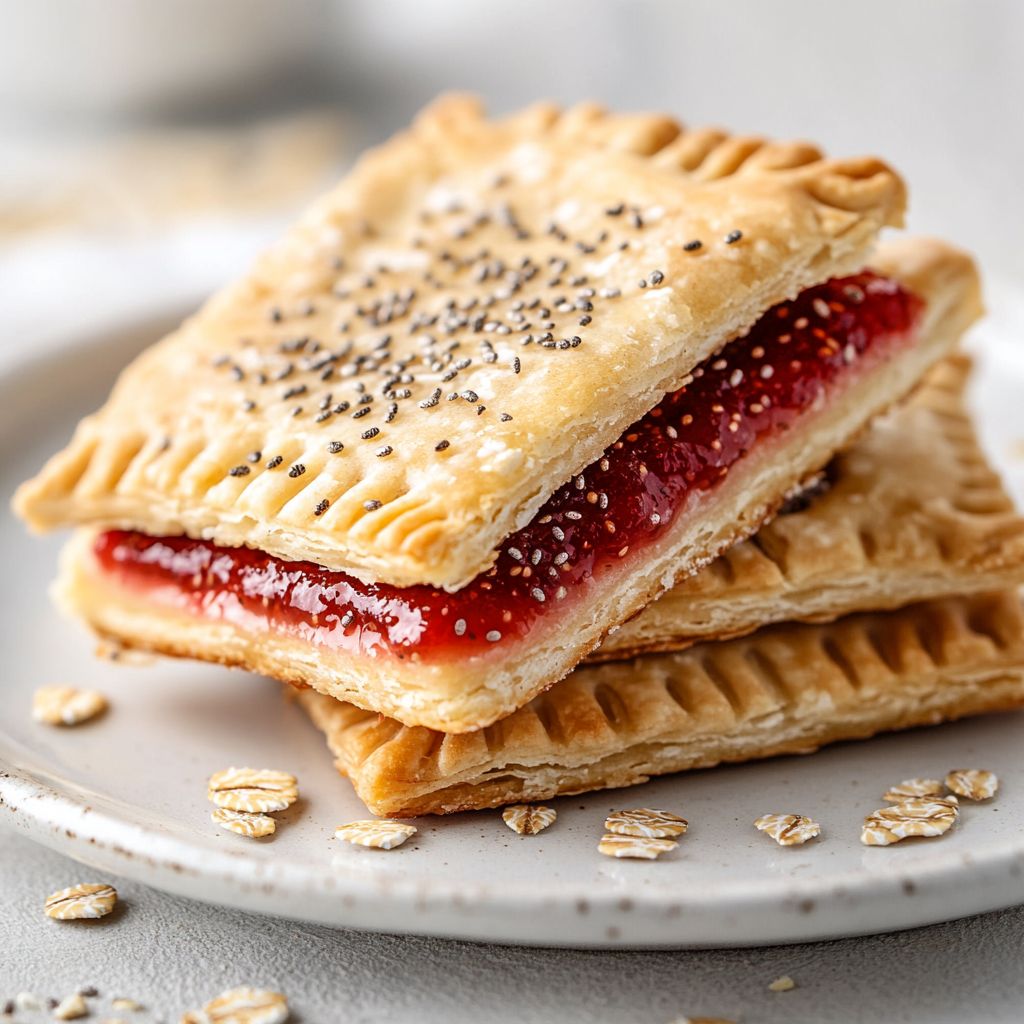
The flavor profile of Homemade Protein Pop Tarts with Strawberry is a celebration of contrasts that come together in harmony. The crust offers a rich, buttery note with a delicate tenderness that yields a slight bite when you bite into it, followed by a crisp edge that reveals itself as you chew. The interior is where the magic happens: a strawberry-forward center that tastes bright and sunlit, with a tartness that cuts through the sweetness, creating a balanced, fruit-forward filling that feels fresh rather than cloying. The protein component contributes a subtle, creamy undercurrent that makes the filling feel substantial, almost custard-like in mouthfeel, without tipping into heaviness. When you pair the two, you get a texture mosaic: flaky, soft, chewy, and a whisper of glaze that adds a glossy sheen and a touch more sweetness, like a tiny dessert that still functions as a nourishing bite.

The aroma plays its part as well: warm butter, toasted pastry, vanilla, and the unmistakable scent of ripe strawberries perfuming the room as they bake. In the mouth, the first impression is the crack of the crust, then the melt of the strawberry center, and finally a faint lingering sweetness that invites the next bite. The interplay between fruity brightness and protein-rich depth makes each piece feel complete on its own, yet surprisingly satisfying as part of a morning routine or a midday snack. This is breakfast that behaves like comfort food—familiar, nostalgic, and entirely contemporary in its approach to nutrition and texture.

Occasions & Pairings

These protein pop tarts shine in a variety of settings, making them a versatile addition to your recipe repertoire. They’re perfect for:

  • Weekday mornings when time is tight but a comforting start is non-negotiable.
  • Post-workout fuel that tastes like a treat but delivers protein and energy to recover and recharge.
  • Weekend brunches where you want a playful nod to nostalgia with a health-conscious twist.
  • Kids’ lunch boxes or after-school snacks, offering a familiar shape with upgraded nutrition.
  • Potlucks or gatherings where a portable pastry with universal appeal can stand out.

Pair these pop tarts with a warm cup of coffee, a glass of cold milk, or a dollop of yogurt on the side for a complete, balanced bite. For a more indulgent experience, a light dusting of citrus zest or a drizzle of dairy-free glaze can complement the strawberry notes without masking the protein-forward core. If you’re feeding a crowd with varied needs, consider offering a dairy-free or gluten-free variation so everyone can enjoy the same beloved treat in a form that suits their dietary choices.

Tips, Variations & Substitutions

  • Fruit variations: Swap the strawberry filling for other stone fruits in peak season, or mix berries that hold up well when baked, such as raspberries or blueberries. A tangier fruit will balance sweetness in a delightful way.
  • Protein options: Use a versatile protein source that blends smoothly into the filling, such as a neutral-tinished whey or plant-based protein. Keep in mind that different proteins may subtly alter texture and sweetness; you may adjust sweetness accordingly.
  • Diet-friendly twists: To make gluten-free, work with a gluten-free pastry blend that yields a tender crust; for vegan versions, substitute butter with a neutral, plant-based fat and use a vegan protein that behaves well in fillings.
  • Sweetness control: If you prefer less sweetness, reduce the natural sugar in the fruit or use a sugar substitute that bakes well, keeping in mind texture and browning behavior.
  • Texture tweaks: For an extra-crisp crust, finish the bake with a brief blast of high heat to encourage browning on the crust’s exterior while keeping the interior tender.
  • Glaze & finish: A light glaze (citrus-infused or vanilla) adds shine and a hint of sweetness; if you want to skip it, the pastry alone offers plenty of flavor and texture.
  • Make-ahead strategies: Freeze unbaked pastries on a parchment-lined tray, then wrap individually. Bake from frozen and add a few extra minutes if needed. This method keeps the crust flaky and the filling well-set.
  • Portion versatility: Create mini pop tart bites for a party platter or snack-size treats for lunchboxes by trimming the dough into smaller shapes before baking.

Storage & Make-Ahead Ideas

One of the biggest appeals of these pastries is how well they store and travel. If you want to keep them for future mornings or busy days, here are practical strategies to maintain flavor and texture:

  • Room temperature: Store fully cooled pastries in an airtight container for up to 2 days. Ensure they are completely cooled to prevent condensation from making the crust soggy.
  • Refrigeration: If you need them a bit longer, refrigerate for up to 5 days. Reheat gently in a toaster oven or a skillet to restore crispness.
  • Freezing: Freeze baked pastries individually on a tray, then transfer to a freezer bag. They keep well for up to 1 month. Reheat in a toaster oven or conventional oven until the crust returns to its flaky glory.
  • Make-ahead dough & filling: Prepare the dough in advance and freeze, or pre-make the filling and store in the fridge for up to 3 days. Assemble and bake when ready for fresh flavor and texture.
  • Reheating tips: Reheat in a toaster oven to restore crispness, or warm briefly in a microwave if you prefer a soft interior. A quick 10–15 second blast in the microwave can soften the interior without tearing the crust, followed by a short re-crisp in a toaster oven if you want extra crunch.

Fun Facts & Trivia

Did you know that the appeal of handheld pastries taps into a long tradition of portable, comforting foods that fit into busy lives? Here are a few tidbits that celebrate the whimsy and practicality of pastries and their modern reinterpretations:

  • The concept of a quickly heated, individually portioned pastry has roots in mid-20th-century post-war convenience culture, where speed and portability became selling points for households with busy mornings.
  • Strawberries have a storied relationship with desserts and breakfast items, prized for their bright aroma, red hue, and balance of tartness and sweetness that pairs well with creamy fillings and flaky crusts.
  • Protein-enriched versions of classic pastries are part of a broader trend toward smarter indulgence—delighting in flavor while supporting energy needs and muscle maintenance after workouts.
  • Texture legends: achieving a flaky crust that still holds a juicy interior is a culinary skill that has inspired countless riffs on fruit pastries, from turns in laminated dough to simplified, home-friendly versions that prioritize balance over complexity.

Closing Thoughts

Homemade Protein Pop Tarts with Strawberry offer more than a tasty breakfast or snack. They symbolize a deliberate choice to honor pleasure and health in equal measure, to celebrate memory and nourishment side by side, and to prove that a familiar favorite can evolve into something thoughtfully modern without losing its heart. Whether you’re feeding a family, fueling a workout, or simply seeking a comforting bite to begin the day, these pastries invite you to slow down, savor, and enjoy the little rituals that make mornings bright. Bake, taste, and share—let this strawberry-sweet creation become a new staple in your culinary routine, one that respects both flavor and fitness in every bite.

Ingredients

Pastry Dough

  • 2 1/2 cups all-purpose flour
    → The base dry ingredient that forms the crust’s structure. Use all-purpose flour for balanced gluten development that yields a sturdy yet tender crust. If you want a lighter texture, you can substitute up to 1/2 cup with pastry flour, but this will slightly affect tenderness. Sift or whisk to distribute the flour evenly, then chill the mixture after combining with fat to keep the dough flaky.
  • 1/2 cup cold unsalted butter, cubed
    → Butter provides tenderness and flakiness by laminating the dough into thin layers. Keep the butter cold and cut it into small, uniform cubes so it coats with the flour to form pea-sized pieces. Use a pastry cutter, two forks, or a brief pulse in a food processor until the mixture resembles coarse crumbs. Do not overwork; the goal is small pockets of fat that melt during baking to create flakiness. Chill the dough for at least 30–60 minutes before rolling.
  • 1/3 cup granulated sugar
    → Adds a hint of sweetness and helps with browning of the crust. Sugar also tempers saltiness and can aid in the dough’s moisture balance. If you prefer a less sweet crust, you can reduce this to 2 tablespoons, but note it may affect browning.
  • 1/2 teaspoon salt
    → Enhances overall flavor and helps balance the sweetness of the filling and glaze. Use fine salt to ensure even distribution; salt content can be adjusted to taste if you’re using a salted butter variant.
  • 1 large egg
    → Acts as a binder and enriches the dough, helping it come together and hold its shape during rolling and cutting. Use at room temperature for better emulsification; if the dough seems dry, add a teaspoon or two of cold water, a little at a time, until it just comes together.
  • 1/4 cup cold water (plus more as needed)
    → Provides the moisture needed to bring the dough together without overworking gluten. Add gradually to reach a cohesive, pleasantly tacky dough. Keep the water cold to maintain the dough’s tenderness and prevent butter from melting prematurely.
  • 1/3 cup vanilla protein powder (unflavored or vanilla)
    → Increases the protein content of the crust for the “protein Pop Tart” concept. Substituting part of the flour with protein powder will alter texture and may dry the dough; start with a small amount (about 1/4 cup) and adjust with a touch more water or milk as needed to keep the dough cohesive. If you’re sensitive to texture, you can omit this and keep the crust traditional.
  • 1 teaspoon vanilla extract (optional)
    → Adds a pleasant aroma and depth of flavor that pairs beautifully with strawberry. If you’re using protein powder (vanilla), you can reduce or omit this to avoid overbearing vanilla notes.

Strawberry Filling

  • 1 1/2 cups fresh strawberries, hulled and diced
    → Fresh strawberries give bright, tangy-sweet flavor and vibrant color. Dice them into small, even pieces (about 1/4-inch) so they distribute evenly and release juice consistently as the filling cooks. If your berries are very ripe, you can reduce granulated sugar slightly to avoid an overly sweet filling.
  • 1/3 cup granulated sugar
    → Provides sweetness and helps draw moisture from the berries, creating a jam-like consistency as the filling thickens. Taste the filling after macerating; if your berries are very sweet, you may reduce sugar to 2–3 tablespoons. You can also substitute with 2 tablespoons honey or maple syrup for a different sweetness profile.
  • 1 tablespoon lemon juice
    → Brightens the strawberry flavor and helps balance sweetness. Fresh lemon juice is preferred for lively acidity; bottled juice can work in a pinch but may dull the brightness.
  • 1 tablespoon cornstarch or arrowroot powder
    → Acts as a thickener so the filling becomes glossy and holds its shape inside the pastry. Whisk the powder with a small amount of water to make a slurry before stirring into the strawberry mixture, then heat until it thickens. Do not overcook or it may become too firm when cooled.
  • Pinch of salt
    → Amplifies the fruity flavors and balances sweetness in the filling.
  • Optional: 1/2 teaspoon vanilla extract
    → Adds a subtle vanilla note that compliments strawberry. Use if you love a dessert-like strawberry flavor; otherwise, you can skip to keep the filling simple and bright.

Egg Wash

  • 1 large egg, for brushing (egg wash)
    → The egg wash helps seal the pastry edges and gives a glossy, golden finish. Beat the egg and brush along the outer edges of the assembled pastries before baking. For extra shine, you can lighten with a small amount of water, or mix with a touch of milk if you prefer a softer crust.

Glaze

  • 1 cup powdered sugar
    → Creates the classic sweet glaze on top. Sift to remove lumps for a smooth finish. If you prefer a thinner glaze, add a teaspoon of milk at a time until you reach the desired drizzle consistency. You can also tint the glaze with a few drops of strawberry or pink food coloring if you want a fun color.
  • 2–3 tablespoons milk (or plant-based milk)
    → Provides the liquid needed to loosen the glaze to a drizzleable consistency. Start with 2 tablespoons and add more slowly; the glaze should be thick enough to coat but thin enough to flow. Use dairy milk for a richer glaze or non-dairy milk for a lighter option.
  • 1/2 teaspoon vanilla extract
    → Enhances glaze flavor and pairs well with strawberry. If you used vanilla in the crust, you may still want this for a cohesive flavor; adjust to taste.
  • Optional: 1 scoop vanilla protein powder, sifted (into glaze)
    → Adds extra protein and a subtle vanilla note to the top glaze. Start with a small amount (1/2 scoop) to avoid making the glaze gritty; whisk well to dissolve completely for a smooth finish.

Instructions

  • Preheat your oven to 350°F (175°C) and line a large baking sheet with parchment paper or a silicone baking mat to prevent sticking and promote even browning.
    → A hot, well-prepared surface ensures the pastries bake uniformly and release cleanly without tearing.
  • In a large mixing bowl, whisk together 2 1/2 cups all-purpose flour, 1/3 cup granulated sugar, 1/2 teaspoon salt, and 1/3 cup vanilla protein powder until evenly distributed and free of lumps.
    → Even distribution prevents concentrated pockets of sweetness or protein powder that could affect texture and end flavor, while a dry mix forms a stable crust foundation.
  • Add 1/2 cup cold unsalted butter, cubed, to the flour mixture and cut it in using a pastry cutter, two forks, or a brief pulse in a food processor until the mix resembles coarse crumbs with pea-sized pieces of butter.
    → Keeping butter cold and in small pieces creates tiny fat pockets that melt during baking to yield a flaky, tender crust rather than a dense one.
  • Whisk together 1 large egg, 1/4 cup cold water, and 1 teaspoon vanilla extract (if using) in a separate small bowl, then pour gradually into the flour–butter mixture while stirring with a fork until the dough just begins to come together.
    → You want a cohesive dough without overworking; the moisture from the egg and water activates gluten just enough for structure while remaining tender. If the dough seems dry, add 1 teaspoon more cold water at a time until it forms a shaggy-but-holding-together mass.
  • Turn the dough onto a lightly floured surface, divide it into two equal portions, shape each into a disk, wrap tightly in plastic, and refrigerate for at least 30–60 minutes.
    → Chilling relaxes the gluten, firms the fat, and makes the dough easier to roll into crisp, even layers without shrinking during baking.
  • While the dough chills, prepare the strawberry filling: in a medium bowl combine 1 1/2 cups diced fresh strawberries, 1/3 cup granulated sugar, 1 tablespoon lemon juice, and a pinch of salt; stir to coat the fruit and let macerate for 10–15 minutes.
    → Maceration draws out juices and softens the fruit, creating a jam-like filling that bakes into the pastry without drying out the crust.
  • Whisk 1 tablespoon cornstarch (or arrowroot powder) with 1 tablespoon cold water to form a smooth slurry, then whisk this slurry into the strawberry mixture and set aside.
    → The starch thickens the filling so it stays cohesive inside the pastry when hot, while the cold slurry helps prevent lumping and ensures a glossy, uniform texture.
  • Place the strawberry mixture in a small saucepan and cook over medium heat, stirring frequently, just until the mixture thickens and becomes glossy; remove from heat and let cool to room temperature before using.
    → Cooking activates the starch and concentrates the flavor; cooling prevents the filling from making the crust soggy when assembled.
  • Roll one disk of dough on a lightly floured surface to about 1/8-inch (3 mm) thickness and cut into even rectangles suitable for pastries; aim for uniform size to ensure even baking.
    → A thin, even sheet bakes crisper edges while keeping the center nicely filled; uniform rectangles guarantee consistent bake times across all pastries.
  • Spoon about 1–2 tablespoons of the cooled strawberry filling onto the center of each rectangle, leaving a 1/2-inch border; lightly brush the border with beaten egg to act as a glue for sealing.
    → This prevents filling from seeping out and ensures a tight seal that holds its shape during baking; the egg wash helps adhesion and creates a glossy finish.
  • Place a second dough rectangle on top of each filled bottom rectangle, press gently around the edges to seal, then crimp with a fork to reinforce the seal and vent the steam; trim any excess dough if needed.
    → Proper sealing prevents leaks, while crimping and trimming create a neat exterior and consistent thickness for even browning.
  • Chill the assembled pastries on the prepared sheet for about 15 minutes to set the edges and reduce the risk of the filling leaking during baking.
    → Cold pastries hold their shape during oven transfer and help maintain the defined filling pockets for a tidy final product.
  • Preheat the oven again if necessary and brush the tops of the pastries with the remaining beaten egg; optionally sprinkle a light dusting of sugar for extra browning and crunch.
    → The egg wash promotes a glossy, golden finish, while a sugar dusting adds a delicate crunch and visual appeal.
  • Bake the pastries in the preheated oven at 350°F (175°C) for 20–25 minutes, or until the edges are golden brown and the centers are set; rotate the pan halfway through for even color.
    → Even heat distribution ensures uniform browning and complete setting of the filling without undercooking the centers.
  • Transfer the pastries to a rack and allow them to cool completely before glazing; this prevents the glaze from running off and keeps the surface smooth.
    → Cooling ensures the filling thickens fully and the glaze adheres properly for a clean, attractive finish.
  • To make the glaze, sift 1 cup powdered sugar into a bowl, then whisk in 2–3 tablespoons milk and 1/2 teaspoon vanilla extract until smooth and pourable; if using vanilla protein powder in the glaze, whisk in up to 1/2 scoop and adjust with additional milk as needed to maintain a smooth consistency.
    → A smooth glaze provides a cohesive, attractive finish that complements the strawberry filling without overpowering it; protein powder in the glaze boosts nutrition while aiming to keep a silky texture.
  • Drizzle the glaze over the cooled pastries or dip the tops briefly for a glossy, fruity finish; optionally tint with a few drops of strawberry or pink food coloring for a playful look.
    → The glaze seals in moisture and adds sweetness, while color can enhance presentation and appeal for the finished product.

Notes

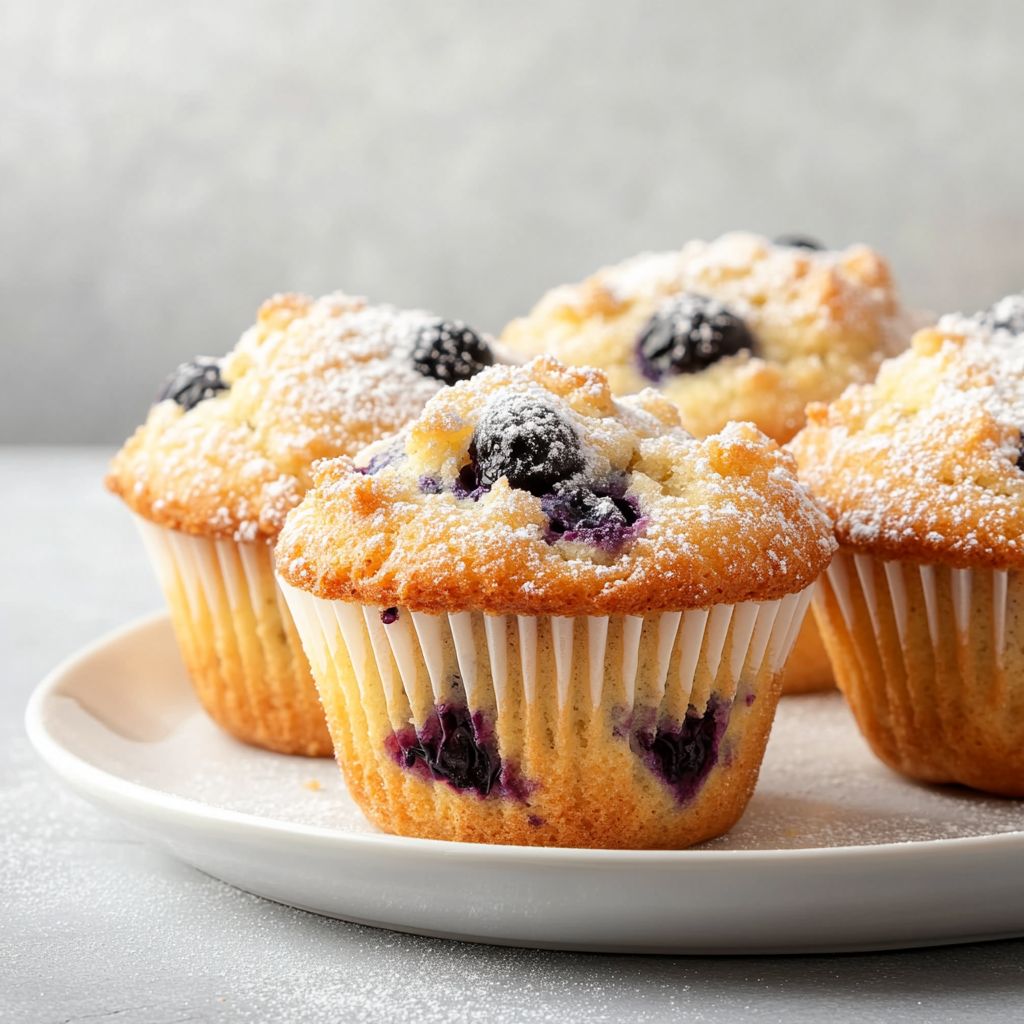
These protein-packed strawberry pop tarts are built with a flaky pastry crust enriched with vanilla protein powder and a bright strawberry filling, then finished with a glossy vanilla glaze. For best results, keep the dough as cold as possible— chill the dough after mixing and again between roll-outs to preserve the fat pockets that create flakiness. Roll between parchment to keep a clean crust; trim and seal edges with the egg wash to prevent leaks. You can customize them by adding finely chopped nuts or a sprinkle of lemon zest to the filling, swapping vanilla protein powder for chocolate for a dessert-like twist, or using frozen strawberries if fresh aren’t available. They freeze well; bake a full sheet then freeze baked pastries or bake from frozen for grab-and-go portions. If you need a dairy-free option, substitute cold coconut oil or a neutral oil for the butter and use a dairy-free glaze. For a gluten-free version, substitute a certified gluten-free all-purpose flour blend and adjust with a touch more water or milk as needed. Always ensure your protein powder is unsweetened if you’re watching sugar intake and that your glaze is whisked smooth to avoid graininess.

Tips

Tips for Making Homemade Protein Pop Tarts with Strawberry

Dough and crust tips

  • Keep all cold: butter should stay cold and firm while you mix. Cold fat creates the flaky, layered texture as the dough bakes.
  • Protein powder considerations: start with ¼ cup to 1/3 cup of protein powder and assess texture. If the dough becomes dry, add a teaspoon at a time of cold water or milk until cohesive. If you’re sensitive to texture, you can omit the protein powder and use the crust as written with flour instead.
  • Flour options: for a lighter crust, substitute up to ½ cup of all-purpose flour with pastry flour, but note it may be less sturdy. Sift or whisk the flour well to distribute evenly.
  • Egg and water handling: use room-temperature egg for better emulsification. Add cold water gradually—the dough should be cohesive and slightly tacky, not wet.
  • Chill is essential: refrigerate dough for 30–60 minutes before rolling to relax gluten and make the dough easier to roll and cut without tearing.
  • Rolling and patching: roll on a lightly floured surface to avoid sticking. If you crack or crumble, patch with a tiny amount of cold water and press into place before chilling again.

Strawberry filling tips

  • Fruit prep matters: dice strawberries into even ¼-inch pieces so they distribute and cook evenly, releasing juice consistently.
  • Maceration balance: macerate with sugar for 15–20 minutes to draw out juices and start thickening. Taste and adjust sugar if berries are very ripe or very sweet.
  • Thickening slurry: whisk cornstarch or arrowroot with a little water to make a slurry before adding to the fruit. Cook until the mixture thickens but remains glossy; remove from heat promptly to prevent over-thickening as it cools.
  • Aroma and balance: a tablespoon of lemon juice brightens the filling. If you add optional vanilla, keep it modest (½ teaspoon) to avoid masking strawberry flavor.
  • Texture tip: let the filling cool slightly before filling to reduce ooze during baking and keep crust from becoming soggy.

Egg wash and sealing tips

  • Brush edges lightly: apply egg wash along the outer edges to help seal and create a glossy finish. Avoid pooling in the center.
  • Sealing technique: press the top crust firmly to the bottom and crimp edges with a fork to prevent filling from leaking during baking.
  • Vent holes: poke a few small vent holes or slits on the top to let steam escape and prevent soggy centers.

Baking and finishing tips

  • Oven temperature: preheat to 375°F (190°C). Bake until pastry is deeply golden, about 18–22 minutes. Rotate the sheet halfway through for even browning.
  • Sheet management: bake on a parchment-lined sheet to prevent sticking and for easy cleanup. If your oven browns unevenly, rotate the sheet and adjust as needed.
  • Cooling: let pastries cool completely on a rack before glazing to prevent the glaze from sliding off or soaking into the crust.

Glaze tips

  • Glaze texture: sift powdered sugar to ensure a smooth glaze. Add milk gradually—start with 2 tablespoons and whisk until you reach a drizzleable consistency. For a thicker glaze, use less milk; for a thinner glaze, add more.
  • Flavor and color: vanilla extract adds depth; you can tint the glaze with a few drops of strawberry or pink food coloring for a fun finish.
  • Protein-powered glaze: if you’re adding protein powder to the glaze, sift well and whisk thoroughly to avoid grittiness. Start with ½ scoop and adjust until smooth.

Storage and make-ahead tips

  • Cooling and storage: cool completely before storing. Store baked pastries in an airtight container at room temperature for 2–3 days, or refrigerate for up to 4–5 days.
  • Freezing: unglazed and fully cooled pastries freeze well for up to 1–3 months. Thaw at room temperature and reheat briefly if desired. You can freeze pre-assembled but unbaked pastries; bake from frozen, adding a few minutes to the bake time.
  • Storing glaze: if you glaze ahead, store unglazed pastries and glaze just before serving for the freshest shine.

Troubleshooting and substitutions

  • Crust too dry or crumbly: chill longer or add a little extra cold water, 1 teaspoon at a time, until dough comes together without being sticky.
  • Crust too sticky: dust with flour or parchment during rolling and work on a cooler surface; chill again before cutting.
  • Filling leaks during baking: reduce filling amount, chill assembled pastries 15–30 minutes before baking, and ensure edges are well sealed.
  • Substitutions: if you prefer a traditional crust, omit the protein powder and vanilla in the crust or substitute with ¼ cup extra flour and a splash more water if needed.

FAQ

What are Homemade Protein Pop Tarts with Strawberry?

A handheld, high-protein pastry with a soft crust and a strawberry filling. Made to be portable and convenient for breakfast or a snack, with extra protein from protein powder or Greek yogurt.

What ingredients do I need for the crust and filling?

Typical ingredients include:

  • Crust: whole-wheat flour (or a gluten-free blend), protein powder (unflavored or vanilla), cold butter or coconut oil, a pinch of salt, and a binding liquid such as yogurt or milk.
  • Filling: mashed strawberries or strawberry jam, a touch of sweetener if needed, and a small amount of cornstarch or arrowroot to thicken.
  • Optional: vanilla extract, lemon zest, or a pinch of cinnamon for extra flavor.
Are these pop tarts gluten-free or vegan-friendly?

Yes, with simple substitutions. Use a gluten-free flour blend for the crust to make them gluten-free. For vegan versions, replace butter with a plant-based butter or oil, use a dairy-free yogurt or milk in the crust, and use a vegan protein powder or omit the powder and increase plant-based protein elsewhere in the recipe.

How should I store and reheat them?

Store baked pop tarts in an airtight container in the refrigerator for up to 4–5 days. For longer storage, freeze them individually wrapped for up to 1–2 months. Reheat in a toaster oven or regular oven at 350°F (175°C) for 5–7 minutes, or microwave briefly if you’re in a rush. Reheating helps the crust regain some crispness.

How long do they stay fresh in the fridge or freezer?

In the fridge: about 4–5 days. In the freezer: 1–2 months when wrapped tightly. For best texture, reheat before enjoying after freezing.

How can I customize the flavor or fillings?

Try these ideas:

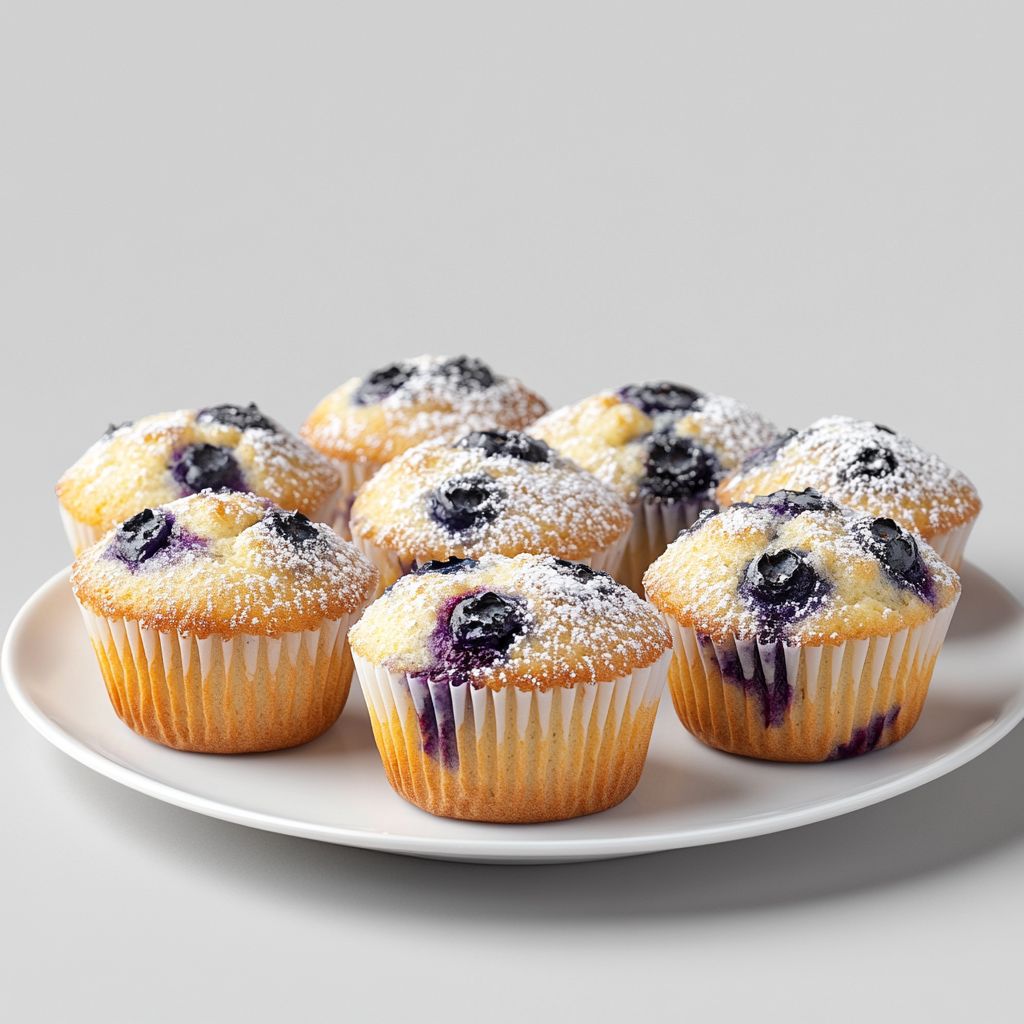
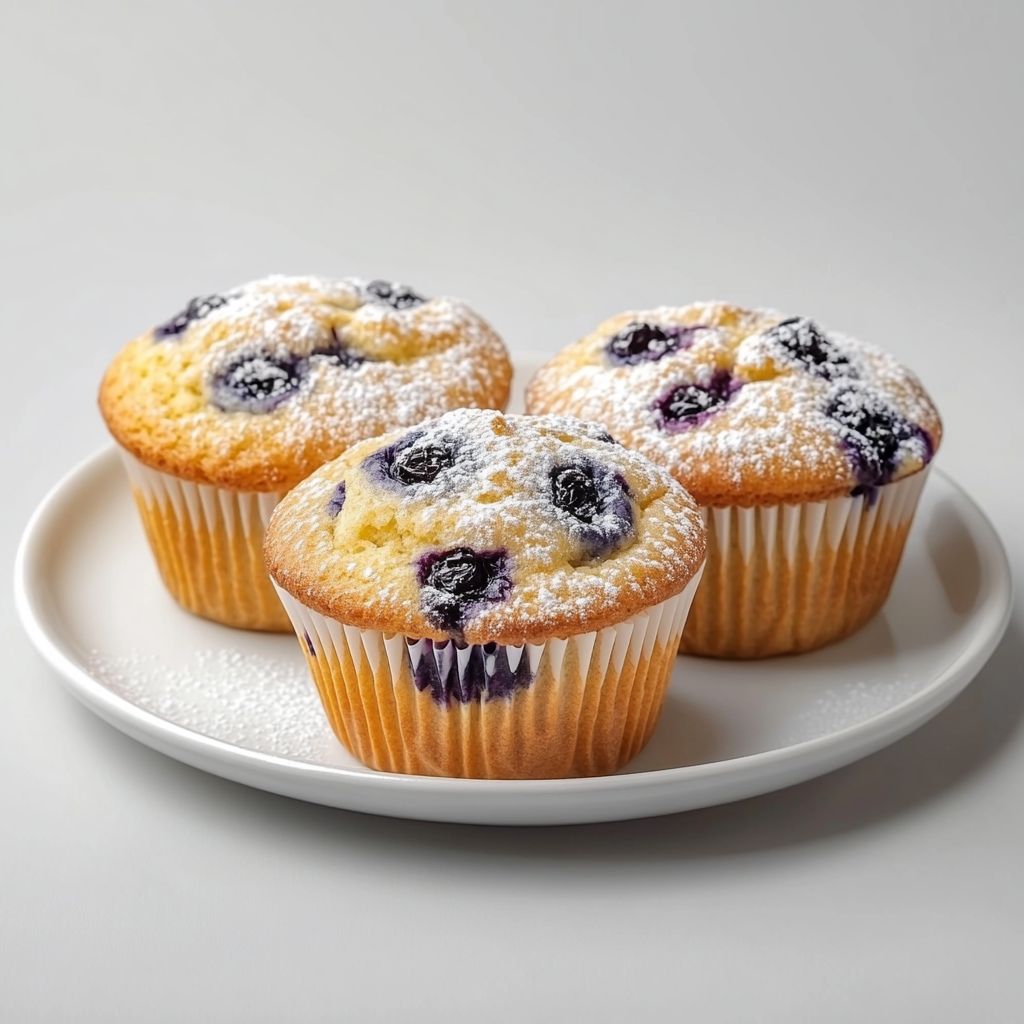
  • Replace strawberry with other berries (blueberry, raspberry) or a mixed berry filling.
  • Add lemon zest or orange zest for a citrus kick.
  • Swirl in a bit of cream cheese filling or a thin layer of almond butter for variety.
  • Swap vanilla extract for almond or mint extract for a different profile.
How much protein do these have per serving?

Protein content varies by protein powder and crust size, but you can expect roughly 12–20 g of protein per pop tart. Using a typical 20–25 g protein powder and a standard crust yields around the higher end of this range. Check your specific ingredient labels for accuracy.

What equipment do I need?

Common tools include: mixing bowls, a rolling pin, a parchment-lined baking sheet, a knife or small cookie cutter to shape the crust, a spatula for filling, and a brush for egg wash (optional) to help the crust brown.

How can I prevent the crust from getting soggy?

Tips to keep crust crisp:

  • Chill the dough before rolling to firm the fats.
  • Avoid overfilling—use a light amount of filling.
  • Consider a brief pre-bake (pre-bake the crust 4–6 minutes before adding filling) to set the base.
  • Seal edges well to prevent leak-through, and brush with a light egg wash or plant-based milk for browning.
Can I bake them ahead of time or freeze them before or after baking?

Yes:

  • Assembled but unbaked: Freeze on a tray until solid, then transfer to a bag for long-term storage; bake from frozen, adding a few extra minutes.
  • Fully baked: Cool completely, wrap individually, and freeze; reheat from frozen in a toaster oven.

Introduction / Hook

Close your eyes for a moment and imagine the warm glow of a kitchen lamp, the sizzle of a searing pan, and the irresistible scent of garlic waking up the air. You bite into something that feels like a cozy hug from the inside out—soft, chewy, and gloriously molten with cheese that stretches in delighted, gooey ribbons. Welcome to Ooey Gooey Cheesy Garlic Chicken Wraps, a recipe that takes all the comfort of a indulgent grilled sandwich and launches it into a portable, weeknight-friendly rhythm. This dish is not merely a meal; it’s an invitation to savor the moment when the wrap breaks open to reveal a treasure trove of tender chicken, garlicky richness, and melty cheese that seems to have learned how to melt with a smile. It’s the kind of dish that makes the whole house smell like a memory you want to relive again and again—crisp tortillas, savory filling, and a finish that lingers with a whisper of char and a kiss of dairy-dreamy goodness. If you’re craving something fast yet deeply satisfying, something you can assemble in minutes and eat with gusto, you’ve found your new weeknight ally, your easy crowd-pleaser, and perhaps a new favorite to tuck into the lunchbox rotation.

The Story Behind the Dish

Every great wrap has a story, and this one began in a kitchen where time was a mischievous thief. It was born from a simple truth: after a long day, there’s something magical about layers—layers of flavor, texture, and comfort—that come together in a single handheld package. A piece of chicken, a blanket of cheese, a whisper of garlic, and a tortilla that acts as both vessel and celebration. The idea grew from a family’s fondness for cozy dinners that travel well, feeding a hungry crew with little fuss and a lot of joy. It’s the kind of dish that travels easily from stovetop to lunchbox, from casual weeknights to a casual dinner party where guests arrive with stories and an appetite that needs a little something extra. The garlic in this dish carries a memory of late-night chats over sizzling skillets, the cheese pulling away in satisfyingly dramatic fashion like a small, edible celebration, and the chicken, perfectly seasoned but never overpowering, serving as a comforting anchor. The wrap itself—soft on the inside, toasty on the outside—brings a sense of completion, a neat seal that keeps the flavors inside and invites you to start again with the first bite. Over time, this combination has become a dependable go-to when you want something that feels homemade, tastes indulgent, and travels well to a crowd or a quiet night in. It’s a dish with a personality: warm, welcoming, a little indulgent, and always a little bit magical in the way it comes together without fuss.

Why You’ll Love This Recipe

  • Quick and practical: This wraps up in the time it takes to heat a skillet, melt cheese, and roll up a tortilla, making it a dependable weeknight hero.
  • Comforting and indulgent: The combination of garlic-infused chicken and melty cheese creates a comforting, immersive experience in every bite.
  • Very forgiving and customizable: Swap proteins, experiment with different cheeses, or add vegetables to suit your mood and pantry.
  • Portable and family-friendly: They’re easy to eat on the go, at picnics, or during a casual movie-night rally at home.
  • Make-ahead potential: Fillings can be prepared in advance and wrapped up for quick assembly when hunger hits.
  • Versatile for crowds: Scale up for a potluck or game night; the familiar flavors appeal to both kids and adults alike.
  • Texture play: The contrast between a soft tortilla, a juicy interior, and a blistered, lightly crisp exterior creates an engaging bite every time.

Flavor Profile & Texture

At the heart of these wraps is an irresistible trifecta: garlicky, cheesy, and creamy with a satisfying protein foundation. The chicken offers a savory backbone, seasoned in a way that accentuates its natural tenderness without overpowering the delicate cheese pull. Garlic contributes a warm, aromatic bite that lingers in the palate, inviting another mouthful. The cheese, when melted, becomes a velvet layer—smooth, rich, and inviting—binding everything into one cohesive, luscious bite. The tortilla acts as a gentle vehicle, absorbing some of the garlic-scented oils and building a gentle, toasty exterior as it rests on the skillet’s heat. The overall texture is a delightful progression: the first bite yields a tender interior, the middle reveals a generous, oozy stretch of cheese, and the final moment gives a pleasant reminder of the tortilla’s slight crispness and the dish’s savory, almost toasted finish. You’ll notice a balance of creamy and savory notes with a hint of sweetness that might come from the natural caramelization of the chicken and the gentle browning of the tortilla edges. Each element—garlic, chicken, cheese, tortilla—plays a supporting role that allows the others to shine, resulting in a harmonious, crave-worthy experience that feels both deluxe and approachable.

Flavor notes to expect on the palate include: a warm garlic perfume that doesn’t overwhelm, a savory depth from well-seasoned chicken, the luxurious melt of cheese that coats the filling like a silky layer, a touch of toasted tortilla on the exterior for crunch and color, and a faint, comforting saltiness that ties everything together. There’s a gentle brightness that can come from a squeeze of fresh lemon or a light herb finish, depending on your mood or pantry, which helps offset the richness without turning the dish into something tangy or tart. The result is a well-rounded, comforting wrap that exhilarates the senses from first glance to final bite, yet remains perfectly suitable for everyday dining. It’s the kind of dish that makes you smile as you bring it to the table and again as you take the first bite, knowing you’ve captured a moment of restaurant-quality comfort in a simple, handheld format.

Occasions & Pairings

These Ooey Gooey Cheesy Garlic Chicken Wraps shine across a spectrum of occasions. They’re ideal for weeknights when time is tight but you still crave something special. They’re equally at home at casual gatherings—game nights, potlucks, or a laid-back backyard party—where you want something that’s crowd-pleasing, easy to share, and not fussy to prepare. For lunch, they travel beautifully; wrap them up and take them to work, school, or a picnic, and you’ll have a satisfying, balanced meal that still feels like a treat. If you’re feeding a bigger crowd, set out a little “wrap station” with the fillings warm and the tortillas warm, and let people craft their own creations with a smile.

Pairings to consider include a crisp, refreshing slaw or a bright garden salad to contrast the warmth and richness. A simple avocado or tomato salsa adds a pop of brightness, while a light yogurt-based dip or a mild ranch can offer a creamy counterpoint that echoes the melty cheese without competing with it. For beverages, something cool and lightly sparkling—like an iced herbal tea, lemon water, or a sparkling citrus drink—can balance the garlic’s warmth and the cheese’s thickness. If you’re in the mood for a more complete spread, serve alongside roasted vegetables or a vanilla-scented corn salad that mirrors the wrap’s savory notes with a touch of sweetness. Finally, finish with something light and citrusy for dessert—a fresh fruit sorbet or a citrus-forward custard can cleanse the palate after the satisfying richness of the wraps.

Tips, Variations & Substitutions

  • Wrap variations: Use different styles of tortillas (white, whole wheat, spinach, sun-dried tomato) to alter color, flavor, and nutrition profile. For a gluten-free option, choose certified gluten-free wraps made from corn or certified gluten-free alternatives.
  • Protein options: While chicken is classic, you can substitute turkey, shrimp, or even plant-based substitutes if you want a vegetarian or vegan approach with dairy-free cheese and a plant-based protein.
  • Cheese ideas: Mix cheeses for depth—think a mild melty base with a sharper cheese for personality, or use a string cheese for easy melting if you’re not using shredded varieties.
  • Garlic intensity: For a milder garlic note, sauté the garlic briefly to mellow its bite. For a bolder flavor, let the garlic sizzle a bit longer to bring out a nutty sweetness.
  • Vegetable boost: Add sautéed onions, bell peppers, or spinach for color, texture, and extra nutrients without compromising on the ooey-gooey experience.
  • Spice it up: A pinch of chili flakes or a dash of hot sauce can turn the wrap into a little more heat without overwhelming the cheese-mellow balance.
  • Vegan and dairy-free: Use plant-based cheese that melts well and a dairy-free butter or oil for the pan. You can also add a vegan “creaminess” with mashed avocado or a cashew cream if you’d like to enrich the filling without dairy.
  • Lighten the dish: Choose a lean chicken cut, trim extra fat, and opt for a lighter cheese option or a lower-fat wrap to make the dish feel lighter while keeping the comforting vibe.
  • Regional twists: Incorporate sun-dried tomatoes for a Mediterranean touch, or add a hint of smoky paprika to evoke a grilled flavor reminiscent of fajita fillings.

Storage & Make-Ahead Ideas

One of the notable strengths of this dish is how forgiving it is when it comes to planning. If you’d like to make parts ahead of time, you can prepare the chicken and cheese mixture in advance and refrigerate it for up to a day. When you’re ready to eat, warm the filling gently in a skillet or microwave, then assemble with fresh tortillas and a quick fold. If you’re cooking for a crowd, you can pre-roll a batch of wraps, wrap them snugly in parchment or foil, and refrigerate. They will reheat nicely in a hot, dry skillet or in an oven for a few minutes, returning to that beloved toasted exterior and gooey interior. Leftovers should be stored in an airtight container in the fridge and consumed within 2–3 days for best texture and flavor. For longer storage, you can freeze assembled wraps (without toasting the exterior) for up to 1 month; reheat thoroughly, then finish on the pan to restore a bit of crispness to the tortilla. When reheating, you may wish to re-toast the wrap briefly in a hot dry skillet or under a hot oven broiler to recapture that inviting, slightly blistered exterior and to help the cheese re-melt evenly throughout the filling.

Fun Facts & Trivia (Optional)

– The concept of “wraps” as a meal carrier became popular as a practical, handheld option for travelers and busy workers seeking convenience without sacrificing flavor. The portability of a wrap makes it a timeless choice for picnics, lunch breaks, and quick dinners that still feel special.

– Garlic has a long history in world cuisines, valued not only for its flavor but for its aroma, which is known to stimulate appetite and create a sense of nostalgia—perfect for a dish designed to evoke comfort and home.

– The “ooey gooey” cheese pull is more than an Instagram moment; it’s a celebration of the chemistry of melted dairy, where proteins loosen and fats spread to create a cohesive, stretchable texture that feels almost magical when you bite into it.

– Wraps have a culinary lineage that spans many cultures, reflecting a universal preference for portable, shareable meals that can be customized to personal tastes while still delivering on warmth and satisfaction.

– The beauty of a garlic-cheese combination lies in its simplicity: a few powerful ingredients, treated with care, can deliver a dish that feels indulgent without requiring a long list of components or lengthy cooking times.

Ingredients

Chicken Filling

    – 2 cups cooked shredded chicken (skinless, boneless; about 1 lb roasted or poached)
    → Provides the protein base for the filling and a hearty texture. Shred while warm into small, even pieces so the sauce and cheese can coat each piece evenly. If using leftovers, briefly rewarm to make shredding easier and to help the filling bind.
    – 8 oz cream cheese, softened
    → Creates the core gooey, creamy component that binds the filling and carries the garlic subtle sweetness. Soften at room temperature or microwave in 10-second bursts until malleable, then beat until smooth before adding to the pan.
    – 1/2 cup shredded mozzarella cheese
    → Provides stretch and a mild, creamy melt that blends with the cream cheese for that signature ooey-gooey texture. For best results, shred from a block rather than pre-shredded varieties which can contain anti-caking agents that impede melting.
    – 1/2 cup shredded cheddar cheese
    → Adds tangy sharpness and richer color to the filling. Use extra sharp for more flavor; if you prefer milder cheese, substitute with Monterey Jack or more mozzarella. Shred from a block for the best melt.
    – 3 cloves garlic, minced
    → Delivers the garlicky backbone of the dish. Mince finely so the garlic disperses evenly; sauté gently with the butter to release aroma without burning, which can impart bitterness.
    – 2 tablespoons unsalted butter
    → Sautéing fat that helps bloom the garlic and create a smooth, glossy sauce base. Keep the heat moderate to prevent browning; butter adds richness and aids in emulsification with the cream cheese.
    – 1/2 cup sour cream or heavy cream
    → Adds extra creaminess and helps loosen the sauce to coat the chicken evenly. Sour cream gives a slight tang; heavy cream yields a richer, silkier texture. If using sour cream, stir in at the end over low heat to prevent curdling.
    – 1/2 teaspoon onion powder (optional)
    → Deepens the savory profile without adding texture. If you don’t have onion powder, you can use half a diced small onion sautéed with the garlic, or omit entirely.
    – Salt to taste
    → Essential for balancing the richness of the cheese and chicken. Add gradually, tasting as you go, since the chicken and cheeses may already contribute salt.
    – Freshly ground black pepper to taste
    → Enhances the overall flavor with a gentle zing. Use a coarse grind for more aroma and bite; adjust after the sauce comes together.
    – 1 tablespoon chopped fresh parsley or chives (optional)
    → Brightens the filling with a pop of color and herbal freshness. Stir in at the end or sprinkle on top of finished wraps as a garnish.

Wraps and Assembly

    – 4 large flour tortillas (10-12 inch)
    → The wrappers that hold the molten filling. Choose soft, pliable tortillas; warming them slightly makes rolling easier and prevents tearing. If gluten-free is needed, use large gluten-free tortillas and follow their cooking instructions.
    – 1-2 teaspoons olive oil or melted butter (for brushing and toasting)
    → Helps crisp the outside of the wraps and keeps the tortillas from drying out as you toast them. Lightly brush or drizzle and then toast in a skillet until golden and the cheese inside is gooey.
    – 2 cups fresh spinach leaves or shredded lettuce (optional)
    → Adds crunch and a fresh contrast to the rich filling. If using, place greens directly on the tortilla before adding the filling to prevent sogginess and help roll snugly.

Optional Add-ins

    – 1/2 cup sliced jalapeños or pickled jalapeños (optional)
    → Introduces a noticeable kick. Use seeds and membranes for more heat or remove them for milder flavor. Add to the filling or inside the wrap for a punch of brightness.
    – 1/2 cup diced bell peppers (optional)
    → Adds color and a slight crunch. Sauté with the garlic for a softer texture, or add raw for more snap inside the wrap.
    – 1/4 cup chopped fresh cilantro (optional)
    → Provides herbal lift and vibrant aroma. Mix into the filling or sprinkle over the finished wraps as a fresh finish.

Instructions

  • Gather and prep all ingredients for the filling and wraps: ensure chicken is shredded and warm, cream cheese is softened to room temperature, and cheeses are grated and ready to melt; having everything measured ensures a smooth sauce and evenly coated chicken.
    → This mise en place prevents delays and helps the sauce emulsify evenly without lumps.
  • Soften the cream cheese to room temperature, or cut into cubes and microwave in short bursts until pliable, so it can be whisked smoothly into the sauce without clumping.
    → Softened cream cheese integrates evenly with butter and garlic for a glossy, cohesive filling.
  • Mince the garlic into very fine pieces so it distributes evenly and releases aroma quickly without burning, which can impart bitterness.
    → Fine mincing ensures uniform flavor and prevents bites of raw garlic.
  • Melt the butter in a heavy skillet over medium heat to create a rich base that carries the garlic’s aroma and aids in emulsifying the sauce.
    → Butter adds depth of flavor and helps carry the dairy components into a smooth sauce.
  • Add the minced garlic to the melted butter and sauté until fragrant, about 30 to 60 seconds, keeping the heat moderate to prevent browning which can taste bitter.
    → Blooming the garlic releases its sweetness—overcooked garlic would dull the overall flavor.
  • Reduce the heat to low and add the softened cream cheese to the skillet; whisk or fold until completely smooth and glossy with the butter and garlic.
    → A smooth base ensures the filling coats the chicken evenly and avoids gritty texture from unmelted cheese lumps.
  • Stir in the sour cream or heavy cream to loosen the base and create a luscious sauce that will cling to the chicken and melt with the cheeses.
    → Sour cream adds tang and body; heavy cream yields a richer, silkier texture for a truly ooey-gooey result.
  • Season the base with onion powder (if using), then salt and freshly ground black pepper to taste, tasting and adjusting gradually to balance richness with brightness.
    → Tasting as you go ensures the sauce remains balanced as the dairy components add salt and tang.
  • Fold in the shredded chicken and 1/2 cup mozzarella and 1/2 cup cheddar, mixing until the chicken is thoroughly coated and the cheese begins to melt into the sauce.
    → Coating the chicken evenly guarantees every bite is creamy and flavorful rather than dry or separated.
  • Remove the pan from heat and finish with the optional chopped parsley or chives, stirring to distribute color and a fresh finish; the herbs brighten the dish.
    → Fresh herbs lift the richness and provide a pop of color for appetizing presentation.
  • Taste the filling and adjust salt and pepper as needed while keeping the mixture warm but not boiling to preserve the dairy texture.
    → Balancing seasoning now prevents under- or over-salted wraps after assembly.
  • Warm the flour tortillas: heat them in a dry skillet over medium heat for 10–15 seconds per side or wrap in a damp paper towel and microwave for 15–20 seconds to make them pliable and easier to roll without tearing.
    → Warm tortillas bend easily around the filling and reduce cracking when wrapping.
  • If using greens, lay spinach leaves (or shredded lettuce) directly on the tortilla to create a fresh barrier that helps prevent sogginess and adds crunch.
    → Greens provide contrast to the creamy filling and help keep the wrap from becoming limp.
  • Spoon a generous line of filling along the center of each tortilla, then sprinkle optional add-ins such as jalapeños (fresh or pickled) and sliced bell peppers if desired.
    → Distributes heat and texture evenly; peppers add color and a slight crunch, while jalapeños add a kick.
  • Fold the sides of the tortilla over the filling and roll tightly from one end to the other, keeping the seam side down and pressing gently to seal.
    → A snug roll prevents leakage during toasting and ensures a neat presentation.
  • Brush the outside of each wrap with olive oil or melted butter and toast in a hot skillet over medium heat until the exterior is golden brown and crisp and the cheese inside remains molten, about 2–3 minutes per side.
    → The outer crust adds texture and helps seal the wrap while the internal cheese stays gooey.
  • Transfer the wraps to a cutting board, let rest for 1–2 minutes to set the melted cheese, then slice in half on a slight diagonal for a professional presentation.
    → Resting prevents oozy cheese from spilling out and makes them easier to handle when serving.
  • Serve immediately with your choice of dipping sauces or a light side salad for a balanced meal.
    → The contrast of crisp exterior and creamy interior is best enjoyed hot and fresh.

Notes

“These ooey gooey cheesy garlic chicken wraps are best enjoyed immediately while the filling stays creamy and the tortillas stay pleasantly crisp. Shred the chicken while warm so the sauce and cheese coat each piece evenly, then sauté the minced garlic in butter to bloom its aroma before folding in the cream cheese, sour cream or heavy cream, and the shredded cheeses for a glossy, melting filling. To keep wraps neat, don’t overfill and place a thin layer of fresh spinach or shredded lettuce on the tortilla before adding the filling. You can customize them by adding sliced jalapeños for heat, diced bell peppers for crunch and color, or chopped cilantro for brightness. If making ahead, refrigerate the filling and greens separately and assemble just before serving to maintain texture and melt. For a gluten-free option, use large gluten-free tortillas and check all add-ins for gluten; the filling itself is gluten-free when dairy and seasonings are used without flour thickeners. For extra indulgence, brush the outside of the tortilla with olive oil or melted butter and toast in a hot skillet until golden and the cheese is molten. Always taste and adjust salt and pepper after the cheese has melted, since cheeses can vary in saltiness, and finish with a squeeze of lime or a dollop of sour cream if desired.”

Tips

Tips for Perfect Ooey Gooey Cheesy Garlic Chicken Wraps

  • Shred the chicken while it’s still warm. Warm shreds absorb the cheesy sauce more evenly, giving every bite that cohesive, saucy coating. If using leftovers, briefly rewarm until just warm to make shredding easier, then pat dry any excess moisture before mixing.
  • Cream cheese should be thoroughly softened and beaten until completely smooth before mixing. This prevents lumps in the filling and helps the sauce emulsify with the other dairy. If your cream cheese is stubborn, microwave in 5–10 second bursts and stir between bursts.
  • Use block cheeses and shred them yourself. Pre-shredded cheeses can have anti-caking agents that hinder melting. A blend of mozzarella for stretch and cheddar for tang creates that classic ooey-gooey bite.
  • Mince garlic finely and sauté gently in the butter until fragrant, not browned. Overbrowning garlic can add bitterness and a harsh bite that competes with the cheese.
  • Butter helps bloom the garlic and provides a glossy sauce base. Keep the heat moderate to prevent scorching, which can ruin the sauce’s texture and flavor.
  • When adding sour cream or heavy cream, stir slowly to loosen the sauce. If using sour cream, add it off the heat or on very low heat to avoid curdling; heavy cream yields a silkier texture but can also thin out the sauce if overmixed.
  • Onion powder (optional) deepens the savory profile without altering texture. If you don’t have it, a small amount of finely minced onion sautéed with the garlic works well.
  • Season gradually. Because the chicken and cheeses bring salt, taste the filling as you go and add salt in small increments to avoid over-salting.
  • Tortillas should be warmed slightly to become pliable. This prevents tearing when rolling. If gluten-free tortillas are used, follow their specific heating instructions to avoid cracking.
  • Brush the outer tortillas with a little olive oil or melted butter to help crisp them as you toast. Toast in a skillet just until golden and the cheese inside is melting.
  • Layer greens (spinach or shredded lettuce) on the tortilla before adding the filling to prevent sogginess and to help roll snugly. Greens add a fresh crunch that contrasts with the creamy filling.
  • Optional add-ins: jalapeños add heat, peppers add color and sweetness, and cilantro adds brightness. Chop and distribute evenly so every bite has a hint of each flavor.
  • Spread the filling in a long line down the center of the tortilla, leave about 1–2 cm (½ inch) of edge free, fold the sides inward, and roll tightly with the seam side down. A snug roll prevents the filling from leaking out during toasting.
  • Make-ahead tips: the chicken filling can be prepared a day ahead and refrigerated. Rewarm gently before assembling. For best texture, assemble the wraps fresh and toast just before serving; dairy-based fillings don’t freeze well and can separate.
  • Storage and reheating: store any leftovers covered in the fridge for up to 2 days. Reheat in a skillet over medium heat, covered, until heated through and the outside is crisp, or microwave with a damp paper towel for a quick reheat. If you want the cheese extra melty, give the wrap a quick re-toast after heating.
  • Serving suggestions: pair with a dollop of sour cream or Greek yogurt, salsa, or sliced avocado for contrast and balance. A squeeze of lime over the filling just before serving can brighten flavors.

FAQ

What are the main ingredients in Ooey Gooey Cheesy Garlic Chicken Wraps?

The filling combines tender chicken, a creamy garlic-cheese base, and melty cheese wrapped in a soft tortilla. Typical ingredients include:

  • Chicken (breasts or thighs), cooked and shredded
  • Garlic (minced or garlic butter)
  • Cream cheese or a blend of cream cheese and sour cream
  • Shredded cheese (mozzarella and/or cheddar)
  • Ranch or mayonnaise for extra tang
  • Soft flour tortillas (or gluten-free tortillas)
  • Seasonings: salt, pepper, paprika or Italian seasoning
  • Optional add-ins: spinach, onions, bell peppers
What equipment do I need to make these wraps?

Keep it simple with common kitchen tools:

  • Skillet or grill pan for cooking and melting
  • Mixing bowls and a spatula or wooden spoon
  • Knife and cutting board for prep
  • Measuring spoons (optional)
  • Baking sheet (if you choose to bake the wraps)
  • Aluminum foil or parchment paper for baking
  • Tongs or a spatula for turning and serving
How do you prepare the filling for the wraps?

Follow these steps for a creamy, cheesy filling:

  • Season and cook the chicken in a skillet until fully cooked, then shred or dice.
  • In the same skillet, melt a bit of garlic butter and add minced garlic; cook 30–60 seconds until fragrant.
  • Stir in cream cheese (and a splash of ranch or sour cream) until smooth and creamy.
  • Fold in shredded cheese and heat until melted and glossy. Adjust with salt, pepper, and seasoning to taste.
  • Optional: mix in chopped spinach or sautéed onions for extra flavor and color.
How do I assemble and cook the wraps?

Assemble and cook with these steps:

  • Warm tortillas briefly to make them more pliable (wrap them in a damp paper towel and microwave 15–20 seconds).
  • Place a portion of filling on the lower third of each tortilla.
  • Fold the sides in, then roll up tightly from bottom to top.
  • To melt the cheese and seal the wrap, cook in a hot skillet seam-side down for 1–2 minutes per side, or until the tortilla is golden and cheese is melted.
  • Alternatively, bake: place seam-side down on a lined baking sheet, brush with a little melted butter, and bake at 400°F (200°C) for 8–12 minutes until lightly crisp and cheese is melted.
Can I bake the wraps instead of pan-searing?

Yes. Baking is a convenient option:

  • Preheat oven to 400°F (200°C).
  • Assemble wraps, place seam-side down on a baking sheet lined with parchment.
  • Brush lightly with melted butter or oil for extra crisp.
  • Bake 8–12 minutes, or until the tortillas are lightly golden and the cheese is gooey.
How long does it take to make Ooey Gooey Cheesy Garlic Chicken Wraps?

Estimated times:

  • Prep time: about 10–15 minutes
  • Cook time: about 10–15 minutes (depending on whether you pan-sear or bake)
  • Total time: roughly 25–30 minutes
Can I meal-prep these wraps for later?

Yes, with a few tips:

  • Prepare the filling in advance and store it in an airtight container for up to 3 days in the refrigerator.
  • Assemble wraps fresh when ready to eat to keep the tortilla from getting soggy.
  • To reheat: warm in a skillet over medium-low heat until heated through and cheese is melty, or wrap in foil and reheat in a 350°F (175°C) oven for 8–10 minutes.
Can I make these dairy-free or gluten-free?

Absolutely, with substitutions:

  • Dairy-free: use dairy-free cream cheese and dairy-free shredded cheese. Use a dairy-free ranch or mayo for added flavor.
  • Gluten-free: use gluten-free tortillas and check all sauces/dressings for gluten.
  • For a lighter option, reduce cheese or use a thinner layer of filling.
What are some tasty variations and add-ins?

Try these to customize your wraps:

  • Spice it up with jalapeños, crushed red pepper, or hot sauce
  • Add crispy bacon or diced bell peppers for texture
  • Stir in sautéed mushrooms or spinach
  • Swap in chipotle or smoky paprika for a different flavor profile
  • Use different cheeses like pepper jack or Gouda for a new melt and taste
How do I reheat leftovers to keep them gooey?

Best methods to preserve melty cheese:

  • Skillet: warm on medium-low, covered, 2–4 minutes, flip once
  • Oven: wrap in foil and bake at 350°F (175°C) for 8–10 minutes
  • Microwave: 20–40 seconds, though cheese may be less gooey
What should I serve with these wraps?

Pair them with easy sides for a complete meal:

  • Simple garden salad or coleslaw
  • Roasted vegetables or corn on the cob
  • Mexican or garlic-lime rice for a heartier option
  • Healthy dips like salsa, guacamole, or yogurt ranch

Introduction / Hook

Imagine a morning where the scent of warm cinnamon swirls through the kitchen like a soft welcome mat. Steam fogs up the windows as the breakfast table becomes a stage for something irresistibly cozy: pancakes that taste like a cinnamon roll, but with the light, airy lift of a perfect pancake. This is cinnamon roll pancakes—a playful, indulgent hybrid that takes the best of two beloved classics and fuses them into a breakfast experience you’ll want to repeat again and again. The moment the first bite touches your tongue, you’re greeted with the cozy nostalgia of a cinnamon-sugar roll and the sun-kissed comfort of a pancake stack. The exterior is lightly golden and fluffy, the center tender with a whisper of warmth, and a glaze or swirl that glides over each piece with a sweetness that feels like a hug. There’s an almost magical contrast: the innocence of a pancake meeting the generous, comforting richness of a cinnamon roll, all in a single mouthful. This dish doesn’t demand a candlelit dinner; it invites the family to gather, to linger, and to smile at the simple joy of a weekend morning fueled by warmth, aroma, and a touch of buttery magic. Whether you’re cooking for a lazy Sunday or making a special brunch of the season, cinnamon roll pancakes are your passport to a moment of bliss that feels both familiar and newly exciting.

The Story Behind the Dish

Every great hybrid begins with curiosity, a pinch of whimsy, and the memory of something comforting. Cinnamon rolls have long held a place of honor on bakery counters and kitchen countertops around the world—twisted spirals of soft dough, cinnamon-sugar warmth, and a glossy glaze that gleams like morning sunlight. Pancakes, meanwhile, are the universal language of easy mornings: batter whisked, a sizzle on the griddle, and a stack elevated by butter and syrup. The idea of marrying these two favorites likely emerged in the quiet hours of a weekend kitchen, where someone thought, “What if the swirl, the aroma, and that luxurious glaze could ride on a pancake’s cloud-soft body?” The result is cinnamon roll pancakes: a tribute to the comfort we crave, with a playful nod to the way breakfast can feel like a celebration.

There’s a more human side to this dish’s story as well. It speaks to traditions passed down through generations—a grandmother’s kitchen scented with cinnamon during holiday baking, a parent’s ritual of starting the day with something a little special, and a brunch table that doesn’t shy away from indulgence. In many homes, brunch is a ceremony of sharing: stories told over steaming mugs, plates that disappear faster than you expect, and the quiet joy of spoons scraping the last drips of glaze from the plate. Cinnamon roll pancakes capture that sense of togetherness in portable form, transforming the comforting familiarity of two beloved treats into something that feels new yet warmly familiar. The dish also reflects a broader cultural moment: the ongoing love affair with comforting, nostalgic flavors presented in clever, accessible ways. It’s about elevating a beloved breakfast into a memory-maker, a dish you’ll want to recreate for anniversaries, birthdays, or simply for the happiness of a long, bright weekend morning.

Why You’ll Love This Recipe

  • Instantly comforting: The familiar scent and sweetness of cinnamon bring instant coziness to your morning.
  • Fluffy yet satisfying: Pancake texture provides a light bite with a satisfying, breadlike comfort that doesn’t overwhelm.
  • Versatile sweetness: A glaze or swirl adds just the right amount of richness without tipping into dessert territory for breakfast time.
  • Family-friendly: Appealing to kids and adults alike, it’s a crowd-pleasing brunch centerpiece that encourages sharing.
  • Make-ahead friendly: You can prep elements in advance, making weekend mornings smoother and more enjoyable.
  • Customizable: The base idea invites variations, from dairy-free to gluten-free adaptations, so a wider range of eaters can enjoy it.
  • Perfect for specials occasions: It’s an elevated breakfast option that still feels approachable for holidays, birthdays, or anniversaries.
  • Visual appeal: A golden stack with a glossy glaze or delicate drizzle looks as inviting as it tastes, ideal for entertaining or sharing on camera.

Flavor Profile & Texture

At first glance, cinnamon roll pancakes deliver a chorus of warm, comforting flavors. The dominant note is cinnamon—aromatic and slightly spicy—curled within a soft, pillow-like pancake that carries an almost bread-like tenderness. The pancake’s inherent lightness acts as a perfect stage for cinnamon’s perfume, letting the spice shine without overwhelming the palate. A gentle sweetness accompanies the cinnamon, resembling the soft caramelized sugars that bloom in a cinnamon roll, but tempered to stay breakfast-friendly. If a glaze or swirl is part of the dish, it introduces a silky, tangy contrast—often softened by a hint of cream cheese or vanilla—that melts over the warm stack and creates a second layer of indulgence as it mingles with the pancake’s surface.

Texture-wise, you encounter contrast in the most satisfying way. The exterior is a delicate, golden crust that yields to a center that remains tender and moist. This is where the magic happens: the pancake’s interior may carry a subtle swirl of cinnamon-sugar flavor, creating ribbons of warmth that echo the cinnamon roll experience. The glaze—whether a light drizzle or a more pronounced creaminess—adds a luscious, almost sticky-gloss finish that clings to each piece, enhancing moisture and providing a little extra sweetness that tastes like a morning treat without being sugar-overload. In total, the dish balances the comfort of a gently sweet bakery treat with the heartiness and convenience of a breakfast staple. The result is a sensory journey—from the first inhale of cinnamon aroma to the last bite of a perfectly balanced stack—that leaves you feeling both satisfied and ready to tackle the day with a smile.

Occasions & Pairings

Cinnamon roll pancakes shine in a variety of moments. They are an ideal centerpiece for a weekend brunch that begs for lingering conversation and the warmth of a kitchen shared by family or friends. They work beautifully for holidays when a festive breakfast sets the tone for celebration—think Mother’s Day, Easter Sunday, or a cozy Christmas morning—but they also hold their own on ordinary weekdays, transforming a routine morning into something to look forward to. For a celebratory touch, pair the pancakes with a sparkling beverage or a robust cup of coffee that complements the spices and sweetness; a mug of hot chocolate can turn the dish into a wintertime delight for younger diners or the young at heart.

When it comes to accompaniments, consider a few simple ideas:
– Fresh fruit accents, such as sliced berries or orange segments, to add brightness and balance to the richness.
– A light whipped topping or a dollop of yogurt to introduce a creamy contrast without overpowering the cinnamon profile.
– A side of crispy bacon or breakfast sausage for those who enjoy a savory counterpoint to the sweetness.
– A small pitcher of extra glaze or syrup for dipping, inviting guests to customize each bite.
For beverages, a hot cup of coffee, a chai latte, or a glass of cold-pressed juice can elevate the experience without clashing with the flavors. The beauty of cinnamon roll pancakes is their friendly adaptability: they can anchor a leisurely brunch, feel festive for a special occasion, or simply provide a comforting weekend ritual that the whole family looks forward to sharing again and again.

Tips, Variations & Substitutions

Flexibility is part of the charm of cinnamon roll pancakes. Here are ideas to tailor the dish to your preferences, dietary needs, or the ingredients you have on hand:

  • Gluten-free option: Use a gluten-free pancake mix or a blend designed for light, airy pancakes. You may want to add an extra touch of leavening to preserve the fluffiness.
  • Vegan adaptation: Replace dairy with plant-based milk and use an oil or vegan butter for the pancakes. For the glaze, a dairy-free cream cheese substitute with a touch of vanilla works beautifully.
  • Low-sugar approach: Reduce the glaze or use a thinner drizzle to keep sweetness in check while preserving the cinnamon character.
  • Flavor twists: Add a pinch of nutmeg, cardamom, or almond extract to introduce a new dimension that still nods to the cinnamon roll vibe. A touch of citrus zest can brighten the profile without overpowering the spice.
  • Fruit-forward variant: Fold in small amounts of grated apple or pear into the pancake batter for a gentle fruitiness that echoes the cinnamon roll’s warmth.
  • Nutty crunch: A sprinkling of toasted pecans, walnuts, or almonds on top or within the swirl adds texture and a toasted note that pairs well with cinnamon.
  • Regional twists: In some regions, you can infuse a maple-laced sweetness and swap in a smoky butter finish for an autumnal or rustic twist that harmonizes with the cinnamon.
  • Make-ahead glaze: Prepare the glaze ahead of time and refrigerate; warm slightly before serving to restore gloss and silkiness.

Storage & Make-Ahead Ideas

These pancakes are forgiving and friendly to make-ahead planning. If you’re preparing ahead for a weekend brunch, you can do a few things to streamline assembly and service. Cook the pancakes to about 90% done, then reheat them gently on a warm, lightly greased skillet or in a low oven, finishing with a fresh drizzle of glaze to revive the glossy finish. If you have leftover pancakes, store them in an airtight container in the refrigerator for up to two days. Reheat gently in a skillet or in the oven to preserve their tenderness and avoid drying them out. For longer storage, you can freeze individual portions after cooling completely; reheat in a toaster oven or conventional oven, adding a light glaze to refresh the gloss and the overall texture.

To maximize flavor and texture, consider these tips:
– Layer a small amount of glaze between pancake layers if you’re stacking them for service; this helps maintain moisture and adds a delightful surprise as you cut through the stack.
– If freezing, flash-freeze the pancakes on a parchment-lined tray before transferring to a freezer bag or container; this prevents them from sticking together.
– Reheat covered to trap steam, which helps restore the moisture and bounce of the pancakes without drying them out.
– If you’re adding fresh fruit as a finish, add it after reheating to maintain brightness and texture rather than sogginess.

Fun Facts & Trivia (Optional)

Did you know that cinnamon has a long, storied past in baking and pastry arts? Cinnamon has been treasured for centuries, celebrated not only for its warm flavor but also for its aromatic perfume that fills a room as soon as it’s heated. In many culinary traditions, cinnamon is a symbol of comfort and celebration—an ingredient that signals the start of a feast or a moment of indulgence after a long day. Pancakes themselves have a history that crosses cultures and continents, from early flatbreads griddled on hot stones to the modern stack enjoyed on lazy weekend mornings. The fusion of cinnamon roll flavors with pancakes is a modern culinary nod to those traditions, a reminder that sometimes the most comforting foods emerge when we let two classics meet and mingle on the plate. To this day, many kitchens around the world embrace recipes that honor both heritage and innovation, offering a playful evolution of breakfast that delights the senses and invites shared moments around the table.

Ingredients

  • Pancake Batter
  • 1 1/2 cups all-purpose flour (or 1 1/2 cups gluten-free all-purpose flour blend; if GF, ensure the blend includes a binder or add 1/2 tsp xanthan gum per cup)
    → The foundational structure for the pancakes. If using gluten-free flour, a binder helps mimic the elasticity of gluten, resulting in a tender crumb. Whisk the dry ingredients together first to ensure even distribution, then whisk in the wet ingredients just until combined to keep the pancakes light.
  • 1 1/4 cups milk (dairy or unsweetened plant-based milk)
    → Hydrates the flour and loosens the batter to the right consistency. If using a thicker plant-based milk, you may need a splash more. For depth of flavor, warm milk slightly (not hot) before mixing, which helps dissolve the sugar and blend with the egg.
  • 1 large egg
    → Provides structure and binding through protein. Bring the egg to room temperature before mixing to help it incorporate smoothly with the milk and flour, preventing a lumpy batter.
  • 2 tablespoons unsalted butter, melted (plus extra for greasing the pan)
    → Adds richness, tenderness, and flavor. Let the butter cool slightly before whisking it into the batter to avoid cooking the egg. If dairy-free, substitute with a light neutral oil (like canola) or melted coconut oil.
  • 1 tablespoon granulated sugar
    → Provides a touch of sweetness and aids browning. You can reduce for a less sweet pancake or replace with brown sugar for a deeper, caramelized note. Dissolving the sugar in the milk beforehand helps prevent graininess.
  • 1 teaspoon baking powder
    → The primary leavening agent that makes the pancakes fluffy. Use fresh powder for best lift; avoid overmixing to prevent toughness once the gluten (or binder) sets.
  • 1/2 teaspoon baking soda
    → Optional lift booster that works with acidic elements (e.g., buttermilk if used or a splash of yogurt) to create extra tenderness and a slight lift. If not using an acid, you can omit this.
  • 1/2 teaspoon ground cinnamon
    → Infuses the batter with warm spice that complements the cinnamon roll theme. Use a moderate amount to keep cinnamon present but not overpowering; you can increase slightly if you love a stronger aroma.
  • 1/4 teaspoon salt
    → Balances sweetness and enhances overall flavor. If using salted butter, reduce the added salt accordingly.
  • Cinnamon Swirl Filling
  • 1/4 cup light brown sugar, packed
    → Provides the classic caramel-like sweetness and moisture for the swirl. Pack the sugar firmly to ensure a consistent swirl; using dark brown sugar will deepen the color and flavor.
  • 1 1/2 teaspoons ground cinnamon
    → Core flavor of the cinnamon roll. Adjust to taste; more cinnamon yields a bolder swirl, which pairs beautifully with the glaze.
  • 2 tablespoons unsalted butter, melted
    → Mix with the brown sugar and cinnamon to create a spreadable, luscious swirl. The melted fat helps carry the cinnamon flavor and keeps the swirl moist inside the pancake layers.
  • Cream Cheese Glaze
  • 4 ounces cream cheese, softened
    → Provides the tangy, creamy frosting characteristic of cinnamon rolls. Softening at room temperature ensures a silky glaze without lumps. If dairy-free, use a soft dairy-free cream cheese alternative with similar fat content.
  • 2 tablespoons unsalted butter, softened
    → Adds richness and helps create a smooth, spreadable glaze when whisked with cream cheese. For dairy-free, substitute with a plant-based butter alternative of similar fat content.
  • 1 cup powdered sugar, sifted
    → Gives the glaze its characteristic thick, pourable texture. Sifting prevents graininess and ensures a smooth finish. Add gradually to reach desired thickness.
  • 1/2 teaspoon vanilla extract
    → Enhances the glaze with warm vanilla notes that complement the cinnamon. Use real vanilla for best aroma; if you only have imitation, use sparingly as it can taste artificial at higher doses.
  • 1–2 tablespoons milk or heavy cream
    → Adjusts glaze consistency to your preference: 1 tablespoon for a thicker glaze that clings to the pancakes, 2 tablespoons for a more drizzling glaze. Add gradually to avoid thinning too much.
  • Optional Add-ins
  • 1/4 cup chopped pecans or walnuts (optional)
    → Adds a textural contrast and a toasty, buttery flavor. Toast nuts lightly before adding for extra crunch and aroma; chop evenly for even distribution in the batter or swirl.
  • 1/4 cup raisins or chopped dates (optional)
    → Introduces bursts of sweetness and chewy texture reminiscent of filled cinnamon rolls. Soak in a teaspoon of warm water or a splash of milk for a few minutes if they’re very dry to rehydrate them before folding into the batter or swirl.
  • Toppings and Serving
  • Butter or extra cream cheese glaze for serving (optional)
    → A little extra at the table lets each pancake be topped as desired. For a lighter finish, drizzle a thin layer of glaze rather than a heavy coating.
  • Powdered sugar for dusting (optional)
    → A delicate finish that evokes the look of a frosted cinnamon roll. Lightly dust right before serving for best appearance and texture.
  • Syrup (maple or cinnamon-spice) for serving (optional)
    → Complements the rich flavors; use sparingly to balance sweetness. Pure maple syrup pairs well with the cinnamon notes.

Instructions

  • Preheat your griddle or large nonstick skillet over medium heat (approximately 350–375°F / 175–190°C) and lightly grease with butter or neutral oil.
    → A properly heated surface ensures the batter sizzles on contact, develops a golden crust, and yields tender pancakes that flip without tearing.
  • Prepare the cinnamon swirl filling by whisking together light brown sugar, ground cinnamon, and the melted butter until you have a spreadable paste.
    → This mixture creates the signature cinnamon swirl; the moisture from the sugar and fat keeps the swirl cohesive and prevents dry pockets inside the pancake.
  • Whisk the dry pancake ingredients in a large bowl: flour (all-purpose or gluten-free blend), granulated sugar, baking powder, baking soda (if using), ground cinnamon, and salt, ensuring even distribution for uniform rise and flavor.
    → Even distribution of leaveners and spices prevents hotspots that could cause uneven browning or off-flavors.
  • Whisk the wet ingredients in a separate bowl: milk, egg, and the melted butter, allowing the egg to come to room temperature for smooth emulsification.
    → Room-temperature egg and melted butter blend smoothly with the dairy, creating a cohesive batter with a tender crumb and preventing lumpy batter.
  • Combine the wet and dry ingredients by pouring the wet into the dry and stirring just until combined; leave a few small lumps for tenderness and do not overmix.
    → Quick mixing preserves air pockets that help the pancakes rise and stay light; overmixing can develop gluten (or binder) too much, resulting in dense pancakes.
  • If using optional add-ins, fold in chopped pecans or walnuts or soaked raisins at this stage with a gentle fold to distribute evenly without deflating the batter.
    → Nuts add texture and aroma; soaked raisins stay moist and distribute evenly for bursts of sweetness in every bite.
  • Let the batter rest for 5–10 minutes at room temperature to hydrate the flour fully and relax the mixture, improving tenderness and evenness of the pancake texture.
    → Resting allows starches to hydrate and leaveners to activate, yielding lighter pancakes with a finer crumb.
  • Lightly oil or butter the griddle again if needed, then ladle about 1/4 cup of batter onto the surface for each pancake; immediately dollop or pipe a line of the cinnamon swirl filling in the center and gently swirl with a small spatula or toothpick to create a ribbon that will bake into the pancake.
    → The swirl creates the cinnamon roll aesthetic inside each pancake; light swirling helps embed the flavor without tearing the batter.
  • Cook the first side until the edges look set and bubbles form on the surface, about 2–3 minutes, then adjust the heat if the bottoms brown too quickly.
    → Waiting for bubbles indicates the center is beginning to set; controlling heat prevents scorching and ensures even browning.
  • Flip the pancake gently with a wide spatula and cook the second side until golden brown and the center is set, about 1–2 minutes more; avoid pressing down to keep the pancake light.
    → A careful flip maintains the swirl integrity and yields an evenly cooked interior without flattening the pancake.
  • Transfer finished pancakes to a warm plate or sheet and cover loosely to keep them warm while you cook the remaining batter; repeat until all batter is used.
    → Keeping pancakes warm prevents drying and stacking them neatly ensures a cohesive, presentable serving.
  • Make the cream cheese glaze by beating softened cream cheese and softened butter until smooth, then gradually whisk in sifted powdered sugar, vanilla, and enough milk or cream to reach a thick but pourable consistency.
    → Proper softening and gradual sugar incorporation prevent lumps; a glossy glaze clings to warm pancakes for a luscious finish.
  • Drizzle the glaze over the warm pancakes or serve it on the side, and finish with a light dusting of powdered sugar if desired.
    → The glaze adds tangy richness that mirrors a cinnamon roll frosting, while warming pancakes helps the glaze flow and cling.
  • Serve with maple syrup or a cinnamon-spice syrup and extra butter if desired to balance sweetness and enhance the aroma.
    → Syrup provides moisture and a complementary sweetness, completing the comforting cinnamon-roll pancake experience.

Notes

These Cinnamon Roll Pancakes are a cozy, indulgent breakfast that deliver the swirled cinnamon filling and creamy glaze of a cinnamon roll in fluffy pancake form. You can customize them by adding chopped pecans or raisins for texture, or swap the cream cheese glaze for a dairy-free version using a plant-based cream cheese and milk. For gluten-free needs, use a gluten-free all-purpose flour blend with a binder (or add 1/2 teaspoon xanthan gum per cup) and ensure all other ingredients (baking powder, glaze components) are gluten-free if needed. The batter comes together quickly—whisk the dry ingredients, whisk in the wet ingredients just until combined to keep the pancakes light. Prepare the cinnamon swirl filling by mixing light brown sugar, cinnamon, and melted butter, then swirl into the batter as you cook for ribbons of cinnamon goodness. The glaze should be whisked smooth and poured while the pancakes are warm so it sets into a glossy finish. Cook pancakes on medium heat; you want a gentle sizzle, bubbles on top, and lightly set edges before flipping to maintain a tender crumb. These pancakes freeze well and reheat nicely for busy mornings, and they pair beautifully with extra glaze, maple syrup, or a dusting of powdered sugar for a brunch-worthy finish.

Tips

Tips for Perfect Cinnamon Roll Pancakes

  • Let the batter rest for 5–10 minutes after mixing. This relaxes the batter and helps prevent dense pancakes, especially when using gluten-free flour. GF batters benefit from a brief hydration period to hydrate the binder fully.
  • Keep ingredients at or near room temperature. Warm milk (not hot) helps dissolve sugar and blends with the egg more evenly, giving a smoother batter. Cold ingredients can lead to a tougher texture.
  • Whisk dry ingredients separately from wet ingredients, then combine just until you see no large streaks. Overmixing (especially with GF blends) can create toughness; a few small lumps are fine.
  • When cooking, preheat a nonstick skillet or griddle over medium heat and grease lightly with melted butter. A tiny drop of water should dance on the surface—if it evaporates immediately, the pan is too hot.
  • For evenly distributed cinnamon swirl, keep the swirl filling slightly warm so it spreads smoothly. Drizzle or spoon a thin ribbon into the center of the batter or swirl gently with an offset spatula after the first contact with the pan.
  • Use about 1/4 cup of batter per pancake for consistent size. If you want more pronounced cinnamon swirls, add 1–2 teaspoons of cinnamon-sugar filling per pancake but avoid overloading to prevent soggy layers.
  • To help the swirl stay defined, mix the brown sugar, cinnamon, and melted butter until cohesive and spreadable. Layer it in a thin line or small spoonfuls rather than large blobs.
  • Flip pancakes when the edges look set and bubbles form on top with some popping; cook the second side until lightly golden. Do not press down on the pancake, which can deflate the air from leavening agents.
  • Whisk the cream cheese glaze smoothly by letting the cream cheese and butter come to room temperature, then beating until lump-free. Sift powdered sugar to prevent graininess, and add milk or cream gradually to reach the desired thickness.
  • For a dairy-free version, substitute with plant-based cream cheese, a mild oil or dairy-free butter in the glaze, and ensure the milk is unsweetened and non-dony flavors. The technique remains the same—the glaze should be thick yet pourable.
  • Adjust glaze thickness to your preference: 1 tablespoon will yield a thicker, clingy glaze, while 2 tablespoons creates a more drizzly finish. If glaze becomes too thin, whisk in a touch more powdered sugar; if too thick, add a splash of milk gradually.
  • Optional add-ins like chopped nuts or raisins should be folded in gently at the end to avoid deflating the batter. Toast nuts first for extra aroma and crunch; rehydrate dried fruits briefly if they are very dry.
  • Keep leftover pancakes or glaze properly stored: refrigerate glaze in an airtight container and re-whisk before serving. Rewarm pancakes in a low oven or skillet to revive tenderness, then drizzle with warm glaze.
  • For make-ahead options, prepare the cinnamon swirl filling in advance and refrigerate. Assemble and cook the pancakes fresh, or partially cook and reheat on low to maintain tenderness. Glaze is best added just before serving for a glossy finish.

FAQ

What are Cinnamon Roll Pancakes?

Cinnamon Roll Pancakes are fluffy pancakes flavored with a warm cinnamon-sugar swirl that mimics the flavors of a classic cinnamon roll. A simple cinnamon-sugar filling is swirled into the batter or onto the cooking surface to create ribbon-like swirls, and they’re typically finished with a tangy cream cheese glaze for that signature roll-tasty finish.

What ingredients do I need?

Options below cover a from-scratch version and a quick mix version. Adjust for dairy-free or vegan needs if desired.

  • For the batter (from-scratch): 1 cup all-purpose flour, 2 tablespoons sugar, 1 teaspoon baking powder, ¼ teaspoon salt, ¾ cup milk (dairy or non-dairy), 1 large egg, 2 tablespoons melted butter or neutral oil, ½ teaspoon vanilla.
  • For the cinnamon sugar filling: ¼ cup brown sugar, 1½ teaspoons ground cinnamon, 1 tablespoon melted butter.
  • Optional glaze: 2 ounces cream cheese, ½ cup powdered sugar, 1–2 tablespoons milk, ½ teaspoon vanilla.
  • Dietary swaps (dairy-free/vegan): use plant-based milk (almond/oat), 1–2 tablespoons oil or vegan butter, flax egg (1 tablespoon ground flaxseed + 3 tablespoons water) in place of the egg, and a dairy-free cream cheese or omit glaze.
How do I prepare the batter and cinnamon filling?

Steps you can follow:

  1. Whisk the dry batter ingredients (flour, sugar, baking powder, salt) in a bowl.
  2. In another bowl, whisk the wet ingredients (milk, egg, melted butter, vanilla).
  3. Combine the wet and dry ingredients just until smooth; do not overmix.
  4. In a small bowl, mix the cinnamon sugar filling (brown sugar, cinnamon) with the melted butter.
  5. Preheat a nonstick skillet or griddle over medium-low heat.

Cooking with the swirl: when the batter hits the skillet, drop a few teaspoonfuls of the cinnamon filling onto the surface in a circular pattern to create ripples or a swirl, then pour batter over or around the swirls to form pancakes. As bubbles form and the edges set, gently swirl with a spoon or spatula to blend the swirl into the pancake before flipping.

Can I make this dairy-free or vegan?

Yes. Use plant-based milk (almond, soy, or oat) and a dairy-free butter or oil in place of the regular butter. Replace the egg with a flax egg (1 tablespoon ground flaxseed + 3 tablespoons water, mixed and allowed to thicken) or use ¼ cup unsweetened applesauce. For the glaze, use a dairy-free cream cheese or omit the glaze. If using store-bought vegan cream cheese, you can still whip in powdered sugar and a splash of non-dairy milk to achieve a smooth glaze.

What pan and heat setting should I use for perfect pancakes?

Use a nonstick skillet or griddle. Preheat over medium-low heat (about 325°F / 165°C). If your pan tends to run hot, lower the heat a bit to avoid burning the swirls. Lightly grease the pan with butter or oil to prevent sticking.

How do I swirl the cinnamon filling so it looks like cinnamon rolls?

Pour the batter onto the skillet to form a pancake. Quickly drop 1–2 teaspoonfuls of cinnamon filling onto the surface in a circular pattern to create a swirl. Use the back of a spoon to gently swirl the filling into the batter without breaking the pancake. Let the batter cook until bubbles form and edges look set, then flip and cook until golden on the other side. If you prefer thicker swirls, you can layer a bit more cinnamon filling after flipping and warm through for a moment.

How do I make the cream cheese glaze?

Typical glaze directions:

  • Beat 2 ounces softened cream cheese with ½ cup powdered sugar until smooth.
  • Whisk in 1–2 tablespoons milk (or non-dairy milk) and ½ teaspoon vanilla until you reach a pourable consistency.
  • Drizzle over the warm pancakes just before serving. Adjust sweetness or thickness by adding more powdered sugar or milk as needed.
How should I store and reheat leftovers?

Store cooled pancakes in an airtight container in the refrigerator for up to 3–4 days. To reheat, use the microwave in 15–20 second bursts or rewarm in a 325–350°F (165–175°C) oven for a few minutes until heated through. Reheat with a light glaze or a little extra butter for moisture.

Can I add extras like apples, nuts, or raisins?

Absolutely. Finely diced apples (tossed with a little lemon juice to prevent browning) or chopped pecans/walnuts can be folded into the batter or sprinkled onto the surface with the cinnamon filling for additional texture. Raisins or chopped dried fruit also work well. If adding apples, you may want to sauté them briefly in a teaspoon of butter and cinnamon before adding to the batter.

Can I prepare this ahead for a brunch?

You can mix the batter ahead and refrigerate for up to 24 hours (bring to room temperature before cooking). The cinnamon sugar filling can be prepared in advance and stored in the fridge. Reheat pancakes on a skillet over low heat, adding a bit of butter to help restore moisture, and drizzle with glaze just before serving.

Introduction / Hook

Imagine a cozy skillet of caramelized onions turning a deep amber, their sweetness blooming as they soften into a glossy, almost jammy ribbon that coats every bite. Picture tender, succulent chicken that browns to a savory kiss on the outside, releasing its juices to mingle with a bed of fluffy rice that drinks up every drop of flavorful broth. Now add a gentle kiss of herbs, a whisper of garlic, and a finish of melted cheese that blankets the top in a luxurious, bubbly crust. All of this happens in one pot, with minimal stirring and almost no cleanup, delivering a comforting, crowd-pleasing meal that tastes like a Sunday feast even on a weekday. Welcome to One Pot French Onion Chicken Rice—an irresistible fusion of classic French onion flavors and practical, weeknight-friendly cooking. This dish captures the rustic charm of caramelized onions, the hearty satisfaction of chicken, and the comforting heartiness of rice, all simmered together until the flavors fuse into something extraordinary. The aroma alone is enough to draw people to the kitchen in anticipation, and the satisfaction of serving a complete, nourishing plate straight from a single pot makes it a favorite in busy homes and cozy gatherings alike.

The Story Behind the Dish

The soul of French onion flavors runs deep in kitchens across the world. French onion soup, with its languid ribbons of caramelized onions, is a testament to the simple magic of turning everyday ingredients into something lush and memorable. Onions, when coaxed over steady heat, release their sugars, transforming into a velvet sweetness that dances with the savory depth of broth and wine. This transformative process has been a cornerstone of home cooking for generations, a reminder that patience at the stove yields extraordinary results. The idea of pairing that quintessential onion sweetness with a more substantial, one-pot meal is a natural evolution of culinary ingenuity—taking a beloved comfort flavor and marrying it with a nourishing protein and starch to create a complete dish in a single pot.

The inspiration behind One Pot French Onion Chicken Rice is to honor that heritage while embracing practical modern cooking. It takes the iconic caramelized onion profile and folds in chicken for protein, rice for starch, and a few pantry-friendly seasonings to create a dish that feels luxurious yet approachable. The result is a dish that feels like a memory—like a kitchen where the air is perfumed with the scent of browned onions, garlic, and herbs, where the pot does all the heavy lifting, and where clean-up is a mere afterthought. This recipe captures the essence of family dinners, Sunday suppers, and weeknight comfort, offering a bridge between traditional French technique and everyday cooking needs. It’s a celebration of how a handful of well-chosen flavors can come together in harmony, turning simple ingredients into something worth savoring and sharing.

Why You’ll Love This Recipe

  • One-pot wonder: All the components—onions, chicken, rice, herbs, and broth—develop together in a single pot, making both cooking and cleaning up incredibly efficient.
  • Deep, mellow flavor: Caramelized onions provide a natural sweetness that counterbalances the savory chicken and a gentle twist of thyme, garlic, and broth for a well-rounded, comforting profile.
  • Versatile and forgiving: The technique works with chicken thighs or breasts, with white or brown rice, and can be adjusted for different spice levels or dietary needs without losing its soul.
  • Budget-friendly and family-friendly: Simple pantry staples come together to create a satisfying meal that both adults and kids will enjoy, with leftovers that still taste fantastic the next day.
  • Rich texture with comforting contrast: Tender chunks of chicken, spoonable, fluffy rice, and the glossy onion sauce create a multi-sensory experience in every bite.
  • Cozy, restaurant-worthy feel at home: The dish offers a touch of elegance—think caramelized edges, a gentle fragrant aroma, and a glossy surface—that makes weeknights feel special.
  • Minimal waste, maximum flavor: The method emphasizes the development of flavor in stages—browning, deglazing, simmering—ensuring every part of the pot contributes to the final harmony.

Flavor Profile & Texture

This dish is a masterclass in balance. The onion presents itself first, slowly releasing its sugars as it caramelizes, yielding a deep, honeyed sweetness that coats the palate. It’s not cloying; it’s nuanced, with a whisper of savory savoriness that arises from the gentle browning of the onions and the slight deglazing with broth or wine. The chicken contributes a comforting, savory backbone, its juices mingling with the onion sweetness to form a robust sauce that clings to every grain of rice. The rice itself acts as both vehicle and amplifier: each grain absorbs the flavorful liquid, swelling into a tender, barley-soft bite that isn’t mushy but luxuriously cohesive.

Herbs and aromatics—often thyme and garlic in this style—add an herbal brightness that lifts the dish without overpowering the onion-forward sweetness. The finish can be as simple as a pinch of fresh parsley for color and a final squeeze of lemon to brighten, or as indulgent as a light shower of grated cheese that melts into the surface and creates a velvety, almost risotto-like finish. The overall texture is a pleasing contrast: the slightly crisp edges of any browning on the chicken, the soft, pillowy rice, and the glossy, almost lacquered onion sauce that binds everything together. It’s a harmony of savory, sweet, and aromatic notes that feels both rustic and refined in equal measure.

Key Taste Notes

  • Caramelized onion sweetness with a savory depth
  • Juicy, well-seasoned chicken that stays tender
  • Herbaceous brightness from thyme and garlic
  • Richer, glossy sauce that coats rice and chicken evenly
  • Optional cheese finish for a creamy, melty top layer

Occasions & Pairings

This dish shines in a variety of settings. It’s ideal for weeknights when you want something comforting yet uncomplicated, a Sunday family dinner that feels special without demanding hours in the kitchen, or a casual gathering where guests will appreciate a one-pot marvel that can feed a crowd with minimal effort. Its versatility makes it a natural for meal prep too; the flavors deepen after a night in the fridge, making it a terrific next-day lunch option that still feels satisfyingly fresh.

Pair it with sides that complement its onion-forward profile:

  • A crisp green salad tossed with a tangy vinaigrette to cut through the richness
  • Roasted vegetables such as Brussels sprouts, carrots, or green beans for color and texture
  • Crusty crust bread or a baguette to scoop up the savory sauce
  • A light white wine, like a Sauvignon Blanc or a dry Chardonnay, to echo the dish’s herbaceous and onion notes
  • For non-alcoholic pairings, a sparkling apple cider or a citrusy sparkling water

Tips, Variations & Substitutions

Every home cook has a preferred pantry setup, and this recipe is designed with that flexibility in mind. Here are ideas to tailor it to your kitchen, dietary needs, or flavor mood:

  • Protein swaps: Use bone-in, skin-on chicken thighs for richer flavor and moisture, or swap in turkey cutlets for a lighter option. For a vegetarian version, substitute a hearty mushroom mix (cremini, portobello) and use a vegetable-based stock, plus a grain like quinoa or barley in place of rice.
  • Rice options: Long-grain white rice is traditional, but you can use brown rice for a nuttier, chewier texture, or short-grain rice for more of a risotto-like creaminess. If using brown rice, you may need a touch more liquid and a longer simmer time.
  • Cheese finish: A light blanket of Gruyère, cheddar, or parmesan on top as it finishes melting elevates the dish and adds a luxurious, creamy layer. If avoiding dairy, skip the cheese and finish with a squeeze of lemon and fresh herbs.
  • Herb variations: Thyme is classic, but you can experiment with a pinch of rosemary, marjoram, or a bay leaf for a different aromatic profile. Fresh parsley or chives sprinkled on top add a fresh, green note.
  • Gluten-friendly note: Ensure your stock is certified gluten-free if you’re avoiding gluten. Many store-bought broths contain gluten, so check the label or use a trusted brand.
  • Make it lighter: Use chicken breasts and a lighter stock, and skip cheese or use a modest amount of a light cheese substitute to preserve the lighter profile while still enjoying the onion sweetness.
  • Make-ahead flavor boost: Caramelize the onions a day ahead and refrigerate. When you’re ready to cook, continue with the recipe to build the final layers of flavor quickly.
  • Texture play: If you prefer a more sauce-forward finish, reserve a splash of broth to stir in at the end and keep the rice a touch looser.

Storage & Make-Ahead Ideas

This dish stores well in the refrigerator for 3–4 days when kept in an airtight container. The flavors often deepen after a night, making leftovers even more appealing. Reheating works best on the stovetop over low to medium heat with a small splash of broth or water to loosen the rice if it seems dry. Stir gently to prevent clumping, and cover to retain moisture. If you’ve topped with cheese, you can reheat covered and uncover for a minute to let the cheese re-melt.

For freezing, it’s best to freeze the dish before the rice fully absorbs all the liquid, so the grains don’t become mushy. Portion into freezer-safe containers or bags, lay flat to chill quickly, and freeze for up to 2–3 months. Thaw overnight in the fridge before reheating on the stove with a little extra stock or water. When reheating, the key is to recover moisture and reheat gently so the chicken stays tender and the rice doesn’t dry out.

Make-ahead strategy: If you’re entertaining or meal-prepping, caramelize the onions a day or two in advance and store them sealed in the fridge. On the day you cook, sear the chicken and finish the dish as a streamlined process, relying on the pre-caramelized onions to accelerate flavor development.

Fun Facts & Trivia (Optional)

  • Caramelized onions, a cornerstone of French onion flavors, require patience—low and slow heat unlocks their natural sugars and creates that signature depth that defines the dish.
  • Rice, when cooked in a well-flavored liquid, becomes a flavor sponge. In one-pot dishes, it not only provides heft but also clarifies and concentrates the overall sauce, delivering a cohesive, spoonable texture.
  • The aroma of onions frying is known to lift mood and appetite—science suggests the smell can trigger pleasant memories and anticipation of comfort food.
  • Herbs like thyme carry a long culinary history, from ancient kitchens to modern tables, offering both fragrance and subtle earthy notes that complement meat and starch beautifully.
  • One-pot meals have a tradition of practicality—developing flavor in stages, reducing cleanup, and giving home cooks more time to enjoy with family and friends rather than standing at the stove.

Ingredients

One Pot French Onion Chicken Rice

– 1.5 pounds boneless, skinless chicken thighs, cut into bite-sized pieces
→ Purpose: provides protein and flavor; Browning the pieces creates a rich fond that flavors the entire one-pot dish. Preparation: pat dry the chicken to promote good sear, season lightly before adding to the pot, and brown in batches to avoid steaming. Tips: thighs stay juicier than breast; if using chicken breasts, reduce cooking time to prevent dryness and monitor for overcooking as the rice simmers.

– 3 large yellow onions, thinly sliced
→ Purpose: form the classic French onion flavor base through caramelization, imparting sweetness and depth to the sauce. Preparation: slice evenly to uniform thickness for even browning, then cook slowly in fat until deeply amber (about 25–30 minutes). Tips: salt lightly during caramelization to help draw moisture; deglaze with wine or stock to lift browned fond; patience yields the best sweetness without burning.

– 3 cloves garlic, minced
→ Purpose: adds aromatic backbone and savory complexity. Preparation: mince finely so it distributes evenly and cooks quickly without burning. Tips: add after onions have softened to prevent scorching; if you prefer a milder garlic note, crush instead of mince and remove before finished cooking.

– 2 tablespoons olive oil
→ Purpose: fat for sautéing onions and browning chicken; helps transfer heat and develop fond. Preparation: heat until shimmering before adding onions. Tips: use extra-virgin for fruity notes, but any neutral oil works; avoid smoking the oil by maintaining medium heat during browning.

– 1 tablespoon unsalted butter
→ Purpose: richness and helps onions caramelize with a velvety mouthfeel. Preparation: add with oil for a butter–oil combination that tolerates higher heat. Tips: for dairy-free adjustments, omit butter or substitute with a neutral oil; butter can also add a glossy finish to the onions.

– 1 1/2 cups long-grain white rice, rinsed until water runs clear
→ Purpose: starch that absorbs the savory onion–chicken liquid to form a cohesive one-pot dish. Preparation: rinse thoroughly to remove surface starch, drain well. Tips: long-grain rice yields fluffier grains; if using parboiled or medium-grain rice, adjust liquid and simmer time accordingly; avoid over-stirring to prevent mushy texture.

– 2 1/2 cups low-sodium chicken stock, warmed
→ Purpose: cooking liquid that flavors and steams the rice while keeping sodium in check. Preparation: warm before adding to maintain steady simmer. Tips: using warmed stock prevents a chill that can slow cooking; adjust salt based on stock saltiness; if desired, substitute with vegetable stock for a lighter profile.

– 1/2 cup dry white wine (optional)
→ Purpose: deglazes the pan, lifting caramelized bits and adding acidity and depth. Preparation: pour after browning chicken and onions and scrape up fond; simmer until reduced slightly before adding stock. Tips: if avoiding alcohol, substitute with an extra 1/2 cup stock or a splash of lemon juice with an extra pinch of sugar to mimic acidity.

– 1 teaspoon dried thyme (or 2 teaspoons fresh thyme leaves)
→ Purpose: herbal note that complements onion and chicken. Preparation: add dried thyme early so it infuses; if using fresh thyme, strip leaves from stems and sprinkle evenly. Tips: dried thyme can become overpowering if burned; add at the right moment and balance with bay leaf and stock.

– 1 bay leaf
→ Purpose: subtle herbal aroma that rounds the dish. Preparation: add whole for easy removal before serving. Tips: remove bay leaf prior to serving to avoid a sharp, bitter edge; you can tie with kitchen twine for easy fishing out.

– Salt to taste (start with 1 1/2 teaspoons kosher salt) and freshly ground black pepper to taste
→ Purpose: essential seasoning at multiple stages to enhance sweetness, chicken flavor, and rice. Preparation: season early in the process and adjust at the end after tasting the finished dish. Tips: season in layers; remember that stock will contribute salt, so taste before adding more salt at the end.

Optional Add-ins

– 1/2 cup grated Gruyere cheese (optional, for topping)
→ Purpose: finishing garnish that creates a cheesy, bubbly crust reminiscent of French onion soup. Preparation: grate or shred so it melts evenly; sprinkle on top after cooking and briefly cover to melt, or place under a brief broil for a golden crust. Tips: fresh Gruyere melts best; pre-shredded varieties may contain anti-caking agents that hinder smooth melting, so grate fresh if possible.

– Fresh parsley, chopped (optional, for garnish)
→ Purpose: adds color and a fresh, herbal aroma at the finish. Preparation: chop just before serving to preserve bright green color. Tips: sprinkle generously just before serving to maintain vibrancy and freshness; can also be added to the pot at the end for a hint of color.

– 1/4 teaspoon smoked paprika (optional)
→ Purpose: light smoky warmth and color enhancement that complements caramelized onions. Preparation: whisk into the pot along with the stock if using; Tips: start with a small amount to avoid overpowering the dish; adjust to taste, balancing with salt and cheese later.

Instructions

  • Pat dry the boneless chicken thighs with paper towels, then cut into bite-sized pieces and season lightly with kosher salt and freshly ground black pepper.
    → This ensures the chicken browns instead of steaming, building a flavorful fond that will deepen the sauce. Dry surfaces promote a crisp sear, while light seasoning at this stage helps establish flavor without oversalting before the stock is added.
  • Heat 1 tablespoon olive oil in a large, heavy-bottomed pot over medium-high heat and brown the chicken in batches without crowding the pan, about 2–3 minutes per side, then transfer browned pieces to a plate.
    → Browning in batches preserves a hot pan surface so the meat sears instead of braising in its own juices; the fond stuck to the pan will flavor the next layers of the dish.
  • Return the pot to medium heat and add the remaining 1 tablespoon olive oil and 1 tablespoon unsalted butter; swirl to melt completely and coat the bottom of the pot.
    → The oil raises the smoke point while the butter adds richness and a glossy finish to the onions, creating a balanced fat for even caramelization.
  • Add the sliced yellow onions with a pinch of kosher salt and cook over medium-low heat, stirring every few minutes until deeply caramelized and amber, about 25–30 minutes.
    → Slow caramelization develops complex sweetness and savoriness; salt helps draw out moisture and promotes even browning, while patience prevents burning and bitterness.
  • Stir in the minced garlic and cook for 30–60 seconds until fragrant, then promptly reduce heat if it begins to color too quickly to avoid bitter notes.
    → Garlic cooks quickly and can turn bitter if burned; brief cooking at this stage preserves its aroma and blends with the onion base.
  • Pour in the rinsed long-grain white rice, stirring to coat the grains with the onion-fat mixture; toast the rice for 1–2 minutes until the edges look translucent and the grains become slightly glossy.
    → Toasting coats each grain with fat and lightly toasts the surface starch, yielding fluffier, separate grains rather than a mushy texture.
  • Deglaze with 1/2 cup dry white wine if using, pouring it into the pot and scraping up the browned fond with a wooden spoon; simmer until the wine is reduced by about half.
    → De-glazing loosens the flavorful browned bits from the pan and concentrates the wine’s acidity and aroma, which will infuse the rice and sauce.
  • Stir in 1 teaspoon dried thyme (or 2 teaspoons fresh thyme leaves) and drop in 1 bay leaf; if using 1/4 teaspoon smoked paprika, whisk it into the pot now to impart a light smoky warmth.
    → Thyme and bay leaf provide aromatic depth that complements onion and chicken; paprika adds subtle color and warmth without overpowering the dish.
  • Pour in the warmed 2 1/2 cups low-sodium chicken stock and return the browned chicken along with any juices to the pot, nestling the pieces into the rice.
    → Warm stock maintains a steady simmer, while returning the chicken and its juices reintroduces all surface flavors into the pot for true one-pot cohesion.
  • Increase heat to bring the mixture to a gentle simmer, then reduce to low, cover the pot with a tight-fitting lid, and cook for 18–20 minutes until the rice is tender and the chicken is cooked through (internal temperature 165°F/74°C).
    → A steady, gentle simmer prevents scorching and ensures even cooking; avoid lifting the lid frequently to keep the steam trapped for proper rice absorption.
  • Remove the lid and gently stir; if there is still liquid, re-cover and simmer a few more minutes until absorbed, being careful not to over-stir which can make the rice gummy.
    → Letting the rice rest briefly after cooking ensures starches finish absorbing moisture and prevents a sticky, overworked texture.
  • Turn off the heat and let the dish rest, covered, for 5 minutes to allow the grains to finish steaming and the flavors to meld.
    → Resting stabilizes moisture distribution in the grains and helps prevent a runny or unevenly cooked dish when served.
  • If using Gruyere cheese, sprinkle 1/2 cup grated cheese over the hot surface and cover briefly to melt, or place the pot under a hot broiler for 1–2 minutes until the top is bubbly and lightly golden.
    → The cheese creates a creamy, toasty crust reminiscent of French onion soup; fresh Gruyere melts smoothly and forms a desirable golden top when broiled.
  • Discard the bay leaf, then fluff the rice with a fork and scatter chopped fresh parsley over the top as a bright, aromatic finish.
    → Parsley adds color and a fresh contrast to the rich onion-scented gravy, enhancing aroma and appearance just before serving.
  • Serve the One Pot French Onion Chicken Rice directly from the pot, spooning portions that include chicken, rice, and a generous amount of caramelized onion sauce for a comforting, cohesive dish.
    → Immediate serving helps preserve the sauce’s sheen and the proper texture of the rice, delivering optimal flavor and presentation.

Notes

This One Pot French Onion Chicken Rice is a comforting, savory one-pot meal built on deeply caramelized onions, browned chicken, and fluffy rice that cook in their own flavorful stock.

Tip: Brown the chicken in batches and pat it dry first to develop a rich fond rather than steaming. Season lightly before searing; thighs stay juicy, but if you use chicken breasts, reduce cooking time to prevent dryness.

Caramelize the onions slowly in olive oil and a tablespoon of butter until deeply amber, about 25–30 minutes. Salt lightly during caramelization to draw out moisture, and deglaze with wine or stock to lift the fond.

After onions are ready, add minced garlic and cook just until fragrant, then stir in the rinsed long-grain rice and warmed chicken stock. Keep the rice in a single even layer and avoid over-stirring to maintain fluffy grains; if using parboiled or medium-grain rice, adjust liquid and simmer time accordingly.

Wine adds brightness; if you skip it, substitute with an extra 1/2 cup stock or a splash of lemon juice with a pinch of sugar to mimic acidity.

Finish with thyme (dried or fresh) and a bay leaf for aroma; remove the bay leaf before serving. Taste and adjust salt at the end, since stock contributes salt.

Optional finishing touches: 1/2 cup grated Gruyere cheese for a bubbly crust (grate fresh for best melt) and a sprinkle of fresh parsley for color. For a dairy-free version, omit butter and cheese or substitute with a neutral oil; you can also add 1/4 teaspoon smoked paprika for a subtle smoky note.

Serving suggestions and storage: this dish reheats well and can be stored in the fridge for 3–4 days or frozen for longer storage. If using as a gluten-free option, ensure the stock and any wine are gluten-free. Pair with a crisp green salad or steamed greens to add brightness and texture to the meal.

Tips

Tips for Perfect One Pot French Onion Chicken Rice

  • Brown the chicken in batches, not all at once. Overcrowding the pot traps steam, which steers the meat toward steaming rather than browning. Let the pieces sit without moving for a minute or two on each side to develop a rich fond before flipping.
  • Caramelize the onions slowly for deep sweetness. Use a wide, heavy pot and cook them on low to medium heat, stirring occasionally until they are deeply amber (about 25–30 minutes). Salt lightly as they cook to help draw out moisture and enhance flavor.
  • Deglaze properly to lift every bit of fond. After browning the chicken and onions, splash in the dry white wine (or a splash of stock if not using alcohol) and scrape up the browned bits from the bottom. Let it reduce by about half to concentrate the flavors before adding stock.
  • Garlic timing matters. Add minced garlic after the onions have softened to prevent scorching. If you prefer a milder garlic note, you can crush garlic and remove it before serving, or add a whole clove to flavor the oil and remove later.
  • Warm stock to keep the simmer steady. Heating the chicken stock before adding reduces temperature drops that slow cooking and helps the rice cook evenly.
  • Measure and pace your seasonings. Salt in layers: start with a modest amount and taste near the end since the stock and cheese (if used) will add saltiness. Stock is often salted, so adjust accordingly.
  • Choose your rice wisely. Rinse long-grain white rice until the water runs clear to remove surface starch and promote fluffy grains. Avoid stirring too aggressively once the rice is cooking to prevent a mushy texture.
  • If you skip the wine, add an extra 1/2 cup stock or a splash of lemon juice with a pinch of sugar to mimic acidity and balance the dish.
  • Herbs and aromatics timing. Add dried thyme early so it can infuse the dish; if using fresh thyme, strip the leaves and sprinkle evenly. Remove the bay leaf before serving to avoid a sharp edge.
  • Finish with optional Gruyère for a French onion soup vibe. Grate fresh Gruyère and sprinkle on top after cooking, then cover briefly to melt, or give it a quick broil for a golden crust. Freshly grated cheese melts best; avoid pre-shredded varieties that can melt unevenly.
  • Garnish and color. A handful of chopped fresh parsley added at the end gives bright color and aroma. If you’re not serving immediately, hold the parsley to scatter just before plating to keep its vibrancy.
  • Optional smoky depth. A 1/4 teaspoon of smoked paprika whisked in with the stock adds a subtle smoky warmth that complements the caramelized onions. Start small and taste as you go.
  • Adjust for dairy-free or lighter profiles. Omit the butter or substitute with a neutral oil. If using cheese, offer it on the side or use a dairy-free cheese that melts well to keep the dish accessible for dairy-free diners.
  • Texture and rest. After the rice finishes cooking, let the pot rest off the heat for 5–10 minutes with the lid on to let the flavors meld and the rice finish absorbing vapors evenly.
  • Make-ahead and storage. The dish improves as flavors meld; you can caramelize the onions a day ahead. Refrigerate leftovers in an airtight container for up to 3–4 days, and reheat gently with a splash of stock if needed to loosen the rice.

FAQ

What is One Pot French Onion Chicken Rice?

A creamy, comforting one-pot dish where chicken, rice, and caramelized onions are simmered together in flavorful stock until tender. Everything cooks in a single pot for easy cleanup.

What ingredients do I need?

Typical ingredients (adjust to taste):

  • 1 lb (450 g) chicken thighs or breasts, cut into bite-sized pieces
  • 2 medium onions, thinly sliced
  • 2 cloves garlic, minced
  • 1 cup long-grain white rice
  • 2 cups chicken stock or broth
  • 1–2 tablespoons butter or olive oil
  • Salt and pepper to taste
  • Optional: 1 teaspoon dried thyme
  • Optional: 2–4 tablespoons cream cheese or sour cream for extra creaminess
  • Optional: ¼ cup grated cheese (Gruyère, cheddar, or mozzarella)
What equipment do I need?

A large, heavy-bottomed pot or Dutch oven with a lid. You’ll also want a wooden spoon or spatula for stirring.

How do I make it? (step-by-step)
  1. Heat butter or oil in the pot over medium heat. Add onions and cook, stirring occasionally, until deeply caramelized (about 8–10 minutes).
  2. Pushing the onions to the side, add chicken pieces and brown on all sides, about 5–6 minutes.
  3. Stir in garlic and cook for 30 seconds until fragrant.
  4. Add rice, then pour in 2 cups chicken stock. Season with salt, pepper, and thyme if using.
  5. Bring to a simmer, then cover and reduce heat to low. Cook for 18–20 minutes, or until the rice is tender and liquid is absorbed.
  6. Remove from heat and let rest, covered, for 5 minutes. Stir in cream cheese or sour cream if desired, and sprinkle in cheese if using. Adjust seasoning to taste.
  7. Garnish with chopped parsley or other herbs and serve.
What type of rice works best?

Long-grain white rice is ideal for a predictable texture and cook-time. Parboiled rice also works well. Avoid relying on quick-cooking rice, which can become mushy in this method. If you only have another type of rice, be prepared to adjust liquid and time accordingly.

Can I use brown rice or other grains?

Yes, but with adjustments. Brown rice needs more liquid and a longer cook time (roughly 40–45 minutes) and may result in a chewier texture. You may want to start with 1 cup brown rice and 2 1/2–3 cups stock, then monitor doneness. Other grains (like quinoa) will alter cooking time and texture significantly.

Can I adapt this recipe for dairy-free or gluten-free diets?

Yes. For dairy-free: use olive oil or a dairy-free butter substitute and omit cream cheese/sour cream or replace with a dairy-free alternative. For gluten-free: ensure your chicken stock/broth is gluten-free; the recipe as written is naturally gluten-free besides any optional dairy additions. If you omit cream cheese, it remains dairy-free and gluten-free.

How long does it take to cook?

Active cooking time is about 20–25 minutes (caramelizing onions, browning chicken, and combining ingredients), with 18–20 minutes of simmering. Total time, including prep and resting, is roughly 40–45 minutes.

How should I store leftovers and reheat?

Let cool completely, then store in an airtight container in the refrigerator for up to 3–4 days. For longer storage, freeze (best within 1–2 months). Reheat on the stove with a splash of stock or water to loosen, or microwave in 1–2 minute bursts, stirring in between until heated through.

What variations or add-ins can I try?

Try any of the following to customize:\n- Add vegetables like peas, mushrooms, bell peppers, or spinach after browning the onions. \n- Add fresh herbs (thyme, parsley) or a pinch of rosemary.\n- Finish with lemon zest for brightness.\n- Stir in extra cheese or a dollop of cream for extra creaminess.\n- Top with crispy pancetta or cooked bacon for added richness.

Introduction / Hook

Imagine the moment you pull apart a warm muffin and a soft, tender cloud of crumb gives way, releasing a gentle sigh of dairy-fresh aroma that mingles with bright bursts of blueberry. Fluffy Cottage Cheese Blueberry Muffins are more than a breakfast treat; they are a small celebration of texture and contrast. The secret to their irresistible lift lies in the humble cottage cheese, folded into the batter to create a surprisingly airy interior that feels luxuriously soft on the tongue, like a bite of pillow-soft comfort that somehow still carries the wholesome bite of a good muffin. Each bite delivers the perfect balance: the mild tang of cottage cheese, the natural sweetness of ripe blueberries, and a whisper of citrus or vanilla that lifts the flavors to a sunlit morning. This recipe is the kind of bake that makes a house smell like a warm hug—crisp edges, a moist center, and little pockets of juicy fruit that pop with every chew. If you crave something that feels indulgent without being heavy, and you want a muffin that stays tender from first bite to the last crumb, you’ve found your new go-to.

From the moment the batter comes together, you can sense the magic of cottage cheese doing quiet, steady work. It coats the flour just enough to keep the crumb tight and pliable, yet it dissolves into the batter to leave behind a delicate, cloud-like texture. Blueberries, those tiny little jewels of sweetness, burst with each bite, their juices painting ribbons of purple through the pale batter. The result is a muffin that isn’t crumbly or crumbly in a dry way, but rather lush and almost melt-in-your-mouth soft—like a breakfast pastry that somehow fits into a leisurely morning without demanding extra time or effort. The aroma is a warm invitation: to brew a pot of coffee, to settle into a quiet corner with a book, or to share with loved ones as a comforting start to the day. This isn’t just a recipe; it’s a little ritual that sets the tone for happiness around a kitchen table.

Another delightful aspect of these muffins is their adaptability. They hold their structure beautifully, yet they don’t feel heavy or dense. The cottage cheese acts as a natural leavening ally, helping the crumb rise with a gentle loft that makes the muffins feel almost ethereal. It’s the kind of texture that makes you want to spread a pat of butter or a smear of light cream cheese, though even without any added toppings, these muffins stand tall and proud—a testament to how a simple ingredient can elevate baked goods to something special. If you’re a fan of blueberry desserts that aren’t syrupy or sugary, you’ll appreciate how these muffins maintain a balanced sweetness and a bright, fresh finish that lingers pleasantly on the palate.

The Story Behind the Dish

Every family has a muffin story, and this one begins in kitchens where dairy is a pantry staple and berries are a seasonal treasure. Cottage cheese has long been a trusted ally for bakers who want extra moisture, a soft crumb, and a touch of tang without relying on heavy fats or dense flours. In many parts of the world, cottage cheese appears in bread, pancakes, and muffins, embraced for its ability to hydrate batter subtly while adding a unique texture that you won’t get from butter or oil alone. The idea of pairing cottage cheese with blueberries isn’t just a modern convenience; it echoes a timeless practice of marrying fruit with a dairy-backed batter to achieve balance—fruit’s brightness tempered by the gentle acidity and creaminess of dairy.

The blueberry in particular holds a storied place in American baking, a fruit that thrives in summer and tends to impart a beautiful color as it cooks. Blueberries offer little juice bursts that sparkle within the muffin, creating pockets of sweetness that contrast with the faint tang of the dairy. The combination feels both comforting and celebratory, a reminder that good breakfasts can be elegant in their simplicity. In many family kitchens, muffins are a weekly ritual—perfect for quick mornings, lunchbox surprises, and weekend brunches. The cottage cheese twist is a nod to cooks who want tenderness without extra butter or heavy fats, a way to achieve a lighter, airier crumb while preserving moisture. It’s a recipe that travels well—made for home bakers who appreciate a thoughtfully composed treat that tastes like it came from a small bakery rather than a box mix.

If you’re curious about origins, you’ll find that bright, fluffy muffins have a long lineage in traditional baking where dairy, fruit, and a fine crumb were the markers of real home cooking. Cottage cheese as a secret lift gained popularity as kitchens modernized, offering a quick way to achieve a superior texture without complicated techniques. The result you’ll taste today is a small alchemy: the cottage cheese binds with flour to create structure, the blueberries provide juiciness and color, and the gentle sweetness arrives with a soft, inviting crumb that stays tender for hours. It’s the kind of recipe that invites you to improvise with what you have—swap in another berry if you like, switch up the citrus note, or fold in a handful of chopped nuts for additional texture. The dish becomes a canvas for regional flavors and seasonal produce, a hallmark of home cooking’s enduring charm.

Beyond the kitchen, this recipe speaks to a culture of accessible, joyful baking. It’s about the idea that you don’t need a long list of fancy ingredients to produce something memorable. With just a few pantry staples and a handful of berries, you can create muffins that feel like a little celebration of the morning. It’s the comforting promise: if you start with something as familiar as cottage cheese and end with something as universal as blueberries, the result is a universally appealing treat that can be enjoyed at dawn, midday, or after dinner as a soft, elegant finish. There’s a reason this style of muffin resonates with families, friends, and busy individuals alike—the balance is approachable, the flavor is bright, and the texture is irresistibly light. It’s a recipe that invites storytelling in the kitchen, as each batch carries a trace of the baker’s mood and style, from the amount of zest to the softness of the crumb, making every bake feel personal and cherished.

Why You’ll Love This Recipe

  • Airy, fluffy crumb: Cottage cheese creates a light, tender interior that rises beautifully without becoming dry or crumbly.
  • Juicy blueberry bursts: Each bite releases a pop of sweetness and a touch of tartness, thanks to high-quality blueberries.
  • Balanced, accessible flavor: A gentle dairy tang with bright fruit notes and a hint of citrus or vanilla harmonizes without overpowering the palate.
  • Quick and forgiving: Suitable for busy mornings; the batter comes together without special tools or long chill times.
  • Make-ahead-friendly: Bake a batch, refrigerate, and reheat—perfect for meal-prep breakfasts and snack times.
  • Versatile base: This batter is a wonderful foundation for variations, from different fruits to subtle spice infusions or nutty textures.
  • Kid-friendly and crowd-pleasing: The soft crumb and fruity sweetness make these muffins a favorite for families and gatherings alike.
  • Comforting aroma: As they bake, the kitchen fills with a cozy scent that signals warmth, care, and a little celebration of the morning.

Flavor Profile & Texture

The flavor profile of Fluffy Cottage Cheese Blueberry Muffins is a gentle symphony rather than a loud, single-note punch. The blueberries contribute a natural sweetness and a mild tartness that keeps the palate energized rather than overwhelmed. Their juice leaves soft, fruity ribbons that peek through the pale crumb, offering occasional bursts of bright flavor as you bite down. The cottage cheese works behind the scenes to deliver moisture and a feather-light crumb. It brings a subtle tang that perfectly counterbalances the fruit’s sweetness, creating a sense of balance that makes the muffins feel elevated without being complicated. If you’re sensitive to dairy, you’ll notice the tang is gentle and refined, not sharp—just enough to give the bite depth and a refreshing finish.

The texture is the star feature. The crumb is airy and delicate, yet sturdy enough to hold its shape when you pick up a muffin. There’s a fine crumb structure that dissolves softly on the tongue, with tiny air pockets that whisper of careful mixing rather than heavy mixing. The exterior offers a light, appealing crust that provides a subtle contrast to the tender interior—crisp at the edges but never tough. This combination means you can enjoy the muffins warm from the oven with a smear of butter, or cooled with a cup of tea or coffee. The flavor remains balanced through the temperature spectrum: warm muffins reveal more pronounced dairy tang and fruit aroma, while cooled muffins showcase a cleaner, more defined blueberry sweetness. Overall, the experience is comforting, approachable, and undeniably satisfying, making every bite feel both wholesome and indulgent in equal measure.

In terms of aroma, you’ll notice a gentle sweet-nutmeg or vanilla note depending on how you season the batter, which lingers as a soft invitation after you’ve finished the last bite. Some bakers like to add a whisper of citrus zest to brighten the fragrance and lift the fruit, while others prefer a more vanilla-forward approach for a classic muffin experience. Either way, the sensory journey—from the initial inhale of warm bakery fragrance to the final, lingering taste of soft crumb and fruit—creates a memorable eating moment that many people return to again and again. The overall mouthfeel is akin to a small, comforting cake that maintains the integrity of a muffin’s structure, offering a refined texture that still feels homemade and approachable.

Occasions & Pairings

These muffins shine in a variety of settings, from everyday breakfasts to special weekend gatherings. They’re equally at home as a quick morning bite before school or work, a relaxed weekend brunch centerpiece, or a dessert-like afternoon treat with a glass of cold milk or a hot beverage. The cottage cheese keeps the muffins pleasantly moist, so they don’t feel heavy even when enjoyed later in the day, which makes them especially suitable for make-ahead meals or a quick, comforting after-school snack. They also pair beautifully with seasonal fruit salads, yogurt bowls, or a light citrus-tinged sauce that doesn’t overpower the gentle flavor of the muffins themselves.

For coffee lovers, these muffins are a natural companion. The creamy, mild tang of the cottage cheese echoes the milkiness of a robust coffee, while the blueberries bring a lively contrast that keeps the palate awake. If you’re in the mood for a more decadent pairing, a simple dollop of whipped cream or a light cream cheese spread can add an extra layer of richness without overshadowing the muffin’s delicate flavor. In a brunch setting, they can be served alongside a selection of fresh fruit, a crisp green salad, and a light quiche to create a balanced spread that feels both comforting and refined. They also work wonderfully for potlucks and gatherings, where their bright color and universal appeal tend to delight both children and adults alike.

Seasonal suggestions can elevate the experience further. In summer, when berries are at their peak, these muffins sing with the freshest fruit available. In cooler months, a hint of cinnamon or nutmeg can be introduced to evoke autumn warmth, while a citrus zest brings a sunlit brightness that makes the muffins feel like a bright counterpoint to a chilly morning. The versatility of this recipe makes it a reliable option when you’re uncertain about what will appeal to a crowd: it’s a safe, crowd-pleasing choice that still feels special and thoughtfully crafted.

Tips, Variations & Substitutions

To keep your baking creative and flexible, here are ideas to tailor Fluffy Cottage Cheese Blueberry Muffins to your preferences, dietary needs, or what you have on hand. Each idea preserves the core concept—the light crumb from cottage cheese and the juicy blueberry accent—while inviting personal touches.

Gluten-Free & Alternative Flours

  • Experiment with a gluten-free flour blend that includes xanthan gum for structure, or try almond flour for a denser, nutty texture with more moisture retention.
  • Use a 1:1 gluten-free substitute with added binding agent to maintain lift and crumb integrity. Expect a slightly different texture, but still wonderfully tender.

Vegan & Dairy-Free Adaptations

  • Replace dairy with plant-based alternatives suitable for your pantry, such as vegan cottage cheese substitutes or silken tofu pureed until smooth, which can mimic the creamy texture needed for tenderness. Be mindful that the flavor notes may shift slightly, but the result can still be soft and moist with a bright finish.
  • Consider using a dairy-free yogurt or a thick plant-based yogurt to help maintain moisture and add tanginess that echoes the original profile.

Fruit Variations

  • Swap blueberries for raspberries, blackberries, or diced strawberries for a different fruit punch, color, and juice release. Mix-in small fruit chunks rather than whole berries if you prefer a more uniform crumb.
  • For a seasonal twist, fold in tart cherries or peaches (in season) to complement the dairy tang with gentle sweetness.

Flavor Enhancers

  • Add a subtle citrus note with a small amount of zest—lemon, orange, or a combination of both—to brighten the flavor profile without overpowering the fruit.
  • Enhance warmth with a pinch of spices like cinnamon, nutmeg, or cardamom, but start small to avoid masking the delicate blueberry and dairy flavors.
  • A vanilla bean or a drop of vanilla extract can deepen the aroma and round out the sweetness.

Texture Tweaks

  • Fold in a handful of chopped nuts (walnuts, almonds) for added crunch and a toasty aroma that complements the softness inside.
  • For a more rustic crumb, mix a portion of the batter with a touch more fat and fruit to create occasional larger pockets of moist crumb.

Storage & Make-Ahead Ideas

One of the best aspects of these muffins is how well they handle storage and make-ahead planning. They stay tender for days when stored properly, and they freeze beautifully for longer-term enjoyment. Here are practical tips to keep the muffins at their best.

  • Storage: Let muffins cool completely, then store in an airtight container at room temperature for up to 3 days. If the environment is warm or humid, refrigerate to extend freshness by a day or so, though refrigeration can slightly change the texture.
  • Make-Ahead: Bake muffins the day before or in advance and reheat gently in a 300°F (150°C) oven for about 5-8 minutes, or warm briefly in a microwave if you’re in a rush. Freshening them up this way helps restore some of the soft crumb they’re known for.
  • Freezing: Freeze baked muffins individually wrapped in parchment or in a freezer-safe container for up to 2-3 months. Thaw at room temperature and warm briefly if you crave a just-baked feel.
  • Storing Batter: If you like the idea of ready-to-bake batter, you can prepare the dry and wet components separately and combine just before baking. This helps you have a quick breakfast option ready on busy mornings, with a batter that’s fresh and lively.

Fun Facts & Trivia (Optional)

Did you know that muffins have a storied history as an American kitchen staple with European influences? The term “muffin” has varied origins, dating back to a 19th-century baking culture that favored small, quick-bake breads and cakes in portable formats. Blueberries, native to North America, became iconic in muffins thanks to their natural sweetness, vibrant color, and resilient texture when baked. In the culinary world, dairy-rich batters—whether using yogurt, cream cheese, or cottage cheese—have long been celebrated for their ability to yield moist, tender crumb. Cottage cheese itself has a long pedigree, valued for its high moisture content and mild tang that can brighten even the simplest baked goods. The combination of these ingredients taps into a tradition of homestyle baking that feels both comforting and timeless, a reminder that good food often comes down to balancing texture, moisture, and flavor with simple staple ingredients.

Another note about blueberries: their pigments, called anthocyanins, are powerful natural antioxidants, contributing not only to color but also to a sense of freshness in the mouthfeel. When baked into muffins, those pigments intensify as the berries release their juices, creating delightful purple swirls within the pale crumb. This visual cue paired with the tender aroma of a just-baked muffin is a sensory memory many of us chase—the kind of moment that makes you pause and smile, just before you take that first bite. The cottage cheese crumb, with its delicate tang, has been a quiet hero in many home kitchens, offering a dairy-forward solution that respects the texture and does not overwhelm the flavor of the fruit. It’s a small culinary trick that packs a big payoff, and it’s a testament to how thoughtful ingredient choices can elevate everyday baking into something memorable.

Ingredients

Muffin Base

  • – 1 1/2 cups all-purpose flour
    → Provides the structure for the muffin crumb. Sift with the dry leaveners (baking powder and salt) to ensure even distribution and a lighter texture. Avoid overmixing once the wet ingredients are added to keep the muffins tender and fluffy.
  • – 1/2 cup granulated sugar
    → Sweetens the batter and helps with browning. If you prefer a less sweet muffin, reduce to 1/3 cup or substitute part of it with a natural sweetener like maple syrup; adjust liquid slightly if using liquid sweeteners to maintain batter consistency.
  • – 2 teaspoons baking powder
    → Primary leavening agent that makes the muffins rise and stay light. Ensure the powder is fresh for maximum lift; whisk it with the flour to distribute evenly and bake promptly after mixing wet and dry ingredients to preserve rise.
  • – 1/2 teaspoon salt
    → Enhances overall flavor and tightens the crumb just enough for structure. If using salted butter, consider reducing to 1/4 teaspoon; use fine sea salt for even distribution and pronounced flavor without salt pockets.
  • – 1 cup cottage cheese (small curd, drained)
    → The star moisture contributor that yields a soft, ultra-tender crumb with extra protein. For the fluffiest result, blend the cottage cheese until smooth before adding to the wet mix; for a chunkier texture, blend less or whisk vigorously to break up lumps.
  • – 2 large eggs, room temperature
    → Provide moisture, structure, and help emulsify the batter for a light, cohesive crumb. Room-temperature eggs mix more evenly with other ingredients; if you’re short on time, whisk them with the cottage cheese to loosen before combining.
  • – 1/4 cup unsalted butter, melted
    → Adds richness and tenderness to the muffins. Melted butter integrates quickly and yields a moister crumb; if you prefer a lighter option, substitute with 3 tablespoons neutral oil and reduce butter to 2 tablespoons. Ensure the butter is not hot to avoid cooking the eggs or scorched flavors.
  • – 1 teaspoon vanilla extract
    → Elevates overall flavor and enhances the blueberry notes. For a deeper vanilla profile, use vanilla bean paste or add a scraped vanilla bean; avoid imitation vanilla if possible for a richer aroma.
  • – 1 cup fresh blueberries (or frozen, do not thaw)
    → The hallmark of the muffins providing juicy bursts and color. If using frozen berries, toss them with a teaspoon of flour to prevent color bleeding and fold in gently to keep berries intact; do not thaw to avoid purple streaks in the batter.
  • – 1 teaspoon lemon zest (optional)
    → Brightens the batter and complements the tang of cottage cheese and blueberries. Zest before extracting juice to avoid adding moisture; if you love a stronger zing, increase to 1 1/2 teaspoons. Use unwaxed lemons for best aroma.

Optional Add-ins

  • – 1/2 cup chopped walnuts (optional)
    → Adds crunch and a toasty, earthy flavor that pairs beautifully with blueberries. Toast the walnuts briefly in a dry pan to deepen their aroma, then chop into small, even pieces to distribute evenly throughout the batter. They also contribute healthy fats and protein for a more satisfying muffin.
  • – 1/2 cup white chocolate chips or mini chocolate chips (optional)
    → Introduces a creamy chocolate contrast that pairs surprisingly well with the fruity blueberries. Use mini chips to avoid large pockets; fold in gently to preserve the light crumb and prevent overmixing.
  • – 2 tablespoons coarse sugar for topping (optional)
    → Creates a subtle, crunchy crust on top as the muffins bake. Sprinkle just before baking; too much can create a gritty crust or sink into the batter, but a light dusting adds a pleasant finish.

Instructions

  • Preheat your oven to 375°F (190°C) and line a 12-cup muffin tin with paper liners or grease it well.
    → This creates a controlled baking environment and ensures the muffins release cleanly after baking.
  • In a large bowl, whisk together 1 1/2 cups all-purpose flour, 1/2 cup granulated sugar, 2 teaspoons baking powder, and 1/2 teaspoon salt until evenly distributed.
    → Sifting or whisking dry ingredients breaks up clumps, distributes leavening, and yields a lighter, more uniform crumb when mixed with the wet ingredients.
  • In a blender or food processor, blend 1 cup cottage cheese (small curd, drained) until smooth, stopping to scrape the sides as needed.
    → A smooth cottage cheese creates a tender, ultra-soft crumb; blending reduces lumps that can create density in muffins.
  • In a separate bowl, whisk 2 large eggs, 1/4 cup melted unsalted butter (cooled to warm, not hot), and 1 teaspoon vanilla extract until the mixture is pale and homogeneous.
    → Room-temperature eggs emulsify more evenly with the fats and dairy, and warming the butter prevents cooking the eggs during mixing.
  • Add the smooth cottage cheese to the egg-butter-vanilla mixture and whisk until completely integrated, creating a cohesive wet base.
    → Uniform integration ensures consistent moisture and structure throughout the batter rather than swirls or curdled pockets.
  • Gently fold the dry ingredients into the wet mixture using a large rubber spatula, stopping as soon as there are no visible streaks of flour to prevent overmixing and a tougher crumb.
    → Minimal mixing keeps gluten in check and preserves a light, tender muffin texture; excessive handling develops toughness.
  • If using lemon zest, fold in 1 teaspoon of zest now, distributing evenly with quick, circular motions and avoiding overmixing that could release excessive oils.
    → The zest brightens the flavor and balances the richness of the cottage cheese without introducing extra liquid.
  • Prepare 1 cup fresh blueberries (or frozen, do not thaw) and, if using frozen berries, toss them with 1 teaspoon all-purpose flour to prevent color bleeding; then fold the berries into the batter with the gentlest possible motion.
    → Coating frozen berries helps keep their color in the batter and folding them in quickly minimizes bruising and juice loss.
  • Optionally, if using walnuts, toast 1/2 cup chopped walnuts in a dry skillet over medium heat until fragrant and lightly golden, about 3 to 5 minutes, then cool completely and fold into the batter.
    → Toasting releases nut oils, enhancing aroma and flavour; chopping into small, even pieces ensures even distribution in each muffin.
  • Optionally, if using white chocolate chips, fold in 1/2 cup chips after the berries to avoid clumping and creating large pockets of sweetness; use a gentle touch to maintain crumb structure.
    → Chips add creamy sweetness that complements blueberries without overpowering the muffin; avoid overmixing when adding chips.
  • Divide the batter evenly among the 12 prepared muffin cups, filling each about 3/4 full using a 1/4-cup measure or two spoons for consistent portions.
    → Proper filling ensures that muffins rise to a domed top without overflowing and bake through in the center.
  • Sprinkle 2 tablespoons coarse sugar on top of the batter in each cup if you desire a light, crunchy top; skip this step if you prefer a softer crust.
    → The sugar creates a delicate crust that contrasts with the tender interior and adds sparkle under the crust.
  • Bake the muffins in the preheated oven, rotating the tin halfway through bake, at 375°F (190°C) for 18 to 22 minutes, until the tops are golden and a toothpick inserted into the center comes out with only a few moist crumbs.
    → Even heat distribution and proper bake time ensure full doneness without drying out the crumb; rotating ensures even browning on all sides.
  • Let the muffins rest in the pan for 5 minutes, then transfer to a wire rack to cool completely, which allows steam to escape and prevents sogginess.
    → Cooling on a rack prevents condensation from accumulating on the bottoms and keeps the crust crisp.
  • Store cooled muffins in an airtight container at room temperature for up to 3 days or freeze for longer storage, reheating gently as desired; thaw frozen muffins in the fridge or at room temperature before reheating.
    → Proper storage maintains moisture and prevents drying; freezing preserves the muffins’ fluffy texture for longer periods.

Notes

These fluffy cottage cheese blueberry muffins are protein-rich and moist, thanks to small-curd cottage cheese that creates a tender crumb. The blueberries burst with juicy sweetness in every bite, while a touch of lemon zest brightens the flavor. For best results, ensure the cottage cheese is well-drained and blended smooth for an ultra-smooth batter; if you prefer a chunkier texture, whisk until only small lumps remain. You can customize them by adding a tablespoon of grated zest from lemon or orange, or swap half of the flour with almond flour for a nuttier profile. They freeze well and reheat beautifully in minutes for a quick breakfast or snack. For an extra boost, serve with a dollop of yogurt or a light honey drizzle. If you need a gluten-free version, substitute with a 1:1 gluten-free flour blend and make sure the baking powder is certified gluten-free.

Tips

Tips for Fluffy Cottage Cheese Blueberry Muffins

  • Sift the dry ingredients with the leaveners. Sifting flour, baking powder, and salt together ensures even distribution, which helps the muffins rise evenly and stay light. This also minimizes overmixing later.
  • Drain and blend the cottage cheese well. For the fluffiest crumb, blend the cottage cheese until very smooth before adding to the wet ingredients. If you prefer a chunkier texture, blend less or whisk vigorously to break up lumps.
  • Use room-temperature eggs. Room-temperature eggs emulsify better with the other ingredients, yielding a moister, cohesive batter. If you’re short on time, whisk eggs with the cottage cheese to loosen before combining.
  • Cool melted butter before adding. Let the melted butter cool slightly so it doesn’t scramble the eggs or curdle the mixture, which helps maintain a tender crumb. If you want a lighter option, you can substitute with 3 tablespoons neutral oil and reduce butter to 2 tablespoons.
  • Don’t overmix after adding wet to dry. Mix just until the flour disappears. Overmixing develops gluten and can make muffins dense rather than fluffy.
  • Fold in blueberries gently and handle frozen berries with care. Fold blueberries in after the batter comes together to avoid breaking them. If using frozen berries, toss them with a teaspoon of flour to prevent color bleed and fold in carefully; do not thaw.
  • Optional lemon zest adds brightness. If you’re using lemon zest, add it to the dry mix to distribute evenly. Zest before juicing the lemon to avoid adding extra moisture. If you love citrus, you can increase to up to 1 1/2 teaspoons for more zing.
  • Add-ins should be balanced. Toasted walnuts bring crunch and aroma; white chocolate chips add sweetness without overwhelming the berries. Chop add-ins evenly to distribute in the batter. For chips, use mini chips to avoid large pockets.
  • Top with a light sugar sprinkle for texture. A small dusting of coarse sugar on top creates a brief crust and pleasant crunch. Too much sugar on top can sink into the batter during bake.
  • Fill muffin cups properly. Fill each cup about 2/3 to 3/4 full for domed, uniform muffins. Overfilling can cause muffins to burst or seam while underfilling yields smaller muffins.
  • Check for doneness accurately. Bake until a toothpick inserted into the center comes out with a few moist crumbs. If using a convection oven, reduce the temperature by about 25°F (14°C) or adjust bake time accordingly.
  • Cool properly to finish the crumb set. Let muffins rest in the pan for about 5 minutes before transferring to a wire rack. This helps set the structure and prevents dense centers from steaming.
  • Store and freeze with care. Store muffins in an airtight container for 2–3 days at room temperature or refrigerate for up to a week. Freeze baked muffins for longer storage; reheat briefly in the microwave or a low oven to refreshed softness.

FAQ

What makes these muffins fluffy?

The cottage cheese adds moisture and protein, which helps create a tender, light crumb. Blending the cottage cheese with the eggs creates a smooth batter, and careful folding of the blueberries prevents them from collapsing the batter. Avoid overmixing to keep the muffins airy.

What ingredients do I need to make Fluffy Cottage Cheese Blueberry Muffins?

Suggested ingredients (adjust for dietary needs):

  • 1 cup cottage cheese (blended until smooth) or lactose-free cottage cheese
  • 2 large eggs
  • 1/2 cup granulated sugar (adjust to taste)
  • 1 1/2 cups all-purpose flour (or 1:1 gluten-free flour)
  • 2 teaspoons baking powder
  • 1/2 teaspoon baking soda
  • 1/4 teaspoon salt
  • 1/2 cup milk (d dairy or non-dairy)
  • 1/4 cup melted butter or neutral oil
  • 1 teaspoon vanilla extract
  • 1 cup fresh or frozen blueberries (if using frozen, do not thaw)

You can adjust sweeteners and dairy to fit your needs.

Can I use lactose-free cottage cheese?

Yes. Lactose-free cottage cheese works perfectly here and will not significantly change texture or flavor. The batter will still be fluffy and moist.

Can I substitute yogurt or sour cream for cottage cheese?

Yes. Plain yogurt or sour cream can replace some or all of the cottage cheese, though texture may be creamier. If you use yogurt, reduce the milk by about 1/4 cup to maintain moisture balance. Greek yogurt will yield a thicker batter; you might add a splash more milk if needed.

How should I prepare the blueberries to prevent sinking?

Toss the blueberries with a tablespoon of flour before adding them to the batter. This helps them stay suspended and distribute evenly during baking. Fold them in gently at the end to avoid color bleeding and color staining the batter.

What size muffin pan and how long to bake?

Use a standard 12-cup muffin tin. Bake at 375°F (190°C) for about 18–22 minutes, or until the tops are lightly golden and a toothpick inserted into the center comes out clean. Let muffins cool in the pan for 5 minutes, then transfer to a wire rack.

Is there a gluten-free version?

Yes. Use a 1:1 gluten-free flour blend (or a gluten-free all-purpose flour). You may need to add an extra tablespoon or two of milk and/or a pinch more baking powder to achieve the same rise. Avoid overmixing to keep the muffins fluffy.

Can I reduce sugar or use alternative sweeteners?

You can reduce sugar to 1/3 cup if you prefer lighter sweetness. For sugar-free options, use a granulated or monk fruit sweetener, keeping in mind some substitutes can alter texture or browning. Start with a 1:1 substitute and adjust to taste, watching moisture balance as needed.

How should I store leftovers?

Store leftover muffins in an airtight container at room temperature up to 2 days. For longer storage, refrigerate up to 5 days or freeze for up to 2–3 months. Reheat in the microwave for 20–30 seconds or warm in a 350°F (175°C) oven for 5–7 minutes to refresh the texture.

Can I freeze the batter or the baked muffins?

Baked muffins freeze well; freeze cooled muffins in a bag or airtight container. Reheat as noted above. Freezing batter is possible but not as commonly recommended; if freezing batter, portion into cups and bake directly from frozen, adding a few extra minutes to the bake time.

Can I customize with flavor additions like lemon, cinnamon, or nuts?

Absolutely. Add 1–2 teaspoons of lemon zest for brightness, 1/4 teaspoon ground cinnamon for warmth, or fold in chopped nuts (walnuts, pecans) for crunch. You can also add a pinch of lime zest or a splash of almond extract for a different twist.

Should I grease the pan or use liners?

Use muffin liners or lightly grease the cups with butter/oil to prevent sticking. Fill each cup about 2/3 full to allow room for rising.

Introduction / Hook

Imagine a bowl full of crisp, golden florets that crackle lightly with every bite, coated in a glossy, seductive glaze that mingles sweet, savory, and a whisper of heat. Picture sesame seeds catching the light as you drizzle the last traces of glaze over a bed of steaming rice or tucked neatly into a vibrant grain-free base. General Tso’s Cauliflower Bowls are not just a vegetarian riff on a popular classic; they’re a celebration of textures and contrasts—the satisfying bite of a well-roasted crown against a tangy, lacquered coating that clings like a friendly hug. This dish is all about transformation: humble cauliflower reimagined as a crave-worthy main that can stand on a weeknight table or shine at a crowded weeknight dinner with friends. The aroma alone can lure even the most skeptical eater to the table—roasted cauliflower mingling with garlic, ginger, a kiss of heat, and a glossy glaze that glimmers like lacquer under warm kitchen light.

What makes these bowls truly special is how they deliver the comforting, nostalgic vibes of a takeout favorite while offering a balanced, vegetable-forward approach. There’s a reason General Tso’s sauce has endured: a brilliant harmony of savoriness, brightness, and a subtle sweetness that invites you to go for “just one more bite.” When you turn that familiar flavor into a plant-powered crowd-pleaser, you unlock a dish that’s not only delicious but also versatile, nourishing, and surprisingly easy to pull off. Every element—from the crisped florets to the glossy, lacquered finish to the little bursts of aroma when you spoon over a tangy sauce—works in concert to create a memorable eating experience. The bowls invite you to savor with all senses: the way steam curls up from the surface, the shimmer of glaze along the florets, the heat that builds gently and gracefully, and the way a squeeze of citrus or a sprinkle of fresh herbs can elevate the entire plate in an instant.

The Story Behind the Dish

The original General Tso’s chicken is a dish born in Chinese-American cuisine, a beloved staple that emerged in the mid-20th century and quickly became a symbol of bold flavors and comforting indulgence. Its signature glaze—slightly spicy, deeply savory, with a glossy, almost syrupy quality—complemented crispy chicken wings or chunks that offered a satisfying textural contrast. Over time, creative cooks began to reinterpret the dish through a plant-forward lens, swapping proteins for vegetables or legumes without losing the essence of the sauce. This cauliflower version pays homage to the spirit of the classic: the same bright lacquer, the same balance of sweet, salty, and heat, but with cauliflower taking center stage as a powerhouse of texture and flavor.

As the tempering of heat and sweetness meets the crisp edges of roasted cauliflower, the dish becomes a story about adaptation and ingenuity—how a much-loved favorite can be reimagined to fit different diets, lifestyles, and celebrations. In many households, cauliflower has become a forgiving canvas for ambitious flavor experiments: it roasts up with caramelized edges, absorbs glossy sauces without losing its bite, and stands proudly as a main dish when paired with grains, greens, or a lively salad. This particular adaptation keeps the soul of the original dish intact—an addictive glaze, a touch of heat, and a sense of comfort that makes you feel a little nostalgic while you’re eating something fresh, modern, and vibrant.

Regionally, cauliflower as a stand-in for meat has become a symbol of culinary flexibility. In home kitchens around the world, cooks have embraced cauliflower’s versatility to create weeknight-friendly meals that don’t compromise on flavor. The bowls you’re about to savor carry with them that sense of cross-cultural exchange—the fusion of traditional Chinese-inspired seasonings with a contemporary plant-forward approach that’s accessible to cooks of all levels. It’s a testament to how a single vegetable can carry multiple identities: from humble side dish to satisfying centerpiece, from weekday comfort to weekend crowd-pleaser. The story behind these bowls is a celebration of adaptation, generosity, and the joy of sharing a dish that fills a room with warmth and conversation as it fills plates with irresistible tastes and textures.

Why You’ll Love This Recipe

  • Plant-forward comfort with the soul of a beloved takeout classic — without sacrificing flavor or indulgence.
  • Crisp-tender cauliflower that roasts to a caramelized edge, providing a satisfying bite every time.
  • A glossy, tangy-sweet glaze that clings to every floret, delivering a balanced hit of heat and brightness.
  • Flexible protein-free main that’s approachable for vegetarians and easily adaptable for vegans or gluten-free diets.
  • One-pan or one-bowl convenience: you can prep the cauliflower and sauce in harmony, then assemble bowls for a quick, visually impressive meal.
  • Perfect for weeknights, meal-prep, or casual gatherings where everyone wants a generous, flavorful dish without heavy cooking timelines.
  • Pairs beautifully with a variety of grains, greens, and crunchy toppings, making it easy to customize for your pantry and preferences.
  • Idea-rich canvas for substitutions, regional twists, or playful add-ins like sesame seeds, scallions, or a squeeze of citrus.
  • Low-muss, high-impact dish: you can deliver big flavor with relatively simple techniques that are forgiving and forgiving to beginners as well as satisfying for seasoned cooks.

Flavor Profile & Texture

The flavor profile of General Tso’s Cauliflower Bowls is a masterclass in balance. The cauliflower itself offers a gentle, nutty sweetness that intensifies as it roasts. Each floret develops a crisp, caramelized edge that adds a roasted depth and a satisfying snap—the kind of texture that makes a bite feel like a small victory. The glaze—silky, glossy, and deeply fragrant—combines savory undertones with a hint of sweetness and a whisper of heat. Think soy or tamari-like savoriness, a bright kiss of acidity, a touch of sweetness, and a gentle chili warmth that doesn’t overpower but instead invites you to lean in for more.

In the background, you’ll notice garlic and ginger perfume the air, offering aromatic bite without being harsh. The glaze is designed to cling, so every bite carries the same brightness and savor as the first, with occasional caramelized edges where the sauce has weathered against the surface of the cauliflower. The dish often benefits from a final, light citrus note or a drizzle of nutty sesame oil to lift the entire flavor profile, brightening the glaze and providing a condiment-friendly finish that you can tailor to your taste.

Texture-wise, you get a multi-layered experience: the crisp exterior of the roasted cauliflower contrasts with the tender interior, and the glaze adds a lacquered sheen that provides a slight stickiness on the surface. When you bite into the bowls, there’s a satisfying chew that stays with you, followed by the quick release of citrusy brightness or a peppery note from optional greens. The toppings—whether sesame seeds, scallions, or toasted nuts—introduce a crunchy counterpoint that elevates every mouthful. This harmonious interplay between crispness, tenderness, gloss, and crunch makes the dish feel substantial, comforting, and just a little glamorous, all at once.

Occasions & Pairings

General Tso’s Cauliflower Bowls shine in a spectrum of settings. They’re ideal for weeknight dinners when you want big flavor with minimal fuss, yet they also scale gracefully for casual gatherings, potlucks, or family-style meals where meat-free options are appreciated. The bowls pair wonderfully with a variety of accompaniments, enabling you to tailor the dish to the occasion and your guests’ preferences. A bright side of greens or a light cucumber salad can contrast the richness of the glaze, while a grain base—like brown rice, quinoa, farro, or even a simple cauliflower “rice” base—provides a hearty, satisfying foundation that keeps portions balanced.

Suggested pairings include a crisp, citrusy beverage or a light beer that doesn’t overwhelm the glaze, plus a cooling yogurt or dairy-free alternative on the side to balance heat for those who prefer milder spice. For holiday tables or celebratory dinners, these bowls can be plated with additional color and texture: a sprinkle of herbs, a few toasted seeds, or a whisper of chili threads to echo the glaze’s warmth. You can also transform bowls into a build-your-own station, inviting guests to choose their toppings, grains, and greens for a custom experience that’s interactive and fun.

If you’re feeding a larger crowd, you can serve the cauliflower bowls alongside other Asian-inspired dishes or fusion plates that echo the sweet-salty-sour balance of the glaze. The versatility of this dish makes it a reliable centerpiece for weeknights and an eye-catching option for entertaining — easy to prepare, visually appealing, and impossibly satisfying in flavor and aroma.

Tips, Variations & Substitutions

  • Make it vegan and gluten-free-friendly by using tamari or coconut aminos in place of regular soy sauce. A touch of maple syrup or agave can replace honey if you’re aiming for a vegan glaze; adjust sweetness to taste.
  • For extra crunch, finish the dish with a handful of toasted sesame seeds or chopped peanuts. A squeeze of lime or lemon over the bowls right before serving can brighten the flavors and add a fresh zing.
  • Experiment with heat: if you love spice, add a pinch of chili flakes or a dab of chili paste to the glaze. If you prefer milder flavors, dial back the heat and let the sweetness and savoriness shine.
  • Texture play: toss the roasted cauliflower florets in a light cornstarch or arrowroot slurry before roasting to intensify crispness. This helps the glaze cling even more firmly to each piece.
  • Color and nutrition: add a handful of quickly blanched greens, like baby bok choy or spinach, to the bowls for color and a pop of freshness. A quick lemon-ginger dressing on the greens can tie everything together beautifully.
  • Make-ahead option: roast the cauliflower florets ahead of time and store them, chilled, in an airtight container. Reheat briefly and toss with warmed glaze just before serving to keep the edges crisp and the glaze glossy.
  • Alternative proteins: if you’re not avoiding meat, crispy fried chicken bites or tempeh strips can be offered as additional components to create a fuller spread, while keeping the cauliflower bowls at the center of the plate for guests who prefer plant-forward options.
  • Regional twists: swap the glaze’s flavor notes to reflect different culinary traditions—incorporate sesame oil, garlic-ginger accents, or a touch of rice vinegar for a tangier, more pungent finish; or meld with a touch of hoisin for a deeper sweetness.

Storage & Make-Ahead Ideas

leftover cauliflower bowls can be a quick, satisfying meal plan for busy weeks. To maximize texture and flavor, store components separately: keep roasted cauliflower in an airtight container and sauce in another, allowing you to reheat the florets and recoat with warm glaze when ready to serve. Reheating in an oven or toaster oven at a moderate temperature helps preserve crispiness more effectively than microwaving, which can soften the exterior. If you’ve already combined the components, a gentle, low-heat reheat and a quick re-glaze can rejuvenate the gloss and aroma.

Make-ahead strategies include roasting the cauliflower in advance and preparing the glaze ahead of time. When you’re ready to eat, warm everything together briefly, then assemble bowls with fresh toppings and greens. For meal prep, portion cooked grains or greens and keep them ready. The dish scales well for batch cooking: you can roast large quantities of cauliflower, store them in the fridge for 3–4 days, and reheat to assemble bowls in minutes. If you freeze, note that cauliflower can change texture slightly after freezing and thawing, so this approach is best reserved for meals where texture is less critical or where you plan to re-crisp the cauliflower upon reheating.

Fun Facts & Trivia (Optional)

General Tso’s sauce has a storied reputation as one of the most enduring flavors in American-Chinese cuisine, yet the dish’s exact origins are debated, with several chefs and regions claiming a version or inspiration. The cauliflower adaptation you’re enjoying is part of a broader modern trend: transforming classic, meat-centered dishes into plant-forward versions that retain the familiar comfort while supporting more vegetables on the plate. Cauliflower’s rise to culinary stardom—roasting to sweet, nutty notes and absorbing bold sauces—has made it a universal canvas for flavor experiments across cuisines. Sesame seeds, scallions, and a dash of citrus or vinegar in glaze and finishing touches reflect a playful balance between Asian-inspired techniques and home-cooked simplicity. The result is a dish that whispers stories of culinary innovation, home kitchens, and the joy of sharing a nourishing meal with loved ones.

Another noteworthy tidbit: the term “bowls” in modern cooking underscores an invitation to mix and match, to layer flavors, textures, and colors as you please. Bowls are not just meals; they’re a narrative in a bowl—each bite a micro-story of textures (crisp-tender florets, glossy glaze, crunchy toppings) and flavors (savory, sweet, sour, spicy) that come together in a harmonious, satisfying whole. When you serve General Tso’s Cauliflower Bowls, you’re inviting everyone around the table to participate in assembling their own balanced, flavorsome plate—an intimate, interactive dining experience that’s deeply satisfying on multiple levels.

Ingredients

Cauliflower Bites

  • 1 large head cauliflower, cut into evenly sized florets
    → The cauliflower is the star of General Tso’s Cauliflower Bowls. Cutting into uniform florets ensures even cooking and crisp edges. After washing, dry thoroughly to remove surface moisture; moisture will steam the coating and prevent browning. For best results, pat dry and keep florets fairly dry before dipping into the batter.
  • 1 cup all-purpose flour (or gluten-free flour blend)
    → This forms the crust base that binds to the cauliflower and gives the coating its structure. If using gluten-free flour, choose a blend designed for frying and consider adding a touch more starch to mimic gluten’s bite. Whisk with the dry seasonings to distribute evenly and prevent clumps.
  • 1/2 cup cornstarch
    → Adds extra crispness and helps the batter cling to the florets for a crackly crust. Mix with the flour to create a light, even coating. If you’re grain-free, substitute with potato starch or a fine rice flour blend, but keep the ratio similar for best texture.
  • 1 teaspoon baking powder
    → Leavens the crust slightly to create a puffier, crisper exterior when fried or baked. Use fresh baking powder for optimal lift. If you skip baking powder, the coating will be denser but still flavorful.
  • 1/2 teaspoon salt
    → Enhances the flavor of the crust, helping balance the sauce’s saltiness later. You can adjust lightly at the end if your sauce is particularly salty.
  • 1/2 teaspoon black pepper
    → Adds a subtle peppery note to the crust. Freshly ground black pepper can intensify aroma; adjust to taste.
  • 1 teaspoon garlic powder
    → Imparts a savory depth that blends with the General Tso’s flavor profile. Since the sauce includes garlic, this powder helps build a cohesive crust aroma even before saucing.
  • 1/2 teaspoon onion powder
    → Adds a gentle sweetness and savory edge that complements the soy, ginger, and garlic in the sauce. Optional if you prefer a sharper crust; keep if you enjoy subtle depth.
  • 3/4 cup cold water
    → Provides the batter with enough body to coat the florets without seeping through. Cold water helps maintain a thicker batter, improving adherence and crispness. If you want a lighter crust, you can replace a portion with cold sparkling water for extra lift.
  • 2 tablespoons neutral oil (optional)
    → A touch of oil in the batter can improve cling and yield a slightly crisper crust when baked or fried. If you’re aiming for a lighter, oil-free crust, omit this and rely on the batter’s water and starches. If using, whisk it into the dry mix or gently blend into the wet ingredients for even distribution.

General Tso Sauce

  • 3 tablespoons soy sauce or tamari
    → The savory backbone of the sauce, providing saltiness and depth. Tamari is gluten-free; choose accordingly. If you’re watching sodium, opt for a low-sodium soy or tamari and balance with a touch more acid or a small amount of water to taste.
  • 2 tablespoons rice vinegar
    → Adds brightness and acidity to balance the sweetness and heat. If you’re sensitive to acidity, start with 1 tablespoon and adjust to taste after simmering the sauce.
  • 2 tablespoons hoisin sauce
    → Introduces a sweet, tangy, umami richness that characterizes General Tso’s flavor. Choose a good quality hoisin and stir well to prevent clumps in the sauce. You can adjust to taste by adding a touch more hoisin or a teaspoon of miso for depth.
  • 2 tablespoons brown sugar (or maple syrup)
    → Provides caramel-like sweetness that counterbalances the tanginess and heat. If you prefer a less sweet version, reduce to 1 tablespoon or substitute with a sugar substitute that behaves well in sauces. Allow the sugar to melt fully for a glossy sauce.
  • 2 garlic cloves, minced
    → Fresh garlic infuses the sauce with aromatics that pair with ginger and soy. Fine-mince to avoid biting pieces and ensure even distribution in the sauce.
  • 1 tablespoon grated fresh ginger
    → Adds warm, spicy brightness typical of General Tso’s. Fresh ginger brightens the sauce a lot more than powdered ginger; grate finely so it dissolves into the sauce.
  • 1 tablespoon cornstarch
    → Used to make a slurry with water (below) to thicken the sauce into a glossy glaze that clings to the cauliflower. Pre-dissolve in the accompanying water to avoid lumps.
  • 2 tablespoons water
    → Combines with the cornstarch to create a smooth slurry for thickening. If the sauce thickens too quickly, add a little more water gradually until you reach the desired consistency.
  • 1 teaspoon sesame oil (optional)
    → Finishes the sauce with a toasty nutty aroma. It’s optional but adds depth; add at the end after removing from heat to avoid breaking emulsion.
  • 1/2 teaspoon chili flakes or 1 teaspoon Sriracha (adjust to taste)
    → Provides heat to mimic the signature General Tso’s spice. Start with less, then increase; the heat should balance the sweetness without overpowering the dish.

Base

  • 2 cups cooked jasmine rice
    → The classic bed for General Tso’s Cauliflower Bowls. Rice provides a neutral base that soaks up the sauce. If you prefer a healthier option, substitute with brown rice or quinoa, but keep in mind cooking times and absorption will differ. Fluff the rice after cooking and keep warm until serving.

Toppings

  • 1 tablespoon sesame seeds
    → For garnish and a light crunch. Toast the seeds briefly in a dry skillet until fragrant to deepen the nutty aroma before sprinkling over the bowls for both flavor and presentation.
  • 2 green onions, sliced
    → Adds fresh herbal brightness and color. Slice thinly on a bias for nicer texture and vibrant green color. Use both white and green parts for more depth.

Optional Add-ins

  • 1 cup broccoli florets (optional)
    → Adds extra texture and color; lightly steam or roast before combining with cauliflower to maintain crisp-tender texture. Works well with the General Tso sauce for a fuller bowl.
  • 1/2 cup red bell pepper, sliced (optional)
    → Brings sweetness and color. Slice thinly so it cooks quickly and remains crisp when tossed with the hot sauce.
  • 1/2 cup snap peas (optional)
    → Adds snap and freshness. Blanch briefly or sauté with a touch of oil to maintain bright color and crunch before mixing with cauliflower bites and sauce.

Oil for Cooking

  • 2 tablespoons neutral oil for frying or air-frying the coated cauliflower
    → If you’re frying, use a neutral oil with a high smoke point (like canola or peanut). For baking or air-frying, lightly brush or spray the coated florets with oil to help achieve crisp edges; the oil amount can be adjusted based on your method and preference. If you skip frying altogether, you can still achieve a crisp exterior by baking at 425°F (220°C) on a parchment-lined sheet, flipping halfway through.

Instructions

  • Preheat your oven to 425°F (220°C) and line a large rimmed baking sheet with parchment paper or a silicone mat.
    → This high heat promotes quick browning and a crisp coating while keeping the cauliflower from sticking to the pan.
  • Rinse the cauliflower and pat it dry, then cut into evenly sized florets, about 1½ inches each.
    → Uniform florets ensure even cooking and consistent crispness; drying thoroughly prevents steam from softening the crust.
  • Whisk together the all-purpose flour, cornstarch, baking powder, salt, black pepper, garlic powder, and onion powder in a large bowl to form an evenly distributed dry base.
    → Sifting or whisking eliminates clumps and guarantees a uniform crust texture that adheres to the florets.
  • In a separate bowl, whisk the cold water with the optional neutral oil (if using) to create a thick, cold batter, then slowly whisk in the rest of the dry mixture until a cohesive batter forms.
    → Cold liquid keeps the batter thick enough to cling to the florets, while the fat (if included) aids adhesion and yields a crisper crust when heated.
  • Dip each cauliflower floret into the batter, turning to coat completely, then lift and let excess batter drip back into the bowl before placing evenly on the prepared baking sheet.
    → A full, even coat ensures a crackly crust; allowing excess to drip prevents pooling that would cause soggy edges.
  • Lightly brush or spray the battered florets with neutral oil (or skip if you prefer a lower-fat version) to promote browning and add initial crispness. Arrange florets in a single layer with space between them.
    → Oil helps the crust fry slightly in the oven heat, producing a more Golden crust and preventing sticking between florets.
  • Bake the coated florets in the preheated oven for 20–25 minutes, turning once halfway, until the crust is deeply golden and the cauliflower is tender around the core.
    → Turning ensures even browning on all sides and prevents one side from scorching while the other stays pale.
  • Meanwhile, in a small saucepan, combine the soy sauce (or tamari), rice vinegar, hoisin, and brown sugar, then stir in the minced garlic and grated ginger.
    → This creates the savory-sweet foundation of General Tso’s sauce; fresh aromatics provide brightness that balances the glaze.
  • In a separate cup, dissolve the cornstarch in 2 tablespoons of water to form a smooth slurry, then whisk it into the simmering sauce.
    → The slurry thickens the sauce into a glossy glaze that clings to the cauliflower without becoming runny.
  • Simmer the sauce for 1–2 minutes, whisking constantly, until it coats the back of a spoon and turns a deep, glossy amber; remove from heat and stir in the optional sesame oil if using.
    → Heat activates the flavors and creates a balanced glaze; sesame oil adds a toasted note but should be added off the heat to preserve its aroma.
  • When the cauliflower bites are crisp and golden, transfer them to a large bowl and pour the warm General Tso’s glaze over them; toss vigorously to coat every piece evenly without tearing the crust.
    → Tossing while warm ensures the sauce adheres seamlessly and prevents crust from cracking when moved.
  • Cook the jasmine rice according to package instructions, then fluff with a fork, and keep warm as the bowls come together.
    → Fluffy rice provides a neutral bed that absorbs sauce and complements the crisp cauliflower without becoming gummy.
  • Toast the sesame seeds in a dry skillet over medium heat for 1–2 minutes until fragrant, then transfer to a small dish for garnishing.
    → Toasting deepens their nutty aroma, adding a crisp, aromatic finish to the bowls.
  • Slice the green onions thinly on a bias to yield elegant ribbons in both white and green parts for color and brightness.
    → The green tops add fresh bite and contrast against the rich glaze on the cauliflower.
  • If using optional add-ins, lightly steam or sauté broccoli florets, red bell pepper slices, and snap peas until just tender, then set aside to fold into the bowls later.
    → Quick blanching or sautéing preserves crisp-tender texture and vibrant color, enhancing the overall bowl composition.
  • To assemble, spoon a generous bed of jasmine rice into each serving bowl, top with a portion of General Tso’s cauliflower bites, then scatter the optional vegetables and green onions over the top.
    → Proper layering ensures each bite has balance of starch, cauliflower, and bright aromatics for a cohesive finish.
  • Finish each bowl with a light sprinkle of toasted sesame seeds and an extra drizzle of the sauce if desired, then serve immediately while the crust remains crisp.
    → Fresh garnish and a hot glaze deliver maximum texture contrast and a glossy presentation that mirrors restaurant standards.

Notes

These General Tso’s Cauliflower Bowls are a crave-worthy, plant-based take on takeout, featuring crisp battered cauliflower bites tossed in a glossy, spicy-sweet General Tso’s sauce and served over warm jasmine rice for a satisfying bowl meal. To keep it gluten-free, use a gluten-free flour blend for the crust and tamari or gluten-free soy sauce in the sauce, and double-check that the hoisin is gluten-free. Dry the cauliflower thoroughly and keep the batter cold to maximize crispness, then fry in neutral oil, bake at 425°F (220°C) on parchment, or air-fry for a lighter, crisper finish. The sauce thickens with a cornstarch slurry (dissolve the cornstarch in water before adding) and should be simmered long enough for the flavors to bloom; adjust sweetness and heat by tasting and balancing with additional rice vinegar, chili flakes, or Sriracha. Garnish with sesame seeds and sliced green onions for color and aroma, and fold in optional add-ins like broccoli, red bell pepper, or snap peas for extra crunch. Leftovers keep 2–3 days in the refrigerator; reheat in a hot oven or air fryer to restore crispness and loosen the glaze if needed. For make-ahead meals, roast the cauliflower and prepare the sauce separately; combine just before serving to retain texture and brightness. You can customize the heat level by reducing or increasing the chili, and a dash of toasted sesame oil at the end adds a fragrant finish. Always check labels on hoisin, soy/tamari, and flour to ensure gluten-free status if you have a gluten intolerance.

Tips

Tips for General Tso’s Cauliflower Bowls

Cauliflower prep and crust tips

  • Pat the cauliflower florets very dry after washing. Surface moisture will steam the coating and prevent browning, so drying thoroughly is key for a crisp crust.
  • Keep florets uniform in size so they cook evenly and develop consistent browning on all sides.
  • Whisk the dry coating ingredients together well and use cold water to form a thick, clingy batter. Rest the batter 5–10 minutes to hydrate the starches and reduce clumping.
  • For extra crispness, try a double-dip: dredge in the dry mix, dip into the wet batter, then coat again in the dry mix before frying or baking.
  • If you want a lighter crust, you can omit the optional oil, or use just a small amount in the wet mixture. If using oil, whisk it into the wet ingredients for even distribution.

Crisping methods: frying, baking, or air-frying

  • For frying, heat neutral oil to about 350–375°F (177–190°C). Fry in small batches to avoid crowding, then drain on a rack instead of paper towels to keep the crust crisp.
  • For baking, preheat to 425°F (220°C). Line a sheet with parchment, space florets well, spray or brush with a little oil, and bake, flipping halfway for even browning.
  • For air-frying, cook at 400°F (205°C) for 12–15 minutes, shaking or tossing halfway through for even texture.
  • Always avoid overcrowding your pan, which can steam rather than crisp the coating. Give each piece room to brown.
  • Finish the crust on a rack in a warm oven (about 200°F/93°C) while you finish the sauce so everything stays hot and crisp just before serving.

Sauce assembly and balance tips

  • Whisk a cornstarch slurry (1 tablespoon cornstarch with 2 tablespoons water) and add it after the sauce begins to simmer to achieve a glossy, clingy glaze. Pre-dissolve to avoid lumps.
  • Simmer the sauce gently to bloom the flavors; avoid boiling after adding the slurry to prevent separation.
  • Taste and adjust as you go: if it’s too salty, add a touch more rice vinegar or a splash of water; if it’s too sweet, a little soy sauce or a splash of vinegar can balance it.
  • If you like more heat, increase chili flakes or Sriracha gradually, tasting after each addition so the spice level remains balanced with the sweetness.
  • Finish the sauce with a drizzle of sesame oil off the heat to preserve its aroma, and stir in the sauce thoroughly so it coats every piece evenly.
  • If the sauce thickens too much while you’re waiting, whisk in small amounts of water until you reach your desired consistency.

Rice, toppings, and serving

  • Prepare jasmine rice so it’s fluffy and separate; fluff with a fork after cooking and keep warm until assembly. You can substitute brown rice or quinoa, but cooking times and absorption will differ.
  • Toast sesame seeds briefly in a dry skillet to deepen their aroma before sprinkling as a garnish.
  • Slice green onions on a bias to add color and a fresh, bright note; use both white and green parts for depth.

Optional add-ins and texture balance

  • Broccoli florets, sliced red bell pepper, and snap peas add color and texture. Lightly steam or roast them before combining so they stay crisp-tender when tossed with the sauce.
  • Keep add-ins separate until the end to prevent sogginess and ensure they retain their shape and color.

Make-ahead, reheating, and storage

  • Cauliflower can be prepared and kept dry in the fridge for a short period before cooking; keep the sauce separate until you’re ready to serve to maintain crispness.
  • Leftovers store in an airtight container for up to 3 days. Reheat the cauliflower in a hot oven (425°F / 220°C) for 5–7 minutes to restore crispness, then toss with warmed sauce.
  • Rice is best reheated with a splash of water to restore fluffiness; reheat gently to avoid drying out.

FAQ

General Tso’s Cauliflower Bowls – FAQs

What are General Tso’s Cauliflower Bowls?

A plant-based twist on the classic General Tso’s dish. Crispy roasted cauliflower florets are tossed in a sticky, sweet‑and‑spicy sauce and served over rice or greens in a bowl. It’s quick, hearty, and customizable.

What ingredients do I need to make this recipe?

Cauliflower florets, cornstarch or arrowroot for coating, oil for cooking, cooked rice or quinoa for the base, soy sauce or tamari, rice vinegar, garlic, ginger, chili paste or red pepper flakes, honey or maple syrup, optional sesame oil, green onions, sesame seeds, and optional vegetables like broccoli or snap peas for the bowl.

Is this recipe vegan, vegetarian, or gluten-free?

It can be vegan, vegetarian, and gluten-free. Use a vegan sweetener (maple syrup or agave) and gluten-free soy sauce or tamari. If using chili paste, check that it’s gluten-free. Leave out honey if you want it strictly vegan.

Can I bake or air-fry the cauliflower instead of frying?

Yes. Toss cauliflower with a light coating of oil and cornstarch, spread on a baking sheet, and bake at 425°F (220°C) for 20–25 minutes, flipping once. For air-frying, cook at 400°F (205°C) for 12–15 minutes. Add the sauce after cooking to keep some crispness.

How do I make the cauliflower extra crispy?

Pat florets dry, toss with a small amount of oil and a generous coating of cornstarch, and avoid overcrowding the pan. A hot oven or air fryer helps; high heat and a single layer promote crispiness. You can double-dip with a light batter for extra crunch.

How spicy is the General Tso’s sauce, and how can I adjust it?

The heat mainly comes from chili paste or red pepper flakes. To reduce heat, use less chili paste or omit red pepper flakes. Increase heat with extra chili paste, or balance heat with a touch more honey/maple syrup. Serve with extra lime for brightness if desired.

How should I assemble the bowls, and what should I serve with?

Base: steamed rice or quinoa or a bed of greens. Top with crispy cauliflower, a drizzle of sauce, and garnishes like sliced green onions and sesame seeds. Add steamed vegetables (broccoli, snap peas) for color and texture. A squeeze of lime brightens the flavors.

How should I store and reheat leftovers?

Store cooled leftovers in an airtight container for up to 3–4 days in the refrigerator. Reheat in an oven or air fryer to restore crispness, or briefly in a microwave if you’re short on time (the cauliflower may be softer).

Can I make this ahead or freeze components?

You can pre-cut the cauliflower and mix the sauce ahead of time. Sauce can be stored in the fridge for up to 5 days. For best texture, cook the cauliflower fresh and toss with sauce just before serving. Freezing is not ideal for the crispy texture.

What are the approximate nutrition details per serving?

Nutrition varies by base and portions. An approximate range per serving (with rice and sauce) is 250–380 calories, 7–12 g protein, 35–50 g carbohydrates, and 8–14 g fat. For gluten-free or vegan adjustments, ensure all ingredients align with your dietary needs.

Introduction / Hook

Imagine a tray of radiant, bite-sized orbs that arrive at the table warm from the oven, their edges kissed with a delicate crisp and their centers a molten, cheesy lullaby. Cheesy Mashed Potato Puff Bites are not just an appetizer; they’re a joyous invitation to slow down for a moment of comforting indulgence. The moment you bite into one, a symphony of textures unfolds: a crackling exterior gives way to a cloud-like interior where mashed potatoes mingle with melted cheese, hint of garlic, and a whisper of herbs. The aroma is irresistible—the savory scent of toasty cheese mingling with buttery potatoes, drifting through the kitchen like a warm hello on a chilly evening. These little puffs are equal parts nostalgia and novelty: familiar comfort with a playful, modern twist that makes them perfect for gatherings, weeknights, or any moment you want to elevate a simple snack into something memorable.

What sets these puff bites apart is their balance between heartiness and lightness. The mashed potato base provides a creamy, familiar canvas, while the cheese brings warmth, tang, and that irresistible pull as it stretches with each bite. The exterior—golden, crisp, and lightly seasoned—offers a satisfying contrast that makes snacking feel like an event rather than a quick nibble. And because they’re designed to be handheld, they invite conversation, pairing easily with a handful of dips or a bright herb crema. In short, Cheesy Mashed Potato Puff Bites are the kind of dish that makes people smile, reach for seconds, and remember to savor the little things in life—the aroma that fills the room, the satisfying bite, and the shared laughter around a plate of something wonderfully indulgent.

Whether you’re hosting a casual game night, planning a festive appetizer spread, or looking for a comforting addition to a weeknight dinner, these puffs strike the perfect balance between everyday and special. They embody the best of comfort food—simple ingredients, a smart technique, and a result that feels and tastes timeless—while also letting you customize with your favorite cheeses, herbs, or tweak textures to suit your crowd. So preheat the oven, cradle a piping bag (or a simple spoon), and get ready to transform humble mashed potatoes into a dazzling, crowd-pleasing bite that disappears as fast as you can plate them.

The Story Behind the Dish

Potatoes have travelled the world with unassuming grace, becoming one of the most versatile canvases in the home cook’s pantry. From rustic purées to crisp croquettes, potatoes have always thrived on a balance of softness and structure. The idea for Cheesy Mashed Potato Puff Bites draws its heartbeat from two classic concepts: the comforting creaminess of mashed potatoes and the irresistible appeal of bite-sized, crispy morsels. In many kitchens, mashed potatoes are the glue that binds a family’s favorite dinners together; turning them into individual puffed bites is a playful nod to the idea that leftovers can become something new and exciting with a little creativity.

The puff bite concept also nods to the long, delicious tradition of making croquettes, croquettes-like snacks, and stuffed potatoes across cultures. In the French culinary world, croquettes transform humble ingredients into elegant finger food—crisp on the outside, pillowy on the inside. In other cuisines, potato-based snacks rely on a deft crunch and a soft interior to carry flavors from herbs, cheeses, and aromatics. Cheesy Mashed Potato Puff Bites take that lineage and reimagine it for modern gatherings: a modernist nod to nostalgia, designed for casual eating while still delivering a chef’s sense of balance and texture. The name itself promises two things: a cheesy, indulgent center and a puffy, airy exterior that makes each bite a small celebration.

In family kitchens and neighborhood potlucks, it’s common to see little innovations emerge as cooks improvise with what’s on hand. You might find a few pinches of green onion, a sprinkle of smoked paprika for warmth, or a dash of hot sauce stirred into the cheese mixture to give the bites a gentle kick. The dish can be a celebration of regional cheeses—think sharp cheddar in the American Midwest, Gruyère for a smoother European vibe, or a peppery cheddar-jack blend for a more playful bite. The beauty of Cheesy Mashed Potato Puff Bites lies in their flexibility: they invite you to honor tradition while inviting your personal twist, turning a familiar staple into something that feels new and exciting every time you make it.

Why You’ll Love This Recipe

  • Crowd-pleasing comfort with a playful twist: familiar mashed potatoes, melted cheese, and a crisp outer shell all in one bite.
  • Versatile and customizable: swap cheeses, add herbs, or fold in crispy bacon, chives, or jalapeños for different personality profiles.
  • Make-ahead friendly: form the bites ahead of time, refrigerate, then bake to golden perfection when guests arrive.
  • Ideal for gatherings: easy to share, finger-friendly, and visually appealing on a platter.
  • Kid-friendly and adult-approved: mild, creamy center with a hint of savory cheese that satisfies all ages.
  • Progressively healthier options exist: you can bake instead of fry, use light cheeses, or incorporate mashed potatoes with olive oil for a lighter touch.
  • Quick to assemble once you have your mashed potatoes ready: minimal hands-on time makes it a practical weeknight treat or a quick party starter.
  • Great vehicle for dipping and pairing: they pair beautifully with herbs, dairy dips, or a tangy yogurt-sour cream mix to brighten the palate.

Flavor Profile & Texture

These little puffs offer a layered sensory experience. The interior is luxuriously creamy, thanks to the mashed potatoes, which behave like a soft, cushiony base that carries melted cheese and a gentle bite of garlic and herbs. The cheese—whether a mellow cheddar, a smoky Gouda, or a sharp cheddar blend—introduces a savory depth that melts into the potato, creating a rich, cohesive center. The exterior provides a satisfying contrast: a light, crisp crust that crackles when you bite into it, giving way to the soft, pillowy interior. Depending on how you season, you might notice a subtle nuttiness from browned edges, a hint of sweetness from caramelized onion flakes, or a touch of brightness from fresh chives.

The texture journey is deliberate. The exterior is crisp and delicate, designed to hold its shape while remaining tender enough to bite through without crumbling. The inside remains soft and fluffy, almost cloud-like, with enough density to be substantial but never heavy. The overall mouthfeel is rounded by a gentle buttery note, which helps to marry the potatoes with the cheese. The aroma is instantly inviting: the scent of toasty cheese rising from the oven, mingling with the warm, comforting perfume of mashed potatoes. When seasoned thoughtfully, the bites carry a balanced umami profile—the savory cheese, a subtle savoriness from garlic, and a whisper of herbaceous freshness that keeps the flavors from veering into heaviness. Each bite should feel like the perfect one-two punch: a crisp snap, then a creamy, cheesy embrace that lingers on the palate.

Occasions & Pairings

Cheesy Mashed Potato Puff Bites are incredibly versatile. They shine as a show-stopping starter at holiday gatherings, a crowd-pleasing appetizer at game nights, or a comforting, shareable snack for a casual weeknight dinner. Their portability makes them ideal for potlucks, picnics, and birthday parties, where guests will appreciate something that feels special without demanding too much effort from the cook. They also adapt well to seasonal flavors, so you can tailor them to match the mood of the moment—think creamy in winter, bright with fresh herbs in spring, or with a hint of smoky paprika for fall gatherings.

Pairings that elevate these puffs include:

  • Dipping sauces: tangy sour cream-chive, spicy sriracha mayo, garlic aioli, or a simple ranch-style dip.
  • Salads: a crisp arugula and lemon vinaigrette salad can provide a refreshing counterpoint to the richness.
  • Vegetable sides: roasted Brussels sprouts with a drizzle of balsamic or honey-glazed carrots offer sweetness and balance.
  • Proteins: they work beautifully alongside roasted chicken, grilled sausages, or a light baked fish for a well-rounded plate.
  • Drinks: sparkling wines, a crisp white like Sauvignon Blanc, or a light beer pair nicely with the cheesy bite and potato texture.
  • Herb accents: sprinkle fresh chives, parsley, or dill on top to brighten the plate and add a pop of color.

Tips, Variations & Substitutions

  • Cheese choices: try a mix of Gruyère and cheddar for a complex melt and balanced tang, or use mozzarella for extra stretch. For a sharper bite, add a small amount of Parmesan or Pecorino.
  • Herbs and aromatics: minced garlic folded into the mashed potato base adds warmth; chives, parsley, or thyme offer fresh brightness. A pinch of smoked paprika introduces a subtle, cozy smokiness.
  • Texture play: for a lighter exterior, brush with a touch of melted butter before baking; for extra crispness, dust lightly with panko breadcrumbs.
  • Make-ahead options: form the bites on a tray, freeze them unbaked, then transfer to a bag. Bake from frozen, adding a few extra minutes to the cooking time.
  • Dietary swaps: to make a vegan version, use dairy-free mashed potatoes (made with olive oil or a plant-based butter) and a vegan cheese that melts well. For gluten-free, ensure any coating uses gluten-free breadcrumbs or omit the crumb entirely.
  • Regional twists: fold in minced jalapeño or poblano pepper for a spicy kick; swap in aged cheddar with a touch of lángos or paprika for a Hungarian-inspired bite; a sprinkle of nutritional yeast can add a cheesy depth for a dairy-free approach.
  • Air fryer alternative: for a lighter touch, air-fry at 375°F (190°C) for 8–10 minutes until golden, then finish under the broiler for a minute to crisp the tops.
  • Serving ideas: a drizzle of truffle oil or a light garlic butter glaze can elevate the dish for a special-occasion feel without complicating preparation.

Storage & Make-Ahead Ideas

Leftovers, if you’re lucky enough to have any, store well in the refrigerator for 2–3 days. To reheat, the best method is a quick bake or air fry to re-crisp the exterior while the interior warms through without becoming dry. Reheating in the microwave is possible, but the exterior may lose its crispness, so a brief follow-up bake or air fry is recommended to restore texture. If you want to prep ahead, you can form the bites on a parchment-lined tray, cover, and refrigerate for up to 24 hours before baking. For freezing, arrange the unbaked bites on a sheet pan, freeze until solid, then transfer to a freezer bag. Bake directly from frozen, adding several minutes to the normal bake time and keeping an eye on the tops; you want the exterior to be crisp, not dried out, and the centers to be warmly melted.

When planning make-ahead meals, this approach helps you cut down on last-minute stress. You can prepare the mashed potatoes in advance, refrigerate them, and then simply mix with cheese and any herbs right before shaping the puffs. If you enjoy hosting, consider pairing a tray of these bites with a rotating selection of dips and fresh herbs, so guests can tailor their bites to their preferences without slowing down the flow of the event.

Fun Facts & Trivia (Optional)

Did you know that potatoes were introduced to Europe from the Americas in the 16th century and rapidly became a staple in many cuisines around the world? In some cultures, mashed potatoes are treated almost like a canvas for creative flavor work—think of creamy potato purées folded with roasted garlic and herbs, or quite boldly, mashed potatoes enriched with cheese, onions, and herbs to serve as a comforting foundation for fried or baked bites. The term “puffs” in a culinary sense often evokes delicate coatings and light textures, reminiscent of pastries or gougères, but in the context of this dish, it signals a crisp exterior around a soft, savory core. Cheese, of course, has a storied history across civilizations, symbolizing both luxury and everyday nourishment; the marriage of cheese with mashed potatoes is a classic pairing that has delighted households for generations. This particular recipe pays homage to those traditions while embracing a modern, snackable format that’s ideal for sharing, socializing, and savoring in small, satisfying bites.

Ingredients

Mashed Potato Base

  • 2 pounds russet potatoes, peeled and cut into chunks
    → Russet potatoes are ideal here because their high starch content yields a fluffy, light mash that binds well with minimal moisture. Boil the potatoes in salted water until very tender, then drain well and mash or rice while still hot. For best results, allow them to dry out for a minute or two before mixing with butter and milk to avoid a gluey texture.
  • 4 tablespoons unsalted butter, melted
    → Butter enriches the potato mash, adding creaminess and depth of flavor. Stir the melted butter into the hot, dry mash so it emulsifies smoothly. If your potatoes are very dry, you can add a touch more milk, but aim for a supple, slightly loose mash that will hold its shape as puffs.
  • 1/2 cup whole milk or heavy cream, warmed
    → Warm dairy integrates more easily into hot potatoes without cooling them, helping to create a silky, reboundable mash. Adjust the amount to reach a smooth, slightly loose texture; too much liquid will make the mixture too soft to handle.
  • 1 teaspoon fine sea salt (adjust to taste)
    → Salting the mash is crucial for flavor balance since the cheese and coating will add salt as well. Sprinkle in gradually and taste before shaping the puffs. If you’re using salted butter, reduce this amount accordingly.
  • 1/2 teaspoon freshly ground black pepper
    → Adds a gentle kick to the potato base, enhancing the cheese and herbs. For a milder flavor, use white pepper; for a bit more bite, go with standard black pepper.

Cheesy & Flavoring

  • 1 cup shredded sharp cheddar cheese
    → The cheddar provides the primary melty, gooey cheese presence. Choose a sharp variety for bold flavor; shred yourself rather than using pre-shredded to avoid starch-heavy coatings that can dull melt. Fold into the hot mash so it melts evenly and creates delicious pockets of cheesy goodness.
  • 1/4 cup grated parmesan cheese
    → Parmesan adds a nutty, savory complexity and helps with binding slightly due to its moisture-absorbing proteins. Use freshly grated if possible for the best aroma and texture. You can omit if you prefer a milder cheesiness.
  • 1/2 teaspoon garlic powder or 1 small garlic clove, minced (optional)
    → Garlic amplifies the savory profile. Garlic powder distributes evenly and blends into the mash; if using fresh minced garlic, sauté it briefly in a teaspoon of butter to mellow its bite before adding.
  • 1/4 teaspoon paprika (optional)
    → A touch of paprika adds color and a hint of smokiness that pairs well with potato and cheese. Use mild sweet paprika for a subtle note, or smoked paprika for more depth.

Binder & Structure

  • 1 large egg, lightly beaten
    → The egg acts as the primary binder to help the mixture hold together as puffs bake. Cool the potato mixture slightly before adding the egg to prevent curdling, then mix just until incorporated to keep the texture tender and light.
  • 1/3 cup all-purpose flour (or gluten-free flour blend)
    → Flour provides structure and helps absorb excess moisture, making the mixture scoopable and able to hold its shape. If you’re gluten-free, use a cup-for-cup GF blend designed for baking and adjust as needed for a cohesive dough-like texture.
  • 1/4 teaspoon baking powder
    → A touch of leavening gives the puffs a light, airy crumb rather than a dense bite. It also helps them stay pale and soft inside while crisping on the outside during baking.
  • Pinch of ground nutmeg (optional)
    → A pinch of nutmeg enhances the potato’s natural sweetness and rounds the cheese’s savoriness. Use sparingly or omit if you prefer a cleaner potato flavor.

Coating & Finish

  • 1/2 cup panko breadcrumbs
    → Panko yields a crisp, light crust that stays crunchy after baking. Roll the formed potato-cheese mixture in the crumbs to ensure even coverage, pressing gently to help the coating adhere. For extra flavor, mix the crumbs with a tablespoon of grated parmesan.
  • 2 tablespoons grated parmesan (for crust)
    → Adds a savory crust with a nutty edge. Mix with the crumbs or sprinkle over the puffs after a quick press to maximize adhesion and flavor.
  • 2 tablespoons neutral oil or melted butter (for brushing)
    → Lightly brush or mist the puffs with oil or butter before baking to promote even browning and a crisper crust. Butter provides more flavor, while oil helps achieve uniform browning in a hot oven.
  • Fine sea salt and freshly ground black pepper, to taste (for coating)
    → After coating, a final light sprinkle helps season the crust. Taste the base first, then adjust with a touch of salt and pepper if needed before baking.

Optional Add-ins

  • 2 tablespoons cooked bacon bits, finely crumbled (optional)
    → Adds smoky savoriness and textural contrast. Ensure the bacon is fully cooked and cool to room temp before folding in to avoid extra moisture; you can fold it into the potato mixture or scatter on top of the crust for a visually appealing finish.
  • 2 tablespoons chopped fresh chives or green onions (optional)
    → Fresh herbs brighten the dish and add a pop of color. Mix into the potato base for even distribution or reserve a few chives to sprinkle on top after baking as a garnish for color and aroma.
  • 1 tablespoon chopped fresh parsley (optional)
    → Adds a fresh, grassy note and vibrant color. Fold into the mixture or use as a finishing garnish to enhance presentation and aroma just before serving.

Instructions

  • Preheat your oven to 350°F (175°C) and line a 12-cup muffin tin with paper liners or grease it well.
    → This ensures the puffs bake evenly and release cleanly from the tins, preventing sticking and making handling easier.
  • Prepare the potatoes by placing peeled russet potato chunks in a large pot and covering with cold salted water by at least 1 inch. Bring to a boil over medium-high heat, then reduce to a simmer until the potatoes are very tender when pierced, about 15-20 minutes. Drain well.
    → Starting with cold water prevents uneven cooking; thorough draining removes excess starch that can make the mash gluey.
  • Return drained potatoes to the warm pot and allow them to dry for 1-2 minutes over low heat, then mash or rice while still hot until smooth and fluffy.
    → Dry, hot potatoes absorb dairy more evenly and yield a lighter texture; ricing yields the fluffiest finish if you have a ricer.
  • Stir in 4 tablespoons melted unsalted butter into the hot mash until fully incorporated and glossy.
    → Melted butter emulsifies into the hot potatoes, creating richness and a cohesive base without separation.
  • Warm 1/2 cup whole milk or heavy cream until just warm, then gradually whisk into the mashed potatoes to achieve a supple, slightly loose texture; stop when you can barely see a ripple in the surface.
    → Warm dairy blends smoothly into hot potatoes, preventing a cool shock that would dull creaminess and helping the mash to bind later.
  • Season the mash with 1 teaspoon fine sea salt and 1/2 teaspoon freshly ground black pepper, tasting and adjusting as needed.
    → Correct seasoning is critical because cheese and the crust will add salt; taste before shaping to avoid under- or over-seasoning.
  • Fold in 1 cup shredded sharp cheddar cheese into the hot mash until evenly distributed and beginning to melt into ribbons.
    → The cheddar provides bold melty pockets of cheese throughout and helps set the texture as the puffs bake.
  • Stir in 1/4 cup grated parmesan to the mash for nutty depth and subtle binding; fold evenly.
    → Parmesan enhances savoriness and contributes a bit of moisture-absorbing protein that aids structure.
  • If using garlic, either whisk in 1/2 teaspoon garlic powder or sauté 1 small minced garlic clove in 1 teaspoon butter until fragrant, then fold into the mash; otherwise skip.
    → Garlic boosts savory aroma; sauteed fresh garlic softens its bite, while powder distributes evenly without texture.
  • Stir in 1/4 teaspoon paprika for a touch of color and mild smokiness, mixing just to distribute.
    → A hint of paprika enhances appearance and rounds the cheese’s savoriness without overpowering the potatoes.
  • Allow the potato mixture to cool slightly, then whisk in 1 large egg that has been lightly beaten; ensure the mixture is not hot enough to curdle the egg.
    → The egg acts as the primary binder to help the puffs hold shape; cooling prevents curdling and preserves tenderness.
  • Whisk in 1/3 cup all-purpose flour, adding gradually until the mixture forms a cohesive dough-like mass that can be scooped; adjust with small amounts of flour as needed.
    → Flour provides structure and moisture absorption so the puffs don’t collapse; avoid overworking to keep a light crumb.
  • Stir in 1/4 teaspoon baking powder and a pinch of ground nutmeg (optional) to aerate the mixture and add warmth; mix just until combined.
    → Baking powder helps create a lighter texture; nutmeg complements the potato sweetness with a subtle spice.
  • Scoop and shape the mixture into small puffs or balls about 1 to 1 1/4 inches in diameter using two spoons or a small cookie scoop; keep shapes uniform for even baking.
    → Uniform sizing ensures even heat exposure and consistent texture across all puffs.
  • In a shallow dish, combine 1/2 cup panko breadcrumbs with 2 tablespoons grated parmesan to create a crisp, nutty crust; mix to distribute evenly.
    → The crumb crust provides a light, crackly exterior that stays crispy after baking and adds savory depth.
  • Roll each potato-cheese portion in the breadcrumb mixture, pressing gently to help adhesion; shake off excess crumbs and place the coated puffs on the prepared muffin tin or a parchment-lined baking sheet.
    → Proper coating adheres during baking and ensures an even crust; pressing helps crumbs cling without flaking off.
  • Lightly brush or spray the tops with 2 tablespoons neutral oil or melted butter to promote even browning and a crisp crust.
    → Fat aids Maillard browning and yields a richer, more appealing crust with better texture contrast.
  • Season the coated puffs with a final light sprinkle of fine sea salt and freshly ground black pepper; ensure seasoning is balanced by tasting one crumb-free puff if possible.
    → A final seasoning elevates the crust’s flavor and helps balance richness from the cheese.
  • Bake in the preheated oven at 350°F (175°C) until the crust is golden and the centers are set, about 15-20 minutes; rotate the pan halfway for even color.
    → Even browning and a firm center indicate a well-cooked puff with a crisp exterior and tender interior.
  • Remove from oven and let the puffs rest on a rack for 5 minutes before serving to finish setting and to prevent steam from making the crust soggy.
    → Resting allows moisture to redistribute and the puffs to finish cooking with a stable, crisp crust.
  • If using 2 tablespoons cooked bacon bits, crumble finely and fold into the mashed potato mixture before adding the egg to distribute smoky crunch throughout; or scatter on top of the crust after shaping for visual appeal.
    → Bacon adds savory depth and texture; ensure it is fully cooled to avoid introducing excess moisture.
  • If using 2 tablespoons chopped fresh chives or green onions, fold into the mixture with the cheese for even distribution and color; alternatively reserve some to sprinkle on top after baking for brightness.
    → Fresh herbs brighten flavor and aroma; folding them in yields dispersed herb notes rather than concentrated pockets.
  • If using 1 tablespoon chopped fresh parsley, fold into the potato base for color and a fresh finish; use extra as a garnish just before serving.
    → Parsley adds vibrant color and a clean note that cuts richness on the palate.

Notes

These Cheesy Mashed Potato Puff Bites are a cozy, crowd-pleasing treat with a fluffy potato center and a crisp, cheesy crust. They work beautifully as an appetizer, side, or party snack and bake up into hot, melty bites every time. You can customize them with extra sharp cheddar, crumbled bacon, or chopped chives for color and aroma. They freeze well—shape and coat the puffs, freeze on a tray, then transfer to a freezer bag to bake from frozen when needed. For a gluten-free version, use a cup-for-cup gluten-free flour blend and gluten-free breadcrumbs (or omit the crust for a softer bite) and ensure your baking powder and seasonings are certified gluten-free. If you prefer a lighter texture, reduce the flour by a tablespoon or two and add a splash more milk to keep the mash moist; for a crisper crust, brush with a little melted butter before baking. Always taste and adjust the salt, since cheese and add-ins can affect overall saltiness. Serve warm with sour cream or a tangy dipping sauce for contrast.

Tips

Tips for achieving fluffy, cohesive mashed potato base

  • Drain potatoes well and return them to the hot pot for 1–2 minutes to dry out excess moisture before mashing. This helps prevent a gluey texture.
  • Mash while still hot, then pass through a ricer or sieve for an ultra-smooth base that binds better with cheese and the coating.
  • Stir in melted butter into the hot mash first to emulsify smoothly, then mix in warm milk gradually. Aim for a supple, slightly loose texture that will hold its shape as puffs.
  • If you overwork the mash, it can become gluey. Mix just until combined and avoid mashing with a heavy hand.

Cheese and flavor integration

  • Fold shredded cheddar into the hot mash so it melts evenly, creating pockets of gooey cheese without clumping.
  • Freshly grated parmesan adds depth and helps with binding; use it for aroma and a nutty finish.
  • Garlic boosts savoriness. If using fresh garlic, sauté briefly in a small amount of butter to mellow its bite before folding in.
  • Balance salt carefully: the cheese and crust will contribute saltiness, so taste the mash before shaping and adjust gradually.

Binder and structure

  • Cool the potato mixture slightly before whisking in the egg to prevent curdling. Then mix just until incorporated to maintain a tender texture.
  • If you’re avoiding gluten, keep the flour measurement and use a cup-for-cup gluten-free flour blend designed for baking. You may need to adjust slightly for a cohesive dough-like texture.
  • The baking powder helps keep the puffs light. If your mixture feels dense, a small additional pinch of baking powder can help, but do not exceed 1/4 teaspoon.
  • A pinch of ground nutmeg enhances the potato’s natural sweetness and complements the cheese; use sparingly or omit if you prefer a cleaner potato flavor.

Coating and finish

  • Firmly roll or pat the formed potato-cheese balls in panko for an even, crisp crust. Mixing the crumbs with grated parmesan adds extra flavor.
  • Brush or spray the puffs with neutral oil or melted butter before baking to promote even browning and a crisper crust. Butter provides more flavor; oil gives more uniform browning in a hot oven.
  • Season the crust lightly with fine sea salt and freshly ground pepper after coating to avoid oversalting the interior.

Make-ahead, storage, and reheating

  • Prepare the bases up to shaping and refrigerate for up to 24 hours. Shape, coat, and bake directly from the fridge—you may need an extra few minutes for baking to brown fully.
  • For freezing, assemble uncooked puffs on a parchment-lined tray, freeze until solid, then transfer to a bag. Bake from frozen, adding 3–5 minutes to the bake time and checking for crispness.
  • To reheat baked puffs, re-crisp in a hot oven (425°F/220°C) for 5–7 minutes to restore crust crunch without drying the centers.

Serving ideas and garnishes

  • Finish with chopped fresh chives, parsley, or green onions for brightness and color. A light sprinkle of paprika on top can add a subtle smoky finish.
  • Pair with a creamy dipping sauce or sour cream for a cool contrast to the warm, cheesy puffs.

Optional add-ins and how to use them

  • 2 tablespoons cooked bacon bits: ensure bacon is fully cooked and cooled to avoid introducing extra moisture; fold into the mash or scatter on the crust for a savory glaze.
  • Herbs: fold in fresh chives, green onions, or parsley for color and brightness; you can also reserve some to sprinkle on top after baking for aroma.

FAQ

Cheesy Mashed Potato Puff Bites – FAQ

What are Cheesy Mashed Potato Puff Bites?

They’re bite-sized, savory nibbles made by mixing mashed potatoes with cheese and a binding agent, coating in breadcrumbs, and baking or air-frying until puffed, golden, and crispy on the outside with a melty cheesy center.

What ingredients do I need?

Essential ingredients (plus optional add-ins):

  • 2 cups cold mashed potatoes
  • 1 cup shredded cheddar cheese
  • 1/4 cup grated parmesan
  • 1 large egg, beaten
  • 1/3 to 1/2 cup breadcrumbs (panko works well) for coating
  • 2 tablespoons sour cream or cream cheese (optional, for extra creaminess)
  • 2 tablespoons chopped chives or scallions (optional)
  • Salt and pepper to taste
  • Oil or cooking spray for baking
How do I make them?

Basic steps:

  1. In a bowl, mix mashed potatoes, cheddar, parmesan, egg, sour cream (if using), and seasonings until well combined.
  2. Stir in enough breadcrumbs to help binding (reserve a little for coating).
  3. Let the mixture rest 5 minutes to firm up slightly.
  4. Scoop small portions and roll into bite-sized balls; roll each in the remaining breadcrumbs to coat.
  5. Place on a parchment-lined sheet; lightly brush or spray with oil.
  6. Bake at 400°F (200°C) for 15–20 minutes until golden and puffed. For extra crispiness, broil for 1–2 minutes watching closely.
Can I bake them or air-fry them?

Yes:

  • Oven: 400°F (200°C) for 15–20 minutes until golden and puffed.
  • Air fryer: 380–400°F (193–204°C) for 8–12 minutes, shaking or turning halfway through.
Can I make ahead?

Yes. You can:

  • Assemble and refrigerate formed bites on a tray for up to 2 hours before baking.
  • For longer make-ahead, freeze formed bites on a tray, then transfer to a bag. Bake from chilled or frozen when ready to serve (adjust time as needed).
Can I freeze them?

Absolutely. Freeze before baking: place shaped bites on a tray until firm, then transfer to a freezer bag. Bake from frozen at 400°F (200°C) for about 22–25 minutes (oven) or 14–16 minutes in an air fryer, until golden.

How many servings does this yield?

Typically about 24–28 bite-sized Puff Bites, depending on how large you roll each piece.

What substitutions or variations can I try?

Mix and match to suit your taste or dietary needs:

  • Cheeses: swap or mix cheddar with mozzarella, Monterey Jack, or Gruyère.
  • Herbs: add chopped parsley, dill, or chives for freshness.
  • Spice: fold in minced jalapeño or a pinch of paprika for heat.
  • Meats: add cooked bacon bits or pancetta for extra savory bites.
  • Gluten-free: use gluten-free breadcrumbs or almond flour as a coating.
  • Dairy-free: use dairy-free cheese and a binder like flax egg or aquafaba, and dairy-free sour cream.
What are common problems and how do I fix them?
  • Too sticky: add more breadcrumbs a little at a time until the mixture holds shape.
  • Too dry/crumbly: add a touch more mashed potato or a spoonful of egg or cheese to bind.
  • Not puffing or browning: ensure the oven is fully preheated and hot; cook closer to the top rack or finish under the broiler for a moment.
  • Sticking to the pan: line with parchment or lightly oil the tray.
What dipping sauces go well with these?

Suggested accompaniments:

  • Sour cream or ranch dip
  • Garlic aioli
  • Marinara or tomato dipping sauce
  • Chive yogurt dip for a tangy finish

Introduction / Hook

Imagine a slice that carries the crisp memory of autumn mornings and the warm, inviting glow of a sugared kitchen. The Irresistible Cranberry Orange Cake is not just dessert; it’s a celebration in crumb and aroma. As you lift the first forkful, you’re greeted by a chorus of bright citrus notes, tart cranberries that lightly pucker the palate in the most agreeable way, and a tender, moist interior that clings softly to the spoon. The top wears a delicate, crackled glaze that glints like captured sunlight, inviting you to dive in. There’s something soul-satisfying about a cake that feels both festive and comforting at once—the kind of recipe that becomes a family favorite, whispered about after the last bite, requested again by friends who couldn’t stop talking about it. This cake is the warm hug you want on a rainy afternoon, the scent that lingers in the house long after the oven cools, and the kind of treat that makes ordinary tea time feel like a holiday moment. The magic rests in the balance: the tang of cranberry, the sunny brightness of orange, and a crumb that’s airy yet substantial enough to stand up to a dollop of cream or a scoop of vanilla ice cream. It’s not merely a cake; it’s an invitation to slow down, savor, and share.

The Story Behind the Dish

Cranberries have long been woven into the fabric of North American culinary traditions, especially in the cool, tart-happy months of autumn and early winter. They grow on low, boggy marshlands, where the vines thrive in damp, peaty soil and the air carries a crisp edge that seems to sharpen every flavor. Historically, cranberries were valued by indigenous communities long before European settlers arrived, prized for their bright color, long shelf life, and the way they could preserve a sense of brightness during long winters. Over time, cranberries migrated from rustic sauces and preserves into the realm of baking, where their tart punch could meet the mellowness of a sweet batter and become something wholly new and modern.

The idea of pairing cranberries with citrus is a natural culinary conversation that many kitchens have enjoyed for generations. Oranges add a cheery aromatic lift that cuts through the tartness of the berries, while the rind’s essential oils contribute a perfume that makes the kitchen feel almost holiday-like even on a Tuesday. This cake, in its best moments, feels like a bridge between generations: it nods to old-world technique—folding, balancing, resting—and embraces contemporary flavors, textures, and a glaze that gleams with a glossy finish. In many homes, a citrus-and-cranberry dessert signals a desire to celebrate abundance, to share something that travels well to gatherings, and to offer a dish that remains comforting even as it feels refined. The Cranberry Orange Cake is, in a sense, a small cultural artifact—the result of centuries of seasonal eating, of cranberry bogs and citrus groves sharing the kitchen counter, and of bakers learning that tart fruit and sun-bright zest can carry a cake toward something memorable and just a little bit magical.

Why You’ll Love This Recipe

  • It’s a crowd-pleaser that never feels heavy—a balance of tart and sweet with a tender crumb that slices neatly for a party tray or a cozy family dinner.
  • The citrus aroma is intoxicating: orange zest brightens every bite and fills the room with a sunny, uplifting scent as the cake bakes and cools.
  • Versatility shines here. The cake holds up well for brunch, teatime, or dessert, and it pairs beautifully with whipped cream, vanilla yogurt, or a scoop of vanilla ice cream.
  • Make-ahead-friendly. The flavors mingle beautifully overnight, so you can bake in advance and finish with a glaze or dusting right before serving.
  • Great balance of textures—from a slightly crisp, delicate glaze to a moist, springy interior that remains soft even after a day or two when stored properly.
  • Simple pantry-friendly ingredients mean you can whisk this up with ease—even on a busy weeknight, with a little planning, it can feel like a special weekend treat.

Flavor Profile & Texture

The flavor journey of this cake begins with a fragrant citrus lift. Orange zest introduces a sunny brightness that feels almost like sunshine captured inside tender cake, while the cranberries supply punctuated bursts of tang that pop against the sweetness. The fruit’s tartness isn’t aggressive; it settles into the crumb with a gentle zing that lingers after the last bite. When you bite into the slice, you’ll notice a soft, moist interior—airy yet sturdy enough to hold its shape without crumbling. The crumb is enriched with a comforting density that makes each mouthful substantial, but never heavy.

The surface offers a subtle contrast: a glaze or glaze-like finish that shimmers and crackles ever so slightly as it cools. This glaze provides a whisper of sweetness and a touch more gloss, making the cake feel festive and polished. There’s a gentle, almost velvety mouthfeel from the natural oils in the zest, which coat the palate and invite the next bite. If you want a richer impression, a light dusting of powdered sugar or a dollop of softly whipped cream can add another layer of creaminess that complements the tart brightness without overpowering it. The cranberry pieces, slightly tart, are jewel-like pockets throughout the slice, offering bursts of color and acidity that balance the cake’s sweetness and contribute to a lively, multi-dimensional texture.

Occasions & Pairings

This cake shines in seasonal celebrations—the kind of dessert that feels right at home on a holiday table, a fall potluck, or a weekend family brunch. Its color and fragrance evoke warmth and conviviality, making it a natural centerpiece for gatherings that celebrate harvest, togetherness, and the simple joy of sharing something homemade. It also adapts well to everyday enjoyment, providing a touch of ceremony to a quiet afternoon tea or a Sunday afternoon with friends.

Pairings to consider include:

  • Vanilla ice cream or softly whipped cream for a classic contrast between cool cream and bright fruit flavors.
  • A light dusting of cinnamon or a pinch of cardamom for an extra layer of warmth that echoes the autumnal vibe.
  • Fresh citrus segments, such as orange or blood orange slices, for a bright, aromatic counterpoint.
  • Herbal tea or a lightly bitter coffee to balance the sweetness and cleanse the palate between slices.
  • A sparkling beverage, like a dry sparkling wine or a cidery fizz, to elevate the cake’s celebratory feel.
  • For a more decadent presentation, a drizzle of white chocolate or a yogurt-based citrus glaze can complement without masking the cake’s core personality.

Tips, Variations & Substitutions

Every kitchen has its own quirks, and this Cranberry Orange Cake is forgiving enough to accommodate thoughtful tweaks. Here are ideas to tailor the bake to your preferences, dietary needs, or what you have on hand:

  • Gluten-free option: Use a 1:1 gluten-free baking blend that’s formulated for cup-for-cup substitution. You may notice a slightly lighter crumb; a small addition of almond flour can add richness if your blend permits.
  • Vegan adaptation: Replace eggs with a flaxseed or chia seed slurry (1 tablespoon ground seeds + 3 tablespoons water per egg, set to gel) and swap butter for a plant-based margarine or coconut oil. A plant-based yogurt can help maintain moisture if your batter requires it.
  • Dairy-free version: Use a high-quality dairy-free butter substitute or melted coconut oil. Ensure any glaze you apply complements dairy-free options if you choose to glaze.
  • Sweetness control: If you prefer less sweetness, reduce the sugar or swap part of it with a touch of honey or maple syrup. Cranberries themselves bring tart brightness, which helps offset sweetness.
  • Flavors that twist beautifully: Add a pinch of ground coriander, rosemary, or thyme for an herby citrus note that works surprisingly well with cranberries. A handful of chopped pistachios or walnuts adds texture and color.
  • Other fruit variations: Sub in dried cherries or cranberries with a splash of orange juice for a different texture and a deeper fruit profile. Fresh raspberries can add a punch of tang if you’re aiming for a more vibrant look and taste.
  • Texture tweaks: If you love a slightly crumblier crumb, reduce liquid by a tablespoon or two. For extra moisture, consider folding in a tablespoon of yogurt or sour cream if you’re not keeping vegan or dairy-free requirements.
  • Glaze dynamics: A glaze can be as simple as a light citrus glaze made from powdered sugar and orange juice, or you can omit the glaze and finish with a light dusting of superfine sugar for a cleaner, more cake-forward presentation.

Storage & Make-Ahead Ideas

The cake is wonderfully forgiving when it comes to storage and make-ahead planning. Here are practical tips to keep it fresh and tasting at its best:

  • Room temperature storage: Once fully cooled, store the cake in an airtight container or wrapped in plastic wrap. It will stay moist and flavorful for 2–3 days at room temperature, especially if the glaze has set and seals the surface.
  • Refrigeration: If your kitchen is warm or you want to keep the cake longer, refrigerate for up to 5 days. Bring slices to room temperature before serving for the best texture and aroma.
  • Make-ahead: You can bake the cake a day or two in advance. The flavors typically deepen as the cake rests, so a short rest period before serving is beneficial. If you plan ahead, you can prepare the glaze separately and apply it just before serving to maintain that glossy finish.
  • Freezing options: Freeze the whole cake or individual slices, well wrapped to prevent freezer burn. Thaw overnight in the refrigerator and bring to room temperature before serving. A light re-warm in the oven can refresh both texture and aroma if you want that freshly-baked feel.
  • Stale-day rescue: If the cake dries a bit over time, a quick warm-up plus a drizzle of citrus glaze or a dollop of whipped cream can restore moisture and dreaminess to the slice.

Fun Facts & Trivia (Optional)

  • The cranberry is a true American native fruit, with wild varieties historically used by Indigenous peoples long before European settlers arrived on the continent.
  • Cranberries are known for their brilliant red color, which comes from anthocyanins—compounds that also offer antioxidant benefits and give autumn dishes their signature hue.
  • Many cranberry harvests in New England are synchronized with “bog harvesting,” where bogs are flooded to allow machines to loosen the berries. The berries float to the surface and are collected for processing.
  • The combination of cranberry and orange appears across many cultures’ desserts and baked goods, because the citrus oils in the zest lift the cranberries’ tartness, creating a bright, balanced flavor that’s instantly comforting.
  • In baking history, citrus zest is often called the “essence of sunshine” in a recipe. Its oils carry fragrance long after the oven is turned off, explaining why citrus-scented cakes feel so inviting and uplifting.

Conclusion & Encouragement to Bake

There is something deeply reassuring about a cake that harmonizes bright fruit, comforting sweetness, and a texture that invites you to cut another generous slice. The Irresistible Cranberry Orange Cake is more than a dessert; it’s a bridge between seasons, a dish that can anchor a meal or crown a teatime, and a creation that travels well to gatherings or a cozy night in. By embracing tart cranberries, sunny orange, and a tender crumb, you craft a slice that feels both timeless and modern—worthy of celebrations, yet perfectly at home on a weeknight table. So preheat your oven, breathe in the citrusy aroma, and let the cake do its quiet magic: the transformation from plain batter into something that lifts the spirit with every bite. Happy baking, and may every slice bring a little more warmth, conversation, and joy to your table.

Ingredients

Irresistible Cranberry Orange Cake

Cake Base

  • – 2 1/2 cups all-purpose flour (unbleached)
    → The flour provides the structure for the cake. For a lighter crumb, you can replace part of the flour with a bit of cake flour or a 1:1 gluten-free baking blend if you need a GF version. Sifting with the leavening helps distribute air for a tender crumb.
  • – 1 1/2 teaspoons baking powder
    → Leavening to help the cake rise and create a light, airy crumb. Use fresh baking powder for the best lift; old powder may yield a denser texture.
  • – 1/2 teaspoon baking soda
    → Reacts with the yogurt and orange juice to produce lift and a soft crumb. Avoid replacing it with baking powder alone, as it may alter the balance of acidity and texture.
  • – 1/2 teaspoon fine salt
    → Enhances flavor and helps balance the sweetness, bright citrus, and tart cranberries. Fine salt distributes more evenly in the batter.
  • – 1 cup granulated sugar
    → Provides sweetness, browning, and moisture retention. If you prefer a lighter cake, reduce to 3/4 cup and compensate with extra citrus zest and yogurt.
  • – 1/2 cup unsalted butter, softened to room temperature
    → Contributes richness and a tender crumb. Cream with sugar until pale and fluffy to incorporate air; this step is key for a light texture. Use high-quality butter for best flavor.
  • – 2 large eggs, at room temperature
    → Bind the batter and contribute structure. Room-temperature eggs integrate more smoothly with the butter-sugar base. If needed, warm refrigerated eggs in warm water for a few minutes.
  • – 1/2 cup plain yogurt (full-fat)
    → Adds moisture and tenderness with a slight tang that complements orange and cranberries. For a dairy-free option, use a full-fat dairy-free yogurt alternative and adjust baking time slightly; whisk until smooth before adding.
  • – 1/4 cup freshly squeezed orange juice
    → Provides bright citrus acidity to balance sweetness and helps activate the baking soda for lift. Use fresh juice for the best aroma and flavor.
  • – Zest of 1 large orange (about 2-3 teaspoons)
    → Delivers intense citrus aroma without extra liquid. Grate only the colorful zest; avoid the white pith, which is bitter. Distribute zest evenly through the batter to maximize flavor.
  • – 1 teaspoon vanilla extract (optional)
    → Adds warmth and rounds the citrus notes. If using vanilla bean paste, you can use a smaller amount (about 1/2 teaspoon) to avoid overpowering the orange.
  • – 1 1/2 cups fresh cranberries, rinsed and dried (whole or halved)
    → Provide tart bursts and festive color. If using frozen cranberries, keep them frozen until mixing or dust with a tablespoon of flour to prevent color bleed and sinking; fold in gently to preserve shape.

Optional Glaze

  • – 1 cup powdered sugar
    → Creates a smooth, glossy glaze when whisked with orange juice. Sift to remove lumps; adjust thickness by adding more sugar or juice to reach drizzle consistency.
  • – 2-3 tablespoons fresh orange juice
    → Liquid for the glaze; start with 2 tablespoons and add more as needed to reach the desired drizzle. Use freshly squeezed juice for brightness.
  • – 1 teaspoon orange zest (optional)
    → Adds extra citrus aroma to the glaze; grate finely and mix in last to avoid clumping. A small amount goes a long way.

Instructions

  • Preheat your oven to 350°F (175°C) and grease two 8-inch round cake pans, then line the bottoms with parchment rounds and lightly flour the sides; This ensures the cakes release cleanly and bake evenly without sticking or tearing when you unmold.
  • Whisk together the all-purpose flour, baking powder, baking soda, and fine salt in a medium bowl until evenly distributed and aerated; This distributes leavening and salt through the batter for a tender, balanced crumb.
  • Cream the unsalted butter and granulated sugar in a large mixing bowl on medium-high speed until the mixture is pale, fluffy, and nearly double in volume, 3–5 minutes; This incorporates air for a light texture and helps emulsify the batter later.
  • Beat in the eggs one at a time, allowing each egg to fully incorporate before adding the next; This creates a stable emulsion that prevents curdling and yields a finer crumb.
  • Beat in the vanilla extract (if using) just until combined; This adds warmth and rounds the citrus notes without overpowering them.
  • Whisk the plain yogurt, freshly squeezed orange juice, and orange zest together in a separate bowl until smooth; This mixture provides moisture, tang, and a bright citrus aroma that complements the cranberries.
  • With the mixer on low (or using a spatula), add the dry ingredients in three additions, alternating with the yogurt mixture in two additions (dry, wet, dry, wet, dry) until just combined; Do not overmix, as excessive stirring can develop gluten and create a denser cake.
  • Fold in the fresh cranberries gently with a silicone spatula, and if using frozen cranberries, keep them frozen or toss with a tablespoon of flour to prevent color bleed and sinking; Fold just until evenly distributed to preserve berries and color.
  • Divide the batter evenly between the prepared pans, smoothing the tops with a small offset spatula and tapping the pans firmly on the counter to release any trapped air pockets; This promotes level domes and uniform baking.
  • Bake in the center of the oven until the cakes are golden and a toothpick inserted into the center comes out with a few moist crumbs (about 25–30 minutes for two 8-inch rounds or 35–40 minutes for a single 9×13 pan); Rotate the pans halfway through for even browning and check for doneness a few minutes before the shorter time ends to prevent overbaking.
  • Cool the cakes in the pans for 10–15 minutes, then invert onto a wire rack and let them cool completely before glazing or stacking; This resting period allows the structure to set and prevents tearing or crumbling when removing from pans.
  • Prepare the glaze: Sift 1 cup powdered sugar into a small bowl, then whisk in 2–3 tablespoons fresh orange juice until smooth and pourable; If needed, add more sugar to thicken or a splash more juice to loosen for the desired drizzle; This yields a glossy, citrusy finish that enhances the cranberry flavor.
  • Add orange zest to the glaze (optional): Whisk in 1 teaspoon orange zest at the very end to heighten aroma and provide a tiny bright zing without clumping; The zest should be finely grated and incorporated just before glazing.
  • Glaze the cooled cake: Place the fully cooled cake on a rack over a tray; Pour or drizzle the glaze in a thin, even stream across the top, allowing it to run down the sides for a natural drip; If layering, spread a thin layer of glaze between the layers and finish with a top drizzle; Let the glaze set for 15–20 minutes before slicing to ensure clean cuts and a neat finish.

Notes

These Irresistible Cranberry Orange Cake notes will help you bake a tender, citrus-bright cake studded with tart cranberries. Start by bringing the ingredients to room temperature and creaming the softened butter with the granulated sugar until light and fluffy to create a tender crumb. In a separate bowl whisk eggs with the plain yogurt, freshly squeezed orange juice, and orange zest, then fold this mixture into the butter–sugar base, alternating with the dry ingredients to keep the batter smooth without overworking it. Gently fold in the cranberries, being careful not to overmix; if using frozen cranberries, keep them frozen or dust with a tablespoon of flour to prevent color bleed and sinking. Bake in a preheated oven until a skewer inserted into the center comes out with a few moist crumbs and the edges are lightly golden. If you’d like a glaze, whisk powdered sugar with orange juice until smooth, adding more juice or sugar to reach drizzling consistency; a touch of orange zest in the glaze adds extra fragrance. For a gluten-free version, substitute the all-purpose flour with a 1:1 gluten-free baking blend and consider adding an extra tablespoon of yogurt or milk to maintain moisture. Let the cake cool completely before glazing or slicing; this helps the crumb set and makes slicing neater. To store, wrap tightly and keep at room temperature for up to 2 days or refrigerate for up to 5 days; you can freeze baked slices for longer storage. This cake pairs beautifully with a dollop of yogurt or a scoop of vanilla ice cream, and you can customize with a pinch of cinnamon or cardamom for a warm-spice twist. Always use fresh orange juice and zest for the brightest citrus aroma, and ensure your leavening agents are fresh for optimal lift.

Tips

Tips for Irresistible Cranberry Orange Cake

  • Preheat the oven to 350°F (175°C) and prepare your pan (greased and lightly floured or lined with parchment). This ensures even baking and easy release.
  • Bring ingredients to room temperature: butter, eggs, yogurt, and orange juice should be warm to the touch but not melted. Room-temperature ingredients emulsify better, resulting in a smoother batter.
  • Cream the butter and sugar thoroughly: beat until pale and fluffy (about 3–5 minutes). This incorporates air and helps create a lighter crumb.
  • Sift the dry ingredients (flour, baking powder, salt) to distribute leavening evenly and prevent dense pockets in the batter.
  • Prepare the cranberries properly: pat them dry to prevent excess moisture. If using frozen cranberries, keep them frozen or dust with a tablespoon of flour to reduce sinking and color bleed.
  • Distribute orange zest evenly: grate only the colorful zest and fold it in with the dry ingredients so the citrus aroma disperses throughout the batter.
  • Alternate adding dry and wet ingredients: add dry ingredients in 2–3 portions, alternating with yogurt and orange juice, to maintain moisture without overmixing.
  • Mind the acidity balance: yogurt and orange juice react with baking soda to create lift; avoid substituting baking powder for baking soda entirely, or the texture may be affected.
  • Do not overmix after adding cranberries: mix just until combined to keep the cake tender and prevent a dense crumb.
  • Bake until done and test for doneness: a toothpick should come out with a few moist crumbs. If your oven runs hot, rotate the pan halfway through baking for even browning.

Glaze tips (Optional)

  • Prepare a smooth glaze by whisking 1 cup powdered sugar with 2–3 tablespoons fresh orange juice. Adjust with more sugar to thicken or more juice to thin for your desired drizzle.
  • Add orange zest to glaze (about 1 teaspoon) for extra aroma; fold in last to avoid clumping.
  • Let the cake cool completely before glazing to ensure a glossy finish that sets nicely.

Make-ahead and variations

  • Dairy-free option: use full-fat dairy-free yogurt and a plant-based butter substitute; note slight texture changes and adjust bake time as needed.
  • Storage: once cooled, store covered at room temperature for 2–3 days or refrigerate up to 5 days. Slices freeze well for longer storage.

FAQ

Irresistible Cranberry Orange Cake – Frequently Asked Questions

What ingredients are needed for Irresistible Cranberry Orange Cake?

Common ingredients (serves 8–10): 2 cups (250 g) all-purpose flour, 1 cup (200 g) granulated sugar, 2 tsp baking powder, 1/2 tsp salt, 1/2 cup (115 g) unsalted butter, softened, 2 large eggs, 1/2 cup (120 ml) milk or yogurt, 1/2 cup (120 ml) freshly squeezed orange juice, zest of 1 orange, 1 cup (150 g) fresh or frozen cranberries, optional vanilla extract (1 tsp) and/or 1/2 cup chopped nuts. Optional glaze: 1 cup powdered sugar with 2–3 Tbsp orange juice.

Can I make this cake gluten-free?

Yes. Use a 1:1 gluten-free all-purpose flour blend that contains xanthan gum, or add 1/2 tsp xanthan gum per cup of flour. Maintain the same leavening and moisture balance; you may need to bake a few minutes longer and keep an eye on doneness.

Can I use frozen cranberries?

Yes. Use frozen cranberries directly without thawing to avoid color bleed. Toss them lightly with a tablespoon of flour to prevent sinking, then fold into the batter. If using frozen fruit, you may need a few extra minutes of bake time; test with a toothpick.

Can I make this into cupcakes?

Absolutely. Line a muffin tin and fill each cup about 2/3 full. Bake at 350°F (175°C) for about 18–22 minutes, or until a toothpick comes out clean with a few moist crumbs. Cool completely before glazing or frosting.

How do I zest and juice the oranges properly?

Use a microplane to grate the bright orange zest, avoiding the bitter white pith. For juice, roll the orange on the counter to loosen the juice, then squeeze to measure 1/2 cup (120 ml). Fresh juice yields the best flavor and aroma.

Should I use a glaze or frosting, and how do I make it?

A light glaze adds a citrusy finish. Whisk together 1 cup (120 g) powdered sugar with 2–3 Tbsp orange juice until smooth. Add a pinch of zest if you like. Drizzle over cooled cake. For a thicker frosting, use a simple buttercream (softened butter, powdered sugar, and a splash of orange juice) if you prefer.

How long and at what temperature should I bake it, and how do I know it’s done?

Bake at 350°F (175°C) for about 45–50 minutes, or until a toothpick inserted into the center comes out with only a few moist crumbs. If using a bundt pan, check a little earlier or later as needed. Let the cake cool in the pan for 10–15 minutes, then transfer to a wire rack to cool completely.

How should I store leftovers, and can I freeze the cake?

Store at room temperature in an airtight container for 1–2 days. Refrigerate for up to 5 days. Wrap tightly and freeze for 2–3 months. Thaw overnight in the fridge or at room temperature. The glaze will set as the cake cools.

Can I customize the flavor with add-ins like nuts or chocolate?

Yes. Add 1/2 cup chopped walnuts or pecans for crunch, or 1/2 cup mini chocolate chips for a chocolate-orange twist. You can swap half of the cranberries for dried cranberries or add a teaspoon of vanilla or almond extract for extra depth. Toast nuts beforehand for more aroma.

Is a dairy-free or vegan version possible?

Yes. Use dairy-free butter (or coconut oil) and plant-based yogurt or milk in place of dairy. For eggs, use flax eggs (1 tablespoon ground flaxseed + 3 tablespoons water per egg) or a commercial egg replacer. The texture stays tender with proper moisture and leavening balance.

Can I adjust the sweetness or citrus intensity?

Yes. Increase or decrease sugar to taste, up to 1 cup if you want it sweeter. For a brighter citrus flavor, add a little more orange zest or a teaspoon of orange extract. If the batter is too thick, a splash more milk or yogurt will loosen it nicely.

Gordon Ramsay Butternut Squash Soup

Introduction / Hook

Imagine a bowl that glows with the soft amber of autumn light, a velvet-smooth soup that glides across your tongue with a whisper of sweetness and a warm, comforting sigh. This Gordon Ramsay-inspired butternut squash soup is more than a starter; it’s an invitation to slow down, breathe in the scent of roasted squash caramelizing at the edges, and savor a depth of flavor that feels both sophisticated and welcoming. The aroma alone—nutty, slightly nutmeg-spiced, with a hint of sweetness—can transport you from a hectic kitchen into a quiet moment of coziness. For days when the weather turns crisp and the evening settles into a silver hush, this soup offers a bright, comforting embrace: silky, silky, and richly satisfying without being heavy. It’s a dish that marries technique with soul, a modern classic that tastes like a well-kept kitchen secret you’re eager to share with friends and family.

The beauty of this dish lies in its balance between brightness and depth. A gentle sweetness from the squash is tempered by savory undertones and a touch of warmth from spices or aromatics. It’s a dish that forgives a busy cook—no need to chase perfection with a hundred tweaks; a few confident steps will yield a soup that feels luxurious yet accessible. In the spirit of Gordon Ramsay’s approach to cooking, the goal is to coax maximum flavor from simple ingredients through careful roasting, improvisational seasoning, and a final whisper of creaminess that remains light on the palate. The result is a bowl of comfort that still feels refined enough for a dinner party, an everyday weeknight, or a Sunday supper that lizzes into a lingering, cozy memory.

As you read on, you’ll feel invited to embrace the technique, the textures, and the gentle drama of a dish that doesn’t shout but speaks clearly with every spoonful. The butternut squash soup you’re about to discover is an ode to seasonal produce, to the art of layering flavor with restraint, and to the joy of a well-executed bowl that nourishes the body and steadies the mood. It doesn’t pretend to be complicated; it simply invites you to cook with confidence and to savor the reward of a well-made, emotionally satisfying soup that pairs beautifully with conversation, a crusty loaf, and a glass of something warm and bright on a chilly evening.

The Story Behind the Dish

Butternut squash soup has roots that wind through kitchens across Europe and North America, where harvest gourds have long provided a comforting canvas for fall flavors. The squash’s natural sweetness, paired with savory notes from stock, aromatics, and herbs, creates a soup that feels both rustic and refined. In many homes, it began as a humble purée, a practical way to stretch a modest harvest while delivering nourishment on colder days. Over time, cooks learned to elevate the base with roasting: letting the squash caramelize at the edges to deepen its flavor, then blending until flawless and silky. This technique transforms a simple puree into something that carries a sense of theater—the aroma, the color, the way it coats the spoon in lush, languid ribbons.

The Ramsay influence here is less about dramatic theatrics and more about clarity, balance, and confidence. Gordon Ramsay’s kitchen philosophy often centers on extracting bold flavors from simple ingredients and presenting them with clean finish and precise execution. In this soup, that translates into highlighting the squash’s inherent sweetness while introducing a counterpoint of savory depth and a whisper of spice or herb that brightens rather than overpowers. It’s the kind of dish that pays homage to seasonal abundance, celebrates technique without fuss, and invites home cooks to trust their palate and adjust with a sure hand. The result is a story in a bowl: autumnal, comforting, and elegantly uncomplicated, with a modern finish that makes it feel relevant in today’s dining landscape.

Behind the scenes, the dish also nods to the social and culinary rituals that accompany gatherings around a shared table. Families come together over warm bowls, friends linger longer when a starter is this comforting, and a carefully prepared soup can set the tone for a meal that feels both intimate and intentionally designed. The story of this soup is really the story of seasonal cooking that respects ingredients, time, and tradition while embracing contemporary sensibilities—light on cream where it counts, generous with flavor where it matters, and sure enough to stand up to conversation and company alike.

Why You’ll Love This Recipe

  • Bright, seasonal flavor: The squash provides a natural sweetness that is enhanced through roasting, creating a deep, honeyed backbone that’s mellow yet distinctly present.
  • Silky texture: When blended to a velvety smoothness, the soup coats the spoon with a luxuriously creamy mouthfeel—without needing heavy thickeners.
  • Balanced richness: A judicious touch of dairy or dairy-free cream creates a luxurious finish while keeping the soup light enough to enjoy as a starter or a main on a cozy day.
  • Versatile comfort: This soup works beautifully as a weeknight staple, a starter for a dinner party, or a comforting lunch on a cooler afternoon.
  • Kitchen confidence, beginner-friendly: The core technique—roasting and blending—helps cooks of all levels achieve restaurant-worthy results with relatively simple steps.
  • Adaptable to many dietary preferences: The base can be a dairy-free or vegetarian foundation, making it suitable for a wide range of eating styles with easy substitutions.
  • Elegant yet approachable presentation: A bowl of this soup invites garnishes and finishes that can elevate a simple meal to something special without overwhelming the palate.
  • Fast to finish: With smart technique, you can go from raw ingredients to a smooth, comforting soup in a short, satisfying session—ideal for busy days or when you crave a little culinary theater.

Flavor Profile & Texture

This soup is a study in balance. The principal flavor is the sun-kissed sweetness of roasted butternut squash, which carries a rich, caramelized nuance that hints at maple or honey without tipping into dessert territory. Layered beneath that sweetness are savory undertones—perhaps a trace of onion or garlic, a gentle simmering of stock or broth, and a whisper of sea salt that makes every spoonful feel bright and alive. If you choose to include aromatics such as thyme, sage, or a pinch of nutmeg or cinnamon, they contribute warmth and spice that evoke early-fall markets and cozy kitchen windows. The result is a creamy, smooth profile with an edge of depth that invites you to go back for a second, even third tasting.

Texture-wise, the soup starts with a barn-smooth body that glides over the tongue, then settles into a creamy, luscious finish. It is not thin; it’s not cloying. It’s the kind of mouthfeel that makes you savor every bite, leaving a lingering sense of comfort. If you prefer a lighter finish, you can thin the soup with a little liquid while keeping the same flavor profile; if you crave indulgence, a touch of cream or a swirl of coconut milk adds silken richness. The finish is often brightened with a final herb oil, a squeeze of citrus to lift the sweetness, or a tiny drizzle of a flavorful oil to add a glossy sheen and a new aroma. The interplay between roasted depth and a fresh, clean finish creates a profile that feels both rustic and refined—exactly the kind of dish that can anchor a meal and spark conversation at the table.

Occasions & Pairings

This butternut squash soup shines in several contexts. It makes a welcoming starter for a holiday feast, where guests appreciate the elegance and warmth without being overwhelmed by richness. It’s equally at home as a stand-alone weeknight supper when paired with a rustic loaf and a simple green salad. For parties, a generous serving in small bowls can be served with crisp garnishes that add texture and color, turning a humble dish into a conversation piece. The soup also works beautifully as a light, comforting lunch during chilly weekends or as a first course for a multi-course menu that aims for balance and finesse.

Pairing ideas (without relying on any specific recipe steps) include a golden, crusty bread that offers a satisfying bite to contrast the smoothness of the soup, a scattering of toasted seeds or croutons for crunch, and a drizzle of a complementary finishing oil or herb oil to add brightness. For drinks, consider a crisp apple- or pear-forward white wine, or a warm non-alcoholic option like spiced citrus tea that echoes the autumnal notes. For desserts, something with vanilla or almond flavors can echo the soup’s warmth if you’re planning a multi-course menu. The aim is to create a cohesive dining experience where the soup sets the mood and the rest of the course follows with complementary flavors and textures.

Tips, Variations & Substitutions

  • Roast for depth: Allow the squash to roasted or caramelize slightly to bring out its natural sweetness and to build a layered flavor foundation without needing a long simmer.
  • Make it vegan or dairy-free: The base can be adapted to a creamy texture using plant-based milks or a gentle swirl of olive oil; for extra body, consider a nut-based cream or a small amount of coconut cream, added at the end for richness without heaviness.
  • Spice it up or keep it comforting: A touch of nutmeg, cinnamon, or cloves adds warmth, while a pinch of smoked paprika, cumin, or a faint chili can introduce an undercurrent of heat and complexity. Adjust to taste and seasonality.
  • Herbaceous lift: Fresh herbs like thyme, sage, chives, or a bit of dill oil added at the finish can brighten the bowl and contrast the sweetness with a clean, aromatic note.
  • Texture play: For a velvety soup, blend thoroughly and pass through a fine-mesh sieve. If you prefer a heartier bite, leave a portion of roasted squash slightly chunkier and fold it back into the smooth base.
  • Regional twists: A splash of citrus (lemon or orange) near the end can lift flavors; a touch of curry powder or garam masala can nudge the dish toward a gentle, global warmth.
  • Gluten-free considerations: This soup is naturally gluten-free when prepared with appropriate stock and seasonings; check labels if you’re using packaged ingredients.
  • Batch-friendly: The base freezes well, so you can portion it for future meals. Thaw gently and reblend to restore that silk-like texture if needed.

Storage & Make-Ahead Ideas

One of the practical strengths of this soup is its ability to be prepared ahead of time without losing its character. The flavors can meld beautifully after resting, and the texture remains silky after reheating with a little extra liquid if necessary. For plan-ahead cooking, you can roast the squash in advance and store it chilled or frozen until you’re ready to blend. Reheat gently on the stove over low heat, whisking or stirring to restore a cohesive, smooth consistency. If you’ve chosen a dairy-based finish, a light re-stir through a small amount of cream or milk at the end will help reclaim the creamy mouthfeel after storage. If you’ve opted for a dairy-free finish, a splash of plant-based milk or a drizzle of oil can help re-emulsify the soup for a glossy, restaurant-like finish.

Leftovers keep well in the refrigerator for several days, tightly sealed. Freeze in portions for longer storage, ensuring you label with date. Thaw overnight in the fridge before reheating on the stove or in a gentle microwave cycle. If the soup thickens after storage, thin it with a small amount of hot water or stock to reach your desired consistency, then taste and adjust the seasoning if needed. This approach makes the soup a reliable make-ahead option that still tastes vibrant and fresh when you serve it, whether for a quiet family dinner or an impromptu gathering with friends.

Fun Facts & Trivia (Optional)

  • The butternut squash is part of the gourd family and is technically a fruit, due to its seeds. Its sweet, nutty flavor makes it a favorite in soups, roasted dishes, and casseroles around autumn markets.
  • Roasting vegetables to deepen sweetness is a technique celebrated by many chefs for transforming a humble ingredient into something deeply flavorful—Gordon Ramsay often emphasizes flavor development through browning and careful searing as a way to maximize taste.
  • In culinary tradition, soups like this one are often used as a bridge between seasons, offering the comforting familiarity of a familiar dish while allowing cooks to showcase seasonal produce and a modern palate.
  • Color plays a part in perception: the warm, golden-orange hue of this soup is visually inviting and can psychologically cue comfort and satisfaction even before the first spoonful.
  • Texture is a defining feature: the dream of a perfectly smooth soup is a balance between thorough blending and careful handling, often achieved by straining or using high-powered blenders to eliminate any fibrous or grainy notes.
  • Versatility in garnishes lets you customize appearance and aroma without altering base flavor: a drizzle of oil, a swirl of cream, roasted seeds, or a hint of citrus zest can dramatically change the first impression of the bowl.

With this Gordon Ramsay-inspired butternut squash soup, you don’t just serve a dish—you present an experience. It’s a celebration of autumn’s bounty, a demonstration of technique that remains approachable, and a reminder that the simplest ingredients can deliver the most memorable flavors when treated with intention, balance, and a touch of culinary confidence. Whether you’re seeking a comforting starter for a holiday meal or a cozy, nourishing bowl to cap a long day, this soup offers warmth, elegance, and a sense of home in every spoonful.

Ingredients

Gordon Ramsay Butternut Squash Soup
Soup Base
    – 1 medium butternut squash (about 2-3 pounds), peeled, seeds removed, and cut into 1-inch cubes
    → The star of the soup. The squash provides natural sweetness and a silky texture once puréed. Peeling and deseeding prevents stringy bites and tough skin from appearing in the final bowl. For an extra depth of flavor, you can roast the squash cubes on a parchment-lined sheet with a little olive oil at 425°F (220°C) for 25–30 minutes until caramelized, then proceed to simmer. If you skip roasting, simply simmer the raw cubes in stock until tender and blend until smooth.

    – 1 tablespoon olive oil
    → Used to gently sweat the aromatics and start building the soup’s foundation without burning. The oil helps lift the flavors of onion and garlic as they soften. For a richer base, you can blend olive oil with a small amount of butter to impart a velvety mouthfeel; if dairy-free, stick with olive oil alone and sauté at medium heat to avoid scorching.

    – 1 tablespoon unsalted butter (optional)
    → Adds a luxurious, creamy body to the soup and helps the aromatics develop a deeper, toasty note. Butter also contributes a slightly nutty finish after blending. If you’re dairy-free, omit and rely on the olive oil or a dairy-free butter substitute, adding it with the onions to mellow the raw taste.

    – 1 large onion, finely chopped
    → Forms the flavor backbone of the soup. Sauté the onion until it’s translucent and starting to turn light golden to maximize sweetness and develop a round, mild sweetness that balances the squash. Uniform chopping ensures even cooking and a smooth final purée.

    – 2 cloves garlic, minced
    → Adds aroma and a faint bite that complements the squash’s sweetness. Mince finely to maximize surface area for quick flavor release, and add after the onion has begun to soften to prevent the garlic from burning and becoming bitter.

    – 1 carrot, peeled and chopped (optional)
    → Contributes gentle sweetness, color, and a touch of body. The carrot’s natural sugars help to balance the squash’s savoriness, yet it’s not essential; include it if you want a slightly richer, more balanced base.

    – 1 celery stalk, chopped (optional)
    → Introduces savory, aromatic notes and depth to the soup. Celery blends into the purée but also supports the overall flavor foundation. If you omit it, the soup will still be delicious; it simply won’t have that classic soffritto-like backbone.

Liquids & Aromatics
    – 3–4 cups vegetable stock (low-sodium) or chicken stock
    → The primary liquid that gently simmer’s the squash and dissolves browned bits from the bottom of the pot. Low-sodium stock lets you control salt more precisely; adjust salt at the end after puréeing. Homemade stock will elevate the depth of flavor, but a good-store bought option works well if it’s unsalted or low-sodium.

    – 1–2 cups water (as needed)
    → Used to adjust the soup’s thickness to your preferred consistency after the squash has softened. Start with less and add gradually; if you roasted the squash, you may need less water since roasting concentrates flavor and can thicken the purée.

    – 1 bay leaf (optional)
    → Adds a subtle, herbal aroma during simmering. Remove before puréeing to avoid any grassy or soapy notes; if you omit, the soup will retain the squash’s sweet, velvety character without additional fragrance.

    – 1/2 teaspoon ground nutmeg
    → Classic pairing for squash soups, introducing warm, comforting spice. Freshly grated nutmeg offers a brighter, more intense aroma; add toward the end of simmering and taste, since its impact grows as the flavors marry. If you’re sensitive to spice, start with a pinch and adjust.

Seasonings
    – Salt, to taste
    → Essential for balancing sweetness and bringing out the squash’s natural flavor. Add gradually, tasting after blending to ensure the final purée isn’t oversalted; remember that stock can contribute salt, so season in layers.

    – Freshly ground black pepper, to taste
    → Adds a gentle peppery lift that brightens the overall flavor profile. Freshly ground pepper gives a cleaner, more vibrant kick than pre-ground; adjust after blending as the sweetness of the squash can mellow pepper’s bite.

    – Optional: pinch of cinnamon or curry powder (optional)
    → A tiny pinch can enhance warmth and depth when used sparingly. Cinnamon will emphasize autumnal notes, while curry powder introduces a subtle, global warmth. If you try them, use 1/8–1/4 teaspoon and adjust slowly to avoid overpowering the squash.

Finish
    – 1/2 cup heavy cream or coconut cream (optional)
    → Adds a luxurious, silky texture and a creamy mouthfeel to the puréed soup. Dairy lovers will enjoy the richness, while coconut cream offers a dairy-free alternative with a slightly tropical nuance. Stir in gently after blending and heat through without boiling to prevent separation.

    – 1–2 tablespoons lemon juice or white wine vinegar (optional)
    → Brightens the sweetness and adds a clean, fresh note that lifts the flavors. Add a little at a time after puréeing, then test and adjust; acidic brightness helps prevent the soup from tasting flat.

Optional Add-ins
    – 1/4 teaspoon chili flakes (optional)
    → If you enjoy a gentle kick, chili flakes provide warmth without overshadowing the squash’s sweetness. Start with a small amount and increase gradually, tasting as you go.

    – Fresh parsley or chives, finely chopped for garnish (optional)
    → Adds a pop of color and a fresh, herbal contrast just before serving. Add just before serving so the herbs retain their aroma and brightness.

    – Toasted pumpkin seeds (pepitas) for garnish (optional)
    → Provide a crunchy texture and nutty flavor that elevates the experience of each bowl. Toast seeds in a dry skillet until they pop and turn golden, then scatter on top right before serving for maximum crunch.

    – Croutons (optional)
    → Extra texture and savory bite. Use sturdy bread and toast with a little olive oil and garlic for a finishing touch that pairs beautifully with the creamy soup.

Instructions

  • Roast the squash cubes to deepen flavor: Preheat your oven to 425°F (220°C). Line a parchment-lined baking sheet with a rim. Toss 1 medium butternut squash (about 2–3 pounds), peeled, seeds removed, and cut into 1-inch cubes with 1 tablespoon olive oil and a pinch of salt. Spread in a single layer and roast 25–30 minutes, turning halfway, until the edges caramelize and the flesh is tender. Remove from oven and let cool slightly before using in the soup.
    → Caramelization concentrates sugars, enhances depth, and creates a silkier purée. If you skip roasting, you can simmer the raw cubes in stock until tender and proceed to purée.
  • Sweat the aromatics: In a large heavy-bottom pot, heat 1 tablespoon olive oil (and 1 tablespoon unsalted butter if using) over medium heat until shimmering. Add 1 large onion, finely chopped, and cook, stirring occasionally, until translucent and just starting to color, about 6–8 minutes.
    → Sweating draws out onion sugars and builds a mellow sweetness that forms the soup’s flavor backbone without browning too aggressively.
  • Build depth with optional soffritto components: Add 1 carrot (peeled and chopped) and 1 celery stalk (chopped) to the pot and cook for 4–6 minutes until they soften and their aromas begin to mingle with the onion.
    → These vegetables contribute natural sweetness, body, and savory backbone similar to a soffritto, enriching the final purée.
  • Bloom the garlic for aroma: Push the vegetables to the side and add 2 minced garlic cloves to the center; stir and cook 30–60 seconds until fragrant, avoiding browning to prevent bitterness.
    → Quick garlic bloom releases essential oils and fragrance, which harmonize with the squash’s sweetness without turning sharp.
  • Combine squash with the aromatics and simmer: Add the roasted squash (or raw if you skipped roasting) to the pot along with 3–4 cups vegetable stock (low-sodium recommended) and, if using, 1 bay leaf. Bring to a gentle simmer over medium heat and cook for 15–20 minutes until the squash is fully tender and flavors meld.
    → Simmering gently allows the squash to break down and release sweetness while integrating with the aromatics; use low-sodium stock so you can control seasoning.
  • Finish the aromatics path by removing the bay leaf: Carefully lift out and discard the bay leaf, then taste the pot and adjust salt if needed before puréeing.
    → Bay leaf adds a subtle herbal note, but it can leave a soapy or grassy impression if left to simmer; removing it ensures a clean, velvety finish.
  • Puréé the soup to a silky texture: Use an immersion blender directly in the pot to blend until completely smooth, or transfer in batches to a blender and blend on high until velvety. Hold the blender steady, tilt the lid slightly to vent steam, and blend in short pulses to avoid splashing. Return the puréed soup to the pot if you used a countertop blender.
    → A smooth, uniform purée is the hallmark of a refined butternut squash soup; blending in batches prevents overheating the appliance and ensures even texture.
  • Adjust thickness and reheating: If the soup is too thick, whisk in small amounts of water or stock, about 1/4 cup at a time, until you reach the desired velvety consistency; if too thin, simmer uncovered for a few minutes to reduce. Reheat gently on low so the soup stays smooth and glossy.
    → Controlling thickness lets you tailor the mouthfeel for bowls or plates and prevents a heavy, pasty texture.
  • Finish with cream or coconut cream (optional): Stir in 1/2 cup heavy cream or coconut cream just after reheating; heat gently until warmed through but do not boil to prevent curdling or separation.
    → Adds a luxurious, satin-smooth mouthfeel and rounds the squash’s sweetness for a richer soup. Dairy-free option preserves body with a dairy-free cream.
  • Brighten the flavor with acid and adjust seasoning: Add 1–2 tablespoons lemon juice or white wine vinegar, adding gradually and tasting as you go; adjust salt and pepper after the acidity is balanced.
    → A touch of acid lifts sweetness, clarifies flavors, and prevents the soup from tasting flat as the squash intensifies.
  • Finish with optional add-ins or garnish at service: If desired, stir in 1/4 teaspoon chili flakes for subtle heat, and ladle the soup into bowls topped with chopped parsley or chives, toasted pepitas, or crunchy croutons for contrast.
    → Garnishes provide color, freshness, and texture that elevate a silky soup into a memorable dish.

Notes

This Gordon Ramsay Butternut Squash Soup is a silky, comforting starter built on roasted squash, aromatics, and a hint of warm nutmeg. To deepen flavor, roast the squash cubes on a parchment-lined tray with a light drizzle of olive oil at 425°F (220°C) for 25–30 minutes until caramelized, then proceed to simmer. If you’re short on time, you can skip roasting and simply simmer raw cubes in stock until tender. Sweat the onion in olive oil (and butter if using) until translucent and lightly golden to release sweetness; add garlic after the onions start to soften to prevent bitterness. Balance the sweetness with low-sodium stock and a bay leaf; finish with a splash of lemon juice or white wine vinegar to brighten. Purée until ultra-smooth, then thin with water as needed to reach your desired consistency. Finish with a swirl of cream or coconut cream for richness, if desired, and taste again for salt and pepper—remember that stock contributes salt, so season in stages. Optional add-ins include a pinch of chili flakes for warmth, chopped parsley or chives for a fresh finish, toasted pumpkin seeds for texture, and croutons for crunch. Leftovers refrigerate well for 3–4 days and freeze beautifully for up to 3 months; reheat gently and avoid boiling to prevent separation.

Tips

Tips for Perfect Gordon Ramsay Butternut Squash Soup

Roast for deeper sweetness (optional but recommended)

If you have time, roast the cubed squash on a parchment-lined sheet at 425°F (220°C) for 25–30 minutes until caramelized. This concentrates flavor and gives the final purée a richer, slightly ganache-like quality. If you skip roasting, a longer simmer in stock will still yield a silky soup, but with a lighter sweetness.

Sweat aromatics gently to build a foundation

Cook the onion in olive oil over medium heat until translucent and lightly golden. Add garlic after the onions begin to soften to prevent burning and bitterness. If you’re using butter, add it with the onions to enhance browning and mouthfeel.

Season in layers

Season the soup at multiple stages: a pinch of salt during sauté, a touch of salt after adding stock, and a final taste and adjust after puréeing. Stock can contribute salt, so taste before adding more salt.

Salt and acid balance

Use low-sodium stock and adjust salt at the end. A splash of lemon juice or white wine vinegar after puréeing brightens the squash’s natural sweetness and prevents the soup from tasting flat. Add acidic notes gradually, tasting as you go.

Manage thickness with stock and water

Start with 3–4 cups stock and 1–2 cups water, adding more only if needed. If you roasted the squash, you may need less water since roasting concentrates flavors and thickens the purée. For a lighter soup, use more water; for a creamier body, use less water or add cream at the end.

Texture matters

For an ultra-smooth soup, purée with an immersion blender directly in the pot until silky. If you want absolute smoothness, pass the purée through a coarse sieve or chinois after blending. Don’t skip this step if you want a glassy, restaurant-grade texture.

Nutmeg and warm spices

A 1/2 teaspoon of ground nutmeg brings warmth. Freshly grate nutmeg for a brighter aroma. Add toward the end of simmering and taste as flavors meld. If using cinnamon or curry powder, use a tiny pinch (1/8–1/4 teaspoon) and adjust slowly to avoid overpowering the squash.

Finish with cream or dairy-free options

Stir in 1/2 cup of heavy cream or coconut cream after puréeing and warming. Do not boil after adding dairy to prevent separation. For a dairy-free version, coconut cream gives a velvety texture with a subtle coconut note.

Acidic brightness and balancing flavors

Use 1–2 tablespoons of lemon juice or white wine vinegar after blending to lift flavors. Start with a small amount, then taste and adjust. Acid helps prevent the soup from tasting flat and enhances the squash’s natural sweetness.

Optional add-ins for depth

1/4 teaspoon chili flakes can add a gentle kick without masking squash flavor. A dash of curry powder or cinnamon can introduce global warmth if used sparingly. Add gradually and taste as you go to keep the squash as the star.

Garnishes that add texture

Top with toast pumpkin seeds (pepitas) for crunch, fresh parsley or chives for color and brightness, or croutons for a contrast in texture. Add garnishes just before serving to maintain their crispness and aroma.

Make-ahead and storage

This soup stores well in the fridge for 3–4 days. Reheat gently on the stove over low heat, stirring often. For longer storage, freeze in airtight containers for up to 2–3 months. Thaw overnight in the fridge and reheat slowly, adjusting thickness with a little stock or water as needed.

Equipment tips for consistency

Use a heavy-bottom pot for even heat distribution to prevent scorching. A good immersion blender makes blending easy and reduces transfer. If you don’t have one, blend in batches in a countertop blender and return to the pot.

Healthier or dairy-free variations

Omit butter and use olive oil only for a dairy-free base. For a lighter version, reduce or omit cream and rely on the squash’s natural creaminess with a touch of olive oil blended in at the end.

Flavor boosters in a pinch

A small roasted garlic clove or a tiny knob of ginger added during sauté can provide an aromatic lift. Remember to keep introductions subtle so they enhance rather than overwhelm the squash.

FAQ

What are the key ingredients for Gordon Ramsay Butternut Squash Soup?

The classic version combines roasted butternut squash with a flavorful soffritto and a silky finish. Typical ingredients include:

  • 1 medium butternut squash, peeled, deseeded, and cubed
  • 1 onion, chopped
  • 1 carrot, chopped
  • 1 celery stalk, chopped
  • 2 garlic cloves, minced
  • 2 tablespoons olive oil or butter
  • 750 ml vegetable or chicken stock
  • 100 ml cream or coconut milk (optional for richness)
  • Salt, pepper, and a pinch of grated nutmeg
How do you prep the butternut squash?

Peel the squash, halve it, scoop out the seeds, and cut into even cubes. For deeper flavor, you can roast the cubes on a lined tray with a little oil at 200°C/400°F for 25–30 minutes until tender and lightly caramelized.

How do you cook Gordon Ramsay Butternut Squash Soup?

Classic method:

  1. Heat olive oil or butter in a large pot. Add chopped onion, carrot, and celery; cook until soft and translucent (about 8–10 minutes).
  2. Stir in minced garlic and cook 1 minute more.
  3. Add roasted squash and pour in stock. Bring to a boil, then simmer 15–20 minutes to blend flavors.
  4. Blend the soup until smooth using an immersion blender or a countertop blender. Return to the pot, stir in cream if using, and season with salt, pepper, and nutmeg.
Can I make this soup dairy-free?

Yes. Skip the cream or substitute with coconut milk, almond milk, or another plant-based cream. Use vegetable stock for a dairy-free base and adjust seasoning to taste.

What flavor boosters can I add for more depth?

Try these additions for Ramsay-style flavor:

  • Fresh ginger (a small knob, peeled and grated) for warmth
  • A pinch of chili flakes or paprika for a gentle kick
  • A squeeze of lemon or a touch of lime zest to brighten the soup
  • Fresh herbs like thyme or coriander at finish
How thick should the soup be, and how can I adjust the texture?

The soup should be silky and fairly smooth. To adjust texture:

  • For thinner soup: add more stock or water and simmer a few minutes
  • For thicker soup: blend more squash into the base, or cook a bit longer to reduce
  • For extra richness without dairy: whisk in a small amount of olive oil at the end
How should I store and reheat leftovers?

Store within 2 hours of cooking in airtight containers.

  • Refrigerate: up to 3–4 days
  • Freeze: up to 2–3 months in freezer-safe containers
  • Reheat gently on the stove over medium heat, stirring, until hot; or microwave in short bursts, stirring in between
What garnishes go well with this soup?

Finish with a touch of flair:

  • Swirl of cream or coconut milk
  • Drizzle of olive oil or a dollop of yogurt
  • Roasted pumpkin seeds or toasted croutons
  • Fresh herbs like parsley or chives
Can I make this in a large batch or for meal prep?

Yes. Scale up the ingredients and use a large pot or two pots. Roast extra squash ahead of time to intensify flavor. Store in portioned containers for quick meals, and reheat as needed.

What equipment do I need to make Gordon Ramsay Butternut Squash Soup?

Essential gear includes:

  • Sharp knife and cutting board
  • Large pot or Dutch oven
  • Roasting tray (if roasting squash before simmering)
  • Immersion blender or countertop blender
  • Wooden spoon or spatula

Introduction

Imagine a dessert that feels like a gentle sunrise in a bowl—creamy, comforting, and softly sweet with the bright, approachable aroma of ripe bananas. Cottage Cheese Banana Pudding Delight is that kind of treat: a silky, spoon-ready indulgence built on the humble, high-protein goodness of cottage cheese, swirled with banana’s natural sweetness, and finished with a kiss of vanilla, a hint of citrus, and a dusting of warmth from cinnamon or nutmeg. It’s the kind of dessert you can whip up in minutes, keep in the fridge for a late-night craving, and proudly serve at family gatherings without tripping over complicated steps or a long list of ingredients. The appeal lies not just in the flavor, but in the texture—the way the cottage cheese creates a creamy, mousse-like body that lightens with the banana’s tropical sweetness, then holds its shape with a gentle set that’s easy to scoop, even after chilling. Your guests will marvel at how something so simple can feel so special, almost like a little culinary hug you can hand to anyone who needs a mood lift, a post-work treat, or a weekend brunch that tastes like sunshine and nostalgia.

In a world of frosted cakes and glossy puddings, this pudding stands out by celebrating everyday ingredients and a smart approach to dessert. The cottage cheese brings protein and a pleasantly tangy undertone that prevents the dish from tipping into cloying sweetness, while the banana contributes natural creaminess and depth. A touch of vanilla—plus optional citrus zest or a whisper of cinnamon—brightens the profile and elevates the humble combo into something memorable. The result is a versatile dessert that can be dressed up for a dinner party or kept casual for a weeknight family supper. It’s the kind of recipe that invites customization, conversation, and a little playful experimentation in the kitchen.

The Story Behind the Dish

Dish stories often begin with a pantry discovery and a craving that refuses to be denied. Cottage Cheese Banana Pudding Delight has its roots in the faithful, no-fuss desserts that appear wherever people want something quick, nourishing, and satisfying. Cottage cheese, a pantry staple that has traveled the globe and earned a place in both savory and sweet recipes, brings a creamy counterpoint to fruit-forward desserts. Its gentle acidity and mild flavor act like a balancing agent, ensuring that the sweetness of ripe bananas doesn’t become cloying. The result is a dessert that feels wholesome and approachable, a conversation between comfort and a touch of culinary curiosity.

The story here is personal as well as culinary. Picture a kitchen where a busy family meets the clock: a parent blending cottage cheese with ripe bananas while the oven stays cool, a child asking if this can be a “banana pudding” but with less worry about dairy or heavy cream. The answer becomes a recipe that travels across generations—scaling in complexity when time allows, staying true to its core: simple ingredients, maximum flavor, and a texture that’s as enjoyable to scoop as it is to savor. This pudding embodies the idea that texture matters as much as taste—creamy, light, and just a touch fluffy, with banana ribbons weaving through every spoonful. It’s a dish that invites stories, memories, and little upgrades, making it a staple in kitchens that love both speed and soul in their desserts.

Why You’ll Love This Recipe

  • Protein-boosted dessert: Cottage cheese provides a satisfying protein kick that makes the pudding feel more balanced and filling than a typical fruit-based dessert.
  • Quick and hassle-free: No bake, no complicated equipment—perfect for busy weeknights or last-minute gatherings.
  • Versatile and forgiving: Simple flavors that adapt to your pantry; you can tweak sweetness, spice, or add-ins without losing the essence of the dish.
  • Kid-friendly and crowd-pleasing: Smooth texture with approachable flavors that appeal to both children and adults, making it ideal for family meals or potlucks.
  • Light yet satisfying: A creamy pudding that feels indulgent without being heavy, making it an ideal end to a comforting meal.
  • Great make-ahead option: The flavors deepen and meld with chilling time, improving overnight or after a few hours in the fridge.
  • Health-conscious notes: Uses real fruit, minimal processing, and can be adjusted for dietary needs with simple substitutions.

Flavor Profile & Texture

Taste Notes

The central flavor is a gentle harmony of banana sweetness and cottage cheese tang. Bananas bring natural caramel-like notes as they ripen, which pair beautifully with the mild acidity of cottage cheese. The vanilla acts as a warm, comforting bow that ties everything together, while optional citrus zest or a whisper of cinnamon can introduce a bright or cozy edge, respectively. When you take a bite, you’ll notice a subtle fruity aroma that carries through the creamy body, ending in a soft finish that lingers pleasantly on the palate.

Texture & Mouthfeel

The texture is the star here. Cottage cheese provides a silky, creamy base with tiny curds that create a delicate, velvety bite. When blended smoothly, the curds melt into a light whipped cream-like body, but with more body than a traditional pudding. Bananas contribute moisture and stretch, giving you ribbons of fruit within every spoonful. If you prefer a smoother experience, blend longer to emulsify all the curds; if you enjoy a touch more bite, pulse briefly to keep some texture intact. The result is a dessert that feels luxurious yet approachable, with a balanced mouthfeel that remains scoopable straight from the fridge without turning soggy or runny.

Occasions & Pairings

This pudding is a versatile companion for several occasions. It shines as a weeknight dessert that cools down a warm meal, a light finish for a weekend brunch, or a bright, crowd-pleasing option for potlucks and family gatherings. Its simplicity makes it appropriate for casual dining, while its creamy richness and fresh banana aroma invite a little extra flair in presentation.

  • Weeknights: Serve in small glasses or ramekins with a sprinkle of toasted nuts or granola for a gentle crunch.
  • Brunch: Layer with fresh fruit or a dollop of yogurt in clear cups to create an appealing, layered dessert that also doubles as a light post-brunch treat.
  • Dessert for gatherings: Offer with a side of shortbread cookies, cinnamon biscotti, or crisp pear slices to contrast textures.
  • Children’s parties: Include colorful fruit toppings or a drizzle of chocolate for a playful twist that remains less heavy than many classic desserts.

Pairings to consider for a complete treat experience:

  • Side dishes: A tart fruit compote (raspberry or blueberry) can brighten the dish, while a small oat crumble adds a crunchy counterpoint.
  • Drinks: A light herbal tea, iced tea with lemon, or a cold brew coffee can complement the pudding’s gentle sweetness without overpowering it.
  • Desserts: A spoonful of whipped cream or a few shards of dark chocolate can elevate the finish for adults, while a dollop of yogurt can add a tangy counterpoint for those who prefer more acidity.

Tips, Variations & Substitutions

Here are practical ideas to tailor Cottage Cheese Banana Pudding Delight to your tastes, dietary needs, or pantry constraints. Each variation keeps the spirit of the dish while offering new textures and flavors.

  • Texture control: For extra creaminess, blend the cottage cheese with the bananas until completely smooth. For more bite, blend just until combined and leave a few banana chunks intact.
  • Sweetness adjustments: Start with a modest amount of sweetener (honey, maple syrup, or a tiny splash of agave) and taste as you go. Bananas provide natural sweetness, so you may not need much additional sugar.
  • Flavor boosters: Add a pinch of cinnamon or nutmeg, or a teaspoon of grated citrus zest (lemon or orange) for a bright lift. A splash of vanilla extract deepens the overall flavor.
  • Vegan option: Replace the cottage cheese with silken tofu or a blend of vegan cream cheese and almond yogurt. Use plant-based milk to achieve the desired consistency. Ensure the fruit remains sweet and ripe to compensate for dairy-free substitutions.
  • Gluten-free and dairy-free: The base pudding is naturally gluten-free with cottage cheese and banana. If using toppings or add-ins like cookies, choose gluten-free options. For dairy-free, stick to vegan substitutions as noted above.
  • Texture variation: Fold in chopped nuts (walnuts, almonds) or a light crumble to add crunch. A spoonful of chia seeds can lend a subtle texture and a hint of nutrition.
  • Flavor twists: Try folding in a spoonful of peanut butter or almond butter for a nutty, richer profile. A few dark chocolate shavings can create a delightful contrast to the fruit sweetness.
  • Make-ahead strategy: The flavors meld nicely after a few hours in the fridge. If making ahead, consider keeping the banana portion partly separate and stirring in before serving to maintain the best texture and color.

Storage & Make-Ahead Ideas

Storing Cottage Cheese Banana Pudding Delight properly ensures it remains delicious and safe to eat. The dish supports preparation ahead of time, making it ideal for hosting or meal-prepping. Here are practical guidelines to maximize flavor and texture while minimizing waste.

Storage basics:

  • Refrigeration: Cover tightly and refrigerate for up to 3–4 days. The pudding will set more as it chills, and flavors will become more cohesive with time.
  • Texture considerations: Bananas may naturally darken a touch after exposure to air. To keep the appearance bright, consider adding a light squeeze of lemon juice to the banana component before blending, or mix in just before serving if color is a concern.
  • Make-ahead steps: You can prepare the base mixture (cottage cheese, banana, vanilla, and sweetener) a day in advance and refrigerate. If you plan to layer with toppings (nuts, granola, fruit), assemble just before serving for a fresher texture.
  • Freezing: Freezing is not ideal for pure cottage cheese-based puddings, as freezing can alter texture and make it grainy upon thawing. If you must freeze, do so for short durations and be prepared for a slightly altered mouthfeel upon thawing.

Make-ahead serving ideas:

  • Individual portions: If you’re hosting a crowd, portion the pudding into small glasses or jars and garnish with your chosen toppings just before serving. This creates an elegant, grab-and-go dessert table.
  • Layered desserts: Create a mini parfait by layering the pudding with yogurt and fresh fruit in clear cups. This not only looks appealing but also adds a playful texture contrast.
  • Finishers on standby: Keep toppings like chopped nuts, cacao nibs, or a dusting of cinnamon in small bowls so guests can customize their portions, adding an interactive element to your gathering.

Fun Facts & Trivia

  • Cottage cheese has a long history as a versatile dairy product used in both cooking and baking around the world. Its mild flavor and creamy texture make it a natural canvas for desserts when paired with fruits and gentle sweeteners.
  • Banana pudding has deep roots in American Southern cuisine, with a tradition of layering vanilla wafers, bananas, and pudding. This version offers a modern, lighter twist by replacing heavier creams with cottage cheese and ripe fruit.
  • Texture matters in desserts: the tiny curds in cottage cheese are what give this pudding its unique mouthfeel, providing a soft, almost fluffy bite that can resemble a light mousse when blended properly.
  • Health-forward dessert idea: By swapping full-fat dairy or heavy creams for cottage cheese, you reduce saturated fat and calories while maintaining a satisfying, creamy experience—an approach loved by athletes and mindful eaters alike.
  • Versatility in one bowl: This dish adapts well across cultures and dietary preferences, proving that simple ingredients can cross boundaries with flavor and texture doing the talking.

Ingredients

Cottage Cheese Pudding Base

    – 2 cups cottage cheese (blended until smooth)
    → Cottage cheese provides a protein-rich, creamy base for the pudding. Blending removes curds for a silkier texture; use full-fat for richness or low-fat for a lighter version. If your blender isn’t powerful enough, blend in batches or pass through a fine-mesh sieve to remove any lumps.
    – 1/2 cup milk or unsweetened almond milk (to loosen to desired consistency)
    → Adds moisture to help reach a spoonable pudding texture. Start with 1/2 cup and add more as needed. Use unsweetened dairy or plant milk to control sweetness and prevent thinning; warmer liquids blend more smoothly with the cottage cheese.

Banana Layer & Sweetener

    – 2 medium ripe bananas, mashed (about 1 cup)
    → Bananas provide natural sweetness and moisture. Use bananas with brown speckles for maximum aroma; mash until smooth with only small lumps if you prefer texture. If bananas are not very sweet, you can add a touch more honey or maple syrup to adjust.
    – 2-3 tablespoons honey or maple syrup (to taste)
    → Natural sweeteners that pair beautifully with banana. Adjust sweetness gradually; honey yields a deeper, floral sweetness while maple provides a caramel note. If using very ripe fruit, you may need less or skip entirely.
    – 1 teaspoon pure vanilla extract
    → Adds warmth and enhances the banana-cottage cheese flavors. Use high-quality vanilla for best aroma; if you have vanilla bean paste, you can substitute with a small amount of paste and scrape in the seeds for extra depth.

Flavor & Texture Enhancers

    – 1/2 cup plain Greek yogurt (optional, for extra creaminess and tang)
    → Increases creaminess and protein content; use plain, unsweetened yogurt. If dairy-free is required, substitute with an unsweetened dairy-free yogurt or simply increase cottage cheese by 1/4–1/2 cup to maintain texture.
    – 1 teaspoon lemon juice (fresh) or orange juice (optional)
    → A touch of citrus brightens flavors and helps prevent banana browning. Add sparingly to preserve the pudding’s banana-forward profile; skip if you prefer a milder taste.
    – Pinch of salt
    → Enhances sweetness and balances flavors; a tiny pinch helps unify the components. Taste and adjust at the end if needed.
    – 1 teaspoon unflavored gelatin dissolved in 2 tablespoons warm water (optional)
    → For a firmer set similar to classic puddings. Bloom gelatin in warm water, then whisk into the cooled cottage cheese mixture before chilling. If you skip this, the pudding will be softer and mousse-like.

Toppings

    – 1 cup fresh berries (strawberries, blueberries, raspberries) for topping
    → Adds brightness, color, and a fresh contrast to the creamy pudding. Wash and pat dry; slice larger berries for even distribution and pleasant bites.
    – 1 small banana, sliced for garnish
    → Reinforces the banana theme and enhances presentation. Slice just before serving; a light drizzle of lemon juice can prevent browning if not serving immediately.
    – 2 tablespoons chopped nuts or granola (optional)
    → Provides crunch and nuttiness. Toast nuts lightly to deepen flavor and maintain crunch; keep separate until serving to avoid sogginess.
    – Whipped cream or coconut cream for serving (optional)
    → Finishes the dessert with a luxurious, airy topping. For dairy-free options, use well-chilled coconut cream whipped to soft peaks; keep toppings cold until serving.

Instructions

  • Blend cottage cheese until smooth in a blender or food processor for 1–2 minutes, stopping to scrape the sides every 30 seconds to remove any remaining curds.
    → Cottage cheese can be gritty; blending until silky ensures a uniform base that mixes evenly with the liquids and yields a luxurious pudding texture. If your blender is less powerful, blend in batches or press the cheese through a fine-mesh sieve after blending to remove lumps.
  • With the blender running, gradually stream in milk or almond milk until the cottage cheese base reaches a thick, spoonable consistency.
    → The liquid helps loosen the grains and achieves a custard-like body. Start with 1/2 cup and add more only as needed to reach the desired thickness; warmer liquids blend more smoothly with cold cottage cheese.
  • Stir in vanilla extract to evenly distribute aroma throughout the base.
    → Vanilla enhances banana and dairy flavors and creates a cohesive, dessert-ready perfume; ensure it is stirred thoroughly so every bite tastes consistent.
  • Mash the two ripe bananas to about 1 cup pulp, aiming for a smooth puree with only small, pleasant specks if you prefer texture.
    → Ripe bananas provide natural sweetness and moisture; mashing them finely ensures a gentle banana flavor distribution in the pudding and prevents large chunks from breaking the smooth base.
  • Stir in 2–3 tablespoons honey or maple syrup, tasting as you go and adjusting sweetness to your preference.
    → Natural sweeteners complement banana and dairy without oversweetening; add gradually since fruit sweetness varies and the final chill dulls sweetness slightly.
  • Optional: whisk in 1/2 cup plain Greek yogurt for extra creaminess and a touch of tang, ensuring it is fully incorporated before proceeding.
    → Yogurt adds richness and a bright tang that contrasts with the banana; if avoiding dairy, substitute with an unsweetened dairy-free yogurt or increase cottage cheese by 1/4–1/2 cup to maintain body.
  • Add 1 teaspoon lemon juice or orange juice and a pinch of salt to the banana mixture, then whisk to blend.
    → Citrus brightens the flavors and the salt helps balance sweetness; add citrus sparingly to preserve banana-forward aroma.
  • Gently fold the banana mixture into the cottage cheese base until just combined, taking care not to overwork so you retain lightness and a slight marble effect if desired.
    → Gentle folding preserves air and prevents a dense, uniform mass; this step also helps distribute banana flavor without over-squeezing the mixture.
  • If you are using unflavored gelatin for a firmer set, bloom the gelatin in 2 tablespoons warm water for 5 minutes, then whisk the dissolved gelatin into the cooled cottage cheese mixture until completely smooth.
    → Gelatin helps the pudding hold its shape like a traditional custard; ensure the mixture is not hot when adding to avoid gelatin breaking down, and whisk until no lumps remain.
  • Chill the pudding base in the refrigerator for at least 2 hours, or up to overnight, to allow flavors to meld and the texture to firm slightly.
    → Cold chilling solidifies structure and enhances mouthfeel; if you used gelatin, the chill will complete the set.
  • Prepare toppings: rinse berries and pat dry, large berries cut into uniform slices, slice an additional small banana for garnish, and lightly toast any nuts or granola to deepen flavor and crunch.
    → Fresh fruit provides bright contrast and texture; toasting nuts enhances their aroma and prevents them from becoming soggy in the pudding.
  • To serve, spoon a generous base layer into each serving glass, layer on the banana mixture or swirl it through, then crown with berries, banana slices, nuts or granola, and a dollop of whipped cream or coconut cream if desired.
    → Layering or swirling creates visual appeal and distinct bite-sized contrasts; cold toppings stay pristine and the dessert remains refreshing.
  • Serve within the same day for best texture and taste, and store any leftovers covered in the refrigerator for up to 2–3 days.
    → The pudding is best fresh, but can be kept chilled; the texture may thicken slightly and flavors deepen as it rests.

Notes

These Cottage Cheese Banana Pudding Delight is a creamy, protein-rich dessert that layers smooth cottage cheese with ripe bananas and a kiss of vanilla for a luscious, spoonable pudding. You can customize it by swirking in a tablespoon of peanut butter, adding a sprinkle of cinnamon, or folding in your favorite chopped fruits or toasted nuts. It can be prepared ahead and kept refrigerated for up to 3 days, making it a convenient grab-and-go treat. For a firmer set, whisk in 1 teaspoon unflavored gelatin dissolved in 2 tablespoons warm water before chilling; if you skip the gelatin, the texture will be lighter and mousse-like. If you need a dairy-free version, substitute the cottage cheese with a high-protein silken tofu or dairy-free yogurt and adjust sweetness to taste. Always ensure flavorings (vanilla extract, toppings, and any gelatin used) are gluten-free if you have gluten intolerance.

Tips

Tips for Perfect Cottage Cheese Banana Pudding Delight

Silky cottage cheese base

  • Blend the cottage cheese thoroughly until completely smooth. If you still notice tiny curds, blend in short bursts and then pass through a fine-mesh sieve to achieve a velvety texture.
  • Let the blended base rest for a few minutes to let any tiny particles settle; give it a quick stir before mixing with the milk to ensure uniform consistency.

Milk adjustments for desired consistency

  • Start with 1/2 cup of milk (dairy or unsweetened plant milk) and add more in 1–2 tablespoon increments until your pudding reaches spoonable, not runny, consistency.
  • Warm milk slightly before mixing with the cottage cheese to help it blend more smoothly and prevent a cold clumpier texture.

Banana layer sweetness and texture

  • Use very ripe bananas with brown speckles for natural sweetness and aroma; mash until mostly smooth with optional small streaks for texture.
  • If bananas are mild, layer in an extra teaspoon of honey or maple syrup to balance sweetness, tasting as you go.
  • For a richer banana flavor, reserve a few thin banana slices to layer on top before chilling.

Sweeteners and flavor balance

  • Honey yields deeper floral notes; maple provides caramel hints. Adjust gradually and taste between additions.
  • For a lighter version, reduce the sweetener by 1–2 tablespoons and rely on banana sweetness; you can always add more after chilling if needed.
  • Vanilla is key—use pure vanilla extract or paste for depth. If using paste, scrape in the seeds for extra aroma.

Optional additions and acidity

  • Plain Greek yogurt adds extra creaminess and tang; if dairy-free, swap with an unsweetened dairy-free yogurt or increase cottage cheese slightly to keep body.
  • A touch of lemon or orange juice brightens flavors and helps prevent banana browning; add a small amount at a time to avoid overpowering the banana.
  • Pinch of salt enhances sweetness—taste and adjust at the end for balance.

Firming the pudding (optional)

  • If you like a firmer set similar to traditional puddings, dissolve 1 teaspoon unflavored gelatin in 2 tablespoons warm water, bloom, then whisk into the cooled cottage cheese mixture before chilling.
  • Without gelatin, the texture will be mousse-like and softer; this is perfectly delicious but softer after chilling.

Layering, chilling, and texture

  • Chill the assembled pudding for at least 2–4 hours, or overnight, to allow flavors to meld and the texture to set. If using gelatin, follow the set time on the package.
  • Gently stir or spoon into serving glasses to keep the banana layer intact; avoid over-mixing when combining base and banana layers.

Toppings and serving tips

  • Keep toppings like berries, banana slices, nuts, granola, and whipped coconut cream ready and add them just before serving to maintain texture and freshness.
  • Toast nuts lightly to deepen flavor; store toasted nuts separately to keep them crunchy until serving.
  • For dairy-free toppings, use chilled coconut cream whipped to soft peaks and a drizzle of dairy-free caramel or maple syrup.

  • Cover tightly and refrigerate for up to 3–4 days. The pudding will thicken slightly as it chills; if it becomes too firm, whisk in a small amount of milk to loosen.
  • Do not add delicate toppings until right before serving to prevent sogginess.

Variations to try

  • Chocolate twist: whisk 1–2 tablespoons cocoa powder into the cottage cheese base for a chocolate banana version.
  • Berry swirl: gently fold in a portion of crushed berries into the base for a fruity ripple effect before layering.

FAQ

What is Cottage Cheese Banana Pudding Delight?

A creamy, lightly sweet layered dessert that combines smooth cottage cheese with mashed bananas, yogurt, and a touch of vanilla, finished with a crunchy topping. It’s quick to make and budget-friendly.

What ingredients do I need to make it?

Common ingredients include:

  • 1 cup cottage cheese (ranch-fat or low-fat works)
  • 2 ripe bananas, mashed
  • 1/2 cup vanilla yogurt or instant vanilla pudding mixed with milk
  • 2–3 tablespoons honey or maple syrup (to taste)
  • 1 teaspoon vanilla extract
  • Crushed graham crackers or crushed cookies for topping (optional)
  • Pinch of cinnamon (optional)
Can I make this dairy-free or low-fat?

Yes. For a dairy-free version, use dairy-free cottage cheese alternative (or blended silken tofu) and dairy-free yogurt or pudding, plus your choice of plant-based milk. For lower fat, use fat-free cottage cheese and light yogurt, and reduce or omit the topping if desired.

Is this suitable for meal prep or make-ahead?

Yes. You can prepare the cream mixture in advance and store it covered in the fridge. Layer with toppings or crumbled crackers just before serving, or assemble the entire dessert a few hours ahead for better flavor meld.

How do I make Cottage Cheese Banana Pudding Delight?

Steps:

  1. Mash the bananas until smooth.
  2. Blend or whisk the cottage cheese until creamy.
  3. Stir in mashed bananas, vanilla yogurt/pudding, honey, and vanilla extract until well combined.
  4. Taste and adjust sweetness if needed.
  5. Layer the mixture with crushed crackers or granola in serving cups or a dish, finishing with a topping of crackers/granola if using.
  6. Chill for at least 2 hours (or overnight) to set and meld flavors.
How long should it chill before serving?

Chill for at least 2 hours for a soft set, or overnight for best flavor and texture. The cooler temperature helps the flavors meld and the cottage cheese to firm up slightly.

How should I store leftovers?

Store in an airtight container in the refrigerator. Consume within 3–4 days for best texture and flavor. If the topping is added, you may keep it separate until serving.

Can I customize the flavors or toppings?

Absolutely. Try these variations:

  • Add a pinch of cinnamon, nutmeg, or cardamom for warmth.
  • Fold in a tablespoon of peanut butter or almond butter for a nutty twist.
  • Mix in cocoa powder for a chocolate banana version.
  • Top with chopped nuts, berries, or a sprinkle of granola for extra crunch.
Is freezing the pudding a good idea?

Freezing is not ideal as the texture may become gritty or separate when thawed. It’s best enjoyed fresh or after a chill in the fridge.

Serving suggestions and presentation ideas?

Serve chilled in individual glasses or bowls. Garnish with banana slices, fresh berries, a drizzle of honey, and a light sprinkle of cinnamon. For a fancy touch, layer in a clear cup to show the swirls of banana and cottage cheese.