Author

Ocean Nightleaf

Browsing

Introduction / Hook

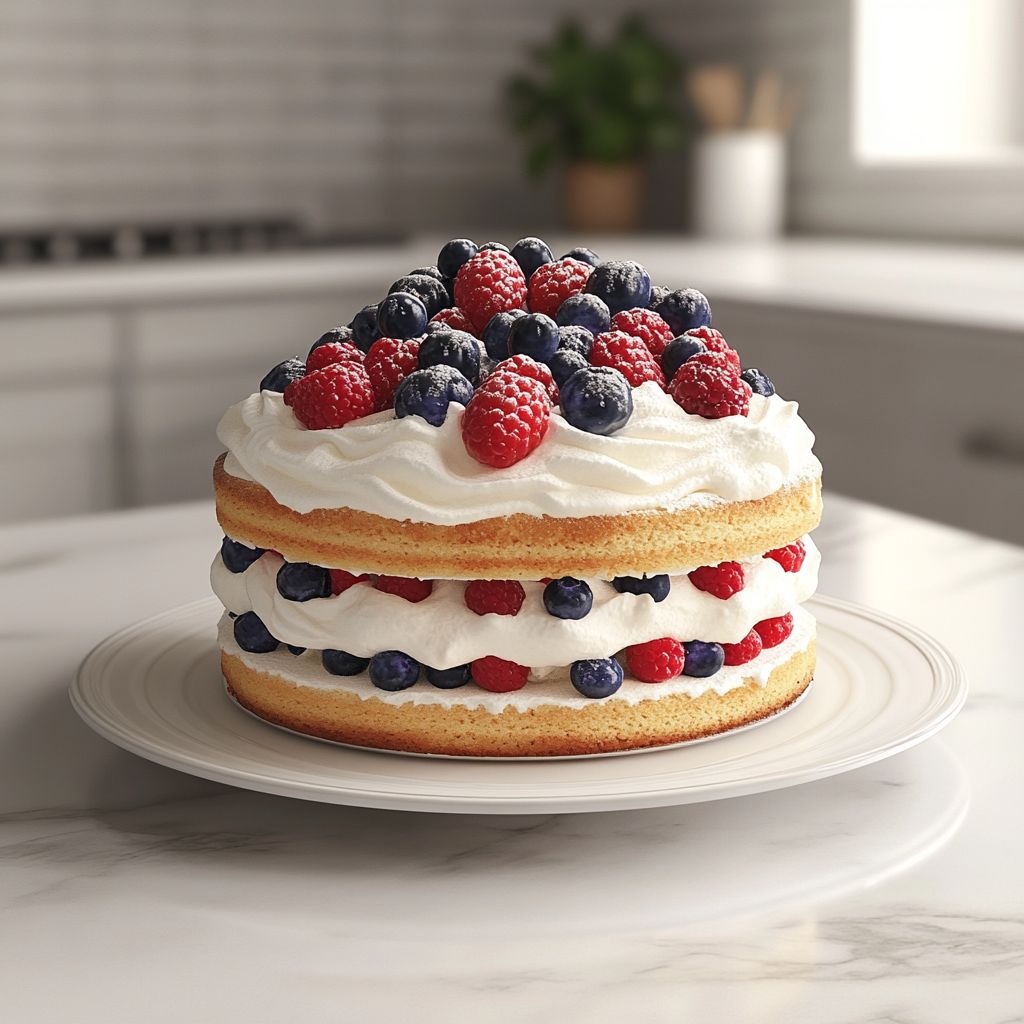
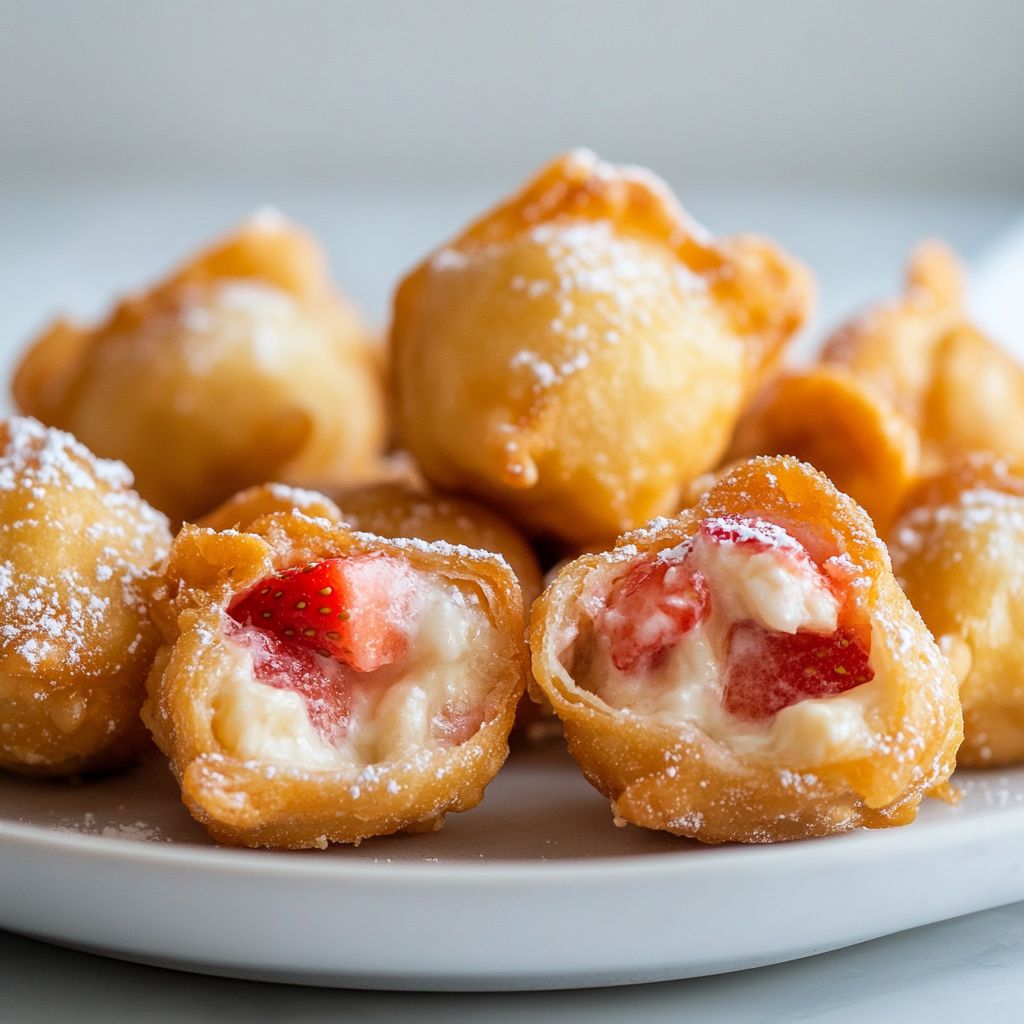
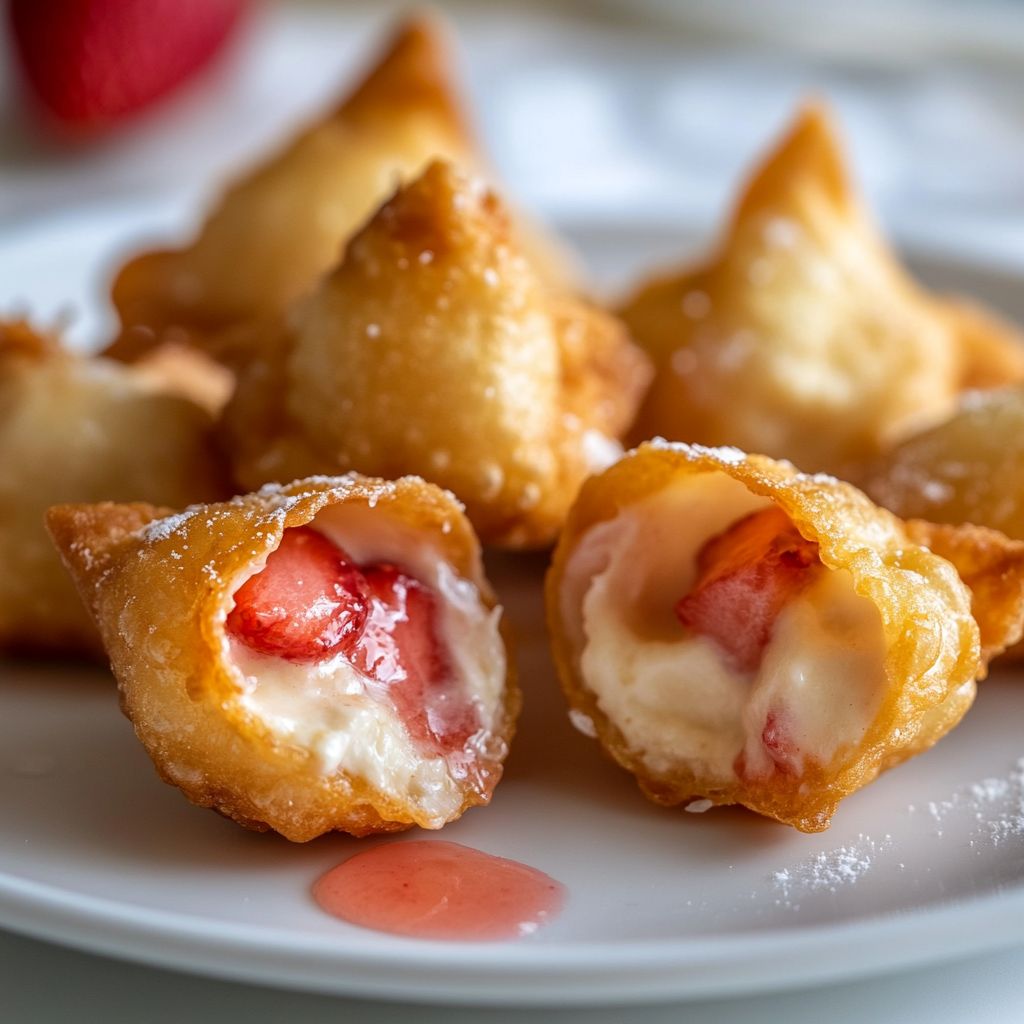
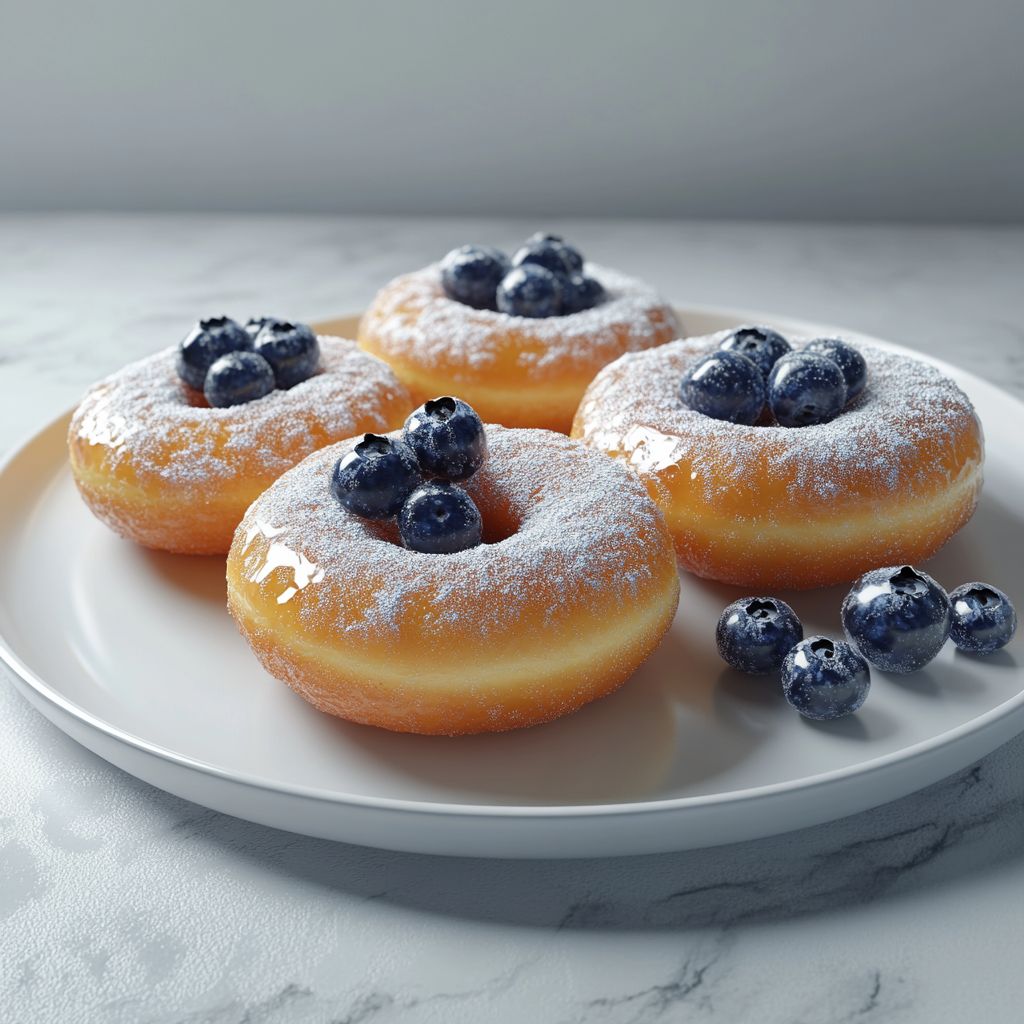
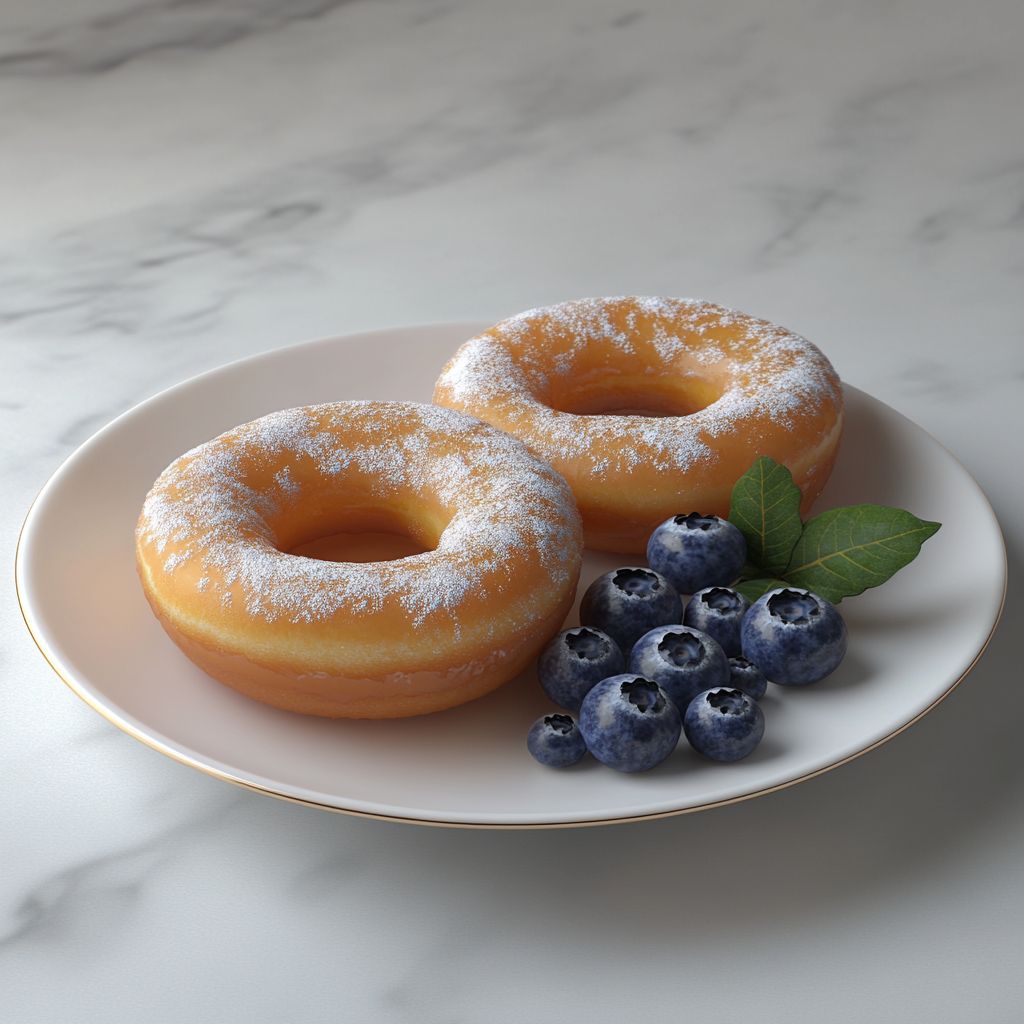
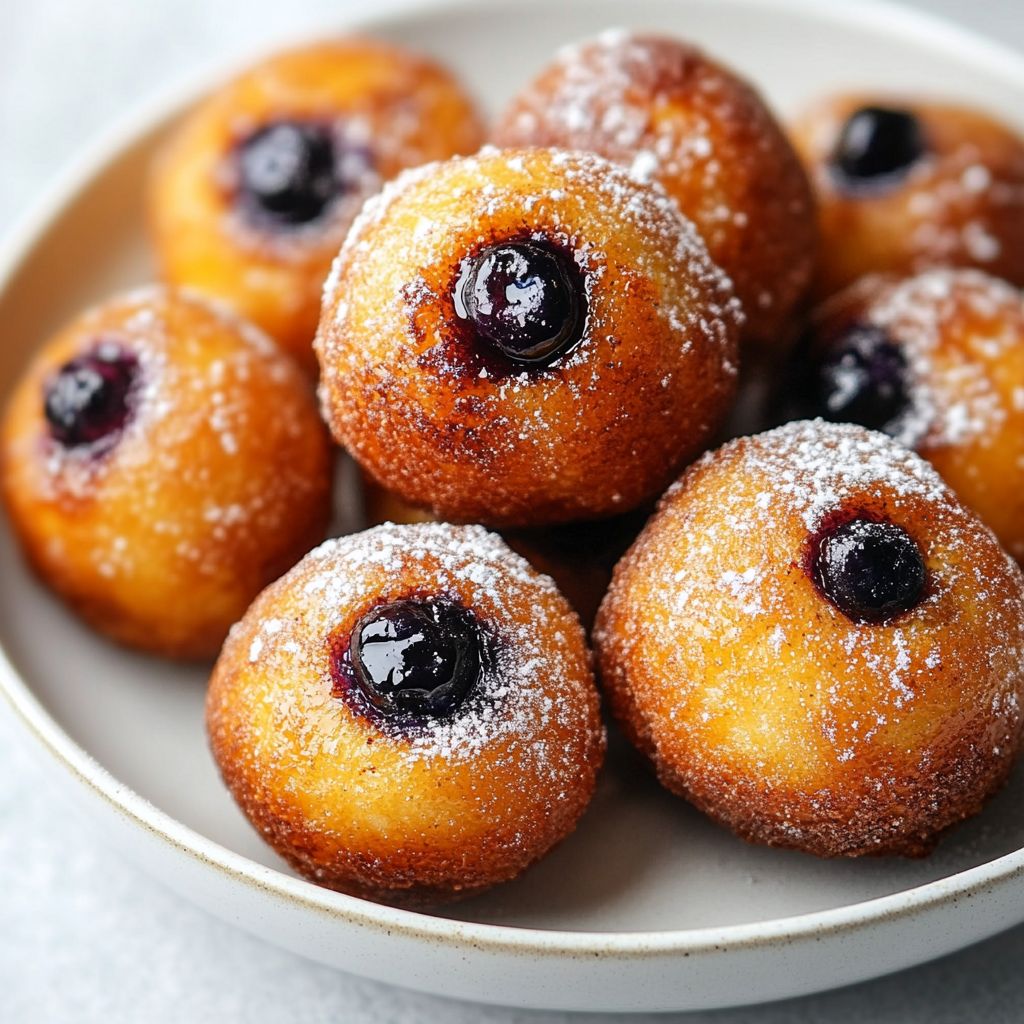
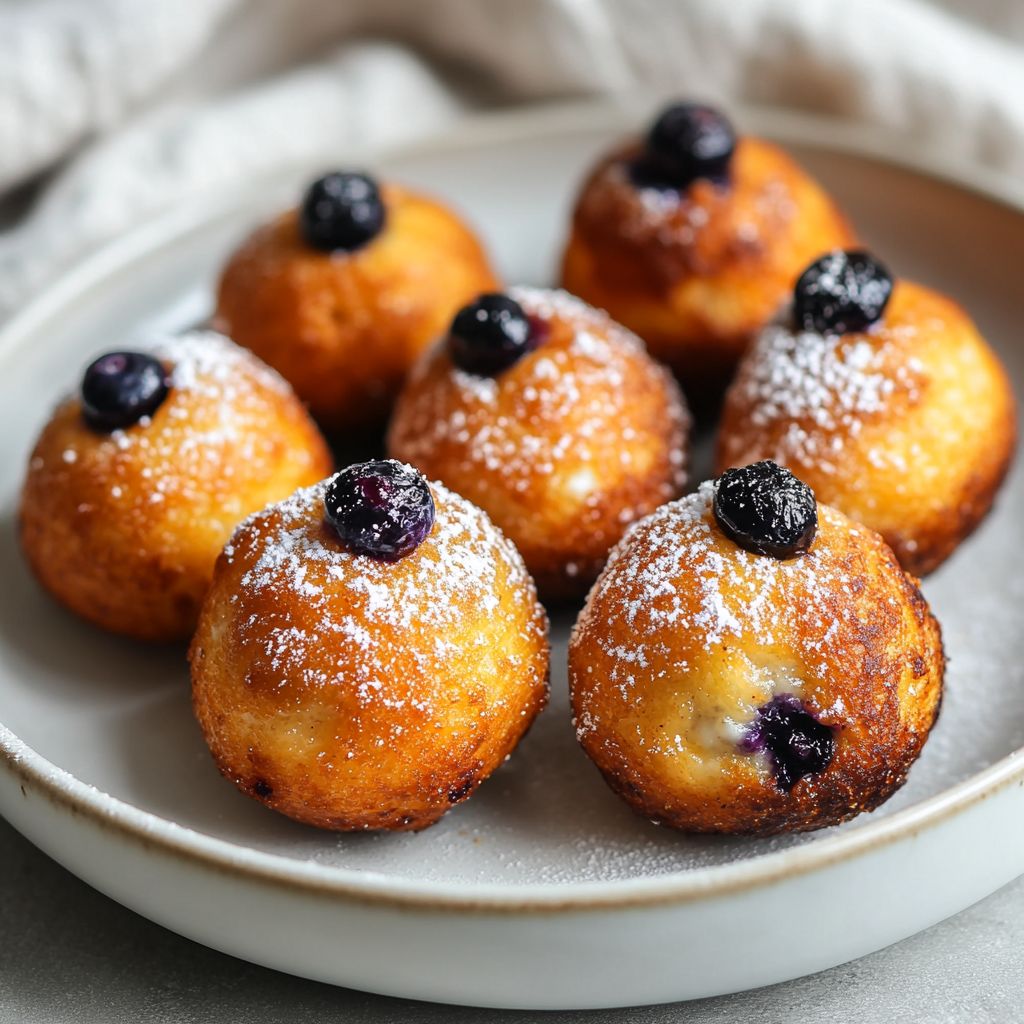
Imagine a plate of golden, bite-size treasures that defy the typical morning ritual: airy, tender donut holes that whisper with vanilla warmth, speckled with bright bursts of blueberry, and a crust that gives just enough crunch to make the first bite feel like a celebration. These Air Fryer Blueberry Cottage Cheese Donut Holes are not just a snack; they’re a small, sunlit moment you can hold in your hand. The air fryer works its magic, turning what could be an indulgence into a lighter, crisper treat with a soft, cloud-like interior. The aroma alone—vanilla, warm dairy sweetness, and the juicy pop of blueberries—invites everyone to the table. They’re the kind of morsels that disappear quickly at a brunch, linger on a coffee break, and somehow taste better when shared with friends or family after a long day. If you’ve ever wished for a donut-y finish to your morning that doesn’t require deep-frying oil or a coffee-sized splurge of guilt, you’ve found something special here. The beauty is in the contrast: a sturdy, lightly crisp exterior that yields to a creamy, almost cheesecake-like center, punctuated by blueberry jewels that burst with tangy-sweet brightness. Each bite feels like a tiny, comforting dessert wrapped in a friendly, everyday snack, perfect for kids, teens, and adults who still believe in the magic of a simple pastry done right.

What makes these donut holes truly sing is how they bridge nostalgia with modern convenience. They echo the soft crumb and comforting sweetness of a classic donut, but they arrive with the clean snap of a well-seasoned bite and the smart efficiency of an air fryer. The recipe honors the familiar flavors—blueberries, vanilla, a touch of cinnamon or zest, and the creamy brightness of cottage cheese—while reimagining their textures and proportions so that every bite feels deliberate, indulgent, and somehow lighter than you’d expect. If you’ve ever turned to cottage cheese as a secret ingredient for lifting texture in baked goods, you’ll recognize the clever balance here: protein-rich curds deliver richness without heaviness, while blueberries deliver color, moisture, and a zing that wakes up the palate. The result is a plate that looks as good as it tastes, inviting you to pair with a steaming cup of coffee or a cold glass of milk and watch the moments of quiet pleasure unfold—one donut hole at a time.

The Story Behind the Dish

Every good dish has a story, and these Blueberry Cottage Cheese Donut Holes arrive with a tale of kitchen improvisation and the joy of quick, comforting treats. The idea grew out of a weekend morning when I wanted something bakery-worthy yet simple enough to pull together with pantry staples. Cottage cheese often sits in the fridge as a quiet workhorse, lending a creamy texture to smoothies, pancakes, and even some baked goods. In this recipe, the cottage cheese isn’t hiding behind a heavy dairy cream; rather, it plays a starring role in delivering tender crumb and a subtle tang that pairs beautifully with the sweetness of blueberries. The air fryer, a relatively modern kitchen ally, came into the mix as a way to achieve that satisfying donut crust without the oil bath of deep-frying. It’s a marriage of textures and cultures—the soft, almost cheesecake-like interior you’d expect from cottage cheese-based batter, with the crisp outer edge that recalls a donut shell, all made possible by a technology that makes heat circulation a friend rather than a challenge. The result feels like a bright nod to weekend mornings and casual gatherings: a treat that can be whipped up quickly, shared easily, and enjoyed by all ages without the heaviness of a traditional fried donut.

In imagining this dish, I drew inspiration from the way many cultures celebrate fruit with dairy and baked goods—blueberries being a natural, jammy accent that lightens and lifts, while cottage cheese introduces a nuance of tang and protein that keeps the crumb from feeling dense. The donut holes themselves are a playful shape that evokes childhood snacks and fairground indulgences, but the cooking method reclaims them as a modern, health-conscious option. The color—the pale ivory interior speckled with pockets of indigo-blue—feels like a little sunrise, a reminder that breakfast can be both nourishing and exciting. It’s a story about balance: balance between indulgence and nutrition, between speed and quality, and between comfort and novelty. And if you’re reading this on a busy weekday or planning a leisurely weekend brunch, the dish offers a gentle invitation to slow down just enough to savor that first bite and then the second, and the third, as the aroma pulls everyone toward the table.

Why You’ll Love This Recipe

  • Quick and hands-on: A friendly, straightforward process that fits into a busy morning, lunch prep, or a relaxed weekend project.
  • Better-for-you indulgence: Soft, creamy interior from cottage cheese pairs with a crisp exterior in a way that feels satisfying without the heaviness of a fried treat.
  • Kid-friendly and shareable: Bite-sized, less messy, and easy for little hands to manage as a fun, interactive breakfast or snack.
  • Customizable base: A gentle canvas for blueberries, but versatile enough to accommodate other fruits, zest, or a touch of spice to suit your mood.
  • Portable and party-ready: Perfect for brunches, potlucks, or school lunches; they transport well and stay tasty for a stay-warm moment on a plate.
  • Air fryer advantage: Achieves a satisfyingly crisp exterior with a tender crumb using little or no oil, offering a lighter alternative to traditional donuts.
  • Protein-friendly option: Cottage cheese contributes protein to the bite, helping to keep you fuller longer than many typical morning pastries.

Flavor Profile & Texture

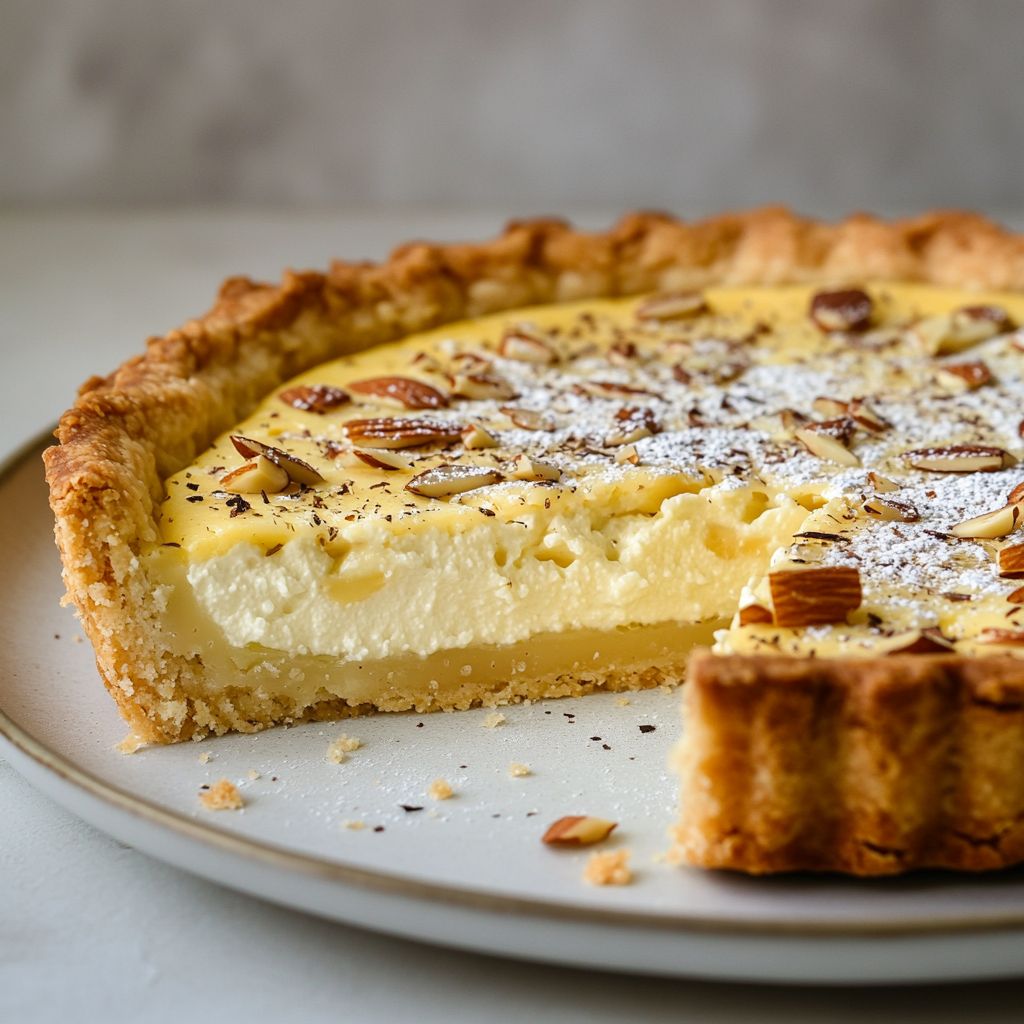
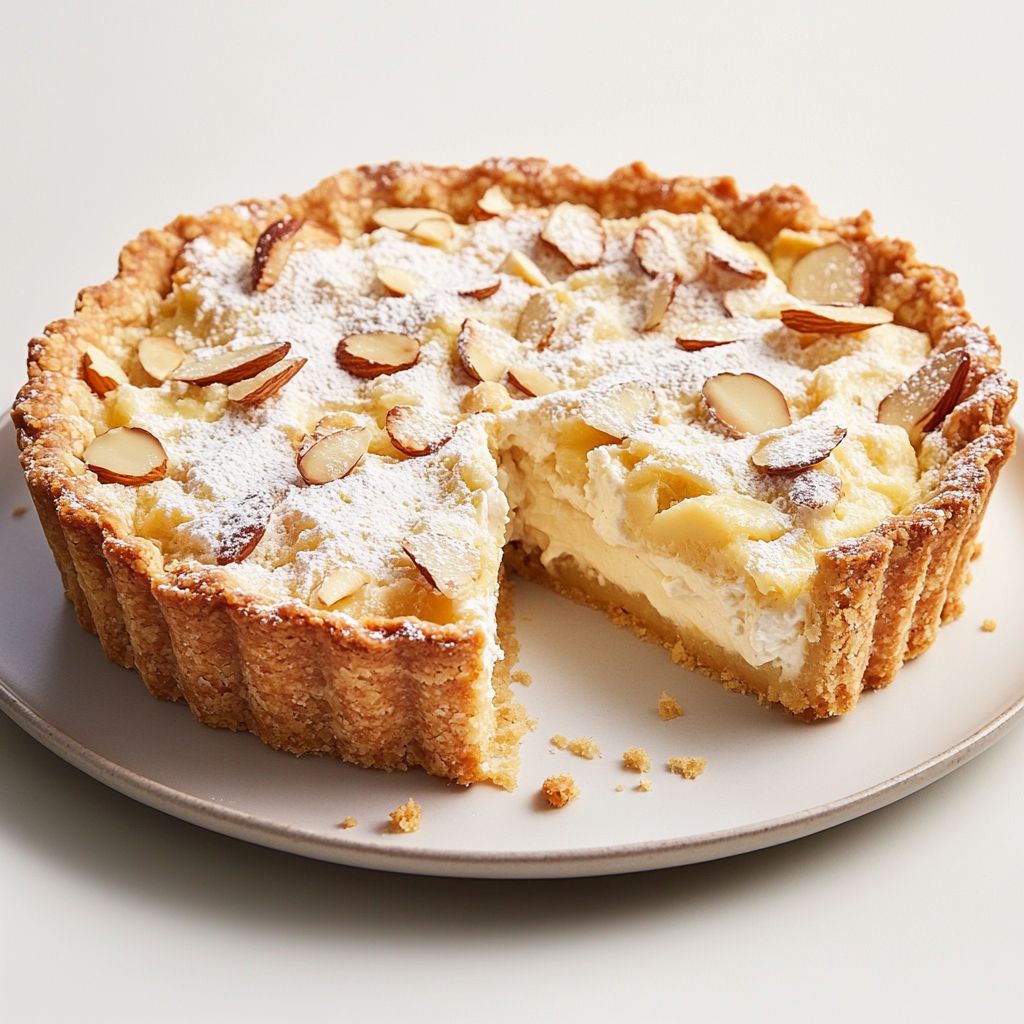
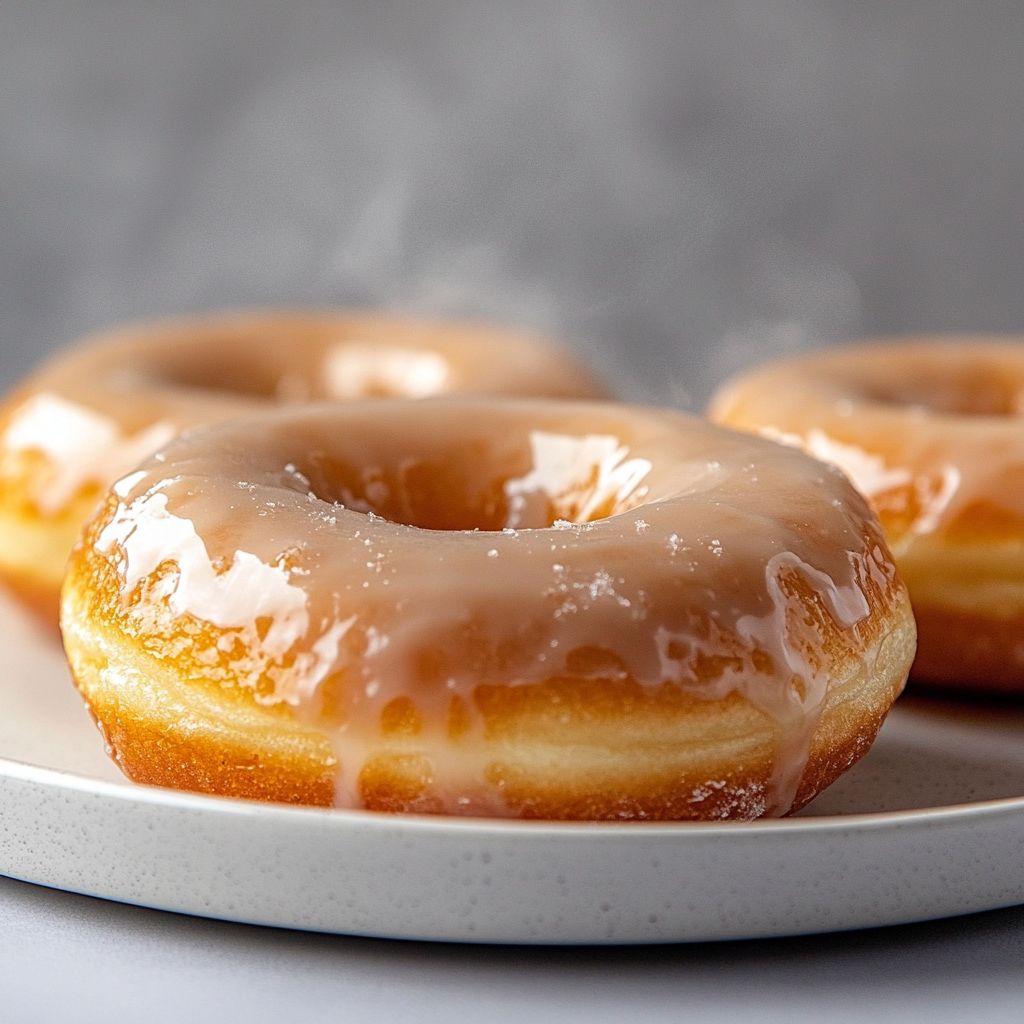
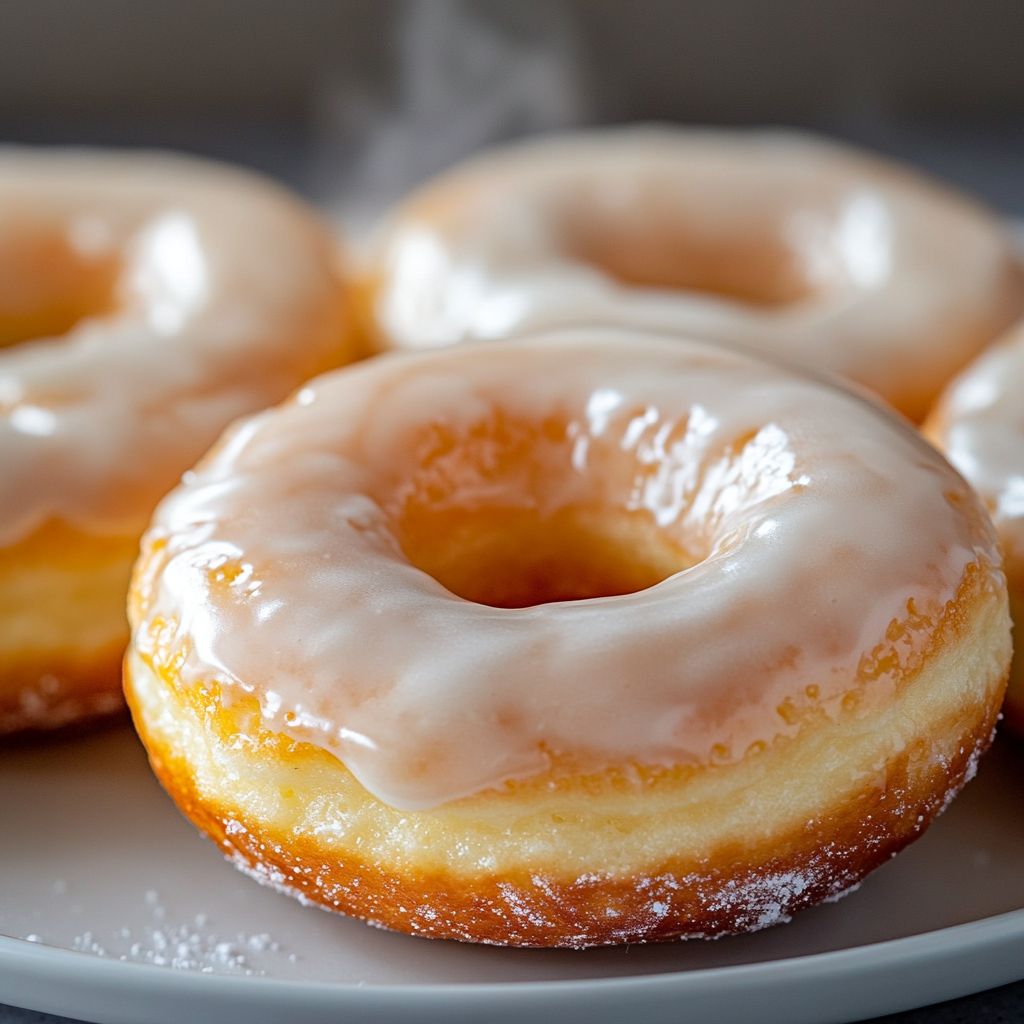
From the first bite, you’ll notice a crisp, lightly sugared exterior that gives way to a delicate, airy interior. The cottage cheese within the batter lends a gentle tang and a moist, almost cheesecake-like crumb that stays tender as you chew. Blueberries punctuate the dough with juicy pockets of sweetness and a bright, tart counterpoint that brightens every bite. The aroma is an inviting blend of vanilla, subtle dairy richness, and the warm, comforting note of a hint of cinnamon or citrus zest, depending on how you season. Texture-wise, the donut holes strike a pleasing balance: a crisp crust that shatters with a clean crack, followed by a supple center that melts in your mouth. The blueberry juice can bleed slightly into the batter during baking, creating tiny blue marbles that are as visually appealing as they are flavorful. The end result is not cloying or heavy; it’s a light, celebratory bite—a reminder that dessert can be a virtuous morning treat when crafted with care. The flavor profile leans toward a refined comfort, with fruit brightness, a gentle dairy creaminess, and a touch of vanilla sweetness that lingers pleasantly on the palate after the final bite.

Occasions & Pairings

This dish shines in moments that call for a warm, friendly vibe: a weekend brunch with friends, a casual Saturday family breakfast, or a midweek pick-me-up that doesn’t derail your day. The donut holes are at home on a buffet table, stacked neatly on a decorative platter, or served in individual portions alongside a pot of coffee or a tall glass of milk. They pair especially well with light, citrusy beverages like a sparkling lemonade or an orange-infused tea, which can cut through the creamy texture of the cottage cheese and brighten the overall experience. For brunch gatherings, consider adding a dollop of yogurt or a light drizzle of a gentle glaze to complement the fruitiness without overpowering the delicate crumb. The versatility also makes them suitable for potlucks and kids’ parties, where a bite-sized option is often the star—a snack that feels indulgent without being overwhelming. If you want to lean into a more sophisticated brunch vibe, pair the donut holes with a fresh fruit salad, a citrus yogurt dip, or a light cheese plate to create a balanced menu that feels thoughtfully curated while still approachable.

Tips, Variations & Substitutions

  • Flavor boosters: add a pinch of cinnamon, nutmeg, or a splash of lemon or orange zest to the batter to lift the aroma and brightness without adding intensity.
  • Fruit substitutions: swap blueberries for raspberries, diced strawberries, or a mix of berries for a slightly different flavor and color profile.
  • Gluten-free option: use a gluten-free baking blend that’s designed for muffins or baked goods to preserve the tender crumb. You can also blend a bit of almond flour with your regular flour for a slightly nuttier note and extra tenderness.
  • Vegan-friendly adaptations: replace cottage cheese with a thick, dairy-free alternative like silken tofu blended with a touch of lemon juice, and use a plant-based egg substitute or a flax/chia “egg” to mimic binding. Ensure the dairy-free alternative contributes similar moisture and structure for a soft interior.
  • Oil and moisture balance: use a neutral oil or applesauce to maintain moisture without overpowering the vanilla flavor. If you prefer lighter texture, reduce any heavier additions and rely on the cottage cheese’s moisture.
  • Texture tuning: for an extra crisper crust, lightly dust the dough with a delicate sugar before air frying, or finish with a subtle sprinkle of cinnamon sugar after cooking (if you’re not strict about no extra sugar).
  • Make-ahead ideas: you can portion the batter into small mounds on a sheet and refrigerate until ready to bake; they’ll hold their shape and bake into consistent holes. If you want to freeze, shape the dough into small rounds, freeze on a tray, then transfer to an airtight container. Bake from frozen, adding a little extra time and watching for doneness.
  • Allergen-aware notes: if you have dairy or egg restrictions, experiment with dairy-free alternatives and gentle binders. The goal is to keep the batter cohesive and the final texture light and tender.

Storage & Make-Ahead Ideas

These donut holes are surprisingly forgiving when it comes to storage. Leftovers can be kept in the refrigerator for a few days in an airtight container. Reheating gently in the air fryer or a warm oven will restore a crisp exterior while reviving the soft interior, making them taste almost freshly baked. If you’re planning ahead for a busy week, you can prepare the batter or dough in advance and refrigerate it briefly; this can help the dough set slightly for easier shaping and more uniform baking. Freezing is another smart option: freeze unbaked dough balls on a sheet until solid, then transfer to a labeled bag. When you’re ready, bake from frozen, adding a touch of extra time as needed and ensuring they are heated through with a golden crust. For gatherings, you can assemble a tray of frozen, ready-to-bake portioned dough balls and bake them as guests arrive, turning a simple entertaining moment into a warm, inviting activity that fills your home with the scent of sweet berries and vanilla.

Fun Facts & Trivia (Optional)

Donut holes, those bite-sized wonders, have a little culinary lore behind them. The concept of biting into a small, uniform donut-like bite has roots in various cultures and culinary experiments designed for portable, shareable treats. The idea of a hole or central portion being distinct from the ring shape has been a topic of kitchen curiosity for generations. In the broader donut world, the legend goes that a ship captain named Hanson Gregory invented the donut hole in the mid-19th century to ensure even cooking and remove the bread-dense center—an anecdote that, while charming, also highlights the long-standing human desire for lighter, more uniform baked goods. Whether you’re a purist for classic donuts or a fan of modern air-fried innovations, these donut holes honor that spirit: small, accessible, and perfect for savoring in a single bite or two without feeling overwhelmed. A few more fun facts: blueberries are among the most antioxidant-rich fruits, and cottage cheese has a history of being used as a protein-rich dairy product in many cultures, offering a unique tangy flavor that complements sweet pastries when used thoughtfully. Together, these ingredients create a modern treat with a nod to tradition and a nod to health-conscious cooking—something that feels both comforting and contemporary at once.

Final Thoughts

In the end, these Air Fryer Blueberry Cottage Cheese Donut Holes are more than just a recipe; they’re an invitation to enjoy a simple, joyful moment in your kitchen. They celebrate texture and balance—crisp exterior, ultra-tender interior, fruity brightness, and a gentle dairy creaminess that doesn’t overpower the palate. They’re adaptable, forgiving, and perfect for those who love a treat that tastes indulgent while still feeling light and quick to prepare. Whether you’re feeding a hungry family, sharing with neighbors, or treating yourself after a long day, these donut holes offer a reliable, delicious solution. So preheat your air fryer in spirit, whisk your batter with a smile, fold in the blueberries with care, and let the kitchen fill with a scent that promises a little sweetness in every bite. The moment you take that first bite, you’ll know you’ve found something genuinely special—something that makes ordinary mornings feel a little more extraordinary, one blueberry-dotted, cottage-cheese-kissed bite at a time.

Ingredients

Donut Hole Batter
– 1 cup cottage cheese (whole-milk, small curd)
→ This base provides moisture, creaminess, and protein, helping to yield a tender, cake-like crumb without adding a lot of fat. For the smoothest batter, blend the cottage cheese in a blender or food processor until completely smooth before mixing with the eggs. If you prefer a chunkier texture, you can pulse just briefly, but smooth results are easiest to shape into evenly sized holes.
– 2 large eggs
→ Eggs act as the primary binder and contribute to the structure that helps the donut holes rise and hold their shape during air frying. Bring eggs to room temperature for better emulsification; whisk until pale and slightly thick before incorporating into the batter to ensure even distribution.
– 1/2 cup granulated sugar
→ Provides sweetness and contributes to browning on the surface for a pleasant aroma and color. If you want a lower-sugar version, reduce sugar and consider adding a pinch more cinnamon or vanilla to compensate for flavor. When using liquid sweeteners, you may need to adjust the flour slightly to maintain batter consistency.
– 3/4 cup all-purpose flour
→ Supplies structure to the batter and helps trap moisture from the cottage cheese. Because this batter is quite wet from the cottage cheese, this amount keeps the texture tender without being dense. For gluten-free diets, substitute with 3/4 cup gluten-free all-purpose flour and add 1/4 teaspoon xanthan gum; you may need an extra tablespoon of milk if the batter becomes too thick.
– 1 teaspoon baking powder
→ The leavening that makes the donut holes light and springy. Fresh baking powder ensures maximum rise; sift it with the dry ingredients to evenly distribute. Do not substitute with baking soda unless you also add an acid and adjust the wet ingredients accordingly.
– 1/4 teaspoon salt
→ Enhances overall flavor and helps tighten the crumb just enough to keep the donut holes from feeling too soft. If using salted butter in other parts of the recipe, you can reduce this to 1/8 teaspoon.
– 1 teaspoon vanilla extract
→ Deepens sweetness and rounds out the tang of the cottage cheese. Use pure vanilla extract for best aroma; if you only have vanilla paste or bean, you can substitute with 1/2 the amount of paste or 1/2 of a vanilla bean scraped in.
– 1/2 cup fresh blueberries (washed and pat-dried)
→ Bursts of blueberry flavor and color throughout the donut holes. To prevent sinking, toss the blueberries with 1 teaspoon of flour before folding into the batter and fold gently to minimize bursting. If using frozen blueberries, keep them frozen and fold quickly to reduce color bleed and moisture release.
– 1 tablespoon neutral oil (for brushing)
→ Lightly coat the air fryer basket and, if desired, brush a thin layer on the formed donut holes to promote browning and prevent sticking. Choose a high-heat oil such as grapeseed or canola; avoid heavily flavored oils that could overpower the delicate flavors.
– 2-3 tablespoons milk (dairy or plant-based) as needed
→ Use to loosen the batter if it feels too thick or dry. Add gradually until the batter just comes together and can be scooped or rolled into small balls. If using yogurt or sour cream as a partial substitute, you may need slightly less flour to maintain the right consistency.

Optional Add-ins
– 1/2 teaspoon ground cinnamon
→ Adds warm spice that pairs beautifully with blueberries. Include with the dry ingredients for even distribution. If you love cinnamon, you can increase to 3/4 teaspoon, but start with 1/2 teaspoon to avoid overpowering the berries.
– Zest of 1/2 lemon
→ Bright citrus aroma that complements the blueberries and cottage cheese. Use a microplane to avoid the bitter white pith; zest should be added to the dry ingredients or just before mixing to preserve essential oils. If you dislike lemon, omit entirely.

Glaze (optional)
– 1/2 cup powdered sugar
→ Provides a light, sweet glaze that makes the donut holes look and taste irresistible. Start with less and add more if you want a thicker glaze. Dairy-free palates can still enjoy this by using plant-based milk in the next step.
– 1-2 tablespoons milk (dairy or plant-based)
→ Adjusts the glaze to a pourable consistency. Add milk a teaspoon at a time until you reach the desired drizzling thickness. If you prefer a thicker glaze, use closer to 1 tablespoon; for a thinner glaze, use 1.5–2 tablespoons.
– 1/2 teaspoon vanilla extract
→ Adds a gentle vanilla note to the glaze to complement the blueberry and cottage cheese flavors. If you already used vanilla in the batter, you can skip this, or use a touch of almond extract (1/8 teaspoon) for a different dimension—just be cautious not to overpower the berry flavor.

Instructions

  • Preheat your air fryer to 360°F (182°C) and lightly spray or brush the air fryer basket with neutral oil to prevent sticking and promote even browning.
    → This ensures the donut holes release cleanly and develop a uniform golden crust without added fat from the batter.
  • Blend the cottage cheese in a blender or food processor until completely smooth, then measure 1 cup and transfer to a large mixing bowl.
    → A smooth base yields a tender, cake-like crumb with even texture; smooth cheese eliminates lumps that could cause uneven cooking.
  • Bring the eggs to room temperature and whisk them in a small bowl until pale and slightly thick, then set aside.
    → Room-temperature eggs emulsify more evenly, helping to trap air and create light structure in the donuts.
  • Whisk the eggs with the granulated sugar and 1 teaspoon vanilla until pale, thick, and well combined, then fold in the smooth cottage cheese mixture.
    → The whisked sugar and eggs create a stable emulsion that carries the batter’s moisture and sweetness evenly; folding in the cheese ensures uniform distribution without deflating the batter.
  • In a separate bowl, whisk together the all-purpose flour, baking powder, salt, and optional cinnamon and lemon zest, ensuring the spices and zest are evenly dispersed.
    → Sifting or whisking dry ingredients prevents clumps and ensures the leavening and flavors are evenly distributed for a uniform rise and aroma.
  • Toss the fresh blueberries with 1 teaspoon of flour to reduce sinking and color bleed, then set them aside.
    → The flour coats the berries lightly, slowing down moisture release and helping them stay suspended in the batter during air frying.
  • Gently fold the dry ingredients into the wet mixture until just combined, then fold in the floured blueberries with a light hand to preserve their shape.
    → Overmixing can develop gluten and toughen the crumb; folding minimizes gluten development while keeping the batter cohesive.
  • If the batter looks very wet or loose, add milk 1 tablespoon at a time until the batter is scoopable but still thick enough to hold a mound without spreading excessively.
    → The right hydration yields a tender crumb while ensuring the batter can be formed into neat balls without flattening during air frying.
  • Lightly brush or oil your hands and portion the batter into small balls about 1 inch in diameter using a small scoop or two spoons, shaping them quickly and gently to maintain a smooth surface.
    → Uniform sizing ensures even cooking; rolling between palms minimizes cracks and keeps the centers tender.
  • Arrange the donut holes in a single layer in the prepared air fryer basket, leaving at least 1/2 inch of space between pieces for air circulation.
    → Proper spacing allows hot air to reach all surfaces, yielding evenly browned exteriors without undercooked centers.
  • Air fry the donut holes at 360°F (182°C) for 6–8 minutes, flipping or turning them halfway through the cook time for even browning.
    → Turning ensures all sides are exposed to direct hot air, producing a consistent crust and interior texture; bake until the edges are golden and the centers feel set.
  • Check for doneness by inserting a small skewer or toothpick; it should come out with a few moist crumbs and the surface should be lightly browned. If needed, give them an additional 1–2 minutes in the air fryer.
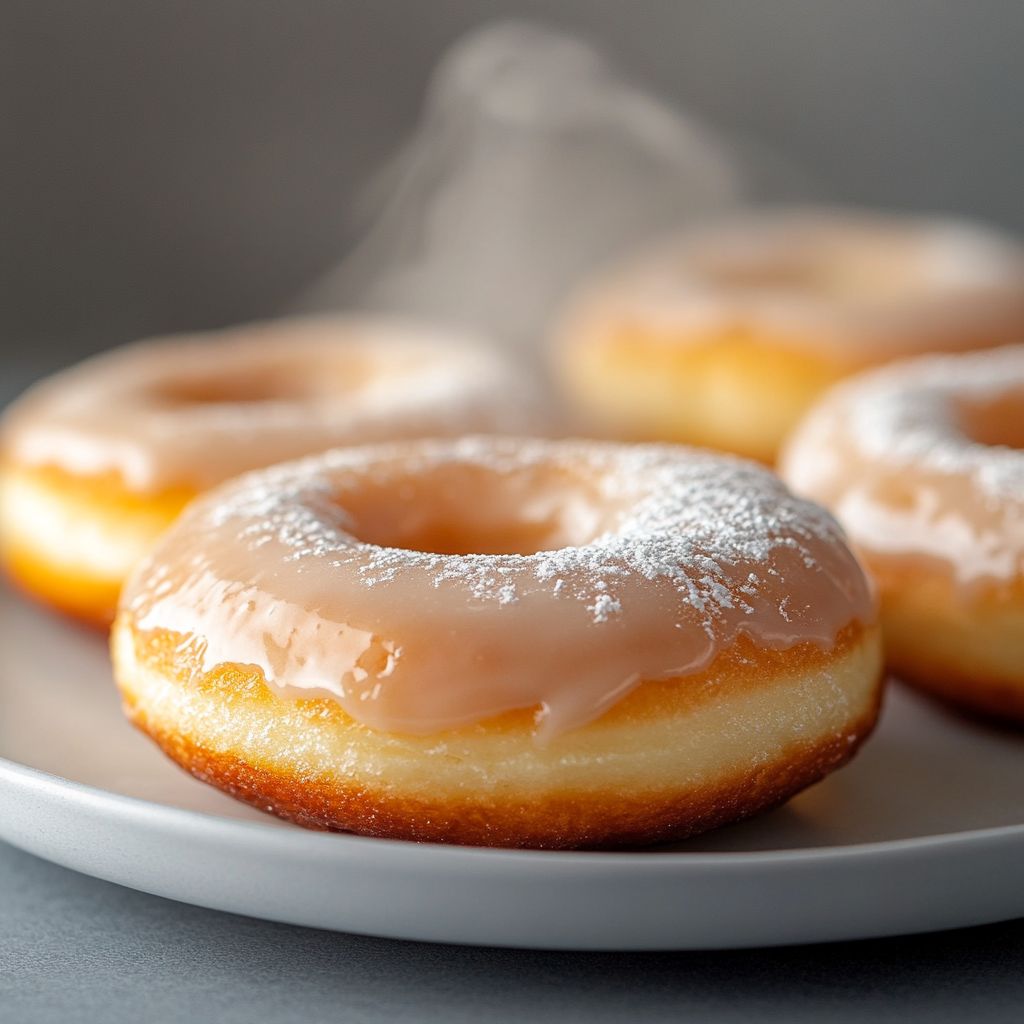
    → The toothpick test confirms the interior isn’t gummy while preventing overcooking that could dry the crumb.
  • Transfer the donut holes to a wire rack and allow them to cool for about 5 minutes before glazing (if using) to set the crust and prevent the glaze from sliding off.
    → Cooling briefly helps the surface crystallize and improves glaze adhesion for a glossy finish.
  • Prepare the glaze by whisking 1/2 cup powdered sugar with 1–2 tablespoons milk and 1/2 teaspoon vanilla until smooth and pourable, adjusting with more milk or sugar to reach the desired consistency.
    → A balanced glaze clings to the warm donuts without running off; adding vanilla enhances the berry-cottage cheese flavors.
  • Drizzle the glaze over the warm donut holes in a thin, even stream or dip the tops, then let the glaze set for a few minutes before serving.
    → A light glaze provides a sweet sheen and a finishing touch that complements the soft crumb without making the donuts overly sweet.

Notes

These Air Fryer Blueberry Cottage Cheese Donut Holes are tender, lightly sweet, and full of creamy cottage cheese with bursts of blueberry throughout. For best texture, blend the cottage cheese until completely smooth, and bring the eggs to room temperature to help emulsify the batter for even rise. To keep the donut holes light, sift the baking powder with the dry ingredients and fold the blueberries in gently after adding flour to minimize bursting and color bleed. If you follow a gluten-free diet, substitute 3/4 cup gluten-free all-purpose flour plus 1/4 teaspoon xanthan gum and you may need an extra tablespoon of milk to reach the right consistency. Toss the blueberries with 1 teaspoon flour before folding to help prevent sinking; if using frozen berries, keep them frozen and fold quickly to reduce color bleed and moisture release. Lightly brush the air fryer basket with neutral oil, and you can brush a thin layer on the formed donut holes to improve browning and prevent sticking. Preheat the air fryer to 350°F (175°C) and cook until the donut holes are golden and set, about 9-12 minutes; check with a toothpick to test doneness. Let cool briefly before glazing; for a simple glaze, whisk 1/2 cup powdered sugar with 1-2 tablespoons milk and 1/2 teaspoon vanilla, adjusting thickness to your liking. To add warmth, mix in 1/2 teaspoon ground cinnamon or 1/2 teaspoon lemon zest to the batter or dry mix. These donut holes can be stored in an airtight container for 2-3 days in the fridge and freeze well unglazed for longer storage; reheat in the air fryer for best texture. Always ensure any gluten-free flour you use is certified GF if you have gluten intolerance. For serving variety, top with a light vanilla glaze, a drizzle of natural yogurt, or chopped nuts for added texture and flavor.

Tips

  • Batter prep for best texture: Blend the cottage cheese until completely smooth for a tender, cake-like crumb. If you prefer a chunkier texture, pulse briefly, but smooth results are easiest to shape. Use room-temperature eggs and whisk them until pale and slightly thick before adding to the batter to improve emulsification and even distribution.
  • Dry ingredients and structure: Sift the baking powder with the dry ingredients (flour and salt) to ensure even rise and a lighter crumb. Do not substitute baking powder with baking soda unless you also provide an acid and adjust the liquids accordingly.
  • Blueberries handling: Toss fresh blueberries with 1 teaspoon of flour before folding to help prevent sinking and color bleed. If using frozen blueberries, keep them frozen and fold quickly to minimize moisture release and color transfer.
  • batter consistency tips: The batter will be fairly wet from the cottage cheese. Add milk gradually until the batter just comes together and can be scooped or rolled into small balls. If it feels too thick, a bit more milk; if too loose, a touch more flour.
  • Shaping and portioning: Use a small cookie scoop or lightly oiled hands to portion batter into evenly sized balls. Lightly roll them to shape. For easier handling, chill the batter 10–15 minutes to firm up slightly.
  • Air fryer setup: Preheat the air fryer to about 340–360°F (170–180°C). Lightly brush the air fryer basket with neutral oil or use a parchment round with holes to prevent sticking. If your air fryer runs hot, reduce the temperature by 25°F and extend the cooking time slightly.
  • Cooking technique: Arrange donut holes in a single layer with space between them. Flip halfway through cooking for even browning. Cook for approximately 8–12 minutes, checking around the 8-minute mark; they should be lightly golden and set in the center. Overcrowding or crowding can lead to uneven doneness.
  • Oil brushing and browning: Brush the formed donut holes lightly with neutral oil to promote browning and prevent sticking. Avoid heavy oiling, which can create a greasy exterior.
  • Glaze guidance (optional): Whisk 1/2 cup powdered sugar with 1–2 tablespoons milk and 1/2 teaspoon vanilla. Adjust to reach a pourable consistency. If you used vanilla in the batter, you can skip the glaze or use almond extract (1/8 teaspoon) for a different note. Drizzle after the donuts have cooled slightly for best setting, or dip for a thicker glaze.
  • Flavor variations: For warm spice, add 1/2 teaspoon ground cinnamon to the dry ingredients. For brightness, add zest of 1/2 lemon. If you love lemon, zest can be added with the dry ingredients or just before mixing; if not, omit.
  • Glaze adjustments for dietary needs: If you need a dairy-free glaze, use plant-based milk and ensure the powdered sugar is dairy-free. The glaze thickness can be adjusted with the amount of milk; use less for a thicker coating or more for a thinner drizzle.
  • Make-ahead and storage: Enjoy fresh donuts soon after baking for the best texture. Store leftovers in an airtight container for 2–3 days at room temperature or refrigerate for up to 5 days. Reheat in the air fryer at 320°F for 2–3 minutes to refresh. Freeze baked donut holes for longer storage; reheat from frozen at 320–330°F for 6–8 minutes.
  • Troubleshooting quick fixes: If the centers are soft or undercooked, extend the cooking time by a minute or two and check again. If the outside browns too quickly, reduce the temperature slightly or shorten the cooking time. If the batter seems too wet, fold in a little extra flour (1–2 tablespoons at a time) and let it rest a few minutes before shaping.

FAQ

What makes Air Fryer Blueberry Cottage Cheese Donut Holes special?

They combine protein-rich cottage cheese with fresh blueberries and a light batter, then cook in an air fryer for a soft, cake-like texture without deep-frying. They’re portable, not overly sweet, and suitable for a quick breakfast or snack.

What ingredients do I need?

Common ingredients include cottage cheese, an egg or two, a small amount of flour (or a gluten-free blend), baking powder, sugar, blueberries, vanilla extract, and a pinch of salt. Optional additions: lemon zest for brightness and a glaze or cinnamon sugar for coating.

How do I make them step by step?
  1. In a blender or bowl, blend cottage cheese, eggs, vanilla, and lemon zest until smooth.
  2. In a separate bowl, whisk together flour, sugar, baking powder, and salt.
  3. Stir dry ingredients into the wet mixture just until combined; avoid overmixing.
  4. Gently fold in blueberries.
  5. Scoop batter into small dough balls or donut-hole shapes and place on parchment-lined tray or air fryer rack.
  6. Air fry at 350°F (175°C) for 8–10 minutes, until puffed and lightly golden. If needed, cook a few minutes longer.
  7. Cool slightly and, if desired, glaze or roll in cinnamon sugar before serving.
How long and at what temperature should I cook them in the air fryer?

Air fry at 350°F (175°C) for about 8–10 minutes. Check for puffed centers and light golden edges; cook longer in 1–2 minute increments if needed. Avoid overcrowding the basket to ensure even cooking.

How can I prevent sticking and get tender donut holes?

Lightly oil or spray the air fryer basket or parchment. Use a nonstick spray on the dough or brush with a small amount of oil. Do not overcrowd the basket, and avoid overmixing the batter to keep it tender. If your batter is too sticky, chill it 10–15 minutes before shaping.

How should I store leftovers and how do I reheat?

Store leftovers in an airtight container in the refrigerator for 2–3 days. Reheat in the air fryer at 320°F (160°C) for 3–4 minutes, or briefly in the microwave if you don’t mind a softer texture. You can freeze baked donut holes for 1–2 months; thaw and reheat in the air fryer for 4–6 minutes.

Can I make a dairy-free or gluten-free version?

Yes. For dairy-free, use a dairy-free cottage cheese substitute (or blended silken tofu) and a dairy-free milk if needed. For gluten-free, use a certified gluten-free flour blend in place of all-purpose flour. The batter may need a touch more moisture or binding depending on the substitutes.

Can I customize with other fruits or flavors?

Absolutely. Swap blueberries for diced strawberries, raspberries, or chopped peaches. Add lemon or orange zest for brightness, or fold in a pinch of cinnamon. You can finish with a simple glaze (powdered sugar + lemon juice) or a cinnamon-sugar coating.

What is the typical yield or how many donut holes does this make?

Yield depends on the size of the holes. Using a small scoop or tablespoon portions, you’ll typically get about 18–24 mini donut holes. Larger portions will yield fewer, like 12–16.

Are these healthier than traditional fried donuts?

Yes, because they’re air-fried with little to no oil, they generally contain fewer calories and less fat per piece. They still have sugar and should be enjoyed in moderation as part of a balanced diet.

Introduction / Hook

As the first sun-warmed berries appear in markets, a cake rises to meet the moment: a Best Berry Cream Cake that feels like summer in every bite. Imagine sponge so moist it quivers when you cut into it, layers of cloud-light cream that whisper of vanilla, and a jewel-toned cascade of berries that pop with bright juice. The scent alone — vanilla, cream, and sun-ripened fruits — can make a kitchen feel like a celebration. This cake is not just dessert; it’s a memory in the making, a centerpiece that invites friends and family to gather, slice, and linger over the soft crackle of the crust and the cool sweetness inside. It’s a recipe you can trust to deliver warmth, elegance, and a little bit of magic, no matter the occasion. In every bite, you’ll taste the generosity of summertime and the art of balancing simplicity with a touch of luxury.

The Story Behind the Dish

This berry cream cake grew out of a kitchen treasure hunt: the desire to pair the familiar comfort of a softly baked sponge with the lively brightness of fresh fruit and the cloud-like kiss of whipped cream. Think of a lineage that stretches from the classic fruit-filled tortes of Europe to the carefree charm of summer birthday layers, where the fruit is the star and the cream is the cooling balm that makes every slice feel indulgent rather than heavy. The cake’s essence is found in contrasts—soft crumb against a lively fruit glaze, a pale, airy cream against a jewel-toned berry burst, and a crust that offers a gentle bite before giving way to the tender interior. It’s the kind of dessert that travels well from a family kitchen to a picnic blanket, carrying with it memories of laughter, shared spoons, and the slow, deliberate joy of savoring something that tastes like sunshine. In a world where desserts can be either showy or pedestrian, this recipe honors both: it looks irresistible on a platter and satisfies with a balance of texture and flavor that feels timeless.

Why You’ll Love This Recipe

  • Versatile and forgiving: the cake invites you to tailor sweetness, fruit combinations, and cream to suit your preferences or what you have on hand.
  • Make-ahead friendly: you can prepare layers and filling ahead of time and assemble when you’re ready to serve, making it ideal for gatherings.
  • Showstopping without being fussy: elegant enough for celebrations, yet approachable enough for a weekend treat.
  • Bright, balanced flavor: the delicate vanilla sponge, airy cream, and vivid berries create a harmonious trio that feels light and satisfying.
  • Crowd-pleasing texture: every bite delivers a gentle crumb, a cool cream layer, and bursts of berry juice that keep things lively.
  • Beautiful presentation: the natural color of the berries against the pale cream makes for a cake that photographs beautifully and tastes even better than it looks.

Flavor Profile & Texture

From the first bite, you’ll notice a chorus of flavors that work in concert rather than compete. The sponge is light and tender, with a subtle butteriness that anchors the sweetness without weighing it down. The cream layer is cool, airy, and subtly sweet, like a soft, edible cloud that glides across the palate. The berries provide a lively contrast—a mix of tart and ruby-sweet notes that awaken the senses and lend a juicy, almost nectar-like brightness to the mouthfeel. When the berries mingle with the cream, their juices weave through the layers, creating gentle ribbons of flavor that surprise with every slice. The outer edges of the cake bring a faint caramelized note and a touch more structure, a delicate crust that gives texture without breaking the delicate balance inside. The overall finish is fresh and clean, with a lingering vanilla aroma and a whisper of berry in the air. In short, the Best Berry Cream Cake is a celebration of contrasts—airy vs. rich, bright vs. creamy, firm vs. yielding—resulting in a dessert that feels both comforting and contemporary.

Occasions & Pairings

This berry cream cake finds its home in a wide range of occasions. It’s perfect for summer birthdays and family gatherings, where a dessert should be memorable but not burdensome to serve. It also suits holiday tables with a lighter touch, spring and early summer dinners, and weekend celebrations that call for something a little special without requiring hours in the kitchen. For pairing ideas, keep things bright and refreshing to complement the fruit and cream. A chilled glass of sparkling wine, Prosecco, or a light rosé can mirror the cake’s brightness without overpowering it. Non-alcoholic options such as a sparkling lemon-ginger soda, a citrusy iced tea, or a blueberry-lavender cooler also pair beautifully. Side dishes should remain light: a simple citrus salad, a herbaceous green salad, or a platter of fresh berries with a hint of citrus zest can echo the cake’s flavors. For dessert courses, a crisp shortbread or almond biscuit pairs nicely, while a delicate lemon tart or a dollop of vanilla yogurt can echo the vanilla notes in the cake. This cake is about harmony—so aim for accompaniments that uplift the berries and the cream rather than compete with them.

Tips, Variations & Substitutions

Here you’ll find ways to adapt the Best Berry Cream Cake to diverse tastes, dietary needs, and seasonal fruits, while preserving its essential charm. For a vegan version, replace dairy cream with a plant-based whipped topping or coconut cream, and use a plant-based sponge or a dairy-free butter substitute. To keep the cake gluten-free, opt for a soft gluten-free flour blend that yields a tender crumb, or experiment with almond flour for a nuttier, denser texture that pairs beautifully with berries. If you want a more pronounced citrus note, add a teaspoon of lemon zest to the sponge or a touch of lemon juice to the cream to brighten the filling. For a deeper berry presence, swirl a small amount of berry puree into the cream or top with a glossy berry glaze that seeps between the layers. You can play with different berry combinations: strawberries with raspberries for classic pink hues, blueberries with blackberries for a midnight-tinted interior, or a seasonal mix like summer blackberries with red currants for a ruby-and-ink effect. For a more refined finish, consider a whisper-thin white chocolate drizzle or a light dusting of confectioners’ sugar just before serving. If you’d like a firmer set for easier slicing, chill the whipped cream longer or use a stabilized whipped cream. For a lighter version, scale down sugar in both sponge and cream and lean into the natural sweetness of the berries. Techniques can vary, but the aim remains the same: a cake that feels luxurious, yet effortless to assemble and share.

Storage & Make-Ahead Ideas

Storing and preparing this cake ahead of time can dramatically simplify entertaining or family gatherings. If you want to assemble in advance, bake the sponge layers and prepare the cream a day ahead, then refrigerate both separately until you’re ready to assemble. Assemble and refrigerate the fully built cake for a few hours to allow the flavors to meld, but avoid leaving the assembled cake at room temperature for extended periods, as the berries can bleed into the cream. You can freeze layered, unassembled sponge portions and thaw them in the fridge before spreading with cream and arranging berries. Fully assembled cakes will keep well in the refrigerator for up to two days; for longer storage, wrap tightly to prevent drying and freeze for several weeks, then thaw slowly in the fridge. To preserve the cake’s color and texture, add berries to the top just before serving rather than mixing them into the cream too far in advance. When slicing, a sharp knife wiped clean between cuts helps maintain neat, even portions. If you’re planning to serve a crowd, consider making a second, smaller cake or a few mini cakes to ensure everyone gets a pristine piece. The more you can prepare ahead—without sacrificing the cake’s bright, fresh character—the more you’ll enjoy the moment of serving.

Fun Facts & Trivia

Delighting in little-known tidbits can deepen your appreciation for this berry celebration. Berries have long been celebrated for color, aroma, and nutrition; their pigments often signify antioxidants that have captured imaginations for centuries. The pairing of a light cake with a cloud-like cream is a classic combination found in many European patisseries, where fruit-filled layers meet whipped creams or custards to create a refined finish that’s still comforting. The idea of folding fruit into a dessert that remains airy is a nod to both traditional techniques and modern preferences for lighter textures. Berry-topped desserts also carry symbolic meaning in many cultures—berries evoke abundance, harvest, and the joy of sharing a simple luxury with loved ones. From a culinary science perspective, the sponge’s starches trap moisture, while fat and sugar help keep the crumb tender; the berries’ natural juices act as a glaze that helps annotate the cake with a glossy, appetizing sheen. In a broader sense, the Best Berry Cream Cake is more than a recipe—it’s a narrative about summer, gatherings, and the pleasure of savoring something that looks as delightful as it tastes.

Ingredients

Vanilla Berry Cake Layers

  • 2 1/2 cups all-purpose flour (312 g)
    → This flour provides the structure and tenderness for the cake crumb. Sifted flour helps prevent dense pockets and ensures even mixing. If you prefer a lighter, more delicate crumb, you can substitute 1/2 of the all-purpose flour with cake flour or replace a portion with cornstarch (1 tablespoon per cup of flour) to mimic a softer texture. Handle the batter gently to keep air in and avoid over-mixing once dry ingredients are added.
  • 1 1/2 cups granulated sugar
    → Sugar sweetens the batter and contributes to moisture retention and browning through caramelization. Cream the sugar with the softened butter until light and fluffy to help trap air for a tender crumb. For a less sweet cake, reduce by up to 1/4 cup, but note it can affect texture and browning.
  • 1/2 cup unsalted butter, softened
    → Butter adds flavor and tenderness; room-temperature butter creams more easily with sugar to create an airy batter. Slice into chunks to help it cream evenly. If you only have cold butter, cut it into small pieces and beat longer to achieve the same creamed texture. Avoid melted butter, which will make the cake denser.
  • 3 large eggs, room temperature
    → Eggs act as binders and leaveners, helping to structure the cake and hold in moisture. Room temperature eggs blend more smoothly with creamed butter and sugar, creating a uniform batter. If eggs are cold, warm them in a bowl of warm (not hot) water for about 5–10 minutes before using.
  • 1 cup whole milk or buttermilk, room temperature
    → Milk adds moisture and tenderness; buttermilk contributes slight acidity that helps activate the baking soda for a fluffier crumb. If using regular milk, add 1 teaspoon white vinegar or lemon juice to mimic acidity and let it sit for 5 minutes before use. Do not warm the dairy above body temperature to avoid curdling.
  • 2 teaspoons vanilla extract
    → Vanilla provides the classic cake aroma and depth. Using pure vanilla extract yields a richer flavor than imitation. For an extra depth, you can add the seeds from 1/2 a vanilla bean or a pinch of vanilla bean paste.
  • 2 teaspoons baking powder
    → Leavening agent that helps the cake rise and become light and tender. Do not skip or substitute with baking soda unless you adjust acidity elsewhere. Sift with the dry ingredients to ensure even distribution and prevent lumps.
  • 1/2 teaspoon baking soda
    → Works with the acid in the dairy (or buttermilk) to produce extra lift and a soft crumb. If you use only milk (no buttermilk), the baking soda will be less active, so rely more on the baking powder for leavening. Ensure it’s well incorporated to avoid big holes in the crumb.
  • 1/2 teaspoon salt
    → Enhances overall flavor and tightens crumb by balancing sweetness. Salt also strengthens gluten networks slightly, improving texture. Use fine sea salt or kosher salt; adjust amount if using a finer salt with different granule size.
  • 1 cup fresh berries for folding into batter (optional)
    → Adding berries (e.g., raspberries, blueberries) gives color and fruity pockets throughout the layers. Gently fold them in at the end to avoid crushing them and staining the batter. If using frozen berries, thaw and pat dry to prevent extra moisture from thinning the batter.

Berry Compote (Filling)

  • 2 cups mixed berries (strawberries, raspberries, blueberries, blackberries), hulled or halved as needed
    → The berry mixture provides a juicy, tangy-sweet layer. Use a mix of berries for varied texture and color. If using frozen berries, thaw and drain any excess liquid to avoid a watery filling; macerate briefly with a touch of sugar if berries are very tart.
  • 1/4 cup granulated sugar
    → Sweetens the fruit and helps draw out juices for a glossy, syrupy fill. Adjust to taste; for very ripe berries, you may use a bit less. Sugar also helps with thickening when combined with heat.
  • 1 tablespoon lemon juice (or 1 teaspoon lemon zest)
    → Brightens the berry flavor and provides a touch of acidity that balances sweetness. Zest adds aromatic oils; juice contributes acidity which helps with setting the sauce. Use fresh lemon to avoid bottled citrus flavor.
  • 1 teaspoon cornstarch dissolved in 1–2 tablespoons cold water
    → Used to lightly thicken the compote so it holds between cake layers without becoming runny. If you prefer a looser glaze, skip the cornstarch; for a thicker filling, increase to 1–1.5 teaspoons. Cook until the mixture just thickens and then cool completely before assembling.
  • Pinch of salt (optional)
    → A small pinch enhances the fruit flavors and balances sweetness. If your berries are very sweet, you may skip this step; if tart, a little salt can amplify the berry notes.

Mascarpone Cream Filling

  • 8 oz mascarpone cheese, softened
    → Creates a rich, creamy layer with a slight tang that complements berries. Soften at room temperature to ensure easy whipping and smooth mixing. Do not overbeat mascarpone; whip just until fluffy to avoid a grainy texture.
  • 1 cup heavy cream, cold
    → Whips into light, airy peaks to provide structure to the mascarpone filling. Chill the bowl and beaters for best volume. Do not overbeat after adding mascarpone, or the mixture may turn grainy or split.
  • 1/3 cup powdered sugar
    → Provides gentle sweetness and helps stabilize the cream. Sift the sugar first to avoid lumps. Increase slightly if you prefer a sweeter filling, but keep in mind it will also soften the whipped texture.
  • 1 teaspoon vanilla extract
    → Adds warmth and depth to the mascarpone cream. Use pure vanilla extract for best aroma. For a brighter flavor, you can add a small amount of lemon zest or a splash of berry liqueur, but this is optional.
  • 1–2 teaspoons lemon zest (optional)
    → Brightens the filling and complements berry flavors without adding extra liquid. Zest finely and fold in at the end to maintain color and fragrance. If you prefer a milder taste, omit.

Cream Cheese Frosting

  • 8 oz cream cheese, softened
    → Forms the tangy, stable base of the frosting. Soften to room temperature to avoid lumps and ensure smooth spreading. For a lighter frosting, you can blend with a bit more butter, but keep proportions to maintain shape and flavor.
  • 1/2 cup unsalted butter, softened
    → Adds richness and creaminess; beat with cream cheese to create a smooth, spreadable frosting. If you prefer a lighter feel, you can reduce butter slightly, but note it will slightly affect texture and stability.
  • 3–4 cups powdered sugar
    → The main sweetener and thickener for frosting. Start with 3 cups and add more to reach the desired sweetness and firmness. Sift before use to prevent gritty texture. For a non-dairy option, use a powdered sugar alternative that suits your dietary needs.
  • 1 teaspoon vanilla extract
    → Classic flavor that pairs well with berries; use pure vanilla for best aroma. Optional: a pinch of salt to balance sweetness.
  • Pinch of salt
    → Enhances the frosting’s flavor and helps balance the sweetness. Even a small amount makes a noticeable difference in depth. If using salted butter, adjust accordingly.
  • 2–3 tablespoons milk or cream (to loosen if needed)
    → Used to adjust the frosting consistency for spreading between layers. Add a teaspoon at a time until you reach a creamy, stable spread. Do not over-add; too loose frosting will slide off the cake.

Toppings and Finishing

  • Fresh berries for topping (strawberries, blueberries, raspberries, and/or blackberries)
    → A vibrant, juicy crown that enhances appearance and flavor. Arrange in concentric rings or a scattered pattern just before serving for maximum visual impact. If berries are large, slice strawberries and leave smaller berries whole for variety in texture.
  • Fresh mint leaves (optional)
    → Adds a refreshing aroma and a pop of color. Tuck a few leaves among the berries just before serving. Do not wash mint leaves too close to serving to avoid wilting—pat dry if not used immediately.
  • Confectioners’ sugar (powdered sugar) for dusting (optional)
    → Lightly dusts the top for a bakery-style finish. Use a light hand to avoid overpowering the berry colors. If serving with a glaze, skip the sugar dusting to keep the surface clean.

Instructions

  • Preheat the oven to 350°F (175°C) and prepare two 9-inch round cake pans by lining the bottoms with parchment discs and greasing the sides well; this ensures clean release and flat tops for even stacking.

    → Parchment prevents sticking, grease seals the sides for clean removal, and a flat top helps with level layers for an even assembly.
  • Sift or whisk together the dry ingredients: 2 1/2 cups all-purpose flour, 2 teaspoons baking powder, 1/2 teaspoon baking soda, and 1/2 teaspoon salt; distribute the leaveners evenly to prevent lumps and ensure uniform rise.

    → Sifting or whisking breaks up any clumps and guarantees even leavening across the batter, producing a lighter, more tender crumb.
  • Cream the 1/2 cup softened unsalted butter with 1 1/2 cups granulated sugar on medium-high speed until the mixture is pale, fluffy, and light; this usually takes 3–5 minutes and traps air for a tender crumb.

    → Proper creaming dissolves sugar and creates microscopic air pockets that expand during baking, yielding a softer, fluffier cake.
  • Beat in the 3 large eggs, one at a time, allowing each to incorporate fully before adding the next; scrape the bowl between additions to maintain even texture.

    → Room-temperature eggs emulsify better with the creamed fat, creating a smooth batter without curdling or separation.
  • Whisk together 1 cup whole milk (or buttermilk) with 2 teaspoons vanilla extract; if using regular milk instead of buttermilk, consider adding 1 teaspoon white vinegar or lemon juice and letting it sit 5 minutes to mimic acidity.

    → Acidity helps activate the baking soda for a finer crumb and better moisture; using buttermilk or an acidified milk improves rise and tenderness.
  • With the mixer on low, alternate adding the dry ingredients and the dairy mixture to the batter in three additions of dry and two of wet, beginning and ending with dry; mix just until no streaks of flour remain.

    → Gentle alternating addition prevents overdeveloping gluten while ensuring even distribution of all components for a uniform crumb.
  • If folding in fresh berries, lightly toss 1 cup berries with a tablespoon of flour to prevent sinking; fold in by hand at the very end with a gentle motion to maintain color and fruit integrity.

    → Coating with flour reduces berry juice release into the batter, preserving a pretty marble of color and preventing a soggy texture.
  • Divide the batter evenly between the prepared pans and smooth the tops with a spatula; tap the pans firmly on the counter a few times to release any air bubbles.

    → Even distribution and bubble elimination prevent doming and ensure level layers that stack neatly for slicing.
  • Bake for 25–30 minutes, or until a toothpick inserted into the center comes out with a few moist crumbs; rotate the pans halfway for even heat distribution.

    → Uniform heat exposure prevents hot spots, while toothpick tests confirm the cake is set without being dry.
  • Cool the cake in the pans for 10–15 minutes, then invert onto a wire rack to cool completely before assembly; remove parchment from the bottoms.

    → Resting in the pans allows the structure to set, while cooling on a rack prevents steam from pooling and sogginess on the bottom.
  • Prepare the berry compote by combining 2 cups mixed berries, 1/4 cup granulated sugar, and 1 tablespoon lemon juice in a saucepan; bring to a gentle simmer and cook until the berries release juice and the mixture thickens slightly.

    → Gentle heat draws out juices and concentrates berry flavor; simmering creates a glossy filling that will set when cooled.
  • Dissolve 1 teaspoon cornstarch in 1–2 tablespoons cold water, whisk it into the simmering berries, and cook until the mixture thickens to a glossy consistency; cool completely before using as a filling.

    → The starch gives body to the compote so it stays between layers without becoming runny, while cooling prevents slippage when assembling.
  • Beat 8 oz mascarpone cheese, softened, with 1/3 cup powdered sugar and 1 teaspoon vanilla until smooth; chill the mixture briefly if needed to maintain a soft, scoopable texture.

    → Soft, well-beaten mascarpone integrates smoothly into the filling and avoids graininess or lumps when layered.
  • Whip 1 cup heavy cream to soft peaks in a chilled bowl, then beat in 1/3 cup powdered sugar and 1 teaspoon vanilla to medium-stiff peaks; fold this whipped cream into the mascarpone mixture in two additions until just combined and fluffy.

    → Lightly whipped cream combined with mascarpone yields a stable, airy filling that holds its shape without becoming dense or runny.
  • Prepare the cream cheese frosting by beating 8 oz cream cheese and 1/2 cup softened butter until smooth and creamy; gradually beat in 3–4 cups powdered sugar, then mix in 1 teaspoon vanilla and a pinch of salt; add 1–2 tablespoons milk or cream to reach spreading consistency.

    → A balanced ratio of fat and sugar creates a creamy, stable frosting that can seal crumbs and hold up for piping or spreading without slipping.
  • If needed, level the cooled cake layers with a serrated knife or cake leveler to create even surfaces; remove any dome to ensure a flat, stable base for stacking.

    → Level layers prevent rocking and uneven filling distribution, yielding a cleaner, professional slice when served.
  • Place the bottom cake layer on a serving plate and apply a thin crumb coat of cream cheese frosting around the top and sides; chill for 15–20 minutes to set the crumb coat.

    → The crumb coat locks in stray crumbs and provides a smooth canvas for the final frosting, improving overall appearance.
  • Spread an even layer of mascarpone filling over the bottom layer, keeping it about 1/4 inch from the edge to prevent squeezing out; dollop or pipe the cooled berry compote in the center and lightly spread to distribute, leaving a small border.

    → This creates contrast with distinct textures and colors while ensuring the berry layer remains visible and neatly contained within the cake.
  • Place the second cake layer on top, press gently to set, and apply a generous, smooth layer of cream cheese frosting over the top and sides to seal and decorate.

    → A final frosting layer smooths the surface, seals the filling, and provides a polished finish for slicing and presentation.
  • Chill the assembled cake for at least 30 minutes to set the frosting; this makes slicing cleaner and helps the fillings set so they don’t smear.

    → Chilling firms the structure, reduces squashing of layers, and enhances the clean, neat look of each slice.
  • Decorate with fresh berries arranged in concentric rings or a scattered pattern on top, tuck a few fresh mint leaves around the berries for color and aroma, and lightly dust with confectioners’ sugar if desired just before serving.

    → Fresh fruit adds visual appeal and juiciness; mint provides aroma; a light sugar dusting gives a bakery-style finish without overwhelming the berry colors.
  • Serve the Best Berry Cream Cake chilled or at room temperature after a short rest; store leftovers tightly wrapped in the refrigerator for up to 3 days, or freeze unfrosted slices for longer.

    → Resting helps flavors meld and the frosting set; refrigeration preserves freshness, while proper freezing prevents freezer burn and maintains texture.

Notes

These Best Berry Cream Cake layers are a show-stopping dessert featuring vanilla cake, a glossy mixed-berry compote filling, and a creamy mascarpone filling beneath a tangy cream cheese frosting. For best results, bring the dairy and eggs to room temperature before mixing and gently fold the berries into the batter at the end to keep their color and shape. If you want a lighter crumb, sift the dry ingredients and consider substituting up to half of the all-purpose flour with cake flour or a small amount of cornstarch per cup to mimic a softer texture; avoid overmixing once dry ingredients are added. Make the berry compote ahead: simmer berries with sugar and lemon juice until thickened, then cool completely before spreading; the cornstarch slurry should be added toward the end to set without becoming gloppy. When preparing the mascarpone filling, whip the cold cream to soft peaks and fold in mascarpone, powdered sugar, vanilla, and optional lemon zest just until combined to keep it airy and glossy. For the frosting, beat cream cheese and butter until smooth, gradually beat in sifted powdered sugar, then loosen with a splash of milk or cream to reach a spreadable consistency; chill briefly between layers to help set. Assemble with a thick layer of mascarpone filling, a spread of berry compote, and a generous coat of cream cheese frosting, finishing with fresh berries and optional mint. This cake refrigerates well—wrap tightly and store up to 2–3 days; leftovers can be sliced while cold and brought to room temperature for easier serving. Gluten-free option: substitute a certified gluten-free all-purpose flour blend and ensure your leavening is gluten-free. You can freeze baked layers (wrapped well) for up to 1 month; thaw and frost as needed for a make-ahead celebration cake.

Tips

Tips for Best Berry Cream Cake

General tips for the batter, filling, and assembly

  • Ensure all refrigerated ingredients (milk, eggs, dairy) are at room temperature before starting. This helps create a smoother, more even batter and a lighter crumb.
  • Measure flour correctly: spoon into the cup and level off with a knife. Sifted flour yields a lighter crumb and prevents dense pockets.
  • Handle the batter gently after adding dry ingredients to keep air in. Overmixing can result in a tougher cake with a dense crumb.
  • If you want a lighter crumb, substitute up to 1/2 cup of all-purpose flour with cake flour or replace a portion with cornstarch (1 tablespoon per cup of flour).
  • For a fruitier flavor and color, fold in fresh berries at the end of batter mixing. Do not overmix; fold just until evenly distributed.
  • Pre-measure and prep fillings and frostings before you bake to streamline assembly and prevent delays once the cake is cooled.

Vanilla Berry Cake Layers

  • Grease and line two 9-inch round cake pans with parchment rounds; this helps the cakes release cleanly and prevents doming.
  • Preheat the oven and bake at a consistent temperature. Rotate the pans halfway through baking for even rise and browning.
  • If domes form on top, level the cooled layers with a long serrated knife before assembling.
  • Test doneness with a toothpick or cake tester; it should emerge with a few moist crumbs, not wet batter.
  • If using fresh berries, gently fold them into the batter at the end to avoid staining and heavy coloration of the crumb.
  • Allow layers to cool completely on a wire rack before filling to prevent melting the mascarpone or cream cheese frostings.

Berry Compote (Filling)

  • Choose a mix of berries for depth of flavor and color; adjust sweetness based on berry ripeness.
  • Thickening: dissolve 1 teaspoon cornstarch in 1–2 tablespoons cold water and whisk into the simmering fruit to lightly thicken. Cook just until the sauce coats the back of a spoon.
  • If using frozen berries, thaw and drain excess liquid to avoid a watery filling; you can still enjoy the convenience without sacrificing texture.
  • Cook the compote until it’s glossy and cohesive, then cool completely before layering. It will thicken a bit more as it cools.
  • Add a pinch of salt only if your berries are very sweet; a tiny amount can intensify the berry flavor.
  • For a smoother texture, you can strain the compote after cooking, then whisk in a little extra cornstarch slurry if needed to reach desired thickness.

Mascarpone Cream Filling

  • Softened mascarpone blends best when at room temperature; warm it slightly if it’s too stiff, but avoid melting.
  • Whip the cold heavy cream to soft peaks before folding into the mascarpone to achieve a stable, airy texture. Chill the bowl and beaters for best volume.
  • Be careful not to overbeat after folding in mascarpone, or the mixture can become grainy or separate.
  • Whisk in the vanilla and lemon zest (if using) gently to preserve the light texture.
  • If you prefer a lighter filling, whip the mascarpone with an extra 1–2 tablespoons of cream to loosen slightly, then fold in.
  • Chill the mascarpone cream briefly before assembling to help it hold its shape between layers.

Cream Cheese Frosting

  • Soften cream cheese and butter to room temperature to avoid lumps. Beat until smooth and creamy before adding sugar.
  • Gradually add powdered sugar, tempering with a little milk or cream to reach a spreadable, stable consistency. Sift sugar to prevent grittiness.
  • If frosting is too stiff, add a small amount of milk or cream; if too soft, refrigerate 15–20 minutes to firm up before continuing.
  • Enhance flavor with vanilla and, optionally, a pinch of salt to balance sweetness. A splash of lemon juice can brighten the frosting if you like.
  • For a lighter frosting, reduce butter slightly and increase cream cheese proportion within your taste and stability preferences.
  • A well-chilled frosting is easier to spread between layers; you can chill layers slightly between assembly steps to prevent sliding.

Toppings and Finishing

  • Choose a mix of fresh berries for visual appeal and varied texture. Dry berries well after washing to prevent extra moisture on the frosting.
  • If desired, lay mint leaves between berries for a fresh aroma; pat dry just before serving to keep them vibrant.
  • Dust the top lightly with confectioners’ sugar right before service, or skip sugar dusting if you’re using a glossy glaze instead for a cleaner finish.
  • For best flavor, allow cake to rest at room temperature for 20–30 minutes before cutting to soften the frostings slightly and enhance the berry flavors.
  • Store any leftover cake refrigerated, well-wrapped, for up to 2–3 days. Bring to room temperature before serving for the best texture and aroma.

FAQ

What is Best Berry Cream Cake?

A light, fluffy vanilla sponge layered with whipped cream and a lush berry filling, finished with fresh berries on top. Perfect for summer celebrations, birthdays, or any berry lovers’ dessert.

What ingredients do I need?

Here’s a breakdown by component:

  • For the cake: 2 cups all-purpose flour, 1 1/2 cups granulated sugar, 1/2 cup unsalted butter (softened), 1 cup milk, 3 large eggs, 2 tsp baking powder, 1/2 tsp salt, 1 tsp vanilla extract.
  • For the berry filling: 2 cups mixed berries (strawberries, blueberries, raspberries), 1/4 cup sugar, 1 tbsp lemon juice, 1 tbsp cornstarch (optional, for thickening).
  • For the whipped cream frosting: 2 cups heavy cream (chilled), 1/4 cup powdered sugar, 1 tsp vanilla extract.
  • Optional toppings: extra berries and fresh mint leaves.
What equipment do I need?
  • Two 9-inch round cake pans or one 9×13-inch pan
  • Parchment paper and nonstick spray
  • Mixing bowls, electric mixer or stand mixer
  • Whisk, spatula, and offset spatula
  • Cooling rack
  • Knife or cake leveler for leveling layers
  • Piping bag or simple spatula for frosting (optional)
How do I bake the cake layers?
  1. Preheat oven to 350°F (175°C). Grease pans, line bottoms with parchment, and set aside.
  2. Whisk dry ingredients: flour, baking powder, and salt in a bowl.
  3. Cream butter and sugar in a separate bowl until light and fluffy.
  4. Beat in eggs one at a time, then mix in vanilla.
  5. Alternately add the dry ingredients and milk to the batter, starting and ending with the dry ingredients, until just combined.
  6. Divide batter evenly between pans. Bake 25–30 minutes, or until a toothpick inserted in the center comes out clean.
  7. Cool pans on a rack for 10 minutes, then invert onto the rack to cool completely before assembling.
How do I make the berry filling?
  1. In a saucepan, combine berries, sugar, and lemon juice. Simmer 5–7 minutes to release juices and soften fruit.
  2. If you want a thicker filling, whisk cornstarch with 1 tablespoon water to make a slurry and stir it into the berries. Simmer until thickened, then remove from heat and cool completely.
  3. For a lighter layer, you can whip the cream separately (see frosting) and fold in a spoonful of cooled berry compote for color.
Can I use frozen berries?

Yes. Use frozen berries thawed and drained well to avoid excess moisture. You may want to reduce the sugar slightly because frozen berries are often sweeter released juices. Thaw, drain, and pat dry before using.

How do I assemble and frost the cake?
  1. Level the cooled cake layers with a knife or leveler if needed.
  2. Place one layer on a serving plate. Spread a generous amount of berry filling over the first layer.
  3. Whip the cream with powdered sugar and vanilla to soft peaks and reserve some for frosting the outside.
  4. Place the second cake layer on top. Apply a thin crumb coat of whipped cream around the cake and chill 15–20 minutes to set.
  5. Finish with a thick layer of whipped cream on top and decorate with fresh berries. Chill until ready to serve.
How long does it take in total?

Approximate timeline: about 30–40 minutes prep, 25–30 minutes bake time for each layer (overlapping), cooling 1–2 hours, and assembly 15–30 minutes. Plan for roughly 2–3 hours overall, plus additional chill time if desired.

How should I store leftovers?

Store the assembled cake in the refrigerator, tightly covered, for up to 2–3 days. If you freeze layers, wrap well and freeze up to 1–2 months; thaw in the fridge before assembling and frosting. Fresh whipped cream is best eaten within a day or two for optimal texture.

What are some good variations or substitutions?

– Gluten-free: Use a 1-to-1 gluten-free flour blend in place of all-purpose flour (still 2 cups) and ensure the mix contains xanthan gum if your blend lacks it. – Dairy-free: Use dairy-free butter substitute and whip coconut cream or almond milk whipped cream. – Vegan: Use a vegan butter substitute, a dairy-free whipping cream alternative (such as coconut or cashew cream), and ensure sugar is vegan. – Berry variations: Use all raspberries, all blueberries, or mix in peaches or blackberries for a different twist. – Flavor boosters: Add 1–2 tablespoons of lemon zest to the cake batter for brightness.

Tips for best results
  • Chill the whipped cream between steps to help it hold shape.
  • To keep the cake moist, brush the cake layers with a light syrup made from sugar and water or berry juice before filling.
  • Pat berry toppings dry if they are very juicy to prevent soggy frosting.
  • Level the cake layers for a clean, even stack and a more appealing cut.

Introduction / Hook

Imagine a pastry that unfolds like a delicate seashell at dawn, each glimmering lamination revealing a whisper-thin layer of dough kissed by butter. The aroma rises first—warm notes of vanilla, citrus, and almond drifting through a sunlit Neapolitan bakery. Then comes the bite: a crisp, crackling outer crust that shatters into a chorus of tiny paper-thin sheets, giving way to a luscious, creamy heart that hugs the palate with a softly sweet, comforting sweetness. This is sfogliatelle, the iconic Neapolitan treasure that feels as much like a memory as it does a dessert. Its allure lies not only in its spectacular appearance but in the symphony of textures and flavors that play across the tongue—the crackly exterior, the silky ricotta-vanilla center, and the faint citrus glow that lingers long after the last bite. It’s a pastry that invites slow savoring, a moment of indulgence in the hustle of everyday life, and a reminder of the craftsmanship that turns simple ingredients into a work of edible art.

To encounter sfogliatelle is to step into a quiet world where time slows, the kitchen air grows sweet with butter and citrus, and the act of eating becomes a small ceremony. The shell is a testament to patience and technique—an orchestration of many, many ultra-thin sheets layered with care—and the filling speaks of comfort and home: a creamy ricotta mixture, sometimes studded with hints of semolina, vanilla, citrus zest, and a touch of sugar that brightens the day. The combination feels both intimate and grand, like a morning spent along the Amalfi coast, where the sea-salt breeze mingles with the scent of roasted coffee and citrus groves. This description is your invitation to slow down, to appreciate the artistry behind every puff and curl, and to imagine the warm, golden pastry arriving at the table, ready to be shared with friends and family.

Whether you’re a seasoned baker drawn to the technical marvel of laminated dough or a curious eater seeking a gateway to Italian pastry traditions, sfogliatelle offer a bridge between labor and luxury. It’s a treat that rewards patience—every bite delivering a chorus of textures that feel almost sculptural in their perfection. And yet, despite the complexity of its craftsmanship, sfogliatelle remains a deeply comforting, recognizably homey pastry. It’s the kind of dessert that makes weekend mornings feel ceremonial, conversations linger longer over coffee, and guests feel a little pampered by something that looks as if it came from a confectioner’s dream—and tastes as if it belongs to a beloved neighborhood bakery where every slice carries a story.

The Story Behind the Dish

Across the Italian landscape, few pastries conjure the aroma of a city like sfogliatelle do for Naples. The pastry is inseparably tied to Campanian devotion to pastry craftsmanship, where butter, flour, and patience are treated as art forms. The name itself—sfogliatella—invites curiosity: it translates to “little leaf,” a nod to the pastry’s most defining feature—the many paper-thin layers that resemble a shell or the delicate pages of a folded leaf. This leaf-like appearance is no accident; it is the product of lamination, a technique that has delighted bakers for generations and that, in the case of sfogliatelle riccia (the curly, layered version), reaches near-extravagant levels of finesse. The dough is repeatedly rolled and folded with butter, turning simple ingredients into a cascade of countless golden sheets. The result is a shell that cracks with a satisfying sigh, each layer revealing a glimmer of what lies within.

There are two major streams of sfogliatelle that have traveled through time and geography to become regional icons: the riccia, with its intricate, ridged, multi-layer crust, and the frolla, a softer, smoother, shortcrust version. The riccia is the showstopper—the pastry that steals the spotlight in bakeries and markets, standing tall on a plate as if it’s artfully caught in a moment of wind. The frolla, while less elaborate in its surface, carries its own charm—a crisp bite with a velvety interior that glides along the palate in a more understated, comforting fashion. Both versions are beloved in Naples and beyond, each offering a doorway into the city’s rich tradition of pastry making.

The origin stories of sfogliatelle are as layered as the pastry itself. Like many beloved regional specialties, they date back to a time when convent kitchens and bakery benches shared ideas, techniques, and the same unyielding devotion to quality. A recurring thread in tales about sfogliatelle speaks of monasteries and convents where nuns and monks, disciplined in the art of dough and patience, gave shape to a dessert that would support the day’s prayers with sweet sustenance. Over the centuries, bakers across Naples and the broader Campania region refined the process, passing down tips, tricks, and a reverence for the dough’s temperature, resting times, and the precise thickness of each sheet. The result is a pastry that is at once a culinary achievement and a cherished symbol of a city’s soul. In modern days, sfogliatelle have become a beloved carry-through snack, a bakery window wonder, and a cherished festival offering, linking grand culinary artistry to the intimate rituals of family breakfasts and afternoon coffees.

Origins & Etymology

The word sfogliatella embodies the philosophy behind the pastry: thinness, layering, and the transformation of simple ingredients into something luminous. Literally translated, “sfogliatella” hints at tiny leaves, an echo of its layered, leaf-like texture. The technique—lamination—has cousins in other European pastries, most famously the croissant, but sfogliatelle elevate the craft to a distinctly Neapolitan expression, where citrus perfumes, vanilla, and a creamy ricotta core converge inside a shell that seems almost architectural in its delicacy. The etymology and the appearance remind us that food often travels with language and lore as much as with methods. Each bite testifies to generations of bakers who have held a quiet pride in their craft, and to the communities that welcomed and celebrated that craft with morning rituals, family gatherings, and citywide pride.

The historical tapestry of sfogliatelle is also a reminder of how regional cuisine adapts, absorbs, and elevates outside influences. The lamination technique, borrowed and refined from broader European pastry traditions, becomes uniquely Neapolitan when the filling—smooth ricotta, semolina, citrus zest, vanilla, and a touch of sweetness—enters the scene. It’s a union of technique and sensibility: precise work that yields a forgiving, comforting interior; bold, dramatic exterior that commands attention without shouting. The pastry’s story is, at its heart, a story about community: about the baker who dreams a little bigger, the shop window that invites a passerby to pause, and the family that shares a plate as a morning ritual or a Sunday treat.

Why You’ll Love This Recipe

  • Striking yet approachable: The dramatic shell makes a powerful impression, perfect for special occasions or a weekend breakfast, while the technique remains a gratifying challenge for home bakers who love lamination and pastry craft.
  • Contrasting textures: A crisp, crackly outer shell gives way to a creamy, lush filling that feels indulgent but balanced, with hints of vanilla, citrus, and a gentle sweetness that never overpowers.
  • Versatility in a single bite: The pastry pairs beautifully with both coffee and dessert courses, making it equally at home beside an espresso cup as it is plated for a celebratory dessert course.
  • Heritage and modernity: Sfogliatelle embody a storied tradition while inviting contemporary interpretations, whether through fillings, citrus varieties, or subtle twists in the dough’s fat and flour ratio.
  • Make-ahead potential (with care): While best enjoyed fresh, sfogliatelle can be planned as a weekend project with thoughtful make-ahead strategies, making this a feasible chef-davorite for holiday mornings or brunch gatherings.

Flavor Profile & Texture

The flavor profile of sfogliatelle is a study in balance. The outer crust delivers a brittle crackle, a testament to properly laminated sheets meeting the heat of the oven. Each layer has a light, toasty note—almost nutty—contributing depth without heaviness. The inside is where the pastry reveals its tenderness: a filling that is often a silky blend of ricotta cheese, a touch of semolina for a gentle granular texture, vanilla for a comforting sweetness, and citrus zest—usually lemon or orange—that lifts the palate with bright, aromatic notes. The citrus tang acts as a beacon, cutting through the richness of the ricotta and inviting the next bite with a renewed curiosity. The texture harmony feels almost musical: a chorus of crisp, delicate leaves giving way to a creamy, mouth-coating richness that lingers with a whisper of sweetness.

Texture-wise, sfogliatelle are about tension in the best possible way. The shell must be crisp enough to crack like dried leaves under a gentle press, yet not so brittle that it shatters into shards. The interior filling should be smooth and comfortable, with enough body to hold its shape inside the shell but soft enough to melt on contact with warm air in the mouth. When served warm or at a gentle room temperature, the interplay of heat, butter, and filling creates a most satisfying sensation: a light, almost ephemeral shell that encases a rich, indulgent center. Aromas of vanilla and citrus buoy the senses before the bite even happens, making the anticipation as much a part of the experience as the flavor itself. The overall effect is sophisticated enough to feel celebratory, yet intimate enough to enjoy in a quiet moment of personal indulgence.

Occasions & Pairings

Sfogliatelle are versatile enough to brighten a weekday morning yet refined enough to star in a festive dessert table. They pair beautifully with coffee rituals and can be a heroic centerpiece for brunch spreads, holiday breakfasts, or intimate gatherings. Serve them for an after-dinner treat that leaves guests sighing with contentment, or present them as a showpiece sweet to elevate a simple afternoon tea with friends.

Recommended pairings:

  • Coffee culture: A bold espresso or a rich cappuccino provides a perfect counterpoint to the pastry’s sweetness and enhances the vanilla-citrus aroma.
  • Dessert wines and liqueurs: A light, citrusy dessert wine or a small glass of amaro can elevate the tasting experience without overpowering the delicate flavors.
  • Complementary bites: A plate of candied citrus peels, toasted almonds, or a small wedge of almond macaron can echo the nutty, citrus notes and add a textural contrast.
  • Seasonal twists: In warmer months, serve sfogliatelle with a dollop of citrus zest-infused whipped cream or a drizzle of sweet orange glaze for a brighter finish.

Occasions span from everyday indulgence to celebration-ready treats. They shine on Easter morning, Christmas breakfasts, or a weekend brunch when you want to make a lasting impression. They also travel well as a charming addition to a pastry platter at a party or a cultural-themed dinner, where their storied origins and stunning silhouette spark conversation and appreciation for Italian confectionery craft.

Tips, Variations & Substitutions

Classic Variations

The two classic forms of sfogliatelle—riccia and frolla—offer distinct experiences. Riccia excels in drama, with its multi-layered, ridged shell that shimmers with light and a more pronounced crunch. Frolla is the softer, rounder sibling, presenting a smoother surface and a slightly sturdier interior that still delights with a crisp snap. When choosing between them, consider your own patience for lamination and your preferred texture in the crust. Both deliver the signature contrast with the creamy filling; the choice is more about texture balance and personal preference than about quality.

Vegan & Gluten-Free Options

For vegan adaptations, you can explore plant-based formulations that aim to preserve the lamination’s integrity and the filling’s creaminess. This often involves a carefully chosen vegan fat that behaves similarly to butter in laminated dough and a ricotta-like cream that uses almond, cashew, or soy-based fillings with vanilla and citrus. Gluten-free lamination is more challenging because the gluten helps create the delicate layers that define the pastry. In gluten-free versions, bakers might rely on carefully balanced gluten-free flours or alternative starches, combined with a stabilizing fat to mimic the texture of traditional dough while maintaining the distinct layers. The result is delicious in its own right, though the texture will inherently differ from the classic wheat-based version. If you pursue these variations, treat them as explorations of texture and aroma rather than exact replicas of the traditional form.

Regional Twists & Flavor Variations

Beyond the core vanilla-citrus profile, sfogliatelle invite friendly experimentation. Consider a subtle zest interplay, such as lemon and orange together, or the addition of light almond paste within the filling for a deeper nutty aroma. Some regional interpretations incorporate pistachios or a touch of almond liqueur for a more aromatic experience. For a brighter finish, a whisper of citrus glaze on the exterior can echo the filling’s brightness while adding a glossy sheen. These variations are a celebration of local ingredients and personal creativity, and they let the pastry evolve without losing its essential character—the spectacular lamination, the crisp shell, and the creamy heart that makes sfogliatelle so beloved.

Storage & Make-Ahead Ideas

Fresh sfogliatelle have their own magic, but thoughtful storage can extend that magic. If you anticipate enjoying them over a couple of days, store them in a cool, dry place covered loosely to allow the shell to maintain its crispness. For longer-term planning, you can freeze sfogliatelle or the components of the dough and filling separately, then reassemble and warm to revitalize the aroma and texture. Reheating gently in a low oven can help restore the crispness of the shell while preserving the creamy interior. If you have unbaked shells or a portion of laminated dough ready, you might freeze the dough sheets and then complete the assembly when you’re ready to bake. The key is to keep the dough and filling as cold as possible before baking to preserve the delicate layers and prevent the butter from melting too soon, which would compromise the shell’s crispness. With a little planning, you can enjoy sfogliatelle even on an ordinary weekday, echoing the sense of ceremony that makes this pastry so special.

Fun Facts & Trivia (Optional)

– The name says it all: sfogliatelle are all about thin leaves—layers upon layers—that resemble an unfolding shell. The visual drama is part of the culinary experience, and many bakers take immense pride in the symmetry and lift of the outer shell.

– Two distinct traditions exist within the same family: the crisp, layered riccia and the smoother, more compact frolla. Each has its own devoted fans, and both contribute to the pastry’s enduring popularity across Campania and beyond.

– The Neapolitan love for coffee, citrus, and delicate sweets is perfectly embodied in sfogliatelle. The pastry is a frequent companion to a morning espresso, a ritual that has traveled beyond Italy as part of global appreciation for Italian pastry culture.

– Modern interpretations often honor the pastry’s roots while exploring new flavors, making sfogliatelle a versatile canvas for pastry chefs who want to pay homage to tradition while inviting contemporary appetites to the table.

Ingredients

Sfogliatelle
Dough

    – Semolina flour (fine grind) 2 1/2 cups (320 g)
    → The backbone of sfogliatella dough. Semolina provides the distinctive texture and helps form ultra-thin, pliable sheets that laminate into the flaky layers after brushing with butter. Use finely milled semolina for a smooth dough and accurate hydration. Sift before measuring and weigh if possible to ensure consistent results. Allow the dough to rest to relax gluten and improve elasticity, which is crucial for rolling very thin without tearing.
    – Cold water 1 cup (240 ml)
    → Hydrates the dough to bring it together without melting the laminated fat. Keep water ice-cold to prevent the fat from softening prematurely, which would hinder lamination. Add gradually, just until the dough holds its shape; too much water will make the dough sticky and tough to roll thin.
    – Salt 1/2 teaspoon
    → Enhances overall flavor and tightens the dough structure just enough to help the sheets hold together during lamination. Dissolve in the water or sprinkle into the flour first for even distribution.
    – Unsalted butter for laminating (cold, in blocks) 1 cup (225 g)
    → This is the fat that creates the flaky, layered structure characteristic of sfogliatelle. Keep it cold and pliable, not melted. A square or rectangular block works best for folding into the dough; handle quickly and keep the dough cool between folds to prevent butter from seeping through the dough.

Filling

    – Ricotta cheese, whole-milk, well-drained 1 1/2 cups (375 g)
    → The creamy center of the pastry. Use high-quality, fresh ricotta and drain well to avoid a watery filling. For a silkier texture, press the ricotta through a sieve or wrap in cheesecloth and let it rest for at least 30 minutes to remove excess moisture before mixing with the rest of the filling. Do not skip draining, or the shells may leak and become soggy during baking.
    – Fine semolina 2 tablespoons
    → Mixed into the filling to help thicken and texturize it, giving a slight custard-like bite that holds together inside the crisp shells. You’ll combine it with milk and cook briefly to form a smooth paste before cooling and folding into the ricotta mixture.
    – Milk 1/2 cup (120 ml)
    → Used to hydrate and cook the semolina in the filling, creating a thick, creamy paste. Warm the milk gently, then whisk in the semolina until smooth and free of lumps; cook just until the mixture thickens, then cool completely before folding into the ricotta.
    – Granulated sugar 1/3 cup (67 g)
    → Provides sweetness that balances the tang of the ricotta and the brightness of citrus zest. Adjust to taste, keeping in mind that the coated shells will also pick up some sweetness from the dusting of powdered sugar after baking.
    – Egg yolks 2 large
    → Bind and enrich the filling, helping it set inside the shells as they bake. Use room-temperature yolks for easier incorporation and a smoother texture. If you prefer a lighter filling, you can reduce to 1 yolk, but the richness will be slightly less.
    – Lemon zest 1 teaspoon
    → Adds a fresh, bright citrus aroma that complements the ricotta. Use finely grated zest and avoid the white pith, which can impart bitterness.
    – Orange zest 1 teaspoon
    → Contributes a classic Sfogliatella scent and flavor. Pair with vanilla for a traditional profile; zest should be fresh and finely grated for even distribution.
    – Vanilla extract 1/2 teaspoon
    → Enhances the creamy ricotta and bright citrus notes. Use pure vanilla extract rather than imitation for a warmer, more pronounced aroma.
    – Candied orange peel, finely chopped 2 tablespoons (optional)
    → Optional burst of citrus sweetness and chewy texture that echoes the pastry’s traditional aromatics. If used, chop finely so it distributes evenly in the filling and doesn’t puncture the dough.
    – Orange blossom water 1/4 teaspoon (optional)
    → A traditional floral note that elevates the filling. Use sparingly, as it can quickly overpower other flavors. If you don’t have it, you can skip this ingredient and rely on zest and vanilla for aroma.

Finish

    – Powdered sugar for dusting 1/4 cup to 1/2 cup
    → Finishes the baked sfogliatelle with a delicate sweetness and a subtle sheen. Dust while the pastries are still warm to help the sugar adhere to the ridges of the flaky shells. Use a fine-mesh sieve to distribute evenly for a professional look.

Instructions

  • Prepare the dough by combining the finely milled semolina flour and salt in a large mixing bowl, then add the ice-cold water gradually and mix with a fork or spoon until a cohesive dough forms; turn it out onto a lightly floured surface and knead for 5–7 minutes until smooth and elastic, then wrap in plastic and rest for 20–30 minutes to allow the gluten to relax for easier lamination.
    → Resting prevents the dough from springing back during rolling, which helps you achieve ultra-thin sheets without tearing.
  • Shape the cold butter into a uniform square or rectangle about 7 by 7 inches (18 by 18 cm) and chill until firm but pliable, ready to seal inside the dough; keep it wrapped and away from heat to prevent melting or soaking into the dough.
    → A cold, evenly shaped butter block is essential for clean laminations; if the butter warms, it leaks and sabotages the layers.
  • Roll the rested dough into a rectangle large enough to encompass the butter block, then place the cold butter block in the center and fold the dough over to completely enclose it, pinching the edges to seal; you should have a secure, butter-filled packet with no gaps.
    → This step creates a sealed butter envelope that will laminate within the dough during rolling, forming the characteristic flaky layers.
  • Roll the butter-encased dough into a long rectangle about 1/4 inch (6 mm) thick, keeping the edges straight and corners square; rotate 90 degrees every few passes to maintain an even thickness and prevent the butter from breaking through.
    → Uniform thickness ensures consistent layering and even puff during baking; rotate to avoid creating asymmetrical folds that could tear.
  • Perform the first fold by folding the dough into a classic “letter fold” (one third over the center, then the opposite third over that), seal any gaps, wrap, and chill for 30–45 minutes; this traps the butter and sets up the lamination.
    → The initial fold creates the first multi-layer structure; chilling prevents the butter from melting and leaking as you work.
  • Roll out the dough again to the original rectangle thickness, then repeat the second fold; wrap and chill for another 30 minutes to build additional layers and tighten the structure.
    → Repeating the folds multiplies the flaky lamination, contributing to the delicate, crisp texture of the final shells.
  • Roll out for a final time to a very thin sheet (about 1/16 inch or 1.5 mm) and ensure the surface is lightly flour-dusted to prevent sticking; trim uneven edges to obtain a neat rectangle ready for cutting.
    → A super-thin sheet yields the delicate, paper-thin layers that create the signature sfogliatella texture once baked.
  • Preheat your oven to 375°F (190°C) and line two baking sheets with parchment paper; position them ready for your shaped shells so you can bake promptly once assembled.
    → A hot, well-prepared oven promotes quick setting of the structure and even browning of the delicate shells.
  • Cut the laminated dough into long rectangles about 4 by 10 inches (10 by 25 cm); these will serve as the shells that encase the ricotta filling.
    → Matching the rectangle size to the filling amount ensures you can wrap and shape the dough without tearing or overfilling.
  • Prepare the filling by draining the ricotta very well for at least 30 minutes, pressing the ricotta through a sieve if possible to achieve a silkier texture; this prevents watery centers that can hinder crisp shells.
    → Well-drained ricotta keeps the filling cohesive and prevents soggy pastries during baking.
  • Make a semolina custard by whisking together the milk and fine semolina in a small saucepan, then cooking over medium heat until the mixture thickens to a smooth, spoonable paste; cool completely before folding into the ricotta.
    → The semolina paste provides body and a gentle toothiness to the filling, helping it stay put inside the shells as they bake.
  • Whisk the cooled semolina paste into the drained ricotta, then add the granulated sugar, egg yolks, lemon zest, orange zest, and vanilla extract; fold until evenly combined, then fold in chopped candied orange peel if using and, optionally, orange blossom water; chill the filling for at least 30 minutes.
    → The citrus zest and vanilla brighten the ricotta while the yolks help set the filling; chilling helps it hold its shape during assembly.
  • Prepare the shells for filling by brushing a thin line of water along the inner long edge of each rectangle; dollop about 2–3 tablespoons of filling onto the bottom third of the sheet in a straight line.
    → The water helps seal the dough when you roll, and the line of filling keeps the center well-populated for a dramatic, classic sfogliatella look.
  • Roll the rectangle up jelly-roll style from the filling edge toward the opposite edge to form a tight log, then place the log seam-side down on the parchment; gently press edges to secure and shape into a curved or conical shell, using light pressure to avoid squeezing out the filling.
    → Rolling around the filling creates a compact core that bakes into a defined shell, while careful sealing prevents leaks and maintains shape during rising.
  • Repeat the filling and rolling process for the remaining rectangles, placing the formed shells on the prepared baking sheets with space between them for expansion; if desired, lightly flatten the tops to encourage a more uniform height while baking.
    → Even spacing prevents sticking and ensures even heat distribution; flattening slightly helps each shell bake evenly to a crisp exterior.
  • Bake the shells in the preheated oven until they are deeply golden and crisp, about 18–22 minutes; rotate the trays halfway through to ensure even browning and avoid hot spots.
    → A uniform bake yields evenly crisp layers and a glossy, appealing crust that contrasts with the creamy filling.
  • Remove the pastries from the oven and cool on a rack for 10–15 minutes before dusting with powdered sugar; dust while still warm so the sugar adheres and outlines the ridges of the flaky shells.
    → Dusting warm pastries creates a delicate sweetness that highlights the pastry’s texture and provides a professional finish.
  • Serve the sfogliatelle slightly warm or at room temperature, storing any leftovers in an airtight container for up to 2 days; re-crisp gently in a 300°F (150°C) oven before serving if desired.
    → Proper storage keeps the shells from becoming soggy; a gentle reheat brings back the crisp, flaky texture.

Notes

These traditional sfogliatelle are a celebration of Italian pastry, with crisp, multi-layered shells and a creamy ricotta filling perfumed by citrus. The secret lies in a very cold, laminated dough built with fine semolina and chilled butter; work quickly and keep the dough cool between folds to maintain distinct laminated layers. Roll the dough as thin as possible, brushing and folding (classic three-turn method) to achieve the flaky texture; let the dough relax after each roll and cover to prevent drying. Drain the ricotta thoroughly and cook the semolina with milk to make a smooth paste that will fold easily into the ricotta—this prevents a soggy filling. Mix in sugar, egg yolks, zest, vanilla, and optional candied orange peel and orange blossom water in small amounts to keep the filling bright but not overpowering. When shaping, wrap the filling smoothly in the dough so you get the characteristic shell shape, and seal the ends well to prevent leakage during baking. Bake in a hot oven (around 350-375°F / 180-190°C) until the shells are deeply golden and crisp, then cool briefly before dusting with powdered sugar. These are best on the day they’re baked, but you can store cooled pastries in an airtight container for a day or two and re-crisp them briefly in a warm oven before serving. If you can’t find orange blossom water, omit it or substitute a tiny splash of vanilla for aroma.

Tips

Tips for Perfect Sfogliatelle

  • Keep the dough and butter as cold as possible during lamination. Chill after each fold and work quickly on a cool surface to maintain the flaky, distinct layered texture.
  • Let the dough rest to relax gluten before rolling again. Resting (20–30 minutes or longer) helps you roll very thin without tearing the sheets.
  • Hydration matters: use ice-cold water and add gradually until the dough just comes together. Too much water will make the dough sticky and difficult to roll into ultra-thin sheets.
  • Fine semolina is key: sift before measuring and weigh if possible for consistency. Proper hydration of the semolina in the dough improves pliability and texture.
  • Butter for laminating: use a cold, pliable block of unsalted butter shaped to fit the dough, and keep it cool between folds to prevent leakage into the dough.
  • Drain ricotta thoroughly: press through a sieve or wrap in cheesecloth for at least 30 minutes to remove excess moisture; this prevents soggy shells and helps the filling set nicely.
  • Filling paste: cook the semolina with milk to a smooth, thick paste and cool completely before folding into the ricotta; this creates a creamy, well-set center without runny filling.
  • Balance citrus and sweetness: grate lemon and orange zest finely (avoid the white pith); use pure vanilla extract; orange blossom water is optional—start with a small amount and adjust to taste to avoid overpowering the filling.
  • Mind the sugar: the filling’s sugar should balance tangy ricotta, but remember the finished shells will pick up some sweetness from the dusting of powdered sugar after baking.
  • Egg yolk binding: two yolks enrich the filling and help it stay intact inside the shells; if you prefer a lighter texture, you can use 1 yolk, knowing it will be slightly less rich.
  • Shaping tips: roll dough wafer-thin and cut to fit around the filling; seal edges well to prevent filling from leaking during baking, and avoid trapping air pockets.
  • Baking guidance: bake until the shells are deeply golden and crisp to ensure the laminated layers separate nicely during cooling; rotate trays if using multiple shelves for even browning.
  • Storage and serving: sfogliatelle are best fresh; dust with powdered sugar while warm for a delicate finish. For make-ahead, freeze unfilled shells and fill/bake from frozen, finishing with sugar just before serving.

FAQ

What are sfogliatelle?

Sfogliatelle are a classic Neapolitan pastry from Naples, Italy. They feature a shell-shaped, laminated dough with hundreds of ultra-thin layers that encase a sweet filling, traditionally a ricotta- and semolina-based cream. There are two main varieties: sfogliatella riccia (flaky and ridged) and sfogliatella frolla (smooth and compact).

What is the difference between sfogliatella riccia and sfogliatella frolla?

Riccia is the flaky, ridged version made with a laminated dough that forms many delicate layers, giving a crisp, crinkled shell. Frolla uses a smoother, shortcrust-like dough, producing a softer, less layered shell. Both are filled with a ricotta-based cream, but the textures are distinct.

Where did sfogliatelle originate?

Sfogliatelle originate in Naples, in the Campania region of Italy. They are a beloved Neapolitan pastry with a long tradition, tied to local bakeries and pastry-making techniques that emphasize thin, layered dough.

What are the traditional fillings and flavors?

The classic filling is a ricotta- and semolina-based cream, flavored with vanilla, milk, and sugar, often scented with orange blossom water and zest from candied citrus. Some modern versions use crema pasticcera (custard) or alternate fillings, but the traditional pairing is ricotta-based with citrus notes.

How do you pronounce sfogliatelle?

In Italian, it’s pronounced roughly as “sfoh-lya-TEL-lah” (singular sfogliatella, plural sfogliatelle). The “gli” sound is a soft palatal sound common in Italian.

How should sfogliatelle be stored and served?

Best eaten fresh on the day they’re made. If needed, store at room temperature in an airtight container for up to 1–2 days; they may dry out over time. To refresh, reheat in a 160–180°C (325–350°F) oven for 5–7 minutes to restore crunch, then dust lightly with powdered sugar before serving.

Can you make sfogliatelle at home? Is it difficult?

Making true sfogliatelle at home is challenging because of the laminated dough that creates the many thin layers. It requires careful rolling, resting, and shaping. A doable approach is to start with a simpler dough (or pre-made shells) and use a ricotta-cream filling. If you want the classic flaky texture, you’ll need to practice the lamination technique or consider using puff pastry as a shortcut for the outer shell while keeping a traditional ricotta filling.

Can you freeze sfogliatelle?

Yes. You can freeze unbaked shells or baked sfogliatelle. Wrap individually, freeze for up to 1–2 months. Thaw at room temperature and reheat in a preheated oven at 160–180°C (325–350°F) for about 8–12 minutes to refresh the texture. Avoid microwaving, which can soften the layers.

Are there regional variations or flavors beyond the classic?

While the Neapolitan classic is the most well-known, you’ll find variations across Campania and beyond, including different citrus infusions, chocolate chips or chocolate fillings, and occasional seasonal variations. The shaping and level of crispness can also vary by bakery, giving each version a unique character while staying true to the lamination and creamy filling concept.

Introduction / Hook

Imagine stepping into a sun-washed Italian kitchen where the air is perfumed with the warm, nutty sweetness of toasted almonds and the creamy, delicate whisper of ricotta. An almond and ricotta tart is not merely dessert; it’s a sensory embrace—the crisp edges giving way to a tender, custard-like heart, brightened by a kiss of citrus and a whisper of vanilla. The crust, butter-scented and gently crumbly, cradles a smooth filling that feels luxuriously indulgent yet unexpectedly light. Every bite carries a tapestry of textures: a flaky crust that shatters softly, a creamy core that glides across the palate, and a hint of almond paste that lingers like a fond memory. This tart invites you to slow down, to savor simple ingredients elevated through balance and technique, and to share a moment of pure Italian warmth with family and friends. It’s the kind of dessert that makes a weeknight feel special and a weekend feast feel intimate, a celebration tucked into a single, elegant slice.

The Story Behind the Dish

Origins and Influence

Almonds have long been a beloved ingredient in Italian patisserie, especially in the southern regions where almond trees flourish in the chaparral sunshine. The marriage of almonds and ricotta in Italian dessert tradition speaks to a philosophy of transforming humble pantry staples into something luminous and celebratory. Versatile and comforting, ricotta–soft, mild, and delicate–offers a gentle canvas that loves the warmth of almonds and the brightness of citrus. In many coastal and inland Italian kitchens, bakers have drawn from a shared heritage of crostate (tarts) and pasticcini that celebrate seasonal produce, local dairy, and the subtle artistry of crusts that crumble softly on first bite. The Italian almond and ricotta tart embodies that historical spirit: a modern expression of classic Sicily-state pastries and southern Italian teatime sweets, where citrus peels, vanilla, and honey might accompany almonds and ricotta in harmony rather than in competition.

As with many Italian desserts, memory and place color the dish as much as its ingredients. A grandmother’s kitchen might recall the scent of roasted almonds mingling with lemon zest when creamy ricotta is whisked into a silken filling. A grandmother’s wooden spoon, a flour-dusted table, and the comforting crackle of a delicate crust—these memories echo in every slice, reminding us that dessert can be both a nod to tradition and a personal, modern expression. The tale of this tart is not just about flavors; it’s about honoring the quiet rituals of family, harvest seasons, and the Italian devotion to turning simple ingredients into something soulful and shareable.

Why You’ll Love This Recipe

  • Elegant yet approachable: A bakery-worthy finish without requiring advanced pastry skills or exotic ingredients.
  • Balanced sweetness: The almond sweetness, ricotta’s creamy tang, and citrus brightness create a harmonious, not cloying, finish.
  • Versatile for occasions: Perfect for Easter feasts, Sunday dinners, or a refined dessert for guests, yet simple enough for a weeknight treat.
  • Texture play: Crisp, buttery crust gives way to a silky, almost custard-like center with a faint almond bite.
  • Make-ahead friendly: The tart lends itself to ahead preparation, making entertaining easier and more relaxed.
  • Adaptable to diet preferences: Naturally adaptable to gluten-free or dairy-alternative diets with small tweaks (see Tips & Variations).

Flavor Profile & Texture

This tart is a study in balance. The crust is a study in texture—fragrant with butter, a hint of almond flour or finely milled almonds, and a delicate crumb that holds together yet shatters gently under a fork. The filling is where the magic happens: ricotta provides a lush, milky body that feels decadently rich on the palate, but remains surprisingly light due to its moisture content and the subtle lift from whisked eggs or a touch of cream (if used in a non-vegan variation). The almond notes are front and center, delivering a warm, toasty aroma that echoes through the bite, while citrus zest (generally lemon or orange) slices through the richness with a clean, bright zing. Vanilla adds a whisper of sweetness and a velvety perfume that lingers on the finish. Subtle sugar, a pinch of salt, and perhaps a hint of almond extract intensify the nutty, creamy symphony without ever shouting over the other flavors. The overall effect is complex yet harmonious: a dessert that feels luxe but remains comforting, refined but intimate.

Texture-wise, you experience a delightful trio: a crisp, shortcrust-like edge that offers a satisfying snap, a tender midsection that yields to a creamy center, and a delicate almond crumbiness that punctuates each mouthful with a gentle grain. Some incarnations introduce a light marbling of almond paste within the filling, which can add a faint caramelized sweetness and a more pronounced almond finish. The citrus note acts like a bright finishing bow, ensuring the tart doesn’t feel indulgent to the point of heaviness. When served slightly warm or at room temperature, the interplay between the crust and the filling grows even more pronounced, inviting the aroma of toasted almonds to fill the room and prompting murmurs of appreciation from guests who discover layers they did not expect in a single slice.

Occasions & Pairings

Italian Almond & Ricotta Tart shines in a variety of contexts, from casual afternoons to festive gatherings. It is equally at home on a Sunday brunch table as it is gracing a celebratory dessert spread. Its adaptability makes it a dependable choice for entertaining, offering an option that feels special without demanding exhaustive effort.

When to Serve

  • Weekend family brunches and teatime treats
  • Holiday dinners as a refined end note
  • Afternoon gatherings and book club meetings
  • Celebrations like birthdays or anniversaries where a lighter, elegant dessert is preferred

Suggested Pairings

  • Beverages: Moscato d’Asti, Prosecco, or a lightly sweet sparkling wine can lift the tart’s almond notes. For non-alcoholic options, a lemon-verbena or orange blossom tea complements the citrus and creaminess.
  • Side bites: Fresh berries (strawberries, raspberries) or a light berry compote provide a tart contrast that echoes the citrus brightness. A dollop of lightly whipped cream or a spoonful of vanilla yogurt can add a touch of tanginess and richness, depending on your preference.
  • Accompaniments: A simple almond biscotti or a crumbly amaretti cookie can echo the nutty theme, while a velvety crema or a small scoop of saffron-infused custard would elevate the dessert for a special occasion.

Tips, Variations & Substitutions

General Guidelines

Because this tart rests on the harmony between its components, any variation should keep the balance intact. The almond presence remains a guiding flavor, the ricotta maintains the creamy heart, and the citrus zest keeps the palate awake. Small adjustments can produce new personality while preserving the essence of the dish.

Gluten-Free & Dairy-Friendly Variations

  • Gluten-free crust: Use finely ground almonds or almond flour, blended with a light amount of gluten-free flour or a mix that suits your dietary needs. Butter or a dairy-free butter substitute helps achieve a crumbly, fragrant crust that mirrors the traditional texture.
  • Dairy-free option: Replace ricotta with a high-quality dairy-free ricotta-style alternative, and opt for a dairy-free butter in the crust. A touch of coconut cream can help replicate the richness while keeping the filling smooth.
  • Vegan adaptation: For a fully vegan version, use a plant-based ricotta substitute that maintains creaminess, and bind with a flax or chia egg if needed (or rely on a ready-made vegan filling). Ensure the crust uses vegan margarine or coconut oil appropriately blended with almond flour.

Flavor Twists

  • Lemon or orange zest swap: If you prefer, swap lemon zest for orange or a combination of both for a different citrus profile that brightens the filling in new ways.
  • Spice notes: A pinch of cardamom or a whisper of cinnamon can add warmth, particularly in cooler months, without overpowering the core flavors.
  • Cherry-almond variation: A few chopped candied cherries or a touch of almond extract can create a more pronounced almond-cherry profile reminiscent of classic amaretti flavors.
  • Herbal accents: A subtle hint of thyme or lemon thyme in the crust can bring an unusual but delightful herbaceous note that pairs with almonds nicely.

Regional Twists

Drawing on regional Italian influences, you can tailor the tart to evoke a specific locale. For a Sicilian accent, emphasize caster sugar and lemon zest with a touch of orange blossom water; for a Piedmontese influence, pair almond flavors with a light dusting of cocoa in the crust or a drizzle of chocolate to finish. Each regional approach gives the tart its own personality while staying faithful to its core: almond, ricotta, and bright fruit notes balanced in a tender crust.

Storage & Make-Ahead Ideas

This tart is forgiving and forgiving in the best possible way: it can be prepared ahead of time and still maintain its charm when served. Storage and make-ahead strategies help you entertain with confidence rather than last-minute stress.

Make-Ahead Tips

  • Crust can be prepared hours to a day in advance. If your crust contains egg or dairy, refrigerate the dough and allow it to come to room temperature slightly before rolling to reduce tearing and shrinkage.
  • Filling can be prepared ahead of time and stored in the refrigerator, especially if you’re using ingredients that benefit from resting, like letting flavors meld. Whisk lightly before pouring into the crust if necessary to restore a smooth consistency.

Storage

  • Refrigerator: Store leftover slices (covered) for up to 3-4 days. The flavors will mellow and the texture will stay pleasant; some people even prefer the tart slightly chilled as the filling firms a touch.
  • Freezer: If you want to freeze, freeze the baked tart in slices or as a whole, wrapped well to protect from moisture and odors. Thaw in the refrigerator overnight before serving. Note that the texture of ricotta can be affected by freezing, so the filling may be slightly denser after thawing, but still delicious.

Fun Facts & Trivia (Optional)

Did you know almonds were once considered a symbol of fertility and plenty in many Mediterranean cultures? Their presence in desserts—from tignosa cookies to almond-taste fillings—reflects both practical farming abundances and a long-standing love for the nut’s aromatic profile. Ricotta’s name itself means “recooked” in Italian, referring to the traditional method of making it from whey. The marriage of these two ingredients—almonds and ricotta—paints a picture of Italian culinary ingenuity: turning byproducts and humble pantry staples into something that glows with elegance and comfort. In some Italian villages, crostata variations with almond frangipane (almond paste) and ricotta filling are served to celebrate spring festivals, symbolizing renewal and sweetness. The citrus note in this tart nods to the Italian love of bright acidity that lifts sweetness and cleanses the palate, a hallmark of many regional desserts that aim to balance richness with a refreshing finish.

Ingredients

Crust

  • 2 cups all-purpose flour
    → The crust’s base provides structure and a tender crumb that can hold the ricotta filling. For extra nuttiness and tenderness, you can substitute up to 1/2 cup of the flour with almond flour. Use cold ingredients and handle the dough as little as possible to keep the fat intact. Whisk the dry ingredients together, cut in the cold butter until the mixture resembles coarse crumbs, then mix in the egg yolk and ice water gradually until the dough just comes together. Chill for at least 30 minutes, then roll between parchment to fit a 9-inch tart pan. If you plan to blind bake, line with parchment and weight with pie weights, then bake until lightly golden.
  • 1/2 cup almond flour (finely ground almonds)
    → Adds a nutty flavor and extra tenderness to the crust, helping create a slightly crumbly, melt-in-your-mouth texture. It also helps the crust hold together without relying solely on gluten. If desired, toast the almond flour lightly before mixing to deepen aroma. Use a gentle folding method and avoid overworking the dough to maintain a delicate crust.
  • 1/2 cup granulated sugar
    → Provides sweetness and aids browning of the crust. Keep in mind that the filling will be sweetened as well, so balance accordingly. Cream butter and sugar briefly if your dough requires it, then incorporate with the other dry ingredients to ensure even sweetness distribution.
  • 1/4 teaspoon fine sea salt
    → Enhances overall flavor and balances the sweetness. Salt in small amounts helps to heighten the aromatics of the vanilla and zest in the filling and crust.
  • 1/2 cup unsalted butter, very cold, cut into small cubes
    → Fat is essential for a flaky, tender crust. Cold butter creates pockets of steam as the crust bakes, yielding flakiness. Handle quickly, using a pastry blender or fingers, and stop as soon as the mixture resembles coarse crumbs. If the butter melts slightly, chill the dough again before rolling.
  • 1 large egg yolk
    → Adds richness and acts as a binder to hold the crust together. Use yolk rather than whole eggs for a crisper crust. If you need to make this dairy-free, you can substitute with 1 tablespoon cold water plus 1 teaspoon lemon juice, though the texture may differ.
  • 2–3 tablespoons ice-cold water
    → Just enough moisture to bring the dough together without making it sticky. Add a little at a time, mixing until the dough forms a cohesive mass. If you see large crumbles, add a touch more water, but avoid over-wetting, which can toughen the crust.
  • 1 teaspoon vanilla extract
    → Adds a subtle vanilla aroma that complements the almond and ricotta filling. Use pure vanilla extract for best flavor; if you prefer, you can omit it for a more neutral crust.

Filling

  • 2 cups whole-milk ricotta, well drained
    → The creamy core of the tart. Drain ricotta for at least 15–30 minutes (or longer in cheesecloth) to remove excess moisture that could make the filling runny. Whisk until smooth before folding in other ingredients to ensure a velvety texture.
  • 1/2 cup almond flour (finely ground)
    → Adds structure and a pronounced almond flavor to the custard-like filling, helping it set without becoming dense. Ensure it is well incorporated to avoid graininess.
  • 3/4 cup granulated sugar
    → Sweetens the filling and balances the bright lemon zest. You can adjust to taste, especially if your ricotta is very sweet or if you plan to serve with a sugary glaze.
  • 2 large eggs
    → Provide structure and creaminess to the filling. Add eggs one at a time to prevent curdling. Let eggs come to room temperature for smoother incorporation; if needed, whisk lightly before adding.
  • 1 teaspoon vanilla extract
    → Rounds out the almond and citrus notes; use pure vanilla for best aroma. If you already have almond extract in the pantry, you can use a drop or two in place of part of the vanilla for a stronger almond presence.
  • Zest of 1 lemon
    → Brightens the filling with fresh citrus notes that pair beautifully with ricotta and almonds. Use only the bright yellow zest, avoiding the bitter white pith.
  • Pinch of salt
    → Balances sweetness and enhances the lemon and vanilla flavors. A tiny pinch is enough to sharpen the overall taste without making the filling salty.
  • Optional: 1 tablespoon lemon juice
    → Extra brightness to the filling if you like a more zippy citrus profile. Add sparingly and taste as you go since lemon juice can thin the filling if overused.
  • Optional: 2 tablespoons heavy cream
    → Adds silkiness and helps keep the filling ultra-creamy. Use only if your ricotta is a bit dry or if you want a looser custard; adjust the sugar slightly if needed to maintain balance.

Optional Add-ins

  • 1/4 teaspoon almond extract (optional)
    → Intenseens the almond flavor without needing more almond flour. Use sparingly to avoid overpowering the ricotta’s subtle dairy notes; combine with the lemon zest for a bright almond note.
  • 1 tablespoon finely grated orange zest (optional)
    → Adds a fragrant citrus layer that pairs well with almond and ricotta. Zest before juicing the fruit to maximize essential oils, and include only the outermost colored layer to avoid bitterness.

Toppings & Glaze

  • 1/4 cup sliced almonds, toasted
    → Provides a decorative crunch on top and a toasty almond flavor that echoes the filling. Toast almonds in a dry skillet over medium heat until golden and fragrant, then sprinkle evenly over the tart before baking or after cooling for added texture.
  • 2 tablespoons apricot jam, warmed and thinned with 1 teaspoon water
    → Glaze that gives the tart a glossy finish and a kiss of sweetness. Strain if necessary to remove fruit bits, and brush over the cooled tart for a professional shine. If you prefer, use peach or orange marmalade for a different fruit note.
  • Powdered sugar, for dusting (optional)
    → Finishing touch that adds a delicate snow-like veil over the tart. Dust just before serving to avoid moisture from the filling dissolving the sugar.

Instructions

  • Preheat your oven to 350°F (175°C) and prepare a 9-inch tart pan by greasing it well or lining it with parchment; this ensures the crust releases cleanly and bakes evenly, producing a tender, flaky base that can support the ricotta filling.
    → A properly heated oven and prepared pan help the crust set evenly without sticking.
  • Whisk together 2 cups all-purpose flour, 1/2 cup almond flour, 1/2 cup granulated sugar, and 1/4 teaspoon fine sea salt in a large bowl to ensure even distribution of sweetness and salt across the crust.
    → Even dry ingredients prevent pockets of sweetness or salt and promote uniform browning and texture.
  • Cut in 1/2 cup unsalted butter, very cold and cut into small cubes, using a pastry blender or two knives until the mixture resembles coarse crumbs with some pea-sized bits of butter remaining.
    → Cold fat creates steam pockets during baking, yielding a light, flaky crust; overworking the mixture warms the fat and tightens the texture.
  • Add 1 large egg yolk and 2–3 tablespoons ice-cold water gradually, mixing with a fork until the dough just comes together; stop as soon as it masss forms to avoid a tough crust.
    → The yolk provides richness and binding, while minimal moisture prevents gluten overdevelopment and keeps the crust tender.
  • Shape the dough into a rough disk, wrap tightly in plastic, and chill for at least 30 minutes to relax gluten and keep the butter firm.
    → Chilling helps prevent shrinkage during baking and makes the dough easier to roll.
  • Roll the dough between two sheets of parchment into a circle about 12 inches in diameter, then transfer it to a lightly floured surface if needed and ease it into a 9-inch tart pan, pressing into corners and up the sides; trim any excess and crimp the edge as desired.
    → Rolling between parchment minimizes sticking, while pressing into the pan ensures an even crust along the bottom and sides for uniform bake.
  • Dock the crust all over with a fork to perforate the dough and prevent air bubbles, then chill again for 15–20 minutes to minimize shrinkage during baking.
    → Chilling sets the shape and reduces puffing, giving a cleaner, more professional crust.
  • If you plan to blind bake, line the crust with parchment and fill with pie weights or dried beans, then bake for 12–15 minutes until the edges just begin to color; remove weights and parchment and bake 5–7 minutes more until the crust is lightly golden, then cool before filling.
    → Blind baking ensures the crust stays crisp and prevents sogginess from the ricotta filling.
  • While the crust bakes, drain 2 cups whole-milk ricotta in a fine sieve for 15–30 minutes to remove excess moisture, then whisk until smooth to create a velvety filling base.
    → Removing moisture prevents a watery filling and contributes to a silky texture after baking.
  • Stir in 1/2 cup almond flour into the drained ricotta until fully incorporated, ensuring even almond flavor and added structure without grittiness.
    → Almond flour adds nutty aroma and helps the filling set with a delicate bite.
  • In a separate bowl, whisk 3/4 cup granulated sugar with 2 large eggs until light and slightly thickened, then whisk in 1 teaspoon vanilla extract and the zest of 1 lemon.
    → The sugar dissolves evenly and the eggs provide structure; lemon zest infuses bright citrus notes that pair with almond and ricotta.
  • Season the filling with a pinch of salt and, if desired, whisk in optional 1 tablespoon lemon juice for extra brightness; add optional 2 tablespoons heavy cream only if the ricotta seems very thick to achieve a silkier custard.
    → Salt sharpens flavors, lemon juice brightens the profile, and cream adjusts the texture for silkiness.
  • Fold the lemon-zested, vanilla-scented mixture into the almond-ricotta base until completely combined and smooth, ensuring no streaks remain for an even custard.
    → Thorough folding prevents uneven color or texture and keeps the filling silky.
  • Pour the filling into the cooled crust, smoothing the top with a spatula and smoothing any ridges to ensure even baking and a neat final slice.
    → A level surface bakes evenly and presents clean slices for serving.
  • Bake the tart at 350°F (175°C) for 35–45 minutes, or until the center is just set and the edges are lightly golden; if the center still wobbles slightly, bake a few minutes longer and test again.
    → The custard should be gently set and not jiggle like jelly to ensure clean slices and proper texture.
  • Transfer the tart to a rack and cool completely at room temperature, then refrigerate for at least 1–2 hours to allow the filling to firm and the flavors to mellow.
    → Chilling helps the filling hold its shape when sliced and enhances flavor concentration.
  • Toast 1/4 cup sliced almonds in a dry skillet over medium heat until golden and fragrant, then set aside to cool for crunchy top notes.
    → Toaster almonds add a toasty aroma and a contrasting texture that echoes the almond filling.
  • Warm 2 tablespoons apricot jam with 1 teaspoon water until liquid and brushable, then strain if desired to remove any bits for a glossy glaze.
    → A thin glaze provides a professional shine and a subtle sweetness that complements the ricotta and citrus.
  • Brush the cooled tart with the warmed apricot glaze in a thin, even layer to create a glossy surface, then sprinkle the toasted almonds evenly over the top for a decorative crunch.
    → The glaze seals moisture on the surface and the almonds finish the presentation with color and texture.
  • Lightly dust with powdered sugar just before serving if desired, taking care not to saturate the surface, which can soften the glaze.
    → Powdered sugar provides a delicate, snowy finish and a touch of extra sweetness without masking flavors.

Notes

This Italian Almond & Ricotta Tart delivers a crisp almond crust and a silky ricotta filling brightened with lemon zest. For best texture, keep ingredients cold, cut the butter into the flour and mix just until the mixture resembles coarse crumbs, then bind with the egg yolk and a little ice water and chill the dough for at least 30 minutes; you can swap up to 1/2 cup of the all-purpose flour for almond flour for extra nuttiness. If blind baking, line with parchment and weigh with pie weights and bake until lightly golden to prevent a soggy bottom. Drain the ricotta well (15–30 minutes or longer) and whisk until smooth before folding into the filling; use room-temperature eggs added one at a time to avoid curdling, and stir in the lemon zest, vanilla, and a pinch of salt. Optional: a teaspoon of lemon juice or a tablespoon of heavy cream can brighten or loosen the filling if desired, but adjust sugar accordingly to maintain balance. Optional add-ins like 1/4 teaspoon almond extract or 1 tablespoon orange zest deepen the almond-citrus profile. For a glossy finish, brush the cooled tart with warmed apricot jam thinned with a teaspoon of water, then top with toasted sliced almonds and dust lightly with powdered sugar just before serving. Serve at room temperature to enjoy the filling’s creaminess and the crust’s crisp contrast; store leftovers covered in the fridge for up to 3 days, and rewarm gently or enjoy cold. If you prefer a dairy-free version, substitute dairy-free butter, use a dairy-free ricotta substitute, and adjust the egg count to suit the chosen textures.

Tips

Tips for Italian Almond & Ricotta Tart

  • Work with cold ingredients, especially the butter, and handle the dough as little as possible to maintain flakiness. If the dough looks dry, drizzle in water a teaspoon at a time until it just comes together.
  • To make the crust more flavorful and tender, consider substituting up to 1/2 cup of the all-purpose flour with almond flour. Toast the almond flour lightly before mixing to deepen aroma.
  • Roll the dough between parchment paper to prevent sticking and ease transfer to a 9-inch tart pan. Chill the rolled dough until firm before blind baking, and line with parchment and pie weights if you blind bake.
  • Blind bake until the crust is lightly golden to help prevent sogginess from the filling. If you don’t have pie weights, you can use dried beans or rice, but be sure to cool the crust completely before filling.
  • Drain the ricotta well for 15–30 minutes (or longer in cheesecloth) to remove excess moisture; this keeps the filling velvety rather than watery. Whisk the ricotta smooth before folding in other ingredients.
  • For the filling, whisk in the almond flour to help set the custard; make sure it’s evenly integrated to avoid graininess.
  • Allow the eggs to come to room temperature and add them one at a time, whisking between additions to prevent curdling and ensure a smooth custard.
  • When zesting the lemon, only use the bright yellow outer layer. The white pith is bitter. If you want extra citrus brightness, add lemon juice gradually and taste as you go to avoid thinning the filling.
  • Use 1 teaspoon vanilla extract as the base; if desired, you can add a tiny amount (up to 1/4 teaspoon) of almond extract to intensify almond aroma, but avoid overpowering the ricotta’s delicate flavor.
  • For extra depth, you can mix in the optional 1 tablespoon lemon juice or 2 tablespoons heavy cream; add lemon juice gradually and adjust sugar to maintain balance, and use cream to loosen the custard if needed.
  • To finish, toast sliced almonds in a dry skillet until golden and fragrant, then sprinkle on top for texture and aroma. Brush a glaze of warmed apricot jam (thinned with 1 teaspoon water and strained) over the cooled tart for a glossy finish.
  • Just before serving, dust with powdered sugar if desired. This gives a delicate finish that won’t melt into the filling if the tart is well chilled.
  • Storage tips: store baked tart covered in the fridge for 2–3 days; allow to come to room temperature before serving. The tart can be frozen after baking for up to 1 month; thaw in the fridge and bring to room temperature before serving for best texture.

FAQ

Italian Almond & Ricotta Tart — FAQ

What is Italian Almond & Ricotta Tart?

A custardy filling of ricotta and almond flavors on a crisp, buttery crust, finished with a hint of lemon and vanilla—an Italian-inspired dessert with a delicate, nutty sweetness.

What are the main ingredients?

Crust: butter, sugar, flour (or almond flour for gluten-free), pinch of salt. Filling: ricotta cheese, almond meal (or finely ground almonds), granulated sugar, eggs, lemon zest, vanilla extract. Optional toppings: sliced almonds and a light dusting of powdered sugar.

Can I make this tart gluten-free?

Yes. Use almond flour or a gluten-free all-purpose blend for the crust. Make sure the filling ingredients are gluten-free as well. You may need a touch more binding if the dough is very crumbly.

Should I drain the ricotta before using?

Yes. Drain the ricotta for 15–30 minutes to remove excess moisture. If very watery, blot with paper towels to prevent a soggy filling.

How do I blind bake the crust?

Chill the dough, roll it out, and press into the tart pan. Line with parchment and fill with pie weights or dried beans. Bake until the edges are just set, then remove weights and parchment and bake a few minutes longer until the base is dry and lightly golden.

What are the baking times and temperatures?

Bake at 350°F (175°C) for about 25–35 minutes, or until the filling is set and the top is lightly golden. Oven temperatures vary, so start checking around 25 minutes.

How can I tell if the tart is done?

The center should be set with a slight jiggle. The edges should be golden and the top lightly browned. A toothpick inserted near the center should come out with just a few moist crumbs.

How should I store leftovers?

Keep in an airtight container in the refrigerator for 3–4 days. Bring to room temperature or warm gently before serving for the best texture.

Can I freeze this tart?

Yes. Freeze baked tart wrapped well for up to 1–2 months. Thaw in the refrigerator overnight and rewarm gently before serving. Note that texture may be slightly softer after freezing.

What are some serving or topping ideas?

Top with sliced almonds before baking for a crunchy edge, dust with powdered sugar, and serve with fresh berries or a drizzle of honey or lemon glaze. You can also mix a bit of mascarpone into the ricotta for a richer filling.

Introduction / Hook

Imagine a bowl of warmth curled up in a dinner plate — a cozy, forgiving hug of a soup that makes the busiest weeknight feel like a quiet Sunday at home. Cozy Rosemary & Garlic White Bean Soup invites you to slow down and savor simplicity elevated with a kiss of aroma from rosemary and a whisper of garlic. The first spoonful envelops you with creamy texture and mellow, comforting flavor, as if velvet had a taste and it chose to linger in your mouth. It’s the kind of dish that grants instant calm: a simmering pot, the soft hiss of oil meeting garlic, the house filling with a piney, citrusy scent of rosemary, and a sense that even the simplest ingredients can become something quietly magical. This soup doesn’t pretend to be flashy; it earns its charm through balance, patience, and a generous helping of soul. Whether you’re feeding a hectic family, nursing a cold evening, or just craving something soothing after a long day, this recipe provides nourishment that feels both nourishing and celebratory, without demanding perfection in the kitchen.

What makes this particular soup stand out is not just its flavor, but its approach to texture and aroma. It’s creamy enough to feel indulgent, yet light enough to leave room for a crusty slice of bread or a bright green salad should you crave contrast. The rosemary threads through with a subtle piney brightness, the garlic lends warmth rather than bite, and the white beans contribute a velvety body that makes every spoonful feel like a small, comforting indulgence. The result is a dish that tastes like home, yet reads as thoughtfully crafted, a reminder that sometimes the simplest ingredients, treated with care, yield the most satisfying meals.

Beyond its cozy flavor, this soup is an invitation to slow down and share. It’s friendly to cooks of all levels, forgiving of small missteps, and quick to adapt to your pantry. You can tailor thickness, brightness, and aromatics to suit your mood or the season. In colder months, it feels like a warm embrace after a brisk walk; in calmer times, it can stand as a quiet centerpiece for a simple weeknight dinner that leaves room for conversation and lingered laughs around the table.

The Story Behind the Dish

Soups have long held a central place in rustic kitchens, where a handful of pantry staples could become something restorative and unforgettable. White beans, with their creaminess and mild flavor, have historically played the role of comforting canvas in many Mediterranean and European kitchens. They absorb herbs and aromatics with ease, releasing a gentle, hearty sweetness that makes them endlessly adaptable. Rosemary, meanwhile, carries the memory of sunlit hills and Mediterranean air, its resinous needles releasing a pine-forward perfume that pairs beautifully with garlic’s warmth. The marriage of white beans, garlic, and rosemary isn’t merely culinary; it’s a narrative of home cooking—of farmers bringing beans to the stove, of herbs thriving in sun-soaked soils, of alchemy that happens when you simmer, taste, and adjust with love.

In many cohesive culinary traditions, a pot on the stove is a quiet ritual: a place to slow down, to listen to the simmer, to decide whether the broth needs a little more salt, a splash more acidity, or a touch more herb. The idea for a cozy rosemary and garlic white bean soup grows from that very sentiment. It’s a modern nod to old-world kitchens, where a few humble ingredients could become the centerpiece of a meal that satisfies without fuss. You’ll find echoes of Tuscan kitchens in the way rosemary and garlic mingle with beans, of Provençal warmth in the olive oil’s sheen, and of the comforting, dairy-free approach that lets the beans’ natural creaminess shine. It’s a dish that respects tradition while embracing today’s desire for a wholesome, easy, weeknight-friendly supper.

As a personal anecdote, many home cooks discover that a simple pot of soup can become a cherished ritual. For some, it’s a way to welcome guests with the scent of rosemary blooming through the house. For others, it’s a reminder that nourishment can be both satisfying and quick enough to prepare after a long workday. This particular recipe grew from that idea: a pantry-friendly solution that offers warmth, depth, and a touch of elegance without complicating the cooking process. It’s the kind of dish that makes you smile before you even take a bite, knowing that the next spoonful will bring another layer of comfort and connection to the table.

Why You’ll Love This Recipe

  • Comfort without heaviness: The beans provide creaminess and heartiness, while the broth keeps the soup light enough to enjoy as a starter or a main.
  • Layered aromatics: Rosemary and garlic infuse the pot with a fragrant, uplifting scent that elevates everyday ingredients into something memorable.
  • Versatile texture: Smooth, velvety base with occasional gentle long-simmered bean chunks gives a satisfying bite in every spoonful.
  • Pantry-friendly: This soup shines with everyday staples, reducing the need for special trips to the market.
  • Vegan and dairy-free by design: Rich, comforting flavor without cream or butter—perfect for dairy-free or plant-forward diets.
  • Make-ahead friendly: Freezes well and re-heats beautifully, making it ideal for meal prep or quick future meals.
  • Pairing-ready: Complements a crisp salad, a crusty loaf, or a simple green herb oil drizzle to finish.
  • Weeknight perfection: Minimal hands-on time, maximum cozy satisfaction, with room to improvise depending on what you have on hand.
  • Economical comfort: Beans are affordable and nutritious, delivering protein, fiber, and sustaining energy in a single bowl.

Flavor Profile & Texture

From the first inhale, this soup greets you with rosemary’s evergreen brightness and a gentle garlic warmth that feels both inviting and uplifting. The aroma is herbal and comforting, not overpowering—a hint of pine and citrus that lifts the senses. When you taste it, you’ll find a delicate harmony between a silky, bean-based body and a light, savory broth. The white beans contribute a creamy, almost buttery texture without needing dairy, creating a luxurious mouthfeel that doesn’t sit heavy on the palate. The olive oil (or a light drizzle at serving) contributes a glossy sheen and a fruity kiss that brightens the overall flavor. If you linger with the spoon, you’ll notice subtle notes of lemon or white pepper—tiny accents that awaken the palate and keep the soup from feeling one-note.

Texture-wise, expect a gently thickened consistency with a few softened bean halves that maintain their structure for texture variation. Some cooks like to give a portion of the soup a quick purée with a stick blender to achieve extra creaminess, while others prefer a mostly smooth base with a few intact beans for contrast. Both approaches work beautifully; the choice simply reflects your mood. The finish is clean and comforting, with a lingering warmth that invites a second bowl or a slow, mindful tasting. The balance of rosemary, garlic, beans, and a modest oil renders a soup that feels refined yet incredibly approachable—a testament to how well simple ingredients can harmonize when treated with patience and care.

Occasions & Pairings

This soup shines in many settings, from quiet weeknights to casual gatherings. It’s equally at home as a starter for a dinner party or as a modest, satisfying meal on its own. Its versatility makes it a dependable choice for seasons when you want something hot and soothing, yet not too heavy to cause post-dinner drowsiness. On a chilly evening, it’s the kind of dish that invites you to slow your pace, gather around the table, and linger over conversation as the steam rises and fragrant steam curls through the room.

Pairing ideas to elevate the experience include:

  • Crusty bread or toasted sourdough with a light brushing of olive oil and a sprinkle of flaky salt.
  • A bright, crisp green salad with lemon vinaigrette to provide a contrast in texture and acidity.
  • Grilled vegetables or a roasted squash side dish to bolster autumnal tones.
  • A glass of dry white wine (such as Pinot Grigio or Sauvignon Blanc) to echo the herbaceous notes.
  • A simple herb oil (parsley, chives, or dill) swirled in at the end for color and aromatics.

Occasion-wise, this soup suits family dinners, weeknight comfort meals, or weekend meal-prep sessions when you want a flavorful, nourishing option that stores well. It’s particularly delightful for fall and winter menus, when the rosemary and garlic scent feels like a protective, warming blanket from the kitchen. For a lighter brunch twist, you can serve it in smaller portions with a dollop of olive oil and a crisp salad on the side, turning the dish into a sophisticated starter with a rustic core.

Tips, Variations & Substitutions

Here are plenty of ways to tailor this soup to your preferences, dietary needs, or pantry inventory. The goal is to keep the essence intact while offering flexibility.

  • Bean choices: Cannellini beans are the classic option, but you can substitute navy beans or small white beans. If you use larger beans, adjust cooking time so they stay tender but not mushy.
  • Herb tweaks: If you don’t have fresh rosemary, you can use dried rosemary sparingly (about 1/3 the amount) or swap in a blend of thyme and a pinch of rosemary. Fresh thyme also pairs beautifully for a different aromatic profile.
  • Garlic intensity: For a milder garlic flavor, roast the garlic beforehand to bring sweetness; for a stronger kick, add minced garlic toward the end of cooking and let it bloom a bit in the hot oil.
  • Additional greens: Stir in chopped kale, spinach, or Swiss chard near the end of cooking for color, nutrition, and a pleasant bite. This works especially well in colder months when leafy greens are at their best.
  • Texture preferences: Blend a portion of the soup with an immersion blender and leave the rest chunky for a creamy-textured, rustic mixture. Or blend completely for a smooth, velvety finish.
  • Stock and dairy: Use vegetable stock to keep the dish vegan; a light chicken stock can add extra depth. The soup is dairy-free by design, but a finishing drizzle of olive oil adds richness without dairy.
  • Acidity balance: A squeeze of lemon juice or a splash of balsamic vinegar near the end brightens the flavors. Start with a small amount and adjust to taste to avoid overpowering the beans’ natural sweetness.
  • Regional twists: A pinch of smoked paprika or cumin can introduce a subtle warmth that nods to smoky, comforting regional soups without tipping the balance too far from the original profile.
  • Make-ahead tips: The flavors deepen as it rests. Make the soup a day ahead; reheat gently and adjust seasoning before serving so it tastes fresh and vibrant.

Storage & Make-Ahead Ideas

The soup stores beautifully, making it an excellent option for meal prep or Sunday batch cooking. After cooling, transfer to airtight containers and refrigerate for up to 4 days. When reheating, do so gently on the stove over medium-low heat, stirring occasionally to prevent sticking. If the soup thickens in the fridge, whisk in a splash of stock or water to reach your preferred consistency.

For freezing, portion the soup into freezer-safe containers or sturdy freezer bags. It freezes well for up to 3 months. Thaw overnight in the refrigerator, then reheat slowly on the stove, adding a touch of broth if needed to restore the right texture. If you’ve added greens like kale or spinach, you may notice some color change after freezing; simply reheat until bright and warm, tasting and adjusting seasonings as you go.

Make-ahead strategies include preparing a batch of aromatics (garlic and rosemary) and a batch of stock in advance, then combining them with beans and water when you’re ready to cook. You can also blend a portion of the beans ahead of time and refrigerate; combining a pre-blended base with whole beans later provides an ultra-silky texture in a hurry.

Fun Facts & Trivia (Optional)

  • Rosemary has a long-standing association with memory and sanctity in various cultures. The herb’s aroma is believed to sharpen focus and evoke nostalgic feelings, making it a fitting companion for comforting soups.
  • Beans are one of the oldest cultivated crops in human history and were a staple in many traditional diets around the world. Their creamy texture and mild flavor make them extraordinary carriers for herbs and spices.
  • Garlic’s pungency comes from sulfur compounds that mellow when heated, releasing a sweet, roasted profile that harmonizes with beans. It’s a classic pairing in rustic soups across Mediterranean cuisines.
  • Soups as a weekly staple have pragmatic roots in preserving food and ensuring nourishment with limited ingredients. They remain popular worldwide for their versatility, affordability, and ability to feed many with minimal waste.

Ingredients

Soup Base

  • 2 tablespoons extra-virgin olive oil
    → Olive oil acts as the cooking medium to sauté the onion and garlic, releasing aroma and carrying the rosemary’s oils. Use extra-virgin for best flavor; heat gently until the surface shimmers, then swirl to coat the pan. Avoid smoking the oil to prevent bitterness.
  • 1 medium yellow onion, finely chopped
    → Onions form the savory base; fine chopping ensures they soften quickly and blend into the soup for a smooth texture. If you prefer chunkier texture, you can dice larger, but smaller pieces integrate better.
  • 3 cloves garlic, minced
    → Garlic provides pungent sweetness and depth. Mince finely and add after the onions start to soften to prevent scorching; for more punch, crush or press while sautéing to maximize surface area.
  • 2 teaspoons fresh rosemary, finely chopped
    → Rosemary lends a piney, aromatic note that pairs beautifully with beans. Remove leaves from woody stems and mince and bloom it lightly with the onions to release oils without burning.
  • 1 bay leaf (optional)
    → A bay leaf adds subtle herbal aroma during simmering. Remove it before serving to avoid any sharp texture or overly strong flavor.
  • 4 cups low-sodium vegetable stock
    → The stock provides the liquid body and savory depth; using low-sodium controls salt levels. If making homemade stock, strain well and taste before seasoning.
  • 2 cans cannellini beans (15 oz each), drained and rinsed
    → White beans contribute protein, creaminess, and body. Rinsing removes excess starch and salt from canning; reserve a few beans to mash for thicker texture if desired.
  • 1/4 cup dry white wine (optional)
    → Adds acidity, brightness, and depth; deglaze the pot after sautéing to lift flavorful bits from the bottom. If avoiding alcohol, substitute with an extra 1/4 cup stock and cook a bit longer so flavors meld.
  • 1 tablespoon fresh lemon juice
    → A bright finish that lifts the flavors and enhances the creamy bean base. Add at the end of cooking and taste, adjusting for acidity.
  • 1/2 teaspoon fine sea salt, or to taste
    → Salt enhances every flavor component; start conservatively and adjust after tasting the finished soup, especially if using canned beans or stock with sodium.
  • Freshly ground black pepper to taste
    → Adds gentle heat and depth. Grind right before serving to preserve aroma.
  • 1/4 teaspoon red pepper flakes (optional)
    → A subtle warmth that complements the rosemary and garlic. Omit if you prefer a milder version.

Optional Add-ins

  • 1/4 cup heavy cream or coconut cream (optional)
    → For a creamier texture and richer mouthfeel. Stir in at the end off the heat and adjust with a touch more stock if needed. Coconut cream makes it dairy-free with a slightly tropical note.
  • 1 tablespoon grated Parmesan cheese or vegan cheese (optional)
    → Finishes with a savory, salty note; add just before serving and let it melt into the hot soup. For vegan options, use a dairy-free cheese.
  • 1/4 cup chopped fresh parsley (optional)
    → Adds color and a fresh herbal lift. Chop finely and sprinkle on top just before serving to retain brightness.

Toppings

  • Fresh parsley, chopped, for garnish
    → Extra green color and aroma. Add just before serving to keep its brightness vivid.
  • Lemon wedges, for serving (optional)
    → Provide an extra citrus burst for guests who want more brightness; serve on the side to control intensity.
  • Crusty bread or toasted baguette slices, for serving (optional)
    → Perfect for dipping and soaking up the flavorful broth. Toast the bread with a light brush of olive oil for best texture.

Instructions

  • Rinse and drain the cannellini beans under cold running water and set aside.
    → Removing the canning liquid and excess starch prevents the soup from looking cloudy and helps control salt; rinsing also brightens the bean flavor and keeps texture intact. Reserve a few whole beans if you want to mash for extra body later.
  • Warm a large heavy-bottomed pot over medium heat and add the olive oil, swirling to coat the surface.
    → Heating the oil until it shimmers creates a smooth medium for sautéing aromatics and helps prevent sticking, enabling even browning of the onion.
  • Add the finely chopped yellow onion with a pinch of fine sea salt and sauté until translucent and tender, about 5 to 7 minutes.
    → The onion forms the savory foundation of the soup; salting early draws out moisture for faster softening and deeper flavor development.
  • Stir in the minced garlic and cook for 30 to 60 seconds until fragrant but not browned.
    → Garlic releases its sweetness and aroma quickly; cooking briefly prevents bitterness and preserves its distinct notes.
  • Add the finely chopped fresh rosemary and the bay leaf, cooking for 1 to 2 minutes to bloom the herbs while stirring constantly.
    → Blooming releases essential oils, intensifying the piney aroma and ensuring even distribution without scorching the herbs.
  • Deglaze with the dry white wine (if using), scraping up any browned bits from the pot with a wooden spoon, then simmer until the wine reduces by half, about 2 minutes.
    → Lifting fond from the bottom concentrates savory depth and adds acidity; reducing prevents a raw-wine taste in the final soup.
  • Pour in the low-sodium vegetable stock and bring the mixture to a gentle simmer over medium heat.
    → A steady simmer melds the aromatics with the stock without breaking emulsions; avoid a rolling boil which can make the soup cloudy and mushy the beans.
  • Stir in the rinsed cannellini beans and simmer for 15 to 20 minutes, stirring occasionally; if you prefer a thicker texture, mash about ¼ cup of the beans against the side of the pot to loosen the soup.
    → Simmering lets flavors marry and lightly softens the beans; mashing a portion provides natural creaminess without dairy.
  • Remove and discard the bay leaf, then taste and adjust the seasoning with salt and freshly ground black pepper.
    → Bay leaves impart aroma but are not edible; proper seasoning ensures balanced acidity and bean sweetness before serving.
  • Stir in the fresh lemon juice, then re-taste and adjust salt and pepper as needed to brighten the dish.
    → Lemon lifts the creamy bean base and prevents the soup from tasting flat; add gradually and recheck before plating.
  • If using heavy cream or coconut cream, gently swirl it in now off the heat to avoid curdling and adjust the soup with a splash of stock if needed.
    → The added fat creates a richer, silkier mouthfeel; adding off heat preserves emulsion and prevents separation.
  • If using grated Parmesan cheese or vegan cheese, stir it in just before serving and allow it to melt into the hot soup.
    → Cheese adds depth and saltiness; incorporate at the end to maintain smooth texture and prevent graininess.
  • Stir in chopped fresh parsley (optional) just before serving to preserve bright color and aroma.
    → Fresh herbs brighten the dish and provide a pop of color; chop finely for even distribution.
  • Ladle the soup into bowls and garnish with additional fresh parsley; offer lemon wedges on the side and crusty bread or toasted baguette slices for dipping.
    → Finishing with bright herbs, citrus, and a sturdy bread complements the creamy beans and soaks up the flavorful broth.

Notes

These cozy rosemary & garlic white bean soup notes are designed to help you craft a comforting, fragrant bowl with minimal fuss and maximum aroma. Start by heating 2 tablespoons olive oil over medium heat and sautéing the finely chopped onion with a pinch of salt until translucent, about 5–7 minutes. Add the minced garlic and 2 teaspoons fresh rosemary and cook 1–2 minutes more, just until the garlic is fragrant and the rosemary blooms; avoid browning to keep a gentle, piney aroma.

Optional deglazing step: pour in 1/4 cup dry white wine and simmer until reduced by half to lift flavorful bits from the bottom of the pot; if you prefer not to use wine, substitute with an extra 1/4 cup stock and proceed. Then stir in 4 cups low-sodium vegetable stock and 1 bay leaf (if using). Rinse and add 2 cans cannellini beans (drained) to the pot, reserving a handful to mash later for thicker texture. Add lemon juice (1 tablespoon) at the end of cooking to brighten the creamy base, and season with 1/2 teaspoon salt and freshly ground pepper to taste, plus optional red pepper flakes for a gentle kick.

Simmer the soup for 15–20 minutes to let flavors meld. For a creamier consistency, mash about 1/2 cup of the beans with a fork or briefly pulse them in the pot with an immersion blender, then stir back in; you can also blend a portion to a smooth texture and leave the rest chunky for variation. Remove the bay leaf before serving. Optional add-ins: stir in 1/4 cup heavy cream or coconut cream at the end for richness; finish with 1 tablespoon grated Parmesan or a vegan cheese if desired, and scatter chopped fresh parsley just before serving for color and freshness.

Storage and tips: this soup keeps well in the fridge for 3–4 days and freezes beautifully in portions for up to 2–3 months. Reheat gently over low heat, thinning with a splash of stock if necessary. To keep the dish gluten-free, use a gluten-free stock and avoid any croutons unless they are certified gluten-free. Toppings suggestions: garnish with extra chopped parsley, a squeeze of lemon, and serve with crusty bread or gluten-free bread slices for dipping.

Tips

Tips for Cozy Rosemary & Garlic White Bean Soup

  • Prep first: Have all ingredients measured and ready before you start. Rinse the cannellini beans well and reserve a few beans or their liquid if you want to adjust texture later.
  • Seeded sofrito: Sauté the onion in olive oil over medium-low heat until it’s soft and translucent. This helps build a sweet, savory base without browning too aggressively.
  • Blooming rosemary: Add the finely chopped fresh rosemary with the onions so its oils release without burning. Keep the heat gentle and stir often to prevent scorching.
  • Garlic timing: Add minced garlic after the onions start to soften, and cook just until fragrant (about 30–60 seconds). Garlic can become bitter if browned too long; bloom it rather than fry it hard.
  • Deglaze for depth: If using the optional white wine, pour it in after sautéing the aromatics and scrape up any browned bits from the bottom. Let it reduce almost completely to concentrate the flavor.
  • Stock choice: Use low-sodium stock so you can control salt later. If you’re making homemade stock, taste and adjust its saltiness before adding it to the pot.
  • Bean texture: For a creamier soup, mash a quarter to a half of the cannellini beans and then stir them back in. You can also puree a portion with an immersion blender and mix back for a velvety body.
  • Simmer time: Simmer gently to meld flavors, about 15–25 minutes. If you simmer longer, keep the pot partially covered to avoid excessive evaporation.
  • Seasoning balance: Add the lemon juice at the end to brighten the flavors. Taste and adjust salt and pepper after the soup has rested a minute or two.
  • Optional dairy-creamy option: If you want richness, whisk in 1/4 cup heavy cream or coconut cream at the end off the heat. Coconut cream keeps it dairy-free with a hint of tropical note.
  • Finish with cheese or parsley: Stir in a tablespoon of grated Parmesan or vegan cheese just before serving if you like a deeper savory finish. A sprinkle of chopped parsley at the end adds color and freshness.
  • Serving texture: Offer crusty bread or toasted baguette slices for dipping. A light brush of olive oil on the bread before toasting adds extra crunch and flavor.
  • Storage and reheating: Refrigerate leftovers up to 4 days. The flavors deepen with time. If freezing, freeze without dairy additions and reheat gently, adding lemon juice and any dairy or dairy-free cream after reheating.

Make it dairy-free, lighter, or richer

  • Dairy-free option: Use coconut cream or omit dairy entirely. If using coconut cream, add a bit at a time to reach desired richness.
  • Richer finish: A small amount of extra virgin olive oil whisked in at the end can add gloss and depth without extra dairy.

Finish, taste, and serve

  • Finish with brightness: A final squeeze of lemon juice right before serving brightens the creamy base.
  • Plate with purpose: Ladle into bowls, top with chopped parsley, a crack of black pepper, and a lemon wedge on the side for extra zing.

FAQ

Cozy Rosemary & Garlic White Bean Soup — FAQ

What makes this soup cozy and comforting?

Aromatic rosemary and garlic, creamy white beans, and a warm, savory broth come together for a hearty, comforting bowl—perfect for chilly evenings. The beans provide fiber and protein, making it satisfying without heaviness.

What are the main ingredients?

Typically: olive oil, onion, garlic, fresh rosemary, white beans (cannellini or great northern), vegetable broth, salt, and pepper. Optional additions include lemon juice or zest, greens (spinach or kale), and a splash of cream or dairy-free milk for extra creaminess. Serve with crusty bread.

Can I use dried beans instead of canned?

Yes. If using dried beans, rinse and soak them (overnight or quick soak), then simmer until tender before adding to the soup. This adds time but can reduce sodium and cost. If using canned beans, rinse and drain before adding.

How can I make it creamy without dairy?

Blend a portion of the beans with some broth using an immersion blender and stir back into the pot to create a creamy texture. For extra creaminess, you can also add a small splash of dairy-free milk (almond, oat, etc.).

Is this soup vegan and gluten-free?

Yes. When made with vegetable broth and without dairy, it’s vegan. It’s also naturally gluten-free, assuming the broth is gluten-free and no gluten-containing thickeners are used.

How should I store and reheat leftovers?

Cool completely, then refrigerate in an airtight container for up to 4 days. For longer storage, freeze for up to 3 months. Reheat on the stove over medium-low, stirring, and thin with a bit of broth if needed.

Can I customize the flavor or add toppings?

Absolutely. Add lemon juice or zest for brightness, red pepper flakes for heat, chopped greens (spinach or kale), or croutons. A drizzle of olive oil and a final pinch of rosemary can boost aroma. If not strictly vegan, a sprinkle of grated Parmesan also works.

What kitchen equipment do I need?

A large pot or Dutch oven, a wooden spoon for stirring, and an immersion blender (optional) for creaminess. You’ll also want a can opener if using canned beans and basic measuring tools.

How long does it take to make from start to finish?

With canned beans, roughly 25–35 minutes from start to serving (including sautéing onions and garlic and simmering). If using dried beans, plan additional time for soaking and cooking.

What are good serving suggestions?

Serve hot with crusty bread, a light drizzle of olive oil, and a sprinkle of fresh herbs. If desired, add a touch of lemon juice and a handful of greens for color and brightness. For a heartier meal, pair with a side salad or roasted vegetables.

Introduction / Hook

Imagine a bite-sized dessert that crackles at the edges, releasing a whisper-soft rush of creamy richness with every mouthful. Picture a perfectly crisp wrapper turning golden in hot oil, giving way to a luxurious cheesecake center that tastes like a dream you’d save for after a magical night out. Now add a bright ribbon of strawberry that flickers between sweet and tart, like summer sunlight trapped in a bite. Deep Fried Strawberry Cheesecake Stuffed Wonton Bites are the little treasure trove of contrast: the outside is crackly and warm, the inside lush and cool, and the fruit’s fragrance dances through the air as they emerge from the fryer or air fryer with a tantalizing sheen. This is not just a dessert; it’s a celebration of textures and contrasts, a bite that makes the ordinary feel festive, shareable, and irresistibly craveable. These bites are the kind of treat that draws a crowd, invites oohs and ahhs, and somehow tastes even better because it looks like something you’d find at a chic dessert bar, yet you can recreate at home with minimal fuss. As the scent of vanilla, cream cheese, and sugared fruit fills your kitchen, you’ll understand why these little morsels have a way of turning a simple gathering into a memorable experience.

From holiday gatherings to casual weeknight indulgences, these stuffed wonton bites strike a balance between sophistication and comfort. They echo nostalgia—think warm family memories and street-food vibes—while delivering a modern, playful twist that’s perfect for celebrations, date nights, or kids’ dessert moments. The magic lies in the gentle tang of the cheesecake center, the brightness of the strawberry note, and the irresistible snap of the wrapper against the soft filling. Each bite is a tiny performance: a warm, crispy chorus that leads into a creamy, luscious center, followed by a fleeting whisper of fruit. The simplicity of the idea makes it accessible, but the ultimate eating experience feels indulgent enough to make you pause and savor. It’s the kind of dish that tastes like a labor of love, even when it came together in a flash, because the harmony of flavors and textures tells a story you’ll want to tell again and again.

Whether you’re courting friends with a playful dessert tray, planning a special date-night treat, or simply craving something uplifting after dinner, these deep-fried strawberry cheesecake stuffed wonton bites deliver a satisfying, smiles-for-miles moment. They invite you to lean into a little decadence without feeling heavy, to revel in the contrast between a crisp exterior and a creamy interior, and to enjoy a dessert that looks as glamorous as it tastes. In short: these bites are a celebration in miniature, a dessert that proves big joy can come in small, perfectly fried packages.

The Story Behind the Dish

Every good dessert carries a thread of memory, and this one is a gentle homage to the way culinary boundaries blur when you’re chasing something irresistibly comforting. Wontons—the delicate dumpling skins familiar from Chinese kitchens—have traveled far beyond their original home, winding their way into creative, modern sweets and savory twists across the globe. The idea of stuffing something creamy into a wrapper and then giving it a quick, hot kiss of heat is a universal kitchen narrator: it starts with a simple technique and ends with a surprising, stylish finish. In this recipe, the wonton wrapper becomes a portable vessel for a cheesecake dream, a nod to both street-food swagger and the timeless charm of a classic American dessert.

The concept of pairing fruit with a creamy filling is a tale as old as dessert itself. Strawberries, with their bright aroma and sun-kissed sweetness, have a long lineage of pairing with dairy to create balance—think strawberry creams, cheesecakes, and elegant tarts. When you tuck a berry’s brightness into a creamy, tangy filling and seal it within a crisp wrapper, you’re blending two worlds: the indulgent, nostalgic richness of cheesecake and the playful, snackable allure of fried bites. This dish stands at that delicious crossroads, inviting stories of gatherings, shared bites, and the little rituals of passing plates around the table.

Culturally, this mash-up leans into a broader food-scene trend: honoring the familiar while presenting it in a new, visually exciting form. It’s the kind of recipe that sparks conversations—about texture, technique, and the joy of turning a crowd-pleaser into a touchstone for a special-occasion platter. If you’ve ever watched a tray of bite-size desserts disappear at a party and wished for something both chic and approachable, you’ll recognize the appeal of these stuffed wonton bites: they deliver theater and comfort in one glorious package.

Why You’ll Love This Recipe

  • Super-crisp exterior with a luxuriously creamy interior that melts in your mouth.
  • Bright, fruit-forward notes from strawberry that cut through the richness of the cheesecake filling.
  • Simple pantry-friendly approach: make-ahead options and minimal fuss for maximum impact.
  • Kid-friendly yet elegant enough for entertaining; a guaranteed crowd-pleaser.
  • Versatile base—works with air frying for a lighter version or traditional deep frying for a classic crunch.
  • Elegant appetizer or dessert component that can be dressed up for holidays or kept casual for weeknights.
  • Iconic bite-size presentation that’s perfect for dipping and sharing, encouraging conversation and smiles.

Flavor Profile & Texture

At the heart of these bites lies a trifecta of sensory experiences that make every bite feel intentional and memorable. The exterior wrapper—thin, delicate, and lacquered with a light kiss of heat—offers an immediate crackle and a warm, satisfying crunch. It’s a textural invitation that signals something gently indulgent just beneath the surface. The first thing you notice after that initial crunch is the creamy, velvety filling. Cheesecake essence—subtly tangy, mellow-sweet, and richly smooth—glides across the palate, bringing a luxurious, spoonful-like comfort to the bite without heaviness. The strawberry element adds a bright, fresh counterpoint: aromatic, slightly tart, and fruit-forward, it elevates the whole experience rather than overpowering it. It’s the way the berry’s sweetness feels balanced by the tang of the cream cheese, like a dance between summer sun and a cool breeze on a warm evening.

Texture-wise, there’s a harmonious progression: the outer shell gives way to a soft, pillowy interior, then a distinct, creamy mouthfeel that lingers pleasantly. The taste journey is short but densely layered—crisp, creamy, fruity, and then a whisper of vanilla and warmth that lingers on the palate. The aroma is part of the spectacle: a toasty vanilla-cream perfume, hints of dairy-rich sweetness, and the fresh brightness of strawberry that invites another bite. The combination feels luxurious enough to feel special, yet approachable enough to whip up for weeknight indulgence. It’s a modern take on two classics—creamy cheesecake and fruit-filled fried pastries—reimagined as a playful, shareable bite that’s both comforting and celebratory.

Occasions & Pairings

These stuffed wonton bites are versatile enough to grace a variety of occasions, from intimate date nights to bustling holiday gatherings. They shine as a crowd-pleasing appetizer at dinner parties, a sophisticated addition to a dessert table, or a playful finale to a casual family meal. Their bite-sized nature makes them perfect for grazing-style events where guests can sample a range of flavors without committing to a full slice of cake or parfait. They also work beautifully as a sweet snack for a movie night or a tea-time treat, especially when paired with a sparkling beverage or a hot cup of tea after a rich dinner.

Pairing ideas to elevate the experience:

  • Drinks: A sparkling rosé, a light Prosecco, or a glass of iced tea with citrus to echo the brightness of the strawberry notes.
  • Sides: A small dollop of whipped cream or vanilla yogurt for dipping, or a few fresh mint leaves for a refreshing finish on the palate.
  • Dessert trio: Combine with a dark chocolate ribboned tart or a lemon custard bite for a well-balanced dessert platter.
  • Seasonal twists: In winter, dust with a pinch of cinnamon or nutmeg; in summer, serve with a fresh berry coulis or a light citrus glaze to amplify the fruitiness.

Tips, Variations & Substitutions

Here are ideas to tailor the concept to your taste, dietary needs, or pantry constraints, while preserving the essence of the dish:

  • Wrapper alternatives: If you want to keep things lighter, try air-frying using ultra-thin pastry sheets or spring roll wrappers. For a gluten-free version, seek out gluten-free wonton wrappers or use rice paper wraps that you briefly toast for a crisp edge.
  • Filling variations: The cheesecake interior can be flavored with a touch of vanilla, lemon zest, or almond extract. For a richer center, blend a portion of mascarpone into the filling to boost creaminess.
  • Fruit options: While strawberry is classic here, you can experiment with other berries like raspberries or blueberries, or a chopped stone fruit layer (peach or apricot) for a seasonal twist.
  • Vegan approach: Use a dairy-free cream cheese alternative and coconut cream to mimic richness. A pinch of agar-agar or cornstarch can help set a firmer filling if desired.
  • Sweeteners: If you’re watching sugar, consider using a touch of honey or maple syrup in the filling, or a light dusting of powdered sugar just before serving.
  • Heat level: For a spiced note, add a pinch of cinnamon or cardamom to the filling, or a tiny amount of chili powder if you want a playful contrast with the strawberry.
  • Make-ahead tips: Assemble the stuffed bites up to a day in advance and refrigerate them on a parchment-lined tray. Fry or air-fry just before serving to retain crispness. If freezing, freeze unfried stuffed bites on a tray and transfer to a bag; fry from frozen in small batches for best texture.
  • Presentation: Roll the finished bites in a light dusting of powdered sugar and serve with a small bowl of strawberry coulis or a dollop of whipped cream for a glamorous touch.

Storage & Make-Ahead Ideas

Because these bites are best enjoyed while warm, plan ahead to maximize texture and flavor. The assembly is forgiving, and you can separate components to facilitate make-ahead preparations:

  • Make-ahead filling: Prepare the cheesecake filling in advance and refrigerate in an airtight container. Keep it tightly wrapped to preserve its creamy texture. Bring to room temperature before using to ensure smooth filling when piping into wrappers.
  • Assemble and store: Assemble the stuffed bites on a parchment-lined tray, cover tightly, and refrigerate for up to 24 hours before frying or air-frying. The crisp shells will hold their shape, and the filling will stay soft and creamy when reheated properly.
  • Freezing options: Freeze unfried stuffed bites on a baking sheet until solid, then transfer to an airtight container or freezer bag. Fry or air-fry from frozen, adding a minute or two to the cooking time to ensure the center warms through and the wrapper stays crisp.
  • Leftovers: If you have any fried bites left, reheat briefly in a hot oven or air fryer to restore crispness. Do not overcrowd the tray, as steam can soften the exterior.

Fun Facts & Trivia (Optional)

Did you know that wonton skins, in their many forms, have a surprisingly global journey? While they are a staple in Chinese cuisine, creative chefs around the world have embraced them as a versatile canvas for both savory and sweet ideas. The light, almost wafer-thin texture of the wrapper lends itself perfectly to a quick fry, producing that signature bubbly, lacy edge that many dessert lovers crave. Cheesecake itself is a descendant of early dairy-rich desserts that date back to ancient civilizations, but the modern, smooth, cultured version we adore today took shape in the Americas and Europe. Combining the two into a single bite is a testament to how culinary imagination can bridge continents and generations, turning a familiar comfort into a contemporary, crowd-pleasing treat.

And if you’re curious about the color of the exterior—its warm, honey-gold hue—the magic comes from a simple, patient fry or air-fry session. The wrapper browns just enough to offer structure and flavor, while the interior remains lush and soft, a deliberate contrast that satisfies both texture-hungry diners and flavor purists. The strawberry note is the bright, sunny punctuation on the end of each bite, reminding you that fruit can soar in a dessert landscape even when wrapped in decadence. In short, these bites aren’t just a recipe; they’re a small, joyful lecture in texture and balance, delivered in seconds of indulgent crunch.

Ingredients

Wonton Shells

  • – Wonton wrappers, square (24-32 per package; thawed if frozen)
    → These wrappers form the outer shells of the bites. Handle gently to avoid tearing and keep them covered with a damp towel to prevent drying out as you work. For mini bites, use smaller wrappers and adjust quantity accordingly.
  • – Water, for sealing edges
    → Lightly dampen wrapper edges with water to seal the seams securely when folding; this prevents filling from leaking out during frying. Use a little at a time and avoid soaking the wrappers.

Cheesecake Filling

  • – Cream cheese, softened (8 oz / 225 g)
    → Forms the creamy center of each bite. Let the cream cheese come to room temperature (about 30–60 minutes) and beat until silky and lump-free to ensure a smooth filling that seals well inside the wonton.
  • – Powdered sugar (confectioners’ sugar), 1/4 cup
    → Provides a smooth sweetness without a gritty texture. Sift before adding to the filling to prevent lumps and blend until fully incorporated. Adjust to taste if you prefer sweeter filling.
  • – Vanilla extract, 1/2 teaspoon
    → Enhances the creaminess with warm vanilla notes. Use pure vanilla for best aroma; you can adjust to taste if you like a stronger vanilla presence.
  • – Fresh lemon juice, 1 teaspoon (optional)
    → Brightens the richness of the filling and helps balance the sweetness. Use freshly squeezed juice; add a few drops at a time and taste as you go to avoid overpowering the cream cheese.
  • – Salt, a pinch (optional)
    → A small pinch heightens flavors and prevents the filling from tasting flat. Balance with the sweetness of the sugar.
  • – Finely chopped fresh strawberries, 1/4 cup (optional)
    → Adds real strawberry texture and flavor to the cheesecake filling. Pat dry the pieces before folding to minimize extra moisture; fold in gently to keep the mixture smooth and not watery.

Strawberry Center (optional)

  • – Strawberry jam or preserves, 1–2 teaspoons per wonton (optional)
    → Creates a bright strawberry center when placed in the middle of the filling before sealing. Choose a jam with minimal seeds for a smoother center; warm slightly if needed to ease spreading.

Frying

  • – Neutral frying oil (vegetable oil, canola, or peanut oil), enough for deep frying (about 3–4 cups)
    → Use a high smoke point oil and heat to 350–375°F (175–190°C). Fry in batches to avoid crowding, which drops oil temperature and results in greasy, soggy wrappers. Save oil for reuse only a few times if properly strained and stored.

Serving & Toppings

  • – Powdered sugar, for dusting (optional)
    → A light dusting adds a finishing touch just before serving. Dusting too early can cause clumping as the bites cool.
  • – Strawberry sauce or chocolate sauce for dipping (optional)
    → Enhances the strawberry cheesecake flavor with a complementary dip. Serve warm or at room temperature in a small dipping bowl for best results.

Instructions

  • Gather and prepare your mise en place by thawing 24–32 square wonton wrappers if needed and keeping them covered with a damp towel; have water in a small bowl, a clean folding surface, and a parchment-lined sheet pan ready for resting finished bites.
    → Keeping wrappers moist prevents tearing during filling and sealing, while a dedicated resting sheet pan helps maintain their shape before frying.
  • Beat the softened cream cheese until smooth and creamy using a spatula or electric mixer on medium speed to break up any lumps; transfer to a mixing bowl ready for the next step.
    → A lump-free, silky filling yields a uniform texture inside each bite and seals cleanly without gaps when wrapped.
  • Sift the powdered sugar and fold it into the cream cheese, then add vanilla extract, fresh lemon juice (if using), and a pinch of salt; mix until the filling is glossy and cohesive.
    → Sifting prevents gritty texture, while vanilla and lemon balance sweetness with aroma and brightness for a well-rounded cheesecake flavor.
  • Fold in the finely chopped fresh strawberries, if using, with a gentle motion to avoid breaking the pieces and to maintain some fruit texture inside the filling; refrigerate the mixture for 15–20 minutes to firm slightly.
    → Chilled, cohesive filling is easier to portion and seal, and reduces the risk of leaking during frying.
  • If using a strawberry center, warm the strawberry jam or preserves until spreadable and set aside; this makes it easier to place into the filling without tearing wrappers.
    → Warm jam flows more readily into the center and stays contained, enriching the bite with a concentrated strawberry note.
  • Portion the filling by placing about 1 teaspoon onto the center of a wonton wrapper, keeping the mound compact and centered to avoid overflow when sealed.
    → Proper portioning ensures a consistent size and a tight seal, which prevents leakage during frying.
  • If using jam in the center, add a small dollop of jam (about 1–2 teaspoons) on top of the filling in the middle of the wrapper before sealing; this creates a bright core that remains enclosed in the final bite.
    → The jam center provides a distinct strawberry burst inside each bite while keeping the outer wrapper intact.
  • Moisten the exposed edge of the wrapper with water using a fingertip or a small brush, applying only enough to create a bond without oversaturation that would weaken the wrapper.
    → Water acts as edible glue, allowing you to seal seams firmly and prevent gaps that can leak filling during frying.
  • Carefully fold and seal the wrapper to enclose the filling, pressing gently around the edges to expel air pockets and form a compact, bite-sized pouch; ensure there are no visible gaps.
    → A tight seal plus a well-pressed edge yields a crisp, uniform crust and reduces the risk of fountaining filling in hot oil.
  • Transfer the sealed bites to a parchment-lined tray seam-side down and refrigerate or freeze briefly for about 15 minutes to help the shapes set before frying.
    → A brief chill helps the integrity of the shape during immersion and minimizes spattering when the bites hit hot oil.
  • Set up your frying apparatus and heat neutral oil in a deep pot to 350–375°F (175–190°C), using a thermometer to monitor temperature precisely.
    → Maintaining this temperature ensures a crisp, properly cooked crust while preventing the filling from becoming greasy or undercooked.
  • Fry the wonton bites in small batches, 3–5 at a time, letting them sink gently, turning once or twice, until golden brown and crisp, about 2–3 minutes per batch; avoid overcrowding to sustain oil temperature.
    → Frying in batches prevents temperature drop, which yields uneven browning and soggy wrappers.
  • Remove the fried bites with a slotted spoon and drain on a rack or paper towels; allow them to rest for a minute to set the crust before serving.
    → Draining and resting prevent steam buildup that can soften the crust and help maintain crisp texture.
  • Dust the finished bites lightly with powdered sugar just before serving for a delicate finish; keep an eye on clumping as they cool.
    → A brief sugar dust adds a subtle sweetness and attractive presentation without overwhelming the filling.
  • Serve with strawberry sauce or chocolate sauce in a small dipping bowl for added flavor and contrast; offer them promptly while the crust remains crisp.
    → Dipping sauces heighten the strawberry cheesecake profile and provide options for guests who prefer extra sweetness or richness.
  • Store any leftovers in an airtight container in the refrigerator for up to 2 days and reheat briefly in a 350°F oven for 5–7 minutes to re-crisp the crust before serving again.
    → Gentle reheating preserves the crust’s crunch and the creamy center without overmelting or sogginess.

Notes

“These deep fried strawberry cheesecake stuffed wonton bites are best enjoyed while the wrappers stay crisp and the creamy filling remains rich and fragrant. To ensure clean sealing and minimize leaks, keep the wonton wrappers covered with a damp towel as you work, thaw fully if using frozen wrappers, and lightly dampen only the edges with water before folding to seal securely. Let the cream cheese filling come to room temperature, then beat until silky and lump-free; sift in the powdered sugar, add vanilla and a pinch of salt, and fold in finely chopped fresh strawberries if you like extra texture. If you want a bright jam center, place 1–2 teaspoons of strawberry jam in the center before sealing; you can also add a few drops of fresh lemon juice to brighten the richness, adding gradually and tasting as you go. Chill the filling briefly so it holds its shape when enclosed, then assemble by placing filling in the center, adding jam if using, and folding to form a triangle or rectangle with edges firmly pressed to prevent air pockets. Fry in neutral oil heated to 350–375°F (175–190°C) in batches to avoid crowding, cooking about 2–3 minutes per side until the wrappers are golden and crisp; drain on a rack or paper towels and keep warm briefly in a low oven if needed. Maintain a steady oil temperature and avoid overcrowding, which can cause soggy bites. Let the bites cool slightly before serving, then dust lightly with powdered sugar and offer strawberry or chocolate sauce for dipping. For best texture, serve soon after frying; if reheating, warm in a 350°F oven for 3–5 minutes to regain crispness. You can prepare and freeze assembled, uncooked bites on a parchment-lined tray, then transfer to a freezer bag; fry from frozen, adding 1–2 minutes to the fry time. Always refrigerate any leftovers and discard filling that has been left at room temperature for more than 2 hours.”

Tips

Tips for Perfect Deep Fried Strawberry Cheesecake Stuffed Wonton Bites

Wontons, wrappers and sealing

  • Keep gathered wrappers covered with a damp towel as you work to prevent drying and tearing. If wrappers dry out, lightly mist with water and reseal with a barely damp edge.
  • Lightly moisten only the edge of each wrapper—use a small brush or your fingertip. Too much water can make the wrapper slippery and prone to breaking during sealing or frying.
  • Seal all edges firmly to prevent filling from leaking out during frying. Gently press the seams with your finger or a small sealing tool for a tight seal.
  • To minimize air pockets, gently press and roll the filling to a compact shape before folding the wrapper around it.
  • If you notice cracking or tearing, consider chilling the filled but unsealed pockets for 10–15 minutes before sealing and frying to help the filling set.

Cheesecake filling and optional additions

  • Ensure cream cheese is at room temperature (30–60 minutes) and beat until silky and lump-free. Any lumps will create weak spots in the seal and affect texture.
  • Sift powdered sugar before adding to the filling to prevent gritty texture and ensure a smooth sweetness.
  • Use pure vanilla extract for the richest aroma. Start with 1/2 teaspoon and adjust to taste if you prefer stronger vanilla notes.
  • Fresh lemon juice adds brightness; add a few drops at a time and taste. Too much lemon can taste tangy against the sweetness.
  • A pinch of salt enhances flavor and prevents the filling from tasting flat. Taste and adjust with the other ingredients.
  • If using fresh strawberries, pat pieces dry to minimize extra moisture that can make the filling runny or soggy. Fold in gently to keep texture.
  • When adding strawberry pieces, keep the total filling volume balanced so the wrapper still seals well without bulging.

Strawberry center option

  • If using strawberry jam or preserves, use 1–2 teaspoons per wonton and spread a thin layer in the center. Warm the jam slightly to ease spreading and reduce seeds for a smoother center.
  • Place the jam in the middle of the filling, then cover with a small amount of filling before sealing to avoid bursting the center during frying.

Frying technique

  • Use a neutral oil with a high smoke point (vegetable, canola, or peanut). Heat to 350–375°F (175–190°C). Maintain temperature by frying in small batches.
  • Test your oil with a small sealed piece or a stray wrapper before batch frying to ensure immediate sizzle and buoy up without burning.
  • Fry in batches to avoid crowding, which drops oil temperature and causes greasy, soggy wrappers. Do not exceed the recommended batch size.
  • Fry until the wrappers are crisp and golden, about 2–4 minutes per batch. Flip halfway if needed to ensure even browning.
  • Use tongs to remove bites and drain on a rack over a sheet pan or on paper towels. For extra crispness, finish with a short stint in a warm oven (about 200°F / 95°C) for 5–10 minutes after frying.
  • Oil can be reused a few times if properly strained and stored in a cool, sealed container. Do not reuse if it smells rancid or looks cloudy.

Make-ahead, storage and reheating

  • Assembled raw wontons can be frozen on a parchment-lined tray until solid, then transferred to an airtight bag. Fry from frozen, adding 1–2 minutes to the frying time.
  • Fried bites are best served fresh. If you need to store leftovers, refrigerate the fried bites in an airtight container for up to 2 days and re-crisp in a 350°F (175°C) oven for 5–7 minutes.
  • Chill any assembled filling components separately to help maintain texture and reduce risk of moisture release during frying.

Serving, toppings and dips

  • Dust lightly with powdered sugar just before serving to avoid clumping as they cool.
  • Offer strawberry or chocolate sauce in small dipping bowls. Warm the sauce slightly to enhance pourability and flavor pairing with strawberry cheesecake bites.
  • For a fruit-forward twist, serve with a fresh strawberry slice or a thin drizzle of lemon glaze to echo the filling’s brightness.

FAQ

Deep Fried Strawberry Cheesecake Stuffed Wonton Bites – FAQ

What are Deep Fried Strawberry Cheesecake Stuffed Wonton Bites?

They are bite-sized desserts made by stuffing square wonton wrappers with a creamy strawberry cheesecake filling, sealing the edges, and frying until goldeny crispy. They’re perfect for entertaining or a fun treat.

What ingredients do I need?

Key ingredients:

  • Wonton wrappers (square)
  • Cream cheese, softened (8 oz / 226 g)
  • Powdered sugar (¼ cup / 30 g)
  • Vanilla extract (1 tsp)
  • Fresh strawberries, finely chopped (¼ cup) or strawberry jam (2–3 tbsp)
  • Egg white or water for sealing (or beaten egg to seal)
  • Neutral oil for frying (vegetable, canola, or peanut)
  • Optional for serving: additional powdered sugar, chocolate sauce, or strawberry sauce
How do you make the filling?

Steps:

  1. Beat the softened cream cheese until smooth and fluffy.
  2. Stir in powdered sugar and vanilla until well combined and creamy.
  3. Fold in finely chopped strawberries or swirl in strawberry jam.
  4. Chill the filling 15–20 minutes to firm slightly for easier scooping.
How do you assemble and seal the wontons?

Assembly tips:

  1. Place about 1 teaspoon of filling in the center of a wonton wrapper.
  2. Moisten the edges with a little water or beaten egg.
  3. Fold the wrapper to seal (classic method: fold to form a triangle or pinch all the edges to create a small pouch). Press firmly to remove air pockets.
  4. Repeat with the remaining wrappers.
How long and at what temperature should I fry them?

Frying instructions:

  • Heat oil to 350°F (175°C).
  • Fry in small batches for 2–3 minutes until golden and crisp.
  • Drain on paper towels and allow a moment to cool before serving.
How can I prevent leaks and soggy wrappers?

Tips:

  • Do not overfill the wrappers; smaller amounts seal more reliably.
  • Make sure edges are evenly moistened before sealing.
  • Pat the filling dry if it’s watery (drain strawberries well if using fresh).
  • Seal all edges firmly and press out any air pockets before frying.
Can I bake or air-fry these instead of deep frying?

Yes:

  • Preheat to 400°F (205°C). Lightly oil a baking sheet or spray with cooking spray. Bake for 8–12 minutes, flipping halfway, until crisp and lightly golden.
  • Air-frying: Preheat to 375°F (190°C). Cook for 6–8 minutes, shaking once or twice, until crisp.
How should I store leftovers and reheat them?

Storage and reheating:

  • Unfried assembled bites: refrigerate up to 24 hours before frying.
  • Fried bites: store in an airtight container for up to 2 days.
  • Reheat: in an air fryer at 350°F (175°C) for 3–5 minutes, or in a preheated oven at 350°F (175°C) until crisp.
Can I make gluten-free or dairy-free versions?

Yes:

  • Use gluten-free wonton wrappers. Verify all fillings and dipping sauces are gluten-free.
  • Use dairy-free cream cheese (plant-based) and ensure any sauces or jams are dairy-free.
What dipping sauces or toppings pair well with these?

Suggestions:

  • Powdered sugar for dusting
  • Strawberry sauce or fruit compote
  • Chocolate sauce or hot fudge
  • Caramel sauce
  • Vanilla or dark chocolate ganache drizzle

Introduction / Hook

Imagine a warm, golden ring of comfort resting in your hand, its surface glowing with a delicate, glassy sheen of vanilla glaze. The moment you bite, a soft, tender crumb gives way to a cloud-light interior that seems to melt on the tongue. The scent is intoxicating—vanilla that seems to carry a whisper of caramelized sugar and a hint of butter—like a bakery has folded itself into your kitchen. Vanilla donuts are more than just a treat; they’re an invitation to slow down, to savor a moment of pure nostalgia, and to share a simple pleasure with anyone lucky enough to be near. They’re the kind of doughnut that greets you with a friendly, nostalgic smile on a Saturday morning, or accompanies a quiet cup of coffee as the world outside wakes up. In every bite, there’s a promise: comfort, warmth, and a touch of sweetness that feels like a hug you can eat.

What makes vanilla donuts truly special is their versatility. They can be everything from a refined, glossy bite that pairs beautifully with a hot latte to a casual, cozy treat that tastes like home with a cinnamon-flicked sip of cocoa. The beauty of vanilla is its quiet luxury—scented with the familiar, never overpowering, and capable of carrying a spectrum of flavors that bloom with every bite. In this description, you’ll discover not just a recipe, but a story of texture, aroma, and the way a single flavor can anchor a moment, a memory, and a morning routine. The goal here is to awaken your senses, spark your creativity, and give you a canvas that is both comforting and endlessly adaptable. If you’ve ever wished for a donut that feels gentle on the palate yet utterly satisfying, you’re in the right place. The vanilla donut is a classic for good reason: it speaks a universal language of sweetness, warmth, and shared smiles.

The Story Behind the Dish

Donuts have a long, winding tale that threads through markets, home kitchens, and bustling bakeries around the world. The concept of fried dough can trace its roots to ancient and medieval culinary traditions, but the modern donut—round, with a hole in the middle, and a glossy glaze—takes its most beloved form from a blend of European influences and American bakery culture. Vanilla, as a flavor cornerstone, traveled from far-flung lands to become a universal pantry staple. Vanilla beans, harvested from tropical orchid vines, carried with them a scent and sweetness that could transform humble dough into something memorable. In many home kitchens, vanilla was the first flavor that children learned to recognize and name, a gateway to the bigger, more adventurous flavors that would follow. The donut, with its satisfying bite and forgiving nature, became the perfect vessel for vanilla’s gentle magic.

The exact origin of the glazed vanilla donut as we know it is not tied to a single city or baker but to a tradition: soft, enriched dough fried until golden, then crowned with a glaze that sings of vanilla and sugar. In countless American breakfast tables, a vanilla-glazed donut accompanies coffee, acts as a celebratory sweet for birthdays, or makes a mundane Tuesday feel special. The beauty of this dish lies in how it bridges eras—grandmother’s kitchen where dough was kneaded by hand, a bustling bakery where morning rushes hum, and modern home kitchens where technology and tradition mingle to deliver something both timeless and fresh. Each batch tells a small, personal story: a quiet act of care, a moment of patience, and a finished product that invites sharing—the universal language of “I made this for you.”

Beyond its culinary lineage, the vanilla donut embodies a sense of possibility. You can keep the base recipe classic and faithful, or you can invite a parade of variations—zests of citrus for brightness, a glaze that glistens with a hint of brown butter, or a simple dusting of powdered sugar for a nostalgic finish. The donut, at its core, is a forgiving canvas. It welcomes experimentation while remaining comforting and familiar. It is in this balance—between tradition and adaptation—that vanilla donuts find their enduring appeal, offering a sense of home while inviting you to personalize the experience for your family, guests, or a quiet solo indulgence.

Why You’ll Love This Recipe

  • Exceptional aroma: the moment you begin, the kitchen fills with warm vanilla and the gentle sweetness of fresh-baked bread, a scent that invites lingering at the counter.
  • Soft, tender crumb: the texture is light enough to melt on the palate yet substantial enough to hold a kiss of glaze without collapsing.
  • Versatile glaze options: a classic vanilla glaze is timeless, but the recipe welcomes variations—lemon, almond, cocoa, or a simple sugar dusting—to suit any mood or occasion.
  • Family-friendly and approachable: simple, comforting flavors that appeal to both kids and adults, with a forgiving dough that’s easy to work with for bakers of all levels.
  • Perfect for any moment: breakfast on a busy morning, a lazy weekend treat, a party dessert, or a luxe pairing with coffee or tea during an afternoon catch-up.
  • Renews slowly: though best fresh, these donuts can be enjoyed for a day or two with proper storage and reheating, preserving their comforting bite and aroma.
  • Customization playground: the base invites creative flourishes—citrus zest, a coffee-kissed glaze, or a drizzle of caramel—so you can tailor the experience to your palate and season.
  • Make-ahead friendly: with planning, you can set up a dough to rest or a glaze to chill, transforming a bake into a gather-ready moment.

Flavor Profile & Texture

The vanilla donut presents a delicate symphony of flavors that warm the senses without overpowering them. The core is a softly enriched crumb, rich with dairy notes and a touch of sweetness that keeps the bite light rather than cloying. Vanilla itself is the star, offering a creamy, comforting aroma that blooms as the donut bakes or fries. Its sweet, almost floral depth is complemented by a gentle butteriness and a hint of bakery-crust caramelization around the edges, a natural byproduct of frying or baking that yields a light, satisfying crust. The glaze or topping is the finishing kiss, a thin, glossy veil that seals in moisture and adds a whisper of sweetness and sheen. When the glaze is vanilla-based, you get a reiteration of the core flavor, but with an amplified scent that lingers on the tongue and in the air as you bite again and again.

Textures are the heart of the experience. The exterior crackles softly in places where the dough meets heat, creating a subtle crispness that gives way to a pillowy, almost cloud-like interior. This contrast—crisp outside, tender inside—defines the donut’s charm. The interior crumb should be fine and even, with a delicate crumb structure that deforms gently under your bite rather than tearing or becoming dry. If you’re enjoying a glaze, the first skim of sweetness should be bright and clean, letting the vanilla notes carry through without becoming heaviness. Some enjoy a light dusting of superfine sugar or a gentle drizzle that forms a glassy line, echoing the glaze’s shine and adding a bit of texture and sparkle with each bite. Hygienically, the balance between the donut’s inherent richness and the glaze’s gloss should feel harmonious, not heavy—an everyday indulgence that tastes like a smile you can savor.

In the mouth, the aroma carries before the taste. Vanilla’s fragrance unfolds in layers: a top note of floral vanilla, a heart of creamy richness, and a lingering warmth that invites the next bite. The sweetness is refined, leaning toward comforting rather than dessert-candy level, so the donut remains suitable for breakfast or an afternoon treat. If you choose to incorporate citrus zest or a hint of almond in the glaze, you’ll notice an inviting brightness that lifts the vanilla’s depth, adding liveliness to the flavor profile without overwhelming the core experience. The balance is essential: the ultimate vanilla donut should feel indulgent but not heavy, luxurious yet easy to enjoy with a cup of coffee or a glass of milk.

Occasions & Pairings

Vanilla donuts are wonderfully adaptable for a wide range of moments. They shine on weekend brunch tables, alongside frothed cappuccinos and poured-over cortados, or as a simple dessert duo with a fruit compote and a light crumb topping. They also work beautifully for celebrations that call for a touch of sweetness without fuss—birthdays, baby showers, or casual get-togethers with friends and neighbors. For weekday mornings, they’re a comforting sight that turns a routine routine into a small celebration, offering a sense of luxury in a familiar form.

Pairings can elevate the experience. Try the following ideas to complement the vanilla profile:

  • Hot coffee, especially a dark roast with a creamy finish, to contrast sweetness and highlight vanilla’s warmth.
  • Espresso-based drinks for a bold, balanced pairing that can cut through the richness.
  • A glass of cold milk to echo the creaminess and keep the flavor profile approachable for all ages.
  • A light fruit compote or fresh berries to provide a bright counterpoint to the vanilla’s mellow sweetness.
  • A citrus twist in the glaze, such as lemon or orange, for a refreshing lift that’s perfect for spring or summer celebrations.
  • A spice kick in glaze or dusting—cinnamon, nutmeg, or cardamom—for a cozy, autumnal or holiday-inspired version.

Tips, Variations & Substitutions

The beauty of a vanilla donut lies in its adaptability. Here are some ideas to customize and tailor the recipe to your preferences or dietary needs, while preserving that classic vanilla hallmark:

  • Texture tweaks: If you like a chewier bite, you can experiment with a slightly higher fat content in the dough, or opt for a cake-donut approach with a bit more density. For a lighter crumb, incorporate a touch of buttermilk or yogurt to introduce tenderness and moisture.
  • Glaze variations: Classic vanilla glaze is timeless, but a few simple swaps expand the flavor universe. Add lemon zest and a splash of lemon juice for a bright citrus vanilla glaze. Mix in dark cocoa powder for a chocolate-vanilla glaze, or blend almond extract with a pinch of salt for a nutty, fragrant finish. You can also use a simple glaze of powdered sugar and milk, tinted with a drop of vanilla and a tiny dusting of cinnamon for warmth.
  • Vegan option: Replace dairy with plant-based milk (almond, soy, or oat) and use a plant-based butter substitute. Ensure the leavening remains balanced to preserve tenderness, and consider a coconut-vanilla glaze for a tropical twist.
  • Gluten-free option: Use a gluten-free all-purpose blend with a touch of xanthan gum if your blend doesn’t contain it. The texture can remain soft and light with careful handling and gentle mixing to avoid overdeveloped gluten.
  • Other flours: A portion of almond or cake flour can add a delicate nutty note or a softer crumb; adjust liquids slightly to maintain the dough’s mobility.
  • Flavor twists by zest: A subtle zest of orange, lemon, or even lime can brighten vanilla without masking it. A tiny pinch of cardamom or a whisper of ginger can evoke a spiced vanilla profile that’s perfect for seasonal gatherings.
  • Decorative toppings: Finish with pearl sugar for a crunchy bite, or drizzle a contrasting glaze in a lattice pattern for an elegant presentation.
  • Healthy-ish angles: If you want a lighter indulgence, bake the donuts instead of frying. The result is a gentler, drier crust with a tender interior, which can be glazed or lightly dusted with powdered sugar.

Storage & Make-Ahead Ideas

Vanilla donuts are best enjoyed fresh, but there are practical ways to store and even make them ahead so you can welcome guests or enjoy a quick treat later without sacrificing too much of their charm.

  • Short-term storage: Keep freshly glazed donuts in an airtight container at room temperature for up to 1–2 days. If you layer them, place a sheet of parchment between layers to prevent sticking or glaze transfer.
  • Reheating tips: To restore softness after refrigeration or a few hours on the counter, warm donuts briefly in a low oven (around 300°F / 150°C) for a few minutes, or microwave in short bursts until just warm. A quick re-glazing can revive the sheen.
  • Make-ahead scoop: Prepare the dry mix and store in a jar; when ready, combine with liquids to form the batter. This works well for weekend mornings when you want to bake with minimal effort on the day-of.
  • Freezing option: Freeze baked donuts—unfrosted or fully glazed—in a single layer on a tray, then transfer to a freezer bag. Thaw at room temperature and reheat gently for best texture. Glazes may need a light refresh or a new glaze layer after reheating for the best shine.
  • Glaze efficiency: If you’re preparing multiple batches, keep the glaze warm and smooth, adding a touch of milk or water if it thickens too much. A glossy coat is easier to achieve when the glaze flows smoothly over a cooled donut.

Fun Facts & Trivia (Optional)

Did you know that vanilla is one of the most labor-intensive flavors to produce, which is why vanilla desserts often feel like premium experiences? The orchid from which vanilla flavor comes requires hand pollination and meticulous curing to reveal its aromatic oils, a process that is as much a science as an art. In the world of donuts, the glaze acts as a modern ritual—an almost ceremonial finish that crowns the dough with a shimmering surface, sealing in moisture and delivering that classic first bite each time. The donut itself is a universal symbol of sharing and hospitality: a round, accessible shape without a beginning or end, much like a friendly circle of friends gathering around a table. Vanilla, with its familiar, comforting presence, makes that circle feel even warmer. And in many cultures, the ritual of sharing a plate of donuts is a way to say, in the simplest terms, that happiness can be found in the small, beautifully ordinary things—like a perfectly glazed vanilla donut on a lazy Sunday morning.

Another delightful note: donuts have inspired countless regional variations—from cake donuts that stay soft longer to airy yeast donuts that pull apart in a cloud of steam. The vanilla flavor, though, remains a unifying thread, connecting tradition to modern variations. The glaze itself has its own lineage as a canvas for flavor experiments—sometimes a straightforward sugar-vanilla glaze that catches the light, other times a bold, glossy finish that invites you to drizzle again and again. In the end, a vanilla donut is more than a dessert; it’s a small ceremony of comfort, a ritual that signals a pause in the day to enjoy sweetness, warmth, and connection with whoever shares the moment with you.

Ingredients

Donut Base

    – 2 1/2 cups all-purpose flour (plus extra for dusting)
    → This flour provides the structure and chew of the donuts through the gluten network. If you need a gluten-free version, use a 1:1 gluten-free all-purpose blend and consider adding 1/2 teaspoon xanthan gum per cup of flour to mimic the springiness of gluten. Handle: measure and whisk with a pinch of salt to ensure even distribution; dust lightly when rolling out to prevent sticking. Tip: avoid overworking the dough to keep a tender crumb.
    – 1/4 cup granulated sugar
    → Sugar not only sweetens but also feeds the yeast, helping a steady rise. Prepare: mix with the warm milk so it dissolves before adding yeast. Tip: if your dough is a bit dry, you can increase by up to 1–2 tablespoons, but avoid oversweetening, which can dull the vanilla note.
    – 2 1/4 teaspoons active dry yeast (about 1 packet)
    → Yeast is the leavening agent that creates the light, airy donut crumb. Prepare: proof the yeast in a small portion of warm milk with a pinch of sugar until bubbly to ensure it’s alive. Handle: keep temperature around 105–110°F (40–43°C). Tip: if your yeast is sluggish, the dough may not rise well—warm environment and fresh yeast help.
    – 1 cup warm milk (110°F/43°C)
    → Provides moisture and activates the yeast; also helps dissolve the sugar and fat into the dough. Prepare: warm gently and not hotter than 110°F to avoid killing the yeast. Dairy or non-dairy alternatives work; if using dairy-free milk, ensure it is unsweetened. Tip: use full-fat dairy for richer flavor and softer crumb.
    – 2 large eggs, room temperature
    → Eggs contribute structure, richness, and moisture; they also help emulsify the dough for a tender crumb. Prepare: beat slightly before mixing to ensure even distribution. Tip: room-temperature eggs combine more smoothly with the milk, promoting even dough consistency.
    – 4 tablespoons unsalted butter, melted and cooled
    → Fat from butter adds tenderness and flavor, softening the gluten network for a melt-in-the-mouth crumb. Prepare: melt and cool to just a touch warmer than room temperature before adding to dough to avoid prematurely cooking the eggs. Tip: if you prefer a lighter dough, substitute with neutral oil in equal amount, but you’ll lose some butter flavor.
    – 2 teaspoons vanilla extract
    → Provides the characteristic vanilla aroma that defines these donuts. Prepare: use pure vanilla extract for best flavor; for extra depth, you can scrape in vanilla bean seeds. Tip: add with the eggs for even distribution of flavor throughout the dough.
    – 1/4 teaspoon fine sea salt
    → Enhances overall flavor and tightens the crumb by balancing sweetness. Prepare: distribute evenly by whisking into the flour. Tip: salt helps fermentation flavors develop and prevents the dough from tasting flat.
    – 1/2 teaspoon ground cinnamon (optional)
    → Adds a warm, subtle spice note that complements vanilla. Prepare: whisk into the flour if using; tip: keep it optional to cater to purists who prefer plain vanilla.

Glaze

    – 1 cup powdered sugar (confectioners’ sugar)
    → Forms the glaze that coats the donuts with a sweet, glossy finish. Prepare: sift to remove lumps; whisk with liquid gradually to reach a smooth consistency. Tip: if you want a thicker glaze, use less milk; for a thinner glaze, add a splash more milk.
    – 2–3 tablespoons milk (dairy or non-dairy)
    → Adjusts glaze thickness. Prepare: begin with 2 tablespoons and add 1 tablespoon at a time until you reach your desired drizzle consistency. Tip: warm milk slightly to help the glaze flow more smoothly, but avoid hot liquid which can melt the donuts too quickly.
    – 1/2 teaspoon vanilla extract
    → Subtle vanilla note in the glaze to harmonize with the donut flavor. Prepare: add with the sugar and milk after initial mixing to ensure an even distribution. Tip: for a chocolate glaze, omit vanilla and replace with a pinch of cocoa or melted chocolate.

Frying

    – Neutral oil for frying (such as canola or peanut), enough to fill a heavy-bottom pot to about 2 inches depth
    → The oil is the medium that crisps the outside while keeping the inside soft. Prepare: heat to 350–375°F (175–190°C) and monitor with a thermometer. Maintain steady temperature during frying; too hot will burn the crust before the interior cooks, too cool will yield greasy donuts. Tip: fry in batches to keep the oil temperature stable, and let the donuts rest on a rack after frying to drain excess oil.

Optional Toppings and Finishes

    – Cinnamon-sugar coating: 1/2 cup granulated sugar + 1–2 teaspoons ground cinnamon
    → Optional after-fry finish for a classic cinnamon-dusted look and flavor. Prepare: mix well and toss warm donuts gently to coat; the heat helps the sugar adhere. Tip: coat while donuts are still warm so the glaze or butter hasn’t set yet, which helps sugar stick better.
    – Rainbow sprinkles (optional): 1/4 cup
    → Adds color and texture; sprinkle while glaze is still tacky so they adhere. Prepare: use nonpareils or tiny jimmies for a tidier finish. Tip: apply a light coat of glaze first or dip in the glaze then in sprinkles for a decorative effect.
    – Finely chopped toasted nuts (optional): 1/4 cup
    → Provides crunchy contrast and nutty flavor. Prepare: toast nuts lightly to deepen flavor, cool, then chop finely. Tip: press into the glaze or simply sprinkle over the cinnamon-sugar finish for a sophisticated texture.

Instructions

  • Proof the yeast by mixing 1/4 cup warm milk (105–110°F/40–43°C) with a pinch of granulated sugar, then sprinkling 2 1/4 teaspoons active dry yeast over the surface and letting it sit 5–10 minutes until foamy.
    → This ensures the yeast is active and capable of leavening; if it does not foam, discard and start with fresh yeast to avoid a dense dough.
  • Whisk the remaining 1 cup warm milk with the two large eggs, 4 tablespoons melted butter cooled to just warm, and 2 teaspoons vanilla extract until smooth and evenly combined.
    → This creates a cohesive, emulsified wet base that carries fat and flavor into the dough; using room-temperature eggs helps the mixture combine without clumping.
  • Whisk together 2 1/2 cups all-purpose flour, 1/4 cup granulated sugar, 1/4 teaspoon fine sea salt, and 1/2 teaspoon ground cinnamon (if using) until completely integrated.
    → Sifting or whisking distributes salt and cinnamon evenly, which prevents uneven flavor and crumb structure in the final donuts.
  • Pour the foamy yeast mixture into the wet mixture, then gradually incorporate the dry ingredients, stirring with a spatula or wooden spoon until a shaggy dough forms.
    → Merging gradually prevents flour from flying and ensures even hydration; a shaggy dough indicates sufficient moisture without overworking the gluten yet.
  • Turn the shaggy dough out onto a lightly floured work surface and knead by hand for 6–8 minutes until the dough is smooth, elastic, and only slightly tacky; perform the windowpane test by stretching a small piece until it becomes translucent without tearing.
    → Kneading develops gluten for structure and chew; the windowpane confirms the dough has sufficient elasticity for a tender crumb.
  • Lightly oil a large bowl and place the dough inside, turning once to coat, then cover with a clean towel or plastic wrap and let rise in a warm, draft-free spot until doubled in size, about 1 to 1 1/2 hours.
    → Proper bulk fermentation builds flavor and lightness; a warm environment accelerates fermentation without overproofing the dough.
  • Gently punch down the dough to release gas, then roll it on a lightly floured surface to about 1/2 inch (12–13 mm) thickness and dust with flour as needed to prevent sticking.
    → Rolling to a uniform thickness ensures even cooking; light flouring prevents sticking without weighing the dough down with excess starch.
  • Dip a 3-inch donut cutter (or a 3-inch circle with a 1-inch inner hole) into flour and cut out rounds, re-rolling scraps as necessary until all dough is used; place cut donuts and holes on a parchment-lined sheet.
    → Using a constant thickness and properly floured cutters yields consistent donut shapes and even frying; re-rolling dough multiple times can toughen it, so keep scraps to a minimum.
  • Cover the cut donuts and holes loosely with a towel and let them rise again for 20–30 minutes until puffy and just slightly spring back when touched.
    → A second, shorter proof helps the dough relax, expands the crumb, and improves the final texture after frying.
  • Meanwhile, set a heavy-bottomed pot or deep fryer on the stove and attach a thermometer; add neutral oil to a depth of about 2 inches and heat to 350–375°F (175–190°C), adjusting heat to maintain temperature.
    → Maintaining a steady frying temperature yields a crisp exterior and a tender interior; too hot and the crust will burn before the center cooks, too cool and the donuts will absorb excess oil.
  • Carefully fry the donuts in batches, turning once with tongs, for 1–2 minutes per side until they are deep golden and puffed; adjust the heat as needed to keep the oil within the target range.
    → Quick, even frying seals in moisture and creates the characteristic airy crumb; frequent temperature checks prevent greasy or undercooked centers.
  • Transfer the fried donuts to a rack set over a baking sheet to drain excess oil for 1–2 minutes, then let cool slightly before glazing.
    → Draining removes surface oil that would prevent the glaze from adhering properly and helps set the crust for a clean finish.
  • Whisk 1 cup powdered sugar with 2–3 tablespoons milk and 1/2 teaspoon vanilla extract until smooth and glossy, adjusting with more sugar or milk to reach a consistency suitable for dipping.
    → A smooth glaze coats evenly and sets to a pleasant sheen; warming the milk slightly can help the glaze flow more freely without making the donuts soggy.
  • Dip the top of each donut into the glaze to coat, allowing any excess glaze to drip back into the bowl, and place back on the rack for the glaze to set.
    → A thin, even coating provides a balanced vanilla sweetness that complements the donut crumb; dipping while still warm helps the glaze adhere.
  • Optionally, while the glaze is still tacky, toss the donuts in a cinnamon-sugar mixture (1/2 cup granulated sugar with 1–2 teaspoons ground cinnamon) for a classic finish.
    → The warmth of the donuts helps the sugar cling, creating a fragrant crust with additional texture and flavor.
  • Optionally, while the glaze remains tacky, sprinkle rainbow sprinkles (1/4 cup) or press finely chopped toasted nuts (1/4 cup) onto the surface for color and crunch.
    → Toppings add visual appeal and contrasting textures; apply promptly so they adhere to the glaze before it fully sets.
  • Allow the glazed and finished donuts to rest on the rack for 10–15 minutes to set the glaze completely before serving.
    → Resting ensures the glaze firms enough to handle without smearing and yields a cleaner finish when biting into the donut.
  • Serve the vanilla donuts fresh for best texture and aroma; store any leftovers in an airtight container at room temperature for up to 2 days or freeze for longer storage.
    → Freshness matters for tenderness and flavor; proper storage maintains crumb and sweetness over time.

Notes

These vanilla donuts are tender, fluffy, and lightly sweet with a rich vanilla aroma.

Key to a soft crumb is handling the enriched yeast dough gently: proof the yeast in warm milk with a pinch of sugar until foamy, keeping the mixture around 105–110°F (40–43°C). If there is no activity, discard and start again with fresh yeast.

Whisk the dry ingredients (all-purpose flour, granulated sugar, fine sea salt, and optional cinnamon) and whisk the wet ingredients (warm milk, eggs, melted cooled butter, and vanilla). Combine until just a cohesive dough forms; it will be soft and a bit sticky. Cover and let rise until doubled, about 60–90 minutes in a warm spot. Gently deflate, roll to about 1/2 inch to 3/4 inch thick, cut into donut rounds, and let them proof again 20–30 minutes until puffy.

Frying: heat neutral oil to 350–375°F (175–190°C) in a heavy pot. Fry donuts in batches, 45–60 seconds per side until lightly golden. Maintain steady temperature; too hot will brown the crust too quickly, too cool will yield greasy donuts. Drain on a rack and cool slightly before glazing.

Glaze: sift the confectioners’ sugar and whisk with 2–3 tablespoons milk and 1/2 teaspoon vanilla until smooth. Dip cooled donuts or drizzle glaze to coat; adjust thickness by adding more milk for a thinner glaze, or less milk for a thicker coating. For a glossy finish, allow the glaze to set for a few minutes before serving.

Optional finishes: a cinnamon-sugar coating (1/2 cup sugar + 1–2 teaspoons ground cinnamon), rainbow sprinkles, or finely chopped toasted nuts. Apply while the glaze is still tacky for best adhesion.

Make-ahead and storage: the dough can be prepared and refrigerated overnight after the first rise; roll, cut, and allow to rise before frying the next day. Fried donuts are best eaten fresh but can be stored in an airtight container at room temperature for 1–2 days. Unfried donut rounds can be frozen on a sheet, then transferred to a bag for freezing and fried directly from frozen after a short thaw and rise. Rewarm in a 350°F oven to refresh.

Substitutions and dairy-free options: for a gluten-free version, use a 1:1 gluten-free all-purpose blend with 1/2 teaspoon xanthan gum per cup of flour; ensure all ingredients (especially glaze) are certified gluten-free. For dairy-free donuts, substitute plant-based milk and a dairy-free butter or neutral oil; the texture remains tender though flavor may vary. For deeper vanilla, scrape the seeds from a vanilla bean into the dough or add a few extra drops of vanilla extract.

Tips

Tips for the Donut Base

  • Measure the flour by weight when possible. If you must scoop, fluff the flour first, lightly spoon into the measuring cup, and level off for accuracy. This prevents a dense, heavy crumb.
  • For gluten-free versions, use a 1:1 gluten-free all-purpose blend and add 1/2 teaspoon xanthan gum per cup of flour to mimic gluten’s elasticity. Handle the dough gently to keep it tender.
  • Fully dissolve the sugar in the warm milk so the yeast has even feeding, which helps a consistent rise and a softer crumb.
  • Proof the yeast in a small amount of warm milk with a pinch of sugar until bubbly. Maintain a temperature around 105–110°F (40–43°C). If there’s no foam, the yeast may be dead and you should start over with fresh yeast.
  • Warm milk should be around 110°F (43°C); hotter will kill the yeast and colder slows fermentation. If using non-dairy milk, make sure it’s unsweetened and at a similar temperature.
  • Room-temperature eggs emulsify better with the liquids, producing a smoother dough. If you forgot to plan, you can gently warm the eggs in a bowl of warm (not hot) water for a few minutes.
  • Melted butter adds tenderness and flavor. Let it cool to just warmer than room temperature before mixing to avoid cooking the eggs or scrambling them.
  • Pure vanilla extract gives a true vanilla aroma; scraping in vanilla bean seeds intensifies flavor. Add the vanilla with the eggs for even distribution.
  • Distribute salt evenly in the flour to strengthen the crumb and prevent a flat-tasting dough. A quick whisk helps.
  • The optional cinnamon is best whisked into the flour so the spice is evenly dispersed—omit if you prefer a pure vanilla profile.
  • Avoid overworking the dough. Gentle mixing and a light hand yield a tender, airy crumb. Overhandling can develop gluten too much and result in denser donuts.
  • If dough seems very sticky, chill it for 15–20 minutes to firm up, then roll and cut. If it’s dry, whisk in small increments of milk, a teaspoon at a time, until you reach a smooth, tacky consistency.
  • Roll the dough to about 1/4 inch thickness for classic donut shape and airiness. Rolling thinner can cause holes to be fragile, while thicker dough may take longer to cook through.
  • Use a sharp circular cutter and re-roll scraps gently—donuts baked from too-dry scraps can be tough. Let scraps rest briefly to relax the dough before re-cutting.
  • Let shaped donuts rise on a parchment-lined tray or tray with a light dusting of flour; a second, short rise (about 20–30 minutes) helps them puff and hold their shape during frying.

Tips for the Glaze

  • Sift powdered sugar to remove lumps; whisk gradually with the milk to reach a smooth, glossy glaze. Start with 2 tablespoons milk and add more as needed.
  • Test the thickness by dipping a donut edge in the glaze. It should coat in a thin, even layer and set without running off the donut.
  • Warm milk helps glaze flow more smoothly, but avoid hot liquid which can melt or deform freshly fried donuts.
  • Vanilla in the glaze harmonizes with the donut flavor. If making a chocolate glaze, skip the vanilla or replace with a pinch of cocoa powder for a different profile.
  • For flavor variations, consider citrus zest (lemon or orange) grated into the glaze for a bright finish.

Tips for Frying

  • Use neutral oil with a high smoke point (canola or peanut). Fill a heavy-bottom pot to about 2 inches depth and heat to 350–375°F (175–190°C) with a candy/deep-fry thermometer for accuracy.
  • Maintain a steady oil temperature; too hot gives burnt exteriors while the centers remain undercooked, too cool makes donuts greasy. Fry in batches to avoid temperature drop.
  • Gently lower dough into the oil with tongs or a slotted spoon; flip halfway to promote even browning. Fry until golden and cooked through, about 1–2 minutes per side depending on thickness.
  • Let fried donuts rest on a rack to drain excess oil; avoid stacking while hot, which can soften the crust.
  • Reuse oil after straining; store oil in a cool, dark place and discard if it develops off-odors or becomes very dark.
  • Safety tip: keep kids and pets away from hot oil, and never leave the stove unattended during frying.

Optional Toppings and Finishes

  • Cinnamon-sugar coating: mix 1/2 cup granulated sugar with 1–2 teaspoons ground cinnamon. Coat warm donuts so the sugar adheres better to the surface.
  • Rainbow sprinkles: apply while glaze is tacky so they stick. For a tidier finish, apply sprinkles after a light glaze layer or dip directly into sprinkles after glazing.
  • Finely chopped toasted nuts: toast nuts to deepen flavor, cool, and chop finely. Press into glaze or dust over the cinnamon-sugar finish for added texture and aroma.

General Storage and Reheating Tips

  • Fresh donuts are best the same day. Store in an airtight container at room temperature for up to 2 days; refrigerating can dry them out.
  • To refresh, warm lightly in a 300–325°F (150–160°C) oven for 3–5 minutes or microwave just until warm (short pulses) to revive the tenderness.
  • Freeze unglazed donuts for longer storage; thaw and glaze before serving for best texture.

FAQ

What are vanilla donuts?

Vanilla donuts are soft, ring-shaped pastries flavored with vanilla extract. They can be fried or baked and are often coated with a vanilla glaze or sprinkled with sugar for extra sweetness.

What ingredients do I need for classic vanilla donuts (fried or baked)?

For the batter, you’ll typically need:

  • 2 cups all-purpose flour
  • 1/2 cup granulated sugar
  • 2 tsp baking powder
  • 1/2 tsp salt
  • 3/4 cup milk (dairy or non-dairy)
  • 2 large eggs
  • 2 tbsp melted butter or neutral oil
  • 2 tsp vanilla extract

Optional glaze ingredients (for coating):

  • 1 cup powdered sugar
  • 1–2 tbsp milk
  • 1 tsp vanilla extract
Do vanilla donuts require yeast or baking powder?

Vanilla donuts can be made with either yeast or baking powder. This common recipe uses baking powder for a quicker, cake-like texture, but yeast donuts are also popular and yield a chewier, airy crumb.

Can I bake vanilla donuts instead of frying them?

Yes. To bake them: preheat to 350°F (175°C). Lightly grease a donut pan, mix the batter, fill wells about 3/4 full, and bake 12–15 minutes until a toothpick comes out clean. Let cool and glaze if desired.

How do I make vanilla glaze for donuts?

For a simple vanilla glaze: whisk together 1 cup powdered sugar, 1–2 tbsp milk (adjust for desired thickness), and 1 tsp vanilla extract until smooth. Dip cooled donuts into the glaze or drizzle over them. Add sprinkles if you like.

How long do vanilla donuts stay fresh and how should I store them?

Store cooled donuts in an airtight container at room temperature for 1–2 days for best texture. Refrigeration can extend freshness to about 4–7 days but may dry them slightly. For longer storage, freeze donuts (unfrosted or glazed) for up to 1–2 months. Thaw at room temperature and re-glaze if desired.

Can I make gluten-free vanilla donuts?

Yes. Use a 1:1 gluten-free flour blend that contains xanthan gum or add 1/2 teaspoon xanthan gum per cup of flour if your blend doesn’t include it. You may need to adjust liquid slightly to achieve a batter that’s not too stiff or too loose. Start with the standard measurements and add small amounts of milk as needed.

What oil is best for frying vanilla donuts?

Use a neutral oil with a high smoke point, such as canola, vegetable, or peanut oil. Heat to about 350–365°F (175–185°C) and fry the donuts until golden, usually 1–2 minutes per side. Avoid strongly flavored oils that can overpower the vanilla flavor.

How should I decorate vanilla donuts?

Decoration ideas:

  • Vanilla glaze with sprinkles or edible glitter
  • Chocolate glaze drizzle
  • Cinnamon sugar dusting
  • Glazed with crushed nuts or coconut
Troubleshooting: my donuts are dense, greasy, or undercooked. What can I do?

Tips:

  • Dense donuts: avoid overmixing the batter, measure flour correctly, and don’t overwork the dough. Ensure your leavening (baking powder) is fresh.
  • Greasy donuts: maintain oil temperature around 350–365°F (175–185°C). If oil is too hot, the outside cooks too quickly while the inside stays doughy.
  • Undercooked centers: fry longer at proper temperature or bake longer if using the oven method. For baked donuts, avoid overly thick batter.

Introduction / Hook

Imagine a warm morning, the kitchen filled with the soft scent of vanilla and sun-kissed berries, and the first bite delivering a gentle, tender crumb that melts on your tongue. Baked Blueberry Donuts are not just a treat; they’re a quiet celebration of simplicity and comfort. There’s something incredibly satisfying about a donut that tastes indulgent without the heaviness of frying. When you bite into one, you’re met with the bright pop of blueberries, a hint of citrus, and a light kiss of sweetness that doesn’t overwhelm. The texture is a tapa of contrasts—soft, almost cloud-like interior with a delicate outer crust, a result of a careful balance between moisture and heat. This isn’t dessert masquerading as breakfast; it’s a morning ritual you’ll want to repeat on weekends, quick weekday mornings, and everything in between. The beauty of baked donuts lies in their radiantly approachable charm: no splattering oil, no long waits, just a few pantry staples and a little patience as the oven does the heavy lifting. Once you’ve tasted them, you’ll understand why they’ve earned a place in so many homes—the kind of recipe you reach for when you want something cozy, trustworthy, and just a little fancy all at once.

Blueberries have a way of turning ordinary mornings into something worth cherishing. Their natural sweetness and bright tang mirror the buoyant scent of a well-balanced batter, while their purple-blue hue adds a playful burst of color that makes a plate feel like a celebration. When baked into donuts, those little jewels distribute themselves into juicy pockets, ensuring every bite carries a fruity surprise. There’s also something wonderfully nostalgic about a baked donut: it nods to the pleasure of a classic bakery treat while delivering it with a lighter, more modern sensibility. It’s as if summer found a cozy home in a muffin pan—the best of both worlds, wrapped into one perfect bite-sized package.

This recipe is more than just a dessert-forward breakfast; it’s a canvas for warmth, memory, and shared moments. It’s ideal for Sunday brunches that spill out into bright afternoons, for a quick Saturday pick-me-up, or for turning a simple weekday into something that feels special without demanding your entire day. The batter comes together with pantry staples—flour, sugar, a few dairy or dairy-free stand-ins, a touch of leavening—and before you know it, the kitchen is perfumed with citrus zest and blueberry perfume. The real magic lies in the balance: not too sweet, not too dense, and exceptionally tender. If you’ve ever wished for a bakery-quality donut you could bake at home without special equipment, this recipe delivers that dream with surprising grace. Get ready to welcome a tray of golden, blue-speckled donuts that bake to perfection and disappear almost as quickly as they appear.

The Story Behind the Dish

Donuts have long enjoyed a storied place in culinary history, traveling from old-world yeast-raised pleasures to modern, innovation-driven indulgences. The baked version, in particular, started as a friendly response to households craving the joy of donut flavors without the extra oil. It’s a practical evolution that honors tradition while embracing lighter textures and simpler techniques. The blueberry variation, in turn, echoes the fruit’s seasonal charm. Blueberries have been celebrated in many cultures for their vibrant hue, their sweetness, and their reputation as a “superfruit” long before that term gained traction. In North American breakfast culture, blueberries pair naturally with citrus and cream, and they thrive in quick breads, muffins, and, indeed, baked donuts. The combination of these two icons—blueberries and baked donuts—feels almost inevitable: a modest, comforting pastry that feels both homely and celebratory, a nod to wholesome ingredients and the joy of making something from scratch with love and patience.

Historically, donuts were a practical response to a need for portable, affordable treats that could travel well. Whether you’re ferrying a batch to a neighbor, a classroom, or a weekend picnic, baked donuts carry the same spirit with less heaviness than their fried cousins. The blueberry variation adds a touch of elegance to the humble donut, reminding us that everyday recipes can carry a sense of occasion without requiring a special occasion. The kitchen becomes a small stage where the simple act of stirring, smelling, and baking transforms ordinary ingredients into something memorable. In many homes, these donuts become a kind of edible memory—the scent of lemon zest and blueberries that brings back a specific morning, a family’s ritual, or a cherished pause before a busy day.

In a broader cultural sense, this dish bridges the gap between bakery nostalgia and home cooking. It speaks to the human preference for comfort food that is still light enough for morning consumption, to flavors that feel both familiar and slightly elevated, and to textures that offer a gentle, forgiving bite. The baked donut trend aligns with a desire for approachable indulgence—desserts and pastries that taste like bakery-worthy treats but fit into a balanced routine. The blueberry donut story is a small but meaningful thread in the larger tapestry of seasonal eating, where harvest fruits meet everyday cooking in ways that sustain both body and spirit.

Why You’ll Love This Recipe

  • Quick and approachable: No frying, no special equipment required beyond a donut pan. You can have a batch ready in under an hour, from measuring to cooling.
  • Naturally sweet and bright: Blueberries provide natural sweetness and a lively tart note that keeps the flavor balanced rather than cloying.
  • Soft, tender crumb: The baked texture delivers a delicate, cake-like bite with enough structure to hold its shape for a satisfying morning bite.
  • Versatile and forgiving: Easy to adapt with dairy or dairy-free milk, and friendly to a range of dietary needs with simple substitutions.
  • Family-friendly and crowd-pleasing: Appealing to kids and adults alike, making them ideal for weekend breakfasts, brunches, or a quick dessert.
  • Make-ahead potential: These donuts can be prepared, baked, and stored for later indulgence, which makes hosting or busy mornings easier.

Flavor Profile & Texture

The flavor profile of Baked Blueberry Donuts is a delicate balance between bright fruit, creamy moisture, and a whisper of citrus. The blueberries contribute a natural sweetness with a hint of tang, while the citrus zest reinforces that sunny, fresh flavor that makes you feel like you’ve started the day with a little sunshine. The crumb is soft and tender—almost confessional in its willingness to melt away on your tongue—yet it has enough density to support a light glaze or dusting of sugar without crumbling. The outer crust forms a subtle, agreeable crust—a soft snap that yields to the inner cloudiness. The glaze, if you choose to glaze them, adds a glossy, dainty sheen that catches the light and completes the dish as a polished breakfast pastry. The overall mouthfeel is comforting but not heavy, which is precisely what makes these donuts suitable for morning eating, mid-afternoon coffee breaks, or a celebratory brunch corner. The blueberries’ juicy pockets bring pleasant bursts of flavor in every bite, and the subtle citrus notes linger, inviting the next bite without shouting for attention.

In terms of texture, there’s a gentle balance between crumb and crust. The interior crumb is fine and tender, with a tiny amount of chew that keeps the donut from feeling too delicate. The glaze, when applied, introduces a slightly candy-like sheen and a thin, glossy layer that provides a light, sweet cap without overwhelming the fruit in the center. There’s also an appealing aroma—the combined scent of warm flour, vanilla, lemon or orange zest, and blue fruit—that makes the experience multi-sensory. When you pair these donuts with a cup of coffee or a pot of tea, the flavors harmonize beautifully. The richness of the beverage grounds the bright notes, and the fruitiness of the donuts brightens the palate, preparing you for another bite.

Occasions & Pairings

These baked blueberry donuts are versatile enough to slot into many occasions, yet they preserve an air of whimsy that makes them feel special without being fussy. Here are some ideas for serving and pairing:

  • Weekend brunch centerpiece: Arrange the donuts on a platter with fresh lemon slices and a dusting of powdered sugar for a sunny, inviting spread.
  • Daily breakfast treat: A warm donut with a cup of coffee or a glass of cold milk is a classic morning pairing that feels indulgent without being heavy.
  • Afternoon tea-time bite: Pair them with a lightly brewed tea or a mimosa for a casual, celebratory vibe.
  • Picnics and potlucks: Donuts travel surprisingly well when stored properly in an airtight container, making them an easy portable dessert or snack.
  • Gift-worthy treat: Bake a batch and package them in decorative boxes with a ribbon; they make a thoughtful homemade gift for neighbors or teachers.

Pairings to consider for a complete starter-to-finish experience include:

  • Drinks: A light coffee with well-stacked crema, a chai latte, or a sparkling citrus-flavored water to mirror the citrus notes in the batter.
  • Side items: Fresh berries, a dollop of vanilla yogurt, or a lemon-curd swirl on the side for an added zing.
  • Desserts: A small spoon of whipped cream or a delicate lemon glaze can turn a breakfast donut into a dessert plate after dinner.

Tips, Variations & Substitutions

Make-Ahead & Storage Tips

To maximize flavor and keep texture intact, bake the donuts and cool completely before storing. Store in an airtight container at room temperature for up to 2 days. For longer storage, freeze baked donuts in a single layer on a sheet tray, then transfer to a resealable bag or container. They freeze well for up to 2 months. Reheat gently in a 325°F (165°C) oven for 6–8 minutes, or warm them briefly in the microwave if you’re in a hurry. If you prefer a glaze, you can drizzle and set it after reheating, or simply dust with powdered sugar for a lighter finish. If you’re freezing a glaze, it’s best to glaze after reheating to preserve the glaze’s shine and texture.

Vegan Version

Substitute dairy with plant-based milks (almond, oat, soy, or coconut) and use unsweetened applesauce or mashed banana in place of eggs to maintain moisture and structure. A touch more leavening may be helpful to compensate for the lack of gluten structure, so you might increase baking powder by a pinch. Ensure the batter remains not too dense; adjust with a splash more plant-based milk if needed. The result will be equally tender and fruit-forward while staying completely vegan.

Gluten-Free Version

Use a 1:1 gluten-free all-purpose flour blend designed for baking, ensuring it contains xanthan gum or another binder. You may need to adjust the liquid slightly, as gluten-free batters can be a touch thicker. The blueberries still provide moisture and juiciness, and the crumb should remain light and tender with careful handling to avoid over-mixing. A gluten-free glaze or a dusting of sugar will finish the donuts beautifully.

Dairy-Free Version

Choose dairy-free milk and a plant-based butter substitute or neutral oil. The texture should still be soft and moist, as long as you maintain the right balance of fat and moisture. If using oil, you’ll want a mild-tavored oil like canola or sunflower to avoid overpowering the blueberry and citrus notes. The result is a delectable dairy-free baked donut that doesn’t compromise on flavor or crumb.

Seasonal Variations

While blueberries are the star, you can swap in other berries when their season peaks or mix in a small amount of finely chopped fruit for surprising texture gems. Strawberry slices, raspberries, or blackberries pair wonderfully with lemon zest. A hint of orange zest works beautifully as an alternate citrus note. For a fall twist, you could add a pinch of cinnamon or nutmeg with the berries to evoke a cozy autumn aroma. If you’re feeling adventurous, a citrus-blueberry combo using a mix of lemon and lime zest can add a bright, tropical edge.

Mini Donut vs Regular Donuts

Mini donut pans yield bite-sized treats that are perfect for tasting parties or a playful brunch look. They bake faster and can be shared easily. Regular donuts offer a more substantial feel that’s ideal for a weekend breakfast or dessert course. Both versions benefit from a light glaze or a gentle dusting of sugar to finish, and the batter can be scaled up or down depending on your pan size. The choice mostly comes down to your preferred portion control and presentation style.

Storage & Make-Ahead Ideas

Preparing these donuts in advance makes weekend mornings effortless and brings a bakery-style experience to your home. When planning ahead, consider the following:

  • Make-ahead batter: You can assemble the dry ingredients ahead of time and store them in a labeled jar. In the morning, whisk with liquids and fold in the berries for fresh-dough donuts.
  • Batch storage: Bake a larger batch and store in an airtight container. If you plan to serve them over several days, consider a light glaze or sugar dusting on the day of serving to keep them feeling fresh.
  • Freezing: As mentioned, baked donuts freeze well. Defrost at room temperature and rewarm for best texture and aroma. A quick re-glaze adds a just-baked sheen and crispness.
  • Reheating tips: If you want to recreate that freshly baked feel, reheat gently in the oven rather than the microwave to preserve moisture and a delicate crust.

Fun Facts & Trivia (Optional)

Did you know that blueberries are one of the only natural foods that came with a purple-blue color that never fades, even when baked? Their pigments, called anthocyanins, contribute to the fruit’s vivid color and are believed to have antioxidant properties. Donuts themselves date back to 19th-century Europe, but the modern baked donut trend really found its footing with quick, home-friendly recipes that make simple breakfast treats feel like a special indulgence. The combination of blueberries with citrus zest taps into a long culinary tradition of bright, fruity breakfasts that lift mood and energy, something many cultures have embraced for centuries as a way to begin the day on a positive note.

Another fun note: the donut pan, which gives these treats their classic ring shape, was invented to ensure even baking and uniform consistency. Baking at the right temperature allows the outer crust to form a gentle edge while the center remains moist and tender—an ideal balance for a morning pastry. When you bake donuts at home, you’re participating in a culinary lineage that spans generations, turning simple ingredients into a shared, comforting ritual that marks the start of a new day with care and joy.

As you embark on making your own batch of Baked Blueberry Donuts, you’re stepping into a doorway that leads to countless small moments of delight: the anticipation of pulling a tray from the oven, the sight of a glaze catching the light, the first bite that releases a chorus of fruity freshness. It’s a reminder that food, even in its simplest forms, holds the power to brighten mornings, connect families, and invite us to pause and savor the ordinary magic of home cooking.

Ingredients

Donut Base

  • 2 cups all-purpose flour
    → Flour provides the backbone and structure of the donuts. It forms the gluten network that gives the crumb its shape while remaining tender if mixed just until combined. For best results, fluff the flour, spoon it into a measuring cup, level off, and sift if you want lighter texture. Do not overmix once the wet ingredients are added, or the donuts may become dense and chewy.
  • 3/4 cup granulated sugar
    → Sugar sweetens the batter and contributes to browning and moisture retention during baking. It also helps tenderize the crumb when emulsified with fat and eggs. Use granulated sugar for a clean sweetness that pairs well with blueberries. If you prefer a deeper flavor, you can substitute part of it with light brown sugar, but this will slightly alter texture and color.
  • 2 teaspoons baking powder
    → Primary leavening agent that creates rise and a light, cakey crumb. Fresh baking powder yields the most reliable lift; store it in a cool, dry place and replace every 6–9 months if opened. Whisk it with the dry ingredients to distribute evenly and prevent lumps.
  • 1/2 teaspoon baking soda
    → Additional leavening and helps with browning and tenderness, especially when paired with acidic ingredients like buttermilk. Ensure your batter isn’t overly acidic—too much can dull flavor and cause excessive puffing then collapse. This works with the buttermilk to produce a soft, airy crumb.
  • 1/4 teaspoon fine sea salt
    → Enhances the flavors of the batter and balances the sweetness. A small amount goes a long way in pulling the other flavors forward. If you use salted butter, you may reduce this to a pinch.
  • 2 large eggs
    → Bind the batter and contribute to structure and moisture. Eggs help set the crumb as the donuts bake. For a smoother, lighter batter, let the eggs come to room temperature and whisk them lightly with the sugar before adding to the wet ingredients.
  • 3/4 cup cultured buttermilk
    → Adds moisture, tenderness, and a subtle tang. The acidity helps activate the baking powder/soda for a tender, airy crumb. If you don’t have buttermilk, whisk 3/4 cup milk with 1 tablespoon lemon juice or white vinegar and let stand for 5 minutes before using; this will mimic the acidity.
  • 1/3 cup neutral oil (e.g., canola or sunflower)
    → Provides moisture and a forgiving crumb without imparting a heavy buttery flavor. Oil yields a softer, more uniform crumb compared to butter. If you prefer a richer flavor, you can substitute melted butter (about 1/3 cup) but expect a slightly denser texture and use a tad less fat elsewhere to balance.
  • 1 teaspoon pure vanilla extract
    → Adds warmth and depth to the batter. Pure vanilla provides a richer aroma than imitation. If you’re using vanilla bean paste, you can reduce the extract slightly and still achieve a strong vanilla note.
  • 1 cup fresh blueberries, gently folded in with a light coating of flour to prevent sinking
    → Blueberries give bursts of juicy sweetness and color. Pat them dry after washing, and toss with a small amount of flour (about 1 teaspoon) to keep them evenly distributed and prevent them from sinking to the bottom. Fold in last to prevent bursting and color bleed into the batter.
  • 1 tablespoon lemon zest (optional)
    → Brightens the berry flavor and adds a fresh citrus aroma. Zest is best added at the end of mixing to preserve its fragrant oils. If you don’t have a zester, finely grate the outer yellow skin with a microplane.

Optional Add-ins

  • 1/2 cup chopped walnuts (optional)
    → Adds a crunchy contrast and nutty flavor that pairs nicely with blueberries. Lightly toast the walnuts (5–7 minutes at 350°F / 175°C) to deepen their flavor, then chop to small, even pieces so they distribute evenly throughout the batter.
  • 1/2 cup mini chocolate chips (optional)
    → Introduces pockets of melted chocolate that complement the blueberry sweetness. Use mini chips to ensure even distribution without overwhelming the berry flavor. Fold in gently to avoid bleeding the color into the batter.

Glaze (Optional)

  • 1 cup powdered sugar
    → The base for a smooth glaze. Sift to remove lumps before whisking with the liquid. A glaze gives a glossy finish and a quick sweet melt on biting into the donut.
  • 2–3 tablespoons milk (or dairy-free milk)
    → Adjusts glaze thickness. Start with 2 tablespoons and add more as needed to achieve a pourable, coating consistency. For a bright lemon glaze, substitute part of the milk with lemon juice.
  • 1/2 teaspoon vanilla extract
    → Adds depth to the glaze. Use vanilla to enrich sweetness, especially when the glaze will sit on a blueberry base. If you’re avoiding vanilla, you can leave this out, but expect a more neutral glaze.

Toppings

  • 1/2 cup granulated sugar for coating (optional)
    → For a simple, sweet crust, roll cooled donuts in this sugar. For best results, brush the donuts lightly with melted butter first to help the sugar adhere and form a delicate crust.
  • 2 teaspoons ground cinnamon (optional)
    → Creates a warm, spiced crust when used with the sugar topping. Mix with the sugar and toss the warm donuts to evenly coat. This topping adds aroma and texture without adding glaze.

Instructions

  • Preheat your oven to 350°F (175°C) and thoroughly grease a 6-cavity donut pan with nonstick spray or brush it with neutral oil and dust with flour to ensure easy release after baking.
    → This creates a slick surface so the delicate donut rings come out intact without tearing.
  • Whisk together the dry ingredients: 2 cups all-purpose flour, 3/4 cup granulated sugar, 2 teaspoons baking powder, 1/2 teaspoon baking soda, and 1/4 teaspoon fine sea salt in a large bowl until evenly combined and free of lumps.
    → Sifting or whisking distributes leaveners and salt uniformly, ensuring consistent rise and balanced flavor in every donut.
  • In a separate bowl, whisk the eggs with the sugar for 1–2 minutes until pale, slightly thickened, and the sugar is barely dissolved to help create a tender, airy crumb.
    → Beating with sugar aerates the eggs and helps emulsify fats for a lighter texture; room-temperature eggs incorporate more evenly.
  • In another bowl, whisk 3/4 cup cultured buttermilk, 1/3 cup neutral oil, and 1 teaspoon pure vanilla extract until smooth and well combined.
    → The acids and fat create moisture and tenderness; oil yields a softer crumb that stays moist after baking.
  • Gently fold the wet ingredients into the dry ingredients just until the batter comes together and there are no large pockets of flour; do not overmix to avoid a dense, tunnel-filled texture.
    → Minimal mixing keeps the gluten development in check, resulting in a tender, cake-like crumb rather than a chewy one.
  • Pat the 1 cup fresh blueberries dry and toss them with about 1 teaspoon of flour, then gently fold into the batter with a spatula to coat and suspend them without bursting.
    → The flour dusting helps the berries stay dispersed rather than sinking to the bottom during baking, and gentle folding prevents color bleed.
  • If using lemon zest, grate 1 tablespoon of zest and fold it into the batter now, keeping zest away from the heat so the fragrant oils remain vibrant.
    → Zest adds bright citrus aroma and flavor, but adding it at this stage preserves the essential oils for maximum brightness.
  • Optionally, for added texture and flavor, toast 1/2 cup chopped walnuts in a small dry skillet or in the oven at 350°F (175°C) for 5–7 minutes, then cool and fold into the batter just before filling the pan.
    → Toasting deepens nutty aroma and prevents raw nut flavor; chop finely for even distribution.
  • Optionally, fold in 1/2 cup mini chocolate chips gently toward the end of mixing to avoid breaking the chips and bleeding color.
    → Mini chips distribute evenly without overwhelming blueberry color and ensure pockets of chocolate in the final dough.
  • Transfer the batter to a piping bag or a large spoon, and fill the prepared donut pan cavities about 2/3 full to give space for rising and to avoid overflow.
    → Proper filling creates the classic donut shape with a rounded top and ensures even dome formation during baking.
  • Bake in the preheated oven for 12–15 minutes, or until the donuts are set, lightly golden around the edges, and a toothpick inserted comes out with few moist crumbs.
    → This timing yields a tender, cakey crumb; begin checking at 12 minutes to prevent overbaking which would dry the donuts.
  • Allow the donuts to cool in the pan for 5–7 minutes, then transfer to a wire rack to cool completely before glazing to ensure the glaze adheres and sets properly.
    → Cooling stops carryover cooking and prevents glaze from sliding off a warm surface; a cool surface yields a smooth glaze.
  • While donuts cool, prepare the glaze by whisking 1 cup powdered sugar with 2–3 tablespoons milk and 1/2 teaspoon vanilla in a small bowl until completely smooth and free of lumps; adjust thickness with more sugar or milk as needed.
    → Sift the powdered sugar first to prevent lumps; a smooth glaze coats evenly and dries to a glossy finish on the donuts.
  • Dip the cooled donuts into the glaze, turning to coat fully, and place back on the rack to set; drizzle or spread to achieve a thin, even layer.
    → A glossy, even glaze adds sweetness and a barrier that helps preserve moisture and showcase the blueberry crumb.
  • If you prefer a dry sugar crust, roll the still-wet-glazed donuts in 1/2 cup granulated sugar mixed with 2 teaspoons ground cinnamon, and toss gently to coat.
    → The sugar-cinnamon crust adds texture and a warm aroma, while the glaze still provides sweetness and moisture beneath the crust.

Notes

These blueberry donuts are tender, light, and lightly sweet, with juicy berries in every bite. To keep them moist and airy, mix the dry ingredients and wet ingredients separately and fold together just until combined, then fold the blueberries in gently to prevent bursting and color bleed; coating the berries in a little flour helps them stay evenly distributed. If you need a gluten-free version, substitute the all-purpose flour with a 1:1 gluten-free flour blend and use gluten-free baking powder; you may need to add 1–2 tablespoons more buttermilk or milk to achieve a thick, scoopable batter and bake times may vary slightly. Donuts are best enjoyed the day they’re baked but will store well; cool completely and freeze individually for up to a month, then reheat in a 325°F (165°C) oven for 5–7 minutes. For a quick finish, glaze with a lemon-vanilla glaze (powdered sugar whisked with milk and vanilla) or dust with powdered sugar and cinnamon for a light crust. You can customize with optional add-ins like chopped walnuts or mini chocolate chips, and if using lemon zest, add it toward the end of mixing to preserve its aroma. Always use fresh leavening and properly measure your flour to avoid a dense crumb.

Tips

Tips for Perfect Baked Blueberry Donuts

  • Measure flour correctly by spooning it into the measuring cup and leveling off the top. This prevents compacted flour from making the donuts dense. If you want an even lighter crumb, you can sift the dry ingredients together before mixing.
  • Let cold ingredients come to room temperature before mixing. Eggs, buttermilk, and oil blend more smoothly when warmed, helping you achieve a tender, cohesive batter without lumps.
  • Combine the dry ingredients (flour, sugar, baking powder, baking soda, and salt) first and whisk well. This ensures even leavening and a uniform crumb throughout the donuts.
  • Coat blueberries lightly in flour (about 1 teaspoon) before folding into the batter. This helps prevent sinking and distributes the berries more evenly without color bleed.
  • When folding in blueberries and optional add-ins, do so gently to avoid breaking berries and turning the batter purple. Fold just until evenly incorporated.
  • For the lemon zest, add it last after the other wet ingredients are mixed so the essential oils don’t evaporate. This keeps the bright citrus aroma intact.
  • Fill the donut cavities about two-thirds to three-quarters full. This allows the donuts to rise without overflowing and helps achieve a nice domed top.
  • Prepare your donut pan properly: thoroughly grease with a neutral oil or nonstick spray designed for baked goods, then dust with a little flour or use a silicone brush to ensure easy release.
  • Don’t overbake. Start checking for doneness around the minimum time with a toothpick inserted into a donut coming out with a few moist crumbs. If it’s clean or with a few crumbs, they’re done. Overbaking dries them out.
  • If using frozen blueberries, do not thaw before adding if possible; fold them in still frozen but be mindful that they may bleed color slightly. You may want to bake a minute or two longer and watch carefully for doneness.
  • Glaze tips: sift powdered sugar before adding liquid to avoid lumps. Start with 2 tablespoons of milk and add more as needed to reach a pourable but slightly thick consistency. For a lemon glaze, substitute a portion of the milk with fresh lemon juice.
  • Let the donuts cool on a rack before glazing or topping. This prevents the glaze from sliding off and ensures a smooth finish.
  • For the glaze to set nicely, allow the donuts to rest uncovered for a few minutes after glazing. A light crust will form, making the finish more stable for stacking or storage.
  • Storage: keep baked donuts in an airtight container at room temperature for up to 2 days, or freeze after cooling for longer storage. If freezing, place on a sheet pan to freeze individually, then transfer to a bag to prevent sticking.
  • Flavor variations: to intensify blueberry flavor, add a touch more zest or a splash of vanilla extract. If you’re adding walnuts, lightly toast them (5–7 minutes at 350°F / 175°C) to deepen their flavor before chopping and folding in.
  • When using the optional cinnamon sugar topping, brush the cooled donuts with a little melted butter to help the coating adhere and form a delicate crust.

FAQ

What ingredients do I need for Baked Blueberry Donuts?

For standard donuts (about 6–9, depending on pan):

  • 2 cups all-purpose flour (you can substitute 1½ cups whole wheat flour for a nuttier texture)
  • ½ cup granulated sugar
  • 2 teaspoons baking powder
  • ½ teaspoon baking soda
  • ½ teaspoon salt
  • 1 cup milk (dairy) or dairy-free milk
  • ⅓ cup neutral oil (such as canola) or melted light coconut oil
  • 1 large egg
  • 1 teaspoon vanilla extract
  • 1 cup blueberries (fresh) or ¾ cup frozen blueberries, do not thaw
  • Optional: zest of 1 lemon for brightness

Glaze (optional): 1 cup powdered sugar, 1–2 tablespoons milk, ½ teaspoon vanilla or lemon juice.

Can I make these dairy-free or gluten-free?

Yes. Dairy-free: use dairy-free milk (almond, soy, oat) and ⅓ cup neutral oil; skip any butter. Gluten-free: replace with a 1:1 gluten-free all-purpose flour blend (check that your blend includes xanthan gum or add ½ teaspoon if not). The rest of the batter stays the same. Note that some gluten-free blends behave differently, so you may need a splash more liquid to achieve the right batter consistency.

Do I need a donut pan, or can I bake these in a muffin tin?

You’ll get the classic donut shape with a donut pan. If you don’t have one, you can bake the batter in a greased muffin tin to make donut muffins. Bake at 350°F (175°C) for 18–20 minutes (check with a toothpick) until set.

What temperature and how long do I bake the donuts?

Preheat the oven to 350°F (175°C). Bake for 12–15 minutes for standard donuts, or 18–20 minutes if using a muffin tin or a thicker batter. They’re done when the edges are golden and a toothpick inserted into a center comes out clean.

How do I know when they’re done?

Check that the edges are golden brown and a toothpick inserted into the center comes out clean with a few moist crumbs. The donuts should spring back lightly to the touch; if they look pale or feel dense, give them a couple more minutes and recheck.

Can I use frozen blueberries?

Yes. Use frozen blueberries if needed, but do not thaw them. Pat dry to reduce excess moisture, and consider tossing them with a teaspoon of flour to help prevent sinking and color bleeding into the batter.

How can I keep the donuts moist and tender?

Avoid overmixing the batter—mix just until the ingredients are combined. Use oil (not butter) for moisture, and don’t overbake. If you want extra tenderness, you can substitute ¼ cup of the milk with plain yogurt or buttermilk.

What toppings or glaze pair well with baked blueberry donuts?

Glaze options:

  • Classic lemon glaze: 1 cup powdered sugar + 2 tablespoons milk + ½ teaspoon lemon juice
  • Vanilla glaze: 1 cup powdered sugar + 1–2 tablespoons milk + ½ teaspoon vanilla
  • Or simply dust with a little powdered sugar, or top with a few fresh blueberries and lemon zest
How should I store leftovers and how long do they last?

Store at room temperature in an airtight container for 1–2 days for best texture. Refrigerate up to 4 days. You can freeze baked donuts (individually wrapped) for 2–3 months. Thaw at room temperature and rewarm briefly in the microwave or oven to refresh the texture.

Can I freeze the batter or baked donuts?

Yes. You can freeze the batter (well-wrapped) for up to 1–2 months; defrost and stir before baking, adding a minute or two to bake time if needed. Baked donuts freeze well if cooled completely, then wrapped and frozen for 2–3 months. Thaw at room temperature or warm briefly before serving.

How many donuts does this yield and can I scale the recipe?

Yield depends on the pan you use. A standard 6-cavity donut pan yields about 6 donuts; a 12-cavity mini donut pan yields about 12 mini donuts. If you bake in a muffin tin, expect about 6 muffins. To scale up, double the ingredients and adjust bake time slightly (start with a couple of extra minutes) and ensure not to overcrowd the pan so heat circulates properly.

Troubleshooting: my donuts are dense, crumbly, or sinking

Common issues and fixes:

  • Dense or dry donuts: Bake time may be too long or batter too thick. Slightly increase milk or oil next time and avoid overmixing.
  • Donuts sinking in the middle: Ensure the oven is fully preheated and that your leaveners (baking powder/soda) are fresh. Do not open the oven door during the first 10 minutes of baking.
  • Color bleeding from blueberries: Pat berries dry and toss them with a little flour before adding to batter to help suspend them.
  • Very pale donuts: Either bake time is too short or oven temperature is off. Use an oven thermometer to verify 350°F (175°C).

Introduction / Hook

Picture a dessert that feels both indulgent and effortless—the kind of treat that wears its charm lightly and still leaves you with a lingering sense of celebration. Eclair Cake is that glorious paradox: a no-fuss, no-oven-needed creation that tastes like a confection born of a bakery window and a friendly kitchen counter. As you cut into it, a glossy surface catches the light, inviting you to pause, breathe in the scent of chocolate and something creamy, and imagine the moment when every forkful yields a whisper of sweetness and a sigh of satisfaction. This is the dessert you bring to a gathering and watch as it disappears, leaving behind smiles, stories, and a chorus of “one more slice, please.” Its magic lies not in complicated technique but in the alchemy of simple textures coming together—crisp edges giving way to a pale, velvety center, all crowned with a lacquered sheen that glistens like a crafted chocolate glaze. It’s comfort with a twist, tradition dressed in a modern, no-bake form, and a reminder that the best desserts often arrive with less effort than you think and more memory than you expect.

As you consider making this treat, you’ll notice how it plays with anticipation. The anticipation begins with the first layer you see—an orderly, inviting structure that hints at familiarity, then unfolds into layers that tempt the palate with contrast: a lightly firm base that yields to a creamy interior, a cool finish that lingers, and a finish that is both rich and surprisingly balanced. There’s a sense of nostalgia here—perhaps you remember a grandmother’s kitchen after a long day, or a potluck table where a similarly elegant, approachable dessert disappeared faster than the coffee was poured. Yet the experience remains distinctly contemporary: a dessert that feels grown-up enough for dinner parties, but friendly enough for weeknights when you want to treat yourself without spending hours in the kitchen. The flavors are quiet and confident—chocolate that isn’t cloying, a creamy element that never becomes heavy, and a finish that feels glossy, smooth, and utterly inviting. It’s the kind of dish that gives you a moment of pause before the first bite, a moment to appreciate how something so simple can be so deeply satisfying.

The Story Behind the Dish

Origins and Evolution

The word “eclair” evokes a French pastry that is elegant, elongated, and filled with a light, custard-like center, finished with a glossy chocolate coat. The traditional eclair is a labor of technique: puff pastry baked to airy perfection, piped with a delicate filling, and topped with a rich glaze. The American version that many of us grew up with—often called Eclair Cake—takes the essence of that dessert and translates it into a stunning, no-bake confection made for sharing. It’s a clever fusion: the sophistication of éclair flavors married to the ease of a layered cake assembled in a single pan. By reimagining the structure with layers that mimic the soft bite of a filled éclair and a final chocolate glaze that gleams like a ribbon, bakers and home cooks alike created a dessert that is universally approachable yet undeniably special.

In the mid-to-late 20th century, as kitchens grew busier and entertaining shifted toward make-ahead desserts, versions of Eclair Cake began to pop up in community cookbooks, church fundraisers, and family dessert tables. The appeal was clear: assemble ahead of time, let the layers mingle and soften, and pull out a showstopper that requires little hands-on active time. The cake’s “assembly line” nature—layer, layer, glaze—handed the baton to home cooks who wanted to deliver something with the elegance of a pastry shop without needing a pastry chef’s precision. Over the decades, creative families and cooking clubs added personal touches: a deeper chocolate finish, a hint of espresso, a sprinkle of texture on top, or a swap in the base to accommodate dietary preferences. What remains constant is the sense of a shared moment: a dessert that travels well, serves many, and carries with it a whisper of indulgence that doesn’t intimidate.

A Cultural Snapshot

While the éclair itself traces its origins to French patisserie classicism, the American adaptation captures something universal about dessert culture: the joy of layering flavors and textures to coax delight from simple ingredients. It’s emblematic of a kitchen philosophy that values memory as much as taste—the idea that a dessert can be a vessel for stories: the family picnic, the school bake sale, the neighbor’s generosity during holiday gatherings. Eclair Cake sits comfortably at the crossroads of tradition and practicality, a testament to how centuries-old flavor profiles can evolve into modern, accessible confections that still feel luxurious when sliced and served on a sunlit afternoon or after a comforting weeknight meal.

Why You’ll Love This Recipe

  • No-bake brilliance: You don’t need to heat up the oven or master complex pastry techniques to achieve a dessert that feels luxurious and polished.
  • Make-ahead practicality: This dessert benefits from a little time in the chill chamber, giving you room to plan and still deliver something memorable.
  • Crowd-pleasing charm: The layers, the light creaminess, and the glossy finish appeal to a wide range of tastes, making it an ideal showpiece for entertaining.
  • Texture magic: A contrast-driven dessert that combines a gentle snap or crispness at the edges with a silky, almost cloud-like interior, finished with a lush, glossy top.
  • Adaptable to preferences: The concept translates across dietary needs with widely adaptable base textures and finishes—without compromising the overall experience.
  • Retro appeal with modern ease: It channels a nostalgic vibe while remaining practical for today’s schedules, gatherings, and sharing culture.
  • Kid-friendly and indulgent in balance: It provides that celebratory treat without feeling overly heavy, making it perfect for family occasions.

Flavor Profile & Texture

This dessert is a study in balance. The top layer offers a lacquered sheen that speaks of chocolate richness without heaviness, a surface that yields to the fork with a soft resistance, inviting the first bite. Underneath, the interior presents a contrast that keeps every slice interesting: a creamy, smooth middle that glides on the tongue, tempered by a gentler sweetness that never overwhelms. The base, depending on how you assemble it, can deliver a light, biscuit-like crunch or a more tender, compact bite. The overall flavor is familiar and comforting—think signals of chocolate and vanilla in a rounded, dessert-dish harmony—yet the exact composition feels refined, polished, and almost revelatory in how approachable it is to replicate at home.

Chemistry aside, texture is king here. The crispness of the base or the slight bite of the layer beneath adds structure, preventing the dessert from feeling overly soft or cloying. The center’s airiness is a reminder of classic custard-like desserts, but with a cooling, shoulder-of-chocolate finish that lingers pleasantly. The final gloss on top acts like a mirror to the flavors beneath: a polished, inviting surface that catches the light and invites a second, third, and fourth slice with a smile. Sensory notes include a subtle, rounded sweetness that evolves with each bite, a gentle chocolate aroma that’s never sharp, and a veil of creaminess that coats the palate without heaviness. When served slightly chilled, the dessert refrains from becoming too firm, maintaining that effortless, elegant mouthfeel that makes it suitable for serving to guests and family alike.

Think of the flavor journey as a conversation between two familiar companions: the comforting, mellow sweetness that speaks of nostalgia, and the glossy chocolate finish that makes the entire piece feel refined and celebratory. The harmony is purposeful—neither component dominates, allowing the balance to be felt with the first bite and appreciated more deeply with subsequent ones. As the layers mingle over time, the flavors meld in appealing ways: the creaminess becomes smoother, the chocolate finish softens into a celestial glaze, and the overall sensation is one of indulgence that doesn’t overwhelm the senses. It’s dessert storytelling in edible form: each bite reveals a little more of the character you’ve crafted, leaving you with a sense of arrival and satisfaction long after the last crumb has disappeared from the plate.

Occasions & Pairings

When to Serve This Dessert

This Eclair Cake shines in a variety of settings, from casual weeknight dinners to special-occasion gatherings. It’s perfect for potlucks where you want something that travels well, looks impressive on the dessert table, and can be prepared ahead of time. It also fits nicely into holiday menus as a lighter, crowd-pleasing finale that requires minimal last-minute fuss. For birthdays or celebratory moments, it offers a nostalgic, accessible elegance that both adults and younger guests appreciate. And because it’s inherently shareable, it’s a natural choice for family reunions, church suppers, and neighborhood get-togethers where the focus is on connection as much as on taste.

Suggested Pairings

Pair this dessert with beverages and accompaniments that enhance its flavors without competing with them. A simple cup of coffee or a mild tea provides a warm counterpoint that rounds out the chocolate and cream. For gatherings, a light, sparkling beverage can refresh the palate between slices. Fresh berries or a light fruit compote can add a bright counterpoint if you want a contrasting note on the plate. If you’re serving a more substantial dessert spread, consider a light, neutral dessert wine or a smooth, medium-bodied beverage that won’t overwhelm the dessert’s delicate balance. On the table, a dollop of softly whipped topping can provide an extra layer of creaminess for those who crave it, while citrus zests or a faint sprinkle of flaky salt can offer tiny bursts of brightness that lift the overall profile without masking the dessert’s signature harmony.

Tips, Variations & Substitutions

  • Texture experiments: Depending on your base choice, you can tailor the final mouthfeel. A crisper base yields a more pronounced bite, while a softer base creates a more unified, melt-in-your-mouth experience. Consider how the base interacts with the creamy interior and adjust accordingly for your preferred balance.
  • Vegan and dairy-free options: The concept translates well to dairy-free or vegan adaptations by swapping the base materials and the finishing glaze with plant-based equivalents. The key is to maintain the contrast between a structured base, a smooth center, and a glossy top while preserving the overall sweetness and mouthfeel.
  • Gluten considerations: If gluten is a concern, explore base options that provide a similar texture and crunch without gluten-containing components. The goal is to keep the dessert’s architecture intact while accommodating dietary needs.
  • Flavor twists: You can introduce subtle accents that echo traditional éclair flavors without adding complexity. A hint of coffee, a touch of vanilla, or a dash of almond can deepen the profile. Use these ideas to tailor the dessert to a particular theme or season without altering the core concept.
  • Seasonal variations: For a warm-weather twist, consider a lighter, fruit-forward topping or a citrus-inflected finish. In cooler months, a richer, darker glaze can amplify the dessert’s comforting vibe.
  • Make-ahead strategies: Assemble and refrigerate the dessert well in advance of serving. The chilling not only helps the layers meld but also improves sliceability. If you’re tight on time, you can prepare components a day ahead and complete assembly the day of serving.
  • Serving presentation: Think about the display. A neatly leveled top and clean, even slices make a striking table presentation. Dusting with a light decorative finish or cutting the dessert with a hot knife can yield pristine, restaurant-like slices.

Storage & Make-Ahead Ideas

The beauty of this dessert is that it’s designed for make-ahead success. Once assembled, it benefits from resting in the refrigerator, where the layers have a chance to harmonize and the texture becomes more cohesive. For best results, cover it loosely to protect the surface from drying and to prevent it from absorbing odors from other foods. When stored properly, the dessert typically maintains its texture and flavor for several days, which makes it ideal for events that require advance preparation. If you need to freeze a version for longer-term storage, approach with care: ensure the surface is protected from ice crystals and that the texture remains pleasant after thawing. While freezing can alter the exact mouthfeel, many people still enjoy the dessert after a well-managed freeze-thaw cycle, especially when it’s allowed to come to a comfortable, cool serving temperature before slicing.

Make-ahead strategies can also help when you’re feeding a crowd. You can portion the dessert into a tray or pan, label slices by day, and keep it chilled until time to serve. If you want to add a dramatic reveal for guests, you can add a final, polished finish just before serving—lightly warmed chocolate or a fresh gloss—so the top gleams anew as you cut the first slice. For holiday menus or family celebrations, consider preparing a few seasonal garnishes that complement the dessert’s texture and balance. A gentle sprinkle of something texturally interesting on top—such as a hint of crunch, a fine dusting, or a contrasting color—can elevate the presentation and make the experience feel extra special without complicating the recipe itself.

Fun Facts & Trivia (Optional)

Did you know that the allure of layered, no-bake desserts has roots in a long tradition of convenience-foods that emerged as home cooks sought to maximize flavor with minimal time in the kitchen? The idea behind Eclair Cake embodies a pantry-friendly magic: take a few reliable, everyday components, arrange them with care, and allow them to mingle in a cool, quiet setting. The result is a dessert that feels luxurious, yet remains approachable for bakers of all skill levels. The glossy top, reminiscent of the classic éclair glaze, is often the final touch that makes this dessert feel like a bakery creation in a home kitchen. And because the layers absorb flavors as they rest, patience truly pays off—an elegant reminder that good desserts aren’t merely about immediate impact but about the evolving harmony that unfolds as the dish sits and settles.

Historically, potlucks and community gatherings across many cultures have favored dishes that can be prepared in advance and shared in generous portions. Eclair Cake exemplifies that ethos: a recipe that travels well, stays a crowd favorite, and offers a sense of celebration with minimal last-minute effort. Its enduring popularity speaks to how kitchens across generations have embraced the idea that dessert can be both simple and spectacular—a sweet moment that brings people together without demanding a chef’s touch.

In the end, what makes Eclair Cake so enduring is its ability to feel timeless and fresh at once. It nods to classic pâtisserie while inviting home cooks to make it their own. It rewards patience, celebrates sharing, and delivers a final plate that invites compliments, memories, and perhaps the best part of any dessert: the conversation that begins as the first slice meets the mouth and continues long after the last bite is gone.

Ingredients

Graham Crackers & Cream Filling

  • – Graham crackers (plain, original) 2 boxes
    → Base layers: aim for whole sheets to create a smooth, uniform surface. Arrange in a single layer on the bottom of a 9×13-inch pan; if needed, break crackers to fill gaps. Using standard crackers yields even soaking of the filling. For gluten-free versions, choose certified GF graham crackers and ensure no cross-contamination.
  • – Instant vanilla pudding mix (two 3.4 oz boxes)
    → Forms the creamy custard-like filling between the cracker layers. Prepare according to package instructions using 4 cups cold milk for both boxes combined; refrigerate the pudding until set before layering. For a lighter texture, you can fold in whipped cream after the pudding sets, but this is optional.
  • – Cold milk (4 cups)
    → Hydrates the pudding mix; use cold milk to help the pudding set faster and achieve a smoother texture. If dairy-free is required, you can substitute with almond milk or oat milk, but expect a thinner consistency. Keep milk chilled until ready to mix.
  • – Heavy cream (2 cups)
    → Whipped into soft peaks and folded into the pudding to create a rich, mousse-like filling. Chill the bowl and beaters; whip to medium peaks, then fold gently to retain volume. Do not overwhip into butter; if you do, start over with a fresh bowl.
  • – Powdered sugar (1/4 cup)
    → Sweetens the whipped cream component and helps create a balanced sweetness in the filling. Sift before adding to prevent graininess and adjust to your taste if you prefer a sweeter or lighter filling.
  • – Pure vanilla extract (1 teaspoon)
    → Enhances flavor in the whipped cream and pudding filling. Use pure vanilla for the most fragrant aroma; avoid imitation vanilla that can taste artificial when combined with chocolate glaze.

Chocolate Ganache Topping

  • – Semisweet chocolate chips (1 cup)
    → The base of the glossy, thick ganache that coats the cake. Good chocolate yields a smooth glaze; choose high-quality chips and chop any larger pieces if needed for even melting. For a darker glaze, use 60–70% cacao chips.
  • – Heavy cream (1/3 cup)
    → Melted with chocolate to make a luxuriously smooth glaze. Heat gently or melt in short bursts, then stir until completely smooth. The ratio should yield a pourable glaze that coats but does not pool excessively on top.
  • – Unsalted butter (1 tablespoon)
    → Stirred into the ganache for shine and a velvety finish. Add at the end after the ganache is smooth; it helps the glaze spread evenly and adds richness. If you prefer a vegan version, substitute with a plant-based butter substitute.

Optional Add-ins

  • – Chopped nuts (optional) 1/2 cup
    → Adds crunch and a nutty contrast to the creamy layers. Toast nuts in a dry skillet until fragrant to intensify flavor, then cool and sprinkle between layers or on top. If serving to kids, you may want to chop finer for easier bites.
  • – Whipped topping or extra whipped cream for topping (optional) 8 oz container
    → Use stabilized whipped topping for a lighter, fluffier finish or simply top with extra whipped cream for a classic look. If using regular whipped cream, whip until stiff peaks for a stable top that holds under the glaze.

Instructions

  • Line a 9×13-inch pan with a single, seamless layer of graham crackers, covering the bottom completely and pressing gently to create a flat surface.

    → This establishes a stable foundation that absorbs the filling evenly and prevents gaps that would show through in the final cake.
  • Prepare the instant vanilla pudding by whisking the two boxes with 4 cups of cold milk until the mixture thickens to a smooth custard-like consistency, then refrigerate until fully set.

    → Chilling allows the pudding to firm so it can layer cleanly and hold its shape when combined with whipped cream, avoiding a runny filling.
  • Whip the heavy cream (2 cups) to soft-to-medium peaks with an electric mixer, adding powdered sugar and pure vanilla extract during the process until the cream holds gentle peaks.

    → Whipped cream provides light volume and sweetness; beating to the correct peaks ensures it folds into the pudding without deflating.
  • Fold the whipped cream into the set pudding using a large silicone spatula, incorporating in a gentle folding motion until the mixture is pale, airy, and uniform.

    → This creates a mousse-like filling with structure, maximizing creaminess while preserving airiness for a luscious texture.
  • Spoon a generous layer of the pudding-cream filling over the first cracker base and spread it evenly with an offset spatula, reaching the edges without tearing the crackers.

    → Even coverage ensures every bite is balanced and prevents thick pockets that could cause uneven slicing or soggy patches.
  • Place a second layer of graham crackers over the filling, aligning them to cover the surface and filling any minor gaps with broken crackers as needed.

    → A second cracker layer adds the classic multilayer effect and helps modulate moisture absorption for a softer final texture.
  • Repeat the process by adding another layer of filling and then another layer of crackers, continuing until you approach the top of the pan, finishing with a final top layer of filling for a smooth surface.

    → Multiple alternating layers maximize flavor distribution and ensure the cake has a cohesive, dessert-like bite with even moisture.
  • Cover the pan and refrigerate for at least 4 hours or preferably overnight to allow the crackers to soften and the flavors to meld into a cohesive, sliceable cake.

    → The resting time lets the texture become tender and uniform, making it easier to cut neat slices and improves flavor integration.
  • Prepare the chocolate ganache by heating the heavy cream (1/3 cup) just to a simmer, then pouring it over the semisweet chocolate chips (1 cup) in a heatproof bowl and letting it sit for 1–2 minutes before whisking until completely smooth.

    → Gentle heating prevents scorching and ensures the ganache emulsifies fully, yielding a glossy, pourable glaze that coats evenly.
  • Stir in the unsalted butter (1 tablespoon) into the ganache off the heat until it is fully melted and the glaze shines, then set aside to cool slightly to a pourable but not runny consistency.

    → Butter heightens gloss and adds a slightly velvety finish; cooling prevents the glaze from sliding off the cake too quickly.
  • When the pudding cake is thoroughly chilled, pour the ganache over the top, using a spatula to spread it in a thin, even layer that drapes slightly over the edges. Let it set until glossy and firm to the touch.

    → A well-set ganache seals the top with a smooth, dessert-like finish and provides a contrasting chocolate sheen against the pale filling.
  • If using optional add-ins, sprinkle toasted chopped nuts between layers or on top after the ganache has begun to set, and gently press them into the surface for even distribution.

    → Toasting enhances nut flavor and crunch, while even distribution prevents clumps that could cause uneven bites.
  • Optionally top with stabilized whipped topping or extra whipped cream for a lighter finish, piping or dolloping as desired, and refrigerate briefly to set before slicing.

    → The topping adds a classic éclair-cake look and a soft contrast to the glossy glaze, while stabilization helps it hold its shape under the ganache.
  • To serve, run a warm knife blade under hot water, wipe dry, and slice cleanly into squares, wiping the blade between cuts for neater portions.

    → A warmed knife minimizes crackling and tearing through the chilled layers, producing neat, restaurant-style portions.

Notes

These eclair cake notes guide you through layering graham crackers with a creamy vanilla filling and a glossy chocolate ganache to create a classic, no-bake dessert. Start by lining a 9×13-inch pan with whole sheets of plain graham crackers in a single layer, breaking as needed to fill gaps for a smooth base. Prepare two boxes of instant vanilla pudding with 4 cups cold milk; refrigerate the pudding until set, then, if you like a lighter texture, fold in whipped cream after it firms. Whip 2 cups heavy cream with 1/4 cup powdered sugar and 1 teaspoon pure vanilla to soft or medium peaks, then fold gently into the cooled pudding to make a mousse-like filling. Layer a portion of the pudding over the cracker base, then add another layer of graham crackers, then more pudding; repeat until you reach the top, finishing with a final cracker layer. Chill the assembled cake for at least 4 hours or overnight to allow the crackers to absorb the filling and soften to a cake-like texture. For the ganache, melt 1 cup semisweet chocolate chips with 1/3 cup heavy cream in short bursts until smooth, then whisk in 1 tablespoon unsalted butter until glossy. Pour and spread the ganache over the top, letting it drip slightly over the edges for a finished look. Optional: sprinkle chopped nuts between layers or top with whipped topping for extra height and texture. If you need gluten-free options, use certified gluten-free graham crackers and ensure all mix-ins come from gluten-free sources to avoid cross-contamination. To make dairy-free versions, substitute almond or oat milk for the milk in the pudding, use a dairy-free whipped topping or coconut cream, and use a dairy-free butter substitute in the ganache. Always store leftovers in the refrigerator, tightly covered, and bring to room temperature for a creamier texture before serving.

Tips

Base layers and pan prep

  • Use whole graham crackers to create a smooth, even surface. Arrange in a single layer on the bottom of a 9×13-inch pan; if needed, break crackers to fit along the edges and fill gaps for a uniform base.
  • For gluten-free versions, choose certified GF graham crackers and ensure no cross-contamination with gluten-containing products.
  • Lightly grease or line the pan with parchment to make removing the cake easier after chilling.

Preparing the pudding and filling

  • Mix the two boxes of instant vanilla pudding with 4 cups of cold milk total. Use a whisk or mixer to blend until smooth, then refrigerate until set before layering to avoid soggy crackers.
  • For a lighter texture, fold in whipped cream after the pudding has set. This adds lift without weighing down the layers.
  • Keep the milk and glass bowl chilled while whipping to help the mixture set more firmly.

Whipped cream and folding technique

  • Whip the heavy cream with the powdered sugar and vanilla until you reach soft to medium peaks. Chill the bowl and beaters for best volume.
  • Fold the whipped cream into the set pudding gently to maintain airy texture. Do not overmix or you may deflate the cream.

Powdered sugar, vanilla, and flavor balance

  • Sift powdered sugar before adding to the whipped cream to prevent grittiness and ensure a smooth filling.
  • Use pure vanilla extract for the best aroma; avoid imitation vanilla which can taste artificial when paired with chocolate.

Ganache topping tips

  • Chop semisweet chocolate chips if they’re large to ensure even melting. For a darker glaze, use chips with 60–70% cacao.
  • Warm the heavy cream just until it’s steaming, then pour over the chopped chocolate or add the cream to the bowl and whisk until smooth. You want a pourable but not watery glaze.
  • Stir in the unsalted butter at the end after the ganache is smooth for a glossy finish. If you’re making a vegan version, use a plant-based butter substitute.

Assembly and chilling guidance

  • Layer the cake by alternating crackers and pudding, finishing with a final layer of crackers. Pour the ganache over the top and let it set before slicing.
  • Chill the cake for at least 2–4 hours, or overnight if possible, to allow the layers to meld and the ganache to firm up. Longer chilling enhances flavor and cutting cleanly.
  • To prevent soggy edges, ensure even thickness of each layer and avoid letting crackers soak too long in the pudding mixture.

Optional add-ins and toppings

  • Chopped nuts (1/2 cup) add crunch and a nutty contrast. Toast them in a dry skillet to intensify flavor, then sprinkle between layers or on top. For kids, chop nuts finer.
  • Whipped topping or extra whipped cream (8 oz) can be used for topping. Stabilized whipped topping holds up longer under the ganache; if using regular whipped cream, whip to stiff peaks for a stable top.

Make-ahead, storage, and variations

  • Store leftovers in the refrigerator, covered, for up to 2–3 days. Texture may soften as the crackers absorb more filling over time.
  • Gluten-free and dairy-free adaptations: use certified GF graham crackers, dairy-free milk for the pudding, and dairy-free butter substitutes if desired. Always check labels for cross-contamination and vegan suitability if needed.

FAQ

What is Eclair Cake?

Eclair Cake is a no-bake dessert that recreates the flavors of classic cream-filled éclairs using layers of graham crackers, a creamy pudding filling, and a glossy chocolate glaze. It’s refrigerated to set, and the flavors meld together overnight for a soft, sliceable treat.

What ingredients do I need to make Eclair Cake?

Common ingredients include:

  • Graham crackers (regular or honey) to form the layers
  • Instant vanilla pudding mix (2 boxes) with cold milk (about 4 cups)
  • Whipped topping (8 oz, thawed)
  • Chocolate glaze: semisweet chocolate chips, butter, and a little milk or cream
  • Optional flavor boosts: vanilla extract, a pinch of salt, or a teaspoon of espresso powder for mocha flavor
How do I assemble Eclair Cake?

Basic steps:

  1. Prepare pudding according to package directions using the cold milk; let it thicken.
  2. Fold in whipped topping until smooth.
  3. Spread a thin layer of pudding over the bottom layer of graham crackers, then top with another layer of crackers.
  4. Repeat the layering (pudding then crackers) until you run out, finishing with a top layer of crackers.
  5. Prepare the chocolate glaze and spread it evenly over the top layer.
  6. Refrigerate for at least 4–6 hours, preferably overnight, before slicing.
How long should I chill the cake?

Chill for at least 4–6 hours, but overnight is best. This allows the crackers to soften and the flavors to meld, making clean, sliceable pieces.

Can I make Eclair Cake ahead of time?

Yes. You can assemble up to a day before serving. Keep it covered in the refrigerator. If you expect to hold it longer than 24 hours, you may want to check the texture and top glaze before serving.

Can I customize or make variations of this cake?

Absolutely. Some popular variations:

  • Use chocolate pudding instead of vanilla for a richer flavor
  • Add a thin layer of coffee or espresso mixed into the pudding for a mocha twist
  • Swirl in lemon zest with vanilla pudding for a bright citrus note
  • Drizzle caramel or add a sprinkle of sea salt on the glaze for a salted chocolate version
  • Use dairy-free whipped topping and almond or coconut milk for a dairy-free version
Can I use different crackers or a different crust?

Graham crackers are traditional, but you can experiment with vanilla wafers or gluten-free crackers. Some people use a buttered shortbread crust for a richer base, though this changes the texture and flavor slightly. If you switch to a crust, adjust the layering so the crackers don’t crumble.

How should I store leftovers?

Keep Eclair Cake refrigerated in an airtight container or tightly covered. It will stay good for 2–4 days; the texture will continue to soften as it sits, which some people prefer.

Can I freeze Eclair Cake?

Freezing is not ideal for texture, especially for the top chocolate glaze and the crust. If you must, freeze unfrosted slices individually and glaze after thawing in the refrigerator, but expect some texture changes.

How do I make the chocolate glaze shine and set well?

Tips for a glossy glaze:

  • Gently melt chocolate with butter and a splash of milk or cream; stir until smooth
  • Avoid overheating the chocolate to prevent seizing
  • If the glaze is too thick, whisk in a teaspoon of milk at a time until you reach a pourable consistency
  • Spread while warm for a smooth, even finish; refrigerate to set

Introduction / Hook

Imagine a stack of pancakes that smells like autumn mornings—a warm, inviting chorus of caramelized apple sweetness, whispering cinnamon, and a gentle tang from creamy yogurt baked into the fluffy crumb. This Apple Yogurt Pancakes recipe is more than breakfast; it’s a gentle invitation to pause the rush of the day and savor sunshine on a plate. Each bite delivers a delicate balance: the tender, almost cloud-like interior, the crisp edges that yield to a soft, yielding center, and the bright orchard fragrance that lingers as you reach for another bite. The aroma alone can turn a sleepy kitchen into a welcoming café, where sleepy eyes brighten, a mug of coffee finds its soulmate, and little hands cheer for a breakfast that feels special without demanding a marathon of effort. These pancakes are the kind of dish that makes weekend mornings feel like a celebration and weekday mornings feel a little kinder. They’re versatility incarnate: comforting enough to be a cozy family staple yet refined enough to impress guests with minimal fuss. And because yogurt helps keep the batter tender and the flavors balanced, you’ll taste something wholesome and honest with every mouthful—a little tang, a lot of warmth, and the bright fruitiness of apples that tastes of orchard hikes and sunlit days gone by.

As you breathe in the aroma, you’ll notice a whisper of vanilla, a hint of citrus zest if you choose to add it, and the soft sweetness of the apples slowly caramelizing in the pan. The yogurt’s gentle tang acts as a counterpoint to the natural sweetness of the fruit, so each bite lands with a comforting, well-rounded flavor. This isn’t about masking ingredients with heavy syrups or overly sweet glazes; it’s about letting simple, high-quality components do the work. The result is a pancake that stays tender even after cooling, a stack that invites you to drizzle maple, spoon a dollop of yogurt, or fold in a handful of chopped apples for extra texture. It’s the kind of recipe that makes your kitchen feel like a home: unpretentious, warmly scented, and absolutely satisfying from the first bite to the last crumb.

Whether you’re feeding a sleepy family on a weekend morning, planning a leisurely brunch with friends, or simply treating yourself to a comforting weekday breakfast, these Apple Yogurt Pancakes adapt with grace. They’re forgiving, forgiving, and friendly—the kind of dish you’ll return to again and again, discovering new nuances with each variation you try. The apples add seasonal charm, the yogurt lends moisture and a subtle acidity, and the spices weave a familiar, homey aroma that makes everyone smile. If you’ve ever wished for pancakes that taste like they belong to a cozy kitchen but still feel bright and modern, you’ve found a keeper in this recipe. Read on to discover the story behind the dish, why it shines, how to enjoy it at different occasions, and the thoughtful tweaks that let you tailor it to your dietary needs or flavor preferences—all while keeping the spirit of comfort and joy intact.

The Story Behind the Dish

Food often carries echoes of seasons, places, and memories, and these Apple Yogurt Pancakes are no exception. The idea grew from two intimate threads: the universal appeal of pancakes—simple, forgiving, and endlessly comforting—and the bright, healthful glow of yogurt, which has long played a hero’s role in baking and breakfast across many cultures. The combination felt both timeless and transformative: a classic breakfast staple elevated by the tang and moisture of yogurt, plus the quintessential autumn sweetness of apples. It’s the sort of recipe that could have appeared in a sunlit kitchen in a village in the foothills of a European countryside, where families gather on crisp mornings to share the first bite of a day that promises more than ordinary possibilities. Yet it’s also entirely modern, adaptable to busy mornings, plant-based kitchens, or a lazy weekend brunch with friends.

The apples themselves whisper of harvest-time markets, orchard trips, and the gentle ritual of preparing fruit that’s deeply familiar yet always a little exciting—the moment you smell their fragrance as they caramelize in a hot skillet, you’re transported to an open-air stall, copper pans gleaming, and the knowing nod of a vendor who’s seen this scene countless times. The tang of yogurt is a reminder of civilizations that nurture animals and cultures that celebrate dairy as a daily partner in cooking. Put these threads together, and you have a dish that feels both nostalgic and fresh—something you’d serve to a crowd that includes grandparents, teenagers hungry for a weekend feast, and little ones discovering the joy of a perfectly fluffy pancake for the first time.

In many homes, Sunday mornings are the time to trade hurried breakfasts for something a little more ceremonial: a pause that invites conversation, laughter, and the slow pleasure of savoring a warm plate before the day unfolds. These Apple Yogurt Pancakes are designed to fit into that rhythm—they’re not fussy, but they offer a moment of delight that makes the rest of the morning feel lighter and more joyful. It’s easy to imagine a family gathering around a sun-dappled kitchen table, the plate stacks growing as the air fills with cinnamon, vanilla, and the irresistible scent of apples in a buttery crust. The dish also nods to the global pantry: yogurt from dairy-rich regions, apples from orchards that could be anywhere from the Pacific Northwest to Central Europe, a dash of spice that evokes far-flung markets. It’s this blend of comfort and curiosity that makes the dish feel timeless, while still being wonderfully practical for modern cooks who crave something special without complicating their routine.

Beyond family affection and nostalgia, the dish is a quiet celebration of textures and balance. The batter comes together with gentle whisking, the apples are invited to mingle with the batter’s moisture, and the pan does the rest—creating edges that offer a satisfying crisp and interiors that stay tender. It’s a reminder that the simplest ingredients, treated with a touch of care, can yield something that feels indulgent without being heavy. The apples lend a natural sweetness and a slight crunch, while the yogurt ensures the crumb remains peachy-soft, almost mousse-like in the center. Cinnamon, vanilla, and a whisper of citrus zest (if you like) tie the flavors together in a warm, inviting hug. The dish invites you to slow down, breathe in the aroma, and choose happiness in a stack of pancakes that tastes like home with a gentle modernist twist.

Why You’ll Love This Recipe

  • Naturally tender and moist: The yogurt in the batter helps keep the pancakes soft and light, even after they cool slightly.
  • Balanced sweetness: Apple sweetness, a touch of sugar, and the tang of yogurt create a harmonious flavor that doesn’t rely on cloying syrups.
  • Simple, forgiving technique: A few quick whiskes, a gentle fold, and you’re ready to cook—no complicated steps or long rests required.
  • Versatile and customizable: The base batter is a canvas for flavor and texture tweaks, making it easy to tailor to your tastes or dietary needs.
  • Comforting aroma: The kitchen fills with cinnamon, vanilla, and caramelized apples, turning breakfast into a sensory experience that feels like a warm hug.
  • Family-friendly and crowd-pleasing: A great option for weekend brunch or a relaxed weekday breakfast that feels special for everyone at the table.

Flavor Profile & Texture

The flavor journey begins with the tangy lift of yogurt, which brightens the pancake without overpowering it. This tang is then circled by familiar fall sweetness—the crisp, slightly tart bite of apples, which occasionally give a soft pop of juiciness in every bite. Cinnamon steps in as the warm, inviting note that anchors the dish in comfort, while a whisper of vanilla adds depth and a subtle perfume that lingers on the palate. If you choose to add citrus zest, the brightness of lemon or orange can lift the entire profile, making the flavors feel more expansive and awake. The apples, when diced or shaved into small pieces, introduce small pockets of sweetness and a gentle tender bite that contrasts with the soft crumb of the pancake itself.

Texture-wise, the batter relies on the yogurt to retain moisture, while a touch of leavening opens the crumb to create a light, airy interior. The surface cooks to a delicate gold, with edges that crisp and offer a faint crackle when you bite into them. Inside, the crumb remains pliant and surprisingly plush, almost cloud-like, so you’ll notice a satisfying melt as you chew. The apples lend gentle resistance, providing textural variety that keeps the mouth engaged and prevents the pancake from feeling too uniform. If you opt for a crunchier finish—by lightly browning the apples first or adding a touch of chopped nuts—you introduce an extra layer of texture that can make the dish feel more complex, yet still harmoniously integrated with the yogurt and apple base. The overall experience is a balanced duet: soft, moist, and tender at the center with a slightly caramelized, crisp edge, and a scent that envelops the room in a comforting, inviting warmth.

Occasions & Pairings

These Apple Yogurt Pancakes shine brightest when they’re the centerpiece of a leisurely brunch or a cozy weekend breakfast, but they’re adaptable enough for a quick weekday treat that still feels special. They pair beautifully with a drizzle of pure maple syrup or a dollop of whipped cream for extra indulgence, while a spoonful of yogurt folded on top can echo the batter’s tang and keep the dish feeling light. If you’re aiming for a more autumnal mood, pair with a warm cider or a spiced chai that echoes the spice notes found in the pancakes themselves. For fruit-forward lovers, a side of sautéed apples or cranberries can extend the theme and add a vivid color contrast on the plate. And for those who enjoy a savory-sweet balance, a side of crisp bacon or smoky ham can be a delightful counterpoint, though the dish is delicious on its own as a vegetarian-friendly choice.

This pancake option is equally at home on a holiday table as it is on a camera-ready social brunch, because it photographs beautifully and sounds irresistibly comforting when described. It can anchor a family breakfast with children who love to help in the kitchen, or be a quick, comforting solution for adults craving nourishment after a busy morning. The portability of a stack makes it easy to pack into a lidded container for a picnic or a lazy Sunday in the sunlit living room, paired with a glass of cold milk, a mug of tea, or a refreshing glass of sparkling water with a squeeze of citrus.

Occasions to consider:
– Weekend brunch with family or friends
– Autumn or winter mornings when you crave a homey, comforting dish
– A light, satisfying birthday breakfast
– A brunch spread with yogurt bowls, granola, and fresh fruit
– A quick, comforting weekday breakfast when time is short but flavor is not compromised

Suggested pairings:
– Maple syrup, honey, or a light drizzle of caramel
– A dollop of yogurt or whipped cream
– Fresh fruit compote or sautéed apples
– Coffee, chai, or a light milk-based beverage
– A sparkling hard cider or a glass of milk for children

Tips, Variations & Substitutions

Here are ways to tailor Apple Yogurt Pancakes to your preferences, dietary needs, or what you have on hand. Use these ideas to maintain the spirit of the dish while exploring new flavors and textures.

  • Flour and gluten-free options: Use a versatile gluten-free flour blend in place of regular flour to craft a gluten-free version that remains tender and light. If you’re avoiding gluten altogether, consider a blend designed for baking that yields a similar crumb.
  • Dairy-free and vegan adaptations: Replace dairy yogurt with a plant-based yogurt (almond, soy, coconut, or oat) and swap milk accordingly. The batter will still be tender, and the apples will provide moisture and sweetness. If you want eggs to be omitted for vegan options, use a plant-based egg replacer or a flaxseed/chia mixture to help with binding.
  • Different yogurts: Greek yogurt adds extra thick creaminess and tang; regular yogurt keeps things light and delicate. You can experiment with different varieties to accent the tang or sweetness to taste.
  • Flavors and spices: A pinch of nutmeg or a dash of cardamom can elevate the spice profile for a more sophisticated note. A splash of vanilla extract or a light zest of lemon or orange brightens the overall taste.
  • Fruit variations: If apples aren’t available, pears, peaches, or berries can work well, offering their own flavor personality while maintaining moisture in the batter.
  • Texture twists: For a crisper edge, cook pancakes a bit longer on medium heat and allow the surface to develop a golden, slightly caramelized crust. For softer edges, cook them a touch more gently and flip with care to keep their shape.
  • Sweetness controls: Sugar can be reduced if your apples are particularly sweet or if you plan to serve with a sweet syrup. A pinch of salt helps highlight the flavors and balance sweetness.
  • Make-ahead options: You can prepare the batter in advance and refrigerate it for a short period, bringing it to room temperature and giving it a gentle stir before cooking. This can help with a smoother consistency after chilling.
  • Portion control: To keep portions uniform, use a consistent ladle or a small measuring cup to portion the batter onto the griddle, allowing even cooking and a cohesive stack.

Storage & Make-Ahead Ideas

Storing and reheating are straightforward, so you can enjoy Apple Yogurt Pancakes beyond the moment they come off the skillet. Leftover pancakes can be kept in a covered container in the refrigerator for a couple of days. When reheating, a quick pass in a warm skillet or a brief rewarm in a low oven will help restore their soft interior and gentle crispness around the edges. If you love the idea of making a batch ahead for busy mornings, you can prepare the batter in advance and store it in the refrigerator for a short period, giving it a light stir before cooking. For freezing, allow the pancakes to cool completely, then stack them with parchment between layers and freeze in a freezer-safe bag or container. Reheat gently on a skillet or in a toaster oven, adding a splash of milk or water to restore moisture if needed.

To keep the apples from browning if you’re prepping in advance, you can toss them with a little lemon juice to preserve their color, or add them fresh as you cook the pancakes to maintain maximum texture and brightness. If you’re planning ahead for a brunch, consider pairing the pancake stacks with a few fruit garnishes or a small jar of compote that you can heat briefly just before serving, ensuring a fresh, vibrant finish that complements the warm, comforting pancakes.

Fun Facts & Trivia (Optional)

– Pancakes are among the oldest known forms of cooked batter, with variations found in cuisines around the world, from thick crepe-like discs to fluffy drop pancakes. The idea of using yogurt in baking has ancient roots in Mediterranean and Middle Eastern cuisines, where tangy dairy products are valued for adding moisture and balance to sweet dishes.
– Apples have a natural sweetness and moisture that makes them ideal for baking. They also bring a touch of tartness that helps balance heavier flavors, especially in breakfast pastries. Different apple varieties offer distinct textures and flavors, from crisp and tart to soft and honeyed, which can subtly influence the pancake’s final taste.
– The aroma of cinnamon is known to evoke feelings of warmth and comfort, a reason why it’s such a frequent companion to fall breakfasts. The scent alone can trigger happy memories of family gatherings, cozy kitchens, and festive celebrations.

Ingredients

Apple Yogurt Pancakes

Pancake Batter

  • 1 cup all-purpose flour (you can substitute whole wheat flour for a nuttier, denser texture)
    → Provides the structure and body for the pancakes. All-purpose flour yields a light, tender crumb, while whole wheat adds a bit of nuttiness and heft. If you’re gluten-sensitive, use a certified gluten-free blend with a binder and adjust the liquid to reach a pourable batter. Ensure dry ingredients are whisked together to distribute leaveners evenly.
  • 1 cup plain yogurt (full-fat or 2%)
    → Adds moisture and tenderness, with a subtle tang that balances sweetness. The yogurt’s acidity helps awaken the leavening agents for a lighter pancake. If using Greek yogurt, which is thicker, whisk in a splash of milk to reach a pourable consistency and avoid a dense batter. Let refrigerated yogurt come to room temperature before mixing for smoother batter.
  • 2/3 cup milk (dairy or unsweetened non-dairy)
    → Provides the extra liquid needed to loosen the batter to a pourable state. Room-temperature milk blends more evenly with the yogurt and eggs, preventing curdling. If the batter seems too thick, add a little more milk, a tablespoon at a time, until it pours easily.
  • 2 large eggs
    → Bind the batter, contribute moisture, and support structure as the pancakes cook. Use eggs at room temperature to improve emulsification and fluffiness. Beat lightly before adding to the wet ingredients to avoid dense pockets.
  • 2 tablespoons granulated sugar
    → Provides sweetness and aids browning on the hot griddle, helping to develop a golden crust. You can reduce to 1 tablespoon for a less sweet version or substitute with a drizzle of maple syrup added to the wet ingredients. If using a sugar substitute, be mindful of potential changes in browning and texture.
  • 1 teaspoon baking powder
    → Primary leavening that makes pancakes puff and light. Fresh baking powder yields the best lift. If your yogurt is particularly acidic, you can supplement with a pinch of baking soda (see next item) for extra fluff.
  • 1/2 teaspoon baking soda
    → Optional additional lift that reacts with the yogurt’s acidity to produce a lighter crumb. Use only if you’re aiming for extra fluff; omit if you’re sticking with baking powder alone. If used, reduce the amount of extra acid in other ingredients accordingly.
  • 1/4 teaspoon salt
    → Enhances overall flavor, balancing sweetness and enriching the pancake crumb. Use fine salt so it disperses evenly and doesn’t leave a gritty mouthfeel.
  • 1 teaspoon pure vanilla extract
    → Adds depth and aroma to the batter. Real vanilla provides a richer flavor; use it for better pancake complexity. Add with the wet ingredients to ensure even dispersion.
  • 1 teaspoon ground cinnamon (optional)
    → Introduces warm spice that pairs beautifully with apples. If you plan to fold apple pieces into the batter, cinnamon helps unify flavors. Omit if you prefer a plain pancake, or substitute with nutmeg or cardamom for a different spice note.
  • 1 tablespoon melted butter or neutral oil
    → Contributes moisture and tenderness while helping the pancakes release from the pan. Butter adds flavor; oil yields a lighter texture and easier flipping. Add to the wet ingredients and mix just until combined to avoid greasy pancakes from overmixing.

Apple Filling

  • 1 medium apple, peeled and finely diced (about 1 cup)
    → Provides sweet-tresh appleiness and texture within the pancake. Finely dicing ensures even cooking and distribution; choose crisp varieties like Honeycrisp or Granny Smith for a balance of sweetness and tartness. If you prefer chunky pieces, cut slightly larger but keep pieces uniform for even cooking.
  • 1 tablespoon lemon juice
    → Prevents browning of the apple pieces and adds a bright, fresh acidity that counteracts sweetness. Freshly squeezed lemon juice is best; zest can be added for extra aroma if desired.
  • 1 tablespoon brown sugar (or maple syrup)
    → Sweetens the apples and aids gentle caramelization as they cook. Brown sugar offers a hint of molasses; adjust to taste. If you prefer a cleaner apple taste, you can omit or substitute with a teaspoon of maple syrup and reduce the overall sweetness elsewhere.
  • 1/2 teaspoon ground cinnamon
    → Echoes the spice in the batter and enhances the apple flavor. For a stronger cinnamon presence, increase to 1 teaspoon. Reduce if you want a subtler flavor or if you’re serving to those sensitive to spice.
  • Pinch of salt
    → Balances sweetness and sharpens the apple’s flavor. A small pinch helps bring out the natural aromas of the apples and spices.

Toppings

  • Pure maple syrup for serving
    → Finishes the pancakes with a glossy, fragrant sweetness. Warm the syrup slightly to ensure it pours easily and coats the pancakes smoothly. Use real maple syrup for best flavor; artificial syrups will taste flat in comparison.
  • Pat of unsalted butter for serving
    → Adds richness and a creamy finish as it melts over hot pancakes. Place on top while they’re still warm to let it melt into the surface, enhancing moisture and flavor. If you’re avoiding extra fat, you can skip or use a light drizzle of maple syrup instead.
  • Powdered sugar for dusting (optional)
    → A delicate finishing touch that adds a hint of sweetness and a nice presentation. Lightly sift over the stack just before serving to prevent clumping and to keep the look neat.

Instructions

  • Whisk the dry pancake ingredients together in a large bowl: sift or whisk flour, granulated sugar, baking powder, baking soda (optional), and fine salt, plus the optional ground cinnamon, until evenly distributed.
    → Even distribution prevents clumps of leavening and salt in the batter, which ensures a uniform rise and balanced flavor in every pancake.
  • Whisk the wet ingredients separately: whisk plain yogurt (unseasoned and brought to near room temperature), milk, eggs, vanilla extract, and the melted butter or neutral oil until smooth and fully integrated.
    → Room-temperature yogurt and eggs emulsify more readily with the fats, yielding a tender crumb and preventing separation or curdling in the batter.
  • Prepare the apple filling: in a medium bowl, combine finely diced apple, lemon juice, brown sugar, ground cinnamon, and a pinch of salt; toss to coat evenly.
    → The lemon juice protects the apples from browning and brightens their flavor, while the sugar and cinnamon create a glossy, caramelized note that complements the pancake batter.
  • Combine the wet and dry ingredients: pour the wet mixture into the dry ingredients and whisk gently just until the batter comes together with a few small lumps remaining.
    → Overmixing develops gluten and leads to tougher pancakes; a few lumps keep the texture light and tender.
  • Fold in two thirds of the prepared apple filling into the batter with a spatula, distributing the apples evenly but avoiding overworking the batter.
    → Folding gently preserves the batter’s airiness for a fluffy result while embedding apple pockets for flavor and texture.
  • Let the batter rest for about 10 minutes at room temperature to hydrate the flour and relax gluten.
    → Resting helps the batter achieve a smoother consistency and improves the final tenderness as the leavening agents activate before cooking.
  • Preheat a heavy skillet or flat griddle over medium heat (approx. 325–350°F / 165–175°C) and lightly grease with a small amount of butter or neutral oil, wiping away excess to avoid greasy pancakes.
    → A properly heated, well-greased surface ensures an even crust, prevents sticking, and allows pancakes to flip cleanly.
  • Scoop about 1/4 cup of batter per pancake onto the hot surface and gently spread into a 4–5 inch circle; lightly press a few pieces of the remaining apple filling onto the surface if desired.
    → Using a consistent portion yields evenly sized pancakes that cook at the same rate; adding apple pieces on top creates visible pockets of apple flavor.
  • Cook the first side until bubbles form on the surface and the edges look set, about 2 to 3 minutes, then reduce heat slightly if they are browning too quickly.
    → Bubbles indicate the batter is setting below, while the edges firm up so the pancake releases cleanly when flipped; controlling the heat prevents scorching and ensures even cooking.
  • Flip each pancake with a wide spatula and cook the second side until golden and cooked through, roughly 1 to 2 minutes, adjusting the time for thicker pans or larger pancakes.
    → A proper flip shows a uniform golden crust; cooking through to the center ensures the eggs and yogurt are fully heated and safe to eat.
  • Transfer finished pancakes to a warm plate or a 200°F (93°C) oven to keep them warm while you finish the remaining batter, stacking them loosely.
    → Keeping warmth prevents condensation from making the tops soggy and allows you to serve a hot stack all at once.
  • While you cook the rest, finish the apple filling by sautéing the remaining seasoned apples in a small skillet over medium heat for 2 to 3 minutes to concentrate their flavor and create a glossy glaze.
    → This extra step intensifies the apple sweetness and provides a beautiful contrast of soft apples with the pancake in every bite.
  • Serve the apple yogurt pancakes in a stacked formation with a pat of butter on top and warm maple syrup, optionally dusted with powdered sugar for a delicate finish.
    → The butter melts into the hot pancakes, enriching moisture and flavor, while maple syrup adds a glossy sweetness that complements the tang of yogurt and the apple filling.

Notes

These Apple Yogurt Pancakes are light, tender, and perfumed with warm cinnamon and apple. The yogurt in the batter adds moisture and a slight tang that balances the sweetness of the apples. You can customize them by using a whole-wheat flour for a nuttier bite or a certified gluten-free flour blend if you’re gluten sensitive; you can also fold in your favorite nuts, seeds, or dried fruits for texture and flavor. They freeze well and make a great grab-and-go breakfast or snack. For an extra boost, serve with a dollop of yogurt or a drizzle of maple syrup and extra sautéed apples. Always ensure your gluten-free flour or baking powder is certified gluten-free if you have gluten intolerance.

Tips

Tips for Apple Yogurt Pancakes

Batter and mixing tips

  • Use ingredients at room temperature for a smoother, more uniform batter. Take the yogurt, milk, and eggs out about 15 minutes before mixing.
  • Whisk dry ingredients (flour, baking powder, baking soda, salt, cinnamon) together in a bowl before adding to wet ingredients to ensure even leavening.
  • Beat eggs lightly and whisk them into the wet ingredients just until combined. Overmixing can develop gluten and make pancakes tougher.
  • When using Greek yogurt, whisk in a splash of milk to achieve a pourable batter; this prevents dense pockets in the pancake.
  • Let the batter rest 5–10 minutes after mixing. This hydrates flour and helps the leaveners activate for fluffier pancakes. Do not rest too long or the batter may thicken.
  • If you want extra fluff, you can add a pinch more baking powder or a tiny bit of baking soda if your yogurt is very acidic, but adjust other acid ingredients to avoid too much tang.

Apple filling and flavor tips

  • Finely dice the apple so pieces cook evenly; consider 1/4 to 1/2 inch dices. Crisp apples like Honeycrisp or Granny Smith balance sweetness and tartness.
  • Toss the apples with lemon juice to prevent browning and brighten the flavor. A bit of lemon zest can enhance aroma.
  • Brown sugar or maple syrup helps the apples caramelize as they cook. If you prefer a lighter apple flavor, reduce sugar or omit and rely on the batter’s sweetness.
  • For a softer, saucier apple filling inside the pancake, pre-cook the diced apples with a little butter, lemon juice, and cinnamon for 2–3 minutes until just tender.
  • If you fold raw apples into the batter, ensure the pieces are evenly distributed and not overly large to avoid uneven cooking.

Cooking on the griddle or pan

  • Preheat the pan or griddle over medium heat and lightly grease with oil or butter. A well-seasoned skillet or nonstick pan helps pancakes release easily.
  • Use about 1/4 cup of batter per pancake for uniform size. If you want larger or smaller pancakes, adjust the portion.
  • Let bubbles form on the surface and the edges look set before flipping; this usually takes 2–3 minutes per side. Avoid pressing down on the pancake after flipping; this squeezes out air and makes them dense.
  • Maintain a steady medium heat; if pancakes brown too quickly, lower the heat a touch. If they stay pale, increase the heat slightly or extend cooking time a bit.
  • Keep finished pancakes warm in a 200°F (90°C) oven while cooking the rest to prevent soggy stacking and ensure even serving.

Toppings, serving, and make-ahead

  • Warm maple syrup is best for coating; you can whisk a spoonful of maple into a little yogurt for a creamy drizzle.
  • Dust with powdered sugar or serve with a dollop of yogurt or whipped cream for extra richness. A sprinkle of cinnamon on top adds aroma.
  • For a dairy-free version, serve with a plant-based yogurt or a drizzle of maple and fruit compote.
  • The batter can be mixed ahead and refrigerated for up to 24 hours; give it a quick whisk before cooking. The apples can be prepared ahead, but fresh apples taste best when used right away.
  • Leftover pancakes can be cooled, refrigerated for 2–3 days, or frozen. Reheat in a toaster or warm skillet; you can sprinkle a little water or milk to refresh the texture.

FAQ

Apple Yogurt Pancakes – FAQ

What are Apple Yogurt Pancakes?

Apple Yogurt Pancakes are fluffy morning pancakes made with yogurt for moisture and tenderness, folded with fresh apples for natural sweetness and a hint of fruitiness in every bite.

What ingredients do I need?

Common ingredients include all-purpose flour, baking powder, a pinch of salt, sugar, eggs, yogurt (regular or Greek), milk, grated or finely chopped apples, cinnamon, and a little butter or oil for the pan. Optional additions include vanilla extract or a splash of maple syrup.

Can I use Greek yogurt or dairy-free yogurt?

Yes. Greek yogurt will make the batter thicker and richer. If you prefer dairy-free, use a plant-based yogurt (like almond, soy, or coconut yogurt). You may need a splash more milk to reach a pourable batter.

Should I grate or dice the apples?

Grated apples blend into the batter for even sweetness and moisture, while diced apples add bursts of fruit in each pancake. Grate for fluffier texture; dice for more defined apple pieces.

How do I prevent the pancakes from sticking?

Preheat a nonstick skillet or lightly oiled pan over medium heat. Use a small amount of butter or oil between batches, and avoid overcrowding the pan to maintain even cooking.

What temperature and how long do I cook them?

Cook on medium heat. Heat the pan until a drop of batter sizzles, then cook each side for about 2–3 minutes, or until golden brown and cooked through. Adjust time if your apples are very juicy or if your batter is thicker.

How do I store leftovers?

Store cooled pancakes in an airtight container in the refrigerator for up to 2–3 days. You can stack them with parchment between layers to prevent sticking. Reheat gently in a skillet, toaster, or microwave.

Can I freeze the pancakes?

Yes. Layer cooled pancakes with parchment or wax paper and place in a freezer-safe bag. They keep well for up to 1–2 months. Reheat in a skillet or toaster until warm.

How can I customize the flavor?

Try adding vanilla extract, a pinch of nutmeg, or a dash of cinnamon to the batter. Chopped walnuts or pecans add crunch, and a drizzle of maple syrup pairs nicely with the apples.

Is this recipe dairy-free or vegan?

To make it vegan, use a plant-based yogurt and a non-dairy milk (such as almond or oat milk). Use a neutral oil or melted dairy-free butter substitute instead of butter for the pan.