Introduction / Hook
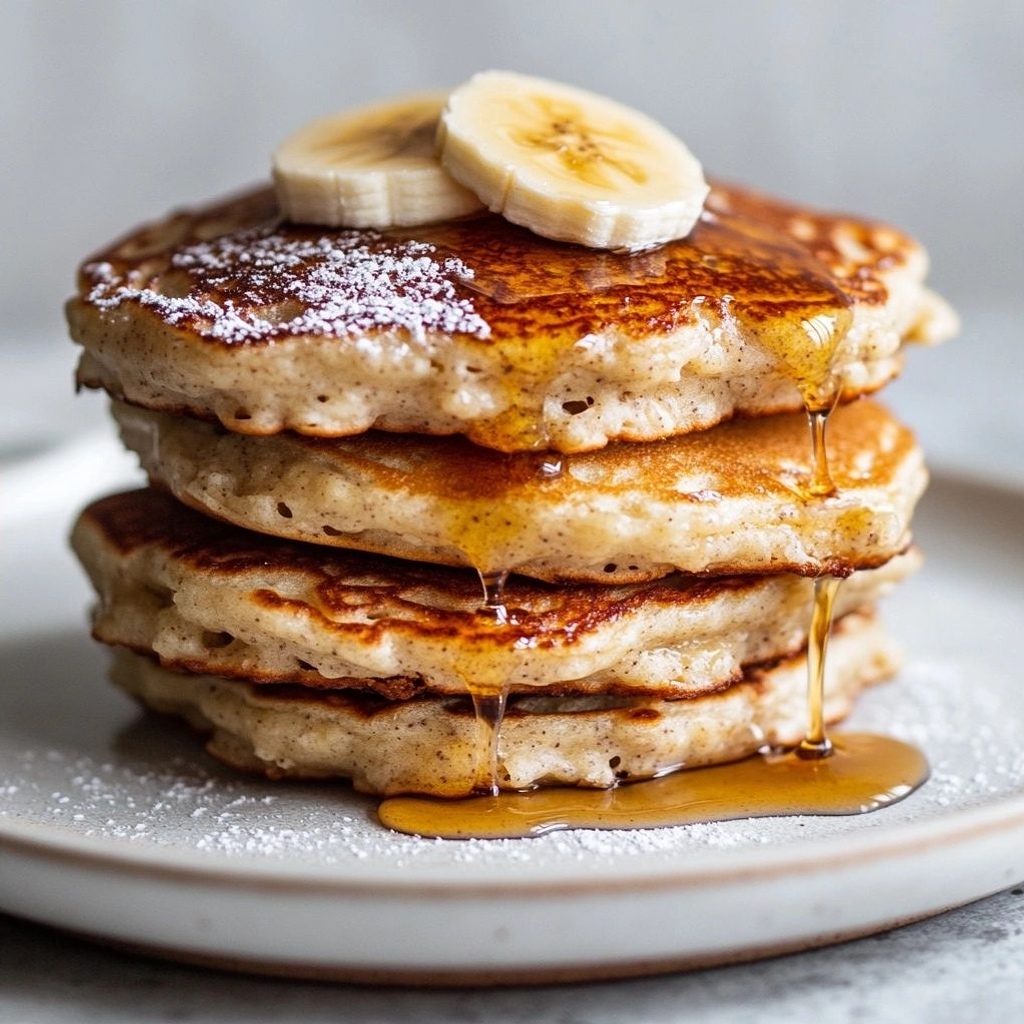
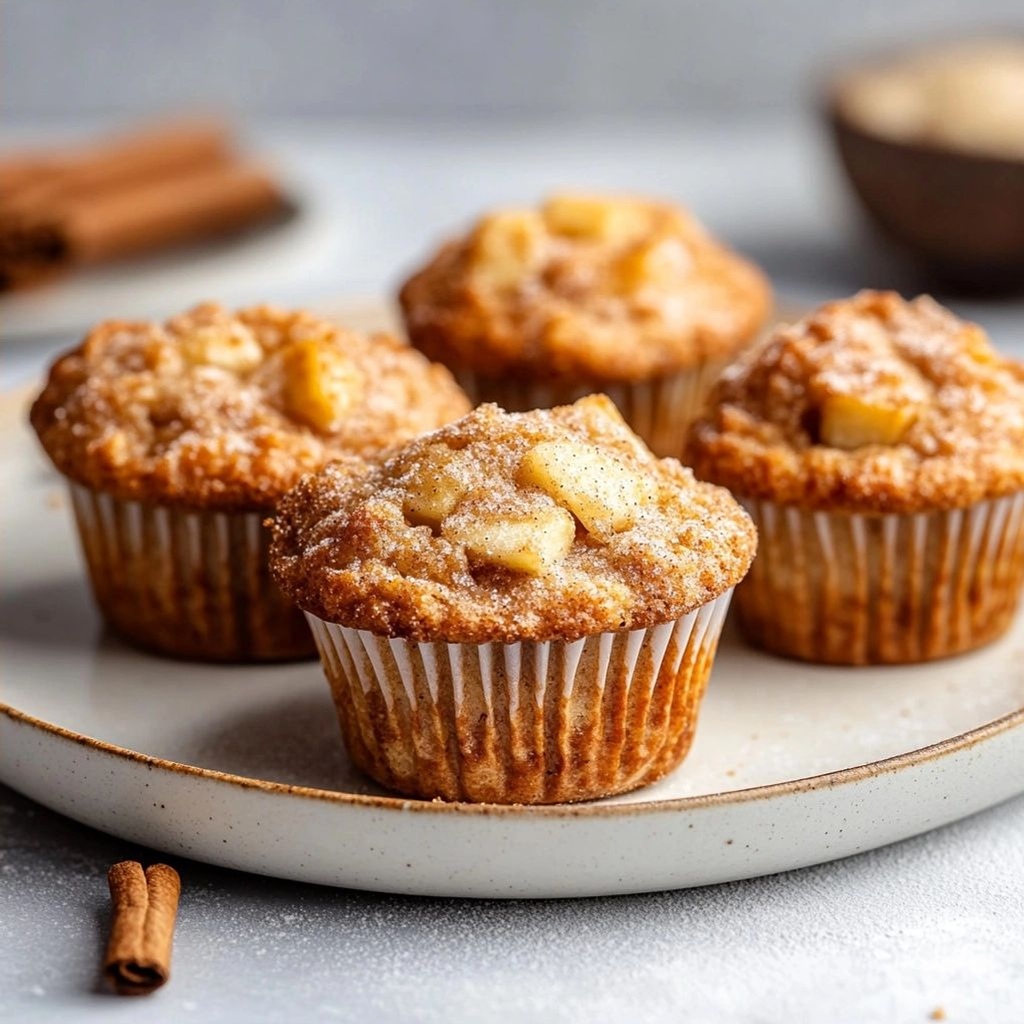
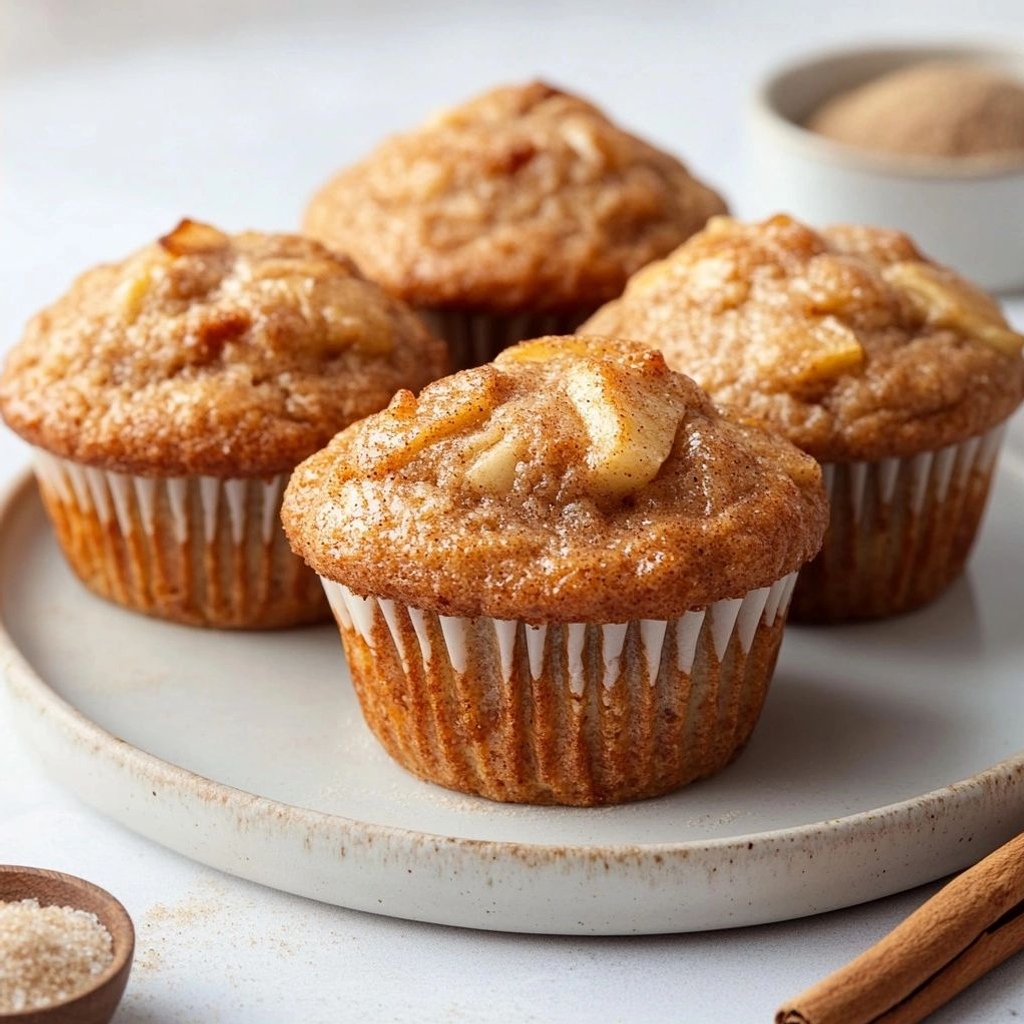
There’s something impossibly comforting about the scent of apples and cinnamon drifting through a quiet kitchen on a weekend morning. The moment you lift the lid on a batch of Apple Cinnamon Muffins, you’re transported to a sunlit orchard, a cozy bakeshop, and the first bite that tastes like warm memories. These muffins strike a perfect balance between tart apple brightness and sweet, tender crumb, with a vanilla-spiked aroma that hugs you from the moment you peel back the paper wrappers. They’re the kind of treat that makes ordinary mornings feel special, and they’re equally at home alongside a mug of coffee, a cooling glass of milk, or a drizzle of maple syrup. In short: they’re the kind of muffins you’ll bake again and again, long after the first crumb has vanished.
The Story Behind the Dish
Apple cinnamon is one of those timeless flavor combinations that feels both universal and deeply personal. For generations, families have gathered around a warm oven during harvest season, sharing stories while bits of apple browning and the kitchen filling with spice. The pairing of apples and cinnamon appears in some of the oldest baking traditions—think apple pies with cinnamon-sugar crusts, or skillet cakes perfumed with ground bark and sweet fruit. Muffins, as a modern, grab-and-go iteration, bring that heritage into a more casual daily ritual. They’re a nod to the way comfort foods evolve: from rustic batches baked in cast-iron skillets to convenient, perfectly portable morsels you can tuck into lunch boxes or savor with a mid-afternoon tea. This recipe honors that lineage—simple, sturdy, and wonderfully adaptable—while giving you a canvas for your own tweaks and memories.
Why You’ll Love This Recipe
- Quick and approachable: A straightforward mixing method means you’ll have freshly baked muffins in under an hour, with minimal equipment and maximum aroma.
- Moist, flavorful crumb: The apples provide natural sweetness and moisture, while cinnamon delivers warmth and depth without overpowering the fruit.
- Versatile sweetness: Balanced enough to be enjoyed for breakfast, snacking, or a comforting dessert, with room to tailor sweetness to your taste.
- Kid-friendly and crowd-pleasing: Familiar flavors that appeal to both children and adults, making them ideal for school lunchboxes, brunch spreads, or potlucks.
- Customizable: Easily adaptable to dietary needs or pantry staples—swap dairy, experiment with nuts, or add a twist of citrus for brightness.
Flavor Profile & Texture
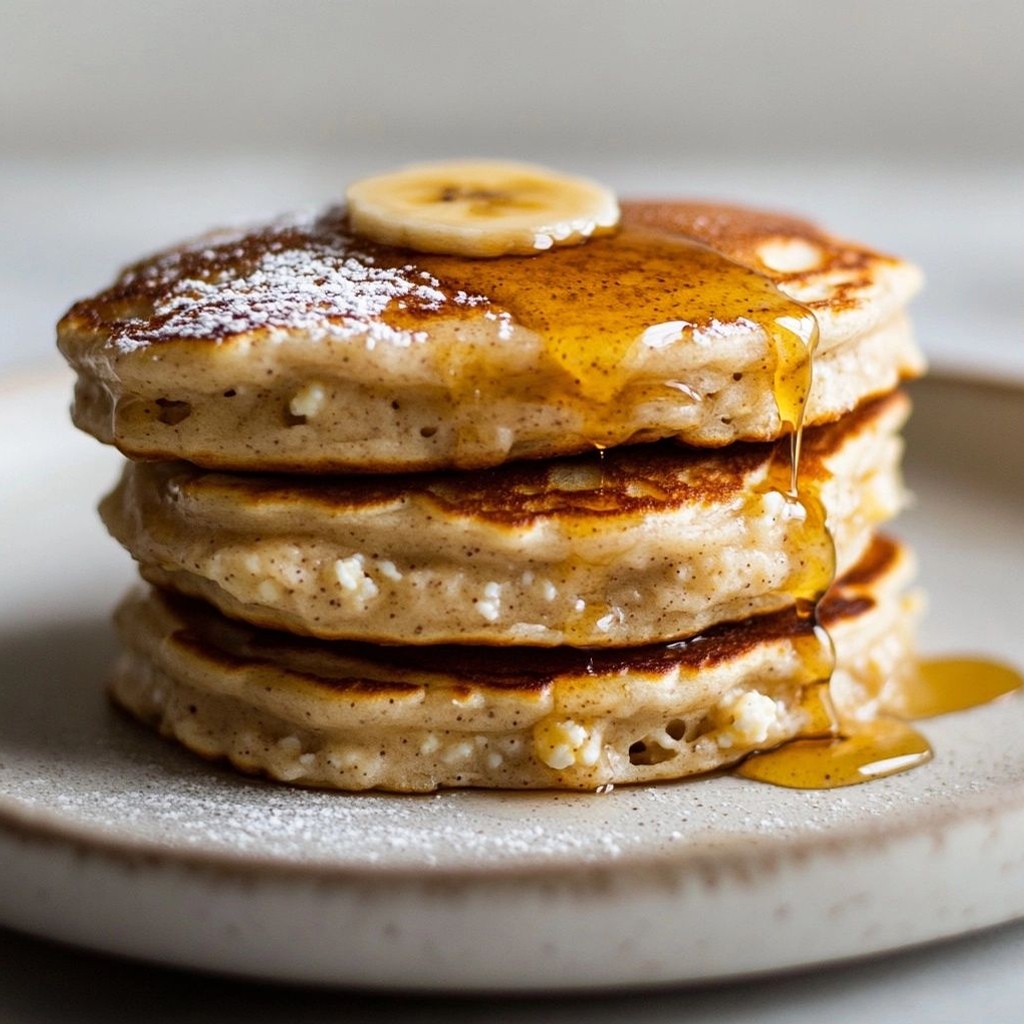
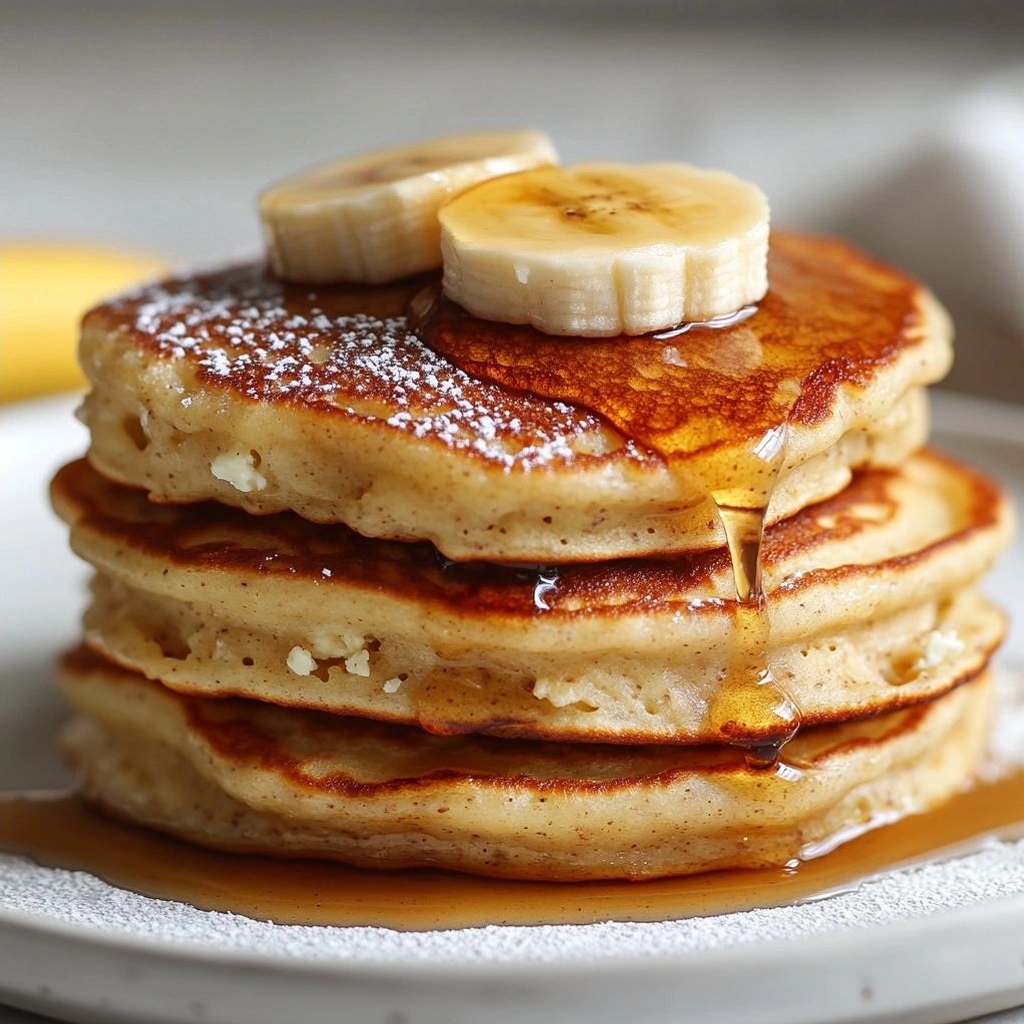
The first inhale delivers a gentle perfume of cinnamon and vanilla, mingling with the sweet acidity of apples. When you bite in, you’re met with a tender, moist crumb that barely melts in your mouth. The apple pieces offer pockets of juiciness that burst with each chew, while the cinnamon lingers in the background like a familiar, comforting embrace. A light, slightly crisp top—often a result of a dusting of sugar before baking—gives way to a soft center that remains moist even after cooling. If you choose to include a crunchy streusel topping or a handful of toasted walnuts, you’ll introduce a delightful contrast in texture: a whisper of crunch against the soft, fluffy interior. The aroma is a harmonious chorus: warm spice, apple sweetness, and a hint of vanilla that whispers, “stay a little longer.”
Occasions & Pairings
Apple Cinnamon Muffins are wonderfully versatile, making them suitable for a range of moments:
- Weekday mornings: A comforting, grab-and-go start that pairs beautifully with coffee, black tea, or a glass of cold milk.
- Brunch menus: Serve with yogurt parfaits, a fruit salad, or a light quiche for a cohesive, comforting spread.
- Afternoon tea or coffee breaks: They’re a natural companion to a warm beverage, offering a gentle sweetness that’s not overpowering.
- Family gatherings and potlucks: Muffins travel well and make a friendly, shareable option that often disappears quickly.
- Seasonal celebrations: Their autumnal vibe makes them a natural fit for fall gatherings, harvest dinners, and Thanksgiving-related treats.
Suggested Pairings
- Drinks: hot apple cider, cinnamon-spiced coffee, vanilla chai, or a dash of almond milk.
- Side dishes: a light fruit salad with citrus zest, a simple yogurt cup, or a crisp green salad to balance the sweetness.
- Desserts: a scoop of vanilla ice cream or a dollop of whipped cream for a dessert-forward finish.
Tips, Variations & Substitutions
Here are ideas to tailor the muffins to your preferences, dietary needs, or what you have on hand:
- Flour variations: Use half whole wheat flour for a heartier crumb, or an all-purpose gluten-free blend for a gluten-free option. Ensure your blend contains a 1:1 ratio to maintain structure.
- Sweetness tweaks: If your apples are particularly tart, add a tablespoon or two of brown sugar or a touch of honey to balance. For a milder sweetness, reduce added sugar slightly and rely on the natural fruit sweetness.
- Dairy alternatives: Swap milk with almond milk, soy milk, or oat milk. Use dairy-free margarine or melted coconut oil in place of butter if needed.
- Fat and moisture: If you’re avoiding butter, melted coconut oil or a neutral oil (like canola) can work in a pinch, though the flavor will shift slightly.
- Fruit variations: Grated apple is classic, but you can use finely chopped pears or a mix of apples for a varied texture and flavor. A handful of raisins or chopped dried cranberries adds a nice fruity bite.
- Texture twists: Try a streusel topping with brown sugar, butter, and cinnamon for a crunchy crown. Add chopped walnuts, pecans, or pecan pieces for extra crunch and nutty notes.
- Spice balance: For a warmer profile, add a pinch of nutmeg, cardamom, or a dash of allspice. For brightness, a teaspoon of orange zest can lift the flavors nicely.
- Make-ahead variations: The batter can be prepared a few hours in advance and refrigerated; let it rest to come to room temperature before portioning into tins for baking, which can help the crumb set better in some kitchens.
- Vegan option: Use dairy-free butter substitute and non-dairy milk, and ensure your sweetener is vegan-friendly. The structure remains light and tender with a small amount of neutral oil to maintain moisture.
- Low-sugar version: Reduce sugar by up to one-third or use a natural sweetener like mashed ripe bananas or applesauce to maintain moisture while dialing back sweetness.
Storage & Make-Ahead Ideas
To keep muffins soft and fresh, follow these practical storage tips:
- Room temperature: Store in an airtight container at room temperature for up to 3 days. For best texture, place a paper towel in the container to absorb excess moisture and keep the muffins from getting soggy.
- Refrigeration: If you must refrigerate, wrap muffins individually and place in an airtight container to prevent them from drying out. They’ll stay good for up to 5 days, though refrigeration can dull the crumb slightly.
- Freezing: Muffins freeze well for up to 3 months. Wrap each muffin tightly in plastic wrap and place in a freezer-safe bag or container. Thaw at room temperature or warm briefly in a toaster oven to revive the texture.
- Make-ahead strategy: You can mix the dry ingredients in advance and store them in an airtight jar. When ready to bake, whisk in the wet ingredients and fold in the apples. This is especially handy for busy weekday mornings.
- Reheating tips: A quick 10-15 second zap in the microwave can brighten the flavors, but be careful not to overheat, which can make the crumb dense. A brief bake at a low temperature can also revive a slightly stale muffin with a softer crumb.
Fun Facts & Trivia (Optional)
Did you know that apples rise to the top of the “most widely grown fruit” list across many regions, and cinnamon has a long-standing history as one of the world’s oldest spices? Here are a few more tidbits that pair nicely with Apple Cinnamon Muffins:
- The term “cinnamon” comes from the Hebrew word “unknown,” but the spice itself has been cherished in ancient civilizations for its fragrance and preservative qualities, long before modern food safety and packaging.
- Apple varieties vary widely in sweetness and texture, which means the same muffin recipe can yield subtly different experiences depending on whether you use a firm, tart Granny Smith, a sweet Fuji, or a crisp Honeycrisp.
- In many cultures, apples and spice marked the transition from late summer to autumn—a signal that harvest season was in full swing and kitchens would soon be filled with breads, pies, and muffins that showcased seasonal produce.
- Vanilla, often used to flavor baked goods, originates from orchids of the genus Vanilla, with real vanilla extracts derived from beans that take meticulous processing. It’s the gentle, aromatic note that lifts the apples and cinnamon without overpowering them.
- Some bakers like to finish muffins with a dusting of coarse raw sugar before baking to create a brief, caramelized sparkle on top, which adds a light crunch and a visually appealing finish.
Conclusion / Call to Action
Apple Cinnamon Muffins are more than a recipe; they’re an invitation to slow down, savor a comforting moment, and share sweetness with the people you care about. They offer the warmth of fall in every bite and the versatility to suit many dietary needs and occasions. Whether you’re stacking a dozen for a family breakfast, packing a couple for a busy workday, or simply treating yourself to a cozy kitchen moment, these muffins deliver a dependable, delicious experience every time. So preheat the oven, grab a crisp apple, and let the scent of cinnamon and baking batter fill your home—the kind of aroma that makes you smile before you even take a bite.
Ingredients
Muffin Base
- 2 cups all-purpose flour
→ This forms the structure of the muffins. It provides the starches that trap air and give the crumb its body. If using whole wheat or a gluten-free blend, expect a denser texture; adjust by adding a little extra liquid if needed. Sift or whisk to aerate and distribute evenly with the leaveners for a light, even rise. - 1/2 cup granulated sugar
→ Adds sweetness and helps tenderize the crumb by interfering slightly with gluten formation. If you prefer a lighter sweetness, you can reduce to 1/3 cup. For a more pronounced caramel note, you can use a portion of brown sugar in addition to the granulated sugar. - 2 teaspoons baking powder
→ The primary leavening agent that causes the muffins to rise and become fluffy. Make sure it’s fresh for best lift. Do not overmix after adding the wet ingredients; this can deflate the batter and result in a tougher crumb. - 1/2 teaspoon baking soda
→ Provides additional lift and helps with browning when paired with an acidic ingredient like dairy (milk) or lemon juice from the apples. If your apples are very tart or you use yogurt, this will enhance the rise. Dissolve evenly by whisking with the flour mixture. - 1/2 teaspoon salt
→ Enhances flavor and tightens the crumb by strengthening gluten slightly. It also balances the sweetness and helps the cinnamon and apples pop. Use fine salt for even distribution. - 1/2 teaspoon ground cinnamon
→ Gives classic apple-cinnamon aroma and warmth. For a more pronounced spice, you can increase to 3/4 teaspoon, or add a pinch of ground nutmeg or allspice. Sifting with the dry ingredients ensures even spice distribution in every bite. - 1/4 teaspoon ground nutmeg (optional)
→ Subtle warmth that pairs well with apples. If using, add to the dry mix so it’s evenly dispersed. Do not overdo it; a little goes a long way. - 1 cup milk (d dairy) or plant-based milk
→ Provides the necessary liquid to hydrate the dry ingredients and activate the leaveners. Dairy milk contributes a bit more richness; plant milks (almond, soy, oat) can be used for dairy-free versions. If using a non-dairy milk with low fat, consider adding a bit of extra melted butter or oil for tenderness. - 2 large eggs, room temperature
→ Bind the batter and contribute to structure and moisture. Room-temperature eggs blend more smoothly into the batter, leading to a uniform crumb. For a richer flavor, you can whisk them with the milk before combining with dry ingredients. - 1/3 cup unsalted butter, melted and cooled OR 1/3 cup neutral oil
→ Adds tenderness and moisture. Butter brings flavor; oil yields a moister, more forgiving crumb. If using butter, ensure it is fully cooled before mixing to prevent cooking the eggs. Substituting with oil will generally keep muffins softer and increase shelf life. - 1 teaspoon vanilla extract
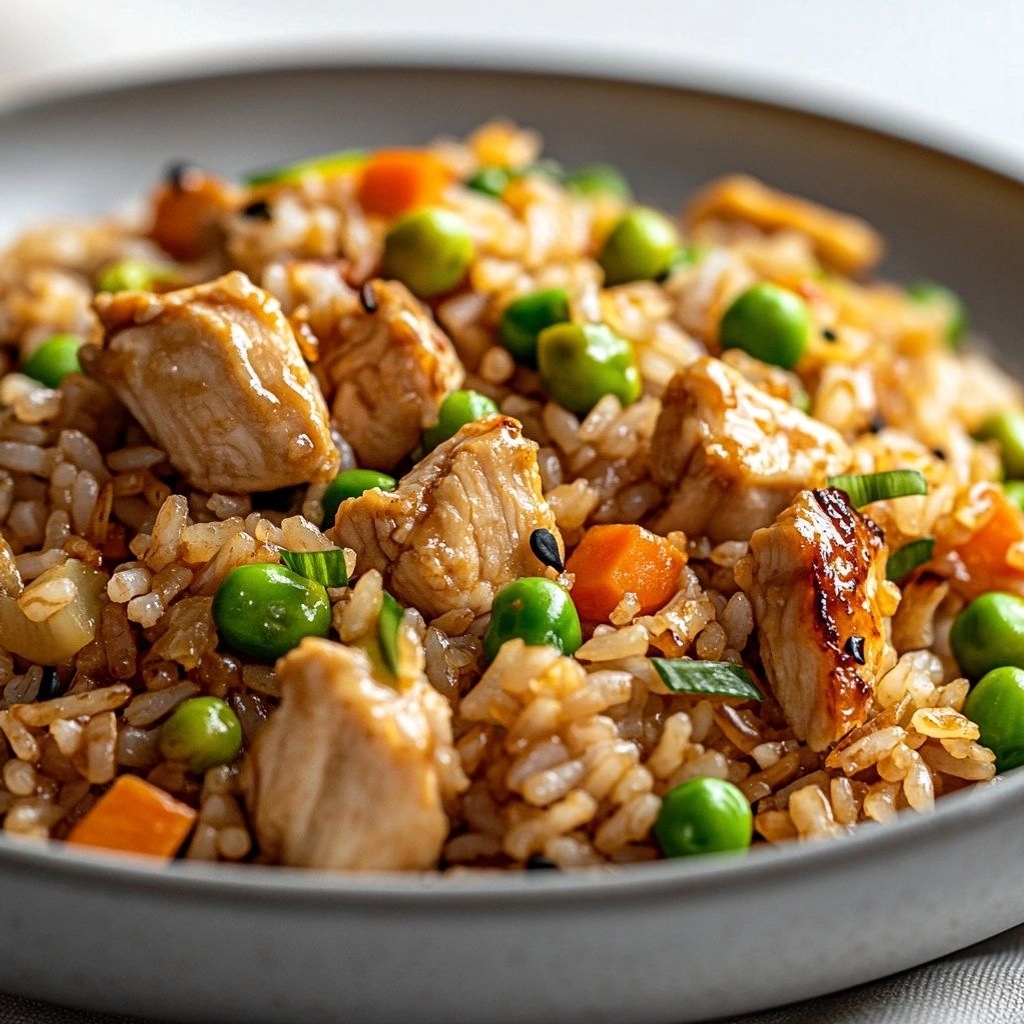
→ Enhances overall flavor and deepens the sweetness. Use pure vanilla extract for best aroma; if you have vanilla bean paste or seeds, they can intensify the vanilla flavor without adding more liquid. - 1 cup finely diced apples (about 1 medium apple), tossed with 1 teaspoon lemon juice
→ The apples provide moisture, sweetness, and contrasting texture. Tossing with lemon juice helps prevent browning and adds a hint of brightness. Use firm, but not underripe apples (like Honeycrisp or Gala) for a crisp bite that holds up during baking.
Optional Add-ins
- 1/2 cup chopped walnuts (optional)
→ Adds nuttiness and crunch. Chop walnuts evenly to small bite-sized pieces so they distribute well in the batter. Toasting them lightly before adding can enhance their flavor and crunch, but this step is optional. If you have a nut allergy, omit entirely and substitute with toasted oats or chocolate chunks. - 1/2 cup raisins or chopped dates (optional)
→ Provide pockets of extra sweetness and a chewy texture. If using dried fruit, consider soaking chopped dates or raisins in warm water for 10 minutes to plump them, then pat dry before folding into the batter to avoid soggy muffins. - 1/2 teaspoon ground cinnamon (additional, optional)
→ A secondary pinch of cinnamon can intensify the apple flavor in the finished muffins. If adding, mix with the dry ingredients so it distributes evenly throughout the batter.
Instructions
- Preheat your oven to 350°F (175°C) and line a 12-c cup muffin tin with paper liners or grease it well.
→ This ensures the muffins do not stick to the tin and makes them easier to remove after baking; a properly preheated oven also promotes an even rise for all cups. - Whisk the dry ingredients together: all-purpose flour, granulated sugar, baking powder, baking soda, salt, cinnamon, and nutmeg (if using).
→ Sifting or whisking aerates the flour and distributes leaveners and spices evenly so the muffins rise uniformly and maintain a balanced flavor in every bite. - In a separate bowl, whisk the wet ingredients: milk, eggs, melted cooled butter (or oil), and vanilla extract until fully combined.
→ Freshly whisked wet ingredients ensure smooth incorporation with the dry mix, prevent clumping, and help create a tender crumb with even moisture distribution. - Combine the wet and dry ingredients just until they are mostly incorporated and there are a few small streaks of flour; do not overmix.
→ Gentle mixing creates air pockets for rising while avoiding gluten overdevelopment, which would yield a dense, coarser crumb. - Gently fold in the diced apples that have been tossed with lemon juice, ensuring they are evenly distributed without overworking the batter.
→ The apples add moisture, sweetness, and texture; coating with lemon prevents browning and helps them stay distinct in the muffin crumb during baking. - If using optional add-ins, fold in the walnuts or raisins (or dates) now, distributing them evenly throughout the batter.
→ Even distribution prevents large pockets of add-ins and ensures each muffin contains a balanced bite with spice and fruit. - Divide the batter evenly among the prepared muffin cups, filling each about three-quarters full to allow room for rising.
→ This prevents overflow and promotes a domed top with a uniform crumb; overfilling causes tunneling and spillover into the pan. - Tap the filled pan firmly on the countertop once or twice to settle the batter and expel large air pockets.
→ Gentle tapping removes rough air gaps, leading to a smoother surface and even bake in the center of each muffin. - Bake in the preheated oven for 18–22 minutes, or until the tops are golden and a toothpick inserted into the center comes out clean with a few moist crumbs.
→ Oven temperatures vary; starting checks at 18 minutes prevents overbaking, while the toothpick test confirms doneness without undercooking the interiors. - Cool the muffins in the pan for 5 minutes, then transfer them to a wire rack to cool completely.
→ Resting briefly in the pan allows the structure to set and prevents them from collapsing when removed from the pan; cooling on a rack prevents condensation from softening the crust. - If desired, brush the tops with a little melted butter or a light glaze while still warm to add a touch more richness and sheen.
→ A brief glaze or butter enhances flavor, adds moisture, and creates an appealing finish without masking the apple-cinnamon character.

Notes
These Apple Cinnamon Muffins are tender, warmly spiced, and perfectly suited for breakfast or a cozy snack. To ensure a light crumb, sift or whisk the dry ingredients together, then fold the wet ingredients into them just until combined—overmixing can lead to a tougher texture. Use fresh baking powder for best lift, and consider adjusting for gluten-free or alternative flours by adding a little extra liquid if needed, as gluten-free blends can yield a denser crumb. If dairy-free, swap to plant-based milk and either a neutral oil or melted coconut oil for tenderness. The apples should be firm and finely diced (about 1/3 inch) and tossed with a bit of lemon juice to prevent browning and brighten the flavor; mix them in gently so they remain evenly distributed without sinking. Optional add-ins like chopped walnuts or raisins can add texture and sweetness—toast walnuts first for extra aroma. Bake until a toothpick comes out with a few moist crumbs for a tender interior. Let the muffins cool completely before storing; they freeze well for quick mornings. For extra depth, drizzle a little natural yogurt or almond butter, or brush with a pale glaze once cooled. Always ensure your flour and leaveners are fresh and, if needed for dietary reasons, use certified gluten-free ingredients.
Tips
Tips for Perfect Apple Cinnamon Muffins
- Measure dry ingredients by weight for the most consistent results. If you only have measuring cups, gently spoon flour into the cup and level off—don’t scoop, which can compact the flour and make the batter dense.
- Keep your butter and eggs at room temperature or comfortably cool. This helps achieve a smooth, cohesive batter and an even crumb. If your eggs are cold, gently whisk them with the milk to help emulsify.
- To maximize rise and keep muffins light, avoid overmixing once the wet ingredients are added. Stir just until you no longer see flour streaks, then fold in apples and optional mix-ins.
- Fruit prep matters: toss diced apples with a tiny bit of flour before adding to the batter to help prevent sinking and to keep them evenly distributed during baking.
- For a moister crumb, you can replace part of the milk with yogurt or sour cream (up to 1/4 cup per batch). This adds tenderness and a slight tang that pairs nicely with cinnamon.
- If using whole wheat or gluten-free flour, you may need to adjust with an extra tablespoon or two of milk. Start with 1 tablespoon at a time until the batter looks similar to the normal version—not too stiff or too loose.
- Brown sugar can add depth: substitute a portion of the granulated sugar with light brown sugar (up to 1/4 cup) for a caramel note and moister crumb.
- To boost cinnamon aroma, gently warm the milk with the cinnamon mixed in for a minute, then cool to room temperature before mixing. This blooms the spice and intensifies flavor.
- For a crisp top, fill muffin cups to just below the rim and bake at a moderate temperature. If tops brown too quickly, tent with foil halfway through baking.
- Storage: once cooled completely, store muffins in an airtight container at room temperature for 2–3 days, or freeze unfrosted muffins for up to 2 months. Rewarm gently in the microwave or a 350°F oven.
- Make-ahead tip: you can mix the dry ingredients a day ahead and refrigerate. Add the wet ingredients and apples just before baking to maintain peak leavening and texture.
Optional add-ins adjustments:
- Walnuts: toast briefly to deepen flavor, then fold in just before the final mix to maintain even distribution.
- Raisins or dates: soak briefly in hot water or orange juice to plump before adding to batter.
- Extra cinnamon: a 1/2 teaspoon additional cinnamon can be mixed with the dry ingredients if you love a stronger spice note; consider a pinch of nutmeg or allspice for warmth.
FAQ
What ingredients do I need for Apple Cinnamon Muffins?
Dry: 2 cups all-purpose flour, 1/2 cup granulated sugar, 2 teaspoons baking powder, 1/2 teaspoon baking soda, 1/2 teaspoon salt, 1 teaspoon ground cinnamon. Wet: 1 large egg, 1 cup milk (or dairy-free alternative), 1/4 cup melted butter or oil, 1 teaspoon vanilla. Fruits: 1 1/2 cups chopped apples (about 1 medium apple). Optional: 1/4 cup brown sugar for topping, 1/4 cup chopped nuts.
Can I make these muffins dairy-free or vegan?
Yes. Use a dairy-free milk (almond, soy, oat) and replace butter with a plant-based oil or melted coconut oil. For vegan, use flax egg or chia egg in place of the egg (1 tablespoon ground flax + 3 tablespoons water per egg) and ensure all other ingredients are vegan.
What apples are best for muffins?
Choose firm, tart apples like Granny Smith, Honeycrisp, or Pink Lady. They hold up well during baking and provide a nice contrast to the cinnamon-sweet batter. You can also mix a sweeter apple with a tart one for depth.
Can I make gluten-free Apple Cinnamon Muffins?
Yes. Use 2 cups gluten-free all-purpose flour blend (with xanthan gum included, or add 1/2 teaspoon xanthan gum if your blend requires it). The rest of the recipe remains the same. Note: texture may be slightly different; avoid overmixing and bake until a toothpick comes out clean.
How should I store leftover muffins?
Store at room temperature in an airtight container for up to 3 days. For longer storage, freeze muffins individually wrapped in plastic, then place in a freezer bag for up to 2–3 months. Thaw at room temperature and rewarm if desired.
Can I freeze muffin batter or baked muffins?
Yes. For batter, you can freeze the wet and dry components separately or freeze portions of batter in lined muffin tins and bake from frozen, adding a few extra minutes. For baked muffins, freeze individually and reheat in the microwave or oven until warm.
My muffins sink in the middle after baking. What went wrong?
This usually happens if the batter was overmixed, too much leavening, or the oven temperature was too low. Mix just until ingredients are combined, ensure your baking powder is fresh, and bake at the recommended 375°F (190°C) until a toothpick comes out clean. Do not open the oven door during the first 15 minutes.
Can I add nuts, oats, or other mix-ins?
Yes. Add 1/2 cup chopped walnuts or pecans, or 1/4 cup rolled oats for texture. If using nuts, fold them in with the apples so they distribute evenly.
What if I want jumbo or mini muffins?
For mini muffins, reduce bake time to about 12–15 minutes. For jumbo muffins, fill about 3/4 full and bake 28–32 minutes, checking with a toothpick. Adjust times as needed based on your oven.
What is the best bake temperature and approximate time?
Preheat to 375°F (190°C). Bake standard muffins for about 18–22 minutes, or until they are lightly golden and a toothpick inserted into the center comes out clean or with a few crumbs. Ovens vary, so start checking at 18 minutes.