Introduction / Hook
Picture a glittering New Year’s Eve table, the clink of champagne, and a platter that whispers of elegance with every delicate bite. Elegant Smoked Salmon Canapés are not just appetizers; they are a celebration in miniature, a sensory invitation that melds silky fish, airy crunch, and bright citrus—perfectly poised to kick off the festivities or close out the old year with a refined flourish. The moment you set these canapés down, the room fills with whispers of sophistication and festive anticipation. The smoked salmon’s melt-in-your-mouth texture contrasts with crisp toasts or wafer-thin crackers, while the creamy, tangy spread and aromatic dill paint a picture of coastal luxury. They’re as visually captivating as they are delicious, with a ribbon of caper, a delicate herb flourish, and a glossy sheen that says: tonight, we celebrate in style. If you’re seeking a show-stopping bite that’s effortless to assemble yet unforgettable in taste, you’ve found your go-to party starter.
The Story Behind the Dish
Smoked salmon has long held a place of honor on holiday tables and celebratory menus across many cultures. In Nordic and Baltic regions, smoking fish is both an art and a practical tradition, born from generations of seafaring kitchens where families learned to preserve bounties of the sea. The result is a flavor profile that feels timeless—rich, savory, with a delicate smoky note that never overwhelms the fish’s natural sweetness. Canapés, meanwhile, emerged as a refined way to present small, elegant bites at gatherings, from soirees to grand receptions. The combination of smoked salmon with bread or crisp crackers, a touch of creaminess, and a hint of brightness has a universal appeal because it harmonizes textures and flavors in a single, elegant mouthful. Over the years, chefs and home cooks alike have elevated this pairing by introducing artisanal toppings, citrus zest, and herbaceous accents that enhance the salmon without masking its signature character. This dish embodies that evolution—a classic foundation that invites modern, festive interpretation while honoring tradition. The New Year’s Eve setting adds a layer of meaning: as the clock strikes midnight, these canapés offer a poised, celebratory note that complements sparkling memories and future ambitions.
Why You’ll Love This Recipe
- Elegant presentation with minimal effort: Stunning on a platter, yet quick to assemble.
- Versatile base: Choose crostini, rye crisps, or delicate water crackers to suit your crowd.
- Balanced flavors: Smoky salmon, creamy spread, tangy capers, and fresh herbs create a harmonious bite.
- Make-ahead friendly: Assemble canapés ahead of time and finish with a light squeeze of lemon just before serving.
- Crowd-pleasing appeal: A refined appetizer that feels luxe without being intimidating or heavy.
- Customizable for dietary preferences: Works beautifully for gluten-free platters when paired with gluten-free crisps or cucumber rounds.
Flavor Profile & Texture
The flavor journey begins with the salmon: a delicate, slightly briny richness that speaks of pristine waters and careful smoking. The texture is luxuriously silky, yielding to a gentle bite that melts on the tongue. Layered on top is a creaminess—often sourced from a light cream cheese or a zesty, whipped dairy spread—that provides a smooth canvas to carry the salmon’s savor without overwhelming it. A touch of citrus zest or a squeeze of lemon adds brightness, a spark that cuts through the richness and lifts the entire bite. The capers contribute a tiny pop of briny contrast, offering a citrusy, vinegar-kissed note that awakens the palate. Finely minced onions or shallots can introduce a mellow sweetness and a subtle crunch, while fresh dill delivers a quintessential herbaceous aroma that pairs perfectly with seafood. The base—whether a crisp crostini, a crispbread, or a delicate cracker—offers a satisfying crunch that contrasts with the tender salmon, creating a dynamic texture that makes each bite an experience. The overall flavor is refined but never heavy, elegant yet approachable, ideal for party vibes where conversation and toasts accompany the food. The balance of salt from the salmon and capers with the creamy tang of the spread creates a chorus of notes: a whisper of smoke, a hint of citrus, a kiss of herb, and a bright finish that lingers just long enough to invite another bite.
Occasions & Pairings
These canapés are tailor-made for festive occasions and social menus that demand a touch of sophistication. They shine on New Year’s Eve as a luxe opener or late-night palate-cleanser, but they also fit beautifully into other celebrations—anniversaries, engagement parties, milestone birthdays, or a refined cocktail hour. They’re equally comfortable on a formal hors d’oeuvre table or a more casual, intimate gathering when you want to elevate the spread without adding stress to the cook’s schedule. For pairing, consider:
- Wine: A chilled sparkling rosé or a dry sparkling wine (think Prosecco or Cava) mirrors the celebration vibe, while a crisp white like Sauvignon Blanc or a dry sparkling Riesling complements the salmon’s brightness.
- Drinks: Classic cocktails with citrus notes, such as a French 75 or a light gin fizz, pair nicely without overpowering the delicate flavors.
- Side dishes: A light cucumber-dill salad or a fennel citrus slaw can echo the herbaceous notes and add a refreshing contrast.
- Desserts: Consider citrus-forward desserts or delicate pastries with berry coulis to maintain balance across the menu.
- Garnishes: Fresh dill, lemon zest twists, or a tiny sprig of fennel frond can be sprinkled on top for visual pop and aroma.
Tips, Variations & Substitutions
Here are ideas to tailor Elegant Smoked Salmon Canapés to your preferences, dietary needs, and available ingredients:
- Base variations: Use thinly sliced cucumber rounds for a gluten-free, lighter option, or drizzle white bean purée on crostini for a creamy, protein-rich foundation.
- Herb-forward versions: Swap dill for chives or tarragon to explore different aromatic profiles that pair with salmon.
- Creamy spread alternatives: Mix cream cheese with goat cheese for a tangier bite, or blend Greek yogurt with lemon juice and a pinch of pepper for a lighter option.
- Vegan adaptation: Use smoked carrot or cured mushroom slices in place of salmon, and top with a cashew-based cream or olive tapenade for a plant-based canapé with a similar visual and textural appeal.
- Gluten-free approach: Build on crisp rice crackers, gluten-free crostini, or cucumber rounds to ensure the canapés are safe for gluten-sensitive guests.
- Flavor boosters: A whisper of horseradish, a drop of Dijon mustard, or a light citrus aioli can elevate the layer without overpowering the fish.
- Regional twists: Incorporate a thin slice of avocado for creaminess, or a microplane of lemon zest and caper for an intensified briny, citrusy lift.
Storage & Make-Ahead Ideas
One of the most practical strengths of these canapés is their resilience when planned ahead. You can prepare several elements in advance and assemble close to serving time for maximum freshness. Here are some strategies to keep everything crisp, vibrant, and tasty:
- Prep the base: Toast crostini or crispbread ahead of time and store in an airtight container to maintain crunch. If you’re using crackers, keep them in their original packaging until assembly to prevent moisture exposure.
- Make the spread: Prepare the herbed cream cheese or yogurt-based spread up to a day in advance. Store covered in the refrigerator, and whisk briefly to restore creaminess before assembly.
- Smoked salmon: Keep the salmon refrigerated until you’re ready to assemble. Slice just before serving to preserve texture and appearance.
- Assemble strategically: For best texture, add the salmon and toppings just before the moment of serving. If you must pre-assemble, place a light, non-soggy barrier (like a thin layer of spread on the base) and refrigerate, then finish with a fresh squeeze of lemon and a final herb garnish right before presenting.
- Make-ahead platter: You can arrange a pre-assembled platter a few hours ahead for events if kept chilled and covered. Add citrus zest and herbs at the last minute to maintain vibrant aroma.
- Freezing: Not recommended for assembled canapés, but you can freeze the base components (like crostini) if needed and thaw briefly before use; the salmon and spreads are best fresh for texture and flavor.
Fun Facts & Trivia (Optional)
Did you know that smoked salmon is often associated with luxury due to the labor-intensive curing and smoking process? In many cultures, the act of sharing smoked salmon at a gathering is not just about the food—it’s about hospitality, storytelling, and the ritual of welcoming guests with something special. The caper garnish is more than decorative; capers offer a bright, tangy bite that cuts through richness and adds a hint of Mediterranean sunshine to the plate. Dill, beyond its fragrance, is known for its digestive properties and refreshing aroma, which makes it a natural companion to rich seafood dishes. The concept of canapés—tiny, artfully arranged bites—grew in sophistication during the early 20th century as cocktail culture blossomed. Small, elegant bites allowed hosts to offer a variety of flavors without demanding full meals, aligning perfectly with the social dynamics of high-energy celebrations and late-night toasts. In contemporary menus, these canapés often symbolize a bridge between tradition and modern culinary creativity, inviting guests to explore flavors in a single, delightful mouthful.
Make It Your Signature
While Elegant Smoked Salmon Canapés are wonderfully complete as written, they also invite your personal stamp. Consider hosting a “Canapé Night” where guests contribute toppings or variations, turning the platter into a collaborative, interactive centerpiece. You could provide a few base components and a selection of toppings—capers, lemon zest, fresh herbs, finely grated red onion, or a dollop of citrus crème—and let guests assemble their own bites. This not only adds an element of fun and conversation but also makes the presentation more dynamic and engaging. For a truly show-stopping moment, serve the canapés on a mirror-like tray with a light dusting of edible gold powder on the rim for a festive, luxury touch that captures the light and the mood of New Year’s Eve.
Visual & Sensory Experience
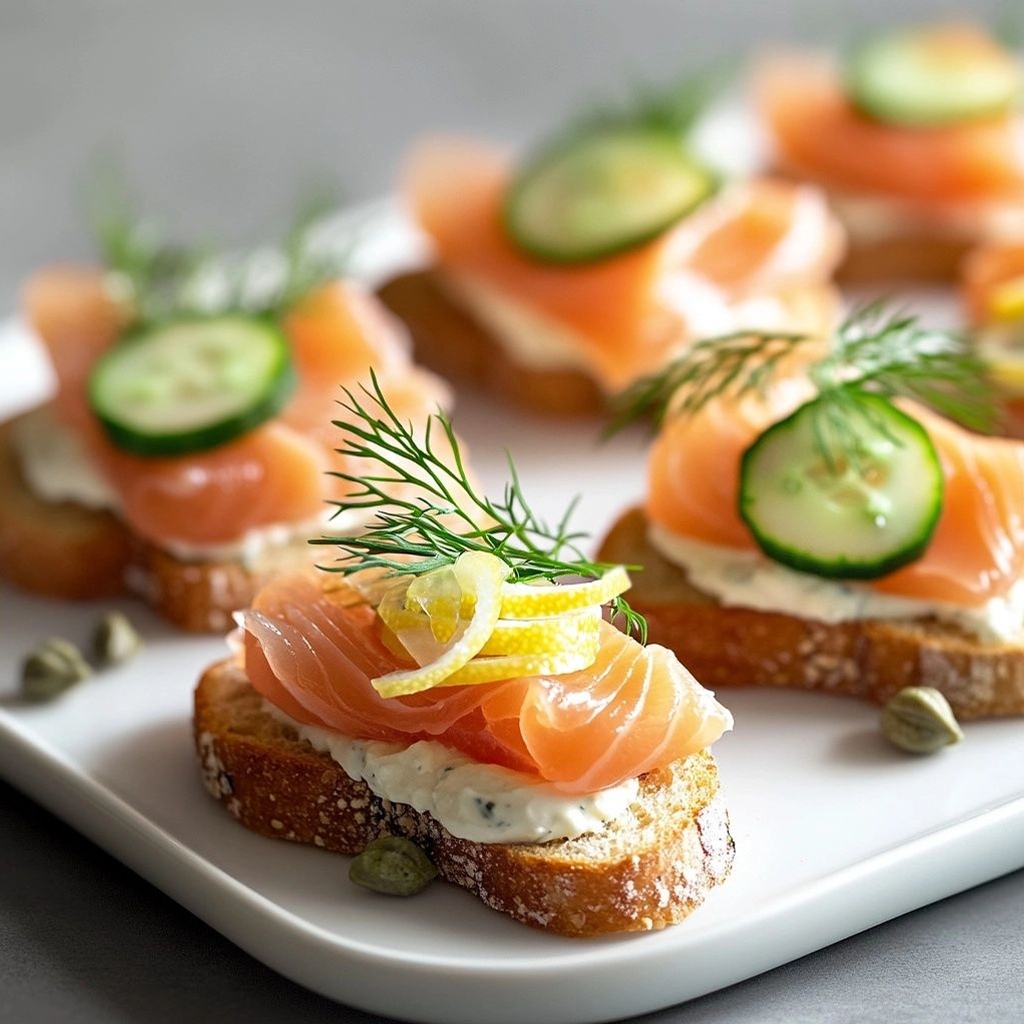
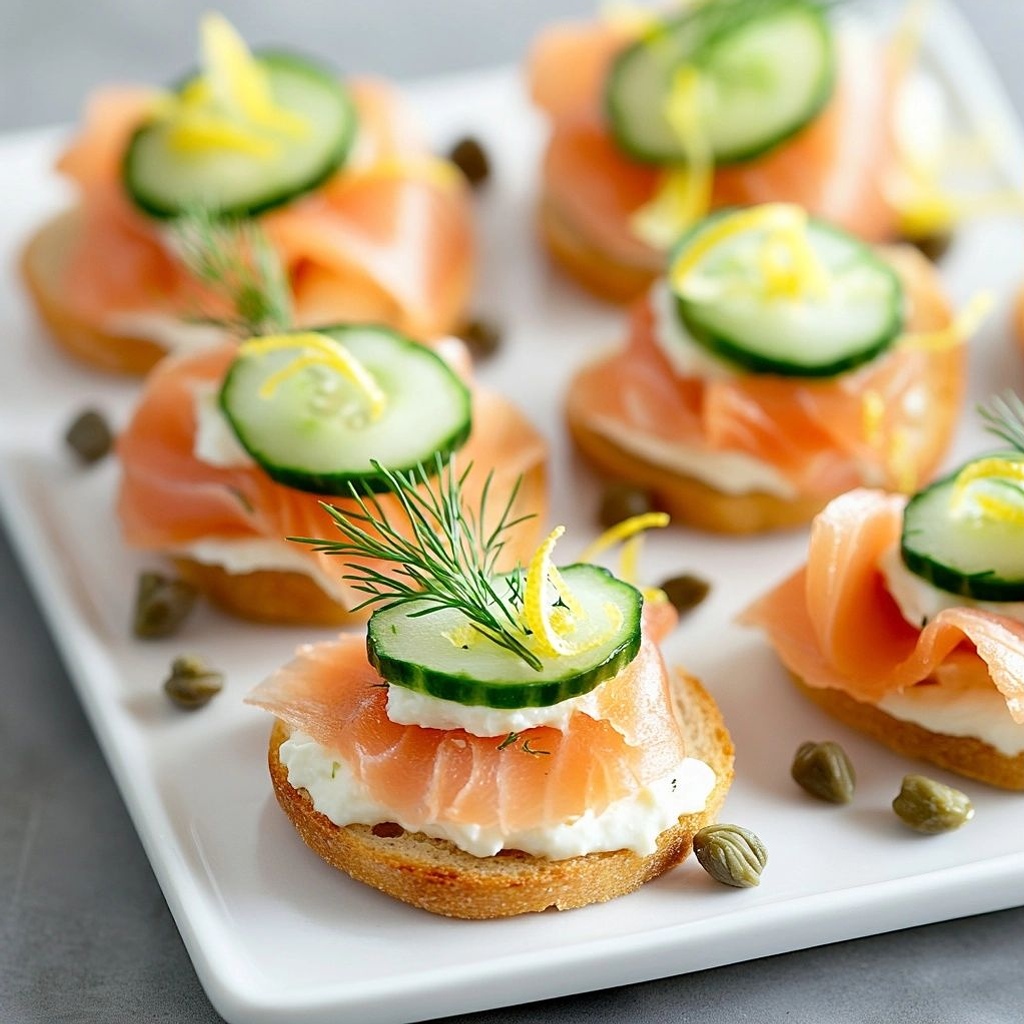
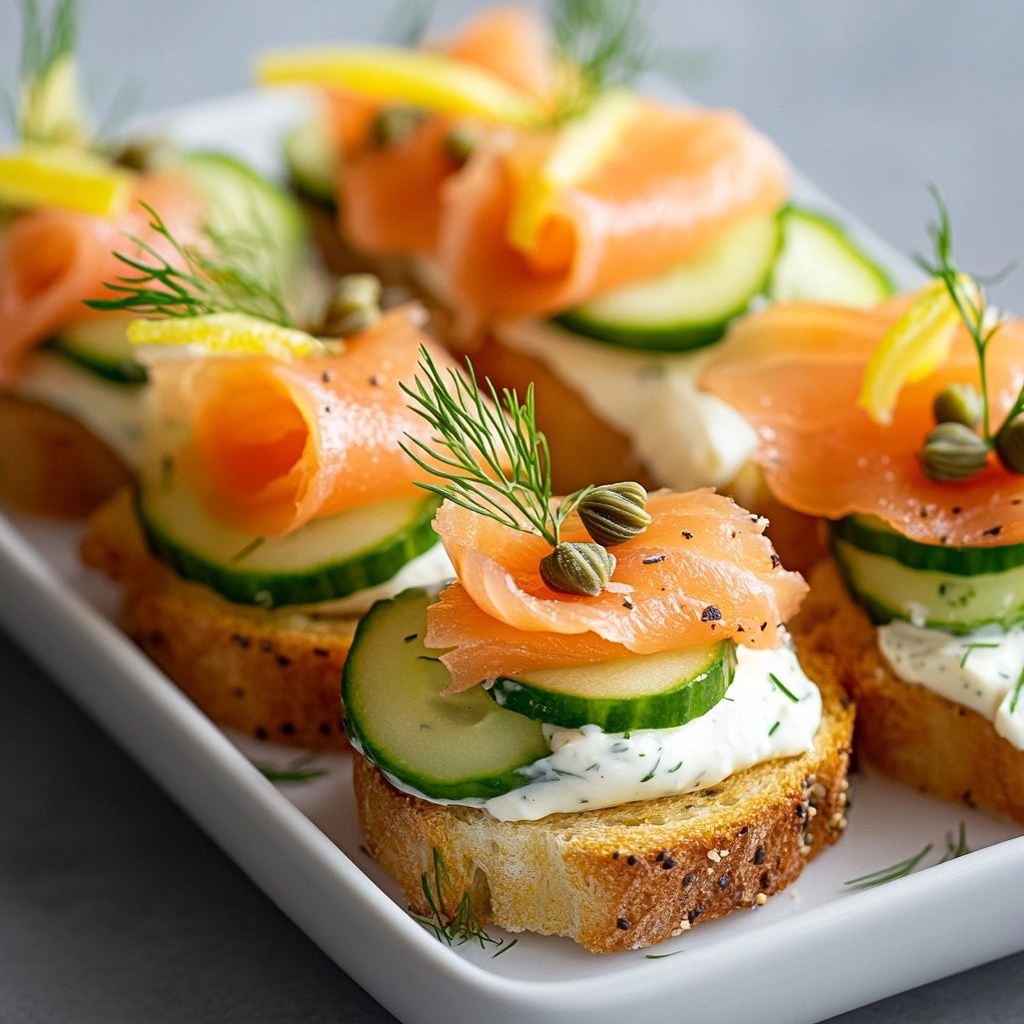
Consider the visual narrative as you plate. The contrast of pale pink salmon against the creamy white spread, finished with emerald dill and the glint of a caper, creates a color story that is instantly appealing. The aroma should entice without overpowering: a gentle smoke, a whisper of lemon, and a fresh herb bouquet. The bite should begin with a satisfying crunch, move into a velvety center, and end with a bright, slightly briny finish. The entire experience is a celebration in miniature—a reminder that festive eating can be as refined as it is delicious. When you arrange the canapés, think about symmetry, spacing, and the way the light catches the glaze on the salmon. A well-lit platter with a few lemon twists can become the centerpiece of your appetizer table, inviting guests to linger and sample as conversation flows into the new year.
Conclusion
Elegant Smoked Salmon Canapés embody the spirit of New Year’s Eve: glamorous, effortless, and deeply satisfying. They offer a refined bite that travels well from kitchen to table, pleasing both eye and palate. With their timeless combination of smoky salmon, creamy spread, bright citrus, and herbaceous lift, they stand as a testament to culinary balance—luxury without pretension, simplicity without compromising impact. Whether you’re hosting a small celebration at home or a larger soiree with friends and family, these canapés set the tone for an evening that sparkles with possibility. So, embrace the ritual of assembling beauty on a plate, toast to new beginnings, and let every bite carry the warmth of shared moments and cherished traditions. Your guests will remember the elegance, the flavor, and the way these little bites made the night feel truly special.
Ingredients
Base
-
– 24 mini rye bread rounds, about 1 inch in diameter (or French bread crostini)
→ Provides a sturdy, crisp platform for toppings while keeping the canapés light. Toast lightly to enhance crunch and deepen flavor without browning the bread too much. If using baguette slices, cut into small rounds and toast until edges are golden.
– 1 small cucumber, seeded and cut into thin rounds (optional for a fresh bite)
→ Adds a cool, crisp contrast to the creamy spread and salmon. Slice as thin as possible for delicate bite-sized canapés; pat dry to remove excess moisture so the base stays firm.
Spread
-
– 8 oz cream cheese, softened to room temperature
→ Creates a silky, stable base that binds the toppings together. Soften to room temperature so it spreads evenly without tearing the bread. For lighter version, blend with a spoonful of sour cream or crème fraîche.
– 2 tbsp sour cream or crème fraîche, at room temperature
→ Adds tang and moisture, loosening the cream cheese for a creamier spread. Use full-fat for richness; low-fat versions may reduce mouthfeel but still work well.
– 1 tsp lemon zest, finely grated
→ Brightens the spread with citrus aroma that pairs beautifully with salmon. Grate finely to avoid gritty bits; zest over the bowl rather than the finished mixture to avoid browning.
– 1 tbsp fresh dill, chopped
→ Dill is classic with smoked salmon, providing herbaceous freshness that cuts through the richness. Chop finely so that every bite carries flavor without large leaf pieces.
– 1 tbsp fresh lemon juice
→ Adds clean acidity to balance richness and salmon. Use freshly squeezed juice for best brightness; adjust to taste if your salmon is saltier.
– 1/2 tsp black pepper, freshly ground
→ Subtly accentuates flavors in the spread without overpowering the fish. Freshly ground pepper gives more aroma; sprinkle lightly and adjust as needed.
Smoked Salmon
-
– 8 oz smoked salmon, thinly sliced, cut into small bite-sized pieces
→ The star topping; choose high-quality cold-smoked salmon with a silky texture. Slice into small squares or ribbons so each canapé is cohesive and easy to eat in one bite. If the slices are pliable, roll or fold neatly to maintain shape on the bread.
Garnishes
-
– 1 small cucumber, extra thinly sliced or ribbons (see Base)
→ Optional fresh crunch and moisture; arrange as a delicate topping over the spread. Ensure slices are dry to prevent soggy canapés; pat dry if needed.
– 2 tbsp capers, drained and patted dry
→ Provide briny, tangy bites that complement the salmon. Rinse briefly if they’re very salty; pat dry to avoid bringing excessive moisture to the base.
– 1-2 tbsp fresh dill sprigs or chives, finely chopped
→ Additional herbaceous finish; dill ties with salmon flavor while chives add a mild onion note. Use only long stems chopped to avoid bulky pieces.
– Lemon wedges or zest curls for serving
→ A bright finishing note; lemon can be squeezed lightly at the table for those who want extra acidity. Zest curls can add a perfume of citrus when placed atop each canapé.
Optional Add-ins
-
– 1 tbsp red onion, finely minced
→ Introduces a subtle sharpness that contrasts with the creamy spread and salmon. Finely mince to prevent rough chunks; soak briefly in cold water if you want to soften the bite, then pat dry to avoid added moisture.
– 1 tbsp caper brine (to taste, optional)
→ If you love extra briny kick, a few drops of caper brine mixed into the spread can intensify the salmon pairing. Add sparingly to avoid overpowering and saltiness; adjust with more cream cheese if needed.
– Pinch of sea salt or flaky salt, to finish
→ Enhances overall savoriness; use sparingly since salmon and capers are salty. Taste before final plating and err on the side of restraint.
Instructions
- Toast the 24 mini rye bread rounds lightly in a preheated 350°F (175°C) oven or in a lightly greased skillet until the edges are just golden and crisp to support toppings without becoming hard.
→ A toasted base provides crunch and prevents sogginess from the spread and toppings, ensuring bite remains stable and elegant. - If using cucumber for base, peel (optional for color), seed, and slice the small cucumber into 1/16-inch thin rounds, pat dry to remove surface moisture, and set aside.
→ Very thin slices add cool contrast and moisture balance without overpowering the spread; patting dry prevents the base from becoming soggy. - Soften the cream cheese to room temperature for 20–30 minutes until pliable, then transfer to a mixing bowl for easy incorporation.
→ Softened cheese spreads smoothly, avoiding lumps or tearing of the bread, which helps the canapés look professional. - Stir in the sour cream or crème fraîche until fully integrated and the mixture is light and spreadable, using a spatula to fold rather than vigorously beating.
→ The dairy adds moisture and tang, loosening the cream cheese for a silkier, more forgiving spread that stays on the bread. - Add the finely grated lemon zest to the spread, then fold in the fresh dill and the fresh lemon juice, mixing gently to distribute evenly without overworking.
→ Zest provides aromatic citrus brightness while lemon juice balances richness; folding prevents splitting the mixture and keeps it cohesive on the bread. - Season the spread with freshly ground black pepper, tasting as you go to ensure a subtle bite that complements the salmon without overpowering it.
→ Freshly ground pepper delivers aroma and a delicate heat that enhances the overall flavor profile when paired with smoked salmon. - Using a small spoon or offset spatula, evenly smear a generous but not overflowing layer of the prepared spread onto each toasted rye round.
→ A uniform layer ensures every bite carries the creamy base, salmon, and garnish for balanced flavor and presentation. - Cut the 8 oz of smoked salmon into small bite-sized pieces, roughly the size of the canapés, and arrange neatly on top of the spread on each bread round.
→ Bite-sized pieces guarantee cohesive one-bite canapés, and neat arrangement enhances visual appeal for a New Year’s Eve spread. - If desired, place a sliver or neat fold of cucumber (from the optional base) atop the salmon for an extra fresh bite and visual contrast.
→ The cucumber adds crispness and a cool counterpoint to the smoky salmon, elevating texture and appearance. - Scatter 2 tablespoons of capers, drained and patted dry, across the canapés to introduce briny brightness that cuts richness without overwhelming the fish.
→ Capers provide a sharp, saline pop that echoes the oceanic flavors of salmon and brightens the overall bite. - Finish with a light sprinkle of chopped fresh dill or chives over the tops, using long stems chopped finely so every bite carries herbaceous notes without large leaf pieces.
→ Herbs tie the salmon to the creamy base, lending aroma and a clean finish that reads well from plate to palate. - Offer lemon wedges or zest curls on the side for guests to adjust brightness at the table, allowing individuals to tailor acidity to their preference.
→ A final citrus touch at service enhances aroma and lets diners customize tang, keeping the canapés vibrant on the plate. - For optional add-ins, fold in the finely minced red onion into a portion of the spread if desired, or drizzle a few drops of caper brine into the remaining spread before assembling; taste and adjust with extra cream cheese if needed.
→ Red onion adds a subtle sharpness and color contrast, while caper brine intensifies the briny character without needing additional salt. - Finish any remaining canapés with a light pinch of sea salt or flaky salt just before plating, tasting to ensure the balance is correct given the saltiness of the salmon and capers.
→ Finishing salt heightens savoriness and final flavor perception, but should be restrained to avoid overpowering the salmon’s smoke.
Notes
These elegant smoked salmon canapés are built on crisp rye bread rounds and layered with a silky citrus-dill cream cheese spread, then topped with delicate pieces of smoked salmon and bright garnishes for a festive, New Year’s Eve bite. For best results, toast the rye lightly to deepen flavor and ensure a sturdy base that won’t crumble. Use soft, room-temperature cream cheese and sour cream or crème fraîche to create a spread that’s easy to smooth and scoop, and fold in lemon zest, lemon juice, and fresh dill to brighten the richness of the salmon. Slice the cucumber as thin as possible for an unobtrusive crunch, and pat it dry to avoid soggy canapés. When assembling, keep components chilled until just before serving and arrange on a platter with lemon wedges for a vibrant finishing touch. If you’d like a gluten-free option, swap the rye with crisp gluten-free crackers or lightly toasted baguette rounds made from gluten-free flour. Optional add-ins like minced red onion or a splash of caper brine can elevate the tang and briny notes, but add them sparingly to maintain balance with the salmon and cream cheese. These canapés are best prepared close to serving time; assemble the spread and salmon ahead, but add cucumber and fresh herbs just before displaying to keep textures crisp. Store any leftovers covered in the refrigerator for up to 24 hours; before serving, pat dry any extra moisture on the cucumber slices and reassemble as needed for a pristine presentation.
Tips
- Plan ahead: toast the bread rounds and cut cucumber rounds a few hours before serving. Keep both in airtight containers at room temperature to maintain crunch and prevent sogginess.
- Spread technique: soften cream cheese to room temperature, then whip with the sour cream until smooth for a light, scoopable consistency. A few seconds in a mixer can create a satin texture that holds toppings better.
- Flavor balance: add lemon zest and juice to the spread gradually, tasting as you go. The citrus brightens the richness of salmon; avoid overpowering it with too much lemon at once.
- Herb handling: chop dill finely and fold it into the spread just before assembly to preserve its fresh aroma. If you’re using chives, snip very small to avoid large onion-like bites.
- Salmon prep: cut salmon into uniform bite-sized pieces and keep them chilled until assembly. If slices are pliable, roll or fold neatly to maintain a neat, bite-sized appearance on each canapé.
- Assembly order: base (bread) → spread → smoked salmon → garnishes. This helps the components set correctly and prevents sliding or sogginess.
- Garnish wisely: keep cucumber garnish extra dry; pat with a paper towel to avoid added moisture. Capers should be drained and patted dry to prevent water pooling on the bread.
- Make-ahead options: prepare the spread and cucumber rounds a few hours in advance, then assemble just before serving to retain crispness. For a make-ahead approach, pipe the spread onto bases for quicker assembly.
- Texture contrasts: consider including a crisp element such as a thin cucumber ribbon or a light pickle to provide a refreshing bite against the creamy spread and salmon.
- Salt management: taste the spread and salmon before final plating. If using caper brine or salted salmon, reduce additional salt to avoid oversalting the canapés.
- Serving presentation: arrange on a chilled platter or serving tray over crushed ice to keep everything cold without sweating the bread. Garnish just before serving to preserve color and texture.
- Variations for dietary needs: for gluten-free options, substitute rye bread with cucumber rounds topped with a dollop of the spread and salmon, or use gluten-free crackers as the base.
FAQ
What are Elegant Smoked Salmon Canapés?
Delicate slices of smoked salmon on crisp toppings like toast points or cucumber rounds, finished with cream cheese or herbed spreads, capers, dill, and a touch of lemon—all designed for a festive New Year’s Eve presentation.
What ingredients do I need?
Key ingredients typically include smoked salmon, cream cheese or dill yogurt spread, thinly sliced baguette or light crackers, cucumber or pumpernickel rounds, fresh dill, lemon zest, capers, and optional garnishes such as caviar or caviar pearls for a luxe touch.
What is the suggested serving size?
Plan for about 3–4 canapés per guest for a cocktail hour. For a 6–8 person party, 24–32 canapés usually provides enough variety and abundance.
How do I assemble the canapés?
Spread a light layer of cream cheese or herb spread on the base, top with a small slice of smoked salmon, add a cucumber wheel or toast point, and finish with a sprig of dill, caper, or lemon zest. For a visual pop, place the salmon in a tiny rosette shape on the spread.
Can I make these ahead of time?
Yes. Prepare the toppings and bases separately, then assemble shortly before serving to maintain crispness. You can refrigerate the bases and spreads up to 24 hours. Roll salmon slices and chill, then assemble just before presenting.
Are there good substitutions for dietary needs?
Yes. Use gluten-free crackers or cucumber rounds as the base for a gluten-free option. Use dairy-free cream cheese or avocado spread for a vegan or dairy-free variation. Replace smoked salmon with thinly sliced grilled halloumi or marinated artichoke for a non-fish option.
What flavor pairings work well?
Classic pairings include dill, lemon zest, capers, and crème fraîche. For a richer profile, add a dollop of horseradish cream or a light champagne-mignonette. Fresh chives or chive oil also complements the salmon beautifully.
What is the best way to present them for a New Year’s Eve party?
Arrange on a tiered serving tray or a mirror platter with alternating bases (crisp crackers and cucumber rounds). Garnish with edible gold flakes or small lemon curls for a festive New Year look, and keep chilled until just before guests arrive.
How long do they keep on a serving tray?
Best served within 30–60 minutes of assembly to preserve crisp bases. If you must prepare ahead, assemble components up to 4–6 hours in advance and refrigerate, then assemble just before serving.
What tools help with quick assembly?
A sharp knife for neat salmon slices, a small offset spatula for spreading, a piping bag for neat cream cheese swirls, and a mini melon baller or cookie cutter to create decorative bases. A serving tray with a cold pack underneath helps keep everything chilled.