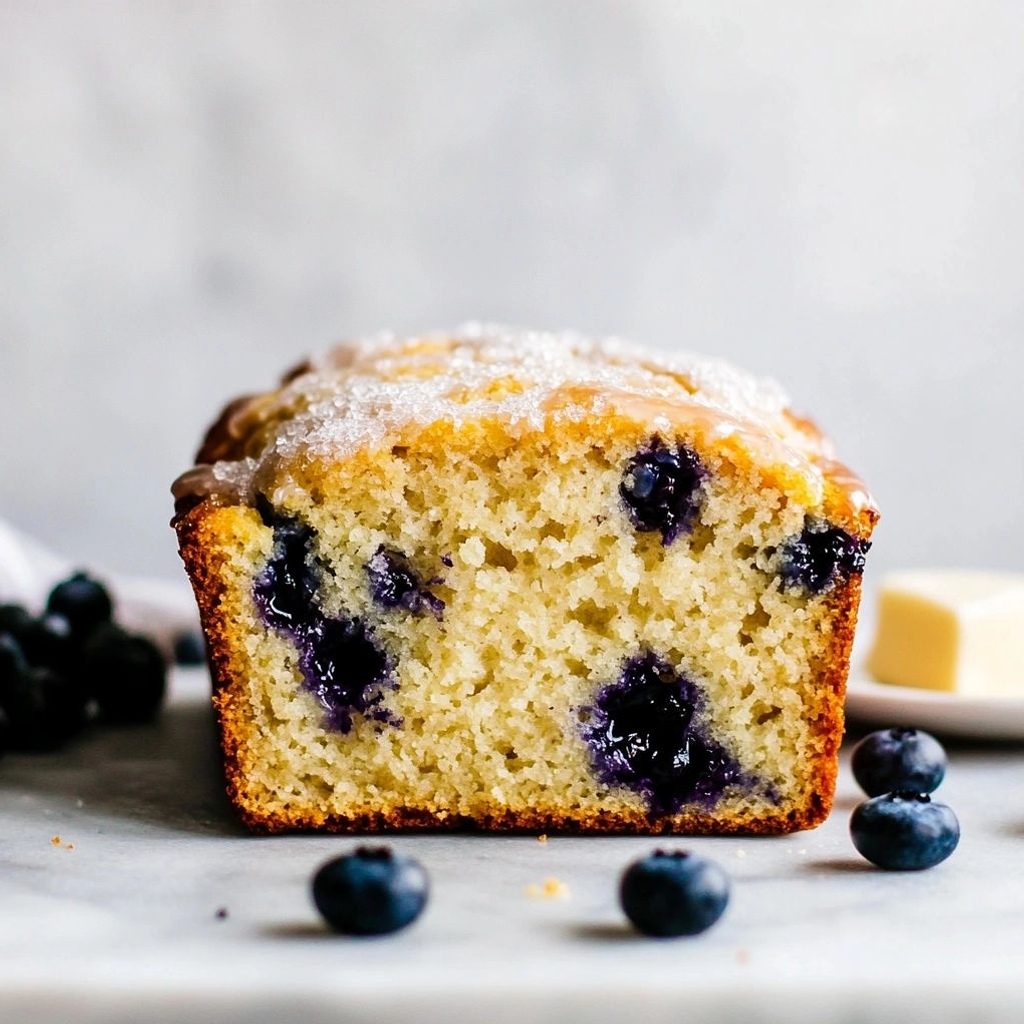
Author

Ocean Nightleaf

Browsing

Introduction / Hook

Step into a pan that smells like a warm embrace: honey shimmering as it meets garlic’s sharp perfume, infusing a chorus of flavors as shrimp pinks and sausage slices caramelize in a glossy glaze. This Honey Garlic Shrimp, Sausage & Broccoli is the kind of dish that feels simple, yet feels special—like a celebration of weeknights turned into something memorable. The crackle of the skillet, the way the broccoli edges blister and bite back just right, and the savory, smoky notes from sausage mingle with the natural sweetness of honey to create a balance that dances across the palate. Everything you wanted in a fast, flexible one-pan meal is here: vibrant color, a harmonious mix of protein and greens, and a sauce that clings to every bite without weighing you down. It’s comfort with a zing, a little sultriness from the garlic, a wink of sweetness from honey, and a satisfying sea-meets-farmland moment in every mouthful.

Comfort doesn’t have to mean heavy or dull. This dish proves that you can coax deep, restaurant-worthy flavors from everyday ingredients and a single skillet. It’s the kind of recipe you reach for when you’re juggling errands, need to feed a hungry crowd, or simply crave something savory and bright. The combination of shrimp, sausage, and broccoli is not just a crowd-pleaser; it’s a multipurpose base that adapts to whatever you have on hand—leftover rice, a handful of cherry tomatoes, or a squeeze of lemon to finish. It invites creativity while delivering reliability: a reliable weeknight hero that still feels like a treat.

As you read on, you’ll discover not only how this dish comes together, but why the flavors work so well together. You’ll travel through the story of how the ingredients harmonize, explore how to tailor the recipe to your dietary needs, and find inspiration for serving suggestions that will turn this from a dinner into a complete, well-rounded meal.

The Story Behind the Dish

Every kitchen has its own legend about how a dish came to be, and this one began in the sense of a busy weeknight where all the best intentions are easy to forget. A bag of bright broccoli, a few plump shrimp on ice, and a ring of Italian sausage sitting in the freezer became a prompt for a single-pan supper that would salvage the evening without sacrificing flavor. The idea was simple: a balance of sweet, savory, and a touch of garlic to wake things up; a protein duo that could hold its own in a quick caramelization; and broccoli to provide crunch, color, and a healthful contrast to the richness of the sausage and the glaze. The result was a dish that felt both coastal and rustic—a nod to seafood markets by the sea and to hearty, comforting sausage suppers around a family table.

Culinary traditions from different corners of the world often influence the way home cooks improvise. The honey-garlic glaze carries a universal appeal: it’s approachable, forgiving, and forgiving enough to let whatever you add next shine. Shrimp brings a light, delicate sweetness that pairs beautifully with the deep savor of sausage, while broccoli offers a green bite that keeps the dish balanced and bright. The combination speaks to the modern home cook’s reality: you want something quick, flavorful, and flexible enough to adapt to what’s in the fridge. In that spirit, this dish transcends a single culture’s boundaries, uniting elements that feel both familiar and novel. It’s a modern comfort meal with a worldly wink, a dish you’ll want to revisit and remix without hesitation.

Over time, this recipe evolved into a reliable method: a hot pan, a sizzling chorus of ingredients, a glaze that sticks, and a finish that invites you to serve with confidence. It’s become a staple in kitchens where time is precious but taste matters just as much as speed. The story isn’t just about the ingredients; it’s about the joy of turning simple components into something more—something that tastes like a home-cooked celebration, even on a Tuesday.

Why You’ll Love This Recipe

  • One-pan wonder: Everything cooks together in a single skillet, minimizing cleanup and maximizing flavor.
  • Bright, balanced flavors: The honey-garlic glaze delivers sweetness and depth that complement the briny shrimp and smoky sausage.
  • Texture contrast: Searing achieves caramelized edges, while broccoli adds crisp-tender bite for a satisfying mouthfeel.
  • Versatile and forgiving: Swap proteins, swap greens, or adjust seasonings to fit what you have on hand or dietary needs.
  • Fast and weeknight-friendly: A satisfying dinner can come together in a flash, leaving you time for what matters most.
  • Family-friendly appeal: The dish’s flavors are widely appealing to both kids and adults, making it a smart choice for busy households.
  • Make-ahead potential: Components can be prepped, stored, or warmed quickly for future meals, without sacrificing taste.
  • Perfect for pairing: Serves as a hearty main with simple accompaniments like rice, crusty bread, or a light salad.

Flavor Profile & Texture

This dish is a study in savoring contrasts that somehow harmonize. The shrimp brings a delicate, sweet seafood flavor and a silky texture when perfectly cooked—pink, plump, and just barely resisting the bite. The sausage contributes a smoky, savory backbone, releasing its own juices and a hint of spice that mingles with the other elements. The broccoli provides a crisp-tender bite and a vegetal brightness that cuts through the richness of the proteins, offering freshness with every forkful. The honey garlic glaze is the star that ties everything together: honey’s mellow sweetness coats the surface, while garlic delivers a warm, pungent kick that lingers. The glaze’s viscosity helps cling to the shrimp and sausage, creating glossy, clingy morsels rather than a watery sauce.

What you taste, in order of impression, is a symphony of warm, comforting notes with a lift of brightness. The first bite greets you with a sheen of sweet-savory gloss and a savory perfume from garlic. Then the sausage’s smoky undertones peek through, followed by the bracing bite of broccoli. The shrimp finishes with a delicate fruitiness that lightly perfumes the air around the plate. The overall experience is both comforting and bright—comforting because the flavors feel familiar and satisfying, and bright because of the garlic and broccoli’s green lift and the honey’s mellow sweetness. The plate becomes a balanced canvas where each ingredient holds its own while contributing to a chorus of taste. It’s the kind of dish that feels luxurious despite its quick, practical method, inviting you to savor the textures and to appreciate how well the elements cooperate under a simple, well-timed glaze.

Occasions & Pairings

This Honey Garlic Shrimp, Sausage & Broccoli shines in a variety of settings, making it a versatile staple in your meal rotation.

  • Weeknight dinners: Fast, flavorful, and satisfying after a long day.
  • Casual gatherings: A simple centerpiece that can feed a small crowd with minimal fuss.
  • Date nights at home: Elegant enough to feel special without requiring a reservation or a long prep list.
  • Meal-prep friendly: Make a batch on Sunday to reheat for lunches or quick dinners during the week.
  • Holidays with a relaxed vibe: A one-pan option that sits comfortably on a buffet or side table alongside other seasonal dishes.

Pairing ideas to elevate the meal:

  • Grains and starches: Serve over steamed jasmine rice, quinoa, or a soft pilaf to soak up the glaze. A crusty baguette or garlic bread is perfect for sopping up the sauce.
  • Fresh acidity: A squeeze of lemon or lime at the table brightens the dish and adds a citrusy lift that complements the honey-garlic glaze.
  • Green balance: A simple cucumber-dill salad or a cucumber-tennsion salad can add refreshing contrast to the warm flavors.
  • Drink pairings: A crisp white such as Sauvignon Blanc or Pinot Grigio works beautifully; for something with a touch more body, a lightly oaked Chardonnay can be a nice match. For beer lovers, a pale ale or lager’s malt notes echo the dish’s warmth without overpowering the seafood.
  • Finishers: A light dusting of lemon zest or a few chili flakes at the end can add a bright finish or a gentle heat, depending on your preference.

Tips, Variations & Substitutions

  • Protein swaps: Use chicken thighs or breasts sliced evenly, or substitute with firm tofu or tempeh for a vegetarian version. Shrimp pairs particularly well with Italian sausage, but chicken or tofu will work with a similar glaze.
  • Broccoli alternatives: Swap in broccolini, green beans, or asparagus spears for a different texture and color. For a lighter option, use shredded Brussels sprouts or spinach at the end to wilt quickly.
  • Glaze customization: If you prefer a lighter glaze, reduce the honey slightly or substitute maple syrup for a different nuance. A splash of soy sauce or tamari can add depth and umami if you like a more savory profile.
  • Spice level: Add crushed red pepper flakes to taste, or finish with a pinch of smoked paprika for a subtle smoky note that echoes the sausage.
  • Gluten considerations: Most sausages contain gluten, so opt for gluten-free varieties if needed. Check labels for gluten-free certification if you’re cooking for someone with celiac disease or a gluten intolerance.
  • Healthy twists: Use half honey and half maple syrup for a nuanced sweetness, or swap in a small amount of avocado oil to keep the glaze slick without excessive sweetness.
  • Cooking method variations: This dish can be adapted to a sheet-pan method: arrange the sausage slices and broccoli on a sheet pan, bake until nearly done, then add shrimp and glaze for a quick finish. You’ll still achieve that glossy coating and crisp-tender vegetables with a little less hands-on time.
  • Regional twists: Add a pinch of dried oregano or thyme to nod to Italian flavors, or incorporate a splash of rice wine vinegar for a touch of brightness reminiscent of Asian-inspired glaze nuances. The glaze is forgiving enough to carry small seasonal tweaks beautifully.

Storage & Make-Ahead Ideas

Leftovers can be a delight, not a disappointment. Here are practical tips to keep this dish delicious beyond the first night:

  • Storage: Store cooked leftovers in an airtight container in the refrigerator for up to 3 days. For best texture, keep the broccoli slightly separate from the glaze if possible, and reheat gently to preserve tenderness and prevent overcooking the shrimp.
  • Reheating tips: Reheat on the stovetop over low to medium heat, stirring gently, until just warmed through. If the dish seems dry, splash a little broth or water to loosen the glaze and refresh the sauce.
  • Make-ahead strategies: You can prep components in advance: slice the sausages, chop the broccoli, and mix the honey-garlic glaze (without cooking) ahead of time. When you’re ready to cook, simply bring a pan to heat, add the components, and finish with the glaze. This approach minimizes active prep on busy nights.
  • Freezing considerations: Shrimp can become mushy after freezing, so it’s best to freeze only the sausage and broccoli or to freeze the fully cooked dish with the shrimp included. If you freeze, thaw slowly in the fridge and reheat gently to preserve texture.

Fun Facts & Trivia

Did you know that honey, often described as nature’s sweetener, has been used in cooking for thousands of years across cultures? Its thick, syrupy texture makes it an ideal glaze when paired with high-heat cooking, allowing it to caramelize into a lacquer that clings to proteins and vegetables. Garlic, revered in many cuisines, not only adds flavor but is also celebrated for its potential aroma-therapeutic qualities, a reminder that cooking can be as much about scent as taste. Broccoli—a member of the cruciferous family—brings a crisp-tender bite and a green vibrance that stands up to bold sauces, while shrimp offers a delicate seafood foundation that pairs surprisingly well with smoky sausages. The pairing of seafood with sausage is a classic example of how pantry staples can intersect in comforting, flavorful ways, turning a simple skillet into a small culinary vacation.

Historically, one-pan meals have been a practical necessity for home cooks around the world. The efficiency and flavor development you achieve in a single skillet reflect generations of clever technique: searing to create Maillard flavor, letting caramelized sugars form a glossy glaze, and balancing textures so that no element overpowers another. This dish embraces that tradition while inviting a modern sense of flexibility, encouraging cooks to experiment with what’s in the kitchen rather than sticking to a rigid formula. It’s a small celebration of culinary resourcefulness, a reminder that great taste can emerge from everyday ingredients when you bring them together thoughtfully.

Closing Thoughts

Honey Garlic Shrimp, Sausage & Broccoli is more than a recipe—it’s a canvas for meal-time creativity. It honors the comfort of familiar flavors while inviting you to tailor the dish to your mood, season, and pantry. Whether you’re cooking for a family, feeding a couple on a cozy date night, or prepping lunches for the week, this one-pan marvel offers quick ease, satisfying depth, and a satisfying finish that lingers on the palate. The next time you crave something that feels indulgent without being indulgent in terms of effort, reach for this dish. Let the honey’s glow gild the skillet, let the garlic wake the senses, watch the broccoli blister at the edges, and savor the moment when shrimp and sausage come together in a glossy, savory kiss. It’s a little celebration of pantry wit and comforting warmth—a dish you’ll want to return to, again and again, with new twists and simple improvisations that keep it fresh, relevant, and utterly delicious.

Ingredients

Protein & Sausage

  • – 1 pound large shrimp, peeled and deveined (tails removed or left on for presentation)
    → The shrimp provide the primary protein and quick-cooking bite. For the best sear, pat dry the shrimp with paper towels to remove surface moisture, then season lightly with salt just before sautéing. If thawing frozen shrimp, ensure they are completely thawed and patted dry to prevent steaming in the pan. If leaving tails on, this will give a nicer presentation; if you prefer easier eating, remove tails before cooking. Use deveined shrimp for convenience and texture. Do not overcook; shrimp turn opaque and curl when done; cook 2–3 minutes per side depending on size.
  • – 12 oz smoked sausage or Italian sausage, sliced into 1/4-inch rounds
    → The sausage adds a savory, fatty richness and a second texture to the dish. If using raw sausage, brown thoroughly before combining with sauce to render fat and caramelize; if using pre-cooked sausage, just heat and brown slightly to deepen flavor. Slice evenly to ensure even cooking. For gluten-free, check packaging. You can leave the casing on or remove; removing casing will allow for crisper edges in the pan.

Produce & Aromatics

  • – 4 cups broccoli florets, cut into bite-sized pieces
    → Provides brightness, crunch, and nutritional balance. For best texture, steam or blanch broccoli briefly until just tender and bright green, then rinse under cold water to stop cooking if you plan to toss with hot sauce at the end; alternatively, add raw but this will need longer cooking. Evenly cut florets help uniform cooking. If you prefer softer broccoli, cook a bit longer with the sauce.
  • – 4 cloves garlic, minced
    → Garlic forms the aromatic base of the honey-garlic glaze. Finely mince or press to emulsify evenly into the sauce; avoid chunky pieces that burn. If you prefer sweeter notes, you can lightly sauté garlic in oil for 15–20 seconds before adding honey to mellow sharpness. Fresh garlic is best for aroma; pre-peeled cloves save time.

Sauce & Glaze

  • – 2 tablespoons honey
    → Honey supplies natural sweetness and helps create a glossy glaze that clings to shrimp and broccoli. Use a light floral honey for a cleaner sweetness; if your honey is thick, warm it slightly to improve mixing with soy sauce. Add gradually to taste; for a deeper caramel flavor, drizzle a bit more at the end. If you want to reduce sweetness, use 1 tablespoon and adjust with more soy or a splash of lemon juice.
  • – 2 tablespoons low-sodium soy sauce
    → Provides saltiness and umami to balance sweetness. Low-sodium is preferred so you can control overall salt. If gluten-free is required, substitute tamari or coconut aminos. Mix with honey before adding to the pan to ensure even coating; avoid pouring directly that may cause overly salty outcome. For a richer color, allow the sauce to simmer briefly to thicken slightly.
  • – 1 tablespoon rice vinegar or fresh lemon juice
    → Adds acidity to brighten the glaze and depth of flavor. Rice vinegar yields a subtle tang; lemon juice provides a more pronounced citrus note. Use whichever you prefer or have on hand. Add off the heat or simmer briefly with the sauce to balance sweetness; if you omit, consider a pinch of zest to brighten the dish.
  • – 1 teaspoon sesame oil (optional)
    → Adds a nutty, toasty finish to the glaze. Use sparingly as it can dominate other flavors. If you skip sesame oil, you can substitute with a small amount of extra olive oil or a drizzle of toasted oil later in cooking. Add at the end to preserve aroma; heat may cause aroma to fade if split across long cooking.
  • – 1/4 teaspoon red pepper flakes (optional)
    → Gentle heat to complement honey and garlic. Adjust to taste; add more if you love spice. Add with the sauce and let simmer just enough to bloom the spice, but watch from burning in high heat. If you are sensitive to heat, skip; sweet-savoury combination remains.
  • – Salt and freshly ground black pepper to taste
    → Seasoning is essential to balance sweetness from honey and umami from soy. Salt the shrimp lightly before searing; taste as you go to avoid oversalted dish. Pepper adds aromatic heat; use freshly ground pepper for best aroma. Add at the end after glazing, to preserve aroma and not dull the flavor.

Oils & Finishes

  • – 2 tablespoons olive oil
    → Used for searing the shrimp and sausage, and for carrying garlic aroma. Use a high-heat oil but not overpowering; olive oil adds flavor and helps brown without sticking. If you prefer a neutral oil, substitute with avocado oil. Pat ingredients dry before adding to pan to get crisp edges.
  • – 2 lemon wedges or a small squeeze of lemon juice (optional)
    → Finishes with a bright citrus note that lifts the glaze. Squeeze over the dish just before serving to preserve brightness; you can add zest for extra aroma if desired.

Optional Garnishes

  • – Sesame seeds and chopped green onions (optional)
    → Adds color, a slight crunch, and fresh onion aroma. Toast sesame seeds lightly in a dry pan before sprinkling to intensify flavor. Scatter green onions just before serving for a fresh, crisp finish. If using on a plated dish, moderate amounts prevent overpowering other flavors.

Instructions

  • Pat the shrimp dry with paper towels and season lightly with salt just before cooking.
    → Dry surfaces promote a strong sear without steaming; salt adds seasoning without drawing out moisture if applied right before the pan.
  • Slice the smoked or Italian sausage into 1/4-inch rounds and pat the slices dry with a clean towel.
    → Even slices ensure uniform browning and render fat evenly; patting dry reduces extra moisture that can steam the sausage.
  • Heat 1 tablespoon of olive oil in a large skillet over medium-high heat until shimmering.
    → A hot pan encourages a crisp, golden crust on the sausage without sticking; oil acts as a carrier for browning flavors.
  • Add the sausage slices to the hot skillet in a single layer and brown on one side, then turn to brown the other side, about 2–3 minutes per side. Transfer the browned sausage to a plate, leaving the rendered fat in the pan.
    → Proper browning develops caramel notes and enhances texture; removing the sausage leaves space for the vegetables to cook and prevents soggy results.
  • Add the broccoli florets to the skillet with the remaining fat and sauté until bright green and just tender, about 3–4 minutes. If needed, add a splash of water and cover briefly to steam, then uncover to finish.
    → Quick sauté preserves color and crunch; overcooking makes the broccoli mushy and dull.
  • Add the minced garlic to the skillet and cook for 20–30 seconds until fragrant, stirring constantly to prevent scorching.
    → Garlic cooks quickly and can burn; short sauté releases aromatic oils that form the flavor base for the sauce.
  • In a small bowl, whisk together the honey, low-sodium soy sauce, and rice vinegar (or lemon juice) until completely smooth and emulsified.
    → Pre-mixing ensures even coating of the glaze and prevents separation when added to the hot pan; the acidity from vinegar or lemon balances sweetness.
  • Return the browned sausage to the skillet with the broccoli, then pour the honey-soy glaze over the mixture and simmer for 1–2 minutes to coat everything and reduce slightly.
    → Glazing brings the flavors together and thickens the sauce for clinging to the shrimp and vegetables; avoid over-reduction which can make the glaze too sticky or burnt.
  • Introduce the shrimp to the pan in a single layer and cook for 2–3 minutes on the first side until the edges begin to turn pink, then flip and cook 1–2 minutes more until pink opaque and curled.
    → Shrimp cook rapidly; correct timing yields a tender bite without toughness; remove promptly to prevent drying.
  • If using sesame oil, drizzle 1 teaspoon over the dish off the heat and toss gently to distribute aroma without evaporating it.
    → Sesame oil has a strong aroma that fades with prolonged heat; off-heat application preserves the nutty flavor.
  • Season with additional salt and freshly ground black pepper to taste, then finish with a squeeze of lemon juice or lemon wedges for brightness.
    → A touch of acidity brightens the glaze and cuts richness; seasoning should be adjusted after saucing to balance sweet and salty notes.
  • Transfer to serving dish and finish with a scatter of sesame seeds and thinly sliced green onions if using, for color and a crisp finish.
    → Garnishes add visual appeal and a fresh onion aroma without overpowering the glaze.

Notes

These Honey Garlic Shrimp, Sausage & Broccoli come together in one skillet for a quick, weeknight-friendly meal, delivering protein, crisp-tender broccoli, and a glossy honey-garlic glaze. The shrimp provide fast-cooking protein, while the sausage adds savory richness and texture, and the broccoli keeps the dish bright and balanced.

Preparation and cooking notes:

  • Pat the shrimp dry with paper towels and season lightly with salt just before cooking to promote a crisp sear. If using thawed frozen shrimp, ensure they are fully thawed, patted dry, and added to a hot pan in a single layer to avoid steaming.
  • Brown the sausage first to render fat and develop caramelization, then remove and set aside. Slice sausage evenly (about 1/4 inch) for uniform cooking.
  • Produce the broccoli by cutting into bite-sized florets. Blanch or steam until just tender and bright green for a crisper texture, then shock in cold water to stop cooking if you plan to toss with the glaze; or add raw and cook longer with the sauce for softer florets.
  • Garlic should be minced finely to emulsify into the glaze; avoid chunky pieces that burn. If you prefer a milder note, sauté garlic briefly in oil for 15–20 seconds before adding honey.
  • Glaze: whisk 2 tablespoons honey with 2 tablespoons low-sodium soy sauce (or tamari/coconut aminos) in a small bowl; add 1 tablespoon rice vinegar or lemon juice for brightness. If you want a thicker glaze, simmer the sauce briefly to reduce before returning proteins to the pan. For gluten-free needs, ensure the soy alternative is gluten-free.
  • Sesame oil is optional but adds a nutty finish; use sparingly and add at the end to preserve aroma. Red pepper flakes are optional for a gentle heat—adjust to taste.
  • Season with salt and freshly ground black pepper to balance sweetness and umami; taste as you go and adjust soy/honey balance accordingly.

Finishing and serving ideas:

  • Return the shrimp and sausage to the pan with the broccoli, pour the glaze over, and toss to coat; cook 1–2 minutes just until everything is heated through and glossy.
  • Finish with a squeeze of lemon or a small amount of zest for brightness if desired. Serve over rice, quinoa, or cauliflower rice to soak up the sauce. Garnish with sesame seeds and chopped green onions for color and aroma.
  • Storage: refrigerate leftovers in an airtight container for up to 3 days. Reheat gently in a skillet with a splash of water or in short intervals in the microwave, stirring to recoat with glaze.

Tips

Tips for perfect Honey Garlic Shrimp, Sausage & Broccoli

  • Prep smart: have all ingredients measured and ready (shrimp patted dry, sausage sliced evenly, broccoli trimmed, garlic minced). Dry surfaces promote browning rather than steaming.
  • Dry shrimp thoroughly: surface moisture can create steam and prevent good sear. If thawing frozen shrimp, pat dry after thawing and let air-dry for a minute before cooking.
  • Cook in batches if needed: overcrowding the pan drops the temperature and leads to soggy results. Cook shrimp in a single layer, then set aside while you finish the sauce and broccoli.
  • Choose your sausage wisely: raw sausage should be browned to render fat and develop flavor; pre-cooked sausage only needs a quick browning for texture and color. Slice evenly for uniform cooking.
  • Prep broccoli for best texture: blanch or steam until just tender and emerald bright, then shock in cold water to halt cooking if you plan to toss with hot glaze later. If you prefer softer broccoli, extend the cook time slightly with the sauce.
  • Garlic handling matters: finely mince or press garlic so it emulsifies into the glaze; avoid large chunks that burn. If you like a milder garlic note, briefly sauté garlic in oil for 15–20 seconds before adding honey.
  • Build the glaze off heat: whisk honey, soy, and acid (rice vinegar or lemon) in a small bowl before adding to the pan to ensure an even coating and prevent clumping.
  • Use heat to your advantage: medium-high heat helps sear proteins and develop flavor, but reduce to medium when adding the glaze to prevent scorching honey.
  • Balance salt carefully: both soy and sausage contribute salt. Taste the sauce as it thickens and adjust with a pinch of salt or more acid if needed.
  • Add bright citrus at the end: a squeeze of lemon juice or a bit of zest right before serving brightens the glaze and prevents the citrus from fading during cooking.
  • Optional sesame oil: a tiny drizzle at the end adds a toasted note. If using, start with 1/2 teaspoon or less to avoid overpowering the glaze.
  • Spice level: red pepper flakes are optional and customizable. Add more for heat or omit entirely for a milder dish; the honey-soy glaze still shines without it.
  • Finish with texture: sesame seeds and chopped green onions add color and aroma; toast sesame seeds in a dry pan briefly to boost flavor before sprinkling on top.
  • Glaze consistency tips: for a thicker glaze, simmer the sauce briefly to reduce; if too thick, add a splash of water or broth to reach desired consistency.
  • Flavor layering: if you like deeper caramel, allow the sausage to brown a bit more and let bits deglaze slightly in the pan after removing shrimp.
  • Allergen-conscious swaps: use tamari or coconut aminos for gluten-free soy; substitute olive oil for a milder fat or avocado oil for a higher-heat option.
  • Serving suggestions: pair with steamed rice, quinoa, or cauliflower rice; keep extra broccoli on the side for a larger veggie portion if preferred.
  • Storage and reheating: store cooled leftovers in an airtight container up to 3 days. Reheat gently on the stove with a splash of water to preserve texture; avoid overcooking shrimp when reheating.

FAQ

Honey Garlic Shrimp, Sausage & Broccoli – FAQ

What ingredients do I need for Honey Garlic Shrimp, Sausage & Broccoli?

The dish combines shrimp, sausage, and broccoli with a honey garlic sauce. Typical ingredients include:

  • 12–16 oz shrimp, peeled and deveined
  • 8–12 oz sausage (sweet or smoked, such as kielbasa or Italian), sliced
  • 2 cups broccoli florets
  • 3–4 cloves garlic, minced
  • 2–3 tablespoons honey
  • 2–3 tablespoons soy sauce or tamari (gluten-free)
  • 1–2 teaspoons rice vinegar or lemon juice
  • 1–2 tablespoons olive oil or butter
  • Salt and pepper to taste
  • Optional: red pepper flakes for heat, 1 teaspoon cornstarch mixed with 1 tablespoon water to thicken
Can I use different protein or vegetables?

Yes. Swap sausage for chicken, turkey, or additional shrimp. You can also mix in other vegetables like bell peppers, snap peas, or cauliflower. If you change proteins, adjust total cooking time so the proteins stay tender and cooked through. If using precooked sausage, reduce cooking time accordingly.

How do I cook Honey Garlic Shrimp, Sausage & Broccoli?

Follow these steps for best results:

  1. Heat a large skillet over medium-high heat with a tablespoon of oil. Sear the sausage slices until browned, then remove and set aside.
  2. In the same pan, add broccoli and a splash of water or broth. Stir-fry 2–3 minutes until bright green and just tender, then add the garlic and cook 30 seconds more.
  3. Return the sausage to the pan. Add the shrimp and cook until they turn pink and opaque, about 2–3 minutes. Avoid overcooking.
  4. Whisk together honey, soy sauce, and vinegar/lemon juice. Pour over the skillet and toss to coat.
  5. (Optional) Stir in a cornstarch slurry (1 teaspoon cornstarch + 1 tablespoon water) and simmer 1–2 minutes until the sauce thickens.
  6. Taste and adjust with salt and pepper. Serve hot over rice, quinoa, or noodles, with a squeeze of lemon if desired.
How can I adjust the sweetness and heat of the sauce?

To adjust sweetness and heat:

  • Use less honey for a less sweet sauce, or more for a sweeter glaze.
  • Adjust heat with red pepper flakes or a small amount of chili sauce.
  • Brighten the flavor with a splash of lemon juice or a dash of extra soy sauce.
How do I thicken the honey garlic sauce?

Use a light cornstarch slurry: mix 1 teaspoon cornstarch with 1 tablespoon cold water, then stir into the sauce while it simmers until it coats the shrimp and broccoli.

Is this dish gluten-free?

It can be gluten-free by choosing gluten-free sausage and tamari or gluten-free soy sauce instead of regular soy sauce. Double-check labels on all sauces and sausages to avoid hidden gluten. Serve with gluten-free starch like rice.

How should I store and reheat leftovers?

Cool promptly and store in an airtight container in the refrigerator for 3–4 days. Reheat on the stove over medium heat until hot, adding a splash of water if the sauce thickens. The broccoli may soften after reheating, which is normal.

What are good serving suggestions for this dish?

Serve over steamed rice (white, jasmine, or basmati), quinoa, or noodles. Garnish with sesame seeds, sliced scallions, or a wedge of lemon for brightness. A simple side salad also pairs well.

Can I freeze Honey Garlic Shrimp, Sausage & Broccoli?

Fresh is best. You can freeze cooked leftovers for 2–3 months, but broccoli texture may suffer after thawing. If freezing, store without thickened sauce and reheat, then add sauce fresh when serving. Reheat on the stove rather than in the microwave for best texture.

Introduction / Hook

Imagine a tray of delicate, snow-white spheres glinting like tiny winter treasures, their surfaces dusted with a veil of powdered sugar that melts away at the first touch. Inside, a soft, crumbly center unfurls with a surprising, sun-kissed note of strawberry—bright, fruity, and just a whisper tart. Strawberry Snowball Cookies are that charming paradox: elegant in appearance, playful in flavor, and utterly comforting with every bite. They evoke memory and celebration in one graceful bite, the kind of cookie you reach for when you want something that feels festive enough for a holiday platter and effortless enough for a casual afternoon tea. The scent alone—cream, butter, and a kiss of strawberry—has a way of pulling people to the kitchen, drawing smiles as they anticipate that first powder-sugared bite. If you’re seeking a cookie that feels both timeless and fresh, traditional yet with a modern twist, this is your new go-to. The name itself conjures a scene: snow on pine, berries kissed by sunlight, a cozy kitchen where laughter lingers and the oven hums softly in the background. Get ready to fall in love with a treat that tastes like a little celebration in every mouthful.

The Story Behind the Dish

Snowball cookies, often called Russian tea cakes or snowball confections, have long had a place at gatherings that celebrate warmth, generosity, and togetherness. They’re the kind of cookies that family members pass from one hand to another with a whispered “these are your favorites!”—a small ritual that turns baking into memory-making. The strawberry variation of these beloved cookies tells a more modern, sunlit story: it’s the fusion of classic European-inspired butter cookies with the bright, summer-invoking flavor of ripe strawberries. Many households in search of a “showpiece” cookie for holiday trays or summer bake sales have found that folding in strawberry elements—whether through puree, dried fruit, or powdered strawberry flavor—transforms the familiar silhouette into something both nostalgic and river-clear in its taste.

In this narrative, the strawberry element channels the spirit of local markets and farmers’ stands—the moment when you stumble upon a crate of jewel-bright berries, their scent filling the air, and you’re struck with the idea that a simple cookie could carry that memory forward. It’s a dish that travels well between seasons: in winter, the cookies feel like a snow-dusted treat that brings a touch of sun; in spring and summer, they echo strawberry fields and picnics in the shade. The elegance of their exterior—perfect little spheres rolled in sugar—belies the ease with which they come together, a testament to the joy of simple ingredients transformed by technique and a bit of patience. The dish’s history is less about a single origin and more about a continuum: the traditional butter-based snowball cookie, reimagined with the bright, fruit-forward charm of strawberries to suit contemporary palates and seasonal sensibilities.

Origin and Cultural Touchpoints

Snowball cookies have roots and variations across many cultures, often tied to festive occasions, weddings, or holiday windowsills. The common thread is a buttery dough that yields to a tender crumb and collapses softly under the pressure of a bite, releasing a fragrance that blends vanilla, almond, and toasted nuts with sugar. The strawberry adaptation nods to ongoing culinary conversations about how tradition can evolve to reflect local ingredients, dietary choices, and global palates. It’s a reminder that recipes are not static artifacts but living conversations that travel, adapt, and joyfully surprise us along the way.

Why You’ll Love This Recipe

Strawberry Snowball Cookies offer a constellation of appealing qualities that make them a favorite for bakers and guests alike:

  • Elegant yet approachable: They look professional enough for a cookie tray, yet are simple enough for a weekend bake with family.
  • Low-effort, high-impact: A few pantry staples, a gentle mixing routine, and a quick bake yield results that feel special without requiring advanced technique.
  • Bright, balanced flavor: The sweetness of butter and powdered sugar is brightened by fresh or dried strawberries, delivering a fruity nuance without overpowering the delicate crumb.
  • Soft texture with a crisp edge: The classic snowball exterior provides a crisp bite that dissolves into a tender, crumbly center as you chew.
  • Versatile for many diets and occasions: With smart swaps, these cookies can be made vegan, gluten-free, or sugar-conscious, expanding their appeal across dietary needs.
  • Great for gifting: Their petite size, charming appearance, and joyful flavor make them ideal for sharing with friends, neighbors, teachers, and coworkers.
  • Seasonally flexible: While they shine during holiday trays, they also pair beautifully with spring picnics, bridal showers, and summer tea gatherings.

Flavor Profile & Texture

The most captivating thing about these cookies is how the flavor unfolds in layers. The initial impression is a mild, buttery richness that comes from a classic shortbread-style dough. It’s immediately followed by a fruity brightness—the strawberry element lends a sunlit tang without tipping into tartness, creating a harmonious balance that lingers on the palate. The strawberry notes can come from fresh puree, freeze-dried berries ground to a powder, or a gentle infusion of dried fruit, depending on what you have on hand. This strategy ensures that you get a vivid pink hue and a pronounced berry aroma without turning the dough overly moist or heavy.

Texture-wise, you’ll experience a light, crumbly bite that almost dissolves on the tongue. The exterior is a chalky-feel sugar crust—powdered sugar dusted to the point of “snowy” sheen—that cracks slightly as you press into the cookie, releasing a soft, tender crumb inside. The contrast between the exterior and interior is part of the magic, making every mouthful feel like a little celebration. Some bakers like to incorporate finely chopped nuts for a faint toasty crunch; others prefer a purely smooth crumb for that quintessential melt-in-your-mouth sensation. Either way, the balance between buttery richness, fruity brightness, and a hint of vanilla or almond in the background creates a dessert that’s at once comforting and refreshing.

Aromatic notes often emerge beyond the obvious strawberry. A whisper of vanilla bean or almond extract deepens the cookie’s character, while a touch of citrus zest can illuminate the berry flavor and lift the overall taste. If you prefer a more pronounced nutty profile, toasted pecans or almonds can be folded into the dough, adding texture and a gentle earthiness that complements the fruit’s sweetness without overpowering it.

Occasions & Pairings

These cookies are the kind that travel well and suit many settings. Here are some ideas to make the most of their versatility:

  • Their snow-white exterior mirrors the season’s aesthetics and pairs beautifully with other classic cookies, fruit tarts, and spiced treats.
  • Afternoon tea or coffee gatherings: The cookies’ refined shape and delicate flavor are a natural match for scones, light finger sandwiches, and a pot of tea.
  • Bridal showers or baby showers: Their pretty appearance and gentle sweetness make them a crowd-pleasing option that fits with soft color palettes and floral décor.
  • Summer picnics and garden parties: The freshness of strawberry feels seasonally appropriate and bright in warm weather.
  • Gift-giving: Pack them in decorative tins or boxes for a cozy, homey present that stays fresh and visually appealing.

Pairing suggestions to complement the cookies:

  • Light sparkling beverages like a brut champagne or a dry rosé to mirror the cookie’s fruit-forward brightness.
  • Aloe- or vanilla-infused tea for a comforting, aromatic pairing that doesn’t compete with the fruit flavors.
  • Plain or vanilla yogurt, or a dollop of lightly sweetened whipped cream for a contrasting texture in a dessert platter.
  • A simple berry compote on the side for dipping, which can intensify the strawberry notes if you’re serving them as part of a larger dessert spread.

Tips, Variations & Substitutions

One of the joys of a cookie like Strawberry Snowball Cookies is how forgiving and adaptable it is. Here are ideas and ideas to customize without losing the essence of the treat:

  • Vegan version: Use dairy-free butter and a plant-based milk if your dough requires moisture adjustments. Most shortbread-like doughs rely on fat and a touch of liquid, so you may need to adjust with aquafaba or a splash of plant milk. Skip eggs entirely, as these cookies typically don’t rely on eggs for structure.
  • Gluten-free option: Swap all-purpose flour for a gluten-free blend that includes a binder (like xanthan gum) if your blend lacks it. Almond flour can substitute partially for a tender crumb, but you may need to adjust fat slightly to maintain the dough’s cohesiveness.
  • Less sweet: Reduce powdered sugar by a small amount or use a granulated sugar that you pulse into a finer texture to avoid an overly sweet finish while preserving the snowball effect.
  • Strawberry-forward flavor alternatives:
    Ground freeze-dried strawberries provide a robust flavor and color; fresh strawberry puree yields a delicate hue and aroma. For a deeper berry note, use a small amount of strawberry jam in the dough with care to maintain the right dough consistency.
  • Texture twists: Add finely chopped freeze-dried strawberries or white chocolate chips for subtle crunch and color variation. Toasted almond slivers introduce a toasty aroma and a more pronounced nutty contrast.
  • Regional twists: A pinch of cardamom or a small splash of kirsch or orange liqueur can bring a surprising but harmonious note that pairs well with strawberry.
  • Dairy-free snowball exterior: The dusting sugar is essential for the signature look, but you can use a dusting of coconut sugar for a hint of caramel and a slightly different color and texture.

Storage & Make-Ahead Ideas

Cookies with a delicate crumb and powdered sugar exterior are best kept in a cool, dry place, but the exact approach varies slightly depending on how you’ve prepared them:

  • Storage of baked cookies: Place cooled cookies in an airtight container, layering with parchment to prevent sticking. They typically stay fresh for about 3–5 days at room temperature. For longer storage, freeze baked cookies for up to 1–2 months; thaw at room temperature when ready to serve.
  • Make-ahead dough: You can prepare the dough in advance, refrigerate for up to 2–3 days, then portion and bake as needed. This is especially handy for holiday cookie production or quick entertaining prep.
  • Make-ahead assembly: If you prefer the dough to be stiff enough to roll into neat spheres, chill it for 30–60 minutes before rolling. This helps maintain uniform shapes and prevents flattening during baking.
  • Reheating tips: If cookies have softened after storage, a brief warm-up in a low oven (around 300°F / 150°C for 5-7 minutes) or a short time in a microwave (not recommended for long) can refresh them, returning a touch of the melt-in-your-mouth feel.

Fun Facts & Trivia (Optional)

Delightful details that add flavor to your baking knowledge:

  • Snowball cookies are a staple in many holiday dessert assortments around the world, with various name variations like snowballs, butterballs, and meltaways. They share a common technique: a soft, buttery dough that is rolled into spheres and generously dusted with sugar while warm.
  • The visual appeal of snowball cookies makes them a favorite for gift-giving and themed cookie exchanges. Their pristine white exterior often evokes a winter wonderland vibe that pairs naturally with red and green holiday colors, especially when a strawberry hue is introduced.
  • Using freeze-dried strawberries is a practical way to intensify flavor and color. The powder blends seamlessly into the dough, resulting in vivid specks and a robust aroma while preserving the crumbly texture.
  • Strawberry is one of the most universally loved fruit flavors in desserts, thanks to its balance of sweetness and acidity. When incorporated into a shortbread-style cookie, it helps achieve a bright, fresh finish that contrasts with the richness of butter and sugar without overwhelming it.

Ingredients

Strawberry Snowball Cookie Dough

  • 1 cup unsalted butter, softened to room temperature
    → The butter provides tender moisture and rich flavor; it’s creamed with the sugar to create a light, airy base and helps the dough come together without becoming greasy. Softened butter (not melted) ensures even creaming; if it’s too warm the dough may spread during baking, and if too cold it may resist blending. Cream until pale and fluffy before adding other ingredients to build a delicate crumb.
  • 1/2 cup powdered sugar
    → Powdered sugar sweetens the dough and contributes to a melt-in-your-mouth texture; it also helps the fat and dry ingredients bind smoothly. Sift the powder before measuring to avoid lumps, and add gradually so the mixture stays smooth and light. This sugar is incorporated into the dough rather than just for coating, so accuracy helps perfect texture.
  • 2 cups all-purpose flour
    → Provides the structural framework for the cookies. Measure carefully and whisk with the cornstarch and salt to ensure even distribution before adding to the butter-sugar mixture. Do not over mix once the flour is added; minimal mixing yields a tender, crumbly cookie typical of snowball cookies.
  • 1/4 cup cornstarch
    → Tenderizes the dough by limiting gluten formation, creating the delicate, crumbly texture characteristic of snowball cookies. Sift with the flour for even distribution. If you prefer a slightly firmer bite, you can reduce to 2 tablespoons, but keep the balance with flour intact to avoid crumbly dough.
  • 1/2 cup freeze-dried strawberry powder or finely ground freeze-dried strawberries
    → Infuses the dough with bright strawberry flavor and color without adding moisture. If you only have whole freeze-dried berries, blitz them in a processor or spice grinder into a fine powder before measuring. Powder yields uniform flavor; avoid using hydrated or fresh fruit that would alter dough consistency. If you want stronger strawberry notes, adjust slightly up to 2/3 cup powder while balancing with a touch more flour if needed.
  • 1 teaspoon vanilla extract
    → Enhances the berry aroma and rounds sweetness. Use pure vanilla extract for best flavor; if you only have imitation vanilla, the cookies will still taste good but less rich. Add with the other dry ingredients to ensure even flavor distribution.
  • 1/4 teaspoon fine sea salt
    → Balances the sweetness and intensifies the strawberry flavor; salt also helps highlight aroma and prevent the cookie from tasting flat. Use fine salt to ensure even distribution throughout the dough.

Strawberry Snowball Cookie Add-ins

  • 2 tablespoons finely chopped almonds or pistachios (optional)
    → Adds a subtle crunch and nutty contrast to the tender crumb. Chop very small so pieces distribute evenly and don’t weigh the dough down. If toasting, do it briefly (about 5 minutes at 350°F) to boost aroma; omit if making a nut-free version.
  • 1/3 cup mini white chocolate chips (optional)
    → Provides creamy sweetness that pairs nicely with strawberry. Fold in gently to prevent melting into a clump; keep dough cool if your kitchen is warm to maintain distinct chip pockets.

Strawberry Snowball Cookie Coating

  • 1 1/2 cups powdered sugar, for rolling
    → The classic snowball exterior is achieved by rolling warm cookies in powdered sugar, creating a soft, snowy coating. Use freshly sifted sugar to avoid lumps; roll the cookies while they’re still warm to help the coating adhere evenly.
  • Extra 2 tablespoons powdered sugar for finishing dusting (optional)
    → For a more pronounced snowy finish, dust cooled cookies with additional powdered sugar. This adds sweetness and a pretty appearance, but use sparingly if you prefer a lighter coating or a less sugary finish.

Instructions

  • Preheat your oven to 325°F (165°C) and line two baking sheets with parchment paper or silicone mats to prevent sticking and promote even browning.
    → This ensures the cookies bake evenly and release cleanly, preventing breakage when handling while still hot.
  • Whisk together 2 cups all-purpose flour, 1/4 cup cornstarch, and 1/4 teaspoon fine sea salt in a medium bowl until the mixture is uniform and any clumps are broken up.
    → Even distribution of dry ingredients avoids concentrated pockets of flour or salt, producing a tender, uniform crumb.
  • In a large mixing bowl, cream 1 cup unsalted butter, softened to room temperature, with 1/2 cup powdered sugar on medium-high speed until the mixture is pale, fluffy, and light enough to hold a soft peak.
    → Proper creaming creates an emulsion that traps air for tenderness; under-creaming results in a dense cookie, while over-creaming can cause greasiness.
  • Beat in 1 teaspoon vanilla extract until fully incorporated, scraping the bowl as needed to ensure even flavor distribution.
    → Vanilla brightens strawberry flavor and rounds sweetness; scraping ensures no hidden pockets of butter remain unflavored.
  • With the mixer on low, gradually add the dry ingredient mixture to the butter-sugar base in 3 additions, mixing until a soft dough forms and then stopping immediately to avoid overworking the gluten.
    → Gentle incorporation prevents toughness; a just-combined dough yields the delicate, crumbly texture characteristic of snowball cookies.
  • Fold in 1/2 cup freeze-dried strawberry powder or finely ground freeze-dried strawberries, and if using, 2 tablespoons finely chopped almonds or pistachios and 1/3 cup mini white chocolate chips with a spatula until evenly distributed.
    → The strawberry powder imparts concentrated berry flavor and color without moisture; distribute add-ins evenly so every bite has a balanced mix.
  • Chill the dough, wrapped tightly, for 30 to 60 minutes until firm enough to handle for shaping.
    → Chilling reduces spread during baking and makes it easier to roll evenly into balls for a uniform snowball silhouette.
  • Line a third sheet with parchment and set up the coating by measuring 1 1/2 cups powdered sugar in a shallow bowl; sift if possible to remove lumps for a smooth finish.
    → A smooth, evenly adherent coating yields a pristine sparkling exterior typical of snowball cookies.
  • Scoop small portions of dough, about 1 tablespoon each, and roll between your palms to form smooth, compact balls roughly 3/4 inch in diameter.
    → Uniform balls ensure even baking and consistent coating coverage; rolling helps seal any cracks and creates a polished surface.
  • Place the dough balls on the prepared sheets about 1 inch apart and bake for 12 to 14 minutes, rotating the sheets halfway for even browning; the cookies should be set along the edges but still pale in the centers.
    → Pale centers indicate fully baked interior with a delicate crumb; overbaking will dry the cookies and ruin the snowy texture.
  • Remove from the oven and allow the cookies to cool on the sheet for 5 to 7 minutes; this brief rest firmens the crust just enough to handle without cracking the coating.
    → Cooling on the sheet helps set the shape while remaining warm enough to accept the coating evenly.
  • Roll each warm cookie in the prepared powdered sugar, turning to coat evenly on all sides, then transfer to a rack to cool completely and set the coating.
    → Coating while still warm adheres best; a gentle turn ensures a uniform snow-like layer that dries to a soft crust.
  • If you desire a deeper snowy finish, dust the cooled cookies with an additional 2 tablespoons of powdered sugar just before serving.
    → A light extra dusting enhances appearance and sweetness without making the cookie overly sugary.
  • Store the cookies in an airtight container at room temperature for up to 4 to 5 days, placing parchment between layers to prevent sticking; for longer storage, freeze them for up to 1 month.
    → Proper storage maintains the delicate texture and coating, preventing moisture buildup and keeping the cookies fresh.

Notes

These strawberry snowball cookies are delicate, crumbly treats that melt in your mouth with a bright strawberry aroma from the freeze-dried strawberry powder and a tender crumb created by cornstarch and softened butter. The dough comes together with powdered sugar and vanilla, and the subtle salt balances sweetness for a classic snowball bite.

You can customize them by folding in two tablespoons of finely chopped almonds or pistachios for a nutty crunch, and/or 1/3 cup mini white chocolate chips for creamy sweetness. If you prefer a dairy-free option, substitute with a neutral-tavored dairy-free butter and a plant-based chocolate add-in if desired.

Rolling and coating: Roll warm cookies in 1 1/2 cups powdered sugar for a soft, snowy exterior, and dust with an extra tablespoon or two if you want a bolder finish. Sift the sugar first to avoid lumps and ensure an even coat.

Storage and make-ahead: Bake cookies until just set and allow to cool completely, then store in an airtight container at room temperature for several days; for longer freshness, freeze baked cookies or freeze the unbaked dough shaped into rounds. If freezing dough, freeze on a parchment-lined tray until solid, then transfer to a bag and bake from frozen, adding a minute or two to the bake time.

Gluten-free note: If you need a gluten-free version, substitute a certified gluten-free all-purpose flour blend (and ensure the cornstarch is gluten-free); follow the same steps—the cookies will still be tender and snowy when rolled in sugar.

Tips

FAQ

What are Strawberry Snowball Cookies?

Strawberry Snowball Cookies are delicate, shortbread-like cookies flavored with strawberry and coated in a snowy layer of powdered sugar. The dough is typically made with butter, flour, powdered sugar, a pinch of salt, vanilla, and strawberry flavor from freeze-dried strawberries or strawberry powder. After baking, they’re rolled in more powdered sugar to create the signature snowball look.

What ingredients do I need?

Common ingredients include:

  • All-purpose flour (or gluten-free flour blend)
  • Unsalted butter, softened
  • Powdered sugar (plus extra for coating)
  • Freeze-dried strawberries or strawberry powder
  • Vanilla extract
  • Salt
  • Optional: white chocolate chips or chopped nuts
Can I make these gluten-free?

Yes. Use a gluten-free all-purpose flour blend (one that’s cup-for-cup) and a little xanthan gum if your blend doesn’t already include it. Check that other ingredients (like vanilla extract) are gluten-free, and avoid cross-contamination by using clean utensils and bowls.

Can I make them dairy-free or vegan?

Yes, with substitutes. Use a plant-based butter or dairy-free margarine 1:1 in place of the butter. Some powdered sugars are processed with bone char, so choose a vegan-certified powdered sugar if needed. Note that using dairy-free butter can slightly affect texture, so chill the dough a bit longer if it seems too soft.

How should I flavor them with strawberry?

Flavor comes from freeze-dried strawberries or strawberry powder. Use finely ground freeze-dried strawberries (about ¼ to ½ cup, finely ground) or 2–4 tablespoons of strawberry powder. You can adjust to taste, but avoid using fresh fruit, which adds moisture and can make the dough sticky.

Should I chill the dough before shaping?

Yes. Chilling for at least 1 hour (or up to overnight) helps cookie dough firm up, making it easier to roll into balls and reducing spreading during baking. You can also freeze portions for longer storage.

How do I bake them to avoid cracking or sinking?

Bake at a steady, accurate temperature (usually around 350°F / 177°C). Bake until the edges are barely set and just beginning to color, but the centers remain pale. Let the cookies cool slightly, then roll in powdered sugar while they’re still warm to help the coating adhere. If they crack, they may have spread too much or been chilled too long—try adjusting chilling time or dough temperature next time.

How should I store Strawberry Snowball Cookies?

Store at room temperature in an airtight container for up to a week. Layer with parchment to prevent sticking. For longer storage, freeze the baked cookies (uncoated or coated) for up to 2–3 months; thaw at room temperature and dust with fresh powdered sugar before serving.

Can I freeze the dough or baked cookies?

Both work well. To freeze dough, portion into balls, freeze on a tray, then transfer to a bag; bake directly from frozen, adding 2–4 minutes to the bake time. To freeze baked cookies, cool completely, then wrap well or freeze in an airtight container. Reheat briefly in a low oven to refresh texture and coating.

What equipment will make this easier?

Helpful tools include:

  • Mixing bowl and spatula or a hand mixer
  • Measuring cups and spoons
  • Baking sheet lined with parchment
  • Cooling rack
  • Small cookie scoop or tablespoon for even portions
  • Fine-mesh sieve for powdered sugar coating
Can I reduce sugar or use alternatives?

Powdered sugar is used both in the dough and for coating; reducing it will change texture and the snow-like coating. If you must reduce sugar, do so gradually and expect a denser texture. Some bakers try sugar substitutes that are good for baking, but results can vary; test in small batches. If you replace with a liquid sweetener, moisture balance will be affected, so you may need to adjust flour or chill time accordingly.

Introduction / Hook

Imagine a breakfast muffin that tastes like a sunny vacation in a single bite. The moment you lift one from the tin, you’re met with the warm scent of toasted coconut, a bright spark of pineapple, and a whisper of vanilla that lingers on the air. These Coconut and Pineapple Cottage Cheese Muffins aren’t just a snack; they’re a mood booster, a little celebration you can carry with you from morning commute to weekend brunch. The secret magic lies in the harmony between tropical sweetness, tangy cottage cheese, and a moist, tender crumb that melts on the tongue. Each bite offers a balance of lush fruitiness and creamy richness, with a light, pastry-like texture that feels indulgent without being heavy. They’re the kind of muffins that make you pause, savor, and smile, and they somehow taste like sunshine even on a gray day.

From the very first inhale of their aroma—coconut toasting in the pan, the tang of pineapple, a hint of citrusy zest—the kitchen becomes a tiny island. The batter comes together with an effortless ease that promises quick mornings and relaxed weekends alike. These muffins are versatile enough to transition from a weekday breakfast on the go to a leisurely Sunday treat for family and friends. They’re also a natural crowd-pleaser for gatherings where you want to offer something wholesome yet luxurious, familiar yet exciting, and undeniably delicious.

What makes this recipe stand out isn’t just the flavor; it’s the texture and the story behind it. The cottage cheese lends a gentle tang and a soft, almost custard-like moisture that stays tender long after the oven timer dings. The pineapple provides freshness and a sunny sweetness that doesn’t overwhelm—think tropical notes interwoven with a comforting, home-baked vibe. The coconut adds a delicate crunch and toasty perfume that lingers, inviting another bite before you even finish your first cup of coffee. It’s a balance of contrasts—the creamy and the crisp, the bright and the cozy—that keeps every mouthful interesting and satisfying.

Whether you’re preparing a batch for a busy work week, packing a lunchbox with a wholesome morning option, or baking for a brunch with friends, these muffins deliver with consistent charm. They’re adaptable, forgiving, and forgiving in the best possible way: a recipe that feels both playful and reliable, capable of turning ordinary mornings into something special without requiring elaborate steps or hard-to-find ingredients. And the best part is how naturally they pair with a range of toppings and accompaniments—an extra squeeze of citrus, a dollop of yogurt, a drizzle of honey, or a cinnamon-kissed crumble—each tweak offering a new way to fall in love with this cheerful, sunlit muffin.

The Story Behind the Dish

The idea for Coconut and Pineapple Cottage Cheese Muffins grows out of the intersection between tropical flavors and a pantry-friendly protein boost. Coconut and pineapple are a classic duo that evokes beaches, palm trees, and island breezes—ingredients that have graced countless desserts, puddings, and breakfast dishes across cultures. Cottage cheese, once an overlooked house staple, has undergone a renaissance as a versatile, protein-rich ingredient that blends smoothly into batters and batters alike, gifting moisture, structure, and a gentle tang without needing a lot of butter or heavy cream. When these elements come together, the result is a muffin that feels celebratory and fresh, yet unpretentious enough for everyday mornings.

There’s a personal thread to this recipe, too. It’s the kind of dish that a busy home cook might pull out on a Saturday when there’s still time to savor the process: grating a touch of orange zest, toasting coconut until it perfumes the room, then folding in pineapple for a pop of sunshine. It’s the kind of recipe that invites you to improvise—swap in frozen fruit, add a pinch of cardamom for a hint of spice, or sprinkle a few chopped almonds for a nutty crunch. The muffins become a canvas, a small stage on which you can display your pantry’s personality and your morning mood in equal measure.

Historically, coconuts and pineapples have traveled across oceans in caravans of trade and migration, carrying bits of culture with them. In many tropical and subtropical cuisines, coconut is a cornerstone, offering a bold aroma and a delicate sweetness, while pineapple provides a bright acidity that cuts through richness. Cottage cheese, meanwhile, has enjoyed centuries of steady ubiquity as a simple, accessible protein source that can soften the edges of a recipe and lend structure without heaviness. The fusion of these ingredients in a muffin format is a modern nod to traditional flavors, reimagined for breakfast tables, lunchboxes, and coffee breaks—a small tribute to travel, memory, and the joy of a well-balanced bite.

Why You’ll Love This Recipe

  • Speed and simplicity: The batter comes together quickly, with pantry-friendly ingredients you likely already have on hand.
  • Protein-forward and satisfying: Cottage cheese adds moisture, creaminess, and a gentle tang that elevates the flavor without heaviness.
  • Bright, tropical flavor: Pineapple brings a crisp sweetness that contrasts with toasty coconut and a hint of citrus zest for depth.
  • Moist, tender crumb: The muffins stay soft and fresh longer than many other quick breads, making them perfect for grab-and-go mornings.
  • Versatile and forgiving: Easily adaptable for different dietary needs or flavor twists without losing balance.
  • Kid-friendly and crowd-pleasing: A gentle, approachable flavor profile that appeals to both young tasters and adult palates.
  • Breakfast, snack, or treat: Works beautifully as a portable breakfast, an afternoon pick-me-up, or a light dessert with yogurt or fruit.
  • Feel-good vibe: A comforting, homemade bake that feels indulgent yet wholesome—great for sharing with friends and family.

Flavor Profile & Texture

The flavor profile of these muffins is a delightful dance between tart and sweet, with a tropical brightness that never veers into overpowering. The cottage cheese contributes a mild tang and a whisper of lactic sweetness that plays off the natural sugars in pineapple. Pineapple chunks or crushed pineapple pieces release pockets of juicy, sunny sweetness as you bite, creating bursts of fruitiness that refresh the palate. Toasted coconut layers in the crumb provide a gentle crunch and a toasted, nutty aroma that lingers after each mouthful, echoing the scent of a sunlit kitchen.

The crumb is moist but not in a heavy way—the kind of moisture that makes you want to take another bite rather than reach for a glass of milk to wash it down. The outer crust forms a delicate, light edge that gives way to a softer interior, almost akin to a cupcake texture but with the heartiness of a muffin. The balance of ingredients yields a crumb that is tender enough to melt in your mouth, yet sturdy enough to hold up to a crumbly topping or a drizzle of yogurt, fruit compote, or citrus glaze. Aromas of warm coconut, pineapple, and vanilla waft through the kitchen as the muffins bake, making the entire house feel welcoming and festive.

Texture-wise, think a gentle contrast: a tender, almost pillowy center with a subtle, crisp edge that provides a satisfying bite. The coconut flecks offer a light crunchy sensation, while pineapple provides occasional juicy pops that awaken the palate. When eaten fresh and warm, these muffins deliver an indulgent mouthfeel—soft, moist, and ever-so-slightly springy—before cooling into a more structured, portable form suitable for on-the-go mornings. The result is a comfort food that doesn’t feel heavy or cloying, yet delivers a memorable, lingering sweetness tied to its tropical ingredients.

Occasions & Pairings

  • Brunch gatherings: A vibrant star alongside fruit platters, spreadable yogurts, and a light mimosas or sparkling tea.
  • Weekday breakfasts: Bake a batch on Sunday and enjoy through the week for quick, nourishing mornings.
  • Kids’ lunches or snacks: Their natural sweetness and familiar flavors make them a hit in lunch boxes or afternoon snacks.
  • Tea-time or coffee breaks: Pair with a hot beverage and a squeeze of citrus for a refreshing contrast.
  • Holidays and celebrations: Dress them up with a citrus glaze or a dusting of powdered sugar for a festive touch.

Suggested pairings to enhance the tropical vibe include a light citrus yogurt or a dollop of coconut yogurt, a fresh fruit salad featuring mango and kiwi, or a simple chia seed pudding for a complete, protein-packed breakfast bowl. For beverages, consider a glass of sparkling water with a twist of lime, a lightly sweet iced tea, or a tropical smoothie that mirrors the muffin flavors. If you’re serving these muffins at a brunch, a small platter of citrus wedges, pineapple rings, and toasted coconut can create a visually appealing, cohesive spread that invites guests to indulge in the vibe of a vacation morning.

Tips, Variations & Substitutions

  • Make it dairy-free: Substitute the cottage cheese with a plant-based yogurt or silken tofu blended until smooth. You’ll still get moisture and a creamy texture, with a touch of tang preserved from the yogurt or tofu.
  • Gluten-free option: Use a gluten-free all-purpose flour blend or almond flour for a different texture. If using almond flour, you may want to add an extra tablespoon of moisture to compensate for the lower absorbency.
  • Sugar adjustments: If you prefer less sweetness, reduce the pineapple sugar or omit additional sugar calls, relying on the natural sweetness of the fruit and vanilla.
  • Flavor twists: Add a pinch of vanilla or almond extract for a richer aroma. A small amount of orange zest or lime zest can brighten the finish, echoing the tropical theme.
  • Fruit variations: If fresh pineapple isn’t available, crushed pineapple from a can (in its own juice, not syrup) works beautifully. You can also fold in diced mango or papaya for a different tropical note.
  • Texture tweaks: For extra coconut flavor, toast the coconut shreds until they’re lightly browned and fold them in at the end for a more pronounced crunch and aroma.
  • Make-ahead variations: Prepare the dry mix in advance and store it in an airtight container. In the morning, whisk with the wet components and bake for a fresh batch in less time.
  • Nutty accents: A handful of chopped macadamia nuts or toasted almonds add crunch and a complementary flavor profile that pairs well with coconut and pineapple.

Storage & Make-Ahead Ideas

These muffins store nicely and can be a lifesaver for busy weekdays. For the best texture and flavor, let them cool completely before storing. You have several practical options depending on your plan for the week:

  • Room-temperature storage: Place muffins in an airtight container or a resealable bag. They will stay fresh for about 2 to 3 days, maintaining moisture and aroma.
  • Refrigeration: If you’re stacking several muffins, separate layers with parchment paper to prevent sticking. Refrigeration extends freshness to about 4 to 5 days, though the crumby texture may firm up slightly—reheat gently to revive softness.
  • Freezing: Freeze individual muffins wrapped in plastic wrap or parchment, then store in a freezer-safe bag. They keep well for up to 2 to 3 months. Thaw at room temperature or warm in a low oven to restore plushness.
  • Make-ahead batter: You can mix the dry ingredients and keep them in a jar or container, then combine with wet ingredients the night before you plan to bake. This reduces morning prep time and still yields fresh-tasting muffins.

Reheating tips: If muffins have cooled too much and lost some of their tenderness, rewarm them gently in a low oven (about 300°F/150°C) for 5–7 minutes, or microwave in short intervals until warm. A light brush of melted butter or a quick citrus glaze can revive aroma and moisture if desired.

Fun Facts & Trivia (Optional)

  • The combination of coconut and pineapple is a classic pairing across many tropical cuisines, celebrated for its ability to evoke sunshine and vacation in everyday meals.
  • Cottage cheese as a baking ingredient has gained popularity in recent years for its protein content and its ability to contribute to a moist crumb without relying on large amounts of fat.
  • Toasted coconut releases a more intense aroma than untoasted coconut, which can elevate the perception of freshness and depth in baked goods.
  • Fluffy muffins with a custard-like interior are sometimes described as “cloudy” or “tender” crumbs in baking circles, a testament to the soft, moist texture achieved by the right balance of dairy, fruit, and fat.
  • Many cultures consider pineapple a symbol of hospitality and warmth, making it a fitting centerpiece for a recipe designed to welcome guests into your kitchen.

Closing Thoughts

In the end, Coconut and Pineapple Cottage Cheese Muffins are more than a single recipe—they’re an invitation to slow down and savor a small morning ceremony. They celebrate the bright sweetness of pineapple, the toasty aroma of coconut, and the comforting creaminess of cottage cheese, all wrapped in a tender, portable form. They’re ideal for when you want something that feels special but doesn’t demand complicated techniques or hard-to-find ingredients. They travel well, pair with a range of beverages and toppings, and adapt to dietary needs with a few mindful substitutions. Best of all, they give you a reason to pause in the middle of a busy day, take a bite, and let the tropical calm wash over you, one soft, sunlit crumb at a time.

Final Note: A Little Tariff of Joy

Cooking is a language of bring-you-close-to-home comfort and small experiments that pay off with a smile. These muffins are a friendly, forgiving project that welcomes tweaks and personal touches. So, bake a batch, share them with family or friends, and let the aroma fill your space with a promise of good mornings, easy afternoons, and the gentle reminder that sometimes the simplest flavors—the coconut, the pineapple, the cottage cheese—can come together to create something genuinely memorable.

Ingredients

Muffin Base
– 1 1/2 cups all-purpose flour
→ Provides the primary structure and body of the muffin crumb. If you want a lighter texture or need a gluten-free option, substitute with a 1:1 gluten-free flour blend and consider adding an extra tablespoon of milk or juice to compensate for moisture differences. Sift the flour with the leaveners to ensure even rise and a tender crumb.
– 2 large eggs, room temperature
→ Eggs act as binders and help trap air during mixing, contributing to structure and moisture. Room temperature eggs blend more smoothly with fats and dairy, resulting in a uniform batter and a lighter final texture. If you must use cold eggs, lightly whisk them first to speed up emulsification.
– 1/2 cup cottage cheese, blended until smooth
→ The cottage cheese provides moisture, protein, and a tender crumb; blending eliminates curds for a creamy batter and even texture. For a chunkier bite, pulse briefly to maintain small curds rather than fully smooth. If you’re watching fat intake, you can use part-skim, though fat contributes flavor and tenderness.
– 1/2 cup granulated sugar
→ Sweetness, browning, and moisture retention in the muffins. If you prefer less sugar, reduce to 1/3 cup or substitute with light coconut sugar for a deeper flavor. For a dairy-free version, consider using applesauce or mashed banana to add sweetness and moisture.
– 1/2 cup unsalted butter, melted and cooled slightly
→ Adds richness and tenderness to the crumb; melted butter incorporates evenly and yields a moist muffin. Let it cool a bit to avoid cooking the eggs. For a dairy-free version with a stronger coconut profile, substitute with melted coconut oil.
– 1 teaspoon vanilla extract
→ Enhances overall flavor and helps lift the tropical notes from the pineapple and coconut. If you have a vanilla bean, scrape the seeds for extra depth. You can also add 1/2 teaspoon coconut extract for a more pronounced coconut aroma.
– 2 teaspoons baking powder
→ Leavening that creates lift and a light, fluffy crumb. Use fresh baking powder for best results; whisk or sift with dry ingredients to distribute evenly and prevent dense spots.
– 1/4 teaspoon baking soda
→ Provides additional lift in combination with the pineapple’s acidity and cottage cheese. Use sparingly to avoid metallic or soapy notes; ensure there are no lumps to distribute evenly in the batter.
– 1/4 teaspoon salt
→ Balances sweetness and enhances flavor; salt also strengthens gluten structure and helps the other ingredients come forward in flavor. If using salted butter, reduce the added salt by half.

Pineapple & Coconut
– 1/2 cup crushed pineapple in juice, drained well (reserve 1-2 teaspoons juice)
→ Brings bright tropical sweetness, moisture, and a touch of acidity that helps the batter rise. Drain well to prevent soggy muffins; reserve a small amount of juice to adjust moisture if needed and whisk lightly into the batter if it seems too stiff.
– 1/2 cup sweetened shredded coconut, plus extra for topping
→ Adds tropical flavor, texture, and a hint of chewiness. Toast the coconut lightly in a dry pan until fragrant to intensify flavor, then fold into the batter. Use extra for topping to create a pleasing browned crust on the muffins.

Optional Add-ins
– 1/3 cup chopped macadamia nuts (optional)
→ Rich, buttery crunch that pairs beautifully with pineapple and coconut. Toast nuts lightly before folding for deeper flavor, and chop them into small, even pieces to distribute evenly without sinking to the bottom.
– 1/4 cup diced candied pineapple or pineapple chunks (optional)
→ Extra pineapple pieces provide bursts of sweetness and tropical texture. Keep pieces small so they distribute evenly and don’t puncture the muffin walls; if using candied pineapple, adjust sugar elsewhere to avoid an overly sweet bake.

Toppings
– 2 tablespoons extra shredded coconut for sprinkling on top
→ Creates a decorative, toasted crust and extra coconut aroma. Press lightly onto batter surface after filling muffin cups to ensure it adheres and browns evenly during baking.
– Optional glaze: 2 tablespoons reserved pineapple juice mixed with 1/3 cup powdered sugar
→ Finishes muffins with a glossy tropical glaze that enhances flavor and appearance. Whisk until smooth; drizzle after muffins cool. If too thick, thin with a splash more juice; for dairy-free, substitute with coconut milk and adjust sugar accordingly.

Instructions

  • Preheat your oven to 350°F (175°C) and line a 12-cup muffin tin with paper liners or grease it well.
    → This ensures the muffins do not stick to the tin and makes them easier to remove after baking. Greasing also helps the tops rise evenly and prevents the bottoms from becoming soggy.
  • Toast the 1/2 cup sweetened shredded coconut in a dry skillet over medium heat until lightly golden and fragrant, about 2 to 3 minutes, then transfer to a plate to cool.
    → Toasting concentrates the coconut’s sweetness and aroma, contributing a toasted texture that contrasts with the soft muffin crumb.
  • Whisk together the 1 1/2 cups all-purpose flour, 2 teaspoons baking powder, 1/4 teaspoon baking soda, and 1/4 teaspoon salt in a large bowl, then sift or whisk again to ensure even distribution.
    → Sifting or whisking dry ingredients prevents clumps, promotes uniform leavening, and yields a lighter, more even crumb.
  • Blend the 1/2 cup cottage cheese until completely smooth using a blender or immersion blender, then scrape down and reserve for folding into the batter.
    → Blending eliminates curds for a creamy batter and uniform texture; if you prefer a small bit of texture, pulse briefly to retain tiny curds.
  • In a separate large bowl, beat the 2 large eggs with 1/2 cup granulated sugar until pale and slightly thick, about 1 to 2 minutes, then whisk in the 1/2 cup melted and cooled butter and 1 teaspoon vanilla extract; fold in the blended cottage cheese until the mixture is smooth.
    → Beating eggs with sugar builds air for lift, while the melted butter adds richness; vanilla enhances tropical flavors and helps mellow coconut notes; fully incorporating the cottage cheese ensures a cohesive, moist batter.
  • Drain the 1/2 cup crushed pineapple in juice well and fold the pineapple along with the cooled toasted coconut into the wet mixture, using a gentle motion to distribute evenly without deflating the batter; reserve 1–2 teaspoons of juice to adjust moisture if needed.
    → The pineapple adds moisture, sweetness, and acidity that helps the batter rise; proper drainage prevents soggy muffins, while the reserved juice lets you fine-tune batter consistency as you fold in dry ingredients.
  • Fold the dry ingredients into the wet ingredients in two to three additions, mixing until just combined and no large streaks remain; do not overmix as this can develop gluten and make the muffins tough. If the batter feels very stiff, whisk in the reserved pineapple juice a teaspoon at a time to reach a scoopable consistency.
    → Gentle folding preserves air bubbles for a light crumb; overmixing or overworking the batter can yield dense muffins with tunnels.
  • If using optional add-ins, lightly fold in 1/3 cup chopped macadamia nuts (toasted for deeper flavor) and/or 1/4 cup diced candied pineapple, distributing evenly without overworking the batter.
    → Toasting nuts beforehand heightens their aroma and crunch; small pieces ensure even distribution and prevent sinking to the muffin bottoms.
  • Spoon or scoop the batter into the prepared muffin cups, filling each about 3/4 full to allow room for rising; avoid overfilling to prevent overflow and uneven domes.
    → Filling 3/4 full gives a domed top and a tender crumb while controlling overflow during baking.
  • Sprinkle the 2 tablespoons extra shredded coconut evenly over the tops and lightly press it onto the batter surface to help it adhere and brown during baking.
    → The topping creates a visually appealing crust and an extra coconut aroma as the muffins bake.
  • Bake in the preheated oven at 350°F (175°C) for 18–22 minutes, rotating the pan halfway if your oven has hot spots; insert a toothpick into the center—if it comes out clean or with a few moist crumbs, the muffins are done.
    → A measured bake ensures a moist interior with a delicate crumb; rotating promotes even browning and prevents uneven centers.
  • Cool the muffins in the pan for 5 minutes, then transfer to a wire rack to cool completely before glazing or serving; this prevents steam from making the bottoms soggy and helps the tops set.
    → Resting allows steam to escape and the crumb to firm, which makes handling and eating easier and prevents a gummy texture.
  • Optional glaze: whisk 2 tablespoons reserved pineapple juice with 1/3 cup powdered sugar until smooth and glossy; drizzle over cooled muffins just before serving, thinning with a splash more juice if needed.
    → The glaze adds a bright tropical sheen and extra sweetness that complements the coconut and pineapple; drizzle sparingly to avoid oversaturation of the crumb.

Notes

These tropical coconut and pineapple cottage cheese muffins are moist and fluffy, thanks to blended cottage cheese and juicy pineapple, with a sunny coconut aroma from toasted shredded coconut. For best texture, drain the pineapple well and lightly whisk the eggs before adding them to the batter. If you need a gluten-free option, substitute the all-purpose flour with a 1:1 gluten-free flour blend and consider adding an extra tablespoon of milk or juice to compensate for moisture; sift the flour with the baking powder and baking soda to distribute leaveners evenly and prevent dense spots. Toast the coconut lightly in a dry skillet to deepen flavor before folding into the batter. You can customize with 1/3 cup chopped macadamia nuts or 1/4 cup candied pineapple for extra bite. To finish, reserve some pineapple juice to adjust moisture if the batter seems too stiff, or use it in a quick glaze by mixing with powdered sugar. Muffins can be topped with the additional 2 tablespoons shredded coconut for a browned crust. Bake at 350°F (180°C) until golden and a toothpick comes out clean; cool in the pan briefly before transferring to a rack. These muffins freeze well and make a great grab-and-go option; reheat in a moderate oven or in the microwave as desired. For a glossy finish, whisk 2 tablespoons pineapple juice with 1/3 cup powdered sugar and drizzle after muffins cool. Always ensure your cottage cheese is smooth and creamy and consider dairy-free swaps like melted coconut oil if you prefer a dairy-free version.

Tips

Tips for Making Coconut and Pineapple Cottage Cheese Muffins

  • Temperature matters. Use room-temperature eggs for better emulsification with the melted butter. If your eggs are cold, lightly whisk them before mixing to speed up incorporation.
  • Prepare the dairy and dairy-free options. If you want a lighter, dairy-free version, substitute melted coconut oil for the butter and optionally increase liquid slightly to compensate for the lack of fat tenderness.
  • Blend cottage cheese for a smooth batter. Blending the cottage cheese until smooth helps prevent curds from creating a grainy texture. If you prefer a bit of texture, pulse briefly to keep small curds.
  • Sift dry ingredients with leaveners. Sift flour, baking powder, baking soda, and salt together to ensure even rise and a tender crumb. This also helps prevent dense patches in the muffins.
  • Mind the sugar balance. If you cut sugar, consider 1/3 cup or substitute with light coconut sugar for deeper flavor. Sugar contributes browning and moisture retention as the muffins bake.
  • Toast the coconut for depth. Lightly toast the shredded coconut in a dry pan until fragrant before folding it in to intensify tropical aroma and flavor.
  • Drain pineapple well. Drain crushed pineapple completely, reserving 1–2 teaspoons of juice to adjust moisture if the batter seems stiff. Excess juice can make muffins soggy.
  • Moisture balance with pineapple juice. If the batter is too stiff, whisk in a small amount of reserved pineapple juice or add a splash of milk to loosen it.
  • Enhance flavor with extract. A teaspoon vanilla helps lift tropical notes; for a stronger coconut aroma, add 1/2 teaspoon coconut extract along with the vanilla.
  • Fold in add-ins evenly. If using macadamia nuts or candied pineapple, toast the nuts first for richer flavor and chop evenly to prevent sinking.
  • Don’t overmix after adding dry ingredients. Stir just until combined to avoid a tough, dense crumb. It’s okay if there are a few small lumps.
  • Fill cups properly. Fill muffin cups about 2/3 to 3/4 full to encourage domed tops and even rise without overflow.
  • Topping and glaze help. Press extra shredded coconut on the batter surface for a browned crust. If using the glaze, whisk pineapple juice with powdered sugar until smooth and drizzle after cooling for a glossy finish.
  • Storage and freezing. Store cooled muffins in an airtight container at room temperature for 2–3 days, or freeze for longer storage. Reheat briefly for best texture.
  • gluten-free option. For a gluten-free version, substitute with a 1:1 gluten-free flour blend and consider adding an extra tablespoon of milk or juice to compensate for moisture. Sift with leaveners and fold gently just before baking.
  • Always preheat your oven. Preheating ensures the muffins start rising immediately for a lighter texture. Bake at a moderate temperature (around 350°F/175°C) and test doneness with a toothpick—clean or with a few moist crumbs is ideal.

FAQ

What makes Coconut and Pineapple Cottage Cheese Muffins unique?

These muffins blend protein-rich cottage cheese with tropical pineapple and coconut for moist, fluffy bites. The cottage cheese adds moisture and tenderness, while the fruit and coconut provide bright flavor.

What ingredients do I need to make them?
  • 1 cup cottage cheese
  • 3/4 cup crushed pineapple, well drained
  • 1/2 cup shredded coconut (sweetened or unsweetened)
  • 1 1/2 cups all-purpose flour (or 1:1 gluten-free flour blend)
  • 2/3 cup granulated sugar (or coconut sugar for a lower-glycemic option)
  • 2 large eggs
  • 1/3 cup neutral oil (vegetable or canola) or melted coconut oil
  • 1 teaspoon baking powder
  • 1/2 teaspoon baking soda
  • 1/4 teaspoon salt
  • 1 teaspoon vanilla extract
  • Optional: 1 teaspoon lemon zest
Can I make these muffins gluten-free?

Yes. Use a 1:1 gluten-free flour blend in place of all-purpose flour. If your mix lacks xanthan gum, you may want to add 1/4–1/2 teaspoon to help with structure. The texture will be similar, though it may be slightly denser depending on the blend you choose.

Can I make these dairy-free?

To make dairy-free, substitute cottage cheese with a smooth dairy-free alternative such as blended silken tofu with a splash of dairy-free yogurt or plant-based yogurt. Use the same amounts and proceed with the rest of the recipe as-is. You may also use a dairy-free oil like avocado oil.

How should I handle the pineapple to avoid soggy muffins?

Drain the crushed pineapple well and pat dry with paper towels to remove excess moisture. Lightly pat the cottage cheese to remove retted moisture if very watery. Folding in well-drained pineapple helps keep the muffins tender without becoming soggy.

What are the baking tips for perfect muffins?

Tips for best results: mix until just combined (lumps are okay); don’t overmix the batter to avoid toughness; fill muffin cups about 2/3 full; bake in a preheated oven until a toothpick comes out clean; if you like extra coconut flavor, sprinkle a few extra coconut flakes on top before baking.

What temperature and how long do I bake them?

Bake at 350°F (175°C) for 18–22 minutes, or until the tops are lightly golden and a toothpick inserted into the center comes out clean. Oven temperatures can vary, so start checking at 18 minutes.

How should I store or refrigerate leftovers?

Store cooled muffins in an airtight container. At room temperature, they stay fresh for about 2 days. Refrigerate for up to 5 days. To retain moisture, you can wrap each muffin in plastic wrap or foil before refrigerating.

Can I freeze these muffins?

Yes. Freeze baked muffins in an airtight container or freezer bag for up to 1–2 months. Thaw at room temperature or warm briefly in a 325°F (165°C) oven for a few minutes to restore softness.

How can I customize flavors or add-ins?

Try these ideas:
– Add 1/4 cup chopped nuts (walnuts or pecans) for crunch.
– Increase coconut to 3/4 cup for a stronger coconut flavor.
– Add a tablespoon of pineapple juice to the wet ingredients for extra pineapple brightness.
– Swap 1/2 cup of flour for an equal amount of almond flour for a nuttier texture (note: almond flour yields denser muffins).
– Zest a bit more citrus (lemon or lime) to enhance the tropical zing.

Introduction / Hook

Imagine a warm, sunlit morning where the air smells faintly of vanilla and butter, and the kitchen hums with the soft clink of a mixing bowl. Out comes a tray of muffins that look like little clouds—light, tender, and impossibly fluffy—with a delicate tang that hints at the cottage cheese tucked inside. These are Fluffy Cottage Cheese Muffins: not just a treat, but a comforting breakfast or afternoon snack that feels both indulgent and wholesome in every bite. The secret is in the crumb: the cottage cheese lends moisture and lift, while minimal mixing keeps the batter airy, so each muffin rises like a soft sunrise in your muffin cups. They’re the kind of muffins you reach for when you need a quick mood boost, a gentle hug from the oven, and a recipe you can trust to deliver cozy texture without heaviness. The aroma alone invites conversation—talk of weekend brunches, lazy Sundays, and the small rituals that turn a simple snack into a memory. Welcome to a recipe that celebrates simplicity and tenderness, with the bright zing of citrus and a hint of sweetness that never overwhelms the delicate tang of cottage cheese. With every bite, you’ll feel the warmth of home and the joy of a treat that feels familiar, yet intriguingly fresh.

The Story Behind the Dish

Cottage cheese has long enjoyed a quiet, versatile role in kitchens around the world. Its soft curds and mild flavor make it a natural partner for baked goods, where it brings extra moisture and a tender crumb without weighing things down. The idea of muffins built around cottage cheese taps into a timeless truth: humble dairy, when used thoughtfully, can elevate everyday baking into something special. In many cultures, cottage cheese or similar curd cheeses have been folded into batters to create soft, cushiony textures—whether in sweet breads, pierogis, or light pastries. This recipe takes that spirit and translates it into a modern muffin that’s equally at home on a weekday breakfast plate or a weekend brunch table. The result is a pastry that embodies comfort without excess, a slice of sunshine you can carry with you in a paper wrapper. There’s a little bit of nostalgia in the air—the memory of family kitchens, where a warm oven and a plate of muffins could brighten a morning, a trip, or a quiet moment of self-care. And yet, the technique remains refreshingly simple: blend, fold, and bake until the batter catches a delicate, pale glaze of gold. The cottage cheese does more than add moisture; it lends a subtle, creamy lift that makes the muffins feel airy rather than crumbly, just sweet enough to satisfy cravings while leaving room to savor the flavor of vanilla, lemon, or berries that you might fold in. This is baking that invites you to slow down, inhale the scent of warm batter, and trust that a few honest ingredients can yield something wonderfully special.

Why You’ll Love This Recipe

  • Effortless lightness: thanks to the cottage cheese, the muffins stay incredibly fluffy with a delicate crumb that melts in your mouth.
  • No heavy mixing required: a few simple folds are all you need, making this approachable for bakers of all levels.
  • Protein boost with a comforting texture: cottage cheese adds protein and moisture, turning a simple snack into something a little more nourishing.
  • Versatile flavor base: the tang of dairy, the brightness of citrus, and optional add-ins (berries, nuts, or a touch of zest) pair beautifully with a range of toppings or glazes.
  • Make-ahead friendly: the batter-friendly nature of these muffins makes them ideal for batch-baking and busy mornings.
  • Kid-friendly and grown-up at the same time: the taste is familiar and comforting, yet refined enough for weekend gatherings.
  • Great for a variety of diets with easy substitutions: you can adapt to gluten-free or dairy-free preferences while keeping that signature tenderness.
  • Visible results: the tops bloom into gentle domes with a faint crackly surface, signaling that the inside is pillowy and perfectly cooked.
  • Perfect for pairing: they work beautifully with coffee, tea, or a glass of cold milk, making them a versatile companion for any seasonal mood.

Flavor Profile & Texture

The flavor profile of Fluffy Cottage Cheese Muffins sits at a welcoming crossroads: a soft, creamy base with a whisper of tang from the cottage cheese, a kiss of sweetness, and a bright citrus note that lifts the palate. The mild dairy tang is not sharp but rather gentle, like a friendly whisper that says “comfort” while still exciting the senses. Vanilla smooths the edges, creating a warm, almost custard-like undertone that makes the muffins feel luxurious without being heavy. If you opt for lemon zest or orange zest, you add a citrus perfume that enhances the lightness and brings a clean, fresh finish to each bite. The crumb is remarkably tender—almost silk-like on the inside—yet it holds together with the structure provided by a touch of flour and the lift from any leavening used. Outside, the muffin tops may develop a subtle, delicate crust—golden, slightly crisp at the edges, offering a gentle contrast to the soft interior. If you choose add-ins like fresh berries, chopped nuts, or a sprinkling of coarse sugar, you’ll enjoy bursts of sweetness or crunch that punctuate the homogeneous, cloud-like texture. The overall mouthfeel is a celebration of balance: moist but not wet, airy but not fragile, and sweet enough to satisfy without dulling the nuanced dairy flavor. This is a muffin that tastes like a warm, comforting breakfast, yet feels light enough to dream about as a mid-afternoon pick-me-up.

Occasions & Pairings

Fluffy Cottage Cheese Muffins are a flexible option for many occasions. They shine as a quick weekday breakfast when you’re rushing out the door but still crave something homemade. They also elevate weekend brunch, offering a kid-friendly addition to a spread of eggs, fruit, and yogurt. The muffins are equally at home as a coffee companion or a teatime treat, where their gentle sweetness and tender crumb can slow down the pace of a busy afternoon. For holidays or casual gatherings, these muffins can serve as a reliable crowd-pleaser, easily dressed up with citrus glaze, a dusting of powdered sugar, or a light lemon yogurt drizzle. Pairing ideas to enhance their charm include:

  • With beverages: a robust cup of coffee or a lightly brewed tea; a glass of cold citrus-infused water or a small glass of milk for kids.
  • Accompaniments: fresh fruit salad, a dollop of yogurt or a spoon of jam, or a simple drizzle of honey to create a layered sweetness.
  • Side dishes: a plate of overnight oats, a fruit compote, or a small cheese board that nods to the dairy theme without competing with the muffins.
  • Seasonal variations: in winter, pair with cinnamon-spiced yogurt or a warm fruit compote; in spring, highlight berries and lemon zest for brightness; in autumn, add a touch of nutmeg and toasted pecans for warmth.

Flavor Pairing & Texture Details

To maximize flavor harmony, consider how the muffin’s textures interact with each other. The moist center, courtesy of cottage cheese, benefits from a hint of zest or a splash of vanilla that keeps the taste lively without overshadowing the dairy note. Tortilla-soft crumb inside plays against the slight crust formed on the edges during baking, offering a subtle crunch to contrast with the interior softness. When you introduce add-ins like blueberries or raspberries, their tart juice bursts punctuate the gentle sweetness and create a soft, juicy bite that complements the cottage cheese’s creamy texture. Nuts, if used, contribute a pleasant nutty aroma and a gentle crunch that adds depth without making the muffins feel heavy. A light glaze or a dusting of sugar on top can transform the surface into a glossy, appealing finish that invites you to bite in and experience the initial crisp snap giving way to a tender center. The overall flavor is approachable and comforting, a subtle sophistication that makes these muffins feel appropriate for a quiet morning at home or a cheerful gathering with friends and family.

Tips, Variations & Substitutions

  • Make it lighter with dairy-free options: use a plant-based cottage cheese substitute or blended silken tofu to mimic the creaminess, and choose a dairy-free yogurt or yogurt alternative to maintain moisture.
  • Gluten-free adaptation: replace all-purpose flour with a gluten-free 1:1 baking blend. Check for proper binding agents in the blend to keep the crumb cohesive.
  • Vary the flavor: add lemon or orange zest for brightness; a pinch of ground cardamom or almond extract can create a warm, aromatic profile that’s distinct from the standard vanilla.
  • Berry boost: fold in fresh or frozen berries for pockets of tart sweetness. Blueberries work particularly well because their juiciness pairs beautifully with the dairy base.
  • Nut-free by default: omit any nuts if you’re baking for those with allergies, but a light sprinkle of rolled oats on top can add texture without introducing allergen risk.
  • Heritage twists: incorporate a small amount of tangy yogurt in place of some cottage cheese to vary acidity and creaminess, or fold in a handful of finely chopped fresh herbs (like chives) for a savory-sweet hybrid experience.
  • Size and bake time adjustments: for mini muffins, reduce bake time accordingly and monitor for doneness to avoid drying out the interior.
  • Sweetness control: control sugar by using less sugar in the batter or opting for a natural sweetener (like mashed ripe banana) to maintain moisture and flavor balance without overt sweetness.

Storage & Make-Ahead Ideas

The beauty of these muffins lies in their resilience. They store well, stay moist, and can be enjoyed over several days when kept properly. Here are practical tips to maximize freshness and convenience:

  • Room temperature storage: store in an airtight container at room temperature for up to 2-3 days. If your climate is warm or humid, consider refrigerating to extend freshness, though refrigeration can slightly alter texture.
  • Refrigeration and reheating: reheating briefly in a microwave or a warm oven helps restore the softness of the crumb and revives aromas of vanilla and citrus.
  • Freezer-friendly: once cooled, freeze muffins individually wrapped in parchment or plastic wrap. They can be frozen for up to 2-3 months. Thaw at room temperature or warm directly from the freezer for a quick breakfast.
  • Make-ahead strategy: prepare a large batch of muffins and freeze; in the morning, simply reheat a few to serve immediately, turning a rushed routine into a comforting ritual.
  • Flavor longevity: to preserve fresh taste, add any zests or citrus toppings after thawing rather than freezing with them mixed in, ensuring the bright scents remain vibrant when you eat them.

Fun Facts & Trivia

Fun tidbits about cottage cheese and muffins add a layer of charm to the recipe. Cottage cheese has a storied history across many cultures as a practical way to preserve milk’s goodness. Its curds form the creamy backbone that bakers have long exploited to soften crumb and add moisture. The “muffin” itself—derived from medieval English terms for small cakes—has evolved into a soft, lightly domed treat that can carry a variety of fillings and flavors. In some regions, similar dairy-based batters have been used to create airy, quilted textures that feel almost like a cross between a cake and a bread—an early form of what we now lovingly call a muffin. The combination of cottage cheese with a simple baking approach is a nod to both frugality and comfort: a reminder that great taste can come from humble ingredients, treated with care and a gentle touch of creativity. If you listen closely while these muffins bake, you might imagine a kitchen filled with the soft rustle of parchment, the clink of measuring cups, and the soft sigh of the oven as it welcomes a batch of little clouds into the world.

Ingredients

Muffin Base

    – 1 1/2 cups all-purpose flour
    → Provides structure and body to the muffins. Sift the flour or whisk with the dry ingredients to ensure a light, even crumb, and measure by spooning into the cup and leveling off to avoid compacting; for a lighter texture, replace up to 1/3 of the flour with a cake flour blend or use a 1:1 gluten-free flour blend with 1/4 teaspoon xanthan gum per cup if you need a gluten-free version.
    – 1/2 cup granulated sugar
    → Sweetness and browning; helps create a tender crumb by slightly inhibiting gluten formation. Dissolve evenly in the wet ingredients for even sweetness; For a lighter version, reduce to 1/3 cup or substitute with 2 tablespoons honey; If using sweetened cottage cheese, adjust sugar accordingly.
    – 2 tsp baking powder
    → Leavening agent ensuring rise and fluffy crumb; distribute evenly with flour for uniform lift; Use fresh baking powder (opened within last 6 months); test by spritzing a pinch into warm water to see fizz; Do not overmix or the muffins become peaked and dense.
    – 1/2 tsp baking soda
    → Additional leavening and helps browning; reacts with acidity from cottage cheese to produce extra lift; Avoid using too much or your muffins will taste metallic; If substituting with yogurt, ensure acidity balance; Allow batter to rest briefly to hydrate baking soda for best rise.
    – 1/4 tsp salt
    → Flavor enhancer and to help balance sweetness; improves tenderness and overall flavor; Use fine table salt for accuracy; If using salted butter, reduce salt to 1/8 tsp to avoid over-salting.
    – 1 cup cottage cheese, smooth
    → Main moisture and protein source that yields a soft, fluffy crumb; For best results, blend cottage cheese until completely smooth before mixing with wet ingredients. If your cottage cheese is very watery, drain a bit or pat dry; using low-fat cottage cheese may produce a lighter crumb, but full-fat yields richer texture. For ultra-smooth batter, pass through a blender or sieve.
    – 2 large eggs
    → Bind and structure the batter; provide moisture and lift; Bring eggs to room temperature for better emulsification, whisk briefly before adding to the mixture. If you need a vegan alternative, use 1/4 cup unsweetened applesauce plus 1 tablespoon ground flaxseed mixed with 3 tablespoons water per egg; note that crumb and rise will differ slightly.
    – 1/3 cup milk
    → Additional moisture and helps thin the batter to a scoopable consistency appropriate for muffins; Choose dairy or non-dairy depending on preference. If using very moist cottage cheese, you may reduce the milk to 2–3 tablespoons; For tang, use buttermilk or add 1 teaspoon lemon juice to dairy-free milk to mimic acidity.
    – 1/4 cup unsalted butter, melted
    → Fat contributes tenderness, moisture, and flavor; Melted butter blends evenly into the batter, preventing greasy pockets. If you prefer a lighter texture, substitute with 1/4 cup neutral oil; Let the butter cool slightly before mixing with eggs to avoid curdling the mixture.
    – 1 teaspoon vanilla extract
    → Flavor foundation that complements cottage cheese; If using vanilla bean paste, use the same amount. For extra aroma, you can add a pinch of salt or some lemon zest to brighten the flavor. Use real vanilla for best results; store in a cool, dark place to maintain potency.

Optional Add-ins

    – 1/2 cup fresh blueberries
    → Adds pockets of sweetness and color; Blueberries hold up well in muffins. Toss berries with 1 tablespoon flour to prevent sinking, fold gently into batter at the end to maintain shape; If using frozen, thaw and pat dry; Do not overmix to avoid bleeding color into the batter.
    – Zest of 1 lemon
    → Brightens flavor and pairs nicely with blueberries; Use only the yellow zest, avoiding the white pith which can be bitter. Add to the wet ingredients with the vanilla; For extra brightness, add a teaspoon of lemon juice as well.
    – 1/2 cup chopped nuts
    → Provides crunch and flavor; Toast nuts lightly (6–8 minutes at 350°F) to intensify aroma, then chop into even pieces for even distribution. If you have nut allergies, omit or substitute with toasted seeds or rolled oats for crunch.
    – 1/4 cup mini chocolate chips
    → Adds chocolatey sweetness; Coat chips in a teaspoon of flour before folding to distribute more evenly and prevent sinking; Fold in at the end to keep chips from melting into the batter; Use semisweet or dark chocolate for a deeper flavor; For dairy-free, ensure chips are labeled dairy-free.

Instructions

  • Preheat your oven to 350°F (175°C) and line a 12-cup muffin tin with paper liners or grease it well.
    → This ensures the muffins do not stick to the tin and makes them easier to remove after baking, creating clean edges and a professional finish.
  • Blend the cottage cheese until completely smooth in a blender or food processor.
    → A smooth puree integrates evenly into the batter, preventing lumps that could create crumbly pockets and dense texture.
  • Sift together the all-purpose flour, granulated sugar, baking powder, baking soda, and salt in a large mixing bowl.
    → Sifting distributes leavening evenly, lightens the mixture, and prevents clumps that would hinder rise.
  • Whisk the eggs, milk, melted unsalted butter (cool to warm), and vanilla extract in a separate bowl until the mixture is smooth and homogeneous.
    → Warming the butter prevents it from re-solidifying and helps emulsify the batter for a tender crumb.
  • Whisk the smooth cottage cheese into the wet mixture until fully integrated.
    → Incorporating the cheese at this stage ensures moistness and a uniform texture throughout the muffins.
  • Pour the wet mixture into the bowl of dry ingredients and stir with a spatula just until the batter comes together and no large pockets of dry flour remain.
    → Gentle stirring minimizes gluten formation, yielding a light, tender crumb without tunnels or toughness.
  • Add lemon zest to the batter if using, and whisk gently to distribute the bright citrus evenly.
    → The zest provides aromatics that brighten the muffin flavor; whisking in small amounts prevents concentrated spots.
  • If using blueberries, toss them with 1 tablespoon of flour to prevent sinking, then add to the batter.
    → Coating berries with flour reduces moisture release during baking, helping berries stay suspended and maintain color.
  • Gently fold in any optional add-ins (blueberries, chopped nuts, or mini chocolate chips) into the batter until evenly distributed.
    → Fold with a gentle motion to preserve airiness; overmixing or overworking the batter will compact the crumb.
  • Scoop or spoon the batter into the prepared muffin cups, filling each about two-thirds full for optimal rise and domed tops.
    → This portion size creates even muffins with a nice crown and prevents overflow during baking.
  • Bake in the preheated oven for 18–22 minutes, or until the tops are lightly golden and a toothpick inserted into the center comes out with a few moist crumbs.
    → Oven calibration varies; start checking around 18 minutes to prevent overbrowning and ensure a moist, tender interior.
  • Let the muffins rest in the pan for 5 minutes after baking, then transfer to a wire rack to cool completely.
    → Resting allows the steam to escape gradually and the crumb to set, making removal easier and preventing soggy bottoms.
  • Store cooled muffins in an airtight container at room temperature for up to 3 days, or freeze for longer storage; rewarm as desired.
    → Proper storage preserves moisture and texture, while freezing extends shelf life without sacrificing crumb.

Notes

“These fluffy cottage cheese muffins are light, moist, and protein-rich thanks to the cottage cheese, yielding a tender crumb with a subtle tang. To customize, fold in fresh blueberries, lemon zest, chopped nuts, or mini chocolate chips; toss any berries in a teaspoon of flour to prevent sinking. For best texture, blend the cottage cheese until completely smooth, bring eggs to room temperature, and avoid overmixing once the wet and dry ingredients meet. If your cottage cheese is very watery, drain briefly or pat dry and adjust the milk to reach a scoopable batter. Bake until a toothpick comes out clean and the tops are lightly golden. They freeze well and reheat nicely for a quick breakfast or snack; rewarm in a 350°F oven for a few minutes or in the microwave in short bursts. For an extra treat, serve with a dollop of yogurt or a drizzle of honey or maple syrup. Always ensure your cottage cheese is well-drained and smooth for ultra-light muffins.”

Tips

Tips for Perfect Fluffy Cottage Cheese Muffins

  • Temperature and texture: Let cottage cheese, eggs, and milk come to room temperature before mixing to improve emulsification and even hydration.
  • Smooth the base: For ultra-smooth batter, blend cottage cheese until completely smooth, or press through a fine sieve; drain any excess whey if very watery for a softer crumb.
  • Measure dry ingredients correctly: Sift or whisk dry ingredients together, then spoon into the cup and level off to avoid dense muffins; this helps a light crumb.
  • Avoid overmixing: Stir just until flour disappears; overmixing develops gluten and can make muffins peaked and dense. Use a gentle folding motion with a spatula.
  • Fresh leavening: Use fresh baking powder and baking soda; test baking powder by a quick fizz test with warm water; replace if older than 6 months for reliable rise.
  • Resting the batter: Allow batter to rest 5–10 minutes after mixing; this hydrates the leaveners and improves rise and tenderness.
  • Filling tips: Fill muffin cups about 2/3 to 3/4 full to leave room for expansion; avoid overfilling which can cause domed or sunken tops.
  • Incorporating add-ins: Toss add-ins like blueberries with a teaspoon of flour to prevent sinking; fold in at the end to preserve shape and color; if using frozen berries, do not thaw completely.
  • Moisture balance: If your cottage cheese is very wet, drain lightly or pat dry; you may reduce milk by 1–2 tablespoons to maintain scoopable batter.
  • Flavor boosters: Add lemon zest with vanilla for brightness; a teaspoon of lemon juice can enhance tang when using dairy-free milk.
  • Butter vs oil: Melted butter adds flavor and tenderness; if you want a lighter texture, substitute with 1/4 cup neutral oil; cool butter slightly to prevent curdling when added to eggs.
  • Testing doneness: Bake until a toothpick inserted in the center comes out with a few moist crumbs; rotate the pan halfway for even browning; avoid overbaking to keep muffins moist.
  • Storage and freshness: Cool completely before storing; keeps 2–3 days at room temperature in an airtight container or freeze for longer; rewarm gently to revive softness.

FAQ

Fluffy Cottage Cheese Muffins — FAQ

What makes these muffins fluffy?

Fluffiness comes from blending the cottage cheese until smooth to create a light, airy batter, plus eggs for structure and a gentle fold of the batter with leavening agents. Avoid overmixing after adding dry ingredients to keep them tender.

What ingredients do I need to make Fluffy Cottage Cheese Muffins?

Basic ingredients (yields about 12 muffins):

  • 1 cup cottage cheese (smooth)
  • 2 large eggs
  • 1/2 cup granulated sugar
  • 1/2 cup milk (d dairy or non-dairy)
  • 3/4 cup all-purpose flour
  • 1 teaspoon baking powder
  • 1/4 teaspoon salt
  • 2 tablespoons melted butter or neutral oil
  • 1 teaspoon vanilla extract
  • Optional: lemon zest, berries, or chocolate chips
Can I substitute cottage cheese with something else?

Yes. You can use ricotta or cream cheese for a similar texture. For dairy-free or lighter options, blend silken tofu with a splash of dairy-free milk or use dairy-free yogurt; eggs can be replaced with flax eggs or applesauce if needed.

Are these muffins gluten-free?

They can be made gluten-free by using a 1:1 gluten-free all-purpose flour blend in place of all-purpose flour. GF flours may affect texture slightly, so you might need a touch more or less liquid.

Can I make them dairy-free or egg-free?

Yes. For dairy-free, use dairy-free cottage cheese alternatives (or silken tofu blended with dairy-free milk) and a dairy-free fat. For egg-free, replace eggs with 2 flax eggs (2 Tbsp ground flax + 6 Tbsp water per egg, mixed and rested) or use 1/2 cup applesauce total for two eggs.

How long and at what temperature should I bake them?

Preheat to 350–375°F (175–190°C). Line or grease a muffin tin. Bake 18–22 minutes, or until a toothpick inserted into the center comes out clean. Baking times may vary with muffin size or oven, so start checking at 18 minutes.

How should I store or freeze the muffins?

Store at room temperature in an airtight container for 1–2 days, or refrigerate up to 5 days. Freeze them for up to 3 months. Thaw at room temperature and reheat briefly in the microwave or oven.

Can I add mix-ins like berries or chocolate chips?

Absolutely. Fold in about 1 cup of mix-ins such as blueberries, raspberries, chopped berries, or chocolate chips after the batter is combined. If using sweet mix-ins, you may want to slightly reduce the sugar.

How can I prevent muffins from sinking or becoming dense?

Use fresh leavening (baking powder), measure ingredients accurately, and avoid overmixing once dry ingredients are added. Ensure your cottage cheese is well blended and not watery, and bake until just set rather than underbaking. Do not open the oven door mid-bake.

Can I make mini muffins or larger muffins?

Yes. For mini muffins (about 24 mini cups), bake about 12–15 minutes. For larger muffins, bake 20–25 minutes. Adjust time accordingly and perform a toothpick test.

Introduction / Hook

Imagine a sunny bowl bright with ruby-red strawberries, glistening with a whisper of balsamic glaze, and settled on a bed of emerald greens. The first bite is a revelation: the sweetness of ripe berries breaks open to reveal a tangy, slightly smoky kiss of aged balsamic, while the greens offer a crisp, peppery counterpoint. A handful of toasted nuts adds a honeyed crunch, and a delicate crumble of cheese—creamy and savory—pulls the whole ensemble into a comforting harmony. Balsamic Strawberry Salad is a celebration of contrast: sweet and tart, soft and crunchy, rustic and elegant, all in one bowl. It’s a dish that feels both summery and sophisticated, a breeze of brightness that can light up weeknights, brighten brunches, and serenade picnics with the same effortless charm. If you’ve ever wished for a salad that tastes like sunshine, this is it—an edible postcard from the garden, a quick jaunt to the farmers market in a single spoonful, and a reminder that simplicity, when done well, can be spectacular.

What sets this salad apart is its balance and versatility. It doesn’t rely on heavy sauces or complicated techniques; instead, it leans on the natural sweetness of strawberries, the resinous, mature sweetness of balsamic, and the fresh, peppery bite of greens to create a melody that sings with minimal effort. It’s forgiving enough to stretch from a fast weeknight dinner to a special-occasion accompaniment, and it wears dressing lightly—enough to unite flavors, but not overwhelm them. The dish invites you to play with textures: juicy berries that burst with every bite, crunchy nuts for contrast, creamy cheese for a savory lull, and greens that offer a cool, refreshing backbone. The result is something you’ll reach for again and again, a reliable crowd-pleaser that makes everyday meals feel a touch more intentional, and every bite feel like a little celebration.

The Story Behind the Dish

The marriage of strawberries and balsamic is a modern twist on two ingredients with storied pasts. Strawberries have traveled a long road from the forests of Europe to the cultivated varieties of today, carrying with them the scent of warm afternoons, berry-laden fields, and grandmother’s jam jars. Balsamic vinegar, meanwhile, carries the history of aging rooms and wooden barrels in Modena and nearby regions of Italy. Traditionally produced from grape must and aged for years, balsamic develops a deep sweetness and a complexity that hints at fig, raisin, and dark fruit—an elixir that can elevate a simple dish into something memorable. When these two ingredients meet in a salad, you’re witnessing a culinary narrative: the bright, sun-warmed fruit meets the dark, contemplative glaze, like a conversation between summer and tradition.

There’s a story behind why many home cooks gravitate toward this pairing. In Italian kitchens, salads are not mere side dishes; they’re vibrant courses, finishing bursts of color and flavor that bridge the gap between course to course without apology. A drizzle of balsamic over strawberries, greens, and a few nuts was popularized as a way to bring complexity to a light meal, especially during warm months when heavy sauces feel out of place. The combination works because balsamic’s sweetness isn’t cloying; it’s nuanced, often with a hint of acidity that wakes the palate just enough to transform simple greens into something more inviting. The dish has since traveled across continents, picking up Western garden herbs, bold cheeses, and crunchy toppings along the way, all while retaining its core identity: a bright, balanced, quick-to-make salad that tastes of sunshine but finishes with a sophisticated tang.

Why You’ll Love This Recipe

  • Quick to assemble: No long simmering, no complicated techniques—perfect for weeknights or last-minute meals.
  • Bright and balanced flavor: The natural sweetness of berries is tempered by the acidity and depth of balsamic, with greens adding a crisp counterpoint.
  • Texture galore: Juicy strawberries, crunchy toasted nuts, creamy cheese, and tender greens keep every bite interesting.
  • Versatile and forgiving: Easily adaptable to what you have on hand; swap greens, nuts, or cheese to suit your pantry or diet.
  • Seasonal and presentable: The color contrast makes it a visually striking dish for brunches, picnics, or light entertaining.
  • Healthy and satisfying: Packed with fiber from greens and fruit, healthy fats from nuts, and protein from cheese (or plant-based substitutes).

Flavor Profile & Texture

The core flavor of Balsamic Strawberry Salad is a study in balance. The strawberries bring a perfumed sweetness that feels almost floral at the peak of ripeness. When you bite into one, you might notice hints of strawberry jam and a touch of citrus—it’s a brightness that lifts the dish from mere fruit to the star of a salad. The balsamic, ideally a well-aged, slightly syrupy variety, darkens the fruit’s sweetness with a dignified tang and a whisper of woodiness. It’s not harsh or sharp; it’s polished and complex, a glaze that lightly clings to surfaces and lingers on the palate to invite the next bite.

The greens—often a mix of peppery arugula, spinach, or butter lettuce—offer a cool, crisp foundation. Their bitterness or mildness helps balance the sweeter notes, giving the salad a refreshing edge rather than a cloying sweetness. Toasted nuts add a toasty, nutty aroma and a satisfying crunch that punctuates the softness of the fruit and the creaminess of cheese, if you choose to include it. The optional cheese, such as creamy feta or tangy goat cheese, contributes a savory, almost tangy push that ties the salad together, while the nuts bring a toasty, slightly caramelized note. The entire mouthful moves from bright to rich to clean, ending on that brisk, refreshing finish that makes you reach for another bite without thinking.

Texture is as important as flavor here. The juicy, plump berries burst with juice; the greens provide a crisp bite; the nuts offer a crisp crunch and a hint of fat that carries the dressing; and the cheese, when used, melts into the background, adding compound flavor without heaviness. This is a salad that plays across the palate, encouraging a sequence of sensations rather than a single, flat note. It’s light enough for a warm evening, yet substantial enough to pair with a small protein or a crusty piece of bread for a more composed meal. The aroma—sweet berries, vine-kissed greens, and a wisp of balsamic—is inviting, almost hypnotic, and lures you into a moment of slow, mindful tasting that makes you savor each component and how well they harmonize together.

Occasions & Pairings

This salad is a versatile guest at many tables, from casual summer lunches to holiday spreads where you want a lighter counterpoint to richer dishes. It shines as a centerpiece for a bright weeknight dinner on its own, but it also works beautifully as a side—paired with grilled chicken, a seared scallop, or a slice of smoked salmon. For brunch, it offers a refreshing counterpoint to eggs, avocado toast, or a frittata. It’s equally at home at a potluck or picnic; it travels well if kept chilled and dressed just before serving to prevent the greens from wilting.

Pairings to consider include:

  • Proteins: Grilled chicken, roasted turkey, seared halloumi or halloumi’s vegetarian counterpart, or a delicate poached fish for a lighter option.
  • Breads and grains: Crusty baguette slices, herbed focaccia, or a barley or quinoa pilaf to make the plate feel more substantial.
  • Drinks: A crisp white wine like Sauvignon Blanc or a dry rosé can mirror the salad’s brightness, while sparkling water with a squeeze of lemon keeps things simple and refreshing.
  • Other sides: A lemony yogurt-cucumber dip or a light herb vinaigrette can be served alongside for added brightness and balance.

Tips, Variations & Substitutions

One of the wonderful aspects of Balsamic Strawberry Salad is how easily it adapts to different tastes, dietary needs, and seasonal fruit availability. Here are ideas to customize and elevate it, without losing its essential spirit.

Vegan and dairy-free options

Skip the cheese or substitute with a plant-based cheese that melts or crumbles similarly. For a richer, dairy-free profile, add a little extra olive oil and a splash of lemon juice to brighten the greens and balance the balsamic.

Gluten-free and nut-free adaptations

Swapping toasted nuts for seeds, such as pumpkin or sunflower seeds, keeps the salad crunchy without the risk of nut allergies. Ensure that any store-bought dressings used are certified gluten-free if you need to be strict about gluten content.

Fruit variations

Strawberries are classic, but you can switch in other stone fruits as they come into season. Peaches, nectarines, or blueberries offer a different daily delight while preserving the same balance of sweet-tresh and tangy balsamic. When using stone fruits, slice them just before serving to maintain their texture.

Herbs and greens twists

Experiment with fresh mint, basil, or cilantro for a herbal lift. Swap arugula for baby kale, butter lettuce, or a spring mix for varying textures and levels of bitterness.

Flavor boosters

For extra depth, drizzle a tiny amount of aged balsamic reduction instead of regular balsamic, or add a pinch of cracked black pepper to the greens before assembling. A whisper of citrus zest over the top can further brighten the dish.

Regional twists

In warm climates, a touch of citrus segments (orange or grapefruit) can replace some of the sweetness of the berries and add a refreshing zing. In Italian-leaning kitchens, a handful of fresh arugula and a crumble of feta can feel like a nod to coastal menus.

Storage & Make-Ahead Ideas

To preserve maximum flavor and texture, think in components rather than just as a finished salad. The assembly is quick, but the best results come from keeping elements separate until serving time.

  • Dressings: If you’re preparing the dressing ahead of time, store it in a sealed container in the refrigerator. Shake or whisk well just before using to re-emulsify the mixture.
  • Greens: For longer ahead prep, wash, spin dry, and refrigerate greens in a sealed container with a dry paper towel to absorb moisture. This helps keep the greens crisp when you dress the salad later.
  • Fruits: Strawberries can be washed and sliced ahead of time, but keep them refrigerated and covered to prevent them from weeping or absorbing too much moisture. If you anticipate extra moisture, consider adding berries just before serving or to lightly dressed greens to maintain texture.
  • Crunch and cheese: Toast nuts and crumble cheese close to serving time to maximize aroma and crunch. If you must prep earlier, store in an airtight container separately and add at the last moment for best results.
  • Make-ahead strategy: The dressings and greens can be prepared ahead, but assemble the salad no more than 15–20 minutes before serving to prevent wilting and to maintain a vibrant texture.

In many households, a few hours of fridge-time do wonders for flavors as the balsamic intensifies and the greens soak up just enough dressing to become cohesive without losing their bite. If you’re hosting a brunch or a light dinner, you can assemble the greens and wash the fruit earlier in the day, then finish with nuts and cheese, and a final touch of dressing just before you sit down. This approach keeps the salad looking crisp and tasting fresh, even after the morning rush of guests and activities.

Fun Facts & Trivia

Did you know that balsamic vinegar, especially the traditional varieties aged for years, can fetch high prices and be aged for decades? The slow aging in wooden barrels allows the vinegar to develop its characteristic sweetness, tang, and depth, much like wine. The color and intensity of balsamic can tell you a lot about its age and quality, with darker varieties often hinting at longer aging and more concentrated flavors. Strawberries, too, have a surprisingly long cultivation history, with various cultivars adapted to different climates around the world. In culinary traditions, the moment a ripe strawberry is cut, its fragrance releases immediately, a perfume that can enhance even the simplest salads when partnered with something as universally beloved as balsamic. The combination has become almost a modern classic, and once you’ve tasted it, you understand why: it’s a succinct, bright representation of how two classic pantry staples can collaborate to create something fresh, comforting, and memorable.

In a broader sense, this salad represents a culinary philosophy: let the ingredients speak for themselves, and use a minimal amount of technique to honor their natural character. It’s a gentle reminder that good food doesn’t have to come with exhaustive recipes or complicated steps. Sometimes, the simplest idea—greens, fruit, a drizzle of a rich glaze, and a touch of crunch—can become your most-loved dish of the week. The cultural crosscurrents in this salad—Italian balsamic heritage meeting the American emphasis on fresh, seasonal produce—mirror the global kitchen’s ongoing conversation about how to create vibrant flavors with respect for ingredients and a sense of whimsy.

Conclusion / Final Thoughts

Balsamic Strawberry Salad is more than a dish; it’s an invitation. An invitation to slow down, savor the moment, and celebrate the everyday beauty of seasonal produce. It’s a reminder that flavor can be bold without being heavy, that color can be a signal of joy, and that a well-balanced bite can transform a simple meal into a memory. Whether you’re feeding a crowd or indulging in a quiet night at home, this salad offers a flexible, dependable way to bring brightness to the table. So next time you’re seeking something that feels special yet effortless, reach for this salad. Let the strawberries, greens, and balsamic do the talking, and you’ll discover that the simplest combination can deliver the most delicious result.

Ingredients

Salad Base
  • 6 cups mixed greens (baby spinach, arugula, and/or romaine)
    → The leafy foundation of the salad. Rinse greens to remove grit and spin dry until completely dry; moisture on leaves will wilt the dressing and soften the greens, so dryness is essential for crisp texture. Choose a mix for varied flavors: spinach is mild, arugula adds peppery bite, and romaine provides crunch. If prepping ahead, store greens in a clean container with a paper towel to absorb moisture and keep them crisp.
  • 2 cups strawberries, hulled and sliced
    → Provides bright sweetness and acidity. Hull by removing the green caps and slice into even pieces so they distribute evenly throughout the salad. Prepare just before serving to prevent juice from pooling and softening greens; if possible, slice strawberries just before tossing to maintain texture.
Dressing
  • 3 tablespoons balsamic vinegar
    → Flavor base for the dressing: tangy-sweet with a syrupy edge. Use a high-quality aged balsamic for richer depth; if you only have a regular balsamic, you may want to slightly increase the honey to balance acidity. This amount yields a light dressing that lightly coats the greens without weighing them down.
  • 1/4 cup extra-virgin olive oil
    → Provides body and helps emulsify the dressing. Use a good-quality EVOO with fruity or peppery notes; whisk vigorously or shake in a mason jar to form a stable emulsion that clings to leaves. If you prefer a lighter finish, reduce to 2 tablespoons and compensate with more vinegar.
  • 1 tablespoon honey or maple syrup
    → Balances acidity from the balsamic and brightens the overall flavor. Honey gives richer sweetness and pairs nicely with the dairy and greens; maple offers a lighter, caramel-like sweetness that complements strawberries. Add to taste and whisk until fully incorporated.
  • 1 teaspoon Dijon mustard
    → Acts as an emulsifier and adds a subtle peppery warmth that helps the dressing cling to greens. Whisk or shake well to ensure a smooth, glossy emulsion; do not skip this step as it helps prevent the oil from separating.
  • 1 tablespoon fresh lemon juice (optional)
    → Adds brightness and balance if you want a more zippy dressing. Use freshly squeezed juice for best flavor; omit if you prefer a deeper balsamic note or if using a very sweet strawberry batch.
  • 1/2 teaspoon salt, to taste
    → Essential for seasoning. Start with a small amount, then taste and adjust; salt heightens the flavors of greens and berries and helps balance the dressing’s acidity.
  • 1/4 teaspoon freshly ground black pepper (optional)
    → A light kick that enhances the tangy-sweet profile. Freshly ground pepper provides more aroma than pre-ground; adjust according to heat tolerance.
Optional Add-ins
  • 1/4 cup crumbled goat cheese or feta (optional)
    → Adds creamy tang that complements the sweetness of the strawberries and the bitterness of the greens. Crumble and sprinkle over the salad just before serving to preserve texture and shape; keep cheese chilled to prevent it from melting into the dressing.
  • 1/3 cup toasted nuts (pecans or walnuts) (optional)
    → Provides crunch and a toasty, nutty flavor. Toast nuts in a dry skillet over medium heat until fragrant, about 3–5 minutes, stirring often; cool completely before adding to the salad to maintain crunch and prevent soggy pieces.
  • 1/4 red onion, thinly sliced (optional)
    → Adds sharp bite to balance the sweetness. Slice very thin and rinse in cold water or soak briefly to mellow pungency; pat dry before adding to the salad to maintain texture and color.

Instructions

  • Rinse the 6 cups of mixed greens in cold water to remove any grit or soil, then transfer them to a clean towel or a salad spinner and spin dry until every leaf feels completely dry; moisture on the surface will dilute the dressing and wilt the greens, so thorough drying is essential for crisp texture and vibrant color.
  • Tear or cut the greens into bite-sized pieces and arrange them in a large mixing bowl; this creates uniform portions for even dressing distribution and ensures each bite has a balanced mix of textures and greens.
  • Hull the 2 cups of strawberries by removing the green caps, then slice them into even pieces (about 4–6 slices per berry) and place the slices on a plate; preparing strawberries just before serving preserves their color and prevents juice from pooling, which can water down the salad.
  • In a small bowl, whisk together 3 tablespoons balsamic vinegar, 1 tablespoon honey, 1 teaspoon Dijon mustard, 1 tablespoon fresh lemon juice (optional), 1/2 teaspoon salt, and 1/4 teaspoon freshly ground black pepper until the mixture is smooth and cohesive; this base builds the dressing’s sweet-tinish, tangy, and rounded backbone while the mustard helps with emulsification.
  • Slowly drizzle in 1/4 cup extra-virgin olive oil while whisking vigorously to form a stable emulsion, or transfer the dressing to a mason jar, seal tightly, and shake vigorously for 15–30 seconds; emulsification binds the oil and acid so the dressing clings to the leaves rather than separating.
  • Taste the dressing and adjust as needed by whisking in a bit more honey for sweetness, a splash more lemon for brightness, or a pinch more salt to balance acidity; adjusting now ensures the final salad is well-seasoned from the start.
  • In a large mixing bowl, drizzle a portion of the dressing over the greens and toss with tongs in a lifting motion, turning the bowl so the leaves roll from the bottom to the top; toss until the greens are lightly coated and glistening, stopping before they look wet or heavy, to avoid sogginess.
  • Check the greens after the initial toss; if they appear under-dressed, add small increments of dressing and toss again until the leaves have a delicate sheen but are not swimming in dressing; this helps maintain texture and prevents overpowering acidity.
  • Add the sliced strawberries to the dressed greens and toss gently with a light, folding motion to distribute the berries without breaking them; strawberries release juice as they warm, so handle carefully to preserve color and shape for a visually appealing salad.
  • If using red onion, thinly slice 1/4 onion into very fine rings or shards, rinse under cold water for 10–15 seconds to mellow sharpness, pat dry, and scatter over the salad; the mild onion bite provides a contrasting note to the sweetness of the berries.
  • Optionally toast 1/3 cup nuts (pecans or walnuts) in a dry skillet over medium heat for 3–5 minutes, stirring often until fragrant and lightly browned, then cool completely before scattering over the salad to provide a crisp, nutty counterpoint to the greens and fruit.
  • Optionally crumble 1/4 cup goat cheese or feta over the salad just before serving to introduce creamy tang that complements the berries and greens, keeping the cheese well-chilled to maintain structure and prevent it from melting into the dressing.
  • Transfer the dressed salad to serving bowls or plates, finish with a light final drizzle of dressing if desired, and serve immediately to enjoy the bright balance of sweet, tangy, and peppery flavors while the greens stay crisp and the strawberries are vibrant.

Notes

These balsamic strawberry salad notes help you build a bright, crisp dish that shines with a tangy-sweet dressing and fresh fruit. Start with thoroughly washed and completely dry greens; moisture will weigh the leaves and dull the dressing, so spin dry, pat dry, and store greens in a container with a paper towel to keep crisp. Hull and slice the strawberries just before you plan to serve to preserve texture and vibrant color, and toss them with the greens at the last moment for even distribution. For the dressing, whisk together 3 tablespoons balsamic vinegar, 1/4 cup extra-virgin olive oil, 1 tablespoon honey or maple syrup, 1 teaspoon Dijon mustard, 1 tablespoon fresh lemon juice (optional), 1/2 teaspoon salt, and 1/4 teaspoon freshly ground black pepper until the emulsion is smooth and glossy; taste and adjust honey and vinegar to balance sweetness and acidity. If you want a stronger bite, add a little more Dijon or lemon. Assemble by lightly coating the greens with dressing, then top with strawberries and optional add-ins: 1/4 cup crumbled goat cheese or feta, 1/3 cup toasted nuts, and 1/4 red onion thinly sliced; sprinkle the cheese and nuts on top just before serving to preserve texture. For make-ahead service, keep components separate: store the greens and berries washed and dry, the dressing in a separate container, and assemble right before eating to maintain crunch. This salad pairs beautifully with grilled chicken or salmon for a complete meal, and you can customize by swapping arugula for spinach or adding herbs like basil or mint for a fresh twist.

Tips

Tips for perfect Balsamic Strawberry Salad

  • Dry greens thoroughly after washing. Moisture on leaves will dilute the dressing and wilt the greens. Use a salad spinner and spin until completely dry, then pat dry with a clean towel to maximize crispness.
  • Choose a greens mix with variety (baby spinach, arugula, romaine) to add sweetness, peppery bite, and crunch. If prepping ahead, store greens loosely in a container with a paper towel to absorb moisture and keep leaves crisp.

Strawberries and fruit prep

  • Hull strawberries and slice evenly to ensure they distribute well. Slice as close to serving as possible to prevent juices from pooling and softening greens.
  • If you must slice strawberries ahead, keep them on a plate or in a shallow container to minimize juice leakage and separate from greens until just before tossing.

Dressing tips

  • Use a high-quality aged balsamic for richer depth; if only regular balsamic is available, balance the sweetness with a touch more honey.
  • Whisk vigorously or shake in a mason jar to form a stable emulsion. A good emulsion clings to leaves and prevents oil from pooling at the bottom.
  • Adjust sweetness and acidity by varying honey/maple syrup and optional lemon juice. Start small, then taste and adjust to your preference.
  • Dijon mustard acts as an emulsifier and adds a subtle warmth; it helps the dressing cling to greens and prevents separation.
  • For a lighter finish, you can reduce olive oil to 2 tablespoons and compensate with a splash more balsamic or a touch of water to reach your desired consistency.
  • Store leftover dressing in a sealed container in the fridge; re-emulsify with a quick whisk or shake before using.

Optional add-ins and texture

  • For creamy tang, sprinkle crumbled goat cheese or feta just before serving. Keep cheese chilled to prevent it from melting into the dressing.
  • Toast nuts (pecans or walnuts) in a dry skillet over medium heat until fragrant, about 3–5 minutes. Cool completely before adding to the salad to maintain crunch.
  • If using red onion, slice very thin and rinse in cold water or soak briefly to mellow its bite; pat dry before adding to preserve texture and color.

Assembling and plating

  • Toss greens lightly with just enough dressing to coat. Add strawberries and any add-ins gradually to avoid over-dressing.
  • For an appealing presentation, spread the greens on the plate, scatter strawberry slices evenly, and finish with a sprinkle of nuts and cheese just before serving.

Make-ahead and storage

  • Dress the salad just before serving for maximum crispness. If you need to prep ahead, keep greens, strawberries, and dressing separate and combine at the last moment.
  • Leftover dressing can be stored in the fridge for up to a week; greens and fruit are best consumed freshly to maintain texture and flavor.

FAQ

What ingredients do I need for Balsamic Strawberry Salad?

Core components include fresh greens (like arugula, spinach, or mixed greens), ripe strawberries, olive oil, and balsamic vinegar or glaze. For flavor balance, you may add salt, pepper, and a touch of honey or maple syrup. Optional toppings include crumbled goat cheese or feta, shaved parmesan, chopped walnuts or pecans, and fresh mint.

  • Mixed greens or spinach/arugula
  • Fresh strawberries, sliced
  • Olive oil
  • Balsamic vinegar or balsamic glaze
  • Salt and pepper
  • Honey or maple syrup (optional)
  • Optional toppings: goat cheese or feta, parmesan, nuts, mint
How do I make the balsamic dressing for this salad?

Whisk together 3 parts olive oil to 1 part balsamic vinegar for a light dressing. Add a pinch of salt and pepper, and sweeten with honey or maple syrup to taste. If you want a thicker glaze, you can simmer balsamic for a few minutes until reduced and slightly syrupy.

Should I macerate the strawberries before adding them?

Optional but tasty. Toss sliced strawberries with a teaspoon of balsamic or a pinch of sugar and let sit for 10 minutes to intensify their flavor. Drain briefly if using a glaze that’s already sweet to avoid oversweetening the salad.

Can I prepare this salad ahead of time?

You can prep components in advance. Wash and dry greens, slice strawberries, and keep them separate from the dressing. Dress the salad just before serving to keep the greens crisp.

What greens pair best with this salad?

Light, peppery greens work well, such as arugula or a baby spinach blend. A mix of greens can also be delicious. Avoid heavy romaine if you prefer a lighter, more delicate salad.

Can I add cheese or nuts to the salad?

Yes. Crumbled goat cheese or feta adds tang and creaminess, while shaved parmesan provides a sharp note. For crunch, sprinkle walnuts, pecans, or almonds. If you’re vegan or dairy-free, skip the cheese or use a dairy-free alternative.

How can I adjust sweetness or acidity?

If the dressing is too sharp, add a touch more honey or maple syrup. If it’s too sweet, add a bit more balsamic or a splash of lemon juice. Balancing acidity and sweetness to taste is key.

Is this salad vegan or dairy-free?

Without cheese, it is vegan and dairy-free. To keep it dairy-free but still creamy, you can add avocado slices or a sprinkle of dairy-free feta if desired.

How should I store leftovers?

Store components separately: keep greens in an airtight container, strawberries in a separate bag or container, and dressing in a jar. Dress just before serving to avoid soggy greens. Leftovers are best consumed within 1 day.

What are some tasty variations I can try?

Try these: add orange segments or blueberries for a citrusy twist; swap greens (baby kale or romaine) for a different texture; incorporate avocado slices for creaminess; drizzle with a garlic-infused olive oil for extra depth; or top with sesame seeds for crunch.

What serving suggestions pair well with this salad?

Pair with grilled chicken or shrimp for a light, balanced meal, or serve as a side with a lean protein. It also works nicely as a refreshing starter for a summer meal or potluck.

Introduction & Hook

Imagine a dessert that glows with ivory elegance, a cake that carries the fresh brightness of ruby-red strawberries in every bite. The first taste is lush and creamy, a whisper of sweetness that’s balanced by a gentle tang, like a delicate first kiss of summer. This White Chocolate Strawberry Cheesecake is more than a treat; it’s a celebration of contrasts—silky richness meets sun-warmed fruit, smooth texture meets subtle crunch, and a crust that offers a quiet, confident foundation to the glossy, dreamy filling. When you cut into it, the slices release a cloud of aroma that mingles vanilla, ripe berries, and a kiss of indulgence, inviting you to linger at the table a little longer. It’s the kind of dessert you want at a special occasion, yet it’s friendly enough for a weeknight celebration with family or close friends. The experience begins with the scent—an inviting, dairy-sweet aroma that hints at decadence without being overpowering—and ends with a finish that carries a clean, refreshing aftertaste, like a sunset after a warm afternoon. If you’ve ever wished for a cheesecake that feels timeless and modern at the same time, this is your recipe.

The Story Behind the Dish

Cheesecake as a concept travels through history like a well-loved heirloom, evolving with each era and culture. Its roots reach back to ancient civilizations that experimented with soft cheese and bread or biscuit bases, shaping simple yet comforting desserts. Over centuries, cheesecakes traveled from taverns and markets to dining tables of grand homes, each region adding its own personality—firmer, silkier, more custardy, or more indulgent. The modern cheesecake, especially in Western traditions, often embraces a balance between a luscious filling and a crisp or crumbly crust, with flavors that range from citrus to chocolate to fruit-forward summits. The White Chocolate Strawberry Cheesecake you see today is a contemporary homage to those timeless roots, a fusion that marries the classic indulgence of a creamy filling with the bright, sunlit sweetness of strawberries and the smooth, mellow sweetness of white chocolate. The idea behind this particular rendition grew from summer picnics and holiday gatherings when the fruit’s peak vitality is at its height and the mood is celebratory. It’s a dessert that invites sharing, conversation, and a little bit of swoon-worthy indulgence. In many kitchens, this flavor combination evokes old family recipes passed down through generations, reimagined with a modern touch—an elegant upgrade that still feels familiar, comforting, and inviting to all who gather around the table.

Why You’ll Love This Recipe

  • Effortless elegance: A refined dessert that delivers restaurant-quality taste with a home-kitchen sensibility.
  • Luxuriously creamy filling: A smooth, velvety texture that feels indulgent without being heavy, balanced by a gentle tang.
  • Bright fruit contrast: The natural sweetness and tartness of strawberries cut through richness, creating a refreshing finish.
  • Subtle chocolate kiss: White chocolate lends a delicate, dreamy sweetness that complements the fruit rather than overpowering it.
  • Visually stunning: The pale ivory filling with ruby-red strawberries creates a striking, magazine-worthy slice every time.
  • Versatile for occasions: Equally at home as a showpiece dessert for holidays, birthdays, or an romantic dinner for two, as well as a crowd-pleasing option for gatherings and celebrations.
  • Make-ahead friendly: This dessert lends itself to planning ahead, making it ideal for when you want to do a lot of hosting without last-minute stress.

Flavor Profile & Texture

The flavor profile of this cheesecake is a study in balance. The filling presents as rich and creamy on the first mouthful, with a gentle, almost vanilla-like sweetness that feels warm and comforting. There’s an undercurrent of subtle dairy notes that keep it feeling lush rather than cloying. The white chocolate element introduces a restrained sweetness, a soft, milky tone that lingers with a slight vanilla-cream nuance. It’s not cloying; it’s a refined sweetness that invites you to take another bite. The strawberries contribute brightness and a gentle tartness that wakes the palate, preventing the richness from becoming heavy. When you encounter a spoonful, you experience a smooth, satiny texture—almost cloud-like—beneath a light, almost crumbly edge from the crust that provides a delicate, inviting crack with each cut. The overall mouthfeel is one of luxurious suppleness, where the filling seems to melt a little on the tongue before giving way to a faint, crisp finish from the crust. The fragrance echoes through the room: a comforting blend of soft dairy, a whisper of vanilla, and the sun-warmed fragrance of ripe fruit. This is a dessert that pleases the senses in layers, rewarding slow, appreciative tasting rather than quick bites.

Occasions & Pairings

Where this cheesecake shines is in its versatility. It’s a natural centerpiece for a milestone celebration—anniversaries, graduations, family reunions, or a festive holiday dessert table—yet its approachable flavor makes it a standout for intimate weeknight dinners or a special Sunday treat. Serve it chilled as the sun dips low, and pair it with sparkling beverages—champagne, prosecco, or a lightly sweet sparkling rosé—to echo the cake’s soft sweetness and add a celebratory sparkle. For non-alcoholic pairings, a cool berry compote or a lightly brewed herbal tea can accentuate the fruitiness without competing with the creamy notes. As a dessert, it also plays nicely with other light finishers: a dollop of whipped cream, a few fresh strawberry slices, or a dusting of citrus zest to lift the aroma and provide a tiny citrus counterpoint. If you’re planning a multi-course meal, this cheesecake pairs especially well with delicate starters and a bright salad, followed by a lighter main course, so the finale remains a memorable crescendo rather than a heavy close. It’s also an excellent option for a dessert bar or a semi-formal affair where guests can admire the presentation and then slice into the cake for a shared, communal experience.

Tips, Variations & Substitutions

Here are ideas to tailor this dessert to different preferences, occasions, or dietary needs while preserving its charm and balance. The goal is to sustain the dessert’s essence—creaminess, fruit brightness, and a hint of chocolate—without turning it into a rigid set of instructions.

Vegan & Dairy-Free Variations

For a vegan or dairy-free version, you can explore plant-based cream alternatives and a non-dairy cheese analogue optimized for a cheesecake-like texture. Look for silky, neutral-flavored plant-based cream cheeses or cashew-based fillings that can mimic creaminess. Choose a dairy-free option for the filling and a crust made from crushed cookies or biscuits that align with your dietary needs. A touch of vanilla and a light fruit layer on top can help replicate the flavor profile while keeping texture smooth and luscious. If you’re experimenting, you might consider a dairy-free white chocolate substitute, ensuring it melts smoothly into the filling for a similar indulgent effect.

Gluten-Free & Allergy-Friendly Options

To keep this dessert gluten-free without sacrificing structure, use a crust built from gluten-free biscuits or finely ground nuts and a binding agent that suits your preference. The aim is to achieve a crisp, but tender base that remains sturdy when sliced, providing that essential contrast to the soft filling. If you have nut allergies, consider seeds or a gluten-free, seed-based crust that offers a similar crunch and flavor depth, ensuring the overall experience remains cohesive and satisfying.

Flavor Twists & Regional Variations

Take the essence of this dessert in new directions by swapping in different berry varieties when in season—blackberries, raspberries, or a mix of berries can deliver varying degrees of tartness and aroma. Add a hint of citrus zest (lemon or orange) to the filling for a brighter finish that accentuates the fruit. You can also adjust the “white chocolate” presence by using a lighter touch or a more pronounced chocolate note, depending on whether you want the chocolate to whisper or to declare itself. For a tropical twist, consider a coconut-tinged filling with pineapple or passion fruit accents, maintaining the same creamy texture while introducing a new cultural context.

Texture & Structure Adjustments

If you prefer a firmer slice or a more mousse-like interior, you can vary the balance between the filling and the crust to your liking. A slightly thicker filling yields a more indulgent dessert, while a thinner layer highlights the crust’s crispness and the fruit’s brightness. You can also experiment with chilling times to influence the mouthfeel—shorter chilling for a lighter, more aerated fill, longer chilling for a denser, more refined bite. The key is consistency and patience, allowing the flavors to settle and the texture to become perfectly cohesive.

Storage & Make-Ahead Ideas

One of the practical joys of this dessert is its ability to be prepared ahead, with flavors maturing beautifully as it rests. When stored properly, you can keep this cheesecake for several days in the fridge, allowing you to offer slices to guests with minimal effort. Cover the dessert to protect from drying out, and consider storing with a thin layer of barrier (like parchment) to prevent the surface from absorbing any odors in the fridge. If you want to freeze for longer-term planning, wrap individual slices or the whole cake tightly to prevent freezer burn, and thaw gradually in the fridge when you’re ready to serve. If you need to re-soften after refrigeration, a brief return to room temperature can help the filling regain its silkiness, while a gentle flick of the spoon will reveal that coveted, custard-like interior beneath the surface. For make-ahead practicality, you can prepare the base and the filling in advance and assemble close to serving time, ensuring fresh fruit elements are added at the end to maintain their vibrancy. The aim is to preserve texture, prevent dryness, and ensure that the final slice feels like a fresh, celebratory moment rather than a reheated afterthought.

Fun Facts & Trivia (Optional)

Cheesecake is a dish with many legends attached to it, from ancient athletes seeking nourishment to modern bakers searching for the perfect balance of tang and sweetness. The addition of fruits to cheesecakes, particularly berries, has a long tradition in various cuisines, often symbolizing abundance and the sweetness of seasonality. White chocolate, which brings a gentle creaminess to this recipe, was first introduced in the early 20th century and quickly found its place in many desserts, where it complements rather than competes with fruit flavors. The combination of white chocolate with strawberries is a classic pairing that echoes the contrast between ivory and scarlet, lightness and vibrancy, making it a favorite for celebrations and everyday indulgence alike. In some culinary circles, strawberries are celebrated for their fragrance and seasonal accessibility, turning a simple dessert into a sensory memory of long, sunlit days. The cheesecake form itself—soft center, slightly firmer edges—mirrors the balanced, comforting nature of family gatherings and shared desserts, where everyone finds a familiar, comforting bite that also invites new discoveries with each slice.

Ingredients

Crust

  • 1 1/2 cups gluten-free graham cracker crumbs (certified gluten-free)
    → The crust forms the base and edge of the cheesecake, providing structure and a sweet, toasty contrast to the creamy filling. Crumbs are mixed with melted butter (and sugar if using) and pressed firmly into a 9-inch (23 cm) springform pan. Bake briefly to set before adding the filling to improve bite and prevent a soggy bottom.
  • 1/4 cup unsalted butter, melted
    → Fat from the butter binds the crumbs into a cohesive crust and adds richness. Use cooled melted butter to prevent softening the filling; press into the pan evenly across the bottom and slightly up the sides for a sturdy base.
  • 2 tablespoons granulated sugar (optional)
    → Adds a touch more sweetness and helps with browning of the crust. If using very sweet crackers, reduce or omit.

Filling

  • 4 (8-ounce) packages cream cheese, softened to room temperature
    → The primary base of the cheesecake; softened cheese blends smoothly with sugar to create a silky, lump-free filling. Beat on medium speed until completely smooth, scraping the sides of the bowl to avoid lumps.
  • 1 cup granulated sugar
    → Sweetens the filling and helps achieve a light, fluffy texture when beaten with the cream cheese. Add gradually to maintain a creamy emulsion; avoid overbeating after eggs are added to prevent cracking.
  • 1/2 cup sour cream
    → Adds tang and moisture, contributing to a softer, more velvety crumb. Use full-fat for best texture; whisk in after the sugar is incorporated to keep the mixture smooth.
  • 1/2 cup heavy cream
    → Increases richness and tenderness, helping the batter stay smooth and lush. Use at room temperature to maintain a stable emulsion and prevent curdling.
  • 3 large eggs
    → Provide structure and moisture; add one at a time on low speed to minimize air pockets. Do not overmix after adding eggs to avoid a cracked top during baking.
  • 2 teaspoons pure vanilla extract
    → Adds depth and aroma; pure extract gives a cleaner vanilla note. You can substitute with vanilla bean paste for a stronger, more concentrated flavor.
  • 6 ounces white chocolate, melted and cooled slightly
    → Imparts a distinct white chocolate flavor that pairs beautifully with strawberries. Melt gently (low heat or over a double boiler) and cool just to above room temperature before folding to avoid cooking the batter.
  • 1 tablespoon cornstarch
    → Stabilizes the filling to help prevent cracking and improves texture, yielding a silkier slice. Whisk with the other dry ingredients or dissolve in a small amount of the cream before adding to the cheese mixture.
  • 1/4 teaspoon fine sea salt
    → Balances sweetness and enhances the tang of the cream cheese. Use fine salt for even distribution and flavor balance.
  • 1 cup fresh strawberries, hulled and diced (optional)
    → Adds fruity pockets of strawberry flavor throughout the filling. Fold in gently to keep the batter smooth; for a more pronounced strawberry swirl, macerate the dice with 1 teaspoon sugar for 10–15 minutes before mixing.

Strawberry Swirl (optional)

  • 1 cup fresh strawberries, hulled and pureed
    → Creates a vibrant strawberry swirl through the cheesecake. Puree until smooth and strain seeds if you prefer a silkier texture; swirl into batter just before baking for marbled visuals.
  • 1 tablespoon granulated sugar
    → Sweetens the puree and helps balance acidity; adjust depending on the strawberries’ sweetness.
  • 1/2 teaspoon lemon juice (optional)
    → Brightens the strawberry flavor and prevents the puree from tasting flat. Leave out if you prefer a milder swirl.

Toppings

  • 1 cup fresh strawberries, sliced
    → Fresh slices on top provide color, brightness, and a juicy contrast to the creamy interior; arrange decoratively after chilling for best appearance. Add gradually as you slice to maintain neat presentation.
  • 2 ounces white chocolate, melted, for drizzle
    → Creates a glossy, decorative finish that echoes the filling. Drizzle over the chilled cheesecake with a spoon or piping bag; allow to set briefly before slicing. Use gentle, slow strokes to maintain clean lines.

Instructions

  • Preheat your oven to 350°F (175°C) and position a rack in the center of the oven.
  • → Establishes even heat distribution for both crust and filling, preventing hot spots that could bake unevenly.

  • Wrap the outside of a 9-inch (23 cm) springform pan with two layers of heavy-duty aluminum foil and place the pan on a rimmed baking sheet.
  • → Foil protects against leaks during the water bath, and the rimmed sheet catches drips for easier cleanup and oven protection.

  • In a medium bowl, combine gluten-free graham cracker crumbs, sugar (if using), and melted butter; mix until the crumb mixture resembles wet sand and holds together when pressed.
  • → This creates a cohesive crust that bakes into a sturdy foundation with a balanced sweet-butter flavor.

  • Press the crust firmly into the bottom of the prepared pan and press a little up the sides with the flat bottom of a measuring cup or a small glass for an even, compact shell.
  • → A uniform press ensures even baking, prevents gaps, and yields clean slicing after chilling.

  • Chill the crust for 10 minutes in the refrigerator to firm the butter and set the shape before baking.
  • → Chilling minimizes crust slump during the hot bake and helps it hold its form when the filling is added.

  • Bake the crust in the preheated oven for 8 to 10 minutes until it looks set and lightly fragrant, then remove and cool completely on a rack.
  • → Brief baking drys the crust, creating a pleasant snap and a barrier against moisture from the filling; cooling prevents warping when filling is added.

  • Reduce the oven temperature to 325°F (165°C) in preparation for the filling.
  • → A gentler heat allows the dense filling to set evenly without cracking.

  • In a large stand mixer or with a hand mixer on medium speed, beat the softened cream cheese until completely smooth and free of lumps, about 2 to 3 minutes.
  • → Thorough emulsification yields a silky filling with a glossy texture and prevents graininess on slicing.

  • Add the granulated sugar and beat on medium speed until the mixture is light and fluffy, about 2 to 3 minutes.
  • → Properly creamed sugar integrates air and sweetness evenly; be cautious not to overbeat later after eggs are added to avoid cracks.

  • Beat in the sour cream until just incorporated, then scrape down the bowl to check for any stray lumps.
  • → Sour cream adds tang, moisture, and a velvety crumb; scraping ensures an even mixture throughout.

  • Pour in the heavy cream and mix on low speed until the batter is smooth and cohesive.
  • → The cream increases richness and helps create a lush, smooth mouthfeel; keep temperatures stable to maintain emulsion.

  • With the mixer on low, add the eggs one at a time, beating after each addition just until combined.
  • → Adding eggs individually minimizes air incorporation and reduces the risk of cracks in the finished cheesecake.

  • Stir in the vanilla extract and mix until evenly dispersed throughout the batter.
  • → Vanilla provides depth and aroma; even distribution ensures consistent flavor in every slice.

  • Gently fold in the melted white chocolate that has cooled to just above room temperature.
  • → A cooled chocolate prevents cooking the batter and ensures a smooth, uniform swirl of chocolate throughout the filling.

  • Whisk together the cornstarch and fine sea salt, then whisk into the cheese mixture or fold in with a small amount of batter to dissolve completely.
  • → Cornstarch stabilizes the filling, helping to prevent cracking and yielding a silkier texture.

  • Gently fold in 1 cup fresh strawberries, hulled and diced (optional), distributing them evenly without overmixing.
  • → Even distribution provides fruity pockets of flavor; overmixing can break berries and color the batter too much.

  • If making a strawberry swirl, puree 1 cup strawberries with 1 tablespoon sugar and 1/2 teaspoon lemon juice; strain seeds if you prefer a silkier texture and set aside.
  • → The puree creates a vibrant swirl; straining yields a smoother swirl with less seed texture that interferes with the batter’s smoothness.

  • Pour the filling into the cooled crust and, if using swirl, dollop some strawberry puree on the surface and gently swirl with a knife to create a marbled pattern.
  • → Pouring evenly fills the crust while swirling adds visual appeal and distinct strawberry flavor throughout the cake.

  • Prepare a water bath by placing the foil-wrapped pan into a larger baking dish and carefully pouring hot water into the outer dish until it comes halfway up the sides of the springform.
  • → The water bath provides gentle, uniform heat that minimizes cracking and helps the cheesecake bake evenly.

  • Bake the cheesecake in the 325°F (165°C) water bath for about 60 to 75 minutes, until the center barely jiggles when gently nudged.
  • → A slight wobble indicates a just-set center; overbaking makes the filling dry and dense, while underbaking can cause a sunken center.

  • Turn off the oven, crack the door, and let the cheesecake cool in the oven for 60 minutes to prevent sudden shocks that cause cracking.
  • → Slow cooling minimizes structural stress and helps maintain a smooth surface on top.

  • Remove the cheesecake from the oven and the water bath, then cool on a rack to room temperature before refrigerating.
  • → Gradual cooling prevents cracking and ensures the interior sets evenly without moisture buildup on the surface.

  • Refrigerate the cheesecake for at least 4 hours, preferably overnight, to fully set and allow flavors to meld.
  • → Chilling firms the filling for clean slicing and enhances texture and flavor integration.

  • Just before serving, arrange fresh strawberry slices on top for color and brightness, and drizzle with melted white chocolate in thin, decorative lines if desired; let the drizzle set briefly before slicing.
  • → Fresh berries brighten the appearance and provide contrast in texture, while a chocolate drizzle adds a glossy finish and extra sweetness that complements the filling.

  • To serve, unlock and remove the springform ring, slice with a warmed knife for clean cuts, and present with a clean, even perimeter on each plate.
  • → Warming the knife minimizes sticking and yields neat, restaurant-quality slices with minimal crumbling.

Notes

These gluten-free strawberry cheesecake slices are creamy and luscious with a crisp gluten-free crust and a bright strawberry swirl. You can customize the crust by using certified gluten-free graham crackers or swap in a nut-based crust for extra texture and flavor; for a lighter crust, reduce the butter slightly or press more firmly into the pan. To enhance strawberry flavor, fold in fresh berries into the filling or increase the swirl amount with the puree. They freeze well—slice, wrap individually, and store in a freezer-safe container for up to 2–3 months; thaw in the fridge before serving. Chill the cheesecake thoroughly, preferably overnight, to achieve clean slices and a velvety texture. Serve chilled with extra fresh berries or a dollop of whipped cream for a decadent finish. If you have gluten intolerance, always ensure all ingredients are certified gluten-free and take care to prevent cross-contamination by using clean utensils, pans, and surfaces. For best results, bake the cheesecake in a water bath and avoid overmixing after eggs are added to minimize cracking.

Tips

Tips for Perfect White Chocolate Strawberry Cheesecake

  • Crust firmness: Use gluten-free graham cracker crumbs and mix with melted butter (and optional sugar) until the texture resembles wet sand. Press firmly into a 9-inch springform pan, spreading evenly up the sides for a sturdy edge. Chill briefly before filling to help the crust hold its shape.
  • Pre-bake the crust: Bake the crust for 5–8 minutes to set it and reduce sogginess. A quick bake gives a crisper bite that contrasts nicely with the creamy filling.
  • Cool crust completely: Allow the crust to cool completely before adding the filling to prevent steam from softening the crust and to avoid cracks in the cheesecake.
  • Butter temperature: Use cooled melted butter to avoid warming the filling. Warm butter can thin the filling and hinder emulsification.
  • Softened cream cheese: Soften the cream cheese to room temperature, cut into chunks, and beat until completely smooth. Scrape the bowl often to prevent lumps and ensure a silky filling.
  • Gradual sugar incorporation: Add granulated sugar in stages to maintain a smooth emulsion. Avoid overmixing after eggs are added to prevent cracking.
  • Eggs method: Add eggs one at a time on low speed, mixing just until combined. Overmixing after eggs can trap air and lead to cracks.
  • Room-temperature ingredients: Keep all filling ingredients at room temperature for even mixing and a lighter texture. Cold ingredients can lead to a lumpy batter.
  • White chocolate handling: Melt the white chocolate gently and cool it slightly before folding into the filling. If the chocolate is too hot, it can seize the emulsion or cook the eggs.
  • Cornstarch role: Whisk cornstarch with salt and other dry ingredients or dissolve in a small amount of cream before adding to the cheese mixture to help prevent cracking and improve texture.
  • Strawberries in filling: Fold in diced fresh strawberries gently to avoid overmixing and to retain berry pockets. For a stronger strawberry note, macerate the dice with 1 teaspoon sugar for 10–15 minutes, then drain before folding.
  • Strawberry swirl option: If making a swirl, puree 1 cup of strawberries until smooth, strain seeds if you prefer silkiness, and swirl into batter just before baking for visible marbling.
  • Strawberry puree balance: Add up to 1/2 teaspoon lemon juice to the strawberry puree if desired to brighten flavor; adjust sugar accordingly to avoid excessive sweetness.
  • Pan preparation for water bath: If using a water bath, wrap the bottom of the pan with heavy-duty foil to prevent water seepage and maintain a moist, even bake.
  • Baking temperature and time: Bake at 325°F (160°C) until the center jiggles slightly. The cheesecake will firm up as it cools, and residual heat continues to set the filling.
  • Cracking prevention: Avoid overbaking and slow cooling gradually in the oven with the door ajar to minimize cracks. A crack is cosmetic and can be covered with toppings, but prevention is best.
  • Cooling strategy: Cool the cake completely on a rack, then refrigerate for at least 4 hours or overnight. Chilling helps flavors meld and makes clean slicing easier.
  • Slicing technique: Dip a sharp knife in hot water, wipe clean, and slice with long, smooth strokes for neat cuts. Re-warm the blade between slices for best results.
  • Finishing touches: Add fresh strawberry slices on top just before serving to maintain bright color and juicy texture. Drizzle melted white chocolate after chilling for a glossy finish that sets nicely.

FAQ

What are the main ingredients for White Chocolate Strawberry Cheesecake?

Crust: graham crackers (or digestive biscuits), melted butter, a pinch of salt. Filling: cream cheese, granulated sugar, vanilla extract, melted white chocolate, sour cream or heavy cream, eggs. Topping: fresh strawberries, optional strawberry glaze, and extra white chocolate for garnish.

Can I use a premade crust or do I need to bake a crust from scratch?

Both work. A store-bought crust is convenient; if using it, follow the filling directions as written. If you use a raw crust, you might bake it briefly before adding the filling to help it set and stay crisp.

Should I use a water bath when baking?

Yes, a water bath helps prevent cracks and keeps the center creamy. Wrap the outside of the springform pan with foil, place it in a larger baking dish, and pour hot water into the outer dish until it comes halfway up the sides of the cheesecake pan.

What temperature and how long should I bake the cheesecake?

Bake at 325°F (165°C) for about 45–60 minutes. The edges should be set and the center will still jiggle slightly when you move the pan. It will firm up as it cools.

How do I prevent the cheesecake from cracking?

Use a water bath, avoid overbaking, and do not open the oven during the first hour. After baking, cool gradually in the oven with the door slightly ajar for about an hour, then finish cooling on a rack before refrigerating.

Can I make this cheesecake with no dairy or gluten-free options?

Yes. For dairy-free, use dairy-free cream cheese, dairy-free sour cream or coconut cream, and dairy-free white chocolate. For gluten-free, use gluten-free graham crackers or a gluten-free crust. Always check labels to confirm absence of gluten and dairy if needed.

How long should the cheesecake chill before serving?

Chill in the refrigerator for at least 4 hours, but overnight is best for clean slices and a firm texture. Keep it covered to prevent drying or absorbing fridge odors.

Can I freeze White Chocolate Strawberry Cheesecake?

Yes. Freeze whole cheesecake or individual slices wrapped tightly. It keeps well for 1–2 months. Thaw overnight in the refrigerator before serving.

Can I make mini cheesecakes from this recipe?

Absolutely. Fill lined muffin cups with crust and filling, then bake at 325°F (165°C) for about 18–22 minutes (until set). Adjust bake time as needed and refrigerate before serving.

How can I customize toppings and flavors?

Try strawberry compote, fresh berries, or a drizzle of melted white chocolate. Add lemon or orange zest to the filling for brightness. You can swirl in strawberry puree for color and flavor, or top with sliced strawberries for a pretty finish. For a lighter touch, reduce sugar slightly or use part-sour-cream instead of all cream.

Introduction / Hook

Imagine a morning where the air carries the sweet glow of baked apples mixed with warm cinnamon, and the scent lingers long after the kettle has whistled. Picture pancakes that arrive on the table in a flash, golden and tender, each bite yielding a soft, pillow-like center and a hint of caramelized fruit at the edges. 15-Minute Apple Pancakes are the kind of breakfast that makes you feel like a kitchen magician—where speed meets comfort, and everyday ingredients transform into something a little magical. In less time than it takes to brew a cup of coffee, you can have a stack that feels indulgent without demanding a long morning labor. They’re the kind of dish that welcomes a busy weekday with a smile and invites weekend guests to linger at the table a bit longer, savoring the aroma of warm apples and spices that wraps around you like a cozy blanket.

What makes these pancakes stand out isn’t only their speed. It’s the way they balance brightness and coziness in every bite—the crisp bite of apple, the soft, airy texture of the pancake, and the gentle kiss of vanilla or spice that whispers familiarity without overpowering. They’re not heavy; they’re not fussy; they don’t require a pantry full of hard-to-find ingredients. They feel bright enough for a spring morning and comforting enough for a rainy Sunday, a perfect convergence of practicality and pleasure. In a few quick steps, you’ll have a warm, comforting stack that tastes like a homey toast to cheerful mornings and casual weekend brunches alike.

The Story Behind the Dish

There’s something universally appealing about apples meeting pancakes: both are simple, seasonal, and deeply adaptable. The idea for 15-Minute Apple Pancakes grew out of a kitchen counter filled with apples from a weekend farmers’ market and a hankering for something warm and comforting that wouldn’t derail a busy morning. It’s a love letter to quick breakfasts that still feel thoughtful—an homage to the way a family might gather for a Saturday brunch and the way a weekday morning can be brightened by a few golden pancakes that come together in the blink of an eye.

In many cultures, apples appear as a symbol of abundance and comfort, a fruit that travels well from orchards to breakfast tables. The pancake itself tells a quiet story of adaptation: a familiar staple (flour, eggs, milk) reimagined with the addition of apples and a light touch of spice to echo seasonal aromas. The result is a dish that speaks of home—of warm kitchens, the clang of a skillet, and the soft sound of fruit sizzling as it mingles with batter. It’s a modern riff on classic togetherness: a recipe born from the need to feed hungry souls quickly, yet crafted with enough care to feel special. The origins may be humble, but the spirit is generous—the kind of dish you return to when you want simplicity that still feels like a treat.

Why You’ll Love This Recipe

  • Lightning-fast breakfast: perfect for busy mornings, yet satisfying enough to feel indulgent.
  • Kid-friendly and grown-up enough for a brunch crowd; the apples add a fresh sweetness that appeals to all ages.
  • Versatile and forgiving: adapts to what you have on hand, from different apple varieties to dairy or gluten-free substitutions.
  • Comforting flavor with a bright twist: a gentle warmth from spice and vanilla, balanced by the crisp sweetness and tart bite of apples.
  • One-pan or one-skillet simplicity: minimal cleanup and easy stovetop timing, so you can focus on enjoying the moment with your loved ones.
  • Perfect for all seasons: the apples lend a reminder of autumn warmth, while the batter keeps the dish light enough for any time of year.
  • Great for meal planning: make ahead a small batch of apples or batter components for even quicker mornings.

Flavor Profile & Texture

The flavor profile of these pancakes is a joyful balance between fruit-forward brightness and comforting pancake warmth. The apples provide a natural sweetness and a subtle tartness that wake up the palate, while the spices—think cinnamon and a whisper of nutmeg or cardamom—create a cozy depth that feels like autumn in a bite. The pancake batter itself tends toward the light and tender side, resulting in a soft crumb that remains moist without being dense. There’s a delicate vanilla undercurrent that elevates the apple sweetness without overpowering it, making every mouthful feel polished and bright.

Texture-wise, you’ll experience a pleasing contrast: the batter yields a fluffy, slightly springy interior, while the apple slices or shreds bring a gentle chew and a caramelized edge where they meet the hot pan. If you’ve ever bitten into a pancake with a touch of crisp caramelization around the edges, you know that moment of satisfying texture—this dish achieves that in a lighter, more delicate way. The result is a breakfast that glides across the tongue, with the apples contributing bounce and a lingering fruitiness that stays with you after the last bite. It’s a flavor conversation between the soft pancake and the fresh fruit—one that’s simple, honest, and comforting in the most delightful way.

Pairing suggestions naturally arise from these flavors. A light drizzle of maple or honey can echo the sweetness; a dollop of yogurt or a spoonful of creamy ricotta can add a tangy contrast; a sprinkle of chopped nuts introduces a satisfying crunch. The aroma itself—warm apples, toasted spices, and a hint of vanilla—creates a sensory preface that makes you want to linger at the table, savoring the moment before you dive into the next spoonful.

Occasions & Pairings

15-Minute Apple Pancakes shine in a range of occasions, from casual weekday mornings to leisurely weekend gatherings. They’re ideal for school-day rush hours when you need speed without skimping on nourishment. They also work beautifully for weekend brunch with friends, where their approachable sweetness complements other dishes without competing with them. For holiday mornings or family celebrations, these pancakes offer a comforting, homey option that doesn’t require you to spend hours in the kitchen.

Pair them with a simple set of accompaniments to tailor the experience to the occasion:

  • Drizzle a little maple syrup or a kiss of honey for extra sweetness and a glossy finish on top.
  • Top with a dollop of yogurt, crème fraîche, or ricotta to add a cool, creamy balance against the warm apples.
  • Scatter toasted nuts (pecans, walnuts, or almonds) for a crunchy counterpoint and a toasty aroma.
  • Serve with a side of bacon or sausage for a heartier breakfast, or keep it vegetarian and light with a side of fresh fruit salad.
  • Pair with a warm beverage: a cup of cinnamon-spiced tea, a robust coffee, or a glass of sparkling apple cider to echo the fruit-forward notes.
  • For a cozy brunch spin, add a spoonful of vanilla yogurt and a sprinkle of cinnamon-sugar on top for a dessert-like finish.

Seasonality can also guide your pairing choices. In the fall, lean into a rustic, maple-forward emphasis with a mug of hot cider. In spring, you can brighten the plate with a garden-fresh fruit salad on the side and a lighter drizzle of syrup. The versatility means you can adapt the plate to the moment without losing the essence of the dish.

Tips, Variations & Substitutions

  • Apple varieties matter: Crunchy, juicy apples like Honeycrisp, Gala, or Pink Lady offer a satisfying bite and a balanced sweetness; tart apples such as Granny Smith provide a brighter counterpoint that many love in this dish.
  • Gluten-free option: Use a gluten-free all-purpose flour blend. The batter should still yield a light, airy pancake without becoming gritty or dense.
  • Dairy-free/vegan twist: Use a plant-based milk with a vegan egg substitute (for the egg-likeness in the batter) or opt for a flax egg substitute. The pancakes will still be tender and lightly fluffy, and the apples will shine through.
  • Egg-free approach: Consider using a dairy-free milk and a little extra leavening to maintain lift and tenderness; you can also experiment with a commercially available egg replacer according to package directions.
  • Flavor twists: Add a pinch of allspice, cloves, or cardamom to evoke a warm spice profile without altering the core character of apples and vanilla.
  • Texture twists: Add a handful of rolled oats to the batter for a subtle heartiness and extra chewiness that pairs beautifully with caramelized apple edges.
  • Scale for different occasions: For a brunch serving, you can cook them in larger patties that are easy to share, or keep them small for a finger-food vibe at a casual party.
  • Make-ahead tip: Pre-slice apples and toss with a little lemon juice to prevent browning. A quick pre-mix of dry ingredients stored in a jar can speed up the morning routine; you can pour in the wet ingredients and fold in the apples just before cooking for an almost instant breakfast.

Storage & Make-Ahead Ideas

The beauty of this recipe lies in its quick assembly, which makes it naturally friendly to make-ahead strategies. If you want to prep ahead for the week, you can slice apples and store them in a lightly lemon-juice-dappled container to prevent browning. The dry mix can be prepared ahead of time in a jar with a label for “Apple Pancake Mix” so you can whisk in wet ingredients and fold in apples for a fast morning batch. Leftovers, if any, store well in an airtight container in the refrigerator for a day or two. Reheat gently in a skillet with a splash of milk to restore some moisture and warmth, or warm in a low oven to revive the edges’ faint caramelization.

If you’re freezing batter (optional in some setups), do so in a resealable freezer-safe container or individual portions. Thaw overnight in the fridge and then proceed as usual. Should you prefer to freeze cooked pancakes, let them cool completely before layering with parchment paper and sealing in a freezer bag. Reheat in a skillet or in a warm oven until the center is just heated through and the exterior re-crisps ever so slightly. The apples may soften a bit after freezing, but the overall experience remains comforting and satisfying.

For meal-prep mornings, this approach is particularly practical: pre-slice apples, have dry ingredients ready, and keep a jar of the ready-to-use batter mix in the fridge for day-of use. The result is a breakfast ritual that feels like a well-practiced routine rather than a last-minute scramble.

Fun Facts & Trivia

Apples have long carried a symbolic role in many foods and traditions around the world. They’re one of the most widely cultivated fruits, with a broad range of varieties developed to suit different climates and palates. In the kitchen, apples are not just a fruit; they’re a culinary chameleon that can add sweetness, tang, crunch, or tenderness depending on how they’re prepared. The pairing of apples and pancakes feels almost inevitable: both are gentle, comforting, and familiar, yet when combined they offer something a little refreshing and bright. The concept of quick, satisfying breakfasts that still feel special is a modern interpretation of long-standing rituals around gathering and nourishment. The quick-cook nature of these pancakes makes them especially suited for the era of busy mornings, where speed and heart-warming flavor aren’t mutually exclusive—an intersection where traditions meet modern living in the most delicious way.

Historically, many cultures have embraced the idea of fruit-topped or fruit-infused pancakes as a way to celebrate harvest abundance. In some traditions, a touch of spice is added to evoke warmth during cooler months, turning a simple pancake into something that carries the scent of home and the glow of shared meals. The 15-Minute Apple Pancakes pay homage to that sense of abundance and the joy of quick, comforting meals that don’t demand a grand setup—proof that a little ingenuity and good apples can turn a simple morning into something memorable.

Ingredients

15-Minute Apple Pancakes
Pancake Batter

    – 1 cup all-purpose flour
    → Provides the structure and body for the pancake batter. For a lighter texture, substitute half with whole-wheat flour or a gluten-free all-purpose blend designed for pancakes, then whisk well with the dry ingredients. Sift the flour to remove lumps and measure correctly to avoid dense pancakes. Do not overmix once the wet ingredients are added; a few small lumps yield tender, fluffy pancakes.
    – 2 tablespoons granulated sugar
    → Adds sweetness and helps browning on the griddle. You can decrease to 1 tablespoon if you want a less sweet pancake or omit entirely when using sweet-topping apples. Mix with the dry ingredients so the sugar distributes evenly and doesn’t clump in pockets. If you prefer rich color, a touch more sugar can be used, but adjust maple syrup serving accordingly.
    – 2 teaspoons baking powder
    → Leavening that creates light, airy pancakes. Sift with the flour to distribute evenly and prevent dense centers. Check the freshness of your baking powder; older powder loses potency. The batter should bubble slightly after mixing and rest for a minute if time allows; otherwise, cook immediately for a quick breakfast.
    – 1/4 teaspoon salt
    → Enhances flavor and helps balance sweetness while aiding even browning. Fine salt is best for accurate measurement; too much can taste salty, so keep within quantity. Salt also helps strengthen the batter’s structure in combination with the egg and flour.
    – 1 cup milk (dairy or plant-based)
    → Provides moisture and binds with the starch to form a cohesive batter. Dairy milk yields a richer crumb, while plant-based milks keep it light. Use room-temperature milk for smoother emulsification; cold milk may chill the batter and slightly slow mixing. If the batter seems too thick, whisk in a tablespoon or two of extra milk until pourable but not loose.
    – 1 large egg
    → Acts as a binding agent and adds tenderness and richness. Beat the egg lightly with the milk before combining with the dry ingredients to prevent curdling and ensure even distribution. For dairy-free versions, use a suitable egg replacer and follow its instructions; results may vary slightly.
    – 2 tablespoons melted butter (or neutral oil)
    → Adds moisture, flavor, and helps pancakes release from the pan. Use cooled, melted butter or a light oil so it blends smoothly into the batter. If avoiding dairy, use a neutral oil; oil may produce slightly lighter texture. You can substitute with applesauce in some recipes for lower fat, but expect a different crumb.
    – 1 teaspoon vanilla extract
    → Infuses aroma and sweetness that complements apples. Real vanilla paste or extract is preferred for depth; avoid overpowering with too much. If you don’t have vanilla, a splash of almond extract can work, but use sparingly as it changes flavor.
    – 1/2 teaspoon ground cinnamon (optional)
    → Adds warmth that pairs beautifully with apples. Add to the batter if you like cinnamon throughout the pancake, or omit here and rely on the apple filling for cinnamon flavor. If you’re new to cinnamon, start with 1/4 teaspoon and adjust to taste after cooking a test pancake.

Apple Filling

    – 1 medium apple, peeled, cored, and diced
    → Provides sweet-tened fruit pieces to fold into or top the pancakes. Dice evenly so the apples cook quickly on the stovetop. For a softer texture, dice smaller; for more bite, keep chunks larger. Toss with a teaspoon of lemon juice if you want to prevent browning and brighten flavor.
    – 1 tablespoon lemon juice
    → Keeps the apples bright and prevents browning during quick sautéing on the stove. The acidity also balances the natural sweetness and helps maintain the apples’ shape under short cooking time. Use freshly squeezed lemon juice whenever possible for the best brightness.
    – 1/2 teaspoon ground cinnamon
    → Essential for classic apple pancake flavor; you can tailor to taste. Combine with the diced apples in the sauté pan so the spice coats every piece evenly. If you plan to serve with maple, keep this spice level moderate to avoid clashing with the syrup.
    – 1 tablespoon unsalted butter
    → Used to sauté the apples, giving a gloss on the surface and helping with caramelization. Ensure the pan is hot but not smoking to prevent burning; swirl the butter until it stops foaming before adding apples. For dairy-free, substitute with coconut oil or light oil, though flavor will shift slightly.
    – 1 tablespoon light brown sugar (optional)
    → Adds a caramel note as the apples cook; adjust sweetness to your taste. If your apples are very sweet, you can omit this; watch for over-browning on medium heat by adding a splash of water if needed to deglaze and stop scorching.

Toppings

    – Pure maple syrup
    → Classic topping that adds moisture and a deep, sweet glaze to the pancakes. Warm the syrup before serving to help it flow evenly over the stack. If avoiding sugar, serve with a dollop of yogurt and fresh fruit as a contrast in flavor and texture.
    – Powdered sugar (optional)
    → A light dusting adds visual appeal and a hint of extra sweetness. Sift lightly to avoid clumps and ensure an even finish. If you’re avoiding refined sugar, substitute with a pinch of cinnamon or a sugar-free alternative.
    – Additional apple slices or apple compote (optional)
    → Extra fruit provides a fresh, bright contrast to the warm pancakes and echoes the apple filling. Slice apples thinly for neat stacks, or serve a small spoonful of cool apple compote on top for a different texture.

Instructions

  • Preheat a nonstick skillet or griddle over medium heat and lightly grease with a neutral oil or a small amount of melted butter. This ensures the pancakes release cleanly, develop an even golden crust, and prevents sticking that can tear the pancake as you flip.

    → A properly heated surface creates instant sizzle when batter hits, helping to set the structure quickly so the centers stay tender rather than gummy.
  • Whisk together the dry pancake ingredients: 1 cup all-purpose flour, 2 tablespoons granulated sugar, 2 teaspoons baking powder, 1/4 teaspoon salt, and 1/2 teaspoon ground cinnamon (optional) until evenly combined. Sifting or whisking thoroughly ensures the leavening and sweetener distribute evenly, preventing dense pockets and ensuring uniform browning.

    → Even distribution of baking powder prevents uneven rise and ensures fluffy, uniform coins rather than dense centers.
  • In a separate bowl, whisk together the wet pancake ingredients: 1 cup milk, 1 large egg, 2 tablespoons melted butter (cool to stop cooking the egg), and 1 teaspoon vanilla extract until smooth and fully emulsified. This creates a cohesive mixture that blends smoothly with the dry for tender pancakes.

    → Room-temperature milk emulsifies better, and having the butter cooled prevents cooking the egg on contact, resulting in a uniform batter.
  • Create a well in the center of the dry ingredients and pour in the wet ingredients; whisk just until combined with a few small lumps remaining, then let the batter rest for 5 minutes if time allows. Resting hydrates the flour and activates the baking powder for better rise, while avoiding overmixing that can toughen the crumb.

    → A lightly mixed batter traps air for fluffiness; the brief rest allows the starch to swell and the gluten to relax, producing a softer pancake.
  • Prepare the apple filling: peel (optional), core, and dice 1 medium apple into evenly sized 1/4-inch to 1/2-inch pieces. Toss the diced apples with 1 tablespoon lemon juice and 1/2 teaspoon ground cinnamon to brighten flavor and prevent browning during quick cooking.

    → Uniform dice ensure even cooking so every bite has fruit, while lemon juice preserves color and adds a subtle brightness that complements the batter’s sweetness.
  • Sauté the apples in a small skillet: melt 1 tablespoon unsalted butter over medium heat, then add the apples and 1 tablespoon light brown sugar (optional). Sauté, stirring occasionally, until the apples are just tender and caramelized along the edges (about 3–4 minutes). Remove from heat and set aside.

    →Caramelizing the apples develops depth of flavor and a glossy surface that pairs beautifully with the pancake crumb; using medium heat prevents scorching and keeps the pieces intact.
  • Decide how to incorporate apples: if you want apple pieces inside the pancake, fold about 1/4 to 1/3 cup of the sautéed apples into the batter with a gentle fold using a rubber spatula; keep motions light to preserve air in the batter. If you prefer topping, skip folding and reserve the apples for the finished pancakes.

    → Gentle folding preserves the batter’s light texture, while keeping fruit distribution even for pockets of apple flavor in every bite.
  • Cook the first pancake: using a 1/4-cup measuring cup or ladle, portion batter onto the hot griddle to form round pancakes about 4–5 inches in diameter. If using apples inside, drop a few apple pieces into the center of each pancake now. Allow the batter to spread into an even circle without nudging it, which helps maintain uniform thickness.

    → A controlled portion yields evenly sized pancakes that stack neatly; apple pieces in the center create pockets of fruit throughout the cake.
  • Watch for bubbles and set edges: cook until bubbles form on the surface and the edges look mostly set, about 1 1/2 to 2 minutes. This signal means the pancake has developed enough structure to flip without tearing.

    → The set edges indicate the interior has begun to cook; delaying flips prevents gumminess and ensures a cleaner turn.
  • Flip the pancake carefully using a wide spatula and cook the second side until golden brown and the center is set, about 1 to 2 minutes more. If the centers resist, reduce heat slightly and give them a bit more time rather than forcing a quick finish.

    → Proper flipping technique preserves shape and prevents the pancake from breaking; lower heat if needed to prevent burning while cooking through.
  • Transfer finished pancakes to a warm tray or oven rack and repeat with the remaining batter, keeping stacks warm in a 200°F (93°C) oven if cooking in batches. This prevents chilling and ensures you serve a cohesive stack.

    → Stacking and warming helps maintain moisture and texture across all pancakes, so the entire serving remains tender and evenly cooked.
  • To finish and serve, warm 1/2 cup pure maple syrup if desired and arrange toppings: dust with powdered sugar, add extra apple slices or a small spoon of apple compote, and serve with warm maple syrup. The warmth helps syrup flow smoothly over the pancakes and enhances the aroma of vanilla and cinnamon.

    → Maple syrup provides moisture and gloss; powdered sugar adds a light sweetness and visual appeal without overpowering the apple flavor.

Notes

These 15-Minute Apple Pancakes are a quick and cozy breakfast that come together in minutes thanks to a simple batter and a fast sauté of apples. You can customize them by adjusting the apple filling with more or less cinnamon, or by adding chopped nuts, raisins, or a splash of vanilla. For a gluten-free version, use a gluten-free all-purpose flour or 1:1 pancake blend and make sure the baking powder is gluten-free. If you like them lighter, substitute half the flour with a light whole-wheat or gluten-free mix and whisk the dry ingredients well; sifting the flour helps avoid dense centers. Use room-temperature milk for smoother emulsification; if the batter seems thick, whisk in a tablespoon or two more until pourable but not runny. The lemon juice in the apples helps prevent browning and brightens the flavor, and you can adjust the amount to taste. When sautéing the apples, keep the heat medium and swirl in the butter until it stops foaming before adding the apples to prevent scorching and to give the fruit a glossy finish. The batter should rest for a minute after mixing if time allows to improve tenderness, but they cook quickly as a 15-minute pancake. Serve warm with pure maple syrup, a light dusting of powdered sugar, yogurt, or extra apple slices; the topping choices let you tailor sweetness and texture. For make-ahead options, prep the batter and filling separately, then cook on the griddle as you go. Always measure ingredients accurately and preheat the pan for even browning.

Tips

Tips for perfect 15-Minute Apple Pancakes

  • Batter rest: Let the batter rest 5–10 minutes after whisking. This helps hydrate the flour and relax gluten, yielding tender pancakes. If you’re pressed for time, even a 2-minute rest improves texture.
  • Mixing technique: Whisk dry ingredients together, then whisk wet ingredients separately and combine just until the batter is moistened. A few small lumps are okay; overmixing creates dense, chewy centers.
  • Milk temperature and substitutions: Use room-temperature milk for smoother emulsification. If using dairy-free milk, choose unsweetened varieties like almond or oat. If your plant milk is very thick, whisk in a splash of water to reach pourable consistency.
  • Browning and fat: Add melted butter to the batter but ensure it’s cooled slightly to avoid cooking the eggs. Alternatively, a light neutral oil works and can produce slightly lighter pancakes. Brush or lightly grease the pan between batches.
  • Pancake size and pan: Use a 1/4-cup measure for uniform pancakes. Preheat a nonstick skillet or griddle over medium heat and lightly grease; the pan should be hot but not smoking before the first pancake hits it.
  • Test and adjust: If the batter seems very thick, whisk in a tablespoon or two of milk to loosen. If too thin, whisk in a teaspoon or two more flour. The batter should pour slowly but smoothly.
  • Apple filling prep: To prevent browning, toss diced apples with 1 teaspoon lemon juice. For extra brightness, add a pinch more lemon just before cooking. Dice evenly so they cook quickly and evenly.
  • Cooking the apples: Sauté apples in butter with cinnamon and a touch of brown sugar until just tender and glossy (about 2–4 minutes). If the pan looks dry or the apples release too much moisture, cook a bit longer or deglaze with a teaspoon of water to avoid burning.
  • Fold-in vs topping: For a subtle apple flavor in every bite, fold a portion of the lightly cooled apples into the batter. If you prefer more bite, reserve apples as a topping or mix only half into the batter.
  • Seasoning balance: If you’re using maple syrup, keep cinnamon in the filling moderate so it complements rather than competes with the syrup. A touch of vanilla in the batter enhances overall aroma.
  • Cooking cues: Flip when bubbles appear on the surface and the edges look set. Use a thin spatula to avoid tearing; cook the second side until golden brown, about 1–2 minutes.
  • Serving and warming: Stack cooked pancakes and keep them warm in a low oven (about 200°F/95°C) while you finish the rest. Serve with warm maple syrup, extra apple slices, and a dollop of yogurt if desired.
  • Make-ahead options: Batter can be mixed ahead (up to a few hours) and refrigerated; give it a quick whisk before cooking. The apple filling can be prepared in advance and reheated gently with a splash of water or lemon juice to refresh the glaze.
  • Storage: Leftover pancakes keep 1–2 days in the refrigerator; rewarm in a skillet over low heat or in a warm oven to restore texture. Freeze cooled pancakes in a single layer, then bag for up to 1 month; reheat directly from frozen, covered, in a 350°F (175°C) oven for about 8–10 minutes.

FAQ

What ingredients do I need for 15-Minute Apple Pancakes?

For a classic version: 1 cup all-purpose flour, 1 tablespoon sugar (optional), 1 teaspoon baking powder, ¼ teaspoon salt, 1 cup milk (dairy or plant-based), 1 large egg, 2 tablespoons melted butter or neutral oil, 1 teaspoon vanilla extract, 1 medium apple (grated or finely chopped), and ½ teaspoon ground cinnamon. Optional: a pinch of nutmeg or a splash of lemon juice to brighten the apples. For a dairy-free option, use plant-based milk and oil; sugar can be omitted if you prefer less sweetness.

Is there a vegan version?

Yes. Use 1 flax egg (1 tablespoon ground flaxseed + 3 tablespoons water, rested 5 minutes) or another vegan binder in place of the egg, plant-based milk, and replace butter with oil (or melted coconut oil). These adjustments keep the pancakes fluffy while staying dairy- and egg-free.

Should I grate the apple or chop it?

Grating the apple works best because it releases moisture quickly and flavors the batter evenly. If you grate, you may want to squeeze out excess moisture with a clean towel. Finely chopping also works; just keep pieces small so they cook through in 15 minutes.

How should the batter look, and what if it’s too thick or thin?

The batter should be thick but pourable. If it’s too thick, whisk in a splash of milk; if too thin, whisk in a little extra flour (or a spoonful of yogurt for dairy versions) until it coats the back of a spoon.

What heat should I use and how do I cook them?

Preheat a nonstick skillet over medium heat (about 300–325°F / 150–165°C). Lightly butter or oil the pan. Pour small rounds (about ¼ cup batter each) and cook 1–2 minutes per side, until the edges look set and bubbles form on top, then flip and finish. Keep the heat steady so the pancakes cook through in about 2 minutes per batch.

How many pancakes does this make and how long does it take?

This 15-minute recipe typically yields 8–10 small pancakes (about 3–4 inches in diameter). If you make larger pancakes, the cooking time will increase slightly.

Can I make this gluten-free?

Yes. Use 1 cup gluten-free all-purpose flour blend. If your blend lacks xanthan gum, add ¼ teaspoon xanthan gum to help with structure. Adjust with a little more milk if needed to reach a pourable batter. The rest of the ingredients stay the same.

Can I store leftovers or freeze them?

Yes. Refrigerate cooled pancakes in an airtight container for up to 2 days. For longer storage, freeze them in a single layer on a baking sheet, then transfer to a freezer bag. Reheat in a toaster, toaster oven, or microwave (about 20–40 seconds per pancake) until warm. A quick reheat in a skillet with a bit of butter refreshes the edges.

What toppings or serving suggestions pair well?

Classic maple syrup is perfect, but you can also top with yogurt or dairy-free yogurt, sliced fresh apples, a sprinkle of cinnamon sugar, chopped nuts, or a dollop of applesauce. A squeeze of lemon juice over grated apples adds brightness.

Are there quick variations I can try?

Add-ins like blueberries, raisins, or chopped walnuts work well. You can also swap in a pinch more cinnamon or a dash of nutmeg for warm spice, or fold in a tablespoon of oats for heartiness. For extra fluff, whisk the egg separately and fold in gently, or whip the egg white to soft peaks and fold in last.

Introduction / Hook

Imagine a slice of cake that feels like a warm hug from a sunny Italian afternoon. A delicate, cloud-light crumb that melts on the tongue, carried by the gentle richness of ricotta, lifted by bright lemon zest, and kissed with a whisper of vanilla. This is the essence of a Ricotta Cake: a humble, friendly dessert that looks modest in its simplicity but unfurls a bouquet of comforting, celebratory flavors with every bite. It’s not merely a cake; it’s a memory-maker—one that invites you to slow down, slice a piece, and let the aroma travel through the kitchen like a promise of togetherness. The beauty of this cake lies in its balance: the ricotta keeps the crumb incredibly tender and moist, while a citrusy brightness keeps it feeling fresh rather than heavy. It can be enjoyed with a cup of coffee in the morning, served as a finale to a sunny lunch, or offered as a gentle, crowd-pleasing dessert after a weeknight dinner. Once you taste it, you’ll understand why this recipe has a quiet way of becoming a staple, a pantry friend you reach for when you want to bring a little sunshine to the table.

Whether you’re a baking novice or a kitchen adventurer, this Ricotta Cake welcomes you with open arms. The batter is forgiving, the bake time forgiving, and the result universally loved. There’s something almost magical about the way the flavors unfold: the subtle sweetness of the cake, the creamy sotto-voice of the ricotta, and the citrus notes that poke through like a bright chorus. It’s a cake that respects your time, your pantry, and your guests, delivering a comforting slice without demanding a complicated procedure. And the best part? It’s already primed to become a canvas for your creativity—a blank page on which you can doodle with citrus, nuts, berries, or a delicate glaze as your mood dictates.

As you prepare to bake, you’ll notice how this cake responds to the moment: a quick zest of lemon to wake up the batter, a touch of vanilla to add warmth, and perhaps a handful of add-ins to suit the season. It’s a dessert with a personality as adaptable as your kitchen. The aroma alone is enough to draw people to the table, and the first forkful confirms what the senses have been hinting at—the cake is tender, the texture refined, and the balance of ingredients impeccably intuitive. In short: this Ricotta Cake is comfort with a refined edge, sophistication without stiffness, and a guarantee of smiles around the table. That’s the promise you’re about to indulge in.

The Story Behind the Dish

Ricotta has long been a beloved ingredient in Italian cooking, cherished for its light, slightly creamy character and its ability to marries well with both sweet and savory dishes. The term ricotta itself comes from the Italian phrase “ricottare,” meaning “to recook” or “to cook again.” This name harkens back to the traditional process of reheating whey to coax every last drop of cheese from it, yielding a fresh, delicate curd that’s perfect for a dessert like this. In many Italian households, ricotta is a staple that appears in cannoli and cassata, as well as in simple, comforting cakes that celebrate the cheese’s milky sweetness. The Ricotta Cake, in its most charming form, embodies this tradition by turning humble, readily available ingredients into a cake that feels both rustic and refined.

There is a timeless thread that runs through Southern and Central Italian baking—the use of ricotta to give a moist, tender interior without relying solely on butter or cream. This technique is especially beloved in regions that celebrate citrus, almonds, and fresh eggs in the spring and early summer. A traditional torta di ricotta in many Italian towns is not a showpiece but a daily pleasure: a modest pan filled with a light batter, a clean oven, and a slice that tastes of sunshine. The modern Ricotta Cake you’ll bake today pays homage to that sensibility while embracing contemporary textures and flavor pairings. It’s a bridge between eras—a recipe that feels both timeless and current, simple enough for a weekend kitchen but elegant enough to grace a special occasion table.

Beyond its Italian roots, Ricotta Cake has found a beloved global audience because it answers a universal craving: something that’s sweet without being cloying, indulgent yet approachable, and versatile enough to be dressed up or kept simple. In many homes, a sheet pan or loaf pan of ricotta cake becomes a star at Easter gatherings, a comforting shade of gold at casual Sunday dinners, or a bright, lemon-dusted centerpiece for spring celebrations. The story is less about a single origin and more about a shared experience—the way ricotta transforms ordinary ingredients into something that feels like a gift to your senses. In that spirit, this cake invites you to craft your own narrative with each bake, adding your own favorite twists and letting the results speak to your pantry and your palate.

Why You’ll Love This Recipe

  • Creamy, cloud-soft crumb: The ricotta lends a gentle, almost cheesecake-like tenderness that stays moist for days without becoming heavy.
  • Bright, balanced flavor: Lemon zest or orange zest lightens the richness, while vanilla adds warmth and depth.
  • Very approachable: A forgiving batter that yields dependable results even for bakers new to cake-making.
  • Versatile base: A perfect canvas for add-ins like citrus glazes, fresh berries, toasted nuts, or a dusting of powdered sugar.
  • Make-ahead friendly: bake ahead for gatherings; the flavors deepen and the texture improves with time.
  • All-purpose appeal: Friendly to a wide range of palates, from kids to guests who appreciate a refined but not fussy dessert.
  • Minimal pantry drama: Often, you already have the core ingredients on hand—ricotta, eggs, sugar, flour, a citrusy zing, and a pinch of salt.
  • Comfort factor without heaviness: It delivers comfort and satisfaction without weighing you down, making it ideal for celebrations or everyday dessert cravings.

Flavor Profile & Texture

The flavor of Ricotta Cake is a delicate harmony of milky richness and bright citrus, with a subtle sweetness that lands softly on the palate. The ricotta provides a gentle creamy foundation that feels almost indulgent, yet because it’s made from whey rather than full-fat cream, the finish remains light and approachable. This is not a dense, heavy dessert; it’s a tender, inviting slice that invites you to linger and savor the seconds. The zest from lemon (or orange) is your bright counterpoint—sunny and fragrant, it amplifies the cake’s aroma and brightens the overall flavor, preventing the richness from tipping into heaviness.

Texture-wise, think of a cake that dissolves into a soft, airy crumb with a subtle spring on the bite. The interior should feel moist but not wet, with a fine, even crumb that almost melts as you chew. The surface of the cake can present a delicate, barely crackled crust, especially if a light glaze or dusting of sugar is added. A glaze—whether lemon, vanilla, or a delicate citrus syrup—can glaze the top with a glassy sheen, adding a touch of sweetness and a hint more moisture. If you’re more inclined toward a rustic finish, a gentle dusting of powdered sugar or a scatter of toasted almonds provides crunch and visual appeal while complementing the cake’s refined tenderness. The aroma alone—warm vanilla, citrus zest, and the faint, comforting scent of baked cake—often feels like a small celebration in the kitchen, a sensory reminder of why baking can feel like a love letter to those you care about.

When you take a bite, the creamy interior interacts with the crisp, aromatic exterior, creating a pleasing duality: the soft, almost custard-like center and the light, slightly crisp edges that offer a gentle contrast. The lemon or citrus notes are not overpowering but act as a refreshing beacon, lifting the dish and ensuring it remains vibrant rather than verbose. If you decide to fold in add-ins—such as white chocolate chips, sliced almonds, or blueberries—the texture shifts in delightful ways: the chocolate or nuts introduce gentle crunch or bursts of sweetness, while berries add a tiny tang and bursts of juiciness. The cake’s forgiving nature encourages experimentation, inviting you to discover your preferred balance between creamy richness and citrus brightness, all without losing its characteristic lightness.

Occasions & Pairings

This Ricotta Cake is the kind of dessert that shines in a crowd without demanding a formal setting. Its adaptability makes it perfect for a range of occasions, from intimate family dinners to holiday gatherings, and from casual weekend brunches to Easter tables where citrus and spring flavors take center stage.

  • Weeknight dessert: A comforting, quick-to-minish slice after dinner with a cup of tea or coffee.
  • Brunch centerpiece: Slice it generously, pair with fresh berries, a dollop of whipped cream, or a light lemon glaze for a bright finish.
  • Spring celebrations: The citrus note pairs beautifully with spring flowers and lighter fare, making it an ideal seasonable choice.
  • Easter and holiday desserts: A refined but unfussy cake that complements a variety of festive flavors without feeling overly indulgent.
  • Tea-time companion: Serve alongside a pot of Earl Grey or a citrus-infused black tea for a cozy afternoon ritual.

Pairings to consider, depending on your mood and occasion:

  • Fresh fruit compotes or a berry coulis brushed lightly on the slices for a pop of color and acidity.
  • A silky vanilla- or citrus-glaze drizzle that adds a glossy finish and a touch more sweetness.
  • Light whipped cream or a cloud of lemon-infused mascarpone on the side for extra richness.
  • Plain or vanilla ice cream to create a delightful contrast of temperatures and textures.
  • A glass of sparkling wine, Moscato d’Asti, or a crisp Prosecco to elevate celebrations without overpowering the cake’s delicate flavors.

Tips, Variations & Substitutions

  • Flavor boosters: Add a teaspoon of vanilla extract and a tablespoon of lemon zest for a more pronounced citrus aroma. A pinch of almond extract can introduce a subtle nutty nuance that pairs beautifully with ricotta.
  • Gluten-free option: Substitute with a high-quality gluten-free flour blend and a touch of cornstarch (about 1 tablespoon) to help mimic the structure of regular flour. Ensure the blend you choose performs well in cakes for best results.
  • Dairy-free option: Use a plant-based ricotta alternative (almond, coconut, or soy-based) and a dairy-free butter or neutral oil. You may need a little extra moisture from dairy-free yogurt or a splash of dairy-free milk to achieve the same tenderness. A flax or aquafaba egg-replacer can help with structure if you’re adapting the recipe for vegan diets.
  • Nutty twists: Fold in toasted chopped almonds or pistachios for crunch. A sprinkle of almond meal on top before baking can create a delightful crust and extra aroma.
  • Fruit-forward variations: Fold in fresh blueberries, thinly sliced strawberries, or finely chopped rhubarb for a seasonal twist. Ensure fruit is dry to avoid excess moisture in the batter.
  • Chocolate note: A handful of white chocolate chips or finely chopped dark chocolate creates a delightful contrast with the citrus and ricotta.
  • Alcoholic accent: A splash of limoncello, orange liqueur, or a dash of sweet Marsala can deepen the flavor profile and give the cake a celebratory flair.
  • Make it extra light: To boost the cake’s lightness, fold in soft whipped egg whites at the very end. This technique preserves airiness while keeping the cake tender.
  • Bottom-line texture: If you want a slightly denser crumb, substitute half of the ricotta with a smooth yogurt (dairy) or a plant-based yogurt for a different mouthfeel while maintaining moisture.

Storage & Make-Ahead Ideas

One of the most appealing aspects of Ricotta Cake is how well it holds up and even improves with a little aging. The flavors mellow and meld, and the crumb remains tender, making it a fantastic candidate for advance planning.

Storage tips:

  • Refrigeration: Store the cake, well wrapped or in an airtight container, in the refrigerator for up to 3–4 days. The interior will stay moist, and the citrus notes will continue to brighten with time.
  • Room temperature: If you live in a cooler climate or plan to serve within a day, the cake can stay at room temperature for several hours in a covered container. Just be mindful that ricotta can feel a touch firmer at room temperature after sitting for several hours.
  • Freezing: Slice the cake and wrap individual portions tightly in plastic wrap, then freeze for up to 2–3 months. Thaw in the refrigerator overnight or at room temperature for a few hours, and glaze or dust with sugar if desired before serving.
  • Make-ahead strategy: If you want to plan a bake-for-ahead scenario, you can prepare the batter, refrigerate for up to 24 hours before baking, and then bake as usual. The resting time can intensify the flavors and improve the crumb.

Glazing and finishing ideas:

  • Fresh glaze: Whisk together lemon juice with powdered sugar until glossy; drizzle over cooled cake for a bright finish.
  • Simple dusting: A light snowfall of powdered sugar offers a classic, elegant touch without masking the cake’s tenderness.
  • Berry topping: Spoon a berry compote over the slices for a fresh, vibrant finish that contrasts with the creamy interior.

Fun Facts & Trivia (Optional)

  • The word ricotta literally means “recooked” in Italian, a nod to the traditional method of reheating whey to extract more curd. This history is directly tied to the way ricotta achieves its characteristic brightness and light texture in desserts and beyond.
  • Ricotta is a versatile ingredient across Italian sweets, from cannoli fillings to soft, creamy cheesecakes. Its gentle flavor acts as a blank canvas that happily accepts citrus, vanilla, nuts, and fruits without clashing, making it a favorite for both everyday and festive baking.
  • Although associated with Italy, similar cheese-based, light-textured desserts appear in various cultures, illustrating a shared love for tender, comforting sweets that celebrate dairy and citrus in balance.
  • Cassata, a well-known Sicilian cake, also centers on ricotta but layers it with candied fruit and sometimes marzipan or chocolate. While cassata is often more elaborate, the basic principle—light ricotta with a sweet, aromatic profile—connects it to the humble Ricotta Cake you’ll bake at home.
  • Classic Italian desserts frequently pair citrus and ricotta to brighten the palate. The lemon zest in Ricotta Cake echoes this tradition, providing a fragrant aroma that instantly evokes sun-kissed hills, olive trees, and the zest of morning zest on a gentle sea breeze.

Ingredients

  • Ricotta Cake Base
  • – 1 1/2 cups all-purpose flour (unbleached)
    → Provides the main structure and crumb for the cake. If you need a gluten-free version, substitute with 1 1/2 cups gluten-free all-purpose flour and add 1/2 teaspoon xanthan gum per cup to mimic gluten’s elasticity. Sift the flour lightly and spoon into the measuring cup, leveling off for accuracy.
  • – 1 cup ricotta cheese, well-drained
    → Core moisture and creaminess; ricotta gives the cake its signature light yet rich texture. To ensure a smooth batter, drain the ricotta in a fine sieve for 20–30 minutes to remove excess whey. If you see excess moisture, pat gently with paper towels, but do not press; a very wet batter can cause sinking in the middle.
  • – 3 large eggs, at room temperature
    → Structure and binding; room-temperature eggs emulsify better with the fat and sugar for a smooth batter. Beat the eggs with sugar until pale and slightly thick to incorporate air for a lighter crumb.
  • – 1 cup granulated sugar
    → Sweetness and to balance the tang of the ricotta; helps with browning on the surface. If you prefer a less sweet cake, reduce by 2–3 tablespoons and compensate with a touch more zest or vanilla. Ensure even mixing to prevent grainy texture.
  • – 1/2 cup unsalted butter, melted and cooled
    → Adds richness, moisture, and a tender crumb; melted butter blends easily into the batter. Let it cool slightly before mixing to avoid cooking the eggs; if you prefer, you can substitute with 1/2 cup neutral oil, though this will subtly change flavor and crumb.
  • – 1/4 cup milk (optional)
    → Adjusts batter consistency and moisture; add if the batter seems very thick. Use whole milk for richer flavor or a non-dairy milk for dairy-free versions, adjusting other fats if needed to maintain moisture balance.
  • – 1 teaspoon pure vanilla extract
    → Flavor backbone that enhances the overall sweetness and complements citrus; use high-quality vanilla or vanilla bean paste for a deeper aroma. If using vanilla bean, scrape the seeds and add with the extract.
  • – Zest of 1 lemon (finely grated)
    → Bright, fresh citrus aroma that lifts the ricotta and butter; grate finely and avoid the white pith. The zest can be added with the flour and sugar to distribute evenly; if you like extra brightness, add a touch of lemon juice (see optional).
  • – 1 tablespoon lemon juice (optional)
    → Adds acidity to balance richness and enhance brightness; use sparingly to avoid curdling. If used, mix in with the wet ingredients after zest to distribute evenly.
  • – 2 teaspoons baking powder
    → Leavening that helps the cake rise and achieve a light crumb; whisk with the flour to ensure even distribution and to prevent lumps. Adjust slightly if using GF flour blends as directed on the package.
  • – 1/4 teaspoon salt
    → Amplifies sweetness and flavors, enhances the lemon and ricotta notes; use fine table salt for even distribution.
  • Optional Add-ins
  • – 1/2 cup mini chocolate chips or fresh berries (optional)
    → Adds bursts of flavor and texture; fold in gently to avoid breaking berries or bleeding color. If using chocolate chips, a light toss with a teaspoon of flour helps keep them from sinking.
  • – 1/4 cup chopped almonds or toasted nuts (optional)
    → Provides crunch and a nutty contrast to the creamy cake. To maximize aroma, toast the nuts in a dry skillet or oven until golden and fragrant, then cool and chop to even pieces.
  • – 1/2 teaspoon almond extract (optional)
    → Enhances an almond note that pairs well with lemon and ricotta. Use sparingly; omit if nut allergies are a concern or if you prefer a purer flavor.
  • Glaze / Toppings (Optional)
  • – 1/2 cup powdered sugar
    → Light dusting adds a touch of sweetness and a polished finish. If you plan to glaze, this serves as the base for a simple lemon glaze.
  • – 2 tablespoons fresh lemon juice (for glaze)
    → Turns powdered sugar into a bright lemon glaze that complements the ricotta cake. Whisk with sugar until smooth; adjust with a few drops of water or milk if needed to reach a pourable consistency. Drizzle over cooled cake after it’s completely cooled to set nicely.

Instructions

  • Preheat your oven to 350°F (175°C) and grease a 9×5-inch loaf pan or line it with parchment for easy removal.
    → This ensures the cake releases cleanly and slices neatly without tearing the crust.
  • Drain the ricotta in a fine-mesh sieve set over a bowl for 20–30 minutes, pressing lightly to remove excess whey without squeezing, to prevent a runny batter and soggy crumb.
    → Extra moisture weakens structure; draining concentrates the creamy texture essential for a light, tender crumb.
  • Sift the all-purpose flour with the baking powder and salt into a medium bowl to distribute leavening evenly and prevent lumps.
    → Sifting aerates the dry mix and ensures an even rise, while salt enhances flavor balance.
  • In a large bowl, whisk the eggs with the granulated sugar until the mixture is pale, thick, and ribbons form when you lift the whisk, about 2–3 minutes; this emulsification traps air for a lighter crumb.
    → Proper aeration is crucial for height and a tender texture in a ricotta-based cake.
  • Slowly whisk in the melted and cooled butter in a thin, steady stream while the eggs and sugar are whisking, so the fat emulsifies smoothly and prevents curdling.
    → Emulsification ensures a cohesive, moist batter without oily streaks.
  • Stir in the drained ricotta, then add the vanilla extract, lemon zest, and lemon juice (if using) and mix until the batter is uniform and creamy; if you include milk, whisk in 1–2 tablespoons at this stage to loosen the batter as needed.
    → Ricotta provides moisture and a delicate crumb, while citrus adds brightness; adding milk only as needed maintains balance.
  • Gently fold in the sifted dry ingredients into the wet mixture in 2–3 additions, using a folding motion with a spatula until just combined; stop as soon as you see flour streaks disappear to avoid overdeveloping gluten.
    → Overmixing makes the cake dense; gentle folding preserves tenderness.
  • If using optional add-ins, toss 1/2 cup mini chocolate chips or berries with 1 teaspoon of flour, then fold them in evenly to distribute without sinking; also fold in 1/4 cup chopped almonds if desired.
    → Coating add-ins with flour helps them stay suspended rather than gravitating to the bottom during baking.
  • Pour the batter into the prepared loaf pan and smooth the top with a spatula to ensure even height and uniform bake; tap the pan once on the counter to expel large air pockets.
    → An even surface bakes more consistently and prevents doming or hollow centers.
  • Bake in the preheated oven for about 45–55 minutes, or until a toothpick inserted into the center comes out with a few moist crumbs; if the top over-browns, tent loosely with foil for the last 10–15 minutes.
    → This provides a moist interior with a delicate crumb and prevents a dry, overcooked crust.
  • Cool the cake in the pan for 15 minutes, then run a knife around the edges and invert onto a rack to cool completely before glazing or dusting.
    → Resting the cake stabilizes the crumb and makes slicing clean and tidy.
  • If using the glaze, whisk 1/2 cup powdered sugar with 2 tablespoons fresh lemon juice until smooth and pourable, then drizzle over the completely cooled cake and let the glaze set briefly.
    → The glaze adds a bright, acidic counterpoint that complements the ricotta and lemon notes, while setting to a glossy finish.

Notes

This ricotta cake is a light, creamy dessert with a bright citrus note and a tender crumb thanks to the ricotta and lemon zest. For best texture, drain the ricotta well (about 20–30 minutes) to remove excess whey, and let the eggs, butter, and milk come to room temperature so the batter emulsifies evenly. Beat the eggs with the sugar until pale and slightly thick to introduce air, then whisk in the melted cooled butter, ricotta, vanilla, lemon zest, and lemon juice before folding in the sifted flour and baking powder.

If you need a gluten-free version, substitute with 1 1/2 cups gluten-free all-purpose flour and add 1/2 teaspoon xanthan gum per cup to mimic gluten’s elasticity. Sift the GF flour with the baking powder to ensure even rise, and measure by spooning into the cup and leveling off for accuracy to prevent dense results.

Optional add-ins like 1/2 cup mini chocolate chips or fresh berries can be folded in gently to maintain the cake’s delicate crumb. A 1/4 cup chopped almonds or toasted nuts add a pleasant crunch. If using almond extract, add 1/2 teaspoon sparingly to avoid overpowering the lemon and ricotta flavors.

To bake, grease and line your pan (an 8×8-inch square or a 9-inch round works well) and spread the batter evenly. Bake at a moderate heat until the center is set and a toothpick comes out with a few moist crumbs, then rotate the pan halfway through for even browning. Start checking around 40–45 minutes; baking times vary with pan size and flour type, so rely on doneness rather than time alone.

For a simple glaze, whisk 1/2 cup powdered sugar with 2 tablespoons fresh lemon juice until smooth, then drizzle over a completely cooled cake. You can also dust with a light shower of powdered sugar and a little extra lemon zest for freshness. This cake stores well refrigerated for up to 3 days and can be frozen in slices for longer keeping; thaw at room temperature before serving for the best texture.

Tips

Tips for Ricotta Cake

  • Drain the ricotta well: place the ricotta in a fine sieve over a bowl and let it drain for 20–30 minutes to remove excess whey. Pat gently with paper towels; do not press. A very wet batter can cause the cake to sink in the center.
  • Use room-temperature ingredients: eggs and butter should be at or near room temperature for better emulsification and a smoother batter. If any ingredient is cold, give it a few extra minutes to come to temperature before mixing.
  • Prepare dry ingredients properly: whisk the flour, baking powder, and salt together, then sift lightly to distribute the leavening evenly. This helps the cake rise evenly and prevents lumps, especially if using gluten-free flour blends.
  • Mixing technique matters: beat the eggs with the sugar until pale and slightly thick to introduce air. Add the ricotta and liquids gradually, then fold in the dry ingredients just until combined. Avoid overmixing after adding flour to keep the crumb tender.
  • Balance flavor with zest and vanilla: lemon zest adds brightness that complements the ricotta and butter. Add vanilla early to let its aroma develop. If using lemon juice, add sparingly to avoid curdling.
  • Optional add-ins go in carefully: if you use berries or chocolate chips, toss them with a teaspoon of flour first to prevent sinking or color bleed. Fold them in gently at the end of mixing.
  • Texture and hydration tips: if the batter seems very thick, whisk in a tablespoon or two of milk to loosen it. If you’re aiming for a lighter crumb, rest the batter 10 minutes before baking to let the flour hydrate.
  • Pan and bake guidance: grease and line your pan (8×8 inch or 9-inch round are common choices) for easy removal. The cake should rise to a light crust; it will continue to set as it cools.
  • Doneness and finishing: test with a toothpick in the center—aim for a few moist crumbs rather than raw batter. If using the glaze, ensure the cake is completely cooled before applying it so the glaze sets nicely.
  • Glaze and topping tips: whisk 2 tablespoons lemon juice with 1/2 cup powdered sugar to make a bright lemon glaze; adjust to a pourable consistency. Drizzle over cooled cake and let it set before slicing.
  • Storage and make-ahead: store leftovers airtight in the refrigerator for up to 3 days. Bring to room temperature before serving, or rewarm briefly to refresh the crumb. Slices can be frozen for longer storage.

FAQ

Ricotta Cake – FAQs

What is Ricotta Cake?

Ricotta Cake is a moist, tender dessert that uses ricotta cheese to create a rich crumb. It often features citrus zest and vanilla, giving it a light cheesecake-like texture without being overly dense.

What ingredients do I need for a basic Ricotta Cake?

A typical lineup includes:

  • Ricotta cheese (full-fat works best)
  • Granulated sugar
  • Eggs
  • All-purpose flour (or gluten-free 1:1 flour)
  • Baking powder
  • Zest of lemon or orange
  • Vanilla extract
  • Neutral oil (or melted butter)
  • Salt
  • Optional: a splash of milk to loosen the batter
Can I make this gluten-free?

Yes. Use a gluten-free 1:1 baking flour blend in place of all-purpose flour. You may need to add a little extra liquid if the batter seems dry, as some gluten-free blends absorb more moisture. Keep an eye on bake time since gluten-free batters can behave a bit differently.

Can I make it dairy-free or vegan?

Yes, with substitutions. Use a dairy-free ricotta (made from almonds, cashews, or tofu-based) and replace eggs with flax eggs (1 tablespoon ground flaxseed + 3 tablespoons water per egg) or other vegan egg substitutes. Use a plant-based oil and dairy-free milk if your recipe calls for it. The texture may be slightly different, but you can achieve a moist, flavorful cake.

How do I bake it and how long does it take?

Preheat to 350°F (175°C). Grease a 9-inch round cake pan. Bake for about 40–55 minutes, or until the top is golden and a toothpick inserted in the center comes out with a few moist crumbs. If the top browns too quickly, loosely tent with foil for the last 10 minutes.

What flavors and add-ins work well?

Great options include:

  • Fresh citrus zest (lemon, orange)
  • Vanilla extract
  • Blueberries or sliced strawberries
  • Chocolate chips
  • Slivered almonds or poppy seeds
  • A pinch of cinnamon or almond extract

Dust with powdered sugar before serving for a finishing touch.

How should I store leftovers and how long do they keep?

Let the cake cool completely, then cover or refrigerate. It will keep 3–4 days in the fridge. Bring slices to room temperature before serving for the best texture. You can freeze individual slices for 2–3 months; wrap well and thaw in the fridge or at room temperature.

Can I make this ahead of time or freeze the batter?

You can mix the batter and refrigerate it for up to 24 hours before baking. Bake as directed the next day. Freezing the batter is less common, but you can freeze prepped batter for shorter periods and bake directly from frozen with a few extra minutes of bake time, watching for doneness.

What pan size should I use, and how does it affect bake time?

The classic choice is a 9-inch round cake pan. If you use a loaf pan (8×4 inches), expect a longer bake time (roughly 50–70 minutes) and a denser crumb. Always check doneness with a toothpick in the center.

Introduction / Hook

Picture this: a breakfast that tastes like a pastry, yet feels like a warm hug you can sink into with every bite. Stuffed Cream Cheese French Toast takes the best of both worlds—the indulgent, creamy richness of a luxurious pastry and the comforting, crowd-pleasing charm of classic French toast—and elevates it to brunch-worthy perfection. The bread, tender and airy, cradles a luscious cream cheese filling that lightly tangs with vanilla and just a whisper of citrus. When seared to a caramelized, golden crust, each slice offers a molten center that glides across your palate, followed by a hint of cinnamon, a kiss of butter, and a drizzle of maple syrup that brings everything into blissful harmony. This is not just a dish; it’s an invitation to linger at the table, to savor the morning, and to watch as the room fills with the heady aroma of warm bread, sweet dairy, and comforting spice. Whether you’re planning a leisurely weekend brunch, a festive holiday breakfast, or a spontaneous celebration with friends, stuffed cream cheese French toast is a showstopper that feels both special and incredibly easy to pull off. The scent alone can spark conversations, the texture can spark smiles, and the flavor can spark a new favorite morning ritual. Let this recipe be your go-to, a timeless twist that remains endlessly adaptable to seasons, moods, and guests.

The Story Behind the Dish

French toast has a storied past that stretches across centuries and continents, a humble solution born of necessity, sweetened by memory, and refined into a beloved brunch icon. The concept—slices of day-old bread soaked in a custardy mixture and fried until caramelized—has appeared in kitchens from medieval Europe to modern breakfast spots around the world. It’s a dish that grew out of practicality: bread that might otherwise go stale found new life when bathed in eggs, cream, and a round of heat until its exterior turned to a gentle lacquer and its interior remained soft and custardy. Over time, cooks began to experiment with fillings, glazes, and accompaniments, transforming what could have been a simple thrift dish into a celebration of breakfast.

The stuffed variation we’re celebrating here is a natural evolution of that curiosity. Cream cheese—velvety, slightly tangy, and wonderfully adaptable—offers a luxurious contrast to the bread’s toasty exterior. The idea of tucking a soft cheese filling inside a slice of bread echoes traditions from various cultures where dairy and bread co-create a comforting texture and a mellow sweetness. In many families, this kind of stuffed French toast becomes a weekend ritual, a way to gather round the table with loved ones and share stories over a plate of steaming slices. The flavors whisper of warm kitchens, early mornings full of potential, and the simple joy of turning ordinary ingredients into something memorable. It’s a dish that honors the past while inviting modern twists—a perfect canvas for seasonal fruits, zests, and syrups that reflect the moment and the mood.

No matter where your kitchen sits, stuffed cream cheese French toast has a universal appeal: it feels indulgent without being pretentious, it’s not fussy to make, and it scales beautifully for crowds. The technique—pan-searing until a bronzed crust forms, then letting the interior rest in a gentle warmth—creates a contrast that’s irresistible: crisp edges that crackle softly beneath your fork, and a creamy heart that melts away with the first bite. It’s a dish that tells a story with every slice: of family breakfasts, of late-night cravings turned into morning joy, of the way simple ingredients can become a little moment of magic when treated with care and imagination.

Why You’ll Love This Recipe

  • Decadence meets everyday practicality: a luxurious, creamy filling inside everyday bread creates a restaurant-worthy breakfast that you can replicate at home.
  • Impressive yet approachable: it looks special on the table, but the method is straightforward and forgiving, making it perfect for cooks of all levels.
  • So adaptable: the cheese filling, the bread choice, and the toppings can be tuned to taste, dietary needs, and seasonal fruit availability—no two batches are the same.
  • Make-ahead friendly: you can assemble or prep components in advance, allowing you to enjoy the moment with guests rather than rushing around the kitchen.
  • Great for crowds: a single batch serves many, and you can keep the slices warm with a gentle finish in the oven while you mingle.
  • Comforting aroma: the kitchen will fill with the scent of caramelized bread, vanilla, and warm dairy—an irresistible invitation to breakfast.
  • Kid- and family-friendly: familiar flavors and a playful twist make it a hit with children and adults alike, encouraging shared plates and conversation.

Flavor Profile & Texture

Expect a symphony of textures and a tapestry of flavors that balance sweetness with gentle tang. The first impression is the crust: a crisp, honeyed edge that sings when it meets a fork. Underneath, the bread remains wonderfully soft and tender, surprisingly light, with just enough structure to hold the creamy center without collapsing. The star filling—cream cheese—introduces a subtle tang that cuts through the sweetness, creating a refined balance rather than a cloying dessert-like sensation. Vanilla threads through every bite, mingling with a whisper of citrus zest and warm spices to lift the richness into something bright and inviting. Cinnamon adds a familiar warmth that evokes weekend brunches and cozy mornings, while a light drizzle of maple syrup or honey invites a gentle sweetness that doesn’t overpower the cheese’s tang.

The custard around the stuffed bread gently soaks in, resulting in a texture that is custardy but not soggy—airy enough to feel light, yet decadent enough to feel special. Each slice delivers a harmonious blend: the creamy center glides with ease, the bread retains a delicate chew, and the exterior offers a satisfying crispness. When you bite into it, you’ll notice layers of flavor and texture unfolding in sequence—the initial sweetness of the glaze, the subtle tang of the cream cheese, the warm kiss of cinnamon, and the comforting, almost nostalgic scent that rises as the dish rests and the heat does its quiet finishing work. The overall effect is a comforting, elegant breakfast that feels both luxurious and heartwarming at once.

Occasions & Pairings

This versatile dish shines in a variety of settings:

  • Weekend brunch with family or friends: a centerpiece that invites relaxed conversation and leisurely serving.
  • Holiday mornings: a glamorous addition to a celebratory spread, pairing beautifully with fresh berries and sparkling drinks.
  • Brunch potlucks: easy to transport and keep warm, making it a dependable crowd-pleaser.
  • Romantic mornings or special occasions: a refined twist on a beloved favorite that feels thoughtful without being fussy.

Pair it with a few complementary elements to elevate the experience. Consider creamy whipped cream or a dollop of mascarpone for extra richness, a scattering of fresh berries for brightness, or a citrus compote to introduce a tart contrast. For beverages, you can offer a lightly sparkling orange mimosa, a smooth, medium-roast coffee, or a velvety latte. If you want to push the indulgence, a glass of crisp champagne or a sparkling rosé can turn the breakfast into a festive moment. For a comforting finish, serve with a side of lightly sautéed apples or pears, perhaps with a hint of brown butter and cinnamon to echo the flavors in the toast itself. The beauty of this dish is that it pairs well with simple, bright accompaniments or with more luxurious touches—the choice belongs to your mood and the occasion.

Tips, Variations & Substitutions

Here are ideas to tailor stuffed cream cheese French toast to your tastes, dietary needs, and the seasons:

  • Bread choices: brioche or challah give the most cushiony, plush texture, but sturdy sandwich bread or thick-cut French loaves also work well. For a lighter feel, try a premium white bread with a tender crumb.
  • Cheese filling variations: classic cream cheese is the star, but you can mix it with a spoonful of lemon curd for brightness, or blend in a touch of ricotta for extra creaminess. A small amount of yogurt can add tang and silkiness as well.
  • Flavor twists: add orange or lemon zest to the filling or to a light glaze for a citrusy lift. A pinch of nutmeg or cardamom can offer a deeper spice note that complements the cheese.
  • Sweetener options: maple syrup, honey, or brown sugar can be mixed into the filling for a deeper sweetness. A light dusting of powdered sugar just before serving adds a delicate finish.
  • Vegan option: use full-fat vegan cream cheese and plant-based milk in the custard-like soak. Choose a sturdy bread such as a thick-cut gluten-free loaf to maintain structure.
  • Gluten-free version: select a well-made gluten-free loaf with good density and moisture-retention so it absorbs the flavors without falling apart.
  • Low-carb approach: substitute a low-carb bread or cloud bread concept and use a low-carb cream cheese filling; keep the cinnamon and vanilla for balance.
  • Regional twists: fold in a spoonful of vanilla-bean paste, or swap maple for a regional honey or date syrup to reflect local flavors.
  • Texture play: finish the slices under a hot broiler for a few seconds to intensify that caramelized crust if your pan yields a lighter crust.

Storage & Make-Ahead Ideas

To keep this dish feeling fresh and vibrant, consider these practical options for planning and leftovers:

  • Make-ahead assembly: you can prepare the stuffed slices a few hours ahead and keep them covered in the refrigerator until you’re ready to cook. They’ll absorb some of the milk-and-egg soak during this rest, contributing to a richer texture.
  • Short-term storage: refrigerate any cooked leftovers in an airtight container for up to 3 days. Reheat gently in a skillet over low heat with a splash of milk to restore moisture and a crisp exterior.
  • Freezing: assembled, unbaked stuffed slices can be frozen on a parchment-lined tray, then transferred to a freezer bag. Thaw in the refrigerator before cooking. Cooked leftovers can also be frozen and reheated, though the texture of the bread may be more delicate after freezing.
  • Make-ahead serving: if you’re hosting a brunch, you can keep a batch warm in a low oven (around 200°F/93°C) on a sheet pan, loosely covered with foil, while you mingle with guests. This helps maintain warmth without overcooking the exterior.

Fun Facts & Trivia (Optional)

Delightful tidbits that add depth to the dish and spark conversation at the table:

  • Pain perdu, the French name for French toast, translates to “lost bread.” It’s a playful nod to turning stale bread into a delicious new dish, a reminder that clever cooking can transform leftovers into something extraordinary.
  • French toast appears in countless cultures with their own unique twists. Some versions, like the German “Armer Ritter” (Poor Knights), use bread soaked in egg batter and fried to a golden finish, while others emphasize fruit fillings, syrups, or liqueur finishes for celebrations.
  • The combination of bread, cheese, and sweet toppings is a reminder of how dairy and grain have long been partners in the culinary world, offering comfort and satisfaction across breakfast and beyond.
  • A little vanilla in a dish as common as French toast has the magical effect of enhancing the perception of sweetness and depth, which is why it’s a staple in so many breakfast classics.
  • Seasonality can shape this dish into something that reflects the moment—think peaches in late summer, apples and cinnamon in autumn, or citrus zest in winter—giving you a reason to reinvent the same comforting dish with new flavors each season.

Ingredients

Stuffed Cream Cheese French Toast

Bread

  • 6 slices thick-cut brioche or challah bread (about 3/4 inch thick)

    → The bread should be sturdy and slightly stale to absorb the custard without becoming soggy. Day-old bread is ideal; if using fresh, toast lightly or dry in a low oven (250°F / 120°C) for 5–8 minutes to dry the surface before soaking.

Cream Cheese Filling

  • 8 oz (1 cup) cream cheese, softened at room temperature

    → The creamy center of the stuffed toast. Softening at room temperature ensures the filling spreads evenly and can be piped or pressed between slices. For easier spreading, whip with a fork until smooth.
  • 2 tablespoons powdered sugar (or granulated sugar) to sweeten and smooth the filling

    → Powdered sugar yields a silkier texture; adjust sweetness to taste. If you prefer, replace with a small amount of honey or maple syrup for a different flavor.
  • 1 teaspoon vanilla extract

    → Enhances the flavor of the cream cheese filling. Use pure vanilla for best aroma; you can add a pinch of lemon zest for brightness if desired.
  • Pinch of salt

    → Balances the richness of the cream cheese and helps the flavors pop. A little goes a long way.
  • 1 tablespoon milk or heavy cream (optional) to loosen the filling

    → If the mixture is too thick to spread, whisk in a small amount of milk or cream until it reaches a spreadable consistency for even filling between slices.

French Toast Batter

  • 4 large eggs

    → The foundation of the custard that coats the bread. Beat until fully combined to prevent streaks; whisk to emulsify with the dairy for a smooth texture.
  • 1 cup whole milk or half-and-half

    → Adds creaminess and moisture to the batter. Half-and-half gives richer flavor; use lower-fat milk if you prefer lighter toast. Avoid ultra-thin milk to prevent soggy bread.
  • 1 teaspoon vanilla extract

    → Flavor booster for the batter; use pure vanilla for best aroma. If you like, combine with a pinch of almond extract for a different profile, but keep amounts small to avoid overpowering the dairy.
  • 1/2 teaspoon ground cinnamon

    → Provides warmth and spice that complements the cream cheese filling. Increase to 3/4 teaspoon for stronger spice; optional nutmeg can be added too.
  • 2 tablespoons granulated sugar

    → Subtle sweetness in the batter that helps browning; adjust to taste. Omit if the filling is already quite sweet.
  • Pinch of salt

    → Balances sweetness and enhances overall flavor.

Cooking

  • 2 tablespoons unsalted butter, for the pan

    → Creates a flavorful, golden crust and prevents sticking. Use a nonstick skillet and melt butter before adding the soaked bread; wipe between batches to maintain even browning.

Serving and Toppings

  • Pure maple syrup for serving

    → Classic accompaniment; real maple syrup provides depth and sweetness to balance the richness. Warm before serving for easier pouring.
  • Powdered sugar for dusting (optional)

    → A light dusting adds a pretty finish and extra sweetness. Sift just before serving to avoid clumping.
  • Fresh berries or sliced fruit (e.g., strawberries, blueberries, raspberries)

    → Fresh fruit adds brightness and contrast to the richness. Use ripe, in-season fruit for best flavor; you can macerate with a splash of lemon juice for extra juiciness.
  • Whipped cream (optional)

    → Adds a light, creamy contrast to the dense stuffed toast. Pipe in small rosettes or serve a dollop on top for an elegant finish.

Instructions

  • Gather and bring all ingredients to room temperature before mixing to ensure smooth emulsions and even distribution of flavors. This includes the cream cheese, eggs, milk, vanilla, cinnamon, sugar, and butter for cooking, as well as the brioche or challah slices and any toppings you plan to serve with the dish.

    → Room-temperature ingredients blend more evenly, preventing lumps in the filling and custard and ensuring a cohesive texture in the final toast.
  • Prepare the cream cheese filling by blending the softened cream cheese with powdered sugar, vanilla, and a pinch of salt until the mixture is smooth and pliable; if the mixture feels thick, whisk in 1 teaspoon of milk or cream at a time until it is easily spreadable.

    → A smooth, spreadable filling ensures even distribution between slices and prevents chunky pockets that can burst through the bread during cooking.
  • Prepare the bread by arranging 6 slices of thick-cut brioche or challah, each about 3/4 inch thick; verify uniform thickness for even soaking and browning, and if any slices are dry or stale, lightly toast or dry in a 250°F (120°C) oven for 5–8 minutes to prevent soggy interiors.

    → Uniform, sturdy bread soaks evenly and holds the cream cheese filling without collapsing during cooking.
  • Assemble three stuffed sandwiches by spreading a generous, even layer of the cream cheese filling on the flat side of 3 bread slices, then topping each with a second slice to form sandwiches; press gently to seal and minimize filling leakage during soaking.

    → A consistent filling layer prevents uneven flavor and helps the sandwiches hold together while soaking and cooking.
  • Whisk the French toast batter in a shallow dish by combining 4 large eggs, 1 cup milk or half-and-half, 1 teaspoon vanilla, 1/2 teaspoon ground cinnamon, 2 tablespoons sugar, and a pinch of salt until completely blended and smooth; whiskers should show no separate fat or streaks for a uniform custard.

    → A well-emulsified batter coats the bread evenly and browns evenly, producing a creamy interior without separate curds of egg or dairy.
  • Dip each stuffed sandwich into the batter, turning to soak both sides for about 20–40 seconds per side; lift with tongs and let excess custard drip back into the dish; lightly press on the sandwich to help the custard permeate the crust without tearing the bread.

    → Proper soaking ensures the interior becomes custardy while the exterior still forms a crisp, golden crust; avoid oversoaking which can cause the filling to leak and the bread to become mushy.
  • Preheat a large nonstick or cast-iron skillet over medium heat and melt 1 tablespoon unsalted butter, swirling to coat the surface evenly; allow the butter to foam but not burn, and wipe the pan between batches if needed to maintain consistent browning.

    → A properly preheated, well-greased pan prevents sticking, promotes an even sear, and contributes to a golden crust.\
  • Cook the first soaked stuffed sandwich in the hot skillet for 3–4 minutes on the first side, then carefully flip with a wide spatula and cook another 3–4 minutes on the second side until the bread is deeply golden and the filling is warmed through; avoid pressing down hard to prevent squeezing out the cream cheese.

    → Even browning yields both texture and flavor, while gentle turning preserves the delicate filling and prevents it from oozing out.
  • Remove the first sandwich to a warm plate and repeat the soaking and cooking process with the remaining two sandwiches, adding additional butter to the pan as needed to maintain even browning and prevent sticking; avoid crowding the pan to keep heat stable.

    → Cooking in batches ensures each slice browns properly and cooks through without steaming, which can dull the crust color and texture.
  • Keep finished stuffed French toast warm in a 200°F (90°C) oven on a wire rack set over a baking sheet while you complete all servings, ensuring the crust remains crisp and the interiors stay warm without sweating.

    → A gentle warm hold preserves crispness and heat distribution without sogginess from stacked pieces.
  • To serve, transfer the stuffed French toast to plates and drizzle with warm pure maple syrup; dust with a light coat of powdered sugar and garnish with fresh berries or sliced fruit; offer whipped cream on the side if desired to add a creamy contrast.

    → Warm maple syrup complements the rich filling, while fruit and whipped cream add brightness, acidity, and a luxurious finish that balances the dish.

Notes

These stuffed cream cheese French toast are decadently rich with a creamy vanilla center encased in lightly crisp, golden bread, making them a luxurious brunch that feeds a crowd.

  • Bread prep: Choose sturdy thick-cut brioche or challah (about 3/4 inch thick). Slightly stale bread absorbs the custard without becoming soggy; day-old bread is ideal. If your bread is fresh, lightly toast or dry in a low oven (250°F / 120°C) for 5–8 minutes to dry the surface before soaking.
  • Cream cheese filling: Soften the cream cheese at room temperature and whip with powdered sugar and vanilla until smooth. Add a pinch of salt to balance richness, and whisk in a small splash of milk or cream if the filling feels thick and won’t spread evenly. For easier filling, pipe the mixture between the slices or spread evenly with a spatula.
  • Optional flavor boosters: A tiny pinch of lemon zest or orange zest can brighten the filling; a light pinch of almond extract in the batter adds a subtle aroma—use sparingly to avoid overpowering the dairy.
  • French toast batter: Whisk 4 large eggs with 1 cup whole milk or half-and-half, 1 teaspoon vanilla, 1/2 teaspoon ground cinnamon, 2 tablespoons sugar, and a pinch of salt until completely combined and pale. Let the mixture rest 5–10 minutes to bloom the spices, then whisk again before dipping.
  • Dip and soak: Dip each bread slice into the custard briefly, about 15–20 seconds per side, allowing it to saturate without turning gummy. For very thick slices, you can let soak a few extra seconds, but avoid oversoaking to prevent a soggy center.
  • Assemble: Spread a generous amount of the cream cheese filling on one slice and top with another slice to form a sandwich. If you prefer, pipe the filling in a neat line down the middle and press the other slice on top to seal.
  • Cooking: Heat a skillet or nonstick pan over medium heat and melt 1–2 tablespoons unsalted butter. Cook the stuffed sandwiches 2–3 minutes per side, or until the outside is deeply golden and the center is warm. Wipe the pan between batches to avoid uneven browning. Keep cooked pieces warm in a low oven (around 200°F/90°C) while you finish the rest.
  • Make-ahead and storage: Cream cheese filling can be made up to 2 days ahead; assemble the sandwiches just before cooking, or prepare fillings and bread slices in advance and assemble in the moment. Refrigerate assembled sandwiches for up to 2 hours if needed; do not let them sit in custard too long before cooking, or the bread may become soggy.
  • Serving and toppings: Serve hot with pure maple syrup and a dusting of powdered sugar. Fresh berries or sliced fruit add brightness; a dollop of whipped cream or a dollop of yogurt can balance the richness. For added flair, garnish with citrus zest or a light dusting of cinnamon.
  • Variations and substitutions: For dairy-free or vegan options, use dairy-free cream cheese, plant-based milk, and a flax or aquafaba-based binder. For gluten-free, ensure the bread is certified gluten-free; thick-cut GF bread works best with similar soaking times. If you want a lighter version, use reduced-fat cream cheese and less sugar in the filling.

Tips

Tips for Stuffed Cream Cheese French Toast

  • Bread selection: Use 6 slices of thick-cut brioche or challah about 3/4 inch thick. The bread should be sturdy and slightly stale to absorb the custard without becoming soggy. Day-old bread is ideal; if using fresh, toast lightly or dry in a low oven (250°F / 120°C) for 5–8 minutes to dry the surface before soaking.
  • Cream cheese filling: Soften the cream cheese at room temperature so it spreads evenly between slices. For a silkier filling, whip with a fork until smooth or transfer to a piping bag to limit leakage. Sweeten with powdered sugar (or granulated sugar) to taste, and add 1 teaspoon vanilla extract and a pinch of salt. If the mixture is too thick, whisk in 1 tablespoon milk or heavy cream until spreadable.
  • Flavor balance: A pinch of salt in the filling enhances richness. Consider a tiny splash of lemon zest for brightness, or a light fold of lemon/orange zest into the filling for a citrusy note that complements the sweetness.
  • Batter prep: whisk 4 large eggs with 1 cup whole milk (or half-and-half) and 1 teaspoon vanilla until fully combined. Add 1/2 teaspoon ground cinnamon, 2 tablespoons granulated sugar, and a pinch of salt. For deeper warmth, increase cinnamon to 3/4 teaspoon or add a pinch of nutmeg. Keep the batter at room temperature for easier dipping.
  • Custard texture: If your batter seems too thin, whisk in another egg or a tablespoon of milk. If it’s too thick, thin with a splash of milk until it coats the bread evenly without running off in thick globs.
  • Assemble smartly: Spread a generous layer of cream cheese filling on one bread slice, place a second slice on top, and press gently to seal. For neater edges, trim crusts or use a small offset spatula to guide the filling to the center while sealing.
  • Soaking approach: Dip the stuffed sandwich into the custard, coating both sides, and let excess drip back into the bowl. Because the filling is inside, avoid letting the bread soak far too long or the edges may leak. If you’re unsure, a quick 10–20 second dip per side is enough for thick slices.
  • Pan prep: Use a nonstick skillet or well-seasoned cast iron and 2 tablespoons unsalted butter. Melt the butter and maintain a medium-low heat to allow the centers to set without burning the exteriors. Wipe the pan between batches to maintain even browning.
  • Cooking time: Cook until the underside is golden and the center is just set, typically about 3–4 minutes per side. If the bread browns too quickly, lower the heat and cook longer to prevent the filling from oozing out.
  • Finish options: For a crispier exterior, finish the slices briefly under a hot broiler or in a 350°F (175°C) oven for 6–8 minutes to ensure the filling is warm and cheese melted through the center.
  • Serving temperature: Serve immediately for the best texture. If needed, keep cooked pieces warm in a low oven (about 200°F / 95°C) on a sheet pan, loosely covered with foil to retain moisture without steaming the crust.
  • Make-ahead ideas: Cream cheese filling can be prepared a day in advance and stored in the fridge; bring to room temperature before assembling. Assemble stuffed sandwiches and refrigerate up to 2 hours before cooking. For longer storage, freeze assembled sandwiches (well wrapped) and thaw in the fridge before dipping and cooking.
  • Glaze and toppings: Warm pure maple syrup before serving so it flows easily. A light dusting of powdered sugar looks pretty and adds a touch of sweetness. Fresh berries or sliced fruit provide brightness and cut through richness; whipped cream adds a luxurious contrast if desired.
  • Diet-friendly twists: For a dairy-free version, use dairy-free cream cheese and a non-dairy milk (like almond or oat) in the batter. For a gluten-friendly option, ensure the bread is gluten-free and keep the batter free of wheat-containing thickeners; the technique remains the same.
  • Troubleshooting quick fixes: If the filling leaks while cooking, check that the edges are well-sealed and the pan isn’t too hot. If the toast seems too soggy, reduce soaking time or use slightly drier bread next time. If the center isn’t setting, finish in the oven for a few minutes to ensure the filling warms through.
  • Flavor variations to try: Add a teaspoon of almond extract to the batter for a nutty aroma, or fold in a teaspoon of orange zest to the cream cheese filling for a citrusy twist. A pinch of ground cardamom can also add a fun, warm spice note.

FAQ

What is Stuffed Cream Cheese French Toast?

Stuffed Cream Cheese French Toast is a breakfast treat where thick slices of bread are spread with a creamy cream cheese filling, sandwiched together, then dipped in a cinnamon-vanilla egg custard and cooked until golden. The result is a tender interior with a creamy center and a crisp, caramelized exterior. It’s typically served with maple syrup and fresh fruit.

What ingredients do I need?

Serves about 4–6 depending on portion size. You’ll need:

  • 6–8 slices thick-cut bread (brioche, challah, or Texas toast)
  • 8 oz cream cheese, softened
  • 2–4 tbsp granulated sugar (adjust to taste)
  • 1 tsp vanilla extract
  • 1/2 tsp ground cinnamon
  • Pinch of salt
  • 3–4 large eggs
  • 1 cup milk or dairy-free milk
  • 2 tbsp butter or oil (for cooking)
  • Optional fillings: jam, fresh berries, sliced fruit, or chocolate chips
Can I make it ahead?

Yes. You can prepare the filling in advance and refrigerate. For best results, assemble the stuffed sandwiches and refrigerate up to 24 hours before cooking, then bake or fry just before serving. If soaking bread in custard overnight, shorten the soak time a bit the next day to avoid sogginess.

How do I assemble the stuffed French toast?

Spread the cream cheese filling on one slice, add any desired fillings (jam, fruit, chips), then top with another slice to make a sandwich. Repeat with the remaining slices. Whisk together the custard: eggs, milk, vanilla, and cinnamon. Dip each sandwich in the custard for about 15–30 seconds per side, letting it soak slightly. Cook on a greased skillet or griddle until golden on both sides.

What is the best bread to use?

Thick-cut brioche or challah is ideal for tenderness and soaking capability. Texas toast is a good budget option. Day-old or slightly stale bread works well because it soaks up the custard without falling apart. Avoid very thin sandwich bread unless you’re short on time.

How long does it take to cook?

On the stove: about 3–4 minutes per side, depending on thickness, until golden and the center is set. In the oven: bake at 350°F (175°C) for 25–35 minutes if assembled as a bake, or 18–22 minutes if you prefer open-faced slices, flipping once if needed.

Can I bake it or pan-fry it?

Both methods work. Pan-frying in butter over medium heat gives a crisp exterior and tender center. Baking is convenient for feeding a crowd: place the assembled sandwiches on a parchment-lined sheet and bake until golden and set, or bake as individual stuffed slices for even browning.

How do I reheat leftovers?

Store leftovers in the fridge for up to 2–3 days. Reheat in a toaster oven or regular oven at 350°F (175°C) for 8–12 minutes until warmed through and the crust is still crisp. If using a microwave, expect softer results.

What flavor variations can I try?

Get creative with fillings and toppings. Ideas include:

  • Orange or lemon zest added to the cream cheese
  • Swirls of fruit preserves or jam inside the filling
  • Mini chocolate chips or chopped nuts
  • Berries or sliced bananas cooked with the filling
  • Spiced maple syrup or a dusting of powdered sugar
  • A savory twist: cream cheese mixed with herbs and a pinch of salt

Introduction / Hook

Imagine waking up or winding down with the soft, comforting glow of coffee carried into a silk-smooth pudding. The aroma of roasted beans lingers in the air, curling around a spoonful of indulgence that is neither a dessert nor a beverage, but something wonderfully in between. Coffee pudding invites you to slow down, to savor the contrast between a velvety, custard-like texture and the bold, roasted notes of coffee. It’s a dessert that understands your love for caffeine without overwhelming it—gentle enough for a leisurely brunch, yet rich enough to crown a late-night indulgence. When you crack into its glossy, pudding-y surface, you’re met with a quiet, satisfying jiggle that confirms you’ve found something truly special: a dessert that whispers rather than shouts, offering warmth, comfort, and a touch of café elegance in every bite.

The beauty of coffee pudding lies in its balance. It’s not a coffee drink turned into dessert, nor is it a heavy custard that drifts into cloying territory. It sits at the intersection of smooth creaminess and the dark, complex flavors of coffee. The first bite carries a gentle caffeine kiss, followed by a luxurious mouthfeel that lingers on the tongue. There’s a subtle sweetness that never competes with the coffee; instead, it enhances it, like a chorus supporting the lead singer. The result is a dessert that feels sophisticated enough for a dinner party, approachable enough for a weekend treat, and comforting enough for a quiet Tuesday night alone with a good book or a warm conversation with someone you love.

In a world of quick, flashy desserts, coffee pudding asks for a moment of attention. It doesn’t demand applause after the first spoonful; it rewards patience with a more nuanced flavor as it meets the palate in waves. The top might gleam with a delicate sheen, promising something luscious beneath, while the spoon reveals a custardy core that holds its shape with a gentle resistance. It’s the kind of dessert that makes you pause—almost ceremonial in its simplicity—before you dive back in for another spoonful, and then another, until the last bite leaves you with a lingering coffee warmth that feels like a soft memory you want to revisit tomorrow morning.

The Story Behind the Dish

Coffee and dessert have a long, intimate history, each borrowing flavors from the other and creating rituals around them. Puddings and custards, in their many forms, have traveled across continents, adapting to local milk, cream, and spice profiles. Coffee pudding can be traced to kitchens where dairy and coffee met in a gentle, domestic harmony. It’s a dessert that knows how to honor both its ingredients—coffee for its depth and aroma, and dairy for its silkiness—without letting one overpower the other.

There’s a certain nostalgia to coffee pudding. It echoes late-night study sessions, early mornings at the cafe corner where a barista knows your order by heart, and the quiet joy of sharing something comforting after a long day. In some cultures, similar puddings are treated as everyday luxuries—simple, unpretentious, yet deeply satisfying. The dish you’re about to read is a modern take that invites experimentation: a classic canvas that can be tinted with seasonal spices, a splash of vanilla, or a hint of chocolate. It’s both timeless and flexible, a reflection of how coffee itself has become a global, everyday indulgence that still feels special.

If you’ve ever stood in a kitchen imagining what a grown-up pudding should taste like—rich, creamy, with a hint of espresso—then you already know the spirit of this recipe. It respects tradition while inviting you to make it your own. The story of coffee pudding is really the story of coffee culture meeting homey comfort, a bridge between the quick energy of a morning cup and the slow, indulgent pleasure of dessert. And like the best stories, it invites you to participate: to whisk, to taste, to adjust, and to serve with a ceremonious flourish that makes a simple bowl feel like a shared moment.

Why You’ll Love This Recipe

  • Silky, spoonable texture that melts on the tongue and clings softly to the memory.
  • Bold coffee flavor balanced with a gentle sweetness that never overwhelms the palate.
  • Versatility that fits many occasions—from elegant after-dinner finales to cozy brunch highlight reels.
  • Make-ahead friendly: this is a dessert you can prepare in advance and serve chilled, allowing flavors to mellow and flourish.
  • Adaptable to different diets and taste preferences with thoughtful substitutions (vegan, dairy-free, or lower-sugar options) without sacrificing character.
  • Beautiful presentation possibilities: a glossy top, a dusting of cocoa or cinnamon, and optional toppings that enhance texture and aroma.
  • Pure comfort with a touch of café sophistication—perfect for anyone who adores the fragrance of freshly brewed coffee as much as the first bite of dessert.

Performance Benefits

Beyond taste, this dessert suits busy lives. It is forgiving in practice, forgiving in texture as a set custard, and forgiving of small adjustments. It’s a dessert you can scale up for a dinner party without fear of getting bogged down in complicated technique. The process remains accessible, and the reward is consistently satisfying. If you’ve ever wanted a dessert that feels both intimate and impressive, coffee pudding offers that dual appeal with minimal drama and maximal comfort.

Flavor Profile & Texture

The flavor profile of coffee pudding centers on a deep, roasted coffee foundation that acts as the backbone for every bite. Depending on the coffee used, you might notice notes of dark chocolate, toasted hazelnuts, or even a whisper of caramel. The sweetness, while present, is carefully moderated so that it doesn’t mask the coffee’s natural complexity. Vanilla often threads through the base, adding a soft floral/creamy nuance that makes the overall impression round and inviting.

The texture is where coffee pudding shines. It’s not as dense as a heavy custard nor as light as a gelatinous mousse. It sits in a happy middle ground—creamy enough to coat the spoon with ease, yet firm enough to hold a gentle shape on the plate. When chilled properly, it develops a delicate glaze on top, a mirror-like sheen that invites the next spoonful. The mouthfeel carries a luxurious silkiness, punctuated by the subtle grain of fine coffee grounds or dissolved coffee particles depending on the method used. Some versions offer a faint, satisfying contrast in texture with a light whipped topping or a crunchy crumble of chocolate cookies or toasted nuts. These textural variations can transform the dessert from something everyday to something that feels like a moment of indulgence worthy of celebration.

Pairing this with a companion bite can elevate the experience. A sliver of dark chocolate or a shard of brittle biscuit can emphasize the bitter-sweet edge of coffee, while a dollop of softly whipped cream brings brightness and a cloud-like counterpoint to the dense pudding. For those who love warmth, a pinch of cinnamon or cardamom can awaken the senses and lend a subtle spice that makes the aroma even more inviting as it warms the room. The overall sensory journey—from the nose to the tongue to the lingering finish—should feel like a comforting, familiar hug with a touch of café luxury.

Occasions & Pairings

This versatile dessert shines in a variety of settings. Consider serving it for:

  • Elegant dinner parties, where its quiet sophistication complements a refined menu.
  • Weekend brunches, pairing beautifully with light pastries, fruit, and a good pot of coffee.
  • Celebrations and holidays, offering a grown-up dessert option that’s not overly fussy.
  • A cozy weeknight treat when you want something special but not overly complex.

Suggested pairings (flavors and textures that complement coffee pudding):

  • Chocolate elements: a drizzle of dark chocolate sauce, cocoa-dusted cookies, or a shard of chocolate praline.
  • Nutty accents: toasted almonds, hazelnuts, or pistachios add crunch and depth.
  • Fresh contrasts: a lightly whipped cream or creme fraiche dollop, or citrus zest adding brightness.
  • Caramel and toffee notes: a caramel ribbon or a few flakes of sea salt to create a thrilling sweet-salty balance.
  • Coffee companions: serve alongside biscotti, coffee biscotti triangles, or a robust espresso on the side to extend the experience.

Occasion-specific ideas:

  • For a dinner party, plate individual portions with a glossy top and a delicate dusting of cocoa, paired with a small almond tuile for textural contrast.
  • For a weekend brunch, layer the pudding in parfait glasses with fruit compote and a light whipped topping to create a visually appealing, multi-layer dessert.
  • For a winter gathering, lightly infuse the pudding with cinnamon or cardamom to evoke cozy, spicy notes that feel seasonally appropriate.

Tips, Variations & Substitutions

Every kitchen has its own personality, and this coffee pudding welcomes a range of tweaks to suit dietary needs, flavor preferences, or what you have on hand. Here are some ideas to customize without turning the dessert into a different dish entirely.

  • Vegan or dairy-free version: Use a plant-based milk (almond, soy, oat, or coconut) and a dairy-free thickener (such as cornstarch or agar-agar depending on the recipe approach). A splash of vanilla bean extract adds the creamy note that dairy often provides.
  • Lower-sugar approach: Reduce the sweetener slightly and rely on the natural bitterness of espresso to balance. Consider using a natural sweetener like maple syrup or coconut sugar for a nuanced flavor.
  • Flavor twists: Add a pinch of spices such as cinnamon, cardamom, or nutmeg to the base for a warm, aromatic profile. A whisper of orange zest or a small amount of vanilla bean can lift the pudding with a bright finish.
  • Espresso intensity: Use a stronger coffee concentrate or a mix of espresso and a dark roast to deepen the flavor. If you prefer milder coffee notes, you can dilute with additional milk or water to your liking.
  • Texture play: For a velvety, ultra-smooth finish, strain the liquid before setting. If you enjoy a bit of bite, aim for a slightly less firm set. If you crave silk, whisk vigorously during the cooling stage to incorporate air and create lightness.
  • Regional twists: In some cultures, a touch of caramelized sugar or a hint of smoky flavor can be introduced by using a smoked sugar or by briefly toasting the top burnished layer with a torch for a caramelized finish.
  • Gluten-free friendly: The dessert itself is naturally gluten-free if prepared with gluten-free thickeners and using ingredients that do not introduce gluten-containing components. Always check labels if you are purchasing pre-made thickeners or flavor enhancers.
  • Make-ahead variations: Prepare the base the day before and gently rewarm before setting, if your approach allows. Some people enjoy serving coffee pudding at a slightly warmer temperature, which can accentuate aroma and mouthfeel.

Storage & Make-Ahead Ideas

One of the most appealing aspects of a well-crafted coffee pudding is how well it plays with advance planning. Here are practical tips to ensure your dessert remains as delightful on day two as it was on day one.

  • Make-ahead: Coffee pudding generally sets best when made ahead. Prepare the base, allow it to cool to room temperature, then refrigerate in a covered container until you’re ready to serve. This approach allows flavors to meld and develop depth.
  • Storage duration: In the fridge, the pudding typically keeps well for 2 to 4 days when stored properly. For best texture, avoid frequent reheating while maintaining a cool, even environment that preserves its silkiness.
  • Air exposure: Cover the surface with plastic wrap to prevent a skin from forming. If a skin does develop, you can whisk gently to reintroduce a smooth surface before serving.
  • Freezing considerations: Freezing pudding that contains dairy can lead to texture changes. If you prefer the option to freeze, consider versions adapted with dairy-free milk and appropriate thickeners. Thaw slowly in the fridge and gently whisk to restore creaminess if needed.
  • Make-ahead serving ideas: Present individual portions in clear glass cups or ramekins. When ready to serve, you can top with a touch of whipped cream, a dusting of cocoa, or a few chocolate shavings for an elegant finish.

Fun Facts & Trivia (Optional)

Did you know that coffee has inspired countless desserts around the world, from tiramisu to affogato? Coffee’s bold, roasted profile transitions seamlessly into the realm of desserts, where it can impart warmth without overpowering the dish. Puddings, not unlike custards, have a storied history dating back centuries, with roots in European kitchens before spreading across continents and cultures. The combination of coffee and dairy has long been celebrated for its ability to create a comforting, almost nostalgic experience—one that evokes early morning conversations over a shared cup or late-night study sessions punctuated by a sweet reward. The modern coffee pudding you’re about to enjoy is a nod to that heritage, updated with a contemporary sensibility that emphasizes balance, texture, and room-temperature elegance as part of the overall dining experience.

In culinary lore, pudding has often served as a bridge between everyday family meals and special occasions. Its adaptability makes it a canvas—one you can paint with spice, citrus, or chocolate in subtle ways, depending on the mood and the season. Coffee, meanwhile, has grown from a simple beverage into an emblem of social ritual across the globe. When these two elements meet in a dessert, they create a small, universal moment: the satisfaction of something creamy and rich, punctuated by the crisp, invigorating scent of coffee that invites you to linger at the table just a little longer.

Another fun fact: many cultures have their own variations of coffee desserts that emphasize different textures and flavors. Some lean more into creamy custards, others into airy mousses, and some strike a balance that sits somewhere in between. The coffee pudding described here is deliberately versatile, designed to honor that cross-cultural spirit while offering a straightforward, dependable method to achieve a luxurious result at home. It’s the kind of dessert that invites conversation—about coffee, about technique, about personal preferences—and leaves you with the sense that you’ve uncovered a small secret to making sweetness feel intimate and refined.

Final Thoughts

Coffee pudding is more than a dessert; it’s an invitation to slow down and savor texture, aroma, and the quiet pleasure of a well-balanced bite. It celebrates the way coffee can be both robust and comforting, a drink that can spark energy and soothe at the same time when transformed into something meant to be enjoyed with a spoon. Whether you’re curling up with a good book, hosting friends for a dinner party, or simply treating yourself after a long day, this pudding offers a touch of café elegance that feels accessible, timeless, and deeply satisfying. Embrace the ritual: brew a strong cup, pour a silky mixture into the dish, let it set, and serve with a flourish. The moment you lift the spoon and release that first wave of aroma, you’ll understand why coffee pudding endures in kitchens around the world—because it invites you to pause, smile, and take pleasure in something wonderfully simple and utterly delicious.

Ingredients

    Coffee Pudding
    Pudding Base
    – 2 cups whole milk (480 ml)
    → This is the primary liquid that gives the pudding its body and a smooth, gentle mouthfeel. Whole milk provides natural creaminess without being too rich. Warm the milk before combining with the other ingredients to help the starch dissolve and to prevent lumps. If you’re dairy-free, substitute with 2 cups unsweetened almond, soy, or oat milk, but expect a lighter texture and adjust thickener accordingly.
    – 1/2 cup heavy cream (120 ml)
    → Adds rich, velvety texture and a luxurious mouthfeel, helping the pudding set firmer and feel silky on the palate. If you omit, the pudding will still set thanks to the cornstarch and yolks, but it will be lighter; for a dairy-free version, you can substitute with an additional 1/4 cup of coconut cream or use a moisture-balanced plant-based milk and a touch more butter at the end if desired.
    – 1/3 cup granulated sugar (67 g)
    → Provides sweetness and helps dissolve evenly into warm milk for a smooth custard. Using superfine sugar aids quick dissolution and avoids graininess. You can adjust to taste or replace with a mix of white and brown sugar for a deeper caramel note; remember that brown sugar will add moisture and a hint of molasses.
    – 3 tablespoons cornstarch (24 g)
    → Primary thickening agent that yields a glossy, custard-like texture. Make a slurry by whisking the cornstarch with a few tablespoons of the cold milk to prevent lumps, then whisk the slurry into the hot milk. Cook gently, stirring constantly, until the mixture thickens and just coats the back of a spoon. Overcooking can cause a slightly starchy or gummy finish.
    – 2 large egg yolks
    → Contribute richness and a smooth, velvety custard texture. Temper the yolks by whisking in a small amount of the hot milk before returning to the pot to prevent scrambling. If avoiding eggs, you can increase cornstarch to 4 tablespoons and use a bit more butter for gloss, but you will lose some custard depth and creaminess.
    – 2 tablespoons instant espresso powder (or 60 ml strong brewed espresso)
    → Delivers the signature coffee aroma and flavor. Dissolve the espresso powder in a small amount of hot water or whisk in strong brewed espresso to distribute evenly through the mixture. For a milder cup, start with 1 tablespoon and adjust to taste. If using decaf, use decaf espresso powder or decaf brew.
    – 1 teaspoon vanilla extract
    → Enhances the coffee notes and rounds the sweetness with a warm aroma. Use pure vanilla extract for the best depth; add after removing the pudding from heat to preserve the aroma. If using vanilla bean, scrape the seeds into the milk and simmer with the milk and bean for extra complexity.
    – 1/4 teaspoon fine salt
    → Balances sweetness and enhances the overall flavor, helping the coffee notes to pop. A small amount goes a long way; omit only if you are using salted butter elsewhere, but keep the rest to maintain balance.
    – 1 tablespoon unsalted butter, cut into small pieces (optional, for finishing)
    → Optional step to finish with a glossy, smooth surface and an extra-soft mouthfeel. Stir in off the heat until melted and the mixture is silky. If dairy-free, substitute with a small amount of neutral oil or coconut oil, but texture and sheen may differ slightly.
    Optional Toppings
    – 1/2 cup lightly sweetened whipped cream
    → Adds a light, airy contrast to the rich pudding. Whip cold heavy cream with a touch of sugar and vanilla to soft peaks, then dollop on top just before serving. For dairy-free, use coconut cream whipped to soft peaks with a touch of sweetness and vanilla.
    – Cocoa powder or chocolate shavings
    → Provides a visual contrast and a finishing coffee-chocolate note. Sift a light dusting of cocoa powder or shave dark chocolate over the top for a polished presentation. If desired, drizzle a thin amount of espresso syrup for an extra coffee kick.

Instructions

  • Assemble your mise en place and equipment: set a heavy-bottom saucepan, a whisk, a heatproof spatula, a fine-mesh sieve, a medium bowl for tempering yolks, and six 4-ounce ramekins or serving cups within easy reach. This organization ensures a smooth workflow, minimizes the chance of scorching, and keeps your ingredients in the correct order for a proper custard base.

    → Organized setup reduces missteps and lets you maintain even heat and consistent texture throughout the cooking process.
  • Combine the dairy and sugar: whisk together 2 cups whole milk, 1/2 cup heavy cream, 1/3 cup granulated sugar, and 1/4 teaspoon fine salt in the heavy-bottom saucepan; heat gently over medium, stirring occasionally until the mixture is warm and the sugar has dissolved, just shy of simmering. This preheats the base and begins flavor blooming, while ensuring the cornstarch will hydrate evenly when added later.

    → Warming the dairy helps the cornstarch hydrate and prevents lumps, while dissolving sugar ensures a cohesive custard without gritty grains.
  • Whisk a smooth cornstarch slurry: in a small bowl, whisk 3 tablespoons cornstarch with 2 to 3 tablespoons cold milk until completely smooth and free of lumps; this slurry will thicken the custard evenly without forming starch pockets in the hot liquid.

    → Using cold milk prevents premature thickening and ensures the cornstarch disperses evenly when added to the hot mixture.
  • Temper the yolks: in a separate bowl, whisk 2 large egg yolks until pale, then gradually whisk in 1/2 cup of the warm milk to raise their temperature; continue whisking until the yolks look uniform, then pour back into the saucepan with the rest of the base.

    → Tempering prevents the yolks from scrambling when they meet the hot custard, yielding a silky, cohesive texture.
  • Thicken the custard: whisk the tempered yolks, cornstarch slurry, and the hot dairy mixture together over medium-low heat; keep stirring with a wooden spoon or silicone spatula, scraping the bottom and sides, until the mixture thickens and just coats the back of the spoon, about 4 to 6 minutes; avoid boiling to preserve a glossy finish.

    → The thickened custard should hold a line when traced with your finger on the spoon; this indicates proper gel formation of the starch and egg proteins.
  • Strengthen coffee flavor: whisk 1 tablespoon instant espresso powder with 1 tablespoon hot water until dissolved, then whisk the coffee solution into the hot pudding off the heat to distribute evenly; if you prefer a stronger coffee presence, increase to 2 tablespoons espresso powder.

    → Dissolving espresso ensures even distribution and prevents gritty sediment; adding off heat preserves aroma and flavor.
  • Finish the custard with vanilla and butter: stir in 1 teaspoon vanilla extract and 1/4 teaspoon fine salt, then, if using, whisk in 1 tablespoon unsalted butter cut into small pieces until melted and glossy; this adds sheen, richness, and a rounded aroma.

    → Vanilla heightens the coffee notes and the butter enriches the mouthfeel, creating a smoother, more luxurious pudding.
  • Strain and cool the base: pour the hot custard through a fine-mesh sieve into a clean bowl to remove any lumps, then set the bowl over an ice bath for a few minutes or chill briefly at room temperature until it stops steaming; this helps prevent skin formation and speeds up setting.

    → Straining yields a perfectly smooth texture, and rapid cooling reduces carryover heat that could degrade the custard’s texture.
  • Chill the pudding to set: cover the surface with plastic wrap directly on the pudding to prevent a skin, then refrigerate for at least 2 hours or until fully set and cold; the starch and egg proteins will firm up, giving clean, sliceable portions.

    → Direct contact with wrap prevents skin formation; cold temperature encourages the custard to set evenly for clean presentation.
  • Prepare optional whipped cream topping: in a chilled bowl, whip 1/2 cup heavy cream with a pinch of sugar and a drop of vanilla to soft peaks; keep cold until service to maintain structure and a light texture that contrasts the pudding.

    → Soft peaks provide a delicate, airy counterpoint to the dense pudding, enhancing mouthfeel and presentation.
  • Unmold or portion and garnish: just before serving, portion the chilled pudding into bowls or glasses, optionally piping or dolloping the whipped cream on top, and dust with a light sprinkle of cocoa powder or shave dark chocolate for a polished finish and extra aroma.

    → Finishing with cocoa or chocolate shavings adds color, aroma, and a complementary bitter note that highlights the coffee flavor.

Notes

These coffee puddings are a silky, espresso-kissed dessert built from a warm milk custard thickened with cornstarch and enriched with egg yolks for depth. Start by warming the whole milk (and cream if using) to help dissolve the cornstarch and prevent lumps; whisk a slurry of cornstarch with cold milk and whisk it into the simmering milk, then cook gently until the mixture coats the back of a spoon. Temper the yolks by whisking in a small amount of the hot milk before returning them to the pot to avoid scrambling, then cook just until the custard thickens. For the strongest coffee flavor, dissolve the instant espresso in a small amount of hot water or use strong brewed espresso; taste and adjust the strength before finishing. Remove from heat and stir in vanilla, salt, and the butter if using to create a glossy surface and extra silkiness; whisk until the butter is fully incorporated, then strain if you want an ultra-smooth pudding. Pour into serving dishes and chill at least 2–4 hours until set. Optional toppings like lightly sweetened whipped cream and a dusting of cocoa or chocolate shavings add contrast, while espresso syrup can intensify the coffee note. If you prefer a dairy-free version, substitute the 2 cups of milk with a plant-based alternative (unsweetened almond, soy, or oat milk) and omit the butter or replace with a small amount of neutral oil; expect a lighter texture and adjust thickener slightly. The pudding will keep in the fridge for several days; serve cold for a refreshing finish.

Tips

Tips for Perfect Coffee Pudding

  • Warm the milk before combining with the other ingredients to help the starch dissolve and prevent lumps. Keep the heat gentle so you don’t scorch the dairy.
  • Make a smooth cornstarch slurry by whisking the cornstarch with a few tablespoons of cold milk (or a bit of cold milk from the base). Stir this into the hot milk gradually to avoid clumps.
  • Temper the egg yolks: whisk a ladle of the hot milk into the yolks, then whisk the yolk mixture back into the pot. This prevents scrambling and yields a silkier custard.
  • Cook gently and continuously stir with a wooden spoon or silicone spatula. As it thickens, scrape the bottom and sides to prevent scorching and ensure even cooking.
  • Test doneness by coating the back of a spoon; if you run your finger across it and the line stays clean, the pudding is thick enough. Don’t overcook, or it may taste starchy or become gummy.
  • For extra gloss and richness, remove from heat and whisk in the unsalted butter (optional). It adds shine and a velvet mouthfeel. If dairy-free, substitute with a neutral oil or coconut oil and adjust for sheen.
  • Seasoning and flavor: add vanilla after removing from heat to preserve aroma. A pinch of fine salt helps the coffee notes pop; you can adjust sweetness or coffee strength with the espresso powder or brewed espresso.
  • If you want ultra-smooth texture, strain the warm pudding through a fine-mine sieve before dividing into serving dishes.
  • Dairy-free option: use 2 cups unsweetened plant milk and increase cornstarch to 4 tablespoons. Use coconut cream or a bit more plant-based butter/oil for gloss, and consider a dash of vanilla for depth.
  • Serving toppings: lightly whipped cream or coconut whipped cream pairs beautifully with the pudding. Finish with a dusting of cocoa powder, chocolate shavings, or a drizzle of espresso syrup for extra coffee aroma.
  • Chill and storage: refrigerate the pudding for 2–4 hours to set. To prevent a skin from forming, press plastic wrap directly on the surface after it cools, then re-cover. The pudding keeps well for up to 3–4 days.
  • Make-ahead tips: the pudding is forgiving and can be prepared a day in advance. Reheat gently on the stove or in a low-powered microwave, stirring and thinning with a splash of milk if needed.

FAQ

What is coffee pudding?

Coffee pudding is a creamy dessert flavored with coffee, typically thickened with cornstarch (or eggs for a custard-like texture). It can be served chilled or slightly warm and topped with whipped cream, chocolate, or a dusting of cocoa.

What ingredients do I need?

Common ingredients include strong brewed coffee or espresso, milk (dairy or plant-based), sugar, a thickener (cornstarch for a dairy-free option or egg yolks for a custard-like version), vanilla extract, and a pinch of salt. Optional additions: butter or vegan butter for richness.

Can I make it dairy-free or vegan?

Yes. Use plant-based milk (like almond, soy, oat, or coconut) and cornstarch as the thickener. Skip butter, and you’ll have a dairy-free version. If you want a richer texture, add a splash of coconut cream or a bit of oil.

What thickening options are best?

Cornstarch is the easiest and gluten-free option for a smooth pudding. Other choices include tapioca starch or arrowroot. If you want a custard-like texture with eggs, use egg yolks and temper them before adding to the hot mixture.

Is it gluten-free?

Yes, as long as you use gluten-free thickeners (like cornstarch, tapioca, or arrowroot) and keep other ingredients gluten-free. Avoid any flavored add-ins that contain gluten.

How do I make it step by step?

1) Brew a strong coffee or espresso. 2) In a saucepan, whisk sugar with a small amount of milk and the chosen thickener to form a slurry. 3) Add the rest of the milk and the coffee; heat over medium heat, whisking constantly. 4) If using cornstarch, cook until the mixture thickens and coats the back of a spoon; if using eggs, temper yolks with hot liquid, then return to pot and cook until thickened but not boiling. 5) Remove from heat, stir in vanilla and optional butter, and strain if needed. 6) Pour into serving dishes and chill until set.

How long does it take to make?

Active prep and cooking typically take 15–25 minutes. Afterward, chill time is usually 1–4 hours (or overnight) to fully set, depending on your desired firmness.

How do I prevent lumps?

Whisk the slurry (cornstarch with a little cold milk) until smooth before adding to hot liquid. If using eggs, temper the yolks by gradually whisking in a small amount of hot mixture before returning to the pot. If lumps form, strain the pudding through a fine-mesh sieve.

How should I store leftovers?

Store covered in the refrigerator for up to 3–4 days. Keep it covered to prevent a skin from forming. Gently reheat or serve cold; add a splash of milk if it thickens too much after chilling.

Can I make it ahead or freeze it?

You can make it a day ahead and chill until set. Freezing is not recommended for best texture, as freezing can alter the pudding’s consistency; if you must freeze, do so in a well-sealed container and expect some texture changes.

How can I serve or garnish?

Serve chilled in small cups or ramekins. Top with whipped cream, a dusting of cocoa powder or cinnamon, chocolate shavings, or a drizzle of chocolate or caramel sauce. A dash of espresso or coffee syrup also pairs nicely.

Can I adjust the coffee strength or sweetness?

Yes. Use a stronger coffee concentrate or adjust the amount of sugar to taste. Start with less sugar and add more after chilling if needed, so it dissolves evenly.

Can I use instant coffee or just espresso?

You can use either. Espresso or freshly brewed strong coffee yields the best flavor, but instant coffee dissolved in a little hot water works well too. If using instant coffee, dissolve fully before adding to the milk mixture and adjust sweetness to taste.