Introduction & Hook
Imagine a dessert that glows with ivory elegance, a cake that carries the fresh brightness of ruby-red strawberries in every bite. The first taste is lush and creamy, a whisper of sweetness that’s balanced by a gentle tang, like a delicate first kiss of summer. This White Chocolate Strawberry Cheesecake is more than a treat; it’s a celebration of contrasts—silky richness meets sun-warmed fruit, smooth texture meets subtle crunch, and a crust that offers a quiet, confident foundation to the glossy, dreamy filling. When you cut into it, the slices release a cloud of aroma that mingles vanilla, ripe berries, and a kiss of indulgence, inviting you to linger at the table a little longer. It’s the kind of dessert you want at a special occasion, yet it’s friendly enough for a weeknight celebration with family or close friends. The experience begins with the scent—an inviting, dairy-sweet aroma that hints at decadence without being overpowering—and ends with a finish that carries a clean, refreshing aftertaste, like a sunset after a warm afternoon. If you’ve ever wished for a cheesecake that feels timeless and modern at the same time, this is your recipe.
The Story Behind the Dish
Cheesecake as a concept travels through history like a well-loved heirloom, evolving with each era and culture. Its roots reach back to ancient civilizations that experimented with soft cheese and bread or biscuit bases, shaping simple yet comforting desserts. Over centuries, cheesecakes traveled from taverns and markets to dining tables of grand homes, each region adding its own personality—firmer, silkier, more custardy, or more indulgent. The modern cheesecake, especially in Western traditions, often embraces a balance between a luscious filling and a crisp or crumbly crust, with flavors that range from citrus to chocolate to fruit-forward summits. The White Chocolate Strawberry Cheesecake you see today is a contemporary homage to those timeless roots, a fusion that marries the classic indulgence of a creamy filling with the bright, sunlit sweetness of strawberries and the smooth, mellow sweetness of white chocolate. The idea behind this particular rendition grew from summer picnics and holiday gatherings when the fruit’s peak vitality is at its height and the mood is celebratory. It’s a dessert that invites sharing, conversation, and a little bit of swoon-worthy indulgence. In many kitchens, this flavor combination evokes old family recipes passed down through generations, reimagined with a modern touch—an elegant upgrade that still feels familiar, comforting, and inviting to all who gather around the table.
Why You’ll Love This Recipe
- Effortless elegance: A refined dessert that delivers restaurant-quality taste with a home-kitchen sensibility.
- Luxuriously creamy filling: A smooth, velvety texture that feels indulgent without being heavy, balanced by a gentle tang.
- Bright fruit contrast: The natural sweetness and tartness of strawberries cut through richness, creating a refreshing finish.
- Subtle chocolate kiss: White chocolate lends a delicate, dreamy sweetness that complements the fruit rather than overpowering it.
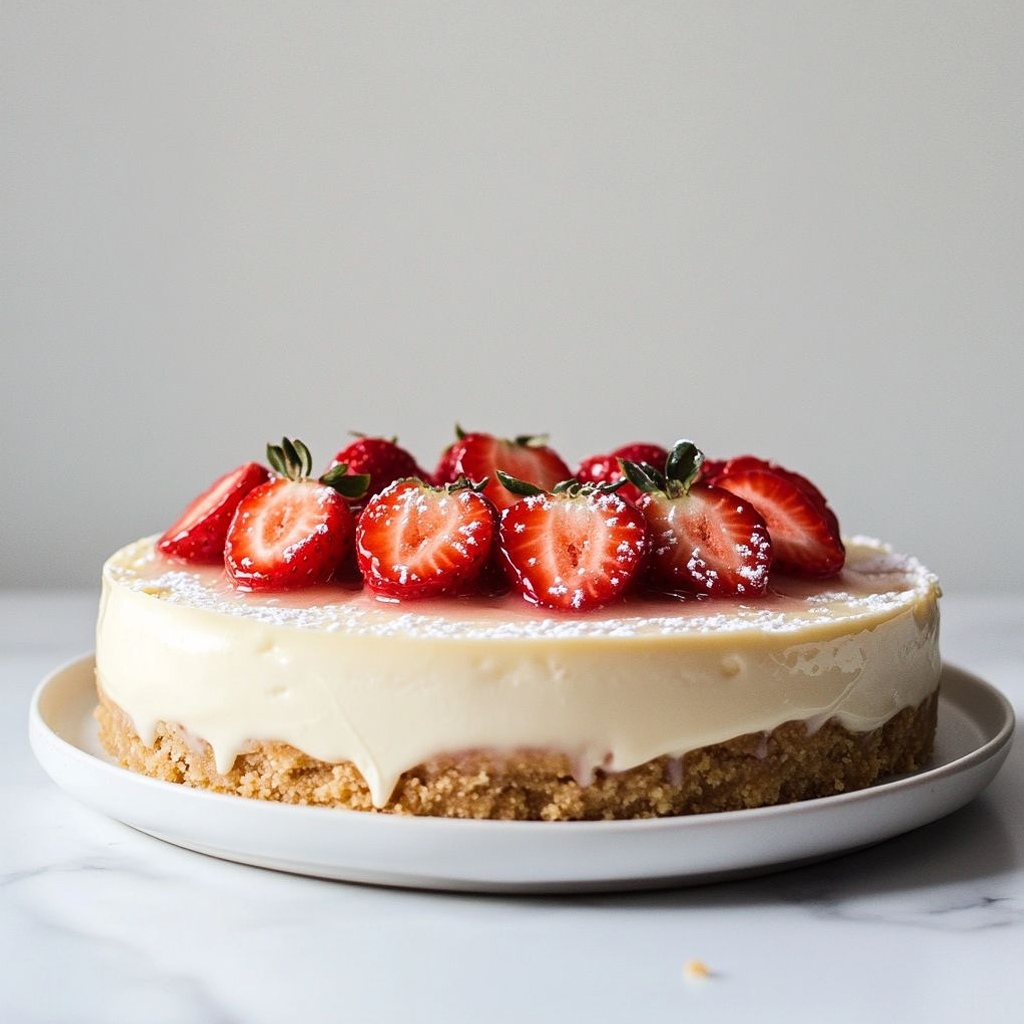
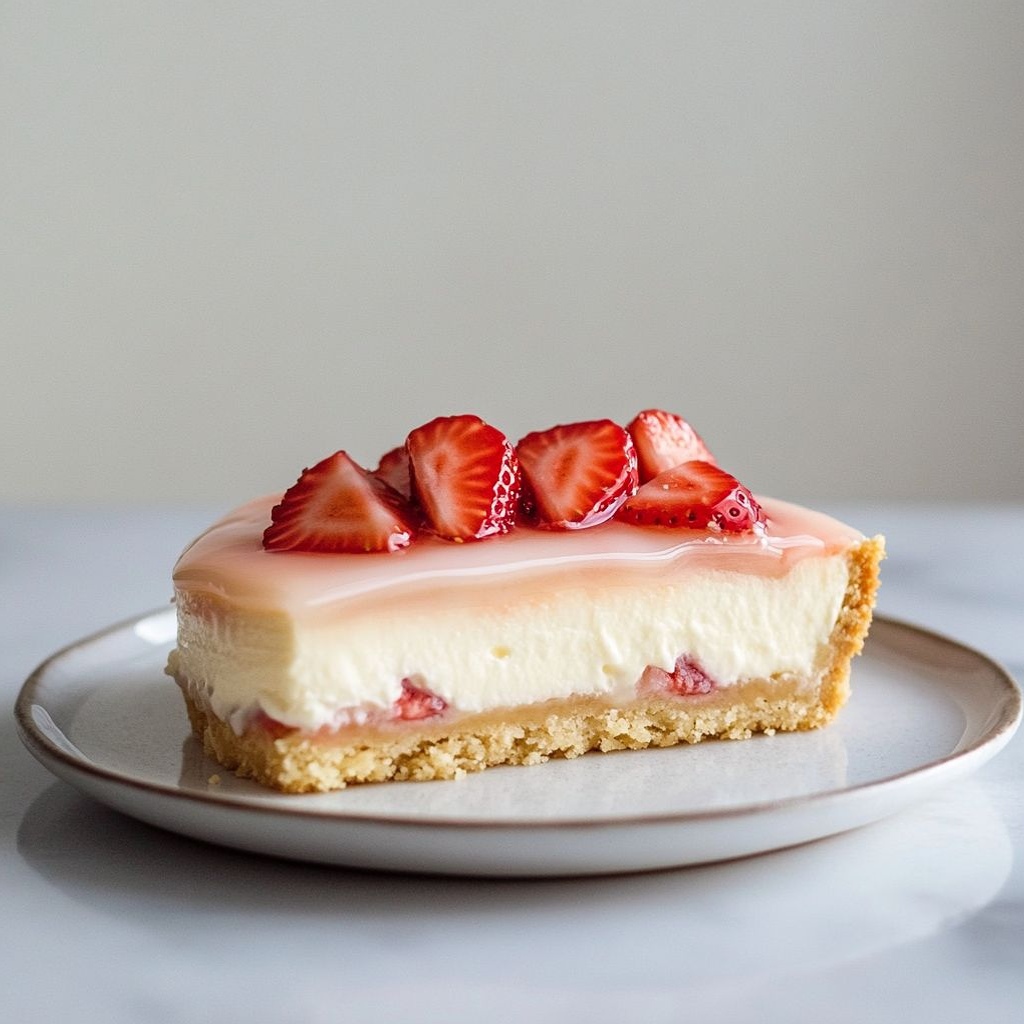
- Visually stunning: The pale ivory filling with ruby-red strawberries creates a striking, magazine-worthy slice every time.
- Versatile for occasions: Equally at home as a showpiece dessert for holidays, birthdays, or an romantic dinner for two, as well as a crowd-pleasing option for gatherings and celebrations.
- Make-ahead friendly: This dessert lends itself to planning ahead, making it ideal for when you want to do a lot of hosting without last-minute stress.
Flavor Profile & Texture
The flavor profile of this cheesecake is a study in balance. The filling presents as rich and creamy on the first mouthful, with a gentle, almost vanilla-like sweetness that feels warm and comforting. There’s an undercurrent of subtle dairy notes that keep it feeling lush rather than cloying. The white chocolate element introduces a restrained sweetness, a soft, milky tone that lingers with a slight vanilla-cream nuance. It’s not cloying; it’s a refined sweetness that invites you to take another bite. The strawberries contribute brightness and a gentle tartness that wakes the palate, preventing the richness from becoming heavy. When you encounter a spoonful, you experience a smooth, satiny texture—almost cloud-like—beneath a light, almost crumbly edge from the crust that provides a delicate, inviting crack with each cut. The overall mouthfeel is one of luxurious suppleness, where the filling seems to melt a little on the tongue before giving way to a faint, crisp finish from the crust. The fragrance echoes through the room: a comforting blend of soft dairy, a whisper of vanilla, and the sun-warmed fragrance of ripe fruit. This is a dessert that pleases the senses in layers, rewarding slow, appreciative tasting rather than quick bites.
Occasions & Pairings
Where this cheesecake shines is in its versatility. It’s a natural centerpiece for a milestone celebration—anniversaries, graduations, family reunions, or a festive holiday dessert table—yet its approachable flavor makes it a standout for intimate weeknight dinners or a special Sunday treat. Serve it chilled as the sun dips low, and pair it with sparkling beverages—champagne, prosecco, or a lightly sweet sparkling rosé—to echo the cake’s soft sweetness and add a celebratory sparkle. For non-alcoholic pairings, a cool berry compote or a lightly brewed herbal tea can accentuate the fruitiness without competing with the creamy notes. As a dessert, it also plays nicely with other light finishers: a dollop of whipped cream, a few fresh strawberry slices, or a dusting of citrus zest to lift the aroma and provide a tiny citrus counterpoint. If you’re planning a multi-course meal, this cheesecake pairs especially well with delicate starters and a bright salad, followed by a lighter main course, so the finale remains a memorable crescendo rather than a heavy close. It’s also an excellent option for a dessert bar or a semi-formal affair where guests can admire the presentation and then slice into the cake for a shared, communal experience.
Tips, Variations & Substitutions
Here are ideas to tailor this dessert to different preferences, occasions, or dietary needs while preserving its charm and balance. The goal is to sustain the dessert’s essence—creaminess, fruit brightness, and a hint of chocolate—without turning it into a rigid set of instructions.
Vegan & Dairy-Free Variations
For a vegan or dairy-free version, you can explore plant-based cream alternatives and a non-dairy cheese analogue optimized for a cheesecake-like texture. Look for silky, neutral-flavored plant-based cream cheeses or cashew-based fillings that can mimic creaminess. Choose a dairy-free option for the filling and a crust made from crushed cookies or biscuits that align with your dietary needs. A touch of vanilla and a light fruit layer on top can help replicate the flavor profile while keeping texture smooth and luscious. If you’re experimenting, you might consider a dairy-free white chocolate substitute, ensuring it melts smoothly into the filling for a similar indulgent effect.
Gluten-Free & Allergy-Friendly Options
To keep this dessert gluten-free without sacrificing structure, use a crust built from gluten-free biscuits or finely ground nuts and a binding agent that suits your preference. The aim is to achieve a crisp, but tender base that remains sturdy when sliced, providing that essential contrast to the soft filling. If you have nut allergies, consider seeds or a gluten-free, seed-based crust that offers a similar crunch and flavor depth, ensuring the overall experience remains cohesive and satisfying.
Flavor Twists & Regional Variations
Take the essence of this dessert in new directions by swapping in different berry varieties when in season—blackberries, raspberries, or a mix of berries can deliver varying degrees of tartness and aroma. Add a hint of citrus zest (lemon or orange) to the filling for a brighter finish that accentuates the fruit. You can also adjust the “white chocolate” presence by using a lighter touch or a more pronounced chocolate note, depending on whether you want the chocolate to whisper or to declare itself. For a tropical twist, consider a coconut-tinged filling with pineapple or passion fruit accents, maintaining the same creamy texture while introducing a new cultural context.
Texture & Structure Adjustments
If you prefer a firmer slice or a more mousse-like interior, you can vary the balance between the filling and the crust to your liking. A slightly thicker filling yields a more indulgent dessert, while a thinner layer highlights the crust’s crispness and the fruit’s brightness. You can also experiment with chilling times to influence the mouthfeel—shorter chilling for a lighter, more aerated fill, longer chilling for a denser, more refined bite. The key is consistency and patience, allowing the flavors to settle and the texture to become perfectly cohesive.
Storage & Make-Ahead Ideas
One of the practical joys of this dessert is its ability to be prepared ahead, with flavors maturing beautifully as it rests. When stored properly, you can keep this cheesecake for several days in the fridge, allowing you to offer slices to guests with minimal effort. Cover the dessert to protect from drying out, and consider storing with a thin layer of barrier (like parchment) to prevent the surface from absorbing any odors in the fridge. If you want to freeze for longer-term planning, wrap individual slices or the whole cake tightly to prevent freezer burn, and thaw gradually in the fridge when you’re ready to serve. If you need to re-soften after refrigeration, a brief return to room temperature can help the filling regain its silkiness, while a gentle flick of the spoon will reveal that coveted, custard-like interior beneath the surface. For make-ahead practicality, you can prepare the base and the filling in advance and assemble close to serving time, ensuring fresh fruit elements are added at the end to maintain their vibrancy. The aim is to preserve texture, prevent dryness, and ensure that the final slice feels like a fresh, celebratory moment rather than a reheated afterthought.
Fun Facts & Trivia (Optional)
Cheesecake is a dish with many legends attached to it, from ancient athletes seeking nourishment to modern bakers searching for the perfect balance of tang and sweetness. The addition of fruits to cheesecakes, particularly berries, has a long tradition in various cuisines, often symbolizing abundance and the sweetness of seasonality. White chocolate, which brings a gentle creaminess to this recipe, was first introduced in the early 20th century and quickly found its place in many desserts, where it complements rather than competes with fruit flavors. The combination of white chocolate with strawberries is a classic pairing that echoes the contrast between ivory and scarlet, lightness and vibrancy, making it a favorite for celebrations and everyday indulgence alike. In some culinary circles, strawberries are celebrated for their fragrance and seasonal accessibility, turning a simple dessert into a sensory memory of long, sunlit days. The cheesecake form itself—soft center, slightly firmer edges—mirrors the balanced, comforting nature of family gatherings and shared desserts, where everyone finds a familiar, comforting bite that also invites new discoveries with each slice.
Ingredients
Crust
- 1 1/2 cups gluten-free graham cracker crumbs (certified gluten-free)
→ The crust forms the base and edge of the cheesecake, providing structure and a sweet, toasty contrast to the creamy filling. Crumbs are mixed with melted butter (and sugar if using) and pressed firmly into a 9-inch (23 cm) springform pan. Bake briefly to set before adding the filling to improve bite and prevent a soggy bottom. - 1/4 cup unsalted butter, melted
→ Fat from the butter binds the crumbs into a cohesive crust and adds richness. Use cooled melted butter to prevent softening the filling; press into the pan evenly across the bottom and slightly up the sides for a sturdy base. - 2 tablespoons granulated sugar (optional)
→ Adds a touch more sweetness and helps with browning of the crust. If using very sweet crackers, reduce or omit.
Filling
- 4 (8-ounce) packages cream cheese, softened to room temperature
→ The primary base of the cheesecake; softened cheese blends smoothly with sugar to create a silky, lump-free filling. Beat on medium speed until completely smooth, scraping the sides of the bowl to avoid lumps. - 1 cup granulated sugar
→ Sweetens the filling and helps achieve a light, fluffy texture when beaten with the cream cheese. Add gradually to maintain a creamy emulsion; avoid overbeating after eggs are added to prevent cracking. - 1/2 cup sour cream
→ Adds tang and moisture, contributing to a softer, more velvety crumb. Use full-fat for best texture; whisk in after the sugar is incorporated to keep the mixture smooth. - 1/2 cup heavy cream
→ Increases richness and tenderness, helping the batter stay smooth and lush. Use at room temperature to maintain a stable emulsion and prevent curdling. - 3 large eggs
→ Provide structure and moisture; add one at a time on low speed to minimize air pockets. Do not overmix after adding eggs to avoid a cracked top during baking. - 2 teaspoons pure vanilla extract
→ Adds depth and aroma; pure extract gives a cleaner vanilla note. You can substitute with vanilla bean paste for a stronger, more concentrated flavor. - 6 ounces white chocolate, melted and cooled slightly
→ Imparts a distinct white chocolate flavor that pairs beautifully with strawberries. Melt gently (low heat or over a double boiler) and cool just to above room temperature before folding to avoid cooking the batter. - 1 tablespoon cornstarch
→ Stabilizes the filling to help prevent cracking and improves texture, yielding a silkier slice. Whisk with the other dry ingredients or dissolve in a small amount of the cream before adding to the cheese mixture. - 1/4 teaspoon fine sea salt
→ Balances sweetness and enhances the tang of the cream cheese. Use fine salt for even distribution and flavor balance. - 1 cup fresh strawberries, hulled and diced (optional)
→ Adds fruity pockets of strawberry flavor throughout the filling. Fold in gently to keep the batter smooth; for a more pronounced strawberry swirl, macerate the dice with 1 teaspoon sugar for 10–15 minutes before mixing.
Strawberry Swirl (optional)
- 1 cup fresh strawberries, hulled and pureed
→ Creates a vibrant strawberry swirl through the cheesecake. Puree until smooth and strain seeds if you prefer a silkier texture; swirl into batter just before baking for marbled visuals. - 1 tablespoon granulated sugar
→ Sweetens the puree and helps balance acidity; adjust depending on the strawberries’ sweetness. - 1/2 teaspoon lemon juice (optional)
→ Brightens the strawberry flavor and prevents the puree from tasting flat. Leave out if you prefer a milder swirl.
Toppings
- 1 cup fresh strawberries, sliced
→ Fresh slices on top provide color, brightness, and a juicy contrast to the creamy interior; arrange decoratively after chilling for best appearance. Add gradually as you slice to maintain neat presentation. - 2 ounces white chocolate, melted, for drizzle
→ Creates a glossy, decorative finish that echoes the filling. Drizzle over the chilled cheesecake with a spoon or piping bag; allow to set briefly before slicing. Use gentle, slow strokes to maintain clean lines.
Instructions
- Preheat your oven to 350°F (175°C) and position a rack in the center of the oven.
- Wrap the outside of a 9-inch (23 cm) springform pan with two layers of heavy-duty aluminum foil and place the pan on a rimmed baking sheet.
- In a medium bowl, combine gluten-free graham cracker crumbs, sugar (if using), and melted butter; mix until the crumb mixture resembles wet sand and holds together when pressed.
- Press the crust firmly into the bottom of the prepared pan and press a little up the sides with the flat bottom of a measuring cup or a small glass for an even, compact shell.
- Chill the crust for 10 minutes in the refrigerator to firm the butter and set the shape before baking.
- Bake the crust in the preheated oven for 8 to 10 minutes until it looks set and lightly fragrant, then remove and cool completely on a rack.
- Reduce the oven temperature to 325°F (165°C) in preparation for the filling.
- In a large stand mixer or with a hand mixer on medium speed, beat the softened cream cheese until completely smooth and free of lumps, about 2 to 3 minutes.
- Add the granulated sugar and beat on medium speed until the mixture is light and fluffy, about 2 to 3 minutes.
- Beat in the sour cream until just incorporated, then scrape down the bowl to check for any stray lumps.
- Pour in the heavy cream and mix on low speed until the batter is smooth and cohesive.
- With the mixer on low, add the eggs one at a time, beating after each addition just until combined.
- Stir in the vanilla extract and mix until evenly dispersed throughout the batter.
- Gently fold in the melted white chocolate that has cooled to just above room temperature.
- Whisk together the cornstarch and fine sea salt, then whisk into the cheese mixture or fold in with a small amount of batter to dissolve completely.
- Gently fold in 1 cup fresh strawberries, hulled and diced (optional), distributing them evenly without overmixing.
- If making a strawberry swirl, puree 1 cup strawberries with 1 tablespoon sugar and 1/2 teaspoon lemon juice; strain seeds if you prefer a silkier texture and set aside.
- Pour the filling into the cooled crust and, if using swirl, dollop some strawberry puree on the surface and gently swirl with a knife to create a marbled pattern.
- Prepare a water bath by placing the foil-wrapped pan into a larger baking dish and carefully pouring hot water into the outer dish until it comes halfway up the sides of the springform.
- Bake the cheesecake in the 325°F (165°C) water bath for about 60 to 75 minutes, until the center barely jiggles when gently nudged.
- Turn off the oven, crack the door, and let the cheesecake cool in the oven for 60 minutes to prevent sudden shocks that cause cracking.
- Remove the cheesecake from the oven and the water bath, then cool on a rack to room temperature before refrigerating.
- Refrigerate the cheesecake for at least 4 hours, preferably overnight, to fully set and allow flavors to meld.
- Just before serving, arrange fresh strawberry slices on top for color and brightness, and drizzle with melted white chocolate in thin, decorative lines if desired; let the drizzle set briefly before slicing.
- To serve, unlock and remove the springform ring, slice with a warmed knife for clean cuts, and present with a clean, even perimeter on each plate.
→ Establishes even heat distribution for both crust and filling, preventing hot spots that could bake unevenly.
→ Foil protects against leaks during the water bath, and the rimmed sheet catches drips for easier cleanup and oven protection.
→ This creates a cohesive crust that bakes into a sturdy foundation with a balanced sweet-butter flavor.
→ A uniform press ensures even baking, prevents gaps, and yields clean slicing after chilling.
→ Chilling minimizes crust slump during the hot bake and helps it hold its form when the filling is added.
→ Brief baking drys the crust, creating a pleasant snap and a barrier against moisture from the filling; cooling prevents warping when filling is added.
→ A gentler heat allows the dense filling to set evenly without cracking.
→ Thorough emulsification yields a silky filling with a glossy texture and prevents graininess on slicing.
→ Properly creamed sugar integrates air and sweetness evenly; be cautious not to overbeat later after eggs are added to avoid cracks.
→ Sour cream adds tang, moisture, and a velvety crumb; scraping ensures an even mixture throughout.
→ The cream increases richness and helps create a lush, smooth mouthfeel; keep temperatures stable to maintain emulsion.
→ Adding eggs individually minimizes air incorporation and reduces the risk of cracks in the finished cheesecake.
→ Vanilla provides depth and aroma; even distribution ensures consistent flavor in every slice.
→ A cooled chocolate prevents cooking the batter and ensures a smooth, uniform swirl of chocolate throughout the filling.
→ Cornstarch stabilizes the filling, helping to prevent cracking and yielding a silkier texture.
→ Even distribution provides fruity pockets of flavor; overmixing can break berries and color the batter too much.
→ The puree creates a vibrant swirl; straining yields a smoother swirl with less seed texture that interferes with the batter’s smoothness.
→ Pouring evenly fills the crust while swirling adds visual appeal and distinct strawberry flavor throughout the cake.
→ The water bath provides gentle, uniform heat that minimizes cracking and helps the cheesecake bake evenly.
→ A slight wobble indicates a just-set center; overbaking makes the filling dry and dense, while underbaking can cause a sunken center.
→ Slow cooling minimizes structural stress and helps maintain a smooth surface on top.
→ Gradual cooling prevents cracking and ensures the interior sets evenly without moisture buildup on the surface.
→ Chilling firms the filling for clean slicing and enhances texture and flavor integration.
→ Fresh berries brighten the appearance and provide contrast in texture, while a chocolate drizzle adds a glossy finish and extra sweetness that complements the filling.
→ Warming the knife minimizes sticking and yields neat, restaurant-quality slices with minimal crumbling.
Notes
These gluten-free strawberry cheesecake slices are creamy and luscious with a crisp gluten-free crust and a bright strawberry swirl. You can customize the crust by using certified gluten-free graham crackers or swap in a nut-based crust for extra texture and flavor; for a lighter crust, reduce the butter slightly or press more firmly into the pan. To enhance strawberry flavor, fold in fresh berries into the filling or increase the swirl amount with the puree. They freeze well—slice, wrap individually, and store in a freezer-safe container for up to 2–3 months; thaw in the fridge before serving. Chill the cheesecake thoroughly, preferably overnight, to achieve clean slices and a velvety texture. Serve chilled with extra fresh berries or a dollop of whipped cream for a decadent finish. If you have gluten intolerance, always ensure all ingredients are certified gluten-free and take care to prevent cross-contamination by using clean utensils, pans, and surfaces. For best results, bake the cheesecake in a water bath and avoid overmixing after eggs are added to minimize cracking.

Tips
Tips for Perfect White Chocolate Strawberry Cheesecake
- Crust firmness: Use gluten-free graham cracker crumbs and mix with melted butter (and optional sugar) until the texture resembles wet sand. Press firmly into a 9-inch springform pan, spreading evenly up the sides for a sturdy edge. Chill briefly before filling to help the crust hold its shape.
- Pre-bake the crust: Bake the crust for 5–8 minutes to set it and reduce sogginess. A quick bake gives a crisper bite that contrasts nicely with the creamy filling.
- Cool crust completely: Allow the crust to cool completely before adding the filling to prevent steam from softening the crust and to avoid cracks in the cheesecake.
- Butter temperature: Use cooled melted butter to avoid warming the filling. Warm butter can thin the filling and hinder emulsification.
- Softened cream cheese: Soften the cream cheese to room temperature, cut into chunks, and beat until completely smooth. Scrape the bowl often to prevent lumps and ensure a silky filling.
- Gradual sugar incorporation: Add granulated sugar in stages to maintain a smooth emulsion. Avoid overmixing after eggs are added to prevent cracking.
- Eggs method: Add eggs one at a time on low speed, mixing just until combined. Overmixing after eggs can trap air and lead to cracks.
- Room-temperature ingredients: Keep all filling ingredients at room temperature for even mixing and a lighter texture. Cold ingredients can lead to a lumpy batter.
- White chocolate handling: Melt the white chocolate gently and cool it slightly before folding into the filling. If the chocolate is too hot, it can seize the emulsion or cook the eggs.
- Cornstarch role: Whisk cornstarch with salt and other dry ingredients or dissolve in a small amount of cream before adding to the cheese mixture to help prevent cracking and improve texture.
- Strawberries in filling: Fold in diced fresh strawberries gently to avoid overmixing and to retain berry pockets. For a stronger strawberry note, macerate the dice with 1 teaspoon sugar for 10–15 minutes, then drain before folding.
- Strawberry swirl option: If making a swirl, puree 1 cup of strawberries until smooth, strain seeds if you prefer silkiness, and swirl into batter just before baking for visible marbling.
- Strawberry puree balance: Add up to 1/2 teaspoon lemon juice to the strawberry puree if desired to brighten flavor; adjust sugar accordingly to avoid excessive sweetness.
- Pan preparation for water bath: If using a water bath, wrap the bottom of the pan with heavy-duty foil to prevent water seepage and maintain a moist, even bake.
- Baking temperature and time: Bake at 325°F (160°C) until the center jiggles slightly. The cheesecake will firm up as it cools, and residual heat continues to set the filling.
- Cracking prevention: Avoid overbaking and slow cooling gradually in the oven with the door ajar to minimize cracks. A crack is cosmetic and can be covered with toppings, but prevention is best.
- Cooling strategy: Cool the cake completely on a rack, then refrigerate for at least 4 hours or overnight. Chilling helps flavors meld and makes clean slicing easier.
- Slicing technique: Dip a sharp knife in hot water, wipe clean, and slice with long, smooth strokes for neat cuts. Re-warm the blade between slices for best results.
- Finishing touches: Add fresh strawberry slices on top just before serving to maintain bright color and juicy texture. Drizzle melted white chocolate after chilling for a glossy finish that sets nicely.
FAQ
What are the main ingredients for White Chocolate Strawberry Cheesecake?
Crust: graham crackers (or digestive biscuits), melted butter, a pinch of salt. Filling: cream cheese, granulated sugar, vanilla extract, melted white chocolate, sour cream or heavy cream, eggs. Topping: fresh strawberries, optional strawberry glaze, and extra white chocolate for garnish.
Can I use a premade crust or do I need to bake a crust from scratch?
Both work. A store-bought crust is convenient; if using it, follow the filling directions as written. If you use a raw crust, you might bake it briefly before adding the filling to help it set and stay crisp.
Should I use a water bath when baking?
Yes, a water bath helps prevent cracks and keeps the center creamy. Wrap the outside of the springform pan with foil, place it in a larger baking dish, and pour hot water into the outer dish until it comes halfway up the sides of the cheesecake pan.
What temperature and how long should I bake the cheesecake?
Bake at 325°F (165°C) for about 45–60 minutes. The edges should be set and the center will still jiggle slightly when you move the pan. It will firm up as it cools.
How do I prevent the cheesecake from cracking?
Use a water bath, avoid overbaking, and do not open the oven during the first hour. After baking, cool gradually in the oven with the door slightly ajar for about an hour, then finish cooling on a rack before refrigerating.
Can I make this cheesecake with no dairy or gluten-free options?
Yes. For dairy-free, use dairy-free cream cheese, dairy-free sour cream or coconut cream, and dairy-free white chocolate. For gluten-free, use gluten-free graham crackers or a gluten-free crust. Always check labels to confirm absence of gluten and dairy if needed.
How long should the cheesecake chill before serving?
Chill in the refrigerator for at least 4 hours, but overnight is best for clean slices and a firm texture. Keep it covered to prevent drying or absorbing fridge odors.
Can I freeze White Chocolate Strawberry Cheesecake?
Yes. Freeze whole cheesecake or individual slices wrapped tightly. It keeps well for 1–2 months. Thaw overnight in the refrigerator before serving.
Can I make mini cheesecakes from this recipe?
Absolutely. Fill lined muffin cups with crust and filling, then bake at 325°F (165°C) for about 18–22 minutes (until set). Adjust bake time as needed and refrigerate before serving.
How can I customize toppings and flavors?
Try strawberry compote, fresh berries, or a drizzle of melted white chocolate. Add lemon or orange zest to the filling for brightness. You can swirl in strawberry puree for color and flavor, or top with sliced strawberries for a pretty finish. For a lighter touch, reduce sugar slightly or use part-sour-cream instead of all cream.