Introduction / Hook
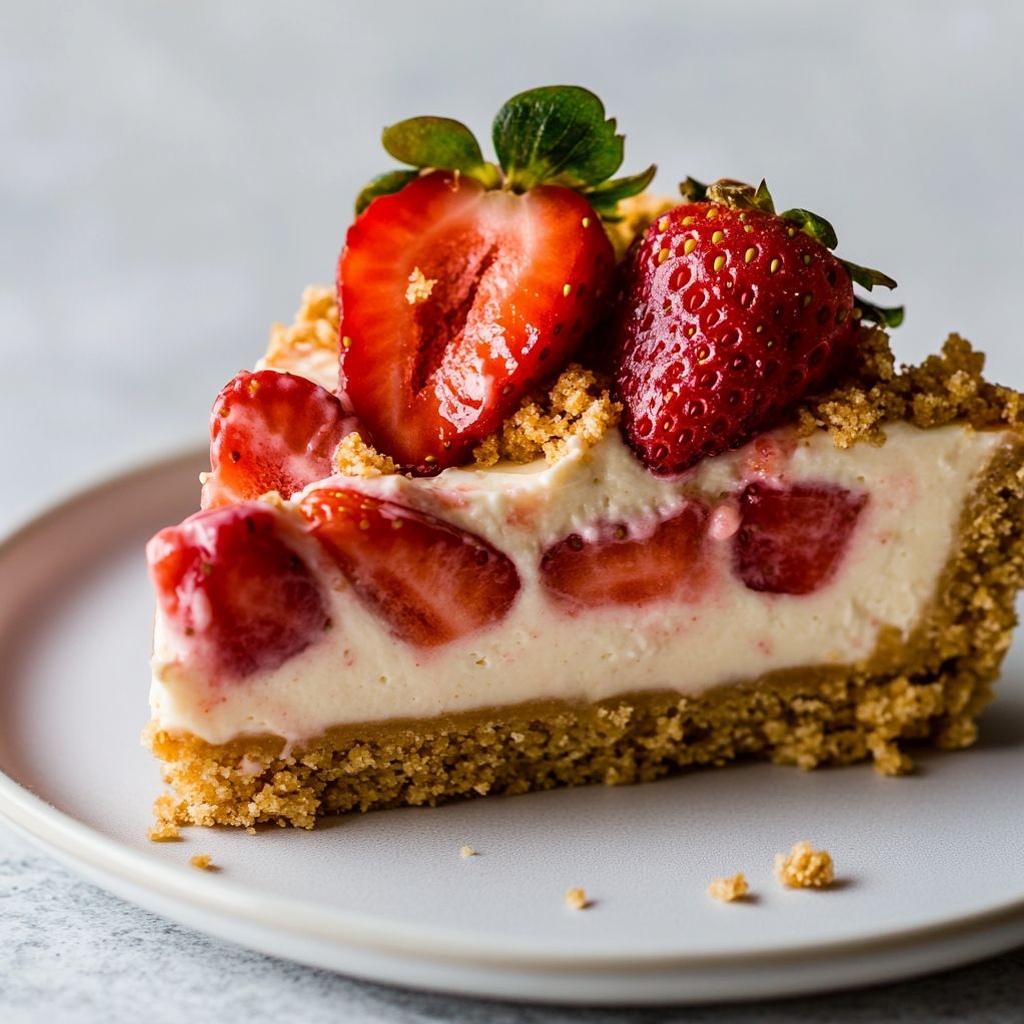
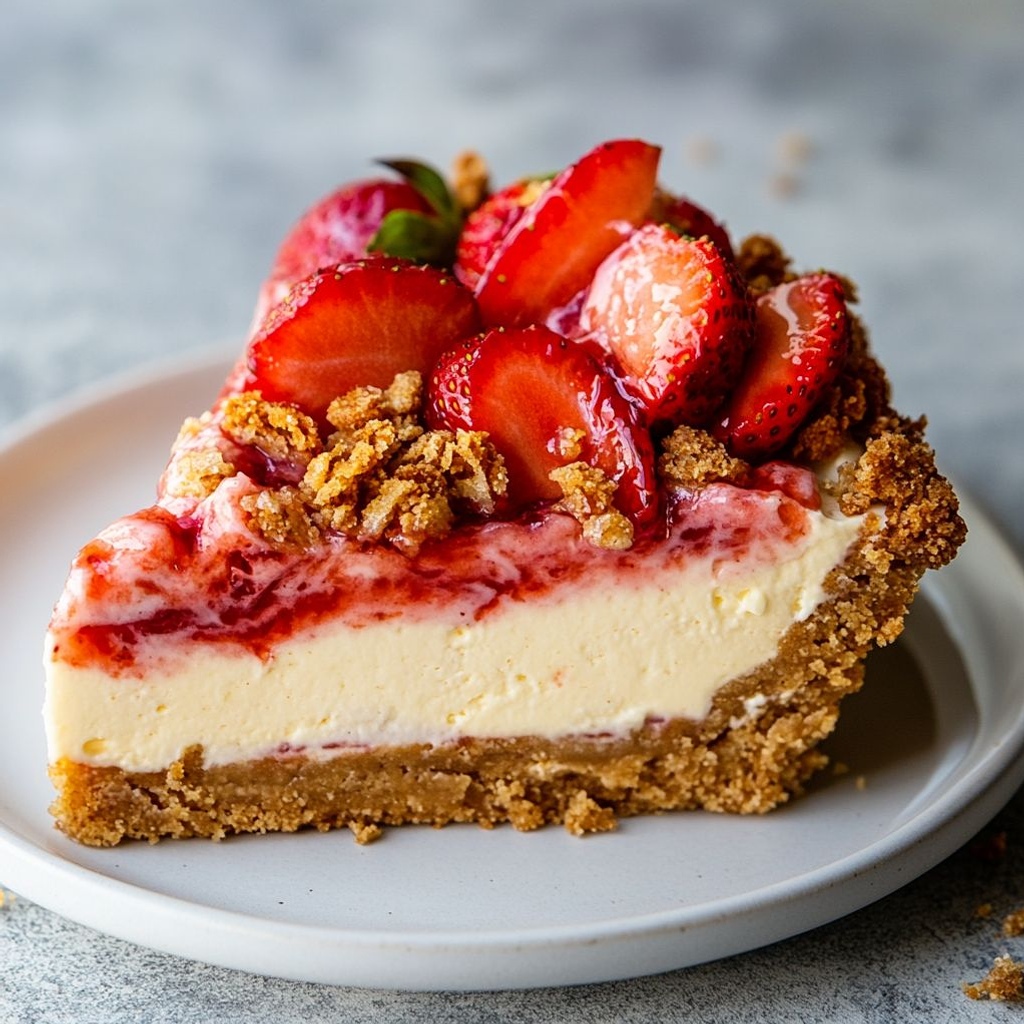
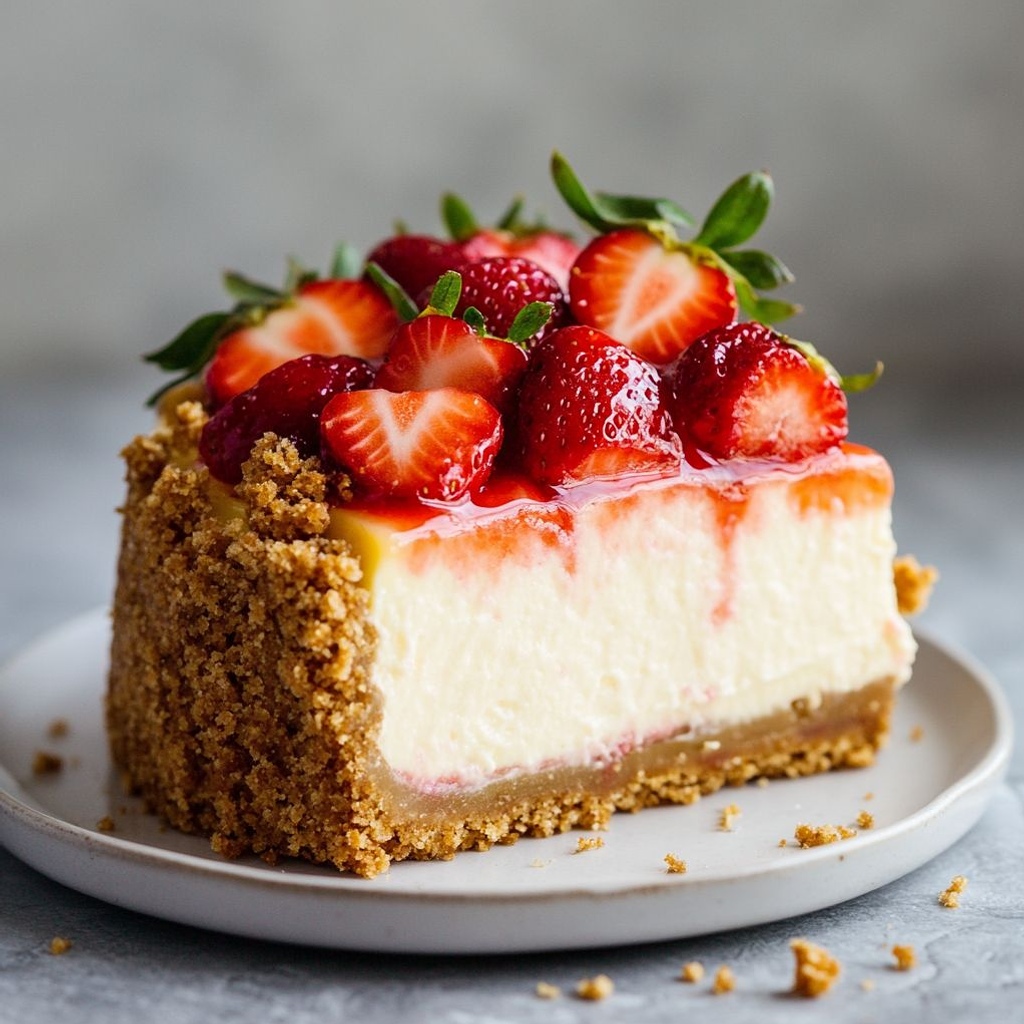
Picture a crescent of velvet cheesecake that glows with the kiss of vanilla, its surface marbled with ribbons of bright strawberry and crowned by a crackling, caramel-tinged crumble. The aroma alone might coax the room’s appetite into a chorus: sweet cream cheese, sun-warmed berries, a whisper of citrus, and a buttery crust that gives way with a satisfying sigh under your fork. This Strawberry Crunch Cheesecake isn’t just a dessert; it’s an invitation—an indulgent moment that feels celebratory enough for holidays and gentle enough for weeknights. With every bite you traverse a texture journey: the first touch is smooth and creamy, the middle reveals strawberry brightness, and the finish delivers a crisp, candy-kissed crunch that lingers pleasantly on the palate. It’s the kind of dessert that looks dazzling on a platter, yet is surprisingly doable in a standard home kitchen. Whether you’re entertaining a crowd, planning a family dessert finale, or simply treating yourself to something special, this cheesecake offers a harmonious balance of tangy, sweet, creamy, and crunchy that makes it hard to resist going back for a second slice—and a third.
As you read on, imagine the fridge doors softly whetting the anticipation of guests as they arrive, the gentle crush of the strawberry crumble between your fingers, and the hush that falls when a slice is set on the table, gleaming with glossy berry sauce and a crackly top. It’s more than a recipe; it’s a memory in the making—the kind of dessert that earns a place in your family’s story and finds a cozy corner on your most-loved dessert table. And because strawberries are at their peak when they’re fresh and vibrant, this cheesecake is designed to celebrate summer in any season: a bright burst of fruit that complements the richness of the filling, with a textural flourish that makes every bite a little celebration of contrast.
The Story Behind the Dish
The origins of cheesecake stretch far back through history, weaving together threads from ancient Greece to modern American kitchens. The early cakes were more like simple cheese pies—dense, rustic, and deeply comforting—made with soft cheese, flour, and a touch of honey, often enjoyed as a celebratory offering at gatherings and temple feasts. Fast forward to today, and the cheesecake has become a symbol of indulgence that can be adapted to countless flavors and textures. The addition of a strawberry topping and a crunchy crumb element is a nod to two timeless dessert traditions: the lush, velvety cheesecake and the satisfying contrast of fruit and crumb that shortbread, streusel, or cookie crumbles provide.
In my own kitchen, this Strawberry Crunch Cheesecake emerged from a sunny weekend when we had an abundance of ripe strawberries and a craving for something comforting yet elegant. I wanted a cheesecake that could stand up to a crowd while remaining approachable enough to assemble without nervy precision. The idea was to pair the smooth, tangy body of a classic cheesecake with a layer of bright berry goodness and a topping that offered a playful crunch—like finding a familiar, beloved story in a fresh, unexpected chapter. I experimented with a couple of combinations: a traditional graham cracker crust, a creamy filling infused with real vanilla, and a strawberry element that could be folded into the batter and then finished with a crumble that crisps up as it bakes. The result was a dessert that feels both timeless and modern, a crowd-pleaser that still carries a personal touch in the form of homemade flavor and texture balance.
The journey to this recipe reminded me that desserts aren’t just about sweetness; they’re about textures, contrasts, and the way aromas can stir memories. The moment the cheesecake cools and the strawberry topping settles into a glossy sheen, you realize you’ve created something that invites sharing and conversation—the kind of dessert that turns a simple dinner into a small celebration. If you’ve ever wanted a show-stopping treat that remains true to home cooking, this Strawberry Crunch Cheesecake speaks to that desire in a language you can read and, most importantly, taste.
Why You’ll Love This Recipe
- Balanced sweetness: The tang of the cream cheese pairs with the fresh strawberry brightness to keep the dessert from tipping into cloying territory.
- Texture magic: A silky, creamy filling contrasts with a buttery crust and a crisp, strawberry crumble topping for a satisfying mouthfeel from first bite to last.
- Make-ahead friendly: The flavors develop beautifully after a night in the fridge, making it ideal for dinner parties or holiday gatherings where you want to do less on the day.
- Impressive without fuss: It looks elegant on the table, yet the steps are approachable for home bakers of all levels, with forgiving bake times and simple components.
- Versatile for occasions: Beautiful for summer fêtes, Easter celebrations, birthdays, or a cozy Sunday dessert when you crave something special.
- Customizable to fit your dietary needs: The base concept can be adapted to gluten-free or dairy-free versions without sacrificing the wow factor.
Flavor Profile & Texture
This cheesecake is an orchestra of textures and flavors, each element playing a distinct role in the overall sensation. The filling—smooth, rich, and luxuriously creamy—provides the backbone of the dessert. It carries a gentle vanilla aroma that whispers rather than shouts, letting the strawberry notes shine through. Inside the filling, you’ll often encounter tiny swirls of bright strawberry, a reminder that the fruit isn’t just a topping but a contender that infuses the core with color and taste. The crust is a comforting, buttery base that anchors the dessert with a gentle crumb and a subtle toasty note from toasting the crust components before assembly.
On top sits a crackly, golden layer of crunch—a crumble that might include crushed cookies, butter, and perhaps a touch of sugar—designed to bake into a crisp cap that shatters with a satisfying snap. Think of it as a pastry break between creamy seas and berry sunsets. The strawberry component can manifest in different forms: a glossy sauce that pools softly when plated, or delicate ribbons folded into the batter to create pockets of strawberry brightness throughout the slice. The contrast between the mellowness of the cheese and the lively acidity of the berries makes each bite feel balanced and complete.
Together, the combination of a crusty edge, a velvety interior, and a crisp topping yields a dessert that is both comforting and sophisticated. It’s a texture-driven experience: the crust gives way to a cloud-like center, which then meets a delicate crunch that lingers pleasantly. The flavor progression is intuitive—first a creamy wave of richness, then the fruity brightness, and finally a crisp, slightly caramelized finish that invites another bite. This is the kind of cheesecake that makes a confident statement on a dessert table, yet remains forgiving enough to prepare with confidence at home.
Occasions & Pairings
Because it’s both celebratory and approachable, this Strawberry Crunch Cheesecake fits a variety of moments. Consider these occasions and pairing ideas to make the most of your dessert:
A centerpiece dessert for Christmas, New Year’s, or Easter gatherings where you want something that feels special but not fussy. - Summer celebrations: A bright finale for a warm-weather menu, paired with a sparkling rosé or a light, citrus-forward dessert wine.
- Birthday dessert: Elevate a birthday meal with a show-stopping slice that looks as good as it tastes.
- Weeknight special occasion: A Sunday dinner treat that feels indulgent yet doable, turning a regular weekend into something memorable.
- Pairings: Light, fresh sides or salads to balance the richness; a dollop of vanilla bean ice cream or fresh whipped cream; a delicate mint leaf garnish for contrast; a chilled glass of champagne, Prosecco, or a petite dessert wine; and a simple lemon or orange zest zesting to lift the berry notes.
Tips, Variations & Substitutions
Here are ideas to tailor the Strawberry Crunch Cheesecake to your pantry, dietary needs, or personal preferences. Each variation preserves the essential charm of the dish while offering new twists.
Vegan & dairy-free version
To adapt for a dairy-free or vegan crowd, substitute a plant-based cream cheese in equal measure with a smooth, neutral profile (such as almond, cashew, or tofu-based cream cheese). Use a coconut yogurt or almond milk-based cream alternative to mimic the creaminess. For the crust, choose a dairy-free butter substitute. The strawberry topping remains natural and vibrant, but monitoring sweetness is key—fruit-based toppings can be inherently sweet, so you may need less added sugar. If you want the crust to stay crisp, consider a crust base made with crushed nuts and dates to add texture and a hint of caramel sweetness.
Gluten-free crust & crust alternatives
For gluten sensitivity, use gluten-free graham crackers or an almond-flour crust for a nutty, rich base. You can also press a simple no-bake crust using finely ground nuts, a bit of coconut oil, and a touch of maple syrup for binding. The goal is to achieve a tender, sandy bite that complements the creamy filling without overpowering it.
Low-sugar or alternative-sweetener options
If you’re watching sugar intake, opt for natural sweeteners such as stevia, monk fruit, or erythritol in place of part or all of the sugar, adjusting to taste. Keep in mind that sweetener behavior can differ in textures, so you may need to adjust the filling’s moisture and set time to achieve the same creamy result. Using ripe, in-season strawberries can contribute natural sweetness that reduces the need for added sugar.
Regional twists
Try a citrus note to awaken the berry brightness—add a teaspoon of lemon zest or orange zest to the filling, or swirl in a light strawberry-lime ribbon. For a chocolatey contrast, you could fold in a small amount of finely chopped dark chocolate into the crust or a light chocolate crumble layer on top, yielding a delightful balance between berry brightness and cocoa depth. If your family loves praline, you can sprinkle a brittle-like crunch atop the strawberry crumble for an extra luxe texture profile.
Make-ahead crunch ideas
Prepare the crust and the filling in advance and assemble the crumble topping close to serving time to preserve maximal crunch. Alternatively, bake the cheesecake a day ahead and refrigerate overnight. The crumble topping can be kept separate and sprinkled on just before serving, ensuring a crisp texture rather than a softened layer.
Storage & Make-Ahead Ideas
This cheesecake thrives on a little planning. Proper storage and make-ahead strategies can save time and preserve texture and flavor.
- Refrigeration: Store leftovers covered in the refrigerator for up to 4–5 days. The flavors continue to mellow and develop with time, making day-two slices deliciously balanced.
- Freezing: The cheesecake freezes well. Wrap the whole cake tightly in plastic wrap, then in foil, or freeze individual slices. It will keep for up to 1–2 months. Thaw overnight in the refrigerator for best texture; you can re-crisp the crumble topping by briefly reheating slices in a low oven or toaster oven.
- Make-ahead assembly: You can prepare the crust and filling a full day in advance. Keep them refrigerated, then assemble the crumble topping on the day you plan to serve and bake as directed. This method helps reduce day-of prep time while still delivering a bakery-fresh feel.
- Make-ahead flavor development: If you’ve got extra time, let the cheesecake chill for 24 hours before serving. The flavors meld beautifully, and the texture becomes even more refined as the cream cheese matures in the fridge.
Fun Facts & Trivia
Delightful details that deepen the experience of a strawberry cheesecake can be fun to share with guests as you slice and serve. Here are a few bite-sized tidbits:
- Strawberries aren’t berries in the botanical sense: They’re aggregate accessory fruits—seeds on the outside are the actual fruits, while the red flesh is derived from the receptacle of the flower.
- Cheesecake’s universal appeal: Variants of cheesecake exist across the globe, from Japanese cheesecake’s airy, souffle-like texture to Italian ricotta-based versions with different flavor profiles. The concept of a creamy, citrusy or vanilla-tinged cheese dessert has a universal appeal that crosses borders.
- Crunchy toppings have a history: The idea of a crisp or crumbly topping on cakes and cheesecakes has long been used to add contrast and texture, a delicious reminder that desserts can be as much about mouthfeel as about flavor.
- Peak strawberry season: Many regions experience peak sweetness in late spring to early summer, aligning perfectly with the strawberry’s natural ripening cycle. That’s when the berries are juiciest, sweetest, and most aromatic—ideal for a dessert that foregrounds fresh fruit.
- A kiss of vanilla: Real vanilla contributes a warmth and depth that makes dairy-based desserts feel luxurious without needing excessive sugar or extra ingredients—the kind of flavor that invites second helpings.
With these ideas, you’re equipped to present a Strawberry Crunch Cheesecake that’s not just a dessert but a memorable experience. Its elegance lies in its simplicity and its generosity in texture—creamy, fruity, and delightfully crisp all at once. Whether you’re teaching a crowd to plate a refined dessert or simply treating your household to something celebratory, this cheesecake invites celebration, conversation, and, most importantly, delicious bites that linger long after the last slice has disappeared. Enjoy crafting, plating, and sharing this delightful treat, and may every slice bring a little more joy to your table.
Ingredients
Crust
- – 1 1/2 cups graham cracker crumbs (or gluten-free graham cracker crumbs, finely crushed)
→ The crust provides the base and structural support for the cheesecake. Crush crackers finely to a sandy texture for even binding; mix with the melted butter and sugar, then press firmly into the pan. Bake or chill to set before filling. For gluten-free, use certified gluten-free crackers to avoid gluten contamination; ensure there are no large chunks that will create gaps in the crust. - – 6 tablespoons unsalted butter, melted
→ Butter binds the crumb mixture into a cohesive crust that browns slightly as it bakes, creating a crisp edge. Let the melted butter cool slightly before mixing with the crumbs to prevent sogginess, then press into an even layer in the pan. If you see dry spots, sprinkle a tiny bit of water and press again. - – 2 tablespoons granulated sugar (optional)
→ Adds a touch of sweetness to the crust to balance tangy filling. Use only if crackers are plain; if using sweetened crackers, reduce or omit. Mix with the crumbs before pressing to distribute evenly. - – 1/4 teaspoon fine salt (optional)
→ Enhances flavor and helps set the crust; omit if the crackers are salted or if using salted butter. In general, a small amount of salt stabilizes the sweetness and adds depth.
Filling
- – 24 oz (680 g) cream cheese, softened to room temperature
→ The creamy base for the cheesecake; soft, room-temperature cream cheese blends without lumps, ensuring a smooth batter. Beat the cheese with sugar until creamy, then add eggs one at a time to minimize air pockets that can cause cracking. If you use cold cream cheese, allow extra time or microwave in short bursts to soften evenly. - – 3/4 cup granulated sugar
→ Sweetens the filling and helps achieve a balanced flavor with the tang of cream cheese. Add gradually while beating to avoid graininess; if you prefer a tarter cheesecake, reduce slightly. - – 3 large eggs
→ Provide structure and moisture; add one at a time and mix just until combined to prevent overbeating, which can introduce air and lead to cracks. Keep eggs at room temperature for best emulsification. - – 1 teaspoon vanilla extract
→ Adds depth and aroma to the filling; use real vanilla for best flavor. If you have vanilla beans, scrape seeds for extra nuance. Avoid artificial vanilla that lacks aroma. - – 1/2 cup sour cream
→ Adds tang and tenderness, contributing to a silky texture and preventing a overly dense filling. Use full-fat sour cream for best flavor; stir into filling after initial cream-cheese mixture is smooth. - – 2 tablespoons all-purpose flour (or 1 tablespoon cornstarch for gluten-free)
→ Provides gentle thickening and helps stabilize the batter to reduce cracking. If using cornstarch, whisk with a small amount of the batter before combining to ensure a smooth mix; for gluten-free, ensure you use a gluten-free flour alternative if needed. - – 1/4 teaspoon salt
→ Balances sweetness and enhances overall flavor. If your cream cheese or topping is salty, adjust accordingly. - – 1 tablespoon lemon juice
→ Brightens flavor and can help counteract the richness of the filling; add after the cream cheese has softened and the sugar has dissolved to avoid curdling. Optional zest can be added for extra aroma.
Strawberry Swirl
- – 1 cup fresh strawberries, hulled and pureed (or finely chopped for texture)
→ The strawberry swirl adds fruity brightness and a marbled look. For a smooth swirl, puree until mostly smooth and strain if seeds bother you; if you prefer texture, keep small chunks and pulse briefly. - – 2 tablespoons granulated sugar
→ Sweetens the puree to balance the tang of the cheesecake; adjust to berry sweetness. If berries are very ripe, you can reduce or omit sugar. - – 1 teaspoon lemon juice
→ Brightens strawberry flavor and aids in maintaining vibrant color; combine with sugar before mixing with puree for even sweetness distribution. - – 1 teaspoon cornstarch (optional)
→ Helps thicken the swirl so it holds shape when marbled into the batter. Dissolve in a teaspoon of water before stirring into the pureed berries; omit if using very thick puree or if you prefer a looser swirl.
Strawberry Crunch Topping
- – 1/2 cup rolled oats
→ Contribute a crisp, streusel-like crunch on top of the cheesecake. Toast lightly in a dry pan or oven to deepen flavor; ensure they stay crunchy after baking by not over soaking in fats. - – 1/4 cup all-purpose flour (or gluten-free 1:1 blend)
→ Helps bind the topping and form crumbly clusters; use gluten-free flour for a gluten-free version. Measure correctly to avoid a dense crumble; mix with sugar and salt before blending with butter. - – 1/4 cup light brown sugar
→ Adds rich caramel notes and moisture to the topping. Pack lightly when measuring; adjust for sweeter or more subtle topping flavor as desired. - – 3 tablespoons cold unsalted butter, diced
→ Cold butter is cut into the dry ingredients to create a crumbly, crunchy crumble that bakes into distinct bits. Keep butter cold until mixing; rub with fingertips or use a pastry blender until pea-sized lumps form. - – 1/2 cup freeze-dried strawberries, crushed (or finely chopped dried strawberries)
→ Provides intense strawberry flavor and keeps crunch after baking; crush into small pieces so they distribute evenly; if unavailable, substitute with finely chopped dried strawberries though texture may soften during baking. - – 1/4 teaspoon fine salt
→ Enhances sweetness and strawberry flavor; adjust to taste, especially if using salted butter.
Instructions
- Preheat your oven to 325°F (165°C) and prepare a 9-inch (23 cm) springform pan by lining the bottom with parchment and lightly greasing the sides with butter or nonstick spray.
→ This ensures even baking, helps the cake release cleanly from the pan, and prevents sticking at the delicate edges. - In a medium bowl, combine the graham cracker crumbs, granulated sugar (if using), and fine salt; stir until the mixture is uniform and the salt is evenly distributed.
→ Even distribution of sugar and salt ensures a balanced crust flavor and prevents pockets of sweetness or saltiness that can skew the taste. - Stir in the melted butter, mixing with a fork or clean fingers until the mixture resembles damp sand; press the mixture into the bottom (and lightly up the sides) of the prepared pan with the flat bottom of a measuring cup to create an even, compact crust.
→ A well-packed crust prevents crumbling and yields clean edges; pressing with the measuring cup ensures an even thickness rather than random lumps. - Bake the crust in the preheated oven at 350°F (175°C) for 8–10 minutes, or chill it in the freezer for 15 minutes if you prefer a no-bake crust; remove and let cool completely before filling.
→ Briefly baking helps set the fats and binders, creating a crisp edge that won’t become soggy once the moist filling is added; chilling (or cooling) prevents it from shrinking when the hot filling is added. - In a large mixer bowl, beat the softened cream cheese on medium speed until smooth and creamy, about 2–3 minutes, stopping to scrape the bowl as needed; this eliminates lumps and promotes a silky filling.
→ Soft, room-temperature cream cheese emulsifies with sugar evenly, preventing grainy texture and ensuring a cohesive batter before the eggs are added. - Beat in the granulated sugar (3/4 cup) gradually on medium-low speed until fully incorporated and the mixture is light and fluffy; scrapes the bowl occasionally to maintain even texture.
→ Adding sugar gradually prevents graininess and helps achieve a smooth, stable base for the eggs to set the cheesecake without cracking. - With the mixer on low, add the eggs one at a time, mixing just until each is incorporated; overbeating at this stage can introduce air and lead to cracks as the cake bakes.
→ Gentle incorporation preserves a dense, creamy texture and reduces surface cracking while still allowing structure from the eggs. - Beat in the vanilla extract and lemon juice, allowing them to blend into the batter; then fold in the sour cream until just combined.
→ Vanilla and lemon brighten the flavor, while sour cream adds tenderness and a slight tang; avoid overt mixing to maintain creamy consistency. - Sprinkle in the all-purpose flour (or cornstarch for gluten-free) and salt, and mix on low until just combined; do not overmix after the flour is added.
→ A small amount of starch stabilizes the batter to prevent cracking while preserving a smooth mouthfeel; overmixing can incorporate too much air. - Prepare the strawberry swirl by puréeing 1 cup of fresh strawberries with 2 tablespoons granulated sugar and 1 teaspoon lemon juice in a blender or processor until mostly smooth; if you dislike seeds, strain the puree; set the swirl aside.
→ The swirl adds brightness and aroma; puréeing and straining makes a velvety swirl that distributes evenly without gritty seed texture. - If you wish a thicker swirl, whisk 1 teaspoon cornstarch with 1 teaspoon water and stir it into the strawberry puree; otherwise omit; set aside.
→ Cornstarch helps the swirl hold its shape during baking, preventing it from turning into a thin ribbon. - Pour the cheesecake filling into the cooled crust, spreading it to an even level with a spatula; drop several spoonfuls of the strawberry puree over the surface and, using a skewer or knife, swirl the puree through the batter to create a marbled pattern.
→ Even distribution of batter and controlled marbling ensure a visually appealing cheesecake with balanced strawberry flavor in every slice. - Prepare the strawberry crunch topping by whisking together rolled oats, all-purpose flour, light brown sugar, and fine salt in a bowl; cut in the cold butter with a pastry blender or fingertips until the mixture resembles coarse crumbs; fold in the crushed freeze-dried strawberries until evenly distributed.
→ The cold butter creates a crumbly, crisp topping that stays crunchy after baking; freeze-dried berries provide intense flavor without adding moisture that could soften the topping. - Evenly sprinkle the strawberry crunch topping over the filled cheesecake batter, pressing down lightly to help it adhere; this allows the topping to bake into crunchy clusters on top.
→ A uniform layer ensures each bite includes the crisp topping and prevents clumps that fail to bake through. - Wrap the outside of the springform pan with two layers of heavy-duty foil and place the pan in a larger baking dish; pour hot water into the outer dish until it rises about 1 inch (2.5 cm) around the springform to create a gentle water bath.
→ The water bath cushions the cheesecake, promoting even heat distribution and preventing the edges from contracting, which reduces cracks. - Bake the cheesecake in the water bath at 325°F (165°C) for about 60–70 minutes, or until the edges are set but the center still wobbles slightly; turn off the oven and leave the cheesecake inside with the door slightly ajar for 1 hour to finish cooking gently.
→ The gentle jiggle indicates proper set without overbaking; the gradual cooling minimizes cracks by avoiding sudden temperature changes. - Remove the cheesecake from the water bath and the foil, then transfer to a rack and let cool to room temperature; once cooled, refrigerate for at least 4 hours or preferably overnight to fully set the filling.
→ Chilling solidifies the structure and makes slicing clean; the filling firms up as it chills, giving a smoother texture in every bite. - To unmold, run a thin knife or spatula around the inside of the pan, release the springform ring, and transfer the cheesecake to a serving platter; slice with a warmed knife for clean cuts.
→ A warm blade prevents sticking and gives you neat, even slices without tearing the topping. - Serve slices chilled or at room temperature, optionally garnished with fresh strawberry slices for color and aroma; enjoy the contrast between the creamy filling, bright strawberry swirl, and crunchy topping.
→ Temperature and presentation enhance texture and flavor perception; serving slightly cooler keeps the topping crisp and the filling velvety.
Notes
These gluten-free Strawberry Crunch Cheesecakes are creamy, tangy, and crowned with a crunchy oat-topped crumble, all nestled in a crisp crust with a bright strawberry swirl. Use certified gluten-free graham crackers or gluten-free cookies for the crust, press the mixture firmly into the pan, and bake with a gentle water bath to help prevent cracking; chill thoroughly before slicing for clean edges. For best texture, let the cheesecake cool gradually at room temperature before refrigerating for at least 4 hours or overnight.
You can customize them by swapping in other berry purées or adjusting the lemon juice to brighten the flavor. For a more pronounced swirl, layer the puree or marble it through the filling with a knife; if you prefer a lighter texture, substitute part of the sour cream with Greek yogurt. The topping can be varied: keep the oat crumble for a classic crunch, or substitute with chopped nuts, coconut, or additional freeze-dried fruit for different flavors and textures. They freeze well—slice and wrap individual portions for easy freezing and thaw in the fridge overnight before serving. Always ensure your crust, toppings, and any mix-ins are certified gluten-free if you have gluten intolerance.
Tips
Crust tips
- Crush graham crackers to a fine sandy texture using a food processor, or place in a zip-top bag and crush with a rolling pin for even binding.
- Let melted butter cool slightly before mixing with the crumbs to prevent a greasy crust; mix until the crumb becomes cohesive and then press firmly into an even layer in the pan.
- For gluten-free crust, use certified gluten-free crackers and avoid any cross-contamination with gluten-containing utensils or surfaces.
- Pre-bake the crust for 8–10 minutes at 350°F (177°C) or chill the crust firmly before filling to help it hold the cheesecake better. If you prefer a no-bake crust, chill longer to set.
- Press the crust evenly to the edges using the bottom of a glass or a flat measuring cup; go all the way up the sides if your pan calls for a完整 edge.
- If the crust looks dry or you see crumbles, sprinkle a few drops of water and press again to improve binding.
Filling tips
- Soften cream cheese to room temperature (about 1–2 hours) and cut into chunks for quicker, smoother mixing; this prevents lumps in the batter.
- Beat cream cheese with sugar until completely smooth and creamy, scraping the bowl as needed; add eggs one at a time on low speed to minimize air pockets.
- Eggs should be added one at a time and mixed just until combined to avoid overbeating, which can cause cracks.
- Use room-temperature eggs and butter to improve emulsification and a silkier texture; if using cold cream cheese, soften longer or microwave in short bursts.
- Blend in vanilla, then fold in sour cream at low speed for a tangy, tender filling; avoid overmixing after sour cream is added.
- Whisk the flour or cornstarch with a little of the batter before adding to ensure even distribution and to help stabilize the batter against cracking.
- Balance the lemon juice with the filling after the mixture is smooth to brighten flavor without curdling; optional lemon zest adds extra aroma.
- Lightly salt the filling to enhance sweetness, but adjust if your ingredients are already salty or using salted butter.
- Consider baking the cheesecake in a water bath and wrapping the pan with foil to prevent water seepage; this helps prevent cracks and promotes even cooking.
- After baking, let the cake cool gradually in the oven with the door ajar for 1 hour, then refrigerate for at least 4 hours (preferably overnight) to set fully and develop flavor.
Strawberry Swirl tips
- Puree fresh strawberries until smooth; strain to remove most seeds if you prefer a silkier swirl, or keep small bits for texture.
- Sweeten the puree with 1–2 tablespoons of sugar and mix with 1 teaspoon lemon juice to brighten flavor and color. Taste and adjust sweetness to your liking.
- For a thicker swirl that holds its shape, dissolve 1 teaspoon cornstarch in a teaspoon of water and whisk into the puree; heat briefly if needed to activate thickening, then cool before swirling.
- Chill the strawberry mixture before swirling to help it stay distinct in the batter and prevent it from bleeding too much into the filling.
- When layering, dollop spoonfuls of the swirl over the filled batter and use a skewer or knife to create marbled patterns; avoid overmixing into the batter to keep color contrast.
Strawberry Crunch Topping tips
- Toast rolled oats and flour (or gluten-free blend) in a dry pan until golden and fragrant to deepen flavor; let cool before mixing with butter.
- Mix in light brown sugar and a pinch of salt to enhance the crumble and balance sweetness.
- Cut cold butter into the dry ingredients using a pastry cutter, two forks, or fingertips until pea-sized lumps form; this yields a crisp, crumbly topping.
- Crush freeze-dried strawberries into fine pieces to intensify strawberry flavor and help the topping keep its crunch after baking; finely chopped dried strawberries are a good substitute.
- Do not overwork the topping; keep it crumbly and clumpy so it bakes into distinct crunches rather than turning into a paste.
- If using salted butter, adjust the salt in the topping to taste to avoid an overly salty finish.
- Scatter topping evenly over the cheesecake just before baking or bake edge-first to keep the center tender and the topping crisp.
FAQ
What is Strawberry Crunch Cheesecake?
Strawberry Crunch Cheesecake is a creamy cheesecake layered over a crunchy crust with a strawberry-flavored crumble or topping. It combines tangy filling, a sweet crust, and a bright strawberry crunch for a dessert that’s both smooth and textured.
What do I need to make the crust?
A classic crust usually uses crushed graham crackers or digestive biscuits mixed with melted butter and a bit of sugar. For extra strawberry flavor, you can add a pinch of freeze-dried strawberry powder or finely chopped dried strawberries.
How do I make the strawberry topping?
Combine sliced fresh strawberries with a bit of sugar and lemon juice. Cook briefly to release juices and thicken into a glossy sauce, then cool before pouring over the cheesecake or mixing into the crumble topping.
How do I make the cheesecake filling?
Beat softened cream cheese with sugar and vanilla until smooth. Add eggs one at a time, mixing just until combined. For extra richness, fold in a little sour cream or heavy cream. Pour the filling over the crust.
Should I bake this cheesecake or make a no-bake version?
You can bake the traditional version in a water bath for a smooth texture, typically at 325–350°F (165–175°C). A no-bake version uses whipped cream and a set with gelatin or an alternative setting agent for a lighter, mousse-like texture.
If baked, how long and at what temperature?
Bake at 325–350°F (165–175°C) for about 50–60 minutes, until the center is just barely set. After baking, turn off the oven and let the cheesecake rest inside for about an hour to prevent cracking.
How can I prevent cracks or a dry top?
Use a water bath, wrap the pan in foil to prevent water leaks, avoid overmixing the filling, and don’t overbake. Cooling gradually—slightly open the oven door at the end—helps prevent cracking.
How long does it need to chill?
Refrigerate for at least 4–6 hours, preferably overnight, to allow the filling to firm fully and the flavors to meld.
How should I store leftovers, and can I freeze it?
Store leftovers covered in the refrigerator for 4–5 days. For longer storage, freeze individual slices wrapped tightly for 2–3 months. Thaw overnight in the fridge before serving.
Can I customize this recipe?
Yes. Swap in a gluten-free crust if needed, use lactose-free or alternative dairy, add lemon zest for brightness, or replace strawberries with raspberries or blueberries. You can also add white chocolate chips or a drizzle of chocolate for extra flair.