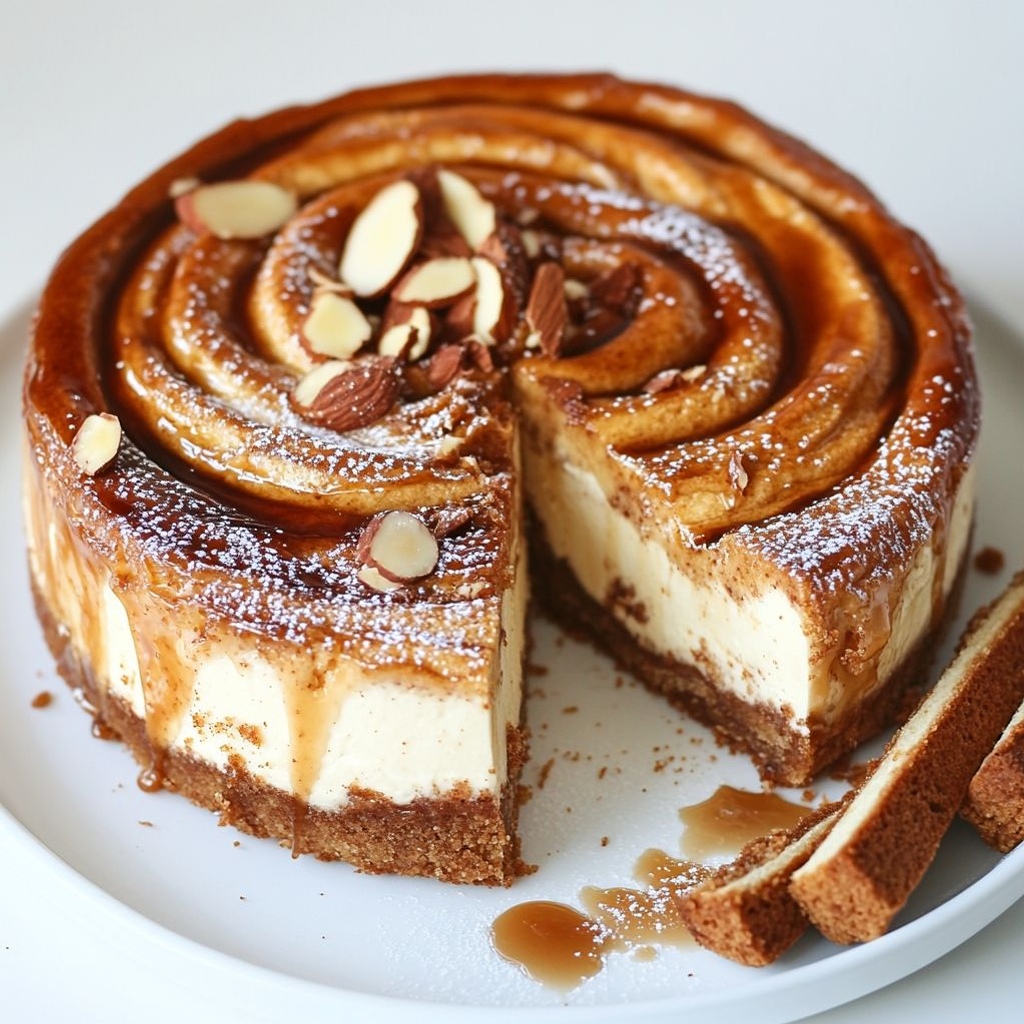
Author

Ocean Nightleaf

Browsing

Introduction / Hook

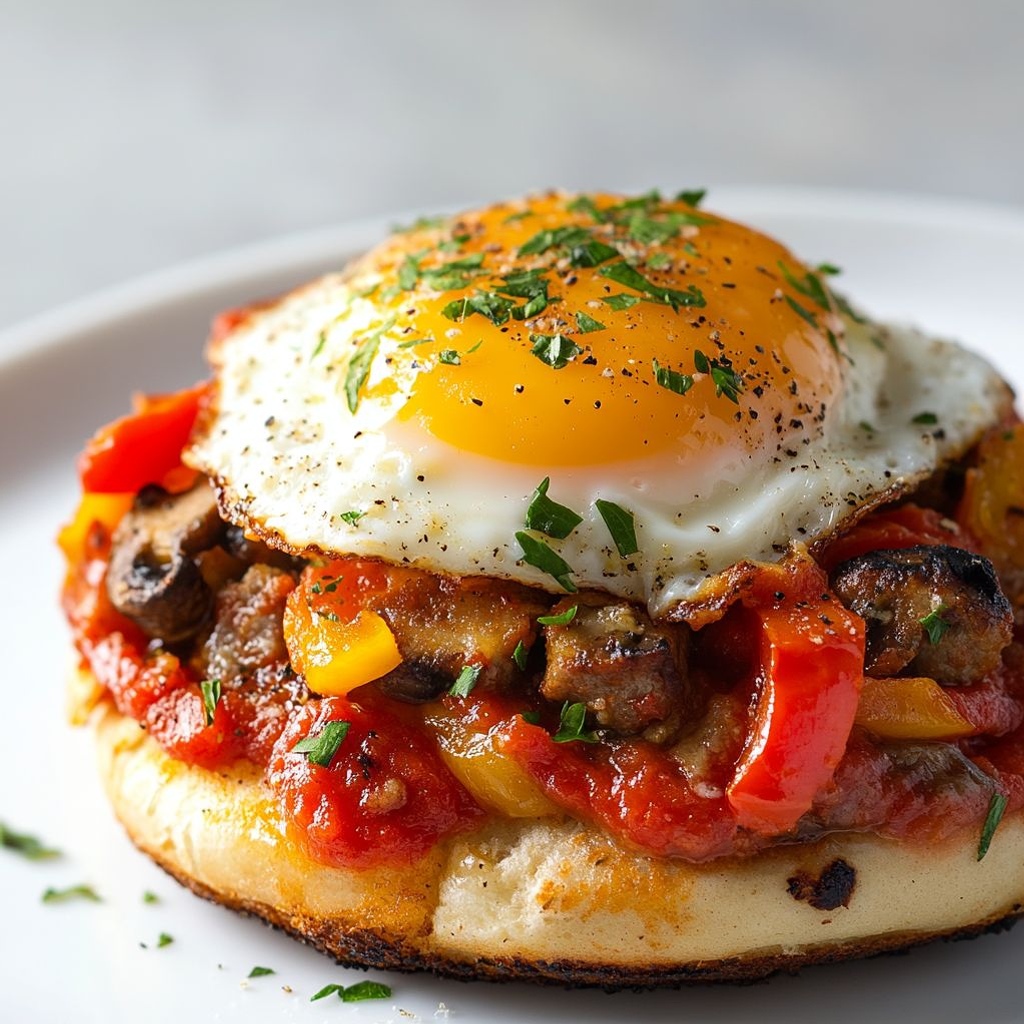
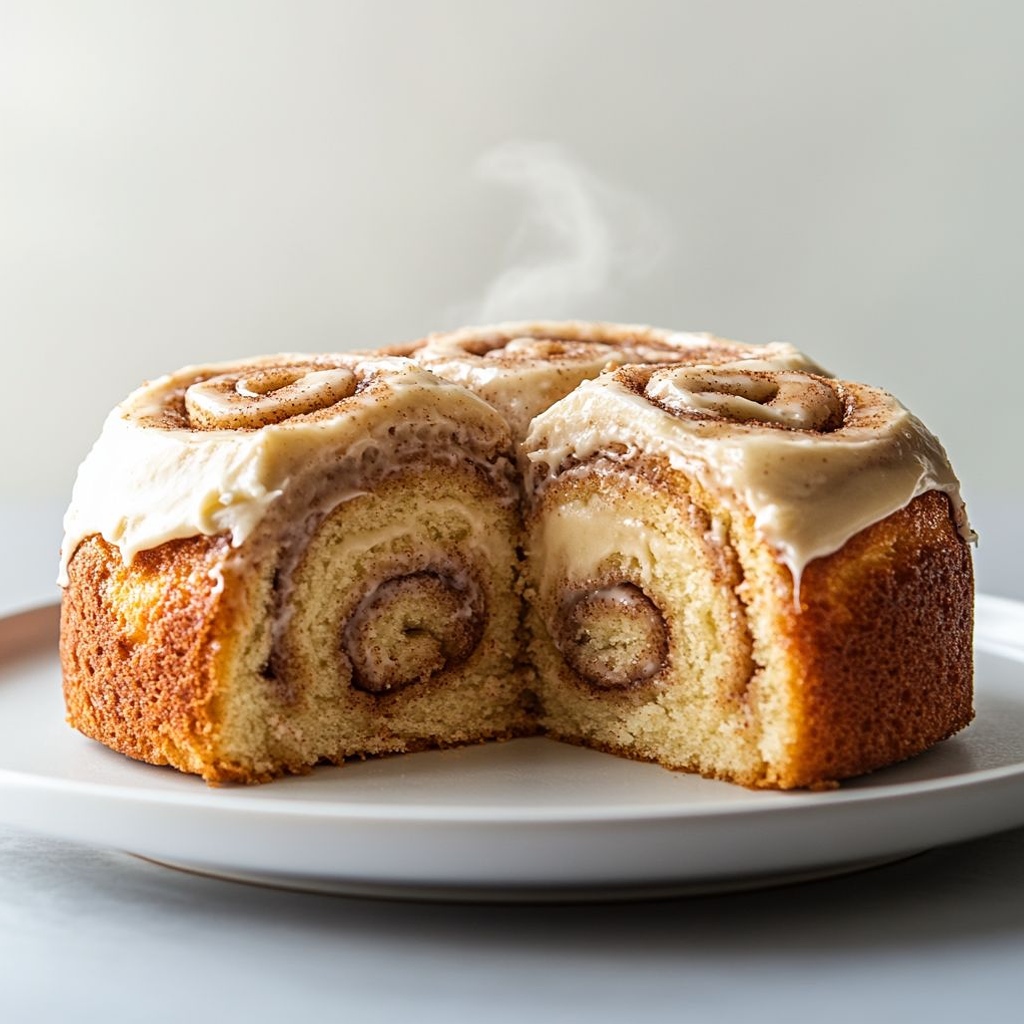
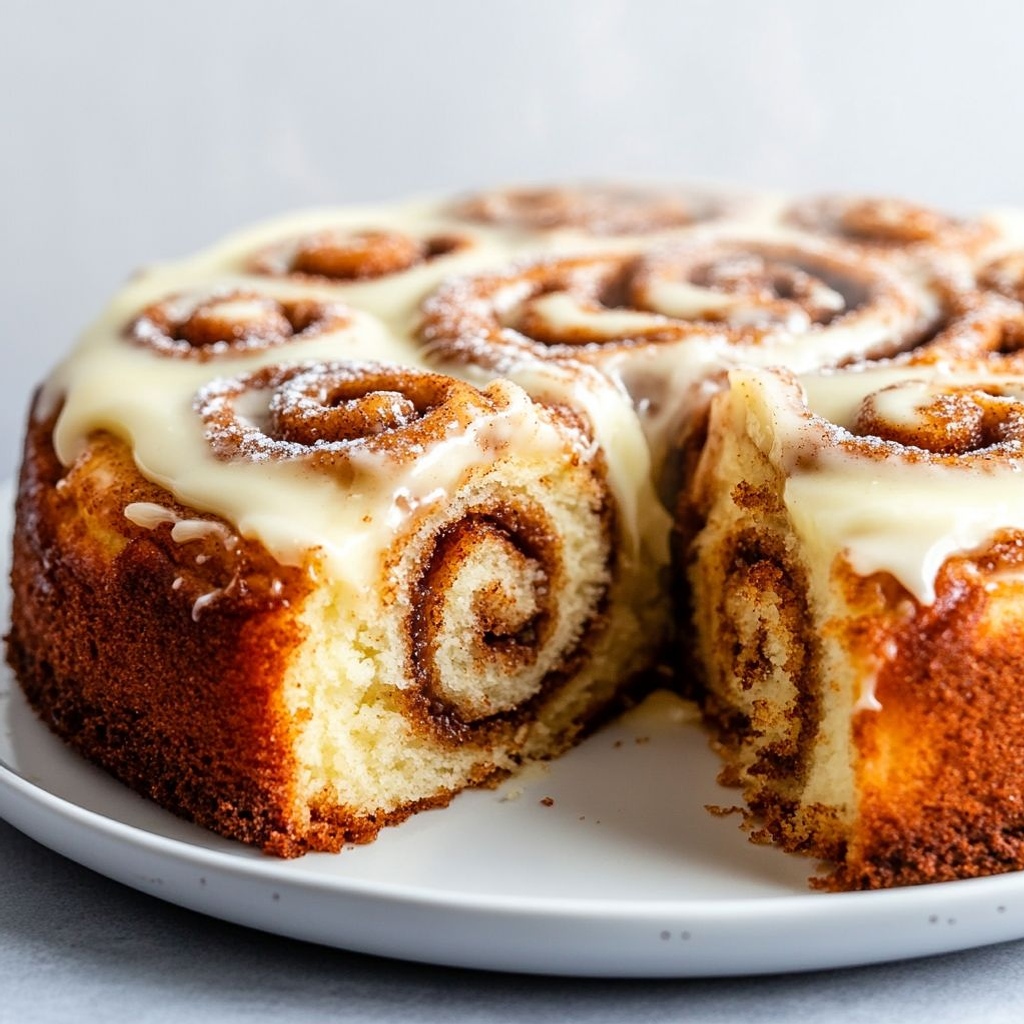
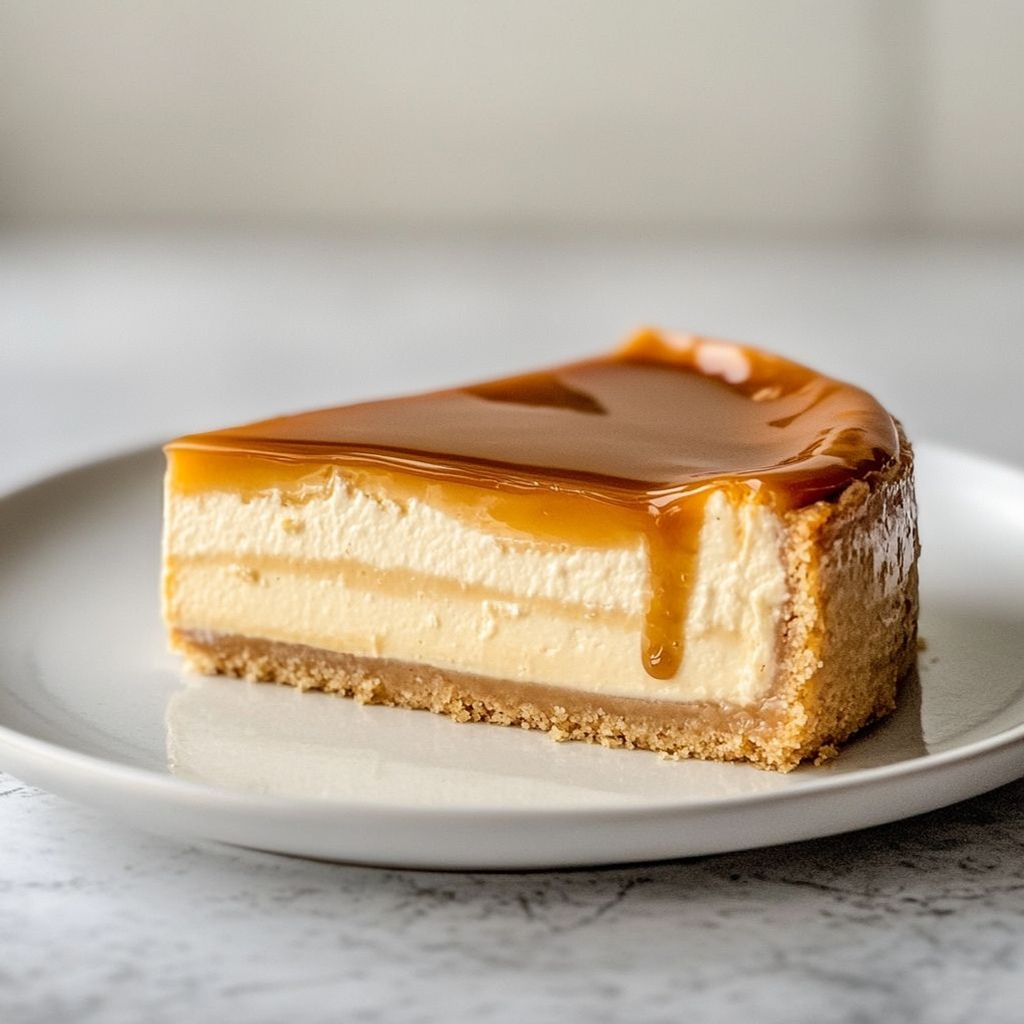
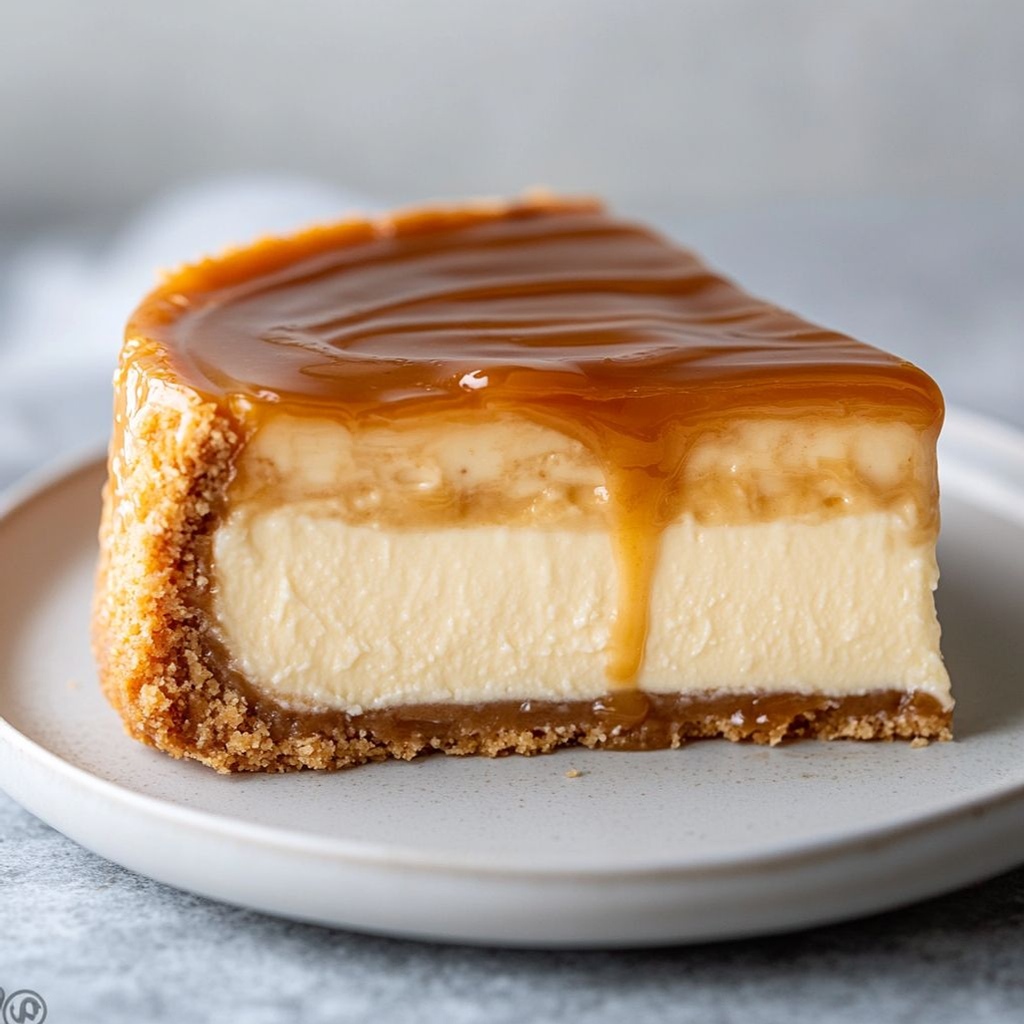
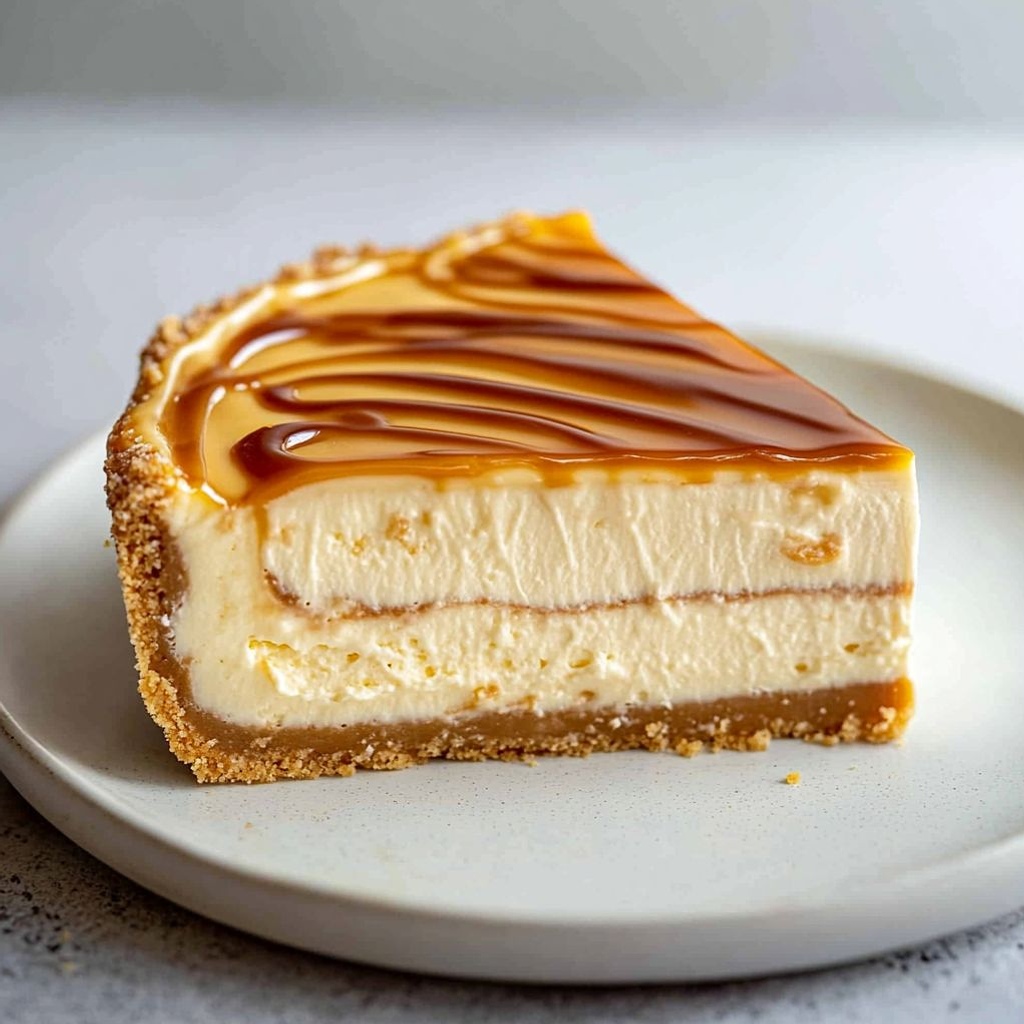
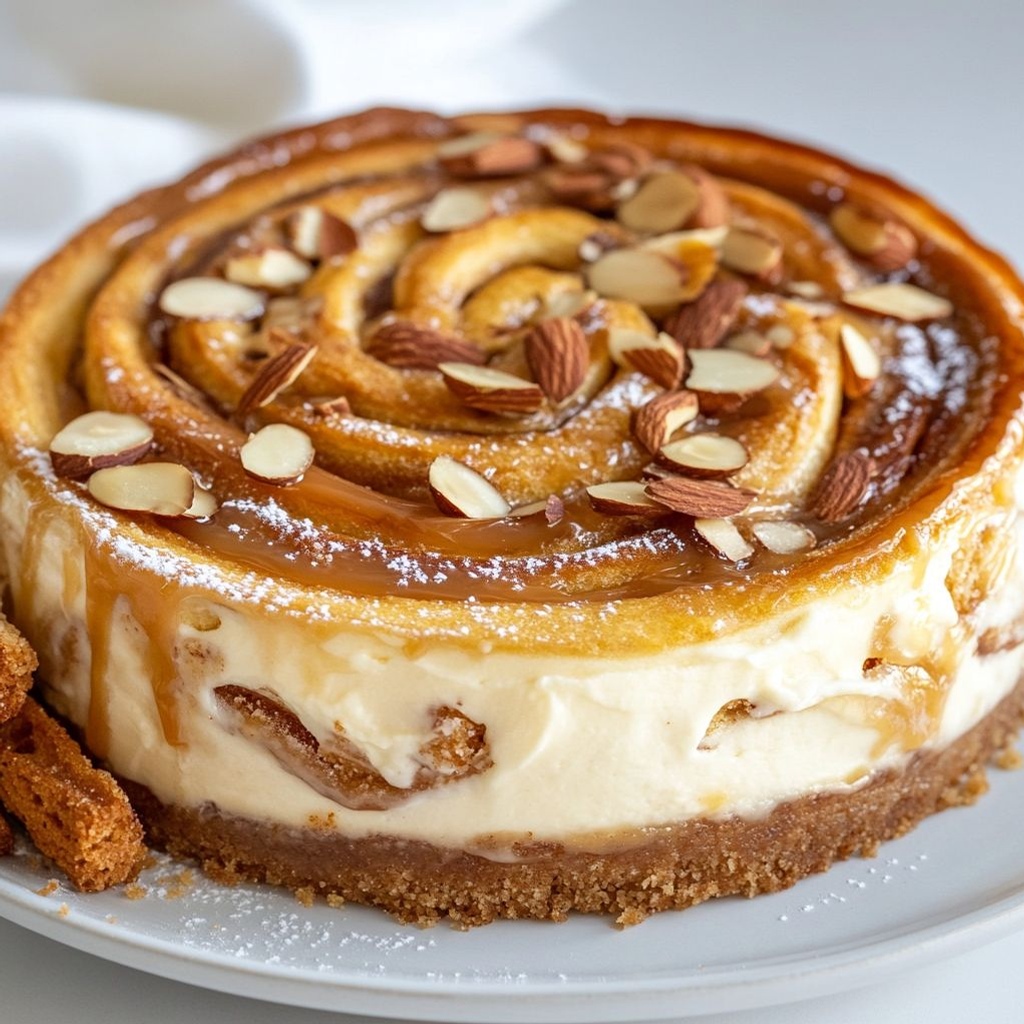
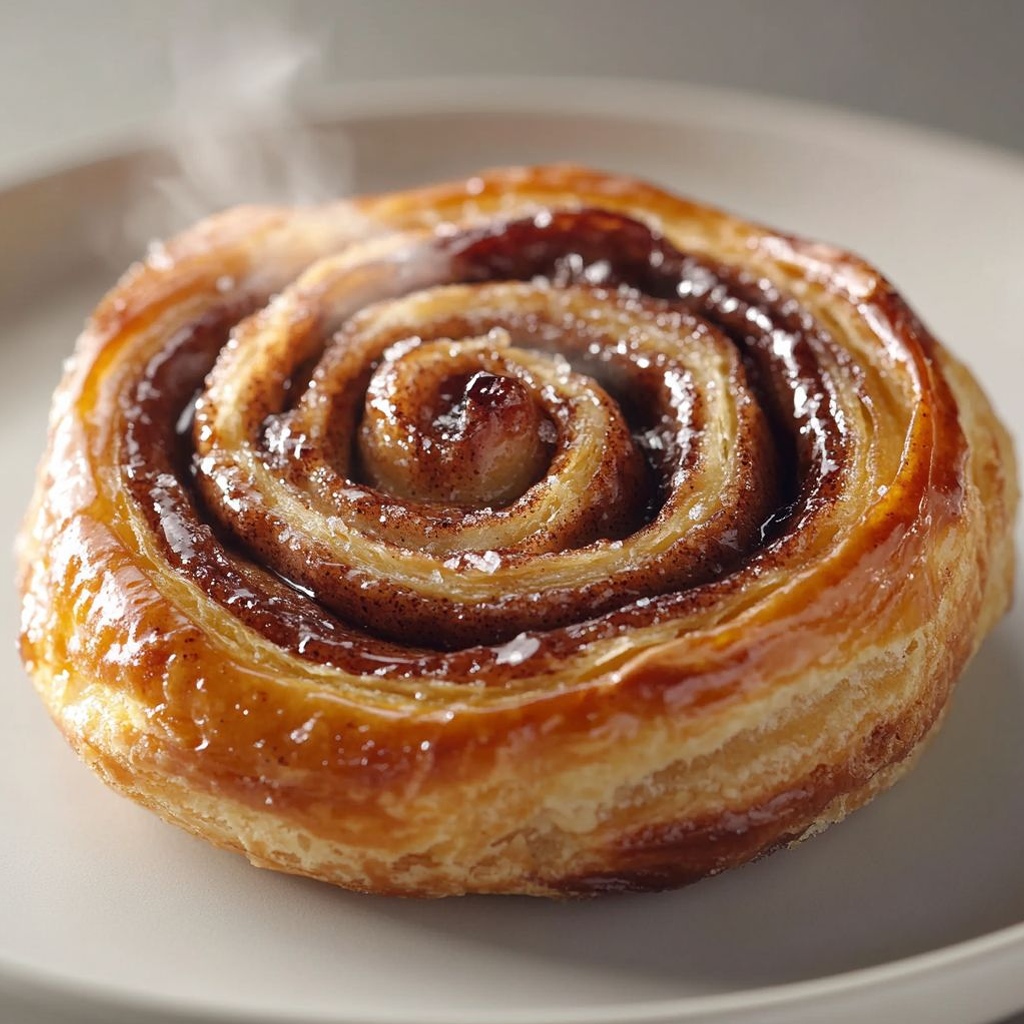
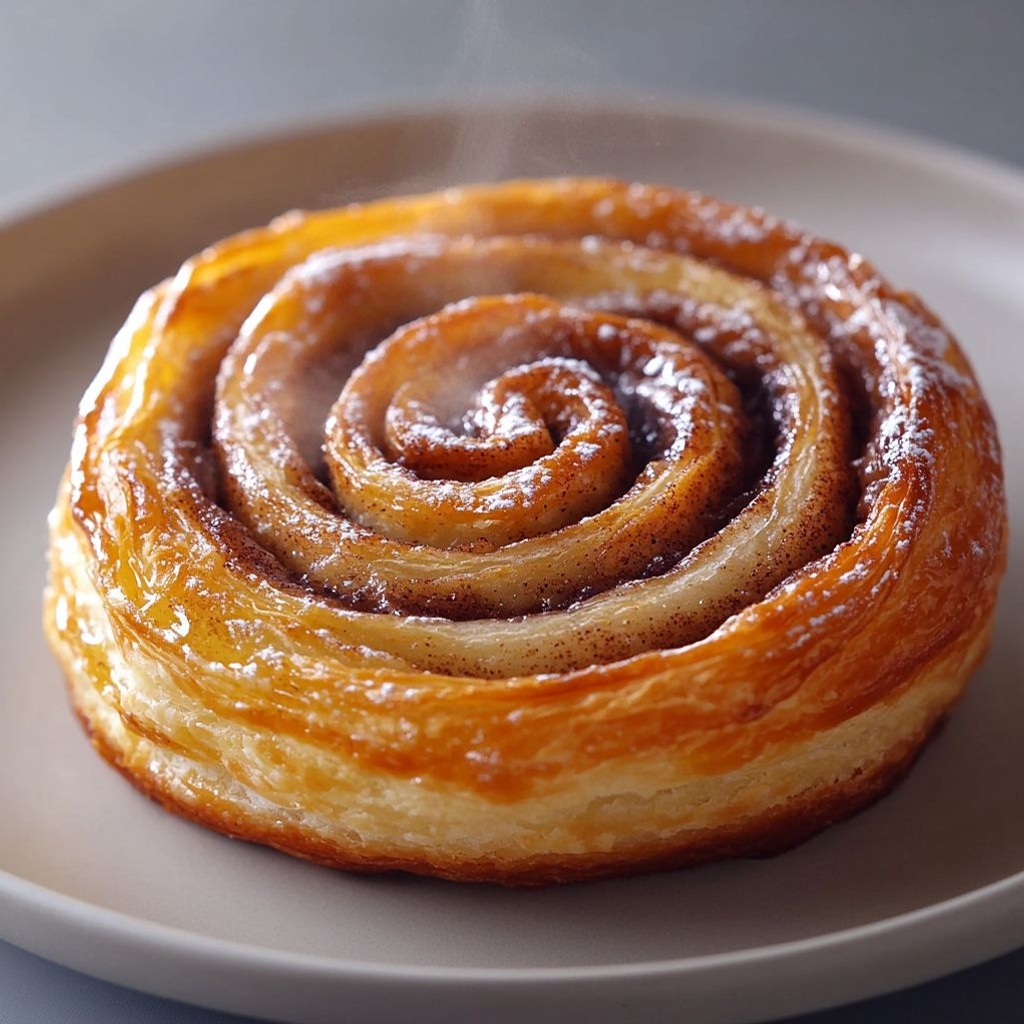
Swirl alla cannella is more than a dessert; it’s a warm invitation to slow down and savor the moment. Picture a kitchen filled with the soft hum of a morning ritual: butter melting into a cloud of brown sugar, vanilla kissing the air, and a ribbon of cinnamon winding through tender dough like a golden, fragrant heartbeat. The aroma alone conjures memories of cozy corners, early sunlight on tiled floors, and the promise of something comforting that feels both familiar and excitingly new. Each slice reveals a glossy, cinnamon-bronzed swirl that melts into a fluffy crumb, offering a gentle spice that lingers without overpowering. This is the kind of treat that brings people closer—a shared bite that tastes like a story told in layers, a memory being made one sweet spiral at a time.

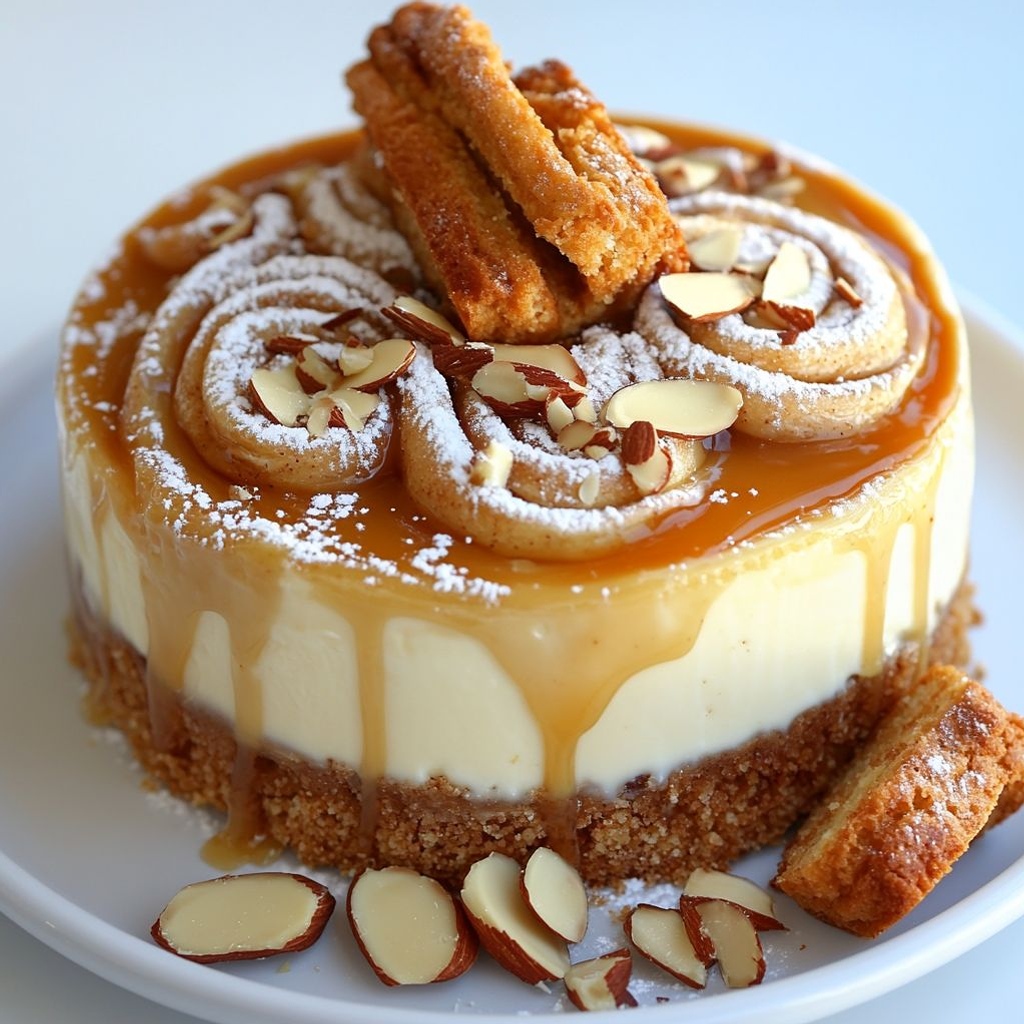
What makes Swirl alla cannella especially memorable is how it marries simplicity with a touch of indulgence. There’s no need for elaborate technique to create that irresistible swirl—just a few elements working in harmony: a soft, rich dough, a dreamy cinnamon-sugar veil, and a finish that crackles with a hint of caramelized sugar. The experience begins the moment you approach the tray—steam curling into the room, the first crackle of the crust, and the moment when the surface gleams with a delicate, honeyed glaze. Every mouthful reveals a contrast: the outer edge with a delicate crisp and the inner spirals that stay pillowy and soft. It’s the kind of treat you bake to share, but you might find yourself reaching for another slice before your coffee has cooled.

In its essence, Swirl alla cannella is a celebration of everyday magic—the kind of dish that turns an ordinary weekend morning into something a little festive, a weekday afternoon into a pause, and a simple bite into a memory you’ll want to revisit. The cinnamon’s warmth is balanced by the richness of the dough, the sweetness is tempered by a whisper of vanilla and salt, and the result is a swirl that feels as comforting as a favorite blanket and as exciting as a new chapter. If you’re looking for a treat that checks the boxes of cozy, adaptable, and crowd-pleasing, this is it: a cinnamon-spiced, melt-in-your-mouth swirl that invites you to linger at the table and share a moment of sweetness with those you love.

The Story Behind the Dish

Swirl alla cannella draws from a long lineage of cinnamon-forward pastries that span continents and centuries. Cinnamon has traveled the spice routes for thousands of years, arriving in kitchens not just as a flavor element but as a symbol of warmth, hospitality, and ceremonial gathering. In many cultures, cinnamon-infused sweets mark celebrations and daily rituals alike, offering a sensory signal that something comforting and special is about to happen. The idea of swirling a cinnamon-sugar filling into soft dough likely emerged in bakeries where efficiency and texture met tradition—where bakers could create something that looks artisan and tastes homey with relatively simple techniques. The swirl itself is a metaphor: a tight coil of comfort, a spiral that mirrors the cycles of life—morning to noon to night—each turn releasing a fragrant echo of yesterday and a promise for tomorrow.

As with many beloved desserts, there’s a personal element to Swirl alla cannella. It’s the kind of recipe that accumulates stories: a grandmother’s hint about letting the dough rest until it glows with life; a morning when the kitchen smelled so irresistibly of cinnamon that neighbors wandered in with cups of coffee; a family brunch where the swirls were passed around with a chorus of “more, please.” In Italian-inflected kitchens and beyond, such treats become tactile memories—hands dusty with flour, a wooden board dusted with sugar, and a table that invites conversation along with the warm aroma wafting through the house. The cinnamon swirl becomes a thread that ties together different generations and different table settings, proving that the simplest pleasures—soft dough, fragrant spice, and a touch of glossy sweetness—are often the most enduring.

Beyond nostalgia, Swirl alla cannella embodies a particular culinary philosophy: high flavor with approachable technique. It invites experimentation while remaining rooted in comfort. The cinnamon layer can be tweaked—more or less, coarser or finer—without sacrificing the overall harmony of the dish. The dough, while indulgent, offers a forgiving texture that can be adapted to different dietary needs or preferences. In many ways, this dish is a canvas: a stage for personal touches, regional twists, and familial signatures, all wrapped up in a single, satisfying swirl of flavor.

Why You’ll Love This Recipe

  • Sleepy-morning appeal: it feels luxurious without requiring hours of hands-on time, making it ideal for weekends or a comforting weekday treat.
  • Irresistible aroma: the kitchen becomes a warm bakery as cinnamon, vanilla, and melted butter mingle in the air, enticing everyone to gather at the table.
  • Soft interior with a hint of crust: the contrast between a tender crumb and a lightly caramelized edge delivers texture that keeps each bite interesting.
  • Versatility in simplicity: the swirl can be adjusted for more spice, more sweetness, or a lighter touch, depending on mood and occasion.
  • Family-friendly and shareable: one pan yields many swirls, making it perfect for brunches, gatherings, and leftovers that disappear quickly when friends and family are around.
  • Adaptable to dietary needs: the concept lends itself to dairy-free, vegan, or gluten-free versions without losing the essence of the dish.
  • Bonus for the eyes: a glossy, well-defined swirl bakes to a beautiful golden-brown and makes for stunning homemade gifts or party platters.
  • Make-ahead friendly: the dough and filling can be prepared in stages, enabling a gentle workflow for busy days or special occasions.

Flavor Profile & Texture

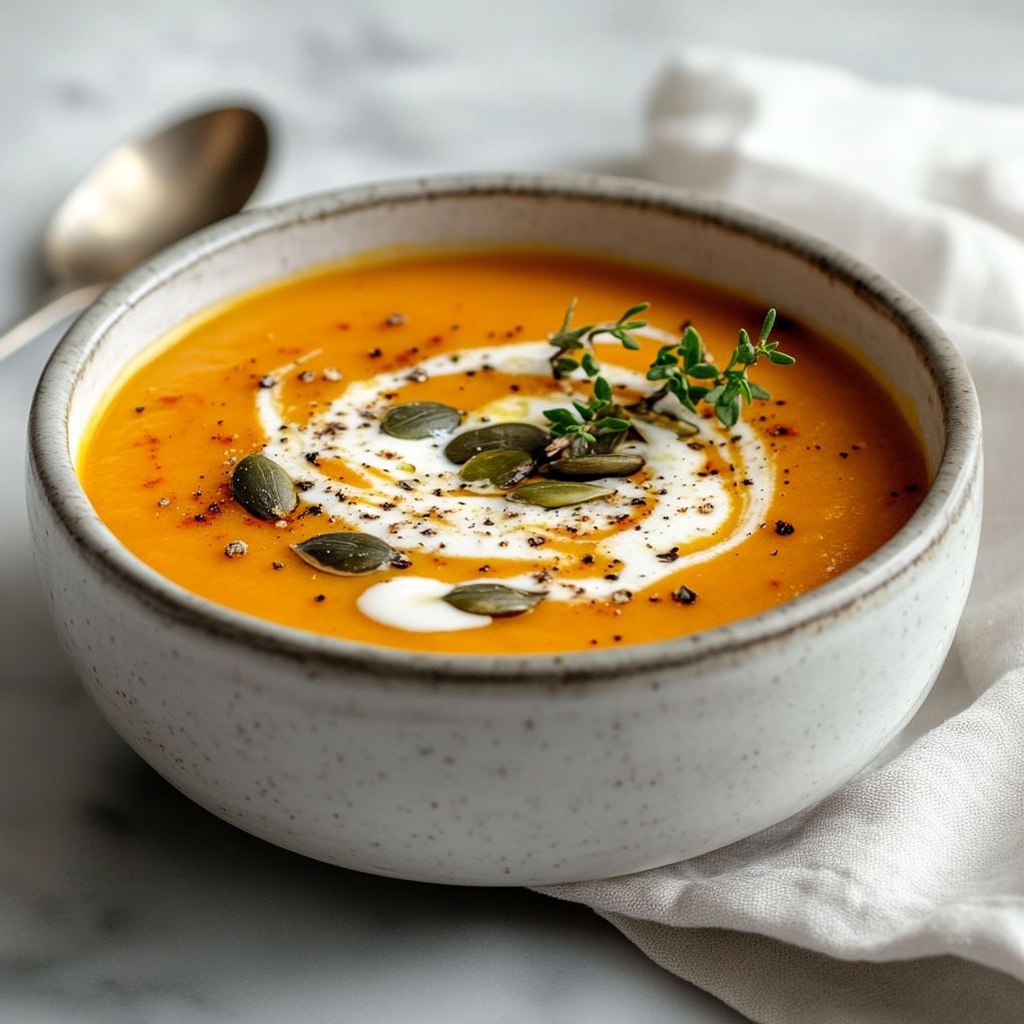
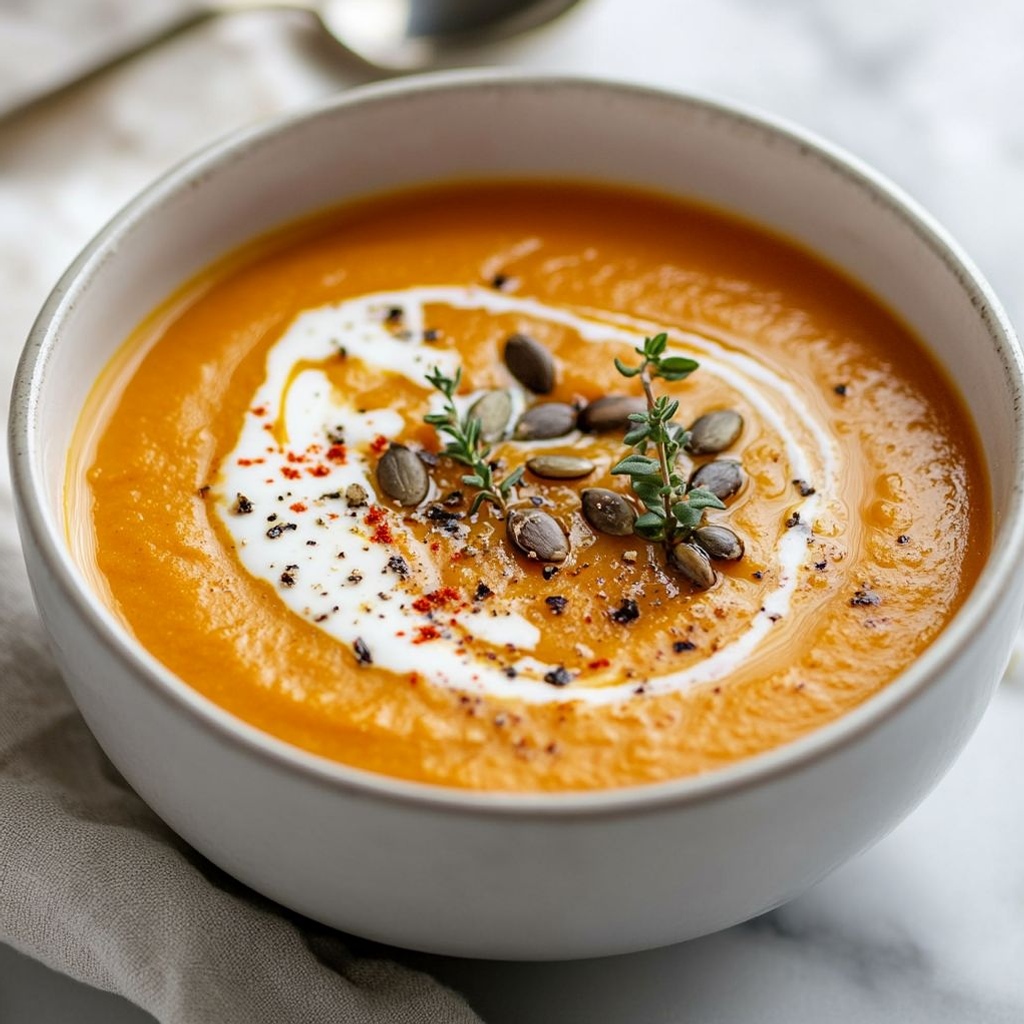
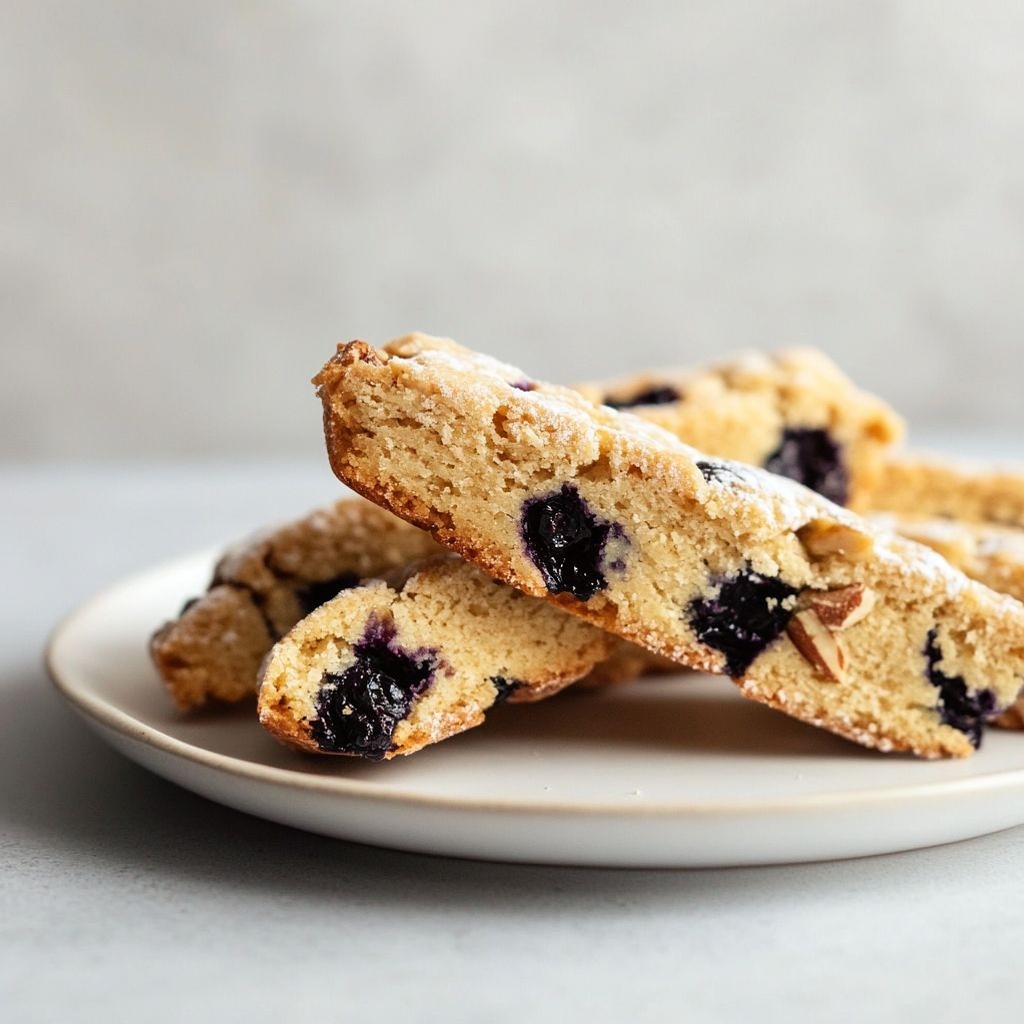
The signature of Swirl alla cannella lies in its balanced flavor profile. Cinnamon provides a warm, woodsy bite with hints of citrus and spice—a medieval market of aroma that never feels heavy. When balanced with a touch of vanilla and a whisper of salt, the sweetness of the dough and the glaze becomes more nuanced, revealing subtle layers of flavor rather than a single note of sugar. The butter in the dough and the filling adds a luxurious richness, giving the crumb a creamy mouthfeel that lingers long after the bite.

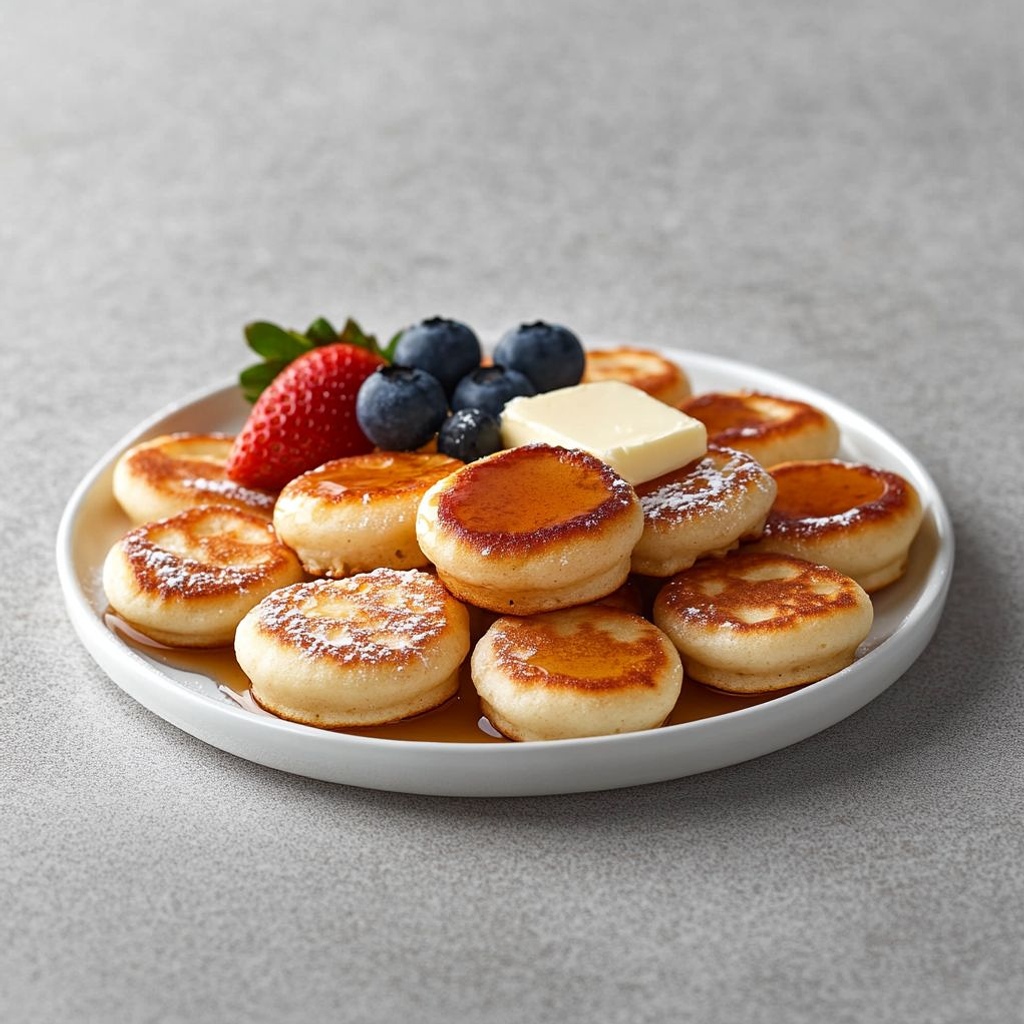
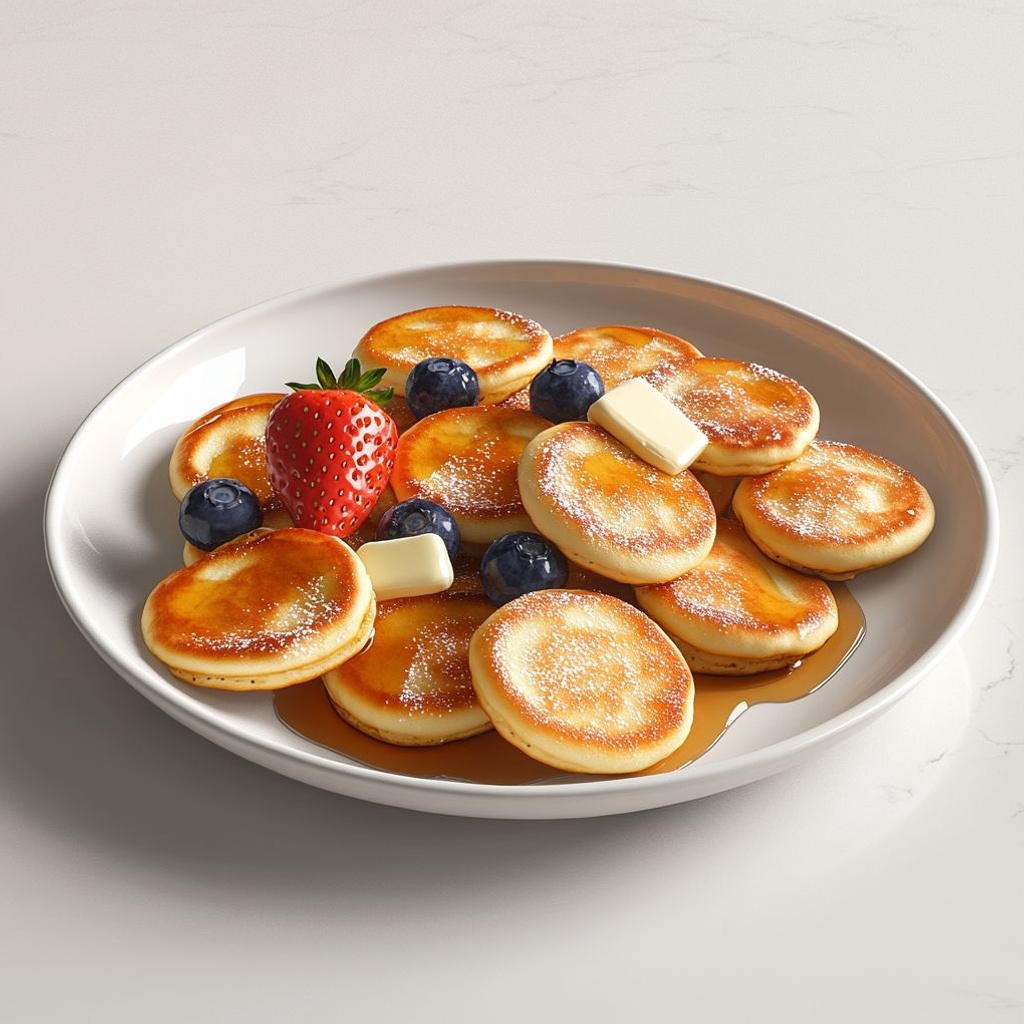
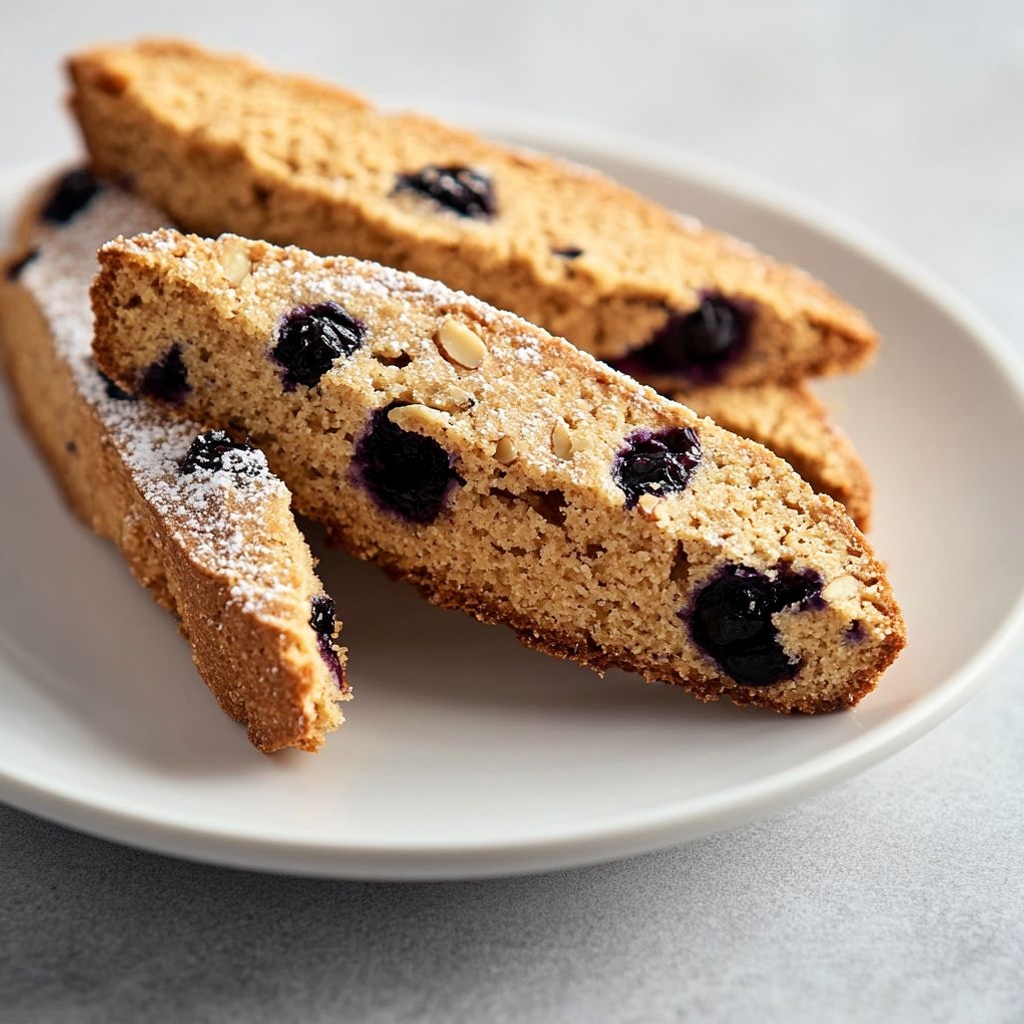
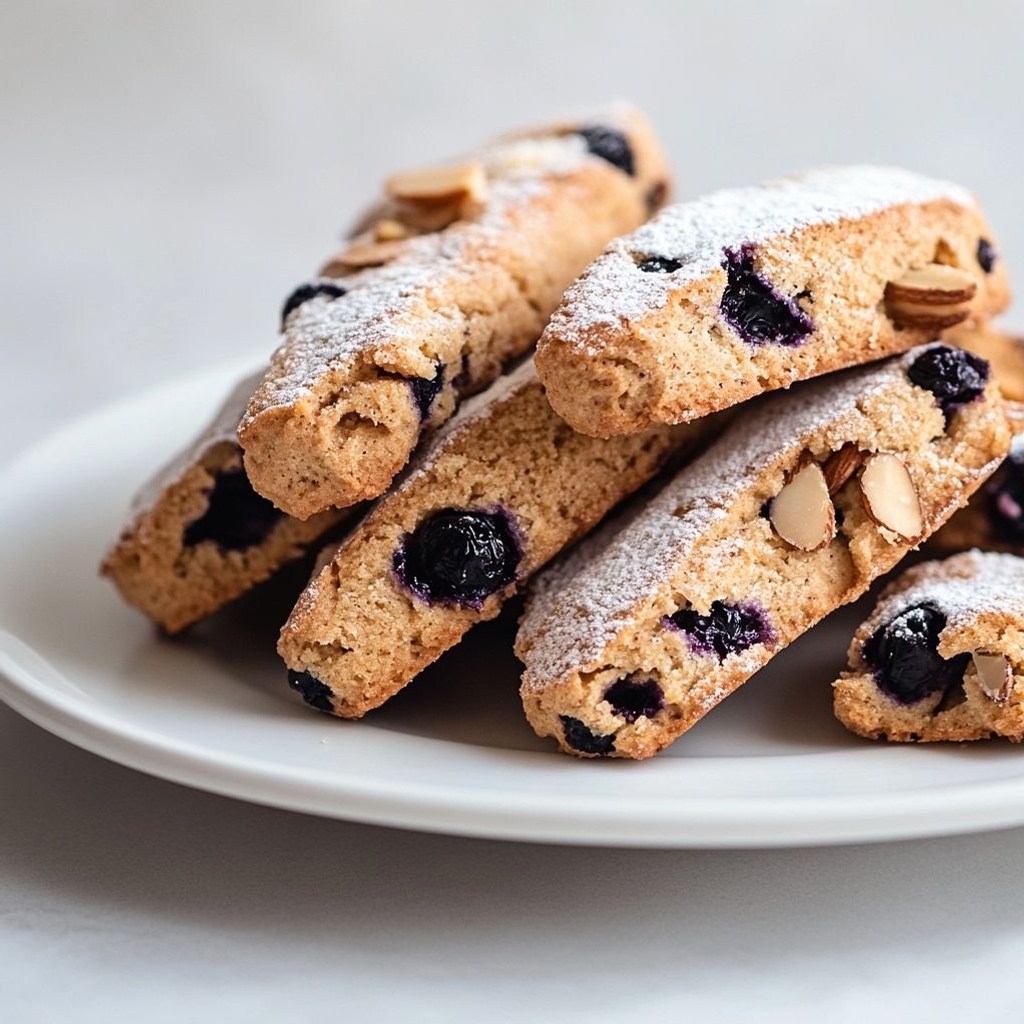
Texture-wise, the dish offers a pleasing contrast. The outer ring often develops a delicate crisp as the sugar caramelizes and the edges set, while the inner swirls remain incredibly soft and pillowlike. The cinnamon-sugar layer, rolled through the dough, creates tiny pockets of spice that release with every chew, giving a gentle warming sensation that grows as you continue to eat. If a glaze or drizzle is used, it provides a slight sheen and an extra kiss of sweetness that ties the whole swirl together—just enough to highlight the flavors without overwhelming them. The dough’s tenderness makes it feel almost buttery, even when prepared with more modest ingredients, and the aromatic presence of cinnamon keeps the palate engaged from first bite to last crumb.

In terms of balance, nothing fights with cinnamon here. Vanilla’s smoothness softens the edge of the spice, while a pinch of salt elevates the natural flavors and prevents the dish from tasting flat. The texture is forgiving enough to accommodate variations: a thicker swirl for a more pronounced cinnamon experience, or a lighter hand for those who prefer a subtler approach. This interplay—spice, sweetness, fat, and salt—creates a sensory experience that feels both timeless and modern, a reminder that comfort food can be elevated without losing its soul.

Occasions & Pairings

Swirl alla cannella shines in many settings, making it a versatile favorite for both everyday moments and special occasions. For weekend breakfasts, it pairs wonderfully with a robust cup of coffee or a creamy latte. It’s also a charming centerpiece for brunch spreads, where its elaborate look invites guests to slice and share, creating an informal ceremony around the table. On holidays, it can be a star side dish or a dessert alternative—especially when plated with a light dusting of powdered sugar or alongside seasonal fruit compotes that bring a bright contrast to the cinnamon warmth.

Pairing ideas to complement the dish include beverages and sides that balance or elevate the flavor profile. A morning coffee with a splash of milk, a cup of spiced chai, or a glass of lightly sweet sparkling wine can create delightful contrasts that enhance the cinnamon notes. For sides, consider a fresh fruit salad with citrus accents to cleanse the palate, a yogurt dip with a hint of honey for a tangy counterpoint, or a simple bowl of nuts and dried fruits that echo the warm spices. For a dessert setting, a scoop of vanilla ice cream or a dollop of mascarpone can add a cool, creamy counterpoint to the rich, spiced swirl, turning a humble treat into a festive finale.

Seasonally, Swirl alla cannella adapts beautifully. In cooler months, its comforting warmth fits perfectly with cozy gatherings and fireside chats. In spring and early summer, you can lighten the mood by pairing it with fresh citrus zest or a berry compote, offering a bright contrast that keeps the dish from feeling heavy. For holiday menus, consider shaping the presentation into a coffee-hour centerpiece or slicing the rolls into bite-sized rounds for a sorbet-like finish on a dessert platter. The key is to celebrate its adaptability and let the cinnamon’s warmth guide the mood of the occasion.

Tips, Variations & Substitutions

  • Vegan options: Use plant-based butter substitutes and a non-dairy milk to craft a plant-forward version that still yields a soft, bouncy crumb and a fragrant cinnamon swirl.
  • Gluten-free approach: Try a gluten-free flour blend designed for bread or roll dough, keeping in mind that texture may shift slightly; add a touch more hydration if the dough feels stiff.
  • Spice variations: Experiment with ground cardamom, nutmeg, or a pinch of clove for a warmer, more complex profile; you can also infuse a hint of orange or lemon zest for brightness.
  • Texture tweaks: For extra bite on the crust, finish with a light brush of melted butter and a sprinkle of coarse sugar just before the final bake.
  • Nut and fruit add-ins: Fold in toasted pecans, walnuts, raisins, or chopped dried apricots to add texture and a bookend sweetness that pairs beautifully with cinnamon.
  • Brown sugar options: Use light or dark brown sugar depending on whether you want more molasses depth or a cleaner sweetness; the deeper the color, the richer the aroma.
  • Flavor boosters: A whisper of vanilla bean paste or almond extract can deepen the aroma and bring out the spice without overpowering it.
  • Regional twists: In some regions, a drizzle of lemon glaze or a glaze made with orange blossom water can lift the dish with a citrusy note that complements the cinnamon.
  • Make-ahead note: Prepare the dough and the cinnamon filling ahead of time and refrigerate; assemble the swirl and bake when ready for a quicker weekend treat.

Storage & Make-Ahead Ideas

Swirl alla cannella stores well, making it a convenient option for meal planning and entertaining. Leftovers can be kept in an airtight container at room temperature for up to 2 days, where they retain tenderness and the scent of cinnamon. For longer storage, wrap slices individually and freeze. When you’re ready to enjoy, reheat gently in a low oven or toaster oven until warmed through and the edges regain a hint of crisp. If you prefer, rewarm in the microwave for a quick single-serving option, though the crust may soften a bit. If you’ve prepared the dough in advance, you can refrigerate the prepared swirl for up to 24 hours before baking; this can ease the morning rush and still yield a tender crumb with fresh aroma.

Make-ahead strategies can transform this treat into a reliable part of your weekly routine. Assemble the dough and filling on a Friday night, let them rest in the fridge, and bake early Saturday morning for that “fresh bakery” scent. Alternatively, bake a portion of the swirl and freeze the rest as unbaked rolls; bake from frozen with a little extra time to ensure the center is fully cooked. By planning ahead, you ensure that the flavor remains vivid and the texture remains fluffy, even when life gets busy.

Fun Facts & Trivia (Optional)

– Cinnamon has played a role in traditional medicine and culinary arts for centuries, valued not only for its aromatic warmth but also for its potential antimicrobial properties in various folk traditions.

– The allure of cinnamon rolls and cinnamon-swirl pastries crosses borders—from European bakeries to Middle Eastern cafés and Asian tea houses—demonstrating cinnamon’s universal appeal as a cozy spice that invites gathering.

– The word cinnamon is believed to originate from the Hebrew word “remon,” reflecting ancient trade routes and the spice’s storied journey from forests and markets to our tables.

– Caramelization and the glossy finish of a well-made cinnamon swirl are a reminder that simple ingredients—flour, fat, sugar, and spice—can transform into something that looks and tastes celebratory.

Closing Thoughts

Swirl alla cannella has a way of turning everyday moments into small, joyful rituals. It’s a recipe that invites experimentation while remaining rooted in comforting tradition. The cinnamon’s warmth, the dough’s tenderness, and the glossy finish create a sensory experience that lingers beyond the last bite. Whether you’re welcoming guests, enjoying a quiet morning at home, or sharing a personal sweet indulgence, this cinnamon swirled treasure offers hospitality in every slice. Embrace its invitation to slow down, to notice the fragrances that drift through your kitchen, and to savor the moment as the swirl unfurls, one fragrant turn at a time.

Ingredients

Dough

  • 3 1/2 cups all-purpose flour
    → The flour provides the primary structure of the cinnamon swirl dough. It forms gluten when mixed and kneaded, giving the rolls their soft chew and lift. Preparation: measure accurately (not packed like rice) and whisk with the yeast, sugar, and salt before adding liquids. Tip: for a softer crumb, you can substitute up to 1 cup of part of the flour with bread flour to increase gluten development; avoid over-kneading to prevent toughness. If dough seems too dry, add extra warm milk a tablespoon at a time.
  • 2 1/4 teaspoons active dry yeast (1 packet)
    → Yeast is the leavening agent that causes the dough to rise and become airy and tender. Activation typically occurs when the yeast is dissolved in warm liquid with a touch of sugar. Preparation: proof the yeast in the warm milk (see below) if you’re unsure about freshness; if it doesn’t foam after 5–10 minutes, discard and start with fresh yeast. Tip: keep the liquid around 105–110°F (40–43°C); hotter temperatures can kill the yeast and hinder rising.
  • 1/3 cup granulated sugar
    → Sugar feeds the yeast and contributes to browning and flavor development during baking. Preparation: mix with dry ingredients to ensure even distribution. Tip: if you prefer a less sweet dough, reduce slightly, but keep enough sugar to feed the yeast and aid moisture retention in the final pastry.
  • 1/2 teaspoon salt
    → Salt strengthens gluten structure, controls fermentation rate, and enhances overall flavor. Preparation: scatter evenly through the dry mix to ensure balanced seasoning. Tip: too much salt can slow or stop yeast activity; always add salt with the flour and not directly onto the yeast.
  • 1 cup warm whole milk (about 110°F/43°C) or dairy-free alternative
    → Liquid hydrates the flour, activates the yeast, and contributes to a soft, extensible dough. Preparation: warm to just about 105–110°F; if you go hotter, it can kill the yeast. Tip: if using dairy-free milk, choose unsweetened varieties for better flavor and balance; if using a fortified plant milk, no extra adjustments are usually needed.
  • 1/4 cup unsalted butter, melted
    → Butter enriches the dough, adding tenderness and flavor. Preparation: melt and cool slightly before whisking into the dough to prevent cooking the eggs or killing the yeast. Tip: for a richer dough, you can swap part of the butter with a combination of butter and cream cheese; this will yield a more luxurious crumb.
  • 1 large egg
    → Eggs contribute structure, richness, and moisture, helping the dough to rise with a tender crumb. Preparation: use at room temperature for better emulsification with the liquids. Tip: if you’re avoiding eggs, you can substitute with a flax or chia egg or use a dairy-free egg replacer, but expect a slightly different texture.
  • 1 teaspoon vanilla extract
    → Vanilla adds depth of flavor that complements cinnamon and the dough’s richness. Preparation: whisk into the liquid components or add with the egg for even distribution. Tip: use real vanilla extract (not imitation) for a more aromatic, mellow sweetness; for a stronger vanilla note, use vanilla bean paste.

Filling

  • 1/2 cup light brown sugar, packed
    → The brown sugar creates a moist, caramelized sweetness that pairs with cinnamon to form the characteristic swirl. Preparation: mix with cinnamon to ensure even distribution. Tip: packing the sugar helps achieve a denser, more luscious filling that doesn’t dry out during baking.
  • 2 tablespoons ground cinnamon
    → Cinnamon provides the signature flavor of the swirl. Preparation: use freshly ground or good-quality ground cinnamon for a strong aroma; store away from light to maintain potency. Tip: for a milder flavor, reduce to 1 tablespoon; for a more intense cinnamon kick, increase slightly but be mindful of balance with the dough sweetness.
  • 2 tablespoons unsalted butter, melted
    → Butter in the filling helps carry the cinnamon flavor and keeps the swirl moist as it bakes. Preparation: brush or spread it evenly over the rolled-out dough before sprinkling sugar and cinnamon. Tip: if you’re including nuts, reserve a portion to press into the filling before rolling to increase texture contrast.
  • Optional: 1/4 cup chopped walnuts or pecans
    → Nuts add crunch and a toasty contrast to the soft rolls. Preparation: toast the nuts lightly in a dry pan before chopping for better flavor and crunch. Tip: keep nuts small and evenly distributed to prevent clumping in one bite; you can mix a few into the filling or sprinkle on top of the swirl before baking.

Glaze

  • 1 cup powdered sugar
    → Powdered sugar forms the base of a smooth, sweet glaze that lightly coats the cinnamon rolls. Preparation: sift to remove lumps for a glossy finish. Tip: adjust the amount of liquid to reach the desired thickness; for a glaze that sets, use a little less liquid, for a drizzleable glaze, add it gradually.
  • 2–3 tablespoons milk or dairy-free alternative
    → Liquid to thin the glaze to your preferred consistency. Preparation: add gradually, whisking until smooth. Tip: warm the milk slightly to help dissolve the sugar fully; if using a dairy-free milk, ensure it’s unsweetened to avoid altering color and sweetness excessively.
  • 1/2 teaspoon vanilla extract
    → Adds a complementary aroma to the glaze, enhancing the overall flavor profile. Preparation: mix into the glaze until fully incorporated. Tip: for a tangier finish, a pinch of salt can help balance sweetness.
  • Pinch of salt (optional)
    → A tiny salt pinch helps cut sweetness and deepen flavor in the glaze. Preparation: whisk in with the other glaze ingredients. Tip: omit if you want a strictly dessert-like glaze; include if you enjoy a balanced finish.

Cream Cheese Frosting (Optional Topping)

  • 2 ounces cream cheese, softened
    → Cream cheese frosting adds a rich, tangy contrast to the sweet rolls. Preparation: soften to room temperature for easy whipping; beat until smooth before adding other ingredients. Tip: high-fat cream cheese yields a creamier result; chill briefly after frosting to set slightly for easier slicing.
  • 2 tablespoons unsalted butter, softened
    → Adds creaminess and helps stabilize the frosting. Preparation: beat with the cream cheese until light and fluffy. Tip: ensure butter and cheese are fully softened to avoid a lumpy texture.
  • 1/2 cup powdered sugar
    → Provides body and sweetness to the frosting. Preparation: sift to avoid lumps; adjust to taste. Tip: for a sweeter frosting, add more sugar; for a lighter frosting, reduce slightly and whisk longer for extra air.
  • 1/2 teaspoon vanilla extract
    → Enhances the frosting’s aroma and depth. Preparation: blend in after the sugar is incorporated. Tip: for a citrusy note, substitute with orange or lemon zest and a drop of zest; this works well with the cinnamon.
  • Pinch salt (optional)
    → A small salt pinch can balance sweetness and improve flavor perception. Preparation: whisk in with the other ingredients. Tip: omit if you’re aiming for a pure sweet frosting; include for enhanced flavor contrast.

Optional Add-ins

  • 1/2 cup raisins or chopped dried apples (optional)
    → Adds chewy bursts of sweetness and a fruitiness that complements cinnamon. Preparation: soak extremely dry raisins in warm water for 10 minutes if using dried fruit to plump them, then drain well before mixing into the filling. Tip: chopped dried apples offer a soft, tart counterpoint that pairs nicely with the spice; adjust sugar in the filling if adding fruit.
  • 1/4 cup toasted chopped almonds or pecans (optional)
    → Adds extra crunch and a nutty flavor that contrasts with the soft roll. Preparation: toast until fragrant, then chop finely to distribute evenly. Tip: add just before rolling to incorporate evenly; nuts may sink slightly during baking if added in excess.

Instructions

  • Proof the yeast by dissolving it in the warm milk (105–110°F/40–43°C) with a small pinch of sugar and letting it foam for 5–10 minutes; this confirms the yeast is active and will leaven the dough.

    → This foaming indicates the yeast is alive and ready to create the tender, airy texture characteristic of cinnamon rolls; if no foam forms, discard and start with fresh yeast for reliable rise.
  • Whisk together the flour, granulated sugar, and salt in a large bowl to achieve even distribution and to help develop consistent gluten when mixed with liquids.

    → Even distribution prevents uneven crumb and ensures uniform fermentation and rise; pre-aerating the dry ingredients helps the dough come together smoothly.
  • In a separate bowl, whisk the melted butter (slightly cooled), the egg, and the vanilla into the foamy yeast mixture until smooth and cohesive.

    → Tempering the egg with the warm liquid prevents scrambling and ensures a uniform emulsion for a tender crumb; vanilla delivers a balanced aroma throughout the dough.
  • Pour the liquid mixture into the dry ingredients and stir with a wooden spoon or dough hook until a shaggy dough forms, then turn out and knead on a lightly floured surface until smooth and elastic, about 8–10 minutes by hand or 5–7 minutes with a mixer on low.

    → Gluten development through kneading creates structure that traps gas during rising, yielding soft, chewy rolls; avoid over-kneading to prevent toughness and overworked dough.
  • Place the dough in a lightly oiled bowl, cover, and let it rise in a warm spot until doubled in size, about 60–90 minutes depending on room temperature.

    → The first rise builds flavor and volume; dough should feel buoyant and airy when poked lightly, not dense.
  • Meanwhile, prepare the filling by combining the light brown sugar and ground cinnamon in a bowl until evenly mixed; set aside for even distribution.

    → Uniform filling ensures each spiral is sweet and spicy in every bite; whisking prevents cinnamon and sugar from forming clumps during rolling.
  • Preheat your oven to 350°F (175°C) and grease a 9×13-inch baking dish or line it with parchment; this ensures easy release and even browning.

    → A properly preheated and prepared pan prevents sticking and promotes uniform bake across the surface of the rolls.
  • Roll the dough on a lightly floured surface into a large rectangle about 12 by 18 inches with an even thickness of roughly 1/4 to 1/2 inch; this provides a consistent base for the spiral and filling.

    → An even thickness prevents thin edges from overbaking and thick center from underbaking; rotate the dough as you roll to maintain square edges.
  • Brush the rolled-out dough evenly with the 2 tablespoons of melted butter, leaving a small margin along the far edge to seal the roll; this helps the filling adhere and keeps the roll intact.

    → Butter creates a lubricated surface for the sugar-cinnamon mixture and contributes to a rich, fragrant crumb as it bakes.
  • Sprinkle the prepared brown sugar and cinnamon mixture evenly over the buttered dough, then press lightly to help it adhere; add optional chopped nuts if using.

    → Even coverage ensures each bite has the characteristic swirl of sweetness and spice; pressing helps prevent shifting during rolling.
  • If using raisins or dried apples, sprinkle them evenly over the filling now; otherwise proceed to the next step and roll the dough tightly from the long edge to form a log.

    → Rolling tightly creates clean, well-defined swirls and prevents loose filling from spilling during baking.
  • Roll the dough tightly from the long edge into a log, seal the seam, and trim off the very ends; slice the log into 12–16 equal pieces with a sharp serrated knife or using kitchen twine to avoid squashing the dough.

    → A tight roll yields uniform spirals and clean cuts; slicing with a gentle sawing motion preserves the shape and prevents deforming the swirls.
  • Arrange the slices in the prepared pan with one cut face up and evenly spaced to allow room for expansion; this prevents sticking and promotes even rising.

    → Proper spacing ensures the rolls bake without merging and brown evenly on all sides.
  • Cover the pan and let the rolls undergo a second rise until puffy, about 30–45 minutes or longer in a cooler kitchen; this step lightens the final crumb.

    → The second proof relaxes the dough again and amplifies volume, producing a softer, airier interior once baked.
  • Bake the rolls in the 350°F (175°C) oven until the tops are golden and an inserted toothpick comes out clean, about 25–30 minutes, rotating the pan halfway for even browning.

    → Finishing color indicates caramelization of the sugar and fully baked centers; rotation prevents hot spots from scorching the tops.
  • While the rolls bake, whisk together the glaze ingredients—powdered sugar, 2–3 tablespoons milk, vanilla, and a pinch of salt—until smooth and glossy to your desired consistency.

    → A glossy, cohesive glaze clings to warm rolls and enhances sweetness without becoming runny; adjust thickness with additional sugar or milk as needed.
  • Optionally, make the cream cheese frosting by beating the softened cream cheese and butter until smooth, then beat in the powdered sugar and vanilla with a pinch of salt until fluffy; keep refrigerated until serving.

    → The tangy frosting provides a luxurious contrast to the sweet rolls; softened ingredients ensure a silky, lump-free texture.
  • Remove the rolls from the oven and let them cool for about 10 minutes before glazing or frosting; this allows the filling to set slightly for cleaner slices.

    → Cool briefly so the glaze doesn’t slide right off and so the rolls slice cleanly; the centers will continue to set as they finish resting.
  • Drizzle the warm rolls with the prepared glaze or spread a generous layer of cream cheese frosting, letting the glaze set as they finish cooling for a glossy finish.

    → The glaze or frosting adds moisture and a sweet finish that complements the cinnamon filling; a light warm drizzle helps it meld with the rolls.
  • Serve the cinnamon swirl warm or at room temperature after a brief resting period to ensure the filling has set and the texture is at its best.

    → Resting helps the structure stabilize and makes slicing easier, while the flavors meld for a richer taste with each bite.

Notes

These Swirl alla cannella cinnamon rolls are a classic, enriched yeast treat featuring a tender, pull-apart crumb and a glossy cinnamon swirl. The dough relies on a careful balance of flour, milk, butter, egg, sugar, and yeast to develop structure and softness. Measure the flour accurately (not packed) and whisk it with the yeast, sugar, and salt before adding liquids to ensure even fermentation.

Yeast and liquids: Use active dry yeast and warm milk around 105–110°F (40–43°C) to activate the yeast without killing it. If your yeast doesn’t foam after proofing, discard and start with fresh yeast. Proofing helps you gauge freshness and yields reliable rising. If the dough seems dry, add warm milk a tablespoon at a time; if it’s too sticky, a touch more flour or a few minutes of kneading will help develop gluten.

Flavor and texture: Butter enriches the dough for tenderness and flavor. Use a room-temperature egg for better emulsification and a uniform crumb. Vanilla enhances the aroma—use real vanilla extract for deeper flavor, or vanilla bean paste for a stronger note. If you want to tweak texture, for a softer crumb you can substitute up to 1 cup of part of the flour with bread flour to boost gluten development, but avoid over-kneading.

Filling and roll: The filing relies on light brown sugar and ground cinnamon; melted butter is brushed on first to help the filling adhere and stay moist as the rolls bake. If you’d like crunch, add nuts such as walnuts or pecans (toasted first for maximum flavor) and press them into the filling before rolling. For a fruity accent, add raisins or chopped dried apples with the filling (soak very dry raisins briefly if using).

Glaze and frosting: A classic glaze of powdered sugar and milk provides a smooth, sweet finish that sets lightly. For a tangy contrast, you can add a cream cheese frosting: beat softened cream cheese with butter, powdered sugar, vanilla, and a pinch of salt until smooth, then spread on warm rolls and let it set slightly before slicing. Adjust the glaze thickness by varying the milk; warm milk helps dissolve the sugar for a glossy finish.

Make-ahead and storage: The rolls can be assembled, cut, and refrigerated overnight for a slow rise, then baked the next day. Leftovers store well in an airtight container for 2–3 days at room temperature or longer in the fridge; they freeze well when baked or unbaked. Reheat gently in a warm oven or microwave with a light sprinkle of water to refresh the texture.

Adaptations and tips: If you’re dairy-free, use an unsweetened fortified plant milk and a dairy-free butter substitute; for a non-egg version, substitute the egg with a flax or chia egg or an egg replacer, noting a slight texture change. Bake at about 350°F (175°C) until golden and cooked through, roughly 25–30 minutes, though ovens vary—watch for a light golden color and a hollow-sounding bottom when tapped. To tailor sweetness, adjust the sugar in the dough or the filling, but keep enough to feed the yeast and maintain moisture during baking.

Yield and serving: This recipe makes generous cinnamon rolls perfect for shareable weekend brunches. Slice while still slightly warm to enjoy the gooey filling, but allow them to rest a few minutes before glazing or frosting for cleaner slices.

Tips

Tips for making Swirl alla Cannella

Dough preparation and yeast

  • Measure flour by weight for best accuracy. If you must use volume, whisk the flour first and spoon into the cup without packing, then level off.
  • Proof the yeast in warm milk with a pinch of sugar. If the mixture doesn’t foam after 5–10 minutes, start over with fresh yeast—expired or inactive yeast won’t rise the dough.
  • Keep liquids around 105–110°F (40–43°C). Too hot can kill the yeast; too cool will slow or prevent rising. If you don’t have a thermometer, test with a candy or instant-read thermometer.
  • Allow the butter to cool slightly after melting before adding to the dough so it doesn’t “cook” the egg or kill the yeast.
  • Room-temperature egg helps emulsification with the liquids, producing a smoother dough. If you must substitute, use a dairy-free egg replacer and anticipate a slightly different texture.
  • For a softer crumb, consider substituting up to 1 cup of part of the flour with bread flour or adding a touch more milk. Avoid over-kneading; stop when the dough is smooth and elastic.
  • Let the dough rise in a warm, draft-free place until doubled in size. If your kitchen is cool, preheat the oven to the lowest setting for a few minutes, then turn it off and place the covered dough inside to rise.
  • Use the windowpane test to judge gluten development: stretch a small piece of dough between your fingers; it should stretch thin enough to become translucent without tearing.

Rolling and filling

  • Roll the dough into an even rectangle, about 1/4 inch thick. Uneven thickness can cause uneven rising and filling distribution.
  • Mix the filling sugars and cinnamon well so every bite has consistent flavor; crumble any clumps before spreading.
  • Brush the rolled-out dough with melted butter evenly, not just on the edges, to prevent dry edges in the final swirls.
  • When adding optional nuts, toast them first for 4–6 minutes until fragrant to amplify flavor and prevent sogginess. Chop finely and distribute evenly.
  • If adding dried fruit, pat it dry after soaking to avoid extra moisture in the dough that could hinder rising.
  • Roll tightly from a long edge to create even swirls. If the roll seems loose, chill it for 15–20 minutes to set the shape before slicing.

Baking and glaze considerations

  • Let the rolls proof again after shaping until they have puffed noticeably, but don’t overproof or they may collapse in the oven.
  • Glaze: sift powdered sugar to avoid lumps. Add liquid gradually and whisk until smooth; the glaze should be pourable but not runny. For a sets-higher-glaze, use slightly less liquid.
  • Warm the milk slightly before adding to glaze if you want a smoother dissolve of sugar. Use unsweetened dairy-free milk to keep color and sweetness predictable.
  • To prevent a soggy bottom, bake on a preheated light-colored sheet pan or bakeware. If your oven tends to brown the tops too quickly, tent with foil for the last 5–10 minutes.

Cream cheese frosting tips (optional)

  • Soften cream cheese and butter fully to avoid lumps. Beat until smooth, then add powdered sugar gradually to achieve a light, fluffy texture.
  • Chill frosting briefly after whipping if you plan to spread it thickly or refrigerate the rolls; this helps frosting hold its shape when slicing.
  • For a deeper tang, increase the cream cheese proportion slightly or whip in a tiny pinch of salt. For a citrus note, add a small amount of zest or a drop of lemon/orange zest.

Storage, make-ahead, and reheating

  • For easier scheduling, assemble the dough, do the first rise, refrigerate overnight, then complete the shape and second rise in the morning before baking. This slows fermentation and can improve flavor.
  • Leftover cinnamon rolls keep well in the fridge for 2–3 days; reheat gently in the microwave in 15–20 second intervals or warm in a low oven to re-crisp the edges.
  • Freeze unbaked rolls after the shape is formed but before the final rise. Thaw and let rise in a warm place, then bake as directed. Bake from thawed dough without thawing fully if needed, adding a few extra minutes.
  • To prevent dryness in advance, store baked rolls in an airtight container or wrap well. Reheat with a splash of milk or a damp paper towel to revive softness.

FAQ

Cos’è Swirl alla cannella?

Swirl alla cannella è una dolce pasta lievitata arrotolata che crea una venatura a spirale di cannella e zucchero. Al taglio si ottiene una stria profumata e soffice, simile a una brioche con ripieno aromatizzato.

Quali ingredienti servono per la versione classica?

Per l’impasto: 300 g di farina, 60 g di zucchero, 7 g di lievito secco attivo, 180 ml di latte tiepido, 40 g di burro morbido, 1 uovo (facoltativo), un pizzico di sale. Ripieno: 60 g di burro fuso, 60–80 g di zucchero, 2–3 cucchiaini di cannella in polvere. Opzionale: scorza grattugiata di limone o arancia per aroma.

Posso usare lievito istantaneo o cambiare il tipo di lievito?

Il classico Swirl alla cannella richiede lievito di birra (lievito secco attivo) e una lievitazione. Se usi lievito istantaneo o baking powder, la preparazione diventa non lievitata e avrà una consistenza diversa (più simile a una brioche rapida). Per una versione veloce senza lievitazione, vedi la FAQ sulle varianti rapide.

Si può rendere l’impasto vegano o senza latticini?

Sì. Utilizza latte vegetale (mandorla, soia, avena) al posto del latte, burro vegano o olio neutro al posto del burro, e opzionalmente evita l’uovo o sostituiscilo con 1 cucchiaio di olio o una purea di banana. Il risultato sarà comunque soffice, ma potrebbe essere leggermente diverso in texture.

Qual è la temperatura e il tempo di cottura consigliati?

Cuoci in forno preriscaldato a 180–190°C per circa 25–35 minuti, a seconda delle dimensioni dello stampo. Controlla con uno stecchino: deve uscire asciutto. Se la superficie si scurisce troppo, copri con un foglio di carta stagnola.

Come si ottiene la spirale di cannella perfetta?

Passaggi chiave: 1) stendi l’impasto in un rettangolo; 2) spennella con burro fuso e spolvera con zucchero misto a cannella; 3) aggiungi scorza di limone se vuoi un aroma fresco; 4) arrotola strettamente dal lato lungo; 5) taglia in fette di circa 2–3 cm e disponile in una teglia unta. Lascia lievitare nuovamente se hai tempo prima di infornare.

Posso prepararlo in anticipo o congelarlo?

Sì. Puoi preparare l’impasto e lasciarlo lievitare in frigorifero una notte. Puoi conservare l’impasto arrotolato in frigorifero fino a 24 ore, poi tagliare e cuocere. Puoi anche congelare la massa arrotolata cruda; scongelala in frigorifero e lascia lievitare prima di cuocerla. Si può anche congelare una volta cotto e poi riscaldare in forno.

Come conservare gli avanzi e come riscaldarli?

Conserva a temperatura ambiente in un contenitore ermetico per 1–2 giorni, oppure in frigorifero per 3–4 giorni. Per riscaldarli, scaldali in forno a 150–160°C per 5–10 minuti o nel microonde a breve intervallo. Resta morbido se lo riscaldi lentamente. Puoi aggiungere una spennellata di burro fuso prima di riscaldare per rinforzare la morbidezza.

Si può rendere senza zucchero o con alternative di dolcificante?

È possibile utilizzare dolcificanti alternativi come zucchero di canna chiaro, zucchero di cocco o eritritolo al posto dello zucchero bianco. Tieni presente che alterano leggermente il sapore e la consistenza. Se usi dolcificanti liquidi, adatta le quantità di latte per mantenere l’impasto idratato. Per una versione meno dolce, riduci la quantità di zucchero nel ripieno.

Quali varianti posso provare per cambiare gusto?

Alcune idee: oltre alla cannella, aggiungi scorza di limone o arancia per un aroma agrumato; sostituisci parte dello zucchero con cacao amaro per una versione cioccolato-cannella; aggiungi gocce di cioccolato, noci tritate o noci pecan nel ripieno; oppure farcisci con crema di formaggio dolcificata come frosting all’inglese per una topping cremosa.

Introduction / Hook

Imagine the soft, puffed charm of a golden English muffin meeting the bold, sun-warmed flavors of a marble-glistening pizza. The result is a handheld breakfast that feels both familiar and thrillingly novel: a waking kiss of tomato brightness, mozzarella’s gentle melt, and a kiss of herbs—all perched on a sturdy, toasty base that travels as easily as your morning commute or weekend brunch. This is not just a recipe; it’s a small rebellion against the ordinary, a way to start the day with a dish that feels both comforting and adventurous. The “Breakfast pizza muffin inglese” takes two beloved breakfast traditions—the quick, satisfying English muffin and the irresistible charm of a pizza—and fuses them into a single, portable, feast-ready slice of morning joy. The first bite delivers a satisfying crunch, followed by a silkily bubbling cheese pull, a tangy note of tomato, and a whisper of garlic or basil that lingers like a quiet chorus in your kitchen. It’s breakfast reimagined for the modern pace: wholesome, indulgent, and endlessly customizable.

As you prepare this dish, you’ll notice how its warmth wraps around you like a comforting blanket. The aroma of toasting muffin and hot-sauce-kissed tomato sauce mingles with the scent of bubbling cheese, basil, and oregano, painting the air with an inviting, café-style fragrance. This is the kind of recipe that makes weekday mornings feel like a small celebration and weekend brunch feel like a tiny vacation. It’s the quiet pride of a home cook who knows how to turn simple ingredients into something memorable. And because it uses an English muffin as its sturdy canvas, you’re getting a portable, mess-free bite that’s ideal for quick meals, drive-friendly breakfasts, or a playful addition to a family table with kids who love the sight of gooey cheese and a perfectly crisp crust.

Beyond the sensory delight, this dish is a study in balance: the muffin’s chewiness contrasts with a tender, almost pillowy egg (if you choose to add eggs), the tomato base provides brightness without overpowering, and the cheese binds everything together with a creamy, savory finish. It’s comfort food that still sparkles with a touch of sophistication. Whether you’re feeding a crowd or simply feeding yourself, this breakfast pizza on an English muffin is a small, satisfying ritual that makes mornings brighter, tastier, and a little bit more playful.

The Story Behind the Dish

Breakfast pizza on an English muffin is a modern culinary anecdote that speaks to two traditions colliding in the best possible way. English muffins have a storied place in breakfast history, beloved for their chewy interior and syrupy-sweet crust that crisps beautifully when toasted. They descended from a long line of yeast-raised breads, evolving in the United States in the 19th and early 20th centuries into the iconic morning staple we know today. Pizza, meanwhile, has its roots in Naples, where humble dough, tomato, and cheese became a beloved street-food canvas for endless creativity. The idea of combining these two worlds—pizza flavors on a toasty muffin—emerged naturally for home cooks who wanted pizza’s comfort and personality without waiting for an evening oven party or a long ingredient list.

In many households, mornings are a flurry of activity: last-minute lunches, car seats, quick showers, and a scramble for energy. The breakfast pizza muffin inglese was born from the desire to capture the essence of a satisfying, savory slice in a form that’s easy to grab, heat, and share. It’s a breakfast-for-anytime, a dish that travels well in a laptop bag, a lunchbox, or a picnic basket. The beauty of this recipe lies in its flexibility: the muffin base is a neutral, forgiving platform, the tomato sauce can range from a simple pantry mix to a vibrant roasted puree, and the toppings can swing toward traditional Italian vibes or lean into the ingredients you have on hand—ham, mushrooms, spinach, or a handful of spicy pepper flakes to wake up the senses. It’s a culinary crossroads that invites experimentation, storytelling, and, most importantly, delicious, reliable mornings.

Some home cooks like to think of it as a small, edible pizza slice designed for mornings, with the speed and convenience of a toaster and the satisfying, layered flavors that make a quick dinner feel special. Others see it as a bridge: it takes the convivial spirit of Italian street food and translates it into a portable, family-friendly breakfast that can grow with your tastes and dietary needs. If you have fond memories of a slow Sunday brunch with a pot of coffee and a board of toppings, or you simply crave something that feels like a treat but is still simple enough to whip up on a busy weekday, this dish offers those memories and possibilities in one confident bite.

Historically, the combination of peppery herbs, tangy tomato, and melted cheese has always spoken to comfort and celebration. When you lay those flavors on the sturdy backbone of an English muffin, you’re marrying two worlds in a way that acknowledges both tradition and modern life. It’s a tiny homage to Italian flavor, a nod to British breakfast staples, and a universal invitation to gather—whether you’re sharing with family, friends, or a morning you want to treat yourself to something a little special.

Why You’ll Love This Recipe

  • Quick and versatile: ready in minutes, perfect for busy mornings or a speedy weekend brunch.
  • Kid-friendly and appealing: the gooey cheese, bright tomato, and fragrant herbs make it a hit with young eaters and adults alike.
  • Customizable: swap toppings to suit preferences, dietary needs, or what you have on hand—vegetarian, vegan, gluten-free, or low-carb options are all easily achievable.
  • Portable and shareable: a muffin base makes it easy to pack for school, work, or picnics, while still feeling indulgent.
  • Restaurant-fresh flavor at home: the toasty muffin provides a crisp bite that contrasts with silky cheese and saucy toppings, creating a satisfying sensory experience.
  • Comforting yet sophisticated: the dish nods to classic breakfast flavors while delivering a pizza-like indulgence that elevates everyday meals.
  • One-pan-friendly prep: you can assemble and bake or toast with minimal equipment, keeping cleanup simple.
  • Great for make-ahead routines: pre-toast the muffins, pre-cook toppings, and assemble later for a rapid finish.

Flavor Profile & Texture

This breakfast pizza muffin inglese delivers a mosaic of textures and tastes that work in harmony. The English muffin acts as a sturdy canvas: its exterior becomes wonderfully crisp in the toaster or oven, providing a contrasting bite to the tender interior. The tomato sauce or fresh tomato releases a bright acidity that lifts the dish, balancing the richness of the cheese. Mozzarella or a melting cheese blend offers a creamy, luscious mouthfeel that becomes irresistibly stretchy as it melts against the warmth of the muffin and the steam rising from the toppings. If you add eggs, you introduce a gentle, custardy richness that lacquered with a kiss of saltiness from the cheese, the dish becomes even more fulfilling, turning breakfast into a comforting, almost indulgent feast.

Herbs play a crucial role in the flavor profile. Fresh basil provides a peppery sweetness that echoes a classic Margherita vibe, while oregano offers a subtle Mediterranean warmth. Garlic, either toasted in the tomato base or lightly infused into olive oil, can add a whisper of sharpness that wakes up the palate. A pinch of crushed red pepper flakes can bring a welcome kick for those who like a bit of heat. The balance of tangy tomato, creamy cheese, and the toasty, toasty muffin creates a multi-layered sensation: the initial crunch of the crust, the soft interior of the muffin, the slickness of cheese, and the bright, slightly acidic tomato—an interplay that keeps each bite interesting.

Texture contrasts are essential to this dish’s charm. The outer edge of the muffin delivers crunch and warmth, while the interior stays tender and airy. If you top with a runny egg, the yolk can turn this into a silky, slow-melting layer that mingles with the tomato and cheese as you bite. If you prefer no eggs, the topping can rely on extra cheese and vegetables to keep the bite satisfying. Optional add-ins like sautéed mushrooms, spinach, or roasted peppers introduce a different texture for variety—soft, earthy mushrooms or crisp, emerald greens that add color and bite without overpowering the signature muffin foundation. In all its variations, the early-morning savoriness remains forward, but the flavors sit comfortably in the background of your day’s first moments, ready to offer warmth and a gentle sense of satisfaction.

Occasions & Pairings

This dish shines in a variety of settings, from hurried weekdays to leisurely weekends. Consider making a batch on a Sunday to grab-and-go all week, or set up a breakfast-for-brunch spread for guests who drop by with a craving for something different yet comforting. It also makes a delightful addition to a potluck, a family brunch, or a hotel-style breakfast at home when you want something minimal-effort but high-impact.

  • Weekday mornings: a fast, flavorful start that pairs well with a cup of coffee or a glass of orange juice.
  • Brunch gatherings: serve alongside a fruit platter, a simple green salad, and sparkling water or a light prosecco for a festive touch.
  • Family-friendly weekend: customize toppings to please both kids and grown-ups—mushrooms, peppers, spinach, olives, or pepperoni on separate tins for a playful toppings bar.
  • Late-night craving: a savory bite that’s comforting but not heavy; reheat in a toaster oven for best texture.

Pairings can elevate the experience. Consider a fresh salad with lemon vinaigrette to cut through the richness, a crisp cucumber and tomato salad for brightness, or a simple fruit bowl to balance the savory elements. Drinks wise, a hot cup of coffee or a sparkling juice can complement the flavors, while a light, dry white wine or a mimosa can be surprisingly harmonious for a brunch setting. If you’re looking for a classic Italian touch, a small glass of sparkling water with a twist of lemon and a drizzle of olive oil over a few cherry tomatoes on the side can echo the dish’s herbaceous notes.

Tips, Variations & Substitutions

  • Make-ahead assembly: toast muffins until just firm, then cool completely. Keep the toppings in separate containers. When ready to serve, add sauce, cheese, and toppings, and bake or broil just until the cheese melts and the toppings are heated through.
  • Vegan/Vegan-friendly: use vegan cheese that melts well and a tomato sauce with olive oil, garlic, and herbs. Replace mozzarella with a plant-based mozzarella alternative and consider adding nutritional yeast for a cheesy note.
  • Gluten-free option: use gluten-free English muffins or gluten-free bagel thins as the base. Ensure toppings and sauces are gluten-free as well.
  • Egg variations: for a more decadent option, crack a small egg onto each muffin half before adding cheese and bake until the egg sets to your liking. For a runny yolk, bake briefly; for a firmer yolk, bake longer.
  • Herb and spice swaps: swap basil for fresh spinach and a pinch of oregano; add sun-dried tomatoes for a sweet, intense tomato note; sprinkle red pepper flakes for a gentle heat.
  • Cheese choices: mozzarella is classic, but you can blend with provolone for extra sharpness, or use fontina for a creamier melt. A Parmesan shower at the end adds a nutty finish.
  • Tomato sauce options: use a simple crushed-tomato base with garlic and olive oil, or a quick roasted tomato purée for deeper sweetness. A swirl of pesto can be a delightful alternative to tomato sauce for a basil-forward profile.
  • Protein accents: a few thin slices of prosciutto, pancetta, or baked turkey can add a savory depth without overpowering the others. If you prefer vegetarian, add artichoke hearts or marinated mushrooms for a meaty texture.
  • Regional twists: for a Mediterranean vibe, add feta crumbs and black olives; for a Mexican twist, replace mozzarella with queso fresco and add a dash of jalapeño and fresh cilantro after baking.

Storage & Make-Ahead Ideas

To maximize convenience, you can build a morning-friendly workflow around this recipe. Here are practical strategies to store, reheat, and even pre-assemble for future meals:

  • Toasting ahead: lightly toast English muffins, then store in an airtight container. When ready to serve, re-toast until crisp before adding toppings and finishing in the oven or broiler.
  • Leftover storage: store assembled but not baked muffins (if you want to bake later) in the refrigerator for up to 24 hours. If you’ve already baked and cooled, refrigerate in an airtight container for 2–3 days; reheat in a toaster oven or skillet until hot and cheese is melty.
  • Freezing: freeze assembled, unbaked muffins on a sheet tray, then transfer to a bag or container. Bake from frozen, adding a few extra minutes to ensure the cheese melts and the muffin base is thoroughly heated.
  • Make-ahead brunch: prepare a batch of toppings (sauce, chopped veggies, grated cheese) and keep in the fridge. In the morning, quickly assemble on muffin halves and bake for a fresh, warm result in minutes.
  • Reheating tips: reheat in a toaster oven at 350°F (175°C) for 6–8 minutes, or until the cheese is bubbling and the muffin is crisp again. Avoid microwaving if you want to preserve crispness, though a quick microwave reheating can work if you’re short on time.

Fun Facts & Trivia (Optional)

Did you know that English muffins, despite their name, owe much of their popularity to American bakery traditions? The modern English muffin as we know it was perfected in the United States in the late 19th and early 20th centuries, with distinct griddled rounds that puff up to a light, open crumb. The name stuck, even though the product hails primarily from American innovation. Pizza, by contrast, has its roots in the bustling streets of Naples, where bakers stretched dough, topped it with tomatoes, cheeses, and herbs, and sold it to locals and visitors. The marriage of these two iconic foods—pizza flavor and an English muffin base—speaks to a broader culinary trend: the willingness of cooks to borrow, blend, and reinvent traditions to suit the moment. It’s a reminder that good food often grows at the intersection of practicality and imagination.

Another small anecdote: in many cultures, the morning meal is a canvas for savory, comforting bites that provide both sustenance and a sense of ritual. A breakfast pizza on an English muffin captures that idea perfectly: it’s not a grand, formal dish, but rather a thoughtful, satisfying routine that can become a weekly highlight. If you’ve ever watched the melted cheese pull across a warm muffin before you bite, you know why this concept resonates—it’s a tiny, edible celebration that can be varied endlessly to reflect what you love or what’s in your pantry.

And if you’re curious about the historical origins of the ingredients themselves, think about the humble tomato’s journey from the Americas to the tables of Europe, bringing brightness and acidity that brighten slow-cooked sauces, while cheese—whether mozzarella, provolone, or fontina—has long been a universal symbol of comfort and indulgence in many cuisines. Put together on a toasted English muffin, these elements tell a simple story of culinary collaboration across borders and generations—a story that continues each morning with every bite.

Ingredients

  • Muffin Base
  • 4 large English muffins, split in half and lightly toasted
    → These form the sturdy, bite-sized base for the breakfast pizza muffins. Splitting allows even sauce and topping distribution, while light toasting helps the bottom stay crisp and resist sogginess from the toppings and egg. Use fresh, good-quality English muffins for the best texture; if you like a crisper edge, toast a bit longer until the surface is golden.
  • 1 cup tomato marinara or pizza sauce
    → A thin, even layer of sauce provides moisture, sweetness, and a classic “pizza” flavor without making the muffins soggy. If using jarred sauce, choose a smooth variety with little chunkiness; gently warm before spreading to improve spreadability and prevent cool sauce from cooling the muffins too much.
  • 2 cups shredded mozzarella cheese (divided)
    → Cheese creates the meltable layer that binds toppings and eggs to the muffin base. Reserve about half to sprinkle on top midway through baking for a bubbly, golden finish. For more depth, mix in a handful of provolone or fontina with the mozzarella.
  • 4 large eggs
    → Eggs are the protein centerpiece and will bake atop each muffin half, mimicking a pizza topping. Crack one egg onto the sauce-covered muffin halves. Bake until the whites are set and the yolk reaches your preferred doneness; if you want runnier yolks, bake shorter, for firmer yolks, bake longer. Let rest a few minutes before serving so the yolk thickens slightly.
  • Vegetables & Aromatics
  • 1/2 cup diced red bell pepper
    → Adds vibrant color, sweetness, and crunch to the pizza muffins. Dice into small, even pieces so they cook evenly under the egg. If you prefer softer peppers, sauté briefly in a little oil until just tender before assembling.
  • 1/2 cup sliced mushrooms
    → Mushrooms contribute umami and moisture. Sauté them first to reduce moisture release and deepen flavor; brown lightly for extra depth, then pat dry if they still release liquid when assembling.
  • 1/4 cup finely chopped onion
    → Provides aromatics and a hint of sweetness. If using raw onion, sauté with peppers and mushrooms until translucent to mellow sharpness and integrate flavor with the other toppings.
  • 1 cup fresh spinach leaves, roughly chopped
    → Adds color and nutrition while wilting down to a compact layer under the egg. Tear or roughly chop to ensure even distribution; add to the muffin tops partway through baking to preserve color and texture.
  • 1 tablespoon olive oil
    → Used to sauté vegetables to enhance flavor and reduce moisture. Choose extra virgin for a fruity, peppery note; heat the oil until shimmering, then sauté the vegetables until just tender and lightly browned.
  • Seasonings & Garnish
  • 1/2 teaspoon dried oregano
    → Classic pizza herb that complements tomato sauce and cheese. Stir in evenly on the sauce layer or sprinkle at the end for a subtle herbal aroma. If you have Italian seasoning, you can substitute a pinch of that.
  • Salt and freshly ground black pepper to taste
    → Essential for balancing flavors. Add a small amount first, then taste and adjust. Kosher salt or flaky sea salt provides a cleaner, crisper finish than fine table salt.
  • Fresh basil leaves, torn for garnish
    → Bright, aromatic finish that brightens the dish. Add after baking to preserve the fresh aroma and vibrant color. Use whole leaves or tear into ribbons for a prettier presentation.
  • 1/4 cup grated Parmesan cheese (optional)
    → Adds a sharp, savory finish and extra umami that pairs well with tomato and mozzarella. Sprinkle lightly during the last minutes of baking if using, to avoid a heavy, salty crust.
  • Optional Add-ins
  • 1/2 cup cooked breakfast sausage crumbles
    → A hearty protein option that makes the muffins more substantial. Use fully cooked sausage; crumble small so it distributes evenly and browns nicely in the oven. If avoiding pork, substitute with turkey sausage or skip entirely for a vegetarian version.
  • 2-3 slices pepperoni or prosciutto (optional)
    → Adds a smoky, cured-meat punch and extra fat for flavor. Slice pepperoni thinly so it crisps slightly during bake; prosciutto can be torn into small pieces and folded into the top for a delicate saltiness. Keep portions modest to maintain balance with eggs.

Instructions

  • Preheat your oven to 350°F (175°C) and line a 12-cup muffin tin with paper liners or grease it well.
    → This ensures the breakfast pizza muffins release cleanly and the bases stay crisp, preventing sticking and sogginess as the toppings bake on top.
  • Split four large English muffins in half and toast them lightly until the cut sides are just golden.
    → Light toasting dries the crumb, adds structure, and helps the bottom stay crisp under the sauce and egg without becoming soggy.
  • Warm 1 cup tomato marinara or pizza sauce until smooth and spreadable, then transfer to a bowl or measuring cup for easy scooping.
    → A warm, smooth sauce spreads evenly over the muffin halves and prevents cool sauce from cooling the muffin tops too much, which could hinder egg setting.
  • Spread a thin, even layer of sauce on each muffin half, leaving a small border at the edge to prevent overflow.
    → A thin layer provides moisture and flavor without creating a soggy base that could impede egg cook‑through.
  • Shred 2 cups mozzarella cheese and reserve about half for topping later, keeping the cheese cool so it melts evenly.
    → Cheese creates the meltable binding layer for toppings and eggs; reserving half ensures a bubbly, golden finish mid‑bake.
  • Prepare vegetables: dice 1/2 cup red bell pepper, slice 1/2 cup mushrooms, finely chop 1/4 cup onion, and loosely chop 1 cup fresh spinach leaves.
    → Uniformly sized pieces ensure even cooking and distribution; smaller dice cook faster and integrate more smoothly with the eggs.
  • Heat 1 tablespoon olive oil in a skillet over medium heat, then add the peppers, mushrooms, and onion; sauté until the vegetables are just tender and lightly browned, about 4–5 minutes.
    → Sautéing deepens flavor and drives off moisture; browning adds savory notes that contrast with the eggy richness.
  • Stir in the chopped spinach and cook just until wilted, 1–2 minutes, then remove from heat and let any excess moisture drain on a clean towel or paper.
    → Wilted spinach folds into the topping without releasing liquid during baking, keeping the muffin tops from becoming soggy.
  • Evenly distribute the sautéed vegetables (pepper, mushrooms, onion) and wilted spinach over the sauce‑covered muffin halves, then sprinkle a light pinch of dried oregano across the vegetables.
    → Layering the vegetables evenly ensures every bite has color, texture, and flavor; oregano provides classic pizza‑like aromatic notes.
  • Crack four eggs, one onto the center of four muffin halves, keeping the remaining halves egg‑free; gently position each egg so the white surrounds the yolk without spilling over the edge.
    → Using four eggs matches the quantity available and preserves a balanced yolk to white ratio for proper set and richness; centering the yolk ensures even cooking.
  • Scatter the remaining 1 cup mozzarella cheese evenly over all muffin halves, ensuring the eggs are covered but not overloaded, and, if using, sprinkle 1/4 cup grated Parmesan over the tops.
    → The extra cheese creates a bubbly, golden crust; Parmesan adds a sharp finish when added toward the end of bake to avoid excessive saltiness.
  • Place the muffin tin in the oven and bake until the egg whites are set and the yolks reach your desired doneness, about 14–18 minutes; if you prefer runnier yolks, start checking around 12 minutes.
    → This timing balances the egg texture with fully melted cheese and cooked vegetables while maintaining a tender muffin base.
  • Remove the muffins from the oven and rest them on a rack for 3–5 minutes to allow the yolks to thicken slightly and the toppings to set for easier handling.
    → Resting helps the filling redistribute and prevents a runny surface when you bite into the muffin.
  • Torn fresh basil leaves are scattered over the hot muffins as a final garnish so the aroma remains bright and the color stays vibrant.
    → Fresh basil provides a refreshing contrast to the warm tomato and cheese, elevating the dish’s aroma and presentation.
  • Serve the breakfast pizza muffins warm, ideally with a knife or fork to maintain the tidy topping distribution and to ensure the yolk remains intact until cut.
    → Serving hot preserves the mozzarella’s melt, the egg’s creaminess, and the crisp edges of the toasted muffin halves.
  • Optional add‑in: If using cooked breakfast sausage crumbles, crumble and distribute them evenly on the sauce layer before adding the vegetables or eggs to introduce a hearty, savory bite.
    → Fully cooked crumbles brown nicely and integrate with the sauce and cheese for a more substantial bite.
  • Optional add‑in: If using pepperoni or prosciutto, lay slices on top of the sauce before adding the vegetables or scatter torn pieces over the top with the cheese so they crisp slightly during bake.
    → Pepperoni adds smoky, cured notes and a little extra fat for flavor; prosciutto adds delicate saltiness and folds nicely into the texture of the muffin tops.

Notes

These breakfast pizza muffins are a hearty, colorful start to the day, built on toasted English muffin halves with a bright tomato layer, vegetables, and a bubbly cheese topping crowned by a baked egg. You can customize them by swapping in your favorite vegetables or proteins such as cooked sausage, pepperoni, or prosciutto, or keep it vegetarian with extra spinach and mushrooms. To prevent sogginess, spread sauce in a thin, even layer and pat vegetables dry after sautéing; pre-toasting the muffins helps them stay crisp. Bake until the eggs are set to your liking and the cheese is melted and bubbly, then rest a few minutes before serving to let the yolk thicken slightly. For make-ahead meals, assemble the toppings and refrigerate up to a day before baking, or freeze baked muffins for quick breakfasts; reheat in a 350°F (175°C) oven or toaster oven until warmed through. If you need a gluten-free option, substitute gluten-free English muffins (or use a sliced portobello as the base) to keep this dish accessible. Fresh basil leaves torn over the top add aroma and color, and a light grating of Parmesan near the end of baking adds a savory finish. Finally, season to taste with salt and pepper and enjoy as a satisfying, hands-on morning meal.

Tips

General assembly tips

  • Arrange toppings in even layers so every muffin half bakes uniformly and the egg cooks through consistently.
  • Have all toppings prepped and ready before you begin assembling to keep the process smooth and prevent soggy muffins.
  • If you’re making a smaller batch, use a baking sheet with a rack to keep air circulating around each muffin half for even browning.

Muffin bases and sauce

  • Choose fresh, quality English muffins for the best texture; fresh not overly dense muffins toast more evenly.
  • Lightly toasting the cut sides helps the bottoms stay crisp after the sauce and egg are added.
  • Spread a thin, even layer of tomato sauce or marinara to prevent soggy bases—too much sauce can make the muffin heavy and messy.
  • If the sauce is thick from a jar, warm it briefly to improve spreadability and avoid cooling the muffins when spreading.

Cheese and eggs

  • Use mozzarella for a classic melt; reserving half to top during baking gives a bubbly, golden finish.
  • For deeper flavor, fold in small amounts of provolone or fontina with the mozzarella.
  • Crack each egg directly onto the sauce-covered muffin halves and bake until the whites are set. For runnier yolks, bake a bit shorter; for firmer yolks, extend the bake time. Let the muffins rest a few minutes after baking so the yolk thickens slightly before serving.

Vegetables and aromatics

  • Dice peppers and onions into small, even pieces so they cook through with the egg and don’t stay crunchy.
  • Saué mushrooms first to reduce moisture; brown lightly to deepen flavor, then pat dry if they release liquid during assembly.
  • If you prefer softer vegetables, sauté until just tender and let cool slightly before adding to the muffins.
  • Spinach should wilt a little to reduce volume; add it partway through baking to keep its color vibrant.
  • Use olive oil to sauté vegetables; a quick sauté enhances texture and prevents moisture overload on the muffins.

Seasonings and garnish

  • Dried oregano adds classic pizza flavor; sprinkle evenly on the sauce layer or dust lightly at the end for aroma.
  • Taste with salt and pepper as you go; flaky sea salt can provide a brighter finish than fine table salt.
  • Fresh basil is best added after baking to preserve fragrance and color; tear or chop just before serving for the strongest aroma.
  • Parmesan adds a sharp finish—sprinkle lightly in the last minutes of baking if using to avoid overpowering the other flavors.

Optional add-ins

  • Cooked sausage adds heartiness; crumble into small pieces so it browns evenly and distributes well.
  • Pepperoni or prosciutto provides a smoky, cured note—slice thinly for crisping or fold into the top for saltiness. Use modest amounts to keep the eggs as the main protein.

Baking tips and texture

  • Preheat the oven to a steady temperature and bake on a center rack for even heat distribution.
  • Midway through baking, check the level of browning and rotate the pan if your oven cooks unevenly.
  • Allow the muffins to rest a few minutes after removing from the oven; this helps the egg finish setting and makes them easier to slice or eat by hand.

  • Assemble the base and toppings up to a day in advance; cover and refrigerate, pulling out to finish baking when ready.
  • To meal-prep, assemble a tray of muffin halves with sauce and cheese, cover tightly, and refrigerate; top with eggs and finish baking when you’re ready to eat.
  • Leftovers can be stored in the fridge for 1–2 days and reheated in a hot oven or toaster oven to restore crispness; avoid microwaving if you want to keep the crust crisp.

  • For a gluten-free version, use gluten-free English muffins and ensure the sauce and toppings are gluten-free.
  • To make it vegetarian, omit meat add-ins and increase vegetables for color and texture.
  • Experiment with different cheeses (e.g., provolone, fontina, or a light sprinkle of cheddar) to alter melt and flavor balance.

FAQ

Che cosa è la Breakfast pizza muffin inglese?

Una versione veloce di pizza per la colazione realizzata usando muffin inglesi come base. Viene farcita con salsa di pomodoro e formaggio, con o senza uova e altri ingredienti a piacere, poi cotta al forno finché il formaggio è fuso e dorato.

Quali ingredienti servono?
  • Muffin inglesi tagliati a metà
  • Salsa di pomodoro o passata di pomodoro
  • Formaggio mozzarella o cheddar grattugiato
  • Uova (facoltative, una per muffin)
  • Ingredienti opzionali: prosciutto cotto, pancetta, salsiccia, funghi, spinaci, pomodorini
  • Olio d’oliva, sale, pepe, origano o basilico a piacere
Posso rendere la ricetta vegetariana o senza glutine?

Sì. Versione vegetariana: ometti la carne e aggiungi verdure extra. Versione senza glutine: usa muffin inglesi senza glutine o sostituisci con pane gluten-free tostato; adatta i condimenti di conseguenza.

Come si prepara passo-passo?
  1. Preriscalda il forno a 190–200°C (375–400°F).
  2. Taglia i muffin inglesi a metà e tostali leggermente.
  3. Spalma una sottilissima salsa di pomodoro su ogni metà.
  4. Aggiungi il formaggio grattugiato sulla salsa.
  5. Distribuisci eventuali ingredienti extra (carne, funghi, spinaci, ecc.).
  6. Se vuoi uova, crea uno spazio al centro di ogni metà e rompi un uovo o versa un uovo sbattuto.
  7. Inforna per 8–12 minuti, o finché il formaggio è fuso e l’uovo è cotto a seconda della tua preferenza.
Quanta temperatura e tempo di cottura serve?

Cuoci a 190–200°C. Tempo totale circa 8–12 minuti per muffin senza uovo; se aggiungi uova, potrebbe richiedere 12–15 minuti o fino a quando l’uovo è cotto a tuo gusto. Usa forno statico o ventilato a seconda del tuo apparecchio.

Come ottenere una crosta croccante?

Consigli: tosta leggermente i muffin prima di assemblarli, spennella le superfici con un po’ d’olio d’oliva, usa una teglia o una griglia per favorire la doratura e, se possibile, termina la cottura sotto il grill o il broiler per un minuto finale.

Posso prepararlo in anticipo o congelarlo?

Si può preparare in anticipo: assembla le basi e conservale in frigorifero fino a 24 ore prima di cuocere. Puoi congelare muffin inglesi già farciti o separati da salsa e formaggio, poi scongelare prima di cuocere. Per riscaldare, riporta in forno a 180°C per 8–12 minuti (più se è freddo dal congelatore).

Come si serve e con cosa accompagnare?

Servi subito, magari con una spolverata di origano o basilico fresco. Puoi accompagnare con una semplice insalata, avocado a fette, pomodori tagliati o una porzione di frutta fresca per bilanciare la colazione.

Quali varianti interessanti posso provare?
  • Aggiungere pancetta croccante o salsiccia sbriciolata
  • Uso di formaggi diversi (parmesan, fontina, cheddar stagionato)
  • Verdure come spinaci, funghi, peperoni o pomodorini
  • Uovo sbattuto al centro o uovo in camicia al forno
  • Condimenti: pesto al posto della salsa, una spolverata di origano o peperoncino
Quali errori comuni evitare?

Evita di spalmare troppa salsa o di sovraccaricare con troppo cibo, che può rendere umidi gli muffin. Non cuocere troppo a lungo l’uovo se vuoi mantenere la consistenza morbida. Assicurati che i muffin siano ben tostati prima di aggiungere ingredienti umidi per ottenere una crosta più croccante.

Introduction / Hook

A bowl of Zuppa di zucca butternut is autumn made edible—silky, amber-colored, and whispering of harvest. Picture this: a spoon gliding through a velvet-orange pool that glows like sunset, its surface kissed with a drizzle of olive oil and a hint of nutmeg that makes your senses lean in for more. The aroma is a warm embrace—the sweet caramelization of squash meeting the savory chorus of onions, garlic, and a touch of stock. It’s the kind of soup that makes a weeknight feel like a cozy festival, a meal that turns a simple pantry into a passport to a sunlit trattoria. Each spoonful carries the memory of roasted squash’s edge-of-fall sweetness—like a caramel-backed lullaby—and a subtle peppery finish that lingers, inviting another sip. This dish is not just sustenance; it’s a ritual of comfort, a slow-blooming joy that pairs simplicity with a touch of elegance. If you’ve ever longed for a soup that is both nourishing and indulgent, this Zuppa di zucca butternut delivers in spades: it is creamy without being heavy, bright without being brash, and homey enough to evoke family Sundays and new memories all at once.

The Story Behind the Dish

Soups made from squash share a long, comforting lineage in many culinary traditions, but the specific pairing of butternut squash with the airier, Italian-inflected style of zuppa offers a modern twist on a time-honored idea. In Italian cucina povera—the “cuisine of the poor”—recipes were born from humble, staple ingredients transformed with patience, intuition, and a little ingenuity. On countless autumn evenings, families would gather around a simmering pot, coaxing sweetness from the squash while balancing it with pantry staples like onions, garlic, olive oil, and a splash of stock. The result was a nourishing, affordable dish that could bring warmth to a table regardless of the season, yet truly comes alive when the days turn cooler and the night air carries a hint of woodsmoke.

Butternut squash, with its creamy texture and natural sweetness, has become a beloved canvas for soups in kitchens around the world. Though not traditionally Italian in the strict sense, its presence in modern Italian-inspired soups is a natural evolution—an homage to seasonal produce, a nod to the idea that great flavor often grows from simple ingredients treated well. The name Zuppa di zucca simply means “pumpkin soup,” but in this version, the butternut’s nutty notes and velvety body are highlighted by the technique of roasting or sweating the aromatics, producing a soup that feels both rustic and refined. In many homes, this dish has a gentle origin story: a late-afternoon harvest, a family-sized pot on the stove, the comforting aroma that lures everyone to the kitchen, and the first spoonful that tastes like a welcome home.

If there’s a personal touch to this dish, it’s the way you can tailor it to your table’s mood. Some families swirl in a splash of cream for extra silk; others opt for coconut milk for a dairy-free velvet; many prefer a dusting of toasted seeds or a whisper of sage oil to finish. It’s a dish that embodies the spirit of autumn—an edible celebration of harvest, warmth, and the simple pleasure of gathering around a steaming bowl with good bread and good company.

Why You’ll Love This Recipe

  • Quick to prepare: a weeknight-friendly soup that comes together with pantry staples and minimal hands-on time.
  • Balanced creaminess: naturally silky from roasted butternut, with optional dairy or dairy-free finishes to suit preferences.
  • Seasonal versatility: highlights autumn squash at its peak, but adaptable to any winter squash you have on hand.
  • Comforting without heaviness: a comforting bowl that feels luxurious while staying light enough to enjoy for dinner and beyond.
  • Versatile finish: finish with a drizzle of olive oil, a swirl of cream or coconut milk, roasted seeds, or a hint of herbs for a customized touch.
  • Family-friendly and crowd-pleasing: a universal favorite that pairs with a wide range of breads, salads, and sides.
  • Make-ahead friendly: the flavors deepen as it rests, and it stores beautifully for future quick meals.

Flavor Profile & Texture

The soup presents a harmonious balance of sweetness and savoriness. The butternut squash provides a natural, caramel-like sweetness that is tempered by onions and a touch of olive oil or butter, which adds a gentle savoriness. Garlic lends a warm, aromatic backdrop, while vegetable stock or chicken stock introduces a subtle depth that makes the soup feel substantial without heaviness. Depending on your finish, you might encounter a whisper of nutmeg or cinnamon, which enhances the squash’s sweetness with a sunlit spice note. A splash of cream or coconut milk can turn the texture into a satin-like luster, coating the palate with a luxurious mouthfeel that lingers pleasantly after each spoonful. The texture itself is smooth and spoonable, yet never overly thin—like a silken cloud that clings just enough to your lips before lazily cascading into the bowl.

Topping and finishing choices further shape the experience. A drizzle of extra-virgin olive oil adds a fruity note and a glossy sheen, while crushed roasted seeds (pumpkin seeds, sunflower seeds, or almonds) provide a welcome crunch and a toasty, nutty counterpoint. A scattering of crispy sage leaves or a pinch of smoked paprika can introduce an earthy contrast that makes the flavors feel layered rather than single-note. If you prefer a more rustic texture, you can blend the soup less, leaving a few small squash chunks that yield a pleasant bite and chunkier mouthfeel. The result is a soup that can comfort the soul with a simple spoonful, yet invite you to linger as you refine toppings and finishing touches to suit the moment or the company at your table.

Occasions & Pairings

Zuppa di zucca butternut shines in the autumn and winter months, when the days grow shorter and the table becomes a welcoming focal point for family, friends, and cozy evenings. It’s perfect as a starter for a celebratory fall dinner, a comforting weeknight supper after a busy day, or a warming course before a heartier main. The soup also pairs beautifully with seasonal moments like Thanksgiving or a casual Sunday meal after a day spent outdoors, perhaps raking leaves or gathering pumpkins at a local farm stand.

Pairings that elevate the experience include:

  • Crusty bread, rustic sourdough, or toasted baguette slices for dipping and texture contrast.
  • Salty toppings like crispy pancetta, prosciutto, or a light sprinkle of grated parmesan for a savory counterpoint.
  • Herby or citrusy notes: a squeeze of lemon, a pinch of fresh thyme or sage, or a delicate herb oil to brighten the finish.
  • Wine and beverages: a crisp white like Pinot Grigio or a light, fragrant Vermentino pairs nicely; for non-alcoholic options, a sparkling apple cider or a herb-infused water complements the soup’s sweetness.
  • Side dishes: a simple green salad with a sharp vinaigrette, roasted vegetables, or a fruit-forward chutney can create a balanced, complete meal.

Tips, Variations & Substitutions

  • Roasting the squash before simmering intensifies sweetness and adds a gentle caramel edge. If you’re short on time, you can skip roasting and simply sauté the cubed squash with onions until tender, then proceed with the recipe as usual.
  • Make it dairy-free: use coconut milk or almond milk for creaminess. If you want a richer texture without dairy, use a small amount of olive oil and a splash of coconut milk at the end.
  • Vegan and gluten-free friendly: the base (squash, onions, garlic, stock) is naturally vegan and gluten-free; ensure your stock is labeled gluten-free if needed.
  • Flavor boosters: add a pinch of nutmeg, cinnamon, or a touch of curry powder for a warm, aromatic twist. A teaspoon of smoked paprika or a few drops of lemon juice can lift the flavors in a refreshing way.
  • Texture variations: for a chunkier result, reserve a cup of roasted squash and some onions, then blend the rest for a smooth base and fold the chunks back in for contrast.
  • Finishing touches: a swirl of cream or coconut milk, a drizzle of high-quality olive oil, roasted pumpkin seeds, or a handful of microgreens can elevate the presentation and flavor.
  • Regional twists: incorporate a small amount of pancetta rendered until crisp, then use the rendered fat to sauté onions for a savory, umami-forward version.
  • Make it heartier: fold in cooked quinoa, barley, or roasted chickpeas to add protein and texture, turning the soup into a satisfying one-pot meal.

Storage & Make-Ahead Ideas

This soup stores well and often tastes even better the next day as the flavors meld. For make-ahead and storage:

  • Refrigeration: store in an airtight container for up to 4 days. Reheat gently on the stovetop or in the microwave, adjusting thickness with a splash of stock or water as needed.
  • Freezing: freeze for up to 3 months. Thaw overnight in the fridge, then reheat gently. If the soup seems thick after thawing, whisk in a little hot stock or water to reach your desired consistency.
  • Make-ahead strategy: prepare the base (sautéed onions and garlic with squash) up to the point of simmering, refrigerate, and finish with stock and simmering when you’re ready to serve. This approach reduces active cooking time while preserving rich flavor.
  • Storage tips for toppings: store any toppings separately (roasted seeds, herbs, or a drizzle of olive oil) and add just before serving to preserve texture and color.

Fun Facts & Trivia

Here are a few morsels of bite-sized history and curiosity about this autumn favorite:

  • Butternut squash is a winter squash variety, prized for its dense, creamy flesh and naturally sweet flavor that intensifies with roasting and slow cooking.
  • “Zuppa” in Italian simply means soup, but the texture and technique of zuppas can range from thin broths to thick, creamy creations like this one.
  • Autumn soups like this one are a staple in many cultures because they make the most of fall harvests, turning a bundle of vegetables into a comforting, nourishing meal that can stretch across days.
  • Toasted seeds sprinkled on top are not just a garnish—they bring a toasty crunch and a nutty contrast that complements the soup’s sweet-sqrt notes beautifully.
  • Tempus and taste: the beauty of a squash-based soup lies in its ability to be both simply delicious and richly layered, depending on finishing techniques and toppings, which is why it’s a favorite in homes and bistros alike.

Ingredients

Zuppa Base

  • 1 medium butternut squash (about 2-3 pounds), peeled, seeds removed, and cubed
    → The squash is the star of this soup, providing the creamy body and natural sweetness. Peel and seed the squash, then cut into uniform cubes so they cook evenly. For a deeper, roasted flavor, toss the cubes with a little olive oil and roast on a parchment-lined sheet at 425°F (220°C) for 20–25 minutes until the edges caramelize; the roasted flesh can be scooped into the pot to enhance sweetness and complexity.
  • 1 tablespoon extra-virgin olive oil
    → Used to sauté the onions and garlic at the start. Olive oil adds a smooth foundation and helps carry aromatics. If roasting the squash, the oil can also be used to coat the pieces before roasting for even browning. Choose high-quality EVOO for the best flavor; avoid overheating beyond the smoke point to prevent bitterness.
  • 1 medium yellow onion, chopped
    → Provides the savory base and sweetness as it cooks. Chopping evenly promotes uniform cooking; sauté till translucent and lightly golden to develop flavor. If you have time, sweating the onion slowly over medium heat yields a sweeter, deeper result.
  • 2 cloves garlic, minced
    → Garlic contributes aromatic depth and a hint of warmth. Mince finely so it disperses through the soup; add after the onions have warmed to protect against bitter notes from burnt garlic. For a milder profile, crush rather than finely mince and add a touch earlier.
  • 2 medium carrots, diced
    → Carrots add natural sweetness, color, and body. Dice into small, even pieces so they soften at the same rate as squash; you can mash a portion at the end for extra creaminess if you desire a thicker texture.
  • 2 celery stalks, diced
    → Celery contributes subtle earthy notes and a gentle crunch when not fully blended; dice fine so it cooks down and blends with the squash, adding depth to the broth.
  • 4 cups vegetable broth (low-sodium)
    → The primary liquid that carries the squash flavor. Low-sodium broth helps you control salt; warm it before adding so the soup maintains a gentle simmer rather than a hard boil, which can dull flavors.
  • 1 cup water
    → Used to adjust the soup’s thickness to your liking. Start with less and add in increments if the soup seems too thick after blending; this keeps the final texture silky without diluting the squash flavor.
  • 1/2 cup coconut milk or heavy cream (optional)
    → Adds luxurious creaminess and a smoother mouthfeel. Coconut milk keeps the soup dairy-free; stir in after blending or at the end on low heat to avoid splitting. If using dairy cream, add gradually off the boil and whisk gently to incorporate.
  • 1/2 teaspoon ground cumin (optional)
    → Brings warm, earthy notes that pair beautifully with squash. To bloom its aroma, briefly toast the cumin in the pot with the onions for 20–30 seconds before adding squash, then proceed with the recipe.
  • 1/4 teaspoon ground coriander (optional)
    → Adds a subtle citrusy brightness that complements the squash’s sweetness. Toast briefly with the onions to release aroma; use sparingly to avoid overpowering the squash flavor.
  • Pinch of nutmeg or cinnamon (optional)
    → A light dust of fall spice enhances the autumn vibe of the soup. Nutmeg is classic with butternut; cinnamon can work too, but keep it minimal to avoid clashing with other flavors.
  • Salt to taste
    → Essential for bringing forward flavors; add gradually during cooking and adjust at the end after any reductions or reductions in volume. Taste frequently as you dilute or concentrate the soup.
  • Freshly ground black pepper to taste
    → Adds a gentle kick and balances sweetness; pepper is best added toward the end to preserve its aroma and heat level. Grind just before serving for maximum punch.
  • 1 tablespoon dry white wine or dry vermouth (optional)
    → Deglazes the pot after sautéing to lift browned bits and introduce brightness. Allow the alcohol to cook off for a minute or two before simmering; the resulting depth complements the squash without overpowering it.
  • 1/4 teaspoon smoked paprika (optional)
    → Imparts a subtle smoky sweetness that pairs nicely with roasted squash. Use sparingly to avoid overwhelming the squash’s natural flavor; adjust to taste.

Optional Add-ins

  • 1/4 cup roasted pumpkin seeds (pepitas), toasted and lightly salted (optional)
    → Adds a satisfying crunch and nutty flavor that contrasts the smooth soup. Toast seeds in a dry skillet over medium heat, stirring often, until they pop and turn golden; season lightly with salt while warm, and sprinkle on top just before serving for best texture.
  • 2 tablespoons chopped fresh parsley or sage leaves (optional)
    → Fresh herbs brighten the bowl; choose parsley for a clean, grassy note or sage for a warm, aromatic accent. Chop just before serving and scatter over the soup for color and fragrance.
  • Gluten-free croutons or toasted bread cubes (optional)
    → For textural contrast and heartiness; if serving as GF, use gluten-free bread and toast until crisp. Toss with a little olive oil and salt if desired.
  • 1/4 teaspoon crushed red pepper flakes (optional)
    → If you like a bit of heat, sprinkle a small amount to taste; adjust after tasting the soup to keep the focus on squash sweetness.

Toppings

  • 1 tablespoon extra-virgin olive oil for finishing (optional)
    → A drizzle at service adds a glossy finish and rich aroma. Finish bowls with a light drizzle rather than pouring heavily; use quality EVOO for the best flavor.
  • 1 tablespoon fresh lemon juice (optional)
    → A bright, acidic contrast that lifts the sweetness; add a small amount and taste, since lemon can quickly overpower. Alternatively skip if you’re using coconut milk which provides creaminess.
  • Grated Parmesan cheese or vegan parmesan (optional)
    → Adds a salty, umami note on top; if using dairy cheese, grate finely and sprinkle just before serving. For vegan, use a plant-based alternative.

Instructions

  • Prepare the squash for the base by choosing your pathway: roast the squash to deepen sweetness or cook it raw directly in the pot. If roasting, preheat to 425°F (220°C) and line a sheet pan with parchment; toss 1 medium butternut squash (peeled, seeds removed, and cubed) with 1 tablespoon extra-virgin olive oil and a pinch of salt and pepper; arrange in a single layer and roast 20–25 minutes until edges caramelize and flesh is tender; allow to cool briefly, then scoop the roasted flesh into a large heavy pot.
    → Roasting concentrates sugars and creates a richer, toasty flavor; scooping the roasted flesh into the pot ensures the squash blends smoothly with fewer raw flavors. If you skip roasting, simply add fresh cubes to the pot with the broth later.
  • Warm the olive oil in a large heavy-bottomed pot over medium heat and sauté the onion with a pinch of salt until it becomes translucent and lightly golden, 5–7 minutes; this builds a savory foundation and helps release the onion’s sweetness; stir occasionally and avoid browning too aggressively to keep the flavor balanced.
    → Sautéing slowly draws out moisture and flavor; salting early helps draw out moisture and flavors; keep heat moderate to prevent scorching.
  • Add minced garlic and, if using, the ground cumin and coriander; cook for 20–30 seconds until fragrant but not browned; this blooms the spices and releases their essential oils, ensuring a layered aroma rather than a harsh raw garlic taste.
    → Blooming spices awakens their warm notes; overcooking can lead to bitter and burnt notes, so keep it short and watchful.
  • Add the diced carrots and celery; sauté 5–7 minutes until they begin to soften and their edges start to glaze slightly; this builds texture and sweetness that will meld with the squash later.
    → Small dice ensure uniform cooking, avoiding crunchy bits while the squash softens; stirring helps release moisture and prevents sticking.
  • If you roasted the squash, add the roasted flesh to the pot now, scraping in any caramelized bits from the sheet pan with a spatula; if you did not roast, add the raw cubed squash to the pot instead and stir to coat with the aromatics; this step integrates the squash with the flavor base and helps it begin releasing its starches.
    → Incorporating roast residue (fond) adds depth; ensure any excess liquid from roasting is not splashing; use a spatula to scrape fond into the pot for maximum flavor.
  • Pour in 1/4 cup dry white wine or dry vermouth (if using) and simmer 1–2 minutes to evaporate alcohol and lift browned bits from the bottom, scraping with a wooden spoon to dissolve any fond; this deglazes and adds brightness.
    → Alcohol carries aromatics and removes the browned bits from the pan, enriching the soup with a clean acidity; cook until the liquid reduces slightly.
  • Stir in 4 cups low-sodium vegetable broth and 1 cup water; warm the liquids separately if possible to prevent temperature shock, then bring the pot to a gentle simmer over medium heat; this provides the cooking liquor for the vegetables and sets the stage for uniform softening.
    → Using warm broth maintains steady simmering; too hot broth can raise the temperature quickly and cause uneven cooking; keep at a gentle simmer for even flavors.
  • Simmer the soup gently for 20–25 minutes, or until the squash, carrots, and celery are very tender when pierced with a fork; this allows starches to release and the flavors to meld; keep the pot partially covered to reduce splashing and maintain a steady simmer.
    → Tender vegetables ensure a creamy, smooth blend; if the mixture seems too thick, add a splash more broth or water.
  • Blend the soup until velvety smooth using an immersion blender right in the pot, or carefully puree in batches in a blender; ensure you vent the blender lid to let steam escape and hold the lid down with a kitchen towel to prevent splatters; return the blended soup to the pot if using a communal blender.
    → A silky texture is the hallmark of zuppa di zucca; blending hot liquids requires caution to prevent burns and pressure buildup; work in batches if needed.
  • Stir in 1/2 cup coconut milk or heavy cream (if using) off the heat or on very low heat; whisk gently to combine and prevent curdling; adjust the soup’s body by adding more water or broth if needed to reach your desired consistency; do not bring to a vigorous boil after adding dairy.
    → Dairy or coconut milk adds a luxurious mouthfeel and balances sweetness; heating gently preserves creaminess and prevents separation.
  • Season the soup with salt and freshly ground black pepper to taste; taste again after any dairy is added, as fat can heighten perception of salt; if you desire, grate in a pinch of nutmeg or cinnamon for a warm, autumnal note.
    → Proper seasoning is essential to bring forward squash sweetness and round out the flavors; small increments prevent oversalting.
  • If you choose to use the optional crushed red pepper flakes, stir in 1/4 teaspoon and taste; adjust by adding more sparingly if you want more heat, ensuring the pepper does not overpower the squash’s sweetness.
    → A touch of heat can enhance contrast and balance the dish; add gradually to avoid overwhelming the sweetness.
  • Prepare optional add-ins for texture and brightness: toast 1/4 cup pumpkin seeds (pepitas) in a dry skillet over medium heat until golden and popping, then lightly salt while warm; set aside for topping later.
    → Toasting seeds develops nutty aroma and crunch; salt when warm adheres best and elevates the final texture.
  • Chop 2 tablespoons fresh parsley or sage leaves; measure and set aside to scatter over the soup just before serving; this adds fresh aroma and color.
    → Fresh herbs brighten the bowl and provide a contrast to the creamy base; chop just before serving to preserve volatile oils.
  • If making gluten-free croutons, toss small bread cubes with a little olive oil and salt, then toast on a sheet pan at 375°F (190°C) until crisp; set aside to serve as a crunchy topping.
    → Toasted bread provides texture and acts as a vehicle for scooping the soup; ensures even browning for uniform crunch.
  • Just before serving, finish each bowl with a light drizzle of 1 tablespoon extra-virgin olive oil and a squeeze of 1 tablespoon fresh lemon juice, if desired, to add sheen and a bright contrast; taste and adjust acidity to balance sweetness.
    → A little acid wakes the palate and lifts the soup’s sweetness; drizzle sparingly and adjust after tasting.
  • Finish with a dusting of grated Parmesan cheese or a vegan parmesan alternative on top of each bowl to provide a salty, savory finish; offer additional pepper if desired.
    → Parmesan adds umami and a finishing salt; re-emulsify with the surface fat for a glossy presentation.

Notes

This Zuppa di zucca butternut is a creamy, comforting soup that celebrates the natural sweetness of roasted butternut squash. For a deeper, caramelized flavor, roast the squash cubes at 425°F (220°C) until the edges brown, then scoop the flesh into the pot. Sauté the onion in extra-virgin olive oil until translucent and lightly golden, then add the minced garlic to bloom its aroma without browning. Carrots and celery join the pot for natural sweetness and body, followed by warm vegetable broth and water for the perfect creamy texture when blended.

Flavor boosters and texture tricks: to bloom warm notes, toast 1/2 teaspoon ground cumin and 1/4 teaspoon ground coriander with the onions for 20–30 seconds before adding squash. A pinch of nutmeg or cinnamon enhances the autumn vibe, used sparingly. Season with salt and freshly ground black pepper to taste, and brighten the bowl with 1 tablespoon fresh lemon juice or a drizzle of extra-virgin olive oil at service. Optional deglazing with 1 tablespoon dry white wine or dry vermouth adds brightness; let the alcohol cook off before simmering to keep the squash flavor clean.

  • Roasted pumpkin seeds (pepitas), toasted and lightly salted for crunch on top.
  • Fresh parsley or sage leaves for color and aroma.
  • Gluten-free croutons or toasted gluten-free bread cubes for texture.
  • Crushed red pepper flakes if you like a gentle heat.

To finish and serve, a drizzle of extra-virgin olive oil and a squeeze of lemon brighten the bowl; grated Parmesan or a vegan parmesan adds a salty, savory note. If using coconut milk, stir in at the end on low heat for a dairy-free creaminess that won’t curdle; for a dairy-rich version, whisk in heavy cream off the boil.

  • Storage: Refrigerate leftovers in an airtight container for up to 3–4 days. Freeze for up to 3 months. Reheat gently on the stove, adding more broth or water to reach the desired consistency.
  • Make-ahead tip: roast the squash in advance and refrigerate; reheat with broth to reassemble the soup’s body for a quicker weeknight meal.
  • Allergen and dietary notes: naturally gluten-free if you use gluten-free broth and avoid gluten-containing croutons. To keep it dairy-free, omit dairy and use coconut milk instead; adjust seasoning accordingly.

Tips

Tips for Perfect Zuppa di Zucca Butternut

  • Roast for depth: to build deeper caramelized flavor, roast the cubed squash at 425°F (220°C) until the edges are golden, then scoop the flesh into the pot for extra sweetness and complexity.
  • Aromatics timing: sauté onions first until translucent, then add garlic. Bloom spices like cumin, coriander, or smoked paprika for 20–30 seconds with the onions to wake their aroma before adding squash.
  • Keep the simmer gentle: avoid a vigorous boil. A light simmer helps preserve the squash’s sweetness and prevents the soup from muting in flavor.
  • Texture control: for a silky soup, blend completely until ultra-smooth. For a chunkier texture, blend partially or mash a portion of the softened vegetables and stir back in.
  • Creaminess choice: choose coconut milk for a dairy-free version, or dairy cream if you prefer a richer mouthfeel. Add dairy at the end off the boil to prevent separation; stir coconut milk in off the heat as well.
  • Thickening with liquids: start with less water and broth, adding more gradually after blending if you want a thicker soup. Warm broth before adding to keep the simmer steady.
  • Season gradually: season with salt in stages and re-taste after any reduction or addition of liquids. Remember that roasted squash can be naturally sweet and requires careful balancing of salt and acid.
  • Finish with brightness: a splash of fresh lemon juice brightens the sweetness; add a little at a time and taste. If using coconut milk, lemon can be optional.
  • Spice balance: if using alliums and squash, keep additional spices light to avoid overpowering the squash’s natural flavor. Nutmeg or cinnamon can be used sparingly for autumnal warmth.
  • Crunch and contrast: top with toasted pepitas (pumpkin seeds) for a pleasant crunch, plus optional herbs like parsley or sage for aroma and color. Gluten-free croutons or toasted bread cubes also enhance texture.
  • Make-ahead and storage: the soup keeps well in the fridge for 3–4 days and freezes nicely. Cool completely before storing; reheat gently and adjust seasoning as needed.
  • Equipment tips: an immersion blender makes it easy to reach a smooth texture in the pot; if using a countertop blender, blend in batches and vent the lid to release steam. For ultra-smooth results, strain through a fine sieve after blending to remove any fibrous bits.

FAQ

What ingredients do I need for Zuppa di zucca butternut?

Common ingredients: 1 medium butternut squash (peeled and cubed), 1 onion (chopped), 2 cloves garlic (minced), 1-2 carrots (optional, chopped), 1 celery stalk (optional), 2 tablespoons olive oil or butter, 3-4 cups vegetable stock (or chicken stock), ¼ cup cream or coconut milk (optional for richness), salt, pepper, a pinch of nutmeg, fresh thyme or sage. Optional toppings include a swirl of cream, chili flakes, toasted pumpkin seeds, croutons, or a drizzle of olive oil.

How do I make Zuppa di zucca butternut?

Sauté onion (and aromatics like garlic, celery, carrots) in olive oil or butter until soft. Add cubed butternut squash and cook a few minutes. Add stock, bring to a boil, then simmer 20-25 minutes until squash is tender. Blend until smooth using an immersion blender or stand blender. Stir in cream if using, season with salt, pepper, and a pinch of nutmeg. Serve hot with your chosen toppings.

How long does it take from start to finish?

Prep time is about 10-15 minutes. Simmering takes around 20-25 minutes. Total time is typically 35-45 minutes, depending on your prep speed and the squash size.

Is this soup vegan or vegetarian-friendly?

It can be vegan or vegetarian if you use vegetable stock and omit dairy. For a creamy finish, use coconut milk or a plant-based cream. If you want a dairy version, use cream or milk as desired.

How should I store and reheat leftovers?

Store cooled soup in airtight containers in the refrigerator for up to 3-4 days. For longer storage, freeze for up to 3 months. Reheat gently on the stove or in the microwave, stirring until heated through; adjust seasoning as needed.

What are good flavor variations or add-ins?

Try warming spices like curry powder, ginger, or a touch of cinnamon for varying notes. Add roasted apples for sweetness, a splash of lime or lemon juice for brightness, or a pinch of smoked paprika for depth. A swirl of coconut milk, almond cream, or yogurt also changes the texture and richness. Top with roasted pumpkin seeds or croutons for crunch.

Can I make substitutions for a different diet or ingredients?

Yes. Use vegetable stock or water if you’re low on stock. For dairy-free, skip the cream or use coconut milk. You can substitute olive oil with butter or a neutral oil. If you don’t have butternut squash, you can use other squash varieties or pumpkin puree, adjusting cooking time accordingly.

What toppings go well with this soup?

Popular toppings include a swirl of cream or yogurt, a drizzle of extra virgin olive oil, toasted pumpkin seeds, chopped fresh herbs (thyme, parsley), croutons, chili flakes, or a pinch of grated nutmeg.

Is the soup gluten-free and kid-friendly?

Yes, when made with gluten-free stock and without any gluten-containing add-ins. It’s typically mild and naturally sweet, making it kid-friendly; you can adjust salt and spice levels to suit children.

Introduction / Hook

Picture a sunny morning where the kitchen smells faintly of vanilla and melted butter, and a tray of little golden morsels sits piled high, each one a soft, pillowy surprise. Pancake bites are the kind of breakfast magic that makes the ordinary feel extraordinary: they’re cozy, comforting, and playful all at once. These bite-sized pancakes aren’t just a quick fix to fill hungry trowels of the morning; they’re a tiny celebration you can hold in your hand. The first bite releases a cloud of warmth, a whisper of sweetness, and a gentle dash of nostalgia—like waking up to your favorite brunch at home, but with the convenience of a weekday morning. They’re the kind of treat that pairs perfectly with a mug of steaming coffee, a bowl of tangy yogurt, or a ladle of bright berry compote. In a world that moves quickly, pancake bites offer a pause: a moment to share, to smile, and to savor the little joys that breakfast can be when it’s reimagined as something meant to be popped into the mouth and enjoyed without ceremony.

The Story Behind the Dish

Every great comfort food has a story, and pancake bites are no exception. They emerged from the idea that a classic favorite could be transformed into something portable, shareable, and endlessly adaptable. The humble pancake—born from simple ingredients, flipped on a hot griddle, and enjoyed with syrup—translates beautifully into a format that suits busy mornings, playful gatherings, and impromptu dessert moments. In many households, pancakes are a weekend ritual: a batter whisked with laughter, a kitchen filled with the soft crackle of heat, and a plateful of rounds that disappear as quickly as they appear. Pancake bites capture that ritual in a new shape—small and forgiving, with the same tender crumb and delicate sweetness, but with edges that smile at you with a hint of crispness. The idea is simple yet satisfying: something warm and comforting that you can pop into your mouth, every bite delivering a comforting hush of satisfaction. Some families like to tuck fruit or chocolate chips into the batter, others rely on a subtle spice or citrus zing to brighten the flavor. The result is a dish that feels familiar and fresh at once, a modern twist on a timeless breakfast tradition that invites creativity and sharing.

Why You’ll Love This Recipe

  • Quick and convenient: pancake bites come together in a fraction of the time it takes to cook a stack, making them ideal for rushed mornings or last-minute brunches.
  • Kid-friendly and crowd-pleasing: their small size makes them irresistible to little hands and big appetites alike, turning breakfast into a playful, social event.
  • Flexible and customizable: the bites invite a range of mix-ins and flavor twists, so you can tailor them to your mood, season, or dietary needs without starting from scratch.
  • Make-ahead and freezer-friendly: bake a batch in advance and reheat as needed, turning a once-in-a-week ritual into a daily-friendly habit.
  • Perfect for gatherings: an easy-to-assemble, shareable option for weekend brunches, kids’ parties, and lazy Sunday mornings when everyone is still in pajamas.
  • Versatile pairing opportunities: they work beautifully with syrups, yogurt, fresh fruit, or a dash of cinnamon sugar for extra warmth and aroma.

Flavor Profile & Texture

The flavor of pancake bites sits somewhere between a classic pancake and a delicate pastry. The interior is soft and cloud-like, with a gentle chew that yields to a tender melt as you bite through. The exterior gains a kiss of color and a subtle crispness at the edges, especially when baked or fried just long enough to bronze. The aroma is nostalgic: a warm sweetness that hints at vanilla or a whisper of cinnamon, depending on the mix-ins you’ve chosen. When fruit is included, you get bright, fruity pockets that pop with each bite, adding a juicy burst against the soft crumb. If chocolate or cocoa is folded into the batter, you’ll notice a gentle richness that remains light rather than heavy. The overall balance is comforting and approachable, a brunch staple that feels indulgent without being heavy. The texture invites dipping and drizzling, whether you’re pairing with a silky yogurt, a maple glaze, or a silky fruit sauce. In short, pancake bites deliver the familiar, comforting taste of a pancake in a form that’s perfect for popping, sharing, and savoring in smaller, more spontaneous moments.

Occasions & Pairings

These bites shine in a variety of settings and can be dressed up or down to suit the moment. They’re ideal for busy weekday mornings when you want something homemade but don’t have hours to spend in the kitchen. They’re equally at home on weekend brunch tables where guests arrive with sleepy grins and expect something special, and on children’s party tables where fun, edible geometry draws the eye and tempts the palate. Here are some suggestions for pairing and occasions:

  • Weekday breakfast: serve warm with a drizzle of maple, a dollop of yogurt, and a handful of fresh berries for a balanced start.
  • Brunch centerpiece: arrange the bites on a platter with an assortment of fruit compotes, whipped cream, and a light dusting of cinnamon sugar for a festive touch.
  • Kids’ party snack: offer with skewers and a choice of dips—cream cheese spread, fruit preserves, or nut butter—to encourage dipping and sharing.
  • Breakfast-for-dinner: pair with a brightside salad or savory sides for a playful twist on a comforting meal.
  • Sweet treat: turn them into a dessert bite by glazing with a light citrus glaze or pairing with caramelized fruit compote.

Tips, Variations & Substitutions

One of the joys of pancake bites is how forgiving they are. You can adapt them to almost any dietary preference or flavor mood without starting from scratch. Here are ideas to inspire your experimentation:

  • Flavor twists: fold in bright berries, chocolate chips, mashed ripe banana, or a touch of citrus zest for a lively aroma and flavor.
  • Savory version: skip sweet toppings and add herbs, grated cheese, or cooked bacon bits to the mix for a breakfast-savory bite that pairs with a light aioli or an herby yogurt dip.
  • Vegan option: you can create a plant-based version with a non-dairy milk and a suitable binding agent that mimics the tender crumb of the classic bites.
  • Gluten-free approach: use a gluten-free flour blend designed for pastries or baking to achieve a light, airy crumb that still browns beautifully.
  • Texture play: brush lightly with melted butter or oil before baking to enhance browning, or finish with a quick toss in cinnamon sugar for added crunch and warmth.
  • Fruit-forward variations: include chopped stone fruit in the late season, or fold in grated apple with a pinch of nutmeg for a cozy fall bite.
  • Kid-friendly customization: set out bowls of add-ins and let little ones craft their own combinations for a fun, interactive breakfast activity.
  • Make-ahead tweaks: bake a batch, then freeze in a single layer. Later, reheat in a toaster oven or air fryer to restore a slight crust and keep the centers soft.

Storage & Make-Ahead Ideas

Storage-friendly by design, pancake bites lend themselves to preparation ahead of time and simple reheat rituals. Here are practical ideas to maximize freshness and minimize morning stress:

  • Make-ahead bake: prepare a batch the night before for a quick morning pop-in-the-oven ritual. Once cooled, store in an airtight container to maintain their tenderness.
  • Room-temperature storage: in a sealed container, they stay soft and ready for a few hours, making them ideal for a brunch buffet or a child-friendly morning routine.
  • Reheating: to restore a just-made texture, rewarm in a toaster oven, oven, or air fryer until the surface looks lightly bronzed and fragrant.
  • Freezer-friendly: freeze pre-cooled bites in a single layer, then transfer to a bag or container for longer storage. Thaw briefly or reheat directly from frozen for a quick snack or breakfast.
  • Make-ahead toppings: hold back certain toppings (like fresh fruit or delicate syrups) and add them just before serving to preserve brightness and texture.
  • Batch planning: if you’re hosting a weekend brunch, bake a large batch, then keep warm in a low oven while you finish other dishes, letting the bites stay inviting and fresh.

Fun Facts & Trivia (Optional)

Pancakes are one of the oldest known foods, with evidence of flatbread-like cakes dating back to ancient civilizations. The term “pancake” itself has a long, storied history, reflecting the global love for flat, round cakes cooked on griddles of various kinds. Pancake bites tap into that universal appeal by transforming a traditional dish into a portable, modern version that resonates with today’s busy lifestyles. In many places around the world, pancakes are synonymous with celebrations, from festive breakfasts to communal feasts. The bite-sized form echoes the way many cultures present small, shareable treats during gatherings—loved for their accessibility, their capacity to be customized, and the sense of joy that comes with popping something delightful into your mouth. Fun fact: the best part of pancake bites is how they invite experimentation—whether you’re chasing a nostalgic flavor, chasing a new texture, or chasing a perfect balance of sweetness and warmth, there’s always room for a tiny, glorious bite to surprise your palate.

Ingredients

  • Pancake Bites Batter
    • – 1 cup all-purpose flour (or 1 cup gluten-free all-purpose flour)
      → Provides the primary structure and body for the pancake bites. If using gluten-free flour, add 1/4 teaspoon xanthan gum per cup to mimic gluten’s elasticity. Sift the flour before measuring to prevent dense pockets and whisk with the dry ingredients to distribute evenly. Tip: Do not overmix; mix just until combined to keep the bites light and tender, and add a splash of milk if the batter seems too thick.
    • – 2 tablespoons granulated sugar
      → Adds sweetness and helps with browning to give a golden exterior. Ensure even distribution by whisking with dry ingredients. Tip: For a less sweet version, reduce to 1 tablespoon; consider using brown sugar for a deeper flavor if desired.
    • – 2 teaspoons baking powder
      → Leavening agent that creates a light, fluffy texture in the mini pancakes. Distribute evenly with the flour to ensure consistent rise. Tip: Do not overmix after adding wet ingredients; rest the batter 5–10 minutes to hydrate the flour and enhance tenderness.
    • – 1/4 teaspoon salt
      → Enhances flavor by balancing sweetness and boosting overall taste. Add to the dry ingredients and whisk to disperse evenly. Tip: Use fine-grain salt for even distribution; reduce if you’re aiming for a milder bite.
    • – 1 cup milk (dairy or plant-based, unsweetened preferred)
      → Hydrates the batter, activates the baking powder, and provides moisture. Use unsweetened dairy or plant milk to keep sweetness controlled. Tip: Warm dairy milk slightly to help emulsify with the fat; if using plant milk, choose a thin variety to avoid dense batter, and adjust with more flour or milk as needed.
    • – 1 large egg
      → Binds the batter and adds structure and moisture. Lightly whisk the egg with the milk before combining with the dry ingredients to prevent curdling. Vegans can substitute with 1 tablespoon ground flaxseed + 3 tablespoons water (let sit 5 minutes) as a binder.
    • – 2 tablespoons unsalted butter, melted (or 2 tablespoons neutral oil)
      → Provides richness, moisture, and tenderness; melted butter adds flavor and helps create a tender crumb. If using oil, opt for a neutral flavor to avoid masking the batter’s taste. Tip: Let melted butter cool slightly before adding to the wet ingredients to prevent scrambling the egg.
    • – 1/2 teaspoon vanilla extract
      → Adds aroma and enhances sweetness with a soft, warm backdrop. Use pure vanilla for best flavor; if you have a vanilla bean, you can scrape seeds for a bolder note. Tip: Add with the wet ingredients for even distribution.
    • – 1/2 teaspoon ground cinnamon (optional)
      → Gives a warm, classic pancake flavor. If omitted, the batter remains milder. Tip: If using, whisk into the dry mix so the spice distributes evenly in every bite.
    • – 1 teaspoon butter or neutral oil for greasing the pan
      → Prevents sticking and promotes even browning of the bites. Use a light coating and reapply between batches as needed. Tip: For a quick option, a light spray of cooking spray also works.
  • Optional Add-ins
    • – 1/2 cup blueberries, fresh or frozen (do not thaw if frozen)
      → Adds bursts of sweetness and juicy texture. Fold in gently to avoid breaking berries; if using frozen berries, dust with a little flour to reduce color bleed and soggy pockets.
    • – 1/4 cup mini chocolate chips
      → Creates pockets of melted chocolate throughout. Fold in at the end of mixing to distribute evenly. Tip: Use dairy-free chips if you need a dairy-free version; ensure chips are evenly distributed by tossing them lightly with a spoonful of flour from the dry mix before adding.
    • – 1/4 cup chopped nuts (walnuts or pecans)
      → Adds crunch and toasty flavor. Toast the nuts lightly in a dry pan before chopping to heighten aroma; chop into small, even pieces to distribute evenly in the batter during folding.
  • Serving & Toppings
    • – Maple syrup for serving
      → Traditional pancake companion; warm slightly to thin for easy drizzling. Serve on the side or lightly over the bites for a glossy finish. Tip: A quick warm helps prevent a cold syrup from cooling the pancakes.
    • – Powdered sugar for dusting (optional)
      → Finishing touch that adds a delicate sweetness. Dust only after the bites have cooled slightly to prevent melting and clumping. Tip: Use a light hand for a pretty presentation.
    • – Fresh fruit for serving (optional)
      → Adds brightness and balance; berries, sliced bananas, or citrus segments work well. Tip: Slice fruits just before serving to maintain texture and color.
    • – Yogurt for dipping (optional; plain Greek or dairy-free)
      → Provides creamy tang that complements the sweetness. Use about 2–4 tablespoons per serving as a dip; whisk with a touch of vanilla or lemon juice if desired. Tip: For a quicker dip, mix yogurt with a pinch of honey or maple syrup to taste.

Instructions

  • Preheat your oven to 350°F (175°C) and grease or line a 12-cup muffin tin with paper liners.
    → This ensures the pancake bites release cleanly after baking and promotes even browning on all sides.
  • Whisk together the dry ingredients: 1 cup all-purpose flour (or 1 cup gluten-free all-purpose flour), 2 tablespoons granulated sugar, 2 teaspoons baking powder, 1/4 teaspoon salt, and 1/2 teaspoon ground cinnamon (optional). If using gluten-free flour, add 1/4 teaspoon xanthan gum per cup to mimic gluten’s elasticity.
    → Distributes leavening and salt evenly for uniform rise; sifting or whisking prevents dense pockets and helps GF batters mimic a traditional crumb.
  • Whisk together the wet ingredients: 1 cup milk (unsweetened preferred), 1 large egg, 1/2 teaspoon vanilla extract, and 2 tablespoons melted butter or neutral oil.
    → Creates a smooth, cohesive emulsion that hydrates the dry mix and provides moisture and richness to the bites.
  • Fold the wet ingredients into the dry just until evenly moistened, with a few small lumps remaining; do not overmix, or the batter will develop toughness. If the batter looks very thick, add a splash more milk.
    → Gentle mixing yields a tender crumb, while clumping indicates underhydration; resting the batter briefly hydrates flour and improves tenderness.
  • Let the batter rest for 5–10 minutes at room temperature to hydrate the flour and relax any gluten (where present) for a finer crumb.
    → Resting allows starch granules to swell and leavening to begin, resulting in lighter, more uniform bites.
  • Gently fold in your chosen add-ins: blueberries, mini chocolate chips, or chopped nuts, using a rubber spatula with a light hand to distribute evenly without bruising berries or breaking chips.
    → A careful fold keeps the pieces suspended throughout the batter for even distribution; if using berries, keep them cold and fold in at the end to avoid color bleeding.
  • Divide the batter evenly into the prepared muffin cups, filling each about 3/4 full to allow room for slight puffing without overflowing.
    → Filling to 3/4 ensures the bites rise without spilling and yields a balanced pancake-to-crust ratio.
  • Bake in the preheated oven for 12–14 minutes, or until the edges are golden and a toothpick inserted into a center bite comes out with a few moist crumbs. Rotate the pan halfway through baking for even browning.
    → Proper oven time ensures a tender interior with a slight spring; underbaking yields gummy centers, while overbaking dries them out.
  • Remove the muffin tin from the oven and let the bites rest in the pan for 5 minutes, then transfer to a wire rack to cool completely.
    → Cooling sets the crumb and makes them easier to lift from the tin; transferring to a rack prevents condensation from clumping the crust.
  • Serve the pancake bites warm or at room temperature with maple syrup, and optionally dust with powdered sugar or offer fresh fruit and yogurt for dipping.
    → Maple syrup enhances the pancake flavor and the toppings provide contrast in texture and brightness; cooling allows flavors to settle and makes dipping easier.
  • Store any leftovers sealed in an airtight container at room temperature for 1–2 days or freeze them for longer storage; reheat briefly in the microwave or a low oven before serving.
    → Proper storage preserves tenderness and prevents the bites from drying out; freezing with parchment between layers helps maintain individual portions.

Notes

These gluten-free pancake bites are light, tender mini pancakes that come together quickly for a cozy breakfast or a kid-friendly snack. They can be made with either all-purpose flour or gluten-free all-purpose flour; if you choose gluten-free, add 1/4 teaspoon xanthan gum per cup to mimic gluten’s elasticity. Whisk the dry ingredients (including sugar, baking powder, salt, and optional cinnamon) separately and whisk the wet ingredients (milk, egg, melted butter or oil, vanilla) together, then fold the wet into the dry just until combined to keep them airy; do not overmix. Rest the batter for 5–10 minutes to hydrate the flour and improve tenderness. Lightly grease a skillet or mini pancake pan and cook small rounds until set and golden on the bottom, flip and cook ~1–2 minutes more. Keep the heat moderate to avoid browning too quickly. Add-ins like blueberries, mini chocolate chips, or chopped nuts can be folded in at the end. Grease the pan between batches as needed. These pancake bites freeze well and reheat in a 350°F (180°C) oven or in a microwave for quick breakfasts. Serve with maple syrup, fresh fruit, yogurt, or a dusting of powdered sugar. For dairy-free versions, use plant-based milk and a neutral oil in place of butter. Ensure your ingredients, especially baking powder, are fresh for best rise and cloud-light texture.

Tips

Tips for Perfect Pancake Bites

Batter consistency, resting & mix

  • Mix dry and wet ingredients separately, then fold together just until combined. A few small lumps are fine; overmixing can make the bites tough.
  • Let the batter rest for 5–10 minutes after mixing. This hydrates the flour and helps create a tender crumb.
  • For gluten-free flour, include 1/4 teaspoon xanthan gum per cup of flour to mimic gluten-like elasticity. Sift the flour before measuring to prevent dense pockets.
  • If the batter seems too thick, add a splash of milk. If it’s too thin, whisk in a small additional spoonful of flour (or a touch of cornstarch) to thicken.

Pan prep, heat & nonstick technique

  • Use a nonstick skillet or mini pancake pan; lightly grease with butter or neutral oil. Wipe away excess to prevent excessive greasing.
  • Preheat over medium-low heat. Too hot, and the outsides will burn before the insides set; too cool, and the bites won’t brown nicely.
  • Test with a small drop of batter first. If it sizzles and browns quickly, you’re at the right temperature.
  • Keep the pan clean and lightly oiled between batches to prevent sticking and promote even browning.

Portioning, timing & doneness

  • Portion with a 1 tablespoon scoop (or rounded teaspoon for bite-size pieces) and space them about 1/2–1 inch apart for even expansion.
  • Cook until bubbles form on the surface and the edges look set, about 2–3 minutes. Flip carefully and cook 1–2 minutes more until golden.
  • Keep an eye on color to avoid over-browning; if your pan browns quickly, lower the heat slightly and extend the cooking time a few seconds.

Add-ins: berries, chips & nuts

  • Fold add-ins gently at the end of mixing to avoid breaking berries or overworking the batter. For frozen berries, do not thaw and dust with a touch of flour to reduce color bleed and soggy pockets.
  • Blueberries: if using fresh, halve or keep whole depending on size. Toss with a tiny bit of flour if they’re juicy to minimize bleeding.
  • Mini chocolate chips: fold in at the very end; consider using dairy-free chips if you need a dairy-free version and toss with a spoonful of flour to distribute evenly.
  • Chopped nuts: toast lightly in a dry skillet before chopping to heighten aroma and crunch; fold evenly into the batter.

Flavor, sweetness & dairy-free options

  • Vanilla adds warmth; for extra brightness, add a pinch of lemon zest or a dash of almond extract in addition to the vanilla.
  • Cinnamon is optional but adds a classic pancake note. If using, whisk it with the dry ingredients for even distribution.
  • For dairy-free versions, use unsweetened plant milk and melted dairy-free butter or neutral oil. If using oil, opt for a light, neutral flavor to avoid masking the batter.

Make-ahead, storage & freezing

  • Batter can be refrigerated 24 hours; give it a gentle stir before using as it may thicken as it rests.
  • Leftover bites store in an airtight container in the fridge for 2–3 days. Reheat gently to preserve tenderness.
  • Freeze uncooked batter in an airtight container or freezer-safe bag (refrigerate overnight to thaw, then cook as directed). You can also freeze fully cooked bites; reheat in a 350°F (175°C) oven for 5–7 minutes or until warmed through.

Reheating & serving ideas

  • Reheat bites in a warm pan with a quick brush of butter, or in the oven at 350°F (175°C) for 5–7 minutes until warmed through.
  • Serve with warm maple syrup, a dusting of powdered sugar, and fresh fruit for contrast.
  • Dip bites in plain Greek yogurt or dairy-free yogurt. A touch of vanilla or lemon juice in the dip enhances the pairing.

FAQ

What are pancake bites?

Pancake bites are small, bite-sized pancakes that cook quickly and are perfect for snacking or a quick breakfast. They’re typically made from a simple pancake batter and can be baked in a mini muffin tin or pan-fried to golden perfection.

What ingredients do I need?

Basic batter: all-purpose flour, milk (dairy or non-dairy), eggs, baking powder, a pinch of salt, and sugar. For optional flavor, add vanilla extract, melted butter or oil, and mix-ins like chocolate chips or berries.

Can I make this dairy-free or gluten-free?

Yes. For dairy-free, use non-dairy milk (almond, soy, oat) and oil or dairy-free butter. For gluten-free, substitute with a 1:1 gluten-free flour blend and ensure the baking powder is gluten-free. Adjust liquid slightly if needed.

How do I cook pancake bites?

Option A: Bake — preheat to 350°F (175°C). Grease a mini muffin tin, fill 3/4 full, and bake 12–14 minutes until a toothpick comes out clean. Option B: Skillet — heat a lightly oiled nonstick pan over medium heat, drop spoonfuls of batter, and cook 2–3 minutes per side until golden.

How long do they take to cook?

Baking in a mini muffin tin takes about 12–14 minutes. Pan-frying takes around 4–6 minutes total, depending on the size and heat.

What is the yield?

About 20–24 mini pancake bites when using a standard mini muffin tin (about 1 inch each). Yield can vary with bite size.

How should I store and reheat leftovers?

Store: refrigerate in an airtight container for up to 3 days. Freeze: place on a baking sheet to freeze individually, then transfer to a zip-top bag for up to 1 month. Reheat: microwave 15–20 seconds for soft bites, or warm in a 350°F (175°C) oven for 5–7 minutes for a crisper texture.

How can I customize with mix-ins?

Mix-ins are optional and easy to add: chocolate chips, blueberry or diced banana, cinnamon, nutmeg, or a splash of vanilla. Fold them into the batter just before cooking.

What toppings go well with pancake bites?

Serve with maple syrup or honey, fresh berries, a dollop of yogurt, powdered sugar, or a smear of almond butter for extra flavor and dipability.

Any tips for fluffy, even bites?

Don’t overmix the batter; whisk just until combined. Let the batter rest for 5–10 minutes to hydrate the flour. Fill muffin cups about 3/4 full and grease well to prevent sticking. If baking, rotate the pan halfway through for even browning.

Introduzione / Gancio

Immagina un dessert che cattura subito l’estate: fragole fresche, rosse come piccole lampade di gioia, accolte da una crema vellutata che ricorda la morbidezza di una nuvola al mascarpone. Fragole ripiene è un gioco di contrasti: la succosità succede al primo morso, la dolcezza si spezza con una nota di agrume, la cremosità si sfalda tra la freschezza della frutta. È un dessert che non solo soddisfa il palato, ma racconta una storia di colori, profumi e tradizioni semplici ma irresistibili. Ogni fragola diventa un piccolo scrigno, pronto a regalare un momento di gioia a chiunque abbia la fortuna di assaggiarla. Non c’è bisogno di una cucina da chef per realizzarlo: bastano pochi gesti discreti, ingredienti di qualità e un tocco di creatività per trasformare una merenda estiva in un’esperienza memorabile. Lasciati guidare da questa ricetta, e scopri come una portata apparentemente modesta possa brillare come un dessert da grande tavola, capace di conquistare adulti e bambini con la sua semplicità elegante e la sua bellezza cromatica.

La storia dietro il piatto

Le fragole hanno avuto un posto speciale nelle cucine italiane fin dall’antichità, coltivate con cura lungo i bordi dei mercati estivi e nei giardini di casa. In molte regioni italiane, la fragola è molto più di un frutto: è un simbolo della stagione che cambia, un invito a riunirsi attorno al tavolo per condividere momenti di dolce leggerezza. Fragole ripiene nasce dall’osservazione semplice e quasi magica di come due elementi semplici—la fragola e una crema—possono unirsi per creare qualcosa di nuovo e raffinato. La versione classica, spesso servita fredda dopo un pasto leggero, mette in evidenza la fragranza della fragola e la ricchezza cremosa che la riempie, offrendo un equilibrio tra acidità e dolcezza, tra consistenze che si sfiorano a ogni morso. In molte cucine familiari italiane, questo dessert è diventato una piccola tradizione delle estati, una ricetta di famiglia che si trasmette da nonne a nipoti con piccole modifiche che raccontano i gusti personali e le abitudini del luogo.

La bellezza di Fragole ripiene risiede nel suo carattere frugale ma curato: una dolce idea di presentazione, una gestione attenta della temperatura, una scelta di ingredienti che celebra la stagionalità. In passato, alcune varianti prevedevano ripieni a base di crema pasticcera aromatizzata al limone, o una crema al mascarpone aggiunta con una leggera nota di vaniglia. Nel corso degli anni, chef e appassionati si sono divertiti a sperimentare: cioccolato fondente fuso a filo su ciascuna fragola, scorza di agrumi grattugiata per una scossa aromatica, o una spolverata di nocciole o pistacchi triturati per una croccantezza inattesa. Queste storie si intrecciano con la ricetta di casa, trasformando Fragole ripiene in una tavolozza di versioni, tutte racchiuse dall’idea semplice di abbracciare la fragola con una crema che ne esalti la freschezza.

Perché amerai questa ricetta

  • È una delizia immediata: pochi ingredienti, zero difficoltà, grandi risultati.
  • È estremamente versatile: si adatta a varie preferenze, allergie e diete senza perdere il fascino del dessert.
  • Colore e presentazione irresistibili: il rosso vivo delle fragole contrasta con la crema chiara, regalando una tavolozza visiva perfetta per giornate di festa o cene informali.
  • Perfetta per ogni stagione estiva, ma anche per occasioni speciali come compleanni, brunch o merende di famiglia.
  • Funziona bene come dessert leggero dopo un pasto abbondante: una nota dolce che non appesantisce.
  • Facile da preparare in anticipo: si mantiene bene in frigorifero per diverse ore, permettendoti di goderti l’evento senza stress.

Profilo di gusto e consistenza

Fragole ripiene è un balletto sensoriale. La fragola, matura al punto giusto, offre una dolcezza aromatica con una leggera nota acidula che sveglia le papille. All’interno, una crema morbida e vellutata, spesso a base di mascarpone, ricotta o crema pasticcera, si unisce al cousu de crème con una consistenza setosa e avvolgente. A seconda della scelta di riempimento, si può ottenere una crema delicatamente dolce, quasi satinata, oppure una crema più ricca e densa che regge la pellicina esterna della frutta senza scivolare. Per creare equilibrio, si può arricchire la crema con scorza di limone o di arancia per una nota fresca e aromatica, o con una piccola quantità di vaniglia o liquore leggero per un profumo insinuante. La consistenza della fragola, croccante all’esterno se esposta al freddo, si sposa splendidamente con la cremosità interna. Il risultato finale è una combinazione di morbidezza, freschezza e una punta di croccantezza se si aggiunge una guarnizione di granella di nocciole, cioccolato grattugiato o pistacchi tritati. La temperatura gioca un ruolo chiave: servire freddo valorizza la crema e mantiene la fragola sferzante, mentre una leggera leggera leggera differenza di temperatura può rivelare diverse sfumature di gusto. Parliamo di equilibrio: l’acidità naturale della fragola sostiene la dolcezza della crema, l’aroma della scorza di agrumi richiama i profumi della campagna estiva, e una punta di sale può sorprendentemente elevare la percezione di dolcezza, rendendo ogni morso pieno e memorabile.

Occasioni & Abbinamenti

Fragole ripiene è una soluzione perfetta per una varietà di contesti:

  • Brunch estivo o dessert leggero a fine pasto, quando serve qualcosa di elegante ma senza pesantezza.
  • Compleanni, anniversari o occasioni speciali dove vuoi offrire qualcosa di raffinato ma semplice da preparare.
  • Picnic al parco o pranzo al mare: si mantiene al fresco e può essere gustato in porzioni monodose, facili da portare.
  • Degustazioni di vini o momenti di buon cibo tra amici: abbinamenti come Prosecco, Moscato d’Asti o vini frizzanti leggeri valorizzano la dolcezza della fragola e la crema.

Per accompagnare, cerca contrasti di sapore e temperatura: una spolverata leggera di pistacchi o nocciole dona croccantezza, una grattugiata di cioccolato fondente aggiunge profondità, e una fogliolina di menta fresca enfatizza la freschezza. Se vuoi elevare l’esperienza, scegli una limonata profumata o un cocktail a base di agrumi leggermente frizzante che riprenda le note di scorza presente nel ripieno. Per chi preferisce l’opzione calda, una tazza di caffè espresso o un tè verde freddo può offrire quel bilanciamento ideale tra dolcezza e tonicità. Inoltre, Fragole ripiene si presta bene a presentazioni personalizzate: puoi riempire ogni fragola al tavolo o preparare un vassoio già farcito in anticipo per una festa all’aperto. Il segreto è mantenere la crema stabile, ma anche renderla accessibile a chiunque, offrendo dimensioni piccole ma audaci per una degustazione raffinata.

Consigli, Varianti & Sostituzioni

Ecco come personalizzare la ricetta a seconda dei gusti, delle esigenze alimentari o delle disponibilità di ingredienti:

  • Varianti di riempimento: crema a base di mascarpone, ricotta delicata con un tocco di vaniglia, o crema pasticcera leggera aromatizzata al limone. Ogni variante offre una texture cremosa diversa, pur mantenendo l’equilibrio tra fragola e crema.
  • Texture e croccantezza: aggiungi una granella di nocciole, pistacchio o mandorle per un effetto croccante che contrasta la morbidezza interna della crema.
  • Note di cioccolato: incidi una piccola tasca nella fragola e, se vuoi, aggiungi una mini goccia di cioccolato fondente o una facile glassa al cacao per un tocco dessert da pasticceria.
  • Varianti vegane: sostituisci la crema con una crema vegana a base di anacardi o anacardi + latte di cocco, aggiungendo un tocco di succo di limone per l’acidità e un pizzico di vaniglia; assicurati che le fragole siano ben mature per mantenere la dolcezza naturale.
  • Varianti senza latticini: usa yogurt di soia o di mandorla (non zuccherati) mescolati con crema di anacardi o una purea di ricotta salata al posto del mascarpone.
  • Interpretazioni regionali: aggiungi un filo di liquore all’arancia o di limoncello per un profumo agrumato più marcato; oppure sostituisci la crema classica con una crema di ricotta arricchita con miele e scorza di limone per una versione più leggera.
  • Presentazione: servile su vassoio di porcellana bassa o in coppette trasparenti per mostrare il gioco di colori. Puoi anche usare bacche di menta o piccole foglie di basilico per un tocco di freschezza visiva.
  • Bio e sostenibilità: scegli fragole biologiche o di produttori locali per una fragranza più autentica e una riduzione dell’impatto ambientale.

Conservazione & Idee per preparare in anticipo

Fragole ripiene è una preparazione che si presta bene al piano di lavoro organizzato. Per ottenere il massimo dalla presentazione e dalla consistenza, considera questi consigli pratici:

  • Se vuoi preparare in anticipo, riempi le fragole poco prima di servire per evitare che assorbano troppa umidità e si ammorbidiscano eccessivamente. Puoi, però, preparare la crema in anticipo e conservarla in frigorifero, coperta, fino a un paio di ore prima dell’assembramento.
  • Per evitare che le fragole rilascino liquidi, asciugale delicatamente dopo averle lavate e tamponale con carta assorbente prima di farcirle.
  • Se vuoi conservare gli avanzi, lessa la fragola riempita senza aggiunta di liquidi extra e riponila in un contenitore ermetico in frigorifero per al massimo 1 giorno. Meglio consumarla subito per preservarne freschezza e consistenza.
  • Far conoscere l’occasione: se hai bisogno di servirle in un buffet, prepara fragole riempite solo al momento di portare in tavola o prepara una versione “riempimento a parte” da farcire ad hoc, in modo da mantenere la crema soffice e fresca.
  • Se vuoi fornire una versione più veloce, puoi utilizzare fragole già pronte e conservarle al fresco; quando è ora di servire, farciscile all’ultimo momento per una presentazione impeccabile.

Fatti divertenti & curiosità

Forse non lo sai, ma alcune curiosità interessanti riguardanti le fragole e questo tipo di dessert possono rendere la tua preparazione ancora più divertente:

  • Le fragole non sono veri frutti di bosco secondo la classificazione botanica; sono considerati “frutti aggregati” perché contengono molti piccoli frutti individuali sparsi sulla stessa arenaria fiorale. Questo renderà ogni fragola un piccolo mosaico di semi e polpa, una vera delizia botanica.
  • La fragola è un simbolo di convivialità in molte culture: la sua forma rotonda richiama la pienezza del raccolto e spesso è associata a celebrazioni estive, matrimoni e momenti di festa familiare.
  • La crema al mascarpone, spesso usata in Fragole ripiene, è una crema italiana ricca e vellutata che si presta bene a infinite interpretazioni: si sposa con caffè, cacao, cacao amaro, vaniglia e agrumi—una tavolozza di aromi che può cambiare l’umore del dessert di stagione.
  • La presentazione monoporzione di fragole ripiene è ideale per banchetti, buffet o dessert staging: è pratica, elegante e permette a ciascuno di gustare una porzione controllata senza rinunciare all’estetica.
  • Un tocco di colore e sapore può cambiare l’esperienza: anche una piccola grattugiata di scorza di limone o di arancia può elevare la percezione di freschezza e aggiungere un profumo che rimbalza tra fragranza e dolce.

Ingredients

Fragole ripiene

  • 20 large strawberries, washed, hulled and with cavities prepared for filling (tops left on for garnish)
    → The strawberries act as the vessel for the creamy filling. Choose firm, ripe berries with bright red color. Rinse gently and pat dry; hull by removing the green caps, then use a small knife to carefully hollow out the centers to create space for the filling. Keep the hollow sides pale and dry to improve filling adhesion.

Filling

  • 1/2 cup ricotta cheese, well-drained and smooth
    → Provides light creaminess and body to the filling. Ricotta adds moisture and a mild flavor that pairs well with strawberries; drain in cheesecloth for 15–20 minutes to remove excess whey so the filling isn’t runny. If you want extra silkiness, whip briefly until smooth before combining with other ingredients.
  • 1/2 cup mascarpone cheese, softened to room temperature
    → Adds rich, velvety texture and a luxurious mouthfeel. Soften fully to prevent lumps; whisk with ricotta until the mixture is cohesive and smooth. Keeping it at room temperature for about 15 minutes before mixing helps achieve a creamier filling.
  • 2 tablespoons powdered sugar, sifted
    → Sweetens the filling evenly and quickly without gritty texture. Start with 2 tablespoons and taste; add more if you prefer a sweeter filling. Using powdered sugar ensures a silky consistency that pipes well into the hollowed berries.
  • 1 teaspoon vanilla extract or vanilla paste
    → Provides a warm, aromatic note that enhances the dairy base. Use pure vanilla for best flavor. If using vanilla paste, scrape the seeds from the pod to intensify the vanilla aroma.
  • Zest of 1/2 lemon (optional)
    → Brightens the filling with a citrus lift that contrasts nicely with the sweetness. Use a microplane to zest only the yellow layer of the rind, avoiding the bitter white pith. If you love citrus, increase to 1 teaspoon total zest.
  • Pinch of salt
    → Balances sweetness and enhances overall flavor. Add during mixing to ensure even distribution and a balanced final taste.

Optional Add-ins

  • 2 tablespoons finely chopped pistachios
    → Adds color, crunch, and a subtle nutty flavor. Chop to a fine-to-medium size so pieces stay evenly distributed and don’t puncture the strawberry shells. If you use salted pistachios, reduce any additional salt in the filling.
  • 2 tablespoons mini dark chocolate chips or finely chopped dark chocolate
    → Introduces a chocolate contrast that pairs beautifully with strawberry filling. Fold in gently so the chips are distributed but don’t melt into a single blob; you’ll get little pockets of chocolate in each bite.
  • 1 tablespoon honey or maple syrup (optional)
    → A touch of extra sweetness or moisture if the filling seems a bit thick. Stir in a small amount at a time and taste to achieve your preferred sweetness level without overpowering the strawberry flavor.

Toppings

  • 2 ounces (about 60 g) dark chocolate, melted and cooled slightly for drizzling
    → Creates an elegant finish and adds a silky chocolate layer that complements the strawberry filling. Melt gently using a double boiler or microwave in short bursts; let it cool just enough to drip smoothly without running off the berries.
  • 1–2 tablespoons chopped pistachios or almond slivers for sprinkling
    → Adds a final crunch and visual contrast. Lightly toast nuts in a dry skillet for extra aroma before chopping to the desired size, then sprinkle just before serving to maintain crunch.
  • Fresh mint leaves for garnish (optional)
    → Provides a fresh aroma and color contrast. Garnish each berry just before serving to keep the leaves vibrant and crisp.
  • Cocoa powder or powdered sugar for dusting (optional)
    → A light dusting adds elegance and a touch of additional sweetness. Use a fine-mesh sieve to distribute a delicate layer over the finished berries.

Instructions

  • Prepare the strawberries by rinsing them under cold water, patting dry, removing the green caps, and carefully hollowing the centers with a small knife to create a cavity for filling while keeping the outer shell intact for garnish.

    → The strawberries act as the vessel for the creamy filling. Choose firm, ripe berries with bright red color. Rinse gently and pat dry; hull by removing the green caps, then use a small knife to hollow out the centers, keeping the hollow sides pale and dry to improve filling adhesion.
  • Drain the ricotta by wrapping it in cheesecloth and squeezing gently to remove excess whey for 15–20 minutes, then transfer the well-drained ricotta to a mixing bowl.

    → Provides light creaminess and body to the filling; draining ensures the mixture does not become runny and helps it pipe cleanly into the strawberry cavities.
  • Let the mascarpone soften to room temperature for about 15 minutes so it blends smoothly with the ricotta; scoop into the ricotta and whisk until cohesive and lump-free.

    → Softened mascarpone yields a velvety filling and prevents lumps; warming helps achieve a silky texture when combined with the ricotta.
  • Sift the powdered sugar to remove any grit, then whisk it into the ricotta–mascarpone mixture with the vanilla and a pinch of salt until evenly incorporated.

    → The sugar dissolves quickly for a smooth, pipeable filling and balances sweetness with subtle salt for depth.
  • Add the vanilla extract or vanilla paste, and if desired, the lemon zest; whisk to distribute evenly, then fold in a pinch of salt to round the flavor.

    → Vanilla provides warmth and aroma; lemon zest adds brightness, while salt enhances overall flavor balance.
  • If using optional add-ins, fold in 2 tablespoons finely chopped pistachios and/or 2 tablespoons mini dark chocolate chips into the filling, distributing evenly without overmixing.

    → Gentle folding prevents breaking the filling’s smooth texture and ensures pieces stay suspended for even bites.
  • Taste the filling and adjust sweetness if needed by whisking in an additional 1/2 to 1 tablespoon powdered sugar until the flavor is balanced with the tart strawberries.

    → Tasting during mixing ensures the final dessert is not overly sweet and the strawberry flavor remains dominant.
  • Fill each hollow strawberry cavity with the prepared filling using a small spoon or piping bag fitted with a round tip, pressing gently to compact the filling and then wiping away any excess at the rim for neat presentation.

    → A controlled fill prevents overflow and ensures the berries stay upright and attractive on the serving platter.
  • Place the filled strawberries on a chilled serving platter and refrigerate for 15–20 minutes to set the filling and help the berries retain their shape.

    → Chilling firms the dairy filling and helps the berries hold their form before topping.
  • Prepare the toppings while the berries rest: melt the 2 ounces of dark chocolate slowly in a double boiler or microwave in short bursts, then cool slightly so it is glossy but thick enough to drizzle.

    → Properly melted chocolate flows smoothly over the berries and creates an elegant finish without running off completely.
  • Lightly toast the pistachios in a dry skillet over medium heat until fragrant, then cool and chop to the desired size for sprinkling.

    → Toasting intensifies the nutty aroma and helps the pieces stay crunchy when sprinkled on the finished berries.
  • Just before serving, drizzle the cooled chocolate over the filled strawberries in thin lines, then sprinkle with the toasted pistachios or almond slivers and garnish with fresh mint leaves if using; finish with a light dusting of cocoa powder or powdered sugar for a refined look.

    → The drizzle adds a glossy chocolate layer and the crunch and color from nuts plus mint elevate the presentation and flavor balance.
  • Serve the fragole ripiene promptly while the fillings are set and the chocolate is still glossy; refrigerate any leftovers and enjoy within 24 hours for best texture and freshness.

    → Freshness is key for this delicate dessert, as the berries soften and the filling can loosen over time if left too long.

Notes

“These gluten-free strawberry-stuffed treats are light, creamy, and naturally gluten-free thanks to the fruit shells and a luscious ricotta–mascarpone filling. Drain the ricotta well (about 15–20 minutes) to keep the filling thick and not runny, and let the mascarpone come to room temperature so the mixture stays smooth. Gently hollow the strawberries, keeping the outer surface pale and dry to maximize filling adhesion, and leave the tops on for an elegant garnish. Flavor the filling with powdered sugar, vanilla, and, if desired, a pinch of lemon zest for brightness, plus a small pinch of salt to balance sweetness. Customize with 2 tablespoons finely chopped pistachios for color and crunch, or fold in 1 tablespoon mini chocolate chips for tiny pockets of chocolate. A drizzle of melted dark chocolate and a few fresh mint leaves elevate the presentation. If the mixture seems thick, a tiny amount of honey or maple syrup can be stirred in to adjust sweetness and moisture, but add gradually to avoid masking the strawberry flavor. Chill the filling briefly before filling the berries, then refrigerate the assembled treats until ready to serve; they’re best served the same day, though the filling can be prepared a few hours in advance. Store any leftovers in the fridge and consume within 1–2 days. Always ensure your dairy is fresh and your utensils are dry to maintain a smooth, cohesive filling.”

Tips

Consigli pratici per Fragole ripiene

Scelta e preparazione delle fragole

  • Scegli fragole grandi, sode e dal colore acceso; lavale rapidamente e asciugale bene prima di lavorarle.
  • Rimuovi i calici (le foglie verdi) e scava delicatamente l’interno per creare una cavità uniforme per la farcitura. Mantieni i bordi asciutti per favorire l’adesione della crema.
  • Lascia i cappellini intatti per usarli come guarnizione e per una presentazione ordinata.

Preparazione del ripieno

  • Scola bene la ricotta: avvolgila in un panno da formaggio per 15–20 minuti per eliminare il siero in eccesso e ottenere una crema più ferma.
  • Lascia ammorbidire la mascarpone a temperatura ambiente (circa 15 minuti) e lavora con la ricotta fino a ottenere crema liscia e omogenea.
  • Setaccia lo zucchero a velo e aggiungilo gradualmente al composto. Assaggia e aggiusta la dolcezza se necessario.
  • Aggiungi vaniglia (estratto o pasta) e la scorza di limone se desideri un tocco agrumato; integra un pizzico di sale per bilanciare i sapori.

Aggiunte opzionali e aromi

  • 2 cucchiai di pistacchi finemente tritati aggiungono colore, croccantezza e un sapore nocciolato; se sono salati, riduci o ometti l’aggiunta di sale nella farcitura.
  • 2 cucchiai di gocce o cioccolato fondente spezzettato danno piccoli contrasti di sapore; incorporale delicatamente per non scioglierle eccessivamente.
  • 1 cucchiaio di miele o sciroppo d’acero è opzionale per una nota di dolcezza extra o per dare maggiore umidità alla crema; aggiungi poco per volta e assaggia.

Assemblaggio, presentazione e conservazione

  • Riempire le cavità delle fragole usando una sac-à-poche oppure un cucchiaino piccolo, evitando di rompere i gusci.
  • Riempire poco prima di servire per evitare che la frutta rilasci troppa acqua; se possibile, lasciare riposare in frigorifero 15–30 minuti per rassodare leggermente la crema.
  • Guarnire con i cappellini, cioccolato fuso a filo e/o nocciole tostate finemente per un tocco decorativo e di croccantezza.
  • Conserva in frigorifero in un contenitore singolo per non schiacciare i frutti; ideali entro 1 giorno dalla preparazione per gusto e consistenza ottimali.

Toppings e decorazioni

  • Fai cadere una sottile striscia di cioccolato fuso per un effetto elegante; lascia intiepidire finché non si solidifica leggermente.
  • Spolvera con cacao in polvere o zucchero a velo al momento di servire per un tocco finale raffinato.
  • Per un tocco di colore, aggiungi foglie di menta fresca come guarnizione finale.

FAQ

Cos’è Fragole ripiene?

Le fragole ripiene sono un dessert semplice in cui le fragole fresche vengono private del picciolo e riempite con una crema dolce. La crema può essere a base di mascarpone, formaggio cremoso o panna montata, e si presta a tante varianti decorative.

Quali ingredienti servono?

Ingredienti di base:

  • Fragole grandi e sode
  • Crema: mascarpone, formaggio cremoso o panna montata
  • Zucchero a velo
  • Vaniglia
  • Scorza o succo di limone
  • Cioccolato fondente o cacao per decorare

Opzioni/dietetici:

  • Granella di nocciole o pistacchi
  • Alternativa vegana: crema di mandorle/tofu o panna vegetale
Come si prepara passo-passo?

Procedimento di base:

  1. Lava e asciuga bene le fragole; rimuovi il picciolo lasciando un piccolo incavo.
  2. Prepara la crema: mescola mascarpone o formaggio cremoso con zucchero a velo e vaniglia, poi incorpora panna montata se vuoi una consistenza leggera.
  3. Con una sac à poche o un cucchiaino, riempi l’incavo delle fragole con la crema.
  4. Decora se vuoi con scaglie di cioccolato, scorza di limone o una spolverata di cacao.
  5. Raffredda in frigo prima di servire per circa 30–60 minuti.
Le fragole si possono preparare in anticipo?

Sì, puoi prepararle fino a 2 ore prima, ma è consigliabile riempire le fragole poco prima di servirle per evitare che la crema faccia scendere i succhi e ammorbidisca la frutta.

Quali varianti di ripieno esistono?

Varianti comuni:

  • Crema al mascarpone con vaniglia e panna montata
  • Crema di formaggio dolcificata
  • Crema al cioccolato (cioccolato fuso o cacao mescolato nella crema)
  • Crema al pistacchio o granella pistacchi
  • Versione leggera con yogurt greco e miele
  • Versione vegana con crema di anacardi o tofu ricotta
Come scegliere le fragole migliori?

Scegli fragole grandi, sode, dal colore rosso intenso e lucente, profumate e prive di macchie. Evita fragole molli o con parti molli/macheolate. Le fragole più dolci si riempiono bene quando non sono troppo mature.

Come evitare che le fragole si ammorbidiscano o perdano il ripieno?

Asciugale bene dopo averle lavate, asciugale delicatamente con carta assorbente. Riempile poco prima di servirle e conserva in frigo. Se vuoi un effetto più stabile, usa crema addensata o rafforza la crema con una piccola quantità di gelatina in fogli o di agar-agar secondo la ricetta.

Ci sono versioni senza latticini o vegane?

Assolutamente. Usa una crema di nocciole o mandorle, o una crema di anacardi, mescolata a latte vegetale e dolcificante. Per la “panna” montata, utilizza panna di cocco ben fredda o una panna vegetale specifica. Il risultato resta cremoso e gustoso.

Come presentarle per una festa o un’occasione speciale?

Disponile su un piatto largo, decorale con cioccolato fuso a fili, scaglie di cioccolato, scorza di limone o arancia, granella di nocciole o pistacchi e qualche fogliolina di menta. Puoi completare con un velo di glassa leggera o zucchero a velo per un tocco elegante.

Quali errori comuni evitare?

Errori frequenti:

  • Fragole troppo mature che rilasciano troppa acqua
  • Ripieno troppo liquido che sgocciola
  • Riempire troppo; potrebbe fisicamente traboccare
  • Non asciugare bene le fragole prima di riempirle
  • Lasciarle a temperatura ambiente troppo a lungo

Introduction / Hook

Imagine a sunlit Italian cucina where afternoons drift in with the scent of toasted almonds, a whisper of vanilla, and the bright sparkle of blueberries. Biscotti ai mirtilli is where classic Tuscan biscuit tradition meets the vivid charm of summer berries. Each bite is a delicate balance: the outer lattice is crisp and biscuit-like, giving way to a tender, almost cake-like interior that carries bursts of juicy blueberries and a kiss of citrus. It’s a dessert that feels celebratory yet cozy, elegant enough for a dinner party and approachable enough for a cozy weekend treat. When you dip these biscotti into a cup of coffee, a glass of dessert wine, or even a mug of hot tea, you’ll hear the crackle as the first bite gives way to a soft, fragrant crumb, releasing a chorus of flavors that tell a story of and beyond the pantry—fruit, nuts, sun, and a little sweetness that lingers on the palate. This is not just a biscotti; it’s a small holiday in every bite, a memory waiting to be shared with family and friends.

Blueberries bring a summer sun to the biscuit world—their gentle acidity brightens the almond-dusted sweetness, and their purple-blue flecks create a visual treat that makes the plate feel festive. The flavor is nuanced, not cloying: fruity notes that don’t overwhelm, complemented by a hint of vanilla and a subtle tang that makes you reach for a second bite before you know it. The texture is the star: a biscotti that’s sturdy enough to be dunked without crumbling, yet tender enough to melt on the tongue with a crumbly crumb that leaves a satisfying, nourishing finish. This recipe is all about balance—between crisp and soft, between orchard-fresh fruit and the toasty warmth of almonds, between the rustic charm of a traditional Italian cantuccino and the playful brightness of blueberries harvested at their peak.

Whether you’re planning a brunch, a teatime spread, or a dessert table that begs for a little Italian sunshine, biscotti ai mirtilli is a perfect bridge between casual and elegant. It’s a recipe that invites experimentation—swap in different berries, add a citrus twist, or fold in white chocolate for a decadent twist. Most of all, it invites sharing: crumble a few slices onto a cake plate and watch the conversations start as people pick up the first crumb and reveal the vibrant fruit inside. The beauty of this biscotti lies not only in its taste but in its versatility. It is a calling card for generosity: something you bake once and then give away to neighbors, friends, and family, each person discovering a tiny piece of your kitchen’s character in every bite.

The Story Behind the Dish

Biscotti, in its Tuscan form—often known as cantucci—has long been tied to slow, communal rituals. Traditionally baked twice, they earned their reputation as the ideal dunking companion for Vin Santo, the sweet dessert wine that cradles the flavors of toasted nuts and citrus. The idea of pairing a robust, storied biscotti with the bright, modern charm of blueberries feels like a natural evolution: a tribute to the past that welcomes the fruit-forward freshness demanded by contemporary palates. In many Italian kitchens, desserts are not merely sweet endings but conversations between seasons—harvested fruit, the scent of toasted nuts, and lingering aromas of vanilla and citrus zest that remind us of long summer days and sun-kissed mornings. Blueberries, though not native to the heart of Tuscany, embody a sense of seasonal optimism that resonates with cooks who want a snack that feels special yet approachable.

As with many beloved Italian recipes that travel, the story of biscotti ai mirtilli has grown through family kitchens, overseas communities, and food writers who love to play with tradition. The blueberries become a bridge between places: the Mediterranean pantry’s familiar almond, orange zest, and vanilla meeting berries that evoke North American summers. The result is a biscotti that honors its Tuscan heritage while wearing a fresh, vibrant coat. This dish has become a favorite during late-spring gatherings and summer picnics, a reminder that good baking can capture the moment when fruit is at its peak and the air itself seems sweet with possibility. It invites curiosity: what if you pair a centuries-old technique with a fruit that’s designed for outside warmth and bright color? The answer is a biscotti that tastes like a memory in the making—sunlight captured in a crisp, edible canvas.

Why You’ll Love This Recipe

  • Accessible yet elegant: A classic biscotti technique modernized with juicy blueberries for a fresh, contemporary twist.
  • Great for make-ahead moments: biscotti keep well and even improve with a day or two of rest, making them ideal for entertaining without last-minute stress.
  • Perfect dunkers: The biscotti’s sturdy, crisp exterior contrasted with a tender interior makes them ideal for coffee, tea, or dessert wine.
  • Color and aroma that brighten any table: the purple-blue flecks and fruity aroma add visual appeal as well as mood-lifting fragrance.
  • Versatile flavor base: vanilla, almond, and citrus zest provide a warm, comforting flavor while letting the blueberries shine.
  • Kid-friendly and crowd-pleasing: familiar flavors with a subtle twist that appeals to both young tasters and discerning palates.

Flavor Profile & Texture

The flavor profile of biscotti ai mirtilli is a delicate dance of contrasts. The blueberries contribute bright, tangy bursts that cut through the sweetness, leaving traces of their mild tartness on the palate. The almond-forward base provides a nutty, warm backbone—think toasted marcona almonds with a hint of buttery depth. Vanilla mirrors the fragrance of a sun-drenched kitchen, wrapping all the elements in a soft, creamy veil that lingers after the bite. A whisper of citrus zest—often lemon or orange—lifts the entire composition, adding a citrusy sparkle that keeps the flavor from feeling heavy.

Texture is key here. The biscotti offer a crisp, satisfying snap when broken, a quintessential trait that makes them ideal for dunking. Inside, the crumb is tender and slightly cake-like, a welcome softness that contrasts with the crunch of the outer layers. The blueberries stay surprisingly intact, their color mirroring a gentle jewel-toned speckle across the pale biscuit. Each slice reveals a mosaic of lightly sugared edges and chewy pockets where fruit has baked into the dough, creating pockets of juiciness that pop against the dry, brittle exterior. The experience is a long, slow dissolution of textures and flavors—from a crisp first bite to a moist, fruity finish that makes you want to reach for another slice before you’ve even finished the first.

In aroma, expect a warm orchestra: roasted almonds, a hint of vanilla bean, the citrus zests, and a subtle berry sweetness that evokes a sun-warmed summer morning. The combination is comforting yet lively, making the biscotti feel both familiar and novel at the same time. It’s a sensory invitation to slow down, savor the moment, and share a simple pleasure with someone you love.

Occasions & Pairings

This biscotti shines in many settings. It’s equally at home on a weekend brunch table as it is on a formal dessert spread. Serve it alongside:

  • Robust coffee or a frothy cappuccino for a classic Italian experience.
  • A dessert wine or a sparkling Prosecco to elevate a festive toast.
  • Plain yogurt or lemon mascarpone for a light, easy parfait option.
  • Aromatic black tea or green tea to bring out the berry brightness.
  • Fresh fruit or a simple berry compote to echo the blueberry theme.

Occasionally, biscotti ai mirtilli can take center stage at a summer party: place them on a tiered platter with other cookies and pastries, pair them with a citrusy punch or a minty lemonade, and let the vibrant color sparkle against a white plate. For a more intimate moment, bring them to a coffee-and-cookie afternoon with friends or family, where the crispness and depth prompt lingering conversations about favorite memories and new discoveries in the kitchen.

Tips, Variations & Substitutions

  • Berry variations: swap blueberries for blackberries, raspberries, or a mix of berries for different color and flavor notes.
  • Flavor boosters: a touch of orange zest or a hint of almond extract can amplify the nutty and citrus tones without overpowering the berry brightness.
  • Texture tweaks: for extra crunch, toast the nuts a bit longer or use a coarser sugar on top of the dough before shaping.
  • Vegan option: replace eggs with a flaxseed or chia seed “egg” mixture and use a plant-based butter substitute to maintain richness.
  • Gluten-free option: use a gluten-free all-purpose blend or finely ground almond flour to maintain a moist, dense crumb while keeping the biscotti structure intact.
  • Nut-free variation: if you need to avoid tree nuts, reduce the almond content and substitute with sunflower seeds or skimp on the nuts entirely, using extra berries for moisture and flavor.
  • Sweetness level: adjust sugar to taste; for a lighter version, dial back a little and rely on the natural sweetness of the fruit.
  • Texture variety: experiment with adding white chocolate chips or a dusting of powdered sugar for a different aesthetic and mouthfeel.
  • Regional twists: introduce a pinch of cinnamon or cardamom to evoke warm spice notes common in many Italian and Mediterranean desserts.

Storage & Make-Ahead Ideas

Biscotti are famously forgiving when it comes to storage, and biscotti ai mirtilli benefit even more from a little resting time. Once completely cool, store in an airtight container in a cool, dry place. They stay crisp and flavorful for about a week, and their flavor often deepens with a day or two of rest, giving you a chance to savor the evolving texture and aroma.

Make-ahead approach: bake the biscotti in advance, let them cool completely, and keep them airtight. When you’re ready to serve, slice and return them to a warm oven briefly to refresh the crispness. If you’re planning to freeze, freeze the un-sliced dough or the baked biscotti in a freezer-safe bag or container. Thaw at room temperature and, if needed, give them a quick re-dunk in a low-heat oven to restore their crispness.

Revisiting flavors: store-bought or homemade vanilla extract can be used to add a gentle aromatic lift between batches. A quick re-dunk in a cup of coffee right before serving can revitalize the aroma and bring the flavors back to life after a night of storage.

Fun Facts & Trivia (Optional)

Did you know that biscotti literally translates to “twice-baked” in Italian? This double-baking technique gives the cookies their characteristic crispness that makes them ideal for dunking. The tradition comes from a time when mdistribution to households lacked modern ovens streamlined the process—baking twice ensured the biscuits would last longer and endure long journeys, whether by boat or on the family table. Blueberries, while not a Tuscan staple, have a modern story of their own. When embraced by culinary explorers, they bring a sense of brightness and contemporary appeal to classic formats, creating an edible bridge between different culinary eras and geographies. The fusion of the old and the new is at the heart of biscotti ai mirtilli, a dessert that pays homage to heritage while inviting a fresh, vibrant spirit into the kitchen.

In many Italian households, the ritual of cutting biscotti with a gentle, decisive motion—then savoring the moment with a preferred beverage—becomes more than a recipe: it’s a shared ritual that signals hospitality, conversation, and time spent together. The blueberry accent adds a modern twist to this timeless practice, reminding us that even beloved classics thrive when touched by seasonal fruit and the playful curiosity of home cooks who love to experiment and share. This is food storytelling at its most delicious: a story you bake, slice, and savor with friends and family, a narrative that travels beyond borders and returns as a comforting taste of home.

Ingredients

Biscotti Base

  • 3 cups all-purpose flour
    → Provides the main structure and crumb of the biscotti dough. Measure the flour accurately (scoop with a spoon and level off) to avoid a dense, hard texture. If you need a gluten-free version, substitute with a 1:1 gluten-free blend designed for cookies and consider adding a binder like 1/4 teaspoon xanthan gum per cup of flour to help with structure.
  • 1 cup granulated sugar
    → Adds sweetness and helps with browning and a crisp exterior during the first bake. You can reduce to 3/4 cup for less sweetness, but keep in mind it will affect browning and chewiness. If substituting with honey or maple syrup, adjust the liquid slightly to maintain dough consistency.
  • 2 teaspoons baking powder
    → Provides a gentle lift and helps the dough become sliceable after the first bake. Whisk into the dry ingredients to distribute evenly and prevent pockets of leavening that could cause uneven texture.
  • 1/2 teaspoon salt
    → Enhances overall flavor and balances the sweetness. Dissolve evenly in the dry mix to avoid salty spots in the final biscotti. If using salted butter, reduce this by half a pinch.
  • 3 large eggs
    → Bind the dough, add moisture, and contribute to the structure after the second bake. Beat lightly and fold into the dough with the cooled melted butter and vanilla. For a richer crumb, you can use 2 whole eggs and 1 additional yolk; avoid overmixing to keep the dough tender.
  • 1/2 cup unsalted butter, melted and cooled
    → Adds richness, tenderness, and flavor. Incorporating melted, cooled butter helps the dough come together smoothly and contributes to a slightly crisper crust after the second bake. For a dairy-free version, substitute with an equal amount of neutral oil (e.g., canola) but note the flavor and texture will differ slightly.
  • 1 teaspoon vanilla extract
    → Enhances the overall flavor profile and complements the blueberries. Use high-quality pure vanilla for the best aroma; if you only have imitation vanilla, use only a small amount to avoid artificial aftertaste.
  • Zest of 1 lemon, finely grated
    → Adds bright citrus aroma that pairs beautifully with blueberries. Use a microplane to grate the zest without the bitter white pith; if you don’t have lemon, orange zest can be a close substitute with a similar fresh note.
  • 1 cup dried blueberries
    → The star fruit component; dried berries retain shape and flavor through baking. If using large freeze-dried blueberries, they’ll stay crisp; if using rehydrated or plump dried berries, they’ll impart more moisture, so adjust flour by a tablespoon or two if needed and fold evenly to distribute.
  • 1/2 cup chopped almonds
    → Adds crunch and a nutty depth that pairs well with the blueberries. Toast almonds lightly in a dry skillet or oven until fragrant, then cool completely and chop into even pieces to ensure even distribution and predictable bite throughout the biscotti.

Optional Add-ins

  • 1/4 teaspoon almond extract (optional)
    → Intensifies almond aroma that complements blueberries. Use sparingly to avoid overpowering the berries; add to the wet ingredients with eggs and vanilla for even distribution.
  • 1/2 cup white chocolate chips (optional)
    → Introduces pockets of creamy sweetness. Fold in with the dried blueberries to distribute evenly; if the chocolate seems very sweet, you may reduce the sugar slightly to maintain balance in the cookie’s overall flavor profile.

Optional Coating

  • 4 ounces dark chocolate, chopped, for dipping (optional)
    → Creates a glossy, crisp chocolate shell on the biscotti. Melt gently using a double boiler or in short bursts in a microwave, then dip biscotti halfway and set on parchment. Tempering the chocolate yields a smoother, shinier finish if you have the technique.
  • 1 teaspoon neutral oil (optional)
    → Helps thin the melted chocolate for a smoother coating and easier dipping. Use a neutral oil such as canola or sunflower; add a little at a time to reach the desired dipping consistency without making the chocolate too greasy.

Instructions

  • Preheat your oven to 350°F (175°C) and line a large baking sheet with parchment paper or a silicone baking mat.

    → This creates a nonstick surface for the dough and ensures even browning without sticking, which is essential for cleanly sliced biscotti later.
  • Whisk together the dry ingredients: 3 cups all-purpose flour, 2 teaspoons baking powder, and 1/2 teaspoon salt in a large bowl until evenly distributed.

    → Uniformly distributed leavening and salt prevent pockets of baking powder or salty bites, ensuring a balanced crumb and consistent texture throughout the biscotti.
  • Toast the chopped almonds: spread 1/2 cup almonds on a dry skillet over medium heat, stirring frequently, until lightly toasted and fragrant, about 4–6 minutes; transfer to a plate to cool and then coarsely chop.

    → Toasting concentrates nut oils for deeper aroma and flavor; cooling prevents melting into the dough and chopping ensures even crunch in each bite.
  • In a separate large bowl, whisk 3 large eggs with 1 cup granulated sugar until the mixture is pale and slightly thickened, 2–3 minutes; this aerates the batter and helps with structure.

    → Proper aeration creates tenderness and helps the dough hold together after baking; avoid overbeating once the flour is added to prevent toughness.
  • Whisk in 1/2 cup melted and cooled unsalted butter, 1 teaspoon vanilla extract, and zest of 1 lemon to the egg-sugar mixture.

    → The cooled butter adds richness and tenderness; vanilla and lemon zest brighten the flavor profile and aroma. Ensure the butter is cooled to prevent cooking the eggs.
  • Add the dry ingredients to the wet ingredients in two additions, mixing with a wooden spoon or silicone spatula just until a shaggy dough forms and no dry flour remains.

    → Gentle folding preserves a tender crumb and avoids developing gluten too much, which would make the biscotti denser and harder to slice.
  • Fold in 1 cup dried blueberries and 1/2 cup chopped almonds until evenly distributed; if using 1/2 cup white chocolate chips, fold them in with the berries.

    → Even distribution prevents clumping and ensures bursts of blueberry flavor in every bite while preserving the dough’s structure during slicing.
  • Optionally add 1/4 teaspoon almond extract to the wet ingredients with vanilla and lemon zest for a more pronounced almond aroma.

    → A small amount deepens the almond note without overpowering the blueberry and citrus fragrance; add sparingly to avoid masking the berries.
  • Cover the dough and refrigerate for 15–30 minutes to firm up, making it easier to shape into a loaf.

    → Chilling reduces stickiness and helps form a stable log that slices cleanly for the second bake.
  • Turn the dough out onto the prepared sheet and form into a rough 12-inch long by 3-inch wide log, tapering slightly at the ends; lightly wetting hands can prevent sticking.

    → A well-shaped log bakes evenly; smoothing the surface with wet hands prevents cracks and ensures uniform slicing after the first bake.
  • Bake the log at 350°F (175°C) until firm and lightly golden, about 25–30 minutes; the exterior should feel set but the inside remains pale.

    → This first bake sets the loaf so it can be sliced into biscotti without crumbling; a firm exterior helps hold the crumb together during subsequent slicing.
  • Remove from oven and let the loaf rest on the sheet for 10–15 minutes to rest and continue firming; then transfer to a rack to cool completely.

    → Resting allows starches to relax and retighten, making slicing cleaner and reducing crumb crumble during the second bake.
  • Reduce oven temperature to 325°F (165°C); once the loaf is completely cool, slice it diagonally into 1/2-inch thick slices using a sharp serrated knife; place slices on parchment-lined sheets with space between them.

    → A diagonal cut increases surface area for the second bake, promoting extra dryness and crunch while even spacing ensures uniform drying.
  • Return the sheets to the oven and bake the slices a second time until dry and crisp, about 10–15 minutes per side, flipping halfway; total time may vary with thickness.

    → The second bake dries out the interior and develops biscotti’s characteristic crunch; flipping ensures even crusting on all surfaces.
  • Remove from heat and cool completely on a rack; the biscotti will continue to crisp as they cool and become sturdier for dipping or enrobing.

    → Cooling finishes the drying process and sets the final texture, preventing soft spots that could cause breakage during storage or dipping.
  • Optional coating: Melt 4 ounces dark chocolate with 1 teaspoon neutral oil in a double boiler or in short bursts in the microwave, stirring until smooth; dip biscotti halfway, place on parchment, and let set at room temperature or refrigerate briefly.

    → The chocolate adds a glossy shell and additional sweetness; thinning the chocolate with oil ensures a smooth, even dip that clings without heavy pooling.
  • Store cooled biscotti in an airtight container at room temperature for up to 2 weeks, or freeze for longer storage; keep the chocolate-coated version in the same conditions once set.

    → Proper sealing prevents staleness and keeps biscotti crisp; freezing preserves flavor and texture for future indulgence.

Notes

These blueberry biscotti are a twice-baked, crisp-on-the-outside, tender-on-the-inside treat that brighten the afternoon with lemon zest and sweet dried blueberries mingling with toasted almonds. The base flour provides structure, while the butter adds richness and the vanilla lifts the overall aroma; they pair beautifully with coffee, tea, or dessert wine.

You can customize them by swapping the almonds for pistachios or adding white chocolate chips for pockets of creamy sweetness. If you prefer a stronger berry bite, you can increase the dried blueberries by a few tablespoons while keeping the dough balanced with a touch more flour if needed. They freeze well and make a great grab-and-go snack. For an extra boost, serve with a dollop of mascarpone or a light lemon glaze.

Gluten-free adaptation: substitute the all-purpose flour with a 1:1 gluten-free baking blend designed for cookies and consider adding 1/4 teaspoon xanthan gum per cup of flour to help with structure. If you have gluten intolerance, always ensure your flour blend and baking powder are certified gluten-free.

Tips for handling: whisk the baking powder and salt into the dry ingredients and fold in the eggs, cooled melted butter, vanilla, and lemon zest just until combined. Shape the dough into two logs before the first bake; bake until set, then cool, slice on a bias into biscotti, and return to the oven to dry out until crisp. If the dough feels sticky, chill for 20–30 minutes before slicing to minimize crumbling. When dipping in chocolate, temper for a smoother finish or dip only the ends for a lighter touch.

Tips

Tips for Biscotti ai mirtilli

  • Flour handling: For a light, tender crumb, measure flour correctly—scoop with a spoon into the cup and level off. When making a gluten-free version, use a 1:1 GF flour blend designed for cookies and consider adding 1/4 teaspoon xanthan gum per cup of flour to help with structure.
  • Sugar and browning: Sugar aids browning and crispness after the first bake. If you prefer less sweetness, reduce to 3/4 cup, but be aware it will slightly affect browning and texture. If substituting with honey or maple syrup, reduce or adjust the liquid to maintain dough consistency.
  • Dry ingredients distribution: Whisk or sift flour, baking powder, and salt together so leavening and salt are evenly distributed. This prevents uneven pockets of rise and improves texture.
  • Eggs and binders: Eggs bind the dough and contribute to the second-bake structure. Beat them lightly and fold into the dough with the cooled melted butter and vanilla. If you want a richer crumb, you can use 2 whole eggs and 1 additional yolk, but avoid overmixing to keep the dough tender.
  • Butter handling: Melted and cooled butter helps the dough come together smoothly and contributes to a crisper crust after the second bake. If dairy-free is needed, substitute with a neutral oil of equal measure, noting flavor and texture will differ slightly.
  • Flavor boosters: Use high-quality vanilla and lemon zest to brighten blueberries. Add zest before zesting lemon sections to avoid bitterness from the white pith. If you don’t have lemon, orange zest can be a good substitute for a similar citrus lift.
  • Fruit and nuts: Toast almonds lightly to intensify their aroma, then cool completely before chopping for even distribution. For the blueberries, ensure they’re evenly distributed so every bite has fruit. If using large freeze-dried blueberries, they stay crisp; if using rehydrated dried berries, they’ll add more moisture and may require a touch more flour.
  • Optional add-ins: If using almond extract, keep to 1/4 teaspoon and add to wet ingredients for even distribution. White chocolate chips fold well with the blueberries, but if they’re very sweet, consider reducing the sugar slightly to balance flavors.
  • Optional coating: If dipping in dark chocolate, melt gently using a double boiler or short microwave bursts. Dip biscotti halfway, then set on parchment. For a smoother finish, temper the chocolate or add 1 teaspoon neutral oil to thin it to your desired consistency.
  • First bake strategy: Shape the dough into two even logs on a parchment-lined tray. Bake until the logs are set and lightly golden around the edges; they should be firm to the touch but not hard. This stage firms the crumb for clean slicing.
  • Cooling between bakes: Cool the logs on the baking sheet for 10–15 minutes before slicing. A brief chill helps you slice cleanly and minimizes crumbling.
  • Slicing technique: Use a sharp serrated knife to cut biscotti on a diagonal into about 1/2-inch slices (roughly 1.3 cm). Cutting on a bias increases surface area for the second bake and improves crispness.
  • Second bake for crispness: Place slices cut-side down on the baking sheet and bake again until dry and crisp. Rotate trays halfway through to promote even drying. If you prefer chewier biscotti, shorten the second bake; for crisper results, extend it slightly.
  • Storage and keeping quality: Once completely cooled, store in an airtight container at room temperature. For longer storage, freeze the baked biscotti—they freeze well and thaw quickly. Keep chocolate-coated portions separate if you plan to store for an extended period, to prevent milk or cocoa bloom from transferring.
  • Troubleshooting tips: If the dough seems too sticky, chill the dough for 15–20 minutes before shaping. If the biscotti crumble after slicing, it may be overbaked or too dry; briefly misting the logs with water before the second bake can help them stay intact, but use sparingly. If using gluten-free flour, be mindful of structure—adding a binder or a touch more moisture may help.
  • Variations and serving ideas: Serve with tea or dessert wine, or pair with a fruit compote or yogurt for a lighter finish. The lemon zest and blueberries pair beautifully with a light vanilla bean or a drizzle of citrus glaze on the cooled biscotti.

FAQ

Biscotti ai mirtilli – FAQ

Domanda 1: Cosa sono i Biscotti ai mirtilli?

Risposta: Sono biscotti dolci preparati con una base di farina, zucchero, burro o olio, uova e lievito, arricchiti con mirtilli freschi o secchi. Grazie alla seconda cottura risultano croccanti all’esterno e teneri all’interno, con un piacevole tono di limone/vaniglia.

Domanda 2: Quali sono gli ingredienti principali?

Risposta: Per circa 40 biscotti serve una base di:

  • 250 g di farina 00
  • 150 g di zucchero
  • 100 g di burro morbido (o olio)
  • 1 uovo grande
  • 1 cucchiaino di lievito per dolci
  • 1 pizzico di sale
  • 150–180 g di mirtilli freschi o surgelati
  • Scorza grattugiata di 1 limone e 1 cucchiaino di estratto di vaniglia
Domanda 3: Come si prepara l’impasto?

Risposta: In una ciotola mescola gli ingredienti secchi (farina, lievito, sale). In un’altra, lavora burro e zucchero fino a ottenere una crema, aggiungi l’uovo, la scorza e la vaniglia. Unisci gli ingredienti liquidi a quelli secchi, aggiungi i mirtilli e amalgama delicatamente. Forma un cilindro di impasto su carta forno e procedi alla prima cottura.

Domanda 4: Temperatura e tempi di cottura?

Risposta: Preriscalda il forno a 180°C. Cuoci per 25–30 minuti finché la superficie è dorata. Lascia raffreddare 10 minuti, taglia a fette di circa 1 cm di spessore, poi rimetti in forno a 170°C per 8–12 minuti per lato, finché sono croccanti.

Domanda 5: Posso usare mirtilli freschi o surgelati?

Risposta: Sì. I mirtilli freschi danno un sapore vivace; i mirtilli surgelati vanno usati direttamente ancora congelati (senza scongelarli) per evitare che rilascino troppa umidità. In entrambi i casi, può essere utile infarinare leggermente i mirtilli per evitare che affondino troppo durante la lavorazione.

Domanda 6: Posso sostituire la farina o rendere la ricetta senza glutine?

Risposta: Si può sostituire con una farina integrale o una miscela senza glutine 1:1, tenendo presente che la consistenza cambia e potrebbe essere necessario aggiungere 1–2 cucchiai di liquido. Se vuoi una versione meno rustica, prova una miscela senza glutine specifica per torte, ma controlla i tempi di cottura.

Domanda 7: Si possono congelare l’impasto o i biscotti cotti?

Risposta: Entrambe le opzioni funzionano. Puoi congelare l’impasto già formato (avvolto bene) e tagliarlo a fette direttamente dal freezer. Puoi anche congelare i biscotti cotti, conservandoli in contenitore ermetico; riattivali in forno a bassa temperatura per qualche minuto se vuoi renderli nuovamente croccanti.

Domanda 8: Come conservarli al meglio?

Risposta: Conserva i biscotti ai mirtilli in un contenitore ermetico in luogo fresco e asciutto. Dovrebbero mantenersi bene per 3–5 giorni. Per prolungarne la freschezza, puoi congelarli sia crudi che cotti (vedi Q7).

Domanda 9: Quali varianti di sapore si possono provare?

Risposta: Alcune idee: aggiungere scorza di limone o scorza d’arancia in omaggio al limone; utilizzare vaniglia o una fiala di estratto di mandorla; sostituire parte dei mirtilli con gocce di cioccolato o mirtilli secchi. Per una versione più profumata, aggiungi un pizzico di cannella o zenzero in polvere.

Domanda 10: È possibile una versione vegana o senza allergeni?

Risposta: Sì. Per una versione vegana sostituisci il burro con olio di cocco o olio vegetale e utilizza latte vegetale al posto delle uova (ad es. 1 cucchiaio di semi di lino macinati mescolati con 3 cucchiai d’acqua come sostituto dell’uovo). Per evitare glutine, usa una miscela di farine senza glutine 1:1. Tieni presente che la textura potrebbe variare leggermente a seconda delle sostituzioni.

Introduction / Hook

Imagine a warm oven glowing with a swirl of cinnamon that perfumes the house the moment you open the door. A cake that carries the cozy nostalgia of a cinnamon roll but wears the tenderness of a day-brightened cake. Cinnamon roll cake is the delightful compromise your sweet-toothed self has been dreaming of—where buttery layers, sugar-kissed swirls, and cream-cheese glaze converge into a single, comforting slice. As you slice into it, you reveal ribbons of cinnamon-sugar goodness winding through a soft, tender crumb that sighs with vanilla and a hint of brown butter. The aroma wafts through the room, turning ordinary mornings into celebrations and casual afternoons into special occasions. It’s not just dessert; it’s a memory in the making—the kind of treat that makes your kitchen feel like the hub of a cozy home.

What makes this cinnamon roll cake so irresistibly magnetic is its ability to be both nostalgic and indulgent without feeling overpowering. It holds the familiar charm of a cinnamon roll—those spicy-sweet notes, the creamy tang of a glossy frosting—while presenting them in a cake form that’s lighter on the palate and easier to portion for gatherings. It’s the kind of recipe that welcomes experimentation, inviting you to play with the textures and flavors while still delivering that signature cinnamon warmth. Whether you’re baking for a weekend brunch, a celebratory gathering, or a simple “treat-yourself” moment, this cinnamon roll cake stands ready to deliver comfort in abundance. The first bite is a revelation: a soft crumb that cradles a cinnamon core, a satin glaze that glows like morning sun on a classroom desk, and a lingering sweetness that invites another slice without ever tipping into cloying. Welcome to a cake that tastes like a hug in a pan—rich, inviting, and absolutely addictive.

In this introduction to cinnamon roll cake, you’ll discover a dessert that bridges the best of two worlds: the homey, chewy joy of a cinnamon roll and the soft, even-keeled texture of a classic sheet cake. It’s a recipe that speaks to all ages—kids who love the swirl of cinnamon, adults who crave that velvet frosting, and friends who appreciate a dish that looks as inviting as it tastes. This isn’t just about following a recipe; it’s about creating a sensorial experience that starts with the scent of vanilla and cinnamon and ends with the glow of satisfied smiles around the table. So preheat your oven, let the butter soften to its creamy smile, and prepare to pour love into every layer. The journey to your most memorable slice begins now.

The Story Behind the Dish

The cinnamon roll, with its fragrant, spiraled layers of dough and cinnamon-sugar treasure, traces a lineage that winds through many kitchens and cultures. The version most of us recognize today is deeply rooted in Scandinavian baking traditions, where kanelbulle—literally cinnamon bun—has a devoted following and a storied place on festive tables and everyday breakfasts alike. Cinnamon has long enjoyed a role in sweet and savory dishes across Europe and the Middle East, traded along ancient routes that turned simple ingredients into shared rituals. The idea of marrying that iconic roll with a cake form isn’t just a clever fusion; it’s a celebration of how dessert can evolve while carrying its heart from generations past.

In many households, the aroma of cinnamon and vanilla rising from the oven conjures childhood memories—the morning rush before school, the ritual of helping Mom or Grandma dust powdered sugar on top, and the small shouts of delight when the first slice finds its way to a hungry plate. The cinnamon roll cake is a modern homage to those memories, a recipe that honors the spirit of a roll while embracing the ease and elegance of a cake. Bakers often approach it as a canvas: you can swirl cinnamon throughout a tender batter, then bathe the top in a creamy glaze that gleams like morning frost. The result feels timeless and new at once, a comfort piece that can anchor a weekend brunch, a birthday breakfast, or a holiday table with a whisper of nostalgia and a bold, comforting finish.

For many home bakers, this cake also represents a welcome invitation to creativity. Not everyone has the time to roll and proof dozens of dough layers, but almost everyone can celebrate with a cake that captures the essence of cinnamon rolls—without the extra steps. And there’s a storytelling aspect to it as well: you can tell guests that they’re enjoying a recipe that’s been reimagined for modern kitchens, one that nods to tradition while embracing a simple, reliable method that yields a crowd-pleasing result every time. The cinnamon roll cake is more than a dessert; it’s a conversation starter—a way to share warmth, memory, and a little bit of sweetness with the people you love.

Why You’ll Love This Recipe

  • Effort meets indulgence: A single cake that delivers the cinnamon-roll experience without requiring a full day of rolling and proofing. It’s a smart shortcut that still tastes deeply, warmly comforting.
  • Versatile texture: A soft, fluffy cake crumb with ribbon-like swirls of cinnamon throughout that create pockets of warmth in every bite. The surface glazes to a glossy finish that invites a fork and a bite.
  • Iconic flavor palette: The familiar harmony of butter, warm cinnamon, brown sugar, and vanilla, balanced by a tangy cream-cheese glaze that adds brightness and a luxurious mouthfeel.
  • Perfect for a crowd: Easy to slice into generous portions, making it ideal for brunches, potlucks, celebrations, or a simple sweet treat after dinner.
  • Make-ahead friendly: The cake and its glaze can be prepared ahead of time in stages, with refrigeration allowing flavors to settle and blend for a more cohesive finish.
  • Customizable: Adaptable to dietary needs or flavor twists—vegan, gluten-free, or nutty add-ins—without losing the core cinnamon-roll essence.
  • Simple elegance: This cake looks stunning on a table—frosted to a satin sheen, with cinnamon ribbons visible beneath the surface, making it a natural centerpiece for a seasonal table.

Flavor Profile & Texture

The flavor profile of this cinnamon roll cake centers on the warm, cozy notes you expect from a cinnamon roll, elevated by the light, tender crumb of a cake. On the first bite, you’re met with a gentle sweetness that isn’t cloying, paired with the aromatic spice of cinnamon that has been kissed by a touch of brown sugar, butter, and vanilla. The cinnamon-sugar core becomes a quiet, cinnamon-flavored core that distributes its warmth throughout the slice, providing little bursts of spice with each mouthful. The vanilla in the cake adds a soft, creamy sweetness that rounds out the edges of the cinnamon’s boldness, while hints of butter enrich the overall sensorial experience, making every bite feel rich and comforting.

As you move toward the frosting or glaze, a different pleasure unfolds. A cream cheese-based glaze delivers a tangy, velvety counterpoint to the cake’s sweetness. The glaze lands with a glossy sheen, a silky finish that lingers on the palate and invites you to chase another bite. The texture contrast is part of the magic: the crumb remains tender and light, while the glaze adds a luxurious, almost satin-like finish that remains just soft enough to melt on contact. If you listen closely while cutting a slice, you can hear the gentle sigh of the cake as the knife passes through the moist interior, a reminder of how well-balanced this dessert is—soft, not crumbly; sweet, but with enough tang to keep it sophisticated. The cinnamon ribbons, visible when you cut, provide little pockets of concentrated warmth that surprise the senses and remind you of the classic cinnamon roll experience in a cake form.

In terms of mouthfeel, think of a cake that carries a whisper of the buttered richness typical of a cinnamon roll, without the chewiness of a thick yeast-based dough. The cake should feel light on the tongue, yielding to a moist crumb rather than drying out, while the glaze adds a smooth, creamy finish that clings slightly to the surface and carries the lingering sweetness of vanilla and cream cheese. The combination is a cohesive symphony: the cake offers softness and comfort, the cinnamon swirls provide aromatic depth, and the glaze crowns the top with a glossy, tangy freshness. It’s a balance between the familiar and the refined—a slice that makes you feel both at home and indulged at the same time.

Occasions & Pairings

This cinnamon roll cake shines in many settings, from casual weekday mornings to festive weekend gatherings. Its approachable sweetness makes it a friendly offering for a brunch menu, a potluck, or a celebration that doesn’t require elaborate dessert setups. It’s also a wonderful option for holiday mornings—Christmas, Easter, or special family reunions—where a show-stopping, yet comforting, dessert can anchor the feast and spark conversation around the table. The cake’s visual appeal, with cinnamon swirls visible in cross-section slices, invites admiration and a sense of occasion without being fussy to serve. It pairs beautifully with warm beverages and seasonal accompaniments, enhancing the overall experience.

Suggested pairings:
– Beverages: fresh-bresh coffee, rich espresso, almond milk latté, chai tea, or a mug of hot cocoa for a cozy chocolate counterpoint.
– Side items: a light fruit compote (pear, apple, or berry), vanilla yogurt, or a dollop of whipped cream for extra richness.
– Desserts: a small scoop of vanilla bean ice cream or a bright lemon curd spooned alongside can offer a pleasing contrast.
– Seasonal accents: toasted pecans or walnuts for crunch and a hint of nuttiness; a dusting of powdered sugar or a thin drizzle of caramel to amplify the glaze’s sheen.
– Holiday menus: pair with a light brunch savory like herb frittata or smoked salmon and cucumber bites to provide balance between sweet and savory courses.

The versatility of cinnamon roll cake means you can adjust its presentation to suit the occasion. For a more casual setup, keep the glaze light and let the cinnamon ribbons speak for themselves. For a more formal brunch or dessert course, thicker frosting or a double-glazed top can elevate the dish and make it feel more like a centerpiece. In any setting, it’s the kind of dessert that invites conversations about family traditions, memories of grandmother’s kitchen, and plans for future gatherings—the kind of dish that creates anticipation and then delivers with every forkful.

Tips, Variations & Substitutions

  • Make it lighter: Use a portion of neutral oil or light yogurt in place of part of the fat to adjust richness without sacrificing moisture.
  • Flavor twists: Add a whisper of orange zest to the cake batter for a citrus note that brightens the cinnamon. A pinch of espresso powder can deepen the cinnamon flavor without making it taste like coffee.
  • Gluten-free option: Use a 1:1 gluten-free flour blend designed for baking, keeping an eye on moisture since some blends absorb more liquid. A touch of additional milk or yogurt may be needed to maintain a tender crumb.
  • Vegan adaptation: Swap dairy milk with a plant-based milk, use coconut or vegan butter, and replace the cream cheese glaze with a dairy-free version using vegan cream cheese and non-dairy butter. Ensure sweetener balance remains similar to maintain the glaze’s tangy sweetness.
  • Nutty twist: Toasted walnuts or pecans folded into the cinnamon swirl add a nice crunch and a toasty depth that complements the softness of the cake.
  • Caramel-kissed version: Drizzle a thin caramel glaze over the top or swirl a ribbon of caramel into the batter for an extra layer of luxury and depth.
  • Make-ahead hints: Bake the cake and cool completely. Store unfrosted, then frost just before serving to preserve the glaze’s gloss. This makes it ideal for entertaining when you want to prep parts of the dessert in advance.
  • Portion control: For a neater presentation, trim the outer edges to reveal a clean parlor-like cross-section. This also helps with even serving sizes for guests.
  • Terroir-inspired variation: Use brown sugar with a hint of maple syrup in the swirl for a more autumnal or rustic flavor profile.

Storage & Make-Ahead Ideas

Storage and make-ahead planning is a practical virtue for this cake. If you bake the cake in advance, allow it to cool completely before covering loosely with plastic wrap or a cake dome to avoid condensation that could soften the glaze. Here are practical guidelines to keep the cake fresh and delicious:

  • Room temperature: The cake can be kept covered at room temperature for up to 2 days, though it’s best enjoyed fresh or within 24 hours for maximum tenderness.
  • Refrigeration: Store in the refrigerator for up to 4 days. If the glaze seems to stiffen, let slices come to room temperature for a few minutes before serving to restore a silky mouthfeel.
  • Freezing: Individual slices freeze well for up to 2 months. Wrap tightly in plastic and place in a freezer bag. Thaw overnight in the fridge or at room temperature, then rewarm gently in the microwave or with a short stint in a low oven. If you’re freezing the whole cake, freeze before frosting for a clean reassembly; frost after reheating.
  • Make-ahead strategy: Bake the cake one day, cool completely, and refrigerate. The next day, bring to room temperature, drizzle with glaze, and finish with any toppings (nuts, zest, extra cinnamon) just before serving for a fresh, wow-worthy presentation.

Fun Facts & Trivia

  • Historical roots: Cinnamon has been traded and treasured since ancient times, often valued for its aromatic spice and potential medicinal qualities. Its journey from the Far East to European kitchens adds a sense of global connection to comforting desserts like this cake.
  • Swedish influence: The cinnamon bun, or kanelbulle, holds a special place in Swedish culture, with a dedicated day on the calendar to celebrate the beloved pastry. This cake is a nod to that tradition, translated into a cake form for modern bakers.
  • Texture storytelling: The name “cake” evokes a certain expectation of tenderness, which this dessert delivers by embracing a soft crumb and a glossy glaze, a textural contrast that keeps every bite intriguing.
  • Color psychology: The warm cinnamon tones paired with ivory frosting create a visual cue that feels comforting and inviting—colors that subconsciously suggest a cozy, homey experience even before the first bite.
  • Versatility in serving: Because the cake can be sliced and served with or without frosting, it adapts to different preferences and occasions, from sweet tooth-focused celebrations to lighter brunch menus.
  • Seasonal flexibility: While it shines in autumnal moods with its cinnamon warmth, it’s equally satisfying in spring mornings when paired with fresh berries or citrus zest.

Ingredients

Cake Base
  • 2 1/2 cups all-purpose flour
    → Structure and body form the cake crumb. This flour provides the main framework that supports the cinnamon swirl and tender crumb. To avoid a dense texture, measure by spooning the flour into the cup and leveling off with a knife (spoon-and-sweep method) rather than scooping directly from the bag. If you prefer a lighter crumb, you can substitute 1/4 cup of the flour with cake flour, but keep in mind it will slightly alter the texture.
  • 1 cup granulated sugar
    → Adds sweetness and assists in browning and moisture retention during baking. In a cinnamon roll cake, sugar helps develop a slightly caramelized edge around the swirl. If you want a slightly less sweet cake, you can reduce by 2–4 tablespoons, understanding it will affect moisture and crumb.
  • 1/2 cup unsalted butter, melted and cooled
    → Provides richness, moisture, and a tender crumb by coating flour particles and slowing gluten formation. Use cooled melted butter to prevent cooking the eggs when they are added. If you skip butter and use oil instead, the crumb will be tender but slightly different in mouthfeel; keep oil neutral-flavored for best cinnamon flavor.
  • 2 large eggs, room temperature
    → Bind and structure the batter; room-temperature eggs emulsify better with fats, resulting in a smoother crumb. If eggs are cold, warm them in a bowl of warm water for 5–10 minutes before measuring and adding to the mixture to avoid a lumpy batter.
  • 1 cup whole milk
    → Provides moisture and tenderness; whole milk adds flavor and a rich crumb. If using a non-dairy alternative, choose an unsweetened version with similar fat content and adjust with a teaspoon of melted butter if needed to maintain richness.
  • 1/2 cup sour cream or plain yogurt
    → Adds tenderness, moisture, and a slight tang that complements the cinnamon. Use full-fat for best texture and flavor. Whisk it into the wet ingredients until smooth to ensure even distribution and to prevent curdling when the batter comes together.
  • 2 teaspoons vanilla extract
    → Flavor foundation; vanilla enhances sweetness and rounds out spice flavors. Use high-quality vanilla or vanilla paste for a more pronounced aroma. If using vanilla extract, measure carefully to avoid overpowering the cinnamon.
  • 2 teaspoons baking powder
    → Primary leavening that helps the cake rise and stay light. Ensure freshness for optimal lift; whisk with dry ingredients to distribute evenly and avoid dense pockets in the batter.
  • 1/2 teaspoon baking soda
    → Additional leavening and helps neutralize acidity from the sour cream/yogurt, contributing to a tender crumb and even rise. Like baking powder, use fresh baking soda for best results.
  • 1/4 teaspoon salt
    → Balances sweetness and enhances flavor, as well as strengthening the gluten structure just enough to improve crumb without making it tough. If using salted butter, adjust salt downward accordingly.
  • 1 1/2 teaspoons ground cinnamon (for batter)
    → Infuses the cake with warmth that complements the cinnamon swirl. Whisk this with the dry ingredients to ensure an even distribution; for a stronger cinnamon note, you can increase slightly, but keep it balanced with sugar and dairy.
Filling
  • 3/4 cup light brown sugar, packed
    → Creates the cinnamon-sugar swirl that becomes gooey and caramelized during baking. Packed sugar ensures consistent sweetness and moisture. If your brown sugar is clumpy, break lumps with a fork before mixing with the cinnamon; you can also lightly loosen it with a teaspoon of water if needed.
  • 2 1/2 tablespoons ground cinnamon
    → The signature flavor of cinnamon rolls. Freshly ground cinnamon yields a stronger aroma; if using pre-ground, whisk with the brown sugar to distribute evenly and avoid clumps in the swirl.
  • 2 tablespoons unsalted butter, melted
    → Creates a paste to bind the cinnamon-sugar mix and helps it swirl smoothly through the batter. Allow the butter to cool slightly before mixing with sugar to prevent melting the sugar too much and making the swirl runny.
Cream Cheese Frosting
  • 8 oz cream cheese, softened
    → The tangy backbone of the frosting that complements the sweetness of the cake. Soften at room temperature for several hours or in a warm spot briefly to ensure a smooth, lump-free frosting. If you refrigerate, let it soften again before using.
  • 1/4 cup unsalted butter, softened
    → Adds richness and helps stabilize the frosting so it holds its shape on slices. Beat with the cream cheese until light and fluffy; avoid melted butter, which can make the frosting too loose.
  • 2 cups powdered sugar
    → Sweetens and creates a silky, spreadable texture. Sift before adding to the mixture to avoid grittiness. Adjust to taste if you prefer a thinner or thicker frosting.
  • 1/2 teaspoon vanilla extract
    → Adds depth and aroma to the creamy frosting. For an extra depth of flavor, use vanilla paste or bean scrapings in addition to extract.
  • Pinch of salt
    → Balances the sweetness and enhances the tanginess of the cream cheese. A small pinch is usually enough; omit only if you are using salted butter and find the frosting already balanced.
Optional Glaze
  • 1/2 cup powdered sugar
    → Gives a light, glossy finish that dries to a soft glaze on top of the frosting. Start with this amount and add more sugar if you want a thicker glaze, or a bit more milk for a thinner glaze.
  • 2–3 tablespoons milk or heavy cream
    → Adjusts glaze consistency; add gradually to avoid runs. Use heavy cream for a richer glaze that sets a bit firmer when chilled, or milk for a lighter finish.
  • 1/2 teaspoon vanilla extract
    → Boosts flavor in the glaze; optional, but it helps the glaze harmonize with the cinnamon and cream cheese flavors without adding extra sweetness.
Pan and Preparation Notes
  • Non-stick baking spray or melted butter, for greasing a 9×13 inch (approx. 23×33 cm) baking pan
    → Ensures easy release of the cake after baking and helps prevent sticking at the edges of the swirl. If you prefer, line the pan with parchment paper for clean edges and easy lift-out slices.
  • Parchment paper (optional), for lining the pan
    → Creates an easy lift-out and prevents sticking, making neat slicing possible. This is especially helpful if you want perfectly square pieces or plan to photograph the cake slices.

Instructions

  • Preheat your oven to 350°F (175°C) and prepare a 9×13 inch baking pan by greasing with non-stick spray or melted butter and lining with parchment if desired.
    → Ensures the cake releases cleanly from the pan and prevents sticking at the edges and corners; parchment aids in neat lift-out slices and easy cleanup.
  • Whisk together the dry ingredients for the cake base: 2 1/2 cups all-purpose flour, 1 cup granulated sugar, 2 teaspoons baking powder, 1/2 teaspoon baking soda, 1/4 teaspoon salt, and 1 1/2 teaspoons ground cinnamon.
    → Uniform distribution of leaveners and spice prevents uneven rising and hot spots; whisking also helps aerate the flour for a lighter crumb.
  • In a separate bowl, whisk the wet ingredients: 2 large eggs at room temperature, 1 cup whole milk, 1/2 cup sour cream or plain yogurt, 1/2 cup melted and cooled unsalted butter, and 2 teaspoons vanilla extract.
    → Room-temperature eggs emulsify with fats to create a smooth batter; cooled butter prevents cooking the eggs and ensures even incorporation.
  • Pour the wet ingredients into the dry ingredients and mix just until combined, stopping as soon as the batter comes together with a few small lumps remaining.
    → Overmixing develops gluten and yields a tougher crumb; mixing until moistened preserves tenderness and lightness.
  • Prepare the cinnamon-sugar filling by combining 3/4 cup light brown sugar, 2 1/2 tablespoons ground cinnamon, and 2 tablespoons melted butter in a small bowl; whisk to form a cohesive paste.
    → A thick, cohesive paste clings to the batter and swirls evenly without running too much, producing classic cinnamon-roll ribbons.
  • Spread half of the batter in an even layer across the prepared pan using an offset spatula, filling any gaps and smoothing the surface to the edges.
    → Establishes a uniform base for the swirl and prevents uncooked pockets; tapping the pan helps settle the batter and eliminate air bubbles.
  • Sprinkle half of the cinnamon-sugar filling evenly over the first batter layer, ensuring it covers the surface without clumping at the edges.
    → Distributes cinnamon flavor consistently in the swirl; even coverage avoids concentrated pockets that could burn or taste oversweet.
  • Dollop the remaining batter over the filling in spoonfuls across the pan; use a knife or skewer to swirl the batter through the filling to create ribboned marbling.
    → Swirling distributes the cinnamon in a visually appealing pattern while ensuring pockets of flavor in every bite.
  • Bake in the preheated oven at 350°F (175°C) for 30–40 minutes, or until a toothpick inserted into the center comes out with a few moist crumbs and the top springs back when gently pressed; if the top browns too quickly, tent with foil.
    → The crust should be set yet moist inside; testing with a toothpick confirms doneness without overbaking, which would dry the crumb.
  • While the cake bakes, prepare the cream cheese frosting by beating 8 oz cream cheese and 1/2 cup unsalted butter at medium speed until light and smooth, scraping the bowl as needed.
    → Proper aeration yields a creamy, lump-free frosting that spreads evenly and adheres to the cake slices.
  • Gradually add 2 cups powdered sugar to the cream cheese mixture on low speed, then increase to medium and beat until smooth; mix in 1/2 teaspoon vanilla extract and a pinch of salt, adjusting for taste.
    → Slow addition prevents gritty texture and ensures a glossy, spreadable frosting with balanced sweetness and tang.
  • Let the baked cake cool in the pan on a wire rack for 15–20 minutes, then spread the cream cheese frosting evenly over the top and allow a few minutes for the frosting to set before slicing.
    → Cooling helps the frosting set and prevents it from sliding off; a slightly warm cake with cooled frosting yields clean, neat slices.
  • Optionally, prepare a lightweight glaze by whisking 1/2 cup powdered sugar with 2–3 tablespoons milk or heavy cream and 1/2 teaspoon vanilla until smooth, then drizzle over the frosted cake for a shiny finish.
    → The glaze adds a delicate sweetness and a glossy appearance; adjust thickness by adding more sugar or liquid as needed.
  • Slice the cake into squares and serve; refrigerate leftovers in an airtight container for up to 3–4 days, letting individual portions come to room temperature or warm gently before serving for optimal softness.
    → Proper storage maintains moisture and flavor; gentle warming revives the tender crumb and cinnamon aroma.

Notes

These cinnamon roll cake notes help you achieve a tender, cinnamon-swirl cake crowned with a creamy cream cheese frosting. To maximize rise and an even crumb, measure flour using the spoon-and-sweep method and whisk dry ingredients (including baking powder and baking soda) so there are no clumps. Bring ingredients to room temperature so fats emulsify with liquids, and stir wet and dry just until combined to keep the crumb light. Cool melted butter completely before mixing with eggs to prevent curdling, and choose full-fat milk and sour cream or yogurt for tenderness and flavor. For the swirl, spread half of the batter in the pan, sprinkle the cinnamon-sugar filling, then drop in the remaining batter and gently swirl with a knife for an even ribbon. Bake until a toothpick tests with a few moist crumbs and let the cake cool completely before frosting. Cream cheese frosting should be creamy and spreadable: beat softened cream cheese and butter until smooth, add powdered sugar gradually, then vanilla and a pinch of salt; if the frosting sets too firm, beat in a splash of milk. If you want a glossy finish, whisk a glaze of powdered sugar with milk or cream and a touch of vanilla. Allow the cake to rest for at least 20 minutes after frosting to set before slicing. Make-ahead tips: you can bake the cake a day in advance, store wrapped at room temperature for up to 1–2 days or refrigerate for up to 5 days; slice and reheat gently to serve. For freezing, wrap slices tightly and freeze for up to 2–3 months; reheat in a low oven or microwave. Variations: add orange zest to the frosting for citrus notes, or sprinkle toasted pecans on top; for dairy-free versions, use dairy-free cream cheese and butter and a dairy-free yogurt or sour cream substitute, keeping in mind the texture may vary.

Tips

Cake Batter Tips
  • Measure the flour using the spoon-and-sweep method (scoop then level) to prevent a dense crumb. This helps keep the cake light and tender even with the cinnamon swirl.
  • Let cold ingredients come to room temperature (eggs, milk) before mixing. Room-temperature fats and dairy emulsify more smoothly, giving a silkier crumb and better rise.
  • Whisk the dry ingredients (including the cinnamon) separately from the wet ingredients to ensure even distribution of leaveners and spices, which helps you avoid streaks or dense pockets.
  • Mix until just combined after you add the wet to the dry. Overmixing develops gluten and can make the cake tough; a few streaks of flour are okay.
  • For a lighter crumb, you can substitute 1/4 cup of the flour with cake flour, but expect a slightly softer structure and a different mouthfeel.
  • Use cooled melted butter (not hot) to prevent cooking the eggs and to keep the batter uniform. If you switch to oil, use a neutral oil for the best cinnamon flavor and a tender texture.
  • Ensure the batter is smooth and even in color with no visible oil slicks or lumps before pouring into the pan.
  • Preheat the oven to a steady 350°F (175°C) and bake until a toothpick tests clean with a few moist crumbs. If the top browns too quickly, tent lightly with foil and continue baking.
  • Cool the cake in the pan on a rack for at least 10–15 minutes before frosting to set the structure and make slicing neater.
Filling Tips
  • Make the cinnamon-sugar filling into a paste by combining the melted butter with the brown sugar and cinnamon; this helps it swirl smoothly rather than bleed into the batter.
  • Spread the filling evenly over the batter and avoid pooling at the edges. An offset spatula works well for a uniform swirl.
  • If the swirl seems too runny, chill the filling for 10–15 minutes to thicken, which helps it stay where you want it during baking.
  • For a stronger cinnamon presence, you can increase the cinnamon by a teaspoon or two, but taste as you go to avoid overpowering the sweetness.
Cream Cheese Frosting Tips
  • Let the cream cheese and butter soften fully at room temperature; this prevents lumps and yields a smoother frosting.
  • Beat the cream cheese and butter together until light and fluffy, scraping the bowl halfway through to ensure even texture.
  • Sift the powdered sugar to avoid grittiness, then add gradually to reach the desired sweetness and spreadability.
  • Balance sweetness with a pinch of salt and a splash of vanilla. If the frosting seems too thick, beat in a teaspoon of milk or cream at a time until it holds its shape but spreads smoothly.
  • If you refrigerate the frosting, let it soften a bit before spreading to maintain a creamy texture on the cake.
Optional Glaze Tips
  • Start with 1/2 cup powdered sugar and add milk or cream gradually to reach your preferred consistency. A glaze that’s too thick won’t set nicely; too thin will run off the slices.
  • Use milk for a lighter glaze or heavy cream for a richer, shinier finish that sets a bit firmer when chilled.
  • A half-teaspoon of vanilla adds a subtle aroma that helps the glaze harmonize with the cinnamon and cream cheese flavors.
Pan and Preparation Tips
  • Grease a 9×13 inch pan well or line with parchment for easy removal of the cake slices and clean edges.
  • Line the pan with parchment for cleaner lifts and even slicing, especially if you’re photographing the cake or want perfectly square pieces.
  • Center the pan in the oven and consider rotating halfway through baking for even browning and consistent texture on all sides.
  • If the top starts to brown too quickly, loosely tent with foil to prevent over-browning while the interior finishes baking.
Make-Ahead, Storage, and Serving Tips
  • The cake base can be baked a day ahead; cool completely, wrap well, and store at room temperature if frosting will be added soon. Frost just before serving for best texture.
  • Frosted cake should be kept refrigerated and is best within 2–3 days. Bring to room temperature for easier slicing and fluffier frosting texture.
  • Leftover slices can be wrapped and frozen for up to 1 month; thaw in the refrigerator and bring to room temperature before serving for a softer crumb.
  • For clean slices, chill the frosted cake for 15–20 minutes before slicing, then wipe the knife between cuts for neat edges.
  • If you crave extra moistness, brush a light syrup over the top before applying frosting, but test first to avoid soggy edges.

FAQ

What is Cinnamon Roll Cake?

It’s a soft, tender cake swirled with cinnamon-sugar ribbons and finished with a creamy glaze, combining the cozy flavors of classic cinnamon rolls in a cake form.

What ingredients do I need?

Main batter: all-purpose flour, granulated sugar, baking powder, salt, milk, eggs, vanilla, and butter. Cinnamon swirl: brown sugar, cinnamon, melted butter. Glaze: powdered sugar, milk or cream, vanilla. Optional: a dash of nutmeg or cream cheese in the glaze.

How do you make the cinnamon swirl?

Whisk cinnamon with brown sugar and melted butter to form a paste. Swirl into the batter by spooning dollops of the cinnamon mixture and using a knife or skewer to create ribbons before baking.

What pan size and baking temperature/time should I use?

Use a 9×13-inch baking pan. Preheat to 350°F (175°C). Bake for 28–34 minutes, until a toothpick inserted into the center comes out with a few moist crumbs. Avoid overbaking for a tender cake.

How do I know the cake is done?

Begin checking at about 28 minutes. The center should spring back to a light touch, and a toothpick should come out with a few moist crumbs, not wet batter. If using a thermometer, aim for 210–212°F (99–100°C) at the center.

How do I glaze the cake and when should I apply it?

Whisk powdered sugar with milk or cream and vanilla until smooth. Drizzle over the cake while it’s warm so the glaze sinks in and forms a glossy finish. For a richer option, use a cream cheese glaze (softened cream cheese, butter, vanilla, and powdered sugar).

Can I make this ahead or freeze it?

Yes. You can bake, cool, and refrigerate up to 2–3 days. For longer storage, wrap the cooled cake and freeze up to 2–3 months. Thaw and reheat gently in the microwave or oven, and re-glaze if desired.

Are there dairy-free or gluten-free options?

Yes. Use dairy-free milk and butter substitutes. For gluten-free, use a 1:1 gluten-free flour blend (verify it works well in cakes). For dairy-free glaze, use plant-based milk and dairy-free powdered sugar. Check labels to avoid cross-contamination.

How many servings does this yield and any tips for even slices?

A 9×13-inch cake yields about 12–16 pieces. Chill the cake for 15–20 minutes before slicing, wipe the knife between cuts, and slice in clean, straight motions for even portions.

Serving ideas and flavor variations?

Serve warm with vanilla ice cream or whipped cream. For variations, swirl in chopped pecans or walnuts, or add a hint of orange zest to the glaze. You can also try a cream cheese glaze or a maple glaze for different flavor profiles.

Introduzione / Hook

Immagina una piccola balla dorata, brillante di zeste di limone e lucidata da una leggera crosta luminosa, che esplode in una morsa di sapore fresco non appena la addenti. Bocconcini proteici limone e mirtilli sono l’equivalente culinario di una promessa: leggeri ma sostanziosi, delicati ma decisi, capaci di accompagnarti dalle prime luci del mattino fino al crepuscolo senza mai perdere un grammo di carattere. Ogni boccone è una sinfonia di agrumi luminosi e frutti estivi, racchiusa in una dimensione tascabile che sembra pensata apposta per chi ha fretta ma non vuole rinunciare alla qualità. La magia sta nel contrappunto tra la nota acida del limone, la dolcezza mielata dei mirtilli e la completezza proteica che arriva dall’ingrediente giusto. È una piccola merenda, una coccola dopocena, un compagno di viaggio o una pausa salubre durante una giornata piena. Non è solo una ricetta: è una filosofia di snack che mette al centro gusto, energia e leggerezza, senza compromessi.

La versione “proteica” di questo bocconcino rende omaggio a chi cerca uno spuntino che sostenga l’attività fisica o semplicemente risulti saziante senza appesantire. È una celebrazione di sapori semplici ma raffinati, in cui limone e mirtillo si fanno protagonisti, mentre una base morbida ma ferrea ne sostiene la struttura. È come una carezza di campagna all’ora del tè, reinterpretata per chi vive tra lezioni, allenamenti, progetti e appuntamenti. La fragranza del limone si mescola con la freschezza del frutto di bosco, e tutto viene raccolto in consistenze che variano dal setoso al leggermente croccante, offrendo una sensazione multisensoriale ad ogni morso. Prepararla potrebbe diventare una piccola routine domestica: una routine che profuma di giovinezza, salute e gioia di condividere cibo che fa bene al corpo senza rinunciare al piacere.

La storia dietro il piatto

Questa creazione nasce dall’incontro tra la tradizione italiana degli spuntini leggeri e la modernità della cucina sportiva. In molte cucine mediterranee, la merenda o la piccola porzione di metà mattina è stata a lungo considerata sacra: qualcosa di sfizioso ma anche nutriente, capace di sostenere i ritmi di una giornata intensa. I bocconcini, per l’idea di piccole dimensioni e di facilità di consumo, richiamano l’immagine dei bocconcini di formaggio tipici della cucina italiana, ma qui si rinnova il concetto trasformandolo in una versione proteica e fresca. L’ingrediente protagonista, il limone, è un omaggio all’estate e all’energia vitale: la sua scorza profumata e il succo brillante donano vivacità, acidità controllata e schiariscono i profili gastrici. I mirtilli, piccoli ma potentemente aromatici, aggiungono una nota dolce-acidula che equilibra l’intero palato. Il risultato è una piccola porzione di felicità che pensa in grande: saziante, nutriente e adatta a essere gustata in qualunque contesto, dal piano di lavoro al cesto del picnic.

Secondo una leggenda metropolitana ma piacevole, la versione in formato bocconcino è nata quando una nutrizionista gourmande voleva offrire ai pazienti post-allenamento una merenda che fosse comoda da prendere al volo, ma che contenesse proteine, carboidrati leggeri e grassi confinati entro limiti ragionevoli. L’idea di racchiudere tutto in una piccola pepita ha poi trovato terreno fertile tra chef di casa, sportivi e genitori in cerca di alternative sane e sfiziose per i propri figli. Nel corso degli anni, si è affinata con l’uso di ingredienti che favoriscono la coesione, la structura e la morbidezza, senza necessariamente ricorrere a cotture complesse. Così, ogni boccone diventa una piccola storia da raccontare: di gusto, di salute e di quotidianità ritrovata attraverso una merenda che è entrata a far parte di molte routine moderne.

Perché amerai questa ricetta

  • Praticità e velocità: si prepara in fretta e non richiede cottura complessa, ideale per chi vive una vita frenetica ma non vuole rinunciare a un snack di qualità.
  • Equilibrio proteico: una base che fornisce proteine utili a sostenere i muscoli, a moderate carboidrati e a una piccola quota di grassi salutari.
  • Sapore bilanciato: la brillantezza del limone si fonde con la dolcezza dei mirtilli, creando un profilo gustativo fresco e invitante.
  • Portabilità: perfetto da prendere al lavoro, in palestra, a scuola o in viaggio. Si conserva bene in contenitori richiudibili e si gusta freddo o a temperatura ambiente.
  • Versatilità: può essere adattato a diverse preferenze alimentari senza perdere la sua identità, grazie a varianti senza lattosio, senza glutine o vegane.
  • Qualità nel dettaglio: l’esperienza è ricca di texture, con un nucleo morbido, una superficie leggera e una nota croccante che può arrivare da eventuali ingredienti aggiuntivi come noci o fiocchi d’avena.

Profilo di sapore e consistenza

Il profumo è luminoso e pulito, come una mattina di primavera. Il limone offre una scorza delicata e un aroma agrumato che si diffonde subito nell’aria, seguito da una nota fresca e succosa proveniente dai mirtilli maturi. All’assaggio, si prova una dolcezza equilibrata: i mirtilli introducono una punta di naturale succo che contrasta con la leggera acidità del limone, mantenendo il palato vivace e reattivo. La texture è studiata per offrire una doppia sensazione: da una parte una lieve aderenza della base che tiene insieme gli ingredienti proteici, dall’altra una morbidezza che fa scivolare delicatamente il boccone. In bocca, si percepisce una leggera componente cremosa che si fonde con una struttura ferma ma non rigida. Se aggiunta una componente croccante, come una spolverata di cereali integrali tostata o di semi, si ottiene una terza dimensione di reazione sensoriale: croccantezza che fa da contrappunto al cuore morbido. Complessivamente, il sapore è rinfrescante, energico e accattivante, capace di restare impresso nella memoria gustativa grazie al contrasto tra la fredda dolcezza dei mirtilli e la lucidità aromatica del limone.

Dal punto di vista delle sensazioni gustative, questo bocconcino è un invito a un’esperienza polifonica: l’acidità moderata del limone stimola l’apice della lingua, seguito da una dolcezza fruttata che allunga la persistenza aromatica. L’elemento proteico offre sazietà e corpo, evitando che l’assunzione di zuccheri possa creare picchi di fame poco dopo. L’insieme è pensato per rimanere equilibrato, non troppo dolce né invasivo, adatto anche a chi preferisce sapori puliti e non troppo lunghi al palato. L’accompagnamento ideale è una temperatura ottimale: fresco, ma non freddo eccessivo, per far emergere al meglio i profumi e la consistenza senza compromettere la fragranza. In accompagnamento, si presta a essere servito sia in contesti minimalisti sia in presentazioni più ricercate, dove la bellezza visiva del colore giallo pallido e del blu intenso dei mirtilli cattura l’occhio insieme al gusto.

Occasioni & Pairings

Questi bocconcini sono perfetti per una grande varietà di momenti, dall’energia di una mattinata al ritmo di una giornata lavorativa, alle pause tra una lezione e l’altra. Possono diventare un rituale di inizio giornata, una piccola ricompensa post-allenamento o una merenda da condividere con amici e familiari. Grazie alle loro dimensioni contenute, sono ideali per buffet, catering, cene informali o per accompagnare un aperitivo a base di frutta fresca e formaggi leggeri. Ecco alcune idee di abbinamenti e contesti in cui brillano:

  • Colazione al volo: accanto a una tazza di tè verde o un caffè leggermente amaro, per iniziare la giornata con un tocco di leggerezza e proteine.
  • Spuntino post-allenamento: una fonte rapida di proteine e carboidrati semplici per favorire il recupero muscolare.
  • Lunchbox nutritivo: una opzione elegante e sana per la merenda a scuola o in ufficio, facilmente trasportabile e poco ingombrante.
  • Aperitivo informale: serviti in piccoli pirottini con una punta di yogurt denso o una crema leggera al limone come salsa di accompagnamento.
  • Dolci pensieri per i bambini: la combinazione di colori vivaci e sapori familiari può trasformarsi in un piccolo rito quotidiano che incoraggia scelte alimentari sane.

Idee di pairing:

  • Bevande: tè alle erbe, limonata non troppo dolce, o una fettina di spremuta d’arancia per creare una sinergia fresca.
  • Dolci leggeri: una yogurtita naturale, semifreddo al limone o una fresca crema di ricotta light per un contrappunto cremoso.
  • Contorni: una mini selezione di frutta di stagione e una manciata di noci o semi per intensificare la texture e l’apporto proteico.

Sapori, texture e ingredienti chiave (senza ricetta passo-passo)

La ricetta si fonda su tre elementi chiave che lavorano sinergicamente per offrire un’esperienza gustativa completa. Il primo è la nota agrumata del limone: non troppo pungente, ma sufficiente a definire il profilo, con una scorza che sprigiona olio aromatico al primo contatto con gli odori della cucina. Il secondo è la dolcezza scintillante dei mirtilli, capaci di rilasciare un succo fragrante che rende ogni boccone limpido e rinfrescante. Il terzo elemento è la componente proteica: una base ricca ma leggera che tiene insieme le parti morbide, conferendo corpo e sostegno al palato. L’equilibrio fra queste parti crea una sensazione di completezza: non si tratta solo di una merenda fresca, ma di una piccola creazione che sa sostenere l’energia, calmare l’appetito e offrire piacere sensoriale in un formato pratico. Non è soltanto gusto; è un’esperienza che stimola la memoria olfattiva, il sorriso e la voglia di tornare a casa con una merenda pronta all’uso.

Per chi ama la cucina modulare, questa preparazione si presta a variazioni tematiche. Puoi pensare di sostituire i mirtilli con lamponi, more o pezzetti di pesca, oppure aggiungere una nota erbacea leggera (menta o basilico) per una sorpresa fresca. Per chi segue diete particolari, è facile immaginare versioni vegane utilizzando creme vegetali al posto di prodotti lattiero-caseari, sostituzioni di proteine in polvere prive di allergeni comuni o l’uso di fiocchi di avena senza glutine. L’interpretazione è elastica senza perdere l’anima: una base che trattiene gli ingredienti con una coesione delicata e una superficie lucida che trattiene i profumi aromatici.

Tips, Varianti & Sostituzioni

  • Varianti di gusto: prova a spruzzare una piccola quantità di succo di limone aggiuntivo o incorporare scorza di limone finemente grattugiata per un’impronta ancora più agrumata. Per una dolcezza più marcata, aggiungi una punta di miele o sciroppo d’acero nel giusto equilibrio.
  • Versione vegana: utilizza yogurt di soia o di mandorla come base cremosa, e scegli proteine vegetali o una miscela di noci macinate per dare corpo. Assicurati che i leganti siano compatibili con le alternative scelte.
  • Gluten-free: se l’eventuale base contiene fiocchi di avena, opta per avena certificata senza glutine per mantenere la ricetta accessibile a chi ha sensibilità o intolleranze.
  • Contenuto proteico: la quantità di proteine può essere aumentata o modulata a seconda delle preferenze personali integrando meglio la scelta proteica senza alterare troppo la texture.
  • Texture alternative: aggiungi una piccola vellutata di semi di chia o di lino per creare una micro-croccantezza o una micro-gelificazione che dia una nuova patina sulla superficie.
  • Armonie aromatiche: se vuoi una versione più esotica, puoi includere una puntina di zenzero grattugiato o una spolverata di cannella per un tocco speziato che si sposa bene con limone e mirtilli.

Conservazione & Idee per preparare in anticipo

Una delle grandi virtù di questi bocconcini è la capacità di resistere nel tempo senza perdere consistenza o sapore. Conservazione, preparazione in anticipo e facilità di trasporto sono virtù chiave di questo snack, che si presta bene a essere preparato in anticipo o in grandi lotti per l’intera settimana. Ecco alcuni consigli pratici per mantenere al meglio la freschezza e la consistenza:

  • Refrigerazione: riponi i bocconcini in contenitori ermetici o in vaschette singole, separandoli se vuoi evitare che si appallottolino. Conservano la loro integrità per 3-5 giorni in frigorifero.
  • Congelamento: per una preparazione ancora più lunga, è possibile congelarli singolarmente; durante la scongelamento lento in frigorifero, possono riacquistare una parte della loro morbidezza originale. Evita di scongelarli a temperatura ambiente se vuoi mantenere al massimo la texture.
  • Riscaldamento leggero: se preferisci una consistenza più morbida e una fragranza rinvigorita, scalda leggermente in forno a bassa temperatura o in microonde a intervalli brevi. Tuttavia, la maggior parte del gusto si gusta perfettamente fredda o a temperatura ambiente.
  • Make-ahead: una versione preparata la sera prima per l’indomani mattina può partire con una nota fresca, pronta da gustare appena si arriva in cucina. Puoi anche conservare gli ingredienti base e assemblare i bocconcini al momento.

Curiosità & Trivia

Lo sguardo curioso dei buongustai a volte coglie dettagli sorprendenti dietro una preparazione apparentemente semplice. Ecco alcune curiosità interessanti che si collegano a questa ricetta:

  • I bocconcini di formaggio, ispirazione del nome, hanno una lunga tradizione italiana, ma qui sono reinterpretati in chiave proteica, offrendo una versione moderna di uno snack classico.
  • Il limone è una delle frutte più amate in cucina per la sua capacità di elevare tutto ciò che tocca senza sovrastarlo. La combinazione limone-mirtillo è una quindi una coppia intramontabile in molte cucine del mondo, rinforzata qui da una base proteica.
  • La popolarità degli snack proteici ha spinto i cuochi casalinghi a cercare soluzioni creative che non sacrificano sapore e texture. Questa ricetta è un esempio di come si possa coniugare gusto, salute e praticità in un unico, grazioso boccone.
  • La filosofia di “no-bake” o di preparazioni senza cottura è molto apprezzata in ambienti dinamici, perché riduce i tempi di preparazione e minimizza l’uso di calore. La freschezza degli ingredienti crudi o leggeri diventa un valore aggiunto in molte cucine moderne.

Ingredients

Bocconcini Base

  • – 200 g bocconcini (fresh mozzarella pearls), drained and finely chopped
    → The mozzarella provides a protein-rich, creamy base for the bites. Chop finely so it blends evenly into the dough and do not skip patting dry to remove excess brine moisture, which can otherwise make the dough too loose. If very watery, press gently to extract more liquid before mixing.
  • – 1/2 cup plain Greek yogurt (unsweetened), thick and well-drained
    → Adds moisture and creaminess while acting as a binder with the mozzarella. Use thick yogurt for better structure; stir in gradually until the dough comes together without becoming too sticky. If your yogurt is very thick, loosen with 1–2 teaspoons water or lemon juice.
  • – 1 scoop unflavored whey or plant-based protein powder (≈25–30 g)
    → Boosts the protein content and helps the bites hold their shape during baking. Sift to avoid lumps; if using a dairy-free protein, choose a smooth powder and adjust moisture as needed. If skipping, substitute with an extra 2–3 tablespoons Greek yogurt and a pinch more almond flour.
  • – 1/3 cup almond flour (finely ground almonds)
    → Provides structure and absorbs extra moisture from the dairy while keeping the bites tender. If you don’t have almond flour, grind blanched almonds in a processor until very fine.
  • – 1 large egg, lightly beaten (optional)
    → Acts as a binder and helps the dough set during baking, giving a firmer bite. If you prefer a dairy-free or egg-free version, increase Greek yogurt to 2–3 tablespoons and add an extra 1 tablespoon almond flour instead.
  • – Zest of 1 lemon
    → Adds bright citrus aroma that pairs beautifully with blueberries and the mozzarella’s mild flavor. Zest the lemon before juicing to capture the essential oils; avoid the white pith. Use freshly grated zest for the most vibrant flavor.
  • – 1 tablespoon lemon juice
    → Brightens the dough and balances the richness; add gradually and stop when the dough has a cohesive, scoopable texture. If using very large lemons, adjust to taste as acidity can vary.
  • – 2 tablespoons honey or maple syrup
    → Natural sweetness to harmonize with lemon and dairy while contributing a touch of moisture. Warm the honey slightly if it’s thick so it distributes evenly; you can reduce by 1–2 teaspoons if you prefer a less sweet bite.
  • – 1 cup fresh blueberries, gently folded into the mixture (or thawed frozen, well-drained)
    → Imparts juicy bursts of fruit and color; fold in carefully to minimize bursting and staining the dough. If using frozen berries, pat dry to limit extra moisture and keep the bites from becoming soggy.
  • – 1/4 teaspoon fine sea salt
    → Enhances the dairy and lemon flavors and balances sweetness; salt level can be adjusted to taste, especially if your yogurt is slightly salted or your cheese brings extra saltiness.

Optional Add-ins

  • – 2 tablespoons chopped pistachios or almonds (for crunch)
    → Adds texture and a nutty contrast to the soft mozzarella core. Chop finely for even distribution; toast lightly to deepen flavor and keep them crisp during baking.
  • – 1 tablespoon chia seeds or ground flax seeds (optional)
    → Provides extra fiber, omega-3s and a slight gel-like binding that can help the dough cohesion. If using whole seeds, crush slightly so they mix well; increase yogurt by 1 teaspoon if the mixture feels dry.
  • – 1/4 cup shredded coconut (optional)
    → Introduces a gentle sweetness and a subtle tropical note; lightly toast before mixing to amplify flavor and prevent moisture absorption. Fold in at the end to preserve texture.
  • – 1 tablespoon poppy seeds (optional)
    → Adds delicate crunch and a pretty speckled appearance; sprinkle on top before baking for visual appeal and a crisp bite.

Instructions

  • Preheat your oven to 350°F (175°C) and line two standard 12-cup muffin tins with paper liners or grease them well.
    → This ensures the bites release cleanly from the cups and promotes even browning without sticking.
  • Pat the bocconcini dry with paper towels and finely chop until uniform small pieces; this step prevents excess brine moisture from making the dough loose and helps it hold its shape during baking.
    → Finely chopped mozzarella distributes evenly, creating a creamy core without watery pockets.
  • In a large mixing bowl, whisk together the thick Greek yogurt, lemon zest, and lemon juice with the honey until completely combined and smooth; this builds a bright, moist foundation and helps the flavors marry.
    → Fresh lemon zest oils intensify aroma and brighten the dough; warm honey slightly if thick to aid even blending.
  • Sift the unflavored whey or plant-based protein powder into the yogurt mixture and stir until just incorporated and free of lumps; this boosts protein content and ensures the dough binds without grittiness.
    → Sifting prevents clumps that could create pockets of dry protein and disrupt texture.
  • Stir in the almond flour and the fine sea salt until the dough begins to come together; if the mixture seems too wet, sprinkle in an extra teaspoon of almond flour gradually; if too dry, whisk in a teaspoon of yogurt.
    → This balance establishes structure while keeping the bites tender; almond flour provides absorption and crumb.
  • Lightly beat the egg and fold it into the dough; this binding layer helps the bites set firmly during baking; if you prefer dairy-free or egg-free, omit the egg and increase yogurt by 2–3 tablespoons plus 1 tablespoon extra almond flour instead.
    → The egg adds cohesion and a firmer texture; omitting it changes moisture and structure, so adjust accordingly.
  • Gently fold in the chopped bocconcini and the blueberries until evenly distributed but not crushed; use a rubber spatula and fold with a sweeping motion to minimize berry bursting and color bleed.
    → Even distribution ensures each bite has cheese and fruit, while careful handling preserves fruit integrity and prevents purple staining.
  • If using optional add-ins (2 tablespoons chopped pistachios or almonds, 1 tablespoon chia or flax seeds, 1/4 cup shredded coconut, or 1 tablespoon poppy seeds), fold them in now or sprinkle seeds on top before baking for texture and visual appeal; toast nuts first to deepen flavor and maintain crunch.
    → Toasting draws out fats and intensifies the nutty flavor, helping add-ins stay crisp during baking.
  • Use a 1 tablespoon scoop or two spoons to portion the dough into the prepared muffin cups, filling about 2/3 full; press down lightly to compact each mound so the bites bake evenly and hold their shape.
    → Uniform portions ensure consistent cooking and a cohesive bite across all pieces.
  • Bake in the preheated oven for 16–20 minutes, rotating the tins halfway through; bake until the edges are lightly golden and the centers are set to a gentle spring when touched, with a toothpick coming out with a few moist crumbs.
    → Proper doneness yields a tender crumb without becoming dry or crumbly, while rotation promotes even browning.
  • Let the bites rest in the pans for 5–7 minutes after removing from the oven, then transfer to a wire rack to cool completely; this cooling period allows the structure to finish setting and prevents crumbling when handling.
    → Resting stabilizes moisture distribution and preserves the delicate texture.
  • Serve immediately or refrigerate in an airtight container for up to 3–4 days; for longer storage, freeze unbaked or fully cooled bites and reheat from frozen as needed; this preserves freshness and safety of the dairy components.
    → Proper cooling and storage maintain texture, moisture, and bright lemon notes for convenient snacking.

Notes

These gluten-free bocconcini lemon and blueberry bites are protein-packed and naturally sweetened by the delicate combination of mozzarella and yogurt, with bright lemon zest and juicy blueberries for a refreshing bite. The texture should be tender with a subtle creaminess from the cheese and yogurt, balanced by almond flour for structure. They make an elegant snack or appetizer that holds well in the fridge or freezer.

  • Pat the chopped bocconcini dry after draining to remove excess brine moisture; moisture can make the dough too loose. If very watery, press gently to extract more liquid before mixing.
  • Use thick, well-drained Greek yogurt to provide moisture and bind the bites. If the yogurt is very thick, whisk in 1–2 teaspoons water or lemon juice to reach a scoopable consistency.
  • Sift or whisk the protein powder to avoid lumps; if you’re dairy-free, choose a smooth plant-based powder and adjust moisture as needed. If skipping the powder, substitute with an extra 2–3 tablespoons Greek yogurt and a pinch more almond flour.
  • Almond flour adds structure and helps absorb extra moisture from the dairy. If you don’t have almond flour, grind blanched almonds in a processor until very fine.
  • The lemon zest and juice brighten the dough; zest the lemon before juicing to capture the essential oils. Add lemon juice gradually and stop when the dough is cohesive and scoopable.
  • Honey or maple syrup provides a natural, balanced sweetness. Warm honey slightly if thick to distribute evenly; you can reduce by 1–2 teaspoons if you prefer a less sweet bite.
  • Fold in fresh blueberries gently to avoid bursting and staining the dough. If using frozen berries, pat them dry to limit extra moisture.
  • Optional add-ins like chopped pistachios or almonds give pleasant crunch; chia seeds or ground flax seeds add fiber and a touch of binding. Toast nuts lightly for deeper flavor.
  • For dairy-free or gluten-free adaptations, substitute with certified gluten-free and dairy-free ingredients (e.g., dairy-free yogurt and protein powder). If needed, increase yogurt by a bit and adjust almond flour to maintain scoopable dough.
  • Make-ahead and storage: form and refrigerate the bites up to 24 hours before baking. Bake as directed and store leftovers in the fridge for 3–4 days, or freeze for 1–2 months. Reheat gently to preserve moisture and texture.

Tips

Consigli per l’impasto e l’aroma

  • Assicurati che i bocconcini siano ben asciugati: tampona i bocconcini tagliati con carta assorbente per eliminare l’umidità in eccesso; troppa acqua rende l’impasto troppo morbido e difficile da modellare.
  • Setaccia la proteina in polvere prima di aggiungerla per evitare grumi; se l’impasto risulta ancora appiccicoso, incorpora un cucchiaio alla volta di farina di mandorle.
  • Usa yogurt greco denso e ben scolato; se è molto spesso, allunga con 1–2 cucchiaini di acqua o succo di limone per una consistenza lavorabile.
  • Grattugia la scorza di limone prima di spremere il succo per trattenere gli oli essenziali; evita la parte bianca (pith) poiché può risultare amara.
  • Se vuoi una versione senza uova, aumenta lo yogurt a 2–3 cucchiai e aggiungi 1 cucchiaio di farina di mandorle in più per la stabilità.

Incorporazione di mirtilli e sapori

  • Mescola i mirtilli con cautela per evitare che scoppino; asciugali bene prima di unirli per limitare l’umidità extra nell’impasto.
  • Se usi mirtilli congelati, asciugali e lasciali sgocciolare bene per evitare che rendano umido l’impasto.
  • Per un aroma ancora più vivace, includi un pizzico in più di scorza di limone durante l’incorporazione.

Formazione, cottura e texture

  • Usa una cucchiaia da gelato o un dosatore per porzionare l’impasto in palline di dimensioni uguali; questo assicura cottura uniforme e una presentazione gradevole.
  • Se l’impasto è troppo morbido, raffreddalo 10–15 minuti in frigorifero prima di modellarlo; il raffreddamento aiuta a mantenere la forma durante la cottura.
  • Rivesti la teglia con carta forno o utilizza un tappetino siliconico per evitare che i bocconcini si attacchino.
  • Controlla la doratura: dovrebbero essere leggermente dorati ai bordi e compatti al tatto; se risultano morbidi, prosegui la cottura 2–3 minuti in più.
  • Per una crosticina leggermente più evidente, spruzza leggermente con olio o spennella con una minima quantità di olio EVO a metà cottura.

Sostituzioni, varianti e note di gusto

  • Per una versione senza latticini, sostituisci la mozzarella con formaggio vegano a sapore neutro e mantieni lo yogurt vegetale; potresti aumentare la farina di mandorle di 1–2 cucchiai per la coesione.
  • Se non hai proteine in polvere, aggiungi 2–3 cucchiai extra di yogurt e 1 cucchiaio in più di farina di mandorle per mantenere la struttura.
  • Per un profilo di limone più intenso, aumenta leggermente la scorza e aggiungi qualche goccia di succo extra, controllando l’acidità per non eccedere.
  • Aggiunte croccanti: 2 cucchiai di pistacchi o mandorle tritate; tostali leggermente per intensificare il sapore e mantenerli croccanti durante la cottura.
  • Per un apporto di fibre extra, aggiungi 1–2 cucchiaini di semi di chia o di lino; se usi semi interi, schiacciali leggermente per favorire l’emulsione.

Stoccaggio, preparazione anticipata e presentazione

  • Conserva le palline cotte in un contenitore ermetico in frigorifero fino a 2 giorni; riscaldale brevemente in forno o al microonde a bassa potenza per ritrovare la morbidezza.
  • Per prepararle in anticipo, forma le palline e congela su un vassoio; una volta congelate, trasferiscile in sacchetti. Cuoci direttamente da surgelate, aggiungendo 3–5 minuti al tempo di cottura.

Presentazione e abbinamenti

  • Servile con una salsa leggera al limone o yogurt al limone per una dip fresca.
  • Guarnisci con scorza di limone grattugiata o foglioline di menta per un tocco di freschezza.
  • Per una nota di dolcezza, aggiungi un filo di miele o sciroppo d’acero al piatto finale, senza mescolare nell’impasto.

FAQ

Che cosa sono i Bocconcini proteici limone e mirtilli?

Piccoli snack proteici della grandezza di bite, preparati con yogurt o yogurt vegetale, proteine in polvere, avena e mirtilli, aromatizzati al limone. Sono facili da portare con te e ideali come spuntino post-allenamento o merenda nutriente.

Quali sono gli ingredienti principali?
  • Proteine in polvere (gusto neutro o limone)
  • Yogurt greco o yogurt vegetale
  • Avena macinata o fiocchi finemente tritati
  • Miele o sciroppo d’agave
  • Scorza e succo di limone
  • Mirtilli freschi o congelati
  • Un pizzico di sale
  • Facoltativi: olio di cocco, burro di mandorle/neve di cocco
Come si preparano i bocconcini proteici limone e mirtilli?

Mescola in una ciotola gli ingredienti secchi (proteine, avena, sale). A parte unisci yogurt, miele, scorza e succo di limone. Combina gli elementi liquidi con quelli secchi fino a ottenere un impasto compatto, aggiungi i mirtilli. Forma bocconcini delle dimensioni di una noce, disponili su carta forno e lasciali rassodare in frigorifero per almeno 30–60 minuti. Conserva in un contenitore ermetico.

Tempo di preparazione e tempo di riposo?

Tempo di preparazione: circa 15–25 minuti. Tempo di riposo in frigorifero: 30–60 minuti (o più, per una consistenza più soda).

Posso adattarli a diverse diete (senza lattosio, vegane, senza glutine)?

Sì. Alcune varianti:

  • Senza lattosio: yogurt di soia o di cocco; proteine in polvere a base vegetale.
  • Vegani: usare yogurt vegetale e proteine in polvere vegan; escludere eventuali ingredienti di origine animale.
  • Senza glutine: usare avena certificata gluten-free.
  • Per ridurre zuccheri: scegliere miele o sciroppo d’agave con moderazione e frutta meno dolce.
Come conservarli?

Conserva i bocconcini in un contenitore ermetico in frigorifero fino a 4–5 giorni. Possono anche essere conservati nel freezer per 1–2 mesi; cuoc (non cotti) o scongela in frigorifero prima di consumarli.

Posso congelarli?

Sì. Disponili su una teglia per un’ora per rapida congelazione, poi trasferiscili in un sacchetto o contenitore adatto al freezer. Per consumarli, lasciali scongelare in frigorifero o a temperatura ambiente per alcuni minuti.

Posso usare altri frutti oltre ai mirtilli?

Assolutamente. Puoi sostituire con fragole a cubetti, lamponi, more o piccole quantità di frutta secca tritata. È possibile anche aggiungere scorza d’arancia o lime per variare il profumo.

Come migliorare la consistenza e il gusto?

Se l’impasto è troppo morbido, aggiungi un po’ di avena macinata. Se è troppo secco, aggiungi yogurt o un cucchiaino di succo di limone. Per una nota extra, aggiungi un tocco di vaniglia, una manciata di scorze di limone o una collo di cioccolato fondente spezzettato.

Qual è l’apporto proteico approssimativo per porzione?

Gli apporti variano in base agli ingredienti scelti. In genere una porzione di bocconcini (circa 8–12 pezzi) può fornire indicativamente tra ~6 e ~12 g di proteine per pezzo, con carboidrati variabili e grassi moderati. Per una stima più accurata, controlla le etichette degli ingredienti che usi e suddividi per porzioni.

Introduction / Hook

Imagine a slice that feels like a velvet cloud on your tongue, a cheesecake that carries the warm, indulgent kiss of caramel in every bite. Cheesecake al dulce de leche is not just a dessert; it’s a celebration of two beloved classics coming together in perfect harmony. The moment you release the first forkful, you’ll hear the soft sigh of a creamy center giving way to a ribbon of luscious dulce de leche that threads through the surface like caramel sunlight. The crust, subtly sweet and wonderfully crunchy, cradles the creamy filling as if it were a tiny golden shoreline. And the aroma—oh, the aroma—a slow, caramelized sugar scent that swirls through the room, inviting everyone to gather around the table with spoons poised and smiles ready. This dessert is a bridge between cultures, a nod to nostalgia, and a modern, irresistible indulgence that shines at celebrations and quiet weekends alike. It’s the kind of recipe you want to cook because you know it will make ordinary moments feel extraordinary, turning a simple slice into a shared memory that lingers long after the last bite.

In every spoonful, you’ll taste the delicate tang of cream cheese balanced by the toffee-like sweetness of dulce de leche, with a hint of vanilla and a whisper of salt to keep the flavors bright and honest. The first bite feels fine and smooth, then gradually reveals more depth as the caramel folds through the center. It’s comfort with a touch of sophistication, familiar enough to earn a place in your family repertoire, but special enough to feel like a treat you’d serve to guests who deserve something memorable. If you’ve ever loved a classic cheesecake and also fallen for the irresistible richness of dulce de leche, you’re about to discover a dessert that respects both loves while elevating them to a new, irresistible peak.

The Story Behind the Dish

Dulce de leche is a whisper of culinary history—one of those comforting legends that has traveled across generations and borders. Though its exact origin is the subject of affectionate debate among cooks and historians, most stories agree on a simple, patient method: milk and sugar simmered together until they transform into a thick, amber-sweet confection with a magical, glossy sheen. In Argentina, Uruguay, and much of Latin America, dulce de leche is more than a sauce—it’s a cultural staple, a pantry treasure, and a companion to countless desserts, from ice cream to pastries to pastries stuffed with fruit. The scent of slowly caramelizing milk evokes sunlit kitchens and long conversations, a reminder that good things often come from patient preparation and a gentle touch.

Cheesecake, meanwhile, has its roots in European cheesecakes that migrated across oceans and evolved into the modern, creamy form we love today. The marriage of cheesecake and dulce de leche feels almost natural: a silky, tangy filling that aligns beautifully with the deep caramel notes of dulce de leche. When you swirl or ribbon the caramel through the batter or lay it as a gleaming top, you create a dessert that looks as luxurious as it tastes. The result is a hybrid that honors both traditions—the Latin American beloved dulce de leche and the classic New World cheesecake—while offering a contemporary celebration of texture and flavor. The idea of combining these two treasures isn’t just about indulgence; it’s about storytelling through taste. Each bite becomes a page in a delicious diary, a reminder that food can connect cultures, memories, and the people you share it with.

As families pass down recipes and reinterpret them for modern kitchens, Cheesecake al dulce de leche becomes a canvas for personal touch: you can tuck in a touch of citrus zest for brightness, a splash of espresso for depth, or a sprinkle of sea salt to punctuate the sweetness. It’s the kind of dish that invites improvisation without losing its essence—a creamy core, a caramel kiss, and a crust that offers a satisfying counterpoint to the luxurious filling. If you’ve ever pursued a dessert that feels both timeless and contemporary, you’ve found it in this cheesecake, a treat that travels well from a cozy Sunday supper to a festive soirée.

Why You’ll Love This Recipe

  • Luxuriously creamy, with a caramel-kissed center: The dulcet undertones of dulce de leche melt into the velvety cheesecake for a smooth, indulgent mouthfeel.
  • Balanced sweetness: The tang from cream cheese and a hint of vanilla keep the richness in check, so every bite feels refined rather than heavy.
  • Effortful-looking, you-can-do-it results: It’s an impressive dessert that rewards patience but doesn’t require pastry-chef precision to succeed.
  • Versatile in presentation: Whether you drizzle more dulce de leche on top, swirl it through the batter, or finish with a salted caramel layer, it’s easy to customize.
  • Crowd-pleasing for celebrations and weeknights alike: Elegant enough for guests, comforting enough for family gatherings.
  • Textural harmony: A crisp, buttery crust grounds the creamy filling, while the dulce de leche introduces a glossy, luscious ribbon that surprises with every slice.
  • Make-ahead friendly: This dessert is forgiving when it comes to timing, making it ideal for parties and meal planning.

Flavor Profile & Texture

The flavor profile of Cheesecake al dulce de leche is a careful composition of contrasts that come together in a single, unforgettable bite. The filling presents a gentle tang from cream cheese, which acts as a counterpoint to the deep sweetness of dulce de leche. Vanilla adds a soft, seductively aromatic warmth, while a delicate pinch of salt elevates every caramel note, helping it sing rather than overpower. You’ll notice a light, creamy silkiness in the texture, which glides across the palate and lingers with a faint, luxurious glow of caramel at the finish.

The crust offers its own character—a crisp, buttery base that provides a satisfying crunch and a caramelized edge of toasty flavor. Depending on your choice of crackers or cookies, the crust might carry a subtle toffee-like nuance that plays beautifully with the dulce de leche. When dulce de leche is swirled through the batter or layered on top, it creates a ribbon of decadence that catches the light and reveals itself slice after slice. The interplay of these components—tangy, creamy, caramel-rich, and a touch salty—creates a multi-dimensional experience that keeps the palate intrigued from first bite to last crumb.

Texture-wise, think: a firm yet yielding slice, a crust that gives under a gentle press, a filling that holds its shape but dissolves smoothly on the tongue, and a caramel layer that remains glossy and luscious. The contrast between the cool, creamy center and the slightly caramelized surface can be accentuated by a quick refrigerate before serving, ensuring the flavors settle and the slice holds its structure for an elegant presentation. If you prefer a touch more texture, you can optionally finish with a salted caramel drizzle that adds a brief crunch and a wave of salt-tinged sweetness at the end of each bite.

Occasions & Pairings

This cheesecake shines at every kind of gathering—from intimate family dinners to festive celebrations. It’s particularly fitting for holidays, birthdays, or any event that calls for something a little extra special without requiring an elaborate set-up. Its classic yet indulgent character makes it a reliable centerpiece for dinner parties, potlucks, or as a show-stopping weekend dessert to cap off a meals-with-friends night.

Pairing ideas to elevate the experience:

  • Beverages: A robust espresso, a dark roast coffee, or a glass of aged port or sherry can complement the caramel notes without overwhelming the cheesecake’s delicate tang.
  • Fruit & freshness: Fresh berries (strawberries, raspberries, or blueberries) offer a bright contrast that cuts through the sweetness. A light citrus zest over the plate can awaken the palate between bites.
  • Side options: A dollop of whipped cream or a spoonful of lightly whipped mascarpone can add a cloudlike counterpoint to the dense filling.
  • Dessert pairings: Dark chocolate shards, a quiet almond biscotti, or a pinch of flaky sea salt on top can provide textural and flavor accents that enhance the overall experience.

Tips, Variations & Substitutions

Tips for a flawless cheesecake al dulce de leche

– Temperature matters: Use room-temperature cream cheese to avoid lumps and achieve a silky filling. Gently blend the filling until smooth, avoiding over-mixing which can introduce air pockets.

– Gentle water bath environment: If you bake, a water bath helps prevent cracks and ensures even heat. If you skip it, monitor the edges to prevent over-baking.

– Dulce de leche placement: For a dramatic look, swirl dulce de leche through the batter with a skewer before baking or chilling. For a more uniform top, reserve a portion to drizzle after chilling.

– Chilling time: A longer chill (overnight if possible) helps the flavors meld and makes slicing neat, clean edges easier.

Variations

  • Use a crumbled biscuit crust with melted butter and a filling of cream cheese blended with dulce de leche and a touch of lemon juice; refrigerate until set for a creamy, no-oven alternative.
  • Add a teaspoon of finely ground espresso or a shot of espresso to the filling for a mocha-inspired twist that deepens the caramel notes.
  • Incorporate a teaspoon of orange or lemon zest to brighten the profile; the zest brings a fresh counterpoint to the sweetness.
  • Finish with a final sprinkle of flaky sea salt or a light salt sprinkle on top right before serving to enhance the caramel’s complexity.
  • Use crushed almonds, hazelnuts, or macadamias in the crust for added texture and an extra layer of flavor that pairs beautifully with dulce de leche.
  • Swirl in finely ground almonds or gluten-free cookies for a crust that remains crisp and satisfying for gluten-sensitive guests.
  • Use a plant-based cream cheese and vegan butter in the crust; pair with a dairy-free dulce de leche alternative if available, keeping in mind texture may shift slightly.

Substitutions

  • If you don’t have homemade dulce de leche on hand, good-quality store-bought varieties work beautifully. For a lighter touch, use half dulce de leche and half plain caramel sauce with a touch of salt.
  • For dairy-free or lactose-free versions, choose a high-quality dairy-free cream cheese and adjust sweetness to taste, ensuring the texture remains creamy.
  • If you’re avoiding dairy entirely, choose a vegan butter or coconut oil-based crust, ensuring the ratio of butter to cookies yields a sturdy, crisp base.

Storage & Make-Ahead Ideas

One of the greatest strengths of this cheesecake is how well it travels from the kitchen to the table and how forgiving it is in terms of timing. You can prepare it a day ahead or stash slices in the freezer for impromptu gatherings.

Refrigeration: Once set, store the cheesecake tightly covered in the refrigerator for up to 4-5 days. This makes it an excellent candidate for weekend meal planning or a make-ahead dessert for a dinner party.

Freezing: Slice the cheesecake and wrap individual portions tightly in plastic wrap, then place in an airtight container or zip-top bag. Freeze for up to 2-3 months. Thaw overnight in the refrigerator before serving. The filling remains creamy, though the texture may become slightly denser after freezing; a light whipping of the surface before serving can refresh its appearance.

Make-ahead strategies: If you’re hosting, you can prepare the crust and filling separately a day in advance, keeping them refrigerated. Assemble and bake (or set) just before serving, or opt for the no-bake version if you’re short on oven time. For a busy weekend, consider portioning the filling into mini cheesecakes in muffin tins; this makes individual servings easier to portion and serve at a party.

Fun Facts & Trivia (Optional)

Did you know that dulce de leche literally translates to “candy of milk”? It’s a name that hints at the beloved caramel-like sweetness that has charmed kitchens across Latin America and beyond. The exact technique—whether milk is simmered, baked, or slow-cooked to coax out its caramel color—has inspired generations of cooks to experiment, share, and improvise. In some regions, dulce de leche is a pantry staple as essential as flour or sugar, used to fill pastries, spread on toast, or elevate coffee and chocolate desserts to something closer to a ritual. The cultural resonance of this ingredient is matched by its adaptability: it’s wonderful in simple cookies, luxurious in cheesecakes, and endlessly creative in layered desserts and toppings. If you’ve ever tasted a spoonful of dulce de leche straight from the jar, you know the allure of its glossy, melt-in-your-mouth texture and caramel-forward flavor profile—an irresistible foundation for a cheesecake that feels both familiar and novel.

From a culinary perspective, this dessert showcases a global palate: the creamy, tangy backbone of a classic cheesecake meets the deeply nostalgic sweetness of dulce de leche. It’s a reminder that desserts aren’t just about sugar; they’re about memory, texture, and the way a single bite can conjure a memory of a childhood kitchen or a festive gathering with friends. Whether you’re revisiting a family recipe or crafting a new tradition, Cheesecake al dulce de leche invites you to slow down, savor, and share. It’s the kind of dessert that makes conversations linger, cameras flourish, and spoons disappear—one luscious slice at a time.

Ingredients

    Crust
    – 1 3/4 cups graham cracker crumbs (or digestive biscuits)
    → To form the crust: crush crackers into fine crumbs, then mix with sugar and melted butter until the texture resembles wet sand. Press firmly into the bottom and slightly up the sides of a 9-inch springform pan. Chill briefly before filling to help the crust set and stay crisp during baking.
    – 1/4 cup granulated sugar (optional, for crust)
    → Adds gentle sweetness to the crust; adjust based on the sweetness of your crackers. Mix with crumbs and butter, then press into pan.
    – 6 tablespoons unsalted butter, melted (85 g)
    → Binds the crust; use melted, cooled butter to evenly moisten the crumbs. If the crust seems dry, add a touch more butter, then press evenly, and chill to set before filling.

    Filling
    – 4 (8 oz) packages cream cheese, softened to room temperature (about 900 g)
    → The creamy base of the cheesecake; soften completely to avoid lumps and beat until smooth. Scrape the bowl often for a silky batter that sets evenly.
    – 1 cup granulated sugar (200 g)
    → Sweetens the filling; beat with the cream cheese until light and fluffy, dissolving sugar for a smooth texture. Adjust to taste if you prefer less sweetness.
    – 4 large eggs, room temperature
    → Provide structure and setting for the baked cheesecake. Add one at a time on low speed, mixing just until combined to prevent overbeating and cracks.
    – 1/2 cup sour cream, at room temperature (120 g)
    → Adds moisture and tang, yielding a creamier texture. Blend in after the cheese is smooth to avoid curdling; keep batter glossy.
    – 1/4 cup heavy cream (60 ml)
    → Increases richness and silkiness of the filling. Add gradually to reach the desired consistency without thinning the batter too much.
    – 1 teaspoon vanilla extract
    → Provides classic vanilla aroma; use pure vanilla extract or vanilla bean paste for best flavor. Avoid imitation vanilla for a richer note.
    – 2 tablespoons all-purpose flour or 2 tablespoons cornstarch (for stabilization)
    → Helps the filling set and reduces cracking. If gluten-free, use a gluten-free flour blend; mix thoroughly to avoid lumps in the batter.
    – 1/4 teaspoon fine salt
    → Enhances overall flavor balance and prevents the filling from tasting flat. Even with cream cheese, a pinch of salt lifts sweetness.
    – Optional: 1 teaspoon lemon zest (zest of 1 lemon)
    → A hint of brightness to cut through richness; distribute evenly to avoid large specks of zest. Use fresh zest for best aroma.

    Dulce de Leche Swirl
    – 1/2 to 1 cup dulce de leche, warmed to pourable consistency (120–250 g)
    → The signature caramel-like swirl; warming makes it easier to pipe or swirl through the batter. Drizzle or ripple through the filling after a portion is poured into the pan for even distribution.
    – Optional extra dulce de leche for topping after bake
    → If you want a very pronounced swirl or surface layer, dollop and swirl more dulce de leche on top after baking and before chilling; it will set as it cools.

    Finish and serving
    – flaky sea salt for finishing (pinch)
    → Finishing salt enhances the dulce de leche sweetness and adds a subtle crunch. Sprinkle just before serving for best texture.
    – fresh berries or whipped cream for serving (optional)
    → Classic accompaniments that balance richness; add just before serving to preserve texture and presentation.

Instructions

  • Preheat your oven to 350°F (175°C) and grease a 9-inch springform pan; if desired, line the bottom with parchment to ensure clean release, then set aside while you prepare the crust.
    → Proper pan preparation prevents sticking and ensures clean slices when the cheesecake is unmolded after chilling.
  • Crumble graham crackers (or digestive biscuits) into a fine, uniform crumb and transfer to a mixing bowl; add granulated sugar (optional) and pour in melted butter; stir until the mixture resembles wet sand and holds together when pressed; this creates a cohesive, flavorful crust that bakes evenly.
    → Uniform crumbs and even moisture distribution prevent crust gaps and ensure a sturdy base.
  • Press the crumb mixture firmly into the bottom and slightly up the sides of the prepared pan using the flat bottom of a measuring cup or a small flat-bottomed tool; chill for 15 minutes to set the crust so it does not crumble when filling is added.
    → A compact, chilled crust acts as a stable foundation for the creamy filling and resists shifting during baking.
  • Bake the crust in the preheated oven for 8 to 10 minutes until it is set and lightly golden; remove and cool completely on a rack before adding the filling to prevent soggy edges from steam and moisture.
    → Par-baking seals the crust, enhances flavor, and keeps it crisp under a moist cheesecake filling.
  • Reduce the oven temperature to 325°F (165°C) in preparation for baking the filling; this gentler heat helps the cheesecake set slowly and reduces the risk of cracks.
    → A stable, slow bake yields a smoother, creamier interior without overcooking the edges.
  • In a large mixing bowl, beat the softened cream cheese on medium speed until smooth and creamy, about 2 to 3 minutes, scraping the bowl halfway to ensure no lumps remain; this yields a velvet texture free of clumps.
    → Lumps can cause an uneven texture and uneven rise during baking, so thorough smoothing is essential.
  • Gradually add the granulated sugar to the cream cheese while continuing to beat on medium speed until the mixture is light, fluffy, and fully incorporated; this dissolves the sugar and contributes to a tender filling.
    → Proper sugar incorporation prevents gritty pockets and ensures a silky batter.
  • With the mixer on low speed, add the eggs one at a time, beating just until each is combined before adding the next; overmixing at this stage can overdevelop gluten or incorporate too much air, leading to cracks.
    → Gentle incorporation preserves density and a smooth, crack-free center.
  • Beat in the sour cream, heavy cream, and vanilla extract until the batter is smooth and glossy; this step adds moisture, tang, and a luxurious mouthfeel; avoid overbeating to prevent incorporate air bubbles that may surface as cracks.
    → Dairy enriches the texture and flavor, producing a creamy, balanced cheesecake.
  • Sprinkle in the all-purpose flour or cornstarch and the fine salt, then mix on low speed just until the batter comes together and no lumps remain; the stabilizer helps the cheesecake set firmly and minimizes cracking during cooling.
    → Stabilizers create a more uniform set and reduce surface cracking without altering the flavor.
  • If using lemon zest, fold in the zest at this stage to distribute bright citrus aroma evenly without large specks; zest should be added with the last mix to avoid overheating the surface and dulling its fragrance.
    → A touch of lemon heightens flavor without overpowering the dulce de leche.
  • Warm the dulce de leche to a pourable consistency by microwaving in short bursts or placing the container in a warm bath; stir until smooth and free of thick ribbons so it swirls beautifully into the batter without breaking apart.
    → A pourable consistency ensures clean, even swirls that bake into the cheesecake rather than sinking to the bottom.
  • Pour half of the cheesecake filling into the cooled crust, then drizzle one-third of the warmed dulce de leche over this layer; use a knife or skewer to gently swirl the dulce de leche through the batter to create marbled ribbons, ensuring some pockets for flavor distribution later.
    → Swirling distributes dulce de leche flavor and creates an appealing visual pattern without overpowering the texture.
  • Pour the remaining filling over the swirled layer and smooth the top with an offset spatula to an even surface; this ensures uniform baking and an attractive finish when sliced.
    → A level top helps the cheesecake set evenly and slices cleanly for presentation.
  • Wrap the bottom and sides of the springform pan tightly with heavy-duty aluminum foil to seal out water, then set the pan in a larger high-sided baking dish; pour hot water into the outer dish until it reaches halfway up the springform to form a water bath that cushions the bake and reduces cracking.
    → The water bath provides a humid, gentle environment that prevents shrinking and cracking, yielding a creamy center.
  • Bake the cheesecake in the water bath at 325°F (165°C) for 60 to 70 minutes, or until the center wobbles slightly when the pan is gently jiggled; if the top becomes too browned, tent with foil and continue baking until the edges are set but the center remains just shy of firm.
    → A barely-set center yields a creamy interior as the cheesecake cools and chills, while the edges are fully set.
  • Turn off the oven, crack the door, and let the cheesecake cool in the oven for about 1 hour to gradually drop the temperature and minimize cracking from sudden heat loss; this slow cooling stabilizes the structure.
    → Gradual cooling prevents rapid moisture migration and keeps the surface smooth.
  • Carefully remove the cheesecake from the water bath and outer foil; place on a rack to cool completely before refrigerating; once cool, cover loosely and refrigerate for at least 4 hours or ideally overnight to ensure full set and clean slices.
    → Chilling tightens the filling, enhances flavor melding, and makes slicing effortless.
  • Just before serving, optionally drizzle a final delicate swirl of dulce de leche on top or dollop with extra, and finish with a pinch of flaky sea salt; serve with fresh berries or lightly whipped cream if desired for contrast and balance.
    → Sea salt accents sweetness and enhances caramel notes, while berries or whipped cream provide brightness and texture.

Notes

This cheesecake al dulce de leche is a decadent, creamy dessert with a buttery crust and ribbons of caramel-like dulce de leche swirled through the filling. For a gluten-free option, use gluten-free graham crackers or digestive biscuits (or a nut-based crust) and ensure all substitutes are certified gluten-free. Crush the crackers into fine crumbs, then mix with a little sugar and melted butter until the texture resembles wet sand; press firmly into a 9-inch springform pan and chill briefly to help set the crust before filling.

Keep ingredients at room temperature for a smoother batter: soften the cream cheese completely, beat with the sugar until light and fluffy, and scrape the bowl often. Add eggs one at a time on low speed to avoid overmixing, which can cause cracks. Blend in sour cream, heavy cream, vanilla, and a pinch of salt until the mixture is glossy.

To bake with minimal cracking, use a water bath: wrap the pan in foil to seal and place it in a larger roasting pan filled with hot water. Bake until the center barely jiggles, then gradually cool in the oven with the door ajar to prevent sudden temperature changes. If you don’t use a water bath, bake at a slightly lower temperature and monitor closely, cooling slowly on the counter before refrigerating.

For the dulce de leche swirl, warm the dulce de leche to a pourable consistency and drizzle or ripple through the batter after the first pour into the pan, then swirl gently with a knife for a marbled look. Reserve extra dulce de leche for topping after chilling if you want a more pronounced finish.

Finish and serving: a light sprinkle of flaky sea salt enhances the dulce caramel flavor and provides a nice contrast. Serve with fresh berries or a dollop of whipped cream. The cake needs to chill at least 6 hours, preferably overnight, for clean slices. It freezes well—wrap tightly and freeze, then thaw in the fridge before serving. For tidy slices, wipe the knife between cuts and slice through a fully chilled cake.

Tips

Consejos prácticos para Cheesecake al Dulce de Leche

  • Crust duro y crujiente: asegúrate de triturar las galletas hasta obtener migas finas. Mezcla con el azúcar (si lo usas) y la mantequilla derretida hasta que la textura parezca arena mojada. Presiona firmemente en el fondo y ligeramente por los bordes de un molde desmontable de 23 cm. Refrigera 10–15 minutos antes de rellenar para que la base se asiente.
  • Consistencia de la base: si la mezcla de galleta parece seca, añade un poco más de mantequilla derretida, una cucharadita a la vez, y vuelve a mezclar hasta que tenga una textura que se adhiera al molde sin desmenuzarse.
  • Para opciones sin gluten: usa galletas sin gluten y, si lo prefieres, añade una pizca de sal en la corteza para equilibrar sabores.
  • Crema bien suave: deja el queso crema a temperatura ambiente hasta que esté muy blando y sin grumos. Bate a velocidad media hasta lograr una mezcla suave y esponjosa; raspa el bol con espátula varias veces para incorporar bien.
  • Azúcar y batido: incorpora el azúcar con la crema de queso hasta que la mezcla esté ligera y esponjosa. Un batido insuficiente puede dejar sabor a queso y una textura menos suave.
  • Huevos con cuidado: añade los huevos uno a la vez a baja velocidad, mezclando apenas hasta que se integren. Evita batir en exceso para prevenir burbujas de aire y grietas.
  • Hidratación y acidez: añade la crema agria y la nata lentamente, procurando que la mezcla quede brillante. Estos ingredientes aportan humedad y suavidad, así que no los añadas en frío del todo.
  • Vainilla y aroma: usa vainilla de buena calidad (extracto puro) para un aroma más rico. Si usas vainilla en pasta, evita excederte para no aportar amargor.
  • Opción de estabilizante: si decides usar harina o maicena, mézclalos bien con los otros ingredientes secos para evitar grumos y asegurar que el relleno no se agriete al hornearse.
  • Ralladura de limón (opcional): si te gusta un toque cítrico, añade solo 1 cucharadita de ralladura de limón para dar frescura sin sobrecargar el sabor.
  • Dulce de leche templado para el remolino: calienta el dulce de leche hasta que tenga consistencia de vertido para facilitar su merodeo en la masa. Si está muy espeso, añade un chorrito de leche o crema para aligerarlo.
  • Cómo hacer el remolino: añade una capa de masa, vierte hilos de dulce de leche templado en diferentes puntos y usa un palillo para hacer remolinos suaves. Evita verter todo en un solo lugar para una distribución uniforme.
  • Más dulce de leche para la superficie: si quieres un sabor más marcado, añade más dulce de leche al final, justo antes de hornear o tras enfriar ligeramente. Ten en cuenta que endurecerá al enfriar.
  • Horneado seguro: hornea a 325–350°F (160–175°C). Si horneas sin baño María, envuelve el exterior del molde con varias capas de papel aluminio para evitar filtraciones de agua y para mantener la cocción uniforme.
  • Prevención de grietas: para evitar grietas, hornea a baño María y deja que el pastel enfríe lentamente dentro del horno con la puerta entreabierta tras apagar el calor. Esto reduce el choque de temperatura.
  • Enfriado y reposo: deja enfriar completamente el cheesecake a temperatura ambiente, luego refrigéralo al menos 4 horas o idealmente toda la noche para que tome cuerpo y quede suave al cortar.
  • Finishing y servicio: espolvorea una pizca de sal marina justo antes de servir para realzar el dulce; acompáñalo con frutos rojos o crema batida para contrarrestar la riqueza.
  • Almacenamiento: guarda las porciones cubiertas en el refrigerador hasta 3–4 días. También puedes congelar porciones individuales envueltas; descongélalas en refrigeración antes de servir.

FAQ

Cheesecake al dulce de leche — Preguntas frecuentes

¿Qué es la Cheesecake al dulce de leche?

Es un pastel de queso cremoso con un toque de dulce de leche, que puede llevar una base crujiente de galleta y, a veces, una capa o remolino de dulce de leche por encima o dentro del relleno.

¿Qué necesito para la base?

Galletas trituradas (tipo digestive o vainilla), mantequilla sin sal derretida y una pizca de sal. Opcional: una cucharada de azúcar si las galletas no son dulces.

¿Qué necesito para el relleno?

Queso crema a temperatura ambiente, azúcar, huevos, vainilla y crema espesa. También dulce de leche para el remolino o capa. Opcional: una yema extra para mayor riqueza.

¿Qué tamaño de molde es ideal?

Un molde redondo de 20–23 cm (8–9 pulgadas) funciona perfecto. Si usas un molde más grande, el relleno quedará más delgado; para porciones más gruesas, usa un molde de 18 cm.

¿Se hornea al baño María?

Sí, es recomendado hornear al baño María para evitar grietas y cocción desigual. Envuelve la base del molde en papel aluminio y coloca el molde en una bandeja con agua caliente.

¿A qué temperatura y por cuánto tiempo hornear?

Hornear a 160–165 °C (325–330 °F) durante 60–70 minutos, o hasta que el centro esté apenas tembloroso al mover ligeramente el molde. Apaga el horno y deja que termine de cocerse con el calor residual.

¿Cómo evitar que se agriete o se parta?

Usa baño María, no abras la puerta del horno durante la cocción y permite que el relleno se cocine suavemente. Deja reposar el cheesecake dentro del horno con la puerta entreabierta unos minutos al terminar.

¿Cómo enfriar y desmoldar correctamente?

Retira el baño María y deja enfriar a temperatura ambiente, luego refrigera mínimo 4–6 horas o toda la noche. Desmolda pasando un cuchillo fino por los bordes y retirando con cuidado el aro del molde.

¿Cómo decorar o hacer un remolino de dulce de leche?

Una vez frío, añade una capa de dulce de leche por encima y crea remolinos con un tenedor o cuchillo. Puedes espolvorear con sal marina y decorar con nueces picadas o trocitos de chocolate.

¿Se puede adaptar para dietas o sustituciones?

Sí. Para versión sin gluten, usa galletas sin gluten. Para reducir azúcares, utiliza un edulcorante apto para repostería y ajusta la cantidad de dulce de leche. Si no quieres crema espesa, puedes usar yogur griego espeso mezclado con un poco de crema, aunque la textura será menos firme.

¿Cómo conservar y cuánto dura?

Conservar refrigerado: 4–5 días. También se puede congelar por porciones durante 1–2 meses; descongélalo en el refrigerador durante la noche antes de servir.

¿Cuántas porciones rende?

Con un molde de 20–23 cm suele rendir 8–12 porciones, dependiendo del tamaño de las rebanadas.

Introduction / Hook

Imagine a dessert that greets you with the crisp snap of biscotti, the warm, cozy aroma of cinnamon, and a cloud of velvety cheesecake that feels like a hug in every bite. Biscotti cheesecake al cinnamon roll is not just a dessert; it’s a story of textures dancing together—crunch meeting creaminess, spice flirting with sweetness, and tradition meeting indulgence. As you cut into it, the edges offer a satisfying chew from biscotti shards that crumble softly, while the center stays luxuriously smooth, radiating the comforting scent of cinnamon-sugar swirls that evoke early mornings and holiday gatherings. This creation invites you to pause, take a breath, and let your senses glide through layers of flavor that feel both familiar and intriguingly playful. It’s the type of dessert that makes you linger at the table, share a few smiles, and linger a while longer over the last forkful, savoring how each mouthful reveals a new harmony of taste and texture.

What makes this biscotti cheesecake al cinnamon roll so irresistible is its ability to fuse two beloved classics into one unforgettable experience. The biscotti provides a crisp, golden backbone that stands up to the creamy, tangy richness of cheesecake, while a cinnamon roll-inspired twist threads through the center, bringing warmth, softness, and a hint of caramelized sweetness. It’s like a bakery tour in a single slice: the first bite gives you a toasty snap, the middle reveals a cloudlike creaminess, and the finish lingers with a gentle spice and a whisper of vanilla. If you’ve ever enjoyed a warm cinnamon roll and a slice of cheesecake separately, you’ll recognize the magic in this hybrid—where every element has room to shine, yet nothing overpowers the others.

For anyone with a soft spot for comforting desserts, this dish is a celebration of small, thoughtful contrasts. The biscotti’s bite invites you to slow down and savor, the cheesecake’s silkiness invites mouthfuls that melt into happiness, and the cinnamon roll influence adds a kiss of warmth that makes you feel instantly at home. It’s a dessert that doesn’t demand ceremony or fuss; it invites you to gather around and share, to dip a spoon and let conversation mingle with the lingering aroma of spice and dairy. Whether you’re baking for a weekend brunch, a festive celebration, or a quiet evening with a loved one, this biscotti cheesecake al cinnamon roll promises a memorable moment—one that lingers long after the last crumb has disappeared.

From a culinary standpoint, this dish is a love letter to textures and contrasts. The biscotti’s sturdy bite contrasts with the silkiness of the cheesecake, delivering a satisfying mouthfeel that keeps you intrigued from the first slice to the last. The cinnamon roll influence adds a warm, caramel-tinged sweetness that rounds out the profile without tipping into cloying sweetness, ensuring that each bite remains balanced and refined. The result is a dessert that feels elegant enough for special occasions, yet approachable enough to bake for a family Sunday dinner or a spontaneous tea-time treat. If you’re a fan of cross-cultural sweets that tell a story with every bite, you’ll find that this biscotti cheesecake al cinnamon roll has a magnetic charm that’s hard to resist.

The Story Behind the Dish

Every great dessert has a genesis, and this one is no exception. It began as a playful experiment in a sunlit kitchen, where the aromas of a classic Italian biscotti recipe mingled with the creamy promise of a traditional American cheesecake and the cozy spice of a cinnamon roll—three familiar favorites meeting at the same table. The idea was simple: honor the crunch and coffee-shop nostalgia of biscotti while letting the cheesecake’s tangy richness and the cinnamon roll’s comforting sweetness weave a narrative of indulgence without surrendering balance. The result is a dessert that feels both rooted and adventurous, a tribute to the way culinary borders blur when people cook with curiosity and affection.

In many Italian households, biscotti are a symbol of friendship and celebration—cookies baked twice for a guaranteed crispness that stands up to dunking in coffee or dessert wine. The cinnamon roll, meanwhile, carries the memory of a morning ritual: soft dough swirled with cinnamon, sugar, and a glaze that gleams with promise. Cheesecake has its own universal appeal—a creamy, lush canvas that can be dressed in countless ways. Combining these elements wasn’t about replicating a single iconic recipe; it was about crafting a new memory that draws upon the best parts of each heritage. The baking process, too, tells a little anecdote: as the mixture settles and cools, you’re reminded of patience, the patience that lightens up a gathering and invites stories to unfold as the scent travels through the house.

As with many beloved desserts, there are countless regional variations and family twists that could influence the final result. Some cooks might introduce espresso notes to mirror the coffee compatibility of biscotti, while others might weave in a touch of orange zest to lift the spice with a citrus whisper. The warmth of cinnamon is a universal language, yet it can be tuned to be bold or delicate depending on preference. The beauty of this dish is that it invites storytelling—home cooks can adapt, improvise, and make it their own, while still preserving the heart of what makes it so comforting and festive at the same time.

Why You’ll Love This Recipe

  • Triple-comfort flavor profile: the crisp biscotti bite, the lush cheesecake creaminess, and the cinnamon-sugar warmth all in one harmonious bite.
  • Textural drama without fuss: a sturdy crust or crust-like crunch followed by a smooth, melt-in-your-mouth center.
  • Versatile for occasions: perfect for holiday gatherings, weekend gatherings, brunches, or a special date night at home.
  • Make-ahead friendly: can be prepared in advance and served chilled or at room temperature for easy entertaining.
  • Gourmet vibe with approachable execution: it feels luxurious and sophisticated, yet is approachable for home cooks who love comforting flavors.
  • Customizable sweetness and spice: the balance between cinnamon, vanilla, and dairy can be tuned to taste, allowing for a personalized finish.
  • Transforms everyday ingredients into something memorable: biscotti and cheesecake are accessible, but together they become an impressive showpiece.

Flavor Profile & Texture

Aroma and First Impression

From the moment you lift the lid or slice into the dessert, you’re met with an inviting fragrance that seems to wrap around you like a cozy shawl. The cinnamon note rises first, warm and comforting, followed by a delicate tang from the cheesecake’s creaminess. If you peeled back the top layer a little, you’d catch a hint of vanilla—soft, creamy, almost custard-like in its impression. The biscotti component offers a faint roasted, nutty facet that hints at coffee and almond, depending on the exact biscotti variety used. Together, these aromas create a sensory invitation that makes the mouth water before the first bite is even taken.

Taste Journey

The taste unfolds in a balanced progression. The initial bite delivers a crisp, slightly sweet snap from the biscotti shards embedded in the crust or almond-hinted crumble. It’s not only textural; it also introduces a toasty, caramelized character that harmonizes with the next layer—a silken, subtly tangy cheesecake that provides richness without heaviness. The cinnamon roll influence introduces a gentle spice and a caramelized sweetness that lingers on the palate, echoing in the fade-out with a soft, comforting warmth. In some iterations, a whisper of citrus or vanilla can surface, brightening the profile and preventing the sweetness from becoming too cloying. The overall impression is one of refined indulgence: familiar flavors reimagined into a sophisticated, celebratory dessert that remains inviting to the everyday palate.

Texture Symphony

Texture is at the heart of the experience. The biscotti pieces deliver a controlled crunch that resists melting away too quickly, ensuring contrast with the cheesecake’s ultra-smooth, airy creaminess. The cinnamon roll element adds a cloud-like softness in the center, which can feel almost souffle-like if the dessert is well-chilled and softly set. The combination yields a mouthfeel that is dynamic but cohesive, with each bite revealing a new note—crackly edge, dreamy center, and a waxing spice that lingers long after the bite is gone. The temperature plays a subtle role too: serving slightly chilled maintains the crispness of the biscotti while keeping the cheesecake luxuriously soft, creating a harmonious interplay between temperature, texture, and flavor.

Occasions & Pairings

This biscotti cheesecake thrives in social settings and quiet moments alike. Its elegance makes it suitable for special occasions, while its comforting familiarity ensures it’s never out of place at a casual gathering or weeknight dessert run.

  • Holidays and celebrations: a show-stopping centerpiece for Christmas dessert tables, Easter brunches, or birthday gatherings where guests expect a little something memorable.
  • Brunch or afternoon tea: pairs beautifully with coffee, espresso, or a tempting dessert wine that brings out the cheesecake’s creaminess.
  • Romantic evenings: a refined yet cozy dessert that pairs well with a mug of hot cocoa, an aged whiskey, or a sweet vermouth for a comforting closer to the meal.
  • Potlucks and family dinners: easy to slice into generous portions and transport without losing its integrity.

Pairings to consider, based on the mood and season:

  • Beverages: a robust coffee, a glass of dessert wine, or a lightly sweet sparkling drink can enhance the cinnamon notes and balance the richness.
  • Side accompaniments: a scoop of vanilla bean ice cream, a dollop of whipped cream, or a few fresh berries to bring brightness and a pop of color.
  • Storage-friendly companions: citrus zest or a dusting of cocoa powder can be added right before serving to alter the aroma and finish.

Tips, Variations & Substitutions

Tips for Perfection

To maximize texture and flavor, consider these gentle refinements. Choose biscotti that are crisp and toasted to bring a pronounced crunch that won’t crumble too easily. If your biscotti is softer than ideal, a quick light bake will restore its firmness. Keep the dessert slightly chilled to maintain a contrast between the crunchy edges and the creamy center. For a more intense cinnamon experience, you can increase the cinnamon ratio in the swirl or dust the top with a fine, warm cinnamon-sugar mix just before serving. If you want a cleaner, neater look when slicing, chill the assembled dessert until the center is firm, then cut sharp, clean slices with a warm knife between each cut.

Variations

There are many ways to twist this dessert while preserving its essence. Consider these ideas to tailor the dish to your preferences or the occasion:

  • Espresso-kissed version: incorporate a hint of espresso powder into the cheesecake filling or dust the top with a cocoa-espresso dust for a mocha twist that complements the biscotti’s coffee-friendly profile.
  • Orange-Cennamella note: add a touch of orange zest to brighten the cinnamon warmth. The citrus notes lift the overall profile and pair nicely with vanilla and the creaminess of the filling.
  • Nut-forward variation: use biscotti with almond or hazelnut flavors to amplify the nuttiness and add a gentle toasty aroma that works beautifully with the cinnamon.
  • Vegan-friendly approach: swap traditional dairy components for high-quality plant-based alternatives to achieve a similarly lush mouthfeel while accommodating dietary preferences.
  • Gluten-free option: use gluten-free biscotti and ensure that all other components are gluten-free to maintain the desired texture and flavor balance.
  • Fruit-inspired twist: fold in a light fruit compote or layer with a fruit glaze to add brightness and color contrast that complements the spice notes.

Substitutions

If you’re working with pantry constraints, you can adapt the components in thoughtful ways. For example, a dense, creamy base can be achieved with a smooth ricotta-cheese blend or a lighter mascarpone alternative, depending on what you have on hand. The spice profile can be adjusted to taste—more cinnamon for warmth, or a hint of nutmeg and cloves to evoke a holiday sense of depth. In some kitchens, a portion of the biscotti can be replaced with a similar crunchy texture like teething biscuits or nutty cookies, as long as they bring that crisp element that anchors the dessert’s structure.

Storage & Make-Ahead Ideas

One of the practical delights of this dessert is its adaptability for ahead-of-time planning. It firms up nicely after chilling, which makes it ideal for entertaining when you want to spend more time with guests and less time in the kitchen during the event.

  • Make-ahead: prepare the dessert up to the point of serving, then refrigerate or chill until ready to slice. Since the flavors mellow with time, the cinnamon warmth can become even more integrated the next day.
  • Storage: wrap tightly and store in the refrigerator for several days. If you prefer longer storage, it freezes well; wrap slices individually and freeze for up to a couple of months. Thaw in the refrigerator or at room temperature, and if desired, re-briefly chill to restore a clean slice.
  • Reheating and serving tips: if you like the center to feel warmer and more indulgent, you can briefly warm slices in a low oven or gentle microwave, making sure not to melt the texture into something too soft. A cold, fresh dollop of whipped cream or a scoop of vanilla ice cream can elevate the experience when served warm or at room temperature.
  • Make-ahead flavor alignment: if you’re planning a multi-course menu, consider preparing the base and the swirl ahead of time, then assemble and chill just before serving to maintain the crispiness of the biscotti and the integrity of the cheesecake center.

Fun Facts & Trivia (Optional)

  • Biscotti, literally meaning “twice-baked” in Italian, were originally developed as a way to preserve cookies for longer journeys and were famously dunked in coffee or wine to soften them before eating.
  • Cheesecake’s origins stretch back to ancient civilizations, with early versions found in places like Greece and Rome. Modern cheesecakes often feature a mix of cream cheese and other dairy, creating a smooth, luxurious texture that has worldwide appeal.
  • Cinnamon has been prized for its warm, comforting aroma for centuries and was once considered a valuable spice in ancient trade routes. Today, its familiar scent is a universal cue for dessert and homey baking moments.
  • Combining biscotti with cheesecake is a celebration of texture and tradition—an inventive marriage of a cookie meant for dunking and a dessert designed for indulgence, each bringing its own history into a single, delicious slice.

Ingredients

Crust and Base

  • 1 1/2 cups finely crushed biscotti (about 180 g)
    → This crust forms the base for the cheesecake, adding crunch and biscotti flavor. Grind biscotti into fine crumbs in a food processor until powdery, then measure 1 1/2 cups. Mix with melted butter until the mixture resembles wet sand and holds together when pressed into the pan. Chill briefly before filling to set.
  • 4 tablespoons unsalted butter, melted (60 g)
    → The butter binds the crust crumbs into a cohesive shell that bakes into a sturdy foundation. Use unsalted butter to control salt level; whisk with the crumbs, then press into a 9-inch springform pan. Chill for 10 minutes to set before filling.

Cheesecake Filling

  • 24 oz (680 g) cream cheese, softened to room temperature
    → Cream cheese provides the creamy, tangy base of the cheesecake. For a smooth filling, ensure it is fully softened to avoid lumps; beat with sugar until light and fluffy, but do not overbeat to prevent cracks. Room-temperature cheese blends evenly with other ingredients.
  • 3/4 cup granulated sugar (150 g)
    → Sugar sweetens to balance tang; beat with cheese until smooth; add gradually to avoid graininess. If crystals remain, ensure the cheese is soft and not cold.
  • 3 large eggs, room temperature
    → Eggs provide structure and moisture to the filling. Add eggs one at a time on low speed to minimize air pockets; keep even temperature to prevent cracks.
  • 1/2 cup sour cream or full-fat Greek yogurt, at room temperature
    → Adds moisture, tenderness, and a slight tang; use full-fat for richness. Whisk until smooth before folding into the filling to avoid lumps.
  • 1 teaspoon vanilla extract (or 1/2 vanilla bean)
    → Vanilla enhances depth of flavor; real vanilla provides more aroma. If using vanilla bean, scrape seeds and whisk with the cream cheese until evenly dispersed.
  • 1 tablespoon all-purpose flour
    → A touch of flour helps stabilize the batter, preventing cracks and shrinking as it bakes and chills. Sift and whisk into the filling with the cream cheese before adding eggs.

Cinnamon Swirl

  • 2 tablespoons unsalted butter, melted
    → Creates the cinnamon-sugar swirl that mimics cinnamon roll filling. This fat helps the swirl spread evenly through the batter when marbled, and keep it from sinking. Keep the mixture warm but not hot to avoid cooking the batter.
  • 2 tablespoons brown sugar
    → Provides moisture and a rich caramel note that pairs with cinnamon. Mix with the melted butter and 1 teaspoon cinnamon for a thick, spreadable swirl. If you prefer milder sweetness, use 1 tablespoon.
  • 1 teaspoon ground cinnamon
    → Signature spice for cinnamon rolls; a strong aroma without overpowering the cheesecake. Adjust up to 1 1/2 teaspoons if you love cinnamon, and marble through the filling in generous ribbons for visible swirls.
  • 1/4 teaspoon salt (optional)
    → A small pinch to balance sweetness; omit if using salted butter or if you prefer a milder swirl.

Toppings

  • 1/2 cup powdered sugar
    → Use for glaze or light dusting of the cooled cheesecake. If making a glaze, whisk with 2 tablespoons milk and a splash of vanilla to a pourable consistency. You can also dust a light layer after glazing for a decorative finish.
  • 2 tablespoons milk or heavy cream
    → Liquid to thin the glaze; start with 1 tablespoon and add more until you reach your desired pourable consistency. For dairy-free options, use almond milk or coconut milk, keeping the glaze thick enough to coat a spoon.
  • 1/4 teaspoon vanilla extract
    → Adds aroma to the glaze; balances the sweetness and cinnamon notes. Stir the vanilla into the glaze after the sugar and milk are combined for even distribution.

Instructions

  • Preheat your oven to 325°F (165°C) and position a rack in the center of the oven; set a 9-inch springform pan on a baking sheet for stability; line the interior with a parchment round and lightly grease the sides with butter or nonstick spray.

    → A steady oven temperature ensures even baking and prevents cracks; parchment prevents sticking and makes unmolding easier.
  • Grind the biscotti into very fine crumbs using a food processor or place them in a resealable bag and crush with a rolling pin until they resemble powdery sand.

    → Uniformly fine crumbs create a cohesive crust that bakes evenly and supports the cheesecake without crumbling.
  • Measure 1 1/2 cups of the biscotti crumbs after grinding, then transfer to a bowl and whisk in the melted butter until the mixture resembles wet sand and holds its shape when pressed.

    → The butter binds the crumbs into a compact, sliceable crust; too little butter will crumble, too much will be greasy.
  • Press the crust mixture into the bottom and lightly up the sides of the prepared 9-inch springform pan, applying even weight with the flat bottom of a measuring cup or a small glass; chill the crust for 10 minutes to set.

    → A cooled, firm crust holds its shape during filling and slicing, preventing leakage and sogginess.
  • In a large mixing bowl, beat softened cream cheese with granulated sugar on medium-low speed until the mixture is completely smooth and free of lumps; scrape the bowl as needed to ensure even texture.

    → Softened cream cheese blends more uniformly with sugar, creating a silky filling; beating on low avoids incorporating air that can lead to cracks later.
  • Sprinkle in the all-purpose flour and mix on low speed just until combined; do not overbeat after the flour is added to maintain a tender texture.

    → A small amount of flour stabilizes the batter, reducing cracking as it sets during chilling and baking, while keeping the batter smooth.
  • Beat in the sour cream (or Greek yogurt) and vanilla extract until the batter is creamy and homogeneous; scrape the sides and fold in any stray lumps with a spatula.

    → Sour cream adds moisture and tenderness with a subtle tang; bringing it to-room temperature avoids curdling and ensures smooth integration.
  • With the mixer on low, add the eggs one at a time, fully incorporating each before adding the next; stop as soon as the last egg is blended to avoid over-aerating the batter.

    → Adding eggs gradually on low speed minimizes air pockets that can cause cracks and helps the cheesecake set evenly.
  • In a separate small bowl, whisk the melted butter, brown sugar, 1 teaspoon ground cinnamon and salt until the sugar is dissolved and the mixture is smooth; keep this cinnamon swirl mixture warm but not hot.

    → A warm swirl will distribute evenly when marbling without cooking the batter; cinnamon aroma should be strong but not scorched.
  • Pour half of the cheesecake batter onto the chilled crust and spread evenly to the edges; drizzle or spoon the cinnamon swirl across the surface in a loose lattice or ribbon pattern; use a knife or skewer to marble the swirl into the batter in broad, decorative swirls.

    → Marbling creates the signature cinnamon roll look and distributes cinnamon flavor without overpowering the cheesecake; avoid over-swirling which can blend the layers too much.
  • Carefully spoon the remaining batter atop the swirled layer and smooth the surface with an offset spatula; the top should be level to ensure even baking and slicing.

    → A uniform top prevents uneven browning and helps the cheesecake slice cleanly after chilling.
  • Wrap the outside of the springform pan securely with two layers of heavy-duty aluminum foil to seal, then place the pan in a larger roasting pan; pour hot water into the roasting pan until it reaches about halfway up the sides of the cheesecake (a water bath).

    → The water bath provides gentle, even heat that reduces cracking and keeps the center creamy by insulating the cake during baking.
  • Bake the cheesecake at 325°F (165°C) for about 55–70 minutes, or until the outer edges are set and the center still has a slight wobble when the pan is gently nudged.

    → The center should appear a bit jiggly because it will continue to set as it cools; overbaking dries the filling and increases cracking risk.
  • Turn off the oven and leave the cheesecake inside with the door cracked about 4 inches for 1 hour to gradually cool and minimize sudden temperature changes that can cause cracking.

    → Slow cooling helps the structure set evenly and reduces cracks caused by rapid cooling.
  • Remove the cheesecake from the water bath, carefully unwrap, and refrigerate uncovered for at least 4 hours or overnight to finish firming and to allow flavors to meld.

    → Chilling solidifies the texture for clean slicing and enhances flavor depth; do not skip this step for the best results.
  • Prepare the glaze by whisking 1/2 cup powdered sugar with 2 tablespoons milk and 1/4 teaspoon vanilla until smooth and pourable; adjust with more milk or sugar to reach a thick but pourable consistency.

    → A well-balanced glaze adds a glossy finish and a touch of sweetness without overpowering the cheesecake; a proper consistency coats the slice without pooling.
  • When the cheesecake is fully chilled, spoon or drizzle the glaze over the top in a thin, even layer and allow it to set for about 15 minutes before slicing.

    → A thin glaze sets quickly and helps keep the surface from becoming sticky when cut; it also adds a visually appealing finish.
  • Dust with a light sprinkle of additional cinnamon powder or powdered sugar if desired for an extra cinnamon roll-inspired presentation; serve chilled or at room temperature in clean, neat slices.

    → Finishing touches enhance aroma and appearance; slight warming to room temperature improves aroma and flavor release in each bite.

Notes

These biscotti cheesecake al cinnamon roll is a decadent twist on the classic cheesecake, featuring a crisp biscotti crust and a cinnamon-roll inspired swirl. To ensure a creamy filling and clean slices, prep the crust and filling in stages and avoid overmixing. The notes below will help you achieve a stable bake, visible swirls, and a glossy glaze.

  • Crust and base: Grind biscotti into a fine crumb (about 1 1/2 cups). Combine with 4 tablespoons melted butter until the mixture resembles wet sand and holds when pressed. Press firmly into a 9-inch springform pan to form an even crust, then chill for 10–15 minutes to set before filling.
  • Cheesecake filling: Soften 24 oz (680 g) cream cheese to room temperature to avoid lumps. Beat with 3/4 cup granulated sugar until smooth and fluffy, then add 3 large eggs one at a time on low speed. Fold in 1/2 cup sour cream or full-fat Greek yogurt and 1 teaspoon vanilla. Add 1 tablespoon all-purpose flour and whisk just until incorporated. Avoid overmixing to prevent cracks. Bake until the edges are set and the center wobbles slightly; cool gradually on a rack before refrigerating to firm up.
  • Cinnamon swirl: Keep the swirl mixture warm but not hot. Combine 2 tablespoons melted butter, 2 tablespoons brown sugar, 1 teaspoon ground cinnamon, and 1/4 teaspoon salt (optional) until smooth. Dollop and swirl through the batter with a knife or skewer to create generous ribbons that marble through without sinking.
  • Toppings and finish: For a glaze, whisk 1/2 cup powdered sugar with 2 tablespoons milk (or dairy-free alternative) and 1/4 teaspoon vanilla until smooth. Drizzle over cooled cheesecake or dust lightly with sugar. Adjust the glaze thickness by adding more milk a teaspoon at a time if needed. The glaze hardens slightly as the cheesecake chills, giving a polished finish.
  • Make-ahead and storage: Bake the cheesecake a day ahead and chill overnight for cleaner slicing. It keeps well in the refrigerator for up to 4–5 days. Slice and serve chilled or slightly at room temperature. You can freeze baked slices wrapped tightly for 1–2 months; thaw overnight in the fridge before serving.

Tips

Tips for making Biscotti cheesecake al cinnamon roll

  • Crust consistency and handling

    Grind biscotti to a fine crumb and measure exactly 1 1/2 cups. The crust should resemble wet sand when mixed with melted butter and should hold together when pressed into the pan. If the mixture feels too dry, you can add a teaspoon or two of extra melted butter, but avoid making it soggy. After pressing into a 9-inch springform, chill for at least 10 minutes to set before filling.

  • Softening and beating cream cheese

    Let the cream cheese sit at room temperature until soft and pliable to avoid lumps. Beat with the sugar until the mixture is smooth and pale, but don’t overbeat once the eggs are added, or you risk cracks in the finished cake. Keep everything at room temperature for the best texture.

  • Eggs and temperature

    Add eggs one at a time on low speed to minimize air pockets. Keeping ingredients at room temperature helps them emulsify more evenly, resulting in a silkier filling with fewer cracks.

  • Sour cream or Greek yogurt

    Use full-fat for the richest texture and a tangy note. Whisk the sour cream or yogurt until smooth before folding into the filling to avoid lumps and streaks in the batter.

  • Vanilla and flour

    If using vanilla bean, scrape the seeds and whisk them through the cheese mixture for deeper aroma. Sift the flour and whisk it in with the cream cheese before adding eggs to help stabilize the batter and prevent graininess.

  • Cinnamon swirl components

    Keep the melted butter mixture warm but not hot so it blends evenly into the swirl. Brown sugar adds moisture and a caramel note; if you prefer a milder swirl, reduce to 1 tablespoon. Use 1 teaspoon cinnamon (or up to 1 1/2 teaspoons for a stronger cinnamon aroma) to balance sweetness without overpowering the filling.

  • Swirl technique

    Spread half of the filling in the pan, dollop the cinnamon swirl over it, then cover with the remaining filling. Use a knife or skewer to marble the batter in loose ribbons—don’t over-mix—so the cinnamon design remains visible after baking.

  • Preventing cracks and ensuring a smooth bake

    Consider baking the cheesecake in a water bath or at least wrap the pan well and place it in a larger pan with hot water. The moisture helps prevent cracks and keeps the surface glossy. Do not overbake; the center should still jiggle slightly when you move the pan. Let it cool gradually on a rack before refrigerating.

  • Glaze and topping tips

    For the glaze, start with the powdered sugar and milk, then add vanilla and whisk until you reach a pourable but thick consistency. If it’s too thin, add a bit more sugar; if too thick, add a touch more milk. Apply glaze to cooled cake or dust with a light veil of powdered sugar for a decorative finish.

  • Make-ahead and storage

    The crust and filling can be prepared ahead: keep the crust pressed and chilled, and you can even prepare the filling and swirl up to a day in advance (store covered in the fridge). Slices refrigerate well for up to 4–5 days and freeze beautifully for 1–2 months. Thaw overnight in the fridge before serving for best texture.

FAQ

Che cos’è Biscotti cheesecake al cinnamon roll?

È un dessert a stratificazione che combina una base croccante di biscotti, una crema di formaggio soffice e un swirl dolce ispirato al cinnamon roll. Si può gustare freddo o a temperatura ambiente, offrendo una piacevole fusione di texture tra croccante e cremosa.

Quali sono gli ingredienti principali?

Base: biscotti sbriciolati (tipo digestive/biscotti secchi) mescolati con burro fuso. Ripieno: formaggio cremoso, zucchero, uova, vaniglia, un pizzico di sale e panna acida (opzionale). Swirl cinnamon roll: zucchero, cannella e burro per creare l’effetto swirl; topping opzionale di glassa di zucchero.

Come si prepara la base di biscotti?

1) Macina i biscotti fino a ottenere una consistenza sabbiosa. 2) Mescola con burro fuso finché il composto è omogeneo. 3) Premi bene sul fondo di una teglia a cerniera rivestita con carta forno. 4) Metti in frigo per 15-20 minuti per rassodare prima di riempire.

Come si crea il swirl al cinnamon roll all’interno della cheesecake?

Prepara un mix di zucchero e cannella con una piccola quantità di burro fuso. Se usi rotoli di cinnamon roll già pronti, tagliali a pezzetti piccoli e spennellali con la miscela cannella-zucchero, da distribuire sulla crema di formaggio a metà cottura per creare l’effetto swirl. In alternativa, mescola un po’ di impasto di cinnamon roll (già lievitato) con zucchero e cannella e agguanta in cucchiaiate durante la preparazione.

Qual è la temperatura e il tempo di cottura consigliati?

Cuoci a 170°C (340-350°F) per 45-60 minuti, o finché i bordi si sono rassodati e il centro è appena tremolante. Se la superficie marrone troppo rapidamente, copri con carta stagnola negli ultimi 10-15 minuti. Per una consistenza uniforme, considera la cottura in bagno-maria.

È necessario utilizzare un bagno-maria?

È consigliato per evitare crepe e ottenere una crema più liscia. Se non hai una grande teglia adatta al bagno-maria, avvolgi la teglia in alluminio resistente e posizionala in una teglia più grande riempita di acqua calda per metà durante la cottura.

Come si raffredda e si conserva la cheesecake?

Lascia raffreddare completamente a temperatura ambiente, quindi trasferisci in frigorifero per almeno 4-6 ore o preferibilmente durante la notte. Conserva ben chiuso in frigorifero fino a 3-4 giorni. Puoi anche congelarla: avvolgila bene e durare fino a 1-2 mesi; scongelala in frigorifero prima di servire.

Posso prepararla in anticipo?

Sì. Puoi preparare la base e la crema in anticipo. Assemblala una volta che la base è fredda, poi cuoci e raffredda. Se vuoi, congela la cheesecake non cotta in porzioni singole per agevolare la preparazione futura.

Come adattare la ricetta per diverse esigenze (gluten-free, dairy-free, ecc.)?

Varianti:
– Gluten-free: usa biscotti gluten-free per la base; assicurati che il cinnamon roll sia adatto a una versione gluten-free o prepara una schermatura con impasto senza glutine.
– Dairy-free: usa formaggio cremoso vegano o crema di formaggio a base di mandorle, burro vegetale al posto del burro tradizionale e panna acida vegetale (opzionale).
– Senza zucchero o a ridotto contenuto zuccheri: sostituisci con dolcificanti adatti e riduci la quantità di zucchero nella crema e nel swirl.
– Senza uova: sostituisci con chia/flax eggs o miscele commerciali per cheesecake vegane (il risultato potrebbe essere leggermente diverso in consistenza).

Quali abbinamenti o toppings consigliate per servire?

Caramello salato, glassa di zucchero a velo, scaglie di cioccolato, salsa al cioccolato bianco, una spolverata di cannella extra o granella di noci. Per un tocco fresco, aggiungi scorza di arancia o limone grattugiata sulla crema prima che si rapprenda.

Quali errori comuni evitare?

Evitare di sovrassbitare la crema durante l’impasto, che può portare a una cheesecake dura. Assicurarsi che gli ingredienti siano a temperatura ambiente, utilizzare un bagno-maria per una superficie liscia, non aprire troppo spesso il forno durante la cottura e lasciare raffreddare lentamente per prevenire crepe.