Introduction / Hook
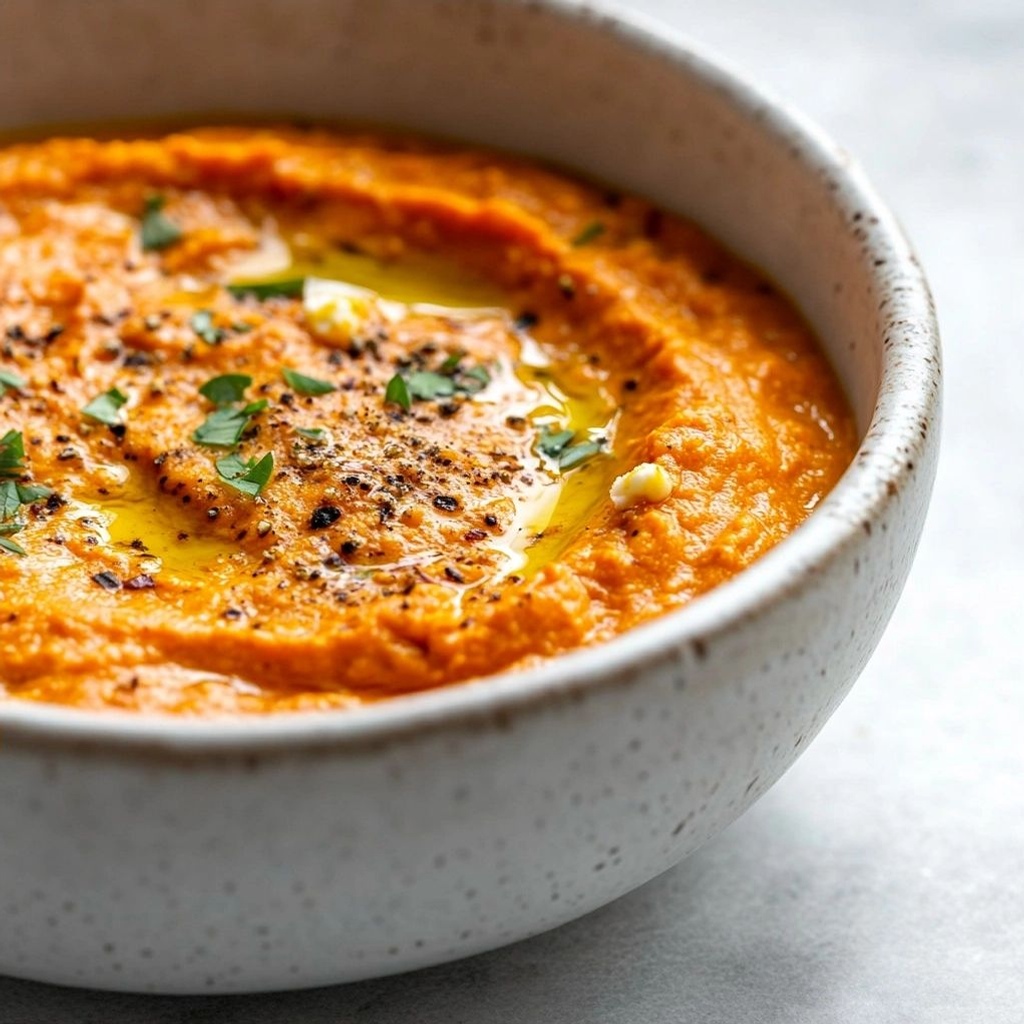
There’s something irresistibly vibrant about a bright carrot and roasted red pepper feta dip that makes any gathering feel festive. From the moment you lift the lid, a warm wave of sweetness from caramelized carrots mingles with the smoky kiss of roasted peppers, while feta lends a creamy, tangy backbone that ties everything together in a single, swoon-worthy dip. It’s the kind of dish that invites enthusiastic dipping, sparks conversation, and somehow makes vegetables feel indulgent. Picture a rustic wooden board, a drizzle of olive oil catching the light, and a chorus of crunching, soft, and tangy textures all at once as you scoop into this luminous dip. The aroma is comforting without being heavy—a balance of summer garden brightness and Mediterranean sunshine. This isn’t just a dip; it’s an edible mood booster, a centerpiece in a casual appetizer spread, and a reliable crowd-pleaser that can morph from party starter to weeknight hero in minutes.
The Story Behind the Dish
Bright carrot and roasted red pepper feta dip grew out of a desire to celebrate the simplest, most flavorful vegetables in a velvety, savory-sweet form. In many kitchens across the Mediterranean and parts of the Middle East, peppers and carrots have long been roasted to concentrate their natural sugars and to mellow their sharp edges, creating a depth of flavor that’s hard to resist. Feta, with its crumbly texture and briny finish, has a knack for brightening dishes and lending a touch of saltiness that elevates each bite. The combination of roasted vegetables with tangy cheese isn’t new, but this particular pairing—carrot’s sunny sweetness with red pepper’s smoky pepperiness and feta’s distinct bite—feels modern, fresh, and ideal for dunkable moments. In home kitchens, this dip often evolves from a simple puree to a vibrant centerpiece as cooks add a splash of lemon, a pinch of herbs, or a drizzle of olive oil, turning everyday vegetables into something that feels celebratory. The origin story of this dip isn’t about a strict recipe so much as a mood: a desire to create something bright, shareable, and deeply comforting—perfect for afternoons that drift into evenings, for potlucks that demand color, and for Sunday gatherings that deserve a little extra sparkle.
Why You’ll Love This Recipe
- Quick to make: Roasting the peppers and carrots is hands-off, and the final blend comes together in minutes.
- Vibrant and versatile: The dip can be served warm or at room temperature, making it ideal for parties, picnics, or weeknight snacks.
- Colorful and inviting: The bright orange of carrots and the ruby red of peppers create a stunning visual that whets the appetite before a single bite.
- Balanced flavors: The natural sweetness of roasted vegetables blends with feta’s tang and a whisper of citrus or herbs for a complex, well-rounded finish.
- Flexible dietary options: The base is naturally vegetarian and can be adapted for vegan or dairy-free diets with simple substitutions.
- Perfect pairings: It shines with crisp vegetables, baked pita chips, toasted baguette slices, or as a creamy spread on wraps and sandwiches.
Flavor Profile & Texture
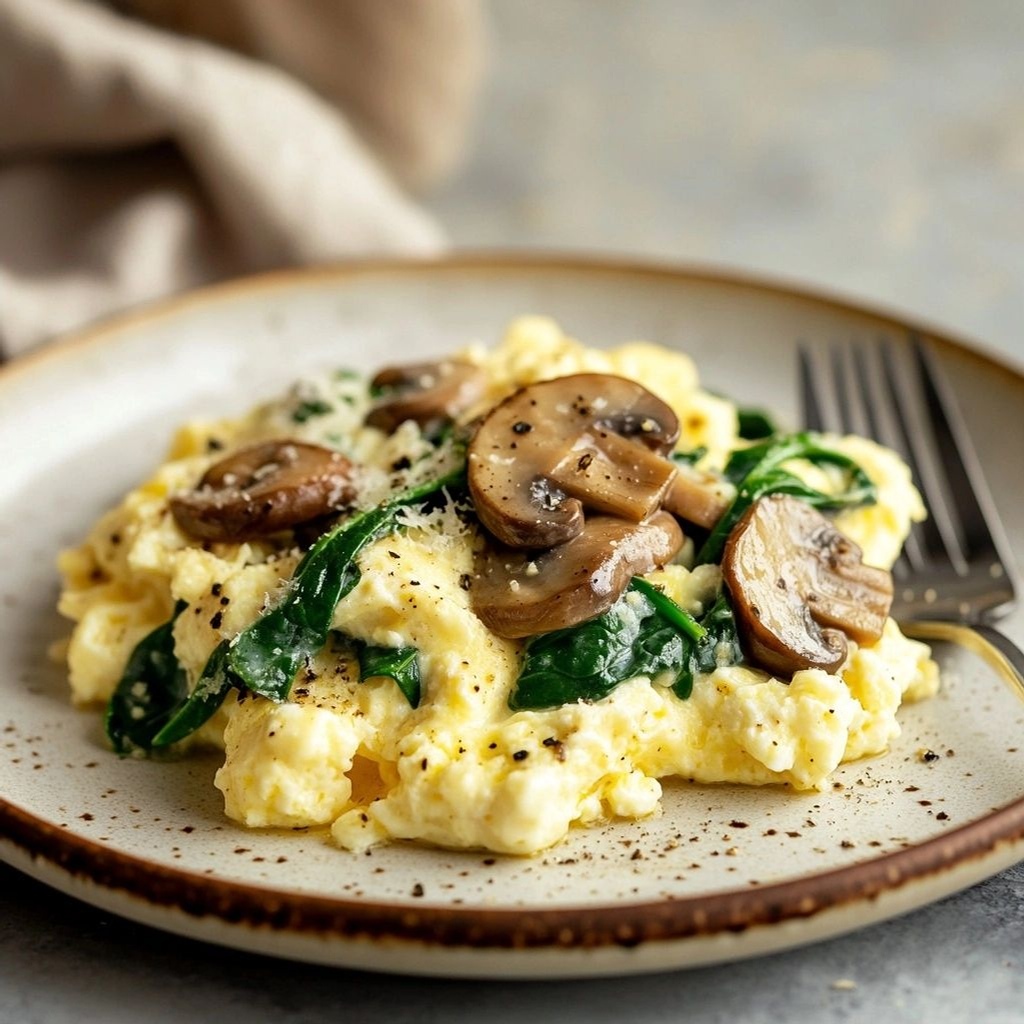
The dip delivers a harmonious chorus of flavors. The carrots contribute a mellow sweetness that is intensified by roasting, allowing their natural sugars to caramelize and deepen. Roasted red peppers add a smoky sweetness with a slight char that introduces a subtle, appetizing edge. The feta anchors the mixture with its salty, tangy personality, providing a savory backbone that counterpoints the sweetness in a most satisfying way. When blended, the texture strikes a balance between creamy and chunky: you’ll encounter smooth, luscious carousel of dip with occasional fibrous specks of carrot and pepper for texture and visual interest. A final touch—be it a squeeze of lemon, a drizzle of olive oil, or a sprinkle of fresh herbs—brightens the dish and lifts the flavors to a sunlit finish. The result is a dip that feels indulgent yet fresh, comforting yet vibrant, and always ready to bring a room together.
Texture Details
Expect a velvety, scoopable body that clings to the chips and bread you pair it with. The feta bits add tiny bursts of savory saltiness, giving a pleasant contrast to the creamy base. If you prefer a silkier texture, you can blend longer; if you crave more substance, pulse briefly to retain some of the chunkiness. The roasted vegetables themselves offer a tender bite with a subtle chew, ensuring every bite has layers rather than a single note.
Occasions & Pairings
This dip shines in a variety of settings. It’s equally at home at casual weeknight tastings, festive holiday gatherings, or a summer garden party. Its brightness elevates even the simplest of spreads, making it a conversation starter and a crowd-pleaser in one.
Occasions
- Wholesome weeknight dips for family dinners or movie nights
- Casual parties and potlucks where guests will gather around a shared board
- Brunch spreads that benefit from a savory, colorful option
- Picnics and outdoor gatherings where a bright, easy-to-transport dip fits perfectly into a cooler
- Appetizers for holiday dinners, adding a Mediterranean-inspired brightness to the table
Pairings
- Crackers, pita chips, warm pita wedges, and sliced baguette
- Vegetable crudités like cucumber ribbons, celery sticks, and rainbow peppers
- Grilled bread crostini with a light brushing of garlic oil
- Fresh herbs such as parsley, dill, or chives to brighten the top
- A splash of extra-virgin olive oil or a hint of lemon zest for a lift
- Complementary dips with similar brightness, like herb yogurt or olive-tapenade, to create a sampler board
Tips, Variations & Substitutions
Here are several ways to tailor this dip to your kitchen, dietary needs, or flavor preferences. Each variation preserves the core idea while offering a new experience with familiar ingredients.
Make-Ahead & Prep
- Roast the carrots and peppers a day ahead; refrigerate and re-blend or warm gently before serving.
- Prepare a double batch and freeze half in an airtight container for a quick party starter later on. Thaw in the fridge overnight, then reblend with a touch of olive oil if needed to loosen the texture.
Vegan & Dairy-Free Options
- Replace feta with crumbled firm tofu that’s been marinated in lemon juice, olive oil, and a pinch of salt for a tangy bite. You can also use a dairy-free feta alternative if available.
- Blend with a cashew cream base to achieve a similarly creamy texture without dairy, adjusting salt to taste to mimic feta’s saltiness.
Gluten-Free and Low-Carb Variants
- Serve with gluten-free crackers or veggie sticks to maintain a gluten-free spread.
- For a low-carb version, keep the dip as is but pair it with cucumber rounds, radish slices, or cheese crisps instead of bread.
Regional Twists
- Incorporate roasted garlic for an extra savory depth and a warm, cozy aroma.
- Finish with a pinch of smoked paprika or toasted cumin to introduce a subtle smokiness or earthiness that echoes roasted peppers.
- Add chopped kalamata olives for a briny note that complements feta beautifully.
Herbs, Citrus & Spice
- Stir in lemon juice or zest for a citrusy lift that brightens the dip, especially if you’re serving it with heavier breads.
- Fresh dill or parsley adds a green, fresh contrast; chives provide a delicate onion note that pairs well with feta.
- A pinch of chili flakes or finely minced jalapeño introduces a gentle heat that balances the sweetness of the vegetables.
Storage & Make-Ahead Ideas
Storing and reheating can preserve or even enhance flavors when done thoughtfully. Here are practical tips to keep this dip at its best.
Storage
- Store any leftover dip in an airtight container in the refrigerator for up to 3 days. The flavors often deepen slightly as it sits, which many find appealing.
- For a creamier texture after chilling, let the dip come to room temperature for 15–20 minutes and give it a gentle stir; a small splash of olive oil can restore the glossy, inviting finish.
Freezing & Reheating
- Freezing is possible, but the texture may change upon thawing. If you freeze, blend again with a splash of water or olive oil after thawing to recapture a creamy consistency.
- Reheat gently on the stovetop over low heat or in the microwave at short intervals, stirring in between to prevent scorching. A little extra lemon juice or olive oil can refresh the flavors after reheating.
Make-Ahead Strategies
- Roast vegetables a day ahead; blend shortly before serving for a fresh, vibrant dip with minimal last-minute effort.
- Assemble a dipping board ahead of time, then chill the dip separately. Just before serving, re-whisk and arrange on the platter for an inviting, ready-to-pass centerpiece.
Fun Facts & Trivia (Optional)
Did you know that roasted peppers have a long culinary lineage across many cultures, often used to impart a smoky sweetness without heat? Carrots, once a resilient underground staple, have been selectively bred to be sweeter and more vibrant, turning a humble root into a color-saturated star of color-forward dishes. Feta cheese, traditionally made from sheep’s milk in Greece and nearby regions, carries a distinct tang that resonates with briny notes found in the Mediterranean pantry. When these three ingredients meet—carrot, roasted red pepper, feta—the result is a dip that feels modern and nostalgic at once, a bridge between sunlit summer gardens and charming, cozy gatherings indoors. The dip’s versatility reflects a broader trend in contemporary entertaining: crowd-pleasing dishes that celebrate vegetables as glamorous, crave-worthy fare rather than as mere sides. It’s also a reminder that simplicity, when executed with attention to balance and texture, can produce the most memorable flavors.
Another fun tidbit: dips of this sort encourage convivial sharing. They invite people to linger around the table, to sample a little here and there, and to discover their own perfect pairings. The act of dipping—scooping a generous portion onto a crisp piece of bread or a fresh carrot stick—creates a sensory moment that’s both comforting and celebratory. In many cultures, communal bowls and shared dips symbolize hospitality and togetherness, turning a simple appetizer into a social ritual. So beyond the taste, this Bright Carrot & Roasted Red Pepper Feta Dip is about creating connection, one fragrant, colorful bite at a time.

Ingredients
- Dip Base
- 1 cup roasted red peppers, drained and chopped
→ Roasted peppers provide sweetness and a smoky depth that forms the vibrant base of the dip. Chopping them finely helps them blend smoothly with the other ingredients, creating a creamy, uniform texture without large chunks. - 1 cup grated carrots (finely grated)
→ Finely grated carrots release moisture and natural sweetness that brighten the dip while adding subtle body. Grating rather than slicing ensures an evenly smooth consistency when mixed with the feta and dairy. If you prefer a chunkier texture, grate slightly coarser. - 8 oz feta cheese, crumbled
→ Feta provides a salty, tangy backbone and creamy mouthfeel. Crumble before measuring to ensure accurate volume and even distribution. For a milder dip, use a block of feta and mix until completely integrated; for a stronger feta bite, slightly press more crumbles into the mixture. - 1/2 cup Greek yogurt or sour cream
→ Adds creaminess and helps mellow the saltiness of feta while contributing body. If you want a lighter dip, use Greek yogurt; for extra richness, substitute full-fat sour cream. Temper yogurt at room temperature before mixing to prevent curdling. - 2 tbsp extra-virgin olive oil
→ A touch of oil enriches the texture, enhances mouthfeel, and helps emulsify the mixture for a smoother dip. Use a good-quality, fruity olive oil for best flavor; drizzle and whisk in gradually to avoid greasiness. - 1 garlic clove, finely minced
→ Garlic adds aromatic warmth that complements the feta’s saltiness. Mince finely or press to maximize flavor release; if you’re sensitive to garlic, start with half a clove and adjust to taste. - 1 tbsp lemon juice
→ Brightens the dip, counteracts the richness, and enhances the cheese’s tang. Freshly squeezed lemon juice yields a more vibrant acidity than bottled. Add gradually and taste to balance saltiness. - 1/2 tsp ground cumin (optional)
→ Cumin introduces a subtle earthy warmth that pairs well with carrot and pepper flavors. Use sparingly; too much can overpower the feta. If you don’t have cumin, a pinch of smoked paprika can provide a similar warmth. - Salt and black pepper to taste
→ Seasoning is essential to bring out each ingredient’s character. Since feta is naturally salty, add salt in small increments, tasting as you go. Freshly cracked pepper adds a mild bite that contrasts the creamy texture. - Optional Add-ins
- 2 tbsp chopped fresh parsley
→ Fresh parsley adds a bright, herbal note and a pop of color that lifts the presentation. Chop finely so it distributes evenly; use flat-leaf parsley for a milder flavor and vibrant green hue. If desired, substitute with dill for a more pronounced accent. - 1/2 cup chopped olives (green or kalamata, pitted)
→ Olives introduce a briny contrast that deepens the flavor profile and complements the feta. Chop to small pieces so they blend into the dip rather than sinking to the bottom. If olives seem too strong, rinse quickly to reduce excess salt. - 1/4 cup crumbled feta (for extra feta bite)
→ Extra feta intensifies tanginess and texture. Add after the base is blended to maintain some chunks for bite and visual appeal. If you prefer a smoother dip, omit this addition. - Pinch red pepper flakes
→ Adds a gentle heat that lifts the sweetness of peppers and carrots. Add gradually, especially if serving to guests who vary in spice tolerance. This is optional and can be omitted for a milder dip.
Instructions
- Gather all ingredients and tools, placing them within arm’s reach to streamline the workflow and maintain surface cleanliness during assembly.
→ Having everything ready reduces interruptions and ensures you can taste and adjust seasoning as you go without scrambling for items. - Roast peppers can be used already roasted; if using fresh peppers, char and roast them first until blistered, then peel and drain, to build the smoky, sweet base essential for depth.
→ Roasting concentrates sweetness and impart a savory char, which amplifies the dip’s final flavor and color. - Chop the roasted red peppers finely until nearly paste-like, then transfer to a large mixing bowl to create a uniform base that blends smoothly with dairy and feta.
→ Finely chopped peppers disperse evenly, preventing pockets of chunky pepper that could disrupt the dip’s creamy texture. - Finely grate the carrots using a microplane or fine grater to maximize surface area and release moisture; measure 1 cup from the grated pile.
→ Finely grated carrot integrates fully with the feta and yogurt, contributing brightness and body without introducing grainy texture. - Crumble the feta cheese before measuring to ensure accurate volume and even distribution; set aside any extra crumble for optional added bite later.
→ Crumbling creates small, uniform particles that emulsify more readily into the dip, delivering consistent saltiness and creaminess. - In a separate small bowl, whisk together the Greek yogurt (or sour cream), lemon juice, and extra-virgin olive oil until well emulsified and smooth.
→ Proper emulsification creates a glossy, cohesive base that coats the vegetables and cheeses evenly, improving mouthfeel and stability. - Stir in the finely minced garlic and the optional ground cumin (if using) to evenly distribute aromatics and warm the overall flavor; season with a pinch of salt to begin building depth.
→ Garlic provides aromatic intensity; cumin adds an earthy warmth. Starting with a small amount allows you to balance saltiness and heat later without overpowering the dip. - Fold the pepper and carrot mixture into the emulsified dairy using a spatula until a uniform, cohesive base forms; avoid over-mixing to keep a silky texture.
→ Gentle folding preserves the vibrant colors and prevents the dip from becoming dense or butter-like, ensuring a replenishable spreadable consistency. - Gradually add the feta crumble into the mixture, folding in with deliberate turns to incorporate but still maintain some creamy feta pockets for bite.
→ Partial feta integration provides tangy creaminess while preserving textural contrast for a more sophisticated dip experience. - Season the dip with lemon juice, black pepper, and salt to taste, tasting after each addition to maintain balance against the feta’s inherent saltiness.
→ Feta can be quite salty, so incremental tasting ensures you don’t oversalt and you achieve a bright, well-rounded finish. - Integrate the optional add-ins if desired: chopped fresh parsley for brightness, chopped olives for briny depth, and/or a pinch of red pepper flakes for a gentle kick; fold in gently so colors and textures remain vibrant.
→ Fresh herbs and olives elevate aroma and complexity, while pepper flakes introduce a controlled heat that complements the sweetness of peppers and carrots. - Transfer the finished dip to a serving bowl, smoothing the top with a spatula and letting it rest at room temperature for about 15 minutes to allow flavors to meld.
→ A brief resting period helps the dairy proteins relax and the flavors to harmonize, resulting in a more cohesive dip with a smoother mouthfeel. - Serve with warm pita chips, toasted baguette rounds, or crisp vegetables; provide small bowls of extra olive oil, fresh herbs, or olives on the side for guests to customize.
→ Offering a variety of dippers and optional toppings lets guests tailor the texture and intensity, enhancing the presentation and enjoyment of the dish.

Notes
These Bright Carrot & Roasted Red Pepper Feta Dip is a vibrant, creamy spread that brings warmth from roasted peppers and tang from feta. You can customize it with your favorite herbs or olives for a briny contrast, and it pairs beautifully with veggie sticks, toasted bread, or crisp crackers. For a lighter version, you can use Greek yogurt in place of sour cream or reduce the feta slightly and compensate with a splash of extra lemon juice. The dip can be prepared a day ahead—the flavors marry more deeply after the ingredients have had time to rest in the fridge. If you prefer a smoother texture, blend longer; for more texture and bite, pulse briefly to keep small chunks intact. To serve, offer an assortment of dippers: cucumber ribbons, carrot sticks, celery sticks, pita wedges, or toasted crostini. Store tightly covered in the refrigerator for up to 3 days; the olive oil may thicken the dip as it chills, so whisk gently and loosen with a small splash of water or yogurt before serving. For an extra feta-forward profile, sprinkle a little crumbled feta on top just before serving and heat briefly to soften. Always taste and adjust salt carefully, considering the saltiness of feta and any added olives.
Tips
- Peel and seed the roasted red peppers if you want a smoother dip. If you prefer a bit more texture, leave some skin intact for a subtle roasted note and color variation.
- For the best texture, drain the peppers well and press out as much liquid as possible before chopping to prevent a watery dip.
- To prevent the feta from breaking apart and to achieve a creamy, cohesive dip, crumble it thoroughly and let it come to room temperature before mixing.
- Grate the carrots finely or use a microplane to maximize moisture release and ensure the carrot sweetness blends evenly with the feta. If you only have larger holes, pulse briefly in a food processor to avoid stringy pieces.
- Whisk the feta and dairy base (yogurt or sour cream) with the olive oil in a slow, steady stream to build a stable emulsion. This prevents separation and yields a glossy dip.
- Add lemon juice gradually and taste as you go. The acidity should balance the saltiness of the feta without overpowering the other flavors.
- Warm the olive oil slightly (not hot) before adding it to the mixture to help carry aromatics and improve smoothness. Do not add cold oil directly to dairy, which can cause curdling.
- Use minced garlic for even distribution. If you’re sensitive to garlic, you can sauté it for 30 seconds in a tiny amount of oil to mellow its bite before adding.
- Optional cumin adds warmth; if omitting, consider a pinch of smoked paprika or a small squeeze of orange zest to brighten the dip instead.
- Season in stages. Start with a small pinch of salt, tasting before adding more, since feta is salty and olives can be briny. Finish with fresh crack of black pepper just before serving.
- Chill the dip for at least 30 minutes to let flavors meld. If time allows, refrigerate for a few hours or overnight for deeper flavor development.
- For a lighter version, substitute full-fat dairy with low-fat yogurt and adjust seasoning accordingly. For extra richness, use full-fat Greek yogurt and a touch more olive oil.
- Make-ahead tip: assemble the base up to 1 day in advance and refrigerate. Stir well and adjust seasoning before serving; the flavors will intensify with time.
- Serving ideas: pair with warm pita wedges, crisp vegetables, or use as a spread on sandwiches or atop grilled fish. A drizzle of extra virgin olive oil and a sprinkle of fresh herbs elevate the presentation.
- Storage: store in an airtight container in the refrigerator for up to 3–4 days. For longer storage, freeze in a tightly sealed container for up to 1 month, then thaw and whisk to recombine texture.
- Texture tweaks: if the dip seems too thick, whisk in a small amount of water, milk, or extra yogurt—add gradually until you reach your desired consistency.
FAQ
What is Bright Carrot & Roasted Red Pepper Feta Dip?
A creamy, tangy dip made from roasted red peppers, sweet carrots, and crumbled feta, blended with a touch of olive oil and lemon for brightness. Perfect with pita, veggies, or crackers.
What are the main ingredients?
Roasted red peppers, cooked or roasted carrots, crumbled feta cheese, olive oil, lemon juice, garlic, salt, and optional herbs like parsley or dill.
Can I make this dairy-free or vegan?
Yes. Substitute feta with a plant-based feta or chopped almonds/cashews for creaminess, and use olive oil and lemon for brightness. You can also add a splash of unsweetened almond milk to reach desired consistency.
How do I roast the peppers and carrots?
Roast peppers under a broiler or on a grill until charred and softened, then peel and seed. For carrots, roast until tender and slightly caramelized. You can also use store-bought roasted peppers to save time.
Is there a quick version?
Yes. Use jarred roasted red peppers and pre-cooked roasted carrots or carrot chips. Blend with feta, olive oil, lemon juice, and garlic for a fast, bright dip in about 10–15 minutes.
What should the texture be like?
Aim for a creamy, scoopable dip with a slight chunkiness from the roasted vegetables. Adjust by adding more olive oil or a splash of water or lemon juice if needed.
What are good serving suggestions?
Serve with pita bread triangles, tortilla chips, cucumber or carrot sticks, or use as a spread on crostini. It also pairs well with grilled vegetables or as a topping for baked falafel.
How long does it keep in the fridge?
Store in an airtight container for up to 3–4 days. Let it come to room temperature for easier scooping before serving.
Can I freeze this dip?
Freezing is not ideal because feta texture may change. If you must, freeze for up to 1 month and thaw in the fridge, then whisk well and adjust with a drizzle of olive oil and lemon to regain creaminess.
How can I adjust the flavor level?
Add more lemon juice or a pinch of chili flakes for brightness and heat. Increase feta for a saltier, creamier dip, or balance with a touch of honey or maple syrup if you prefer a slightly sweeter profile.