Author

Ocean Nightleaf

Browsing

Introduction / Hook

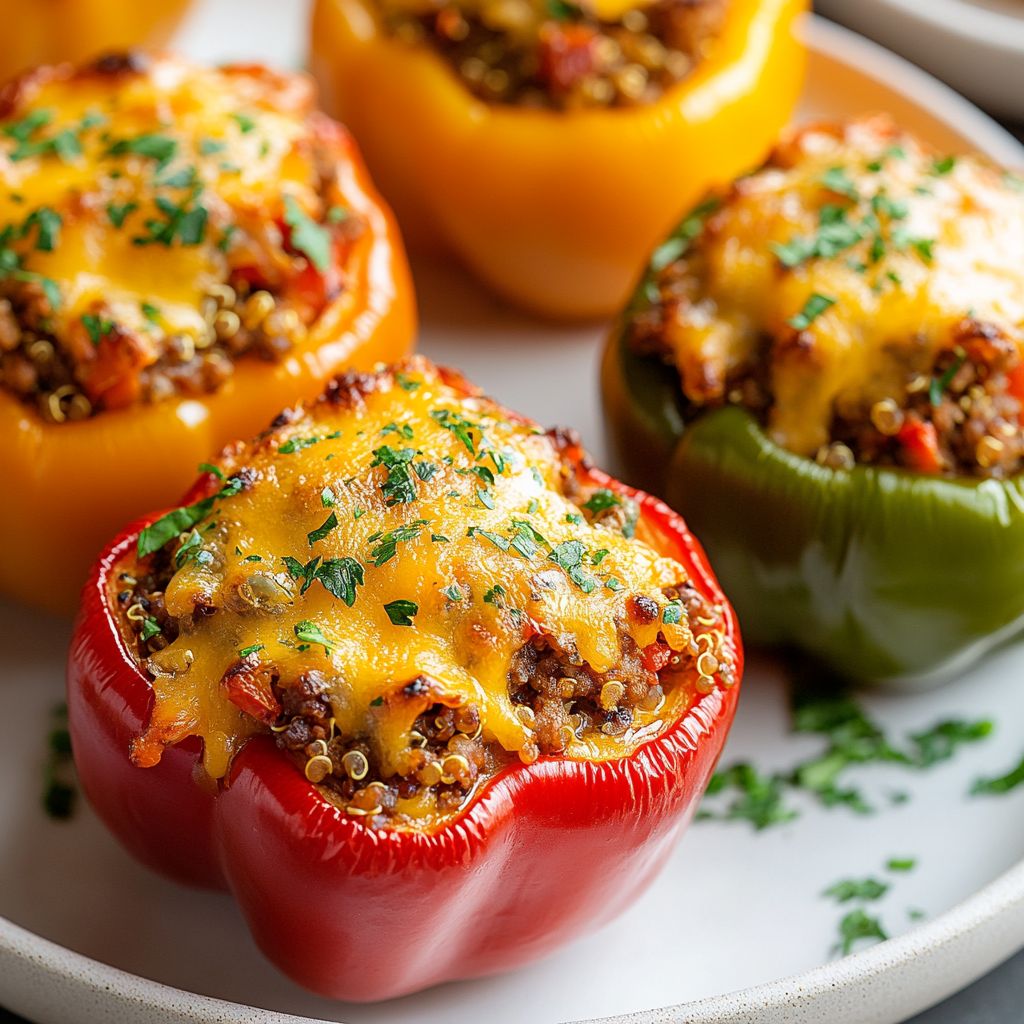
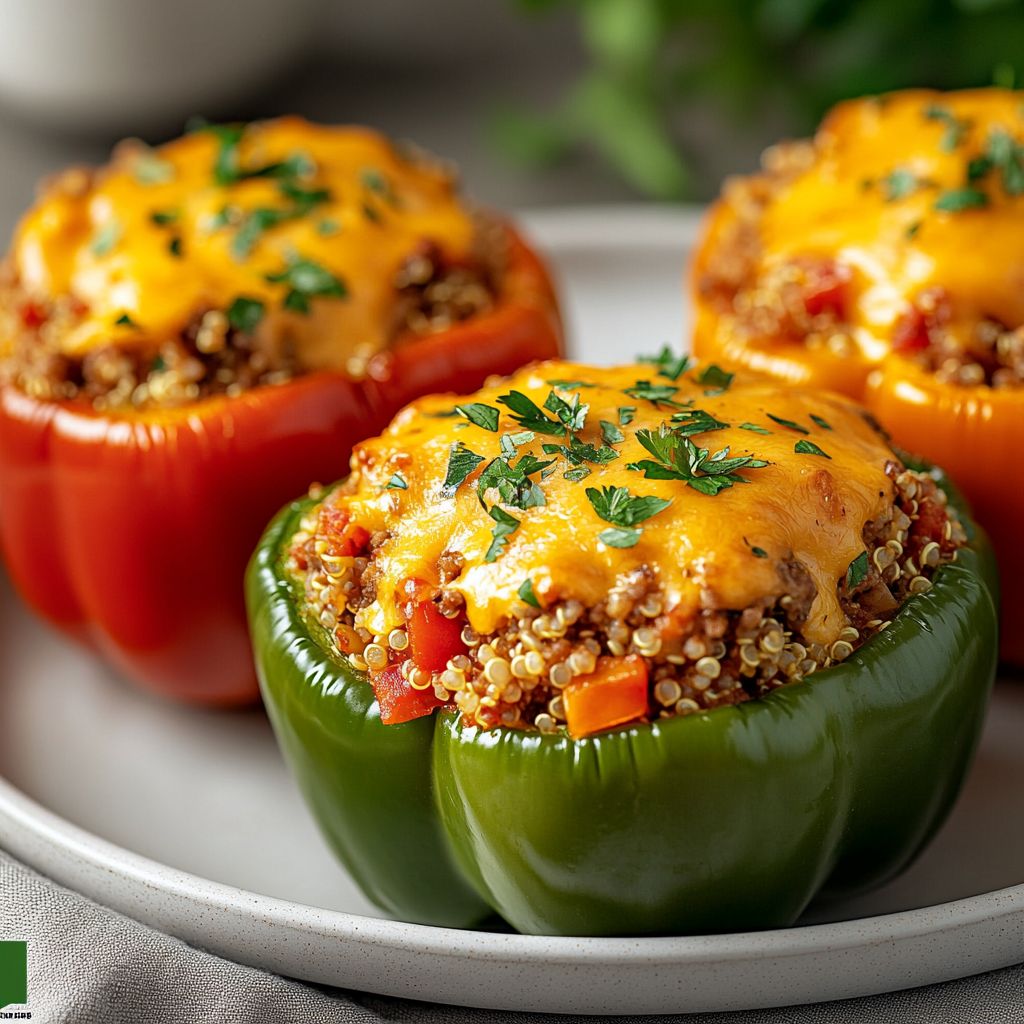
Welcome to a culinary experience that promises to tantalize your taste buds and satisfy your deepest comfort food cravings—our delectable Cheesy Stuffed Bell Peppers. Imagine a vibrant array of robust, colorful bell peppers, each one brimming with a savory filling that’s rich, cheesy, and undeniably satisfying. This dish is a symphony of textures and flavors, combining the crispness of fresh peppers with a warm, gooey insides that will leave you yearning for more. Whether you’re embarking on a solo cooking adventure or welcoming friends and family around the dinner table, these Cheesy Stuffed Bell Peppers are destined to be a showstopper. Let’s dive into this culinary masterpiece that’s as visually stunning as it is deliciously fulfilling!

The Story Behind the Dish

Stuffed bell peppers have a history as colorful as the peppers themselves. This classic dish is beloved across different cultures and continents, each region adding its own unique spin. Originally, the idea of stuffing vegetables can be traced back to ancient Greece and Rome, where diners enjoyed a variety of produce filled with seasoned meats and grains. As trade routes expanded, so did the exchange of culinary ideas, paving the way for stuffed peppers to take root in European and Mediterranean cuisines.

However, the variant we celebrate today owes much to the Spanish influence, where the tradition of pimientos rellenos—peppers stuffed with a variety of fillings—remains a staple. With modern adaptations and global recognition, the Cheesy Stuffed Bell Peppers have found their place in the heart of Western cuisine, celebrated for their taste, nutrition, and versatility.

Why You’ll Love This Recipe

  • Versatile Delight: These stuffed peppers are perfect for any meal, whether it’s a quick weeknight dinner or a dazzling showpiece at your next gathering.
  • Nutritious and Satisfying: Packed with protein, fiber, and essential nutrients, each pepper brings a wholesome meal option to your plate, without compromising on taste.
  • Customizable Flavors: From mild to spicy, the choice of cheese and seasonings can be adjusted to match your palette. Add a personal touch with your favorite herbs or extra veggies.
  • Family-Friendly: An all-ages crowd-pleaser that gets everyone excited to eat their veggies. Even the pickiest eaters will have a hard time saying no!

Flavor Profile & Texture

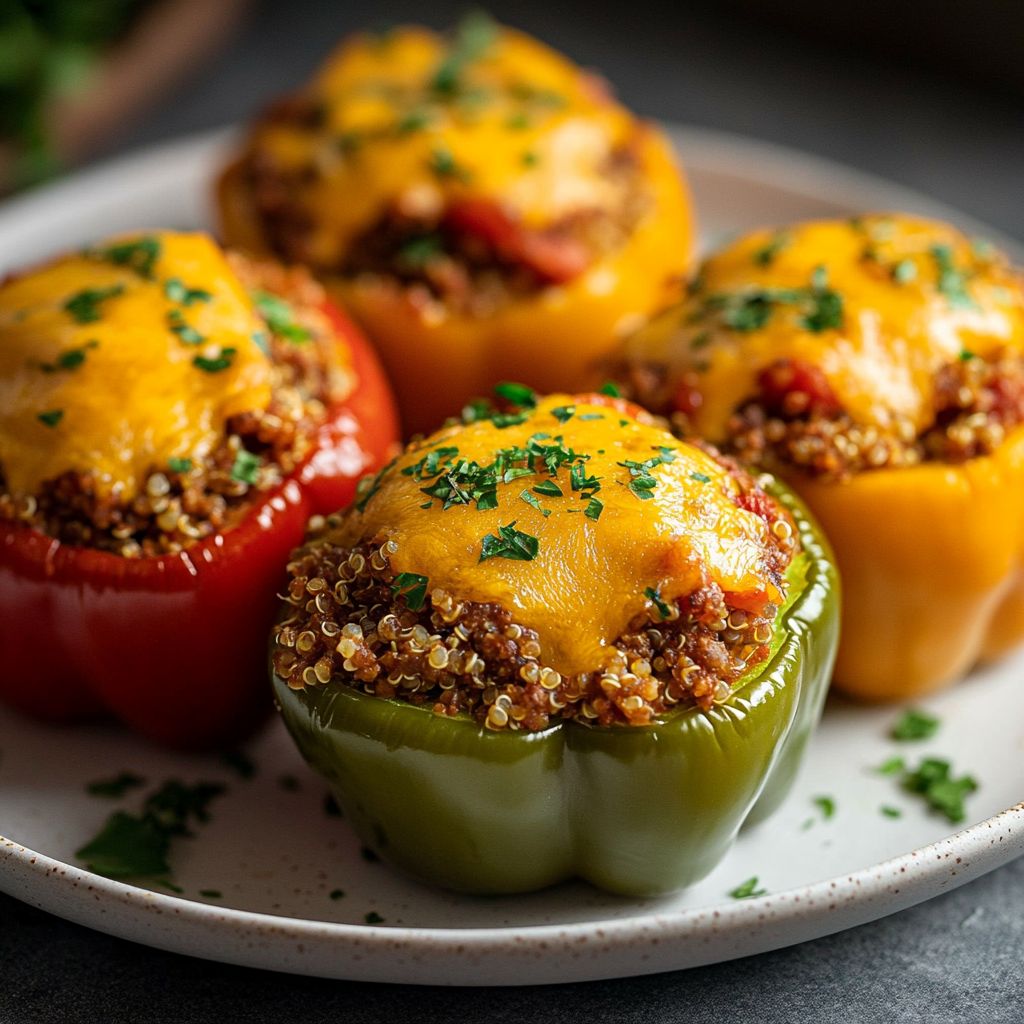
The flavor journey begins with the bell peppers themselves, offering a slightly sweet, refreshing crunch that contrasts beautifully with the sumptuous filling. Inside, the stuffing is a blend of hearty grains, perfectly seasoned meats, or plant-based proteins, combined with a medley of aromatic spices. The star of the dish, of course, is the cheese—a luscious gooey consistency that binds everything together, imparting a creamy, indulgent taste.

Bite into a Cheesy Stuffed Bell Pepper and experience the harmonious interplay of textures: the tender, baked pepper skin giving way to the soft, almost melt-in-your-mouth stuffing, all cloaked in an irresistible cheese layer that bubbles and browns to perfection.

Occasions & Pairings

Cheesy Stuffed Bell Peppers are the perfect choice for an array of occasions. Planning a dinner party? These peppers make a beautiful and filling main course. For a laid-back family meal, prepare them as a wholesome and fun twist on regular stuffed vegetables.

To enhance your dining experience, pair these peppers with a simple green salad or a crusty loaf of bread for added texture. For drinks, opt for a bright, crisp white wine, like Sauvignon Blanc or Pinot Grigio, or enjoy with a refreshing classic like lemonade. To finish the meal, you might serve a light, fruit-based dessert such as a sorbet or a fresh fruit salad.

Tips, Variations & Substitutions

Creative Customizations

  • Spice It Up: For those who crave some heat, consider adding jalapenos or a dash of hot sauce into the filling.
  • Herbal Boost: Add a handful of fresh herbs such as basil, oregano, or parsley to elevate the flavors.
  • Vegan and Gluten-Free Variations: Replace cheese with a vegan alternative and swap grains for quinoa or cauliflower rice for a gluten-free option.

Regional Twists

  • Italian Flair: Include Italian sausage, risotto rice, and mozzarella to give the dish a Tuscan twist.
  • Southwestern Style: Incorporate black beans, corn, and taco seasoning for a Mexican flair.

Storage & Make-Ahead Ideas

If you plan to prepare these peppers ahead of time, simply assemble them and store them unbaked in the refrigerator for up to 24 hours. Once you’re ready to enjoy them, bake as usual, adding a few extra minutes for even cooking.

For storing leftovers, cover and refrigerate cooked peppers for up to four days. Reheat them gently in the oven to revive their original textures and flavors. Alternatively, freeze individual portions by wrapping them in plastic wrap and foil for two to three months. Thaw overnight in the refrigerator before reheating.

Fun Facts & Trivia

Did you know that bell peppers are not only colorful but also incredibly healthy? A rich source of vitamins A and C, they also provide a good dose of fiber and antioxidants. Also, each color of bell pepper has its unique nutritional benefits—red peppers are packed with beta-carotene, whereas green ones are slightly lower in sugar. Enjoying a variety of colors in your Cheesy Stuffed Bell Peppers not only pleases the eye but also ensures a wide spectrum of nutrients!

Now, with this wealth of knowledge and inspiration at your fingertips, it’s time to embark on a delicious journey with our Cheesy Stuffed Bell Peppers. Get ready to create a dish that not only delights the senses but also tells a story of cultural legacy and kitchen creativity. Bon appétit!

Ingredients

  • Bell Peppers

    → Choose large, firm bell peppers in colors like red, green, or yellow for sweetness and a vibrant look. Slice the tops off and remove the seeds carefully to create a bowl-like shape. This will hold the cheesy filling and provide a delicious, edible vessel for the dish.
  • Rice

    → Use cooked white or brown rice as the base of the stuffing. It acts as a bulk ingredient to help fill the bell peppers and add texture. Cook the rice according to the package instructions and let it cool slightly before mixing with the other ingredients. Using leftover rice can enhance the flavors.
  • Ground Meat (beef, turkey, or chicken)

    → Ground meat adds protein and substance to the stuffing. Cook the meat in a skillet until brown and crumbly before mixing it with the rice and other ingredients. For a healthier option, lean turkey or chicken works well without sacrificing flavor.
  • Cheese (cheddar, mozzarella, or cream cheese)

    → Cheese provides the creamy, melty texture that makes cheesy stuffed peppers irresistible. Use shredded cheese for mixing into the filling, and reserve some for topping the peppers. Allow the cheese to reach room temperature before adding it to ensure even melting.
  • Onion

    → Diced onions enhance the flavor of the stuffing, adding a savory depth. Sauté the onions in a bit of oil until translucent before mixing them in with the meat and rice. For a milder flavor, consider using sweet onions.
  • Garlic

    → Minced garlic brings aromatic earthiness and enhances the overall flavor profile. Sauté garlic briefly with onions, being careful not to burn it, as this can create a bitter taste. Fresh garlic is preferred for maximum flavor.
  • Tomato Sauce

    → A few spoonfuls of tomato sauce keep the filling moist and add a touch of acidity, balancing out the richness of the cheese. Stir it into the filling mixture alongside the rice and meat. Look for a sauce with no added sugar for a healthier option.
  • Spices (salt, pepper, cumin, paprika)

    → Seasonings add necessary flavor to the dish, enhancing the natural taste of the ingredients. Adjust the amounts to your preference, but generally, a teaspoon of salt and pepper each works well. Cumin and paprika provide depth and hint of warmth; adjust to taste.
  • Fresh Herbs (parsley or cilantro)

    → Chopped fresh herbs brighten up the dish and add a refreshing element. Mix them in with the filling and sprinkle over the tops after baking for contrast. Use freshly chopped herbs for the best flavor—dried herbs can work in a pinch, but they won’t have the same vibrancy.

Instructions

  • Preheat your oven to 375°F (190°C) and ensure a rack is placed in the center.

    → Preheating allows for an even cooking temperature throughout the entire dish, ensuring the peppers cook through and the cheese melts properly when it bakes.
  • Prepare the bell peppers by slicing the tops off and removing the seeds and membranes gently.

    → Choosing firm bell peppers ensures they hold their shape while baking. Removing the insides makes space for the filling. Take care to avoid cutting through the bottom, which would cause leaks.
  • In a medium saucepan, cook 1 cup of rice according to package instructions, using either water or broth for added flavor.

    → Cooking rice a little ahead allows it to cool before being combined with hot ingredients later, preventing it from becoming mushy.
  • In a skillet over medium heat, add a tablespoon of oil and diced onion. Sauté until the onion becomes translucent, about 5 minutes.

    → This caramelizes the natural sugars in the onions, making them sweet and flavorful, which enhances the filling.
  • Add minced garlic to the skillet with the sautéed onions and cook for an additional 1-2 minutes until fragrant but not browned.

    → Garlic cooks quickly and can burn easily, leading to bitterness. Cooking until just fragrant keeps the flavor vibrant and fresh.
  • Add 1 pound of ground meat to the skillet and cook until browned and crumbly, breaking it up with a spatula, approximately 7-10 minutes.

    → Browning the meat develops rich flavors through the Maillard reaction, boosting the overall taste of your filling.
  • Once the meat is browned, reduce the heat and mix in ¼ cup of tomato sauce, allowing it to integrate with the meat, onions, and garlic.

    → Tomato sauce adds moisture to the filling which helps bind the ingredients together while also enhancing the flavor with its acidity.
  • Combine the cooked rice with the meat mixture in a large mixing bowl, then add 1 cup of shredded cheese and spices (1 tsp each of salt, pepper, cumin, and paprika).

    → Combining the ingredients while everything is still warm helps the cheese melt effectively throughout the filling, creating a cohesive mixture.
  • Fold in freshly chopped herbs, if using, to the mixture carefully, ensuring even distribution without over-mixing.

    → Folding helps maintain the lightness of the filling while ensuring the herbs are evenly scattered throughout.
  • Using a spoon, fill each prepared bell pepper with the cheesy filling, packing it firmly but not overly so, leaving a little space at the top for the cheese that will be melted on top.

    → Properly packing the filling allows for a rich, hearty bite but also assures that the peppers maintain their structure during baking.
  • Place the stuffed peppers upright in a baking dish and top each with a sprinkle of reserved shredded cheese.

    → The cheese on top will melt into a deliciously gooey layer, adding to the visual appeal and flavor.
  • Cover the baking dish with aluminum foil to prevent moisture loss and bake for 25 minutes, then remove the foil and bake for an additional 10-15 minutes until the peppers are tender and the cheese is bubbly and golden.

    → Covering initially helps steam the peppers, making them tender, while the uncovered baking allows the cheese to brown and crisp up.
  • Once cooked, remove the dish from the oven and let the peppers rest for about 5 minutes before serving.

    → Letting them rest allows the filling to settle and makes serving easier, as the insides will not be too hot to touch.
  • Garnish the cheesy stuffed peppers with additional chopped fresh herbs before serving, if desired.

    → Sprinkling fresh herbs on top adds a burst of color and flavor, enhancing the dish visually and gustatorily.

Notes

These cheesy stuffed bell peppers are a hearty and nutritious meal that showcases vibrant vegetables and a savory filling. The bell peppers not only serve as a delicious vessel for the stuffing but also add a pop of color to your plate. You can mix and match the cheese, spices, and ground meat to suit your taste preferences, making this dish versatile for any occasion. For an extra layer of flavor, top the stuffed peppers with additional cheese before baking—this creates a bubbly, golden crust that is sure to please. Leftovers can be stored in the refrigerator and reheated easily, making them a convenient option for meal prep. Consider serving with a side salad or crusty bread for a complete meal. Feel free to add your favorite vegetables, such as corn or black beans, to the filling for added nutrition and texture. Enjoy experimenting with different combinations!

Tips

Cooking Tips for Cheesy Stuffed Bell Peppers

  • Prepping the Peppers: To prevent the peppers from falling over while baking, you can slice a thin layer off the bottom of each pepper. This will stabilize them without compromising the filling capacity.
  • Rice Substitutes: For a creative twist, consider using quinoa or couscous instead of rice. They offer different textures and flavors, while still holding up well in the peppers.
  • Seasoning the Meat: Make sure to season the ground meat with salt and pepper during the cooking process to enhance the flavor. You can also add a splash of Worcestershire sauce for an extra depth of flavor.
  • Cheese Varieties: Experiment with different cheese combinations. Adding a bit of feta or goat cheese into the filling can introduce a tangy flavor that pairs wonderfully with the sweetness of the peppers.
  • Pre-baking the Peppers: For a softer pepper, bake the empty peppers for about 10-15 minutes before adding the filling. This will ensure they are tender on the inside while still holding their shape.
  • Even Cooking: To ensure even cooking, place the stuffed peppers in a baking dish that allows them to stand upright. You can also add a bit of water or broth to the bottom of the dish, which helps steam and cook the peppers thoroughly.
  • Finishing Touch: Allow the stuffed peppers to cool for a few minutes after baking. This will help the filling set a bit more and make them easier to serve without spilling.
  • Storing Leftovers: These stuffed peppers store well in the fridge for up to 3 days. Reheat in the oven or microwave, and they also freeze nicely for up to a month—just be sure to wrap them well to prevent freezer burn.
  • Garnishing: For a pop of color and flavor, top the stuffed peppers with a dollop of sour cream or Greek yogurt before serving. This adds creaminess and balances the richness of the cheese.

FAQ

What ingredients do I need to make Cheesy Stuffed Bell Peppers?

To make Cheesy Stuffed Bell Peppers, you will need bell peppers, cooked rice, ground meat (beef or turkey), cheese, diced tomatoes, onions, garlic, and various seasonings such as salt, pepper, and Italian herbs.

Can I use different types of cheese for this recipe?

Yes! You can use any cheese you prefer, such as mozzarella, cheddar, or a blend. Feel free to mix different cheeses for a richer flavor.

How do I prepare the bell peppers before stuffing them?

Start by cutting the tops off the bell peppers and removing the seeds and membranes. You can also blanch them in boiling water for a few minutes to soften them if desired.

Can I make this recipe vegetarian?

Absolutely! Replace the ground meat with additional vegetables or beans, and adjust the seasoning to your taste. You can also use quinoa or lentils for added protein.

How long should I bake the stuffed bell peppers?

Bake the stuffed bell peppers in a preheated oven at 375°F (190°C) for about 25-30 minutes, or until the peppers are tender and the cheese is melted and bubbly.

Can I make Cheesy Stuffed Bell Peppers ahead of time?

Yes! You can prepare the stuffed peppers in advance and refrigerate them. Just bake them when you’re ready to serve, adding a few extra minutes to the cooking time if they are cold from the fridge.

What can I serve with Cheesy Stuffed Bell Peppers?

Cheesy Stuffed Bell Peppers pair well with a side salad, garlic bread, or steamed vegetables for a complete meal.

Are Cheesy Stuffed Bell Peppers healthy?

They can be a healthy meal option! By using lean meat, a variety of vegetables, and whole grains, you can make a nutritious dish. Adjust the cheese and add plenty of veggies for a healthier twist.

Introduction / Hook

Imagine a dish where velvety strands of pasta glide through a luscious, creamy sauce, each bite punctuated by the subtle yet distinct tang of freshly grated Parmesan cheese. Welcome to the world of Creamy Spinach Parmesan Pasta, a culinary delight that effortlessly combines comfort and elegance in every mouthful. As you bring this dish to life in your own kitchen, you’ll witness the transformation of humble ingredients into a gourmet masterpiece that smells, tastes, and looks like it belongs in a five-star restaurant. With its irresistibly creamy texture and rich flavors, this pasta dish invites you to indulge in a moment of pure bliss, turning any mealtime into a special occasion.

The Story Behind the Dish

The origins of pasta stretch back centuries, deeply rooted in Italian culinary traditions, where it serves as the heart of countless beloved dishes. Creamy Spinach Parmesan Pasta draws inspiration from classic Italian recipes, where the use of fresh ingredients and simple techniques bring out the natural flavors of each element. Spinach was first cultivated more than 2,000 years ago in ancient Persia, eventually making its way to Italy in the 8th century. Known as “the prince of vegetables” in Europe, spinach has long been celebrated for its nutritional benefits. Meanwhile, Parmesan cheese, known as Parmigiano-Reggiano in Italy, has been crafted in the Parma region since the Middle Ages. A historic staple in Italian kitchens, its sharp and nutty profile has made it an irreplaceable ingredient in gourmet cooking.

Combining spinach and Parmesan with pasta represents a fusion of health and indulgence, an evolution from traditional dishes like Alfredo. As it became an international favorite, this creamy pasta recipe adapted to incorporate regional flavors and preferences, always keeping a touch of its Italian roots. Hence, Creamy Spinach Parmesan Pasta is not just a recipe but a story laid on a plate, one that speaks of cultural exchange, culinary ingenuity, and the timeless appeal of Italian-inspired cuisine.

Why You’ll Love This Recipe

  • Simple Ingredients: Most components are likely already in your pantry or easily found in any local grocery store.
  • Quick Preparation: In about 30 minutes, you can have a restaurant-quality meal ready to enjoy, making it perfect for busier weeknights.
  • Nutritious and Delicious: Packed with vitamins from the spinach and calcium from the cheese, it marries health with taste seamlessly.
  • Adaptability: Perfect for customization; you can easily alter ingredients to suit dietary preferences or available pantry items.
  • Family-Friendly: A hit with adults and children alike, it’s a versatile meal that pleases every palate at the table.

Flavor Profile & Texture

The interplay of flavors and textures in Creamy Spinach Parmesan Pasta is nothing short of magical. As you dig in, the pasta hugs every droplet of the creamy sauce, which is unapologetically rich and decadent. The star ingredient, Parmesan cheese, provides a nutty, savory backbone with its salty and sharp notes, dancing harmoniously with the smooth, velvety base. Complementing the sauce is spinach, its earthiness providing a fresh, slightly bitter contrast that balances out the dish beautifully. The texture is utterly satisfying — the soft, yielding pasta intersects with the occasional tender leaf of spinach. Such is the magic of creamy pasta — every bite is buttery smooth yet punctuated by a delightful crispiness where the cheese has melded perfectly into the sauce.

Occasions & Pairings

Creamy Spinach Parmesan Pasta can turn a casual dinner into a celebration, making it ideal for a variety of occasions. Whether you’re crafting a romantic feast for two or hosting a cozy dinner party, this dish serves as a magnificent centerpiece. Consider serving it during special holidays like Valentine’s Day, paired with a light, effervescent Prosecco to complement its rich flavors. For a full dining experience, accompany the pasta with a crisp arugula salad tossed with lemon vinaigrette to contrast the creaminess. For dessert, a light and fruity option like a sorbet provides a refreshing finish.

Tips, Variations & Substitutions

This dish welcomes creativity, allowing you to tailor it to fit your personal taste and nutritional requirements without losing its essence. For a robust, aromatic twist, incorporate roasted garlic into the sauce, or sprinkle toasted pine nuts on top as a final flourish for an added crunch and nutty dimension.

For a lighter version, swap out some of the heavy cream with Greek yogurt or milk. If catering to vegan guests, use nutritional yeast in place of Parmesan for that cheesy note and substitute with a plant-based cream. You can also enhance the dish’s nutritional profile by adding proteins such as grilled chicken or shrimp, or other vegetables like sun-dried tomatoes or mushrooms which enrich the flavor spectrum distinctly.

Storage & Make-Ahead Ideas

Creamy Spinach Parmesan Pasta is a versatile dish that stores well, making it perfect for meal prep. Once cooled, transfer any leftovers to an airtight container and keep them in the refrigerator for up to four days. To reheat, gently warm on the stove with a splash of milk to return it to its creamy consistency, ensuring the pasta doesn’t dry out.

If you anticipate a busy week, consider preparing the sauce ahead of time — it can be made in advance and refrigerated for up to three days, or frozen for up to three months. Simply reheat, cook fresh pasta, and combine when ready to serve. This make-ahead strategy will save time without compromising the dish’s delightful flavor and texture.

Fun Facts & Trivia

Did you know that Parmesan cheese is sometimes referred to as the “King of Cheeses”? It’s because of its rich history and the craftsmanship involved in its creation. A single wheel of Parmigiano-Reggiano must age for a minimum of 12 months before it earns the prestigious stamp, highlighting its authenticity and quality.

Moreover, spinach’s claim to fame isn’t just due to its nutritional punch — it surged in popularity in the 1920s thanks to the famed cartoon character, Popeye, whose strength was attributed to this leafy green. Today, it continues to be beloved across the globe, not just for its health benefits but for its versatility in countless dishes, including this delightful pasta.

In conclusion, Creamy Spinach Parmesan Pasta is a symphony of flavors and textures, a dish that invokes the comfort of home cooking while exuding the sophistication of fine dining. With its rich heritage, endless adaptability, and undeniable taste, it’s a recipe that deserves a place at your table, promising warmth and satisfaction in each serving.

Ingredients

  • Pasta
    → Use 8 ounces of your preferred pasta, such as fettuccine or penne, as the base for this dish. The pasta should be cooked al dente to provide a firm texture that holds up well in the creamy sauce. Be sure to salt the boiling water generously before adding the pasta to enhance its flavor. Once cooked, reserve a cup of pasta water before draining to help adjust the sauce consistency later.
  • Fresh Spinach
    → 4 cups of fresh spinach leaves will bring a vibrant color and rich nutrients to the dish. The spinach should be washed thoroughly and roughly chopped before adding it to the sauce. When sautéed, it wilts down significantly, so using a generous amount ensures that each serving is packed with flavor and health benefits.
  • Parmesan Cheese
    → 1 cup of freshly grated Parmesan cheese is essential for achieving the creamy and cheesy texture of the sauce. Freshly grating the cheese ensures better melting and flavor compared to pre-grated options. Reserve some for garnishing the finished dish, as it adds a lovely touch of richness on top.
  • Heavy Cream
    → 1 cup of heavy cream will serve as the base for the creamy sauce, contributing richness and a smooth consistency. Make sure to use heavy cream rather than lighter alternatives, as it emulsifies perfectly with the cheese and pasta. Allow the cream to come to room temperature before adding it to prevent curdling.
  • Garlic
    → 3 cloves of garlic, minced, will add a fragrant depth of flavor to the sauce. Garlic should be sautéed until fragrant but not browned, as overcooking can result in bitterness. Fresh garlic cloves are preferred for their robust flavor; if using pre-minced garlic, adjust the quantity to prevent overpowering the dish.
  • Olive Oil
    → 2 tablespoons of extra virgin olive oil serves as the cooking medium for the garlic and spinach. Use high-quality olive oil for the best flavor. Heat it gently in a skillet to avoid burning the garlic. This oil also adds healthy fats to the dish, enhancing the overall richness of the sauce.
  • Salt
    → 1 teaspoon of salt is crucial for enhancing the flavors in the dish. This should be added in stages, starting with boiling the pasta water and later, adjusting to taste as you combine the ingredients. Seasoning is important to bring out the natural flavors of the spinach and cheese.
  • Pepper
    → 1/2 teaspoon of freshly ground black pepper will add a subtle spiciness to the creamy sauce. Freshly grinding the pepper maximizes its flavor and aroma compared to pre-ground options. Adjust the quantity based on your taste preferences, using more for a spicier kick.

Instructions

  • Bring a large pot of salted water to a boil over high heat.

    → The salt enhances the pasta’s flavor and helps to season it during cooking. Make sure the water is boiling vigorously before adding the pasta so that it cooks evenly without becoming mushy.
  • Add 8 ounces of your preferred pasta to the boiling water and cook according to the package instructions until al dente.

    → Cooking the pasta al dente means it will have a firm bite and hold its shape when mixed with the sauce. Check for doneness a minute or two before the suggested cooking time by tasting a piece.
  • Before draining the pasta, reserve 1 cup of the pasta cooking water and set it aside.

    → This starchy water can help adjust the cream sauce’s consistency and help it cling to the pasta better, providing a perfect texture.
  • Drain the pasta in a colander and set aside, making sure not to rinse it, as this can remove the starch that helps the sauce adhere.

    → Rinsing can lead to a watery dish, so let the pasta continue to steam in the colander while you prepare the sauce.
  • Heat 2 tablespoons of extra virgin olive oil in a large skillet over medium heat.

    → The oil serves as the base for the sauce and should be heated enough to sauté the garlic and spinach without burning them. A moderate heat allows the flavors to develop beautifully.
  • Add 3 cloves of minced garlic to the skillet and sauté for about 30 seconds until fragrant.

    → Be vigilant as garlic can burn quickly; stirring constantly will ensure it becomes fragrant and softened, releasing its sweet flavor without turning bitter.
  • Add 4 cups of roughly chopped fresh spinach to the skillet and cook until wilted, about 2-3 minutes.

    → Stir the spinach often to ensure it wilts evenly and to trap steam within the pan. This not only reduces its volume significantly but also brings out its vibrant flavor.
  • Pour in 1 cup of heavy cream and bring it to a gentle simmer.

    → The heavy cream constitutes the creamy base of the sauce. Stirring continuously will prevent the cream from curdling and will allow it to combine smoothly with the sautéed ingredients.
  • Add 1 cup of freshly grated Parmesan cheese into the skillet and stir until melted and combined.

    → Grating your cheese fresh helps it melt better and integrate into the sauce. Stir well until the cheese is fully dissolved, ensuring a creamy texture throughout.
  • Season the sauce with 1 teaspoon of salt and 1/2 teaspoon of freshly ground black pepper.

    → Add salt and pepper gradually, tasting as you go. This is crucial for balancing the flavors of the dish, ensuring it is seasoned well without being overpowering.
  • Add the drained pasta to the skillet and toss it gently to combine with the creamy spinach Parmesan sauce.

    → Using tongs or two forks, lift and fold the pasta in the sauce to coat evenly. This technique helps ensure every piece of pasta is covered and balances the flavors throughout.
  • If the sauce appears too thick, gradually mix in some of the reserved pasta water, one tablespoon at a time, until desired consistency is achieved.

    → The reserved starchy water is your ally for achieving the right sauciness. This step allows you to customize the thickness of the sauce based on personal preference.
  • Serve the creamy spinach Parmesan pasta immediately, garnished with additional grated Parmesan cheese if desired.

    → Plating while hot enhances the enjoyment of the dish; the added cheese provides a finishing touch that elevates the flavor profile and presentation.

Notes

  • Cooking the Pasta
    → Begin by bringing a large pot of salted water to a boil. Add your choice of pasta and cook according to package instructions until al dente. This typically means an additional minute less than the suggested cooking time. Reserve a cup of pasta water before draining to adjust the sauce later, then set the drained pasta aside.
  • Sautéing the Spinach
    → In a large skillet, heat the olive oil over medium heat. Once the oil is shimmering, add the minced garlic and sauté until fragrant, about 30 seconds, being cautious not to brown it. Gradually add the chopped spinach, stirring frequently, until wilted down. This should take just a few minutes. Make sure to remove the skillet from heat soon after the spinach wilts to prevent overcooking.
  • Making the Creamy Sauce
    → Reduce the heat to low and stir in the heavy cream into the sautéed spinach and garlic mixture. Mix well to incorporate. Gradually add the freshly grated Parmesan cheese, stirring continuously until melted and the sauce is smooth. If the sauce becomes too thick, add reserved pasta water a little at a time until you reach your desired consistency. Season the sauce with salt and freshly ground black pepper to taste.
  • Combining Pasta and Sauce
    → Gently fold the cooked pasta into the creamy spinach sauce, ensuring that every piece is well coated. If necessary, continue to adjust the sauce’s consistency with more pasta water. This creamy coating is what makes the dish satisfying and flavorful.
  • Serving the Pasta
    → Once combined, remove the skillet from heat. Taste and adjust seasoning if needed. Serve the pasta warm and garnish with extra grated Parmesan cheese and a sprinkle of black pepper for added flavor. A drizzle of high-quality olive oil on top just before serving can enhance the richness.
  • Storage Tips
    → If you have leftovers, store them in an airtight container in the refrigerator for up to 3 days. Reheat gently on the stove or in the microwave, adding a splash of cream or pasta water to restore creaminess. Keep in mind that the pasta may absorb some of the sauce as it sits, so adjusting the moisture is key.

Tips

  • Choose the Right Pasta:
    Opt for pasta types with ridges, like rigatoni or fusilli, which can hold the creamy sauce better than smoother varieties. This helps ensure every bite is bursting with flavor.
  • Prepping the Spinach:
    If you have time, you can sauté the spinach separately in a bit of olive oil and garlic to enhance its flavor before incorporating it into the sauce.
  • Grate Your Own Cheese:
    Avoid pre-grated Parmesan as it often contains anti-caking agents that hinder melting. Freshly grated cheese will melt smoothly, giving a luxurious creamy texture to your dish.
  • Tempering the Cream:
    To prevent curdling when adding the cream to the hot ingredients, whisk in a small amount of the sauce liquid first to gradually raise the temperature before fully incorporating it.
  • Garlic Cooking Tips:
    Keep a close eye on the garlic while sautéing; it should be cooked just until fragrant, usually 30 seconds to 1 minute. If it starts to brown, remove it immediately to avoid bitterness.
  • Stirring the Sauce:
    Once you combine the pasta with the sauce, gently toss the ingredients rather than stirring aggressively to prevent breaking the pasta and ensuring an even coating of sauce.
  • Seasoning in Layers:
    Always taste and adjust seasoning at each step. After combining pasta, spinach, and sauce, add salt and pepper gradually until you achieve a balanced flavor.
  • Finishing Touches:
    For added flavor, finish the dish with a sprinkle of red pepper flakes, fresh herbs like basil or parsley, and an extra drizzle of olive oil before serving for a pop of freshness and color.

FAQ

What ingredients do I need for Creamy Spinach Parmesan Pasta?

You will need pasta (such as fettuccine or penne), fresh spinach, Parmesan cheese, garlic, heavy cream, olive oil, salt, pepper, and optional red pepper flakes for a little heat.

How long does it take to prepare Creamy Spinach Parmesan Pasta?

The entire dish can be prepared in about 20-30 minutes, making it a quick and delicious meal option.

Can I use frozen spinach instead of fresh spinach?

Yes, you can use frozen spinach. Be sure to thaw and drain it thoroughly to remove excess moisture before adding it to the dish.

Is this recipe suitable for vegetarian diets?

Yes, Creamy Spinach Parmesan Pasta is suitable for vegetarians, as it does not contain meat or fish.

Can I make this recipe gluten-free?

Absolutely! Just use gluten-free pasta in the recipe, and make sure any other ingredients are certified gluten-free.

What can I use instead of heavy cream?

If you want a lighter option, you can substitute heavy cream with half-and-half or a non-dairy alternative like coconut milk or cashew cream.

How can I make the sauce thicker?

To thicken the sauce, you can simmer it longer to reduce the liquid, or add a bit of cornstarch mixed with water until the desired consistency is achieved.

Can I add protein to this dish?

Yes! Grilled chicken, shrimp, or even chickpeas can be added for extra protein and flavor.

Introduction: A Dish That Delights

Imagine a dish that captures the essence of glossy, succulent flavors dancing together in a wok, delivering a symphony of tastes to your palate. This is the magic of our Quick Honey Garlic Shrimp Stir-Fry. In less than 30 minutes, you’ll be savoring a meal that marries the sweetness of honey with the savory zing of garlic and the delicate brininess of shrimp. It’s a dish that is not only visually appealing with its vibrant colors but also incredibly aromatic and satisfying. Perfect for busy weeknights or for impressing last-minute guests, this stir-fry elevates the everyday meal into something extraordinary.

The Story Behind the Dish

The art of stir-frying originated in China, where quick-cooking methods were developed to preserve fuel and maximize flavors. Historically, this technique was prized for its ability to cook food rapidly over high heat, ensuring maximum nutrient retention and vibrant flavors. The combination of honey and garlic in cuisine can also trace its roots back to ancient China, where honey was often used in culinary practices not just for sweetness, but also for its health benefits. Our recipe is a modern take on these time-honored practices, blending a touch of sweetness and spice to create a dish that feels both timeless and timely.

Why You’ll Love This Recipe

  • Quick and Easy: Ready in under 30 minutes, it’s a perfect weeknight meal.
  • Healthy: Shrimp is a low-calorie protein packed with nutrients.
  • Family-Friendly: A sweet-savory flavor profile that kids and adults alike will enjoy.
  • Economical: Requires minimal ingredients, most of which you might already have at home.
  • Versatile: Easily customizable with your favorite vegetables or serving styles.

Flavor Profile & Texture

This dish is a delightful blend of flavors and textures that work harmoniously to excite the senses. The shrimp, when cooked just right, are tender and juicy, enveloped in a glaze that is both subtly sweet and richly savory. The honey acts as a natural sweetener, balancing the pungency of aromatic garlic. As the shrimp cook quickly, the sugars from the honey begin to caramelize, creating a glaze that coats your spoon, and eventually your taste buds, with a glossy, sumptuous layer of flavor. Each bite offers a satisfying contrast, from the firm snap of perfectly cooked shrimp to the lingering sweet and aromatic garlic finish that invites you back for another forkful.

Occasions & Pairings

The Quick Honey Garlic Shrimp Stir-Fry is the perfect choice for various occasions, ensuring that any meal is memorable. Serve it on:

  • Weeknights: With its simplicity and speed, it’s an ideal choice for a comforting family dinner after a busy day.
  • Dinner Parties: Its fragrant aroma and glossy sheen make it a stunning centerpiece for a casual dinner with friends.
  • Special Occasions: Elevate a romantic dinner at home with a dish that feels restaurant-quality.

Pair your dish with:

  • Sides: Steamed jasmine rice or fluffy quinoa to soak up the flavorful glaze.
  • Drinks: A crisp white wine, like Sauvignon Blanc, to cut through the sweetness, or a light lager beer for a refreshing complement.
  • Dessert: A light fruit sorbet or a refreshing citrus salad.

Tips, Variations & Substitutions

This dish is wonderfully versatile and can easily be adjusted to suit your dietary needs and taste preferences. Consider some of these tips and variations:

  • Vegetarian: Substitute shrimp with firm tofu or tempeh for a meat-free version. Ensure you press the tofu to remove excess moisture before cooking.
  • Gluten-Free: Use tamari or coconut aminos in place of soy sauce to keep the recipe gluten-free.
  • Spice it Up: Add a pinch of chili flakes or sriracha for a fiery kick.
  • Regional Twists: Incorporate ingredients like grated ginger, a splash of lime juice, or sesame seeds for additional depth and regional flair.
  • Make it a Feast: Add a variety of chopped vegetables such as bell peppers, snap peas, or carrots to make it a complete meal in a single dish.

Storage & Make-Ahead Ideas

The beauty of this dish lies also in its simplicity and flexibility when it comes to storage and make-ahead strategies. Here are some useful suggestions:

  • Storage: Store leftovers in an airtight container in the refrigerator for up to 3 days. Ensure the shrimp are refrigerated as soon as they cool to maintain freshness.
  • Reheating: Quickly reheat in a skillet over medium heat to maintain texture, adding a splash of water if the sauce has thickened too much.
  • Make-Ahead: Prep your ingredients ahead of time by peeling and deveining the shrimp, chopping any additional vegetables, and mixing the sauce. Refrigerate each component separately, then combine and cook when ready to serve.
  • Freezing: Although fresh shrimp are preferred, you can prepare and freeze the cooked dish for up to 1 month. Thaw overnight in the refrigerator before reheating thoroughly.

Fun Facts & Trivia

Did you know that shrimp are one of the most widely consumed types of seafood in the world? They are beloved not just for their flavor, but also for their nutritional benefits, providing a rich source of selenium and iodine necessary for thyroid function. The combination of honey and garlic is often touted in natural medicine for immune-boosting properties, making this dish not just a treat for the taste buds, but also potentially beneficial for health!

In conclusion, the Quick Honey Garlic Shrimp Stir-Fry is more than just a meal. It’s a quick getaway into the world of vibrant flavors and rich culinary history, all wrapped up in a simple, delicious package that’s ready in minutes. Whether you’re a seasoned cook or a kitchen novice, this recipe offers an opportunity to create something special, connect with time-honored traditions, and share moments of joy around the dining table.

Ingredients

  • For the Stir-Fry
    • 1 pound large shrimp, peeled and deveined
      → The shrimp should be uncooked and should have a slight sheen to indicate freshness. Ensure they are peeled and deveined for easy cooking and to keep the dish clean. Larger shrimp are preferable as they provide a satisfying bite and cook quickly, absorbing the flavors of the sauce beautifully.
    • 2 tablespoons vegetable oil
      → A neutral oil with a high smoke point is best for stir-frying. Vegetable oil helps in sautéing the shrimp and vegetables without imparting additional flavors, allowing the natural taste of the ingredients and the honey garlic sauce to shine through. Make sure to heat the oil until shimmering before adding the shrimp to ensure a beautiful sear.
    • 1 cup bell peppers, julienned
      → Use a mix of red, yellow, or green bell peppers for a colorful and visually appealing dish. Slice them into thin strips so they cook quickly and evenly, adding crunch and sweetness to the stir-fry. Fresh, crisp peppers enhance the overall texture and flavor of the meal.
    • 1 cup snap peas or snow peas
      → These add a delightful snap and sweetness to the dish. Rinse and trim the ends before adding them to the pan; they should be thrown in at the last minute to retain their vibrant color and crispness. Fresh peas are key to achieving the best texture and crunch.
    • 3 cloves garlic, minced
      → Fresh garlic provides an aromatic flavor that is essential to the honey garlic sauce. Mince the garlic finely to ensure it distributes evenly throughout the dish. Sauté the garlic briefly until fragrant but be careful not to burn it, as burnt garlic can impart a bitter taste.
    • 1 inch fresh ginger, grated
      → Ginger adds a warm, zesty note to the stir-fry that balances the sweetness of the honey. Peel the ginger and use a microplane or grater to create fine shreds that mix well with the other ingredients. Fresh ginger is more potent and flavorful than powdered, making it a better choice for this dish.
  • For the Honey Garlic Sauce
    • 1/3 cup honey
      → Honey serves as the sweet base of the sauce, giving the dish its name. Use a good-quality honey for the best flavor, as this will enhance the overall taste of the stir-fry. If your honey is crystallized, warm it gently to liquefy it before adding to the sauce.
    • 1/4 cup soy sauce (or tamari for gluten-free)
      → Soy sauce provides a savory umami depth to the dish and balances the sweetness of the honey. Use low-sodium soy sauce to control salt levels in the stir-fry. Tamari is a great gluten-free substitute that delivers similar flavor without wheat.
    • 1 tablespoon cornstarch
      → Cornstarch acts as a thickening agent, helping the sauce to coat the shrimp and vegetables beautifully. Mix it with a little cold water to create a slurry before adding to the hot pan to prevent clumping. This will give the sauce a glossy finish and improve its clinginess to the ingredients.

Instructions

  • Prepare the honey garlic sauce by combining honey, soy sauce, and cornstarch in a small bowl.

    → Measure 1/3 cup of honey and pour it into the bowl. Then add 1/4 cup of soy sauce. Finally, sprinkle in 1 tablespoon of cornstarch. Whisk the mixture thoroughly to ensure the cornstarch is fully dissolved, creating a smooth slurry. This step is crucial because it allows the sauce to thicken properly when heated, adhering nicely to the shrimp and vegetables during cooking.
  • Preheat your wok or large skillet over medium-high heat.

    → This will ensure that the cooking surface is hot enough to achieve a nice sear on the shrimp. You will know it’s ready when you can feel the heat radiating off the surface and small droplets of water sizzle immediately upon contact. Proper preheating is essential for stir-frying to prevent sticking and to develop those delightful browned bits that add flavor.
  • Add 2 tablespoons of vegetable oil to the hot wok or skillet.

    → Pour the oil into the pan, swirling it around to coat the bottom evenly. Wait for the oil to shimmer, which indicates it is hot enough. This step is important because hot oil prevents the food from steaming and allows for better browning, resulting in a more flavorful dish.
  • Once the oil is hot, add 1 pound of large shrimp, ensuring they are spread out in a single layer.

    → This will allow the shrimp to sear properly instead of steaming. Cook for about 2-3 minutes on one side without stirring. Look for the shrimp to turn a bright pink color, which indicates they are cooking properly. Flip the shrimp over with a spatula and cook for another 1-2 minutes until they are fully cooked and opaque. Overcrowding the pan will lead to uneven cooking.
  • Remove the cooked shrimp from the pan and set them aside on a plate.

    → Placing the shrimp on a plate helps them rest while you cook the vegetables. This will also prevent them from overcooking and becoming rubbery, as they will continue to cook slightly from residual heat if left in the pan.
  • Add the minced garlic (3 cloves) and grated ginger (1 inch) to the hot pan.

    → Ensure that your garlic is minced finely and your ginger is grated to maximize flavor release. Stir quickly for 15-30 seconds until fragrant but not browned, as burnt garlic can taste bitter. The heat will help to release the essential oils in the garlic and ginger, enhancing the aromatic profile of your stir-fry.
  • Introduce 1 cup of julienned bell peppers and 1 cup of snap peas (or snow peas) to the pan, stirring constantly.

    → Add these vegetables after the garlic and ginger to prevent burning. Stirring helps to evenly cook the vegetables while preventing them from sticking to the pan. Cook for about 2-3 minutes until the peppers are slightly tender but still crisp. Maintaining their crunch adds texture and vibrancy to the dish.
  • Return the cooked shrimp to the pan, ensuring they are evenly distributed among the vegetables.

    → Gently fold the shrimp back in to combine with the vegetables. This will help to ensure they absorb the remaining flavors without breaking apart. It’s important to keep the shrimp warm without overcooking them further at this stage.
  • Pour the prepared honey garlic sauce into the pan, stirring to coat the shrimp and vegetables thoroughly.

    → Allow the sauce to come to a simmer, as this will activate the cornstarch and thicken the mixture, allowing it to cling beautifully to the shrimp and vegetables. Stir for about 1-2 minutes to ensure everything is well coated and heated through.
  • Remove the pan from heat and serve the stir-fry immediately over rice or noodles.

    → Presentation is key, so take care to portion out the stir-fry attractively on serving plates. Serving it hot ensures that the flavors are lively and the textures remain vibrant. Enjoy your quick and flavorful honey garlic shrimp stir-fry!

Notes

These Quick Honey Garlic Shrimp Stir-Fry are not only quick to prepare but also packed with flavor and nutrition. The combination of shrimp, colorful bell peppers, and crisp snap peas makes this dish visually appealing and delightful to eat.

To enhance the dish, ensure your shrimp are fresh and properly cleaned. Using a mix of bell peppers not only adds vibrant colors but also various flavors, contributing to a balanced taste profile. Snap peas are a great finishing touch as they provide a fresh crunch and sweet flavor when added at the end of cooking.

The honey garlic sauce is the star of the dish; it’s simple yet incredibly flavorful. Opt for high-quality honey and low-sodium soy sauce to maintain a balance between sweet and savory. Mixing the cornstarch with cold water first will help prevent clumping and create a beautifully glossy sauce that adheres to the shrimp and vegetables perfectly.

This stir-fry is great served over rice or noodles, making it a complete meal. Feel free to add additional vegetables such as broccoli or carrots for extra nutrition. Leftovers can be stored in the fridge for a couple of days and reheated for easy meals throughout the week. Enjoy this dish as a quick weeknight dinner that is sure to impress!

Tips

Cooking Tips for Quick Honey Garlic Shrimp Stir-Fry

  • Preparation is Key: Before you start cooking, ensure all your ingredients are prepped and within reach. Stir-frying is a fast-paced cooking method, so having everything ready will help you work efficiently.
  • Choose the Right Shrimp: If possible, opt for shrimp labeled as “wild-caught” for better flavor and texture. If using frozen shrimp, thaw them thoroughly under cold water before cooking to maintain taste and quality.
  • Let the Oil Heat: Allow the vegetable oil to heat up significantly before adding the shrimp. This will ensure that the shrimp sear rather than steam, resulting in a better texture.
  • Don’t Overcrowd the Pan: Cook the shrimp in batches if necessary to avoid overcrowding. Overcrowding can cause the shrimp to cook unevenly and can lead to them steaming rather than stir-frying.
  • Monitor Cooking Time: Shrimp cook very quickly, usually in just 2-3 minutes per side. Keep an eye on them and remove them from the pan as soon as they turn pink and opaque to avoid overcooking.
  • Enhance Flavor Layers: You can add extras like red pepper flakes for heat or a splash of lime juice for acidity, which can complement the sweetness of the honey and balance the dish.
  • Mix Sauce Well: Ensure that the honey garlic sauce is thoroughly mixed before adding it to the stir-fry. Give it a quick stir to combine the honey, soy sauce, and cornstarch slurry evenly.
  • Cook Vegetables Crisp: Aim to cook the bell peppers and snap peas just until tender but still crispy. This will enhance their flavor and provide a delightful crunch in the stir-fry.
  • Finish with Freshness: Consider garnishing your dish with sesame seeds or chopped scallions just before serving for a touch of freshness and added flavor.
  • Serve Immediately: Stir-fried dishes are best enjoyed fresh and hot. Serve your honey garlic shrimp stir-fry over steamed rice or noodles for a complete meal.

FAQ

What ingredients do I need for Quick Honey Garlic Shrimp Stir-Fry?

You will need shrimp, honey, garlic, soy sauce, bell peppers, broccoli, olive oil, and optional sesame seeds for garnish.

How long does it take to prepare the Quick Honey Garlic Shrimp Stir-Fry?

The preparation and cooking time for this dish is approximately 20-30 minutes.

Can I use frozen shrimp for this stir-fry?

Yes, you can use frozen shrimp. Just make sure to thaw them properly before cooking.

What vegetables can I add to the stir-fry?

You can add a variety of vegetables such as snap peas, carrots, zucchini, or bok choy according to your preference.

Is this recipe gluten-free?

To make this recipe gluten-free, use a gluten-free soy sauce alternative.

Can I prepare this dish in advance?

For best results, it is recommended to cook fresh. However, you can marinate the shrimp in the honey-garlic sauce a few hours ahead of time.

What can I serve with Quick Honey Garlic Shrimp Stir-Fry?

This stir-fry pairs well with steamed rice, quinoa, or cauliflower rice for a healthy option.

Can I substitute honey with another sweetener?

Yes, you can use maple syrup or agave syrup as alternatives to honey in this recipe.

Introduction / Hook

Imagine stepping into a warm, rustic kitchen, where the air is filled with the tantalizing aroma of simmering vegetables and herbs. Welcome to the heart of Tuscany, captured in a bowl of rich and hearty Vegetable and Bean Stew. This dish, with its vibrant medley of seasonal Mediterranean vegetables and nourishing beans, envelops the senses with a comforting warmth, evoking images of sunlit farms and rolling Italian countryside. Perfect for those cozy evenings when the weather insists you stay in and indulge in a culinary hug, this stew is not just a meal; it’s an experience, a journey to one of Italy’s most enchanting regions, all from the comfort of your home.

The Story Behind the Dish

Tuscany, a region known for its lush landscapes and rich culinary tradition, is the birthplace of this humble yet luxurious stew. The Tuscan Vegetable and Bean Stew is a testament to the Italian philosophy of cucina povera, which translates to “poor kitchen.” This concept emphasizes simplicity and the use of fresh, readily available ingredients. Historically, it was a dish that made the most of what was at hand, turning modest ingredients into gastronomic treasures.

Rooted in the heart of rural Italy, this stew was a staple for farmers and their families. Vegetables plucked fresh from the garden and beans harvested from small patches of land were slow-cooked to perfection over open flames. Over time, the dish has transcended its humble origins to become a celebrated delicacy, admired for its simple yet profound flavors. It’s a testament to how resourcefulness and a love for local produce can create something truly extraordinary.

Why You’ll Love This Recipe

  • Robust Flavor: The combination of fresh vegetables and aromatic herbs creates a rich, satisfying taste that is both hearty and refreshing.
  • Nutrient-Dense: Packed with beans and a variety of vegetables, this stew is a powerhouse of nutrients, perfect for those looking to maintain a balanced diet.
  • Easy to Prepare: With straightforward steps that honor the slow cooking process, this recipe lets you enjoy authentic Italian flavors without convoluted preparation methods.
  • Versatile: Ideal as a main course, it can be adapted to suit various occasions, from casual family dinners to more formal gatherings.
  • Vegan-Friendly: Naturally plant-based, this stew caters to vegans and vegetarians without compromising on taste or satisfaction.

Flavor Profile & Texture

The Tuscan Vegetable and Bean Stew presents a rich tapestry of flavors that are delicately balanced to captivate the palate. You’ll savor the sweetness of ripe tomatoes mingling with the earthiness of beans and the subtle bite of onions and garlic. The fresh herbs, be it rosemary, thyme, or basil, infuse their aromatic essence into every bite, providing a fragrant melody that sings of the Italian countryside.

In terms of texture, this stew is a symphony of contrasts. You’ll experience the tender softness of slowly simmered carrots and zucchini against the creamy consistency of cannellini beans. A hint of crispness from fresh kale or spinach adds a delightful variance, making every spoonful a complete yet varied experience.

Occasions & Pairings

This Tuscan stew is a versatile dish, perfect for numerous occasions. On a chilly winter evening, it warms you to the core, while in summer, its lightness and vibrancy match the season’s spirit. It’s a fantastic choice for weeknight dinners, as it can be made in advance, and its flavors only improve over time, making it an ideal candidate for meal prepping.

When it comes to pairing, a crusty loaf of sourdough or a fragrant rosemary focaccia complements it beautifully. For drinks, a medium-bodied Chianti or a crisp glass of white Vernaccia di San Gimignano amplifies the meal’s Tuscan roots. To finish, consider an almond biscotti or a simple fruit salad for a refreshing finale.

Tips, Variations & Substitutions

One of the joys of this stew is its adaptability, accommodating any number of variations and substitutions:

  • Protein Boost: For those wanting extra protein, add a serving of grilled chicken or Italian sausage.
  • Skipping Beans: If beans aren’t to your taste, add potatoes or root vegetables to retain the stew’s heartiness.
  • Veggie Variations: Feel free to include other vegetables like squash, sweet potatoes, or bell peppers based on seasonal availability or preference.
  • Dietary Alternatives: To make it gluten-free, ensure your stock and any bread pairings are certified gluten-free.
  • Herb Flexibility: If fresh herbs aren’t accessible, use dried ones which are more concentrated in flavor. Adjust quantities accordingly.

Storage & Make-Ahead Ideas

This stew excels as a make-ahead dish. Prepare a large batch and refrigerate it; the flavors will deepen and meld together, becoming even more satisfying after a day or two. Stored in an airtight container, it will keep in the refrigerator for up to five days.

If you plan to freeze it, allow the stew to cool completely. Portion it into airtight containers or heavy-duty freezer bags, leaving some space for expansion, and it will stay fresh for up to three months. To reheat, simply thaw overnight in the fridge and warm gently on the stove.

Fun Facts & Trivia

Did you know that bean stews similar to this Tuscan classic have been enjoyed since Roman times? Ancient Romans valued beans not just for their nutrition but also for their sustainability, as they enrich the soil with nitrogen, promoting better crop yields. In a country rich in culinary heritage, the humble bean stew stands as a historical emblem of Italian cuisine’s emphasis on integrating nature’s best offerings into daily life.

Moreover, the Tuscan approach to this dish, often referred to as “Ribollita” when prepared with leftover bread, echoes the region’s resourcefulness. Originally a way to use up stale bread and old vegetables, ribollita means “reboiled,” showcasing a tradition of not letting anything go to waste, beautifully aligning with today’s sustainable practices.

Ingredients

  • Vegetables
    • 2 tablespoons olive oil
      → Olive oil serves as the primary cooking fat, adding richness and depth of flavor to the stew. Use high-quality extra virgin olive oil for the best taste. Heat the oil in a large pot before adding the vegetables to ensure they sauté evenly.
    • 1 onion (diced)
      → The onion adds sweetness and aroma to the stew. Dice it finely to ensure it cooks down completely and blends into the base of the dish. Cooking it until translucent will enhance its flavor and provide a savory foundation.
    • 2 carrots (sliced)
      → Carrots bring natural sweetness and a slight crunch to the stew. Slice them into uniform pieces so they cook evenly, and add them after the onion to allow them to soften and release their flavors before adding more ingredients.
    • 2 celery stalks (sliced)
      → Celery adds a fresh, crisp texture and subtle flavor to the stew. Slice the stalks so they match the thickness of the carrots, ensuring even cooking. This vegetable also contributes to the aromatic base of the dish along with the onions and carrots.
    • 1 bell pepper (diced)
      → The bell pepper introduces a sweet and slightly tangy flavor along with vibrant color. Remove the seeds and core before dicing; a red, yellow, or orange pepper works best for sweetness, while a green pepper provides a slightly bitter contrast.
    • 2 zucchinis (diced)
      → Zucchinis add a tender, mild flavor and a nice texture to the stew. Dice them into bite-sized pieces and consider adding them toward the end of cooking to prevent them from becoming overly soft and mushy.
    • 2 cups chopped kale or spinach
      → Kale or spinach provides a nutrient boost and adds a vibrant green color. Remove tough stems from kale, and chop the leaves into smaller pieces. Add them to the stew near the end of cooking to retain their color and nutritional value.
  • Legumes
    • 1 can (15 oz) cannellini beans (drained and rinsed)
      → Cannellini beans are creamy and provide a hearty, protein-rich component to the stew. Drain and rinse them before adding to the pot to remove excess salt and preservatives. They help thicken the stew and add substance.
    • 1 can (15 oz) diced tomatoes (with juice)
      → Diced tomatoes add acidity, depth, and color to the stew. Use fire-roasted tomatoes for a smoky flavor. The juice contributes to the stew’s liquid base, while the chunks add texture and visual appeal.
  • Seasoning
    • 2 cloves garlic (minced)
      → Garlic enhances the overall flavor profile with its aromatic qualities. Mince the cloves finely to ensure they distribute evenly throughout the stew, and add them after the vegetables have softened to prevent burning.
    • 1 teaspoon dried oregano
      → Dried oregano brings a classic Italian flavor that complements the stew’s profile. Add it with the garlic to let its oils release fully, which intensifies its aromatic qualities during cooking.
    • 1 teaspoon dried thyme
      → thyme adds an earthy and slightly floral note to the stew. Like oregano, it should be added at the same time as the garlic to maximize its flavor. Use fresh thyme if available, but increase the quantity.
    • Salt and pepper to taste
      → Salt enhances all the flavors within the stew while black pepper adds warmth and depth. Start with a small amount and taste as you go, adjusting to achieve the desired flavor balance.
  • Liquid
    • 4 cups vegetable broth
      → Vegetable broth serves as the base liquid, providing flavor and depth to the stew. A homemade broth is preferable for freshness, but store-bought is convenient. Adjust the quantity depending on how thick or soupy you prefer your stew.
    • 1 tablespoon balsamic vinegar
      → Balsamic vinegar adds acidity and a slight sweetness, enhancing the overall flavor profile of the stew. Stir it in towards the end of cooking to brighten and deepen the flavors without losing its powerful character.

Instructions

  • Heat a large pot over medium heat and add 2 tablespoons of olive oil.

    → This initial step helps create a flavorful base for your stew. The olive oil will warm up, allowing you to sauté the vegetables effectively, which brings out their natural sugars and flavors.
  • Add 1 finely diced onion to the pot and sauté until it becomes translucent, about 5-7 minutes.

    → Cooking the onion until it’s translucent softens its flavor and enhances sweetness, creating a delicious aromatic foundation for your stew. Stir occasionally to ensure it doesn’t burn.
  • Incorporate 2 sliced carrots and 2 sliced celery stalks into the pot. Stir well to combine and cook for an additional 5 minutes.

    → The carrots and celery add complementary flavors and textures. Slicing them uniformly allows even cooking, ensuring that all vegetables contribute to a balanced flavor in the stew.
  • Add 1 diced bell pepper, stirring it into the mixture and cooking for another 3-4 minutes until it softens.

    → The bell pepper not only adds sweetness and color but also blends seamlessly with the other vegetables. This step allows the pepper to soften and release its juices, enriching the overall flavor of the stew.
  • Next, add 2 diced zucchinis and stir the pot, allowing them to cook for about 5 minutes.

    → Zucchini cooks relatively quickly, and adding it at this stage keeps it from becoming too mushy. It should maintain some texture to contribute to the stew’s mouthfeel.
  • Introduce 2 cups of chopped kale or spinach and stir it into the pot, cooking briefly until it wilts, about 2-3 minutes.

    → Adding the greens at the end of cooking helps retain their vibrant color and nutritional value. Wilting them quickly ensures they mix well without losing their structure.
  • Include 2 cloves of minced garlic and cook for about 1 minute until fragrant.

    → Garlic adds depth and richness to the stew. Cooking it too long can cause bitterness, so it’s essential to add it after the other vegetables have softened.
  • Stir in 1 teaspoon of dried oregano and 1 teaspoon of dried thyme, allowing them to cook for a minute to release their oils.

    → Adding dried herbs at this point enhances their aromatic qualities. This step maximizes the flavors as the herbs cook alongside the garlic, creating a fragrant base for the stew.
  • Pour in 4 cups of vegetable broth along with 1 can of diced tomatoes (with juice) and stir well to combine all ingredients.

    → The vegetable broth is the primary liquid that gives the stew its body. Adding diced tomatoes brings acidity, depth, and sweetness that balances the other flavors.
  • Incorporate 1 can of drained and rinsed cannellini beans, stirring them gently into the mixture.

    → Cannellini beans add a creamy texture and protein, making the stew heartier. Rinsing them before use removes excess sodium, enhancing the overall flavor of the dish.
  • Bring the stew to a simmer and reduce the heat to low. Cover the pot and let it cook for 30-40 minutes, stirring occasionally.

    → Simmering allows the flavors to meld and develop, while stirring ensures nothing sticks to the bottom of the pot. This process infuses the broth with the fragrant essences of the vegetables and herbs.
  • Season the stew with salt and pepper to taste, adjusting as necessary to enhance all the flavors.

    → Taste testing is crucial; season gradually, as this step captures the essence of the dish. Proper seasoning enhances the natural flavors and ensures the stew is balanced.
  • Once the stew has reached your desired thickness, stir in 1 tablespoon of balsamic vinegar and cook for an additional 5 minutes.

    → Adding balsamic vinegar brightens the flavors and introduces a hint of sweetness. This finishing touch elevates the stew’s overall profile, making it more complex and inviting.
  • Serve the Tuscan vegetable and bean stew hot, garnished with additional freshly chopped herbs if desired.

    → Serving the stew hot ensures its flavors are fully appreciated, and garnishing adds a fresh touch that enhances its visual appeal and aromatic qualities.

Notes

These hearty Tuscan vegetable and bean stew are perfect for any time of year and are packed with flavor and nutrition. The combination of fresh vegetables, protein-rich beans, and aromatic herbs creates a deliciously satisfying dish that can be enjoyed on its own or with crusty bread for dipping. Feel free to customize your stew by adding seasonal vegetables or your favorite legumes. If you prefer a spicier kick, consider adding a pinch of red pepper flakes or a dash of hot sauce. This stew also keeps well in the refrigerator for several days and tastes even better the next day as the flavors continue to meld. It can be frozen for later use, making it a convenient meal prep option. To serve, top it with a sprinkle of grated Parmesan cheese or a dollop of fresh pesto for added richness and flavor. Enjoy this comforting, wholesome dish knowing it’s both nutritious and satisfying!

Tips

  • Choose Fresh Ingredients: Using seasonal and fresh vegetables will significantly enhance the flavor and texture of your stew. Visit your local farmer’s market for the best produce options.
  • Prep Ahead: To save time, chop all your vegetables and gather your ingredients before starting to cook. This “mise en place” method ensures a smoother cooking experience.
  • Layer Flavors: Sauté onions, garlic, and spices at the beginning to develop a deep flavor base. This step is crucial for bringing out the full potential of the ingredients.
  • Cooking Time: Allow the stew to simmer for at least 30 minutes, but feel free to extend it to an hour or more. The longer it cooks, the more the flavors meld together. Just make sure to add the more delicate ingredients like zucchini and kale towards the end to maintain their texture and nutrients.
  • Adjust Thickness: If you prefer a thicker stew, let it simmer uncovered for longer for some of the liquid to evaporate. Conversely, if it’s too thick, add a bit more vegetable broth to reach your desired consistency.
  • Flavor Adjustment: Always taste your stew before serving. Adjust seasoning with salt, pepper, or a splash more vinegar to fine-tune the flavor to your liking just before serving.
  • Add Heat: If you crave a little spice, consider adding red pepper flakes or a dash of hot sauce when you add the garlic. It will give the stew a nice kick!
  • Garnish for Presentation: Top your stew with freshly chopped herbs like parsley or basil just before serving to add color and a fresh flavor burst.
  • Storage: This stew stores well in the refrigerator for up to 4 days. It also freezes beautifully for an easy meal later on. Just remember to cool it completely before transferring it to an airtight container for freezing.

FAQ

What ingredients are typically used in Tuscan Vegetable and Bean Stew?

Tuscan Vegetable and Bean Stew generally includes a variety of vegetables such as carrots, zucchini, and kale, along with canned or dried beans like cannellini or kidney beans, tomatoes, garlic, and herbs like rosemary and thyme.

Can I use different types of beans in this stew?

Yes, you can substitute different types of beans based on your preference or availability. Great northern beans, pinto beans, or black beans can also work well in this stew.

Is this stew vegan or vegetarian?

Tuscan Vegetable and Bean Stew is naturally vegan and vegetarian as it is made primarily from vegetables and beans, without any animal products.

How long does it take to prepare and cook the stew?

The total time to prepare and cook Tuscan Vegetable and Bean Stew is typically around 45 minutes, including chopping vegetables and simmering the stew.

Can I make this stew in advance and reheat it later?

Absolutely! Tuscan Vegetable and Bean Stew can be made in advance and stored in the refrigerator. It often tastes even better the next day as the flavors meld together. Reheat it on the stove or in the microwave.

What can I serve with Tuscan Vegetable and Bean Stew?

This stew pairs wonderfully with crusty bread, a side salad, or over a bed of rice or quinoa for a more filling meal.

How can I make this stew spicier?

To add some heat to your Tuscan Vegetable and Bean Stew, you can include ingredients like crushed red pepper flakes, diced jalapeños, or a dash of hot sauce while cooking.

Can I freeze Tuscan Vegetable and Bean Stew?

Yes, you can freeze Tuscan Vegetable and Bean Stew. Allow it to cool completely, then store it in an airtight container for up to 3 months. Thaw it in the refrigerator before reheating.

Introduction: The Irresistible Charm of Cheesy Baked Ziti with Spinach

Imagine carrying a steaming dish from the oven, the aroma of bubbling cheese mingling with the comforting scent of marinara sauce wafting through the air, filling your kitchen with irresistible warmth. This is the magic of Cheesy Baked Ziti with Spinach—a heartwarming, soul-satisfying meal that could turn any ordinary evening into a joyous celebration. The combination of tender pasta, rich marinara sauce, creamy ricotta, bubbling mozzarella, and the fresh taste of baby spinach creates a symphony of flavors and textures that delights the senses. Whether it’s the crispy golden edges of cheese or the velvety richness of the sauce, every bite offers a memorable taste experience that feels like a loving embrace. Truly, this dish transforms simple ingredients into something extraordinary, making it nothing short of culinary poetry.

The Story Behind the Dish: A Culinary Classic with a Twist

Baked ziti, a classic Italian-American dish, has long been a staple on dinner tables and at family gatherings, cherished for its comforting and hearty qualities. This delightful rendition, Cheesy Baked Ziti with Spinach, introduces a nutritional twist that brings an extra layer of depth and flavor to the beloved classic. Baked ziti is a direct descendant of Italy’s iconic pasta al forno, a dish that traces its roots back to the fusion of local cuisine and culinary influences absorbed throughout history as trade and migration brought diverse ingredients and cooking techniques to the Italian peninsula. Traditionally prepared for large family gatherings or festive occasions, pasta al forno symbolizes abundance and communal enjoyment. The addition of spinach not only pays homage to Italy’s love of fresh, wholesome ingredients but also elevates this already rich casserole to a more contemporary standard, where healthfulness and taste meet in perfect harmony.

Why You’ll Love This Recipe

  • Comforting and Hearty: Packed with cheese, pasta, and delicious sauce, this dish offers unmatched comfort on a plate.
  • Nutritious Twist: The inclusion of spinach adds a nutritional boost without compromising that beloved cheesy goodness.
  • Easy to Prepare: Simple ingredients and straightforward assembly make it suitable for both novice and seasoned cooks.
  • Make-Ahead Friendly: Easily made in advance, perfect for hectic weeknights or last-minute gatherings.
  • Family-Friendly: Loved by children and adults alike, it’s a great way to sneak in some veggies for picky eaters.

Flavor Profile & Texture

The flavor profile of Cheesy Baked Ziti with Spinach is a testament to the beauty of simplicity and rich culinary tradition. At its heart lies the trio of creamy ricotta, tangy marinara sauce, and stretchy mozzarella, which creates a perfect harmony of flavors that epitomizes comfort food. The ricotta lends a delicate creaminess, balancing the slight tang of the marinara, while the mozzarella forms a luscious, golden crust that ties it all together. The pasta, cooked to a perfect al dente, provides just the right amount of bite, and the inclusion of spinach not only introduces a fresh, leafy element but also subtly enhances the overall taste with its slightly earthy notes. Each mouthful offers a luscious mix of textures—from the smoothness of the cheese sauce to the crispiness of the baked cheese topping—ensuring every bite is a delightful adventure.

Occasions & Pairings

Cheesy Baked Ziti with Spinach is incredibly versatile, making it an ideal choice for a wide range of occasions. Its comforting nature makes it particularly suitable for cooler months, bringing warmth and satisfaction to those cozy nights in. It’s a perfect centerpiece for family dinners, casual get-togethers, or as a crowd-pleaser at potlucks. For a complete meal, consider pairing it with a fresh green salad drizzled with a balsamic vinaigrette to cut through the richness of the cheese. A side of garlic bread complements the Italian flavors and provides a crunchy contrast to the cheesy goodness. As for beverages, a full-bodied red wine like Chianti or a crisp iced tea would pair beautifully, enhancing the flavors of every serving.

Tips, Variations & Substitutions

One of the joys of this dish lies in its flexibility, allowing for creative tweaks and personalized adjustments to suit different tastes and dietary needs. Here are some ideas for customizing your Cheesy Baked Ziti with Spinach:

  • Vegetables: Additions such as sautéed mushrooms, bell peppers, or zucchini can be incorporated for extra nutrition and texture.
  • Protein Boost: Upscale the dish by adding cooked sausage, ground beef, or turkey for an added protein punch.
  • Cheese Variations: Experiment with different cheeses like provolone or fontina for a unique twist on the traditional flavors.
  • Dietary Adjustments: Use whole-grain or gluten-free pasta for alternative dietary needs, and replace regular ricotta with a vegan version for a plant-based option.

Storage & Make-Ahead Ideas

One of the many advantages of Cheesy Baked Ziti with Spinach is its ability to be prepared ahead of time, making it a lifesaver during busy schedules or meal-prep routines. Here’s how you can store and enjoy this dish beyond its initial serving:

  • Refrigeration: Store leftovers in an airtight container in the fridge for up to 3 days. Reheat individual portions in the microwave or a covered dish in the oven until warmed through.
  • Freezing: For longer storage, freeze portions in suitable containers for up to 3 months. Allow the dish to thaw overnight in the fridge before reheating.
  • Make-Ahead: Assemble the dish fully, cover it tightly, and refrigerate for up to a day before baking. This tip is particularly helpful for planning ahead and avoiding last-minute meal stress.

Fun Facts & Trivia

Did you know that baked pasta dishes like ziti have their origins deeply embedded in Italian-American culture dating back to the arrival of Southern Italian immigrants in the 19th century? Seeking comfort in familiar flavors, they adapted their beloved Italian recipes to available American ingredients and methodologies, leading to the creation of delightful, unique dishes. Moreover, the intertwining of spinach and cheese in this dish conveys the Mediterranean ethos of balancing flavors and health, reflecting not only history but also evolving tastes that appreciate tradition and innovation.

In conclusion, Cheesy Baked Ziti with Spinach is more than just a meal—it’s an experience. It’s about crafting something with love that you can share, a dish that bridges nostalgia and modern tastes. As you take your first bite, savor the layers of history, flavor, and comfort that have been lovingly baked together to create a culinary masterpiece worth every moment spent in its preparation.

Ingredients

  • Pasta
    → Use 12 ounces of ziti pasta for the base of the dish. This tubular pasta holds the cheesy sauce well and allows for a satisfying texture. Cook the pasta until al dente before mixing it with the sauce, as it will continue to cook in the oven. Be sure to drain and rinse it in cold water to stop the cooking process, which prevents it from getting mushy.
  • Olive Oil
    → Two tablespoons of olive oil add richness and moisture to the dish. Use high-quality extra virgin olive oil for the best flavor. Heat it gently before adding aromatics like garlic or vegetables, as this helps infuse the oil with flavor.
  • Garlic
    → Three cloves of garlic, minced, provide a fragrant base for the sauce. Fresh garlic is essential for depth of flavor; avoid using jarred garlic as it lacks the punch of fresh. Sauté the minced garlic until it is fragrant, being careful not to burn it, as it can become bitter and overpower the sauce.
  • Fresh Spinach
    → Add 4 cups of fresh spinach, roughly chopped. Spinach wilts down significantly when cooked, contributing both flavor and nutrition. Wash the spinach thoroughly to remove any grit, then sauté it with garlic until just wilted. This helps maintain its vibrant color and nutrients.
  • Ricotta Cheese
    → Use 15 ounces of ricotta cheese to add creaminess and richness to the dish. Choose whole milk ricotta for a creamier texture. Gently mix it with a pinch of salt and some grated Parmesan before layering, as this enhances the flavor. Ensure it’s at room temperature to make mixing easier and smoother.
  • Parmesan Cheese
    → One cup of freshly grated Parmesan cheese adds a salty, savory flavor to the baked ziti. Grating it fresh allows it to melt better in the dish. Incorporate half of the cheese into the ricotta mixture and sprinkle the rest on top for golden, cheesy crust when baked.
  • Marinara Sauce
    → Use 3 cups of your favorite marinara sauce as the base of the dish. This sauce provides moisture and flavor, so choose a high-quality brand or homemade sauce. If using jarred sauce, look for one without added sugars or preservatives for the best taste. Mix half of the sauce with the pasta and layer the rest on top before baking.
  • Mozzarella Cheese
    → Incorporate 2 cups of shredded mozzarella cheese for a gooey, cheesy topping. Opt for low-moisture mozzarella for a better melt. Mix half into the ziti and sprinkle the rest on top before baking to achieve a bubbly, golden cheese layer that enhances the dish.
  • Salt and Pepper
    → Use salt and freshly cracked black pepper to season the dish. Seasoning the pasta water helps infuse flavor right from the start. Adjust salt and pepper to taste in the ricotta and marinara sauce to ensure a well-balanced flavor throughout the dish.

Instructions

  • Preheat your oven to 375°F (190°C) and prepare a 9×13 inch baking dish by lightly greasing it with cooking spray or olive oil.

    → This preparation step is crucial as it prevents the baked ziti from sticking to the dish, ensuring easy serving and clean-up. A higher temperature promotes bubbling and browning of the cheese on top.
  • Bring a large pot of salted water to a rolling boil and add 12 ounces of ziti pasta.

    → Salt enhances the flavor of the pasta from the inside out. Cook the ziti until just al dente according to package instructions, usually about 8-10 minutes, as it will continue to cook in the oven. Stir occasionally to prevent sticking.
  • Once the pasta is cooked al dente, drain it in a colander and rinse it under cold water briefly to stop the cooking process.

    → Rinsing cools the pasta, ensuring it doesn’t become mushy while mixing with the sauce, maintaining a satisfying texture.
  • In a large skillet, heat 2 tablespoons of extra virgin olive oil over medium heat until shimmering.

    → Heating the oil properly infuses it with flavor, which will be passed on to the garlic and spinach. Avoid overheating, as this can scorch the oil.
  • Add 3 cloves of minced garlic to the skillet and sauté for 1-2 minutes until fragrant but not browned.

    → Sautéing garlic enhances its flavor and aroma, but be vigilant to prevent burning, as burnt garlic can impart a bitter taste to the dish.
  • Add 4 cups of roughly chopped fresh spinach to the skillet with the garlic, and stir until wilted, about 2-3 minutes.

    → Adding spinach to the garlic allows it to cook evenly and retain its vibrant color while adding vital nutrients to the dish. Ensure to stir regularly to avoid uneven cooking.
  • In a large mixing bowl, combine 15 ounces of room-temperature ricotta cheese with a pinch of salt and half a cup of grated Parmesan cheese.

    → Mixing in salt and cheese enhances the flavor of the ricotta. Room temperature ricotta is easier to mix and will create a smoother filling.
  • Add the sautéed spinach and garlic mixture to the ricotta bowl, and fold gently to combine, ensuring an even distribution of ingredients.

    → Folding helps preserve the light texture of the mixture by avoiding over-mixing, which can make the ricotta dense.
  • → Coating the pasta with sauce helps to infuse flavor throughout the dish, avoiding dry bites. Use enough sauce to ensure the pasta is moist but not swimming in sauce.
  • Spread half of the ziti and marinara mixture evenly into the prepared baking dish, creating the first layer.

    → Layering helps build structure in the dish; ensure an even spread for consistent cooking.
  • Layer the ricotta mixture on top of the ziti, spreading it evenly to cover the pasta.

    → Even distribution of the ricotta ensures every serving has balanced creaminess and flavor.
  • Add the remaining ziti pasta and sauce on top, spreading it out evenly.

    → This layering technique creates a depth of flavors and textures in the final bake.
  • Sprinkle 1 ½ cups of shredded mozzarella cheese over the top, ensuring even coverage for a gooey finish.

    → Even cheese distribution prevents any dry spots and allows each spoonful to be cheesy and satisfying.
  • Finally, sprinkle the remaining ½ cup of grated Parmesan cheese evenly on top of the mozzarella.

    → This addition creates a golden, crusty topping that adds flavor and visual appeal as it bakes.
  • Cover the baking dish with aluminum foil, ensuring it does not touch the cheese, and place it in the preheated oven. Bake for 25 minutes.

    → Covering prevents the cheese from burning before the dish heats through. The steam generated will help cook the dish evenly.
  • After 25 minutes, remove the foil and continue baking for an additional 15-20 minutes, or until the cheese is golden and bubbly.

    → Uncovering allows the cheese to brown nicely, enhancing the flavor and presentation of the dish.
  • Once done, remove the baked ziti from the oven and let it rest for 10 minutes before serving.

    → Allowing it to rest lets the layers set, making it easier to cut and serve without falling apart.
  • Slice the ziti into squares with a sharp spatula or knife and serve hot.

    → Cutting it while warm ensures clean edges for a beautiful presentation, making serving easier.

Notes

Cheesy Baked Ziti with Spinach is a delightful and comforting dish that combines pasta, cheese, and fresh spinach for a hearty meal. The ziti pasta serves as the base, ensuring each bite is filled with cheesy goodness. Cooking the pasta until al dente is crucial, as it allows the pasta to hold its shape and texture when mixed with the sauce and baked. Rinsing the pasta with cold water after draining is essential to stop the cooking process and prevent it from becoming mushy.

Start by heating high-quality extra virgin olive oil, which brings a rich flavor to the dish. Fresh minced garlic is then added to create a fragrant base—be cautious not to let it burn, as this can alter the taste of the sauce negatively. Next, incorporating fresh spinach not only elevates the dish’s nutrition but also its color and flavor. Ensure you wash the spinach thoroughly and sauté it just until wilted to retain its vibrant look.

The creaminess of the ricotta cheese is a standout feature of the dish. Mixing it with a pinch of salt and some grated Parmesan intensifies the flavors even further. Allowing it to come to room temperature prior to mixing makes it easier to incorporate into the sauce. Freshly grated Parmesan is ideal for its superior melting qualities and robust flavor. To achieve the best texture, mix half of it into the ricotta and reserve the rest for that delightful cheesy crust on top.

Marinara sauce forms the flavorful base of this baked ziti. Choose a high-quality sauce to ensure the best taste, avoiding options laden with sugars or preservatives. Mixing half of it with the pasta ensures every bite is coated, while the remainder layered on top keeps the dish moist during baking. Lastly, the added mozzarella cheese provides that gooey, melty topping everyone loves. Use low-moisture mozzarella for optimal results.

Don’t forget to season your dish well! Using salt and freshly cracked black pepper throughout the cooking process enhances every element, ensuring a harmonized flavor. This baked ziti makes for an excellent meal that not only satisfies but can be easily reheated, making leftovers just as enjoyable as the first serving. Perfect for families or gatherings, this dish is sure to please everyone at the table.

Tips

Cooking Tips for Cheesy Baked Ziti with Spinach

  • Pasta: When cooking the ziti, follow the package instructions for al dente cooking time, which is typically 8-10 minutes. This ensures it holds its shape well during baking. After draining, rinse with cold water to stop cooking and prevent stickiness.
  • Olive Oil: For added depth, consider infusing the olive oil with herbs like oregano or thyme. Simply add a few leaves to the oil as it heats, then remove them before adding garlic and other ingredients.
  • Garlic: To avoid burning garlic, keep your heat at medium-low when sautéing. Stir frequently and watch closely; it should turn golden and fragrant, which typically takes about 30 seconds to 1 minute.
  • Fresh Spinach: You can substitute fresh spinach with frozen spinach if necessary. If using frozen, ensure it’s thawed and water is thoroughly squeezed out to avoid excess moisture in the dish.
  • Ricotta Cheese: To enhance the flavor of the ricotta, consider mixing in some fresh herbs like basil or parsley along with the salt and Parmesan. This adds an aromatic touch to your cheesy mixture.
  • Parmesan Cheese: Be sure to use a microplane or fine grater to get a fluffy texture for the Parmesan, which will help it melt evenly. Reserve some for finishing touches at the end for a lovely presentation.
  • Marinara Sauce: If you want to elevate the sauce, consider adding a splash of red wine or a pinch of red pepper flakes while heating it. This adds complexity and enhances the overall flavor.
  • Mozzarella Cheese: For an even cheesier experience, try mixing half of the mozzarella into the pasta mixture along with ricotta before layering. Be sure to cover the top completely with the remaining cheese to help achieve that irresistible bubbly topping.
  • Salt and Pepper: Taste as you go! Start by seasoning the pasta water and the ricotta mixture, then adjust the flavors in the marinara sauce before combining everything. This way, you can ensure a perfectly seasoned dish.

FAQ

What ingredients do I need for Cheesy Baked Ziti with Spinach?

You will need ziti pasta, marinara sauce, ricotta cheese, mozzarella cheese, grated Parmesan cheese, fresh spinach, garlic, onion, olive oil, and Italian seasoning.

How long does it take to prepare Cheesy Baked Ziti with Spinach?

The preparation time is approximately 20 minutes, and the baking time is around 30-35 minutes, making the total time around 1 hour.

Can I use fresh spinach instead of frozen spinach?

Yes, fresh spinach can be used. Just be sure to sauté it until wilted before adding it to the mix.

How can I make this recipe vegetarian?

This recipe is already vegetarian-friendly! Just ensure that your marinara sauce does not contain any meat products.

Can I make Cheesy Baked Ziti with Spinach in advance?

Yes, you can prepare it ahead of time. Assemble the dish and store it in the refrigerator for up to 24 hours before baking. Adjust the baking time if it’s coming straight from the fridge.

Is there a gluten-free option for the pasta?

Absolutely! You can substitute the ziti pasta with gluten-free pasta. Just ensure to follow the cooking instructions on the package for best results.

Can I freeze leftovers of Cheesy Baked Ziti with Spinach?

Yes, leftovers can be frozen. Store them in an airtight container for up to 3 months. To reheat, thaw in the refrigerator overnight and bake at 350°F until heated through.

What can I serve with Cheesy Baked Ziti with Spinach?

This dish pairs well with a side salad, garlic bread, or a light vegetable side dish for a complete meal.

Introduction / Hook

If you can imagine the perfect fusion of sweet, savory, and succulent in a single bite, then you’ll fall head over heels for our Honey Glazed Chicken Thighs and Rice. Picture tender, juicy chicken thighs cloaked in a sticky, golden honey glaze that glistens enticingly with each hue of the day’s retreating sun. Pair this with the comforting embrace of perfectly cooked rice, which absorbs every aromatic droplet of the seasoned marinade, and you have a dish that not only appeases the appetite but enlivens the spirit.

This recipe captures the quintessence of culinary delight — simplicity and flavor coming together in harmonious dance. Whether you’re an experienced gourmand or a busy individual looking for a swift yet memorable dinner, these honey-glazed beauties will linger in the taste buds and in conversation long after the plates are empty.

The Story Behind the Dish

While honey-glazed meats have graced dining tables globally, the combination of chicken and rice has a particularly rich heritage. Originating from Asian kitchens, where “honey chicken” is customary, this dish has transcended its roots to become a celebrated culinary creation worldwide.

Historically, the integration of honey in cooking dates back to ancient Egypt, where it was used as a natural sweetener long before sugar was commonplace. It was a luxury item, a counterpart to the divine, much like the ambrosia of gods. The technique of glazing chicken with honey spread through the eras, reaching medieval Europe where sweetness was reserved for special occasions.

Today, the use of honey not only imparts an exquisite golden hue to the chicken but also provides a healthier alternative to processed sugars. The adaptability of this ingredient also symbolizes a reunion of cultures, from the Middle Eastern honeyed lamb to the Southeast Asian caramelized pork, proving that some combinations simply belong together.

Why You’ll Love This Recipe

  • Effortless Elegance: With minimal ingredients and easy steps, you’ll achieve the kind of sophisticated flavor that impresses effortlessly.
  • Versatile and Family-Friendly: This dish segues easily from a midweek family meal to a sophisticated dinner party centerpiece.
  • Balance of Flavors: The sweetness of honey juxtaposes beautifully with savory elements, while garlic and soy sauce add complexity to the chicken.
  • Healthy and Natural: Featuring whole ingredients like honey and chicken thighs high in protein, this meal aligns perfectly with balanced eating.

Flavor Profile & Texture

The honey glaze is the headline act, characterized by its seamless fusion of sweetness and umami, with subtle notes of garlic and soy sauce weaving through the blend. The chicken thighs offer moist, succulent bites with every forkful, contrasting beautifully with the slightly crispy, caramelized exterior.

The rice serves as an ideal blank canvas to soak up the glaze’s essence, offering a gentle and neutral counterpoint to intensely flavored chicken. Expect each grain to be infused with fragrant spices and the lingering whisper of honey.

Occasions & Pairings

This dish is perfect for an array of settings, from serene family dinners to lively holiday feasts. It’s especially suited for occasions that prioritize communal enjoyment over intricate preparation.

For pairings, consider a crisp, dry white wine like Sauvignon Blanc or a subtle sparkling cider to engage with the dish’s sweetness. For a non-alcoholic option, a chilled herbal tea with mint can cleanse the palate between bites, enhancing the dining experience.

Suggestions for Side Dishes:

  • Steamed green vegetables, such as broccoli or bok choy, for a healthy and vibrant color contrast.
  • A fresh garden salad with a zesty lemon vinaigrette to counterbalance the richness.
  • Roasted root vegetables, which echo the dish’s earthy undertones.

Tips, Variations & Substitutions

While the recipe is a crowd-pleaser as is, there are numerous avenues to explore for customization or dietary needs:

  • Spice it Up: Add some chili flakes to the glaze for a spicy kick that cuts through the sweetness.
  • Vegan Alternative: Substitute chicken with firm tofu or tempeh, marinated and baked till crispy.
  • Gluten-Free Adaptation: Use tamari instead of soy sauce without sacrificing the umami hit.
  • Regional Twists: For a Mediterranean slant, incorporate a squeeze of lemon and fresh herbs such as oregano.

Storage & Make-Ahead Ideas

If you have leftovers (though it’s highly unlikely), proper storage ensures future enjoyment:

  • Refrigeration: Place the chicken and rice in an airtight container, where it can be refrigerated for up to three days.
  • Freezing: For longer storage, freeze individual portions in freezer-safe bags for up to one month. To reheat, thaw overnight in the refrigerator and warm up on the stove or in the microwave.
  • Make-Ahead: Prepare the honey glaze in advance and marinate the chicken to elevate flavors even further when you’re ready to cook.

Fun Facts & Trivia

Did you know that honey never spoils? Archaeologists have found pots of honey in ancient Egyptian tombs that are over 3,000 years old and still safe to eat. Its natural composition acts as a preservative, keeping it fresh almost indefinitely, much like the timelessness of the dishes it enhances.

Further, rice is a staple food for more than half of the world’s population, with over 40,000 varieties, adaptable to almost any climate and cuisine, showcasing its versatility in dishes, much like the honey-glazed chicken we’re celebrating.

Ingredients

  • Chicken Thighs
    → Bone-in, skin-on chicken thighs are ideal as they remain juicy and flavorful during cooking. They can be left whole or cut into smaller pieces if desired. Make sure to pat them dry before marinating to ensure a crispier skin. Always choose thighs that are even in size for uniform cooking.
  • Honey
    → Honey serves as the primary sweetener and glaze component, providing a shiny finish and rich flavor. Opt for raw or local honey for a more complex taste and to avoid additives. Measure the honey in a liquid measuring cup to make pouring easier and prevent sticking.
  • Soy Sauce
    → Soy sauce adds a savory umami flavor that balances the sweetness of the honey. Choose low-sodium soy sauce if you’re concerned about salt intake. Make sure to stir well before measuring to distribute any sediment that may have settled at the bottom of the bottle.
  • Garlic (minced)
    → Fresh garlic enhances the depth of flavor in the marinade. Mince it finely for even distribution and to release its essential oils, which bring out its bold aroma. For a milder taste, consider roasting the garlic before adding it to the marinade.
  • Fresh Ginger (grated)
    → Grated fresh ginger adds a warm spice and slight bite to the glaze, complementing the honey’s sweetness. Use a microplane for grating, as it yields a finer texture and blends seamlessly into the marinade. Fresh ginger is preferred over powdered for the best flavor and zest.
  • Lemon Juice
    → Freshly squeezed lemon juice brightens the dish with acidity, helping to balance the sweetness of the honey and the saltiness of the soy sauce. Roll the lemon on the counter before cutting to maximize juice yield. Always use fresh juice over bottled for optimal flavor.
  • Rice (long grain preferred)
    → Long grain rice, such as basmati or jasmine, is perfect for this dish as it remains fluffy and separate when cooked. Rinse the rice under cold water before cooking to remove excess starch, which helps prevent stickiness and results in a better texture.
  • Chicken Broth (or water)
    → Chicken broth adds additional flavor to the rice while cooking. Choose low-sodium broth for better control over salt levels in your dish. If using water, consider seasoning with a pinch of salt or a bay leaf to enhance the overall taste.

Instructions

  • Start by marinating the chicken thighs. In a large bowl, combine the honey, soy sauce, minced garlic, grated fresh ginger, and freshly squeezed lemon juice.

    → This mixture will serve as both the marinade and glaze. Ensure you mix well to combine all the ingredients into a smooth sauce, allowing the flavors to meld beautifully. Marinating will enhance the flavor of the chicken, making it juicy and tender. Ensure the thighs are evenly coated in the marinade.
  • Place the chicken thighs in the marinade, ensuring they are fully submerged or covered. Cover the bowl with plastic wrap and refrigerate for at least 30 minutes, or preferably 2 hours.

    → Marinating allows the chicken to absorb the flavors from the honey and spices. If time allows, marinate overnight for maximum flavor infusion. Turn the chicken thighs occasionally during marination to ensure even coating.
  • While the chicken is marinating, rinse the long grain rice under cold water in a fine-mesh strainer until the water runs clear.

    → Rinsing the rice removes excess starch that can cause it to become gummy during cooking. This ensures the rice cooks up fluffy and individual grains remain distinct.
  • In a medium saucepan, combine the rinsed rice and chicken broth (or water) in a ratio of 1 cup of rice to 2 cups of liquid. Bring the mixture to a boil over medium-high heat.

    → The broth adds flavor, while the boiling process initiates the cooking. Ensure you stir the rice briefly after boiling to keep it from sticking to the bottom of the pan.
  • Once boiling, reduce the heat to low, cover the saucepan with a tight-fitting lid, and simmer for about 15-18 minutes.

    → Lowering the heat allows the rice to cook evenly without burning while maintaining moisture. Avoid lifting the lid while cooking, as it releases steam necessary for cooking.
  • After cooking, remove the saucepan from heat and let it sit, covered, for 5 minutes to allow the rice to finish steaming.

    → This resting period lets the rice absorb any residual liquid and makes it fluffier. Use a fork to gently fluff the rice before serving.
  • While the rice is resting, preheat your oven to 400°F (200°C) if cooking the chicken in the oven. Alternatively, prepare a grill for medium heat if grilling the chicken.

    → Preheating is essential as it ensures the chicken cooks quickly and evenly, forming a nice glaze. If grilling, make sure the grates are well oiled to prevent sticking.
  • Remove the marinated chicken thighs from the bowl, shaking off excess marinade, and arrange them skin-side up in a baking dish or on the grill.

    → Proper spacing allows the thighs to cook evenly without steaming each other. Keeping the skin side up allows the fat to render properly, resulting in crispy skin.
  • Drizzle any remaining marinade over the chicken thighs, making sure to reserve some for basting later. Bake in the preheated oven for 35-40 minutes, or until the internal temperature reaches 165°F (74°C).

    → This step caramelizes the honey and creates a delicious, sticky glaze. Use an instant-read thermometer to check for doneness, ensuring safety and preventing overcooking.
  • If grilling, cook for about 6-7 minutes on each side, basting occasionally with reserved marinade to enhance flavor and moisture.

    → Basting infuses the chicken with more flavor and helps maintain juiciness. Ensure the grill lid is closed between flips to maintain heat.
  • Once the chicken is done cooking, remove it from the oven or grill and let it rest for about 5-10 minutes before serving.

    → Resting allows the juices to redistribute, making the chicken more flavorful and tender when cut.
  • Serve the honey glazed chicken thighs over the fluffy rice, garnishing with sesame seeds or chopped green onions if desired.

    → This vibrant addition not only enhances presentation but also adds a subtle crunch and fresh flavor contrast to the sweet glaze. Enjoy your delicious dish!

Notes

These honey glazed chicken thighs and rice create a delightful and filling meal that’s perfect for any night of the week. The combination of honey, soy sauce, garlic, and ginger produces a rich flavor that beautifully marries the sweetness and savory notes. Remember to let the chicken marinate for at least 30 minutes to enhance the flavor, or even overnight for the best results.

Using bone-in, skin-on chicken thighs not only ensures a juicier texture but also offers a richer flavor, so don’t skip this step. When cooking, ensure the skin is well-seared to achieve that lovely crispy finish. The rice cooked in chicken broth elevates the dish, making it more savory and flavorful. Rinsing the rice before cooking is key to achieving that perfect fluffy texture.

This dish is easily customizable; you can add vegetables like bell peppers or snap peas into the rice for an added touch of color and nutrition. If you desire a bit of spice, consider adding a pinch of red pepper flakes or serve with sliced green onions for garnish. These honey glazed chicken thighs and rice not only make for a satisfying meal but also serve well as leftovers, maintaining their flavor when reheated.

Pair it with a simple side salad or steamed green vegetables for a complete meal. Enjoy this dish as a comforting, satisfying dinner that brings both warmth and a burst of flavor to your table!

Tips

Cooking Tips for Honey Glazed Chicken Thighs and Rice

  • Marination Time: Allow the chicken thighs to marinate for at least 30 minutes, but ideally, let them sit for several hours or overnight for maximum flavor infusion. The longer they marinate, the more flavorful they will become.
  • Cooking Method: For crispy skin, consider searing the chicken thighs skin-side down in a hot skillet before transferring them to the oven. This creates a delicious golden brown crust and locks in flavor.
  • Oven Temperature: Bake the chicken at a high temperature (around 400°F or 200°C) to ensure a perfectly caramelized glaze. Keep an eye on them to prevent burning, especially since honey can caramelize quickly.
  • Timing for Rice: Start cooking the rice at the same time you put the chicken in the oven. This way, everything will be ready at once, and the rice will absorb flavors from the chicken broth while it cooks.
  • Resting the Chicken: After removing the chicken from the oven, let it rest for about 5-10 minutes before serving. This resting period allows the juices to redistribute, ensuring tender and juicy meat.
  • Serving Suggestion: Serve the chicken over the fluffy rice, drizzling any leftover glaze from the baking dish over the top for added flavor. You can also garnish with sliced green onions or sesame seeds for extra texture and taste.
  • Storage Tips: Leftovers can be stored in an airtight container in the refrigerator for up to 3 days. Reheat gently in the oven or microwave to preserve texture and flavor.

FAQ

What ingredients do I need for Honey Glazed Chicken Thighs and Rice?

You will need chicken thighs, honey, soy sauce, garlic, rice, chicken broth, olive oil, and your choice of vegetables (optional).

How long does it take to prepare this dish?

The total preparation and cooking time is approximately 45 minutes.

Can I use a different type of meat instead of chicken thighs?

Yes, you can substitute chicken breasts, drumsticks, or even pork thighs. Just adjust the cooking time accordingly.

Is this recipe suitable for meal prep?

Yes, Honey Glazed Chicken Thighs and Rice makes for an excellent meal prep option. It can be stored in the refrigerator for up to 3 days.

What type of rice works best for this recipe?

Jasmine rice or basmati rice works best due to their fragrant qualities, but you can use any type of rice you prefer.

Can I make this dish in a slow cooker?

Yes, you can adapt the recipe for a slow cooker. Combine the honey glaze ingredients and chicken thighs in the cooker and cook on low for 6-8 hours.

How can I make the glaze thicker?

You can thicken the glaze by simmering it longer or by adding a cornstarch slurry (mix cornstarch with water) to the sauce while it’s cooking.

What can I serve as a side dish with Honey Glazed Chicken Thighs and Rice?

Suggested side dishes include steamed vegetables, a fresh salad, or roasted potatoes to complement the meal.

Introduction

Imagine the sizzle of a perfectly cooked piece of salmon, aromatic herbs embracing it as it rests in a pool of tangy, luscious lemon juice. The vibrant colors and enticing aromas beckon from the kitchen, promising not just sustenance but an experience. This is the allure of our One-Pan Lemon Herb Salmon—a dish that captivates the senses and elevates a simple dinner into a moment to remember. With bright citrus notes playing harmoniously against the rich, buttery flavor of salmon, each bite promises to be a symphony of taste and texture. If you’re yearning for a meal that delivers gourmet flavor without the gourmet fuss, this recipe is your ticket to culinary bliss.

The Story Behind the Dish

The origins of citrus-marinated dishes extend back centuries, crisscrossing various cultures from Mediterranean coasts to Asian markets. Each region adds its unique spin, favoring local herbs and spices to complement the citric allure of lemon. Lemon and fish—a match made throughout history—find frequent occasions to unite, as seen in traditional seafood preparations from around the globe. With the emergence of the one-pan cooking craze, influenced by both busy modern lifestyles and a desire for clean-up simplicity, this one-pan approach melds historic flavors with contemporary convenience.

Every time you prepare this dish, know that you’re partaking in a tradition that transcends borders, connecting kitchens and cultures through the timeless appeal of fresh, simple ingredients beautifully combined.

Why You’ll Love This Recipe

  • Ease of Preparation: No complicated techniques or endless steps. Simply assemble and let your oven do the work.
  • Quick to Cook: Ready in less than 30 minutes, making it perfect for last-minute meals or streamlined dinner planning.
  • Healthy & Nutrient-Rich: Packed with omega-3 fatty acids, vitamins, and minerals—salmon is a powerhouse of nutrition.
  • Minimal Clean-Up: Using just one pan ensures that clean-up is a breeze, helping you spend more time enjoying your meal.
  • Versatile Pairing Options: Complements a myriad of sides and wines, perfect for any dining occasion.

Flavor Profile & Texture

This dish brings together the subtle, rich taste of salmon, which when baked, achieves a flaky, melt-in-your-mouth quality. The infusion of lemon juice throughout the cooking process adds a zesty brightness, effectively cutting through the natural oiliness of the fish, while fresh herbs provide an aromatic and earthy complexity. The result is a dynamic flavor journey—each taste contrasting yet balancing the others, leaving a refreshing finish on the palate. Accompanied by roasted vegetables or nestled on a bed of grains, the fish offers a fulfilling texture, balancing soft fish with the varying crunch of accompaniments.

Occasions & Pairings

This One-Pan Lemon Herb Salmon is the ideal candidate for any occasion. Its simplicity makes it feasible for an easy weekday dinner, yet its flavor and presentation shine for a Sunday lunch or dinner party.

Suggested Pairings:

  • Side Dishes: Roasted asparagus, garlic mashed potatoes, or a light arugula salad.
  • Drinks: Pair with a crisp white wine, like a Sauvignon Blanc or Chardonnay, to complement the citrus notes.
  • Desserts: Follow with a lemon tart or a berry compote to continue the fruit theme.

Tips, Variations & Substitutions

Our one-pan approach allows for easy customization, giving you room to adapt the dish to your preferences or dietary needs.

  • Add Spice: Include a pinch of red pepper flakes for a hint of heat.
  • Herb Variations: Substitute dill or thyme for a different herbal essence, or a mix depending on your herb garden’s bounty.
  • Vegan Option: Substitute salmon with firm tofu slices, marinated beforehand to absorb flavors.
  • Gluten-Free: The base recipe is naturally gluten-free when paired with appropriate sides.

Storage & Make-Ahead Ideas

The beauty of this dish extends beyond immediate consumption, offering quick storage solutions and make-ahead potential that add to its appeal.

  • Refrigeration: Store any leftovers in an airtight container for up to 3 days. Reheat in the oven for best texture, or serve cold atop a salad.
  • Freezing: While ideally enjoyed fresh, the dish can be frozen. Allow it to cool completely, wrap tightly in foil, and place in a freezer-safe bag for up to 1 month.
  • Make Ahead: Prepare the lemon and herb marinade in advance. Keep the salmon refrigerated in the marinade for up to 8 hours before cooking, intensifying the infusion of flavors.

Fun Facts & Trivia

Did you know that the pairing of lemon with fish became popularized in the Middle Ages due to its ability to balance and mask the sometimes overly ‘fishy’ odors of less fresh fish? While nowadays we enjoy this duo out of choice, it was initially a culinary necessity that has stood the test of time as a classic pairing.

Moreover, salmon itself has an intriguing journey—once abundant and central to Indigenous cultures in the Pacific Northwest, its preservation methods, from smoking to salting, afforded a celebration of resourcefulness that echoes today as a beloved staple in many households worldwide.

With its storied past and contemporary adaptations, the One-Pan Lemon Herb Salmon remains a testament to culinary evolution, available to simplify our lives while promising tastes that are nothing short of extraordinary every time you indulge.

Ingredients

  • Salmon Fillets
    → Fresh salmon fillets are the star of the dish, providing a rich source of protein and healthy omega-3 fatty acids. Look for fillets that are bright in color with a moist appearance. For the best results, pat the fillets dry with paper towels before seasoning to ensure a nice sear when cooking.
  • Olive Oil
    → Extra virgin olive oil adds flavor and helps to keep the salmon moist while cooking. It also acts as a medium for the herbs and spices to adhere to the fish. Use high-quality olive oil for the best taste and health benefits, and make sure it’s at room temperature before mixing with spices.
  • Fresh Lemons
    → Fresh lemons provide acidity and brightness to the dish, balancing the richness of the salmon. You’ll need both lemon juice and lemon slices. Squeeze the juice directly from the fruit for freshness, and choose organic lemons to avoid pesticides when using the zest.
  • Garlic
    → Fresh garlic adds a robust flavor that complements the salmon and herbs. Mince the garlic finely to release its essential oils and enhance its pungency. To prevent bitterness, add the garlic later in the cooking process if you’re sautéing or roasting.
  • Fresh Herbs (such as parsley, dill, or cilantro)
    → Fresh herbs enhance the dish with vibrant flavors and aroma. Finely chop the herbs to release their natural oils, allowing for even distribution throughout the dish. Always use fresh herbs instead of dried for a more pronounced flavor. Adjust quantities based on personal preference.
  • Salt
    → Kosher salt is ideal for seasoning as it helps to elevate the flavors of the salmon and herbs. Use it sparingly at first, as you can always adjust to taste after cooking. Consider using a flaky sea salt as a finishing touch for added crunch and flavor.
  • Black Pepper
    → Freshly ground black pepper adds a mild heat and depth of flavor. Grind the peppercorns just before seasoning the salmon to maximize its flavor. Adjust the amount based on spice preference, keeping in mind that freshly ground pepper is more potent than pre-ground.
  • Asparagus (or other vegetables, like zucchini or bell peppers)
    → Fresh asparagus adds color, texture, and additional nutrients to the dish. Trim the tough ends and cut the stalks to a uniform size for even cooking. Toss the vegetables in olive oil and season them ahead of time for enhanced flavor.

Instructions

  • Preheat your oven to 400°F (200°C) and prepare a large baking sheet by lining it with parchment paper.

    → Preheating the oven ensures that the salmon cooks evenly from the start, and lining the sheet with parchment paper will prevent sticking and make for easy cleanup.
  • Pat the salmon fillets dry with paper towels on both sides.

    → Drying the fillets will help achieve a nice sear and prevent steaming in the oven, contributing to a flavorful crust.
  • In a small mixing bowl, combine the olive oil, minced garlic, salt, freshly ground black pepper, and chopped fresh herbs.

    → Mixing the olive oil with the other ingredients allows for them to be evenly distributed on the salmon, enhancing the overall flavor profile of the dish.
  • Brush the salmon fillets on both sides liberally with the herb mixture using a basting brush.

    → A generous coating of the oil and herb mixture ensures that the flavors penetrate the salmon while it cooks, leading to a tender and flavorful result.
  • Place the seasoned salmon fillets in the center of the prepared baking sheet, skin side down.

    → Positioning the fillets in the center allows for optimal heat circulation around the fish, ensuring even cooking.
  • Prepare the asparagus by washing it thoroughly, snapping off the tough ends, and cutting any larger stalks to match in size with the smaller ones.

    → Trimming the asparagus this way promotes even cooking and enhances texture; nobody wants chewy, stringy ends in their dish.
  • Toss the trimmed asparagus in a bowl with a drizzle of olive oil, salt, and pepper.

    → Coating the asparagus in olive oil helps it to roast beautifully without drying out, and seasoning enhances its natural flavor.
  • Spread the seasoned asparagus around the salmon on the baking sheet.

    → Arranging the asparagus around the fish allows them to cook concurrently and absorb some of the salmon’s flavors, creating a harmonious dish.
  • Slice one of the lemons into rounds and lay the slices on top of the salmon and asparagus.

    → The lemon slices add acidity during cooking, infusing the salmon and vegetables with a bright, tangy flavor and preventing them from drying out.
  • Transfer the baking sheet to the preheated oven and bake for about 12-15 minutes or until the salmon flakes easily with a fork and reaches an internal temperature of 145°F (63°C).

    → Cooking time may vary depending on the thickness of the fillets; monitoring the internal temperature ensures the salmon is safely cooked without overcooking.
  • Remove the baking sheet from the oven and let the salmon rest for a few minutes before serving.

    → Allowing the fillets to rest helps the juices redistribute within the fish, resulting in a moist and tender bite when you serve.
  • Garnish with extra fresh herbs and a squeeze of fresh lemon juice just before serving.

    → Fresh herbs and a squeeze of lemon elevate the dish, enhancing its presentation and flavor.; the brightness will contrast beautifully with the richness of the salmon.
  • Serve the lemon herb salmon alongside the roasted asparagus for a complete meal.

    → Plating the dish attractively not only adds to the visual appeal but also makes for an inviting presentation, encouraging enjoyment.

Notes

These One-Pan Lemon Herb Salmon fillets are an easy and flavorful meal that combines the richness of salmon with the freshness of herbs and citrus. The simplicity of this dish is perfect for weeknight dinners, requiring minimal cleanup while still delivering a delicious and nutritious meal. Pair the salmon with seasonal vegetables like asparagus, zucchini, or bell peppers for a complete plate. Don’t hesitate to experiment with different herbs to find your preferred flavor profile. Additionally, the leftovers make a great addition to salads or wraps for lunch the next day. Make sure to watch the cooking time closely to avoid overcooking the salmon, which can dry it out. It’s best served immediately after cooking for optimal taste and texture.

Tips

Cooking Tips for One-Pan Lemon Herb Salmon

  • Choose the Right Salmon: When selecting salmon fillets, opt for those that are fresh with a vibrant appearance. Look for fillets with even thickness to ensure even cooking.
  • Preheat the Pan: Make sure to preheat your pan before adding the salmon. This will help achieve a golden-brown crust. A hot pan also reduces the likelihood of sticking.
  • Perfectly Seasoned Fillets: For enhanced flavor, season the salmon fillets generously with salt and pepper just before cooking. This step locks in moisture and enhances the taste.
  • Lemon Zest Flavor Boost: Don’t discard the lemon zest! Grate the outer yellow skin of the lemon before juicing to add an extra burst of citrus flavor to the dish.
  • Cooking Time: Salmon cooks quickly; typically, it takes about 4-6 minutes per side depending on the thickness. A good rule of thumb is to cook until the salmon flakes easily with a fork.
  • Add Garlic Wisely: To avoid burning the garlic, consider adding it halfway through the cooking process. This timing allows the garlic to infuse its flavor without becoming bitter.
  • Don’t Overcrowd the Pan: If you’re cooking vegetables alongside the salmon, make sure to leave enough space in the pan for both the salmon and the veggies. Overcrowding can lead to steaming rather than searing.
  • Resting the Salmon: After cooking, let the salmon rest for a couple of minutes before serving. This helps redistribute the juices and keeps the fish moist.
  • Garnishing: Finish off your dish with a sprinkle of fresh herbs and a few lemon slices on top for a beautiful presentation and additional flavor.
  • Leftover Tips: If you have leftovers, store them in an airtight container in the fridge. Reheat gently in the oven or on a skillet to prevent drying out.

FAQ

What ingredients are needed for One-Pan Lemon Herb Salmon?

The main ingredients include salmon fillets, lemon, fresh herbs (such as dill and parsley), olive oil, garlic, salt, and pepper. You may also add vegetables like asparagus or zucchini for a complete meal.

How long does it take to prepare One-Pan Lemon Herb Salmon?

The total preparation and cooking time is approximately 30 minutes, making it a quick and easy meal option.

Can I use frozen salmon for this recipe?

Yes, you can use frozen salmon. Make sure to thaw it completely before cooking for even results.

What types of herbs work best with this dish?

Fresh herbs like dill, parsley, and basil work wonderfully with lemon herb salmon. Feel free to mix them according to your preference.

Can I make this recipe in the oven instead of on the stovetop?

Absolutely! Preheat your oven to 400°F (200°C), place all ingredients in a baking dish, and bake for about 15-20 minutes or until the salmon is cooked through.

Is One-Pan Lemon Herb Salmon healthy?

Yes, this recipe is healthy as it features salmon, which is high in omega-3 fatty acids, and it’s packed with vegetables. It’s low in carbohydrates, making it a great option for many diets.

What sides pair well with One-Pan Lemon Herb Salmon?

Some great sides include quinoa, brown rice, or a fresh green salad. Roasted potatoes or any seasonal vegetables also complement the dish nicely.

Can I substitute salmon with another type of fish?

Yes, you can substitute salmon with other fish like trout, cod, or tilapia. Just adjust the cooking time based on the thickness of the fillets.

Introduction: The Alluring Allure of Creamy Garlic Chicken with Roasted Veggies

Imagine tender chicken pieces enveloped in a sumptuously creamy garlic sauce, paired with perfectly roasted vegetables that are both nourishing and palate-pleasing. The Creamy Garlic Chicken with Roasted Veggies is not just a dish—it’s a culinary experience that invites warmth, flavor, and comfort right to your dining table. This is the sort of dish that, with each bite, unfolds layers of richness and subtleties that entice your senses and bring a sense of homey satisfaction.

The Story Behind the Dish

Originating from the rich tapestry of European culinary traditions, creamy garlic chicken embodies the luxurious marriage of simplicity and flavor that many classic cuisines are known for. This dish, with its velvety sauce and rustic charm, brings to mind French provincial kitchens, where the focus is on fresh ingredients and the kind of hearty, soul-nourishing meals that are designed to be shared.

Garlic, often revered as the “stinking rose,” has been celebrated for centuries across various cultures, not only for its robust flavor but also for its reputed health benefits. Combine this with the omnipresent element of cream, beloved for its ability to transform ordinary dishes into indulgent experiences, and it becomes clear why this dish has stood the test of time.

Why You’ll Love This Recipe

  • Flavorful Simplicity: This dish manages to be both sophisticated and effortlessly simple, perfect for any level of cooking expertise.
  • Family-Friendly: The delightful combination of creamy and savory flavors makes it a hit among both kids and adults.
  • Nutritious: Packed with vegetables and lean protein, it offers a balanced meal that doesn’t compromise on taste.
  • Versatile: Ideal for a cozy family dinner or a larger gathering where you want to impress without stress.

Flavor Profile & Texture

The predominant flavor in this dish is, unsurprisingly, garlic. When sautéed to a golden hue, garlic’s sharp bite mellows into a warm sweetness that infuses every piece of the chicken and permeates the creamy sauce. Layered into this are hints of earthy herbs and a whisper of lemon, which introduce a refreshing acidity that cuts through the richness of the sauce.

The vegetables, with their natural sugars enhanced by roasting, offer a contrasting texture—crispy edges with tender centers—providing different layers of texture that beautifully complement the chicken’s tender silkiness. Each bite is an orchestration of lush, creamy notes paired with delectably caramelized vegetables.

Occasions & Pairings

This dish is your perfect companion for various occasions:

  • Weeknight Dinners: Quick enough to prepare on a busy evening, yet satisfying and hearty.
  • Holiday Feasts: Ideal for impressing guests with minimal effort on special occasions and holiday gatherings.
  • Themed Dinner Parties: Consider pairing with a crisp white wine to complement the garlic and cream, such as a Chardonnay or Sauvignon Blanc.
  • Side Pairings: Serve it alongside warm, crusty bread to mop up the delicious sauce or a simple green salad to balance the richness.

Tips, Variations & Substitutions

One of the great joys of making Creamy Garlic Chicken with Roasted Veggies is the flexibility to adapt the dish to your liking. Here are some ideas:

  • Added Spice: If you prefer a bit of heat, adding a pinch of red pepper flakes or a splash of hot sauce can elevate the dish.
  • Vegetarian Alternative: Replace chicken with hearty vegetables like mushrooms or cauliflower for a vegetarian twist.
  • Dairy-Free Option: Use coconut cream or a dairy-free cream substitute to cater to lactose-intolerant diets.
  • Herb Variations: Try incorporating fresh herbs such as thyme, rosemary, or basil for an aromatic finish.

Storage & Make-Ahead Ideas

Should you find yourself with leftovers—a rare occurrence with this crowd-pleaser—rest assured it stores beautifully:

  • Refrigerate: Store in an airtight container in the refrigerator for up to three days.
  • Freezing: This dish can be frozen for up to a month. For best results, ensure the chicken and sauce are well-covered to prevent freezer burn.
  • Reheating: Gently reheat on the stove over low heat, stirring occasionally to maintain the cream’s integrity. Add a splash of milk or cream if the sauce has thickened.

Fun Facts & Trivia

Did you know that garlic has been cultivated for over 5,000 years and was used as a form of currency in ancient Egypt? In medieval times, it was eaten to cleanse people of evil spirits and flu, believed to harbor protective properties. This rich history is what you are tasting when you indulge in this dish.

This Creamy Garlic Chicken with Roasted Veggies is more than mere sustenance; it’s a dish that carries with it nuances of history, health, and happiness, perfect for bringing a touch of gourmet indulgence to any meal.

Ingredients

  • Chicken

    → Use boneless, skinless chicken breasts or thighs for a tender and juicy result. Chicken thighs have more fat, which can enhance the flavor and keep the meat moist during cooking. Ensure the chicken is at room temperature before cooking to promote even cooking.
  • Garlic

    → Fresh garlic cloves are essential for creating a rich, aromatic base for the dish. Mince or finely chop the garlic to release its oils and flavor. Be careful not to burn the garlic in the pan, as it can turn bitter.
  • Heavy Cream

    → Heavy cream adds a rich, creamy texture to the sauce, making it indulgent and luxurious. Use fresh heavy cream straight from the refrigerator for the best results; its higher fat content helps create a luscious consistency when combined with garlic and spices.
  • Vegetable Broth

    → Use low-sodium vegetable broth as a base for the sauce to enhance the flavor without adding excessive salt. If you prefer a richer taste, chicken broth can also be used. Allow the broth to come to a gentle simmer before adding to the pan with the garlic.
  • Olive Oil

    → Extra virgin olive oil is perfect for sautéing the chicken and vegetables, imparting a lovely flavor. Use it to lightly coat the bottom of the pan and ensure an even sear on the chicken. Opt for high-quality olive oil for the best taste.
  • Vegetables

    → A mix of colorful vegetables like bell peppers, broccoli, and zucchini brings both nutrition and visual appeal. Chop them into uniform sizes to ensure even roasting. Toss them in olive oil, salt, and pepper before roasting to enhance their natural sweetness and flavor.
  • Salt

    → Salt brings out the flavors of the chicken and vegetables, enhancing the overall taste of the dish. Use kosher salt for seasoning; its coarse texture makes it easier to control the amount you use. Season both the chicken and vegetables generously before cooking.
  • Pepper

    → Freshly ground black pepper adds a subtle heat and depth of flavor. Use a pepper grinder for the freshest taste. Adjust the amount based on your preference for spice; a moderate amount enhances the overall flavor without overpowering the dish.
  • Fresh Parsley (for garnish)

    → Fresh parsley adds a burst of color and a hint of freshness to the dish. Chop it finely and sprinkle it over the finished plate just before serving to brighten the flavors. Use flat-leaf parsley for a more robust flavor compared to curly parsley.

Instructions

  • Preheat your oven to 425°F (220°C) and prepare a large baking sheet by lining it with parchment paper.

    → Preheating the oven ensures that your vegetables roast evenly and develop a nice caramelization, which enhances their natural sweetness. Parchment paper helps prevent sticking and makes cleanup easier.
  • Gather and prepare all your ingredients, including chicken, vegetables, garlic, heavy cream, vegetable broth, olive oil, salt, pepper, and parsley.

    → Having your ingredients ready and within reach (a process called “mise en place”) streamlines the cooking process and helps you work quickly and efficiently, allowing you to focus on technique and flavor.
  • Chop your vegetables—bell peppers, broccoli, and zucchini—into uniform pieces, approximately 1-inch in size.

    → Uniform cutting ensures even cooking and allows all vegetables to roast at the same rate, resulting in optimal texture and flavor.
  • Toss the chopped vegetables in a large bowl with 2-3 tablespoons of olive oil, and season generously with salt and freshly ground black pepper.

    → The olive oil helps the vegetables to roast nicely, while the seasoning enhances their flavors. Use your hands to mix them thoroughly, ensuring every piece is evenly coated.
  • Spread the seasoned vegetables in a single layer on the prepared baking sheet.

    → Spreading the vegetables out allows for proper air circulation and browning; overcrowding the pan can lead to steaming instead of roasting.
  • Place the baking sheet with the vegetables in the preheated oven and roast for 20-25 minutes.

    → Roasting at a high temperature helps to achieve a deliciously crispy exterior while keeping the insides tender. Stir halfway through cooking to promote even browning.
  • While the vegetables are roasting, heat 1 tablespoon of olive oil in a large skillet over medium-high heat.

    → Heating the oil properly ensures the chicken sears effectively, forming a flavorful crust and locking in juices.
  • Season the chicken breasts or thighs generously with salt and freshly ground black pepper.

    → Proper seasoning is crucial for enhancing the chicken’s natural flavor; the seasoning also creates a delicious crust during cooking.
  • Once the oil is shimmering, carefully add the seasoned chicken to the skillet in a single layer.

    → Avoid overcrowding the pan, as this would lower the temperature and prevent a proper sear. Allow the chicken to cook undisturbed for about 6-7 minutes until golden brown.
  • Flip the chicken pieces and cook for an additional 6-7 minutes on the other side until cooked through and the juices run clear.

    → This step is critical for ensuring the chicken is fully cooked. You can use a meat thermometer to check the internal temperature; it should reach 165°F (75°C).
  • Remove the chicken from the skillet and set aside on a plate, covering it with foil to keep warm.

    → Resting the chicken after cooking allows the juices to redistribute, making it more tender and juicy when sliced.
  • In the same skillet, add minced garlic and sauté for about 30-60 seconds until fragrant, stirring constantly.

    → Garlic cooks quickly and can burn easily; stirring continuously ensures it doesn’t scorch, which can create a bitter flavor.
  • Pour in 1 cup of vegetable broth to the skillet and bring to a gentle simmer, scraping up any browned bits from the bottom of the pan.

    → This deglazing step adds great flavor to the sauce and utilizes the fond (browned bits) left in the skillet, enhancing the overall dish.
  • Once simmering, reduce the heat to low and stir in ½ cup of heavy cream.

    → Mixing the cream into the broth thickens the sauce and creates a rich, velvety texture. Stir until fully combined and heated through.
  • Return the chicken to the skillet, spoon the sauce over it, and let it simmer for an additional 3-4 minutes to absorb the flavors.

    → This step ensures that the chicken not only heats back up but also becomes infused with the creamy garlic sauce, enhancing its flavor.
  • When the vegetables are roasted to perfection, remove them from the oven and garnish them with a pinch of salt.

    → An extra sprinkle of salt before serving enhances the flavor of the roasted veggies and helps balance the dish.
  • To serve, arrange the creamy garlic chicken on plates alongside the roasted vegetables.

    → Presenting your dish thoughtfully enhances the dining experience; the colors and textures will invitingly attract attention.
  • Finish by sprinkling freshly chopped parsley over the chicken and vegetables for a touch of color and freshness.

    → The parsley adds visual appeal and a fresh herbal note to the dish, brightening the flavors and making it more vibrant.

Notes

Get ready to enjoy a rich and flavorful Creamy Garlic Chicken with Roasted Veggies, a dish that perfectly balances indulgence and nutrition. Start by preparing your ingredients to ensure a smooth cooking process. First, opt for boneless, skinless chicken breasts or thighs, as they will yield tender meat. Remember to let the chicken reach room temperature before cooking for even cooking.

Fresh garlic is crucial for this recipe—mince the cloves well to release their aromatic properties, but keep a close eye on them while cooking to avoid any bitterness from burning.

The addition of heavy cream transforms your sauce into a luxurious experience. Always use fresh cream right from the fridge, as its higher fat content creates a wonderfully creamy consistency when combined with garlic and broth. Low-sodium vegetable broth serves as an excellent base, but feel free to substitute chicken broth for a deeper flavor. Let the broth simmer gently before integrating it with the other ingredients.

For sautéing, choose extra virgin olive oil to not only cook your chicken and veggies but also to impart a delicious flavor. Invest in a high-quality oil for the best outcome. Your vegetables should be a colorful mix—bell peppers, broccoli, and zucchini work well. Chop them uniformly for even roasting, and coat them with olive oil, salt, and pepper to accentuate their sweetness and flavor during the roasting process.

When seasoning, use kosher salt to enhance flavors without bringing the dish’s sodium level too high. Season both the chicken and vegetables generously before cooking to ensure that every bite is flavorful. Freshly ground black pepper will add a slight kick to the dish—adjust the amount based on your heat tolerance to achieve the perfect balance of taste.

Finally, don’t forget the fresh parsley! This herb not only garnishes the dish beautifully but also adds a refreshing touch. Chop it finely and sprinkle it over the dish just before serving. For a more pronounced flavor, go for flat-leaf parsley over curly parsley.

This Creamy Garlic Chicken with Roasted Veggies is sure to be a hit at your dining table, providing both comfort and nourishment. Enjoy!

Tips

Cooking Tips for Creamy Garlic Chicken with Roasted Veggies

  • Chicken Preparation: To ensure your chicken is evenly cooked, take it out of the refrigerator about 30 minutes before cooking to bring it to room temperature. This prevents the outside from cooking too quickly while the inside remains undercooked.
  • Garlic Handling: For the best garlic flavor, use fresh cloves and mince them right before cooking. If you find you have garlic left over, store it in an airtight container in the fridge for up to a week. However, avoid freezing minced garlic as it can alter its flavor.
  • Creating the Sauce: After sautéing the garlic, add the heavy cream slowly while stirring to avoid curdling. Keep the heat on medium-low to create a velvety sauce without boiling, as boiling can cause the cream to separate.
  • Vegetable Broth Tips: If you’re using store-bought vegetable broth, taste it first before adding salt to ensure the seasoning balances well with the dish. You can also add a splash of white wine for an extra layer of flavor.
  • Oil Choice: When using olive oil, allow it to heat slightly before adding the chicken to achieve a good sear. If the oil starts smoking, it’s too hot. Lower the heat to ensure an even cook without burning.
  • Roasting Vegetables: Spread the vegetables in a single layer on the baking sheet to ensure they roast evenly. Avoid overcrowding, as this can lead to steaming rather than roasting. Check for doneness by piercing with a fork or knife; they should be tender and slightly caramelized.
  • Seasoning: Taste and adjust the seasoning after cooking. If the dish tastes flat, a pinch of salt can often uplift and enhance the flavors. Remember to season in layers, adding some during cooking and then adjusting at the end.
  • Garnishing with Parsley: Adding parsley just before serving preserves its vibrant color and flavor. Consider chopping larger quantities beforehand to garnish several servings quickly.

FAQ

What ingredients do I need for Creamy Garlic Chicken with Roasted Veggies?

You will need chicken breasts, garlic, heavy cream, olive oil, assorted vegetables (like bell peppers, zucchini, and carrots), salt, pepper, and fresh herbs (such as thyme or parsley).

How long does it take to prepare Creamy Garlic Chicken with Roasted Veggies?

The total preparation and cooking time is approximately 40-50 minutes.

Can I use a different type of meat instead of chicken?

Yes, you can substitute chicken with turkey, pork, or even tofu for a vegetarian option.

What vegetables work best for roasting?

Good options for roasting include bell peppers, zucchini, carrots, broccoli, and brussels sprouts. Feel free to mix and match according to your preference.

Is this recipe suitable for meal prep?

Absolutely! Creamy Garlic Chicken with Roasted Veggies is great for meal prep. Just store the components separately in airtight containers for up to 4 days in the refrigerator.

Can I make this recipe dairy-free?

Yes, you can use a dairy-free cream alternative, such as coconut cream or almond milk, to make it dairy-free.

What can I serve with Creamy Garlic Chicken?

This dish pairs well with rice, quinoa, or pasta. You can also serve it with a side salad for a lighter option.

Can I freeze leftovers?

Yes, you can freeze the leftovers. Just make sure to store them in a freezer-safe container and consume within 2-3 months for best quality.

Introduction to Hearty Vegetable and Bean Stew

Imagine the warm, inviting aroma of simmering herbs and spices filling your kitchen, enticing your senses as you anticipate the comfort that awaits. Our Hearty Vegetable and Bean Stew is more than just a meal; it’s a culinary embrace, offering solace and satisfaction with every spoonful. This recipe takes you on a flavorful journey, showcasing the simple yet profound power of combining nature’s bounty into a nourishing and flavorful stew. Perfect for chilly evenings or when you need a wholesome touch, this stew is a symphony of earthy vegetables and protein-rich beans, with a luscious broth that ties every component together into delightful harmony.

The Story Behind the Dish

The origins of vegetable and bean stews can be traced back centuries, rooted in the culinary traditions of cultures around the world. From French ratatouille to Italian minestrone, the theme of combining seasonal vegetables with legumes has been a staple across continents. This approach capitalizes not only on the abundance of fresh ingredients but also on the art of making do with what one has on hand. Historically, these stews were meals of necessity, created from the desire to nourish large families with simple, accessible produce. Our Hearty Vegetable and Bean Stew follows in this tradition, honoring the rustic elegance and practicality of these time-tested recipes while adding its own flair to create something truly special.

In many cultures, such stews are shared during family gatherings and celebrations, symbolizing unity and warmth. This recipe carries those sentiments forward, inviting you to partake in a tradition that spans continents and generations. By cooking this stew, you become part of a living tapestry that celebrates the richness of plant-based foods and their ability to bring people together.

Why You’ll Love This Recipe

  • Nutrient-rich: Packed with an array of vegetables and beans, this stew is a powerhouse of vitamins, minerals, and fiber.
  • Easy to make: With straightforward instructions and common ingredients, you can whip up this delightful dish with minimal fuss.
  • Customizable: The ingredients can be swapped out to suit your preferences or what you have in your pantry, making it incredibly versatile.
  • Vegan friendly: Naturally plant-based, this stew caters to a wide variety of dietary preferences and restrictions.
  • Comforting and satisfying: With its rich flavors and warm textures, it’s perfect for cozy nights in.

Flavor Profile & Texture

The allure of this stew lies in its expertly layered flavors and pleasing textures. At its heart, the stew boasts a robust and aromatic herb-infused broth, which acts as the perfect canvas for the medley of ingredients. Every bite delivers a burst of flavors; the savory notes from carrots and celery, the subtle sweetness of bell peppers, and the deep, hearty undertones of tomatoes create a delightful balance.

Beans introduce a creamy texture that complements the slight crunch of al dente vegetables. The stew’s consistency is substantial yet fluid, providing a comforting experience that warms you from the inside out. Each spoonful is a testament to the beauty of humble ingredients transformed through slow, attentive cooking.

Occasions & Pairings

This hearty stew makes an ideal dish for various occasions, from casual weeknight dinners to festive family gatherings. Its versatility means it can be a standalone entrée or part of a larger meal spread. Here are some suggestions for when to enjoy it and what to pair it with:

  • Cold Winter Nights: Serve alongside crusty bread or warm cornbread to soak up the rich broth.
  • Holiday Meals: Incorporate into your holiday menu as a comforting starter or a vegan main course option.
  • Weeknight Suppers: Pair with a fresh green salad or roasted vegetables for a light yet fulfilling dinner.
  • Serving with Wine: A medium-bodied red wine like Merlot or Zinfandel complements the stew’s robust flavors beautifully.
  • For Lunch or Picnics: Enjoy it chilled or at room temperature, which allows the flavors to meld even further.

Tips, Variations & Substitutions

One of the joys of making a stew like this is its adaptability. You can tweak it to fit dietary needs or personal tastes. Consider the following tips and variations:

  • Vegetable Variations: Enhance the stew with seasonal vegetables like squash or zucchini for a fresh twist.
  • Bean Substitutions: Swap out cannellini beans for chickpeas or kidney beans for a different texture and flavor profile.
  • Herb Additions: Add a bay leaf during simmering for a more complex taste, or finish with fresh basil for a fragrant touch.
  • Spice Adjustments: Give the stew a bit of heat with the addition of red pepper flakes or smoked paprika.
  • Thickening Options: For a thicker consistency, blend a portion of the stew and stir it back into the pot, or add a spoonful of tomato paste.
  • Gluten-Free and Vegan Alternatives: Ensure all spice blends and broth bases are gluten-free and vegan-certified.

Storage & Make-Ahead Ideas

Proper storage and planning are vital for enjoying your stew beyond its initial serving. Here are some useful tips to ensure you get the most out of this delicious dish:

  • Storage: Transfer leftovers to an airtight container and refrigerate for up to five days.
  • Freezing: This stew freezes beautifully! Portion it into freezer-safe bags or containers. It can be frozen for up to three months. Thaw overnight in the refrigerator before reheating.
  • Reheating: Gently reheat on the stovetop over medium heat, stirring occasionally, until warmed through. You can also use a microwave for individual portions.
  • Make-Ahead: Prepare this stew a day in advance, as the flavors will deepen while resting, offering an even richer taste when you serve it.

Fun Facts & Trivia

Did you know that beans, a central ingredient in this stew, have been cultivated for over 7,000 years? They were essential to the diets of ancient civilizations, valued for their resilience and nutritional content. Moreover, their cultivation significantly contributes to soil health, thanks to their nitrogen-fixing properties, making them an eco-friendly crop choice.

In the language of flowers, carrots symbolize roots and foundational strength, which aligns with their role in this dish. Each portion of this stew is not just a meal but a connection to the earth and the cycles of nature that enable these ingredients to flourish.

So, roll up your sleeves and treat yourself and your loved ones to a bowl of this Hearty Vegetable and Bean Stew—where history, flavor, and nourishment unite in every bite.

Ingredients

  • Vegetable Base
    • 2 tablespoons olive oil
      → Olive oil serves as the foundation for sautéing the vegetables, adding richness and depth to the stew. Use extra virgin olive oil for its robust flavor. Heat the oil over medium heat before adding the vegetables to enhance their natural sweetness.
    • 1 large onion (diced)
      → Onions add sweetness and a savory depth to the stew. Dice them into small, uniform pieces to ensure they cook evenly. Sauté the onions until they become translucent; this process unlocks their flavors and enhances the overall taste of the dish.
    • 2 cloves garlic (minced)
      → Garlic provides a fragrant aroma and depth of flavor. Mince the garlic finely to release its oils and ensure it blends well with the other ingredients. Add garlic to the pot once the onions are softened to prevent burning and bitterness.
    • 2 medium carrots (sliced)
      → Carrots add natural sweetness and a vibrant color to the stew. Slice them into even rounds for consistent cooking. Using fresh, firm carrots ensures that they retain their texture and flavor, adding heartiness to the stew.
    • 2 stalks celery (sliced)
      → Celery contributes crunch and a fresh flavor to the stew. Slice the stalks thinly for even cooking. Fresh celery with bright green color and firm texture will give the best results, infusing the stew with aromatic qualities.
    • 1 bell pepper (diced)
      → Bell peppers add a sweet crunch and vibrant color. Dice the pepper into small pieces so they cook quickly and integrate with the other vegetables. Choose a ripe pepper with smooth skin for the best flavor and texture.
    • 1 zucchini (sliced)
      → Zucchini brings moisture and a subtle flavor to the stew. Slice it evenly to ensure quick cooking. Choose medium-sized zucchini that are firm to the touch; avoid those that are overly soft or blemished.
    • 1 can (14.5 oz) diced tomatoes (with juices)
      → Diced tomatoes add acidity, moisture, and a rich flavor base for the stew. Use canned tomatoes packed in juice for a more robust flavor. To keep the stew fresh, consider using low-sodium tomatoes to control salt levels.
  • Legumes
    • 1 can (15 oz) kidney beans (drained and rinsed)
      → Kidney beans provide protein, fiber, and heartiness to the stew. Make sure to drain and rinse the beans to remove excess sodium and retain their flavor. Using canned beans saves time, but if using dried beans, soak and cook them beforehand.
    • 1 can (15 oz) black beans (drained and rinsed)
      → Black beans add texture and additional protein to the stew. Similar to kidney beans, drain and rinse them before adding to the pot for optimal taste. This step also helps remove any canning liquid that can dilute flavor.
  • Liquids and Seasonings
    • 4 cups vegetable broth
      → Vegetable broth serves as the primary liquid for the stew, infusing it with flavor. Use low-sodium broth to control salt levels in the dish. If homemade broth is available, it can enhance the overall freshness and taste.
    • 1 teaspoon dried thyme
      → Dried thyme adds an earthy, herbal flavor that complements the vegetables. Simply sprinkle it into the broth; the heat will help release its aromatic qualities, enriching the stew as it simmers.
    • 1 teaspoon ground cumin
      → Ground cumin brings warmth and complexity to the dish. Add it to the stew early in the cooking process, allowing its flavors to meld with the other ingredients. Avoid using too much, as it can become overpowering.
    • Salt and black pepper (to taste)
      → Salt enhances the overall flavor of the stew, while black pepper adds a hint of heat. Start with a small amount of each and adjust towards the end of cooking to ensure seasoning is balanced.
  • Finishing Touches
    • 1 tablespoon fresh parsley (chopped)
      → Chopped fresh parsley adds a bright, fresh flavor to finish off the stew. Stir it in just before serving to maintain its vibrant color and taste. Choose vibrant green parsley for the best quality.

Instructions

  • Heat 2 tablespoons of olive oil in a large pot over medium heat.

    → Olive oil serves as the foundation for sautéing the vegetables, adding richness and depth to the stew. Heating the oil allows it to reach the right temperature, which ensures even cooking and enhances the natural sweetness of the vegetables you will add next.
  • Add 1 large diced onion to the pot and sauté for 5-7 minutes.

    → Onions add sweetness and a savory depth to the stew. Be sure to dice them into small, uniform pieces so they cook evenly. Sauté until they turn translucent; this process unlocks their flavors and enhances the overall taste of the dish.
  • Stir in 2 minced garlic cloves and cook for an additional minute.

    → Garlic provides a fragrant aroma and depth of flavor. Mince the garlic finely to release its oils and prevent burning. Adding it after the onions are softened helps avoid bitterness, ensuring your stew has a beautiful depth of flavor.
  • Add 2 sliced medium carrots and 2 sliced stalks of celery to the pot.

    → Carrots contribute natural sweetness and vibrant color, while celery adds crunch and a fresh flavor. Slice the vegetables into even pieces for uniform cooking. Use fresh, firm carrots and celery for the best texture and taste.
  • Incorporate 1 diced bell pepper and 1 sliced zucchini into the mixture.

    → Bell peppers add sweetness and vibrant color, while zucchini brings moisture and subtle flavor. Dice the bell pepper and slice the zucchini evenly to ensure they cook at similar rates. Choosing ripe vegetables enhances the stew’s overall flavor.
  • Pour in 1 can (14.5 oz) diced tomatoes with their juices.

    → Diced tomatoes add acidity, moisture, and a rich flavor base for the stew. Use tomatoes packed in juice for robust flavor; this will help create a thick, hearty texture in your stew and balance the flavors of the other vegetables.
  • Add 1 can (15 oz) drained and rinsed kidney beans, followed by 1 can (15 oz) drained and rinsed black beans.

    → Kidney and black beans provide protein, fiber, and heartiness to the stew. It’s important to drain and rinse them to remove excess sodium and any undesired flavors from the canning liquid. If using dried beans, ensure they are cooked and softened before adding.
  • Pour in 4 cups of vegetable broth.

    → Vegetable broth serves as the primary liquid for the stew, infusing it with flavor. Using low-sodium broth allows you to control the salt content. Homemade broth enhances freshness and the overall taste of the stew.
  • Sprinkle in 1 teaspoon of dried thyme and 1 teaspoon of ground cumin.

    → Dried thyme adds an earthy aroma, while cumin introduces warmth and complexity. Adding these spices at this stage allows their flavors to meld with the other ingredients as they cook, creating a well-rounded flavor profile.
  • Season the stew with salt and black pepper to taste.

    → Salt enhances the overall flavor of the stew, and black pepper adds a hint of heat. Start with a small amount of each; it is easier to adjust seasoning towards the end rather than risk overpowering the dish.
  • Bring the stew to a gentle boil, then reduce the heat to low and let it simmer for 30 minutes.

    → Simmering allows the flavors to meld and develop fully. Keep it covered partially to prevent excessive evaporation while allowing some steam to escape. Stir occasionally to ensure nothing sticks to the bottom of the pot.
  • Taste the stew before serving and adjust seasoning if necessary.

    → Tasting the stew ensures all flavors are balanced. You may find it needs a pinch more salt, pepper, or spice, so adjust accordingly. This step is crucial for achieving the perfect flavor.
  • Stir in 1 tablespoon of chopped fresh parsley just before serving.

    → Fresh parsley adds a bright, fresh flavor and a pop of color to the finished dish. Stir it in just before serving to maintain its vibrant color and enhance the stew’s presentation.
  • Serve the hearty vegetable and bean stew hot, ideally with crusty bread or over rice.

    → Serving it hot allows the flavors to shine, and pairing it with crusty bread can add texture, making for a wholesome meal. Enjoy your nutritious and hearty stew!

Notes

  • Start by preparing all the ingredients: Dice the onion, mince the garlic, slice the carrots, celery, bell pepper, and zucchini. Drain and rinse the beans. Having everything prepped will streamline your cooking process.
  • In a large pot, heat the olive oil over medium heat. Once hot, add the diced onion and sauté until it becomes translucent, about 5-7 minutes. This will create a fragrant base for your stew.
  • Add the minced garlic to the pot only after the onions are soft; sauté for about 1 minute until fragrant but not browned. This prevents any bitter flavors from burnt garlic.
  • Next, add the sliced carrots, celery, and bell pepper to the pot. Stir occasionally, cooking them until they start to soften, about 5 minutes.
  • Add the sliced zucchini to the pot along with the canned diced tomatoes (with their juices). Stir everything together, allowing the flavors to mix.
  • Pour in the vegetable broth and bring the mixture to a boil. Once boiling, reduce the heat to a simmer.
  • While the stew simmers, add the rinsed kidney and black beans, along with the dried thyme and ground cumin. Stir well to ensure all ingredients are integrated and coated in the flavorful broth.
  • Season the stew with salt and black pepper according to your taste preferences. It is better to start with smaller amounts and adjust as needed later.
  • Let the stew simmer for at least 20-30 minutes, stirring occasionally, allowing the flavors to meld and the vegetables to become tender. This is where the magic happens!
  • Once done, taste and adjust seasoning if necessary. Serve hot, garnished with fresh chopped parsley for a pop of color and freshness.
  • This hearty vegetable and bean stew can be enjoyed on its own or served with crusty bread or over rice for a more filling meal. It’s perfect for leftovers; the flavors deepen as it sits, making it even more delicious the next day.

Tips

Cooking Tips for Hearty Vegetable and Bean Stew

  • Prepping Your Vegetables: For optimal flavor, prepare all your vegetables before starting to cook. This ensures that you can sauté them quickly and at the right time, maintaining their textures and flavors.
  • Sautéing Technique: When sautéing your onion, garlic, and other vegetables, keep the heat at medium. This prevents burning while allowing the vegetables to become tender and release their natural sugars, enhancing sweetness.
  • Layering Flavors: Consider adding the vegetables in stages based on their cooking times. Start with the onion and garlic, then add the carrots and celery, and finally the bell pepper and zucchini, which require less time to cook.
  • Season Gradually: When seasoning your stew, add spices and herbs gradually. Start with cumin and thyme, then taste as the stew cooks. This helps to build layers of flavor without overpowering the dish.
  • Consistency Check: If your stew appears too thick, add more vegetable broth a little at a time. Conversely, if it’s too thin, let it simmer uncovered to allow some liquid to evaporate.
  • Beans Choice: If using dried beans instead of canned, remember to soak them overnight and cook them until tender before adding them to the stew. This will ensure even cooking and prevent them from becoming mushy.
  • Fresh Herbs: Fresh herbs like parsley should be added at the end of cooking to preserve their flavor and vibrant color. You can also consider adding other herbs such as basil or cilantro for a different taste profile.
  • Flavor Enhancements: For added depth, consider adding a splash of balsamic vinegar or a squeeze of lemon juice just before serving. These can brighten the flavors and add a nice finishing touch.
  • Serving Suggestions: Serve the stew hot with crusty bread or over a bed of rice for a complete meal. This can also help soak up the delicious broth.
  • Make-Ahead Option: This stew tastes even better the next day! Feel free to prepare it in advance and reheat it gently, allowing the flavors to meld together beautifully.

FAQ

What ingredients are needed for the Hearty Vegetable and Bean Stew?

The main ingredients include assorted vegetables (like carrots, potatoes, and bell peppers), various beans (such as kidney beans and chickpeas), vegetable broth, tomatoes, garlic, and herbs like thyme and bay leaf.

How long does it take to prepare the Hearty Vegetable and Bean Stew?

The preparation time is approximately 15 to 20 minutes, while the cooking time ranges from 30 to 40 minutes, making a total time of about 1 hour.

Can I use canned beans for the stew?

Yes, canned beans are a great option as they save time. Just be sure to rinse them well to reduce sodium content before adding them to the stew.

Is this stew suitable for vegans?

Absolutely! The Hearty Vegetable and Bean Stew is entirely plant-based, making it a perfect choice for vegans and vegetarians.

Can I add meat to the Hearty Vegetable and Bean Stew?

Yes, if you prefer a meaty version, you can add cooked meat such as chicken or beef. Adjust the cooking time accordingly to ensure the meat is thoroughly heated.

What can I serve with the Hearty Vegetable and Bean Stew?

This stew pairs wonderfully with crusty bread, rice, or quinoa. It can also be served alongside a fresh salad for a complete meal.

Can leftovers be stored in the fridge?

Yes, the stew can be stored in an airtight container in the refrigerator for up to 3-4 days. It also freezes well for longer storage.

What variations can I make to the Hearty Vegetable and Bean Stew?

Feel free to mix and match vegetables based on your preference or seasonal availability. You can also experiment with different herbs and spices to customize the flavor.

Introduction to One-Pan Lemon Herb Salmon

Imagine a dish that captures the invigorating essence of a Mediterranean seaside landscape: the tangy zest of lemon, the aromatic allure of fresh herbs, and the succulent richness of perfectly cooked salmon. This One-Pan Lemon Herb Salmon not only promises a delectably satisfying meal but also transforms your kitchen into a scene of effortless culinary elegance. Whether you’re seeking a quick weeknight dinner solution or an eye-catching entrée for a special occasion, this dish strikes a harmonious balance between healthful simplicity and gourmet refinement. With just one pan, minimal clean-up, and a symphony of fresh flavors, it’s a culinary masterpiece that’s as delightful to prepare as it is to savor.

The Story Behind the Dish

The origins of lemon herb salmon find their roots in the sun-drenched coasts of the Mediterranean, where seafood is a staple and the abundant local produce forms the foundation of every meal. The luscious interplay of lemon and herbs is a classic pairing, historically celebrated for their ability to enhance and elevate the natural flavors of fish. In this modern rendition, the one-pan approach marries convenience with the time-honored tradition of producing wholesome, fresh meals. This method has been passed down over generations, evolving from fire-heated stones to contemporary ovens, while retaining its rustic charm and nourishing integrity. As cuisine has traveled and transformed, the simplicity and versatility of the approach have made it a beloved choice for home cooks and professional chefs alike.

Why You’ll Love This Recipe

  • Quick and Easy: With everything cooked in a single pan, this recipe minimizes both effort and clean-up time, making it perfect for busy weeknights.
  • Health Benefits: High in omega-3 fatty acids, this dish is not only delicious but also supports heart health.
  • Family-Friendly: The mild yet flavorful taste is appealing to both children and adults, ensuring it’s a hit at the dinner table.
  • Visually Appealing: The vibrant colors of the herbs and lemons create a beautiful presentation, ideal for special dinners and holidays.

Flavor Profile & Texture

This dish offers a tantalizing blend of flavors that dance on your palate. The salmon provides a rich, buttery texture, perfectly contrasted by the bright, zesty punch of lemon. Fresh herbs like dill, parsley, and rosemary add layers of complexity, each with their unique aroma and taste, harmonizing beautifully with the natural flavors of the fish. A hint of garlic enhances its rich undertones, offering subtle earthiness. With its crisp, lightly browned crust and tender, flaky interior, this salmon dish simultaneously delivers satisfying heartiness and refreshing lightness.

Occasions & Pairings

One-Pan Lemon Herb Salmon is versatile enough to serve at an array of occasions. Whether enhancing the menu of a festive holiday dinner or starring as a simple weeknight meal, it consistently impresses. Looking to create an elevated dining experience? Pair this dish with a crisp white wine like Sauvignon Blanc or an unoaked Chardonnay that complements the citrusy notes perfectly. For sides, consider a refreshing cucumber salad or roasted seasonal vegetables. Additionally, a serving of fluffy couscous or a rustic bread adds a comforting, hearty touch to complete the meal.

Tips, Variations & Substitutions

There’s ample room for creativity with this recipe, allowing you to customize it according to your preferences or dietary needs. For a variation, consider using lime instead of lemon, offering a slightly different citrus profile. If you’re cooking for someone who prefers a different protein, swap salmon with another firm fish like cod or halibut. Vegetarians can substitute salmon with marinated tofu or hearty vegetables like eggplant or zucchini. To accommodate different dietary needs, olive oil can be replaced with a buttery vegan alternative or even coconut oil for a tropical twist.

Storage & Make-Ahead Ideas

Any leftovers from this dish can be efficiently stored in an airtight container in the refrigerator, where they’ll remain fresh for up to three days. For those who love to meal prep, this dish can be cooked in advance and stored, allowing the flavors to meld and intensify over time. When ready to serve, gently reheat in an oven preheated to 350°F for approximately 10–15 minutes, ensuring the salmon remains moist but heated through. Alternatively, if preparing for a larger gathering, season the salmon in advance and store it in the refrigerator, then pop it in the oven just before your guests arrive.

Fun Facts & Trivia

Did you know that salmon is one of the most widely farmed fish in the world, with origins tracing back to the icy waters of the Atlantic and Pacific Oceans? In ancient times, salmon was prized by many indigenous peoples for its abundance and nutritional profile, leading it to become a significant part of their diet and culture. Today, the health benefits of salmon are well-documented, and it remains a favorite ingredient in kitchens worldwide, particularly praised for its versatility and robust, adaptable flavors. This dish, with its vibrant colors and rich history, aptly reflects the collective evolution of culinary practices that transcend borders and time.

In conclusion, One-Pan Lemon Herb Salmon is more than just a meal; it’s an experience crafted with simplicity and elegance. Anchored by its Mediterranean roots and elevated by modern techniques, it encapsulates the beauty of minimalist cooking. Perfect for all skill levels and occasions, it continues to be a testament to the art of transforming the ordinary into the extraordinary, one pan at a time.

Ingredients

  • Salmon Fillets
    → Fresh salmon fillets are the star of the dish, providing a rich source of protein and healthy omega-3 fatty acids. Choose fillets that are bright and moist, with a slightly firm texture. For the best flavor and texture, look for wild-caught salmon when possible, as it tends to be more flavorful and sustainable.
  • Olive Oil
    → Extra virgin olive oil is used to drizzle over the salmon and vegetables, providing healthy fats and enhancing flavor. The oil also helps in achieving a delightful golden crust when roasting. Opt for high-quality olive oil for the best taste, and feel free to measure it by feel if a specific amount isn’t critical.
  • Fresh Lemon Juice
    → Freshly squeezed lemon juice brightens the dish with acidity, enhancing the flavors of both the salmon and vegetables. For optimal results, use juice from ripe, juicy lemons; avoid bottled lemon juice as it lacks vibrancy. When juicing, roll the lemon on the countertop to release more juice.
  • Lemon Zest
    → The zest adds a burst of citrus aroma, amplifying the lemon flavor without extra acidity. To zest, use a microplane or zester, taking care to only remove the outer yellow skin and avoiding the bitter white pith underneath. Fresh zest can significantly elevate the overall taste of the dish.
  • Garlic (minced)
    → Minced garlic infuses the dish with its distinct and aromatic flavor, complementing the salmon beautifully. Use fresh garlic cloves rather than pre-minced garlic for better flavor; let the minced garlic sit for a few minutes after chopping to enhance its aromatic qualities. Adjust the amount based on your preference for garlic intensity.
  • Fresh Herbs (such as parsley and dill)
    → Fresh herbs provide an aromatic finish to the dish, enhancing its flavor and visual appeal. Chop the herbs finely before adding them to the dish. Use a combination of parsley and dill for a traditional flavor pairing with salmon. Snip herbs just before using them to retain their freshness and flavor.
  • Cherry Tomatoes
    → Cherry tomatoes add a sweet, juicy burst and vibrant color to the dish. They can be halved or left whole, depending on your preference. Select ripe tomatoes for the best flavor; roasting will enhance their sweetness and create a lovely contrast with the salmon.
  • Asparagus (or preferred vegetables)
    → Asparagus brings a tender-crisp texture and green color, making it an excellent side that pairs well with salmon. Trim the woody ends before cooking. If using other vegetables, ensure they can roast at the same time as salmon, or adjust the cooking times for different types of vegetables.
  • Salt and Pepper
    → Salt and freshly ground black pepper are essential seasonings that enhance all flavors in the dish. Season generously but tastefully; start with a light sprinkle of salt on the salmon and vegetables, then adjust after cooking if more seasoning is needed. Freshly ground pepper adds a nice pungent kick, so use it well for a better flavor profile.

Instructions

  • Preheat your oven to 400°F (200°C) and prepare a large baking sheet by lining it with parchment paper.

    → Preheating your oven ensures that your salmon and vegetables cook evenly from the start. Lining the baking sheet prevents sticking and makes cleanup easier, allowing for a perfectly roasted dish.
  • Arrange your salmon fillets on the prepared baking sheet, skin-side down and spaced apart.

    → This positioning allows for sufficient airflow during cooking, leading to even roasting. Ensure the fillets are of similar thickness for consistent cooking times, which will prevent some pieces from overcooking while others are underdone.
  • Drizzle olive oil evenly over the salmon fillets, using about 2 tablespoons in total.

    → The olive oil not only adds flavor but also helps achieve a crispy texture on the salmon’s surface. Make sure each fillet is coated without drowning them, which can lead to steaming instead of roasting.
  • In a small bowl, combine the fresh lemon juice, lemon zest, minced garlic, salt, and pepper. Stir this mixture until well combined.

    → This marinade infuses the salmon with bright flavors and garlic aroma. Mixing these ingredients ensures each bite will carry an even distribution of the lemony flavor, enhancing the overall dish.
  • Pour the lemon marinade over the salmon fillets, ensuring they are well-coated, and let them sit for 10 minutes to marinate.

    → Allowing the salmon to marinate lets the flavors seep in and develop a more pronounced taste. Remember that the acidity from the lemon can change the texture of the fish, so don’t exceed 20 minutes for the marinating process.
  • While the salmon marinates, prepare the vegetables: trim the woody ends of the asparagus and halve the cherry tomatoes.

    → Trimming the ends of asparagus ensures that you only cook tender stems and eliminates any tough, woody textures. Halving the cherry tomatoes maximizes their exposure to heat, which will caramelize their sugars for added sweetness.
  • Spread the prepared asparagus and cherry tomatoes around the salmon fillets on the baking sheet.

    → This arrangement allows the vegetables to absorb the flavors from the salmon and the marinade, which enhances their taste while roasting. Make sure they are not overcrowded for appropriate browning.
  • Drizzle a little more olive oil over the vegetables and sprinkle with additional salt and pepper to taste.

    → Coating the vegetables in olive oil helps them roast beautifully, resulting in a caramelized finish. Seasoning them will enhance their natural sweetness and balance the dish.
  • Put the baking sheet in the preheated oven and roast for 12-15 minutes, or until the salmon is cooked through and flakes easily with a fork.

    → Cooking time may vary depending on the thickness of the salmon fillets. To check for doneness, insert a fork into the thickest part of the salmon; if it flakes apart easily and is opaque in color, it’s ready. Be cautious not to overcook, as this can dry out the fish.
  • Once cooked, remove the salmon and vegetables from the oven and sprinkle the chopped fresh herbs over the dish for garnish.

    → Garnishing with fresh herbs adds a burst of flavor and visual appeal, elevating the dish. Use this final touch sparingly to allow the natural flavors of the lemon and salmon to shine through.
  • Serve immediately with extra lemon wedges on the side for an additional burst of citrus if desired.

    → Serving fresh lemon wedges allows your guests to add acidity to their taste, enhancing their meal experience. Enjoy the harmonious flavors of this one-pan lemon herb salmon dish!

Notes

These One-Pan Lemon Herb Salmon fillets are not only easy to prepare but also packed with flavor and nutrients. The combination of fresh lemon juice and zest brightens the dish, allowing the rich salmon flavor to shine through. Using a variety of fresh herbs like parsley and dill elevates the dish further, adding layers of aromatic freshness.

Roasting the salmon alongside cherry tomatoes and asparagus creates a beautifully balanced meal, where the sweetness of the tomatoes contrasts wonderfully with the savory salmon. You can experiment with different vegetables like zucchini or bell peppers if you prefer, as long as they have similar cooking times.

This dish is perfect for a weeknight dinner due to its simplicity, but it’s also elegant enough to serve for guests. Feel free to serve it with a side of quinoa or brown rice to soak up the delicious juices. And remember, using high-quality olive oil, fresh ingredients, and properly seasoning will make all the difference in achieving a flavorful outcome.

For the best experience, enjoy the salmon hot from the oven, perhaps with an extra squeeze of lemon on top. Leftovers can be stored in an airtight container in the refrigerator for up to two days, making this a convenient meal prep option.

Tips

Cooking Tips for One-Pan Lemon Herb Salmon

  • Choosing Salmon: Opt for salmon fillets that are bright in color and have a shiny appearance. If available, wild-caught salmon will provide a richer flavor compared to farmed varieties.
  • Prepping the Vegetables: Before assembling, wash and prepare your cherry tomatoes and asparagus. For the tomatoes, cutting them in half can help them roast more evenly and release their juices for added flavor.
  • Marinating the Salmon: For an extra boost of flavor, consider marinating the salmon in olive oil, lemon juice, garlic, and herbs for 15-30 minutes before cooking. This will enhance the flavors and moisture.
  • Even Cooking: Make sure to spread the vegetables and salmon in a single layer in your pan to ensure even cooking. If the pan is overcrowded, the salmon may steam instead of roast, which will affect its texture.
  • Checking Doneness: Salmon is perfectly cooked when it reaches an internal temperature of 145°F (63°C) and flakes easily with a fork. Use a meat thermometer for accuracy.
  • Finishing Touches: Just before serving, add an extra drizzle of high-quality olive oil and a sprinkle of fresh herbs for brightness. A sprinkle of lemon zest can also enhance the dish’s appeal.
  • Serving Suggestions: This dish pairs wonderfully with a side of rice or quinoa, which soak up the delicious juices. A light salad or fresh bread can also complement the meal perfectly.

FAQ

What ingredients do I need for One-Pan Lemon Herb Salmon?

You will need salmon fillets, lemon juice, olive oil, garlic, fresh herbs (such as parsley or dill), salt, and pepper. You can also add seasonal vegetables of your choice for roasting.

How long does it take to prepare One-Pan Lemon Herb Salmon?

The preparation time is about 10 minutes, while the cooking time is approximately 20 minutes. Overall, you can have the meal ready in around 30 minutes.

Can I use frozen salmon for this recipe?

Yes, you can use frozen salmon. However, it’s best to thaw the salmon completely before cooking to ensure even cooking and better flavor absorption.

What vegetables pair well with One-Pan Lemon Herb Salmon?

Vegetables like asparagus, broccoli, zucchini, and cherry tomatoes work well. You can choose your favorites or what you have available to create a colorful meal.

Is One-Pan Lemon Herb Salmon a healthy meal option?

Yes, this recipe is a healthy option. Salmon is rich in omega-3 fatty acids, and the addition of vegetables increases the nutrient content, making it a balanced meal.

Can I substitute the herbs in this recipe?

Absolutely! You can use any fresh herbs you like. Some great alternatives include thyme, basil, or chives, which will impart their unique flavors to the dish.

What should I serve with One-Pan Lemon Herb Salmon?

This dish pairs nicely with rice, quinoa, or a fresh salad. You can also serve it with crusty bread to soak up the delicious juices.

Can I make this recipe ahead of time?

While it’s best served fresh, you can prepare the marinade ahead of time and store the salmon in it for a few hours in the refrigerator before cooking for enhanced flavor.