Introduction / Hook
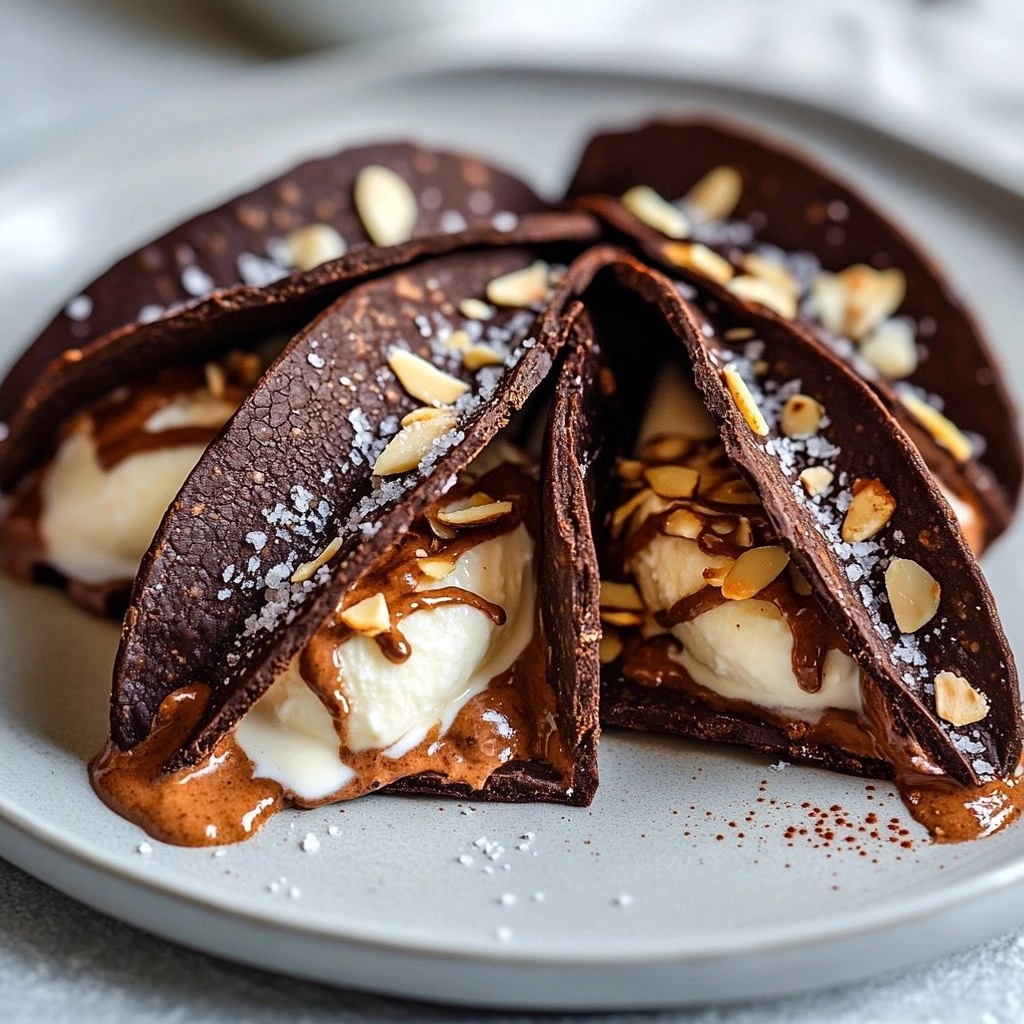
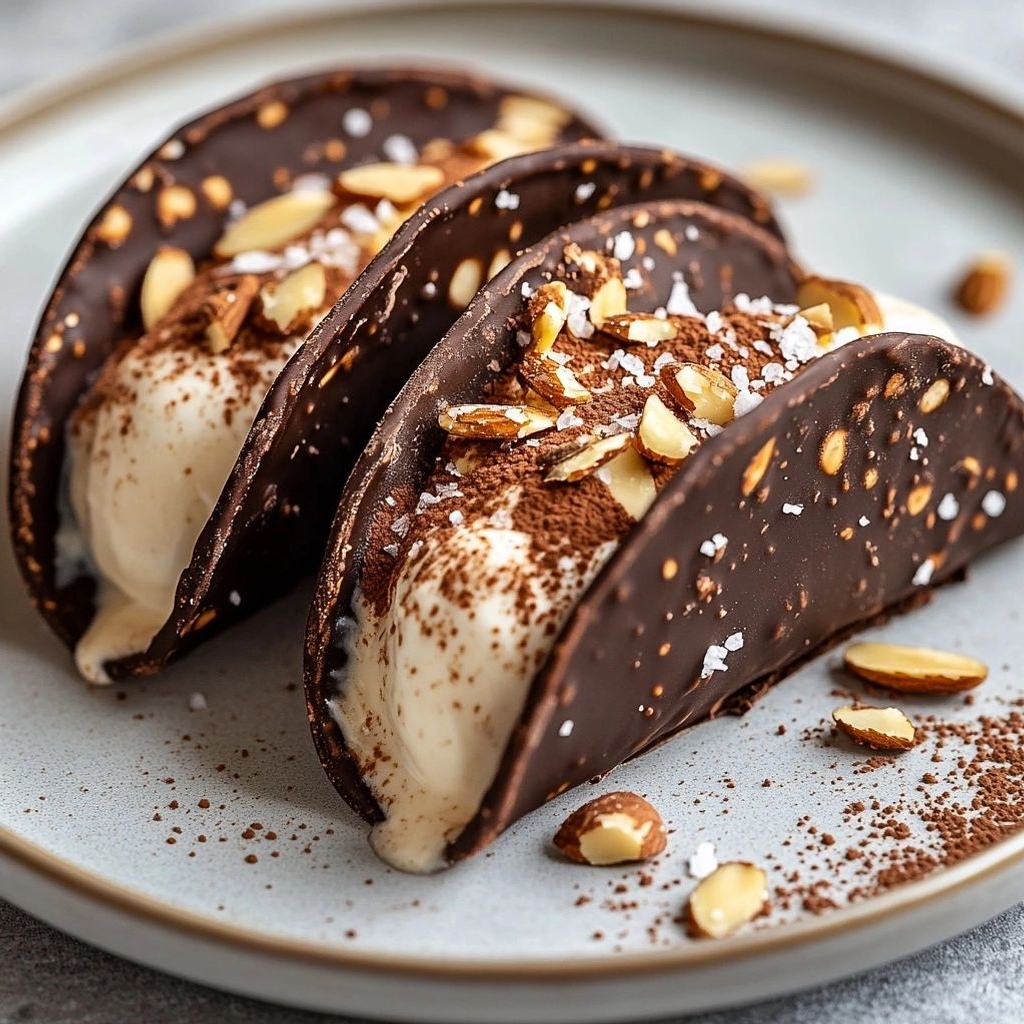
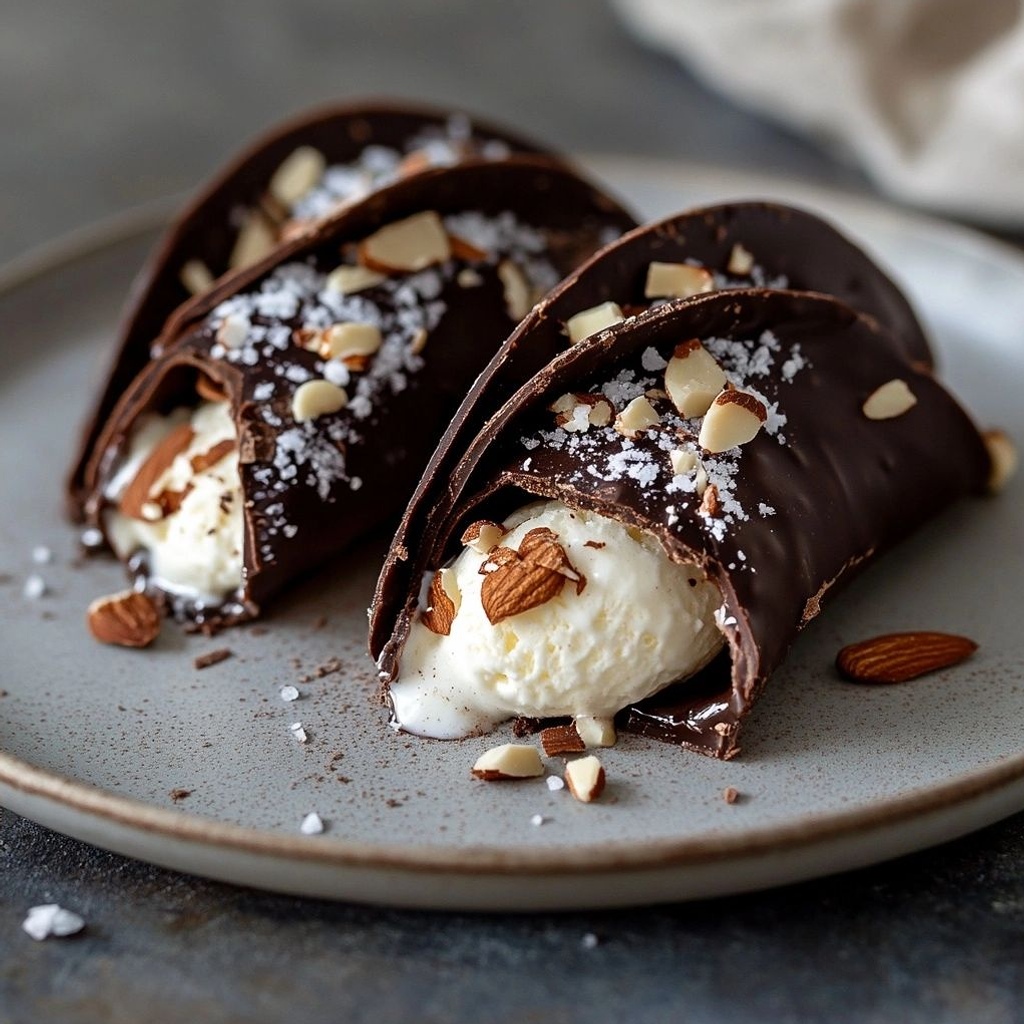
Close your eyes and imagine a warm, sunset-bright afternoon, a gentle breeze curling through the kitchen, and the irresistible scent of chocolate turning glossy as it pools around a crisp, cinnamon-kissed waffle cone. Homemade choco tacos—the kind you bite into with a satisfying crunch, followed by a silken, fudgy center—are more than a dessert. They’re a playful wink to childhood joy, a celebration of simple pleasures, and a testament to how a few smart twists in your kitchen can transform ordinary ingredients into something utterly nostalgic and crave-worthy. From the first crack of the waffle shell to the last lick of melted chocolate, these choco tacos deliver texture and flavor in harmonious balance: a crisp shell, a soft, creamy filling, and a chocolate shell that snaps with every bite. The magic lies in the contrast—the cool, creamy center meeting a warm, crunchy shell, all wrapped in a glossy veil of chocolate that hardens just enough to crack but never overwhelms. If you’ve ever wished for a sundae on-the-go or a fun, crowd-pleasing treat that feels special yet approachable, you’re in for a delicious surprise.
The Story Behind the Dish
Choco tacos have a playful origin story that blends nostalgia with culinary ingenuity. They’re a modern reinterpretation of ice cream-filled delights that date back to the mid-20th century, when snackable, hand-held treats became a way to celebrate summer sunshine, birthday parties, and family gatherings. The concept—filling a shell with decadent, creamy ice cream and sealing it with a glossy coating—speaks to a universal love of textures: the surprise of a bitten edge, the cool melt of filling, and the satisfying crack of chocolate shell. In home kitchens around the world, families adapted the idea using locally loved ingredients—vanilla, chocolate, caramel, or fruit purées—and turned it into a ritual: whip up a batch, scoop into shells, drizzle with chocolate, and share. The Homemade Choco Tacos you’re about to make carry that lineage forward, but with a modern twist: a more compact, sturdy shell that’s easy to handle, a controlled filling that stays perfectly scoopable, and a chocolate coating that hardens to a glossy finish without becoming brittle. This version invites you to celebrate craft, texture, and speed—an ideal project for weekend cooking, a festive party platter, or a playful dessert for kids and grown-ups alike.
Why This Recipe Is Special
What makes Homemade Choco Tacos stand out is not just their deliciousness, but their adaptability and the storytelling that comes with them. They are:
- Texture-rich: from the crisp shell to the smooth ice cream center and a chocolate shell that provides a satisfying snap.
- Customizable: you can switch up flavors, add mix-ins, or swap dairy for vegan options without losing the essence of the treat.
- Impressive yet approachable: looks spectacular on a platter, but the steps are simple enough for a weeknight project or a fun family activity.
- Sensory-delight: the contrast of cold, creamy filling against warm, slightly toasty shells, all wrapped in a kiss of chocolate, creates a memorable tasting experience.
- Make-ahead friendly: you can prepare components in advance and assemble when ready, which is a huge win for gatherings and celebrations.
Flavor Profile & Texture
The flavor journey in a homemade choco taco begins with the shell—a delicate, wafer-thin husk that carries hints of vanilla and a subtle toasty note. It’s crisp, but not brittle; it yields with a gentle bite that invites the next layer. Inside, the ice cream filling (you can choose classic vanilla, a rich chocolate, or a playful caramel swirl) is where the dream truly unfolds. It is cool, creamy, and luxuriously smooth, with a gentle sweetness that lingers on the palate. The chocolate coating on the outside adds a glossy, slightly firm shell that crackles when you bite through, releasing a burst of chocolate flavor that envelops the entire treat. If you opt for a salted caramel or coffee-infused center, you’ll introduce a warm, savory contrast that enhances the overall balance. The textures work in concert: the snap of the chocolate shell, the melt-in-your-mouth creaminess of the filling, and the light, crisp bite of the shell at the very end. Aromas—rich cocoa, caramelized sugar, vanilla bean—rise as the shell meets the ice cream, making the anticipation almost as delightful as the bite itself.
Flavor notes to anticipate:
- Vanilla classic: a clean, sweet base that plays well with any mix-ins or toppings.
- Dark chocolate finish: adds a bittersweet edge that intensifies the chocolate experience.
- Salted caramel twist: a warm, buttery caramel with a pinch of sea salt that brightens the chocolate and ice cream.
- Espresso or mocha variation: a hint of coffee notes for a sophisticated, grown-up depth.
Occasions & Pairings
These choco tacos shine in a variety of settings. They are perfect for playful summer parties, backyard barbecues, and kids’ birthday celebrations, but they also double as a charming dessert for a date night, a potluck, or a holiday dessert table. Serve them with a few simple accompaniments to elevate the experience:
- Pairings: a dollop of whipped cream or a spoon of salted caramel sauce on the side, fresh berries for brightness, or a light chocolate sauce for extra decadence.
- Drinks: a strong espresso or a creamy latte can echo the chocolate flavors; sparkling water with a squeeze of orange zest provides a refreshing contrast.
- Menus & occasions: as a dessert option for summer barbecues, a fun addition to kids’ parties, or a nostalgic nod at a retro-themed event.
One of the joys of this recipe is how forgiving and adaptable it is. Here are ideas to tailor Homemade Choco Tacos to your preferences, dietary needs, or available ingredients:
- Gluten-free options: use gluten-free wafer sheets or gluten-free waffle cones for the shells. Ensure the ice cream and toppings are gluten-free if needed.
- Vegan version: choose dairy-free ice cream (cist or coconut-based can work beautifully) and a vegan dark chocolate coating. Check that the shell ingredients are vegan or make a gluten-free, dairy-free version using plant-based options.
- Low-sugar approach: opt for a low-sugar ice cream and a sugar-free chocolate shell. You can also use a high-cocoa-content chocolate with a touch of a sugar substitute suitable for chocolate coatings.
- Flavor variations: coffee, matcha, strawberry, or pistachio can be layered into the ice cream center, or swirl a ribbon of caramel or fudge into the interior for a surprise center.
- Regional twists: incorporate ingredients like chili-chocolate shell for a kick in the finish, or use dulce de leche as the filling for a Latin-inspired twist. A coconut-lime shell would transport you to a tropical mood.
- Texture play: add tiny chocolate chips, crushed nuts, or toffee bits into the ice cream center for an added crunch that contrasts with the creamy interior.
To keep your choco tacos at their best, consider how you assemble and store each component. The goal is to maintain crispness of the shell, prevent ice cream from becoming icy or icy-watered, and preserve the glossy finish of the chocolate coating.
- Make-ahead: prepare the shells (baked or purchased) in advance and freeze them until you’re ready to assemble. Keep the ice cream well-chilled and scoopable. The chocolate coating can be melted and used on the day you plan to assemble, or you can coat and refrigerate for a few hours if you’re pressed for time.
- Storing filled choco tacos: after assembling, store them in a freezer-safe container with parchment between layers to prevent sticking. They should be consumed within 1–2 weeks for best texture, though they can last longer if kept very cold.
- Reheating tips: if the shells lose their crispness after freezing, a brief warm-up in a low oven (around 200°F / 90°C for a few minutes) can help restore crunch. Avoid overheating, which can melt the ice cream centers excessively.
- Handling: handle gently to avoid cracking the ice cream filling or chipping the shell. A small, warm knife blade can help separate pieces if you’re packing ready-to-serve portions for a party.
While the following is not a recipe in itself here, cultivating a practical approach makes the experience delightful and stress-free. Think of building choco tacos as constructing a tiny edible sculpture—each layer has to be crisp, smooth, and cohesive with the next. Start with clean, well-chilled ingredients. Have your shells ready and your ice cream scoop at the ready, and warm your chocolate coating just enough to glide over the surfaces in a glossy, even coat. The assembly is an exercise in balance: fill proportionally so that the ice cream doesn’t overflow, while ensuring the shell remains sturdy enough to hold the weight without bending. A few practice runs will help you dial in the exact ratios that work for your favorite flavors and shell thickness. When you find that sweet spot—the name of the game is consistency—your guests will be amazed at how simple, elegant, and irresistible these treats are.
Did you know that the concept of turning ice cream into a hand-held dessert has cousins in cultures around the world? In Italy, you can find gelato served in wafer cones that date back to the late 19th century, combining the creamy texture with a crisp shell. In Mexico, crisp corn-based or wafer-based shells sometimes encase frozen desserts flavored with chili or cinnamon, creating a hot-cold, spicy-sweet sensation. The modern chocolate-coated ice cream taco, however, is a versatile product of American culinary creativity, blending the convenience of a street-food treat with the decadence of a dessert that feels like a celebration. The shells themselves are a canvas for flavor: you can infuse them with vanilla, almond, or a touch of citrus to become a signature element. And the chocolate coating—shiny, smooth, and just thick enough—harkens back to classic candy-making techniques that paused the moment with a glossy finish. The fusion of textures and the memory-triggering appeal of chocolate-coated ice cream has a universal charm that makes choco tacos a go-to choice for gatherings where comfort and nostalgia meet contemporary flair.
Homemade Choco Tacos are more than a dessert; they are an invitation to slow down, gather around the kitchen counter, and savor the small, joyful rituals of home cooking. They encourage your inner dessert designer to experiment with flavors, textures, and presentation, all while delivering a familiar comfort that almost everyone recognizes. The beauty of this treat lies in its accessibility: you don’t need fancy equipment or elaborate techniques to achieve a spectacular result. With a handful of simple ingredients, a dash of patience, and a lot of love, you can create an indulgent, crowd-pleasing dessert that looks as impressive as it tastes. Whether you’re hosting a summer soiree, planning a family movie night, or simply treating yourself to a sunshine-sweet afternoon, these choco tacos offer a portable, playful, and deeply satisfying experience that brings people together. Enjoy the process, revel in the flavor, and let the memories of these homemade treats become as enduring as the smiles they bring to the table.
Ingredients
- Choco Taco Shells
- – 6 waffle cone shells (classic sugar waffle cones work best)
→ These shells form the crisp housing for the ice cream–like filling. Use fresh, room-temperature cones to prevent cracking. If your cones feel stale, warm them briefly in a 300°F (150°C) oven for 2–3 minutes to restore crunch and aroma. - – 1/2 cup neutral-tasting oil (like canola or grapeseed)
→ Helps maintain shell crispness and prevents sticking when shaping shells. Add sparingly and ensure it’s well distributed in the batter or coating you use for any homemade shells. Use a light oil to avoid imparting flavor. - – 1/4 cup cocoa powder (unsweetened)
→ Gives a chocolatey note to the shell if you’re forming shells from a chocolate-coated dough or dusting the inside of cones. Sift to remove lumps for an even finish. Pair with a touch of sugar to balance bitterness. - – 2 tablespoons light corn syrup or golden syrup
→ Adds a subtle glossy surface and helps the shell stay pliable as it cools, preventing cracking. If making from scratch, brush a thin layer on the inside of the cone before coating with chocolate or cocoa dust for a slick finish. - – Pinch of salt
→ Enhances the sweetness and depth of the chocolate shell. Salt in small amounts boosts overall flavor without making the shell taste salty. - – Optional: 1/2 teaspoon vanilla extract
→ Adds a hint of warmth to the shell’s aroma, especially if you’re using a homemade chocolate coating. Use pure vanilla for a cleaner, more pronounced vanilla note. - Chocolate Filling
- – 1 cup dark chocolate chips or finely chopped dark chocolate (70% cocoa or your preference)
→ The core flavor and mouthfeel of the taco filling. Melt gently to avoid scorching; use a double boiler or a heatproof bowl over simmering water. Stir until smooth and glossy, then cool slightly before using so it thickens without hardening too much. - – 1/2 cup creamy peanut butter or almond butter (optional for a nutty twist)
→ Adds richness, fat, and a chewy counterpoint to the chocolate. If using, whisk until smooth with a pinch of salt. For a smoother texture, warm slightly and stir until creamy. If sensitivity to peanuts exists, substitute with hazelnut butter or sunflower seed butter. - – 1/4 cup heavy cream or coconut cream
→ Creates a silky, ganache-like interior when blended with melted chocolate. Use at room temperature or warmed slightly to blend smoothly; for a dairy-free version, use coconut cream and omit dairy until the ganache reaches a glossy consistency. - – 1 tablespoon corn syrup or honey (optional, for shine and glaze)
→ Helps keep the filling smooth and slightly glossy as it cools. Adjust sweetness to taste and balance with chocolate’s bitterness. - – 1/2 teaspoon vanilla extract
→ Enhances overall aroma and depth of the chocolate ganache. Pure vanilla is preferred for a clean, bright finish. Add after melting to avoid unnecessary evaporation of aroma. - – Pinch of salt
→ A small amount of salt sharpens chocolate flavor and balances sweetness. Mix thoroughly into the ganache for even distribution. - Filling Center and Texture Add-ins
- – 1/2 cup crushed salted pretzels or crispy rice cereal (optional)
→ Adds contrast in texture with a salty crunch. Fold gently into the cooled ganache or sprinkle inside shells right before filling for an extra bite. If using pretzels, crush to irregular pieces for varied texture. - – 1/4 cup finely chopped roasted peanuts or almonds (optional)
→ Provides a crunchy, nutty layer that pairs well with chocolate. Toast nuts lightly to intensify flavor; chop to small, even pieces to distribute evenly. - Assembling and Toppings
- – 6–8 sugar cones or ice cream cone shells for serving
→ Final count depends on cone size and how full you want each taco. Choose sturdy cones to hold the filling without bending. - – 1/3 cup chopped toffee bits or toffee candy (optional)
→ Adds a toasty, buttery sweetness and a satisfying crunch. Sprinkle over the filling just before the chocolate shell hardens for a set crunch. - – Sea salt flakes, for finishing (optional)
→ A light pinch of flaky sea salt on top enhances chocolate flavor and adds a gourmet edge. Use a light hand to avoid oversalting. - – Extra melted chocolate for dipping or drizzling (optional)
→ Dip the open end of each cone or drizzle over the finished tacos for a glossy finish and extra chocolatey bite. Use tempered chocolate for a clean look and crisp snap.
Instructions
- Preheat your oven to 350°F (175°C) and line a baking sheet with parchment or a silicone mat, then place the waffle cone shells on the sheet in a single layer.
→ This ensures even heating and prevents shells from sticking or bending during handling. - Warm stale or softened cones briefly in the 300°F (150°C) oven for 2–3 minutes to restore crispness, then remove and let cool completely before shaping.
→ Restoring crunch preserves the signature choco taco texture and prevents mushy shells when filled. - Stir together the cocoa powder with a pinch of salt and, if using, a small amount of vanilla, then dust the inside of each cone lightly or brush a thin coat of corn syrup to improve chocolate adhesion.
→ A balanced dusting and a slick surface help the coating cling evenly and create a glossy finish without lumps. - Melt the dark chocolate chips over a gently simmering double boiler or in a heatproof bowl set over barely simmering water, stirring until smooth and glossy; remove from heat and whisk in the optional vanilla and salt.
→ Gentle heat prevents scorching; a glossy ganache coats the shells evenly for a professional bite and appearance. - Whisk the peanut or almond butter with the heavy cream and corn syrup (or honey) until smooth and completely emulsified, then fold in the vanilla and a pinch of salt.
→ A silkier ganache ensures a creamy interior that holds shape without separating as it cools. - Cool the chocolate slightly until it thickens to a spreadable stage, then brush a thin layer inside each cone or dip the open end to create a smooth interior coating; let set briefly.
→ A pre-coat creates a barrier between filling and cone and enhances shine while reducing sogginess. - Pour or scoop the ganache into a chilled bowl and allow it to come to a thick, almost-pipeable consistency; if it is too runny, refrigerate 5–10 minutes while occasionally stirring.
→ A properly thick ganache fills neatly without pooling or dripping, giving a clean slice through the final taco. - If using optional crushed pretzels or crispy rice cereal, fold gently into the cooled ganache just until distributed, then fold in the chopped nuts if using.
→ This adds texture and salt balance; avoid overmixing to prevent crushing all the chunks. - Fill each coated cone with a generous dollop of ganache, smoothing the top with a small spatula or offset knife so the filling mound resembles a small ice cream scoop.
→ A well-shaped center ensures even bite and a balanced ratio of shell to filling when eaten. - Refrigerate the filled cones for 10–15 minutes to set the ganache firmly before sealing with the final shell layer or chocolate coating.
→ Quick chilling prevents the filling from melting the outer shell and keeps the taco intact during dipping or serving. - If you plan to seal the tops with chocolate, rewarm a portion of the melted chocolate briefly to a pourable state and drizzle or pipe a light top layer over each filled cone, then tap gently to level.
→ A second shell or chocolate seal locks in the filling and adds a classic choco taco appearance and bite. - Scatter optional toffee bits or chopped nuts on top of the drizzle before the chocolate fully sets, allowing them to adhere as a finishing crunch.
→ Adds contrasting texture and a toasty note that complements the chocolate and creamy center. - Finish with a light sprinkle of sea salt flakes if desired, then refrigerate until the chocolate is fully set and glossy, about 15–20 minutes.
→ A final salt kiss enhances chocolate depth and provides a gourmet finish without making the treat salty. - Just before serving, optionally drizzle extra melted chocolate over the open end of each cone or dip the open edge for a polished, glossy look and extra chocolatey bite.
→ Tempting appearance and extra chocolate give the tacos that professional, restaurant-quality finish. - Serve the homemade choco tacos immediately for best texture, or store unfrosted shells and ganache separately in airtight containers for up to 2–3 days and assemble just before serving.
→ Fresh assembly ensures maximum crispness and a clean, impressive presentation when guests arrive.
Notes
These homemade Choco Tacos are a playful, indulgent treat that combine crisp chocolate-coated shells with a silky ganache-centered filling for a delightful contrast in texture. You can customize them with your favorite nut butters or add-ins to suit your taste and dietary needs. They’re best enjoyed soon after assembly for maximum crunch, but with proper storage they can be prepared ahead for parties or fun dessert projects.
- Shell integrity: Use fresh, room-temperature waffle cones to prevent cracking. If your cones feel stale, warm them briefly in a 300°F (150°C) oven for 2–3 minutes to restore crunch and aroma. Dust or brush with a light cocoa coating to intensify chocolate flavor on the inside.
- Shell texture and shine: A small amount of corn syrup or golden syrup helps keep the shell pliable as it cools and gives a subtle gloss. Brush the inside of the cones lightly for a slick finish when coating with chocolate or cocoa powder.
- Ganache technique: Melt chocolate gently over a double boiler or in a heatproof bowl over simmering water. Stir until smooth, then cool slightly so it thickens to a ganache-like consistency that holds its shape inside the shell without oozing.
- Nut butter swaps: If you skip peanut butter, try almond, hazelnut, or sunflower seed butter. For a dairy-free version, use coconut cream in place of dairy cream and ensure any chocolate is dairy-free.
- Texture add-ins: Crushed pretzels or crispy rice cereal introduce a salty crunch or a light, airy bite when folded into cooled ganache. Toast nuts to deepen flavor before chopping finely for even distribution.
- Cones and fillings balance: You can vary the ratio of shell to filling to suit preference—more filling for a lush bite, or a thinner shell for a crisper finish. If you prefer a lighter filling, omit the cream and use a ganache that’s slightly more set.
- Toffee and finishing touches: Chopped toffee bits add a buttery crunch; finish with a light sprinkle of sea salt flakes for a gourmet contrast. Drizzle with extra melted chocolate for a glossy, restaurant-worthy look.
- Make-ahead and storage: Assemble the shells and ganache separately, then chill the ganache until thickened before filling. Freeze assembled Choco Tacos on a baking sheet, then transfer to an airtight container for up to 1 month. Thaw briefly at room temperature before serving for best snap.
- Serving ideas: Pair with a scoop of vanilla or coffee ice cream if you’re serving as a full dessert duo, or keep it simple as a chocolatey bite that’s great for parties and kids’ gatherings.
- Safety and quality: Melt chocolate slowly and avoid overheating to prevent seizing. Use good-quality chocolate for a smooth, glossy finish and rich flavor. Store any leftovers in a cool, dry place away from direct heat or sunlight.
Tips
Tips for Perfect Homemade Choco Tacos
- Keep cones at room temperature and use fresh shells. If they feel stale, a quick 2–3 minute warm-up in a 300°F (150°C) oven restores crunch and aroma without making them soggy.
- Distribute oils evenly when coating or forming shells to prevent sticking and to maintain crispness as the shells cool. Use a light hand with oil to avoid overpowering flavor.
- Sift cocoa powder to avoid lumps, ensuring a smooth, even chocolate shell. Balance bitterness with a touch of sugar or a pinch of salt for depth.
- Brush a thin layer of corn syrup or golden syrup on the inside of cones before chocolate coating to create a glossy surface and keep shells pliable during shaping.
- Add a pinch of salt to the shell mixture to enhance sweetness and round out the chocolate note without making it salty.
- For the filling, melt chocolate slowly using a double boiler or a heatproof bowl over simmering water to prevent scorching and achieve a glossy finish.
- Bring dairy or non-dairy cream to room temperature or slightly warm to blend smoothly into the melted chocolate for a creamy ganache-like center.
- Whisk nut butter with a pinch of salt if using; warm gently and stir until smooth to ensure a uniform, lush interior without separating.
- Chill the ganache briefly before assembly to thicken the filling so it stays inside the cone without oozing when you dip or fill.
- Fold in texture add-ins (pretzels, crispy cereal, or chopped nuts) after the ganache has cooled to maintain crunch without melting into the chocolate.
- For extra shine and a professional finish, add a little more corn syrup or honey to the ganache and temper chocolate for a glossy, snap-worthy exterior.
FAQ
What is a Homemade Choco Taco?
A Homemade Choco Taco is a nostalgic treat featuring a waffle-style ice cream shell shaped like a taco, filled with ice cream and rolled in chocolate and toppings. It’s a fun, summery dessert you can customize with your favorite flavors.
What ingredients do I need?
For the shells: a simple waffle cone or tiny waffle-like shells made from flour, sugar, butter, eggs, and milk. For the filling: your choice of ice cream. For the coating: melted chocolate (milk, dark, or white) and toppings like crushed peanuts, sprinkles, or crushed cookies.
How do I make the shells at home?
Prepare a thin batter or use mini waffle cones. Cook on a hot, lightly greased skillet to form a crisp, flat shell. Let cool and shape into a curved taco shell by gently bending while warm; let cool completely before filling.
Can I use store-bought ice cream in this recipe?
Yes. Any flavor works. For best texture, slightly soften the ice cream before scooping into the shell so it fills smoothly without melting too fast.
How do I assemble a Chocolate Taco?
Scoop softened ice cream into the shell, press until level, then freeze briefly to firm. Dip or drizzle with melted chocolate, then roll in toppings (nuts, cookies, or candy pieces). Return to freezer to set.
How long does it take to make Homemade Choco Tacos?
Active prep takes about 20–30 minutes. Freezing between steps adds 1–2 hours, plus optional hardening in the freezer for an hour. Total time depends on freezing duration.
Can I customize flavors and toppings?
Absolutely. Try different ice cream flavors (vanilla, mint chocolate chip, peanut butter, rocky road) and toppings (crushed pretzels, toasted coconut, candy bits). You can also swap chocolate coatings (dark, milk, or white) for different taste profiles.
Is this recipe suitable for make-ahead or freezing?
Yes. Assemble the shells and fill with ice cream, then freeze. For best texture, store in a single layer on a parchment-lined tray and wrap well to prevent freezer burn. Re-crisp the shells slightly before serving if needed.
What are some tips to prevent the shell from cracking?
Work with warm but not-hot shells, avoid over-thinning the batter, and gently shape while still pliable. If cracks occur, patch with a thin layer of melted chocolate as glue and re-freeze briefly.
Are there dietary substitutions I can make?
Yes. Use dairy-free ice cream and vegan chocolate coatings for a dairy-free version. For gluten-free, ensure the shell batter uses gluten-free flour and clean equipment to avoid cross-contamination. You can also try sugar-free or lower-fat options depending on your needs.