Introduction / Hook
Imagine a dessert that wears the cozy charm of a loaf pan—the kind that invites you to cut thick, glossy slices and savor them with a slow, contented sigh. Easy loaf cheesecake is that comforting, crowd-pleasing presence on your dessert table: simple to assemble, stunning to behold, and impossibly silky in texture. The first bite melts cleanly, leaving behind a gentle tang that wakes the palate just enough to remind you why cheesecake is a timeless favorite. The aroma of warm dairy sweetness mingles with a whisper of vanilla, a hint of citrus, and a crust that offers a delicate crunch beneath the creamy center. This is not just a dessert; it’s a pause button for busy days—a treat you can prepare in advance, share with friends, and reclaim moments of calm as you watch the knife glide through a perfectly set slice. Whether you’re hosting a weeknight dinner, a weekend gathering, or a special occasion, this loaf cheesecake makes an impression without demanding your entire evening. It’s the kind of recipe that earns delighted oohs and a chorus of “just one more slice,” even from guests who claim they never have room for dessert. In short, it’s the kind of bake that feels like a warm hello from your oven—reliable, approachable, and deeply satisfying.
Beyond its ease, the loaf format offers a practical elegance: a dessert that travels well, stores neatly, and serves beautifully. A single loaf yields neat, uniform portions that look polished on a platter, making it ideal for potlucks, holiday gatherings, or a family Sunday dinner where you want to end on a high note without complicating your kitchen routine. The texture—creamy, airy, and just firm enough to hold its shape—complements a subtle crust that provides a gentle counterpoint rather than a distraction. This is cheesecake for everyday moments redeemed with a touch of indulgence, and it’s designed to be approachable for bakers at all levels. You’ll notice how effortlessly the flavors come together: a kiss of sweetness, a whisper of tang, and a luxurious mouthfeel that lingers without heaviness. It’s a recipe that invites improvisation and personal touches, letting you tailor sweetness, aroma, or presentation to your own taste and occasion. If you’ve ever wished for a crowd-pleasing, make-ahead dessert that still feels special, you’re in the right kitchen.
As you read on, you’ll discover a dish with a gentle lineage of comfort and celebration. The loaf cheesecake is a modern homage to the classics: the old-fashioned charm of a baked cheesecake with the convenience of a loaf format—the best of both worlds. Its story—rooted in family gatherings, impromptu celebrations, and the universal love of something creamy that pairs perfectly with a cup of coffee or a sparkling dessert wine—will likely echo memories of childhood kitchens, favorite bakeries, and the small rituals that make dessert so much more than a mere sweet course. And because this is an easy recipe, it invites you to focus less on technique and more on the experience: the moment you lift the knife and reveal that glossy, smooth surface; the first sigh as you taste the first bite; the sense of accomplishment you feel when you realize you’ve created something elegant with minimal fuss. Let this loaf cheesecake become a new staple in your baking repertoire—one you can personalize seasonally, adapt to dietary needs, and pass along to others with a warm, confident smile.
The Story Behind the Dish
Cheesecake travels through kitchens and cultures the way stories travel through families—by retelling, adapting, and making it your own. The loaf cheesecake has a lineage that embraces both practicality and indulgence. In many homes, the loaf pan is a trusty workhorse: sturdy, forgiving, and just the right size for small celebrations or intimate gatherings. The idea of shaping a creamy filling into a compact loaf surface isn’t about reinventing the wheel; it’s about translating the essence of a beloved dessert into a form that fits modern rhythms. When bakers began to experiment with single-serve or loaf-sized desserts, they discovered something wonderfully liberating: you could achieve the same luxurious texture and harmonious balance without the complexity of larger, multi-crust cakes. The loaf becomes a neat canvas—easy to portion, easy to share, and easy to transport—whether you’re taking a tray to a friend’s house or presenting it at a family brunch.
This particular loaf cheesecake blends memory with practicality. It nods to the indulgent densities of classic cheesecakes, but with a lighter, more accessible approach. Rather than requiring elaborate equipment or intimidating techniques, it leans into the virtues of patience, gentle heat, and a careful balance of sweet creaminess with a touch of tang. The crust—the quiet foundation that anchors the creamy filling—offers a subtle texture that contrasts with the silken interior, much as a good story rests on a resonant, dependable frame. The result is a dessert that feels special enough for celebrations yet relaxed enough for weeknights. The loaf pan, with its straight sides and even bake, ensures uniform slices that look polished on every plate, making it an ideal choice for gatherings where presentation matters but time is of the essence.
In many households, cheesecake has always been a symbol of sharing: a slice passed around the table, a chorus of pleased murmurs, and a sense of togetherness that expands as the plate shrinks. The loaf version carries that same spirit forward, inviting you to create a dessert that’s not only delicious but also as adaptable as your own kitchen. You can imagine a late-summer picnic where this dessert sits beside berries and citrus, or a cozy winter table where a slice pairs with coffee and a flicker of candlelight. The story of this loaf cheesecake isn’t just about how it’s made; it’s about what it enables—the easy elegance of dessert that fits into real life, the joy of sharing something homemade with warmth and generosity, and the little triumph of mastering a classic dessert with minimal fuss.
Why You’ll Love This Recipe
- Effortless and forgiving: The loaf shape simplifies mixing, setting, and slicing, making it friendly for bakers of all levels.
- Make-ahead magic: This dessert often tastes better after a rest, and it travels well, easing party logistics.
- Silky texture with gentle tang: A creamy center that’s neither too dense nor too light, balanced by a delicate crust.
- Customizable sweetness: A versatile profile that allows you to adjust sweetness or add seasonal flavors without complicating the process.
- Kid-friendly appeal: Smooth, mild flavors that appeal to younger palates while still satisfying adults.
- Elegant presentation: Clean slices and a glossy surface make a simple dessert feel sophisticated on the plate.
- Versatile for occasions: Works beautifully as a weeknight dessert, a potluck contribution, or a centerpiece for holiday tables.
Flavor Profile & Texture
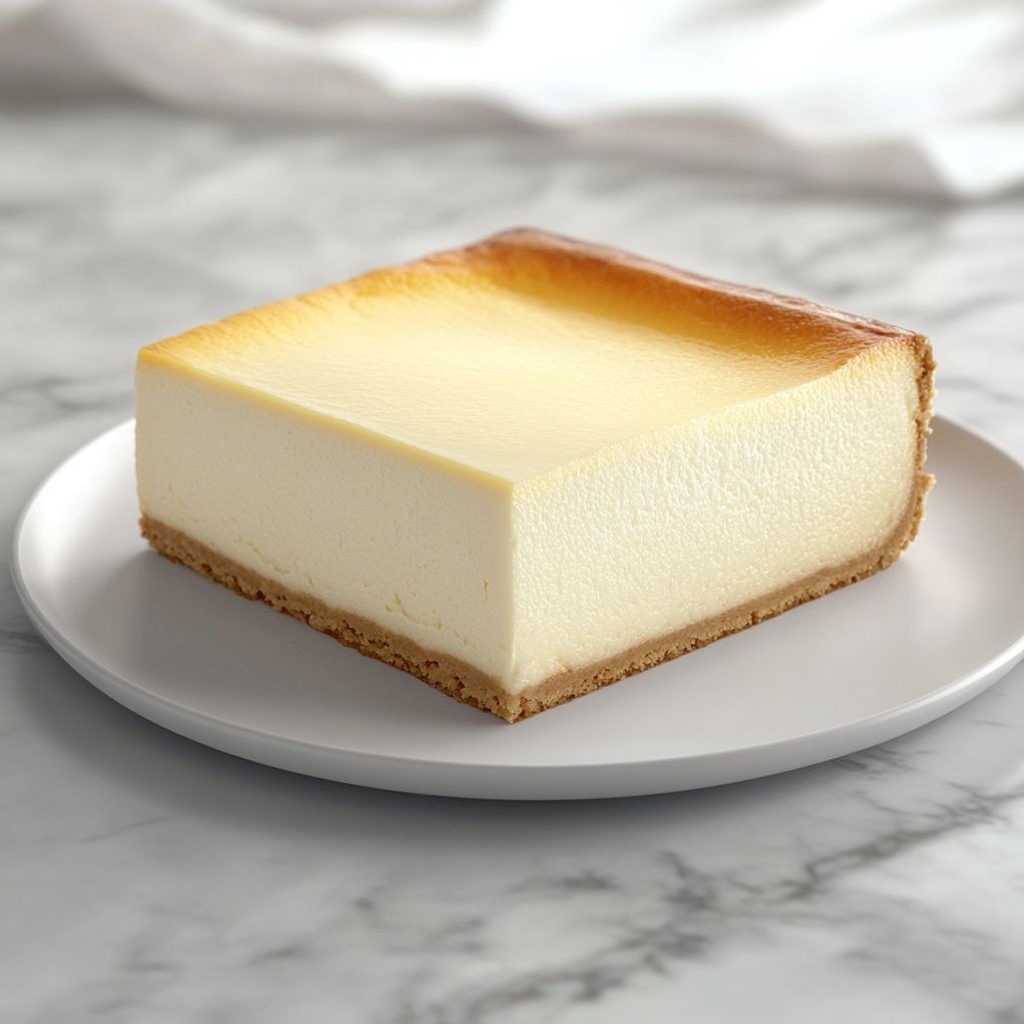
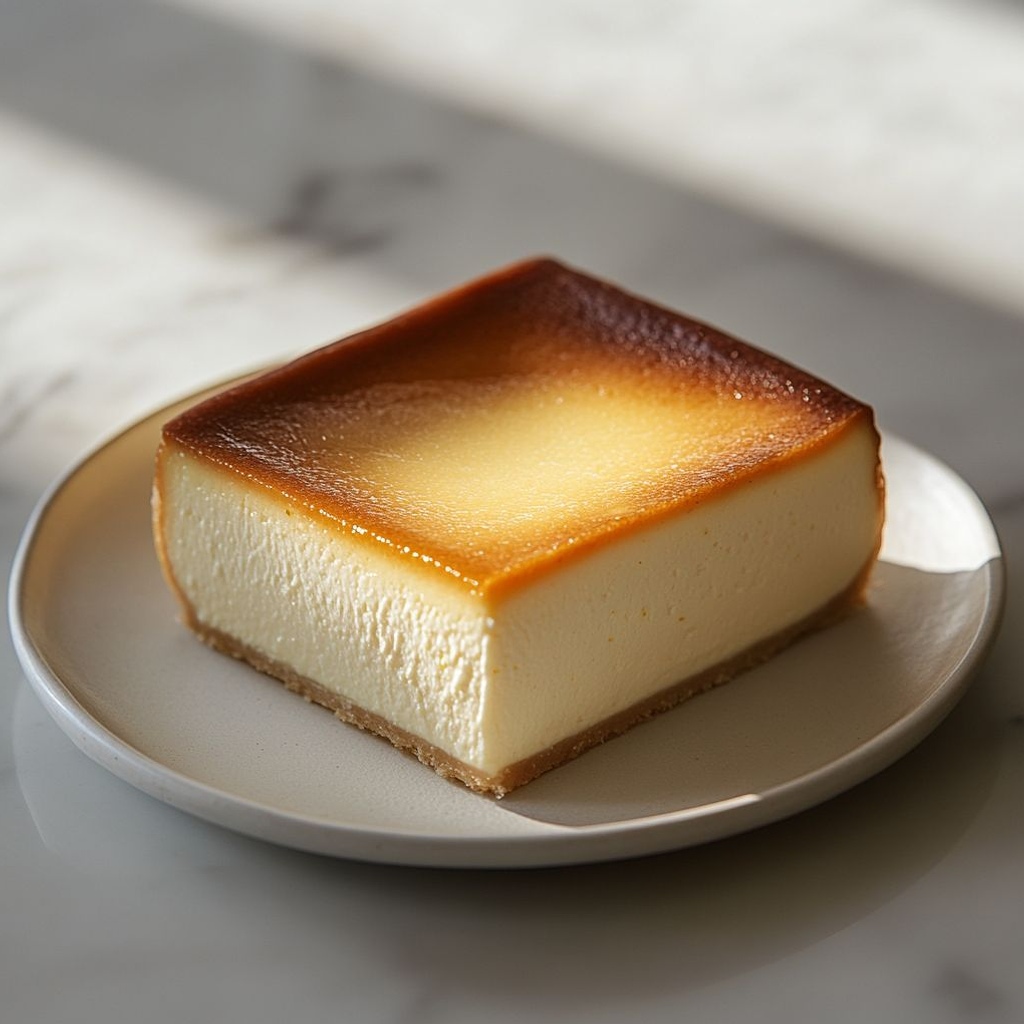
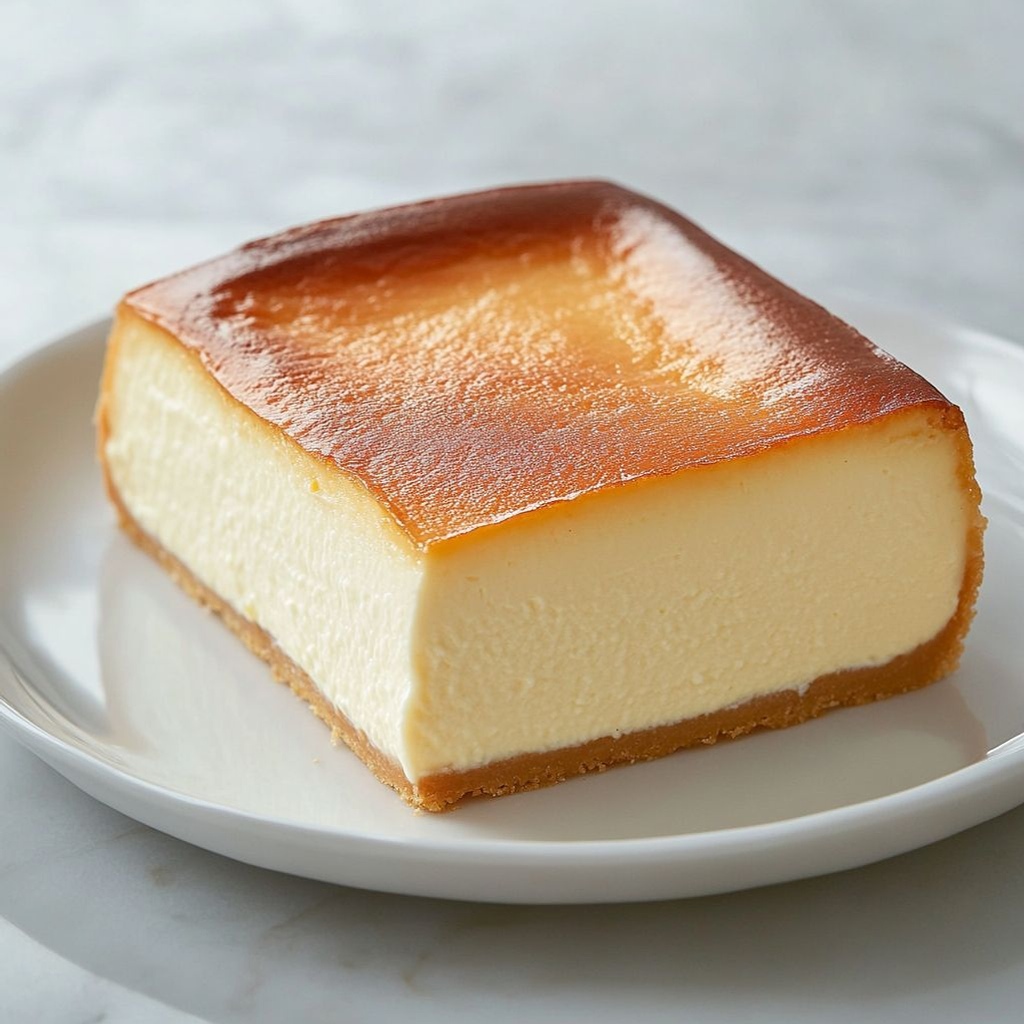
The hallmark of this loaf cheesecake is its balance: a creamy, velvety interior that glides across the tongue, tempered by a faint tang that lifts the sweetness to a refined level. The interior should feel lush but light, with enough structure to hold its shape when sliced. The flavor relies on a gentle harmony rather than bold, overpowering notes, allowing the natural dairy character to shine through while inviting a whisper of vanilla, citrus zest, or a touch of richness that echoes throughout the bite. The texture contrasts are where the magic happens: a barely-there crust provides a subtle crunch that gives way to a silkier middle. When you cut into the loaf, the surface should gleam with a soft, inviting sheen, hinting at the luxurious filling beneath. Each mouthful layers complexity: creamy, airy, and smooth, with a mild sweetness that lingers on the palate, inviting another slice without overwhelming the senses.
The crust—quiet and understated—serves as a gentle counterpoint. It isn’t coarse or crumbly; instead, it offers a delicate snap and a biscuit-like, almost caramelized edge that becomes more pronounced as the dessert rests. As the loaf chills, the flavors meld and the texture settles into a refined equilibrium. The result is a dessert that feels indulgent without being heavy—an accessible luxury that you’ll want to share again and again. The aroma alone invites conversation: a comforting perfume of dairy, faint vanilla, and a whisper of citrus that promises something extraordinary beneath the surface. In essence, this loaf cheesecake delivers a sensory experience that’s at once warm, polished, and deeply satisfying—the kind of bite that makes you pause, close your eyes for a moment, and savor the simple joy of a well-made treat.
Occasions & Pairings
Where does this loaf cheesecake truly shine? Anywhere you want a dessert that feels special without demanding every spare minute. It’s ideal for a relaxed Sunday family dinner when you want to end on a confident note but still have time to linger over conversation. It’s equally at home at a casual brunch, a potluck, or a formal-looking plate that doesn’t overwhelm the event with complexity. Because the loaf format is easy to portion and present, it travels well and serves as a reliable crowd-pleaser for office parties, child-friendly gatherings, and weekend get-togethers with friends. You can tailor the experience to the season, the crowd, or your mood—serve with seasonal fruit, a light drizzle of sauce, or a dusting of zest for a bright finish.
Pairings that elevate the experience include: a tangy berry compote or fresh fruit for a crisp, bright contrast; a crisp sparkling wine or a light dessert wine that cuts through the richness; a simple cup of coffee or tea to round out the flavors; and a contrasting dessert course for a more elaborate menu. If you’re looking to balance the richness, a tart fruit coulis or a few citrus segments can provide a refreshing lift. For a festive touch, garnish with edible flowers or a curl of citrus zest, letting the aroma mingle with the soft sweetness as you plate. The beauty of this dessert lies in its adaptability: it can be dressed up for celebrations or kept understated for a quiet night in, all while delivering that reliable, comforting cheesecake experience people crave.
Tips, Variations & Substitutions
These ideas will help you tailor the loaf cheesecake to different diets, occasions, and flavor preferences, all while preserving the essence of the dessert’s creamy, balanced character.
For a vegan option, use a dairy-free cream substitute and a plant-based crust. Look for a plant-based setting agent that provides a smooth, stable texture. For gluten-free needs, switch to a gluten-free crust made with allergen-friendly cookies or a nut-and-oats base, ensuring the binder and bake time are adjusted accordingly. If you prefer a tad more tang, a small addition of citrus zest or a splash of a tart fruit puree can brighten the filling without overhauling the recipe. For a sweeter profile, you can a little more sugar or a light swirl of jam on top after chilling for a glossy finish. Introduce subtle flavors like vanilla, almond, coconut, or a hint of espresso by infusing the filling with a gentle aroma. You can also layer flavors by folding a small amount of fruit puree or spice into a portion of the batter before setting. If you want more structure, a slightly longer bake time at a lower temperature can help the center set more firmly. If you desire a lighter, airier texture, you can whisk the filling longer to incorporate more air or consider a lighter fat content in the base mixture. Instead of a traditional crust, you can press a thin, crisp base made from finely crushed cookies or crackers with a hint of melted fat to create a delicate boundary that contrasts nicely with the filling. For a purely gluten-free crust, use gluten-free biscuits or crushed nuts pressed firmly into the pan. Serve chilled or at room temperature—both are delicious. A gentle garnish of citrus zest, a dusting of powdered sugar, or a few fresh berries can elevate the plate without overpowering the dessert’s gentle flavor. Since this dessert benefits from resting, you can prepare it a day in advance and refrigerate until service. If you’re delivering it to an event, consider prepping a portion a day ahead and keeping the rest ready for final assembly to ensure peak texture at serving time.
Storage & Make-Ahead Ideas
One of the practical joys of a loaf cheesecake is its forgiving nature when it comes to storage and timing. This dessert can be prepared ahead of time, chilled thoroughly, and served with confidence. If you’re planning for a busy week, you can bake the loaf a day or two before your event. Once cooled completely, wrap it tightly to prevent any odors from seeping in and place it in the refrigerator. Chilled slices will hold their shape well for entertaining and are easy to plate. If you need to transport the dessert for a gathering, a well-wrapped loaf travels neatly in a chilled container or a sturdy box, maintaining its texture and keeping the surface pristine.
For longer-term storage, you can freeze individual slices or the whole loaf. Wrap portions firmly in plastic wrap and place them in a freezer-safe container. When you’re ready to enjoy, thaw them in the refrigerator overnight and bring to room temperature for the best texture. Freezing can be particularly convenient if you’re planning ahead for holidays, birthday celebrations, or meals that require a dessert in reserve. Keep in mind that freezing can slightly alter the subtle texture of the creaminess, so allowing it to come to room temperature will optimize the mouthfeel.
If you anticipate leftovers, consider a quick re-serve strategy: re-cut slices, a gentle rewarming in a low oven or microwave, and a light refresh with a tiny sprinkle of zest or a fruit compote to brighten the surface. The key is to preserve the silkiness of the filling while preventing any dryness or ice crystal formation in the crust. With a little care, this loaf cheesecake remains a dependable, delicious option for days after it first emerges from the oven.
Fun Facts & Trivia (Optional)
Delightful little tidbits can add flavor to the conversation around your cheesecake moment. Here are a few interesting notes that can enrich your appreciation of this comforting treat:
- Cheesecakes have ancient roots in ancient Greece, where they were popular as a nourishing dessert for athletes and travelers. The modern version has evolved into a richer, creamier experience that owes much to European dairy traditions and mid-20th-century American experimentation.
- The loaf pan, with its straight sides and uniform depth, is a practical innovation that makes slicing easier and more consistent, especially for gatherings. It also fits neatly in most refrigerators, making make-ahead dessert planning a breeze.
- Texture is often the hallmark of cheesecakes—the contrast between a delicate crust and a creamy interior can make or break the dessert’s appeal. Achieving the ideal balance is a hallmark of skilled home baking and a delight for those who savor the difference between a dense and a light mouthfeel.
- Flavor pairings for cheesecakes are surprisingly flexible. While vanilla is a classic companion, coastal or seasonal fruits, citrus zest, and even coffee flavors have all been used to complement and elevate the natural dairy tang in cheesecakes across cultures.
- Loaf-sized desserts have surged in popularity for their convenience and shareability. In many families, a single loaf can serve as a week’s worth of dessert for a small household or a centerpiece for a casual gathering, proving that great desserts don’t always require grand stages or elaborate methods.
With these notes in mind, you’re ready to approach Easy Loaf Cheesecake not as a challenge, but as a comforting ritual—one that brings a sense of warmth, ease, and quiet celebration to your table. The loaf format invites you to savor the moment of serving, the smile on a friend’s face as they take their first bite, and the satisfaction that comes from creating something beautiful with minimal fuss. So preheat, mix what you need, and let the simple magic of a well-made loaf cheesecake do the talking—the kind of dessert that makes any occasion feel a little brighter and a lot more special.
Ingredients
Crust
- 1 1/2 cups graham cracker crumbs (or digestive biscuits, gluten-free option)
→ Crust base provides structure and flavor. Use finely ground crumbs to bind with melted butter and any added sugar, then press evenly into the loaf pan. For gluten-free needs, use gluten-free graham crackers or cookies and pulse until fine crumbs for a firm, cohesive crust. - 4 tablespoons unsalted butter, melted
→ Binds the crust crumbs into a cohesive, sliceable base. Allow the melted butter to cool slightly before mixing with the crumbs so the crust doesn’t become oily. Press firmly into the bottom (and a touch up the sides) of the loaf pan and refrigerate briefly to set. - 2 tablespoons granulated sugar (optional)
→ Adds subtle sweetness to the crust and helps balance the tang of the filling. If using very sweet crackers, you can omit; mix with crumbs before pressing into the pan for even sweetness distribution.
Filling
- 16 ounces cream cheese, softened to room temperature
→ The creamy, tangy base of the cheesecake. Soften well to prevent lumps; beat until completely smooth before adding sugar. If lumps appear, briefly microwave in 5-second bursts or let sit at room temperature, then blend again. - 2/3 cup granulated sugar
→ Provides the characteristic sweetness and helps achieve a silky, smooth texture when beaten with the cream cheese. Add gradually and mix on medium speed until light and creamy, then scrap the bowl before adding eggs to avoid streaks. - 3 large eggs
→ Structure and stability for the loaf filling. Add eggs one at a time on low speed to minimize air pockets; keep eggs at room temperature to ensure even incorporation and a creamy batter. If you’re concerned about cracks, bake the loaf in a water bath and avoid overmixing once eggs are added. - 1/2 cup sour cream or full-fat Greek yogurt
→ Adds moisture, tenderness, and a gentle tang that balances the richness of the cream cheese. Use full-fat for best texture. If using yogurt, strain or drain briefly to reduce excess moisture and prevent a souffle-like texture. - 1 teaspoon vanilla extract
→ Enhances the overall flavor with warm, creamy notes. Opt for pure vanilla extract for depth; if using a vanilla bean, you can scrape the seeds and add the pod for extra aroma while the mixture rests. - 1 teaspoon lemon zest (optional)
→ Brightens the filling with a subtle citrus lift that contrasts with the richness. Use fresh zest from organic lemons; zest before juicing to avoid bitterness from the pith. Use sparingly to keep the flavor balanced. - 1 tablespoon cornstarch (or 1 1/2 tablespoons all-purpose flour for a gluten-containing alternative)
→ Helps stabilize and set the filling, reducing cracking and ensuring a creamy slice. If using cornstarch, whisk it with the sugar before adding to the cream cheese to prevent clumping; flour can be slightly heavier and may require a tad more mixing. - 1/4 teaspoon salt
→ A pinch of salt enhances all flavors and counteracts the sweetness. If you used salted butter, reduce or omit; otherwise, this small amount helps round out the filling’s profile.
Optional Toppings
- 1/2 cup mixed berries or berry compote
→ Fresh berries or a glossy compote add brightness and color. If using fresh berries, pat dry to prevent soggy crust; if making compote, simmer berries with a little sugar and lemon juice until syrupy and thick, then cool before spooning over slices. - 2 tablespoons strawberry jam or fruit glaze
→ A glossy, sweet finish for the top. Warm the jam slightly to loosen, then brush lightly over the cooled cheesecake for a professional shine. This can also be swapped for a blueberry or raspberry glaze. - Powdered sugar, for dusting (optional)
→ Finishing touch that adds a delicate, snowy presentation. Dust just before serving; keep refrigerated to maintain clean appearance and prevent clumping.
Instructions
- Preheat your oven to 325°F (165°C) and line a 9×5-inch loaf pan with parchment paper, leaving overhang on the long sides for easy removal.
→ This guarantees the cheesecake releases cleanly from the pan and prevents sticking, which makes slicing neat portions possible. - Combine graham cracker crumbs, granulated sugar (optional), and melted butter in a medium bowl, stirring until the mixture is evenly moistened and holds together when pressed.
→ Uniformly moistened crumbs form a cohesive crust that supports the filling without crumbling, and the butter provides rich flavor and structure. - Press the crumb mixture firmly into the bottom and a little up the sides of the prepared loaf pan using the flat bottom of a measuring cup or the back of a spoon, then refrigerate 10–15 minutes to set.
→ A compact crust grips the filling better and prevents crumbling when the cheesecake is sliced; chilling helps the crust firm up before baking. - Bake the crust for 8–10 minutes at 325°F (165°C) until the edges are lightly golden and the aroma of toasting butter is noticeable, then remove from the oven and allow to cool on a rack.
→ Par-baking sets the crust to resist becoming soggy once the filling is added and enhances overall flavor and texture. - Lower the oven temperature to 325°F (165°C) and let the crust cool completely while you prepare the filling, so the crust stays firm beneath the batter.
→ A cooled crust prevents heat from prematurely softening the crust and helps the cheesecake set evenly. - In a large mixing bowl, beat softened cream cheese on medium-high speed until completely smooth and free of lumps, about 2–3 minutes, scraping the bowl halfway through.
→ Smoothing the cream cheese ensures a silky filling without graininess and prevents visible lumps in the final slice. - Gradually add granulated sugar to the cream cheese and continue to beat on medium speed until the mixture is light, creamy, and pale, about 2–3 minutes, then scrape the bowl again.
→ Gradual incorporation of sugar aerates the batter and helps achieve a glossy, uniform texture without overworking the mixture. - Add eggs one at a time on low speed, beating just until each is incorporated before adding the next, to minimize air pockets and reduce the risk of cracks.
→ Slow, incremental addition of eggs maintains a dense, cohesive batter rather than a foamy one that cracks during baking. - Beat in sour cream (or full-fat Greek yogurt), vanilla extract, lemon zest (if using), and salt on low speed until the batter is smooth and evenly mixed.
→ Sour cream or yogurt adds moisture and tenderness, while vanilla and lemon zest provide depth and brightness that balance the richness. - Whisk cornstarch with the sugar (or whisk cornstarch with a small amount of the filling) in a separate bowl, then fold or beat it into the cheese mixture until fully incorporated and no lumps remain.
→ Cornstarch stabilizes the filling, reducing cracking and helping it set evenly as it bakes. - Pour the filling over the cooled crust, then use an offset spatula to smooth the top into an even surface.
→ A level top ensures uniform bake and clean edges when slicing the finished cheesecake. - Wrap the bottom of the loaf pan tightly with two layers of heavy-duty aluminum foil, place the pan in a larger baking dish, and pour in hot water until it reaches halfway up the sides to create a water bath.
→ The water bath provides gentle, even heat that prevents cracking and yields a creamy, uniform texture. - Bake in the water bath at 325°F (165°C) for about 60–70 minutes, or until the edges are set and the center gives a slight jiggle when gently shaken.
→ The center jiggle indicates the cake is softly set; overbaking leads to a dry, crumbly texture, while underbaking can leave the center undercooked. - Turn off the oven, crack the door open, and let the cheesecake cool in the oven for 1 hour to gradual cooling and to minimize cracking.
→ Slow cooling reduces thermal stress that can cause fissures, producing a smoother finish. - Remove the loaf pan from the water bath, carefully unwrap the foil, and refrigerate the cheesecake for at least 4 hours or preferably overnight until fully chilled and set.
→ Chilling firms the filling, makes slicing clean, and enhances flavor meld of all components. - Before serving, top with 1/2 cup mixed berries or berry compote, or brush with warmed strawberry jam or fruit glaze for a glossy finish, and dust with powdered sugar if desired.
→ Fresh toppings add color, brightness, and contrast to the rich filling; warming glaze ensures an even, professional shine on the surface.
Notes
This Easy Loaf Cheesecake is a creamy, tangy dessert with a buttery crust that slices cleanly and holds its shape. You can customize it with citrus zest, vanilla, or a berry topping. For gluten-free needs, use gluten-free graham crackers or digestive biscuits and ensure any thickener is gluten-free. The cheesecake refrigerates well and can be frozen for longer storage. Always bring ingredients to room temperature for smooth mixing; avoid overmixing after the eggs are added to prevent cracks; bake in a water bath to ensure an even, crack-free finish. Let the cake cool gradually and chill thoroughly before slicing.
Crust tips
- Pulse gluten-free crackers or digestives into a fine, even crumb for a sturdy base.
- Allow melted butter to cool slightly before mixing with crumbs to prevent a greasy crust.
- Press the crust firmly into the loaf pan and up the sides; a brief chill helps set the base for clean slices.
- Optionally increase or reduce sugar in the crust depending on the sweetness of your crackers to balance flavors.
Filling tips
- Soften cream cheese to room temperature for a ultra-smooth filling; beat until completely silky before adding sugar.
- Beat granulated sugar with the cream cheese until light and creamy, then scrape the bowl to avoid streaks.
- Add eggs one at a time on low speed to minimize air pockets; keep eggs at room temperature for even incorporation.
- Stir in sour cream or full-fat yogurt for moisture and tenderness; if using yogurt, drain briefly to reduce excess moisture.
- Add vanilla extract and optional lemon zest for brightness; zest should be fresh and finely grated.
- Whisk in cornstarch (or all-purpose flour for a gluten-containing option) to stabilize and reduce cracking; whisk with sugar first to prevent clumping.
- A pinch of salt enhances overall flavor and balances sweetness; adjust if using salted butter.
- Avoid overmixing after eggs are added to keep the batter silky and prevent a dense texture.
Toppings and serving
- Top with fresh berries, berry compote, or a light fruit glaze for color and contrast; avoid heavy toppings that overwhelm the filling.
- Dust with powdered sugar just before serving for a polished look; keep slices refrigerated to maintain clean presentation.
- Serve chilled or at room temperature after a short rest to allow flavors to meld and texture to relax.
Make-ahead and storage
- Prepare the crust and filling ahead; assemble and bake when ready, or bake and refrigerate overnight for convenience.
- Refrigerate leftovers for 3–5 days; slice as needed to maintain presentation.
- Freeze baked slices for 2–3 months; wrap tightly and thaw in the refrigerator before serving for best texture.
Tip: If you’re new to cheesecakes, a snug water bath (pan wrapped with foil and placed in a larger pan filled with hot water) helps prevent cracks and ensures even baking. Let the loaf cool completely in the pan on a rack before chilling to achieve clean, sliceable edges.
Tips
Tips for the Crust
- Use finely ground graham cracker crumbs (or gluten‑free crackers) and press them evenly into the bottom and slightly up the sides of the loaf pan. A firm, compact crust helps slice cleanly and provides the best bite.
- Let the melted butter cool briefly before mixing with the crumbs so the crust doesn’t become oily. Press firmly with a flat-bottomed cup or glass to create an even layer, then refrigerate briefly to set before filling.
- If you’re making a gluten‑free crust, ensure the crumbs are ground very finely and consider a touch extra binding time in the fridge to help the crust stay cohesive.
- Optional: lightly pre-bake the crust at a moderate heat (about 350°F/175°C) for 8–10 minutes to help it set and stay crisp during chilling and slicing. If you do this, let the crust cool completely before adding the filling.
- Keep the crust balanced with a small amount of sugar if your crackers aren’t sweet. If using very sweet crackers, you can omit the sugar and let the crackers contribute sweetness.
Tips for the Filling
- Soften the cream cheese to room temperature and beat until completely smooth. If lumps persist, microwave in 5‑second bursts or let rest and beat again until silky.
- Add sugar gradually and beat on medium speed until light and creamy. Scrape the bowl well so there are no unmixed pockets before adding eggs.
- Add eggs one at a time on low speed to minimize air pockets. Keep ingredients at room temperature to ensure even incorporation and a creamy batter; overmixing after adding eggs can introduce cracks.
- Use full‑fat sour cream or Greek yogurt for moisture and tenderness. If using yogurt, strain briefly to remove excess moisture for a denser, smoother texture.
- Vanilla adds depth; use pure vanilla extract. If you have a vanilla bean, scrape the seeds into the filling and drop in the pod for extra aroma (remove before baking).
- Lemon zest gives a bright lift. Zest before juicing to avoid bitterness from the pith, and use zest sparingly to maintain balance with the richness.
- Whisk cornstarch (or flour, if using a gluten‑containing version) with the sugar before adding to the cream cheese to prevent lumps. If using flour, note it can make the batter slightly heavier.
- Salt helps round flavors. If you used salted butter, omit or reduce the added salt accordingly.
- To prevent cracking, bake the loaf cheesecake in a gentle, controlled environment—ideally a water bath—and keep mixing to a minimum once eggs are in the batter.
- Cool the cheesecake gradually after baking and refrigerate for at least 4 hours or overnight for clean, easy slicing and a more set texture.
Tips for Optional Toppings
- Fruit toppers: pat berries dry before adding to prevent soggy crust. For a quick compote, simmer berries with a little sugar and a splash of lemon juice until syrupy; cool completely before spooning over slices.
- Glazes and jams: warm jam or fruit glaze slightly to loosen, then brush over cooled cheesecake for a glossy finish. This can be swapped for blueberry, raspberry, or any preferred glaze.
- Powdered sugar: dust just before serving for a delicate finish. Keep the cake refrigerated to maintain a clean appearance and prevent clumping.
- Additional ideas: a light drizzle of melted dark chocolate, toasted nuts, or fresh mint leaves can add color and texture. If adding nuts, toast them lightly to enhance aroma before scattering on top.
FAQ
What is Easy Loaf Cheesecake?
A creamy, classic cheesecake baked in a loaf pan, giving you a tall, sliceable loaf with a graham cracker crust. It’s simple to make and perfect for smaller gatherings.
What ingredients do I need?
Crust: 1 1/2 cups graham cracker crumbs, 3 tablespoons melted butter, 1 tablespoon sugar (optional).
Filling: 16 oz (450 g) cream cheese, softened; 1/2 cup (100 g) granulated sugar; 2 large eggs; 1/2 cup (120 g) sour cream; 1 teaspoon vanilla extract; pinch of salt. Optional: zest of 1 lemon for brightness.
Do I need a crust and how do I make it?
Yes. The crust adds flavor and texture. Mix graham cracker crumbs, melted butter, and sugar (if using). Press the mixture evenly into a greased loaf pan lined with parchment if desired. Chill 10–15 minutes, then bake for 8–10 minutes at 350°F (175°C) until set. Let cool before filling.
What pan size should I use?
Use an 8.5×4.5 inch loaf pan (or a standard 9×5 inch loaf pan). Grease well and consider lining with parchment for easy removal.
How long and at what temperature should I bake?
Preheat to 325°F (165°C). Bake the filled loaf pan for about 50–60 minutes, or until the center is almost set but still slightly wobbly. The top should be pale and the edges set.
Do I need a water bath?
A water bath helps prevent cracks and keeps the cheesecake extra moist, but it’s optional for a loaf. If you use one, place the filled pan in a larger roasting pan with hot water halfway up the sides of the loaf pan. Be careful to wrap the loaf pan in foil to prevent water intrusion. If you skip the water bath, monitor bake time carefully and avoid overbaking.
How do I cool and refrigerate the cheesecake?
Cool the cheesecake in the pan on a rack for about 1 hour. Then refrigerate for at least 4 hours, or ideally overnight, until completely chilled. To help release, run a knife around the edge before cutting and lift the cheesecake out with parchment if used.
How should I store and serve leftovers?
Store slices in an airtight container in the refrigerator for up to 5 days. For longer storage, wrap tightly and freeze for 1–2 months. Thaw in the fridge before serving. Slice with a sharp knife for clean cuts.
Can I make this in advance or freeze it?
Yes. You can bake and refrigerate up to 3 days ahead. The whole loaf can be frozen for up to 1–2 months; wrap tightly and place in an airtight container. Thaw overnight in the fridge before serving.
What variations or add-ins work well?
Enhance flavor with lemon zest or vanilla bean. Swirl in your favorite jam (strawberry, raspberry) or fruit compote before baking. For a chocolate version, add 2–3 tablespoons cocoa powder to the filling or fold in chocolate chips. Avoid overmixing to prevent cracks.