Introduction / Hook
There’s something wonderfully comforting about a loaf that comes together with minimal fuss and maximum aroma. Rustic No Yeast Bread Everyday Bake invites you into a simple, satisfying ritual: mix, shape, bake, and savor the moment when the kitchen fills with the warm scent of toasty crust and soft, steaming crumb. This is bread you can literally make on a weeknight, with pantry staples you already have on hand, yet it tastes like it’s been nurtured by a centuries-old bakery hand. The magic lies in the balance of crackly crust and tender interior, a rustic bite that carries hints of sweetness from the grain, earthy notes from the flour, and a whisper of olive oil or butter that makes every slice feel luxurious. Close your eyes and imagine slicing into a loaf that’s still warm, the crust giving way with a satisfying sigh as steam bursts forth, carrying the comforting aroma of baked bread with a subtle, wholesome character. This is bread for everyday life—humble, reliable, and incredibly delicious.
The Story Behind the Dish
Bread has always been the heart of a home, a symbol of nourishment and community. This no-yeast version nods to generations of bakers who learned to coax flavor and texture from flour, water, salt, and a touch of fat—the essentials that do not require rigid rising times or fancy equipment. The idea behind a no-yeast, rustic loaf is borrowed from traditional quick breads, ancient flatbreads, and the improvisational spirit of farmhouse kitchens where improvisation was both necessity and art. Some traditions relied on natural leavening from a poolish or a starter, but others celebrated the simplicity of batters and doughs that used chemical leaveners or no leavening at all, relying on steam and heat to create a satisfying crumb. This particular recipe blends those ideas into a modern, approachable loaf: sturdy enough to slice for sandwiches, yet soft enough to tear apart with your fingers and savor the texture as you would with a warm, freshly baked roll. It’s bread that respects its lineage while embracing contemporary pantry realities, inviting you to bake with confidence even on the busiest days.
Why You’ll Love This Recipe
- No yeast needed: A quick, approachable bread that yields reliable results without long rising times.
- Versatile texture: A crusty exterior with a tender, slightly chewy crumb that’s perfect for dipping, toasting, or slathering with butter and jam.
- Simple pantry ingredients: Flour, salt, liquid, and a small amount of fat come together in a forgiving dough that’s easy to handle.
- Family-friendly: A loaf that disappears quickly at gatherings, picnics, and weeknight dinners alike.
- Adaptable: Easy to customize with herbs, seeds, cheese, or olives to suit your mood or the season.
- Economical: A budget-friendly bake that yields a generous loaf, reducing waste and stretching meals.
- Kid-friendly: The aroma alone is a magnet—watch little hands rush to the counter to tear off a warm piece.
- Beginner-friendly: With clear steps and forgiving dough, even novice bakers can craft something that feels artisanal.
Flavor Profile & Texture
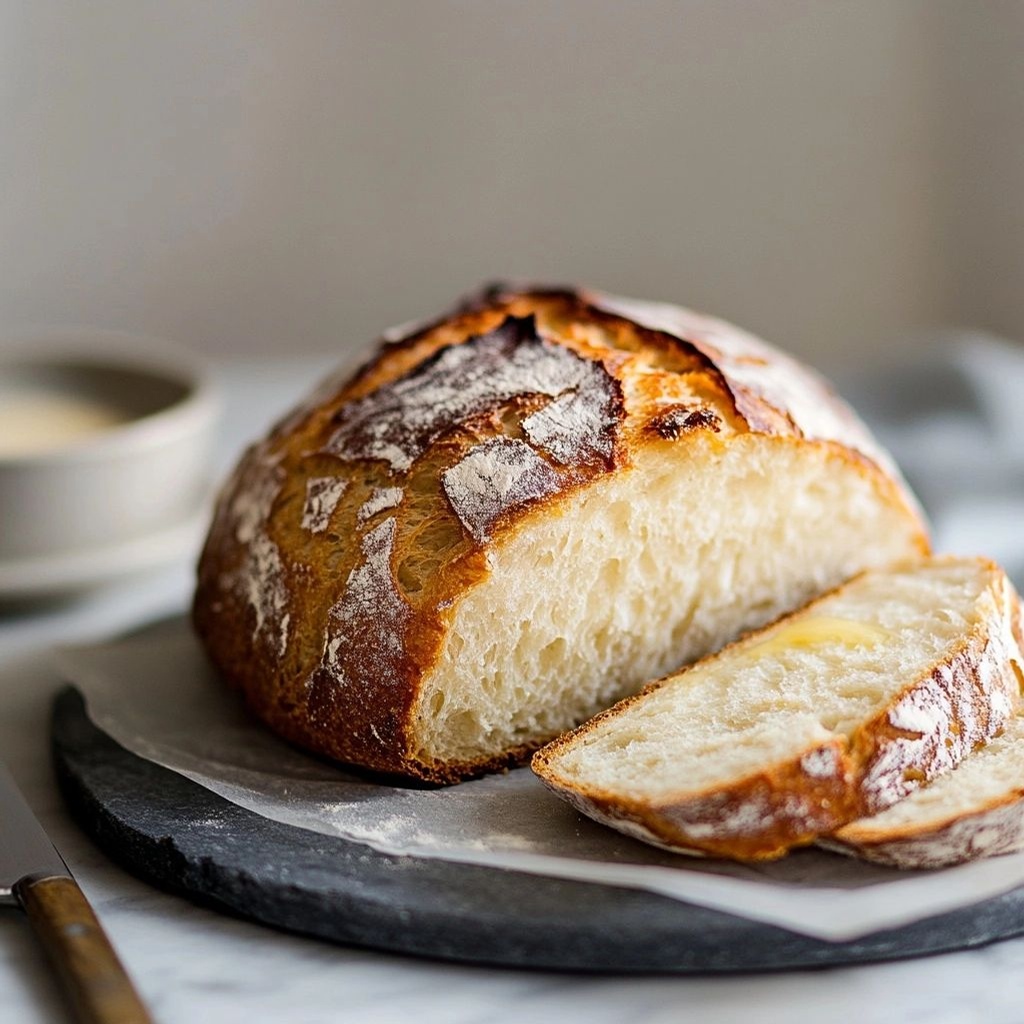
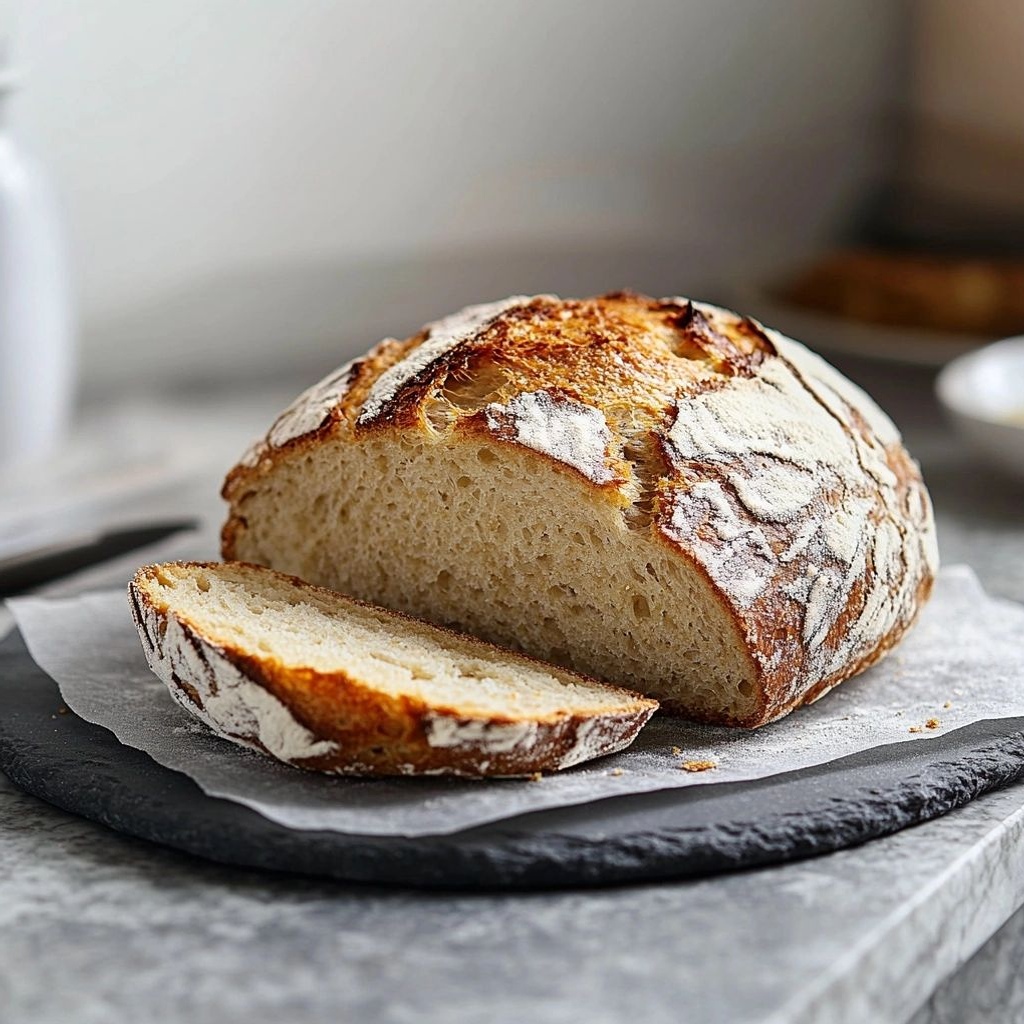
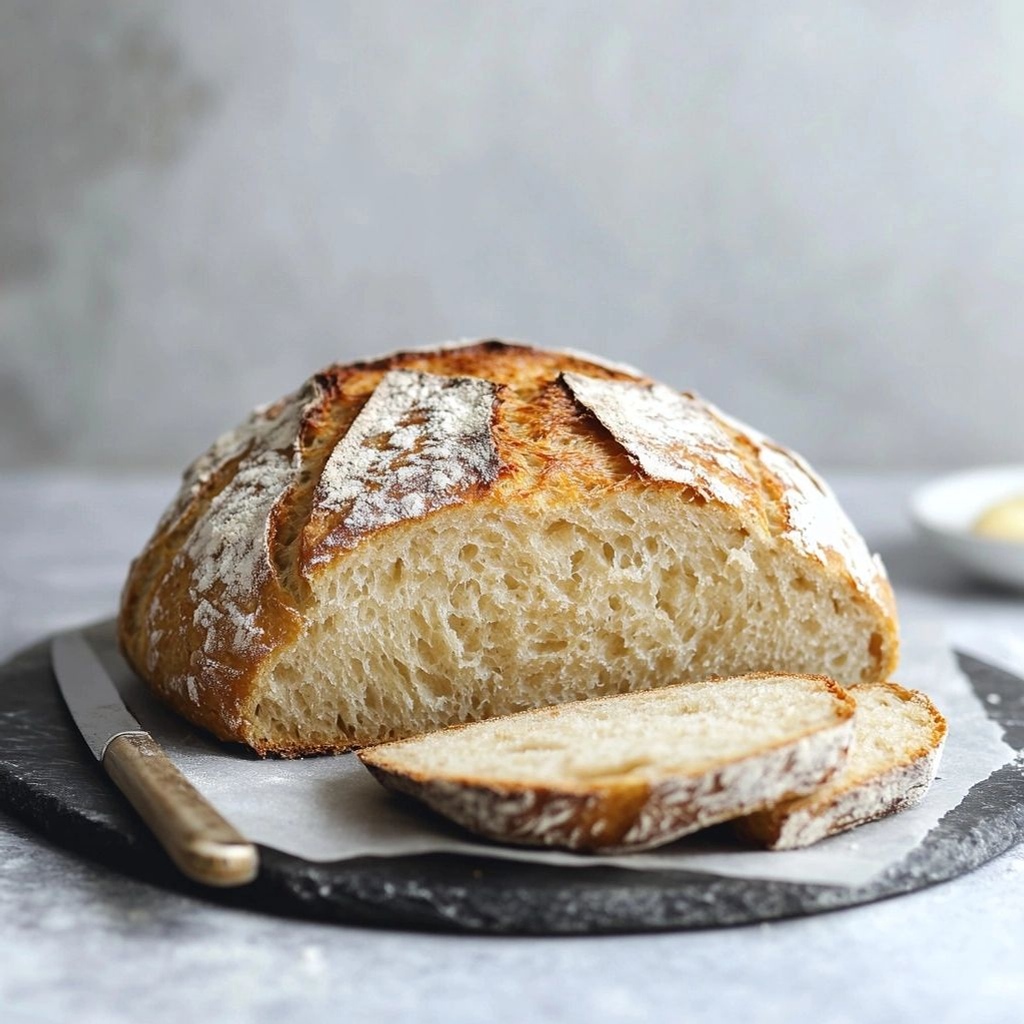
This bread tells a story with every bite. The crust—crisp, crackly, and deeply browned—provides a satisfying snap as you break through, releasing a toasty fragrance with hints of caramelized flour and a whisper of salt that makes the loaf feel polished. Inside, the crumb is moist and light, with a subtle chew that keeps the slice together without feeling dense. Depending on the flour you choose, you’ll notice a gentle nuttiness. White flour yields a milder, more tender crumb, while a blend with whole wheat or whole grain flours introduces a toasty, slightly earthy depth. The presence of a small amount of fat—whether olive oil or melted butter—adds a luxe mouthfeel and helps keep the crumb feeling supple rather than dry. If you add extra flavors, you’ll find that seeds contribute delightful pops of texture, herbs bring herbal brightness, and cheese or olives introduce savory complexity that pairs beautifully with a simple drizzle of olive oil and a sprinkle of sea salt.
The flavor is rounded rather than sharp, making this bread a versatile partner for nearly any topping or accompaniment. A smear of butter that melts into the warm surface, a dab of honey, a slice of tomato and a drizzle of olive oil, or a hearty soup on a chilly evening—these are the moments this loaf is built for. It’s not merely bread; it’s container, vehicle, and canvas for the flavors of your day.
Occasions & Pairings
This rustic loaf shines in a variety of settings, from everyday dinners to weekend gatherings. Here are some ideas to help you plan when to bake and how to enjoy it most:
- Weeknight dinners: Serve alongside a comforting soup, stew, or roasted vegetables. Dip, toast, or toast-and-top for a satisfying meal in minutes.
- Casual sandwiches: Thick slices make excellent interfaces for tomato and mozzarella, hummus and roasted peppers, or egg salad with chives.
- Brad-and-butter moments: A simple slice with a pat of cultured butter or a fruit preserves pairing makes an indulgent afternoon treat.
- Holiday tables: Present slices as part of a rustic cheese board or as a base for pâté and spreads, creating a warm, communal feel.
- Picnics & gatherings: Bake, cool, slice, wrap, and share; this loaf travels well and tastes great at room temperature.
Pairings to consider:
- Soups: tomato-basil soup, creamy potato soup, classic chicken noodle, lentil soup.
- Salads: a bright green salad with lemon vinaigrette, roasted beet salad with goat cheese, or a simple cucumber-teta.
- Cheeses: aged cheddar, Gruyere, or a soft goat cheese spread; olive-oil-dipped bread with sea salt is a delightful starter.
- Drinks: light white wines or sparkling water with a squeeze of lemon; a warm cup of tea or coffee also complements the crust for a comforting breakfast.
- Desserts: a sliver of dark chocolate or honeyed ricotta with fruit makes for a luxe yet simple end to a meal.
Tips, Variations & Substitutions
Here are practical ideas to customize and perfect your no-yeast rustic loaf, whether you’re vegan, gluten-sensitive, or simply curious about flavor twists:
- Flour variations: Use a 50/50 blend of all-purpose and whole wheat for a heartier crumb and nuttier flavor. Try spelt or rye for a denser, more rustic profile. For a gluten-free version, start with a certified gluten-free flour blend designed for bread and adjust hydration accordingly.
- Hydration tweaks: If the dough feels too stiff, add a tablespoon or two of water at a time until it comes together into a cohesive, shaggy dough. If it’s too sticky, incorporate a little more flour, a tablespoon at a time.
- Herbs & aromatics: Fresh rosemary, thyme, or oregano can make a big impact. Finely chop and fold into the dough for an aromatic loaf. A pinch of garlic powder or minced garlic can elevate the savory profile.
- Seeds & crunch: Sesame, flax, sunflower, or pumpkin seeds add texture and nutritional value. Lightly toast them first to intensify flavor, then fold into the dough or sprinkle on top.
- Cheesy twist: Fold in grated Parmesan, cheddar, or feta for a cheesy version that melts deliciously on warm slices.
- Olive oil version: Use extra-virgin olive oil for a fruity note and a tender crumb. Butter yields a richer mouthfeel and a slightly sweeter finish.
- Vegan & dairy-free: Use olive oil and plant-based milk if needed. Ensure any added flavorings are dairy-free if you’re catering to allergies.
- Whole grain boost: Add up to 30–40% whole grain flour for a rustic, hearty loaf. Increase hydration slightly to accommodate the bran.
- Flatbread variant: Shape into thinner rounds and bake on a hot surface for a quick, crisp flatbread with a soft center.
Storage & Make-Ahead Ideas
To keep the loaf at its best, consider the following storage and make-ahead strategies:
- Room temperature: Cool completely, then store in a bread bag or wrapped in a clean kitchen towel for up to 3 days. Avoid airtight containers that trap moisture and soften the crust.
- Refrigeration: It’s not ideal for texture, but if you must refrigerate, wrap tightly to prevent staling and rewarm gently before serving.
- Freezing: Slice the loaf before freezing for easy thaw-and-serve portions. Wrap slices tightly in plastic wrap and foil, or place in an airtight freezer bag. Reheat in a toaster oven or warm oven until crust is crisp again.
- Make-ahead: Prepare the dough a day ahead, cover, and refrigerate. The next day, bring to room temperature, shape, and bake. This can deepen flavor and simplify mealtime.
- Leftover uses: Stale slices make perfect croutons, bruschetta toppings, or breadcrumbs for adding crunch to soups and casseroles.
Flavor Enhancers & Personal Touches
Infuse your loaf with personality by choosing one or two of these ideas to tailor it to your kitchen:
- Finely minced fresh herbs folded into the dough for a garden-fresh aroma.
- A dash of smoked paprika or chili flakes for a gentle, warming kick.
- Grated citrus zest (lemon or orange) for a bright, uplifting note that pairs well with olive oil and sea salt.
- Incorporating olive tapenade or sun-dried tomato pieces into the dough for a Mediterranean-inspired loaf.
- Top with flaky sea salt and a drizzle of olive oil before baking to finish with a salty gloss.
Make-Ahead & Kitchen Confidence
One of the most inviting aspects of this rustic loaf is how dependable it is when you’re pressed for time or new to baking. The method relies on straightforward dough handling, simple ingredient ratios, and a forgiving bake. You’ll discover that the dough comes together smoothly, and the bake provides a crust with instant crusty appeal and a soft, inviting center. The loaf’s resilience makes it an ideal anchor for weeknight meals, weekend projects, and spontaneous gatherings. There’s a quiet confidence in knowing you can pull this bread from the oven and immediately transform a plain table into a comforting scene—someone slicing off a wedge, steam rising in the air, butter melting into the warm crumb, and the room filling with the warm, wholesome scent of freshly baked bread.
Fun Facts & Trivia (Optional)
Bread has long carried cultural significance far beyond sustenance. Quick breads and no-yeast loaves appeared in many culinary traditions where yeast was scarce or time was scarce. The idea of using chemical leavening or relying on steam to achieve lift has roots in various households across the world, from dense, hearty loaves of the countryside to delicate, crusty breads that celebrate simple ingredients. In some traditions, bread is seen as a symbol of hospitality and sharing—an edible invitation to gather around the table. The crust’s crispness can be a sign of a well-hydrated dough and a hot oven, while the tender crumb reveals the gentle balance of moisture and fat within the dough. This rustic no-yeast bread embodies that balance: approachable, comforting, and quietly celebratory of home-cooked food.
Final Thoughts
Rustic No Yeast Bread Everyday Bake is more than a recipe—it’s a doorway to a moment of calm in a busy day, a chance to connect with the simple artistry of baking, and a reliable friend in the kitchen. Its adaptability invites you to experiment and discover your preferred flavor profile, while its straightforward approach ensures success even for beginners. Bake it, slice it, share it, and let the aroma turn ordinary meals into memorable ones. The loaf’s charm lies in its everyday nature: you don’t need a bakery-level setup to craft something wonderful. With a few pantry staples and a little patience, you can create a loaf that feels timeless, rustic, and utterly delicious every single time you bake.
Ingredients
Rustic No Yeast Bread Base
-
– 2 cups all-purpose flour
→ This acts as the main structure for the loaf. All-purpose flour provides a light, workable crumb when combined with the other dry ingredients. If you prefer heartier bread, substitute with 1 cup whole wheat flour (and adjust water slightly).
– 1 cup whole wheat flour
→ Adds nutty flavor and density; increases whole-grain nutrition. For a lighter loaf, reduce to 1/2 cup and compensate with extra all-purpose flour. Sift or whisk to combine with the other dry ingredients for even texture.
– 1 1/4 cups warm water (about 110°F/43°C)
→ Warm water activates the leavening action of baking powder and helps hydrate the flour to form a cohesive dough. If you use colder water, expect a slower rise in the bake; hot water should be avoided to prevent clumping or tearing of the dough.
– 2 tablespoons extra-virgin olive oil
→ Provides moisture, flavor, and a tender crumb. Use a good-quality olive oil; warm it slightly before adding so it incorporates more easily and evenly into the dough. If you skip oil, the crust may be crisper but the crumb a bit drier.
– 2 teaspoons baking powder
→ The primary rising agent in no-yeast bread, giving lift and a light texture. Ensure it’s fresh for full leavening; a stale powder will result in a denser loaf. Sift with the flour to distribute evenly and prevent clumps.
– 1 teaspoon salt
→ Enhances flavor and strengthens gluten formation, improving dough structure. Salt should be evenly dispersed with the dry ingredients to avoid concentrated pockets which could affect taste and rise.
– 1 teaspoon sugar (optional)
→ Encourages browning of the crust and can help with a little fermentation-like flavor in quick breads, even without yeast. If omitting sugar, the bread will still bake fine but may have a milder crust.
Optional Add-ins
-
– 1/4 cup chopped olives (pitted) or sun-dried tomatoes (optional)
→ Add savory depth and moisture. For olives, pat dry to reduce excess moisture; chop evenly so pieces distribute throughout the loaf. Sun-dried tomatoes should be drained well to avoid soggy dough.
– 2 tablespoons sesame seeds or flaxseeds (optional)
→ Seeds add crunch, flavor, and nutrition. Toast sesame seeds in a dry pan briefly to deepen their aroma before mixing. If using flaxseeds, grind them lightly to release nutrients and improve binding.
– 1 tablespoon dried herbs (rosemary, thyme, or oregano) (optional)
→ Aromatic notes that complement rustic bread. Crush dried herbs slightly between fingers to awaken their scent before adding to the dry mix.
– 1/4 cup chopped nuts (optional)
→ Adds texture and richness; choose walnuts or almonds for a hearty crumb. Chop finely to ensure even distribution and prevent large crunchy pockets. Toast briefly for flavor if desired.
Instructions
- Preheat your oven to 400°F (200°C) and lightly grease a 9×5-inch loaf pan or line it with parchment paper; this ensures the loaf releases cleanly and the crust forms evenly during baking.
→ A hot pan helps the dough set quickly to create a stable loaf structure, while parchment or greasing prevents sticking and tearing when you remove the bread. - In a large mixing bowl, whisk together 2 cups all-purpose flour, 1 cup whole wheat flour, 2 teaspoons baking powder, 1 teaspoon salt, and 1 teaspoon sugar (if using); whisking distributes leavening and salt evenly for uniform rise and flavor across the loaf.
→ Even dispersion prevents pockets of baking powder or salt that could taste metallic or cause uneven crumb structure. - In a separate bowl, combine 1 1/4 cups warm water (about 110°F/43°C) with 2 tablespoons extra-virgin olive oil; warming the water helps the oil emulsify into the dough and hydrates the flour to form a cohesive batter-like dough.
→ Warm liquid promotes smoother mixing and tender crumb, while oil provides moisture and flavor without making the dough overly sticky. - Pour the wet ingredients into the dry ingredients and stir with a wooden spoon or dough whisk until just combined and a shaggy dough forms; stop mixing as soon as the flour is moistened to avoid a tough crumb.
→ Overmixing develops gluten too much for a quick bread, resulting in a dense loaf; a few streaks of flour remaining is acceptable for rustic texture. - If desired, fold in optional add-ins such as 1/4 cup chopped olives or sun-dried tomatoes, 2 tablespoons sesame seeds or flaxseeds, 1 tablespoon dried herbs, or 1/4 cup chopped nuts by gently folding them into the dough until evenly distributed; avoid overworking after add-ins to maintain lightness.
→ Even distribution of add-ins ensures every slice has flavor and texture without creating soggy pockets or large concentrated bites. - Spoon or scrape the dough into the prepared loaf pan, smoothing the top with a dampened spatula to create an even surface; this helps the loaf bake uniformly and prevents domed or uneven tops.
→ A level top promotes uniform heat exposure and a consistent crumb throughout the loaf, making slicing easier. - Lightly sprinkle additional flour on the surface if the dough looks very sticky, then bake in the preheated oven for 35 to 45 minutes, or until the crust is deeply golden and a toothpick inserted into the center comes out clean or with only a few moist crumbs; this confirms doneness without underbaking the interior.
→ The baking time can vary with pan type and oven, so test with a toothpick and monitor the color to avoid a pale crust or a dry interior. - Remove the loaf from the oven and let it rest in the pan for 10 minutes to set its structure, then turn it out onto a wire rack to cool completely before slicing; resting prevents crumbs from crumbling and helps finish the internal moisture distribution.
→ Cooling is essential; slicing too soon can crumble the loaf and betray a gummy interior as steam escapes.
Notes
These rustic no-yeast bread loaf notes are designed to help you achieve a tender, flavorful crust with a light crumb in a quick everyday bake. The combination of all-purpose and whole wheat flours provides structure and a wholesome flavor, while baking powder supplies the lift without yeast.
For best results, whisk the dry mix thoroughly to distribute the baking powder and salt evenly, then whisk in the wet ingredients just until a cohesive dough forms. Overmixing can develop too much gluten and make the loaf dense, so fold until the ingredients are just combined.
Hydration matters: if your flour absorbs more or less water than expected, adjust with a tablespoon or two of warm water to reach a soft, cohesive dough that holds together without being sticky. A slight touch of olive oil on your hands can help prevent sticking during shaping.
Flavor and texture variations: add-ins such as olives, sun-dried tomatoes, sesame or flaxseeds, dried herbs, or chopped nuts can transform the loaf. Toast seeds lightly to deepen their aroma, and chop olives or nuts evenly to ensure uniform distribution. If using flaxseeds, grind them for better binding and nutrient release.
Storage and serving: this bread is best enjoyed fresh on the day it’s baked, with warm olive oil, butter, or your favorite spread. It also keeps well for 2–3 days at room temperature wrapped in a clean cloth or stored in a breathable bag. Freeze slices for quick future meals, then thaw at room temperature and refresh in a warm oven for a few minutes to restore softness.
Tips
Tips for Preparing Rustic No Yeast Bread
- Mix dry ingredients thoroughly: Sift or whisk the flours, baking powder, salt, and sugar together so the leavening and seasoning are evenly distributed before adding the wet ingredients. This helps prevent dense spots in the loaf.
- Water temperature matters: Use warm water around 110°F/43°C to activate the baking powder and hydrate the flours for a cohesive dough. Avoid hot water that can damage gluten structure or cause clumping.
- Oil should be incorporated evenly: Warm the olive oil slightly and whisk it into the water before combining with the dry mix to ensure a tender, uniform crumb and moist texture.
- Handle with light touch: No-yeast bread benefits from gentle mixing. Stir until the dough comes together, then let it rest briefly (10–15 minutes) to hydrate the flour and relax the gluten for easier shaping.
- Hydration adjustments: If the dough feels dry or crumbly, add a teaspoon of water at a time until it just comes together. If it’s too sticky, a tablespoon of flour sprinkled around the bowl can help.
- Incorporate add-ins evenly: If using olives, sun-dried tomatoes, seeds, nuts, or herbs, fold them in after the initial dough comes together to prevent them from sinking and to distribute flavor throughout the loaf.
- Flavor and texture with add-ins: Toast seeds before adding to the dough to deepen aroma. For nuts, chop finely and consider a quick toast to boost crunch without overpowering the crumb.
- Shaping for a rustic look: Lightly flour your work surface, shape the dough into a rough oval or round loaf, and gently transfer to a prepared baking surface. Do not overwork; a slightly shaggy exterior adds character.
- Even baking: If possible, bake on a preheated stone or heavy baking sheet to create better crust and even heat. Place the loaf on parchment if using a stone to prevent sticking.
- Crust and crumb control: For a crisper crust, brush the loaf with a little olive oil or water before baking and bake at a steady 425°F (220°C) for 25–30 minutes, or until the crust is deeply golden and the loaf sounds hollow when tapped on the bottom.
- Testing doneness: Tap the bottom of the loaf; it should sound hollow. If you have a kitchen thermometer, an internal temp around 190–200°F (88–93°C) indicates doneness.
- Cooling is essential: Let the loaf rest on a rack for at least 15 minutes after baking to finish the internal steam distribution and avoid a gummy crumb.
- Storage: Store cooled bread in a breathable bag or wrapped in a clean towel for 1–2 days at room temperature. For longer storage, freeze slices or the whole loaf and re-warm as needed.
- Customizing: For a heartier loaf, increase whole wheat flour to 1 1/2 cups and reduce water by a few tablespoons. If you prefer lighter texture, increase all-purpose flour slightly and maintain hydration.
FAQ
What is “Rustic No Yeast Bread”?
A simple, hearty bread made without commercial yeast or fermentation. It typically uses baking powder or baking soda for leavening and relies on high hydration and steam to achieve a rustic, crusty loaf with a chewy crumb.
What ingredients do I need?
Main pantry staples work well: all-purpose or bread flour, baking powder or baking soda, salt, water or milk, and a little oil or butter. Optional add-ins include seeds, herbs, cheese, or chopped olives for variety.
Can I use baking soda instead of baking powder?
Yes. If using baking soda, pair it with an acidic liquid (like yogurt, buttermilk, or lemon juice) to activate it. If you use baking powder, you can use just water for a simpler batter-style dough.
What should the dough texture be like?
The dough is typically wetter than ordinary bread dough, often shaggy and sticky. It should hold a loose shape when scooped, not be stiff. A well-floured surface helps with handling, and a light touch prevents overworking the gluten.
How long does it take to bake?
Total time is usually about 40–60 minutes: 10–15 minutes of mixing, 15–25 minutes of resting or shaping, and 20–25 minutes of baking, depending on oven and loaf size. High heat helps develop a crust.
What equipment do I need?
A sturdy mixing bowl, a baking sheet or loaf pan, parchment paper, a sharp knife or lame for scoring, and an oven-safe dish or cloche if you want extra steam. A kitchen thermometer helps ensure proper internal temperature.
How do I get a crusty exterior?
Preheat the oven well, use a hot baking surface or steam-injection method (a tray of hot water or kneaded steam from a covered bake). Dusting with flour or cornmeal and scoring just before bake also aids crust formation.
Can I add flavors or mix-ins?
Yes. Mix-ins like sesame seeds, poppy seeds, minced garlic, fresh herbs, grated cheese, olives, or sun-dried tomatoes elevate the bread. Add mix-ins to the dough after initial mixing to avoid overworking.
How should I store the finished bread?
Let it cool completely, then store in a paper bag or bread box for 1–3 days. For longer storage, freeze slices individually or whole loaf wrapped tightly. Reheat in a toaster, oven, or skillet to refresh the crust.
What if my dough is too wet or too dry?
If too wet, add a tablespoon of flour at a time until it holds a looser shape. If too dry, add small amounts of water and mix until cohesive. Resting the dough for 10–15 minutes can also help hydration even out.