Introduction / Hook
Imagine a warm, golden loaf that crackles softly as you tear into it, the first bite releasing a wave of comfort and zing all at once. Quick Chilli Bread is not just a snack; it’s a crowd-pleasing ritual that signals game night has begun. The bread’s surface wears a crust that sits somewhere between a toasty cracker and a sun-warmed biscuit, while the interior stays tender, almost pillow-like, ready to absorb the bright kick of chili heat and aromatic herbs. This is the kind of bread you crave when you want something you can dip, scoop, and tear—something that comes together in a flash, yet tastes like you’ve slaved over it for hours. It’s the perfect companion to a bowl of chili, a plate of ribs, or a platter of nachos, turning ordinary evenings into small fiestas where laughter and friendly rivalries simmer just as warmly as the oven.
What makes this Quick Chilli Bread so appealing for game night isn’t just its speed or its bold flavors; it’s the way it brings people together. It’s the scent of melted butter meeting chili flakes as you slice the loaf, the little crunch that gives way to a soft, fragrant crumb, and the way the bread becomes a canvas for toppings—from garlic herb butter to a slick of chili oil. It’s versatile enough to please a crowd with varied tastes: a hint of heat for those who love a little spice, a milder version for the more delicate palates, and a texture that holds up whether you’re dipping into a chunky chili, a smooth bean dip, or a tangy yogurt sauce.
This isn’t a recipe that demands a long kitchen playlist or a multi-hour simmer; it’s designed for the moment you decide you want something warm, comforting, and a touch celebratory. The magic lies in its simplicity: a few pantry staples, a quick mix, and the oven working its quiet alchemy while you set up the score sheets, pour the drinks, and rally the team for kickoff. Yet despite its speed, the outcome feels indulgent, almost bakery-fresh—like a treat you’d savor after a long practice or a hard-fought game.
The Story Behind the Dish
Bread has always held a place of honor in gatherings, a universal conduit for communal feasts and shared stories. Quick Chilli Bread taps into a long tradition of turning humble dough into something special with a touch of spice and a sprinkle of love. The chili’s warming glow echoes memories of tailgate parties and neighborhood pizzazz, where the scent of paprika, cumin, and chili flakes mingled with smoky grills and high-spirited banter. In many cultures, bread is more than sustenance; it’s a symbol of togetherness, a comforting constant in the face of chilly evenings and competitive banter.
This particular recipe borrows from a modern, fast-paced kitchen ethos: you want something crave-worthy that can be whipped up in the time it takes to rally the players, discuss last night’s stunning win, and decide the snack strategy for the next round. Think of it as a culinary micro-story—brief, bold, and satisfying—where the chili provides a story of heat and depth, the herbs give a green whisper of freshness, and the butter invites a luxurious mouthfeel that makes every bite feel lavish without being decadent. The result is a loaf that tastes both familiar and excitingly new, like your favorite comfort food with a lively, game-night twist.
If you’ve ever watched a kitchen transform an ordinary loaf into a game-night hero, you’ll recognize the moment this dish delivers: a simple batter, a quick swirl of seasonings, and the oven’s quiet rise into something that feels like a small victory. The dish embodies the spirit of friendly competition—uncomplicated, always accessible, easy to share, and a little bit magical in how it makes a room feel warmer in just one scent-filled breath.
Why You’ll Love This Recipe
- Speed and ease: Whips up in a flash, ideal for last-minute gatherings or when you want a comforting snack during a busy game night.
- Bold flavor with balance: A gentle heat from chili, fragrant garlic and herbs, and a buttery, tender crumb that keeps every bite luscious.
- Versatile serving options: Standalone snack, dip companion, or a tasty vessel for toppings and spreads.
- Crowd-pleasing texture: A crusty exterior with a soft, chewy interior that holds up to dunking without becoming mushy.
- Accessible ingredients: Common pantry staples come together quickly, with room to customize for dietary needs or flavor preferences.
- Shareable and social: Perfect for slicing into rustic wedges to pass around a living room or kitchen island, fueling conversation and camaraderie.
- Low maintenance: Requires minimal prep, precise timing, and very little hands-on attention, leaving you free to cheer on your team or strategize the next move.
Flavor Profile & Texture
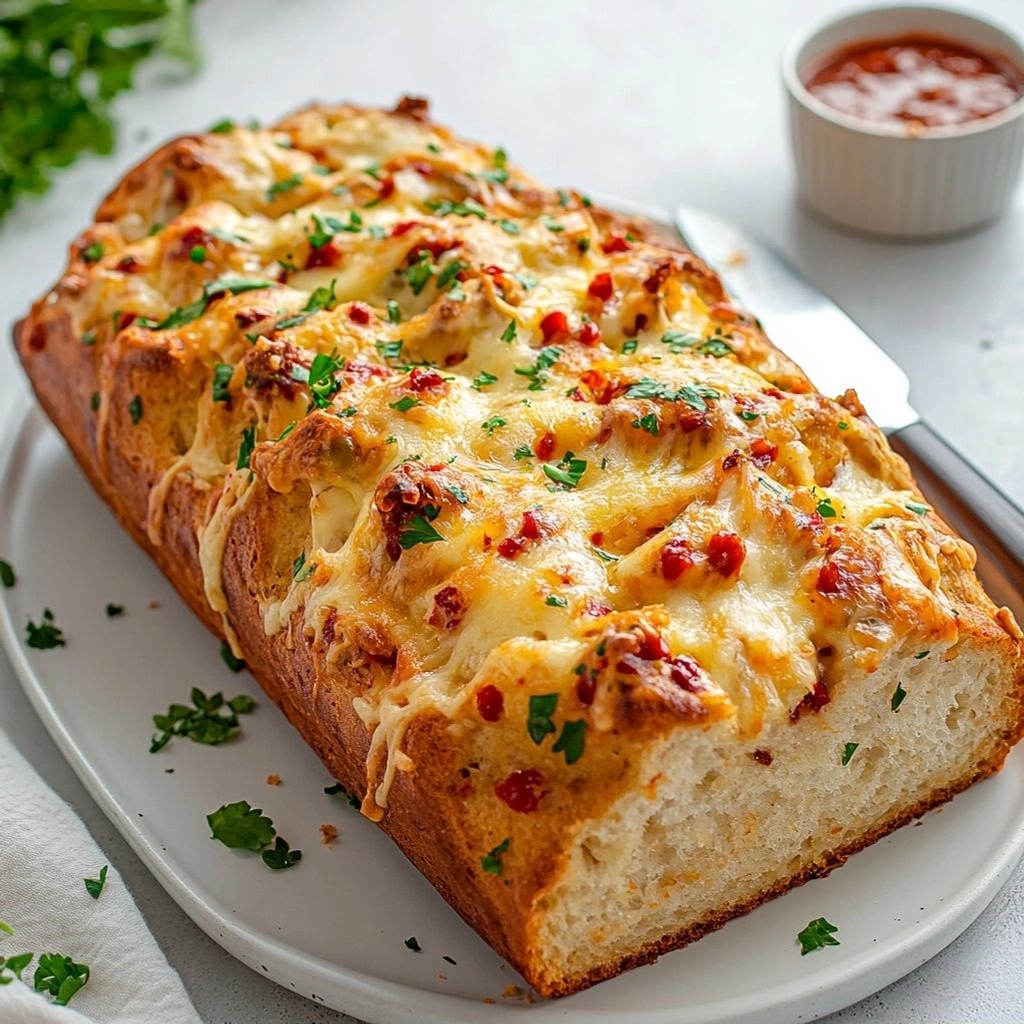
This chilli bread presents a delicious interplay of aromas and sensations. The crust offers a subtle crispness, a result of a quick bake that allows the top to brown evenly and form a delicate, light crunch. Inside, the crumb is tender and slightly airy, with a comforting density that makes it feel substantial without being heavy. The infusion of chili and warm spices creates a gentle heat that lingers on the palate—enough to awaken the senses without overpowering the bread’s inherent softness.
Butter or olive oil brushed across the surface adds a glossy sheen and a rich, mouth-coating finish that enhances the bread’s aroma as it hot-plates from the oven. Fresh garlic or a whisper of onion powder can punch up the savoriness, while a pinch of sugar or honey balances the spice with a trace of caramel sweetness. The chili’s brightness—whether from crushed red pepper, chili flakes, or a pinch of paprika—delivers a rosy warmth that makes the bread feel cozy, almost intoxicatingly inviting.
Texture-wise, you get a delightful contrast: a crackly crust that gives way to a soft, pillowy interior. The bread holds its shape well, making it ideal for tearing into rustic wedges and sharing among friends or family. Each bite reveals subtle herbaceous notes—perhaps thyme, oregano, or parsley—adding a green, fresh lift that brightens the overall profile. If you like a bit more bite, you can finish the loaf with a delicate sprinkle of flaky sea salt, coarse pepper, or even a light dusting of parmesan for a savory, cheesy accent.
Occasions & Pairings
This quick chilli bread shines brightest on game night, but its appeal isn’t limited to sports afternoons. It’s a versatile guest at casual gatherings, movie marathons, potluck dinners, and weeknight dinners when you want something comforting yet fast. Its confident yet flexible flavor makes it compatible with a wide range of dips, spreads, and toppings.
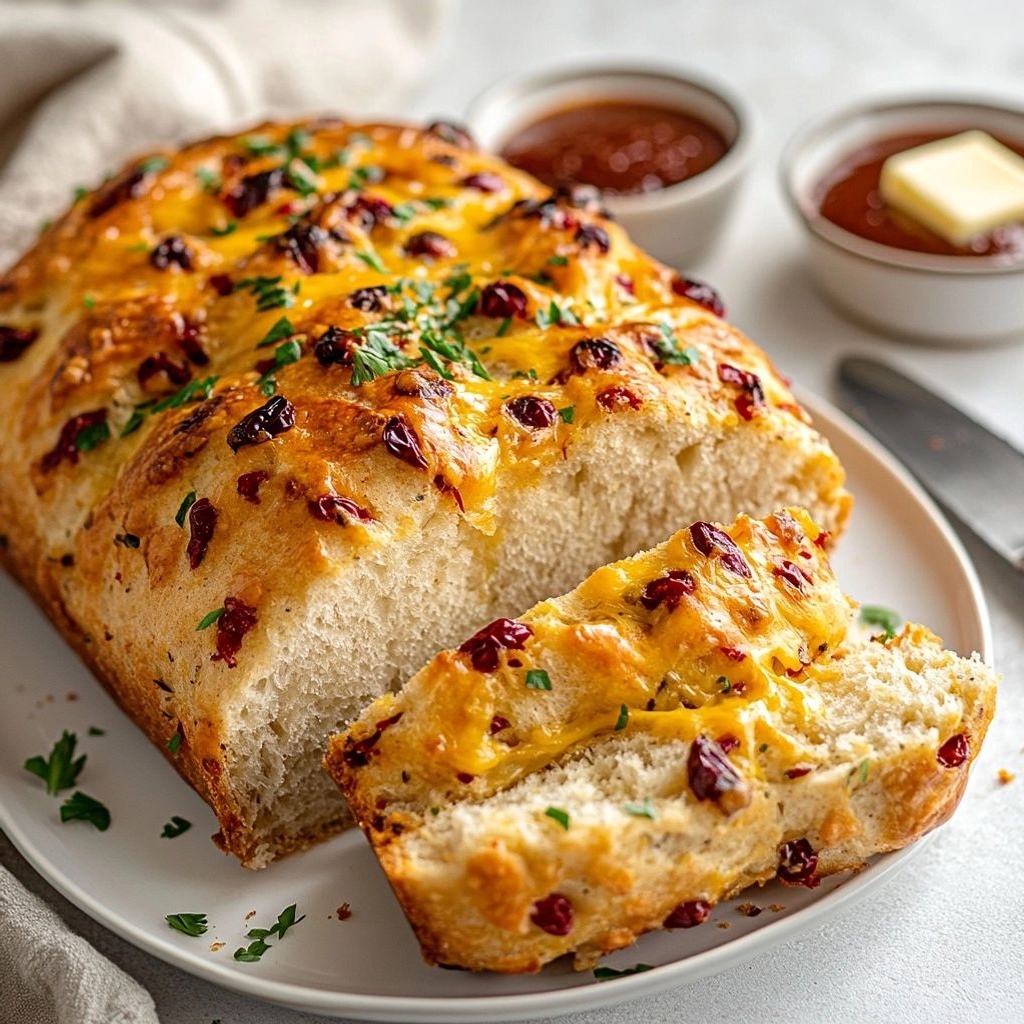
- Pairing ideas: Serve with hearty chili, creamy bean dips, garlic herb butter, chipotle mayo, or a tangy yogurt-dill sauce. It also makes a fantastic canoe for scooping up melted cheese, guacamole, or a smoky salsa.
- Holiday vibes: For a festive twist, brush with herb-butter infused with rosemary and lemon zest, then finish with a shower of finely grated parmesan and a pinch of red pepper flakes.
- Drink pairings: A chilled lager or a light IPA can balance the heat; for non-alcoholic options, a sparkling citrus drink or a ginger-lemon soda adds brightness that complements the spice.
- Occasion notes: Great for party appetizers, tailgate spreads, or casual family dinners. The bread can be a starring starter or a rousing side that ties a tasting platter together.
Tips, Variations & Substitutions
Flexibility is part of what makes this recipe so appealing for game night. Here are ways you can tailor it to your pantry, dietary needs, or flavor mood:
- Vegan version: Replace butter with olive oil or a plant-based butter substitute. Ensure any flavor boosters (like cheese or honey) are swapped for vegan-friendly options or left out.
- Gluten-free option: Use a gluten-free all-purpose flour blend that behaves like regular flour in quick breads. You may need to adjust liquid slightly depending on the blend’s absorption.
- Low-carb idea: Substitute a portion of the flour with almond flour or coconut flour, and increase eggs slightly to help with structure. Keep chili and herbs to preserve flavor.
- Regional twists: Introduce a smoky paprika, ancho chili, or chipotle for deeper heat. Add chopped fresh cilantro, scallions, or chives for a vibrant finish.
- Cheesy uplift: Fold in finely grated aged cheddar or parmesan into the batter, or finish with a cheese crust under the broiler for a molten top.
- Herb playground: Experiment with different herbs like dill, thyme, or oregano to shift the aroma profile from comforting to bright and herby.
- Make-ahead topping: Brush the loaf with a garlic-herb butter before baking and finish with a light dusting of flaky salt and chili flakes right after it comes out of the oven for a glossy, tasting-first moment.
Storage & Make-Ahead Ideas
Leftovers, if you’re lucky enough to have them, store beautifully in an airtight container at room temperature for up to 2 days, or refrigerate for up to a week. For longer storage, wrap slices in parchment and store in a resealable bag or container in the freezer for up to 1 month. To refresh, warm in a 350°F (175°C) oven for about 5-8 minutes, or briefly reheat in a microwave with a light foil cover to retain moisture.
If you’re planning ahead, you can mix the dough and refrigerate it overnight, letting the flavors meld. Allow it to come to room temperature before baking to ensure a good rise and an even crust. This approach is ideal if you’re hosting a game night with a busy afternoon; you can simply pop the loaf into the oven when guests arrive and enjoy a warm, fragrant bread that tastes like it’s just come out of the oven.
For make-ahead flexibility, consider baking the loaf a day in advance and storing it whole. Reheat and slice as needed. The aroma will still feel like a warm welcome, and the texture remains satisfying even after resting. If you want to brighten the flavors the next day, toast slices lightly and brush with a quick lemon-garlic butter to re-ignite the aroma and create a fresh contrast with the chili’s heat.
Fun Facts & Trivia (Optional)
Bread and heat have a long, tasty history together. Many cultures celebrate bread as a symbol of hospitality and warmth, with different spices and ingredients used to guard against the chill of winter or the sting of a long, exhausting day. Chili—especially in regions of the Americas and South Asia—has earned a legendary status for its comforting properties and its ability to bring people together around a steaming bowl or a shared plate. When you combine a speedy bread with chili’s vibrant heat, you’re tapping into a timeless kitchen instinct: nourishment that is quick to prepare, generous in flavor, and wonderfully conducive to communal moments.
Another fun angle: fast breads like this one echo the cottage- to bakery-style traditions where a few simple ingredients are transformed with warmth, time, and a touch of bravado. They invite you to play with texture and taste without the pressure of a longer, more exacting bake. You’ll discover that the best game-night bread isn’t about perfection; it’s about how it makes people smile, how its scent lingers in the room, and how it becomes part of the conversation as the scores come in and friendly bets are laid down.
Conclusion / Invitation to Bake
Ready to elevate your next game night with something that feels both homey and special, fast and deeply flavorful? Quick Chilli Bread is your answer. It’s the kind of dish that delivers joy in every slice, a soft center with a tantalizing hint of heat, and a crust that crackles just enough to remind you that something delicious is happening in the oven. Gather your team, line up the dips, and let the fragrance do the cheering. This bread is more than a snack; it’s an invitation to linger, laugh, and savor a moment of shared warmth as the game unfolds.
Ingredients
- Flour base
– 3 cups all-purpose flour
→ Forms the structure of the bread. Use regular all-purpose flour for a reliable, chewy crumb. If you prefer a heartier texture, substitute with bread flour (protein 12-14%) to develop more gluten and a springier loaf. - Yeast
– 2 1/4 tsp active dry yeast (one packet)
→ Leavening agent that makes the dough rise. Ensure the yeast is fresh and not expired; proof it in the warm water (see below) to confirm it’s active. If using instant yeast, reduce the amount slightly per package guidelines and skip proofing. - Warm water
– 1 cup warm water (about 105–110°F / 40–43°C)
→ Hydrates and activates the yeast; temperature is important—too hot and it will kill the yeast, too cool and the dough will rise slowly. If using a yeast-proof method, this is the liquid you’ll mix with the yeast. - Olive oil
– 2 tbsp olive oil
→ Adds moisture, tenderness, and richness to the dough. Use extra-virgin olive oil for flavor, or a light olive oil if you prefer a milder taste. You can reserve a small portion for brushing the loaf before baking. - Sugar
– 1 tsp sugar
→ Feeds the yeast and helps produce a gentle browning on the crust. Use white sugar; you can substitute with honey or maple syrup in a pinch, but adjust other liquids slightly if you do. - Salt
– 1 tsp salt
→ Enhances flavor and tightens gluten structure for better dough strength. Dissolve in the water before mixing to ensure even distribution. You can reduce to 3/4 tsp if you’re using a particularly salty cheese in toppings. - Chilli heat
– 1–2 tsp red chili flakes or finely chopped fresh red chili
→ Imparts the signature heat and aroma of a chili bread. Start with 1 tsp if you’re unsure of spice tolerance; increase to 2 tsp for a more pronounced kick. If using fresh chiles, remove seeds for a milder heat. - Garlic
– 2 cloves garlic, minced
→ Adds aromatic warmth that complements the chili. Fresh garlic releases more aroma than powdered; mince finely and mix into the dough or into a quick garlic oil to swirl through the loaf after first rise for a stronger flavor. - Onion (optional)
– 1 small onion, finely chopped
→ Gives sweetness and depth if you want a more savory, rustic loaf. Sauté the onion in a little oil until translucent before mixing into the dough for a mellow, sweet-savory note; this is optional depending on your flavor profile. - Chili oil swirl (flavor infusion)
– 1/4 cup extra-virgin olive oil + 1–2 tsp chili flakes (for infusion)
→ Creates a spicy, flavorful swirl when rolled or layered in the dough. Mix the oil with chili flakes and a pinch of salt; warm briefly to release heat and aroma, then swirl into the dough during shaping or brush over the surface before baking for a glossy, spicy crust. - Cheese topping (optional)
– 1 cup shredded mozzarella or sharp cheddar
→ Adds melty, savory richness and a golden, bubbly crust. Shred and sprinkle on top after the first rise, or press gently into the dough before the final proof for an even cheesy crust. For a milder version, use mozzarella; for a stronger bite, mix cheddar with mozzarella. - Fresh herbs (optional)
– 2 tbsp chopped fresh parsley or scallions
→ Bright, fresh finish that contrasts with the heat. Sprinkle on after baking or mix into the dough for a mild herbal note. If using scallions, slice thinly to maximize aroma and color.
Instructions
- Preheat your oven to 375°F (190°C) and line or grease a 9×5-inch loaf pan; this ensures the bread releases cleanly and bakes evenly without sticking.
→ A properly preheated, greased pan guarantees a smooth bake and intact loaf when unmolding. - In a small bowl, combine warm water, 1 teaspoon sugar, and active dry yeast; let it sit for 5–10 minutes until foamy; this confirms the yeast is active and ready to leaven the dough.
→ If the mixture remains flat, the yeast is dead or water was too hot; discard and start with fresh yeast to avoid dense bread. - In a large mixing bowl, whisk together 3 cups all-purpose flour and 1 teaspoon salt; this builds an even dry base that balances flavor and gluten development.
→ Salt slows fermentation slightly and strengthens the dough structure, contributing to a chewy, well-formed crumb. - Create a well in the flour and pour in the foamy yeast mixture, 2 tablespoons olive oil, 1 teaspoon sugar, minced garlic, and optional sautéed onion; stir with a wooden spoon to form a shaggy dough, then bring the edges in toward the center.
→ Introducing fats early helps tenderize the crumb, while garlic and onion (if used) infuse the dough with aromatic depth from the start. - Knead the dough on a lightly floured surface for 8–10 minutes until smooth, elastic, and slightly tacky; if sticking, dust with a pinch more flour and fold the dough over itself to develop gluten without making it dry.
→ Proper kneading aligns gluten strands for structure, giving the bread its chew and spring; under-kneaded dough will feel loose, while over-kneaded dough may become tough. - If using chili oil swirl, gently warm 1/4 cup extra-virgin olive oil with 1–2 teaspoons chili flakes for 1–2 minutes, then cool slightly; fold or swirl a portion into the dough during the first rise for an even distribution of heat without overheating the dough.
→ This creates a marbled, spicy aroma and ensures the oil carries flavor into the crumb rather than sitting as a surface glaze. - Place the kneaded dough in a lightly oiled bowl, cover with plastic wrap or a damp towel, and let rise in a warm, draft-free spot for 60–75 minutes until doubled in size; this builds volume and a softer texture.
→ A proper rise creates air pockets that yield a light crumb; a cold or windy environment can slow or prevent proper expansion. - Lightly punch down the dough to expel large air pockets, then turn it onto a floured surface; roll or pat the dough into a rough rectangle about 12×6 inches, keeping thickness even.
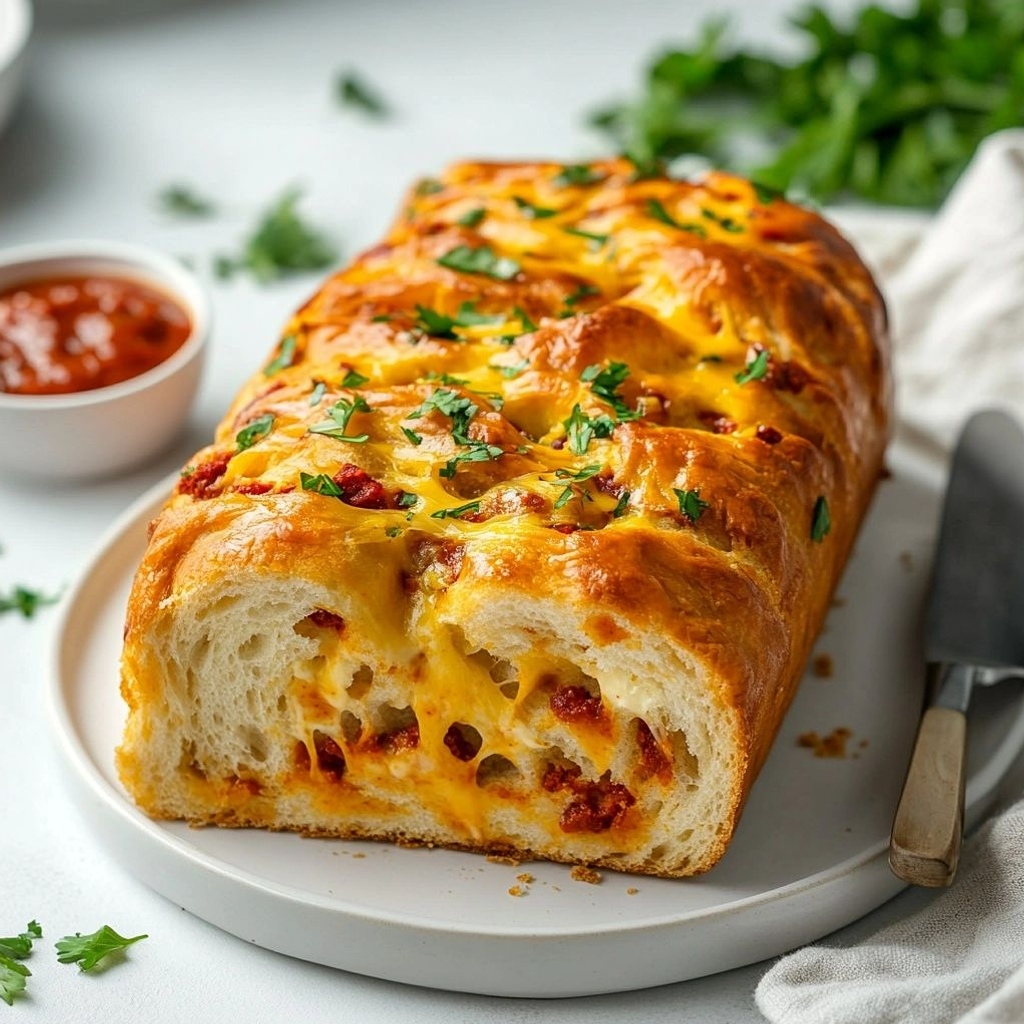
→ Gently deflating the dough reactivates yeast and redistributes gas for an even crumb; a uniform shape ensures even baking and a consistent crust. - Spread or drizzle the chili oil swirl over the dough, then sprinkle 1 cup shredded mozzarella or sharp cheddar over the surface; roll the dough tightly from the long edge to form a log, then seal the seam.
→ Layering cheese and oil creates a spicy, cheesy core with a glossy, flavorful crust as it bakes; rolling tight traps fillings for an appealing spiral. - Place the dough log seam-side down into the prepared loaf pan or arrange it into a round loaf on a parchment-lined sheet; cover loosely and let rise 25–40 minutes until risen by about 1 inch and the surface looks slightly domed.
→ A secondary rise develops more volume and a softer crust, while a domed top signals readiness for baking. - Brush the top with a light coat of olive oil or reserve a small amount of the chili oil infusion to brush just before baking for a glossy finish; this also helps with browning and flavor.
→ A thin oil layer promotes even browning and prevents the crust from drying out during baking. - Bake in the center of the oven for 25–35 minutes, rotating once halfway; test for doneness by tapping the loaf—an evenly hollow-sounding crust indicates doneness; if using a thermometer, target 190–200°F (88–93°C) in the center.
→ Proper bake time and internal temperature ensure a fully cooked crumb with a crisp crust without being dry or doughy. - Remove the loaf from the pan and transfer to a cooling rack; let rest for at least 20 minutes before slicing to allow the crumb to finish setting and the flavors to meld; cutting too early can cause a gummy crumb.
→ Resting ensures clean slices and a stable structure; hot bread tends to crumble and lacks clean separation between slices. - Optionally scatter 2 tablespoons chopped fresh parsley or scallions over the warm loaf after slicing for a bright herbal finish that contrasts with the chili heat; serve while still warm with dips or as a savory toast for game night.
→ Fresh herbs add color, aroma, and a refreshing contrast to the spicy loaf, enhancing overall flavor balance.
Notes
These quick chili bread muffins are a bold, savory bake that comes together fast for game night. The dough relies on a classic yeast base, with a spicy kick from chili flakes or fresh chiles and a garlicky aroma that pairs beautifully with melted cheese and fresh herbs. For a more rustic loaf, you can skip shaping into rolls and bake as a single savory loaf instead. The chili oil swirl adds a fragrant heat that you can intensify or reduce to taste.
Tips for best results: Use fresh active dry yeast and proof it in warm water with a touch of sugar to ensure it’s active before mixing with the dough. If you’re using instant yeast, you can mix it directly with the flour, reducing rise times accordingly. Dissolve salt in the water first to ensure even distribution. When introducing the chili oil swirl, warm the infused oil briefly to release the heat and aroma from the chili flakes, then swirl into the dough during shaping or brush over the surface prior to the final bake for a glossy, spicy finish.
Texture and crumb: The flour base provides structure and chew. If you prefer a lighter crumb, you can substitute part of the all-purpose flour with bread flour for a springier loaf. For a denser, heartier loaf, keep to all-purpose flour and knead a bit longer during the initial mixing. Chill the dough briefly after the first rise if you want easier shaping for rolls or a tighter crumb.
Flavor balance: Garlic, chili, and onion introduce savory depth; if you skip the onion, rely on the garlic and chili to carry the flavor profile. Fresh herbs added after baking give a bright finish, while adding them into the dough provides a subtler herbal note. For a stronger cheesy crust, use a cheddar-mozzarella blend; for a milder crust, stick to mozzarella.
Tips
- Proofing tips: If using active dry yeast, bloom it in a small amount of the warm water (from the 1 cup) with a pinch of sugar for 5–10 minutes until foamy. If it doesn’t foam, start over with fresh yeast—the dough won’t rise properly.
- Dough consistency: Start with 3 cups flour and the 1 cup water as written, then add flour in small increments if the dough is too sticky. The ideal dough should pass the “fold and stretch” test—stretch it gently until you can see a thin, translucent membrane without tearing.
- Kneading guidance: Knead by hand on a lightly floured surface for 8–10 minutes or until the dough is smooth, elastic, and springs back slightly when pressed. If using a stand mixer, mix on low for 6–7 minutes with a dough hook.
- Fermentation note: For a deeper flavor, let the dough rise once until doubled in size in a warm, draft-free spot (about 60–75 minutes). If your kitchen is cool, you can let it rise a second time after shaping to develop more flavor.
- Flavor layering: The chili oil swirl adds a punch; to maximize aroma, gently heat the olive oil with chili flakes for 1–2 minutes, then cool slightly before swirling into the dough or brushing on the surface.
- Garlic and onion integration: For a milder, even distribution of garlic, sauté the minced garlic (and onion, if using) in a teaspoon of oil until just fragrant, then cool before folding into the dough. Raw garlic can be sharper; cooking softens its bite.
- Cheese placement: For an even cheesy crust, sprinkle the cheese topping after the first rise and gently press into the dough before the final proof. If you want a more robust cheese crust, mix some cheese into the dough after the first rise.
- Herb timing: Fresh parsley or scallions add brightness. If you mix the herbs into the dough, do so after the initial knead cycle to avoid bruising their color; otherwise, sprinkle on top after shaping for a vibrant finish.
- Oil usage: Reserve a small amount of olive oil to brush the loaf before baking for a glossy crust. If you want a crunchier crust, brush with a touch of water and sprinkle with a tiny pinch of salt before baking.
- Shaping technique: After the first rise, roll or pat the dough into a rough rectangle, layer the chili oil swirl, herbs, and cheese as desired, then roll tightly and place seam-side down in a loaf pan or on a baking sheet for a rustic loaf.
- Baking tips: Preheat the oven to 375–400°F (190–200°C). Bake until the crust is golden and a tapped bottom sounds hollow, about 25–35 minutes depending on size. If the crust browns too quickly, tent with foil for the last 5–10 minutes.
- Make-ahead and storage: The loaf freezes well once cooled. Slice after freezing for easy game-night portions. Reheat slices in a 350°F (175°C) oven for 5–7 minutes to restore crust crispness.
FAQ
What is Quick Chilli Bread?
A savory quick bread infused with chili peppers, cheese, and herbs, designed to pair with game night dips and snacks. It’s fast to prepare and easy to customize.
How long does it take to make Quick Chilli Bread?
Approximately 40–45 minutes total: 10–15 minutes to mix, 25–30 minutes to bake, plus a few minutes to rest and slice.
What ingredients do I need?
Common ingredients include flour, baking powder, salt, milk or buttermilk, oil or melted butter, shredded cheese, chopped chilies (fresh or canned), and optional herbs like garlic, cumin, or paprika. Variations may add cornmeal for texture or sour cream for richness.
Can I make it spicy or mild?
Yes. For mild heat, use milder chilies or a small amount of chili flakes. For extra kick, add more chopped chilies or a pinch of cayenne. Adjust to taste.
Is this bread gluten-free?
This version is typically made with all-purpose flour. To make it gluten-free, substitute with a 1:1 gluten-free baking mix and check that other ingredients are gluten-free. Baking times may vary slightly.
What dips pair well with Quick Chilli Bread?
Great partners include sour cream and chive dip, garlic herb cream cheese, tomato salsa, bean dip, guacamole, or a smoky queso dip. The bread works well as a vehicle for dippable sauces.
Can I make this ahead and bake later?
Yes. Prepare the batter, cover, and refrigerate for up to 24 hours. Let it come to room temperature for about 20 minutes, then bake as directed. You can also bake it, cool, slice, and reheat in the oven.
What equipment do I need?
A loaf pan or mini loaf pans, mixing bowls, a whisk or spoon, a sharp knife for slicing, and an oven. Optional: parchment paper for easy removal, a mixer if you prefer.
How should I store leftovers?
Store cooled slices in an airtight container at room temperature for 1–2 days, or refrigerate for up to 4 days. Freeze slices for longer storage; reheat in the oven or toaster oven.
Are there any kid-friendly or vegetarian adaptations?
Yes. Use mild chilies or omit them for a milder, kid-friendly bread. Use vegetarian cheese and ensure any toppings or dips also align with your dietary needs. You can also add corn, bell peppers, or shredded zucchini for extra texture.