Introduction / Hook
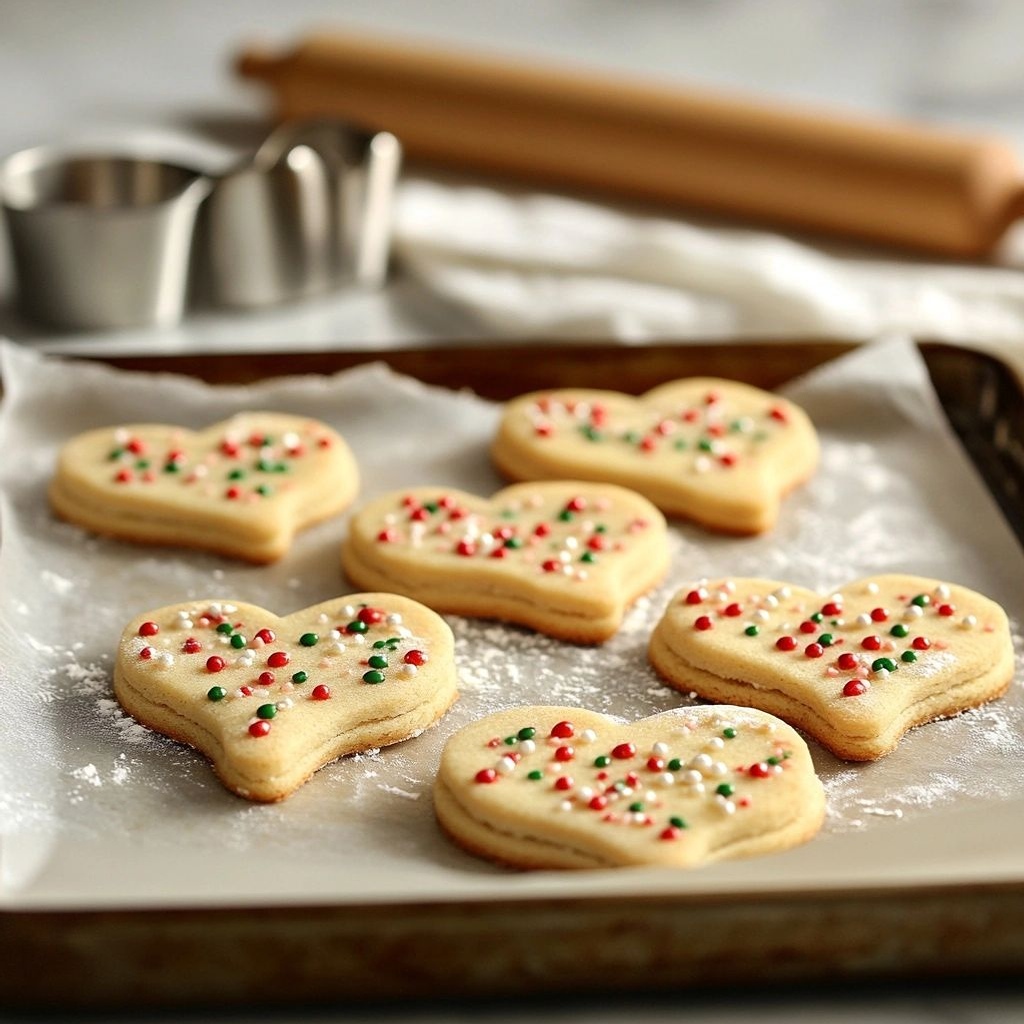
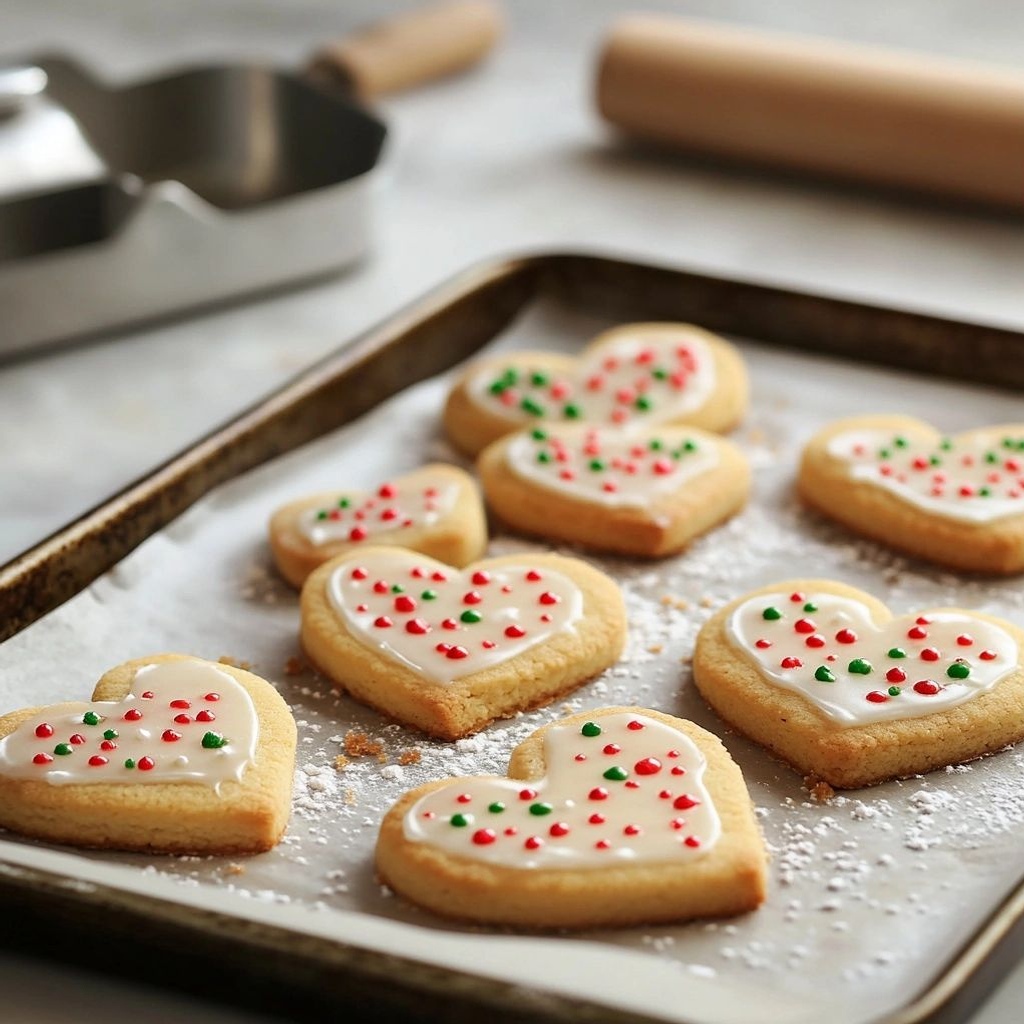
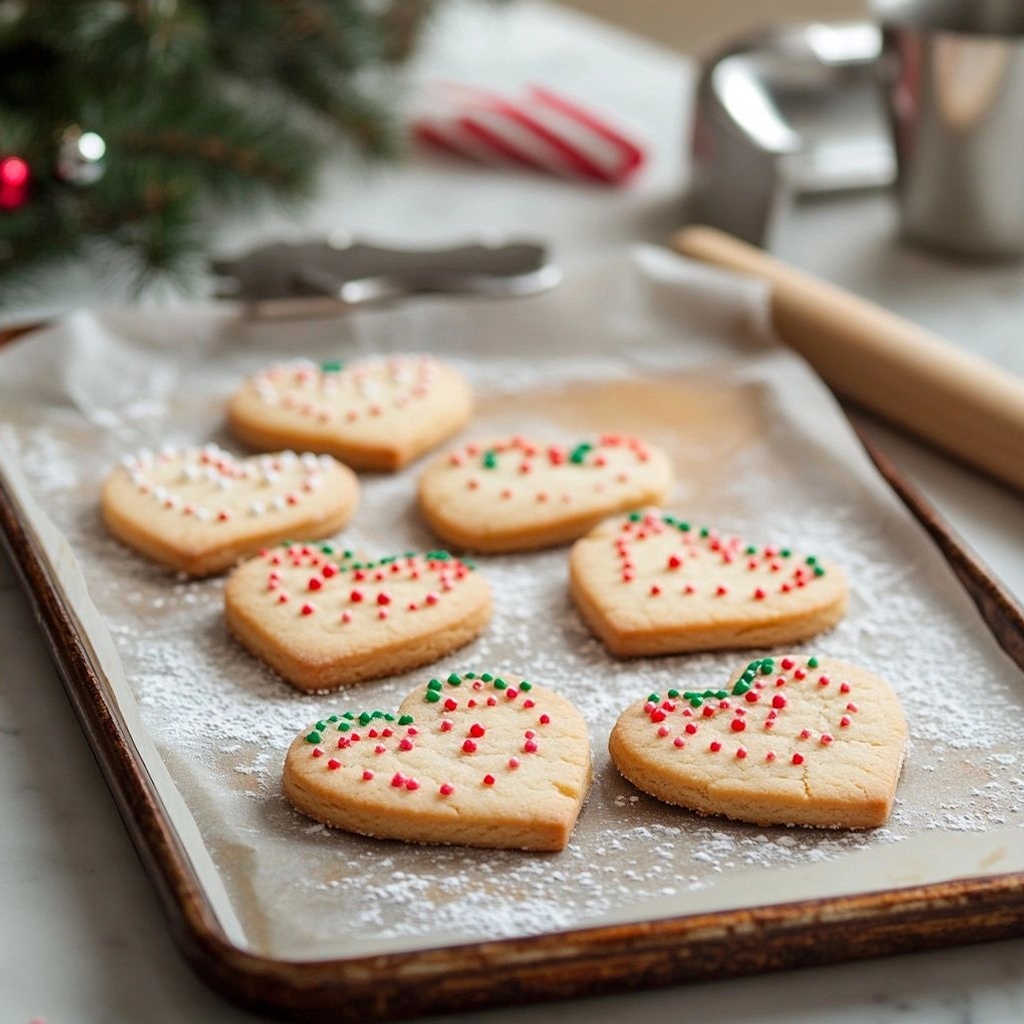
Imagine a tray of cookies that captures the spirit of celebrations with every bite: crisp edges, a soft, buttery center, and little heart-shaped windows of color that shimmer as the light catches them. Festive Slice and Bake Heart Cookies are not just treats; they’re an invitation to savor the joy of the season, to slow down for a moment and share something handmade with your favorite people. The moment you slice into that perfectly chilled log, you hear the satisfying sigh of butter and sugar meeting in a gentle embrace. The aroma wafts through the kitchen—warm vanilla, a hint of citrus, and a whisper of almond—promising a comforting, nostalgic experience that feels both timeless and fresh. These cookies are designed to be effortless enough for a busy holiday week, yet elegant enough to grace a cookie tray at a party, a family gathering, or a thoughtful gift exchange. The color palette is versatile: pale honey, delicate pinks, and crisp, snowy whites that glow against a plate or a ribbon-tied tin. You’ll see the appeal at first glance and then taste the magic with your first bite. The slice-and-bake method is a gift in itself—no rolling or cutting in a flour-dusted frenzy; just shape, chill, slice, bake, and enjoy. In a world of hurried bites and disposable sweets, these heart-shaped treasures offer a pause, a memory, and a little bit of edible sunshine.
The Story Behind the Dish
Heart-shaped confections have a long, storied history in many cultures, where love, friendship, and family bonds are expressed through pastry and sweet indulgence. The act of shaping dough into a heart is a timeless gesture—an edible badge of affection that travels across holidays and seasons. Slice-and-bake cookies themselves entered the baking lexicon as a practical, reliable method for producing uniform cookies without extensive rolling and cutting. The “slice” technique preserves the integrity of a soft, tender crumb while allowing maximum control over thickness, bake time, and texture. The addition of a festive twist—colored layers, subtle citrus zest, or delicate sugar halos—transforms a classic into a celebration-ready indulgence. This recipe is inspired by gatherings of friends and families who gather around a warm oven, exchanging stories as the dough rests in the fridge, waiting to be sliced into little hearts that will soon be shared with smiles and the clink of glassware. The heritage is not just about tradition; it’s about modern convenience meeting old-fashioned comfort, a bridge between the hand-crafted charm of yesteryear and the time-saving realities of today.
Why You’ll Love This Recipe
- Effortless elegance: A simple slice-and-bake method yields perfectly even cookies with minimal effort.
- Versatile holiday look: Heart shapes, subtle color accents, and a gentle sheen make them suitable for Valentine’s Day, Christmas, anniversaries, or just a sweet weekend treat.
- Uniform bake, consistent texture: Chilled logs guarantee even thickness, producing cookies with a tender crumb and a satisfying snap at the edges.
- Customizable flavors: The base dough acts as a canvas for citrus zests, almond, vanilla, or a hint of cinnamon—adaptable to your mood and pantry.
- Gift-ready appeal: Slice-and-bake cookies are perfect for tins, boxes, and gift baskets—beautiful, practical, and delicious.
- Make-ahead friendly: You can prepare the dough in advance, freeze the logs, and bake later for a fresh-from-the-oven experience on demand.
Flavor Profile & Texture
The flavor is a delicate harmony of butter, vanilla, and a whisper of sweetness that melts into the palate. A touch of citrus zest—often lemon or orange—adds brightness without overpowering the creamy base, leaving a clean, comforting aftertaste. If you choose to incorporate almond extract, it introduces a soft, nutty depth that warmly lingers, pairing beautifully with a white chocolate drizzle or a pink-hued icing. The texture is where these cookies truly shine: the slices emerge with a pale, honeyed edge that gives way to a tender, crumbly center, almost pastry-like in its tenderness. They have enough structure to hold their heart shape when sliced, yet they’re delicate enough to crumble upon the first bite, inviting you to savor slowly. A gentle dusting of superfine sugar can give a subtle sparkle, while a light glaze adds a glossy finish that catches the light and elevates the overall appearance. The mouthfeel is balanced—the cookies are not too crumbly, not too dense; they offer a comforting bite that invites you to come back for another. In terms of aroma, think warm vanilla intertwined with a citrusy lift, perhaps a hint of almond, and a soft note of caramel from the sugar as it bakes. This combination makes them instantly comforting and sophisticated at once.
Occasions & Pairings
These Festive Slice and Bake Heart Cookies shine in a variety of settings, from intimate family moments to large holiday gatherings. Consider them for:
- Valentine’s Day celebrations and love-themed gatherings.
- Christmas cookie plates and winter fare, where the heart motif complements seasonal colors.
- Bridal showers or engagement parties, as chic, approachable bite-sized sweets.
- Birthday parties when you want a heart-shaped, shareable treat that feels homemade yet polished.
- Afternoon tea or coffee gatherings, offering a gentle sweetness to pair with a hot beverage.
Pairings to consider for a well-rounded serving experience:
- Bevies: A cup of hot tea (English breakfast, Earl Grey) or a salted caramel latte complements the butter-rich profile. For a festive twist, serve with sparkling rosé or a dessert wine.
- Other sweets: A light fruit-forward compote or a dollop of vanilla bean yogurt can balance the sweetness. A small plate of dark chocolate shards or a light citrus curd may also pair nicely.
- Side bites: Fresh fruit slices (strawberries, raspberries) add brightness, while a handful of roasted nuts introduces textural contrast.
Tips, Variations & Substitutions
Customizing these cookies is part of the fun. Here are ideas to tailor the dough to different preferences, dietary needs, or seasonal flavors:
- Flavor boosters: Add 1–2 teaspoons of citrus zest (lemon or orange) to the dough for a fresh lift. A pinch of cinnamon or cardamom can add warmth for winter months. If you love almond, 1/2 teaspoon almond extract pairs beautifully with vanilla.
- Color twists: Divide the dough and tint one portion with a drop of red or pink food coloring for a festive heart duo. You can also swirl two colors by shaping the dough into a log with contrasting layers before chilling.
- Vegan option: Use a plant-based butter substitute and an aquafaba or flaxseed egg replacer. Ensure the substitute has a similar fat content to maintain texture, and consider adding a bit more moisture (a teaspoon of dairy-free milk) if the dough feels dry.
- Gluten-free option: Swap all-purpose flour for a 1:1 gluten-free baking flour blend that contains xanthan gum. The texture may be a touch crisper but will still deliver a tender bite when properly chilled.
- Nut-free version: Use a dairy-based butter substitute that’s free of nut oils if there are allergies; skip any almond extract or use vanilla as the sole flavor.
- Filled variation: Once sliced, you can press a tiny dot of jam or a few white chocolate chips into the centers of some cookies for a delightful surprise when you bite in.
- Texture play: For a crisper edge, bake on a parchment-lined sheet at the higher end of the recommended temperature and watch closely near the end of bake time. For a softer center, reduce bake time slightly.
- Decorative finish: A light glaze or a dusting of pearl sugar can add sparkle. If using a glaze, drizzle lightly so the cookies maintain their elegant shape and don’t become soggy.
Storage & Make-Ahead Ideas
The beauty of slice-and-bake cookies is their make-ahead convenience. Here are strategies to keep them fresh and ready to bake:
- Refrigeration: After shaping the dough into two or more logs, wrap tightly in plastic wrap and refrigerate up to 3 days. The logs should be firm and well wrapped to avoid drying out.
- Freezing: Freeze unbaked logs for up to 1 month. Slice the logs directly from the freezer into preheated oven, adding a minute or two to the bake time. You can also freeze fully baked cookies in an airtight container for up to 2 months; rewarm gently in a low oven to refresh texture.
- Make-ahead glaze: If you plan to glaze later, bake the cookies first, cool completely, then store in an airtight container. Prepare the glaze separately and drizzle just before serving for best texture and shine.
- Portioning: If you love the idea of a ready-to-bake treat, portion the dough into two logs and freeze. This allows you to bake a handful at a time for fresh cookies whenever you crave them without thawing the entire batch.
Storage & Make-Ahead Ideas
Note: The section above provides storage and make-ahead guidance. Here’s a concise recap to ensure you maximize freshness and texture:
- Fresh baked cookies: Store in an airtight container at room temperature for up to 5 days. Place parchment between layers to prevent sticking and maintain the delicate texture.
- Freezing dough: Wrap logs tightly in plastic wrap and foil; freeze up to 1 month. Thaw briefly in the fridge before slicing for even thickness.
- Freezing baked cookies: Layer in a tin with parchment and seal. Freeze up to 2 months. Rewarm in a low oven to restore softness and shine of any glaze.
Fun Facts & Trivia (Optional)
Did you know that heart-shaped cookies have ancient roots that echo across many cultures? Heart motifs are often associated with love, fertility, and good fortune, appearing in decorative cookies and pastries from European Christmas markets to Middle Eastern confections. The slice-and-bake technique gained popularity as a practical solution in bustling households where time was precious but a homemade touch was still desired. The science behind chilling dough before baking is simple but powerful: it solidifies fat, prevents excessive spreading, and helps preserve defined shapes. Chill time is where flavor and texture meetings take place—air is expelled, fats firm up, and the dough becomes easier to handle, which is essential when working with delicate heart shapes that rely on clean, crisp edges. In the realm of holiday baking, these cookies offer a gentle reminder that you don’t need to be a master pastry chef to create something beautiful and delicious. Sometimes the simplest methods yield the most memorable moments, especially when the end result is a tray of heart cookies that makes the room feel warmer with every bite.
Final Thoughts & How to Enjoy
Festive Slice and Bake Heart Cookies are more than a dessert; they’re a storytelling vehicle. They carry messages of love, care, and celebration, wrapped in a cookie that echoes the comfort of home. With the freedom to customize flavors, colors, and textures, you can tailor these cookies to reflect your personality or the occasion you’re celebrating. They’re an invitation to slow down, savor the process, and share something sweet with the people who matter most. Whether you’re preparing a quiet weekend treat for loved ones or assembling a lavish cookie platter for a big gathering, these heart-shaped delights are sure to spark smiles, warm conversations, and a sense of generosity. Enjoy the process as much as the result, and let the aroma guide you from the kitchen to the heart of your celebration.
Ingredients
- Cookie Dough Base
→ All-purpose flour provides the structure for the cookies. Measure and whisk with a pinch of salt to distribute evenly. For slice-and-bake cookies, a lightly scooped cup of flour yields a tender yet sturdy dough that holds shapes well after chilling. - Unsalted butter, softened to room temperature (1 cup/226 g)
→ Butter binds the dough and imparts rich flavor and a tender texture. Use unsalted so you can control the salt level. Soften completely, not melted, to ensure even creaming with sugars and uniform dough.) - Granulated sugar (3/4 cup/150 g)
→ Sugar creaming with butter creates air pockets for a slightly tender crumb and helps cookies hold their shape. Ensure the butter is soft and beat until light and fluffy for best texture. - Light brown sugar (1/4 cup/55 g, packed)
→ Adds moisture, a subtle molasses warmth, and a chewier edge. Pack lightly and blend in with the creamed butter to avoid gritty texture. - Large egg (1)
→ Binds the dough together and adds structure. For best results, use a room-temperature egg to blend smoothly with butter and sugars, avoiding cracks in the dough. - Pure vanilla extract (1 teaspoon)
→ Provides classic sweetness and aroma. For a toasted, deeper flavor, use a high-quality vanilla and consider a small amount of vanilla bean paste for specks of bean and intensified flavor. - Salt (1/4 teaspoon)
→ Balances sweetness and enhances the cookie flavor. If using salted butter, reduce salt to avoid oversalting; otherwise keep as listed. - Baking powder (1/2 teaspoon)
→ Aids slight lift for a softer slice-and-bake cookie. Do not skip; it helps the cookies maintain shape and prevents dense centers. - Optional Aromas
→ Almond extract (1/2 teaspoon) can be added in place of part of the vanilla for a nutty note. Use sparingly if you are pairing with fruity fillings to avoid overpowering flavors. - Filled Heart Center (Jam or Preserves)
→ A fruit filling in the center creates a pretty, festive heart when sliced. Use seedless raspberry, strawberry, or your favorite jam. If using chunky preserves, warm slightly and strain out large fruit pieces to ensure a smooth, even filling that doesn’t leak when baked. Prepare by rolling dough, cutting heart shapes, and leaving a small hollow around the center to hold the jam. - Filling Technique Add-on (Powdered Sugar Dusting)
→ A light dusting of powdered sugar can be used after baking for a snowy, festive look. Keep a small sieve handy and dust just before serving to prevent moisture drawing from the cookies into the sugar. - Icing or Glaze (Optional)
→ Royal icing or a simple glaze to decorate hearts. Royal icing components include powdered sugar, meringue powder or egg white, and lemon juice. This icing hardens to hold decorations for gifting. Prepare just before decorating; if making ahead, cover tightly to prevent drying out. - Royal Icing Base
→ Powdered sugar (2 cups/240 g) acts as the base. Meringue powder (1 teaspoon) or egg white (1 large, pasteurized) provides stability and gloss. Liquid (1–2 tablespoons) such as lemon juice or water adjusts consistency for piping or flooding. For vivid colors, use gel food coloring and mix in small batches to avoid thinning the icing too much. - Decorative Sprinkles or Colored Sugar (optional)
→ For festive hearts, use nonpareils, sprinkles, or edible glitter. Add after the glaze sets or while slightly tacky to ensure adherence. If using sugar crystals, press gently so they don’t crumble when slicing.
Instructions
- In a medium bowl, whisk the all-purpose flour with the pinch of salt and baking powder until evenly combined to ensure the leavening and salt are distributed, then set aside so the dough lands with a uniform texture when mixed.
→ Sifted flour lightens the dough and the salt and baking powder must be evenly distributed to prevent uneven spreading or crumbly centers during chilling and baking. - In a large mixing bowl, beat the unsalted butter at medium speed until creamy and pale, about 2 minutes, to create a smooth base for sugar incorporation that yields a tender crumb.
→ Proper creaming emulsifies fat and air, yielding a light, sliceable texture as the cookies bake. - Add granulated sugar to the butter and continue beating on medium-high until the mixture is light, fluffy, and pale, 3 to 4 minutes, to develop air pockets that help cookies hold their shape.
→ Thorough creaming prevents dense centers and promotes even texture throughout the cookie. - Beat in the light brown sugar until fully incorporated and the mixture is uniform and glossy, about 1 minute, to introduce moisture and a chewy edge that enhances flavor complexity.
→ Brown sugar adds moisture and a gentle molasses note; beating ensures even distribution before the egg is added. - Beat in the large egg and pure vanilla extract until the batter is smooth and cohesive, 1 to 2 minutes, to bind the mixture and carry flavor evenly through the dough.
→ Room-temperature egg blends more smoothly with fats, preventing streaks and ensuring a uniform dough. - Sprinkle the salt over the batter and mix on low speed just until combined, then scrape the bowl to ensure there are no pockets of salt or dry flour, about 20 seconds.
→ Even salt distribution sharpens the cookie’s flavor without over-salting any single bite. - Add the baking powder and mix on low speed until just incorporated, ensuring the dough gains a light lift without becoming airy, 15 to 20 seconds.
→ A gentle lift helps the cookies hold their shape during slicing and baking while remaining tender. - Stir in the flour mixture on low speed in two additions until a cohesive dough forms, then divide the dough into two equal disks, wrap, and chill for at least 1 hour or up to 3 days to firm the dough for clean slicing and precise heart shapes.
→ Chilling relaxes the gluten, making the dough easier to roll and reducing spread during baking; chilling in disks makes handling easier and faster. - Roll one chilled disk on a lightly floured surface to a 1/4-inch (6 mm) thickness, rotating the dough occasionally to prevent sticking, and use a heart-shaped cookie cutter to cut evenly sized hearts, placing them on a parchment-lined sheet. Leave a shallow depression in the center of each heart by pressing gently with the end of a small spoon or your fingertip to create a cavity for the jam.
→ Uniform thickness ensures even baking; the center cavity accommodates jam without overflow, and parchment prevents sticking for clean release. - Re-roll any remaining dough scraps and cut additional hearts, rechecking that the centers remain hollowed, then chill the cut cookies on the sheet for 15 minutes to firm the shape before baking.
→ Re-chilling after cutting minimizes spreading in the oven and preserves the heart shapes for a clear final presentation. - Preheat the oven to 350°F (175°C) and bake the dough for 10 to 12 minutes, rotating the sheets halfway through to ensure even browning, until the edges are just set and the centers remain pale; remove from oven when lightly golden.
→ Proper oven temperature and rotational baking promote uniform coloration and prevent centers from becoming hard or overbaked. - Allow the cookies to cool on the baking sheet for 5 minutes, then transfer to a wire rack to cool completely before filling, to prevent jam from seeping and to set the cookie structure for handling.
→ Cooling stabilizes the cookies so that the jam filling adheres without tearing the surface and makes them safe to handle and decorate. - Warm your preferred jam or preserves slightly if needed and spoon a small amount into the hollow center of each cooled heart, then press a companion heart or seal with a thin layer of dough if desired; chill briefly to set the filling before decorating.
→ Gentle warming ensures smooth filling that adheres without leaking, and a brief chill helps set the jam for clean slicing later. - Dust a light veil of powdered sugar over the filled centers, using a fine sieve just before serving to create a snowy, festive look while keeping the sugar from drawing moisture from the cookies; store in an airtight container if not serving immediately.
→ Powdered sugar adds visual appeal and a touch of sweetness without overwhelming the cookies; timing matters to avoid moisture-related clumping. - If decorating is desired, prepare royal icing by whisking together powdered sugar, meringue powder or pasteurized egg white, and lemon juice to a thick yet pipeable consistency, then tint with gel colors and pipe or flood onto the cooled cookies; allow to set completely before stacking or gifting.
→ Royal icing provides a hard, glossy finish that preserves decorations during handling and gifting, and proper consistency ensures clean lines without runny edges. - Finish with optional decorative sprinkles or edible accents while the glaze is still tacky, pressing gently to help adherence and avoiding overloading to prevent tipping the cookie centers; allow the icing and decorations to harden fully before packaging.
→ Adhering decorations at the right moment ensures they stay in place during storage and gifting, while allowing the glaze to set yields a durable finish.
Notes
These festive slice-and-bake heart cookies are best when the dough is thoroughly chilled and the centers are properly filled so they hold their shape after baking. Start by preparing a sturdy dough base, ensuring the butter is soft but not melted; cream butter with sugars until light and fluffy to trap air for a tender crumb. Chill the dough after shaping into a long log for slicing cleanly into even hearts. Roll the dough evenly to about 1/4 inch thickness to ensure uniform bake and clean heart shapes. When adding the jam center, create a shallow hollow in each heart to prevent leaking; use seedless jam or blend jam until smooth if chunky, then fill and chill briefly before baking to help the jam set. Bake until edges are lightly golden; avoid overbaking to keep centers soft. After baking, dust with powdered sugar or drizzle icing or royal icing once cookies are cool for a festive touch. Royal icing dries hard and is perfect for gifting; prepare icing base with powdered sugar and a small amount of meringue powder or pasteurized egg white and lemon juice, coloring with gel food colors as desired. To decorate, pipe details or flood with glaze, then decorate with sprinkles or edible glitter while icing is just set. Store cookies in an airtight container at room temperature for up to a week or freeze baked cookies for longer storage. For easier slicing, chill the dough log between steps and use a sharp knife wiped clean between cuts. If you want a nutty aroma, add a pinch of almond extract with the vanilla. Always ensure your ingredients are fresh and use high-quality vanilla for best aroma.
Tips
FAQ
What are Festive Slice and Bake Heart Cookies?
They are buttery sugar cookies shaped like hearts, baked in slices from a log of rolled dough. They’re perfect for holiday gifting and decor, featuring crisp edges and a soft center.
What ingredients do I need?
Common dough: butter, granulated sugar, eggs, vanilla extract, all-purpose flour, baking powder, a pinch of salt. Optional: almond extract, red or green food coloring, and instructions for dairy-free or gluten-free variants.
Do I need to chill the dough before slicing?
Yes. Roll the dough into a log, wrap tightly, and chill for at least 2 hours or up to 3 days. Chilling ensures clean slices and helps maintain the heart shapes during baking.
How should I slice and bake the cookies?
Slice the log into evenly thick rounds (about 1/4 inch/0.6 cm). Place on a parchment-lined sheet, leaving space between cookies. Bake at the recommended temperature until the edges are light golden, about 9–12 minutes depending on thickness.
How do I know when they’re done?
Edges should be set and very lightly golden. Centers may still look pale but spring back slightly to the touch. Do not overbake to keep them tender.
Can I make gluten-free or dairy-free versions?
Yes. For gluten-free, use a 1:1 gluten-free all-purpose flour blend plus a touch more flour if the dough is too soft. For dairy-free, substitute dairy-free butter or margarine and a dairy-free milk if needed for consistency. Some flavors may vary slightly.
How should I store the cookies?
Store baked cookies in an airtight container at room temperature for up to 5 days. For longer storage, freeze baked cookies for up to 2–3 months. You can also freeze the rolled dough log for up to 1 month.
Can I decorate the cookies with frosting or sprinkles?
Absolutely. Once cooled, you can frost with royal icing, buttercream, or a powdered sugar glaze. Add festive sprinkles or edible glitter before the icing sets for a decorator look.
Why did my dough crack while slicing or bake unevenly?
Cracking can happen if the dough isn’t well chilled or if it’s too dry. If so, gently reroll a small portion with a touch of cold water or milk substitute. Uneven bake can result from uneven dough thickness—aim for uniform slices and rotate the baking sheet halfway through.
Variations for festive flavors?
Add 1/2 teaspoon of almond extract or lemon zest for a brighter flavor. Fold in colorful candy bits, chopped nuts, or a pinch of cinnamon for a warm holiday profile. You can also tint portions of the dough with red or green food coloring for a heart-ornament look.