Introduction / Hook
Imagine pulling a warm loaf from the oven, its crust just barely crackling as you slice into it, revealing a soft, honey-colored interior that smells like mornings and quiet kitchens. This is the experience of an 8-ingredient whole wheat bread crafted for sandwiches—simple, honest, and deeply comforting. Every bite carries the wholesome sweetness of whole grains balanced with a touch of tangy depth, a result of careful fermentation and a gentle hand that respects the natural character of each ingredient. No need to fuss with complicated techniques or a long list of groceries; this bread proves that delicious, bakery-worthy slices can emerge from a well-chosen handful of staples. It’s the kind of loaf that becomes a reliable canvas for your favorite fillings—turkey and cranberry, avocado and feta, hummus and roasted vegetables—while preserving the heartbeat of homemade bread: warmth, aroma, and the comforting pull of a crust that gives way to a tender crumb.
The Story Behind the Dish
Whole wheat bread has a storied lineage across many kitchens around the world, a humble staple that traveled from ancient grains to modern pantries with countless variations. The philosophy behind an eight-ingredient formula is a nod to both tradition and practicality: preserve the essence of bread-making—flour, water, salt, a leavening agent, and a minor handful of flavor-enhancers—while removing the guesswork and complexity that can overwhelm a busy cook. This particular rendition honors the balance between the rustic charm of whole wheat and the modern demand for a loaf that slices neatly for everyday sandwiches. The origin story here is less about a specific region and more about a shared kitchen truth: great bread starts with good flour, attentive hydration, and patience. In many homes, the ritual of kneading, resting, and shaping is a quiet act of love, a small daily ceremony that marks the transition from raw ingredients to something cozy, edible, and nourishing. This loaf embodies that spirit—an accessible, reliable bread that brings the comfort of a homemade meal to lunches, picnics, and weeknight dinners alike.
Why You’ll Love This Recipe
- Simple, practical ingredient list: eight components that are easy to find and store, without sacrificing flavor or texture.
- Versatile for sandwiches: sturdy enough to hold a thick layer of fillings, yet soft enough to bite through with ease.
- Balanced nutrition: whole wheat provides fiber and a nutty aroma, while the other elements contribute gentle lift and tenderness.
- Reliable texture: a chewy crust with a moist, airy crumb that stays fresh for days.
- Beginner-friendly or seasoned baker accessible: approachable techniques that yield professional results without long processes.
- Customizable flavor within reach: a base that welcomes gentle sweetness, a whisper of tang, or a hint of nutty depth depending on your pantry.
- Great for make-ahead planning: bake once, enjoy multiple days of sandwiches or toasts, with minimal daily effort.
Flavor Profile & Texture
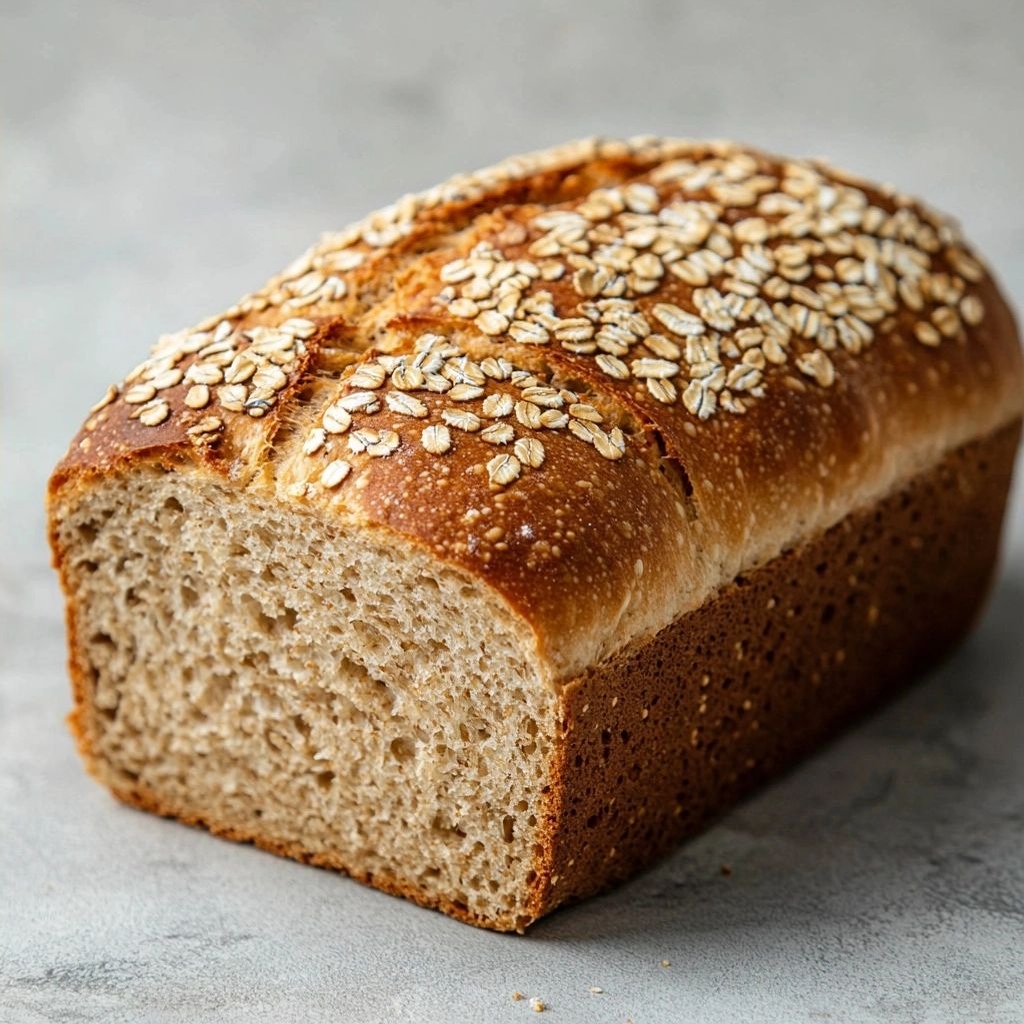
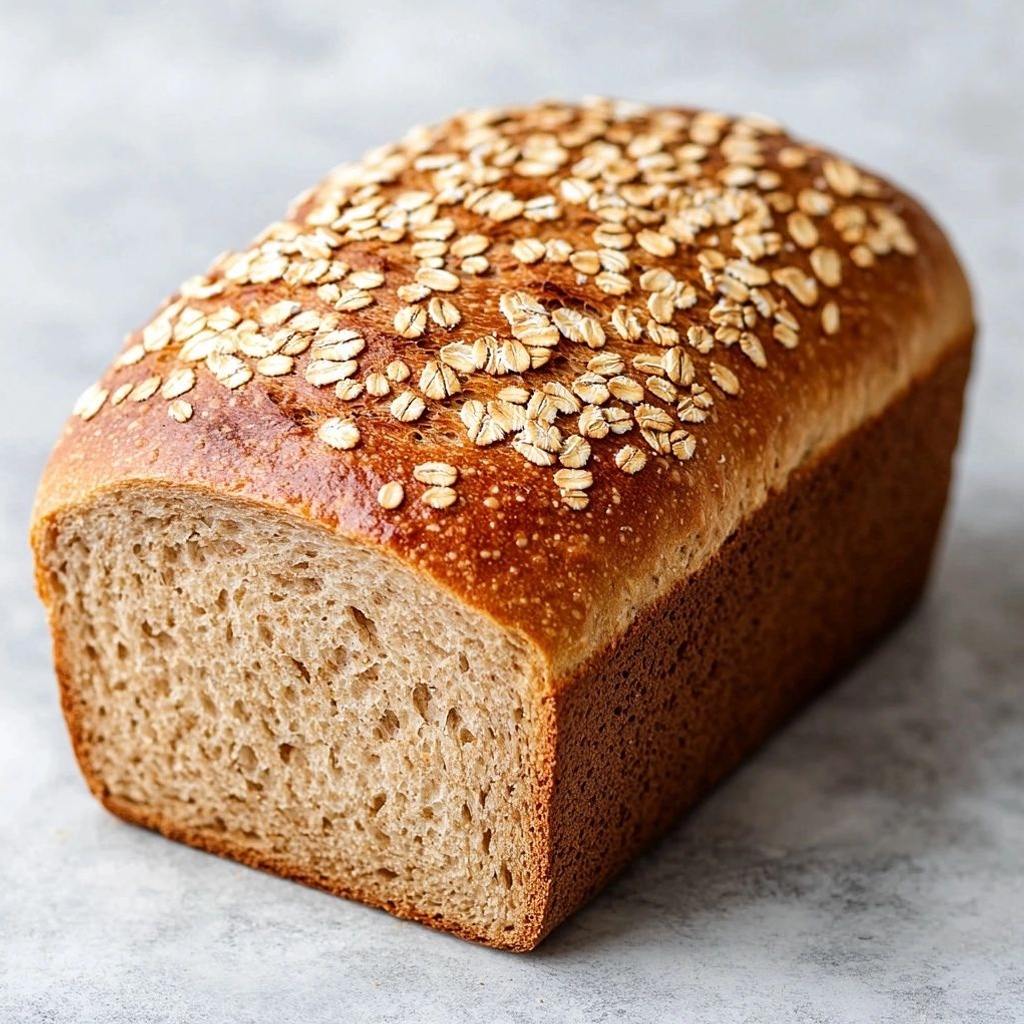
This loaf presents a nuanced spectrum of flavor that makes it ideal for a wide range of fillings. The whole wheat provides a hearty, earthy backbone with subtle sweetness that recalls wheat fields at golden hour. A gentle tang from fermentation and salt heightens the grain’s natural notes, while a dough that is carefully hydrated yields a crumb that feels substantial yet soft—an inviting balance between structure and tenderness. The crust—thin to crisp with a delicate crackle—gives way to a crumb that carries a faint, nutty aroma, a touch of sweetness, and a whisper of maltiness from the wheat. When toasted, the crust deepens in flavor, releasing a faint caramelized edge that harmonizes beautifully with both savory and sweet toppings. The overall texture remains reliably even, with a comforting chew that makes every bite satisfying without being dense. It’s the kind of bread that makes simple sandwiches feel special, as if each slice were a little culinary celebration without being fussy.
Occasions & Pairings
This 8-ingredient whole wheat loaf shines in a variety of settings. On weeknights, it forms the sturdy foundation for quick turkey and avocado lunches or a comforting grilled cheese that melts into the crumb. It also holds its own during weekend gatherings, where slices can be piled with roasted vegetables, a brush of olive oil, and a couple of slices of cheese for a rustic crostini-like treat. For picnics, the bread’s sturdy crumb travels well and pairs nicely with cold cuts, hummus, or a simple tomato-basil topping. It’s also a natural star for breakfast or brunch—the freedom to spread cream cheese, honey, or almond butter across warm slices makes it a versatile morning staple.
Suggested pairings include: a fresh-topped tuna salad with crisp lettuce, slices of ripe tomato, and a sprinkle of lemon zest; roasted chicken with a smear of aioli and peppery arugula; or roasted vegetables glazed with balsamic and wrapped in a soft fold of bread. For drinks, consider a light, citrusy tea or a mellow coffee that complements the bread’s grain-forward profile. Desserts can even find a home here, when you drizzle a little honey or top with seasonal fruit for a quick, open-faced treat.
Tips, Variations & Substitutions
Think of this loaf as a flexible template rather than a rigid prescription. Here are ways to tailor it to your preferences, dietary needs, or pantry availability:
- Hydration and texture: If your dough feels too dry, add a touch more water a teaspoon at a time. If it’s overly sticky, give it a longer rest or a brief, gentle knead to bring it together.
- Fermentation approach: A longer fermentation at a cool temperature can develop deeper flavor and a more open crumb, while a quicker rise at room temperature yields a milder profile. Adjust timing based on your kitchen’s warmth and your schedule.
- Flavor boosters: A pinch of molasses or honey can accentuate the natural sweetness of the wheat, while a dash of malt powder (if available) can contribute a subtle malty note that deepens the loaf’s aroma.
- Texture tweaks for different needs: For a lighter, airier crumb, you can slightly increase hydration or reduce the final shaping time; for a denser loaf, reduce hydration a touch and give the dough a longer rest after shaping.
- Gluten-free adaptation: While this exact eight-ingredient approach is designed for wheat, you can experiment with a gluten-free flour blend that’s optimized for bread; expect a different crumb character and adjust hydration accordingly.
- Vegan and dairy-free considerations: The base concept works with plant-based milks and a dairy-free fat or oil, but keep an eye on hydration and dough handling, as plant milks can impact gluten development.
- Regional twists: Swap in local grains or add a small portion of rye to introduce a rye-forward flavor, or incorporate seeds (pumpkin, sunflower, sesame) into the dough mixture or as a topping for extra texture.
Storage & Make-Ahead Ideas
Proper storage can extend the life of flavor and texture so that your bread remains delicious for days. After cooling completely, wrap the loaf tightly in parchment or plastic wrap, then seal in a plastic bag to minimize drying. You can keep it at room temperature for up to four days, or refrigerate for longer shelf life, though refrigeration can slightly dry the crumb. For longer-term storage, slicing and freezing works beautifully. Freeze individual portions or the entire loaf, wrapped well to prevent freezer burn. To rewarm, you can toast slices or warm a whole loaf in a low oven until the crust regains a bit of crispness and the crumb softens. If you’ve stored leftovers in the fridge, reheat in a quick, gentle fashion to restore moisture and aroma. A simple trick: brush a light layer of water on the crust and re-crisp in a hot oven for a few minutes to revive that freshly-baked texture.
Make-ahead strategies include starting the dough a day ahead and using a bulk fermentation approach that deepens flavor, then shaping and baking the next day. For busy weeks, you can portion the dough into individual balls, refrigerate them, and bake as-needed. The eight-ingredient framework lends itself to these flexible rhythms, letting you enjoy home-baked bread without the last-minute rush.
Fun Facts & Trivia (Optional)
Did you know that the art of bread-making has been an anchor of human civilization for thousands of years? From ancient grains ground into flour to water and salt meeting yeast or sourdough cultures, bread has always been a symbol of nourishment and shared meals. Whole wheat bread, in particular, is celebrated for its earthy aroma and hearty bite, reminding bakers of seasonal grains and rustic kitchens. The specific concept of an eight-ingredient bread honors minimalism without sacrificing depth—the idea that the simplest combination of ingredients, treated with care, can yield something extraordinary. In many cultures, bread is not just food but a cultural touchstone—a staple that carries family memories, gatherings, and everyday rituals. This loaf embodies that spirit: a modern, approachable version of a timeless classic that respects tradition while embracing contemporary practicality.
Closing Thoughts
As you prepare to bake this eight-ingredient whole wheat bread, savor the anticipation as the kitchen fills with the familiar, comforting scent of freshly baked bread. The process is approachable enough for weekend bakers and rewarding enough for weeknights when you crave something inherently satisfying. Its balance of wholesome grains, gentle tang, and tender crumb creates a versatile platform for countless sandwich combinations, from crisp veggie stacks to lean proteins and a buttery spread. Whether you’re feeding a hungry family, packing lunches for coworkers, or simply treating yourself to a quiet moment with a warm slice in hand, this bread offers dependable flavor and texture that elevate everyday meals into small, delicious celebrations. With every loaf you bake, you’re not just making food—you’re crafting a little piece of home that travels with you through lunches, picnics, and shared bites, a reminder that sometimes the simplest recipes are the ones that endure.”
Ingredients
-
Whole wheat flour (2 1/2 cups)
→ The backbone of the bread, providing structure and a hearty, nutty flavor. Whole wheat flour absorbs more water than white flour, so measure accurately and consider a slightly longer knead. Sift or whisk to evenly distribute bran and germ, ensuring a lighter crumb. For a softer loaf, you can substitute up to 1/2 cup with white whole wheat or all-purpose flour, but this will reduce the bran goodness and whole-grain intensity. -
Warm water (1 cup)
→ Activates the yeast and helps hydrate the flour for dough development. Water should be warm to the touch (about 105–110°F / 40–43°C). Too hot will kill the yeast, too cool will slow rising. If your kitchen is cool, you may add a touch more warmth by briefly warming the liquid or letting the dough rise in a warm spot. -
Active dry yeast (2 1/4 teaspoons, one packet)
→ The leavening agent that makes the dough rise and develop air pockets for a light loaf. To ensure reliable rise, gently proof the yeast in the warm water with a pinch of sugar for 5–10 minutes until foamy. If not foamy, replace with fresh yeast. Uniformly distribute by whisking into the flour before mixing to avoid clumps. -
Honey (2 tablespoons)
→ Provides gentle sweetness and helps feed the yeast for a robust rise, while contributing moisture and a soft crumb. It also enhances browning of the crust. If avoiding honey, you can substitute an equal amount of sugar or maple syrup; ensure it dissolves well in the liquid. For a vegan option, maple syrup works nicely. -
Salt (1 teaspoon)
→ Essential for flavor, gluten strength, and dough strength. Salt regulates yeast activity and tightens the gluten network for better crumb. Add salt with the flour to ensure even distribution and to prevent direct contact with yeast, which can slow fermentation if placed in direct contact. -
Olive oil (2 tablespoons)
→ Adds moisture, tenderness, and a softer crumb while aiding dough handling. Use extra-virgin olive oil for richer flavor, or a neutral oil if you prefer a milder taste. If you want a lighter crumb, substitute with light vegetable oil and reduce by 1 teaspoon to balance moisture. -
Warm milk (1/2 cup)
→ Contributes additional richness, tenderness, and acts as extra liquid to balance the dough hydration. Milk also adds small amounts of protein and sugars that promote browning. Use dairy milk for traditional flavor; non-dairy milks (almond, soy, oat) can be used but may alter crumb and browning slightly. Warm to about 100–110°F (38–43°C) before mixing. -
Melted butter (1 tablespoon)
→ Finishes the dough with added flavor and a nuanced, tender crumb. Adding butter after initial mixing helps tenderize the structure and contribute a richer mouthfeel. If dairy-free is required, substitute with an additional tablespoon of olive oil or a neutral oil, noting a slight change in flavor and texture.
Instructions
- Preheat your oven to 375°F (190°C) and lightly grease a standard 9×5-inch loaf pan or line it with parchment paper to prevent sticking.
→ A consistent oven temperature ensures even rise and browning, while greasing or lining prevents the dough from bonding to the pan for clean loaf removal. - Proof the yeast by whisking the active dry yeast (2 1/4 teaspoons) into the warm water (1 cup) with a pinch of honey and let it sit 5–10 minutes until the mixture is foamy and aromatic.
→ This confirms the yeast is active; foamy bubbles indicate healthy fermentation, which is essential for proper rise and light crumb. - Whisk the whole wheat flour (2 1/2 cups) with the salt (1 teaspoon) in a large bowl to distribute salt evenly, ensuring no clumps of bran or salt concentrate.
→ Even distribution of salt and aeration of flour strengthen gluten development and yield a uniform crumb in the finished bread. - Combine the wet ingredients: warm milk (1/2 cup) at 100–110°F (38–43°C) and the melted butter (1 tablespoon) to the foamy yeast mixture, stirring until fully integrated.
→ Warm liquid activates enzymes and helps dissolve fats evenly, promoting tender dough and a soft, cohesive crumb. - Add the honey (2 tablespoons) to the liquid mixture and whisk until dissolved to ensure even sweetness and to feed the yeast for a robust rise.
→ Honey provides gentle sweetness, contributes to browning, and supports fermentation without overpowering the bread’s flavor. - Pour the cultured liquid over the dry ingredients and mix with a wooden spoon or stand mixer on low speed until a shaggy dough forms, then increase speed to knead until the dough becomes smooth and elastic, about 6–8 minutes.
→ Proper mixing hydrates the flour, activates gluten, and develops strength for gas retention; kneading until smooth prevents a dense loaf with a gummy crumb. - Transfer the dough to a lightly oiled bowl, cover with plastic wrap or a damp towel, and let rise in a warm spot until doubled in size, about 60–75 minutes.
→ The first rise builds flavor and structure as gluten network expands; a well-risen dough yields better volume and a tender interior. - Punch down the dough to release excess gas, shape it into a tight loaf, and place it into the prepared pan, smoothing the top with a fingertip to create an even surface.
→ Deflating the dough after the first rise redistributes air pockets for uniform crumb and helps the loaf rise evenly in the oven. - Cover the loaf and allow a second rise until the dough crest inches above the rim of the pan, approximately 25–40 minutes, depending on room warmth.
→ The final proof ensures the loaf reaches the correct height for an appealing sandwich loaf with even crumb and good slicing resistance. - Bake in the preheated oven for 25–30 minutes, or until the crust is deep golden brown and the loaf registers 195–200°F (90–93°C) when tested with an instant-read thermometer; if the top browns too quickly, tent with foil.
→ Correct internal temperature confirms fully cooked bread with a moist yet fully set interior; tenting prevents over-browning while finishing the bake. - Remove the loaf from the oven and rest in the pan for 10 minutes, then transfer to a wire rack to cool completely before slicing to prevent gummy centers and to set the crumb.
→ Cooling allows starches to finish setting and moisture to redistribute, resulting in clean slices that hold together for sandwiches.

Notes
These 8-ingredient whole wheat bread for sandwiches delivers a hearty, wholesome loaf with a soft, sliceable crumb perfect for daily sandwiches. You can customize the loaf by brushing the top with a little water or milk and scoring before baking for a rustic look. For a lighter crumb, substitute up to 1/2 cup of whole wheat flour with white whole wheat or all-purpose flour, but note this will reduce the bran content and nuttier flavor. If you don’t have honey, you can use an equal amount of sugar or maple syrup to feed the yeast and promote browning. Store cooled loaves wrapped airtight at room temperature for up to 3 days, or freeze slices for longer-term use. For a crisper crust, bake on a preheated Dutch oven or bake stone and remove the lid after the first 15 minutes of baking. Always ensure your milk is warm, not hot, to avoid shocking the yeast and compromising rise.
Tips
Tips for Perfect 8-Ingredient Whole Wheat Bread
- Hydration awareness: Whole wheat flour absorbs more water than white flour. If your dough feels dry, add small amounts of warm water or milk a teaspoon at a time until the dough comes together and feels supple.
- Yeast handling: Always proof the yeast in warm water with a pinch of sugar until foamy. If it doesn’t foam after 5–10 minutes, discard and start again with fresh yeast for reliable rise.
- Mixed ingredient order: Whisk the salt into the flour first so it’s evenly distributed before adding the wet ingredients. Direct contact between salt and yeast can slow fermentation.
- Kneading rhythm: Knead until you have a smooth, elastic dough that passes the windowpane test (thin, translucent gluten). If the dough resists, let it rest 10 minutes and knead again to develop gluten without overworking it.
- Oil and butter balance: The olive oil and melted butter keep the crumb tender. If you prefer a lighter crumb, use a bit less oil or increase hydration slightly with a splash of milk.
- Milk temperature: Warm milk around 100–110°F (38–43°C) helps activate enzymes and improve softness. If using dairy-free milk, choose unsweetened varieties to avoid affecting fermentation.
- Sweetener role: Honey feeds yeast and brown crust. If you substitute sugar or maple syrup, ensure it dissolves completely in the liquid to avoid uneven sweetness.
- Rising environment: Let dough rise in a warm, draft-free spot. If your kitchen is chilly, place the dough in an oven with the light on or near a warm pot of water to boost warmth.
- Shaping for sandwich loaves: After the first rise, gently deflate, shape into a tight loaf, and place in a well-greased loaf pan. A tight shape yields a uniform slice with neat crumb.
- Second rise timing: Allow a full second rise until the dough domes about 1 inch above the pan rim. Don’t rush this step, as adequate rise creates light air pockets and better volume.
- Crust browning tips: If the crust browns too quickly, tent the loaf with foil during the final 15–20 minutes of baking. For deeper color, brush the top with a little melted butter right after baking.
- Storage strategy: Cool completely before slicing. Store in an airtight container at room temperature for 2–3 days, or freeze slices for longer storage. Toasting enhances flavor and texture when cold.
- Gluten-free or alternative flours: Substituting with white whole wheat or all-purpose flour reduces bran and may change crumb. For best results, substitute gradually and adjust hydration as needed.
FAQ
What are the 8 ingredients in this Whole Wheat Bread for Sandwiches?
The recipe uses: whole wheat flour, all-purpose flour, warm water, active dry yeast, honey or sugar, salt, olive oil (or another neutral oil), and milk (or water for dairy-free).
Can I make this bread dairy-free?
Yes. Substitute dairy milk with plant-based milk (almond, soy, oat) and use olive oil if you like. The dough will still come together with the other ingredients.
What should the water/milk temperature be for activating the yeast?
Use warm liquid around 105–110°F (40–43°C). If it’s too hot, it can kill the yeast; too cold and the yeast may not activate properly.
Do I need a stand mixer or can I knead by hand?
Both work. A stand mixer with a dough hook makes the process easier and quicker. By hand, knead on a floured surface for about 8–10 minutes until the dough is smooth and elastic.
How long does the rising take?
Typically 1 hour for the first rise, and 30–45 minutes for a second rise after shaping, depending on room temperature. Warmer rooms speed up rising.
Why is bread shaping important for sandwich loaves?
Shaping ensures an even crumb and uniform loaf height, which makes slicing easier for sandwiches and helps with even baking.
Can I bake this bread in a loaf pan?
Yes. After the final shaping, place the dough in a lightly oiled loaf pan. Let it rise until domed above the pan, then bake as directed. Adjust baking time as needed since pans affect heat distribution.
What is the best way to know when the bread is done?
The loaf should sound hollow when tapped on the bottom. An internal temperature around 190–200°F (88–93°C) also indicates doneness.
How should I store and slice the bread for sandwiches?
Cool completely on a rack before slicing. Store sliced bread in an airtight container or resealable bag at room temperature for 2–3 days, or freeze slices for longer storage. For easy sandwich slices, refrigerating before slicing can help with cleaner cuts.