Introduction / Hook
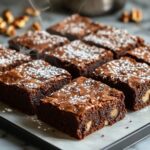
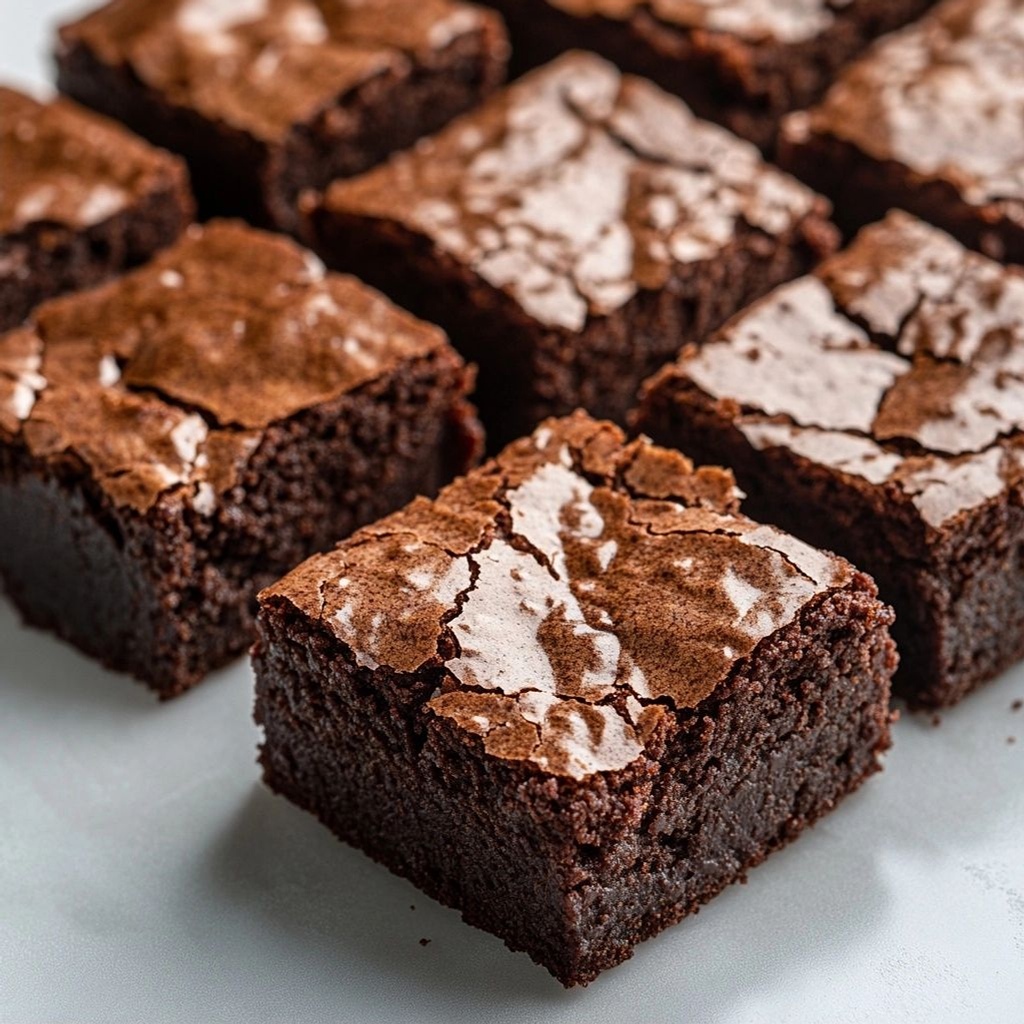
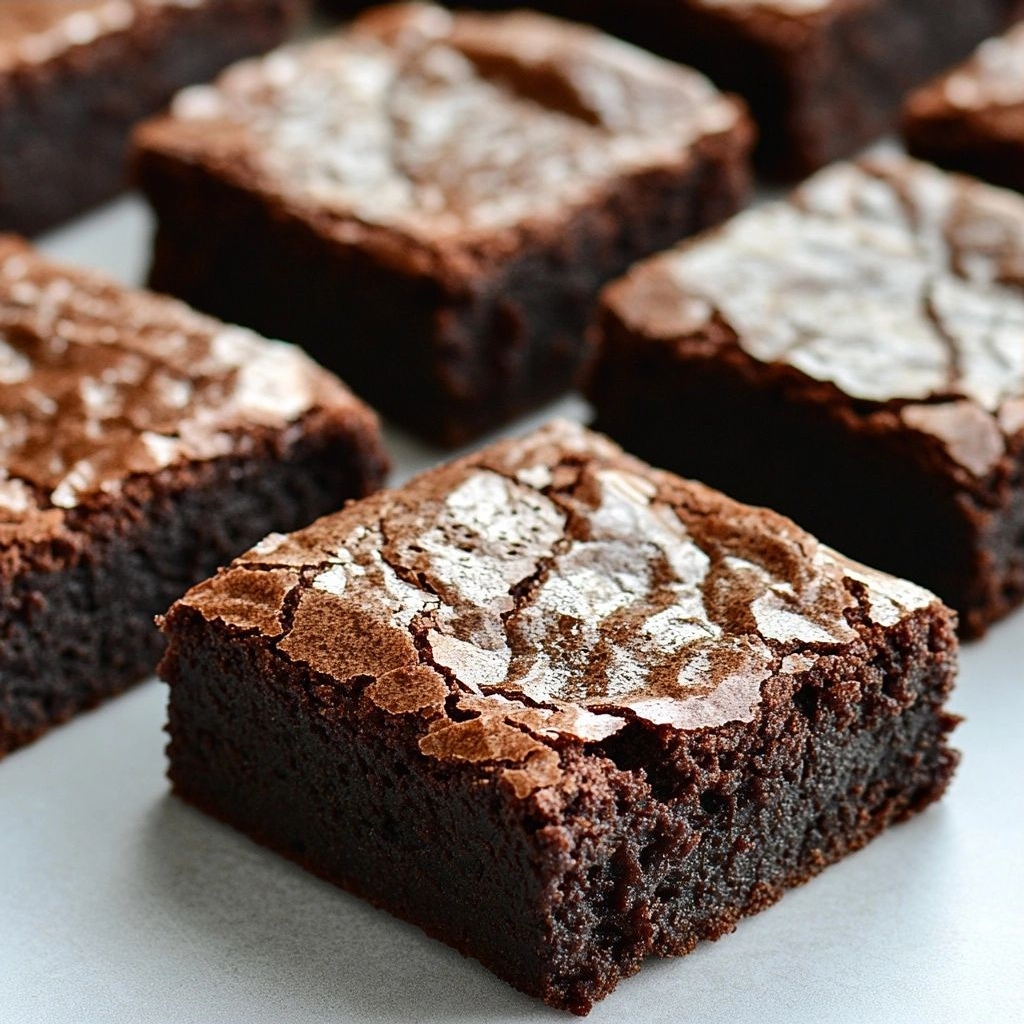
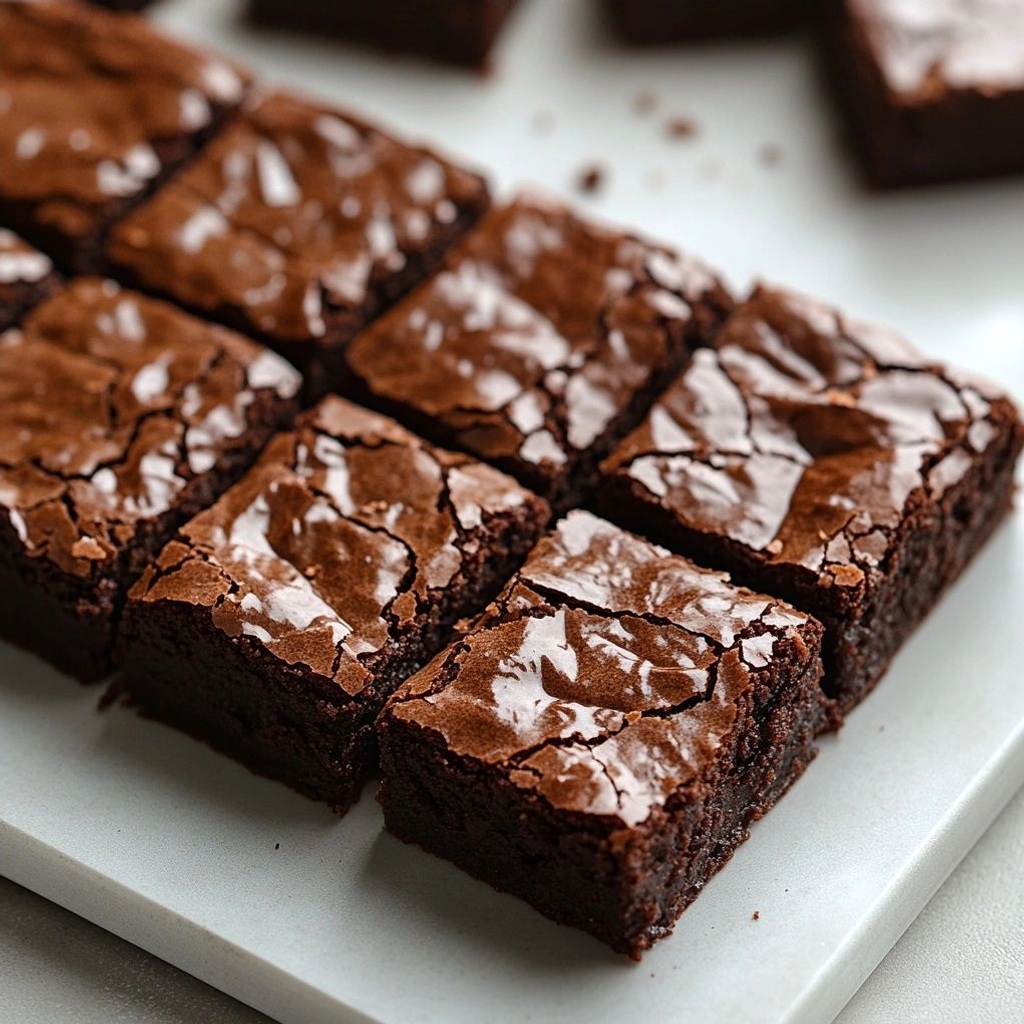
There’s something undeniably irresistible about a brownie that melts on your tongue, leaving a kiss of chocolate on the roof of your mouth and a warm, comforting sigh in its wake. Decadent Homemade Brownies—fudgy, rich, and unapologetically luxurious—offer that perfect balance of tenderness and depth. Close your eyes and imagine a pan of glossy, dark squares cooling just enough to slice. The scent wafts through the kitchen—bittersweet chocolate meeting vanilla, a whisper of espresso, a hint of butter that speaks to generations of bakers who chased the ultimate chocolatey perfection. When you bite in, the outside yields to a velvety, almost pudding-like center that clings to the teeth just long enough to register the intensity before it dissolves into pure, comforting indulgence. These brownies aren’t just dessert; they’re an invitation—to slow down, savor, and share a moment of pure chocolate bliss with someone you love.
The Story Behind the Dish
Brownies trace their roots to 19th-century America, a lineage that begins in earnest with a desire for a portable, cake-like treat that could travel well and please a crowd. Early versions leaned toward a cake-like crumb, but as ovens and cocoa powders evolved, cooks began chasing a fudgier texture—dense, moist, with a sheen that suggested velvet. The fudgy brownie, in particular, became a symbol of home baking that travels across generations: mothers teaching daughters, friends swapping pan-fulls after school, colleagues swapping stories over a warm square with a mug of coffee. The beauty of this recipe lies in its modern nod to nostalgia. It’s a homage to the kitchen ritual of tapping a wooden spoon against the side of a pan, to the way a whisk spins a glossy batter that sings with aroma, to the moment you pull the pan from the oven and the kitchen fills with an intoxicating chorus of cocoa and vanilla. In many households, a batch of fudgy brownies is more than a dessert; it’s a quiet celebration of simple ingredients transformed through care, balance, and a touch of science—the right ratio of fat to sugar to chocolate can turn everyday pantry staples into something that feels luxurious. If you grew up swapping brownie corners with siblings, you know the ritual: the cool, gleaming surface you slice into clean, confident squares; the way the center stays remarkably moist long after the first bite; the dark, glossy sheen that makes the treat look almost like a treasure it would be a shame to rush. This particular rendition honors that tradition while elevating it with a few modern touches: a pinch of espresso to deepen the chocolate, a whisper of salt to sharpen the sweetness, and a texture that remains fudgy, not cakey, no matter how many pieces you end up sharing.
Why You’ll Love This Recipe
- Effortless indulgence: The batter comes together with minimal fuss, making it ideal for weeknights when you crave something comforting but don’t want to spend hours in the kitchen.
- Fudgy texture that stays moist: The balance of butter, chocolate, and a touch of sugar creates that signature dense, melt-in-your-mouth center that brownie lovers chase.
- Silky shine and professional finish: A glossy top and clean edges give you the look of bakery-level brownies in your own kitchen.
- Versatile base for customization: The recipe acts as a canvas—add nuts, chocolate chips, swirls of peanut butter, or a ribbon of caramel if you’re feeling celebratory.
- Scalable for gatherings: Whether you’re feeding a small family or a crowd, the batter scales with ease and holds its fudgy integrity.
- A crowd-pleaser for all occasions: Perfect for birthdays, game nights, bake sales, or a simple treat when you need a little cozy sweetness after a long day.
- Comfort food with sophistication: The recipe achieves sophistication through careful balance—richness without heaviness, depth without bitterness, and texture that lingers on the palate.
Flavor Profile & Texture
These fudgy brownies are a masterclass in chocolate harmony. The flavor begins with a bold, unapologetic chocolate presence—dark cocoa notes that flirt with a whisper of coffee, creating a depth that feels almost resinous in the best possible way. The sweetness is present, but not flabby; it’s tempered by a generous portion of butter, which enriches every crumb and lends a luxurious mouthfeel. A pinch of salt does double duty here: it brightens the chocolate and makes the final bite more dynamic, preventing the sweetness from tipping into cloying territory.
The texture is what makes them memorable. On the outside, a delicate, faint crust forms—shiny, slightly crisp, and giving way to a moist, jammy center that clings to the palate. The middle is dense yet not heavy, a fudgy embrace that feels almost satin-like as you chew. There’s a whisper of vanilla that rounds out the chocolate’s intensity, and a subtle undertone from optional espresso or espresso powder, which deepens the chocolate’s resonance without turning the brownies into coffee-flavored desserts. When you bite into one, you’ll notice the perfect balance: a compact crumb that doesn’t crumble into dust, a soft, almost elixir-like center that remains irresistibly moist for hours after they come out of the oven, and a finish that lingers with a decadent, cocoa-forward aftertaste that makes you reach for another square before you even realize it.
Occasions & Pairings
Fudgy brownies are the chameleons of desserts. They fit into almost any moment with ease:
- Weeknight comfort: A warm square with a glass of milk or a cup of tea is the simplest, most satisfying end to a busy day.
- Celebrations and gatherings: Slice into generous squares for birthdays, potlucks, or casual parties. They pair beautifully with vanilla ice cream or a dollop of whipped cream for an easy dessert upgrade.
- Tea time or coffee breaks: The intensity of chocolate pairs wonderfully with a robust brew or a milky latte.
- Dessert boards: Create a chic dessert board with brownies, berries, and a sprinkling of flaky sea salt, plus a few contrasting textures like crisp shortbread or crunchy almonds.
Pairing ideas to elevate the experience:
- Vanilla ice cream or a warm salted caramel sauce for a classic duo.
- Crumbled toasted nuts—walnuts, pecans, or hazelnuts—for added crunch and contrast.
- Fresh berries or a fig compote to cut through the richness with bright, fruity notes.
- A shot of espresso or a mocha-inspired beverage to echo the chocolate depth.
Tips, Variations & Substitutions
While the fudgy nature is the star, there are many ways to tailor this recipe to your dietary needs, flavor preferences, or what’s in the pantry:
- Make it vegan: Use plant-based butter and dairy-free dark chocolate with high cocoa content, and consider a flax or chia egg substitute if needed—though the result might be slightly less fudgy.
- Gluten-free option: Choose a gluten-free all-purpose flour blend or simply replace with almond flour for a denser, more almond-forward brownie; note that texture will shift slightly.
- Nutty variation: Fold in chopped toasted walnuts or pecans for a crunchy contrast. For a more intense nuttiness, use browned butter (best used with caution so the flavor doesn’t overwhelm the chocolate).
- Sea salt finish: A light sprinkle of flaky sea salt atop the warm surface just as they come out of the oven enhances the chocolate’s brightness and adds a pleasing finish.
- Espresso boost: A teaspoon of instant espresso powder deepens the chocolate flavor without imparting coffee notes if balanced correctly. You can adjust to taste or omit for a milder profile.
- Chewy center variations: For an even fudgier interior, reduce the mixing time a bit and slightly underbake; for a more cake-like result, extend baking time by a few minutes and adjust the fat-to-flour ratio accordingly.
- Swirls and mix-ins: Try a swirl of peanut butter, caramel, or cream cheese in the batter before baking for a dramatic presentation and additional texture.
- Portion control: For single-serve portions, bake in a smaller pan or use muffin cups; keep an eye on bake time as smaller portions bake faster and can overcook quickly.
Storage & Make-Ahead Ideas
Fudgy brownies are both forgiving and enduring, making them ideal for baking ahead or staging for events. Here are practical tips to keep them at their best:
- Room temperature: Store in an airtight container at room temperature for up to 3 days. If your kitchen runs warm, consider refrigerating to maintain freshness, though this will firm up the texture a bit.
- Refrigeration: In the fridge, they stay moist for longer. Bring to room temperature before serving for the best texture.
- Freezing: Freeze individual squares or the entire pan (well-wrapped). They freeze beautifully for up to 3 months. Thaw at room temperature or warm gently in the oven for a few minutes to restore a just-baked feel.
- Make-ahead prep: The batter can be prepared ahead and stored in the fridge for up to 24 hours before baking. This makes it perfect for entertaining—mix, cover, refrigerate, and bake when guests arrive.
- Storing cut edges: If you want cleaner edges after slicing, chill the baked sheet briefly before cutting. This helps edges stay pristine and reduces crumb fallout.
Fun Facts & Trivia (Optional)
Brownies have a charming array of trivia that can delight guests at a dinner party or simply enrich your kitchen lore. Did you know that the earliest brownies didn’t always include chocolate? Some early recipes called for molasses, creating a darker, denser profile that stood in contrast to the more modern, chocolate-forward brownie of today. The “fudge” texture we celebrate now became popular as confectionery science evolved—home cooks experimenting with fat and sugar ratios discovered that a dense, moist crumb could come from less leavening and careful control of moisture. The name “brownie” itself is thought to derive from the mythical Scottish Brownies—household sprites that were said to do chores in exchange for a small, sweet gift. While the modern dessert has no need for woodland sprites, the idea of a humble, comforting treat born from home and heart remains true. In many parts of the world, brownies have become a canvas for tradition: families fold in local ingredients—orange zest in Spain, pistachios in the Middle East, chili or cinnamon in parts of Mexico—and each variation whispers a story about a place, a memory, and a shared bite of happiness.
Closing Thoughts
Decadent Homemade Brownies fudgy are more than just a dessert; they are a ritual of simple ingredients transformed through care, timing, and a dash of culinary curiosity. They invite you to linger in your kitchen, savor the moment you pull the pan from the oven, and revel in that first, glossy bite that tells you you’ve created something truly special. Whether you’re feeding a family, impressing guests, or simply indulging a craving after a long day, these brownies offer a dependable, luxurious escape—a little square of edible velvet that makes the world seem a touch sweeter. So preheat your oven, gather your ingredients, and let the scent of melted chocolate fill your home. The most delicious moment is about to begin.
Ingredients
-
Brownie Base
→ All-purpose flour provides the structure of the brownies. Use sifted flour to avoid lumps and to keep the texture fudgy rather than dense. Do not overmix once the wet ingredients are added, as overworking flour can develop gluten and make the brownies cakier rather than fudgy. -
1 cup all-purpose flour (sifted)
→ Sifted flour ensures an even distribution of starch and prevents clumps that could create uneven pockets in the batter. This helps achieve a uniform crumb and prevents sinking while still allowing the fudgy interior to stay moist. If you don’t have a sifter, whisk the flour vigorously for about 30 seconds and spoon it into the measuring cup, then level off. -
1/2 cup unsweetened cocoa powder
→ Cocoa powder delivers the rich chocolate flavor and deep color essential for fudgy brownies. For a more intense chocolate bite, use natural cocoa powder; for a smoother, mellower taste, choose Dutch-processed. Sift with the flour to avoid gritty bits and ensure even flavor distribution. -
1 cup granulated sugar
→ Sugar provides sweetness and helps contribute to the glossy surface and chewy bite when combined with the melted fat and eggs. Use at room temperature to mix evenly with the cocoa and butter. If you prefer a denser, fudgier crumb, you can use a portion of caster sugar for a finer texture or reduce slightly, but keep sweetness balanced with the cocoa. -
1/2 cup light brown sugar, packed
→ Brown sugar adds moisture and a subtle caramel flavor, helping keep the center fudgy and tender. It also contributes to a slightly chewy crust. Pack the sugar tightly in the measuring cup to ensure the correct amount dissolves evenly into the batter. -
1/2 cup unsalted butter, melted
→ Butter provides fat for richness and tenderness; melting it helps create a smooth, cohesive batter that emulsifies with the eggs. Use unsalted butter so you control the salt level. If you only have salted butter, omit the extra 1/4 teaspoon salt in the next ingredient and taste the batter before baking to adjust if needed. Let the melted butter cool slightly before mixing with the eggs to prevent cooking them. -
2 large eggs, at room temperature
→ Eggs bind the batter and contribute to structure while still allowing a fudgy crumb if not overmixed. Room-temperature eggs blend more smoothly with the melted butter and cocoa, giving a richer, uniform batter. For very large eggs, you can whisk one extra yolk in for extra moisture, but keep to two whole eggs for the classic fudgy texture. -
2 tsp vanilla extract
→ Vanilla enhances the chocolate flavor and rounds the sweetness. Use pure vanilla extract rather than imitation for a more complex aroma. If you have: a quick optional upgrade is to use a vanilla bean scrape or a touch of vanilla paste for deeper flavor. Keep the amount consistent to avoid overpowering the chocolate. -
1/4 tsp salt
→ Salt balances the sweetness and lifts the chocolate notes. If you are using salted butter instead of unsalted, omit this entirely or start with a pinch and adjust after tasting the batter. Even distribution is important; whisk the salt into the cocoa before combining with the sugar to ensure even flavor. -
Optional Add-ins
→ Optional add-ins can customize texture and contrast. If included, fold them in gently after the batter is just combined to avoid overworking and to distribute evenly. -
1/2 cup semisweet chocolate chips or chopped dark chocolate
→ Extra chocolate chunks intensify the fudgy interior with pockets of melted chocolate. Use pieces or chips of similar size to ensure even distribution. If using chips, consider using larger chips for greater melt contrast. Do not overdo to avoid dry pockets; fold in after batter comes together. -
1/2 cup chopped walnuts or pecans (optional)
→ Nuts add texture and a toasty contrast to the dense brownie. Chop nuts into small, even pieces to distribute throughout without sinking to the bottom. For a nuttier, less crumbly bite, toast the nuts lightly in a dry skillet for 3–5 minutes before adding. If you have a nut allergy or prefer a nut-free version, simply omit.
Instructions
- Preheat your oven to 350°F (175°C) and line an 8×8-inch (20×20 cm) square baking pan with parchment paper or grease it well to ensure easy release after baking.
→ A properly prepared pan prevents sticking and allows you to lift the brownies out for clean slicing without breaking the edges. - Sift the 1 cup of all-purpose flour and 1/2 cup of unsweetened cocoa powder together into a medium bowl to ensure even cocoa distribution and to prevent lumps that could create dense pockets in the batter.
→ Sifting aerates the dry ingredients and yields a smoother batter with a fudgier texture. - Whisk the 1 cup granulated sugar and 1/2 cup light brown sugar with the 1/4 teaspoon salt in a large bowl to combine and dissolve any clumps, which helps create a glossy surface and even sweetness in the finished brownies.
→ Uniform sweetness prevents hotspots of sweetness and ensures a balanced chocolate flavor. - Pour the 1/2 cup melted unsalted butter into the sugar and salt mixture, then whisk until fully incorporated and glossy, about 30 seconds, to emulsify the fat and sugar for a tender crumb.
→ Melted butter helps create a smooth, cohesive batter that stays fudgy rather than crumbly. - Beat in the 2 large eggs, one at a time, at room temperature, ensuring each is fully incorporated before adding the next; then whisk in the 2 tsp vanilla extract until the mixture is uniform and slightly thickened.
→ Room-temperature eggs blend more smoothly with the fat and cocoa, resulting in a uniform, rich batter without curdling. - Gradually fold the sifted dry ingredients into the wet mixture using a wide spatula or wooden spoon, turning gently until just combined with streaks of flour remaining, being careful not to overmix.
→ Gentle mixing preserves the fudgy interior by limiting gluten development, which would make the brownies cakier. - Fold in the 1/2 cup semisweet chocolate chips or chopped dark chocolate and the optional 1/2 cup chopped walnuts or pecans if using, ensuring even distribution without overworking the batter.
→ Add-ins create pockets of chocolate and optional crunch, enhancing flavor and texture while remaining evenly dispersed. - Pour the batter into the prepared pan and spread it to an even thickness using a small offset spatula, pressing gently to pack the batter into the corners and create a smooth top.
→ An even surface ensures uniform baking and a neat, sliceable finish once cooled. - Bake in the center of the oven for 22–28 minutes, rotating the pan halfway through baking, until a toothpick inserted near the center comes out with a few moist crumbs but not wet batter.
→ This timing yields a fudgy interior with a slightly set crust; avoid overbaking to maintain moisture. - Let the pan cool completely on a wire rack for at least 1 hour before lifting the slab using the parchment overhang or pan edges, then slice into even squares for clean, uniform pieces.
→ Cooling helps set the structure and prevents crumbling when cutting, giving tidy portions. - If you prefer a denser, chewier center, cover the cooled brownies and refrigerate for 1–2 hours to firm the texture before slicing, which makes cutting easier and enhances the fudgy bite.
→ Chilling tightens the crumb and intensifies chocolate flavor as the fats recrystallize slightly. - For a glossy crust and a more pronounced crackly top, optionally whisk an extra large egg yolk into the batter before folding in the dry ingredients, but maintain the standard two eggs if you prefer a classic fudgy texture.
→ An additional yolk can enrich moisture and contribute a slight sheen on the surface without sacrificing fudginess. - Store leftovers in an airtight container at room temperature for up to 3 days or freeze individual squares wrapped tightly for longer storage, ensuring they are completely cooled before sealing to prevent condensation.
→ Proper storage preserves moisture, prevents staling, and keeps the brownies moist and chocolatey for longer.
Notes
These fudgy brownies are rich, chocolatey, and incredibly moist with a glossy crust on top. The key to achieving a true fudgy texture is to use melted butter and not overmix the batter after adding the flour. For the deepest chocolate flavor, sift the cocoa with the flour, and consider using dark or natural cocoa based on how intense you want the chocolate bite. Let the batter rest for a few minutes after mixing to allow the cocoa to fully hydrate before baking, which helps create a uniform, fudgy crumb.
Tips for best results:
- Use room-temperature eggs to ensure a smooth, cohesive batter that emulsifies with the melted butter and cocoa for a velvety finish.
- Do not overmix once the wet and dry ingredients meet; fold just until you see no visible flour to keep the interior fudgy rather than cakey.
- For an even fudgier center, reduce the flour by a couple of tablespoons or replace a portion of the flour with an extra 1–2 tablespoons of cocoa powder, then adjust sugar if needed.
- Butter should be melted and slightly cooled before whisking with the eggs to prevent cooking them and to maintain a smooth batter.
- Optional add-ins like semisweet chips or chopped dark chocolate create delicious pockets of melt-in chips; nuts add texture and crunch but can be omitted for nut-free versions.
- Line your pan with parchment or generously grease it to ensure easy removal and clean edges. After baking, let the brownies rest in the pan set on a rack for at least 20 minutes before lifting out and cutting; this helps finish the set and keeps slices neat.
- Store leftovers in an airtight container at room temperature for up to 3 days, or freeze baked brownies (well wrapped) for up to 3 months. Rewarm gently before serving for a freshly baked feel.
Serving ideas: pair with a scoop of vanilla ice cream, a dollop of whipped cream, or a drizzle of warm chocolate sauce for an extra indulgent treat. If you’d like a more adult twist, add a teaspoon of espresso powder to deepen the chocolate flavor without overpowering sweetness.
Tips
- Measuring flour accurately is key for fudgy brownies. Fluffing or scooping directly from the canister can add too much flour. Use sifted flour as directed, and if you don’t have a sifter, whisk vigorously for 30 seconds and level with a flat edge.
- Temper the eggs by letting them sit at room temperature for about 30 minutes before mixing. This helps them incorporate smoothly with the melted butter and cocoa, creating a silkier batter that stays fudgy.
- When melting butter, remove it from heat just as it loses its sheen. Overheating can separate fat and water, which can cause cracks or a greasy texture in the finished brownies.
- Don’t overmix once the wet and dry ingredients are combined. Stir just until the flour is incorporated. Overmixing activates gluten, which can make the brownies denser and cakier instead of fudgy.
- For a richer chocolate flavor, consider blooming the cocoa powder with a small amount of hot water or coffee before adding it to the batter. This intensifies the chocolate without adding more sugar.
- Room-temperature ingredients mix more evenly. If your eggs or vanilla are cold, gently whisk them with a splash of warm water to bring them to near room temperature before combining.
- Brown sugar contributes moisture and chewiness. If you prefer an even fudgier middle, you can increase the brown sugar by a tablespoon or two, but keep the white sugar balanced to avoid a too-dense texture.
- Pour the batter into a parchment-lined pan for easy removal and clean edges. If you don’t like parchment, spray the pan well and consider a light dusting of cocoa powder to prevent sticking.
- Optional add-ins should be folded in after the batter comes together. This prevents overmixing and ensures chocolate chips or nuts are evenly dispersed without sinking or clumping.
- If you’re adding nuts, toast them lightly (3–5 minutes) to deepen their flavor and improve crunch contrast. Cool before folding in to avoid releasing excess oils into the batter.
- For extra fudginess, slightly underbake the brownies. Start checking at 22–25 minutes if using a 9×9-inch pan; they will continue to set as they cool. A toothpick should come out with a few moist crumbs, not clean.
- Cool completely in the pan on a wire rack before cutting. This allows the structure to firm up and prevents crumbling. For perfectly clean edges, chill the pan for 15–20 minutes before slicing.
FAQ
What makes these brownies fudgy instead of cakey?
Using a higher fat-to-flour ratio (more butter and chocolate) and less mixing helps retain moisture. Also, a higher amount of egg yolks and minimal whisking prevent gluten development, resulting in a dense, fudgy texture.
Can I use oil instead of butter?
Yes. Using vegetable oil will yield fudgier brownies with a richer crumb. Use the same amount as butter (1:1). You may want to add a touch of extra chocolate or cocoa to compensate for flavor.
Should I use chocolate chips or chunks?
Both work. Chunks melt into the batter for gooey pockets, while chips hold their shape. For easier cutting, fold in a handful of chips or chunks near the end of mixing.
How do I prevent cakey edges?
Line your pan with parchment and avoid overbaking. Check for doneness at the minimum bake time; the center should look slightly underdone but set. Resist the urge to bake longer than necessary.
What size pan should I use?
A 8×8-inch square pan yields thicker fudgy brownies. A 9×13-inch pan will be thinner and more cake-like. Adjust bake time accordingly and start checking early after the minimum time.
How can I make them extra fudgy?
Add an extra tablespoon of butter or a tablespoon of corn syrup for gloss and moisture. Substituting part of the sugar with brown sugar also enhances fudginess and depth of flavor.
Can I make these dairy-free?
Yes. Use a dairy-free butter substitute and dairy-free chocolate or unsweetened baking cocoa. Ensure the chocolate you choose doesn’t contain dairy ingredients if you need strict dairy-free brownies.
What about gluten-free options?
You can replace part or all of the all-purpose flour with a gluten-free all-purpose blend. Start with 1:1 substitution and note that texture may vary slightly. Avoid using almond flour alone, as it can make the batter denser.
How should I store and reheat?
Store in an airtight container at room temperature for up to 3 days, or refrigerate up to 1 week. Reheat individual pieces in the microwave for about 10–15 seconds to restore fudginess, or warm gently in a low oven.