Introduction / Hook
Imagine a silky, indulgent swirl of sweetness that glides across your tongue with buttery ease, leaving behind a warm, comforting glow that lingers long after the last bite. Condensed milk, that golden nectar of dessert alchemy, transforms humble ingredients into show-stopping treats with minimal effort and maximum charm. This isn’t just a pantry staple turned dessert hack; it’s a passport to creamy dreams, a shortcut to nostalgia, and a celebration of simple kitchen magic. Whether you’re craving a quick sweet finish after a weeknight dinner or planning a showpiece dessert for a special occasion, a condensed milk-based dessert can deliver decadence without fuss. The beauty lies in its versatility: a single can can spark a cascade of textures—from luscious fudgy richness to airy, cloud-like textures—and a spectrum of flavors, from caramelized to vanilla and beyond. In these pages, you’ll uncover not only recipes but a world of ideas that showcase why condensed milk remains a beloved ally for home cooks and pastry enthusiasts alike.
The Story Behind the Dish
Condensed milk has a storied history that’s as comforting as the desserts it helps conjure. Born from the need to preserve milk in tropical climates and distant kitchens, condensed milk became a staple in households around the world, morphing in the hands of bakers and chefs into countless iconic sweets. In many cultures, a simple can of condensed milk is a memory of family gatherings, street markets, and the clatter of busy kitchens where cups of hot coffee meet spoonfuls of caramel-sweet magic. The tradition of transforming condensed milk into desserts spans continents—whether it’s the creamy caramel tones of dulce de leche in Latin cuisines, the airy lightness of condensed milk meringues in European patisseries, or the custardy indulgence of panna cotta and tres leches in Latin American and Caribbean classics. The ingredient invites experimentation: you can simmer, whip, bake, churn, or fold to craft textures that range from decadent and fudgy to airy and delicate. This history is not just about technique; it’s about a shared love for something that tastes like “home,” even when you’re miles away from where you grew up. As you read through these ideas, you’ll feel the pull of generations of cooks who discovered that a humble can of condensed milk could become the center of a dessert universe.
Why You’ll Love This Recipe
- Easy access to a world of desserts: condensed milk unlocks creamy, luscious flavors with minimal pantry staples.
- Quick assembly: many desserts can be prepared in under an hour, making them perfect for busy evenings or last-minute gatherings.
- Versatility: from no-bake treats to baked custards, condensed milk adapts to your preferred texture and flavor profile.
- Guaranteed crowd-pleaser: the familiar, comforting sweetness appeals to both kids and adults, making entertaining simpler.
- Customizable: you can adjust sweetness, add aromatics (vanilla, citrus zest, coffee), or swap dairy for non-dairy options to suit dietary needs.
- Longer shelf-life when properly stored: many condensed-milk-based desserts benefit from a rest, allowing flavors to mellow and textures to set.
Flavor Profile & Texture
The core sweetness of condensed milk is lush, creamy, and gently caramelized, a natural sweetness with depth and a hint of toffee. When folded into batters or whipped to soft peaks, it lends a dairy-rich silkiness that coats the palate without heaviness. In desserts, you’ll often notice a beautiful balance between sweet, creamy, and subtly caramel notes, tempered by accents like vanilla, citrus, coffee, chocolate, or salt. Texture-wise, condensed milk can be tamed into multiple personas:
- Rich and fudgy: when gently heated with chocolate or cocoa, it yields a bite-size ganache-like fudge with a melt-in-your-mouth finish.
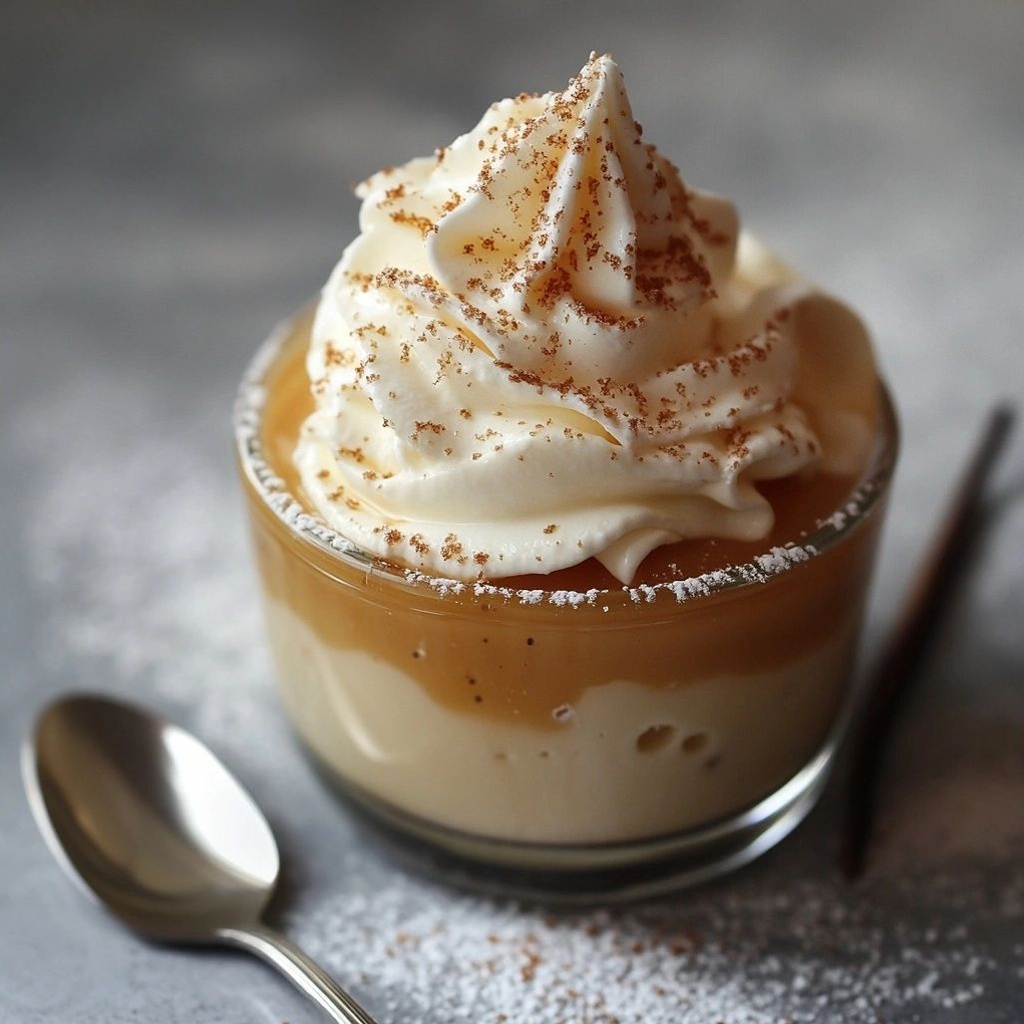
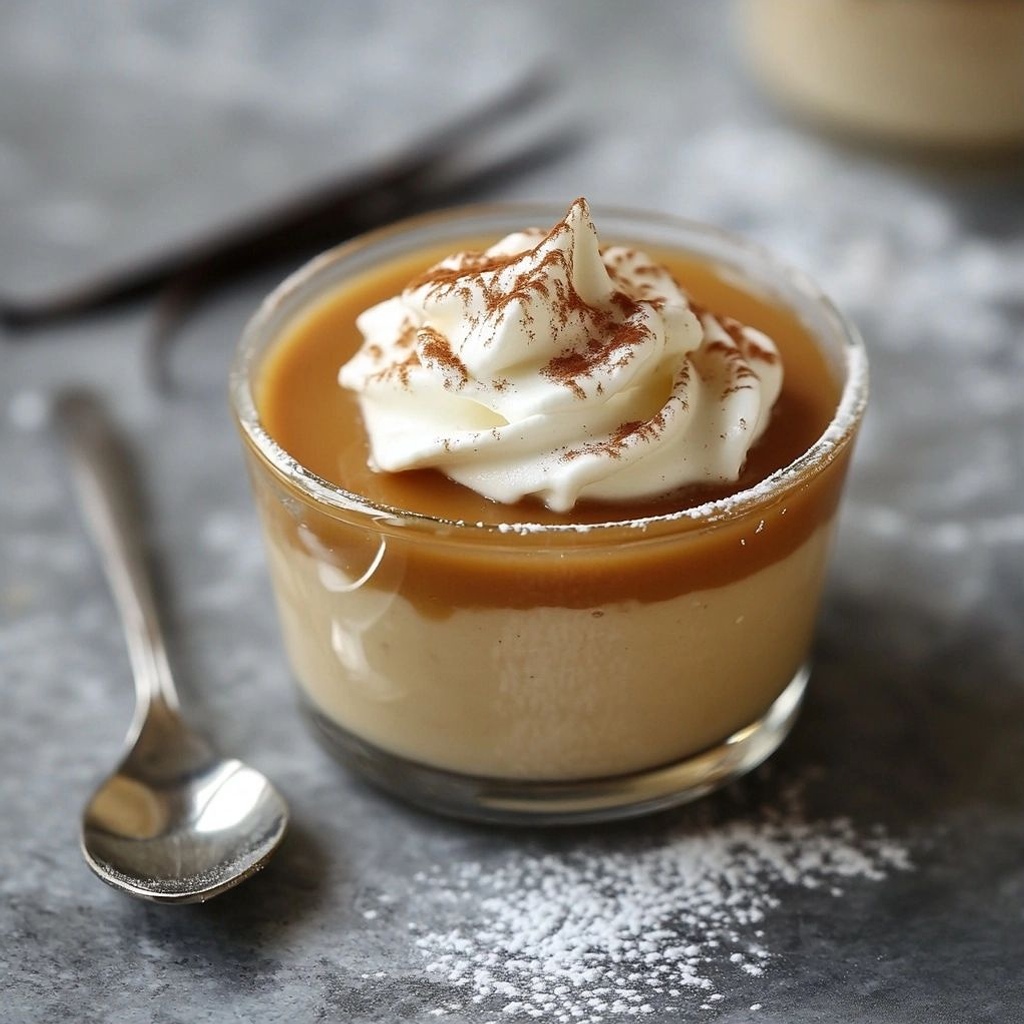
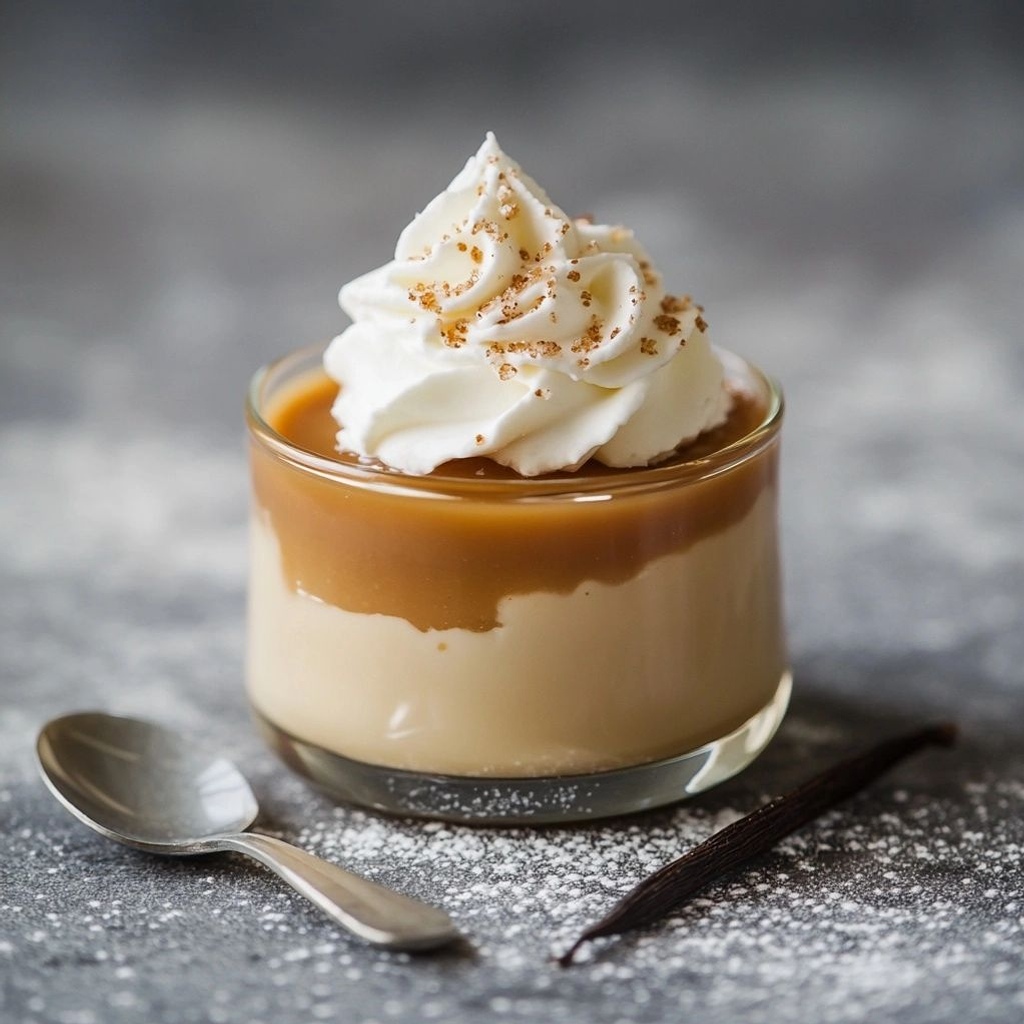
- Silky custard: baked or set with gelatin, the result is a smooth, spoonable cream that holds its shape while remaining luxuriously soft.
- Chewy caramel: simmering or reducing creates dulce de leche-like caramel that can be used as a luscious filling or glaze.
- Airy and light: whipped condensed milk can be incorporated into mousse-like textures or meringue-like toppings for an ethereal finish.
- Cheesy and creamy when paired with dairy blends: the right balance with cream or yogurt can yield a tangy, luscious tang that brightens the sweetness.
The magic lies in pairing this sweetness with contrasting elements—bitter coffee, tart citrus, crunchy textures, and hits of salt—to prevent flavor fatigue and create a well-rounded final bite.
Occasions & Pairings
Condensed milk desserts shine in a variety of settings, from casual weeknight indulgences to celebratory feasts. Here are some ideas on when and how to serve them, along with suggested pairings to elevate the experience:
- Weeknight treat: a quick, no-bake caramel pudding or a condensed milk panna cotta served with fresh berries and a short espresso
- Family gatherings: a warm fudge or dulce de leche cheesecake that’s easy to slice and share
- Summer parties: chilled coconut-condensed milk ice cream or a light tres leches-inspired parfait with tropical fruits
- Holiday desserts: layered caramel-topped puddings or a baked custard with citrus zest and a sprinkle of flaky salt
Suggested pairings to consider include:
- Spiced cookies and shortbread for dunking or crumbled toppings
- Fruit compotes and tart berries to counterbalance the sweetness
- Espresso, dark chocolate, and cocoa-dusted treats to deepen the flavor profile
- Cainto(n)ed desserts with coconut, almond, or pistachio for texture and aroma layers
- Toast-topped nuts, flaky salt, and a drizzle of dark caramel for a sophisticated finish
Tips, Variations & Substitutions
Here are practical ideas to customize condensed milk desserts for different occasions, tastes, and dietary needs:
- Make-ahead flexibility: many condensed milk-based desserts benefit from chilling overnight, allowing flavors to meld and textures to set more firmly.
- Vegan and dairy-free adaptations: substitute regular condensed milk with plant-based condensed milk or whip coconut cream folded with a touch of maple syrup; for baked custards, use coconut milk or almond milk with a plant-based vanilla.
- Low-sugar approach: use light condensed milk or reduce sweeteners in the base, then balance with tart fruits or citrus zest to maintain flavor depth.
- Flavor boosters: add vanilla bean seeds, vanilla paste, espresso powder, citrus zest (lemon, lime, orange), or a pinch of sea salt to enhance complexity.
- Regional twists: fold in toasted sesame paste for a nutty note, stir in cardamom and rose water for a Middle Eastern-inspired dessert, or mix in dulce de leche with a pinch of chili for a Latin edge.
- Texture variations: for a mousse-like effect, whip chilled condensed milk with a touch of lime juice and fold into whipped cream; for a denser bite, bake a custard with eggs and a splash of vanilla.
- Dessert bar ideas: layer condensed milk caramel with crushed cookies and whipped cream in a pan, slice into bars for easy serving at parties.
Storage & Make-Ahead Ideas
Proper storage can preserve the luscious quality of condensed milk desserts and give you confidence when planning menus or meal prep. Consider these guidelines:
- Refrigeration: most chilled condensed milk desserts keep well for 3–5 days in an airtight container. Keep delicate toppings separately if possible to prevent sogginess.
- Freezing: many custards and fudges freeze well, though texture may shift slightly. Wrap tightly to prevent freezer burn. Thaw in the refrigerator overnight and give a gentle stir before serving.
- Make-ahead strategies: prepare the base (caramel, custard, or mousse) a day in advance and finish with toppings just before serving to preserve texture and brightness.
- Storage tips for toppings: keep caramel sauces, chocolate ganache, or fresh fruit compotes in separate containers and assemble prior to serving for the best texture and appearance.
Fun Facts & Trivia (Optional)
Delving into the little-known tidbits about condensed milk reveals a dessert history that’s as rich as the flavors it inspires. Here are a few tasty morsels to nibble on as you cook:
- Condensed milk was invented in the 19th century as a practical solution to preserve milk in hot climates, providing a stable, shelf-stable source of sweetness and creaminess.
- In many cultures, condensed milk pairs beautifully with coffee, creating drinks and desserts that are both comforting and invigorating.
- Best-known variations, such as dulce de leche, arise from slow-cooking sweetened milk until it turns deeply caramelized, yielding a luxurious, spreadable sauce that elevates desserts to a new level.
- Condensed milk’s flexibility has made it a favorite ingredient in no-bake cheesecakes, puddings, and tropical-inspired sweets around the world, reflecting regional flavors and traditions.
- There is a playful tradition of using condensed milk as a “nature’s caramel” in some desserts, where the natural sweetness and creamy texture become the canvas for other ingredients like nuts, citrus, or cocoa.
Conclusion: A World of Sweet Possibilities
Condensed milk is more than a single ingredient; it’s a portal to a spectrum of desserts, each with its own character and story. From the first luxurious lick of a fudgy dump of caramel to the last delicate sigh of a whipped mousse, desserts built around condensed milk invite you into a space where simplicity and sophistication meet. The beauty of this ingredient is its generosity: it lends a helping hand, a smooth texture, and a mood-lifting sweetness that can be bold or delicate depending on how you treat it. As you experiment with the ideas in this guide, you’ll discover that the most memorable desserts aren’t always the most complex; sometimes they’re the ones that let the natural magic of condensed milk shine through—soft, velvety, and as comforting as a hug after a long day. So gather your favorite flavors, relax into the process, and let condensed milk lead you on a delicious journey through desserts that feel both timeless and freshly inspired. Happy cooking, and may your kitchen be filled with the sweet, inviting aroma of caramel, vanilla, and a touch of something wonderfully indulgent.
Ingredients
- Condensed Milk Base
→ The core of classic sweetened condensed milk: a rich, thick dairy syrup that provides sweetness, creaminess, and the foundation for many dessert recipes. Using whole milk yields the traditional, velvety texture with the most depth of flavor. This mixture is gently simmered to reduce water content and integrate the sugar, creating a smooth, glossy syrup that coats desserts beautifully. - 2 cups whole milk
→ Provides a full-bodied dairy foundation with natural fats that contribute to a creamy mouthfeel. Whole milk gives the richest texture; using reduced-fat versions will yield a lighter but thinner result. If you’re avoiding dairy completely, you can substitute a non-dairy milk (like coconut or cashew milk), but the flavor and thickness will differ. For best results, use fresh, unsalted milk and avoid ultra-pasteurized varieties that can affect emulsification during simmering. - 2/3 cup granulated sugar
→ Primary sweetener that dissolves into the milk as it cooks, forming the characteristic caramel-like sweetness of condensed milk. Granulated sugar dissolves evenly and helps with the thickening process as the mixture reduces. If you prefer a lighter sweetness or a dairy-free version, you can experiment with partial substitutions, but pure granulated sugar produces the classic texture and shelf-stable stability. - 1/4 teaspoon salt (optional)
→ A small amount of salt heightens sweetness, rounds the flavors, and can help balance the richness of the milk. It also stabilizes the mixture slightly during reduction, preventing the sweetness from becoming overly cloying. If you are avoiding salt for dietary reasons, you can omit this without dramatically changing the outcome. - 1/2 teaspoon vanilla extract (optional)
→ Imparts a warm, aromatic note that enhances the overall flavor profile of the condensed milk. Vanilla primarily stays in the background, contributing depth rather than sweetness. Use pure vanilla extract rather than imitation for a more nuanced, natural aroma. If you’re using vanilla beans, you can infuse the milk with a scraped bean during simmering for an even richer result. - Optional Flavor Boosts (choose if desired)
→ Enhancers like a drop of almond extract (for a nutty, complementary fragrance), a teaspoon of light corn syrup (to improve shine and viscosity), or a small pinch of cardamom can add unique dessert-specific notes. Include these only if you’re aiming for a particular flavor profile; they are not necessary for a standard sweetened condensed milk.
Instructions
- Measure and prep your ingredients: set 2 cups whole milk, 2/3 cup granulated sugar, 1/4 teaspoon salt (optional), 1/2 teaspoon vanilla extract (optional), and any optional flavor boosts within reach.
→ Having everything measured and ready prevents interruptions while simmering, which can cause uneven dissolution of sugar or scorching on the bottom of the pan. - Combine the milk and sugar in a heavy-bottomed, wide saucepan and whisk once to ensure the sugar begins to wet the milk evenly.
→ A wide, sturdy pan promotes even heat distribution and reduces the risk of scorching as the liquid reduces; whisking at the start helps prevent clumps of sugar from settling and ensures a smooth base. - Place the pan over medium-low heat and slowly bring the mixture to a gentle simmer, stirring occasionally with long, steady motions to dissolve the sugar completely.
→ Gentle heat prevents scorching and caramelization of the milk sugars too early, while regular stirring ensures the crystals dissolve uniformly for a smooth condensed milk. - Reduce the heat to low and maintain a very gentle simmer, occasionally stirring and scraping the bottom with a silicone spatula to prevent any film or crust from forming.
→ Slow simmering concentrates the liquid without burning; frequent scraping keeps the bottom clear and helps achieve a glossy, thick texture. - Continue simmering until the mixture thickens by roughly half and coats the back of a spoon with a smooth, homogeneous gloss, which may take 20 to 40 minutes depending on your stove and pan.
→ The reduction concentrates sweetness and fat, creating the characteristic silky mouthfeel; testing with a spoon helps you gauge proper consistency without over-reducing. - Towards the end, stir in the optional salt and vanilla extract (and any optional flavor boosts) to balance sweetness and layer aromatics, then simmer for an additional 1 to 3 minutes to integrate flavors.
→ Salt enhances sweetness and rounds flavors, while vanilla (or other botanicals) infuses aroma; a brief final simmer ensures even distribution. - Remove the pan from heat and let the condensed milk cool in the pan for 10 minutes before transferring to a sterilized jar, then seal and refrigerate once completely cooled.
→ Allowing a controlled cooling phase prevents rapid temperature shock and helps preserve texture; a properly sealed jar promotes longer shelf life in the refrigerator. - Store the condensed milk in an airtight container in the refrigerator for up to 2 weeks or freeze in portions for longer storage, labeling with date and contents.
→ Proper storage maintains texture and prevents spoilage; freezing in portions makes it easy to portion out for future desserts without thawing large quantities.
Notes
These condensed milk desserts are rich, silky, and incredibly versatile, serving as a foundation for everything from caramel sauces to luscious fillings. You can tailor sweetness and texture by controlling the reduction time and choosing between whole milk and non-dairy alternatives, keeping in mind that dairy-free options will yield a different mouthfeel and gloss.
Key technique tips: simmer the mixture over gentle heat, stirring frequently to prevent scorching and ensure a smooth, glossy syrup. Start with a gentle simmer and reduce the heat as it thickens; the mixture will thicken further as it cools, so aim for a slightly looser consistency than you want in the finished product.
Flavor customization: a pinch of salt enhances sweetness and rounds the richness, while vanilla extract adds a warm aroma. If you’re aiming for nutty or floral notes, consider a drop of almond extract or a hint of cardamom. For a brighter finish, finish with a splash of lemon or lime zest after thickening, taking care not to curdle the mixture.
Substitutions and alternatives: for a dairy-free version, substitute with coconut milk or cashew milk, understanding that the texture and flavor will shift toward coconut or cashew notes. If you’re avoiding refined sugar, you can experiment with natural sweeteners, but pure granulated sugar yields the classic texture and stability. For a smoother shine, add a teaspoon of light corn syrup or a small amount of glucose at the end of cooking.
Texture and storage: use fresh, cold milk to start; reduced dairy fats will yield a lighter syrup. After cooking, cool the condensed milk completely and transfer to a clean jar. It will keep refrigerated for up to 2 weeks; freeze in small portions for longer storage. When reheating, warm gently over low heat and whisk to restore smoothness.
Safety and quality: avoid ultra-pasteurized milk if possible, as it can affect emulsification and texture. If you’re using vanilla beans, infuse the milk with scraped seeds during simmering for a richer, more intense flavor. Always taste and adjust sweetness at the end, since the reduction will concentrate sugars as you cool.
Tips
Tips for Making Condensed Milk Base
- Use a heavy-bottomed saucepan to distribute heat evenly and prevent scorching, especially as the mixture thickens and reduces.
- Warm the milk gently and dissolve the sugar completely before bringing to a simmer. Undissolved sugar can cause graininess and uneven texture.
- Cook over low to medium-low heat. A gentle simmer is key; boiling vigorously can cause scorching and a foamy, uneven final product.
- Stir frequently, especially along the edges and bottom of the pan, to prevent caramelized spots and to help the mixture reduce smoothly.
- Skim foam as needed. A thin layer of foam on top is normal; skimming can yield a smoother, glossy finish.
- Test for thickness by coating the back of a spoon. If it clings in a thin film and leaves a trail when you run your finger through, it’s near the right consistency; continue simmering a few minutes if needed.
- Monitor sweetness and salt: if you’re sensitive to sweetness, reduce sugar to 2/3 cup plus a pinch more salt; the flavor should taste balanced when cold.
- For a richer aroma, add vanilla extract toward the end of cooking and avoid boiling it off; if using vanilla beans, infuse the milk by simmering with the scraped bean for deeper flavor.
- Non-dairy substitutions: if using coconut or cashew milk, expect a different texture and flavor. You may need to adjust simmer time slightly and the final thickness may be less glossy.
- Storage: cool completely, then refrigerate in a clean, airtight container. It thickens further as it chills and will hold for up to 2 weeks. Freeze in small portions for longer storage.
- Flavor boosts: add optional almond extract, a touch of corn syrup for extra shine, or a pinch of cardamom only if you’re aiming for a specific dessert profile; these are optional and should complement, not overwhelm, the base.
Note: If you’re aiming for the classic, velvety condensed milk, avoid ultra-pasteurized milk and stick with fresh whole milk when possible to achieve the richest texture.
FAQ
What is the basic condensed milk dessert recipe?
Typically combines sweetened condensed milk with flavors like vanilla, butter, and sometimes cocoa or fruit. It can be heated gently to thicken into a caramel-like dulce de leche or used as a rich base for puddings, pies, and ice cream toppings.
What ingredients do I need for a simple condensed milk dessert sauce?
Sweetened condensed milk, unsalted butter, vanilla extract, and a pinch of salt. Optional additions: cocoa powder for chocolate version, coffee for mocha flavor, or cream to adjust thickness.
How do I make dulce de leche from condensed milk?
Two common methods: 1) Stove-top: simmer a can of sweetened condensed milk in water for 2–3 hours, covered, ensuring the can is always submerged; cool before opening. 2) Oven: bake an unopened can of condensed milk in a water bath at 350°F (175°C) for 1–1.5 hours until amber, then cool before opening. Note: follow safety guidelines for heated cans.
Can I make condensed milk desserts without dairy?
Yes. Use dairy-free condensed milk alternatives (coconut, almond, or soy condensed milk). Check labels for added sugars. For richness, add coconut cream or dairy-free butter. Be aware of slight flavor differences.
How can I thicken condensed milk dessert sauces?
Simmer gently over low heat, stirring constantly until reduced by 1/3 to 1/2. Add a small amount of cornstarch slurry (1 tsp cornstarch + 1 tsp water) to thicken faster, then cook a minute more. Avoid boiling too vigorously to prevent scorching.
How long does condensed milk dessert last?
Refrigerated finished sauces or desserts last about 1–2 weeks in an airtight container. Dulce de leche can last up to 2 weeks in the fridge. For longer storage, freeze in portions for up to 3 months, then thaw in the fridge.
What are popular dessert ideas using condensed milk?
Desserts include: tres leches cake, Banoffee pies, key lime pie with condensed milk, cheesecake swirls, chocolate fudge, caramel sauce for ice cream, milk puddings, panna cotta with condensed milk, and no-bake cheesecake fillings.
How do I prevent using too much sugar in condensed milk desserts?
Start with the recommended amount of sweetened condensed milk and balance with tangy components (lemon, yogurt), or use unsweetened condensed milk and add sugar to taste. When using dulce de leche, adjust flavor with vanilla and salt to keep balance.
What equipment is best for making condensed milk desserts?
A heavy-bottom saucepan for even heat, a silicone spatula to avoid sticking, and a thermometer if precise thickening is desired. For dulce de leche in oven method, a shallow pan and a larger baking dish for water bath, plus parchment to prevent sticking.