Introduction / Hook
Imagine a bite-sized parade of chocolatey decadence that requires no baking, no complicated equipment, and only a whisper of time before it wins a crowd. No-bake Homemade Choco Tacos party bites are the portable, party-ready version of a beloved frozen treat, reimagined into handheld delights that crunch, melt, and satisfy every craving in one glorious mouthful. The shell is crisp and subtly sweet, the filling luxuriously creamy, and the drizzle of chocolate on top brings it all together like a tiny dessert symphony. These bites are not just snacks; they’re a celebration you can whip up for a crowd in minutes, a playful nod to nostalgic flavors, and a guaranteed showstopper at gatherings of any scale. The aroma alone—rich cocoa, vanilla, and a hint of caramel or coconut—promises happiness with every inhale. And when you bite through that first layer, you’ll hear a faint sigh of delight from your guests, followed by a chorus of “how did you even think of this?” These choco taco bites are everything you want: fun, familiar, and extraordinarily easy to pull off.
The Story Behind the Dish
No-bake treats have a way of becoming modern legends: bright, adaptable, and forgiving in the best possible sense. The choco taco itself is a classic of frozen desserts, born from the idea of combining a crisp, edible shell with a luscious creamy center and a glossy chocolate glaze. It’s a memory-borne flavor—one that evokes summer fairs, family picnics, and the joy of simple indulgence. By translating that iconic concept into bite-size, no-bake form, we honor the spirit of the original while making it accessible for parties, potlucks, or quiet nights when you want something that feels special without demanding oven time. The “no-bake” ethos is especially relevant in a world that moves fast: you can assemble these bites from pantry staples, adapt them to dietary needs, and tailor them to seasonal flavors with a few thoughtful substitutions. In many homes, the choco taco is a bridge between generations—a playful treat that brings old-fashioned comfort into modern, shareable portions. This recipe preserves that bridge but expands it into a format that invites experimentation, conversation, and a little creative plating. Each step is about balance: crisp shells that give way to creamy centers, a chocolate finish that hardens into a glossy coating, and a final flourish that makes every bite feel like a tiny celebration.
Why You’ll Love This Recipe
- No-bake magic: No need for an oven or complicated equipment; whip these up with basic ingredients and a little patience in the freezer.
- Party-perfect: The bite-sized format makes them ideal for trays, platters, and crowds, with easy serving and clean-up.
- Kid-friendly charm: Familiar flavors that appeal to younger palates, while still satisfying the sweet tooth of adults.
- Customizable: Easily adapt flavors with mix-ins, coatings, and toppings to suit preferences, allergies, or seasonal ingredients.
- Make-ahead friendly: Assemble, freeze, and pull out as needed for last-minute gatherings, holidays, or movie nights.
- Portion control: Individually sized bites help with portion awareness without sacrificing fun or indulgence.
- Equipment light: Mostly hands-on assembly with minimal tools, making it a stress-free kitchen project.
Flavor Profile & Texture
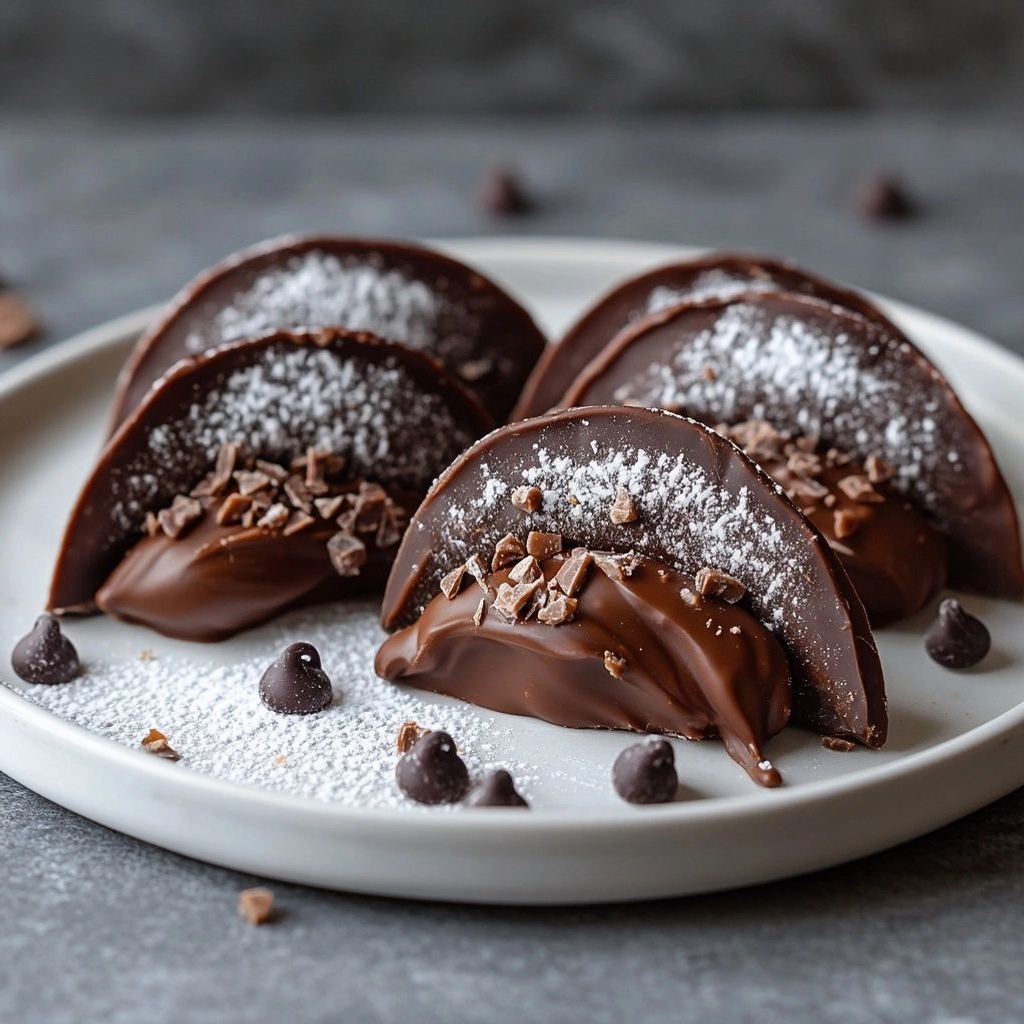
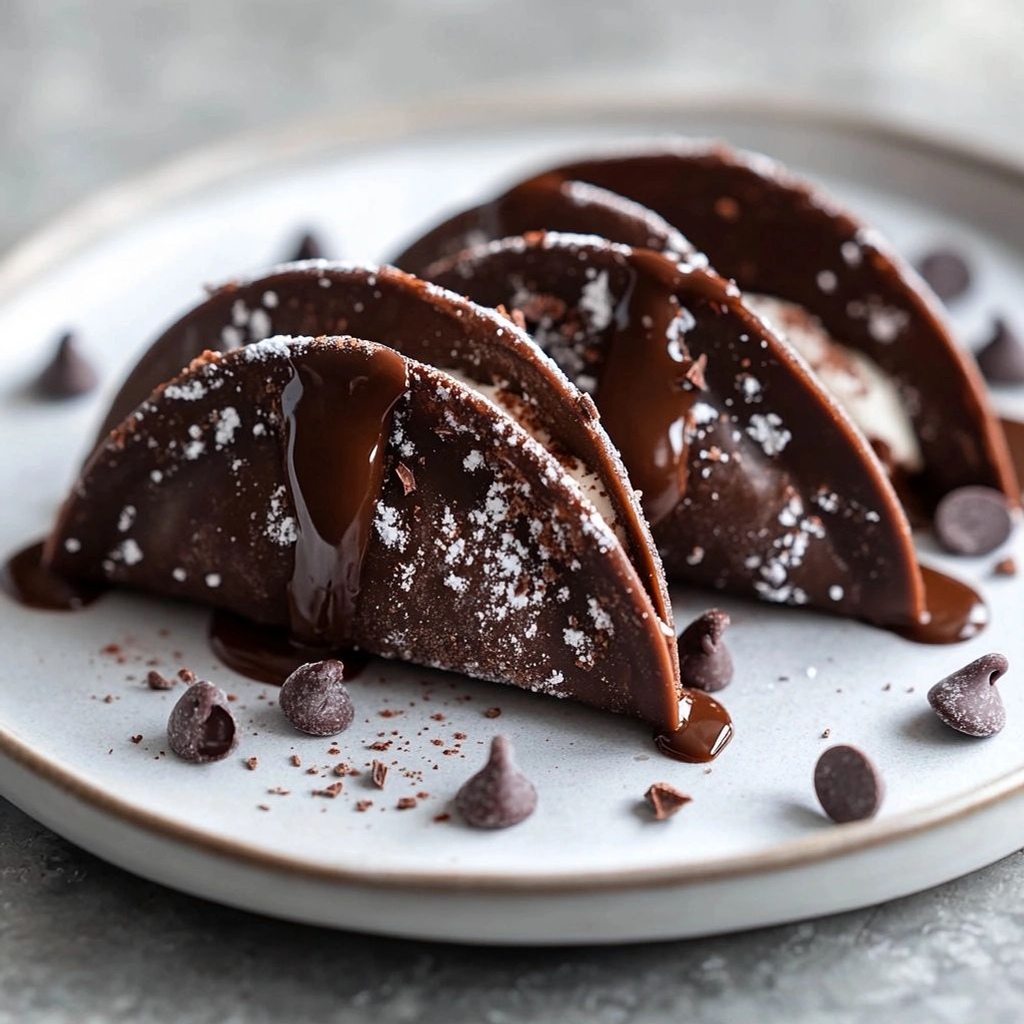
The flavor journey begins with a crisp, slightly sweet shell that delivers a satisfying snap. This shell is often made from a crisp wafer or a shatteringly thin cookie exterior that mimics the texture of a traditional taco shell, but in a bite-sized form. Inside, you’ll encounter a creamy, luscious center—think whipped cream, vanilla custard, or a subtle coconut-tinged filling—that is smooth, airy, and almost cloud-like. The harmony between the shell and the filling is the key: the shell provides structure and a delicate crunch, while the filling adds richness and depth, with a touch of sweetness that never overwhelms. A glossy chocolate coating seals the deal, offering a rich, bittersweet finish that contrasts beautifully with the lighter interior. If you add optional toppings, such as crushed nuts, toasted coconut, or a drizzle of caramel, you introduce new layers of texture and complementary flavors—the saltiness of nuts, the toasty aroma of coconut, or the deep, caramelized notes of a drizzle that hints at the frozen version’s dessert-bar elegance. Overall, you’re chasing a well-balanced trifecta: crisp exterior, creamy interior, and a final chocolate finish that clings with a gentle, satisfying snap as it sets. Texturally, every bite should feel multi-dimensional: a crisp outer shell, a creamy, smooth center, and a delicate glaze that becomes crinkly as it cools. The result is a bite that feels indulgent without being heavy, bright with a touch of vanilla or coconut, and deeply comforting with a chocolate finish that lingers just long enough on the palate to invite the next bite.
Occasions & Pairings
These no-bake choco taco bites shine at a variety of occasions—from casual movie nights and kids’ parties to more polished gatherings where you want a playful, crowd-pleasing dessert. They’re equally delightful as a centerpiece for a dessert table or as a last-minute offering when you’re hosting a crowd. Consider these occasions and pairings to plan your serving plan:
- Holiday gatherings: a tray of bites adds whimsy to a traditional dessert lineup and provides a lighter option amid richer sweets.
- Birthday parties: a colorfully decorated tray with toppings that match the party theme makes for a festive focal point.
- Potlucks and picnics: easy transport, no-melt risk (if kept chilled), and universally loved flavor.
- Movie nights and game days: bite-sized treats that are easy to share and never sticky or messy.
- Tea time or coffee breaks: pair with a warm beverage to balance the chocolate and cream with a little bitterness or brightness from the drink.
Suggested pairings to elevate the experience:
- Drinks: a rich espresso, a vanilla latte, or a dark chocolate stout work beautifully with the chocolate profile.
- Side bites: fresh fruit skewers (like strawberry or orange segments) offer a bright counterpoint to the deep chocolate.
- Desert companions: a light citrus tart or a vanilla bean custard can bridge the flavors for a more elaborate dessert spread.
Tips, Variations & Substitutions
One of the joys of no-bake bites is how forgiving and adaptable they are. Here are ideas to tailor this recipe to your pantry, dietary needs, or flavor preferences:
- To make vegan: use plant-based cream, a dairy-free butter, and dairy-free chocolate for the coating. Choose vegan-friendly shells made from oat, almond, or coconut-based wafers if available.
- Gluten-free version: select gluten-free shells or wafers and ensure the chocolate is certified gluten-free. Many coconut or rice-based wafers are naturally gluten-free.
- Flavor twists: introduce a hint of coconut extract, almond extract, or a dash of espresso powder to the filling to create a coffee-chocolate profile.
- Texture play: add a little crushed pretzel for a salty crunch, or toasted almond slivers for a nutty bite.
- Filling variations: swap in whipped cream with vanilla pastry cream or a light mascarpone mixture for a richer center; mix in a spoonful of peanut butter for a peanut-chocolate version.
- Shell alternatives: use mini waffle bowls, pretzel cups, or crisped rice candy shells to mimic the taco shell texture with different flavor notes.
- Color and presentation: tint the filling lightly with natural colorants (such as beet juice for pink accents or matcha for a green hue) and finish with a contrasting drizzle to fit a themed party.
- Make-ahead technique: assemble up to the point of coating with chocolate, freeze on a parchment-lined tray, then dip in melted chocolate and return to the tray to set—this helps manage time and ensures a glossy finish.
Storage & Make-Ahead Ideas
These treats are particularly forgiving when it comes to planning. Here are practical tips for storing and making ahead:
- Storage: store the bites in an airtight container in the freezer for up to 1 month. If kept in the fridge, consume within 3–4 days to preserve texture and freshness.
- Make-ahead assembly: you can prepare the shells and the filling in advance, then assemble and coat with chocolate close to serving time to maintain that crisp-on-the-outside vibe.
- Reheating and refreshing: if the filling firms up too much after chilling, let the bites sit at room temperature for 10–15 minutes to soften slightly before serving. You can re-dip in chocolate or a quick warm glaze to refresh the coating as needed.
- Transporting: if you’re taking them to an event, place a thin sheet of parchment between layers to prevent sticking, and keep the tray chilled in a cooler or fridge until serving time.
Fun Facts & Trivia (Optional)
The choco taco has a charming history of its own, with stories of novelty items and limited-time flavors that often spark nostalgia. While the original may have dipped into the freezer aisle of a well-known brand, the no-bake, kitchen-made version here captures the same spirit of delight—accessible, playful, and endlessly adaptable. Fun tidbits to savor as you prepare or plate:
- Chocolate-coated shells evoke the tactile satisfaction of dipping and biting into a luscious exterior, a sensation cherished in many frozen novelty desserts.
- The combination of chocolate, vanilla cream, and crispy shell has appeared in countless culinary riffs around the world, each culture adding its own twist on texture and filling.
- Nature-friendly tip: using fair-trade chocolate and organic, non-GMO ingredients can make a simple treat feel more responsible without compromising flavor.
- Presentation hack: serve on a slate board with mini tongs for a chic, minimalist dessert bar that still feels fun and approachable.
Make-It-Special: Presentation Ideas
Even though these bites are simple, the way you present them can elevate the entire experience. Consider these ideas to showcase your no-bake choco taco bites at their best:
- Elegant tray: arrange the bites on a marble or slate tray, interspersed with a few decorative cacao nibs and coconut shavings for texture and visual contrast.
- Themed plating: use small taco-inspired platters or miniature wooden boards to nod to the “taco” concept while keeping a refined vibe.
- Interactive topping bar: offer a selection of toppings—crushed nuts, mini marshmallows, caramel drizzle, sea salt, toffee bits—so guests can customize their bites at the table.
- Serving temperature: for a crisp shell, serve slightly chilled; for a creamier experience, let them warm a touch to enhance the filling’s silkiness.
Final Thoughts
No-bake Homemade Choco Tacos party bites bring together comfort, nostalgia, and effortless practicality in a way that feels indulgent yet approachable. They’re the kind of dessert that earns smiles and starts conversations, the kind of treat you can proudly make for friends and family without sweating the oven timer. Whether you’re feeding a crowd at a backyard gathering, delighting guests at a dessert bar, or simply treating yourself after a long week, these bites deliver a balanced, crowd-pleasing experience every single time. The beauty of this recipe lies not only in the taste but in the freedom it offers: to mix, match, and create variations as vast as your imagination allows. So gather your ingredients, set aside a little patience for the chill time, and prepare to watch your kitchen transform into a mini party where every bite is a small celebration of flavor, texture, and joy.

Ingredients
-
Shell Base – 2 cups gluten-free chocolate wafer cookies, finely crushed
→ This forms the crisp, shell-like exterior of the bites. Crushing the cookies into a fine, uniform crumb ensures even binding and a sturdy shell that will hold the filling without crumbling. If your cookies aren’t already chocolate-flavored, you can use any gluten-free chocolate biscuit and adjust sweetness with the binding fat. Sift the crumbs to remove any large lumps for a smoother shell texture. -
Shell Base – 3 tablespoons melted coconut oil
→ The fat from the coconut oil helps to bind the cookie crumbs into a cohesive, glossy shell that holds its shape when molded. It also adds a subtle tropical aroma and richness. For best results, use melted, warm (not hot) oil and blend it evenly into the crumbs until the mixture clumps together when pressed. If you’re dairy-free, coconut oil keeps the shell crisp and flavorful; if you don’t have it, you can substitute refinEd avocado oil in the same amount, though the texture may be a touch less crisp. -
Chocolate Fudge Filling – 3/4 cup dairy-free dark chocolate chips
→ This creates a rich, glossy fudge layer that melts softly when bitten. Use high-quality dairy-free chocolate for depth of flavor. Melt gently with one of the following methods: (a) double boiler, stirring until smooth, or (b) short bursts in a microwave, stirring between intervals to prevent scorching. If you prefer sweeter fudge, add a teaspoon of maple syrup or a pinch of salt to balance bitterness. -
Chocolate Fudge Filling – 1/2 cup coconut milk (full-fat, refrigerated)
→ The thick coconut milk acts as a creamy binder and helps the ganache set firm yet smooth. Chill the coconut milk can overnight, then scoop out the solidified cream for blending with melted chocolate. Stir until fully incorporated. If you want a thicker fudge, use only the solid coconut cream portion; for a looser texture, add a tablespoon or two of additional coconut milk. -
Vanilla Cream Layer – 1 cup coconut cream (thick, refrigerated)
→ This layer provides a light, contrasting vanilla creaminess to balance the chocolate. Whip the thickened coconut cream with vanilla extract and a touch of sweetness if desired. For best texture, keep the coconut cream very cold before whipping and whip until soft peaks form. If you don’t have a whipped cream texture, you can whisk it vigorously by hand or use an electric mixer for a fluffier result. -
Vanilla Cream Layer – 1 teaspoon pure vanilla extract
→ Enhances the cream’s aroma and depth. Use real vanilla for a more pronounced, fragrant note rather than imitation vanilla. If you have vanilla paste, you can substitute half the amount for a richer vanilla speckled appearance and intensified flavor. -
Vanilla Cream Layer – 1–2 tablespoons maple syrup (optional, to taste)
→ Adds a gentle sweetness to the vanilla layer without making it overly sugary. Start with 1 tablespoon and adjust to preference. If you’re using unsweetened coconut cream, maple syrup helps achieve a balanced profile; for a lower-sugar version, omit and rely on the natural sweetness of the coconut cream. -
Optional Toppings – 1/4 cup chopped roasted peanuts (optional)
→ Adds a crunchy, nutty contrast to the creamy layers. Lightly toast the peanuts in a dry skillet for extra aroma before chopping to medium-sized pieces so they distribute evenly. If you have nut allergies, substitute with chopped roasted almonds or sunflower seeds for a similar texture. -
Optional Toppings – 2 tablespoons cacao nibs (optional)
→ Provides a pop of intense chocolate flavor and a slight snap. Sprinkle over the set filling for a decorative finish and added bitterness that complements the sweetness. Store cacao nibs in a cool, dry place to preserve their crunch.
Instructions
- Line a 24-cup mini muffin tin with paper liners or grease each cavity well to prevent sticking and to ensure easy removal of the assembled bites.
→ Proper lining or greasing creates a nonstick surface that keeps the delicate shell intact and makes unmolding straightforward without tearing the crust. - Finely crush gluten-free chocolate wafer cookies until you achieve a uniform, powdery crumb, then sift to remove any medium or large lumps.
→ A fine, consistent crumb ensures an even, cohesive shell that binds smoothly with the coconut oil and prevents crumbling when filled. - Combine the cookie crumbs with melted coconut oil and mix until all crumbs are evenly moistened and clump together when pressed.
→ The fat from the coconut oil binds the crumbs into a cohesive shell; ensure the mixture is uniformly moistened for a sturdy, glossy shell that holds its shape under filling. - Spoon or portion the crumb mixture into each cavity and press firmly up the sides to form a shallow shell with about 1/8 inch (3 mm) thickness, then chill in the refrigerator for at least 20 minutes or until firm.
→ Chilling sets the shell so it keeps its shape during the subsequent filling steps and avoids squeezing the filling out or collapsing when you add the fudge. - Prepare the dairy-free chocolate fudge filling by gently melting the dairy-free dark chocolate chips with the canned coconut milk using a double boiler or in short bursts in the microwave, stirring between intervals until the mixture is smooth and glossy.
→ Gentle melting prevents scorching and ensures a velvety ganache; the coconut milk provides silkiness and aids in setting firmness without brittleness. - Let the fudge mixture cool slightly to body temperature, then spoon or pipe a generous amount into each chilled shell, smoothing the tops with the back of a spoon, and refrigerate until the filling is set but still slightly glossy, about 15–20 minutes.
→ A brief chill firms the fudge so it stays contained within the shell while remaining soft enough to bite through, mimicking a classic chocolate taco filling. - Whip the thickened coconut cream with vanilla extract and maple syrup (if using) until soft peaks form, keeping the mixture very cold during whipping and using gentle, even strokes for a light, mousse-like texture.
→ The vanilla cream provides a contrasting texture and flavor; chilling prevents the whipped cream from weeping and helps it hold volume. - Spread or pipe a even layer of the vanilla cream over the set fudge in each shell, creating a distinct vanilla center while leaving a small edge of fudge visible around the sides for visual contrast.
→ Layering creates a multi-textured bite: a crisp shell, rich fudge, and a bright vanilla cream; the edge visibility helps evince the different components. - Return the assembled bites to the refrigerator and chill until the vanilla layer is fully set, about 20–30 minutes, testing by gently pressing to confirm that the cream holds its shape.
→ Proper chilling ensures clean bite lines and prevents the top from spreading or sliding when you add toppings. - If using optional toppings, lightly toast the chopped roasted peanuts in a dry skillet until fragrant, then cool and chop to medium-sized pieces; sprinkle over the set vanilla cream, followed by cacao nibs for a bit of snap and extra chocolate aroma.
→ Toasting enhances nutty aroma and flavor; medium pieces distribute evenly for texture without overpowering the bites, while cacao nibs add bitterness that balances sweetness. - Serve the no-bake choco tacos party bites chilled, and store any leftovers in an airtight container in the refrigerator for up to 3 days.
→ Chilled storage maintains the integrity of the layered textures and prevents the filling from softening or separating; keep them cold to preserve firmness and flavor.
Notes
These no-bake choco tacos party bites are naturally gluten-free and can be made vegan with dairy-free chocolate and coconut milk, making them a decadent yet bring-anywhere treat for gatherings. The crisp shell is achieved by finely crushing gluten-free chocolate wafer cookies and binding them with melted coconut oil, creating a sturdy bite-ready shell that won’t crumble under the creamy fillings. The fudge filling uses dairy-free chocolate and canned coconut milk for a glossy, melt-in-the-mouth center, while the vanilla cream layer provides a light, airy contrast that pairs beautifully with the rich chocolate. If you’re serving a dairy-free crowd, this recipe scales beautifully by swapping any dairy ingredients for plant-based alternatives. For a sweeter profile, adjust the maple syrup in the vanilla layer or add a pinch of sea salt to the fudge to balance flavors. These bites freeze well, which makes them perfect for make-ahead party prep or a cool, elegant dessert tray.
- Shell texture: Ensure the cookie crumbs are very fine and evenly mixed with the melted coconut oil. If the shell feels soft, chill the mixture briefly to help it set before molding into shells or cups.
- Fudge filling: Use high-quality dairy-free dark chocolate and whisk the coconut milk in with the melted chips until smooth. For a thicker fudge, use more of the solid coconut cream portion and reduce additional coconut milk.
- Vanilla cream: Keep the coconut cream cold to achieve a fluffy, whipped texture. Whip until soft peaks form, then fold in vanilla extract and maple syrup to taste. If you prefer a lighter vanilla note, whip briefly to maintain creaminess without overbeating.
- Texture balance: Add a small amount of finely chopped roasted peanuts or cacao nibs for a crunchy contrast. Toast nuts lightly to enhance aroma before chopping for even distribution.
- Make-ahead and storage: Assemble shells and fillings, then freeze on a tray before transferring to an airtight container. They will keep well for up to 1 month in the freezer; thaw briefly at room temperature or serve straight from the freezer for a frosty bite.
- Allergies and substitutions: If nut allergies are a concern, substitute chopped roasted almonds or sunflower seeds with similar sizing. If dairy-free, confirm all chocolate and coconut products are certified dairy-free.
- Presentation: Drizzle a tiny amount of melted chocolate over the finished bites for a glossy finish or sprinkle cacao nibs and a pinch of flaky sea salt for a sophisticated, dessert-table look.
- Serving tips: Serve these bites slightly chilled for a firmer shell and a creamy interior. Pair with coffee, sparkling water, or a dessert wine to complement the rich chocolate sweetness.
Tips
- Shell preparation: For a sturdier shell, ensure the shell base is finely crushed and well sifted to remove clumps. Mix in the melted coconut oil until the crumb binds fully; it should hold together when pressed but not feel greasy.
- Shell shaping: Press the mixture firmly into mini muffin cups or silicone half-sphere molds to create even, bite-sized shells. Tap the mold gently on the counter to remove air pockets and ensure a smooth exterior.
- Chill before filling: Chill the shell-lined molds for 10–15 minutes before adding the fudge filling. This helps the shell set and prevents the filling from sinking or sliding.
- Fudge texture: Use high-quality dairy-free dark chocolate chips and full-fat coconut milk for a glossy, silky ganache-like fudge. If you prefer a thicker fudge, use more solid coconut cream and less coconut milk.
- Melting method: When melting chocolate, use a double boiler or gentle microwave bursts in 15–20 second intervals, stirring in between to avoid scorching. Keep heat low and steady for a smooth finish.
- Flavor balance: If the fudge tastes a touch bitter, a small pinch of salt or a teaspoon of maple syrup can balance sweetness. Taste the filling as you go before pouring into the shells.
- Vanilla cream texture: For fluffy vanilla cream, chill the coconut cream thoroughly, then whip with vanilla extract until soft peaks form. If you don’t have a mixer, whisk vigorously by hand until light and airy.
- Warm assembly: If the vanilla cream becomes too thick to pipe, lightly warm the base in a warm-water bath for a few seconds and re-whip to regain scoopable texture.
- Layer stability: Allow each layer (shell, fudge, vanilla cream) to set before adding the next. This prevents mixing of layers and helps maintain distinct, clean lines in each bite.
- Optional toppings: Toasted peanuts or cacao nibs add texture and contrast. Lightly toast nuts to release aroma, then chop to medium pieces so they distribute evenly without sinking.
- Nut-free version: Use toasted sesame seeds or sunflower seeds as an alternative topping for a similar crunch and flavor profile without nuts.
- Storage: Keep assembled bites refrigerated for best texture. They are best enjoyed within 2–3 days; cover loosely to prevent the tops from sticking and to avoid absorbing fridge odors.
FAQ
What are No-bake Homemade Choco Tacos party bites?
They’re bite-sized, no-bake desserts inspired by chocolate-dipped taco shells filled with a creamy chocolate filling and crunchy toppings. Perfect for parties and easy to make ahead.
What ingredients do I need?
Common ingredients include:
– Taco-shaped shells or tortilla chips shaped into shells
– Melted chocolate or chocolate coating
– Creamy filling (e.g., whipped cream, cream cheese with cocoa, or chocolate pudding)
– Optional toppings such as crushed cookies, nuts, sprinkles, shredded coconut, or candy bits
– A pinch of salt and vanilla for flavor
Can I make these without gluten?
Yes. Use gluten-free tortilla shells or gluten-free cookie/cracker crumbs for the shell texture, and ensure your chocolate and toppings are certified gluten-free. Avoid cross-contamination with shared utensils.
Do I need to bake anything?
No. These are entirely no-bake. The shells can be store-bought or made from baked ingredients that are cooled, but the assembly itself requires no oven time.
How do I shape the shells?
If using store-bought shells, you can gently bend or trim them to resemble a taco shape. For a DIY shell, lightly toast edible tortillas or cookie wafers, then fold them over a small form (like a clean cup) to hold their taco shape as they set in the fridge.
How should I fill the tacos?
Choose a filling that sets well and tastes great with chocolate. Popular options include:
– Whipped cream with a hint of cocoa
– Cream cheese whipped with a bit of powdered sugar and vanilla
– Chocolate pudding or ganache
Pipe or spoon into the shell until filled to the brim, then top.
What toppings work best?
Crushed cookies, chopped nuts, mini chocolate chips, rainbow sprinkles, toasted coconut, crushed pretzels, or cookie crumble. Add a drizzle of white or dark chocolate for a finished look.
How far in advance can I make these?
You can assemble them a day ahead and refrigerate. If using dairy-based fillings, keep refrigerated. For best texture, add toppings just before serving to maintain crunch.
How should I store leftovers?
Store in an airtight container in the refrigerator for up to 2–3 days. Keep toppings separate if possible and add just before serving to maintain crunch.
Are they suitable for kids or parties with dietary restrictions?
Yes, with proper substitutions. Use dairy-free fillings and chocolate, or allergy-friendly toppings as needed. For nut-free versions, avoid nuts and use seeds or candy alternatives. Always check labels for allergen information.