Introduction / Hook
Imagine dessert-level indulgence with the simplicity of a sandwich press. A lightweight, fluffy tea-time cake that comes together in minutes, wafting a warm, comforting aroma through your kitchen as if a tiny bakery has parked itself on your countertop. This is the magic of the 5 Mins Tea Time Cake for Sandwich Maker: a quick, clever solution for when a craving strikes between meetings, chores, or when guests drop by unannounced. It’s the sort of treat that makes you feel like a magic wand has been waved—suddenly you have a golden, cloud-soft cake ready to be enjoyed with a cuppa, without the hassle of washing up a dozen bowls or waiting for an oven to preheat. The texture is tender, the crumb delicate, and the flavor adaptable enough to suit a classic afternoon tea or a playful modern twist. The beauty lies in its speed, reliability, and the childlike joy of creating something comforting with very little effort. If you’ve ever wanted to bake with the speed of a snack and the soul of a cake, you’re in for a delicious, cozy surprise.
The Story Behind the Dish
Tea-time sweets have long held a cherished place in kitchens around the world, evolving from elaborate affairs into everyday rituals that celebrate slowness in a world that moves fast. This recipe takes inspiration from that heritage—the idea that a simple, well-balanced cake can transform a moment into something memorable. The sandwich maker, a humble appliance often relegated to grilled cheese fame, becomes a quiet hero here. In many households, the ritual of brewing tea is a short, almost sacred pause—a chance to pause, breathe, and savor a small pleasure. The 5 Mins Tea Time Cake honors that pause by condensing the magic of a classic sponge into a compact, delightful bite that can be whipped up in the blink of an eye. It’s a nod to family kitchens where speed doesn’t mean compromising on comfort, where a quick dessert can invite chatter, laughter, and a sense of togetherness. For those who grew up watching a parent or grandparent plate a modest treat with a confident flip in a familiar pan, this cake is a contemporary homage—bright, adaptable, and wonderfully unpretentious.
Why You’ll Love This Recipe
- Speed and simplicity: Whisk, pour, press, and bake in a fraction of the time it takes for a traditional cake.
- Versatility: A neutral base that loves coffee, tea, citrus, vanilla, chocolate, or spice—customize to your mood.
- Low cleanup: One pan (or one sandwich maker) means minimal dishes to wash and less stress.
- Textural contrast: A tender crumb with a gentle, slightly crisp edge from the sandwich maker’s surface.
- Kid-friendly and adult-approved: Friendly enough for little bakers and sophisticated enough for tea-time guests.
- Perfect for all seasons: Bright citrus in spring, warm spices in fall, and cozy chocolate year-round.
- Economical and pantry-friendly: Uses common pantry staples, reducing waste and saving money.
- Portion control with shareable charm: A few slices go a long way toward a satisfying sweet treat.
Flavor Profile & Texture
The cake presents a delicate balance of sweetness and depth. Depending on how you season it, you can coax sunshine-tasting flavors or a more indulgent profile. The base is usually subtly sweet, with a whisper of vanilla or citrus zest that brightens the aroma as it bakes. If you opt for a hint of almond, the aroma becomes comforting and reminiscent of bakery shelves. When chocolate or cocoa is introduced, the crumb gains a quiet richness that pairs beautifully with a cup of strong tea or coffee. The texture is the star—the crumb is moist and springy, yet tender enough to melt on the tongue. The sandwich maker surface adds a faint, caramelized edge that contrasts nicely with the soft interior, giving you a gentle crust without sacrificing tenderness. The beauty of this approach is that you can push the flavor in two directions: keep it light and fragrant with lemon or vanilla, or lean into deeper flavors with cocoa, cinnamon, or nutmeg. In all cases, you’ll finish with a cake that feels comforting and wholesome, perfect for pairing with fruit compotes, a dollop of cream, or a simple dusting of powdered sugar.
Occasions & Pairings
This cake is an imperfectly perfect companion for a wide range of moments. It shines at tea time—a quiet, unhurried ritual that turns a simple cup into an occasion. It’s also ideal for rainy weekends when you want something sweet but not too heavy to accompany a mug of hot cocoa. Bring it to casual gatherings, where its friendly, approachable nature will spark conversations and compliments. It can serve as a quick after-school treat that satisfies both kids and adults, or as a last-minute dessert for a dinner party when paired with a bright fruit compote or a spoonful of yogurt.
Pairings to consider:
- Drinks: Black tea, Earl Grey, chai, coffee, or a glass of cold milk for a comforting balance.
- Accompaniments: Fresh berries, citrus segments, a dollop of whipped cream, vanilla yogurt, or a light dusting of powdered sugar.
- Flavor boosters: A drizzle of honey, a smear of jam, a swirl of nut butter, or a pinch of cinnamon for warmth.
- Savory contrasts: A thin layer of cream cheese or ricotta can convert the cake into a playful tea-time bite.
Tips, Variations & Substitutions
One of the joys of this recipe is its adaptability. Here are ideas to tailor the cake to your dietary needs, pantry stock, or mood:
- Gluten-free option: Use a gluten-free all-purpose flour blend that is designed for cakes. Choose a blend with xanthan gum if your mix lacks it for best crumb.
- Vegan version: Replace dairy with plant-based milk (almond, soy, oat) and use an oil or vegan butter substitute; ensure your sugar is vegan if needed.
- Low-sugar or sugar-free: Use a natural sweetener like coconut sugar or a zero-calorie sweetener that’s suitable for baking; balance with a touch of vanilla or citrus zest to lift the flavors.
- Flavor twists:
- Lemon or orange zest for a bright citrus profile that sings with tea.
- Cinnamon, cardamom, or nutmeg for a warm, comforting note reminiscent of spiced cake.
- Vanilla bean paste or almond extract to deepen aroma and add fragrance.
- Unsweetened cocoa powder or melted chocolate chips for a chocolatey afternoon treat.
- Dried fruit (raspberries, cranberries, chopped dates) stirred into the batter for pockets of sweetness.
- Texture play: A small amount of yogurt can increase tenderness; a spoonful of sour cream can add richness if you’re not dairy-free.
- Breathable swaps: Use applesauce to replace fat to keep the cake light and moist while reducing calories.
- Make it kid-friendly: Add a pinch of rainbow sprinkles or tiny chocolate chips for colorful bites that delight children.
- Seasonal variations: For autumn, a pinch of cinnamon and a splash of caramel syrup; for spring, a hint of lemon and poppy seeds for a delicate crunch.
Storage & Make-Ahead Ideas
The beauty of this cake lies in its flexibility for make-ahead and storage. You can prepare the batter or the fully baked cake ahead of time, depending on how you want to structure your day.
- Storage of baked cake: Once cooled, store in an airtight container at room temperature for up to 2 days. If you need longer, refrigerate for up to a week, bringing to room temperature or reheating briefly before serving.
- Freezing: Bake and fully cool the cake, then wrap tightly in plastic wrap and freeze for up to 2 months. Thaw at room temperature and reheat gently in a sandwich maker or microwave with a splash of milk to restore moisture.
- Make-ahead batter: You can mix the dry ingredients and store them in an airtight container. When you’re ready, whisk in the wet ingredients and cook. This can be a weeknight hero when time is tight.
- Reheating tips: Use a lightly greased pan or spray to prevent sticking. Reheat in a warm sandwich maker or a nonstick skillet to reestablish a gentle crust while keeping the interior soft.
- Serving suggestions: Warm slices with a spread of lemon curd, honey, or a spoonful of yogurt for a balanced dessert or afternoon snack.
Fun Facts & Trivia (Optional)
Here are a few tidbits that add texture to the story of quick, joyful baking:
- The concept of “tea time” as a structured daily ritual has roots in British culture but has spread globally, inspiring quick, comforting treats that pair perfectly with tea or coffee.
- Many household appliances repurposed for baking started as simple, practical tools. The sandwich maker, originally a sandwich press, has evolved into a multi-tasking kitchen ally for sweet and savory bites alike.
- Texture is often the unsung hero of fast cakes. Achieving the right crumb requires balancing moisture, fat, and flour—tiny adjustments can make a big difference in tenderness and crust.
- Small-batch baking is a growing trend for minimizing waste and maximizing freshness. A 5-minute cake fits neatly into this philosophy, offering a satisfying treat with minimal overhead.
Make-It-Easy: A Quick Narrative Guide to Perfect Execution
While you’re not required to follow a step-by-step here (you’re reading a description, after all), understanding the spirit of the cake can help you achieve better results. Think of your sandwich maker as a compact, friendly oven that loves a slightly thick batter rather than a runny one. The batter should be scoopable but not too loose, allowing for a gentle rise and even crust. Preheat your sandwich maker to a comfortable temperature—enough to set the batter without scorching it. If your device has a temperature dial, aim for a medium setting and adjust based on how the batter behaves. You’ll know you’re onto something when you see a light golden edge beginning to form and the top looks set but not cracked. The timing can vary from 5 to 8 minutes depending on the device and batter density, so watch carefully and rely on color and aroma as your guide. The result will be a cake that feels as cozy as a favorite sweater and as fresh as a spring morning—ready to be shared, savored, and cherished.
Frequently Asked Questions (FAQ)
To further support your journey with this speedy bake, here are answers to common questions that readers often ask when experimenting with quick cakes in sandwich makers:
- Q: Can I bake this without a sandwich maker? A: Yes. You can bake in a regular oven or a toaster oven using a small cake pan or ramekin. Adjust the time to achieve a similar quick-cake texture, starting with 12-15 minutes at a moderate temperature and checking for doneness.
- Q: How do I prevent sticking? A: Lightly grease the surface or oil the sandwich maker plates, and consider a thin layer of parchment or a dusting of flour to promote easy release.
- Q: What if the batter is too thick or too thin? A: If too thick, gently whisk in a little milk or water to loosen. If too thin, add a touch more flour or a spoonful of yogurt to restore structure.
- Q: How long does it take to heat up? A: Preheating times vary by device, but a few minutes is typical. Give the plates a moment to reach temperature before pouring the batter for an even bake.
Closing Thoughts
In a world where speed sometimes means compromise, this 5 Mins Tea Time Cake for Sandwich Maker stands as a welcome exception. It offers comfort, versatility, and a sense of whimsy without demanding complex equipment or hours of time. It invites you to pause, breathe, and savor a small, sweet victory—the sort that turns an ordinary moment into a memory. Whether you’re treating yourself after a long day, baking with a child’s help, or entertaining a few friends with a dessert that feels both classic and modern, this cake delivers with warmth and ease. So next time you crave a gentle, uplifting dessert—and you want it fast—reach for the sandwich maker, gather a handful of pantry staples, and let the aroma carry you away to a cozy, reassuring place where dessert is a quick, joyful ritual rather than a planned event. Enjoy the first bite, and then the next, and savor the simple magic of a cake that proves you can have both speed and soul in one little treat.
Ingredients
-
Self-raising flour
→ This serves as the light, tender base for the quick cake. It already contains leavening agents, so you won’t need extra baking powder if you use true self-raising flour. If you only have plain flour, substitute with 1 cup plain flour plus 1 1/2 teaspoons baking powder and a pinch of salt. Ensure the flour is sifted to avoid lumps and to promote a soft crumb. Use at room temperature to ensure even mixing and accurate measurement. -
Granulated sugar
→ Provides sweetness and contributes to browning and moisture balance in the batter. Measure exactly as listed to avoid a too-sweet or too-dense cake. For a lighter texture, you can slightly reduce or substitute with 2 tablespoons of honey or 1 tablespoon maple syrup, but this will affect structure and moisture. -
Milk (dairy or plant-based)
→ Supplies moisture and helps form the batter; choose a milk with neutral flavor for best cake taste. Use at room temperature to prevent curdling when mixed with the egg. If using plant-based milk, ensure it’s unsweetened to keep the sweetness controlled. For a richer crumb, you may substitute half with yogurt or sour cream. -
Large egg (or flax egg for vegan option)
→ Acts as a binder and helps set the cake structure. If using a flax egg, mix 1 tablespoon ground flaxseed with 3 tablespoons water and let thicken for a few minutes before use. Bring eggs to room temperature for better incorporation and smoother batter. -
Melted butter or neutral oil
→ Provides fat for tenderness and moisture. Butter adds flavor, while oil yields a moister, grain-free crumb. If using butter, melt and slightly cool before folding to prevent curdling with the egg. For a lighter cake, you can reduce fat by half and replace with a little extra milk. -
Vanilla extract
→ Elevates overall flavor with a warm aroma. Use pure vanilla extract rather than imitation for richer depth; if you have vanilla bean, a tiny pinch of scraped seeds can intensify the fragrance. Add to the wet ingredients for even distribution. -
Salt
→ Balances sweetness and enhances the cake’s flavors. A pinch helps to sharpen the taste and improve crumb structure, especially when using plain flour. If using salted butter, adjust by reducing other salt slightly. -
Lemon zest (optional)
→ Bright, fresh notes that brighten a quick tea-time cake. Use finely grated zest from fresh lemons, avoiding the white pith which is bitter. Add to the wet or sift into the dry ingredients to distribute evenly. This works well with vanilla to keep a delicate, refreshing flavor. - Optional add-ins
-
Chocolate chips or chopped berries (optional)
→ Adds bursts of flavor and texture. If using chocolate chips, fold in gently to avoid sinking. For fruit like berries, dust with a tiny amount of flour before folding to keep them suspended. These should be at cool room temperature to prevent melting during mixing. -
Jam or peanut butter swirl (optional)
→ Creates a marbled, indulgent surprise in each slice. Add dollops on top of the batter before closing the sandwich press and gently swirl with a toothpick after spooning the batter into the maker. For safer filling, use a fruit preserve with no large fruit chunks.
Instructions
- Preheat your sandwich maker according to the manufacturer’s instructions and lightly grease the bread plates or brush with a thin film of neutral oil to ensure the cake releases easily.
- Sift the self-raising flour with a pinch of salt into a large mixing bowl to aerate the flour, remove any lumps, and promote a lighter crumb once baked in the compact cavity of the sandwich maker.
- Whisk together the granulated sugar, milk, melted butter (cooled slightly), vanilla extract, and lemon zest (if using) in a separate medium bowl until the sugar is dissolved and the mixture looks glossy; this ensures even sweetness distribution and prevents grainy texture in the final cake.
- Beat the egg into the wet mixture or whisk in a prepared flax egg for vegan cohesion, then continue whisking until the batter looks smooth and slightly increased in volume, which helps to trap air for a tender crumb.
- Pour the wet mixture into the dry ingredients and fold gently with a spatula or wooden spoon until just combined; stop as soon as there are no large streaks of flour to avoid overdeveloping gluten and resulting tougher texture.
- If using optional add-ins (chocolate chips or berries), fold them in now with minimal turning to keep them evenly distributed without sinking to the bottom of the batter; dusting berries with a tiny pinch of flour helps suspend them during mixing.
- Spoon the batter into the preheated sandwich maker, filling each cavity about two-thirds full to allow space for rising, and distribute any optional jam or peanut butter swirl by placing a small dollop on the batter and gently streaking with a toothpick for a marbled effect.
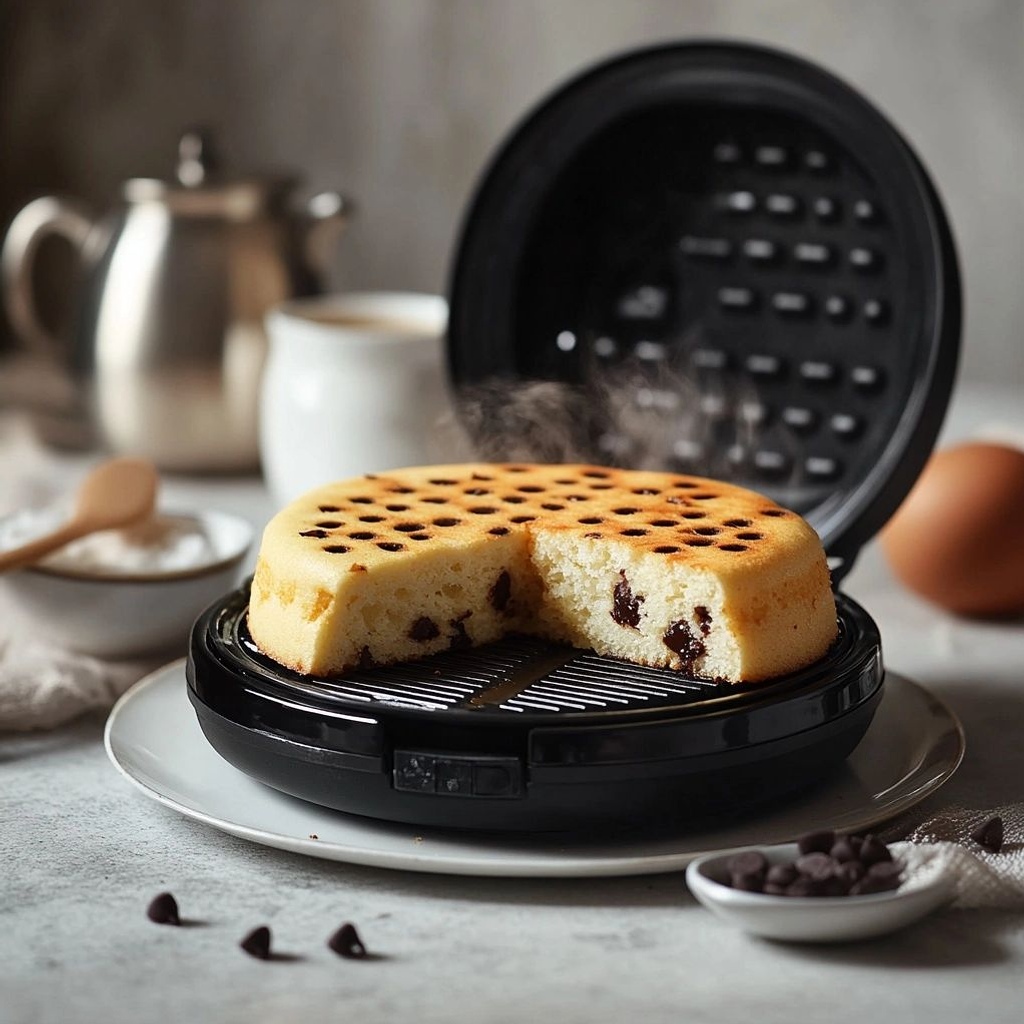
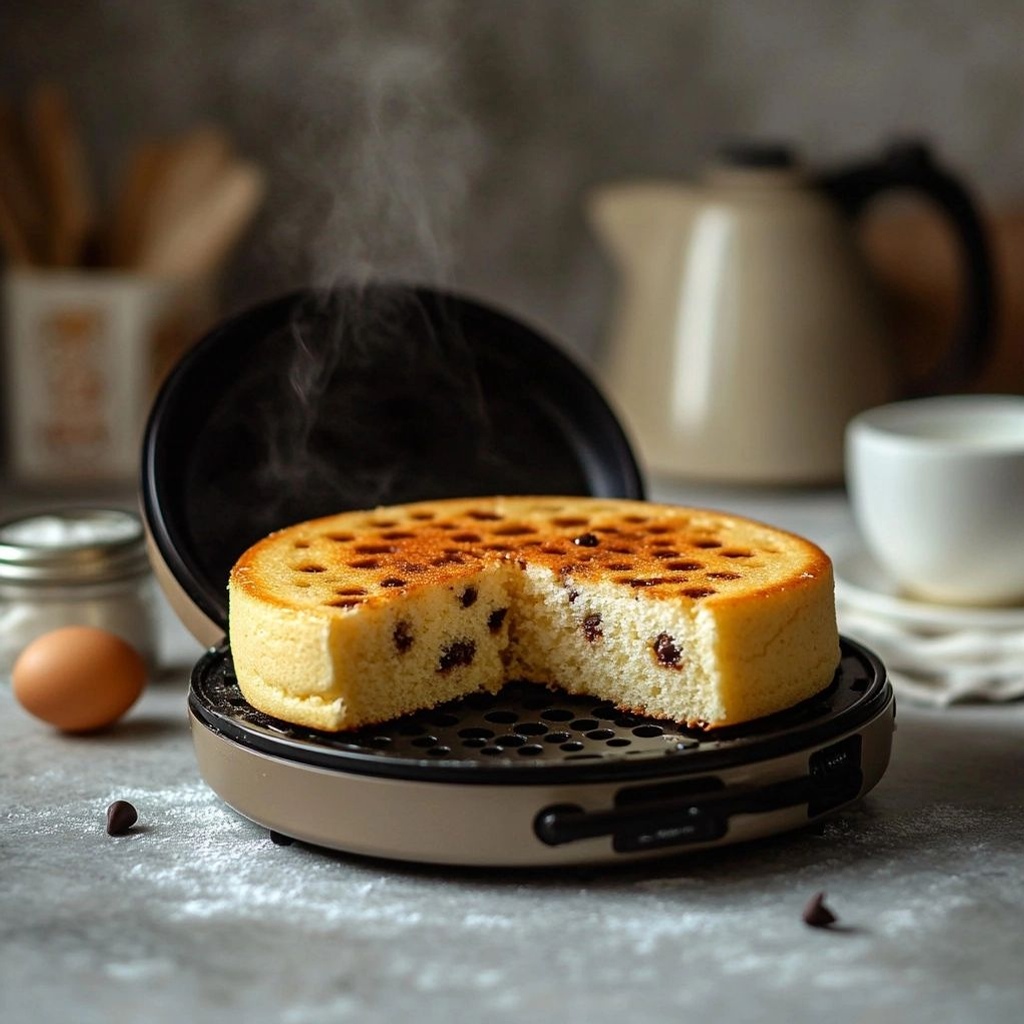
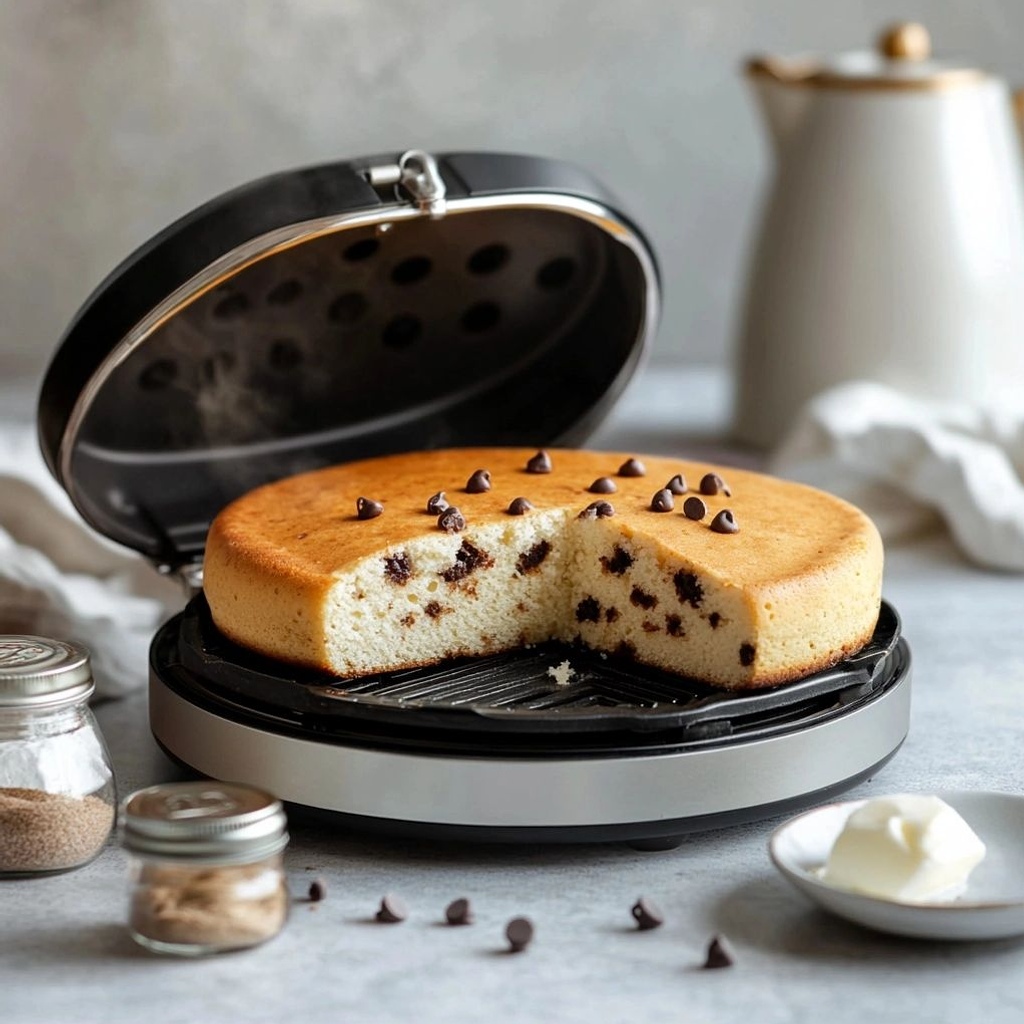
- Close the sandwich maker firmly and cook for about 3 to 5 minutes, depending on the appliance and thickness of the batter, until the exterior is golden, the edges release cleanly, and a tester inserted into the center comes out with a few moist crumbs; avoid opening too early to prevent collapse.
- Raise the lid and briefly check the underside by sliding a clean toothpick or skewer around the edge of a cake to ensure even browning; if needed, reseal and cook for an additional 30 to 60 seconds to finish the center while maintaining a tender crumb.
- Carefully remove the cake from the sandwich maker using a non-metal spatula to avoid marring the nonstick surface, and transfer to a wire rack to cool for at least 5 minutes to set the structure and stop carryover cooking.
- While cooling, prepare a second batch if you are making multiple cakes, ensuring the maker is wiped clean of any burnt sugar or batter residue to prevent off-flavors and uneven browning.
- Dust with a light veil of powdered sugar or serve warm with a spread of jam or a dollop of yogurt if desired, and note that the cake is best enjoyed fresh but will keep for a day or two in an airtight container at room temperature.
- Optional: If you prefer a stronger lemon aroma, add an extra 1/2 teaspoon of lemon zest to the wet mixture and adjust sugar slightly to balance acidity, keeping in mind that citrus can quicken browning due to the natural sugars.
Notes
“These 5 Mins Tea Time Cake for Sandwich Maker is a quick, fuss-free bake that leverages a sandwich press to create a light, golden-tea-time treat in minutes. Use self-raising flour for a tender crumb, or swap to plain flour with baking powder if needed, ensuring the batter is mixed just until combined to avoid toughness. Lightly grease the sandwich maker plates or brush with a neutral oil to prevent sticking, and preheat for even results. Mix dry and wet ingredients separately, then fold gently to keep the batter airy. When filling the press, don’t overfill—about 2/3 full is ideal to prevent overflow in a hot press. Close and cook on medium heat for 3–5 minutes, then check for doneness; a gentle spring or a tiny crack on the surface indicates readiness. If your machine runs hot, reduce the heat or cook a little longer in short bursts, checking frequently. Optional add-ins like chocolate chips or berries should be folded in at the last moment to maintain texture and even distribution. A jam or peanut butter swirl can create a marbled effect; dollop on top of the batter before closing and swirl with a toothpick for a playful look. Let the cake rest for a minute before slicing to let the crumb set, then serve warm with tea, coffee, or a dollop of yogurt. Store any leftovers in an airtight container for up to 2 days, or freeze slices for a quick breakfast; reheat briefly in the sandwich maker or toaster oven. For best flavor, bring all ingredients to room temperature and consider a tiny pinch of lemon zest or vanilla to brighten the quick bake.”
Tips
- Preheat your sandwich maker for even sealing and a uniform crust. A quick 2–3 minute preheat helps the batter set faster and reduces sticking.
- Lightly oil or nonstick-spray the grilling plates, especially if you’re using butter in the batter. This creates a tender, golden crust and easy release.
- Mix the batter just until combined. Overmixing can develop gluten and make the cake dense. A few small lumps are perfectly fine.
- Check batter consistency. It should be pourable but thick enough to hold a gentle mound. If it’s too thick, whisk in a tablespoon of milk; if too thin, add a little flour a spoonful at a time.
- Use room-temperature ingredients to ensure smooth, even mixing and a uniform crumb. Cold milk or butter can cause lumpy batter.
- When using self-raising flour, sift it well to avoid lumps and promote a light crumb. If you’re using plain flour, ensure the correct leavening ratio as noted in the ingredient tip.
- Fold in add-ins like chocolate chips or berries gently and briefly. Over-folding can deflate the batter and cause uneven pockets or sinking during cooking.
- If adding jam or peanut butter swirl, dollop in small amounts and swirl with a toothpick after spooning into the maker. Avoid large chunks that can spill out during sealing.
- Pour or scoop the batter evenly onto the preheated plates. A level, even layer helps the cake bake uniformly and prevents overflow at the edges.
- Cook in short bursts and monitor the progress. Tea-time cakes in a sandwich maker typically take only 3–6 minutes; open carefully to check for a lightly golden top and a set center.
- Let the cake rest for a minute after cooking before opening fully. This helps the crumb to set and reduces crumbling when sliced.
- Allow the sandwich maker to cool slightly before cleaning. Wipe away any butter or batter with a damp cloth once cooled to avoid buildup and sticking on future uses.
- For vegan or dairy-free versions, flax eggs and plant-based milks work well. Ensure plant milk is unsweetened and adjust cooking time slightly if needed due to moisture differences.
- Store leftovers in an airtight container at room temperature for a day or two, or freeze slices for longer storage. Reheat briefly in the sandwich maker or a toaster oven to refresh the crust.
FAQ
What is the 5 Mins Tea Time Cake for Sandwich Maker?
A quick, single-serving cake designed to be cooked in a sandwich maker in about 5 minutes. It’s a simple, teatime treat using pantry ingredients.
What ingredients do I need?
Basic options: 1 cup all-purpose flour, 2–3 tablespoons sugar, 1/2 teaspoon baking powder, pinch of salt, 2 tablespoons oil or melted butter, 1/4 cup milk, optional vanilla or cocoa powder. You can add a small egg or yogurt for moisture if desired.
What equipment is required?
A standard sandwich maker or grill with non-stick surface. Optional: a little oil spray or butter for greasing, a small bowl for mixing, and a spoon or whisk.
How do I prepare the batter?
Whisk the dry ingredients in a bowl. In a separate bowl, mix wet ingredients (oil/butter, milk, vanilla). Combine wet and dry just until smooth. Do not overmix.
How long does it take to cook?
About 4–6 minutes in a preheated sandwich maker. Check after 4 minutes; the surface should be golden and a toothpick should come out clean.
How should I grease the sandwich maker?
Lightly spray with oil or brush a small amount of butter/oil on the plates before pouring the batter to prevent sticking.
Can I add flavors or mix-ins?
Yes. Try a pinch of vanilla, cinnamon, or lemon zest. Mix-ins like chocolate chips, chopped nuts, dried fruit, or a spoon of cocoa powder work well. For a lighter cake, reduce sugar slightly.
What are common troubleshooting tips?
If it sticks, grease the plates more and don’t overfill. If the cake is dense, don’t overmix and ensure the milk is not too little. If it browns too fast, lower the heat or reduce cooking time by a minute.
How should I store leftovers?
Cool completely, then store in an airtight container at room temperature for 1–2 days or freeze individual portions for longer storage. Reheat briefly in the sandwich maker or microwave.
Is this recipe healthy or can I make it gluten-free?
It’s a quick treat, not a health-focused recipe. For gluten-free, substitute with gluten-free all-purpose flour or almond flour, adjusting liquid as needed. You can also use yogurt to improve texture.