Introduction / Hook
There’s something irresistible about the unassuming bar that brings together two childhood favorites in one glossy, bite-size moment of bliss. Picture a bar with a satin smooth chocolate top that gleams in the light, giving way beneath your teeth to a creamy, nutty kiss of peanut butter. The sweetness is balanced, not cloying, like a memory you never want to end. As you chew, a chorus of textures reveals itself—the slight snap of chocolate, the buttery melt of peanut butter, and a whisper of crunch from any added inclusions. It’s comfort and celebration all at once: a dessert that feels like a hug from an old friend, a party in your kitchen, and a simple, honest treat you can share with neighbors, coworkers, and family without fuss.
Peanut butter and chocolate is more than a flavor pairing; it’s a language spoken across generations and cultures. It speaks of after-school snacks, of bake sales, of summer porch swings, and of the quiet joy that arrives when you bite through a thin chocolate shell and discover a luscious, well-balanced center that tastes like roasting coffee and toasted nuts, softened by a touch of sweetness. These bars embody the best parts of indulgence—rich, chocolatey perfume mingling with the toasty aroma of peanut butter, all wrapped in a compact, easy-to-serve form. They invite you to slow down for a moment, to savor, and to smile, no matter your age or the occasion.
In a world of fast-forward desserts, these bars offer a comforting anchor: familiar flavors, a slightly retro charm, and the satisfaction of a finished treat you can proudly present on a tray or wrap up for gifting. They’re the kind of dessert that travels well, becoming a portable hug that fits into lunch boxes, picnic baskets, and holiday trays alike. The beauty lies in their versatility—make them glossy and refined for a dinner party, or rustic and chewy for a backyard barbecue. They’re as at home on a weeknight as they are at a celebration, and they invite you to experiment with textures, intensities, and little touches that suit your mood and pantry.
The Story Behind the Dish
The pairing of peanut butter and chocolate is a story of global flavors converging in a single, iconic treat. Peanut butter, with its roots in centuries of ground-nut dishes across many cultures, found a modern hero in the late 19th and early 20th centuries, when it became popularized in the United States as a protein-packed spread. Chocolate—once a celebrated luxury in the hands of ancient civilizations—evolved into a universal pantry staple through refined farming, processing, and clever confections. When these two ingredients met in the mid-20th century, they produced some of the most enduring confections in dessert history: bars, cups, cookies, and beyond. The exact origins of peanut butter and chocolate bars vary by region and family tradition, but the sentiment is universal: a quick, satisfying treat that feels like it was made for sharing.
For many homes, these bars evoke memory-rich kitchens and clattering mixing bowls, where grandmothers, parents, and kids collaborated on small projects that yielded big smiles. The concept of a “bar” evolved from the desire to bake once and serve many, to transport easily, to slice neatly, and to hold together even as flavors intensified with time. The chocolate shell on top functions as a glossy primer, a signal that something delicious awaits. When you bite through, you encounter a core that’s often a blend of peanut butter, perhaps a touch of sweetness, and a few crunchy elements for personality. The narrative is as much about texture as it is about taste—a balance of smooth, creamy centers and a crisp, flecked or gleaming outer layer that holds everything in place.
If you’ve ever watched a child’s eyes light up when a hand reaches for a familiar square, you’ve witnessed the cultural magic of these bars. They transcend trends, offering a timeless, approachable dessert that can be dressed up or kept cozy. And because they’re cut into definitive, portable portions, they encourage sharing—whether you’re passing a tray down a table at a potluck or tucking a square into a friend’s lunch bag. The story of peanut butter and chocolate bars is really a story about connection: the simple joys of a few pantry staples transformed into something comforting, crowd-pleasing, and enduring.
Why You’ll Love This Recipe
- Quick to assemble: no complicated techniques required, making it perfect for busy weeknights or casual gatherings.
- Crowd-pleasing flavor: the classic peanut butter-chocolate pairing hits familiar notes that never go out of style.
- Versatile texture: a glossy chocolate shell encases a creamy, slightly chewy center that can be customized with crunchy accents or a smooth finish.
- Make-ahead friendly: these bars set up well in the fridge or freezer, making them ideal for meal prep and holiday gifting.
- Adaptable for dietary needs: you can tailor ingredients to be dairy-free, gluten-free, or vegan, without sacrificing flavor or texture.
- Great for gatherings: neatly sliced into bars, they’re easy to serve on platters, in lunchboxes, or as a thoughtful homemade gift.
- Comforting and nostalgic: the flavor profile brings back memories of family kitchens, bake sales, and weekend treats, offering a sense of warmth and familiarity.
- Balanced sweetness: while indulgent, the richness of chocolate is tempered by the savory, roasted notes of peanut butter, preventing an overly sugary finish.
Flavor Profile & Texture
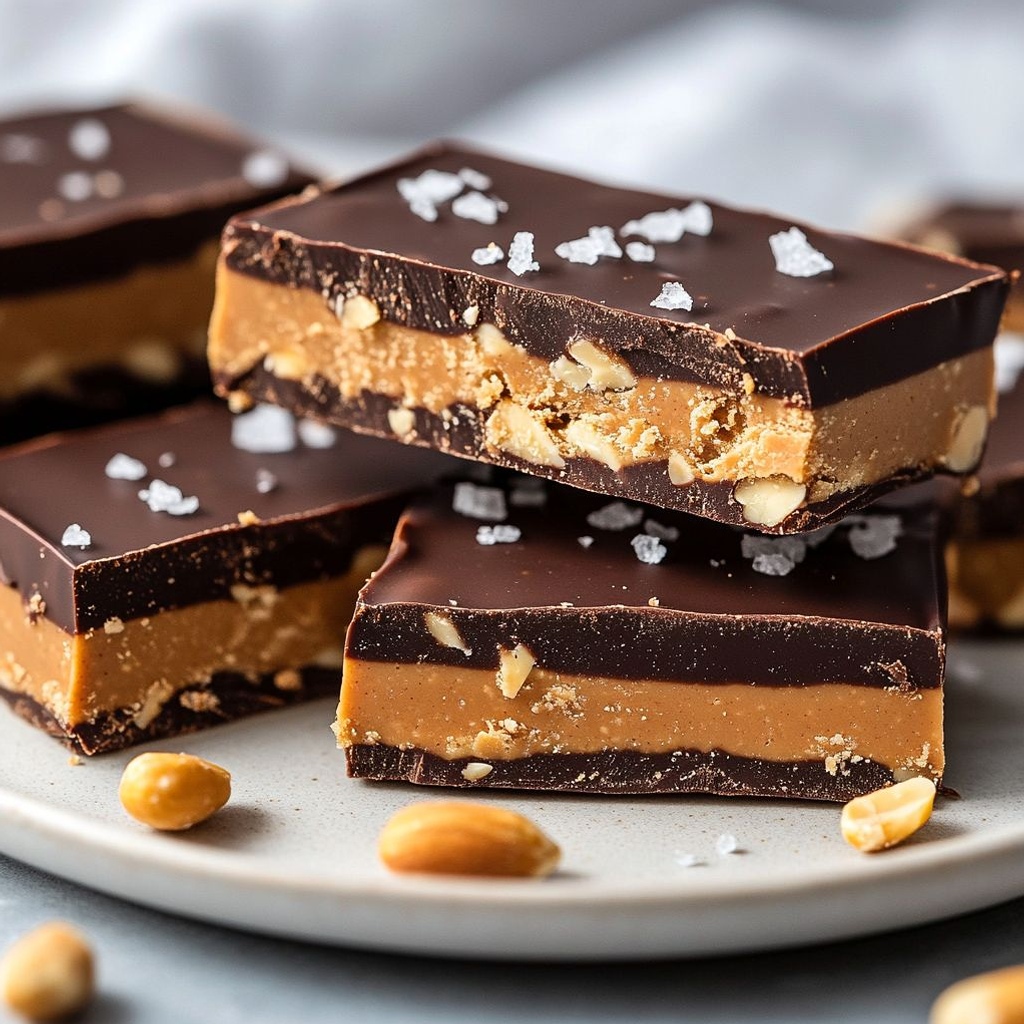
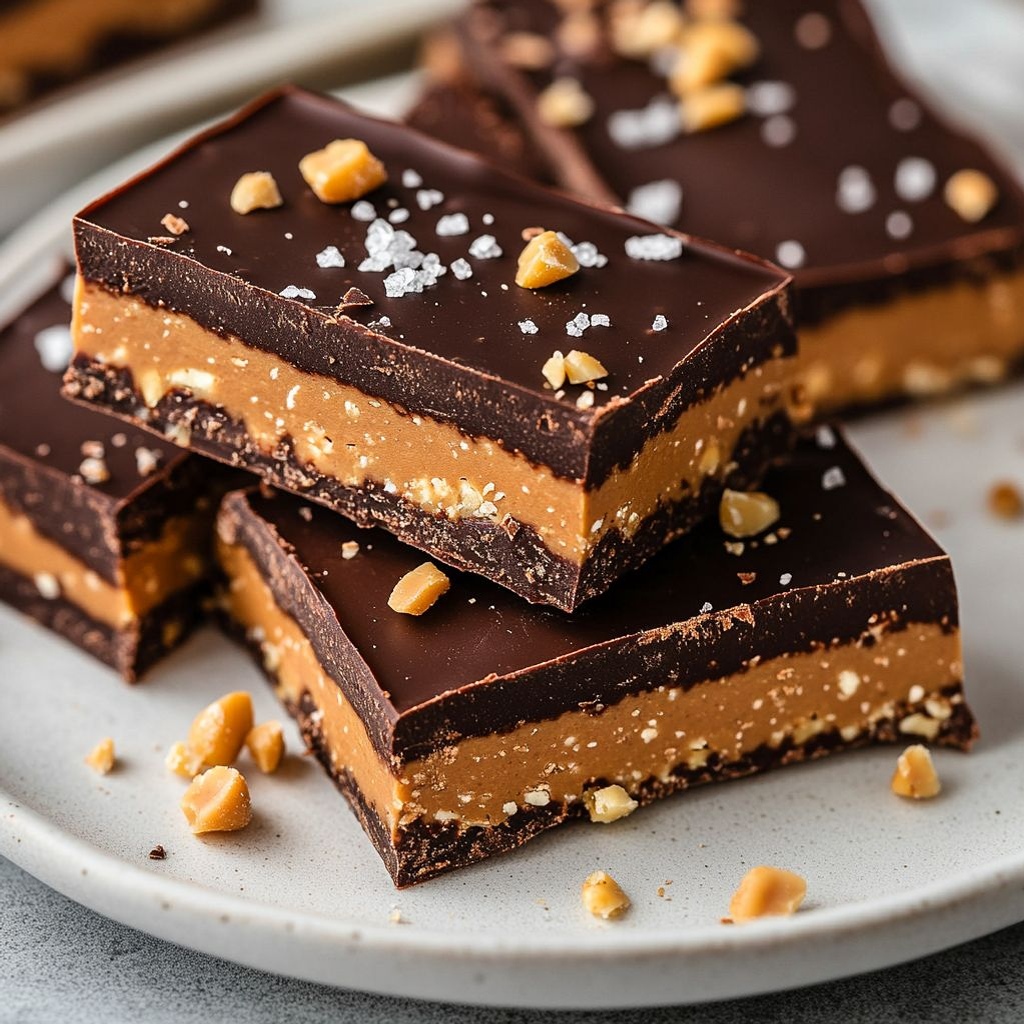
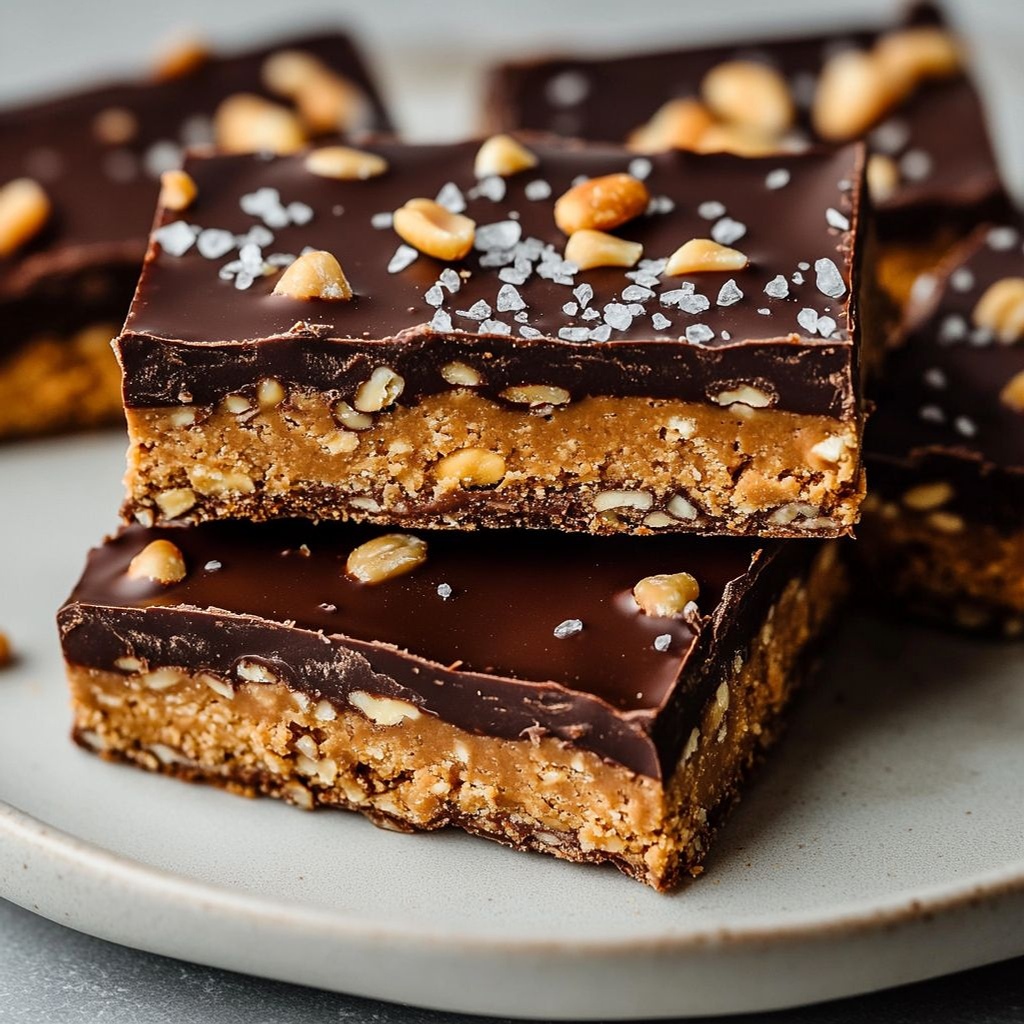
These bars deliver a symphony of flavor that evolves with every chew. The first impression is the aroma—a deep, inviting scent of roasted peanuts and cocoa that fills the room even before you lift a single square. On the palate, you encounter a multi-layered sensation. The top layer—glossy, firm chocolate—offers a precise snap when broken, giving way to a velvety center that tastes of peanut butter’s natural sweetness and roasted depth. The peanut butter core brings a creamy mouthfeel, a slight saltiness, and a hint of caramelized undertones from toasting. Depending on how you customize the bars, you can tilt the texture toward extra chewiness with a hint of oats or keep it ultra-smooth with a streamlined, dense center. Crushed nuts, pretzel bits, or crisp rice can be folded into the center to introduce a contrasting crunch, echoing the texture of candy bars you might buy but with a homemade sentiment and a heartier flavor.
Flavor-wise, you’ll notice an interplay between sweet and savory. The chocolate offers a bittersweet edge that amplifies the roasty, toasty notes of peanut butter, while a touch of salt helps sharpen each element and prevent the flavors from blurring together. If you opt for a higher cocoa percentage in the chocolate, you’ll lean into a more intense chocolate presence, which can pair beautifully with a sweeter, almost honeyed peanut butter. A dash of vanilla in the filling can coax out a rounder, more bouquet-like flavor, while American-style creamy peanut butter brings a smooth, yearned-for familiarity. For those who enjoy a contemporary twist, you can add espresso powder to the chocolate layer to deepen the chocolate profile, or swirl in a touch of honey or maple for a richer, more nuanced sweetness.
The texture is what makes these bars truly addictive. The chocolate shell stands up to the bite with a clean break, then immediately yields to a soft, creamy interior. If you prefer a more substantial bite, you can incorporate oatmeal or chopped nuts into the filling, which adds a gentle chew and a toasty crunch. If you prefer dairy-free or vegan options, you can use plant-based chocolate and coconut oil to mirror the satiny finish of traditional chocolate while maintaining a glossy top. The result is a dessert that feels indulgent without being overly heavy, a balanced treat that greets you with a familiar flavor profile yet offers subtle, personal customization options that keep it fresh and exciting.
Occasions & Pairings
These bars are the universal adhesive of dessert moments. They fit naturally into everyday routines and elevate celebrations with minimal effort. Here are some ideal occasions and pairing ideas to consider:
- Weeknight indulgence: after a long day, a single square paired with a cold glass of milk or a warm cup of coffee hits the spot.
- Lunchbox treat: cut into small, portable squares for children or adults to enjoy at school or work.
- Holiday trays: arrange a dozen or more bars on a platter with a dusting of flaky sea salt or edible gold to create a festive look.
- Potlucks and bake sales: their sturdy form travels well and doesn’t crumble easily, making them a reliable crowd-pleaser.
- Gifting: wrap in parchment and tie with ribbon for a thoughtful homemade gift that feels special yet approachable.
Pairing ideas to enhance the experience include:
- Bevies: a robust coffee, a glass of cold milk, or a not-too-sweet latte provide the perfect counterbalance.
- Savory counterpoints: a sprinkle of sea salt on top, or a light drizzle of caramel, can add an extra dimension to the bar.
- Accompaniments: sliced strawberries or raspberries offer a bright contrast, while a scoop of vanilla ice cream creates a satisfying dessert sandwich vibe.
- Seasonal twists: a dash of cinnamon or chili powder in the chocolate layer adds warmth and a playful kick for autumn and winter menus.
Tips, Variations & Substitutions
Here’s how you can tailor peanut butter and chocolate bars to your pantry, your guests, or your dietary needs:
- Vegan and dairy-free: use dairy-free chocolate and a vegan butter substitute or coconut oil to create a smooth, glossy top and a luscious center.
- Gluten-free: ensure any additional mix-ins (oats, pretzels, or crisps) are certified gluten-free if you or your guests require gluten-free options.
- Nut-free alternative: if you’re catering to nut allergies, substitute peanut butter with sunflower seed butter or tahini for a similar texture and a distinct flavor.
- Texture tweaks: mix in chopped roasted almonds, hazelnuts, or pretzel bits for extra crunch; or keep the filling ultra-smooth for a classic feel.
- Flavor depth: add a pinch of espresso powder to the chocolate layer for a subtle coffee accent that intensifies the chocolate’s richness.
- Sweetness control: choose dark chocolate for a less sweet finish, or blend with milk chocolate for a creamier, sweeter profile.
- Chewy version: swap a portion of butter with brown sugar in the filling to increase chewiness and deepen caramel-like notes.
- Cheese-savvy twist: for a playful savory-sweet balance, a light sprinkle of flaky sea salt on top just before the chocolate sets adds brilliance, especially with dark chocolate.
- Make-ahead hacks: prepare the base and top separately, then assemble and chill to set. This helps when you’re working with a busy schedule or planning a large batch.
Storage & Make-Ahead Ideas
These bars are incredibly friendly to advance planning. Proper storage keeps them tasting fresh and maintaining their texture for as long as possible:
- Refrigeration: after they are fully set, store in an airtight container in the refrigerator for up to two weeks. The cool environment helps maintain the chocolate’s snap and the center’s creaminess.
- Freezing: for longer storage, wrap individual bars or lay them in a single layer on a sheet pan and freeze until solid, then transfer to a freezer-safe container. They will keep well for up to 3 months. Thaw at room temperature for about 15-20 minutes before serving for best texture.
- Make-ahead scheduling: these bars can be made up to 2-3 days in advance of an event. Keep them refrigerated until you’re ready to serve, allowing them to come to fridge temperature so the flavors harmonize.
- Meal-prep friendly: portion the bars into single-serving squares and wrap in parchment or foil. This makes it easy to grab-and-go or share with neighbors unexpectedly.
- Fun setups: for parties, cut into a grid and arrange on a decorative tray with small serving forks or tongs. A light dusting of cocoa powder or powdered sugar can add a refined touch when presenting.
Fun Facts & Trivia (Optional)
Delightful tidbits to pepper into conversation or write on a dessert menu outline:
- Peanut butter’s rise to fame: Peanut paste dates back to the late 19th century as a protein-rich food that could be shelf-stable and easy to digest, finding its way into breakfast and snack menus across the United States and later around the world.
- Chocolate evolution: Once a luxury product, chocolate became more accessible in the 19th and 20th centuries, spurring countless confections that celebrate its versatility, including the classic peanut butter-chocolate combination.
- Iconic collaborations: The idea of pairing peanut butter and chocolate gained significant traction in popular culture, with various brands and homemade recipes contributing to an enduring legacy of bars, cups, and treats that feel both nostalgic and contemporary.
- Texture science: the magic of a glossy chocolate top comes from proper melting and tempering, which yields a crisp snap and a shiny finish—two hallmarks of well-made chocolate-coated bars.
- Seasonal appeal: these bars adapt beautifully to seasonal flavors—think a touch of cinnamon in autumn, a hint of peppermint in winter, or a citrus zest in spring to brighten the center’s profile without overpowering the peanut butter.
In the end, peanut butter and chocolate bars are more than a dessert; they’re a shared experience. They invite you into your own kitchen story, where simple ingredients become a treat that tastes like warmth, comfort, and a little bit of joy. Whether you’re baking for a family Sunday, a bake sale, or a spontaneous sweet moment, these bars offer reliability, nostalgia, and the delicious promise of a perfect bite every time. So arm your pantry with a few dependable staples, set aside a little time, and let the kitchen fill with the irresistible scent of roasted peanuts and melted chocolate—a scent that signals that happiness is about to be formed, cut, and enjoyed in generous, bite-sized pieces.
Ingredients
-
Bar Base
– 2 cups old-fashioned rolled oats
→ The oats provide the chewy, substantial base that holds the bars together. Use old-fashioned rolled oats (not quick oats) to ensure the structure remains sturdy after chilling. If you need a gluten-free version, use certified gluten-free oats. For extra flavor, you can toast them lightly in a dry pan before mixing.
– 1 cup creamy peanut butter
→ Peanut butter is the primary binder and flavor backbone of these bars. Choose a smooth, creamy variety for even spreading and a cohesive dough. If you’re using natural peanut butter that separates, stir well until the oil and solids are evenly combined before measuring. For vegan options, ensure the peanut butter is dairy-free and unsweetened if you prefer less sweetness.
– 1/2 cup unsalted butter, melted
→ The melted butter adds richness and helps bind the oats and peanut butter into a cohesive, sliceable bar. If you want a dairy-free version, substitute with melted coconut oil or a plant-based butter. If using salted butter, reduce added salt to prevent oversalting.
– 1/2 cup powdered sugar
→ Powdered sugar acts as a fine sweetener and helps the base set with a smooth texture. Sift the sugar to avoid gritty bits. If you prefer a less sweet bar, reduce to 1/4 cup or swap for a portion of brown sugar for depth.
– 1/3 cup honey or light corn syrup
→ This sweet syrup provides moisture and helps the base bind together. Honey adds a subtle floral note, while corn syrup offers a cleaner sweetness and firmer set. For vegan options, use agave or maple syrup; note that maple changes flavor slightly and may be less sweet.
– 1/4 teaspoon salt
→ Salt enhances the peanut flavor and balances sweetness. If your peanut butter is salted, you may omit or reduce this amount. Even a small amount helps prevent the bars from tasting bland.
– 1 teaspoon vanilla extract
→ Vanilla deepens the overall flavor and rounds the richness of peanut butter. Use pure vanilla for best aroma. If you’re using vanilla bean paste, you can reduce to about 1/2 teaspoon.
Chocolate Topping
– 1 1/2 cups semisweet chocolate chips
→ The semisweet topping provides a glossy, chocolatey shell that contrasts with the peanut butter base. Choose good-quality chips for smoother melting. If you prefer a darker finish, you can substitute part of the chips with bittersweet or dark chocolate chips.
– 2 tablespoons coconut oil or unsalted butter
→ Fat added with the chocolate helps it melt evenly and creates a shiny, snap-worthy coating. Coconut oil yields a slightly softer finish at room temperature and pairs well with peanut butter; butter provides a richer mouthfeel. Use coconut oil if you need a dairy-free option.
Optional Add-ins
– 1/2 cup chopped roasted peanuts
→ Adds extra crunch and peanut flavor. Roast the peanuts until fragrant and let them cool before chopping to medium-small pieces so they distribute evenly. If using salted peanuts, you may want to reduce additional salt in the base to keep the balance.
– 1/4 cup mini chocolate chips
→ Extra mini chips provide bursts of chocolate throughout the bars. They melt gently into the topping or can be sprinkled on top for added texture. If you want a uniformly smooth top, add these to the topping mixture rather than the base.
– Sea salt flakes for finishing (optional)
→ A light sprinkle of flaky sea salt on top enhances the contrast between sweet, peanutty flavors and chocolate. Sprinkle after the chocolate sets for best effect and to avoid dissolving the salt into the warm chocolate.
Instructions
- Line an 8×8-inch (20×20 cm) square pan with parchment paper, allowing about 2 inches of overhang on two opposite sides so you can lift the bars out easily once set. This nonstick liner prevents sticking and makes clean slicing possible without crumbling the edges.
→ The parchment overhang serves as nonstick handles for lifting and helps you remove the slab in one piece for neater cuts. - Optionally toast the oats: in a dry heavy skillet over medium heat, stir the old-fashioned rolled oats until fragrant and lightly golden, about 3–4 minutes. Toasting deepens the nutty flavor and improves texture by adding a touch of crispness.
→ Toasting enhances aroma and helps the oats stay distinct rather than becoming mushy in the binder. - In a large mixing bowl, combine the creamy peanut butter, melted butter, honey or light corn syrup, and vanilla extract; stir until the mixture is smooth, evenly aerated, and glossy, which ensures a cohesive dough rather than separated fats.
→ The emulsion creates a uniform base that binds the oats and keeps the bars sliceable. - Add the powdered sugar and salt to the binder, then mix until fully dissolved and evenly incorporated with no gritty pockets, using a spatula to scrape the bowl as needed.
→ Sifting the sugar avoids gritty texture and helps the base set with a smooth surface. - Fold the oats into the binder mixture until the oats are completely coated and a thick, cohesive mass forms; this ensures even distribution and prevents the bars from crumbling when cut.
→ Proper folding prevents overmixing, which could compact the bar too tightly or cause stiffness. - Spread the base into the prepared pan in an even layer and press it firmly with a flat-bottomed measuring cup or the back of a spoon until it is level and compact, about 1/4 inch (6 mm) thick. This binding pressure creates clean slices and a dense chew.
→ Firm pressing reduces air pockets and ensures uniform bite across each bar. - Chill the base in the refrigerator for at least 60 to 120 minutes, or until completely firm to the touch; chilling crystallizes the fats and sugars, making the bars sliceable without crumbling.
→ A cold, set base holds together during the chocolate pour and slicing. - Melt the semisweet chocolate chips with the coconut oil (or unsalted butter) using a double boiler or careful microwave heating in 20- to 30-second intervals, stirring between baths until the mixture is smooth and glossy. Avoid overheating to prevent seizing or graininess; if using microwave, heat in short bursts to control temperature.
→ The glossy melted chocolate will seal the base and provide a crisp snap when set. - Pour the melted chocolate over the chilled base, using an offset spatula to spread it evenly from the center toward the edges; work quickly before the chocolate begins to set so the surface remains smooth and level.
→ A uniform top ensures a professional finish and slightly thin chocolate layer that sets with a pleasant snap. - Optional: sprinkle half of the chopped roasted peanuts over the now-spread chocolate layer before it fully sets, if you want visible peanut crunch within the chocolate; alternatively, press the peanuts lightly into the base before pouring the chocolate for even distribution.
→ Peanuts in the top layer add texture and more peanut flavor per bite. - Optional: if using mini chocolate chips, you can stir them into the melted chocolate or sprinkle them on top after you spread the main chocolate layer; either method yields small pockets of chocolate in every bar.
→ Using mini chips in the topping creates varied chocolate distribution and extra sweetness. - Return the pan to the refrigerator and chill until the chocolate is fully set and hard to the touch, typically 60 to 90 minutes; chilling ensures clean, neat slices.
→ A fully set topping guarantees clean breaks and prevents smearing when cutting. - Finish with a light scattering of flaky sea salt over the chocolate once it has completely set, if desired, to enhance contrast between sweet, peanutty flavors and chocolate. Wait to salt until after the chocolate is cold to avoid dissolving the salt into warm chocolate.
→ Salt enhances flavor balance and provides an appealing sparkle, but must be used carefully. - Lift the slab from the pan using the parchment overhang, place it on a cutting board, and slice into bars of your preferred size (about 9 bars from an 8×8 pan or 12 from a 9×9); wipe the knife between cuts for clean edges.
→ Sturdy lifting and precise cuts yield uniform bars that look professional and are easy to portion. - Store the finished bars in an airtight container in the refrigerator for up to 2 weeks or at room temperature for a few days if the climate is cool and dry; this keeps the base chewy and the chocolate glossy.
→ Proper storage preserves texture and prevents the bars from softening or drying out.
Notes
These peanut butter and chocolate bars are a crowd-pleasing treat with a chewy oat base bound by creamy peanut butter and a glossy chocolate topping. For best texture, use old-fashioned rolled oats (not quick oats) and line an 8×8-inch pan with parchment so the bars lift out neatly. If you need a gluten-free version, choose certified gluten-free oats and check that your peanut butter and any syrups are gluten-free as well. Toasting the oats in a dry skillet before mixing deepens the nutty flavor and helps with structure. For dairy-free or vegan options, substitute melted coconut oil or dairy-free butter, and use agave or maple syrup in place of honey; be aware maple can change sweetness and flavor slightly. If your peanut butter tends to separate, stir well until emulsified before measuring. Sift the powdered sugar to avoid gritty texture in the base, and balance the sweetness with a pinch more salt if your peanut butter is unsalted. Chill the assembled bars until the topping is firm—about 2 hours in the fridge, or freeze for a quicker setup. When melting the chocolate topping, do it gently with 2 tablespoons of coconut oil or butter until smooth, then spread over the base and chill again until set. Optional add-ins like 1/2 cup chopped roasted peanuts and 1/4 cup mini chocolate chips add crunch and bursts of chocolate; finishing with a light sprinkle of sea salt flakes enhances the contrast. Slice into bars while cold for clean edges, and store in an airtight container in the fridge for up to a week, or freeze for longer storage. If you’d like a quicker finish, you can skip the add-ins and still enjoy a glossy chocolate shell and satisfying peanut bite. Always verify gluten-free labeling on oats, peanut butter, and syrups if gluten intolerance is a concern.
Tips
Tips for Perfect Peanut Butter and Chocolate Bars
- Pan prep: Line a 9×13-inch pan with parchment, leaving overhang on the sides to lift the bars out for easy slicing.
- Oats: Use old-fashioned rolled oats for a sturdy base. For gluten-free, use certified gluten-free oats. Toast the oats lightly in a dry skillet (3–5 minutes) for extra nuttiness, then cool completely before mixing.
- Peanut butter: If using natural peanut butter that separates, stir well to integrate oil and solids before measuring. Choose creamy, smooth peanut butter for an even, cohesive dough; for vegan options, ensure it’s dairy-free and unsweetened if you prefer less sweetness.
- Butter substitutes: If you want dairy-free bars, substitute melted coconut oil or a plant-based butter for the melted butter; if using salted butter, reduce added salt to prevent oversalting.
- Sugar and texture: Sift powdered sugar to avoid gritty bits and to help the base set smoothly. To reduce sweetness, use 1/4 cup and consider swapping a portion with light brown sugar for depth.
- Syrup choices: Honey adds a floral note and moisture; corn syrup yields a firmer set. For vegan bars, use agave or maple syrup; note that maple can alter flavor and sweetness level.
- Base setting: Press the base firmly into the pan to create clean edges and even thickness. Chill the base for 20–30 minutes before topping to help it set and prevent the chocolate from sinking into a soft foundation.
- Chocolate topping: Melt chocolate chips with coconut oil or unsalted butter over low heat or in short microwave bursts, stirring frequently. Remove from heat while there are still a few chips unmelted to ensure a smooth, glossy finish without scorching.
- Top thickness and texture: For a thicker shell, use more than 1½ cups chocolate chips; for a thinner coating, use slightly less and spread evenly to the edges.
- Finish add-ins: Fold in 1/2 cup chopped roasted peanuts for extra crunch, or sprinkle mini chocolate chips on top as the chocolate is setting for pockets of melty chips. Finish with a light pinch of flaky sea salt after the chocolate has set for contrast.
- Cutting and serving: Let the chocolate set completely at room temperature or refrigerate briefly, then slice with a warm knife (dip in hot water and wipe dry) for clean edges.
- Storage: Keep bars in an airtight container in the fridge for up to 2 weeks; for longer storage, wrap individually and freeze for up to 3 months.
FAQ
What ingredients do I need for Peanut Butter and Chocolate Bars?
Crust: crushed graham crackers (or digestive biscuits) with melted butter and a touch of sugar. Peanut butter layer: creamy peanut butter, powdered sugar, vanilla, and a little melted butter. Topping: melted chocolate (semisweet or dark) with a bit of butter or cream to create a glossy ganache. Optional: a pinch of salt.
Can I make this gluten-free?
Yes. Use gluten-free graham crackers or a gluten-free crumb base for the crust. Check that the chocolate and any add-ins are labeled gluten-free. Adjust sweeteners as needed if using different ingredients.
Should I use creamy or crunchy peanut butter?
Both work. Creamy peanut butter gives a smooth filling, while crunchy peanut butter adds texture with small peanut bits. Choose based on your texture preference.
What kind of chocolate can I use for the topping?
You can use semisweet, milk, or dark chocolate. Dark chocolate will be less sweet; milk chocolate will be sweeter. If you like a glossy finish, add a small amount of butter or cream to the melted chocolate.
Do I need to bake the crust?
Most recipes are no-bake: press the crust into the pan and chill until set. If you prefer a crisper crust, bake it 8–10 minutes at 350°F (175°C), then cool completely before assembling.
How long do I need to chill the bars to set?
After assembling each layer, chill until firm. The peanut butter layer typically needs 30–60 minutes, and the chocolate topping about 20–30 minutes more. Plan 1–2 hours of chilling, or longer in warm kitchens.
How should I store leftovers?
Store in an airtight container in the refrigerator for about 5–7 days. For longer storage, freeze them for 2–3 months—freeze uncut or cut into bars, then thaw in the fridge.
Can I freeze these bars?
Yes. Freeze fully set bars by wrapping well or placing in a freezer-safe container. Thaw in the fridge before serving for best texture.
Can I make this vegan?
Absolutely. Use vegan butter or coconut oil in the crust and filling, and dairy-free chocolate for the topping. Ensure any powdered sugar is vegan or substitute with granulated sugar alternatives.
Can I prepare this ahead for a party?
Yes. You can prepare the crust and peanut butter layer up to a day in advance, then melt and pour the chocolate topping on the day of serving. Keep the prepared layers refrigerated between steps.
How do I cut cleanly through the bars?
Chill the fully set bars until very firm, then wipe the knife between cuts. For extra clean edges, dip a sharp knife in hot water, dry, and slice.
Can I add toppings or mix-ins?
Yes. Try sprinkling flaky sea salt on top, adding chopped peanuts, or drizzling extra melted chocolate after the bars have set for extra flavor and texture.