Introduction / Hook
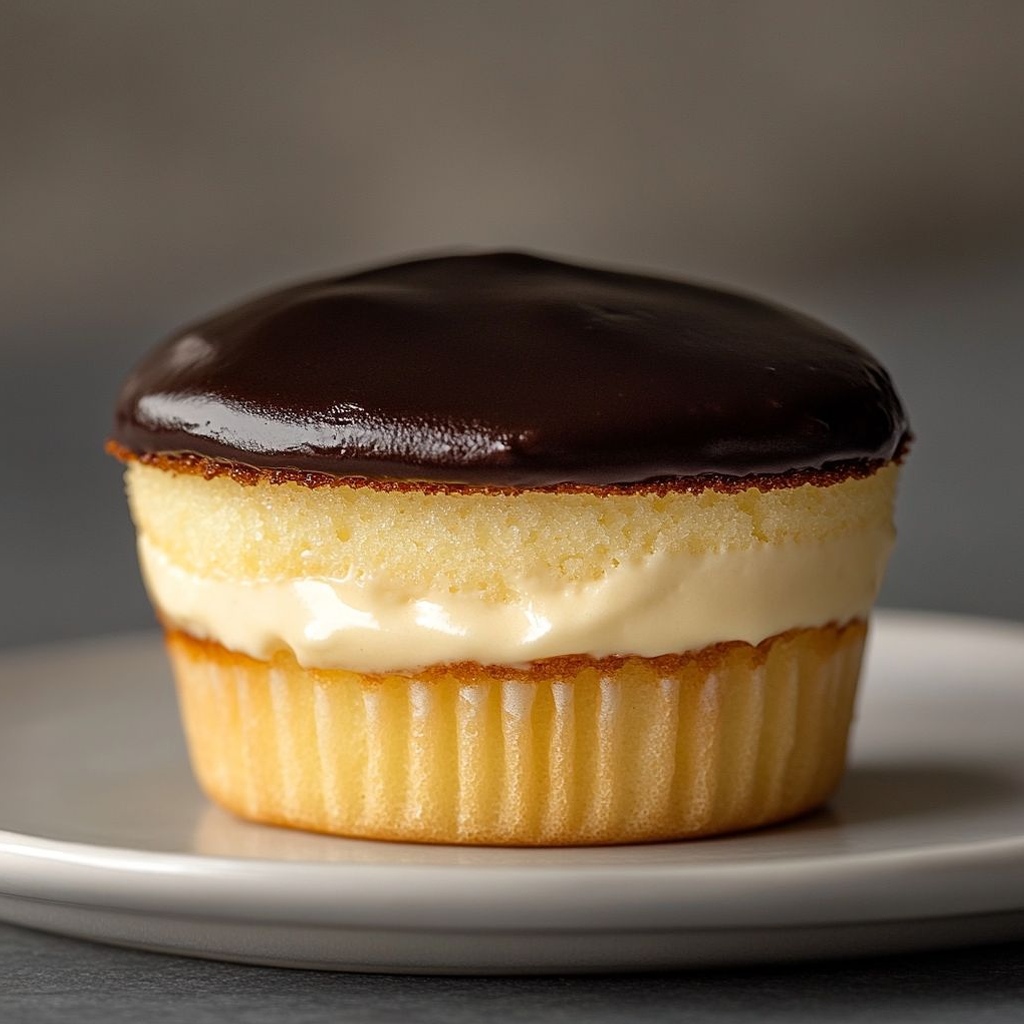
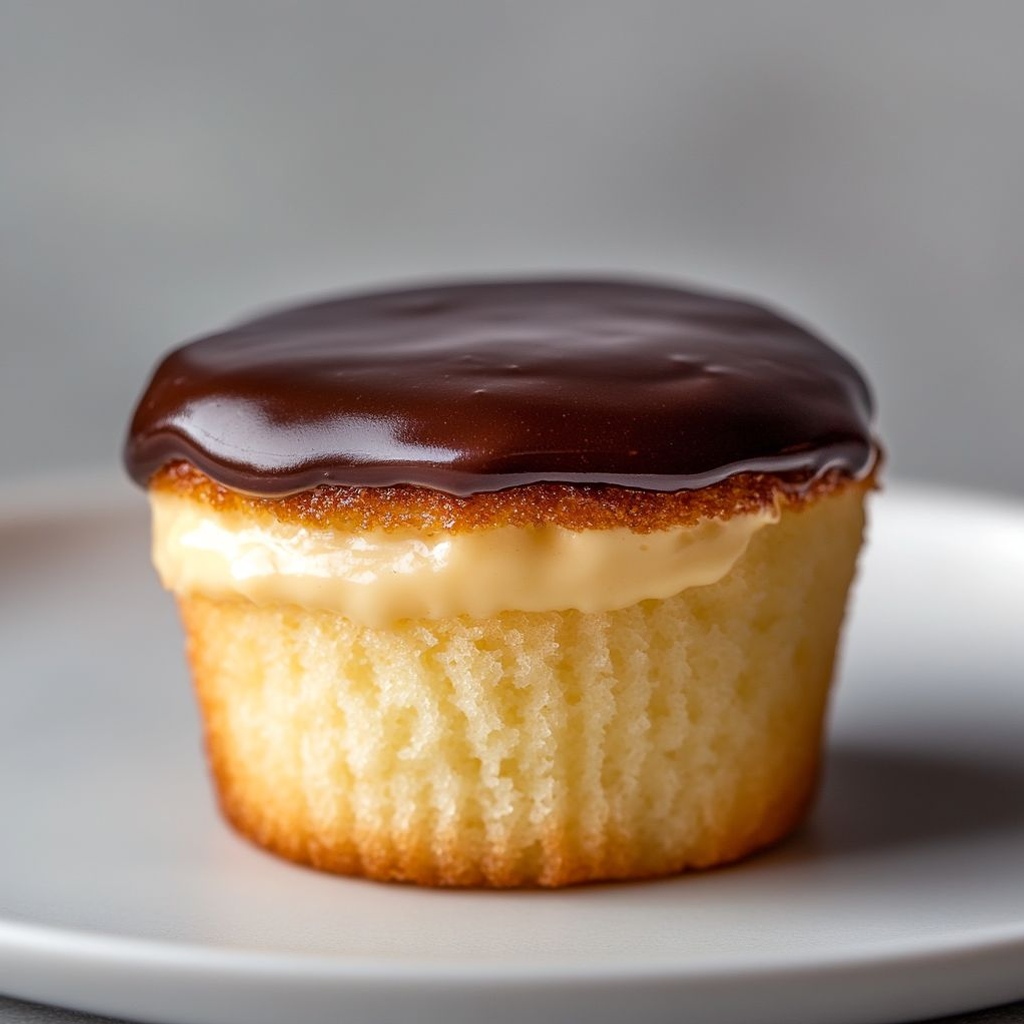
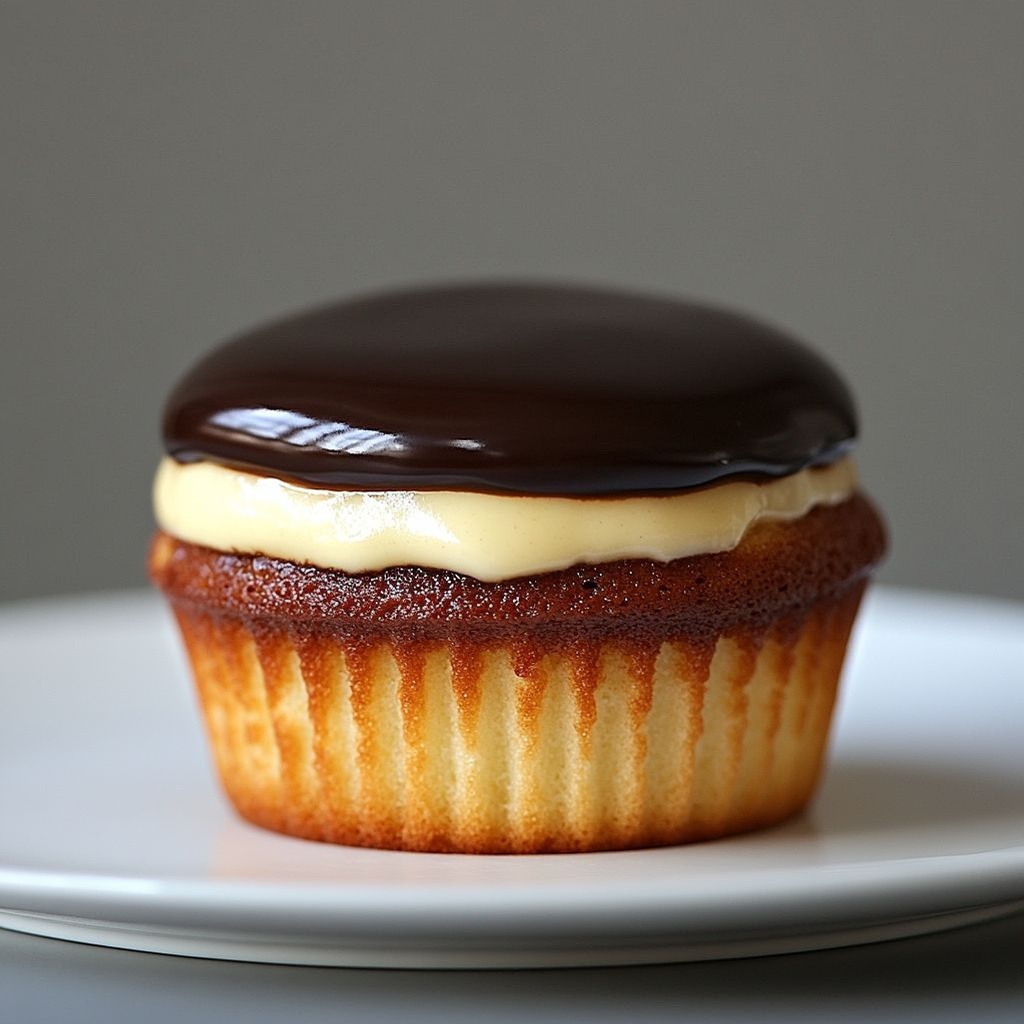
Imagine a bakery’s morning perfume wafting through your kitchen: vanilla-scented batter rising into soft, delicate domes; a silken vanilla custard waiting to embrace every bite; and a glossy, midnight-chocolate glaze that crowns each bite with a kiss of cocoa richness. Cupcake Boston cream is not just a dessert; it’s a celebration of contrast—airy cake, creamy filling, and a lacquered chocolate top that gleams like a window full of promises. This is the kind of treat that makes weekends feel special, invites smiles around the table, and somehow turns simple sweetness into a little ceremony you’ll want to recreate again and again. The bite is light yet indulgent, the fragrance nostalgic yet fresh, and the texture playfully dynamic: a tender crumb that yields to a cool, custardy center, finished with a crackling glaze that shatters into tiny, satisfying shards as you press your fork in. If you’ve ever adored the classic Boston cream pie but craved the portability of a cupcake, you’ve just found your new favorite crowd-pleaser. With each cupcake, you’re serving comfort, whimsy, and a decadent nod to a beloved American dessert—presented in a form that’s perfect for sharing, gifting, or simply savoring solo on a quiet afternoon.
What makes Cupcake Boston cream especially enchanting is how it distills the essence of a historical favorite into a portable, kid-friendly, and party-ready bite. The light vanilla cake acts as a friendly canvas that doesn’t shout, allowing the custard center to shine as the star. The chocolate glaze, glossy and smooth, provides a final, luxurious finish—like a petite, edible piece of chocolate art perched atop a cloud. It’s a dessert that feels special without being fussy; approachable enough for a weeknight but polished enough to impress guests. Whether you’re hosting a brunch, celebrating a birthday, or simply craving a comforting treat that feels like a warm hug, Cupcake Boston cream offers a perfect balance of sophistication and homey charm. And because cupcakes are inherently shareable, this recipe invites conversation, crumb-laden laughter, and the kind of memories that linger long after the last bite.
The Story Behind the Dish
The Boston cream pie has a storied place in American pastry lore, often cited as one of the country’s earliest beloved custard-filled desserts. Its origins trace back to the late 19th or early 20th century in the kitchens of bustling Boston eateries and hotels, where chefs began layering a velvety vanilla custard between sheets of tender cake and sealing it with a lacquer of rich chocolate glaze. Over the years, the pie earned a reputation for elegant simplicity—the sort of dessert that feels grand without being formal. The cupcake version takes that narrative and translates it into individual portions, preserving the spirit of the original while adapting to modern tastes and rituals.
This particular adaptation—Cupcake Boston cream—imagines the classic as bite-sized indulgence. The concept remains faithful: a soft, airy cake that yields to a creamy filling, crowned with a glossy chocolate glaze that delivers a dramatic, glossy finish with every bite. In transforming the pie into cupcakes, you gain portability, portion control, and the delightful thrill of a little cupcake “moment” that can be enjoyed as a standalone treat or dressed up for celebrations. The materials of the original—vanilla, custard, and chocolate—are kept intentionally pure, allowing each element to sing. The result is not simply a cupcake version of a pie; it’s a reimagining that respects tradition while embracing the playful, social nature of cupcakes.
Beyond the kitchen, the story speaks to a broader American culinary culture: a willingness to reinterpret classic flavors in new formats, the love of custard-filled desserts, and the artistry of tempering a glaze to a mirror-like sheen. It’s a reminder that good desserts aren’t about complexity for its own sake; they’re about balance, texture, and the way certain flavors travel from the nose to the taste buds in a single elegant arc. Cupcake Boston cream captures this essence—nostalgic, comforting, and irresistibly modern all at once.
Why You’ll Love This Recipe
- Classic flavors, reimagined: vanilla cake with a creamy center and a glossy chocolate top, delivering all the familiar Boston cream vibes in a more festive, portable format.
- Perfect for gatherings: individual portions are easy to serve, pass around, and eat without fuss, making them ideal for parties, potlucks, and brunches.
- Make-ahead friendly: you can bake the cupcakes, fill them, and glaze them in stages, giving you flexibility when planning events or busy weekends.
- Customizable to fit dietary needs: dairy-free or gluten-free adaptations can be explored without sacrificing the fundamentals of flavor and structure.
- Kid- and adult-friendly: familiar flavors, bright textures, and a little bit of chocolate drama on top make these appealing to a wide range of palates.
- Visually impressive: the dark, glossy top contrasts with the pale cake and creamy center, making them photogenic for social media, gift boxes, or festive platters.
- Versatile pairing opportunities: they pair beautifully with coffee, tea, vanilla ice cream, or fresh fruit compote, making them a flexible option for many menus.
Flavor Profile & Texture
The beauty of Cupcake Boston cream lies in the harmony between three core components. The cake is a delicate, vanilla-forward crumb—soft, tender, and lightly buttery. It provides a gentle, cushioned base that supports the custard center without overpowering it. The custard or cream filling is smooth, velvety, and luxuriously rich. It’s the kind of filling that glides across the palate, leaving a whisper of vanilla and a faint dairy sweetness that lingers in the mouth. The final layer—a chocolate glaze or ganache—brings depth and sophistication. The glaze should feel silky and glossy, just set enough to crack slightly on the first bite. When you combine all three, you get a textural trifecta: the tender crumble of the cake, the cool silk of the filling, and the crisp snap of the chocolate shell.
Flavor-wise, the dish balances vanilla’s soft sweetness with the custard’s warm, eggy depth and the chocolate’s bittersweet finish. If you close your eyes, you can sense each component’s origin: the bakery’s vanilla bean, the custard’s buttery vanilla perfume, and the chocolate’s refined bitterness softened by a touch of cream. Aromas rise in waves—the vanilla’s familiar scent mingling with the faint aroma of cocoa, while the chocolate glaze gleams like a polished surface on a still lake. The overall sensation is comforting and celebratory at once: a dessert that feels like a hug but also a high-five in edible form.
Texture-wise, you’ll notice the contrast that makes this dessert so addictive. The cupcake’s crumb is light and airy, with just enough structure to hold a voluptuous filling. The filling itself—silky and cool—defies the expectation of “just sweet” by offering a subtle richness and a touch of vanilla that echoes through the bite. The chocolate glaze provides a slightly firmer outer shell that yields with a satisfying crack before giving way to the tender interior. It’s a progression that keeps the palate excited and the experience memorable, making each cupcake feel like a little celebration rather than a dessert alone.
Occasions & Pairings
Cupcake Boston cream shines in a variety of settings and occasions. Here are some ideal moments to showcase this treat:
- Holidays and celebrations: birthdays, anniversaries, and family gatherings benefit from the elegant yet approachable nature of these cupcakes.
- Brunch and tea hours: their refined flavor profile pairs beautifully with coffee drinks, hot chocolate, or a light tea service.
- Weekend baking projects: a fun, interactive dessert to bake with friends or family, turning the kitchen into a shared creative space.
- Giftable treats: packaged in pretty boxes, these cupcakes become charming edible gifts for teachers, coworkers, or neighbors.
- Potlucks and office parties: their portable size and crowd-pleasing taste make them a reliable crowd favorite.
Pairing ideas to elevate the experience:
- Drinks: a bold espresso, a lightly sweetened cappuccino, or a cold brew brings out the chocolate and vanilla notes beautifully.
- With fruit: fresh berries, especially strawberries or raspberries, provide a bright counterpoint to the custard’s richness.
- Texture contrasts: a dollop of lightly whipped cream or a small scoop of vanilla ice cream alongside a cupcake can create a delightful dessert ensemble.
- Other desserts: serve alongside a lemon tart or a delicate almond biscuit to explore complementary citrus and nut flavors.
Tips, Variations & Substitutions
While the core concept remains the same, there are many ways to tailor Cupcake Boston cream to your preferences, dietary needs, or available ingredients. Here are ideas to inspire you:
Use real vanilla bean seeds for a more intense aroma, or substitute high-quality vanilla extract if you’re short on beans. A touch of almond extract can add a subtle, complementary note if you enjoy it. Traditional vanilla pastry cream is classic, but you can experiment with flavors: a hint of espresso for a mocha twist, a whisper of citrus zest for brightness, or a pinch of cinnamon for warmth. The traditional approach is a glossy chocolate glaze, but you can explore a semi-sweet ganache, dark chocolate with a splash of cream for a richer feel, or a white chocolate glaze for a lighter, dessert-table-friendly look. Craft the cake with dairy-free milk and a plant-based butter substitute; fill with a dairy-free pastry cream made from almond, oat, or coconut milk; glaze with a dairy-free chocolate that has a glossy, stable finish. Prepare a gluten-free vanilla base using a well-balanced gluten-free flour blend to maintain a tender crumb and good rise, ensuring the filling and glaze pair well. Bake the cakes a day ahead, store them in an airtight container, and fill/glaze closer to serving time for the freshest texture and appearance. For a New-England twist, incorporate a pinch of maple syrup into the custard for a subtle woodland sweetness; for a Mediterranean touch, add orange zest to the filling and a touch of coffee liness to the glaze.
Storage & Make-Ahead Ideas
One of the practical delights of cupcakes is the ease of storage and planning. Here are strategies to keep Cupcake Boston cream fresh, delicious, and ready when you need them:
- Storing freshly made cupcakes: Keep unfilled cupcakes stored in an airtight container at room temperature for up to 2 days. If your filling contains dairy, refrigeration is recommended after assembly.
- Filling and assembly timing: Bake the cakes a day ahead if possible, cool completely, and store in an airtight container. When you’re ready to serve, fill and glaze close to serving time to maintain the best texture of the cake and the gloss of the chocolate.
- Make-ahead assembly: You can prepare the vanilla cake cups, refrigerate them, and then fill and glaze on holiday mornings or party days for a polished finish without last-minute rush.
- Freezing options: Cupcakes without glaze can be frozen for up to one month. Thaw gently at room temperature, then fill and glaze just before serving to preserve the best texture and appearance.
- Glaze stability: If you’re in a warm climate, keep the glaze slightly cooler so it sets with a crisp gleam when added to the cupcakes, ensuring a durable finish that won’t melt too quickly.
Fun Facts & Trivia (Optional)
Delightful little tidbits can add charm to your serving platter. Here are a few to consider sharing with guests:
- The term “Boston cream pie” is widely treated as a cake in many parts of the United States, and some menus proudly label it as a pie; the distinction often comes down to the culinary tradition in a given region—and how one defines a custard-filled dessert with a glossy chocolate top.
- Custard-based desserts have a long, storied lineage across many cultures, and the vanilla custard central to this treat is a cornerstone of patisserie that brings a smooth, lusciously creamy note to desserts of all kinds.
- The visual drama of a glossy chocolate top has made this dessert a popular subject for food photography, with the reflection of light on the glaze creating a dramatic, almost jewel-like surface that invites a closer look.
Final Thoughts
Cupcake Boston cream is more than a reinterpretation of a classic American favorite; it’s a bridging dessert that unites nostalgia with modern convenience. It invites you to slow down and enjoy the ritual of baking—measuring, whisking, tasting, and adjusting—while delivering a finished treat that feels both timeless and contemporary. The interplay of light cake, airy custard, and glossy chocolate is more than a flavor combination; it’s a memorable sensory journey that invites conversation, compliments, and—the best kind of indulgence—shared smiles. Whether you’re a seasoned baker or a home cook experimenting with refined flavors, these cupcakes offer an accessible gateway to a celebratory dessert that feels special yet warm, elegant yet approachable. Ready to bake your own Boston cream moment? Embrace the tradition, savor the texture, and relish the way a single bite can conjure a memory and spark a new favorite tradition in your kitchen.
Ingredients
- Cupcake Base
- 2 cups all-purpose flour (sifted)
→ Provides the structure and crumb for the cupcakes. Sifting the flour before measuring helps ensure the batter rises evenly and prevents dense texture. For a lighter crumb, you may substitute a portion with cake flour, but keep some all-purpose for structure. - 1 1/2 cups granulated sugar
→ Adds sweetness and, when creamed with softened butter, helps trap air for a light, tender crumb. Measure level; if you want a deeper caramel flavor, you can substitute part of the granulated sugar with light brown sugar for extra moisture. - 1/2 cup unsalted butter, softened
→ Provides richness, moisture, and tenderness. Cream this with the sugar until light and fluffy to incorporate air for a loftier batter. Keep the butter at soft room temperature; if it’s too soft, chill slightly before mixing. - 2 large eggs, at room temperature
→ Contribute structure, moisture, and emulsification. Room-temperature eggs mix more evenly with butter and sugar, helping the batter hold together during baking. If eggs are cold, briefly whisk them to loosen before adding. - 3/4 cup whole milk
→ Provides moisture and tenderness; whole milk yields a richer crumb. Use at room temperature to improve emulsification and rise; for a lighter texture, you can substitute part with buttermilk or yogurt, though this will affect flavor and acidity. - 2 teaspoons vanilla extract (pure)
→ Adds depth of flavor that complements the chocolate and custard. Pure vanilla is preferred for its aroma; if you use vanilla paste, you’ll get a stronger vanilla note and visible specks. - 2 teaspoons baking powder
→ Leavening agent that lifts the cupcakes during baking. Distribute evenly by whisking with the dry ingredients; avoid over-mixing once wet and dry ingredients combine to prevent tunneling and dense crumbs. If you scale the recipe, adjust slightly to maintain rise. - 1/4 teaspoon salt
→ Enhances overall flavor and tightens the crumb slightly, helping balance sweetness. Dissolve into the dry ingredients for even distribution.
- 2 cups all-purpose flour (sifted)
- Boston Cream Filling
- 2 cups whole milk
→ The base liquid for the vanilla pastry cream; heating the milk helps integrate with the eggs and cornstarch to create a smooth custard. Whole milk yields a richer texture; you can use a lower-fat milk, but texture will be less luxurious. - 1/2 cup granulated sugar
→ Sweetens the pastry cream; balance with a pinch of salt to prevent cloying sweetness. Taste and adjust after thickening; for a stronger vanilla note, add a dash more vanilla at the end. - 1/4 cup cornstarch
→ Thickening agent that gives the signature smooth, velvety custard texture. Sift to remove lumps and whisk with a splash of cold milk to dissolve fully before adding to hot milk. Cook until it reaches a glossy, nappe-like consistency, then remove from heat to prevent over-thickening. - 4 large egg yolks
→ Primary thickener and enrichers; temper yolks with hot milk to prevent scrambling, then whisk until the mixture thickens. Room-temperature yolks mix more evenly and yield a smoother pastry cream. Save the whites for another use if desired. - 2 tablespoons unsalted butter
→ Adds gloss, richness, and helps stabilize the pastry cream after cooking. Whisk in off the heat so the butter melts smoothly and the cream becomes silky. Do not boil after adding the butter to avoid breaking the emulsion. - 1 teaspoon vanilla extract (pure)
→ Depth of vanilla flavor that shines in the pastry cream; use pure vanilla for best aroma. If desired, you can stir in a small amount of vanilla bean paste for extra strength and tiny vanilla seeds. - Pinch of salt
→ Balances sweetness and enhances the custard’s flavor; a small amount helps the vanilla pop without overwhelming the mixture.
- 2 cups whole milk
- Chocolate Glaze
- 6 ounces semisweet chocolate, finely chopped
→ Forms the rich, glossy glaze that coats the cupcakes and complements the creamy filling. Finely chopping allows rapid, even melting; use high-quality chocolate for a smooth, shiny finish. If you prefer a darker glaze, adjust with darker chocolate while maintaining weight. - 1/2 cup heavy cream
→ Creates a luxurious ganache that melts smoothly over the cupcakes, giving a rich mouthfeel and a glossy surface. Heat the cream until just steaming (do not boil) before pouring over the chocolate to ensure a silky emulsion. For a thicker glaze, reduce the cream slightly. - 1 tablespoon unsalted butter
→ Adds extra shine and a smooth, velvet finish to the glaze. Whisk in off the heat after the ganache is smooth to achieve a mirror-like gloss. If dairy-free, substitute with a neutral-t colored vegan butter or coconut cream, noting that the flavor will change.
- 6 ounces semisweet chocolate, finely chopped
- Optional Toppings
- 1/4 cup mini chocolate chips (optional)
→ Provides an extra chocolate texture and burst of flavor on top. Sprinkle after the glaze has begun to set so they adhere well; avoid adding too early, which can cause them to sink. - Rainbow sprinkles (optional)
→ Decorative and festive; add once the glaze is set to prevent color bleeding into the glaze. Choose non-bleeding sprinkles for a cleaner finish.
- 1/4 cup mini chocolate chips (optional)
Instructions
- Preheat your oven to 350°F (175°C) and line a 12-cup muffin tin with paper liners or grease it well.
→ This ensures the cupcakes bake evenly, release cleanly, and have a tender crumb without sticking. - Sift together the dry ingredients: all-purpose flour, baking powder, and salt into a medium bowl, then whisk to distribute evenly.
→ Sifting aerates the flour, removes lumps, and ensures even leavening for a light, uniform crumb. - Cream the softened butter and granulated sugar on medium-high speed until the mixture is pale, airy, and ribbon-stage.
→ Beating until light incorporates air that will leaven the batter while keeping fat evenly distributed for tenderness. If your butter is too warm, chill briefly before mixing to avoid abrupt melting. - Beat in the eggs one at a time on medium speed, ensuring each egg is fully incorporated before adding the next, then mix in the vanilla extract.
→ Room-temperature eggs emulsify better with sugar and butter, creating a stable emulsion that prevents curdling and leads to a smooth batter. - Alternate adding the dry ingredients and the milk, beginning and ending with the dry ingredients, and mix on low just until each addition is incorporated.
→ This technique prevents overdeveloping gluten, yields a tender crumb, and ensures the batter remains smooth without lumps or tunnels. - Divide the batter evenly among the lined cups, filling each about two-thirds full, then tap the pan to settle the batter and remove air pockets.
→ Proper portioning ensures uniform bake times and level tops; tapping helps collapse large air bubbles for even rise. - Bake the cupcakes in the center rack until a toothpick inserted into the center comes out with only a few moist crumbs (about 18–22 minutes, depending on your oven). Rotate the pan halfway through baking for even color.
→ A tester with a few crumbs indicates doneness without drying the crumb; rotating avoids hot spots that cause uneven browning. - Cool the cupcakes in the pan for 5 minutes, then transfer to a wire rack to cool completely before filling.
→ Cooling here prevents the pastry cream from melting and helps the surface set so the filling and glaze apply cleanly. - Make the vanilla pastry cream by combining the milk, sugar, and a pinch of salt in a heavy saucepan and heating just to steaming.
→ Gentle heating helps the starch hydrate and the fats emulsify for a smooth custard; overheating can scorch milk and impart off-flavors. - In a separate bowl, whisk the egg yolks with the remaining sugar and cornstarch until smooth and pale, ensuring there are no lumps.
→ Thorough whisking disperses the cornstarch and sugar so the custard thickens evenly without specks. - Temper the yolks by gradually whisking in a ladleful of the hot milk, then pour the tempered yolk mixture back into the saucepan with the remaining milk.
→ Tempering prevents scrambling and yields a glossy, smooth pastry cream; whisk continuously during this transfer to maintain an even texture. - Cook over medium heat, whisking constantly until the mixture thickens to a nappe-like consistency, then remove from heat and whisk in the butter and vanilla, followed by a pinch of salt.
→ The butter adds shine and silkiness; keeping the heat from boiling preserves the emulsion and prevents a skin from forming. - Sieve the pastry cream into a clean bowl to remove any lumps, then press a piece of plastic wrap directly onto the surface and refrigerate until fully chilled and thickened.
→ Chilling stabilizes the filling for easy piping and prevents it from sliding out of the cupcakes. - Once the pastry cream is cold, cut a small cone or hollow out the centers of each cooled cupcake using a small paring knife or a round piping tip, creating a cavity for the filling.
→ This creates a defined space for the cream so the filling sits neatly and the outer shell remains intact during eating. - Fill a piping bag fitted with a small round tip (or use a teaspoon) with the pastry cream and pipe into the cavities until slightly domed, then let the filling settle.
→ Piping ensures a clean, controlled distribution and prevents air pockets; fill just to the surface to avoid overstuffing and leaking. - Prepare the chocolate glaze by placing the chopped chocolate in a heatproof bowl and heating the heavy cream in a small saucepan until it just begins to steam, then pour over the chocolate and let sit for a minute before whisking to a smooth ganache.
→ Hot cream melts the chocolate evenly and creates a glossy, stable glaze; resting before whisking prevents scorching and encourages a silky emulsion. - Whisk in the butter off the heat until the glaze is smooth and shiny, then let it cool to a pourable but thick consistency.
→ Off-heat butter helps to tighten and give a reflective gloss; too-hot glaze can melt the filling or run, while too cool glaze will not adhere. - Finish each cupcake by spooning or dipping the top into the chocolate glaze, allowing excess to drip back into the bowl, and let the glaze set at room temperature.
→ A thin, even coating hides the filling and creates the classic Boston Cream appearance; a shallow dip minimizes mess and ensures a smooth finish. - Optionally sprinkle a few mini chocolate chips over the glaze or decorate with rainbow sprinkles after the glaze has set, to add texture and festive color.
→ Toppings provide contrast in flavor and texture, and choosing non-bleeding sprinkles preserves the glaze’s sheen.
Notes
These Boston Cream Cupcakes are a timeless treat featuring a soft vanilla cupcake, a silky vanilla pastry cream filling, and a glossy chocolate glaze. You can customize them by adding a splash of espresso to the pastry cream for a mocha twist, or fold in vanilla bean seeds for extra aroma. They freeze well: bake and cool the cupcakes, then freeze unfrosted or filled and glazed cupcakes; thaw and finish as desired. For an extra touch, serve with a dollop of whipped cream or a light dusting of cocoa powder. Always ensure your flour is certified gluten-free if you have gluten intolerance, and if you need a dairy-free option, substitute accordingly with careful tweaks to texture.
Tips
Tips for Cupcake Boston Cream
- Prepare ingredients to room temperature: Let butter, eggs, and milk sit out for about 30-60 minutes before mixing. This helps the batter emulsify properly, lift evenly, and yields a lighter crumb.
- Sift and measure correctly: Sift the flour and baking powder with the salt to distribute leavening evenly. Spoon the flour into the cup and level off; this prevents a dense, heavy crumb.
- Cream butter and sugar thoroughly: Beat the butter and sugar until pale, light, and fluffy (about 3-4 minutes). This traps air and helps the cupcakes rise during baking.
- Avoid over-mixing after wet and dry combine: Mix just until the ingredients are incorporated to keep the crumb tender and to prevent tunnel holes in the cupcakes.
- Fill liners appropriately: Fill each cupcake liner about 2/3 full to allow room for expansion and to prevent the tops from doming or overflowing.
- Make smooth pastry cream: For the Boston Cream filling, temper the egg yolks with hot milk gradually to prevent scrambling. Cook until the mixture thickens to a glossy nappe, then whisk in butter and vanilla off the heat. Strain if necessary for extra silkiness and refrigerate until cold.
- Keep pastry cream cold and protected: Cover the surface with plastic wrap touching the filling to prevent a skin from forming while it cools.
- Fill with care: Once the cupcakes are completely cooled, create a small pocket or cut a tiny cone from the top and pipe pastry cream inside until it just bulges. Avoid overfilling to prevent leakage.
- Make a smooth chocolate glaze: Heat the heavy cream just to steaming and pour over the finely chopped chocolate. Let sit a minute, then whisk until smooth. Whisk in the butter off the heat for a shiny, velvety finish. If the glaze is too thick, warm it slightly; if too thin, add a bit more chopped chocolate.
- Set the glaze wisely: Let the glazed cupcakes sit at room temperature until the glaze is glossy and set before adding toppings or storing.
- Top and decorate mindfully: Add mini chocolate chips or rainbow sprinkles after the glaze has set to prevent bleeding or sinking. For a cleaner finish, use non-bleeding sprinkles.
- Storage and make-ahead tips: Pastry cream can be made a day ahead and kept refrigerated. Cupcakes can be baked a day ahead and stored in an airtight container; assemble and glaze just before serving for best texture. Refrigerate filled cupcakes if not serving soon, and bring to room temperature before enjoying.
FAQ
What are the main components of Cupcake Boston Cream?
Vanilla cupcakes, a rich pastry cream filling, and a smooth chocolate ganache or glaze on top. Optional decorations include crushed cookies, sprinkles, or fresh fruit.
How do I make the pastry cream filling for the cupcakes?
Whisk together egg yolks and sugar, then temper with hot milk. Return to the stove and cook over medium heat until it thickens to a custard-like consistency. Stir in vanilla and a little butter for shine, then chill until firm enough to pipe.
What temperature and how long should the cupcakes bake?
Bake at 350°F (175°C). Cupcakes typically take 18–22 minutes, or until a toothpick inserted into the center comes out clean. Let them cool completely before filling and glazing.
How do I fill the cupcakes with the pastry cream without making a mess?
Use a small sharp knife to cut a shallow cone-shaped hole in the center of each cupcake or insert a piping tip into a pastry bag filled with pastry cream. Inject a generous amount, then replace the cap you removed or cover with a small piece of cupcake.
Can I make the pastry cream ahead of time?
Yes. Pastry cream can be made 1–2 days in advance. Cover tightly with plastic wrap pressed to the surface to prevent a skin from forming, and refrigerate. Stir gently before using.
Are there dairy-free or gluten-free options for this recipe?
Yes. For dairy-free, use almond or oat milk and dairy-free butter alternatives; use a dairy-free chocolate for the glaze. For gluten-free cupcakes, use a certified gluten-free flour blend and follow the same mixing and baking times. The pastry cream can be made with dairy-free milk and cornstarch as a thickener if needed.
How should I store Boston Cream Cupcakes?
Store refrigerated. Keep them in an airtight container for up to 2–3 days. If you need to keep them longer, freeze unfrosted cupcakes or the filled cupcakes without glaze, then reassemble and glaze after thawing.
Can I freeze Boston Cream Cupcakes?
You can freeze unfrosted cupcakes for up to 2–3 months wrapped well. Pastry cream can be frozen for up to 1 month. Thaw overnight in the fridge, rewarm gently if needed, then fill and glaze before serving.
How do I make a smooth chocolate ganache glaze?
Heat cream until steaming (not boiling), then pour over chopped chocolate or use dark chocolate chips. Let sit briefly, then whisk until glossy and smooth. Allow to cool slightly before pouring over the cupcakes in a thin, even layer.
What are common issues and how can I troubleshoot them?
If the tops sink, bake a bit longer or avoid overmixing the batter. If the pastry cream is runny, add a touch more cornstarch slurry and cook a bit longer. If the glaze beads or won’t set, let it cool a bit more or adjust with a touch of corn syrup for shine. For a smooth finish, chill the filled cupcakes before glazing.