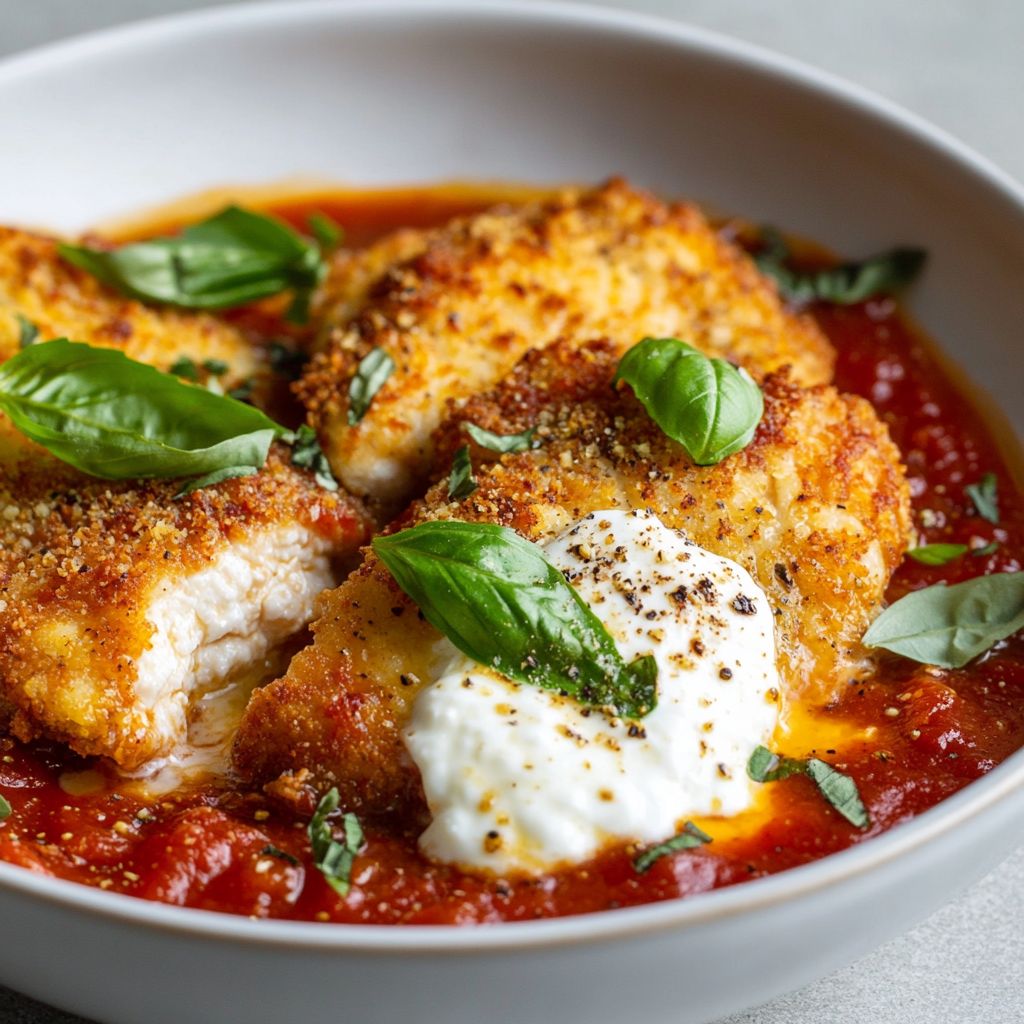
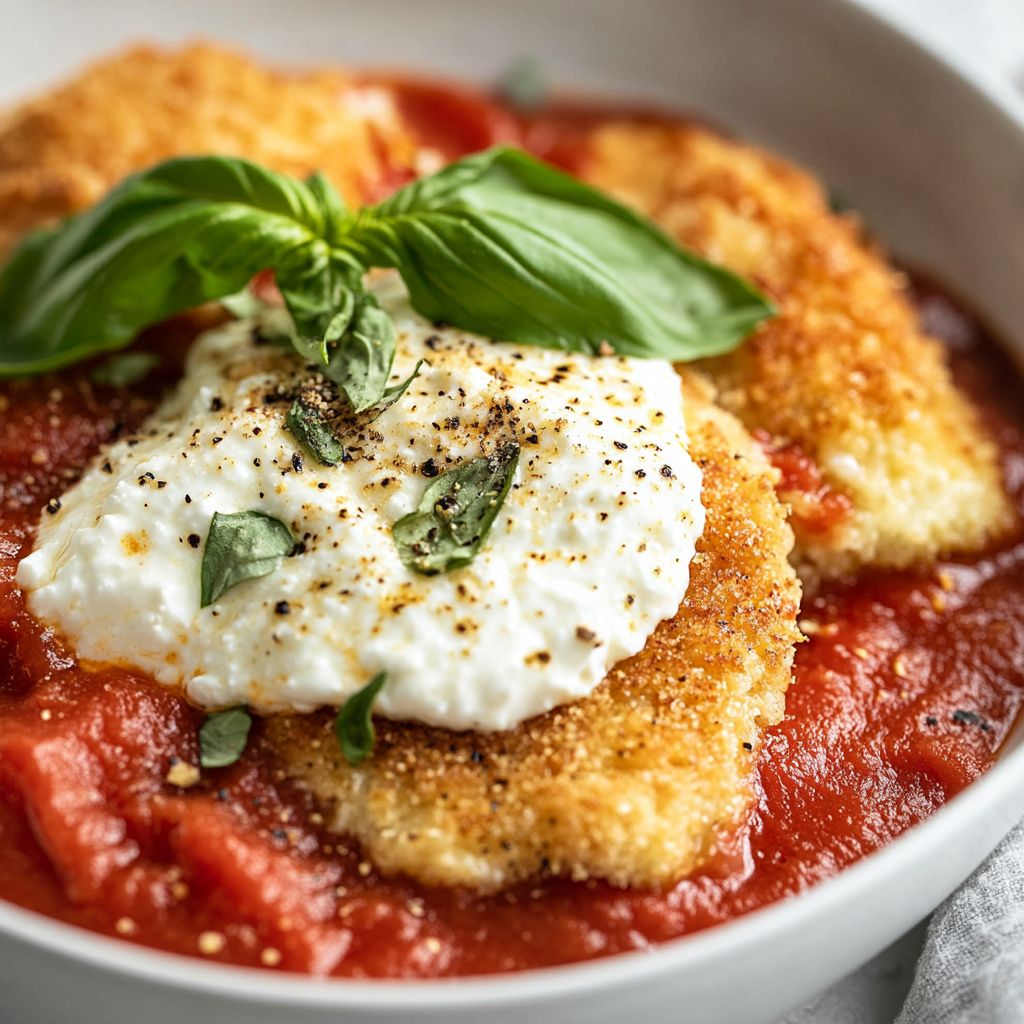
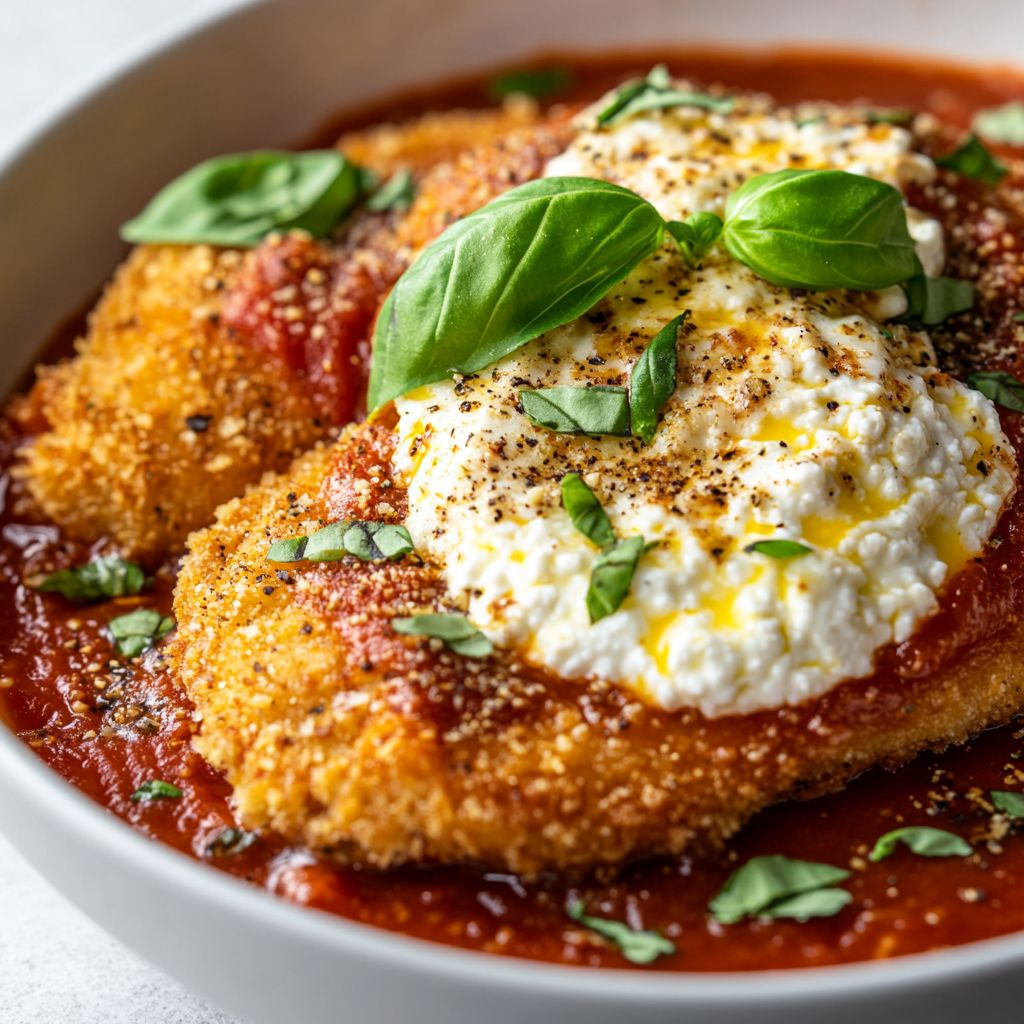
Author

Ocean Nightleaf

Browsing

Introduction / Hook

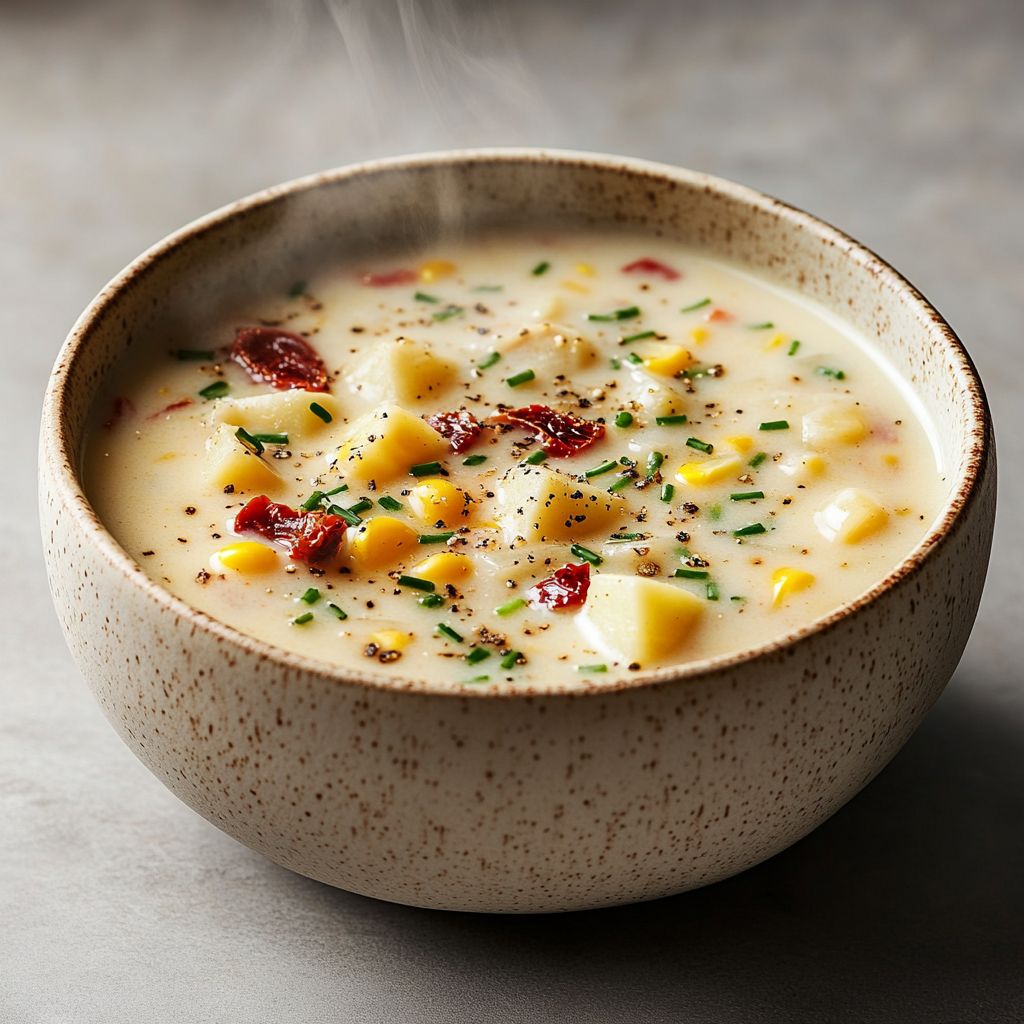
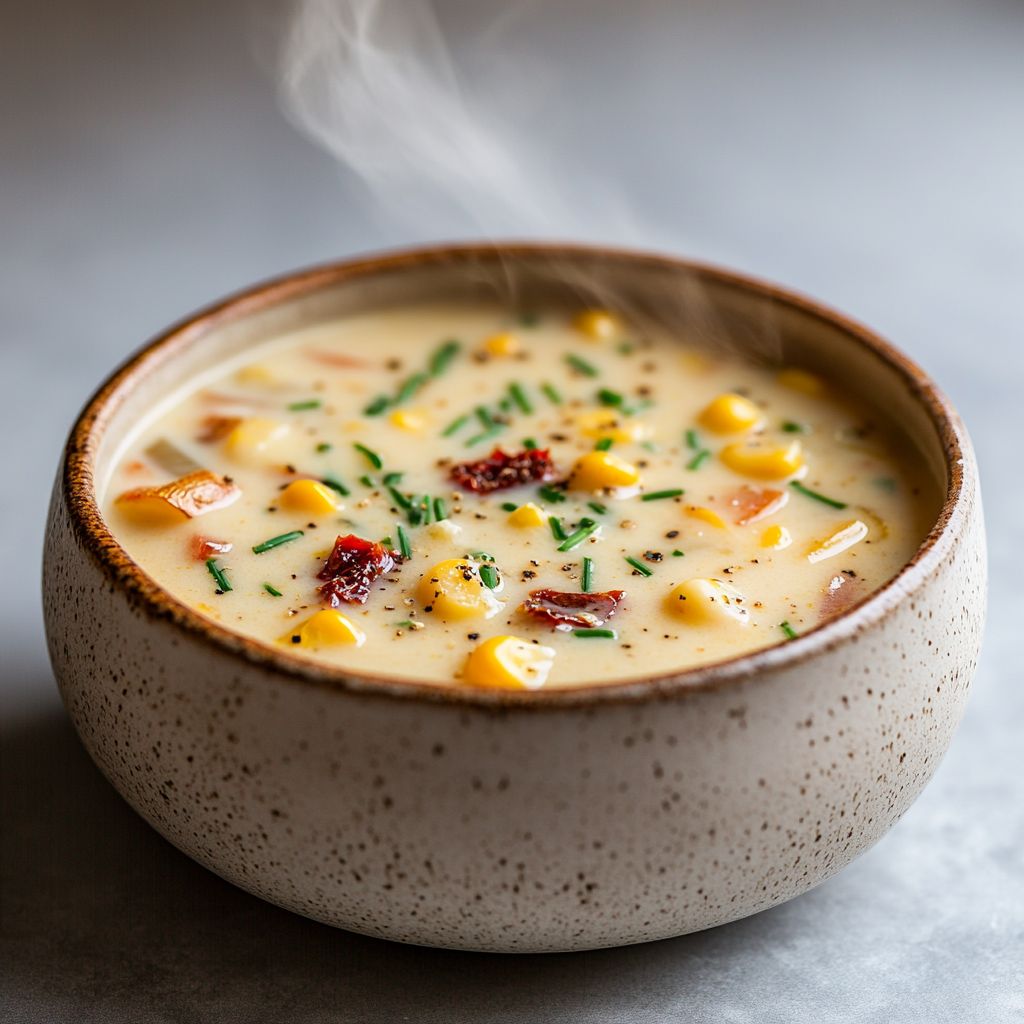
Imagine a bowl that tastes like a sunset: corn kernels bright as summer afternoons, sun-dried tomatoes glinting like preserved rubies, and a velvet-smooth creaminess that coats your palate with warmth. This Sun Dried Tomato Corn Chowder is a cozy, luminous hug in a bowl, a comforting fusion of sun-kissed sweetness and hearty richness. The moment you lift the spoon, fragrant notes of roasted garlic, caramelized onions, and a whisper of herbs fill the air, drawing you in with the promise of something both familiar and delightfully new. It’s the kind of dish that makes a weeknight feel like a celebration and a chilly weekend afternoon feel like a pilgrimage to a sunny, coastal market—where the scent of corn silks, olive oil, and sun-dried tomatoes mingles with the sea breeze of memory. The color is inviting—the pale cream body swirled with ruby-red ribbons and bright corn yellow—inviting you to dive in again and again. In every spoonful, you’ll taste a balance of sweetness from corn, tang from sun-dried tomatoes, and a luxurious, comforting finish that lingers on the tongue. This chowder isn’t just nourishment; it’s a small ritual of savoring the present moment, a dish that invites sharing, storytelling, and a little indulgence in the simplest of pleasures.

What makes this Sun Dried Tomato Corn Chowder stand out is how effortlessly it marries different culinary influences into a single, coherent experience. It draws from the soul-warming tradition of chowders—creamy, velvety, and satisfying—while brightening the profile with the bright, tart-sweet intensity of sun-dried tomatoes. It’s not a heavy-handed, rustic soup, nor is it a delicate consommé. It’s a thoughtfully layered bowl that speaks to homespun comfort and to a chef’s palate who loves a little brightness on a cool day. And because it relies on pantry-friendly savors—corn, sun-dried tomatoes, aromatics, and a creamy stock—it’s the kind of recipe you’ll return to when you want something deeply satisfying but not fussy. You can customize it to your mood, your pantry, or your guests, making it a timeless staple with limitless variations.

The Story Behind the Dish

The lineage of chowder is rooted in seaside towns and harvest kitchens, where sailors and farmers traded stories as much as bowls. Traditional corn chowder—thick, comforting, and whispering of cornfields and sea air—has a long-standing place on North American tables. Sun-dried tomatoes, on the other hand, are a pantry treasure born of sun-warmed afternoons in the sunlit hills of the Mediterranean, where tomatoes are peeled and slowly dried to concentrate their sweet-tortured flavors. It’s a culinary marriage born not of necessity but of curiosity: what happens when the rustic goodness of corn meets the sun-dried brightness of tomatoes? The result is a chowder that carries both the memory of the sea and the sun, a dish that feels both timeless and modern. This recipe often evokes family kitchens where improvisation ruled the stove—a pot of something comforting, a crate of corn on the cob, a jar of dried tomatoes, and a splash of cream turning humble ingredients into something memorable. In many homes, a recipe like this becomes a bridge between generations: the old stories of harvests and summer fairs, and the new stories of creative, weeknight-friendly cooking that still feels special.

Personally, this dish has a little story of its own. I recall a late-summer farmers’ market, baskets of corn stacked high, the air sweet with ripeness and the scent of herbs. A friend handed me a jar of sun-dried tomatoes picked on a hillside, and we chatted about comfort foods that could be shared around a table at the first chill of autumn. When I brought those two ingredients together in a pot, the kitchen seemed to glow with color and scent—the corny sweetness and the tomatoes’ rosy tang weaving a memory you could taste. Since then, this chowder has become a dish I reach for when I want both heartiness and a touch of brightness, a reminder that the simplest pantry items can come together to create something both evocative and deeply satisfying.

Why You’ll Love This Recipe

  • Comfort with a bright twist: The familiar, creamy foundation of a chowder is brightened by sun-dried tomatoes, providing an uplifting, tangy note without overpowering the corn’s natural sweetness.
  • Makes everyday feel special: It’s accessible enough for weeknights but refined enough to serve to guests, turning a casual dinner into a memorable moment.
  • Versatile and forgiving: Customize with pantry staples, swap dairy for dairy-free options, or add proteins to suit your dietary needs.
  • Layered textures and flavors: Silky broth, tender vegetables, plump corn, and chewy tomato ribbons create a pleasing mouthfeel in every bite.
  • One-pot vibe, big flavor: While you’ll find variations, the finished dish often comes together with one pot or a small number of steps, making cleanup a breeze.
  • Meal-prep-friendly: It reheats beautifully, and leftovers can inspire other meals—slightly thickened soup as a sauce for roasted vegetables or a bed for crusty bread.

Flavor Profile & Texture

The Sun Dried Tomato Corn Chowder is a study in balance. The sweetness of corn provides a sunny baseline that invites you to take a gentle, comforting bite. Sun-dried tomatoes contribute a deep, savory tang with a slight tanginess that contrasts beautifully against the corn’s gentle sweetness. The cream or dairy-based base brings a lush richness that glides across the palate, smoothing any sharp edges and tying the components together into a cohesive whole. Aromatics—garlic, onion, and a hint of herbs—deliver a perfume that wafts through the bowl, inviting you back for another sip. The texture is a pleasing continuum: silky, slightly thickened broth that clings to tender chunks of vegetables and corn, with occasional chewy ribbons of tomato for bursts of concentrated flavor. If you prefer a lighter mouthfeel, you can adjust the thickness with stock or dairy substitutes; if you crave more body, you can allow the soup to simmer a little longer or add a small amount of potatoes to naturalize the starches. The end result is an indulgent yet balanced chowder that never feels heavy, but always feels nourishing and deeply satisfying.

Key taste notes you’ll notice include: a gentle sweetness from the corn, a tangy sun-dried tomato presence that remains savory rather than tart, a creamy all-encompassing finish, with a whisper of herbal brightness from thyme or chives. Each bite unfolds like a mini landscape—the corn fields of summer, the salty edge of the sea, and the sun-dried, sun-kissed tomatoes echoing warm afternoons. The dish can carry subtle notes of garlic and onion without dominating; rather, they serve as the bridge that allows the fruit-forward corn and the tomato richness to mingle gracefully. If you’re a dairy lover, the creamy texture is luxurious; if you’re dairy-free, you can achieve a similar mouthfeel with coconut milk or almond milk plus a bit of emulsifier like a small amount of cornstarch blended into the liquid stage. Either way, you end up with a chowder that is comforting, soulful, and precisely the sort of dish that makes you feel cared for simply by sitting down to eat it.

Occasions & Pairings

This chowder shines in a variety of settings, from casual family dinners to festive autumn gatherings. It’s particularly welcome on cool weeknights when you want something cozy yet not overly indulgent, and it also holds its own as a starter or a main in a larger menu for weekend entertaining. The creamy, luxurious texture and bright flavor make it a fine match for a rustic crusty loaf, a sprinkle of fresh herbs, and a drizzle of olive oil. For a complete dining experience, consider these pairings:

  • Side dishes: Warm crusty bread, herbed flatbreads, a light salad of peppery greens with a lemony vinaigrette, or roasted vegetables that echo the chowder’s sweetness (like carrots and parsnips).
  • Drinks: A crisp white wine such as Sauvignon Blanc or a lightly oaked Chardonnay pairs nicely with the richness while cutting through the creaminess. For non-alcoholic options, a sparkling citrus water or a light, herb-infused tea works beautifully.
  • Desserts: A simple fruit dessert, like poached pears or citrus-infused yogurt, offers a clean finish that won’t clash with the soup’s richness.
  • Occasions: Weeknight comfort dinners, weekend gatherings, casual dinner parties, autumn or winter menus, and even a special-looking potluck dish that travels well.

Tastes, Textures & Texture Play: Flavor Profile Deep-Dive

In this section, think about how the flavors speak to each other as you savor the bowl. The corn sweetness provides a mellow, almost floral layer—think corn silks and sunlit fields—while the sun-dried tomatoes add a concentrated, savory brightness that lingers pleasantly. The dairy or non-dairy creaminess binds everything in a cocoon-like finish, ensuring the flavors don’t drift apart. The aromatics—onions and garlic—are present but not aggressive, offering a background perfume that allows the main players to shine. If you’re texture-focused, notice the contrast between the silky broth and the more substantial pieces of corn and vegetables, each bite delivering a slightly different feel. The optional add-ins, such as pieces of tender potato or shreds of smoked meat, introduce another layer of texture and a subtle saltiness that can elevate the dish even further. The world of chowders invites you to play with texture and depth, and this recipe makes that play accessible and delicious.

Tips, Variations & Substitutions

Here are ideas to customize the dish to your dietary needs, pantry, or mood. Each option preserves the soul of the dish while offering a different experience at the table.

  • Dairy-free/vegan: Use olive oil or a neutral-tavored oil to sauté the aromatics. Replace dairy with coconut milk or almond milk, and optionally whisk a tablespoon of cornstarch with the plant milk to help thicken the soup. Use a vegetable stock for the base. The result remains creamy and satisfying with a bright tomato note.
  • Meat-forward version: Add cooked bacon, pancetta, or diced ham for a smoky, savory depth. Sauté the meat first to render fat, then cook the aromatics in the rendered fat for a richer base.
  • Gluten-free: The dish is naturally gluten-free if you use stock that is gluten-free and check any thickeners; most chowders rely on dairy and starches rather than gluten-containing ingredients, making it easily adaptable.
  • Potato boost: Dice a potato and simmer it with the vegetables to give the chowder more body and a heartier bite. Potatoes also help create a naturally creamy texture as they break down slightly during cooking.
  • Tomato variations: If you don’t have sun-dried tomatoes, you can use a bit of tomato paste for depth, adding it early to bloom with the aromatics. For a different brightness, a small splash of lemon juice at the end can lift the flavors.
  • Herbal twists: Use chives, thyme, or a pinch of smoked paprika for a regional twist. A bay leaf during simmering can add a subtle earthy note that enhances the chowder’s complexity.
  • Chunkiness level: If you prefer chunkier chowder, reserve some corn kernels and vegetables to stir in at the end for a contrasting texture. If you want it silkier, blend a portion of the soup and fold back into the pot.
  • Regional twists: A touch of Southwestern spice (cumin and a dash of chili powder) can transform this into a sun-dried tomato-corn cowgirl chowder, while a pinch of fennel seeds gives an Italian-inspired fragrance.

Storage & Make-Ahead Ideas

Like many comforting soups, this chowder keeps well and often tastes better the next day as flavors meld. Here are practical tips for storing and making ahead:

  • Refrigeration: Cool the chowder completely, then store in airtight containers for up to 3–4 days. Reheat gently on the stove over low to medium heat, stirring frequently to prevent scorching. If the chowder has thickened too much in the fridge, whisk in a splash of stock or dairy-free milk to loosen it to your preferred consistency.
  • Freezing: Cream-based soups can separate when frozen and thawed, but you can still freeze them if you’re okay with a quick emulsification step later. Freeze in portioned containers for up to 2–3 months. Thaw overnight in the fridge, then reheat slowly, whisking or stirring vigorously to re-emulsify the cream and restore texture. If you notice separation, a quick whisk with a splash of stock can bring it back together.
  • Make-ahead strategy: Sauté the aromatics and prepare the base a day ahead. Store the sautéed aromatics and stock separately, and then combine and simmer when you’re ready to serve. This approach brings a sense of fresh-cooked aroma with minimal last-minute effort.
  • Meal-prep idea: Cook the corn and sun-dried tomato elements ahead of time, then combine with hot stock and cream when you’re ready to eat. This can be a time-saver for busy families or entertaining.

Fun Facts & Trivia

To add a little extra flavor to your culinary curiosity, here are some tidbits about the ingredients and the dish’s spirit:

  • Corn in chowder: Corn has been a staple in New World diets for centuries, and corn chowder remains a symbol of hearty, rustic cooking that’s equally at home in a seaside kitchen or a kitchen table in the hinterlands.
  • Sun-dried tomatoes: The art of drying tomatoes concentrates their sugars and intensifies their umami, transforming a simple tomato into a pantry hero with a long shelf life and a dramatic flavor boost.
  • Chowder etymology: The term “chowder” likely derives from the halting of French fishermen’s boats to gather chow-chow, a mixed dish, or from the French word “chaudière,” meaning cauldron, emphasizing the communal, shared nature of this hearty category of soups.
  • Color psychology: The warm hues in this dish—golden corn, ruby sun-dried tomatoes—are known to evoke comfort and appetite, making the dish naturally appealing even before the first bite.
  • Regional fusion symbolism: A sun-dried tomato accent on a classic chowder reflects a broader culinary trend of blending Mediterranean brightness with New England heartiness, illustrating how pantry staples can cross borders to create something both nostalgic and novel.

Closing Thoughts: Serving the Dish with Confidence

Sun Dried Tomato Corn Chowder is more than a recipe; it’s a mood, a memory, and a celebration of how simple ingredients can become something remarkable when treated with care and imagination. Embrace the creamy warmth, adjust the brightness to your liking, and let the dish evolve as your pantry and preferences shift with the seasons. Whether you’re feeding a hungry family, sharing with close friends, or simply treating yourself on a quiet evening, this chowder offers nourishment with a touch of sunshine—comfort, character, and a little bit of bright, summery joy in every spoonful.

Optional: Quick Tips for a Perfect First Serve

  • Taste and adjust seasoning at the end; sun-dried tomatoes can bring a salty component, so a gentle balance with salt or a dash of sugar or citrus can help.
  • Finish with a squeeze of lemon or a drizzle of olive oil to brighten the final flavor before serving.
  • If using dairy, a light dusting of freshly cracked black pepper adds a pleasant spark to the creamy finish.

Ingredients

  • Sauté Base
  • – 2 tablespoons extra-virgin olive oil
    → Used to sauté the aromatics and create a flavorful foundation for the chowder without burning. Maintain medium heat and swirl the oil to coat the pot; a touch of butter can be added for richer browning if desired.
  • – 1 medium onion, finely diced
    → Provides sweetness and depth as it softens; dice evenly so it cooks at the same rate as the other vegetables. Sauté until translucent and starting to caramelize for added flavor.
  • – 2 cloves garlic, minced
    → Adds bright, aromatic punch that forms the flavor backbone; add after the onion to prevent browning and cook 30–60 seconds until fragrant.
  • – 2 celery stalks, diced
    → Introduces crisp, vegetal notes and texture; dice uniformly for even cooking and to contrast with the creamy base.
  • – 2 cups potatoes, diced (Russet or Yukon Gold)
    → Contribute body and starch that slightly thickens the chowder as they cook; cut into roughly 1/2-inch pieces for even cooking.
  • Vegetables & Corn
  • – 3 cups corn kernels (fresh from 2 ears or thawed frozen)
    → Provides sweetness, color, and a crisp bite; if using fresh, slice kernels off the cob just before adding; frozen should be thawed and drained well to avoid extra water diluting the chowder.
  • – 1/2 cup sun-dried tomatoes, chopped (rehydrated if using dry varieties)
    → Contribute a tangy, concentrated tomato flavor and chewy texture; if using dry tomatoes, rehydrate in hot water for 10–15 minutes, then drain; if oil-packed, drain the oil (reserve a teaspoon or so for extra flavor) and chop.
  • Broth & Dairy
  • – 4 cups vegetable broth
    → The primary simmering liquid that carries all flavors; use low-sodium broth to control salt; you can adjust with salt later as needed.
  • – 1 cup heavy cream (or full-fat coconut milk for dairy-free option)
    → Adds lush creaminess and body; if using coconut milk, expect a light coconut note and avoid boiling after adding to prevent separation; simmer gently.
  • Seasonings
  • – 1 teaspoon dried thyme
    → Provides earthy herbal aroma that complements corn and tomatoes; if using fresh thyme, use about 1 tablespoon chopped and add early in the simmering stage for maximum flavor.
  • – 1 bay leaf
    → Adds subtle aromatic depth; remove before serving to avoid a lingering bay flavor in the final bite.
  • – Salt and freshly ground black pepper to taste
    → Essential for building the final flavor; start with light seasoning and adjust after tasting the chowder, especially if your broth is salted.
  • Optional Add-ins
  • – 4 slices bacon, cooked until crisp and crumbled (optional)
    → Adds smoky, salty richness and a contrasting texture. If using, render the fat from the bacon first and sauté the aromatics in it for extra depth; fold the crumbled bacon in at the end or serve on top.
  • – 1/2 teaspoon smoked paprika (optional)
    → Adds a subtle smoky note that pairs well with corn and sun-dried tomatoes; add during simmering for even distribution.
  • – Fresh parsley or chives, chopped for garnish (optional)
    → Brightens the dish with color and aroma; sprinkle just before serving for maximum freshness.

Instructions

  • Rehydrate sun-dried tomatoes (if using dry varieties) in hot water for 10–15 minutes until plump, then drain and pat dry; chop to bite-sized pieces so they distribute evenly through the chowder.

    → Rehydration reactivates concentrated flavors and softens the texture, ensuring the tomatoes meld into the soup rather than staying chewy.
  • If you are using bacon, cook the slices in the pot over medium heat until crisp, then crumble and set aside; reserve the rendered fat in the pot for depth of flavor.

    → Rendered bacon fat provides a smoky, salty foundation that enhances the chowder; crumbled bacon later adds texture and richness.
  • Heat 2 tablespoons extra-virgin olive oil in a large heavy pot over medium heat, using the rendered bacon fat if you chose to cook bacon; swirl to coat the bottom and prevent hot spots.

    → A well-coated pot ensures even cooking and prevents sticking, while medium heat preserves aromatics without burning.
  • Add the finely diced onion and a pinch of salt; sauté until translucent and beginning to caramelize at the edges, about 5–7 minutes.

    → Sweating the onions draws out sweetness and develops depth; salted onions soften more evenly and prevent uneven browning.
  • Stir in the diced celery and continue cooking until the celery is tender and starting to soften, about 4–6 minutes longer.

    → Uniformly softened celery contributes subtle vegetal aroma and textural contrast to the creamy base.
  • Add the minced garlic and cook for 30–60 seconds until fragrant, being careful not to brown it; adjust heat if necessary.

    → Garlic releases its fragrant compounds quickly; overheating can make it bitter, so brief sautéing preserves aroma.
  • → Coating the potatoes helps their starches gelatinize during simmering, contributing to creaminess without added roux.
  • Add the corn kernels and sauté for 2–3 minutes to bloom their sweetness and create a slight char on some kernels for flavor complexity.

    → Fresh corn develops a bright, sweet flavor when heated briefly; this step enhances texture and color in the final dish.
  • → Heating tomatoes helps their acidity complement the corn and cream, while distributing their chewy texture evenly.
  • Pour in 4 cups vegetable broth; add 1 teaspoon dried thyme and 1 bay leaf; bring the mixture to a gentle simmer over medium-high heat.

    → The broth carries all flavors; thyme adds earthy aroma and the bay leaf provides a subtle, layered depth to the soup.
  • Reduce the heat to maintain a gentle simmer and cook for 15–20 minutes, or until the potatoes are tender when pierced with a fork; stir occasionally to prevent sticking and ensure even cooking.

    → Gentle simmering gently breaks down potatoes and melds flavors without breaking down the vegetables into a mushy texture.
  • Stir in 1 cup heavy cream (or full-fat coconut milk for a dairy-free option); simmer gently and avoid a rolling boil if using coconut milk to prevent separation or curdling.

    → Cream adds silkiness and body; coconut milk requires gentler handling to maintain smoothness and structure.
  • Remove the bay leaf and season to taste with salt and freshly ground black pepper, adjusting gradually after tasting to account for the broth’s salt level.

    → Bay leaf removal prevents an overly resinous aftertaste, and careful seasoning ensures the chowder is balanced and flavorful.
  • If using bacon, fold in the crumbled bacon now or reserve it to sprinkle on top when serving for a contrasting texture and smoky finish.

    → Adding bacon at the end preserves its crisp texture and distinct flavor against the creamy chowder.
  • Optionally whisk in 1/2 teaspoon smoked paprika during simmer for a subtle smoky note that pairs well with corn and sun-dried tomatoes.

    → Paprika enhances depth and rounds the sweetness of corn with a gentle, earthy-smoky nuance.
  • Rinse and chop fresh parsley or chives and set aside for a bright garnish; sprinkle over the chowder just before serving to lift aroma and color.

    → Fresh herbs finish the dish with a clean, aromatic note that contrasts the creamy base.
  • Ladle the Sun Dried Tomato Corn Chowder into warm bowls and serve with crusty bread or crackers on the side for textural contrast and soaking.

    → A sturdy loaf or crackers help balance the richness and provide a satisfying bite to accompany the creamy chowder.

Notes

These sun-dried tomato corn chowder notes are designed to guide you from simmer to serving, ensuring a dreamy, creamy chowder with bright tomato tang and sweet corn.

  • Flavor base: Sauté the onion (and celery) in olive oil over medium heat until onions are translucent and just starting to caramelize. A small knob of butter can enrich browning if you want richer depth.
  • Sun-dried tomatoes: If using dry tomatoes, rehydrate in hot water for 10–15 minutes, then drain well; chop and add to the pot with the corn. If oil-packed, drain the oil (reserve a teaspoon or so) and chop.
  • Garlic: Add minced garlic after onions have softened, cooking 30–60 seconds until fragrant to prevent browning bitter notes.
  • Vegetables: Dice celery evenly for uniform cooking; potatoes should be ~1/2 inch pieces so they soften at the same rate as corn.
  • Gentle simmer: Pour in 4 cups low-sodium vegetable broth and bring to a gentle simmer; add the bay leaf and thyme (see note below) and simmer until potatoes are just tender (about 12–15 minutes).
  • Thickening and texture: The potatoes and corn help body the chowder; for extra body, you can lightly mash a portion of the potatoes in the pot or blend a cup of the chowder and stir back in.
  • Add dairy: Stir in 1 cup heavy cream (or full-fat coconut milk for dairy-free). Do not boil vigorously after adding coconut milk to avoid separation; simmer gently to heat through and meld flavors.
  • Seasoning: Add 1 teaspoon dried thyme and one bay leaf, then taste and season with salt and black pepper near the end, after tasting the broth. If you use fresh thyme, chop about 1 tablespoon and add early in simmering for freshest aroma.
  • Optional add-ins: For smoky depth, crumble 4 slices of bacon (cook until crisp) and fold in at the end, or serve on top. A 1/2 teaspoon smoked paprika can be added during simmering for a subtle smoke. Garnish with fresh parsley or chives.
  • Finish: Remove the bay leaf before serving. Adjust salt, pepper, and a squeeze of lemon juice or a splash of vinegar if you want a touch of brightness to balance the creaminess.
  • Make-ahead and storage: Chowder can be cooled and refrigerated for up to 3–4 days; reheat gently on the stovetop, adding a splash of broth if it thickens too much. Dairy-based chowders can separate after freezing; best texture is achieved by freezing without dairy and adding cream after thawing, or using dairy-free milk alternatives and thickening with potatoes.
  • Tips for dietary needs: Ensure all broths and sun-dried tomatoes are gluten-free if you need a gluten-free dish. To make vegan, use coconut milk instead of cream and omit any bacon; keep other vegetables and seasonings standard.

Tips

Tips for Sun Dried Tomato Corn Chowder

  • Prep mise en place before you start: chop onions, celery, potatoes to uniform sizes, chop sun-dried tomatoes, and measure thyme, bay leaf, and pepper so everything is ready when you begin.
  • Maintain medium heat when sautéing the base. The goal is fragrant aromatics and golden-brown bits, not burnt edges. If the onions start to look darker, lower the heat and add a splash of water or broth to deglaze.
  • Cook garlic after the onion for maximum aroma without scorching. Add garlic, cook 30–60 seconds until just fragrant, then proceed with the rest of the aromatics.
  • Uniformly dice vegetables (celery and potatoes) to ensure even cooking; 1/2-inch potato pieces work well for a creamy interior with a slight bite.
  • For corn: if using fresh corn, cut kernels off the cob just before adding; if using frozen corn, thaw and drain well to avoid diluting the chowder with extra ice water.
  • Sun-dried tomatoes add tang and chew. For dry tomatoes, rehydrate in hot water for 10–15 minutes, then drain. For oil-packed, drain the oil (reserve a teaspoon for extra flavor) and chop.
  • Choose your broth wisely. Low-sodium vegetable broth helps you control the final salt level; simmer until the potatoes are tender and flavors meld.
  • Dairy or dairy-free: heavy cream adds luxurious body. If using full-fat coconut milk, add after the chowder has simmered for a while and keep the heat gentle to prevent separation; do not boil vigorously.
  • Herbs and aromatics: add dried thyme with the simmering liquid and tuck in the bay leaf. If using fresh thyme, use about 1 tablespoon chopped and add early. Remove the bay leaf before serving.
  • Salt and pepper: season gradually. Start with a light amount, then taste and adjust after the chowder has simmered and dairy has been added, since dairy can mask salt.
  • Optional bacon: if using, render bacon first until crisp, then sauté aromatics in the rendered fat for deeper flavor. Fold in crumbled bacon at the end or serve on top for contrasting texture.
  • Smoked paprika (optional) can be added during simmering for a subtle smoky edge that complements sun-dried tomatoes and corn.
  • Finish with fresh herbs at the end: chopped parsley or chives adds color and brightness just before serving.
  • Texture and consistency tips: if the chowder seems too thin, simmer a bit longer with the pot uncovered to reduce, or mash a few potato pieces against the side to release starch and thicken naturally.
  • Make-ahead and storage: this chowder stores well in the fridge for 3–4 days. Reheat gently on the stove over medium-low, stirring often. Dairy-based chowders tend to thicken as they sit; you can thin with a little broth or water as needed. For freezing, most dairy-based chowders freeze best without the cream; freeze the base separately and add cream on reheating if possible.

FAQ

Sun Dried Tomato Corn Chowder – Frequently Asked Questions

What are the main ingredients for Sun Dried Tomato Corn Chowder?

Classic base includes onion, garlic, sun-dried tomatoes, corn kernels (fresh, frozen, or canned), potatoes for body, and a creamy element from milk or cream plus butter or olive oil. Season with salt, pepper, and herbs such as thyme. Optional extras: crispy bacon or pancetta, shredded cheese, and chopped herbs for garnish.

Is this chowder dairy-free or can I make it dairy-free?

Yes. To make it dairy-free, skip the butter and cream. Use olive oil for sautéing and substitute dairy milk with a plant-based milk (almond, oat, or coconut) and/or coconut milk for richness. You can thicken with potatoes or a small amount of cornstarch slurry. If you want a closer texture to traditional chowder, add a little dairy-free yogurt or cashew cream at the end.

Can I use fresh corn instead of canned or frozen?

Absolutely. Use fresh corn kernels cut from the cob. Fresh corn adds great sweetness and texture. If you’re using fresh corn, you may want to roast or lightly sauté the kernels for extra depth before adding them to the chowder. If using canned corn, drain well; frozen corn can be used directly.

How can I make this recipe vegetarian or vegan?

For vegetarian: use vegetable stock instead of chicken stock and omit any meat. For vegan: use vegetable stock, olive oil instead of butter, and a plant-based milk or coconut milk for creaminess. Omit cheese or use a vegan cheese substitute. All other ingredients can remain the same.

What are the best ways to thicken the chowder?

Body comes from the potatoes and simmering. You can also mash 1 cup of the chowder and stir it back in to thicken. For a quicker fix, whisk a small amount (1–2 teaspoons) of cornstarch or gluten-free flour with a splash of cold milk, then stir into the soup and simmer until thickened. If avoiding gluten, use cornstarch or arrowroot instead of flour.

How long does it take to cook Sun Dried Tomato Corn Chowder?

Plan for about 40 minutes total. Sauté aromatics (onion, garlic) for 5–7 minutes, simmer with stock and potatoes for 15–20 minutes until potatoes begin to soften, then add corn and sun-dried tomatoes and simmer 5–10 more minutes until flavors marry and the chowder thickens.

How should I store leftovers?

Let the chowder cool, then store in an airtight container in the refrigerator for up to 3–4 days. Reheat gently on the stove over medium-low heat, stirring occasionally. If using dairy, you may notice slight separation when reheated; whisk well to smooth it out.

Can I freeze this chowder?

Yes, but dairy can separate after freezing. For best texture, freeze the chowder base without cream or milk; reheat, then whisk in fresh dairy or a milk alternative at the end. It can be frozen for 2–3 months. Thaw in the fridge overnight and reheat slowly on the stove, adding the dairy at the end.

What toppings or garnishes pair well with this chowder?

Suggestions include chopped fresh parsley or chives, extra sun-dried tomato ribbons, a drizzle of olive oil, grated cheese (Parmesan, Pecorino), a dollop of sour cream or yogurt (or dairy-free alternative), crispy bacon or pancetta for non-vegetarian versions, and cracked black pepper or smoked paprika for extra aroma.

How can I customize the spice level or add flavor twists?

To add heat, stir in crushed red pepper flakes or a diced jalapeño with the onions. For depth, try a pinch of smoked paprika or a splash of lemon juice for brightness. Fresh herbs like thyme or dill also lift the flavor. You can swap sun-dried tomatoes for roasted tomatoes for a different tang.

Introduction / Hook

Picture a delicate, sun-kissed pastry that melts at the edge of a bite, releasing a warm whisper of almonds and vanilla. Easy Flaky Sweet Almond Pastry is not just dessert; it’s a memory waiting to unfold on your plate. The first bite is a crisp, whisper-light crunch that gives way to a tender, almost cloudlike interior. You’ll taste toasty almond sweetness that dances with a kiss of caramelized sugar and a hint of citrusy brightness, as if the pastry itself were telling a soft, comforting story. The aroma rises with every bake, a comforting invitation that fills the kitchen like a cozy and fragrant hug. This is the kind of pastry that feels luxurious without demanding perfection; it rewards attention with a flaky texture that seems to puff up with friendly pride. It’s the kind of treat you reach for on a quiet weekend morning, when the sun slides through the blinds just so, turning the kitchen into a stage for cinnamon-dusted dreams and almond-laced reveries. Yet it’s simple enough to pull off on a weekday afternoon, a testament to the idea that extraordinary flavor can be coaxed from humble ingredients and patient, careful layering. The result is not merely a pastry, but a memory you’ll want to recreate—the scent of almonds lingering in the air, the flaky layers yielding to a soft, buttery crumb, and a sweetness that feels balanced, comforting, and utterly irresistible.

The Story Behind the Dish

Flaky pastry and almonds share a long, interwoven history that spans continents and centuries. The concept of a crust that rises into delicate, almost snow-light layers traces back to the evolution of puff pastry, a technique that transformed simple dough into a tapestry of thin sheets that crackle and sigh with every bite. Almonds, meanwhile, have a treasure-laden lineage in pastries worldwide—from the marzipan dreams of European patisseries to the almond-honey notes found in North African and Middle Eastern sweets. The marriage of almond flavor with a buttery, flaky crust feels as if it were written in the margins of kitchen journals across generations: a practical, comforting solution that elevates a humble crumb into something festive and familiar at once. In many homes, a pastry like this has been a staple during family gatherings, holidays, or the quiet, sunlit hours when the best conversations happen around the scent of warm pastry cooling on a rack. The sweetness is gentle, almost motherly in its warmth, while the almond undertone carries a just-right nuttiness that doesn’t shout but lingers—inviting another slice, then another, then another until the plate is bare and the memories linger on the palate.

A Personal Note on Craft and Comfort

For generations, bakers have understood that the joy of pastry lies less in complexity and more in restraint—the precision of layers, the patience to chill, the gentle rolling that preserves the lightness. This Easy Flaky Sweet Almond Pastry is designed to honor that tradition while embracing modern kitchens. It’s a nod to the timeless technique of lamination, but presented in a way that feels approachable: no intimidation, just a rhythm you can follow, a rhythm that rewards careful handling with a final product that is at once refined and warmly familiar. The dish invites you to slow down a touch, to take a moment to listen for the quiet crackle of the crust as it yields to the first bite, to notice how the almond notes unfold in stages—nutty and toasty, then softly sweet, and finally linger with a gentle, comforting aftertaste. It’s a pastry that celebrates contrasts—the crisp exterior meeting a soft interior, the brightness of citrus with the depth of toasted almond, the simple pleasure of butter and dough transformed into something a little magical. It’s not merely about feeding the body; it’s about feeding the senses, the nostalgia, and the small daily rituals that make life feel a little more delicious.

Why You’ll Love This Recipe

  • Effortless elegance: A bakery-worthy flaky crust that you can achieve with careful technique, without needing professional equipment.
  • Versatile sweetness: A delicate almond sweetness that pairs beautifully with coffee, tea, or a glass of dessert wine.
  • Comforting nostalgia: The familiar aroma of toasted nuts and butter evokes memories of family kitchens and festive gatherings.
  • Impressive texture: Layered, light, and crispy on the outside with a tender, almost melt-in-your-mouth interior.
  • Beginner-friendly sophistication: A recipe that feels special yet rewards beginners with a forgiving, approachable process.
  • Make-ahead friendly: The pastry can be prepared in stages, allowing you to plan ahead for busy days or entertaining.
  • Customizable base: While the classic version shines, this pastry lends itself to fillings or flavor variations that can be adapted to seasons or dietary needs.
  • Kid-friendly charm: A sweet indulgence that can be enjoyed as a weekend treat or a special school-day dessert with minimal fuss.
  • Pairs well with conversation: Its aroma invites lingering at the table, making it a delightful centerpiece for gatherings and shared moments.

Flavor Profile & Texture

The flavor profile of Easy Flaky Sweet Almond Pastry unfolds in layers. The first impression is a crisp, delicate crackle from the outer crust, a sensory whisper of butter that seems almost to sigh with the shift of air as the knife glides through. As you bite deeper, you encounter the core—an interior texture that remains tender, almost airy, with a brief moment of flakiness that dissolves into creamy sweetness. The almond presence is the star, offering a nutty richness that is simultaneously toasty and bright. It’s not a heavy almond flavor; rather, it’s a refined, well-balanced essence that carries hints of sweetness without tipping into cloying territory. A subtle kiss of vanilla or citrus zest—depending on adjustments you might enjoy—brightens the almond notes, lifting them just enough to feel lively rather than heavy. The pastry’s base carries a mild butteriness that serves as a comforting foundation, enhancing the sense of warmth and indulgence, while a gentle sugar glaze or dusting (optional in some variations) provides a whisper of gloss and a final note of sweetness that lingers pleasantly on the tongue. The overall experience is one of harmony: the crispness of the crust, the soft resilience of the interior, the aromatic fragrance that fills the room, and the sweetness that feels refined rather than overbearing. It’s a dessert that respects the palate with balance and invites you to slow down and savor each moment of the tasting journey.

Occasions & Pairings

This pastry shines in a variety of settings, from quiet weekday mornings to festive weekend gatherings. It’s equally at home as a refined brunch component, a dramatic centerpiece for a tea party, or a comforting after-dinner treat alongside a warm beverage. For occasions, consider:

  • Brunch gatherings: Serve alongside coffee, espresso, or a light citrusy yogurt parfait for a balanced spread.
  • Holiday mornings: A refined alternative to cinnamon rolls—pair with sparkling or a light dessert wine to elevate the experience.
  • Afternoon tea or coffee break: A perfect companion to a pot of tea, especially Earl Grey, chai, or vanilla latte.
  • Seasonal celebrations: The pastry’s almond base adapts well to glazes or garnishes that reflect seasonal flavors—citrus zest in winter, berry compotes in summer, or a touch of orange blossom in spring.

Pairing suggestions to complement the flavor and texture include:

  • Beverages: Black tea, espresso, or a lightly sweetened almond milk latte; dessert wines such as Moscato or a light Riesling can work nicely if you desire a touch of sweetness at the end of a meal.
  • Side dishes: A light vanilla yogurt or a citrus-infused fresh fruit compote can contrast beautifully with the pastry’s richness.
  • Desserts: A simple, fresh berry salad or a scoop of vanilla bean ice cream creates a pleasing balance of hot/cold and crisp/soft textures.

Tips, Variations & Substitutions

Here are practical ideas to tailor Easy Flaky Sweet Almond Pastry to your preferences, dietary needs, or seasonal ingredients:

  • For a vegan version: Use plant-based butter and a dairy-free egg wash (or skip the wash entirely) to maintain the flaky texture. Some recipes also use yoghurt or almond milk substitutes in the dough to preserve moisture.
  • Gluten-free option: Replace the all-purpose flour with a high-quality gluten-free pastry blend. Add a touch more cold butter and chill the dough thoroughly to preserve lamination and flakiness.
  • Nut-free adaptation: If you’re avoiding almonds, consider a pastry made with sunflower or hazelnut alternative paste, or rotate to a cinnamon-sugar twist with a subtle citrus note to maintain balance.
  • Flavor twists: Fold in a touch of lemon zest or orange blossom water into the pastry dough (or sprinkle zest on top before baking) to brighten the almond profile without overpowering it.
  • Texture tweaks: For extra flakiness, ensure the dough remains cold and perform gentle, rapid folds during shaping. Avoid overworking the dough to keep the layers distinct and light.
  • Sweetness control: If you prefer a sweeter pastry, finish with a light glaze made of powdered sugar and a splash of citrus juice; for a more restrained sweetness, serve with fresh fruit or a dusting of powdered sugar instead of a glaze.
  • Regional flavor twists: In regions with a rich tradition of marzipan, a thin layer of marzipan tucked inside before the final roll can create a delightful, concentrated almond profile that melts into the pastry as it bakes.

Storage & Make-Ahead Ideas

To preserve the pastry’s texture and flavor, consider these practical storage strategies and make-ahead options:

  • Make-ahead: Prepare and chill the dough in advance. If you prefer, you can roll and even bake the pastry ahead of time, then reheat gently to crisp up the crust just before serving.
  • Room temperature storage: The pastry keeps well for 1–2 days when stored in an airtight container at room temperature. A light parchment layer between slices will help prevent sticking and maintain the crispness of the outer crust.
  • Refrigeration: For longer storage, refrigerate wrapped pastries for up to 3–4 days. Reheat gently in a low oven to restore crispness before serving.
  • Freezing: The baked pastry can be frozen for up to 1 month. Wrap tightly to prevent freezer burn, and reheat in a moderate oven to regain texture. If freezing unbaked dough, keep it well-wrapped and chill for a few minutes to firm before baking as usual.

Fun Facts & Trivia (Optional)

Did you know that almonds have been treasured for thousands of years in Mediterranean and Middle Eastern cuisines? They were once considered a symbol of good fortune and prosperity in some cultures. Marzipan, a sweet paste made from almonds and sugar, became a beloved candy across many European kitchens and is often associated with festive seasons and celebratory confections. The artistry of flaky pastry—its pleated layers and delicate crackle—owes much to the invention of laminated doughs, a technique that requires patience and precise temperature control. The magic of this Easy Flaky Sweet Almond Pastry lies in the quiet science of fat distribution, flour quality, and the moment when the dough’s layers unlock their light, airy internal structure in the heat of the oven. This harmony of tradition and technique is what makes a seemingly simple pastry feel like a small triumph every time you bake it.

Ingredients

Easy Flaky Sweet Almond Pastry

Dough (Flaky Pastry)

  • 2 1/2 cups all-purpose flour (unbleached)
    → The base structure of the crust, providing the framework for flakiness. Sift and chill the flour to minimize gluten development and keep the fat cold for distinct laminated layers. Using unbleached flour helps produce a cleaner flavor and texture.
  • 1/2 cup almond flour (finely ground, blanched if possible)
    → Adds a delicate almond flavor and extra tenderness to the crust. Blanched almond flour keeps the crust lighter in color and texture; if using almond meal, the crust may be slightly nuttier and crumblier.
  • 2 tablespoons granulated sugar
    → Subtle sweetness in the crust and helps with browning. Adjust to taste; reduce if serving with a very sweet filling.
  • 1 teaspoon fine sea salt
    → Enhances overall flavor and balances sweetness; use fine salt for even distribution.
  • 1 cup cold unsalted butter, cut into 1/2-inch cubes
    → The cornerstone of flaky pastry. Cold butter creates separate, tender layers when the dough is baked. Keep butter as cold as possible and handle the dough with a light touch to avoid melting the fat.
  • 1 large egg yolk, lightly beaten
    → Enriches the crust and provides gentle binding for a sturdier roll-out. The yolk adds tenderness and richness; use along with the icy water to bring the dough together.
  • 2-3 tablespoons ice-cold water (as needed)
    → Adds just enough moisture to bind the dough. Add gradually and mix until the dough just holds together. Too much water makes the crust tough; stop as soon as it comes together.
  • 1 teaspoon white vinegar or lemon juice (optional)
    → A touch of acidity helps to tenderize gluten slightly and promote flakiness. Keep on the small side to avoid altering flavor; refrigerate dough before rolling for best results.

Almond Filling (Frangipane)

  • 1/2 cup unsalted butter, softened
    → Creates a rich, creamy base for the frangipane. Beat until smooth and airy with the sugar to help the filling set with a tender, custardy texture.
  • 2/3 cup granulated sugar
    → Provides sweetness and balances the almond flavor. Adjust to taste, especially if the crust is already sweet.
  • 1 cup almond flour (finely ground)
    → Key component of the frangipane, delivering intense almond flavor and a moist, custard-like texture when baked. Use finely ground flour to avoid graininess.
  • 2 large eggs
    → Bind the mixture into a cohesive filling that holds its shape as it bakes. Room-temperature eggs mix more evenly for a smooth frangipane.
  • 1 teaspoon pure vanilla extract
    → Deepens and brightens the almond flavor. Use high-quality vanilla for best aroma and sweetness balance.
  • 1/2 teaspoon almond extract (optional)
    → Intensifies almond aroma. Use sparingly to avoid overpowering the filling; combine with vanilla for a rounded almond profile.
  • 1 tablespoon all-purpose flour
    → Helps stabilize the filling and prevents weeping during baking. Use a light hand to keep the custard silky.
  • Pinch of salt
    → Enhances flavors and balances sweetness in the filling.

Egg Wash

  • 1 large egg, beaten with 1 tablespoon water
    → Provides a shiny, golden finish on the baked pastry and helps seal edges. Brush lightly to avoid pooling; reserve any extra wash for brushing other surfaces if needed.

Glaze and Toppings

  • 1/4 cup apricot jam, warmed and strained to remove chunks (glaze)
    → Creates a glossy finish that complements almond flavor. Warm and strain to brush smoothly; brushing onto the cooled pastry yields a bright sheen without clumping.
  • 1 tablespoon water (to thin jam)
    → Adjusts the glaze consistency for brushing; add as needed to reach a spreadable, brushable texture.
  • 1/4 cup sliced almonds, lightly toasted
    → Decorative and adds a pleasant crunch that echoes the almond theme. Toast until lightly golden to maximize flavor; scatter over the filling before final bake or right after cooling for texture.
  • 1-2 tablespoons confectioners’ sugar (optional, for dusting)
    → Finishing touch for a dessert-like look. Dust after the pastry has cooled to prevent the sugar from dissolving into the glaze.

Instructions

  • Whisk together the dry ingredients for the dough: 2 1/2 cups all-purpose flour (unbleached), 1/2 cup almond flour, 2 tablespoons granulated sugar, and 1 teaspoon fine sea salt, until completely blended.
    → The dry mix ensures even sweetness, tenderness, and salt distribution so the crust bakes evenly and tastes balanced.
  • Cut in the cold butter: add 1 cup cold unsalted butter, cut into 1/2-inch cubes, and work it into the dry ingredients with a pastry blender, two forks, or fingertips until the mixture resembles coarse cornmeal with small, pea-sized bits of butter remaining.
    → Cold butter creates distinct laminated layers as the pastry bakes, yielding flakiness; avoid warming the butter to keep those layers intact.
  • Whisk the egg yolk with 2-3 tablespoons ice-cold water and 1 teaspoon white vinegar or lemon juice (optional) in a small bowl to make the binding liquid.
    → The yolk provides richness and tenderness, while the small amount of acid can help relax gluten slightly and improve tenderness; keep the liquid cold so it doesn’t melt the butter.
  • Drizzle the yolk mixture over the flour and fat and mix gently with a fork until the dough just begins to cling together in a shaggy mass.
    → Minimal moisture helps maintain a tender, flaky crumb; stop as soon as the dough holds together to avoid a tough crust.
  • Turn the dough onto a lightly floured surface, press into a rough disk, wrap tightly in plastic, and refrigerate for at least 60 minutes.
    → Chilling relaxes gluten and keeps fat solid, which promotes easier rolling and flakier layers when baked.
  • Prepare the almond frangipane filling by beating 1/2 cup softened unsalted butter with 2/3 cup granulated sugar in a medium bowl until pale and fluffy.
    → Creaming introduces air, producing a tender, custard-like base that set nicely during baking.
  • Beat in 1 cup almond flour until smooth, then add 2 large eggs one at a time, beating after each addition until the mixture is glossy and cohesive.
    → Almond flour provides the characteristic almond custard texture; adding eggs gradually prevents curdling and ensures a silkier filling.
  • Stir in 1 teaspoon pure vanilla extract and 1/2 teaspoon almond extract (if using), plus 1 tablespoon all-purpose flour and a pinch of salt; mix until the frangipane is smooth and uniform in color.
    → Vanilla and almond extracts deepen aroma and flavor; the flour helps stabilize the custard so it does not weep while baking.
  • Preheat your oven to 350°F (175°C) and place a rack in the middle of the oven.
    → Even heating ensures consistent crust and filling browning without scorching the bottom.
  • Roll the dough on a lightly floured surface to about 1/8 inch (3 mm) thickness and gently transfer it to a 9-inch tart pan with a removable bottom, pressing into corners and up the sides.
    → A thin, uniform thickness promotes even baking and crisp edges; a removable-bottom pan makes unmolding easier after cooling.
  • Trim the overhang, flute the edge with your fingers, dock the bottom with a fork to prevent air pockets, and chill the lined pan for 15-20 minutes.
    → Chilling re-solidifies the fat, reduces shrinkage during baking, and helps maintain an even crust during blind baking.
  • Line the chilled crust with parchment and fill with pie weights or dried beans to weight the crust during blind baking.
    → Weights prevent the dough from puffing and shrinking, ensuring a flat, sturdy foundation for the frangipane.
  • Bake the crust in the preheated oven for 12-15 minutes until the edges just begin to color; carefully remove the parchment and weights and bake 5-8 minutes more to dry and set the base.
    → Blind baking creates a firm surface that won’t become soggy when the moist filling is added; this step preserves the crust’s crispness.
  • Spread the frangipane evenly into the pre-baked crust, smoothing with an offset spatula to the edges for a uniform layer.
    → A flat, even surface ensures the filling bakes evenly and slices cleanly; excess height near the edges can overbrown while the center remains underdone.
  • Brush the exposed crust edges with the prepared egg wash to promote even browning and a glossy finish.
    → The wash aids browning and helps the crust achieve a professional, golden sheen along the rim.
  • Return the tart to the oven and bake at 350°F (175°C) for 25-30 minutes, or until the frangipane is puffed, set in the center, and the edges are deeply golden.
    → The gentle bake sets the custard without burning the crust; you can test doneness by gently jiggling the center—if it has a slight wobble, it will firm as it cools.
  • Warm 1/4 cup apricot jam with 1 tablespoon water and strain to remove chunks, then brush a thin, even glaze over the cooled tart surface.
    → The glaze provides a glossy finish and a subtle sweetness that complements the almond flavor while sealing the surface for a lasting sheen.
  • Lightly toast 1/4 cup sliced almonds in a dry skillet over medium heat until lightly golden, about 3-5 minutes, then scatter them over the glazed surface while the jam is still tacky.
    → Toasting intensifies almond aroma and adds a pleasant crunch; placing them while the glaze is tacky helps them adhere.
  • Dust with confectioners’ sugar if desired after the tart has completely cooled, for a delicate finish and dessert-like presentation.
    → A light dusting enhances visual appeal and sweetness without overwhelming the almond flavor.
  • Slice and serve the Easy Flaky Sweet Almond Pastry at room temperature; store any leftovers covered in the refrigerator for up to 3 days.
    → Refrigeration slows moisture migration and maintains the pastry’s texture while keeping flavors fresh for subsequent servings.

Notes

These flaky almond pastries are built on a cold, laminated crust that uses a blend of all-purpose flour and almond flour for a tender, crisp bite and a delicate nutty aroma. Keep the butter very cold and handle the dough with a light touch to maintain distinct layers; chilling the dough between steps helps minimize gluten development and prevents shrinking. The 1 large egg yolk enriches the dough, while ice-cold water (and a touch of vinegar or lemon juice, if you like) brings the dough together without making it tough.

For the almond filling, beat the softened butter with sugar until pale and fluffy, then blend in almond flour, eggs, vanilla, and, if you like, almond extract. The optional extra tablespoon of flour helps stabilize the frangipane so it sets with a custardy texture as it bakes; a pinch of salt rounds the flavors. Room-temperature eggs mix evenly to create a smooth filling.

Assemble and finish with care: roll the crust thin but sturdy, spread the frangipane in the center, brush the edges with egg wash for a glossy finish, and glaze the cooled pastry with warmed apricot jam. Toasted sliced almonds add aroma and crunch; scatter them on top during the last minutes of bake or after the pastry has cooled for best texture. If you prefer a dusting, a light shower of confectioners’ sugar yields a dessert-like look.

Storage and tips: pastries can be baked ahead and stored cool in an airtight container for 1–2 days, or frozen baked pastries for longer storage. You can also freeze unbaked assembled pastries and bake from frozen; add a few extra minutes to the bake time. For gluten-free preparation, substitute a certified gluten-free all-purpose flour blend in place of the regular flour and ensure your almond flour is finely ground; handle the dough gently and chill well for best flakiness. Always refrigerate the dough before rolling for optimal lamination.

Tips

Tips for Easy Flaky Sweet Almond Pastry

Dough and Crust Tips

  • Keep everything cold: chill the flour and butter, and use ice-cold water. Cold fat creates distinct laminated layers for flakiness.
  • Handle the dough lightly. Mix just until the dough comes together to avoid gluten overdevelopment and a tough crust.
  • Sift the flours and use finely ground almond flour to ensure a smooth, tender crust without gritty bits.
  • Add water gradually; stop as soon as the dough holds together. Too much water makes the crust tough and greasy.
  • Optionally add a teaspoon of white vinegar or lemon juice to gently tenderize gluten and boost flakiness, but keep it small to avoid altering flavor.
  • Chill the formed dough for at least 1 hour (or overnight). A rested dough rolls more evenly and stays tender during baking.
  • Roll on parchment or a lightly floured surface, rotating the dough 90 degrees as you roll for even thickness.
  • If the dough springs back, wrap and refrigerate briefly; don’t overwork it or the layers will clump together.

Almond Filling Tips (Frangipane)

  • Beat softened butter and sugar until pale and fluffy to create a custardy, tender base for the frangipane.
  • Use room-temperature eggs and beat them in gradually to avoid curdling and achieve a smooth filling.
  • Finely ground almond flour gives a rich almond flavor and a moist, custard-like texture; almond meal will be nuttier and slightly coarser.
  • Balance vanilla and almond extracts; start with the recommended amounts and adjust to taste.
  • Add a tablespoon of all-purpose flour to stabilize the filling and help prevent leaking during baking.
  • Finish with a pinch of salt to enhance sweetness and deepen almond flavor.
  • If the mixture seems too thick, whisk in a small amount of milk or cream to reach a spreadable consistency.

Egg Wash and Glaze Tips

  • Beat 1 large egg with 1 tablespoon water for a shiny, golden finish; brush lightly on the pastry surface to avoid pooling at edges.
  • Warm the apricot jam and strain to remove chunks for a smooth glaze; brush onto cooled pastry for a bright sheen without streaks.
  • Thin the glaze with a little water if needed to achieve a brushable consistency.
  • Toast sliced almonds until lightly golden to maximize flavor; scatter on top before the final bake or immediately after cooling for extra crunch.
  • Dust with confectioners’ sugar after the pastry has cooled to add a dessert-like touch without dissolving the glaze.

Baking and Assembly Tips

  • Preheat the oven to the recipe’s specified temperature and bake on a parchment-lined sheet for easy cleanup.
  • To prevent sogginess, you can blind-bake a bit (partially bake) the crust before adding the frangipane, especially if the filling is very wet.
  • Seal the edges well with egg wash to prevent the filling from leaking and to promote even browning.
  • Scatter almonds on top before final bake for extra texture, or press them into the surface during the last 10 minutes for a toasted look.
  • Allow the pastry to cool completely before glazing or dusting to preserve shine and structure.
  • Store leftovers in the refrigerator and gently rewarm to refresh the flakiness; the crust may soften slightly when cold.

FAQ

What is Easy Flaky Sweet Almond Pastry?

Easy Flaky Sweet Almond Pastry is a light, buttery dough flavored with almonds that bakes into crisp, flaky layers. It’s versatile for tarts, turnovers, or simple almond-filled pastries and pairs beautifully with fruit jams, frangipane, or lemon curd.

What ingredients do I need?

Basic dough ingredients and flavor elements:

  • 2 cups all-purpose flour (plus extra for rolling)
  • 1/2 cup almond flour or finely ground almonds
  • 1/2 cup cold unsalted butter, cubed
  • 1/3 cup granulated sugar
  • 1 large egg
  • 1 teaspoon vanilla extract
  • 1/2 teaspoon almond extract
  • Pinch of salt
  • 2–4 tablespoons ice-cold water (as needed)
Can I make this gluten-free?

Yes. Use a 1:1 gluten-free flour blend in place of all-purpose flour and add 1–2 tablespoons of almond flour to help mimic fat content. Consider adding 1/4 teaspoon xanthan gum if your blend lacks elasticity. Chill the dough well and roll between parchment for best results.

Can I make the dough ahead of time?

Absolutely. The dough can be wrapped and refrigerated for 1–2 days or frozen for up to 2–3 months. Thaw in the refrigerator before rolling. If frozen, let it come to a workable chill in the fridge for 6–8 hours.

How do I roll and shape it to get flaky layers?

Keep everything cold. After chilling the dough, roll it between two sheets of parchment to about 1/8 inch (3 mm). If it cracks, chill 10–15 minutes and roll again. Use a light touch and avoid overworking the dough. For a filled tart or turnover, cut shapes, add filling, seal edges with a little water, and brush with an egg wash for shine.

What fillings pair well with this pastry?

Try these classic combinations:

  • Frangipane (almond cream) + sliced apples or pears
  • Apricot or raspberry jam
  • Lemon curd with slivered almonds on top
  • Chocolate ganache and toasted almonds
How long and at what temperature should I bake it?

Preheat to 350–375°F (175–190°C). Bake until the pastry is golden and set, typically 25–30 minutes for a tart shell or 16–22 minutes for petit pastries. If you’re making turnovers, bake until the filling is bubbling and the edges are golden.

How should I store leftovers?

Let the pastry cool completely. Store at room temperature in an airtight container for 1–2 days for best flakiness. For longer storage, refrigerate for up to 5–7 days or freeze individual pastries for up to 1 month. Reheat in a 325°F (165°C) oven for 6–8 minutes to restore crispness.

Can I freeze the dough or baked pastries?

Yes. Freeze dough discs wrapped tightly for up to 2–3 months. Bake from thawed dough as directed, or roll while still slightly chilled. Baked pastries freeze well for up to 1 month; reheat gently to avoid sogginess.

Do you have a vegan option?

Yes. Use a plant-based butter substitute and replace the egg with a flax egg or aquafaba (1 tablespoon ground flaxseed whisked with 3 tablespoons water, or 3 tablespoons aquafaba). You may also use a dairy-free glaze if desired. The texture remains flaky when kept cold and not overworked.

Any troubleshooting tips for common issues?

Common fixes:

  • Dough too dry and crumbly: add 1–2 teaspoons ice-cold water at a time, mixing gently until it comes together.
  • Dough too sticky: chill 20–30 minutes, then roll between parchment; use extra flour sparingly.
  • Pastry shrinks in the pan: refrigerate the shaped dough for 15–20 minutes before baking, and avoid stretching when placing.
  • Not flaky enough: ensure butter is very cold and cut into small cubes; don’t overwork the dough.

Introduction / Hook

Imagine a morning where the scent of warm vanilla mingles with the bright aroma of blueberries, curling through the kitchen like a welcome committee. Picture a soft, tender crumb that carries a hint of citrus-touched sweetness, the kind of bite that makes your coffee nervous with anticipation. Welcome to Sugar Free Baked Blueberry Donuts—a pastry that looks like a treat from a bakery window, but feels light enough for a weekday breakfast and friendly enough for a mindful snacker. These donuts offer the comfort of a classic favorite without the heaviness that sugar can bring, trading the fried-grease myths for a delicate, cake-like texture that is both satisfying and surprisingly versatile.

From the very first bite, you’ll notice the juiciness of blueberries popping against a subtly vanilla background, as if summer decided to send a small gift to your morning routine. The outside glimmers with a gentle crust that gives way to a moist interior, and there’s a whisper of warmth that lingers on the palate long after the plate is cleared. This is not merely a healthier version of an indulgence; it’s a reimagined ritual—an invitation to start the day with something nourishing, flavorful, and genuinely comforting. And because it’s baked rather than fried, the donuts carry a lighter footprint, letting you enjoy the pleasure of a classic pastry without the heaviness that can weigh down an afternoon.

What makes Sugar Free Baked Blueberry Donuts especially compelling is how they blend familiar charm with modern baking sensibilities. You don’t need to sacrifice taste or texture to reduce sugar; you simply lean into the fruit’s natural sweetness, embrace a gentle crumb structure, and rely on wholesome, pantry-friendly ingredients that support a balanced lifestyle. They’re ideal for hurried mornings, leisurely weekend brunches, or a thoughtful treat that you can share with family and friends who appreciate something that feels indulgent yet mindful. The donuts become a small, everyday celebration—an edible bookmark that marks the moment you chose nourishment with a smile.

As you read on, you’ll discover a dish that carries a sense of nostalgia and a promise of adaptability. It’s a recipe that invites experimentation—whether you’re aiming for a dairy-free version, a gluten-free approach, or a different berry twist—without losing the essential character that makes these donuts so appealing: a soft, yellow-tinged crumb, a burst of blueberry brightness, and a finish that feels like a little morning luxury.

The Story Behind the Dish

Donuts have long enjoyed a place in the urban morning ritual—the moment when flour, fat, and sugar collide in a hot pan or a hot oven to create something that feels both celebratory and comforting. The classic doughnut has roots that reach deep into culinary history, evolving from simple fried rings into an array of shapes, flavors, and textures. The baked donut, in particular, emerged as a friendlier alternative for home bakers who craved that same spongy, cake-like sweetness without the heaviness of deep-frying. This Sugar Free Baked Blueberry Donut is part of that lineage, an expression of how tradition can be gentle and modern at the same time.

Blueberries, in their turn, carry a storied charm of their own. Native to North America, these little gem-like berries arrived at markets with a promise of color, brightness, and a touch of tartness that balances sweetness beautifully. They’re a natural companion for baked goods, lending moisture and a depth of flavor that can feel almost culinary “magic”—the kind of magic that turns a straightforward batter into something that tastes distinctly summery, even in the chill of early mornings or during a crisp season when berries aren’t at their peak.

The idea behind a sugar-free version is a nod to evolving dietary preferences without compromising the sense of indulgence. The donut becomes a canvas for the fruit’s natural sweetness and for thoughtful substitutions that strip away refined sugars while preserving a rounded, comforting finish. It’s a story about balance: the gentle restraint of sweetness, the soft embrace of a tender crumb, and the invigorating brightness of blueberries all meeting in a morning staple that feels like a treat without shouting decadence.

There’s also a playful nod to the way kitchens have always evolved—from grandmotherly pie plates to modern bakers who experiment with textures, flours, and sweeteners. In many homes, the ritual of baking is as much about the process as the product: measuring by feel, smelling the batter as it rises, watching the batter puff as it bakes, and sharing a tray of warm donuts with someone you love. This recipe captures that sense of home and invention: it is a contemporary homage to a classic that invites you to slow down, savor, and smile at the simple pleasure of a well-made bite.

Why You’ll Love This Recipe

  • Balanced sweetness: Sugar-free by design, but not by taste. The natural fruitiness of blueberries carries the dish, while a gentle sweetness keeps the donuts approachable for all ages.
  • Healthier approach to a beloved treat: Baked donuts with a cake-like crumb offer a lighter alternative to fried varieties, with less oil and a more even crumb structure that’s ideal for breakfast or a midday pick-me-up.
  • Versatile for different diets and preferences: The concept translates well to dairy-free, gluten-free, and plant-based adjustments, depending on the flours, milks, and sweeteners you choose to embrace—without losing the donut’s characteristic charm.
  • Moist, tender texture with blueberry bursts: Each bite delivers a pop of berry juiciness that contrasts with the soft, airy interior and a thin, satisfying crust—texture that delights the senses from first bite to the last.
  • Fast and approachable for busy mornings: While the donuts feel bakery-worthy, the process is friendly for weekday execution, making a batch that can be enjoyed fresh or stored for later in the week.
  • Excellent for gatherings and brunches: The simple, approachable flavor invites pairing with coffee, tea, yogurt, or a light citrus glaze for an elevated brunch centerpiece or a casual weekend treat.
  • Family-friendly and crowd-pleasing: The familiar shape and comforting flavors appeal to kids and adults alike, turning a simple breakfast into a shared moment of joy.
  • Great make-ahead potential: After baking, these donuts retain their softness well, which makes them suitable for prepping ahead for the week or for a weekend batch to freeze and reheat.

Flavor Profile & Texture

At the heart of these donuts is a delicate balance between fruit brightness and a mellow, comforting base. The blueberries contribute a natural sweetness and a slight tang that keeps the flavor fresh rather than cloying. Their juicy bursts create pockets of surprise throughout the bite, giving you little moments of fruit-forward sweetness that lift the crumb rather than weigh it down. The surrounding batter offers a soft, cake-like texture—light and tender with a gentle crumb that yields to a satisfying bite. There’s a cinematic moment when you take a bite: the crust forms a subtle, almost caramelized edge—crisp enough to add structure without becoming a barrier, and soft enough inside to feel almost like a cloud.

In terms of aroma, expect a welcoming blend of vanilla and fruit with a whisper of warmth from the baking process. The vanilla layers through the crumb, echoing in the background as the blueberry notes rise forward, creating a balanced harmony rather than a single-note sweetness. The finish is clean, lingering, and comforting—the kind of flavor that invites you to take another bite, then another, before you even realize you’ve had two or three.

Texture plays a crucial role in the overall experience. The exterior offers a gentle crust that gives a light resistance and a satisfying snap when you bite into it. The interior remains moist, tender, and slightly springy—enough to hold its shape when you pick up a donut with your fingers but soft enough to bite into with ease. If you’ve ever enjoyed a bakery-crackled edge on a baked good, you’ll recognize that same delight here—an unforced, natural crust that enhances the crumb rather than overpowering it. All the while, the blueberries contribute moisture and juiciness, ensuring that the donut doesn’t dry out and that each bite offers a moment of fruity brightness to balance the overall richness.

Occasions & Pairings

These Sugar Free Baked Blueberry Donuts shine in a range of settings, from casual weekday mornings to weekend gatherings. They’re ideal for a quick weekday breakfast when time is tight but you still crave something gratifying. They’re equally welcome at weekend brunches, where a tray of warm donuts can lead a conversation about mornings, memories, and new twists on old favorites. They also work well as a thoughtful dessert or a comforting snack on a road trip or busy afternoon, when a familiar, cake-like bite can lift spirits and provide a sense of home on the go.

Pairing ideas to enhance the experience without overshadowing the donuts:

  • Bright beverages: Freshly brewed coffee, a spicy chai, or a lightly-scented tea can complement the donuts’ vanilla and berry notes.
  • Dairy pairings: A small dollop of yogurt or a splash of cream can add a cool contrast to the warm, textured donut, especially if you prefer a softer bite with a touch of tang.
  • Fresh fruit accents: A few extra blueberries or citrus segments on the side can echo the donut’s fruit profile and brighten the plate.
  • Light sweet sauces: A delicate sugar-free glaze or a drizzle of a citrus-based reduction can lend a glossy finish and an extra hint of sweetness without tipping the sugar balance.
  • Salty counterpoints: A light sprinkle of flaky sea salt or a tiny savory crumb on the plate can create a playful contrast that makes the flavors feel even more vivid.

For special occasions, you can present these donuts with a small tasting board: an assortment of berries, small bowls of yogurt, and a warm beverage selection. The result is a visually appealing, palate-pleasing setup that makes breakfast feel like a celebration, even on a busy weekday.

Tips, Variations & Substitutions

General Tips

To maximize flavor and texture, focus on balance and freshness. Let the batter come together just until the ingredients are harmoniously incorporated, avoiding over-mixing which can lead to a tougher crumb. When the donuts bake, you’ll notice the batter rising and forming a light, rounded top. A gentle rotation of the baking tray partway through ensures even browning. If you’re aiming for a slightly more pronounced crust, a brief, warm bake with a touch longer exposure on the exterior can deliver that satisfying snap without sacrificing interior tenderness.

Dietary Variations

If you’re exploring different dietary approaches, this concept adapts well without losing its essential character. For a gluten-free version, consider a gentle, fine-textured base that yields a soft crumb and holds its shape well. For dairy-free or vegan preferences, swap conventional dairy with plant-based milks and replace any eggs with plant-based substitutes that provide moisture and binding without altering the crumb’s delicate balance. The goal is to maintain the light, cake-like structure while ensuring the batter remains cohesive and easy to portion into donuts. You can also experiment with total sugar-free approaches by choosing non-sugar sweeteners that suit your taste and dietary needs—keeping in mind that some sweeteners can affect moisture and browning, so you may want to adjust proportions accordingly.

Flavor Tweaks & Substitutions (Non-Inclusive of Specific Ingredients)

Try variations that emphasize different fruit notes or add a new dimension to the flavor. For example, a citrus zest can lend a bright aroma that complements the berries. A pinch of warm spice, such as cinnamon or nutmeg, can create a comforting depth that works well with the fruit’s brightness. If you’d like a richer finish, a tiny amount of a smooth fat or milk alternative can be integrated to enhance tenderness, while still preserving the light texture that makes baked donuts appealing. For berry variety, you can explore other berries or stone fruits that pair beautifully with vanilla, provided you maintain a balance that keeps the donut from becoming too wet or heavy.

Regional Twists

Different culinary traditions can inspire small, comforting twists. A touch of almond character or a hint of citrus from a regional citrus variety can give the donuts a distinct personality while preserving the overall lightness. The key is to maintain that familiar donut structure and the bright fruit presence so that each bite remains recognizable and inviting, even as the flavor profile shifts with regional influence.

Storage & Make-Ahead Ideas

These baked donuts are well-suited to make-ahead routines, a practical feature for busy weeks or weekend meal-prep. After baking and cooling completely, you can store them in an airtight container at room temperature for a couple of days, preserving their tenderness. If you want to extend their life, refrigerating them in a sealed container can keep their texture and flavor intact for a little longer, though you may notice a slight firming over time. Freezing is an excellent option for longer storage; place cooled donuts in a freezer-safe bag or container, and they will hold their quality for several weeks. Reheating is simple: warm them gently in a toaster oven or conventional oven, or microwave briefly for a quick treat. The goal is to revive that fresh-from-the-oven warmth while preserving the moist interior and the gentle crust’s bite.

Make-ahead strategies can include preparing a batch of the donut batter (or partially baked donuts) in advance and finishing them off closer to serving time. When you plan ahead, you’ll have a reliable morning staple ready to go, minus the stress of last-minute baking. If you’re freezing, consider labeling with a date to keep track of freshness, and thawing in the fridge overnight before reheating to preserve texture and moisture. The convenience of a baked donut that can be stored and enjoyed over several days makes it a particularly useful addition to a home bakery repertoire.

Fun Facts & Trivia (Optional)

Did you know that the concept of baked donuts has been a delight for home bakers and professional pastry chefs alike for decades? The shift from frying to baking isn’t just about reducing fat; it’s also about expanding flavor and texture possibilities while maintaining a fresh, every-day appeal. Blueberries have long been associated with healthful associations and natural sweetness, and they perform beautifully in baked goods, delivering moisture, color, and a tart note that brightens baked desserts. The combination of these two elements—blueberries and a cake-like, sugar-conscious donut—blends a sense of nostalgia with contemporary dietary awareness, creating a pastry that honors both tradition and modern preference.

Another little nugget: many cultures celebrate donuts in different forms, from beignets in the American South to Berliner-style donuts in Europe. While each tradition has its own unique approach, the essence remains the same: to share something comforting, flavorful, and universally beloved. By reimagining the donut in a sugar-free, baked form, you’re participating in a long line of cooks who honor the past while embracing the present—an edible bridge between generations of morning rituals.

Ingredients

Sugar Free Baked Blueberry Donuts
Donut Base

  • 2 cups blanched almond flour (finely ground)
    → Almond flour forms the tender, gluten-free base and helps give the donuts structure and moisture. Use blanched almond flour for a smoother crumb; measure by spooning into the cup and leveling rather than packing. Store in an airtight container to maintain freshness and prevent rancidity.
  • 1/4 cup coconut flour
    → Coconut flour is highly absorbent and helps balance moisture in gluten-free batters, contributing to a cake-like texture. Use a small amount to avoid a gummy crumb; you may need to adjust liquids if you add more. Sift before measuring to remove lumps for even distribution.
  • 3 large eggs
    → Eggs provide binding, structure, and moisture, helping the batter rise and hold together without gluten. If you prefer a vegan option, substitute with flax eggs (1 tablespoon ground flaxseed + 3 tablespoons water per egg) and allow the mixture to thicken before using; note this will alter texture and rise.
  • 1/2 cup unsweetened almond milk
    → Adds необходим moisture and helps achieve a scoopable batter consistency. Use a dairy-free milk if needed; if your milk is particularly thick, warm it slightly to blend more easily with the other ingredients.
  • 1/2 cup plain Greek yogurt or dairy-free yogurt
    → Contributes creaminess and tenderness, improving crumb and moisture. If using dairy-free yogurt, choose a thick variety (coconut or almond-based) and let it reach room temperature to blend smoothly with the other ingredients.
  • 1/2 cup granulated sugar-free sweetener (erythritol or monk fruit)
    → Provides sweetness without added sugar and aids browning and texture. Choose a granulated form for best texture; avoid liquid sweeteners, which can alter batter consistency. Start with 1/2 cup and adjust to taste depending on the blend you use.
  • 1 teaspoon vanilla extract
    → Adds depth of flavor and enhances the blueberry profile. Use pure vanilla for the strongest aroma; imitation vanilla is acceptable but yields a slightly flatter flavor.
  • 1 teaspoon baking powder
    → Leavening agent that helps the donuts rise for a light, cake-like crumb. Ensure it’s fresh for reliable rise; if in doubt, test a pinch in hot water to confirm fizz.
  • 1/2 teaspoon baking soda
    → Works with the yogurt and dairy to promote browning and lift, contributing to a tender interior. Do not omit if you want a higher rise and softer crumb.
  • 1/4 teaspoon fine salt
    → Balances sweetness and enhances overall flavor; crucial in low-sugar recipes to prevent flat-tinish taste.
  • 1 cup fresh blueberries (or 1/2 cup frozen blueberries, thawed and well drained)
    → The star of the dish, providing pockets of juicy blueberry flavor. If using frozen berries, thaw completely, drain well, and pat dry to prevent color bleeding and soggy batter. Toss berries with a teaspoon of almond flour before folding to help distribute evenly and reduce sinking during baking.
  • 1 teaspoon lemon zest (optional)
    → Brightens the flavor and complements blueberries beautifully. Zest only the yellow part; avoid the bitter white pith. If you skip zest, you can increase vanilla or add a pinch of extra cinnamon for warmth.
  • 1/2 teaspoon ground cinnamon (optional)
    → Adds warmth and depth to the flavor profile. Useful if you want a cozy, bakery-style donut; omit if you prefer a cleaner blueberry note.

Optional Add-ins

  • 2 tablespoons chopped walnuts (optional)
    → Adds a crunchy texture and nutty flavor that contrasts the soft crumb. Chop finely for even distribution; you can toast the nuts lightly to intensify their aroma before folding into the batter. If nut allergies are a concern, substitute with toasted pumpkin seeds or omit entirely.
  • 2 tablespoons sugar-free chocolate chips (optional)
    → Provides pockets of chocolate without sugar; fold in at the end to minimize sinking. Choose chips that hold shape well when baked for best texture.
  • 1 tablespoon shredded unsweetened coconut (optional)
    → Adds chewy texture and aroma; use finely shredded coconut for even distribution. Remove if you prefer a purely blueberry-forward flavor instead.

Glaze or Toppings (Sugar-Free)

  • 1/2 cup powdered sugar substitute (sifted)
    → Gives a smooth, glossy finish without sugar. Use a granulated to powdered powdered form that measures like sugar; if your product isn’t powdery, blitz briefly in a blender.
  • 1-2 tablespoons unsweetened almond milk
    → To achieve a pourable glaze; start with 1 tablespoon and add more as needed. If the glaze becomes too thin, refrigerate briefly to thicken.
  • 1/2 teaspoon vanilla extract (optional)
    → Subtle vanilla note in the glaze; use pure vanilla for best flavor.
  • 1 teaspoon lemon juice (optional)
    → Adds a bright lemony glaze option that pairs well with blueberries; adjust sweetness to taste accordingly.

Instructions

  • Preheat your oven to 350°F (175°C) and thoroughly grease a donut pan with nonstick spray or brush it with melted coconut oil, ensuring every cavity is coated to prevent sticking.
    → Proper coating creates a nonstick surface and makes removing donuts after baking clean and intact, especially with delicate gluten-free batters.
  • In a large bowl, whisk together the dry ingredients: 2 cups blanched almond flour (finely ground), 1/4 cup coconut flour, 1 teaspoon baking powder, 1/2 teaspoon baking soda, and 1/4 teaspoon fine salt; sifted to remove lumps and ensure even distribution.
    → Coconut flour is highly absorbent; sifting and whisking ensure even moisture absorption and a tender, uniform crumb without pockets of dry flour.
  • Prepare the blueberries: rinse fresh blueberries and pat dry, or fully thaw frozen berries and drain well; pat dry to remove surface moisture; toss the berries with 1 teaspoon almond flour before folding to help suspend them in the batter and reduce sinking and color bleeding.
    → The flour coating helps blueberries distribute more evenly and minimizes color bleed into the batter during baking.
  • In a separate medium bowl, whisk together 3 large eggs, 1/2 cup unsweetened almond milk, 1/2 cup plain yogurt (or dairy-free yogurt of similar thickness), and 1 teaspoon vanilla extract (plus lemon zest if using) until the mixture is smooth and emulsified; ensure the eggs are fully integrated to create a cohesive batter.
    → Eggs provide structure and moisture; whisking with the dairy helps prevent curdling and ensures a smooth batter that rises evenly.
  • Pour the wet mixture into the bowl of dry ingredients and fold gently with a silicone spatula or wooden spoon until just combined; avoid overmixing to prevent toughness, and scrape the bottom and sides to incorporate any hidden pockets of flour.
    → Overmixing gluten-free batters can create a dense, crumbly texture; gentle folding preserves a tender, cake-like crumb.
  • Gently fold in the prepared blueberries (tossed with 1 teaspoon almond flour) along with any optional add-ins: 2 tablespoons chopped walnuts, 2 tablespoons sugar-free chocolate chips, and 1 tablespoon shredded unsweetened coconut; fold using a soft, figure-eight motion until just distributed.
    → Gentle folding keeps the berries intact and prevents color bleed; even distribution ensures consistent flavor in every donut.
  • Check batter consistency: if the batter appears too thick and scooping is difficult, whisk in small increments up to 2–3 tablespoons more unsweetened almond milk until the batter reaches a thick but scoopable consistency; do not thin excessively or it will spread during baking.
    → Almond flour and coconut flour absorb moisture; a slightly thick, spoonable batter gives the donuts a tender crumb without collapsing.
  • Spoon or pipe the batter into the prepared donut pan, filling each cavity about 2/3 full for rise and a flat top; tap the pan on the counter a few times to settle the batter and remove air pockets; wipe any drips from the cavity rims for clean edges.
    → Filling 2/3 ensures donuts rise properly without overflowing; tapping eliminates large air pockets and yields an even, rounded top.
  • Bake in the preheated oven for 14–18 minutes, rotating the pan halfway through to promote even browning; check doneness by inserting a toothpick into the center of a donut—no wet batter should cling, only a few moist crumbs; allow to cool in the pan for 5 minutes before transferring to a wire rack.
    → Donut texture depends on even heat; rotating prevents hot spots; a clean toothpick indicates doneness and prevents overbaking which can dry the crumb.
  • Place donuts on a wire rack and let them cool completely before glazing to ensure the glaze adheres and does not melt; if glazing sooner, the heat can cause the glaze to slide off.
    → Proper cooling ensures the glaze sets correctly and the donuts achieve a stable surface for decoration.
  • In a small bowl, whisk together 1/2 cup powdered sugar substitute with 1–2 tablespoons unsweetened almond milk until smooth and pourable; add 1/2 teaspoon vanilla extract and 1 teaspoon lemon juice if a lemon glaze is desired; adjust thickness with more sugar substitute or milk as needed; glaze should be thick enough to coat but thin enough to drip slightly.
    → A smooth, pourable glaze creates a glossy finish; the optional lemon adds bright contrast to blueberries, while vanilla deepens flavor.
  • Dip the top of each cooled donut into the glaze or drizzle with it using a spoon, ensuring an even coat; allow the glaze to set for a few minutes before stacking to avoid smearing and ensure a firm, attractive finish.
    → A consistent glaze enhances sweetness and provides a glossy, bakery-style appearance; setting time prevents running and pooling in the pan’s crevices.
  • If desired, sprinkle additional optional toppings such as a light dusting of extra powdered sugar substitute or a few lemon zest shreds while the glaze is still tacky for decorative contrast; allow to fully set before storing.
    → Toppings add texture and aroma; wait for the glaze to set so toppings adhere rather than sliding off.
  • Store baked donuts in an airtight container at room temperature for up to 2 days or refrigerate for up to 5 days; to rewarm, microwave in short 10–15 second bursts until warm and soft; this keeps the crumb tender and prevents drying out.
    → Proper storage preserves moisture and prevents the delicate gluten-free crumb from drying; gentle reheating restores softness without overcooking.

Notes

These gluten-free sugar-free blueberry donuts are naturally sweetened with ripe blueberries and a sugar-free sweetener, making them a wholesome and guilt-free snack or breakfast option. You can customize them by adding your favorite nuts, seeds, or shredded coconut. They freeze well and reheat beautifully for a quick grab-and-go treat. For an extra boost, serve with a dollop of dairy-free yogurt or a smear of almond butter. Always ensure your blanched almond flour is fresh for a light, tender crumb and your baking powder is active for reliable rise. If you prefer a vegan option, substitute flax eggs (1 tablespoon ground flaxseed + 3 tablespoons water per egg) and allow the mixture to thicken before using; note this will alter texture and rise. To prevent the blueberries from sinking, toss them with a teaspoon of almond flour before folding into the batter. For extra brightness, add lemon zest, and if you like a cozy bakery-style donut, add a pinch of cinnamon.

Tips

Tips for Perfect Sugar-Free Baked Blueberry Donuts

  • Choose the right almond flour: use finely ground blanched almond flour for a tender crumb. Measure by spooning into the cup and leveling, not packing. Store sealed to maintain freshness and prevent rancidity.
  • Balance moisture with coconut flour: coconut flour is highly absorbent. Use a small amount (1/4 cup) and be prepared to adjust liquids if the batter seems dry. Sift coconut flour before measuring to avoid lumps for even distribution.
  • Eggs and binding: eggs provide structure and moisture. If you need a vegan option, substitute with flax eggs (1 tablespoon ground flaxseed + 3 tablespoons water per egg) and allow the mixture to thicken before using; this will affect texture and rise.
  • Moisture from dairy alternatives: warm unsweetened almond milk slightly if your batter needs easier mixing. Add gradually to reach a scoopable consistency; if your batter is too thick, a splash more milk helps.
  • Yogurt tenderness: use plain Greek yogurt or a thick dairy-free yogurt to improve crumb and moisture. Let dairy-free yogurt come to room temperature for easier folding.
  • Sweetener choice: choose a granulated sugar-free sweetener (erythritol or monk fruit) for best texture and browning. Avoid liquid sweeteners as they can thin the batter. Start with 1/2 cup and adjust to taste after mixing.
  • Flavor boost: vanilla extract adds depth; lemon zest brightens blueberry flavor. If skipping zest, you can increase vanilla or add a touch of cinnamon for warmth.
  • Leavening confidence: use fresh baking powder for reliable rise; if unsure, test a pinch in hot water to confirm fizz. Baking soda works with yogurt to help browning and lift, so don’t omit.
  • Salt balance: a pinch of fine salt enhances sweetness and flavor, especially in low-sugar recipes.
  • Blueberry integrity: use fresh blueberries or well-drained thawed frozen berries. Toss thawed berries with 1 teaspoon almond flour before folding to help distribute evenly and reduce sinking, then pat dry to minimize color bleeding and soggy batter.
  • Optional zest and spice: lemon zest adds brightness while cinnamon adds warmth; adjust to your preference or omit if you want a purer blueberry note.

Tips for Optional Add-ins and Glaze

  • Nut add-ins: 2 tablespoons chopped walnuts add crunch; toast lightly to intensify aroma and chop finely for even distribution. If nut allergies are a concern, substitute with toasted pumpkin seeds or omit.
  • Chocolate chips: 2 tablespoons sugar-free chips fold in at the end to minimize sinking and keep pockets of chocolate visible.
  • Shredded coconut: 1 tablespoon shredded unsweetened coconut adds chew and aroma; use finely shredded coconut for even distribution or omit if you prefer pure blueberry flavor.
  • Glaze base: use 1/2 cup powdered sugar substitute (sifted) for a smooth finish. If it isn’t powdery, blitz briefly in a blender to avoid gritty texture.
  • Glaze consistency: start with 1 tablespoon unsweetened almond milk and add more as needed to reach a pourable glaze. If too thin, refrigerate briefly to thicken.
  • Flavor in glaze: add 1/2 teaspoon vanilla extract for a subtle note; optional lemon juice (1 teaspoon) creates a bright lemony glaze that pairs with blueberries. Balance sweetness to taste.

Baking, Cooling, Storage and Troubleshooting

  • Pan prep: grease the donut pan well or use silicone molds; preheat the oven and fill cups about 2/3 full to leave room for rise.
  • Avoid dryness and overbaking: bake until just set and a toothpick comes out with a few moist crumbs; overbaking can make the donuts dry and crumbly.
  • Cooling: let donuts cool in the pan for 5–10 minutes before transferring to a rack to prevent breakage; cool completely before glazing for best shine and adhesion.
  • Make-ahead and storage: donuts freeze well; freeze on a tray, then transfer to an airtight bag. Reheat in a 300°F oven for 5–7 minutes or gently warm in the microwave in short bursts.
  • Glaze storage: keep any leftover glaze refrigerated and re-whisk with a splash of almond milk if needed before use.
  • Allergen and storage notes: store away from strong-smelling foods to avoid odor absorption; ensure gluten- and dairy-free labeling remains intact if sharing with others who have allergies.

FAQ

Sugar Free Baked Blueberry Donuts – FAQs

What makes these donuts sugar-free?

They’re baked with a sugar substitute (such as erythritol, monk fruit, or a blend) and rely on blueberries for natural sweetness. There’s no refined sugar in the batter. If you prefer a sweeter result, you can adjust the sweetener slightly or finish with a sugar-free glaze.

What flour should I use for the best texture?

Almond flour is common for a moist, tender crumb. Coconut flour works but soaks up more liquid, so you’ll usually need extra eggs or added moisture. You can also use a gluten-free 1:1 blend, but texture may vary.

Are these donuts gluten-free?

Yes, when you use almond flour or a gluten-free blend and avoid gluten-containing ingredients. Check labels on any flavorings or sweeteners to be sure.

Can I make them dairy-free or vegan?

Yes. Use a plant-based milk (almond, soy, or oat) and dairy-free yogurt or omit yogurt. For vegan options, replace eggs with flax eggs (1 tablespoon ground flax + 3 tablespoons water per egg) or a commercial egg replacer. You may need to adjust liquids slightly.

Can I use frozen blueberries?

Yes. Frozen berries work well; there’s no need to thaw. Fold them gently to minimize color bleeding into the batter. If berries are very watery, pat them dry or toss with a little almond flour to help prevent sinking.

What are the baking time and temperature?

Preheat to 350°F (175°C). Bake for about 12–15 minutes, or until a toothpick inserted into a donut comes out with a few moist crumbs. If using a different pan, start checking a bit earlier.

How should I store leftovers?

Store in an airtight container at room temperature for 2–3 days. Refrigerate for up to 5–7 days or freeze for up to 2–3 months. Rewarm in the oven or microwave before serving.

Can I freeze the batter or baked donuts?

Baked donuts freeze well. Cool completely, then freeze in an airtight container. For batter, you can prepare dry ingredients in advance and mix with wet ingredients shortly before baking. Textures may vary after freezing.

Can I glaze or top them without sugar?

Absolutely. Try a sugar-free glaze made with cream cheese or yogurt sweetened with a sugar substitute, or a light chocolate drizzle using sugar-free chocolate. You can also finish with cinnamon, chopped nuts, or a dusting of cocoa powder for extra flavor.

How can I adjust sweetness or texture?

Taste the batter and adjust the sweetener to your liking. For a moister crumb, add a little yogurt or milk; for a lighter texture, add another egg or a touch more almond flour. Avoid overmixing and don’t overbake to prevent dryness.

Introduction / Hook

Picture a tray of golden, pillowy rounds that look as if they were plucked from a cloud, each whisper-soft edge tinged with a gentle tan, a delicate bite that gives way to a supremely light interior. This is not just bread; it’s a mood, a playful brunch moment, a memory waiting to happen. Fluffy Cottage Cheese Blueberry Cloud Bread is the kind of recipe that makes mornings feel special and afternoons feel celebratory. The aroma unfurls softly—vanilla, a hint of citrus, perhaps a whisper of almond—as the bread warms, turning a simple kitchen into a sun-drenched café. Then there are the blueberries: jewel-like bursts of sweetness that pop in every bite, painting little pockets of tangy brightness through the tender, cloud-like crumb. It’s comfort with a twist, a modern take that honors tradition while playfully bending it toward lighter, airier, more accessible baking. If you’ve ever imagined folding the comfort of cottage cheese into a dreamlike loaf, you’re about to meet that vision in a glorious, edible moment.

What makes this recipe truly special is its balance. It embraces the nostalgic, homey charm of soft, warm bread while leaning into a lighter texture that almost defies bread science. The cottage cheese adds a gentle tang and a protein-tinged creaminess that keeps the crumb soft and moist without heaviness. Blueberries bring brightness and a touch of tartness that cuts through the natural sweetness, giving you seconds that feel indulgent but somehow more wholesome. It’s the kind of dish that invites sharing—a plate passed around the table, a warm slice teased apart with the hiss of steam, a chorus of “mmms” that say you’ve hit the sweet spot between everyday and extraordinary. And because it’s cloud bread, it toasts beautifully—edges crisping into a delicate crunch while the center remains soft and pillow-like, a perfect foil for butter, honey, or lemon-curd glaze.

The Story Behind the Dish

Cloud bread has a breezy, modern origin story. It emerged from kitchens exploring lighter, low-carb, or gluten-conscious baking, where home cooks and professional chefs alike experimented with leavening alternatives and whipped textures to recreate the comforting mouthfeel of bread without traditional wheat. The concept—airy, egg-white–leaned “clouds” folded into a gentle base—felt almost alchemical: something that could rise with air, yet stay tender and delicate. Our version, Fluffy Cottage Cheese Blueberry Cloud Bread, is a friendly evolution of that idea. It borrows the cloud bread ethos but nudges it toward protein-rich, creamy Canadian-style cottage cheese, which brings a subtle tang and a moisture-retaining crumb that makes every bite feel plush, almost couture in its softness.

In developing this particular rendition, a sunny weekend kitchen became a playground. A scoop of cottage cheese joined eggs and a touch of vanilla, the walls filled with the scent of warm berries and citrus zest, and a sheet of parchment paper became a stage for little dreams forming into real, edible clouds. The blueberries, naturally, carried their own tiny drama—achingly sweet when warmed, they released pockets of juice that stained the crumb with purples and blues, as if the bread wore a delicate summer dress. It’s the kind of dish that started as a curiosity and then settled in as a family favorite—something you reach for on busy mornings, for leisurely weekend breakfasts, or for satisfying, not-too-sweet snacks that still feel celebratory.

Why You’ll Love This Recipe

  • Light, airy texture: The interplay of whipped components and the cloud-bread technique yields a crumb that feels like a soft hug, not a dense slice.
  • Protein-rich and satisfying: Cottage cheese adds a gentle protein boost that helps you feel nourished, even when you’re indulging in something decadently fluffy.
  • Naturally sweet, with fruit-forward brightness: Blueberries provide natural sweetness and tang, so you don’t need to rely on heavy syrups or excess sugar.
  • Gluten-free by nature: This isn’t a gluten-containing bread, which makes it appealing for gluten-sensitive eaters and those looking for an airy alternative to traditional bakery loaves.
  • Versatile and forgiving: It pairs beautifully with a spread of butter, a dollop of Greek yogurt, a drizzle of lemon honey, or a light cream cheese smear—no two bites feel the same.
  • Quick to assemble: Feels like a special treat but comes together with simple steps that don’t demand long waiting times or complicated equipment.
  • Kid-friendly and crowd-pleasing: The gentle sweetness and soft texture make it a hit with younger eaters, while adults appreciate the refined flavor balance.
  • Excellent for make-ahead moments: It holds up well in the fridge and can be refreshed quickly in a toaster or oven, making weekday mornings easier.

Flavor Profile & Texture

The aroma is a prelude to the main event: a mellow, comforting sweetness that comes from the subtle vanilla and the natural sugars in the fruit. The cottage cheese contributes a creamy, slightly tangy note that plays well against the gentle sweetness, a reminder that this is bread with personality rather than a bland, one-note loaf. When you bite in, you’ll notice an almost ethereal lightness—a crumb that lifts and parts with ease, like biting into a soft, warm postcard from a sunlit kitchen.

The blueberries are the stars of the show, delivering juicy pops that contrast beautifully with the soft, cushiony interior. Their fruity perfume is carried through the crumb, leaving behind delicate bursts of berry flavor rather than a cloying sweetness. The texture is a masterclass in balance: at once tender and resilient, with just enough structure to hold its shape when you slice it but so soft that it dissolves on the tongue. There’s a comforting, almost custardy whisper to the bite, tempered by the crisp, lightly toasted edges that emerge when the bread meets a hot surface. Depending on how you toast or warm it, you’ll notice a gentle caramelization along the crust, a small, fragrant crunch that invites you to take another, slower bite to savor the layers of flavor and texture.

In terms of flavor notes, think of a delicate vanilla meadow kissed by fruit and a hint of almond-like aroma from the toasting. The energy of a fresh blueberry, a touch of citrus zest if you choose to add it, and the creaminess of cottage cheese all converge to create something that feels indulgent without heaviness. It’s the rare bread that feels like comfort and novelty at once—soft enough to melt in your mouth, yet with enough personality to stay interesting bite after bite.

Occasions & Pairings

This cloud bread shines in many moments. It’s ideal for weekend brunches where guests arrive with hungry appetites and cheerful conversation; it’s equally welcome as a quick weekday breakfast when you’re dashing out the door but still deserve a moment of calm and delicious aroma swooping through the kitchen. Its versatility makes it a good candidate for tea time, picnic spreads, or even as a charming, less-sugary alternative to dessert on a light-end menu.

Pair it with items that compliment its softness and fruity brightness. Try:

  • Butter swirls and a drizzle of lemon-honey or vanilla honey for a simple, elegant finish.
  • A dollop of thick Greek yogurt or a spoonful of lemon curd to add tang and creaminess.
  • A light cream cheese spread with a whisper of vanilla and a pinch of salt to echo the bread’s flavors.
  • Fresh fruit on the side—strawberries, sliced peaches, or additional blueberries—for extra color and juiciness.
  • A sparkling beverage: a lightly sweetened citrus tea, a dry sparkling wine for brunch, or a cold-brew coffee with a splash of milk.

For holiday spreads or special brunches, consider fancy accompaniments like a dab of ricotta with orange zest, a tiny sprinkle of powdered sugar for guests who expect something a touch sweeter, or a berry compote spooned beside the slices to create a mini-deconstructed trifle feel on plates. If you’re serving children, you can layer on a small amount of nut-free fruit jam as a playful topping that won’t overpower the delicate crumb.

Tips, Variations & Substitutions

  • Texture tweaks: If you like an even lighter crumb, you can fold the blueberries gently into the batter at the end to minimize bursting and color bleed, keeping the crumb airy and evenly distributed with pockets of fruit throughout.
  • Berry swaps: While blueberries are ideal for their color and balanced tart-sweet profile, you can experiment with raspberries, blackberries, or diced peaches for a different fruit-forward version. Smaller berries tend to distribute more evenly; larger chunks give you pockets of juicy surprise.
  • Flavor enhancers: A light zest of lemon or orange can lift the bread’s aroma and brighten the finish. A touch of almond extract adds a pleasant nutty note that pairs well with blueberries.
  • Texture alternatives: If you’d like a more compact bite, consider a touch less binder or a slightly longer resting period to let the batter settle before baking. Conversely, if you crave extra loft, you can lightly whip the base components to introduce more air before folding in fruit.
  • Dietary adaptations: For a gluten-free approach, this recipe already leans gluten-free, thanks to the cloud bread concept. To make it dairy-free, substitute dairy-free cottage cheese and a dairy-free butter or spread. For a vegan version, you’ll want to reimagine the base with a plant-based cottage cheese substitute (such as almond or soy-based curd) and ensure the rest of the components align with vegan guidelines. Note that texture and flavor will shift with substitutions, so adjustments may be needed to maintain the lightness.
  • Sweetness level: If you prefer more sweetness, you can add a gentle touch of sugar or a drizzle of maple syrup after baking. For lower sugar, rely on the natural sweetness of the berries and a tiny amount of vanilla.
  • Even browning: If your oven tends to bake unevenly, rotate the pan halfway through to ensure uniform color on all sides. A light brush of melted butter along the tops before baking can also support a more appealing sheen and tenderness.
  • Make-ahead variations: Prepare the batter ahead, refrigerate for up to 24 hours, and bake when ready. This can be convenient for weekend plans and ensures fresh aroma when you finally bake.

Storage & Make-Ahead Ideas

Cloud bread is surprisingly forgiving when it comes to storage, which makes it perfect for meal prep or entertaining. Here are practical tips to keep it tasting as delightful as the first slice:

  • Room temperature: Freshly baked cloud bread will keep well for a day or two at room temperature in an airtight container or wrapped in parchment, with a light cover to maintain tenderness.
  • Refrigeration: For longer storage, refrigerate slices in an airtight container. They’ll stay soft and ready to rewarm. To restore the soft interior, warm slices gently in a toaster oven, skillet, or quick 10-15 seconds in the microwave—though the toaster oven will yield the best texture.
  • Freezing: You can freeze baked slices or the whole assembled bread once cooled. Wrap tightly and store for up to 1-2 months. Reheat in a moderate oven until warmed through and the edges regain a touch of crispness.
  • Make-ahead, ready-to-bake: If you enjoy planning ahead, prepare a day-before batter with your chosen fruit; store in the fridge. When you’re ready, portion onto a sheet and bake, saving a step on the day you serve.
  • Storage tips for best texture: To preserve the cloud-like crumb, avoid stacking hot slices directly atop one another; let the slices cool completely before stacking, and separate with parchment to prevent sticking.

Fun Facts & Trivia (Optional)

  • Cloud bread has become a symbol of “lighter” baking, often associated with low-carbohydrate and gluten-conscious trends, yet it remains a comforting treat that appeals to a broad audience beyond diet circles.
  • The term cloud bread evokes the idea of lifting, floating textures—airy, light, and ethereal—capturing the imagination of home bakers who crave something that feels whimsical yet familiar.
  • Blueberries are a natural match for dairy-based dream breads because their tart-sweet profile complements creaminess without overpowering it, creating a balanced bite that feels indulgent but not heavy.
  • In some traditions, bread is a symbol of hospitality and warmth; serving a cloud-like loaf with bright berries can evoke a sense of celebration and thoughtfulness, making a simple morning feel like a small ceremony.
  • Many home bakers enjoy experimenting with citrus notes in cloud bread, discovering that a touch of zest or a squeeze of lemon juice can lift the entire crumb and provide a fresh aftertaste that lingers pleasantly on the palate.

Ingredients

Cloud Bread Base

    – 1 cup cottage cheese, blended until smooth
    → The cottage cheese acts as the creamy base of the cloud bread, providing moisture, protein, and a tender crumb. For the smoothest texture, blend until completely lump-free. If your cottage cheese is very watery, drain briefly or press through a fine sieve before blending. Using full-fat cottage cheese yields a richer flavor and softer texture.

    – 4 large eggs, separated
    → Egg whites are whipped to create the light, airy structure of cloud bread, while the yolks enriched with the cottage cheese mixture contribute moisture and body. Ensure no yolk contaminates the whites and that bowls and beaters are impeccably clean for maximum volume. Bring eggs to room temperature for best whipping results.

    – 1/4 cup granulated sugar
    → Adds gentle sweetness and aids with light browning and a slightly more tender crumb. If you prefer, reduce to 2 tablespoons or substitute a sugar alternative and adjust other liquids slightly to maintain balance. Dissolve well into the yolk mixture to avoid graininess.

    – 1 teaspoon vanilla extract
    → Enhances overall flavor and pairs beautifully with blueberries. Use pure vanilla for a richer aroma; add to the yolk/cottage cheese mixture before folding in the whites for even distribution.

    – 1/4 teaspoon salt
    → Elevates the flavors and helps balance sweetness. Fine salt blends quickly and ensures even distribution throughout the batter.

    – 1/2 teaspoon baking powder
    → Provides a gentle lift, helping the cloud bread stay light rather than dense. Don’t overmix after folding in the whipped whites to preserve volume.

    – 1 cup fresh blueberries, rinsed and patted dry, folded gently into batter
    → Blueberries contribute juicy bursts of sweetness and blueberry aroma. Fold them in carefully to avoid breaking them and staining the batter; if using frozen berries, thaw completely and pat dry to minimize extra moisture and color bleed.

Optional Add-ins

    – 1/2 teaspoon lemon zest
    → Brightens the flavor and complements blueberry beautifully. Zest the lemon finely with a microplane, avoiding the white pith, and fold into the batter with the vanilla.

Toppings

    – Powdered sugar for dusting (optional)
    → A delicate dusting adds a touch of sweetness and a polished finish. Dust after the cloud bread has cooled slightly to prevent clumping and melting; use a fine sifter for even coverage.

Instructions

  • Preheat your oven to 325°F (165°C) and line a large baking sheet with parchment paper or a silicone baking mat to create a nonstick, even surface for the cloud bread.
    → This prevents sticking, ensures uniform browning, and makes removal after baking clean and effortless.
  • Blend cottage cheese until completely smooth and lump-free using a blender or food processor for 30 to 60 seconds, stopping to scrape down the sides as needed.
    → A silky cottage cheese base yields an ultra-tine crumb and even texture; any remaining lumps can create irregular pockets and uneven rise. If the cottage cheese is watery, briefly drain or press through a fine sieve before blending for a firmer base.
  • Separate the eggs into two clean, dry bowls—yolks in one and whites in the other—and bring both to room temperature to maximize volume and stability.
    → Room-temperature eggs whip to greater volume, producing the light, airy structure characteristic of cloud bread; ensuring bowls are impeccably clean prevents yolk contamination from inhibiting foam formation.
  • In a medium bowl, whisk the yolks with the blended cottage cheese, granulated sugar, vanilla extract, and salt until the mixture is smooth, pale, and slightly creamy, folding in optional lemon zest if using.
    → Properly combining these elements builds a cohesive, moist base; dissolving the sugar completely prevents gritty texture and evenly distributes vanilla for a balanced flavor. Lemon zest adds bright aromatic notes that enhance blueberries.
  • Whip the egg whites with a pinch of salt at medium-high speed until they hold soft peaks, then increase to stiff peaks; optionally beat in 1/8 teaspoon cream of tartar to stabilize the foam.
    → Stiff, glossy peaks trap air and give cloud bread its signature height; underwhipped whites lead to a dense texture, while overbeating can cause the foam to break.
  • Gently fold about one third of the whipped whites into the yolk–cottage cheese mixture to lighten it, then fold in the remaining whites in two additions using a gentle, figure-eight or over-under motion until just combined.
    → Light folding preserves the air in the whites, preserving volume; heavy stirring deflates the batter and reduces rise.
  • Fold in fresh blueberries gently, distributing them evenly without breaking them; if using frozen blueberries, thaw completely and pat dry to minimize extra moisture and color bleed.
    → Even berry distribution yields balanced flavor in every bite; drying frozen berries prevents extra moisture from weakening the batter and causing soggy spots.
  • Scoop the batter onto the prepared sheet in rounds about 2 to 3 inches in diameter, spacing them 1 to 2 inches apart, and lightly flatten the tops for uniform baking.
    → Even spacing ensures consistent heat exposure and prevents merging; flattening promotes uniform browning and a polished final shape.
  • Bake for 18 to 22 minutes, or until the edges are set and the centers spring back slightly when touched and the rounds are just lightly golden; avoid overbaking to keep the interior tender and cloud-like.
    → Baking within this window sets the structure while preserving the delicate, airy crumb; rotating the sheet halfway can help achieve even browning if your oven has hot spots.
  • Carefully transfer the baking sheet to a rack and cool the cloud bread for 10 to 15 minutes before handling to prevent tearing and collapse.
    → Gentle cooling allows the steam to escape gradually and firms the crumb, making removal and slicing clean without crumbling.
  • Dust the cooled cloud bread lightly with powdered sugar if desired, using a fine sieve to achieve an even, delicate coating.
    → A light sugar dust enhances presentation and sweetness without saturating or masking the blueberry flavor; apply after cooling to prevent clumping.
  • Store any leftovers in an airtight container in the refrigerator for up to 2 to 3 days and rewarm briefly if desired to revive softness.
    → Cloud bread dries as it cools, so refrigeration slows staling; a short reheat restores the tender, fluffy texture without drying out the crumb.

Notes

These fluffy cottage cheese blueberry cloud breads are a light, protein-packed treat with a tender crumb and bursts of blueberry sweetness. To achieve the signature cloud-light texture, blend the cottage cheese until completely smooth, and bring the eggs to room temperature before whipping the whites. Fold the whipped whites into the yolk-cottage cheese mixture gently and stop just before streaks remain to preserve volume. If your cottage cheese is very watery, drain briefly or press through a fine sieve; using full-fat cottage cheese yields a richer flavor and softer crumb. When folding in blueberries, do so gently to avoid breaking berries and staining the batter; if using frozen berries, thaw completely and pat dry to minimize extra moisture and color bleed. For flavor variations, add 1/2 teaspoon lemon zest and a little more vanilla for brightness, and you can adjust the sugar to your taste (1/4 cup works well, or reduce to 2 tablespoons if you prefer less sweetness). Bake on a parchment-lined sheet at 350°F (175°C) until the edges are lightly golden and the centers are set, about 12-15 minutes. Allow to cool slightly on a rack before slicing to help the structure set. These cloud breads store well in an airtight container for 2-3 days, or freeze for longer storage; reheat gently in a toaster or oven to restore softness. You can customize them by sprinkling a light dusting of powdered sugar or serving with a dollop of yogurt. This recipe is gluten-free, so ensure your baking powder is gluten-free if you have gluten intolerance.

Tips

Tips for Fluffy Cottage Cheese Blueberry Cloud Bread

Prep and texture of the base

  • Blend the cottage cheese until completely smooth and lump-free to ensure a tender crumb.
  • If the cottage cheese is very watery, drain briefly or press through a fine sieve before blending. Using full-fat cottage cheese yields a richer flavor and softer texture.
  • Let the cottage cheese come to room temperature if possible for easier blending and a smoother batter.

Egg whites and yolk handling

  • Separate the eggs carefully; ensure no yolk contaminates the whites and that bowls and beaters are impeccably clean for maximum volume.
  • Bring the eggs to room temperature for best whipping results. Whip the whites to stiff, glossy peaks; a pinch of cream of tartar can help stabilize.
  • Whisk the yolks with the cottage cheese mixture along with the sugar, vanilla, and salt until smooth and light, then fold in the whites in stages.

Sweetness, vanilla, and balance

  • The granulated sugar adds gentle sweetness and helps with light browning and a softer crumb. If you reduce sugar to 2 tablespoons or substitute a sugar alternative, adjust other liquids slightly to maintain balance and dissolve sugar well to avoid graininess.
  • Use pure vanilla extract for a richer aroma; add to the yolk mixture before folding for even distribution.

Folding to preserve lift

  • Fold the whipped whites into the yolk–cottage cheese mixture in several additions using a gentle cut-and-fold motion to preserve volume.
  • Avoid overmixing after the whites are incorporated; stop as soon as there are no white streaks left.

Blueberries and add-ins

  • Fold in fresh blueberries gently to keep them intact and avoid color bleeding. If using frozen berries, thaw completely and pat dry to minimize extra moisture and color bleed.
  • Optional lemon zest (½ teaspoon) brightens the flavor and complements blueberry beautifully; zest finely with a microplane and fold in with the vanilla.

Baking and finishing

  • Line the baking sheet with parchment paper or a silicone mat to prevent sticking and promote even browning.
  • Shape the batter into evenly sized rounds to ensure uniform rising. Bake at 300–325°F (150–160°C) until set and lightly golden, about 25–30 minutes; avoid overbaking to keep the clouds soft.
  • Let the cloud bread cool completely on a rack before slicing to allow the crumb to set.

Serving, dusting, and storage

  • Dust with powdered sugar just before serving for a delicate finish; sift for an even dusting.
  • Store leftovers in the refrigerator, covered, for up to 3 days. Reheat briefly in a toaster or a low oven to refresh the texture.
  • Cloud bread freezes well once cooled—wrap well and freeze; reheat from frozen at 325°F (160°C) for 5–7 minutes until warm.

FAQ

What is Fluffy Cottage Cheese Blueberry Cloud Bread?

It’s a light, airy cloud bread made by blending cottage cheese with eggs, vanilla, and a touch of sweetness, then folding in whipped egg whites and fresh blueberries. The result is soft, pillowy rounds with bursts of blueberry flavor.

What ingredients do I need?

Common ingredients (yields 6–8 small rounds):

  • 1 cup cottage cheese (plain, full-fat or part-skim)
  • 3 large eggs, separated
  • 2–3 tablespoons granulated sugar or your preferred sweetener
  • 1 teaspoon vanilla extract
  • 1/2 teaspoon baking powder
  • 1/8 teaspoon salt
  • 1/2 cup fresh blueberries
  • Optional: 1 teaspoon lemon zest or 1/4 teaspoon cinnamon for extra flavor

Tip: Toss blueberries with a teaspoon of flour to help prevent sinking during baking.

Should I separate the eggs, and why?

Yes. Separate the eggs to whip the whites and yolks separately. Whipped egg whites create the fluffy, cloud-like texture, while the yolks add richness. Fold the whipped whites back into the yolk mixture gently to keep the light structure.

How do I mix the batter without deflating it?

Steps:

  • Blend cottage cheese, egg yolks, sugar, vanilla, baking powder, and salt until smooth.
  • Beat egg whites separately until stiff peaks form.
  • Gently fold the whipped whites into the yolk mixture in 2–3 additions until just combined.
  • Fold in blueberries and optional lemon zest.
What oven temperature and bake time should I use?

Preheat to 350°F (175°C). Line a baking sheet with parchment paper and drop rounded tablespoons of batter, or shape into 6–8 rounds. Bake for 12–15 minutes, or until the edges are lightly golden and centers are set. Let cool on a rack before serving.

How many servings does this make, and what is the texture like?

About 6–8 small cloud bread rounds. The texture should be soft and airy with a slight chew near the edges. It’s not as bready as traditional toast, but pleasantly fluffy.

Can I make a dairy-free or vegan version?

Yes, with substitutions:

  • Vegan option: use a plant-based cottage cheese substitute or blended silken tofu in place of cottage cheese. Replace eggs with a vegan binder such as aquafaba (egg white substitute) whipped to stiff peaks, or use flax/chia eggs subbing for each egg.
  • Sweetener and flavor: keep the vanilla and blueberries, and add a touch of lemon zest if desired.

Note: Texture and rise may vary with substitutions; you may need to adjust based on the binder you choose.

How should I store and reheat leftovers?

Store leftovers in an airtight container in the refrigerator for up to 3 days. Reheat gently in a toaster oven or microwave in short bursts until warm. You can also freeze baked rounds for up to 1–2 months; thaw before reheating.

Can I customize the recipe with other fruits or flavors?

Absolutely. Try substituting raspberries, sliced strawberries, or diced peaches. You can also add a pinch of cinnamon, nutmeg, or lemon zest for different flavor profiles. Dried fruit or chocolate chips can be used in moderation, too.

What are common mistakes to avoid?

Common issues and fixes:

  • Overmixing after adding whipped whites can deflate the batter — fold gently.
  • Not whipping whites to stiff peaks — you’ll lose fluffiness. Ensure they hold their shape.
  • Not lining or greasing the sheet well — the rounds may stick. Use parchment and a light spray if needed.
  • Blueberries sinking to the bottom — toss them in a little flour or fold them in with extra batter to distribute.
Does this provide any nutritional information?

Approximate per cloud bread round (varies by exact ingredients and yield): around 60–100 calories, with a balance of protein from cottage cheese and eggs. If you use different sweeteners or dairy substitutes, values will change. For precise numbers, calculate based on your exact brands and measurements.

Introduction / Hook

There’s a dish that evokes kitchen-table nostalgia with every bubbling bubble and golden edge: Chicken Divan Casserole. Imagine a steaming, velvet-soft blanket of creamy sauce embracing tender chicken shards, nestled with florets of emerald broccoli, all crowned by a crisp, butter-kissed crust that crunches like a welcome-home sigh. The aroma will coax even the busiest schedules to pause, the way a familiar comfort song can stop time for a moment. This isn’t just dinner; it’s a memory you can recreate with minimal fuss and maximum warmth. The beauty of Chicken Divan lies in its balance—savory richness that feels indulgent, yet bright with the fresh, green contrast of broccoli and a light, uplifting finish from lemon or herbs. It’s the kind of dish you crave on a busy weeknight and want to tuck away for a cozy weekend at home with family or friends. Every slice promises a little celebration in the form of a casserole, a dish that invites seconds, and perhaps even a story or two to share around the table.

As the oven door opens and the steam rises in wavy ribbons, you’ll notice how the dish transforms the simple ingredients into something that feels special. The scent—creamy, toasty, with a hint of cheese and a whisper of garlic—fills the room and creates an instant sense of occasion. Yet, at its heart, Chicken Divan Casserole is approachable, forgiving, and endlessly adaptable. It’s the kind of recipe that rewards a keeping-it-simple mindset: use what you have, lean on pantry staples, and let the natural flavors of chicken, broccoli, and a smooth sauce do the heavy lifting. The result is a comforting, family-friendly dish that’s as perfect for weeknights as it is for a casual dinner with friends, and it has a timeless appeal that tends to become a favorite in households across generations.

The Story Behind the Dish

Chicken Divan’s charm comes not just from its creamy allure, but from a story that echoes the mid-20th century spirit of American home cooking. In a era when families gathered around the table to savor simple, satisfying meals after long days, casseroles became the language of togetherness. The name “Divan” itself evokes a certain elegance—think of a comfortable seating area in a grand hotel where travelers would linger over conversations, coffee, and a shared sense of hospitality. It’s not an accident that a dish like this feels both refined and practical: a casserole that can be assembled ahead, baked to perfection in a single dish, and served with minimal fuss to a crowd or a small dinner party. The origins aren’t tied to one exact kitchen or city; rather, Chicken Divan is a product of American culinary imagination—twisted into a familiar shape by countless home cooks who wanted to elevate a simple weeknight supper without sacrificing convenience or comfort.

Traditionally, the pairing of chicken with broccoli in a creamy base reflects pantry-friendly thinking of the time: use leftover roast chicken or quickly poached chicken, fold in a velvety sauce that often relied on dairy and stock, and finish with a topping that would brown beautifully in the oven. The broccoli brings a green, fresh counterpoint to the richness, creating a dish that feels balanced and complete on a single plate. Over the years, cooks have added their own touches: a hint of nutmeg in the sauce, a dusting of paprika for warmth, or a scattering of toasted breadcrumbs or cheese on top for that irresistible crackly crown. The result is a timeless classic that resonates with many generations because it answers a universal desire: to eat well, together, without spending hours in the kitchen.

In many kitchens today, Chicken Divan is a bridge between vintage charm and modern practicality. It embraces the idea that comfort food can be refined yet accessible, elegant yet easy. It’s a dish that travels well in memory and in the dish itself: you can recreate the sense of a comforting family meal, adapt it to different dietary needs, and experiment with flavors while keeping the essence intact. The story of Chicken Divan is, in many ways, a love letter to home cooking—an invitation to gather, to savor, and to create new memories around a dish that already feels like a familiar favorite.

Why You’ll Love This Recipe

  • Comforting, crowd-pleasing flavor that feels like a warm hug on a plate.
  • Versatile and forgiving; it accommodates a range of ingredients and a variety of dietary needs.
  • Perfect balance between tender chicken, crisp-tender broccoli, and a luscious, creamy sauce.
  • Make-ahead friendly: assemble, refrigerate, and bake later for effortless entertaining.
  • One-dish convenience with a satisfying, golden topping that adds texture and color.
  • Great for weeknights, Sunday dinners, potlucks, or feeding a crowd without stress.
  • Leftovers reheat beautifully, tasting almost as good as the first slice.
  • A classic dish that invites personalization—swap vegetables, adjust seasonings, or add a final flourish.

Flavor Profile & Texture

From the first bite, Chicken Divan Casserole delivers a textural and flavor journey that feels thoughtfully layered. The sauce is creamy and rich, a gentle, velvety coating that clings to each bite without feeling heavy. Depending on your preparation, this sauce can lean toward a light, dairy-forward finish with a hint of butter and a kiss of stock, or toward a more decadent, indulgent mood with cheese melted throughout. The broccoli provides a bright, fresh bite and a delicate, grassy note that cleanly cuts through the richness, preventing the dish from tipping too far into heaviness. When baked to a delicate amber on top, the breadcrumbs or cheese create a crisp, toasty crust that offers a satisfying contrast to the tender interior—an irresistible combination of soft and crisp in every mouthful.

The chicken itself is the backbone of the dish: succulent, white-meated, and easy to portion. If you’re using leftovers, the texture can become wonderfully resilient, taking on the sauce’s silkiness while still maintaining some bite. If you’re starting from scratch with fresh chicken, you can achieve a similarly tender result by gentle poaching or light sautéing before it meets the sauce. The overall flavor profile is subtly seasoned, with notes that allow broccoli’s vegetal brightness and any added aromatics to shine through. A whisper of garlic, a touch of lemon zest, or a light dusting of nutmeg can elevate the dish without overpowering its classic roots. The result is a comforting, balanced dish that makes every spoonful feel deliberate and comforting at once.

Occasions & Pairings

Chicken Divan Casserole is wonderfully versatile when it comes to occasions. It shines on weeknights when you want something satisfying but not fussy, and it scales up easily for family gatherings, potlucks, or a casual dinner party. Its universal appeal makes it a safe choice for mixed-age crowds, and its make-ahead potential is a boon for hosts who want to plan ahead without sacrificing warmth on the day of the gathering.

Pairing ideas to complement the dish:

  • Side dishes: a light green salad with a bright vinaigrette to cut the richness; a simple lemon herbed rice or wild rice for texture; crusty bread or a warm baguette to sop up sauce.
  • Drinks: a crisp white wine such as Sauvignon Blanc or a Chardonnay with a touch of oak; sparkling water with a wedge of lemon for non-alcoholic options; a light beer with a clean finish for casual meals.
  • Desserts: a citrusy mousse or a tangy fruit tart to balance the creaminess; a light yogurt-based dessert to echo freshness.
  • Seasonal twists: in winter, a hint of roasted garlic can deepen the savoriness; in spring, fresh herbs like dill or tarragon add a fragrant lift; in autumn, a touch of thyme pairs beautifully with roasted notes.

For holiday gatherings or weekend dinners with friends, this casserole makes an impression without requiring you to be tied to the stove for hours. It’s a dish that sparks conversations—about how you prefer to season it, what vegetables you love with it, and how you like to finish it off with a crisp topping. The simplicity of the dish invites personalization, ensuring that no two versions are exactly the same, while the core comfort remains a unifying thread.

Tips, Variations & Substitutions

Make it lighter or dairy-free

Swap in lighter dairy or non-dairy substitutes to suit dietary needs. Use a milk alternative with a touch of olive oil or a vegan cream alternative, and choose a non-dairy cheese or omit cheese altogether for a softer finish. You can mimic the silkiness with a combination of non-dairy cream and broth, or opt for a lighter béchamel made with a splash of olive oil and a gluten-free flour blend.

Gluten-free options

For a gluten-free version, ensure that any thickeners or toppings are gluten-free. Use gluten-free breadcrumbs or swap to a toasted almond or breadcrumb topping made from gluten-free grains. If you’re using condensed soups or packaged sauces, check the label for gluten-containing ingredients and substitute with gluten-free alternatives.

Flavor twists

Introduce subtle twists to suit your pantry or mood. A pinch of curry powder can give a gentle warmth that echoes classic curry-tinted versions of the dish. Fresh lemon zest brightens the sauce, while a handful of chopped fresh herbs like parsley, dill, or tarragon adds a fragrant finish. A small amount of grated Parmesan or Gruyère can deepen the savoriness, or you can leave cheese out entirely for a lighter finish.

Vegetable variations

Broccoli is traditional, but you can mix in other vegetables for texture and color. Cauliflower florets, sliced carrots, or frozen peas add pops of sweetness and color. If you’re using frozen vegetables, thaw and pat dry to minimize extra moisture in the sauce. A mix of vegetables can transform the dish into a seasonal showcase without sacrificing its essence.

Protein options

While chicken is iconic, you can experiment with turkey, rotisserie chicken for convenience, or even a plant-based protein for a vegetarian-friendly rendition. If using plant-based proteins, adjust the sauce to ensure it carries the same creaminess and savoriness, and consider adding a little extra flavor through mushrooms or vegan cheese substitutes.

Make-ahead strategies

Assemble the casserole a day ahead, cover tightly, and refrigerate. When you’re ready to bake, increase the baking time slightly to ensure the center heats through. If you’re using a two-casserole approach for a large crowd, you can freeze one for later by assembling and freezing before baking; just bake from frozen, adding extra time as needed.

Storage & Make-Ahead Ideas

This dish lends itself to advance preparation and practical storage. You can assemble the casserole, cover it well, and refrigerate for up to 24 hours before baking. If you want to freeze it, assemble up to the point of baking, wrap tightly, and freeze for up to 2–3 months. Thaw overnight in the refrigerator before baking, then bake with a little extra time to ensure the center is hot and the topping turns golden.

Leftovers store well in the refrigerator for about 3–4 days in an airtight container. Reheat gently in the oven to preserve the creamy texture and to keep the topping crisp at the edges, rather than microwaving, which can make the topping soggy. If you’re reheating in the oven, cover the dish with foil for the first part of reheating to prevent over-browning, then uncover to finish crisping the top.

Tips for maximum flavor on reheat: a light sprinkle of fresh herbs or a squeeze of lemon can refresh the dish, and a quick broil at the end can restore a crackly top if it has softened during storage.

Fun Facts & Trivia (Optional)

  • Chicken Divan is a quintessential example of mid-20th-century American home cooking that blends practicality with a touch of elegance, often reflecting how households made the most of pantry staples.
  • The name “Divan” evokes a sense of refinement and worldly charm, linking the dish to the idea of a comfortable, inviting space where guests are welcomed to linger and share a meal.
  • Variations of the dish proliferated across home kitchens, with cooks adding ingredients like curry powder, nutmeg, or cheddar to tailor the flavor to family preferences or regional tastes.
  • While many modern versions rely on a cream-based sauce, some contemporary interpretations experiment with lighter or dairy-free sauces, showing how a classic can evolve while preserving its comforting core.
  • In the grand tradition of casseroles, Chicken Divan lends itself to storytelling: it’s the dish that often gets passed down as a comforting memory, reshaped by each generation to fit new tastes and dietary needs.

Ingredients

Chicken Divan Casserole

  • 2 cups cooked chicken breast, diced
    → Use cooked chicken to save time and to maximize flavor. Dice into bite-sized pieces so they distribute evenly in the casserole. Leftover rotisserie chicken works well; ensure it is cooled before mixing to avoid drawing moisture during baking.
  • 4 cups broccoli florets, lightly steamed until just tender
    → Classic Divan pairs broccoli with chicken. Steam until bright green and crisp-tender so the broccoli keeps some bite after baking. Drain well to prevent watery sauce and soggy layers.

Creamy Sauce

  • 1 can condensed cream of chicken soup (10.5 oz)
    → This provides the creamy binding for the casserole; choose regular-fat version for best flavor and texture. If you prefer a lighter dish, whisk in a splash of milk to reach your desired sauce consistency.
  • 1/2 cup mayonnaise
    → Adds richness and a smooth base to the sauce. Use full-fat for best mouthfeel; if avoiding eggs, you can substitute an equal amount of plain Greek yogurt with a bit of sour cream.
  • 1/2 cup sour cream
    → Contributes tang and extra creaminess; use full-fat for deeper flavor and a creamier texture. For a lighter version, use fat-free sour cream but expect a slightly thinner sauce.
  • 1 tablespoon fresh lemon juice
    → Brightens the overall flavor, cutting through the richness of the mayo and cheese. Use freshly squeezed lemon juice for the best aroma; omit if you want a milder profile.
  • 1 cup shredded sharp cheddar cheese, divided
    → Adds cheesiness to the sauce and a bubbling crust on top. Shred cheddar just before using (avoid pre-shredded if possible) and split between sauce and topping (usually half stirred into the sauce, half reserved for topping).
  • 1/2 teaspoon garlic powder
    → Subtle savory note that pairs well with cheddar; adjust to taste. If you prefer a stronger garlic flavor, increase to 3/4 teaspoon or sauté a small minced garlic clove briefly in the sauce base.
  • 1/4 teaspoon onion powder
    → Adds depth without visible onion; optional if you want a cleaner cheesy flavor. You can omit if you’re sensitive to onion powder.
  • 1/2 teaspoon salt
    → Seasoning base; adjust amount depending on the saltiness of the soup and cheese. Taste the sauce and adjust before baking.
  • 1/4 teaspoon black pepper
    → Adds a touch of heat and balance; grind fresh for best aroma; adjust to taste.

Topping

  • 1/2 cup breadcrumbs (panko recommended)
    → Creates a crisp, golden crust on the surface. Panko offers the best crunch; mix with a little melted butter or olive oil to help browning.
  • 2 tablespoons melted butter
    → Used to moisten and toast the breadcrumbs for a rich, crunchy topping. If dairy-free, substitute with olive oil or a dairy-free spread.

Optional Add-ins

  • 1/2 cup sliced mushrooms, optional
    → Adds earthy flavor and moisture. Sauté the mushrooms in a teaspoon of butter (or olive oil) until the water has evaporated before adding to the casserole to avoid extra liquid.
  • 1/4 teaspoon paprika, optional
    → Provides color and a gentle warmth to the sauce or crumb topping. Sprinkle into the sauce or over the top before baking to tint the crust slightly.
  • 1/4 cup chopped fresh parsley, optional
    → Finishes with color and a hint of brightness. Mix into the sauce at the end or sprinkle on the finished dish as a fresh garnish.

Instructions

  • Preheat your oven to 350°F (175°C) and lightly grease a 9×13-inch baking dish or casserole pan.

    → A hot, greased pan prevents sticking and ensures clean, even slices when the casserole is baked and served.
  • Dice the cooked chicken breast into bite-sized pieces (about 1/2-inch cubes) if it is not already pre-diced, so every forkful contains poultry and the pieces distribute evenly.

    → Uniform dice ensures even cooking and helps the sauce cling to each piece rather than sliding off in clumps.
  • Lightly steam the broccoli florets until they are bright green and just tender, then drain thoroughly and pat dry to remove excess moisture.

    → Steaming preserves color and snap, while thorough drainage prevents watery sauce and soggy layers.
  • Whisk the sauce base: in a medium bowl, whisk together the condensed cream of chicken soup, mayonnaise, sour cream, lemon juice, garlic powder, onion powder, salt, and pepper until smooth and cohesive.

    → This creates a silky binding for the vegetables and chicken; well-emulsified sauce coats without separation, and the spices balance richness.
  • Stir in half of the shredded cheddar cheese into the sauce until it melts and is evenly distributed, reserving the remaining cheddar for topping.

    → Melting into the sauce thickens it slightly and infuses the dish with cheesy flavor while the reserved cheese forms a bubbling crust on top.
  • In a large bowl, fold the diced chicken and broccoli into the sauce, along with any optional add-ins such as sautéed mushrooms, a pinch of paprika, or chopped parsley, until everything is evenly coated without mashing the broccoli florets.

    → Gentle folding ensures even distribution of texture and flavor and keeps broccoli florets intact for texture contrast.
  • Spread the coated mixture into the prepared baking dish in a single, even layer.

    → An even bed ensures uniform baking and consistent portion sizes; avoiding mounds prevents undercooked centers.
  • Sprinkle the remaining cheddar cheese evenly over the surface to begin forming a cheesy crust as the dish bakes.

    → Top cheese melts into a bubbly crust that adds color, flavor, and a pleasing texture contrast with the creamy interior.
  • In a small bowl, combine the breadcrumbs with the melted butter (and a pinch of salt, if desired) until the crumbs are evenly moistened and crumbly.

    → Butter-coated breadcrumbs toast and color beautifully, creating a crisp topping that contrasts with the creamy filling.
  • Distribute the breadcrumb topping evenly over the casserole so every portion develops a crisp crown.

    → A consistent topping bakes to an even, crunchy crown rather than pooling in spots that would stay pale or soggy.
  • Bake the casserole in the preheated oven for 25 to 30 minutes, or until the sauce is bubbling at the edges and the cheese has fully melted; if the topping browns too quickly, tent with foil for the last 5 to 10 minutes.

    → Bubbling indicates thorough heating; foil prevents excessive browning and preserves moisture in the interior.
  • Optionally, for a deeper crust, switch to a brief 1- to 2-minute broil at the end, watching closely to prevent scorching, until the crumb topping is deeply golden.

    → Quick broiling intensifies color and crunch without overcooking the creamy interior.
  • Remove the dish from the oven and let it rest for 5 to 10 minutes before serving to allow the sauce to re-set and the slices to firm up for clean portions.

    → Resting lets the casserole thicken slightly so it slices neatly and the flavors meld without runny sauce.
  • Garnish with chopped fresh parsley if desired, then portion and serve hot, ideally with a light salad or grain side to balance richness.

    → Parsley adds a fresh color and a hint of brightness that complements the dish’s creamy depth.

Notes

These Chicken Divan Casserole notes guide you to a creamy, comforting bake with broccoli and savory chicken. Use cooked chicken to save time and maximize flavor—leftovers such as rotisserie chicken work beautifully; dice into bite-sized pieces to distribute evenly. Lightly steam the broccoli just until tender-crisp and drain well to avoid watery sauce. For the creamy sauce, whisk together condensed cream of chicken soup with mayonnaise and sour cream, then fold in fresh lemon juice, half of the cheddar, garlic powder, onion powder, salt, and pepper, tasting and adjusting before assembling. Stir the sauce with the chicken and broccoli or spread a portion of it to coat the veggies, then spoon into a casserole dish and top with the remaining sauce and the remaining cheddar for a glossy, bubbling crust. The topping is a crisp crumb layer: mix breadcrumbs (panko for extra crunch) with melted butter or olive oil and sprinkle over the casserole; bake until the top is golden and the sauce is bubbling, about 25–30 minutes at 350°F (175°C). Optional add-ins like sliced mushrooms or a sprinkle of paprika can add depth and color, while a final scattering of chopped fresh parsley brightens the finished dish. Let the casserole rest 5–10 minutes before serving to let the sauce set, and refrigerate leftovers promptly; this dish re-heats well in the oven or microwave. If you prefer a lighter version, you can substitute part or all of the sour cream with plain yogurt and use a lighter mayo, but plan for a slightly thinner sauce.

Tips

Pro Tips for Chicken Divan Casserole

  • Keep chicken pieces uniform: Dice the cooked chicken into even bite-sized pieces so they distribute evenly. If using leftovers like rotisserie chicken, let it cool completely before mixing to avoid extra moisture.
  • Broccoli texture matters: Lightly steam the broccoli just until tender and vibrant green. Drain thoroughly and pat dry to prevent extra moisture from making the casserole watery.
  • Sauce harmony: Whisk the condensed soup with the mayonnaise and sour cream until smooth before folding in lemon juice and cheese. A smooth base helps the sauce emulsify with the cheddar as it bakes, giving you a creamy, cohesive result.
  • Cheese handling: Use freshly shredded sharp cheddar whenever possible. Reserve about half for the topping and fold the rest into the sauce for a cheesier center. Pre-shredded cheese can melt unevenly and clump.
  • Flavor boosters: If you want a stronger garlic note, sauté a minced garlic clove in a teaspoon of butter for about 30 seconds before adding to the sauce, or increase garlic powder to 3/4 teaspoon. Fresh lemon juice should be freshly squeezed for the brightest flavor.
  • Season gradually: The soups and cheese provide salt, so start with 1/2 teaspoon salt and 1/4 teaspoon pepper. Taste the sauce before baking and adjust to your preference.

Cheese and Sauce Craft

  • Prevention of separation: Heat the sauce gently and remove from heat before adding cheese; stir until melted and smooth to avoid gritty textures.
  • Lighter options: For a lighter version, whisk in a splash of milk to adjust thickness, or substitute part of the sour cream with plain Greek yogurt. You can also use light mayo, but expect a slightly thinner sauce.

Topping and Browning

  • Crunchy topping: Use panko for the crispiest crust. Toss breadcrumbs with 2 tablespoons melted butter and a touch of olive oil to improve browning. A light sprinkle of paprika can add color and warmth.
  • Even browning: Bake at 350–375°F (175–190°C) until the casserole is bubbling and the top is golden. If the top browns too quickly, loosely tent with foil to finish cooking through the center without scorching the crust.

Make-Ahead, Storage, and Variations

  • Make ahead: Assemble the casserole up to 24 hours in advance, cover, and refrigerate. Bake 30–40 minutes from chilled, adding a few extra minutes if needed until hot and bubbly.
  • Gluten-free option: Use gluten-free condensed cream of chicken soup. Ensure all add-ins are gluten-free as well.
  • Optional add-ins: Sautéed mushrooms (moisture evaporated) add depth; paprika adds color and a gentle warmth; chopped fresh parsley brightens the finish—stir in parsley at the end or sprinkle on top as a garnish.
  • Storage for leftovers: Refrigerate in an airtight container for 3–4 days. Reheat gently in the oven or microwave, covered, to preserve moisture and texture.

FAQ

Chicken Divan Casserole – FAQ

What is Chicken Divan Casserole?

Chicken Divan Casserole is a comforting baked dish featuring tender chicken, broccoli, and a creamy sauce, typically topped with cheese and breadcrumbs. It’s often assembled in a casserole dish and baked until bubbly and golden.

What ingredients are typically used?

A typical version includes:

  • Cooked chicken (diced or shredded)
  • Steamed broccoli florets
  • Creamy sauce (such as a combination of mayonnaise or sour cream with a creamy soup or bechamel)
  • Cheese (shredded cheddar and/or parmesan)
  • Breadcrumbs or crushed crackers for topping
  • Butter or a light drizzle to help the topping brown

Variations may use cooked rice or noodles, and different cheeses or seasonings.

How do I make Chicken Divan Casserole?

Basic steps:

  1. Steam or lightly blanch the broccoli until just tender.
  2. Mix the creamy sauce (mayonnaise or sour cream with a light cream soup or bechamel) and season to taste.
  3. Combine the chicken, broccoli, and sauce in a baking dish.
  4. Top with shredded cheese and breadcrumbs; dot with butter if using breadcrumbs.
  5. Bake in a preheated oven at 350°F (175°C) for about 25–30 minutes, until bubbly and the top is golden.
Can I use rotisserie chicken?

Yes. Rotisserie chicken is a convenient option. Shred or dice the meat and use it in place of cooked chicken breasts or thighs.

Can I freeze or make this ahead?

Yes:

  • Assembled but unbaked casseroles can be frozen for up to 2–3 months. Thaw in the fridge before baking, then bake as directed, adding a few extra minutes if needed.
  • Leftovers can be refrigerated for 3–4 days and reheated in the oven (or microwave) until hot.
Is there a gluten-free version?

Absolutely. Use gluten-free cream soup or a homemade bechamel, and replace breadcrumbs with gluten-free breadcrumbs or omit them. Check all pantry items to ensure there’s no hidden gluten.

What are good variations or add-ins?

Try:

  • Adding sliced mushrooms, bell peppers, or sun-dried tomatoes
  • Using a different cheese blend (Swiss, Gruyère, or mozzarella)
  • Stirring in a splash of lemon juice or Dijon mustard for brightness
  • Using a lighter sauce with Greek yogurt or low-fat mayo

Keep the broccoli visible for color and texture balance.

What should I serve with Chicken Divan Casserole?

Good accompaniments include:

  • Steamed white or brown rice
  • Buttered noodles or mashed potatoes
  • A simple green salad or steamed vegetables
How many servings does this yield?

Most standard casseroles yield about 6 servings, depending on the dish size and portion thickness. You can adjust the recipe to fit a larger or smaller bake if needed.

How should I store leftovers?

Store cooled leftovers in an airtight container in the refrigerator for 3–4 days. Reheat in the oven at 350°F (175°C) until hot, or microwave in short intervals until warmed through. If frozen, thaw before reheating.

Introduction / Hook

Imagine a stack of warm, cloud-soft pancakes that carry the gentle sweetness of ripe bananas, the creamy tang of cottage cheese, and a hint of vanilla in the air. The moment you lift a fluffy coin from the plate, a delicate steam swirls upward, carrying with it the comforting aroma of a cozy kitchen on weekend mornings. These aren’t just any pancakes; they’re a celebration of texture and balance. The banana lends natural sweetness and moisture, while cottage cheese folds in light, airy holes and a subtle tang that keeps the batter from feeling heavy. Each bite delivers a tender crumb that almost dissolves on the tongue, followed by a finish that’s softly fruity, softly creamy, and warmly comforting. If you’ve ever wished for pancakes that feel indulgent yet bright and wholesome at the same time, you’ve found them in this dreamy, fluffy rendition. This dish invites you into a ritual—mixing, scooping, and stacking—where the kitchen becomes a sanctuary of scent, sound, and sweet anticipation.

The Story Behind the Dish

Fluffy banana cottage cheese pancakes sit at an intersection of homey nostalgia and modern, lighter cooking. They evoke sleepy Sunday mornings and the idea that breakfast can be a little something special without demanding hours of time. The cottage cheese component isn’t accidental: it’s a nod to traditions that celebrate dairy as a tender-building block in morning fare. Cottage cheese brings a gentle creaminess and a touch of tang that keeps the sweetness of banana from tipping into cloying territory. The banana, a universal symbol of comfort and nourishment, adds moisture and natural sugar, reducing the need for heavy fat or long whisking sessions. The result is a pancake that feels like a breezy bridge between classic flapjacks and a fresh, contemporary breakfast idea. In different cultures, bananas and soft cheeses have found homes in breakfast blends, desserts, and even street-food-inspired stacks. This recipe tastes like a story told in layers: the fruit’s fragrance, the dairy’s smoothness, and the warm spice of a well-loved skillet. It’s a dish that travels well—whether you’re cooking for a busy weekday morning or a lazy weekend brunch—yet remains rooted in the simple pleasure of a well-made pancake.

Why You’ll Love This Recipe

  • Quick to assemble: You can have a stack on the table in minutes, with minimal mixing and no complicated steps.
  • Light and satisfying: The cottage cheese creates a tender crumb that feels indulgent but not heavy.
  • Balanced sweetness: Banana provides natural sweetness, reducing the need for extra sugar and allowing toppings to shine.
  • Kid-friendly and crowd-pleasing: The flavors are approachable for both little eaters and grown-ups, making it a versatile brunch option.
  • Customizable texture: The batter can be whisked to a gentle gloss or left a touch rustic to yield pockets of softness and airiness.
  • Pairing-friendly: Pairs beautifully with a drizzle of maple, berries, a dollop of yogurt, or a sprinkling of toasted nuts for texture.
  • Versatile base: Works well for those seeking lighter breakfasts, post-workout meals, or comforting weekend treats.
  • Make-ahead potential: The batter (if kept refrigerated) can rest briefly to enhance tenderness, and leftovers reheat beautifully.

Flavor Profile & Texture

These pancakes present a symphony of textures and flavors that feel both sunny and comforting. The first impression is a soft, cushiony bite—the surface gently browned, the center tender and ethereal. The banana contributes a mellow sweetness and fruity aroma that feels natural rather than sugary, so the flavor remains light and approachable. Interwoven with that fruit softness is the cottage cheese’s discreet tang and its little wisps of curd, which create tiny air pockets inside the pancake. It’s almost like biting into a cloud that’s been kissed by fruit. The overall flavor is warm and familiar, not over-seasoned, letting the banana’s sweetness and the dairy’s smoothness take center stage. Subtle vanilla notes add a creamy perfume, while a whisper of cinnamon or nutmeg (if you choose to use them) can echo autumnal mornings without overpowering the dish. The texture offers a delightful contrast: the outer surface is gently crisped, offering a light bite; the interior remains velvety and soft, with occasional tender crumbs that melt as you chew. When topped with fresh fruit, a drizzle of maple, or a dollop of yogurt, the pancake becomes a complete, harmonious bite—soft, bright, and satisfying all at once.

Occasions & Pairings

This pancake recipe is incredibly versatile, making it a fitting choice for a variety of moments and settings. Here are some ideas to guide serving and pairing:

  • Weekend brunch centerpiece: Build a small pancake tower with alternating layers of fruit and yogurt, and set out a few toppings for guests to customize.
  • Weekday mornings: A quick, wholesome option that travels well in a container for school or work, especially if you keep a few toppings on hand.
  • Family-friendly breakfasts: A crowd-pleasing option that can be scaled up easily for larger gatherings.
  • Brunch-to-dinner transition: Serve with savory sides—such as eggs or a light sausage alternative—to create a balanced, satisfying meal.
  • Special occasions: Elevate with a berry compote, a touch of citrus zest in the topping, and a dusting of powdered sugar for a celebratory feel.

Pairing suggestions to enhance the experience without overshadowing the pancake’s delicate character:

  • Fruity adornments: Fresh berries, sliced bananas, orange segments, or a spoonful of sliced peaches.
  • Dairy accents: A dollop of Greek yogurt, a smear of ricotta, or a glossy yogurt-based sauce to add tang and creaminess.
  • Sweet glazes and syrups: A light maple drizzle, a touch of honey, or a citrusy honey-lemon glaze for brightness.
  • Crunch and contrast: Toasted sliced almonds, walnuts, or a sprinkle of granola for texture.

Tips, Variations & Substitutions

Even though the core concept remains simple, there are numerous ways to tailor these pancakes to different tastes, dietary needs, or seasonal fruits. Here are ideas to inspire creativity while preserving the delicate balance that makes this recipe so appealing:

  • Texture tuning: If you prefer a lighter, more ethereal pancake, whip the egg whites separately and fold them into the batter just before cooking. For a heartier bite, skip the extra air and keep the batter more cohesive.
  • Milk and dairy swaps: If you want a dairy-free version, replace cottage cheese with a smooth plant-based alternative (such as blended silken tofu or a creamy almond yogurt) and use a dairy-free milk substitute. The texture will remain tender with careful blending.
  • Flavors and spices: A pinch of cinnamon, nutmeg, or vanilla bean can deepen the aroma without overpowering the banana’s sweetness. For a citrus lift, grate a little lemon or orange zest into the batter.
  • Vegan adaptation: Use fully ripe bananas, a smooth plant-based yogurt, and a splash of a neutral oil or applesauce to maintain tenderness without dairy.
  • Gluten-free approach: If you’re avoiding gluten, use a gluten-free flour blend designed for pancakes. The cottage cheese and banana still provide excellent moisture and structure, so you won’t miss a traditional wheat component.
  • Protein-boosting options: A scoop of neutral-flavored protein powder (adjusting liquid as needed) can help strengthen the batter for post-workout mornings while keeping the pancakes light.
  • Fruit-forward variation: Swap part of the banana with grated apple or pears for a different sweetness profile and a hint of crisp texture in each bite.
  • Sweetness control: For a less sweet end result, reduce the quantity of banana or pair with unsweetened fruit toppings and a minimal drizzle of maple.

Storage & Make-Ahead Ideas

These pancakes lend themselves to practical make-ahead strategies, so you can enjoy a comforting breakfast with minimal morning effort. A few friendly guidelines to help you store, reheat, and keep flavors vibrant:

  • Leftovers: Store cooled pancakes in an airtight container in the refrigerator for up to 2–3 days. Reheat gently in a skillet on low heat, covered, or in a warm oven to preserve their tenderness.
  • Freezing option: Layer pancakes with parchment between each cake and freeze. When ready to eat, reheat in a skillet, toaster oven, or microwave, though the skillet or oven method better preserves a slight outer crisp.
  • Make-ahead batter: If you’d like to prep the batter ahead of time, whisk the wet components and refrigerate, then fold in any dry elements just before cooking to maintain the light texture.
  • Flavor freshness: To preserve peak aroma, store any fruit toppings separately and combine just before serving. A quick squeeze of lemon or orange on certain fruits can help maintain bright color and flavor.

Fun Facts & Trivia (Optional)

Bananas and cottage cheese, two ordinary pantry staples, converge in this simple pancake to create a texture that delights the palate in surprising ways. Bananas have been a staple in many cuisines for centuries, prized for their natural sweetness, creamy texture, and accessibility. Cottage cheese, with its long history in dairy culture, was once a staple in many households for its protein and versatility. When these two ingredients meet pancake batter, they unlock a tender crumb that stands up to toppings while remaining light enough to feel almost self-indulgent. The result is a breakfast option that feels special without requiring special occasions or complicated techniques. And because this dish leans on naturally sweet fruit and dairy, it can be a wonderful starting point for introducing younger eaters to the joys of a homemade morning feast, one bite at a time.

Closing Thoughts

Fluffy banana cottage cheese pancakes offer a gentle invitation to slow down and savor a morning ritual that’s both comforting and exciting. They celebrate the beauty of simple ingredients transformed into something greater than the sum of its parts. The creamy hush of cottage cheese paired with the sunlit sweetness of banana creates a textural and flavor partnership that resonates with warmth, balance, and a touch of whimsy. Whether you’re cooking for a quiet family breakfast, a festive weekend brunch, or a slightly indulgent treat after a long week, these pancakes deliver a sense of home—airy, flavorful, and endlessly reassuring. As you slice into the first stack and watch the steam rise, you’ll understand how a few humble ingredients, treated with care, can become a small triumph in the kitchen—one tender, delicious bite at a time.

Ingredients

Pancake Batter
    – 2 ripe bananas (mashed)
    → Bananas provide moisture, natural sweetness, and binding; use very ripe fruit with brown spots for best flavor. Mash thoroughly until mostly smooth with a few tiny lumps for texture; if you want a lighter batter, whisk the bananas with the eggs a bit before combining with the cottage cheese.
    – 1 cup cottage cheese (blended until smooth)
    → Adds protein, moisture, and tenderness, contributing to fluffy pancakes. Blend in a blender or with a whisk until completely smooth to avoid visible curds; if you prefer a chunkier texture, blend less. If the mixture seems watery, drain a little whey and pat the cheese dry before mixing.
    – 2 large eggs
    → Provide structure and lift, helping the batter hold together and stay tender. Beat lightly and whisk into the banana-cottage cheese mixture; for extra light pancakes, fold in softly whipped egg whites at the end. Bring eggs to room temperature for easier emulsification.
    – 1 cup all-purpose flour
    → Gives the batter body and crumb structure. If making gluten-free, substitute with a 1:1 gluten-free flour blend and adjust with a splash of milk if needed. Sift to remove lumps and ensure a smooth batter; adjust thickness with additional milk if the batter is too thick.
    – 1/2 cup milk
    → Hydrates the dry ingredients and contributes to tenderness; use dairy milk for richer flavor or a non-dairy alternative if needed. Start with 1/2 cup and add 1–2 tablespoons more if the batter seems thick.
    – 1 tsp baking powder
    → Leavening that creates air pockets for fluffy pancakes; whisk into the dry ingredients before combining with the wet. Let the batter rest 5–10 minutes to hydrate and activate; avoid overmixing after resting to keep pancakes light.
    – 1/4 tsp salt
    → Enhances flavor and balances sweetness; use fine-grain salt for even distribution. Adjust to taste if using very sweet add-ins.
    – 1 tsp vanilla extract
    → Adds aroma and depth of flavor; use pure vanilla for best results; for extra depth, you can scrape in a bit of vanilla bean as well. Avoid excessive amounts which can overwhelm the banana and cottage cheese notes.
    – 1-2 tbsp sugar (optional)
    → Provides additional sweetness and browning; bananas add some sweetness, but you can omit sugar if fruit is very ripe. If using honey or maple syrup, reduce liquids slightly to keep the batter from getting too runny.
Cooking Fat
    – 1-2 tbsp butter or neutral oil for cooking
    → Used to grease the pan to prevent sticking and contribute a touch of flavor. Butter adds richness but can brown quickly, while neutral oil offers steadier heat. Heat the pan to medium and cook pancakes in batches, wiping the pan between batches to maintain even browning.
Optional Add-ins
    – 1/2 cup blueberries (fresh or frozen, not thawed)
    → Adds bright flavor and color; fold in gently just before cooking or sprinkle onto pancakes as you pour. If using frozen berries, do not thaw to avoid color bleed; pat dry if they release a lot of moisture.
    – 1/4 cup chocolate chips
    → Introduces pockets of sweetness and texture; toss chips with a teaspoon of flour before adding to batter to keep them from sinking; use mini chips or finely chopped dark chocolate for even distribution.
    – 1/4 cup chopped nuts (walnuts or pecans)
    → Adds crunch, protein, and healthy fats; toast nuts lightly to intensify flavor, then chop into small, even pieces so they distribute evenly throughout the batter.
    – 1/2 tsp ground cinnamon (optional)
    → Provides warm spice that pairs beautifully with banana and vanilla; adjust to taste, or replace with a pinch of nutmeg or cardamom for variation. Freshly ground spices offer the best aroma.
Toppings
    – Pure maple syrup
    → Classic accompaniment that enhances the banana-cottage cheese flavor; warm syrup slightly for easier pouring and fuller aroma. Use a small amount to control sweetness, or pair with yogurt and fruit for a lighter option.
    – Fresh fruit slices (banana, berries)
    → Adds brightness and contrast; slice fruit just before serving to maintain color and texture. Bananas and berries work particularly well with these pancakes.
    – Greek yogurt or whipped cream (optional)
    → Adds extra creaminess and protein; choose plain or vanilla yogurt for a tangy balance, or whipped cream for a richer topping. If using yogurt, consider a thicker, strained variety for nicer texture.

Instructions

  • Mash the bananas thoroughly with a fork or potato masher until they are mostly smooth, leaving a few tiny lumps for texture to contribute moisture and gentle banana flavor.
    → Provides natural sweetness and binding; thorough mashing ensures a uniform distribution when folded into the batter, while small bits keep the pancake pleasantly moist.
  • Blend the cottage cheese until completely smooth in a blender or with a whisk until no visible curds remain, then if the mixture seems watery, drain a tablespoon or two of whey and pat the cheese dry before combining with the other ingredients.
    → Smooth cottage cheese integrates fully for tender pancakes; removing excess whey prevents a watery batter that could make them flat.
  • Beat the eggs lightly in a separate bowl to emulsify the yolks and whites, then bring the eggs to room temperature for easier whisking and better incorporation into the batter.
    → Room-temperature eggs emulsify more evenly, contributing lift and a tender crumb to the final pancake.
  • Sift or whisk together the all-purpose flour, baking powder, and salt in a large mixing bowl to ensure even distribution and to remove lumps that could cause uneven pockets in the pancakes.
    → Dry ingredients evenly hydrated promote uniform rise and a light texture; sifting prevents clumps from forming visible streaks in the batter.
  • Whisk the mashed bananas, smooth cottage cheese, eggs, vanilla extract, and sugar (if using) in a medium bowl until the mixture is uniform and smooth with no large lumps remaining.
    → Creates a cohesive wet base so the batter stays moist and evenly flavored; whisking thoroughly helps with emulsification and structure.
  • Pour the wet mixture into the bowl of dry ingredients and stir gently with a rubber spatula until just combined, stopping as soon as there are no dry streaks to avoid tough pancakes from overmixing.
    → Gentle folding preserves tenderness; overmixing can develop gluten and make the pancakes dense.
  • Add milk in small increments, stirring after each addition until the batter is thick but pourable; you want a consistency that spreads slightly in the pan without running too thin.
    → Proper hydration of the flour yields a tender crumb; too thick or too thin batter will affect rise and texture.
  • Let the batter rest at room temperature for 5–10 minutes to hydrate the flour and allow the baking powder to activate, which will help create a softer, fluffier pancake after cooking.
    → Resting time enables better gas retention and a lighter final texture; do not skip for the best lift.
  • Preheat a nonstick skillet or griddle over medium heat (approximately 325–350°F / 170–175°C) and verify the surface is warm by sprinkling a few drops of water; if they dance and evaporate quickly, the pan is ready.
    → Consistent moderate heat ensures even browning and prevents burning; a properly heated surface helps pancakes set quickly without sticking.
  • Lightly grease the cooking surface with 1–2 teaspoons of butter or a thin film of neutral oil, wiped with a paper towel to remove excess, so the pancakes release cleanly and acquire a subtle toasty flavor.
    → A thin coat prevents sticking and adds a touch of richness without greasing the pan too heavily, which would dilute browning.
  • Fold in your chosen optional add-ins (blueberries, chocolate chips, chopped nuts, or cinnamon) with a gentle hand just before cooking to distribute evenly without overworking the batter.
    → Add-ins provide color, flavor, and texture; distributing them evenly avoids clumps or sinking to the bottom.
  • Spoon batter onto the hot pan in rounds about 1/4 cup each, spacing them evenly to allow room for spreading, and avoid crowding which can cause uneven cooking.
    → Uniform portions ensure consistent cooking times and easier flipping; spacing prevents pancakes from merging.
  • Cook the first side until bubbles form on the surface and the edges look set and slightly dry, about 2–3 minutes, then monitor and adjust heat if the bottoms brown too quickly or pale undercooked areas remain.
    → Bubbles indicate the batter is setting and releasing from the pan; waiting for edges to set prevents tearing when flipped.
  • Flip the pancakes with a wide spatula in one confident motion and cook the second side for 1–2 minutes more until golden brown and just cooked through; adjust timing based on pancake diameter and pan heat.
    → A swift, even flip ensures a clean edge and uniform doneness; the second side develops color and completes the cooking process.
  • Transfer the finished pancakes to a warm plate and repeat with the remaining batter, wiping the pan with a paper towel and re-greasing as needed to maintain even browning for subsequent batches.
    → Keeping a clean, lightly oiled surface avoids sticking and ensures consistent texture across the batch.
  • Serve the pancakes stacked with warm maple syrup, fresh fruit slices, and optionally Greek yogurt or whipped cream for extra richness and contrast in texture.
    → The toppings amplify banana and vanilla notes; serving warm preserves the pancake’s tenderness and enhances overall aroma.

Notes

These fluffy banana cottage cheese pancakes are protein-packed and naturally sweetened by ripe bananas, yielding tender, comforting pancakes with a bright banana aroma. You can customize them with blueberries, chocolate chips, chopped nuts, or a pinch of cinnamon for warmth. They freeze well and reheat beautifully for quick breakfasts or snack times. For extra lift, you can fold in softly whipped egg whites at the end and let the batter rest 5–10 minutes to hydrate the flour and activate the leavening. If making gluten-free, substitute the all-purpose flour with a 1:1 gluten-free flour blend and ensure your baking powder is gluten-free; you may need a splash more milk to achieve a pourable batter. If the cottage cheese seems watery, drain a little whey or pat the cheese dry before mixing. Cook on medium with 1–2 tablespoons of butter or neutral oil, wiping the pan between batches for even browning. Top with pure maple syrup, yogurt, or fresh fruit to taste. Tailor the sweetness to your fruit ripeness and add-ins for a wholesome, satisfying breakfast any day of the week.

Tips

Tips for Fluffy Banana Cottage Cheese Pancakes

Pancake Batter Tips

  • Choose very ripe bananas with brown spots for natural sweetness and moisture. Mash until mostly smooth, leaving a few tiny lumps for texture. If you want an even lighter batter, whisk the mashed bananas with the eggs briefly before combining with the cottage cheese.
  • Blend the cottage cheese until completely smooth to avoid visible curds. If the mixture seems a bit watery, drain a small amount of whey and pat the cheese dry before mixing.
  • Bring eggs to room temperature to improve emulsification. Beat lightly and whisk into the banana–cottage cheese base; for extra light pancakes, fold in softly whipped egg whites at the end.
  • Sift the all-purpose flour to remove lumps and ensure a smooth batter. For gluten-free needs, use a 1:1 gluten-free flour blend and add a splash of milk if the batter is too thick.
  • Start with 1/2 cup milk and add 1–2 tablespoons more only if the batter seems thick. This helps achieve a pourable yet thick pancake batter.
  • Whisk the baking powder into the dry ingredients, then rest the batter for 5–10 minutes to hydrate and activate. After resting, mix just until combined to keep the pancakes light.
  • Use fine-grain salt to evenly distribute flavor. If using very sweet add-ins, you may want to reduce the added salt slightly.
  • Vanilla extract adds aroma and depth. Use pure vanilla and avoid overdoing it; a slight scrape of vanilla bean can intensify the flavor for a more pronounced banana note.
  • Sugar is optional. Bananas add sweetness, but you can omit sugar if fruit is very ripe. If using honey or maple syrup, reduce the liquids slightly to maintain the right batter consistency.
  • Aim for a batter that pours slowly off the spoon and holds its shape in the pan. If too thick, add a splash more milk; if too thin, whisk in a bit more flour until it thickens but remains pourable.
  • Let the batter rest briefly after mixing to relax the flour and improve tenderness, but avoid overmixing after resting to keep the pancakes fluffy.
  • Preheat your pan to medium and test with a tiny amount of batter. The surface should shimmer, and bubbles should form evenly before flipping.

Cooking Fat and Pan Tips

  • Use 1–2 tablespoons of butter or a neutral oil to grease the pan. Butter adds richness but can brown quickly; oil offers steadier heat. For best results, you can combine a small amount of butter with oil to balance flavor and browning.
  • Preheat the pan to a steady medium heat before cooking each batch. If the pan is too hot, pancakes will burn; if too cool, they may be pale and dense.
  • Wipe the pan between batches to remove any browned bits that could cause uneven browning or sticking.
  • Grease the pan lightly each time to prevent sticking, but avoid pooling fat which can lead to greasy pancakes.
  • When cooking, drop batter in evenly sized circles. Cook until edges look set and bubbles form on the surface, then flip and cook until golden and cooked through.
  • Keep finished pancakes warm in a low oven (about 200°F/95°C) on a rack while you finish the rest of the batch to prevent sogginess from steam.

Optional Add-ins Tips

  • Blueberries: fold in gently just before cooking or sprinkle onto pancakes as you pour. Fresh or frozen works; if using frozen, do not thaw to avoid color bleed. Pat dry if they release a lot of moisture.
  • Chocolate chips: toss chips with a small amount of flour before adding to batter to help keep them suspended and prevent sinking. Use mini chips or finely chopped dark chocolate for even distribution.
  • Nuts: toast walnuts or pecans lightly to intensify flavor, then chop into small pieces for even distribution throughout the batter.
  • Ground cinnamon adds a warm spice note that pairs beautifully with banana and vanilla. Start with 1/2 teaspoon and adjust to taste; you can also try nutmeg or cardamom for variation.

Toppings Tips

  • Warm pure maple syrup to release its aroma and make pouring easier; use a modest amount to keep the dish balanced with the pancakes’ flavor.
  • Fresh fruit slices (banana, berries) add brightness. Slice fruit just before serving to maintain color and texture; bananas pair especially well with these pancakes.
  • Greek yogurt (plain or vanilla) or whipped cream adds extra richness and protein. For a tangy balance, choose a thicker strained yogurt and consider a drizzle of honey or a squeeze of lemon zest for contrast. If using yogurt, thicker varieties can help keep the topping from pooling.

FAQ

What are the main ingredients for Fluffy Banana Cottage Cheese Pancakes?

The batter typically includes ripe bananas, cottage cheese, eggs, and a small amount of flour or oats. Add baking powder, vanilla, and a pinch of salt. Optional extras include cinnamon, a splash of milk to adjust consistency, and a little butter or oil for cooking.

Why are these pancakes so fluffy?

The combination of mashed banana, cottage cheese, and eggs provides moisture and structure, while baking powder adds lift. Avoid overmixing the batter to keep the pancakes light and airy.

Can I make these pancakes gluten-free?

Yes. Use gluten-free flour, almond flour, or gluten-free oats (certified gluten-free) in place of regular flour. You may need a touch more or less liquid to achieve a pourable batter.

Can I substitute cottage cheese with yogurt or ricotta?

Yes. You can substitute with equal parts Greek yogurt or ricotta. For Greek yogurt, you might need a splash more milk to adjust the batter’s consistency. Ricotta works well but may yield a richer texture.

How do I cook them so they don’t stick or burn?

Cook on a medium heat in a lightly greased nonstick skillet. Use about 1/4 cup of batter per pancake, wait until bubbles form and edges look set, then flip and cook 1–2 minutes more. Adjust heat as needed to prevent browning too quickly.

How should I store and reheat leftovers?

refrigerate cooked pancakes in an airtight container for up to 3–4 days. Reheat in a toaster oven or skillet until warmed through. For longer storage, freeze cooked pancakes for up to 1–2 months and reheat directly from frozen.

How can I naturally add sweetness?

Ripe bananas provide natural sweetness. You can also add a touch of maple syrup or honey to the batter, or serve with fresh fruit and a drizzle of syrup. If you like, add cinnamon for warmth without extra sugar.

Can I freeze the batter or the pancakes?

Best practice is to freeze cooked pancakes for 1–2 months; reheat in a skillet or toaster oven. Freezing batter is possible but may affect texture and leavening; if freezing batter, thaw fully and stir in a little milk to loosen before cooking.

What toppings pair well with these pancakes?

Top with sliced bananas, berries, a dollop of cottage cheese or yogurt, a sprinkle of nuts, and a drizzle of maple syrup or honey. A light dusting of cinnamon also complements the flavors nicely.

Are there common add-ins or variations I can try?

Try folding in blueberries, chocolate chips, or chopped nuts for texture. You can also mix in a tablespoon of chia seeds for extra fiber or swap some of the flour for rolled oats for a heartier bite.

Introduction / Hook

Imagine a sun-drenched kitchen, the windows open to a warm breeze, and a tray of glistening chicken resting on the counter, its surface lacquered with a honey-gold sheen. Fresh Honey Lime Chicken is more than a dish; it’s a bright, comforting hug on a plate. The moment you lift the lid or set the fork down, you’re greeted by a chorus of sensory notes: the sweet, floral kiss of honey, the zesty sparkle of lime, and a hint of savory depth that promises both satisfaction and a touch of adventure. This is the kind of meal that makes weeknights feel like a holiday, casual Friday dinners feel festive, and leftovers feel almost celebratory. It’s simple enough for busy families, yet nuanced enough to impress guests, with a glaze that shines and a balance that lingers on the palate long after the last bite.

What makes Fresh Honey Lime Chicken especially enchanting is its ability to pair with a wide range of sides and drinks while carrying a distinct personality all on its own. The fragrance that fills the kitchen when the sauce comes together is almost magical—a warm sweetness tempered by citrus brightness and a whisper of savory depth. It’s not a heavy dish; it’s a polished, approachable centerpiece that invites you to savor each bite and to explore the flavors at your own pace. Whether you’re cooking for a family meal, a casual weeknight date night, or a small gathering of friends, this dish adapts with grace and offers a sense of coastal sunshine no matter where you are.

As you read on, you’ll discover how the harmony of honey and lime translates into a cooking experience that feels both effortless and special. You’ll be immersed in the sensory journey—from the glossy sheen of a finished piece to the way the flavors unfold in layers as you chew. There’s something universally comforting about a dish that respects both simplicity and soul, something that makes you reach for seconds with a smile. Welcome to a recipe that invites you to press pause on the ordinary and embrace a moment of bright, comforting, everyday elegance.

The Story Behind the Dish

Fresh Honey Lime Chicken carries a small, sunlit history within its glaze. Its concept grew from and celebrates two universal kitchen inspirations: the sweetness of nature’s gifts and the vibrancy of citrus. The honey-tinged glaze is a nod to long afternoons spent gathering harvests in blooming orchards and meadows, where blossoms perfume the air and bees hum a soft, timeless tune. Lime—that lively citrus fruit—adds a spark reminiscent of seaside markets, where color is everywhere and tangy, refreshing scents mingle with the scent of grilled foods and ocean air. When those elements come together, they tell a story about balance: gentle sweetness that never overpowers, and brightness that never feels sharp or sour, but instead clean and uplifting.

In many kitchens around the world, bright glazes like this one have a shared purpose: to bring a simple protein to life with something more than salt and pepper. The dish’s lineage can be traced to culinary traditions that honor citrus as a brightener, honey as a natural sweetness that rounds the edges, and a touch of savory depth—often from aromatics or a hint of umami. It’s a modern interpretation that favors accessibility and versatility, crafted for cooks who want a dependable centerpiece without spending hours in front of the stove. The result is a dish that feels timeless and contemporary at once—comforting enough for everyday meals, yet polished enough to feel special when friends gather around the table.

There’s also a personal element to this recipe’s story. Many households share a favorite weeknight go-to that evolves over time—siblings swap tweaks, parents add a favorite herb, a grandmother’s technique sneaks in through the back door of the kitchen. Fresh Honey Lime Chicken has become one of those evolving memories: a dish that travels with people as they move, lands on different tables, and nonetheless retains its core identity—a bright glisten, a gentle kiss of sweetness, and a citrus note that lifts the whole plate into a moment of sunshine.

Why You’ll Love This Recipe

  • Quick and approachable: It’s designed for weeknights when you want something flavorful without spending hours in the kitchen.
  • Bright flavor profile: The interplay of honey sweetness and lime’s tangy brightness creates a refreshing, balanced finish that feels uplifting and satisfying.
  • Versatile pairing: Works beautifully with a wide range of sides—from fluffy rice and quinoa to roasted vegetables or a light greens salad.
  • Kid-friendly yet sophisticated: Gentle sweetness appeals to younger palates while the citrus note engages adult tastes, making it a crowd-pleaser for mixed ages.
  • One-glaze, many moments: The glossy, caramelized glaze adds visual appeal and depth without needing a complex sauce or multiple components.
  • Adaptable for different diets: The dish centers on a simple protein and a bright glaze, which can be tweaked with substitutions if needed.
  • Low-cost comfort: Uses everyday pantry staples combined in a way that feels special, delivering big flavor without a big price tag.
  • Timeless appeal: The flavors feel familiar and comforting, yet fresh enough to feel modern and vibrant in today’s dining landscape.

Flavor Profile & Texture

The essence of Fresh Honey Lime Chicken rests in its elegant balance of contrasts. At first bite, you encounter a gentle sweetness that is not cloying but rather polished and refined. The honey contributes a soft, floral note—like a whisper of nectar—that coats the palate in a velvety sheen. This sweetness is tempered by lime’s bright acidity, which cuts through the richness and adds a lively, citrus-driven lift. The result is a flavor that feels clean, uplifting, and deeply satisfying, leaving a lingering citrusy glow on the tongue that invites the next bite rather than demanding a palate cleanse.

Texture-wise, the chicken is tender and succulent, with a light, glossy glaze that gives a reassuring gloss without being sticky. The glaze often develops a subtle caramelized glaze where it meets the surface, adding a gentle, slightly chewy texture that contrasts with the soft interior of the meat. The overall mouthfeel is balanced: a delicate crispness or slight chew on the exterior gives way to juicy, yielding interior meat, while the glaze coats every bite with a harmonious mix of sweetness and citrus brightness. Aromatics—such as a hint of garlic or onion, and possibly herbs like cilantro or parsley—may emerge as you chew, adding depth and a fresh lift that keeps the flavors from feeling flat. It’s a sensory symphony that feels both comforting and lively at once.

Beyond taste and texture, the dish offers visual appeal. The glaze lends a warm amber hue, and the glaze’s sheen catches the light in a way that makes the plate look almost celebratory. This is a dish that photographs beautifully—its colors are bright, its edges invite closer inspection, and the glistening surface suggests a mouthwatering, flavorful experience awaiting the eater. The aroma, too, plays a crucial role: the scent of honey softening with citrus zest wafts up as you approach the table, signaling something delightful just around the corner. The sensory package—sight, aroma, taste, and texture—comes together to create a comforting, crave-worthy experience that elevates everyday meals into something memorable.

Occasions & Pairings

Fresh Honey Lime Chicken shines in a variety of settings, from casual weeknights to small gatherings where you want something nourishing and bright without fuss. It’s the kind of dish that effortlessly spans seasons; in warmer months, it pairs wonderfully with light, refreshing sides, and in cooler months, it can be accompanied by heartier grains and roasted vegetables to create a balanced plate.

When to serve this dish:

  • Weeknight dinners that want flavor without heavy effort
  • Casual family gatherings or potlucks
  • Summer barbecues or outdoor meals with a bright, citrusy centerpiece
  • Lunch-friendly option to pack for midday meals with a fresh, vibrant bite

Suggested pairings:

  • Side dishes: Fluffy rice, quinoa, or farro to soak up the glaze; roasted vegetables like broccoli, asparagus, or bell peppers; a crisp cucumber-tennap salad for contrast; or a simple herbed greens salad for balance.
  • Drinks: A light, citrus-forward white wine such as Sauvignon Blanc or a Pinot Gris; sparkling water with a splash of lime for a non-alcoholic option; or a refreshing iced tea with a hint of mint.
  • Desserts: A soft citrus-forward dessert such as lemon panna cotta or a vanilla yogurt–based dessert with a citrus zest finish to echo the flavors on the plate.

Tips, Variations & Substitutions

Although the core idea remains simple—bright citrus, gentle sweetness, and tender protein—the dish is flexible enough to accommodate preferences, dietary needs, and ingredient availability. Here are ideas to tailor the experience while preserving the spirit of the dish:

  • Flavor boosters: Consider adding a pinch of red pepper flakes or a small amount of finely grated fresh ginger for an extra layer of warmth and complexity that plays well with citrus.
  • Herb alternatives: If you love cilantro, fold in a little chopped cilantro after cooking for a fresh, green counterpoint. Parsley or Thai basil can also bring a different aromatic profile.
  • Sweetness adjustments: For a less sweet glaze, reduce the honey intensity by substituting part of the sweetness with a touch of brown sugar or a splash of maple syrup to introduce a gentle molasses note.
  • Citrus variations: If lime isn’t available, a whisper of lemon or orange zest can lift the glaze with a slightly different citrus personality, while still maintaining the bright, sunny vibe.
  • Protein swaps: To make a plant-forward version, substitute firm tofu or tempeh for the chicken, ensuring they soak up the glaze in a way that mirrors the original dish’s brightness. For seafood lovers, shrimp or firm white fish can be a quick, delightful alternative.
  • Gluten and dairy considerations: The glaze itself is naturally gluten-free and dairy-free if prepared with simple pantry staples. If you’re serving with a gluten-free starch, ensure your sides are labeled accordingly. If dairy is part of a served side (like a butter-based starch), you can adapt by using olive oil or dairy-free butter.
  • Spice and heat: If you relish a bit more heat, add a touch of chili and let the heat settle in the glaze as it rests, offering a gentle kick without overwhelming the citrus sweetness.
  • Make-ahead note: If you want to prep components in advance, you can stir up the glaze mixture ahead of time and store it in the fridge, then rewarm gently when ready to serve and apply to the cooked protein for a fresh glaze.

Storage & Make-Ahead Ideas

Storage and make-ahead strategies help you enjoy this dish even when your schedule is tight. You can imagine this approach as a way to extend the pleasure beyond dinner time, turning one meal into a few comfortable, lightly planned occasions.

  • Leftovers: Refrigerate any cooked portions in an airtight container for up to 3–4 days. Reheat gently to preserve moisture, and if possible, pour a touch of the glaze over the reheated chicken to refresh the surface and keep the glaze glossy.
  • Freezing: Cooked chicken can be frozen for longer storage. Freeze in shallow, airtight containers or sturdy freezer bags for up to 2–3 months. Thaw overnight in the refrigerator and rewarm slowly to maintain moisture.
  • Make-ahead serving ideas: Prepare the sides ahead of time and keep them crisp and fresh. When it’s time to serve, reheat the protein gently and plate with the sides for a nearly effortless, fresh-feeling dinner.
  • Leftover pairing ideas: Transform small leftovers into a new meal by tossing the sliced chicken with greens for a bright lunch bowl, or layer into a wrap with sliced veggies for a quick take-to-work option.

Fun Facts & Trivia (Optional)

Honey and lime each carry their own little bit of history that enriches the dining experience. Honey has been treasured across cultures for millennia, celebrated not only for its sweetness but also for its potential health benefits and its use in traditional remedies and cooking. Lime, with its vivid aroma and rind oils, has long been a staple in coastal cuisines where citrus brightens seafood and light proteins. Together, honey and lime form a pairing that’s both timeless and contemporary, a reminder that sometimes the simplest ingredients can create the most memorable meals. In many culinary traditions, citrus is used as a balancing agent—its acidity sharpens the flavors around it while its aroma enhances the overall sensory profile of the dish. The combination of these two elements with a mild protein creates a comforting, accessible dish that can feel like a small celebration in the kitchen no matter the occasion.

Ingredients

Fresh Honey Lime Chicken
Marinade
  • 4 boneless, skinless chicken breasts (about 1.5-2 lb)
    → The chicken is the protein base of the dish. Choose breasts of similar size for even cooking or lightly pound to about 1/2 inch thickness to ensure rapid, uniform browning and to prevent dry edges. Pat dry before marinating to promote better adhesion of the flavors and a nicer sear.
  • 3 tablespoons fresh lime juice
    → The lime juice provides bright acidity to balance the sweetness of honey and helps tenderize the meat slightly. Use freshly squeezed juice for the freshest, most vibrant citrus notes. Strain out seeds after juicing to avoid bitter pops in the sauce.
  • 1 tablespoon lime zest
    → Lime zest adds essential oils and aroma, intensifying the citrus profile without adding excess liquid. Zest before juicing the lime to maximize yield, and avoid the white pith which can introduce bitterness.
  • 2 tablespoons honey
    → Honey supplies gentle sweetness and contributes to a glossy glaze as the chicken cooks. Let honey come to room temperature or gently warm it to mix smoothly with lime juice and oil. If you prefer a stronger citrus balance, you can adjust upward by 1/2 tablespoon while tasting as you go.
  • 1 tablespoon olive oil
    → The oil helps distribute the marinade evenly, adds moisture to the chicken, and aids browning on contact with hot surfaces. Use extra-virgin olive oil for a richer flavor, or substitute with avocado oil if you’re cooking at higher heat.
  • 2 garlic cloves, minced
    → Garlic infuses savory depth and aroma that complements the citrus sweetness. Mince finely so the flavor disperses evenly throughout the marinade. If you prefer a milder profile, you can grate the garlic to maximize surface area and speed infusion.
  • 1/2 teaspoon salt
    → Salt enhances the overall flavor and helps the marinade penetrate the meat. Start with this amount and adjust after cooking if needed. If you’re using an additional salty component (like soy sauce in a variation), reduce the added salt accordingly.
  • 1/4 teaspoon black pepper
    → Freshly ground black pepper adds subtle heat and aromatic depth that pairs with lime and honey. Grind just before using for the strongest aroma, and adjust to taste if you prefer milder or hotter results.
  • Optional: 1/4 teaspoon red pepper flakes or 1 small jalapeño, minced
    → Adds a gentle kick that complements the citrus and honey glaze. Seed jalapeños to control heat; wear gloves when handling if you’re sensitive to capsaicin. Include in the marinade for infused heat or sprinkle over finished chicken for a brighter finish.
Finish & Serving
  • 1 lime, cut into wedges for serving
    → Fresh lime wedges provide an extra burst of brightness at the table. Squeezing a little over hot chicken just before eating enhances the citrus glaze and balances the sweetness. Remove seeds from wedges for cleaner servings.
  • 2 tablespoons chopped fresh cilantro for garnish (optional)
    → Cilantro adds a fresh, herbal note that lifts the dish and contrast with the honey-lime glaze. Chop just before serving to preserve color and fragrance; discard tough stems or chop finely to distribute evenly over the platter or plates.

Instructions

  • Pound the chicken breasts to an even thickness of about 1/2 inch (1.25 cm) to ensure rapid, uniform browning and juicy interiors; place the breasts between two sheets of plastic wrap and gently tap with a flat meat mallet or rolling pin until uniform, then pat dry with paper towels to remove surface moisture that would hinder searing and create steam.
    → Uniform thickness promotes even cooking from edge to center, and drying the surface helps achieve a crisp, caramelized crust rather than a steamed, pale result.
  • Whisk together the marinade ingredients — freshly squeezed lime juice, lime zest, honey, olive oil, minced garlic, salt, pepper, and the optional red pepper flakes or minced jalapeño — until the sugar dissolves and the mixture is well emulsified; this creates a balanced glaze with bright acidity, sweetness, and aromatic depth that will cling to the chicken.
    → An evenly combined marinade ensures consistent flavor in every bite and prevents uneven separation of the oils and liquids.
  • Place the chicken in a large resealable bag or shallow dish; pour the marinade over the chicken, turning to coat every surface; seal and refrigerate for 30 minutes to 2 hours to allow flavors to penetrate while avoiding over-tenderizing from lime acidity.
    → Marinading ensures flavor penetration and helps tenderize the meat slightly without breaking down the protein too much.
  • Carefully remove the chicken from the marinade, letting excess drip back into the bag or dish; pat dry to promote a strong sear; pour the remaining marinade into a small saucepan and bring to a rolling boil over medium-high heat for 2–3 minutes to kill any bacteria, then simmer briefly to produce a glossy glaze for finishing.
    → Boiling the used marinade renders it safe for use as a glaze and concentrates flavors without risking contamination.
  • Preheat your oven to 400°F (200°C) and line a rimmed sheet pan with parchment or lightly oil the surface to prevent sticking and promote even browning; a hot oven helps set the glaze quickly without drying the chicken.
    → Lining the pan makes cleanup easier and oiling reduces risk of sticking during roasting.
  • Heat 1 tablespoon olive oil in a large skillet over medium-high heat until just shimmering; add the marinated chicken in a single layer without crowding and sear for 2–3 minutes per side until deeply golden and crust forms, then flip only once to maximize browning and flavor development.
    → A good sear creates flavor compounds (Maillard reaction) and gives the chicken a visually appealing crust that holds in juices.
  • Transfer the seared chicken to the prepared sheet pan and arrange in a single layer; brush the tops with a thin coat of the boiled glaze to begin the finish and help the glaze cling during roasting, then place in the oven to finish cooking until the internal temperature reaches 165°F (74°C).
    → Finishing in the oven ensures even doneness through the thicker parts of the breasts while the glaze caramelizes for a glossy, lacquered look.
  • Roast the chicken for 8–12 minutes, rotating the pan halfway if needed for even browning and monitoring with a digital thermometer to ensure accuracy; smaller or thinner breasts will require less time, thicker pieces more, so rely on the temperature rather than time alone.
    → Internal temperature is the reliable indicator of doneness, protecting against undercooked center or dry edges.
  • While the chicken roasts, continue to simmer the reserved glaze in a small saucepan over medium heat until it thickens to a glossy, syrupy consistency, about 3–5 minutes; this concentrated glaze will impart a bright, honey-lime finish as you plate.
    → Reducing the glaze intensifies its citrus and honey notes and helps it cling to the chicken without making the surface too runny.
  • When the chicken reaches 165°F (74°C), remove it from the oven and tent loosely with foil; allow it to rest 5 minutes to reabsorb juices; during resting, brush with the thickened glaze for a final glossy finish and intensified flavor.
    → Resting redistributes juices for a juicier bite, and a final glaze application enhances aroma and appearance.
  • To finish and serve, optionally cut the chicken into thick slices, arrange on a platter, squeeze fresh lime wedges over the pieces to brighten the glaze, and garnish with chopped cilantro if using; serve immediately with extra lime wedges on the side for additional brightness.
    → Fresh lime juice at the table allows guests to adjust tartness to their liking, while cilantro adds a fresh, aromatic contrast to the honey-lime glaze.

Notes

These Fresh Honey Lime Chicken breasts are marinated in fresh lime juice, lime zest, honey and olive oil to create a bright, glossy glaze that sears beautifully while keeping the meat juicy. The combination of citrus, sweetness and garlic yields a vivid, restaurant-quality flavor with a simple, weeknight-friendly cooking method—pan-sear, bake, or grill until the internal temperature reaches 165°F (74°C). You can customize them by adding a pinch of red pepper flakes for heat, extra minced garlic, or fresh cilantro or parsley for brightness. Leftovers refrigerate well and reheat gently, making this a reliable make-ahead option. For a complete meal, serve with brown rice, quinoa, or a crisp green salad; a dollop of yogurt or a sprinkle of sesame seeds can add creamy richness or texture. If you’re cooking for gluten sensitivity, be sure all marinades and condiments you use are gluten-free, especially any soy sauce substitutes or flavorings. Always taste and adjust seasoning after cooking, as honey sweetness and lime acidity can vary between batches.

Tips

Tips for Perfect Fresh Honey Lime Chicken

  • Even pieces cook evenly: If your chicken breasts vary in size, gently pound the larger ones to about 1/2 inch thickness or slice the breasts in half horizontally to create uniform portions. This helps achieve uniform browning and prevents dry edges.
  • Marinating smartly: Marinate in the fridge for 30–60 minutes for citrus-friendly flavor. Avoid marinating much longer (beyond 4 hours) because the lime juice can begin to change the texture of the meat. Pat the chicken dry before adding to the marinade for better searing.
  • Use a non-reactive container: A zip-top bag or glass/ceramic dish works best to prevent any metallic or off flavors from reacting with the marinade.
  • Fresh zest and juice are key: Zest the lime before juicing to maximize flavor; strain the juice to remove seeds and pulp, which can introduce bitterness or seeds into the glaze.
  • Garlic preparation matters: Mince finely (or grate) the garlic so its flavor distributes evenly. If you prefer a subtler note, grate for more surface area and faster infusion.
  • Seasoning balance: The marinade contains salt, but you can adjust after cooking based on taste. If you’re using additional salty components (like soy sauce in other variations), reduce the added salt to prevent over-seasoning.
  • Handle heat carefully: Use a hot, well-seasoned skillet (cast iron or heavy stainless) and avoid overcrowding the pan. This ensures a good crust and prevents steaming the chicken.
  • Managing the glaze: The honey can burn if the pan is too hot. Sear over medium-high heat, then reduce slightly when you add the glaze to allow it to thicken without scorching.
  • Create a quick pan sauce: After searing, deglaze the pan with a splash of lime juice or broth to lift fond, then simmer to a glaze. This makes a glossy finishing sauce to spoon over the chicken.
  • Rest before slicing: Let the chicken rest for 3–5 minutes after cooking to reabsorb juices and stay moist; slice against the grain for the best texture.
  • Garnish and serving: Serve with lime wedges and cilantro just before plating to preserve color and aroma. Fresh cilantro brightens the glaze and adds a pop of color.
  • Food safety and reuse: If you plan to use any marinade as a sauce, boil it for at least 1–2 minutes to kill any bacteria from the raw chicken. Do not reuse leftover marinade that hasn’t been boiled.

FAQ

Fresh Honey Lime Chicken – FAQ

What ingredients do I need for Fresh Honey Lime Chicken?

Chicken: 4 skinless chicken breasts or 4 chicken thighs. Sauce: ¼ cup honey, ¼ cup fresh lime juice, zest of 1 lime, 2 cloves garlic (minced), 2 tablespoons olive oil, 1–2 tablespoons soy sauce or tamari (optional for depth), salt and pepper to taste, and red pepper flakes (optional). Garnish: fresh cilantro or lime wedges.

Can I use chicken thighs instead of chicken breasts?

Yes. Chicken thighs stay juicier and more forgiving. They may take a few minutes longer to cook; remove from heat when the internal temperature reaches 165°F (74°C).

Should I marinate the chicken before cooking?

Marinating for 15–30 minutes (or up to 2–4 hours in the fridge) adds flavor. If you’re short on time, you can skip marinating and proceed to cooking, using the honey-lime mixture as a glaze during cooking.

What is the best cooking method for this dish?

Pan-sear in a skillet over medium-high heat until browned, then cook through. You can finish with a quick glaze by spooning the honey-lime sauce over the chicken during the last few minutes. Alternatively, grill the chicken over medium heat for a smoky finish.

What temperature should the chicken be cooked to?

Cook until the internal temperature reaches 165°F (74°C) and the juices run clear. If using thighs, 175°F (79°C) is acceptable for well-done texture.

How do I prevent the honey from burning?

Cook over moderate heat and avoid high heat, which can burn the honey. If the glaze thickens too quickly, lower the heat and add a splash of lime juice or water to loosen, then continue cooking.

How should I store leftovers?

Store in an airtight container in the refrigerator for 3–4 days. Reheat gently in a skillet or microwave. You can freeze cooked chicken for 2–3 months; thaw completely before reheating.

What sides pair well with Fresh Honey Lime Chicken?

Try steamed rice, quinoa, or cauliflower rice, plus roasted or sautéed vegetables like asparagus, broccoli, or bell peppers. A simple cucumber cilantro salad also complements the citrusy glaze.

Is this recipe gluten-free?

Yes, provided you use gluten-free soy sauce or omit soy sauce altogether. Traditional soy sauce contains gluten, so choose tamari or coconut aminos if needed.

Can I adjust the spice level?

Yes. For milder flavor, skip the red pepper flakes. For extra heat, add a pinch more flakes or a dash of chili paste to the glaze.

Introduction / Hook

Picture a warm, sunlit bowl that feels like a hug in a hurry. The base sizzles with seared chicken, simmering tomato warmth, and a bright chorus of herbs, all crowned by a fluffy, creamy veil of cottage cheese that melts luxuriously into every bite. This is not your typical chicken parmesan—it’s a modern, lighter take that fits into busy weeknights, meal-prep Sundays, and cozy lunches without sacrificing the soul of the dish. The Cottage Cheese Chicken Parm Bowl is comfort food reinvented as a nourishing, protein-packed bowl that travels beautifully from stove to desk and back again. It invites you to take a spoonful and hear the crackle of a lightly crisped crust, the tang of tomato, and the gentle, almost velvety whispers of cottage cheese swirls mingling with melted cheese and fresh herbs. In a single bowl, you’ll taste tradition and innovation, familiarity and surprise, all harmonizing in a comforting, crave-worthy bite.

The Story Behind the Dish

Chicken parmesan arrived in American kitchens as a bold, indulgent riff on classic Italian flavors: breaded chicken, tangy tomato sauce, and melty cheese. Over time, cheffy technique gave way to homey simplicity, and home cooks began remixing the concept to suit busy lives and evolving dietary preferences. The Cottage Cheese Chicken Parm Bowl is a contemporary homage to that lineage—a dish that preserves the beloved elements—tomato brightness, garlic-scented aroma, and herbaceous lift—while swapping in cottage cheese for a lighter, creamier decadence that doesn’t bog you down. The idea grew from a desire to keep the signature creaminess that cheese typically provides, but with a tangy, fresh spin that pairs perfectly with a hearty grain or greens base. It’s the kind of recipe that feels both familiar and fresh, like a family favorite that has learned a few new dance steps. The bowl format honors the modern dining style that many crave: a complete, balanced plate in one convenient vessel, where each component can shine on its own or blend together in a comforting, cohesive bite.

Why You’ll Love This Recipe

  • Quick, weeknight-friendly preparation that fits into a busy schedule without sacrificing flavor or texture.
  • High-protein, satisfying meal thanks to lean chicken and cottage cheese, keeping you full longer.
  • Comforting yet lighter than traditional parm, delivering the classic flavors without heavy heaviness.
  • Highly customizable to suit dietary preferences, pantry staples, and family tastes.
  • Great for meal prep: assemble bowls in advance or pull together components for easy weekday lunches.

Flavor Profile & Texture

The Cottage Cheese Chicken Parm Bowl offers a confident balance of bright, savory, and creamy notes. The chicken, ideally cooked to a crisp, golden exterior, provides a confident, rib-sticking protein backbone. Tomato sauce or a bright pomodoro brings a gentle acidity and sweetness that wake up the palate, reminiscent of sunny afternoons and comforting Italian dishes. The cottage cheese acts as a light, airy counterpoint to the tomato’s tang and the chicken’s savoriness—its mild, dairy-forward flavor blends with a touch of salt to mimic the creaminess of ricotta or mozzarella, but with a distinctive lift that feels modern and approachable. When combined with a grain base—whether fluffy quinoa, nutty farro, or tender brown rice—the bowl develops a pleasing, multi-textured experience: the soft creaminess from the cottage cheese, the chew of the grain, the tender bite of chicken, and the slight bite of tomato sauce all mingle into harmonious layers. If you enjoy a little crispness, a sprinkle of toasted breadcrumbs or a light crust on the chicken’s edges adds a satisfying crunch that contrasts beautifully with the smoothness of the cheese. The fragrance is irresistible: garlic, oregano, basil, and a hint of parmesan waft through the air as the dish comes together, making your kitchen feel like a sunny trattoria while keeping it comfortably domestic.

Occasions & Pairings

This dish shines in a multitude of eating occasions, from weeknights to casual gatherings. It’s equally at home on a weeknight dinner table as it is in a bring-a-dowl lunch lineup, a meal-prep Sunday rotation, or a relaxed movie-night spread. The bowl format makes it easy to scale up for family meals or portion out for lunches, ensuring that you have a nourishing, satisfying option ready to go.

  • Weeknights: a quick, wholesome alternative to takeout that still delivers big on flavor.
  • Meal prep / lunchboxes: components can be prepared in advance and assembled in bowls for grab-and-go meals.
  • Casual gatherings: serve in small bowls as a playful, comforting appetizer or main course for a relaxed dinner party.

Pairing ideas to elevate the experience:

  • Side: a crusty garlic bread, a fresh green salad with lemon vinaigrette, or roasted vegetables for color and crunch.
  • Drinks: a simple red wine with light tannins, a sparkling water with a splash of citrus, or a chilled white wine for a brighter finish.
  • Desert: a tart citrus dessert or a light gelato to balance the creamy richness of the bowl.

Tips, Variations & Substitutions

  • Protein variations: swap chicken for turkey cutlets, shrimp, or plant-based proteins like chickpeas or seasoned tofu for a vegetarian or pescatarian option.
  • Cheese alternatives: if you want even lighter, use a portion of cottage cheese blended with a pinch of softened mozzarella for a creamy, stringy finish; for dairy-free, use a creamy cashew ricotta or a plant-based cheese substitute.
  • Bread crumb crunch: for a subtle crunch without making a full breading, sprinkle toasted breadcrumbs or crushed kife crackers over the top just before serving.
  • Base customization: choose your favorite grain or greens as a base—quinoa, farro, brown rice, barley, or even a bed of sautéed spinach and farro for a hearty, fiber-rich bowl.
  • Herb and spice tweaks: swap oregano for Italian blend, or add a pinch of red pepper flakes for a gentle heat that plays with the tomatoes.
  • Gluten-free and dairy-free: ensure any added crusts or toppings are certified gluten-free; use dairy-free cheese substitutes to maintain a dairy-free profile while preserving creaminess.
  • Make-ahead ideas: cook the chicken, sauce, and grains separately, then assemble the bowls in the morning for quick lunches, or portion everything into meal-prep containers for the week.

Storage & Make-Ahead Ideas

To preserve texture and flavor, store components separately when possible. The chicken can be stored in an airtight container for up to a few days; the cottage cheese blend stays freshest covered in the refrigerator. The grains or greens base hold well, but for the best texture, keep them separate from the sauce and cheese until serving. When ready to eat, reheat the chicken and sauce gently on the stovetop, then assemble with fresh cottage cheese and the warmed base. If you plan to freeze components, freeze the chicken and sauce separately from the dairy component, as dairy can separate or alter texture after freezing and thawing; for best results, add cottage cheese after reheating rather than freezing it. For make-ahead meals, you can prepare the sauce in advance (if you’re using a tomato-based base) and refrigerate for up to 3–4 days. When it’s time to serve, rewarm and combine with the chicken and the base, finishing with a dollop of cottage cheese and a fresh drizzle of olive oil and herbs to brighten the flavors.

Fun Facts & Trivia

Did you know that chicken parmesan, or “parmigiana di pollo,” grew popular in Italian-American communities as a hearty, affordable dish that could stretch a single chicken breast into a satisfying meal? The dish became a staple in diners and family kitchens across the United States, evolving with regional twists and personal family secrets. Cottage cheese, once a simple farmer’s product, gained prominence in the American pantry for its high-protein content and versatile texture, often used to mimic creaminess without adding heavy fats. In recent years, cooks have embraced cottage cheese in inventive ways beyond breakfast snacks, including as a surprising, airy cheese layer in dishes like this parm-inspired bowl. The Cottage Cheese Chicken Parm Bowl embodies the fusion of old-world comfort with modern nutrition-focused cooking—honoring a beloved classic while offering a lighter, more versatile format that fits into today’s fast-paced culinary landscape.

Final Thoughts

At its heart, this dish invites you to enjoy the best of both worlds: the familiar, comforting flavors of a traditional chicken parmesan and the bright, modern practicality of a bowl that can adapt to mood, season, and pantry. It’s a celebration of texture and contrast—the crisp bite of the chicken, the silky smoothness of cottage cheese, the tangy tomato, and the fresh, verdant lift of herbs. Whether you’re cooking for one or feeding a family, this Cottage Cheese Chicken Parm Bowl is a versatile, satisfying choice that proves supper can be both comforting and clever, simple and indulgent, all in one nourishing plate.

Ingredients

Cottage Cheese Chicken Parm Bowl

Base

    – 1 cup cooked quinoa
    → Quinoa provides a hearty, protein-rich grain base that soaks up sauce and complements the creamy cottage cheese layer. Prep: rinse quinoa, cook in 2 cups water or broth until fluffy and the liquid is absorbed, then fluff with a fork. Tip: season lightly with salt after cooking to enhance its nutty flavor.
    – 1 cup cooked brown rice
    → Alternative grain base with a slightly chewier texture and mild nutty flavor. Prep: cook according to package directions until tender, then fluff and season with a pinch of salt. Tip: use day-old brown rice warmed gently with a splash of water to restore moisture.

Chicken & Coating

    – 2 boneless skinless chicken breasts (about 1 lb total), pounded to 1/2-inch thickness
    → Provides the protein and ensures even cooking. Pounding creates uniform thickness for crisp coating and quick, even browning. Tip: pat dry and lightly season with salt before breading to help crust adhere.
    – 1 large egg, beaten
    → Binds the coating to the chicken, creating a cohesive crust. Tip: whisk with a pinch of salt and pepper, and ensure the egg is well combined with little streaks for even adhesion.
    – 1/2 cup breadcrumbs (panko recommended) or gluten-free breadcrumbs
    → Creates a crunchy, Parm-crusted exterior that mirrors classic chicken parm. Tip: for extra flavor, mix with 1/4 cup grated Parmesan and 1/2 teaspoon Italian seasoning; dry the chicken well to help the crust crisp up.
    – 1/4 cup grated Parmesan cheese
    → Adds sharp, salty notes and helps browning of the crust. Tip: use freshly grated Parmesan for best flavor and no clumping.
    – 1 teaspoon Italian seasoning
    → Provides the essential Italian herb profile that flavors the crust and complements the tomato sauce. Tip: if using a dried blend, give it a quick rub between fingers to release essential oils.
    – 1/2 teaspoon garlic powder
    → Delivers classic garlic aroma without moisture; you can replace with 1-2 cloves minced if you prefer fresh garlic, but monitor to prevent burning. Tip: lightly mix into breadcrumb mixture for even distribution.
    – 1/4 teaspoon onion powder
    → Adds subtle savory sweetness and aroma that pairs with tomato sauce. Tip: skip if you prefer pure garlic-forward flavors.
    – 1/4 teaspoon salt
    → Seasoning for the crust; adjust to dietary needs. Tip: remember the sauce and Parmesan add salt too, so taste as you go.
    – 1/4 teaspoon black pepper
    → Adds a mild kick and enhances browning. Tip: use freshly ground pepper for more aroma.
    – 2 tablespoons olive oil, for cooking
    → Used to sear and crisp the crust; helps deliver a golden exterior. Tip: keep heat medium-high to avoid burning breadcrumbs; cook in batches if needed to avoid crowding the pan.

Sauce

    – 1 1/2 cups marinara sauce (look for no added sugar or minimal sugar) or homemade tomato sauce
    → The flavorful base for the Parm bowl; provides acidity to cut richness and a bed for the chicken. Prep: if needed, simmer garlic and onion in a splash of olive oil before adding tomatoes; season with oregano and a pinch of red pepper flakes. Tip: choose a robust sauce for best flavor and simmer to develop depth.
    – 2 cloves garlic, minced
    → Builds aroma and depth for the sauce; sauté in olive oil until fragrant before adding tomatoes. Tip: press garlic or mince finely to maximize flavor; avoid burning by controlling heat.
    – 1/2 small onion, finely chopped
    → Adds sweetness and body to the sauce; sauté until translucent. Tip: dice finely for even integration and avoid large chunks in the sauce.
    – 1 tablespoon olive oil
    → Used to cook aromatics and enrich the sauce’s base. Tip: use extra-virgin for richer flavor; keep pan moderately hot to prevent burning.
    – 1/2 teaspoon dried oregano
    → Classic herb that pairs with tomato sauce; a little goes a long way. Tip: crush between your fingers to release aroma before adding to sauce.
    – Pinch red pepper flakes (optional)
    → Adds a gentle heat to balance the richness of the dish. Tip: start with a pinch and adjust to taste.

Cottage Cheese Layer

    – 1 cup small-curd cottage cheese
    → The creamy, protein-rich layer that substitutes for traditional ricotta or mozzarella; it adds moisture and tang. Prep: drain any excess whey briefly if very watery; season lightly with salt and pepper. Tip: for a smoother texture, whisk briefly with a fork to break up lumps.
    – 1/4 cup shredded mozzarella cheese (optional for extra melt)
    → Provides a meltier, cheesier finish atop the cottage cheese; omit for a lighter option. Tip: sprinkle on near the end and briefly broil to melt without drying the layer.
    – 1 tablespoon chopped fresh basil or parsley
    → Adds fresh herbal brightness that echoes classic parm flavors. Tip: tear or chop finely to distribute evenly through the layer.

Greens & Extras

    – 2 cups fresh baby spinach or arugula
    → A light bed of greens to add color, nutrients, and a contrasting bite to the creamy cheese and saucy chicken. Prep: rinse and spin dry; you can wilt them in a hot skillet with 1 teaspoon olive oil if you prefer warm greens. Tip: add greens under the chicken to create a nice texture mix in every bite.
    – 1 teaspoon olive oil
    → Used to lightly sauté greens if wilted; helps prevent dry greens and adds sheen. Tip: heat pan until shimmering before adding greens and drizzle with a touch of lemon for brightness.
    – 1 tablespoon lemon juice (optional)
    → Brightens greens and finishes with a clean acidity that cuts through the creamy cottage cheese. Tip: add in small increments to taste; can substitute with a splash of red wine vinegar if preferred.

Toppings & Garnish

    – 2 tablespoons grated Parmesan cheese
    → Finishing touch that adds savoriness and helps browning if you broil the assembled bowl. Tip: use freshly grated Parmesan for best aroma and texture.
    – Fresh basil leaves or parsley, for garnish
    → Finishing aromatics that lend color and a fresh scent; tear or chop just before serving to preserve oils. Tip: sprinkle over the top at the end for maximum brightness.
    – Salt and pepper, to taste
    → Final seasoning to adjust saltiness and balance; start with small amounts and taste as you go. Tip: consider the saltiness of the sauce, cheese, and crust before adding more.

Instructions

  • Preheat your oven to 400°F (200°C) and line a baking sheet with parchment paper or a silicone mat to prevent sticking and promote even browning on the crust.
    → This ensures the crust develops a crisp, golden exterior without burning and makes cleanup easier.
  • Place the chicken breasts between two sheets of plastic wrap and gently pound to an even 1/2-inch thickness using a meat mallet or rolling pin, rotating as needed to avoid tearing; pat dry with paper towels and lightly season on both sides with salt to help the crust adhere and cook evenly.
    → Uniform thickness promotes uniform browning and prevents thicker areas from remaining undercooked while thinner edges overcook.
  • Set up a dredging station with a shallow bowl of beaten egg seasoned with a pinch of salt and pepper, and a second shallow bowl containing breadcrumbs (panko recommended) mixed with grated Parmesan, Italian seasoning, garlic powder, onion powder, salt, and pepper.
    → Evenly seasoned crumbs create the Parmesan crust and ensure consistent flavor and texture around the chicken.
  • Dredge each pounded chicken breast first in the egg, allowing excess to drip back into the bowl, then press into the breadcrumb mixture, turning to coat all sides and pressing gently so the crumbs cling without shedding.
    → A thorough coating forms a protective crust that browns well and holds up to sauce without flaking off.
  • Heat 2 tablespoons olive oil in a large skillet over medium-high heat and sear the coated chicken pieces until the crust is deep golden brown on the first side, about 2–3 minutes, then flip and sear the other side for another 2 minutes; work in batches if necessary to avoid crowding the pan.
    → Searing builds depth of flavor via Maillard browning and creates a sturdy crust that won’t sog in sauce.
  • Transfer the seared chicken to the prepared baking sheet and finish in the preheated oven until the internal temperature reaches 165°F (74°C), about 8–12 minutes depending on thickness; remove and let rest 5 minutes before slicing to retain juiciness.
    → Oven finishing ensures the chicken is fully cooked through while the crust remains crisp, and resting redistributes juices for moist slices.
  • Meanwhile, prepare the sauce by heating 1 tablespoon olive oil in a skillet over medium heat, sautéing minced garlic and finely chopped onion until translucent and fragrant, about 2–3 minutes; add marinara, oregano, and red pepper flakes, then simmer gently for 10–15 minutes to meld flavors.
    → Sautéing aromatics builds depth, while simmering concentrates flavors so the sauce coats the chicken nicely instead of tasting watery.
  • Season the sauce with a pinch of salt and pepper, taste for balance, and adjust with a splash of water if it thickens too much; keep warm until ready to spoon over the chicken.
    → Proper seasoning in the sauce ensures the dish remains bright and cohesive with the crust and cheese.
  • Prepare the cottage cheese layer by whisking the 1 cup small-curd cottage cheese with a pinch of salt and pepper until smooth, then fold in the 1/4 cup shredded mozzarella and the chopped fresh basil; drain any excess whey if very watery.
    → A smooth, seasoned cottage cheese layer provides creaminess and an even distribution of cheese and herbs over the sauced chicken.
  • Rinse and dry the greens, then if desired, briefly wilt them in a hot skillet with 1 teaspoon olive oil for 30–60 seconds to soften and brighten their flavor, or keep them raw for more bite; wilted greens create a tender contrast to the creamy layer.
    → Using greens adds color, nutrition, and a refreshing counterpoint to the richness of the crust and cheese.
  • Reheat the cooked quinoa and/or brown rice: in a small saucepan or microwave, fluff the grains with a fork, add a splash of water or broth, cover, and heat until just steaming; season lightly with salt to taste.
    → Reheating and fluffing ensures the grain base is light and separates into individual grains, preventing a dense, paste-like texture in the bowl.
  • Assemble the bowls by dividing the warm grain base among four bowls, arranging a bed of greens if using, then placing a chicken breast on each; spoon some sauce over the chicken and top with a portion of the cottage cheese layer.
    → Layering in this order ensures each bite delivers crunch from crust, warmth from chicken, brightness from greens, and creaminess from the cottage cheese for a balanced bite.
  • Finish the bowls by sprinkling 2 tablespoons grated Parmesan over each, and optionally broil for 1–2 minutes on a high rack until the cheese is bubbly and lightly browned; watch closely to prevent burning.
    → A brief broil adds a toasty finish to the top, enhances aroma, and helps meld the components together without drying the cheese layer.
  • Garnish with fresh basil or parsley and season to taste with additional salt and pepper; serve immediately to enjoy the contrast of crisp crust, creamy cheese, saucy chicken, and vibrant greens.
    → Finishing with fresh herbs brightens the dish, and tasting at the end ensures the final seasoning is correct for all components combined.

Notes

These gluten-free Cottage Cheese Chicken Parm Bowls are a protein-rich, comforting meal built on a crisp Parm-crusted chicken over a bed of fluffy quinoa or brown rice, with a creamy cottage cheese layer and a bright tomato sauce. To keep it gluten-free, use gluten-free breadcrumbs (or crushed gluten-free crackers) and a no-added-sugar marinara. Prep: rinse quinoa and cook in 2 cups water or broth until fluffy, or cook brown rice to package directions; pound the chicken to 1/2-inch thickness and bread with a seasoned mix (1/4 cup breadcrumbs, 1/4 cup grated Parmesan, 1 teaspoon Italian seasoning, 1/2 teaspoon garlic powder, 1/4 teaspoon onion powder, salt and pepper). Pan-sear in olive oil until golden, then finish in a hot oven or under the broiler to set the crust. The cottage cheese layer should be small-curd and lightly seasoned; whisk briefly to smooth and optionally fold in 1/4 cup shredded mozzarella for extra melt, along with fresh basil or parsley. A bed of spinach or arugula adds color and nutrition; wilt greens in a teaspoon of olive oil or serve raw for contrast. Finish with extra Parmesan, a squeeze of lemon, and salt and pepper to taste. For serving, assemble bowls and heat until everything is warm and the sauce is bubbly; bake at 400°F for 10-15 minutes to glaze the top if you like. Leftovers refrigerate 3-4 days and rewarm gently on the stove or in the microwave. For make-ahead meals, prep grains, chicken, and cottage cheese layer separately and assemble when ready. Substitutions: swap quinoa for more veggies under the chicken or use brown rice for a chewier texture; dairy-free options include non-dairy cottage cheese alternatives and dairy-free cheese, plus gluten-free crusts as needed.

Tips

Tips for Cottage Cheese Chicken Parm Bowl

Base tips

  • Quinoa: Rinse thoroughly to remove bitterness, then cook in a 2:1 liquid ratio (water or broth) until fluffy. Fluff with a fork off the heat and season lightly with salt to bring out its nutty flavor. If you’re short on time, substitute with cooked brown rice or another grain you enjoy.
  • Brown rice: Cook to tender perfection, fluffy and separated. For best texture, use day-old brown rice warmed with a splash of water to restore moisture and prevent clumping.

Chicken & Coating tips

  • Pound the chicken to an even 1/2-inch thickness for uniform cooking and crisp coating. Pat dry and lightly season with salt before breading to help the crust adhere.
  • Coating: use breadcrumbs or gluten-free breadcrumbs; mix in 1/4 cup grated Parmesan and 1/2 teaspoon Italian seasoning for extra flavor. Dry the chicken well to promote a crisp crust.
  • Dip in a beaten egg and press the crumb mixture onto both sides; let the crust set for a minute before cooking to improve adhesion.
  • Cook in olive oil over medium-high heat, in batches to avoid crowding. Turn once to achieve an even golden crust and ensure the chicken reaches 165°F (74°C) inside.
  • Freshly grated Parmesan enhances browning and aroma. If you want extra melt, sprinkle mozzarella only in the final minute or briefly broil after assembling.
  • Crust questions: For an extra-crispy finish, finish in a hot oven (425°F/220°C) for a few minutes or until the crust is deeply golden.

Sauce tips

  • Enhance aromatics by sautéing minced garlic and finely chopped onion in olive oil before adding tomatoes. Simmer to develop depth and round out flavors; oregano and a pinch of red pepper flakes amplify the Italian profile.
  • Taste and adjust: if the sauce tastes too acidic, add a pinch of sugar or a drizzle of olive oil to balance. Allow the sauce to simmer 10–15 minutes to meld flavors and thicken slightly.
  • Texture control: for a smoother sauce, puree lightly or crush tomatoes; for a chunkier sauce, leave some texture intact.

Cottage Cheese Layer tips

  • Drain any excess whey if the cottage cheese is very watery. Season with a touch of salt and pepper, then whisk briefly to smooth lumps for a creamier layer.
  • For extra creaminess, whisk in a tablespoon of cream cheese or a splash of milk. If using mozzarella, add just before serving for a soft, gooey top.
  • Fresh herbs like chopped basil or parsley folded into the cottage cheese add brightness and a cohesive parm flavor.

Greens & extras tips

  • Greens add color and balance: rinse and dry well; wilt in a hot skillet with 1 teaspoon olive oil or serve raw for contrast. Placing greens under the chicken helps distribute greens in every bite.
  • Finish with a splash of lemon juice or a light drizzle of red wine vinegar to brighten the greens. Season lightly with salt to taste after wilting.

Toppings & garnish tips

  • Parmesan: use freshly grated Parmesan for maximum aroma and a better melt when briefly broiled.
  • Garnish with fresh basil or parsley right before serving to preserve color and aroma. Tear leaves by hand to release essential oils.
  • Season the final dish with salt and pepper to taste, considering the saltiness already present in the sauce and cheese. If in doubt, add less salt at the end and adjust as needed.

FAQ

What is Cottage Cheese Chicken Parm Bowl?

A protein-packed bowl inspired by classic chicken parmesan, featuring tender chicken, marinara, and a topping of cottage cheese for creaminess. Serve over a base like brown rice, quinoa, cauliflower rice, or greens for a complete meal.

What ingredients do I need to make this dish?

Core ingredients:

  • Chicken breasts or thighs, cut into tender pieces
  • Marinara sauce
  • Low-fat or full-fat cottage cheese
  • Shredded mozzarella or sliced mozzarella
  • Parmesan cheese, grated
  • Olive oil
  • Italian seasoning, garlic powder, salt, and pepper
  • Base options: brown rice, quinoa, cauliflower rice, or greens
  • Optional garnishes: fresh parsley or basil
Can I use different greens or bases for the bowl?

Yes. Good options include:

  • Base: cooked brown rice, quinoa, cauliflower rice, or a mixed greens bed
  • Extras: roasted vegetables (zucchini, bell peppers, mushrooms) or a handful of spinach

Adjust portions to match your nutrition goals and appetite.

How do I cook the chicken for the parm bowl?

Steps:

  • Pat chicken dry and season with salt, pepper, garlic powder, and Italian seasoning.
  • Heat olive oil in a skillet over medium heat and sear chicken until lightly browned, about 3–4 minutes per side.
  • Pour a thin layer of marinara over the chicken, sprinkle mozzarella on top, and cook just until the cheese melts. You can finish in a 400°F (200°C) oven for 5–8 minutes if you prefer.
How do I assemble the Cottage Cheese Chicken Parm Bowl?

Assembly:

  • Place your chosen base in a bowl (rice, quinoa, cauliflower rice, or greens).
  • Top with the chicken parmesan pieces.
  • Top with a generous spoonful of cottage cheese (or a cottage cheese mixture with a pinch of herbs).
  • Finish with extra marinara and a sprinkle of Parmesan and fresh herbs.
How can I make this dish lighter or higher in protein?

Suggestions:

  • Use 1% or fat-free cottage cheese or reduce the amount of cheese and add more lean chicken for protein.
  • Choose whole grains like quinoa or brown rice for extra fiber.
  • Skip extra cheese on top or opt for part-skim mozzarella.
  • Add more vegetables to increase volume without adding many calories.
How long does it take to make this dish?

Approximate timeline:

  • Prep: 5–10 minutes
  • Cook chicken and melt cheese: 10–15 minutes (or 15–20 minutes if baked)
  • Assemble and serve: 5 minutes

Total: about 20–30 minutes depending on fondness for oven finish.

How should I store and reheat leftovers?

Storage and reheating:

  • Store leftovers in an airtight container in the refrigerator for up to 3–4 days.
  • Reheat in the microwave in 1–2 minute bursts, stirring in between, or reheat in a skillet over medium heat until warmed through.
  • Keep cottage cheese topping separate if you want to preserve texture, then add just before serving.
Can I freeze any components or the whole dish?

Freezing notes:

  • Cooked chicken with marinara freezes well. Freeze in portions for convenience.
  • Cooked base (rice/quinoa) freezes okay, though texture may change slightly.
  • Cottage cheese does not freeze well; best added fresh after reheating.
Are there dairy-free or vegetarian options?

Yes. Alternatives:

  • Use dairy-free mozzarella and a dairy-free cottage cheese substitute, or replace cottage cheese with a dairy-free ricotta or blended tofu for creaminess.
  • For a vegetarian version, keep the marinara and cheese toppings but ensure the base remains plant-based (brown rice or quinoa with extra vegetables).
What are some tips to get the best flavor and texture?

Tips:

  • Pat the chicken dry to get a good sear and prevent steaming.
  • Don’t overcook the chicken; aim for juicy pieces with a light crust.
  • Use a good quality marinara with a balanced sweetness to pair with the cottage cheese.
  • Let the cottage cheese stand for a few minutes at room temperature for creaminess, or stir in a pinch of Italian seasoning.

Introduction / Hook

Imagine a warm, bubbly pan arriving at the table just as the day’s light begins to fade. The aroma rises first — a comforting, enveloping scent that mingles creaminess with toasty, golden notes. Then comes the sight: a casserole crowned with a delicate crust that glistens like kissed porcelain, steam curling upward in lazy ribbons. This is not merely a weeknight supper; it’s a little celebration you can pull together in moments when you crave something familiar, indulgent, and wholly satisfying. The Million Dollar Chicken Casserole is the kind of dish that makes a house feel like a home: simple ingredients transformed into something luxurious by warmth, patience, and a touch of nostalgia. It’s the kind of recipe that, once you’ve tasted it, becomes a trusted standby — a go-to solution for busy evenings, family gatherings, or any time you want to feed a crowd with minimal fuss and maximum comfort.

From the first bite, you’ll notice the creamy richness that surrounds every bite, balanced by a savory backbone and a topping that offers a gentle crunch. It’s the kind of dish that sparks conversation around the table, as everyone eagerly reaches for the last spoonful and exchanges whispers about how good it smells as it bakes. If you’ve ever wished for a dish that feels luxurious without demanding a long, complicated process, this casserole delivers. It’s a reminder that extraordinary flavor doesn’t always require extraordinary effort; sometimes, it just requires a little patience, a well-timed bake, and a generous handful of heart.

As you prepare to read on, picture the moment you pull the dish from the oven: the way the steam fogs the kitchen, the soft hiss as the top settles into a shimmering crust, and the first scoop that reveals a creamy, comforting interior. This is not a public chef’s plate; it’s a home cook’s invitation to gather, share, and savor. The Million Dollar Chicken Casserole is your passport to a cozy, memorable meal that tastes like a celebration, even on a Tuesday night.

The Story Behind the Dish

Casseroles have long held a cherished place in home kitchens around the world. They began as practical, make-ahead meals that could stretch a single everyday purchase into something substantial enough to feed a family, with flavors that promised warmth during chilly seasons and long workdays. The idea that a humble collection of ingredients could come together into something greater-than-the-sum-of-its-parts is at the heart of many traditional casseroles, and the Million Dollar Chicken Casserole is a modern homage to that timeless concept. It blends familiarity with a touch of indulgence, a nod to mid-century comfort cooking while embracing today’s love of convenience without sacrificing soul or flavor.

The “million-dollar” moniker is a wink to those make-ahead, crowd-pleasing dishes that feel priceless in their ability to nourish people, spark laughter, and create lasting memories. It’s the kind of dish that shows up at potlucks, church suppers, and family reunions, quietly outshining more elaborate meals with its reliable charm. In many households, a dish like this becomes a rite of passage: you learn to assemble it in half the time it took to learn your grandmother’s favorite family recipe, you discover how leftovers can become new, comforting lunches, and you realize that the best recipes often arrive not as grand gestures but as acts of daily generosity.

What makes this particular casserole special is its balance between decadence and homeliness. The creamy core suggests a touch of luxury, while the heartiness of the dish keeps it grounded in everyday comfort. It’s not about showmanship; it’s about the sensory pleasure of a dish that feels velvety and lush against the bite of a softly textured topping. The dish invites you to tell stories at the table, to linger over seconds, and to appreciate the way a well-crafted casserole can turn simple ingredients into something that feels celebratory without needing a special occasion.

Over the years, countless home cooks have adapted casseroles to reflect their families’ tastes, and the Million Dollar Chicken Casserole invites that same spirit of personal touch. Perhaps you’ll fold in a favorite herb, swap in a seasonal vegetable, or swap a portion of the protein for something plant-based. The beauty of this dish lies not only in its dependable comfort but in its adaptability — it’s a canvas for your kitchen personality, a dish that says “home” in a language everyone understands.

Why You’ll Love This Recipe

  • Comfort in a pan: Creamy, savory, and richly satisfying, this casserole delivers instant comfort with every forkful.
  • Make-ahead magic: It’s naturally forgiving for make-ahead meals, so you can assemble in advance and bake when you’re ready.
  • Crowd-pleasing versatility: Perfect for weeknights and potlucks, it scales up easily to feed a larger group without sacrificing flavor.
  • Texture harmony: A lush, creamy interior contrasts with a crisp, golden topping for a satisfying bite every time.
  • Economical luxury: Rich in flavor and satisfying in portion, it feels indulgent without being wasteful or extravagant.
  • Family-friendly: The familiar flavors and gentle seasoning make it a safe bet for diners of all ages.
  • Leftovers that reinvent themselves: Leftover casserole textures beautifully transform into quick lunches or a new dinner with a simple twist.
  • One-pan elegance: You’ll enjoy the sense of accomplishment that comes from creating something that looks and tastes special with minimal cleanup.

As you read further, you’ll see how the dish can be tailored to fit different seasons, dietary needs, and taste preferences, all while preserving that signature sense of indulgence and homey charm. The Million Dollar Chicken Casserole isn’t just a recipe; it’s a dependable storytelling tool for your dinner table — a dish that invites sharing, conversation, and the simple joy of good food enjoyed together.

Flavor Profile & Texture

At its core, this casserole offers a layered experience designed to satisfy a spectrum of cravings. The center presents a tenderness that speaks of slow, gentle heating — a comforting, almost lullaby-like mouthfeel that coats the palate with warmth. The dominant sensation is a lush creaminess that glides across the tongue, delivering a savory depth that lingers pleasantly after each bite. The overall flavor is thoughtfully balanced rather than overpowering: richness with a light lift of brightness, a whisper of herbal notes, and a subtle, comforting savor that makes you reach for another spoonful.

The topping provides the much-loved contrast that makes casseroles so appealing. As you encounter the first crusty layer, you’re met with a delicate crackle and a toasty fragrance that evokes bakery mornings and family dinners. Beneath the surface, the texture remains moist and cohesive, ensuring every mouthful has a harmonious blend of softness and substance. The interplay between the creamy interior and the crisp topping is where the dish truly shines, offering a satisfying bite that rewards both patience and appetite.

Flavors that weave through the dish tend to feel round and familiar, leaning into notes of comfort without overwhelming the senses. There’s a gentle savor that remains steady across bites, a touch of warmth that hints at caramelized edges, and a subtle, almost imperceptible sweetness that helps balance the savory backbone. If you savor balance and depth over punch, this casserole delivers in spades. It’s a dish that knows when to whisper and when to sing — never rushing, always inviting you to slow down and appreciate the texture and aroma as they unfold together.

The aroma is a big part of the experience. When the dish bakes, the kitchen fills with a nurturing scent that feels like a welcome hug: slightly herbaceous, toasty, and warm enough to make everyone pause at the door, take a deep breath, and smile in anticipation. That scent-laden moment is a signal that dinner is almost ready, and it’s one of those sensory cues that makes a home feel complete. In short, the flavor profile and texture marry comfort with sophistication, delivering a dish that tastes both immediate and timeless.

Occasions & Pairings

When to Serve

This versatile casserole shines in a range of settings, from casual weeknights to festive gatherings. It’s an ideal centerpiece for family dinners, especially when you’re feeding a mix of ages and appetites. It also works brilliantly for potlucks, church socials, or community events where a single dish can quickly become a crowd favorite. During cooler months, it becomes a reliable go-to for cozy evenings, while at any time of year it holds its own as a comforting, shareable dish that invites conversation and connection around the table.

Ideal Pairings

Pair this casserole with light, fresh counterpoints that balance its richness. A bright, crisp salad adds contrast and a necessary lift, while steamed or roasted vegetables provide color and a mild sweetness. Crusty bread or warm biscuits are excellent for mopping up any remaining sauce, turning each meal into a satisfying, all-inclusive experience. For drinks, a glass of chilled white wine or a lightly sparkling beverage can cut through the creaminess and refresh the palate, while a savory non-alcoholic option can complement without overpowering the dish. For dessert, consider something citrusy or fruit-forward to lift the meal and provide a clean finish after the comforting main course.

Tips, Variations & Substitutions

Flexible Foundations

The beauty of a Million Dollar Chicken Casserole lies in its adaptability. If you’re cooking for family members with different tastes, think of this dish as a base you can tailor at the table. You can explore gentle tweaks that preserve the comforting core while giving each iteration its own character. For instance, you might swap in a different protein or add a seasonal vegetable to shift the flavor profile slightly without losing the dish’s signature essence.

Dietary Alternatives

  • Vegetarian: Replace the protein with hearty vegetables, plant-based proteins, or legumes. You can also layer in mushrooms for a meaty texture and depth of flavor.
  • Gluten-free: Use gluten-free thickeners or pre-made gluten-free casseroles bases; ensure the topping or any crumb component is certified gluten-free if needed.
  • Dairy-free / Lacto-friendly: Choose dairy-free cream alternatives and a non-dairy cheese substitute if you wish to keep the creaminess without dairy.
  • Low-carb / Keto-friendly: Reduce or replace any grain-based toppings with low-carb alternatives such as crushed nuts or seeds for a crunchy finish, and emphasize the protein-to-veg balance for a lighter profile.

Flavor Twists & Add-Ins

  • Herb infusions can lift the dish without changing the texture dramatically. Try infusing the creamy base with a pinch of fresh herbs or dried aromatics that suit your pantry.
  • Roasted or caramelized onions add sweetness and depth, while a splash of tangy notes from a citrus zest or a light acidity can brighten the dish in a pleasing way.
  • Texture play: consider a different topping style, such as a crumbly, nutty crust or a crisp, seed-based layer for extra crunch and nuance.
  • Spice alternatives: a gentle whisper of warmth from mild spices or a touch of smoked paprika can transform the profile without overwhelming the dish’s comforting character.

Regional & Cultural Twists

Think about regional flavors and how they could subtly influence the casserole’s character. A touch of Southwestern-inspired seasoning for a zesty warmth, a Mediterranean olive oil and herb profile for brightness, or a hint of almond or pistachio crunch for a nutty accent can all offer delightful variations while keeping the dish approachable and familiar.

Storage & Make-Ahead Ideas

One of the greatest strengths of this dish is its suitability for make-ahead cooking and thoughtful storage. It’s a progenitor of the “plan ahead, savor later” approach that many home cooks cherish. Here are practical ideas to maximize flavor, texture, and convenience:

  • Make-ahead assembly: You can assemble the casserole up to the point of baking and refrigerate it for several hours or overnight. When you’re ready to cook, simply bake as directed, adding a few extra minutes if it’s cold from the fridge.
  • Make-ahead baked casserole: Prepare, bake until just set, and cool completely. Cover and refrigerate. Reheat gently in the oven, covered, to preserve moisture and prevent over-browning.
  • Freezing: Assemble and freeze unbaked, tightly wrapped. Thaw overnight in the fridge before baking. For frozen, baked leftovers, reheat slowly to prevent drying out and to maintain the creamy texture.
  • Leftovers: Store in an airtight container in the fridge for up to 3-4 days. Reheat in the oven or a covered skillet with a splash of liquid to restore creaminess without scorching the edges.
  • Portioning for meal prep: Consider dividing into individual portions for quick lunches or for easy freezer-to-oven meals during busy weeks.

Make It Your Season

Seasonality can influence how you store or reuse leftovers. In the fall and winter, embrace the comforting, oven-warm aroma; in spring and summer, keep portions light with vibrant salads on the side and a bright citrus note to balance richness. The dish is resilient and forgiving, adapting to your schedule and your preferences without losing its essence.

Fun Facts & Trivia (Optional)

  • casseroles emerged as a practical solution in mid-20th-century kitchens, offering nourishment for families with minimal time investment, and they continue to be treasured for their generosity and practicality.
  • The term “Million Dollar” in dishes often signals a luxurious, crowd-pleasing payoff without a prohibitive price tag, a nod to kitchens that stretch pantry staples into something extraordinary.
  • Casseroles have long been associated with potlucks and community gatherings, where sharing a hearty dish is an expression of hospitality and togetherness — a tradition that this recipe embodies in a modern, approachable way.
  • The comforting aroma of a bubbling casserole is scientifically linked to feelings of well-being and nostalgia, which is why these dishes feel like a warm welcome home after a long day.
  • Variations of this dish can be found in many cultures, each adding a unique twist. The core idea — layering ingredients, slow heating, and a satisfying top — remains a universal symbol of nourishment and shared meals.

Conclusion / Final Thoughts

The Million Dollar Chicken Casserole is more than a recipe; it’s a culinary ambassador for home, comfort, and connection. It invites you to slow down just enough to savor scents, textures, and flavors that feel both timeless and personal. Whether you’re cooking for a small family, a big crowd, or yourself on a night when you deserve a little luxury, this casserole offers a dependable path to a memorable meal. It’s the sort of dish you’ll return to again and again, drawing comfort from its creamy heart, its crisp crown, and the sense of abundance it brings to your table. Embrace the ritual: preheat, prepare, bake, and gather — because sometimes the simplest meals become the most cherished memories.

Ingredients

Million Dollar Chicken Casserole

Chicken and Noodles
  • 3 cups shredded cooked chicken (rotisserie works)
    → Purpose: Provides the protein backbone and moisture; Shredded texture helps the sauce cling to every bite and ensures even distribution throughout the casserole. Preparation: If using a rotisserie chicken, remove skin and bones, then shred the meat with two forks into bite-sized pieces. If starting from raw chicken, poach or bake until fully cooked (165°F/74°C) and cool slightly before shredding. Tips: For extra flavor and moisture, use a mix of white and dark meat; reserve a few tablespoons of pan juices to moisten the chicken if it seems dry.
  • 8 oz egg noodles, cooked and drained
    → Purpose: Adds substantial body and acts as a starch to help thicken and bind the creamy filling. Preparation: Cook noodles in salted water until al dente, drain well, and lightly toss with a teaspoon of oil to prevent sticking. Tips: Do not overcook; undercook slightly so they hold up during baking and don’t turn mushy.
Creamy Sauce Foundation
  • 1 can condensed cream of chicken soup (10.5 oz)
    → Purpose: Forms the creamy, savory base that coats the chicken and noodles. Preparation: Use the condensed soup undiluted as listed; do not water it down. Tips: Choose a low-sodium version if you’re watching salt, and whisk the soup well with the other dairy ingredients to ensure a smooth sauce.
  • 1 cup sour cream
    → Purpose: Adds tang, richness, and helps emulsify the sauce for a silkier texture. Preparation: Soften slightly at room temperature to prevent lumping when whisked into the hot mixture. Tips: Full-fat sour cream yields the richest flavor and creaminess; substitute with Greek yogurt for a lighter version (thin with a splash of milk if needed).
  • 8 oz cream cheese, softened
    → Purpose: Thickens and enriches the sauce for a luxurious mouthfeel. Preparation: Soften to room temperature, then whisk or beat until completely smooth before adding to the sauce to avoid lumps. Tips: Cutting into cubes or letting it sit out longer speeds softening; if lumps form, warm gently and whisk vigorously until silky.
  • 1/2 cup milk (whole or 2%)
    → Purpose: Adjusts the sauce thickness to a pourable, spoonable consistency. Preparation: Add gradually, heating briefly if needed to incorporate. Tips: Start with 1/2 cup and add more as you test the texture; if the mixture seems too thick after assembly, loosen with a little additional milk or chicken broth.
Vegetables and Aromatics
  • 1/2 medium onion, finely diced
    → Purpose: Provides sweetness and depth to the casserole’s aroma. Preparation: Sauté in a small amount of butter or oil until translucent and softened to mellow sharpness. Tips: If you prefer less onion, you can omit or reduce to 1/4 cup; cooking the onion first helps prevent a raw onion bite in the final dish.
  • 2 cloves garlic, minced
    → Purpose: Adds warmth and savory complexity to the creamy base. Preparation: Mince finely and add with onions or after onions begin to soften to prevent burning. Tips: Fresh garlic provides stronger aroma; if short on time, you can substitute 1/4 teaspoon garlic powder, but fresh garlic is preferred for flavor.
  • 1 cup frozen peas and carrots (optional)
    → Purpose: Introduces color, texture, and a touch of sweetness. Preparation: Thaw and drain if possible; fold in with the chicken and noodles before transferring to the baking dish. Tips: For a crispier bite, add these toward the end of the baking time; you can substitute with corn or green beans if desired.
Cheese Layer
  • 2 cups shredded cheddar cheese
    → Purpose: Core cheesy flavor and helps bind the filling as it melts. Preparation: Shred cheese freshly for the best melt; fold about half into the sauce mixture and reserve the rest to sprinkle on top before baking. Tips: Use sharp cheddar for a more pronounced cheese presence; consider a small amount of mozzarella (optional, see below) for extra stretch and gooey texture.
  • 1/2 cup shredded mozzarella (optional)
    → Purpose: Extra melt and a creamy, stretchy texture on top. Preparation: If using, mix a portion into the sauce and sprinkle the rest over the top in the final layer. Tips: Use sparingly to avoid overpowering the cheddar’s flavor; mozzarella can brown quickly, so keep an eye on the bake time.
Seasonings
  • 1/2 teaspoon garlic powder
    → Purpose: Amplifies savory notes and fills in gaps if fresh garlic is light in flavor. Preparation: Measure with a level spoon; sprinkle evenly into the sauce. Tips: If you have fresh garlic, you can use half the amount of powder in combination with the minced garlic for depth; avoid adding too much powder to prevent chalky taste.
  • 1/4 teaspoon black pepper
    → Purpose: Brightens flavors and balances richness. Preparation: Use freshly ground pepper for the strongest aroma. Tips: Taste the mixture before baking and adjust if you’ve used salted soup; build pepper gradually to your preferred heat level.
  • 1/2 teaspoon dried thyme (or substitute with 1 teaspoon chopped fresh thyme)
    → Purpose: Adds herbaceous, earthy notes that pair with chicken. Preparation: Sprinkle into the sauce so the flavor infuses during bake. Tips: If using fresh thyme, strip leaves from stems and chop; dried thyme is more concentrated, so adjust to taste and prefer 1/2 to 1 teaspoon if using dried leaves.
Topping
  • 2 cups Ritz crackers, crushed
    → Purpose: Creates a crisp, buttery crust on top that contrasts with the creamy filling. Preparation: Crush crackers finely to resemble breadcrumbs; mix with melted butter until evenly coated. Tips: If you prefer gluten-free, substitute with gluten-free crackers or panko; for extra crunch, reserve a small handful of cracker crumbs to sprinkle on top just before baking.
  • 4 tablespoons unsalted butter, melted
    → Purpose: Binds the cracker topping and contributes richness and gloss to the crust. Preparation: Melt and whisk into the cracker crumbs until evenly damp. Tips: Using unsalted butter helps you control the final salt level; adjust salt in the filling if you’re using salted crackers.
  • Salt to taste
    → Purpose: Seasoning to balance the creamy sauce and crackers. Preparation: Add gradually and taste as you go, because condensed soup and crackers can already contribute salt. Tips: Start with a pinch and increase in small increments; you can finish with a light seasoning after baking if needed.
Garnish (optional)
  • Chopped fresh parsley
    → Purpose: Visual appeal and a hint of fresh herb brightness to finish the dish. Preparation: Finely chop right before serving for the most vibrant color. Tips: Sprinkle over the hot casserole just after baking so the parsley stays bright; you can omit if you don’t have fresh herbs.

Instructions

  • Preheat your oven to 350°F (175°C) and grease a 9×13-inch baking dish with butter or nonstick spray.
    → This ensures even heat distribution and prevents the creamy casserole from sticking, making clean slices and easy serving.
  • Shred the chicken: If using rotisserie chicken, remove skin and bones and shred the meat with two forks into bite-sized pieces; if starting from raw chicken, poach in simmering water or bake until fully cooked (165°F/74°C), then cool slightly and shred. Reserve 2–3 tablespoons of pan juices if available to moisten the mixture later.
    → Purpose: Shredded meat evenly coats with sauce and yields a moist, cohesive filling rather than dry chunks; keeping some moisture helps prevent a dry casserole.
  • Cook the egg noodles in salted water until al dente, drain well, and lightly toss with a teaspoon of oil to prevent sticking.
    → This gives the filling body and ensures the noodles hold up during baking without turning mushy; undercook slightly so they retain texture after baking.
  • Whisk the sauce base: In a medium bowl, whisk the condensed cream of chicken soup (undiluted) with the sour cream, softened cream cheese, and milk until completely smooth; if lumps form, microwave the cream cheese for 10–15 seconds or warm the bowl and whisk again.
    → This creates a silky, stable foundation that coats the chicken and noodles without separation, ensuring even moisture and flavor distribution.
  • Sauté the aromatics: In a skillet, melt 1 tablespoon of butter over medium heat, add the finely diced onion and sauté until translucent and softened, about 3–4 minutes; then stir in the minced garlic and cook just until fragrant, 30–60 seconds, to prevent garlic from burning.
    → Sautéing builds sweetness and depth, mellowing sharp onion flavors and releasing garlic aroma without burning, which would impart bitterness.
  • Thaw and drain the peas and carrots: If frozen, transfer to a colander and run under a brief rinse or thaw at room temperature, then pat dry; squeeze out excess moisture before folding into the filling.
    → This preserves color and prevents excess water from thinning the sauce, while ensuring the vegetables stay tender-crisp rather than soggy.
  • Build the filling: In a large mixing bowl, combine the shredded chicken, cooked noodles, sautéed onion and garlic, and thawed peas and carrots; pour the prepared sauce over and gently fold with a spatula until everything is evenly coated without mashing the noodles; fold in 1 cup of the cheddar into the filling for binding and extra flavor.
    → Purpose: Even coating ensures every bite is creamy, while folding preserves noodle texture and distributes cheddar for a cohesive filling.
  • Season the filling: Sprinkle 1/2 teaspoon garlic powder, 1/4 teaspoon black pepper, and 1/2 teaspoon dried thyme (or 1 teaspoon fresh thyme, chopped) over the filling; whisk gently to incorporate and taste before assembling, adjusting salt if necessary since the soup is salty.
    → These seasonings boost savory depth and herbal brightness, filling gaps from the creamy base without overpowering the chicken.
  • Transfer the filling to the prepared baking dish and spread it into an even layer with a spatula or the back of a spoon so the top bakes uniformly.
    → An even layer ensures consistent heat penetration and a uniform slice; press lightly to compact without crushing noodles.
  • Prepare the topping: In a medium bowl, mix the crushed Ritz crackers with the melted butter until the crumbs are evenly coated; the butter should be fully absorbed for a cohesive crust; season lightly with a pinch of salt if your crackers are unsalted.
    → This yields a crisp, buttery crust that provides contrast to the creamy filling and helps seal moisture during baking.
  • Top the casserole and cheese: Sprinkle the remaining 1 cup cheddar evenly over the filling and, if using, scatter the 1/2 cup mozzarella; lay the cheese in a light, even layer so it melts smoothly without pooling.
    → Cheddar provides flavor and body; mozzarella adds stretch and surface gloss; layering helps achieve an attractive, gooey top without leaning too salty.
  • Scatter the cracker topping evenly over the cheese layer and press gently to help adhesion; then drizzle any remaining melted butter from the cracker mixture over the top to ensure a golden, crisp crust.
    → The butter-bound crackers crisp and brown evenly, creating a toasty topping that contrasts with the creamy filling.
  • Bake in the preheated oven for 25–35 minutes, or until the casserole is bubbling around the edges and the top is golden brown; test doneness by inserting a small knife in the center to ensure the filling is hot throughout; if the top browns too quickly, tent with foil for the last 5–10 minutes.
    → This cooks the chicken through, melts the cheese evenly, and achieves a crisp topping without drying the interior; a bubbling center indicates proper heating and cohesion.
  • Remove from oven and rest for 10 minutes before serving to allow the filling to set and make slicing easier; garnish with chopped fresh parsley if desired.
    → Resting helps the sauce thicken further and makes clean cuts; parsley adds a fresh color contrast and a hint of brightness to finish the dish.

Notes

“These comforting Million Dollar Chicken Casserole bites are a cozy, crowd-pleasing dish that brings together shredded chicken, egg noodles, a creamy sauce, and a buttery cracker crust for a golden top. Use rotisserie chicken to save time, or poach raw chicken until cooked and shred finely. Cook noodles to al dente, drain well, and toss with a little oil to prevent sticking. The creamy base comes from undiluted condensed cream of chicken soup whisked with sour cream, softened cream cheese, and a splash of milk; warm gently to blend smoothly. Fold in the chicken, noodles, and optional peas and carrots, then stir in half the cheddar (plus mozzarella if you like extra melt). Transfer to a greased baking dish, top with the remaining cheese, and finish with crushed Ritz crackers mixed with melted butter for a crisp, buttery crust. Bake at 350°F (175°C) for 25–30 minutes until bubbling and cheese is melted; let rest 5–10 minutes before serving. For a gluten-free version, substitute gluten-free crackers and a gluten-free condensed soup, or make a simple sauce with chicken stock and dairy thickened with cornstarch; always check labels to ensure all ingredients are gluten-free. Leftovers reheat beautifully and can be frozen after baking for future meals. Garnish with chopped fresh parsley for a bright finish.”

Tips

Prep and Plan Ahead

  • Scale flavors by degree of doneness: if using a store-bought rotisserie chicken, remove skin and bones first, then shred with two forks for even texture that clings to the sauce.
  • Cook noodles to al dente. They’ll finish cooking in the oven, so undercooking slightly prevents mushiness.
  • Have all dairy at room temperature before mixing. Soften cream cheese and sour cream to help create a smooth, cohesive sauce without lumps.
  • Read through the whole recipe once before you start so you can pace adding ingredients and prevent overbrowning of the cracker topping.

Make-Ahead and Storage

  • Assemble the casserole, then refrigerate up to 24 hours before baking. Add 10–15 minutes to the bake time if the dish is cold from the fridge.
  • Freeze unbaked portions for up to 2–3 months. Thaw overnight in the fridge, then bake as directed. You may need a splash more milk if sauce thickens after freezing/thawing.
  • Leftovers store well in the fridge for 3–4 days. Reheat gently in the oven at 325–350°F (165–175°C) until bubbling and hot, or reheat in portions in the microwave, covered to prevent drying out.

Sauce and Texture Tips

  • Keep the condensed soup undiluted for maximum creaminess. If you must thin, use a small splash of milk or chicken broth and whisk back to smooth consistency.
  • Whisk the sour cream, cream cheese, and milk together before adding to the chicken mixture to avoid curdling and ensure a silky sauce.
  • If sauce seems too thick after mixing, loosen with a little more milk or chicken broth—you want a pourable, spoonable consistency, not a dry lump.

Vegetables, Aromatics, and Flavor Balance

  • Finish onions and garlic sauté until fragrant but not browned to keep a clean, mellow base; raw onion bite can carry into the final bake if undercooked.
  • Frozen peas and carrots add color and sweetness; thaw and drain well or fold in near the end of baking if you prefer a crisper texture.
  • Fresh thyme provides bright herb notes; if using dried thyme, be mindful it’s more potent—start with ½ teaspoon and adjust to taste.

Cheese and Topping Tips

  • Shred cheddar fresh for best melt; reserve half to fold into the sauce and sprinkle the rest on top for a golden, flavorful crust.
  • Optional mozzarella adds extra stretch—use sparingly to avoid overpowering the cheddar. If used, mix some into the sauce and some on top.
  • Cracker topping: crush crackers finely, mix with melted butter for even coating. For gluten-free versions, use gluten-free crackers or gluten-free panko; consider adding a few extra crumbs just before baking for extra crunch.
  • Salt to taste after the filling is mixed. Condensed soup and crackers can contribute salt, so taste and adjust gradually.

Baking, Serving, and Variations

  • bake at 350°F (175°C) until the top is golden and bubbling; cover if the top browns too quickly, then uncover to finish.
  • Let the casserole rest 5–10 minutes after baking to set the filling for cleaner servings.
  • For lighter versions, substitute Greek yogurt for half of the sour cream (thin with a splash of milk as needed).
  • Gluten-free option: use gluten-free condensed soup and crackers; verify all ingredients are certified GF if needed.
  • To boost flavor, add a pinch of paprika, a dash of hot sauce, or a squeeze of lemon over the finished dish for brightness.

Serving and Presentation

  • Garnish with chopped fresh parsley for color and a fresh aroma just before serving.
  • Pair with a simple green salad or steamed vegetables to balance richness.

FAQ

What is Million Dollar Chicken Casserole?

A creamy, comforting chicken casserole featuring tender shredded chicken in a rich sauce, topped with buttery crackers. It’s quick to assemble and baked until bubbly and golden.

What ingredients do I need?
  • 3 cups cooked shredded chicken
  • 1 can (10.5 oz) cream of chicken soup
  • 1 cup sour cream
  • 1 cup shredded cheddar cheese
  • 1/2 cup finely chopped onion (optional)
  • 1 cup crushed Ritz crackers (or any buttery crackers)
  • 4 tablespoons butter, melted
  • Optional: 8 oz cream cheese, softened
  • Optional: 2 cups broccoli florets, steamed (for a veggie boost)
Can I assemble this ahead of time?

Yes. You can assemble the casserole up to 24 hours in advance and refrigerate it unbaked. Keep the topping separate if you want the crackers extra crisp, then sprinkle on just before baking. If you refrigerate, add a few extra minutes to the bake time when you start from cold.

How do I bake it?

Preheat oven to 350°F (175°C). In a bowl, mix the soup, sour cream (and cream cheese if using), onion, and half of the cheddar. Stir in the shredded chicken (and broccoli if using). Spread the mixture in a greased baking dish. Toss crackers with melted butter and sprinkle over the top with the remaining cheddar. Bake for 25–30 minutes, until hot and bubbly and the topping is golden. If the top browns too quickly, loosely tent with foil.

Can I freeze or refrigerate before baking?

Yes. You can freeze assembled unbaked casserole for up to 2 months. Thaw in the refrigerator overnight and bake as directed, adding 10–15 minutes to the bake time if needed. You can also refrigerate the assembled casserole for up to 24 hours; bake from the fridge, adding a few extra minutes to ensure the center is hot.

Is this dish gluten-free?

Traditional versions use crackers with gluten and a cream-of-chicken soup that may contain gluten. For a gluten-free option, use gluten-free crackers and a gluten-free cream soup (or make a white sauce from scratch with gluten-free stock). Check all labels to ensure they are certified gluten-free.

Is there a dairy-free or lighter variation?

Yes. For a dairy-free version, use dairy-free cream soup and sour cream alternatives, plus a dairy-free cheese substitute. You can also substitute light sour cream or yogurt and reduce butter in the topping. For a lighter option, use less cheese and crackers, and consider adding more vegetables to stretch the dish.

How can I customize the recipe?
  • Add steamed vegetables like broccoli, peas, or mushrooms.
  • Swap the cheddar for another cheese blend (e.g., Monterey Jack or mozzarella).
  • Play with spices: a pinch of paprika or garlic powder for extra flavor.
  • Use different crackers or a crumb topping with breadcrumbs and herbs.
How should I store leftovers and how long will they keep?

Store cooled leftovers in an airtight container in the refrigerator for 3–4 days. Reheat in the microwave in 1–2 minute intervals, stirring, or reheat in a 350°F (175°C) oven until hot. You can also freeze individual portions for longer storage.

What are good serving suggestions?

Serve with a simple green salad or steamed vegetables and a crusty bread or rolls. A light fruit side or pickles can balance the creamy richness nicely. For a complete meal, pair with rice or mashed potatoes.

Approximately how many servings does this yield and what are the rough nutrition notes?

Depending on portion size, this dish typically serves 6–8. Nutrition varies with ingredients and toppings, but a generous serving is often in the 400–550 calorie range, with protein from chicken and fats from the cheese and crackers. For precise values, calculate using your exact ingredients and brands.

Introduction / Hook

Picture a morning where the air carries a cozy swirl of cocoa and warm bakery notes, a moment when time slows just enough for you to savor a small, tender miracle. Healthy Chocolate Breakfast Donuts offer the best of two worlds: the comforting, chocolatey joy we crave on a lazy weekend and the smart, nourishing foundations that keep energy steady through a busy weekday. They’re not just a treat; they’re a morning ritual that says yes to flavor and yes to balance. The first bite reveals a soft, cake-like crumb that melts into your mouth with a gentle sweetness, while a whisper of cocoa lingers, rich enough to feel indulgent but light enough to start your day without that heavy aftertaste. Imagine a little ring of happiness—glossy enough to hint at a glaze you can skip or add, moist enough to satisfy without weighing you down, and crafted with wholesome ideas that your future self will thank you for. This isn’t about deprivation; it’s about a thoughtful reimagining of a beloved classic that fits into a modern, mindful morning routine.

In this version, the aroma does the talking—think espresso steam meeting cocoa, a hint of warmth from toasty spices, and perhaps a subtle sweetness that sneaks up on you as you take the first bite. The donuts stand as a gentle invitation to begin the day with a smile, a sense of nourishment, and a dash of everyday luxury. They’re portable for a quick commute, satisfying for a mid-morning craving, and sturdy enough to be enjoyed at a kitchen counter or shared at a sunlit breakfast table. There’s a quiet confidence in this recipe: you’re choosing something that tastes decadent but feels thoughtful, a compromise that respects both your cravings and your goals. Welcome to a breakfast donut that actually fits into real life—delicious, comforting, and entirely doable.

The story behind Healthy Chocolate Breakfast Donuts is one of balance, memory, and the joy of treating yourself without losing sight of nourishment. It’s about waking up to a little ritual that combines the sensory pleasure of chocolate with the comfort of a familiar pastry, all while leaning into wholesome ingredients and mindful portioning. It’s the kind of recipe you return to when you want something a touch celebratory on a Tuesday morning, something that makes the week feel special without requiring a long morning at the stove. And because mornings are personal, there’s room here for your own twists: a glaze you adore, a texture tweak you crave, or a flavor accent that speaks to your family’s favorites. This is not a one-size-fits-all indulgence; it’s a thoughtfully crafted canvas that invites your own morning story to unfold.

The Story Behind the Dish

Every beloved breakfast begins with a memory, and for these donuts the memory is of strolling into a sunlit bakery on a weekend morning, the air thick with sweet steam and the soft shuffle of feet on tile. Yet the more we pursued that bakery-like experience, the more we wanted to translate it into weekday practicality: something that could be whipped up with confidence, that traveled well, and that offered a gentler energy boost than a heavy pastry with a sugar spike. The idea grew from a simple realization: a do-anytime treat can be both satisfying and nourishing when its foundations are thoughtful and balanced, not overwhelming.

The evolution of this dish mirrors a shift in morning rituals across kitchens and coffee bars worldwide. People began to crave ritual without rigidity—something that feels special enough to kick off a celebration of the day, yet versatile enough to adapt to different schedules, dietary preferences, and seasonal moods. The concept of a breakfast donut, reimagined with a focus on wholesome texture and chocolate depth, emerged as a delightful compromise between indulgence and wellness. It’s a dish born from the intersection of comfort and practicality: a little ring of joy that nods to childhood memories but speaks to modern habits, family kitchens, and the desire to start mornings with intention and satisfaction.

Over time, the recipe gathered curious iterations—more fiber without sacrificing tenderness, a touch of natural sweetness that doesn’t overwhelm, and a structure sturdy enough to hold up in a lunchbox or a desk drawer. Each tweak was guided by a simple philosophy: treat the donut like a small celebration of the day, but design it so it can be enjoyed often, with a gentle, sustained energy that supports focus, creativity, and steady mood. The result is a donut that feels familiar and comforting, yet carries a modern, ingredient-conscious approach beneath its chocolatey surface.

Why You’ll Love This Recipe

  • Quick to bake and easy to customize, making weekday mornings feel like a small win.
  • Moist, tender crumb that delivers a satisfying bite without heaviness or excess sugar.
  • Chocolate-forward flavor that satisfies cravings while keeping the sweetness approachable for all ages.
  • Versatile base that invites gentle adaptations to suit preferences and dietary needs (without compromising texture).
  • Portable and snack-friendly, ideal for school lunches, commutes, or afternoon coffee rituals.
  • Flavorable enough to pair gracefully with a wide range of beverages and toppings, from warm drinks to bright fruit compotes.
  • Family-friendly appeal that can be enjoyed by kids and adults alike, turning ordinary mornings into shared moments.
  • Built on a foundation of balance: a treat that feels indulgent but remains thoughtful about nourishment and portion control.

Flavor Profile & Texture

The flavor profile centers on chocolate’s comforting richness, tempered by a soft sweetness that doesn’t overwhelm and a gentle, almost caramel-like undercurrent that emerges as the donut rests on the tongue. The chocolate is present but not domineering, offering a refined cocoa note that pairs beautifully with a mild, bakery-like crust and a moist interior. There’s an undertone of warmth—subtle spices or toasted hints—that elevates the chocolate without masking its character. The overall taste is indulgent without being heavy, a dare-to-satisfy-now-but-feel-good-afterwards kind of experience.

Texture-wise, these donuts strike a delicate balance between cake-like tenderness and a sturdy crumb that holds its shape when picked up and eaten by hand. The exterior offers a faint glaze-ready gloss or a gentle dry-sugar kiss, depending on your chosen finish, while the interior stays soft and pillowy. The moisture content, crafted with careful contrasts, yields a crumb that lightly springs back, with a refined crumb structure that hints at bakery style without sacrificing everyday practicality. If you choose to add a glaze or drizzle, it becomes a glossy, inviting finish that crackles just enough as you bite, adding an extra layer of textural delight. For those who prefer a more nuanced texture, a light dusting of cocoa or a delicate sprinkling of edible accents can provide a little crunch or shimmer without overwhelming the softness inside.

Occasions & Pairings

These Healthy Chocolate Breakfast Donuts shine in a variety of settings. They’re ideal for a relaxed weekend breakfast, a quick weekday treat that still feels special, or a sunny brunch where you want to offer something comforting but not overly rich. They are equally at home next to a cup of coffee or a glass of cold milk, pairing well with a simple fruit salad, a dollop of yogurt, or a small spoonful of bright jam that cuts through the cocoa with a tangy contrast. Their portability makes them a natural choice for school mornings or office snack breaks, turning a routine moment into a small pause filled with aroma and warmth.

For pairings, think about beverages that complement chocolate’s depth. A robust coffee or a mid-strength tea can enhance the cocoa notes, while a creamy dairy or plant-based milk can soften the finish. Fresh berries or citrus segments can provide a refreshing acidity that balances sweetness, and a light yogurt or a mild ricotta could serve as a gentle, tangy counterpoint if you’re serving these for a brunch spread. If you’re shaping a seasonal menu, pairings can shift subtly with the calendar—warming spices in autumn and a brighter, zesty zest in spring can influence your topping ideas or an accompanying fruit compote.

Tips, Variations & Substitutions

  • Think texture and sweetness first: if you prefer more bite or extra tenderness, adjust the moisture profile with subtle swaps in fat or liquid components, keeping the balance that makes the interior soft yet structured.
  • Flavor twists are welcome: a hint of spice, a touch of espresso-like depth, or a splash of vanilla can elevate the chocolate without complicating the finish. If you enjoy contrast, a bright citrus zest or a blueberry swirl can offer a delightful lift.
  • Finish options: decide between a light glaze for a glossy finish or a gentle dusting of something that adds visual appeal and a whisper of sweetness. A simple, cinnamon-tinged powder or a cocoa-sugar kiss can provide a beautiful finish without overpowering the core flavors.
  • Make it your own with gentle substitutions: you can explore different flour blends or moisture-adjusting components to suit preferences or dietary goals, and you can scale sweetness to taste by adjusting natural sweeteners and fruit accents in a respectful, balanced way.
  • Global twists: draw inspiration from traditional desserts around the world by incorporating subtle aromatics or toppings that nod to different culinary backgrounds, all while maintaining a soft and approachable profile.

Storage & Make-Ahead Ideas

Leftovers, if any, can be tucked away for later enjoyment, preserving the gentle sweetness and soft interior. Store gently in an airtight container at room temperature for a day or two, or refrigerate them to extend their freshness for another couple of days. For longer storage, these donuts freeze well—wrap them individually to protect against freezer burn and maintain their delicate texture when thawed. Reheat gently to bring back the warmth and aroma, giving them a quick revival that tastes almost as fresh as the first bite. If you’re making ahead for a busy week, consider freezing the donuts in stages and warming them as needed, so each morning starts with that sense of bakery-delight without a long morning prep.

To keep the experience bright and appealing, reheat with a brief gentle warmth and avoid overheating, which can dull the tender crumb. A light glaze or finish can be added after reheating if you prefer a more polished look, but even without a finish, their inherent tenderness remains a pleasure. If you like to refresh the flavor, a quick Canadian-tale moment, such as a squeeze of citrus or a sprinkle of a fragrant zest, can offer a new morning twist without complicating the overall approach.

Fun Facts & Trivia (Optional)

Donuts have a long, playful history that mirrors the evolution of breakfast culture. The beloved circular shape with a hole in the middle is not just for aesthetics; it was historically practical, allowing dough to cook more evenly and produce a uniform texture. Chocolate, as a flavor, has traveled a remarkable journey from ancient Mesoamerican origins to a global staple in desserts and beverages—its inclusivity across cultures makes it a natural fit for a breakfast treat that aims to feel comforting yet modern. The idea of turning a classic pastry into a wholesome morning option taps into a broader trend: honoring cravings while weaving in balance, nourishment, and a sense of everyday luxury. By reimagining a traditional indulgence as a breakfast donut, this recipe participates in a broader conversation about how we can enjoy the flavors we love while staying mindful of our energy, mood, and schedule. And that is a tiny, delicious celebration of the daily routine itself.

Ingredients

Donut Base

    – 1 cup oat flour (gluten-free if needed)
    → Oat flour provides a light, tender crumb that pairs well with chocolate and keeps the donuts naturally approachable for gluten-free diets. If you don’t have oat flour, blend rolled oats until very fine, then measure. Sift to remove any larger particles for a smoother batter.

    – 1/2 cup almond flour
    → Almond flour adds moisture, richness, and a subtle nutty note that improves crumb softness in baked goods. Use finely ground almond flour, not almond meal, to avoid a grainer texture. Gently whisk with other dry ingredients to ensure even distribution.

    – 1/3 cup unsweetened cocoa powder
    → Provides the chocolate flavor and color. Choose Dutch-processed for a smoother, milder chocolate or natural cocoa for a more robust bite; sift to remove lumps and ensure even coloring in the batter.

    – 1/4 teaspoon fine sea salt
    → Enhances the sweetness and brings out the chocolate flavor; use fine salt so it distributes evenly and doesn’t create pockets of saltiness in the batter.

    – 1 teaspoon baking powder
    → Leavening that helps the donuts rise to a light, cake-like texture. Make sure it’s fresh and evenly dispersed by whisking with the dry ingredients; this will prevent a compact crumb and give a nice dome on the baked donuts.

    – 1/4 teaspoon baking soda
    → Works with acidic ingredients to contribute to browning and lift, improving crumb tenderness. Ensure it’s evenly mixed with the other dry ingredients to avoid uneven pockets of leavening.

Wet & Sweeteners

    – 1 large ripe banana, mashed
    → Banana provides moisture and natural sweetness while acting as a binder in place of extra fat. Mash until smooth (a few small lumps are okay if you prefer a bit more texture). Very ripe bananas with dark spots offer the best flavor concentration.

    – 2/3 cup unsweetened almond milk (or any plant milk)
    → Hydrates the dry ingredients to form a cohesive batter without dairy. Use at room temperature for best mixing; if batter seems too thick, whisk in a tablespoon at a time until you reach a thick, spoonable consistency.

    – 1/4 cup unsweetened applesauce
    → Adds moisture and acts as a partial fat replacer, contributing to a lighter, tender crumb. It also helps bind the batter. Use unsweetened to avoid extra sugar; you can replace part of the banana with applesauce if you prefer.

    – 1 large egg, lightly whisked (or 1 flax egg: 1 tablespoon ground flaxseed + 2.5 tablespoons water, mix and let sit 5 minutes)
    → Egg provides structure and moisture; flax egg is a reliable vegan alternative that mimics binding when fully prepared. If using flax, let the mixture gel before adding to the batter to ensure a cohesive texture.

    – 2 teaspoons pure vanilla extract
    → Enhances overall flavor and depth, especially with chocolate. Use pure vanilla extract for the strongest aroma; avoid imitation if possible, and add to wet ingredients to distribute evenly.

    – 2 tablespoons pure maple syrup (or honey)
    → Adds a touch of natural sweetness and helps keep the donuts moist. If you prefer a lower sugar version, reduce to 1 tablespoon and rely more on banana ripeness for sweetness; drizzle extra at glaze stage if desired.

Optional Add-ins

    – 1/3 cup dark chocolate chips (70% cacao)
    → Pockets of melted chocolate provide extra indulgence. Fold in gently at the end to avoid overmixing and sinking; chips can slightly weigh the batter, so handle with light hands for even rise.

    – 1/4 cup chopped walnuts or pecans
    → Adds crunch and a toasty note that contrasts with the soft crumb. Toast nuts lightly before chopping to intensify flavor; fold in last to keep their texture intact in the finished donuts.

    – 1 tablespoon chia seeds or ground flaxseed
    → Boosts fiber and helps with binding, particularly in vegan versions. If using whole chia, you may notice slight texture; consider grinding flaxseed for smoother batter. Increase hydration slightly if batter thickens after adding seeds.

Glaze & Toppings

    – 1/3 cup dairy-free dark chocolate chips or chopped dark chocolate
    → Melted chocolate creates a glossy glaze that complements the chocolate base while keeping the recipe dairy-free. Melt gently over low heat or in 20-second bursts in the microwave, stirring between sessions to avoid scorching.

    – 1-2 teaspoons coconut oil
    → Helps thin and shine the glaze for easy drizzle. A small amount goes a long way; using refined or unrefined coconut oil will alter aroma slightly, so choose based on your preference for coconut note in the glaze.

    – 2-3 tablespoons unsweetened almond milk (to adjust glaze consistency)
    → Used to loosen the glaze to a pourable consistency for a smooth drizzle. Add gradually; if the glaze thickens after refrigeration, warm slightly or add a touch more milk to regain pouring consistency.

    – Optional toppings: shredded coconut (toasted), cacao nibs, or chopped hazelnuts
    → Finish with a textural contrast and visual appeal. If toasting coconut or nuts, do so briefly on low heat to release aroma; sprinkle immediately after glazing for best adhesion.

Instructions

  • Preheat your oven to 350°F (175°C) and lightly grease a 6-cavity donut pan with nonstick spray or brush with neutral oil; you may dust with a tiny amount of oat flour to prevent sticking.
    → A well-greased pan ensures donuts release cleanly and retain their domed shape without tearing the crust.
  • Sift or whisk together the dry base components—oat flour, almond flour, unsweetened cocoa powder, fine sea salt, baking powder, and baking soda—in a large bowl until evenly combined and free of lumps.
    → Sifting aerates the mix and distributes leavening uniformly, which promotes a light, tender crumb and consistent rise in every cavity.
  • Mash the ripe banana until completely smooth with a few tiny lumps optional for texture, then whisk in the unsweetened almond milk, applesauce, vanilla extract, and maple syrup until the mixture is uniform; keep mixture at room temperature for optimal emulsification.
    → Fully mashed banana provides moisture and binder; warming the liquids helps them integrate smoothly into the dry ingredients for a cohesive batter.
  • Whisk in the egg (or prepare a flax egg by mixing 1 tablespoon ground flaxseed with 2.5 tablespoons water and letting it sit 5 minutes until gelled), then fold the wet ingredients into the dry just until a thick batter forms; avoid overmixing to protect tenderness.
    → The egg or flax gel supplies structure and moisture; overmixing gluten-free batters can create toughness and a dense crumb.
  • If using optional add-ins (dark chocolate chips, chopped walnuts or pecans, or chia/ground flaxseeds), fold them in now with a gentle hand to distribute evenly without breaking up the batter or causing chips to sink.
    → Add-ins enhance flavor and texture, but gentle incorporation preserves lift and prevents sinking.
  • Spoon or pipe the batter into the prepared donut pan cavities, filling each about two-thirds to three-quarters full to allow room for expansion; tap the pan firmly on the counter to settle the batter and eliminate air pockets.
    → Proper filling ensures a uniform dome and prevents mis-shapen donuts; tapping minimizes large air gaps that can create cracks during baking.
  • Bake for 12–15 minutes, or until a toothpick inserted into a center donut emerges with only a few moist crumbs and the edges look set; if your oven bakes unevenly, rotate the pan halfway through baking.
    → Accurate doneness testing prevents dry, crumbly donuts and ensures a tender interior with a light crust.
  • Cool the donuts in the pan for 5–7 minutes on a rack, then invert or gently remove them to a cooling rack to finish cooling completely before glazing; this prevents steam from softening the glaze and helps the surface hold the glaze evenly.
    → Resting stabilizes the crumb and creates a dry surface that oozes less glaze during application.
  • Prepare the glaze by melting 1/3 cup dairy-free dark chocolate chips with 1–2 teaspoons coconut oil and 2–3 tablespoons unsweetened almond milk in a heatproof bowl over simmering water or in short bursts in the microwave, stirring until smooth; adjust with more almond milk to reach a pourable consistency.
    → Gentle heat preserves gloss and prevents scorching; coconut oil helps the glaze set with a glossy finish while maintaining dairy-free integrity.
  • Glaze the cooled donuts by dipping the tops or drizzling in a thin, even layer, then immediately scatter optional toppings such as toasted shredded coconut, cacao nibs, or chopped hazelnuts; allow the glaze to set at room temperature before stacking or serving.
    → A uniform glaze adheres best to dry surfaces, while toppings add texture, aroma, and visual appeal once the glaze begins to firm.
  • Store any leftovers in an airtight container at room temperature for up to 2 days or refrigerate for up to 5 days; rewarm individual donuts briefly in the microwave before serving to restore softness.
    → Donuts stay moist when stored properly; reheating revives a freshly baked texture without drying out.

Notes

These Healthy Chocolate Breakfast Donuts are softly sweet with moisture from ripe banana and unsweetened applesauce, plus a touch of pure maple syrup for natural sweetness. The batter relies on oat and almond flours for a tender, cake-like crumb and a rich chocolate flavor. You can customize them by folding in your favorite mix-ins such as chopped nuts, cacao nibs, or a small handful of dried fruit. They freeze well and make a great grab-and-go breakfast or snack; reheat in the microwave for a quick warm bite. For a polished finish, glaze with a smooth dairy-free chocolate glaze or drizzle with maple syrup, and serve with a swirl of dairy-free yogurt if you like.

Gluten-free note: if you are gluten sensitive, ensure your oat flour is certified gluten-free and that your baking powder is gluten-free. If you don’t need gluten-free options, you can experiment with using regular all-purpose flour in place of the oat and almond flours, but keep an eye on moisture—you may need to adjust with a splash of milk. For storage, keep baked donuts in an airtight container at room temperature for up to 3 days or freeze for longer keeping quality.

Tips

Tips for Healthy Chocolate Breakfast Donuts

  • Batter prep and ingredient handling: If you don’t have oat flour, blend rolled oats until very fine and measure before sifting. This helps achieve a tender crumb similar to traditional donuts. For best texture, sift all dry ingredients (oat flour, almond flour, cocoa, salt, baking powder, baking soda) together to break up lumps and ensure even distribution.
  • Flour choice and texture: Use finely ground almond flour rather than almond meal to avoid a gritty crumb. If you notice the batter is too dense, whisk in an additional tablespoon of almond milk at a time until it reaches a thick, spoonable consistency.
  • Chocolate handling: Sift cocoa powder to remove lumps and choose Dutch-processed for a smoother, milder chocolate or natural cocoa for more bite. This choice will influence how your dough browns and how noticeable the chocolate flavor is.
  • Leavening insight: Fresh baking powder helps donuts rise to a light, cake-like texture. If you’re using natural cocoa (which can be less acidic), you may rely more on baking powder for lift. If you use Dutch-processed cocoa, the baking soda’s role is smaller unless you add a bit of acidity (e.g., a splash of yogurt or a teaspoon of cider vinegar) to balance it.
  • Moisture balance: Bananas provide moisture and act as a partial fat replacer. Very ripe bananas offer the best flavor. If your batter seems dry, add a splash more plant milk or a teaspoon of applesauce to rehydrate.
  • Eggs vs flax eggs: If vegan, use a flax egg and let it gel for about 5 minutes before mixing. For best structure, add wet ingredients to the dry gradually and avoid overmixing once the dry and wet are combined.
  • Sweetness control: The combination of banana and maple syrup adds natural sweetness; taste the batter before baking and adjust with an extra teaspoon of maple if you like it sweeter, or rely on the glaze to add sweetness later.
  • Texture tips: Do not overmix the batter; mix until just combined to keep the donuts light and tender. If you notice a dense crumb, gently fold in 1–2 extra tablespoons of milk and a pinch more leavening if needed.
  • Optional add-ins (crunch and flavor): For chocolate chips, toss them with a teaspoon of flour before folding to prevent sinking. Toast nuts lightly to intensify their flavor, then fold in at the end to keep their crunch.
  • Donut pan prep: Grease a donut pan well or use a silicone mold to prevent sticking. Fill each cavity about 2/3 full to allow room for doming during baking. If you overfill, expect overflow and uneven shapes.

Baking, Glazing, and Finishing Tips

  • Baking temperature and timing: Bake at a moderate temperature (around 350°F / 175°C) until a toothpick inserted near the center comes out with a few moist crumbs. If your oven runs hot, lower the temperature 25°F and check a bit earlier to avoid over-browning.
  • Cooling: Let donuts cool in the pan for 5–10 minutes before transferring to a wire rack. This helps prevent breakage and ensures the interior finishes cooking without drying out.
  • Glaze consistency: Melt dairy-free dark chocolate with a bit of coconut oil and whisk in almond milk a little at a time until you reach a smooth, pourable glaze. If the glaze is too thick, warm slightly; if too thin, add a touch more melted chocolate and chill briefly to thicken.
  • Glazing technique: For a glossy finish, dip the tops of cooled donuts into the warm glaze or drizzle with a spoon. Allow the glaze to set completely at room temperature or in the fridge for a quicker seal. You can lightly re-warm the glaze if needed to maintain smooth drips.
  • Flavor boosts for glaze: If you want a deeper chocolate note, add a pinch of espresso powder to the glaze. For a nutty aroma, sprinkle toasted chopped hazelnuts or shredded coconut right after glazing.
  • Make-ahead glaze plan: Prepare the glaze and toppings ahead of time. Rewarm glaze in 20-second bursts in the microwave, stirring between bursts, and stir in a splash of almond milk to restore pourability as needed.
  • Storage: Store baked donuts in an airtight container at room temperature for up to 2 days, or refrigerate for 4–5 days. Freeze unfrosted donuts for up to 1–2 months; thaw at room temperature and glaze when ready to eat.
  • Make-ahead option: You can bake and cool the donuts up to a day in advance, then reheat briefly in a 300°F (150°C) oven for 5–7 minutes to refresh the crumb before glazing.
  • Troubleshooting – dense crumb: This can happen if overmixed or if there’s too much flour. Add a little more almond milk or applesauce to reach a thicker batter that still flows off a spoon. Ensure baking powder is fresh and evenly distributed.
  • Troubleshooting – uneven rise or sinking: Check that the batter is not too heavy from extra add-ins and that the pan is properly greased. Fill cavities to the same level to encourage even doming, and avoid opening the oven door during the first half of baking.

FAQ

What are Healthy Chocolate Breakfast Donuts?

A baked, wholesome donut designed for a balanced breakfast or morning snack. They’re choco-rich, naturally sweetened with fruit and a touch of maple, and made with then-healthy pantry staples like oats and yogurt for a soft, cake-like texture.

What ingredients do I need?

Common ingredients you might use (or swap with equivalents):

  • Rolled oats (blended into oat flour) or oat flour
  • Ripe banana or applesauce for moisture
  • Greek yogurt (or dairy-free yogurt)
  • Eggs (or flax/chia eggs for vegan)
  • Cocoa powder
  • Baking powder and a pinch of salt
  • Milk or dairy-free milk
  • Vanilla extract
  • Maple syrup, honey, or another natural sweetener (optional)
  • Optional add-ins: chocolate chips, chopped nuts, cinnamon
Can I make this gluten-free?

Yes. Use certified gluten-free oats (or oat flour) and gluten-free baking powder. Ensure all other ingredients are labeled gluten-free if you have celiac disease or a severe gluten sensitivity.

Is this vegan or dairy-free?

You can make a vegan/dairy-free version. Use flax eggs or chia eggs instead of real eggs, dairy-free yogurt, and plant-based milk, and choose dairy-free chocolate chips. Replace honey with maple syrup or agave.

How do I bake them (time and temperature) and what pan should I use?

Preheat your oven to 350°F (175°C). Bake for about 12–15 minutes, or until a toothpick inserted comes out with a few crumbs. Grease a donut pan well or use silicone donut molds. If you don’t have a donut pan, you can bake the batter in a muffin tin for muffins or mini muffins as an alternative.

How should I store and reheat leftovers?

Store donuts in an airtight container at room temperature for up to 3 days. They’ll keep in the fridge about 4–5 days and freeze well for 2–3 months. Reheat briefly in a microwave (15–20 seconds) or in a 325°F (165°C) oven for a few minutes to restore softness.

How can I customize the flavors?

Try these mix-ins and tweaks:

  • Add a teaspoon of espresso powder for a mocha flavor
  • Sprinkle cinnamon or a pinch of chili powder for warmth
  • Swirl in peanut butter or almond butter inside the batter
  • Add orange or peppermint zest for a bright twist
  • Top with a light glaze or sprinkle with crushed nuts
Can I reduce or substitute sugar?

You can rely on the banana and a small amount of maple syrup to sweeten. For less sugar, use a very ripe banana and only 1–2 tablespoons of maple syrup or omit it altogether. If you want sweeter donuts without added sugar, you can blend dates or use a sugar-free sweetener designed for baking, keeping in mind moisture balance may change.

Do I need special equipment like a donut pan?

A donut pan makes the classic shape easy, but it’s not strictly required. You can bake in a silicone donut mold, a standard muffin tin (as muffins), or even shape the batter into small rounds on a baking sheet. Just adjust bake time as needed.

Can I make these ahead for meal prep?

Yes. Bake and cool completely, then freeze in an airtight container or freezer bags. Thaw at room temperature or reheat in a toaster oven or microwave. For best texture, reheat just until warm and soft.