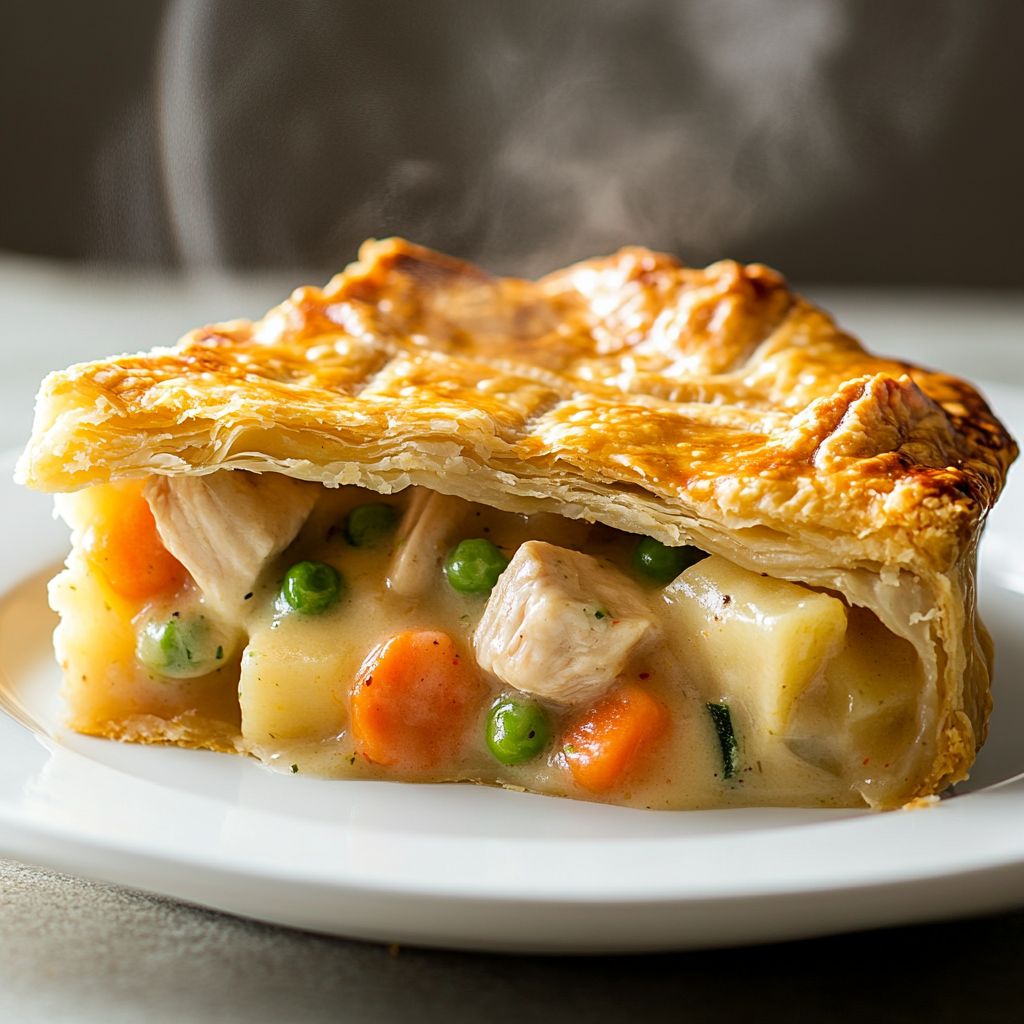
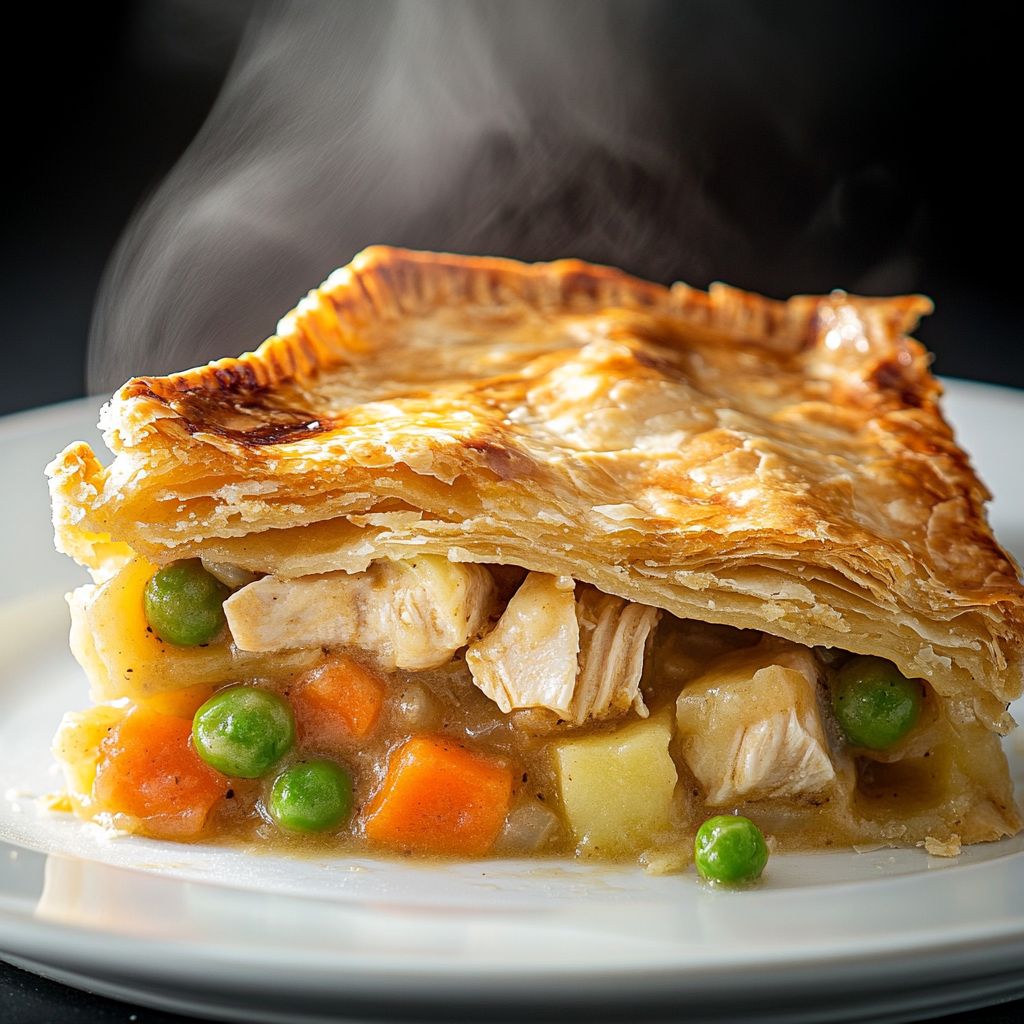
Author

Ocean Nightleaf

Browsing

Introduction / Hook

Imagine the comforting aroma wafting through your kitchen, filling every corner of your home with the smells of tender chicken, hearty vegetables, and flaky, buttery crust. There’s nothing quite like a homestyle chicken pot pie to evoke feelings of warmth and nostalgia. This dish is the epitome of comfort food, perfect for winding down after a long day or sharing with loved ones around the dinner table. The intricate layers of flavors and textures work harmoniously to create an experience that is both soothing and satisfying; a dish that is truly special and worth making time and time again.

The Story Behind the Dish

The chicken pot pie boasts a rich history, with roots tracing back to medieval Europe where savory pies were a staple of noble feasts. The concept was brought to the New World by European settlers, and thus began this dish’s journey into the heart of American cuisine. Traditionally, chicken pot pies were enjoyed at any time of the year, made with whatever ingredients were readily available or leftover, reflecting the resourceful spirit of home cooks throughout history.

Over time, the chicken pot pie has evolved into a quintessential symbol of American comfort food, yet it continues to reflect its original purpose: a meal that is both nourishing and indulgent. Whether served at family gatherings, special occasions, or simply as a heartwarming weeknight dinner, this classic dish remains an enduring favorite across generations.

Why You’ll Love This Recipe

  • Easy to Make: Despite its impressive appearance, this chicken pot pie is surprisingly easy to prepare, making it accessible for cooks of all skill levels.
  • Ultimate Comfort Food: Perfect for those cold, blustery days when all you want is something cozy to eat.
  • Family-Friendly: Both adults and kids will love this timeless dish, ensuring clean plates and satisfied tummies.
  • Customizable: Incorporate your favorite vegetables or herbs to personalize the recipe to your liking.

Flavor Profile & Texture

The essence of a great chicken pot pie lies in its delicate balance of flavors and textures. The creamy filling is infused with succulent chicken and a medley of vegetables like carrots, peas, and potatoes, each providing its own subtle sweetness and earthy notes. The sauce, rich with chicken stock and cream, envelops these ingredients, binding them together with a luscious, velvety consistency.

Encasing this delectable filling is the pièce de résistance — a golden, flaky crust that is both buttery and crumbly, providing a delightful contrast to the hearty interior. As your fork breaks through the crust, the filling’s aromatic steam rises, tantalizing your senses and promising a truly satisfying culinary experience.

Occasions & Pairings

The homestyle chicken pot pie is wonderfully versatile and can be tailored to suit a range of occasions. It serves as a perfect main course on a chilly winter night or as a star dish at a casual family gathering. For holiday meals, consider presenting this dish as a comforting alternative or complement to traditional fare.

Pair your chicken pot pie with a simple green salad or roasted vegetables to add freshness and crunch. When it comes to drinks, a crisp, chilled white wine like Chardonnay or a light ale complements the richness of the pie beautifully. For dessert, something light and fruity, such as a lemon tart or apple crumble, offers a perfect end to a delightful meal.

Tips, Variations & Substitutions

One of the beauties of chicken pot pie is its adaptability. Here are some tips and variations to make your recipe sing:

  • Vegetarian Version: Swap the chicken for mushrooms or a mix of root vegetables for a hearty vegetarian alternative.
  • Gluten-Free Option: Use gluten-free flour to make the crust or opt for a pre-made gluten-free pie crust from the store.
  • Herb Infusion: Add herbs such as thyme or rosemary to the filling for an aromatic boost.
  • Cheesy Variation: Stir in some grated cheese into the filling for added richness and flavor.

Storage & Make-Ahead Ideas

This chicken pot pie is just as delightful the next day, and it’s well-suited for making in advance. After baking, allow the pie to cool before storing leftovers in an airtight container in the refrigerator for up to three days. To reheat, place in a preheated oven until warmed through. Alternatively, freeze the unbaked pie for later enjoyment; simply wrap it tightly in plastic wrap and aluminum foil before freezing.

If you’re aiming to get ahead, consider preparing the filling up to a day in advance and storing it in the refrigerator. When ready to assemble, simply fill your crust and bake as directed, reducing your active cooking time substantially.

Fun Facts & Trivia

Did you know that the world’s largest chicken pot pie was made in Pottsville, Pennsylvania, and weighed in at an astonishing 10,540 pounds? This mammoth creation was crafted in 1997 and stands as a testament to the enduring popularity of this wholesome dish.

While the classic chicken pot pie maintains its traditional appeal, its core concept has inspired many variations worldwide, including everything from seafood pies in New England to spicy versions influenced by southwestern flavors. This adaptability and timelessness are perhaps the secret to the chicken pot pie’s lasting legacy.

Ingredients

Homestyle Chicken Pot Pie Ingredients

    Pie Crust

  • 2 1/2 cups all-purpose flour
    → All-purpose flour is the primary ingredient that combines with fat to create the structure of the pie crust. It should be measured accurately and sifted beforehand if necessary to ensure a light, flaky texture. When mixing, avoid overworking the dough to keep it tender.
  • 1 teaspoon salt
    → Salt enhances flavor in the dough, balancing the richness of the ingredients. Use fine salt for even distribution, and add it to the flour before mixing in the fat.
  • 1 cup unsalted butter (cold, cubed)
    → Cold butter is key for a flaky crust, as the butter will create pockets of steam during baking. Cut the butter into cubes and keep it refrigerated until ready to use to prevent it from melting into the flour.
  • 6 to 8 tablespoons ice water
    → Ice water helps bind the dough together without warming it up. Start with 6 tablespoons and add more as needed, mixing until the dough holds together but is not sticky. Using cold water also aids in achieving a flaky texture.
    Filling

  • 2 cups cooked chicken (shredded or cubed)
    → Use leftover roasted chicken or poach chicken breasts for a homemade touch. Ensure the chicken is cooked through and seasoned well; this will be the main source of protein and flavor in the pot pie.
  • 1 cup carrots (diced)
    → Fresh or frozen carrots add sweetness and color. Dice them into even pieces for uniform cooking. If using fresh carrots, steam or sauté until just tender, as they will cook further in the oven.
  • 1 cup peas (fresh or frozen)
    → Peas provide a burst of sweetness and a pop of color. If using fresh peas, blanch them briefly; if using frozen, simply measure and incorporate them directly into the filling without thawing.
  • 1/2 cup celery (diced)
    → Celery adds crunch and a subtle savoriness to the filling. Dice evenly and sauté with other vegetables to soften them and release their flavors before mixing with the chicken.
  • 1/2 cup onion (diced)
    → Onion provides depth of flavor in the filling. Dice finely and sauté with the celery until translucent to enhance the overall taste of the pot pie.
  • 1/4 cup all-purpose flour
    → This thickens the filling and gives it a creamy consistency. After cooking the vegetables, sprinkle the flour over and stir to create a roux, which will help bind the filling once the broth is added.
  • 1 3/4 cups chicken broth
    → Broth adds moisture and flavor to the filling. Use low-sodium chicken broth to control the salt levels in the dish. After adding the broth, stir well and let it simmer to thicken before combining with the chicken and vegetables.
  • 1/2 cup heavy cream
    → Heavy cream enriches the filling, making it creamy and luxurious. Add it after the broth has thickened to incorporate well and provide a comforting richness to the dish.
  • 1 teaspoon dried thyme
    → Thyme adds an aromatic herby flavor that pairs beautifully with chicken. Use dried thyme for convenience; if using fresh, adjust the amount to taste as it’s more potent.
  • Salt and pepper to taste
    → Season liberally to enhance all other flavors in the filling. Taste the filling before pouring it into the crust and adjust as needed for optimal flavor.

Assembly and Topping

  • 1 egg (beaten, for egg wash)
    → An egg wash creates a beautiful golden-brown crust. Beat the egg and brush it over the top of the crust before baking to give it a glossy finish. Make sure to cover all edges well for an even bake.

Instructions

  • Prepare the pie crust by combining the all-purpose flour and salt in a large mixing bowl.

    → This ensures a uniform distribution of the salt, which will prevent any areas of the crust from being bland. Use a whisk to integrate the ingredients for a lighter texture.
  • Add the cold, cubed unsalted butter to the flour mixture.

    → Using a pastry cutter or your fingertips, cut the cold butter into the flour until the mixture resembles coarse crumbs with pea-sized pieces of butter remaining. This step is crucial because it’s the butter that creates the flaky texture of the crust.
  • Slowly add 6 tablespoons of ice water to the flour-butter mixture, one tablespoon at a time, while mixing gently with a fork.

    → This helps to hydrate the flour without overworking the dough. Only add more water if the dough does not hold together when pressed.
  • Gather the dough into a ball and divide it in half. Flatten each half into a disc, wrap them in plastic wrap, and refrigerate for at least 1 hour.

    → Chilling the dough allows the gluten to relax, making it easier to roll out later and contributes to a flaky texture once baked.
  • Preheat your oven to 425°F (220°C).

    → Preheating the oven ensures that the crust begins to bake immediately upon entering, which helps achieve a crisp, golden finish.
  • Remove one disc of pie crust from the refrigerator and roll it out on a lightly floured surface to about 1/8 inch thick.

    → Make sure to rotate the dough as you roll to maintain a circular shape. Keeping the surface floured prevents sticking, and this thickness allows it to hold the filling without becoming soggy.
  • Transfer the rolled-out dough into a 9-inch pie dish, pressing it gently into the bottom and sides. Trim any excess crust hanging over the edges.

    → Pressing the dough into the dish evenly helps prevent the crust from shrinking during baking. The excess can be trimmed and used for decorative edges or a second pie.
  • Bake the bottom crust in the preheated oven for about 10 minutes until lightly golden. Remove from the oven and set aside to cool slightly.

    → Pre-baking the crust helps it to stay crisp even after adding the moist filling. Watch closely to prevent over-browning.
  • While the crust is baking, prepare the filling by dicing the onion and celery.

    → A uniform dice of vegetables ensures they cook evenly. A sharp knife will help make clean cuts and speed up the process.
  • In a large skillet, sauté the diced onions and celery in a bit of oil over medium heat until the onion is translucent and the celery is tender, about 5-7 minutes.

    → This step releases the natural sugars in the vegetables, enhancing the depth of flavor in your filling.
  • Add the diced carrots to the skillet and continue to cook for another 3-4 minutes until slightly softened.

    → Adding carrots after the onions and celery allows their sweetness to develop without becoming mushy in the final dish.
  • Sprinkle the all-purpose flour over the vegetable mixture in the skillet and stir well to coat the vegetables.

    → This creates a roux, which will thicken the filling and give it a creamy consistency. Cooking the flour for a minute also helps eliminate the raw flour taste.
  • Slowly pour in the chicken broth while stirring, ensuring there are no lumps. Allow the mixture to simmer for 5-7 minutes until it thickens.

    → Stirring continuously while adding broth prevents clumping and helps achieve a smooth filling. Simmering reduces the liquid to the right consistency.
  • Add the cooked, shredded chicken, heavy cream, peas, dried thyme, and salt and pepper to taste. Stir well to combine all the ingredients.

    → Incorporating the chicken and cream adds heartiness and richness. Taste at this point to adjust seasoning according to your preference.
  • Pour the filling into the pre-baked pie crust, spreading it evenly.

    → An even distribution ensures that each slice of the pot pie contains a balanced amount of filling.
  • Remove the second disc of chilled pie dough from the refrigerator and roll it out to the same thickness as before.

    → This will serve as the top crust, sealing in the filling and preventing it from drying out during baking.
  • Gently place the rolled-out dough over the filled pie, pressing the edges to seal tightly. Trim any excess.

    → Sealing the edges prevents the filling from bubbling over during baking. You can also crimp the edges for a decorative touch.
  • Cut several small slits in the top crust to allow steam to escape during baking.

    → These vents prevent a soggy crust by allowing excess moisture to release, helping achieve a beautifully baked pie.
  • Brush the top crust with the beaten egg to create an attractive, golden glaze.

    → This step enhances the appearance of the pie and contributes to that appealing golden color when baked.
  • Bake the assembled chicken pot pie in the preheated oven for 30-35 minutes or until the crust is golden brown and the filling is bubbling.

    → Keep an eye on the edges; if they brown too quickly, cover them with foil to prevent burning.
  • Remove the pie from the oven and allow it to cool for at least 10 minutes before slicing.

    → Allowing it to rest helps the filling set slightly, preventing it from spilling out when you cut into the pie.
  • Serve warm and enjoy your homestyle chicken pot pie!

    → This dish is comfort food at its finest, perfect for cozy meals and gatherings.

Notes

Homestyle Chicken Pot Pie is the perfect comfort food dish that promises warmth on a plate. This recipe features a flaky, buttery crust that encases a creamy chicken and vegetable filling, making it an irresistible meal for any occasion.

When preparing the pie crust, ensure that your ingredients are cold, especially the butter, as this is crucial for achieving the desired flakiness. It’s advisable to work quickly to prevent the butter from warming up during the mixing process. Always remember to measure your ingredients accurately for the best results!

For the filling, you can use leftover chicken, which saves time and adds great flavor. Incorporating a variety of vegetables not only adds nutritional value but also enhances the dish’s complexity and taste. Consider incorporating the vegetables gently to preserve their texture. The combination of chicken broth and heavy cream will create a lush and savory filling, which will be thickened with flour to ensure it holds up nicely within the pie.

As you assemble your pot pie, be sure to brush the top crust with the beaten egg wash thoroughly. This step is vital for creating that beautiful golden color that makes your pot pie aesthetically pleasing and appetizing. Adjust the seasonings just before baking to ensure that every bite is flavorful and satisfying.

This dish can be made ahead of time and even frozen for convenience; simply thaw and bake when you’re ready to enjoy! Serve hot with a side salad for a complete meal that’s sure to please your family and friends.

Tips

Tips for Preparing Homestyle Chicken Pot Pie

  • Chill your ingredients: Keeping your butter and water very cold is essential for a flaky pie crust. You can also chill your mixing bowl and utensils before starting to keep everything cold.
  • Don’t overmix the dough: When combining the flour and butter, mix until just combined. Overworking the dough can lead to tough crusts.
  • Rest the dough: After you prepare the pie crust, refrigerate it for at least 30 minutes. This helps to relax the gluten and makes it easier to roll out.
  • Cook your filling ahead of time: Take the time to fully cook your vegetables until they are tender before combining them with the chicken. This ensures that each ingredient contributes its full flavor.
  • Season as you go: Build flavor layers by seasoning each component of your filling—from the vegetables to the chicken broth. Be sure to taste as you prepare!
  • Allow for steam release: When you place your top crust over the filling, don’t forget to cut slits or create a lattice to allow steam to escape. This prevents a soggy filling and helps the crust bake evenly.
  • Check for doneness: Keep an eye on the pie during baking. If the crust starts to brown too quickly, you can tent it with aluminum foil to prevent burning while the filling finishes cooking.
  • Let it cool before serving: Once out of the oven, allow your pot pie to rest for at least 10-15 minutes. This will give the filling time to set and make serving easier.
  • Customize the filling: Feel free to experiment with other vegetables, such as corn, potatoes, or green beans, to suit your taste preferences or to use what you have on hand.

FAQ

What ingredients are needed to make Homestyle Chicken Pot Pie?

The main ingredients include chicken, pie crust, carrots, peas, potatoes, onions, garlic, chicken broth, heavy cream, and various seasonings like thyme and pepper.

How long does it take to prepare the Homestyle Chicken Pot Pie?

Preparation time typically takes about 30 minutes, and baking time is around 30 to 40 minutes, making the total time approximately 1 to 1.5 hours.

Can I use store-bought pie crust for this recipe?

Yes, you can absolutely use store-bought pie crust to save time. Just ensure it’s thawed if frozen before using it in the recipe.

Is it possible to make the chicken pot pie ahead of time?

Yes, you can prepare the filling ahead of time and store it in the refrigerator. Assemble the pie shortly before baking for the best results.

What type of chicken should I use for Homestyle Chicken Pot Pie?

You can use cooked rotisserie chicken for convenience or boil and shred chicken breasts. Both options work well in the recipe.

Can I add other vegetables to the Chicken Pot Pie?

Absolutely! Feel free to add other vegetables like corn, green beans, or mushrooms to customize the filling to your taste.

Is it possible to make a vegetarian version of this dish?

Yes, simply replace the chicken with a variety of vegetables or plant-based protein and use vegetable broth instead of chicken broth.

How do I know when the Chicken Pot Pie is done baking?

The pot pie is done when the crust is golden brown and the filling is bubbly. You can also insert a knife into the center to check that it’s hot all the way through.

Introduction: A Comforting Classic with a Gooey Twist

Imagine taking a bite of warm, creamy pasta, enveloped in a rich, velvety cheese sauce and topped with a golden, crunchy crust. This is not just any macaroni and cheese; this is the ultimate Cheesy Baked Mac and Cheese. A dish that instantly brings a sense of warmth and comfort, it is perfect for a cozy family dinner or a delightful potluck offering. As the aroma of baking cheese fills your kitchen, you’ll find yourself eagerly anticipating the melt-in-your-mouth experience. Whether you’re a seasoned chef or a cooking novice, this recipe promises to deliver an exquisite balance of flavor and texture that will make any mealtime special.

The Story Behind the Dish

Macaroni and cheese has earned its place as a beloved staple in many households around the world, but its roots trace back to the time-honored culinary practices of Italy and France. Originally introduced in the 13th century by using cheese over hand-cut pasta, it was the innovative cooks of the Renaissance era who paved the way for this delectable comfort food. Over time, this dish crossed oceans and landed in America, becoming an essential part of Southern cooking tradition.

Thomas Jefferson is often credited with popularizing macaroni and cheese in the United States. After sampling the dish in France, he brought back a pasta machine and introduced this cheese-laden delight to his guests at Monticello. This paved the path for mac and cheese to be integrated into American cuisine, where it evolved into the creamy baked indulgence we relish today.

Why You’ll Love This Recipe

  • Unbeatable Comfort: Perfectly creamy and cheesy with a breadcrumb topping that provides a delightful crunch.
  • Family-Friendly: Loved by kids and adults alike, making it an easy win at family dinners.
  • Versatile: Serve it as a main dish, accompany it with a salad, or pair it with proteins like chicken wings or grilled meats.
  • Easy to Make: Requires simple, readily available ingredients, making it perfect for a quick and satisfying meal.

Flavor Profile & Texture

The essence of this baked macaroni dish lies in the harmony between the silky cheese sauce and the al dente pasta. With a combination of sharp cheddar and creamy mozzarella, the sauce provides a robust flavor that tantalizes the palate. The breadcrumbs on top, infused with a hint of garlic, complement the dish with a slight crunch, creating a textural contrast. Each bite offers the comforting, homey taste of melted cheese paired with pasta, making it a consistently delightful dining experience.

Occasions & Pairings

This dish is well-suited for nearly any occasion, whether you’re hosting a festive holiday gathering or enjoying a quiet night in. Cheesy Baked Mac and Cheese can stand alone as a hearty main course or serve as a satisfying side dish in a larger meal.

Consider these pairing ideas to enhance your dining experience:

  • Side Dishes: Serve with roasted vegetables, a fresh garden salad, or garlic bread to complete your meal.
  • Beverages: Pair with a crisp white wine, like a Chardonnay, or offer a chilled beer or a homemade lemonade for the kids.
  • Desserts: Follow up with a light dessert, such as a fruit parfait or a creamy panna cotta, for a balanced meal.

Tips, Variations & Substitutions

Here are several ways to adapt this recipe to suit your taste or dietary needs:

  • Alternative Cheeses: Embrace diversity with Gruyère, Fontina, or Gouda to create unique flavor profiles.
  • Dairy-Free: Use non-dairy cheese and milk alternatives, like almond or oat milk, for a lactose-free version.
  • Spice It Up: Add some heat with a sprinkle of cayenne or chopped jalapeños mixed into the cheese sauce.
  • Vegetarian Twist: Incorporate blanched broccoli or wilted spinach for added nutritional benefit and color.
  • Gluten-Free: Use gluten-free pasta and breadcrumbs to make this dish suitable for those avoiding gluten.

Storage & Make-Ahead Ideas

This dish is as convenient as it is delicious, with options for making ahead and storing:

  • Refrigeration: Store any leftover mac and cheese in an airtight container in the refrigerator for up to 3-4 days. Reheat in the oven or microwave until warmed through.
  • Freezing: Prepare the recipe up until the baking stage, then cover tightly with foil and freeze. When ready to eat, bake from frozen, adding an additional 15-20 minutes to the cooking time.
  • Make-Ahead: Prepare the cheese sauce and pasta up to 24 hours in advance and keep them separate until it’s time to bake, ensuring the best texture for your finished dish.

Fun Facts & Trivia

Did you know that the world record for the largest serving of macaroni and cheese was set in Toronto, Canada, in 2010, and weighed an astonishing 2,469 pounds? This incredible culinary feat is a testament to the dish’s widespread appeal and its capacity to bring people together on a grand scale. Additionally, the concept of boxed mac and cheese was introduced in 1937 by Kraft Foods, and it became an instant hit during the Great Depression due to its affordability and simplicity.

Whether you’re a lifelong devotee or a newcomer, Cheesy Baked Mac and Cheese captivates with its timeless blend of simplicity, comfort, and indulgence. From its storied history to modern-day adaptations, this dish invites creativity and customization while remaining faithful to its roots as the ultimate comfort food. Whatever the occasion, this recipe is sure to make your dining experience both memorable and incredibly satisfying.

Ingredients

  • Macaroni

    → 2 cups elbow macaroni is the base of this dish. It should be cooked al dente according to package instructions, as this will ensure the pasta holds its shape and texture during baking. Avoid overcooking, as it will continue to soften while baking in the cheese sauce.
  • Butter

    → 4 tablespoons unsalted butter is used to create a roux, which thickens the cheese sauce. It’s important to use unsalted butter to control the saltiness of your dish. Be sure to melt it over low heat to prevent burning before adding the flour.
  • All-Purpose Flour

    → 1/4 cup all-purpose flour is essential for thickening the sauce. The flour should be whisked together with the melted butter to form a smooth roux, which helps create a creamy texture in the final dish. Cook it for a minute or so to remove the raw flour taste.
  • Milk

    → 2 cups whole milk adds creaminess and volume to the cheese sauce. It should be warmed slightly before adding to the roux to help prevent lumps. Whole milk is preferred due to its fat content, resulting in a richer flavor and texture.
  • Cheddar Cheese

    → 2 cups shredded sharp cheddar cheese provides the characteristic cheesy flavor of this dish. Use freshly shredded cheese for the best meltability and taste, as pre-shredded cheese often contains anti-caking agents that affect texture. Gradually stir in the cheese once the milk is combined for a smooth sauce.
  • Mustard Powder

    → 1 teaspoon mustard powder enhances the overall flavor of the cheese sauce, giving it a subtle tang. This ingredient should be whisked into the dry ingredients along with the flour to ensure it gets distributed evenly. Adjust the amount based on your preference for tanginess.
  • Salt

    → 1 teaspoon salt is crucial for bringing out the flavors in the mac and cheese. Season the pasta water generously with salt and taste the cheese sauce before baking to ensure it’s well-seasoned. It’s important to adjust the salt to taste, especially considering the saltiness of the cheese.
  • Black Pepper

    → 1/2 teaspoon freshly ground black pepper adds warmth and depth to the dish. It’s best to use freshly ground pepper for the most pronounced flavor. Feel free to adjust the amount based on your preference for spice.
  • Panko Breadcrumbs

    → 1/2 cup panko breadcrumbs are used for a crunchy topping. They should be mixed with a tablespoon of melted butter before sprinkling over the mac and cheese. Using panko instead of regular breadcrumbs provides a lighter, crispier texture when baked.

Instructions

  • Bring a large pot of salted water to a boil over high heat.

    → Start with enough water to fully submerge the macaroni, as this prevents it from sticking together. Add a generous amount of salt, which helps flavor the pasta as it cooks, making it more tasty.
  • Add 2 cups of elbow macaroni to the boiling water and cook according to the package instructions until al dente.

    → Stir the pasta occasionally to keep it from clumping. Cooking the pasta al dente ensures it maintains a firm texture that holds up during baking in the cheese sauce. Overcooked pasta will turn mushy.
  • Drain the cooked macaroni in a colander and set aside.

    → This step helps remove excess water that could dilute your cheese sauce. Make sure to shake the colander gently to remove any lingering moisture.
  • In a large saucepan, melt 4 tablespoons of unsalted butter over low heat.

    → Heating the butter slowly helps prevent it from burning. Melt until completely liquefied, which will take a couple of minutes. Stir occasionally to ensure even melting.
  • Add 1/4 cup of all-purpose flour to the melted butter and whisk continuously for about 1 minute.

    → This forms a roux, which will thicken your cheese sauce. Whisking continuously prevents lumps from forming and cooks out the raw flavor of the flour.
  • Gradually whisk in 2 cups of warmed whole milk.

    → It’s important to warm the milk slightly in the microwave or on the stovetop before adding, as this minimizes temperature shock and helps prevent lumps from forming in the sauce. Continue to whisk until the mixture is smooth.
  • Add 1 teaspoon of mustard powder, 1 teaspoon of salt, and 1/2 teaspoon of freshly ground black pepper to the milk mixture.

    → Whisk these dry ingredients in well to incorporate them evenly throughout the sauce, enhancing the flavor profile without clumping.
  • Continue to cook the sauce over medium heat, whisking constantly until it thickens and begins to bubble gently.

    → This process should take about 5-7 minutes. The sauce is ready when it coats the back of a spoon; it should have a creamy consistency.
  • Remove the saucepan from the heat and slowly stir in 2 cups of shredded sharp cheddar cheese until completely melted and smooth.

    → Adding the cheese off the heat prevents the cheese from becoming grainy or separating. Freshly shredded cheese will melt better than pre-shredded cheese.
  • Fold the drained macaroni into the cheese sauce, ensuring each piece is evenly coated.

    → Use a spatula or large spoon to gently combine, being careful not to break the pasta while mixing. Make sure there are no dry patches or clumps of macaroni.
  • Preheat your oven to 350°F (175°C) and prepare a 2-quart baking dish.

    → Grease the baking dish with butter or cooking spray to prevent sticking. Preheating the oven ensures your macaroni and cheese will bake evenly and thoroughly.
  • Pour the macaroni and cheese mixture into the prepared baking dish, spreading it into an even layer.

    → Use the back of a spoon or a spatula to flatten the top. This will help the dish to heat evenly and brown nicely on top.
  • In a small bowl, combine 1/2 cup of panko breadcrumbs with 1 tablespoon of melted butter.

    → The butter helps the breadcrumbs brown and adds a rich flavor. Mix until the panko is evenly coated for an even crunch on top.
  • Sprinkle the panko breadcrumb mixture evenly over the macaroni and cheese.

    → Make sure to cover the top completely to achieve a crispy, golden crust. This contrast in texture is key to the dish.
  • Bake in the preheated oven for 25-30 minutes or until the top is golden brown and the cheese is bubbling.

    → Keep an eye on the dish during the last few minutes to prevent burning. You can broil for an additional 1-2 minutes for an extra crispy top if desired.
  • Remove the dish from the oven and allow it to cool for a few minutes before serving.

    → Letting it rest helps the cheese sauce to set slightly, making it easier to serve. Enjoy your cheesy baked mac and cheese!

Notes

These cheesy baked mac and cheese muffins are a comforting classic that everyone loves. The key to achieving the perfect creamy sauce is ensuring your roux (butter and flour mixture) is cooked properly before adding the milk. This dish is easily customizable; feel free to experiment with different types of cheese or add in ingredients like cooked bacon, sautéed vegetables, or even a kick of hot sauce for those who enjoy a bit of spice.

After baking, allow the mac and cheese to sit for a few minutes to let it set up, making it easier to serve. This dish is not only a great main course but also perfect as a side dish for gatherings. To store leftovers, place them in an airtight container in the refrigerator for up to 3-4 days. For reheating, adding a splash of milk can help restore the creaminess of the cheese sauce. Enjoy with a side salad or steamed vegetables to balance the richness!

Tips

Cooking Tips for Cheesy Baked Mac and Cheese

  • Cooking the Pasta: Ensure the elbow macaroni is cooked just until al dente. This allows the pasta to maintain its firmness while baking in the cheesy sauce, preventing it from becoming mushy. Remember, it will continue to cook in the oven, so undercooking is better.
  • Making the Roux: When melting the butter for your roux, keep the heat low and stir continuously to prevent it from browning. This step is key for a smooth and silky cheese sauce.
  • Avoiding Lumps in the Sauce: Warm the milk slightly in a separate pot before adding it to the roux. This helps to prevent any lumps from forming and ensures a smooth consistency in your cheese sauce.
  • Choosing Cheese: For the best flavor and texture, opt for high-quality, block cheddar cheese and shred it yourself. This can make a significant difference in how well the cheese melts and blends into the sauce.
  • Flavor Balance: Don’t skip the mustard powder! It adds a wonderful depth of flavor that complements the cheese. You can experiment with different types of mustard powder to find what you like best.
  • Seasoning Wisely: Taste your cheese sauce before pouring it over the pasta. Adjust the salt and pepper to your liking, as the flavors can change once baked. Remember that the cheese you use will also contribute to the overall saltiness of the dish.
  • Baking Tips: For an even baking, spread the mac and cheese into a lightly greased baking dish in an even layer. This ensures that it cooks uniformly and the top gets a nice golden crust.
  • Creating a Crunchy Topping: Mix the panko breadcrumbs with melted butter thoroughly before sprinkling on top. This will help them achieve that desirable crunch during baking. If you want, you can also add grated cheese to the breadcrumb mixture for extra flavor.
  • Resting Time: After pulling the mac and cheese out of the oven, let it rest for about 5-10 minutes before serving. This helps the sauce to thicken slightly and makes it easier to scoop.

FAQ

What ingredients do I need for Cheesy Baked Mac and Cheese?

You will need elbow macaroni, shredded cheese (such as cheddar, mozzarella, or a blend), milk, butter, flour, breadcrumbs, and seasonings like salt and pepper. Optional ingredients can include mustard powder or garlic powder for additional flavor.

How long does it take to prepare Cheesy Baked Mac and Cheese?

The total time is about 30 to 40 minutes, which includes 10 minutes for preparation and 20 to 30 minutes for baking.

Can I use different types of cheese?

Yes! You can use any cheese that melts well. Popular choices include cheddar, mozzarella, gouda, and even cream cheese for added creaminess. Mixing different cheeses can enhance the flavor.

Can I make Cheesy Baked Mac and Cheese ahead of time?

Yes, you can prepare it ahead of time. Assemble the dish, cover it tightly with foil, and store it in the refrigerator for up to 24 hours. When ready to bake, let it sit at room temperature for about 30 minutes before putting it in the oven.

Is it possible to make Cheesy Baked Mac and Cheese gluten-free?

Absolutely! You can use gluten-free pasta and a gluten-free flour blend to make the roux. Just be sure that all your cheese and seasonings are gluten-free as well.

How can I make my Cheesy Baked Mac and Cheese creamier?

To achieve a creamier texture, add more milk or use a combination of heavy cream and milk. Additionally, adding cream cheese or sour cream can enhance the creaminess.

What can I add to Cheesy Baked Mac and Cheese for extra flavor?

You can add cooked bacon, sautéed onions, or vegetables such as broccoli or spinach. Spices like paprika, cayenne pepper, or even a splash of hot sauce can also elevate the flavor profile.

How do I store leftovers of Cheesy Baked Mac and Cheese?

Store leftovers in an airtight container in the refrigerator for up to 3-4 days. You can reheat them in the microwave or in the oven, adding a splash of milk to help retain moisture.

Introduction: The Ultimate Comfort Food

Picture this: a fluffy, velvety mountain of creamy mashed potatoes, steam gently swirling upward, the scent hinting at fresh butter and a touch of garlic. Each spoonful promises a smooth, rich texture that melts in your mouth, delivering warmth and comfort unlike any other dish. Welcome to the world of Classic Creamy Mashed Potatoes—a dish so simple yet so powerfully satisfying, it’s a staple in homes across the globe. Whether you’re cozying up on a chilly evening or hosting a big family gathering, this dish is the epitome of comfort food with an irresistible allure.

The Story Behind the Dish

Mashed potatoes have been at the heart of hearty meals for centuries. Their origins trace back to 1771, when they were first introduced by Frenchman Antoine Parmentier, who popularized the potato as a staple in French cuisine. However, the concept of mashing potatoes may even predate this, with versions found in European cooking as far back as the 17th century, hinting at their longstanding appeal.

This dish has traveled through time, morphing into various forms influenced by different cultures, yet the core remains unchanged—a humble potato, elevated by creamy goodness and simple seasoning. It has always been a companion to main courses, an ideal match for roasted meats and gravies, but it has also stood its ground as a standalone dish admired for its simplicity and flavor.

Why You’ll Love This Recipe

  • Simple Ingredients: Wholesome and readily available ingredients make it an easy go-to any day of the week.
  • Quick and Easy: Prep and cooking time is minimal, allowing you to whip up a delicious batch in no time.
  • Customizable: Adjust the ingredients to suit dietary needs or personal preferences without losing its classic appeal.
  • Family-Friendly: Loved by kids and adults alike, making it a perfect choice for family dinners.
  • Comforting: Its classic taste brings comfort and nostalgia, often reminding people of home-cooked meals and cherished memories.

Flavor Profile & Texture

The magic of creamy mashed potatoes lies in their delicate balance of flavors and textures. The initial sensation is the creamy, buttery richness that coats your taste buds. There’s a subtle hint of garlic that adds depth without overpowering the potato’s mild earthiness. A touch of cream enhances the silky texture, while the softness of the potatoes provides a pillow-like bite that’s both satisfying and indulgent.

The mesmerizing smoothness is complemented perfectly by a well-seasoned finish, using just enough salt to elevate each flavor while allowing the potatoes to take center stage. It’s this perfect harmony that makes mashed potatoes a favorite for so many.

Occasions & Pairings

Classic Creamy Mashed Potatoes are incredibly versatile, making them suitable for a range of occasions, from holiday banquets to everyday dinners. They’re a staple on Thanksgiving tables, often alongside turkey and gravy, but they’re also a comforting presence at Sunday roasts with lamb or beef.

For a complete meal, consider pairing them with:

  • Roasted Chicken: A classic combination that highlights the creamy and savory notes.
  • Grilled Steak: The perfect match for savory juices and a touch of char.
  • Vegetable Stews: A vegetarian’s delight when served with a rich, flavorful stew.
  • Wine Pairings: Try a Chardonnay or a light, fruity Pinot Noir to complement the buttery smoothness.
  • Desserts: Follow up your meal with a light, refreshing lemon sorbet to cleanse the palate.

Tips, Variations & Substitutions

While the classic recipe is beloved for a reason, there’s always room for creativity:

  • Garlic Infusion: For garlic lovers, consider roasting a whole bulb and mashing the soft cloves into the potatoes.
  • Dairy-Free Alternative: Substitute with almond milk and vegan butter for a dairy-free version.
  • Italian Twist: Add Parmesan cheese and a sprinkle of fresh rosemary for a Tuscan-inspired variation.
  • Herb Lover’s Mix: Incorporate fresh chives or dill to introduce a fresh, herby aroma.
  • Texture Contrast: Fold in crispy bacon bits or fried shallots for an unexpected crunch.

Storage & Make-Ahead Ideas

Mashed potatoes are as practical as they are tasty, and they store surprisingly well:

  • Refrigeration: Once cooled, store in an airtight container in the refrigerator for up to three days.
  • Freezing: Spoon portions into freezer-safe bags or containers, and store for up to a month. Thaw overnight in the fridge before reheating.
  • Reheating: On the stove, reheat over low heat, stirring frequently. Add a splash of milk or cream to bring back the creamy consistency.
  • Make-Ahead: Prepare and refrigerate. On the day of serving, reheat and freshen up with additional butter or cream.

Fun Facts & Trivia

Did you know that during the 1800s, mashed potatoes were hailed as the dish that saved French soldiers from starvation? Antoine Parmentier, who championed the potato, served it in various forms to highlight its nutritional value. Today, Ireland celebrates National Mashed Potato Day on October 21, honoring one of the world’s favorite side dishes.

Additionally, mashed potatoes have made their way into pop culture, famously featuring in the movie “Close Encounters of the Third Kind,” where they’re used to craft an iconic mountain model—a testament to their enduring popularity and versatile appeal.

In conclusion, Classic Creamy Mashed Potatoes are more than just a side dish; they are a cherished culinary tradition that offers warmth, nostalgia, and endless possibilities for adaptation. Whether you’re a seasoned chef or a home cook, there’s a unique satisfaction in crafting the perfect batch of mashed potatoes, and with this guide, you’re well on your way to creating memories and meals that will be savored and remembered.

Ingredients

  • Potatoes
    → The base of the dish, providing the necessary starch and texture for creamy mashed potatoes. Yukon Gold or Russet potatoes are preferred for their buttery flavor and smooth consistency. Peel them before boiling to ensure a uniform texture, and cut them into even chunks to promote even cooking.
  • Butter
    → Adds richness and a velvety mouthfeel to the mashed potatoes. Use unsalted butter for better control over the saltiness of the dish. Allow the butter to come to room temperature before mixing it in to ensure smooth incorporation without clumps.
  • Heavy Cream or Milk
    → Provides creaminess and a softer consistency. Heavy cream yields the richest flavor, but whole milk can be used for a lighter version. Warm the cream or milk before adding it to the potatoes to prevent cooling them down and to help achieve a smoother texture.
  • Salt
    → Essential for enhancing the flavor of the potatoes. Use fine sea salt or kosher salt to ensure even distribution throughout the mashed potatoes. Season the water used for boiling the potatoes generously to impart flavor during cooking.
  • Black Pepper
    → Adds a hint of warmth and depth to the dish. Freshly cracked black pepper is recommended for the best flavor. Adjust the amount based on personal preference; start with a small amount and increase gradually.
  • Garlic (optional)
    → Infuses the mashed potatoes with a fragrant, savory flavor. Roast or sauté the garlic before adding it for a milder, sweeter taste. If using raw garlic, mince it finely and add it to the potatoes while mashing to fully release its flavor.
  • Chives or Parsley (optional)
    → Fresh herbs can brighten the flavors and add a pop of color to your mashed potatoes. Finely chop the herbs and fold them in just before serving to maintain their vibrant color and fresh taste.

Instructions

  • Peel the potatoes using a vegetable peeler, making sure to remove all the skin.

    → This prevents any tough, fibrous texture from ruining the smoothness of your mashed potatoes. Ensure you peel them evenly, removing any eyes or blemishes, to keep the flavor consistent.
  • Cut the peeled potatoes into uniform chunks, approximately 1 to 2 inches in size.

    → Chopping the potatoes into even pieces ensures they cook at the same rate, which is vital for achieving an even texture. Uneven sizes can lead to some pieces being undercooked while others are overcooked.
  • Place the potato chunks in a large pot and fill with cold water, covering the potatoes by at least an inch.

    → Starting with cold water allows for gradual cooking. This prevents the outsides from cooking too quickly, ensuring the centers become tender and creamy without falling apart.
  • Add a generous amount of salt to the water to season the potatoes as they cook.

    → Well-seasoned water infuses the potatoes with flavor, resulting in a more delicious mash. Aim for about 1-2 tablespoons of salt per quart of water.
  • Bring the pot to a boil over medium-high heat, then reduce the heat slightly to maintain a gentle boil.

    → A vigorous boil can cause the potatoes to break down too much, leading to a watery mash. Cooking at a steady, moderate boil helps them cook evenly and achieve the desired texture.
  • Cook the potatoes for about 15-20 minutes, or until they are fork-tender.

    → Test doneness by piercing a potato chunk with a fork; it should slide in easily. Overcooking can lead to waterlogged potatoes, while undercooking will result in lumps.
  • Once cooked, drain the potatoes in a colander and allow them to steam for a minute to release excess moisture.

    → This step prevents watery mashed potatoes by allowing steam to escape, concentrating their flavor and texture. Make sure to let them sit briefly but do not let them sit for too long, as they should still be warm.
  • Return the drained potatoes to the pot or a large mixing bowl.

    → Using the same pot retains heat, which helps all the ingredients meld together nicely during mashing.
  • Add the room-temperature butter to the potatoes, breaking it into smaller pieces for easier incorporation.

    → Allowing the butter to warm slightly helps it melt quickly and blend into the potatoes smoothly, avoiding any lumps in your mash.
  • Warm the heavy cream or milk in a small saucepan over low heat until just heated through, then pour it into the potato mixture.

    → Warming the liquid prevents cooling down the potatoes and helps create a silky texture. Cold cream can cause the potatoes to stiffen.
  • Using a potato masher, mash the potatoes until smooth and creamy, being careful not to overwork them to maintain fluffiness.

    → Mash gently until you see no lumps. Over-mashing can release excess starch, leading to gummy potatoes, so stop when you achieve your desired texture.
  • Season the mashed potatoes with fine sea salt and freshly cracked black pepper to taste.

    → Taste as you season; this allows you to adjust the saltiness and spice levels according to your preference. Freshly cracked black pepper gives a more intense flavor.
  • If using, incorporate optional ingredients such as roasted or sautéed garlic for additional flavor, mixing thoroughly to combine.

    → This step enhances the overall flavor of your mashed potatoes without overwhelming them. If using raw garlic, ensure it is minced finely to disperse its flavor evenly.
  • Fold in finely chopped chives or parsley just before serving for a fresh, herbal pop and beautiful color contrast.

    → Adding herbs at the end prevents them from wilting and losing flavor, making your dish visually appealing and more vibrant in taste.
  • Transfer the creamy mashed potatoes to a serving bowl and garnish with a pat of butter on top, if desired.

    → The melted butter will create a delicious, glossy finish while adding richness. Serve immediately for the best texture and warmth, as mashed potatoes can become stiff when left to sit.

Notes

These classic creamy mashed potatoes are a comforting side dish that elevates any meal. To achieve the smoothest texture, ensure to choose the right type of potatoes, such as Yukon Gold or Russet, as they provide the best flavor and consistency. Remember to peel and cut the potatoes evenly before boiling for even cooking. After boiling, draining all excess moisture is essential to avoid watery potatoes.

When incorporating butter, using it at room temperature will help avoid clumps and create a uniform mix with the potatoes. For the creaminess factor, warming the heavy cream or milk before adding it is crucial for maintaining the temperature of the potatoes.

Season generously with salt during boiling, as this enhances the overall flavor of the dish. Freshly cracked black pepper should be used for the best taste, and adjust its quantity according to your preference.

If you decide to incorporate garlic, roasting or sautéing it beforehand will offer a sweeter and milder profile. For a burst of freshness, consider adding chopped chives or parsley right before serving. This not only enhances the flavor but also adds a beautiful color contrast to the dish.

For ultimate creaminess, consider using a potato ricer or food mill instead of a traditional masher, as this will help achieve that ultra-smooth consistency. Serve them warm and enjoy the comforting richness these mashed potatoes bring to your table!

Tips

  • Choosing the Right Potatoes: Always opt for starchy potatoes like Yukon Gold or Russets for the best texture. They create fluffier mashed potatoes compared to waxy varieties. Make sure to peel and chop them into equal-sized pieces for consistent cooking.
  • Boiling Tips: Place the cut potatoes in cold, salted water to start; this helps them cook evenly. Bring the water to a boil and reduce the heat to simmer until the potatoes are fork-tender, usually about 15-20 minutes.
  • Draining and Steaming: After boiling, drain the potatoes thoroughly to avoid watery mashed potatoes. Let them sit in the colander for a few minutes to steam off excess moisture.
  • Mashing Method: Use a potato masher for a rustic texture or a ricer for ultra-smooth mashed potatoes. Avoid using a food processor, as it can make the potatoes gluey due to overmixing.
  • Incorporating Ingredients: When adding butter and warm heavy cream or milk, do so gradually. Start with a bit, mix thoroughly, and then incorporate more to reach your desired consistency without overworking the potatoes.
  • Seasoning: Taste your mashed potatoes after each addition of salt and pepper. Season gradually and remember that flavors can intensify as they sit. For the best results, adjust seasoning just before serving.
  • Incorporating Garlic: For a hint of garlic, roast it in the oven or sauté it gently in butter until golden before adding to the potatoes. Avoid adding raw garlic directly to keep the flavor mild and smooth.
  • Herb Garnish: Add chives or parsley just before serving for freshness. This not only enhances the flavor but also adds a beautiful color contrast to your dish.
  • Storage Tips: If you have leftovers, store them in an airtight container in the fridge for up to 3 days. Reheat gently on the stove with a splash of milk or cream to revive creaminess.
  • Serving Suggestions: Serve your creamy mashed potatoes as a side dish with a pat of butter on top or pair with gravy, roasted meats, or vegetables for a complete meal.

FAQ

What type of potatoes are best for making creamy mashed potatoes?

For the creamiest mashed potatoes, starchy potatoes like Russets or Yukon Golds are recommended. These types yield a fluffy texture and absorb milk and butter well.

Should I peel the potatoes before boiling them?

Yes, it is generally recommended to peel the potatoes before boiling to achieve a smoother texture. However, some people prefer to leave the skins on for added flavor and nutrition.

What ingredients do I need for classic creamy mashed potatoes?

The basic ingredients include potatoes, butter, milk or cream, salt, and pepper. You can also add garlic, sour cream, or herbs for extra flavor.

How can I make my mashed potatoes extra creamy?

To enhance creaminess, use warm milk or heavy cream and ensure the butter is softened. Avoid over-mixing to prevent them from becoming gummy; a hand masher is ideal.

Can I prepare mashed potatoes in advance?

Yes, you can prepare them in advance. Store the mashed potatoes in an airtight container in the refrigerator. Reheat gently on the stove or in the microwave, adding a little butter or milk to restore creaminess.

Is it okay to freeze mashed potatoes?

Yes, mashed potatoes can be frozen. Make sure they are cool before transferring them to an airtight container. When reheating, add a splash of milk to help restore their creamy texture.

What is the best way to season mashed potatoes?

Season with salt and pepper to taste. You can also enhance the flavor with garlic powder, onion powder, or fresh herbs like chives or parsley.

How do I fix mashed potatoes that are too dry?

If your mashed potatoes are too dry, add in warm milk, cream, or melted butter, a little at a time, until you reach your desired consistency. Stir gently to incorporate the added liquid.

Introduction: A Symphony of Flavors in Every Bite

Imagine a dish that effortlessly brings together the heartwarming goodness of succulent chicken, vibrant veggies, and the rich, luxurious taste of garlic butter. Sounds tantalizing, doesn’t it? Meet the One-Pan Garlic Butter Chicken & Veggies — a recipe that promises to whisk you away on a culinary journey packed with flavor and convenience. Picture this: tender, golden-brown chicken thighs, nestled among a rainbow of fresh vegetables, all bathed in a mouthwatering garlic butter sauce that infuses every bite with a symphony of flavors. And the best part? This delightful dish only requires one pan, making for an easy clean-up and ensuring you have more time to savor the magic on your plate.

The Story Behind the Dish: A Culinary Tradition

The concept of a one-pan meal is both ancient and universal, tracing its roots to a time when cooking over a single open flame was commonplace. Across cultures and continents, this cooking method has endured — not simply for its convenience but for the unique depth of flavor it provides. The use of garlic butter is particularly entrenched in European culinary traditions, where it often graces the tables from rustic farmhouses in France to bustling trattorias in Italy. This dish brilliantly encapsulates a world of tradition and innovation, marrying an age-old cooking technique with the timeless allure of garlic and butter.

Why You’ll Love This Recipe

  • Simple and Quick: With everything you need cooking in a single pan, you’ll spend less time in the kitchen and more time enjoying your meal.
  • Healthy Balance: Combining protein-rich chicken with an array of vegetables, this meal is as nourishing as it is delicious.
  • Flavor Boost: The robust garlic butter sauce enhances every element, making each bite fuller and more satisfying.
  • Minimal Cleanup: With only one pan to wash after dinner, this meal is low on post-dinner chores.
  • Customizable: This recipe is adaptable, allowing you to tweak the ingredients based on your preference or dietary needs.

Flavor Profile & Texture: A Harmonious Blend

The flavor profile of this dish is a testament to its craftsmanship. The savory richness of garlic butter serves as the heart of the dish, enveloping the chicken in a silky coat of flavor that enhances its natural juices. With each bite, the chicken offers a tender and juicy experience, complemented by the crispness of the roasted vegetables. The veggies add a sweet and earthy contrast to the buttery richness, punctuated by garlic’s aromatic tenor. The result is a dance of flavors and textures where crunchy meets creamy, and sweet meets savory, crafting a truly memorable dining experience.

Occasions & Pairings: Perfect on Any Table

This One-Pan Garlic Butter Chicken & Veggies is versatile enough to be a centerpiece at many occasions. Whether it’s a relaxed weeknight dinner or a festive family gathering, this dish fits seamlessly into any setting. It’s particularly well-suited for:

  • Weeknight Dinners: Quick and easy, providing maximum delight with minimal effort.
  • Casual Get-Togethers: Its rustic charm fits in well with informal meals where conversation flows as freely as the wine.
  • Holiday Meals: A reliable sidekick to your holiday centerpiece, its flavors harmonize beautifully with traditional holiday fare.

For pairings, consider serving with a light green salad or crusty bread to soak up every bit of that delicious sauce. A crisp white wine or a light lager also makes an ideal pairing, offering a refreshing counterbalance to the dish’s rich flavors.

Tips, Variations & Substitutions: Make It Your Own

One of the beauties of this dish lies in its adaptability. Here are a few tips and variations to make this recipe truly yours:

  • Vegetable Substitutions: Feel free to swap in seasonal vegetables like asparagus, broccoli, or bell peppers. Each brings its own unique character to the dish.
  • Herb Variations: Introduce fresh herbs such as rosemary or thyme to change up the flavor profile slightly. A sprinkle of parsley at the end can add freshness.
  • Spice Lovers: For those who enjoy a little heat, consider adding a pinch of red pepper flakes or a drizzle of spicy sriracha.
  • Dietary Considerations: For a dairy-free version, substitute the butter with a plant-based alternative.
  • Lemon Zest: A touch of lemon zest right before serving can lighten the dish and elevate its fragrant notes.

Storage & Make-Ahead Ideas: Meal Prep Magic

Not only is this meal delicious when freshly prepared, but it also stands up well as a make-ahead option. Here’s how you can maximize its convenience:

  • Storage: Refrigerate leftovers in an airtight container for up to 3 days. The flavors deepen as they marinate in the garlic butter.
  • Reheating: Gently reheat in the oven or on the stovetop to preserve the integrity of the texture. Avoid microwaving, which can cause the chicken to become rubbery.
  • Freezing: While it’s best enjoyed freshly made, you can freeze the cooked dish. Allow it to cool, then freeze in a sealed container for up to a month. Thaw in the refrigerator before reheating.
  • Meal Prepping: Prepare the garlic butter sauce and chop your veggies ahead of time to make the cooking process even more streamlined.

Fun Facts & Trivia: A Global Inspiration

Did you know that garlic butter, a pivotal component of this dish, shares a love story with the French table? Known as “beurre à la bourguignonne,” this flavorful blend is traditionally served with escargots in France. It’s no wonder its decadent flavors have made their way into kitchens worldwide, leaving a legacy of indulgence and satisfaction. With the rise in popularity of one-pan meals, this dish has become a modern-day classic, drawing inspiration from various culinary traditions across the globe to deliver a universally pleasing dining experience.

In closing, the One-Pan Garlic Butter Chicken & Veggies is more than a meal; it’s an invitation to explore a world of flavors and create moments of joy around your dinner table. Whether you’re seeking a quick weekday solution or a comforting dish for special occasions, this recipe is here to deliver unforgettable taste and simplicity each time you prepare it.

Ingredients

  • Chicken Thighs
    → Boneless, skinless chicken thighs are preferred for this dish due to their juiciness and tender texture. They can absorb flavors well and stay moist during cooking. Ensure they are patted dry before seasoning to achieve a nice sear when cooking.
  • Salt and Pepper
    → These basic seasonings enhance the natural flavors of the chicken and veggies. Use kosher salt for better distribution and freshly cracked black pepper for a stronger flavor. Adjust to taste, but don’t skimp as they elevate the overall dish.
  • Olive Oil
    → Olive oil serves as the cooking fat, adding richness and helping to brown the chicken. Use a good-quality extra virgin olive oil for the best flavor. Ensure the oil is heated before adding the chicken to achieve a golden crust.
  • Garlic
    → Fresh garlic, minced or thinly sliced, is key for imparting its aromatic flavor into the dish. Use at least 4-6 cloves for a robust garlicky taste, adjusting based on preference. To prevent burning, add it to the pan when the chicken is nearly cooked.
  • Butter
    → Unsalted butter enriches the dish and adds a creamy texture. It should be added towards the end of cooking to achieve a garlic butter finish. Allow the butter to melt gently with the garlic to create a flavorful sauce.
  • Vegetables (Carrots and Broccoli)
    → A mix of carrots (sliced into thin rounds) and broccoli florets adds color, nutrition, and texture to the dish. Cut the vegetables so they cook quickly and evenly with the chicken. Ensure they are fresh, as this makes the overall dish more vibrant.
  • Lemon Juice and Zest
    → Fresh lemon juice and zest brighten the flavors of the dish. The acidity balances the richness of the butter and oil. Use a zester to capture the aromatic oils from the lemon peel and freshly squeeze the juice over the finished dish for a fresh burst of flavor.
  • Fresh Parsley (for garnish)
    → Chopped fresh parsley not only adds a pop of color to the dish but also a herbal freshness that complements the richness of the garlic butter. Use flat-leaf parsley for a better flavor profile, and sprinkle it just before serving to retain its vibrant color.

Instructions

  • Prepare the chicken by patting it dry with paper towels and seasoning both sides with salt and pepper.

    → Drying the chicken removes excess moisture, which is crucial for achieving a good sear. The seasoning enhances the flavor, ensuring every bite is delicious. Generously season both sides to create a flavorful crust.
  • Heat a large skillet over medium-high heat and add the olive oil.

    → Heating the oil until shimmering creates an ideal cooking environment for the chicken, ensuring it browns properly. Using the right temperature allows the chicken to develop a golden crust while sealing in juices.
  • Add the seasoned chicken thighs to the hot skillet in a single layer, ensuring not to overcrowd the pan.

    → Placing the chicken in a single layer allows even cooking and helps achieve a nice sear. Overcrowding the pan causes steaming instead of browning, resulting in a less flavorful dish.
  • Sear the chicken for about 7-8 minutes without moving it, then flip and cook for an additional 5-7 minutes, or until the internal temperature reaches 165°F (75°C).

    → Allowing the chicken to sear undisturbed helps develop a rich golden-brown color. Use a meat thermometer to check doneness, ensuring that you don’t overcook it, which can lead to dryness.
  • Remove the chicken from the skillet and set it aside on a plate.

    → Letting the chicken rest allows the juices to redistribute, ensuring it remains succulent when served. This step is essential for maintaining moisture in the meat.
  • Add the sliced carrots to the same skillet and sauté for 3-4 minutes until they begin to soften.

    → Using the residual oil and fond (browned bits) in the pan infuses the carrots with flavor. This step also helps to develop a sweet, caramelized flavor in the vegetables.
  • Add the broccoli florets and sauté for an additional 3-4 minutes until they turn bright green and are tender-crisp.

    → Brightening the broccoli enhances its flavor and nutritional value. Cooking until tender-crisp ensures they maintain some crunch and color, contributing to the dish’s texture.
  • Stir the minced garlic into the vegetables and cook for 1-2 minutes until fragrant.

    → Adding garlic at this point allows it to infuse its flavor into the vegetables without burning. Garlic can quickly become bitter if overcooked, so keep an eye on it until it’s aromatic.
  • Return the chicken to the skillet, nestling it among the vegetables.

    → Placing the chicken back into the skillet allows it to absorb the flavors of the garlic and vegetables while reheating simultaneously, ensuring each component of the dish harmonizes together.
  • Add the butter to the skillet and let it melt. Swirl the pan gently to combine it with the garlic and vegetables.

    → The butter adds richness and creates a creamy sauce. Swirling the pan allows the melted butter to coat the chicken and veggies evenly, enhancing flavor.
  • Drizzle fresh lemon juice over the chicken and vegetables, then add the lemon zest.

    → The acidity of the lemon brightens all the flavors and balances the richness of the butter, elevating the dish. Zesting before juicing captures oils with aromatic flavor, adding depth to the dish.
  • Garnish with freshly chopped parsley just before serving.

    → Parsley adds a fresh, herbal touch that contrasts beautifully with the rich flavors of the dish. Adding it last preserves its vibrant color and flavor, ensuring the dish looks appealing.
  • Serve hot, ensuring each plate has a mix of chicken, vegetables, and the garlic butter sauce.

    → Distributing the ingredients evenly on the plates guarantees that every bite is as flavorful as intended. The presentation adds to the overall dining experience, making it visually appetizing.

Notes

These One-Pan Garlic Butter Chicken & Veggies are a simple yet delicious weeknight meal that packs a punch of flavor. The boneless, skinless chicken thighs stay juicy and tender, absorbing all the wonderful notes of garlic and butter. For added depth, don’t skip the fresh garlic, which should be introduced towards the end of cooking to prevent burning while still infusing its aromatic essence into the dish.

The blend of carrots and broccoli not only creates a colorful presentation but also ensures a healthy balance in your meal. Make sure to cut the vegetables evenly for consistent cooking; they should be tender but still crisp when served. Use fresh produce for the best results, as this significantly enhances the overall taste.

Don’t forget about the lemon juice and zest! This finishing touch brightens the entire dish, cutting through the richness of the butter and olive oil. Squeeze fresh lemon juice right before serving for maximum flavor impact, and use a zester for extracting the fragrant oils from the lemon peel.

Garnishing with freshly chopped parsley adds not just a burst of color but also an additional layer of freshness that beautifully complements the savory elements of the dish. Serve hot, and enjoy it straight from the pan for a simple, hassle-free dining experience. This dish is perfect for busy nights and is sure to please everyone at the table!

Tips

  • Preparation of Chicken: Make sure to bring your chicken thighs to room temperature before cooking. This will help them cook more evenly. For extra flavor, consider marinating the chicken in olive oil, garlic, salt, and pepper for at least 30 minutes prior to cooking.
  • Perfectly Cooking the Chicken: Sear the chicken thighs skin-side down (if they have skin) on medium-high heat to achieve a beautiful golden crust. Avoid overcrowding the pan as this can cause steaming instead of browning. If your pan is too crowded, cook in batches.
  • Timing for Vegetables: To ensure that the carrots and broccoli maintain their crunch and color, add them to the pan about halfway through the cooking time of the chicken. This allows them to cook through without becoming mushy.
  • Garlic Handling: When adding garlic to the pan, keep a close eye on it, as minced garlic can burn quickly. Stir it in for about 30 seconds or until fragrant before adding the butter.
  • Incorporating Butter: Add the butter towards the end of cooking to create a glossy sauce. Let it melt and foam up with the garlic, then toss the chicken and veggies in the mixture to coat them evenly for added richness.
  • Utilizing Lemon: For the best flavor, use a zester to grate the lemon peel before juicing. This way, you get the aromatic oils from the peel, enhancing the dish with an intense lemon fragrance.
  • Final Adjustments: Taste and adjust seasoning at the end, adding more salt, pepper, or lemon juice as needed. This is the moment to enhance the overall flavor just before serving.
  • Garnishing: When garnishing with parsley, chop it finely for better distribution. Add it just before serving to keep the leaves vibrant and fresh, ensuring it adds a beautiful finishing touch to the dish.

FAQ

What ingredients do I need for One-Pan Garlic Butter Chicken & Veggies?

You will need chicken breasts, garlic, butter, assorted vegetables (like broccoli, bell peppers, and carrots), olive oil, salt, pepper, and any preferred herbs or spices.

How long does it take to prepare this dish?

The preparation time is approximately 10 minutes, and cooking time is around 25-30 minutes, making it a total of about 40 minutes.

Can I use frozen chicken or vegetables?

Yes, you can use frozen chicken or vegetables. However, the cooking time may need to be adjusted to ensure everything is properly cooked through.

What type of vegetables works best in this recipe?

Best options include broccoli, bell peppers, zucchini, carrots, and asparagus. You can customize the vegetables based on your preferences or seasonal availability.

Is this recipe suitable for meal prep?

Absolutely! This dish can be prepared in advance and stored in the refrigerator for up to 3-4 days. Just reheat in the microwave or oven before serving.

Can I make this recipe dairy-free?

Yes, you can substitute the butter with a dairy-free alternative such as coconut oil or a plant-based butter to make it dairy-free.

What should I serve with One-Pan Garlic Butter Chicken & Veggies?

This dish is a complete meal on its own, but you can serve it with rice, quinoa, or a fresh salad for added texture and flavor.

How can I enhance the flavor of this dish?

Add fresh herbs like parsley or thyme, a splash of lemon juice, or a sprinkle of red pepper flakes for extra flavor and a little kick.

Introduction

Imagine biting into a perfectly crispy exterior that gives way to a soft, flavorful interior—a sensation dominated by a harmonious blend of zesty lemon and earthy herbs. These are Crispy Baked Lemon Herb Potatoes, an enchanting and versatile dish that promises to elevate your mealtime experience. Ideal for any occasion, these potatoes are not just any side dish; they are a symphony of taste and texture, crafted to delight the senses. Whether you’re cooking for a family gathering or a quiet dinner at home, these potatoes are bound to impress and invigorate your taste buds.

The Story Behind the Dish

The history of potatoes intertwined with culinary traditions is rich and varied. Potatoes have been a staple food for centuries, first cultivated in the Andes region of South America before being introduced to Europe in the 16th century. They quickly became a crucial source of nutrition across the globe. The versatility of potatoes is unmatched, from mashed to roasted, and they have found their place in countless cuisines worldwide.

The concept of adding herbs and lemon to baked potatoes offers a twist that merges Mediterranean influences with classic comfort food. The punchy citrus notes of lemon are a staple in Mediterranean cooking, known for their ability to brighten flavors and add a refreshing touch to dishes. Herbs like rosemary, thyme, and parsley provide an earthy balance, grounding the vibrant lemon. Together, they create a dish that is not only delicious but rooted in cultural amalgamation.

Why You’ll Love This Recipe

  • Simple and Quick: This recipe requires minimal preparation and ingredients that are readily available, making it an easy choice for any mealtime.
  • Healthy: Baked instead of fried, these potatoes are a healthier alternative without sacrificing flavor.
  • Family-Friendly: The pleasant and subtle flavors are sure to be a hit with both children and adults alike.
  • Versatile: Perfect as a side dish for a wide range of main courses, these potatoes can complement anything from grilled meats to hearty vegan dishes.
  • Customizable: Easily adapt the herbs and additional spices to cater to personal preferences or dietary needs.

Flavor Profile & Texture

Crispy Baked Lemon Herb Potatoes offer a delightful interplay of flavors and textures that culminate in a dish both complex and comforting. The exterior of these potatoes achieves a golden, crispy finish, thanks to a perfect balance of oven temperature and olive oil, creating an inviting crunch with each bite. Inside, the potatoes remain tender and moist, offering a soft counterpoint to the crispy exterior.

The flavor profile is a harmonious blend of tart zing from fresh lemon juice and zest, layered with the savory, aromatic essence of herbs like rosemary and thyme. Each mouthful provides a burst of citrusy freshness coupled with a warm, herbaceous undertone, delivering a taste experience that is simultaneously lively and grounding.

Occasions & Pairings

These Crispy Baked Lemon Herb Potatoes marvelously fit a wide array of occasions. Serve them at festive family gatherings, and their golden sheen and irresistible aroma will steal the spotlight. On weeknights, watch as they transform a simple meal into something special, adding a spark of culinary creativity.

When considering pairings, think of dishes that allow these potatoes to shine. Pair them with grilled chicken, a herb-roasted fish, or even a hearty vegetable stew. For a refreshing contrast, serve alongside a crisp green salad drizzled with a lemon vinaigrette. As far as drinks go, a chilled white wine or light beer pairs beautifully with their zesty flavor, enhancing the culinary experience further.

Tips, Variations & Substitutions

There is endless creativity to explore with this dish. Here are some ideas and tips that can help you personalize and perfect your version:

  • Herbal Variations: Experiment with different herbs such as dill, oregano, or basil for a unique twist. Each herb will bring its own character to the dish.
  • Spice it Up: If you love a little heat, add a sprinkle of chili flakes or cayenne pepper to the seasoning blend for a spicy kick.
  • Citrus Swaps: Try using lime or even orange zest in place of lemon for a slightly different yet equally delightful citrus profile.
  • Dietary Considerations: For those following a vegan or gluten-free diet, this recipe fits seamlessly. Ensure all added ingredients comply with dietary needs.

When preparing the potatoes, ensure they are cut to similar sizes for even cooking. Don’t be afraid to adjust the baking time slightly to achieve your desired level of crispiness.

Storage & Make-Ahead Ideas

One of the many advantages of this dish is its suitability for making ahead, providing convenience without compromising on taste. Here are some practical ways to store and enjoy them later:

  • Refrigeration: Store any leftover potatoes in an airtight container in the refrigerator. They will keep for up to 3-4 days.
  • Freezing: Spread baked potatoes on a baking sheet in a single layer and freeze until solid. Transfer to a freezer-safe container or bag. They will maintain quality for up to a month.
  • Reheating: Reheat in the oven at 375°F (190°C) until heated through and crisp, about 10-15 minutes. If using a microwave, keep in mind they may lose some crispiness.

Advance meal prep is achievable; try partially baking the potatoes, refrigerating them, and completing the baking process right before serving. This method will help save time and ensure they are fresh and perfectly crispy when it’s time to eat.

Fun Facts & Trivia

Did you know that potatoes were once considered highly suspicious by Europeans, leading them to be banned in some regions due to their botany being associated with deadly nightshade plants? It wasn’t until their nutrition value was better understood that they gained widespread acceptance. Also, the inclusion of lemon prominently in this dish is noteworthy because, in ancient times, lemons were a rarity and a sign of wealth. This makes our modern interpretation not just a dish, but a nod to culinary evolutions through time.

From their historical roots to their contemporary adaptations, Crispy Baked Lemon Herb Potatoes are a testament to simple ingredients working together to create something extraordinary. Their unique flavors and textures offer endless enjoyment, ensuring this dish will continue to be beloved across tables and cultures for years to come.

Ingredients

  • Potatoes
    → Choose 2 pounds of waxy potatoes (such as Yukon Gold or red potatoes) for the best texture. Waxy potatoes hold their shape well after cooking and have a creamy interior, making them perfect for baking. Wash and scrub them thoroughly, and cut them into uniform 1-inch cubes for even cooking.
  • Olive Oil
    → Use 1/4 cup of extra virgin olive oil for a rich flavor and to help achieve a crispy exterior. Olive oil not only helps the potatoes to brown but also adds a delicious taste. Ensure it is at room temperature before use to allow it to coat the potatoes evenly.
  • Fresh Herbs
    → A combination of 2 tablespoons each of finely chopped fresh rosemary and thyme adds an aromatic quality and depth of flavor to the dish. These herbs should be finely chopped to maximize their surface area, releasing their essential oils and flavors into the potatoes.
  • Lemon Zest
    → Grate the zest of 1 lemon to add bright citrus notes to the dish. The zest is vital for providing a concentrated lemon flavor without the acidity that comes with lemon juice. Be sure to only grate the yellow skin and avoid the bitter white pith beneath.
  • Garlic Powder
    → 1 teaspoon of garlic powder will infuse the potatoes with a robust flavor. It should be mixed with the other seasonings to ensure it distributes evenly among the potatoes. Using garlic powder gives a smoother taste than fresh garlic, which can burn during baking.
  • Salt and Pepper
    → Use 1 teaspoon of salt and 1/2 teaspoon of freshly cracked black pepper to season the potatoes. Salt enhances all the flavors, while pepper adds a subtle heat. Adjust according to taste. It’s best to use freshly ground pepper for a more intense flavor profile.

Instructions

  • Preheat your oven to 425°F (220°C) and ensure the oven rack is positioned in the center.

    → Preheating the oven at a high temperature ensures that the potatoes will roast quickly, resulting in a crispy exterior and a fluffy interior. By positioning the rack in the center, the hot air circulates evenly around the potatoes.
  • Wash and scrub 2 pounds of waxy potatoes (Yukon Gold or red potatoes) thoroughly under running water.

    → Cleaning the potatoes removes any residual dirt and pesticides, which is essential for safe consumption. Wax potatoes are chosen due to their high moisture content and low starchiness, which prevents them from falling apart when baking.
  • Cut the cleaned potatoes into uniform 1-inch cubes using a sharp knife and a cutting board.

    → Ensuring the potato pieces are uniform promotes even cooking, preventing some pieces from becoming mushy while others remain firm. A sharp knife provides cleaner cuts, reducing the chance of bruising the potatoes.
  • In a large mixing bowl, combine the diced potatoes with 1/4 cup of extra virgin olive oil.

    → The olive oil not only helps in crisping the potatoes but also enhances the overall flavor. To ensure the potatoes are evenly coated, use your hands or a spatula to toss them gently, ensuring all sides are glistening with oil.
  • Add 2 tablespoons each of finely chopped fresh rosemary and thyme to the bowl with the potatoes.

    → Finely chopping the herbs maximizes their exposure to air, releasing aromatic oils that impart flavor to the potatoes. Make sure to mix thoroughly to evenly distribute the herbs throughout the potatoes.
  • Grate the zest of 1 lemon directly into the bowl containing the potatoes and herbs.

    → The lemon zest enhances the dish with its bright, aromatic notes without adding acidity. Carefully avoid grating the bitter white pith, as it can negatively affect the flavor.
  • Sprinkle 1 teaspoon of garlic powder, 1 teaspoon of salt, and 1/2 teaspoon of freshly cracked black pepper over the potato mixture.

    → Garlic powder provides a smooth, consistent garlic flavor that won’t burn, while salt and black pepper enhance all the other flavors. Use a spoon to gently mix the ingredients, ensuring even distribution of the seasonings across all potato pieces.
  • Spread the seasoned and coated potato cubes in a single layer on a large baking sheet lined with parchment paper or lightly greased.

    → Arranging the potatoes in a single layer prevents steaming and promotes even browning and crispiness. Use a spatula to ensure they are not overcrowded; if necessary, use two baking sheets.
  • Bake the potatoes in the preheated oven for 30-35 minutes, turning them halfway through for even roasting.

    → Turning the potatoes allows for uniform browning and crisping on all sides. Check for doneness by poking a potato cube with a fork; it should be tender inside and golden brown outside.
  • Once the potatoes are crisp and golden, remove them from the oven and let them cool for a few minutes before serving.

    → Allowing the potatoes to cool briefly helps them firm up and enhances their crunchiness. Serve them warm as a delicious side dish or a snack!

Notes

  • Choosing the Right Potatoes
    For this recipe, opt for waxy potatoes like Yukon Gold or red potatoes, as they offer the best texture for baking. Their creamy interiors and ability to hold shape ensure the final dish has a delightful bite.
  • Preparing the Potatoes
    Wash and scrub the potatoes thoroughly to remove any dirt. Cutting them into uniform 1-inch cubes is crucial for even cooking and achieving a consistent crispy texture.
  • Using Olive Oil
    Extra virgin olive oil not only enhances the flavor but also assists in achieving a golden, crispy exterior. Make sure it’s at room temperature so it coats the potatoes evenly when mixed.
  • Herb Selection and Preparation
    Fresh herbs like rosemary and thyme should be finely chopped to release their flavors fully. The combination enhances the potatoes with aromatic notes, making them fragrant and flavorful.
  • Adding Lemon Zest
    The lemon zest is essential for brightening the dish. Take care to zest only the yellow part of the lemon; the white pith can introduce bitterness. This zest will elevate the overall flavor profile significantly.
  • Flavoring with Garlic Powder
    Incorporating garlic powder will add depth to the flavor without the risk of burning that comes with fresh garlic. Ensure it’s mixed thoroughly with the other seasonings for an even distribution of flavors.
  • Seasoning the Potatoes
    Proper seasoning is key to enhancing the natural flavors of the potatoes. Use freshly cracked pepper for better flavor and adjust salt to your preference to ensure the best results.
  • Baking for Crispiness
    Spread the seasoned potatoes in a single layer on a baking sheet to ensure maximum crispness. Remember to preheat your oven for an evenly baked result, and consider tossing the potatoes halfway through cooking for even browning.
  • Serving Suggestions
    These crispy lemon herb potatoes make a great side dish for any meal. Pair them with roasted meats or fish, or serve them as a part of a hearty salad. They can also be enjoyed as a snack on their own!

Tips

Cooking Tips for Crispy Baked Lemon Herb Potatoes

  • Preheat the Oven: Always preheat your oven to 425°F (220°C) before placing the potatoes inside. A hot oven is crucial for achieving that crispy exterior while keeping the inside soft and fluffy.
  • Don’t Overcrowd the Baking Sheet: Spread the potatoes out in a single layer on the baking sheet. Overcrowding can trap steam and prevent crispiness. If necessary, use two baking sheets.
  • Tossing Technique: When mixing the potatoes with the olive oil and seasonings, use your hands or a spatula to ensure each piece is well-coated. This helps in achieving an even crispness.
  • Stir Halfway: About halfway through the baking time, stir the potatoes or flip them to ensure they brown evenly on all sides.
  • Cooling Time: After taking the potatoes out of the oven, let them cool on the baking sheet for a few minutes. This allows the exterior to firm up a bit more before serving.
  • Serving Suggestions: Serve these potatoes immediately for the best texture. They pair well with grilled meats, fish, or a fresh salad as part of a balanced meal.
  • Make It Your Own: Feel free to experiment with different herbs or spices based on your preference. Dill, parsley, or even a sprinkle of paprika can offer a different flavor profile.

FAQ

What ingredients do I need to make Crispy Baked Lemon Herb Potatoes?

You will need potatoes, olive oil, lemon juice, garlic, fresh herbs (like rosemary and thyme), salt, and pepper.

Can I use other types of potatoes for this recipe?

Yes, you can use different types of potatoes such as red potatoes or Yukon Gold potatoes, but the cooking time may vary slightly.

How do I achieve maximum crispiness for the potatoes?

To achieve maximum crispiness, ensure the potatoes are cut into uniform sizes, soak them in water for 30 minutes before baking, and use a hot baking sheet.

Can I prepare the potatoes in advance?

Yes, you can cut and soak the potatoes in water up to a day in advance and store them in the refrigerator until you are ready to bake.

What are some good herb substitutes if I don’t have fresh herbs?

Dry herbs can be used as substitutes; however, use them sparingly. Dried herbs like oregano, basil, or parsley can work well in this recipe.

Can I make this recipe vegan?

Yes, this recipe is already vegan as it doesn’t include any animal products. Just ensure you are using plant-based ingredients for any optional dips or sides.

How long should I bake the potatoes for optimal results?

Bake the potatoes at 425°F (220°C) for approximately 25-35 minutes, or until they are golden brown and crispy, flipping them halfway through.

What dipping sauces pair well with Crispy Baked Lemon Herb Potatoes?

These potatoes pair well with garlic aioli, sour cream, or a spicy ketchup. You could also serve them with a homemade herb dip for added flavor.

Introduction / Hook

Welcome to a culinary experience that promises to tantalize your taste buds and satisfy your deepest comfort food cravings—our delectable Cheesy Stuffed Bell Peppers. Imagine a vibrant array of robust, colorful bell peppers, each one brimming with a savory filling that’s rich, cheesy, and undeniably satisfying. This dish is a symphony of textures and flavors, combining the crispness of fresh peppers with a warm, gooey insides that will leave you yearning for more. Whether you’re embarking on a solo cooking adventure or welcoming friends and family around the dinner table, these Cheesy Stuffed Bell Peppers are destined to be a showstopper. Let’s dive into this culinary masterpiece that’s as visually stunning as it is deliciously fulfilling!

The Story Behind the Dish

Stuffed bell peppers have a history as colorful as the peppers themselves. This classic dish is beloved across different cultures and continents, each region adding its own unique spin. Originally, the idea of stuffing vegetables can be traced back to ancient Greece and Rome, where diners enjoyed a variety of produce filled with seasoned meats and grains. As trade routes expanded, so did the exchange of culinary ideas, paving the way for stuffed peppers to take root in European and Mediterranean cuisines.

However, the variant we celebrate today owes much to the Spanish influence, where the tradition of pimientos rellenos—peppers stuffed with a variety of fillings—remains a staple. With modern adaptations and global recognition, the Cheesy Stuffed Bell Peppers have found their place in the heart of Western cuisine, celebrated for their taste, nutrition, and versatility.

Why You’ll Love This Recipe

  • Versatile Delight: These stuffed peppers are perfect for any meal, whether it’s a quick weeknight dinner or a dazzling showpiece at your next gathering.
  • Nutritious and Satisfying: Packed with protein, fiber, and essential nutrients, each pepper brings a wholesome meal option to your plate, without compromising on taste.
  • Customizable Flavors: From mild to spicy, the choice of cheese and seasonings can be adjusted to match your palette. Add a personal touch with your favorite herbs or extra veggies.
  • Family-Friendly: An all-ages crowd-pleaser that gets everyone excited to eat their veggies. Even the pickiest eaters will have a hard time saying no!

Flavor Profile & Texture

The flavor journey begins with the bell peppers themselves, offering a slightly sweet, refreshing crunch that contrasts beautifully with the sumptuous filling. Inside, the stuffing is a blend of hearty grains, perfectly seasoned meats, or plant-based proteins, combined with a medley of aromatic spices. The star of the dish, of course, is the cheese—a luscious gooey consistency that binds everything together, imparting a creamy, indulgent taste.

Bite into a Cheesy Stuffed Bell Pepper and experience the harmonious interplay of textures: the tender, baked pepper skin giving way to the soft, almost melt-in-your-mouth stuffing, all cloaked in an irresistible cheese layer that bubbles and browns to perfection.

Occasions & Pairings

Cheesy Stuffed Bell Peppers are the perfect choice for an array of occasions. Planning a dinner party? These peppers make a beautiful and filling main course. For a laid-back family meal, prepare them as a wholesome and fun twist on regular stuffed vegetables.

To enhance your dining experience, pair these peppers with a simple green salad or a crusty loaf of bread for added texture. For drinks, opt for a bright, crisp white wine, like Sauvignon Blanc or Pinot Grigio, or enjoy with a refreshing classic like lemonade. To finish the meal, you might serve a light, fruit-based dessert such as a sorbet or a fresh fruit salad.

Tips, Variations & Substitutions

Creative Customizations

  • Spice It Up: For those who crave some heat, consider adding jalapenos or a dash of hot sauce into the filling.
  • Herbal Boost: Add a handful of fresh herbs such as basil, oregano, or parsley to elevate the flavors.
  • Vegan and Gluten-Free Variations: Replace cheese with a vegan alternative and swap grains for quinoa or cauliflower rice for a gluten-free option.

Regional Twists

  • Italian Flair: Include Italian sausage, risotto rice, and mozzarella to give the dish a Tuscan twist.
  • Southwestern Style: Incorporate black beans, corn, and taco seasoning for a Mexican flair.

Storage & Make-Ahead Ideas

If you plan to prepare these peppers ahead of time, simply assemble them and store them unbaked in the refrigerator for up to 24 hours. Once you’re ready to enjoy them, bake as usual, adding a few extra minutes for even cooking.

For storing leftovers, cover and refrigerate cooked peppers for up to four days. Reheat them gently in the oven to revive their original textures and flavors. Alternatively, freeze individual portions by wrapping them in plastic wrap and foil for two to three months. Thaw overnight in the refrigerator before reheating.

Fun Facts & Trivia

Did you know that bell peppers are not only colorful but also incredibly healthy? A rich source of vitamins A and C, they also provide a good dose of fiber and antioxidants. Also, each color of bell pepper has its unique nutritional benefits—red peppers are packed with beta-carotene, whereas green ones are slightly lower in sugar. Enjoying a variety of colors in your Cheesy Stuffed Bell Peppers not only pleases the eye but also ensures a wide spectrum of nutrients!

Now, with this wealth of knowledge and inspiration at your fingertips, it’s time to embark on a delicious journey with our Cheesy Stuffed Bell Peppers. Get ready to create a dish that not only delights the senses but also tells a story of cultural legacy and kitchen creativity. Bon appétit!

Ingredients

  • Bell Peppers

    → Choose large, firm bell peppers in colors like red, green, or yellow for sweetness and a vibrant look. Slice the tops off and remove the seeds carefully to create a bowl-like shape. This will hold the cheesy filling and provide a delicious, edible vessel for the dish.
  • Rice

    → Use cooked white or brown rice as the base of the stuffing. It acts as a bulk ingredient to help fill the bell peppers and add texture. Cook the rice according to the package instructions and let it cool slightly before mixing with the other ingredients. Using leftover rice can enhance the flavors.
  • Ground Meat (beef, turkey, or chicken)

    → Ground meat adds protein and substance to the stuffing. Cook the meat in a skillet until brown and crumbly before mixing it with the rice and other ingredients. For a healthier option, lean turkey or chicken works well without sacrificing flavor.
  • Cheese (cheddar, mozzarella, or cream cheese)

    → Cheese provides the creamy, melty texture that makes cheesy stuffed peppers irresistible. Use shredded cheese for mixing into the filling, and reserve some for topping the peppers. Allow the cheese to reach room temperature before adding it to ensure even melting.
  • Onion

    → Diced onions enhance the flavor of the stuffing, adding a savory depth. Sauté the onions in a bit of oil until translucent before mixing them in with the meat and rice. For a milder flavor, consider using sweet onions.
  • Garlic

    → Minced garlic brings aromatic earthiness and enhances the overall flavor profile. Sauté garlic briefly with onions, being careful not to burn it, as this can create a bitter taste. Fresh garlic is preferred for maximum flavor.
  • Tomato Sauce

    → A few spoonfuls of tomato sauce keep the filling moist and add a touch of acidity, balancing out the richness of the cheese. Stir it into the filling mixture alongside the rice and meat. Look for a sauce with no added sugar for a healthier option.
  • Spices (salt, pepper, cumin, paprika)

    → Seasonings add necessary flavor to the dish, enhancing the natural taste of the ingredients. Adjust the amounts to your preference, but generally, a teaspoon of salt and pepper each works well. Cumin and paprika provide depth and hint of warmth; adjust to taste.
  • Fresh Herbs (parsley or cilantro)

    → Chopped fresh herbs brighten up the dish and add a refreshing element. Mix them in with the filling and sprinkle over the tops after baking for contrast. Use freshly chopped herbs for the best flavor—dried herbs can work in a pinch, but they won’t have the same vibrancy.

Instructions

  • Preheat your oven to 375°F (190°C) and ensure a rack is placed in the center.

    → Preheating allows for an even cooking temperature throughout the entire dish, ensuring the peppers cook through and the cheese melts properly when it bakes.
  • Prepare the bell peppers by slicing the tops off and removing the seeds and membranes gently.

    → Choosing firm bell peppers ensures they hold their shape while baking. Removing the insides makes space for the filling. Take care to avoid cutting through the bottom, which would cause leaks.
  • In a medium saucepan, cook 1 cup of rice according to package instructions, using either water or broth for added flavor.

    → Cooking rice a little ahead allows it to cool before being combined with hot ingredients later, preventing it from becoming mushy.
  • In a skillet over medium heat, add a tablespoon of oil and diced onion. Sauté until the onion becomes translucent, about 5 minutes.

    → This caramelizes the natural sugars in the onions, making them sweet and flavorful, which enhances the filling.
  • Add minced garlic to the skillet with the sautéed onions and cook for an additional 1-2 minutes until fragrant but not browned.

    → Garlic cooks quickly and can burn easily, leading to bitterness. Cooking until just fragrant keeps the flavor vibrant and fresh.
  • Add 1 pound of ground meat to the skillet and cook until browned and crumbly, breaking it up with a spatula, approximately 7-10 minutes.

    → Browning the meat develops rich flavors through the Maillard reaction, boosting the overall taste of your filling.
  • Once the meat is browned, reduce the heat and mix in ¼ cup of tomato sauce, allowing it to integrate with the meat, onions, and garlic.

    → Tomato sauce adds moisture to the filling which helps bind the ingredients together while also enhancing the flavor with its acidity.
  • Combine the cooked rice with the meat mixture in a large mixing bowl, then add 1 cup of shredded cheese and spices (1 tsp each of salt, pepper, cumin, and paprika).

    → Combining the ingredients while everything is still warm helps the cheese melt effectively throughout the filling, creating a cohesive mixture.
  • Fold in freshly chopped herbs, if using, to the mixture carefully, ensuring even distribution without over-mixing.

    → Folding helps maintain the lightness of the filling while ensuring the herbs are evenly scattered throughout.
  • Using a spoon, fill each prepared bell pepper with the cheesy filling, packing it firmly but not overly so, leaving a little space at the top for the cheese that will be melted on top.

    → Properly packing the filling allows for a rich, hearty bite but also assures that the peppers maintain their structure during baking.
  • Place the stuffed peppers upright in a baking dish and top each with a sprinkle of reserved shredded cheese.

    → The cheese on top will melt into a deliciously gooey layer, adding to the visual appeal and flavor.
  • Cover the baking dish with aluminum foil to prevent moisture loss and bake for 25 minutes, then remove the foil and bake for an additional 10-15 minutes until the peppers are tender and the cheese is bubbly and golden.

    → Covering initially helps steam the peppers, making them tender, while the uncovered baking allows the cheese to brown and crisp up.
  • Once cooked, remove the dish from the oven and let the peppers rest for about 5 minutes before serving.

    → Letting them rest allows the filling to settle and makes serving easier, as the insides will not be too hot to touch.
  • Garnish the cheesy stuffed peppers with additional chopped fresh herbs before serving, if desired.

    → Sprinkling fresh herbs on top adds a burst of color and flavor, enhancing the dish visually and gustatorily.

Notes

These cheesy stuffed bell peppers are a hearty and nutritious meal that showcases vibrant vegetables and a savory filling. The bell peppers not only serve as a delicious vessel for the stuffing but also add a pop of color to your plate. You can mix and match the cheese, spices, and ground meat to suit your taste preferences, making this dish versatile for any occasion. For an extra layer of flavor, top the stuffed peppers with additional cheese before baking—this creates a bubbly, golden crust that is sure to please. Leftovers can be stored in the refrigerator and reheated easily, making them a convenient option for meal prep. Consider serving with a side salad or crusty bread for a complete meal. Feel free to add your favorite vegetables, such as corn or black beans, to the filling for added nutrition and texture. Enjoy experimenting with different combinations!

Tips

Cooking Tips for Cheesy Stuffed Bell Peppers

  • Prepping the Peppers: To prevent the peppers from falling over while baking, you can slice a thin layer off the bottom of each pepper. This will stabilize them without compromising the filling capacity.
  • Rice Substitutes: For a creative twist, consider using quinoa or couscous instead of rice. They offer different textures and flavors, while still holding up well in the peppers.
  • Seasoning the Meat: Make sure to season the ground meat with salt and pepper during the cooking process to enhance the flavor. You can also add a splash of Worcestershire sauce for an extra depth of flavor.
  • Cheese Varieties: Experiment with different cheese combinations. Adding a bit of feta or goat cheese into the filling can introduce a tangy flavor that pairs wonderfully with the sweetness of the peppers.
  • Pre-baking the Peppers: For a softer pepper, bake the empty peppers for about 10-15 minutes before adding the filling. This will ensure they are tender on the inside while still holding their shape.
  • Even Cooking: To ensure even cooking, place the stuffed peppers in a baking dish that allows them to stand upright. You can also add a bit of water or broth to the bottom of the dish, which helps steam and cook the peppers thoroughly.
  • Finishing Touch: Allow the stuffed peppers to cool for a few minutes after baking. This will help the filling set a bit more and make them easier to serve without spilling.
  • Storing Leftovers: These stuffed peppers store well in the fridge for up to 3 days. Reheat in the oven or microwave, and they also freeze nicely for up to a month—just be sure to wrap them well to prevent freezer burn.
  • Garnishing: For a pop of color and flavor, top the stuffed peppers with a dollop of sour cream or Greek yogurt before serving. This adds creaminess and balances the richness of the cheese.

FAQ

What ingredients do I need to make Cheesy Stuffed Bell Peppers?

To make Cheesy Stuffed Bell Peppers, you will need bell peppers, cooked rice, ground meat (beef or turkey), cheese, diced tomatoes, onions, garlic, and various seasonings such as salt, pepper, and Italian herbs.

Can I use different types of cheese for this recipe?

Yes! You can use any cheese you prefer, such as mozzarella, cheddar, or a blend. Feel free to mix different cheeses for a richer flavor.

How do I prepare the bell peppers before stuffing them?

Start by cutting the tops off the bell peppers and removing the seeds and membranes. You can also blanch them in boiling water for a few minutes to soften them if desired.

Can I make this recipe vegetarian?

Absolutely! Replace the ground meat with additional vegetables or beans, and adjust the seasoning to your taste. You can also use quinoa or lentils for added protein.

How long should I bake the stuffed bell peppers?

Bake the stuffed bell peppers in a preheated oven at 375°F (190°C) for about 25-30 minutes, or until the peppers are tender and the cheese is melted and bubbly.

Can I make Cheesy Stuffed Bell Peppers ahead of time?

Yes! You can prepare the stuffed peppers in advance and refrigerate them. Just bake them when you’re ready to serve, adding a few extra minutes to the cooking time if they are cold from the fridge.

What can I serve with Cheesy Stuffed Bell Peppers?

Cheesy Stuffed Bell Peppers pair well with a side salad, garlic bread, or steamed vegetables for a complete meal.

Are Cheesy Stuffed Bell Peppers healthy?

They can be a healthy meal option! By using lean meat, a variety of vegetables, and whole grains, you can make a nutritious dish. Adjust the cheese and add plenty of veggies for a healthier twist.

Introduction / Hook

Imagine a dish where velvety strands of pasta glide through a luscious, creamy sauce, each bite punctuated by the subtle yet distinct tang of freshly grated Parmesan cheese. Welcome to the world of Creamy Spinach Parmesan Pasta, a culinary delight that effortlessly combines comfort and elegance in every mouthful. As you bring this dish to life in your own kitchen, you’ll witness the transformation of humble ingredients into a gourmet masterpiece that smells, tastes, and looks like it belongs in a five-star restaurant. With its irresistibly creamy texture and rich flavors, this pasta dish invites you to indulge in a moment of pure bliss, turning any mealtime into a special occasion.

The Story Behind the Dish

The origins of pasta stretch back centuries, deeply rooted in Italian culinary traditions, where it serves as the heart of countless beloved dishes. Creamy Spinach Parmesan Pasta draws inspiration from classic Italian recipes, where the use of fresh ingredients and simple techniques bring out the natural flavors of each element. Spinach was first cultivated more than 2,000 years ago in ancient Persia, eventually making its way to Italy in the 8th century. Known as “the prince of vegetables” in Europe, spinach has long been celebrated for its nutritional benefits. Meanwhile, Parmesan cheese, known as Parmigiano-Reggiano in Italy, has been crafted in the Parma region since the Middle Ages. A historic staple in Italian kitchens, its sharp and nutty profile has made it an irreplaceable ingredient in gourmet cooking.

Combining spinach and Parmesan with pasta represents a fusion of health and indulgence, an evolution from traditional dishes like Alfredo. As it became an international favorite, this creamy pasta recipe adapted to incorporate regional flavors and preferences, always keeping a touch of its Italian roots. Hence, Creamy Spinach Parmesan Pasta is not just a recipe but a story laid on a plate, one that speaks of cultural exchange, culinary ingenuity, and the timeless appeal of Italian-inspired cuisine.

Why You’ll Love This Recipe

  • Simple Ingredients: Most components are likely already in your pantry or easily found in any local grocery store.
  • Quick Preparation: In about 30 minutes, you can have a restaurant-quality meal ready to enjoy, making it perfect for busier weeknights.
  • Nutritious and Delicious: Packed with vitamins from the spinach and calcium from the cheese, it marries health with taste seamlessly.
  • Adaptability: Perfect for customization; you can easily alter ingredients to suit dietary preferences or available pantry items.
  • Family-Friendly: A hit with adults and children alike, it’s a versatile meal that pleases every palate at the table.

Flavor Profile & Texture

The interplay of flavors and textures in Creamy Spinach Parmesan Pasta is nothing short of magical. As you dig in, the pasta hugs every droplet of the creamy sauce, which is unapologetically rich and decadent. The star ingredient, Parmesan cheese, provides a nutty, savory backbone with its salty and sharp notes, dancing harmoniously with the smooth, velvety base. Complementing the sauce is spinach, its earthiness providing a fresh, slightly bitter contrast that balances out the dish beautifully. The texture is utterly satisfying — the soft, yielding pasta intersects with the occasional tender leaf of spinach. Such is the magic of creamy pasta — every bite is buttery smooth yet punctuated by a delightful crispiness where the cheese has melded perfectly into the sauce.

Occasions & Pairings

Creamy Spinach Parmesan Pasta can turn a casual dinner into a celebration, making it ideal for a variety of occasions. Whether you’re crafting a romantic feast for two or hosting a cozy dinner party, this dish serves as a magnificent centerpiece. Consider serving it during special holidays like Valentine’s Day, paired with a light, effervescent Prosecco to complement its rich flavors. For a full dining experience, accompany the pasta with a crisp arugula salad tossed with lemon vinaigrette to contrast the creaminess. For dessert, a light and fruity option like a sorbet provides a refreshing finish.

Tips, Variations & Substitutions

This dish welcomes creativity, allowing you to tailor it to fit your personal taste and nutritional requirements without losing its essence. For a robust, aromatic twist, incorporate roasted garlic into the sauce, or sprinkle toasted pine nuts on top as a final flourish for an added crunch and nutty dimension.

For a lighter version, swap out some of the heavy cream with Greek yogurt or milk. If catering to vegan guests, use nutritional yeast in place of Parmesan for that cheesy note and substitute with a plant-based cream. You can also enhance the dish’s nutritional profile by adding proteins such as grilled chicken or shrimp, or other vegetables like sun-dried tomatoes or mushrooms which enrich the flavor spectrum distinctly.

Storage & Make-Ahead Ideas

Creamy Spinach Parmesan Pasta is a versatile dish that stores well, making it perfect for meal prep. Once cooled, transfer any leftovers to an airtight container and keep them in the refrigerator for up to four days. To reheat, gently warm on the stove with a splash of milk to return it to its creamy consistency, ensuring the pasta doesn’t dry out.

If you anticipate a busy week, consider preparing the sauce ahead of time — it can be made in advance and refrigerated for up to three days, or frozen for up to three months. Simply reheat, cook fresh pasta, and combine when ready to serve. This make-ahead strategy will save time without compromising the dish’s delightful flavor and texture.

Fun Facts & Trivia

Did you know that Parmesan cheese is sometimes referred to as the “King of Cheeses”? It’s because of its rich history and the craftsmanship involved in its creation. A single wheel of Parmigiano-Reggiano must age for a minimum of 12 months before it earns the prestigious stamp, highlighting its authenticity and quality.

Moreover, spinach’s claim to fame isn’t just due to its nutritional punch — it surged in popularity in the 1920s thanks to the famed cartoon character, Popeye, whose strength was attributed to this leafy green. Today, it continues to be beloved across the globe, not just for its health benefits but for its versatility in countless dishes, including this delightful pasta.

In conclusion, Creamy Spinach Parmesan Pasta is a symphony of flavors and textures, a dish that invokes the comfort of home cooking while exuding the sophistication of fine dining. With its rich heritage, endless adaptability, and undeniable taste, it’s a recipe that deserves a place at your table, promising warmth and satisfaction in each serving.

Ingredients

  • Pasta
    → Use 8 ounces of your preferred pasta, such as fettuccine or penne, as the base for this dish. The pasta should be cooked al dente to provide a firm texture that holds up well in the creamy sauce. Be sure to salt the boiling water generously before adding the pasta to enhance its flavor. Once cooked, reserve a cup of pasta water before draining to help adjust the sauce consistency later.
  • Fresh Spinach
    → 4 cups of fresh spinach leaves will bring a vibrant color and rich nutrients to the dish. The spinach should be washed thoroughly and roughly chopped before adding it to the sauce. When sautéed, it wilts down significantly, so using a generous amount ensures that each serving is packed with flavor and health benefits.
  • Parmesan Cheese
    → 1 cup of freshly grated Parmesan cheese is essential for achieving the creamy and cheesy texture of the sauce. Freshly grating the cheese ensures better melting and flavor compared to pre-grated options. Reserve some for garnishing the finished dish, as it adds a lovely touch of richness on top.
  • Heavy Cream
    → 1 cup of heavy cream will serve as the base for the creamy sauce, contributing richness and a smooth consistency. Make sure to use heavy cream rather than lighter alternatives, as it emulsifies perfectly with the cheese and pasta. Allow the cream to come to room temperature before adding it to prevent curdling.
  • Garlic
    → 3 cloves of garlic, minced, will add a fragrant depth of flavor to the sauce. Garlic should be sautéed until fragrant but not browned, as overcooking can result in bitterness. Fresh garlic cloves are preferred for their robust flavor; if using pre-minced garlic, adjust the quantity to prevent overpowering the dish.
  • Olive Oil
    → 2 tablespoons of extra virgin olive oil serves as the cooking medium for the garlic and spinach. Use high-quality olive oil for the best flavor. Heat it gently in a skillet to avoid burning the garlic. This oil also adds healthy fats to the dish, enhancing the overall richness of the sauce.
  • Salt
    → 1 teaspoon of salt is crucial for enhancing the flavors in the dish. This should be added in stages, starting with boiling the pasta water and later, adjusting to taste as you combine the ingredients. Seasoning is important to bring out the natural flavors of the spinach and cheese.
  • Pepper
    → 1/2 teaspoon of freshly ground black pepper will add a subtle spiciness to the creamy sauce. Freshly grinding the pepper maximizes its flavor and aroma compared to pre-ground options. Adjust the quantity based on your taste preferences, using more for a spicier kick.

Instructions

  • Bring a large pot of salted water to a boil over high heat.

    → The salt enhances the pasta’s flavor and helps to season it during cooking. Make sure the water is boiling vigorously before adding the pasta so that it cooks evenly without becoming mushy.
  • Add 8 ounces of your preferred pasta to the boiling water and cook according to the package instructions until al dente.

    → Cooking the pasta al dente means it will have a firm bite and hold its shape when mixed with the sauce. Check for doneness a minute or two before the suggested cooking time by tasting a piece.
  • Before draining the pasta, reserve 1 cup of the pasta cooking water and set it aside.

    → This starchy water can help adjust the cream sauce’s consistency and help it cling to the pasta better, providing a perfect texture.
  • Drain the pasta in a colander and set aside, making sure not to rinse it, as this can remove the starch that helps the sauce adhere.

    → Rinsing can lead to a watery dish, so let the pasta continue to steam in the colander while you prepare the sauce.
  • Heat 2 tablespoons of extra virgin olive oil in a large skillet over medium heat.

    → The oil serves as the base for the sauce and should be heated enough to sauté the garlic and spinach without burning them. A moderate heat allows the flavors to develop beautifully.
  • Add 3 cloves of minced garlic to the skillet and sauté for about 30 seconds until fragrant.

    → Be vigilant as garlic can burn quickly; stirring constantly will ensure it becomes fragrant and softened, releasing its sweet flavor without turning bitter.
  • Add 4 cups of roughly chopped fresh spinach to the skillet and cook until wilted, about 2-3 minutes.

    → Stir the spinach often to ensure it wilts evenly and to trap steam within the pan. This not only reduces its volume significantly but also brings out its vibrant flavor.
  • Pour in 1 cup of heavy cream and bring it to a gentle simmer.

    → The heavy cream constitutes the creamy base of the sauce. Stirring continuously will prevent the cream from curdling and will allow it to combine smoothly with the sautéed ingredients.
  • Add 1 cup of freshly grated Parmesan cheese into the skillet and stir until melted and combined.

    → Grating your cheese fresh helps it melt better and integrate into the sauce. Stir well until the cheese is fully dissolved, ensuring a creamy texture throughout.
  • Season the sauce with 1 teaspoon of salt and 1/2 teaspoon of freshly ground black pepper.

    → Add salt and pepper gradually, tasting as you go. This is crucial for balancing the flavors of the dish, ensuring it is seasoned well without being overpowering.
  • Add the drained pasta to the skillet and toss it gently to combine with the creamy spinach Parmesan sauce.

    → Using tongs or two forks, lift and fold the pasta in the sauce to coat evenly. This technique helps ensure every piece of pasta is covered and balances the flavors throughout.
  • If the sauce appears too thick, gradually mix in some of the reserved pasta water, one tablespoon at a time, until desired consistency is achieved.

    → The reserved starchy water is your ally for achieving the right sauciness. This step allows you to customize the thickness of the sauce based on personal preference.
  • Serve the creamy spinach Parmesan pasta immediately, garnished with additional grated Parmesan cheese if desired.

    → Plating while hot enhances the enjoyment of the dish; the added cheese provides a finishing touch that elevates the flavor profile and presentation.

Notes

  • Cooking the Pasta
    → Begin by bringing a large pot of salted water to a boil. Add your choice of pasta and cook according to package instructions until al dente. This typically means an additional minute less than the suggested cooking time. Reserve a cup of pasta water before draining to adjust the sauce later, then set the drained pasta aside.
  • Sautéing the Spinach
    → In a large skillet, heat the olive oil over medium heat. Once the oil is shimmering, add the minced garlic and sauté until fragrant, about 30 seconds, being cautious not to brown it. Gradually add the chopped spinach, stirring frequently, until wilted down. This should take just a few minutes. Make sure to remove the skillet from heat soon after the spinach wilts to prevent overcooking.
  • Making the Creamy Sauce
    → Reduce the heat to low and stir in the heavy cream into the sautéed spinach and garlic mixture. Mix well to incorporate. Gradually add the freshly grated Parmesan cheese, stirring continuously until melted and the sauce is smooth. If the sauce becomes too thick, add reserved pasta water a little at a time until you reach your desired consistency. Season the sauce with salt and freshly ground black pepper to taste.
  • Combining Pasta and Sauce
    → Gently fold the cooked pasta into the creamy spinach sauce, ensuring that every piece is well coated. If necessary, continue to adjust the sauce’s consistency with more pasta water. This creamy coating is what makes the dish satisfying and flavorful.
  • Serving the Pasta
    → Once combined, remove the skillet from heat. Taste and adjust seasoning if needed. Serve the pasta warm and garnish with extra grated Parmesan cheese and a sprinkle of black pepper for added flavor. A drizzle of high-quality olive oil on top just before serving can enhance the richness.
  • Storage Tips
    → If you have leftovers, store them in an airtight container in the refrigerator for up to 3 days. Reheat gently on the stove or in the microwave, adding a splash of cream or pasta water to restore creaminess. Keep in mind that the pasta may absorb some of the sauce as it sits, so adjusting the moisture is key.

Tips

  • Choose the Right Pasta:
    Opt for pasta types with ridges, like rigatoni or fusilli, which can hold the creamy sauce better than smoother varieties. This helps ensure every bite is bursting with flavor.
  • Prepping the Spinach:
    If you have time, you can sauté the spinach separately in a bit of olive oil and garlic to enhance its flavor before incorporating it into the sauce.
  • Grate Your Own Cheese:
    Avoid pre-grated Parmesan as it often contains anti-caking agents that hinder melting. Freshly grated cheese will melt smoothly, giving a luxurious creamy texture to your dish.
  • Tempering the Cream:
    To prevent curdling when adding the cream to the hot ingredients, whisk in a small amount of the sauce liquid first to gradually raise the temperature before fully incorporating it.
  • Garlic Cooking Tips:
    Keep a close eye on the garlic while sautéing; it should be cooked just until fragrant, usually 30 seconds to 1 minute. If it starts to brown, remove it immediately to avoid bitterness.
  • Stirring the Sauce:
    Once you combine the pasta with the sauce, gently toss the ingredients rather than stirring aggressively to prevent breaking the pasta and ensuring an even coating of sauce.
  • Seasoning in Layers:
    Always taste and adjust seasoning at each step. After combining pasta, spinach, and sauce, add salt and pepper gradually until you achieve a balanced flavor.
  • Finishing Touches:
    For added flavor, finish the dish with a sprinkle of red pepper flakes, fresh herbs like basil or parsley, and an extra drizzle of olive oil before serving for a pop of freshness and color.

FAQ

What ingredients do I need for Creamy Spinach Parmesan Pasta?

You will need pasta (such as fettuccine or penne), fresh spinach, Parmesan cheese, garlic, heavy cream, olive oil, salt, pepper, and optional red pepper flakes for a little heat.

How long does it take to prepare Creamy Spinach Parmesan Pasta?

The entire dish can be prepared in about 20-30 minutes, making it a quick and delicious meal option.

Can I use frozen spinach instead of fresh spinach?

Yes, you can use frozen spinach. Be sure to thaw and drain it thoroughly to remove excess moisture before adding it to the dish.

Is this recipe suitable for vegetarian diets?

Yes, Creamy Spinach Parmesan Pasta is suitable for vegetarians, as it does not contain meat or fish.

Can I make this recipe gluten-free?

Absolutely! Just use gluten-free pasta in the recipe, and make sure any other ingredients are certified gluten-free.

What can I use instead of heavy cream?

If you want a lighter option, you can substitute heavy cream with half-and-half or a non-dairy alternative like coconut milk or cashew cream.

How can I make the sauce thicker?

To thicken the sauce, you can simmer it longer to reduce the liquid, or add a bit of cornstarch mixed with water until the desired consistency is achieved.

Can I add protein to this dish?

Yes! Grilled chicken, shrimp, or even chickpeas can be added for extra protein and flavor.

Introduction: A Dish That Delights

Imagine a dish that captures the essence of glossy, succulent flavors dancing together in a wok, delivering a symphony of tastes to your palate. This is the magic of our Quick Honey Garlic Shrimp Stir-Fry. In less than 30 minutes, you’ll be savoring a meal that marries the sweetness of honey with the savory zing of garlic and the delicate brininess of shrimp. It’s a dish that is not only visually appealing with its vibrant colors but also incredibly aromatic and satisfying. Perfect for busy weeknights or for impressing last-minute guests, this stir-fry elevates the everyday meal into something extraordinary.

The Story Behind the Dish

The art of stir-frying originated in China, where quick-cooking methods were developed to preserve fuel and maximize flavors. Historically, this technique was prized for its ability to cook food rapidly over high heat, ensuring maximum nutrient retention and vibrant flavors. The combination of honey and garlic in cuisine can also trace its roots back to ancient China, where honey was often used in culinary practices not just for sweetness, but also for its health benefits. Our recipe is a modern take on these time-honored practices, blending a touch of sweetness and spice to create a dish that feels both timeless and timely.

Why You’ll Love This Recipe

  • Quick and Easy: Ready in under 30 minutes, it’s a perfect weeknight meal.
  • Healthy: Shrimp is a low-calorie protein packed with nutrients.
  • Family-Friendly: A sweet-savory flavor profile that kids and adults alike will enjoy.
  • Economical: Requires minimal ingredients, most of which you might already have at home.
  • Versatile: Easily customizable with your favorite vegetables or serving styles.

Flavor Profile & Texture

This dish is a delightful blend of flavors and textures that work harmoniously to excite the senses. The shrimp, when cooked just right, are tender and juicy, enveloped in a glaze that is both subtly sweet and richly savory. The honey acts as a natural sweetener, balancing the pungency of aromatic garlic. As the shrimp cook quickly, the sugars from the honey begin to caramelize, creating a glaze that coats your spoon, and eventually your taste buds, with a glossy, sumptuous layer of flavor. Each bite offers a satisfying contrast, from the firm snap of perfectly cooked shrimp to the lingering sweet and aromatic garlic finish that invites you back for another forkful.

Occasions & Pairings

The Quick Honey Garlic Shrimp Stir-Fry is the perfect choice for various occasions, ensuring that any meal is memorable. Serve it on:

  • Weeknights: With its simplicity and speed, it’s an ideal choice for a comforting family dinner after a busy day.
  • Dinner Parties: Its fragrant aroma and glossy sheen make it a stunning centerpiece for a casual dinner with friends.
  • Special Occasions: Elevate a romantic dinner at home with a dish that feels restaurant-quality.

Pair your dish with:

  • Sides: Steamed jasmine rice or fluffy quinoa to soak up the flavorful glaze.
  • Drinks: A crisp white wine, like Sauvignon Blanc, to cut through the sweetness, or a light lager beer for a refreshing complement.
  • Dessert: A light fruit sorbet or a refreshing citrus salad.

Tips, Variations & Substitutions

This dish is wonderfully versatile and can easily be adjusted to suit your dietary needs and taste preferences. Consider some of these tips and variations:

  • Vegetarian: Substitute shrimp with firm tofu or tempeh for a meat-free version. Ensure you press the tofu to remove excess moisture before cooking.
  • Gluten-Free: Use tamari or coconut aminos in place of soy sauce to keep the recipe gluten-free.
  • Spice it Up: Add a pinch of chili flakes or sriracha for a fiery kick.
  • Regional Twists: Incorporate ingredients like grated ginger, a splash of lime juice, or sesame seeds for additional depth and regional flair.
  • Make it a Feast: Add a variety of chopped vegetables such as bell peppers, snap peas, or carrots to make it a complete meal in a single dish.

Storage & Make-Ahead Ideas

The beauty of this dish lies also in its simplicity and flexibility when it comes to storage and make-ahead strategies. Here are some useful suggestions:

  • Storage: Store leftovers in an airtight container in the refrigerator for up to 3 days. Ensure the shrimp are refrigerated as soon as they cool to maintain freshness.
  • Reheating: Quickly reheat in a skillet over medium heat to maintain texture, adding a splash of water if the sauce has thickened too much.
  • Make-Ahead: Prep your ingredients ahead of time by peeling and deveining the shrimp, chopping any additional vegetables, and mixing the sauce. Refrigerate each component separately, then combine and cook when ready to serve.
  • Freezing: Although fresh shrimp are preferred, you can prepare and freeze the cooked dish for up to 1 month. Thaw overnight in the refrigerator before reheating thoroughly.

Fun Facts & Trivia

Did you know that shrimp are one of the most widely consumed types of seafood in the world? They are beloved not just for their flavor, but also for their nutritional benefits, providing a rich source of selenium and iodine necessary for thyroid function. The combination of honey and garlic is often touted in natural medicine for immune-boosting properties, making this dish not just a treat for the taste buds, but also potentially beneficial for health!

In conclusion, the Quick Honey Garlic Shrimp Stir-Fry is more than just a meal. It’s a quick getaway into the world of vibrant flavors and rich culinary history, all wrapped up in a simple, delicious package that’s ready in minutes. Whether you’re a seasoned cook or a kitchen novice, this recipe offers an opportunity to create something special, connect with time-honored traditions, and share moments of joy around the dining table.

Ingredients

  • For the Stir-Fry
    • 1 pound large shrimp, peeled and deveined
      → The shrimp should be uncooked and should have a slight sheen to indicate freshness. Ensure they are peeled and deveined for easy cooking and to keep the dish clean. Larger shrimp are preferable as they provide a satisfying bite and cook quickly, absorbing the flavors of the sauce beautifully.
    • 2 tablespoons vegetable oil
      → A neutral oil with a high smoke point is best for stir-frying. Vegetable oil helps in sautéing the shrimp and vegetables without imparting additional flavors, allowing the natural taste of the ingredients and the honey garlic sauce to shine through. Make sure to heat the oil until shimmering before adding the shrimp to ensure a beautiful sear.
    • 1 cup bell peppers, julienned
      → Use a mix of red, yellow, or green bell peppers for a colorful and visually appealing dish. Slice them into thin strips so they cook quickly and evenly, adding crunch and sweetness to the stir-fry. Fresh, crisp peppers enhance the overall texture and flavor of the meal.
    • 1 cup snap peas or snow peas
      → These add a delightful snap and sweetness to the dish. Rinse and trim the ends before adding them to the pan; they should be thrown in at the last minute to retain their vibrant color and crispness. Fresh peas are key to achieving the best texture and crunch.
    • 3 cloves garlic, minced
      → Fresh garlic provides an aromatic flavor that is essential to the honey garlic sauce. Mince the garlic finely to ensure it distributes evenly throughout the dish. Sauté the garlic briefly until fragrant but be careful not to burn it, as burnt garlic can impart a bitter taste.
    • 1 inch fresh ginger, grated
      → Ginger adds a warm, zesty note to the stir-fry that balances the sweetness of the honey. Peel the ginger and use a microplane or grater to create fine shreds that mix well with the other ingredients. Fresh ginger is more potent and flavorful than powdered, making it a better choice for this dish.
  • For the Honey Garlic Sauce
    • 1/3 cup honey
      → Honey serves as the sweet base of the sauce, giving the dish its name. Use a good-quality honey for the best flavor, as this will enhance the overall taste of the stir-fry. If your honey is crystallized, warm it gently to liquefy it before adding to the sauce.
    • 1/4 cup soy sauce (or tamari for gluten-free)
      → Soy sauce provides a savory umami depth to the dish and balances the sweetness of the honey. Use low-sodium soy sauce to control salt levels in the stir-fry. Tamari is a great gluten-free substitute that delivers similar flavor without wheat.
    • 1 tablespoon cornstarch
      → Cornstarch acts as a thickening agent, helping the sauce to coat the shrimp and vegetables beautifully. Mix it with a little cold water to create a slurry before adding to the hot pan to prevent clumping. This will give the sauce a glossy finish and improve its clinginess to the ingredients.

Instructions

  • Prepare the honey garlic sauce by combining honey, soy sauce, and cornstarch in a small bowl.

    → Measure 1/3 cup of honey and pour it into the bowl. Then add 1/4 cup of soy sauce. Finally, sprinkle in 1 tablespoon of cornstarch. Whisk the mixture thoroughly to ensure the cornstarch is fully dissolved, creating a smooth slurry. This step is crucial because it allows the sauce to thicken properly when heated, adhering nicely to the shrimp and vegetables during cooking.
  • Preheat your wok or large skillet over medium-high heat.

    → This will ensure that the cooking surface is hot enough to achieve a nice sear on the shrimp. You will know it’s ready when you can feel the heat radiating off the surface and small droplets of water sizzle immediately upon contact. Proper preheating is essential for stir-frying to prevent sticking and to develop those delightful browned bits that add flavor.
  • Add 2 tablespoons of vegetable oil to the hot wok or skillet.

    → Pour the oil into the pan, swirling it around to coat the bottom evenly. Wait for the oil to shimmer, which indicates it is hot enough. This step is important because hot oil prevents the food from steaming and allows for better browning, resulting in a more flavorful dish.
  • Once the oil is hot, add 1 pound of large shrimp, ensuring they are spread out in a single layer.

    → This will allow the shrimp to sear properly instead of steaming. Cook for about 2-3 minutes on one side without stirring. Look for the shrimp to turn a bright pink color, which indicates they are cooking properly. Flip the shrimp over with a spatula and cook for another 1-2 minutes until they are fully cooked and opaque. Overcrowding the pan will lead to uneven cooking.
  • Remove the cooked shrimp from the pan and set them aside on a plate.

    → Placing the shrimp on a plate helps them rest while you cook the vegetables. This will also prevent them from overcooking and becoming rubbery, as they will continue to cook slightly from residual heat if left in the pan.
  • Add the minced garlic (3 cloves) and grated ginger (1 inch) to the hot pan.

    → Ensure that your garlic is minced finely and your ginger is grated to maximize flavor release. Stir quickly for 15-30 seconds until fragrant but not browned, as burnt garlic can taste bitter. The heat will help to release the essential oils in the garlic and ginger, enhancing the aromatic profile of your stir-fry.
  • Introduce 1 cup of julienned bell peppers and 1 cup of snap peas (or snow peas) to the pan, stirring constantly.

    → Add these vegetables after the garlic and ginger to prevent burning. Stirring helps to evenly cook the vegetables while preventing them from sticking to the pan. Cook for about 2-3 minutes until the peppers are slightly tender but still crisp. Maintaining their crunch adds texture and vibrancy to the dish.
  • Return the cooked shrimp to the pan, ensuring they are evenly distributed among the vegetables.

    → Gently fold the shrimp back in to combine with the vegetables. This will help to ensure they absorb the remaining flavors without breaking apart. It’s important to keep the shrimp warm without overcooking them further at this stage.
  • Pour the prepared honey garlic sauce into the pan, stirring to coat the shrimp and vegetables thoroughly.

    → Allow the sauce to come to a simmer, as this will activate the cornstarch and thicken the mixture, allowing it to cling beautifully to the shrimp and vegetables. Stir for about 1-2 minutes to ensure everything is well coated and heated through.
  • Remove the pan from heat and serve the stir-fry immediately over rice or noodles.

    → Presentation is key, so take care to portion out the stir-fry attractively on serving plates. Serving it hot ensures that the flavors are lively and the textures remain vibrant. Enjoy your quick and flavorful honey garlic shrimp stir-fry!

Notes

These Quick Honey Garlic Shrimp Stir-Fry are not only quick to prepare but also packed with flavor and nutrition. The combination of shrimp, colorful bell peppers, and crisp snap peas makes this dish visually appealing and delightful to eat.

To enhance the dish, ensure your shrimp are fresh and properly cleaned. Using a mix of bell peppers not only adds vibrant colors but also various flavors, contributing to a balanced taste profile. Snap peas are a great finishing touch as they provide a fresh crunch and sweet flavor when added at the end of cooking.

The honey garlic sauce is the star of the dish; it’s simple yet incredibly flavorful. Opt for high-quality honey and low-sodium soy sauce to maintain a balance between sweet and savory. Mixing the cornstarch with cold water first will help prevent clumping and create a beautifully glossy sauce that adheres to the shrimp and vegetables perfectly.

This stir-fry is great served over rice or noodles, making it a complete meal. Feel free to add additional vegetables such as broccoli or carrots for extra nutrition. Leftovers can be stored in the fridge for a couple of days and reheated for easy meals throughout the week. Enjoy this dish as a quick weeknight dinner that is sure to impress!

Tips

Cooking Tips for Quick Honey Garlic Shrimp Stir-Fry

  • Preparation is Key: Before you start cooking, ensure all your ingredients are prepped and within reach. Stir-frying is a fast-paced cooking method, so having everything ready will help you work efficiently.
  • Choose the Right Shrimp: If possible, opt for shrimp labeled as “wild-caught” for better flavor and texture. If using frozen shrimp, thaw them thoroughly under cold water before cooking to maintain taste and quality.
  • Let the Oil Heat: Allow the vegetable oil to heat up significantly before adding the shrimp. This will ensure that the shrimp sear rather than steam, resulting in a better texture.
  • Don’t Overcrowd the Pan: Cook the shrimp in batches if necessary to avoid overcrowding. Overcrowding can cause the shrimp to cook unevenly and can lead to them steaming rather than stir-frying.
  • Monitor Cooking Time: Shrimp cook very quickly, usually in just 2-3 minutes per side. Keep an eye on them and remove them from the pan as soon as they turn pink and opaque to avoid overcooking.
  • Enhance Flavor Layers: You can add extras like red pepper flakes for heat or a splash of lime juice for acidity, which can complement the sweetness of the honey and balance the dish.
  • Mix Sauce Well: Ensure that the honey garlic sauce is thoroughly mixed before adding it to the stir-fry. Give it a quick stir to combine the honey, soy sauce, and cornstarch slurry evenly.
  • Cook Vegetables Crisp: Aim to cook the bell peppers and snap peas just until tender but still crispy. This will enhance their flavor and provide a delightful crunch in the stir-fry.
  • Finish with Freshness: Consider garnishing your dish with sesame seeds or chopped scallions just before serving for a touch of freshness and added flavor.
  • Serve Immediately: Stir-fried dishes are best enjoyed fresh and hot. Serve your honey garlic shrimp stir-fry over steamed rice or noodles for a complete meal.

FAQ

What ingredients do I need for Quick Honey Garlic Shrimp Stir-Fry?

You will need shrimp, honey, garlic, soy sauce, bell peppers, broccoli, olive oil, and optional sesame seeds for garnish.

How long does it take to prepare the Quick Honey Garlic Shrimp Stir-Fry?

The preparation and cooking time for this dish is approximately 20-30 minutes.

Can I use frozen shrimp for this stir-fry?

Yes, you can use frozen shrimp. Just make sure to thaw them properly before cooking.

What vegetables can I add to the stir-fry?

You can add a variety of vegetables such as snap peas, carrots, zucchini, or bok choy according to your preference.

Is this recipe gluten-free?

To make this recipe gluten-free, use a gluten-free soy sauce alternative.

Can I prepare this dish in advance?

For best results, it is recommended to cook fresh. However, you can marinate the shrimp in the honey-garlic sauce a few hours ahead of time.

What can I serve with Quick Honey Garlic Shrimp Stir-Fry?

This stir-fry pairs well with steamed rice, quinoa, or cauliflower rice for a healthy option.

Can I substitute honey with another sweetener?

Yes, you can use maple syrup or agave syrup as alternatives to honey in this recipe.

Introduction / Hook

Imagine stepping into a warm, rustic kitchen, where the air is filled with the tantalizing aroma of simmering vegetables and herbs. Welcome to the heart of Tuscany, captured in a bowl of rich and hearty Vegetable and Bean Stew. This dish, with its vibrant medley of seasonal Mediterranean vegetables and nourishing beans, envelops the senses with a comforting warmth, evoking images of sunlit farms and rolling Italian countryside. Perfect for those cozy evenings when the weather insists you stay in and indulge in a culinary hug, this stew is not just a meal; it’s an experience, a journey to one of Italy’s most enchanting regions, all from the comfort of your home.

The Story Behind the Dish

Tuscany, a region known for its lush landscapes and rich culinary tradition, is the birthplace of this humble yet luxurious stew. The Tuscan Vegetable and Bean Stew is a testament to the Italian philosophy of cucina povera, which translates to “poor kitchen.” This concept emphasizes simplicity and the use of fresh, readily available ingredients. Historically, it was a dish that made the most of what was at hand, turning modest ingredients into gastronomic treasures.

Rooted in the heart of rural Italy, this stew was a staple for farmers and their families. Vegetables plucked fresh from the garden and beans harvested from small patches of land were slow-cooked to perfection over open flames. Over time, the dish has transcended its humble origins to become a celebrated delicacy, admired for its simple yet profound flavors. It’s a testament to how resourcefulness and a love for local produce can create something truly extraordinary.

Why You’ll Love This Recipe

  • Robust Flavor: The combination of fresh vegetables and aromatic herbs creates a rich, satisfying taste that is both hearty and refreshing.
  • Nutrient-Dense: Packed with beans and a variety of vegetables, this stew is a powerhouse of nutrients, perfect for those looking to maintain a balanced diet.
  • Easy to Prepare: With straightforward steps that honor the slow cooking process, this recipe lets you enjoy authentic Italian flavors without convoluted preparation methods.
  • Versatile: Ideal as a main course, it can be adapted to suit various occasions, from casual family dinners to more formal gatherings.
  • Vegan-Friendly: Naturally plant-based, this stew caters to vegans and vegetarians without compromising on taste or satisfaction.

Flavor Profile & Texture

The Tuscan Vegetable and Bean Stew presents a rich tapestry of flavors that are delicately balanced to captivate the palate. You’ll savor the sweetness of ripe tomatoes mingling with the earthiness of beans and the subtle bite of onions and garlic. The fresh herbs, be it rosemary, thyme, or basil, infuse their aromatic essence into every bite, providing a fragrant melody that sings of the Italian countryside.

In terms of texture, this stew is a symphony of contrasts. You’ll experience the tender softness of slowly simmered carrots and zucchini against the creamy consistency of cannellini beans. A hint of crispness from fresh kale or spinach adds a delightful variance, making every spoonful a complete yet varied experience.

Occasions & Pairings

This Tuscan stew is a versatile dish, perfect for numerous occasions. On a chilly winter evening, it warms you to the core, while in summer, its lightness and vibrancy match the season’s spirit. It’s a fantastic choice for weeknight dinners, as it can be made in advance, and its flavors only improve over time, making it an ideal candidate for meal prepping.

When it comes to pairing, a crusty loaf of sourdough or a fragrant rosemary focaccia complements it beautifully. For drinks, a medium-bodied Chianti or a crisp glass of white Vernaccia di San Gimignano amplifies the meal’s Tuscan roots. To finish, consider an almond biscotti or a simple fruit salad for a refreshing finale.

Tips, Variations & Substitutions

One of the joys of this stew is its adaptability, accommodating any number of variations and substitutions:

  • Protein Boost: For those wanting extra protein, add a serving of grilled chicken or Italian sausage.
  • Skipping Beans: If beans aren’t to your taste, add potatoes or root vegetables to retain the stew’s heartiness.
  • Veggie Variations: Feel free to include other vegetables like squash, sweet potatoes, or bell peppers based on seasonal availability or preference.
  • Dietary Alternatives: To make it gluten-free, ensure your stock and any bread pairings are certified gluten-free.
  • Herb Flexibility: If fresh herbs aren’t accessible, use dried ones which are more concentrated in flavor. Adjust quantities accordingly.

Storage & Make-Ahead Ideas

This stew excels as a make-ahead dish. Prepare a large batch and refrigerate it; the flavors will deepen and meld together, becoming even more satisfying after a day or two. Stored in an airtight container, it will keep in the refrigerator for up to five days.

If you plan to freeze it, allow the stew to cool completely. Portion it into airtight containers or heavy-duty freezer bags, leaving some space for expansion, and it will stay fresh for up to three months. To reheat, simply thaw overnight in the fridge and warm gently on the stove.

Fun Facts & Trivia

Did you know that bean stews similar to this Tuscan classic have been enjoyed since Roman times? Ancient Romans valued beans not just for their nutrition but also for their sustainability, as they enrich the soil with nitrogen, promoting better crop yields. In a country rich in culinary heritage, the humble bean stew stands as a historical emblem of Italian cuisine’s emphasis on integrating nature’s best offerings into daily life.

Moreover, the Tuscan approach to this dish, often referred to as “Ribollita” when prepared with leftover bread, echoes the region’s resourcefulness. Originally a way to use up stale bread and old vegetables, ribollita means “reboiled,” showcasing a tradition of not letting anything go to waste, beautifully aligning with today’s sustainable practices.

Ingredients

  • Vegetables
    • 2 tablespoons olive oil
      → Olive oil serves as the primary cooking fat, adding richness and depth of flavor to the stew. Use high-quality extra virgin olive oil for the best taste. Heat the oil in a large pot before adding the vegetables to ensure they sauté evenly.
    • 1 onion (diced)
      → The onion adds sweetness and aroma to the stew. Dice it finely to ensure it cooks down completely and blends into the base of the dish. Cooking it until translucent will enhance its flavor and provide a savory foundation.
    • 2 carrots (sliced)
      → Carrots bring natural sweetness and a slight crunch to the stew. Slice them into uniform pieces so they cook evenly, and add them after the onion to allow them to soften and release their flavors before adding more ingredients.
    • 2 celery stalks (sliced)
      → Celery adds a fresh, crisp texture and subtle flavor to the stew. Slice the stalks so they match the thickness of the carrots, ensuring even cooking. This vegetable also contributes to the aromatic base of the dish along with the onions and carrots.
    • 1 bell pepper (diced)
      → The bell pepper introduces a sweet and slightly tangy flavor along with vibrant color. Remove the seeds and core before dicing; a red, yellow, or orange pepper works best for sweetness, while a green pepper provides a slightly bitter contrast.
    • 2 zucchinis (diced)
      → Zucchinis add a tender, mild flavor and a nice texture to the stew. Dice them into bite-sized pieces and consider adding them toward the end of cooking to prevent them from becoming overly soft and mushy.
    • 2 cups chopped kale or spinach
      → Kale or spinach provides a nutrient boost and adds a vibrant green color. Remove tough stems from kale, and chop the leaves into smaller pieces. Add them to the stew near the end of cooking to retain their color and nutritional value.
  • Legumes
    • 1 can (15 oz) cannellini beans (drained and rinsed)
      → Cannellini beans are creamy and provide a hearty, protein-rich component to the stew. Drain and rinse them before adding to the pot to remove excess salt and preservatives. They help thicken the stew and add substance.
    • 1 can (15 oz) diced tomatoes (with juice)
      → Diced tomatoes add acidity, depth, and color to the stew. Use fire-roasted tomatoes for a smoky flavor. The juice contributes to the stew’s liquid base, while the chunks add texture and visual appeal.
  • Seasoning
    • 2 cloves garlic (minced)
      → Garlic enhances the overall flavor profile with its aromatic qualities. Mince the cloves finely to ensure they distribute evenly throughout the stew, and add them after the vegetables have softened to prevent burning.
    • 1 teaspoon dried oregano
      → Dried oregano brings a classic Italian flavor that complements the stew’s profile. Add it with the garlic to let its oils release fully, which intensifies its aromatic qualities during cooking.
    • 1 teaspoon dried thyme
      → thyme adds an earthy and slightly floral note to the stew. Like oregano, it should be added at the same time as the garlic to maximize its flavor. Use fresh thyme if available, but increase the quantity.
    • Salt and pepper to taste
      → Salt enhances all the flavors within the stew while black pepper adds warmth and depth. Start with a small amount and taste as you go, adjusting to achieve the desired flavor balance.
  • Liquid
    • 4 cups vegetable broth
      → Vegetable broth serves as the base liquid, providing flavor and depth to the stew. A homemade broth is preferable for freshness, but store-bought is convenient. Adjust the quantity depending on how thick or soupy you prefer your stew.
    • 1 tablespoon balsamic vinegar
      → Balsamic vinegar adds acidity and a slight sweetness, enhancing the overall flavor profile of the stew. Stir it in towards the end of cooking to brighten and deepen the flavors without losing its powerful character.

Instructions

  • Heat a large pot over medium heat and add 2 tablespoons of olive oil.

    → This initial step helps create a flavorful base for your stew. The olive oil will warm up, allowing you to sauté the vegetables effectively, which brings out their natural sugars and flavors.
  • Add 1 finely diced onion to the pot and sauté until it becomes translucent, about 5-7 minutes.

    → Cooking the onion until it’s translucent softens its flavor and enhances sweetness, creating a delicious aromatic foundation for your stew. Stir occasionally to ensure it doesn’t burn.
  • Incorporate 2 sliced carrots and 2 sliced celery stalks into the pot. Stir well to combine and cook for an additional 5 minutes.

    → The carrots and celery add complementary flavors and textures. Slicing them uniformly allows even cooking, ensuring that all vegetables contribute to a balanced flavor in the stew.
  • Add 1 diced bell pepper, stirring it into the mixture and cooking for another 3-4 minutes until it softens.

    → The bell pepper not only adds sweetness and color but also blends seamlessly with the other vegetables. This step allows the pepper to soften and release its juices, enriching the overall flavor of the stew.
  • Next, add 2 diced zucchinis and stir the pot, allowing them to cook for about 5 minutes.

    → Zucchini cooks relatively quickly, and adding it at this stage keeps it from becoming too mushy. It should maintain some texture to contribute to the stew’s mouthfeel.
  • Introduce 2 cups of chopped kale or spinach and stir it into the pot, cooking briefly until it wilts, about 2-3 minutes.

    → Adding the greens at the end of cooking helps retain their vibrant color and nutritional value. Wilting them quickly ensures they mix well without losing their structure.
  • Include 2 cloves of minced garlic and cook for about 1 minute until fragrant.

    → Garlic adds depth and richness to the stew. Cooking it too long can cause bitterness, so it’s essential to add it after the other vegetables have softened.
  • Stir in 1 teaspoon of dried oregano and 1 teaspoon of dried thyme, allowing them to cook for a minute to release their oils.

    → Adding dried herbs at this point enhances their aromatic qualities. This step maximizes the flavors as the herbs cook alongside the garlic, creating a fragrant base for the stew.
  • Pour in 4 cups of vegetable broth along with 1 can of diced tomatoes (with juice) and stir well to combine all ingredients.

    → The vegetable broth is the primary liquid that gives the stew its body. Adding diced tomatoes brings acidity, depth, and sweetness that balances the other flavors.
  • Incorporate 1 can of drained and rinsed cannellini beans, stirring them gently into the mixture.

    → Cannellini beans add a creamy texture and protein, making the stew heartier. Rinsing them before use removes excess sodium, enhancing the overall flavor of the dish.
  • Bring the stew to a simmer and reduce the heat to low. Cover the pot and let it cook for 30-40 minutes, stirring occasionally.

    → Simmering allows the flavors to meld and develop, while stirring ensures nothing sticks to the bottom of the pot. This process infuses the broth with the fragrant essences of the vegetables and herbs.
  • Season the stew with salt and pepper to taste, adjusting as necessary to enhance all the flavors.

    → Taste testing is crucial; season gradually, as this step captures the essence of the dish. Proper seasoning enhances the natural flavors and ensures the stew is balanced.
  • Once the stew has reached your desired thickness, stir in 1 tablespoon of balsamic vinegar and cook for an additional 5 minutes.

    → Adding balsamic vinegar brightens the flavors and introduces a hint of sweetness. This finishing touch elevates the stew’s overall profile, making it more complex and inviting.
  • Serve the Tuscan vegetable and bean stew hot, garnished with additional freshly chopped herbs if desired.

    → Serving the stew hot ensures its flavors are fully appreciated, and garnishing adds a fresh touch that enhances its visual appeal and aromatic qualities.

Notes

These hearty Tuscan vegetable and bean stew are perfect for any time of year and are packed with flavor and nutrition. The combination of fresh vegetables, protein-rich beans, and aromatic herbs creates a deliciously satisfying dish that can be enjoyed on its own or with crusty bread for dipping. Feel free to customize your stew by adding seasonal vegetables or your favorite legumes. If you prefer a spicier kick, consider adding a pinch of red pepper flakes or a dash of hot sauce. This stew also keeps well in the refrigerator for several days and tastes even better the next day as the flavors continue to meld. It can be frozen for later use, making it a convenient meal prep option. To serve, top it with a sprinkle of grated Parmesan cheese or a dollop of fresh pesto for added richness and flavor. Enjoy this comforting, wholesome dish knowing it’s both nutritious and satisfying!

Tips

  • Choose Fresh Ingredients: Using seasonal and fresh vegetables will significantly enhance the flavor and texture of your stew. Visit your local farmer’s market for the best produce options.
  • Prep Ahead: To save time, chop all your vegetables and gather your ingredients before starting to cook. This “mise en place” method ensures a smoother cooking experience.
  • Layer Flavors: Sauté onions, garlic, and spices at the beginning to develop a deep flavor base. This step is crucial for bringing out the full potential of the ingredients.
  • Cooking Time: Allow the stew to simmer for at least 30 minutes, but feel free to extend it to an hour or more. The longer it cooks, the more the flavors meld together. Just make sure to add the more delicate ingredients like zucchini and kale towards the end to maintain their texture and nutrients.
  • Adjust Thickness: If you prefer a thicker stew, let it simmer uncovered for longer for some of the liquid to evaporate. Conversely, if it’s too thick, add a bit more vegetable broth to reach your desired consistency.
  • Flavor Adjustment: Always taste your stew before serving. Adjust seasoning with salt, pepper, or a splash more vinegar to fine-tune the flavor to your liking just before serving.
  • Add Heat: If you crave a little spice, consider adding red pepper flakes or a dash of hot sauce when you add the garlic. It will give the stew a nice kick!
  • Garnish for Presentation: Top your stew with freshly chopped herbs like parsley or basil just before serving to add color and a fresh flavor burst.
  • Storage: This stew stores well in the refrigerator for up to 4 days. It also freezes beautifully for an easy meal later on. Just remember to cool it completely before transferring it to an airtight container for freezing.

FAQ

What ingredients are typically used in Tuscan Vegetable and Bean Stew?

Tuscan Vegetable and Bean Stew generally includes a variety of vegetables such as carrots, zucchini, and kale, along with canned or dried beans like cannellini or kidney beans, tomatoes, garlic, and herbs like rosemary and thyme.

Can I use different types of beans in this stew?

Yes, you can substitute different types of beans based on your preference or availability. Great northern beans, pinto beans, or black beans can also work well in this stew.

Is this stew vegan or vegetarian?

Tuscan Vegetable and Bean Stew is naturally vegan and vegetarian as it is made primarily from vegetables and beans, without any animal products.

How long does it take to prepare and cook the stew?

The total time to prepare and cook Tuscan Vegetable and Bean Stew is typically around 45 minutes, including chopping vegetables and simmering the stew.

Can I make this stew in advance and reheat it later?

Absolutely! Tuscan Vegetable and Bean Stew can be made in advance and stored in the refrigerator. It often tastes even better the next day as the flavors meld together. Reheat it on the stove or in the microwave.

What can I serve with Tuscan Vegetable and Bean Stew?

This stew pairs wonderfully with crusty bread, a side salad, or over a bed of rice or quinoa for a more filling meal.

How can I make this stew spicier?

To add some heat to your Tuscan Vegetable and Bean Stew, you can include ingredients like crushed red pepper flakes, diced jalapeños, or a dash of hot sauce while cooking.

Can I freeze Tuscan Vegetable and Bean Stew?

Yes, you can freeze Tuscan Vegetable and Bean Stew. Allow it to cool completely, then store it in an airtight container for up to 3 months. Thaw it in the refrigerator before reheating.

Introduction: The Irresistible Charm of Cheesy Baked Ziti with Spinach

Imagine carrying a steaming dish from the oven, the aroma of bubbling cheese mingling with the comforting scent of marinara sauce wafting through the air, filling your kitchen with irresistible warmth. This is the magic of Cheesy Baked Ziti with Spinach—a heartwarming, soul-satisfying meal that could turn any ordinary evening into a joyous celebration. The combination of tender pasta, rich marinara sauce, creamy ricotta, bubbling mozzarella, and the fresh taste of baby spinach creates a symphony of flavors and textures that delights the senses. Whether it’s the crispy golden edges of cheese or the velvety richness of the sauce, every bite offers a memorable taste experience that feels like a loving embrace. Truly, this dish transforms simple ingredients into something extraordinary, making it nothing short of culinary poetry.

The Story Behind the Dish: A Culinary Classic with a Twist

Baked ziti, a classic Italian-American dish, has long been a staple on dinner tables and at family gatherings, cherished for its comforting and hearty qualities. This delightful rendition, Cheesy Baked Ziti with Spinach, introduces a nutritional twist that brings an extra layer of depth and flavor to the beloved classic. Baked ziti is a direct descendant of Italy’s iconic pasta al forno, a dish that traces its roots back to the fusion of local cuisine and culinary influences absorbed throughout history as trade and migration brought diverse ingredients and cooking techniques to the Italian peninsula. Traditionally prepared for large family gatherings or festive occasions, pasta al forno symbolizes abundance and communal enjoyment. The addition of spinach not only pays homage to Italy’s love of fresh, wholesome ingredients but also elevates this already rich casserole to a more contemporary standard, where healthfulness and taste meet in perfect harmony.

Why You’ll Love This Recipe

  • Comforting and Hearty: Packed with cheese, pasta, and delicious sauce, this dish offers unmatched comfort on a plate.
  • Nutritious Twist: The inclusion of spinach adds a nutritional boost without compromising that beloved cheesy goodness.
  • Easy to Prepare: Simple ingredients and straightforward assembly make it suitable for both novice and seasoned cooks.
  • Make-Ahead Friendly: Easily made in advance, perfect for hectic weeknights or last-minute gatherings.
  • Family-Friendly: Loved by children and adults alike, it’s a great way to sneak in some veggies for picky eaters.

Flavor Profile & Texture

The flavor profile of Cheesy Baked Ziti with Spinach is a testament to the beauty of simplicity and rich culinary tradition. At its heart lies the trio of creamy ricotta, tangy marinara sauce, and stretchy mozzarella, which creates a perfect harmony of flavors that epitomizes comfort food. The ricotta lends a delicate creaminess, balancing the slight tang of the marinara, while the mozzarella forms a luscious, golden crust that ties it all together. The pasta, cooked to a perfect al dente, provides just the right amount of bite, and the inclusion of spinach not only introduces a fresh, leafy element but also subtly enhances the overall taste with its slightly earthy notes. Each mouthful offers a luscious mix of textures—from the smoothness of the cheese sauce to the crispiness of the baked cheese topping—ensuring every bite is a delightful adventure.

Occasions & Pairings

Cheesy Baked Ziti with Spinach is incredibly versatile, making it an ideal choice for a wide range of occasions. Its comforting nature makes it particularly suitable for cooler months, bringing warmth and satisfaction to those cozy nights in. It’s a perfect centerpiece for family dinners, casual get-togethers, or as a crowd-pleaser at potlucks. For a complete meal, consider pairing it with a fresh green salad drizzled with a balsamic vinaigrette to cut through the richness of the cheese. A side of garlic bread complements the Italian flavors and provides a crunchy contrast to the cheesy goodness. As for beverages, a full-bodied red wine like Chianti or a crisp iced tea would pair beautifully, enhancing the flavors of every serving.

Tips, Variations & Substitutions

One of the joys of this dish lies in its flexibility, allowing for creative tweaks and personalized adjustments to suit different tastes and dietary needs. Here are some ideas for customizing your Cheesy Baked Ziti with Spinach:

  • Vegetables: Additions such as sautéed mushrooms, bell peppers, or zucchini can be incorporated for extra nutrition and texture.
  • Protein Boost: Upscale the dish by adding cooked sausage, ground beef, or turkey for an added protein punch.
  • Cheese Variations: Experiment with different cheeses like provolone or fontina for a unique twist on the traditional flavors.
  • Dietary Adjustments: Use whole-grain or gluten-free pasta for alternative dietary needs, and replace regular ricotta with a vegan version for a plant-based option.

Storage & Make-Ahead Ideas

One of the many advantages of Cheesy Baked Ziti with Spinach is its ability to be prepared ahead of time, making it a lifesaver during busy schedules or meal-prep routines. Here’s how you can store and enjoy this dish beyond its initial serving:

  • Refrigeration: Store leftovers in an airtight container in the fridge for up to 3 days. Reheat individual portions in the microwave or a covered dish in the oven until warmed through.
  • Freezing: For longer storage, freeze portions in suitable containers for up to 3 months. Allow the dish to thaw overnight in the fridge before reheating.
  • Make-Ahead: Assemble the dish fully, cover it tightly, and refrigerate for up to a day before baking. This tip is particularly helpful for planning ahead and avoiding last-minute meal stress.

Fun Facts & Trivia

Did you know that baked pasta dishes like ziti have their origins deeply embedded in Italian-American culture dating back to the arrival of Southern Italian immigrants in the 19th century? Seeking comfort in familiar flavors, they adapted their beloved Italian recipes to available American ingredients and methodologies, leading to the creation of delightful, unique dishes. Moreover, the intertwining of spinach and cheese in this dish conveys the Mediterranean ethos of balancing flavors and health, reflecting not only history but also evolving tastes that appreciate tradition and innovation.

In conclusion, Cheesy Baked Ziti with Spinach is more than just a meal—it’s an experience. It’s about crafting something with love that you can share, a dish that bridges nostalgia and modern tastes. As you take your first bite, savor the layers of history, flavor, and comfort that have been lovingly baked together to create a culinary masterpiece worth every moment spent in its preparation.

Ingredients

  • Pasta
    → Use 12 ounces of ziti pasta for the base of the dish. This tubular pasta holds the cheesy sauce well and allows for a satisfying texture. Cook the pasta until al dente before mixing it with the sauce, as it will continue to cook in the oven. Be sure to drain and rinse it in cold water to stop the cooking process, which prevents it from getting mushy.
  • Olive Oil
    → Two tablespoons of olive oil add richness and moisture to the dish. Use high-quality extra virgin olive oil for the best flavor. Heat it gently before adding aromatics like garlic or vegetables, as this helps infuse the oil with flavor.
  • Garlic
    → Three cloves of garlic, minced, provide a fragrant base for the sauce. Fresh garlic is essential for depth of flavor; avoid using jarred garlic as it lacks the punch of fresh. Sauté the minced garlic until it is fragrant, being careful not to burn it, as it can become bitter and overpower the sauce.
  • Fresh Spinach
    → Add 4 cups of fresh spinach, roughly chopped. Spinach wilts down significantly when cooked, contributing both flavor and nutrition. Wash the spinach thoroughly to remove any grit, then sauté it with garlic until just wilted. This helps maintain its vibrant color and nutrients.
  • Ricotta Cheese
    → Use 15 ounces of ricotta cheese to add creaminess and richness to the dish. Choose whole milk ricotta for a creamier texture. Gently mix it with a pinch of salt and some grated Parmesan before layering, as this enhances the flavor. Ensure it’s at room temperature to make mixing easier and smoother.
  • Parmesan Cheese
    → One cup of freshly grated Parmesan cheese adds a salty, savory flavor to the baked ziti. Grating it fresh allows it to melt better in the dish. Incorporate half of the cheese into the ricotta mixture and sprinkle the rest on top for golden, cheesy crust when baked.
  • Marinara Sauce
    → Use 3 cups of your favorite marinara sauce as the base of the dish. This sauce provides moisture and flavor, so choose a high-quality brand or homemade sauce. If using jarred sauce, look for one without added sugars or preservatives for the best taste. Mix half of the sauce with the pasta and layer the rest on top before baking.
  • Mozzarella Cheese
    → Incorporate 2 cups of shredded mozzarella cheese for a gooey, cheesy topping. Opt for low-moisture mozzarella for a better melt. Mix half into the ziti and sprinkle the rest on top before baking to achieve a bubbly, golden cheese layer that enhances the dish.
  • Salt and Pepper
    → Use salt and freshly cracked black pepper to season the dish. Seasoning the pasta water helps infuse flavor right from the start. Adjust salt and pepper to taste in the ricotta and marinara sauce to ensure a well-balanced flavor throughout the dish.

Instructions

  • Preheat your oven to 375°F (190°C) and prepare a 9×13 inch baking dish by lightly greasing it with cooking spray or olive oil.

    → This preparation step is crucial as it prevents the baked ziti from sticking to the dish, ensuring easy serving and clean-up. A higher temperature promotes bubbling and browning of the cheese on top.
  • Bring a large pot of salted water to a rolling boil and add 12 ounces of ziti pasta.

    → Salt enhances the flavor of the pasta from the inside out. Cook the ziti until just al dente according to package instructions, usually about 8-10 minutes, as it will continue to cook in the oven. Stir occasionally to prevent sticking.
  • Once the pasta is cooked al dente, drain it in a colander and rinse it under cold water briefly to stop the cooking process.

    → Rinsing cools the pasta, ensuring it doesn’t become mushy while mixing with the sauce, maintaining a satisfying texture.
  • In a large skillet, heat 2 tablespoons of extra virgin olive oil over medium heat until shimmering.

    → Heating the oil properly infuses it with flavor, which will be passed on to the garlic and spinach. Avoid overheating, as this can scorch the oil.
  • Add 3 cloves of minced garlic to the skillet and sauté for 1-2 minutes until fragrant but not browned.

    → Sautéing garlic enhances its flavor and aroma, but be vigilant to prevent burning, as burnt garlic can impart a bitter taste to the dish.
  • Add 4 cups of roughly chopped fresh spinach to the skillet with the garlic, and stir until wilted, about 2-3 minutes.

    → Adding spinach to the garlic allows it to cook evenly and retain its vibrant color while adding vital nutrients to the dish. Ensure to stir regularly to avoid uneven cooking.
  • In a large mixing bowl, combine 15 ounces of room-temperature ricotta cheese with a pinch of salt and half a cup of grated Parmesan cheese.

    → Mixing in salt and cheese enhances the flavor of the ricotta. Room temperature ricotta is easier to mix and will create a smoother filling.
  • Add the sautéed spinach and garlic mixture to the ricotta bowl, and fold gently to combine, ensuring an even distribution of ingredients.

    → Folding helps preserve the light texture of the mixture by avoiding over-mixing, which can make the ricotta dense.
  • → Coating the pasta with sauce helps to infuse flavor throughout the dish, avoiding dry bites. Use enough sauce to ensure the pasta is moist but not swimming in sauce.
  • Spread half of the ziti and marinara mixture evenly into the prepared baking dish, creating the first layer.

    → Layering helps build structure in the dish; ensure an even spread for consistent cooking.
  • Layer the ricotta mixture on top of the ziti, spreading it evenly to cover the pasta.

    → Even distribution of the ricotta ensures every serving has balanced creaminess and flavor.
  • Add the remaining ziti pasta and sauce on top, spreading it out evenly.

    → This layering technique creates a depth of flavors and textures in the final bake.
  • Sprinkle 1 ½ cups of shredded mozzarella cheese over the top, ensuring even coverage for a gooey finish.

    → Even cheese distribution prevents any dry spots and allows each spoonful to be cheesy and satisfying.
  • Finally, sprinkle the remaining ½ cup of grated Parmesan cheese evenly on top of the mozzarella.

    → This addition creates a golden, crusty topping that adds flavor and visual appeal as it bakes.
  • Cover the baking dish with aluminum foil, ensuring it does not touch the cheese, and place it in the preheated oven. Bake for 25 minutes.

    → Covering prevents the cheese from burning before the dish heats through. The steam generated will help cook the dish evenly.
  • After 25 minutes, remove the foil and continue baking for an additional 15-20 minutes, or until the cheese is golden and bubbly.

    → Uncovering allows the cheese to brown nicely, enhancing the flavor and presentation of the dish.
  • Once done, remove the baked ziti from the oven and let it rest for 10 minutes before serving.

    → Allowing it to rest lets the layers set, making it easier to cut and serve without falling apart.
  • Slice the ziti into squares with a sharp spatula or knife and serve hot.

    → Cutting it while warm ensures clean edges for a beautiful presentation, making serving easier.

Notes

Cheesy Baked Ziti with Spinach is a delightful and comforting dish that combines pasta, cheese, and fresh spinach for a hearty meal. The ziti pasta serves as the base, ensuring each bite is filled with cheesy goodness. Cooking the pasta until al dente is crucial, as it allows the pasta to hold its shape and texture when mixed with the sauce and baked. Rinsing the pasta with cold water after draining is essential to stop the cooking process and prevent it from becoming mushy.

Start by heating high-quality extra virgin olive oil, which brings a rich flavor to the dish. Fresh minced garlic is then added to create a fragrant base—be cautious not to let it burn, as this can alter the taste of the sauce negatively. Next, incorporating fresh spinach not only elevates the dish’s nutrition but also its color and flavor. Ensure you wash the spinach thoroughly and sauté it just until wilted to retain its vibrant look.

The creaminess of the ricotta cheese is a standout feature of the dish. Mixing it with a pinch of salt and some grated Parmesan intensifies the flavors even further. Allowing it to come to room temperature prior to mixing makes it easier to incorporate into the sauce. Freshly grated Parmesan is ideal for its superior melting qualities and robust flavor. To achieve the best texture, mix half of it into the ricotta and reserve the rest for that delightful cheesy crust on top.

Marinara sauce forms the flavorful base of this baked ziti. Choose a high-quality sauce to ensure the best taste, avoiding options laden with sugars or preservatives. Mixing half of it with the pasta ensures every bite is coated, while the remainder layered on top keeps the dish moist during baking. Lastly, the added mozzarella cheese provides that gooey, melty topping everyone loves. Use low-moisture mozzarella for optimal results.

Don’t forget to season your dish well! Using salt and freshly cracked black pepper throughout the cooking process enhances every element, ensuring a harmonized flavor. This baked ziti makes for an excellent meal that not only satisfies but can be easily reheated, making leftovers just as enjoyable as the first serving. Perfect for families or gatherings, this dish is sure to please everyone at the table.

Tips

Cooking Tips for Cheesy Baked Ziti with Spinach

  • Pasta: When cooking the ziti, follow the package instructions for al dente cooking time, which is typically 8-10 minutes. This ensures it holds its shape well during baking. After draining, rinse with cold water to stop cooking and prevent stickiness.
  • Olive Oil: For added depth, consider infusing the olive oil with herbs like oregano or thyme. Simply add a few leaves to the oil as it heats, then remove them before adding garlic and other ingredients.
  • Garlic: To avoid burning garlic, keep your heat at medium-low when sautéing. Stir frequently and watch closely; it should turn golden and fragrant, which typically takes about 30 seconds to 1 minute.
  • Fresh Spinach: You can substitute fresh spinach with frozen spinach if necessary. If using frozen, ensure it’s thawed and water is thoroughly squeezed out to avoid excess moisture in the dish.
  • Ricotta Cheese: To enhance the flavor of the ricotta, consider mixing in some fresh herbs like basil or parsley along with the salt and Parmesan. This adds an aromatic touch to your cheesy mixture.
  • Parmesan Cheese: Be sure to use a microplane or fine grater to get a fluffy texture for the Parmesan, which will help it melt evenly. Reserve some for finishing touches at the end for a lovely presentation.
  • Marinara Sauce: If you want to elevate the sauce, consider adding a splash of red wine or a pinch of red pepper flakes while heating it. This adds complexity and enhances the overall flavor.
  • Mozzarella Cheese: For an even cheesier experience, try mixing half of the mozzarella into the pasta mixture along with ricotta before layering. Be sure to cover the top completely with the remaining cheese to help achieve that irresistible bubbly topping.
  • Salt and Pepper: Taste as you go! Start by seasoning the pasta water and the ricotta mixture, then adjust the flavors in the marinara sauce before combining everything. This way, you can ensure a perfectly seasoned dish.

FAQ

What ingredients do I need for Cheesy Baked Ziti with Spinach?

You will need ziti pasta, marinara sauce, ricotta cheese, mozzarella cheese, grated Parmesan cheese, fresh spinach, garlic, onion, olive oil, and Italian seasoning.

How long does it take to prepare Cheesy Baked Ziti with Spinach?

The preparation time is approximately 20 minutes, and the baking time is around 30-35 minutes, making the total time around 1 hour.

Can I use fresh spinach instead of frozen spinach?

Yes, fresh spinach can be used. Just be sure to sauté it until wilted before adding it to the mix.

How can I make this recipe vegetarian?

This recipe is already vegetarian-friendly! Just ensure that your marinara sauce does not contain any meat products.

Can I make Cheesy Baked Ziti with Spinach in advance?

Yes, you can prepare it ahead of time. Assemble the dish and store it in the refrigerator for up to 24 hours before baking. Adjust the baking time if it’s coming straight from the fridge.

Is there a gluten-free option for the pasta?

Absolutely! You can substitute the ziti pasta with gluten-free pasta. Just ensure to follow the cooking instructions on the package for best results.

Can I freeze leftovers of Cheesy Baked Ziti with Spinach?

Yes, leftovers can be frozen. Store them in an airtight container for up to 3 months. To reheat, thaw in the refrigerator overnight and bake at 350°F until heated through.

What can I serve with Cheesy Baked Ziti with Spinach?

This dish pairs well with a side salad, garlic bread, or a light vegetable side dish for a complete meal.