Author

Ocean Nightleaf

Browsing

Introduction: A Tempting Skillet Symphony

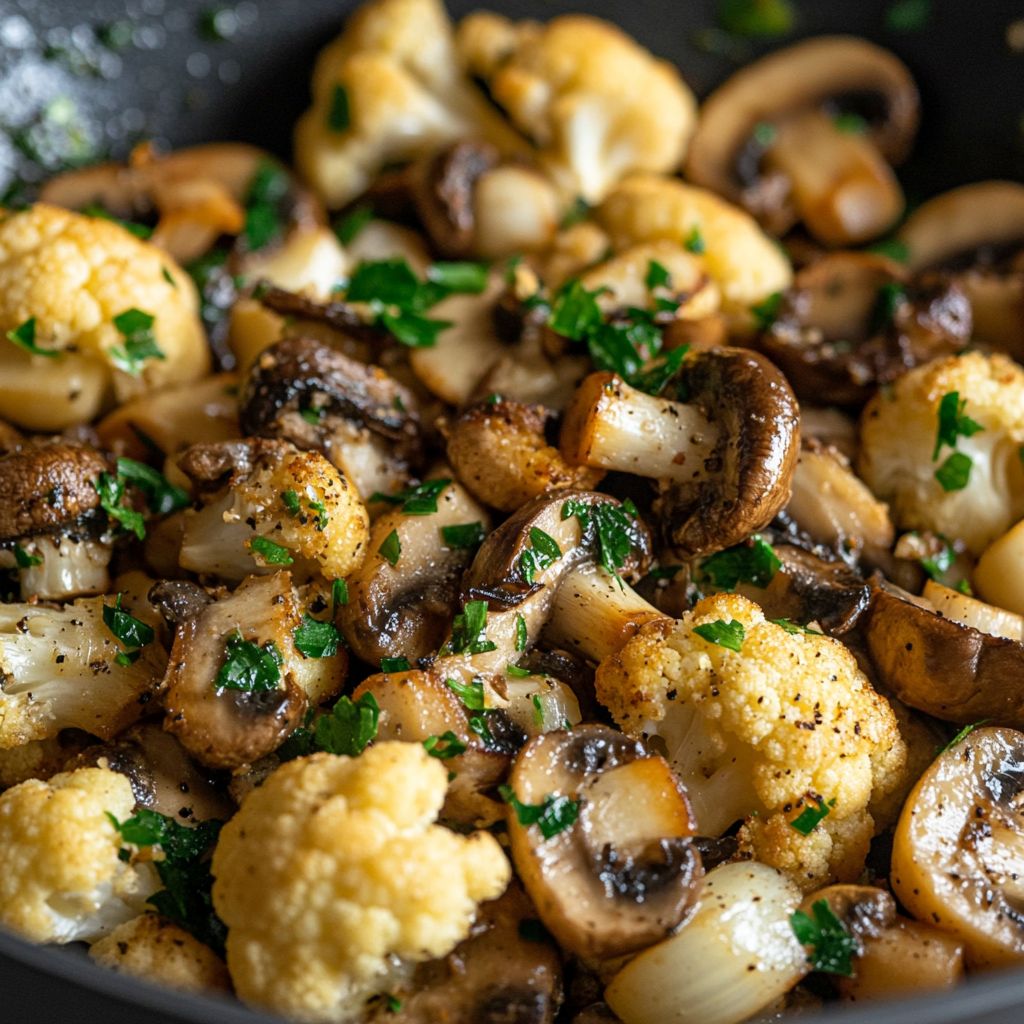
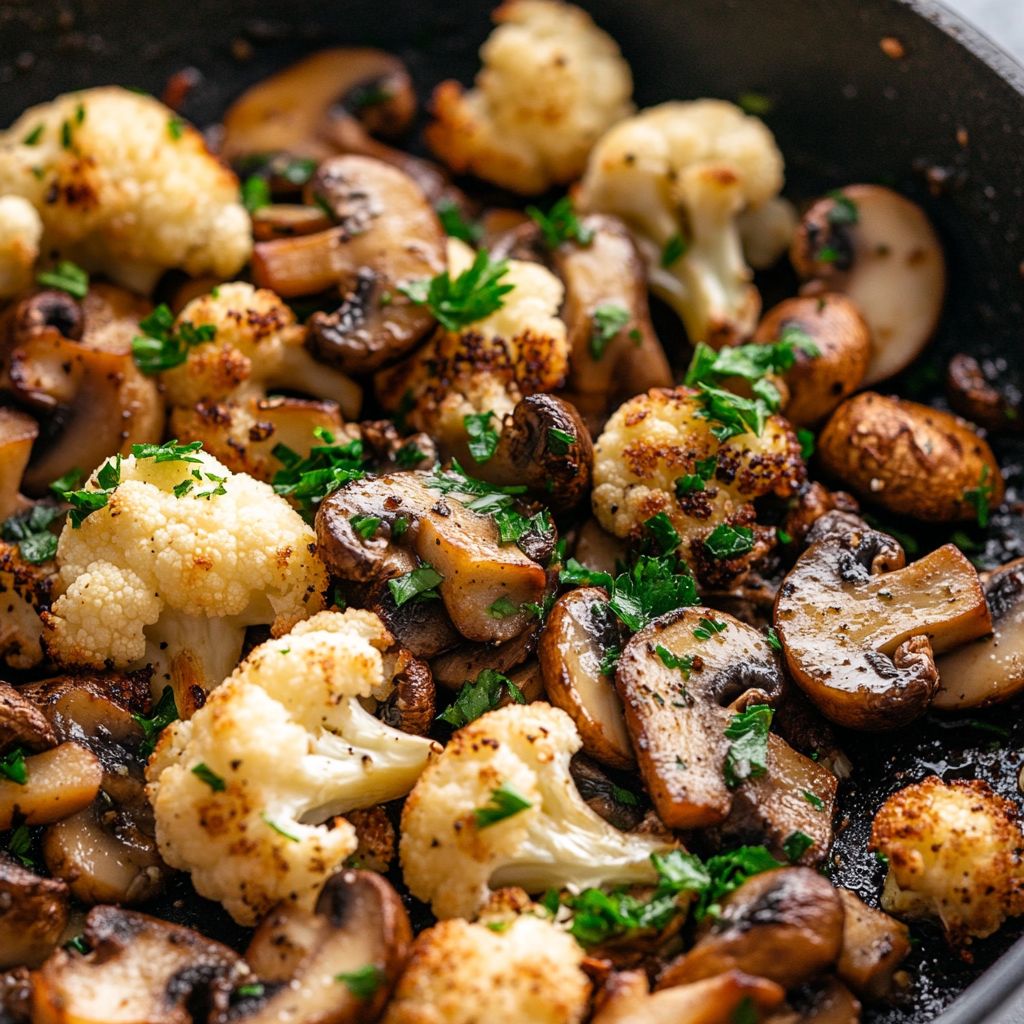
Imagine the enticing aroma of garlic wafting through the air, mingling with the earthy scent of mushrooms and the subtle nutty notes of roasted cauliflower. Welcome to the culinary delight that is the Garlic Cauliflower Mushroom Skillet. This dish is a celebration of simplicity and flavor, simmered together in one convenient and visually appealing skillet. Whether you’re trying to impress dinner guests or looking for a new favorite to add to your weekly menu, this recipe has all the delicious elements to captivate your taste buds from the first bite to the last.

The Story Behind the Dish

Embracing the harmony of plant-based ingredients, the Garlic Cauliflower Mushroom Skillet draws inspiration from rustic, European home-cooking traditions where the freshest produce is elevated through simple yet mindful preparation. This dish pays homage to the humble peasant kitchens of Italy and France, where garlic and mushrooms have long been staple flavors, used liberally to bring out the rich, wholesome essence of meals. The addition of cauliflower provides a gentle nod to British culinary influences, where this cruciferous wonder has been a beloved vegetable for centuries.

Why You’ll Love This Recipe

  • Quick and Easy: The Garlic Cauliflower Mushroom Skillet comes together in under 30 minutes, making it perfect for busy weeknights.
  • Healthy and Nutrient-Rich: With low calories and high nutritional value, cauliflower and mushrooms provide the perfect base for a balanced meal.
  • Family-Friendly: With its comforting flavors and textures, this dish can please even the picky eaters at your table.
  • One-Pan Wonder: Minimal cleanup is required, allowing you to spend less time washing dishes and more time savoring every bite.

Flavor Profile & Texture

From the very first bite, the Garlic Cauliflower Mushroom Skillet presents a symphony of harmonious flavors and textures. The mushrooms offer a deep umami taste, the garlic adds a pungent zest, and the cauliflower, when sautéed to perfection, develops a slightly sweet, caramelized essence. Together, these ingredients come alive with their nuanced flavors, enhanced with a touch of salt and pepper, creating a comforting yet nuanced experience. The texture is where the magic truly happens; you’ll find the tender yet hearty feel of the mushrooms and the lightly crisped, golden bits of cauliflower to be utterly irresistible.

Occasions & Pairings

This versatile dish is an excellent choice for a variety of occasions. Serve it as a hearty main course on a brisk autumn evening, or bring it to life as a brilliantly flavorful side during a festive holiday meal. The skillet pairs wonderfully with a crusty artisan bread, allowing you to mop up every last bit of its delightful juices. For drinks, consider a chilled glass of Sauvignon Blanc for its crispness, or a light red wine like Pinot Noir to match the earthy notes. As a side, a simple arugula salad with a lemon vinaigrette complements the skillet’s flavors beautifully.

Tips, Variations & Substitutions

  • Creative Variations: Incorporate a sprinkle of red pepper flakes for a spicy kick, or a generous handful of freshly grated Parmesan cheese for an extra layer of richness.
  • Dietary Alternatives: To make this dish vegan, substitute the cheese with nutritional yeast. For a gluten-free version, ensure that all aspects remain free from any gluten-containing products.
  • Regional Twists: Add a dash of soy sauce and ginger for an exciting Asian twist, or toss in some sun-dried tomatoes and basil for a Mediterranean flair.

Storage & Make-Ahead Ideas

Have leftovers? No problem! The Garlic Cauliflower Mushroom Skillet stores beautifully. Place any remaining portions in an airtight container and refrigerate for up to three days. Reheat gently over low heat, adding a splash of water or broth if needed to return the dish to its original deliciousness. This recipe can also be made ahead of time; simply prepare as directed, then cool, cover, and refrigerate. Reheat just before serving to ensure maximum flavor and texture.

Fun Facts & Trivia

Did you know that cauliflower is a member of the brassica family, which also includes broccoli, kale, and cabbage? Meanwhile, mushrooms are fascinating fungi that have been cultivated for thousands of years and are praised not only for their taste but also for their health benefits, being rich in antioxidants and vitamins. Garlic, another ancient favorite, has been celebrated for its culinary and medicinal properties in cultures worldwide, from the tombs of Egyptian pharaohs to modern-day kitchens.

The Garlic Cauliflower Mushroom Skillet embraces these time-honored ingredients, blending them into one delicious and nourishing meal that respects tradition and innovation alike. So go ahead, make this skillet yours, and join the fascinating culinary journey of flavors, textures, and aromas that define this exquisite dish.

Ingredients

  • Cauliflower
    • 1 medium head of cauliflower (cut into florets)
      → The cauliflower serves as the main vegetable in this dish, providing a hearty texture that mimics the bite of meat while being packed with nutrients. Ensure the florets are evenly sized for consistent cooking. Choose a head that is firm and free of dark spots for the best flavor.
  • Mushrooms
    • 8 ounces of cremini mushrooms (sliced)
      → These mushrooms add a rich, earthy flavor to the skillet. Slice them uniformly to promote even cooking and ensure they caramelize nicely. Fresh mushrooms should be firm and have a smooth cap for optimal taste and texture.
  • Garlic
    • 4 cloves of garlic (minced)
      → Garlic provides a pungent, aromatic flavor that is essential in this dish. Mince the garlic finely to allow its essential oils to infuse into the skillet evenly, releasing its robust flavor. Fresh garlic is always best for maximum impact.
  • Onion
    • 1 small onion (diced)
      → The onion adds sweetness and depth to the overall flavor profile. Dice it evenly to ensure uniform cooking. Yellow or white onions work well; use fresh ones that are free of blemishes for the best results.
  • Seasonings
    • 1 teaspoon dried thyme
      → Thyme brings a subtle herbal note to the dish, complementing the garlic and mushrooms beautifully. Dried thyme is more concentrated than fresh, so use it sparingly. Store in a cool, dry place to maintain its potency.
    • Salt (to taste)
      → Salt is crucial for enhancing all the flavors in the skillet; adding it to taste helps balance the dish. Use kosher or sea salt for a coarser texture and better control over the seasoning.
    • Black pepper (to taste)
      → Freshly cracked black pepper adds a mild heat and depth. Adjust the amount according to your heat preference; fresh grinding releases more oils and intensifies its flavor.
  • Cooking Oil
    • 2 tablespoons olive oil
      → Olive oil serves as the cooking medium for sautéing the garlic, onion, cauliflower, and mushrooms. It adds a fruity richness and healthy fats to the dish. Use extra virgin olive oil for its superior flavor and benefits, heating it gently to avoid burning.
  • Fresh Parsley (for garnish)
    • 2 tablespoons fresh parsley (chopped)
      → Chopped parsley adds a fresh, vibrant touch to the finished dish, balancing the flavors with its bright notes. Use flat-leaf parsley for its robust flavor, and chop it finely to distribute it evenly over the skillet.

Instructions

  • Gather all ingredients and equipment on your countertop, ensuring you have the cauliflower, cremini mushrooms, garlic, onion, thyme, olive oil, salt, black pepper, and fresh parsley ready for use.

    → Having everything within reach ensures a smooth cooking process and minimizes the chance of forgetting any ingredients.
  • Prepare the cauliflower by cutting it into even-sized florets. Use a sharp knife and cut down through the center, then separate the florets by trimming off the core.

    → Uniformity in size is crucial as it allows the cauliflower to cook evenly, preventing some pieces from becoming overcooked while others remain underdone.
  • Slice the cremini mushrooms evenly, making sure each piece is about 1/4 inch thick. Use a clean cutting board and ensure your knife is sharp to make this process easier.

    → Properly slicing the mushrooms ensures they caramelize well, enhancing their natural flavors while providing a consistent texture in the dish.
  • Peel and dice the small onion into small, uniform pieces, about 1/4 inch in size. Use a sharp knife and a stable cutting board for safety.

    → Dicing the onion evenly allows it to soften uniformly as it cooks, ensuring a consistent release of sweetness throughout the dish.
  • Minimize the garlic cloves and mince them finely using a chef’s knife. Keep one hand steady on the knife’s handle and the other guiding the blade over the garlic.

    → Fine mincing releases the essential oils from the garlic, making its pungent flavor and aroma more pronounced in the cooking process.
  • Heat the olive oil in a large skillet over medium heat until it shimmers slightly, indicating that it’s hot enough for cooking.

    → Preheating the oil properly prevents the ingredients from sticking to the pan and allows for better browning of the vegetables.
  • Add the diced onion to the skillet and sauté for 2-3 minutes until it becomes translucent and starts to release its sweetness, stirring occasionally to prevent sticking.

    → This process creates a flavorful base for the skillet; keep an eye on the onion to avoid burning as it should soften, not brown.
  • Introduce the minced garlic to the skillet and sauté for an additional 30 seconds, stirring constantly until it becomes fragrant but not browned.

    → Garlic cooks quickly and can burn easily; constant stirring helps to ensure it infuses its flavor without turning bitter.
  • Incorporate the cauliflower florets into the skillet, tossing them in the oil, onion, and garlic mixture to coat them evenly.

    → This ensures that the cauliflower absorbs all the beautiful flavors from the garlic and onions as it cooks, enhancing the overall taste of the dish.
  • Sprinkle the dried thyme evenly over the cauliflower and season with salt and black pepper to taste, mixing well to incorporate the seasonings.

    → Seasoning at this stage allows the flavors to blend into the cauliflower and mushrooms as they cook, intensifying the taste profile.
  • Add the sliced mushrooms to the skillet and stir everything together, allowing the mixture to sauté for 5-7 minutes until the cauliflower is tender and the mushrooms release their moisture, stirring occasionally.

    → This step is vital for developing flavor; the sautéing process helps caramelize the vegetables beautifully, ensuring a rich, delicious result.
  • Check the doneness of the cauliflower by piercing a floret with a fork; it should be tender yet retain some firmness. Adjust seasoning if necessary at this stage.

    → This check is important to avoid mushy cauliflower; you want a nice texture that adds a hearty element to the dish.
  • Once cooked, remove the skillet from heat and garnish with freshly chopped parsley, sprinkling it evenly over the top.

    → Garnishing with parsley not only adds a pop of color but also contributes a fresh flavor that brightens the dish.
  • Serve warm, either as a side dish alongside proteins or as a main vegetarian dish, showcasing the vibrant colors and aromas of your garlic cauliflower mushroom skillet.

    → Serving it immediately ensures the dish is enjoyed at its freshest and hottest, allowing the myriad of flavors to shine through.

Notes

These garlic cauliflower mushroom skillet meals are an excellent way to incorporate more vegetables into your diet while enjoying a savory and satisfying dish. Cauliflower serves as the star ingredient, providing a meaty texture without the calories. To enhance flavor, it’s important to sauté the garlic, onion, and mushrooms together, allowing their flavors to meld beautifully. Ensure your garlic is fresh, as it can elevate the entire dish with its aromatic qualities.

Feel free to experiment with the seasonings; a pinch of crushed red pepper flakes can add a nice kick if you enjoy heat. The addition of fresh parsley not only brightens the dish visually but also adds a fresh flavor which complements the richness of the mushrooms and cauliflower. Serve this skillet dish warm as a side or as a main course, perhaps alongside a grain like quinoa for a filling meal.

For those looking to make this dish more substantial, consider adding protein such as chickpeas or tofu. This dish is also great for meal prep; it can be stored in an airtight container in the fridge for a few days or frozen for later enjoyment. Simply reheat on the stovetop or microwave before serving.

Tips

Cooking Tips for Garlic Cauliflower Mushroom Skillet

  • Prep Ahead: Before you start cooking, wash and prepare all your ingredients. Cutting the cauliflower into similar-sized florets ensures they cook evenly, while slicing the mushrooms and dicing the onion in advance saves time during the cooking process.
  • Cooking Temperature: Use medium heat to sauté the vegetables. This allows for gradual cooking, giving the vegetables enough time to soften and caramelize without burning. Keep the heat consistent to avoid any uneven cooking.
  • Garlic Timing: Add the minced garlic towards the end of cooking the onions and mushrooms. Garlic burns easily, and adding it too early could result in a bitter flavor. Sauté it for about 1-2 minutes until fragrant before adding the cauliflower.
  • Texture Matters: If you prefer a bit of crunch in your cauliflower, you can blanch the florets for a couple of minutes before adding them to the skillet. This quick cooking method keeps their color vibrant and showcases their natural sweetness.
  • Flavor Boost: If you have them on hand, consider adding a splash of vegetable broth or white wine when cooking the mushrooms. This will deglaze the skillet and enhance the depth of flavor in the dish.
  • Check for Doneness: Taste the cauliflower towards the end of cooking. You want it to be fork-tender but still slightly firm to maintain some structure. If you overcook it, it may become mushy and lose its appeal.
  • Balancing Flavors: Adjust the seasoning after cooking. If the dish tastes flat, a little more salt or pepper can enhance the overall flavor. Consider adding a squeeze of lemon juice for brightness just before serving.
  • Garnishing: Don’t forget the fresh parsley! Adding it right before serving ensures it retains its bright color and fresh taste. This final touch makes the dish visually appealing and adds contrast to the rich flavors of the garlic and mushrooms.

FAQ

What are the main ingredients in Garlic Cauliflower Mushroom Skillet?

The main ingredients include cauliflower, mushrooms, garlic, olive oil, and seasonings such as salt and pepper. You can also add herbs like parsley for extra flavor.

How long does it take to prepare Garlic Cauliflower Mushroom Skillet?

The total time for preparation and cooking is approximately 20 to 25 minutes.

Can I use frozen cauliflower for this recipe?

Yes, you can use frozen cauliflower. Just make sure to thaw and drain it before cooking to avoid excess moisture.

Is this dish suitable for vegetarians and vegans?

Yes, Garlic Cauliflower Mushroom Skillet is entirely plant-based, making it suitable for both vegetarians and vegans.

What can I serve with Garlic Cauliflower Mushroom Skillet?

This dish pairs well with quinoa, rice, or as a side with your favorite protein like grilled chicken or tofu.

Can I add other vegetables to this skillet?

Absolutely! You can incorporate other vegetables such as bell peppers, spinach, or zucchini to enhance the flavor and nutrition.

How should I store leftovers of Garlic Cauliflower Mushroom Skillet?

Store leftovers in an airtight container in the refrigerator for up to 3 days. Reheat in a skillet or microwave before serving.

Can I prepare Garlic Cauliflower Mushroom Skillet in advance?

Yes, you can prepare the vegetables in advance and store them in the refrigerator. Just sauté them fresh when you’re ready to serve for the best flavor and texture.

Introduction / Hook

Imagine taking a bite of a dessert where the tropical sweetness of pineapple meets the creamy decadence of cheesecake, all effortlessly packed into a bite-sized indulgence. This is exactly what you experience with Mini Pineapple Upside-down Cheesecakes. Each delicate treat is a tiny masterpiece of flavors and textures, guaranteed to transport your taste buds to a sun-drenched paradise. Whether you’re looking to impress guests at a party, pamper yourself with a luxurious treat, or simply enjoy a tantalizing twist on a classic dessert, these mini cheesecakes hold the key. With visually stunning presentation and blissful flavors, they embody the joy of sharing and savoring something truly special.

The Story Behind the Dish

The Pineapple Upside-down Cake has been a beloved dessert in American homes for almost a century. Its origins can be traced back to the early 1900s when canned pineapple became readily available, thanks to the pioneering efforts of the Hawaiian Pineapple Company, now known as Dole. The pairing of pineapples with cherries, often accentuated by a luscious caramel glaze, quickly became an iconic dessert choice. Meanwhile, cheesecake’s roots delve deeper, originating in ancient Greece and transforming over centuries into a globally cherished dessert. By merging these two time-honored desserts, the Mini Pineapple Upside-down Cheesecakes pay homage to culinary innovation, capturing the essence of history and flavor in each tiny layer.

Why You’ll Love This Recipe

  • Bite-sized Delight: Perfectly portioned for easy serving and sharing at gatherings.
  • Flavor Fusion: Combines the tropical, caramelized delight of pineapple with creamy, rich cheesecake.
  • Versatile Treat: Ideal for various occasions, from casual get-togethers to sophisticated dinner parties.
  • Visual Appeal: Each mini cheesecake is visually stunning, offering an irresistible invitation to indulge.
  • Easy to Make Ahead: Can be prepared ahead of time, freeing you to enjoy your event without stress.

Flavor Profile & Texture

The Mini Pineapple Upside-down Cheesecakes create a harmonious balance of zest, sweetness, and creamy richness. With their golden, caramelized pineapple tops, each bite starts with a burst of juicy, tropical flavor complemented by the luscious tartness of cherries. As you delve deeper, the smooth, dense cheesecake layer tempts your palate with its creamy allure. A hint of vanilla adds depth, while the subtle crust offers a pleasant, crumbly contrast. This intricate layering of textures — from the caramelized top to the velvety center and crunchy base — makes for a sumptuous tasting experience.

Occasions & Pairings

These delightful mini cheesecakes are incredibly versatile and can elevate numerous occasions:

  • Celebrations: Host memorable birthdays, anniversaries, or showers with these charming treats.
  • Holidays: They bring a refreshing summery touch to festive gatherings during Easter or Thanksgiving.
  • Casual Gatherings: Perfect for potlucks or picnics, offering guests a sophisticated dessert option.

For ideal drink pairings, consider serving with:

  • Sparkling Wine: Its effervescence enhances the dessert’s lightness and brings out fruity notes.
  • Earl Grey Tea: Provides a citrus complement that harmonizes with the pineapple flavor.

Tips, Variations & Substitutions

Customization is key with this versatile recipe. Here are some suggestions to make it your own:

  • Make it Vegan: Substitute the cream cheese with a vegan alternative and replace eggs with a flaxseed mixture.
  • Gluten-Free Option: Use a gluten-free flour blend for the crust to cater to those with gluten sensitivities.
  • Flavor Twists: Add a sprinkle of cinnamon or nutmeg to the cheesecake batter for a warm, spice-forward take.
  • Fruit Variations: Try with other canned fruits like peaches or apricots for a different flavor profile and visual appeal.

Storage & Make-Ahead Ideas

Efficiency is crucial, especially for entertaining. These mini cheesecakes offer convenience with their make-ahead potential. Here’s how:

  • Ahead of time, bake these treats up to two days before your event. Cover them and store in the refrigerator to maintain freshness.
  • For longer preservation, freeze the cheesecakes. First, let them cool completely, then wrap each tightly in plastic wrap followed by foil. They can be frozen for up to three months.
  • To serve, thaw in the refrigerator overnight and allow them to come to room temperature before enjoying.

Fun Facts & Trivia

The Pineapple Upside-down Cake surged in popularity thanks to a 1925 Dole recipe contest, which captured America’s fascination. The charming presentation of fruit in the dessert echoed the era’s obsession with intricate and artistic food displays. This mini version of the beloved cake not only adds a contemporary twist but also serves as a delightful nod to culinary history, proving that great taste and creativity in the kitchen stand the test of time.

By embarking on the adventure of making Mini Pineapple Upside-down Cheesecakes, you’re not only treating yourself to a delightful taste of the tropics but also engaging in an enduring culinary tradition, connecting the past’s flavors with the innovations of modern gastronomy. Each cheesecake is a testament to the richness of dessert heritage, inviting you to savor and share its delicious story, one bite at a time.

Ingredients

  • Cream Cheese Layer
    • 16 oz cream cheese (softened)
      → Cream cheese forms the creamy base of the cheesecake layer. It should be at room temperature to ensure easy mixing and a smooth texture. Softening it allows for incorporation air, creating a light and fluffy filling. Choose a full-fat cream cheese for the best richness and flavor.
    • 1/2 cup granulated sugar
      → Sugar acts as the sweetener for the cheesecake layer, balancing the tartness of the cream cheese. It should be mixed thoroughly with the cream cheese to dissolve properly. Avoid using powdered sugar, as it can change the texture.
    • 1 teaspoon vanilla extract
      → Pure vanilla extract enhances the overall flavor of the cheesecake. It should be added to the mixture to deepen the taste profile and complement the other ingredients. Avoid imitation vanilla for a more authentic flavor.
    • 2 large eggs
      → Eggs are essential for binding the cheesecake mixture and providing structure. They should be at room temperature for even mixing and to prevent curdling when added to the batter. Be careful not to overmix once the eggs are added to maintain a smooth texture.
  • Pineapple Topping
    • 1 cup crushed pineapple (drained)
      → Crushed pineapple provides both moisture and natural sweetness, along with a tropical flavor. It must be well-drained to prevent a soggy cheesecake. You can use fresh, canned, or frozen pineapple, but be sure to remove excess liquid for the best results.
    • 1/4 cup brown sugar
      → Brown sugar adds a rich, caramel-like flavor to the topping. It helps create a beautiful syrup while baking. Remember to pack the brown sugar into the measuring cup for accurate measuring.
    • 2 tablespoons butter
      → Butter adds richness and helps to caramelize the sugar during baking. It should be melted to easily combine with the pineapple and sugar, enhancing the overall flavor of the topping.
  • Crust
    • 1 1/2 cups graham cracker crumbs
      → The graham cracker crumbs form the base of the cheesecake, providing texture and a slight sweetness. Use crushed graham crackers or pre-packaged crumbs, and ensure they are finely crushed for a cohesive crust. Alternatively, you can use digestive biscuits for a similar flavor.
    • 1/4 cup granulated sugar
      → Sugar in the crust balances the earthy flavor of the graham crackers, adding a touch of sweetness. Similar to the cream cheese layer, it should be mixed well with the crumbs for even distribution.
    • 1/2 cup unsalted butter (melted)
      → Melted butter acts as the binder for the graham cracker crumbs, helping to hold the crust together. It should be melted and slightly cooled before mixing with the dry ingredients for better integration and a firmer crust.
  • Garnish (Optional)
    • Whipped cream (for topping)
      → Whipped cream adds a fluffy, light texture to the cheesecake, providing a contrast to the creamy filling. Use heavy cream and whip until soft peaks form, then dollop on top before serving for an elegant finish. You can sweeten it lightly with powdered sugar, if desired.
    • Maraschino cherries (for topping)
      → Maraschino cherries provide a pop of color and sweetness, making the dessert visually appealing. Place one cherry on each cheesecake for a classic touch. Ensure they are drained well before use to avoid excess moisture.

Instructions

  • Preheat your oven to 325°F (163°C) and line a 12-cup muffin tin with paper liners or grease it well.

    → This step is crucial as it ensures the mini cheesecakes bake evenly and prevents them from sticking to the tin, allowing for easy removal after baking. Preheating the oven helps to create the right environment for the cheesecakes to rise properly.
  • Prepare the crust by combining 1 1/2 cups graham cracker crumbs and 1/4 cup granulated sugar in a mixing bowl.

    → Mixing the dry ingredients first ensures the sugar is evenly distributed throughout the crumbs, providing a uniform sweetness in the crust. Use a fork or whisk to break up any clumps in the graham cracker crumbs.
  • Pour in 1/2 cup of melted unsalted butter into the graham cracker mixture and stir until all crumbs are well moistened.

    → The melted butter acts as a binder, helping the crumbs stick together for a cohesive crust. Ensure the butter is not too hot to avoid cooking the crumbs.
  • Evenly distribute the crumb mixture among the prepared muffin cups, pressing down firmly to form a compact crust.

    → Pressing down helps the crust hold its shape during baking. Use the back of a measuring spoon or your fingers to ensure an even, flat surface.
  • Bake the crusts in the preheated oven for 8-10 minutes until lightly golden and fragrant, then remove and let cool slightly.

    → Baking the crust helps to develop its flavor and sets it before adding the cheesecake layer, ensuring it won’t become soggy later. Letting it cool slightly prevents the filling from melting when added.
  • In a large mixing bowl, beat 16 oz of softened cream cheese with 1/2 cup granulated sugar using an electric mixer on medium speed until smooth and creamy.

    → Beating the cream cheese first allows for a smooth texture, preventing lumps in the final cheesecake. Make sure to scrape down the sides of the bowl to incorporate all ingredients evenly.
  • Add 1 teaspoon of vanilla extract and mix until fully incorporated.

    → Vanilla extract enhances the flavor profile of the cheesecake, creating a more complex taste. Avoid using imitation vanilla, as it can detract from the quality.
  • Carefully add 2 large eggs, one at a time, mixing on low speed after each addition until just combined.

    → Adding eggs gradually helps to avoid overmixing, which can introduce too much air and lead to cracks in the cheesecake. Mixing on low allows for gentle incorporation.
  • Use a spatula to gently fold in the well-drained 1 cup of crushed pineapple until evenly distributed.

    → Folding ensures that the pineapple is mixed into the batter without deflating it, maintaining a light and fluffy texture. Make sure to press out excess liquid from the pineapple before adding it.
  • Evenly spoon the cheesecake mixture over the pre-baked crusts, filling each muffin cup about 3/4 full.

    → This gives the cheesecakes room to rise slightly while baking. Using a spoon or small measuring cup helps with even distribution.
  • Prepare the pineapple topping by melting 2 tablespoons of butter in a small skillet over medium heat.

    → Melting the butter in a skillet allows for easier mixing with the sugar and pineapple, as well as ensuring it doesn’t cool and solidify. Make sure it is fully melted but not browned.
  • Stir in 1/4 cup of packed brown sugar and 1 cup of drained crushed pineapple into the melted butter and cook for 2-3 minutes, until slightly bubbly.

    → Cooking the pineapple with the sugar creates a glossy, syrupy topping that enhances the overall flavor. Make sure to stir continuously to prevent burning.
  • Remove from heat and carefully spoon the warm pineapple topping over each cheesecake.

    → Adding the topping while it’s warm helps it meld into the cheesecake, providing a smooth and flavorful finish. Be generous to ensure each cheesecake is lovingly topped.
  • Bake the mini cheesecakes in the oven at 325°F (163°C) for 20-25 minutes or until the edges are set but the center slightly jiggles.

    → The slight jiggle indicates that the cheesecakes will firm up as they cool, preventing them from becoming overcooked and dry. Use the pale color as another sign they are properly baked.
  • Remove the cheesecakes from the oven, and allow them to cool in the muffin tin for at least 30 minutes before transferring them to a wire rack to cool completely.

    → Gradually cooling the cheesecakes helps to prevent cracking as they adjust to the temperature change. Leaving them in the tin for a while also helps them set without sticking.
  • Chill the cooled cheesecakes in the refrigerator for at least 2 hours, or until they are completely chilled and set.

    → Chilling enhances the flavors and helps firm up the texture, leading to a classic cheesecake experience. Cover with plastic wrap if chilling for longer.
  • Before serving, optionally top each cheesecake with whipped cream and a maraschino cherry.

    → Whipped cream adds a light, airy contrast to the rich cheesecake, and cherries contribute a touch of color and sweetness. Use a piping bag for an elegant presentation if desired.

Notes

  • These mini pineapple upside-down cheesecakes are a delightful twist on the classic dessert, featuring a creamy cheesecake filling and a sweet, caramelized topping. Start by ensuring that your cream cheese is fully softened, as this will prevent lumps and create a silky texture. Plan to make the cheesecake layers in small ramekins or muffin tins for easy serving.
  • When preparing the crust, be sure to mix the graham cracker crumbs with melted butter and granulated sugar until the mixture resembles wet sand. This helps to ensure a firm and cohesive base. Press this mixture firmly into the bottom of your containers to create a solid foundation for the cheesecake layers.
  • As you prepare the pineapple topping, draining the crushed pineapple thoroughly is crucial to avoid excess moisture that could make the cheesecakes soggy. Consider slightly heating the mixture of pineapple, brown sugar, and melted butter on the stovetop before adding it to the crust, enhancing the caramelization and flavor development.
  • For baking, setting the oven temperature correctly is essential. Bake the cheesecakes just until the edges are set but the centers still have a slight jiggle; this helps to maintain a creamy texture without becoming overly firm.
  • If you’re feeling creative, feel free to experiment by adding different flavor extracts to the cream cheese layer, such as almond or coconut, for a unique twist. Similarly, you can substitute the crushed pineapple with other fruits, like peaches or cherries, to suit your taste preferences.
  • These cheesecakes can be made in advance; let them cool completely before refrigerating. They taste even better the next day as the flavors meld together. When ready to serve, garnish with freshly whipped cream and maraschino cherries for an extra special touch that elevates presentation.
  • This dessert not only brings a fantastic combination of flavors but also is a fun way to enjoy a classic with a twist. Perfect for parties or a special occasion, these mini cakes are sure to impress your guests!

Tips

Cooking Tips for Mini Pineapple Upside-down Cheesecakes

  • Prepare Ahead: Consider preparing the cream cheese layer and crust a day in advance. Refrigerate the cheesecake batter and crust separately, then assemble when ready to bake. This can enhance flavors and reduce prep time on the day of serving.
  • Mixing Technique: When mixing the cream cheese, use a hand mixer or stand mixer on low speed to prevent incorporating too much air. Overmixing can lead to cracks in the cheesecakes during baking. Mix until smooth and just combined instead.
  • Cools Before Baking: After mixing the cream cheese layer, let it sit at room temperature for about 10-15 minutes before pouring over the crust. This ensures it bakes evenly and prevents a temperature shock that may result in cracks.
  • Crust Consistency: Ensure that the graham cracker crumbs are finely crushed and evenly mixed with the melted butter and sugar. The crust should hold together when pressed; if it feels too dry, add a touch more melted butter until the right consistency is reached.
  • Layering Topping: When layering the pineapple topping, spoon it evenly over the cream cheese layer before baking. This will help create a beautiful caramelization effect and allow the flavors to meld together as it cooks.
  • Temperature Check: To ensure the cheesecakes are done, gently shake the pan. The center should be slightly jiggly but not liquid-like. It will firm up as it cools. Avoid opening the oven door frequently, as it can cause sudden temperature changes.
  • Pineapple Drainage: Be diligent in draining the crushed pineapple thoroughly. Excess liquid can lead to a soggy bottom crust. Press the pineapple between paper towels or let it sit in a strainer for extra drainage if needed.
  • Cooling Time: After removing from the oven, cool the cheesecakes in the pan for about an hour before transferring them to the refrigerator. This helps them set properly and prevents them from cracking.
  • Garnishing Tips: For the whipped cream topping, chill your mixing bowl and whisk beforehand. This helps the cream whip more easily, achieving a light and fluffy texture. If using maraschino cherries, make sure they are well-drained to avoid excess juice running into the whipped cream.
  • Storage Advice: These mini cheesecakes can be stored covered in the refrigerator for up to 3 days. They also freeze well for up to a month. To freeze, wrap them tightly in plastic wrap and place in an airtight container.

FAQ

What ingredients do I need to make Mini Pineapple Upside-down Cheesecakes?

You will need cream cheese, sugar, vanilla extract, crushed pineapple, crushed graham crackers, butter, eggs, and maraschino cherries.

How long does it take to prepare Mini Pineapple Upside-down Cheesecakes?

The preparation time is about 20 minutes, followed by 25-30 minutes of baking time.

Can I use fresh pineapple instead of canned pineapple for the recipe?

Yes, you can use fresh pineapple. Just make sure to cut it into small pieces and cook it down with some sugar to caramelize before adding it to the cheesecakes.

Are Mini Pineapple Upside-down Cheesecakes suitable for gluten-free diets?

You can make them gluten-free by substituting the crushed graham crackers with gluten-free options, such as almond flour or gluten-free cookies.

How should I store leftover Mini Pineapple Upside-down Cheesecakes?

Store them in an airtight container in the refrigerator for up to 3 days. For longer storage, they can be frozen for up to 2 months.

Can I make Mini Pineapple Upside-down Cheesecakes ahead of time?

Yes, you can prepare the cheesecakes a day in advance and store them in the refrigerator until ready to serve.

What can I use as a topping for the Mini Pineapple Upside-down Cheesecakes?

You can top them with whipped cream, additional caramelized pineapple, or toasted coconut for extra flavor and decoration.

How do I know when Mini Pineapple Upside-down Cheesecakes are done baking?

They are done when the edges are set and the center has a slight jiggle. A toothpick inserted into the center should come out clean or with only a few crumbs attached.

Introduction: A Delectable Twist on a French Classic

Imagine a dish that marries the deep, savory richness of French onion soup with the comforting, hearty embrace of rice. This is precisely what you get with French Onion Soup Rice—a culinary masterpiece that transforms traditional flavors into something extraordinary. With its enticing aroma and beautifully layered flavors, this dish promises to captivate your senses from the very first bite. Whether you’re a fan of classic French cuisine or simply in search of a deliciously warming meal for a cozy night in, French Onion Soup Rice is an indulgence you won’t want to miss.

The Story Behind the Dish

French onion soup has a storied history dating back to the 18th century. Originating from the humble kitchens of France, this beloved soup was once considered a poor man’s meal due to its simple ingredients: onions, beef broth, and often a slice of stale bread. Over time, French onion soup gained popularity and became celebrated for its comforting qualities, eventually earning a spot on menus in high-end restaurants worldwide.

Taking inspiration from this classic, French Onion Soup Rice was born. This innovative dish maintains the soul-warming essence of traditional French onion soup while adding a twist with the inclusion of rice, creating an entrée that’s robust enough to be served as a stand-alone meal. By blending these elements, the dish provides a contemporary homage to its predecessor while delighting palates with familiar yet fresh flavors.

Why You’ll Love This Recipe

  • Rich and Savory Flavors: The dish embodies all the savory goodness of French onion soup with a unique twist, making it perfect for both classic food lovers and those looking for something new.
  • Comforting and Filling: With rice taking the spotlight, this dish is both satisfying and a well-balanced meal.
  • Versatile and Adaptable: Ideal for lunch, dinner, or a potluck dish, it suits various occasions and settings.
  • Simple Ingredients: Using pantry staples, you’ll achieve incredible depth of flavor without the need for complicated culinary skills.
  • Family-Friendly: This dish appeals to all ages, from kids to adults—making it a go-to meal for family dinners.

Flavor Profile & Texture

The beauty of French Onion Soup Rice lies in its multifaceted flavor profile and texture. The experience starts with the initial aromatic wave of sweet, caramelized onions, hinted with a subtle smokiness from the broth. This is enriched by the nuttiness of Gruyère or Swiss cheese, known for its creamy texture and slightly salty taste, melting beautifully to create a gooey layer of flavor that envelopes the rice.

Texture-wise, the dish is a medley of contrasting components: tender grains of rice interspersed with softly cooked onions, all draped in a layer of melted cheese that lends a creamy finish to each bite. It’s this symphony of flavors and textures that make French Onion Soup Rice a truly unforgettable culinary experience.

Occasions & Pairings

French Onion Soup Rice is an incredibly versatile dish, making it suitable for an array of occasions. From a casual family dinner on a chilly evening to a sophisticated addition to a holiday feast, it adapts seamlessly to any setting.

Pair it with a crisp green salad dressed in a light vinaigrette to complement the richness of the dish. Alternatively, a side of roasted seasonal vegetables can add color and further nutritional value to your meal. For drink pairings, consider a full-bodied red wine such as Cabernet Sauvignon or a refreshing sparkling water with a hint of citrus for a delightful balance.

Tips, Variations & Substitutions

Customize Your Creation

  • Add Protein: For an even heartier meal, add cooked chicken breast or sautéed mushrooms to the mix.
  • Go Gluten-Free: Substitute traditional rice for a gluten-free variety such as quinoa or wild rice.
  • Cheese Varieties: Experiment with different cheeses like Gouda, Provolone, or even a mild Cheddar for unique nuances in flavor.
  • Dietary Alternatives: For a vegan version, swap out cheese with your favorite plant-based alternative and use vegetable broth instead of beef broth.

Storage & Make-Ahead Ideas

French Onion Soup Rice is perfect for meal prepping or making ahead for busy weeknights. After preparing, allow it to cool to room temperature before storing it in an airtight container. It will keep well in the refrigerator for up to four days.

Reheat on the stovetop over low heat, adding a splash of broth or water to maintain moisture. Alternatively, you can freeze portions for up to two months. When frozen, defrost in the refrigerator overnight before reheating.

Fun Facts & Trivia

Did you know that French onion soup was reportedly a favorite of King Louis XV of France? Legend has it that the dish was created when the king returned from hunting to find only onions, butter, and champagne in his lodge’s kitchen. With these ingredients, the first version of this soup was assembled, setting the stage for the dish’s evolution over centuries.

In terms of modern dining, French Onion Soup is often a staple at French bistros around the globe, making French Onion Soup Rice a delightful derivative that continues to honor and celebrate this rich culinary heritage.

Whether you’re a fan of French cuisine or just someone who appreciates the comforting fit of rice in any meal, French Onion Soup Rice offers an experience that is both familiar and beautifully elevated. Dive in and savor the flavors steeped in tradition yet brimming with innovation.

Ingredients

  • Rice Base
    • 1 cup long-grain white rice
      → Long-grain white rice provides the foundation for the dish, absorbing flavors while maintaining a light, fluffy texture. Rinse the rice under cold water before cooking to remove excess starch, which can make the final dish gummy.
    • 2 cups vegetable broth
      → Vegetable broth adds a deep, savory flavor to the rice, enhancing the overall taste of the dish. Use low-sodium broth to control the salt level. If homemade, ensure it’s well-seasoned and flavorful for the best results.
  • Onion Mixture
    • 3 large yellow onions (sliced)
      → Yellow onions are perfect for caramelizing, providing a rich sweetness that forms the base of the soup. Slice them thinly to ensure even cooking and optimal caramelization. Aim for uniform slices for consistent flavor and texture.
    • 3 tablespoons butter
      → Butter enriches the onion mixture, aiding in caramelization while adding a creamy mouthfeel. Use unsalted butter for more control over the seasoning. Allow it to melt completely over low heat before adding the onions.
    • 1 tablespoon olive oil
      → Olive oil helps prevent the butter from burning while adding a fruity depth to the dish. Use a good quality extra virgin olive oil for the best flavor. Drizzle it in with the butter before adding the onions to ensure a smooth combination.
    • 1 teaspoon sugar
      → Sugar helps speed up the caramelization process, enhancing the sweetness of the onions. Use a light brown or granulated sugar for a subtle depth. Add it toward the end of cooking to encourage more browning without burning the onions.
    • 1 teaspoon salt
      → Salt draws out moisture from the onions and enhances their natural sweetness. Add it at the beginning of cooking to help the onions soften and distribute flavors evenly. Adjust the amount based on personal preference and broth saltiness.
    • 1 tablespoon balsamic vinegar
      → Balsamic vinegar adds acidity and depth, balancing the sweetness of the caramelized onions. Use high-quality balsamic for a richer flavor. Add it at the end of cooking to prevent evaporation of the nuanced flavors.
  • Herbs and Seasoning
    • 1 teaspoon dried thyme
      → Dried thyme complements the dish with earthy notes that accentuate the caramelized onions. Crush the dried thyme between your palms before adding to release its essential oils and increase flavor. Add it early in the cooking process to allow the flavors to meld.
    • 1 bay leaf
      → A bay leaf adds depth and a subtler herbal note to the bubbling flavors of the soup. Use a whole leaf and remove it before serving, as it can be tough and inedible. Add it alongside the broth to infuse the flavor during simmering.
  • Final Touches
    • 1 cup grated Gruyère cheese
      → Gruyère cheese is essential for topping the soup with a gooey, rich crust. Grate your cheese fresh for a meltier texture. When broiling, spread it evenly and adjust the amount based on personal cheesiness preference.
    • Fresh parsley (for garnish)
      → Fresh parsley adds a pop of color and brightness that contrasts the rich flavors of the soup. Chop finely and sprinkle over the top just before serving for a fresh flourish. Look for bright green leaves to ensure freshness.

Instructions

  • Rinse the long-grain white rice in cold water before cooking.

    → This step removes excess starch that can lead to a gummy texture in the finished dish. Rinsing enhances the rice’s ability to remain fluffy after cooking, ensuring that it absorbs flavors beautifully.
  • In a medium saucepan, combine 1 cup of rinsed rice with 2 cups of vegetable broth.

    → The vegetable broth will infuse the rice with a rich, savory flavor. Bring the mixture to a boil over medium-high heat, which helps the rice cook evenly and absorb the broth’s essence.
  • Once boiling, reduce heat to low, cover, and simmer for 15-20 minutes, or until the rice is tender and the liquid is absorbed.

    → Cooking the rice with the lid on traps steam, which is essential for even cooking. Check for doneness by gently fluffing with a fork; if all liquid is absorbed and rice is tender, it’s ready.
  • While the rice is cooking, prepare the onion mixture. Heat a large skillet over medium heat.

    → Preheating the skillet allows the butter to melt evenly and helps create a suitable environment for caramelizing the onions without burning them.
  • Add 3 tablespoons of butter and 1 tablespoon of olive oil to the skillet and let them melt.

    → Combining butter with olive oil prevents burning, while the butter provides flavor and richness. Ensure the mixture is bubbly before adding the onions to enhance caramelization.
  • Add the 3 sliced yellow onions to the skillet and stir to coat them evenly in the butter and oil mixture.

    → Even coating helps each onion slice caramelize uniformly, releasing their natural sugars and resulting in a sweet, rich flavor. Stir occasionally to avoid sticking.
  • Sprinkle 1 teaspoon salt over the onions and stir gently.

    → Salt draws out moisture from the onions, aiding in the caramelization process. It also enhances the onions’ natural sweetness. Add it at the beginning for better distribution.
  • Cook the onions over medium heat, stirring occasionally, for about 20-25 minutes until they are deeply golden brown and caramelized.

    → Patience is key here; slow cooking allows the sugars in the onions to caramelize properly. Adjust heat if the onions begin to brown too quickly, ensuring they cook evenly.
  • Once the onions are caramelized, sprinkle 1 teaspoon of sugar and add 1 teaspoon of dried thyme.

    → The sugar speeds up caramelization and brings out additional sweetness. Crushing the thyme releases its oils, amplifying its flavor. Add these when the onions are nearly done for maximum effect.
  • Stir in 1 tablespoon of balsamic vinegar, allowing it to combine with the onions and reduce slightly.

    → Balsamic vinegar adds a touch of acidity that balances the sweetness of the taramelized onions. Adding it at the end preserves its complex flavor profile.
  • Add 1 bay leaf to the skillet and pour in the cooked rice, merging it from the saucepan into the onion mixture.

    → The bay leaf infuses gentle herbal notes as the flavors meld. Stir thoroughly to ensure even distribution of rice and onions, allowing the dish to resemble a cohesive mixture.
  • Add additional vegetable broth as needed for moisture, stirring until the mixture is well combined and heated through.

    → If the rice seems too dry, adding broth helps achieve the desired risotto-like consistency, making the dish an inviting, creamy texture.
  • Preheat your broiler while preparing the final touches, ensuring it’s ready for the cheese topping.

    → A broiler creates high, direct heat that will melt and brown the cheese, providing a delicious contrast to the rich soup.
  • Spoon the rice and onion mixture into oven-safe bowls or directly into a large serving dish.

    → Use even portions, allowing the flavors to meld beautifully. Individual bowls lend themselves well to serving, giving each person their own portion of cheesy goodness.
  • Generously sprinkle 1 cup of grated Gruyère cheese over the top of the rice mixture.

    → Grated Gruyère melts beautifully, forming a golden crust; therefore, spreading it evenly ensures consistent cheesiness and an inviting presentation.
  • Place the bowls or dish under the broiler for 2-5 minutes, watching closely until the cheese is bubbly and golden brown.

    → Broiling can quickly turn the cheese from perfectly melted to burnt, so stay attentive. Rotate the dish if your broiler heats unevenly to achieve even browning.
  • Remove the dish from the oven and let it cool for a minute.

    → Cooling slightly allows the cheese to set, making it easier to serve without losing the melted integrity of the topping.
  • Garnish with freshly chopped parsley just before serving.

    → The bright green color and fresh flavor of parsley elevate the dish visually and palate-wise, providing a delightful contrast to the rich, comforting flavors of the soup.
  • Serve piping hot and enjoy the rich, comforting flavors of your French Onion Soup Rice.

    → Take a moment to appreciate the aromas and textures before diving in; it’s the perfect warming, hearty meal.

Notes

These French Onion Soup Rice bowls offer a delicious and hearty meal, combining the rich flavors of caramelized onions and the comfort of rice. The caramelization of the onions is key, so take your time to develop their sweetness and depth. The use of both butter and olive oil ensures a beautifully balanced flavor profile, while the addition of balsamic vinegar and thyme enhances the complexity of the dish. For the best texture, ensure your rice is fluffed after cooking. Top with freshly grated Gruyère cheese for an authentic French touch and pop it under the broiler until golden and bubbly. Serve hot, garnished with fresh parsley for a delightful presentation. Consider adding crusty bread on the side for an extra heartiness, perfect for a cozy dinner.

Tips

Cooking Tips for French Onion Soup Rice

  • Rinsing Your Rice: Always rinse your long-grain rice under cold water until the water runs clear. This helps remove excess starch, preventing the rice from becoming gummy and allowing it to cook up light and fluffy.
  • Caramelizing Onions: Be patient when caramelizing the onions. Low and slow cooking is key; it might take 25-30 minutes to achieve that perfect caramel color and rich flavor. Stir occasionally to prevent sticking and burning.
  • Browning your Butter: Ensure your butter is melted and bubbly before adding onions, which avoids burning. Cooking the onions in a combination of butter and olive oil gives you the best flavor while protecting the milk solids in the butter.
  • Timing the Sugar: Adding sugar early can lead to burnt onions. Instead, add it towards the end of the onion cooking process to enhance sweetness without discoloring the onions too much.
  • Seasoning Wisely: Adjust your added salt based on the broth’s saltiness. Start with less, especially if using store-bought broth, and add more as needed. Taste frequently throughout cooking to achieve your desired flavor balance.
  • Using Balsamic Vinegar: Add balsamic vinegar after the onions have caramelized to retain its complex flavors. Don’t let it cook for too long, as it can turn bitter if overcooked.
  • Infusing with Herbs: For the best infusion of thyme flavor, crush the dried thyme between your fingers before adding it to release its oils. This enhances your soup’s overall flavor profile right from the start.
  • Handling the Bay Leaf: Remember to remove the bay leaf before serving the soup. While it adds great depth of flavor while cooking, it is not meant to be eaten.
  • Preparing the Cheese: For a beautiful cheesy crust, ensure the Gruyère cheese is grated finely and spread evenly across the top before broiling. Keep an eye on it while broiling to avoid burning, as cheese can go from perfectly melted to charred in seconds.
  • Garnishing: A sprinkle of freshly chopped parsley adds a vibrant pop of color and freshness that contrast nicely with the rich, savory flavors of the soup. Always chop it just before using to keep it looking bright and appealing.

FAQ

What is French Onion Soup Rice?

French Onion Soup Rice is a delicious fusion dish that combines the rich flavors of traditional French onion soup with rice. It typically features caramelized onions, beef or vegetable broth, and is often topped with melted cheese.

How do I make the caramelized onions for this dish?

To caramelize onions, slice them thinly and cook them slowly in butter or oil over low heat, stirring occasionally until they become golden brown and sweet. This process usually takes about 30-45 minutes.

Can I use a different type of cheese besides Gruyère?

Yes, you can use other types of cheese such as Swiss, mozzarella, or provolone. However, Gruyère is traditional for its nutty flavor and great melting quality.

What type of rice works best for French Onion Soup Rice?

Long-grain rice, such as basmati or jasmine, works well for this dish as it remains fluffy. Additionally, risotto rice like Arborio can also be used for a creamier texture.

Is this recipe suitable for vegetarians?

Yes, French Onion Soup Rice can be made vegetarian by using vegetable broth instead of beef broth and ensuring that the cheese used is rennet-free.

How long does it take to prepare French Onion Soup Rice?

The total preparation and cooking time is typically around 1 to 1.5 hours, which includes about 30-45 minutes for caramelizing the onions.

Can I make French Onion Soup Rice ahead of time?

Yes, you can prepare the dish ahead of time. Store it in an airtight container in the refrigerator and reheat it gently. However, for the best taste and texture, it’s recommended to add cheese just before serving.

What can I serve with French Onion Soup Rice?

French Onion Soup Rice pairs well with a simple mixed green salad, crusty bread, or even as a side to grilled meats or roasted vegetables for a complete meal.

Introduction

Imagine a dish that combines the delightful sweetness of roasted vegetables with a crispy coating that’s pure culinary magic. Enter the world of Crispy Smashed Carrots – a stunningly simple yet remarkably flavorful recipe that will steal the show at your dining table. As you bite into these vibrant orange beauties, be prepared for the delightful contrast of textures: crispy exteriors yielding to creamy, sweet interiors. The aroma of roasted carrots, kissed by a hint of herbs and spices, will fill your kitchen, inviting everyone to gather around and savor each bite. Whether you’re a seasoned cook or a home chef looking to elevate your vegetable repertoire, Crispy Smashed Carrots promise a memorable addition to any meal.

The Story Behind the Dish

Cultural historians might not mention Crispy Smashed Carrots among ancient feasts, but their roots certainly extend into culinary traditions that celebrate the humble carrot. Once mere garnish on dinner tables, carrots have enjoyed an evolution, claiming a rightful place as a centerpiece of creativity in cuisines worldwide. Originating from modern culinary innovation, Crispy Smashed Carrots reflect a trend of transforming simple, accessible ingredients into exquisite preparations. Inspired by the popular smashed potatoes, this dish is a testament to the versatility and adaptation of ingredients that reflect both tradition and innovation. Its story is a celebration of the carrot’s journey from the earth to the gourmet realm, proving that with a little imagination, even the most commonplace vegetables can become extraordinary.

Why You’ll Love This Recipe

  • Simple Ingredients: Made with everyday ingredients that might already be in your pantry.
  • Quick Preparation: With a few easy steps, you can have a gourmet side dish in under an hour.
  • Versatile: Perfect as a side for weekday dinners or a special holiday feast.
  • Healthy: Packed with vitamin-rich carrots, this dish is nutritious as well as delicious.
  • Customizable: Easily adjustable with different herbs and spices to suit your taste.

Flavor Profile & Texture

The magic of Crispy Smashed Carrots lies in their delightful balance of flavors and textures. Imagine this: the natural sweetness and earthiness of carrots is heightened through roasting, creating a caramelized exterior that crunches with every bite. Inside, the carrots remain tender, contrasting beautifully with their crisp coats. Seasoned with a medley of choice spices and perhaps a sprinkle of herbs like rosemary or thyme, each bite offers a burst of flavor that is both comforting and exciting. As you savor these carrots, the subtle nuances of the chosen seasonings play a harmonious symphony of taste, leaving a lasting impression on your palate.

Occasions & Pairings

Crispy Smashed Carrots make an excellent addition to any meal, elevating both casual dinners and formal gatherings. They’re perfect for:

  • Weeknight Dinners: Pair with grilled chicken or tofu for a balanced meal.
  • Holiday Feasts: A fantastic side dish that pairs well with roast turkey or ham.
  • Vegetarian Spreads: Serve alongside a fresh salad and whole-grain bread for a wholesome vegetarian meal.
  • Wine Pairings: Complement the dish with a light white wine like a Chardonnay or a vibrant Pinot Grigio to accentuate the sweet and savory overtones.

Tips, Variations & Substitutions

The versatility of Crispy Smashed Carrots allows for endless creativity and adaptation. Here are some tips to make this dish your own:

  • Spice It Up: Add a hint of heat with a sprinkle of red pepper flakes or cayenne pepper.
  • Dairy-Free Option: Use olive oil instead of butter for a vegan version.
  • Savory Twist: Finish with a dusting of parmesan cheese for an umami boost.
  • Herb Variations: Experiment with dill, oregano, or basil for different flavor profiles.
  • Colorful Mix: Use rainbow carrots to add color diversity on your plate, making it visually stunning.

Storage & Make-Ahead Ideas

One of the conveniences of this dish is its ability to be prepared ahead of time. Here’s how you can manage and maximize your time:

  • Storage: Keep any leftovers in an airtight container in the fridge for up to 3 days.
  • Reheating: To maintain crispness, reheat in the oven at 350°F (175°C) for about 10 minutes.
  • Freezing: Not recommended, as the texture of the carrots may change upon thawing. However, if needed, freeze in a single layer and bake directly from frozen when ready to enjoy.
  • Make-Ahead: Boil and smash the carrots ahead of time, refrigerate, and roast them just before serving to ensure they’re crispy.

Fun Facts & Trivia

Did you know? Carrots were originally purple in color before the orange variety was cultivated in the Netherlands. Aside from being tasty, carrots are high in beta-carotene, an antioxidant that converts to vitamin A in the body, promoting good vision and overall health. The creative adaptation of carrots into dishes like Crispy Smashed Carrots exemplifies the diverse potential of simple, nutritious ingredients in culinary art. So, the next time you crunch into this delightful dish, remember that you’re enjoying a piece of both nature’s bounty and a chef’s creativity!

Ingredients

  • Crispy Smashed Carrots
  • Main Ingredients
    • 1 pound baby carrots
      → Baby carrots are preferred for their tender texture and naturally sweet flavor. They should be washed and trimmed, leaving the skins on for added nutrients and flavor. If using larger carrots, cut them into even-sized pieces for consistent cooking.
    • 2 tablespoons olive oil
      → Olive oil adds richness and helps achieve a crispy exterior while roasting. Use high-quality extra virgin olive oil for the best flavor. Toss the carrots in the oil after smashing to ensure even coating for optimal crispiness.
    • 1 teaspoon sea salt
      → Sea salt enhances the natural sweetness of the carrots and brings out their flavor. Sprinkle it liberally before baking and adjust to taste. Use coarse sea salt for a bit of texture and a burst of salinity as you bite into the crispy carrots.
    • 1/2 teaspoon black pepper
      → Freshly cracked black pepper adds a warm heat that complements the sweetness of the carrots. Adjust the amount based on your spice preference. Grinding the pepper just before sprinkling will ensure maximum flavor.
  • Optional Seasonings
    • 1 teaspoon garlic powder (optional)
      → Garlic powder infuses the smashed carrots with savory depth without overpowering their natural sweetness. Use fresh garlic for a stronger flavor if desired, but ensure it’s finely minced to avoid burning during roasting.
    • 1 teaspoon smoked paprika (optional)
      → Smoked paprika adds a wonderful smoky flavor that pairs beautifully with roasted vegetables. Use it sparingly, as a little goes a long way in enhancing the taste. Ensure it’s mixed evenly for consistent flavor throughout the dish.
    • Fresh herbs (e.g., parsley or thyme, optional)
      → Fresh herbs add a burst of freshness and color. Use finely chopped herbs and sprinkle them over the carrots just before serving for a vibrant touch. Thyme complements the earthy flavor of carrots well, while parsley brings brightness.

Instructions

  • Preheat your oven to 425°F (220°C) and line a baking sheet with parchment paper.

    → Preheating your oven is crucial for achieving that desired crispy texture; high heat will help caramelize the natural sugars in the carrots, leading to a beautifully roasted exterior. The parchment paper prevents sticking and makes clean-up easier.
  • Wash and trim the 1 pound of baby carrots, ensuring they are clean and ready for cooking.

    → Washing removes any dirt or residue, ensuring the carrots are safe to eat and retaining their vibrant color. Trimming the tops and any tough ends allows for better presentation and ensures a consistent eating experience.
  • Boil a large pot of salted water and add the cleaned carrots, cooking for about 5-7 minutes until just tender but still firm.

    → Blanching briefly in salted water helps to enhance the carrots’ flavor and retains their vibrant color. This step softens them enough for smashing while helping to maintain their sweet, fresh taste.
  • Drain the carrots in a colander and let them rest for a minute to steam off excess water.

    → Allowing the carrots to steam helps remove moisture, which can hinder crispiness once roasted. This step also ensures that the carrots will brown nicely without steaming further in the oven.
  • Place the carrots on the prepared baking sheet and use the bottom of a heavy glass or a large fork to gently smash each one until they are flattened, about half an inch thick.

    → Smashing the carrots increases their surface area and exposes more of their flesh to the hot air in the oven, which results in extra crispiness and caramelization. Be careful not to smash too aggressively to avoid breaking them apart completely.
  • Drizzle 2 tablespoons of olive oil over the smashed carrots, followed by 1 teaspoon of sea salt and 1/2 teaspoon of black pepper. Toss gently to coat evenly.

    → Olive oil not only helps with crisping but also adds depth of flavor. Tossing thoroughly ensures each carrot is seasoned uniformly, maximizing taste while roasting. Using sea salt and freshly cracked pepper enhances the natural sweetness and adds a layer of flavor to each bite.
  • (Optionally) Sprinkle 1 teaspoon of garlic powder and 1 teaspoon of smoked paprika evenly over the carrots for added flavor.

    → These spices contribute aromatic complexity and depth. Garlic powder adds savory notes while smoked paprika offers a hint of smokiness. Ensure both are evenly distributed over the carrots to enhance every bite.
  • Roast the carrots in the preheated oven for 25-30 minutes or until they are golden brown and crispy around the edges.

    → Roasting at a high temperature helps achieve a crispy exterior, while the sugars in the carrots will caramelize, enhancing their sweetness. Check halfway through and flip the carrots for even roasting.
  • Remove the baking sheet from the oven and allow the carrots to cool slightly before serving.

    → Allowing the carrots to cool for a few minutes lets them finish cooking without becoming overly soggy. This brief resting period also enhances the flavor as the seasonings settle in.
  • (Optional) Garnish with chopped fresh herbs like parsley or thyme just before serving to add color and freshness.

    → Fresh herbs brighten up the dish and provide a fresh pops of flavor that contrast beautifully with the roasted carrots’ sweetness. Sprinkle them generously just before serving to maintain their vibrant color.

Notes

These crispy smashed carrots are a delightful twist on traditional roasted vegetables, delivering a perfect balance of sweetness and savory crunch. The smashing process not only helps to create a crispy exterior but also allows the olive oil and seasonings to penetrate the carrots, enhancing their flavor. Feel free to experiment with additional spices or herbs based on your preference. For a fun presentation, consider serving the carrots with a sprinkle of fresh herbs on top right before serving. These smashed carrots pair excellently with any protein or can be enjoyed as a standalone snack. Ensure you choose high-quality ingredients for the best flavor profile, and enjoy the crispy textures that make this dish so irresistibly good!

Tips

  • Choosing the Right Carrots: Opt for baby carrots for their sweetness and uniform cooking. If using larger carrots, select ones that are firm and vibrant, and cut them into even pieces to ensure they cook evenly.
  • Smashing Technique: After boiling or roasting the carrots, use a flat surface like a cutting board and gently press down with the bottom of a cup or pan to smash them. This technique increases the surface area, allowing for better crispiness during roasting.
  • Prepping for Crispy Texture: Make sure to dry the carrots after washing them. Excess moisture can lead to steaming instead of roasting, which may inhibit the crispiness.
  • Coating with Oil: Toss the smashed carrots in olive oil thoroughly, ensuring every piece is coated. This not only helps in achieving a crispy texture but also enhances the flavor of the dish.
  • Baking Tips: Arrange the carrots in a single layer on a baking sheet. Overcrowding can trap steam, leading to soggy results. Consider using a wire rack on the baking sheet to elevate the carrots for better air circulation.
  • Flipping Midway: For even crispiness, flip the carrots halfway through roasting. This allows both sides to develop that perfect, golden-brown crust.
  • Testing for Doneness: Carrots are done when they are tender and crispy on the edges. A fork should easily penetrate the carrots without too much resistance.
  • Serving Suggestions: Serve your crispy smashed carrots hot out of the oven, garnished with fresh herbs for added flavor and presentation. They make a delightful side dish to any meal or a healthy snack!
  • Storage Tips: If you have leftovers, store them in an airtight container in the refrigerator for up to 3 days. To reheat, place them in a hot oven for a few minutes to regain their crispiness.

FAQ

What are crispy smashed carrots?

Crispy smashed carrots are a delicious side dish made by boiling carrots until tender, smashing them, and then roasting them in the oven until they are crispy and caramelized.

What ingredients do I need to make crispy smashed carrots?

You will need fresh carrots, olive oil, salt, pepper, and any additional seasonings or herbs you prefer, such as garlic powder, thyme, or parsley.

How do I prepare the carrots for this recipe?

First, peel the carrots and cut them into even-sized pieces. Boil the carrots in salted water until they are fork-tender, then drain and let them cool slightly before smashing.

What is the best way to smash the carrots?

You can use the bottom of a glass or a potato masher to gently press down on the carrots until they are flattened but not completely mushy.

How long should I roast the smashed carrots?

Roast the smashed carrots in a preheated oven at 425°F (220°C) for about 20-25 minutes, or until they are golden brown and crispy.

Can I make crispy smashed carrots in advance?

Yes, you can boil and smash the carrots in advance. Store them in the refrigerator and roast them just before serving for the best texture.

What can I serve crispy smashed carrots with?

Crispy smashed carrots pair wonderfully with a variety of dishes, including roasted meats, fish, or as part of a vegetable platter. They also complement grains like quinoa or couscous.

Can I add cheese to the crispy smashed carrots?

Absolutely! Sprinkling grated Parmesan or crumbled feta over the carrots before roasting can add a delicious cheesy flavor.

Introduction to Honey Butter Sweet Potato Cornbread

Imagine biting into a piece of cornbread that perfectly marries the gentle, earthy sweetness of sweet potatoes with the luxurious, rich creaminess of honey butter. This is not just any cornbread; it’s a soul-warming, comfort-giving creation that makes your taste buds dance in blissful harmony. Whether it’s the soft, tender crumb or the aromatic caress of honey that lingers with every bite, this Honey Butter Sweet Potato Cornbread is sure to captivate anyone who seeks the nostalgic embrace of homemade goodness. Dive in as we explore what makes this dish so uniquely irresistible, from its heartwarming story to its luscious taste profile.

The Story Behind the Dish

Cornbread holds a cherished place in American culinary history, with roots tracing back to Native American cuisine. Before wheat flour was widely available, cornmeal was the primary grain used by indigenous peoples and early settlers, leading to the development of various cornbread recipes. The addition of sweet potatoes to cornbread is a delightful twist influenced by Southern cooking traditions. Sweet potatoes, a staple in Southern kitchens, complement the cornmeal’s mild flavor while adding a natural sweetness and moisture that elevates the traditional recipe.

Honey Butter Sweet Potato Cornbread represents more than just the fusion of ingredients; it’s a tapestry woven from cultural exchange and regional tradition. The introduction of honey butter adds a layer of decadence, transforming the humble cornbread into a luxurious treat. This dish is a testament to the creativity born from diverse food cultures and the evolution of comfort food through generations.

Why You’ll Love This Recipe

  • Ultimate Comfort: The combination of sweet potatoes and honey butter in cornbread is as comforting as a warm hug on a chilly day.
  • Versatile Delight: Perfect as a standalone snack, a side dish for spicy stews, or a sweet companion to breakfast dishes.
  • Nutritional Benefits: Packed with vitamins from sweet potatoes and antioxidant properties from honey, this cornbread offers a healthier twist to traditional recipes.
  • Kid-Friendly: The gentle sweetness and soft texture make it appealing to children and picky eaters alike.
  • Easy to Make: Straightforward instructions and commonly available ingredients allow even novice bakers to succeed.

Flavor Profile & Texture

The flavor profile of Honey Butter Sweet Potato Cornbread is a symphony of subtle sweetness and warm, buttery richness. The sweet potato imparts a natural sweetness that is gently underscored by the earthiness of cornmeal. The honey not only enhances this sweetness but also introduces floral notes that elevate the dish beyond ordinary cornbread.

The texture sets this cornbread apart – tender, moist, and slightly crumbly, with a lightness that belies its hearty ingredients. Each bite offers a melt-in-your-mouth experience, with just enough densness to feel substantial but never heavy. The buttery crust that forms on top adds a satisfying contrast, providing a hint of crispiness that gives way to the tender cake beneath.

Occasions & Pairings

The versatility of this dish is part of its magic. Serve it on a cool autumn evening alongside a robust chili or a spicy jambalaya for a comforting, meal. It’s a wonderful addition to holiday spreads, providing a sweet and savory balance to classics like turkey and cranberries. For breakfast or brunch, consider pairing it with a dollop of yogurt or a pat of melting butter and a drizzle of extra honey.

Perfect Pairings

  • Drinks: A smooth, creamy latte or a glass of fresh apple cider complements the flavors beautifully.
  • Main Courses: Beef stew, BBQ ribs, or fried chicken elevate this cornbread into a full meal.
  • Other Sides: Coleslaw, green beans, or roasted root vegetables round out the menu.

Tips, Variations & Substitutions

Making Honey Butter Sweet Potato Cornbread opens up a world of creativity in the kitchen. Here are some ways to customize the recipe:

Variations

  • Spicy Variation: Add a pinch of cayenne pepper or chopped jalapeños for a subtle heat.
  • Herbed Twist: Incorporate fresh rosemary or thyme for a fragrant herbal note.
  • Nutty Addition: Stir in a handful of toasted pecans or walnuts for a crunchy surprise.

Substitutions

  • Gluten-Free: Swap out standard flour for a gluten-free blend to cater to dietary restrictions.
  • Vegan Alternative: Use plant-based butter and a flaxseed egg replacement for all-vegans.
  • Low Sugar: Use maple syrup instead of honey for a lower glycemic index.

Storage & Make-Ahead Ideas

One of the joys of this cornbread is its excellent shelf life, making it ideal for both immediate enjoyment and make-ahead planning. Here’s how to keep it fresh:

  • Room Temperature: Store tightly covered at room temperature for up to three days.
  • Refrigeration: Extend freshness by refrigerating in an airtight container for up to a week.
  • Freezing: Wrap individual pieces in plastic wrap and store in a freezer bag. Thaw at room temperature or warm in an oven before serving.

For meal prep enthusiasts, prepare the batter a day ahead and refrigerate it. Simply pour it into the baking tin when needed, and enjoy freshly baked cornbread with minimal effort.

Fun Facts & Trivia

Did you know that the sweet potato is a distant cousin of the ordinary potato, contrary to popular belief? These tubers belong to a separate botanical family altogether. Meanwhile, honey has been a cherished sweetener for centuries and was even used as currency in some ancient cultures. Cornbread itself has a varied history across regions, with every locale adding its signature touch, resulting in a plethora of recipes all bearing the same name but tasting distinctly unique.

Modern interpretations, like our Honey Butter Sweet Potato Cornbread, are an ode to the adaptability of traditional cuisines to new tastes and ingredients. So whether you are a food historian or just someone who loves to eat, this cornbread is a delicious way to celebrate culinary heritage while indulging in the simple joys of eating well.

Ingredients

  • Sweet Potatoes
    → Sweet potatoes are the star ingredient, providing natural sweetness and moisture to the cornbread. They should be peeled, boiled, and then mashed until smooth. Opt for medium to large sweet potatoes that are firm and free of blemishes to ensure the best flavor and texture in the final product.
  • Honey
    → Honey serves as a natural sweetener, enhancing the flavor profile of the cornbread while keeping it moist. Use pure, raw honey for the best taste. To make it easier to mix, consider warming the honey slightly before adding it to the batter, as this will help it blend more seamlessly with the other ingredients.
  • Butter
    → Unsalted butter enhances the richness and flavor of the cornbread. It should be melted and cooled slightly before being mixed into the batter. Using good-quality butter will yield a richer, creamier taste, so avoid margarine or low-fat spreads for best results.
  • Cornmeal
    → Cornmeal is the main dry ingredient that gives cornbread its signature texture and flavor. Use medium or fine ground cornmeal for a pleasing crumb. It’s essential to store the cornmeal in a cool, dry place to keep it fresh. Avoid using stale cornmeal, as it can impart an off-flavor to your dish.
  • All-Purpose Flour
    → All-purpose flour acts as a binder, providing structure to the cornbread. Sift the flour before measuring to aerate it, which helps achieve a lighter texture. It’s important not to overmix the batter once the flour is added, as this can lead to dense cornbread.
  • Baking Powder
    → Baking powder is the leavening agent that gives the cornbread its rise and lightness. Ensure that the baking powder is fresh for maximum effectiveness. You can test its potency by adding a teaspoon to water; if it fizzes, it’s still good to use!
  • Salt
    → A pinch of salt enhances all the other flavors in the cornbread, balancing the sweetness of the honey and sweet potatoes. Use fine sea salt as it dissolves easily in the batter, distributing saltiness evenly throughout the cornbread.
  • Milk
    → Milk adds moisture to the batter, helping combine dry ingredients for a smoother texture. Use whole milk for creaminess, or you can substitute with a dairy-free alternative if desired. Make sure the milk is at room temperature to allow for proper mixing.

Instructions

  • Begin by peeling and chopping the sweet potatoes into small, even-sized chunks, then place them into a large pot of cold, salted water.

    → This method helps the sweet potatoes cook uniformly. The salt enhances their natural flavor as they boil. Aim for approximately 2-3 cups of sweet potatoes to ensure you have enough for the cornbread…
  • Bring the pot of water to a rolling boil over high heat, reduce to medium heat, and cook the sweet potatoes for about 15-20 minutes until they are tender when pierced with a fork.

    → Cooking them until tender is crucial; if they are undercooked, they won’t mash properly, affecting the texture of the cornbread. Be sure to stir occasionally to prevent sticking…
  • Once the sweet potatoes are tender, drain them in a colander and let them cool slightly before mashing them in a large mixing bowl until smooth and creamy.

    → It’s important to mash them while they are still warm, as this makes the process easier and yields a smoother texture. Ensure there are no lumps for an even batter…
  • In a separate bowl, melt the unsalted butter in the microwave or on the stovetop and allow it to cool for a couple of minutes.

    → Cooling the butter prevents it from cooking the eggs or altering the texture of the batter when combined. If using the microwave, heat in short intervals to avoid overheating…
  • Once cooled, add the warm honey to the melted butter and whisk until well combined.

    → Whisking incorporates air into the mixture and evenly distributes the honey. Warm honey mixes more smoothly; if it thickens too much, gently heat it again…
  • Add the mashed sweet potatoes to the butter and honey mixture, stirring until fully integrated and smooth.

    → This step enhances the sweetness and moisture of your batter, creating the foundation for delicious cornbread. Ensure there are no visible traces of sweet potato left…
  • In a different bowl, combine the cornmeal, all-purpose flour, baking powder, salt, and any desired spices (like cinnamon or nutmeg) to enhance the flavor.

    → Mixing the dry ingredients separately ensures even distribution of the leavening agent and seasonings, preventing clumps in your final batter…
  • Slowly add the dry ingredients to the sweet potato mixture, using a spatula to fold them together gently.

    → Folding prevents gluten development, which keeps the cornbread light and fluffy. Stop mixing as soon as you no longer see dry flour to avoid overworking the batter…
  • Gradually pour in the milk while continuing to fold the batter until it reaches a smooth and slightly thick consistency.

    → Ensure that the milk is at room temperature for thorough mixing, and avoid over-mixing to maintain the desired texture…
  • Preheat your oven to 375°F (190°C) and prepare an 8-inch square baking dish by greasing it with butter or lining it with parchment paper.

    → Proper preparation prevents the cornbread from sticking and makes for easy removal. Preheating the oven helps facilitate even cooking from the start…
  • Pour the cornbread batter into the prepared baking dish, spreading it evenly with a spatula to ensure a uniform thickness.

    → Using a spatula helps maintain the structure of the batter; spreading it evenly allows for even baking throughout, helping prevent uneven or gooey spots…
  • Bake the cornbread in the preheated oven for 25-30 minutes, or until a toothpick inserted into the center comes out clean or with a few moist crumbs.

    → This testing method is crucial; if the toothpick comes out wet, it’s not cooked through, but if it’s completely clean, it might be overbaked. Check the cornbread at around 25 minutes for doneness…
  • Once baked, remove the cornbread from the oven and allow it to cool in the pan for about 10 minutes before transferring it to a wire rack.

    → Cooling helps set the structure, making it easier to slice without crumbling. If left too long in the pan, it can become soggy…
  • Serve warm, optionally drizzled with additional honey or topped with butter.

    → Serving warm enhances the flavors and creates a delightful experience, as the butter melts into the bread, enriching every bite…

Notes

These Honey Butter Sweet Potato Cornbread muffins are a delightful twist on the classic cornbread recipe, enhanced with the natural sweetness of sweet potatoes and honey. The addition of melted butter contributes a rich flavor, making this cornbread moist and decadent. For the best results, ensure you mash the sweet potatoes until smooth for a uniform texture. Remember to check that your baking powder is fresh to achieve the perfect rise in your cornbread.

Feel free to experiment by adding mix-ins like corn kernels, chopped jalapeños, or fresh herbs to add a unique flair to your cornbread. This recipe can be enjoyed warm as a side dish or served as a snack throughout the day. If you have leftovers, they store well in an airtight container and can be reheated in the oven or microwave. Consider serving alongside a dollop of honey butter for an extra touch of sweetness.

For a gluten-free version, you can substitute the all-purpose flour with a gluten-free blend, but be sure to adjust the liquid ingredients slightly based on the absorbency of your flour choice. Enjoy this comforting cornbread alongside chili, soup, or as part of a festive meal.

Tips

Cooking Tips for Honey Butter Sweet Potato Cornbread

  • Preparation of Sweet Potatoes: To ensure even cooking and easy mashing, cut the sweet potatoes into uniform pieces before boiling them. This will help them cook evenly. Once boiled, let them cool slightly before mashing to avoid burns.
  • Mixing Ingredients: When combining the wet and dry ingredients, mix just until they are combined. A few lumps are okay—overmixing can result in a tough texture, so be gentle with your batter.
  • Testing Doneness: To check if your cornbread is done, insert a toothpick into the center. It should come out clean or with just a few moist crumbs. Be careful not to overbake, as this can lead to dry cornbread.
  • Cooling Time: Allow the cornbread to cool for a few minutes in the pan before transferring to a wire rack. This helps it set up and makes for easier slicing without falling apart.
  • Serving Suggestions: For a delicious twist, serve the cornbread with additional honey butter made by mixing butter with honey. This enhances the flavor profile and adds a lovely finishing touch.
  • Storage Tips: To keep your cornbread fresh, store it in an airtight container at room temperature for up to two days. For longer storage, wrap it tightly in plastic wrap and freeze for up to three months. Thaw at room temperature before serving.
  • Flavor Variations: Consider adding ingredients like chopped herbs, jalapeños, or cheese for a savory twist. You can also substitute a portion of the cornmeal with whole wheat flour for added nutrition.
  • Panning: For a golden crust, consider preheating a cast iron skillet with a bit of butter in the oven before pouring in the batter. This will give the cornbread a crispy bottom and enhance the flavor.

FAQ

What is Honey Butter Sweet Potato Cornbread?

Honey Butter Sweet Potato Cornbread is a delicious twist on traditional cornbread, incorporating sweet potatoes for added moisture and flavor, and honey butter for a rich, sweet finish.

What ingredients are needed to make Honey Butter Sweet Potato Cornbread?

The main ingredients include cornmeal, flour, mashed sweet potatoes, honey, butter, baking powder, milk, and eggs. Optional additions can include spices like cinnamon or nutmeg.

How long does it take to prepare Honey Butter Sweet Potato Cornbread?

Preparation time is typically around 15-20 minutes, while baking takes about 25-30 minutes. Expect a total time of approximately 45-50 minutes from start to finish.

Can I use canned sweet potatoes instead of fresh?

Yes, you can use canned sweet potatoes as a convenient alternative. Just ensure they are well-drained and mashed before using them in the recipe.

Is Honey Butter Sweet Potato Cornbread gluten-free?

Traditional recipes are not gluten-free, but you can make a gluten-free version by using a gluten-free flour blend instead of regular flour.

How can I store leftovers?

Store any leftovers in an airtight container at room temperature for up to 2 days, or refrigerate for up to 5 days. You can also freeze individual slices for longer storage.

What can I serve with Honey Butter Sweet Potato Cornbread?

This cornbread pairs well with soups, stews, and chili. It’s also great as a side dish for holiday feasts or BBQs, served warm with additional honey butter.

Can I make this recipe ahead of time?

Yes, you can prepare the batter ahead of time and store it in the refrigerator for a few hours before baking. However, freshly baked cornbread tastes best!

Introduction – A Warm Embrace of Cinnamon and Apple

Imagine biting into a warm, tender fritter, the comforting fragrance of cinnamon and freshly baked apples enveloping your senses. Each morsel bursts with a perfect balance of sweetness and spice, offering a nostalgic embrace reminiscent of cozy autumn days. Let the flavors carry you to an orchard suffused with the crisp aura of fallen leaves. This is the experience of a Baked Apple Fritter — a creation that melds tradition with the simplicity of modern baking, and it’s waiting to be your next delicious adventure in the kitchen.

The Story Behind the Dish – From Orchards to Your Oven

Baked Apple Fritters have a storied past, tracing their roots to the European ancestors of modern doughnut-style confections. Fritters themselves are romance-infused dough pastries, rich with history as rural treats crafted to celebrate harvests. Particularly popular in regions abundant with orchards, these apple-laden delights were initially deep-fried, serving as joyful indulgences when apples were gathered in the brisk months of fall.

Transitioning from a traditional deep-fried method to baking goes beyond just a change in cooking technique; it represents a culinary evolution. Baking the fritters allows the elemental flavors of fresh apples and aromatic spices to shine while offering a healthier alternative to the deeply rooted classic. Transporting an age-old tradition to our contemporary lifestyles, Baked Apple Fritters symbolize the blending of past and present, bringing the taste of homemade goodness directly to your oven rack.

Why You’ll Love This Recipe

  • Effortless Baking: This recipe foregoes the mess and complexity of deep frying, making it perfect for novice bakers and easy weekend baking sessions.
  • Healthier Choice: Remember indulging doesn’t have to mean overindulging. Baked Apple Fritters are lighter on calories, reducing guilt without sacrificing taste.
  • Seasonal Delight: Maximizing the flavors of in-season apples adds freshness and vibrancy that is unbeatable, taking advantage of nature’s bounty.
  • Family-Friendly: An excellent dish to get kids involved, from mixing batter to the joy of watching fritters rise, it’s a fun and educational kitchen activity.
  • Can Be Made Ahead: Prepare your dough in advance, allowing you to enjoy a warm, chewy treat at the drop of a hat when guests arrive unexpectedly.

Flavor Profile & Texture – Layers of Comfort

The flavor profile of a Baked Apple Fritter is a symphony of contrasts harmoniously existing within each bite. You encounter the tartness of the apple juxtaposing with the underlying sweetness of the batter. Cinnamon, nutmeg, and allspice dance around your palate, offering layers of warmth and zest that are evocative of a seasonal celebration. Baking helps maintain the apple’s moisture, ensuring a tender crumb that is delightfully soft yet firm enough to support the fruit’s juiciness without becoming soggy.

The texture is an integral part of this indulgence — perfectly chewy at the center, with a slightly crisp edge formed by the baking process, which mimics the apples’ natural caramelization. This contrast within each fritter makes every bite a unique experience, teetering between the delicate crunch and pillow-like softness, leaving you craving more.

Occasions & Pairings

Baked Apple Fritters are versatile enough to match any occasion. They can turn an ordinary breakfast into an extraordinary one, providing a hearty, sweet companion to a cup of robust coffee or tea. Picture a leisurely Sunday brunch, where their aroma welcomes your guests with open arms, complementing other brunch favorites like scrambled eggs and bacon.

For an elegant dessert option, consider pairing them with a scoop of vanilla ice cream or a dollop of freshly whipped cream. The warmth of the fritters contrasts beautifully with the cold creaminess, creating a dish that’s both comforting and sophisticated. During the holiday season, serve them alongside mulled cider or a spiced wine, enhancing their seasonal flavors and bringing an additional dimension of festivity to your gathering.

Tips, Variations & Substitutions

One of the joys of Baked Apple Fritters is the ability to adapt and customize them to fit your personal culinary style. Here are some ideas to make them your own:

Creative Twists

  • Add-Ins: Experiment by adding cranberries, raisins, or even shredded carrots for a more textured experience.
  • Glaze It: Drizzle a simple glaze made from powdered sugar and milk over the warm fritters for an extra hint of sweetness.
  • Swirl In Some Spice: Incorporate ginger or cardamom for a different spice element that elevates the traditional cinnamon-coating.

Dietary Alternatives

  • Vegan Option: Substitute dairy with plant-based milk and butter alternatives, and use flaxseed meal in place of eggs.
  • Gluten-Free: Gluten-free flour blends are widely available and work well without altering the texture significantly.

Regional Variations

Explore flavors from different cultures by opting for regional apple varieties — Granny Smith for a tart punch, or Honeycrisp for sweetness. Incorporate spices from Indian to Middle Eastern origins for a deeper taste profile. You can even blend in nuts like pecans or almonds for a nutty, earthy twist that echoes southern influences.

Storage & Make-Ahead Ideas

Preserving the freshness of Baked Apple Fritters is easy, with solutions that extend their shelf life while retaining flavor and texture.

  • Refrigeration: Keep them in an airtight container and store them in the refrigerator for up to three days. Enjoy them at room temperature or lightly warm them in the oven before serving.
  • Freezing: Once cooled, freeze individually on a baking sheet before transferring them to a freezer-safe bag. They can last up to three months, and simply pop them in the oven to heat up when ready to eat.
  • Make-Ahead: Prepare your dough ahead and refrigerate. On the day of serving, just mold them into shape and bake fresh. This technique ensures they’re ready whenever the craving calls.

Fun Facts & Trivia

Did you know that an apple fritter was once part of Abraham Lincoln’s favorite meal, marking it as not just a treat for today’s sophisticated palates but one revered through the annals of time? Apple fritters also find sainthood with the celebration of ‘Johnny Appleseed Day’ in remembrance of the man responsible for spreading apple orchards across America.

In conclusion, Baked Apple Fritters are more than just an inviting pastry. They encapsulate the heartwarming charm of home cooking with an easy approach that allows everyone to be a baker. This recipe respects its origins while embracing new-age baking, making it as intriguing in its history as it is delightful in its taste. Once you savor these fritters, you may find yourself welcoming them as an enduring part of your culinary repertoire.

Ingredients

  • Dough Base
    • 2 cups all-purpose flour
      → The main structure of the fritters, all-purpose flour provides the necessary gluten to create a light and airy dough. It should be measured precisely to ensure the right texture; too much can make the fritters dense. Sifting the flour before measuring can help aerate it for an even lighter result.
    • 1 tablespoon baking powder
      → This leavening agent is crucial for giving the fritters their lightness and fluffiness. Ensure it’s fresh for maximum potency; old baking powder can lead to dense fritters. Simply mix it evenly with the flour to distribute it throughout the dough.
    • 1/2 teaspoon salt
      → Salt enhances the overall flavor of the fritters by balancing the sweetness of the apples and sugar. It should be mixed into the dry ingredients to ensure even distribution throughout the dough.
    • 1/4 cup granulated sugar
      → This sweetener provides the necessary sweetness for the dough. Granulated sugar helps to create a tender texture; for a deeper flavor, consider substituting brown sugar. It should be mixed with the dry ingredients to evenly sweeten the fritters.
    • 2 large eggs
      → Eggs serve as a binding agent, helping to hold the fritters together while also adding richness. They should be at room temperature for easier mixing. Beating them lightly before adding them to the mixture can ensure they incorporate smoothly.
    • 3/4 cup milk
      → Milk adds moisture to the dough, ensuring the fritters remain soft and tender. Use whole milk for a richer flavor, or a non-dairy alternative if preferred. Make sure it’s at room temperature so it mixes seamlessly with the eggs.
    • 1 teaspoon vanilla extract
      → Pure vanilla extract elevates the flavor of the fritters, giving them warmth and a hint of sweetness. Always opt for pure vanilla over imitation for the best, most authentic flavor. Add it to the wet ingredients before combining with the dry.
  • Apple Filling
    • 2 cups apples (peeled, cored, and diced)
      → Fresh apples provide natural sweetness and moisture, and their texture adds a delicious bite to the fritters. Choose tart apples like Granny Smith for a balanced flavor or sweeter apples such as Fuji for a milder taste. Dice them into small, uniform pieces to ensure even distribution throughout the dough.
    • 1/2 teaspoon ground cinnamon
      → This spice adds warmth and enhances the apple flavor. It should be evenly mixed into the diced apples before incorporating them into the dough to ensure that every bite has a touch of cinnamon warmth.
    • 1 tablespoon lemon juice
      → Lemon juice keeps the diced apples from browning and adds a bright acidity that balances the sweetness. It should be mixed with the apples immediately after dicing to preserve their fresh flavor and color.
  • Frying & Coating
    • Vegetable oil (for frying)
      → Choose a neutral oil with a high smoke point, such as canola or peanut oil, to fry the fritters. Heat the oil to the appropriate temperature (around 350°F or 175°C) before frying; too cool oil will result in greasy fritters, while too hot can burn them.
    • 1/2 cup powdered sugar (for dusting)
      → This sugar adds a sweet finishing touch to the fritters. Sprinkle it generously over the warm fritters immediately after removing them from the oil for it to adhere properly. For a fun variation, mix in a little cinnamon for a chai-inspired flavor.

Instructions

  • Start by preparing the dough base. In a large mixing bowl, combine 2 cups of all-purpose flour, 1 tablespoon of baking powder, 1/2 teaspoon of salt, and 1/4 cup of granulated sugar.

    → This is the foundation of your fritters. Mixing these dry ingredients ensures they are evenly distributed, which helps the fritters rise uniformly during frying.
  • In a separate bowl, whisk together 2 large eggs, 3/4 cup of milk, and 1 teaspoon of vanilla extract until well combined.

    → Whisking the wet ingredients thoroughly incorporates air, enhancing the fluffiness of your fritters. Using room temperature ingredients aids in achieving a smooth mixture.
  • Gradually add the wet mixture into the dry ingredients, stirring gently with a spatula until just combined. Do not over-mix; a few lumps are okay.

    → Over-mixing can lead to tough fritters due to gluten development. Stirring until just combined ensures a light and tender texture.
  • Prepare your apple filling by peeling, coring, and dicing the apples into small, even pieces. Then, toss the diced apples with 1 tablespoon of lemon juice and 1/2 teaspoon of ground cinnamon.

    → Dicing the apples uniformly promotes even distribution throughout the fritters. The lemon juice prevents browning, while the cinnamon enhances flavor.
  • Carefully fold the diced apples into the fritter batter using a spatula until evenly incorporated.

    → Folding gently preserves the airiness of the batter while ensuring that the apple pieces are well distributed, giving every fritter a delicious apple bite.
  • In a deep, heavy-bottomed pot or a frying pan, heat vegetable oil to 350°F (175°C). You can use a cooking thermometer for accuracy.

    → Maintaining the oil temperature is crucial; too cool, and the fritters will absorb excess oil; too hot, and they may burn. It’s best to use an oil with a high smoke point, like canola or peanut oil.
  • Using a large spoon or ice cream scoop, carefully drop spoonfuls of the batter into the hot oil, being cautious not to overcrowd the pot.

    → Frying in batches allows the fritters to cook evenly and rise properly. Overcrowding lowers the oil temperature, which can lead to greasy fritters.
  • Fry the fritters for 2-3 minutes on each side or until they are golden brown and float to the surface. Use a slotted spoon to turn them as needed.

    → Monitor their color carefully; golden brown indicates they are properly cooked. Floating fritters signify they are cooking correctly and will help ensure a light texture.
  • Once cooked, remove the fritters from the oil and place them on a plate lined with paper towels to absorb excess oil.

    → Draining excess oil helps maintain the fritters’ lightness and prevents them from becoming soggy.
  • While the fritters are still warm, generously dust them with powdered sugar, optionally mixing in a little cinnamon for added flavor.

    → Sprinkling powdered sugar while hot ensures it adheres well to the fritters, creating a deliciously sweet finish that enhances their appeal.
  • Serve the apple fritters warm and enjoy their delightful texture and flavor!

    → Warm fritters are best as the flavors are at their peak and the textures are perfectly soft and fluffy, offering a delightful bite.

Notes

These baked apple fritters are a delightful treat that brings together the comforting flavors of spiced apples and dough, perfect for breakfast or as a sweet snack. The dough is light and fluffy, while the apple filling offers a sweet burst in every bite. You can use any variety of apples based on your preference and availability, but combining tart and sweet apples can deliver a more nuanced flavor profile. For an added twist, consider incorporating nuts or raisins into the apple filling.

When frying, ensure your oil is at the right temperature to achieve golden-brown fritters without absorbing excess oil, keeping them light and crispy. If you’re looking for a healthier alternative, you can bake the fritters in the oven at a high temperature for a enjoyably light version, just remember to adjust the cooking time accordingly.

The fritters are best enjoyed fresh from the fryer, dusted with powdered sugar. For an extra indulgent treat, pair them with a side of caramel sauce or a dollop of whipped cream. These fritters also make a wonderful dessert option or can be served at brunch gatherings. Leftovers can be stored in an airtight container for a couple of days, but they’re so delicious they might not last that long!

Tips

Cooking Tips for Baked Apple Fritters

  • Prepare your workspace: Before you begin, ensure your kitchen is clean and you have all your ingredients measured and ready to go. This will help streamline the process and prevent any last-minute scrambling for items.
  • Choose the right apples: Select apples that are firm and slightly tart, like Granny Smith or Honeycrisp, for the best balance of flavor. Avoid soft or mealy apples, as they will not hold up well during the cooking process.
  • Mix ingredients carefully: When combining your wet and dry ingredients, mix them gently until just combined. Overmixing can lead to tough fritters. A few lumps are perfectly fine.
  • Let the dough rest: Allow the dough to rest for about 10 minutes after mixing. This resting period helps the flour hydrate and the baking powder activate, resulting in fluffier fritters.
  • Testing oil temperature: To check if your oil is hot enough, drop a small amount of batter into the oil. If it sizzles and rises to the top quickly, the oil is ready. If it browns too fast, lower the heat, and if it doesn’t sizzle, increase the heat slightly.
  • Use a thermometer: For best results, use a candy or deep-fry thermometer to monitor the oil temperature throughout frying. Maintaining the right heat will yield crispy, golden-brown fritters.
  • Don’t overcrowd the pan: Fry fritters in small batches to avoid lowering the oil temperature, which can lead to greasy fritters. Ensure there’s enough space around each fritter for proper frying.
  • Drain properly: Use a slotted spoon to remove the fritters from the oil, letting excess oil drip off. Then place them on a paper towel-lined plate to absorb more grease, keeping them crispy.
  • Serve warm: Baked apple fritters are best enjoyed warm. Dust them with powdered sugar just before serving for an extra touch of sweetness.
  • Storing leftovers: If you have any leftovers, store them in an airtight container at room temperature for up to two days. To reheat, place them in a 350°F (175°C) oven for about 5-10 minutes to restore their crispiness.

FAQ

What are baked apple fritters?

Baked apple fritters are a delicious dessert made with fresh apples, cinnamon, and dough that is baked until golden instead of being deep-fried, making them a healthier option.

How do I prepare the apples for the fritters?

Start by peeling, coring, and dicing the apples into small pieces. You can also toss them with lemon juice to prevent browning.

Can I use any type of apple for this recipe?

Yes, you can use a variety of apples! Granny Smith, Honeycrisp, or Fuji apples work well due to their balance of sweetness and tartness.

How can I make the fritters healthier?

You can make the fritters healthier by using whole wheat flour, reducing the sugar, and using unsweetened applesauce instead of oil or butter.

Can I add other spices to the fritters?

Absolutely! You can enhance the flavor by adding nutmeg, ginger, or cardamom to the batter along with the cinnamon.

What is the best way to store leftover fritters?

Store leftover fritters in an airtight container in the refrigerator for up to 3 days. You can reheat them in the oven to restore their texture.

Can I freeze baked apple fritters?

Yes, you can freeze baked apple fritters. Place them in a single layer on a baking sheet to freeze individually, then transfer them to a freezer bag for up to 2 months.

What can I serve with baked apple fritters?

Baked apple fritters can be served with a drizzle of caramel sauce, a dusting of powdered sugar, or a scoop of vanilla ice cream for extra indulgence.

Introduction

Picture this: a crisp autumn morning, the air lightly kissed by the chill of fall, with a golden sunrise peeking through leaves tinged with shades of orange, red, and gold. What could make this scenic morning more perfect than the aroma of freshly fried treats wafting through your kitchen, warming you from the inside out with every bite? Welcome to the delightful world of Apple Fritter Bites—a divine fusion of warm, cinnamon-kissed apples and a delicate, fluffy pastry that’s perfect for starting your day on a sweet note or indulging as a comforting snack.

Apple Fritter Bites bring a little piece of this heavenly experience into your home, making it easy to create a treat that’s as comforting as a hug and as delicious as it is inviting. Picture biting into a tender, buttery exterior that gives way to a soft, sweet apple core fragrant with the essence of cinnamon and a hint of nutmeg, conjuring memories of fall festivals and family gatherings.

The Story Behind the Dish

Apple Fritters have a rich and storied past, an enduring testament to the delights that result when simple ingredients are blended with loving care and culinary creativity. Originating as a medieval dish, fritters began as savory items before evolving into the sweet variations we enjoy today. They played a significant role in European peasant cuisine, where they were made with leftover batter and the year’s fresh bounty, turning the mundane into a celebration of seasonal produce. The apple, a fruit synonymous with American fall traditions, made the perfect companion, marrying sweetness and slight tartness in a way few ingredients can match.

Today, these indulgences are enjoyed globally, often found at street fairs, in bakeries, and on breakfast menus alike. The transformation from full-sized fritters to visual and edible delights like Apple Fritter Bites speaks to our constant evolution of culinary arts and the creativity that’s inspired by our favorite classic flavors.

Why You’ll Love This Recipe

  • Quick and Easy: While some fritter recipes may seem intimidating, Apple Fritter Bites are wonderfully approachable, making it possible for enthusiasts of all skill levels to indulge in homemade goodness.
  • Family-Friendly: The perfect size for little hands, these bites are great for children, and they make a beautiful addition to family breakfasts or brunches.
  • Seasonal and Versatile: These bites capture the essence of fall but are charming and delicious year-round. You can take them from casual gatherings to celebratory events with ease.
  • Comforting Aromas: Nothing compares to the scent of apples and cinnamon; it’s a mood-lifter that evokes comfort and joy.

Flavor Profile & Texture

Apple Fritter Bites are a symphony of flavors and textures. The outside is slightly crisp, forming a beautiful golden crust while the inside remains fluffy and soft. The sugar used in the batter caramelizes beautifully during frying, creating a slightly sweet exterior that’s balanced beautifully by the apples. A generous amount of cinnamon brings warmth, while nutmeg introduces a subtle, earthy undertone that pairs perfectly with the tart-sweet juxtaposition of apples. The apples themselves cook until tender yet retain a satisfying bit of bite, providing a refreshing contrast in texture with every morsel. This, paired with the sweet finish of powdered sugar or glaze, creates a balance so heavenly you’ll find yourself reaching for “just one more” (again and again).

Occasions & Pairings

Though particularly perfect during the autumn months, these bites are versatile enough to be enjoyed year-round. Here are some occasions and pairings to consider:

  • Breakfast Treat: Serve alongside strong, hot coffee or a spiced chai tea to make any morning feel special.
  • Dessert Delight: Accompany with a scoop of vanilla bean ice cream or a dollop of whipped cream for a decadent dessert.
  • Party Favorite: Present at brunches, holiday parties, or as a sweet addition to a potluck for instant crowd-pleasing. These bites can serve as both a standalone treat or part of a delicious dessert platter.

Tips, Variations & Substitutions

  • Fruit Substitutions: If you’d like to shake things up, consider using pears, peaches, or even berries as an apple alternative for a switch in flavor.
  • Dietary Options: For those needing a gluten-free option, substitute the all-purpose flour with a gluten-free blend. To make it vegan-friendly, use a plant-based milk and egg substitute.
  • Add Those Extras: Try including a sprinkle of chopped nuts for added crunch, or drizzle with caramel sauce for an extra indulgent touch.

Storage & Make-Ahead Ideas

Apple Fritter Bites are best enjoyed fresh, but if you find yourself with leftovers, they can be stored at room temperature in an airtight container for a day or two. For longer storage, refrigerate them and gently reheat in an oven to regain some of that fresh-from-the-fryer warmth. When making ahead, prepare the batter and diced apples separately, then combine and fry just before serving to maintain optimal freshness.

Fun Facts & Trivia

Did you know that fritters have their own day of recognition? National Apple Fritter Day falls on June 2nd annually in the United States—an excellent excuse to enjoy these bites to your heart’s delight! Furthermore, fritters are so beloved in American culture that one town—Ludington, Michigan—holds an annual ‘Apple Fest’ celebrating all things apple, of which fritters are a crowd favorite, keeping this age-old pastry firmly rooted in our hearts (and bellies).

Delving into the world of Apple Fritter Bites is more than just a culinary adventure; it’s a celebration of tradition, flavor, and the warmth that sharing a delicious treat can bring. With each bite, you’re not just enjoying a dessert but partaking in a piece of history crafted by countless generations of cooks who refined this simple delight into something spectacular. So go ahead, savor each delectable mouthful, and let the inviting aroma transport you to an idyllic orchard filled with the laughter of family and friends.

Ingredients

  • Fritter Batter
    → This forms the base of the apple fritter bites, providing a fluffy, tender inside. The batter should be mixed until just combined to ensure the fritters are light and airy, avoiding overmixing which can make them dense.
    • 1 cup all-purpose flour
      → All-purpose flour is the main structure-building component of the batter. It provides the necessary gluten for elasticity and helps the fritters hold their shape. Be careful not to overmeasure; spoon flour into the measuring cup and level it off with a knife for accuracy.
    • 1/2 cup granulated sugar
      → Sugar sweetens the batter and aids in browning the fritters during frying, giving them a golden color. It can also help to enhance the overall flavor. Use fine granulated sugar to ensure it dissolves quickly into the batter.
    • 1 teaspoon baking powder
      → Baking powder is a leavening agent that adds volume and lightness to the fritters. Ensure that it is fresh for the best rise. Sifting it into the dry ingredients can help distribute it evenly.
    • 1/2 teaspoon ground cinnamon
      → Cinnamon adds a warm, cozy flavor to the fritters, complementing the sweetness of the apples. Use fresh cinnamon for the best flavor potency. If desired, feel free to adjust the amount according to your taste preference.
    • 1/4 teaspoon salt
      → Salt enhances the overall flavor of the fritters, balancing the sweetness. A small amount is sufficient, as too much can overpower the batter. Use fine table salt for even distribution.
    • 1/2 cup whole milk
      → Milk adds moisture to the batter, creating a rich texture. Use whole milk for a greater creaminess; if using a lower-fat option, you may need to adjust the flour slightly to achieve the right consistency.
    • 1 large egg
      → The egg acts as a binder in the batter, holding all the ingredients together, and adds richness and moisture. Make sure it is at room temperature to blend easily into the batter.
  • Apples
    → Fresh apples are the star ingredient of the fritters, adding natural sweetness and a juicy texture. Use a variety known for cooking, such as Granny Smith or Honeycrisp, and ensure they are diced into small, even pieces for consistent cooking.
    • 2 medium apples (peeled, cored, and diced)
      → Peeling and coring the apples ensures a smoother texture in the fritters. Dice them into small pieces (about 1/4 inch) to ensure they cook evenly within the batter and integrate well without overwhelming it.
  • Frying Ingredients
    → These ingredients are essential for getting a perfect outer crisp to the fritters when frying. Make sure to follow temperature guidelines to prevent sogginess.
    • Vegetable oil (for frying)
      → Vegetable oil has a high smoke point, making it ideal for frying. Use enough to submerge the fritters partially (about 2-3 inches in depth) in a deep pot. Heat the oil to around 350°F (175°C) to achieve a perfect golden exterior while cooking the interior thoroughly.
  • Glaze
    → The glaze adds a sweet, sticky finish to the fritters, enhancing their flavor and making them more appealing visually. Mix well to ensure a uniform consistency for easy drizzling.
    • 1 cup powdered sugar
      → Powdered sugar is used to create a glaze that coats the fritters with a sweet finish. Sifting the sugar beforehand can help eliminate lumps for a smoother glaze.
    • 2-3 tablespoons milk
      → The milk thins the powdered sugar to create a drizzleable glaze. Adjust the amount of milk based on your desired consistency; start with less and add more as needed.
    • 1/2 teaspoon vanilla extract (optional)
      → Vanilla extract adds a lovely depth of flavor to the glaze, enhancing the overall sweetness. Use pure vanilla extract for the best results, as imitation vanilla can have a harsher taste.

Instructions

  • Gather all your ingredients and equipment before starting the recipe.

    → This step ensures that you have everything you need within reach, making the cooking process smoother and more efficient, preventing interruptions while cooking.
  • In a large mixing bowl, whisk together the flour, sugar, baking powder, cinnamon, and salt until evenly combined.

    → This helps to distribute the leavening agent and spices uniformly, ensuring every bite of the fritters is flavorful. Use a whisk instead of a spoon for better aeration of the dry ingredients.
  • In a separate bowl, combine the milk and egg. Beat them together until well blended.

    → This step ensures that the egg integrates smoothly into the batter, creating a uniform texture. Make sure the egg is at room temperature so it incorporates easily without lumps.
  • Gradually add the wet mixture to the dry ingredients, stirring gently with a spatula or wooden spoon until just combined.

    → Mixing just until combined prevents overmixing, which could lead to denser fritters. It’s okay if there are a few small lumps; this is preferred for a light texture.
  • Carefully fold in the diced apples, ensuring they are evenly distributed throughout the batter.

    → Folding helps maintain the airiness of the batter while incorporating the apples, which provide flavor and moisture. Use a gentle motion to avoid deflating the batter.
  • Prepare your frying setup by filling a heavy-bottomed pot with vegetable oil to a depth of about 2-3 inches.

    → Using a heavy-bottomed pot helps maintain an even temperature while frying. Ensure the oil is deep enough to allow the fritters to float for even cooking.
  • Heat the oil over medium heat until it reaches 350°F (175°C) using a candy or deep-fry thermometer.

    → Maintaining the correct frying temperature is crucial for achieving a crispy exterior without burning. If the oil is too cool, the fritters will absorb oil and become greasy; too hot, and they will burn on the outside while remaining uncooked inside.
  • Once the oil is ready, drop tablespoonfuls of the fritter batter into the hot oil, being careful not to overcrowd the pot.

    → Overcrowding lowers the oil temperature, affecting frying quality. Fry in batches of 3-4 fritters, allowing space for them to expand and ensuring even cooking.
  • Fry the fritters for about 2-3 minutes on each side or until they turn golden brown, using a slotted spoon to turn them.

    → Constantly checking and turning ensures even browning. Frying in batches allows for proper temperature maintenance and results in a better texture.
  • Once golden brown, remove the fritters from the oil and place them on a paper towel-lined plate to drain excess oil.

    → This step prevents the fritters from becoming soggy and maintains their crispiness. Allow them to cool slightly before glazing.
  • While the fritters are cooling, prepare the glaze by sifting the powdered sugar into a mixing bowl.

    → Sifting eliminates lumps, resulting in a smoother glaze texture. It also helps the sugar dissolve more evenly when mixed with the liquid.
  • Add 2 tablespoons of milk and the vanilla extract (if using) to the powdered sugar, and whisk until you achieve a smooth consistency.

    → Adjusting the milk quantity helps you control the thickness of the glaze. Start with less and add more to reach your desired drizzle quality.
  • Drizzle the glaze over the warm fritters using a spoon or a piping bag for a more controlled application.

    → Drizzling the glaze while the fritters are still warm allows the sugar to slightly melt into the fritters, enhancing the overall flavor and appearance.
  • Serve the apple fritter bites warm for the best taste and texture.

    → Serving them while warm enhances the flavors and provides the most enjoyable eating experience. The glaze will also have a delightful sticky texture when warm.

Notes

These Apple Fritter Bites are a delightful treat, perfect for breakfast or as a sweet snack. The fritter batter is light and fluffy, crucial for achieving the right texture, so be careful not to overmix it. Fresh apples contribute a juicy sweetness, making each bite irresistible. When frying, make sure the oil is at the right temperature to achieve a crisp exterior without sogginess inside.

For the glaze, ensure the powdered sugar is sifted to prevent lumps and make for a smooth drizzle. You can customize your fritters by adding spices or incorporating different types of apples to vary the flavor profile. They can be enjoyed warm, but they’re also delicious at room temperature. For an extra touch, consider adding a sprinkle of cinnamon or a dash of nutmeg to the glaze for enhanced flavor.

These fritter bites are best served fresh, but they can be stored in an airtight container at room temperature for a couple of days. If you have leftovers, they can be reheated in an oven or microwave. Enjoy your homemade treats drizzled with glaze for a sweet finishing touch!

Tips

Tips for Preparing Apple Fritter Bites

  • Mixing the Batter: When preparing the fritter batter, mix the ingredients until just combined. Overmixing can lead to dense fritters. Use a rubber spatula to gently fold in the dry ingredients with the wet ones.
  • Selecting Apples: Choose tart apples like Granny Smith or sweet ones like Honeycrisp for a balanced flavor. Using a mix can provide complexity to the taste. Scale the sweetness by adjusting the sugar based on your apple choice.
  • Dicing Apples: Cut the apples into small, uniform pieces (around 1/4 inch) to ensure they evenly distribute and cook through within the batter. This also helps maintain a pleasant texture in every bite.
  • Frying Temperature: Use a kitchen thermometer to monitor the oil temperature. If the oil is too hot, the fritters will brown quickly but remain uncooked inside; if too low, they will absorb excess oil and become greasy. Aim for a steady temperature around 350°F (175°C).
  • Fry in Batches: Avoid overcrowding the pot while frying. Frying in smaller batches allows the oil temperature to remain consistent and ensures even cooking and browning.
  • Draining Excess Oil: Once fried, place the fritters on a wire rack set over a baking sheet or on paper towels to drain excess oil. This will help maintain their crispiness.
  • Preparing the Glaze: To achieve a smooth glaze, sift the powdered sugar before mixing it with milk. Be gradual when adding milk to reach your desired consistency, aiming for a pourable glaze.
  • Flavor Enhancement: Adding vanilla extract to your glaze not only deepens the flavor but can also create a more aromatic experience. Consider adding a pinch of cinnamon into the glaze for an extra flavor twist that pairs beautifully with the fritters.
  • Serving Suggestions: Serve the fritter bites warm for the best taste and enjoyable texture. They pair wonderfully with a scoop of vanilla ice cream or a dollop of whipped cream for an indulgent treat.

FAQ

What are Apple Fritter Bites?

Apple Fritter Bites are small, deep-fried pastries made with apple chunks, often flavored with cinnamon and sugar. They are similar to traditional apple fritters but in bite-sized portions, making them perfect for snacking or sharing.

What ingredients do I need to make Apple Fritter Bites?

You will need apples, all-purpose flour, sugar, cinnamon, baking powder, eggs, milk, and oil for frying. Optional ingredients include vanilla extract and powdered sugar for dusting.

Can I use any type of apple for this recipe?

Yes, you can use any type of apple, but varieties like Granny Smith and Honeycrisp are popular for their balance of sweetness and tartness, which enhances the flavor of the fritters.

How do I ensure my Apple Fritter Bites turn out crispy?

To achieve crispy fritters, ensure your oil is at the right temperature (around 350°F or 175°C) before frying. Avoid overcrowding the pan, and allow enough space between each fritter for even cooking.

Can I bake Apple Fritter Bites instead of frying them?

Yes, you can bake them as a healthier alternative. Preheat your oven to 375°F (190°C), place the fritters on a baking sheet lined with parchment paper, and bake for about 15-20 minutes or until golden brown.

How should I store leftover Apple Fritter Bites?

Store any leftover Apple Fritter Bites in an airtight container at room temperature for up to two days. For longer storage, you can refrigerate them, but they may lose some crispiness.

Can I freeze Apple Fritter Bites?

Yes, you can freeze Apple Fritter Bites. Allow them to cool completely, then place them in a freezer-safe container or bag. They can be stored in the freezer for up to three months. Thaw in the refrigerator and reheat in the oven for best results.

What can I serve with Apple Fritter Bites?

Apple Fritter Bites are delicious on their own, but you can serve them with a drizzle of caramel sauce, a dusting of powdered sugar, or a scoop of vanilla ice cream for a delightful dessert experience.

Introduction: A Symphony of Comfort and Flavor

Imagine wrapping your hands around a steaming bowl, and inhaling the comforting, slightly sweet aroma that rises to greet you. This isn’t just any dish — it’s a luxurious bowl of Butternut Squash Soup. Velvety smooth and bursting with flavors that dance between earthy sweetness and hinting spice, this soup is an indulgence that’s both heartwarming and utterly satisfying. Perfect for brisk autumn days or cozy holiday dinners, Butternut Squash Soup stands as a testament to the magic that simple ingredients can create. Its rich, creamy texture and vibrant golden hue make it a feast for both the palate and the eyes. With each spoonful, you’ll be transported to a place of warmth and contentment, making this dish not just a meal but a sensory experience worth every moment. Dive into the lusciousness of this culinary masterpiece, and allow its flavors to envelop you in a sense of pure indulgence.

The Story Behind the Dish

Butternut Squash Soup has graced tables across various cultures and kitchens, each adding its own unique twist. This dish hails from the broader family of squash soups, which have been a staple in many traditional cuisines, particularly in North America, where squash has been cultivated for thousands of years. The Native Americans were among the first to utilize this versatile root vegetable, savoring its nutrition-packed offerings in soups and stews long before it became a modern comfort food.

In the 20th century, as culinary arts evolved, chefs around the world began to refine traditional squash soups into the creamy, aromatic versions we cherish today. Butternut squash, in particular, became a favorite for its natural sweetness and nutty undertones, which lend themselves perfectly to soups. This modern take on an ancient classic has become a beloved staple in households worldwide, cherished not just for its flavor but also for its warm, nourishing qualities.

Why You’ll Love This Recipe

  • Nutrient-Rich: Packed with vitamins and minerals, this soup is as wholesome as it is delicious.
  • Whole Family Favorite: Its gentle sweetness and creamy texture make it a hit with both kids and adults.
  • Perfect for Meal Prep: Whether you’re making a quick weekday dinner or preparing meals for the week, this soup fits seamlessly into your cooking schedule.
  • No-Fuss Ingredients: Easily accessible, everyday ingredients that require minimal effort to transform into something extraordinary.

Flavor Profile & Texture

The flavor profile of Butternut Squash Soup is a balanced symphony of sweet, savory, and creamy. At its core, the natural sweetness of the butternut squash sets the stage, enhanced by aromatic spices like nutmeg and cinnamon to bring warmth and complexity. The savory notes often come from a subtle sauté of onions or garlic, providing depth and a roundness that ties the flavors together. Creaminess is achieved through pureed squash, often complemented by rich chicken stock or coconut milk for added luxury. This results in a smooth and velvety texture that glides effortlessly across the palate.

Occasions & Pairings

This harmonious dish finds its place at virtually any occasion, from intimate dinners to grand holiday feasts. It’s an ideal starter for Thanksgiving, taking advantage of the fall harvest, or a comforting choice for a dinner party on a chilly night. Pair it with a crisp, buttery Chardonnay or a robust Merlot for a sophisticated dining experience. On the table, Butternut Squash Soup pairs beautifully with crusty breads or soft, herbed rolls. For a fuller meal, consider serving it alongside a fresh green salad or roasted chicken dish.

Tips, Variations & Substitutions

One of the charms of Butternut Squash Soup is its adaptability. Here are some creative ways to put your own spin on this classic:

  • Vegan Option: Replace chicken stock with vegetable broth, and substitute cream with coconut milk for a completely plant-based delight without sacrificing creaminess.
  • Add a Kick: Introduce a hint of heat with a touch of cayenne pepper or a sprinkle of chili flakes for those who crave a spicier dish.
  • Herbal Infusion: Include fresh herbs like sage or rosemary to the cooking process for an aromatic elevation.
  • Nutty Excellence: Garnish with toasted pumpkin seeds or pecans for a delightful crunch and a nutty flavor contrast.

Storage & Make-Ahead Ideas

One of the beauties of this Butternut Squash Soup is its ability to taste even better as leftovers, with flavors deepening as they meld. Store in an airtight container in the refrigerator for up to five days. For longer preservation, it freezes exceptionally well — simply pour into a freezer-safe container, allowing space at the top for expansion, and store for up to three months. Reheat gently on the stove or microwave, stirring occasionally to ensure even warming. For those ahead of the game type of cooks, this soup is a perfect make-ahead dish; prepare the entire batch, refrigerate or freeze, and reheat when needed, offering a delicious, home-cooked meal with minimal effort.

Fun Facts & Trivia

Did you know that the butternut squash, botanically a fruit, descends from the squash family native to the Americas? These fruits (yes, fruits!) were once revered as a symbol of goodness and prosperity by the Incas. Another surprising tidbit: butternut squash is extremely low in calories yet packed with content, providing abundant Vitamin A, C, E, potassium, and fiber — a nutrition powerhouse clothed in an orange coat. The squash’s shape even inspired some early kitchen inventions; its remarkable similarity to a violin led pioneering chefs to slice it creatively, not just for taste but for aesthetic presentation, a method still retained in fine dining standards today.

Harness the comfort and elegance of Butternut Squash Soup, whether serving for a touch of nostalgia in a cozy setting or an expression of refined, modern culinary art. It embodies both a longstanding tradition and an invitation to innovate, promising not just nourishment for the body, but joy and connection to the culinary world.

Ingredients

  • Butternut Squash
    → The star ingredient of this soup, butternut squash provides a rich, sweet flavor and smooth texture when pureed. Choose squash that is firm and heavy for its size, with a beige skin and a well-developed stem. Peel and cube it into even pieces to ensure they cook uniformly and blend easily into a velvety soup.
  • 1 medium onion (chopped)
    → Onion adds depth and savory flavor to the soup. Chop it finely to ensure even cooking and distribution in the mix. Use a yellow onion for a sweet and mellow taste, which will caramelize nicely when sautéed, enhancing the overall flavor profile of the soup.
  • 2 cloves garlic (minced)
    → Garlic adds a fragrant, robust flavor to the soup, complementing the sweetness of the squash. Mince it finely to release its aromatic oils, aiding in distributing the garlic flavor throughout the soup. Ensure not to overcook it, as burnt garlic can impart a bitter taste.
  • 2 tablespoons olive oil
    → Olive oil is used for sautéing the onions and garlic, helping to build the foundation of flavor in the soup. Use extra virgin olive oil for a fresher, fruitier taste. Heat it gently over medium heat before adding the onions to avoid burning, which can lead to bitterness.
  • 4 cups vegetable broth
    → Vegetable broth serves as the cooking liquid that will blend the flavors together. Opt for a low-sodium variety to control the saltiness of the soup. Heating the broth prior to adding it to the pot can speed up the cooking process and help the flavors meld together more swiftly.
  • 1 teaspoon ground ginger
    → Ground ginger enhances the soup with a warm, spicy note that pairs beautifully with the sweetness of the squash. Measure it accurately and add it mid-cooking to release its flavors, but be cautious with the quantity as it can easily overpower the other ingredients.
  • 1/2 teaspoon ground cinnamon
    → Cinnamon provides an additional layer of warmth and complexity to the soup. Use a fresh spice to ensure maximum flavor, and add it towards the end of cooking for the best aroma. Be sure not to add too much, as a little goes a long way.
  • Salt and pepper to taste
    → Salt and black pepper are essential for balancing and enhancing the flavors of the soup. Start with a small amount and taste as you go, adjusting as necessary. Freshly cracked black pepper will provide a superior flavor compared to pre-ground options.
  • 1/2 cup coconut milk (optional)
    → Coconut milk can be added for creaminess and a subtle, tropical sweetness that complements the soup. Use full-fat coconut milk for the richest flavor and smoothest texture. Stir it in after pureeing the soup and heat gently to incorporate without boiling, preserving its creamy consistency.
  • Fresh herbs for garnish (optional)
    → Fresh herbs like cilantro or parsley add a burst of color and a fresh taste to the finished soup. Chop them finely and sprinkle them on top just before serving to provide a vibrant contrast to the soup’s warm tones. Consider adding a drizzle of olive oil for extra flavor and appeal.

Instructions

  • Begin by preparing the butternut squash.

    → Carefully use a sharp vegetable peeler to remove the tough outer skin of the squash. Cut the squash in half lengthwise using a sturdy knife, scooping out the seeds with a spoon. Then, slice the squash into even cubes, about 1-inch in size, which will help them cook uniformly and blender smoothly into the soup.
  • Chop the onion into fine pieces.

    → Place the onion on a cutting board and, with a sharp knife, cut off both ends. Slice the onion in half from root to stem. Peel off the skin and lay it flat. Make multiple horizontal cuts, followed by vertical cuts, then slice down to create finely chopped pieces. This technique ensures that the onion cooks evenly and integrates well into the soup.
  • Mince the garlic cloves.

    → Smash each clove with the flat side of your knife to loosen the skin, then peel it off. Finely chop the garlic by slicing it into thin slivers, gathering the slices, and then chopping across them repeatedly for a finer mince. This technique releases the garlic’s essential oils, enhancing its flavor, which will permeate the soup.
  • Heat the olive oil in a large pot over medium heat.

    → Pour 2 tablespoons of extra virgin olive oil into the pot, allowing it to warm for about a minute. This helps release its flavors without burning. To check if it’s hot enough, you can dip a piece of onion in; it should sizzle gently when the oil is ready.
  • Add the chopped onion to the pot and sauté.

    → Once the oil is hot, add the chopped onion. Stir frequently for about 5-7 minutes until the onion becomes translucent and slightly caramelized. This process develops the onion’s natural sugars, enhancing the soup’s depth of flavor.
  • Stir in the minced garlic and cook briefly.

    → Add the minced garlic to the pot and cook for 1-2 minutes, stirring constantly. Garlic cooks quickly and can burn, so watch closely until it becomes fragrant. This step builds an aromatic base for your soup.
  • Add the cubed butternut squash to the pot.

    → Gently stir in the squash cubes and mix with the onions and garlic. This encourages the squash to soak up the flavors from the sautéed ingredients. Cook for about 3-4 minutes, allowing the squash to soften slightly, preparing it for the broth.
  • Pour in the vegetable broth.

    → Add 4 cups of low-sodium vegetable broth to the pot, ensuring the squash is fully submerged. If you prefer a smoother soup, you can add a bit more broth. Bring the mixture to a gentle boil, which will help everything cook evenly.
  • Season with ground ginger and ground cinnamon.

    → Carefully measure and add 1 teaspoon of ground ginger and 1/2 teaspoon of ground cinnamon into the pot. Stir to evenly distribute the spices. This flavor layering enhances the soup, creating a warm and inviting taste.
  • Reduce the heat and simmer.

    → Lower the heat to a gentle simmer, cover the pot partially, and let the soup cook for about 20-25 minutes or until the squash is tender when pierced with a fork. This step allows the flavors to deepen and meld together beautifully.
  • Test the squash for doneness.

    → After 25 minutes, use a fork to check if the squash pieces are soft enough to easily break apart. This ensures the soup will blend smoothly and provides the desired texture.
  • Carefully blend the soup until smooth.

    → Using an immersion blender, blend the soup directly in the pot until it reaches a velvety consistency. If you don’t have an immersion blender, carefully transfer the soup in batches to a countertop blender. Blend until smooth, ensuring to vent the lid to allow steam to escape and prevent splashes.
  • Return the blended soup to the pot and stir in the coconut milk (if using).

    → Add 1/2 cup of full-fat coconut milk to the velvety soup, stirring gently to combine. This will enrich the soup and provide an indulgent creaminess. Heat through on low while stirring, being careful not to boil the soup, as high heat can affect the coconut milk’s texture.
  • Season with salt and pepper to taste.

    → Start by adding a small pinch of salt and a few cracks of black pepper, stirring well. Taste the soup and adjust the seasoning as necessary, remembering that this balance is crucial in enhancing the overall flavor.
  • Serve the soup and garnish as desired.

    → Ladle the hot soup into bowls, and if desired, top with chopped fresh herbs like cilantro or parsley for color and added freshness. A drizzle of olive oil can also enhance visual appeal and flavor, making your dish inviting and delicious.

Notes

Butternut squash soup is a comforting dish that is both nutritious and delicious. The natural sweetness of butternut squash combined with the savory notes from onion and garlic creates a harmonious blend of flavors. When preparing this soup, following some key tips can enhance its overall quality.

Start by selecting a firm and heavy butternut squash, as this ensures the best flavor and texture. Once you’ve peeled and cubed the squash, it’s important to keep the pieces uniform in size to guarantee even cooking. Sauté the onions until they’re soft and translucent, allowing them to caramelize slightly for additional sweetness.

When adding garlic, remember to mince it finely and introduce it to the pot after the onions have begun to soften. This helps to create a rich aromatic base. Be careful not to overcook the garlic to avoid bitterness; a couple of minutes is usually sufficient.

Using high-quality extra virgin olive oil will build a robust flavor as you sauté the vegetables. When adding the vegetable broth, consider heating it prior to use. This step not only speeds up the cooking time but also helps to meld the flavors of the soup more quickly.

Incorporating ground ginger and cinnamon is key to bringing warmth and complexity to the soup. Adding these spices at the right time is crucial; ginger during cooking and cinnamon towards the end will help preserve their aromatic properties without overwhelming other flavors.

As you approach the finishing touches, adjust the seasoning with salt and freshly cracked black pepper. Be sure to taste as you go to achieve the desired flavor balance. If you’re looking for a creamier texture, stir in full-fat coconut milk after pureeing the soup, as this adds richness without overpowering the original flavors.

Finally, garnishing the soup with fresh herbs not only adds a lovely color contrast but also a fresh note that brightens the flavors. A drizzle of olive oil just before serving can enhance both the flavor and presentation. Enjoy your delicious and nutritious butternut squash soup!

Tips

Cooking Tips for Butternut Squash Soup

  • Choosing Butternut Squash: Look for squash that feels heavy and has smooth, unblemished skin. The more mature the squash, the sweeter and richer the flavor will be. Don’t forget to cut it into uniform pieces for even cooking.
  • Sautéing Aromatics: Start by heating the olive oil before adding chopped onions. This allows the onions to absorb the oil’s flavor, helping them to caramelize perfectly. Stir frequently to prevent sticking or burning.
  • Perfect Garlic Timing: Mince the garlic just before adding it to the pot; this will ensure that it retains its fresh flavor. Cook it until fragrant, which usually takes about 30 seconds, ensuring it doesn’t brown too much.
  • Broth Temperature: Warming up the vegetable broth on a separate stove or microwave before adding it to the pot can speed up the cooking time, allowing the flavors to meld quicker.
  • Balancing Spices: When adding ground ginger and cinnamon, consider starting with half the amount suggested, then tasting the soup to adjust to your preference. This helps ensure that the flavors remain balanced.
  • Salt and Pepper to Taste: Season gradually! It’s easier to add salt and pepper than to remove it. Starting with a pinch and tasting frequently ensures you can achieve the desired flavor profile.
  • Perfect Creaminess: If using coconut milk, stir it in after the soup has been pureed for a smooth consistency. Avoid boiling it after adding, as high heat can separate the creaminess.
  • Garnishing: For a vibrant finishing touch, use fresh herbs right before serving. They not only enhance the flavor but also brighten the appearance of your soup, making it visually appealing.
  • Storage: This soup stores well in the refrigerator for up to a week. To maintain freshness, store in an airtight container and reheat gently on the stove or in the microwave, adding a splash of broth if it thickens too much.

FAQ

What ingredients are needed to make Butternut Squash Soup?

You will need butternut squash, onions, garlic, vegetable or chicken broth, olive oil, salt, pepper, and optional spices like nutmeg or cinnamon.

How long does it take to prepare Butternut Squash Soup?

The preparation time is approximately 10-15 minutes and cooking time is about 30-40 minutes, depending on your method.

Can I make Butternut Squash Soup vegan?

Yes! Simply use vegetable broth instead of chicken broth and ensure any added cream or toppings are plant-based.

What are some ways to customize my Butternut Squash Soup?

You can add ingredients like apple for sweetness, ginger for spice, or coconut milk for a creamy texture. Top with seeds or herbs for extra flavor.

How should I store leftover Butternut Squash Soup?

Store leftovers in an airtight container in the refrigerator for up to 4-5 days. You can also freeze it for up to 3 months.

What is the best way to serve Butternut Squash Soup?

Serve it warm, garnished with a drizzle of olive oil, a sprinkle of fresh herbs, or a dollop of sour cream or yogurt.

Can I blend the soup to make it creamy?

Yes, blending the soup will give it a smooth and creamy texture. You can use an immersion blender or a countertop blender for this.

Is Butternut Squash Soup healthy?

Yes, butternut squash soup is generally low in calories and high in vitamins A and C, fiber, and antioxidants, making it a healthy choice.

Introduction: A Delectable Morning Delight

Imagine waking up to the serene sound of birds chirping outside your window and the sun’s first light gently rising over the horizon. There is nothing quite like starting your day with a breakfast that feels like a warm embrace — one that transports you, even just in thought, to a cozy French café. Enter the Croissant Breakfast Sandwich: a symphony of flavors and textures that promises to make your mornings spectacular. With a golden, flaky croissant at its heart, this sandwich brings indulgence and simplicity together in perfect harmony. Its buttery aroma alone is enough to make your mouth water, inviting you to take that first, irresistible bite.

The Story Behind the Dish

The croissant, a quintessential component of this breakfast sandwich, is steeped in a rich history that contributes to its allure. While this buttery pastry is synonymous with France, its origins are, interestingly, entwined with Austrian culinary traditions. The croissant’s ancestry can be traced back to the Austrian kipferl, a crescent-shaped bread enjoyed as early as the 13th century. In the 17th century, this delightful pastry made its way to France, evolving into the airy, laminated version that we adore today.

Coupling this iconic pastry with popular breakfast elements, such as eggs, cheese, and perhaps a slice of ham or bacon, elevates the simple sandwich to an experience of luxurious taste. This combination reflects the blend of culinary influences, drawing from sophisticated French techniques and classic American breakfast staples. It’s a partnership that speaks to global culinary exchanges and the boundless creativity present in modern kitchens.

Why You’ll Love This Recipe

  • Quick and Easy: This sandwich can be assembled in under 20 minutes, making it an ideal choice for busy mornings.
  • Versatile and Customizable: Whether you prefer a vegetarian option or are a sausage aficionado, the croissant breakfast sandwich can be tailored to suit your likes and dietary needs.
  • Rich and Satisfying: The combination of a crusty croissant, soft scrambled eggs, and melted cheese ensures a satisfying meal that keeps you full and energized well into the afternoon.
  • Perfect for Entertaining: These sandwiches are a hit for brunch gatherings, offering something a little more upscale yet familiar.

Flavor Profile & Texture

The delightful contrast of textures and flavors in a Croissant Breakfast Sandwich is what makes it so special. Imagine biting into a perfectly flaky croissant, with its layers gently shattering against your lips. That initial crunch gives way to a tender, buttery interior that melts in your mouth. As you continue your culinary journey, your taste buds are met with the soft, luscious texture of creamy, scrambled eggs, intermingling with melted cheese that offers a luxurious depth of flavor.

Should you opt to add crispy bacon or a delicate slice of ham, the savory saltiness highlights the natural sweetness of the croissant while adding a satisfying crunch or a salty kick. If you prefer a fresher take, consider adding crisp greens or avocado slices for a layer of freshness and a creamy contrast. With each bite, you discover a new wave of flavors, each complementing the other to create a truly unforgettable breakfast experience.

Occasions & Pairings

These sandwiches are perfect for a multitude of occasions. Whether it’s a leisurely Sunday brunch with friends, a morning family gathering, or a simple weekday meal that adds a touch of elegance to your routine, Croissant Breakfast Sandwiches are a versatile choice. Pair them with freshly brewed coffee or a glass of orange juice to enhance the breakfast experience. For a more lavish spread, serve alongside a fruit salad or a refreshing smoothie, completing the meal with a touch of natural sweetness.

Tips, Variations & Substitutions

Creative Variations

One of the beauties of the croissant breakfast sandwich is its adaptability. Here are some creative twists:

  • Vegetarian Delight: Opt for roasted vegetables such as bell peppers and mushrooms in place of meat.
  • Spicy Kick: Add a splash of hot sauce, jalapeños, or pepper jack cheese for a fiery flavor.
  • Sweet and Savory: Drizzle a bit of honey or maple syrup over bacon to create a sweet-salty fusion.
  • Herb Infusion: Mix fresh herbs like chives or basil into your scrambled eggs for an aromatic touch.

Dietary Alternatives

  • Gluten-Free: Use a gluten-free croissant option available at many specialty stores.
  • Dairy-Free: Opt for plant-based cheeses and spreads for those who are lactose intolerant.

Storage & Make-Ahead Ideas

If you anticipate busy mornings, these sandwiches can be partially prepared in advance to save time.

  • Pre-Cooked Ingredients: Prepare your bacon or protein choices the night before, storing them in the refrigerator until assembly.
  • Storing Leftovers: If you have leftover sandwiches, wrap them tightly and store in the refrigerator for up to 48 hours.
  • Reheating: Keep the croissants crispy by reheating them in an oven at a low temperature, ensuring you avoid mushy results in the microwave.
  • Freezing: These sandwiches can be frozen. Wrap them individually, and reheat straight from frozen, extending oven time as needed.

Fun Facts & Trivia

Did you know that there is a somewhat romantically embroidered tale about the croissant’s shape being inspired by the crescent on the Turkish flag? This story is set back in the 17th century, following the Austrian victory at the siege of Vienna. Bakers in Vienna are said to have created the kipferl in the shape of the crescent from the Ottoman flag to symbolize the victory over the besieging forces. True or legend, it’s a fascinating behind-the-scenes tidbit that adds to the intrigue of this iconic pastry.

The croissant breakfast sandwich beautifully marries the elegance of French patisserie with hearty breakfast classics, delivering a culinary masterpiece that delights on every level. Whether it’s part of a leisurely brunch or a fanciful midweek indulgence, this sandwich is bound to make every breakfast an extraordinary event.

Ingredients

  • Croissant Base
    • 4 large butter croissants
      → Croissants should be fresh and flaky, providing a rich, buttery flavor that serves as the perfect vehicle for the filling. Choose high-quality croissants for the best texture and taste. If homemade, allow them to cool slightly before slicing to prevent them from becoming soggy.
  • Egg Mixture
    • 6 large eggs
      → Eggs are the star ingredient in this sandwich, providing protein, richness, and a creamy texture. Crack the eggs into a bowl and whisk them with a pinch of salt and pepper until well combined. For fluffier eggs, consider adding a splash of milk or cream before cooking.
    • 1/4 cup milk or cream
      → This adds creaminess and richness to the scrambled eggs, making them more indulgent. Use whole milk or heavy cream for the best flavor and texture. Whisk it together with the eggs until fully combined.
  • Cheese
    • 1 cup shredded cheese (cheddar, Swiss, or your choice)
      → Cheese adds a savory, melty component that enhances the sandwich’s flavor profile. Choose a cheese that melts well; shredded cheese allows for even distribution throughout the eggs. For the best results, use freshly shredded cheese instead of pre-packaged.
  • Veggies (Optional)
    • 1/2 cup diced bell peppers
      → Bell peppers add a sweet, crunchy texture and a pop of color. Dice them into small, even pieces to ensure they cook evenly. Sauté the peppers lightly in a pan before adding them to the egg mixture for enhanced flavor.
    • 1/2 cup chopped spinach
      → Spinach contributes nutritional value and a vibrant green color. Use fresh spinach, and chop it roughly. Sauté briefly with the eggs to wilt it down; this helps to preserve the flavor and nutrients.
  • Condiments (Optional)
    • 2 tablespoons mayonnaise
      → Mayonnaise adds creaminess and tang to the sandwich. You can use regular or flavored mayonnaise, or even a herb-infused version for extra flavor. Spread it on the inside of the croissant for added moisture and taste.
    • Hot sauce or mustard (to taste)
      → These condiments add a kick to the sandwich. Use your preferred hot sauce or a zesty mustard to balance the richness of the croissants and eggs. Start with a small amount and adjust according to your taste.
  • Garnishes (Optional)
    • Fresh herbs (such as chives or parsley)
      → Fresh herbs provide a burst of flavor and a fragrant touch to the sandwich. Chop them finely and sprinkle on top of the assembled sandwich for a fresh finish. Make sure to use herbs that complement the overall flavor of your sandwich.

Instructions

  • Preheat your oven to 350°F (175°C) and place a baking sheet in the oven.

    → Preheating ensures that the croissants get warmed through evenly and helps maintain their flaky texture, making them more enjoyable when prepared with the fillings.
  • Slice each butter croissant in half horizontally using a serrated knife.

    → A serrated knife helps to cut through the flaky layers without squishing the croissant. Take your time to ensure a clean cut, maintaining the integrity of the flaky layers for a better sandwich structure.
  • In a large mixing bowl, crack 6 large eggs and whisk them together with a pinch of salt and freshly cracked pepper until fully blended.

    → Whisking incorporates air into the eggs, which helps achieve a light and fluffy texture once cooked. The salt enhances the egg’s natural flavor, so make sure it is evenly distributed.
  • Add 1/4 cup of milk or cream to the egg mixture and whisk until combined.

    → The milk or cream adds richness and creates a creamier texture in the scrambled eggs; this enhances the overall flavor and mouthfeel of your sandwich.
  • Heat a non-stick skillet over medium heat and add a small amount of butter or oil to the pan.

    → Heating the skillet properly ensures even cooking of the eggs. A little fat will prevent sticking and add flavor; make sure to coat the bottom of the pan evenly.
  • Pour the egg mixture into the skillet and let it sit undisturbed for a few moments to allow the bottom to set.

    → Letting the eggs sit helps form a base, which makes it easier to fold and cook them evenly. This initial setting stage is crucial for achieving a soft, custardy texture.
  • Using a spatula, gently stir the eggs, pushing the set edges toward the center, allowing the uncooked eggs to flow to the edges.

    → This technique prevents the eggs from overcooking and ensures soft curds form. Stir carefully to avoid breaking the eggs into too small pieces.
  • When the eggs are nearly set but still slightly runny, fold in the shredded cheese and any desired vegetables like diced bell peppers or chopped spinach.

    → Adding the cheese now allows it to melt into the warm eggs, creating a deliciously creamy consistency. Vegetables add moisture and flavor, and folding them in at this stage ensures they are evenly distributed and warmed through without losing their texture.
  • Remove the skillet from heat and allow the residual heat to finish cooking the eggs.

    → Carryover cooking will continue to gently cook the eggs to the perfect doneness without becoming dry or rubbery. Aim for a creamy consistency that appears slightly undercooked, as it will firm up with the residual heat.
  • If using, spread 1 tablespoon of mayonnaise on the inside of each croissant half.

    → Mayonnaise adds moisture and flavor, balancing the richness of the eggs and croissant. Spreading it evenly helps each bite be flavorful and creamy.
  • Fill each bottom half of the croissant with a generous portion of the scrambled egg and cheese mixture.

    → Being generous ensures that every bite of the sandwich is satisfying and fulfilling. Aim to mound the filling slightly to account for the top half of the croissant.
  • Optionally, drizzle your hot sauce or mustard over the scrambled egg filling before placing the croissant tops back on.

    → This adds a spicy or tangy note that contrasts beautifully with the rich flavors of the eggs and croissants; adjust the amount to suit your taste for heat.
  • Place the assembled croissant sandwiches on the preheated baking sheet and bake in the oven for 5-7 minutes until warmed through and slightly crispy.

    → Baking not only warms the sandwiches but also gives a light crispness to the croissants, enhancing textural contrast. Keep an eye on them to prevent browning too much.
  • Remove the croissant breakfast sandwiches from the oven and allow them to cool slightly for a minute before garnishing with freshly chopped herbs if desired.

    → Allowing them to cool slightly prevents burns when biting into the sandwich. Fresh herbs brighten the flavor and add visual appeal, making your dish look appealing.
  • Serve the croissant breakfast sandwiches immediately and enjoy!

    → Serving them warm preserves the integrity of the filling, making for a delightful breakfast experience. Pair with a fresh fruit salad or a side of crispy bacon for a complete meal.

Notes

These croissant breakfast sandwiches are an indulgent and satisfying way to start your day. The flaky, buttery croissants serve as the perfect base for the creamy scrambled eggs and your choice of cheese. For the best results, ensure you use fresh croissants and high-quality cheese that melts easily. You can customize the filling to suit your taste by adding sautéed vegetables like bell peppers and spinach, which not only enhance flavor but also boost nutritional value.

If you prefer a bit of tang, consider spreading a layer of mayonnaise inside the croissant, and feel free to add a touch of hot sauce or mustard for some heat. Fresh herbs such as chives or parsley can elevate the sandwich with a burst of flavor and visual appeal. These breakfast sandwiches are best enjoyed immediately but can also be wrapped and stored in the refrigerator for a quick breakfast option throughout the week. Just reheat them in the oven or microwave before serving. Enjoy your delicious creation!

Tips

Cooking Tips for Croissant Breakfast Sandwiches

  • Choosing the Right Croissants: Always aim for the freshest croissants available. If you’re buying from a bakery, consider going during peak hours when they are likely to be freshly baked. If purchasing from a grocery store, look for croissants with a golden brown color and flaky texture.
  • Preparing the Egg Mixture: When whisking the eggs, try to incorporate air into the mixture for fluffier results. A manual whisk or an electric mixer on low speed can achieve this. For additional creaminess, consider beating in a tablespoon of cream cheese along with the milk.
  • Cooking the Eggs: Use a non-stick skillet or a well-seasoned cast iron pan to avoid sticking. Cook the eggs over medium-low heat and stir gently to achieve a soft, fluffy texture. Avoid overcooking, as they will continue to cook while you assemble the sandwich.
  • Adding Cheese: For the best melting effect, add the shredded cheese to the eggs just before they are fully cooked and continue to stir until the cheese is melted. If using multiple types of cheese, experiment with different combinations for unique flavors.
  • Prepping Veggies: Sautéing the vegetables not only builds flavor but also reduces moisture, preventing the sandwich from becoming soggy. Cook the bell peppers and spinach until just tender; this should take only a few minutes. Drain any excess moisture before mixing them into the egg mixture.
  • Enhancing Flavor with Condiments: Experiment with condiments before spreading them on the croissants. Mixing mayonnaise with a hint of lemon juice or garlic can elevate the taste. Remember to adjust the quantity of hot sauce based on your spice tolerance, and always taste as you go!
  • Presentation: When assembling your sandwich, consider layering the ingredients in a way that each bite has a combination of textures and flavors. Place the egg mixture on the flat side of the croissant, don’t be afraid to let it overflow slightly!
  • Fresh Garnishes: Scatter the chopped fresh herbs over the completed sandwich just before serving to add not only color but also a fresh, aromatic element. Consider pairing with a light salad to complement the richness of the sandwich.

FAQ

What ingredients do I need to make Croissant Breakfast Sandwiches?

You will need croissants, eggs, cheese (such as cheddar or Swiss), cooked bacon or sausage, and any additional toppings like spinach, avocado, or tomato.

Can I make Croissant Breakfast Sandwiches ahead of time?

Yes, you can prepare the ingredients ahead of time. Cook the eggs and meat, and store them in the refrigerator. Assemble the sandwiches in the morning for a quick breakfast.

How do I cook the eggs for the sandwich?

You can scramble, fry, or poach the eggs depending on your preference. For a classic touch, try making scrambled eggs and add a bit of cream for richness.

Can I use store-bought croissants?

Absolutely! Store-bought croissants will save you time and can still taste delicious. Just warm them up slightly before assembling your sandwich.

What can I substitute for bacon or sausage in this recipe?

For a vegetarian option, you can use sautéed mushrooms or a veggie sausage. Avocado or roasted vegetables can also add flavor and texture.

How can I make the sandwich more nutritious?

You can add leafy greens like spinach or kale, use whole grain croissants, or include sliced tomatoes and avocado to enhance nutrition.

What kind of cheese works best for Croissant Breakfast Sandwiches?

Cheddar, Swiss, and Gruyère are great choices. You can also experiment with goat cheese or feta for a different flavor.

How do I heat the sandwich after assembling it?

You can heat the sandwich in a skillet over medium heat, in an oven at about 350°F (175°C) for a few minutes, or in a microwave for a quick option.

Introduction: The Allure of the Spinach and Feta Croissant

Imagine biting into a flaky, buttery croissant that crumbles delicately at your touch, unveiling a savory filling of wilted spinach creamed together with tangy feta cheese. The contrast of crisp pastry and creamy filling creates a delightful texture that dances on your palate. This Spinach and Feta Croissant is not just any pastry—it’s a journey of flavors and aromas that transport you to a quaint European café. Whether enjoyed as a breakfast indulgence or a satisfying snack, its harmonious blend of ingredients makes each bite a memorable culinary experience. Embark on this gastronomic adventure and rediscover the simple joys of a perfectly crafted croissant.

The Story Behind the Dish: A Culinary Crossroad

The Spinach and Feta Croissant is a beautiful fusion of French and Mediterranean culinary traditions. The croissant, with its French origins, is a symbol of baking sophistication. Its history dates back to the early 19th century and has become synonymous with elegance and craft. On the other hand, the Mediterranean flavors of spinach and feta bring memories of vibrant Greek landscapes and blue seas.

Originally, the combination of spinach and feta cheese is a staple in Greek cuisine, often found in the popular pie known as Spanakopita. By marrying these two beloved elements—French pastry craftsmanship and Greek filling traditions—we create something entirely new yet warmly familiar. This culinary crossroad represents the globalization of food, where best-loved regional dishes come together to create a universally beloved snack.

Why You’ll Love This Recipe

  • Delectable Flavor Fusion: Enjoy the marriage of buttery French croissant pastry with rich Mediterranean fillings.
  • Perfect Anytime Treat: Whether served for breakfast, brunch, or as a party appetizer, these croissants are versatile and sure to satisfy.
  • Wholesome Ingredients: With fresh spinach and high-quality feta cheese, this recipe brings healthy greens and proteins into the delicious package.
  • Simple Yet Sophisticated: Easy enough for novice bakers yet impressive for entertaining guests.
  • Vegetarian Delight: A crowd-pleaser that caters to vegetarian preferences without compromising on flavor.

Flavor Profile & Texture: A Symphony of Delights

The Spinach and Feta Croissant is a masterclass in texture and flavor. The croissant itself offers a light, flaky crust that shatters pleasingly with each bite, revealing a soft, layered interior. Within this decadent shell lies a filling that is both hearty and creamy. The spinach provides an earthy, slightly sweet backdrop that perfectly complements the brininess of the feta cheese.

The feta cheese stands out, offering its tangy, salty notes which cut through the richness of the pastry, providing a balanced taste that is both nuanced and satisfying. The moisture from the filling keeps the interior luscious and prevents the croissant from becoming dry. Each mouthful is an orchestrated balance of contrast—richness and acidity, flakiness and creaminess.

Occasions & Pairings: When and How to Serve

This croissant is quite the chameleon of dishes, suitable for myriad occasions. Serve it as a luxurious start to a weekday morning or as a lavish treat at brunch gatherings. It makes an excellent partner to a cup of rich, aromatic coffee or a glass of freshly squeezed orange juice, enhancing its flavors with each accompanying sip.

On more casual occasions, pair it with a crisp green salad laced with cucumbers, tomatoes, and olives for a Mediterranian twist. As for beverages, consider matching it with a light Chardonnay or an effervescent champagne to complement its buttery nature.

Tips, Variations & Substitutions: Personalizing Your Croissant

  • Customizable Fillings: Add sun-dried tomatoes, black olives, or even sautéed mushrooms for an additional burst of flavor.
  • Making Vegan-Friendly: Use vegan butter for the pastry and replace feta with plant-based alternatives to suit vegan diets.
  • Gluten-Free Option: Substitute traditional croissant dough with a gluten-free pastry dough. Store-bought options can expedite this process.
  • Spice It Up: Introduce some heat by adding red pepper flakes or finely chopped jalapeños into the filling.

Storage & Make-Ahead Ideas: Savvy Preparations

The beauty of the Spinach and Feta Croissant lies not only in its immediate pleasure but in its adaptability for make-ahead preparations. You can construct the croissants up to the baking stage and freeze them for up to a month; when you need them, bake them fresh, straight from the freezer.

Store leftover croissants in an airtight container at room temperature for up to two days. To reheat, simply pop them in an oven at 350°F (175°C) for a few minutes until they regain their crispy exterior.

For reheating, consider using the oven instead of the microwave, which could alter the crisp texture of the croissant. Should you wish to simplify a busy morning, you can prepare the filling a day in advance, allowing for swift assembly.

Fun Facts & Trivia: Delving Deeper into Culinary Lore

Did you know that the croissant didn’t originate in France? Its roots lie in Vienna, Austria, from where it traveled to France and evolved into the buttery delight we cherish today. The crescent shape is symbolic, named after the shape of the Islamic crescent moon—crafted to celebrate victory by Christian Europe over the occupation forces in the Battle of Vienna.

Meanwhile, feta cheese has a history that stretches back over 8,000 years and is often considered one of the oldest cheeses in the world. Originating in Greece, it holds a venerable place in Mediterranean cuisine.

These facts enhance the understanding of our Spinach and Feta Croissant, celebrating not just its delightful taste, but also its rich historical roots.

Ingredients

  • Croissant Dough
    • 4 cups all-purpose flour
      → All-purpose flour provides the structure needed for the croissant dough. It creates a gluten network that allows the croissant to rise and become flaky. For best results, measure using the spoon-and-level method to avoid compacting the flour.
    • 1 teaspoon salt
      → Salt enhances flavor and strengthens the gluten structure in the dough. It also controls yeast fermentation, helping to regulate the rising of the dough for optimal lift and texture. Be sure to mix it evenly with the flour before incorporating other ingredients.
    • 1 tablespoon granulated sugar
      → Sugar provides a touch of sweetness and helps in browning the croissant during baking. It also contributes to yeast activation, which is essential for fermentation. Use white granulated sugar for this purpose to achieve the best results.
    • 1 cup unsalted butter (cold)
      → Cold unsalted butter is essential for achieving the flaky layers of the croissant. It should be cut into small cubes and incorporated into the dough using a technique called lamination, where layers of dough and butter are folded together. Using unsalted butter allows you to control the saltiness of your pastry.
    • 1 cup whole milk (warm)
      → Warm whole milk activates the yeast and helps to hydrate the flour. Make sure it is warm, not hot, to avoid killing the yeast. The creaminess of whole milk also adds richness to the dough, resulting in a more indulgent croissant.
    • 2 teaspoons active dry yeast
      → Active dry yeast is the leavening agent that allows the dough to rise. It should be sprinkled over the warm milk to activate before mixing it into the dough. Make sure to check the expiration date for best results, as expired yeast may not rise properly.
  • Filling
    • 2 cups fresh spinach (chopped)
      → Fresh spinach adds a vibrant color and nutritional value to the filling. It should be rinsed, and any tough stems removed before chopping it coarsely. Sautéing the spinach for a few minutes until wilted will enhance its flavor and reduce moisture content before mixing.
    • 1 cup crumbled feta cheese
      → Feta cheese contributes a salty, tangy flavor that complements the earthiness of spinach. Use quality feta for better taste and texture. Crumble it into small pieces to ensure even distribution throughout the filling.
    • 1/4 teaspoon black pepper
      → Black pepper serves to enhance the flavors of the spinach and feta. Use freshly ground black pepper for the best flavor. Adjust the amount according to your taste preference, being careful not to overpower the other ingredients.
    • 1/4 teaspoon nutmeg (optional)
      → Nutmeg adds a warm, aromatic flavor that pairs beautifully with spinach and cheese. Use freshly grated nutmeg if available, as it has a more potent flavor compared to pre-ground. Add sparingly, as it can easily overpower the dish.
    • 1 tablespoon olive oil (for sautéing)
      → Olive oil is used for sautéing the spinach, adding richness and flavor to the filling. Choose a high-quality extra virgin olive oil for the best taste. Heat it in a pan over medium heat before adding the spinach to wilt it down.

Instructions

  • Prepare your croissant dough by combining flour, salt, and sugar in a large mixing bowl.

    → This step establishes the base for your croissant dough. Use a whisk or a fork to mix these dry ingredients thoroughly before adding any liquid. This helps ensure the salt and sugar are evenly distributed, leading to a consistent dough.
  • Add the active dry yeast to the warm milk in a separate bowl and let it sit for 5-10 minutes until it becomes frothy.

    → Activating the yeast is crucial for proper fermentation. The frothy appearance indicates the yeast is alive and ready to create carbon dioxide, which will result in a light and airy croissant. Ensure the milk is warm to the touch (around 100°F or 37°C) but not boiling.
  • Combine the frothy yeast mixture with the dry ingredients and mix until a dough begins to form.

    → Gentle mixing at this stage helps incorporate the liquid into the flour without overworking the gluten. You can use a spatula or your hands for this, continuing until there are no dry pockets remaining.
  • Incorporate the cold, cubed unsalted butter into the dough by cutting it in with a pastry cutter or your fingers, aiming for a rough texture with pea-sized pieces of butter remaining.

    → This lamination process creates layers in the croissant, essential for achieving the flaky texture. Be careful not to overmix, as you still want chunks of butter that will melt during baking, creating steam and lift.
  • Knead the dough gently on a floured surface for about 5 minutes until smooth, then form it into a ball and place it in a greased bowl.

    → Kneading strengthens the dough’s gluten structure, making it elastic. After kneading, ensure the dough is smooth and elastic before covering it with plastic wrap to allow for proper rising.
  • Cover the bowl with a damp cloth and let it rise in a warm place until it doubles in size, about 1-2 hours.

    → This step allows the yeast to ferment and produce gas, causing the dough to expand. A warm, draft-free area, like an oven turned off but slightly warmed, is ideal for this process.
  • While the dough rises, sauté the chopped spinach in olive oil over medium heat for 2-3 minutes until wilted and all moisture has evaporated.

    → Sautéing the spinach concentrates its flavor and fat content, making it a savory filling. Ensure it’s not watery by cooking it until all moisture evaporates, as excess moisture can lead to soggy croissants.
  • Once cooled, combine the sautéed spinach with crumbled feta, black pepper, and nutmeg (if using) in a mixing bowl.

    → Mixing the filling thoroughly ensures even distribution of flavors. This balance of spinach and feta creates the characteristic taste profile of the croissant. Adjust seasoning to your preference.
  • Roll out the risen dough on a lightly floured surface into a large rectangle, about 1/4 inch thick.

    → A uniform thickness ensures even baking, allowing all layers to achieve the desired flakiness. Use a rolling pin and apply even pressure while rolling out to avoid tearing the dough.
  • Cut the dough into triangles by slicing the rectangle into long strips and then diagonally across, creating the triangle shapes for the croissants.

    → Cutting triangles provides the shape needed to roll up the croissants properly. Ensure your triangles are roughly equal in size for uniform baking.
  • Place a spoonful of the spinach-feta filling at the base of each triangle and roll tightly towards the point, forming a crescent shape.

    → Rolling from the base towards the top triangle tip ensures a tight croissant that maintains its shape. Avoid overstuffing to prevent spillage during baking.
  • Arrange the rolled croissants on a baking sheet lined with parchment paper, allowing space between each for expansion during baking.

    → Proper spacing is crucial as croissants rise significantly in the oven and require room to spread out. Ensure that they don’t touch to maintain a good texture.
  • Cover the croissants with a cloth and let them rise again for 30-45 minutes until slightly puffed.

    → This secondary rising creates more air pockets and enhances the croissant’s flakiness. Be patient; this step is essential for achieving the right texture.
  • Preheat your oven to 375°F (190°C) during the last 10 minutes of the second rise.

    → Preheating ensures that the croissants start baking in a consistently hot environment, which is necessary for proper puffing and browning.
  • Before baking, brush the tops of the croissants with a beaten egg for a glossy finish.

    → An egg wash enhances the color and shine of the croissants, giving them an appealing appearance. Use a pastry brush for an even application.
  • Bake the croissants in the preheated oven for 15-20 minutes or until golden brown and flaky.

    → Baking at the right temperature allows the butter to melt and create steam, which is essential for the flakiness of the croissant. Keep an eye on the croissants in the last few minutes of baking for a perfect golden hue.
  • Remove the croissants from the oven and allow them to cool on a wire rack for a few minutes before serving.

    → Cooling on a wire rack prevents condensation from forming beneath the croissants, which can make them soggy. Enjoy the croissants warm or at room temperature for the best flavor!

Notes

These Spinach and Feta Croissants are a delicious combination of flaky pastry and savory filling, ideal for breakfast or a snack. Start with a well-prepared croissant dough by ensuring all your ingredients are at the right temperature—cold butter and warm milk are key for that perfect flaky texture. After mixing the dough, remember to laminate it properly for multiple layers that create the signature flakiness of croissants.

For the filling, sautéing the spinach in olive oil not only enhances its flavor but also reduces moisture, which is crucial to prevent sogginess in the croissants. Crumbling the feta cheese ensures that it distributes evenly throughout, adding a creamy texture that pairs wonderfully with the spinach. You can customize the filling by adding herbs or spices according to your preference, but be mindful of balancing flavors; a pinch of nutmeg can add warmth to the dish without overwhelming it.

Once baked, these croissants are at their best when served warm. They can also be made ahead and stored in the freezer, making them a convenient option for busy mornings. Reheat them in the oven for a few minutes to restore that fresh-baked quality. Enjoy with a side salad for a light lunch or on their own for a delightful snack.

Tips

Tips for Preparing Spinach and Feta Croissant

  • Measuring Ingredients: Accurate measurement of ingredients, especially flour and butter, is crucial for the success of your croissant. Use a kitchen scale for precise measurements if possible.
  • Laminating the Dough: When incorporating cold butter into your croissant dough, make sure to keep everything cold. If the butter begins to soften, return the dough to the refrigerator for a while to prevent it from blending into the dough instead of creating layers.
  • Resting the Dough: After mixing the dough, allow it to rest in the refrigerator for at least 2 hours or overnight. This helps to relax the gluten, making it easier to roll out and shape the croissants.
  • Sautéing Spinach: To avoid excess moisture in your filling, sauté the chopped spinach just until wilted and then let it cool before mixing it with feta. This prevents soggy pastries.
  • Flavoring Wisely: Adjust the seasonings to your personal taste but remember that feta cheese is already salty. Start with small amounts of salt or pepper and add to taste.
  • Shaping Croissants: When rolling out the dough, make sure to create a triangle shape. This will help in achieving the classic croissant shape as you roll it from base to tip.
  • Baking Temperature: Preheat your oven properly before placing the croissants inside. A hot oven (around 400°F or 200°C) will help them puff up quickly and develop that signature flaky outer layer.
  • Egg Wash: For a golden, shiny finish, brush the croissants with a beaten egg before baking. You can add a splash of milk to the egg for a richer color.
  • Cooling: Allow the baked croissants to cool on a wire rack to prevent them from becoming soggy. Enjoy them warm or at room temperature!

FAQ

What ingredients do I need to make spinach and feta croissants?

You will need puff pastry, fresh spinach, feta cheese, garlic, onion, salt, pepper, and an egg for egg wash.

Can I use frozen spinach instead of fresh?

Yes, you can use frozen spinach. Make sure to thaw and drain it well to remove excess moisture.

How do I prevent the croissants from becoming soggy?

Make sure to drain any excess liquid from the spinach mixture, and avoid overfilling the croissants.

Can I add other ingredients to the filling?

Yes! You can add ingredients like cream cheese, onions, or herbs like dill or parsley to enhance the flavor.

How long do I bake the spinach and feta croissants?

Bake them in a preheated oven at 400°F (200°C) for about 20-25 minutes or until they are golden brown.

How can I store leftover croissants?

Store them in an airtight container in the refrigerator for up to 3 days. You can also freeze them for longer storage.

Can I make the filling in advance?

Yes, you can prepare the filling ahead of time and store it in the refrigerator for up to 24 hours before using it.

What can I serve with spinach and feta croissants?

They pair well with a simple salad or a bowl of soup for a complete meal.