Author

Ocean Nightleaf

Browsing

Introduction / Hook

Imagine a dinner plate that captures the drama of the sea in every bite. A lobster, radiant in its shell, arrives at the table with a scent that mingles salt air, warm butter, and bright citrus. The moment you crack open the shell, a burst of sweetness and briny depth spills out, as if the ocean itself had been tucked inside a tender, pearly morsel. This isn’t just seafood; it’s a ritual—an edible celebration of coastal waters, patient fishermen, and the art of turning simple ingredients into something memorable. In this exploration of lobster, you’ll discover not only how to cook it with confidence, but why it holds a timeless appeal across cuisines and cultures. Whether you’re a seasoned seafood lover or someone who savors a luxurious yet approachable centerpiece, this dish invites you to slow down, savor the moment, and let butter melt into memory.

Lobster is one of those ingredients that instantly elevates a meal without requiring a kitchen full of fuss. It can be the star of a grand dinner or the elegant touch that turns a weeknight into a small coastal escape. The allure lies in its dual nature: the meat is incredibly delicate and almost creamy, while its shell carries a chorus of mineral, oceanic flavors that awaken the palate. When prepared with balance—gentle heat, a touch of acidity, and a whisper of aromatics—the lobster reveals a chorus of flavors: sweet, a touch of brine, citrusy brightness, and a luxurious richness that lingers without heaviness. This long-form guide will walk you through the story, the why, and the many ways to enjoy lobster, so you can approach your next lobster moment with confidence and joy.

The Story Behind the Dish

lobster has swum through centuries of culinary history, transforming from a forgotten fare of coastal communities to a symbol of coastal luxury. In early colonial America, lobster was so plentiful that it was often considered, proverbially, the “poor man’s protein.” Fishermen would haul the lobsters from traps and lay them out to dry in the sun while they tended their gear. It’s hard to imagine today, but in some places, lobster was simply ground into the daily meals of sailors and farmers, not the celebrated centerpiece we know now. The shift from communal staple to coveted delicacy is a tale of cultivation, transport, and shifting tastes. As transportation improved and markets expanded, lobster became more widely available. The rise of Maine as a lobster powerhouse in the United States played a pivotal role: clean cold waters produce meat that’s wonderfully sweet and firm, a quality that has endeared the species to chefs and home cooks alike.

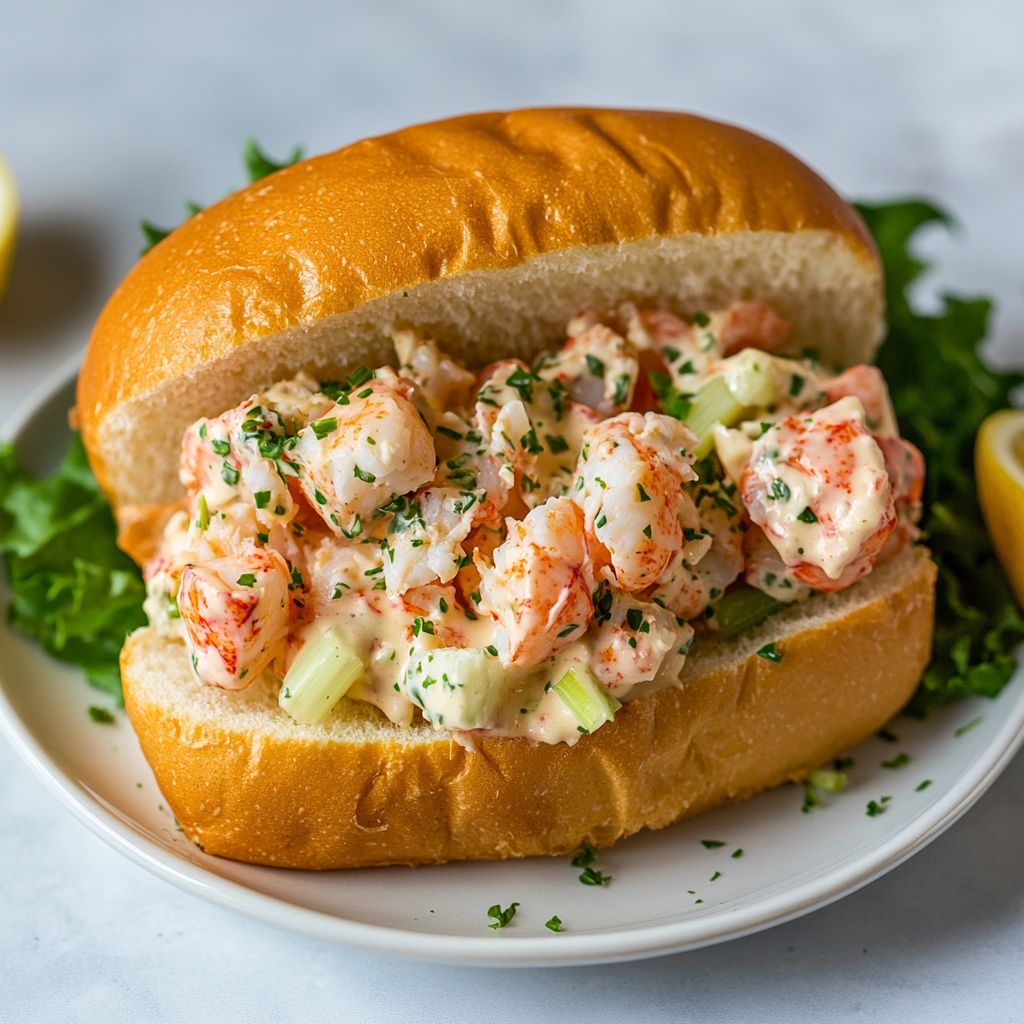
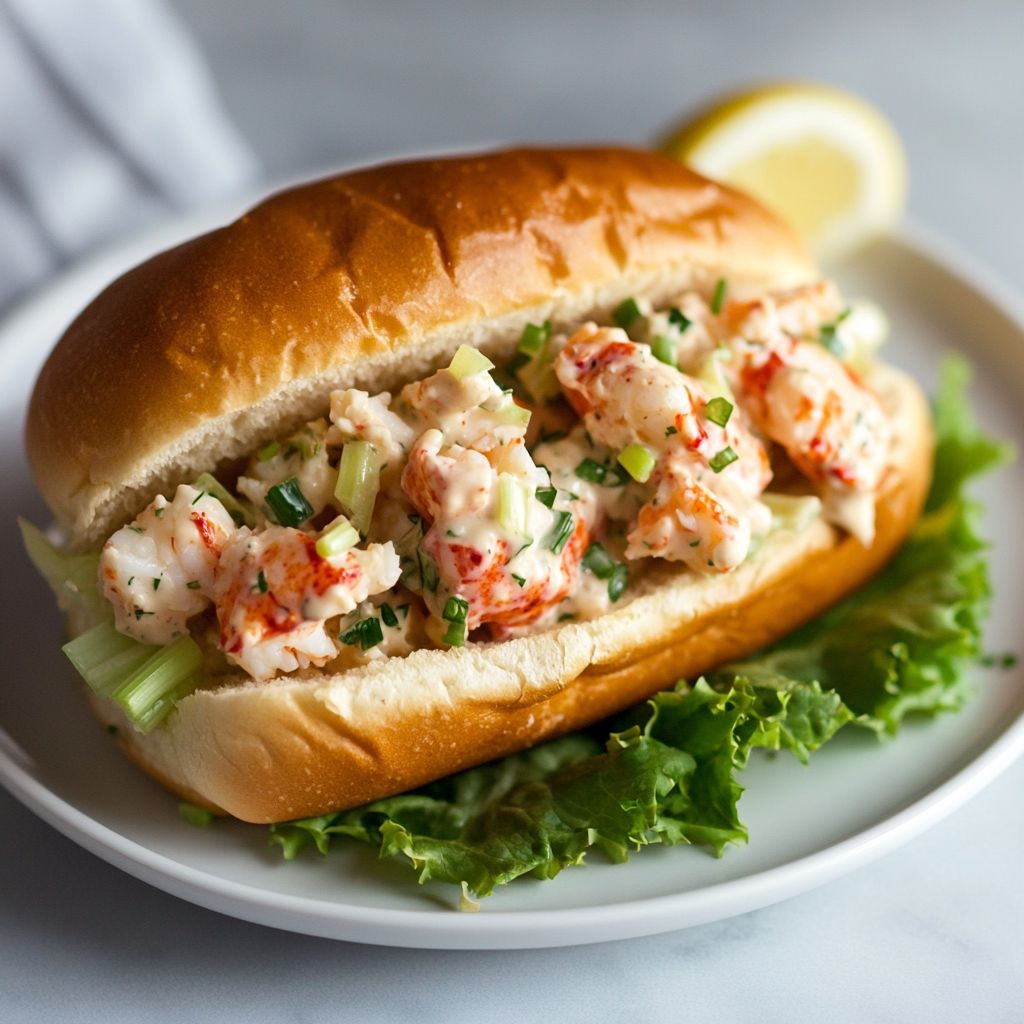
Throughout Europe and parts of Asia, lobster appears in a mosaic of preparations—poached, steamed, broiled, or simmered in a fragrant court of wine, herbs, and butter. The French classic Lobster Thermidor—where lobster meat is enriched with egg yolks, brandy, and a light creamy sauce, then baked—speaks to the dish’s capacity for airborne elegance. In America, the lobster roll—sometimes hot with butter, sometimes cool with mayonnaise—became an iconic symbol of New England summers. The tale of lobster is a reminder that a single creature from the sea can travel through cultures, adapting to local tastes while preserving a core identity of sweetness, texture, and a certain luxury that makes the meal feel special without needing ostentation.

Modern lobster cooking also embraces sustainability and responsibility. Responsible fisheries practices, seasonal closures, and careful handling ensure that the abundant ocean harvest remains available for future generations. When you approach lobster with mindfulness—choosing fresh, responsibly sourced lobsters, cooking with respect for the meat’s delicate texture—you join a lineage of cooks who treat seafood as a privilege and a duty at once.

Why You’ll Love This Recipe

  • Impressive but approachable: Lobster makes a statement, yet with the right technique, it’s simply cooked and deeply satisfying.
  • Quick-to-prepare centerpiece: When done well, lobster can be on the table in a short, focused window—great for weeknights that feel like celebrations and for leisurely weekend dinners.
  • Versatile for occasions: From intimate date nights to festive gatherings, lobster fits a broad range of settings and moods.
  • Luxurious flavor with everyday accessibility: The taste is indulgent without requiring complicated equipment or long marination times.
  • Nutritious and protein-rich: Lobster meat is a lean source of high-quality protein, with a delicate fat profile that carries flavor beautifully.
  • Perfect canvas for variations: A simple shellfish can take on butter, citrus, herbs, or a bright wine-based reduction, making it adaptable to your pantry.

Flavor Profile & Texture

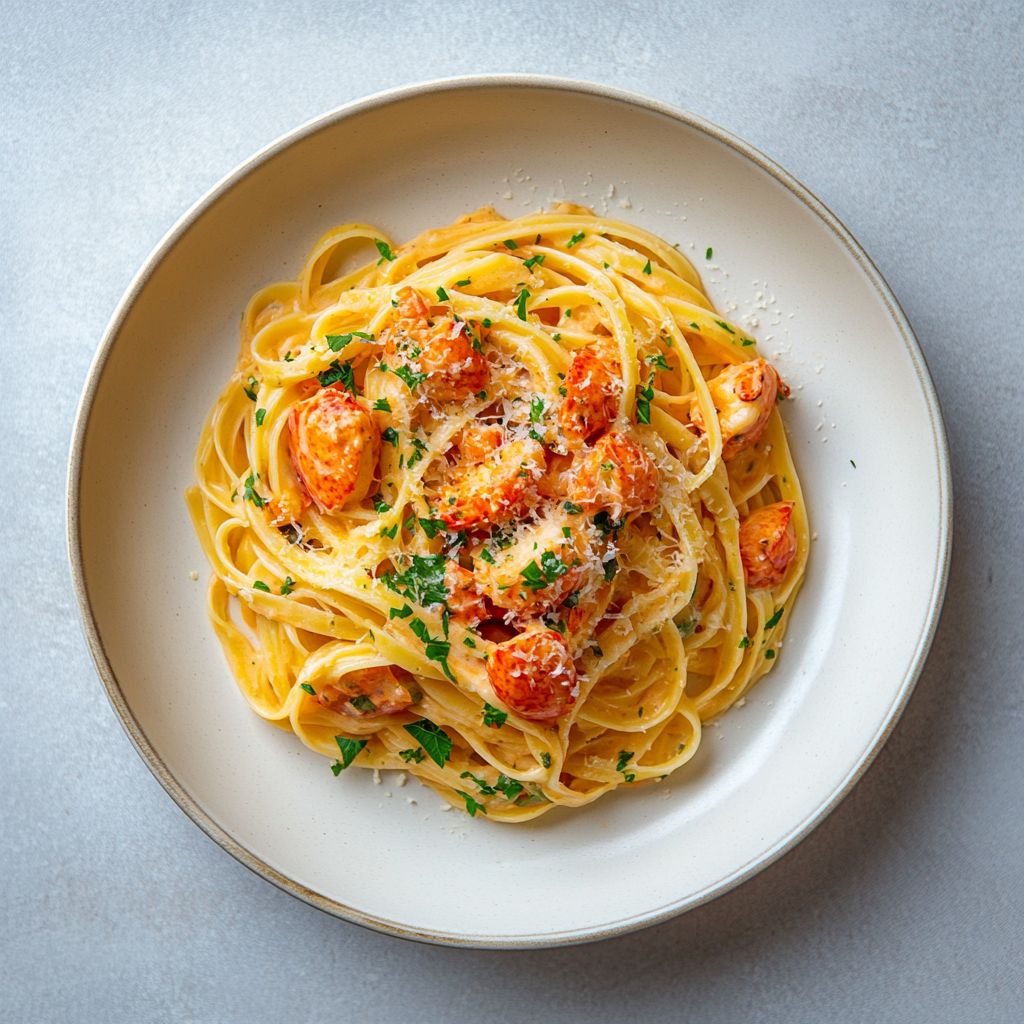
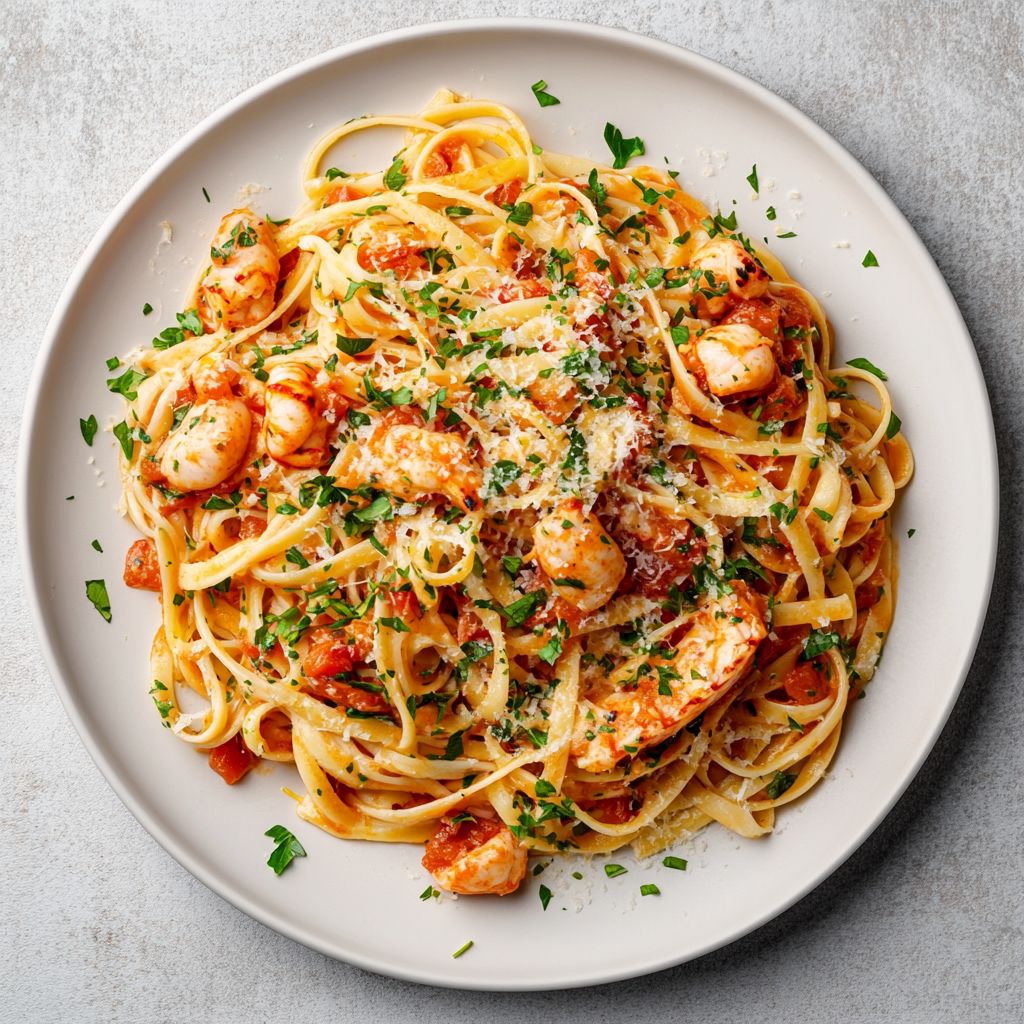
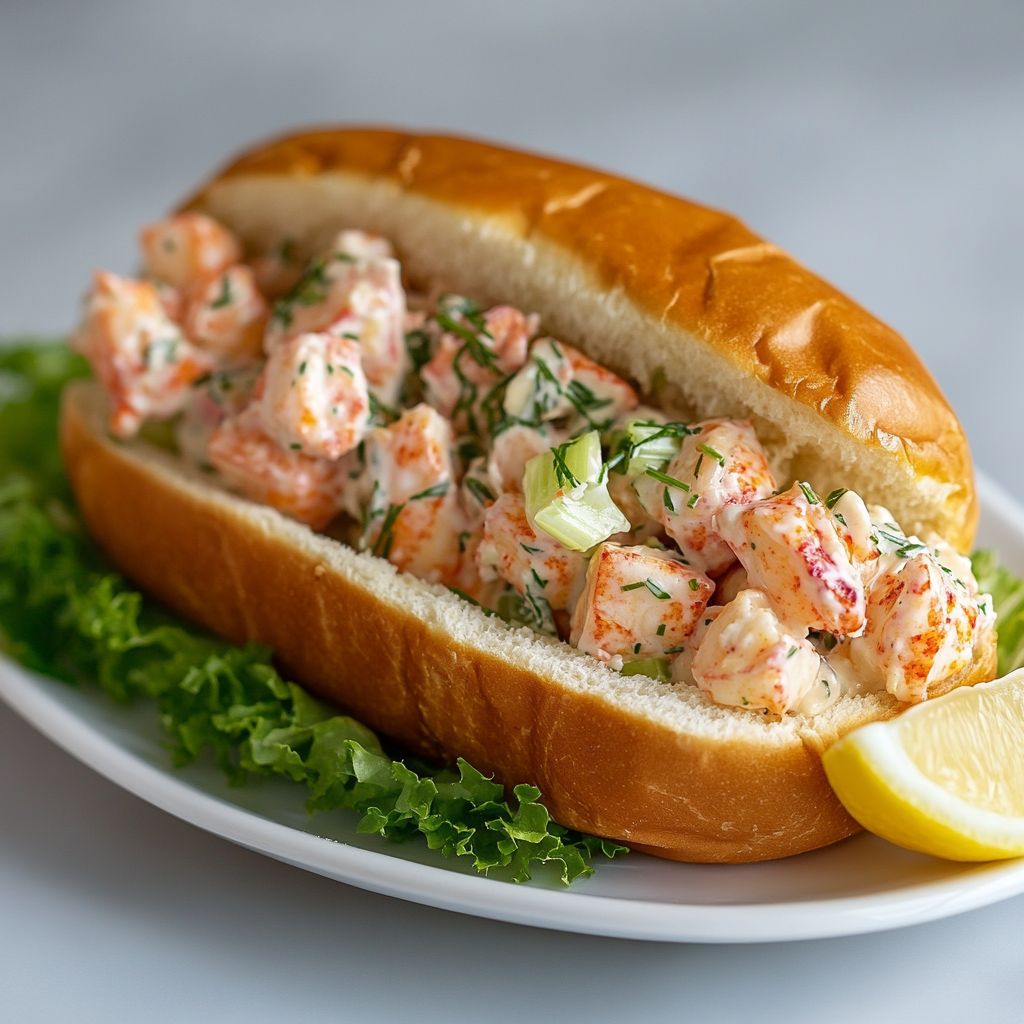
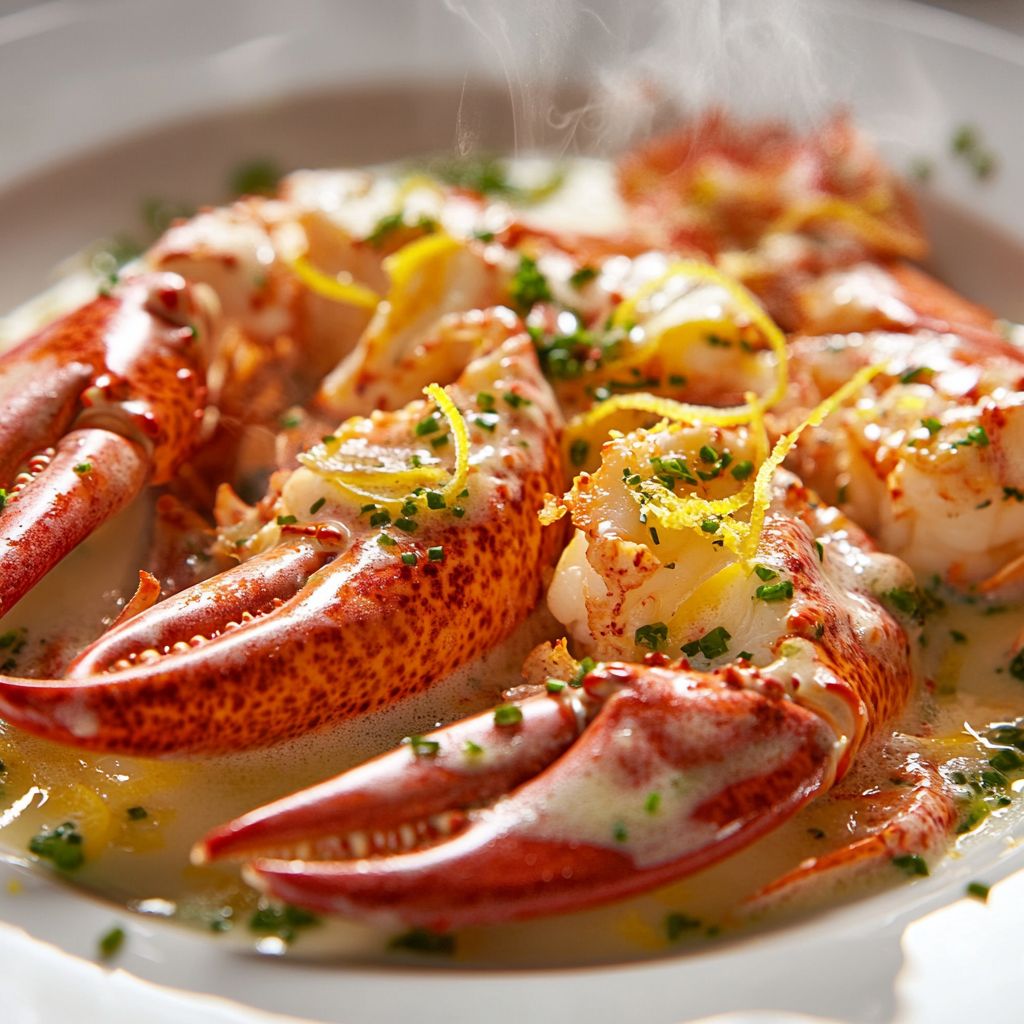
The essence of lobster lies in its tender, resilient meat that holds up to heat and sauces alike. When steamed or boiled, the meat is snow-white with a faint translucence and a clean, oceanic sweetness. The flavor sits squarely in the realm of refined seafood—bright, slightly mineral, with a subtle sweetness that intensifies with a kiss of heat. The texture is what makes lobster iconic: firm yet yielding, almost velvety in the mouth, and free of any rubbery chew when cooked with care. The shell offers a reservoir of flavor, which is why many preparations call for a light broth, wine, or lemony butter to carry the aromatics to the meat itself.

A classic pairing elevates this profile into a balanced celebration of contrasts. The richness of butter meets the brightness of lemon or verjus, while a touch of garlic or shallot provides savory depth without overpowering the sweetness of the meat. Fresh herbs—tender tarragon, chives, parsley, or a hint of dill—lift the dish, adding an herbal lift that echoes the sea breeze. A whisper of white wine or a splash of champagne can introduce an acidity that cuts through the butter, giving the dish a poised, restaurant-worthy finish. When you imagine the flavor, think of steam rising from a wooden board, a lemon wedge glistening with condensation, a necklace of butter brushing against pale lobster meat—an orchestration of temperatures, textures, and tastes that harmonize in every bite.

In terms of mouthfeel, lobster is a study in contrast. The exterior of the meat—especially if briefly broiled or kissed with hot butter—offers a slight caress of crispness, while the inside remains succulent and juicy. This contrast is part of the appeal: you get a brief, satisfying tarte-tang of texture with every mouthful, followed by a melt-in-your-mouth softness that lingers on the palate. When you pair lobster with a starch, such as corn on the cob, new potatoes, or a chunk of rustic bread, you add an earthy sweetness that complements the oceanic notes perfectly. The overall effect is a well-balanced plate that feels both celebratory and comforting at the same time.

Occasions & Pairings

Lobster is the kind of dish that lends itself to a range of occasions, each enriched by thoughtful pairings:

  • Romantic dinners: A candlelit table, a chilled glass of white wine, and lobster as the centerpiece create an intimate, luxurious atmosphere.
  • Weekend family feasts: Lobster pairs beautifully with simple sides like corn on the cob, warm bread, and a bright salad, turning a regular weekend into a memory.
  • Holiday celebrations: A whole lobster or lobster tails can anchor a celebratory seafood spread, alongside seasonal vegetables and festive sauces.
  • Summer al fresco dinners: Light, zesty sauces and citrusy accompaniments brighten the dish for warm-weather dining.

Pairings to consider:

  • Side dishes: Buttered corn, pan-seared potatoes, or a light citrus salad.
  • Sauces: Clarified butter with lemon, a garlic-herb butter, or a crisp white-wine and shallot reduction that adds a glossy finish.
  • Drinks: A crisp Sauvignon Blanc, a zesty Chardonnay, or a glass of Champagne or dry rosé to echo the brightness of the seafood.
  • Desserts: A light citrus sorbet or a delicate vanilla-infused custard to cleanse the palate after the richness.

Tips, Variations & Substitutions

Whether you’re cooking for two or feeding a crowd, these tips will help you nail lobster with confidence and flexibility:

  • Choosing the lobster: Live lobsters are the gold standard for flavor and texture, but pre-cooked lobster meat is a convenient alternative that still delivers excellent results. If you buy live lobsters, ensure they are still alive and showing good activity when you choose them.
  • Freshness cues: A live lobster should feel heavy for its size, with a clean, briny aroma. The shell should be hard and glossy, not soft or discolored. For pre-cooked meat, look for a bright, opaque color and a clean, oceanic scent.
  • Cooking times: Lobster meat cooks quickly. Overcooking leads to toughness, while undercooking risks texture and safety. If you’re boiling or steaming, plan on about 8-12 minutes for a 1¼–1½ pound lobster, and adjust slightly for larger lobsters. Tail meat should be opaque and firm; claw meat should be succulent but not tough.
  • Butter vs. oil: A classic method uses clarified butter to prevent a greasy finish. If dairy-free or avoiding butter, olive oil with a touch of garlic and lemon can create a luscious alternative that still feels indulgent.
  • Mind the shell: If you’re serving whole lobsters, a quick, gentle crack along the tail and claws makes the meat easier to access without damaging the delicate interior.
  • Variations by region: A Cajun-spiced boil with paprika and cayenne adds warmth; a Mediterranean twist with olive oil, lemon, garlic, and parsley brightens the flavor; a simple Asian-inspired version may include ginger, scallions, and a light soy-lish glaze for a savory-slightly umami finish.
  • Dairy-free options: Use a bright lemon-garlic vinaig with olive oil or a dairy-free butter substitute to maintain richness without dairy.
  • Meal-prep tips: If you’re planning ahead, cook the lobster meat and store it chilled. Reheat gently to preserve texture, or keep it chilled to fold into salads or cold preparations where you don’t want extra heat.

Storage & Make-Ahead Ideas

Lobster deserves respectful handling in terms of storage and timing. Here are practical guidelines to keep flavors at their best:

  • Cooked lobster meat: Refrigerate promptly within two hours of cooking, in an airtight container. It will stay best for up to 2 days. Reheat gently via a short steam or by briefly warming in a warm pan with a little butter—do not overheat, or the meat can become dry.
  • Raw lobster: If you buy live lobsters and don’t plan to cook them immediately, keep them in the refrigerator with a damp towel over them for up to 24 hours. Avoid submerging them in water or keeping them in a sealed bag; they need airflow.
  • Freezing: For longer storage, thawed lobster meat can be frozen in an airtight container for up to 2-3 months. If you’re freezing whole lobsters, they’ll be best used within a couple of months; the quality gradually declines over time.
  • Make-ahead sauces: A lemon-butter sauce or garlic-herb butter can be prepared in advance and warmed gently before serving to preserve the silkiness of the butter and the brightness of the lemon.
  • Leftover ideas: Toss chopped lobster into a light pasta with olive oil and herbs, fold into a spring salad with citrus, or serve on toast with a dab of herbed mayo for a refined sandwich—these keep the lobster feeling fresh and delicious beyond the initial meal.

Fun Facts & Trivia

Delightful morsels of lobster lore often accompany a good meal. Here are some tidbits that might surprise you:

  • Color change: Lobsters are naturally blue or blue-green due to copper-based proteins in their blood. When cooked, the pigments transform to a characteristic crimson red, which is why we associate cooked lobster with that iconic red shell.
  • Long-lived crustaceans: Some lobsters have been known to live well over a century in the wild, which makes them one of nature’s most patient seafood treasures.
  • Colorful shells: The shell’s bands of color can indicate species and regional variations, offering subtle hints about the terroir of the sea where they lived.
  • A shellfish that sparked recipes: Lobster is the muse behind numerous celebrated dishes, from Lobster Thermidor to Lobster Bisque, each reflecting a different culinary tradition and technique.
  • Economic and ecological note: The perception of lobster has evolved along with fisheries management. Sustainable harvesting practices help ensure that these creatures remain available for future generations to enjoy, while maintaining healthy ocean ecosystems.

In the end, lobster is more than a dish—it’s a narrative of the sea, a bridge between coastline culture and kitchen craft. Whether you’re crafting a simple, butter-kissed preparation or a more complex sauce with wine and aromatics, the lobster invites you to slow down, savor the process, and relish the connection between land and sea. As you prepare to cook, consider not just the technique, but the story behind each bite—the fisherman’s dawn, the tide’s rhythm, and the shared joy of gathering around a table to celebrate seafood at its finest.

Ingredients

Lobster

    – 2 live lobsters (1.25–1.5 lb each)
    → The main protein; select lively lobsters with glossy, unblemished shells and intact claws for best meat yield. Keep them cold until ready to cook and plan to cook promptly after purchase for optimal texture. If using previously frozen lobster tails, ensure they are fully thawed and pat dry before cooking to prevent excess moisture.
    – 4 quarts water (1 gallon) for boiling lobsters, plus 2–3 tablespoons kosher salt per gallon
    → A large pot with a rolling boil ensures even cooking and quick, tender meat. The salt seasons the lobster flesh like seawater; adjust if your water is very salty or if using pre-seasoned stock. Do not crowd the pot; give the lobsters space to submerge fully for uniform doneness.
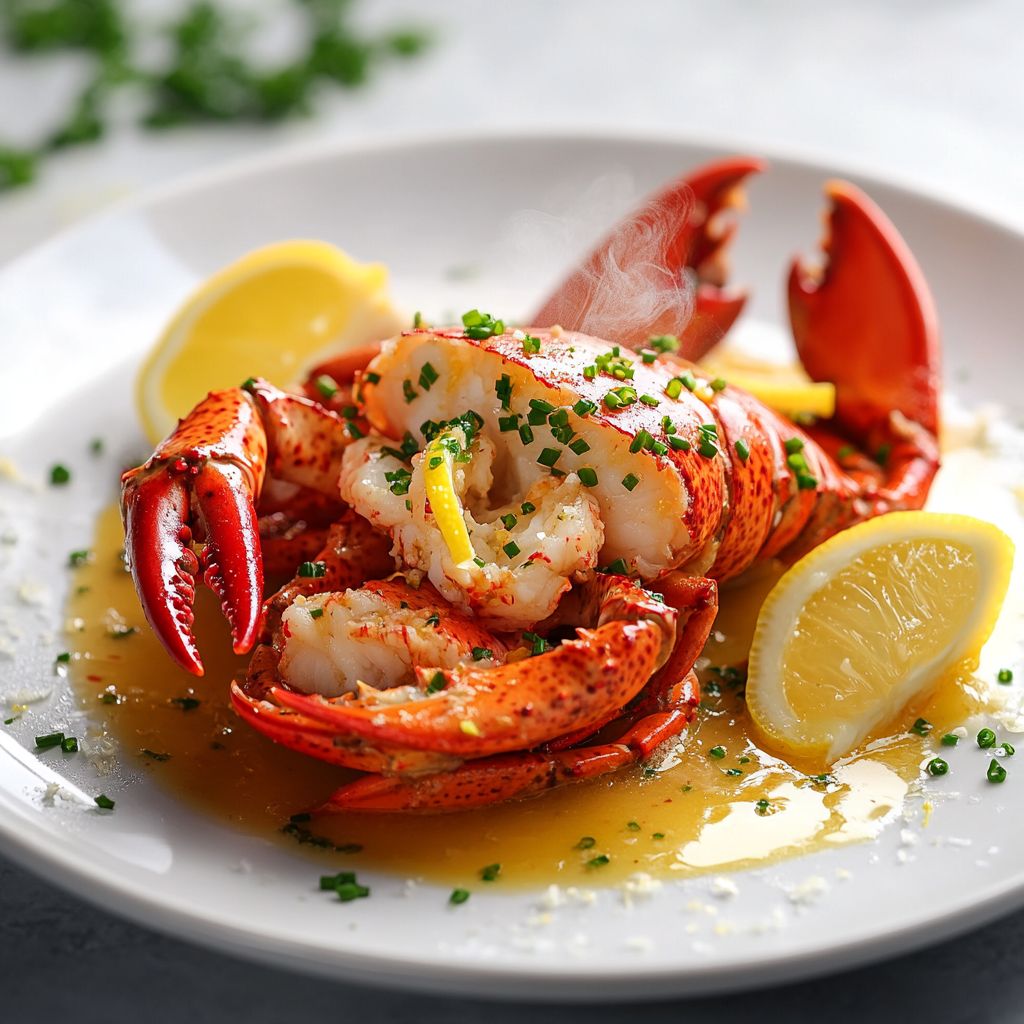
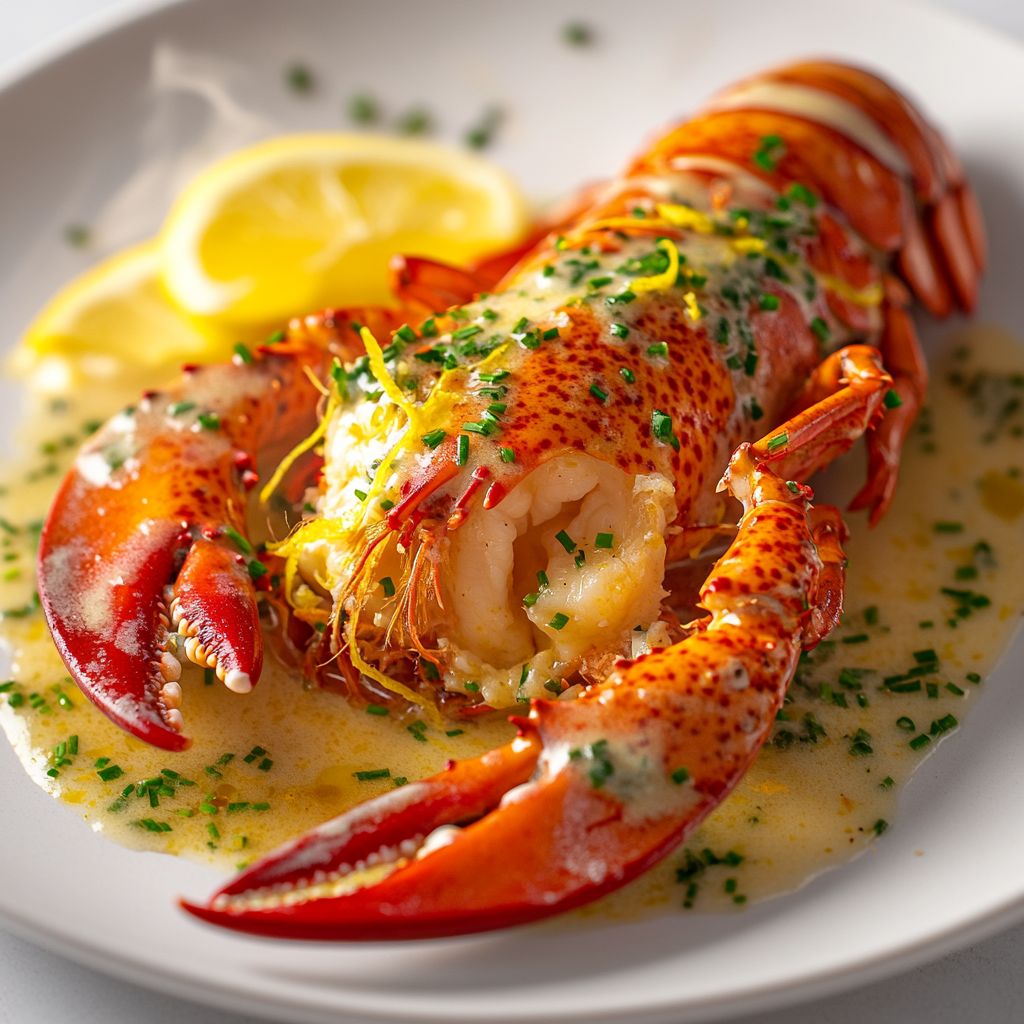
    – 1 lemon, cut into wedges
    → Adds bright acidity that balances the rich butter and enhances sweetness in the lobster meat. Serve wedges on the side and squeeze over meat just before dipping. Fresh lemon is preferable; avoid bottled juice for maximum aroma.

Dipping Sauce

    – 1/2 cup unsalted butter, melted
    → The creamy, rich base for dipping. Using unsalted butter lets you control the final salt level; melt gently to keep a smooth emulsion and prevent separation. If needed, strain solids after melting for a cleaner sauce.
    – 2 cloves garlic, minced
    → Provides a warm, aromatic foundation for the sauce. Finely mince to distribute evenly; you can optionally sauté briefly in butter (30 seconds) to mellow sharpness, but do not burn the garlic, as it will taste bitter.
    – 1 tablespoon fresh lemon juice
    → Brightens the butter and cuts through richness. Use freshly squeezed juice for vibrant flavor; strain if you prefer a smooth, pulp-free dipping sauce.
    – 1 tablespoon chopped fresh parsley
    → Adds fresh, herbal note and color. Add parsley after the butter and garlic have blended to preserve its bright green color and aroma; mince finely for even distribution.
    – Pinch of salt
    → Seasoning is essential to balance the richness of the butter. Start with a small pinch and adjust after tasting, considering the natural saltiness of the lobster meat and any salt in the butter itself.

Optional Add-ins

    – 1 tablespoon dry white wine (optional)
    → Adds subtle acidity and depth to the sauce. Warm the wine with the butter and garlic, then simmer briefly to reduce and mellow before adding lemon and parsley. Avoid boiling vigorously to prevent the emulsion from breaking.
    – 1/4 teaspoon paprika (optional)
    → Provides a touch of color and a hint of sweet smokiness. Use mild or smoked paprika according to preference; it is optional and can be omitted to keep the pure butter flavor front and center.

Garnish & Serving

    – Fresh parsley for garnish
    → A small handful of chopped parsley adds a pop of color and fresh aroma to the platter. Use a clean knife and pat dry before sprinkling; avoid wilted leaves for best presentation.
    – Extra lemon wedges for serving
    → Additional wedges allow guests to adjust tanginess to taste. Keep wedges chilled until plating to preserve brightness and aroma; offer alongside the dipping sauce for a vibrant finish.

Instructions

  • Choose and prep the lobsters: Inspect 2 live lobsters (1.25–1.5 lb each) to ensure glossy, intact shells and claws; keep them cold until ready to cook and plan to cook promptly after purchase for optimal texture.
  • → Live, lively lobsters cook more evenly and yield firmer meat; cold storage slows microbial growth and preserves quality, so prepare to cook as soon as possible after purchase.

  • Set up the boiling water: In a large stockpot, combine 4 quarts (1 gallon) of water with 2–3 tablespoons kosher salt per gallon; bring the water to a full rolling boil over high heat.
  • → A salty, vigorously boiling bath seasons the lobster flesh like seawater and ensures quick, even cooking; do not crowd the pot so each lobster submerges fully for uniform doneness.

  • Submerge the lobsters: Using long tongs, grasp each lobster and gently lower it headfirst into the boiling water to ensure full immersion; return the pot to a rolling boil and maintain a vigorous boil during cooking.
  • → Submerging quickly minimizes stress and ensures an even start to cooking; maintaining a strong boil prevents uneven heat and undercooked meat.

  • Boil until cooked: Boil the lobsters for 8–12 minutes, depending on size (1.25–1.5 lb); the shells should turn bright red and the meat should appear opaque and firm.
  • → Proper timing yields tender, flavorful meat without rubbery texture; if uncertain, an internal temperature of 140–145°F (60–63°C) is a good guide.

  • Remove and rest the lobsters: Use tongs to lift the lobsters from the pot and drain; transfer to a rack or large platter to rest 5–10 minutes so the meat firms and is easier to crack.
  • → Resting stops further carryover cooking and prevents scorching of delicate meat; it also makes cracking and extracting meat cleaner and safer.

  • Make the dipping butter: Set a small saucepan over very low heat and gently melt 1/2 cup unsalted butter, ensuring the butter remains smooth and clear.
  • → Low, steady heat prevents separation and browning, yielding a silkier dipping sauce with a clean buttery flavor.

  • Flavor the butter with garlic: Add 2 cloves minced garlic to the melted butter and stir; simmer 30–60 seconds until fragrant, taking care not to brown the garlic.
  • → Gentle heating releases garlic aroma without imparting bitter notes; frequent stirring keeps garlic from scorching at the bottom.

  • Finish the sauce with lemon and parsley: Stir in 1 tablespoon fresh lemon juice and 1 tablespoon chopped fresh parsley; season with a pinch of salt and taste, adjusting as needed.
  • → Fresh acidity brightens the rich butter and complements the sweetness of lobster; parsley adds color and a fresh herb lift, so chop finely for even distribution.

  • Incorporate optional white wine (if using): If using 1 tablespoon dry white wine, add it to the butter-garlic mixture and simmer briefly to reduce by about one-third, then proceed with lemon and parsley.
  • → The wine adds a subtle acidity and depth; simmering concentrates its flavor and helps integrate it with the butter without diluting the emulsion.

  • Incorporate optional paprika (if using): If using 1/4 teaspoon paprika, whisk it into the sauce after the wine (or after garlic if not using wine) to add a touch of color and a hint of smoky sweetness.
  • → Paprika enhances visual appeal and adds a subtle flavor dimension; it remains optional to preserve pure butter-forward flavor.

  • Prepare lemon wedges and garnish: Slice lemon into wedges if not pre-cut and have fresh parsley ready for garnish; these brighten the plate and offer additional brightness at service.
  • → Fresh citrus and herbs refresh the dish at the table and provide aroma; keep parsley bright and dry for best presentation.

  • Crack and extract the lobster meat: When lobsters are cool enough to handle, twist off the tails and claws; crack the shells with a lobster cracker or the back of a heavy knife and remove the meat in clean, bite-sized pieces, trimming any cartilage.
  • → Properly extracted meat is easier to eat and looks cleaner on the plate; removing cartilage ensures a pleasant texture during dipping.

  • Plate and serve: Arrange lobster meat on a platter with some shells for visual appeal, ladle a portion of the warm dipping butter into small bowls, and place lemon wedges and parsley garnish nearby; present immediately for best flavor and texture.
  • → Serving promptly while hot ensures optimal tenderness and aroma; the butter sauce should be refreshed as needed to maintain its smooth, emulsion-like consistency.

Notes

“These perfectly boiled lobster tails are simple to prepare and pair beautifully with a luminous garlic-lemon butter for dipping. Begin with two live lobsters (1.25–1.5 lb each) and keep them cold until cooking; cook promptly after purchase for best texture. Fill a large pot with 4 quarts water and salt it with 2–3 tablespoons kosher salt per gallon; bring to a rolling boil, then add the lobsters headfirst, cover and return to a boil. Simmer 8–12 minutes depending on size until shells turn bright red and meat is opaque; remove and rest briefly before cracking to extract meat. Slice the tails and claws to access the meat, using tongs and kitchen shears for clean, even portions. Serve with lemon wedges to brighten the sweetness of the meat. For the dipping sauce, melt 1/2 cup unsalted butter on low heat, stir in 2 minced garlic cloves, 1 tablespoon lemon juice, 1 tablespoon chopped parsley, and a pinch of salt; keep warm but not hot enough to separate the emulsion. Optional: swirl in 1 tablespoon dry white wine and 1/4 teaspoon paprika for depth and color. If you prefer, you can steam the lobsters instead of boiling or finish under a brief grill blast for color. Garnish with extra parsley and serve lemon wedges on the side. Leftover lobster meat can be stored in the refrigerator for up to 2 days and used in salads, pasta, or lobster rolls. Always handle live seafood with care, discard any lobsters that do not look active, and sanitize utensils and surfaces to prevent cross-contamination.”

Tips

Tips for Lobster Preparation and Serving

  • Selection and handling: Pick live lobsters that are active and respond to touch. Their shells should be glossy with intact claws and no strong odors. Keep them cold and cook as soon as possible after purchase for the best texture. If you’re using thawed lobster tails, pat them dry to remove excess moisture before cooking.
  • Storage and thawing: If you must store live lobsters briefly, keep them in a breathable container in the coolest part of the kitchen. For frozen tails, thaw slowly in the refrigerator overnight or under cool running water just before use, then pat dry to ensure even cooking.
  • Boiling equipment and water: Use a large pot (at least 6–8 quarts) so the lobsters have room to submerge. Fill with enough water to cover them (about 4 quarts per batch as a guideline) and season with 2–3 tablespoons kosher salt per gallon. Bring to a vigorous rolling boil before adding the lobsters, and avoid crowding the pot so the temperature doesn’t drop.
  • Cooking times and doneness: For 1.25–1.5 lb live lobsters, expect about 8–12 minutes of boiling once the water returns to a boil after adding them. You’re looking for bright red shells and opaque, firm meat. If in doubt, test a claw meat for tenderness rather than solely relying on color.
  • Cooling and cracking: Remove lobsters with tongs and let them rest briefly before cracking. Resting helps the meat set and makes it easier to remove from shells. Use lobster crackers or the back of a small knife to avoid tearing the meat.
  • Dipping butter sauce technique: Keep the melted butter warm but not hot enough to separate. If the emulsion begins to break, whisk vigorously or briefly remove from heat and whisk until smooth again. For a smoother sauce, strain the melted butter to remove any solids after melting.
  • Garlic handling in the sauce: Finely mince garlic and, if desired, lightly sauté it in the butter for about 30 seconds to mellow sharpness. Avoid burning the garlic, which can impart bitter notes.
  • Lemon and acidity balance: Add fresh lemon juice gradually, tasting as you go to balance richness. A touch of lemon brightens the butter and enhances the lobster sweetness.
  • Herb and seasoning timing: Add chopped fresh parsley after the butter and garlic have blended to preserve color and aroma. A pinch of salt should be adjusted at the end, considering the saltiness of the butter and the lobster meat.
  • Optional add-ins—wine: If using dry white wine, warm it with the butter and garlic and simmer briefly to reduce and mellow before adding lemon and parsley. Do not boil vigorously after adding wine to preserve the emulsion.
  • Optional add-ins—paprika: A 1/4 teaspoon of paprika adds color and a hint of sweetness. Use mild or smoked paprika depending on preference, or leave out entirely to keep the butter-forward flavor front and center.
  • Serving presentation: Arrange lobsters on a large platter with lemon wedges, fresh parsley, and small bowls of melted butter. Offer extra lemon wedges so guests can adjust brightness to taste. Keep garnish bright by patting dry wilted leaves and cutting fresh parsley just before serving.

FAQ

Lobster FAQ

What lobster species are commonly used in recipes?

Most home recipes use American Maine lobster (Homarus americanus). European lobster (Homarus gammarus) is common in Europe. Langoustines are a different, smaller species. For best flavor, rely on fresh or properly thawed lobster rather than precooked meat.

Fresh vs. frozen lobster: which is better?

Fresh live lobster yields the best flavor and texture. Frozen lobster tail meat is convenient but can be slightly softer or firmer when thawed. If you buy frozen, thaw in the fridge or under cold running water and use promptly.

How do I choose a live lobster at the market?

Look for lobsters with intact claws and antennae, a hard, glossy shell, and a clean, seaworthy smell. The tail should curl underneath when picked up. Heavier for its size usually means more meat. Live lobsters should react to touch and stay lively until you cook them.

How do I thaw frozen lobster safely?

Most thawing is best done in the refrigerator overnight. If you’re in a hurry, place the lobster (in its packaging or in a sealed bag) under cold running water for 20–30 minutes, then cook promptly. Do not thaw at room temperature or in warm water.

How do I boil lobster step-by-step, and how long does it take?

– Fill a large pot with salted water (about 2–3 tablespoons salt per gallon) and bring to a rolling boil.
– Grasp the live lobster, headfirst, and submerge it into the boiling water. Cover.
– Boil times (rough guide): 1 lb: 8–10 minutes; 1.25–1.5 lb: 9–12 minutes; 2 lb: 12–15 minutes; 3 lb: 15–18 minutes. The shell should be bright red and the meat opaque.
– Remove with tongs, drain, and let rest briefly before cracking.

How do I steam lobster, and how does it differ from boiling?

Steaming uses less water and is gentler on the meat.
– Add 2 inches of water to a large pot and bring to a boil. Place a steamer insert or rack, then the lobster. Cover.
– Steam times (rough guide): 1 lb: 8–10 minutes; 1.5–2 lb: 10–12 minutes; 2–3 lb: 12–15 minutes. The lobster is cooked when the shell is bright red and the meat is opaque.

How can I tell if lobster is cooked properly?

The shell should be bright red. Meat should be opaque and firm, not translucent. If the meat looks glossy or undercooked, return it to the heat for a few more minutes. Avoid overcooking, which makes the meat tough and chewy.

How do I remove lobster meat from the tail and claws?

For the tail: twist the tail off the body, place on a cutting board, and trim off the flippers. Use a knife or kitchen scissors to cut along the top of the tail shell, pry open, and pull out the tail meat. For claws and legs: twist off the large claws, crack the claws with a lobster cracker or heavy knife, and pull out the meat. The small legs contain edible meat too—squeeze or bite off the tip to extract. Remove the dark vein (intestine) from the tail meat if visible.

What sauces or flavorings pair well with lobster?

Classic options include drawn butter (melted butter with a squeeze of lemon), garlic butter, lemon-herb butter, or a light white wine beurre blanc. Light additions like chives, tarragon, or dill complement lobster nicely. For a simple preparation, drizzle melted butter and a touch of lemon over the meat.

How should I store and reheat lobster leftovers?

Cool cooked lobster promptly, then refrigerate in an airtight container within two hours. Use within 2–3 days. To reheat, steam or warm gently in a little butter over low heat, or briefly reheat lobster meat in a skillet with a splash of white wine or broth to avoid drying it out. Do not reheat aggressively; it can turn rubbery.

Introduction / Hook

Imagine a plate where ocean brightness meets cozy hearth warmth—the whisper of butter, the kiss of sea salt, and the creamy hug of aged cheese all weaving together with ribbons of tender pasta. This lobster mac and cheese isn’t just a dish; it’s a celebration of contrast, a luxurious twist on a timeless comfort classic. From the first whiff of garlic gently sautéing in butter to the moment you encounter that glorious crust of breadcrumbs crunching atop a molten, ocean-kissed center, every bite feels like a small voyage. The lobster’s briny sweetness lights up the richness of melted cheeses, while a velvety béchamel binds everything into a silky, spoon-stopping groove. It’s the kind of dish that makes a weeknight feel like a special occasion and a special occasion feel like you’re dining at a sunlit coastal bistro.

In the kitchen, this recipe is a bridge—between sea and shore, between indulgence and homey comfort, between simpler weeknights and a party-worthy centerpiece. The aroma alone can pull a crowd toward the stove: a hint of citrus zest dancing with nutty butter, a chorus of melting cheese, and the faint sea-salt scent that reminds you you’re about to savor something truly coastal. It’s not merely about luxury ingredients; it’s about technique, balance, and the confidence to plate something spectacular without fuss. You’ll learn to coax out the best from each component, letting the lobster’s delicate sweetness mingle with the cheese without ever getting drowned by the sauce.

This lobster mac and cheese is for moments when you want to feel pampered without sacrificing warmth or approachability. It’s for a celebratory family dinner, a date night at home, or a dinner party that deserves a little extra shine. And because the heart of the dish lies in technique as much as in ingredients, you’ll gain a toolkit for recreating this indulgent comfort with confidence—whether you’re using lobster tails, leftover meat from a seafood boil, or a quick fresh catch. It’s a dish that rewards patience with a texture that sings and flavors that linger—creamy, toasty, briny, and bright all at once.

The Story Behind the Dish

Macaroni and cheese travels with a storied lineage, tracing its roots to both Italian kitchens and early American gatherings where a humble, dairy-rich sauce found a faithful home with elbow noodles. The addition of lobster to this classic is a distinctly coastal evolution—an homage to the yearning of seaside towns to elevate everyday meals into something worthy of a seaside sunset. In New England, where lobster boats rhythmically rise and fall with the tides, cooks began pairing the soft, yielding pasta with slices of sweet lobster and a lush béchamel—silky and pale, pale yellow from the cheese, and rich with subtle aromatics. It’s a dish that captures the spirit of the coast: robust, comforting, and just a touch glamorous.

In many homes and restaurants, the dish became a canvas for regional character and personal memory. A grandmother’s kitchen might carry a note of nutmeg or smoked paprika whispered into the sauce; a coastal bistro might finish the dish with a crackling breadcrumb crust that crackles like a shoreline shell. The essence is simple: take the sea’s best treasure, fold it into a velvety cheese sauce, and tuck it into pasta that holds its shape and heart. The result is a seafood-centered comfort food that feels special without being fussy, hearty without heaviness, and elegant enough to serve alongside a crisp green salad or a glass of sparkling wine.

When you prepare this recipe, think of it as a bridge between two culinary brooks—the classic, homestyle mac and cheese you grew up with and the premium, seaside dish you order on a celebratory evening out. The technique is timeless: a roux-based sauce that swells with dairy, seasoned with a light touch of mustard, white pepper, and a bright lift of lemon or zest. Fold in the lobster gently so the meat stays succulent, then finish with a layer of cheese that melts into a satin glaze. A final, buttery breadcrumb crust adds texture and a toasty tone that echoes the crackle of a seaside campfire. It’s a story told in flavors and textures, a narrative of comfort meeting coast in each indulgent bite.

Why You’ll Love This Recipe

  • Luxurious comfort: A show-stopping upgrade to a beloved classic that remains approachable for home cooks.
  • Seafood-bright without overpowering richness: The lobster sweetness and briny notes cut through the cheese for balance and glow.
  • Silky, never gluey texture: A well-made béchamel binds the pasta and lobster into a creamy, cohesive bite.
  • Texture contrast: A crisp, golden breadcrumb crust provides a satisfying crunch against the creamy interior.
  • Flexible and forgiving: Works with fresh lobster, pre-cooked lobster meat, or even high-quality crab if needed.
  • Customizable for your needs: Gluten-free or low-carb variations, and several cheese combinations to suit your palate.
  • Perfect for entertaining: A guaranteed crowd-pleaser that still feels thoughtful and gourmet.

Flavor Profile & Texture

The centerpiece of this dish is the luscious, cheese-forward sauce that carries the lobster’s delicate sweetness in its folds. The base is a classic velvety béchamel, enriched with a blend of cheeses that melt into a satin sheen—think sharp cheddar for a sly bite, plus a reserve of Gruyère or Parmesan to deepen the cheese map with a nutty, toasty note. A kiss of Dijon or a whisper of dry mustard heightens the dairy’s creaminess without stealing the spotlight. A touch of lemon zest or a splash of lemon juice brightens the richness, ensuring the sauce feels lively rather than heavy.

The lobster itself offers a gentle brine and sweet, tender meat that fluffs up beautifully within the pasta. When folded into the macaroni, the lobster pieces distribute in every forkful, offering a moment of sweetness and a distinct, refined character that elevates the entire dish beyond a traditional mac and cheese. The pasta chosen for this recipe should be sturdy enough to hold sauce without collapsing; tubes or shells are excellent as they cradle bits of lobster and sauce, while a classic elbow pasta can work in a pinch if you prefer a familiar bite.

Texture plays a starring role. The interior should be luxuriously creamy, with the pasta fully coated but not overwhelmed by the sauce. The surface benefits from a light, buttery breadcrumb crust that turns crisp and toasty under high heat, offering a welcome contrast to the velvet center. When you scoop in, you should hear a gentle crack of the crust, followed by the soft surrender of the cheese-laced interior. Aromas—garlic, butter, and a hint of lemon—rise from the pan, inviting you to lean in for a closer look and a deeper inhale before the first bite.

Occasions & Pairings

This lobster mac and cheese shines on occasions that deserve a touch of luxury without sacrificing warmth. It’s equally at home on a family table during a special weekend dinner, a celebratory birthday meal, or a holiday spread that calls for something memorable yet comforting. If you’re entertaining, it’s a dish that can be prepared with a little advance planning and then finished in the oven with a short, high-heat blast to achieve that coveted crust.

Pairing is part of the experience. For drinks, a crisp, citrus-driven white wine such as Sauvignon Blanc or a lightly oaked Chardonnay complements the lobster’s sweetness and the cheese’s richness. If you prefer something with more acidity, a dry sparkling wine or Prosecco can cut through the richness beautifully. For a non-alcoholic route, a chilled sparkling apple cider or a lemony iced tea with a hint of dill mirrors the dish’s briny brightness.

Side dishes can be as simple as a bright green salad with a tangy vinaigrette to balance the creaminess, roasted asparagus with lemon, or a light tomato and cucumber salad for freshness. A simple, lightly dressed slaw or a fennel salad can also pair nicely, adding crunch and peppery bite to contrast the softness of the main course. For a more complete seafood-forward menu, consider a light shellfish starter or a delicate crusty baguette to dip into the luscious sauce.

Tips, Variations & Substitutions

Make it your own

  • Cheese combinations: The classic approach uses a blend of sharp cheddar with a nutty cheese like Gruyère or fontina. You can experiment with a touch of Parmesan for salt and umami, or a blue cheese crumble folded in sparingly for a bold finish.
  • Breadcrumb crust: For extra crunch and color, mix breadcrumbs with a little melted butter and a pinch of paprika or lemon zest before sprinkling on top.
  • Herbs and aromatics: A whisper of fresh thyme, chives, or tarragon can brighten the overall flavor without overshadowing the lobster.
  • Mustard and citrus: A small amount of Dijon and a hint of lemon zest lift the dish, keeping the richness from feeling cloying.

Dietary variations

  • Gluten-free: Use gluten-free pasta and ensure any breadcrumbs are gluten-free. The sauce itself is naturally gluten-free if you skip any flour-based thickening beyond the roux, or you can use a gluten-free roux once per batch.
  • Lactose-light option: Use lactose-free milk and cheeses, and salt to taste. The texture will remain creamy, though the mouthfeel may be slightly lighter.
  • Low-carb alternative: Swap pasta for thinly sliced, blanched zucchini or spaghetti squash ribbons. You may need to adjust the sauce thickness, adding a touch more béchamel to coat the vegetables.
  • Vegetarian note: If you want a lighter, non-seafood version, omit the lobster and boost the cheese and a handful of sautéed mushrooms for umami and texture. This still delivers a luxurious mac and cheese with a deeper, earthy profile.

Regional twists

  • New England seafood twist: Fold in a touch of velouté and finish with a light drizzle of melted butter and lemon to echo a coastal fare.
  • Spice note: A pinch of white pepper or a tiny amount of smoked paprika can add warmth that pairs well with seafood milk sauces.

Storage & Make-Ahead Ideas

To make entertaining easier, you can assemble the dish up to the final bake stage and refrigerate for several hours or even overnight. If you’re refrigerating, hold off on the breadcrumb topping until you’re ready to bake, so the crust stays crisp. Once baked, portions can be stored in an airtight container in the fridge for a couple of days. Reheat gently on the stovetop over low heat with a splash of milk to loosen the sauce, or reheat in a moderate oven, covered, until heated through and then uncover and finish with a brief under-broiler blast to re-crisp the top.

Freezing is possible but not ideal for texture. If you must freeze, freeze the assembled but unbaked dish in a well-wrapped container; thaw fully in the fridge before baking, then finish with the breadcrumb topping. Expect the texture to be slightly less supple after defrosting, but the flavors will still sing with the lobster’s sweetness and the cheese’s glow.

Make-ahead tips: Prepare the sauce and lobster up to the point of combining with pasta, then store separately. When you’re ready to cook, toss the hot pasta with the cooled sauce and lobster, transfer to a baking dish, top with breadcrumbs, and bake until everything is warmed through and the crust is golden. This can save you time on busy evenings while still delivering a restaurant-worthy finish.

Fun Facts & Trivia (Optional)

  • Lobster was once considered the “poverty food” of colonial America and was often reserved for prisoners and servants; now it’s a coveted luxury, especially around festive occasions.
  • Macaroni and cheese dates back to early European kitchens, but the modern American version with elbow pasta and a cheese sauce became popular in the 18th and 19th centuries, evolving into countless regional riffs—this lobster variation is one of the most elegant evolutions.
  • Beurre monté and béchamel are age-old French techniques that lend this recipe a silky harmony. Mastery of the roux is what ensures the sauce coats the pasta without separating, even as it basks in cheese’s molten glow.
  • A crusted top isn’t just for texture; it’s a signal to the senses—the crack of crisp breadcrumbs releasing a toasty aroma that rounds out the creamy center and invites another generous scoop.
  • Pairing traditions matter: sparkling wines or a bright white with a touch of citrus can elevate shellfish-rich dishes by cleansing the palate between bites, making each mouthful feel as fresh as the first.

Ingredients

Lobster & Seafood

  • – 1 lb (450 g) cooked lobster meat, chopped into bite-sized pieces
    → Lobster provides the star protein and rich, sweet flavor. Use fresh cooked meat from a lobster or fully thawed frozen meat if needed. Chop into uniform bite-sized pieces so every bite has lobster without large chunks that are hard to eat. If you have a mix of tail and claw, keep larger pieces from the tail intact for textural variety.

Pasta

  • – 1 lb (450 g) elbow macaroni or small shells, dry
    → The pasta forms the body of the dish. Cook until al dente just before it’s fully tender to account for carryover cooking when folded into the hot cheese sauce. Reserve 1/2 cup pasta water to loosen the sauce if needed. Do not rinse after boiling to keep starch for emulsification.

Cheese Sauce Base

  • – 4 tablespoons (1/4 cup) unsalted butter
    → Base fat to create a smooth roux that thickens the cheese sauce. Melt gently over medium-low heat to avoid browning; whisk in flour to form a light, sandy roux that will not taste floury.
  • – 1/4 cup all-purpose flour
    → Acts as the thickening agent forming the roux with butter. Sift to remove lumps if necessary and cook briefly (1–2 minutes) to remove raw flour taste before adding liquids.
  • – 2 cups whole milk
    → Provides body and creaminess to the cheese sauce without making it overly rich. Warm before whisking into the roux to prevent curdling; if you only have 2% milk, you may thicken with extra cheese and a splash of cream.
  • – 1 cup heavy cream
    → Adds luxurious silkiness and helps stabilize the emulsified cheese sauce. For a lighter version, substitute an additional 1/2 cup milk but add a bit more cheese to maintain creaminess.
  • – 2 cups shredded sharp cheddar cheese
    → Provides bold cheddar flavor and a gooey melt. Shred from a block rather than using pre-shredded to avoid anti-caking agents that can hinder melting. Stir in gradually over low heat to prevent oil separation (the “oil slick”).
  • – 1 cup shredded Gruyere or fontina cheese
    → Adds subtle nuttiness and a mellower melt that complements the cheddar. Gruyere and fontina melt smoothly and contribute creaminess without overpowering the lobster. Use freshly shredded for best texture.
  • – 2 oz cream cheese (optional)
    → Extra creaminess and a silkier sauce; this helps emulsify and stabilize the cheese melt. Soften at room temperature before whisking into the sauce to avoid clumping.
  • – 1 teaspoon Dijon mustard
    → Brightens the cheese sauce and helps balance richness with a slight tang. Stir in with the roux before adding milk to distribute evenly.
  • – 2 cloves garlic, minced
    → Adds aromatic depth that complements the lobster. Sauté in the butter with the roux for a minute to release the aroma; for milder garlic, blanch briefly in warm milk rather than sautéing with butter.
  • – 1/4 teaspoon ground white pepper or black pepper
    → Enhances seasoning without adding color; white pepper keeps a clean sauce look. Adjust to taste after sauce thickens.
  • – Pinch of ground nutmeg
    → Classic mac and cheese flavor note that adds warmth and rounds the cheese. Use freshly grated nutmeg if possible for a more vibrant aroma.
  • – 1/4 teaspoon paprika or optional cayenne
    → Adds a hint of color and subtle warmth; adjust to heat tolerance. Cayenne will make the dish spicier; paprika is milder for a more family-friendly version.
  • – Salt to taste
    → The sauce will need salt to bring out the cheese flavors; add gradually after tasting the sauce since the cheese may already be seasoned. Remember the pasta water likely contains salt too, so adjust accordingly.

Toppings & Finish

  • – 1 cup panko breadcrumbs
    → Creates a crunchy top layer when baked. For extra crunch, mix with the melted butter before sprinkling over the dish; use light, dry breadcrumbs to avoid sogginess.
  • – 2 tablespoons unsalted butter, melted
    → Binds breadcrumbs with fat for a crisp, golden topping. Drizzle over breadcrumbs and toss to coat evenly if using buttered breadcrumbs; this helps achieve uniform browning in the oven.
  • – 1/4 cup grated Parmesan (optional)
    → Adds a sharp, salty note that complements the lobster and cheese sauce. Combine with breadcrumbs or sprinkle on top just before baking for a crisp crust.
  • – 2 tablespoons chopped fresh parsley (optional)
    → Fresh herb finish that brightens the dish and adds color. Add after baking for a fresh aroma, or mix into the breadcrumbs for a green speckle throughout the top.

Seasonings & Aromatics

  • – 1 teaspoon Old Bay seasoning (optional)
    → Classic seafood seasoning that enhances the lobster flavor without overpowering the dish. Use sparingly and adjust to taste; omit if you prefer a milder flavor or if you have dietary restrictions.
  • – Salt and black pepper to taste
    → Essential seasoning to balance the rich sauce and seafood. Season gradually, tasting as you go, because the lobster and cheese both contribute saltiness. Use white pepper if you want minimal visibility in the sauce.
  • – Zest of 1 lemon (about 1 teaspoon)
    → A bright citrus note that cuts fatty richness and refreshes the palate. Add to the sauce early for integrated aroma or sprinkle over the baked dish just before serving for a clean citrus aroma.
  • – 1 tablespoon lemon juice (optional)
    → Adds a touch of acidity to balance the richness; add at the end to taste to avoid curdling the sauce. Use fresh lemon for best brightness.

Instructions

  • Preheat your oven to 350°F (175°C) and lightly grease a 9×13-inch baking dish or line it with parchment; this ensures even heat transfer and easy removal of the finished dish.
    → A well-prepared pan prevents sticking and promotes uniform browning across the top and edges.
  • Bring a large pot of salted water to a rolling boil and cook the pasta until just al dente, about 1–2 minutes before the package directions; reserve 1/2 cup of the starchy pasta water and do not rinse the pasta.
    → Starch on the surface helps the sauce emulsify and cling to the noodles; the reserved water can loosen the sauce if it thickens too much.
  • Prepare the lobster meat by patting dry and ensuring bite-sized pieces; if tail pieces are larger, keep them a bit bigger for texture but trim any cartilage or shell fragments for clean bites.
    → Uniform pieces ensure even distribution and pleasant mouthfeel in every forkful.
  • In a heavy-bottom saucepan, melt 4 tablespoons (1/4 cup) unsalted butter over medium-low heat and whisk in 1/4 cup all-purpose flour to form a light roux; cook for 1–2 minutes, whisking constantly, until the mixture is pale and not browned.
    → The roux thickens the sauce and provides a smooth foundation without raw flour taste; avoid browning to keep the sauce silky.
  • Add the minced garlic to the roux and sauté for about 30–60 seconds until fragrant; keep the heat moderate to prevent scorching and bitterness.
    → Garlic flavor should be aromatic and integrated, not burnt, which would impart a bitter note to the sauce.
  • Whisk in 2 cups whole milk and 1 cup heavy cream gradually, heating the mixture until it is steaming and begins to thicken; do not boil vigorously to prevent curdling and separation.
    → A gentle simmer thickens the béchamel while preserving a glossy, cohesive sauce that coats the pasta evenly.
  • Stir in 1 teaspoon Dijon mustard, 1/4 teaspoon ground nutmeg, 1/4 teaspoon paprika (or cayenne if you want heat), and 1/4 teaspoon white pepper; season with salt to taste, and add 1 teaspoon lemon zest; consider adding up to 1 teaspoon Old Bay for a classic seafood kiss.
    → These aromatics sharpen and balance the richness, with lemon zest brightening the sauce and Old Bay enhancing the lobster’s flavor without overpowering it.
  • Reduce the heat to low and gradually fold in 2 cups shredded sharp cheddar and 1 cup shredded Gruyère (or fontina); if using 2 oz cream cheese, whisk it in after softening at room temperature; continue stirring until the cheese is completely melted and the sauce is smooth.
    → Gentle cheese incorporation prevents oil separation and yields a velvety, cohesive sauce that clings to the pasta.
  • If the sauce seems too thick, loosen with small additions of the reserved pasta water or a splash of milk, mixing until the sauce coats the back of a spoon; taste and adjust salt as needed since the cheese and lobster will contribute saltiness.
    → Proper thickness ensures a luscious coating without weighing down the pasta, and tasting early avoids over-salting later.
  • Gently fold in the lobster meat until evenly distributed, then fold in the drained pasta, using tongs to lift and turn until every noodle is coated with sauce.
    → Gentle folding preserves the lobster texture and ensures even sauce coverage on every bite.
  • Spread the lobster-cheese mixture into the prepared baking dish in an even layer; this promotes uniform heating and caramelization around the edges.
    → A level surface ensures consistent baking and a cohesive slice when serving.
  • Prepare the topping by mixing 1 cup bread crumbs (panko preferred) with 2 tablespoons melted butter and 1/4 cup grated Parmesan; evenly sprinkle the topping over the pasta; optional fresh parsley can be stirred into the crumbs for color.
    → The buttery breadcrumbs create a crisp, golden crust that contrasts with the creamy interior, enhancing texture and flavor.
  • Bake in the 350°F (175°C) oven for 20–25 minutes, until the top is golden and the filling is bubbling around the edges; if you desire a deeper crust, broil for 1–2 minutes at the end, watching closely to prevent burning.
    → Baking sets the sauce and cheese, while a brief broil deepens browning for a professional, restaurant-style finish.
  • Remove from the oven and allow the dish to rest for 5–10 minutes before serving to help the sauce set slightly for clean slicing; garnish with extra lemon zest or chopped parsley if desired.
    → Resting improves portioning and helps the sauce re-bind, making each serving smoother and more visually appealing.

Notes

This lobster mac and cheese is a luxurious, crowd-pleasing dish that pairs succulent lobster with a silky three-cheese sauce. For best texture, use freshly cooked lobster meat chopped into bite-sized pieces and keep larger tail pieces intact for variety. Cook the pasta to al dente and reserve 1/2 cup of the pasta water; do not rinse after boiling to preserve starch that helps emulsify the sauce. Melt the butter gently to form a light roux, whisk in the flour, then whisk in warm milk and heavy cream before gradually melting in cheddar and Gruyere (or fontina) to create a smooth, glossy sauce. Finish with Dijon, minced garlic, white pepper, a pinch of nutmeg, and a touch of paprika or cayenne, then season with salt to taste after tasting, since the lobster and pasta water contribute saltiness. A bright note from lemon zest and lemon juice helps cut the richness and keep the dish vibrant.

Tips for texture and adaptations: to make this gluten-free, use gluten-free pasta and replace the all-purpose flour with a gluten-free flour blend or a light cornstarch slurry; omit or replace the breadcrumbs with gluten-free crumbs. If you prefer a lighter version, reduce the butter and cream and compensate with more milk while maintaining enough cheese for creaminess. For a crisp top, toss panko with melted butter and a little Parmesan, then bake until golden, or finish with a quick broil. Leftovers store well in the refrigerator for up to 3 days and reheat gently in the oven or on the stove with a splash of milk to restore creaminess. Finish with extra lemon zest and chopped parsley for a fresh aroma just before serving. Always taste and adjust salt at the end, since cheese and lobster can vary in saltiness.

Tips

Tips for Lobster Mac and Cheese

1) Lobster selection and prep

  • Use fresh-cooked lobster meat when possible for the best flavor; fully thaw frozen meat and pat dry before using.
  • Chop lobster into uniform bite-sized pieces so every bite has lobster, and reserve some larger tail pieces for textural variety.
  • If you have mixture of tail and claw meat, keep larger tail chunks intact for visual appeal and chew.

2) Pasta preparation

  • Cook the pasta until just under al dente; it will finish cooking in the hot sauce and baking step.
  • Reserve 1/2 cup of the starchy pasta water to loosen the sauce if needed.
  • Do not rinse the pasta after boiling to keep starch that helps emulsify the cheese sauce.

3) Making a smooth cheese sauce (roux-based)

  • Melt butter over medium-low heat to avoid browning; whisk in flour to form a light roux that won’t taste raw.
  • Warm the milk and cream before adding to the roux to prevent curdling and help the sauce emulsify smoothly.
  • Add cheeses gradually, off the heat if possible, to prevent oil separation and ensure a glossy sauce.
  • Stir in Dijon mustard early to distribute its tang evenly; add garlic with the roux so it releases aroma without burning.
  • Keep heat low to medium and avoid boiling once the cheese is melted to prevent separation.

4) Seasoning and balancing flavor

  • Season gradually; the cheese and lobster add salt, so adjust salt at the end after tasting the sauce.
  • White pepper keeps a clean look in the sauce; nutmeg adds warmth—use freshly grated if possible.
  • Old Bay is optional but enhances seafood flavor; lemon zest brightens the dish, and lemon juice can be added at the end to taste to avoid curdling.

5) Incorporating lobster with the sauce

  • Fold lobster into the hot sauce off the heat to avoid overcooking the meat; reserve some pieces for topping if desired.
  • Be gentle when mixing to prevent broken pieces from turning mushy.

6) Topping and finishing nicely

  • For a crunchy top, use panko breadcrumbs mixed with melted butter; a sprinkle of Parmesan adds extra toasty flavor.
  • Uniformly coat breadcrumbs with melted butter to promote even browning; bake uncovered until golden and crisp.
  • Fresh parsley adds color and brightness—stir in after baking or sprinkle on top just before serving.

7) Seasonings and aromatics

  • Adjust Old Bay to taste; it enhances seafood flavor without overpowering the cheese.
  • Lemon zest and juice provide a refreshing contrast to the richness—add zest early for integrated aroma or finish with a squeeze just before serving.

8) Make-ahead, storage, and reheating

  • Prepare components ahead: sauce, pasta, and lobster; assemble just before baking if you want a crisp topping.
  • Leftovers store well in the fridge for 2–3 days; reheat gently in the oven with a splash of milk to restore creaminess.

FAQ

What is lobster mac and cheese?

A luxurious comfort dish that folds tender lobster meat into a creamy, cheesy sauce with pasta, usually finished with a buttered breadcrumb topping and baked until bubbly and golden.

What ingredients do I need?

Common ingredients include:

  • 1 lb lobster meat (about 2 cups chopped)
  • 1 lb pasta (elbow macaroni or shells)
  • 2 cups milk and 1 cup heavy cream
  • 4 tbsp butter and 4 tbsp flour (for a roux)
  • 2–3 cups shredded cheese (a mix of sharp cheddar with Gruyère or fontina; finish with parmesan)
  • 2 garlic cloves (optional)
  • Salt, pepper, and a pinch of cayenne or paprika
  • 1/2 cup dry white wine (optional)
  • 1/2 cup breadcrumbs and 1–2 tbsp melted butter (topping)
  • Fresh herbs like thyme or chives (optional)
Should I use fresh lobster or can I use pre-cooked?

Fresh lobster yields the best texture and flavor. You can use pre-cooked lobster meat or frozen lobster; thaw thoroughly and pat dry before adding to the pasta. If using live lobsters, boil or steam until just cooked, then remove meat.

How do I make the cheese sauce (béchamel)?

Make a smooth béchamel:

  • In a saucepan, melt 4 tbsp butter over medium heat.
  • Whisk in 4 tbsp flour to make a roux; cook 1–2 minutes (do not brown).
  • Gradually whisk in 2 cups milk and 1 cup cream; simmer until thick and smooth.
  • Season with salt, pepper, garlic, and a pinch of cayenne or paprika. Remove from heat and gradually stir in the shredded cheeses until melted. Add white wine if using for extra brightness.
How do I bake lobster mac and cheese?

Steps:

  • Cook pasta in salted water until just under al dente, then drain.
  • Fold the lobster meat into the cheese sauce, then combine with the hot pasta.
  • Transfer to a buttered baking dish. Mix breadcrumbs with melted butter and parmesan, then sprinkle on top.
  • Bake in a preheated 375–400°F (190–200°C) oven for 15–25 minutes, until bubbling and golden. For extra crust, broil briefly at the end.
How do I prevent the sauce from separating or curdling?

Tips:

  • Keep heat moderate and cook the béchamel slowly; don’t boil once the cheese is added.
  • Add cheese gradually off the heat to prevent clumping, and use a smooth, well-emulsified sauce.
  • Stir pasta and lobster into the sauce gently to avoid breaking the sauce.
Can I make this ahead or freeze it?

Yes:

  • Make the sauce and lobster up to a day ahead, then refrigerate. Assemble with pasta just before baking.
  • For freezing, freeze the assembled unbaked dish tightly wrapped. Thaw overnight in the fridge, then bake as directed (add 5–10 minutes if chilled).
  • When freezing, you may need a bit more liquid or a longer bake time to ensure the center is heated through.
What substitutions or variations work (gluten-free, dairy-free, etc.)?

Variations:

  • Gluten-free: use gluten-free pasta and gluten-free breadcrumbs.
  • Dairy-free: use dairy-free milk (almond, oat, or soy) and dairy-free cheese; use a dairy-free butter or oil and a gluten-free roux (starch-based sauce).
  • Flavor twists: add a pinch of truffle oil, smoked paprika, or a splash of white wine for depth; folded in finely chopped herbs for brightness.
What cheeses work best and how much should I use?

Best melting combo: 2 cups sharp cheddar for bite + 1 cup Gruyère or fontina for melt, finished with ½ cup grated Parmesan for depth. Total cheese: about 2–3 cups, adjust to taste. Use grated or shredded cheeses for smooth melting.

How do I store leftovers and reheat them?

Storage and reheating tips:

  • Cool to room temperature, then refrigerate in an airtight container up to 3–4 days.
  • Reheat in a 350°F (175°C) oven for 15–20 minutes, covered with foil, until hot and bubbly. Re-crisp the top under the broiler for 1–2 minutes if desired.
  • Microwave reheats quickly but can make the top soggy; if using, cover and heat in short intervals.

Introduction / Hook

Close your eyes for a moment and let the scent of the sea wash over you in a single, shimmering memory. A plate appears, twinkling with the glow of a coastal sunset: velvet strands of pasta wrapped around succulent morsels of lobster, a glossy sauce that clings like silk, and a whisper of citrus that cuts through the richness with a bright, cheerful zing. This isn’t just dinner; it’s a gateway to a seaside celebration you can summon any night of the week. Lobster pasta is one of those rare dishes that feels indulgent without being complicated, glamorous without pretension, and deeply comforting without ever tipping into heaviness. Every forkful carries a little piece of the ocean’s mystery—somewhere between the way the lobster meat stays tender and the way the sauce envelops the pasta so gracefully that time slows down just enough to savor the moment.

Imagine dining in a sunlit kitchen where the hum of a small town comes through the window: a chorus of clinking glasses, the distant chatter of neighbors, and the soft hiss of something wonderful coming together on the stove. The dish invites you to linger—to lean into a simple, well-balanced marriage of briny sweetness, creamy lushness, and a spark of brightness that keeps you reaching for just one more bite. It’s the kind of plate you want to share with someone you love, yet sturdy enough to serve as a showpiece for a weeknight treat or a special occasion. Lobster pasta has a way of turning ordinary evenings into memories, of transforming routine meals into something you’ll tell stories about later. In short, it’s comfort with couture, elegance with ease, and flavor that feels both timeless and thrillingly new.

This is a dish designed to celebrate craft—how a few high-quality ingredients, treated with respect and attention, can become something greater than the sum of their parts. It’s about savoring the briny sweetness of the sea and the comforting, almost nostalgic pull of well-made pasta, all brought together with a glossy, mouthwatering finish that makes every bite feel like a small celebration. Whether you’re feeding a family, hosting friends, or treating yourself to a restaurant-quality moment at home, lobster pasta stands ready to deliver a dining experience that’s worth lingering over. And the best part? It can be as quick as a weeknight and as luxurious as a weekend feast, depending on how you pace the prep and what you decide to pair with it. The journey from pan to plate becomes a little ritual of delight, a reminder that good food can be both an intimate ritual and a shared joy.

As you read on, you’ll discover not only the sensory magic of this dish but also the stories, textures, and techniques that make it robust yet approachable. You’ll learn how the dish balances oceanic sweetness with bright acidity, how the sauce clings to each strand of pasta without pooling, and how lobster’s natural sweetness is allowed to shine without being overwhelmed. This isn’t merely about following steps; it’s about inviting a sense of place into your kitchen—the harbor, the kitchen table, the clink of wine glasses, the whisper of a seaside breeze. And the best part is that you can adapt it to your own pantry, your dietary preferences, and your mood, without sacrificing the charm or the payoff. So, take a breath, imagine that first perfect bite, and embark on a culinary voyage that promises to be memorable, satisfying, and absolutely delicious.

The Story Behind the Dish

The lineage of lobster pasta is a romance between coastal abundance and Italian culinary craft. It’s the kind of dish that feels both timeless and modern because it sits at the crossroads of two great culinary traditions. On one shore you have regions where lobster is celebrated as a jewel of the sea—prepared simply to let its natural sweetness shine, with a light hand, in a way that honors the crab or crustacean’s delicate texture. On the other shore you have kitchens that prize a silky, cohesive sauce that keeps every strand of pasta contentedly coated, so nothing feels dry or separate. When these sensibilities meet, lobster pasta is born: a dish that speaks of sea air and sunlit kitchens, of long conversations over a shared plate, of family gatherings where everyone leans in to savor each bite.

There’s a charming anecdote often told in harbor towns: the first time a chef paired a lobster main with a simple, unadorned pasta, the room quieted as diners realized that luxury can live in restraint. The lobster’s sweetness carried the dish, while a modest, well-balanced sauce offered a satin backdrop that allowed the flavors to breathe rather than compete. Over generations, cooks refined the approach, discovering that a light aromatics strategy, a gentle simmer, and a careful reduction could elevate the dish without masking the lobster’s character. This story echoes in coastal communities around the world, where sea-breeze afternoons blur into evenings of convivial meals and the clatter of plates becomes a hymn to shared delight.

Culturally, this dish embodies a spirit of fusion—an appreciation for seafood’s natural superiority married to the comforting familiarity of pasta. It’s emblematic of how food travels, how chefs borrow and blend ideas across oceans and cuisines, and how a single plate can evoke a sense of place. In many homes, lobster pasta is reserved for holidays or celebratory dinners, but its essence is accessible: it invites you to slow down, to savor, and to enjoy the artistry of turning a few pristine ingredients into something greater than a momentary indulgence. The dish’s popularity also reflects a broader culinary truth: the best seafood dishes don’t rely on complexity for impact. They rely on balance, technique, and generosity of spirit—the kind of generosity that invites you to share, to smile after the first bite, and to remember that good food can make ordinary days feel special.

As you explore this recipe, you may notice echoes of coastal memories—salt on your lips after a swim, the warm glow of a kitchen window at dusk, the soft clink of a wine glass. The dish becomes a canvas on which you can project your own memories and preferences. It welcomes improvisation in the most comforting way: you can choose different shapes of pasta to alter texture, adjust the balance of richness and brightness to suit your palate, or add a subtle accent that nods to regional flavors you love. The beauty lies in its adaptability, in how a simple, well-executed dish can carry the weight of tradition while inviting personal expression. The lobster itself is the star, but it’s the way the entire plate comes together—via a glossy, envelope-like sauce that grips every strand, with the lobster’s tender morsels punctuating the bite—that truly tells the story of this dish.

Why You’ll Love This Recipe

  • Effort-to-delight ratio that feels special without being intimidating, making it perfect for both weeknights and celebrations.
  • A luxurious yet approachable seafood dish that showcases the sweetness of lobster without overpowering the pasta.
  • A velvety, glossy sauce that clings to every strand, delivering a cohesive bite each time you lift your fork.
  • Balanced flavors that pair briny, oceanic notes with bright citrus or herbal lift, creating a multi-dimensional tasting experience.
  • Comforting textures: the tender meat of lobster, the satisfying bite of al dente pasta, and the smoothness of a carefully emulsified sauce.
  • Versatility in presentation—from an elegant plated dinner to a cozy family-style meal with generous portions.
  • Flexible to dietary needs with potential for dairy-free, gluten-free, or plant-forward adaptations without sacrificing flavor.
  • Excellent runner for entertaining guests, as it feels sophisticated while still being achievable with patience and care.
  • Pairing-friendly profile that plays well with light white wines, crisp greens, and simple side dishes or desserts.
  • A sense of occasion: the dish signals care and celebration, even when prepared for a quiet, intimate dinner at home.

Flavor Profile & Texture

At its core, lobster pasta is a study in balance. The lobster meat lends a natural sweetness and a delicate, almost candy-like bite that remains tender against heat and time. The pasta provides a comforting, familiar foundation—plump, strand-like ribbons that coil around the fork with ease, offering a pleasing chew that sustains the luxurious bite. The sauce, when done well, is a glossy, almost satin-like curtain that gathers on each strand, transforming the entire mouthful into one cohesive moment rather than a sequence of separate flavors. The sea-salted umami of the lobster is tempered by a gentle richness, often achieved through a smooth emulsification. What makes this dish sing, however, is the brightness that dances across the palate—hint of citrus, a tincture of herb, a whisper of aromatic acidity that lifts the entire plate without stealing from the lobster’s sweetness.

Texture-wise, expect a luscious mouthfeel with a gentle, lingering finish. The pasta should be tender but not mushy, holding its shape and allowing the sauce to cling. The lobster chunks, if cut into bite-sized morsels, provide bursts of succulent texture—slightly firmer than the surrounding meat—creating moments of contrast that keep the eating experience dynamic. The sauce itself offers a silkiness that coats without heaviness, a balance of dairy-like creaminess and lighter, more translucent elements that keep the dish from tipping into richness overload. In many renditions, a subtle ring of emulsified liquid—perhaps a touch of the seas or a delicate reduction—gives the dish a lift that makes every mouthful feel alive and bright. When you pair the dish with a quick squeeze of citrus or a fresh herb note, you invite a crispness that awakens the senses and keeps the flavors vivid from first bite to last.

The seafood sweetness, the starch of the pasta, and the glossy finish of the sauce work in harmony to deliver a plate that feels simultaneously indulgent and refined. The aromatics—though not overpowering—provide a gentle perfume that lingers after the plate is cleared, inviting you to take another bite and another, as if the dish itself were telling a slow, delicious story. In practice, you’ll experience a progression: a first impression of velvety indulgence, followed by a mid-palate balance where the brininess of the sea meets the comforting depth of the sauce, and finally a bright, lingering finish that leaves a memory of ocean air and home-cooked warmth. This is the kind of dish that rewards those who savor the moment and appreciate the subtle craft that makes every element feel intentional and well-tuned.

Occasions & Pairings

This lobster pasta shines in a variety of settings, from festive dinners to quiet weeknights where you want a little luxury without a long prep timeline. It works beautifully as the centerpiece for a family celebration, a date night at home, or a dinner party where you want to impress without overwhelming your guests with complexity. Because the dish holds onto the lobster’s sweetness and doesn’t rely on heavy sauces, it also serves as a forgiving platform for a range of wine pairings and side dishes. A light, crisp white wine or a delicately fragrant sparkling option can complement the dish without competing with the seafood’s character. For sides, consider a simple green salad with a tart vinaigrette, a loaf of crusty bread to catch every drop of sauce, or a delicate vegetable sauté that brings color and balance to the plate.

If you’re planning a holiday dinner or a special weekend meal, this dish can act as a showpiece while still feeling approachable. It pairs nicely with courses that echo the same balance—light antipasti, a fresh caprese-style presentation, or a simple citrus-based appetizer to mirror the dish’s brightness. For a more robust pairing, you could choose a slightly fuller white wine with just a touch more body, or a light, dry sparkling wine that adds a celebratory sparkle to the table. Dessert can be something simple and refreshing, like a citrus-forward sorbet or a light, fruit-driven pastry that cleanses the palate after a rich, comforting main.

For everyday enjoyment, this dish becomes a little ritual: you plan a quiet evening, you select a good piece of seafood for freshness, you plate with care, and you let the sauce do the talking. It’s a reminder that a delicious, satisfying meal doesn’t always require grand gestures—sometimes it’s the quiet confidence of a well-executed plate that makes the biggest impression. And if you want to tailor the dish to your preferences, you can pair it with simpler, freer sides or build a multi-course menu that doesn’t overwhelm the palate but rather celebrates the stars of the dish: the lobster, the pasta, the silky sauce, and the gentle brightness that ties everything together.

Tips, Variations & Substitutions

  • Make it dairy-light or dairy-free: employ a silky emulsion that relies on a touch of a dairy-free option, or use olive oil-based finishing to preserve gloss and mouthfeel without dairy.
  • Pasta options: while classic long pasta is a favorite, you can experiment with broader ribbons or even shaped pasta to alter texture. Different shapes hold the sauce in unique ways, creating new bite experiences.
  • Seafood variations: if lobster isn’t available, a combination of other shellfish or a robust white fish can offer a similar seafood-forward profile, though flavor and texture will shift accordingly.
  • Gluten-free approach: choose gluten-free pasta that maintains a satisfying bite and texture; the sauce’s viscosity will help keep the coating intact.
  • Herbal and citrus accents: keep notes light and fresh. A few zest shavings or a gentle herbal finish can lift the dish without overpowering the seafood’s sweetness.
  • Regional twists: add a hint of a distant coastal influence by incorporating a subtle, peppery note or a small amount of a regional aromatic to nod to tradition without crowding the lobster’s character.
  • Make-ahead versatility: prepare a portion of the sauce in advance and reheat gently, finishing with fresh pasta to maintain texture and brightness. This approach helps when you’re entertaining and want to serve a hot plate without last-minute stress.

Storage & Make-Ahead Ideas

For leftovers, store the cooked pasta and lobster separately from any sauce in airtight containers in the refrigerator for up to a couple of days. When reheating, warm the sauce gently in a pan to coax its gloss back, then toss with fresh, hot pasta to bring the dish back to life. If you’ve prepared a larger batch, you can freeze the sauce portion for a future meal, keeping in mind that seafood flavors can shift slightly after freezing and thawing. Reheat slowly to preserve its delicate balance and avoid breaking the sauce’s emulsion. If you’re making this ahead for a party, consider cooking the pasta to al dente and finishing the dish with the lobster and sauce just before serving, ensuring the pasta resents less time soaking in moisture and maintains a desirable bite and sheen.

To keep everything vibrant for guests, you can offer a finishing station: a little zest of citrus, a handful of chopped herbs, and a light drizzle of the finishing sauce on top at the last moment. This preserves the experience of a freshly made plate and gives everyone the sense that they’re watching a chef’s workshop unfold, even in the comfort of a home kitchen. If you’re eager to keep the lobster whole and impressive, you can portion the meat into large chunks and plate with minimal mixing, letting guests scoop as they desire, creating an element of theater at the table. For those who want to minimize mess, pre-toss the pasta with a small amount of sauce and keep the rest on the side for a quick finish at the table. The key is to respect the texture of the lobster and the silkiness of the sauce, avoiding over-mixing or overcooking, which can dull the luxury of the dish.

Fun Facts & Trivia (Optional)

  • Lobster has long been considered a luxury food in many regions, but its availability has made it a celebrated staple for seafood lovers around the world.
  • The idea of pasta pairing with seafood has deep roots in both Italian and Mediterranean culinary traditions, reflecting a preference for simple, expressive flavors that let the ingredients speak for themselves.
  • The gloss on the sauce often comes from an emulsification process that blends fats and liquids into a cohesive, velvety finish—an ancient technique that remains central to many seafood pastas.
  • Lobster meat is naturally forgiving when prepared correctly, offering a delicate sweetness that carries well with lighter sauces and a gentle acidity to keep flavors buoyant.
  • The dish embodies the idea that simplicity can deliver grandeur—minimalist ingredients treated with care can result in a memorable, restaurant-worthy experience at home.

Ingredients

Lobster Pasta

Lobster Prep

  • 12 oz cooked lobster meat, roughly chopped
    → The star protein of the dish; chop into bite-sized pieces so they distribute evenly through the pasta. If you only have claw meat, that’s fine too. If starting from raw lobster, cook until just opaque, remove the meat from the shell, and pat dry before adding to the sauce to avoid thinning it.

Pasta and Base

  • 12 oz linguine or spaghetti (uncooked)
    → The pasta base that will carry and cling to the lobster sauce. Cook in well-salted water until al dente. Reserve about 1 cup of the starchy cooking water before draining to adjust sauce consistency later if needed.
  • 2 tablespoons extra-virgin olive oil
    → Used to coat the pan and begin the aromatics without burning the garlic. High-quality olive oil adds fruity, fresh notes to the sauce. Heat over medium before adding aromatics.
  • 2 tablespoons unsalted butter
    → Adds richness and helps emulsify the sauce as it finishes. Add after sautéing aromatics to prevent browning the garlic and shallot; swirl to distribute evenly for a glossy finish.
  • 3 cloves garlic, minced
    → Provides the savory foundation for the sauce. Mince finely so the garlic dissolves evenly; avoid letting it brown harshly, which can introduce bitterness.
  • 1 shallot, minced
    → Introduces a subtle sweetness and depth beyond onion. Sauté with the garlic until translucent and fragrant; if you don’t have shallot, substitute with 1/4 onion.
  • 1/2 cup dry white wine
    → Deglazes the pan and lifts any browned bits (fond) from the aromatics and shell flavor, adding acidity to balance richness. Allow it to reduce by about half to concentrate flavor before adding the stock.
  • 1 cup seafood stock or clam juice
    → Builds body and depth in the sauce with a hint of oceanic flavor. Use a stock you enjoy sipping; if salty, reduce salt in the final seasonings. Simmer briefly to reduce slightly before adding cream.
  • 1 cup heavy cream
    → Creates the creamy, luscious sauce that coats the pasta and lobster. For a lighter version, substitute with half-and-half, but note the sauce won’t be as thick. Do not boil vigorously after adding cream to prevent curdling; keep at a gentle simmer.
  • 1 cup crushed tomatoes or halved cherry tomatoes
    → Adds color, acidity, and a touch of brightness. Crushed tomatoes give a bit more body; fresh cherry tomatoes offer a sweeter, fresher note when simmered briefly with the sauce.
  • 1/2 teaspoon red pepper flakes
    → Introduces a subtle warmth to complement the lobster without overpowering it. Adjust to taste; start with a little and add more if you want more heat.
  • Zest of 1 lemon and 1 tablespoon lemon juice
    → Brightens the rich sauce and enhances the seafood’s sweetness. Add zest toward the end of cooking for aroma and stir in lemon juice just before serving to keep the brightness intact.
  • 1/2 cup freshly grated Parmesan cheese
    → Adds salty, nutty depth that helps thicken and finish the sauce. Best when grated fresh from a block; stir in off the heat to prevent clumping and to preserve flavor.
  • 2 tablespoons chopped fresh parsley
    → Finishes the dish with color and a light, herbaceous note. Stir in at the end to preserve brightness; reserve a little for garnish if desired.
  • Fine sea salt, to taste
    → Seasoning is key to bringing all components together. Start with a small pinch and adjust after tasting, especially since the seafood stock and Parmesan add saltiness.
  • Freshly ground black pepper, to taste
    → Adds a subtle kick that complements the richness. Grind just before serving for maximum aroma and bite.

Optional Add-ins

  • 1/2 cup chopped fresh basil (optional)
    → Basil adds a bright, aromatic note that pairs beautifully with lemon and seafood. Add at the very end to maintain vibrant color and fresh flavor.
  • 1/4 cup grated Pecorino Romano (optional)
    → Provides a sharper, tangier cheese flavor that complements lobster without masking its sweetness. Use sparingly and taste as you go to avoid overpowering the dish.

Instructions

  • Fill a large pot with 4 to 6 quarts of water, salt generously, and bring to a rolling boil so the pasta has enough room to cook evenly and to properly season as it cooks.
    → Well-salted water seasons the pasta from the inside as it cooks and prevents sticking by keeping starch separate.
  • Add 12 oz linguine or spaghetti to the boiling water and cook until al dente according to package instructions, stirring occasionally to prevent sticking; reserve about 1 cup of the cooking water before draining to adjust the sauce later if needed.
    → Saving pasta water provides a starchy, gluten-rich liquid that helps loosen and emulsify the sauce, making it cling to the noodles.
  • Pat the 12 oz cooked lobster meat dry with paper towels and roughy chop if not already; drying and rough chopping ensures even distribution and prevents excess moisture from thinning the sauce.
    → Dry meat re-heats quickly without diluting the sauce; bite-sized pieces ensure lobster appears in every forkful.
  • In a large skillet, heat 2 tablespoons extra-virgin olive oil over medium, swirling to coat the bottom; warming the oil first prevents the aromatics from scorching and gives an even base for the sauce.
    → A properly heated oil foundation prevents raw garlic flavor and builds a glossy base for the sauce.
  • Add 3 minced garlic cloves and 1 minced shallot to the skillet and sauté until just translucent and fragrant, about 2 minutes, stirring frequently and avoiding any browning that would introduce bitterness.
    → Gentle sweating unlocks sweetness and depth without introducing harsh notes from over-browned garlic.
  • Deglaze the pan with 1/2 cup dry white wine, scraping up any browned bits with a wooden spoon, and simmer until the wine reduces by about half to concentrate the aromatics.
    → The fond lifts flavor from the pan and the reduction intensifies acidity to balance richness.
  • Stir in 1 cup seafood stock or clam juice and bring to a gentle simmer; simmer briefly to reduce slightly and build a richer base for the sauce.
    → Stock adds body and oceanic nuance; reduction concentrates those flavors for the final sauce.
  • Pour in 1 cup crushed tomatoes or halved cherry tomatoes and simmer for 5 to 7 minutes, allowing them to soften and integrate color and brightness into the sauce.
    → Tomatoes contribute acidity, sweetness, and body, balancing the richness of cream and lobster.
  • Lower the heat to a gentle simmer and whisk in 1 cup heavy cream, maintaining a steady, just-bubbling simmer to keep the sauce creamy without curdling.
    → Cream creates the luscious texture that coats the pasta; a gentle simmer preserves silkiness and prevents separation.
  • Stir in the zest of 1 lemon and 1 tablespoon lemon juice, and add 1/2 teaspoon red pepper flakes; combine so the bright citrus and subtle heat lift the seafood while maintaining balance.
    → The acidity from lemon and a hint of heat balance the richness and echo the lemon notes in seafood dishes.
  • Off the heat, whisk in 1/2 cup freshly grated Parmesan cheese until smooth and emulsified, then season with salt to taste; this finishes the sauce with a nutty, salty kiss without clumping.
    → Adding cheese off the heat prevents clumping and preserves flavor; it also helps thicken the sauce slightly for coating.
  • Gently fold in the lobster meat and warm through for 2 to 3 minutes, turning the pieces to heat evenly without overcooking which can make the lobster tough.
    → Lobster retains moisture and tenderness when warmed briefly in the sauce rather than boiled or simmered extensively.
  • Add the drained pasta to the skillet with the sauce and lobster; toss with tongs, gradually adding the reserved pasta water as needed to loosen the sauce and help it cling to the pasta until glossy and evenly coated.
    → Starchy pasta water helps emulsify the sauce and ensures a cohesive, shiny coating on every strand.
  • Season the dish with fine sea salt and freshly ground black pepper to taste, tasting and adjusting as needed after combining the pasta and sauce.
    → Final seasoning balances all components since seafood stock and Parmesan contribute saltiness; taste before serving.
  • Stir in 2 tablespoons chopped fresh parsley at the end for color and a fresh, herbal note, reserving a pinch for garnish if desired.
    → Parsley provides brightness and contrast to the rich sauce; heat can dull herbs, so add at the end.
  • Optionally, if using basil, fold in 1/2 cup chopped fresh basil just before serving to preserve vibrant color and fragrance; or, if you prefer a sharper cheese presence, grate 1/4 cup Pecorino Romano over the top and taste as you go.
    → Basil adds a distinctive citrusy aroma that pairs beautifully with lemon and seafood; Pecorino Romano offers a tangier finish than Parmesan.
  • Divide the lobster pasta among warmed plates, spoon extra sauce over each portion, and finish with a light dusting of lemon zest and a final pinch of parsley for a visually vibrant, aromatic presentation.
    → Serving immediately ensures optimal texture and aroma while the sauce remains glossy and flavorful.

Notes

These lobster pasta dishes are luxurious, crowd-pleasing seafood meals built around tender lobster meat, a silky tomato-cream sauce, and al dente pasta. With a few smart prep steps and careful attention to seasoning, this dish comes together quickly and feels restaurant-worthy at home.

  • Prep the lobster meat first: chop 12 oz of cooked lobster meat into bite-sized pieces so they distribute evenly through the sauce. If you only have claw meat, that works too. If starting from raw lobster, cook until just opaque, remove the meat from the shell, and pat dry before adding to the sauce to avoid thinning the sauce.
  • Cook the pasta in well-salted water until al dente. Reserve about 1 cup of the starchy cooking water before draining; you may need it to loosen the sauce later and help it cling to the pasta.
  • Start the sauce with 2 tablespoons of extra-virgin olive oil and 2 tablespoons of unsalted butter. Sauté the minced garlic and shallot slowly over medium heat until translucent and fragrant, being careful not to brown them, which can introduce bitterness.
  • Deglaze with 1/2 cup dry white wine and simmer until it reduces by about half, concentrating the flavors and lifting any browned bits from the pan.
  • Stir in 1 cup seafood stock or clam juice and 1 cup crushed tomatoes or halved cherry tomatoes. Simmer briefly to meld the flavors; the tomatoes will provide brightness and body to the sauce.
  • Pour in 1 cup heavy cream and maintain a gentle simmer. Do not boil vigorously after adding cream to prevent curdling; if the sauce thickens too much, loosen with a splash of the reserved pasta water.
  • Season with 1/2 teaspoon red pepper flakes, fine sea salt, and freshly ground black pepper to taste. Add the lemon zest of 1 lemon and 1 tablespoon lemon juice toward the end of cooking to brighten the richness.
  • Stir in 1/2 cup freshly grated Parmesan cheese off the heat to create a glossy, silky finish. This helps thicken the sauce and adds a nutty depth without overpowering the lobster.
  • Fold in the lobster pieces and 2 tablespoons chopped fresh parsley just before serving. Taste and adjust seasoning with salt and pepper as needed; reserve a small amount of parsley for garnish if desired.
  • Optional accents: add 1/2 cup chopped fresh basil for a bright herbal note, or 1/4 cup grated Pecorino Romano for a sharper cheese edge. If using Pecorino, add sparingly and adjust salt accordingly.
  • Finishing tips: keep the sauce warm on a very low simmer and add a splash of pasta water if you need to loosen it. Toss the cooked pasta with the sauce over low heat until well coated and glossy.
  • Serving and leftovers: finish with extra lemon zest and parsley. The sauce will thicken as it sits, so a quick rewarm with a splash of pasta water helps restore the silkiness. This dish pairs well with a crisp white wine and crusty bread to mop up the sauce.

Tips

Lobster prep and handling tips

  • Chop the cooked lobster meat into bite-sized pieces so it distributes evenly through the sauce. If you only have claw meat, that’s fine too. If starting from raw lobster, cook until just opaque, remove the meat from the shell, and pat dry before adding to the sauce to prevent thinning the sauce.
  • Pat the lobster dry thoroughly after prepping. Any extra moisture can loosen the sauce and dilute the flavors. If you have time, chilling the meat for 10–15 minutes helps it hold its shape when folded into the hot sauce.

Pasta and base preparation tips

  • Salt the pasta water generously. The pasta itself should taste like the sea, not bland. Aim for the water to taste like the ocean itself, since it’s the primary seasoning for the sauce components.
  • Cook the linguine or spaghetti until al dente, since it will finish cooking in the sauce. Reserve about 1 cup of the starchy cooking water before draining to adjust the sauce consistency if needed.
  • Use high-quality olive oil to build the base flavor. Heat the oil to shimmering but not smoking to prevent burning the garlic and shallot later.
  • When adding butter, do so after the aromatics have softened. This helps emulsify the sauce and keeps it glossy rather than greasy.
  • Mince garlic and shallot finely so they dissolve evenly into the sauce rather than leaving raw bits that can taste sharp.

Sauce development tips

  • Deglaze with dry white wine and reduce by about half to concentrate the acidity and aroma. This step lifts any browned bits from the pan and adds depth to the base.
  • When adding stock and cream, keep the heat moderate and avoid a vigorous boil after cream is added. A gentle simmer helps the sauce emulsify and prevents curdling.
  • Crush the tomatoes for body, or use halved cherry tomatoes for brightness. Simmer just enough to meld their flavor without breaking down too much.
  • Red pepper flakes should be subtle. Start with 1/2 teaspoon and adjust to taste so the heat complements, not overwhelms, the lobster.

Finishing flavors and balance

  • Finish with the zest of 1 lemon and lemon juice just before serving to preserve brightness. Add zest toward the end for aroma and stir in lemon juice off heat to keep the citrus note lively.
  • Stir in freshly grated Parmesan off the heat to avoid clumping and to preserve its nutty aroma. If the sauce thickens too much, splash in a bit of reserved pasta water to loosen.
  • Add chopped fresh parsley at the very end for a bright, herbaceous note and vibrant color. Reserve a small amount for garnish if desired.
  • Season with fine sea salt and freshly ground black pepper to taste, remembering that the stock and cheese add salinity. Taste as you go and adjust in small increments.

Finishing the dish and serving tips

  • Toss the pasta with the sauce in the skillet so the starch helps emulsify the mixture and cling to every strand. If the sauce seems too thick, loosen with a splash of the reserved pasta water.
  • Fold in the lobster meat at the end and heat just to warm through to maintain tenderness; overcooking will make the seafood tough.
  • Garnish with extra parsley, a light dusting of Parmesan, and a final squeeze of lemon juice if desired. Serve immediately for best texture and aroma.

Optional add-ins and substitutions

  • 1/2 cup chopped fresh basil can be added at the very end for a bright, aromatic note; it pairs nicely with lemon and seafood.
  • 1/4 cup grated Pecorino Romano provides a sharper cheese accent. Use sparingly and taste as you go to avoid overpowering the lobster’s sweetness.
  • If you prefer a lighter version, substitute half-and-half for heavy cream, but expect a thinner sauce.

FAQ

What is lobster pasta?

Lobster pasta is a luxurious, comforting dish that features tender lobster meat tossed with pasta in a rich, flavorful sauce made with garlic, butter, white wine, and citrus. It’s commonly made with linguine or fettuccine to hold the sauce nicely.

What ingredients do I need to make lobster pasta?

Common ingredients include:

  • Lobster meat (1–1.5 lb cooked claw/tail meat or lobster tails)
  • Pasta (linguine, fettuccine, or spaghetti)
  • Butter and olive oil
  • Garlic (and optional shallot)
  • Dry white wine
  • Heavy cream or half-and-half
  • Lemon zest and juice
  • Salt, pepper, and red pepper flakes (optional)
  • Fresh parsley and grated Parmesan (optional)
How do I cook the lobster for this dish?

Options:

  • Live lobster: Boil in salted water until shells turn bright red and meat is opaque, about 8–10 minutes for 1 lb lobsters. Let cool, then remove meat from tails and claws and cut into bite-sized pieces.
  • Pre-cooked lobster: Use the meat directly in the sauce or briefly warm it in the sauce at the end.
  • Alternatively, you can steam lobster and then extract the meat.
How do I make the lobster pasta sauce?

In a large skillet, melt butter with a little olive oil. Sauté minced garlic (and shallot if using) until fragrant. Add dry white wine and simmer until reduced by half. Stir in lemon zest and juice, then add cream and simmer 2–3 minutes. Season with salt, pepper, and red pepper flakes if desired. Add the lobster meat to warm through, then toss in the cooked pasta. Finish with chopped parsley and a squeeze of lemon.

Can I use frozen lobster?

Yes. Thaw frozen lobster in the refrigerator overnight. Pat the meat dry before cooking. Do not thaw at room temperature. If using thawed lobster meat, you can skip the initial boiling/steaming step and simply warm the meat in the sauce at the end.

How do I avoid overcooking the lobster?

Cook lobster just until the meat is opaque and firm. When added to the hot sauce, keep the heat moderate and toss gently for 1–2 minutes to warm through without turning rubbery. If you’re using pre-cooked meat, heat it just enough to coat with sauce.

What pasta shape works best for lobster pasta?

Flat, saucy pastas hold the sauce well. Good choices include linguine, fettuccine, or pappardelle. Thick spaghetti can work too. Avoid very delicate shapes that won’t hold onto the sauce.

Can I make this dairy-free or gluten-free?

Yes:

  • Dairy-free: Use olive oil or a dairy-free butter substitute and replace cream with coconut cream or a dairy-free milk, thickened slightly with a slurry of cornstarch.
  • Gluten-free: Use gluten-free pasta and check that any added products (parmesan, stock) are gluten-free.
Can I prepare this in advance or store leftovers?

Keep sauce and lobster separate from cooked pasta if planning ahead. Reheat sauce gently and toss with freshly cooked al dente pasta when serving. Leftovers can be refrigerated for 1–2 days in an airtight container. Do not freeze pasta with the cream sauce, as it can separate.

What are good serving suggestions and wine pairings?

Serve with a light salad and crusty bread to mop up the sauce. For wine, try a dry white such as Chardonnay, Sauvignon Blanc, or Pinot Grigio. A sparkling wine or Prosecco also pairs nicely with the richness of lobster pasta.

Introduction / Hook

Close your eyes and imagine the scent of the sea carried on a gentle breeze, the soft crackle of a warm buttered bun meeting a treasure of sweet, succulent lobster meat, and a bright whisper of summer lemon kissing every bite. A lobster roll is more than a sandwich; it’s a coastal ritual, a celebration of peak-season ingredients, and a reminder that simple things, when treated with care, become transportive. In a single mouthful, you travel from a sunlit shoreline to a bustling seaside shack, from childhood picnics to weekend indulgence, all without leaving your kitchen. This dish is the culinary equivalent of a postcard—memories folded into a crusty bun, the ocean’s generosity translated into a creamy, citrus-touched richness, and a playful crunch that keeps you coming back for more.

What makes a lobster roll sing isn’t just the lobster itself, but the way its flavors are balanced and the textures thoughtfully layered. It’s about how the meat remains tender and glossy, how the bread achieves a delicate kiss of golden butter without surrendering its own character, and how a zing of citrus or a hint of mild sweetness from fine herbs can elevate the experience. It’s about restraint and respect: knowing when to let the lobster shine, when to add a whisper of mayo or a pat of butter, and when to tuck the whole thing into a sun-warmed bun that gives just enough give with every bite. This description preps you for a dish that feels like a vacation in a single, satisfying package—luxurious yet approachable, refined yet comforting, and always deeply satisfying in the way only a well-made lobster roll can be.

As you read on, you’ll discover not just how to savor this classic but how to make it yours: the way you choose the bun, the balance of creaminess and brightness, the choice between a cold mayo-based relish or a warmly buttered lobster experience, and the little touches that transform a good roll into an unforgettable one. Whether you’re cooking for a sunny weeknight treat, hosting friends on a warm weekend afternoon, or recreating a coastal escape in your own kitchen, this lobster roll guide is your passport to a dish that feels both timeless and wonderfully current. The goal is joy—uncomplicated, generous, and perfectly tailored to your preferences. So, lean in, take a breath of sea-salted air, and get ready to fall in love with a sandwich that has captivated diners for generations.

The Story Behind the Dish

The lobster roll grew from the working docks and picnic tables of New England, a region where seafood has long been the heartbeat of coastal life. Fishermen and coastal families would gather after a long day at sea or a long morning mending nets, turning simple, sturdy ingredients into something celebratory. The earliest versions were humble—crusty bread split open with a generous scoop of finely chopped lobster, perhaps a touch of mayonnaise or a light dressing, and a pinch of salt to make the flavors sing. As communities along the Maine and Atlantic coasts embraced the idea, regional twists emerged, each purist defending their method—whether to serve the lobster cold with a mayo-based coat or warm with a butter-drenched glaze. What binds these origins is a shared philosophy: honor the lobster’s sweetness, treat the bread as a canvas, and keep the preparation quick enough to preserve the meat’s delicate texture and aroma.

Over the decades, the lobster roll became a symbol of coastal summers and a testament to simple craftsmanship. Beach shacks, roadside stands, and family-owned markets would compete not with extravagant ingredients but with the perfect balance—bread toasted to a gentle bronze, lobster meat that remains tender rather than stringy, and a dressing that lifts without overpowering. In many ways, the roll mirrors the region’s character: unpretentious, generous, and a little bit indulgent without tipping into opulence. The term itself has inspired countless variations across the country and beyond, each claimant offering their own memory, their own coastal legend, and their own method for achieving that coveted bite—the moment when crust gives way to creamy, briny lobster and a whisper of citrus or butter lingers on the palate.

Today, the lobster roll sits at the crossroads of tradition and modern cooking. You’ll find purists who insist on specific bun types, precise lobster cuts, and exacted temperatures; you’ll find explorers who push the boundaries with regional herbs, spiced riffs, or gluten-free adaptations. The beauty of this dish is its flexibility, its ability to be both a precise homage to a cherished regional method and a canvas for personal taste. The goal remains the same: to celebrate the lobster’s natural sweetness and to present it in a way that feels right for you, whether you’re at a sunlit picnic, a bustling coastal market, or a quiet dinner at home that somehow tastes like a sea breeze made edible.

As you read the rest of this guide, you’ll encounter stories of seaside towns, small-town ingenuity, and the timeless joy of sharing something delicious with people you love. The lobster roll isn’t a complicated recipe; it’s a ritual of timing, texture, and balance. It asks you to pay attention to the lobster meat’s freshness, to lightly toast the bread to coax out a touch of buttered fragrance, and to choose a dressing or a butter finish that complements rather than competes with the lobster’s natural sweetness. When these elements align, every bite feels bright, creamy, and uplifting—a reminder that some of life’s best pleasures are born from simple, well-chosen ingredients treated with care and respect.

Why You’ll Love This Recipe

  • Quick to assemble and forgiving enough for weeknights or casual gatherings, yet refined enough to feel special for guests.
  • Celebrates the luxurious sweetness of lobster with a light, balanced dressing or a butter-kissed finish that preserves its delicate texture.
  • Versatile for different tastes and dietary needs: cold mayo-based versions, warm butter-enhanced styles, or dairy-free adaptations with plant-based spreads.
  • Perfectly portable for picnics, beach days, or elegant, minimal-effort dinners that still feel celebratory.
  • Textures play a key role: the soft, pillowy interior of the lobster meat, the gentle crunch of a crisped bun, and the silky creaminess of a dressing that glides across the palate.
  • Low-maintenance elegance: minimal equipment, quick assembly, and a dish that looks as good as it tastes with little fuss.
  • Heritage and storytelling baked into every bite—each roll invites you to partake in a coastal tradition that has delighted families for generations.
  • Great as a standalone hero or as part of a bigger seafood spread, pairing beautifully with light sides and bright beverages.

Flavor Profile & Texture

The lobster in a roll delivers a multi-layered flavor experience. The lobster meat—bright, slightly sweet, and richly oceanic—offers a natural brininess that is immediately inviting. When combined with a dressing or a butter finish, you get a creamy balance that coats the tongue without weighing down the meat. A hint of citrus—usually lemon—lifts the dish, cutting through the richness and sharpening the seafood’s inherent sweetness. If mayo is used, it should be light and tangy, providing a silkiness that remains distinct from the lobster itself, allowing the meat’s texture to shine rather than obscuring it. In butter-forward versions, the lobster takes on a luscious indulgence—an almost caramelized edge from a quick, gentle heat that enhances the butter’s sweetness and adds a delicate new dimension to the overall flavor.

The texture is the star here. The lobster meat should stay tender and juicy, not dry or crumbly, with an almost melt-in-the-mouth quality in every bite. The bun is more than a vessel; it’s a crucial component that frames the experience. A well-toasted, lightly crusted bun offers just enough bite and warmth to provide a satisfying contrast to the soft lobster filling, while its interior remains plush enough to cradle the meat without shredding. When executed with care, the roll offers a comforting, cohesive bite: you taste the lobster’s sweetness, the gentle salt from the sea, the warmth of the bread, and the zing of citrus or the smoothness of a carefully chosen dressing, all in a single, harmonious mouthful.

Texture and balance also come from proportion. Too much dressing or too much butter can overwhelm the lobster, dulling its bright, delicate flavors. Too little can make the roll feel dry and incomplete. The ideal roll respects the lobster’s integrity while using the bun and dressing to create a unified, luscious mouthfeel. The end result is bright, creamy, and satisfying—every component working in quiet concert to deliver a classically elegant yet casually approachable seafood sandwich.

Occasions & Pairings

A lobster roll is inherently versatile, making it a fit for a range of occasions. It shines on sun-drenched summer days at the beach or in the garden, but it’s also a wonderful choice for a relaxed weekend supper or a celebratory lunch when you want to feel special without overcomplicating the menu. Its elegance makes it appropriate for casual dinner parties, where guests can customize their own bites with different toppings or styles, turning a simple platter into an interactive experience.

Pairings elevate the whole experience. Light, crisp white wines such as Pinot Grigio, Sauvignon Blanc, or a chilled sparkling wine can brighten the dish without overpowering the delicate lobster. If you prefer beer, a pale ale or a light lager with a clean finish complements the sweetness of the meat and the butter or dressing’s richness. For non-alcoholic options, citrus-infused sparkling water or a homemade lemonade with a touch of sea salt can echo the dish’s brightness and coastline vibes.

Side dishes that harmonize well with a lobster roll include corn on the cob, a simple green salad with a lemon vinaigrette, crisp potato chips, or a light pickled vegetable slaw to add a refreshing snap. Desserts that finish the meal with a clean, bright note—like a lemon tart or a barely sweet fruit pavlova—keep the meal from feeling heavy after the richness of the roll. The key is to maintain balance: keep sides light and refreshing to let the lobster roll remain the central star of the plate.

Tips, Variations & Substitutions

Classic approaches

If you’re aiming for a traditional Maine-style experience, you may choose a lightly seasoned lobster dressed minimally with mayo or a touch of lemon juice, allowing the lobster’s natural sweetness to lead. A simple butter-toasted bun can offer a warm, glossy finish that highlights the meat’s texture. The bread should be soft but resilient enough to hold up to the filling without collapsing, and the lobster should be cut into bite-sized pieces that are easy to eat in a single mouthful. The goal is to create a balance where the lobster remains the dominant flavor, with the dressing and bun providing complementary notes rather than competing flavors.

Dietary substitutions

For dairy-free or vegan adaptations, you can use a plant-based mayo mixed with a squeeze of lemon and a dash of salt, or opt for a butter substitute to achieve a similar lacquer on the bun. For gluten-free versions, select a sturdy gluten-free bun or serve the lobster on a bed of crisp lettuce cups with the same dressing for a lighter, low-carb take. If you’re avoiding mayo entirely, a bright olive oil–based dressing with a hint of Dijon and capers can offer a tangy, savory counterpoint that still respects the lobster’s sweetness.

Regional twists

Regional twists abound. Some cooks prefer a Connecticut-style approach: a hot lobster filling drenched in browned butter for a deeply glossy finish with a toasty bun. Others lean toward a bright, colander-friendly mayo dressing with chopped celery for crunch and a sprinkle of chives for aroma. Fusion versions may incorporate a hint of tarragon, dill, or tarragon-lemon mayonnaise for an herbaceous lift. The beauty here is that the lobster roll invites personalization—you can craft the experience around your favorite flavor notes while honoring the dish’s coastal identity.

Storage & Make-Ahead Ideas

The best lobster rolls shine when the lobster meat remains plump and fresh. If you’re prepping in advance, store cooked lobster meat chilled in an airtight container for up to a day. Dressings or mayo mixtures are best prepared close to serving to maintain texture and brightness. To assemble ahead, keep the lightly toasted buns separate from the lobster mixture and add just before serving to prevent sogginess. If you style your rolls for a buffet or party, consider offering a few topping options—herbed mayo, lemon butter, crisp pickle slices, or scallion greens—so guests can customize their bites without compromising the integrity of the main attraction.

For a make-ahead approach with minimal compromise, you can toast and lightly butter the buns in advance and store them in an airtight container. When it’s time to serve, briefly rewarm the buns just until they release a gentle butter aroma, then fill with lobster that’s been lightly dressed, ensuring the meat remains moist and flavorful. This strategy keeps the dish quick to assemble while preserving the ideal textures and the lobster’s delicate sweetness.

Fun Facts & Trivia (Optional)

  • The lobster’s bright red color only appears after it’s cooked; raw lobster meat is typically bluish-green to translucent. The heat brings out a natural pigment called astaxanthin, which turns the shell red.
  • There are several claimed “origins” of the lobster roll, with stories spanning coastal Maine to Connecticut and beyond. The common thread is a celebration of lobster with simple, high-quality accompaniments that let the seafood shine.
  • In some regions, the butter-forward version of the roll is preferred, while others insist on a mayo-based filling. Both approaches honor the lobster and the sea, but each offers a distinct sensory experience.
  • Split-top buns, often lightly toasted with butter, have become a de facto standard for many lobster rolls, as they provide the perfect balance of tenderness inside and a bit of crispness on the outside.
  • Serving temperature matters: a cold, mayo-based filling delivers a refreshing bite, while a warm, butter-drenched filling creates a decadent, almost comforting sensation. Many cooks enjoy both styles across different meals and occasions.

Closing Thoughts

A lobster roll is a testament to the power of restraint and the beauty of high-quality ingredients treated with care. It invites you to pause, savor, and appreciate the way a few simple components—lobster, bread, and a supporting dressing or butter finish—can come together to create something exceptionally satisfying. Whether enjoyed as a quick weeknight treat or a centerpiece of a long, sunlit weekend lunch, the lobster roll offers a sensory journey as uplifting as a sea breeze. Use this guide as your compass to craft a roll that feels like a personal signature—one that reflects your preferences, honors traditional methods, and still feels as special as a coastal afternoon by the water.

Ingredients

Lobster Roll Filling

  • 1 1/2 pounds cooked lobster meat, claw and knuckle meat, roughly chopped into bite-sized pieces
    → The star filling of the dish. Use fully cooked lobster meat (preferably claw and knuckle meat for the best texture and sweetness). Fold gently to keep larger chunks intact so each bite offers a pleasing chew rather than a mushy filling. If you buy pre-shucked meat, pat it dry to remove excess moisture before mixing with the dressing to prevent a watery result.
  • 1/2 cup mayonnaise
    → Provides creaminess and acts as the binder that holds the filling together. Choose a high-quality, full-fat mayonnaise for best flavor and emulsification; if you want a lighter option, substitute part with Greek yogurt but keep enough mayo to maintain a smooth, cohesive texture. Chill the dressed lobster briefly before serving to help set the filling.
  • 2 tablespoons fresh lemon juice
    → Adds bright acidity to balance richness and bring out the lobster’s sweetness. Use freshly squeezed juice from a ripe lemon. Start with 2 tablespoons and adjust to taste; avoid overdoing it, which can skew the delicate seafood flavors. A touch of lemon zest can be added for extra aroma if desired.
  • 1 teaspoon Dijon mustard (optional)
    → Introduces a subtle tang and helps emulsify the dressing, giving it a bit of bite without overpowering the lobster. If you don’t have Dijon, a small amount of whole-grain mustard works too. Use sparingly to prevent masking the sea flavors.
  • 2 tablespoons finely diced celery
    → Provides crisp texture and a mild vegetal note that contrasts with the creamy filling. Dice celery very finely so it distributes evenly and doesn’t poke through the soft lobster; for extra crunch, you can reserve a tablespoon to fold in right before serving.
  • 1 tablespoon finely chopped chives or green onions
    → Adds color and a light onion lift without becoming overwhelming. Snip the herbs finely so they distribute evenly and avoid large, stringy pieces; they also contribute a fresh aroma that pairs well with lemon.
  • 1/2 teaspoon kosher salt (adjust to taste)
    → Balances the richness and enhances the lobster’s sweetness. Start with a conservative amount and taste the filling after the dressing has been incorporated; remember mayo can contribute salt, so add gradually and in increments.
  • 1/4 teaspoon freshly ground black pepper
    → Provides a subtle peppery backbone that complements seafood without overpowering it. Use freshly ground pepper for brighter aroma and flavor; grind over the bowl just before mixing for the most vibrant taste.
  • 1/4 teaspoon Old Bay seasoning or paprika (optional)
    → A classic seafood spice that adds warm, maritime aromatics. Use sparingly as a finishing touch; you can sprinkle a tiny pinch after tasting to avoid masking the lobster’s natural sweetness.

Lobster Roll Bun Prep

  • 4 New England-style split-top hot dog buns
    → The traditional vessel for a lobster roll, offering a sturdy, airy crumb that holds generous filling without collapsing. Split-top buns are ideal because they stay open when loaded and toast beautifully on the inside. If you can’t find them, use any soft, elongated bun but adjust technique accordingly to avoid spillage.
  • 2 tablespoons unsalted butter, melted
    → For toasting the buns to a golden-brown, buttery crust that adds flavor and helps prevent sogginess from the filling. Brush the cut sides evenly and toast until just browned; watch closely so the butter doesn’t burn and the buns stay light and crisp.

Optional Add-ins

  • 1/2 teaspoon prepared horseradish (optional)
    → Adds a sharp, spicy kick that enhances the lobster’s sweetness. Start with a small amount and taste, as horseradish can quickly dominate the delicate flavors; mix into the dressing or fold in at the end.
  • 1 tablespoon chopped fresh dill or tarragon (optional)
    → Introduces herbal brightness and a hint of anise or summer freshness. Dill is traditional with seafood; use sparingly to avoid clashing with lemon and lobster sweetness. Tarragon offers a similar brightness with a slightly different herbal note.

Instructions

  • Prepare the lobster meat by inspecting and chopping it to bite-sized pieces: Confirm you have about 1 1/2 pounds of cooked claw and knuckle lobster meat, then roughly chop into uniform chunks and pat dry any surface moisture if using pre-shucked meat to prevent a watery dressing.
    → Dry, evenly sized pieces guarantee consistent texture and prevent the filling from becoming soggy as the dressing coats each bite.
  • Make the dressing base by whisking the mayo, lemon juice, mustard, and seasonings: In a large mixing bowl, combine 1/2 cup mayonnaise, 2 tablespoons fresh lemon juice, 1 teaspoon Dijon mustard (optional), 1/4 teaspoon kosher salt, and 1/4 teaspoon freshly ground black pepper; whisk until smooth and emulsified.
    → Emulsification creates a creamy, cohesive dressing that clings to the lobster without separating, ensuring a glossy, bound filling.
  • Incorporate crisp texture by adding celery and chives to the dressing: Finely dice 2 tablespoons celery to about 1/8 inch and snip 1 tablespoon chives or green onions; fold them into the dressing until evenly distributed.
    → Fine dice distribute crunch and aromatics throughout the filling, so every bite has a balanced contrast to the soft lobster.
  • Gently fold the lobster into the dressing to coat without breaking chunks: Transfer the prepared lobster into the bowl and use a silicone spatula to fold with a lifting motion; continue until the lobster pieces are coated but still hold their shape.
    → Gentle folding preserves the lobster’s texture and prevents turning the filling into mush, yielding distinct, chewy chunks in every bite.
  • Optionally integrate horseradish or extra dill for brightness and heat: If using horseradish, whisk in 1/2 teaspoon into the dressing or fold in at the end; if using dill or Tarragon, fold in 1 tablespoon chopped herb; then taste and adjust seasoning.
    → A small amount of horseradish or fresh herbs enhances aroma and accents the lobster without overpowering its sweetness.
  • Chill the dressed lobster to set the filling and meld flavors: Cover the bowl with plastic wrap and refrigerate for 20–30 minutes; this helps the dressing emulsify further and makes the filling easier to portion.
    → Chilling firm-molds the texture and ensures the filling remains cohesive when stuffed into buns.
  • Prepare the buns for assembly by splitting and readying four New England-style split-top buns: Separate the buns and place them cut-side up on a clean surface, ensuring they are dry and ready for toasting.
    → Split-top buns stay open when loaded and toast evenly, preventing the filling from spilling out and giving a sturdy cradle for the lobster.
  • Toast the buns in butter to achieve golden color and a crisp, flavorful crust: Melt 2 tablespoons unsalted butter; Brush the cut sides of the buns evenly with butter, then toast them cut-side down in a hot skillet over medium heat until they are golden and lightly crisp, about 2–3 minutes.
    → The buttered, toasted surfaces add flavor, create a barrier against moisture, and provide a sturdy base that supports a generous filling.
  • Fill the toasted buns with the dressed lobster, distributing evenly and gently: Use a spoon or small scoop to portion the filling into each bun, keeping the chunks visible and not overpacking to avoid squashing the texture; leave enough room at the top for a neat presentation.
    → Even distribution prevents one bite from being overstuffed or underfilled, preserving the sandwich’s balance and mouthfeel.
  • Finish and serve immediately with lemon wedges for extra brightness: Arrange the filled lobster rolls on plates with lemon wedges and serve right away to maintain the contrast between the creamy filling and the crisp, warm bun.
    → Serving promptly preserves the ideal texture—the crisp bun, creamy dressing, and succulent lobster—before the mayo softens the crust.

Notes

These lobster rolls are a classic New England sandwich featuring tender, fully cooked lobster dressed in a bright, creamy mayo dressing and tucked into lightly toasted split-top buns. For best texture, use claw and knuckle meat and pat dry any pre-shucked meat to prevent a watery filling; fold gently to keep larger chunks intact so each bite offers chew. Chill the dressed lobster briefly before serving to help set the filling. Choose a high-quality, full-fat mayonnaise; if you want a lighter option, substitute part with Greek yogurt but keep enough mayo to maintain a smooth binding. Fresh lemon juice brightens the richness—start with 2 tablespoons and adjust to taste; a touch of lemon zest can be added for extra aroma. A little Dijon mustard is optional but helps emulsify the dressing; if unavailable, a small amount of whole-grain mustard works too. Add 2 tablespoons finely diced celery for crisp texture and 1 tablespoon finely chopped chives or green onions for color and a light onion lift. Season with 1/2 teaspoon kosher salt (adjust to taste) and 1/4 teaspoon freshly ground black pepper; 1/4 teaspoon Old Bay seasoning or paprika is optional and should be used sparingly as a finishing touch so you don't mask the lobster's sweetness. For the bun, toast 4 New England-style split-top buns brushed with 2 tablespoons melted butter until golden and just crisp. If split-top buns aren't available, use a soft elongated bun and toast similarly to resist sogginess. Optional add-ins include 1/2 teaspoon prepared horseradish for a sharp kick and 1 tablespoon chopped fresh dill or tarragon for herbal brightness; add to the dressing or fold in at the end. Serve immediately with lemon wedges; leftover filling can be refrigerated briefly if needed, but best enjoyed fresh to preserve texture. For best results, assemble right before serving or chill components separately if preparing ahead, then mix and fill just before serving.

Tips

Choosing and preparing the lobster meat

  • Opt for fully cooked lobster meat, focusing on claw and knuckle portions for the best texture and sweetness. Fold gently to keep larger chunks intact so each bite remains chewy and satisfying.
  • If you buy pre-shucked meat, pat it very dry to remove excess moisture before mixing with the dressing to prevent a watery filling.

Dressing the filling: emulsification and balance

  • Use a high-quality, full-fat mayonnaise as the base for creaminess and stable emulsification. For a lighter option, substitute part with Greek yogurt but retain enough mayo to keep a smooth, cohesive texture.
  • Fresh lemon juice brightens and balances richness; start with 2 tablespoons and adjust to taste. Avoid overshooting, which can dull the lobster sweetness. Add a touch of lemon zest if you want extra aroma.
  • Dijon mustard adds a subtle tang and helps emulsify the dressing. If you don’t have Dijon, a small amount of whole-grain mustard works too. Use sparingly to avoid masking delicate seafood flavor.
  • Fold in the mayo dressing gently to prevent breaking the lobster meat. Chill the dressed filling briefly before serving to help set the mixture for firmer scooping.

Texture and crunch: vegetables and herbs

  • Finely dice celery to provide crisp, vegetal contrast without disrupting the filling’s cohesion. You can reserve a tablespoon to fold in right before serving for extra crunch.
  • Chives or green onions should be finely chopped so they distribute evenly and add a light onion lift without large, stringy pieces.

Seasoning and finishing touches

  • Start with 1/2 teaspoon kosher salt and adjust to taste after the mayo is incorporated; mayo itself adds salt, so add gradually. A pinch of freshly cracked black pepper should be added just before mixing for a bright aroma.
  • Old Bay or paprika can be used sparingly as a finishing note to echo classic seafood flavors. If using, sprinkle a tiny pinch after tasting to avoid overpowering the lobster.

Buns: toasting and preparation

  • New England-style split-top buns are traditional for their sturdy, airy crumb that holds generous filling. If unavailable, use any soft, elongated bun but adjust technique to keep the filling contained.
  • Brush cut sides with melted unsalted butter and toast until just browned. Toasting enhances flavor and helps prevent sogginess from the filling; monitor closely to avoid burning.

Optional add-ins: horseradish, dill and Tarragon

  • Horseradish: a half-teaspoon can provide a sharp kick. Start with a small amount and taste, since horseradish can quickly dominate the delicate flavors. Mix into the dressing or fold in at the end for control.
  • Herbs: dill or tarragon add brightness. Dill is traditional with seafood; use sparingly to avoid clashing with lemon and the lobster’s sweetness. Tarragon offers a slightly different herbal note but should still be used in small amounts.

  • You can dress the lobster a bit in advance and refrigerate for up to a few hours; if you do, keep the mixture loosely covered to prevent drying. For best texture, fold in celery and herbs just before serving.
  • When ready to serve, spoon the filling into the toasted buns just before eating or assemble ahead and keep the filling chilled, then fill buns at service to maintain crunch.
  • Serve with lemon wedges and, if desired, classic pickle chips or coleslaw on the side for a refreshing contrast.

Troubleshooting and quick fixes

  • Filling is too loose or watery: pat the lobster dry again and add a bit more mayo or a touch of cream cheese to aid binding. Chill the mixture briefly to help set before filling the buns.
  • Filling tastes flat: re-balance with a small squeeze of lemon or a pinch more salt, then fold in a touch more celery or herbs for brightness.
  • Buns become soggy before serving: toast longer and consider lining the bun with a crisp lettuce leaf to create a barrier between the filling and the bread.

FAQ

What is a lobster roll?

A lobster roll is a sandwich built with lobster meat tucked into a split-top bun. It can be served warm with butter (Maine-style) or cold with mayonnaise (Connecticut-style).

What lobster meat should I use for the best lobster roll?

Use fresh, preferably claw and knuckle meat for texture. Aim for large chunks and avoid predominantly tail meat. If using pre-cooked lobster, gently dice it to keep a juicy texture without becoming mushy.

What bread is best for a lobster roll?

Split-top hot dog buns or New England-style rolls work best. Lightly butter and toast them to add flavor and prevent sogginess. Brioche buns are a tasty alternative for a richer bite.

What’s the difference between a Maine hot lobster roll and a Connecticut cold lobster roll?

A Maine hot lobster roll tosses lightly cooked lobster in melted butter and serves the meat warm. A Connecticut cold lobster roll uses mayonnaise (or a light mayo-dressing) and is served cold for a creamy salad-style filling.

How should I season and dress the lobster meat?

Keep it simple: lightly season with salt and pepper, then choose your dressing. For cold rolls, mix lobster with a small amount of mayonnaise, a squeeze of lemon juice, and optional chopped chives or celery. For hot rolls, toss with melted butter and a touch of lemon.

How do I prevent the bun from getting soggy?

Toast the split-top bun in butter until lightly golden, then fill it just before serving. If making ahead, keep the lobster filling separate and assemble at serving time. A light drizzle of lemon juice can help balance moisture without making it soggy.

How do I cook lobster for the roll?

If using live lobster, boil or steam until the meat is opaque and just cooked through, then cool, remove meat from the shells, and chop. For convenience, you can use pre-cooked lobster meat. Avoid overcooking to keep the meat tender.

Can I make lobster rolls ahead or store leftovers?

Best enjoyed fresh. Store cooked lobster meat in the fridge for up to 2 days. Do not assemble the sandwich ahead of time to prevent sogginess. Reheat or refresh the lobster meat gently if needed, then assemble with toasted buns when ready to serve.

What are some common variations and substitutions?

Variations include: cold mayo-based filling with celery and chives; hot buttered lobster with a touch of lemon; swapping mayo for yogurt for a lighter version; using gluten-free buns; adding herbs like tarragon or dill; and incorporating avocado or paprika for extra flavor.

Introduzione / Gancio

Immagina una crema dorata che danza tra la dolcezza matura delle banane e la profondità ricca del burro di arachidi, avvolta da una nuvola leggere di cremosa che si scioglie sul palato. Questo è Burro di Arachidi Banana, una fusione semplice ma irresistibile di due ingredienti che hanno accompagnato generationi di colazioni, merende e dessert veloci. È una ricetta che profuma di estate quando le banane sono al massimo della loro dolcezza, ma resta sorprendentemente confortevole in qualsiasi stagione: un abbraccio di gusto che non pretende abilità culinarie da maître patissier, ma premia chi sa apprezzare la semplicità con un tocco di creatività. In un solo cucchiaio trovi una texture vellutata, una nota affumicata o tostato tipica del burro di arachidi, e una nuance fruttata che anima il palato senza sovrastarlo. È lo snack perfetto per una pausa energizzante tra una riunione e l’altra, un dessert rapido che non tradisce la delicatezza delle banane mature, o un accompagnamento stuzzicante per crostini croccanti, pancake soffici, o una manciata di frutta fresca. Lascia che il profumo avvolgente ti guidi: una casa che inizia a riempirsi di una dolce promessa, una tavola che invita a condividere, un momento che trasforma un semplice ingrediente in un piccolo rituale di piacere quotidiano.

La storia dietro il piatto

Burro di Arachidi Banana è nato dall’incontro tra due alimenti iconici della cucina casalinga globale: l’umile banana, frutto naturalmente dolce e cremoso quando maturato, e il burro di arachidi, una crema ricca e corposa che racconta storie di scambi culturali, esplorazioni e cucina di recupero. Le banane hanno accompagnato l’umanità lungo secoli di coltivazioni tropicali, viaggiando dagli orti alle cucine di tutto il mondo, dove la loro versatilità è stata celebrata in mille preparazioni: frullate in smoothie cremosi, fritte in dolci sati, o semplicemente gustate da sole. Il burro di arachidi, invece, ha radici profonde nelle tradizioni di molte regioni, dove è diventato una fonte di proteine, energia e gusto, trasformando pane arrotolato e dolci semplici in piccoli capolavori quotidiani. Quando questi due elementi si incontrano, nasce una crema che parla di convivialità: ideale da spalmare su fette di pane tostato al mattino, da mescolare in una frullata per una colazione robusta, o da utilizzare come cuore di dessert veloci. La storia di questa ricetta è quindi una storia di praticità, di comfort e di gioia condivisa — un promemoria che le cose migliori a tavola sono spesso quelle nate dall’incontro di due ingredienti semplici ma pieni di carattere.

Perché amerete questa ricetta

  • Quick and comforting: una preparazione lampo che non richiede abilità avanzate, perfetta per chi ha poco tempo ma non vuole rinunciare al gusto.
  • Bilanciamento di sapori: la dolcezza naturale delle banane si fonde con la ricchezza tostata del burro di arachidi, creando una sinfonia di note che non stancano mai.
  • Versatilità infinita: si presta a molteplici utilizzi — spalmato su pane tostato, come accompagnamento a pancake o yogurt, o come finishing vibe per dessert freddi e semifreddi.
  • Comfort sano: una combinazione di ingredienti familiari che offre energia sostenuta, ideale come spuntino post-allenamento o merenda bambini-adulti.
  • Adatta a diverse diete: facilmente personalizzabile con alternative vegetariane o vegane, senza rinunciare al gusto.
  • Riduce lo spreco: una crema che valorizza banane成熟a con avanzi o piccole imperfezioni, trasformandoli in qualcosa di amatissimo.

Profilo di sapore e consistenza

La crema Burro di Arachidi Banana si distingue per un profilo gustativo che basta a sé stesso o, se si vuole, si integra con accompagnamenti talvolta sorprendenti. All’olfatto, emerge una dolce aromaticità di banana matura, con note terrose tipiche del burro di arachidi tostato: una punta di nocciola, leggero sentore di cacao o cioccolato fondente a seconda della varietà di arachidi utilizzata. Al palato, la consistenza è vellutata e longeva: una seta cremosa che avvolge il palato e lascia una sensazione nutritiva e avvolgente. Il contrasto tra la dolcezza fruttata e la rotondità salata del burro di arachidi crea una texture che scivola con facilità, offrendo una leggera viscosità che spinge a gustarne piccole cucchiaiate. Se aggiungi una punta di sale marino, note di vaniglia o un velo di cannella, emergono nuove sfumature: una profondità quasi caramellata, una leggera speziatura che riscalda e invita a proseguire. La crema è genericamente cremosa ma può essere resa ancora più seducente se si slotterà con un tocco di liquido (latte o latte vegetale) o se si lavora a una consistenza un po’ più densa per uso spalmabile. In ogni caso, la magia sta proprio nel trasformare due ingredienti semplici in qualcosa che sembra di lusso, pur mantenendo la facilità di realizzazione e l’immediatezza del piacere quotidiano.

Occasioni & abbinamenti

Questo Burro di Arachidi Banana è una compagna versatile per diverse occasioni:

  • Colazione casalinga: spalmatelo su pane tostato caldo o su una fetta di croissant per una partenza dolce e sostanziosa.
  • Merenda perfetta per bambini e adulti: spennellato su cracker croccanti o servito con bastoncini di mela e cetriolo per un tocco di freschezza e croccantezza.
  • Dessert express: una cucchiaiata tra due biscotti, oppure usato come cuore cremoso di una coppa di yogurt freddo, per un dessert che non rinuncia alla tradizione.
  • Dolci senza forno: come magnete di sapore per gelati, budini o semifreddi veloci, dove la crema funge da legante cremoso e arricchente.
  • Abbinamenti classici: si sposa bene con lamponi freschi, banane a fette, pezzi di cioccolato fondente, granella di nocciole o un filo di miele grezzo per enfatizzare la dolcezza naturale.
  • Bevande: una puntura di questa crema sul lato di un bicchiere di latte freddo o su uno smoothie di banana crea una texture ricca e appagante che resta leggera nel gusto.
  • Variazioni stagionali: se vuoi un tocco estivo, aggiungi scorza di limone o lime grattugiata per un profilo agrumato che illumina la crema; in inverno, una spolverata di cannella o noce moscata ne accentua l’aroma coccoloso.

Taglio sensoriale: texture, consistenze e sensazioni

La bellezza di questa crema risiede nella sinergia tra una base cremosa e una nota di croccantezza residua che può emergere a seconda delle aggiunte. Una versione base tende a offrire una silkness continua, ideale per essere miscelata in bevande, frullati o yogurt. Se preferisci una texture più audace, prova a aggiungere piccoli pezzi di banane essiccate o una spolverata di granola croccante sui bordi del bicchiere: l’effetto contrasto tra liscia e croccante amplifica la sensazione di comfort. Per chi ama una finish leggermente salata, una piccola punta di sale marino o di sale Maldon esalta la nota tostata del burro di arachidi e bilancia la dolcezza naturale della banana. Un ulteriore stratagemma: scaldare leggermente la crema per renderla lucida e setosa, poi raffreddarla per creare un effetto “spalmabile” ancora più invitante. Ogni piccolo dettaglio di texture è un modo per trasformare una merenda in un rituale sensoriale che coinvolge olfatto, gusto e tatto.

Tips, variazioni & sostituzioni

  • Versione vegana: assicurati che il burro di arachidi sia puramente vegetale e che non contenga latte. Puoi usare latte di mandorla o di soia per ammorbidire la crema se vuoi una consistenza meno densa.
  • Intensità di nocciola: scegli burro di arachidi tostato per un profilo più robusto; se preferisci una nota più delicata, opta per una versione non tostée.
  • Dolcezza modulabile: la banana matura offre una dolcezza naturale; se necessario, aggiungi un goccio di miele o sciroppo d’acero in piccole quantità per equilibrarne il sapore.
  • Varianti di gusto: un tocco di cacao amaro o una spolverata di peperoncino in piccole quantità può trasformare la crema in una versione audace e intrigante.
  • Abbinamenti di frutta secca: pistacchi, semi di chia, o anacardi tritati aggiungono croccantezza e profondità gustativa.
  • Texture a strati: per un dessert dal character presentabile, disponi strati di crema alternati a strati di banana fresca in bicchiere, creando un dessert finger-friendly.
  • Versione senza latticini: se la tua dieta esige l’esclusione di lattice, la crema resta cremosa con latte vegetale, oppure può essere usata in versione pura con banane ben mature per una consistenza più densa.
  • Sostituzioni di frutta: se le banane non sono di stagione, puoi utilizzare la purea di another frutto dolce, come la pera matura, per una crema con una tonalità di gusto leggermente diversa.

Conservazione & Idee per preparare in anticipo

La crema Burro di Arachidi Banana si conserva bene in frigorifero in un contenitore ermetico per 3–5 giorni. Per mantenere la texture cremosa, lascia che raggiunga la temperatura ambiente prima di riutilizzarla, o scalda leggermente al microonde o a bagnomaria. Se vuoi congelarla, congela in porzioni individuali e scongela lentamente in frigorifero o a temperatura ambiente; la consistenza potrebbe diventare leggermente meno setosa, ma è perfetta per arricchire smoothies o dolci freddi. Per azioni veloci, puoi preparare una base di crema e conservarla in frigorifero; quando vuoi servire, aggiungi una manciata di frutta fresca o una spolverata di cacao per dare un tocco di presentazione. Le idee make-ahead includono: preparare una base di crema da utilizzare come cuore di dessert freddi, oppure mescolare in anticipo con un po’ di latte vegetale per una crema pronta all’uso nei vostri snack quotidiani. Se vuoi fare una versione più leggera, riduci la quantità di burro di arachidi o sostituisci parte della banana con una purea di mela per un profilo meno intenso ma sempre piacevole.

Curiosità & Trivia (Opzionale)

Lo sapevi che sia la banana sia il burro di arachidi hanno una lunga storia di uso quotidiano in cucine di tutto il mondo? Le banane, originarie di regioni tropicali, hanno accompagnato mercati, caravans e cucine domestiche per secoli, diventando una fonte di energia rapida e un ingrediente versatile per dolci, snack e piatti salati. Il burro di arachidi, invece, è un classico della cucina nordamericana, ma è diventato popolare in molte culture grazie alla sua capacità di offrire proteine, grassi sani e gusto intenso in una forma facilmente spalmabile. La combinazione di questi due elementi in una crema unica non è solo una scelta di gusto: è un piccolo tributo alla convivialità e all’arte di trasformare spezzoni di frutta e cucina quotidiana in qualcosa di speciale. In molte cucine del mondo, la semplicità è la chiave: una crema come questa dimostra che la natura offre già tutto ciò di cui la nostra tavola ha bisogno per nutrire, confortare e sorprendere, a patto di avere la curiosità di esplorare nuove armonie di sapore.

Ingredients

Burro di Arachidi Banana

  • 2 ripe bananas (mashed)
    → Bananas should be very ripe (yellow with brown spots) to maximize natural sweetness and moisture. Peel and mash with a fork or potato masher until mostly smooth with a few small lumps for texture. For an ultra-smooth spread, pulse briefly in a small blender or food processor. Allow mashed bananas to come to room temperature to ensure easy mixing and a creamy final texture.
  • 1/2 cup creamy peanut butter (smooth)
    → Choose a smooth, creamy peanut butter without large peanut pieces to achieve a cohesive, spreadable base. If the oil has separated, stir well before measuring. For a vegan or low-sugar option, use unsweetened natural peanut butter and adjust sweetness with the banana and optional honey or maple syrup. Salt content will affect flavor, so adjust if using salted peanut butter.
  • 1 tablespoon honey or maple syrup (optional)
    → Adds gentle sweetness and helps balance the banana’s tang. Use pure maple syrup for a vegan option or honey for a slightly different flavor profile. If bananas are very ripe and sweet, you can omit this ingredient entirely; start with less and add to taste.
  • 1/2 teaspoon pure vanilla extract (optional)
    → Provides a warm aroma that rounds out the peanut butter flavor. Use high-quality vanilla; if unavailable, you can omit without compromising the recipe, or substitute a drop of almond extract carefully.
  • Pinch of salt
    → Enhances the peanut butter flavor and helps balance sweetness. Start with a small pinch and adjust to taste, especially if your peanut butter is salted.
  • 1-2 tablespoons milk (dairy or plant-based) to loosen the spread (adjust as needed)
    → Adds creaminess and helps reach a scooping consistency. Start with 1 tablespoon and mix; add more gradually until you reach your desired thickness. For a dairy-free version, unsweetened almond milk or soy milk works well and won’t alter flavor significantly.

Optional Add-ins

  • 2 tablespoons chopped dark chocolate or chips (optional)
    → Introduces pockets of chocolate sweetness and richness. Use mini chips or finely chopped chocolate to ensure even distribution; fold in after the base mixture is combined to avoid sinking to the bottom.
  • 1-2 tablespoons crushed roasted peanuts (optional)
    → Adds extra crunch and a deeper peanut flavor. Toast peanuts lightly to deepen aroma, then crush coarsely before folding in. Great for texture; skip if avoiding nuts for allergy reasons.
  • 1/4 teaspoon ground cinnamon (optional)
    → Adds warmth and a subtle spice that complements peanut butter and banana. Start with a small amount and increase to taste; works well with the vanilla if used.
  • 1 tablespoon chia seeds or ground flaxseed (optional)
    → Boosts nutrition and helps thicken the mixture as they hydrate. If using chia seeds, allow the mixture to rest a few minutes so the seeds can swell; for a smoother texture, use ground flaxseed instead.

Optional Toppings

  • Sliced banana rounds for serving (optional)
    → Fresh slices add brightness and extra banana flavor. Arrange on top just before serving to keep them from browning too quickly in the spread.
  • Drizzle of extra peanut butter (optional)
    → Intensifies peanut butter richness on toast or crackers. Warm the peanut butter slightly to loosen for easy drizzling; thin with a splash of milk if needed.
  • Cocoa powder dusting (optional)
    → Finishes with a chocolatey touch. Lightly dust on top to avoid overpowering the banana-peanut balance; pair with sliced bananas for a dessert-like presentation.

Instructions

  • Gather and prepare the ingredients by setting out 2 ripe bananas, 1/2 cup creamy peanut butter, 1 tablespoon honey or maple syrup (optional), 1/2 teaspoon vanilla extract (optional), a pinch of salt, and 1-2 tablespoons milk; ensure all items are ready at room temperature.
    → Use very ripe bananas to maximize natural sweetness and moisture; bringing ingredients to room temperature ensures easy blending and a creamy final texture.
  • Mash the bananas until mostly smooth with a few small lumps using a fork or potato masher.
    → Ripe bananas mash quickly and evenly; leaving small lumps adds a pleasant texture that complements the creamy peanut butter.
  • Stir the peanut butter to re-emulsify any separated oils, then measure 1/2 cup and fold into the mashed bananas until fully incorporated.
    → A smooth, emulsified peanut butter base prevents oily streaks and ensures even flavor distribution throughout the spread.
  • Whisk or fold in the honey or maple syrup if using, blending until thoroughly combined.
    → The added sweetness balances the banana’s tang and peanut butter’s savor, while also helping achieve a cohesive texture.
  • Add the vanilla extract (if using) and a pinch of salt; mix until evenly distributed.
    → Vanilla enhances aroma and rounds the flavors; salt amplifies peanut butter and banana sweetness while keeping the spread balanced.
  • Drizzle in 1 tablespoon of milk and whisk until the mixture becomes creamy and spreadable; add more milk in small increments until you reach the desired consistency.
    → Milk loosens the mixture for a scoopable spread; adding gradually prevents excess thinning and allows precise texture control.
  • If using optional add-ins, fold in chopped dark chocolate, crushed roasted peanuts, cinnamon, or chia or flaxseed after the base is well combined; distribute evenly with gentle folding.
    → Folding with a spatula preserves texture and prevents ingredients from sinking; even distribution ensures every bite has flavor and contrast.
  • If using chia seeds, allow the mixture to rest for 5–10 minutes to let the seeds hydrate and thicken the spread; if using ground flaxseed, whisk in and note it thickens as well.
    → Hydration by chia seeds thickens the mixture, giving it a more spoonable consistency without additional processing.
  • Check the texture and adjust with more peanut butter or milk as needed to achieve a balanced, spreadable, scoopable consistency.
    → You want enough cohesion to hold its shape on toast while remaining soft enough to spread easily; small adjustments gradually prevent over-thinning.
  • Spoon the finished Burro di Arachidi Banana into a serving dish or jar; cover and refrigerate if not serving immediately, and bring to room temperature before serving for best creaminess.
    → Refrigeration can firm the spread; warming slightly restores smoothness and ease of spreading on bread or crackers.
  • When serving, top with optional banana slices, a drizzle of extra peanut butter, and a light dusting of cocoa powder to finish; present promptly to preserve color and texture.
    → Fresh banana slices add brightness and aroma; warmed peanut butter drizzle enhances richness, while cocoa powder adds a chocolatey note that complements banana and peanut butter.
  • Serve on toast, pancakes, crostini, or as a dip for fruit; enjoy immediately for best texture and flavor.
    → The spread is versatile and best used when fresh; using it promptly ensures optimal moisture and mouthfeel.
  • Store any leftovers in an airtight container in the refrigerator for up to 3-4 days; stir before using and adjust thickness with a splash of milk if needed.
    → Proper sealing prevents drying out or absorbing odors; refrigeration extends freshness while maintaining a creamy texture when re-softened.

Notes

These gluten-free banana peanut butter spreads are naturally sweetened by ripe bananas and contain no added refined sugar, making them a wholesome and versatile topping for toast, fruit, or desserts. You can customize it by folding in chopped dark chocolate, crushed roasted peanuts, ground cinnamon, or chia seeds for extra texture and nutrition. It stores well in the fridge for up to 5–7 days and can be frozen for longer storage. For an extra boost, serve with sliced bananas, a drizzle of extra peanut butter, or a dollop of yogurt. If you need to loosen the spread for easier scooping, whisk in a splash of dairy or plant-based milk. Always choose smooth peanut butter with no added sugar; adjust salt if your peanut butter is salted.

Tips

Consigli utili per Burro di Arachidi Banana

  • Banane molto mature: l’aroma e la dolcezza massima si ottengono con banane gialle a maturazione avanzata (con macchie marroni). Sminuzzale con una forchetta o schiacciacele rapidamente nel robot se vuoi una superficie ultra liscia. Lasciare a temperatura ambiente facilita l’insieme degli ingredienti.
  • Controllo della texture: per una crema liscia e omogenea, frulla brevemente; per una versione con pezzetti, riduci i tempi di frullatura o schiaccia a mano in alcuni punti.
  • Burro di arachidi: mescola bene se l’olio si è separato. Scegli una versione cremosa e non zuccherata se vuoi controllare meglio la dolcezza. Se usi burro di arachidi naturale, aggiusta la dolcezza con la banana o con miele/sciroppo.
  • Dolcificanti: miele o sciroppo d’acero sono opzionali. Se le banane sono molto mature, potresti non averne bisogno. Aggiusta la dolcezza assaggiando durante la preparazione.
  • Vaniglia: opzionale. Conferisce profondità di aroma; se non disponibile, una punta di mandorla è possibile ma usala con parsimonia.
  • Sale: un pizzico aiuta a bilanciare la dolcezza e l’aroma. Aggiusta a gusto, soprattutto se usi burro di arachidi salato.
  • Latte per la consistenza: inizia con 1 cucchiaio e aggiungi poco alla volta fino a raggiungere la consistenza desiderata. Scegli latte vegetale non zuccherato se vuoi una versione vegan.
  • Temperatura degli ingredienti: lasca i banana a temperatura ambiente prima di unirli al burro di arachidi per evitare grumi o una crema troppo fredda.
  • Aggiunte opzionali:
    • Cioccolato fondente o gocce: aggiungili a fine preparazione per distribuire bene i pezzi senza affondare al fondo.
    • Arachidi tostate tritate: danno croccantezza extra; evita se hai allergie o preferisci una crema liscia.
    • Cannella in polvere: aggiunge calore e si sposa bene con banana e arachidi; inizia con 1/8 cucchiaino.
    • Seme di chia o lino macinato: aumentano fibre e aiutano ad addensare. Se usi chia, lascia riposare qualche minuto affinché si idratino; per una consistenza più liscia usa semi di lino macinati.
  • Guarnizioni suggerite: fette di banana per servire, un filo extra di burro di arachidi e una leggera spolverata di cacao per un tocco dessert; aggiungile al momento di servire per evitare che le banane anneriscano.
  • Conservazione: riponi in un contenitore ermetico in frigorifero. Consumalo entro 3–5 giorni; può anche essere congelato a porzioni per 1–2 mesi. In caso di conservazione prolungata, fai tornare la crema a temperatura ambiente e mescola prima di usare.
  • Preparazione in anticipo: è facile preparare una grande quantità e conservare in frigorifero o congelatore in porzioni. Per una consistenza extra cremosa al momento dell’uso, aggiungi un poco di latte e mescola bene.
  • Abbinamenti di servizio: ottimo su pane tostato, crackers, pancake oppure come crema per lo yogurt. Sperimenta con spezie o una spolverata di cacao per una presentazione più golosa.
  • Avvertenze allergie: contiene arachidi. Non prepararlo per chi ha allergie; etichetta chiaramente se lo servi a ospiti con allergie e considera alternative prive di arachidi.

FAQ

Cos’è Burro di Arachidi Banana?

Una crema spalmabile che combina burro di arachidi e purea di banana, offrendo una consistenza cremosa o leggermente densa a seconda degli ingredienti. Può essere arricchita con dolcificanti, cacao, vaniglia e un pizzico di sale per un sapore equilibrato. È uno snack nutriente e versatile per merenda o colazione.

Quali sono gli ingredienti base?

Ingredienti tipici:

Come si prepara in pochi minuti?

Procedimento rapido:

Qual è la differenza tra crema liscia e compatta?

Per una consistenza cremosa e liscia, frulla o mescola energicamente con un cucchiaio finché non è omogenea. Per una versione più croccante, aggiungi arachidi tritate grossolanamente o pezzi di banana piccolissimi. L’aggiunta di meno olio rende la crema più densa; più olio la rende più fluida.

Come posso variare il gusto?

Varianti popolari:

Come conservarla al meglio?

Conservala in un barattolo ermetico in frigorifero. Dura tipicamente 1–2 settimane. Se si separa olio dall’impasto, basta mescolare bene. Per una conservazione più lunga, puoi prepararla in piccole porzioni e congelarla per 1–2 mesi; scongelala in frigo e mescola prima dell’uso.

Quali sono i benefici nutrizionali?

Benefici principali:

Nota: è una crema calorica; dosarla secondo le esigenze energetiche individuali.

Come utilizzare questa crema in ricette?

Suggerimenti d’uso:

Cosa fare se si separa olio e massa?

Se compare separazione, mescola vigorosamente con un cucchiaio o frulla brevemente. Se è troppo densa, aggiungi un piccolo filo di olio neutro o latte vegetale poco alla volta fino a ottenere la consistenza desiderata. Conserva in frigorifero per ridurre la separazione.

Ci sono allergeni e alternative per chi è allergico alle arachidi?

Contiene arachidi, quindi chi è allergico deve evitarla. Alternative sicure:

Se si prepara per chi è vegano, evita dolcificanti di origine animale come miele.

Introduction / Hook

Imagine a single bite that wraps you in a warm, velvet-black night of chocolate, then suddenly reveals a sunlit, creamy heart of peanut butter. The aroma alone is a small celebration: cocoa dust drifting through the air, a whisper of vanilla, a hint of roasted peanut that makes your mouth water long before you taste. Cioccolato Burro Arachidi is not merely a dessert; it’s an invitation to slow down, to savor, to share. It’s the kind of treat that sits at the intersection of comfort and celebration, where the familiar meets the sublime in a way that makes you smile with your eyes closed and your senses fully listening. Whether you’re curling up with a mug of coffee on a rainy afternoon, plating a show-stopping finish for guests, or giving a homemade gift that feels like a warm hug wrapped in glossy chocolate, this indulgence speaks the language of joy without saying a word.

In the kitchen, flavors are memories in disguise. The chocolate here isn’t just sweet; it’s a storyteller. It carries the dusky richness of a well-tempered bar, the subtle bitterness that keeps it honest, and a luxurious gloss that catches the light in the best possible way. The peanut butter, whether silky or a touch nubbly, lends creaminess and a gentle saltiness that makes the chocolate seem even more chocolatey. Together, they fuse into a texture that can be soft and creamy, with a surprising snap on the first bite, a line of sesame-like sparkle from salt crystals, and perhaps a little crunch if you choose to fold in roasted nuts or crunchy bits. The experience is multi-sensory: you’ll hear a quiet crack, feel a satin-smooth melt on your tongue, and taste the balance of sweetness, savoriness, and roasted warmth that lingers pleasantly after the last bite.

The Story Behind the Dish

Chocolate and peanut butter have a long, affectionate history that reads like a mini travelogue through the popular palate. Chocolate, with its ancient roots in Mesoamerica, carried ceremonial weight and then quiet sweetness into daily life as it spread across continents. Peanut butter, born from the late 19th and early 20th centuries in the United States, emerged as a nutritious, creamy staple that could be spooned, spread, or stirred into countless dishes. When these two ingredients began to meet in confectionery workshops, bakeries, and kitchen tables, a simple pairing blossomed into iconic combinations that survive and thrive across generations.

The exact origin of the chocolate-peanut butter cup is a tale of entrepreneurial spirit. In the 1920s, candy makers began to experiment with pairing the smooth, velvety texture of chocolate with the rich, creamy, slightly salty bite of peanut butter. The idea caught fire—think of a glossy chocolate shell encasing a cloud of peanut butter—creating a bite-sized dessert that felt both nostalgic and novel. In the United States, one name is often recalled in relation to this invention: Reese, who popularized the ready-to-enjoy cup and helped transform the pairing into a staple of seasonal treat trays, movie nights, and party dessert tables. Yet the appeal of chocolate and peanut butter travels beyond borders: bakers in Italy, the United Kingdom, and beyond adapt the combination to local techniques and textures, from ganache-filled pastries to crisp-edged bars to simple, elegant dipped chocolates. Cioccolato Burro Arachidi captures that global charm and folds it into a distinctly comforting, almost universal experience: chocolate that glows with depth and peanut butter that glides with ease, balanced by a touch of salt and perhaps a whisper of sea-salt crystal crunch.

In many kitchens, this flavor duo becomes a canvas for sentiment—grandmothers passing down secret tips, friends exchanging a quick “I made this for you” moment, or bakers testing the balance of sweetness and savoriness. It’s a dish that invites storytelling as it is designed to be tasted. The Italian-influenced style of this treat often emphasizes high-quality cocoa, a glossy finish, and the optional inclusion of delicate textures—crisped rice, finely chopped nuts, or a dusting of cocoa powder—to add dimension without overwhelming the core harmony. It’s a dessert that rewards patience: tempered chocolate that shines, a peanut butter center that remains pleasantly soft, and a finish that hints at both chocolate-depth and nutty warmth long after the plate has emptied.

Why You’ll Love This Recipe

  • Versatility in texture: whether you prefer a satin, melt-in-your-mouth center or a slightly more structured bite with a delicate snap, this chocolate–peanut butter pairing can adapt to your preferred mouthfeel.
  • Simple elegance: with a handful of pantry staples, you can achieve a refined finish that feels bakery-worthy but is approachable enough for a weeknight treat.
  • Make-ahead friendly: this is one of those desserts that benefits from resting time—chilling the chocolate shell or letting a peanut butter filling set can deepen flavors and improve texture.
  • Customizable to dietary needs: by choosing dairy-free chocolate or adjusting the sweetener, you can create a satisfying version that suits vegan, gluten-free, or low-sugar preferences without sacrificing personality.
  • Perfect for gifting: individually wrapped pieces or a nicely arranged tray make a thoughtful present for neighbors, colleagues, or hosts—no wrapping required beyond a pretty box or a simple ribbon.
  • Pairing-friendly: these flavors pair beautifully with coffee, milk, a glass of milk stout, or a late-afternoon tea, making them a natural addition to seasonal dessert tables or everyday indulgences alike.
  • Timeless appeal: chocolate and peanut butter is a classic combination that resonates with both kids and adults—nostalgia without sacrificing sophistication.

Flavor Profile & Texture

The flavor profile of Cioccolato Burro Arachidi is a study in balance. The chocolate provides a deep, roasted aroma with a velvety sweetness that can swing from milk-chocolate warmth to more intense, dark-cocoa notes, depending on the cocoa percentage you choose. If you opt for a dark chocolate, the bitterness will play against the peanut butter’s creaminess, creating a sophisticated, almost grown-up treat. A good peanut butter that isn’t overly sweet adds another layer of nuance: roasted peanut notes, a whisper of salt, and a silky mouthfeel that carries through the middle of each bite. The salt becomes a crucial companion to the two stars—the salt sharpens the chocolate’s flavor and highlights the roasted notes in the peanut butter, while also preventing the sweetness from becoming cloying.

Texture-wise, you can envision a glossy, smooth shell encasing a luscious center. The exterior should have a pristine shine and a clean, crisp snap when broken or bitten. Inside, the center remains pleasantly soft, with a gentle resistance that reveals the peanut butter’s creaminess and any added textures, such as lightly crushed peanuts or crisped rice, if you choose to fold them into the filling. The contrast between the crisp, shell-like chocolate and the inner, almost velvety core is what elevates this dessert from a simple candy to a memorable tasting experience. If you plan to incorporate a delicate crunch, think about adding roasted peanut bits, a sprinkle of sea salt, or a thin layer of crisped rice to the bottom of the shell. Each addition brings a new dimension—crunch, saltiness, and a fleeting toasty note that lingers softly as the chocolate coats your palate.

Flavor harmony is essential here. The chocolate should never feel heavy; it should elevate and compliment the peanut butter, which itself should not dominate with sweetness. The best iterations strike a midpoint: chocolate that coats with a mirror-like gloss, peanut butter that is mellow but unmistakably peanut-forward, and a final touch of salt to tie everything together. Aroma plays a big role as well: the scent of roasted peanuts invites you in, and as the chocolate sets, the scent settles into a comforting, inviting finish. For those who enjoy a subtle twist, an optional dusting of cinnamon, chili powder, or espresso powder can brighten the flavor profile without overpowering the core duo. The result is a dessert that feels familiar in the best possible way—comforting, indulgent, and emotionally satisfying, with a modern polish that suits contemporary dessert tables as well as traditional family gatherings.

Occasions & Pairings

This treat shines in a variety of settings, from casual weeknight sweets to festive giftable goodies. On a weeknight, a small plate of Cioccolato Burro Arachidi can accompany a hot cup of coffee, a glass of cold milk, or a robust vanilla bean ice cream. For gatherings, arrange the chocolates in elegant paper liners or serve as part of a larger dessert board with fruits, nuts, and a few bars of crisp wafers to provide contrast. The versatility makes it a dependable choice for multiple occasions:

  • a refined finish for Christmas Eve dinners, Easter gatherings, or anniversary celebrations where guests expect something both comforting and a touch refined.
  • Party favorites: a crowd-pleasing bite that travels well in boxes, baskets, or trays and holds up at room temperature for a few hours if kept away from heat.
  • Gift-ready sweets: individually wrapped chocolates or a coordinated box makes a thoughtful, handmade present that feels special but not fussy.
  • Pairings to enhance the experience: coffee and espresso drinks; full-bodied milk or dark beers; a glass of port or a light red wine; vanilla, coffee, or caramel ice cream; fresh berries for a bright counterpoint; and a sprinkle of flaky sea salt to highlight the chocolate’s sweetness and the peanut butter’s savoriness.

For a complete sensory menu, consider building a short tasting tray: one or two pieces with a bold dark chocolate, one with a smooth milk chocolate, and one with a crisped-rice variation. Let guests compare the differences in texture, aroma, and balance. You’ll likely notice how the simplest variations—type of chocolate, presence of salt, or the addition of a crunchy element—dramatically alter the overall experience. These nuances are what make Cioccolato Burro Arachidi not just a dessert, but a small, edible landscape of flavor and texture that invites exploration and conversation.

Tips, Variations & Substitutions

  • Dairy-free and vegan options: use dairy-free dark chocolate or milk alternatives and either a plant-based butter substitute or a vegan peanut butter. For a smoother finish, slightly warm the chocolate to encourage a glossy shell, then temper it to stabilize the snap, even with dairy-free ingredients.
  • Sweetness adjustments: if you prefer a less sweet bite, opt for 70%+ cacao dark chocolate or consider using a chocolatier’s dark couverture with a natural, lower-sugar profile. For sweeter preference, choose a milk chocolate with a higher cocoa butter content, and a touch of sugar in the peanut butter to balance the palate.
  • Texture twists: fold in coarsely chopped roasted peanuts for a rustic crunch, use crisped rice for a light airy snap, or sprinkle fine sea salt on top just after dipping to amplify the flavor contrast.
  • Flavor folds: a pinch of ground cinnamon, espresso powder, or smoky paprika can push the flavor into dessert-bar territory. A few crystal flakes of maldon or fleur de sel add a final, magical salt-kissed finish.
  • Gluten-free and grain-free considerations: ensure that all chocolate and any add-ins are certified gluten-free if you’re catering to gluten intolerance. If you want a grain-free base for a bar-like version, you could start with a cocoa-almond crust and fill with peanut butter ganache, but note that the classic “peanut butter cup” shape relies on a chocolate shell and a peanut butter center rather than a crust.
  • Make-ahead options: you can make the chocolate shells in advance and fill them with a prepared peanut butter center later, or assemble and refrigerate for a crisp, fresh finish. Freezing is a strong option for long-term storage, especially if you wish to transport them to events in advance. Wrap individually to prevent sticking and to preserve the glossy surface.
  • Regional twists: in some regions, a touch of hazelnut paste can be added for a Nutella-inspired variation; in others, a drizzle of white chocolate on top provides a striking visual and a different sweetness profile. You can also experiment with cocoa nibs for a crunchy bite and a cocoa intensity that lingers on the palate.

Storage & Make-Ahead Ideas

To maintain the pristine appearance and texture, store Cioccolato Burro Arachidi in a cool, dry place away from direct sunlight. The ideal environment is a pantry or a dedicated dessert drawer that stays around 60-68°F (15-20°C). If your kitchen runs warm, a quick chill in the refrigerator (not the freezer) helps the shell set properly and prevents the center from becoming overly soft. Once set, handle pieces gently to avoid fingerprints or smudges on the glossy surface, and place them in parchment or silicone liners to prevent sticking.

Leftover pieces, if there are any, store well for several days in an airtight container. For longer-term storage, you can freeze the chocolates for up to 2-3 months. Wrap each piece individually in parchment paper, then place in a rigid container or a sealed freezer bag to protect against odor absorption. When ready to enjoy, thaw gradually at room temperature to preserve the texture and sheen, avoiding rapid temperature changes that could cause condensation on the surface. If you’ve used any added crunchy elements, you may notice moisture changes affecting texture after freezing; in that case, a quick re-temper of the chocolate shell can help restore snap and gloss before serving again.

Make-ahead ideas include preparing the chocolate shells in advance and filling them up to a day later, which is a particularly handy approach for holiday parties or gift boxes. You can also prepare a large batch of peanut butter centers and freeze them in small portions; when you’re ready to assemble, simply temper more chocolate, dip, and set. This approach minimizes last-minute rushes and allows you to tailor quantities for a crowd. If you’re plating for a dinner party, consider prepping a few “choose-your-own” topping options: sea salt, chopped roasted almonds, a pinch of chili powder, or a dribble of toasted sesame oil for a surprising finish that complements the peanut butter without overpowering it.

Fun Facts & Trivia (Optional)

  • The classic chocolate–peanut butter pairing has a long-running love affair in American confections and has inspired countless variations, from cups and bars to brownies and cookies. It’s a testament to how two ingredients can become a signature flavor profile when treated with care and balance.
  • The rise of peanut butter cups in the early 20th century is tied to the rise of modern packaged confections. Chocolate makers and candy inventors experimented with combining the smoothness of chocolate with the creamy, savory depth of peanut butter, leading to a universal favorite that transcends age and culture.
  • In the culinary world, the pairing of chocolate and nuts—whether peanuts, almonds, or hazelnuts—has long been celebrated for its textural contrasts and sensory complexity. The addition of salt as a flavor enhancer is a relatively simple trick that elevates both the chocolate and the nutty paste, turning a simple treat into a memorable tasting experience.
  • Italy, with its own rich chocolate heritage, often celebrates confectionery that emphasizes glossy finishes and refined textures. Cioccolato Burro Arachidi nods to that tradition while embracing the American peanut butter story, creating a bridge between continents and culinary histories.
  • For chocolate lovers who enjoy a modern twist, chocolate with peanut butter is a versatile canvas for other culinary explorations—think salted caramel layers, coffee-infused ganache, or a hint of orange zest that brightens the palate in unexpected ways.

Ingredients

  • Base al Cioccolato
    • 1 1/2 cups all-purpose flour (or gluten-free flour blend)
      → Provides structure for the base and helps bind the chewy brownie-like layer. If using a gluten-free blend, choose a 1:1 GF flour and consider adding 1/4 teaspoon xanthan gum per cup to mimic gluten. Sift with the cocoa to ensure even distribution and avoid lumps; mix until just combined to keep the base tender.
    • 1/2 cup unsweetened cocoa powder
      → Creates the rich chocolate flavor and deep color. Sift with the flour to prevent clumps and ensure even distribution. Dutch-processed will yield a smoother, milder chocolate notes; natural cocoa will be more robust and slightly fruity, so adjust sugar accordingly.
    • 1/2 cup granulated sugar
      → Sweetens the base and helps with moisture retention and browning during baking. If you prefer a deeper flavor, substitute with light brown sugar or a mix of brown and white sugar. For a less sweet bar, reduce by up to 2 tablespoons.
    • 1/3 cup unsalted butter, melted
      → Adds richness and tenderness to the crumb; ensures a fudgy yet crumbly texture. Let the melted butter cool slightly before mixing with dry ingredients to prevent cooking the egg if you include one in the base; use dairy-free butter if a vegan version is desired.
    • 1 large egg
      → Acts as a binder and contributes to the structure and moisture of the base. At room temperature, it emulsifies better for a cohesive batter. For vegan preparation, substitute with 1 chia egg (1 tablespoon chia seeds + 2.5 tablespoons water, rested 5–10 minutes) or 1/4 cup applesauce plus 1 tablespoon melted coconut oil.
    • 1/2 teaspoon vanilla extract
      → Enhances the chocolate aroma and rounds sweetness; use pure vanilla for best flavor. If you prefer, you can omit, but it adds a noticeable depth to the base.
    • 1/4 teaspoon salt
      → Balances sweetness and enhances chocolate intensity; use with unsalted butter. If your butter is salted, reduce or omit this salt to avoid over-seasoning.
  • Ripieno al Burro di Arachidi
    • 1 cup creamy peanut butter (smooth)
      → Core filling that provides the signature salty-sweet contrast and a creamy texture. Stir well if the PB has oil separation; for natural peanut butters, use a whisk or beat with a little powdered sugar to achieve a smooth, spreadable consistency.
    • 1/4 cup powdered sugar (confectioners’)
      → Helps the filling set and stay cohesive without becoming gritty. Sift before measuring to prevent lumps; adjust to taste if you like it sweeter or slightly more savory.
    • 2 tablespoons unsalted butter, softened
      → Adds richness and helps create a glossy, cohesive filling that holds its shape when chilled. If vegan, substitute with coconut oil or dairy-free butter and ensure it’s soft for easy mixing.
    • 1/2 teaspoon vanilla extract
      → Boosts the peanut butter aroma and smooths the overall flavor; optional–add a pinch of salt to balance if the peanut butter is unsalted.
  • Glassa al Cioccolato
    • 1/2 cup semisweet chocolate chips
      → Creates a glossy, appealing top coating that locks in moisture and adds extra chocolate flavor. Melt gently using a double boiler or microwave in short bursts, stirring until smooth. For a vegan option, use dairy-free chocolate chips.
    • 1 tablespoon coconut oil or butter
      → Keeps the melted chocolate fluid for a thin, even glaze and helps achieve a shiny finish. Coconut oil provides a clean sheen and sets firm at room temperature; adjust quantity to reach your desired pourability.
  • Optional Toppings
    • 1/4 cup chopped roasted peanuts (optional)
      → Adds extra crunch and peanut flavor. Toast the peanuts lightly to deepen aroma, then scatter over the warm glaze so they adhere well. Ensure they are fully cooled before serving to maintain crispness.
    • Sea salt flakes for finishing (optional)
      → A light pinch enhances the chocolate and peanut butter contrast. Sprinkle after glazing and just before the chocolate sets for best adhesion and a balanced finish.

Instructions

  • Preheat your oven to 350°F (175°C) and line a 9×9-inch baking pan with parchment paper or grease it well.
    → Preheating ensures even baking from the start and lining the pan prevents sticking, which makes clean removal and slicing easier.
  • Sift together the dry components for the base: 1 1/2 cups all-purpose flour (or gluten-free flour blend) and 1/2 cup unsweetened cocoa powder, then whisk in 1/2 cup granulated sugar and 1/4 teaspoon salt until uniformly distributed.
    → Sifting with the cocoa avoids lumps and yields a consistent, tender crumb; a light whisk ensures even color and sweetness distribution.
  • If using gluten-free flour, add 1/4 teaspoon xanthan gum per cup of flour to mimic gluten and improve structure; whisk again to evenly incorporate.
    → Xanthan gum acts as a binder in gluten-free blends, giving your base cohesion and chew without graininess.
  • Whisk in the wet elements for the base: 1 large egg and 1/3 cup melted unsalted butter that has cooled slightly, along with 1/2 teaspoon vanilla extract, until the mixture is smooth and cohesive.
    → The cooled butter prevents scrambling the egg and helps emulsify fat with moisture for a glossy, uniform batter.
  • Fold the wet ingredients into the dry ingredients and mix just until combined, stopping as soon as there are no visible flour streaks.
    → Overmixing develops gluten in flour-based batters or toughens gluten-free blends; just-wet batter yields a tender base with fudgy character.
  • Spread the batter evenly in the prepared pan to about 1/4-inch thickness, using a spatula to press and smooth the surface.
    → An even layer ensures uniform baking and a stable foundation for the peanut butter filling.
  • Bake the base for 12–14 minutes at 350°F (175°C) until the edges set and a toothpick inserted near the center comes out with a few moist crumbs; then remove and let it cool completely on a rack.
    → Cooling fully sets the structure so the filling can be spread without sliding, and prevents the filling from sinking into the base.
  • Prepare the peanut butter filling by combining 1 cup creamy peanut butter with 1/4 cup powdered sugar, 2 tablespoons softened unsalted butter, and 1/2 teaspoon vanilla extract in a bowl; stir until smooth and cohesive.
    → Powdered sugar helps the filling hold shape without gritty texture, while the butter adds gloss and cohesion for easy spreading.
  • If the peanut filling is very stiff, briefly warm it in the microwave in 5-second bursts or let it sit at room temperature for a few minutes, then stir to achieve a spreadable consistency that can be evenly brushed over the cooled base.
    → A spreadable filling ensures a uniform layer without tearing the base or causing gaps at the edges.
  • Spread the peanut butter filling in an even, thin layer over the cooled chocolate base using an offset spatula, keeping it away from the pan edges to avoid overflow during glazing.
    → A controlled, even layer gives clean slices and prevents the glaze from pooling at the sides.
  • Chill the assembled pan in the refrigerator for 20–30 minutes or until the peanut butter layer is firm to the touch; this helps the layer hold its shape when you apply the glaze.
    → Chilled filling resists smearing under the chocolate glaze and yields clean, precise bars.
  • Meanwhile, prepare the chocolate glaze by melting 1/2 cup semisweet chocolate chips with 1 tablespoon coconut oil or butter in a double boiler or in short microwave bursts, stirring until smooth and glossy.
    → The addition of fat keeps the glaze thin enough to pour and creates a shiny, professional finish that sets nicely as it cools.
  • Pour and spread the warm glaze over the peanut butter layer in a thin, even sheet, tilting the pan to reach the edges without missing any spots; avoid creating thick edges that crack later.
    → A smooth, even glaze seals the filling and provides a glossy top that highlights the layers.
  • If using optional toppings, scatter 1/4 cup chopped roasted peanuts over the glaze while it is still warm so they adhere, and gently press them into the surface.
    → Toasted peanuts deepen aroma and crunch; pressing them helps them stay put as the glaze sets.
  • Finish with a light sprinkle of sea salt flakes (optional) over the glaze just as it begins to set for a balanced sweet-salty finish.
    → Salt enhances chocolate and peanut butter contrast and intensifies flavor with a sophisticated finish.
  • Let the glaze set completely at room temperature or refrigerate about 30 minutes for a quicker firming, then lift the bars from the pan using the parchment overhang and cut into even squares or rectangles with a sharp, warm knife for clean edges.
    → Properly set bars slice cleanly, showing distinct layers, and a warm knife prevents dragging of glaze while cutting.

Notes

These Cioccolato Burro Arachidi bars are a luscious mix of a chewy chocolate base, a salty-sweet peanut butter filling, and a shiny chocolate glaze. To ensure clean edges and even layers, line the pan with parchment and press the base firmly and evenly. For gluten-sensitive cooks, use a 1:1 gluten-free flour blend and verify that all other ingredients (cocoa and chocolate chips) are gluten-free. If you want a vegan version, replace the egg with a chia or flax egg and substitute dairy ingredients with plant-based alternatives (vegan butter and dairy-free chocolate).

Base preparation tips: Sift the all-purpose flour (or gluten-free blend) with the cocoa to prevent lumps and to distribute the color evenly. Whisk in the granulated sugar and salt. Let the melted butter cool slightly before whisking in the egg and vanilla so the egg doesn’t scramble. Add wet ingredients to the dry just until combined to keep the base tender and fudgy; overmixing can make it dry or tough. Press the batter into an even layer in the prepared pan and use a spatula to smooth the surface.

Ripieno al Burro di Arachidi tips: Stir the peanut butter until completely smooth and emulsified; if natural peanut butter has oil separation, whisk to combine. Sift the powdered sugar to avoid gritty texture, then beat with the softened butter and vanilla until glossy. Taste and adjust salt if needed. Spread the filling evenly over the cooled base and chill until the filling is firm before glazing.

Glassa al Cioccolato tips: Melt the chocolate chips with the coconut oil or butter until smooth and glossy. Let it cool slightly so it doesn’t melt the filling when you pour. Pour a thin, even layer over the set peanut butter and tilt the pan to cover the surface. Allow the glaze to set completely at room temperature or refrigerate for faster results. Optional toppings like chopped roasted peanuts and a light sprinkle of sea salt add texture and a final punch of flavor; scatter before the glaze fully hardens so they adhere.

Serving and storage: Chill the assembled bars until the glaze is firm, then cut into bars with a sharp knife; wipe the blade between cuts for clean edges. Store in an airtight container in the fridge for up to a week, or freeze for longer storage. Bring to room temperature for 15–20 minutes before serving for the best bite. This treat pairs wonderfully with a cold glass of milk or a cup of coffee.

Tips

Consigli pratici per Cioccolato Burro Arachidi

  • Scegli ingrediente a temperatura ambiente quando richiesto (uovo, burro, burro di arachidi) per una emulsione più omogenea e una consistenza più liscia.
  • Setacciare insieme farina e cacao con la nota di xanthan gum (se usi una versione senza glutine) aiuta a evitare grumi e a dare struttura stabile alla base.
  • Se utilizzi cacao naturale, il sapore sarà più robusto e fruttato: potresti voler aumentare leggermente lo zucchero o bilanciare con un pizzico di sale extra, a seconda dei tuoi gusti.
  • Non lavorare troppo l’impasto della Base al Cioccolato: mescola solo fino a quando gli ingredienti sono incorporati per mantenere una base tenera e fudgy.
  • Per evitare che l’uovo si cuocia quando aggiungi burro fuso, lascia raffreddare leggermente il burro fuso prima di unirlo agli ingredienti secchi.
  • Versione vegana: sostituisci l’uovo con una chia egg (1 cucchiaio di semi di chia mescolato a 2,5 cucchiai di acqua; lascia addensare) oppure usa 1/4 di tazza di purè di mela o purea di banana insieme a olio di cocco; scegli una margarina o burro vegetale al posto del burro.

Consigli per la Base al Cioccolato

  • Setaccia farina e cacao insieme per una distribuzione uniforme e una base senza grumi.
  • Se usi una farina senza glutine, aggiungi 1/4 cucchiaino di xanthan gum per cup di farina per imitare la chiusura della glutine.
  • Per una glassa di cioccolato più liscia, preferisci cacao olandese (Dutch-process) se vuoi sapore più morbido; il cacao naturale darà nota più vigorosa, quindi regola lo zucchero di conseguenza.

Consigli per il Ripieno al Burro di Arachidi

  • Se il burro di arachidi tende a separarsi, mescola bene per riunire l’olio; per burro di arachidi naturale, usa una frusta o monta con un po’ di zucchero a velo fino a ottenere una crema liscia e spalmabile.
  • Per una consistenza compatta e setosa, assicurati che il burro sia morbido ma non sciolto mentre aggiungi zucchero a velo e vaniglia.
  • Puoi aumentare o diminuire lo zucchero a velo in base al tuo gusto: più zucchero darà una crema più densa e dolce.

Glassa al Cioccolato: trucchi e tecnica

  • Sciogli il cioccolato a bagnomaria o al microonde, mescolando spesso. Fai raffreddare leggermente prima di versarlo sulla base per una glassa lucida e non troppo liquida.
  • Aggiungi 1 cucchiaio di olio di cocco o burro per una glassa più fluida e lucida che si stenderà bene. L’olio di cocco tende a solidificarsi a temperatura ambiente, donando una finitura brillante.
  • Versa la glassa ancora tiepida sulla superficie calda ma non bollente per ottenere una copertura liscia e uniforme.

Optional Toppings e presentazione

  • 1/4 cup di arachidi tostate tritate: tostatele leggermente in padella per intensificare l’aroma, poi distribuiscile subito sulla glassa ancora morbida per far aderire bene.
  • Una leggera spolverata di fiocchi di sale marino esalta il contrasto tra cioccolato e burro d’arachidi; aggiungi solo al momento giusto, prima che la glassa indurisca.

Note di servizio

  • Lascia raffreddare completamente la tavoletta prima di tagliarla per definire meglio i pezzi.
  • Conserva in frigorifero se vuoi che il ripieno rimanga ben stabile; porta a temperatura ambiente per qualche minuto prima di servire per un morso più morbido.

FAQ

Cioccolato Burro Arachidi – FAQ

Che cos’è Cioccolato Burro Arachidi?

È un dolce semplice che combina cioccolato fondente o al latte con burro di arachidi. Può essere preparato come barretta, tavoletta o piccoli tartufi senza cottura, spesso raffreddato in frigorifero per solidificarsi.

Quali ingredienti servono?

Ingredienti base (per una tavoletta):

  • 200 g di cioccolato fondente o al latte
  • 150 g di burro di arachidi cremoso
  • 2–3 cucchiai di zucchero a velo (facoltativo)
  • 20 g di burro o olio di cocco (facoltativo, serve a rendere più lucido e morbido)
  • 1 cucchiaino di estratto di vaniglia
  • un pizzico di sale
  • opzionali per decorare: granella di sale, arachidi tritate, cocco grattugiato
Come si prepara passo passo?

Procedimento semplice:

  1. Fondi il cioccolato a bagnomaria o al microonde, mescolando di tanto in tanto.
  2. In una ciotola a parte, mescola burro di arachidi con vaniglia, zucchero a velo (se usato) e un pizzico di sale.
  3. Versa uno strato sottile di cioccolato fuso in una teglia rivestita con carta da forno.
  4. Lascia solidificare leggermente in frigorifero (5–10 minuti).
  5. Aggiungi il ripieno di burro di arachidi e livellalo.
  6. Copri con il resto del cioccolato fuso e liscia la superficie.
  7. Raffredda in frigorifero finché il cioccolato è completamente solido, quindi taglia a barrette o spezza in pezzi.
Posso usare cioccolato al latte invece che fondente?

Sì. Puoi usare cioccolato al latte o fondente a seconda del tuo gusto. Il gusto e la consistenza cambieranno leggermente, ma il risultato sarà altrettanto gustoso.

È possibile prepararla in versione vegana?

Sì. Usa cioccolato fondente vegano e burro di arachidi senza derivati animali. Puoi sostituire il burro normale con olio di cocco o olio vegetale per facilitare l’emulsione, se preferisci.

Posso trasformarla in tartufi anziché in barrette?

Assolutamente. Dopo aver mescolato burro di arachidi e cioccolato, lascia rassodare e poi con le mani forma delle palline. Ripassale nel cioccolato fuso e mettile a raffreddare su carta forno.

Come conservarla?

Conservala in frigorifero in un contenitore ermetico. Si mantiene bene per 1–2 settimane. Per una conservazione più lunga, puoi anche congelarla (2–3 mesi); lascia scongelare a temperatura ambiente prima di servirla.

Come personalizzare la ricetta?

Varianti comuni:

  • Aggiungi una manciata di arachidi tostate spezzettate tra uno strato e l’altro.
  • Spruzza una piccola quantità di sale grosso prima di raffreddare per un contrasto salato-dolce.
  • Incorpora una cucchiaiata di miele o sciroppo d’acero per una dolcezza diversa.
  • Usa cioccolato bianco per una versione panna e rosee con burro di arachidi chiaro.
Quali sono gli errori comuni da evitare?

Errori comuni:

  • Cioccolato che si solidifica troppo rapidamente se non raffredda in modo uniforme.
  • Burro di arachidi troppo denso o poco cremoso, che rende difficile lo strato uniforme.
  • Non raffreddare abbastanza tra gli strati, provocando rivestimento non uniforme.
  • Utilizzare cioccolato troppo vecchio o non conservato correttamente che non si tempera bene.
Quante porzioni rende?

Con una tavoletta da circa 20×15 cm, tagliata a pezzi, otterrai circa 12–16 porzioni, a seconda delle dimensioni delle barrette o dei tartufi che prepari.

Introduzione / Hook

Immagina una tavola accogliente di mattina: la cucina è pervasa da un richiamo caldo di dolcezza matura, mentre una teglia dorata emana vapore fragrante. Banana e noci si abbracciano in una maniera semplice ma irresistibile, una combinazione che parla di casa, di lentamente maturare delle cose buone e di una cura che non richiede artifici: basta una banana ben matura, un pugno di noci croccanti e l’odore invitante della dolcezza appena sfornata. Banana e Noci è una celebrazione dell’umiltà: non serve una lista infinita di ingredienti, basta cuore, pazienza e un po’ di tecnica per ottenere una torta soffice, umida al centro, con una crosta leggermente croccante e un profumo che inonderà la casa. In poche parole, è la promessa di una merenda degna di essere condivisa, di una colazione che trasforma un giorno ordinario in un piccolo rituale di felicità. Lasciati conquistare dal contrasto tra la dolcezza della banana e la profondità tostata delle noci, e scopri come questa ricetta possa diventare un punto fermo della tua cucina, pronta da ripetere in ogni stagione con piccoli adattamenti che la rendano sempre nuova.

Ogni morso racconta una storia: la morbidezza compatta che trattiene la umidità senza appesantire, l’aroma di vaniglia, magari una leggera punta di cannella o scorza di limone che accende la nota dolce, e la tasca di croccante fornita dalle noci che interrompe la dolcezza in un equilibrio perfetto. È una ricetta che si adatta a momenti diversi: una colazione confortante, una merenda rustica, un dessert veloce da portare in tavola quando gli amici arrivano all’improvviso. E al di là del gusto, c’è un fascino pratico: si presta a essere realizzata anche con ingredienti ridotti o sostituzioni intelligenti, restando sempre morbida, profumata e appagante. Se stai cercando un dessert o una merenda che trasmetta calore e semplicità, Banana e Noci è pronta a diventare una tua alleata fidata.

La Storia Dietro il Piatto

Banana e Noci nasce dall’incontro tra due ingredienti umili ma pieni di carattere: la banana, frutto simbolo di maturità e conforto, e le noci, una piccola bacchetta magica di sapore terroso e fruttato. In molte tradizioni, la banana è presente in preparazioni confortevoli: pane, torte, dolci da forno che riuniscono famiglia e amici attorno a una tavola condivisa. Le noci, d’altro canto, hanno una storia antica nelle cucine di tutto il mondo: sono una fonte di croccantezza, di fibre, di grassi buoni e di profondità gustativa che sa tenere compagnia alla dolcezza del frutto giallo.

Questa ricetta trae ispirazione dal concetto di cucina povera elevata: pochi ingredienti di base, una tecnica che mette in risalto la qualità di ciò che si usa, e risultati che sorprendono per morbidezza e profumo. In molte culture, la torta o il plumcake di banana è considerato un modo pratica per riciclare banane mature, ma qui l’approccio è arricchito con una nota di noci tostate che aggiungono corpo e una leggera resistenza al morso. Personalmente, ho scoperto Banana e Noci in una cucina familiare dove la presenza di banane mature è sempre stata una scusa per accendere il forno e creare qualcosa di dolce insieme. Da quel primo assaggio è nata una fiducia: basta avere banane ben mature, un po’ di olio o burro, una manciata di noci e una spolverata di spezie per trasformare ingredienti semplici in qualcosa di speciale. Questa storia si riflette in ogni fetta: una memoria di casa, una promessa di comfort e una dimostrazione che la semplicità può suonare come una sinfonia quando sono giuste le proporzioni e il tempo di cottura.

Perché Amerai questa Ricetta

  • Versatilità: si presta a numerose varianti e adattamenti, rendendola una base perfetta per sperimentare con altri frutti, spezie o tipi di noci.
  • Equilibrio di sapori: la dolcezza neutra delle banane mature si sposa magnificamente con la ricchezza terrosa delle noci, bilanciata da una leggera nota di vaniglia e spezie.
  • Texture irresistibile: fuori croccante e dorato, dentro umido e soffice grazie all’umidità intrinseca delle banane, per una fetta che non lascia residui pesanti nello stomaco.
  • Confortevole ma strutturato: è una merenda o una colazione che nutre senza appesantire, perfetta per iniziare la giornata o per una coccola di metà pomeriggio.
  • Facilità di preparazione: richiede ingredienti comuni e una tecnica semplice, ideale per chi è alle prime armi ma desidera risultati professionali.
  • Compatibilità alimentare: si presta a versioni senza glutine o senza latticini senza perdere character e gusto, mantenendo la struttura e l’equilibrio.
  • Perfetta per il riciclo creativo: se hai banane in eccesso o noci avanzate, è la ricetta ideale per trasformarle in qualcosa di gustoso e condivisibile.

Profilo di Sapore & Texture

Il profilo di sapore di Banana e Noci è una delicata sinfonia di dolcezza e profondità. Le banane, mature ma ancora compatte, rilasciano zuccheri naturali che trasformano ogni morso in una coccola morbida e vellutata. La dolcezza è ben bilanciata da una punta di vaniglia, che esalta le note fruttate senza sovrastarle, e da una leggera cangerata di cannella o scorza di limone, a seconda dei gusti, che introduce un accento speziato luminoso. Le noci, tostate o leggermente tostate, aggiungono una nota terrosa, quasi caramellata, che si intreccia con il dolce delle banane. In bocca, si crea un contrasto tra la croccantezza delle noci e la morbidezza del cuore del dolce, offrendo una texture dinamica: un primo morso soddisfacente, seguito da una seconda fetta che rivela una mollevo umido e avvolgente.

Gli elementi di umidità non sono eccessivi: la banana agisce come legante naturale, mantenendo il tutto soffice, ma senza risultare pesante o affogato. Lo strato superiore, se dorato, offre una sottile crosticina che fa scintillare il palato al primo contatto. L’aroma è una tentazione che si percepisce già dal forno: banana, vaniglia, un accenno di scorza agrumata e le noci che fumano leggermente, creando una promessa olfattiva che invita al taglio e al assaggio. A livello di abbinamenti gustativi, questa torta regala una base neutra sufficiente da essere accompagnata da una crema leggera (mascarpone o yogurt greco), da un filo di miele o sciroppo leggero, o da una leggera spolverata di cacao amaro per un finale nota e intrigante. In breve, Banana e Noci è un’opera bilanciata dove dolcezza, croccantezza e aroma si intrecciano senza mai sovrapporsi, regalando un dessert o una merenda che resta fresca, ma confortevole, ad ogni morso.

Occasioni & Abbinamenti

Questa torta si adatta a una moltitudine di momenti e contesti, rendendola una scelta affidabile per qualsiasi periodo dell’anno.

  • Colazione casalinga: servita a temperatura ambiente o leggermente tiepida, accompagnata da una tazza di caffè o latte, è una partenza dolce ma non eccessiva per la giornata.
  • Merenda della mano: tagliata in fettine generose, è perfetta da gustare con amici o familiari durante una pausa pomeridiana.
  • Dessert veloce per la cena: una fetta con una cucchiaiata di crema leggera o yogurt e magari una leggera glassa al limone può trasformarsi in un dessert elegante ma semplice.
  • Occasioni speciali: con una presentazione curata, una spolverata di zucchero a velo o una decorazione di frutti di bosco, può essere una chiusura accattivante per una cena informale o un tea party.
  • Abbinamenti consigliati: caffè espresso o macchiato, tè nero o verde, una selezione di formaggi freschi leggeri come ricotta o mascarpone, una coulée di miele o sciroppo d’acero, oppure una sfera di gelato alla vaniglia per elevare il gusto.

Consigli, Varianti & Sostituzioni

Banana e Noci è una base molto flessibile, che invita a personalizzazioni e sperimentazioni. Ecco alcune idee per rendere questa torta ancora più adatta ai tuoi gusti o alle tue necessità dietetiche:

  • Versione vegana: sostituisci l’uovo con una miscela di semi di lino macinati in acqua (1 cucchiaio di semi di lino macinati mescolato con 3 cucchiai di acqua per ogni uovo desiderato) o utilizza un purè di banane come legante. Usa olio di cocco o olio di oliva al posto del burro e latte vegetale al posto del latte tradizionale.
  • Gluten-free: scegli una farina gluten-free bilanciata oppure usa farina di mandorle o una miscela di farine senza glutine per una consistenza più umida e ricca.
  • Noci alternative: se preferisci una versione senza noci, puoi sostituire con nocciole, mandorle affettate o semi di zucca per una croccantezza differente.
  • Aromi extra: aggiungi una punta di cardamomo, zenzero in polvere o un po’ di scorza di arancia per dare una nota fresca e speziata che si abbina bene alle banane.
  • Versione senza latticini: sostituisci il burro con olio neutro o purea di mele per una versione leggera, mantenendo l’umidità grazie al frutto maturo.
  • Versione al cioccolato: aggiungi gocce di cioccolato fondente all’impasto per una versione più golosa; evita un eccesso per non appesantire la torta.
  • Texture diversa: se preferisci una torta più sofficissima, sostituisci una piccola percentuale di farina con amido di mais o amido di tapioca, oppure aggiungi una manciata di yogurt per una crumb più leggera.
  • Dolcezza controllata: per una versione meno dolce, riduci una piccola porzione di zucchero nell’impasto o utilizza banane particolarmente mature che sprigionano zuccheri naturali senza bisogno di ulteriore dolcificante.

Conservazione & Idee Make-Ahead

Banana e Noci mantiene la propria umidità e sapore per diversi giorni se conservata correttamente. Ecco alcuni suggerimenti utili:

  • Conservazione a temperatura ambiente: una fetta ben coperta o una torta tagliata può rimanere soffice per 2-3 giorni in un contenitore ermetico, lontano da luce diretta e fonti di calore.
  • Riposo in frigorifero: se desideri conservarla più a lungo, è consigliabile riporla in frigorifero in contenitore chiuso; durerà circa una settimana, ma potrebbe assorbire un po’ l’umidità, quindi è utile scaldarla leggermente prima di servirla.
  • Congelamento: porziona la torta o congela le singole fette avvolte singolarmente in pellicola e poi in un contenitore. Si mantiene bene fino a 2-3 mesi. Per gustarla al meglio, scongelala lentamente in frigorifero e scaldala leggermente nel forno o nel microonde.
  • Make-ahead: puoi preparare l’impasto (senza cottura) e conservarlo in frigorifero per un massimo di 24 ore prima di infornarlo. Oppure, se hai banane molto mature, congela le banane e, una volta scongelate, usale direttamente nell’impasto per facilitare la preparazione quando sei di fretta.

Curiosità & Trivia (Opzionale)

Una piccola finestra sulla cultura culinaria può arricchire la tua esperienza di cucina. Il connubio banana e noci non è solo una scelta di gusto, ma una porta aperta su storie di migrazione, scambi gastronomici e adattamenti regionali. Le banane, originarie dell’Asia sudorientale, hanno accompagnato il viaggio dell’uomo per via delle loro qualità nutritive e della loro praticità: arrivano a maturare dolcemente anche in climi meno ideali e si prestano a una miriade di preparazioni, dal dolce al salato. Le noci, presenti in molte tradizioni culinarie del Mediterraneo e dell’Europa, portano una nota di rusticità e di terra, che si sposa in modo sorprendente con la dolcezza fruttata. In alcune culture, i dolci alle banane sono considerati simbolo di abbondanza e di convivialità: offrire una fetta di Banana e Noci significa condividere un momento di calore e semplicità. Un piccolo dato curioso: in alcune regioni, si usa aggiungere una punta di scorza di limone per dare freschezza al dessert, o si preferisce una spolverata di cacao o di cannella come tocco finale, a seconda della stagione e della tavola.

Ingredients

Banana e Noci Base

  • 2 cups all-purpose flour (240 g)
    → Provides structure and crumb; sift with the dry ingredients to ensure an even, light texture. For a gluten-free version, use a 1:1 gluten-free flour blend and consider adding a small amount of xanthan gum if your blend lacks it.
  • 1 teaspoon baking powder
    → Leavening to help the loaf rise and keep the crumb tender. Distribute evenly by whisking with the flour; avoid overmixing once wet ingredients are added to maintain lightness.
  • 1/2 teaspoon baking soda
    → Reacts with the bananas’ natural acidity and the sugars to create lift and browning. Ensure it’s evenly dispersed in the dry mix to prevent uneven pockets of rising.
  • 1/2 teaspoon salt
    → Enhances overall flavor and balances sweetness; if using salted butter, you may reduce the added salt slightly.
  • 1 teaspoon ground cinnamon
    → Provides warmth that pairs beautifully with banana and walnuts; adjust to taste. For a stronger aroma, toast the cinnamon briefly in the dry ingredients before mixing.
  • 2 large ripe bananas, mashed
    → Source of moisture and natural sweetness; mash until mostly smooth with a few small lumps for texture. Very ripe bananas (with abundant brown spots) yield the best flavor. If your bananas are underripe, you can gently warm them to soften before mashing.
  • 2 large eggs, at room temperature
    → Bind the ingredients and contribute to a tender crumb; room-temperature eggs blend more evenly with the batter. Lightly whisk the eggs before adding to the mixture for smoother incorporation.
  • 1/2 cup unsalted butter, melted and cooled (or 1/2 cup neutral oil)
    → Adds richness, moisture, and a tender crumb. If you prefer a dairy-free version, substitute with a neutral oil. Ensure the butter is cooled so it doesn’t cook the eggs when mixing.
  • 3/4 cup granulated sugar (or 1/2 cup granulated + 1/4 cup packed brown sugar)
    → Sweetness and moisture; brown sugar contributes a subtle caramel note and extra moisture. If bananas are very ripe, you can reduce sugar by 2–3 tablespoons without sacrificing flavor.
  • 1 teaspoon vanilla extract
    → Enhances banana and walnut aroma; use pure vanilla for the best depth of flavor. If using a vanilla bean, scrape the seeds for a stronger fragrance.
  • 1/2 cup milk (dairy or plant-based)
    → Adds moisture and helps bring the batter to a thick, spoonable consistency. If using a thicker flour blend, you may need a little more milk. Warm dairy milk slightly to improve integration with the melted fat.
  • 1 cup walnuts, roughly chopped (plus extra for topping)
    → Gives crunchy texture and nutty flavor that contrasts with the soft crumb. Chop into medium pieces to distribute evenly; toast nuts briefly in a dry pan for richer flavor before folding into the batter, and reserve a few for sprinkling on top before baking.

Optional Add-ins

  • 1/2 cup dark chocolate chips (optional)
    → Adds pockets of molten chocolate that complement banana sweetness; fold in gently at the end to avoid overmixing. Use dairy-free chips if needed.
  • 1/2 cup shredded coconut (optional)
    → Introduces texture and a subtle tropical note; toast the coconut lightly to maximize flavor before adding. If using, reduce flour by 1–2 tablespoons to compensate for the extra dry ingredient.
  • 1/4 cup chopped dates or raisins (optional)
    → Provides chewy sweetness and depth; soak very dry dates/raisins in warm water for 10 minutes, then drain well and pat dry to prevent soggy batter.

Instructions

  • Preheat your oven to 350°F (175°C) and grease a 9×5-inch loaf pan or line it with parchment paper.
    → This ensures the banana bread releases cleanly and does not stick, making slicing neat and easy.
  • Toast the walnuts in a dry skillet over medium heat until fragrant and lightly browned, about 2–3 minutes, then transfer to a plate to cool and reserve a handful for topping.
    → Toasting concentrates the nut oils, heightening aroma and crunch; keep stirring to prevent burning and remove promptly when ready.
  • Sift or whisk together the dry ingredients in a large bowl: flour, baking powder, baking soda, salt, and ground cinnamon until evenly distributed and any lumps are broken up.
    → Sifting promotes even rise and a lighter crumb by preventing dense pockets of leavening or spice.
  • Mash the bananas in a separate bowl until mostly smooth with a few small lumps using a fork or potato masher; the texture will contribute moisture and banana flavor without being completely uniform.
    → Very ripe bananas yield more sweetness and moisture; leaving small lumps adds pleasant banana texture in every slice.
  • Whisk together the eggs with granulated sugar (or 1/2 cup granulated sugar plus 1/4 cup packed brown sugar), then whisk in the vanilla and the cooled melted butter (or neutral oil) and the milk until the mixture is smooth and emulsified.
    → This creates a cohesive wet base; using cooled fat prevents scrambling the eggs and the liquids help hydrate the dry ingredients evenly.
  • Stir the mashed bananas into the wet mixture until evenly incorporated and there are no streaks of banana left; this ensures balanced moisture and banana flavor throughout the batter.
    → Uniform distribution prevents concentrated spots of sweetness and moisture that could affect texture.
  • Pour the banana-wet mixture into the bowl of dry ingredients and mix gently with a rubber spatula until just combined; stop as soon as there is no visible flour to avoid gluten development and a dense crumb.
    → Overmixing activates gluten, leading to a tougher loaf; a few streaks of flour are acceptable for a tender crumb.
  • Fold in the 1 cup chopped walnuts and any optional add-ins (dark chocolate chips, shredded coconut, or chopped dates) with a few light turns until evenly distributed; do not overwork once the nuts are added.
    → Nuts and add-ins provide texture and flavor; folding gently preserves air pockets for lightness.
  • Spoon the batter into the prepared loaf pan and smooth the top with the back of a spoon; press a few extra walnuts into the surface to create a crunchy, visually appealing crust.
    → A level surface ensures even baking and topping placement helps with aroma as it bakes.
  • Bake in the preheated oven at 350°F (175°C) for 60–70 minutes, or until a toothpick inserted into the center comes out with only a few moist crumbs; if the loaf browns too quickly, tent with foil after 40 minutes.
    → Doneness is best tested with a toothpick; retreat if the center is still wet to avoid an undercooked middle.
  • Allow the loaf to cool in the pan for 10 minutes, then invert onto a wire rack to cool completely before slicing; this helps set the crumb and makes removing clean slices easier.
    → Resting enables the crumb to finish setting and prevents crumbling when cut.
  • Once completely cooled, slice and serve; store leftovers wrapped tightly at room temperature for up to 3 days or freeze for longer storage.
    → Cooling fully before slicing yields cleaner cuts; proper storage preserves moisture and flavor.

Notes

This banana-walnut loaf is naturally sweetened with ripe bananas and features a tender crumb with warm cinnamon and crunchy walnuts.

You can customize it by folding in your favorite add-ins from the Optional Add-ins list, such as dark chocolate chips, shredded coconut, or chopped dates.

It bakes into a loaf that slices beautifully, freezes well, and makes a satisfying breakfast or afternoon treat.

For a gluten-free version, use a 1:1 gluten-free flour blend and consider adding a small amount of xanthan gum if your blend lacks it, and ensure all other ingredients suit gluten-free needs.

Tips

Consigli pratici per Banana e Noci

  • Setacciare la farina insieme al lievito in polvere, al bicarbonato, al sale e alla cannella per distribuire bene gli agenti lievitanti e ottenere una pagnotta dal crum bene levigato.
  • Non lavorare troppo l’impasto una volta aggiunti gli ingredienti liquidi: mescola solo finché gli ingredienti sono appena uniti per evitare una consistenza elastica e una mollica densa.
  • Usa banane molto mature: più dolci e viscose, aggiungono UMIDITÀ e sapore. Se le banane sono ancora verdi, scaldale leggermente o schiacciale formando alcuni piccoli grumi per texture.
  • Uova a temperatura ambiente e burro raffreddato (o olio neutro) aiutano a mantenere una crum morbida e uniforme.
  • Se l’impasto sembra troppo secco, aggiungi latte poco alla volta fino a ottenere una consistenza densa ma spalmabile.
  • Toasta le noci leggermente in una padella secca o in forno per 5–8 minuti per esaltarne aroma e croccantezza; lascia raffreddare prima di incorporarle.
  • Per gli add-ins, aggiungi cioccolato, cocco o datteri solo alla fine per non spezzare l’impasto o farlo indebolire.
  • Se vuoi una crosticina extra, spolvera leggermente con zucchero di canna poco prima di infornare.

Varianti, sostituzioni e trucchi

  • Versione senza glutine: usa una farina 1:1 per gluten-free e, se il tuo mix non contiene xantano, aggiungi 1/4–1/2 cucchiaino di xanthan gum per migliorare l’elasticità dell’impasto.
  • Versione dairy-free: sostituisci il burro con olio neutro o olio di cocco; se usi olio, l’impasto potrebbe restare un po’ più umido, aggiusta con una cucchiaiata di latte.
  • Riduzione dello zucchero: se le banane sono molto mature, puoi diminuire lo zucchero di 2–3 cucchiai senza perdere dolcezza.
  • Varianti di gusto: puoi aggiungere una punta di noce moscata o una scorza fine di limone per una nota agrumata che contrasta bene con le noci.
  • Per aumentare proteine: aggiungi una cucchiaio di semi di chia o noci extra nell’impasto, mantenendo l’equilibrio di liquidi.

Cuocitura, raffreddamento e presentazione

  • Preparare lo stampo: ungere e rivestire con carta forno per facilitare la rimozione; una teglia da loaf standard 9×5 pollici è comune, ma adatta secondo la tua teglia.
  • Forno: preriscaldare a circa 180°C. Infornare e cuocere finché lo stecchino esce non bagnato con poche briciole umide, tipicamente circa 50–60 minuti a seconda dello stampo e del forno.
  • Doneness test: infilare uno stecchino al centro; deve uscire pulito o con bricioline asciutte; evitare stecchini troppo bagnati.
  • Raffreddamento: lasciare raffreddare lo stampo 10–15 minuti, poi sformare e far raffreddare completamente su una griglia tozza per evitare fratture e liquidi stagnanti.
  • Presentazione e conservazione: tagliare a fette e servire. Conservare in contenitore ermetico a temperatura ambiente per 2–3 giorni, oppure congelare le fette per 1–3 mesi.

FAQ

Che cosa è Banana e Noci?

Banana e Noci è un dessert semplice e nutriente a base di banane mature schiacciate mescolate con noci tritate, un tocco di dolcificante e spezie. Può essere gustato al cucchiaio, come merenda o come colazione veloce, ed è facile da personalizzare con varianti a piacere.

Quali ingredienti servono?

Ingredienti tipici (dosaggio a piacere per 2 porzioni):

  • 2 banane mature
  • 1/4-1/2 tazza di noci tritate (noci, nocciole, o mandorle)
  • 1-2 cucchiaini di miele o sciroppo d’agave
  • 1-2 cucchiaini di yogurt (opzionale, può essere sostituito con yogurt vegetale per una versione vegana)
  • 1/2 cucchiaino di cannella in polvere
  • 1/2 cucchiaino di estratto di vaniglia (facoltativo)
  • un pizzico di sale

Come si prepara?

Procedimento semplice:

  1. Schiacciare le banane in una ciotola fino a ottenere una crema grossolana.
  2. Aggiungere le noci tritate, la cannella, la vaniglia e il sale; mescolare bene.
  3. Se si usa, incorporare lo yogurt per rendere la consistenza più cremosa.
  4. Dolcificare con miele o sciroppo d’agave a piacere.
  5. Servire subito o lasciare raffreddare in frigorifero per una versione più compatta.
Quanto tempo ci vuole?

Tempo di preparazione: circa 10-15 minuti. Non è necessario cuocere; se si desidera una versione fredda, è sufficiente raffreddare in frigorifero per 20-30 minuti prima di servire.

Posso rendere questa ricetta vegana o senza lattosio?

Sì. Per una versione vegana/senza lattosio:

  • Omettere lo yogurt o sostituirlo con yogurt vegetale (soia, mandorla, avena, ecc.).
  • Usare sciroppo d’agave o sciroppo d’acero al posto del miele.

Il resto degli ingredienti è naturalmente privo di latte.

Sostituzioni e varianti comuni

Varianti utili:

  • Noci diverse: mandorle, nocciole o anacardi al posto delle noci.
  • Dolcificante alternativo: miele, sciroppo d’acero, zucchero di cocco.
  • Aggiunte gustose: gocce di cioccolato fondente, cacao in polvere, scorza d’arancia, un cucchiaio di burro di arachidi o di mandorle.
  • Versione più cremosa: aggiungere più yogurt o yogurt vegetale.
Come conservare Banana e Noci?

Conservazione:

  • In frigorifero: 2-3 giorni in contenitore ermetico.
  • In freezer: può essere conservato porzionato per 1-2 mesi; meglio consumarlo entro 1 mese per mantenere consistenza e gusto.

Consiglio: se prepari in anticipo, aggiungi una spruzzata di limone sulle banane tagliate per ritardarne l’ossidazione.

È adatto ai bambini? ci sono allergie da considerare?

Sì, è generalmente adatto ai bambini, ma va tenuto presente:

  • Contiene frutta secca; tagliare la preparazione in pezzi piccoli per evitare rischi di soffocamento nei bambini molto piccoli.
  • Allergie: può contenere noci. Se un bambino è allergico alle noci, omettere le noci o sostituirle con semi (p. es. semi di girasole) se non presenti allergie.

Sempre verificare eventuali allergie individuali.

Quali altre idee di servizio o presentazione posso provare?

Idee per servire:

  • Spolverare con cacao o cioccolato grattugiato.
  • Servire con frutta fresca (mirtilli, lamponi) e una cucchiaiata di yogurt.
  • Presentare in coppette individuali con un filetto di miele sul top.

Intro / Hook

Immagina una ciotola che profuma di estate: fragole fresche, lucide come gocce di rubino, che sprigionano una dolce acidità, accompagnate da semi di chia che, una volta assorbiti dal succo, diventano piccole perle gelatinose. Fragole e semi di chia: due ingredienti apparentemente semplici, ma insieme creano una sinfonia di contrasti incredibilmente equilibrata. Ogni morso è un viaggio sensoriale che inizia con la freschezza fruttata delle fragole, segue con la cremosità setosa che si sviluppa grazie ai semi di chia e si conclude con una nota leggera e rinfrescante, quasi aromatica, che invita a prendere un altro cucchiaio. Questa combinazione non è solo gustosa: è una celebrazione di contrasti ben calibrati—acidulo, dolce, croccante, morbido—che rende ogni boccone memorabile.

Fragole e semi di chia è una ricetta che parla di semplicità consapevole. È una preparazione che esalta la qualità degli ingredienti di stagione, senza bisogno di lunghe operazioni o cotture complesse. È perfetta per chi cerca una colazione nutriente che si prenda cura di corpo e palato, o per un dessert leggero che sorprende anche i palati più esigenti. Le fragole, piene di vitamina C, danno colore e vivacità; i semi di chia, ricchi di fibre, proteine e omega-3, trasformano la consistenza in qualcosa di quasi magico, capace di riempire la bocca di velluto senza appesantire. È una ricetta che si presta a essere gustata in qualsiasi momento della giornata, ma trova la sua massima espressione nelle mattine estive, quando la casa è piena di profumi di frutta maturata al sole.

In questa descrizione ti guiderò attraverso un viaggio sensoriale e culturale: dalle origini degli ingredienti, alle ragioni per cui questa combinazione funziona così bene, fino ai piccoli accorgimenti che renderanno la tua versione ancora più brillante. Preparati a scoprire come un piatto apparentemente semplice possa diventare un riferimento quotidiano per chi crede che mangiare bene sia anche un piacere, un rituale di benessere che inizia con una ciotola di fragole fragranti e semi di chia pronti a gonfiarsi di sapore.

The Story Behind the Dish

La fragola, frutto amato in gran parte del mondo, ha una storia inventiva che attraversa culture diverse. In Italia è una compagna inseparabile delle estati al mercato, dei gelati artigianali e delle merende al parco con amici e familiari. Le fragole non sono semplicemente un frutto; sono simboli di convivialità, di pranzi soleggiati e di ricordi di giovinezza. La loro dolcezza, spesso amplificata da una punta di acidità, richiama momenti di riscoperta della stagione calda: ore di risate all’aria aperta, passeggiate tra filari e pende di frutti maturi, e un profumo che riempie la cucina non appena le fragole toccano il tagliere.
Nel frattempo, i semi di chia hanno una storia molto più antica, intrecciata con la tradizione di diverse civiltà mesoamericane. I popoli Maya e Aztechi li chiamavano “gocce di luna” e li usavano non solo per l’alimentazione, ma anche per le loro proprietà ritenute nutritive e idratanti. I semi di chia sono piccoli, ma hanno una presenza sorprendentemente grande nel mondo della nutrizione moderna: ricchi di fibre, proteine vegetali, acidi grassi omega-3 e una capacità unica di assorbire liquidi, trasformandosi in una gelatina delicata che avvolge ogni pezzo di frutta e ogni cucchiaio di crema.
Quando questi due elementi si incontrano in una sola preparazione, nasce una fusione che parla di dialetto, di tradizione e di innovazione alimentare. È un abbraccio tra l’emozione della fragola fresca, tipica delle ricette estive italiane, e la praticità contemporanea della chia, spesso presente nelle colazioni healthy di tutto il mondo. L’incontro tra fragola e chia non è casuale: entrambi gli ingredienti richiamano una certa rusticità, una semplicità genuina, ma insieme creano un effetto sorprendentemente sofisticato, capace di conquistare sia chi cerca gusto autentico sia chi desidera prestazioni nutrizionali elevate in una preparazione gustosa.

Questa storia è anche una storia di cucina casalinga: di nonni che insegnano a non sprecare, di cucine che diventano laboratori di creatività, dove un paio di cucchiai di fragole fresche si trasformano in una delizia efficace per iniziare la giornata. È una storia di stile di vita, di equilibrio tra gusto e benessere, dove la cucina semplice celebra la stagione e incoraggia a sperimentare senza paura di sbagliare. In fondo, Fragole e Semi di Chia è una celebrazione della semplicità: pochi ingredienti di alta qualità che, messi insieme con cura, svelano una profondità di sapori e una consistenza sorprendente che invita a un altro assaggio.

Why You’ll Love This Recipe

  • Preparazione rapida e a misura di tempo: richiede pochissimo sforzo, ma regala un risultato che sembra frutto di una cucina raffinata.
  • Equilibrio tra dolcezza e freschezza: fragole mature donano un tocco frizzante, mentre i semi di chia offrono una nota cremosa e vellutata.
  • Versatilità: perfetto per colazione, merenda, dessert leggero o finale di pasto informale; si adatta bene a vari contesti e gusti.
  • Benefici nutrizionali: antiossidanti naturali dalle fragole, fibre e omega-3 dai semi di chia, insieme a una modesta dose proteica per sostenere energie e sazietà.
  • Compatibilità con diete diverse: naturalmente gluten-free e facilmente adattabile a vegani o a chi segue una dieta a basso contenuto di zuccheri se calibrata con dolcificanti alternativi.

Flavor Profile & Texture

La fragola è una porta d’ingresso profumata: succosa e aromatica, con note di pesca e brioche, accompagnate da una leggera acidità che pulisce il palato. Quando mordi una fragola ben matura, senti un’esplosione di succo che inonda la bocca, seguito dalla retro- nota di foglia verde dovuta al profumo del frutto ancora fresco. I semi di chia, non appena si ammorbidiscono nel liquido, creano una rete setosa dotata di una leggera elasticità: una gelatina delicata che avvolge i pezzi di frutta e crea una consistenza quasi lattiginosa senza essere pesante. Insieme, le due texture si equilibrano magnificamente: la croccantezza iniziale delle fragole alligna con la morbidezza gelatinosa delle chia, e questa ultima forma una sorta di “pavimento” in cui i sapori si possono adagiare con grazia. L’insieme è leggero, rinfrescante e confortante al tempo stesso.

Dal punto di vista gustativo, la miscela è una danza di contrasti: dolce naturale delle fragole, acido luminoso, una leggera nota erbacea che si può percepire in alcuni frutti di fragola di stagione, e una base neutra ma ricca fornita dalle chia. Se si aggiunge una piccola spolverata di scorza di limone o di lime, si esalta il profilo agrumato, rendendo l’intera preparazione ancora più profonda. Alcuni preferiscono un tocco di vaniglia o una punta di menta per rifinire la nota aromatica; altri, invece, amano lasciare il sapore così puro, consentendo al frutto di guidare l’esperienza gustativa. In ogni caso, la consistenza cremosa, tipica della chia, con la freschezza delle fragole, crea una sinfonia che è al tempo stesso confortante e vivace, in grado di soddisfare sia i sensi sia la voglia di nutrimento equilibrato.

Occasions & Pairings

Questo piatto è un compagno versatile per molte occasioni. Per una colazione estiva, servilo in una ciotola grande insieme a yogurt naturale (o yogurt di soia per una versione vegan) e una manciata di granola croccante. Può diventare anche una merenda al volo, pronta in pochi minuti e capace di tenere a bada la fame tra una corsa al parco e un caffè pomeridiano. Se vuoi presentarlo come dessert leggero, aggiungi una cucchiaiata di panna montata vegetale o una salsa leggera di cioccolato fondente per un tocco di indulgence senza appesantire.
Per accompagnarlo in modo tematico, ecco alcune combinazioni utili:
– Abbinamenti con bevande: acqua frizzante al limone, tè freddo all’ibisco, o una spruzzata di Prosecco per un tocco festivo, se il contesto lo permette.
– Contorni e dessert: servilo con una cucchiata di yogurt greco, una manciata di nocciole tostate o granola all’olio di cocco; per una versione vegan, opta per yogurt di mandorle o di avena.
– Abbinamenti di sapore: aggiungi scorza di limone o arancia per un tocco agrumato, oppure una spolverata di pepe rosa per un accento fruttato e leggermente speziato che sorprende.

Tips, Variations & Substitutions

  • Versione vegan o senza lattosio: utilizza yogurt di mandorle, cocco o soia al posto di yogurt vaccino; i semi di chia manterranno la funzione di addensante.
  • Dolcificanti alternativi: se preferisci una versione meno dolce, aggiungi una piccola quantità di sciroppo d’acero o miele (opzioni non vegane) oppure opta per un dolcificante naturale a basso indice glicemico come lo stevia o la monk fruit, tenendo presente che i sapori naturali della fragola spesso bastano a conferire dolcezza sufficiente.
  • Varianti di frutta: oltre alle fragole, puoi inserire pezzi di mango, pesche o kiwi per una versione multicolorata e con diversi profili di dolcezza.
  • Texture extra: aggiungi una manciata di noci o semi tostati per un contrasto croccante, oppure una cucchiata di granola al momento di servire per mantenere la freschezza.
  • aromi e spezie: una punta di vaniglia, un pizzico di cannella, o un tocco di pepe nero può elevare l’aroma e creare profondità di sapore interessanti.
  • Contro-indicazioni comuni: evita di mescolare troppo a lungo, per non comprimere eccessivamente la struttura delle fragole; lasciale riposare solo il necessario per permettere ai chia di assorbire liquidi e creare la gelatina iniziale.
  • Varianti regionali: in stile mediterraneo, aggiungi scorza di limone e un filo di miele per un profilo fresco e naturale; in stile latino-americano, aggiungi una spolverata di cacao amaro e una goccia di succo di arancia per un twist sorprendente.

Storage & Make-Ahead Ideas

Fragole e semi di chia è una preparazione particolarmente adatta a idee di make-ahead. Puoi preparare una base di fragole tagliate e chia in una tazza o in un barattolo, insieme a un latte o yogurt a tua scelta, e conservarla in frigorifero per up to 1-2 giorni. Se vuoi mantenere la crema leggera e non far perdere ai frutti il loro colore, aggiungi i semi di chia poco prima di servire, o prepara una grande porzione di base al giorno precedente e suddividila in vasetti individuali per una colazione pronta all’uso.
Per chi preferisce una versione fredda, questa preparazione è eccellente come dessert al cucchiaio freddo: lascialo raffreddare in frigorifero, poi gusta subito o alzalo con una spolverata di scorza di limone e una fogliolina di menta per una freschezza extra. Se hai tempo, è interessante anche preparare una versione al bicchiere: alterna strati di fragole, chia gelatinosa e yogurt o crema di mandorle per un dessert al cucchiaio dall’aspetto invitante.

Fun Facts & Trivia

  • Chia, superfood millenario: i semi di chia sono stati una fonte di nutrimento per antiche civiltà mesoamericane per secoli, apprezzati per la loro capacità di assorbire liquidi e fornire energia sostenuta durante i viaggi e le campagne sportive.
  • Fragola, simbolo di convivialità: oltre a essere un frutto nutriente, la fragola è spesso associata a momenti di condivisione e allegria durante le stagioni di mercato e le tavole estive italiane.
  • Equilibrio di sapori: l’unione tra la dolcezza naturale della fragola e la leggera gelificazione della chia crea una sensazione di leggerezza, rendendo questa preparazione ideale per chi cerca gusto senza sensi di colpa.
  • Versatilità senza fine: questo accostamento è talmente flessibile che si presta a infinite varianti, permettendo di introdurre spezie, agrumi, o diversi tipi di latte vegetale in base agli gusti e alle esigenze alimentari.

Conclusione

Fragole e Semi di Chia non è solo una ricetta, ma un piccolo rito di benessere che incarna l’idea che la cucina sana possa essere estremamente appetitosa, elegante e accessibile a chiunque. È una proposta che invita a rallentare, a osservare la bellezza di una semplice fragola rossa come una gemma, a lasciarsi coinvolgere dal morbido abbraccio dei semi di chia che si espandono con delicatezza nel liquido, e a celebrare la gioia di mangiare bene senza rinunciare al piacere sensoriale. In poche mosse, questa combinazione si trasforma in una base perfetta per una colazione nutriente, una merenda rinfrescante o un dessert leggero che chiude la giornata con una nota fresca e soddisfacente. Preparala, gusta la semplicità, lascia che la fragranza invada la tua cucina e scopri perché Fragole e Semi di Chia è diventato un piccolo classico delle cucine moderne: una ricetta che non delude mai, che si adatta a ogni stagione, e che sa come far tornare il sorriso sulle labbra ad ogni cucchiaio.

Ingredients

  • Chia Budino Base
  • Latte di mandorla non zuccherato (2 tazze)
    → Base liquida per il budino di chia. Scegli latte vegetale o animale in base alle preferenze; per una consistenza cremosa, preferisci latte intero se usi latte animale. Mescola bene con i semi di chia e lascia riposare almeno 2 ore o tutta la notte, mescolando a metà tempo per evitare grumi.
  • Semi di chia (1/3 tazza)
    → Addensante chiave: i semi di chia assorbono liquidi e si trasformano in una gelatina che ricorda il budino. Per texture liscia, mescola bene subito e riposa; se si formano grumi, sbatti o frulla brevemente.
  • Sciroppo d’acero o miele (2 cucchiai)
    → Dolcezza naturale che equilibra l’acidità e la freschezza delle fragole. Opta per sciroppo d’acero se vuoi una versione vegana; aggiungilo poco per volta, assaggiando dopo la prima ora di riposo.
  • Estratto di vaniglia (1/2 cucchiaino)
    → Aggiunge profumo e profondità al budino. Usa vaniglia pura o una pasta di vaniglia per un aroma più intenso.
  • Pizzico di sale
    → Migliora l’equilibrio dei sapori e valorizza la dolcezza. Usane solo un pizzico e aggiusta al momento di servire.
  • Fragole Macerate
  • Fragole fresche, tagliate a pezzi (1 tazza)
    → Fragole di stagione per colore e sapore vivace. Tagliale a pezzi piccoli per facilitare la macerazione e ottenere succo; se vuoi una salsa più liscia, puoi schiacciarne alcuni pezzi con una forchetta.
  • Succo di limone (1 cucchiaino)
    → Un tocco di acidità che completa la dolcezza delle fragole e aiuta a preservarne il colore. Usa succo fresco e aggiungi gradualmente.
  • Zucchero o sciroppo d’acero (1 cucchiaino)
    → Opzionale: utile se le fragole non sono molto mature. Serve a estrarre più succo e creare una leggera salsa. Regola in base alla dolcezza delle fragole.
  • Condimenti opzionali
  • Fette di fragola extra per decorare (facoltativo)
    → Aggiungono freshness e colore al piatto. Conserva le fette in frigorifero fino al momento di servire per mantenere consistenza e vivacità.
  • Fette o lamelle di mandorla tostate o pistacchi tritati (facoltativo)
    → Aggiungono crunch e una nota nocciolata. Tostale leggermente in padella asciutta per 1–2 minuti finché profumano; cospargi poco prima di servire per mantenere la croccantezza.
  • Cocco grattugiato non zuccherato (facoltativo)
    → Dona consistenza cremosa e aromi tropicali. Usalo non zuccherato e tostalo leggermente per intensificare l’aroma.
  • Cioccolato fondente grattugiato o nibs di cacao (facoltativo)
    → Un accenno di cacao che si sposa bene con fragola e chia. Usa con moderazione per non sovrastare i sapori delicati.

Instructions

  • Unisci latte di mandorla non zuccherato, semi di chia, sciroppo d’acero e estratto di vaniglia in una ciotola media e aggiungi un pizzico di sale.
    → Questo crea la base cremosa del budino: i semi di chia assorbono liquidi e si gonfiano, formando una gelatina setosa; mescola bene per distribuire i semi in modo uniforme e impedire grumi.
  • Copri la ciotola e lascia riposare la base chia per almeno 2 ore o tutta la notte, mescolando a metà tempo.
    → Il riposo consente ai semi di assorbire liquido lentamente, sviluppando la consistenza tipica del budino; mescolare a metà fase previene grumi e garantisce una gelificazione uniforme.
  • Se la consistenza appare ancora parzialmente fluida al termine del riposo, dai una breve frullata o sbatti vigorosamente con una frusta per rompere eventuali grumi residui.
    → Un’ulteriore frullata assicura una texture liscia e cremosa prima di servirla, senza pezzi di semi non addensati.
  • Macerate le fragole: in una ciotola, taglia le fragole fresche a pezzi piccoli, aggiungi il succo di limone e lo zucchero o lo sciroppo d’acero. Mescola delicatamente e lascia riposare 15–30 minuti.
    →La macerazione estrae succo e aromi dalle fragole, crea una leggera salsa e aiuta a mantenere il colore vivo; il limone bilancia la dolcezza e previene l’ossidazione.
  • Tosta le mandorle o i pistacchi: scalda una padella asciutta a fuoco medio-basso e tosta per 1–2 minuti, mescolando spesso fino a che profumano leggermente e diventano dorati.
    → Il tostato sviluppa aroma e croccantezza; rimuovi dalla padella e lascia raffreddare prima di usarli come guarnizione.
  • Opzionale: prepara il cocco grattugiato non zuccherato e grattugia cioccolato fondente o nibs di cacao, mantenendoli in piccoli contenitori separati per una decorazione elegante.
    → Il cocco aggiunge una nota tropicale cremosa; il cacao conferisce profondità di sapore senza sovrastare la fragola.
  • Assembla il dessert in bicchieri o ciotoline: inizia con uno strato di budino di chia, aggiungi uno strato di fragole macerate (con un po’ del loro liquido), ripeti se vuoi una porzione più alta, terminando con budino.
    → Gli strati creare texture contrastante tra gelatina cremosa e succo di fragola; i succhi delle fragole leggermente invasano la base per un sapore uniforme.
  • Guarnisci con fragole fresche a pezzi, fette o lamelle di mandorla tostata, cocco tostato e un soffio di cioccolato fondente o nibs di cacao, se ti piace.
    → Le guarnizioni aggiungono colore, croccantezza e profondità aromatica; posiziona le decorazioni in modo ordinato per un aspetto invitante.
  • Lascia riposare i bicchieri in frigorifero per almeno 20–30 minuti prima di servire, in modo che il budino si rassodi ulteriormente e i sapori si amalgamino.
    → Il raffreddamento finale migliora la consistenza cremosa e rende l’esperienza di assaggio più equilibrata.
  • Servi subito o conserva in frigorifero coperto per 2–3 giorni; se hai conservato, dai una leggera mescolata prima di gustarlo per ricomporre la crema e ridare uniformità al dessert.
    → Il budino di chia può sviluppare una leggera separazione nel tempo; mescolare ripristina la texture cremosa e distribuisce i succhi di fragola.
  • Se vuoi una versione più rapida, riduci i semi di chia a 1/4 tazza e accelera il riposo a 1–2 ore; questa modifica riduce tempo di attesa mantenendo una consistenza accettabile.
    → È utile quando hai meno tempo ma desideri comunque una dessert al cucchiaio con sapori freschi e naturali.

Notes

“Queste fragole e semi di chia budino sono un dessert leggero e rinfrescante, perfetto per una colazione o un dessert estivo: il budino di chia si ottiene mescolando latte di mandorla non zuccherato con semi di chia, dolcificante a scelta e una leggera nota di vaniglia, quindi lasciando riposare finché si crea una gelatina cremosa. Le fragole macerate aggiungono freschezza e colore, completando il piatto con un tocco agrumato dal succo di limone.”

Preparazione del budino di chia

  1. In una ciotola ampia mescola latte di mandorla non zuccherato, semi di chia, sciroppo d’acero o miele e l'estratto di vaniglia insieme a un pizzico di sale. Mescola bene per evitare grumi iniziali.
  2. Lascia riposare in frigorifero per almeno 2 ore o durante la notte, mescolando a metà tempo per mantenere una consistenza cremosa e uniforme.
  3. Se dopo il riposo si formano grumi, sbatti brevemente con una forchetta o frulla leggermente per rendere il budino più liscio.

Fragole macerate

  1. In una ciotola, unisci fragole fresche tagliate a pezzi con succo di limone e il dolcificante scelto (zucchero o sciroppo d'acero). Mescola delicatamente per non sfaldare troppo la frutta.
  2. Lascia macerare per 10–20 minuti finché rilascia succo: questo intensifica il colore e l'aroma, e aiuta a bilanciare la dolcezza del budino.

Presentazione e varianti

  • Componi in bicchierini o ciotoline alternando strati di budino di chia e fragole macerate; termina con una spolverata di fragole fresche extra per decorare.
  • Opzionale: aggiungi topping croccanti come fette o lamelle di mandorla tostate, pistacchi tritati o cocco grattugiato non zuccherato per una nota nocciolata e una texture contrastante.
  • Per una versione più cremosa e ricca, completa con una cucchiaiata di yogurt naturale o yogurt di cocco al posto di una parte del latte di mandorla.
  • Se vuoi varianti più intense, prova una lieve grattugiata di scorza di limone sopra le fragole macerate o un filo di cacao nibs per un accenno di cacao senza appesantire.

Consigli di conservazione

Conserva i budini di chia e le fragole macerate separatamente in contenitori ermetici in frigorifero. Assemblali solo poco prima di servire per mantenere la consistenza fresca. I budini si mantengono bene 2–3 giorni; le fragole macerate possono rimanere in frigo 1–2 giorni.

Tips

Consigli utili per la base di chia

  • Preparazione iniziale: mescola bene la base liquida (latte di mandorla) con i semi di chia e lascia riposare almeno 2 ore o meglio durante la notte, mescolando a metà del tempo per evitare che si formino grumi.
  • Texture cremosa: se dopo il riposo noti grumi, sbatti energicamente con una forchetta o frulla brevemente per ottenere una consistenza più liscia.
  • Scelta del latte: per una versione cremosa con latte animale preferisci latte intero; se vuoi una versione vegana usa latte di mandorla non zuccherato o un altro latte vegetale non zuccherato.
  • Dolcificazione equilibrata: aggiungi lo sciroppo d’acero o il miele poco per volta, assaggiando dopo la prima ora di riposo per evitare di sovrappreprodurre la dolcezza.
  • Aromi e sapidità: inserisci l’estratto di vaniglia e un pizzico di sale per esaltare la dolcezza e dare profondità al budino.

Consigli per le fragole macerate

  • Pezzi piccoli, sapore intenso: taglia le fragole fresche a pezzi piccoli per facilitare la macerazione e ottenere sia succo che pezzi di frutta.
  • Acidità e brillantezza: aggiungi il succo di limone fresco gradualmente; serve a bilanciare la dolcezza e a preservare il colore.
  • Dolcezza extra: se le fragole non sono molto mature, aggiungi zucchero o sciroppo d’acero poco per volta finché non ottieni la giusta nota di dolcezza; lascia macerare per almeno 15–30 minuti per estrarre più succo.
  • Salsa liscia: se preferisci una salsa liscia, frulla o schiaccia parte delle fragole macerate e, se vuoi, passa al setaccio per eliminare semini e pezzi grossi.

Condimenti opzionali: come esaltare il piatto

  • Fette di fragola extra: decorano e aggiungono freschezza; tienile in frigorifero fino al momento di servire per una migliore consistenza.
  • Frutta secca croccante: tosta mandorle a fette o pistacchi in padella asciutta 1–2 minuti finché profumano, quindi aggiungi poco prima di servire per mantenere la croccantezza.
  • Reale aroma Coco: cocco grattugiato non zuccherato, tostato leggermente per intensificare l’aroma; cospargilo appena prima di servire.
  • Cioccolato: una spolverata di cioccolato fondente grattugiato o nibs di cacao aggiunge una nota di cacao senza sovrastare i sapori di fragola e chia; usane una quantità moderata.

Presentazione e conservazione

  • Presentazione a strati: versa il budino di chia in bicchieri o coppette, alternando con le fragole macerate per creare strati visibili e invitanti.
  • Temperature ideali: serve freddo; prepara il budino in anticipo e conserva in frigorifero per 2–3 giorni; conserva le fragole macerate separate fino al momento di assemblare per mantenere consistenza e colore.
  • Stagionalità: utilizzare fragole di stagione per colore e sapore più vivaci; se vuoi, aggiungi una nota di scorza di limone grattugiata per un tocco fresco.

Varianti utili

  • Per una versione cremosa ancora più ricca, prova una base 50/50 di latte di mandorla e latte di cocco (attenzione alle calorie e al sapore dominante).
  • Se non segui una dieta vegan, puoi sostituire lo sciroppo d’acero con miele o sciroppo di miele; aggiungi però poco per volta e assaggia.

FAQ

Fragole e Semi di Chia – FAQ

Quali sono gli ingredienti principali?

Fragole fresche, semi di chia e un liquido a scelta (latte animale o vegetale). È possibile aggiungere un dolcificante come miele o sciroppo d’acero e, se si desidera, un aroma come vaniglia o scorza di limone.

Quali sono i benefici per la salute?

Le fragole sono ricche di vitamina C e antiossidanti; i semi di chia forniscono fibre, proteine e omega-3. Insieme possono favorire la sazietà, la digestione e la salute del cuore.

Come si prepara un pudding di chia con fragole?

Mescola 3 cucchiai di semi di chia con 250 ml di latte (vegetale o vaccino). Mescola bene, lascia riposare 5-10 minuti, quindi mescola di nuovo per evitare grumi. Riponi in frigo per almeno 2 ore o tutta la notte. Al momento di servire aggiungi fragole a pezzi e, se vuoi, dolcificante o yogurt. Opzionalmente aggiungi vaniglia o scorza di limone per aroma.

Quanto tempo si conserva in frigorifero?

Si conserva in frigorifero in contenitore chiuso per circa 2-3 giorni. Se hai usato fragole, è preferibile consumarlo entro 1-2 giorni per mantenere la freschezza delle frutta, oppure aggiungere fragole fresche al momento del servizio.

Le fragole e i semi di chia devono essere ammollati prima?

Non è strettamente necessario ammollare i semi di chia separatamente: vanno semplicemente mescolati con il liquido e lasciati assorbire. Per una consistenza cremosa, lascia riposare il composto per almeno 2 ore o tutta la notte. L’ammollo è utile per accelerare l’addensamento.

Come evitare i grumi nel pudding di chia?

Segui le proporzioni corrette e mescola bene all’inizio. Se noti grumi, mescola nuovamente e lascia riposare un po’ di più. Un abbonamento utile è agitare vigorosamente in un barattolo oppure mescolare con una frusta prima di riporre in frigo.

Quali abbinamenti funzionano bene con fragole e chia?

Yogurt (greco o vegetale), granola o muesli, miele o sciroppo d’acero, foglie di menta, scorza di limone o vaniglia. Puoi aggiungere noci, cocco grattugiato o una manciata di fiocchi d’avena per una consistenza extra.

Posso sostituire le fragole con altra frutta?

Sì. Altre bacche come lamponi, mirtilli o more funzionano bene. Frutta come kiwi o mango è anche adatta. Ricorda che frutti molto acquosi possono rilasciare liquido in eccesso; potresti regolare leggermente la quantità di latte o di chia di conseguenza.

È adatta a diete particolari (vegetariana/vegana/latte-free)?

Assolutamente. Puoi usare latte vegetale (mandorla, soia, avena) e omettere eventuali derivati animali. È adatta a vegan e vegetariano; fai attenzione alle eventuali aggiunte come miele se stai seguendo una dieta vegana.

Quali alternative di latte si prestano meglio?

Latte di mandorle, latte di soia, latte di avena o latte di cocco sono ottime scelte. Scegli in base al gusto desiderato: il latte di mandorle è neutro, mentre il cocco apporterà una nota tropicale.

Introduction / Hook

Imagine stepping into a sun-warmed kitchen where the air is perfumed with the sweet tang of blueberries and the toasty, nutty aroma of almonds. A bowl of deep indigo mirtilli sits beside a jar of honey, a splash of vanilla, and a scatter of citrus zest, inviting you to pause and savor. Mirtilli e Mandorle is more than a dessert or a snack; it’s a celebration of contrasts—the bright juiciness of berries meeting the muted, comforting depth of almonds, the softness of a tender crumb against a delicate crunch, and the gentle kiss of sweetness that never oversteps its welcome. This dish embodies a philosophy of cooking that values simplicity, seasonality, and a touch of rustic elegance. It’s the kind of recipe that makes an ordinary afternoon feel ceremonial, a moment to gather friends and family around the table and let the flavors do the talking. Each bite is a little trip—an ode to summer meadows, orchard lanes, and granny’s kitchen, where memories and flavors mingle like notes in a beloved song.

The Story Behind the Dish

Blueberries, or mirtilli, have a long, wandering compass—found in wild hedgerows of northern Europe, cultivated in neat rows across American farms, and cherished across the Mediterranean for their bright, tart finish. Almonds, meanwhile, are among the oldest nut companions in cooking, a staple that crosses borders and centuries with grace. Put these two ingredients together, and you get a dish that feels both familiar and adventurous—like a bridge between sunlit Italian summers and the cooler, pine-scented air of northern orchards. In many Italian-inspired kitchens, almonds are ground into meal or folded into pastry to create a gentle crumb that cradles fruit flavors without overpowering them. The blueberries bring a whispered acidity that cuts through the richness of nuts and any dairy that might accompany them, while their blue-black skins glow like tiny midnight flags, signaling the kiss of ripe warmth. There is a poetic balance here: the land’s sweetness and the gardener’s care, meeting in a plate that invites conversation as much as indulgence.

Historically, both ingredients have stories of daily life and celebration. Almonds were a symbol of good fortune and abundance in many cultures, traded along ancient routes and gifted in harvest festivals. Blueberries, often harvested in late spring and summer, became emblematic of short, glorious seasons—moments to be celebrated, not hurried. When chefs and home cooks began weaving these two ingredients into the same dish, they created something that felt timeless: a recipe that could comfort on a rainy day and still sparkle in the sun. The result is not merely a dessert; it’s a narrative of hospitality, a ritual of sharing that invites people to linger, to talk, to laugh, and to let the flavours unfold slowly—like a good story told over a long afternoon.

In contemporary kitchens, Mirtilli e Mandorle has become a canvas for regional twists and creative improvisation. A drizzle of lemon or orange zest lifts the blueberry brightness; a pinch of vanilla or almond extract deepens the aroma; a scattering of sea salt enhances the interplay between fruit and nut. Some cooks add a light crumble or a soft, almond-forward pastry base, while others fold roasted almond slices into a contrasting layer that crackles between bites. The beauty of this dish lies in its adaptability: it can be rustic and homey for a family dinner, or polished enough for a summer picnic, a dessert buffet, or a casual dinner party where guests are invited to spoon it out of a shared dish and into their own bowls.

Why You’ll Love This Recipe

  • Seasonal and comforting: Highlights the peak flavors of blueberries and almonds, delivering brightness and warmth in every mouthful.
  • Versatile for different diets: Naturally lends itself to gluten-free and dairy-free adaptations with simple ingredient swaps.
  • Quick to assemble: Designed for simplicity, with components that can be prepared ahead or combined in minutes for a speedy, satisfying treat.
  • Kid-friendly and crowd-pleasing: A gentle sweetness that appeals to young palates while offering sophisticated notes for adults.
  • Low-effort elegance: Achieves a refined, bakery-style finish without requiring advanced pastry skills or specialized equipment.
  • Ingredient-driven excellence: Lets the quality of the fruit and nuts shine, with minimal bells and whistles to distract from their natural goodness.
  • Perfect for many occasions: Works beautifully as a breakfast treat, a teatime indulgence, a light dessert, or a dessert-to-go option for gatherings.

Flavor discoveries within easy reach

As you ponder this dish, you’ll notice how the blueberries release a tart-sweet juice that seems to awaken the almond’s gentle nuttiness. The almond brings a toasty, slightly caramelly underscore that lingers on the palate, inviting another bite. If a hint of citrus appears, it brightens the finish, like a sunbeam slipping through leaves. The texture ranges from tender, fruit-forward bite to a delicate crunch depending on how you choose to present it—whether with a crumbly topping, a soft almond cream, or simply baked to a glossy fruit confit that glistens under a glaze of natural sweetness.

Flavor Profile & Texture

Mirtilli e Mandorle speaks in contrasts: tartness and sweetness, softness and crunch, brightness and depth. The blueberries provide vibrant acidity that cuts through the nutty undertones of almonds, creating a balanced profile that is neither cloying nor sparse. The almonds contribute a gentle, toasty warmth, a faint nutty butteriness that rounds out the fruit’s sharp edge. In texture, you might expect a harmony of succulence and crumb. Juicy, bursting berries offer a pop of juice with every bite, while toasted or ground almonds lend a subtle graininess and a low-sweet, malty finish. If there is a crust or crumble involved, it tends to be crumbly and delicate, designed to cradle the fruit without overshadowing it. In a more refined interpretation, an almond paste or frangipane layer can add creamy depth, providing a velvety counterpoint to the lively blueberries. The scent—roasted almonds mingled with fresh blueberries and a whisper of citrus—creates an irresistible sensory memory that lingers long after the plate is empty.

Occasions & Pairings

This dish is relentlessly versatile. It shines as a bright Sunday brunch centerpiece, a light summer dessert after a hearty pasta, or a comforting afternoon snack paired with a dollop of yogurt or a scoop of vanilla gelato. It also adapts gracefully to celebrations and casual gatherings alike. For a festive touch, serve with a drizzle of honey or a lemon-vanilla glaze that adds a glossy sheen and an extra layer of aroma. In terms of pairings, consider:

  • Drinks: Prosecco or Moscato d’Asti for a sparkling, festive note; a sparkling mineral water with a lemon twist for a refreshing non-alcoholic option; a light dessert wine for a more indulgent pairing.
  • Side dishes: A dollop of Greek yogurt, a scoop of mascarpone or ricotta, or a light vanilla custard can complement and balance the almond’s richness.
  • Garnishes: Fresh mint, lemon zest, a pinch of sea salt, or a light dusting of powdered sugar to finish and highlight flavors.
  • Occasions: Summer picnics, weekend breakfasts, holiday tables, or as a bright finale for a pasta night with friends.

Tips, Variations & Substitutions

One of the most appealing aspects of Mirtilli e Mandorle is its adaptability. Here are a few ideas to tailor the dish to your pantry, dietary needs, or mood:

  • Gluten-free: Use almond meal as the base and ensure any added crust is made with gluten-free flours or oats labeled gluten-free.
  • Vegan: Replace dairy components with coconut yogurt, almond milk, or a plant-based butter substitute. Ensure any glaze uses a plant-based sweetener or maple syrup.
  • Nut variations: Swap almonds for pistachios, hazelnuts, or walnuts to introduce different textures and flavor notes. Toast the nuts lightly to deepen aroma.
  • Fruit variations: While blueberries are classic, blackberries, raspberries, or sliced peaches can bring their own charm. Mix and match seasonal berries for a colorful medley.
  • Flavor boosters: A pinch of cardamom, cinnamon, or a splash of vanilla extract can deepen the warmth. Citrus zest (lemon, orange) brightens the finish; a teaspoon of orange blossom water adds a delicate floral hint.
  • Texture plays: For a crisper topping, add a small amount of rolled oats or a touch of sesame seeds. For a softer, more custardy profile, incorporate a light almond cream or a silken tofu-based filling.
  • Make-ahead ideas: Prepare a blueberry compote ahead of time and mix with almonds just before serving to preserve the contrast between juicy fruit and crisp nuts.

Storage & Make-Ahead Ideas

To keep the magic of Mirtilli e Mandorle intact, consider how to store and streamline preparation across days. If you are assembling a layered or baked version, assemble components ahead of time and refrigerate until ready to finish in the oven or to serve cold. Blueberries can be prepared in advance as a compote or a fresh topping, kept in an airtight container in the refrigerator for up to 3–4 days. Toasted almonds retain their aroma best when stored in an airtight jar away from light and heat; they can be prepared in advance and re-crisped quickly in a warm oven for serving. If you are making a dairy-based version with almond cream or a light yogurt topping, keep the dairy component separate until serving to maintain texture and prevent sogginess. For freezing, freeze blueberries uncooked for longer storage, and freeze almond components separately if you anticipate needing to thaw and assemble quickly later. When reassembling after chilling or freezing, allow time for components to come to room temperature to recapture the intended texture and aroma.

Fun Facts & Trivia (Optional)

– Blueberries are not just delicious; they’re also packed with antioxidants called anthocyanins, which give the berries their characteristic color and offer potential health benefits. Their flavor peaks at the height of summer, making them a favorite seasonal treat.

– Almonds have a storied history that traces back thousands of years. They were once considered a luxury item and a symbol of prosperity in several ancient cultures, and they continue to be beloved for their distinct aroma and versatility in both sweet and savory dishes.

– The combination of fruits and nuts is a recurring motif in many culinary traditions because they balance each other so well: the acidity and brightness of fruit offset the richness of nuts, while both bring distinct textures to the plate.

– In Italian-inspired kitchens, almond paste or frangipane is a classic pairing with fruit; it adds a velvety richness that can elevate a simple fruit dish into something that feels raffinato—elegant and refined—without requiring elaborate techniques.

Final Thoughts

Mirtilli e Mandorle is a recipe that invites you to slow down, to trust your senses, and to lean into the natural harmony of ingredients that grew under the sun. Its charm lies in its ability to be both comforting and bright, rustic and refined, simple and memorable. Whether you’re serving it as a lush weekend breakfast, a breezy dessert after a weeknight meal, or a centerpiece for a summer gathering, this dish offers a graceful balance between fruit’s lively tang and almonds’ quiet depth. Keep the ingredients close, stay curious about what flavors you can coax from them, and let the preparation become a ritual of hospitality you’ll want to repeat—again and again, with different fruits, different nuts, different memories. When you plate it, do so with a touch of care: a final sprinkle of zest, a drizzle of honey, or a small curl of almond cream can transform everyday ingredients into something worth savoring, something that tastes like a story worth telling.

Ingredients

Mirtilli e Mandorle

Muffin Base

  • 1 1/2 cups almond flour (blanched, finely sifted)
    → Provides a tender, moist crumb with a pronounced almond flavor. Almond flour yields a gluten-free batter that benefits from the addition of oats or another binder to mimic a traditional muffin texture. For best texture, weigh the flour; avoid packing to prevent a dense crumb. If you prefer a lighter texture, substitute up to 1/2 cup with a gluten-free all-purpose flour blend.
  • 1/2 cup gluten-free rolled oats (certified gluten-free)
    → Adds texture, moisture, and structure. If you want a finer crumb, pulse oats briefly in a blender to a coarse meal before mixing. Use certified GF oats to ensure gluten-free results. Do not overmix; fold gently to keep oats intact.
  • 2 large eggs (room temperature)
    → Bind and aerate the batter, contributing to rise and cohesion. Room-temperature eggs emulsify more easily with oil and milk; whisk eggs with sugar before adding to the batter for a smooth emulsion. For vegan option, substitute with 2 flax eggs (2 tablespoons ground flaxseed mixed with 6 tablespoons water per egg; let sit 5 minutes).
  • 1/3 cup neutral oil (such as avocado or light olive oil) or melted butter (cooled)
    → Provides moisture and tenderness; avoid heavy oils that overpower blueberry flavor. If using butter, melt and cool slightly to prevent scrambling the eggs; for dairy-free, oil is preferred.
  • 1/2 cup unsweetened dairy-free milk (almond, oat, or soy) or dairy milk
    → Hydrates batter and helps activate the leavening; choose unsweetened to control sweetness and avoid unwanted flavors. If using thicker coconut milk from a can, dilute with water to reach a similar consistency as other milks.
  • 1/3 cup granulated sugar (adjust to taste)
    → Sweetness balance and contributes to browning. You can reduce or replace with maple syrup or honey for a different flavor; if using liquid sweeteners, reduce the milk slightly to keep batter consistency.
  • 1 teaspoon vanilla extract
    → Adds depth of flavor; vanilla enhances almond and blueberry notes. If desired, use vanilla bean paste for a stronger, flecked vanilla presence.
  • 1 teaspoon baking powder (gluten-free)
    → Leavening that gives a light, fluffy crumb. Ensure it’s fresh; replace if you notice a weak rise. For extra lift, you can add 1/4 teaspoon baking soda with a splash of lemon juice or yogurt to react.
  • 1/4 teaspoon fine salt
    → Balances sweetness and enhances flavors; adjust if using salted butter.
  • Zest of 1/2 lemon (optional)
    → Adds citrus brightness that complements blueberries; zest the lemon before juicing, and fold zest into sugar to release oils for stronger flavor. If you prefer orange, use orange zest.

Blueberries

  • 1 1/2 cups fresh blueberries (washed and dried)
    → The star berries; handle gently to avoid crushing. If berries are large, you can halve them to distribute more evenly. For best color retention, pat dry before folding. If using frozen berries, do not thaw completely; toss with 1 tablespoon gluten-free flour to prevent sinking and color bleed.
  • 1 tablespoon gluten-free flour or cornstarch (to coat berries)
    → Coats the berries to reduce color bleed and help prevent sinking in the batter. Dust the berries with flour or starch in a separate bowl, then fold them in gently at the end.

Optional Add-ins

  • 1/4 cup sliced almonds (toasted)
    → Adds extra almond flavor and a satisfying crunch. Toast almonds in a dry skillet over medium heat until fragrant and lightly browned, then cool completely and fold into batter or sprinkle on top. Toasting enhances their nuttiness and aroma; store leftovers airtight to maintain crunch.
  • 2 tablespoons chopped crystallized lemon peel (optional)
    → Provides bright citrus bursts that pair beautifully with blueberries and almonds. Chop finely for even distribution; if using preserved lemon bits, rinse quickly to reduce extra salt and sugar before adding.

Toppings

  • 1 tablespoon coarse sugar for topping (optional)
    → Creates a sparkling, crunchy top and helps browning; sprinkle lightly over batter-filled cups just before baking. If you prefer a softer crust, skip this topping.

Instructions

  • Preheat your oven to 350°F (175°C) and line a 12-cup muffin tin with paper liners or grease it well.
    → This ensures the muffins do not stick to the tin and makes them easier to remove after baking.
  • In a small bowl, combine the 1/3 cup granulated sugar with the zest of 1/2 lemon (optional) and rub with your fingertips until the oils are released and the mixture looks slightly damp.
    → Zest aromas are intensified when rubbed with sugar, helping lemon notes carry through the batter in the baked muffin.
  • In a separate bowl, whisk the eggs with the lemon-sugar mixture and 1 teaspoon vanilla until the mixture is pale and thick.
    → This creates an emulsion that traps air for a lighter crumb and distributes sweetness evenly.
  • Whisk in the 1/3 cup neutral oil (or cooled melted butter) and the 1/2 cup unsweetened dairy-free milk (or dairy milk) until the batter is smooth and cohesive.
    → Oil or melted butter provides moisture and tenderness; milk hydrates the dry ingredients to support rise and structure.
  • In a large bowl, whisk together the 1 1/2 cups almond flour, 1/2 cup gluten-free rolled oats, 1 teaspoon gluten-free baking powder, and 1/4 teaspoon fine salt until evenly distributed.
    → Sifting and whisking prevent clumps and ensure even leavening, yielding a tender, cohesive crumb in gluten-free batter.
  • In a small bowl, toss the 1 1/2 cups fresh blueberries with 1 tablespoon gluten-free flour or cornstarch until evenly coated.
    → Coating berries reduces color bleed and helps prevent sinking during baking for a uniform speckled crumb.
  • Gently fold the wet ingredients into the dry ingredients along with the coated blueberries until just incorporated, stopping as soon as there are no visible streaks of dry flour.
    → Overmixing can toughen gluten-free batters and cause a dense crumb; folding keeps the batter light and moist.
  • If using toasted almonds, toast 1/4 cup sliced almonds in a dry skillet over medium heat until fragrant and lightly browned, then cool completely before adding.
    → Toasting concentrates almond flavor and enhances crunch; avoid burning and cool fully to prevent cooking the batter when folded in.
  • Fold 1/4 cup toasted sliced almonds and 2 tablespoons chopped crystallized lemon peel into the batter, distributing evenly but without overworking.
    → Adds citrus brightness and nutty texture for extra complexity in each bite.
  • Divide the batter evenly among the prepared muffin cups, filling each about 2/3 to 3/4 full to allow room for doming.
    → Proper portioning ensures uniform rise and prevents batter from overflowing during baking.
  • Sprinkle 1 tablespoon coarse sugar over the tops of the batter-filled cups if you want a sparkling, crunchy crust.
    → The sugar aids browning and adds a pleasant crunch; omit for a softer crust or lower sugar.
  • Bake in the preheated oven for 18–22 minutes, or until the tops are lightly golden and a toothpick inserted into a center muffin comes out with a few moist crumbs.
    → Oven performance varies; start checking at 18 minutes and rely on the toothpick test to confirm doneness without drying the muffins.
  • Remove muffins from the oven and allow them to rest in the tin for 5 minutes before transferring to a wire rack to cool completely.
    → Resting helps set the crumb and makes removal from the pan clean, while cooling stabilizes texture for eating.
  • Serve the muffins once cooled, and store leftovers in an airtight container at room temperature for up to 2–3 days or freeze for longer storage.
    → Proper cooling and storage preserve moisture, prevent mold, and maintain flavor and texture over time.

Notes

These gluten-free blueberry almond muffins are lightly sweetened with sugar and the natural brightness of blueberries, making them a wholesome and satisfying breakfast or snack option.

You can customize them by adding your favorite nuts, seeds, or dried fruits. For extra texture, fold in a few tablespoons of crushed almonds or a handful of gluten-free oats reserved from the batter mix.

They freeze well and make a great grab-and-go treat. To enjoy later, cool completely, wrap individually, and freeze; reheat in a 350°F (175°C) oven for 8–12 minutes or until warmed through.

For an extra boost, serve with a dollop of yogurt, a drizzle of honey or maple syrup, or a smear of almond butter.

Tips for best results: use blanched almond flour and sift it well for a tender crumb. Use certified gluten-free oats and fresh gluten-free baking powder for consistent rise. If you’re using frozen blueberries, toss them with 1 tablespoon gluten-free flour to prevent sinking and color bleed. If you’d like a brighter citrus note, fold in the zest of half a lemon before mixing.

Optional substitutions: for vegan preparation, replace eggs with 2 flax eggs (2 tablespoons ground flaxseed mixed with 6 tablespoons water per egg; let sit 5 minutes). You can also substitute dairy milk with an unsweetened plant milk of your choice.

Tips

Consigli utili per Mirtilli e Mandorle

Questi consigli sono pensati per ottenere muffin soffici, umidi e dal gusto equilibrato tra mandorle e mirtilli, sfruttando al meglio gli ingredienti della ricetta.

Consigli generali

  • Pesa la farina di mandorle e la farina GF per una consistenza costante; evita di pressarla per non ottenere una torta troppo densa.
  • Per una consistenza più leggera, puoi sostituire fino a metà della farina di mandorle con una miscela di farine senza glutine universale (GF all-purpose).
  • Usa ingredienti a temperatura ambiente (uova, latte vegetale o latte) per una migliore emulsione e una margine di lievitazione più uniforme.
  • Se vuoi una nota in più di aroma, aggiungi un filetto di scorza di limone solo appena grattugiato e mescola con lo zucchero prima di incorporarlo all’impasto.

Consigli per l’impasto

  • Non mescolare troppo: lavora gli ingredienti solo finché sono amalgamati per mantenere una giusta morbidezza e una consistenza leggera.
  • Se usi olio neutro, evita oli che coprano il sapore; se usi burro, falla raffreddare leggermente prima di unirlo agli altri liquidi per non cuocere le uova.
  • Per un impasto più stabile, è utile mescolare i liquidi separatamente e poi aggiungerli ai soli ingredienti secchi fino a ottenere una massa omogenea.
  • La scorza di limone (opzionale) va inserita con lo zucchero per liberare al meglio gli oli essenziali.

Consigli per i mirtilli

  • Lavare e asciugare bene i mirtilli per evitare umidità in eccessiva che potrebbe rendere l’impasto piuttosto umido.
  • Per evitare che i mirtilli affondino e che il colore tinga troppo l’impasto, rivestire i mirtilli con 1 cucchiaio di farina GF o amido di mais prima di aggiungerli alla massa.
  • Se usi mirtilli congelati, non scongelarli completamente: mantienili parzialmente congelati e aggiungili delicatamente all’impasto per evitare che perdano colore troppo rapidamente.

Consigli per gli add-in opzionali

  • Mandorle a scaglie (tosate) aggiungono croccante e intensificano l’aroma: tostatele in una padella asciutta finché non dorano, poi incorporale all’impasto o usale come decorazione.
  • scorza di limone candita o scorza di limone finemente tritata: distribuirla in modo uniforme per un’esplosione di freschezza.

Toppings

  • Lo zucchero grossolano sulla sommità crea una crosticina croccante; se preferisci una superficie più morbida, ometti il topping.

Consigli di cottura e presentazione

  • Inforna a 180°C (350°F) fino a doratura leggera e fino a quando uno stecchino inserito al centro esce pulito. Il tempo può variare a seconda del forno, quindi controlla spesso.
  • Riempire gli stampi 2/3 dell’altezza e utilizzare pirottini o stampi ben imburrati per facilitare la rimozione.
  • Se usi forno con ventilazione (convezione), riduci la temperatura di circa 20°C per evitare una doratura troppo rapida all’esterno.

Conservazione e varianti

  • I muffin si conservano in contenitore ermetico a temperatura ambiente per 2-3 giorni; per tempi più lunghi, congela una volta raffreddati.
  • Per una versione vegana, sostituisci ogni uovo con 2 uova di lino (2 cucchiai di semi di lino macinati mescolati con 6 cucchiai d’acqua, lasciare rassodare 5 minuti) e usa latte vegetale senza zucchero.

FAQ

Che cos’è “Mirtilli e Mandorle”?

“Mirtilli e Mandorle” è una ricetta semplice che unisce mirtilli freschi o surgelati e mandorle tostate o tritate, ideale come snack, dessert leggero o merenda. Può essere realizzata in diverse versioni (muffin, torta, crumble o barrette) a seconda degli ingredienti scelti e del tempo disponibile.

Quali ingredienti servono per la versione base?

Ingredienti tipici per una versione base (puoi adattare le dosi a seconda della consistenza desiderata):

  • 200 g farina di avena (gluten-free se certificata) o farina normale
  • 100 g mandorle tritate grossolanamente
  • 150 g mirtilli freschi o surgelati
  • 100 g zucchero di canna (o miele/sciroppo d’acero)
  • 100 ml olio neutro o olio d’oliva leggero (o burro fuso)
  • 2 uova (o 2 cucchiai di semi di lino macinati + 6 cucchiai d’acqua per versione vegana)
  • 1 cucchiaino lievito per dolci
  • Scorza di mezzo limone (opzionale) e un pizzico di sale
Posso rendere questa ricetta vegana?

Sì. Ecco alcune sostituzioni comuni:

  • Uova: 2 cucchiai di semi di lino macinati mescolati con 6 cucchiai d’acqua (letto come “uovo di lino”) oppure purè di banana lieve.
  • Zucchero: miele o sciroppo d’agave/colza; usare sciroppo d’acero come alternativa vegana.
  • Olio: olio di cocco o olio di oliva dolce al posto del burro.

Con queste modifiche, la ricetta resta gustosa e adatta a una dieta vegana.

Qual è il metodo di preparazione per questa ricetta?

Procedimento di base:

  • Preriscalda il forno a 180°C e prepara una teglia o una placca rivestita di carta forno.
  • In una ciotola, mescola gli ingredienti secchi: farina, mandorle, lievito, sale e scorza di limone.
  • In un’altra ciotola, unisci gli ingredienti liquidi: olio, zucchero, uova (o alternativa vegana) e vaniglia.
  • Unisci gli elementi liquidi a quelli secchi mescolando fino a ottenere un composto omogeneo.
  • Aggiungi i mirtilli e mescola delicatamente per non romperli troppo.
  • Versa l’impasto in teglia o distribuiscilo in stampi per muffin; inforna.

Tempo totale vario in base alla forma scelta, ma l’impasto di base si cuoce in forno caldo finché dorato.

A che temperatura e per quanto tempo devo cuocere?

Temperatura consigliata: 180°C (forno statico). Tempi indicativi:

  • Torta o plumcake: 25–30 minuti, controllando con uno stuzzicadenti alla fine (uscire asciutto).
  • Muffin: 18–22 minuti (varia in base al forno).
  • Crumbles o barrette: 25–30 minuti, finché la superficie è dorata.
Come si conserva questa ricetta?

Conservazione consigliata:

  • Confezionata in contenitore ermetico, a temperatura ambiente, si mantiene 2–3 giorni.
  • In frigorifero, dura circa 4–5 giorni.
  • Per prolungarne la durata, è possibile congelare porzioni già tagliate fino a 2 mesi. Scongelare in frigorifero o a temperatura ambiente prima di servire.
Posso variare con altri frutti di bosco o agrumi?

Sì. Prova aggiunte come:

  • Frutti di bosco alternativi (fragole a pezzetti, lamponi, more)
  • Una punta di scorza d’arancia o limone in più per un profumo agrumato
  • Una spolverata di cannella o vaniglia per profondità di gusto
Questo piatto è adatto a una dieta senza glutine o senza lattosio?

Dipende dagli ingredienti utilizzati. Consigli:

  • Usa farina di avena certificata senza glutine per una versione gluten-free.
  • Assicurati che l’olio, lo zucchero e gli altri ingredienti non contengano tracce di lattosio.
  • Se utilizzi burro, sostituiscilo con olio neutro o olio di cocco per una versione senza lattosio.
Come servire al meglio “Mirtilli e Mandorle”?

Suggerimenti di presentazione:

  • Tiepido, accompagnato da yogurt greco o yogurt di mandorle.
  • Con una pallina di gelato alla vaniglia o una cucchiaiata di crema di mandorle.
  • Tagliato a fette e servito come dolce da fine pasto, o come snack accompagnato da una bevanda calda.
Quali sono i valori nutrizionali approssimativi per porzione?

Valori indicativi per porzione (variano in base agli ingredienti scelti e alla dimensione della porzione):

  • Calorie: circa 180–320 kcal per porzione
  • Proteine: 5–9 g
  • Grassi: 9–18 g
  • Carboidrati: 22–40 g

Questi valori sono approssimativi e dipendono dalle dosi precise e dalle varianti utilizzate.

Introduction / Hook

When the oven sighs to life and the kitchen fills with a cozy, cinnamon-lit aroma, you know you’re about to taste something that feels like a hug from a Sunday afternoon. Mela e Cannella is more than a dessert; it’s an invitation to slow down, to watch steam rise in delicate ribbons, and to savor the way simple ingredients—ripe apples, a warm kiss of spice, a whisper of butter—come together to create something comforting, elegant, and unforgettable. Each bite echoes the crisp sweetness of harvest apples kissed by sun and breeze, tempered by the sultry warmth of cinnamon, and rounded with a hint of vanilla or almond that lingers on the palate like a fond memory. This is the kind of recipe that makes a weeknight feel like a celebration and a holiday feel like home. It’s a dish that travels with you through time—rooted in rustic kitchen tables, yet polished enough to grace a plate for guests—so you can share a little piece of autumn in every serving. From the first fragrant waft to the last satisfyingly soft bite, Mela e Cannella invites you to pause, smile, and let the moment slow down around you.

The Story Behind the Dish

Apples and cinnamon have long danced together in kitchens across the Mediterranean and beyond, but Mela e Cannella has a distinctly Italian heart. In many Italian households, autumn is a time when orchards yield their treasures in abundance and the air is perfumed with spice as families gather to preserve, bake, and celebrate the harvest. Cinnamon, often associated with distant lands, arrived in Europe via trade routes centuries ago, imbuing local desserts with a sense of adventure and warmth. In rural Italy, bakers and grandmothers alike turned humble fruits into comforting desserts that could feed a crowd without fuss, letting the apple’s natural sweetness carry the show while cinnamon added a comforting, almost nostalgic depth. The origin of this dish in its truest sense is less about a single recipe and more about a mood: the joy of peeling away the layers of a tart apple to reveal tender flesh beneath, the scent of a warm kitchen chasing away the chill of autumn evenings, and the shared happiness of turning a simple idea into something that tastes like home.

The name Mela e Cannella evokes a timeless pairing—apple and cinnamon—that appears again and again in Italian storytelling, from old family cookbooks to bustling trattorie menus. It’s a reminder that sometimes the most satisfying desserts aren’t lavish or complicated; they’re composed of everyday ingredients treated with care, allowing their natural flavors to unfold slowly in the oven. In markets across Italy, you’ll find apples of many varieties, each offering its own personality—some crisp and tart, others mellow and honeyed—paired with fragrant cinnamon that brings a gentle heat and a resinous sweetness that lingers long after the last bite. If you close your eyes and breathe in the scent of this dish, you might imagine a sunlit orchard, a wooden table smeared with flour, and the soft clinking of a family’s shared laughter as everyone gathers to savor the warmth of the season together.

Historically, desserts like Mela e Cannella served more than dessert duty—they functioned as a social glue. Sharing a sweet treat after a meal is a ritual in many cultures, but in Italy there is a special emphasis on seasonality, regional variations, and the idea that food should tell a story. The apple’s symbolism—temptation, knowledge, renewal—meets cinnamon’s connotations of spice and protection, and together they tell a small tale of harvest, home, and hospitality. This dish, in its essence, is flexible enough to fit a weeknight dinner or a festive feast, and it carries with it a sense of place and time that makes it feel like a memory you haven’t yet lived but already crave.

As you explore Mela e Cannella, you’ll notice its beauty lies not only in flavor but in technique and texture: the fruit’s natural sweetness tempered by spice, the possible contrast of a crisp exterior with a tender, stewy interior, and the aroma that wraps around you as the kitchen becomes a sanctuary of comfort. It invites you to adjust, to experiment, and to make it your own—whether you prefer a rustic, almost bread-pudding-like rendition, a polished, pastry-wrapped version, or a lighter, fruit-forward interpretation. This dish is a doorway into a season of warmth, family, and the art of transforming simple ingredients into something truly special.

Why You’ll Love This Recipe

  • Instant comfort with a bright, fruit-forward base tempered by aromatic spice.
  • Versatile and adaptable to many diets and occasions without losing its charm.
  • Beautifully aromatic and visually appealing, making it perfect for entertaining or weeknight indulgence.
  • Simple pantry ingredients with the potential for creative twists and personal touches.
  • Great make-ahead potential: can be prepared in advance and finished to warm, caramelized perfection.
  • Kid-friendly without sacrificing depth; adults will appreciate the nuanced spice notes.
  • Pairs effortlessly with a variety of accompaniments, from creamy dairy to crisp textures and bright citrus notes.

Flavor Profile & Texture

Mela e Cannella presents a balanced symphony of flavors and textures. The apples contribute a natural sweetness and a gentle tartness that evolves as they bake, becoming tender and almost silky in contrast to their firmer, crisp cousins. The cinnamon introduces a warm, intimate heat that spreads through the dish in soft waves, never sharp, and it often carries with it subtle hints of vanilla, honey, or almond depending on the chosen flavor notes. If there is a dairy element involved, it adds a creamy richness that rounds the edges, smoothing the spice and accentuating the apples’ fruitiness. The overall profile can be described as cozy, comforting, and a touch indulgent without being heavy.

Texture-wise, you can expect a spectrum: parts of the dish may offer a gentle crumble or crumble-like crust that yields to a juicy, fruit-filled center; other variations may showcase a nearly custardy interior with a delicate crust providing a light crunch. The edges tend to caramelize slightly, creating a delicate lacquer of sweetness that accents the apples’ natural flavors. The cinnamon-infused aroma lingers, inviting another bite and encouraging you to savor the contrast between soft, stewy fruit and a more structured bite from a crust or topping. If you opt for a more rustic version, you’ll relish the imperfect, homey textures that celebrate the fruit’s shape and character. For a refined finish, a smoother, more cohesive texture—achieved with gentle mixing and a lighter touch during baking—lets the cinnamon and apples shine in a polished, elegant harmony. In every bite, the dish reveals a careful balance: fruit’s bright acidity, enough sweetness to satisfy, and spice that warms without overwhelming. The sensory experience—aroma, texture, temperature, and flavor—works together to create a dessert that feels both familiar and special, casual yet celebratory, simple yet deeply satisfying.

Occasions & Pairings

Mela e Cannella is a flexible companion for many moments. It shines as a comforting end to a weeknight dinner, a centerpiece of a cozy fall or winter meal, or a refined finish to a festive gathering. The dish’s warmth and sweetness make it an ideal palate-friendly ending after a hearty, savory course, especially when the weather turns cool and the evenings grow longer. Its simple elegance also makes it suitable for holiday tables, family reunions, or intimate dinners where you want something tender and memorable without requiring hours in the kitchen.

Pairing ideas to elevate the dining experience (without becoming fussy) include:

  • Creamy or softly whipped dairy: a dollop of mascarpone, crème fraîche, vanilla yogurt, or a light whipped cream can lift the fruit’s brightness and add luxurious richness.
  • Vanilla, almond, or citrus accents: a touch of vanilla bean, a drizzle of almond cream, or a hint of orange zest can add a fragrant lift that complements cinnamon beautifully.
  • Nuts for texture and warmth: toasted almonds or walnuts introduce a pleasing crunch and a nutty undertone that echoes autumnal flavors.
  • Cheerful contrasts: a scoop of vanilla bean ice cream or a dollop of ricotta can provide a creamy counterpoint to the soft fruit and warm spices.
  • Wine and beverages: a glass of late-harvest Riesling, Moscato, or a lightly spiced mulled drink pairs nicely with the dish’s sweetness and spice profile.

Occasion-wise, think of Mela e Cannella for:

  • Autumn family dinners and harvest-themed celebrations
  • Halloween or Thanksgiving-table comfort with a Mediterranean twist
  • Cozy romantic dinners when you want something indulgent yet approachable
  • Potlucks and gatherings where a warm, shareable dessert is the star

Tips, Variations & Substitutions

One of the greatest strengths of a dish centered on fruit and spice is its adaptability. Here are practical ideas to tailor Mela e Cannella to your preferences, dietary needs, or what you have on hand:

  • Vegan or dairy-free: Use a plant-based butter or coconut oil for the fat, and consider coconut cream or almond cream for richness without dairy. If you’re using a pastry-style crust, choose a vegan dough or a nut-meal topping to maintain texture and flavor.
  • Gluten-free: Swap in a gluten-free flour blend or use a topping built from oats (certified gluten-free, if needed) and almond flour to keep the structure light and crumbly without gluten.
  • Lower sugar or lighter finish: Choose naturally sweet apples and reduce added sweeteners. A splash of lemon juice can brighten the apples, while a drizzle of honey or maple syrup, if desired, provides a gentle sweetness without overpowering the fruit’s character.
  • Regional twists: For a Sicilian flair, add a pinch of coffee or cocoa dust to the cinnamon for a mocha-like aroma. For a Tuscan touch, use a touch of orange zest or a splash of Vin Santo in a serving sauce.
  • Texture variations: If you prefer a crisper top, bake longer at a slightly lower temperature to enhance browning; for a tender, custard-like center, cover loosely with foil during the final stage to prevent over-browning while allowing moisture to settle.
  • Nuts and seeds: Add toasted pine nuts or crushed amaretti for a crunchy, almondy note that nods to classic Italian flavors.
  • With other fruits: Pears, quince, or even berries can be folded into the dish for a different balance of sweetness and acidity while keeping the apple-cinnamon essence central.

Make-Ahead Tips

To save time on busy days, you can prepare elements ahead of time. Slice apples and toss them with a little acid (like lemon juice) to prevent browning. If you’re baking a version with a crust, you can assemble the dish a day in advance and refrigerate covered, then bake when you’re ready. If you’d like to serve the dish warm for guests, reheat gently to bring back the fragrance and tenderness. A cooled version also stores well in the refrigerator for a couple of days and can be gently warmed when needed to regain its comforting aroma.

Storage & Reheating

Leftovers can be stored in an airtight container in the refrigerator for up to 3-4 days. Reheating in a low oven or on a stovetop-friendly pan with a splash of water or a light glaze can help restore moisture. If the dish includes a topping or crust, you may want to rewarm covered to avoid over-browning. For those who love a crisp top, finishing briefly under a broiler can re-create a lightly caramelized texture, but watch it closely to prevent burning. If you prefer freezing, consider freezing the prepared, unbaked apple filling alternately with the crust, then baking straight from frozen with extended time; note that texture may shift slightly in the freezing process, but the flavor remains inviting.

Fun Facts & Trivia (Optional)

– Cinnamon has a long history as a spice that crosses borders and cultures. In ancient Greece and Rome, it was valued not only for flavor but for medicinal properties, believed to aid digestion and warmth the body. Its presence in a dessert like Mela e Cannella taps into that tradition of spice as both comfort and cultivator of appetite.

– The apple’s cultural symbolism spans many traditions—from the biblical to the fairy-tale, representing knowledge, temptation, and new beginnings. In autumn-centric cuisines, the apple is a reliable canvas for spiced sweetness, and its versatility makes it a staple fruit in both everyday and festive desserts.

– The pairing of apple and cinnamon is a timeless duo across many culinary traditions, yet each culture adds its own twist: a touch of lemon or orange zest for brightness, a drizzle of caramel, or a hint of vanilla for warmth. Mela e Cannella embodies the beauty of this cross-cultural duet, while keeping a distinctly Italian sensibility—simple, honest ingredients treated with care, yielding a dessert that feels both rustic and refined.

– In culinary lore, the aroma of cinnamon when it hits the oven is often described as comforting and inviting, capable of turning a quiet kitchen into a welcoming space. This is not just about flavor but about memory and mood: the anticipation of something delicious, shared with family and friends, and the sense that time slows just enough to savor a moment together.

Ingredients

Muffin Base

  • 1 cup gluten-free rolled oats
    → These oats provide bulk, heartiness, and structure to the muffins. They also contribute to moisture retention when left whole. For a softer crumb, you can pulse them briefly in a processor to create a light oat flour, but avoid over-processing to preserve some texture. Use certified gluten-free oats if you need to keep the recipe gluten-free.
  • 1 cup gluten-free all-purpose flour
    → Forms the main structure of the muffins along with leavening. Use a reliable gluten-free blend that includes xanthan gum or guar gum; if your blend does not contain binder, add 1/4 teaspoon xanthan gum per cup of flour. Sift to lighten the batter and prevent dense muffins.
  • 1/2 cup almond flour
    → Adds tenderness, moisture, and a pleasantly nutty flavor, helping to keep the crumb soft without adding gluten. If you’re allergic to nuts, you can replace with a second cup of gluten-free all-purpose flour, but the texture will differ.
  • 1/2 cup brown sugar or coconut sugar
    → Provides sweetness and moisture; coconut sugar adds a deeper caramel note. If reducing sugar, you can cut to 1/3 cup and compensate with a splash of extra milk or applesauce to maintain moisture.
  • 2 teaspoons baking powder (gluten-free)
    → Leavening to lift the muffins and create a light crumb. Ensure your powder is fresh for best rise; expired baking powder can result in a dense texture.
  • 1/2 teaspoon baking soda
    → Works with the acidic apples and lemon juice to produce additional lift and a tender crumb. Combines with the brown sugar and yogurt/eggs to encourage browning and height during baking.
  • 1 teaspoon ground cinnamon
    → The defining flavor for Mela e Cannella; use freshly ground for the strongest aroma. If you love a stronger cinnamon bite, you can increase to 1 1/2 teaspoons, but start with 1 teaspoon to avoid overpowering the apples.
  • 1/4 teaspoon ground nutmeg (optional)
    → Adds a subtle warm spice that complements cinnamon and apples. Optional; if omitted, you can rely on the cinnamon plus apple flavor for warmth.
  • 1/4 teaspoon salt
    → Balances sweetness and enhances overall flavor while sharpening the crumb. Don’t skip salt even in sweeter recipes, as it helps flavors come forward and improves texture.
  • 2 large eggs, room temperature
    → Bind the batter, add structure, and contribute richness. Room temperature eggs mix more evenly; if vegan, substitute with 2 flax eggs (2 tablespoons ground flaxseed mixed with 6 tablespoons water, let sit 5 minutes) and adjust liquid as needed.
  • 1 cup unsweetened almond milk
    → Provides moisture and helps hydrate the dry ingredients; you can substitute dairy milk if preferred. If using a thicker non-dairy milk (like oat milk), you may slightly adjust the amount to achieve a pourable batter.
  • 1/4 cup neutral oil (avocado oil or light virgin olive oil)
    → Keeps the muffins moist without weighing them down with strong flavors. Oil helps tenderize the crumb; for a lighter version, you can substitute half with applesauce, but the crumb will be less rich.
  • 1 teaspoon vanilla extract
    → Enhances the overall aroma and sweetness; use pure vanilla for best flavor. For an extra layer of depth, you can use vanilla bean paste.
  • 2 medium apples, peeled and diced
    → The star of the dish; apples add moisture, sweetness, and fruity flavor. Choose firm apples (like Honeycrisp, Fuji, or Granny Smith) so they hold their shape during baking. Toss the dice with a teaspoon of lemon juice to prevent browning and to brighten their flavor in the batter.
  • 1 tablespoon lemon juice
    → Prevents apple browning and adds a touch of brightness that elevates the apple flavor in the muffins. If you prefer a milder citrus note, use 1/2 tablespoon.
  • 1/4 cup unsweetened applesauce (optional)
    → Additional moisture and moisture retention to keep muffins soft. You can replace part of the oil with applesauce (up to 1/4 cup) to reduce fat content while maintaining tenderness.

Optional Add-ins

  • 1/2 cup chopped walnuts (optional)
    → Adds crunch and a toasty, nutty flavor. Toast walnuts lightly in a dry skillet for 3–4 minutes before chopping to maximize aroma and flavor, then fold evenly into the batter for distribution and texture.
  • 1/2 cup raisins or chopped dates (optional)
    → Provide bursts of sweetness and chewy texture. If dried fruit are very dry, soak them briefly in warm water or apple juice for 10 minutes to plump them, then drain well before adding so they don’t leak extra moisture into the batter.

Apple Cinnamon Crumble Topping (Optional)

  • 3 tablespoons gluten-free flour
    → Part of a crumble topping that creates a delicate, crumbly crust on top. The flour helps bind the butter and sugar into a sandy texture that crisps beautifully during baking.
  • 2 tablespoons rolled oats
    → Adds extra crunch and a toasty edge to the topping. Toast lightly first to maximize flavor and ensure the oats stay crisp after baking.
  • 2 tablespoons brown sugar
    → Provides sweetness and caramelization for a warm, desert-like topping. You can substitute with coconut sugar for a similar flavor profile and a slight caramel note.
  • 1/2 teaspoon cinnamon
    → Extra spice that pairs with the apples; increases aroma and flavor in the topping. If you like a bolder top, you can add up to 1 teaspoon.
  • 1 tablespoon cold butter or coconut oil
    → Cut into small pieces and worked into the dry ingredients to form a crumbly texture. Cold fat helps create that signature crumb; dairy butter yields a richer crumble, while coconut oil keeps it dairy-free.

Finish / Glaze (Optional)

  • 2 tablespoons maple syrup
    → A light drizzle finish that adds a hint of sweetness without overpowering the apple flavor. Use pure maple syrup for best flavor; adjust quantity to taste when serving.
  • 1 teaspoon lemon juice
    → Dilutes the maple slightly to a glaze-like consistency and adds a fresh brightness that complements the apples and cinnamon. If you prefer a thicker glaze, skip the extra lemon juice or add 1/2 teaspoon water instead.

Instructions

  • Preheat your oven to 350°F (175°C) and line a 12-cup muffin tin with paper liners or grease it well.
    → This ensures muffins rise evenly and do not stick to the tin, making removal clean and preserving the delicate crumb structure.
  • Whisk the dry ingredients together in a large bowl: gluten-free rolled oats, gluten-free all-purpose flour, almond flour, brown sugar or coconut sugar, baking powder, baking soda, ground cinnamon, optional nutmeg, and salt.
    → Sifting or whisking distributes leavening and spices uniformly, prevents clumping, and yields a light, tender crumb.
  • In a separate bowl, whisk the wet ingredients: eggs at room temperature, unsweetened almond milk, neutral oil, vanilla extract, and (if using) the optional applesauce; mix until completely combined and glossy.
    → A homogeneous wet mixture ensures even moisture and emulsification, which helps prevent a dense batter and promotes even rise.
  • Toss the diced apples with 1 tablespoon lemon juice in a small bowl to prevent browning and brighten the apple flavor in the batter.
    → The acid from the lemon slows oxidation and enhances the apples’ brightness, ensuring they stay vibrant after baking.
  • Add the wet mixture to the dry ingredients and stir just until the batter comes together; stop before it becomes completely smooth to preserve tenderness.
    → Minimal mixing limits gluten development in gluten-free blends, yielding a lighter, more tender muffin crumb.
  • Gently fold the apple chunks into the batter using a folding motion until evenly distributed without mashing the pieces.
    → Even distribution ensures each muffin contains apple bites, and gentle folding helps retain the fruit’s shape during baking.
  • If using optional add-ins (walnuts or raisins/dates), fold them in now after lightly coating them with a small amount of flour to help distribute them evenly and prevent sinking.
    → Toasted walnuts add aroma and crunch; flour coating helps keep add-ins suspended rather than sinking to the bottom.
  • Prepare the Apple Cinnamon Crumble Topping (Optional): in a small bowl combine gluten-free flour, rolled oats, brown sugar, and cinnamon; cut in cold butter or coconut oil with a pastry cutter or two forks until the mixture resembles coarse crumbs, then refrigerate briefly to keep fat cold.
    → Cold fat creates a crumbling, sandy texture that becomes crisp as it bakes, contrasting nicely with the muffin crumb.
  • Spoon batter into the prepared muffin cups about 2/3 full and, if using crumble, sprinkle the topping evenly over each muffin.
    → Filling to 2/3 ensures room for rising; topping provides a golden, crackly crust that enhances texture and appearance.
  • Bake at 350°F (175°C) for 18–22 minutes, rotating the pan halfway through, until the muffins are golden and a toothpick inserted into the center comes out with a few moist crumbs.
    → Rotating ensures even heat exposure; the toothpick test confirms doneness without overbaking, preserving moistness.
  • While the muffins bake, prepare the Finish / Glaze (Optional): whisk 2 tablespoons maple syrup with 1 teaspoon lemon juice to create a pourable glaze.
    → The glaze adds a delicate sweetness and brightness that complements the apples and cinnamon without overpowering them.
  • Let the muffins cool in the pan for 5 minutes, then transfer to a wire rack to cool completely before glazing or serving.
    → Cooling allows the structure to set; glazing on completely cooled muffins prevents the glaze from sliding off and ensures an even finish.
  • Drizzle the maple lemon glaze over cooled muffins just before serving or while they are still slightly warm for quicker setting.
    → A light drizzle enhances aroma and adds a glossy finish; applying while warm helps adhesion and quick setting.
  • Store any leftovers in an airtight container at room temperature for up to 2–3 days or freeze for longer storage; rewarm gently before serving if frozen.
    → Proper sealing limits staling and maintains moisture; freezing extends shelf life without compromising crumb.

Notes

These gluten-free Mela e Cannella muffins are warmly scented with cinnamon and apples, moist from diced apples and a touch of applesauce, and lightly sweetened with brown sugar or coconut sugar. Use firm apples such as Honeycrisp or Granny Smith to hold their shape during baking, and toss the apples with a teaspoon of lemon juice to prevent browning and brighten their flavor.

You can customize them by adding chopped walnuts, raisins, or chopped dates for texture and extra sweetness. Toast the nuts lightly before folding them into the batter to maximize aroma and ensure even distribution.

If you want extra texture and a dessert-like finish, prepare the Apple Cinnamon Crumble Topping (gluten-free flour, oats, brown sugar, cinnamon, and cold butter or coconut oil) and sprinkle it over the muffins before baking. For a simple glaze, drizzle a mix of maple syrup and lemon juice over warm muffins after they come out of the oven.

They freeze well and make a great grab-and-go snack. To reheat, warm from frozen in a 350°F (175°C) oven for 10–12 minutes or in a microwave for 20–30 seconds until warm.

Always ensure your gluten-free oats and baking powder are certified gluten-free if you have gluten intolerance. If you’d like a vegan version, substitute 2 flax eggs (2 tablespoons ground flaxseed mixed with 6 tablespoons water, let sit 5 minutes) and use dairy-free milk, and you can replace part of the oil with applesauce to maintain moisture.

Tips

Muffin Base – Practical Tips

  • Pre-measure and sift the gluten-free all-purpose flour to lighten the batter and prevent dense muffins. If your blend lacks a binder, add 1/4 teaspoon xanthan gum per cup of flour for structure.
  • For a softer crumb, pulse the gluten-free rolled oats briefly to a light texture, but keep some whole oats for bite. Do not over-process to avoid a paste-like batter.
  • Use room-temperature eggs and almond milk to improve emulsification and a tender crumb. If you’re vegan, swap in 2 flax eggs (2 tablespoons ground flaxseed + 6 tablespoons water, rested 5 minutes) and adjust liquids as needed.
  • Keep the oil light and neutral to prevent a heavy mouthfeel. If you want a lighter version, replace part of the oil with applesauce, but expect a slightly softer crumb.
  • When adding apples, dice them evenly and toss with a teaspoon of lemon juice to prevent browning and brighten flavor. If you use very juicy apples, you may want to drain excess moisture after chopping.
  • Within the batter, aim for a cohesive mix with minimal stirring. Overmixing gluten-free batter can lead to a gummy texture; fold ingredients together just until combined and then stop.
  • Prepare a muffin tin with liners or a light spray of oil. Filling cups about 2/3 full helps avoid doming and allows room for the crumble topping if you choose to add it.
  • For a brighter aroma, add the vanilla with the wet ingredients. If you crave a stronger citrus note, consider a touch more lemon juice or a tiny splash of orange zest.
  • If the batter looks too thick, loosen with a splash of almond milk; if it’s too loose, fold in a spoonful of oats or a bit more flour blend until it thickens to a scoopable consistency.

Optional Add-ins – Tips for Extras

  • Toast walnuts in a dry skillet for 3–4 minutes to intensify nutty flavor before folding into the batter. Let cool, then chop evenly for distribution.
  • Soak raisins or chopped dates in warm water or apple juice for 10 minutes to plump them. Drain well before adding so they don’t release extra moisture into the batter.
  • If adding extra fruit, cut into uniform pieces to ensure even baking and prevent undercooked centers in larger chunks.

Apple Cinnamon Crumble Topping – Tips

  • Keep the butter or coconut oil cold when making the crumble. Rub it into the dry ingredients with fingertips to create a light, sandy texture that browns beautifully as it bakes.
  • Toast the oats lightly before mixing with the crumble components to boost crunch and flavor. Mix into the topping just before sprinkling over the muffins.
  • Adjust the cinnamon in the topping to taste. If you love spice, you can go up to 1 teaspoon, but start with 1/2 teaspoon to avoid overpowering the apples.
  • For dairy-free topping, use coconut oil or a solidified plant-based fat. It will still form a crumbly, crisp crust on top.

Finish / Glaze – Glazing Tips

  • Maple glaze adds a gentle sweetness without masking apple flavor. Use pure maple syrup and drizzle lightly so it doesn’t soak into the muffins.
  • Adding a touch of lemon juice to the glaze gives brightness and helps thin the glaze to a pourable consistency. If you want a thicker glaze, skip the lemon or add a tiny bit of water.
  • For a quick glaze alternative, a light dusting of powdered sugar or a simple lemon glaze can be used, but maple keeps the dessert wholesome and aromatic.

  • Muffins store well in an airtight container at room temperature for up to 3 days. For longer storage, freeze baked muffins (2–3 months) and reheat gently before serving.
  • Unbaked batter portions can be frozen in muffin cups. Thaw, then bake as directed for fresh-tiber muffins with minimal effort.
  • Crumbles and toppings can be prepared in advance and stored in the fridge in an airtight container; top muffins just before baking for maximum crunch.

FAQ

Che cos’è “Mela e Cannella”?

È una ricetta dolce a base di mele e cannella, versatile come dessert, spuntino o colazione. Può essere preparata in versioni veloci in padella, al forno o come salsa aromatica per pancake e croissant. Varianti includono aggiunte di scorza d’arancia, vaniglia o frutta secca.

Quali ingredienti servono per la versione base?
  • mele (2-4 medie, varietà come Pink Lady o Granny Smith)
  • cannella in polvere (1 cucchiaino, o a gusto)
  • zucchero o miele (1-2 cucchiai, o dolcificante a piacere)
  • succo di limone (1 cucchiaio)
  • burro o olio neutro per la cottura (1-2 cucchiai)
  • acqua o succo di mela (un po’ per la cottura)
  • amido di mais o maizena (1 cucchiaino, opzionale, per addensare)
Come si preparano le mele prima della cottura?

Lavale, rimuovi il torsolo e tagliale a fettine o cubetti. Per evitare che anneriscano, spruzza con succo di limone. Se le userai per forno, mescolare con cannella e zucchero fin dall’inizio.

Procedura passo-passo per la versione in padella?

1) Sciogli il burro in una padella a fuoco medio. 2) Aggiungi le mele, una spolverata di cannella e lo zucchero. 3) Cuoci 5-7 minuti, mescolando di tanto in tanto, finché le mele iniziano ad ammorbidirsi. 4) Aggiungi succo di limone e un po’ d’acqua se serve per evitare attaccamenti. 5) Se vuoi una salsa più densa, sciogli l’amido di mais in una cucchiaio d’acqua fredda e aggiungilo, mescolando finché si addensa. 6) Togli dal fuoco e servi caldo.

Posso fare una versione al forno?

Sì. Preriscalda il forno a 180-190°C. Mescola mele a fette con cannella, succo di limone e un po’ di zucchero. Disponi in una teglia e cuoci per 20-30 minuti, finché le mele sono tenere e leggermente dorate. Se desideri una salsa, aggiungi 1-2 cucchiai di liquido durante la cottura.

È possibile rendere la ricetta senza glutine?

La versione base è naturalmente priva di glutine. Evita aggiunte che contengano glutine (p.es. strudel o impasti con farina di grano). Se addensi la salsa, usa amido di mais o tapioca; controlla eventuali additivi nei dolcificanti se devi evitarli.

Come rendere la ricetta vegana?

Sostituisci il burro con olio di cocco o olio vegetale neutro. Per dolcificare, preferisci sciroppo d’acero, agave o zucchero di canna. La ricetta resta morbida e aromatica speziata.

Come conservare e riscaldare gli avanzi?

Conserva in frigorifero in contenitore ermetico per 2-4 giorni. Per riscaldare, scalda in padella a fuoco basso con un po’ di liquido o nel microonde, mescolando di tanto in tanto. Se congeli, prevedi una consistenza leggermente diversa al riscaldo.

Quali abbinamenti o accompagnamenti sono consigliati?

Servi Mela e Cannella con una pallina di gelato alla vaniglia, una cucchiaiata di panna montata o yogurt, o come ripieno per pancake, crepes o croissant. Puoi aggiungere noci o nocciole tritate per croccantezza.

Quali errori comuni evitare?

Non abusare della cannella; troppa può coprire gli altri gusti. Non cuocere troppo a lungo per non far disfare le mele; se usi amido, aggiungilo solo a fine cottura. Assaggia durante la cottura e regola dolcezza e acidità a gusto.