Author

Ocean Nightleaf

Browsing

Introduction / Hook

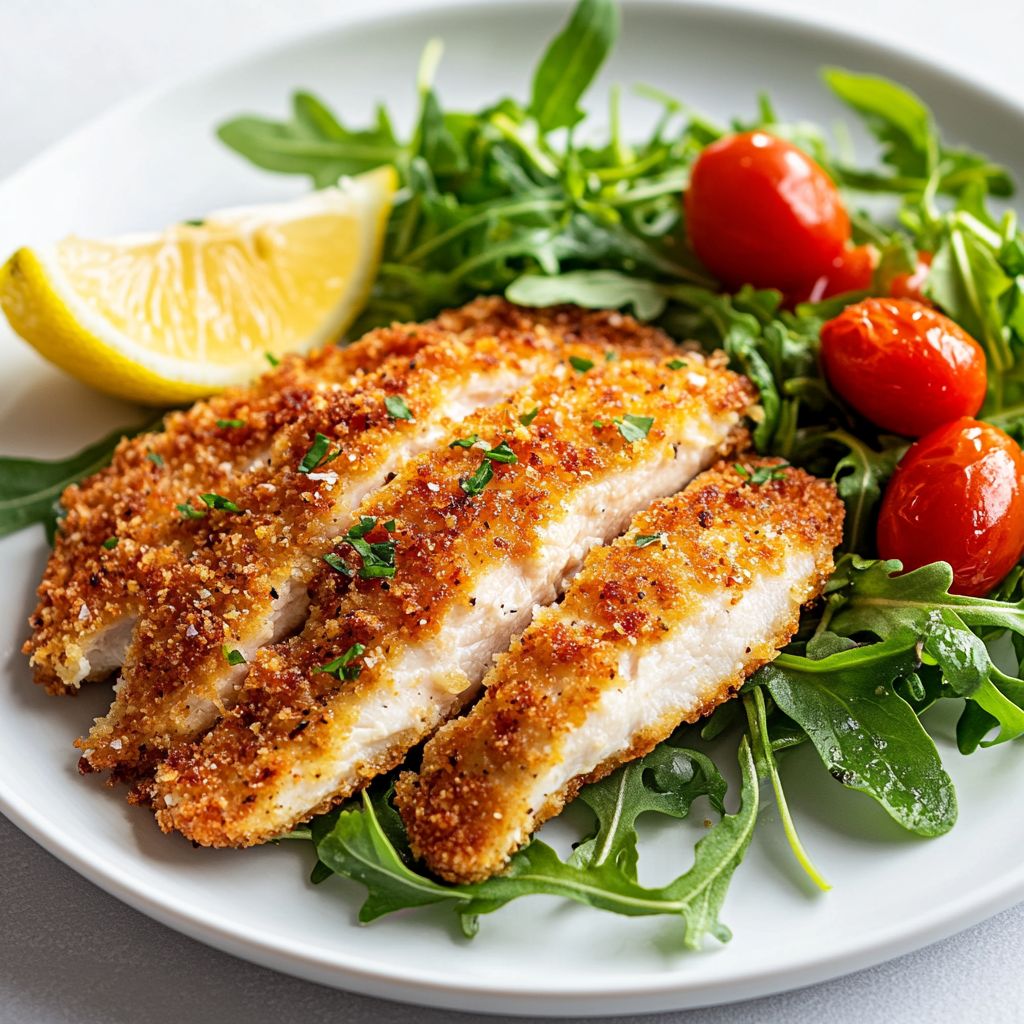
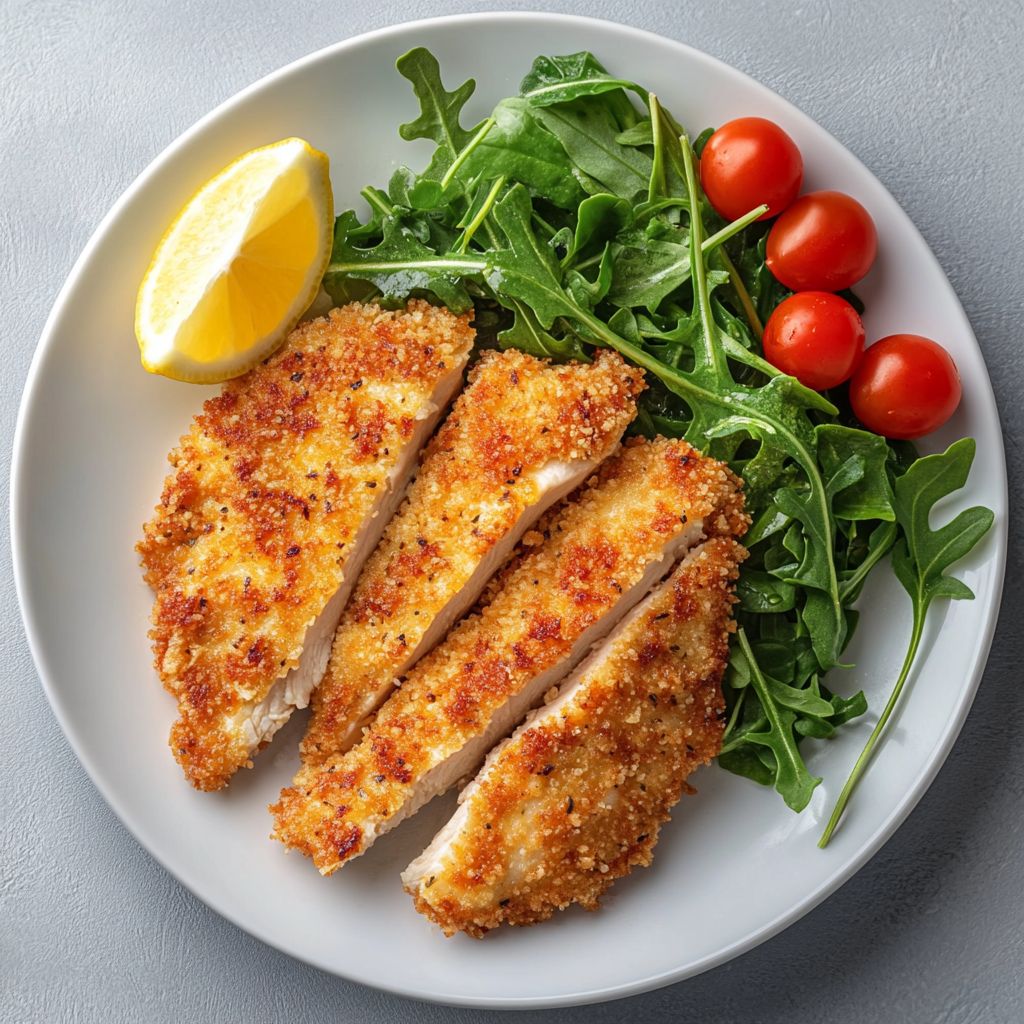
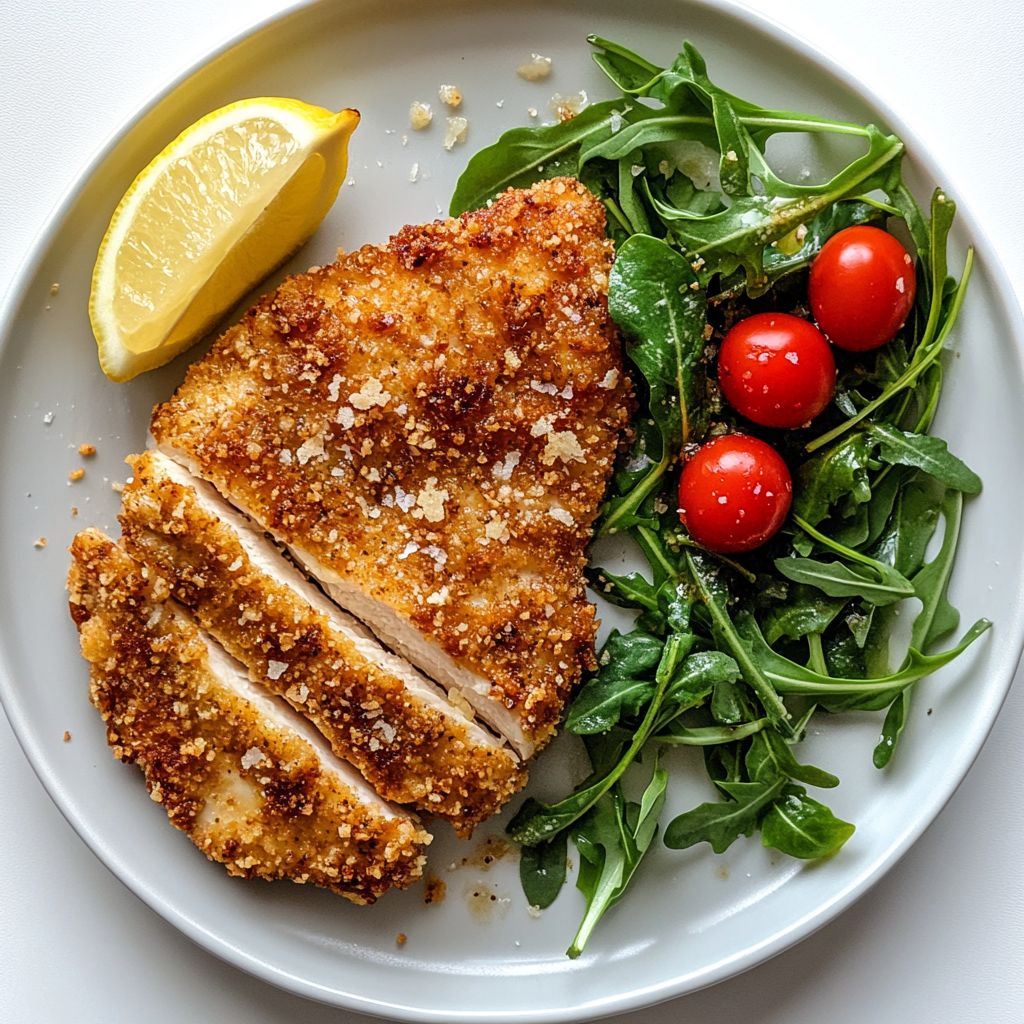
Imagine a plate that instantly conjures the sunlit streets of Milan: a thin, tender chicken cutlet cloaked in a crackling, golden crust, brightened by a sharpened whisper of lemon and a kiss of parmesan. Italian Chicken Milanese is the kind of dish that makes a weeknight feel like a celebration and a Sunday supper feel like a memory you’ll return to with a satisfied sigh. The aroma alone—warm butter slipping into sizzling olive oil, bread crumbs turning to a toasty bronze, faint notes of garlic and herbs drifting through the kitchen—is enough to make you pause, slow down, and savor. This is comfort food with a sophisticated edge: rustic in its simplicity, elegant in its finish, and wonderfully adaptable to whatever you have in the pantry.

At its heart, Italian Chicken Milanese is about balance: a crisp, savory crust that gives way to juicy, delicate chicken, with acidity and brightness cutting through the richness. It’s a dish that knows how to make a statement without shouting. The crust carries the savory perfume of cheese and herbs, while the inside stays moist and tender, almost scoffingly easy to love. It’s the kind of dish that invites conversation—pair it with a bright salad, a splash of white wine, and a slice of lemon—so the table becomes a place where flavors mingle as gracefully as friends.

Beyond the plate, this dish carries a sense of tradition. It’s a modern iteration of cotoletta alla milanese, a classic from Lombardy that has traveled across kitchens and continents, finding its own voice in chicken form. The result is not just a meal, but a small ceremony: a bite that crackles, followed by the gentle yield of the chicken, finished with a citrusy finish that lingers just long enough to invite another bite.

The Story Behind the Dish

Cotoletta alla milanese, historically made with veal, is a storied emblem of Milanese cooking. In the heart of Lombardy, cooks learned to honor the simple two- or three-ingredient crust—breadcrumbs, cheese, and a hint of herbs—while keeping the meat tender and juicy. The concept traveled, adapted, and evolved. Chicken, being more widely accessible and versatile in many modern kitchens, became a popular stand-in that still carries the soul of the original: a crisp exterior that seals in moisture, and a bright, lemon-touched finish that cleanses the palate.

The tale of this dish is also a story of shared tables. In Italy, meals are not just sustenance; they are daily rituals, opportunities to gather, reflect, and celebrate. Milanese cooks would often serve cotoletta with simple accompaniments that honor the dish itself—perhaps a wedge of lemon, a handful of fresh greens, and a drizzle of olive oil. As families migrated and cuisines blended, chicken versionals emerged in homes and restaurants around the world, keeping the essence intact while inviting new interpretations: a whisper of garlic here, a hint of parsley there, or a citrusy sparkle from a squeeze of lemon.

Historically, the technique mirrors the practical cooking cultures of Europe: a sequence of dabs and dredges that protects the meat, followed by a quick, high-heat sear that creates that unmistakable crust. This is not a heavy, bread-drowned fry; it’s a deft, almost artisanal crust that delivers texture without masking the chicken’s tenderness. The result is a dish that feels timeless, yet versatile enough to adapt to dietary preferences and seasonal ingredients—proof that classic traditions can sing in a modern kitchen.

Why You’ll Love This Recipe

  • Fast and adaptable: a weeknight hero that delivers restaurant-worthy texture in a home kitchen.
  • Bright and comforting: the crisp crust paired with juicy chicken and a citrus finish is simultaneously satisfying and refreshing.
  • Versatile sides: pairs beautifully with a peppery arugula salad, roasted vegetables, or a silky potato purée.
  • Family-friendly: approachable flavors that appeal to both kids and adults, with room for customization.
  • Impressive for guests: despite its elegant presentation, it’s surprisingly simple to prepare, making you look like a seasoned host.
  • Make-ahead friendly: components can be prepped in stages, giving you flexibility during busy days.
  • Gluten- and dairy-friendly options possible: with mindful substitutions, you can maintain the crisp crust while accommodating dietary needs.

Flavor Profile & Texture

The flavor of Italian Chicken Milanese comes from a harmonious trio: the savory, cheesy crust; the delicate chicken; and the lemony brightness that punctuates every bite. The crust, often a blend of breadcrumbs with grated parmesan or pecorino, delivers a toasty, slightly nutty note that lingers in the mouth. If you enjoy a hint of garlic or fresh herbs in the crust, these flavors offer a subtle perfume rather than a dominant punch, ensuring the chicken stays the star.

Texture plays a starring role. The exterior is crisp and crackly, a tactile contrast to the moist, tender interior. When you bite through, you experience a satisfying crunch that yields to the soft, succulent meat within. The cheese in the crust adds a mild savoriness, while lemon brings a bright citrus lift that cuts through the richness. There’s a whisper of butter or olive oil from the pan finish that rounds out the crust’s edge. If you accompany the dish with a fresh salad, the acidity from tomatoes or a lemon vinaigrette can echo the lemon’s tang, creating a balanced and lively dining experience.

Occasions & Pairings

This dish shines in many settings. It’s equally at home on a casual weeknight table as it is on a shared Sunday family meal. Its elegance makes it a natural choice for intimate dinners, date nights, or dinner parties where you want to impress without overcomplicating the process. The citrus kiss keeps it bright enough for spring and summer menus, yet comforting enough for cooler evenings when you crave something familiar and satisfying.

Pair it with a crisp white wine that mirrors the dish’s brightness—think Pinot Grigio, Soave, or a young Verdicchio. For non-wine enthusiasts, a sparkling water with a splash of lemon or a light, lemony soda can be a refreshing accompaniment. On the plate, consider a simple arugula salad with cherry tomatoes and shaved parmesan, a roasted vegetable medley, or a creamy potato purée to anchor the meal. For a more rustic approach, a side of sautéed greens or a lemon-infused risotto provides a complementary taste and texture narrative.

Tips, Variations & Substitutions

Tips for an ultra-crisp crust

Choose a crumby breadcrumb mixture with a little cheese for extra savoriness. Let the crust rest on the meat for a moment after dredging in a light layer of flour or cornmeal to help it adhere evenly, then let the coated cutlets come to a brief room-temperature rest before cooking. This rest improves crust adhesion and ensures even browning. When you cook, maintain a steady, moderate heat so the crust becomes deeply golden without burning. A touch of butter toward the end of cooking can enrich the crust’s color and flavor, but add it gradually to prevent scorching.

Variations: proteins, coatings, and flavors

Traditional cotoletta alla milanese uses veal, but chicken is the beloved modern adaptation. You can also explore variations such as pork cutlets or turkey cutlets for a lighter alternative. For a gluten-free version, swap regular breadcrumbs for toasted gluten-free breadcrumbs or finely crushed almonds or cornmeal. If you like a stronger cheese presence, fold finely grated parmesan or pecorino into the crumb mix. For a herb-forward crust, mix in finely chopped parsley, thyme, or oregano.

Flavor twists are easy to implement. A squeeze of lemon right before serving enhances the dish’s citrus footprint. A touch of capers, a few olives, or a light herb garden salad on the side can transform the palate without overpowering the core flavors. If you prefer a richer finish, finish the dish with a drizzle of high-quality extra-virgin olive oil or a tiny dollop of garlicky aioli on the side for dipping.

Dietary-friendly twists

Gluten-free: use a gluten-free breadcrumb or crushed almonds for texture. Dairy-free: omit cheese in the crust or substitute with a dairy-free cheese option, while maintaining the crisp crust with an extra pinch of salt and lemon zest. Low-carb: use an almond meal-based crust; skip breading altogether and finish with a lemon–garlic pan sauce for moisture and flavor. Vegan: substitute chicken with cauliflower or king oyster mushrooms in the same breading and cooking process, adjusting the crust to be oven-crisp instead of pan-fried if needed.

Regional twists & inspiration

Add a touch of regional Italian flavor by swapping in pecorino for parmesan, using fennel pollen for a fragrant finish, or finishing the dish with a quick parsley-lemon gremolata for brightness. In coastal regions, a light squeeze of lemon paired with a drizzle of olive oil echoes the sea breeze. In the mountains, a crisp herb crust with thyme and rosemary can evoke rustic, hearty dinners. The beauty of Milanese-style cooking lies in its adaptability: the technique remains the same, while the flavor accents reflect your pantry and preferences.

Make-ahead ideas

Pre-bread the crusted cutlets and refrigerate them on a parchment-lined tray for up to a day before cooking. This can save time on a busy evening. You can also prepare the salad or greens ahead of time and dress just before serving to preserve crispness. If making a larger batch for a gathering, keep the cooked cutlets warm in a low oven on a wire rack to maintain the crust’s crunch as you finish the rest of the dish.

Storage & Make-Ahead Ideas

Leftover Milanese will stay fresh in an airtight container in the refrigerator for a couple of days. Reheat gently to maintain crispness: the best approach is a quick re-crisp in a hot skillet with a tiny bit of oil, or in a hot oven for a few minutes until the crust regains its crunch. Avoid microwaving if you want to preserve texture; the crust can become soggy in the microwave. For longer storage, you can freeze the breaded, uncooked cutlets (before frying). When ready to use, thaw them completely and cook as you would fresh cutlets, ensuring the crust has enough time to crisp.

If you’re hosting a larger dinner, consider preparing a big batch of the crusted coating and keeping the coated chicken ready in the fridge. When you’re ready to cook, the process becomes nearly hands-off: heat oil, fry until golden, rest briefly, and serve with your favorite lemony accents and greens. This approach keeps the dish approachable while allowing you to scale up for gatherings without sacrificing texture or flavor.

Fun Facts & Trivia (Optional)

– The term “alla milanese” translates to “in the Milanese style,” a designation that has spread across Italian and international menus to denote breaded and fried meat with a crisp crust. The milk-white, buttery butter sauce of some traditional versions is a nod to the old-fashioned finishing touches that elevated everyday meals into special occasions.

– While cotoletta alla milanese is often associated with veal, chicken, pork, and even mushrooms have found homes in this culinary niche, proving that the technique and spirit can be adapted to many ingredients without losing its essence.

– The lemon wedge on the plate isn’t just for garnish; the citrus acidity brightens the crust’s richness, balances the savory cheese, and complements the tenderness of the meat. It’s a tiny flourish with a huge impact.

– In some culinary circles, the crust’s cheese-to-breadcrumb ratio is seen as a signature: more cheese yields a richer, nuttier crust, while a lighter approach emphasizes crunch and the chicken’s natural flavors.

Ingredients

Chicken Prep

  • 4 boneless, skinless chicken breasts (pounded to 1/4 inch thickness)
    → This is the protein base for Italian Chicken Milanese. Pounding to about 1/4 inch thickness ensures quick, even cooking and a tender bite beneath the crisp crust. Place the breasts between sheets of plastic wrap and gently flatten with a meat mallet or rolling pin to uniform thickness. If fillets are particularly thick, butterfly or halve them before pounding. Rest the flattened cuts briefly to redistribute moisture, which helps the crust adhere better.

Dredging & Breading

  • 1/2 cup gluten-free all-purpose flour
    → The flour provides the first dry layer that the egg wash will cling to and begins creating the crust. For gluten-free cooks, this keeps the dish accessible. Lightly season the flour with a pinch of salt and pepper to add a subtle base flavor; for extra crispness, consider whisking in 1 teaspoon cornstarch or using a blend of GF flour and fine rice flour.
  • 2 large eggs, lightly whisked with 1 tablespoon water or milk
    → The eggs act as the binding mechanism that holds the breadcrumbs to the chicken and forms a cohesive crust as it fries. Use room-temperature eggs for better emulsification; for richer flavor, you can add a teaspoon of Dijon mustard or a splash of cream to the egg wash. After coating, let the coated chicken rest a few minutes so the crust adheres firmly.
  • 1 cup gluten-free breadcrumbs
    → The main crispy shell of the Milanese. Gluten-free breadcrumbs (or gluten-free panko) provide crunch and texture; when mixed with Parmesan they yield a savory, browned crust. For extra color and aroma, toast the crumbs lightly in a dry skillet for 2–3 minutes before coating to deepen flavor.
  • 1/2 cup finely grated Parmesan cheese (Parmigiano-Reggiano)
    → Adds sharp, nutty umami to the crust and helps it brown nicely. Use freshly grated Parmigiano for maximum aroma and flavor; mix evenly with breadcrumbs so every bite has balanced cheese, and press gently to help the crust cling.
  • 1 teaspoon dried oregano
    → Provides a classic Italian herb note that complements the lemon and parsley later. If you prefer, you can substitute with 1 tablespoon finely chopped fresh parsley in the coating to brighten the crust, but be mindful that fresh herbs can burn more readily during frying. Adjust to taste.
  • 1/2 teaspoon garlic powder
    → Offers savory depth without risking raw garlic burning during frying. Garlic powder distributes evenly in the crust; if you prefer fresh garlic, you can finely mince one small clove and mix it into the egg wash, but keep the amount modest to avoid overpowering the chicken.
  • 1/2 teaspoon kosher salt
    → Essential to season the crust and the chicken interior; Parmesan will contribute salt, so taste as you go. Lightly salt the flour or the breadcrumbs to ensure a balanced flavor; you can adjust after frying if needed.
  • 1/4 teaspoon freshly ground black pepper
    → Adds a gentle kick and depth, ensuring flavor is distributed through every bite. Pepper complements the lemon and parsley; distribute evenly in the crumb mixture for consistent seasoning.

Frying

  • 1/3 to 1/2 cup extra-virgin olive oil
    → The fat used to fry the chicken and achieve a crisp, golden crust. Maintain medium-high heat (about 350°F/175°C); avoid overcrowding the pan to ensure even browning. Fry the coated cutlets 2–3 minutes per side until golden and the chicken registers 165°F (74°C). Transfer to a rack or paper towels to drain; strain and reuse the oil if desired and not degraded by previous cooking.

Finish & Serve

  • 1 lemon, cut into wedges
    → A bright finishing touch that cuts through the richness of the fried crust. Squeeze some lemon over the hot chicken just before serving to brighten flavors; serve wedges on the side for individual adjustment and consider a light zest finish for added aroma.
  • 1 tablespoon finely chopped fresh flat-leaf parsley
    → Adds color and a fresh herbal note to balance richness. Sprinkle over the hot chicken immediately after frying so the parsley stays vibrant; if you prefer, you can omit, but it does elevate the dish with a visually appealing finish.

Instructions

  • Flatten each chicken breast to 1/4 inch thickness by placing it between two sheets of plastic wrap and gently pounding with a meat mallet or rolling pin until uniform.

    → This uniform thickness ensures quick, even cooking and a tender bite beneath the crust. If a fillet is particularly thick, butterfly or halve it before pounding, then let the pieces rest briefly on a rack to redistribute moisture and help the crust adhere.
  • Arrange three shallow pans in a line to create a dredging station: one with gluten-free all-purpose flour lightly seasoned with a pinch of salt and pepper, one with eggs lightly whisked with 1 tablespoon water or milk, and one with gluten-free breadcrumbs blended with 1/2 cup finely grated Parmigiano-Reggiano, 1 teaspoon dried oregano, 1/2 teaspoon garlic powder, 1/2 teaspoon kosher salt, and 1/4 teaspoon freshly ground black pepper.

    → The dry flour provides the first coating for the egg wash, the eggs act as the binding bridge, and the breadcrumb-cheese mixture creates the crisp, savory crust. Toasting the crumbs lightly in a dry skillet for 2–3 minutes before coating deepens flavor and color; cool before use.
  • Dredge each pounded chicken breast first in the seasoned flour, coating completely and tapping off excess; then dip into the egg wash, allowing excess to drip off; finally press into the Parmesan–breadcrumb mixture, turning to coat all surfaces and pressing gently so the crust adheres firmly.

    → The flour helps the egg wash cling and begins the crust; the egg wash helps the crumbs bind; pressing ensures thick, even crust coverage that won’t slid off during frying. Let coated pieces rest 5–10 minutes to set the crust.
  • Heat 1/3 to 1/2 cup extra-virgin olive oil in a wide skillet over medium-high heat until shimmering and reaching about 350°F (175°C).

    → This precise temperature creates an immediate sear that crisps the crust without absorbing excessive oil, while cooking the chicken through. If you don’t have a thermometer, test with a crumb; it should sizzle briskly. Maintain temperature and avoid overcrowding the pan.
  • Fry the breaded chicken in batches, cooking 2–3 minutes on the first side until the crust is deeply golden, then flip and cook 2–3 minutes on the other side until the crust is browned and the internal temperature reaches 165°F (74°C).

    → A steady, hot pan yields an even, crisp crust and juicy interior. Use tongs to turn gently to avoid crust loss; if the oil begins to deplete in temperature, briefly lift the pan and adjust the heat to recover the crust.
  • Transfer fried cutlets to a rack set over a baking sheet or to paper towels to drain the excess oil and let them rest 1–2 minutes to set the crust.

    → Draining prevents sogginess and resting helps the crust re-crisp slightly as the surface heat dissipates.
  • Repeat the dredging and frying steps for any remaining chicken pieces, maintaining oil temperature and frying in batches to preserve crispness; refresh or strain oil if it becomes dark or foamy.

    → Consistent batches ensure uniform browning and texture across all cutlets, and prevent flavor contamination from degraded oil.
  • Finish the dish by immediately squeezing a wedge of lemon over each hot chicken Milanese, then sprinkle with 1 tablespoon finely chopped fresh flat-leaf parsley and, if desired, a touch of lemon zest; serve with additional lemon wedges on the side.

    → The citrus brightens the rich, fried crust and the parsley adds color and a fresh aroma; serve promptly to enjoy the crust while it stays crisp.
  • If planning to reuse the frying oil, allow it to cool completely, strain through a fine-mesh sieve to remove crust bits, and store in a sealed container for future frying if the oil still smells clean and is not excessively dark or degraded.

    → Reusing clean oil is economical and reduces waste, but discard oil that shows signs of rancidity or heavy darkening to avoid off flavors.

Notes

These gluten-free Italian Chicken Milanese are crispy, lemon-bright, and satisfying with a crust built from gluten-free flour and breadcrumbs. To ensure a tender bite and quick, even cooking, pound the chicken to about 1/4 inch thickness and let the flattened cuts rest briefly before breading. Use certified gluten-free flour and gluten-free breadcrumbs (or gluten-free panko) and toast the crumbs lightly in a dry skillet for 2–3 minutes to deepen flavor and promote browning. The eggs act as the binding around the crust, so keep the eggs at room temperature and let the coated chicken rest a minute or two before frying so the crust adheres well. Fry in about 1/3 to 1/2 cup extra-virgin olive oil at medium-high heat (around 350°F/175°C) until golden and the chicken reaches 165°F (74°C). Drain well on a rack or paper towels. Finish with lemon wedges and a sprinkle of finely chopped fresh flat-leaf parsley to lift the flavors and add color. These notes also apply if you want to remake the dish: reheat gently in a hot skillet to recrisp the crust. For variation, add a pinch of garlic powder to the breading or substitute fresh parsley for oregano in the crust to taste, but avoid overpowering the citrus finish.

Tips

Chef’s Tips for Italian Chicken Milanese

  • Let the pounded chicken sit about 10 minutes after flattening to redistribute moisture. Pat dry with paper towels if any moisture remains; a dry surface helps the crust cling and stay crispy.
  • To maximize crust adhesion, lightly season the chicken itself with a pinch of salt before dredging, then season the flour and breadcrumbs as a separate step so the crust tastes balanced in every bite.
  • For extra crispness, mix a small amount of cornstarch or rice flour into the gluten-free breadcrumbs. Toasting the breading mixture in a dry skillet for 2–3 minutes before coating adds aroma and color without burning.
  • Use room-temperature eggs for the egg wash to improve emulsification and binding. A teaspoon of Dijon mustard or a splash of cream in the wash can add depth, but keep it subtle so the crust remains crisp.
  • When using gluten-free breadcrumbs, consider adding a tablespoon of grated Parmesan or a touch of finely grated lemon zest to the crust for extra savoriness and brightness.
  • Opt for freshly grated Parmigiano-Reggiano rather than pre-grated cheese. It melts more evenly and provides a richer nutty flavor that browns nicely with the breadcrumbs.
  • Herbs in the crust matter: dried oregano is classic, but you can swap in finely chopped fresh parsley (about 1 tablespoon) for a fresh lift. Be mindful that fresh herbs can burn easily; add them to the finishing lemon zest instead if desired.
  • Keep the coating uniform by dredging first in gluten-free flour, then egg wash, then breadcrumb mixture. Let the coated chicken rest 5–10 minutes before frying to help the crust set.
  • Maintain a steady frying temperature around 350°F (175°C). If the oil is too hot, the crust will burn before the chicken cooks; if too cool, you’ll end up with a soggy crust. Use a thermometer for accuracy.
  • Do not overcrowd the pan. Fry in batches if needed; crowded pan lowers oil temperature and leads to uneven browning. Transfer finished pieces to a rack set over a sheet pan instead of paper towels for crisper results.
  • After frying, drain briefly and keep the crust crisp by finishing in a warm oven (about 200°F/95°C) for a few minutes if you’re not serving immediately.
  • Finish with lemon: squeeze fresh lemon over hot chicken to brighten the richness, and serve lemon wedges on the side. A touch of lemon zest over the crust just before serving adds a fragrant finish.
  • Parsley adds color and freshness; sprinkle the chopped parsley immediately after frying so it stays vibrant. If you prefer a milder look, omit or add a pinch of zest instead.
  • Make-ahead option: bread the chicken and refrigerate the coated cutlets up to 2 hours before frying. You can also freeze breaded, uncooked cutlets for up to 1 month; bake or fry directly from frozen, adding a minute or two to the cook time.
  • For a lighter approach, you can bake the breaded cutlets on a parchment-lined sheet at 425°F (220°C) until golden and cooked through, then finish with a quick broil to brown the crust.

FAQ

What is Italian Chicken Milanese?

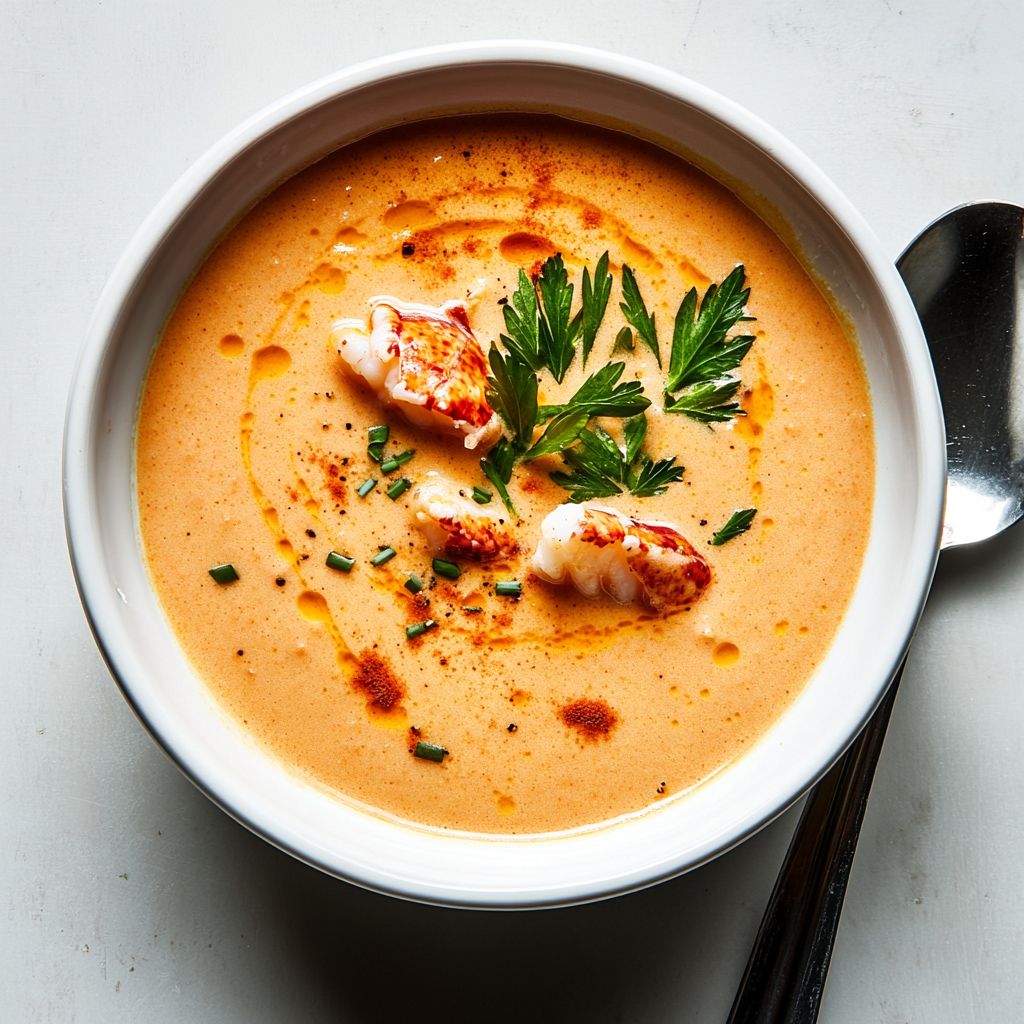
Italian Chicken Milanese is a classic Milanese dish featuring thin, breaded chicken cutlets that are pan-fried in olive oil or butter until golden and crisp. It’s typically served with a squeeze of lemon and a simple salad or arugula on the side.

What cut of chicken is best?

Use boneless, skinless chicken breasts. For even cooking, lightly pound them to about 1/4 inch (6 mm) thickness, then trim to an even size.

What ingredients do I need?

Basic setup:

  • Chicken breasts (pounded thin)
  • All-purpose flour (or gluten-free flour)
  • Eggs (beaten)
  • Breadcrumbs (panko for extra crunch, or seasoned breadcrumbs)
  • Grated Parmesan cheese
  • Salt and pepper
  • Optional herbs: parsley, oregano
  • Olive oil or neutral oil for frying
  • Lemon wedges for serving
How do I bread and prep the chicken?

Steps:

  1. Season the chicken lightly with salt and pepper.
  2. Dredge in flour, tapping off excess.
  3. Dip in beaten eggs to coat.
  4. Coat with a mixture of breadcrumbs and grated Parmesan (and herbs, if using). Press gently to adhere.
  5. Set on a rack or plate for a few minutes to help the crust set before cooking.
How do I fry it to get a crispy crust?

Heat about 1/4 inch of oil in a skillet over medium heat until shimmering (around 350–360°F / 175–180°C). Fry the cutlets 2–3 minutes per side, until golden and cooked through (internal temperature 165°F / 74°C). Let excess oil drain on paper towels.

Can I bake it instead of frying?

Yes. Preheat the oven to 425°F (220°C). Place breaded cutlets on a baking sheet lined with parchment or on a wire rack. Lightly spray or brush with oil. Bake 20–25 minutes, flipping halfway, until the crust is golden and chicken reaches 165°F (74°C).

How long does it take to cook?

Pan-fried: about 4–6 minutes total (2–3 minutes per side) depending on thickness. Baked: about 20–25 minutes at 425°F (220°C), flipping once.

What should I serve it with?

Common pairings include a simple arugula or green salad with lemon, roasted or boiled potatoes, risotto, or a light pasta with lemon and olive oil. A lemon wedge on the side brightens the dish.

How should I store leftovers?

Store cooked Milanese in an airtight container in the fridge for up to 3 days. Reheat in a hot skillet or oven to restore crispiness; avoid microwave reheating if you want crunch. You can also freeze cooked or breaded uncooked portions for longer storage.

Are there gluten-free or dairy-free variations?

Yes:

  • Gluten-free: use gluten-free breadcrumbs and flour.
  • Dairy-free: omit Parmesan or use a dairy-free Parmesan alternative; use dairy-free breadcrumbs if needed.
  • Oil choice: olive oil or other neutral oils work well for frying; you can also use clarified butter for a richer crust.
Tips to avoid a soggy crust and common mistakes

Tips:

  • Pat the chicken dry before breading to help the crust adhere.
  • Keep oil hot enough and avoid overcrowding the pan to prevent steaming.
  • Rest the breaded chicken for a few minutes before cooking to help the crust set.
  • Mix breadcrumbs with Parmesan for extra flavor and crunch.
  • If baking, place on a rack so air can circulate and the crust stays crisp.
Can I make ahead or freeze?

You can bread the chicken and refrigerate for up to 24 hours before cooking. You can also freeze raw breaded cutlets for up to 1 month; thaw before cooking. Do not freeze after cooking as texture may be affected.

Introduction / Hook

Imagine biting into a cloud—one that feels gentle on the tongue yet undeniably luxurious in taste. Fluffy Japanese Cotton Cheesecake Cupcakes are a masterclass in restraint and elegance: a delicate balance of lightness and richness that somehow feels both everyday-friendly and utterly special. The cupcake-sized version of a classic Japanese soufflé cheesecake, these little wonders rise like pillows of vanilla-tinged air, with a subtle tang that awakens the palate without overpowering it. The moment you slip one from the tray, a faint citrus-y aroma teases your senses, and the surface yields to reveal a springy, cloud-soft interior. They’re not just desserts; they’re a mood lifted into a bite, a reminder that sophistication can arrive in the most approachable, cup-sized form.

In the kitchen, these cupcakes invite a quiet focus: gentle folding rather than aggressive stirring, patience as the batter expands in a warm oven, and the slow magic of a baked cloud taking shape. They’re perfect for a weekend bake that doubles as a centerpiece for a tea party, a low-key celebration, or a thoughtful gift to someone who deserves something airy and tender. The texture is what people remember—an almost souffle-like interior with a custardy, creamy center that lingers on the tongue. The flavor is bright and comforting at once: a whisper of vanilla, a delicate tang, and a finish that feels both indulgent and refreshing. This is the kind of treat that makes ordinary afternoons feel like a small, celebratory ritual.

The Story Behind the Dish

Cotton cheesecake, as it’s affectionately called in many kitchens, traces its charm to the culinary fascination with airy, cloud-like desserts. In Japan, where precision meets playfulness in pastry, bakers sought a texture that was at once elegant and approachable—a cake that rose high, was impossibly soft, and carried a sweetness that felt light as air. The Cotton Cheesecake became a beloved bridge between the soft, wobbly texture of a soufflé and the comforting familiarity of a traditional cheesecake. The result is a dessert that looks ethereal yet behaves with the reliability of a well-made cupcake. Its success lies in a careful balance: the batter must be bright and wavy with air, yet stable enough to support a gentle rise without collapsing into a dense crumb. When baked properly, the cake separates into a tender interior and a wafer-thin crust that crackles ever so slightly, creating a symphony of textures in every bite.

The “cupcake” adaptation is a modern, accessible twist on a classic. By portioning the batter into individual cups, you invite a neat portion control without sacrificing the signature airy texture. It’s a playful homage to street-side cafés and refined patisseries alike, where the aroma of vanilla and a hint of citrus dances through the kitchen. As a story about technique, the Cotton Cheesecake honors patience and respect for the batter: the air you fold in, the gentleness with which you bake, and the careful post-bake handling that keeps the cloud intact. For many families and bakeries, this dessert became a gentle signature—something that looks delicate, tastes luxurious, and feels approachable enough to share with friends, neighbors, and loved ones.

Beyond the kitchen, this dish has traveled through generations of home cooks who treasured the idea that dessert can be light as a feather yet deeply satisfying. The cupcakes become a canvas for small personal touches—a drizzle of something fragrant, a dusting of sugar, or a pairing that elevates the overall experience. The tradition of crafting something so airy also echoes a broader culinary conversation: how to achieve indulgence without heaviness, how to savor sweetness with restraint, and how to transform humble ingredients into something memorable through technique and care.

Why You’ll Love This Recipe

  • Ultra-light, cloud-like texture that feels luxurious yet surprisingly gentle on the palate.
  • Cupcake form makes serving effortless and elegant, ideal for gatherings, picnics, or gifting.
  • Balanced sweetness with a subtle tang and a whisper of vanilla, so flavors feel refined rather than cloying.
  • Impressive presentation: the pale, flawless domes and delicate cracks convey artistry with minimal effort.
  • Adaptable to different occasions and diets, offering a delightful base for creative twists.
  • Minimal equipment and a forgiving batter when treated with care—perfect for confident beginners and seasoned bakers alike.
  • Versatile pairing options, from light fruit accents to a sophisticated cup of tea or matcha latte.
  • Make-ahead friendly for entertaining; bake in advance and finish with a finishing touch just before serving.

Flavor Profile & Texture

The flavor profile of these cotton cupcakes is an artful balance. The interior carries a creamy, custard-like richness that dissolves into a delicate, airy crumb. There’s a whisper of vanilla that acts as a warm umbrella for the palate, complemented by a gentle brightness—often a citrus note—that lifts the cake rather than competing with it. The crust offers a light kiss of toasty sweetness, a tiny textural contrast that makes each bite feel dynamic rather than uniform. The overall mouthfeel is soft, almost ethereal, with a resilient tenderness that resists crumbling into dry crumbs. The aroma is inviting long before the first bite, with a perfume of vanilla, a hint of citrus zest, and an almost imperceptible dairy scent that signals comfort and familiarity.

Texture-wise, the hallmark is contrast: a thin, resilient outer shell that holds a cloud-soft center, a crumb that springs back with a gentle bounce, and a moistness that stays with you. This is not a dense cheesecake nor a traditional sponge cake; it’s a hybrid of lightness and creaminess that feels like a confection born from patience and precision. The mouthfeel is buoyant enough to be refreshing, but richly satisfying enough to feel indulgent. The result is a treat that makes people lean in, curious to explore the interplay between air, dairy, and that signature, mellow sweetness that lingers in the finish.

Occasions & Pairings

These cupcakes shine in moments when you want something that’s special without being over-the-top. They’re ideal for weekend gatherings, intimate tea parties, or a delicate dessert after a bright, cheerful lunch. Their refined yet approachable nature makes them a crowd-pleaser at baby showers, bridal showers, and book club meetings alike. Because they’re individually portioned, they’re perfect for potlucks and holiday trays, adding an airy luxury to any spread without the need for slicing or plating drama.

Pairing ideas to elevate the experience include:

  • Light tea teams: green tea, matcha latte, or citrus-infused black tea.
  • Fresh fruit accents: berries, stone fruits, or a simple compote to add a pop of color and brightness.
  • Neutral desserts: a dollop of lightly sweetened whipped cream or a faint drizzle of a simple fruit glaze.
  • Wine or bubbly notes: a sparkling wine or a glass of late-harvest dessert wine to complement the creaminess.

The beauty of this recipe lies in its versatility. You can keep it clean and understated for sophisticated gatherings, or you can introduce playful twists for birthdays and celebrations. An afternoon with a cup of tea becomes a ceremony when these little cakes are part of the spread, inviting conversation, smiles, and a shared appreciation for the lightness of the moment.

Tips, Variations & Substitutions

Vegan & Dairy-Free

Transforming these cupcakes into a vegan or dairy-free version is a delightful experiment that highlights how adaptable airy desserts can be. A vegan approach typically uses plant-based substitutes for creaminess and structure—think dairy-free cream cheese alternatives and a replacement for any dairy-dependent elements with a neutral, plant-based fat. Egg alternatives, often proteins or aquafaba-based foams, are used to replicate the lift that egg whites contribute to the original texture. The aim is to preserve the signature cotton-like interior while maintaining an indulgent, melt-in-your-mouth finish. Expect a slightly different mouthfeel, but one that remains light, bright, and satisfying. The key is to maintain the overall buoyancy of the batter and to handle it with the same gentle touch you’d apply to the traditional version.

Gluten-Free Options

Gluten-free adaptations can be accomplished with the right choice of flours or gluten-free blends that mimic the tenderness of standard batters. A blend of light gluten-free flours, plus a touch of starch to improve tenderness and lift, can help maintain the cloud-like texture. The same principles—gentle folding, careful handling, and stable heat—apply. If you opt for gluten-free, you may notice a slightly different crumb and a very light bite, but the overall experience remains buoyant and refined. Consider pairing gluten-free cupcakes with similar toppings and serving styles to preserve cohesion across a dessert spread.

Flavor Twists & Add-Ins

While the classic version shines with its own name, there are charming ways to personalize these cupcakes without losing their essence. Subtle citrus zest (like lemon or orange) can brighten the profile without overpowering the creaminess. A touch of vanilla bean adds a luxury aroma. For a more sophisticated angle, a light matcha or green tea infusion can introduce an earthy, aromatic note that pairs beautifully with the dairy sweetness. Chocolate lovers can pursue a quiet cocoa swirl inside the batter or a delicate chocolate drizzle on top. If you’d like a fruit-forward version, a swirl of berry purée folded into a portion of the batter creates miniature flavor landscapes within the same cloud-like cake.

Regional Twists

Drawing on regional flavor profiles is a wonderful way to honor tradition while adapting to modern tastes. A hint of yuzu (or lemon-yuzu) can infuse the cake with an unmistakable brightness associated with East Asian citrus. A light drizzle of roasted sesame or a pearly dusting of ground almonds can add texture and aroma without shifting the dessert away from its airy identity. In some cultures, a gentle spice note—like cardamom or a whisper of cinnamon—gives warmth to the finish while maintaining elegance. The key is to stay within the language of “soft, airy, refined” and to let any additions be modest, serving to enhance the cloud rather than overwhelm it.

Storage & Make-Ahead Ideas

One of the great joys of these cupcakes is their ability to be prepared ahead and enjoyed at leisure. Ideally, bake, cool completely, and store in an airtight container to protect the tender crumb from humidity. They keep well for a couple of days at room temperature if kept in a cool, dry place, and refrigeration can extend their life by a little longer; however, chilling may alter the texture slightly, making it feel more dense than ethereal. If you’re planning ahead for a special event, consider baking the cupcakes a day in advance and finishing with any toppings or garnishes just before serving to preserve their buoyant interior. Freezing is possible for longer storage, but for the best texture, freeze them unadorned and defrost gently at room temperature, re-tilting with a light finishing touch to restore the soft, cloud-like surface.

Make-ahead strategies can also involve preparing the batter in stages if you want to ensure peak lift at serving time. For example, you could prepare a purely whipped, airy component and fold it into a softly integrated base closer to the moment of baking. The result remains the same: a tender, air-filled bite that invites a lingering smile. If needed, a brief reheat after refrigeration can help revive some of the fresh-soft feel, but avoid overheating, which can dull the cake’s delicate texture.

Fun Facts & Trivia (Optional)

Hidden in the airy elegance of these cupcakes are a few small facts that delight pastry enthusiasts. The term “cotton” in Cotton Cheesecake evokes the notion of cotton candy-like airiness, but not the sugary sweetness; it’s a playful metaphor for the light, fluffy crumb that seems to melt almost instantly. In Japan, the technique of incorporating air through careful folding and careful baking mirrors the broader culinary philosophy of precision and balance—a nod to how the simplest, most refined desserts can emerge from meticulous technique and patient execution. The cupcake format is a modern homage to street-side café culture, where the combination of portability and beauty makes a dessert feel both intimate and shareable. Finally, many people love these for their photogenic appeal—the pale domes with a delicate surface crack are a favorite subject for food photography, turning a humble kitchen into a little studio of sweetness.

Ingredients

Cotton Cheesecake Batter

    – Cream cheese, softened to room temperature (approx 300 g)
    → The creamy base of the cotton cheesecake; cream cheese provides tang and body. Softened to room temperature ensures it blends into a silky batter without lumps. Beat with sugar until smooth and airy, then fold in yolks to maintain lightness. If the cheese is still cold, warm gently in 5–10 second bursts in the microwave or leave at room temperature for 1–2 hours before mixing.
    – Granulated sugar – 120 g
    → Adds sweetness and helps create a smooth, pale batter when beaten with the cheese. Add sugar gradually to the cheese and yolk mixture to emulsify fat with moisture, preventing graininess. For the silkiest batter, use superfine sugar; avoid overmixing after adding flour to preserve airiness.
    – Egg yolks, large – 5
    → Richness and structure; yolks contribute to a creamy custard-like texture. Whisk yolks with part of the sugar until thick and pale, then whisk into the cheese mixture to ensure smoothness. Temper the yolks with a little of the milk if adding warm liquids to prevent scrambling.
    – Whole milk – 60 ml
    → Adds moisture and helps loosen the batter for a light, airy crumb. Use lukewarm milk to aid emulsification with the cheese and yolks; excessive liquid can weigh the batter, so keep to a small amount.
    – Melted unsalted butter – 60 g
    → Provides richness and tenderness to the crumb. Cool butter to lukewarm before mixing so it doesn’t cook the yolks; fold in after yolk mixture to maintain a smooth emulsion and avoid greasy separation.
    – Lemon juice – 1 tablespoon
    → Brightens the flavor and balances richness with a touch of acidity. Freshly squeezed juice is best; you can add a teaspoon of lemon zest as an optional aroma boost. Ensure to strain to avoid seeds.
    – Vanilla extract – 1 teaspoon
    → Adds depth and fragrance; use pure vanilla for the best aroma. If using a vanilla bean, scrape seeds into the batter or infuse the milk briefly for extra flavor.
    – All-purpose flour – 40 g
    → Provides a delicate structure to help the batter hold its shape in cupcake form. Sift with cornstarch to keep the crumb extra tender and to minimize lumps; do not overmix after combining to preserve light texture.
    – Cornstarch – 15 g
    → Creates the ultra-tender, cloud-like crumb characteristic of cotton cheesecake and helps stabilize the batter. Sift with flour to distribute evenly and prevent lumps; this also helps the cupcakes rise softly rather than collapse.
    – Salt – 1/4 teaspoon
    → Enhances overall flavor by balancing sweetness and acidity. Use fine salt for even distribution; a pinch goes a long way in this delicate batter.

Meringue

    – Egg whites – 5 large
    → The aerating component that gives the cupcakes their signature loft. Whip to stiff, glossy peaks and gently fold into the batter to preserve volume. Bring whites to room temperature before whipping for maximum volume; ensure no yolk contaminates the whites.
    – Cream of tartar – 1/4 teaspoon
    → Stabilizes the whipped whites to prevent collapse during baking. If you don’t have cream of tartar, substitute with 1/2 teaspoon lemon juice or white vinegar; this helps achieve stable, foamy meringue.
    – Granulated sugar – 60 g
    → Sweetens and hardens the meringue structure; add in 2–3 additions while whipping until the meringue becomes glossy and holds stiff peaks. Dissolve sugar completely to avoid gritty texture and ensure fluffy cupcakes.

Optional Toppings

    – Powdered sugar – for dusting
    → Finishing touch that adds a light, elegant look and helps hide minor cracking. Sift lightly over cooled cupcakes just before serving for a pristine appearance.
    – Fresh berries – 1/2 cup
    → Adds color, brightness, and a pleasant tart contrast to the rich cheesecake. Rinse, pat dry, and if using frozen berries, thaw and pat dry to prevent excess moisture; arrange on top or serve on the side.

Instructions

  • Preheat your oven to 350°F (175°C) and line a 12-cup muffin tin with paper liners or grease it well.
    → This ensures the cupcakes release cleanly and the crumb stays tender as it bakes evenly without sticking.
  • If using a water bath, place the prepared muffin tin in a larger, deep baking dish and arrange it on the rack. Fill the outer dish with hot water to come halfway up the sides of the muffin tin.
    → The water bath provides gentle, even heat that helps the cotton cheesecake rise without cracking and keeps the texture ultra-soft.
  • Sift the all-purpose flour (40 g) and cornstarch (15 g) together with the salt (1/4 tsp) into a small bowl and set aside.
    → Sifting distributes dry ingredients evenly, minimizes lumps, and the cornstarch helps create the shatteringly tender crumb characteristic of cotton cheesecake.
  • In a mixer or large bowl, beat the softened cream cheese (300 g) with granulated sugar (120 g) on medium speed until completely smooth and airy, about 2–3 minutes. Scrape the bowl, then continue beating until light and fluffy.
    → Beating until smooth and airy prevents a grainy texture and ensures the batter will emulsify with the other liquids for a cloud-like rise.
  • Whisk in the egg yolks (5 large) one at a time, allowing each yolk to fully incorporate before adding the next, then whisk in the lemon juice (1 tablespoon) and vanilla extract (1 teaspoon).
    → Adding yolks one by one builds a stable emulsion; lemon juice adds brightness and helps balance richness, while vanilla deepens aroma.
  • Warm the whole milk (60 ml) to lukewarm, then whisk it in gradually with the melted unsalted butter (60 g) that has cooled to lukewarm.
    → Lukewarm liquid aids emulsification with the cheese base; cool butter prevents partial scrambling of yolks and keeps the emulsion silky.
  • Stir in the sifted dry ingredients (flour and cornstarch mixture) in two or three additions, folding just until the batter is smooth and uniform; avoid overmixing to preserve air.
    → Gentle folding maintains the batter’s aeration so the cupcakes stay light after baking.
  • In a separate clean bowl, whip the egg whites (5 large) with cream of tartar (1/4 teaspoon) on medium speed until foamy, then gradually add granulated sugar (60 g) in 2–3 additions and continue whipping to stiff, glossy peaks.
    → Proper meringue stability locks in volume; room-temperature whites whip to maximum volume and the sugar helps form a crisp, glassy structure that folds into the batter without deflating.
  • Gently fold one third of the meringue into the cheese batter to lighten it, then fold in the remaining two additions in a careful, under-and-over motion until no white streaks remain.
    → This technique preserves trapped air that gives the cupcakes their signature cotton-like crumb while evenly distributing the meringue for uniform rise.
  • Spoon or pipe the batter into the prepared muffin cups, filling each about two thirds to three quarters full to leave room for expansion.
    → Filling to the right level prevents overflow and ensures a domed, uniform top without cracking.
  • Bake in the preheated oven (350°F / 175°C) for 18–22 minutes, or until the centers are set and the tops are pale with a slight wobble; to prevent cracking, do not open the oven too early.
    → The gentlest heat and minimal disturbance maintain the delicate structure; a slight jiggle indicates a custardy center without being underdone.
  • Turn off the oven and leave the cupcakes inside with the door ajar for 8–10 minutes to gradually finish cooking and set, then remove and cool on a wire rack completely.
    → Gradual cooling helps prevent sudden contraction that would crack the surface and tear the delicate crumb.
  • Dust cooled cupcakes with powdered sugar and garnish with fresh berries if desired, arranging berries on top or serve on the side for a bright contrast; keep refrigerated until serving.
    → A light dusting elevates presentation and adds a thin barrier to moisture, while berries provide color and tart balance that complements the cheesecake flavor.

Notes

These fluffy Japanese Cotton Cheesecake Cupcakes are light, cloud-like treats formed by folding a silky cream cheese batter with a glossy meringue to create a delicate, souffle-inspired crumb. Using room-temperature ingredients and gentle folding helps maximize height and tenderness. For extra lift and stability, whip the meringue until stiff, then fold into the batter in three additions, taking care to maintain volume.

  • Bring cream cheese, eggs, milk, and butter to room temperature (approx 20–25°C) before mixing to ensure a smooth, cohesive batter with no lumps.
  • Beat the cream cheese with sugar until completely smooth and airy, then whisk in egg yolks with the milk, melted butter (cool to lukewarm), lemon juice, and vanilla until evenly combined. For extra brightness, you can fold in lemon zest as an aroma boost.
  • Sift the flour with the cornstarch and salt; fold lightly into the cheese mixture to give just enough structure without deflating the batter.
  • Whip the egg whites with cream of tartar until stiff, glossy peaks, then gradually add granulated sugar in 2–3 additions until the meringue is smooth and stable.
  • Gently fold the meringue into the cheese batter in three additions, using quick, folding motions to preserve air and softness.
  • Fill muffin cups 3/4 full. For moisture and even rise, bake with a light water bath by placing the muffin tin in a larger pan of hot water, or omit the bath if your oven runs humid and you prefer a crisper top.
  • Bake at a low temperature around 150–160°C (300–320°F) until the centers set and the tops are lightly golden, then cool gradually in the pan to avoid sudden shrinkage.
  • Let cool completely before dusting with powdered sugar or topping with fresh berries for color and a contrast of acidity.
  • Store leftovers in an airtight container in the refrigerator for 2–3 days; bring to room temperature before serving for the best texture. The cupcakes can be gently reheated for a few seconds to revive creaminess.

Optional gluten-free adaptation: Substitute the all-purpose flour with a 1:1 gluten-free baking blend and add 1/2 teaspoon xanthan gum per cup of flour to maintain structure. Fresh lemon juice is preferred; strain to remove seeds.

Tips

Tips for Fluffy Cotton Cheesecake Cupcakes

Preparation and ingredient readiness

Cheesecake batter technique

Meringue technique

Baking, assembly, and the water bath

  • Fill cupcake liners about 2/3 full to leave room for a gentle rise without overflow.
  • To keep the texture ultra-tender, bake the cupcakes in a water bath: place the filled muffin tin inside a larger roasting pan, then pour hot water into the outer pan halfway up the sides of the muffin tin.
  • Double-check that the cupcake tin is well-sealed from the water (wrap the outer pan with foil if needed) and bake at 150–160°C (300–320°F) for about 50–60 minutes, or until the tops are pale and the centers feel set with a gentle jiggle.
  • Turn off the oven and leave the cupcakes inside with the door slightly ajar for 1–2 hours to cool gradually and prevent cracking. Then refrigerate (preferably overnight) to firm the interior and intensify flavor.
  • If cracks appear, dust with powdered sugar or garnish with fresh berries to camouflage and enjoy the characteristic cotton-soft texture.

Cooling, serving, and storage

  • Allow cupcakes to cool completely before removing liners to prevent breakage. Chill to set the delicate crumb.
  • Store in an airtight container in the refrigerator. Bring to room temperature for 15–20 minutes before serving for best flavor and texture; best consumed within 2–3 days.
  • Just before serving, dust with a light shower of powdered sugar and/or top with fresh berries for color and a bright contrast to the creamy interior.

FAQ

What makes Japanese Cotton Cheesecake Cupcakes different from regular cheesecake?

They are lighter and fluffier, with a soufflé-like texture. The batter folds whipped egg whites into a cream cheese base, giving a delicate rise. They are typically baked at a lower temperature in a water bath to stay moist and prevent cracking, and they are sized as cupcakes rather than a single large cheesecake.

What ingredients are typically used?

Common ingredients include cream cheese, sugar, eggs, a splash of milk or cream, melted butter, vanilla, and a small amount of flour or cornstarch to stabilize. Optional additions include lemon zest or juice for brightness. For dairy-free or gluten-free versions, swap with dairy-free cream cheese, plant-based milk, and gluten-free flours as needed.

Do I need a water bath, and how do I set it up?

Yes, a water bath helps maintain moisture and prevents cracking. Place the filled muffin tins in a larger baking pan, then pour hot water into the outer pan until it reaches about halfway up the sides of the muffin cups. Bake as directed, then remove the water bath and cool gradually in the oven or at room temperature.

How can I prevent cracks or a sunken center?

Tips: use room-temperature ingredients, gently fold the whipped whites into the cheese batter, and avoid overmixing. Bake at a lower temperature with a water bath, and do not open the oven door during the first 20–25 minutes. Fill cups about 2/3 full and allow them to cool gradually in the oven with the door slightly ajar before removing.

What pan size and filling amount should I use?

Use a standard 12-cup muffin tin or mini muffin tin. Fill each cup about 2/3 full to give space for rising. Baking times vary: cupcakes may take roughly 18–22 minutes (larger cups) or 12–15 minutes (mini cups); watch for a pale top and a soft jiggle in the center.

Can I make a dairy-free or gluten-free version?

Yes, with adjustments. For dairy-free, substitute cream cheese, butter, and milk with dairy-free alternatives. For gluten-free, use gluten-free flour or cornstarch as a stabilizer. Note that texture and rise can vary with substitutions, so you may need to tweak amounts or mixing times.

How should I store and serve leftovers?

Store leftovers in an airtight container in the refrigerator for up to 3–4 days. Bring to room temperature for about 15–20 minutes before serving for best texture and aroma. They’re lovely with fresh berries or a light dusting of powdered sugar.

Can I freeze these cupcakes?

Yes. Freeze cooled cupcakes wrapped well in plastic wrap and then foil. They keep well for 1–2 months. Thaw in the refrigerator or at room temperature, and re-warm gently if desired. Frosting can be added after thawing if preferred.

Common troubleshooting: my cupcakes sank, cracked, or browned too fast — what went wrong?

Sinking often means underbaking or chilling too soon after baking. Cracking can be caused by too-high oven heat or not using a water bath; keep heat gentle and use a water bath. Excess browning usually means the oven is running hot; consider lowering the temperature by about 25°F (14°C) or tenting lightly with foil if the tops brown too quickly.

What flavors or toppings work well with these cupcakes?

Enhance aroma with vanilla, lemon zest, or a touch of almond extract. For variation, mix in matcha powder for a green-tea twist or cocoa for a chocolate version. Top with fresh berries, a light glaze, whipped cream, or a small dollop of lemon curd. A dusting of powdered sugar also adds a simple finish.

Introduction / Hook

Close your eyes and imagine the hush of a shoreline at golden hour—the air scented with salt, a caress of sea breeze, and the soft clink of a spoon against a warm, porcelain bowl. This lobster bisque is your invitation to that moment, condensed into a spoonful of velvet richness. It’s not just a soup; it’s an experience that feels indulgent without demanding extravagance. The first sip carries the sweet, briny kiss of lobster, a whisper of dairy that smooths every edge, and a gentle, lingering warmth that seems to echo the glow of a sunset on calm water. It’s the kind of dish that tastes like a memory you’ve been saving for a special occasion—even if that occasion is simply Tuesday night when you deserve a little celebration.

What makes this lobster bisque truly special is its balance. It isn’t loud or boisterous; it speaks softly in layers. There’s depth from carefully coaxed shell flavors, a touch of sweetness that comes from caramelized aromatics, and a creamy silk that never veers toward heaviness. It’s a dish that teaches you to trust patience: the more you let the flavors mingle, the more they reveal themselves. The aroma when you lift the lid is enough to make you pause—an aromatic chorus of the sea, roasted undertones, and a hint of brightness that hints at a citrus or herb finish. And when you finally taste it, the texture glides across the tongue—luxuriously smooth, with a subtle bite of delicate seafood sweetness that lingers like a fond memory.

In the pages that follow, you’ll discover a recipe that respects tradition while welcoming modern convenience. It’s a dish that rewards careful technique without requiring a culinary degree. It invites you to savor every step—from a gentle simmer that unlocks hidden flavors to a final, elegant finish that makes the entire kitchen feel like a small, celebratory dining room. If you’ve ever wanted to serve something that feels both sophisticated and comforting, this lobster bisque is your gateway. It’s the kind of dish you’ll want to share, the kind that becomes a family favorite, a dish you’ll crave on chilly evenings, and a dish that invites your guests to linger, spoons in hand, long after the last mouthful has disappeared.

The Story Behind the Dish

Lobster bisque sits at a crossroads of maritime history and French culinary artistry. The term “bisque” itself has roots in the maritime ports of Brittany and the Atlantic coast, where fishermen learned to coax every possible flavor from humble catch. In traditional versions, the shells—once discarded as waste—were simmered to extract a rich stock, then reduced to concentrate the essence of the sea. This practice gave birth to a technique that feels almost magical: transform discarded shells into a treasure, turning scarcity into luxury. The bisque, then, is a triumph of transformation, a celebration of resourcefulness, and a reminder that even in the kitchen, the sea provides when you know how to listen.

There is a romantic thread in the dish’s journey as well. In coastal communities, seafood was not only sustenance but a shared ritual—frequently prepared for celebrations, visitors, and family gatherings. A pot that breathes with the coastal breeze, simmering on a stove as gulls wheel above, becomes a storyteller. The bisque, with its silky finish and deeper notes from roasted vegetables and aromatics, captures that sense of place. It’s a story of shells carefully opened, of patience in reducing a stock to its most concentrated form, and of a final flourish that turns humble seafood into something that feels ceremonial.

Over time, chefs across regions embraced the bisque’s elegance, but they also brought their own sensibilities to it. Some leaned into brighter acidity with a touch of citrus or tomato for brightness; others preferred a purer, creamer profile, relying on dairy to blanket the richness and mellow the oceanic notes. The beauty of lobster bisque lies in its flexibility: the core idea remains simple—build depth from the sea, refine the texture until it glides on the palate, and finish with a whisper of brightness that keeps the dish from tipping into heaviness. This particular rendition honors that lineage while offering a warm, accessible approach that home cooks can master with patience and attention.

And there’s a small, almost serendipitous beauty to the act of making it. The shells, once a practical byproduct, become the custodians of flavor. The slow simmer, the careful straining, the way the aromas fill the kitchen with salty sweetness and faint roasty notes—these elements turn cooking into an intimate, almost cinematic moment. The bisque invites you to pause, to savor the process, and to acknowledge that great seafood cuisine is as much about the journey as the destination: a pot, a spoon, a kitchen filled with scent, and a table set for those you love most.

Why You’ll Love This Recipe

  • Luxurious texture without heaviness: a silky, spoonable richness that feels indulgent yet balanced.
  • Deep, layered flavor: shell-derived savor, a hint of aromatics, and a subtle, refined finish that lingers.
  • Elegant but approachable: a dish that makes everyday dinners feel festive without requiring formal training.
  • Perfect for special occasions or weeknights: it adapts to both intimate dinners and larger gatherings with ease.
  • Flexible and forgiving: small adjustments in technique or finishing touches allow for personalization while preserving the core character.
  • Aromatic and comforting: the warm aroma alone conjures memories of coastal markets and family meals.
  • Beautifully presentable: the pale, rose-gold hue and smooth surface invite admiration and conversation at the table.

Flavor Profile & Texture

The fundamental allure of lobster bisque is the sense of contrast that unfolds with every spoonful. At its core you’ll encounter a mellow sweetness from the sea, a refined saline note that speaks of fresh coastal waters, and a linen-soft creaminess that coats the mouth without clinging. The lobster itself contributes delicate sweetness and a subtle brine, while the most careful preparation extracts a deeper, more contemplative background—a mineral backbone that anchors the dish. The shell-based reduction lends a distant, hushed complexity: roasted undertones, faint caramelization, and a whisper of earthiness that makes it not just a soup, but a narrative of flavors.

Texture-wise, this bisque is all about balance. It glides smoothly across the tongue, offering a velvety mouthfeel that remains audibly light, never heavy. There is a gentle body to it, achieved by a refined emulsification that keeps fat from becoming greasy. A touch of acidity or brightness at the finish can lift the final note, so the palate ends with a crisp, clean impression rather than a lingering heaviness. The aromatics—the quiet warmth of alliums, the gentle perfume of herbs, the faint tang of citrus—work in concert to evoke the sea’s personality without overpowering the seafood itself.

In practice, the flavor journey unfolds in stages. First, the aroma opens with the sea’s whisper, balanced by the mild sweetness of roasted aromatics. As the bisque warms, you perceive the stock’s depth—a chorus of savory, mineral flavors that have been coaxed from the shells until they sing. Then, the dairy component rounds the edges, lending a satin character that makes the soup feel like a luxurious blanket rather than a brittle cheese-and-salt bite. Finally, a curated finish introduces a spark—whether from a splash of spirit, a citrus kiss, or a delicate herb note—that ensures the dish stays bright and inviting from first bite to last.

Occasions & Pairings

This lobster bisque shines in moments that call for something a touch more refined. It’s perfect for holiday meals that deserve an upfront impression, intimate dinners that deserve a standing ovation, or any occasion that benefits from a sense of maritime grandeur. The dish pairs beautifully with a crisp white wine, especially one that mirrors the seafood-forward character with a bright acidity. A light herbaceous cushion or a citrus-forward note in the wine works particularly well, as it complements the dish’s brightness without clashing with its creamier, richer core.

Pairing ideas to consider:

  • Accompaniments: a thin, toasted baguette or a few crisp crostini spread with a mellow topping that doesn’t overwhelm the bisque’s delicacy.
  • Side dishes: a simple green salad with a lemony vinaigrette or roasted vegetables that offer a gentle sweetness to contrast the soup’s richness.
  • Drinks: a dry sparkling wine or a chilled white with subtle mineral notes; for non-alcoholic options, a citrusy sparkling beverage with a clean finish works well.
  • Dessert: something light and citrusy, such as a lemon sorbet or a delicate vanilla-infused pastry, to close the meal without competing with the memory of the sea.

Tips, Variations & Substitutions

Tips for Best Results

Even though this is a refined dish, approachable techniques help you achieve a consistently luxurious result. Pay attention to temperature control as you reheat and finish the bisque to preserve the delicate texture. If you’re simmering a stock or a base, keep the heat low and steady to avoid breaking emulsions. When you strain, do it slowly and purposefully to preserve the smooth texture and remove any small particles that might disrupt the creamy surface. A gentle hand with seasoning—tasting as you go and adjusting for balance before serving—will reward you with a more harmonious final plate.

Variations

There are many ways to tailor this dish to your preferences or to reflect regional flavors, while keeping the essence of a refined lobster bisque. Consider these directions, all of which maintain the dish’s core character without veering into complexity:

  • Seafood-forward refinement: emphasize the lobster’s natural sweetness by limiting aggressive ingredients and letting the oceanic notes stand at the forefront.
  • Brighter finish: finish with a touch of citrus or a bright herb finish to lift the palate and offer a modern contrast to the creaminess.
  • Woodsy depth: introduce a hint of smoke or a roasted component to add a subtle, comforting dimension that pairs well with white wine.
  • Make it lighter: for a lighter version, reduce dairy slightly and emphasize a clearer stock for a cleaner, more bouillon-like finish.
  • Make it vegan or dairy-free: use a plant-based cream substitute and a robust vegetable or mushroom-based stock, ensuring the texture remains silk-like with emulsification methods that preserve body.
  • Gluten-free by design: ensure any thickeners or additions are gluten-free, particularly if you’re using pre-made stocks or mixes—stick to naturally compatible ingredients and you’ll maintain texture and flavor.
  • Regional twists: add a whisper of fennel, saffron, or smoked paprika to evoke a coastal market in different locales, always balancing the intensity so the lobster remains the star.

Substitutions & Accessibility

If certain ingredients aren’t on hand, there are graceful stand-ins that preserve the essence. A well-made stock with robust flavor can stand in for more elaborate reductions, while a gentle dash of cream can substitute for a richer dairy addition. For substitutions, focus on maintaining balance: swap any component in ways that do not overwhelm the delicate sweetness of the lobster and the mellow dairy finish. The beauty of this dish is that it rewards thoughtful improvisation while still delivering a cohesive, sophisticated end result.

Storage & Make-Ahead Ideas

The bisque behaves well with some make-ahead planning. You can prepare the flavorful base in advance and finish the dish when you’re ready to serve, which is especially helpful for entertaining. If you’re refrigerating leftovers, store in airtight containers for up to 3 days. Reheat gently over low heat, stirring frequently to prevent scorching and to preserve the silkiness. If you’d like to freeze the dish, note that dairy can change texture when frozen and thawed; for best results, freeze the stock or base separately and re-create the final texture and balance upon reheating with a small additional amount of dairy if needed. A quick re-emulsification by whisking or a gentle blitz with an immersion blender can bring back the creamy, seamless texture.

Make-ahead suggestions that maintain quality:

  • Prepare the seafood stock or shell-based reduction a day ahead and refrigerate; reheat slowly and proceed with the finishing steps when ready.
  • Have ready a fresh garnish or bright finishing element to add just before serving to preserve color and aroma.
  • Scale up for a dinner party by preparing base flavors in larger batches and finishing in smaller portions to ensure texture remains optimal at service time.

Fun Facts & Trivia (Optional)

– The word bisque is believed to come from the French word “bis cuites,” meaning twice-cooked, referring to the long method of extracting maximum flavor from seafood shells.

– Lobsters have long fascinated cooks because their flavor scales up with age and size, and the method of building flavor from shells highlights a clever approach to turning what might seem like waste into something luxurious.

– In some coastal traditions, bisques are served with a light touch of citrus zest or a delicate herb oil that adds aromatic complexity right at the moment of tasting, making the finish feel freshly lifted rather than heavy.

– The bisque technique showcases the elegance of emulsification: a careful marriage of stock and cream, yielding a surface that remains smooth and inviting even as flavors deepen. This is a classic example of how science and artistry meet in the kitchen to create something that tastes effortless yet is built on precise technique.

– While the seafood industry evolves, the appeal of well-prepared bisque endures as a symbol of hospitality and refined taste—proof that good cooking can feel timeless, even as trends change.

Ingredients

  • Lobster Bisque Base
      – 2-3 lobster tails and/or lobster bodies (about 2 lb total), cooked and peeled, shells reserved for stock
      → These shells are simmered to extract gelatin and deep seafood flavor that form the backbone of the classic bisque. Keep the meat for finishing (chopped into bite-sized pieces later). If you only have meat, you can supplement with store-bought lobster stock, but shells deliver the richest, traditional texture and aroma.
      – 2 tablespoons unsalted butter
      → Butter provides the fat necessary to sauté aromatics and to form a smooth roux with the flour. Use unsalted butter so you can control the final salt level. Do not let it burn; keep the heat medium so it glazes the vegetables without browning.
      – 1 tablespoon olive oil
      → Olive oil raises the smoke point of the butter and adds a fruity note that complements seafood. Heat until shimmering before adding aromatics to prevent the butter from scorching.
      – 1 medium onion, finely chopped
      → Onions give natural sweetness and depth to the base. Finely dicing ensures a silky texture after puréeing. Sauté until translucent and soft, not browned, to keep the bisque bright.
      – 1 celery stalk, finely chopped
      → Provides a gentle, herbaceous counterpoint to the sweetness of the onion. Finely chop so it blends smoothly into the final soup rather than delivering crunch.
      – 1 carrot, finely chopped
      → Contributes natural sweetness and color; cut small so it breaks down evenly during simmering and contributes to the body of the bisque.
      – 2 garlic cloves, minced
      → Adds a sharp, aromatic bite that enhances the shellfish flavor. Mince finely and add after onions begin to soften; garlic can become bitter if burned, so keep heat moderate and stir frequently.
      – 2 tablespoons tomato paste
      → Deepens color and rounds out sweetness, creating a richer flavor profile. Cook the paste with the aromatics for 1–2 minutes to caramelize its sugars and reduce sharp acidity.
      – 1/2 cup cognac or brandy (optional for flambé)
      → De-glazes the pan, lifting browned bits and imparting a luxurious, fruity aroma. If you’re comfortable, flambé to burn off alcohol and intensify flavor; otherwise, simply let it simmer a few minutes to reduce and concentrate.
      – 1 cup dry white wine
      → Provides acidity and brightness that balance the seafood sweetness. Choose a dry, reputable wine and reduce by about half to intensify flavors before adding stock.
      – 4 cups lobster stock (or high-quality seafood stock)
      → The primary liquid and flavor carrier. If using homemade stock, the gelatin from shells will help give the bisque its luscious body; store-bought stock should be concentrated or reduced slightly to mimic that body.
      – 1 teaspoon dried thyme or 1 tablespoon fresh thyme leaves
      → Thyme threads a subtle, earthy note through the seafood. Use fresh thyme if possible; add dried thyme early in the simmering so its flavor melds with the base, and fish out the sprigs before puréeing.
      – 1 bay leaf
      → Promotes a gentle, herbal aroma that complements the shellfish. Remove before puréeing to avoid a sharp or resinous aftertaste.
      – 1/4 teaspoon cayenne pepper or white pepper
      → Light heat to enhance flavor complexity without overpowering the delicate lobster. Start with a small amount and adjust to taste after the rest of the ingredients have simmered.
      – 2 tablespoons all-purpose flour
      → Used to create a light roux with the butter, giving the bisque body and a smooth texture after puréeing. Whisk in and cook briefly to remove raw flour flavor, aiming for a pale blond color.
      – Salt to taste
      → Salt levels will depend on the stock you’re using; season gradually after the bisque has reduced and the flavors have melded. Remember that lobster stock often carries salt, so add sparingly and adjust at the end.
  • Cream, Thickener, and Finish
      – 1/2 cup heavy cream
      → Adds luxurious richness and a velvety mouthfeel. Temper it by whisking in a little hot stock before adding to the pot to prevent curdling; avoid boiling vigorously after adding to preserve the creaminess.
      – 1-2 tablespoons lemon juice
      → Brightens the soup and cuts the richness, balancing the sweetness of the seafood. Add gradually, tasting after each addition, until you reach a clean, fresh tang without sourness.
      – Salt and white pepper to taste
      → Fine-tuning after cream addition is essential since dairy can dull flavors. White pepper gives a subtle heat without visible specks in the pale bisque.
      – 1/2 cup chopped lobster meat (optional)
      → If you reserved meat from the initial shelling, fold in at the end for tender bites and to showcase the lobster flavor. Chop into bite-sized pieces so they distribute evenly and don’t overwhelm the soup’s texture.
      – Fresh parsley or chives for garnish (optional)
      → Finishing herbs add a pop of color and a fresh aroma. Slice thinly and sprinkle just before serving to preserve brightness; they also offer a clean contrast to the soup’s richness.
  • Garnish and Serve
      – Lemon wedges for serving (optional)
      → A bright squeeze at the table enhances the overall flavor and pairs beautifully with seafood. Serve with a small wedge on the side for guests to adjust brightness to taste.

Instructions

  • Warm a heavy-bottom pot over medium heat and melt 2 tablespoons unsalted butter with 1 tablespoon olive oil until the butter foams and just begins to shimmer.
    → This fat pairing prevents the butter from burning while creating a glossy, flavorful base for sweating the aromatics.
  • Sauté the finely chopped onion, celery, and carrot in the butter–oil mixture until they are translucent and soft, about 5–7 minutes, stirring occasionally to promote even cooking without browning.
    → Sweating these vegetables draws out their sweetness and builds a smooth sweetness foundation; avoid browning to keep the bisque bright and clean.
  • Add 2 minced garlic cloves and 2 tablespoons tomato paste; continue sautéing for 1–2 minutes, stirring constantly until the paste deepens in color and becomes fragrant.
    → Tomato paste concentrates umami and colors the base; cooking removes raw sharpness and integrates flavors evenly.
  • If using cognac or brandy, pour in 1/2 cup and flambé carefully, or reduce gently by simmering 2–3 minutes to burn off alcohol while concentrating the aromatics.
    → Flambéing dissolves browned fond and elevates the aroma with a subtle sweetness; if not flambéing, simmer briefly to reduce and intensify flavor.
  • Ahurst: Deglaze with 1 cup dry white wine, increasing heat to medium-high and simmering until reduced by about half, 4–6 minutes.
    → Reduction concentrates acidity and bright fruit notes that balance the shellfish sweetness.
  • Stir in 4 cups lobster stock and add 1 teaspoon dried thyme (or 1 tablespoon fresh thyme leaves) along with 1 bay leaf; bring to a gentle simmer.
    → Thyme and bay leaf introduce herbal depth; simmering helps these aromatics meld with the shellfish flavors without becoming overpowering.
  • Sprinkle 2 tablespoons all-purpose flour evenly over the simmering mixture and whisk vigorously to form a light roux; cook 2–3 minutes to remove raw flour taste and achieve a pale blond color.
    → The roux provides body and helps the bisque attain a luxurious, silky texture once fully combined with liquid.
  • Gradually whisk in the remaining stock (if any) or continue whisking the 4 cups of lobster stock already in the pot to ensure a smooth, lump-free consistency; maintain a gentle simmer as the mixture thickens slightly.
    → Slow incorporation prevents lumps and ensures the roux fully emulsifies, delivering a refined mouthfeel.
  • Maintain a gentle simmer for 20–30 minutes, skimming any foam, and keep the heat steady to avoid boiling which can dull flavors and create a grainy texture.
    → Slow simmer extracts gelatin from shells (if stock is homemade) and allows flavors to meld into a cohesive bisque.
  • Remove the bay leaf and any thyme stems; if using fresh thyme leaves, discard the stems and leave the leaves behind for a clean herbal finish.
    → Removing the aromatics prevents resinous or bitter notes from overpowering the delicate lobster flavor.
  • Use an immersion blender to puree the bisque directly in the pot until completely smooth and velvety, or carefully transfer to a blender in batches and blend on high, venting steam as needed.
    → A smooth texture is essential for a classic bisque; blending breaks down vegetables and any small shell fragments for a restaurant-grade satin finish.
  • Optional: Pass the pureed bisque through a fine-mesh sieve into a clean pot to remove any remaining fibrous bits for an ultra-silky finish.
    → Sieving guarantees the most refined texture, especially useful if any shell particles or tough fibers passed through the blender.
  • Stir in 1/2 cup heavy cream and warm the bisque over low heat until just heated through; do not allow it to boil vigorously to prevent curdling.
    → Cream enriches the texture and adds luscious mouthfeel; tempering with a small amount of hot bisque before adding helps prevent curdling.
  • Gradually add 1–2 tablespoons lemon juice, tasting after each addition, and season with salt and white pepper until the flavor is balanced and bright.
    → A touch of acidity lifts the richness, brightening the overall profile; adjust salt carefully since the stock may already contain salt.
  • Fold in 1/2 cup chopped lobster meat and heat just until warmed through, about 1–2 minutes; avoid overcooking the meat to keep it tender and succulent.
    → The reserved lobster meat delivers textural contrast and prominent aroma without turning firm or rubbery.
  • Ladle the bisque into warmed bowls, garnish with finely chopped fresh parsley or chives, and serve with lemon wedges on the side for guests to adjust brightness.
    → Fresh herbs provide color and a lift of aroma; a lemon wedge lets each diner tailor the brightness to their liking and complements the seafood.

Notes

This lobster bisque is a luxurious, silky soup built on a deeply flavored stock and a pale roux, finished with cream and tender lobster meat. For maximum depth, simmer the reserved lobster shells with the aromatics to extract gelatin and shellfish aroma, then strain; the meat can be chopped and reserved to fold in at the end. Sauté the onion, celery, and carrot in butter and olive oil over medium heat until translucent but not browned, then stir in garlic and tomato paste and cook briefly to deepen color and sweetness. If you choose to flambé the cognac or brandy, do it safely after the aromatics have released their fragrance to lift the pan and caramelize the sugars; otherwise let it simmer to reduce and concentrate. Add the white wine and reduce by about half before adding your stock to maintain bright acidity that balances the seafood sweetness. Whisk in the flour with the fat to make a smooth roux; cook it long enough to lose the raw flour taste but keep a pale blond color so the bisque stays light and refined. Add the stock, thyme, bay leaf, cayenne, salt, and pepper, then simmer gently until the flavors meld and the vegetables are tender. For the smoothest texture, blend the soup and pass it through a fine sieve or chinois; return to the pot and stir in the cream and lemon juice, warming gently without boiling to prevent curdling. Fold in chopped lobster meat at the end so it stays tender, and garnish with chopped parsley or chives. Taste and adjust salt, finishing with a touch more lemon juice if you like a brighter finish. If you prefer a gluten-free version, substitute cornstarch or a gluten-free flour for the roux and whisk in slowly to avoid lumps. Make-ahead tip: prepare the stock and base, then refrigerate up to 1 day or freeze up to 1 month; reheat gently, add cream and lobster meat just before serving. Leftovers refrigerate 2–3 days and can be gently reheated, adding a splash of stock if needed to restore body.

Tips

Tips for Lobster Bisque

  • Maximize shell flavor: simmer the shells with the aromatics to extract gelatin and depth; if you have time, roast the shells lightly before simmering to deepen color and richness.
  • Skim fat for a glossy bisque: after simmering, chill the stock and remove the fat layer for a cleaner, lighter finish. A fat separator also helps.
  • Aromatics technique: sweat the onions, celery, and carrot until translucent rather than browning; garlic should be added after the aromatics soften to prevent bitterness.
  • Build depth with tomato paste: cook the tomato paste with the aromatics for 1–2 minutes to caramelize its sugars and mellow acidity.
  • Alcohol handling: if flambéing with cognac or brandy, do it safely with a long lighter and away from flammable objects; otherwise simmer to reduce and concentrate flavor.
  • Wine reduction: use a dry white wine and simmer until reduced by about half to intensify acidity and aroma before adding stock.
  • Roux technique: whisk in flour to make a light roux and cook briefly until pale blond; this prevents raw flour taste and keeps the bisque silky.
  • Prevent lumps: sprinkle flour gradually while whisking; if lumps form, blend briefly or strain after cooking before adding cream.
  • Seasoning: salt levels depend on your stock; taste the bisque after reduction and before finishing with cream, then adjust gradually to avoid oversalting.
  • Strain for silkiness: strain the bisque through a fine-mesh sieve or chinois to remove solids and achieve a velvety texture; press solids gently to extract more flavor without grit.
  • Finish with lobster meat: fold in the reserved lobster meat at the end so it stays tender; cut into bite-sized pieces for even distribution.
  • Cream handling: temper the cream by whisking in hot stock before returning to the pot; avoid boiling after adding dairy to prevent curdling.
  • Texture control: for extra body, blend 1/2 of the soup and then reincorporate, or use an immersion blender in short bursts to emulsify without breaking the stock.
  • Brighten and balance: add lemon juice gradually, tasting after each addition; you want a clean brightness without sourness.
  • Make-ahead tips: bisque can improve when rested overnight; reheat gently, skim fat again, and adjust seasoning before serving.
  • Serving ideas: finish with a swirl of cream, a few chopped herbs (parsley or chives), and a lemon wedge; serve with crusty bread or buttered toast for contrast.

FAQ

Lobster Bisque Recipe – FAQ

What is lobster bisque?

Lobster bisque is a smooth, creamy soup made from lobster shells to create a rich stock, then enriched with cream and pieces of lobster meat. It’s typically flavored with cognac or brandy, white wine, aromatics, and tomato paste for depth of flavor.

What ingredients do I need for a classic lobster bisque?

Common ingredients include:

  • lobster shells (from 1–2 lobsters) and lobster meat
  • onion, carrot, celery, garlic
  • tomato paste
  • brandy or cognac and white wine
  • seafood stock or water
  • butter and olive oil
  • heavy cream
  • bay leaf, thyme, salt, pepper, cayenne or paprika
  • optionally parboiled rice or stale bread for thickening
Can I use lobster tails or just whole lobster?

You can use lobster tails, but you’ll still want some shells to build the stock. If you only have tails, you can purchase seafood stock or use additional lobster meati—however, shells are essential for the classic bisque flavor and body.

How do I prepare the lobster for the soup?

Steps:

  • Cook the lobster (boil or steam) until just done, then remove meat and reserve.
  • Break down the shells and reserve them for making stock.
  • Chop aromatics (onion, carrot, celery, garlic) for the stock base.
How is the bisque thickened if I don’t want to use heavy cream?

Traditional bisque uses a small amount of starch to emulsify and thicken. Common methods:

  • blend in parboiled rice (about 1/4 cup per 4 cups stock) until smooth
  • use a bread paste (stale bread soaked and blended)
  • finish with a light roux or a slurry of cornstarch if you prefer
Can I make lobster bisque ahead or freeze it?

Yes. You can make the stock ahead, refrigerate, and then finish the bisque when ready. The bisque (without the final cream) can be refrigerated for 1–2 days. For freezing, freeze the stock or the cooled bisque (without adding cream) for up to 2–3 months. Thaw gently and reheat, then whisk in cream just before serving.

What’s the best way to deglaze and flavor the bisque?

After sautéing the vegetables, add the lobster shells and cook briefly to release flavor. Deglaze with brandy or cognac and light-flame if safe to do so, then add white wine. This step concentrates the shell flavors and helps emulsify the final soup.

How do I finish and garnish lobster bisque for serving?

Finish by stirring in warm cream (do not boil after adding cream to avoid curdling). Add chopped lobster meat and adjust seasoning with salt, pepper, and a squeeze of lemon if desired. Garnish with a drizzle of cream, fresh chives or tarragon, and an extra piece of lobster meat.

What are common mistakes to avoid when making lobster bisque?
  • Overcooking or breaking down the lobster meat, making it tough
  • Not properly roasting or simmering the shells to develop depth
  • Not deglazing properly, which can leave the stock flat
  • Adding cold cream to a hot pot and causing curdling
  • Using low-quality stock or not straining the stock, resulting in a gritty texture
How can I adapt lobster bisque for dairy-free or gluten-free diets?

For dairy-free: substitute coconut cream or almond/cava milk blends and use olive oil instead of butter; keep the thickness with rice or bread, which are gluten-free if using rice. For gluten-free: ensure stock and any thickeners (like roux) are gluten-free; rice or bread-based thickeners can be replaced with gluten-free bread.

Serving tips: what to pair with lobster bisque?

Serve hot with crusty baguette slices or buttery croutons. A light green salad, a glass of chilled white wine (Sauvignon Blanc or Chardonnay), or a splash of extra cognac stirred in at the table can elevate the experience.

Introduction / Hook

Imagine the shiver of a sea breeze, the glittering sheen of a perfectly chilled shell, and the scent of butter melting into a gentle chorus of garlic and lemon. A single bite of lobster can carry you from a crowded coastal market to a sunlit terrace overlooking the ocean, where laughter echoes and every forkful feels like a small celebration. Lobster recipes aren’t merely meals; they are gateways to seaside memories, to summer evenings that stretch into velvet nights, to the sense that you’ve discovered something both elegant and deeply comforting. When you choose lobster, you’re choosing an experience—one that turns ordinary dinners into occasions and weeknights into feasts for the senses. The thrill lies not only in the meat itself but in the way you present it: the crack of the shell, the way the meat holds a kiss of heat and the bright kiss of citrus, and the way a well-chosen herb lifts the dish without shouting over its delicate sweetness. This collection of lobster recipes invites you to explore the many faces of this regal crustacean—from refined, classic preparations to bright, breezy coastal twists—so you can savor the ocean in every bite, no matter the season or setting.

In the pages ahead, you’ll discover a tapestry of lobster-inspired ideas designed to be both approachable for home cooks and enchanting for guests. Whether you’re planning a quiet weekend supper, a festive dinner with family, or a glamorous dinner party where you want to impress without overcomplicating the kitchen, these lobster-centric dishes offer a wealth of possibilities. We’ll wander through traditional favorites and modern reinterpretations, all anchored by the same truths: lobster pairs exquisitely with butter, citrus, herbs, and a touch of salt, and the most memorable lobster dishes are built on balance—where oceaniness meets richness, simplicity meets technique, and texture plays with tenderness. As you read on, let your imagination drift toward the coastline, toward a platter that gleams with pale pink and ivory meat, and toward the satisfying crack of the shell that announces a truly special bite. This is your invitation to cook with confidence, curiosity, and a dash of coastal glamour.

Whether you’re a long-time lobster lover or a curious newcomer, the recipes gathered here celebrate the spirit of lobster in all its versatility. From buttery, lemon-kissed preparations that give the meat a radiant gloss to lighter, herb-forward interpretations that let the lobster shine, you’ll find a spectrum of flavors and textures. The goal is simple: to help you recreate the magic of the sea in your kitchen—no matter where you are or how much time you have. So take a deep breath of that briny air and set your plan in motion. The lobster is ready, the kitchen awaits, and the heat of the pan promises that first, glorious mouthful that will make your senses sing.

The Story Behind the Dish

Lobster has long carried a dual aura in the culinary world: it is both a symbol of luxury and a beloved staple of seaside culture. In many coastal regions, fresh lobster has defined local markets, seasonal menus, and family celebrations for generations. The allure of lobster can be traced back to ancient and medieval times when crustaceans were a cherished resource in coastal communities, and as shipping and trade expanded, so did the reach of lobster into grand banquets and refined dining rooms. Over the centuries, the lobster’s wild sweetness, its firm texture, and its ability to take on a range of flavors—whether mellow with butter or bright with citrus—made it a canvas for chefs and home cooks alike.

Across the Atlantic, lobster traditions took shape in different forms. In New England, the lobster roll emerged as a quintessential summer staple—virtually a ritual: fresh cooked lobster meat tucked into a butter-toasted bun, often dressed lightly to preserve the lobster’s clean taste. In France, more indulgent preparations—think lobster in a creamy, wine-kissed sauce or treated to a delicate gratin—highlighted a different culinary sensibility: one that pairs opulence with restraint. In both cases, the essence is the same: pristine lobster meat, a respectful balance of fat and brightness, and a setting that invites leisurely savoring rather than hurried consumption. The dish you’re about to explore brings together these maritime whispers—the adventurous spirit of seaside markets, the comforting sway of butter and citrus, and the sense that cooking with lobster is, at its heart, an act of celebration.

Personal memories often flavor the way we approach lobster. For many families, the ritual starts with a trip to the docks or the fishmonger, followed by a lively kitchen scene where children help crack shells and adults share stories while the air fills with the smell of sizzling butter. Those memories inform the way we approach lobster recipes: with respect for the meat’s delicate sweetness, a love for bright acidity to cut through richness, and an appreciation for textural contrast—where succulent, yielding lobster meat meets a crisp green herb, or a crunchy, toasty edge on crusty bread. In this collection, you’ll find that same spirit of storytelling in every recipe: a chance to pass down favorite techniques, to experiment with new flavor pairings, and to create a moment that feels both timeless and freshly inspired.

Why You’ll Love This Recipe

  • Elegant yet approachable: Lobster has a luxurious aura, but the recipes here are designed for home cooks who want a chef-worthy result without daunting techniques.
  • Versatile for all seasons: Whether you’re craving a light citrus-forward dish in summer or a richer, comforting option in cooler months, there’s a lobster recipe for every mood.
  • Fast and simple elements that shine: The focus is on the lobster’s natural sweetness, with supporting flavors that enhance rather than overpower.
  • Impressive presentation: A well-plated lobster dish makes any table feel special—perfect for date nights, anniversaries, or celebratory dinners with friends and family.
  • Protein-packed and satisfying: Lobster provides a luxurious texture and a satisfying protein boost, making these dishes both nourishing and indulgent.
  • Customizable to dietary needs: Many of the concepts can be adapted for dairy-free, gluten-free, or lighter preparations by swapping ingredients and sauces.
  • Great for learning techniques: From selecting the right lobster to balancing flavors with citrus, herbs, and light fats, these recipes offer opportunities to refine your cooking instincts.

Flavor Profile & Texture

The hallmark of lobster is its bright, sweet meat—firm yet yielding, with a delicate brininess that carries the crispness of summer in every bite. When paired with butter, garlic, and lemon, the meat becomes a radiant centerpiece: the fat from the butter coats the mouth with a silky richness while the lemon lightens the palate, letting the natural sweetness shine through. Add fresh herbs—tarragon, chervil, parsley, chives—and you invite green, aromatic notes that feel almost seaside herb garden in a single mouthful.

Texture-wise, lobster offers a pleasing contrast: the shell provides a satisfying crack, exposing the tender meat within, which is then complemented by a crisp, lightly browned surface or a velvety sauce that clings to every strand. Sauces and accompaniments can range from a bright, citrusy reduction that sizzles with a sheen of gloss to a rich, velvety beurre blanc or a robust garlic butter that invites dipping and dunking. The balance is key: you want the dish to feel luxurious and indulgent, yet clean and bright enough to savor in long, lingering bites. The interplay of textures—soft, buttery meat with a slight chew, the crunch of fresh herbs or toasted bread, and the gentle silkiness of a well-made sauce—creates a symphony in your mouth that keeps you reaching for more without fatigue.

In seafood cooking, the concept of brightness is everything. The lobster’s sweetness can quickly become overshadowed by heaviness if the dish relies solely on rich fats. The recipes here cultivate a thoughtful balance: citrus acidity to punctuate richness, a touch of heat or pepper for depth, and herbs that add fragrance and lift. The result is a repertoire of lobster flavors that range from clean and ocean-forward to deeply comforting and luxurious, always anchored by the unmistakable personality of the lobster itself.

Occasions & Pairings

Where and when you enjoy lobster can elevate the eating experience as much as the dish itself. Here are ideal occasions and thoughtful pairings to consider as you plan menus and moments.

  • Holiday dinners and special celebrations: A glamorous centerpiece that impresses guests without requiring an entire restaurant-scale kitchen.
  • Weekend indulgence: A refined treat that feels like a hotel lounge moment, served with a glass of something crisp and sparkling.
  • Summer al fresco dinners: Light, citrus-bright preparations paired with corn on the cob, green salad, and crusty bread to soak up sauce.
  • Date nights and anniversaries: A romantic, accessible way to show care with a dish that looks and tastes special.
  • Family gatherings and tastings: A way to introduce lobster to younger palates or those new to shellfish with gentle, balanced flavors.

Pairing suggestions to complement lobster dishes include;

  • Wine: A bright, mineral white such as Chablis or a crisp Chardonnay; for lighter, citrusy preparations, a Sauvignon Blanc or a dry sparkling wine works beautifully. If you prefer red, opt for a light, peppery Pinot Noir with richer, butter-laden versions.
  • Side dishes: Grilled corn on the cob, a simple green salad with a lemon vinaigrette, garlic bread or a crusty baguette for the perfect dunking, and a light potato preparation to round out the meal.
  • LIBATIONS and desserts: A light sorbet or citrusy dessert to refresh the palate; a gentle Limoncello or sparkling water with a twist of lemon can be refreshing between bites.

Tips, Variations & Substitutions

Cooking with lobster invites creativity while respecting the delicate nature of the meat. Here are practical tips and variations to help you tailor dishes to your taste, dietary needs, or available ingredients.

  • Choose the lobster wisely: Fresh lobster or high-quality frozen lobster meat both work well. If using whole lobsters, look for bright shells and a clean, oceanic smell; if using meat, seek a firm, translucent texture with a pale pink or white color.
  • Herb and citrus balance: Fresh herbs and citrus zest are your friends. Tarragon, chives, parsley, and chervil offer brightness; lemon or lime introduces a tangy counterpoint to the richness.
  • Butter vs. dairy-free alternatives: Butter adds depth and silkiness; for a dairy-free version, use olive oil or a blend of olive oil with a starchy component like a white wine reduction to mimic body without dairy.
  • Gluten-free considerations: If a sauce or topping uses flour as a thickener, swap with a gluten-free option such as cornstarch or arrowroot to keep textures light and glossy.
  • Protein swaps and variations: If you can’t find lobster, you can adapt recipes using langoustines, jumbo shrimp, or a seafood medley. For a vegetarian or vegan nod, you can treat king oyster mushrooms as a “lobster” substitute in certain sauces with a robust, umami foundation and citrus notes to mimic brightness.
  • Regional twists: Incorporate fennel or tenné (tarragon-based) notes for a French-inspired finish; or add smoky paprika and roasted garlic for a Spanish-leaning version.
  • Make it lighter or richer: For a lighter, more citrus-forward version, lean on lemon, white wine, and herbs; for a richer profile, deepen the sauce with a touch of cream or a butter-based emulsion, ensuring balance so the lobster remains the star.

Storage & Make-Ahead Ideas

Fans of seafood know that timing matters. Lobster is best enjoyed fresh, but there are thoughtful ways to store and reuse leftovers so you don’t waste a precious ingredient or flavor. Here are practical ideas to help you plan and maximize your lobster dishes.

Leftover lobster meat can be stored in the refrigerator for a couple of days if kept in a well-sealed container. For longer storage, cooked lobster meat can be frozen, ideally within a day of cooking, and kept for up to several months. When ready to enjoy, defrost gently in the refrigerator overnight or use a cold-water method if you’re in a hurry, then reheat carefully to preserve tenderness; overheating can make the meat tough.

To make ahead for a special occasion, consider preparing components that store well in advance—such as a bright lemon-butter sauce, herb blends, or a light seafood stock (if you’re crafting a dish that calls for it). You can assemble the dish close to serving time, adding the lobster at the last moment to preserve its delicate texture. If you’re pairing with a starchy side like roasted potatoes or a bakery loaf, you can complete the baking or roasting steps ahead of time and finish with a quick, gentle reheat just before plating.

For sauces and dressings, making them a day ahead can deepen flavors. A citrus-herb reduction or a light, emulsified butter sauce often benefits from resting; keep it refrigerated and rewarm gently, whisking as needed to restore gloss and cohesion. If you’re serving a dish that features raw or semi-cooked components, ensure proper chilling and handle with care to preserve both flavor and safety.

Fun Facts & Trivia

Delightful tidbits and surprising notes about lobster can add flavor to your table talk as you serve. Consider these morsels of trivia as you plan meals or host guests:

  • Color changes: Lobsters are typically blue or dark when alive, but the moment they’re cooked, their shell turns bright red due to a pigment called astaxanthin; the shell’s other pigments are masked until heat releases them.
  • Age and size variety: Lobsters grow throughout their lives, and larger lobsters tend to have more meat in their claws—a prized feature for many cooks and eaters who want substantial bites.
  • Claws and meat distribution: The two claws often differ in texture; the crusher claw provides chunkier meat, while the pincer claw yields a more delicate, fibrous texture. A well-prepared dish will celebrate the unique characteristics each claw offers.
  • Historical cuisine: The “thermidor” style—a refined French preparation—revolves around a creamy, wine-laced sauce that envelops lobster meat before it’s baked briefly under a crust or broiled to finish. The name itself evokes a sense of luxury and technique developed through generations of French culinary craft.
  • Sea-to-table storytelling: In many coastal communities, lobster is more than food—it can be a daily rhythm, a seasonal heartbeat, and a memory shared with neighbors and loved ones who gather around boiling pots, sunny decks, and candlelit tables to celebrate togetherness.

With these sections, you have a thorough and inviting guide to lobster recipes that honors the meat’s natural brilliance while offering a spectrum of ideas to suit many occasions. This content is designed to be easily navigated, SEO-friendly, and rich with sensory language that invites readers to imagine, plan, and cook with confidence. Whether you’re dreaming of a simple lobster dinner that feels like a vacation or a sophisticated feast that turns an ordinary night into something memorable, these sections work together to inspire, educate, and delight.

Ingredients

Lobster Base

    – 2 lobster tails (8 oz each), thawed if frozen, shells intact and tails split lengthwise to expose meat
    → The main protein for this dish. Splitting the tails allows the meat to rest over the shell for even heat transfer and faster cooking. If using frozen tails, thaw completely in the refrigerator or under cold running water before prepping.
    – 4 tablespoons unsalted butter, melted
    → Provides rich, glossy flavor and serves as the primary sauce base. Melting ensures it can be brushed evenly onto the lobster meat and mixed smoothly with aromatics. Use unsalted butter to better control seasoning.
    – 2 cloves garlic, finely minced
    → Delivers a foundational savory aroma that infuses the butter quickly. Finely mince to maximize surface area for quick flavor release; if you prefer milder garlic, you can gently sauté it in a teaspoon of butter before adding to the sauce.
    – 1 tablespoon fresh lemon juice
    → Adds bright acidity to balance the richness of the butter and enhances the freshness of the seafood. Freshly squeezed juice yields a cleaner, more vibrant flavor than bottled varieties.
    – 1/2 teaspoon lemon zest (optional)
    → Intensifies citrus aroma by releasing essential oils from the zest; grate only the yellow part of the rind to avoid bitter white pith. Use if you want an extra zing.
    – Salt to taste
    → Essential for highlighting the lobster’s natural sweetness and to balance the butter. Start with a small amount and adjust after tasting the sauce; if your butter is salted, reduce the salt accordingly.
    – Freshly ground black pepper to taste
    → Adds a subtle peppery bite that complements seafood. Grind just before use for maximum aroma; adjust to your preferred heat level.
    – 1/4 cup dry white wine (optional)
    → Deglazes the pan and adds dimension and acidity to the sauce. Let it reduce by half to concentrate flavors. If avoiding alcohol, substitute with seafood stock or extra lemon juice.
    – 1 teaspoon neutral oil for brushing shells (optional)
    → Helps prevent sticking and promotes even browning when finishing under heat. Use sparingly and wipe away any excess to avoid greasy texture.

Lemon-Butter Finish and Garnish

    – 2 tablespoons chopped fresh parsley
    → Fresh parsley provides a vibrant green color and a light, herbal note. Chop finely so it distributes evenly and doesn’t clump when sprinkled on the dish after cooking.
    – Pinch of paprika or red pepper flakes (optional)
    → Adds a touch of color and a subtle warm note without overpowering the lobster’s delicate flavor. Use sparingly to keep the focus on the lobster.
    – Lemon wedges for serving
    → Offer an extra citrus brightness for guests who want a stronger lemon kick at the table. Place on the side for easy squeezing.
    – 1 teaspoon chopped fresh chives (optional)
    → Provides a mild oniony lift and a pop of green; sprinkle just before serving to preserve flavor and texture.
    – Extra melted butter for dipping (optional)
    → A traditional finishing touch for dunking the lobster meat; serve warm in a small dish alongside the plate. Use unsalted butter if you want full control over saltiness.

Instructions

  • Preheat your oven to 425°F (218°C) and line a rimmed baking sheet with parchment paper or a silicone mat; position a small bowl of the lemon-butter sauce nearby so you can baste the lobster tails during cooking.
    → A hot, prepared surface ensures quick, even cooking and makes cleanup easier by preventing sticking and scorching of the butter.
  • Pat the thawed lobster tails dry with paper towels to remove surface moisture before cooking, which helps the meat brown and the butter glaze adhere better.
    → Moisture on the surface turns to steam in the oven, preventing nice browning and causing the sauce to wash away.
  • Arrange the tails on the prepared sheet with the meat side up and the shells curved away from each other; brush the shells lightly with neutral oil to prevent sticking and to encourage even browning around the edges.
    → Oil on the shell conducts heat more evenly and helps render a subtle gloss without oil pooling on the meat.
  • In a small saucepan, gently melt the 4 tablespoons unsalted butter over low heat, then add the finely minced garlic and swirl until fragrant but not browned; remove from heat to keep the aroma bright.
    → Low, steady heat draws garlic flavor into the butter without scorching, which would impart a bitter taste.
  • Whisk in 1 tablespoon fresh lemon juice and, if using, 1/2 teaspoon lemon zest, then season with salt and freshly ground black pepper; if you are using white wine, pour in 1/4 cup now and simmer until reduced by about half.
    → The acid brightens richness, zest intensifies citrus aroma, and reduction concentrates flavors for coating the lobster evenly.
  • Brush the exposed lobster meat generously with the warm lemon-butter mixture, reserving a portion to finish the dish; ensure every ribbed area is coated so the butter can baste during cooking.
    → Coating the meat creates a glossy glaze, protects against drying, and distributes flavor uniformly as the tails heat through.
  • Transfer the sheet to the oven and bake for 8–12 minutes, depending on tail size; rotate the pan midway to promote even browning and check for doneness by looking for opaque, firmly set meat that is just shy of not raw.
    → Lobster cooks quickly; turning ensures consistent heat exposure and prevents uneven pockets of underdone meat near the center.
  • If you desire deeper color and a slightly crustier exterior, switch oven to broil for 30–60 seconds at the end while watching closely to prevent burning.
    → High, direct heat finish adds attractive color and texture without overcooking the interior if kept brief.
  • Remove the tails from the oven, brush with any remaining lemon-butter sauce, and rest the meat for 2–3 minutes to allow carryover heat to finish gentle cooking and to reabsorb moisture.
    → Resting stabilizes the juices and ensures the meat remains tender and juicy when cut into.
  • Scatter 2 tablespoons chopped fresh parsley over the lobster and, if desired, a pinch of paprika or red pepper flakes for a subtle warm note and color; arrange lemon wedges on the side for bright bursts of citrus at the table.
    → Fresh herbs brighten the plate, paprika adds color, and lemon wedges empower guests to customize acidity to taste.
  • Serve with extra melted butter on the side for dipping, allowing guests to deepen richness if they wish; offer chopped fresh chives on top just before serving for a final herb lift.
    → Dipping butter is a traditional finish that enhances mouthfeel, while chives add a fresh oniony note and color.

Notes

“These lobster tails with lemon-butter finish are luxurious, quick to cook, and pair beautifully with bright citrus and a rich butter sauce.”

For best results, thaw tails completely, pat dry, and split them lengthwise as described in the ingredients so the meat sits over the shell for even heat. Keep the shells intact to help insulate the meat and make serving elegant.

  • Prepare the lemon-butter base: In a small saucepan, whisk together the melted butter, minced garlic, fresh lemon juice, and lemon zest (if using). Season with salt and freshly ground black pepper. If you’d like a subtle complexity, simmer in 1/4 cup dry white wine until reduced by half; or substitute with seafood stock or additional lemon juice to keep it alcohol-free.
  • Shell prep and oil: Brush the shells lightly with neutral oil (optional) to prevent sticking and promote even browning. This also helps the exposed meat develop a glossy, appetizing finish.
  • Cooking method: You can bake, broil, or grill. For oven-broiling, preheat to 425°F (220°C). Place tails on a baking sheet, meat side up, shell-side down. Brush with the lemon-butter sauce and baste halfway through cooking. Bake/broil for about 6–8 minutes, depending on tail size, until the meat is opaque and just cooked through. If grilling, cook cut-side up for 4–5 minutes, then finish shell-side down for 1–2 minutes and baste.
  • Basting and finishing: Re-toss the meat with a little extra warm lemon-butter mid-cooking to keep it moist. After cooking, drizzle a touch more sauce and sprinkle with finely chopped parsley and a pinch of paprika or red pepper flakes for color and a gentle warmth. Serve with lemon wedges on the side for extra brightness and a few chopped chives if you like a mild onion note.
  • Optional butter depth: Keep extra melted butter on the side for dipping to enhance richness at the table; use unsalted butter if you want precise salt control.
  • Gluten-free note: This dish is naturally gluten-free, but check that wine, stock, and any seasonings are gluten-free if you have gluten intolerance. If you prefer not to use wine, use seafood stock or additional lemon juice instead.
  • Make-ahead and storage: The sauce can be prepared a few hours ahead and gently warmed just before serving. Leftovers refrigerate well for 1–2 days; reheat gently to avoid breaking the butter emulsion.
  • Pairings and presentation: Serve with a simple green salad or steamed vegetables and gluten-free crusty bread for mopping up sauce. A bright white wine like Sauvignon Blanc or a light sparkling wine pairs nicely with the citrusy, buttery flavors.

Tips

  • Thaw and prep properly: If your lobster tails are frozen, thaw completely in the refrigerator or under cold running water. Pat dry before splitting to expose the meat for even cooking and better sauce adhesion.
  • Split tails correctly: Split the tails lengthwise to expose the meat, keeping the shells intact. This creates a natural bed for the meat to rest on and helps heat transfer evenly from the shell to the meat for a more uniform cook.
  • Work with the butter base: Use unsalted melted butter as your sauce base. Keep the heat gentle to prevent browning or separating; a glossy, emulsified finish comes from patience and gentle simmer rather than a hard boil.
  • Aromatics timing: Add minced garlic to the melted butter and cook briefly just until fragrant—about 30–60 seconds. Don’t let it brown, or it’ll turn bitter and overpower the lobster’s delicate flavor.
  • Brighten with lemon: Add fresh lemon juice to the sauce for acidity that cuts richness and enhances seafood brightness. If using lemon zest, grate only the yellow zest to avoid bitterness from the pith; zest can be added near the end for fresh aroma.
  • Seasoning fundamentals: Salt the sauce gradually, tasting as you go. Remember your lobster shells and any salt in the butter will contribute to overall seasoning, so adjust accordingly. Finish with freshly ground black pepper to taste.
  • Wine option and reductions: If using dry white wine, add it to the sauce and let it reduce by half to concentrate flavors. If avoiding alcohol, substitute with seafood stock or extra lemon juice for acidity.
  • Shell brushing tip: If you plan to finish the tails under heat, brush shells lightly with neutral oil to prevent sticking and promote even browning. Wipe away any excess to avoid greasiness.
  • Managing emulsion: If the sauce starts to separate, whisk in a tiny splash of cold water or a little extra lemon juice to re-emulsify. Maintain a gentle simmer and avoid high heat.
  • Finish options: For a luxurious finish, simmer the tails briefly in the butter sauce then finish under a hot broiler or on a hot grill for a minute or two until the meat is just opaque and lightly caramelized at the edges.
  • Sauce vs meat timing: Keep the lobster meat hot while finishing the sauce; spoon the warm lemon-butter over the meat or pour it onto the plate to ensure every bite has glossy, buttery coating without cooling the lobster.
  • Herb and garnish strategy: Use fresh parsley, chives, and a light sprinkle of paprika or red pepper flakes for color and a gentle aroma. Sprinkle chopped parsley just before serving to preserve bright color and fresh flavor.
  • Serving and dipping: Offer extra melted butter on the side for dipping. Provide lemon wedges for guests who want a stronger citrus kick.
  • Make-ahead and storage: Sauce can be prepared up to a day ahead and gently reheated over low heat, whisking to re-emulsify. Fresh lobster is best enjoyed the day it’s cooked; store cooked meat separately if you have leftovers.

FAQ

How do I boil a whole lobster?

Fill a large pot with water and salt it generously (about 2–3 tablespoons per gallon). Bring to a rolling boil. Grasp the lobster from the back and lower it headfirst into the pot. Return to a boil and cook:

  • 1 lb lobsters: about 8–10 minutes
  • 1–1.5 lb lobsters: about 9–12 minutes
  • 1.5–2 lb lobsters: about 12–15 minutes
  • Larger lobsters: 15–20 minutes

When done, remove with tongs and let rest a few minutes before cracking the shell.

How do I steam lobster instead of boiling?

Place a steamer insert in a large pot with about 2 inches of water. Bring to a boil, add the lobsters, cover, and steam until cooked:

  • About 8–10 minutes per 1 lb
  • 12–15 minutes for larger lobsters

The shell will be bright red and the meat opaque when done.

How can I tell if lobster is cooked properly?

Look for:

  • The shell turning bright red
  • The meat turning opaque white or pink
  • An internal temperature of 140–145°F (60–63°C)
How do I crack and extract lobster meat safely?

Let the lobster cool slightly. Use a lobster cracker or heavy kitchen shears to crack claws and tails. Twist off the claws, crack the shells, and pry out the meat. For the tail, cut along the underside to loosen the meat and pull it out. Use a small fork or pick for the legs and body meat. Optional: reserve the tomalley or discard it if you prefer.

How should I prepare lobster tails?

Thaw frozen tails fully if needed. Preheat oven to 425°F (220°C). Using kitchen shears, cut the top of the shell down the center to the tail fin, then gently pry the meat up and over the shell so it sits on top. Brush with melted butter and lemon if desired. Cooking times (varies by size):

  • 4–6 oz tails: 8–10 minutes
  • 6–9 oz tails: 10–12 minutes
  • 9–12 oz tails: 12–14 minutes

Alternatively, broil for 4–6 minutes until the meat is opaque and lightly browned.

What is a quick, tasty lobster dish I can start with?

Try a simple Lobster Garlic Butter Pasta:

  • Sauté minced garlic in butter until fragrant
  • Add chopped lobster meat and a splash of lemon juice
  • Toss with cooked pasta, fresh parsley, and grated Parmesan
  • Season with salt and pepper to taste
How do I make lobster bisque from scratch?

A classic lobster bisque uses shells to build stock, then creamy, smooth soup base:

  • Sauté lobster shells with onion, carrot, celery, and tomato paste
  • Deglaze with brandy or dry sherry (flambé if desired)
  • Simmer in water or broth for 30–45 minutes, strain, then return to pot
  • Puree part of the liquid, whisk in cream or milk, season with salt, pepper, and a pinch of paprika or cayenne
How do I make classic lobster rolls?

Use warm, buttered rolls and lobster meat dressed lightly with mayo, lemon juice, chopped celery, salt, and pepper:

  • Gently mix lobster meat with mayo and seasonings
  • Fill lightly toasted buns and serve with a squeeze of lemon
How should I store and freeze lobster meat?

Proper handling keeps flavor and texture:

  • Cooked lobster meat can be refrigerated in an air-tight container for up to 3–4 days
  • Freeze cooked lobster meat for 2–3 months in a freezer-safe container or bag
  • Thaw frozen lobster in the refrigerator overnight or under cold running water before use
Can I substitute frozen lobster meat in recipes?

Yes, but plan for a slightly shorter cooking time since frozen meat releases moisture as it thaws. Pat dry if needed before tossing into hot dishes to prevent excess water.

What sides and beverages pair best with lobster?

Classic pairings include:

  • Drawn butter and lemon wedges
  • Grilled corn on the cob or boiled potatoes
  • Light, crisp white wines like Chardonnay or Sauvignon Blanc, or a dry sparkling wine
  • A simple green salad to balance richness

Introduction / Hook

Imagine cracking open a glistening lobster tail, the shell giving way to pristine, snow-white meat that yields with a gentle press. The aroma unfurls in the air like a sunlit breeze off the sea: a seductively rich, silky finish that clings to every bite, a whisper of citrus and a subtle herbaceous lift that makes the senses sing. This lobster tail recipe isn’t just a dish; it’s an invitation to slow down, savor the moment, and celebrate the simple luxury of seafood that tastes of the coast. It’s a celebration you can recreate at home without the fuss of a five-star kitchen, yet it delivers the same sense of occasion—an experience that feels special enough for a date night, yet approachable enough for a weekend family dinner. The moment you glimpse the shell turning pinkish-gold under heat and hear a soft sizzle, you’ll know you’re in for something memorable.ox

The Story Behind the Dish

Lobster has long been a marker of coastal abundance and maritime hospitality. Across coastal towns, the first glimpse of a glimmering lobster tail signals a meal that bridges the salt of the sea with the warmth of the hearth. In many traditions, tails are shared during festive gatherings, weddings, and milestone celebrations, where the elegance of the crustacean is matched by the care with which it’s prepared. The practice of presenting lobster in a way that highlights the tenderness of the meat—without drowning it in overpowering flavors—speaks to a philosophy of restraint paired with luxury. This recipe draws on that heritage: a technique that respects the lobster’s delicate sweetness while accentuating it with a light, glossy finish and a gentle kiss of aromatics. The result is a dish that feels timeless, yet fresh, capable of transporting a dinner table to a seaside bistro even if you’re dining in a cozy apartment kitchen. It’s the kind of dish that prompts stories—of summers spent by the water, of celebrations with loved ones, and of the quiet joy found in perfectly cooked seafood shared around a well-set table.

Why You’ll Love This Recipe

  • Elegant, restaurant-quality flavor at home: tangy brightness meets a rich, velvety finish without requiring a mountain of ingredients or elaborate technique.
  • Versatile cooking approach: whether you prefer a quick broil, a gentle bake, or a quick grill, the method keeps the lobster tender and the texture pristine.
  • Impressive presentation with minimal effort: the result looks sophisticated on the plate, making any weeknight feel like a special occasion.
  • Fast cooking time: lobster tails adapt quickly, so you can have a stunning dish on the table in a pinch—perfect for weeknights or spontaneous celebrations.
  • Customizable flavors: you can tailor the aromatics and finishing notes to suit your preferences or dietary needs, from clean and citrusy to rich and herbaceous.

Flavor Profile & Texture

The meat of a lobster tail is famously tender and subtly sweet, with a texture that’s firm enough to hold its shape yet Jell-O-soft where the fibers pull apart in strands. When cooked properly, it remains juicy, moist, and almost buttery in its mouthfeel, even without any added richness. The outer shell provides a crisp, caramelized contrast that anchors the dish, while the inner meat glides through with a delicate, saline finish that hints at the ocean but doesn’t overwhelm. The finishing notes of this recipe bring a glossy, silky mouthfeel that lingers on the palate—the kind of finish that makes the last bite feel like the first bite again. Aromatics contribute a gentle warmth rather than a sharp bite, offering a balanced complexity: a faint breath of something herbaceous, a whisper of citrus tang, and a soft, almost nutty underpinning that ties everything together. The overall impression is refined and comforting at once—sophisticated enough for a celebration, yet intimate enough for a cozy dinner at home.

In terms of texture, anticipate a pleasant contrast: a lightly crisp edge where the meat meets the shell, giving way to the tender, luscious flesh in the center. The final flourish, a satin-smooth finish, makes each bite feel luxurious without being heavy. The dish thrives on balance—the bright, clean lift that cuts through the richness, the tender bite that invites you to linger, and the subtle aftertaste that keeps you reaching for another mouthful.

Occasions & Pairings

This lobster tail recipe shines in a variety of settings, from intimate weeknight dinners to festive gatherings. It’s equally at home as the centerpiece of a romantic date night, a special family celebration, or a guest-worthy addition to a holiday menu. Its versatility also makes it a welcoming star for seasonal menus—think spring freshness with bright citrus accents, or a luxurious autumn treat that pairs beautifully with roasted vegetables and crisp greens. For beverage pairing, a chilled, crisp white wine with good acidity—think a bright Chardonnay or a dry Sauvignon Blanc—helps cut through the richness and keep the dish feeling light on the palate. If you prefer bubbles, a brut sparkling wine or a light, citrus-forward sparkling wine can elevate the experience without overpowering the seafood’s sweetness. When it comes to sides, consider simple, high-contrast accompaniments: a lemony herb quinoa or a light, peppery arugula salad; roasted asparagus or haricot verts; or a small serving of velvety mashed potatoes to cradle the succulent meat. For a complete seafood-forward menu, include a light soup or a garden-driven starter and a fresh, citrusy dessert to finish on a bright note.

Tips, Variations & Substitutions

  • Cooking methods: The technique works well across several heat sources. You can broil for a crisp, caramelized surface; bake for even, gentle cooking; or grill to pick up a smoky finish and those appetizing grill marks. Each method highlights the lobster’s natural sweetness in a slightly different way, so choose based on your equipment and mood.
  • Flavor twists: If you love a brighter finish, lean into citrus-inspired notes with a light, zesty finish. For a richer profile, introduce a subtle, herb-forward aroma that builds a gentle complexity without overwhelming the meat’s sweetness. A touch of warmth from mild spices can be added sparingly for a cozy, comforting edge during cooler months.
  • Dietary adaptations: This approach can be translated into lighter or plant-forward options by using a similar finishing technique on a robust plant-based protein or a hearty vegetable roast with a similar glossy finish. If a dairy-free version is desired, focus on a glossy, oil-based emulsion that carries all the aromatics without dairy richness.
  • Regional twists: For a nod to coastal regions, incorporate regional herbs and citrus varieties that are commonly used in your area. A Southwestern-inspired version might lean into a citrus and herb backbone with a hint of smoky paprika, while a Mediterranean twist could lean on olive oil, garlic notes, and a touch of saffron’s aroma.
  • Make it your own: If you’re cooking for a crowd with varying tastes, offer a couple of finish options at the table—one light and citrus-forward, another with a richer, more decadent touch—so guests can choose their preferred profile.

Storage & Make-Ahead Ideas

Lobster meat is best enjoyed freshly cooked for peak texture and flavor. If you have leftovers, store them promptly in the refrigerator in an airtight container. Consume within a day or two for best quality. Reheating should be done gently; a quick warm-up in a low-heat oven or a gentle, indirect reheating on a skillet with a light amount of the finishing liquid helps preserve moisture and texture. If you anticipate making ahead for a celebration, consider preparing the shell portions in advance and finishing them with a light application of the glossy sauce just before serving. For entertaining, you can set up a small, elegant crustacean station where guests crack and savor the lobster themselves; this not only reduces the final plating workload but also elevates the dining experience with a sense of shared delight. If you plan to freeze lobster tails, do so only if they are precooked, and remember that freezing and thawing can affect texture; plan accordingly to ensure the best possible final result when you reheat.

Fun Facts & Trivia (Optional)

  • Lobster was once considered so common and abundant that it was often fed to prisoners in colonial times, a far cry from today’s luxury impression. Over the centuries, the perception of lobster transformed into a delicate indulgence enjoyed in refined settings.
  • In some coastal traditions, lobster tails are celebrated for their symbolism of renewal and abundance, making them a popular choice for milestone celebrations and seasonal feasts.
  • The delicate white meat in lobster tails becomes wonderfully tender when heated just to the right temperature—overcooking can lead to a rubbery texture, while undercooking can leave the meat overly firm and less flavorful. Achieving the perfect balance is the hallmark of a seasoned cook’s touch.
  • Culinary scientists often highlight the way heat triggers the proteins in lobster meat to denature, resulting in a melt-in-the-mouth texture that’s simultaneously firm and yielding—a rare combination that explains the dish’s enduring appeal.

Ingredients

Lobster Tail Prep

    – 2 lobster tails (6-8 oz each), thawed if frozen; split the shell lengthwise and gently lift the meat on top of the shell for even cooking
    → Splitting and lifting the meat allows for even heat distribution and easy basting with the garlic butter, while presenting a neat, restaurant-style presentation. If tails are frozen, thaw completely in the refrigerator and pat dry before preparing.
    – 1 tablespoon olive oil (optional, for brushing on shell)
    → A light brushing of oil helps prevent sticking and promotes even browning on the shell during broiling or baking; use sparingly to avoid greasing the meat.

Garlic Butter Sauce

    – 4 tablespoons unsalted butter, melted
    → The butter is the flavor backbone of the sauce; melted butter ensures a smooth, cohesive base that can be easily whisked with aromatics to coat the lobster meat.
    – 2 cloves garlic, minced
    → Freshly minced garlic infuses the sauce with robust aromatics; mince finely to distribute flavor evenly and avoid large garlic pieces that may burn.
    – 1 tablespoon fresh lemon juice
    → Brightens the richness of the butter and enhances the natural seafood flavor; fresh juice yields a cleaner citrus note than bottled.
    – 1 teaspoon lemon zest (optional)
    → Adds an intense citrus aroma that complements the lobster; zest before juicing to capture essential oils and avoid bitterness from the white pith.
    – 1/4 teaspoon salt, or to taste
    → Enhances overall flavor and balances the butter’s richness; adjust after tasting the sauce.
    – 1/8 teaspoon freshly ground black pepper
    → Subtle heat and depth that pairs well with seafood; freshly ground pepper provides more aroma than pre-ground.
    – 1 tablespoon dry white wine or seafood stock (optional)
    → Adds depth and a touch of acidity; if used, simmer 1–2 minutes to reduce before whisking in butter for a glossy finish.

Finish and Serve

    – Fresh parsley, chopped, 2 tablespoons
    → Provides a bright green contrast and fresh herbal note; chop finely and sprinkle just before serving to preserve color and aroma.
    – Lemon wedges, for serving
    → Offer a final burst of acidity; guests can adjust brightness to taste by squeezing over before eating.

Optional Add-ins

    – Breadcrumbs (panko) mixed with 1 tablespoon melted butter, 2 tablespoons total
    → A light, crisp topping adds texture; sprinkle over the lobster during the final broil for a delicate, golden crust.
    – Pinch of paprika or Old Bay seasoning
    → A small amount of spice and color that pairs nicely with seafood; start with a pinch and adjust to preference.

Instructions

  • Thaw your lobster tails completely if frozen, placing them in the refrigerator overnight; pat dry with paper towels before prep.
    → Thawing ensures even cooking and prevents excess steam from moisture on the shell; drying helps the butter and seasonings adhere for a better crust and flavor development.
  • Preheat your broiler to high (approximately 500°F / 260°C) and position the rack about 6 inches from the heat source; line a rimmed sheet pan with foil or parchment for easy cleanup and optimal heat transfer.
    → High, direct heat yields a quick, even char and vibrant color on the shell and meat; lining the pan prevents sticking and makes cleanup effortless.
  • Using kitchen shears, cut along the center of the back of each lobster tail from the open end toward the tail but stop just before the tail fan; gently spread the shell apart and lift the meat over the shell so it sits on top; press down lightly to rest.
    → This split-and-lift technique exposes the meat for even heat, allows the butter to baste directly onto the flesh, and creates the classic restaurant presentation where the meat fans over the shell.
  • Lightly brush the exposed shell with olive oil using a small pastry brush, applying only to the shell and not the meat.
    → A thin oil coating on the shell promotes browning and prevents sticking to the pan, while oil on the meat can hinder browning and texture.
  • Arrange the tails on the prepared sheet pan with the meat resting on top of the shell; keep them curled as needed but avoid overlap so each tail receives direct heat.
    → Proper spacing ensures uniform cooking and allows the garlic butter to coat every piece evenly, resulting in consistent flavor and color.
  • Make the garlic butter sauce: In a small saucepan over low heat, melt 4 tablespoons unsalted butter until just fluid; add 2 minced garlic cloves and simmer 1–2 minutes until fragrant but not browned.
    → Gentle heating releases garlic aroma without turning it bitter; melting butter first ensures a smooth, cohesive base for emulsification with aromatics.
  • Whisk in 1 tablespoon fresh lemon juice, 1 teaspoon lemon zest (optional), 1/4 teaspoon salt, and 1/8 teaspoon freshly ground black pepper; if using, stir in 1 tablespoon dry white wine or seafood stock and simmer 1–2 minutes to reduce slightly.
    → The lemon brightens the richness, while the wine or stock adds depth; reducing concentrates flavors and gives the sauce a glossy, clingable texture.
  • Remove sauce from heat and keep warm until ready to baste; if it begins to separate, whisk vigorously to return to a smooth emulsion.
    → A cohesive emulsion ensures the sauce coats the lobster evenly without oily separation, producing a silky finish.
  • Brush or spoon a portion of the warm garlic butter over the exposed lobster meat, turning the tails slightly to coat all sides; reserve any remaining sauce for finishing.
    → Even coating guarantees consistent flavor and moist meat; basting during cooking helps prevent drying and builds a luscious finish.
  • For optional breadcrumbs topping: in a small bowl mix 2 tablespoons panko breadcrumbs with 1 tablespoon melted butter and a pinch of paprika or Old Bay; set aside.
    → This light crust adds texture and color; the butter helps the crumbs brown and adhere during the final moments of broiling.
  • Broil the lobster tails until the meat is opaque and just firm to the touch, 8–12 minutes total depending on tail size; rotate the pan halfway to promote even cooking.
    → Doneness is indicated by an opaque, pink-white meat; undercooking results in a soft texture, while overcooking can make the meat tough.
  • During the final 1–2 minutes of cooking, if using breadcrumbs, sprinkle the breadcrumb mixture on top and continue broiling until golden; watch closely to prevent burning.
    → The quick high-heat finish crisps the topping and adds an appealing contrast of texture without compromising the lobster meat.
  • Remove the pan from the oven; spoon any remaining garlic butter over the meat for a final glaze; let the lobster rest 2 minutes to reabsorb juices and set the butter.
    → Resting relaxes the proteins, redistributes moisture, and ensures a juicy bite with a glossy finish.
  • Sprinkle fresh parsley over the lobster tails and serve with lemon wedges on the side; the parsley adds color and a fresh herbal note, while the lemon offers a bright finish.
    → The final garnish enhances aroma and appearance, and the lemon lets guests adjust brightness to taste for a balanced, elegant presentation.

Notes

“These lobster tails are prepared by first thawing completely if frozen and patting dry, then splitting the shell lengthwise and gently lifting the meat onto the shell for an even cook and a restaurant-style presentation. Brush the exposed shell lightly with olive oil to prevent sticking and help with browning. For the garlic butter sauce, whisk together 4 tablespoons melted unsalted butter, 2 minced garlic cloves, 1 tablespoon fresh lemon juice, and 1 teaspoon lemon zest (optional); season with 1/4 teaspoon salt and 1/8 teaspoon freshly ground black pepper, and add 1 tablespoon dry white wine or seafood stock if you like a touch of acidity. Simmer 1–2 minutes to blend, then whisk in a bit more butter for a glossy finish. Broil or bake the lobster tails on a lined sheet pan, about 6–8 minutes, until the meat is opaque and just cooked through; baste once or twice with the sauce during cooking for maximum flavor. Finish with 2 tablespoons chopped fresh parsley and lemon wedges for squeezing at the table. Optional add-ins include a light breadcrumb topping: combine breadcrumbs (panko) with 1 tablespoon melted butter and a pinch of paprika or Old Bay, sprinkle over the tails during the final broil for a delicate golden crust. For a gluten-free option, omit the breadcrumbs or use certified gluten-free breadcrumbs. If you prefer a lighter version, reduce the butter slightly and increase stock or lemon juice to maintain moisture and brightness. Leftovers can be stored in an airtight container in the fridge for 1–2 days and reheated gently; any extra sauce can be warmed over low heat with a splash of stock or water to loosen. Always taste and adjust salt after the sauce has combined with the lobster, and serve with extra lemon for brightness. A crisp white wine, like Sauvignon Blanc, pairs beautifully with this dish.”

Tips

Tips for Perfect Lobster Tail with Garlic Butter

  • Thaw and prep: If tails are frozen, thaw completely in the refrigerator (allow ~24 hours for typical 6–8 oz tails). Pat dry before preparing to ensure cleaner separation from the shell and better browning.
  • Shell prep and presentation: Split the shell lengthwise using sharp kitchen shears, from the base to the tip. Gently lift the meat onto the shell so it sits on top—this helps with even heat distribution and creates a restaurant-style presentation. Keep the meat attached at the base for stability during cooking.
  • Oil on the shell: Brush a light layer of olive oil on the outside of the shell to promote even browning and prevent sticking. Avoid coating the lobster meat heavily; you want the butter to flavor the meat, not slip off.
  • Meat moisture: After splitting, pat the lobster meat dry with paper towels. Extra moisture can create steam and prevent browning, especially under high heat.
  • Butter sauce foundations: Melted butter forms the base of the sauce—keep it warm but not bubbling vigorously. Whisk in minced garlic, citrus (juice and zest), salt, and pepper off heat, then rewarm gently before finishing. If using optional wine or stock, simmer briefly to reduce before adding butter for a glossy finish.
  • Flavor balance: Fresh lemon juice brightens the richness; add zest before juicing to capture essential oils. Taste the sauce and adjust salt at the end, since the butter can mellow the saltiness.
  • Cooking timing and doneness: For 6–8 oz tails under a hot broiler, expect about 6–10 minutes total, depending on heat and tail size. The lobster meat should be opaque and firm to the touch; avoid overcooking, which makes it tough.
  • Basting technique: Brush the lobster meat with garlic butter 2–3 times during cooking to build flavor and keep the meat moist. Reserve a small amount of sauce for finishing and table service.
  • Crust option: If using breadcrumbs for a light crust, mix 1 tablespoon melted butter with 2 tablespoons breadcrumbs and a pinch of paprika or Old Bay. Sprinkle over the lobster during the final 1–2 minutes of broiling and watch closely to prevent burning.
  • Herbs and garnish: Finish with chopped fresh parsley for color and a fresh aroma. Serve with lemon wedges for guests to add brightness to taste at the table.
  • Make-ahead and storage: Sauce can be prepared a day ahead and gently reheated. Leftover lobster can be stored, then reheated gently in a low oven with a little extra melted butter to re-moisten the meat.

FAQ

What ingredients do I need for a simple lobster tail recipe?
  • Lobster tails (1–2 per person)
  • Unsalted butter, melted (about 2–4 tablespoons per tail)
  • Garlic, minced (1–2 cloves per tail)
  • Lemon juice (1 teaspoon per tail)
  • Salt and freshly ground black pepper
  • Optional: paprika for color, chopped parsley for garnish
How do I thaw lobster tails safely?

Thaw frozen tails in the refrigerator overnight for the best texture. If you’re short on time, seal the tails in a plastic bag and submerge in cold water for 30–40 minutes, changing the water if it warms up.

How should I cut the lobster tail before cooking?

Butterfly the tail to expose the meat:

  1. Place tail on a cutting board, shell side up. Using kitchen scissors, cut along the center of the top shell from the open end toward the tail, stopping just before the tail fin.
  2. Gently spread the shell apart and lift the meat through the slit so it sits on top of the shell (this is the “butterflied” presentation).
  3. Optionally, cut along the center of the meat with a sharp knife to create a more even portioning, then set aside.
What is the best cooking method for lobster tails?

Broiling or baking are quick and reliable:

  • Broil: Place tails on a foil-lined pan, cut side up, brush with butter, and broil 6–10 minutes depending on size, until the meat is opaque and slightly opaque near the shell.
  • Bake: Preheat to 425°F (220°C). Arrange tails on a baking sheet, brushed with butter, and bake 10–12 minutes, or until internal temperature reaches 140–145°F (60–63°C).
  • Alternative: Steam or grill for extra smoky flavor, following similar timing guidelines.
How do I tell when lobster tail is done?

Check for these signs:

  • The meat is opaque and firm, not translucent.
  • The internal temperature reaches about 140–145°F (60–63°C).
  • The shell turns bright red and the meat separates easily from the shell.
How much butter and seasoning should I use?

A good baseline per tail (4–6 oz tail):

  • 2–4 tablespoons melted butter
  • 1–2 cloves garlic, minced
  • 1 teaspoon lemon juice
  • Salt and pepper to taste
  • Optional: pinch of paprika for color, chopped parsley for garnish
Can I cook lobster tails on the grill?

Yes. Grilling adds a smoky flavor:

  • Preheat grill to medium-high. Brush tails with oil or melted butter.
  • Place tails cut-side down and grill 2–4 minutes, until the shell begins to color. Flip and baste with butter, then cook 3–6 more minutes until the meat is opaque.
  • Keep an eye on timing; tail thickness affects how long it takes.
How do I avoid overcooking and keep the meat tender?

Tips to prevent dry lobster:

  • Cook tails in short intervals, checking early for doneness.
  • Use a thermometer to reach 140–145°F (60–63°C).
  • Butter, lemon, and a gentle oven heat help keep moisture.
  • Pull the tails off just as the meat turns opaque.
What are some tasty flavor variations I can try?

Try these popular options:

  • Garlic butter with lemon and parsley
  • Lemon-dill or lemon-zest with fresh herbs
  • Spicy Cajun or paprika rub on top
  • White wine butter sauce for dipping
What are good sides and serving suggestions for lobster tails?

Serving ideas to complete the plate:

  • Steamed or roasted asparagus, green beans, or zucchini
  • Classic corn on the cob or corn salad
  • Buttery mashed potatoes or garlic risotto
  • Fresh lemon wedges and chopped parsley for garnish

Introduction / Hook

In the hush of a candlelit table, a copper pot sighs with a perfume of sea salt and roasted shells. A swirl of cream catches the light, turning the surface into a pale caramel tapestry. This is lobster bisque—a dish that feels like a coastal legend and a kitchen’s quiet triumph all at once. When you lift a spoonful, first comes the brightness of the sea—briny lobster notes with a whisper of cognac or madeira—then a velvet hug of cream that coats the palate without heaviness. It’s the kind of soup that makes a moment feel elevated, even on a weeknight, and yet it carries the whisper of dinner party grandness in every sip. The beauty of lobster bisque lies in its balance: the intensity of a shellfish stock tempered by dairy richness, the sweetness of lobster meat rising against a backdrop of roasted aromatics, and a finish that glints with a kiss of citrus or herb. If you’ve ever craved something that feels indulgent but refined, familiar yet unfamiliar, this bisque welcomes you with open arms and the promise of a sensorial voyage—creamy, bright, ocean-fresh, and utterly comforting.

Imagine the kitchen filled with the soft sigh of simmering shells, the nutty warmth of toasted aromatics, and the subtle crackle of a chef’s favorite pan, all converging into a single spoonful. Lobster bisque invites you to slow down, savor, and indulge in the kind of depth that only time can coax from humble ingredients. It’s a dish that can conjure a memory of seaside markets, a grandmother’s cookbook, or a first fancy dinner date—the kind of memory you chew on long after you’ve finished the last bite. The recipe you’re about to explore is less about chasing perfection and more about honoring generous ingredients with a technique that respects their essence: extracting every drop of flavor from lobster shells, coaxing sweetness from mirepoix and tomato, and finishing with cream that glows like morning light on a calm sea. If you’re ready to treat yourself and your guests to a voyage of aroma, texture, and nuance, this lobster bisque is your vessel.

The Story Behind the Dish

Lobster bisque sits at an intersection of maritime abundance and French culinary finesse. The word “bisque” is steeped in history and rumor, often traced to old European kitchens where the shells of crustaceans were not wasted but transformed into something greater than the sum of their parts. One prevalent theory suggests that bisque traces its name to the French phrase bis cuites, meaning “twice-cooked,” a nod to the careful, layered process of extracting flavor from shells and then refining it into a smooth, luxurious soup. Others associate it with a time when cooks were keen to stretch every morsel of seafood into a comforting, nourishing bowl for sailors, travelers, and families alike. Regardless of etymology, the technique has endured because it works: shells are roasted or sautéed to unlock deep, roasted sweetness; they’re simmered to yield a robust stock; and then the stock is enriched and refined to lacquer the palate with a silk-smooth texture.

The lobster bisque that has become a modern classic blends technique with a touch of opulence. In traditional preparations, the shells are simmered with aromatics, often a hint of tomato paste for color and acidity, and sometimes a splash of brandy or cognac to lift the freshwater-like sweetness of seafood with a flinty, bright note. The result is a deeply flavored stock that, after straining, is sometimes thickened with a small amount of rice or a classic roux—though contemporary versions often rely on emulsification or careful reduction to achieve their characteristic creaminess. In many coastal regions, bisque is as much a memory as a recipe: a family’s version passed down through generations, each generation adding its own signature flourish—whether a squeeze of citrus, a whisper of fennel, or a final swirl of cream that makes the surface gleam like satin.

Nova Scotia, Maine, Brittany, and Normandy each lay claim to the spirit of bisque in their seafood traditions. In New England kitchens, the bisque tradition often borrows the lobster’s own sweetness, letting it mingle with butter, wine, and cream to create a bowl that feels both celebratory and homely. In French kitchens, the emphasis lies in a velvety texture and a refined balance—shellfish stock that’s deeply savory yet bright, with dairy tones that soften the intensity without dulling the shellfish character. The modern lobster bisque you’ll discover here is a respectful blend of those lineages: the stock is robust, the texture limned with cream, and the finish polished with a hint of aromatics and a final kiss of warmth. It’s a dish that honors the sea’s generosity while celebrating the craft of the kitchen—patience, precision, and a little bit of showmanship, all coming together in a single spoonful.

Why You’ll Love This Recipe

  • Luxurious texture with silky, spoon-coating richness that feels indulgent but not heavy.
  • Deep, resonant seafood flavor built from a well-developed lobster stock, with just the right amount of sweetness from aromatics and a bright finish from citrus or wine.
  • Versatile and crowd-pleasing for special occasions, dinner parties, or romantic nights at home.
  • Relatively approachable for home cooks who want to explore French techniques without a daunting list of steps.
  • Make-ahead friendly: you can prepare elements in advance, then finish into a perfect bisque when guests arrive.
  • Customizable to fit dietary needs or preferences with thoughtful substitutions (vegan, gluten-free, dairy-free options available).
  • Beautiful as a course centerpiece or a luxurious starter that sets the tone for a memorable meal.
  • Pairs wonderfully with a range of beverages and sides—from crisp white wines to crusty bread with butter—enhancing the meal rather than competing with it.

Flavor Profile & Texture

At first touch, lobster bisque greets you with a gentle wave of sea-salt air and roasted complexity. The aroma alone is enough to conjure a coastal market at dawn—the brine of lobster, the sweetness of caramelized onions and celery, and the murmured warmth of garlic and herbs sautéed in butter. The stock carries a profound depth, a result of simmering lobster shells long enough to extract every ounce of seasoning and mineral from their hulls. When the liquid is strained and enriched, the texture becomes silk, a luscious velvet that glides across the tongue rather than clinging to it. The cream–stock relationship is a careful dance: dairy smooths the edges, but it never hides the lobster’s identity. In your mouth, you’ll sense layers—savory core, a hint of sweetness, a spark of acidity or citrus, and a subtle, wine-like finish that lingers with grace.

The flavor notes unfold in stages. There’s the initial brininess—a reminder of the ocean’s vastness—balanced by the sweetness of the lobster meat itself. Then comes a toasty, roasted depth from the shells, often enriched by a touch of tomato that provides color and a gentle tang. The aromatics—onion, celery, carrot, perhaps a small amount of fennel or garlic—offer savory sweetness and a hint of herbaceous lift. A splash of cognac, sherry, or white wine introduces a bright, fruity note that brightens the palate and prevents the bisque from tipping into sameness. Finally, the finish carries a silky coat of cream, sometimes a final squeeze of lemon or a delicate herb note (tarragon or chives) that keeps the flavors expansive rather than heavy. In texture, imagine a silken custard-like soup that still feels buoyant enough to be ladled with ease, a color that glows amber or pale porcelain depending on the stock and cream ratio, and a mouthfeel that coats without feeling slick or greasy. It’s luxurious without being exhibitionist—an edible embrace that invites lingering, conversation, and, of course, second helpings.

Occasions & Pairings

Lobster bisque is a dish that signals celebration, but it also adapts beautifully to intimate weeknight dinners when you want to elevate the ordinary. It shines as a course for holiday menus, an enticing starter before a seafood platter, or a luxe main for a seafood-forward dinner. Its versatility makes it suitable for multiple settings:

  • Holiday gatherings and special occasions where a dish with immediate wow-factor is welcomed.
  • Romantic dinners at home, where slow, deliberate tasting and a refined plate elevate the evening.
  • Dinner parties, where its impressive presentation proves a memorable opener that pairs well with wine and conversation.
  • Weeknights when you crave comfort without sacrificing sophistication—especially when you’re cooking for guests who appreciate seafood.

Pairings enhance the bisque’s elegance. A crisp, well-chilled glass of champagne or a dry sparkling wine can echo the celebratory feel. For more traditional pairings, a Chardonnay with a little oak, a Meursault, or a White Burgundy complements the wine-like finish and the buttery texture beautifully. If you prefer a lighter touch, a Sauvignon Blanc with bright acidity can cut through the richness and lift the dish. For non-alcoholic pairings, a chilled cucumber-mint water or a lemon-ginger iced tea provides refreshing balance without competing with the soup’s depth. On the side, offer thin slices of toasted baguette brushed with melted butter and a whisper of garlic, or a light salad with citrusy vinaigrette to provide contrast and a refreshing finish to the course. A final note: avoid overpowering sauces or textures that compete with the bisque’s refined flavor profile. The goal is harmony, not distraction, so let the soup be the star of the plate.

Tips, Variations & Substitutions

Here are practical ideas to tailor lobster bisque to your pantry, mood, or dietary needs while preserving its soul:

  • Stock first, flavor later: Build a rich lobster stock from shells, carrot, celery, onion, and a splash of white wine. Simmer slowly to draw out maximum depth, then strain for a clean base. This foundation sets the tone for the entire dish.
  • Roux or no roux: Traditional bisque often uses a light roux to help thicken and emulsify. If you want to avoid gluten or prefer a lighter texture, you can thicken with a small amount of rice that has been simmered and pureed, or simply reduce the stock until it coats the spoon before adding cream.
  • Finish with flair: A splash of cognac or brandy added toward the end of cooking brightens the dish and ties the seafood flavors together. If you’re avoiding alcohol, a touch of white wine vinegar or lemon zest can provide a similar lift.
  • Dairy variations: Classic bisque uses cream, but you can adapt for dairy-free by using coconut cream or almond milk, adding a touch of olive oil or coconut oil to maintain richness. The flavor will skew slightly, but it stays luscious and velvety.
  • Meat alternatives: If lobster isn’t available, you can use shrimp or scallops as a substitute, or create a “lobster-inspired” stock by infusing with seaweed for depth.
  • Texture play: For an extra-smooth bisque, pass the blended mixture through a fine sieve or chinois. If you prefer a heartier bite, reserve some lobster meat in chunky pieces to be folded back in at the end.
  • Color adjustments: If the stock looks pale, a teaspoon of tomato paste adds color and a gentle acidity; for a deeper hue, a small amount of burnt butter can contribute complexity (when used judiciously).
  • Make-ahead approach: Prepare the stock and the base (sans cream) up to a day ahead. Reheat gently, finish with the cream, and add the lobster meat just before serving for a fresh, silky texture.

Storage & Make-Ahead Ideas

Like many refined soups, lobster bisque stores well and can be a time-saver for entertaining. Here are guidelines to keep flavor intact and texture at its best:

  • Stock storage: Lobster stock can be made in advance and frozen for up to 3 months. Thaw in the refrigerator overnight before use, then rewarm gently.
  • Bisque storage: The finished bisque can be refrigerated for 2–3 days. Reheat slowly over low heat, whisking to restore a smooth emulsion. Add cream at the last moment to prevent separation.
  • Make-ahead workflow: If you’re entertaining, prepare the stock and aromatics ahead of time. On the day of service, reheat the stock, finish with the cream and any lobster meat, and serve promptly to preserve its silkiness.
  • Freezing tips: If you must freeze the final bisque, freeze without dairy and add cream after thawing and reheating, warming gently to re-emulsify the texture.
  • Ahead flavor boosters: A small amount of roasted aromatics, a squeeze of lemon, or a final splash of cognac right before serving can refresh the dish when made ahead.

Fun Facts & Trivia (Optional)

Did you know that bisque, by definition, should be a smooth, creamy soup typically made from shellfish? The term has become a culinary shorthand for luxurious seafood soups, but it originally denoted a specific method of preparation that extracted maximum flavor from crustaceans. Some chefs insist that a true bisque must be strained and then reintroduced to the shellfish meat, ensuring an even, refined texture without any graininess. The color of a classic lobster bisque, deep and amber-hued, is a visual cue to its intensity—the result of long, careful reduction and the natural pigments released by lobster shells during cooking.

Another fun note: lobster, once considered a mere “poverty food” in Europe, gained prestige over centuries as methods to capture and cook crustaceans evolved. Today, lobster bisque conjures images of seaside culinary elegance, often featured in menus that celebrate coastal ingredients and the artistry of French technique. In homes and restaurants alike, the dish serves as a bridge between rustic seafood stock and refined creaminess, a testament to how simple ingredients, when treated with patience and respect, can yield extraordinary comfort and sophistication.

Conclusion: A Dish That Feels Like a Moment

Lobster bisque is more than a soup; it’s an invitation to slow down, to savor the first fragrance that greets you when you lift your spoon, and to linger over the last, luxurious mouthful. It holds a memory of the sea and a promise of warmth, a touch of elegance without ceremony, and a sense that a well-made dish can turn an ordinary evening into something worthy of celebration. Whether you’re serving it to guests who expect a showstopper or to loved ones who deserve a little extra care, this bisque offers that rare balance: indulgence that nourishes, finesse that comforts, and techniques that empower you to create something truly memorable. Embrace the ritual—the roasting, the simmering, the emulsifying—and let the result be a tribute to sea, season, and the joy of sharing good food.

Ingredients

Lobster Bisque Base

    – 1 1/2 pounds cooked lobster meat, chopped into bite-sized pieces
    → This is the star of the dish, providing both texture and luxurious lobster flavor. Use a mix of claw and tail meat for variety and color. If your lobster meat is refrigerated, pat it dry to remove excess moisture before adding to the bisque to prevent thinning. Reserve a few larger chunks for garnish just before serving.
    – Lobster shells from 1-2 lobsters, cleaned and cracked to expose the interior
    → The shells are simmered to extract maximum lobster flavor and deep color for the stock. Roasting the shells lightly in a dry pan for 5–8 minutes before simmering intensifies the sweetness and umami. Strain the shells out well to keep the bisque velvety.

Base & Aromatics

    – Unsalted butter, 3 tablespoons
    → Butter provides a rich fat base to sauté aromatics and, if you make a roux, to help thicken the bisque. Using unsalted butter lets you control the final seasoning more precisely. Melt gently to avoid browning; you want sheen and aroma, not color.
    – Extra-virgin olive oil, 1 tablespoon
    → Olive oil raises the smoke point and prevents the butter from burning during sweating of vegetables. It also adds a light fruity note that complements seafood flavor.
    – Yellow onion, 1 medium, finely chopped
    → Onions form the sweet, foundational base of the flavor. Sweat slowly until translucent to release their sugars without browning, which keeps the bisque smooth and balanced.
    – Celery stalks, 2, finely chopped
    → Celery provides subtle earthiness and crunch to the early stage; it also adds depth to the aroma as the mixture sweats. Dice finely so it dissolves pleasantly into the stock during simmering.
    – Carrot, 1 medium, finely chopped
    → Carrot adds gentle sweetness and color, helping to balance the seafood richness. Chop small so it cooks evenly with the other aromatics.
    – Garlic, 2 cloves, minced
    → Garlic delivers a sharp, warming aroma that lifts the seafood flavors. Mince finely so it distributes evenly without biting into chunks in the bisque.
    – Tomato paste, 2 tablespoons
    → Tomato paste adds depth, color, and a subtle sweetness that complements the shellfish flavor. Cook it with the aromatics for a minute to mellow its rawness and bring out its umami.
    – All-purpose flour (or gluten-free flour), 1–2 tablespoons
    → Used to form a light roux with the butter, giving gentle body and helping the bisque cling to the lobster meat. If avoiding gluten, use a gluten-free flour blend; cook until the raw flour taste disappears.
    – Dry white wine, 1/2 cup
    → Deglazes the pan, lifting fond from the vegetables and shells while introducing acidity that brightens the rich flavors. Simmer briefly after adding to reduce and concentrate the aroma.
    – Brandy or cognac, 2–3 tablespoons (optional)
    → A classic enhancement for shellfish soups, adding depth and a touch of sweetness. If you choose to use it, stir in before adding stock and allow to cook off the alcohol for a minute or two.

Stock & Flavor Build

    – Lobster stock or seafood stock, 4 cups (preferably unsalted)
    → The primary liquid that carries the bisque’s seafood-forward flavor. If you’ve boiled shells, you should have stock on hand; otherwise, simmer shells with aromatics to make a fresh stock. Strain well to keep the texture velvety.
    – Water, as needed to adjust consistency
    → Use to reach the desired thickness after simmering and straining the stock. Add gradually to avoid thinning the bisque too much; you can always reduce again by simmering longer if it’s too thin.
    – Bay leaf, 1
    → A subtle, fragrant note that rounds out the aromatics. Remove before blending or serving to avoid an overpowering herbal edge in the final dish.
    – Fresh thyme, 2–3 sprigs (or 1/2 teaspoon dried)
    → thyme adds a woodland, herbal nuance that complements seafood beautifully. If using dried thyme, crush slightly between your fingers to release essential oils before adding.
    – Salt, to taste
    → Essential to balance the sweetness of vegetables and the richness of the cream. Start with a small amount and taste as you go, especially if your stock is salted.
    – Freshly ground black pepper, to taste
    → Adds a gentle bite that helps lift the lobster flavors. Grind fresh just before serving for maximum aroma and brightness.
    – Smoked paprika or cayenne pepper, 1/8–1/4 teaspoon (optional)
    → A light pinch can introduce a subtle warmth and a hint of smokiness without overpowering the delicate seafood notes. Use sparingly if you’re sensitive to heat.

Finish & Garnish

    – Heavy cream, 1/2–1 cup
    → Stirred in at the end to enrich and emulsify the bisque, giving a luxurious, silky texture. If you prefer a lighter version, you can use half-and-half or a splash of cream, but full cream yields the classic velvety finish.
    – Fresh lemon juice, 1 teaspoon
    → A small touch of brightness to cut through the richness and highlight the seafood sweetness. Add after tasting to avoid over-acidifying the soup.
    – Fresh chives or tarragon, finely chopped for garnish (optional)
    → Adds a fresh, herbaceous contrast and a pop of color. Chives give a mild oniony note; tarragon delivers delicate anise-like brightness that pairs well with seafood.
    – Reserved lobster meat for garnish (optional)
    → Extra large chunks reserved for topping the bisque at service create a visually appealing contrast and a burst of lobster flavor in every spoonful. If your meat is pre-cooked, briefly rewarm or warm through in the hot bisque before serving.

Serving & Accompaniments

    – Crostini or toasted bread slices
    → A crisp, neutral anchor to scoop the creamy bisque and soak up every bit of flavor. Toast with a touch of garlic for extra aroma if desired, and rub with a cut clove while hot for a quick finish.
    – Lemon wedges (optional)
    → Serve on the side for guests who want an extra burst of brightness. A quick squeeze just before eating brightens the rich soup without altering the texture.

Instructions

  • Roast the lobster shells in a dry skillet over medium-high heat until deeply golden and fragrant, about 5–8 minutes, turning once to color evenly.
  • → Roasting concentrates sugars and umami in the shells, building a deeper, more complex stock color and flavor before you simmer the stock.
  • In a large stockpot, combine the roasted shells with 4 cups unsalted lobster stock or seafood stock (or water if stock is not yet available); bring to a gentle simmer over medium heat, then cook for 30–40 minutes to extract maximum flavor and color.
  • → A steady simmer avoids toughening proteins and prevents clouding; simmering gently draws gelatin and mineral flavors from the shells without emulsifying fat into an opaque stock.
  • Strain the stock through a fine-mesh sieve or cheesecloth into another pot, pressing on the solids to extract every last drop, and discard the shells.
  • → Straining yields a velvety liquid free of shell fragments, ensuring a smooth bisque with a refined texture.
  • In a clean heavy-bottom pot, melt 3 tablespoons unsalted butter with 1 tablespoon extra-virgin olive oil over medium heat until the butter foams but does not color.
  • → The oil raises the butter’s smoking point, preventing burning while the butter provides rich flavor and a glossy mouthfeel essential to the base.
  • Add the finely chopped yellow onion, celery, and carrot; season lightly with salt and sweat until translucent and soft, about 8–10 minutes, stirring occasionally to promote even cooking.
  • → Sweating releases the vegetables’ sugars and aroma compounds without browning, creating a sweeter, smoother foundation for the bisque.
  • Add the minced garlic and tomato paste; cook, stirring, for 1–2 minutes until the paste darkens slightly and fades raw notes.
  • → Caramelizing tomato paste deepens color and umami, balancing the seafood sweetness and helping the bisque cling to the lobster meat later.
  • Sprinkle in 1–2 tablespoons all-purpose flour; whisk continuously to form a light roux and cook for 1–2 minutes to remove the raw flour taste.
  • → The roux provides gentle body to the bisque and helps it emulsify with the dairy without separating; gluten-free flour can be used as a direct substitute if needed.
  • Pour in 1/2 cup dry white wine; whisk to deglaze the pan, scraping up any fond, and simmer until the wine is reduced by about half to concentrate the acidity and flavor.
  • → Deglazing lifts flavorful browned bits from the pan, adding depth and a bright acidity that cuts richness without overpowering the shellfish.
  • If using brandy or cognac, add 2–3 tablespoons now and simmer 1–2 minutes to burn off the alcohol and concentrate the sweetness.
  • → Alcohol carries aromatics into the broth; simmering reduces it to a mellow, integrated note that enhances the seafood profile.
  • Pour the strained stock back into the pot with the aromatics; add enough water to reach the desired consistency, add the bay leaf and fresh thyme, and bring to a gentle simmer.
  • → The stock and added water balance intensity with body; bay leaf and thyme impart aromatic complexity that complements the lobster without overpowering it.
  • Simmer gently for 20–30 minutes, partially covered, to marry flavors while maintaining a silky texture for the final bisque.
  • → Slow simmering melds aromatics with stock, yielding a harmonious base that remains smooth when finished with cream.
  • Remove and discard the bay leaf and thyme sprigs; strain the aromatics again through a fine sieve to ensure an ultra-smooth base for finishing.
  • → Straining a second time ensures a perfectly velvety bisque free of leaf fragments or fibrous bits that could rupture the texture.
  • Return the smooth stock to the pot; season with salt and freshly ground black pepper to taste; add a pinch of smoked paprika or cayenne for a subtle, warming undertone if desired.
  • → Proper seasoning balances the sweetness of the vegetables with the richness of the dairy and seafood; spices should be added in small increments and adjusted by taste.
  • Stir in 1/2–1 cup heavy cream; bring the bisque to a gentle simmer and avoid boiling to prevent curdling and separation of the dairy.
  • → Cream adds a luxurious, velvety texture and a satin finish; overheating can cause separation, so keep heat steady and just below a boil.
  • Stir in 1 teaspoon fresh lemon juice and taste; adjust brightness with more juice if needed to lift the rich flavors without making the soup sour.
  • → A touch of acid brightens the sweetness of the lobster and cream, clarifying the palate and enhancing the overall balance.
  • Fold in the chopped lobster meat, warming it gently in the hot bisque for 2–3 minutes until just heated through; do not overcook to preserve tender texture.
  • → Pre-cooked lobster only needs gentle warming to maintain its delicate texture and prevent toughening; it contributes color and succulent bites to each spoonful.
  • Taste and adjust seasoning one final time, correcting salt, pepper, and acidity, and if the bisque is too thick, whisk in a little hot water or stock to reach the desired consistency.
  • → Final checks ensure the flavor is balanced and the texture is perfect, with the bisque coating the spoon smoothly.
  • Keep a few larger pieces of lobster meat reserved for garnish and gently rewarm them in the hot bisque just before service; if desired, tuck them into bowls as a show-stopping finish.
  • → Reserved chunks provide a visual and textural contrast at plating, echoing the lobster flavor and offering a luxurious bite in each serving.
  • Prepare crostini or toasted bread slices; rub with a cut clove of garlic if desired and toast until golden and crisp to serve alongside the bisque for dipping.
  • → Crisp bread adds a textural counterpoint to the creamy bisque, and a light garlic aroma enhances the seafood savor in every bite.
  • Serve the lobster bisque hot in warmed bowls with a few reserved lobster chunks on top and a squeeze of lemon on the side for guests who want extra brightness; accompany with the crostini and lemon wedges.
  • → Warming the bowls helps maintain a luxurious temperature from first spoonful to last, while the garnish and citrus offer aroma, color, and balance.

Notes

This lobster bisque is a luxurious, shellfish-forward soup built from roasted lobster shells, aromatics, and a silky cream finish. For maximum depth, roast the shells lightly in a dry pan to intensify sweetness, then simmer with the aromatics and stock, straining well to keep the liquid bright and velvety. Add the chopped lobster meat toward the end to preserve its texture, and if your meat is refrigerated, pat it dry before folding it in so the bisque stays creamy rather than thin. A small splash of brandy or cognac added after deglazing can deepen the flavors, while a pinch of smoked paprika or cayenne provides a subtle warmth without masking the seafood; finish with fresh lemon juice to brighten the finished soup. If you prefer a lighter version, substitute half-and-half or a dairy-free cream, but note that the result will be less rich and silky. To make ahead, prepare the stock and base up to the cream stage, refrigerate or freeze, then reheat gently and add the cream just before serving. Gluten-free or dairy-free adjustments are easy: use a gluten-free flour or omit the roux, ensure your stock is gluten-free, and use a dairy-free cream if needed. Serve with crostini or toasted bread and lemon wedges, and garnish with reserved lobster chunks and chopped chives or tarragon for color and a fresh finish; avoid boiling after adding the cream to prevent separation and keep the texture smooth.

Tips

Tips for Lobster Bisque

  • Maximize lobster flavor by using a mix of claw and tail meat and patting dry if refrigerated; reserve larger chunks to garnish for a visually appealing finish.
  • Lightly roast the lobster shells in a dry skillet for 5–8 minutes before simmering to intensify sweetness and umami; crush or chop the shells after to maximize flavor extraction.
  • Sweat the aromatics gently in a mix of unsalted butter and olive oil; keep the vegetables pale and translucent to build a clean base without caramelized notes that can deepen the color too much.
  • Cook the tomato paste with aromatics for about a minute to mellow its raw flavor and contribute depth and color to the bisque.
  • Prepare a light roux with butter and flour (or gluten-free flour) and cook 1–2 minutes; this gives gentle body to the bisque without a heavy paste; if gluten-free, use a blend and cook until the raw flavor disappears.
  • Deglaze with dry white wine and brandy or cognac (if using); simmer to reduce by about half to concentrate flavors and lift the seafood sweetness.
  • Simmer the shells with stock for 20–30 minutes (or longer if you have time) to extract maximum flavor and color; strain through a fine-mesh sieve to keep the liquid velvety.
  • Keep stock unsalted or lightly salted; adjust salt after incorporating the lobster meat and cream to avoid oversalting the bisque.
  • Reserve some large lobster meat chunks for garnish and warming gently in the hot bisque just before serving to preserve their texture and shape.
  • Finish with cream off the heat; add gradually and whisk or blend briefly to emulsify; avoid vigorous boiling after adding cream to prevent curdling.
  • Season gradually with salt, pepper, and a pinch of smoked paprika or cayenne for a subtle warmth; taste after each adjustment to maintain balance.
  • A splash of fresh lemon juice at the end brightens the flavors; add a little at a time and taste to avoid overpowering the seafood sweetness.
  • For a smoother texture, blend the bisque briefly and pass through a fine sieve; for a heartier mouthfeel, blend less and leave some small pieces of lobster.
  • Make ahead: bisque refrigerates well for 1–2 days; reheat slowly over low heat, stirring, and re-emulsify with a touch of cream if needed; add reserved lobster meat at service.
  • Serve with crisp crostini or garlic-rubbed bread and lemon wedges; garnish with chopped fresh chives or tarragon and some reserved lobster meat for a luxurious finish.

FAQ

What is lobster bisque?

Lobster bisque is a creamy, smooth soup traditionally made from lobster stock, lobster flesh, aromatics, a touch of wine or cognac, and cream. The lobster shells are simmered to extract flavor, then strained for a velvety texture.

What ingredients do I need to make lobster bisque?

For a classic lobster bisque, you’ll need lobster (tails or claws), shells for stock, aromatics (onion, carrot, celery, garlic), tomato paste, cognac or brandy, dry white wine, butter, flour (for a roux) or cornstarch for thickening, heavy cream or crème fraîche, salt and pepper, bay leaf, and thyme. Optional: paprika or cayenne for heat, lemon juice to brighten, and fresh lobster meat for the finished soup.

Can I use pre-cooked lobster or leftover lobster?

Yes. Use the meat from pre-cooked lobster for the finishing, and save the shells to make the stock. If you only have meat, you can simmer shells briefly in stock to extract flavor, or buy lobster stock.

How do I make the stock for lobster bisque?

Simmer lobster shells with onions, carrots, celery, garlic, and herbs in water to extract flavor. Deglaze with white wine, then simmer 30–60 minutes. Strain the stock and return to the pot. This forms the base; you can enrich with a bit of cream at the end if desired.

How do I thicken and smooth the bisque?

Traditionally, bisque is thickened with a roux (butter and flour) and then strained to a velvety texture. You can also purée a portion of the stock and lobster meat and whisk it back in, or use a cornstarch slurry for a lighter thickening. Finish with cream for silkiness.

Can I make a dairy-free or lighter version?

Yes. To reduce dairy, skip the heavy cream or use a plant-based cream. Use olive oil instead of butter, and thicken with a light roux made with flour or cornstarch. The texture will be lighter and the flavor will rely more on the lobster stock.

How should I store and reheat lobster bisque?

Store in an airtight container in the fridge for up to 3 days. Reheat gently over low heat, stirring often to prevent curdling. If the soup thickens, thin with a little broth or water. Do not boil after adding dairy; heat just until steaming hot.

How do I season and adjust the flavor?

Taste and adjust with salt, pepper, and a splash of lemon juice or white wine to brighten. A pinch of cayenne or paprika adds warmth. If stock is very salty, balance with a touch of cream or a splash of water.

What are good garnishes and serving suggestions?

Serve hot with a drizzle of cream or crème fraîche, chopped chives or parsley, and a few lobster meat pieces. Pair with crusty bread or garlic croutons. A splash of cognac at the end can add depth (optional).

Can I freeze lobster bisque?

You can freeze the stock or the finished bisque (without dairy) for up to 2–3 months. Thaw in the fridge, then reheat gently and whisk in a little cream if desired.

Introduction / Hook

Imagine a sun-washed afternoon by the coast, where light breezes carry the scent of sea salt and the soft crunch of a butter-toasted bun gives way to a delicate, ocean-sweet treasure within. A lobster roll is not just a sandwich; it’s a moment of pure seaside indulgence that feels both timeless and effortlessly modern. This Lobster Roll Recipe invites you to savor coastal elegance with every bite. The meat—the tender, briny sweetness of lobster—meets a whisper of richness and a bright kiss of lemon and crunch, all tucked into a warm, glossy roll. It’s comfort that still feels celebratory, a dish you can share with friends on a summer evening or treat yourself to after a long day. The aroma alone—thin wisps of buttery toasting, a hint of citrus, the purity of fresh seafood—promises an experience that lingers long after the last bite disappears. Whether you’re near the water or simply chasing that coastal mood in your kitchen, this lobster roll captures the essence of a seaside restaurant without demanding a passport or a long meal. It’s a dish that invites you to slow down, savor, and toast to memories made around a simple, well-crafted bite.

The Story Behind the Dish

The lobster roll is a quintessential emblem of New England coastal culture, a dish born from practicality, abundance, and a love of crisp, satisfying simplicity. For generations, lobstermen hauled in their daily catch, and families turned the bounty into quick, nourishing meals that could travel—whether to a picnic on a fog-draped pier or a bustling seaside shore lunch. The concept of a lobster salad tucked into a soft bun emerged from the desire to combine the ocean’s prize with portability and comfort. In the early 20th century, clever cooks in Maine and parts of New England started pairing lightly dressed lobster with buttery, split-top buns—an idea that caught on in bistros, roadside shacks, and seasonal eateries across the coast. The result was a dish that felt luxurious without being fussy, a celebration of peak-sweet lobster meat, tender bread, and a creamy—but not heavy—balance of texture and flavor.

Over time, regional interpretations grew up around this humble sandwich. Some prefer a lean, almost bare rendition that lets the lobster shine; others crave a touch more creaminess, a sprinkle of celery for crunch, or a bright citrus note to mimic the sea air. The beauty of the lobster roll lies not only in its ingredients but in its adaptability—the way a single, well-made bite can evoke a day’s worth of memories: sun-warmed sunlit docks, cool sea spray, the laughter of friends, a gentle cheers of clinking glasses. The dish has traveled well beyond New England, finding homes in urban bistros and cozy home kitchens around the world, where cooks honor the same core ideas: fresh, pristine seafood, a comforting roll, and a balance that allows each element to speak for itself. This recipe captures that heritage while remaining approachable, a bridge between tradition and contemporary flavor that feels both nostalgic and entirely new with every serving.

Why You’ll Love This Recipe

  • Fast and satisfying: A lobster roll can come together in a matter of minutes, making it perfect for a quick lunch, a relaxed weekend dinner, or a standout addition to a casual gathering.
  • Elegant simplicity: The dish relies on high-quality lobster meat and a well-made roll, letting the ocean’s sweetness and the bread’s toasty warmth shine through without overwhelming the palate.
  • Versatile appeal: The lobster roll works beautifully for weeknights, weekend gatherings, or sunny al fresco meals. It adapts to a range of sides and dressings, from crisp greens to tangy pickles, depending on your mood.
  • Texture contrast that sings: Tender, succulent lobster against a softly crunchy, lightly buttered bun creates a balanced bite with each mouthful.
  • Luxurious feel, everyday practicality: Even though it feels indulgent, the dish is surprisingly approachable and can be assembled with pantry-friendly shortcuts if needed.
  • Family-friendly charm: It’s a crowd-pleaser that both kids and adults can enjoy, with room to customize the amount of dressing, spice, or lemon brightness to suit different tastes.

Flavor Profile & Texture

The lobster roll is a study in clean, bright contrasts. The lobster meat itself is typically tender, with a sweetness that hints at the ocean’s depth. When nestled in a split-top bun that has been gently warmed or lightly brushed with a bit of butter, the bread contributes a subtle, toasty crust and a soft, chewy crumb that yields with a delicate press of the teeth. This contrast—soft interior, crisp exterior—gives the bite a satisfying texture from the first to the last bite.

The overall flavor profile tends toward the refined and seaworthy: a pristine, almost pristine sweetness from the lobster is complemented by creamy richness from a dressing that binds without weighing down the meat. A touch of brightness—often from citrus or a touch of acidity—cuts through the richness and lifts the dish, keeping it feeling light and lively rather than heavy. There’s a gentle saltiness that mirrors the sea, balanced by the bun’s mild sweetness and a whisper of aromatics that can range from delicate herbs to a subtle savoriness from pepper or onion notes in the dressing. The result is a cohesive chorus of flavors: the sea’s own sweetness meeting toasty bread, where each bite reveals tenderness in the lobster and crispness in the bun. It’s a sandwich that tastes like summer—airy, bright, and deeply satisfying all at once.

A well-made lobster roll doesn’t overwhelm the senses with one dominant flavor. Instead, it invites you to explore the layers: the succulent meat’s natural sweetness, the bread’s comforting warmth, the dressing’s creamy tang, and a citrusy zing that reminds you of sunlit docks and breezy afternoons. The textures and flavors are designed to complement each other, so you notice each component as you take your next bite—the way the roll keeps the lobster juicy without sogginess, the contrast of warm bread and cool meat, and the subtle whisper of herbs or citrus that clean the palate between bites.

Occasions & Pairings

This dish shines in a range of settings, making it a versatile centerpiece for your menu. Its elegance and simplicity suit weekend lunches as well as more festive evenings. Here are some ideas to help frame occasions and pairings:

  • Summer picnics and beach days: A classic choice for warm-weather gatherings where a crisp salad, sliced fruit, or pickled vegetables offer a refreshing counterpoint.
  • Casual cocktails and social bites: Pair with light, sparkling beverages or cold beers to keep the mood breezy and fun.
  • Weeknight dinners: A quick, impressive option that feels special without requiring a long cooking session.
  • Celebrations and coastal-inspired menus: Elevate the experience with small, complementary courses like a crisp slaw, a light citrus salad, or a chilled seafood starter.

Pairings to consider (without stepping into actual recipe instructions):

  • Side dishes with crunch: A tangy coleslaw, a fennel and apple salad, or crisp pickle spears add brightness and textural contrast.
  • Bevy companions: A chilled white wine with bright acidity, a sparkling rosé, or a cold lager can harmonize with the dish’s oceanic notes.
  • Dessert options: A light lemon gelée, a vanilla bean ice cream, or a sorbet to cleanse the palate after the rich, creamy bite.

Tips, Variations & Substitutions

Here are ideas to tailor the lobster roll to your preferences, dietary needs, or available ingredients, all while preserving the dish’s core charm:

Classic Spin

Keep the essence of the traditional lobster roll by favoring a clean lobster-meat-forward approach with a lightly dressed mixture and a soft, toasted roll. The balance should feel airy and luxe rather than heavy, allowing the sweet lobster to remain the focal point.

Flavor Elevations

  • Herb accents: A gentle whisper of fresh chives, tarragon, or parsley can brighten the dish without overpowering the lobster’s natural sweetness.
  • Citrus lift: A subtle citrus note—fresh lemon or a hint of zest—can awaken the flavors and add a refreshing edge to the bite.
  • Crunchy contrasts: A light crunch from finely shredded celery or cucumber can provide a playful textural counterpoint while keeping the dish bright and light.

Vegan or Alternative Versions

  • Vegan substitutes: For those avoiding shellfish, a sea-inspired plant-based option can echo the texture and saltiness through carefully chosen plant proteins and a tangy, creamy dressing that mimics the mouthfeel of a classic lobster roll.
  • Non-shellfish seafood substitutes: If lobster isn’t available, other white, delicate seafood options or even crab can offer a similar tenderness and sweetness, adjusted with respectful seasoning and balance.

Gluten-Free & Dietary Adjustments

  • Gluten-free bun: Swap in a gluten-free roll or a sturdy gluten-free option that toasts nicely and holds up to the filling without crumbling.
  • Lightening the dressing: If you’re watching fat or calories, you can emphasize a lighter emulsified dressing while keeping the shellfish’s natural moisture and flavor.

Regional Twists

  • Mid-Atlantic influence: A touch of celery seed or a dash of cracked black pepper can give a nod to regional seasoning traditions while staying true to the dish’s spirit.
  • Southern coastal flare: A hint of a pale paprika or a delicate chili oil drizzle can introduce a subtle warmth and depth to the roll.

Storage & Make-Ahead Ideas

While lobster rolls are best enjoyed fresh, there are practical ways to plan ahead and reduce last-minute stress without sacrificing quality:

  • Properly cooled components: If you’re preparing elements ahead of time, keep the lobster meat and any dressing refrigerated separately from the bread. This helps prevent sogginess and keeps textures vibrant.
  • Rolls for serving: Toast or warm the buns just before serving to preserve the ideal contrast of textures. If you’re entertaining, you can toast a batch of buns in advance and store them in a clean, dry container to reheat gently as needed.
  • Leftovers: If you have leftover lobster meat, it can be stored in an airtight container in the refrigerator for a short period. Reheat gently and assemble fresh rolls when you’re ready to enjoy again; avoid prolonged refrigeration that could affect texture.
  • Freezing considerations: Freezing lobster meat is not generally ideal for quality, as moisture loss can alter texture. If you anticipate needing to store, consider freezing only the meat in a way that preserves its moisture, then thawing carefully and assembling fresh when possible.

Fun Facts & Trivia (Optional)

  • Historical abundance: Lobsters were once so plentiful in parts of New England that they were considered food for the poor. Today, they symbolize coastal luxury and culinary refinement, with the lobster roll acting as a bridge between everyday practicality and gourmet experience.
  • Regional pride: Maine is often celebrated as the home of the lobster roll, but the dish has a vibrant presence across coastal communities, each adding its own subtle twist to honor local ingredients and traditions.
  • Eating culture: The lobster roll’s popularity reflects a broader trend toward simple, high-quality ingredients prepared with respect. It embodies the idea that great flavors can come from a few well-chosen components, treated with care and balanced with texture and brightness.
  • A sensory tradition: The ritual of toasting the bun, selecting the freshest lobster, and savoring the first bite is a sensory experience that often becomes a shareable memory—one that lingers well beyond the meal itself.
  • Seasonality matters: In many regions, lobster is a seasonal treasure, and the lobster roll becomes a seasonal emblem—best enjoyed when the seafood is at its peak, enhancing both flavor and texture.

Closing Thoughts

A lobster roll is more than a sandwich—it’s a celebration of land and sea, a small luxury that fits into everyday life with effortless grace. This description-prelude aims to transport you, if only for a moment, to a breezy coastal afternoon where the world slows down and the pleasures of a well-crafted bite take center stage. By focusing on the lobster’s natural sweetness, the bread’s gentle warmth, and a balance of brightness and creaminess, this dish invites you to savor the sea’s bounty with a touch of nostalgia and a spark of novelty. Whether you’re recreating a classic by the coast or capturing that seaside mood in your kitchen, may every bite feel like a vacation you can savor again and again.

Ingredients

Lobster Roll Filling

  • – 1 1/2 to 2 pounds cooked lobster meat, chopped into bite-sized pieces
    → The star of the dish. Use freshly cooked lobster for the best sweetness and texture; if using leftovers, pat the meat dry to remove excess moisture so the dressing coats nicely rather than becoming watery. Break into uniform chunks to ensure each bite has lobster and dressing.
  • – 1/2 cup mayonnaise (full-fat)
    → Provides the creamy binding that holds the filling together without being dry. Use a high-quality mayonnaise for rich flavor. If you prefer a lighter dressing, you can mix in a small amount of sour cream or yogurt, but this will alter the texture and flavor profile.
  • – 2 tablespoons fresh lemon juice
    → Brightens the dressing and enhances the lobster sweetness while cutting through the richness of the mayo. Freshly squeezed juice yields a cleaner, more lively acidity than bottled substitutes.
  • – 1/4 cup finely chopped celery
    → Adds crisp texture and a subtle vegetal note that contrasts with creamy dressing. Dice celery finely so it distributes evenly without large crunchy chunks.
  • – 2 tablespoons finely chopped fresh chives
    → Provides mild onion-like aromatics and a pop of green color. Snip finely to release delicate flavor without overpowering the lobster.
  • – 1 tablespoon minced fresh dill (optional)
    → Dill pairs beautifully with seafood, imparting a light, grassy note. If using, fold in gently to preserve its aroma; omit if you dislike anise-like flavors.
  • – 1 teaspoon Dijon mustard (optional)
    → Adds a touch of tang and helps emulsify the dressing for a smoother texture. If not using mustard, a splash of white wine vinegar can provide similar brightness.
  • – 1/2 teaspoon kosher salt
    → Seasoning baseline; start here and adjust after tasting the mixture. Kosher salt blends more evenly with mayo than iodized salt, avoiding a metallic finish.
  • – 1/4 teaspoon freshly ground black pepper
    → Gives subtle sharpness that enhances all components. Grind just before use for maximum aroma.
  • – 1 teaspoon lemon zest (optional)
    → Adds a fragrant citrus lift without extra acidity; zest only the outer yellow layer to avoid bitterness.

Lobster Roll Buns

  • – 6 New England-style split-top hot dog buns (or brioche hot dog buns), lightly toasted with butter
    → Classic lobster roll buns that cradle the filling and stay sturdy when dressed. Split-top buns hold more dressing and toast beautifully; toast until lightly golden to add crunch and flavor. If you cannot find split-top buns, standard hot dog buns can work but won’t hold as much filling.
  • – 2 tablespoons unsalted butter, melted
    → For toasting the buns, this butter creates a glossy, crisp surface and helps keep the edges from getting soggy. Brush evenly on the cut sides before toasting.

Optional Add-ins

  • – 1/2 teaspoon Old Bay seasoning (optional)
    → A classic seafood spice that adds a gentle warmth and maritime character. Mix into the lobster filling or dust lightly on the surface for a coastal touch. Start with less if you’re sensitive to spice, then adjust to taste.
  • – 1 tablespoon finely chopped celery leaves or dill fronds (optional)
    → Extra herbaceous brightness; adds color and aroma without overpowering the lobster. Fold in at the end to preserve fresh flavor.
  • – 1 teaspoon capers, finely chopped (optional)
    → Introduces a briny bite that accents the sweetness of the lobster. Rinse and pat dry to control saltiness, then mince finely so they distribute evenly.

Serving & Garnish

  • – Lemon wedges, for serving
    → Offer additional acidity to brighten the roll at the table. Squeeze over the filling just before eating if desired to refresh the flavors.
  • – Fresh parsley or chives, for garnish (optional)
    → Fresh herbs add a final pop of color and aroma. Finely chop and sprinkle over the assembled rolls for a restaurant-worthy finish.

Instructions

  • Prepare the lobster meat by breaking it into uniform bite-sized chunks.
    → Uniform pieces ensure even distribution of filling in every bite and prevent stringy texture; if using leftovers, pat dry with paper towels to remove moisture so the dressing coats nicely rather than becoming watery.
  • Make the dressing by whisking full-fat mayonnaise, fresh lemon juice, and salt and pepper in a medium bowl until smooth and emulsified.
    → A stable emulsion helps the dressing cling to the lobster and prevents separation while you spoon it into the buns, yielding a creamy, cohesive filling.
  • Fold in finely chopped celery and fresh chives, then add dill if using; mix just until evenly distributed.
    → The crisp celery and bright herbs provide texture and aromatic contrast to the creamy dressing; dice celery finely so it distributes evenly without large crunches.
  • Season and brighten the mixture with optional lemon zest and Dijon mustard (if using); adjust salt and pepper to taste.
    → Zest adds a fragrant citrus lift without extra acidity, while mustard can enhance emulsion and tang; taste and balance to your preference for a clean, seafood-forward profile.
  • Incorporate optional add-ins such as Old Bay and finely chopped capers if desired; fold gently to avoid breaking the lobster chunks.
    → Old Bay imparts a maritime warmth and a touch of spice; capers introduce a briny bite that complements the lobster’s sweetness without overwhelming it.
  • Chill the filling for 15 to 20 minutes in the refrigerator to meld flavors and help the dressing cling to the lobster.
    → Chilling firms the mixture, improves ease of handling during assembly, and prevents the filling from sliding out of the buns.
  • Toast the split-top New England-style buns (or brioche buns) with melted butter on their cut sides until lightly golden and crisp.
    → Toasting creates a flavorful crust, helps prevent sogginess, and gives structural support to hold the filling without collapsing.
  • Fill each toasted bun generously with the lobster mixture, mounding slightly while keeping a neat edge; press gently to compact without crushing the lobster.
    → A well-packed filling ensures each bite delivers lobster and dressing together, and a tidy presentation is easier to eat.
  • Serve immediately with lemon wedges and a sprinkle of fresh parsley or chives for garnish.
    → A squeeze of lemon brightens the richness just before eating, and fresh herbs provide a restaurant-quality aroma and color.

Notes

These lobster rolls are best enjoyed with freshly cooked lobster for maximum sweetness and a tender bite; pat any leftovers dry to prevent a watery dressing so the mixture coats evenly without pooling.

For the dressing, use a full-fat mayonnaise to achieve creamy binding and brighten with freshly squeezed lemon juice; finely chopped celery and chives add crunch and color, while dill is optional for a classic seafood note.

A small amount of Dijon mustard helps emulsify the mixture and add a subtle tang; if you skip mustard, a splash of white wine vinegar can provide a similar brightness. Season with kosher salt and freshly ground black pepper, tasting and adjusting as needed.

Toast New England-style split-top buns brushed with melted butter until lightly golden to create a crisp edge that holds up to the filling. If you prefer a lighter version, reduce mayo and substitute some of it with yogurt or sour cream, keeping in mind texture will be looser and flavors may mellow slightly.

Optional add-ins like Old Bay, chopped capers, or celery leaves can add coastal nuance—add gradually to taste. For best results, assemble just before serving and serve with lemon wedges and a garnish of fresh parsley or chives for color. If making ahead, keep the filling and buns separate and refrigerate until ready to assemble.

Tips

Tips for Perfect Lobster Roll

  • Use the best lobster you can get: Freshly cooked lobster meat has the sweetest flavor and best texture. If you’re using leftovers, pat the meat very dry with paper towels to prevent a watery dressing and to help the dressing cling.
  • Keep the lobster chunks uniform: Break the meat into bite-sized, uniform pieces so every bite has a balanced lobster-to-dressing ratio. Avoid mashing the meat; you want distinct chunks for texture.
  • Emulsify the dressing properly: Whisk mayonnaise with lemon juice (and Dijon if using) until smooth and glossy. If the mix looks separated, whisk in a splash of cold water or a tiny bit more mayo to bring it back together.
  • Balance acidity and brightness: Fresh lemon juice brightens the filling, but be mindful of too much acidity. Add lemon zest (optional) for fragrance without adding more liquid.
  • Chop textures uniformly: Finely dice celery and chives to distribute crunch and aroma evenly. If you prefer more bite, you can leave a few pieces slightly larger, but keep the majority uniform.
  • Herbs and add-ins: Fold in dill (optional) and chives gently at the end to preserve their delicate aroma. If using Old Bay or capers, start with a small amount and taste before adding more.
  • Creaminess without sogginess: The mayo-based dressing should coat the lobster lightly, not drown it. Start with the recommended amount and add more only if needed to bind.
  • Toast the buns correctly: Use split-top New England buns or brioche buns. Toast with butter until lightly golden and crisp on the edges to create a barrier against sogginess from the filling.
  • Butter the buns generously: Lightly brush both sides of the cut surfaces with melted butter before toasting for a glossy finish and extra flavor.
  • Make ahead tips: The dressing can be prepared a day ahead, but keep the lobster chilled and add it to the dressing just before assembly to preserve texture. Assemble the rolls close to serving for best texture.
  • Assembly guidance: Spoon filling into the buns and press gently to help it stay put. Don’t overfill; you want a neat, easy-to-eat roll with a good lobster-to-dressing balance.
  • Safety and freshness: Keep the dressed lobster refrigerated if not serving immediately. Do not leave perishable seafood at room temperature for extended periods.
  • Garnish and serving: Offer lemon wedges and a sprinkle of chopped parsley or chives for color. A light squeeze of lemon just before eating brightens the flavors on the plate.

FAQ

What is a lobster roll?

A lobster roll is a sandwich featuring tender lobster meat dressed lightly with mayo or butter, packed into a split-top bun. This version uses a mayo-based relish, a touch of lemon, celery for crunch, and toasted buns for extra flavor.

What ingredients do I need?

For 4 servings: 1 to 1.25 pounds lobster meat (knuckle and claw meat is ideal), 3–4 tablespoons mayonnaise, 1–2 celery stalks finely chopped, 1 tablespoon lemon juice, 1–2 teaspoons chopped fresh chives or parsley, salt and pepper, unsalted butter, 4 split-top hot-dog buns. Optional: a pinch of paprika or Old Bay, scallions, or tarragon.

Can I use imitation lobster or other seafood?

Imitation lobster (surimi) is not ideal for authentic flavor. You can substitute langoustine or crab in a pinch, but it won’t taste exactly like lobster. If using canned lobster meat, drain well and pat dry.

How do I cook or prepare the lobster?

Boil or steam live lobsters until the shells are bright red and the meat is opaque (about 8–10 minutes for 1–1.25 lb lobsters). Let cool, then remove meat from tails, claws, and knuckles; chop into bite-sized pieces.

How do I dress the lobster for the roll?

In a bowl, mix the chopped lobster with mayonnaise, lemon juice, celery, chives, and a pinch of salt and pepper. For a lighter version, use half mayo and half Greek yogurt. Taste and adjust seasoning.

What bread should I use?

Classic Maine-style lobster rolls use split-top hot dog buns toasted in butter. You can also use brioche or soft sandwich rolls if you can’t find the real buns. Toast or butter the cut sides for extra flavor and to prevent sogginess.

How do I assemble the rolls?

Butter and toast the buns, then fill with a generous amount of dressed lobster. Keep extra dressing separate to add as needed. Serve immediately for best texture.

What are the differences between Maine and Connecticut styles?

Maine style is typically cold lobster meat mixed with mayo and served on a butter-toasted bun, often with lettuce. Connecticut style is warm lobster tossed in melted butter, served warm in a split-top bun. This recipe is closest to Maine style but can be adapted to Connecticut by using warm butter instead of mayo dressing.

How should I store leftovers?

Store lobster meat and dressing separately in the fridge for up to 1 day. Assembled rolls are best eaten the same day. Reheat lobster meat gently if using warm butter style, but do not reheat the mayonnaise-based dressing.

Can I prep this ahead or freeze it?

You can prep the dressing and chop the celery in advance. Hold off mixing with lobster until ready to serve. Fresh lobster meat does not freeze well; if you have frozen lobster, thaw and drain well before mixing.

Any tips for preventing soggy buns?

Toast buns with butter until golden, and mix just enough dressing to coat the lobster. Keep extra dressing separate and add at serving, so the buns stay crisp.

Introduction / Hook

Imagine a sun-soaked table set along a breezy coastline, the air thick with the scent of the sea and a mosaic of spices. Steam unfurls like wisps of cloud, a chorus of sizzling sounds rising from a grand, communal boil. This is more than a dish; it’s a celebration of gathering, of laughter echoing across the table, of fingers stained with gold and orange and the faint glint of lemon at the corner of every smile. A seafood boil is the kind of feast that instantly makes strangers feel like neighbors, neighbors feel like family, and family feel like the best version of themselves: warm, bold, and incredibly alive. Each bite carries a whisper of the ocean, a memory of long summer days, and a spark of fire that lingers just long enough for you to reach across and pass the next plate. Welcome to a one-pot celebration that honors the sea, the season, and the simple joy of sharing a generous, unhurried meal with people you love.

The Story Behind the Dish

The seafood boil is a vibrant thread in the culinary tapestry of coastal communities, with roots that drift through the Gulf Coast, the Atlantic seaboard, and the river towns where families gather to mark birthdays, birthdays of boats, and the annual return of seafood season. Its most spirited iterations often owe a debt to Cajun and Creole traditions, where bold spice profiles, homemade broths, and a sense of theater turn cooking into an event as much as a sustenance. Historically, these boils emerged as practical, communal feasts: a handful of fresh catch, a stockpot, a sturdy flame, and the instinct to share whatever bounty the tide delivered. Friends would bring what they could—corn, tubers, smoky sausages, or herbs from the garden—while someone kept watch over the fire and tasted the bubbling pot with a yes or no that carried the weight of home. Over time, each family or neighborhood added its own signature touches: a particular spice blend, a preferred finishing kick, or a traditional squeeze of citrus that brightens the entire spread. Today, the seafood boil remains an emblem of hospitality—a sensory symphony of briny sweetness, citrus zest, peppery warmth, and the satisfying, communal ritual of pulling apart a well-seasoned feast with your hands and your heart in equal measure.

Why You’ll Love This Recipe

  • One-pot celebration: A grand, shareable dish that brings people together around a single, steaming centerpiece.
  • Adaptable to any crowd: Easily scaled up or down, with the ability to accommodate different dietary needs and spice preferences.
  • Sensory delight: A chorus of aromas—briny, smoky, citrusy, and subtly sweet—builds anticipation from the moment the pot comes to life.
  • Palette-friendly complexity: A balance of warm heat, bright acidity, and deep, comforting savor creates layers of flavor in every bite.
  • Relaxed yet festive: It feels special enough for a celebration, but the method is forgiving enough for a casual weeknight with friends.
  • Make-ahead and social: The prep can be shared among guests, turning cooking into a collaborative, joyful activity rather than a solo task.

Flavor Profile & Texture

This dish delivers a multifaceted flavor profile that feels both coastal and comforting. The core is a brimming pot of broth or seasoned liquid that carries the essence of the sea—oceanic salinity softened by citrus brightness and a kiss of smoke or spice. The spice level—whether mild, medium, or fiery—acts as a warm invitation rather than a jolt, highlighting the natural sweetness of the seafood and the starches that soak up all the good flavors. Texturally, you’ll experience a dance between al dente, almost creamy interior of potatoes if present, the tender yet resistant bite of shellfish, and the yielding softness of corn-like components if included. The sausage or other smoky, savory elements (when part of the boil) contribute a meaty depth that anchors the dish, while fresh herbs and aromatics provide aromatic top notes that lift the whole plate. The result is a mosaic of textures: taut with chew, silky with brine, and juicy with a lingering coastal aftertaste. And then—once you squeeze a bright wedge of citrus over the spread—the entire table seems to glow with a fresh, mouthwatering finish that makes every bite feel like a small victory.

Occasions & Pairings

A seafood boil is inherently social, making it ideal for a variety of occasions beyond the ordinary weeknight. Consider these scenarios to tailor your gathering:

  • Summer backyard or beach gatherings where the heat requires a meal that’s forgiving and shareable.
  • Family reunions or milestone celebrations that call for a centerpiece dish with communal appeal.
  • Game-day feasts or weekend get-togethers where the aroma draws guests from room to room.
  • Holiday-forward events that want a coastal twist—something festive, tactile, and interactive.

Pairings can be crafted to suit the mood and season. Consider light, crisp beverages to cut through the richness, or a cool, citrusy drink to echo the brightness of the dish. For sides, think of simple, starchy accompaniments and fresh greens that balance the richness without stealing the spotlight. A bright, zesty finish—lemon, lime, or a splash of vinegar—can elevate the entire spread. If you’re serving a crowd with diverse tastes, a few colorful, crunchy garnishes or dips can provide extra texture and contrast that complement the main event without overpowering it.

Tips, Variations & Substitutions

  • Heat and spice: Start with a moderate level and offer additional heat on the side for guests who want more kick. The beauty of a boil is that it’s easy to customize at the table with bowls of hot sauce or pepper flakes.
  • Protein options: This concept travels well with a variety of seafood and shellfish. If you’re cooking for a crowd, mix a few types to create a diverse tasting experience. If seafood isn’t available, you can craft a vegetarian or plant-based version featuring hearty vegetables and plant proteins that mimic the textures of a seafood medley.
  • Vegetable and starch choices: While traditional boils include a mix of sturdy vegetables and starches, you can swap in seasonal produce to maintain freshness and color throughout the year. The goal is to complement the ocean-savory base with textures that hold up to a lively boil.
  • Calibrating the broth: The liquid you choose should be potent enough to carry aromatics and flavors, yet mellow enough to allow the natural sweetness of the seafood to shine through. A good balance of salt, acidity, and warmth is key.
  • Regional twists: A touch of coastal herb blends, a nod to smokiness from a favorite wood-smoked spice, or a signature citrus finish can give your boil a distinctive regional fingerprint.
  • Allergen-aware options: For guests with dietary restrictions, consider a version that keeps the core flavor profile intact while omitting common allergens or substituting with safer alternatives. The same technique and care apply—the emphasis remains on aroma, texture, and communal enjoyment.

Storage & Make-Ahead Ideas

Seafood boils are best enjoyed fresh, but practical planning can help you prepare ahead or store leftovers properly. Here are ideas to keep the spirit of the dish intact, even when schedules are tight:

  • Make-ahead components: If you’re hosting a large gathering, you can prepare the aromatics, broths, and herbs in advance, keeping them refrigerated until ready to cook. This minimizes last-minute rushing and preserves the vibrant flavors that make the boil special.
  • Storage for leftovers: Cold leftovers should be stored in airtight containers in the refrigerator and consumed within 1–2 days for best flavor and safety. Reheat gently to avoid overcooking delicate seafood components; a gentle rewarming ensures the texture remains enjoyable.
  • Freezing note: Most seafood items don’t reheat well after freezing and thawing, so it’s best to enjoy leftovers within a day or two if possible. If you do freeze components separately, thaw slowly in the fridge and rewarm with patience to maintain tenderness.
  • Make-ahead serving: If you’re hosting, consider serving in courses or stations so guests can assemble at their own pace. A well-timed warm-up of the final components can help the dish feel fresh and exciting even as the night goes on.

Fun Facts & Trivia (Optional)

Delightful tidbits that can spark conversations at the table or inspire future variations:

  • The concept of community boil gatherings reflects a long-standing maritime tradition of sharing catches and labor, turning cooking into a social event as much as a meal.
  • In some coastal communities, the boil is more than sustenance—it’s a ritual of gratitude to the waters, the boats, and the hands that worked to bring seafood to the table.
  • Regional spice blends often tell a story of trade routes, local agriculture, and personal family history, giving each boil its own flavorful signature.
  • Texture and aroma are not just sensory delights; they signal readiness and safety in cooking—steam and scent guide the cook as much as time and temperature do.
  • Secret family touches—such as a particular finishing squeeze, a fragrant herb, or a favorite dipping sauce—turn a standard boil into a personal tradition that travels across generations.

Closing Thoughts

A seafood boil is more than a recipe; it’s an invitation to slow down, to connect, and to revel in shared abundance. It celebrates the sea’s generosity and the kitchen’s warmth, turning a simple meal into a memorable event—one that lingers in the mind long after the last napkin has been folded and the last plate has been cleared. Whether you’re cooking for a bright summer evening with neighbors or a cozy weekend gathering with family, this boil offers a canvas wide enough for your favorite flavors and your most cherished company. So gather your crew, set the table beneath the open sky or the glow of kitchen lights, and let the aromas do the rest. The best part of this feast isn’t just the food—it’s the sense of belonging that comes with every shared scoop, every clink of glasses, and every story told between bites. Enjoy the journey of flavor, texture, and togetherness that a seafood boil so effortlessly embodies.

Ingredients

Seafood Boil Base

  • 2 pounds large shrimp, shells on, tails on
    → Shrimp: Adds a succulent protein that holds up well in boiling broth. Cooking with the shells on infuses the meat with flavor as the shells release briny juices. Keep the shells on until serving, and optionally peel the shrimp after cooking for easier eating. If you prefer peeled shrimp, you can shell and devein them before boiling, but you may lose some flavor that the shells contribute while simmering.
  • 2 pounds crab legs, thawed and broken into smaller sections
    → Crab legs bring sweet, delicate meat to the boil. Since most crab legs are sold pre-cooked, your goal is to warm them through without overcooking; add them in the last 5–7 minutes. Break the legs into smaller segments to speed cooking and make dipping easier. Fresh, high-quality crab legs yield the most flavor.
  • 1 pound smoked sausage (Andouille or kielbasa), sliced into 1-inch pieces
    → Sausage adds smoky, spicy richness and fatty notes that help carry flavor throughout the boil. Searing the slices in a hot pan for 1–2 minutes per side before adding to the pot helps render fat and deepen the flavor, though it’s optional if you want to skip extra steps.
  • 4 ears corn on the cob, husks removed, cut into halves or thirds
    → Corn provides sweetness and starch that soaks up the seasoned broth. You can blanch the corn halves for 2–3 minutes beforehand to speed cooking, but it’s not strictly necessary. Keep the corn pieces large enough to grab easily with tongs.
  • 1.5 pounds baby potatoes, washed and halved if large
    → Potatoes act as hearty starches that absorb the boil’s seasonings. Halving larger potatoes ensures even cooking; parboiling briefly (5–7 minutes) beforehand can shorten boil time. Check tenderness with a knife; they should be just tender, not mushy.
  • 1 large onion, cut into thick wedges
    → Onion adds aromatic sweetness to the simmering liquid and helps balance briny seafood. You can keep the skin on for extra flavor or discard after cooking. For more punch, alternate with shallots or add more garlic.
  • 6 cloves garlic, peeled and smashed or left whole in the pot
    → Garlic releases its pungent aroma and depth into the broth. Smash cloves lightly to help release oils; you can remove during serving if you prefer milder flavor. If you’re sensitive to garlic, you can reduce to 4 cloves.
  • 1 lemon, cut into wedges
    → Lemon adds bright acidity that enhances seafood sweetness. Add wedges to the pot early on for citrusy notes and finish with a squeeze of fresh juice over the boil at the end to wake up flavors.

Seafood Boil Broth & Seasonings

  • 4 cups seafood stock or water
    → The liquid forms the base of the boil, carrying spices into the ingredients. Use seafood stock if available for richer flavor; if using water, compensate with extra seasoning and a splash of white wine or beer for depth.
  • 2 bay leaves
    → Bay leaves add herbal aroma to the simmering liquid, subtly infusing the entire boil with resinous notes. Remove them before serving to avoid biting into a sharp leaf.
  • 1/3 cup Old Bay seasoning (or a similar seafood boil spice mix)
    → Old Bay is the signature seasoning for seafood boils, delivering a balanced blend of celery salt, paprika, mustard, and pepper. You can start with 1/4 cup and adjust to taste. If you have a different brand, adapt to the strength of spices by adding gradually.
  • 1 tablespoon smoked paprika (optional)
    → Paprika adds color and a gentle smoky warmth to the broth. If you don’t have smoked paprika, regular paprika works fine; you can also add a pinch of chipotle powder for more heat.
  • 1 teaspoon cayenne pepper (adjust to heat level)
    → Cayenne provides heat and a little depth to the broth. Start with a smaller amount and increase in increments, tasting as you go. For milder heat, omit entirely.
  • Salt to taste
    → Salt amplifies all flavors; since shellfish can vary in saltiness, add gradually toward the end of the boil and adjust as you’re serving. Use a flaky sea salt or kosher salt for better distribution.
  • Optional: 1–2 cups beer or white wine (for depth)
    → Beer or wine adds a malty or fruity note that complements seafood. If using, pour in after the stock to deglaze any browned bits and let it reduce slightly before adding the rest of the liquid.

Seafood Boil Dipping Sauce

  • 1/2 cup unsalted butter, melted
    → The butter serves as a rich, luxurious dipping sauce for the seafood and corn. Melt gently over low heat to avoid separating; add a touch of lemon juice for brightness if desired.
  • 2 cloves garlic, minced
    → Garlic in the butter creates a savory, aromatic dip that complements seafood. Sauté the minced garlic briefly in the melted butter for more intensity, but keep heat low to avoid browning the garlic, which can become bitter.
  • 1 tablespoon fresh lemon juice
    → Lemon juice brightens the butter and adds a crisp contrast to the rich fats from the seafood. Freshly squeezed is best; strain out any seeds for a smooth dip.
  • 1/4 teaspoon salt (adjust to taste)
    → Salt balances the richness of the butter and the brininess of the seafood. Start small and adjust after tasting the sauce with a sample of seafood.
  • Pinch of red pepper flakes (optional)
    → A light touch of heat from red pepper flakes adds a subtle kick without overpowering the dish. Omit if serving to children or guests who prefer milder flavor.

Seafood Boil Garnish

  • 2 tablespoons chopped fresh parsley or cilantro for garnish
    → Fresh herbs add color and a bright finish that lifts the overall flavor. Sprinkle just before serving to preserve vibrant color and aroma; you can also reserve a few leaves to sprinkle on top at the table for extra brightness.

Instructions

  • Choose a large, heavy-bottomed stockpot (12–16 quarts) and place it on a stable burner to ensure even heat distribution and prevent scorching as the boil develops.
    → A wide, sturdy pot allows the seafood and vegetables to move freely in the liquid, creating an even flavor throughout and reducing the chance of hot spots that could overcook delicate seafood.
  • Pour 4 cups seafood stock or water into the pot and set the heat to high to establish a strong base for the boil.
    → The liquid carries all the spices and aromatics; starting with enough volume prevents the broth from scorching and helps maintain a vigorous boil as ingredients are added.
  • Add 2 bay leaves, 1/3 cup Old Bay seasoning, 1 tablespoon smoked paprika (optional), 1 teaspoon cayenne pepper, and salt to taste; stir to combine evenly.
    → Bay leaves and the spice mix infuse the liquid with aroma and depth; stirring ensures that the spices are distributed, preventing clumps and uneven flavor pockets.
  • If using beer or white wine, pour in 1–2 cups now and use a wooden spoon to scrape up any browned bits from the bottom of the pot as the liquid heats; allow the mixture to simmer and reduce slightly.
    → Deglazing lifts flavorful fond from the pot walls, adding complexity and a bit of acidity to balance the brininess of seafood.
  • Bring the liquid to a vigorous simmer with rolling bubbles across the surface to ensure even extraction of aromatics and to start cooking the starches and proteins evenly.
    → A roaring simmer ensures the corn, potatoes, and sausage begin to cook promptly and absorb seasonings rather than steaming slowly in a cooler liquid.
  • Add thick onion wedges and smashed garlic cloves to the simmering liquid, tucking them into the liquid so their aromas permeate the broth; leave skin on the onion for extra sweetness if desired.
    → Aromatics release sweetness and depth as they soften, building a balanced base that harmonizes with seafood flavors.
  • Squeeze the lemon wedges over the pot, then drop the wedges into the liquid to release bright citrus oils; this step brightens the overall flavor profile.
    → The acidity of lemon lifts the briny notes of seafood and enhances the perception of freshness in the finished boil.
  • Add the baby potatoes to the pot and simmer until they are just tender, about 8–12 minutes depending on size; test with a knife to ensure they yield with slight resistance.
    → Paring time to achieve just-tender potatoes prevents mushiness and ensures they hold up when mixed with other components.
  • Stir in the corn pieces and continue to simmer for 5–7 minutes until the kernels are tender but still crisp; adjust cut pieces to ensure uniform cooking.
    → Fresh corn provides sweetness and texture that pairs well with the savory broth and briny seafood, absorbing spices without turning mushy.
  • Add sliced smoked sausage to the pot and simmer for 5–7 minutes to render some fat and infuse the broth with smoky, savory notes; if you prefer a deeper crust, sear the sausage in a hot skillet for 1–2 minutes per side before adding to the boil.
    → Rendering fat early helps distribute rich flavors throughout the boil, while searing adds a caramelized exterior and more pronounced smokiness if you choose that path.
  • Gently place the thawed crab legs into the simmering broth, breaking them into smaller sections as needed; cook for the last 5–7 minutes so they warm through without overcooking.
    → Crab meat is delicate and can become rubbery if overheated; warming just enough preserves sweetness and texture.
  • Finally, add the large shrimp with shells on and simmer for 2–4 minutes until they are pink, opaque, and just cooked through; if using peeled shrimp, reduce time accordingly to avoid toughness.
    → The shells contribute flavor to the broth; leaving them on during cooking also helps keep the shrimp moist and juicy. Peel after serving if desired.
  • Turn off the heat and, if desired, squeeze a little extra lemon juice over the boil; taste and adjust salt or spice level, adding more Old Bay or cayenne in small increments if necessary.
    → Finishing with a touch more acidity and seasoning helps balance the dish and ensures the flavors are vibrant at service.
  • Prepare the seafood boil dipping sauce by melting 1/2 cup unsalted butter on low heat, then whisking in 2 minced garlic cloves and 1 tablespoon fresh lemon juice; season with 1/4 teaspoon salt and a pinch of red pepper flakes if desired.
    → Gentle heat prevents butter from separating; garlic and lemon create a luminous, savory condiment that complements the seafood without overpowering it.
  • Transfer the contents of the pot to a large serving platter or a lined table surface, arranging the shrimp, crab legs, potatoes, corn, and sausage in even layers for easy access; keep warm with a tent of foil if needed.
    → A presentation-friendly spread makes it easier for guests to grab portions and enjoy the variety while maintaining moisture and flavor.
  • Sprinkle 2 tablespoons chopped fresh parsley or cilantro over the spread as a bright garnish to add color and a fresh aroma just before serving.
    → Fresh herbs finish the dish with vibrant color and a crisp aroma that enhances the overall perception of freshness and balance.
  • Serve with lemon wedges on the side and a small dish of the melted garlic butter dipping sauce for dipping; provide plenty of napkins and extra bowls for shells and peels.
    → Offering generous citrus, dipping sauce, and convenient cleanup tools ensures a relaxed, enjoyable communal eating experience.

Notes

These seafood boil notes are designed to help you craft a vibrant, crowd-pleasing feast at home. Start with fresh, high-quality seafood and simmer in a well-seasoned broth built with seafood stock, bay leaves, Old Bay, smoked paprika, cayenne, and a splash of beer or white wine if you like extra depth. Keep the shrimp in their shells (and the tails on) and add crab legs in the last 5–7 minutes so they warm through without overcooking. If using sausage, sear slices in a hot pan for 1–2 minutes per side to render fat and deepen flavor before adding to the pot. Parboil larger potatoes to shorten cook time, and you can blanch corn briefly to speed things up; cut corn into manageable pieces for easy grabbing. Add lemon wedges early for bright citrus notes and finish with a squeeze of lemon over the finished boil; serve with a garlicky melted-butter dipping sauce, lightly salted and enriched with lemon juice and optional red pepper flakes. Finish with chopped parsley or cilantro for color. This dish is naturally gluten-free if you use gluten-free spice blends and skip gluten-containing beer; always read labels and adjust salt and spice to taste. Leftovers refrigerate well for a day or two and reheat gently in the broth to preserve tenderness.

Tips

Pro tips for a flavorful and efficient seafood boil.

  • Use a large pot with plenty of headspace. For the quantities listed, choose a 12–16 quart pot and a strong burner to maintain a steady simmer without overflow.
  • Prep everything in advance. Have the potatoes halved, corn cut, shrimp and crab chilled, sausage sliced, and aromatics ready so you can stay focused on the boil once it starts.
  • Parboil starches if you’re pressed for time. Parboil potatoes 5–7 minutes and corn 2–3 minutes before the main boil to shorten total cooking time and ensure even tenderness.
  • Brown the sausage first. Sear the sliced sausage in a hot dry pan for 1–2 minutes per side to render fat and deepen flavor before adding to the pot.
  • Build a robust flavor base. In the pot, render some onion in a little oil until translucent, then add garlic and let it bloom for 30–60 seconds before adding liquids and spices.
  • Deglaze to lift flavor. After browning aromatics, pour in seafood stock (and optional beer or wine) and scrape up any browned bits from the bottom for richer depth.
  • Season in layers. Start with 1/3 cup Old Bay (or a similar seafood boil blend) and 1 teaspoon smoked paprika if using. Add cayenne gradually, tasting as you go to reach your preferred heat level.
  • Keep bay leaves in until mid-simmer, then remove them. They add aroma without leaving a sharp bite; remove before serving.
  • Use citrus wisely. Add lemon wedges early to infuse brightness; finish with a squeeze of fresh lemon over the boil for a final lift.
  • Add ingredients in stages by cooking time. Begin with potatoes and corn, then sausage, followed by crab legs, and finally shrimp. This keeps everything from overcooking.
  • Shrimp last and watch the time. Large shrimp cook quickly; add them for 2–4 minutes and remove as soon as they’re pink, opaque, and curled.
  • Heat crab legs just through. Since they’re typically pre-cooked, warm them in the boil for about 5–7 minutes, breaking larger legs into smaller pieces for easier eating.
  • Maintain a lively but controlled simmer. A roaring boil can break apart delicate seafood and reduce broth too quickly; adjust the heat to keep a steady simmer.
  • Taste and adjust salt near the end. Shellfish vary in saltiness, so add salt gradually as you near service and taste with a sample of the boil.
  • Whimsical dipping sauce benefits from gentle technique. Melt butter slowly, add minced garlic, lemon juice, and a pinch of salt; a light red pepper flakes pinch adds a subtle kick if desired.
  • Finish with fresh herbs. Scatter chopped parsley or cilantro just before serving for color and a bright aroma that cuts through the richness.
  • Serving setup matters. Line a large platter with paper or parchment, use tongs and seafood crackers, and offer plenty of napkins for a hands-on feast.
  • Storing and reheating leftovers. Refrigerate promptly in shallow containers. Reheat by steaming or simmering briefly in a little broth to re-warm without overcooking.
  • Substitutions and tweaks. If Old Bay isn’t available, combine paprika, celery salt, black pepper, dry mustard, and a pinch of cayenne to mimic the flavor profile; adjust to taste.
  • Keep your workspace clean. Have a separate bowl for shells and a clean area to place finished portions to maintain flavor and avoid cross-contamination.

FAQ

Seafood Boil — Frequently Asked Questions

What is a seafood boil?

A seafood boil is a communal, one‑pot meal where shellfish (such as shrimp, crab, crawfish, mussels or clams), corn on the cob, potatoes, and sometimes sausage are boiled in a heavily seasoned, aromatized liquid. The flavors come from spice blends, garlic, lemon, and butter, and the dish is typically enjoyed by pouring the contents onto a table for casual, shareable eating.

What seafood should I choose for a boil?

Popular choices include shrimp (with shells on for flavor), crab legs or clusters, crawfish, mussels, and clams. You can mix several kinds depending on what’s fresh and affordable. If using lobster or scallops, add them closer to the end to prevent overcooking. Always use fresh or properly thawed seafood for best texture.

What spices and flavorings should I use?

Common bases are Cajun seasoning or Old Bay, garlic, onion, paprika, cayenne or chili powder, black pepper, and bay leaves. Add lemon juice or slices for brightness, and finish with melted butter or a garlic-butter sauce. Some tables also use beer or a splash of fish stock to deepen the flavor.

What other ingredients are typically included?

Potatoes and corn on the cob are staples because they absorb flavor and hold up to long simmering. Sausage (like andouille or kielbasa) is often added for extra richness. You can also include mushrooms or onions, but keep the starches and seafood the focus.

How do I cook a seafood boil step by step?

Fill a large pot with enough water to cover everything and bring to a boil. Add your spice mix, lemon, garlic, and aromatics. Parboil potatoes for about 10–12 minutes, then add corn and sausage for another 5–7 minutes. Finally, add seafood and cook until shrimp turn pink, mussels or clams open, and everything is heated through (times vary by size). Drain and spread the contents on a table or platter; toss with melted butter and extra seasonings if desired.

How do I adjust for different pot sizes or servings?

Scale the water and seasonings proportionally to the volume of ingredients. For very large groups, use a bigger pot or cook in batches to avoid overcrowding, which can dilute flavor. If you’re cooking in stages, start each batch with the spice base and combine contents before serving.

How can I tell when the seafood is cooked?

Shrimp should be opaque and pink (tails may curl). Mussels and clams should open; discard any that don’t open after cooking. Crab legs should be firm, not mushy, and lobster pieces should be opaque. Overcooked seafood becomes chewy, so watch the times closely and remove items as soon as they’re ready.

How should I serve it and what sauces or sides work well?

Traditionally served on a large table covered with newspaper or disposable parchment. Provide melted butter or garlic-butter for dipping, lemon wedges, and optional hot sauces or remoulade. Sides like crusty bread or garlic bread, pickles, and a simple green salad complement the rich flavors without overpowering them.

Can I make a seafood boil if someone has dietary restrictions or allergies?

Yes. For shellfish allergies, skip the seafood and still enjoy potatoes, corn, and sausage with a dairy-free butter substitute for dipping. If fish or shellfish are allowed for others, you can prepare a separate, fully seafood boil batch and keep it separate to avoid cross-contact.

How long do leftovers keep and how should I store/reheat?

Leftovers refrigerate well for 2–3 days in an airtight container. Reheat gently in a steamer, on the stovetop with a splash of broth, or briefly in a hot oven to avoid overcooking the seafood. Do not re‑freeze seafood after it’s thawed and cooked, as texture and flavor deteriorate.

Introduction / Hook

Imagine a plate that captures the essence of the sea—the glimmer of sunlight on gentle waves, the subtle chorus of distant boats, and the first inhale that floods your senses with a brisk, ocean-bright aroma. This seafood-focused journey invites you to taste the coastline in every bite, where the freshness of the catch meets you with a welcoming warmth. It’s not just a dish; it’s a story told through briny depths, bright citrus, and a comforting hug of velvety richness. Each forkful offers a conversation between land and sea—a culinary bridge that celebrates the bounty of oceans, rivers, and estuaries while honoring the farmers and fishers who bring those treasures to our tables. If you’ve ever watched a gull wheel above a harbor, heard the sizzle of seafood meeting a hot pan, and felt your mouth water in anticipation, you’re already halfway there. This recipe is designed to transport you to a seaside kitchen, where ingredients are simple, techniques are approachable, and the results feel indulgent without being fussy.

Seafood has a universal language, spoken in markets from Lisbon to Lagos, from Boston to Busan. It carries with it a sense of place—a region, a season, a tradition. In this preparation, we honor that heritage by weaving together the clean sweetness of fresh seafood with aromatics and a gentle, luminous sauce that lets the ocean’s own character shine through. The goal is to create something that feels both timeless and modern: a dish that works as a comforting weeknight supper, a celebratory weekend centerpiece, and a clean canvas for experimentation. It’s as much about the moment as it is about the meal—the way a table becomes a gathering place, the way stories are exchanged as steam rises and the flavors mingle. You’ll notice how the ingredients behave in harmony, not as competing personalities, but as a chorus that elevates each other to something greater than the sum of its parts.

As you read through this description, let your senses drift toward the texture—the way seafood glides apart with a light lift when you pierce it, the way the juice carries a whisper of brine, the way herbs and citrus carry brightness without overpowering the sea’s natural sweetness. Picture a gentle simmer, a quick sear, a splash of wine or broth that creates a delicate, glossy glaze, and a plate that gleams with color and life. This is seafood that feels accessible—luxurious in its aroma yet simple in its execution, designed to reward you with depth and freshness without demanding obscure ingredients or complicated techniques.

The Story Behind the Dish

Seafood, in all its glorious variety, connects cultures across coastlines and continents. The dish you’re about to explore is a reflection of that maritime tapestry—a fusion of techniques and sensibilities drawn from fishing villages, seaside markets, and kitchens that know how to coax maximum flavor from modest catches. Think of it as a modern homage to centuries of coastal cooking: fishermen returning with the day’s haul, market stalls glowing with glistening shells, and cooks turning that bounty into something that can be shared at a long table with friends and family.

Across the Mediterranean, the Atlantic, and the Pacific littoral, seafood has long been a staple of nourishment and celebration. In some traditions, the emphasis is on speed and lightness—letting the natural sweetness of the seafood take center stage—while in others, a richer, more indulgent approach sits at the heart of the dish. The common thread is respect: for the catch, for the ingredients, and for the people who prepare, present, and savor the meal together. The recipe you’ll discover honors that spirit by offering a balanced approach—an uncomplicated method that respects seasonal seafood, highlights its intrinsic flavors, and invites you to tailor the dish to your coastline, pantry, and preferences.

In many coastal communities, seafood is a communal event. It’s the centerpiece of gatherings after long days by the water, a reason to linger around a table, and a trigger for shared stories—of boats, tides, storms weathered, and harvests celebrated. This recipe aims to recreate that sense of ritual: the anticipation of a simple, elegant plate that has the power to bring people closer, sparks conversation, and leaves everyone with a memory of sunshine, salt air, and a satisfying finish that lingers on the palate.

Why You’ll Love This Recipe

  • Quick to pull together: Perfect for weeknights when you crave something comforting yet bright, with minimal mise en place and straightforward steps that don’t sacrifice flavor.
  • Showcases the best of seafood: The dish is built to let the natural sweetness and delicate textures of the catch shine, with supporting notes that enhance without overpowering.
  • Versatile and adaptable: Works with a variety of seafood combinations, seasonality, and pantry staples, making it easy to customize to what you have on hand.
  • Balanced and nourishing: A thoughtful mix of lean protein, bright aromatics, and a silky sauce that comes together without heaviness, making it satisfying without feeling indulgent.
  • Beautiful for serving: The presentation invites celebration—the colors, the glistening sauce, and the aroma combine to create a memorable table moment.
  • Family-friendly and crowd-pleasing: Gentle flavors that appeal to different ages, making it a reliable choice for gatherings, potlucks, or a special weekend dinner.
  • Perfect pairings are natural: It lends itself to complementary sides and drinks that elevate the experience, from crusty bread to crisp white wine and a bright salad.
  • Resourceful and sustainable: Embraces seasonal seafood options and encourages mindful sourcing, so you can enjoy great flavor while supporting responsible fisheries.

Flavor Profile & Texture

The dish unfolds with a symphony of sea-forward flavors and textures. The seafood itself offers a clean, sweet backbone with a gentle brininess that signals its ocean origin. Surrounding notes provide contrast and depth—aromatics that are bright but not overpowering, a touch of acidity to lift the richness, and a soft, luscious finish that coats the palate in a velvety layer. The texture journey is equally appealing: succulent, tender fillets that flake easily, tender shellfish that release their juices with a satisfying pop, and a lightly silky sauce that binds everything together without binding the seafood down.

Think of the aroma as a bridge between land and sea. A warm spray of fragrant herbs—delicate and fresh—mingles with the natural sweetness of the seafood, while a gentle kiss of citrus or zest provides a lift that makes the dish feel bright and contemporary. The sauce, while comforting in its silkiness, carries just enough body to cling to each bite, ensuring that every mouthful offers cohesion and roundness. The result is a plate that feels polished and elegant, yet approachable enough for a weeknight kitchen. It invites you to savor slowly, to notice how the flavors evolve as the dish rests and the seafood gently mingles with its aromatic companions.

Texture interplay matters here: a crisp edge from a quick sear against a tender interior, a soft, almost creamy sauce, and the occasional bite of briny, chewy shellfish that provides surprise bursts of flavor and contrast. The overall balance is one of harmony—nothing overwhelms; everything contributes. When you take a bite, you should experience a sense of coastal air and sun-warmed seafood, tempered by the gentle tang of a bright note, and then finished with a lingering, comforting finish that invites a second bite rather than calling for a quick finish.

Occasions & Pairings

This seafood-inspired dish shines on a spectrum of occasions. It’s equally at home for a quiet weeknight dinner when you want something nourishing and satisfying, as it is for a celebratory weekend meal with friends and family. If you’re hosting a dinner party, the dish scales beautifully—serve it with a simple grain or a bed of greens for an elegant, effortless table. Its versatility makes it a reliable favorite for holidays that celebrate the sea and its flavors, such as coastal-inspired feasts, summer gatherings, or a special Father’s Day or Mother’s Day treat where seafood takes center stage.

Pairings elevate the experience without overshadowing the delicate notes of the dish. Consider crusty, warm bread to soak up any remaining sauce and juices. A crisp, mineral-driven white wine or a light sparkling wine helps to cut through the richness and keep the palate refreshed between bites. For non-alcoholic options, a chilled citrus-infused water or a subtly salted beverage can mimic the crisp, refreshing finish that wine provides. A bright, fresh salad with fennel, cucumber, and citrus adds a refreshing counterpoint, while a side of simple roasted vegetables or a light grain like quinoa or rice helps round out the plate. If you’re in the mood for a comforting contrast, a small dollop of mashed potatoes or a creamy polenta offers a comforting, indulgent pairing that still allows the seafood to shine.

For seasonal inspiration, tailor the dish to what your local markets offer. Spring brings delicate, sweet shellfish and younger greens; summer offers a bounty of briny fish and plump shellfish; autumn delivers heartier, richer seafood; winter can be brightened with citrus and herbs and a touch of warmth from a flavorful stock. By aligning with seasonal seafood, you not only optimize taste but also support sustainability and quality in your cooking. The right season can accentuate the dish’s aroma and texture, making every bite feel like a small celebration of the moment’s harvest.

Tips, Variations & Substitutions

  • Flexibility with seafood: This dish is forgiving and adaptable. You can mix and match different proteins—white fish fillets, shrimp, clams, mussels, or even calamari—to suit what you have on hand or what’s fresh at the market. The key is to maintain balance so that no single element overwhelms the others.
  • Seasonality and sourcing: Seek the freshest possible seafood, ideally sustainable and responsibly sourced. If you can’t find a particular variety, consider substitutes that offer similar texture or sweetness. For example, a flaky white fish can stand in for another mild, delicate variety, while shellfish can provide a different but complementary bite.
  • Flavor scaffolding: Rather than relying on a long list of ingredients, focus on a few bright, aromatic elements that lift the natural flavors of the seafood. Citrus zest or bright juice, a touch of aromatic herbs, and a gentle savory component can transform simple seafood into something vibrant and cohesive.
  • Vegan/vegetarian option: For a plant-based adaptation, you can use mushroom “seafood” substitutes or heartier vegetables with a similar mouthfeel, paired with a light, flavorful sauce that emphasizes brightness and umami from miso, mushrooms, seaweed, or nutritional yeast. The technique remains respectful to the idea of a seafood-inspired dish while offering a compassionate alternative.
  • Gluten considerations: If you’re avoiding gluten, ensure any thickeners or sauces used are gluten-free. The dish’s core flavors can remain intact without relying on gluten-based components, keeping the texture light and elegant.
  • Regional twists: Add a Mediterranean touch with herbs like dill and parsley, a hint of saffron for warmth, or a splash of white wine to create a subtle, coastal essence. A rustic Provençal or Italian influence can emerge with olive oil, garlic, and herbs—carefully balanced so the seafood remains the star.
  • Heat level: The dish can be prepared with a gentle warmth or a mild kick depending on your audience. If serving kids, keep spices mild and emphasize the seafood’s natural sweetness. For adults, a whisper of chili flakes or cracked black pepper can add nuance without overpowering the dish.

Storage & Make-Ahead Ideas

Seafood is best enjoyed fresh, but there are practical ways to handle leftovers and plan ahead. If you anticipate making this dish for a future meal, consider the following strategies to preserve quality and flavor:

  • Store leftovers promptly in a shallow, airtight container in the refrigerator. For best texture, aim to eat within 1–2 days after cooking.
  • To freeze, cook thoroughly and then freeze in a freezer-safe container. Label with date and use within 1–2 months for optimal flavor and texture. Note that texture can change after freezing, especially for delicate fish; plan to reheat gently to minimize firmness loss.
  • Reheating tips: Reheat slowly on low heat in a covered pan with a splash of broth or water to restore moisture. Avoid high heat that can make seafood rubbery. If you used a sauce, reheat it separately and then combine with the seafood to maintain gloss and texture.
  • Make-ahead ideas: You can prep aromatics (chopping herbs, zesting citrus, mincing aromatics) in advance, so assembly goes quickly on the day you plan to serve. If you’re hosting, consider pre-cimming the sauce to finish with the seafood just before serving, preserving the bright, fresh finish.
  • Storage for sides: If you’re serving alongside grains or vegetables, you can prepare those ahead of time and gently reheat or refresh them to serve with the seafood. Crisp textures in vegetables, for example, are best added close to serving time to maintain their bite.

Fun Facts & Trivia (Optional)

Did you know that the ocean provides an astonishing diversity of flavors, textures, and colors that can be coaxed into countless preparations? Here are a few tidbits to enrich your appreciation for seafood and the dining experience surrounding it:

  • The term “seafood” covers a broad spectrum, including fish, shellfish, and mollusks. Each category brings its own character to a dish, from the delicate flakes of white fish to the briny pop of shellfish and the bracing, mineral notes of mollusks like oysters and clams.
  • Texture and aroma are as important as flavor in seafood dishes. A quick sear can seal in juices and create a contrast between crisp exterior and tender interior, while a gentle simmer can yield a sauce that clings gracefully to every bite.
  • Seasonality matters. The peak flavor of seafood often coincides with fishing seasons and local harvest cycles, which means freshness—and sustainability—are more readily achieved when you shop with the local calendar in mind.
  • Oceans beyond flavor: Sustainable seafood choices not only taste better but also support healthier marine ecosystems. When possible, look for certifications or guidance from trusted seafood guides in your region to choose species that are abundant and harvested responsibly.
  • Pairing idea: A light, crisp white wine with mineral notes is frequently an excellent companion to seafood, as it can highlight the dish’s brightness and cleanse the palate between bites. For non-alcoholic options, a sparkling water with a squeeze of citrus offers similar refreshment and balance.

In the end, this seafood-centered dish is about more than satisfying hunger—it’s about connecting with the sea’s generosity and sharing that bounty in a way that feels effortless and elevated. It invites you to celebrate the ocean’s gifts with simple, confident technique, to honor seasonal availability, and to gather around a table where conversation and aroma mingle as warmly as the flavors themselves. May each bite carry you to a sunlit shoreline, a harbor breeze, and a sense of contentment that lingers long after the plate is cleared.

Ingredients

Seafood Stew

    – 1 lb firm white fish fillets (cod, halibut, or sea bass), cut into 1-inch pieces
    → Role: provides the main protein with flaky texture that soaks up the tomato-based broth. Handling: trim any small bones, pat dry, and cut into even chunks to ensure uniform cooking. Tips: choose fresh fish with a clean ocean scent; if using thawed fish, pat dry to reduce excess moisture and help the stew reduce properly. Do not overcook the fish; add toward the end of simmering to keep pieces tender.
    – 1/2 lb shrimp, peeled and deveined
    → Role: adds sweetness and a succulent, meaty bite to the stew. Handling: rinse and pat dry; tails are optional depending on presentation. Tips: add in the final 2–3 minutes of cooking so they stay tender and just-cooked; if using frozen shrimp, thaw completely and pat dry to prevent extra moisture from diluting the broth.
    – 1/2 lb mussels or clams, scrubbed and debearded (optional)
    → Role: contributes briny depth and a dramatic, shell-on presentation. Handling: scrub shells, remove beards, and discard any open shells. Tips: soak briefly if very sandy; add after the base has simmered and cook until shells open. Discard any shells that do not open.

Aromatics & Vegetables

    – 1 medium onion, finely chopped
    → Role: builds the savory base with natural sweetness; Handling: dice finely for even cooking and smoother texture. Tips: yellow onions give balanced sweetness; red onions will add color but still work well.
    – 3 cloves garlic, minced
    → Role: provides the dish’s aromatic backbone and depth; Handling: mince finely or crush lightly to release more oils. Tips: add after onions to prevent burning; stir frequently to avoid scorching and bitterness.
    – 1 celery stalk, finely chopped (optional)
    → Role: adds crunch and a subtle herbal note; Handling: chop small to blend into the base. Tips: optional if you want a lighter broth; celery also contributes moisture and aroma.
    – 1 carrot, finely chopped (optional)
    → Role: contributes natural sweetness and color; Handling: dice small for even cooking. Tips: adds body to the broth; parsnip can be substituted for a different sweetness profile.
    – 1 tablespoon olive oil
    → Role: base fat for sautéing aromatics and releasing flavors; Handling: use extra-virgin for a fruity, premium flavor. Tips: heat the pot until the oil shimmers before adding aromatics; avoid smoking the oil.

Tomatoes & Liquids

    – 1 can (28 oz) crushed tomatoes
    → Role: forms the rich, tomato-forward broth that carries seafood flavors. Handling: choose crushed for a smooth yet rustic texture; tips: for a silkier broth, blend the tomatoes briefly before adding.
    – 1 cup dry white wine (or additional fish stock)
    → Role: deglazes the pot, adds acidity and depth; Handling: pour in after aromatics have softened to lift browned bits from the bottom. Tips: use a dry wine such as Sauvignon Blanc or Pinot Grigio; substitute with extra stock or water plus a splash of lemon juice if avoiding alcohol.
    – 1–2 cups fish stock or water
    → Role: builds the broth thickness and body; Handling: adjust to desired consistency. Tips: use low-sodium stock to control saltiness; warm the stock before adding to maintain a steady simmer.
    – 2 tablespoons tomato paste (optional)
    → Role: intensifies tomato flavor and adds body to the broth; Handling: whisk into the simmering liquid to eliminate lumps. Tips: optional but helpful for a deeper, meatier sauce.

Herbs & Seasonings

    – 2 tablespoons chopped fresh parsley (plus extra for serving)
    → Role: adds bright, fresh herbal aroma and color; Handling: chop just before use to maximize scent. Tips: reserve some for garnish; parsley at the end keeps its vibrant flavor.
    – 1 teaspoon dried oregano or thyme
    → Role: introduces earthy herb notes that complement tomato and seafood; Handling: use sparingly to avoid overpowering seafood. Tips: if using thyme, strip leaves from the stems; oregano pairs well with tomato-based sauces.
    – 1 bay leaf
    → Role: provides a subtle aromatic layer that deepens the broth; Handling: add during simmer and remove before serving. Tips: it adds complexity without a strong taste, great for a more rounded flavor.
    – 1/2 teaspoon smoked paprika (optional)
    → Role: adds warm, smoky nuance to the broth; Handling: stir in during simmer to release its aroma. Tips: optional but enhances depth without heat; use sweet paprika if you prefer milder flavor.
    – Salt and freshly ground black pepper, to taste
    → Role: essential to balance and enhance seafood flavors; Handling: season gradually and taste as you go. Tips: salt the stock first if using store-bought stock; adjust salt at the end after seafood has released its own moisture.
    – Pinch of red pepper flakes (optional)
    → Role: provides a gentle heat to balance sweetness; Handling: add a small pinch and taste, increase if you like more heat. Tips: keep optional for sensitive palates or children.

Finish & Garnish

    – 1 tablespoon fresh lemon juice
    → Role: brightens the broth and enhances the natural sweetness of the seafood; Handling: add at the end of cooking to preserve citrus brightness. Tips: use freshly squeezed lemon juice and consider a touch of zest for extra aroma.
    – Lemon wedges or extra chopped parsley, for serving
    → Role: optional finish that adds fresh acidity and color; Handling: arrange on each plate for individual brightness. Tips: serve with wedges for diners to adjust acidity; parsley adds fragrance and a fresh look.

Instructions

  • Prep the seafood: Pat dry the fish fillets and cut into uniform 1-inch pieces; pat dry the shrimp after peeling and deveining; scrub mussels or clams, remove beards, and discard any shellfish that is open or smells off.

    → These steps ensure the seafood sears and cooks evenly with minimal added moisture, prevent gritty textures from shellfish, and safeguard against spoiled items. Tips: choose fresh, firm fish with a clean ocean scent; rinse mussels just before cooking and discard any with broken shells.
  • Chop aromatics: Finely dice the onion; mince the garlic; finely chop the optional celery and carrot if using; this creates a consistent base and ensures even extraction of sweetness and aroma.

    → Finely diced vegetables release flavor quickly and blend smoothly into the broth, while exposing maximum surface area for sautéing; keep hands steady with a sharp knife to avoid slipping.
  • Heat the olive oil: In a large heavy pot or Dutch oven, heat 1 tablespoon olive oil over medium heat until it shimmers; swirl to coat the bottom before adding aromatics.

    → A shimmering oil forms a nonstick surface for the vegetables and helps extract flavor; avoid smoking the oil which would impart bitter notes.
  • Sauté the aromatics: Add the onion (and carrot/celery if using) to the pot and cook, stirring occasionally, until the onion is translucent and edges begin to caramelize, about 5–7 minutes; season with a pinch of salt.

    → Sweat the aromatics to develop sweetness and depth; gentle heat prevents harsh flavors and ensures even cooking across pieces.
  • Garlic infusion: Add the minced garlic and sauté for 30–60 seconds until fragrant; stir continuously to prevent burning.

    → Garlic can scorch quickly and turn bitter; adding after the onions season ensures a bright, aromatic base rather than a burned taste.
  • Braise with tomato paste (optional): If using, stir in 1 tablespoon tomato paste and cook for 1–2 minutes until it deepens in color and adheres to the vegetables.

    → Blooming tomato paste concentrates sweetness and thickens the sauce, enriching the overall tomato character without relying solely on crushed tomatoes.
  • Add crushed tomatoes: Pour in the 28-ounce can of crushed tomatoes and mix with the aromatics; bring to a gentle simmer to meld flavors.

    → The crushed tomatoes create a smooth yet rustic broth that carries seafood flavors and provides body; gentle simmer prevents splashing and preserves color.
  • Deglaze with wine: Pour in 1 cup dry white wine and scrape the bottom of the pot with a wooden spoon to lift browned bits; simmer until the liquid reduces by about half.

    → Deglazing integrates caramelized fond into the broth, adding depth and acidity; reducing the wine concentrates its flavors and prevents watery results.
  • Build the broth: Add 1–2 cups warm fish stock or water, 1 bay leaf, and 1 teaspoon dried oregano or thyme (and 1/2 teaspoon smoked paprika if using); season with salt and pepper and bring to a gentle simmer.

    → Stock provides body and moisture; herbs and paprika introduce depth and warmth; simmering early allows flavors to meld before adding seafood, while careful seasoning prevents oversalting later.
  • Simmer the base: Let the tomato-based broth simmer gently, partially covered, for 15–20 minutes to concentrate flavors and harmonize the tomato, herbs, and aromatics.

    → Slow simmer reduces acidity and thickens the sauce slightly, creating a robust foundation for delicate seafood to shine without being overwhelmed.
  • Cook the fish: Gently add the 1-inch fish pieces to the simmering broth in a single layer; nestle them into the sauce and cook without stirring for 5–7 minutes until the fish is opaque and flakes easily when tested.

    → Gentle, even cooking preserves the fish’s texture and prevents breakage; testing with a fork ensures you stop cooking as soon as the center turns opaque.
  • Open the shellfish: Add the cleaned mussels or clams to the pot, cover, and simmer for 4–6 minutes until shells open; discard any shells that remain closed after cooking.

    → The shellfish release their briny juices into the broth, enriching the sauce; opening shells indicate doneness and freshness; discard unopened shells for safety.
  • Finish the seafood: Stir in the peeled shrimp and simmer for 2–3 minutes until they turn pink and are just cooked through; remove the pot from heat promptly to avoid overcooking.

    → Shrimp cook quickly and become tough if overcooked; adding them at the end preserves their delicate texture and sweetness in the final dish.
  • Finish and brighten: Remove the bay leaf, stir in 1 tablespoon fresh lemon juice, and adjust salt and pepper to taste; sprinkle chopped parsley over the surface for color and aroma.

    → Lemon lifts the seafood flavors and balances tomato acidity; fresh parsley adds brightness and a vibrant finish that carries through the aroma when served.
  • Serve: Ladle the seafood stew into warmed bowls and garnish with lemon wedges or extra parsley; present with crusty bread to soak up the flavorful broth.

    → A hot, fragrant bowl with a bright finish and complementary bread enhances the dining experience, offering textural contrast and a satisfying meal.

Notes

These seafood stews are a nourishing, one-pot meal featuring tender white fish, shrimp, and briny mussels or clams simmered in a rich tomato broth. You can customize them by swapping in your favorite seafood varieties or adding vegetables like fennel, celery, or peppers for extra sweetness and texture. They refrigerate and freeze well and reheat beautifully, making them perfect for make-ahead dinners. For an extra brightness, finish with fresh lemon juice and a drizzle of olive oil, and serve with crusty bread or over rice for a heartier meal. Always season in layers: taste the broth after the seafood has cooked and adjust salt and acid at the end to balance the flavors, especially if you used store-bought stock.

Tips

Tips for Perfect Sea Food Stew

  • Choose the freshest seafood you can find: firm white fish fillets, lively mussels or clams, and plump shrimp. If using thawed fish, pat dry to help the broth reduce properly and avoid extra moisture.
  • Prep mise en place: have all aromatics chopped (onion, garlic, celery, carrot) and measured before you start simmering to maintain a steady, controlled cook.
  • Saute aromatics gently: cook onions until translucent and soft, then add garlic. Browning can introduce bitterness; keep the heat moderate and stir frequently.
  • Deglaze to lift flavor: after sauteing, deglaze with the white wine to dissolve caramelized bits on the bottom; simmer until the wine reduces by about half to concentrate its acidity and aroma.
  • Tomato base options: crushed tomatoes give a smooth, rustic texture. For a silkier broth, briefly blend the tomatoes or purée a portion before adding to the pot.
  • Thicken and balance: whisk in tomato paste (if using) to deepen color and body. Start with 1 tablespoon and adjust to desired richness.
  • Stock strategy: warm stock or water before adding to maintain a steady simmer. Use low-sodium stock to better control salt levels; adjust seasoning later.
  • Herb and spice timing: bay leaf can go in early to perfume the broth; add chopped parsley at the end to preserve its bright aroma; oregano or thyme can be added early but use sparingly so they don’t overpower seafood.
  • Season gradually: seafood releases moisture and salt as it cooks; taste the broth as you go and adjust seasoning toward the end rather than at the start.
  • Seafood timing cheat sheet: add fish toward the end so it stays tender, shrimp in the final 2–3 minutes, and mussels/clams after the base has simmered and cook until their shells pop open. Discard any that do not open.
  • Shellfish prep: scrub mussels/clams, remove beards, and discard any broken or open shells; soak very sandy shellfish briefly if needed.
  • Heat and spice adjustability: a pinch of red pepper flakes adds warmth without heavy heat; smoked paprika offers a smoky depth without adding heat—adjust to taste.
  • Finish with brightness: finish with fresh lemon juice right at the end to lift the flavors; a hint of lemon zest can amplify aroma without souring the broth.
  • Garnish and serving: reserve some parsley and lemon wedges for serving; serve with crusty bread to soak up the flavorful broth.
  • Make-ahead and leftovers: this stew tastes great the next day as flavors meld; reheat gently over low heat to avoid overcooking delicate seafood.

FAQ

What counts as seafood?

Seafood includes fish, shellfish, mollusks, and crustaceans. Examples: salmon, shrimp, clams, scallops, oysters, mussels, crab, lobster, squid. It can be wild-caught or farmed.

Is seafood healthy?

Seafood provides high-quality protein and often contains heart-healthy omega-3 fatty acids, vitamins D and B12, and minerals like selenium. Fatty fish (e.g., salmon, mackerel) are especially nutrient-dense.

How can I tell if seafood is fresh?

Fresh fish should have clear eyes, bright, shiny skin, and firm flesh that springs back when touched, with a mild ocean scent. Shellfish should smell like the sea and be alive or tightly closed; discard shells that are cracked or do not close when tapped.

How should I store seafood before cooking?

Keep seafood cold at 32–40°F (0–4°C). Use within 1–2 days for most fish and shellfish. Store in the original packaging or a shallow tray on ice in the fridge, draining excess water. Do not keep raw seafood at room temperature.

How do I thaw frozen seafood safely?

Best: thaw in the refrigerator overnight. For quicker thawing, seal in a bag and submerge in cold water, changing the water every 30 minutes. Do not thaw at room temperature, which can promote bacterial growth.

How do I cook fish vs shellfish?

Fish can be baked, broiled, pan-seared, grilled, or poached. Shellfish (shrimp, mussels, clams, oysters, crab, lobster) are commonly steamed, boiled, or roasted. Cook fish to an internal temperature of 145°F (63°C) and shellfish until their shells open (discard ones that stay closed).

How long does seafood take to cook?

Times vary by type and size. As a rough guide: fish fillets 1 inch thick take about 8–12 minutes in the oven; shrimp take 2–3 minutes per side; scallops 2–3 minutes per side; clams and mussels steam for 5–7 minutes until they open. Always check doneness, not just time.

Are there common seafood allergies and safety tips?

Shellfish is a common allergen; fish allergies also occur. If you are allergic, avoid the seafood and cross-contact with utensils and surfaces. Read labels, wash hands and surfaces after handling, and consult a doctor about emergency plans if there’s a risk of severe reaction.

How do I choose sustainable seafood?

Look for certifications such as MSC (Marine Stewardship Council) or ASC (Aquaculture Stewardship Council). Prefer locally sourced, seasonal options and avoid species that are overfished. Ask your fishmonger for sustainable choices and check reputable guides from NOAA or seafood sustainability organizations.

What are common mistakes to avoid when cooking seafood?

Avoid overcooking, which dries out or tightens the flesh. Don’t overcrowd the pan, season appropriately, and avoid cross-contamination between raw and cooked seafood. thaw properly, and let seafood rest briefly after cooking to retain moisture.

Introduction / Hook

Imagine a plate that feels like a celebration, where each bite is a velvet ribbon of richness woven with the ocean’s kiss. Lobster ravioli sauce is more than a condiment; it’s a sensorial journey that begins with the gleam of lobster meat and ends in a creamy, citrus-bright finish that makes the room feel warmer. The sauce that accompanies lobster-stuffed ravioli is the quiet star of the show—sophisticated, luxurious, and surprisingly comforting all at once. Think of it as a bridge between refined Italian technique and the briny, sun-warmed flavors of the sea. The first aroma—salt and butter mingling with a whisper of garlic, the whispering sizzle of shallots, and a glassy sheen of white wine—promises a dish that is both timeless and modern. This isn’t just pasta with filling; it’s an edible memory you can carry to the table, a moment of restaurant-caliber elegance that you can recreate at home without needing a private chef or a pantry full of rare ingredients.

The Story Behind the Dish

Ravioli, in its many forms, has always carried a lineage of coastal inspiration and regional creativity. The concept of pairing delicate, rapturous seafood with the gentle decadence of cream and butter traces back to Mediterranean kitchens that learned early on to balance luxury with approachability. When chefs began to pair lobster with pasta, they weren’t simply combining two beloved textures; they were crafting a narrative—one that speaks of markets by the sea, of brick ovens warmed by aromatic breads, and of long, gleaming summers where dinners stretch into twilight. The lobster ravioli itself suggests a tradition of handmade pasta; the sauce, a velvety homage to the shellfish’s natural sweetness, elevates the humble ravioli into a chorus where every component has its part to sing.

In many culinary journeys, “seafood with cream” is a gateway dish—easy enough to make at home, yet indulgent enough to feel special. The sauce that accompanies lobster ravioli often borrows from classic seafood bisques and white wine reductions, borrowing their brightness and depth while letting the lobster’s flavor remain the star. It’s a story told in layers: the firm bite of the pasta, the tender morsel inside, and the sauce that ties everything together with a kiss of citrus, a hint of herb, and a glossy, unctuous finish. It’s also a tale of adaptation—an Italian technique embraced by coastal cooks across oceans and cultures who understand that the best sauces respect the seafood, never overpower it.

Why You’ll Love This Recipe

  • Luxurious flavor without endless labor: a sauce that tastes restaurant-worthy but is approachable enough for a dinner at home.
  • Balanced richness: a creamy, buttery base that carries lobster sweetness and a bright citrus note to keep the dish lively.
  • Textural harmony: the smooth sauce, the tender ravioli, and occasional bite of lobster morsels create a pleasing contrast that excites the palate.
  • Versatile pairings: works beautifully with simple greens, crusty bread, or a light risotto, letting the sauce shine without competing flavors.
  • Make-ahead friendly: elements of the sauce can be prepared in advance and finished with fresh pasta for a speedy weeknight luxury.
  • Elegant yet forgiving: you can adjust richness, brightness, and salt balance to suit your preferences, making it suitable for dates, holidays, or everyday celebrations.

Flavor Profile & Texture

The hallmark of a great lobster ravioli sauce is its ability to be simultaneously creamy and bright, indulgent yet clean enough to let the seafood shine. The base tends to be a careful fusion of dairy richness and a wine-driven acidity that lifts the sweetness of the lobster. A small amount of alcohol, often a crisp white wine, adds a subtle tang and complexity, while a touch of citrus—such as lemon zest or a whisper of orange—brightens the finish, preventing any heaviness from overwhelming the palate. Butter contributes a silken sheen, lending a satin finish that coats the tongue, while a mild garlic or shallot undertone provides depth without turning the sauce into a garlicky storm. If you imagine the perfect seafood sauce, this isn’t a heavy alfredo or a shy butter sauce; it’s a confident, eloquent liaison of sea and land, of sea-kissed sweetness and dairy-luxury, finally tied together with a whisper of herbs that sing rather than shout.

Texture-wise, you’ll experience a glossy, almost glassy surface that glides across the ravioli, a velvety mouthfeel that lingers pleasantly yet doesn’t cling too heavily. Small bits of lobster meat add occasional tenderness and a burst of brine that reminds you you’re tasting real shellfish, not a flavor impersonation. The pasta’s delicate bite contrasts with the sauce’s creaminess, creating a harmony that is both comforting and sophisticated. Aromatics—think a bay leaf, a splash of citrus oil, and a hint of fresh herbs—dress the sauce like a scarf, giving it a scent first, a taste second. This layered approach makes each forkful feel like a new experience, from the initial citrus lift to the lingering buttery finish that invites the next bite without saturation.

Occasions & Pairings

Lobster ravioli with a luxurious sauce is a dish tailor-made for special occasions, yet it can be adapted for quieter weeknights that deserve a touch of glamour. Consider these scenarios and pairing ideas to get the most from this dish:

  • an elevated starter or centerpiece that announces a celebration without requiring an entire menu overhaul.
  • a restaurant-caliber experience at home, ideally served with soft candlelight and a crisp, refreshing drink to balance the richness.
  • a stunning main course or first course that leaves guests feeling indulged and impressed, with room for lively conversation around the table.
  • Weeknight upgrade: when you want something luxurious but still doable in a reasonable timeframe, especially if you prep components in advance.

Pairing ideas:

  • White wines: a classic, such as a Chardonnay with moderate oak, or a Sauvignon Blanc for a crisp, citrusy lift. The wine’s acidity helps carve through the sauce’s richness.
  • Greens and textures: a bright arugula salad with a lemon vinaigrette, or wilted spinach with garlic (if you’re comfortable with a little extra aromatics).
  • Accompaniments: crusty garlic bread or a light, herbaceous risotto that won’t overshadow the main course.
  • Side show desserts: a light citrus-forward dessert, like a lemon panna cotta, to echo the zest in the sauce and finish cleanly.

Tips, Variations & Substitutions

Core ideas

While the heart of this sauce is the harmonious blend of lobster sweetness, dairy richness, and citrus brightness, you can tailor it to your pantry, dietary needs, or mood without losing the essence. The following ideas offer flexible directions rather than rigid instructions, so you can apply them as you see fit.

  • Rice or pasta pairing: Although ravioli is the star, this sauce works beautifully with other shapes that cradle the sauce—fettuccine, pappardelle, or even smaller filled pastas that capture the sauce well.
  • Herbs: Fresh chives, tarragon, or flat-leaf parsley add a fleeting brightness that can lift the dish without overshadowing the lobster’s sweetness.
  • Seafood variations: If lobster isn’t available, you can softly substitute with crab meat, shrimp, or a combination of shellfish to keep the seafood-forward profile intact.
  • Vegan or dairy-free options: To keep the concept while avoiding dairy, you can attempt a rich coconut cream base with a lobster-flavoring element such as seaweed or mushroom umami, though the lobster itself would be replaced by plant-based alternatives for a fully vegan version.
  • Gluten-free approach: Use gluten-free pasta or ravioli; the sauce itself remains naturally gluten-free, so it’s a good way to keep the dish inclusive.

Flavorful twists

  • Substitute part of the cream with a lighter stock reduction to coax more of the sea’s brightness into the sauce.
  • Infuse a small amount of saffron or-white wine reduction for a subtle, exotic aroma that pairs nicely with lobster’s sweetness.
  • Add a dash of white pepper for a gentle aromatic heat that doesn’t overwhelm.
  • Finish with a drizzle of high-quality extra virgin olive oil to add a fruity note and a satin finish just before serving.

Storage & Make-Ahead Ideas

When you’re planning a special meal, the idea of making components ahead of time is appealing. Here are practical ways to manage sauce components and leftovers without sacrificing quality.

  • Make-ahead: The sauce base can be prepared in advance up to a point, especially when you are balancing flavors and reducing. If you do this, cool promptly and refrigerate in an airtight container; reheat gently while whisking to re-emulsify if needed.
  • Leftovers: Store leftovers in the fridge for up to 2-3 days. Reheat slowly over low heat, adding a splash of cream or a little pasta water to adjust the texture if it thickens too much.
  • Freezing: Freezing a cream-based lobster sauce is not ideal, as dairy can separate and the texture may suffer. If you must freeze, do so with the understanding that you may need extra whisking and a gentle emulsification when reheating to restore gloss and smoothness.
  • Pasta storage: Cooked ravioli should be stored separately from the sauce if you’re preparing ahead; otherwise, toss lightly to prevent sticking and reheat together with minimal additional moisture for best results.

Fun Facts & Trivia (Optional)

  • The culinary memory of lobster as a celebratory food dates back to coastal cultures where lobster harvests were bountiful and cooking traditions turned abundance into hospitality.
  • Ravioli fillings can be a canvas for regional flavors: from crab and herbs in coastal Italian kitchens to ricotta and spinach in others, but the sauce that accompanies them often carries the sea’s memory with it.
  • In high-end kitchens, a lobster sauce may be finished with a whisper of citrus oil or a tiny amount of lobster bisque reduction, a nod to classic seafood sauces while keeping the dish contemporary and light on its feet.
  • Texture matters as much as flavor: the contrast between the tender ravioli and the smooth, glossy sauce is central to the overall experience, a reminder that great pasta lives at the intersection of technique and imagination.

Inspiration & The Perfect Moment

For those who love the theater of a well-prepared plate, this lobster ravioli sauce offers a moment where technique and luxury meet warmth and hospitality. It’s not merely about following a recipe; it’s about crafting an edible moment that invites conversation, slows time a little, and makes everyone around the table feel cared for. A sauce like this can turn a simple dinner into a memory—the way a fragrance can transport you to a favorite restaurant, or how the first bite lingers, inviting another. The sauce’s brightness, its silky texture, and the gentle saline kiss of lobster together conjure a coastal sunset—soft light, a breeze that carries hints of citrus, and the promise that good food can carry us to places both familiar and new.

Closing Thoughts

Whether you’re cooking for a romantic evening, a family gathering, or simply indulging in a personal culinary retreat, lobster ravioli with a luscious, well-balanced sauce offers a blueprint for making the ordinary extraordinary. It invites you to savor the luxury without pretension, to appreciate the elegance of a simple, well-assembled sauce, and to remember that great dining is as much about the story told by its flavors as the flavors themselves. As you plate this dish, consider the journey from sea to table—the lobster’s sweetness, the silky embrace of cream and butter, the light lift of wine and citrus—and savor the moment when the kitchen becomes a stage for something truly memorable.

Ingredients

Lobster Ravioli Sauce
Lobster & Aromatics

  • 1 cup cooked lobster meat, chopped
    → Use claw and tail meat from a fully cooked lobster; chop into bite-sized pieces so the sauce coats evenly and each bite includes lobster texture. If starting with raw lobster, cook until opaque, then dice; pat dry thawed meat to minimize extra moisture and fold in gently at the end to preserve chunks.
  • 2 tbsp unsalted butter
    → Start the sauce by melting butter over medium heat; it provides a rich, silky base and carries the aromatics. Using unsalted butter lets you control the final salt level; you can combine with a little olive oil to raise the pan’s heat tolerance and prevent browning the butter.
  • 1 tbsp olive oil
    → Adds extra fat and helps prevent butter from burning during sautéing. Choose a good-quality extra-virgin olive oil for flavor; if dairy-free is desired, you can increase oil and omit butter, keeping heat moderate to avoid scorching.
  • 2 shallots, finely minced
    → Shallots provide a subtle, sweet onion-like sweetness that complements seafood without overpowering it. Finely mince so they soften quickly and blend into the sauce; sauté until translucent and just starting to color, avoiding browning which can introduce bitterness.
  • 2 garlic cloves, minced
    → Garlic adds aromatic depth to the base. Add after the shallots and sauté briefly until fragrant (about 30 seconds); avoid browning to prevent acrid notes that can clash with delicate lobster flavor.

Sauce Base & Liquids

  • 1/2 cup dry white wine
    → Deglaze the pan after sautéing aromatics to lift any browned bits and introduce acidity. Choose a dry, crisp wine such as Sauvignon Blanc or Pinot Grigio; simmer until reduced by about half to concentrate flavor and prevent watery sauce. If you prefer no alcohol, substitute with additional lobster stock and a splash of lemon juice.
  • 1 cup lobster stock or seafood stock
    → Provides depth of shellfish flavor to the sauce. If making stock from shells, simmer shells with aromatics for 20–30 minutes, strain, then measure. Use low-sodium stock and adjust salt at the end to avoid oversalting.
  • 2 tbsp tomato paste
    → Adds color, body, and a subtle sweetness; bloom it with the aromatics to deepen flavor before adding wine and stock. This helps the sauce emulsify with cream and prevents a raw-tomato finish.
  • 1 cup heavy cream
    → Gives the luxurious, silky body that coats pasta and lobster pieces. Simmer gently after adding to prevent curdling; for lighter texture, you can mix in half-and-half, but heat must remain gentle and gradual to maintain smoothness.
  • 1-2 tbsp fresh lemon juice
    → Provides bright acidity to balance richness. Add gradually and taste as you go; lemon juice can curdle cream if added too early or boiled, so adjust toward the end of cooking.
  • Zest of 1/2 lemon (optional)
    → Adds fragrant citrus oils for extra brightness. Use a microplane to grate finely and fold in near the end to preserve aroma; if you skip the zest, rely on the juice for brightness.

Seasoning & Finishing

  • Salt, to taste
    → Season progressively; lobster stock and butter contribute salt, so taste after each addition. You want the sauce to be well-seasoned but not overly salty, since the lobster itself adds flavor and saltiness.
  • Freshly ground black pepper, to taste
    → A light crack of pepper enhances seafood flavors; grind just before using and taste after reductions to achieve a balanced finish.
  • Pinch of red pepper flakes (optional)
    → Adds a subtle warmth that complements the sweetness of lobster. Start with a small pinch and adjust based on heat tolerance.
  • 2 tbsp chopped fresh parsley or chives (or tarragon)
    → Fresh herbs brighten the sauce and add color. Add toward the end to preserve aroma; if using dried herbs, reduce to a pinch and add earlier, but fresh is preferred for this dish.
  • 1 tbsp cold butter, for finishing (optional)
    → Monter au beurre: whisk in small cubes of cold butter off the heat to emulsify and create a glossy, luxurious finish. Do not boil after adding the butter to maintain a smooth, cohesive sauce.
  • 1–2 tbsp cognac or brandy, to deglaze (optional)
    → Adds depth and a subtle, warm aroma; you can flambé safely if desired, or simmer briefly to cook off alcohol. If avoiding alcohol, substitute with an extra splash of stock and a touch more lemon for brightness.

Optional Add-ins

  • 1/2 cup roasted red peppers, diced (optional)
    → Provides color and a gentle sweetness that pairs nicely with lobster. Roasted peppers can be jarred or fresh; dice finely and stir in near the end to maintain texture without overpowering the lobster.
  • 1–2 tbsp chopped fresh chives (optional)
    → Finishing herb that adds a delicate onion note and bright green color. Sprinkle at the very end to preserve aroma and vibrancy.

Instructions

  • Prepare mise en place for the lobster ravioli sauce by measuring and arranging all ingredients: 1 cup cooked lobster meat, 2 tbsp unsalted butter, 1 tbsp olive oil, 2 shallots (finely minced), 2 garlic cloves (minced), 1/2 cup dry white wine, 1 cup lobster stock, 2 tbsp tomato paste, 1 cup heavy cream, 1-2 tbsp fresh lemon juice, zest of 1/2 lemon (optional), salt, black pepper, pinch of red pepper flakes (optional), 2 tbsp chopped fresh parsley or chives (or tarragon), 1 tbsp cold butter (optional), 1-2 tbsp cognac or brandy (optional), and any optional add-ins like 1/2 cup roasted red peppers. This upfront organization ensures you can execute each step smoothly without scrambling for components, keeps the sauce cohesive, and prevents over- or under-seasoning as flavors concentrate during reduction.
  • Warm a wide, heavy skillet over medium heat and melt 2 tablespoons unsalted butter with 1 tablespoon olive oil; swirl to coat the pan and maintain a steady medium temperature to prevent scorching, since butter alone can burn before the sauce develops its depth. This combination provides a rich base while the oil raises the pan’s tolerance for heat, preserving delicate aromatics.
  • Sauté the finely minced shallots in the fat until they are translucent and just starting to color, about 3-4 minutes; this softens their sweetness and creates a foundational sweetness that anchors the seafood flavors without overpowering them. Do not let them burn; if they color too quickly, reduce the heat slightly and stir more often.
  • Add the minced garlic and sauté briefly for about 30 seconds until fragrant; this layer of aroma should bloom quickly without browning, which can add bitter notes that clash with the lobster’s sweetness. Stir constantly to avoid hot spots and uneven cooking.
  • Stir in the tomato paste and cook for 1-2 minutes to bloom its sweetness and deepen its color, coating the aromatics evenly; this step helps develop body and ensures the paste emulsifies with the cream later rather than remaining raw-tasting.
  • Deglaze the pan with 1/2 cup dry white wine, scraping up any browned bits from the bottom of the pan with a wooden spoon; simmer until reduced by about half to concentrate the acidity and fruity notes, which balance the cream’s richness and the lobster’s sweetness.
  • Pour in 1 cup lobster stock and bring the mixture to a gentle simmer; reduce the stock by about one-third to intensify shellfish flavor and create a thicker sauce that will coat the pasta nicely.
  • Whisk in 1 cup heavy cream and maintain a gentle simmer, stirring occasionally to prevent scorching; simmer until the sauce thickens slightly and coats the back of a spoon, which indicates the emulsion is forming and the texture will cling to ravioli.
  • Add 1-2 tablespoons fresh lemon juice gradually, tasting as you go to balance richness with bright acidity; lemon juice can curdle cream if added too early or boiled, so add toward the end of reduction and adjust by taste. If desired, fold in lemon zest (half a lemon) in the final moments for additional aroma.
  • Season with salt and freshly ground black pepper, tasting after each adjustment; lobster stock contributes salt, so adjust carefully to avoid oversalting. A light crack of red pepper flakes can be added here for a subtle, warming note if you enjoy a hint of heat.
  • Optional: drizzle in 1–2 tablespoons cognac or brandy to deglaze again and add depth; you can flambé safely away from the heat or simmer for 1-2 minutes to cook off the alcohol, which leaves a refined warmth without harshness; if avoiding alcohol, substitute with a splash more stock and a touch more lemon for brightness.
  • Add the prepared 1 cup of diced lobster meat to the sauce, folding gently to coat each piece without breaking it apart; keep the lobster pieces tender by not overcooking, as they are already cooked and should only warm through and integrate with the sauce’s texture and flavor.
  • Stir in optional add-ins such as 1/2 cup roasted red peppers and 1–2 tablespoons chopped fresh chives or parsley toward the end of cooking to maintain color and fresh aroma; the peppers provide color and sweetness, while fresh herbs lift the dish and keep it vibrant.
  • Finish the sauce with 1 tablespoon cold butter, added off the heat in small cubes and whisked vigorously to emulsify into a glossy, luxurious sheen; this technique (monter au beurre) tightens the emulsion and creates a satin finish that clings to ravioli. Do not boil after adding the butter.
  • Keep the sauce warm on very low heat or in a warm area while you plate and sauce freshly cooked lobster ravioli; avoid overheating, which can separate the emulsion and dull flavor.
  • To serve, spoon the lobster sauce generously over freshly cooked lobster ravioli or toss the ravioli gently in the pan to coat; garnish with additional chopped parsley or chives and a light squeeze of lemon if desired for extra brightness. This presentation showcases the lobster pieces and ensures every bite is balanced with aromatic herbs and a creamy, citrus-kissed shellfish sauce.

Notes

These lobster ravioli sauce notes are intended to help you achieve a glossy, balanced sauce that clings to every lobster-studded bite. Start by melting 2 tablespoons unsalted butter with 1 tablespoon olive oil over medium heat; sauté 2 finely minced shallots until translucent, then add 2 minced garlic cloves and cook just until fragrant. Deglaze with 1/2 cup dry white wine and simmer until reduced by half. Stir in 1 cup lobster stock and 2 tablespoons tomato paste, letting the paste bloom to deepen color and body. Pour in 1 cup heavy cream and simmer gently; toward the end, whisk in 1–2 tablespoons fresh lemon juice (and optionally the lemon zest) to brighten; avoid boiling once the cream is in. For a finishing gloss, whisk in 1 tablespoon cold butter off the heat and, if desired, 1–2 tablespoons cognac or brandy to deglaze and add warmth; if you prefer to skip alcohol, substitute with a touch more stock and a little extra lemon. To keep the lobster texture tender, fold in 1 cup cooked lobster meat at the end, just until warmed through; pat dry thawed meat to minimize extra moisture and preserve chunks. Season gradually with salt and freshly ground pepper, tasting after each addition since the stock and tomato paste contribute salt. Optional: a pinch of red pepper flakes for subtle heat and 2 tablespoons chopped fresh parsley or chives added at the end for color and aroma. If you like color and sweetness, stir in 1/2 cup roasted red peppers near the end. For a dairy-free version, omit the butter and reduce the cream, using extra olive oil to maintain richness. Leftovers refrigerate well for 2–3 days; reheat gently over low heat, whisking to re-emulsify, and adjust seasoning as needed. Always cook the lobster just until opaque, and pat dry thawed meat to minimize moisture and preserve chunks.

Tips

Choosing and handling lobster meat

  • Use claw and tail meat from a fully cooked lobster; chop into bite-sized pieces so the sauce coats evenly and each bite includes lobster texture.
  • If starting with raw lobster, cook until opaque, then dice; pat dry thawed meat to minimize extra moisture and fold in gently at the end to preserve chunks.
  • Pat lobster meat dry after cooking to avoid watery sauce and dilute flavors.

Aromatics and the base

  • Sauté shallots until translucent and just starting to color; avoid deep browning which can introduce bitterness.
  • Add garlic after the shallots and sauté briefly (about 30 seconds) until fragrant; don’t let it brown.
  • Bloom tomato paste with the aromatics to deepen color, body, and to help the sauce emulsify with cream.

Deglazing, stocks, and building depth

  • Deglaze with dry white wine after sautéing aromatics; simmer until reduced by about half to concentrate flavor and avoid a watery sauce.
  • Use 1 cup lobster stock or seafood stock for depth; if making stock from shells, simmer with aromatics, strain, and measure. Use low-sodium stock and adjust salt later.
  • If you prefer no alcohol, substitute with additional lobster stock and a splash of lemon juice.

Dairy handling and texture

  • Stir in heavy cream and simmer gently; avoid boiling to prevent curdling. For a lighter texture, you can use half-and-half but keep heat gentle.
  • Finish with 1 tablespoon cold butter off the heat to emulsify and create a glossy, luxurious finish; do not boil after adding.
  • If the sauce thickens, loosen with a splash of lobster stock or water while maintaining a gentle simmer.

Acidity and brightness

  • Add lemon juice gradually toward the end; too early or boiling can curdle the cream. Optional lemon zest adds fragrant brightness when folded in near the end.
  • Season progressively; lobster stock and butter contribute salt, so taste after each addition to avoid oversalt.

Seasoning, heat, and finishing touches

  • Freshly ground black pepper enhances seafood flavors; a pinch of red pepper flakes adds subtle warmth if desired.
  • Add chopped fresh parsley, chives, or tarragon toward the end to brighten color and aroma; if using dried herbs, add earlier in smaller amounts.
  • 1–2 tablespoons cognac or brandy to deglaze adds depth; you can flambé safely or simmer briefly to cook off the alcohol. If avoiding alcohol, substitute with an extra splash of stock and a touch more lemon.

Make-ahead and storage tips

  • The sauce can be prepared up to a day ahead; rewarm gently and whisk in a splash of cream or stock if it thickens.
  • Keep lobster meat separate from the sauce until ready to serve to avoid overcooking; fold in at the end just before serving for best texture.

FAQ

What is lobster ravioli sauce?

A lobster ravioli sauce is a rich, velvety accompaniment designed to complement delicate lobster-filled pasta. It typically features butter, cream or dairy-free alternatives, garlic and shallots, white wine, lobster stock or shellfish stock, lemon, and fresh herbs to echo the seafood sweetness.

What ingredients are used for a classic lobster ravioli sauce?

Common ingredients include:

  • Butter
  • Garlic and shallots
  • Dry white wine
  • Lobster stock or shellfish stock
  • Cream (heavy cream or half-and-half) or a dairy-free alternative
  • Lemon juice or zest
  • Fresh herbs (tarragon, chives, or parsley)
  • Salt and white pepper
Can I use canned or pre-cooked lobster in the sauce?

Yes. Use drained, well-patted dry lobster meat from canned or pre-cooked lobster. Gently fold it into the finished sauce to warm through without overcooking. If using frozen lobster, thaw completely and pat dry before adding.

How do I make a quick lobster cream sauce?

Basic method:

  • Sauté minced garlic and finely chopped shallots in butter until translucent.
  • Add white wine and simmer until reduced by half.
  • Stir in lobster stock and reduce slightly.
  • Add cream and simmer until lightly thickened.
  • Return lobster meat to the pan, warm through, then finish with lemon juice and herbs. Season to taste.
How can I prevent the sauce from breaking or curdling?

Tips to keep it smooth:

  • Keep the heat low to avoid boiling the cream.
  • Whisk constantly while adding dairy or stock to emulsify.
  • Temper the dairy by adding a small amount of hot liquid before pouring it in.
  • If it starts to separate, remove from heat and whisk in a splash of cold cream or a cold small cube of butter, then rewarm gently.
Are there dairy-free or lighter versions of this sauce?

Yes. Options include:

  • Replace cream with coconut cream or a cashew cream (soaked cashews blended with water).
  • Use olive oil or dairy-free butter in place of dairy butter, and a dairy-free milk with a touch of starch for thickening (e.g., almond milk with cornstarch).
  • Skip the roux and rely on reduced stock and emulsified olive oil for a lighter texture.
What add-ins can customize the flavor of the sauce?

Flavor boosters to consider:

  • Fresh lemon zest or a splash of lemon juice
  • Chopped fresh herbs (tarragon, chives, parsley)
  • Finely grated tomato or a touch of tomato paste for color
  • A pinch of red pepper flakes for a subtle heat
  • Finely chopped roasted garlic or shallots
  • Truffle oil or a small amount of cognac for depth
How long does the sauce keep, and how should I store it?

Storage tips:

  • Refrigerate in an airtight container for up to 2–3 days.
  • Let it cool, then refrigerate promptly to prevent bacterial growth.
  • Chill the lobster separately if you plan to combine later with fresh pasta.
Can I freeze the sauce, and how should I reheat it?

Freezing is best for the dairy-free version or the base sauce without fresh lobster. For best results:

  • Freeze sauce (without lobster meat) in a freezer-safe container for up to 2 months.
  • Thaw in the fridge overnight, then rewarm gently over low heat, whisking to re-emulsify. If using cream, you may need to whisk in a splash of dairy-free milk or a little butter to restore texture.
  • Add pre-cooked lobster meat at the end to warm through, not cook further.
What wine or beverage pairs well with lobster ravioli sauce?

Pairings to enhance the dish:

  • Dry or demi-sec white wines such as Sauvignon Blanc, Chardonnay (unoaked or lightly oaked), or Pinot Grigio.
  • For a sparkling option, a brut Champagne or Prosecco adds brightness.
  • Non-alcoholic: a crisp citrus-forward sparkling water or a white grape juice spritzer with a squeeze of lemon.