Author

Ocean Nightleaf

Browsing

Introduction / Hook

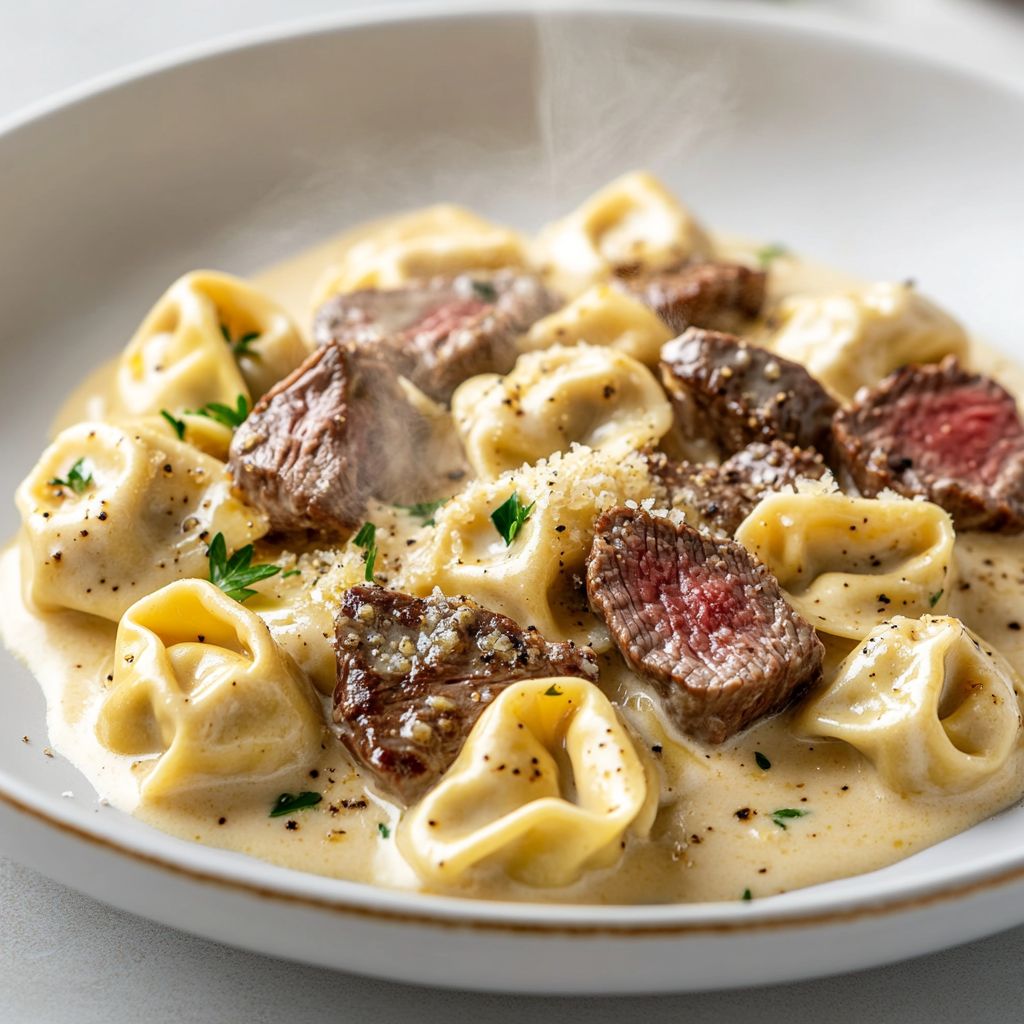
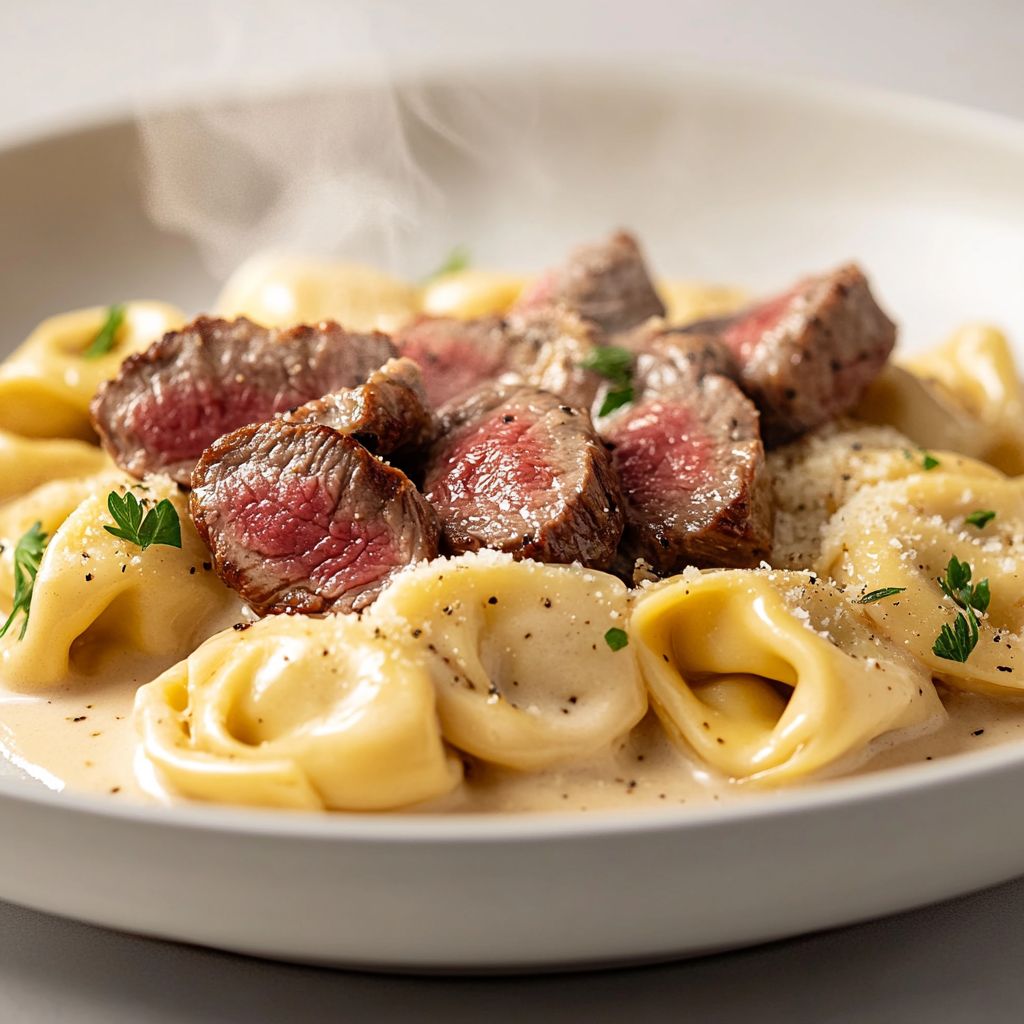
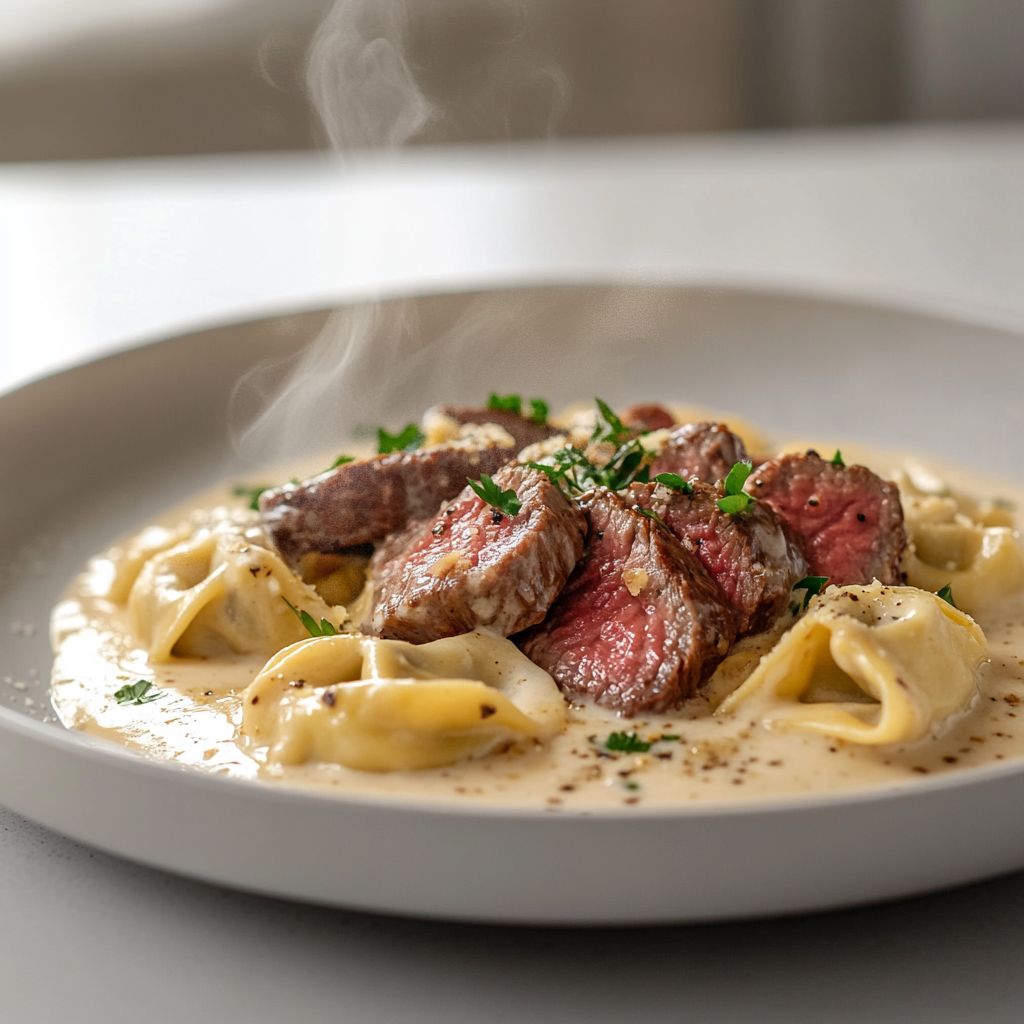
Close your eyes and let the kitchen flood with a chorus of sizzle, scent, and warmth. Cracked garlic releases a burst of sunshine-yellow oil, the kind of fragrance that makes the room feel instantly cozier. A steak sears to a caramel-bronze kiss, its juices glistening as they mingle with the pan’s fond. Then comes the luxury: tortellini, those little pockets of lush dough, surrendering to a velvet embrace as they swim in a sauce that’s equal parts indulgent and comforting. This is Cracked Garlic Steak Tortellini in Creamhouse Sauce Bliss—a dish that feels like a celebration of contrasts: rugged, beefy richness and delicate, pillowy pasta; bright, herbaceous notes cutting through creamy decadence; and textures that keep every bite alive with interest. It’s the kind of recipe that makes a weeknight feel like a memory you’ll want to relive, again and again.

What makes this dish so irresistibly appealing isn’t just the ingredients in harmony, but the way they come together with a sense of theater and ease. Picture a glossy skillet, a swirl of cream-infused sauce catching the light, and a generous plateful of tortellini twined with ribbons of steak and shards of roasted garlic. It’s comfort food with a touch of elegance, the kind of meal that invites lingering, conversation, and a sense of quiet triumph as you plate the final, glossy swirl. And because it’s built on familiar stars—garlic, steak, tortellini, and cream—it feels approachable even when you’re playing with flavors and textures at a higher level. Welcome to a dish that marries rustic heart with refined indulgence, one crack of garlic, one perfect sear, and one spoonful of creamy bliss at a time.

The Story Behind the Dish

There’s a little kitchen folklore tucked into this dish’s name and character. It began in a sun-soaked apartment kitchen where late summer evenings stretched long and the pantry hummed with simple ingredients. The cook—an avid believer in the magic of browned bits and the gentle caress of cream—wanted to capture a moment when sophistication and homeliness met at the stove. The result wasn’t just a pasta dish; it was a memory in a skillet. The “cracked garlic” technique—garlic cloves cracked just enough to release their perfume without becoming overwhelmed by heat—became a signature note, a sensory cue that announces that something special is about to unfold. The concept of a “creamhouse” sauce emerged as a playful nod to those moments when cream, cheese, and a touch of simmering stock come together to cradle every ingredient in a soft, velvety hug. It’s a sauce that drinks deeply from the flavors surrounding it: beefy sear, nutty parmesan, bright citrus, and a whisper of herbaceous green that lingers on the tongue long after the plate is empty.

In many kitchens, recipes arrive as straightforward steps. This one—whether you’re cooking for two or feeding a lively crowd—arrived as a story about balance: how to honor the hearty presence of steak and the delicate, comforting charm of tortellini in the same mouthful, without either element feeling loud or out of place. The result is a dish that tastes like a dream you can actually cook—an intimate dish you might imagine a grandmother teaching you, yet with a modern, glossy finish that makes it feel celebratory. The story continues with every plate served: a reminder that good meals aren’t just about nourishment, but about memory, texture, and the slow pleasure of savoring a sauce that clings to each bite with a confident finish.

Beyond its origins, this dish carries a sense of place: the comforting traditions of Italian-American cooking, where pasta meets meat in a way that feels both familiar and transformative. The tortellini represents the craft and warmth of regional pasta making, while the seared steak brings a rugged, earthy note that anchors the dish in heartiness. The creamhouse sauce acts as the unifying thread—an embrace that ties everything together with a glossy, luxurious sheen. It’s the kind of meal that invites stories to unfold around the table, where laughter, the clink of glasses, and the aroma of garlic create a memory that tastes almost as good as the dish itself.

Why You’ll Love This Recipe

  • Luxurious flavor without fuss: a rich, creamy sauce that feels indulgent, yet comes together with everyday ingredients and straightforward technique.
  • Textural harmony: the crisp sear on steak, the soft, chewy tortellini, and the creamy, silky sauce create a symphony of textures in every bite.
  • Versatile and forgiving: lends itself to substitutions and variations, so you can tailor it to your pantry, dietary needs, or mood without losing its soul.
  • Impressive with minimal effort: the dish looks and tastes like a showstopper, making it perfect for date nights, celebrations, or a hero-weeknight meal.
  • Balanced sweetness and savoriness: roasted garlic sweetness, beefy depth, bright acidity, and a gentle tang from cheese—each element plays its part without overpowering the others.
  • Comforting aroma that lingers: the moment you lift the lid or twirl the pasta, you’ll be met with a comforting fragrance that invites anyone at the table to lean in for a bite.
  • One-pan-friendly mindset, with options: while a little skillet romance is ideal, you can streamline or expand with sides and a simple salad to complete the meal.

Flavor Profile & Texture

Imagine a deep, savory foundation formed by seared steak—the kind of flavor that sings with a hint of char and a rich, beefy backbone. The cracked garlic contributes a bright, intimate warmth, releasing its perfume in the moment of contact with heat. Not a sharp bite, but a toasty sweetness, with citrusy hints and peppery ticks that brighten the palate rather than weigh it down. The tortellini—plump, tender, and slightly al dente in spirit—offers a soft, pillow-like bite that soaks up the sauce’s blanket of cream without surrendering its own identity. The creamhouse sauce is the bridge between elements: a luscious, velvety cream that carries a gentle kiss of cheese, possibly a parmesan or a blend that adds a touch of nuttiness and depth. It embraces every component, allowing the steak’s savor and the tortellini’s softness to coalesce into a cohesive, comforting mouthful.

Texture plays a starring role here: the steak’s caramelized crust delivers a whisper of crispness, while the interior remains juicy and tender. The tortellini—filled with flavors that echo the dish’s star ingredients—presents a soft, chewy bite that resists mushiness while absorbing the sauce’s richness. The sauce itself has a glossy, almost satin-like finish that clings to every surface of pasta and meat alike. Subtle elements—green herbs, a hint of citrus zest, a pinch of pepper or chili—provide a bright contrast that wakes the palate without overpowering the core. Each bite feels balanced, a lesson in how dairy-rich comfort can coexist with beefy depth and a touch of aromatic sharpness. The overall effect is a dish that lingers on the tongue, inviting another forkful as the flavors become more intimate with every moment of warmth and interaction at the table.

Beyond the core flavors, there is a nuanced chorus of aromatics. The garlic’s scent evolves—from sharp to mellow to sweet—as it unites with the cream and cheese, forming an irresistible perfume that places this dish squarely in the realm of “classic with a twist.” If you listen closely to your senses, you’ll note how the sauce’s fat carries aroma and taste across the palate, while the tortellini provides a gentle, comforting counterweight that prevents the dish from feeling heavy. It’s a balance of indulgence and ease, a reminder that great flavors don’t always require complicated methods—just thoughtful combinations and a little patience as everything comes together in a single, harmonious bowl.

Occasions & Pairings

This dish is a versatile star that shines in a wide range of settings. It can be the centerpiece of a special weeknight dinner when you want to feel pampered without spending hours in the kitchen. It’s equally at home for a romantic date night, where the plate’s elegance matches the mood, or for a casual weekend family meal when you’re gathering around the table to share stories and savor good food.

Suggested occasions:

  • Romantic weeknight dinners with a glass of wine and soft lighting.
  • Impressive weekend meals to celebrate birthdays, anniversaries, or milestones.
  • Cozy family dinners that feel like a warm hug after a long day.
  • Casual entertaining with friends, where you want something comforting yet chic on the table.

Pairings to elevate the experience:

  • Side salads: an arugula salad with lemon vinaigrette, or a simple peppery radicchio slaw to cut through the richness.
  • Breads: crusty scenarios like garlic bread or a warm baguette for sopping up every luscious drop of sauce.
  • Wine: a medium-bodied red such as a Pinot Noir or a Rioja works beautifully with the beef and cream; a brighter white like Chardonnay can also pair nicely, especially if the sauce leans lighter with dairy or citrus notes.
  • Drinks for non-alcoholic options: a sparkling citrus mocktail or a chilled white grape juice with a splash of lemon to echo the brightness in the dish.
  • Desserts: citrus-forward options like orange blossom panna cotta or a light, creamy dessert that won’t compete with the richness of the main course.

Tips, Variations & Substitutions

The beauty of Cracked Garlic Steak Tortellini in Creamhouse Sauce Bliss lies in its adaptability. Here are ideas to tailor the dish to your pantry, dietary preferences, or culinary curiosity:

  • Protein substitutions: swap beef for tender lamb, pork tenderloin, or even mushrooms for a vegetarian approach that keeps the dish’s earthy richness. If you prefer poultry, thinly sliced chicken breast also works beautifully, provided you maintain a nice sear to contribute texture.
  • Gluten-free and pasta alternatives: use gluten-free tortellini or other gluten-free stuffed pastas to maintain the dish’s comforting presence without sacrificing texture.
  • Dairy-free or vegan options: replace dairy with a luscious cashew cream or almond cream, and use a dairy-free parmesan substitute or nutritional yeast for a cheesy note that doesn’t rely on dairy.
  • Cheese variations: experiment with a sharper parmesan, pecorino, or a touch of Gouda for a different mellowness in the sauce, adjusting saltiness accordingly.
  • Garlic intensity: if you love garlic, include an extra cracked clove or two, but keep it balanced so the aroma remains fragrant rather than overwhelming.
  • Herbaceous lift: finish with fresh parsley, chives, or a squeeze of lemon to brighten the sauce and cut through its richness.
  • Make-ahead note: you can prepare the sauce ahead of time and rewarm gently with a splash of stock or water to restore gloss and loosenness if it thickens.
  • Regional twists: add a pinch of smoked paprika for a faint, smoky warmth; or a few crushed red pepper flakes for a subtle heat that harmonizes with the creaminess.

Storage & Make-Ahead Ideas

Leftovers can be a gift when stored properly. The sauce has a tendency to thicken as it sits, so gentle reheating is the key to restoring its silkiness. For best results, store the components separately when possible: keep the cooked steak portion and the pasta in separate containers from the sauce. Reheat slowly on the stove over low to medium heat, stirring frequently, and add a splash of stock, broth, or milk as needed to bring back the luscious texture. If you’ve prepared this ahead for a busy week, consider making the sauce in advance and freezing it in small portions. When you’re ready to serve, reheat and toss with freshly cooked pasta and warmed steak for a restaurant-quality finish. The tortellini—being pasta—reheats well if stored separately and added to the warmed sauce at the end to prevent overcooking.

Practical tips for make-ahead success:

  • Store sauces in airtight containers in the refrigerator for up to 3-4 days; freeze for longer storage in small portions.
  • Preserve texture by cooking tortellini al dente and adding to sauce just before serving to avoid sogginess.
  • Warm leftovers gently, avoiding high heat that can cause dairy to separate; a gentle simmer and careful stirring keep the sauce smooth.
  • When reheating, consider finishing with a small pinch of grated cheese for an enhanced finish and depth.

Fun Facts & Trivia (Optional)

  • Tortellini are believed to have originated in the Italian region of Emilia-Romagna, where pasta shapes celebrate the curves of the navel—hence the name “tortellini,” derived from “torta,” meaning round or ring-shaped in some local dialects.
  • The idea of a “creamhouse” sauce in modern fusion料理 nods to the way dairy-based sauces evolved in Italian-American cooking, marrying the creaminess beloved in North American kitchens with classic Italian ingredients.
  • Garlic has a storied place in culinary lore and is celebrated not only for its flavor but for its aroma that can transform simple ingredients into a comforting, memory-making dish. The cracked garlic technique emphasizes aroma without overwhelming bite, a small but powerful trick that many home cooks treasure.
  • Beef and pasta pairings have deep roots in global cuisine, but it’s the balance of a seared crust and a creamy, velvety sauce that makes this particular combination feel both timeless and modern. It’s a nod to the universal appeal of a hearty, satisfying meal that can be prepared with relative ease.
  • A well-made cream sauce is as much about texture as taste. The velvet finish you see on the plate is the culmination of patience, proper heat management, and a thoughtful blend of dairy and cheese that helps the sauce cling gracefully to pasta and meat alike.

Closing Thoughts

Cracked Garlic Steak Tortellini in Creamhouse Sauce Bliss is more than a dish; it’s an invitation. An invitation to savor the tension between crisp sear and creamy silk, to revel in the comforting familiarity of tortellini, and to enjoy the confidence that comes with a simple, well-executed plate. It is a celebration of texture, aroma, and flavor—an edible layering of memories and ideas that comes together in harmony on a single plate. If you’re seeking a recipe that feels luxurious without pretension, that gratifies both the eye and the palate, and that can adapt to your kitchen’s mood and constraints, this is your go-to option. Let the first bite carry you into a small moment of bliss, a taste memory you’ll return to again and again whenever you crave something hearty, elegant, and utterly satisfying.

Final Notes

As you bring this dish to the table, remember that the magic is in balance: the robust character of steak, the soft, inviting tortellini, and the lush, glossy creamhouse sauce that ties it all together. Don’t rush the moment—allow the aromas to rise, the sauce to gleam, and the first forkful to glide across the tongue as you settle into the comfort and joy of a meal that feels both intimate and spectacular. Enjoy the experience, share it with others, and let the Cracked Garlic Steak Tortellini in Creamhouse Sauce Bliss become a little ritual you return to whenever you crave something deeply satisfying and wonderfully comforting.

Ingredients

Tortellini Base
  • 12 oz cheese tortellini (fresh or dried; cooked to al dente per package directions)
    → Tortellini is the star of the dish, providing the cheesy filling and tender bite. For best texture, cook until just tender, drain well, and reserve a few tablespoons of the cooking water to loosen the sauce if it thickens. If using dried tortellini, adjust timing per the package and taste test frequently.
Steak and Aromatics
  • 12 oz ribeye steak, trimmed and cut into 1/2-inch strips
    → The steak provides rich, beefy flavor and a satisfying bite. Sear quickly in a very hot skillet to form a crust, then rest briefly before adding to the sauce so juices redistribute rather than run out and thin the sauce. If you prefer a leaner cut, flank or sirloin works well too.
  • 4 cloves garlic, cracked or lightly crushed
    → Cracked garlic releases more surface area and essential oils than whole cloves, infusing the oil and sauce with a warm, aromatic bite. Sauté with a touch of the steak fat until fragrant, being careful not to burn for a milder sweetness or a more pungent bite depending on your heat level.
  • 1 tablespoon extra-virgin olive oil
    → Olive oil helps sear the steak evenly and prevents sticking in the pan. Use a high-smoke-point oil and heat the pan until shimmering before adding the steak to avoid steaming rather than searing.
  • Salt and freshly cracked black pepper to taste
    → Seasoning is essential to bring out the flavor of the beef and sauces. Apply a generous pinch of kosher salt before searing, and cracked pepper right before the pan so the crust locks in flavor. Adjust at the end if the sauce tastes too salty.
Creamhouse Sauce
  • 1 cup heavy cream
    → The rich heavy cream forms the base of the luscious sauce. Simmer gently to reduce slightly so it coats the pasta without splitting; avoid aggressive boiling that could separate fats. For a lighter touch, you can substitute half-and-half but this will thin the final texture.
  • 1/4 cup cream cheese, softened
    → Cream cheese adds tang and helps emulsify the sauce for a smoothly thick texture. Soften to room temperature so it blends evenly; whisk vigorously if needed to prevent lumps as the sauce thickens.
  • 1/2 cup grated Parmesan cheese, plus extra for serving
    → Parmesan contributes a sharp, savory depth and helps thicken the sauce a touch. Freshly grate it for best flavor; add gradually and taste for salt balance. Reserve some for finishing at the table for guests.
  • 1/2 cup beef stock (or chicken stock)
    → Stock loosens the sauce and adds a savory foundation while deglazing the pan to lift browned fond from the steak. Use low-sodium stock and reduce to your desired consistency; adjust salt accordingly.
  • 2 tablespoons unsalted butter
    → Butter enriches and glosses the sauce, helping to emulsify the cream and stock into a silky finish. Add off heat and whisk in for best sheen; can also be whisked in gradually as the sauce finishes thickening.
  • 1/2 teaspoon crushed red pepper flakes (optional)
    → Adds a gentle warmth that cuts through richness. Increase for more heat or omit entirely for a mild, creamy experience. Add toward the end and taste to adjust.
Finish, Herbs, and Garnish
  • 2 tablespoons chopped fresh parsley (flat-leaf)
    → Fresh parsley brings a bright, herbal contrast to the creamy sauce and beef. Toss most into the sauce while cooking and reserve a sprinkle for finish on the plate to add color and aroma just before serving.
  • 1 tablespoon lemon juice or lemon zest (optional)
    → A touch of acidity brightens the overall dish and helps balance the richness. Lemon zest adds fragrance without altering consistency; lemon juice should be added slowly to avoid curdling the cream.
  • Extra grated Parmesan cheese for serving (to taste)
    → A final shower of Parmesan at the table lets each guest control the level of saltiness and creaminess. Freshly grate just before serving for maximum flavor and aroma.
Optional Add-ins
  • 1 cup sliced mushrooms (cremini or button)
    → Mushrooms introduce earthy umami and texture. Sauté separately in a hot pan until browned to avoid soaking the sauce with water, then stir in near the end so they stay al dente.
  • 2 cups fresh baby spinach (optional)
    → Spinach wilts quickly into hot sauce, adding a vibrant color and lightened nutrition. Stir in at the last minute until wilted to your liking. For a tender bite, tear large leaves rather than folding whole.
  • 1/2 cup sun-dried tomatoes, chopped (optional)
    → Sun-dried tomatoes lend concentrated sweetness and tang that complements the beef and cream. Rehydrate briefly or chop small to distribute evenly; fold in with the pasta to warm through without overcooking the sauce.

Instructions

  • Bring a large pot of salted water to a rolling boil and cook the cheese tortellini until just tender, following the package directions for al dente; drain thoroughly and reserve 2–3 tablespoons of the starchy cooking water to loosen the sauce later, which helps emulsify the sauce and prevent it from becoming too thick or greasy.
    → Reserving a small amount of pasta water lets you adjust the sauce body without thinning it with extra dairy or stock. Al dente tortellini holds its shape during mixing and won’t slodge the sauce.
  • Pat the ribeye steak dry with clean paper towels and season liberally with kosher salt and freshly cracked black pepper on all sides before cooking to promote a robust crust.
    → Drying and seasoned surfaces drive Maillard browning, which builds deep beef flavor and a crust that seals in juices.
  • Heat a heavy skillet (preferably cast iron or stainless) over high heat and add 1 tablespoon extra-virgin olive oil, warming until shimmering but not smoking to ensure rapid, even searing.
    → A hot, well-oiled surface prevents sticking and produces a caramelized crust that anchors the flavor of the dish.
  • Add the steak strips in a single even layer and sear without moving for 1–2 minutes until a deep crust forms, then flip and sear the opposite side for another 30–60 seconds; transfer the steak to a plate and rest briefly to redistribute juices.
    → Resting minimizes juice run-off into the sauce and keeps slices tender rather than watery, which preserves a thick, glossy finish.
  • Reduce the heat to medium and add the cracked or lightly crushed garlic cloves to the pan with any rendered fat and brown bits, sautéing for 30–60 seconds until fragrant but not burned.
    → Cracked garlic releases more aroma and oils than whole cloves, subtly infusing the fat and soon-to-be-sauce with depth; avoid burning to prevent a bitter bite.
  • Deglaze the pan with 1/4 cup beef stock, scraping up the browned fond with a wooden spoon to incorporate its savor into the base of the sauce.
    → The fond is concentrated flavor; deglazing lifts it, forming a foundation for the creamy sauce and reinforcing the overall beefiness.
  • Pour in 1 cup heavy cream and 1/2 cup beef stock, bringing the mixture to a gentle simmer over medium heat to reduce slightly and thicken without curdling.
    → Gentle simmering concentrates the cream while maintaining a smooth, cohesive texture; vigorous boiling can separate fats from the liquid.
  • Whisk in 1/2 cup softened cream cheese until completely smooth and integrated, ensuring there are no lumps; whisking while warm helps the cheese emulsify evenly into the sauce.
    → Cream cheese adds tang and helps stabilize the emulsion, giving the sauce body and a satin finish when heated properly.
  • Gradually stir in 1/2 cup finely grated Parmesan cheese, tasting as you go and adjusting salt, and continue to simmer to allow the cheese to fully melt and integrate.
    → Parmesan contributes sharp, savory depth and a subtle thickness; adding gradually prevents graininess and over-salting.
  • Return the rested steak and any accumulated juices to the pan, spooning sauce over the meat and simmering briefly to rewarm the beef and coat it with the creamy sauce without overcooking.
    → Reintroducing the beef helps unify the flavors and yields a cohesive, glossy sauce clinging to the meat and pasta.
  • Off the heat, whisk in 2 tablespoons unsalted butter to emulsify the sauce and impart a luxurious sheen; keep the sauce warm but not boiling to avoid separating.
    → Finishing with butter enriches the mouthfeel and helps the sauce cling to the pasta and steak with a smooth, glossy finish.
  • If you like a touch of warmth, sprinkle in 1/2 teaspoon crushed red pepper flakes and stir in; taste and adjust with additional salt or pepper as needed.
    → The optional heat cuts richness and provides balance; add gradually to reach your preferred intensity without masking the beef flavors.
  • Gently fold the drained tortellini into the sauce with tongs or a wide spatula, turning to coat each piece without tearing the pasta; if the sauce is too thick, loosen with a little reserved pasta water or additional stock a tablespoon at a time.
    → Gentle folding coats the tortellini evenly and prevents breaking the delicate filling; using the starchy water helps the sauce cling better.
  • Return the pan to very low heat and warm through for about 1 minute, ensuring the tortellini is heated through and the flavors harmonize; remove from heat to prevent overcooking.
    → A brief final warm-through helps marry the components while maintaining tenderness and sauce integrity.
  • Stir in 2 tablespoons chopped fresh flat-leaf parsley to the sauce for brightness, reserving a small sprinkle to finish on each plate.
    → Fresh parsley adds vibrant color and a nuanced herbal note that lifts the creamy richness.
  • Finish with a squeeze of lemon juice or a small amount of lemon zest if desired, adding gradually and tasting to avoid curdling the cream while brightening the dish.
    → Acidity from lemon brightens the palate and balances richness; zest provides aroma without thinning the sauce, while juice should be added conservatively.
  • Plate the creamy garlic steak tortellini with extra grated Parmesan and a final scatter of parsley for color and aroma, offering guests additional Parmesan at the table to tailor saltiness.
    → A finishing shave of cheese and herb garnish enhances aroma, texture, and presentation, inviting guests to customize each bite.
  • Optional add-ins: if using mushrooms, sauté sliced mushrooms separately in a hot pan until deeply browned and then fold into the sauce near the end so they remain flavorful and not waterlogged.
    → Sautéing mushrooms first concentrates their umami and prevents them from soaking the sauce with moisture, preserving a velvety finish.
  • Optional add-ins: for wilted greens, toss in fresh baby spinach at the last moment and cook just until wilted, then fold into the sauce so the greens retain color and tenderness.
    → Spinach adds a lively color and light texture; quick wilting keeps it vibrant and not overcooked.
  • Optional add-ins: for a tangy sweetness, fold in chopped sun-dried tomatoes after the sauce has thickened and the parmesan is incorporated, warming through just to release their concentrated flavor.
    → Sun-dried tomatoes contribute depth and brightness that complement the beef and cream without overpowering the dish.

Notes

These cracked garlic steak tortellini in creamhouse sauce bliss are a restaurant-worthy skillet dinner that layers caramelized beef, garlicky tortellini, and a luscious, silky cream-based sauce. The tortellini is the star of the dish, providing a cheesy filling and tender bite. For best texture, cook the tortellini until just al dente, drain well, and reserve a couple tablespoons of the cooking water to loosen the sauce if it thickens. Sear the steak in a screaming-hot skillet to develop a crust, then rest briefly before slicing and tossing into the sauce so juices stay integrated rather than thinning the finish.

You can customize this dish with add-ins such as sautéed mushrooms for earthy depth, fresh baby spinach for color and nutrition, or chopped sun-dried tomatoes for a bright, tangy note. If you like a bit of heat, keep the crushed red pepper flakes and adjust to taste toward the end. A squeeze of lemon juice or a little lemon zest brightens the richness without curdling the cream.

Finish with 2 tablespoons chopped fresh parsley stirred into the sauce for brightness, plus a final shower of extra grated Parmesan at the table for those who want more salt and depth. A pat of butter whisked in off heat helps emulsify and gloss the sauce. Serve immediately with extra Parmesan on the side and a simple green salad or crusty bread to soak up every delicious drop.

Leftovers can be refrigerated in an airtight container for up to 2 days. Reheat gently on the stove over low heat with a splash of stock or a little extra cream, adding a spoonful of the reserved pasta water to loosen the sauce if it thickens. If your sauce splits, whisk vigorously off heat to bring it back together with the parmesan and cream.

If you need dairy-free or gluten-free options, use dairy-free cream and butter substitutes, and replace the tortellini with a gluten-free version. Choose a gluten-free beef stock and ensure the tortellini is gluten-free. For a lighter version, substitute half-and-half for some of the cream, or use milk with a cornstarch slurry to thicken the sauce. Always taste and adjust salt after using stock, as it can be salty.

Tips

Chef’s Tips for Cracked Garlic Steak Tortellini in Creamhouse Sauce Bliss

  • Cracked garlic technique: Lightly crack or crush the garlic to maximize surface area and essential oils. Sauté with the steak fat on medium-high heat until fragrant, then proceed. Avoid burning the garlic, as scorched bits can add bitterness to the sauce.
  • Pan temperature and searing: Preheat a heavy skillet until just smoking. Sear the 12 oz ribeye in a single layer without crowding, so you form a rich crust. Don’t flip too soon; let one side form a deep crust before turning.
  • Pat and season: Pat the steak dry with paper towels, then season with kosher salt just before searing. A quick crack of fresh black pepper just as it hits the pan helps form a flavorful crust. Taste the sauce later and adjust salt accordingly.
  • Starch water magic: Reserve 2–3 tablespoons of the tortellini cooking water. If the sauce thickens or tightens, whisk in a splash of this starchy water to re-emulsify and loosen the sauce without thinning the flavor.
  • Butter and heat control: Add the 2 tablespoons of butter off the heat or just off the flame at the end of the sauce to finish glossily. This helps emulsify the sauce and gives a luxurious sheen without breaking.
  • Simmer, don’t boil: Keep the cream-based sauce at a gentle simmer. A vigorous boil can separate the fats; gentle simmering allows the cheese and cream to thicken smoothly and coat the pasta nicely.
  • Softened cream cheese: Let the cream cheese soften to ensure it emulsifies evenly. Whisk vigorously if needed to prevent lumps as the sauce thickens and to achieve a velvety texture.
  • Parmesan incorporation: Grate Parmesan fresh and add gradually, tasting as you go. It thickens the sauce slightly and adds depth. Reserve extra for finishing at the table for guests who want more richness.
  • Stock as a base: Use low-sodium stock and deglaze the pan to lift browned fond from the steak. Reduce to your desired consistency, then fold into the sauce for a deeper beef flavor.
  • A touch of heat or not: The optional crushed red pepper flakes add warmth without overpowering the dish. Start with 1/4 teaspoon and increase to taste toward the end to avoid dulling the creamy balance.
  • Herb timing: Stir most of the chopped parsley into the sauce while it simmers so the aroma infuses the dish. Reserve a small amount for finishing to brighten the plate just before serving.
  • A citrus lift: If using lemon, add zest for fragrance early in the sauce and drizzle a few drops of juice at the end, tasting as you go to avoid curdling the cream.
  • Finish with texture: For added depth, sauté optional mushrooms in a hot, dry pan until browned, and fold in near the end so they stay chewy rather than releasing extra moisture into the sauce.
  • Spinach and sun-dried tomatoes: Wilt spinach only at the last moment and fold in chopped sun-dried tomatoes just before serving to keep their color and intense flavor intact.
  • Assembly tip: Slice the rested steak against the grain for maximum tenderness, then toss the warm tortellini with the sauce and steak pieces. A quick toss helps the sauce cling to every piece of pasta.
  • Leftovers and reheating: Store sauce and pasta separately if possible. Reheat gently on low with a splash of stock or pasta water to restore creaminess without breaking the sauce.

FAQ

What is Cracked Garlic Steak Tortellini in Creamhouse Sauce Bliss?

A comforting, restaurant-style pasta dish featuring seared steak, plump cheese tortellini, and a rich garlic cream sauce called Creamhouse Sauce Bliss. It’s finished with a touch of parmesan and fresh herbs for a velvety, crave-worthy bite.

What ingredients do I need to make this dish?

Core ingredients: sliced steak (ribeye or sirloin), cheese tortellini, unsalted butter, olive oil, heavy cream, grated parmesan, garlic (cracked or crushed), salt, black pepper, and fresh parsley. Optional: white wine (for deglazing), crushed red pepper for heat, and extra parmesan for serving. Fresh parsley and a squeeze of lemon can brighten the dish at the end.

How do I crack the garlic for maximum flavor?

Take whole garlic cloves and smash them gently with the flat side of a chef’s knife until they crack open. This releases flavor more quickly than mincing and helps infuse the sauce. You can leave the skins on during smashing and peel them before sautéing, or remove skins after cracking and chop the cloves lightly as desired.

Which cut of steak works best and how should I cook it?

Use a tender, flavorful cut like ribeye or sirloin. Pat dry, season generously with salt and pepper, and sear in a hot skillet with a little oil until a brown crust forms (about 2–3 minutes per side for medium-rare, depending on thickness). Remove and rest briefly before slicing thinly against the grain to keep the pieces tender.

How is the Creamhouse Sauce made?

Mew ingredients: in the same skillet, melt butter, sauté cracked garlic until aromatic (about 30–60 seconds), then pour in heavy cream. Simmer for 2–4 minutes to reduce slightly, whisk in grated parmesan until smooth, season with salt and pepper, and adjust thickness with a splash of pasta water if needed. Optional: add a splash of white wine during the deglazing step for extra depth.

How do I cook the tortellini and combine everything?

Cook tortellini in salted boiling water until just al dente (their package timing usually 2–4 minutes). Reserve about 1/2 cup of the pasta water. Drain the tortellini. Return steak slices to the skillet with the sauce, add the tortellini, and toss to coat, thinning the sauce with the reserved pasta water if necessary. Finish with chopped parsley and extra parmesan before serving.

Can I make this ahead or freeze leftovers?

Best enjoyed fresh, but you can store leftovers in the fridge for 2–3 days. Reheat gently on the stove with a splash of cream or milk to loosen the sauce. Freezing is not ideal, as dairy-based sauces can separate; if you must, freeze components separately (steak and tortellini) and reassemble with fresh cream when reheating.

How can I adapt this for gluten-free or dairy-free diets?

Gluten-free: use gluten-free tortellini and ensure all ingredients (like broth or stock, if used) are gluten-free. Dairy-free: substitute the cream with a thick dairy-free alternative (unsweetened almond or cashew cream) and use a dairy-free parmesan substitute or omit entirely. For extra flavor, add a bit of olive oil and nutritional yeast for a cheesy note. Keep in mind texture and flavor will differ from the original.

What are good serving suggestions and wine pairings?

Serve with a simple green salad or roasted vegetables (asparagus, broccoli, or spinach) and crusty garlic bread. For wine, try a medium-bodied red like Pinot Noir or Barbera, or a crisp white such as Sauvignon Blanc. If you prefer beer, a balanced pale ale or pilsner pairs nicely with the richness of the cream sauce.

What common issues might occur and how can I fix them?

Troubleshooting tips:
– Sauce too thick: add a little pasta water or more cream to loosen.
– Sauce separating or curdling: reduce heat, whisk vigorously, and add a splash of lemon juice or more dairy-free option to stabilize.
– Sauce too salty: add a small amount of unsalted butter or a pinch of sugar to balance.
– Pasta overcooked or mushy: start with a shorter cooking time and finish in the sauce to keep some bite.
– Steak not tender enough: slice thinly against the grain and rest the meat before slicing; sear at high heat to lock in juices.

Introduction / Hook

Imagine a tray of bite-sized treasures that arrive at your table with a warm, cinnamon-tinged fragrance that seems to invite you to take another bite even before you’ve finished the first. Cinnamon-Glazed Apple Fritter Bites are the kind of treat that makes mornings feel brighter and afternoons feel like a cozy gathering in your kitchen. Each little morsel is a tiny celebration: a golden crust that gives way to a tender, apple-kissed crumb, finished with a glossy, cinnamon-spiked glaze that clings to every surface as if in a friendly embrace. The scent alone can conjure memories of autumn markets, street fairs, and the sweet, comforting scent of apples roasting in a sunlit kitchen. And the best part? They’re wonderfully snackable—perfect for crowds, but easily enjoyed by one person who wants a little indulgence without committing to a big dessert. With these fritter bites, you get the best of both worlds: the rustic charm of home-baked apples and the satisfying crisp of a fried treat, streamlined into a portable, shareable format that’s ideal for brunches, picnics, school lunches, or a simple Sunday treat that turns an ordinary afternoon into something special.

What elevates these fritter bites beyond a simple apple novelty is the balance of textures and flavors: the apple’s natural sweetness complemented by a warm blend of cinnamon and spice, the softness of the interior, and a delicate crust that delivers a satisfying crunch on the first bite. Then there’s the glaze—a thin, shiny veil that coats each piece, adding a hint of sweetness and a whisper of citrus or vanilla depending on how you style it. It’s the kind of recipe you can glide into your routine with ease, yet still feel like a little triumph every time you serve it. Whether you’re craving a morning moment that feels like a treat or you’re planning a crowd-pleasing addition to a brunch spread or party dessert, these fritter bites rise to the occasion with a friendly, homemade charm.

Before we dive into the story, the texture, and every possible twist you might want to try, imagine the moment you bite into one: the crackle of the outer layer giving way to a juicy apple core, the lingering warmth of cinnamon dancing on your tongue, and the soft sweetness of the glaze adding just the right finishing kiss. Now, let that image guide you through the rest of this description as we explore what makes Cinnamon-Glazed Apple Fritter Bites so irresistibly delicious and endlessly adaptable.

The Story Behind the Dish

Apple fritters have a long and affectionate presence in many culinary oral histories, often appearing at family breakfasts, fairs, and weekend gatherings where the kitchen is a hub of talk, laughter, and the soft hiss of hot oil. The idea of turning sliced apples into tender, golden bites with a touch of batter-like batter is a concept that transcends borders, reflecting a universal love for fruit fried to a crisp and kissed with sugar and spice. In many cultures, apples symbolize harvest, abundance, and the cozy comforts of home, and cinnamon is an ancient companion to that sweetness, celebrated across centuries for its warmth and depth. The combination of apple and cinnamon is one of those pairings that feels almost inevitable—two pantry staples that, when brought together, evoke memories of crisp autumn mornings, shared brunches, and the simple joy of food that tastes like a hug from a familiar place.

The inspiration for Cinnamon-Glazed Apple Fritter Bites often arrives in the quiet moments of kitchen creativity: you’re sifting flour, rethinking a familiar snack, or watching the clock on a lazy Sunday afternoon as the scent of apples and spice begins to fill the room. The goal is to capture that market-fresh, apple-picking-day feeling and translate it into something portable and tidy—perfect for lingering over with friends and family, or for enjoying solo as a little ritual that turns an ordinary afternoon into something worth remembering. The fritter bite format is particularly friendly for sharing—people can sample one or two, then go back for more without the commitment of a whole slice of pie or a larger dessert. It’s a modern nod to tradition, a way to honor the roots of the dish while making it accessible and easy to bring to the table in today’s busy life.

As you read on, you’ll glimpse the way the dish channels that heritage into a practical, friendly recipe that invites experimentation and personalization. The story isn’t just about history; it’s about what you do with that history in your own kitchen: the way you adjust the apple varieties to suit your sweetness level, the spices you choose to tailor the aroma, and the glaze’s shimmer that can be altered with a dash of citrus zest or a hint of vanilla. It’s a dish that respects its origins while inviting you to stamp your own memory on it, bite by bite.

Why You’ll Love This Recipe

  • Portable, snack-friendly format: perfect for brunch buffets, picnics, or a crowd-pleasing dessert that travels well.
  • Impossibly cozy flavor: warm cinnamon, apple sweetness, and a glossy glaze that adds just the right touch of indulgence without being heavy.
  • Textural contrast that shines: a delicate, lightly crisp exterior encasing a soft, juicy apple interior with every bite.
  • Flexible and forgiving: works well with a range of apple varieties and spice levels, so you can tailor it to your pantry and preferences.
  • Quick to assemble and kid-friendly: a great project for involving little helpers in the kitchen with minimal risk or fuss.
  • Glaze that gleams: a simple finishing touch that elevates the fritters into a party-ready, photo-worthy treat.
  • Make-ahead friendly: you can prep elements in advance and finish them with a glaze when you’re ready to serve, or keep them warm for easy serving.
  • Vanilla, citrus, or spice-driven variations: a gentle invitation to customize the recipe to your mood or season.

Flavor Profile & Texture

The flavor journey of Cinnamon-Glazed Apple Fritter Bites starts with a bright, orchard-fresh apple presence. The apples contribute a natural sweetness and a bit of tart snap that plays beautifully with the warm spice of cinnamon. When you bite into one, you first notice a delicate crackle of the outer crust, followed by a tender, moist interior where the apple pieces stay juicy and vibrant rather than turning mushy. It’s a balance that keeps the fritter bites lively rather than heavy, which is essential for a snack that you might reach for again and again.

The glaze adds the final layer of personality: a silky sheen that clings to the surface, infusing each bite with a gentle sweetness and a hint of fragrant vanilla or citrus, depending on how you style it. The glaze doesn’t overwhelm the apple; rather, it enhances its natural fruitiness and complements the cinnamon with its own whisper of warmth. The cinnamon itself brings a nostalgic note—memories of fresh-baked pastries and warm mornings—without ever dominating the palate. You’ll taste a soft sweetness that lingers, a touch of spice that invites another bite, and an overall finish that feels comforting and satisfying.

Texture-wise, it’s all about contrast. The exterior offers a delicate crispness that gives way to a soft, almost cake-like interior. The apple’s bite remains pleasantly firm, adding a subtle tart brightness that counters the sugar and spice. The result is a trifecta of experiences: the initial crack of the crust, the juicy apple core, and the lingering cinnamon-sweet aftertaste. For some, the fritter bite is a little bit of bakery bliss in a pocket-sized form; for others, it’s a reminder of a fair or carnival, tucked into a quiet moment at home. The beauty of this recipe is that it uses familiar, comforting flavors to create something refined enough to share with guests, while still feeling warm and approachable enough to enjoy any day of the week.

Occasions & Pairings

These fritter bites are versatile enough to slot into a wide array of occasions. They shine as a weekend brunch centerpiece, a lively addition to a holiday breakfast spread, or a casual dessert for a weeknight treat. They also work beautifully for gatherings where guests appreciate a bite-sized option they can sample without committing to a larger portion. Here are some ideas for serving and pairing:

  • Brunch bliss: pair with light whipped cream, a dollop of plain yogurt, or a light lemon-vanilla yogurt sauce to brighten the richness.
  • Seasonal potlucks: bring a warm tray of fritter bites kept in a low oven to maintain a gentle crisp and inviting aroma.
  • Holiday breakfasts: serve with cinnamon-sugar dusting on the side for an extra wink of festive crunch, alongside maple-syrup-drizzled pancakes or waffles.
  • Indulgent dessert: a scoop of vanilla or cinnamon ice cream, a drizzle of extra glaze, and perhaps a sprinkle of toasted nuts for crunch.
  • Pairings: coffee, chai tea, hot apple cider, or a glass of sparkling cider work beautifully with the cinnamon notes and sweetness.

When planning the menu, think about texture variety too: you can balance a batch of fritter bites with something smooth and creamy or something bright and citrusy to keep the palate excited across the meal. If you’re serving at a party, consider offering a couple of dipping options or sauces—brighter citrus glaze on one side and a richer caramel-inspired glaze on the other—to give guests a little narrative with each bite.

Tips, Variations & Substitutions

Here are practical ideas to customize the dish while keeping the essence intact. You can mix and match based on what you have on hand, dietary needs, or desired flavor profile:

  • Apple variety play: choose a mix of apples for depth—crisp, tart varieties provide a lively contrast to the sweetness, while sweeter apples add warmth without needing extra sugar. A touch of tartness helps balance the glaze’s sweetness.
  • Spice spectrum: while cinnamon is the star, you can weave in a pinch of nutmeg, allspice, or cardamom for an herbal, spiced nuance that brightens the aroma and rounds out the flavor.
  • Glaze variations: the glaze can lean toward simple sweetness, citrusy brightness, or vanilla cream notes. A citrus zest (orange or lemon) adds zing; a touch of vanilla extract can soften and deepen sweetness; a light sprinkle of sea salt at the end can enhance all the flavor notes.
  • Texture tweaks: for a crisper exterior, ensure the batter has enough density to form a light crust without becoming heavy. If you prefer a softer bite, you can adjust the ratio of apple to batter or experiment with a touch of warming leavening to create a fluffier center.
  • Flour and dairy options: you can experiment with different flour bases to achieve a unique crumb. For a lighter texture, some bakers like to use a portion of cornmeal for subtle crunch. If you need a dairy-free or vegan version, look to non-dairy milks and plant-based binders that mimic the moisture in the batter and help the fritters hold together during frying or baking.
  • Cooking method variations: while traditional fritters are typically fried, you can also bake or air-fry for a lighter approach. Baking may yield a less crisp exterior, but you can compensate with a hotter finish or a brief broil to re-crisp the surface. The air-fryer method works well for a quick, less-oily result with a satisfying finish.
  • Health-forward tweaks: you can adjust the sweetness by using naturally sweet apple varieties and dialing back sugar in the glaze. Adding a glaze with a light glaze and finishing with a dusting of cinnamon-sugar can give the impression of more sweetness with fewer calories.
  • Allergen-aware options: consider gluten-free flour blends or other gluten-free starches if you need to avoid gluten. For a nut-free variation, simply avoid any nut-based ingredients if they appear in your pantry variations and maintain a simple spice-forward profile.

Storage & Make-Ahead Ideas

To preserve the best texture and flavor, here are practical storage strategies and make-ahead ideas that suit busy cooks or entertaining schedules. These tips focus on keeping the fritter bites tasting as fresh as possible when you’re ready to serve:

  • Make-ahead batter strategy: you can prepare the batter mixture in advance and refrigerate for up to a day. The flavors will continue to meld, and you’ll be ready to fry or bake when the craving strikes.
  • Leftovers: store cooled fritter bites in an airtight container in the refrigerator for a couple of days. Reheat gently in a warm oven or air fryer to restore some of the crisp exterior without drying the interior.
  • Freezing: you can freeze cooked fritter bites after fully cooling; reheat in a moderate oven to re-crisp the crust without letting the interior become soggy. Freezer storage is a reliable way to enjoy them later without sacrificing texture too much.
  • Make-ahead glaze: if you plan to glaze right before serving, keep the glaze separate and warm. Drizzle over right before serving to ensure a glossy finish. If you want the glaze to sink into the surface a touch, brush it on once the fritters are still warm and let the heat draw the glaze into the exterior.
  • Serving strategies: if you’re hosting a brunch, consider keeping the fritter bites warm in a low oven and glazing only at the last moment to prevent sogginess and maintain a crisp edge.

Fun Facts & Trivia (Optional)

– Cinnamon has a long-standing reputation as a comforting spice, with historical roots tracing back to ancient civilizations that valued its aroma for both culinary and medicinal reasons. In classic spice routes across Asia and Europe, cinnamon was treasured for its warmth and ability to pair with fruit, grain dishes, and roasted meats. The fragrant scent is not only inviting but also an instant cue that autumn is here.

– Apples are one of the most widely cultivated fruits in the world and have symbolized knowledge, health, and harvest in countless cultures. The tradition of cooking apples with cinnamon is a natural pairing that appears in many regional cuisines, each bringing its own twist to the basic concept of apple-based pastries and fried treats. The combination of apple and cinnamon is almost universal in comforting desserts, and it’s easy to understand why—each bite offers a gentle sweetness with a spicy, cozy finish.

– The fritter form appears in many culinary traditions, often as a celebratory treat at fairs, markets, and family gatherings. The practice of frying fruits in a light batter is a simple way to concentrate flavor while delivering a satisfying texture contrast. The bite-sized version makes this classic approach accessible to modern cooks who want a quick, shareable snack without sacrificing depth of flavor or charm.

– In culinary storytelling, the glaze on a fritter isn’t just a finish; it’s a layer of aroma and texture that can transform the experience. A glaze that is slightly warm, glossy, and subtly flavored can elevate the dish from “good” to “truly memorable,” offering a finish that lingers on the palate and invites conversation about how you might tweak it for future batches.

– If you’re curious about the science behind the texture, the outer crust forms a brief barrier that traps some of the apple’s moisture inside, which helps keep the interior tender. A properly regulated heat prevents the batter from absorbing too much oil while still achieving that delicate crispness that makes the fritter bite so appealing. This balance is the small magic behind every great fritter—an alchemy of heat, moisture, and the right ratio of batter to fruit.

Ingredients

Apple Filling & Batter

    – 2 cups all-purpose flour (unbleached)
    → Provides structure and body to the fritter batter. All-purpose flour helps create a light, tender crumb around the apple pieces after frying. If you need a gluten-free version, substitute with a 1:1 gluten-free all-purpose blend and add 1/2 teaspoon xanthan gum per cup; sift dry ingredients to aerate and avoid overmixing to keep the fritters tender.
    – 1/2 cup granulated sugar
    → Sweetens the batter and contributes to browning during frying. If your apples are especially sweet, you can reduce this to 1/3 cup. For a deeper flavor, substitute half of the granulated sugar with light brown sugar.
    – 2 teaspoons baking powder
    → Leavening agent that helps the batter rise slightly and create a light, airy texture around the apple chunks. Freshness matters; test by dissolving a pinch in warm water—should fizz vigorously. Do not overmix after adding the dry ingredients to keep fritters tender.
    – 1/2 teaspoon fine salt
    → Enhances flavors and balances sweetness, while helping to strengthen the batter’s structure. Distribute evenly with the dry ingredients to prevent salty pockets.
    – 2 teaspoons ground cinnamon
    → Classic spice essential to apple fritters; use freshly ground cinnamon for a brighter aroma. Adjust to taste, but avoid overpowering the apple flavor; you want warmth, not heat.
    – 1/4 teaspoon ground nutmeg
    → Adds warm, subtle depth that complements cinnamon. Nutmeg is potent, so a small amount goes a long way; you can increase to 1/2 teaspoon if you love a spicier profile, but test with your apples.
    – 2 large eggs, lightly whisked
    → Bind and enrich the batter, helping it cling to the apples during frying. Whisk eggs just until combined and fold into the wet mixture. If you’re dairy-free, substitute with two flax eggs (2 tablespoons ground flaxseed meal + 6 tablespoons water per egg) and proceed.
    – 1 cup milk (whole or 2%)
    → Provides moisture and tenderness; whole milk yields richer fritters, while 2% is a balanced option. For dairy-free, use unsweetened almond, soy, or oat milk with a touch more melted butter or oil to maintain richness.
    – 2 tablespoons unsalted butter, melted and cooled
    → Infuses rich flavor and helps tenderize the crumb; ensure the butter is cooled so it won’t scramble the eggs. Substitute with a neutral oil or melted coconut oil for dairy-free options, noting a slight change in flavor.
    – 1 teaspoon vanilla extract
    → Adds depth of sweetness and aroma; use pure vanilla for best flavor. If using vanilla bean paste, reduce extract to avoid overpowering the batter.
    – 2 cups apples, peeled, cored, and finely diced (about 2 medium apples)
    → The star of the fritters; dice to roughly 1/4-inch pieces so they stay intact while frying. Toss with a small amount of lemon juice (about 1 teaspoon) to prevent browning and help maintain color and texture during frying. If apples are very juicy, pat pieces dry before folding into batter to prevent soggy fritters.
    – Oil for frying (neutral oil such as vegetable, canola, or peanut), enough to shallow fry or fill deep fryer to 2–3 inches
    → Frying medium; maintain a steady oil temperature around 350°F (175°C) for best color and crispness. Do not overcrowd the pan; fry in batches and drain on a rack or paper towels to remove excess fat. If using an air fryer, follow manufacturer guidance and spray lightly with oil for a crisp exterior.

Glaze

    – 1 cup powdered sugar (confectioners’ sugar)
    → Forms the smooth, glossy glaze that coats the fritters. Sift to remove lumps for a silky finish; adjust thickness by adding more sugar for a thicker glaze or a splash of milk for a thinner drizzle. For a maple twist, replace part of the liquid with a teaspoon of maple syrup.
    – 1–2 tablespoons milk or apple juice
    → Liquid to reach the desired glaze consistency. Start with 1 tablespoon and add gradually; apple juice gives a fruity note that pairs nicely with cinnamon and apples. If you used dairy-free milk earlier, you can use a dairy-free option here as well to keep the glaze dairy-free.
    – 1/2 teaspoon ground cinnamon
    → Adds a cohesive spice note that harmonizes with the fritters. Whisk until smooth and evenly distributed; optional but recommended for a consistent flavor across the glaze and fritters.

Optional Add-ins

    – 1/2 cup chopped walnuts or pecans (optional)
    → Introduces a pleasant crunch and toasty nuttiness. For best flavor, toast nuts lightly in a dry skillet until fragrant, then cool and chop into small, even pieces so they distribute evenly through the batter and in every bite.
    – 1/4 cup raisins or chopped dates (optional)
    → Provide chewy bursts of sweetness. If very dry, soak in warm water or apple juice for 5–10 minutes to plump them, then pat dry before adding to the batter to avoid soggy fritters.

Instructions

  • Heat the oil to 350°F (175°C) in a deep, heavy skillet or electric fryer and fit a neutral thermometer to monitor temperature throughout frying.

    → This steady, moderate temperature yields a crisp, evenly colored crust without the fritters absorbing excessive oil; maintain temperature by adjusting the heat and frying in batches to avoid crowding.
  • Prepare the apples by peeling, coring, and dicing into roughly 1/4-inch pieces, then toss with 1 teaspoon of lemon juice and set aside; pat the pieces dry if very juicy before folding into the batter.

    → Dicing to uniform small pieces ensures even cooking and apple distribution, while lemon juice helps prevent browning and keeps color bright during frying; drying excess moisture prevents soggy fritters.
  • Sift or whisk together the dry ingredients in a large bowl: all-purpose flour, granulated sugar, baking powder, fine salt, ground cinnamon, and ground nutmeg; whisk to blend and aerate.

    → Sifting or whisking lightens the flour and distributes leavening and spices evenly, which promotes a tender, uniform crumb and prevents clumping that could weigh down the batter.
  • In a separate bowl, whisk the wet ingredients: eggs (lightly whisked just to combine), milk, melted cooled butter, and vanilla extract; whisk until the mixture is smooth and cohesive.

    → Properly combined wet ingredients ensure even moisture and fat distribution, which helps the batter clump around apples without separating; cooling the butter prevents scrambling the eggs.
  • Create a well in the center of the dry ingredients and pour in the wet mixture; stir with a wooden spoon or silicone spatula just until the batter comes together with a few flour streaks remaining; fold in the diced apples until evenly dispersed.

    → Gentle folding prevents overworking the gluten, yielding a light crumb; coating the apples with batter keeps them suspended and prevents sinking to the bottom during frying.
  • If using optional add-ins, fold in chopped toasted nuts and/or raisins evenly but do not overwork the batter; distribute them so every bite includes a bit of crunch or chew.

    → Toasting nuts enhances aroma and flavor; folding in ensures even distribution without breaking apart the batter’s structure.
  • Let the batter rest for 5 to 10 minutes at room temperature to hydrate the flour and relax the gluten; this rest improves tenderness and helps the batter hold together on frying.

    → Resting reduces toughness, allowing a lighter texture and better batter cohesion when fried; the apples also stay crispier.
  • Prepare the glaze by whisking powdered sugar, 1 to 2 tablespoons milk or apple juice, and 1/2 teaspoon ground cinnamon in a small bowl until smooth and lump-free; adjust thickness by adding more sugar for a thicker glaze or more liquid for a thinner drizzle.

    → A smooth glaze adheres evenly to the warm fritters, and cinnamon echoes the spice profile of the batter for a cohesive flavor.
  • Test the oil temperature with a tiny drop of batter; if it sizzles and rises promptly, the oil is ready; if it sinks, adjust the heat slightly upward and wait a few seconds, then test again.

    → A quick test prevents undercooked centers or overly greasy fritters by confirming the oil is hot enough to sear the batter immediately.
  • Using a lightly oiled teaspoon or small cookie scoop, carefully drop rounded portions of batter into the hot oil, spacing them to avoid crowding; each fritter bite should be about 1 tablespoon of batter.

    → Individual portions ensure uniform cooking and a crisp exterior; overcrowding lowers oil temperature and results in soggy fritters.
  • Fry the fritters for 2 to 3 minutes, turning once with tongs or a slotted spoon, until they are deep golden brown and crisp on the outside and the apples within are tender; adjust time slightly for larger pieces.

    → Proper browning indicates Maillard reaction development and crisp crust, while internal softness confirms doneness without drying out the interior.
  • Transfer the fried fritters to a rack or paper towels to drain briefly, then arrange on a warm plate or keep in a low oven (about 200°F/90°C) while finishing the remaining batches.

    → Draining removes surface oil for a crisper bite, and a gentle warmth keeps bits inviting without further cooking them to dryness.
  • Drizzle or dip the warm fritter bites with the prepared glaze, allowing excess glaze to set briefly before serving; if desired, scatter a pinch of additional cinnamon over the top for visual appeal and aroma.

    → Glazing while warm helps the sugar melt and adhere for a glossy finish; a light dusting of cinnamon complements the spice profile and enhances aroma.
  • Serve the cinnamon-glazed apple fritter bites immediately while still warm and juicy, offering extra glaze on the side for dipping and enjoying the contrast between crisp exterior and tender apple interior.

    → Freshly fried and glazed fritters are at their best when hot, as the glaze sets quickly and the apples remain juicy, delivering the intended balance of textures and flavors.

Notes

“These Cinnamon-Glazed Apple Fritter Bites are best enjoyed warm with a crisp exterior and tender apple pieces, finished with a glossy cinnamon glaze. For best results, fry at about 350°F (175°C) in a neutral oil, working in batches to avoid crowding, and pat the apple pieces dry if they’re very juicy to prevent soggy fritters. Don’t overmix after adding the dry ingredients to keep the fritters light and tender around the apples. To adapt for gluten intolerance, substitute with a 1:1 gluten-free flour blend and add 1/2 teaspoon xanthan gum per cup; sift dry ingredients to aerate and avoid lumping. Freshly ground cinnamon provides a brighter aroma, so grind just before use if possible. The glaze should be silky; adjust thickness with more powdered sugar or a splash of milk or apple juice, and whisk in the cinnamon until evenly distributed. Optional add-ins like toasted walnuts or raisins add texture and sweetness; if using dried fruit, pat dry before folding to prevent soggy bites. Store leftovers in an airtight container and reheat in a 350°F oven for 5–7 minutes to restore crispness. Always ensure your flour and baking powder are fresh and, if gluten-free, certified gluten-free to keep the fritters tender and free from gritty texture.”

Tips

Tips for Perfect Cinnamon-Glazed Apple Fritter Bites

  • Apple prep: Use firm, crisp apples (Granny Smith, Honeycrisp, or Jazz). Peel, core, and dice to about 1/4 inch. Toss with a teaspoon of lemon juice to prevent browning and help maintain color and texture during frying. If apples release a lot of juice, pat them dry before folding into the batter to avoid soggy fritters.
  • Batter handling: Sift the dry ingredients to aerate and distribute the leavening and spices evenly. Mix wet and dry ingredients just until combined; a few small lumps are fine. Overmixing can develop gluten and make the fritters tougher.
  • Rest and hydration: Let the batter rest 10–15 minutes before folding in apples. This hydrates the flour, helping the fritters stay tender without becoming heavy.
  • Coating the apples: Lightly dust diced apples with a little flour before adding to the batter to improve cling and prevent sinking in the oil.
  • Mix-ins and add-ons: If using nuts, toast them first in a dry skillet until fragrant, then chop finely so they distribute evenly. For dried fruit like raisins or dates, plump them in a little warm water or apple juice first, then pat dry before adding.
  • Consistency check: If the batter is too thick to drop easily, whisk in a splash more milk a tablespoon at a time. If too loose, whisk in a bit more flour until it coats the apples nicely.
  • Frying technique: Maintain oil temperature around 350°F (175°C). Fry in small batches to keep the oil temperature steady and prevent soggy fritters. Use a slotted spoon to gently turn fritters for even browning.
  • Size and shaping: Scoop batter by heaping tablespoons or small scoops to create uniform bite-sized fritters for even cooking.
  • Doneness and draining: Fry until golden brown and crisp, about 2–3 minutes per side. Drain on a rack or paper towels to remove excess oil.
  • Glaze approach: Sift the powdered sugar for a smooth glaze, then whisk in milk or apple juice and cinnamon until glossy. If you want a thicker glaze, add more sugar; for a thinner drizzle, add a touch more liquid. For a maple twist, replace part of the liquid with maple syrup.
  • Glaze flavor balance: Add a pinch of extra cinnamon or a splash of vanilla to the glaze to harmonize with the fritter spices. If using orange zest, add a small amount to the glaze for a bright note.
  • Air fryer option: If using an air fryer, spray the batter bites lightly with oil and cook at 360°F (180°C) for 7–9 minutes, flipping halfway, until crisp and golden.
  • Make-ahead and storage: Best enjoyed fresh the day they are made. Leftovers can be refrigerated for 1–2 days; reheat in a 350°F (175°C) oven for 5–7 minutes to restore crispness. They don’t freeze as well after glazing, but unglazed fritter portions can be frozen and reheated.
  • Flavor variations: For a breakfast-y twist, add a pinch of ground cardamom or a splash of vanilla bean paste (instead of or in addition to vanilla extract) to deepen aroma without overpowering the apples.
  • Dairy-free adaptations: Substitute dairy with unsweetened almond, soy, or oat milk and use melted coconut oil or a neutral oil in place of butter. Ensure the glaze uses a dairy-free milk option if needed.

FAQ

Cinnamon-Glazed Apple Fritter Bites – FAQ

What are Cinnamon-Glazed Apple Fritter Bites?

They are bite-sized, cozy treats made with diced apples folded into a light, spiced batter, fried or baked until golden, and finished with a warm cinnamon glaze.

What ingredients do I need?
  • 2 cups peeled, diced apples (about 1–2 medium apples)
  • 1 cup all-purpose flour
  • 1 teaspoon baking powder
  • 1/2 teaspoon ground cinnamon
  • 1/4 cup granulated sugar
  • 1 large egg
  • 1/2 cup milk
  • 2 tablespoons melted butter or neutral oil
  • 1/2 teaspoon vanilla extract
  • Pinch of salt
  • For glaze: 1 cup powdered sugar, 2–3 tablespoons milk, 1/2 teaspoon cinnamon, optional vanilla
Is this recipe gluten-free?

Yes, if you use a gluten-free all-purpose flour blend. For best results, choose a blend with xanthan gum or add about 1/4 teaspoon xanthan gum per cup of flour; expect slight texture differences depending on the blend.

Can I bake them instead of frying?

Yes. Preheat your oven to 400°F (200°C). Scoop or spoon batter into small mounds on a parchment-lined sheet (or use a mini muffin tin). Bake 10–12 minutes, until golden and set. For crisper edges, switch to broil for 1–2 minutes at the end. Brush with glaze before serving.

How do you make the cinnamon glaze?

Whisk together 1 cup powdered sugar, 2–3 tablespoons milk, 1/2 teaspoon cinnamon, and 1/4 teaspoon vanilla until smooth. If it’s too thick, add a splash more milk; if too thin, add a bit more powdered sugar. Drizzle over warm bites or dip the tops.

How do I fry them? Any tips?

Heat a neutral oil (like canola) to 350°F (175°C). Working in batches, drop spoonfuls of batter into the oil and fry 2–3 minutes, turning once, until golden. Drain on paper towels. Keep the oil temperature steady and avoid overcrowding the pan for even cooking.

How should I store leftovers?

Best eaten fresh, but you can store them baked or unglazed for later. Keep in an airtight container at room temperature for up to 2 days, or refrigerate up to 4 days. Rewarm in a 350°F (175°C) oven or air fryer to regain some crispness.

Can I freeze them?

Yes. Freeze unglazed bites on a baking sheet until solid, then transfer to a freezer-safe bag. They keep for up to 2–3 months. Reheat in a 350°F (175°C) oven for 8–10 minutes, then glaze.

Any variations or extra tips?

Try adding chopped nuts (pecans or walnuts) for crunch, use pears instead of apples, or add lemon zest to the glaze for brightness. You can also swap half the flour for whole wheat flour, or add a pinch of nutmeg or cardamom for warm spice notes.

How many bites does this yield?

About 24–30 bites, depending on how large you portion them.

Introduction / Hook

There’s a moment in a cozy kitchen when the world feels forgiving: the glow of warm light on a tray of halved sweet potatoes, their skins flecked with cinnamon-hued caramel, the air thick with the scent of sautéed mushrooms and garlic. Creamy, dreamy, comforting—Creamy Mushroom Stuffed Sweet Potatoes invites you to slow down, savor, and linger at the table. This dish is a hug you can taste: the sweet potato acts as a gentle, earthy canvas, while ribbons of sautéed mushrooms bring deep umami, moisture, and depth. A whisper of cream or a splash of tangy cheese amplifies the silkiness, making every bite feel indulgent without being heavy. It’s the kind of meal that turns weeknights into celebrations and casual lunches into occasions worth sharing. The magic lies in balance: the sweetness of the potato counterpoints the savory, umami-packed mushrooms, and the creamy filling ties the textures together with a whisper of richness. If you’re cooking for family, friends, or simply treating yourself after a long day, this dish delivers on all fronts—comfort, personality, and a touch of elegance, all in one elegantly simple package.

The Story Behind the Dish

Stuffed vegetables have a long romance with home cooking, a tradition of using humble ingredients to create something heartfelt and memorable. Sweet potatoes, in particular, have earned a rightful place in autumnal menus around many cultures, celebrated for their natural sweetness, creamy flesh, and versatility. Mushrooms, the other star in this dish, have a storied reputation as the “meat” of the plant kingdom—dense, savory, and deeply satisfying. When you bring these two together, you’re drawing from a lineage of rustic, pantry-driven meals that came about in kitchens where people relied on simple ingredients to nourish body and soul after hard work or long days.

This specific combination—creamy filling stuffed into roasted sweet potato halves—speaks to modern comfort food with a nod to vegetarian-friendly menus. It’s a dish that feels both rustic and refined: the potato’s natural starchiness creates a gentle thickness, while the mushroom mixture provides a luxurious, almost indulgent texture. The idea isn’t to mask the potato’s character but to dress it in a velvet coat of mushroom goodness. You could imagine this dish appearing on a family table after a harvest festival, or on a weeknight table when you want a restaurant-quality feeling without stepping foot outside your kitchen. For many cooks, this pairing evokes memories of late-summer markets, where fresh mushrooms glisten with dew, and baskets overflow with bright herbs. The dish travels well too: once the potatoes are roasted and the mushroom filling is made, you can assemble, bake, and serve with confidence, knowing that you’ve created something that nods to tradition while embracing contemporary tastes.

Why You’ll Love This Recipe

  • One-dish comfort: A complete, satisfying meal built around a single star ingredient—sweet potatoes—without the need for a heavy sauce or multiple components.
  • Vegetarian-friendly goodness: Rich and creamy without relying on meat, making it an ideal centerpiece for meatless Mondays or family dinners with diverse dietary needs.
  • Simple pantry charm: The filling can be made from everyday ingredients—mushrooms, garlic, herbs, and a touch of cream or dairy-free alternative—yet the result feels luxuriously indulgent.
  • Balanced sweetness and savoriness: The natural sweetness of the potato beautifully offsets the earthy, umami notes of mushrooms, creating a harmonious flavor profile.
  • Textural interplay: Crispy-edged potato skins, tender flesh, and a velvety, mushroom-rich filling deliver a multi-layered mouthfeel in every bite.
  • Make-ahead friendly: You can prep components in advance and finish them quickly for an impressive weeknight or weekend meal.
  • Versatile serving options: Works beautifully as a main course for a cozy dinner or as a substantial side to a larger spread during holidays or gatherings.
  • Customizable for dietary needs: Easily adaptable with dairy-free or gluten-free tweaks, ensuring everyone at the table can enjoy it.

Flavor Profile & Texture

Imagine a sunlit plate where the sweet potatoes offer a gentle, caramelized sweetness that lingers with a soft, buttery texture. The inside of each potato becomes a blank canvas, invitingly pale and creamy, a canvas that the filling paints with depth. The mushrooms contribute a satisfying, earthy chorus—think forest-floor savoriness with a hint of nutty undertones from the gentle sautéing. Garlic adds a warm, aromatic kiss, while fresh herbs—such as thyme or parsley—sprinkle brightness and lift. A touch of cream or a dairy-free alternative glides through the filling, offering a silken, luscious mouthfeel that carries the flavors without becoming heavy.

Texture-wise, you’ll experience contrast and cohesion in every bite. The potato skin provides a gentle snap as you bite into it, giving way to the tender flesh inside. The mushroom blend stays velvety and soft, its moisture making the filling feel luscious rather than dry. If you opt for a breadcrumb topping or a sprinkle of grated cheese, you’ll enjoy a delicate crunch or a slightly toasty surface that adds a toasty, toffee-like aroma. The overall experience is round and comforting: a creamy, savory filling that clings to the sweetness of the potato, finished with a whisper of herbal brightness and a hint of salt that makes the flavors sing together.

Occasions & Pairings

This dish shines in a variety of settings, from casual weeknights to special gatherings. Here are some ideas to help you decide when to serve it and how to round out the plate:

  • Weeknight comfort: Perfect after a long day when you crave something nourishing but not fussy. Pair with a bright green salad and a light vinaigrette to balance richness.
  • Holiday sides: A standout addition to a Thanksgiving or Christmas table as a vegetarian centerpiece or side that still feels festive.
  • Potlucks and gatherings: Easy to transport and reheat, making it a dependable option for sharing with friends and family.
  • Wine and beverage pairings: A crisp white wine with a touch of acidity, like Sauvignon Blanc or Pinot Grigio, complements the mushroom’s earthiness. For non-alcoholic options, try a sparkling apple cider or a lemon-herb infused water to brighten the dish.
  • Seasonal variations: In autumn, roasted root vegetables on the side echo the seasonal mood; in spring, a light, lemony herb salad can add contrast and freshness.

Tips, Variations & Substitutions

Flexibility is part of the charm of this dish. Here are practical ideas to tailor it to your preferences, dietary needs, and what you have on hand:

  • Vegan option: Use a dairy-free cream or cashew cream and substitute grated vegan cheese or breadcrumbs for a dairy-free finish. You’ll still achieve a creamy, luxurious texture without dairy.
  • Gluten-free approach: If you like a crust or topping, use gluten-free breadcrumbs or crushed gluten-free crackers with a drizzle of olive oil for a crisp, golden top.
  • Cheese variants: A tangy cheese like feta or goat cheese crumbles can be scattered on top for a different flavor profile, or a handful of shredded aged cheddar for a sharper bite.
  • Herb and spice play: Swap thyme for rosemary for a piney aroma, or add a pinch of smoked paprika or chili flakes for a subtle kick that pairs well with the mushroom depth.
  • Protein boost: For non-vegetarians or those seeking extra heft, fold in finely chopped cooked pancetta or bacon bits, or top with a sprinkle of crispy shallots for texture.
  • Vegetarian-friendly twists: Stir in spinach, kale, or arugula into the mushroom filling for a pop of color and an extra layer of nutrition.
  • Nutty richness: A small amount of grated parmesan or pecorino can intensify the savory notes; or use nutritional yeast to add a dairy-free cheesy vibe.
  • Other vegetables: If you’re inspired to expand the filling, sauté diced onions, celery, or bell peppers with the mushrooms for a more complex base.

Storage & Make-Ahead Ideas

These stuffed sweet potatoes are forgiving and practical, making them excellent for meal prep or weekend cooking. Here are some guidelines to keep flavors vibrant and textures appealing, even after time passes:

  • Make ahead: You can roast the sweet potatoes and prepare the mushroom filling a day in advance. Store the roasted potatoes chilled, and keep the filling in an airtight container in the refrigerator. When ready to bake, simply reheat the filling gently and stuff into warmed potatoes, then finish in the oven until the tops are lightly browned.
  • Storage: Leftover stuffed potatoes store well in an airtight container in the refrigerator for up to 3 days. Reheat gently in the oven or microwave until warmed through, adding a splash of cream or a drizzle of olive oil to refresh the texture if needed.
  • Freezing: While the baked potato itself may freeze well, the filling can become a bit watery upon thawing. If you plan to freeze, freeze the mushroom filling separately, then reheat and stuff an already-cooked potato when you’re ready to serve.
  • Reheating tips: If the filling seems dry after storage, rehydrate with a small amount of cream, milk, or dairy-free alternative during reheating. A quick broil at the end can restore a lightly crispy top if you used breadcrumbs or cheese.

Fun Facts & Trivia (Optional)

– Sweet potatoes come in a spectrum of colors—from orange to purple—and each hue brings a slightly different sweetness and texture. The orange variety you typically see at markets is rich in beta-carotene, which your body converts to vitamin A.

– Mushrooms aren’t just savory powerhouses; they’re also cherished for their ability to absorb flavors. When sautéed with garlic and herbs, their natural moisture intensifies, creating a deeply satisfying filling that can carry the entire dish.

– The combination of sweet potatoes and mushrooms appears in various culinary traditions around the world, often in stews, roasts, and baked dishes where grounding the flavors with earthy vegetables creates a comforting, homey feel that resonates across generations.

Closing Thoughts

Creamy Mushroom Stuffed Sweet Potatoes are more than a recipe; they are an invitation to slow down and celebrate the everyday ritual of cooking for the people you care about. They embody warmth, nourishment, and the quiet joy of transforming simple ingredients into something that feels special. With their creamy, mushroom-kissed filling nestled inside a tender, caramelized sweet potato, these stuffed beauties offer a versatile canvas for seasonal produce, dietary preferences, and your own creative whimsy. Whether you’re feeding a busy family, treating guests to a tasteful vegetarian option, or planning a cozy date-night dinner, this dish delivers a superb balance of comfort and sophistication. So roast the potatoes, sauté the mushrooms, fold in a silky sauce, and nestle the filling back into the warm embrace of the potato skin. Let the aromas rise, the flavors mingle, and the first bite transport you to a kitchen filled with laughter, warmth, and the comforting promise of good food shared with good company.

Ingredients

Creamy Mushroom Stuffed Sweet Potatoes
Sweet Potatoes

  • – 4 large sweet potatoes (about 8–10 oz each), scrubbed clean and roasted until very tender and scoopable
    → The base of this dish relies on the potato flesh being perfectly tender and fluffy, so it can be easily scooped and filled with the creamy mushroom mixture. Roasting concentrates natural sugars and yields a rich, caramelized interior. Prick the skins with a fork before roasting to vent steam, then bake at 400°F (200°C) for 45–60 minutes or until a knife slides in with no resistance. Choose potatoes of similar size for even cooking and uniform stuffing. After roasting, let them rest a few minutes so they’re comfortable to handle before splitting and scooping out a shallow cavity for filling.
  • – 1-2 teaspoons extra-virgin olive oil, for brushing or rubbing on potatoes before roasting
    → A light oil helps the skins crisp slightly and carries a bit of salt and any aromatics onto the surface, improving texture and flavor. Brush the potatoes with oil before roasting; if you prefer a leaner version, you can omit the oil, but you’ll miss out on the subtle crispness and flavor enhancement it provides.
  • – 1/2 teaspoon kosher salt, plus more to taste
    → Salt is essential to bring out the natural sweetness of the potato and to season the flesh as it roasts. It also helps draw out moisture so the centers stay fluffy rather than watery. Salt the potatoes before roasting, then taste the filling and adjust with a final pinch of salt at the end if needed, especially if using unsalted dairy products in the filling.

Mushroom Filling

  • – 2 cups cremini mushrooms, sliced
    → Mushrooms provide the savory, earthy backbone of the filling. Slicing them evenly ensures uniform browning. Cremini offer deeper flavor than white button mushrooms and hold up well to mixing with dairy and herbs. You want to cook them until most of their moisture evaporates so the filling isn’t soggy.
  • – 1 tablespoon olive oil
    → Used to sauté the mushrooms and aromatics. It helps achieve a golden brown color and richer flavor. Heat the oil in a skillet until shimmering before adding mushrooms to prevent sticking and steaming, which would dull color and taste.
  • – 1 tablespoon unsalted butter (optional)
    → Butter adds a luxurious richness and depth to the filling. If you’re keeping this dairy-free, omit the butter and rely on extra olive oil or dairy-free margarine for flavor. If using, melt with the oil for a fuller sauté.
  • – 1 small onion, finely chopped
    → Onion builds the base sweetness and depth of flavor. Sauté until translucent and lightly caramelized to bring a rounded savoriness to the mixture. If you want quicker preparation, you can grate the onion instead of dicing.
  • – 2 garlic cloves, minced
    → Garlic introduces aromatics and a sharp, peppery note that brightens the mushroom filling. Add toward the end of the sauté to prevent burning and bitterness; finely mince so it distributes evenly.
  • – 1 teaspoon fresh thyme leaves
    → Thyme adds an earthy, herbaceous note that pairs beautifully with mushrooms. If you don’t have fresh thyme, you can substitute dried thyme (about 1/2 teaspoon) and crush it a bit to release aroma. Stir in with the mushrooms to bloom the herb’s flavor.
  • – 1/4 cup dry white wine or vegetable stock (optional)
    → Deglazing with wine (or stock) lifts the browned fond from the pan, intensifying the mushroom flavor and creating a cohesive filling. If avoiding alcohol, use extra stock and cook until reduced by half to concentrate the flavors. This step helps prevent a watery filling.
  • – 4 oz cream cheese, softened
    → Cream cheese provides creaminess and helps bind the mushroom mixture so it stays sturdy inside the potato. Ensure it’s softened to blend smoothly; this also lightens the texture and adds a pleasant tang. For a lighter version, use part cream cheese and part sour cream or Greek yogurt.
  • – 1/4 cup heavy cream or plant-based cream (optional)
    → Adds extra silkiness and looseness to the mixture, making it easier to spoon into the wells. Use dairy cream for indulgence or a non-dairy option to keep the dish vegan or dairy-free. If using, add gradually until you reach your desired consistency.
  • – 1/4 cup grated Parmesan cheese (optional) or 2 tablespoons nutritional yeast (optional for vegan)
    → Parmesan provides a sharp, nutty finish and helps deepen the overall flavor. Nutritional yeast is a vegan alternative that delivers a similar cheesy note without dairy. If using dairy cheese, taste and adjust salt carefully since Parmesan is salty.
  • – Salt and black pepper to taste
    → Seasoning is crucial for balance. Since the filling contains dairy, it can become salty quickly, so taste as you go and add pepper to finish for a subtle bite. If you’ve used salted stock or cheese, reduce additional salt accordingly.

Finish & Garnish

  • – Fresh parsley or chives, chopped, for garnish
    → Fresh herbs provide a bright contrast to the rich mushroom filling and add a pop of color. Sprinkle just before serving to preserve the vibrant green and clean aroma. If desired, you can mix a little parsley into the filling for a more integrated herb note.
  • – Smoked paprika or cracked black pepper, for finishing touch (optional)
    → A light dusting of smoked paprika adds a hint of warmth and color that complements the earthy mushrooms and sweet potatoes. Use sparingly to avoid overpowering the filling; this is purely a finishing flourish.

Instructions

  • Preheat your oven to 400°F (200°C) and line a large baking sheet with parchment for roasting the sweet potatoes.
    → This ensures even heat distribution, prevents sticking, and makes the skins crispier as the potatoes roast.
  • Scrub the four large sweet potatoes under cold running water until the skins are clean, then pat them completely dry with a clean towel.
    → Clean skins prevent dirt from scorching and ensure an even surface for oil adhesion and seasoning during roasting.
  • Brush each potato with 1–2 teaspoons extra-virgin olive oil and evenly sprinkle 1/2 teaspoon kosher salt over the skins.
    → Oil promotes browning and flavor transfer to the skin, while salt seasons the exterior and helps draw moisture for a crisper finish.
  • Prick the potatoes all over with a fork to vent steam during roasting.
    → Piercing prevents bursting, allows moisture to escape evenly, and results in a uniform, fluffy interior.
  • Roast the potatoes in the preheated oven until very tender and scoopable, about 45–60 minutes, flipping once if desired for even color.
    → Roasting concentrates natural sugars and yields fluffy flesh that can be easily scooped to hold the filling; test doneness with a knife—it should slide in with little resistance.
  • Let the potatoes rest 5–10 minutes after removing from the oven, then cut a lengthwise slit in each potato and carefully scoop out the flesh into a large bowl, leaving a shallow 1/4-inch wall around the skins.
    → Resting prevents steam burn, and creating a well allows the filling to sit neatly without overflowing.
  • Mash the scooped potato flesh with a fork until light and fluffy, then season with a pinch more salt if needed and set aside.
    → Fluffy mashed potato forms a creamy base that blends with the mushroom filling, while the added salt ensures balanced flavor throughout.
  • Warm 1 tablespoon olive oil in a large skillet over medium heat and swirl to coat the pan.
    → Properly heated oil prevents sticking and encourages even browning of the aromatics and mushrooms, enriching their flavor.
  • Add the finely chopped onion to the skillet and sauté until translucent and lightly caramelized, about 5–7 minutes.
    → Onion sweetness builds depth and body in the filling; caramelization concentrates flavor and avoids a sharp onion bite.
  • Stir in the minced garlic and fresh thyme, cooking until fragrant, about 30–60 seconds, then pour in 1/4 cup dry white wine or vegetable stock to deglaze the pan and lift browned fond.
    → Deglazing concentrates savory flavors from the pan and creates a cohesive, aromatic base for the mushrooms; use stock if avoiding alcohol and reduce to concentrate.
  • Add the sliced cremini mushrooms and cook until they release their moisture and the pan looks relatively dry with deeply browned mushrooms, about 6–9 minutes.
    → Evaporating moisture prevents a soggy filling and allows the mushrooms to achieve a rich, caramelized color and flavor.
  • Reduce heat to low and stir in 4 oz cream cheese and 1/4 cup heavy cream (or plant-based cream) until the mixture is smooth and cohesive, then fold in 1/4 cup grated Parmesan or 2 tablespoons nutritional yeast.
    → Cream cheese provides creaminess and binds the mixture; dairy or vegan cheese deepens the savoriness and helps the filling melt smoothly.
  • Season the mushroom mixture with salt and black pepper to taste and adjust as needed after tasting, then continue cooking just until heated through.
    → Dairy can quickly become salty, so taste before final assembly and aim for balanced seasoning that complements the roasted potato base.
  • Spoon the mushroom filling into each potato shell, mounding slightly, and arrange on a parchment-lined baking sheet.
    → Filling evenly distributed ensures consistent heat and presentation; the shells provide structure and neat portions.
  • Sprinkle an additional 1–2 tablespoons grated Parmesan or nutritional yeast on top of the filled potatoes and bake in a 375°F (190°C) oven for 10–15 minutes until the filling is hot and the tops are lightly golden.
    → Finishing cheese adds savor and helps set the creamy interior; avoid overbaking to prevent dryness or scorching the topping.
  • Garnish the finished potatoes with chopped fresh parsley or chives and, if desired, finish with a light dusting of smoked paprika or cracked black pepper just before serving.
    → Fresh herbs provide a bright contrast to the richness, while paprika or pepper adds a subtle warmth and visual appeal without overpowering the dish.

Notes

These creamy mushroom stuffed sweet potatoes are hearty, comforting, and naturally gluten-free, making them a satisfying weeknight main or cozy weekend lunch. You can customize them by swapping in your favorite cheeses (such as extra Parmesan, Gruyère, or a dairy-free alternative), adding spinach or kale, or finishing with chopped nuts for crunch. They reheat beautifully, so they’re great for meal prep: bake a batch, store them in airtight containers, and reheat in the oven or microwave until hot and steaming. They also freeze well when assembled and baked, then reheated from frozen for a quick weeknight dinner. For an extra richness, finish with a squeeze of lemon juice or a drizzle of hot sauce and a scattering of fresh herbs. Always ensure your dairy products, stocks, wine (if using), and any packaged ingredients are gluten-free certified if you have gluten intolerance.

Tips

Tips for Creamy Mushroom Stuffed Sweet Potatoes

  • Choose uniform potatoes and prep well. Pick 4 large sweet potatoes of similar size for even roasting. Scrub the skins clean, prick with a fork to vent steam, and roast at 400°F (200°C) until very tender (45–60 minutes). Rest the potatoes for 5–10 minutes after baking so they’re easy to handle before you split and scoop them.
  • Oil and seasoning on the skin. Brushing the skins with 1–2 teaspoons of extra-virgin olive oil helps them crisp slightly and adds subtle flavor. If you want to cut fat, you can omit the oil, but expect less crispness and aroma.
  • Create a neat stuffing cavity. After the potatoes are tender, make a shallow cut along the top and gently scoop out the flesh, leaving a sturdy shell. Scoop enough potato to form a comfortable well for the mushroom filling, but don’t mash the skin.
  • Dry the mushrooms for a better filling. Sauté 2 cups sliced cremini mushrooms in a hot pan with 1 tablespoon olive oil. Cook until most of the moisture has evaporated and the mushrooms are deeply browned; this prevents a watery filling.
  • Layer aromatics for depth. Add 1 small finely chopped onion and 2 minced garlic cloves to the mushrooms. Sauté until the onion is translucent and lightly caramelized to build sweetness and savoriness.
  • Deglaze to maximize flavor. Deglaze the pan with 1 teaspoon fresh thyme and 1/4 cup dry white wine or vegetable stock. Scrape up the browned fond and let it reduce by about half to concentrate the mushroom flavor and prevent a watery filling.
  • Bind and creaminess—choose dairy to fit your diet. Soften 4 oz cream cheese and blend it into the mushroom mixture. If dairy-free, use a plant-based cream cheese and a little extra dairy-free cream or yogurt to reach a creamy, scoopable texture.
  • Control the sauce and texture. Add 1/4 cup heavy cream or plant-based cream gradually to loosen the filling to a spoonable consistency. Stop when it’s creamy but not runny.
  • Cheesy finish with balance. Stir in 1/4 cup grated Parmesan or 2 tablespoons nutritional yeast. Parmesan adds nutty savoriness; nutritional yeast keeps it dairy-free while delivering a cheesy note. Taste and adjust salt since cheese can be salty.
  • Season thoughtfully as you go. Salt to taste, then pepper lightly. Because the filling contains dairy, it can carry salt quickly. Taste before stuffing and adjust at the end if needed, especially if using salted stock or cheese.
  • Make-ahead options and reheating. Filling can be prepared a day ahead and refrigerated; reheat gently before mixing into the potatoes. Assemble and bake just before serving for best texture, or stuff the shells and reheat in a covered dish to keep moist.
  • Versatility and substitutions. For a vegan version, use dairy-free cream cheese, plant-based cream, and nutritional yeast. Add wilted spinach, chopped sun-dried tomatoes, or herbs like parsley to vary the flavor without changing the method.

FAQ

What are the main ingredients in Creamy Mushroom Stuffed Sweet Potatoes?
  • 4 medium sweet potatoes
  • 2 cups mushrooms (cremini or button), sliced
  • 4 oz cream cheese (or dairy-free alternative)
  • 1 small onion, diced
  • 2 cloves garlic, minced
  • 1–2 cups spinach (optional)
  • Olive oil, salt, pepper
  • Fresh thyme or smoked paprika
  • Optional toppings: shredded cheese or vegan cheese, chopped parsley
How do I bake the sweet potatoes?

Preheat oven to 425°F (220°C). Scrub the potatoes clean, pat dry, and pierce each with a fork. Bake on a sheet 45–60 minutes until tender and easily pierced. For a faster option, microwave the potatoes 5–7 minutes per potato, then finish in the oven to set the filling.

How is the creamy mushroom filling prepared?

Sauté onions in a bit of olive oil until translucent, add mushrooms and cook until browned and their moisture evaporates. Stir in garlic (and spinach if using) until wilted. Lower heat and mix in cream cheese until melted and creamy. Season with salt, pepper, and thyme or smoked paprika. Keep warm until the potatoes are ready.

Can I make this dairy-free or vegan?

Yes. Use dairy-free cream cheese (and optional dairy-free milk or cashew cream). Skip regular cheese or substitute vegan cheese. For extra cheesy flavor, add nutritional yeast. The filling will stay creamy with the plant-based alternatives.

Can I prepare this ahead of time?

Yes. You can bake the potatoes in advance and store them refrigerated, then reheat before stuffing. Alternatively, prepare the filling up to a day ahead and refrigerate; reheat before combining with the potatoes.

How should I reheat leftovers?

Reheat in the oven at 350°F (175°C) for 10–15 minutes, covered loosely, until heated through. For a quicker option, microwave in 1–2 minute bursts until hot, though the texture may be softer.

Can I freeze the stuffed potatoes?

You can freeze them, but texture may vary. For best results, freeze the assembled but unbaked potatoes wrapped tightly up to 2 months. Thaw overnight in the fridge and bake as directed. You can also freeze baked stuffed potatoes for up to 1–2 months and reheat in the oven.

What toppings or variations work well?

Try toppings like chopped parsley or chives, crumbled feta or vegan cheese, toasted breadcrumbs, or a drizzle of hot sauce. For extra texture, add crispy bacon bits (if you eat meat) or toasted walnuts. Spice lovers can add a pinch of red pepper flakes or jalapeño.

What are some serving ideas to pair with this dish?

Pair with a bright green salad or steamed greens (like kale or broccoli) and a protein such as roasted chickpeas, grilled chicken, or lentils. A simple side of quinoa or wild rice also complements the creamy filling nicely.

How can I prevent the filling from becoming too runny?

Cook the mushrooms until their moisture evaporates and drain any excess liquid. Use a thickener like cream cheese or a small amount of cashew cream to bind the filling. For extra thickness, you can whisk in a teaspoon of cornstarch dissolved in a little water and heat briefly to meld.

Introduction / Hook

Imagine waking up to a warm, golden-brown crescent of pastry that bursts with melty cheese, savory eggs, and your favorite breakfast fixings—all in one handheld pocket. Homemade Breakfast Hot Pockets are the thing you reach for when mornings are busy, yet you still crave the cozy, comforting satisfaction of a fresh-from-the-oven breakfast. The aroma alone is enough to coax sleepy household members from their cups of coffee, drawing them toward the kitchen with the promise of something deeply satisfying. These handheld breakfast wonders marry the best of two worlds: the convenience of a grab-and-go bite and the heartiness of a beloved breakfast plate. With a crisp, flaky crust that yields to a warm, cheesy melt, every bite is a little celebration of mornings done right. And because these pockets are truly homemade, you can tailor them to your family’s tastes, dietary preferences, and the cadence of your week—whether you’re fueling early workouts, school runs, or a slow weekend brunch with friends.

What makes these breakfast pockets feel special is not just the comforting flavors but the sense of control and creativity they invite. You can craft one batch and savor a week’s worth of grab-and-go breakfasts, or assemble a family-friendly assortment that covers vegetarian mornings, meat lovers, and spicy twists. The dough itself can be tender and flaky, the filling a harmony of textures—from creamy yolk-rich eggs to crisp vegetables and to warm, melty cheese. The result is a portable breakfast that tastes like a little bite of weekend indulgence, reimagined for weekdays without sacrificing flavor or satisfaction.

The Story Behind the Dish

Hot pockets as a concept sprang from a desire to combine portability with comfort—an edible, portable meal you could stash in a lunchbox or grab on the go. The modern version popularized in the late 20th century drew from a long tradition of stuffed pastries found in kitchens around the world: empanadas in Latin American courts, calzones in Italian bakeries, pierogi pockets in Eastern European households, and the humble hand pie that has fed travelers and families for generations. The idea is simple: wrap a flavorful filling in a soft, pliable casing so you can eat with your hands, wherever the day takes you.

In many homes, breakfast is the day’s most hectic moment—a rush of schedules, carpool lines, and the perpetual question of “What’s for breakfast?” Turning that moment into something satisfying, even a little celebratory, is what inspired this homemade version. The joy of making breakfast pockets at home is the opportunity to reclaim a ritual that feels special but remains practical. It’s a gentle rebellion against grab-and-go fatigue, a reminder that mornings can be comforting, nourishing, and delicious without demanding hours in the kitchen. The result is a versatile canvas: you can start with a basic, dependable dough, then invite a parade of fillings—savory, smoky, or veggie-forward—so every pocket carries a story you’re excited to tell at the breakfast table.

Why You’ll Love This Recipe

  • Quick and comforting: a warm, satisfying breakfast that comes together with minimal fuss, ideal for busy mornings and lazy weekends alike.
  • Make-ahead friendly: you can prep a batch in advance, refrigerate or freeze, and reheat when needed, turning breakfast into a predictable, stress-free ritual.
  • Customizable fillings: the base concept invites endless variation—cheesy eggs with breakfast sausage, spinach and mushroom with feta, or a Southwestern-inspired mix with peppers and chiles.
  • Family-friendly and kid-approved: portable, easy-to-eat bites that you can tailor to each child’s tastes without sacrificing flavor.
  • Economical and flexible: use leftover proteins, vegetables, or cheeses to create a satisfying breakfast that stretches your ingredients further.
  • Portable goodness: perfect for school lunches, road trips, picnics, camping mornings, or a post-workout snack that still feels indulgent.
  • Texture contrast that delights: a flaky, lightly crisp crust encasing a creamy, savory interior that stays warm for longer than you’d expect.
  • Kid-safe and adult-loved: you can dial up or down the richness, add heat for grown-ups, or keep it mild for little eaters.

Flavor Profile & Texture

These Homemade Breakfast Hot Pockets strike a beautiful balance between toasty, buttery crust and a rich, satisfying interior. The crust is flaky and tender, with delicate layers that crackle softly at the edges as it bakes. When you bite in, the outer shell gives way to a warm, creamy interior where the flavors mingle in a comforting harmony. Think lightly browned eggs folded with cheese that melts into a glossy pool, mingling with savory fillings like breakfast sausage, crisp bacon, or sautéed vegetables. The cheese offers a lingering, gooey pull that keeps each bite indulgent, while the vegetables provide a fresh counterpoint that keeps the flavors vibrant rather than heavy.

Texture is a choreography here: a crisp bite from the crust, a soft, custardy core from the eggs, a melty ribbon of cheese, and the occasional pop of a sautéed pepper or onion for brightness. The flavor palette can lean traditional and comforting—savory eggs, ham, and cheddar—or adventurous and bright with spinach, feta, sun-dried tomatoes, and herbs. Subtle butteriness in the crust carries the filling, while a touch of pepper, paprika, or oregano can lift the profile without overwhelming the core flavors. The overall effect is a handheld breakfast experience that feels both nostalgic and fresh—like a familiar breakfast dish reimagined into an accessible, grab-and-go format.

Occasions & Pairings

These breakfast pockets shine in a variety of settings. They’re ideal for weekend brunch gatherings where guests can grab a pocket and mingle, for busy weekday mornings when speed and comfort matter most, and for special occasions like camping trips, early-morning sports events, or school lunches that need a little extra care. The portability means you can host a breakfast “bar” where everyone customizes their fillings on demand, adding a playful, interactive element to your meal.

Pairing suggestions to elevate the experience:

  • Drinks: a hot cup of coffee, a mug of chai, or a glass of orange juice to brighten the richness of the pockets.
  • Sides: a simple fruit salad, a tangy tomato and avocado salad, or a light yogurt parfait to balance the savory richness.
  • Condiments and extras: hot sauce, salsa verde, a dollop of sour cream, fresh herbs like chives or cilantro, or a squeeze of lemon to brighten the fillings.
  • Additional pairings: a crisp green salad with a sesame-ginger dressing for a brunch vibe, or roasted breakfast potatoes for a heartier spread.

Tips, Variations & Substitutions

Tips for a Flaky, Flavorful Crust

To achieve a flaky, tender crust, focus on keeping the dough cool and handling it gently. Use cold butter or a butter substitute, and work quickly to prevent the fat from melting into the flour before baking. If you’re short on time, you can opt for store-bought puff pastry or pie dough as a quicker alternative, then tailor the fillings to your taste. Whether you roll the dough thin for a delicate shell or thicker for a heartier bite, the goal is a crust that crisps beautifully in the oven while staying sturdy enough to hold a generous filling.

Fillings: Endless Possibilities

While classic combinations shine, the beauty of homemade pockets lies in the fillings. Consider these thematic ideas without strict measurements:

  • Classic Breakfast: scrambled eggs, cheddar, diced ham or turkey, and a hint of green onion.
  • Veggie Delight: sautéed spinach, mushrooms, red peppers, feta or mozzarella, and a whisper of garlic.
  • Southwestern Sunrise: eggs, chorizo or black beans, pepper jack cheese, corn, and a dash of cumin.
  • Havarti & Herb: eggs, bacon or smoked salmon, havarti, dill, and a touch of lemon zest.
  • Garden Fresh: egg whites or eggs with zucchini, cherry tomatoes, mozzarella, and fresh basil.
  • Meaty Comfort: sausage or bacon with peppers, onions, and provolone for a hearty bite.
  • Cheesy Spinach Ricotta: spinach, ricotta, mozzarella, and a pinch of nutmeg for warmth.

Dietary Adaptations

  • Vegan: use egg substitutes or a tofu scramble filling, and opt for a vegan pastry dough or a gluten-free crust that suits your dietary needs.
  • Gluten-free: choose a gluten-free pastry dough option or a crust made from almond flour or gluten-free flour blends, ensuring the filling remains flavorful and satisfying.
  • Lighter option: use less cheese or a lower-fat cheese variety, add more vegetables, and lean proteins to balance richness.
  • Low-carb approach: create a crust from almond flour or cheese-based crusts, and fill with eggs, vegetables, and high-fat, low-carb fillings.

Regional Twists & Global Flavors

Infuse pockets with regional charm by embracing different spice blends, cheeses, and fillings. A Mediterranean twist might feature feta, olives, sun-dried tomatoes, and spinach. A Cajun-inspired version could include scrambled eggs, andouille sausage, peppers, and a sharp cheddar. An Asian-inspired pocket could pair scrambled eggs with scallions, sesame oil, and a touch of soy, wrapped in a flaky crust for a surprising, delicious mash-up. The versatility of the concept invites playful experimentation that honors familiar flavors while delivering them in a handheld, convenient form.

Storage & Make-Ahead Ideas

One of the greatest strengths of Homemade Breakfast Hot Pockets is their ability to stay fresh across days or weeks when stored properly. You can prepare a big batch and enjoy them across the week or freeze portions for longer-term convenience. Here are flexible, practical ideas to maximize freshness and minimize waste:

  • What to store in the fridge: once cooled, you can refrigerate assembled pockets for up to 3–4 days. Reheat gently to preserve texture and moisture.
  • Freezing unbaked or baked: you can freeze pockets either before baking (on a parchment-lined tray, then bagged) or after baking (cooled, wrapped, and stored). Frozen unbaked pockets bake directly from frozen; frozen baked pockets reheat well in an oven or toaster oven until heated through.
  • Make-ahead strategy: prepare fillings and dough in advance, store separately, and assemble pockets when ready to bake. This reduces morning prep time to mere minutes.
  • Reheating guidance: reheat in a hot oven or toaster oven to restore the crust’s crispness and melt the interior without overcooking. If you’re in a hurry, an air fryer or microwave can work, but the crust may lose some of its crunch in the microwave.
  • Portion control: freeze in individual portions for easy grab-and-go breakfasts, perfect for lunchboxes or quick outings.

Fun Facts & Trivia (Optional)

– The concept of pocketed pastries spans many cultures, from empanadas and samosas to calzones and hand pies; each region puts its own spin on the idea of a portable, stuffed treat. Breakfast pockets are a modern, home-friendly twist that makes this ancestral idea accessible first thing in the morning.

– The name “Hot Pocket” is widely associated with a well-known packaged product, but making a homemade version lets you customize fillings and crust to your heart’s content, and it can taste noticeably fresher and more satisfying than convenient-store equivalents.

– The best part of these pockets is the sense of personal ritual they foster: choosing the fillings, rolling out the dough, and watching them puff and brown as the kitchen fills with aroma—it’s a small celebration of morning that you can replicate any day of the week.

Ingredients

Homemade Breakfast Hot Pockets
Dough

  • – Refrigerated crescent roll dough (8-count)
    → The outer wrapper that forms the hot pocket. Use the standard 8-count sheets so the pockets close neatly around the filling. Keep the dough cold before assembly to maintain tender layers and prevent tearing; roll or press gently to create a uniform rectangle that will enclose the filling without leaking.

Fillings

  • – Large eggs, 4, scrambled with 2 tablespoons milk
    → Provides the fluffy, protein-rich filling that binds with the other ingredients. Whisk the eggs with milk and scramble just until they are set and still slightly creamy; avoid overcooking to prevent a dry filling. Let the mixture cool briefly before filling to limit moisture transfer into the dough.
  • – Breakfast sausage, crumbled, 8 oz (225 g), fully cooked and drained
    → Adds savory, meaty depth and flavor. Cook the sausage until browned and crumbly, then drain excess fat on paper towels to prevent greasy pockets inside the crust. Cool slightly before mixing with eggs to maintain filling structure.
  • – Shredded cheddar cheese, 1 cup (about 4 oz)
    → Provides melty richness and a sharp, tangy bite that complements eggs and sausage. Use freshly shredded cheese for better melt; avoid very moist pre-shredded blends that can release extra moisture. Keep cheese at room temperature for easier incorporation into the filling.
  • – Onion, finely diced, 1/2 cup
    → Adds sweetness and aroma to the filling. Sauté the onion until translucent and lightly caramelized to reduce moisture; this helps prevent a soggy crust. Cool before mixing with the other ingredients.
  • – Red bell pepper, diced, 1/2 cup
    → Contributes color and crisp, sweet notes. Sauté with the onion until softened and moisture has evaporated; pat dry or blot with a paper towel to minimize excess liquid that could dampen the crust.
  • – Fresh spinach, chopped, 1 cup
    → Brings greens and nutrition. Wilt the spinach briefly in a hot pan and press out excess moisture so the filling stays cohesive and does not make the dough soggy. Chop finely for even distribution.
  • – Fine salt, 1/2 teaspoon
    → Enhances overall flavor of the filling. Be mindful that the sausage and cheese add salt, so adjust to taste. Consider reducing if using salty sausage or cheese blends.
  • – Ground black pepper, 1/4 teaspoon
    → Adds subtle heat and depth. Freshly ground pepper offers more aroma; adjust to taste depending on your spice preference.
  • – Garlic powder or onion powder, 1/2 teaspoon
    → Quick, even seasoning that complements egg and meat flavors without adding extra moisture. Use powder rather than garlic salt to control salt balance and prevent oversaturation of the filling.
  • – Milk, 1–2 tablespoons (to scramble eggs)
    → Keeps eggs tender and creamy. If you prefer richer eggs, use a splash of half-and-half; avoid too much milk which can make the filling runny when baked. Use cold milk to help slow the cooking slightly if you’re timing is tight.

Egg Wash

  • – Egg wash: 1 large egg beaten with 1 tablespoon water
    → Used to seal and glaze the outer crust for a glossy, golden finish. Brush lightly along the edges of the assembled pockets before baking to help seal seams and prevent leakage. If avoiding eggs, you can use a small amount of milk or water, but browning and sealing will be less pronounced.

Optional Add-ins

  • – Mushrooms, sliced, 1/2 cup (optional)
    → Adds an earthy, savory note. Cook mushrooms first to release moisture, then briefly sauté until dry before adding to the filling to prevent soggy pockets. Chop or slice evenly for uniform distribution.
  • – Green onions, chopped, 1/4 cup (optional)
    → Provides a fresh, mild onion flavor and color. Add after cooking to preserve their crisp texture and bright taste, or fold into the filling if you prefer a milder green note.
  • – Bacon or diced ham, 1/2 cup (optional)
    → Adds additional smoky, savory depth. Cook until crisp and drain fat; blot with paper towels to limit grease that could weaken crust integrity. Chop into small pieces for even distribution.
  • – Hot sauce or jalapeño, to taste (optional)
    → For a spicy kick. Include in the egg mixture or filling in small amounts and taste as you go to avoid overpowering the other flavors. Remember that kids may prefer milder warmth.

Instructions

  • Preheat your oven to 375°F (190°C) and line two rimmed baking sheets with parchment paper or silicone mats.
    → This ensures even browning and prevents the dough from sticking, making it easier to remove the pockets once they are baked.
  • Brown the breakfast sausage in a skillet over medium-high heat until completely cooked and crumble-groups form; drain fat on paper towels and cool completely.
    → Browning develops depth of flavor and crumbled texture distributes evenly inside each pocket; draining fat prevents greasy pockets and helps the filling set.
  • Sauté finely diced onion and red bell pepper in a teaspoon of oil over medium heat until the onions are translucent and the peppers are softened and lightly caramelized; transfer to a plate and cool completely.
    → Cooking the vegetables reduces moisture and concentrates sweetness; cooling prevents excess moisture from breaking the dough seal.
  • Wilt spinach in a hot dry skillet for 30–45 seconds, then transfer to a clean towel and squeeze out as much moisture as possible; finely chop and set aside.
    → Removing moisture from greens prevents soggy pockets and helps the filling hold together inside the crust.
  • Whisk eggs with 1–2 tablespoons milk until the mixture is uniform, then scramble in a lightly greased skillet over medium heat until just set and still creamy; remove from heat and let cool briefly.
    → Light scrambling creates a fluffy, cohesive filling that binds with the other ingredients; cooling stops carryover cooking that could dry the eggs.
  • In a large bowl, combine the cooled eggs, cooked sausage, shredded cheddar, sautéed onion and pepper, wilted spinach, fine salt, black pepper, and garlic or onion powder; fold gently until evenly distributed and taste for balance.
    → Even distribution ensures every bite has consistent flavor; avoid overmixing to keep the texture tender and avoid breaking the curds of cheese.
  • If using mushrooms, cook sliced mushrooms in a small skillet over medium heat until their moisture evaporates and the edges are golden; transfer to a plate and cool completely.
    → Dry mushrooms prevent extra moisture from seeping into the dough, which could make the crust soggy.
  • If using green onions, chop and set aside; adding them later maintains their bright flavor and crisp texture rather than wilting them into the filling.
    → Fresh aromatics contribute color and brightness; add after cooling to preserve texture.
  • If using bacon or diced ham, cook until crisp, drain fat, and chop into small pieces; cool before mixing with the filling.
    → Adds extra smoky, savory depth and crunchy bits; draining fat prevents greasy pockets from forming.
  • If using hot sauce or jalapeño, finely mince and add a small amount to the filling or egg mixture, then taste and adjust; avoid overpowering the other flavors.
    → A controlled, even heat enhances the overall profile without masking the main ingredients.
  • Unroll the crescent dough and gently press the perforations to seal; then roll or press each sheet into a tidy rectangle about 5×7 inches (12×18 cm) and keep the dough cold until assembly.
    → Flattening into rectangles creates a stable seam line for folding and seals evenly, while cold dough resists tearing during handling.
  • Place eight approximate portions of the filling onto the bottom half of each rectangle, using about 1/3 to 1/2 cup per pocket depending on dough size; distribute evenly to avoid overcrowding the edges.
    → Even portions ensure that the pockets close neatly and bake consistently without spurting filling.
  • Fold the top half of the rectangle over the filling to form a pocket, then press the edges firmly together to seal; crimp with a fork along the seam to reinforce the seal and prevent leaks.
    → Proper sealing traps moisture inside the filling and prevents the filling from seeping out during baking.
  • Brush a thin layer of egg wash along the outer surfaces and especially at the seams to promote a glossy, golden finish and to help seal the pockets further.
    → The wash aids browning and creates a cohesive crust while sealing any tiny gaps that could leak.
  • Bake the pockets on the prepared sheets in the preheated oven for 14–18 minutes, or until the crust is deep golden brown and the filling is hot throughout; rotate the pans halfway through for even browning.
    → Even heat distribution prevents one side from browning faster and ensures the interior reaches a safe, piping-hot temperature.
  • Remove the baking sheets from the oven and let the hot pockets rest on a rack for 5–10 minutes before serving; this allows the filling to set and makes handling less risky.
    → Resting firms the filling and makes cutting or biting into the pockets safer and neater.
  • Serve warm immediately, or cool completely and refrigerate in an airtight container for up to 3 days; reheat on a baking sheet in a 350°F (177°C) oven for 8–10 minutes or until heated through.
    → Reheating in the oven restores a crisp crust and ensures the filling is reheated evenly without drying out.
  • For longer storage, freeze baked pockets on a sheet tray until firm, then transfer to a resealable freezer bag; reheat from frozen at 350°F (177°C) for 15–20 minutes or until hot and the crust is crisp.
    → Freezing in a single layer preserves texture, and reheating directly from frozen keeps the pockets intact without sogginess.

Notes

These homemade breakfast hot pockets are a comforting, handheld breakfast option featuring a flaky crescent-roll crust encasing a savory filling of fluffy scrambled eggs, fully cooked sausage, shredded cheddar, and sautéed onions and red bell pepper with fresh spinach. For best results, keep the dough cold and handle it gently so the layers stay tender and the pockets seal neatly around the filling. Make sure the filling is cooled before assembly to prevent a soggy crust: scramble the eggs with milk until just set, cook and drain the sausage, sauté the onion and pepper until most of the moisture evaporates, and press the spinach to remove excess liquid. Use freshly shredded cheddar for better melt and flavor, and season the filling with salt, pepper, garlic powder or onion powder to taste, bearing in mind the sausage’s salt level. Before sealing, brush the outer edges with egg wash to help the pockets seal and achieve a glossy, golden crust. Optional add-ins like mushrooms, green onions, bacon or jalapeño can be folded into the filling for extra depth; cook mushrooms until dry and chop everything evenly for uniform filling. Bake at 375°F (190°C) for about 18–22 minutes, or until the pockets are golden and the filling is hot and set; let them rest 5–10 minutes before serving. To freeze, assemble and freeze unbaked pockets on a sheet pan, then transfer to airtight bags; bake from frozen, adding 6–10 minutes to the bake time. You can also freeze baked pockets and reheat in a 350°F (175°C) oven for 12–15 minutes. Reheat leftovers thoroughly before eating and serve with your favorite hot sauce or salsa for extra zing.

Tips

Tips for Perfect Homemade Breakfast Hot Pockets

  • Dough handling: Keep the refrigerated crescent roll dough very cold until you’re ready to fill. Chill the sheets, then roll or press into a uniform rectangle (about 6 × 9 in) to ensure the filling seals evenly and pockets bake up with tidy edges. Handle gently to avoid tearing the layers; avoid over-rolling to prevent the dough from bursting at the seams.
  • Preparing the fillings: Scramble eggs with the 1–2 Tbsp milk until just set and creamy, then cool briefly before mixing with the rest of the filling to prevent soggy crust. The sausage should be fully cooked and well-drained; pat with paper towels to remove fat. For spinach, wilt briefly and squeeze out moisture; for onions and peppers, sauté until they’re soft and moisture has evaporated to avoid a wet filling.
  • Moisture management: Pat or squeeze as needed to remove excess moisture from vegetables. Blot with paper towels after sautéing to keep the dough from getting soggy. If using mushrooms (optional), dry them well after cooking.
  • Cheese tips: Use freshly shredded cheddar for the best melt; keep it at room temperature for easier incorporation. Avoid very moist pre-shredded blends that release extra moisture during baking.
  • Seasoning balance: Since the sausage and cheese add salt, start with the 1/2 tsp salt and adjust after tasting the filling. Freshly ground black pepper adds aroma; garlic powder or onion powder helps season without adding extra moisture.
  • Filling amount: Don’t overfill the pockets. A centered, evenly distributed filling helps the dough seal properly and reduces leaks. Leave the edges clean for a strong seal.
  • Sealing the pockets: Brush the egg wash along the edges before folding (or crimp with a fork) to seal seams well and create a glossy, golden crust. If you see gaps or cracks, press the dough back together and reseal before baking.
  • Shaping and assembly: Roll the dough to a consistent thickness so the pockets bake evenly. Place the filling in a line down the center, leaving a margin at the edges to seal without squeezing filling out.
  • Egg wash: The 1 large egg with 1 Tbsp water gives a nice glaze; brush lightly on edges and top for sealing and color. If avoiding eggs, a small amount of milk or water works, but browning will be less pronounced.
  • Baking environment: Bake on a parchment-lined sheet or silicone mat to prevent sticking. Space pockets apart so they don’t fuse as they puff. Preheat your oven fully before baking for even browning.
  • Cooling and serving: Let hot pockets rest 5–10 minutes after baking to set the filling and make them easier to handle. This also helps prevent burns from steam and keeps the filling from running.
  • Make-ahead and storage: Freeze unbaked pockets on a sheet, then transfer to a freezer bag. Bake from frozen, adding a few extra minutes to the bake time. Fully baked pockets can be stored in the fridge for 2–3 days and reheated in the oven for best texture; for longer storage, freeze them and reheat as needed.
  • Optional add-ins: If using mushrooms, green onions, or jalapeño, cook or add after the filling has cooled slightly to preserve texture. If adding hot sauce, start with a small amount and taste, so flavors stay balanced.

FAQ

What are Homemade Breakfast Hot Pockets?

Handheld pastry pockets with a flaky crust and a savory breakfast filling, typically scrambled eggs, cheese, and meat or vegetables. Great for make-ahead breakfasts or quick meals on the go.

What dough should I use for the crust?

Options include refrigerated pizza dough for a sturdy base, puff pastry for a flaky crust, or crescent roll dough for easy, pillowy pockets. For gluten-free, use a gluten-free pie crust or GF puff pastry and follow the package directions.

What fillings work best?

Classic combos include scrambled eggs + cheese + breakfast sausage or bacon, with optional toppings like sautéed spinach, peppers, onions, and mushrooms. Keep fillings pre-cooked and well-drained to prevent sogginess.

Can I make them ahead or freeze them?

Yes. Assemble unbaked pockets and freeze on a parchment-lined tray until firm, then transfer to a freezer bag. Bake from frozen, adding 5–10 minutes to the cooking time. You can also bake, cool completely, wrap individually, and freeze; reheat in the oven or air fryer.

How do I bake them for best results?

Preheat the oven to about 400°F (200°C). Place pockets on a parchment-lined tray, seal edges well, and brush with an egg wash (or water for a dairy-free option). Bake 12–20 minutes, or until the crust is golden and cooked through. Cooking time varies with dough type.

How do I reheat leftovers?

For best texture, reheat in a 350°F (175°C) oven or toaster oven for 8–12 minutes until hot and crispy. An air fryer works well in about 8–10 minutes. Microwaving is quick but may soften the crust.

Can I make them vegan or gluten-free?

Absolutely. Use vegan eggs or tofu scramble, vegan cheese, and plant-based sausage. For gluten-free, use a GF crust (GF pie crust or GF puff pastry) and ensure fillings are dairy-free if needed. Adjust cooking times as needed for the crust type.

How can I prevent the crust from getting soggy?

Dry fillings well before stuffing, pre-cook moisture-heavy veggies (pat dry), and avoid overfilling. Seal edges firmly and consider brushing the outside with a light egg wash or oil to help crispness. Bake on a rack or parchment to allow heat circulation.

How long do they keep in the fridge or freezer?

Refrigerated leftovers are best within 3–4 days. Frozen pockets keep for about 2–3 months. For best quality, reheat from frozen rather than thawing first.

Can I customize fillings for kids or different tastes?

Yes. Try ham and cheese, sausage and pepper jack, veggie-filled with spinach and mushrooms, or a southwest version with eggs, black beans, peppers, and cheddar. Split fillings into portions to create different flavors in each pocket.

Introduction & Hook

Picture a tray of bite-sized jewels—pale, silky squares crowned with a whisper of blush and a temptingly bright raspberry swirl. Each little morsel promises a moment of pure indulgence: a creamy center that glides across the tongue, a barely-there crack as you bite, and a bright fruit kiss that lingers long after the bite. Homemade Raspberry Swirl Cheesecake Bites are the kind of dessert that makes ordinary weeknights feel special and turns casual gatherings into memorable moments. They’re elegant enough to grace a bridal shower dessert table or a holiday buffet, yet approachable enough for an afternoon treat when the craving for something rich and fruity strikes. The magic lies not just in the flavor, but in the balance—the way the tart-tinted raspberry ribbon threads through a velvety cheesecake, the contrast between a delicate, crumbly crust and a smooth, irresistible filling, and the cool finish that leaves your palate craving another bite.

As you imagine them, you can almost sense the aroma wafting through your kitchen: a hint of vanilla that softens the tang, a citrusy brightness that keeps the richness lively, and a subtle buttery undertone that grounds the sweetness. These bites are more than a dessert; they are a small, refined moment—easy to share, delightful to savor, and perfectly suited for making any occasion feel a touch more special. They also embody a modern, approachable style of baking: you get the elegance of a classic cheesecake but in a compact form that fits on a single platter, making it easier to serve, portion, and enjoy with friends and family. In short, they’re the kind of treat you reach for when you want something comforting, familiar, and a little bit glamorous—without any fuss.

The Story Behind the Dish

Cheesecake has a long and winding history that travels across cultures and centuries. From ancient Greek banquets to the refined New York-style cheesecakes of mid-20th-century diners, the idea of a smooth, tangy cheese filling resting on a biscuit-like base has a universal appeal. The version you see here—portioned into delicate bites with a raspberry swirl—embodies a modern interpretation that honors both tradition and whimsy. It’s a dessert born of the idea that dessert should be shareable without sacrificing indulgence. Miniature desserts have become a beloved trend because they invite sampling, conversation, and a playful approach to flavor and texture. A single bite can deliver a surprising balance of richness and brightness, a reminder that dessert can be both comforting and exciting at the same time.

The idea of swirling fruit through a creamy filling is as old as cheesecake itself, in spirit if not in technique. Fruit swirls, ribbons, and marbled patterns emerged as a way to highlight seasonal produce and add visual appeal. Raspberry, with its vibrant hue and tart-sweet character, pairs exceptionally well with the tang of cream cheese. When transformed into little cheesecake bites, the swirl becomes a tiny piece of artistry—visible yet delicate, a design you can practically taste with your eyes. It’s a plate-friendly dessert that invites guests to pick, nibble, and admire the marbled pattern that runs like a thread of color through the pale filling. This dish, then, is a nod to both history and modern entertaining: a classic flavor elevated through presentation, portion, and the joy of sharing.

In many homes, the best desserts are those that carry a sense of tradition while feeling fresh and doable. The cheesecake bite format is a celebration of that duality—structured enough to feel special, simple enough to make on a weekend, and versatile enough to adapt to different occasions. The raspberry swirl adds a lively note, reminiscent of summer markets and sunlit mornings, while the creamy texture speaks to the timeless comfort of cheesecake. It’s a fusion of memory and novelty, a small bite that carries a big smile.

Why You’ll Love This Recipe

  • Portion-controlled indulgence: individual bites mean you can sample without overindulging, and guests can enjoy as many or as few as they’d like.
  • Elegant flavor balance: tangy, creamy filling harmonizes with a subtle fruit swirl for a bright, refreshing finish that doesn’t overwhelm the palate.
  • Textural contrast: a delicate, crumbly foundation provides a gentle crunch against a velvety center, creating a satisfying mouthfeel from first bite to last.
  • Visual appeal: the raspberry ribbon adds a pop of color and artistry, making the tray a centerpiece for any table or party spread.
  • Make-ahead friendly: these bites can be prepared in advance and kept chilled, giving you more time to mingle with guests rather than tending a hot dessert.
  • Versatile for occasions: suitable for holiday gatherings, showers, birthdays, potlucks, or casual weekend treats—easily dressed up or down to fit the vibe.
  • Customizable sweetness: the creamy base allows you to adjust the sweetness to taste with subtle tweaks in the swirl’s intensity, ensuring it appeals to both kids and grown-ups alike.
  • Adaptable to dietary needs: with careful substitutions, you can tailor the concept to vegan or gluten-free preferences without sacrificing texture or flavor.

Flavor Profile & Texture

Let your senses guide you as you imagine these bites. The first impression is visual—the satin sheen of the filling and the ruby glow of the raspberry swirl against a pale canvas. As you bring one to your lips, the aroma offers a gentle whiff of vanilla, a hint of citrus, and a clean dairy note that promises smoothness. The initial bite introduces a delicate crack that yields to a luxuriously creamy interior, rich without being overwhelming. The filling carries a refined sweetness—soft, rounded, and lightly tangy—reminiscent of classic cheesecake but lighter in feel when enjoyed in a smaller, bite-sized format.

The raspberry swirl is not merely an afterthought; it’s a lively counterpart that cuts through the richness with brightness and a touch of tartness. When you encounter the swirl, your palate experiences a ribbon of fruit that remains distinct yet complementary, accentuating the cheesecake’s natural creaminess rather than competing with it. This contrast is where the magic happens: the swirl brings a fruity vibrancy, while the filling offers a velvety, almost satin-like texture that glides across the tongue. The crust—subtly crumbly and sturdy enough to support the bite without crumbling away—provides a gentle crunch and a neutral, buttery foundation that allows the filling and swirl to take center stage. The overall effect is a symphony of textures and flavors: smooth, airy yet indulgent; tart, bright but balanced; and cool, comforting with a lingering, refined finish.

Texture-wise, these bites deliver a refined economy of sensation. The outer layer isn’t crusty in the way a cookie would be, but it has enough structure to hold its shape as you pop the piece into your mouth. The interior is lush and pillowy, with enough density to feel substantial without veering into heaviness. The raspberry swirl creates a ribbon of color and flavor that appears in each bite, ensuring that no two mouthfuls are exactly the same and inviting you to savor the variety in a small, repetitive ritual. The finish is clean and airy, with a subtle sweetness that evaporates pleasantly, leaving room for a final, satisfied sigh and the next delicious bite.

Occasions & Pairings

These Raspberry Swirl Cheesecake Bites shine in settings where elegance meets practicality. They are ideal for a stylish dessert table at a wedding or shower, a festive addition to a holiday spread, or a crowd-pleasing option for a birthday party or family gathering. Their bite-sized nature makes them perfect for buffets, trays, and grazing platters, where guests can help themselves without needing utensils. They also make a thoughtful after-school treat or a special-end-of-week indulgence to share with someone you love. The aesthetic of the bites invites a touch of celebration, yet their approachable flavor makes them welcome in everyday moments as well.

Pair these bites with beverages that complement their profile. A light sparkling wine or a citrus-forward tea can echo the brightness in the swirl, while a rich, dark coffee or a creamy latte can echo the cheesecake’s smoothness. For a non-alcoholic pairing, consider a chilled berry shrub or a sparkling water with a splash of lemon to lift the palate between bites. If you’re building a dessert trio or platter, layer in a contrasting bite—perhaps something with a pastry crust and a dollop of cream—to create a balanced, visually appealing spread that takes guests on a mini tour of textures and flavors.

Tips, Variations & Substitutions

Every home baker loves a few flexible ideas to tailor a dessert to mood, season, or dietary needs. Here are some thoughtful approaches to customizing Raspberry Swirl Cheesecake Bites while keeping the essence intact:

  • Fruit variations: swap in different fruit ribbons such as strawberry, blackberry, or blueberry for seasonal variety. Each fruit adds its own character—think tang for red berries, or a sweeter note for stone fruits.
  • Crust consciousness: if you prefer a gluten-conscious version, consider a crust built from gluten-free cookies or a nut-based base that still delivers a satisfying crunch. The goal is a foundation that balances with the creamy center rather than overpowering it.
  • Vegan options: for a vegan adaptation, use plant-based cream cheese alternatives and a non-dairy butter or fat to bind the crust. The texture should remain smooth, with the swirl providing the fruity brightness to counterbalance the dairy substitute.
  • Dairy-free tweaks: if dairy is a concern but you want a close approximation, blend a dairy-free cream cheese substitute with a light non-dairy yogurt to echo the tang and creaminess without milk-derived ingredients.
  • Sweetness control: if you’re serving guests with a particularly sensitive palate, you can dial back the sweetness of the filling and the swirl by reducing a hint of sugar or using a naturally sweetened fruit syrup for the swirl.
  • Flavor enhancements: a whisper of citrus zest in the filling or a pinch of vanilla bean can deepen the aroma and brighten the flavor without altering the core structure.
  • Make-it-ahead tricks: these bites are well-suited for chilling ahead of time, then slicing just before serving to maintain clean edges and an appealing presentation.
  • Portion play: try making different sizes of bites—tiny minis for a grand dessert display, or a mix of larger pieces for a more generous treat that still feels refined and special.

Storage & Make-Ahead Ideas

One of the biggest joys of bite-sized desserts is their ease of storage and their resilience when prepared in advance. If you’re planning ahead for a party or a busy week, these tips can help you keep them at their best:

  • Refrigeration: store the bites in an airtight container, ideally layered with parchment or waxed paper to prevent sticking. They stay freshest when kept chilled and protected from strong odors from other foods.
  • Make-ahead timelines: you can prepare the components ahead of time and assemble or swirl closer to serving if you wish. The filling and swirl patterns hold well when refrigerated, so you can plan a day or two in advance for a relaxed setup.
  • Freezing: for longer-term make-ahead, freeze individual bites on a tray, then transfer to a freezer-safe container or bag. They retain texture well and thaw relatively quickly at room temperature or in the fridge, maintaining a creamy interior with a bright swirl.
  • Freezer-safe presentation: for best results after freezing, allow bites to come to nearly room temperature before serving, then give them a light pat with a clean finger to restore smoothness and sheen on the surface.
  • Reheating: if you prefer a slightly warmer finish, you can let frozen bites thaw in the fridge, then give them a quick, gentle warm-up in a low oven or on a warm plate—though most people enjoy them cold or just slightly chilled to maintain the creamy texture.
  • Portability: for gatherings, consider packing the bites on a tray layered with parchment to keep them intact during transport. This way, you arrive with a ready-to-serve platter that requires minimal handling at the event.

Fun Facts & Trivia (Optional)

Cheesecake lore is full of delicious anecdotes. Here are a few tidbits that might amuse and inspire:

  • Raspberry love: the name raspberry comes from the Latin rubus idea, with “rubus” meaning “bramble bush”—a nod to its wild, vibrant fruit that pairs beautifully with dairy-based desserts.
  • Miniaturization trend: turning desserts into bite-sized versions is not just about portion control; it’s about turning a familiar flavor into a playful, shareable experience that invites exploration and conversation.
  • Visual poetry: marbled or swirled desserts have long captured the imagination because the patterns celebrate the union of two textures and hues, turning dessert into edible art that’s as pleasing to the eye as to the palate.
  • Texture education: the contrast between a crumbly base and a velvety center is a reminder that texture often carries as much flavor as aroma and taste—each bite telling a subtle story of mouthfeel.

Ingredients

Crust

    – 1 1/2 cups graham cracker crumbs (or digestive biscuit crumbs), finely crushed
    → The crust provides the base and structure for the cheesecake bites. Crush crackers until fine and even, then mix with melted butter (and salt) to form a cohesive, pressable mixture. Press firmly into the bottoms of a mini muffin tin to create a compact shell that holds its shape during baking. For gluten-free versions, use gluten-free crackers or biscuits and ensure they are finely ground for a uniform crust.
    – 4 tablespoons unsalted butter, melted and cooled to warm
    → Binds the crust together and adds richness. Use melted butter that has cooled slightly so it doesn’t seize the filling. Combine with crumbs and press evenly into each cup. If you want a crisper crust after baking, prebake the crust for about 5 minutes before adding the filling.
    – 2 tablespoons granulated sugar (optional)
    → Adds a touch of sweetness to balance the crackers’ flavor. Mix into the crumb mixture before pressing. If your crackers are already sweet, you can omit this.
    – 1/4 teaspoon salt
    → Enhances overall flavor and helps balance sweetness. Distribute evenly through the crust mixture before packing into cups.

Cheesecake Filling

    – 16 oz (450 g) cream cheese, softened to room temperature
    → Core of the bite, providing the creamy, tangy base. Ensure the cream cheese is fully softened to avoid lumps; beat with sugar until smooth and silky for a glossy texture. Do not overbeat after adding egg to prevent air pockets that can cause cracks.
    – 3/4 cup granulated sugar
    → Sweetens the filling and contributes to a smooth, stable texture. Beat with the cream cheese until light and fluffy; overbeating after adding eggs can introduce air and lead to cracking during baking.
    – 1 large egg
    → Adds structure and helps the filling set as it bakes. Add the egg after the cheese and sugar are smooth, mixing just until incorporated to maintain a creamy texture and avoid curdling.
    – 1/2 teaspoon vanilla extract
    → Adds classic cheesecake aroma and depth of flavor. Use pure vanilla extract for best results; if you have a vanilla bean, scrape seeds for an extra layer of flavor.
    – 2 tablespoons sour cream
    → Provides extra tang and creaminess, helping the filling stay moist and smooth. Use full-fat sour cream, cold from the fridge; fold in gently after initial mixing to maintain a velvety texture.
    – 1/2 teaspoon lemon zest (optional)
    → Subtle brightness that complements the raspberries. Zest the lemon before juicing; avoid the white pith, which can impart bitterness. Fold zest into the filling with the other ingredients.

Raspberry Swirl

    – 1 cup fresh raspberries (or thawed frozen)
    → The bright, fruity swirl that contrasts with the creamy filling. Use ripe berries for maximum flavor; refrigerate until needed and gently mash some for texture, leaving a few whole for bursts of color.
    – 2 tablespoons granulated sugar
    → Sweetens the raspberries to balance tartness. Adjust to taste depending on the raspberries’ sweetness; mix with raspberries before heating or mashing.
    – 1 teaspoon lemon juice
    → Enhances raspberry flavor and provides a bit of acidity to cut through the richness of the cheese. Use freshly squeezed juice and add gradually, tasting as you go.
    – 1 teaspoon cornstarch, dissolved in 1 tablespoon cold water (slurry)
    → Thickens the raspberry mixture so the swirl holds its shape during baking. Stir the slurry into the raspberries over low heat until the sauce thickens to a pourable consistency, then cool slightly before swirling into the batter.

Toppings (Optional)

    – Powdered sugar, for dusting on finished bites
    → A light dusting adds a polished finish and a touch more sweetness. Sift over just before serving to prevent clumping and maintain a delicate appearance.
    – Fresh raspberries, for garnish
    → Enhances visual appeal and adds a fresh bite when serving. Select firm berries and wash right before use; pat dry to avoid extra moisture on the bites.
    – White chocolate drizzle (optional)
    → Provides a creamy, sweet contrast to the tangy cheesecake. Melt gently in short bursts, then drizzle in a thin, even stream once the bites have cooled; allow the drizzle to set before serving.

Instructions

  • Preheat your oven to 325°F (163°C) and prepare a mini muffin tin by lining each cup with paper liners or greasing well for easy release and clean edges.
    → This prevents the delicate cheesecake from sticking and makes removal simple, especially since the bites are small and require intact shells.
  • Finely crush graham cracker crumbs to 1 1/2 cups using a food processor or by sealing in a bag and pounding with a rolling pin until uniform and powdery.
    → A fine, uniform crumb yields a cohesive crust that grips the filling without crumbly gaps; inconsistent texture can cause the crust to crumble when unmolded.
  • Combine the crust components by whisking 4 tablespoons melted unsalted butter (cooled to warm), 2 tablespoons granulated sugar (optional), and 1/4 teaspoon salt until the mixture resembles damp sand.
    → The fat from the butter binds the crumbs into a firm shell; salt balances sweetness; warming the butter helps it incorporate smoothly without cooking the sugar.
  • Press about 1 tablespoon of the crust mixture into each cup of the mini muffin tin, pressing firmly with the back of a spoon or a small flat-bottomed tool to form a compact, even shell.
    → A uniform, tightly packed crust provides structure for the filling and prevents it from sliding or puffing during baking.
  • If you choose to prebake the crust, bake the shells for 5 minutes at 325°F (163°C), then cool completely before adding the filling.
    → Par-baking helps set the crust so it doesn’t become soggy from the wet filling and ensures a crisp, well-defined base.
  • Soften 16 oz cream cheese to room temperature and scrape it into a clean bowl, ensuring there are no cold spots that could cause lumps.
    → Softened cream cheese blends smoothly with sugar, yielding a glossy filling; cold or hard cheese will resist mixing and create lumps that are hard to smooth.
  • Beat the softened cream cheese with 3/4 cup granulated sugar on medium speed until the mixture is light, fluffy, and free of lumps, about 2 to 3 minutes.
    → Proper aeration gives a silky texture and helps the filling set without cracks; scrape the bowl halfway through to maintain even mixing.
  • With the mixer on low, add 1 large egg and mix just until incorporated, avoiding overbeat to prevent air pockets that can crack during baking.
    → Overmixing introduces air that expands in the oven and cracks the cheesecake; keep to as little mixing as possible once the egg is added.
  • Beat in 1/2 teaspoon vanilla extract, 2 tablespoons sour cream, and 1/2 teaspoon lemon zest (if using) until the batter is smooth and glossy.
    → Vanilla and sour cream enrich the flavor and texture; lemon zest provides brightness; mix just to blend the ingredients evenly.
  • Evenly fill each crust with the cheesecake batter to about 2/3 full using a spoon or piping bag for accuracy.
    → Filling to about 2/3 allows room for the raspberry swirl without overflowing, ensuring clean edges after baking.
  • Prepare the raspberry swirl by combining 1 cup fresh raspberries (or thawed), 2 tablespoons sugar, and 1 teaspoon lemon juice in a small saucepan, then gently mash some berries with the back of a spoon and bring to a light simmer.
    → The raspberries release their juices, creating a vibrant swirl; careful simmering concentrates flavor without turning the fruit into juice.
  • Mix a teaspoon cornstarch with 1 tablespoon cold water to make a slurry, then whisk the slurry into the raspberry mixture and cook over low heat until the sauce thickens to a pourable but viscous consistency; remove from heat and let cool briefly.
    → The cornstarch thickens the swirl so it holds its shape during baking, producing distinct marbling rather than a runny smear.
  • Drop a small spoonful of the raspberry sauce onto each cheesecake filling and use a toothpick or skewer to swirl it through the batter in a marbled pattern.
    → Swirling creates an appealing raspberry ribbon that bakes into the bite; avoid over-swirl, which can blend the colors too much.
  • Bake the assembled bites at 325°F (163°C) for about 14 to 18 minutes, or until the center is just set and the edges are barely tinged with color.
    → The low, steady heat gently sets the filling without cracking; start checking around 14 minutes to avoid overbaking, which makes the texture dry.
  • Cool the pan on a wire rack for 15 minutes, then carefully transfer the bites to the rack to cool completely, and refrigerate for at least 2 hours to fully set.
    → Cooling at room temperature prevents sudden temperature shock that could cause cracking, and chilling ensures clean, firm bites for slicing or biting.
  • Before serving, dust with powdered sugar, garnish with fresh raspberries, and, if desired, drizzle white chocolate in a thin, even line over the tops once they are completely cool.
    → Powdered sugar adds a polished finish; fresh raspberries enhance color and aroma; white chocolate drizzle provides a sweet contrast that sets as it cools.

Notes

These gluten-free raspberry swirl cheesecake bites are creamy, tangy, and have a crisp crust that you press into mini muffin cups. For the gluten-free version, use finely ground gluten-free crackers or digestive biscuits and, if your crackers are already sweet, you can skip the optional crust sugar. Prebake the crust for about 5 minutes to help keep it crisp after baking. The filling comes together by beating softened cream cheese with granulated sugar until smooth, then adding the egg, vanilla, sour cream, and, if using, lemon zest; mix until just combined to maintain a silky texture and avoid cracks. The raspberry swirl is created by simmering raspberries with sugar and lemon juice, thickened with a cornstarch slurry, then cooled slightly before swirling into the batter. Bake in mini muffin cups as directed, then chill the bites until set (2–4 hours or overnight) for clean removal. Finish with a light dusting of powdered sugar, a few fresh raspberries, or a white chocolate drizzle if desired. These bites store well in the fridge for several days and freeze well for make-ahead meals. When serving, let them come to room temperature for better creaminess and flavor, and remember to confirm all ingredients are gluten-free if you have gluten intolerance.

Tips

Tips for Perfect Raspberry Swirl Cheesecake Bites

Crust tips

  • Use a food processor to grind graham crackers (or digestive biscuits) into ultra-fine crumbs for a smooth, cohesive crust. If you don’t have a processor, seal the crackers in a bag and crush with a rolling pin until very fine.
  • Mix the crumbs with melted butter and a pinch of salt until the mixture just clumps when pressed. If the crust feels dry, add a teaspoon more melted butter or a splash of water to bring it together.
  • Press the crust firmly into the bottoms and slightly up the sides of each mini muffin cup. Use the flat bottom of a small glass or measuring spoon to achieve an even, compact shell without air pockets.
  • Chill the crust for 10–15 minutes before baking to help it set. For a crisper crust, prebake for 4–5 minutes, then cool completely before adding the filling.
  • To keep gluten-free crust cohesive, use finely ground gluten-free crackers and ensure they’re ground evenly; the same butter-to-cracker ratio works well.

Cheesecake filling tips

  • Let cream cheese sit at room temperature until very soft, then beat until smooth and creamy to avoid lumps. Check for any remaining lumps before adding sugar.
  • Beat the sugar with the cream cheese until light and airy, but stop as soon as you reach a glossy texture. Overbeating after the egg is added can introduce air and cause cracks.
  • Add the egg on its own step, mixing just until incorporated. Overmixing after the egg goes in can create air pockets that lead to cracks during baking.
  • Scrape the bowl and add vanilla, lemon zest (if using), and sour cream. Fold gently to maintain a silky texture without deflating the mixture.
  • Room-temperature eggs mix more smoothly into the batter. If your eggs are cold, warm them in a bowl of warm water for a few minutes before adding.
  • Maintain the batter’s thickness; if it seems too loose, refrigerate 15–20 minutes before filling the cups to help prevent spreading.

Raspberry swirl tips

  • Use ripe raspberries for vibrant flavor and color. Fresh berries yield a brighter swirl; thawed berries work too—just drain excess liquid to avoid thinning the batter.
  • Cook the raspberries with sugar and lemon juice just enough to release juice and create a loose sauce. Stir in the cornstarch slurry and simmer until the mixture thickens to a pourable but not runny consistency. Cool completely before swirling.
  • For defined swirls, lightly mash some berries and leave a few whole for color bursts. Spoon dollops of the raspberry sauce onto the filled batter and swirl with a skewer or knife in a gentle figure-8 pattern.
  • Allow the swirl to cool slightly before mixing into the batter if you’re swirling into warm batter; this helps maintain distinct patterns and prevents the swirl from blending too much.
  • If you prefer a stronger raspberry flavor, reduce the sauce slightly and brush a tiny amount of it onto the top of the batter just before baking—avoid overloading, which can cause pooling.

Toppings tips

  • Dust with powdered sugar just before serving to keep the appearance light and prevent clumping.
  • Garnish with fresh raspberries close to serving time to maintain firmness and prevent sogginess from moisture.
  • White chocolate drizzle adds contrast and sweetness. Melt in short bursts on low heat, stirring constantly, and drizzle onto cooled bites. Let the chocolate set completely before serving.

Storage and troubleshooting tips

  • Keep the bites refrigerated in an airtight container. They are best served chilled and hold their shape when cold.
  • Store in the fridge for up to 5 days; freeze for longer storage (1–2 months). Wrap well to prevent freezer burn and thaw in the fridge before serving.
  • Common cracks can come from overbaking or rapid temperature changes. Bake until the centers just jiggle and finish with some residual warmth off the oven, then cool gradually in the pan.
  • If you notice the crust pulling away or the filling cracking after chilling, a light fruit glaze or additional swirls on top can hide imperfections and still taste fantastic.

FAQ

What ingredients do I need for Homemade Raspberry Swirl Cheesecake Bites?
  • Crust: 1 1/2 cups graham cracker crumbs, 3 tablespoons granulated sugar, 4 tablespoons unsalted butter (melted), pinch of salt (optional).
  • Cheesecake filling: 8 ounces cream cheese (softened), 1/3 cup granulated sugar, 1 teaspoon vanilla extract, 1 large egg, 2 tablespoons sour cream or plain yogurt (optional), pinch of salt.
  • Raspberry swirl: 2 tablespoons raspberry jam or preserves (or puree 1/4 cup fresh raspberries with 1 teaspoon sugar), 1–2 teaspoons water to loosen jam if needed.
  • Optional garnish: fresh raspberries, grated chocolate, or a light dusting of powdered sugar.
What equipment will I need to make these bites?
  • Mini muffin tin (12 cups) or silicone mini muffin cups, with liners.
  • Mixing bowls, electric mixer or sturdy whisk, spatula.
  • Measuring spoons and cups, toothpicks or small skewer for swirling.
  • Cooling rack and an airtight container for storage.
How do I prepare the crust?
  1. Preheat oven to 325°F (165°C). Line the muffin tin with liners.
  2. Combine graham cracker crumbs, sugar, and a pinch of salt in a bowl. Stir in melted butter until the mixture resembles wet sand.
  3. Divvy the crust mixture into each muffin cup (about 1 tablespoon per cup). Press down firmly with the back of a spoon or a small glass to form a compact crust.
  4. Chill the crust in the freezer for 8–10 minutes to set before filling.
How do I make the cheesecake filling?
  1. Beat the cream cheese with the sugar and a pinch of salt until very smooth and creamy (about 1–2 minutes).
  2. Beat in vanilla. Add the egg and mix on low speed just until combined; avoid overmixing.
  3. Stir in sour cream or yogurt, if using, until the mixture is smooth and uniform.
How do I create the raspberry swirl?
  1. Divide the filling evenly among the cups, filling each about 2/3 full.
  2. Drop 1 small dollop (about 1/2–1 teaspoon) of jam onto the top of the filling in each cup. You can also use a raspberry puree.
  3. Gently swirl the jam into the filling with a toothpick or skewer to create ribbons.
How long and at what temperature should I bake them, and how do I chill them?
  1. Bake at 325°F (165°C) for 14–16 minutes, or until the edges are set and centers are slightly jiggle-y.
  2. Cool the pan on a rack for 15–20 minutes, then refrigerate and chill for at least 3–4 hours or overnight until firm.
How should I serve and store the bites?
  • Remove from the muffin tin and store in an airtight container, with parchment between layers, in the fridge for up to 4–5 days.
  • For longer storage, freeze the bites on a sheet pan for 1–2 hours, then transfer to a freezer-safe bag. They keep about 2–3 months. Thaw in the fridge overnight before serving.
  • Garnish with fresh raspberries or a light dusting of powdered sugar when serving.
Can I make these bites ahead for parties or holidays?

Yes. They’re best served chilled. You can prepare crusts and fillings ahead, assemble and bake the day you plan to serve, or freeze assembled bites (unbaked) and bake from frozen (add a few extra minutes to the bake time). Ensure they are fully set before storing.

Can I customize flavors or use substitutes for dairy or gluten?

Yes. Here are some ideas:

  • Gluten-free: use gluten-free graham cracker crumbs or finely crushed digestive biscuits with a touch more butter as needed.
  • Dairy-free: use dairy-free cream cheese and a dairy-free butter substitute; texture may vary slightly.
  • Flavor variations: swap in strawberry, blueberry, or lemon curd for different swirl flavors; add chocolate chips to the filling for a mocha twist.
What should I do if the bites crack or sink in the middle?
  • Cracks: avoid overmixing; bake until the center is just set and edges are firm. A few tiny cracks are common but can be minimized with careful mixing.
  • Sinking centers: don’t overfill cups—about 2/3 full is ideal. Try not to open the oven during the first half of baking. If using a water bath, keep water level modest and not touching the tins.

Introduction / Hook

Imagine the scent of a sunlit autumn kitchen: crisp apples surrendering their sweetness to a warm, cinnamon-scented embrace, while a tender cake crumb meets a flirtatious crackle on the surface. The Apple Fritter Cake is not just a dessert; it’s a celebration of contrasts—soft and slightly dense, sweet and a touch tart, fritter’s heartiness with the elegance of a cake’s crumb. Each slice unfolds like a memory: weekend mornings where the air tastes of caramelized apples and the promise of comfort as dependable as a favorite blanket. This cake doesn’t rush you; it invites you to linger, to savor the aroma as it blooms through the room, to slice another piece, and to feel a little piece of fall settle into your day no matter the season outside. If you’ve ever wished for the best of two beloved desserts—the cozy punch of a fritter and the shareable goodness of a cake—this recipe is your bridge between those worlds, a versatile centerpiece for gatherings or a cozy treat for one that somehow feels indulgent without shouting for attention.

In a single bite, you’ll catch the familiar warmth of allspice and cinnamon, the bright juiciness of orchard apples, and a creamy, comforting crumb that holds everything together. The experience is as much about texture as taste: the edge of the cake sporting a delicate crisp—like a gentle, edible crust—while the interior remains moist and generous, a perfect canvas for a drizzle of glaze or a veil of powdered sugar. It’s the kind of dessert that disappears quickly in a lively kitchen, only to leave a sweet glow in its wake—an aroma that clings to your apron and lingers on your fingertips long after the last forkful has vanished.

The Story Behind the Dish

Apple fritters have long enjoyed a glorious reputation in American comfort food lore: sliced apples, a kiss of sugar, a whisper of spice, all dipped in batter and fried to a golden halo. The fritter’s allure lies in the contrast between the crisp exterior and the tender, often juicy interior. But fritters aren’t always convenient for sharing, and a family table can crave something that presents like a cake while delivering the orchard-fresh notes we adore in a fritter. The Apple Fritter Cake emerged as a culinary bridge—a clever adaptation that honors the fritter’s personality while borrowing the cake’s forgiving structure and celebratory vibe. It’s the kind of idea that plants itself in the memory of a kitchen, where a batch of apples on the counter becomes a conversation starter: “What if we baked the apples inside a cake so every slice feels like a fritter, minus the extra oil and mess?” The result is a dessert that travels well, serves a crowd, and adapts to whatever apple variety you have on hand, from tart Granny Smiths to mellow Honeycrisps to fragrant Cortlands.

Historically, cakes have always borrowed from regional flavors and traditions—seasonal fruits providing the bright centerpiece of autumn baking; nuts and spices weaving warmth into the crumb; a glaze or dusting turning a simple slice into a moment of celebration. The Apple Fritter Cake embodies this lineage: it’s rooted in the rustic charm of apple-based treats, but it’s polished enough to present at a brunch, a potluck, or a casual holiday table. The story behind this dish is one of culinary curiosity—an experiment that felt too good to keep to a notebook—and the joy of discovery that comes when two beloved concepts meet in a single, sliceable form.

There’s a gentle nod to nostalgia in every bite, a memory of picking apples at a farm stand, of kitchen windows fogging up with steam while butter melts into sugar, and of the slow, comforting ritual of turning simple ingredients into something truly memorable. The Apple Fritter Cake is a tribute to those small, luminous moments: the crackle of the crust, the softness of the crumb, the way steam lifts the scent of vanilla and spice into the room. It’s a recipe that invites storytelling as much as enjoying, a dessert you can tailor to your story—whether you’re baking it for a cozy family night, a celebratory brunch, or a friendly gathering that calls for something sweet, shareable, and a little bit magical.

Why You’ll Love This Recipe

  • Versatile comfort: It’s a cake with the personality of a fritter, giving you the best of both worlds in one slice.
  • Impressive yet approachable: It looks like a showpiece but is forgiving to bake, even for bakers who aren’t pastry pros.
  • Room-temperature friendly: It remains moist and flavorful for hours, so you can serve it warm or at room temperature.
  • Family-friendly and crowd-pleasing: Slices disappear quickly at gatherings, making it a favorite for brunches, potlucks, and holiday mornings.
  • Adaptable to your pantry: Works with a variety of apples, spices, and optional flavor accents, so you can tailor it to season and preference.
  • Make-ahead potential: Bake ahead and refresh with a quick glaze or a dusting of powdered sugar before serving, easing the day-of workload.
  • Gloriously comforting aroma: The kitchen becomes a sanctuary as cinnamon, vanilla, and warm fruit scents fill the air, triggering cozy sensory memories.

Flavor Profile & Texture

The Apple Fritter Cake is a study in harmonious contrasts. Take a bite and you’ll notice a gentle sweetness that feels like a reassuring hug rather than a shout. The apples provide bright, fresh notes—tart or sweet depending on the variety—balanced by warm spices such as cinnamon, nutmeg, and a whisper of allspice. Vanilla adds a creamy-sweet backbone that carries through every layer of crumb. The cake itself offers a tender, springy crumb that stays moist thanks to the fruit pieces and the richness of the batter, yet it remains structured enough to hold its shape when plated with a slice glaze or a simple dusting.

Textures play a starring role. The exterior may reach a light crisp or a delicate crackle, reminiscent of the fritter’s edge, while the interior remains soft, almost velvet-like, with pockets of apple juicy bite in every bite. If you choose to finish it with a glaze, the glaze may pool gently, creating a thin glossy coat that adds a kiss of sweetness without overpowering the fruit. The optional crumble or streusel on top introduces another layer of texture—nutty, crunchy, and warmly spiced—adding an autumnal complexity that makes each mouthful interesting and satisfying. The flavor journey moves from fresh fruit brightness to comforting spice to buttery crumb, and then to the lingering aftertaste of vanilla and caramelized apple, inviting another slice before you even realize it’s happening.

Texture by Section

  • Crust/Edge: Slight crisp, with a delicate crackle that signals the fritter-inspired spirit of the dish.
  • Crumb: Moist, tender, and springy, with a uniform density that makes every bite feel generous.
  • Apple Pieces: Firmer than the cake’s crumb, giving a pleasant bite and bursts of sweet-tresh apple flavor.
  • Moisture Balance: Apple pieces release jus to keep the cake lively; proper starch and sugar balance helps maintain moisture without sogginess.
  • Aroma: A warm bouquet of cinnamon, vanilla, and apple fills the room as it bakes and cools, inviting conversation and dessert cravings alike.

Occasions & Pairings

This cake thrives anywhere a dessert needs to be both comforting and shareable. Consider its role in these moments:

  • Brunch gatherings: A slice alongside bold coffee or a chai makes for a cafe-worthy breakfast-leisure hybrid.
  • Holiday mornings: A centerpiece for Christmas, Thanksgiving, or a harvest-table spread brings warmth without requiring heavy prep on the day itself.
  • Weekend indulgence: A cozy treat with a movie night or a book-and-tea moment that feels special but not fussy.
  • Potlucks and celebrations: Easy to slice and pass around, with the option to dress up with a glaze or whipped topping to elevate the presentation.

Pairings to consider:

  • Drinks: Hot apple cider, vanilla latte, almond milk, or a straight-forward black coffee to cut through the sweetness.
  • Side options: A dollop of lightly sweetened whipped cream, a scoop of vanilla or cinnamon ice cream, or a spoonful of mascarpone for extra richness.
  • Dessert companions: Caramel sauce, cinnamon-sugar dusting, or a light drizzle of maple glaze to deepen the autumnal notes.

Tips, Variations & Substitutions

  • Fruit variations: While apples are traditional, consider pears for a softer bite, or a mix of apples with a handful of dried tart cherries for a fruity tang.
  • Spice profile: Adjust cinnamon levels to taste; add a pinch of ground ginger, clove, or allspice for a spiced-forward version, or swap in cardamom for a floral twist.
  • Gluten-free option: Use a gluten-free all-purpose flour blend with a little extra baking powder to maintain lift. A small amount of almond flour can add nutty depth, but test the batter’s texture as it can stiffen when subbing.
  • Vegan adaptation: Replace eggs with flax eggs or applesauce to preserve moisture and binding without dairy or eggs. Use a plant-based milk if needed to adjust batter consistency.
  • Dairy-free approach: Choose dairy-free butter or a neutral oil (like light olive oil or melted coconut oil). This keeps the crumb tender while still delivering richness.
  • Texture tweaks: For more fritter-like edges, lightly dust the surface with cinnamon-sugar just before baking and consider a short extra bake at a slightly higher heat to form a crisper edge.
  • Make-ahead topping: If you love a glaze but want to keep the cake crisp on the day of serving, store glaze separately and only drizzle right before serving.
  • Storage-friendly tweaks: If you’re baking ahead, consider slicing the cake and storing slices in an airtight container to keep portions easy to grab and serve later.
  • Flavor boosters: A splash of vanilla bean paste or a hint of lemon zest can brighten the overall flavor, particularly when using varieties of apples that are more tart.

Storage & Make-Ahead Ideas

The Apple Fritter Cake plays well with advance planning, making it ideal for busy weekends or hosting. Here are practical tips to keep it at its best:

  • Room temperature storage: Store fully cooled slices in an airtight container at room temperature for up to 3 days. If your climate is humid, consider a light wrap to preserve texture, but avoid sealing while still warm to prevent condensation.
  • Refrigeration: If you need to keep it longer, refrigerate for up to 5 days. Allow slices to come to room temperature before serving to regain some of the cake’s softness.
  • Freezing: Slice the cake and freeze in a single layer on a baking sheet, then transfer to a freezer bag or airtight container. Freeze up to 1 month. Thaw overnight in the fridge or at room temperature and warm gently in the oven if you desire a just-baked feel.
  • Make-ahead strategy: Bake the cake a day or two ahead, cool completely, and store sealed. When ready to serve, rewarm gently and add a fresh glaze or dusting to refresh the aroma and taste.
  • Glaze considerations: If you’re freezing, drizzle the glaze after thawing and reheating to preserve texture and shine rather than letting the sugar crystallize during freezing.

Fun Facts & Trivia (Optional)

Delightful tidbits to share with guests or tuck into your kitchen conversation:

  • The term “fritter” has roots in frying techniques and culinary traditions across many cultures, but the apple fritter we celebrate in this cake is distinctly American in its comforting, home-baked interpretation.
  • Apples were one of the earliest fruits cultivated in North America, and their pairing with spices like cinnamon reflects a heritage of pantry-smart cooking that makes the most of fall harvests.
  • Varieties of apples you choose will subtly shift the cake’s sweetness and texture. Tart apples (like Granny Smith) brighten the dish and let spice notes shine, while sweeter varieties (like Fuji) enrich the cake’s natural sugar, creating a more caramel-like finish.
  • Bringing the fritter spirit into a cake format is a playful reminder that great desserts often emerge when cooks look for cohesion between two beloved concepts rather than just replicating one.

Final Thoughts

The Apple Fritter Cake is more than a dessert; it’s a warm invitation to slow down and savor the moment. It captures the essence of fall—fruit, spice, and a hint of caramel—while offering the comfort and shareability of a classic bake. It’s a recipe that thrives in homes with lively conversation, with family members who hover by the oven watching the cake rise, and with friends who offer to bring coffee to round out the morning ritual. Whether you’re celebrating a small triumph or simply enjoying a quiet Sunday, this cake brings a touch of bakery delight into your kitchen, wrapped in the familiar, generous spirit of home cooking. Each slice tells a story—of orchard trips, of grandma’s pantry, of rainy-day cravings met with something sweet—and invites you to start a new story of your own with the next forkful. May it become a dependable favorite, a reliable crowd-pleaser, and a go-to comfort that you reach for again and again when the air turns crisp and the apples promise sweetness.

Ingredients

Cake Base
    – 2 cups all-purpose flour
    → All-purpose flour provides the cake’s structure and tender crumb. Sift with the baking powder, baking soda, salt, and cinnamon to ensure even distribution of leaveners and spices, and to prevent clumps. For a gluten-free version, substitute 2 cups gluten-free all-purpose flour (with 1/2 tsp xanthan gum if your blend doesn’t include it). Do not overmix after adding wet and dry ingredients to keep the cake light and airy.

    – 1 cup granulated sugar
    → Sugar sweetens the batter and contributes to browning and moisture retention, which helps create a soft, tender crumb. Creaming sugar with melted butter isn’t required here since the butter is melted; it still dissolves and distributes sweetness evenly. For a more tender crumb, you can slightly reduce the sugar by 1–2 tablespoons if you’re aiming for a less sweet cake.

    – 2 teaspoons baking powder
    → The primary leavening that makes the cake rise as it bakes, creating a light and fluffy texture. Use fresh, active baking powder for best lift—tap the container to check for strength, and if it’s outdated, the rise will be weak. Do not overmix after adding the dry ingredients to preserve air that has been incorporated.

    – 1/2 teaspoon baking soda
    → Provides additional lift and reacts with the acidity in the batter (from buttermilk) to boost browning and tenderness. Ensure it’s evenly distributed by whisking with the dry ingredients. If you omit buttermilk, you can still include soda but combine with a bit more acid elsewhere; otherwise, you can reduce the soda to 1/4 teaspoon.

    – 1/2 teaspoon salt
    → Balances sweetness and enhances the overall flavor of the cake, making the apple flavors pop. Salt also helps strengthen the structure by tightening the gluten network just enough for a tender crumb. If you’re using salted butter, reduce added salt to 1/4 teaspoon.

    – 1/2 teaspoon ground cinnamon
    → Adds warm spice that complements the apple filling and ties the cake to classic apple fritter flavors. For a stronger spice profile, you can increase to 3/4 teaspoon, but start with this amount and adjust to taste in future batches.

    – 1/2 cup unsalted butter, melted and cooled
    → Provides rich flavor and a moist, tender crumb without needing to cream butter with sugar. The melted butter blends quickly with the wet ingredients, yielding a soft crumb. Make sure it’s cooled slightly so it doesn’t scramble the eggs or curdle the batter.

    – 2 large eggs, room temperature
    → Eggs act as binders and help emulsify the batter, contributing to structure and moisture. Bringing them to room temperature helps them incorporate more easily with the melted butter and buttermilk, producing a smoother batter. For a dairy-free version, substitute with 2 flax eggs (2 tbsp ground flaxseed meal mixed with 6 tbsp water, let sit 5 minutes).

    – 1 cup buttermilk (or 1 cup milk + 1 tablespoon lemon juice, let curdle 5 minutes)
    → Buttermilk adds tang, tenderness, and reacts with baking soda for extra lift. If you’re using regular milk, acidify it with lemon juice or vinegar and let it sit to thicken slightly before use. For non-dairy, use soy or almond milk with a splash of lemon juice and a pinch of cream of tartar for acidity.

    – 1 teaspoon pure vanilla extract
    → Imparts warm, aromatic depth that enhances the overall flavor profile of the cake and pairs well with apples. Use only pure vanilla extract for the best flavor; avoid imitation vanilla, which may taste flat in this rich, spiced batter.

Apple Filling
    – 2 cups apples, peeled and diced
    → Apple chunks provide moisture, sweetness, and pockets of tartness that balance the cake. Choose crisp varieties like Granny Smith or Honeycrisp for texture and bright flavor. Tossing with lemon juice helps prevent browning and keeps the color vibrant during baking.

    – 2 tablespoons granulated sugar
    → Coats the apples to draw out some juices and add a touch of sweetness that complements the batter’s sugar. If your apples are already quite sweet, you can reduce this to 1 tablespoon or omit it.

    – 1 tablespoon all-purpose flour
    → Lightly coats the apples to absorb excess moisture released during baking, helping keep the batter from thinning and ensuring a cohesive cake with a tender crumb.

    – 1/2 teaspoon ground cinnamon
    → Reinforces the warm apple spice theme and pairs with the cake’s cinnamon. If you prefer stronger spice, you can increase to 3/4 teaspoon.

    – 1 tablespoon lemon juice
    → Brightens the apple flavor and helps prevent browning, especially if the cake batter sits before baking. It also slightly counterbalances the sweetness and enhances overall aroma.

    – Pinch of salt
    → Elevates the fruity sweetness and helps balance flavors within the filling. A tiny amount goes a long way in intensifying taste.

Streusel Topping (optional)
    – 1/2 cup all-purpose flour
    → Creates a crumbly, crunchy topping that contrasts with the soft cake beneath. The flour is the base for a traditional streusel texture.

    – 1/3 cup granulated sugar
    → Adds sweetness and helps form a slightly crisp crust when baked with butter. Adjust to taste if your filling is sweeter, and you prefer less sugar.

    – 1/4 cup light brown sugar
    → Adds caramel notes and moisture to the topping, contributing to that classic fritter-like streusel crunch. If you want a lighter topping, you can substitute with more granulated sugar.

    – 1/4 cup cold unsalted butter, cubed
    → Cut into the dry ingredients to form a crumbly texture that browns nicely in the oven. Keeping the butter cold helps create distinct, sandy morsels rather than a cohesive dough.

    – 1/2 teaspoon ground cinnamon
    → Adds warmth and ties the topping to the apple filling. For a stronger spice, double the amount.

Glaze (optional)
    – 1 cup powdered sugar
    → Provides a smooth, glossy finish that lightly sweetens the cake. The glaze adds moisture and a hint of sweetness on top after cooling.

    – 2–3 tablespoons milk (d dairy or plant-based)
    → Adjusts glaze consistency; start with 2 tablespoons and add more as needed until it coats the cake evenly without being runny. For thicker glaze, use less liquid; for a thinner drizzle, add a bit more.

    – 1/2 teaspoon vanilla extract
    → Delivers a subtle aroma and depth to the glaze, enhancing the overall apple-cinnamon flavor. Use pure vanilla for best results; omit if you prefer a simpler sugar glaze.

Optional Add-ins
    – 1/2 cup chopped pecans or walnuts (optional)
    → Adds extra crunch and a toasty, nutty flavor that contrasts with the soft cake. Toast the nuts briefly in a dry pan or oven (about 5–6 minutes at 350°F/175°C) to heighten aroma before folding into the batter or sprinkling on top for texture.

    – 1/2 cup raisins or dried cranberries (optional)
    → Introduce pockets of chewy sweetness that complement the apples. If using very dry dried fruit, soak briefly in warm water for 10 minutes to plump them, then drain before mixing.

Instructions

  • Preheat your oven to 350°F (175°C) and grease a 9×13-inch baking pan or line it with parchment paper for easy release and even heat distribution.

    → A well-prepared pan prevents sticking, ensures clean slices, and helps the cake bake evenly without tearing when removed.
  • Whisk the dry ingredients for the cake: 2 cups all-purpose flour, 2 teaspoons baking powder, 1/2 teaspoon baking soda, 1/2 teaspoon salt, and 1/2 teaspoon ground cinnamon in a medium bowl until uniformly distributed.

    → Sifting or whisking breaks up clumps and guarantees the leaveners and spice are evenly dispersed, preventing uneven rise or spicy pockets in the crumb.
  • Whisk the wet ingredients: in a separate large bowl, whisk 1/2 cup melted and cooled unsalted butter with 1 cup granulated sugar until smooth; add 2 large eggs, one at a time, whisking after each addition; whisk in 1 cup buttermilk (or 1 cup milk with 1 tablespoon lemon juice) and 1 teaspoon pure vanilla extract until the mixture is smooth and fully emulsified.

    → Emulsification creates a uniform batter that traps air for a tender crumb; room-temperature eggs integrate more easily with the melted butter and dairy, preventing curdling.
  • Fold the wet and dry ingredients together just until combined and there are no visible streaks of flour; stop mixing as soon as the batter comes together to maintain a light, airy texture.

    → Overmixing develops gluten, leading to a dense cake; gentle folding preserves the delicate structure necessary for a fritter-like crumb.
  • Prepare the Apple Filling: in a bowl, combine 2 cups peeled and diced apples with 2 tablespoons granulated sugar, 1 tablespoon all-purpose flour, 1/2 teaspoon ground cinnamon, 1 tablespoon lemon juice, and a pinch of salt; toss to coat evenly and set aside.

    → The flour helps absorb released juices, lemon juice brightens flavor and slows browning, and cinnamon reinforces the apple-spice profile for depth in every bite.
  • Prepare the Streusel Topping (optional): in a small bowl, mix 1/2 cup all-purpose flour, 1/3 cup granulated sugar, 1/4 cup light brown sugar, 1/4 cup cold unsalted butter (cubed), and 1/2 teaspoon ground cinnamon; cut in the butter with a pastry cutter or two forks until the mixture resembles coarse crumbs; keep cold until ready to use.

    → Cold butter creates distinct crumbly pockets that caramelize during baking, providing a contrasting texture to the soft cake.
  • Assemble the batter and apples: pour about two-thirds of the batter into the prepared pan and spread to cover the base; spoon the apple filling in an even layer over the batter; spoon the remaining batter over the apples and gently spread; use a knife to swirl the batter a few times to distribute the apples without fully mixing.

    → Layering creates harmonious pockets of apple sweetness and prevents the filling from sinking completely, while a light swirl preserves distinct components for a fritter-like bite.
  • Top with streusel (if using): evenly sprinkle the prepared streusel over the batter and apples; lightly press into the surface to help adhesion during baking.

    → The streusel will brown and form a crisp, buttery crust that complements the tender cake beneath.
  • Bake the cake: place in the oven and bake at 350°F (175°C) for 34–40 minutes, or until a toothpick inserted into the center comes out with a few moist crumbs and the edges are lightly golden.

    → Oven temperatures vary; start checking around 34 minutes and use the toothpick test to confirm doneness while ensuring a moist but cooked crumb.
  • Cool the cake in the pan for 15–20 minutes, then transfer to a wire rack to cool completely before glazing.

    → Allowing the cake to set prevents the glaze from sliding off and helps the slices hold their shape when cut.
  • Prepare the glaze (optional): in a small bowl whisk 1 cup powdered sugar with 2–3 tablespoons milk and 1/2 teaspoon vanilla extract until smooth and pourable; adjust consistency with more sugar for a thicker glaze or more milk for a thinner drizzle.

    → A smooth glaze adds a glossy finish and a light sweetness that complements the apple-cinnamon flavors without overpowering them.
  • Glaze the cake (optional): drizzle the glaze in a thin, even stream over the cooled cake; allow the glaze to set for about 15 minutes before slicing.

    → A set glaze provides a clean, attractive presentation and a subtle moisture boost that enhances the overall mouthfeel.
  • Serve and store: cut into squares or wedges and serve; store leftovers covered at room temperature for up to 2 days or refrigerate for up to 5 days, or freeze for longer storage.

    → Proper storage maintains moisture and flavor; cooling completely before refrigerating helps preserve texture and crumb structure.

Notes

These Apple Fritter Cake notes are designed to help you bake a tender, cinnamon-spiced cake with apple filling, optional streusel, and a glossy glaze. For best texture, avoid overmixing the batter once the wet and dry ingredients meet, and ensure your leaveners are fresh. If you’re making a gluten-free version, substitute 2 cups gluten-free all-purpose flour (with 1/2 tsp xanthan gum if your blend doesn’t include it) and sift it with the baking powder, baking soda, salt, and cinnamon to distribute them evenly. Bring eggs and butter to room temperature to help emulsify the batter. When preparing the apple filling, toss diced apples with lemon juice to prevent browning and to keep brightness; the filling also includes a touch of sugar, cinnamon, and a little flour to absorb moisture so the cake stays cohesive. For the streusel topping, keep the butter cold and cut it into the dry ingredients to form chunky crumbs that crisp as they bake. The glaze should be whisked from powdered sugar with milk and a splash of vanilla; adjust thickness to coat the cake without pooling. Optional add-ins like chopped pecans or walnuts and raisins or dried cranberries add texture and sweetness; toast the nuts briefly before using for maximum aroma. Bake until a toothpick inserted into the center comes out with a few moist crumbs. Store the cake in an airtight container for several days, or freeze slices for longer storage; reheat gently to restore the warm, fritter-like comfort. Serve with a scoop of vanilla ice cream or a dollop of whipped cream for a dessert that evokes classic apple fritters, and always adapt ingredients and add-ins to fit dietary needs.

Tips

Tips for Apple Fritter Cake

  • Dry ingredients with leaveners and spices: Sift the flour, baking powder, baking soda, salt, and cinnamon together to distribute the leaveners evenly and prevent clumps. This helps the cake rise evenly and maintain a tender crumb.
  • Melted butter handling: Use melted and cooled butter so it blends quickly with the wet ingredients. Ensure it isn’t hot when combining with eggs to avoid curdling.
  • Don’t overmix the batter: Mix wet and dry ingredients just until incorporated. Overmixing develops gluten and can make the cake dense or tough.
  • Buttermilk or acidity: If you use regular milk, add lemon juice or vinegar and let it sit a few minutes to thicken, mimicking buttermilk’s tenderness and lift.
  • Room-temperature eggs: Eggs at room temperature emulsify more easily, resulting in a smoother batter. If using cold eggs, whisk a bit longer to incorporate air.
  • Apple preparation: Choose crisp apples (Granny Smith, Honeycrisp) for texture and bright flavor. Toss with lemon juice to prevent browning and drain excess juice to keep the batter from becoming too wet.
  • Macerating the apples: If your apples release a lot of juice, lightly pat them dry after tossing with sugar and cinnamon to avoid a soupy filling.
  • Streusel texture tips: Keep the butter cold and cut into the dry ingredients until the mixture resembles coarse crumbs. This yields a crunchy, distinct streusel instead of a doughy layer.
  • Streusel aroma: Toast the streusel topping briefly in the oven or a skillet before baking to deepen the nutty aroma and flavor.
  • Glaze timing and consistency: Apply glaze once the cake is cooled for a smooth, glossy finish. If the glaze is too thick, whisk in a bit more milk; if too thin, whisk in a little more powdered sugar.
  • Glaze flavor balance: Use pure vanilla in the glaze to echo the cake’s apple-cinnamon notes, but omit if you prefer a simple sugar glaze.
  • Add-ins for variety: Toasted pecans or walnuts add crunch and nuttiness; raisins or dried cranberries introduce chewy sweetness. If using dried fruit, plump them first in warm water.
  • Moisture management with apples: If the apple filling seems overly juicy, drain or pat the apples dry before adding to the batter to prevent a soggy crumb.
  • Pan prep and bake readiness: Grease and line the pan with parchment for easy removal. Preheat the oven and bake until a toothpick tests clean with a few moist crumbs for a tender center.

FAQ

What is Apple Fritter Cake?

Apple Fritter Cake is a gently spiced, moist cake studded with chopped apples, echoing the flavors of a fried apple fritter but baked for a simpler, less oily treat. It’s often finished with a light glaze or crumb topping.

How is it different from traditional Apple Fritters?

Traditional fritters are pieces of apple coated in batter and deep-fried until crisp. Apple Fritter Cake uses a cake batter baked in the oven, resulting in a soft, tender crumb with apple pieces distributed throughout—no frying required.

What ingredients do I need?

Core ingredients typically include chopped apples, all-purpose flour, granulated sugar, brown sugar, eggs, milk (or dairy-free milk), oil or melted butter, baking powder, cinnamon, vanilla, and a pinch of salt. Optional glaze or streusel toppings are common.

Can I make this gluten-free?

Yes. Use a 1:1 gluten-free all-purpose flour blend plus 1/2 teaspoon xanthan gum per cup of flour if your blend doesn’t include it. The texture may be a bit denser, but it still tastes great.

Can I make this dairy-free?

Absolutely. Use dairy-free milk (like almond or soy) and substitute oil or dairy-free butter for the butter. If your apples are tart, you might need a touch more sugar to balance flavors.

How do I bake it? Temperature and time?

Preheat to 350°F (175°C). Bake in a greased 9×13-inch pan for about 30–40 minutes, or until the top is golden and a toothpick inserted into the center comes out with a few moist crumbs. If using a loaf pan, bake 50–60 minutes and check for doneness with a toothpick.

How do I know when it’s done?

Look for a golden-brown top and edges pulling slightly away from the pan. A toothpick inserted into the center should come out with only a few moist crumbs. If it’s wet or batter-like, bake a little longer and retest every 5 minutes.

How should I store and reheat leftovers?

Cool completely, then store airtight at room temperature for 1–2 days, or refrigerate up to 5–7 days. Reheat slices in the microwave for 15–25 seconds or warm in a low oven (about 325°F) for 5–10 minutes to freshen the crust. Wrap tightly to prevent drying.

Can I freeze the cake or batter?

Baked Apple Fritter Cake can be frozen for up to 2–3 months. Wrap slices or the whole cake tightly in plastic wrap and foil. Thaw overnight in the fridge or at room temperature, then reheat as above. Batter can be frozen for short periods, but the rise may be affected; best to mix fresh.

What are some topping or variation ideas?

Glaze: mix powdered sugar with a splash of milk (dairy or non-dairy) and vanilla until smooth. Crumble topping: combine brown sugar, flour, cold butter; sprinkle over batter before baking for a crumbly crown. Other ideas include caramel sauce, chopped walnuts, extra cinnamon, or a splash of maple syrup for extra warmth.

Introduction / Hook

Imagine a cupcake that feels like a cloud resting on a plate—light as a sigh, golden as pre-dawn sunlight, and whispering of vanilla, citrus, and summer afternoons. Golden Angel Food Cupcakes are the sort of treat you reach for when you crave something delicate yet indulgent, something that lifts your mood with every bite. They’re not just desserts; they’re a gentle celebration of air and sweetness, a reminder that less can be more when the ingredients sing in harmony. The moment you slice into one, you’ll hear a quiet cheer in your mouth: a soft crack, a tender crumb, and a clean finish that leaves you ready for the next bite without heaviness. These cupcakes are an invitation to slow down, breathe in the scent of warm vanilla and citrus zest, and share a simple, elegant pleasure with friends, family, or a quiet afternoon alone with a good book. They’re the kind of treat that makes ordinary moments feel special, the kind you’ll return to again and again for birthdays, brunches, and sunny weekend gatherings.

The Story Behind the Dish

Angel food cake has a storied place in American baking lore, a dessert born from resourceful kitchens where batter was whisked to airy heights and baked in tall, ungreased pans. Its very name evokes lightness and grace, as if each bite were a miniature slice of sunshine. The concept traveled through generations, evolving from humble gatherings to the refined sweet that graces elegant brunch spreads today. The “angel” moniker likely nods to the ethereal texture—snow-white, feather-light, and almost otherworldly in its tenderness. Golden Angel Food Cupcakes honor that heritage while adding a sunlit twist: a gentle infusion of color and flavor that comes from careful handling of the batter and a careful balance of sweetness. The result is a modern rendition that respects tradition yet feels fresh enough for contemporary tables—perfect for a spring celebration, a bridal shower, or a garden party where the sun itself seems to dip just a touch lower to admire the dessert lineup.

In many homes, angel food has long been a dessert of celebrations, where family recipes were passed down with pride and a smile. The light crumb is achieved by folding delicate air into the batter and avoiding any heavy mixing that could deflate it. Bakers learned to treat this cake with reverence: no grease on the pan, careful lifting, and a slow, steady bake that yields a uniformly pale, golden crust. The result is a cake that tastes of the clean sweetness of sugar, the warm embrace of vanilla, and the bright lift of citrus—an ideal canvas for toppings, glazes, and summer berries. Golden Angel Food Cupcakes carry that tradition forward, offering a portable, single-portion version of a classic that doesn’t sacrifice the integrity of the original texture. Each cupcake is a small, celebratory package—airy, tender, and irresistible when you bite into it with a little reverence for the craft that created such a light, airy sweetness.

Why You’ll Love This Recipe

  • Incredibly light and delicate texture that melts on the tongue without feeling fragile.
  • Golden crust with a soft, pale interior that reveals a comforting vanilla and citrus aroma.
  • Wholesome and versatile—pairs beautifully with fresh berries, yogurt, citrus curd, or a drizzle of honey.
  • Naturally lower in heaviness than traditional butter-based cupcakes, making them a crowd-pleasing, everyday treat.
  • Ease of assembly and elegance in presentation—perfect for brunches, showers, and tea parties.
  • Adaptable to different dietary needs with thoughtful substitutions that don’t compromise the texture.
  • Bright, memory-making aroma that fills the kitchen and lingers in conversations long after the last bite.

Flavor Profile & Texture

At first glance, you’ll notice the sun-kissed glow of the cupcake’s exterior—a pale gold that hints at the gentle sweetness inside. Take a bite, and you’ll experience a feather-light crumb that dissolves with the airiness of a sigh. The flavor profile centers on a clean, sweet vanilla base that’s brightened by citrus—think a whisper of lemon or orange zest that mingles with the vanilla without overpowering it. There’s a subtle acidity and freshness that keeps the sweetness from tipping into cloying territory, offering a balanced finish.

The texture is where these cupcakes truly shine. The crumb is ultra-soft, almost melt-in-your-mouth, with a buoyant lift that suggests it rose as if bathed in sunshine. There’s a gentle, almost velvety mouthfeel, followed by a delicate crust that provides just enough contrast to enhance the eating experience. If you bite into a well-made Golden Angel Food Cupcake, you’ll notice how the crumb remains tender years after baking, a testament to careful whisking and mindful handling. When paired with a light glaze or a dollop of whipped cream and a scatter of fresh berries, the flavors become a bright, harmonious dance of vanilla, citrus, and fruit that feels both celebratory and comforting.

Occasions & Pairings

These cupcakes are versatile enough to shine at a wide range of occasions. They work beautifully for:

  • Brunches and tea parties: a refined sweet that complements delicate pastries and fruit plates.
  • Spring and summer gatherings: pair with fresh berries, lemon curd, or a light honey-vanilla drizzle.
  • Weddings and showers: a touch of elegance and airy sweetness that won’t overwhelm the palate.
  • Weeknight desserts: a quick, satisfying treat that feels special without being heavy.
  • Gifts and favors: wrap individually with translucent wrap and a ribbon for a charming, edible token.

Pairing ideas to elevate the experience:

  • Fresh fruit compotes or berry coulis to add a vibrant contrast.
  • Light whipped cream or a dollop of vanilla yogurt for a creamy balance.
  • Herbal tea or a sparkling citrus beverage to mirror the citrus notes.
  • A Limoncello or orange blossom glaze for a radiant finish (use sparingly to maintain balance).
  • Edible gold leaf or a light dusting of powdered sugar for a festive touch.

Tips, Variations & Substitutions

While the essence remains the same—a delicate, golden cupcake—there are many ways to tailor Golden Angel Food Cupcakes to your preferences, dietary needs, or seasonal ingredients. Here are ideas to inspire creativity without drowning you in steps.

  • Vegan option: Explore aquafaba as a substitute for egg whites. Whip aquafaba to stiff peaks and fold gently into the batter for a similar floaty crumb with a plant-based twist.
  • Gluten-free approach: Use a gluten-free cake flour blend or a carefully chosen gluten-free all-purpose mix that preserves the tender crumb. Avoid heavy substitutions that alter texture.
  • Flavor twists: Swap the citrus zest for almond, lime, or grapefruit for a different aroma profile. A touch of vanilla bean paste can deepen the vanilla character.
  • Herbal or floral accents: Add a pinch of edible dried lavender, rose, or thyme to the batter or glaze for an aromatic surprise. Use sparingly to avoid overpowering the vanilla.
  • Color accents: A tiny amount of turmeric or saffron in the batter can yield a warmer golden hue and a subtle warmth of flavor, perfect for autumnal or celebratory presentations.
  • Nutty crust or topping: A light sprinkle of toasted almond slivers or pistachio bits on top adds texture and color, while still maintaining the cupcake’s delicate essence.
  • Glaze ideas: A thin lemon glaze or a vanilla glaze complements the cupcakes without weighing them down. For a dairy-free option, use a light glaze made with plant-based milk and a touch of citrus zest.
  • Make-ahead strategy: Bake a batch, cool completely, and store in an airtight container. They stay tender for several days; frost or glaze just before serving for maximum freshness.

Storage & Make-Ahead Ideas

Golden Angel Food Cupcakes are forgiving when it comes to freshness and timing, making them ideal for events where timing is everything. Here are practical tips to keep them at their best:

  • Storage: Keep baked cupcakes in an airtight container at room temperature for up to 2-3 days. They stay tender and light, with minimal drying if kept away from direct sunlight and heat.
  • Refrigeration: If you’re topping with fresh fruit or dairy-based creams, refrigerate within a few hours to maintain quality. Bring to room temperature before serving for optimal texture and aroma.
  • Freezing: Freeze baked cupcakes individually wrapped or in a freezer-safe container for up to 1-2 months. Thaw at room temperature, then re-glaze or re-whip any toppings if desired for a refreshed finish.
  • Make-ahead strategy: Bake and cool the cupcakes in advance, then store. In the hours before serving, whisk a light glaze, cream, or fresh berries to top them, creating a moment of fresh, just-made appeal.

Fun Facts & Trivia (Optional)

  • The term “angel food” likely reflects the cake’s cloud-like texture and pale, delicate crumb—the kind of dessert you imagine angels might nibble after a long day.
  • Angel food cupcakes offer a way to enjoy the classic texture in a compact, single-portion form, making it easier to portion for guests at gatherings.
  • Historically, angel food cake was baked in ungreased tubes or pans to maintain maximum height and avoid deflation, a practice rooted in the science of aeration and the control of fats and oils in the batter.
  • Using citrus zest in angel food models a bright, modern touch that bridges traditional technique with contemporary flavors, appealing to both nostalgia and novelty.
  • Small touches—like a light glaze or a handful of fresh berries—can elevate these cupcakes from everyday treats to show-stoppers at celebrations, while preserving their airy core.

Ingredients

Angel Food Cupcake Base
  • 8 large egg whites, at room temperature
    → The egg whites are the light and airy foundation of angel food cupcakes. They provide most of the structure and lift when whipped into stiff peaks. For best volume, ensure no yolk or oil contaminates the whites, separate eggs cleanly, and let them come to room temperature before whipping.
  • 1 cup granulated sugar
    → Sugar stabilizes the whipped egg white foam and contributes sweetness and moisture as it dissolves during beating. Add the sugar gradually in 3–4 additions as the whites whip to stiff, glossy peaks, which helps set a tall, tender crumb. If you have superfine sugar, it can dissolve more quickly for a silkier batter.
  • 1 cup cake flour, sifted
    → Cake flour yields the ultra-light, delicate crumb characteristic of angel food. Sifted flour should be measured after sifting to ensure accuracy, then gently folded into the whipped whites to preserve volume. Do not overwork; fold in small batches just until incorporated.
  • 1/4 teaspoon salt
    → A touch of salt balances sweetness and enhances the vanilla aroma. It also helps strengthen the batter’s structure without adding noticeable saltiness. If you’re on a strict low-sodium plan, you can omit it, but it does improve flavor balance.
  • 1/2 teaspoon cream of tartar
    → Cream of tartar stabilizes the whipped egg whites, helping them hold their volume and stay stiff longer during baking. It’s most effective when added at the beginning of whipping. If you don’t have cream of tartar, you can substitute a pinch of lemon juice, but the texture may be slightly less stable.
  • 1 teaspoon vanilla extract
    → Pure vanilla adds warmth and depth to the delicate crumb. Use high-quality vanilla for a more pronounced aroma. Add during or immediately after whipping the whites to evenly distribute flavor without collapsing the foam.
  • 1/2 teaspoon lemon zest (optional)
    → Lemon zest introduces bright citrus aroma that complements the light cake and helps create a sunny, golden flavor. Use only the yellow part of the rind; grate finely and fold in gently to avoid releasing bitter oils from the white pith.
  • 1/4 teaspoon almond extract (optional)
    → A small amount adds a subtle nutty almond note that pairs nicely with lemon. Use sparingly, as almond flavor can overpower the delicate angel food if used in excess. If used, add along with vanilla for a harmonious fragrance.
  • 12–16 paper cupcake liners (optional)
    → Liners make portioning and removal easy when baking cupcakes. If you prefer a more rustic look, you can bake directly in a greased muffin pan, but liners greatly simplify serving and cleanup.
Golden Lemon Glaze
  • 1/2 cup powdered sugar (confectioners’ sugar)
    → The glaze base; sift to remove lumps and whisk with lemon juice until smooth. The sugar dissolves into a glossy coating that gently sweetens and brightens the lemon flavor. If the glaze is too thick, add a tiny amount of lemon juice or a splash of water to reach drizzle consistency.
  • 2 tablespoons fresh lemon juice
    → Provides acidity and vibrant lemon flavor that cuts through the sweetness of the cake. Use fresh juice for the best brightness; strain to remove seeds and pulp if a clearer glaze is desired. Adjust with more juice or sugar to reach your preferred thickness.
  • 1 teaspoon lemon zest (optional)
    → Intensifies lemon aroma in the glaze. Zest finely and whisk into the glaze at the end to preserve the citrus oils. Avoid zesting the white pith, which can introduce bitterness.
Toppings (optional)
  • Whipped cream, lightly sweetened (optional)
    → A fluffy crown adds richness and pairs beautifully with lemon. Whip cold cream to soft-to-medium peaks and fold in a touch of sugar and vanilla. Apply just before serving to maintain the light texture.
  • Fresh berries (optional)
    → Provides color, tartness, and bright contrast. Rinse gently and pat dry; layer berries around or on top of the glazed cupcakes for an eye-catching finish. Choose berries that are in season for the best flavor.

Instructions

  • Preheat your oven to 350°F (175°C) and line a 12-cup muffin tin with paper liners or grease it well.

    → This ensures the delicate angel food batter releases cleanly from the cups and the liners prevent sticking, which preserves the light crumb and makes removal easy without tearing the cakes.
  • Separate 8 large egg whites from the yolks, placing the whites in a clean, dry bowl and reserving the yolks for another use or discard.

    → Any yolk or fat in the whites will inhibit full-volume whipping, so ensure all equipment is squeaky clean and yolks remain separate to maintain pure foam that can lift the cake high.
  • Bring the egg whites to room temperature and measure; wipe the mixing bowl and beaters with a trace of lemon juice or vinegar to remove any residual fat.

    → Room-temperature whites whip to a more stable, voluminous foam, and a clean, slightly acidic surface helps stabilize the structure for maximum lift.
  • Add 1/2 teaspoon cream of tartar to the whites and start beating on low speed until foamy, then increase to medium-high to form soft peaks.

    → Cream of tartar provides stability to the meringue, helping the foam hold its shape during folding and baking, which is essential for a tall, tender crumb.
  • Gradually add 1 cup granulated sugar in 3–4 additions while continuing to whip to stiff, glossy peaks; stop as soon as the sugar is fully dissolved and the peak holds its shape.

    → Slow sugar incorporation builds a stable meringue by strengthening the protein network; add in stages to prevent weeping or deflation and to maintain a shiny, smooth batter texture.
  • Sift 1 cup cake flour with 1/4 teaspoon salt, then measure; sift again if necessary to ensure an ultra-light powder.

    → Cake flour is finer and lower in protein, yielding the characteristic delicate crumb; sifting after measuring preserves accurate weight and prevents gritty pockets that would weigh the batter down.
  • In three additions, fold the dry ingredients into the whipped whites using a large spatula with a gentle cutting motion, rotating the bowl as you go and stopping as soon as there are no visible flour streaks.

    → Folding preserves the aeration from the whipped whites; overworking will deflate the batter and reduce rise, whereas light, methodical folding keeps the crumb tender and lofty.
  • Stir in 1 teaspoon vanilla extract and, if using, 1/2 teaspoon lemon zest (and 1/4 teaspoon almond extract) until evenly distributed without deflating the batter.

    → Vanilla deepens the aroma of the delicate cake, lemon zest brightens the citrus note, and almond adds a subtle nuttiness; fold gently to keep flavor even without breaking the foam.
  • Spoon or pipe the batter into the prepared liners, filling each about two-thirds full to allow room for expansion.

    → Angel food batter rises dramatically; filling cups to two-thirds prevents overflow and ensures a tall, uniform cupcake height with a gentle domed top.
  • Bake in the preheated oven for 14–18 minutes, or until the tops are pale, feel springy to a light touch, and a toothpick inserted near the edge comes out clean or with a few tender crumbs.

    → Short bake time minimizes drying; the foam structure sets quickly to hold the lift, while the pale color indicates proper moisture and delicate crumb rather than browning that would indicate Maillard reactions overpowering the fine texture.
  • While the cupcakes bake, whisk 1/2 cup powdered sugar with 2 tablespoons fresh lemon juice until smooth and glossy, adding more juice or sugar as needed to reach a drizzleable consistency; optionally whisk in 1 teaspoon lemon zest at the end.

    → The glaze provides bright acidity and a glossy finish that complements the light cake; straining the juice can remove seeds for a cleaner glaze, and adjusting thickness ensures a nice drizzle without pooling too heavily.
  • Transfer the baked cupcakes to a cooling rack and let them cool in the liners for about 5 minutes to set slightly before removing; then lift the cupcakes out of the tin and cool completely on the rack.

    → Cooling gradually while intact preserves the structure formed during baking; removing too soon risks tearing the delicate crumb, while complete cooling prevents condensation from melting the glaze later.
  • Drizzle the cooled cupcakes with the lemon glaze, letting it cascade down the sides for an appealing finish, and allow the glaze to set for a few minutes.

    → A quick glaze sets into a glossy sheen that highlights the lemon aroma; a gentle drizzle avoids soggy tops and keeps the cake’s delicate crumb intact.
  • Prepare optional toppings: whip 1/2 cup cold heavy cream with 1–2 tablespoons powdered sugar and a pinch of vanilla to soft peaks; keep chilled until ready to garnish.

    → Lightly whipped cream adds richness and a cloud-like contrast to the airy cake; chilling prevents the cream from slipping or deflating when applied to the cupcakes.
  • When ready to serve, dollop or pipe a modest amount of whipped cream onto each glaze-coated cupcake and finish with a few fresh berries for color and tartness.

    → The whipped cream and berries provide textural contrast, balance sweetness, and create an elegant presentation suitable for bright, citrus-forward desserts.
  • Store any leftovers in an airtight container at room temperature for up to 1–2 days, or refrigerate for up to 3 days; glaze may soften over time, so re-glaze lightly if desired before serving.

    → Angel food cupcakes are best eaten fresh with light toppings; proper storage slows staling and maintains the delicate crumb while allowing flavors to meld.

Notes

These Golden Angel Food Cupcakes are light, delicate treats built on a meringue-like base of whipped egg whites folded with cake flour, vanilla, and optional lemon zest for a sunny, tender crumb. For best volume, ensure the whites are cleanly separated and at room temperature, whip to stiff, glossy peaks, and add the granulated sugar in 3–4 additions so the foam stays stable as you beat. Fold the dry ingredients into the whites in small batches, using gentle, lifting motions to preserve the aeration; finish with vanilla and lemon zest (if using) folded in just until incorporated. Do not grease the cupcake liners or the baking pan; the ungreased surface helps the batter grip and rise fully, creating the signature tall, airy cupcakes. Bake until the tops are pale and springy to the touch, then cool inverted or on a rack to prevent collapsing the delicate structure.

To glaze, whisk together powdered sugar and fresh lemon juice until smooth, adding lemon zest if you want an extra lemon aroma. The glaze should be pourable but not runny; adjust with a tiny splash of water or more juice to reach drizzle consistency. If you prefer a simpler finish, a light amount of whipped cream and a few fresh berries provide a beautiful, balanced finish that complements the lemon note without overpowering the delicate cake. For an extra citrusy punch, serve with a small spoonful of lemon curd on the side.

Storage and gluten-free notes: These cupcakes are best enjoyed the day they’re baked for best tenderness, but they can be kept in an airtight container at room temperature for 1–2 days or refrigerated for up to 3 days. Unfrosted cupcakes freeze well for up to 1–2 months; thaw at room temperature and glaze before serving. If you need a gluten-free version, use a certified gluten-free cake flour or a light gluten-free baking blend designed for tender cakes, and ensure all ingredients (including baking powder) are certified gluten-free to avoid cross-contamination.

Tips

Tips for Perfect Golden Angel Food Cupcakes

  • Ensure all equipment and bowls are impeccably clean and free of any fat or yolk residues. Any trace of oil can prevent the egg whites from whipping to their fullest volume. Use glass or metal bowls if possible and wipe them with a little white vinegar or lemon juice to degrease.
  • Egg whites should be at room temperature (about 68–70°F/20–21°C) to whip to their maximum volume. If they’re chilling in the fridge, let them sit for 30–60 minutes before beating.
  • Separate eggs carefully. Even a speck of yolk will deflate the foam. Use clean, dry egg whites only for best stability and lift.
  • Beat the whites with cream of tartar (or a pinch of lemon juice) until they hold stiff, glossy peaks. Add sugar in 3–4 additions as the whites whip to create a stable foam that supports a tall, tender crumb.
  • When folding in the cake flour, sift the flour with the salt and gently fold in small batches. Use a light, lift-and-turn motion to preserve the air trapped in the foam; avoid overmixing, which can deflate the batter.
  • Do not grease cupcake liners or the muffin cups. Angel food relies on a non-greased surface to climb and set structure. Fill liners about 2/3 full to allow for rising without overflow.
  • Flavor boosters like lemon zest and almond extract are optional but work best in small amounts. Fold in zest and extracts near the end of mixing to preserve their aroma without masking the delicate cake.
  • For the glaze, sift the powdered sugar first and whisk with fresh lemon juice until smooth. If the glaze is too thick, thin with a small amount of lemon juice or water; if too thin, whisk in a bit more sugar. Add lemon zest at the end for a fragrant finish.
  • Apply toppings (whipped cream or fresh berries) just before serving to maintain texture. Keep whipped cream cold and fold in a touch of sugar and vanilla if you’re serving later in the day.
  • Storage tips: store baked cupcakes in an airtight container at room temperature for 1–2 days. For longer storage, refrigerate (bringing to room temperature before serving helps the crumb stay tender). Glaze and toppings are best added just before serving to keep the texture light and fresh.

FAQ

What are Golden Angel Food Cupcakes?

Golden Angel Food Cupcakes are light, airy treats made with only egg whites, sugar, and cake flour. They rise tall and tender without any fat, and the tops acquire a delicate golden hue from gentle baking and a touch of vanilla or citrus zest. They’re naturally gluten-free when using a true angel food technique with light cake flour.

What ingredients do I need to make them?

For about 10–12 cupcakes, you’ll need:
– 8 large egg whites, at room temperature
– 1 cup plus 2 tablespoons (about 210 g) granulated sugar, divided
– 1 cup cake flour, sifted with 2 tablespoons cornstarch
– 1/4 teaspoon salt
– 1 teaspoon cream of tartar
– 1 teaspoon vanilla extract (clear vanilla preferred for the light color)
– Optional: 1/2 teaspoon citrus zest (lemon or orange) for aroma

Should I separate the eggs and whip the whites to stiff peaks?

Yes. Separate the whites from the yolks carefully, ensuring no yolk gets into the whites. Use clean, oil-free bowls. Whip the whites with the cream of tartar on medium speed until foamy, then gradually add the sugar in 3–4 additions, beating until stiff, glossy peaks form. Do not overbeat. Gently fold in the vanilla and zest, then fold in the sifted flour mixture in small portions.

Do I need to grease the pan for these cupcakes?

Do not grease the batter surface. Traditional angel food relies on the batter climbing the sides of a non-greased pan. If you’re using muffin tins, use ungreased liners or lightweight silicone cups. Paper liners can work, but they may slightly limit height; for best rise, bake in ungreased, nonstick muffin cups or a lightly greased silicone mold and remove after cooling.

What baking temperature and time should I use?

Bake at 350°F (175°C). Fill cupcake cups about 2/3 full and bake for about 12–15 minutes, until the tops are lightly golden and spring back when touched. Every oven is different, so start checking at 12 minutes and watch for a pale golden color with a soft, spongy texture.

How can I keep the tops looking fluffy instead of shrinking or collapsing?

Keep the batter airy by folding gently, avoid overmixing, and don’t deflate the whites. Do not open the oven during the first 2/3 of baking. Ensure the oven is fully preheated. After baking, let the cupcakes cool inverted if possible (rest them upside down in a clean rack) so they don’t collapse from gravity as they cool.

Can I bake these as regular cupcakes in a standard muffin pan?

Yes, you can bake them in a muffin pan, but results vary. Use ungreased paper liners or silicone cups and fill 2/3 full. The tops may be a bit shorter than traditional angel food, but they’ll still be light and tender. If you want taller cupcakes, consider baking in a dedicated angel food or tube-cake mold instead.

How do I add flavor or color without breaking the light texture?

Flavor options:
– 1/2 teaspoon citrus zest (lemon or orange) for aroma
– 1/2 teaspoon almond extract for a nutty note
– 1/2 teaspoon vanilla extract for warmth (clear vanilla helps keep color light)
For color, avoid adding heavy ingredients that weigh down the batter. A light zest or a small amount of vanilla is enough to enhance aroma without dulling the delicate crumb.

How should I store or freeze Golden Angel Food Cupcakes?

Store at room temperature in an airtight container for 1–2 days. For longer storage, freeze unfrosted cupcakes (wrapped well) for up to 1 month. Thaw at room temperature and frost just before serving. Frosting is optional but recommended if you want a little extra sweetness on top.

What frostings or glazes pair well with these cupcakes?

Because the base is fat-free and delicate, light toppings are best:
– Simple lemon glaze: 1 cup powdered sugar + 1–2 tablespoons lemon juice, a splash of vanilla
– Vanilla glaze: 1 cup powdered sugar + 2–3 tablespoons milk or water + 1/2 teaspoon vanilla
– Fresh berry compote and a dollop of lightly whipped cream (or dairy-free alternative)
For a golden finish, a thin glaze adds shine without weighing down the crumb.

What should I do if the cupcake crumb is too dense or not airy?

Possible causes and fixes:
– Whites not whipped enough: re-whip until stiff, glossy peaks.
– Overfolding: fold more gently and in smaller increments.
– Too much flour: measure flour by scooping and leveling or use a kitchen scale.
– Oven too cool: preheat thoroughly and bake with the rack in the middle.
– Humidity: on very humid days, angel food can be a touch denser; ensure the whites are perfectly stiff and sugar is added gradually.

Introduction / Hook

Picture a cozy weeknight dining table where the comforting nostalgia of a backyard barbecue meets the homey warmth of a pie crust fresh from the oven. The Pioneer Woman Cheeseburger Pie is that delicious harmony realized in a single dish: a bubbling, golden crust cradleing a savory, burger-inspired filling that tastes like a summer cookout, but with the convenience and heartiness of a family-friendly pie. The moment you lift the first slice, the crust sighs apart and the filling gleams with melted dairy and browned edges, inviting you to dive in. It’s the kind of dish that makes a kitchen feel like a welcoming hug: familiar flavors, confident technique, and a dish that serves as centerpiece and crowd-pleaser in one elegant, irresistible package. Whether you’re feeding a bustling household, hosting friends, or planning a casual Sunday dinner, this recipe delivers comfort with a touch of ranch-to-table charm, all wrapped in a flaky crust that turns everyday dinner into a small celebration.

The Story Behind the Dish

Every good Pioneer Woman recipe has a story steeped in memory, practicality, and the joyful chaos of family meals. The cheeseburger pie is no exception—a dish born from the idea that the best home-cooked meals blend the simplicity of a burger with the warmth of a pie. In Ree Drummond’s world, a busy ranch kitchen becomes a stage where everyday ingredients are transformed into something that feels special without fuss. The cheeseburger pie mirrors how many families cook in real life: a handful of reliable ingredients, a roomy skillet or pie dish, and a watchful eye on the clock so dinner arrives hot and satisfying just as conversations start to crescendo around the table. It’s the type of recipe that travels easily from a quick weeknight supper to a potluck favorite—proof that great comfort food doesn’t need to be elaborate to be deeply memorable. The dish also nods to American culinary tradition, where the idea of a “burger” can be reimagined in a pie crust, an approach that blends the best of both worlds: the familiar flavors of a classic cheeseburger and the homey, crowd-pleasing reliability of a pie.

Beyond the kitchen, this recipe evokes the open-hearted hospitality the Pioneer Woman embodies: a sense of abundance, a table set with care, and a dish that invites sharing, stories, and laughter. It’s a recipe that travels across seasons and celebrations, adapting to your pantry while preserving the essence of a family favorite—crispy crust, a rich, savory filling, and that unmistakable resonance of a dish that says, “You’re home.” The backstory is less about exact measurements and more about a spirit of practicality fused with warmth—where a pie dish becomes a stage for a burger’s soul, and a weeknight supper becomes a memory worth repeating again and again.

Why You’ll Love This Recipe

  • One-dish wonder: A complete, satisfying meal in a single pie—no sides required, though they’re always welcome.
  • Family-friendly flavor: Comforting, familiar notes that appeal to kids and adults alike, with a velvet, melty cheese finish.
  • Versatile and forgiving: Works with pantry staples and adjustable seasonings, so you can tailor it to your tastes or what you have on hand.
  • Make-ahead friendly: You can assemble ahead of time and bake when ready, making it ideal for busy evenings or weekend meal prep.
  • Impressive presentation: A bubbling, golden crust that arrives at the table like a centerpiece, instantly elevating your dinner moment.
  • Subtle depth of flavor: The filling balances savory meatiness with a gentle, creamy finish, so every bite feels luxurious without being heavy.

Flavor Profile & Texture

This cheeseburger pie is built around contrasts that keep the palate engaged. The crust offers a crisp, flaky bite on the first moment, yielding to a tender, almost pastry-like interior that holds together as you cut and serve. The filling brings a savory, robust character—meatiness with a browned, slightly caramelized edge that hints at the grill, paired with dairy richness that glides across the tongue. Think melted cheese forming a soft, gooey ribbon through a deeply browned top layer, creating a creamy, comforting mouthfeel. There’s a whisper of tang and brightness that cuts through the richness, often derived from a few well-chosen flavor enhancers, and a subtle savory pause that makes room for a lingering aftertaste of goodness.

As you chew, you’ll notice a balance between salty, meaty notes and the gentle sweetness that a well-browned crust can carry. The texture plays with contrast: a crisp crust, a velvety filling, and pockets of melty cheese that stretch into long, satisfying strands with every slice. The dish doesn’t overwhelm with intensity; instead, it invites slow, mindful bites, letting you savor how the crust and filling interlock, how the heat carries through the plate, and how the aroma fills the room and settles into memory. It’s a celebration of comfort food done with a touch of culinary confidence—a dish that makes ordinary evenings feel a little more special without ever feeling fussy.

Occasions & Pairings

This cheeseburger pie shines in a variety of settings, from everyday weeknights to more relaxed entertaining. It’s a natural choice when you want a dish that looks impressive without demanding hours in the kitchen. Consider serving it for:

  • Weeknight family dinners when someone needs a little extra warmth and reassurance at the table.
  • Casual gatherings or potlucks where you want a shareable centerpiece that’s easy to portion and serve.
  • Game-day spreads where the bold, comforting flavors hit the spot and the pie’s sturdy slices stay neat on a crowded table.
  • Sunday dinners with a hearty, no-fuss main that pairs nicely with a simple green salad and a light beverage.

Pairing ideas to accompany the pie include easy, crisp salads that add brightness to the plate, and sides that offer texture contrasts, such as a crunchy slaw or roasted vegetables. For beverages, a sparkling cider, a cold lager, or a light red wine can complement the savory richness without overpowering it. If you’re looking to lean into the “burger” theme, a pickle-forward relish or a tangy tomato-based condiment on the side can echo familiar burger flavors without complicating the dish. The goal is to balance the indulgence of the pie with lighter, fresh accompaniments that keep the meal satisfying but not overwhelmed.

Tips, Variations & Substitutions

One of the joys of a dish like this is how easily it adapts to taste, dietary needs, and pantry realities. Below are ideas to customize, simplify, or elevate the cheeseburger pie while keeping its heart intact.

Make it your own

  • Spice it up: Add a pinch of hot sauce or a squeeze of mustard into the filling to brighten the beefy base.
  • Herbal lift: A touch of fresh herbs or dried aromatics can add subtle complexity without complicating the dish.
  • Cheese variations: If you love a particular cheese’s melt, consider a blend that melts well and provides a creamy texture without overpowering the filling’s character.

Dietary alternatives

  • Vegetarian option: Replace the meat with a hearty mushroom and lentil mixture or a plant-based crumble that browns and crisps similarly for texture and depth.
  • Gluten-free version: Use a gluten-free pie crust or a crust substitute such as a chewier biscuit-style crust, ensuring every bite remains crisp and delicious.
  • Dairy-free version: Use dairy-free cheese and a non-dairy cream or sauce that still offers a luscious, melty finish that the pie requires.

Regional twists

  • Southwestern vibe: Incorporate a subtle smokiness with a dash of paprika and a hint of cumin, plus a dollop of smoky salsa on the side for dipping.
  • Midwestern comfort: Emphasize hearty, straightforward flavors with a dash of onion powder and a pinch of brown sugar for a gentle sweetness that pairs with the crust.

Texture and technique tips

  • Brown the filling well: A good sear on the meat base adds depth and prevents a bland, gray interior. Don’t shy away from letting the edges caramelize.
  • Vent the crust: If you’re blind-baking or using a top-heavy filling, a few slits or a light air vent on the crust helps prevent sogginess.
  • Let it rest: A short rest after baking helps the filling set and makes slicing easier, ensuring perfect portions and clean edges.

Storage & Make-Ahead Ideas

This dish lends itself to smart meal planning, whether you want to prepare ahead for a busy week or keep leftovers that reheat gracefully. Consider these strategies:

  • Make-ahead assembly: Prepare the crust and the filling separately, then assemble just before baking for the freshest possible crust.
  • Refrigeration: Leftovers can be stored in an airtight container in the refrigerator for up to 3–4 days. Reheat gently in a 350°F (175°C) oven or in portions in the microwave, depending on your time and texture preference.
  • Freezing: The baked pie freezes well. Wrap tightly, and freeze for up to 2–3 months. Thaw in the refrigerator overnight and reheat in a moderate oven until hot and bubbling.
  • Make-ahead tips: If you’re hosting, you can assemble the pie up to a day ahead, refrigerate unbaked, and bake when ready to serve. The result is a dinner that comes together with minimal stress.

Fun Facts & Trivia (Optional)

Delightful tidbits can add flavor to any cooking narrative. Here are a few light, curious notes related to cheeseburgers, pies, and classic American comfort food traditions:

  • The idea of combining burger flavors with a pastry shell isn’t new, but it has had enduring appeal in American home cooking, where practical, crowd-pleasing dishes often blend familiar flavors in new formats.
  • Pies are a versatile canvas in American culinary history—savory fillings inside flaky crusts show up in many regional traditions, from pot pies to rustic galettes—each serving as a comforting table centerpiece.
  • The concept of the “ cheeseburger” as a quintessential American staple emerged in the early 20th century, evolving into countless regional versions; the cheeseburger pie is a celebrated example of melding burger nostalgia with pie-night practicality.
  • Pie crusts have long been used as vehicles for both savory and sweet fillings, reflecting a tradition of turning simple pantry staples into satisfying, shareable meals for families and communities alike.
  • For many home cooks, a dish like this becomes a signature comfort food—a recipe passed along, slightly tweaked, and ultimately cherished for the sense of home it evokes every time it comes to the table.

In closing, the Pioneer Woman Cheeseburger Pie stands as a timeless fusion of comfort, ease, and heartwarming flavor. It invites you to gather around the table, to slice and share, and to savor the tiny, delicious moments that make a meal truly memorable. It’s not merely a recipe; it’s an invitation—an opportunity to celebrate togetherness, to embrace the joy of good food made with care, and to welcome friends, family, and even ordinary weeknights into the cozy world of a pie that tastes like home.

Ingredients

    – Pie Crust
    – 1 (9-inch) refrigerated pie crust, thawed

    → Use a standard 9-inch pie crust for the base. For the best texture and to prevent a soggy bottom, blind-bake the crust for 6–8 minutes before filling, or par-bake according to package instructions. If you prefer homemade, roll and fit your own crust and pre-bake as above to ensure a crisp foundation for the cheeseburger filling.
    – Beef Filling
    – 1 pound ground beef (80/20)

    → The star of the dish, this beef should be browned to crumbles with good caramelization. Crumble the meat as it cooks and drain excess fat to keep the filling from becoming greasy. 80/20 fat content offers enough flavor and moisture to mimic a juicy burger.
    – 1 small onion, finely chopped

    → Adds sweetness and savory depth; sauté with the beef until soft and translucent to build a flavorful foundation for the filling.
    – 1 cup green bell pepper, diced

    → Color, crunch, and a touch of sweetness; cook until tender but not mushy to maintain texture in the pie filling.
    – 2 cloves garlic, minced

    → Provides aromatic bite and classic burger savoriness; add toward the end of browning to prevent scorching and bitterness.
    – 1 tablespoon olive oil

    → Used to sauté the veggies and begin flavor development; olive oil keeps everything from sticking and helps carry aromas. If your pan is well-seasoned, you can skip it, but a little oil helps achieve even browning.
    – Seasonings
    – 1 teaspoon kosher salt

    → Essential for bringing out the natural flavors of the beef and vegetables. Taste and adjust at the end, especially if your ketchup or cheese is salty.
    – 1/2 teaspoon freshly ground black pepper

    → Adds subtle heat and enhances overall flavor. Freshly ground pepper provides a brighter, more robust note than pre-ground.
    – 1 tablespoon Worcestershire sauce

    → Delivers umami, depth, and a hint of tang reminiscent of grilled burgers. If you’re avoiding this, substitute with a teaspoon of soy sauce plus a pinch of paprika for a similar savory balance.
    – 2 tablespoons ketchup

    → Introduces a gentle sweetness and tang, echoing burger flavors. Choose a ketchup with clean ingredients for best flavor; adjust to taste.
    – 1 tablespoon yellow mustard

    → Provides a classic burger tang and helps brighten the filling. Dijon can be used for a slightly sharper bite if preferred.
    – Thickener & Liquid
    – 1/2 cup beef broth

    → Adds moisture and helps the beef mixture form a cohesive, sliceable filling. Use low-sodium broth to better control salt levels in the pie.
    – 2 tablespoons all-purpose flour

    → Works as a thickener to give body to the filling and help it hold its shape as it bakes. Whisk the flour into the beef mixture with the simmered liquid to prevent clumps. You can omit if you prefer a looser, egg-based custard instead.
    – Egg Mixture
    – 3 large eggs

    → The eggs act as a binding agent and custard base, helping the pie slice neatly and hold the beef and cheese together during and after baking.
    – 1/2 cup milk (whole or 2%, or use half-and-half for extra richness)

    → Adds creaminess to the custard and helps set the filling without becoming too heavy. Whole milk yields a richer texture; skim milk will be lighter.
    – Cheese
    – 2 cups shredded cheddar cheese (divided)

    → Cheddar provides classic cheeseburger flavor and gooey melt. Reserve about half to fold into the beef mixture for a cheesy filling, and keep the other half to sprinkle on top before baking for a golden, bubbly crusty finish.
    – Optional Toppings
    – Dill pickle slices

    → A traditional burger garnish that adds briny crunch. Serve slices on top or on the side for contrast with the warm, cheesy pie.
    – Tomato slices

    → Fresh tomato adds brightness and juiciness to each serving. Arrange on top of individual slices or plates just before serving.
    – Lettuce shreds

    → Adds a crisp, refreshing bite to balance the rich pie. Use thin shreds to distribute evenly when serving.

Instructions

  • Preheat your oven to 375°F (190°C) and set a rack in the middle; blind-bake the crust by lining a 9-inch pie crust with parchment, filling with pie weights or dried beans, and baking for 6–8 minutes until the edges are pale and the bottom looks dry. Remove weights and parchment and bake 2–4 minutes more if the bottom still appears fragile, then let the crust cool slightly before filling.
    → Blind-baking creates a dry, crisp foundation that prevents a soggy bottom once the custard and filling are added, ensuring clean slices.
  • Heat 1 tablespoon olive oil in a large skillet over medium heat and sauté the finely chopped onion until it becomes translucent and lightly golden, about 3–5 minutes; this builds sweetness and depth as a flavor base for the beef filling.
    → Soft onions release their sugars and mellow sharpness, forming a natural foundation for the burger filling’s savoriness.
  • Add 1 pound ground beef to the skillet and crumble it with a spatula; cook until deeply browned with caramelized bits, then drain off excess fat to prevent greasiness and set the meat aside briefly to rest.
    → Browning adds Maillard flavor and draining fat keeps the filling cohesive and not greasy when baked.
  • Return the beef to the skillet and stir in 1 cup diced green bell pepper; cook until the pepper is tender-crisp, about 3–4 minutes, so the pie retains texture and color.
    → Maintaining some bite in the pepper provides contrast to the rich filling and prevents a mushy result.
  • Add 2 cloves minced garlic and cook for about 30 seconds, just until fragrant; remove from direct heat if the pan is very hot to prevent scorching.
    → Garlic loses its sharpness if overheated; brief cooking releases aroma without bitterness.
  • Season the mixture with 1 teaspoon kosher salt, 1/2 teaspoon freshly ground black pepper, 1 tablespoon Worcestershire sauce, 1 tablespoon ketchup, and 1 tablespoon yellow mustard; stir to distribute evenly and taste for balance before thickening.
    → These seasonings mimic classic cheeseburger seasoning, boosting umami, tang, and savory brightness; adjust after baking if needed.
  • Sprinkle 2 tablespoons all-purpose flour over the meat mixture and cook 1 minute to remove raw flour flavor, then gradually whisk in 1/2 cup beef broth, bringing the mixture to a simmer and cooking until thickened to a cohesive filling.
    → The flour-warmed thickener integrates with the broth to create a sliceable, meat-forward filling that holds together during baking.
  • In a separate bowl, whisk together 3 large eggs and 1/2 cup milk until fully combined and smooth to form a custard base for the pie.
    → The custard binds the filling, adds richness, and helps the pie slice neatly after baking.
  • Stir 1 cup shredded cheddar into the warm beef filling (off the heat) to melt and incorporate, reserving the remaining 1 cup cheddar for topping; this ensures a cheesy, cohesive interior with melty pockets.
    → Folding cheese into the hot filling yields creamy melt throughout and avoids a separate hard cheese layer.
  • Spread the beef and cheese filling evenly into the blind-baked crust, then slowly pour the egg-milk custard over the filling, tilting the pan to ensure even saturation without pooling and to help the custard surround the meat evenly.
    → The custard distribution guarantees a uniform set and prevents dry edges, resulting in a cohesive slice with creamy interior.
  • Sprinkle the remaining 1 cup cheddar evenly over the top to form a bubbly, golden crust while baking, which adds color, flavor, and a shield against over-drying the filling.
    → The topper melts into the custard, creating an appealingly glossy, cheesy finish.
  • Bake in the 375°F (190°C) oven for 25–30 minutes, or until the custard is set in the center and the top is lightly golden and bubbly; test doneness by gently wiggling the pan or inserting a small knife—it should come out clean with a slight custard clinging.
    → Proper bake time ensures the custard sets firmly without curdling and the cheese browns for a desirable crust.
  • Remove from the oven and let the pie rest for 10–15 minutes before slicing to allow the filling to firm up for clean cuts and easier handling.
    → Resting lets the custard and cheese set, preventing runny slices and ensuring neat portions.
  • Serve with optional toppings such as dill pickle slices, tomato slices, and lettuce shreds on the side or atop each slice for a burger-like contrast and fresh crunch.
    → Toppings echo classic cheeseburger flavors and provide brightness to balance the rich, cheesy pie.

Notes

These Pioneer Woman Cheeseburger Pie notes are designed to help you achieve a crisp crust and juicy, cheesey filling. Blind-bake the crust for 6–8 minutes before filling to prevent a soggy bottom; if you’re making your own crust, roll it out, fit it into the pan, and blind-bake as described to ensure a crisp foundation. Brown the beef (80/20 works best for flavor) until it forms crumbles and develops caramelization; crumble as it cooks and drain excess fat to keep the filling from greasing. Sauté the onion and green pepper until they’re softened and slightly caramelized to build depth; add minced garlic toward the end of browning to avoid bitterness. Use 1 tablespoon olive oil to start the sauté; you can skip if your pan is well-seasoned but it aids even browning. Seasoning: 1 teaspoon kosher salt, 1/2 teaspoon freshly ground black pepper, 1 tablespoon Worcestershire sauce, 2 tablespoons ketchup, 1 tablespoon yellow mustard; these contribute classic burger flavors; taste and adjust because cheese and ketchup can be salty. Thicken the filling with 1/2 cup beef broth and 2 tablespoons all-purpose flour; whisk the flour into the simmered beef and liquid to prevent clumps; you can omit the flour for a looser custard and instead rely on eggs and milk, or use a gluten-free thickener such as cornstarch. For the Egg Mixture, whisk 3 large eggs with 1/2 cup milk and pour into the filling; the custard helps the pie slice neatly. Cheese: reserve about half of the 2 cups cheddar to fold into the beef and reserve the rest to sprinkle on top for a bubbly crust. Optional toppings—dill pickle slices, tomato slices, and lettuce shreds—add brightness and crunch; add them after baking or serve on the side. If making gluten-free, use a gluten-free pie crust and consider substituting cornstarch for flour. The pie can be assembled ahead and refrigerated up to 24 hours before baking; bake until the center is set and the top is golden, usually about 30–40 minutes at 350°F; let the pie rest 10 minutes before slicing to let the custard firm up. Leftovers reheat well in the oven or microwave; store in the fridge for up to 3–4 days. The dish pairs nicely with a simple green salad or crisp pickles for contrast.

Tips

Tips for Perfect Cheeseburger Pie

  • Crust foundation: Blind-bake the crust for 6–8 minutes using pie weights or dried beans lined with parchment. This prevents a soggy bottom and yields a crisp base; if making homemade crust, chill, roll evenly, and pre-bake as directed to ensure a sturdy foundation for the filling.
  • Brown the beef properly: Use 80/20 ground beef and cook in a hot skillet in batches, crumbling as you go. Deep browning adds flavor; drain excess fat after browning to keep the filling from being greasy.
  • Sauté aromatics with intention: Cook onion and green pepper until softened but not mushy to maintain texture in the finished pie. A little olive oil helps prevent sticking and promotes even browning.
  • Garlic timing: Add minced garlic toward the end of browning to prevent scorching and bitterness while still delivering its aroma.
  • Seasoning balance: Salt the filling gradually and taste before adding cheese. Worcestershire, ketchup, and mustard deliver umami and tang; start conservatively if you’re watching salt, then adjust after incorporating cheese.
  • Thickener and moisture: Use beef broth and flour to create a cohesive, sliceable filling. Whisk the flour into the liquid to prevent lumps; if you prefer a looser custard, reduce the flour or omit it for a lighter texture.
  • Egg custard binding: The eggs and milk form a custard that helps the pie slice neatly. Whisk well and pour evenly over the filling before baking for uniform set.
  • Cheese layering: Reserve about half of the cheddar to fold into the beef for a creamy interior, and sprinkle the rest on top for a bubbly, golden crust. You can mix in a bit of other cheeses for different flavors if you like.
  • Optional toppings at serving: Dill pickle slices, tomato rounds, and lettuce shreds add bright contrast and crunch. Add just before serving to keep textures crisp and colors vibrant.
  • Assembly and bake: Allow the filling to cool slightly before filling the crust to reduce extra moisture. Bake until the custard is set and the top is golden; a gentle jiggle in the center is okay, but avoid runny filling.
  • Rest and slice: Let the pie rest 10–15 minutes after baking. Resting helps the filling firm up for clean slices and easier serving.
  • Make ahead and storage: Assemble and refrigerate up to 1–2 days before baking. Leftovers keep 3–4 days in the fridge and reheat well in a 350°F oven. You can freeze unbaked filling assembled in the crust for longer storage, but texture may vary after thawing.
  • Variations: For a lighter version, use leaner beef and less cheese; or substitute half the beef with ground turkey. Add sautéed mushrooms or a pinch of smoked paprika for extra depth if you like.

FAQ

What is Pioneer Woman Cheeseburger Pie?

A comforting, family‑friendly dish inspired by The Pioneer Woman. It combines seasoned ground beef with cheese in a pie‑like crust, delivering a savory, cheeseburger‑style meal in a sliceable form.

What ingredients do I need to make it?

Typical ingredients include:

  • Ground beef
  • Onion and garlic
  • Ketchup or tomato sauce
  • Mustard or Worcestershire sauce
  • Cheese (such as American or cheddar)
  • A crust (pie crust, biscuit crust, or crescent roll crust)
  • Salt and pepper, plus any optional toppings like pickles

Note: exact ingredients may vary by version of the recipe you’re following.

Do I need to brown the beef before assembling?

Yes. Brown the ground beef with chopped onion (and garlic, if using) until fully cooked, then drain excess fat before mixing with sauces and seasonings. This step builds the savory base for the pie.

How do I assemble and bake it?

General steps:

  • Preheat your oven (commonly around 375–400°F).
  • Prepare your crust in a pie dish or baking pan.
  • Spread the cooked beef mixture over the crust and top with cheese.
  • Cover with a second crust if your version uses a top crust, or bake until the crust is golden if using a biscuit or crescent crust.
  • Bake until the crust is golden and the cheese is melted and bubbly, usually 25–35 minutes depending on crust type.
How long does it take to make?

Active prep is typically 15–20 minutes. Baking time is about 25–35 minutes, so plan for roughly 40–60 minutes total, depending on crust type and oven.

How many servings does it yield?

Most cheeseburger pies yield about 6–8 servings, depending on how large you slice the pieces and the size of your baking dish.

Can I make it ahead or store leftovers?

Yes. You can:

  • Assemble and refrigerate unbaked for up to 1 day, then bake as directed.
  • Refrigerate baked leftovers for 3–4 days.
  • Freeze unf baked for up to 1–2 months; bake from frozen, adding 15–20 minutes to the bake time.
Can I customize fillings or substitutions?

Absolutely. Try:

  • Ground turkey, turkey sausage, or plant-based crumbles for a lighter or vegetarian option.
  • Different cheeses (cheddar, Swiss, pepper jack) for varying flavors.
  • Optional add-ins like sautéed mushrooms, bell peppers, or pickles.
  • Spices like Worcestershire sauce, paprika, or hot sauce for extra depth.
Is it gluten-free?

Most versions use a crust that contains gluten. To make it gluten-free, use a gluten-free crust or make a crustless version. Ensure any sauces or toppings are gluten-free as well, if needed.

Tips for a crust that doesn’t get soggy

Try these tricks:

  • Pre-bake or blind bake the crust slightly before adding the filling if your crust type supports it.
  • Drain the beef well to remove excess fat and moisture.
  • Brush the crust with an egg wash or a little oil to seal and promote browning.
  • Consider a thicker crust or adding a cheese layer that helps crisp the bottom.
How should I reheat leftovers?

Reheat in a 350°F oven for 10–15 minutes to help re-crisp the crust. You can microwave for a quicker option, but the crust may be softer.

What are common mistakes to avoid?

Avoid overloading with wet toppings that can sog the crust, not draining fat from the beef, under-seasoning, and underbaking the crust. Also, skip the crust if you prefer a crustless version and adjust bake times accordingly.

Introduction / Hook

Imagine a kitchen filled with the warm, comforting scent of cinnamon and apples, a soft chorus of butter sizzling in the pan, and the first bite that dissolves into a moist, tender crumb. Mouthwatering Applesauce Muffins aren’t just a snack; they’re a gentle invitation to slow down and savor a moment of cozy sweetness. Each muffin carries a whisper of autumn mornings, a note of nostalgia, and a little sunshine tucked into a compact, grab-and-go treat. The beauty of these muffins lies in how they balance simplicity with indulgence — the applesauce lends a lush moisture that stays with you long after the crumb has vanished, while spices and a touch of vanilla carry a comforting warmth that feels like a hug from your favorite baking memories. Whether you’re rushing out the door on a busy weekday or setting a weekend brunch with neighbors, these muffins rise to the occasion with effortless charm. They’re baby-friendly enough to share with little hands and sophisticated enough to impress grown-up palates, proving that a humble batter can yield an extraordinary bite every single time. Inhale the aroma as it creeps through the room, and you’ll know you’ve found a recipe worth returning to, again and again.

The Story Behind the Dish

Applesauce muffins sit at a crossroads of comfort and practicality, a family-friendly staple that travels easily from kitchen to lunchbox to picnic blanket. The use of applesauce in baked goods rose to prominence as a natural way to replace some of the fat while keeping moisture intact—a trick many home bakers learned to preserve tenderness without sacrificing flavor. In this particular recipe, applesauce serves as the quiet hero: it’s not flashy, but it makes a quiet assertion that less can be more. The idea likely has roots in home economies where cooks sought to stretch ingredients, reduce grease, and still deliver something bright and appealing to hungry mouths after a long day. In many households, applesauce is part of the pantry’s heart—its gentle sweetness and smooth texture pairing beautifully with warm spices. The resulting muffins carry with them little rituals of the past: jars of homemade applesauce resting on a shelf, the tapping sound of a spoon as it sweeps through the bowl, the soft crackle of a sugar crust forming on the top as they bake. Personal anecdotes abound of mothers and grandmothers swapping tips across the dinner table, swapping stories about kids who would choose these muffins over chips or candy, and about chilly mornings when a batch would vanish before noon because they were simply irresistible. The dish has traveled through kitchens, across generations, and into modern menus as a reliable canvas for flavor, a comforting reminder that everyday baking can feel deeply satisfying without being fussy.

Why You’ll Love This Recipe

  • Moisture that lasts: Applesauce creates a tender crumb that stays soft even hours after baking, making these muffins perfect for breakfast, snacks, or mid-afternoon treat runs.
  • Simple, pantry-friendly ingredients: They come together with everyday staples, so you’re not chasing rare components or complicated equipment.
  • Kid-friendly and adult-approved: The aroma is universally appealing, and the spice profile is comforting without overpowering sweetness.
  • Flexible and forgiving: A forgiving batter that adapts to what you have on hand—different apples, a splash of dairy-free milk, or a handful of add-ins.
  • Versatile for various diets: Easily adaptable to gluten-free, vegan, or lower-sugar versions with small substitutions, without sacrificing texture or flavor.
  • Perfect for meal prep: Bake a batch on Sunday and you’ve got grab-and-go breakfasts or quick snacks ready for the week.
  • Elegant enough for guests: They’re not merely “kid muffins”; with a light dusting of cinnamon sugar or a gentle glaze, they shimmer for weekend gatherings.

Flavor Profile & Texture

The flavor is a warm embrace of orchard sweetness and spice. The applesauce introduces a delicate fruitiness and a natural sweetness that doesn’t shout; it husks the batter with moisture and a subtle tang that keeps the muffin from feeling too rich. Cinnamon stands as the aromatic lead, with whispers of vanilla and a hint of nutmeg or allspice adding depth. In the background, a gentle, almost caramelized note emerges from the sweet-tened edges, offering a soft contrast to the soft, tender crumb at the center. When you bite into one, the texture is where the magic happens: a light, airy interior that carries enough density to feel substantial without heaviness. The crusty tops provide a playful contrast, offering a tiny crunch before the inner softness yields. If you’re lucky enough to catch a muffin with a few apple bits, you’ll experience pockets of bright tartness that punctuate the sweetness, like little sparkles of citrus in a comforting cup of tea. The overall sensation is cozy and familiar, yet bright enough to linger in memory long after the last bite. It’s the kind of flavor profile that pairs elegantly with butter spread thinly on top or a dollop of yogurt swirled with a touch of honey. Even without elaborate toppings, the balance of spice, fruit, and moist crumb makes each bite feel indulgent and homey at once.

Occasions & Pairings

These muffins shine in a range of settings, from everyday breakfasts to weekend gatherings. They’re ideal for a cozy weeknight treat or a brunch spread where you want something that looks charming on a plate but doesn’t require hours of kitchen time. They pair wonderfully with:

  • Hot beverages: a mug of cinnamon-spiced chai, a rich cup of coffee, or a glass of cold milk that cleanses the palate between bites.
  • Fruit or yogurt: a small bowl of Greek yogurt with a drizzle of maple syrup, a handful of fresh berries, or a dollop of spiced yogurt complements the muffins’ softness.
  • Seasonal sides: a warm apple compote or a simple butter glaze can elevate the muffins into a more sophisticated treat for weekend brunches.
  • Pairing desserts: a light lemon tart, a few squares of dark chocolate, or a scoop of vanilla bean ice cream provides a pleasing contrast without overshadowing the muffins.
  • Holiday menus: these muffins can serve as a comforting addition to a holiday breakfast table, especially when you want something gentle and not overly rich after a heavy feast.

Tips, Variations & Substitutions

One of the greatest strengths of Mouthwatering Applesauce Muffins is how forgiving and customizable they are. Here are ideas to tailor the muffins to your needs, preferences, or dietary goals:

  • Use a 1:1 gluten-free flour blend that’s designed for baking. Some blends perform best with an extra tablespoon or two of applesauce to maintain moisture, so adjust accordingly. A mix of 60% white rice flour and 40% oaten flour can yield a nice texture without becoming crumbly.
  • Replace dairy with a plant-based milk (almond, soy, oat) and use a neutral oil in place of butter, or simply swap butter for a light olive oil. The applesauce already helps with moisture, so you won’t miss too much fat. For eggs, use a flax egg (1 tablespoon ground flaxseed + 3 tablespoons water per egg) or an equivalent vegan binding agent.
  • Substitute half of the all-purpose flour with whole wheat or white whole wheat for a heartier bite. You may want to increase the applesauce by a tablespoon or two to keep the batter moist.
  • Stir in chopped apples for extra texture, a handful of chopped nuts (walnuts or pecans) for crunch, or golden raisins for bursts of sweetness. A pinch of lemon zest can brighten the muffins and balance the spice.
  • Swap half the cinnamon for cardamom or allspice to shift the aroma profile. A splash of vanilla extract or almond extract can also deepen the flavor without complicating the batter.
  • If you prefer less sugar, reduce sugar by a quarter to a half cup and compensate with a touch more applesauce or a drizzle of honey after baking. Keep an eye on moisture; the batter should still feel cohesive and pourable but not too runny.
  • Add a pinch of ground cloves or nutmeg for a more autumnal vibe. A tiny amount goes a long way, so start small and adjust to taste.
  • Dry ingredients can be measured and stored in a jar, ready to whisk with wet ingredients. This makes weekday mornings even smoother and still yields a fresh-baked aroma in minutes.

Storage & Make-Ahead Ideas

Storage and make-ahead strategies keep these muffins ready for busy days without sacrificing quality. For best results:

  • Store muffins in an airtight container at room temperature for up to 3 days. If you’ve added a glaze or topping, keep it separate until serving to preserve the texture of the muffins.
  • Refrigeration: They can be refrigerated for up to a week, though refrigeration can subtly dry the crumb. Reheat gently in a toaster oven or microwave with a damp paper towel to restore softness.
  • Freezing: Freeze muffins individually wrapped in plastic or stored in a freezer-safe bag for up to 3 months. Thaw at room temperature and rewarm briefly for a close-to-fresh experience. For best results, freeze without glaze or toppings.
  • Make-ahead: Dry mix prep is your friend: combine flour, sugar, spices, and leavening agents in a jar; keep applesauce and any liquids separate in the fridge until you’re ready to bake. On baking day, whisk wet ingredients into the dry, fold in optional add-ins, and bake as usual. This is particularly handy if you anticipate a busy morning or a last-minute guest.
  • If you know you’ll be reheating muffins, consider adding a touch of orange zest or a thin glaze that can be applied after reheating, giving a fresh tang without making the tops soggy during storage.

Fun Facts & Trivia (Optional)

Apples in baking evoke not just flavor but culture and history. The humble apple is one of humanity’s oldest cultivated fruits, and it has inspired countless sweet treats around the world. Applesauce itself has a storied presence in many cuisines, often celebrated for its simplicity and ability to adapt to different flavor profiles. In some cultures, applesauce is used as a natural, gentle accompaniment to fat-rich dishes, a reminder that balance can be achieved with thoughtful substitutions. The muffin, born of quick-bread traditions, became a symbol of convenience and home cooking in the 19th and 20th centuries, particularly in North America, where muffins offered a portable, affordable breakfast for laborers, students, and families alike. Pairing apples with warm spices in a muffin form is a union that transcends generations: it taps into a sense of nostalgia while remaining perfectly suited to modern kitchens, where efficiency and comfort go hand in hand. A fun little tidbit: many bakers love to finish muffins with a light dusting of cinnamon-sugar right after they come out of the oven, a tiny ritual that creates a delicate crackly crust and an extra layer of aroma—the auditory cue of something delicious just waiting to be eaten.

Ingredients

Muffin Base

    – 2 cups all-purpose flour
    → Provides the primary structure and body for the muffins. Gluten strands trap air to lift the batter as it bakes, so mix gently and only until the dry and wet ingredients come together to keep the crumb tender. For variations, you can substitute half with whole wheat pastry flour for a heartier texture or use a certified gluten-free all-purpose blend if needed.
    – 3/4 cup granulated sugar
    → Adds sweetness and helps with browning and tenderizing the crumb by drawing moisture into the batter. Dissolve evenly into the wet ingredients by whisking with the eggs and applesauce. If you prefer less sweetness, reduce by a few tablespoons or substitute part of it with an additional 1–2 tablespoons of applesauce, noting this will affect moisture slightly.
    – 1/4 cup light brown sugar (packed)
    → Contributes moisture, a subtle caramel flavor, and a soft, fudgy note to the muffin crumb. Pack the sugar lightly when measuring and consider reducing the liquid slightly if you use a lot of brown sugar. This ingredient is optional; omit if you want a leaner muffin.
    – 1 teaspoon baking powder
    → Leavening that helps the muffins rise and develop a light crumb. Fresh baking powder is crucial for proper lift, so check the expiration date and whisk or sift it with the flour to distribute evenly for uniform rising.
    – 1/2 teaspoon baking soda
    → Provides extra lift and helps browning when combined with acidic components. It also contributes to a softer crumb. Make sure it’s evenly distributed by whisking with the dry ingredients; don’t overmix to avoid toughness.
    – 1/2 teaspoon fine sea salt
    → Enhances overall flavor and helps balance sweetness, while reinforcing the crumb structure. Use fine salt for even distribution; if using salted butter in other recipes, adjust accordingly.
    – 1 teaspoon ground cinnamon
    → The signature warmth for applesauce muffins. Freshly ground cinnamon offers a stronger aroma; measure before adding to the dry mix and consider a quick whisk to release fragrance. If you love spice, you can increase to 1 1/4 teaspoons.
    – 1/4 teaspoon ground nutmeg (optional)
    → Adds a subtle, nutty warmth that complements apples. Use a light hand; a pinch goes a long way. If you don’t have nutmeg, it’s perfectly fine to omit without compromising the recipe.
    – 1 cup unsweetened applesauce
    → The star moisture source and fat replacer, responsible for a soft, tender crumb. Use unsweetened to control sweetness and moisture; if your applesauce is very thick, you can whisk it with the eggs to help emulsify and distribute evenly throughout the batter. For a richer flavor, you can mix in a tablespoon of apple butter.
    – 2 large eggs, at room temperature
    → Provide structure, moisture, and help emulsify the batter. Room-temperature eggs incorporate more air when whisked, contributing to lift. If you’re vegan, substitute with two flax eggs (2 tablespoons ground flaxseed whisked with 6 tablespoons water, per egg) and reduce the applesauce by 2 tablespoons per flax egg to maintain moisture.
    – 1 teaspoon pure vanilla extract
    → Enhances the fruity sweetness and adds depth to the muffin flavor. Use high-quality vanilla for a richer aroma; if you only have imitation vanilla, the taste is milder and not as nuanced. Add to the wet ingredients and whisk well for even distribution.
    – 1/3 cup neutral vegetable oil (or 1/3 cup light olive oil)
    → Provides moisture and a tender crumb without relying on butter. Use a neutral oil to avoid altering the flavor of the apples; If you prefer a richer crumb, you can substitute half the oil with melted coconut oil, but note the coconut notes may come through. Measure accurately to maintain batter consistency.

Optional Add-ins

    – 1 cup finely diced apples (about 1 medium apple)
    → Adds bursts of fruity sweetness and texture. Dice apples evenly into small pieces (about 1/4 inch) and toss with a teaspoon of flour to prevent sinking. For a crisper bite, cut fewer larger chunks; for softer muffins, smaller pieces work best. If you’re short on applesauce, you can substitute half of the applesauce with additional diced apples for more texture.
    – 1/2 cup chopped walnuts (optional)
    → Imparts a pleasant crunch and a toasty, nutty note. Toast the walnuts lightly in a dry skillet for 2–3 minutes or bake at 350°F for 5–7 minutes to intensify flavor before folding into the batter. Chop into medium-sized pieces so they distribute evenly and don’t sink to the bottom.
    – 1/2 cup raisins or chopped dates (optional)
    → Adds chewy pockets of sweetness; soak dried fruit in warm water for 5–10 minutes if very dry to plump them up, then drain well and fold in. Soaked fruit distributes more evenly and reduces the chance of dryness in the muffins. You can also pulse a few pieces with flour to help them suspend in the batter.
    – 1 tablespoon turbinado sugar or coarse sugar for topping (optional)
    → Creates a delicate, sugary crust on top that adds a subtle crunch and sparkle as the muffins bake. Sprinkle just before baking to prevent melting into the batter. It’s a nice finishing touch, especially for presentation and texture contrast.

Instructions

  • Preheat your oven to 350°F (175°C) and line a 12-cup muffin tin with paper liners or grease it well.
    → This ensures the muffins do not stick to the tin and makes them easier to remove after baking.
  • Whisk together the dry ingredients: all-purpose flour, granulated sugar, light brown sugar, baking powder, baking soda, fine sea salt, ground cinnamon, and optional ground nutmeg in a large bowl until evenly distributed.
    → Sifting or whisking these elements together prevents clumps, ensures uniform rise from the leaveners, and guarantees consistent flavor in every muffin.
  • Whisk the wet ingredients in a separate bowl: unsweetened applesauce, eggs at room temperature, vanilla extract, and neutral oil until smooth and fully integrated. If the applesauce is very thick, whisk it with the eggs first to loosen texture and then whisk in the oil for a stable emulsion.
    → A well-emulsified wet mixture traps air and promotes a tender, evenly moist crumb without streaks of fat or fruit.
  • Create a well in the center of the dry ingredients and pour the wet ingredients into it; fold gently with a rubber spatula or whisk just until the batter comes together and no large pockets of flour remain. Do not overmix; a few small lumps are desirable for a tender crumb.
    → Gentle folding preserves air bubbles that contribute to lift and a light muffin texture.
  • If using optional add-ins, prepare them: dice apples into about 1/4-inch pieces and toss with a teaspoon of flour to prevent sinking; lightly toast walnuts in a dry skillet for 2–3 minutes to deepen flavor; soak raisins or dates in warm water for 5–10 minutes, then drain and pat dry.
    → Coating apples helps them stay suspended in the batter, toasted nuts release aroma, and hydrated dried fruit avoids dehydration in the oven.
  • Fold the prepared add-ins into the batter with a gentle motion until evenly distributed, using a light touch to maintain the batter’s airy structure.
    → Overworking at this stage can collapse air pockets and lead to a denser muffin.
  • Spoon or scoop the batter into the prepared muffin cups, filling each about 2/3 to 3/4 full to allow space for rising; use a heaping 1/4 cup or a medium scoop for uniform portions and even baking.
    → Consistent portions ensure even rise and uniform crumb across all muffins.
  • Sprinkle 1 tablespoon turbinado sugar or coarse sugar over the tops if desired, just before baking, to create a delicate crackly crust and a touch of sparkle.
    → The sugar topping adds texture and a brief crunch that contrasts with the soft interior.
  • Bake at 350°F (175°C) for 18–22 minutes, until the edges are golden and a toothpick inserted into the center comes out with a few moist crumbs; rotate the pan halfway if your oven has hot spots for even browning.
    → Proper baking time yields a springy top and a moist, tender crumb without undercooking or drying out the muffins.
  • Cool the muffins in the pan for 5–10 minutes, then transfer to a wire rack to cool completely; this stops the cooking process and avoids a soggy bottom, while the crumb firms for better handling.
    → Proper cooling prevents steam from softening the crust and helps maintain the muffin shape.
  • Store cooled muffins in an airtight container at room temperature for up to 3 days, or freeze for longer storage; reheat gently if desired to restore softness and aroma.
    → Proper storage preserves moisture and flavor, preventing staleness and freezer burn.

Notes

These applesauce muffins are naturally fruity and lightly sweetened with applesauce, making them a comforting and versatile breakfast or snack. You can customize them by adding your favorite nuts, seeds, or dried fruits. They freeze well and make a great grab-and-go option. For an extra boost, serve with almond butter, peanut butter, or a dollop of yogurt. If you need a gluten-free version, substitute the all-purpose flour with a certified gluten-free all-purpose blend or use whole wheat pastry flour for a heartier crumb. Always ensure your baking powder is fresh for maximum lift.

  • Preheat the oven to 375°F (190°C). Line a 12-cup muffin tin with paper liners or lightly grease.
  • Whisk the dry ingredients (flour, granulated sugar, brown sugar, baking powder, baking soda, salt, cinnamon, nutmeg) in a large bowl. In a separate bowl, whisk applesauce, eggs, and vanilla, then whisk in the oil. Add the wet ingredients to the dry and mix just until combined; overmixing can make the crumb tough.
  • Gently fold in optional add-ins such as diced apples, walnuts, and/or raisins. If using raisins or dates, soaking them briefly to plump them helps keep pockets of sweetness distributed.
  • Divide batter evenly among the muffin cups. If desired, sprinkle a little turbinado sugar on top for a delicate crust. Bake for 18-22 minutes, or until a toothpick inserted in the center comes out clean.
  • Cool muffins in the pan for 5 minutes, then transfer to a wire rack. Store airtight at room temperature for a few days, in the fridge for up to a week, or freeze for up to 3 months.
  • Flavor tweaks: For a richer crumb, substitute half the oil with melted coconut oil (note coconut flavor may come through). To adjust sweetness, reduce granulated sugar by a few tablespoons or substitute with extra applesauce, but keep an eye on moisture.

Tips

Tips for Mouthwatering Applesauce Muffins

  • Mixing technique matters: Whisk the dry ingredients (flour, sugar, leaveners, salt, cinnamon, optional nutmeg) together well, then whisk the wet ingredients (applesauce, eggs, vanilla, oil) separately and fold them together just until no dry streaks remain. The batter should look slightly lumpy, not smooth.
  • Keep the crumb tender: Do not overmix; gentle folding traps air without developing tough gluten. If you substitute half the flour with whole wheat pastry flour or use a gluten-free blend, resist overmixing to preserve tenderness.
  • Leavening freshness: Use fresh baking powder and baking soda; whisk them into the flour so every muffin gets a fair lift. If they’ve aged, muffins may be pale and dense.
  • Temperature matters: Use room-temperature eggs to help emulsify and trap more air for a lighter crumb. If you’re vegan, use two flax eggs (2 Tbsp ground flaxseed whisked with 6 Tbsp water per egg) and reduce applesauce by 2 Tbsp per flax egg.
  • Flavor depth: Toast the cinnamon briefly in the dry mix to release aroma; if you like more warmth, increase to 1 1/4 tsp. Nutmeg is optional but adds a subtle nutty warmth; a pinch goes a long way.
  • Moisture control: The applesauce is the main moisture source; unsweetened applesauce helps control sweetness and moisture. If your applesauce is very thick, whisk it with the eggs to help distribute evenly; for a richer crumb, stir in a tablespoon of apple butter.
  • Best add-ins handling: Toss diced apples with a teaspoon of flour before folding so they don’t sink. Toast walnuts lightly for 2–3 minutes to boost flavor, and soak raisins or dates briefly to plump them up before adding. For crunch on top, sprinkle turbinado sugar just before baking.
  • Portion and bake: Fill muffin cups about 2/3 full for domed tops. Lightly spray or line cups to prevent sticking. If you want a taller muffin, you can fill a touch more but avoid overfilling to prevent overflow.
  • Flavor boosters: Use a good-quality vanilla extract; it deepens the fruity notes. If using olive oil instead of neutral oil, expect a mild olive note; for a purer neutral crumb, stick with a neutral oil.
  • Variations: For heartier muffins, substitute half the flour with whole wheat pastry flour or a gluten-free blend. You can also substitute half of the oil with melted coconut oil for a subtle tropical aroma, but note the coconut flavor may come through.
  • Storage and freshness: Cool completely before storing. Keep muffins in an airtight container at room temperature for 2-3 days, or freeze for longer storage. Reheat gently to restore softness.

Optional Add-Ins Tips

  • Apples: Use about 1 cup finely diced apples (≈1 medium). Cube pieces around 1/4 inch for even distribution; more apples = moister, less apples = more crumb.
  • Nuts: Toast 1/2 cup walnuts before folding in for a more pronounced nutty flavor; chop to medium pieces so they distribute without sinking.
  • Dried fruit: Soak 1/2 cup raisins or chopped dates in warm water 5–10 minutes, then drain and fold in; soaking helps them stay plump and flavorful.

FAQ

What makes Mouthwatering Applesauce Muffins special?

These muffins are incredibly moist and naturally sweetened with applesauce. The warm cinnamon flavor and fluffy texture make them perfect for a quick breakfast or a tasty snack anytime.

What ingredients do I need?
  • 1 1/2 cups all-purpose flour (or gluten-free 1:1 substitute)
  • 1/2 cup granulated sugar
  • 1/2 teaspoon salt
  • 1 teaspoon baking powder
  • 1/2 teaspoon baking soda
  • 1 teaspoon ground cinnamon
  • 1 cup unsweetened applesauce
  • 1/4 cup neutral oil (such as vegetable or canola) or melted butter
  • 1 large egg (or 1/4 cup applesauce for a vegan option)
  • 1/2 teaspoon vanilla extract
  • Optional add-ins: 1/2 cup chopped apples, raisins, walnuts, or chocolate chips
Can I make this gluten-free?

Yes. Use a gluten-free 1:1 flour blend. Ensure your baking powder is gluten-free and consider adding 1/4 to 1/2 teaspoon xanthan gum if your flour blend doesn’t include it. The batter should look and feel similar to the wheat version.

Are there dairy-free or vegan options?

Absolutely. Use a dairy-free milk (like almond or soy milk) and substitute oil for butter. Replace the egg with a flax egg (1 tablespoon ground flaxseed + 3 tablespoons water, mixed and allowed to gel) or use an extra 1/4 cup applesauce in place of the egg.

How do I mix the batter?
  1. Preheat oven to 375°F (190°C) and line a muffin tin or grease cups.
  2. In a bowl, whisk dry ingredients: flour, sugar, salt, baking powder, baking soda, and cinnamon.
  3. In another bowl, whisk wet ingredients: applesauce, oil (or melted butter), egg (or flax egg), and vanilla.
  4. Pour the wet ingredients into the dry and stir just until combined. Do not overmix.
  5. Fold in any optional add-ins if desired.
  6. Fill muffin cups about 3/4 full.
  7. Bake for 18–22 minutes, until golden and a toothpick comes out clean.
  8. Cool in the pan for 5 minutes, then transfer to a wire rack to cool completely.
What temperature and bake time should I use?

Bake at 375°F (190°C) for about 18–22 minutes. Times can vary slightly based on oven and pan type, so start checking at 18 minutes and look for a golden top and a clean toothpick.

How can I tell when they are done?

The muffins are done when the tops are golden and a toothpick inserted into the center comes out clean or with a few moist crumbs. They should spring back lightly to touch.

How should I store the muffins?

Store at room temperature in an airtight container for 2–3 days. For longer storage, refrigerate up to 1 week or freeze for up to 3 months. Reheat briefly in the microwave or wrap and warm in a 350°F (175°C) oven for a few minutes.

Can I freeze muffins or the batter?

Yes. Freeze baked muffins in a single layer on a tray, then transfer to a freezer bag for up to 3 months. To bake from frozen, add 2–3 minutes to the bake time or bake from thawed. You can also freeze portioned batter in muffin cups or a freezer-safe container for Baking prep; thaw and bake as directed.

What flavor variations can I try?

Get creative with mix-ins and zest:

  • Add 1/2 cup diced apples for extra texture
  • Stir in 1/4 cup raisins or chopped walnuts
  • Swap in chocolate chips for a sweeter treat
  • Add a pinch of nutmeg or orange zest for a different spice profile
  • Top with a light cinnamon sugar sprinkle before baking

Introduction / Hook

Imagine a bowl that feels like a warm embrace on a cold day: a creamy, velvety base that glides across the tongue, carrying the smoky kiss of bacon and the comforting softness of potatoes. This is Million Dollar Soup—a luxurious, crowd-pleasing creation born from humble ingredients and seasoned with fresh herbs, a whisper of garlic, and a hint of butter that makes every spoonful feel like a small celebration. The aroma alone is enough to turn a routine weeknight into a memory, with wisps of simmered stock, curling steam, and the irresistible sound of bacon crackling in the distance. It’s the kind of soup that invites you to slow down, to savor not just the flavor, but the story that accompanies each bite—the way the ingredients interact to create something greater than the sum of their parts. In the world of comfort food, this is the one that earns its “million-dollar” name without needing a fancy kitchen or showroom ingredients.

At first glance, it might look simple—potatoes, bacon, and herbs swimming in a smooth, rich cream—but the magic lies in the balance. The potatoes lend their natural starch to thicken and marshal a luxurious mouthfeel, while the bacon provides smoky depth and a satisfying chew. Aromatics drift through the air, suggesting a winter garden: thyme wisping with garlic, onions singing softly in butter, and a touch of cream that coats every curve of the spoon. It’s both hearty and elegant, quick enough for a weeknight yet refined enough to serve as the centerpiece of a small dinner party or a cozy family Sunday supper. This is the soup that tells a story about home, about generosity, and about the joy of turning everyday pantry staples into something memorable.

What makes Million Dollar Soup truly special is its ability to adapt. It can be as simple or as luxurious as your pantry allows, from a version that leans into dairy richness to a more vibrant, herb-forward iteration that feels lighter on the palate. It’s a dish that welcomes improvisation: a splash of white wine to brighten the finish, a handful of chives for a fresh bite, or even a gentle cheese drizzle for a golden, glossy finish. And because it starts with familiar, forgiving ingredients, you can tailor it to suit dietary needs or preferences without sacrificing character. Whether you’re feeding a hungry crew after a long day, hosting a casual weekend gathering, or simply treating yourself to a comforting solo dinner, this soup delivers warmth, satisfaction, and a sense of indulgence that feels just right for any occasion.

In essence, Million Dollar Soup is more than a recipe—it’s an invitation. An invitation to slow down, to savor, and to enjoy the small luxuries that make everyday meals feel special. It’s the kind of dish you’ll reach for when you crave something creamy, soulful, and deeply satisfying. And with every spoonful, you’ll discover why this bowl has earned its name: it delivers comfort with a touch of elegance, a sense of celebration in every bite, and the timeless appeal of a dish that tastes like you’ve earned it—even when you haven’t left your kitchen. So gather your potatoes, your smoky bits of bacon, and your favorite herbs, and let this Million Dollar Soup remind you that delicious, nourishing food can feel as grand as a feast, even when it’s made at home.

The Story Behind the Dish

Like many beloved comfort foods, Million Dollar Soup has a memory tucked into its folds—a tale of everyday generosity turning into something memorable. The story begins in humble kitchens where families in cold climates learned to coax luxury from simple ingredients. Imagine a pot simmering on a stovetop, the air filling with the scent of roasted potatoes, sizzling bacon, and a ribbon of thyme drifting through the steam. It’s the kind of scent that signals warmth, safety, and the promise of something indulgent. Over time, cooks began to refer to this creamy, bacon-kissed potato soup as “million-dollar” for two reasons: first, its flavor feels richly complex, as if countless techniques and ingredients have been folded into a single, comforting bowl; second, its affordability is undeniable—the same familiar items that feed a hungry family can become something akin to a small feast with the right touch of patience and care.

The origins are not tied to a single place or tradition but to a shared kitchen ethos: make the most of what you have, balance textures and flavors, and finish with a flourish of herbs to brighten the richness. In many households, this soup became a weekly ritual during the colder months, a go-to supper that could be ready in the time it takes to set the table and pour a glass of something comforting. Over generations, the recipe might have shifted—more potatoes here, a touch more cream there, a handful of green onions or chives to add color and bite—but the essence remains the same: a creamy, satisfying soup that feels luxurious without demanding culinary mastery or rare ingredients. The name stuck because, to those who know it well, the dish appears to transform modest groceries into something that tastes like a small triumph—a culinary “million-dollar moment” achieved with a simple pot, steady hands, and a generous spirit.

There is also a subtle nod to regional practicality in the dish. Potatoes and bacon are staples in many home kitchens, making this soup accessible in diverse communities around the world. The herbs—think thyme, chives, parsley—are common in home gardens and windowsills, allowing cooks to personalize the flavor profile with what they have on hand. In this sense, Million Dollar Soup becomes a culinary treasure hunt: you start with familiar building blocks and then layer in your own memories, whether that means a stronger smoky backbone from extra bacon, a brighter finish with fresh herbs, or a velvety finish achieved with a touch more cream. It’s a dish that travels well in the heart as it travels well in the pantry—reliable, comforting, and endlessly adaptable—without losing its signature charm.

Why You’ll Love This Recipe

  • One-pot comfort with a luxurious twist: creamy texture, smoky bacon, and tender potatoes all in a single, soothing bowl.
  • Versatile and forgiving: adaptable to dairy preferences, dietary needs, and pantry substitutions without sacrificing flavor.
  • Perfect for weeknights and special occasions alike: quick enough for a busy evening, yet refined enough to serve guests with confidence.
  • Herb-forward brightness: a splash of fresh herbs elevates the richness and provides a lively contrast to the silky base.
  • Family-friendly and crowd-pleasing: familiar flavors that appeal to both kids and adults, with room for customization.
  • Leftover-friendly: even leftovers taste comforting and can be repurposed into a creamy potato soup bake or a sandwich starter.
  • Make-ahead-friendly: components can be prepped ahead, and the soup reheats beautifully for future meals.

Flavor Profile & Texture

The flavor of Million Dollar Soup is a harmony of contrasts that come together in a single, comforting bite. The base is a luxurious creaminess that feels indulgent but not heavy—like satin on the palate—thanks to a gentle blend of dairy and a touch of butter. The potatoes contribute a starchy depth that thickens the soup naturally, releasing their starch as they soften and barely melt into the silk of the cream. This is not a thin broth; it’s a velvety, spoon-coating experience that clings to the warmth of the bowl and lingers on the tongue.

The bacon introduces a quintessential smoky granularity to every mouthful. It offers textural contrast—crisp edges giving way to tender bites—while its rendered fat enriches the soup with a depth that can only come from those caramelized edges and the inevitable hint of smoke. Herbs—usually thyme and chives or parsley—add brightness and a savory, almost meadow-like note that lightens the depth of the cream and bacon. A whisper of onion or shallot and a kiss of garlic can round out the sweetness of the potato and lift the finish into something more aromatic and dimensional.

In terms of mouthfeel, you’ll experience a smooth, seductively thick texture that coats the palate but does not feel heavy. The starch from the potatoes binds with the fats to create a comforting body, while the bacon bits provide bursts of savoriness and a satisfying chew. The finish is warm, lingering, and subtly herbaceous, with a clean aftertaste that invites another spoonful rather than a pause to wipe away heaviness. When you finally top the soup with a scattering of fresh herbs or a drizzle of cream, you bring a final note of brightness and a glossy shine that makes the dish look as good as it tastes. The overall experience is one of balance: richness without heaviness, smoky depth without being overpowering, and a texture that remains elegant enough to feel like a special treat, even as it remains perfectly approachable for everyday meals.

Occasions & Pairings

Million Dollar Soup shines in moments when you want something cozy yet impressive. It’s a natural for weeknights when you crave comfort after a long day, and it also stands up to pairing with a casual dinner party or a family weekend feast. The creamy, bacon-kissed profile makes it especially welcome during the colder months, when the body seeks warmth and nourishment. Yet its refined texture and bright herbal finish can also suit transitional seasons when you want something satisfying without being too heavy for a late dinner.

Pairing ideas to elevate the experience include:

  • Crusty bread or toasted baguette slices for dipping and scooping, perfect for mopping up every last trace of the velvety soup.
  • A light side salad with citrus vinaigrette to provide a contrasting bite and balance the richness.
  • Freshly grated cheese or a dollop of sour cream stirred in at the table for an indulgent, creamy finish (if dairy is welcome).
  • Wine or beverages: a crisp white such as Sauvignon Blanc or Chardonnay, or a lightly brewed cold beer to complement the smoky notes.
  • For non-dairy adaptations, serve with a green-leaf salad and a warm oat milk–based cream that mimics the mouthfeel without dairy.

Tips, Variations & Substitutions

These ideas help you tailor Million Dollar Soup to your preferences, dietary needs, or what’s in your refrigerator right now. The goal is sustained richness with room for personal touches that enhance the core character of the dish.

  • Herb-forward variant: Surge the herbal brightness by using a larger handful of fresh thyme and chives, and finish with a squeeze of lemon or a splash of white wine to lift the aroma and cut through the richness.
  • Meat options: If you prefer turkey bacon, pancetta, or a vegan alternative, you’ll still achieve a satisfying smoky backbone. For a vegetarian version, swap bacon for olive oil or mushroom “bacon” and add a pinch of smoked paprika for depth.
  • Dairy variations: For a lighter version, use 1% milk with a smaller amount of cream, or substitute half-and-half. For dairy-free, blend soaked cashews with water to mimic creaminess, or use coconut milk with a neutral-flavored base and a touch of nutmeg for warmth.
  • Potato choices: Russet potatoes create a naturally thick and creamy texture; Yukon Golds add a buttery richness. Peel if you like a smoother mouthfeel, or leave the skins on for rustic charm and added nutrients.
  • Thickness control: If the soup seems too thick, thin it with a little stock or milk until it reaches your preferred consistency. If too thin, simmer a bit longer to reduce, or whisk in a small amount of cornstarch slurry (keep it gentle so you don’t lose creaminess).
  • Cheesy finish: A modest addition of sharp cheddar or Gruyère melted in at the end can provide a luxurious, melty finish with a savory bite.
  • Herb discoveries: Freshly chopped parsley, chives, or dill can each bring a different vibrancy. Try dill with a lemon zest finish for a bright, garden-inspired version.
  • Make it bright: A small splash of dry white wine or a splash of apple cider can brighten the overall flavor. If alcohol isn’t desired, substitute a little more broth and a teaspoon of lemon juice for a similarly fresh effect.

Storage & Make-Ahead Ideas

Million Dollar Soup stores beautifully and often tastes even better after a brief rest, as flavors mingle and mellow into a harmonious whole. Here are practical tips for making ahead and keeping it delicious.

  • Make-ahead: Prepare the base (bacon rendered and aromatics softened) in advance, refrigerate, and finish with potatoes and cream when reheating. This can reduce active cooking time on busy days.
  • Storage: Refrigerate in an airtight container for up to 3–4 days. The soup will thicken slightly as it sits; whisk in a little milk or stock when reheating to restore the desired creaminess.
  • Freezing: While dairy-rich soups can be frozen, some separation may occur upon thawing. Freeze in portions, then reheat slowly over gentle heat, whisking in a touch of milk or stock to recover the silky texture. If you anticipate a dairy separation, you can blend the soup slightly after reheating to restore smoothness.
  • Reheating tips: Reheat gently over medium-low heat, stirring frequently to prevent scorching. Add a splash of broth or cream to loosen if needed and to recapture the creamy mouthfeel.
  • Make-ahead serving: If you’re hosting and want to keep a luminous finish, bloom the herbs and finish with a small drizzle of cream just before serving to maintain shine and color.

Fun Facts & Trivia (Optional)

Here are a few tidbits that add a little extra flavor to the story behind Million Dollar Soup:

  • “Million-dollar” as a descriptor for humble dishes is a charming kitchen trope that appears across cultures, signaling the delight of elevating simple ingredients into something nearly priceless in taste and satisfaction.
  • Potatoes, often the star of the show in this soup, gained global popularity after their introduction to European cuisine centuries ago, becoming a versatile canvas for comforting, crowd-pleasing dishes.
  • Bacon’s smoky depth can be controlled by selecting thicker-cut slices that render fat slowly, or by using a leaner cut and adding a touch of smoked seasoning to simulate the same effect without excess grease.
  • Herbs, particularly thyme and chives, do more than add aroma—they contribute subtle mineral notes and brightness that balance the richness of dairy and pork, reminding us that herbs are the unsung heroes of many creamy classics.

Conclusion & Call to Action

Million Dollar Soup is more than a recipe; it’s an invitation to celebrate the everyday kitchen with a plateful of warmth, flavor, and comfort. Its simplicity belies its depth, and its adaptability means you can tailor it to match your mood, your guests, and your pantry. Whether you’re curling up with a novel on a winter night, feeding a crowd after a long day, or preparing a intimate dinner that feels like a small holiday, this creamy, bacon-kissed potato soup has you covered. Let its luxurious texture and bright herb finish remind you that, sometimes, the most memorable meals come from the art of balancing modest ingredients with a touch of love. Ready your pot, gather your ingredients (in spirit, if not in exact quantities), and savor the moment as the flavors unfold—million-dollar richness, made at home, for you and yours.

Ingredients

Million Dollar Soup – creamy soup with bacon, potatoes, and herbs

Creamy Base

  • – 6 slices bacon, diced and cooked until crisp
    → Bacon renders flavorful fat that forms the flavor base for the soup. Cook in a heavy pot over medium heat until crisp, then remove with a slotted spoon and reserve the fat in the pot (about 1-2 tablespoons) to sauté the onion and garlic. This step adds smoky, salty depth and a touch of richness; crumble the bacon to sprinkle on top later for texture.
  • – 2 tablespoons unsalted butter
    → Butter helps build a creamy roux base and assists in sautéing the aromatics. Use unsalted butter so you control the salt level. Melt into the bacon fat (or in a fresh drizzle) and swirl in the flour to form a light roux, which will thicken the soup as it cooks. If you prefer a leaner version, you can skip the butter and rely on the bacon fat for flavor, though the texture will be less velvety.
  • – 1 medium yellow onion, diced
    → The onion provides natural sweetness and a savory backbone. Sauté with the bacon fat and butter until they are soft and translucent, sometimes lightly golden. This development depth enhances the final flavor rather than a sharp onion bite.
  • – 2-3 cloves garlic, minced
    → Garlic contributes aromatic warmth and subtle heat. Add after the onions have softened to prevent burning; cook just until fragrant (about 30-60 seconds). Crushing or finely mincing increases surface area and intensifies the aroma.
  • – 2 tablespoons all-purpose flour
    → The flour is used to make a light roux with the fat to thicken the soup, giving it a creamy body without needing excessive dairy. Stir the flour into the fat and cook for 1-2 minutes to remove raw flour taste, then gradually whisk in the broth. If you prefer a gluten-free version, substitute with 2 tablespoons cornstarch whisked into a cold liquid or use a gluten-free thickener blend.
  • – 4 cups chicken broth (low-sodium)
    → The broth provides the primary liquid and a savory, satisfying base. Choosing a low-sodium broth lets you control the final salt level; simmer with the potatoes until tender, and adjust seasoning near the end. If you want more depth, you can replace part of the broth with a splash of white wine, then cook off the alcohol.
  • – 1 cup heavy cream
    → Heavy cream delivers the rich, silky texture that defines Million Dollar Soup. Stir it in after the potatoes begin to break down and the heat is gentle to avoid curdling. For a lighter version, you can substitute with 1 cup whole milk plus an extra tablespoon of starch/thickener, but the soup will be thinner.
  • – 2 medium Russet potatoes, peeled and diced into 1/2-inch cubes
    → The potatoes provide substantial body and natural starch that helps thicken the soup as they cook. Use firm potatoes to hold their shape; you can cut them after rinsing to ensure uniform dice. If you prefer a creamier, smoother texture, you can mash a portion of the potatoes and whisk back into the pot for extra creaminess.
  • – Salt and black pepper to taste
    → Seasoning is essential to balance the richness and highlight the potato sweetness. Add gradually, tasting as you go since the bacon and broth contribute salt. If you’ve added a bay leaf, remember to remove it before serving and adjust final seasoning after unsealing.
  • – 1 bay leaf (optional)
    → The bay leaf introduces a gentle herbal note during simmering without overpowering the potatoes. Remove before serving. If you don’t have a bay leaf, a pinch of dried thyme works as a substitute.

Herbs & Finish

  • – 2-3 sprigs fresh thyme (or 1/2 teaspoon dried thyme)
    → Thyme lends a subtle earthy, lemony note. Add the fresh sprigs to the simmering soup and remove before serving; if using dried thyme, use a smaller amount and allow it to steep briefly to release its aroma.
  • – 2 tablespoons fresh parsley, chopped (plus extra for garnish)
    → Parsley brightens the richness and provides a fresh finish. Stir a portion into the soup near the end of cooking and reserve some for a vibrant garnish on each bowl. For a bolder bite, you can also mix in chopped cilantro if you enjoy that flavor, though it will change the profile.
  • – 1/4 teaspoon ground nutmeg (optional)
    → A tiny pinch of nutmeg enhances the creaminess of dairy-rich soups by adding warm, nutty background notes. Use sparingly; taste as you go so it doesn’t dominate the dish.

Toppings

  • – 1/2 cup shredded cheddar cheese (optional)
    → Cheese adds a melty, tangy finish that pairs beautifully with potato soup. Sprinkle into bowls while hot for a creamy, gooey layer or reserve for a finish on top. If the soup is too thick, stirring in cheese can help emulsify and enrich it further.
  • – 1/2 cup sour cream or crème fraîche (for serving)
    → A dollop of sour cream or crème fraîche adds cool creaminess and a slight tang that cuts through richness. Place a spoonful atop each serving and optionally swirl in for an extra luxurious look and mouthfeel.
  • – 2-3 tablespoons chopped fresh chives or parsley (for garnish)
    → Fresh herbs spark color and brightness at the finish. Sprinkle on just before serving to preserve their aroma and color. Chives give a mild onion-y note that complements the bacon and potatoes.
  • – Extra crispy bacon bits (optional)
    → Additional crisp bacon adds texture and smoky saltiness to each bowl. Crumble over the top at serving time to keep the bacon extra crunchy.

Instructions

  • Cook the bacon in a heavy, wide pot over medium heat until crisp and browned, stirring occasionally to render the fat evenly; remove the bacon with a slotted spoon and set it on a paper towel–lined plate, then leave the rendered fat in the pot. Crumble the bacon so it can be sprinkled on top later.
    → Rendering the fat creates the flavor base for the soup, while crisp bacon provides smoky salt and texture when finished.
  • If there is more than about 1–2 tablespoons of fat remaining, tilt the pot and spoon off the excess, leaving just enough to sauté the aromatics; return the crisp bacon to its plate until service.
    → Controlling fat amount prevents a greasy base and helps the soup achieve a balanced, creamy mouthfeel.
  • Add 2 tablespoons unsalted butter to the pot with the reserved bacon fat and stir over medium heat until melted and shimmering; this mixture will carry the onions and flour smoothly without scorching.
    → Butter enhances creaminess and helps form a smooth roux that thickens the soup properly.
  • Add the diced yellow onion to the pot and sauté until soft and translucent, about 5–7 minutes, stirring occasionally and sprinkling with a pinch of salt to draw out moisture.
    → Sweating the onion builds natural sweetness and a savory backbone that balances the bacon and potatoes.
  • Stir in the minced garlic and cook 30–60 seconds until fragrant, keeping the heat moderate to prevent browning; fine mincing increases surface contact for a more pronounced aroma.
    → Garlic should perfume the fat without burning, which would introduce a bitter note to the soup.
  • Sprinkle in the all-purpose flour and whisk to form a light roux with the fat and onions, cooking for 1–2 minutes to remove the raw-flour taste and to begin building body.
    → A proper roux gives the soup structure, thickening evenly without relying on excessive dairy.
  • Gradually whisk in the low-sodium chicken broth, pouring in a slow, steady stream while whisking continuously to prevent lumps; bring the mixture to a gentle simmer.
    → Slow, steady incorporation of liquid ensures a smooth, cohesive base and avoids graininess.
  • Add the peeled and 1/2-inch diced Russet potatoes and the bay leaf (if using); simmer, uncovered, at a gentle boil or low simmer until the potatoes are tender when pierced with a fork, about 15–20 minutes, stirring occasionally to prevent sticking. Remove the bay leaf after simmering.
    → The potatoes release starch that thickens the soup naturally; cooking them until tender ensures a creamy texture and evenly cooked pieces.
  • Stir in the heavy cream and continue to simmer gently until the potatoes begin to break down and the soup thickens to a creamy consistency, about 5–10 minutes; avoid boiling after adding the dairy to prevent curdling.
    → The cream enriches the soup with luscious silkiness, while gentle heat preserves its smooth texture.
  • Season with salt and black pepper to taste, tasting frequently as the bacon and broth contribute salt; adjust the seasoning to achieve a balanced, rich flavor. If you used bay leaf and dried herbs, confirm their flavors are integrated before final seasoning.
    → Proper seasoning defines the dish, ensuring the potatoes’ sweetness and the bacon’s saltiness are harmonious.
  • Add 2–3 sprigs fresh thyme (or 1/2 teaspoon dried thyme) and simmer for 1–2 minutes, then remove the thyme sprigs or discard the dried thyme; this yields a subtle earthy brightness without overpowering the potato base.
    → Fresh thyme provides aroma and lift; removing stems prevents woody or hairy bits in the final bowls.
  • Stir in 2 tablespoons chopped fresh parsley (reserve a little for garnish) to brighten the richness; taste again and adjust seasoning as needed.
    → Parsley adds a fresh finishing note and vibrant color that enhances perceived freshness.
  • Optionally fold in 1/4 teaspoon ground nutmeg, whisking thoroughly, and taste before serving to ensure it remains a whisper of warmth rather than a dominant flavor.
    → Nutmeg subtly enhances the creaminess and depth of dairy-rich soups when used sparingly.
  • If the soup is thicker than you prefer, whisk in a splash of broth, milk, or cream until it reaches your desired body; if too thin, simmer a few minutes longer or lightly mash a portion of the potatoes and whisk back in.
    → Adjusting texture ensures a luxurious, spoonable consistency that coats the palate.
  • Prepare the toppings: crumble the reserved crispy bacon, shred cheddar if using, and arrange sour cream or crème fraîche, chopped chives or additional parsley, and any extra herbs within reach for finishing.
    → Finishing toppings provide contrasting textures and flavors that elevate the dish at service time.
  • Ladle the hot soup into warmed bowls and finish with your chosen toppings: scatter shredded cheddar, place a dollop of sour cream or crème fraîche, sprinkle chopped chives or parsley, and sprinkle the crispy bacon bits on top; serve immediately with crusty bread if desired.
    → Finishing with toppings immediately before serving preserves their texture and color, delivering a comforting, restaurant-quality bowl.

Notes

This Million Dollar Soup is a creamy, comforting bowl that marries smoky bacon, potatoes, and herbs into a velvety broth. You can customize it by adjusting the herbs (thyme and parsley are classic) or by stirring in additional vegetables like carrots or celery for sweetness and texture; finishing with toppings such as shredded cheddar, sour cream, or extra crispy bacon adds extra richness and bite. It freezes well and makes great leftovers—reheat gently and whisk in a splash of cream if needed to restore the silky finish. Always ensure your bacon, broth, and any thickening agents are gluten-free if you have gluten intolerance.

Tips

1) Build a deeply flavorful base

  • Let the bacon render slowly in a heavy pot over medium heat until crisp, then remove with a slotted spoon and reserve the fat in the pot. This fat is your flavor backbone—use about 1–2 tablespoons to sauté the aromatics for maximum smoky depth.
  • Use unsalted butter alongside the bacon fat. Melt it in and swirl in the flour to form a light roux. This is what gives the soup its creamy body without relying on excess cream.
  • Cook the onions in the fat and butter until they’re soft and translucent, letting their natural sweetness develop. If they get too brown, lower the heat and move them around more frequently.
  • Add minced garlic after the onions have softened to prevent burning. Cook just until fragrant—30 to 60 seconds—to keep a bright, aromatic note without bitterness.
  • Stir in the flour and cook for 1–2 minutes to remove the raw flour taste. Then gradually whisk in the broth to avoid lumps and create a smooth base.
  • For a gluten-free version, substitute with a cornstarch slurry (bloom 2 tablespoons cornstarch in a little cold liquid) or a gluten-free thickener blend. Whisk in gradually to reach your desired thickness.

2) Control the liquid and body

  • Use low-sodium chicken broth to control salt. Simmer with potatoes until tender, then adjust seasoning at the end to avoid oversalting.
  • If you want extra depth, replace part of the broth with a splash of white wine and let the alcohol cook off before adding the potatoes.
  • When you add the heavy cream, keep the simmer gentle. Stir in the cream after the potatoes begin to break down to prevent curdling; if needed, temper the cream first with a bit of hot soup.

3) Potatoes: texture and thickness

  • Use russet potatoes for substantial body and natural starch to help thicken the soup. Peel and dice into even 1/2-inch pieces for uniform cooking.
  • If you prefer a silkier texture, mash a portion of the potatoes and whisk back into the pot for extra creaminess. For a chunkier soup, mash less.
  • Keep the potatoes simmering gently; a vigorous boil can break them apart and alter texture. Adjust the heat as the soup thickens.

4) Seasoning and balance

  • Season gradually with salt and pepper, tasting as you go. The bacon, broth, and bay leaf all contribute salt and depth, so add in stages rather than all at once.
  • Consider using a bay leaf during simmering for a subtle herbal note. Remove it before serving; if you don’t have bay, a pinch of dried thyme works as a substitute.
  • Optional nutmeg (1/4 teaspoon) adds warmth and helps the dairy feel smooth—use sparingly and taste as you go.

5) Herbs, finish, and texture

  • Fresh thyme sprigs added during simmering impart an earthy, lemony note; remove the stems before serving. If using dried thyme, add less and allow it to steep briefly.
  • Fresh parsley (and optional chives) brightens the finish. Stir some in near the end and reserve extra for garnish. Cilantro can be used if you enjoy its flavor, but it changes the profile.

6) Toppings and serving texture

  • Shredded cheddar adds a melty finish; add to bowls while hot or whisk in off heat to emulsify and enrich. If the soup is thick, cheese can help loosen and emulsify it a touch.
  • A dollop of sour cream or crème fraîche on top adds cool creaminess and a tang that cuts richness. Swirl in for a luxurious look and mouthfeel.
  • Top with chopped fresh chives or parsley for color and a mild onion note that pairs well with bacon. Finish with extra crispy bacon bits for added texture and smoky crunch.

7) Make-ahead, storage, and reheating tips

  • The base (bacon fat, roux, onions, and broth) can be prepared ahead and stored in the fridge for up to 2 days. Rewarm gently, then add cream and potatoes when reheating to avoid curdling.
  • Do not boil after adding dairy; heat gently and whisk regularly to maintain a silky texture. If the soup thickens too much after refrigeration, whisk in a splash of broth or milk to loosen.
  • If freezing, consider freezing without the cream and potatoes; add them fresh when reheating to maintain texture. Cream can separate after freezing; re-emulsify by whisking well and warming slowly.

FAQ

What is Million Dollar Soup?

Million Dollar Soup is a creamy potato soup with smoky bacon, tender potatoes, and fragrant herbs. It’s rich, comforting, and easy to customize with different milks, herbs, or toppings.

What are the main ingredients?

Key components typically include potatoes (Yukon Gold or Russet), bacon, onion, garlic, chicken or vegetable stock, cream or milk, butter, salt, pepper, and fresh herbs such as thyme and parsley. Optional add-ins include sour cream or shredded cheese for extra richness.

How do you make it step by step?

Render the bacon until crispy and set aside. In the same pot, sauté onion and garlic in the bacon fat until translucent. Add diced potatoes and stock; simmer until potatoes are fork-tender. For a creamier texture, mash some potatoes or blend partially with an immersion blender, then stir in cream and the cooked bacon back in. Finish with salt, pepper, and chopped herbs.

Can you make it lighter or dairy-free?

Yes. For a lighter version, use less cream or substitute with milk. For a dairy-free option, substitute with unsweetened dairy-free milk (like almond or cashew) and a dairy-free butter alternative or olive oil. You can also finish with a splash of dairy-free creamer and mix in some olive oil for richness.

Can I make it ahead or for meal prep?

Yes. The soup reheats well on the stove or in the microwave. Cool completely before refrigerating for up to 3–4 days. If you plan to reheat later, you may need to add a little stock or milk to loosen the texture as it reheats.

How should I store and reheat leftovers?

Store in an airtight container in the fridge. Reheat gently on the stove over medium-low, stirring often. Add a splash of stock or milk if it thickens too much. Do not boil vigorously, or the cream may separate.

What potatoes are best for this soup?

Waxy potatoes like Yukon Gold or red potatoes hold their shape and give a silky texture. Russet potatoes can break down more, creating a thicker, creamier result. Yukon Gold is a popular choice for a balanced texture.

Can I make this without bacon or use an alternative?

Absolutely. For a vegetarian version, omit the bacon and use olive oil with a little smoked paprika or a splash of liquid smoke for a smoky note. You can also add sautéed mushrooms, tempeh bacon, or nutritional yeast for extra depth.

How do I adjust the thickness or texture?

For a thicker soup, simmer longer to reduce liquid or mash more potatoes. For a lighter soup, add more stock or milk. If you’d like a smoother texture, blend fully with an immersion blender; for a chunkier texture, blend lightly or mash only some potatoes.

Serving suggestions and toppings?

Top with chopped fresh herbs (parsley or chives), additional crispy bacon, a swirl of cream or sour cream, cracked pepper, shredded cheese, and serve with crusty bread or a side of toasted garlic bread.