Introduction / Hook
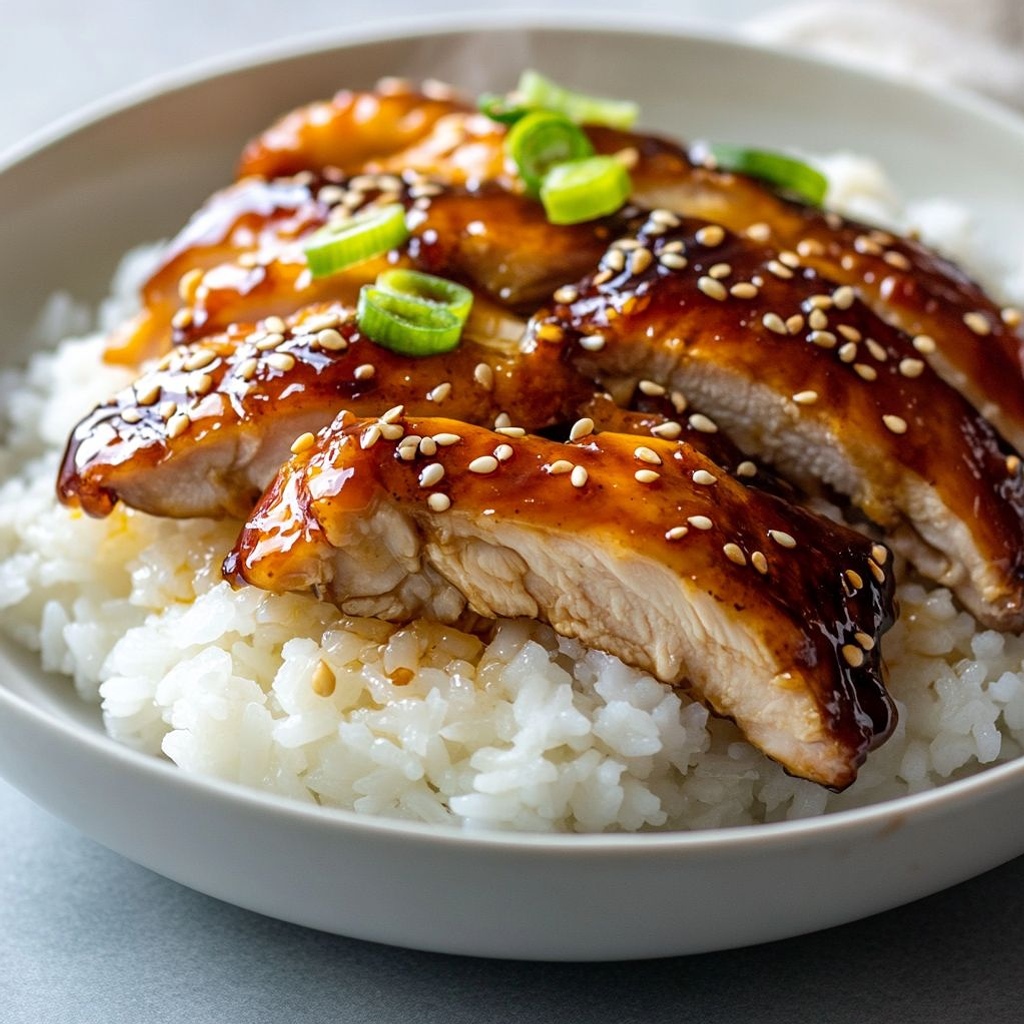
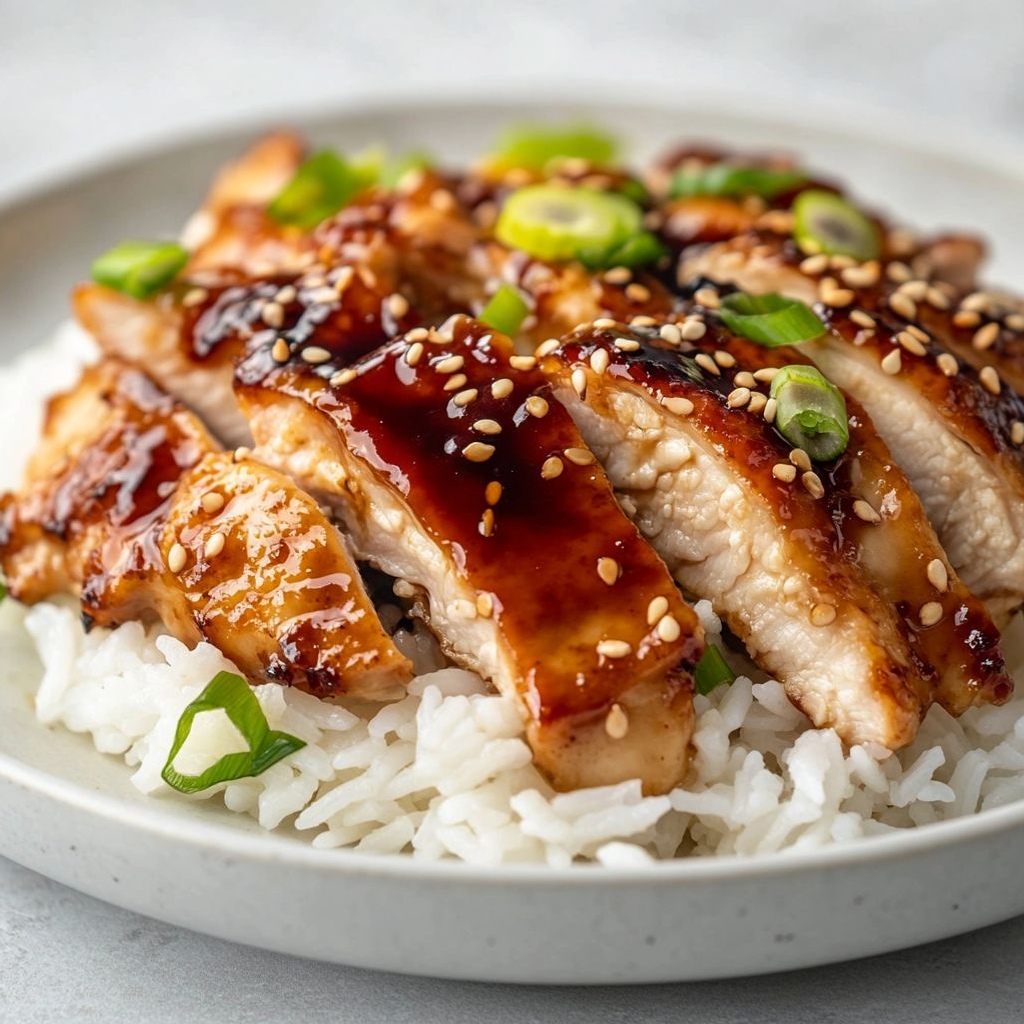
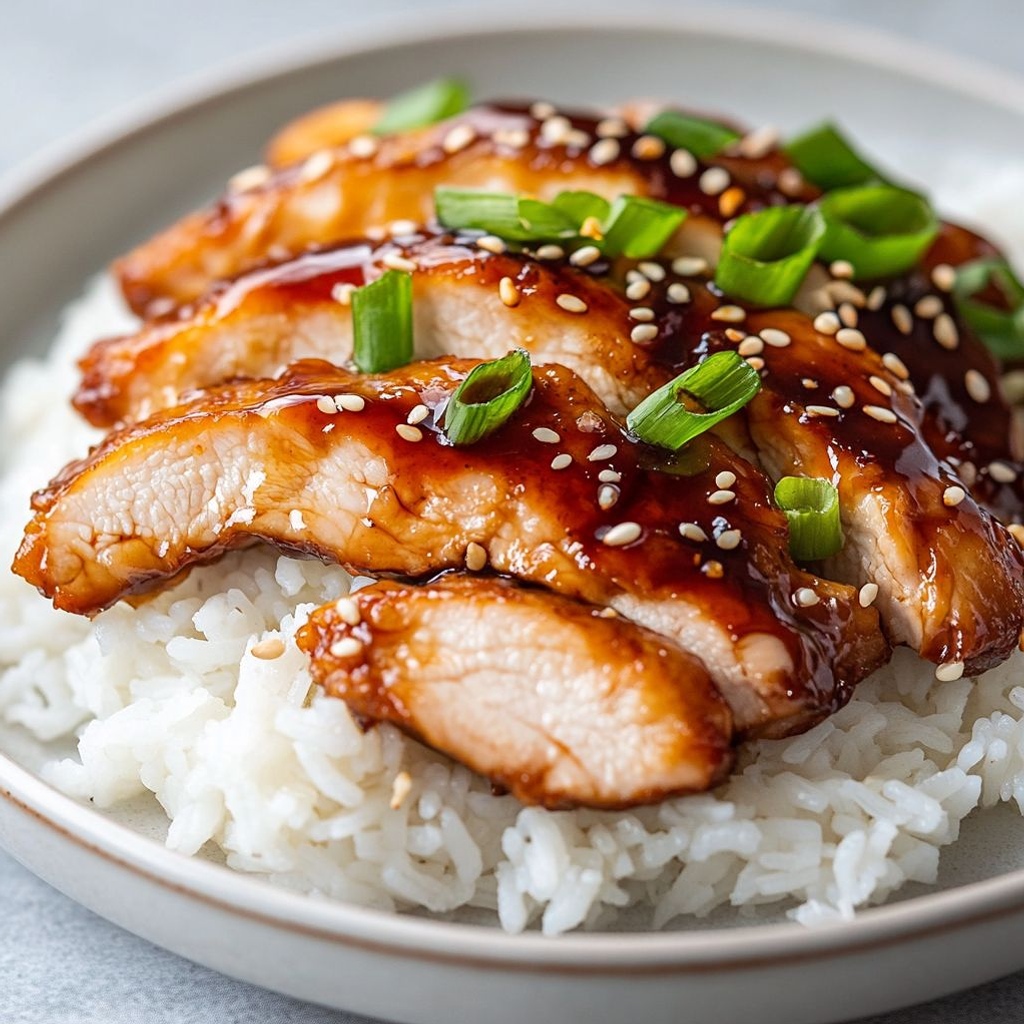
Imagine a warm, glossy bowl arriving at your table, each bite delivering a kiss of sweetness and salt, a hit of smoky caramelized edge, and the comforting familiarity of perfectly steamed rice. Teriyaki Chicken and Rice is not just a dish; it’s a celebration of balance—the way a few simple ingredients can come together to create something radiant, fragrant, and deeply satisfying. The aroma alone can summon memories of cozy kitchens, bustling nights when dinner was a bright, doable victory, and weekends when you deserve a little extra glow in your meal. This dish invites you to slow down, savor the sizzle, and let the glossy glaze cling to tender chicken as it mingles with fluffy rice to form a harmonious, comforting bite every time.
What makes a Teriyaki-inspired supper truly special is its ability to transform plain ingredients into something that feels both restaurant-worthy and incredibly homey. The surface of the chicken glistens with a lacquered sheen, reflecting light as you fluff the rice beneath it. Aromas rise in swirls: sesame, garlic, ginger, and a hint of citrus that brightens the dish without overpowering it. Each element has its moment to shine—yet they never compete; they cooperate to deliver one cohesive flavor that feels instantly familiar and quietly exotic at the same time.
Whether you’re cooking for a weeknight family dinner, entertaining friends, or craving something that tastes like a comforting hug, this dish adapts with ease. It’s friendly to many dietary preferences, forgiving of improvisation, and surprisingly quick to pull together when life is busy but you still want something memorable. The beauty of Teriyaki Chicken and Rice lies in the way it invites you to play with texture and color—crisp-tender chicken, velvety sauce, and a bed of rice that soaks up every last drop of the glaze—creating a simple, stunning centerpiece for your table.
The Story Behind the Dish
Teriyaki, a word that carries both technique and spirit in its syllables, originates from Japan and refers to the method of glazing and grilling or broiling foods so that the surface caramelizes into a glossy, lacquer-like finish. The term teriyaki combines “teri” (gloss or shine) and “yaki” (grill or bake), capturing the essence of the technique: heat applied with a sweet-savory glaze that clings to the protein as it caramelizes. While teriyaki’s roots are humble—crafted in households and markets long before fast-paced modern kitchens—the dish rose to global popularity because of its approachable flavor profile. It doesn’t require a parade of ingredients to deliver luxury; it rewards patience and balance, letting a few pantry staples sing in harmony.
In many homes and restaurants around the world, chicken serves as the perfect canvas for teriyaki’s charms. It’s a canvas that loves a glossy lacquer, a canvas that works beautifully with the neutral, fluffy backdrop of rice. The story you’re cooking when you prepare Teriyaki Chicken and Rice is a story of cross-cultural delight: a Japanese technique reimagined in a way that feels accessible to weeknights and celebratory dinners alike. The sauce—often built from soy, a touch of sweetness, and a hint of acidity—becomes a conversation starter: some prefer more ginger punch, others lean toward a citrus brightness or a deeper, molasses-like savor. The rice below acts as the receptive partner, soaking up the glaze and offering a gentle, comforting bed that anchors the brighter notes above. It’s a dish that travels well in memory: the first bite when the glaze clings to the chicken, the second when the rice soaks up the remaining glaze, the third when a sesame-studded bite completes the circle of flavor in your mouth.
If you’ve ever imagined a meal that feels both everyday and extraordinary, you’ve glimpsed the essence of this dish’s journey. It speaks to the universal language of comfort food while carrying a nod to culinary technique that elevates the simple to the sublime. It’s a reminder that sometimes the most satisfying experiences come from a handful of bright ingredients treated with respect, patience, and a little kitchen confidence.
Why You’ll Love This Recipe
- Quick and comforting: Perfect for weeknights when you crave something tasty yet achievable without a long list of ingredients.
- Balanced sweetness and savoriness: A glossy glaze provides a harmony of flavors that feels both indulgent and well-rounded.
- Versatile and forgiving: Adaptable to your pantry, dietary needs, and flavor preferences without losing its essence.
- Texture contrast: Crispy, caramelized edges on the chicken paired with tender morsels and a soft, fluffy bed of rice create a satisfying mouthfeel.
- One-pan or one-pan-plus-starch appeal: While you can plate it simply, it also scales beautifully with vegetables, seeds, or greens to add color and nutrition.
- Family-friendly and crowd-pleasing: A dish that kids and adults often reach for again and again, with broad appeal across tastes.
- Make-ahead potential: Great for meal prep or feeding a crowd, since it stores well and reheats smoothly.
Flavor Profile & Texture
The flavor journey begins with the aroma of toasted sesame, a whisper of ginger, and the umami depth of soy. As the glaze thickens and clings to the chicken, you’ll notice a delicate sweetness that echoes in the background like a fond memory—enough to please without tipping into cloying territory. The ginger provides a bright, almost citrusy bite that enlivens the glaze and keeps it from feeling heavy. A subtle tang or acidity—often drawn from a touch of vinegar or citrus—lifts the sauce, ensuring it remains lively and balanced even as it becomes deeply caramelized on contact with heat.
Texture-wise, you’ll experience a pleasing contrast. The chicken, once cooked, develops a lacquered, slightly sticky surface that gives way to succulent, juicy interior bites. The rice underfoot absorbs the last glossy ribbons of glaze, becoming a perfect sponge that rounds out the dish. If you choose to introduce vegetables, the mix can add a crunchy snap or a tender bite, echoing the glaze’s sheen and infusing the plate with color and freshness. Sesame seeds scattered on top—golden punctuations that crunch lightly—offer a final textural note and a nutty aroma that lingers pleasantly as you finish the last spoonful.
For those who enjoy a little heat, a gentle chili-driven note can be introduced without overpowering the core balance, allowing the epilogue to still be sweet-savory rather than sharp. The beauty of this dish is its ability to maintain its core identity while welcoming small, personal twists that honor the original flavor while reflecting your own tastes and pantry reality.
Occasions & Pairings
When to serve
Weeknights that demand comfort and speed, weekend gatherings where you want something elegant without fuss, and casual dinners that still feel celebratory—all are ideal moments for Teriyaki Chicken and Rice. It also shines as a family-friendly option for busy households, a potluck staple that travels well, and a forgiving canvas for adding seasonal vegetables when they’re at their best in the market.
Suggested pairings
- Vegetable accompaniments: Steamed broccoli, sautéed bok choy, snap peas, or wok-ed mixed vegetables add color and nutrition while maintaining balance with the glaze.
- Wholesome starches: Apart from the base rice, try quinoa, brown rice, or even cauliflower rice for a lighter variation.
- Garnishes and finishing touches: Sliced scallions, sesame seeds, and a drizzle of extra glaze can lift the plate and introduce extra aromatics.
- Drinks: A crisp white like a Sauvignon Blanc, a light lager, or a cold glass of green tea can harmonize with the dish’s sweet-savory notes.
- Dessert: Light, citrus-forward desserts such as a yuzu cheesecake or lemon sorbet cleanse the palate after a hearty main.
Tips, Variations & Substitutions
- Kid-friendly variations: Keep flavors gentle by reducing any heat and focusing on a balanced sweetness. Serve with extra steamed vegetables or a mild side to suit younger palates.
- Gluten-free option: Use tamari or coconut aminos in place of traditional soy sauce to maintain depth of umami without gluten.
- Low-sodium version: Choose low-sodium soy sauce and reduce additional salt; allow the natural sweetness to carry the glaze.
- Vegan adaptation: Swap chicken for a firm tofu or tempeh, and you can still achieve a glossy glaze that adheres beautifully by pan-searing before glazing generously.
- Protein swap: This technique works beautifully with salmon, shrimp, or pork for a different culinary journey while preserving the beloved glaze’s gloss and balance.
- Vegetable boosters: Caramelized onions, bell peppers, or pineapple chunks can be added to give extra sweetness and texture, or a crisp-tried vegetable medley for color contrast.
- Flavor twists: Add a dash of sesame oil at the end for an extra nutty aroma, or incorporate a splash of citrus juice (orange or lime) to brighten the glaze.
- Make it ahead: The glaze can be prepared in advance and reheated with the protein, making it convenient for meal prep or a planned dinner.
- Cooking method variations: Pan-searing to sear the chicken first gives a deeper texture, followed by simmering with the glaze; or finish under a broiler for a quick lacquered char.
Storage & Make-Ahead Ideas
Teriyaki Chicken and Rice stores beautifully in the refrigerator for several days, making it a practical choice for meal prep. Allow any leftover chicken and rice to cool completely before transferring to airtight containers. In the fridge, you can expect good quality for about three to four days. When reheating, loosen with a splash of water or broth and rewarm gently to preserve moisture and texture. If you’d like to freeze portions, do so within separate airtight containers or freezer bags; the glaze may thicken slightly after freezing, but a gentle re-warming and a brief simmer can bring back a silky texture and the glaze’s shine. For the best texture after thawing, consider reheating on the stovetop or in a covered pan rather than in the microwave, which can dull surface glaze and dry the chicken slightly. If you’re making ahead, you can prep the rice and sauce in advance and combine them with warmed chicken just before serving to preserve the most vibrant presentation and texture.
Fun Facts & Trivia (Optional)
- The glossy finish that characterizes teriyaki comes from a caramelized glaze that forms a light, shiny layer as sugars reduce and the surface browns—a technique that locks in moisture and amplifies flavor.
- Teriyaki-style dishes cross borders widely, evolving into numerous regional interpretations—think sweet-savory profiles in Korea, the smoky lacquer found in some Hawaiian-inspired twists, and the bright citrus notes in contemporary fusion plates.
- In Japanese kitchens, the term teriyaki is more commonly used to describe the cooking method rather than a specific recipe; many households create their own version by adjusting sweetness, acidity, and glaze thickness to match personal preference.
- Sesame seeds on top not only add a gentle crunch but also contribute a subtle nutty aroma that enhances the overall fragrance as the dish is served.
- Rice, the trusty base, has a long history in many cuisines as a staple that brings balance and depth to saucy dishes—when paired with glossy teriyaki, it becomes a comforting duo that appeals to both tradition and modern taste trends.
Ingredients
Teriyaki Sauce
- 1/2 cup soy sauce (low-sodium)
→ Purpose: Forms the savory, umami backbone of the glaze and marinade for the chicken and rice. Preparation: Use as the primary salty component of the sauce, balancing with sweetness and aromatics. Tips: Low-sodium soy sauce helps you control overall saltiness; if you only have regular soy sauce, reduce or omit any additional salt in the recipe. - 1/4 cup mirin
→ Purpose: Provides sweetness and depth to the glaze, contributing a gentle, glossy finish. Preparation: Combine with the soy sauce as the base for the teriyaki sauce; simmer to meld flavors. Tips: If mirin isn’t available, substitute with 1 tablespoon sake or dry sherry plus 1 teaspoon sugar, then adjust sweetness as needed. - 2 tablespoons brown sugar or honey
→ Purpose: Adds caramel sweetness that helps balance the saltiness and creates the characteristic glaze. Preparation: Whisk into the soy-mirin mixture until dissolved. Tips: Taste the glaze and adjust sweetness to balance with soy; start with less and add more if needed. - 2 cloves garlic, minced
→ Purpose: Contributes aromatic depth and warmth to the glaze. Preparation: Mince finely to maximize surface area for even flavor distribution. Tips: Sauté briefly with ginger if you’re starting the sauce directly in the pan to bloom the aroma. - 1 teaspoon grated fresh ginger
→ Purpose: Adds bright, spicy freshness and depth to the glaze. Preparation: Freshly grate to maximize aroma; skins removed. Tips: If fresh ginger is unavailable, a pinch of ground ginger can substitute, but fresh gives a more vibrant flavor. - 1 teaspoon sesame oil (optional)
→ Purpose: Adds a toasted, nutty aroma that enhances the teriyaki profile. Preparation: Use a small amount, stirred in at the end for aroma. Tips: This is optional; skip if you prefer a lighter glaze or want to avoid added fat. - Cornstarch slurry (2 tablespoons cornstarch + 2 tablespoons cold water)
→ Purpose: Thickens the teriyaki glaze to a glossy, clingy consistency. Preparation: Whisk cornstarch with cold water to form a slurry, then gradually whisk into the simmering sauce until the desired thickness is reached. Tips: Add gradually and simmer a minute or two after adding slurry to fully activate the thickening; whisk to prevent lumps.
Chicken
- 1.5 pounds boneless skinless chicken thighs, cut into 1-inch pieces
→ Purpose: Main protein of the dish; thighs stay juicy and become tender when cooked with the glaze. Preparation: Cut into uniform pieces for even cooking; pat dry before cooking to promote browning. Tips: Thighs are forgiving and work well here; if using breasts, watch for faster cooking times and keep them moist by not overcooking. - 1 tablespoon cornstarch
→ Purpose: Coats the chicken to promote a crisp sear and provide a surface for the glaze to cling to. Preparation: Toss chicken pieces in cornstarch until lightly coated. Tips: Shake off excess cornstarch to prevent a pasty coating; use just enough to lightly dust the pieces. - 1 tablespoon neutral oil (e.g., canola, grapeseed)
→ Purpose: Used for searing the chicken; provides a nonstick surface and helps develop a golden crust. Preparation: Heat in a large skillet over medium-high until shimmering before adding chicken. Tips: Do not overcrowd the pan; cook in batches if necessary to maintain a good sear. - Salt to taste
→ Purpose: Enhances flavor balance with the glaze. Preparation: Lightly season the chicken before searing, then rely on the glaze for most of the saltiness. Tips: Start with a light pinch and adjust after tasting the sauce’s salt level. - Black pepper, freshly ground to taste
→ Purpose: Adds a subtle peppery note that complements the glaze. Preparation: Season the chicken lightly before cooking. Tips: Keep it light; the teriyaki glaze provides most of the seasoning.
Rice
- 2 cups jasmine rice
→ Purpose: Serves as the starch base to accompany the saucy chicken. Preparation: Rinse under cold water until the runoff runs clear to remove surface starch; cook with the water and salt in a covered pot. Tips: Rinsing helps prevent gummy rice; fluff with a fork after resting for 5–10 minutes to maximize tenderness. - 3 1/2 cups water
→ Purpose: Hydrates and cooks the rice to fluffy grains. Preparation: Use the specified ratio for stovetop cooking; adjust by stove and pot type if needed. Tips: Do not lift the lid during cooking; allow the rice to steam off heat for best texture. - Pinch of salt
→ Purpose: Enhances the rice flavor without overpowering the glaze. Preparation: Add to the cooking water. Tips: If you’re salt-sensitive, you can reduce or omit; you can finish with a small pat of butter for extra richness if desired.
Garnish and Optional Add-ins
- Sesame seeds, toasted
→ Purpose: Finishing touch that adds a nutty crunch and visual appeal. Preparation: Toast in a dry skillet over medium heat for 1–2 minutes until fragrant, then sprinkle over the dish. Tips: Watch closely to prevent burning; toast rights before serving for maximum aroma. - Green onions (scallions), sliced
→ Purpose: Fresh, crisp brightness that complements the savory glaze. Preparation: Slice thinly on the bias; scatter over the top just before serving. Tips: Use both white and green parts for color and flavor; omit the white part if you want less bite. - Steamed broccoli florets (optional)
→ Purpose: Adds color, texture, and nutritional balance. Preparation: Steam until vibrant green and just tender; toss with a light drizzle of sesame oil or a touch of sauce for cohesion. Tips: Do not overcook; bright green color is best visually and texturally. - Chili flakes or sriracha (optional)
→ Purpose: Adds heat for spice lovers. Preparation: Sprinkle a small pinch over the finished dish or whisk into the sauce to control heat level. Tips: Start with 1/4 teaspoon and increase gradually to taste; heat level can dramatically change the character of the dish.
Instructions
- Whisk together the teriyaki sauce components: 1/2 cup low-sodium soy sauce, 1/4 cup mirin, 2 tablespoons brown sugar or honey, 2 cloves minced garlic, and 1 teaspoon grated fresh ginger in a small saucepan; bring to a gentle simmer over medium heat and cook about 3 to 4 minutes to dissolve the sugar and meld the flavors; remove from heat and whisk in 1 teaspoon sesame oil if using; set aside to cool slightly so the glaze can thicken evenly when you add the cornstarch later.
→ Why: Heating extracts aromatic compounds and ensures the sugar fully dissolves, creating a smooth, glossy glaze that coats the chicken evenly. - Prepare the cornstarch slurry: In a small bowl, whisk together 2 tablespoons cornstarch and 2 tablespoons cold water until completely smooth and free of lumps; set this slurry near the stove so you can whisk it into the sauce quickly once it thickens.
→ Why: The slurry thickens the glaze to a clingy, lacquer-like coating without turning cloudy, and adding it gradually prevents lumps and streaks in the sauce. - Prepare the chicken: Pat the chicken thighs dry with paper towels and cut into uniform 1-inch pieces; toss the pieces with 1 tablespoon cornstarch in a large bowl until lightly coated; season with a light pinch of salt and freshly ground black pepper.
→ Why: Drying the meat promotes a crisp sear, cornstarch helps form a surface for the glaze to cling to, and light seasoning balances the salty glaze. - Heat the oil: In a large skillet, heat 1 tablespoon neutral oil over medium-high heat until shimmering; add the cornstarch-dusted chicken in a single layer without crowding the pan; sear undisturbed 2 to 3 minutes per side until golden brown and crust forms; transfer browned pieces to a plate and repeat with remaining chicken, adding more oil as needed.
→ Why: A proper sear creates color, depth of flavor, and a texture that holds up to the glaze; do not overcrowd to avoid steaming instead of browning. - Simmer with sauce: Return all browned chicken to the skillet and pour in about half of the prepared teriyaki sauce to create a glaze; bring to a gentle simmer, watching for bubbling; reduce the heat to maintain a gentle simmer so the sauce thickens without scorching.
→ Why: Simmering helps the sauce reduce slightly, concentrate flavors, and begin coating the chicken evenly before thickening with the slurry. - Thicken glaze: Whisk the cornstarch slurry into the simmering sauce in a slow, steady stream; continue to simmer for 1 to 2 minutes, whisking constantly to prevent lumps, until the glaze reaches a glossy, clingy consistency that coats the back of a spoon.
→ Why: The cornstarch activates with heat to produce a smooth, lacquer-like glaze that adheres to the chicken rather than pooling on the pan. - Finish chicken with glaze: Return all chicken pieces to the pan and toss to coat evenly with the thickened glaze; simmer 1 to 2 minutes more until the chicken is fully cooked through (internal temperature 165°F / 74°C) and the glaze is glossy and thick; if the sauce reduces too much, splash in a little of the reserved sauce to loosen.
→ Why: Reintroducing the chicken allows even coating and final cooking; checking internal temperature ensures safety and juiciness. - Rice preparation: Rinse 2 cups jasmine rice under cold running water until the water runs clear to remove surface starch; drain well and transfer to a pot with 3 1/2 cups water and a pinch of salt; bring to a boil over high heat, then cover, reduce the heat to low, and simmer for 15 minutes without lifting the lid.
→ Why: Rinsing prevents gummy texture from excess starch; a covered, low simmer traps steam for fluffy grains. - Rest and fluff rice: Turn off the heat and let the rice rest, still covered, for 10 minutes; then remove the lid and fluff the grains gently with a fork to separate them without breaking the kernels.
→ Why: Resting finishes steam distribution and prevents clumping; fluffing creates light, individual grains for a pleasing base for the sauce. - Toast garnish: Toast 1 tablespoon sesame seeds in a dry skillet over medium heat for 1–2 minutes until fragrant and light golden; transfer to a small plate to cool and maintain crunch.
→ Why: Toasted seeds release nutty aroma and add visual contrast; do not walk away, they burn quickly. - Slice green parts: Thinly slice 4–5 green onions on the bias, separating the white and green parts; rinse and pat dry to remove any grit and retain bright color.
→ Why: Sliced scallions provide fresh brightness; bias-cut pieces look more professional and distribute evenly in bites. - Optional broccoli: If using broccoli, steam florets until vibrant green and just tender, then season with a light drizzle of sesame oil or a tiny amount of teriyaki to tie it to the glaze; keep bright color for contrast.
→ Why: Steamed broccoli adds color, texture, and nutritional balance; avoid overcooking to prevent mushiness and color loss. - Finishing and plating: To plate, mound a scoop of jasmine rice on each plate, spoon a generous portion of the teriyaki chicken and glaze over the top, and garnish with the toasted sesame seeds and sliced green onions; arrange broccoli on the side if using.
→ Why: This presentation ensures balanced portions, cohesive flavor with glaze lacquer, and attractive color contrast for appetite.
Notes
These teriyaki chicken and rice bowls are flavorful, balanced, and satisfying, with a glossy, savory glaze that clings to tender chicken and pairs beautifully with fluffy jasmine rice. Customize them by adding colorful vegetables such as bell peppers, snap peas, broccoli, or mushrooms; you can also swap the chicken for tofu, shrimp, or beef if you prefer. They reheat well for meal prep and store nicely in the fridge or freezer; rewarm gently on the stove or in a microwave to keep the glaze glossy. For an extra boost, finish with toasted sesame seeds and sliced green onions, and serve with steamed broccoli or a simple Asian slaw on the side. Always check that your soy sauce and any other condiments are gluten-free if you have gluten intolerance, and balance saltiness by tasting the glaze before coating the chicken.
Tips
Glaze and Sauce Tips
- For a glossy, clingy teriyaki glaze, add the cornstarch slurry gradually while simmering and simmer 1–2 minutes after thickening to activate the starch. If it gets too thick, whisk in a little water or broth.
- Taste the sauce after simmering and adjust saltiness and sweetness before cooking the chicken; the glaze will intensify slightly as it reduces with the heat.
- Finish with a small drizzle of sesame oil off the heat to add aroma without thinning the glaze.
Chicken Preparation and Searing Tips
- Pat chicken dry thoroughly and toss with a light cornstarch coating to promote a crisp sear and better glaze adhesion.
- Cook in batches to avoid crowding the pan; this ensures a proper sear instead of steaming the chicken.
- Season lightly with salt and pepper before searing, then rely on the glaze for most of the seasoning to prevent oversalting.
Rice Tips
- Rinse jasmine rice until the water runs clear to remove surface starch and yield fluffier grains.
- Use the recommended water ratio and avoid lifting the lid during cooking; let the rice steam off the heat for best texture.
- Season the cooking water with a pinch of salt; if you’re salt-sensitive, you can reduce or omit, and consider finishing with a small pat of butter for richness.
Garnish and Add-ins Tips
- Toast sesame seeds in a dry skillet until fragrant, then sprinkle over the dish just before serving for a nutty crunch.
- Slice green onions thinly on the bias for bright color and flavor; use both white and green parts for depth.
- Steam broccoli until vibrant green and just tender; a light toss with sesame oil helps tie it to the glaze.
- For added heat, sprinkle chili flakes or sriracha gradually; start with 1/4 teaspoon and adjust to taste.
Make-Ahead and Storage
- The teriyaki sauce can be made ahead and stored in the fridge for up to a week; reheat gently and whisk in a splash of water if it thickens.
- Leftovers store well in the fridge for 3–4 days; reheat gently in a skillet and add a splash of water to loosen the glaze if needed.
FAQ
What ingredients do I need for Teriyaki Chicken and Rice?
Here’s a simple, pantry-friendly list to make Teriyaki Chicken and Rice:
- 1 lb (450 g) chicken breasts or thighs, cut into bite-sized pieces
- 1/2 cup soy sauce (or tamari for gluten-free)
- 1/4 cup honey or brown sugar
- 2 tablespoons rice vinegar
- 1–2 cloves garlic, minced
- 1 teaspoon grated fresh ginger
- 1 teaspoon sesame oil
- 1/4 cup water or chicken stock
- 2 cups cooked white rice (jasmine or basmati)
- Optional: 1–2 teaspoons cornstarch mixed with water for thickening
- Sesame seeds and sliced green onions for garnish
- Optional veggies: broccoli florets, bell peppers, or snap peas
Is this recipe gluten-free?
It can be gluten-free. Use tamari or a certified gluten-free soy sauce in place of regular soy sauce, and check all labels (including honey, vinegar, and any store-bought sauces) to ensure they’re gluten-free. If you’re unsure, use a dedicated gluten-free teriyaki alternative and avoid cross-contamination with utensils and surfaces.
Can I use chicken thighs instead of chicken breasts?
Yes. Chicken thighs stay juicier and more forgiving. If using boneless skinless thighs, cook until the internal temperature reaches 165°F (74°C). They may need a few extra minutes of simmering in the sauce to become tender.
What is the best method to cook this dish?
Steps for best flavor and texture:
– Optional: marinate chicken in a portion of the sauce for 10–15 minutes.
– Sauté chicken in a skillet with a little oil until browned and cooked through; remove and set aside.
– In the same pan, simmer the remaining sauce until glossy. If using cornstarch, whisk in a slurry to thicken.
– Return chicken to the pan and toss to coat in the sauce.
– Serve over warm rice and garnish with sesame seeds and green onions. Add vegetables during the sauce simmer if desired.
How do I make the teriyaki sauce from scratch?
To make the sauce from scratch: combine 1/2 cup soy sauce (or tamari), 1/4 cup honey or brown sugar, 2 tablespoons rice vinegar, 1–2 cloves minced garlic, and 1 teaspoon grated ginger in a small saucepan. Bring to a simmer for 5–7 minutes, then thicken with a cornstarch slurry (1 tablespoon cornstarch mixed with 2 tablespoons water) if you want a glossy, clingy sauce. Adjust sweetness or salt to taste.
Can I use store-bought teriyaki sauce?
Yes. If you use store-bought teriyaki sauce, you may need less honey or sugar. Use about 3/4 to 1 cup of sauce for the chicken and rice, and thicken with a cornstarch slurry if you want a thicker glaze. Taste and adjust with a splash of water or stock if needed.
How long does it take to make this dish?
Typical timeline: 10–15 minutes of prep, 15–20 minutes of cooking. If you marinate the chicken, add 10–15 minutes for marinating. Total time is usually around 25–40 minutes, depending on marination and cooking pace.
How should I store leftovers and reheat?
Store cooled leftovers in an airtight container in the refrigerator for up to 3–4 days. Reheat on the stovetop over medium heat, stirring occasionally, or microwave in 1–2 minute bursts until heated through. Reheat the rice separately to prevent it from getting mushy.
What sides or variations can I serve with this dish?
Good accompaniments include steamed or stir-fried vegetables (broccoli, snap peas, basketball peppers), or a side of additional rice. For variation, try cauliflower rice for a lower-carb option, add pineapple chunks during cooking for a sweet-tangy twist, or top with fried egg for a quick extra protein.
Can I make this ahead or freeze it?
Marinate the chicken (without cooking) for up to 24 hours in the fridge. The sauce can be prepared ahead and stored in the fridge for up to 3–4 days. For freezing, freeze marinated chicken in an airtight bag for up to 3 months; thaw before cooking. The sauce can be frozen and reheated with the chicken when cooking.
What are common mistakes to avoid?
Avoid overcooking the chicken, which can dry it out. Don’t boil the sauce aggressively after adding cornstarch, or it may become too thick or lumpy. If the sauce isn’t glossy enough, simmer a bit longer or add a touch of water to reach desired consistency. Taste and adjust balance of salty, sweet, and tangy before returning the chicken to the pan.