
Introduction / Hook
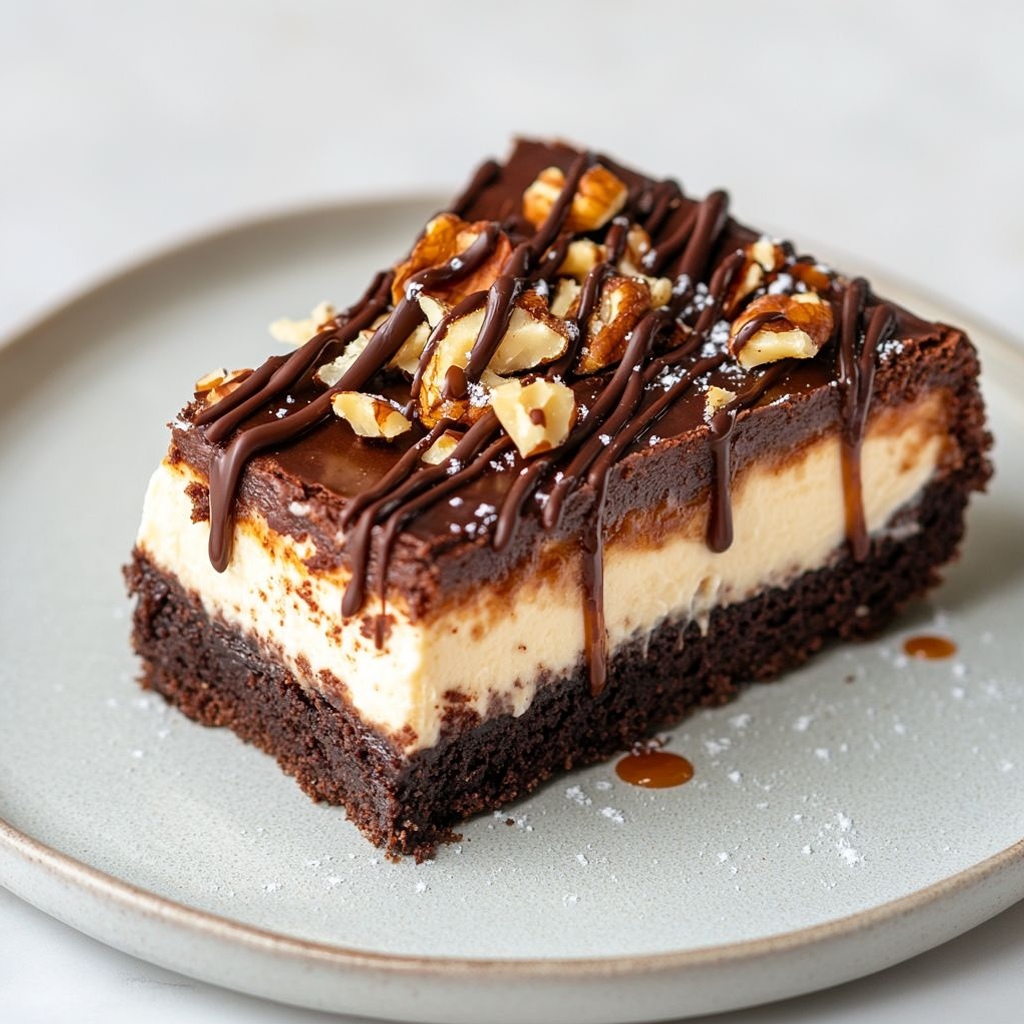
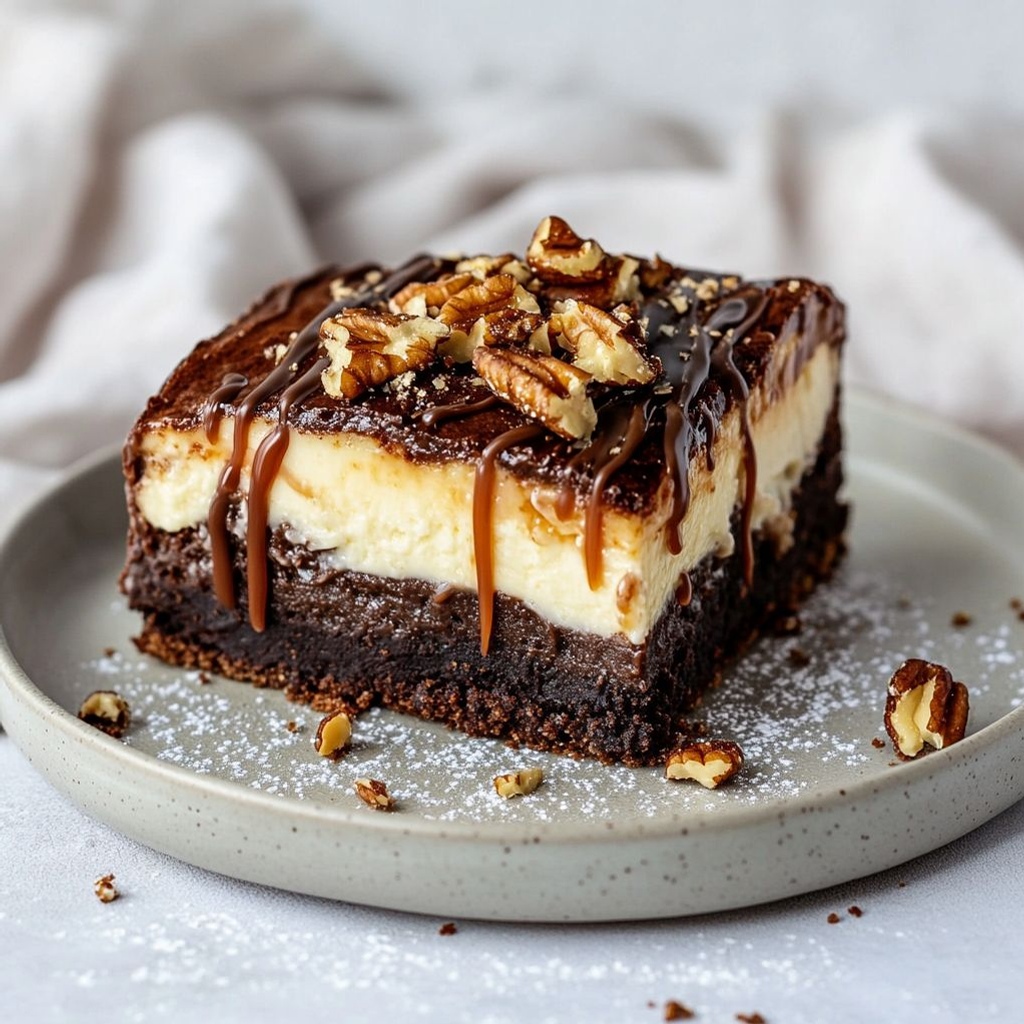
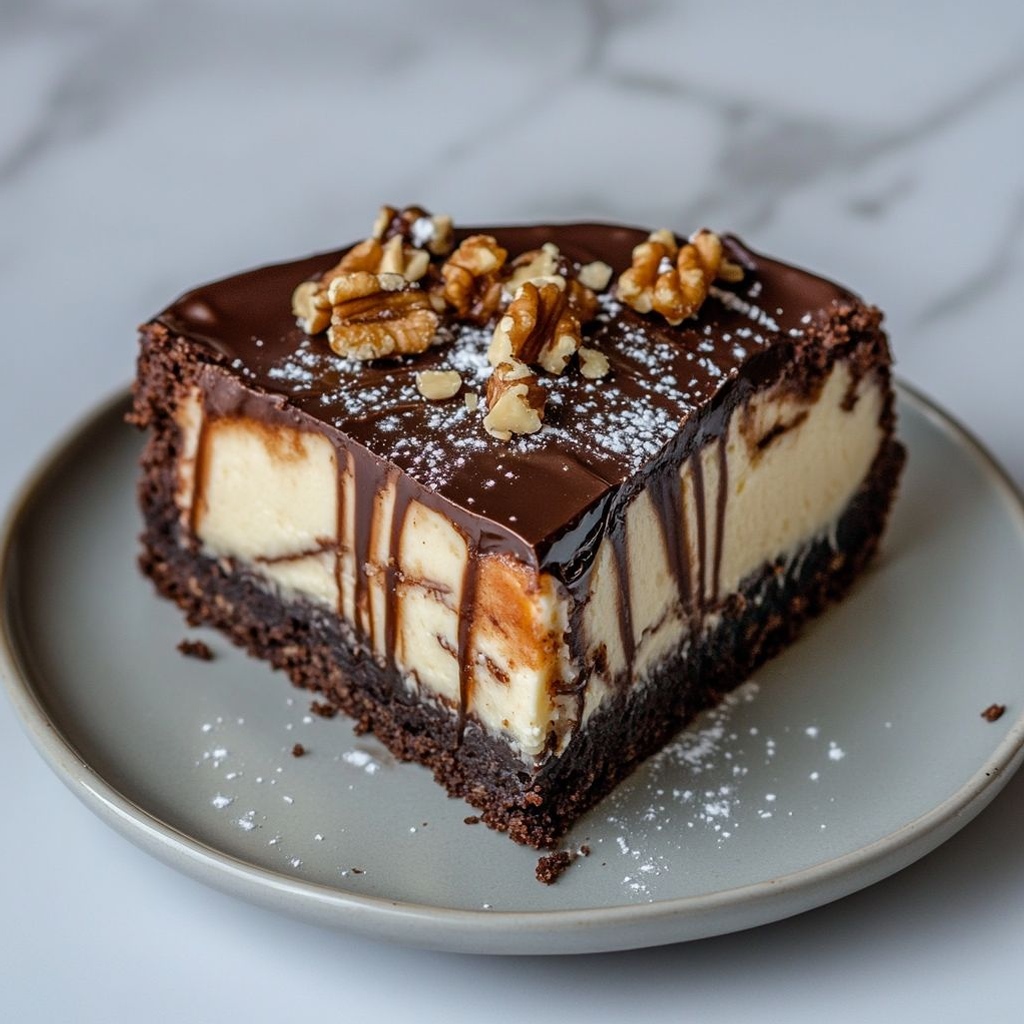
Loaded Brownie Cheesecake is the kind of dessert that feels like a celebration in every bite. Picture a brownie that’s fudgy enough to sound indulgent when you cut it, yet somehow tender enough to yield to a spoonful of silky cheesecake. Now crown that duo with a glossy ribbon of chocolate ganache and a scattering of chocolate chips or caramel swirls for drama. In one slice you taste the best of both worlds: the irresistible, almost-crispy edge of a brownie giving way to a cream-cheesy center that’s tangy, smooth, and deeply comforting. The aroma alone—molten chocolate, vanilla, butter, and a faint hint of salt—is enough to set the table for a feast of spoons, smiles, and seconds. This dessert isn’t merely indulgent; it’s a sensory experience that invites lingering conversation, the kind of dessert that becomes a memory you’ll crave long after the last bite disappears.
Loaded Brownie Cheesecake is the sweet convergence of two iconic treats, crafted for those moments when you want something familiar yet exciting, comforting yet wow-worthy. It’s the kind of dessert people remember at the end of a dinner party, the one they dream about during a busy week, and the perfect centerpiece for birthdays, anniversaries, and holiday gatherings. The magic lies not just in the flavors, but in how those flavors interact—rich cocoa meeting tangy cream cheese, a soft, fudgy core that holds together with a resilient bite, and a glossy finish that gleams like a jewel on a plate. As you read, imagine the first cut releasing a whisper of steam, the knife gliding through a brownie crust that cracks ever so slightly, revealing a velvet cheesecake interior that seems to glow with vanilla warmth. It’s dessert theater you can recreate in your kitchen, with that same awe-inspiring moment every time you slice a piece for friends and family.
The Story Behind the Dish
The idea of marrying brownies and cheesecake is a tale as sweet as the dessert itself—the result of a home baker’s wish to honor two timeless loves on one plate. Brownies have long been the backstage heroes of gatherings: dense, chocolaty, and deeply familiar, they anchor memories of childhood kitchens and weekend baking projects. Cheesecake, with its velvet tang and luxurious mouthfeel, has always carried a sense of celebration, often reserved for special occasions. Putting the two together felt inevitable to many bakers who loved the best of both worlds but wanted something that didn’t require multiple full desserts on the table.
In many households, the story begins with a fridge half-full of ingredients and a craving that refuses to wait for a formal recipe. A square of leftover brownie may have found its destiny when someone thought, “What if we layer it with cheesecake and drizzle on something glossy and chocolatey on top?” The result is a dessert that balances contrasts—dense brownie against airy cheesecake, a crackly top against a creamy center, a touch of salt that brightens the chocolate and cheese all at once. Some bakers tell the tale with a wink: a bake-sale, a potluck, a family gathering where everyone left the table with spoons in the air and a chorus of “one more slice.” The Loaded Brownie Cheesecake has since traveled across kitchens and coffee shops, evolving with add-ins like chocolate chips, swirls of caramel, or crushed cookies. It’s a modern classic that feels both nostalgic and new—a sweet that never fails to spark a little magic at the end of a meal.
Why You’ll Love This Recipe
- Two beloved desserts in one glorious slice: fudgy brownie and creamy cheesecake, united under a glossy chocolate finish.
- Textural contrast that keeps every bite interesting—from the crisp edges of the brownie to the smooth, tangy cream cheese center.
- Versatile and forgiving: adaptable to a range of dietary needs and flavor twists without losing its soul.
- Make-ahead friendly: ideal for entertaining because you can prepare components in advance and assemble when guests arrive.
- Impressive without being intimidating: a show-stopper dessert that feels fancy but is surprisingly approachable.
- Celebrate any occasion: birthdays, holidays, potlucks, and weeknight treats alike—this dessert fits the moment.
- Rich but balanced: the tang of cream cheese tempers the sweetness of chocolate, while a dash of vanilla and a touch of salt brighten the flavors.
Flavor Profile & Texture
The Loaded Brownie Cheesecake delivers a multi-layered taste experience that’s both comforting and luxe. The base is a brownie layer that tastes like a classic, home-kissed chocolate brownie—deep cocoa notes, a whisper of coffee or espresso to intensify the chocolate, and a texture that’s irresistibly fudgy with gently crisp edges. The brownie is the sturdy foundation that gives the slice its bite and structure, a familiar anchor for dessert lovers who crave a substantial mouthfeel.
Atop this sits the cheesecake layer—a smooth, airy, and luxurious cream cheese filling that carries a tangy brightness. It’s not cloyingly sweet; it’s gently acidic and whisper-soft, almost like a velvet curtain between the chocolate and the sky. If the brownie is the night, the cheesecake is the soft glow of a candlelight moment—quiet, comforting, and wonderfully indulgent. The two layers meet in harmony, each complementing the other: the cheesecake’s tang cuts through the richness of cocoa, while the brownie lends a deeply satisfying heft to the slice.
Finish with a glossy chocolate ganache or a drizzle of caramel, and you’ve added a new dimension: a satin-shiny top that cracks slightly as you cut, releasing a faint aroma of vanilla and cocoa. A pinch of flaky sea salt can lift the sweetness and reveal a more complex chocolate profile, while optional add-ins—like chocolate chips that melt into pockets of gooeyness, or crushed cookies for a playful crunch—add texture and personality. Every bite should deliver a chorus of sensations: the bite of a firm edge, the melt-in-your-mouth center, the whisper of cream cheese, and a final kiss of chocolate that lingers on the palate. This is dessert that satisfies the deep appetites of serious chocolate lovers and the soft cravings of cheesecake fans alike.
Occasions & Pairings
Loaded Brownie Cheesecake is perfectly suited for a range of moments. It shines as a showpiece at holiday dinners, family reunions, and birthday celebrations, but it’s also an excellent choice for casual weekend gatherings. Its richness makes it an ideal treat after a light dinner, or a decadent conversation starter at a wine-and-dessert party. Because it’s substantial, a small wedge is often all you need to feel satisfied, making it ideal for larger groups where you want to stretch desserts across many guests without sacrificing impact.
Pairing ideas to elevate the experience:
- Serve with a scoop of vanilla bean ice cream for a classic duo that softens the chocolate intensity with cold creaminess.
- Offer whipped cream or a dollop of mascarpone for extra creaminess and a delicate balance to the tangy cheesecake layer.
- Pair with a bold espresso or a chocolate-dusted porter for an after-dinner pairing that echoes the dessert’s cocoa notes.
- Complement with fresh berries (strawberries, raspberries) to introduce a bright acidity that contrasts beautifully with the chocolate and cheese.
- Finish with a light dusting of cocoa powder or a few sea-salt flakes to amplify the chocolate and provide a subtle crunch.
Tips, Variations & Substitutions
Colorful variations and substitutions open up a world of flavor while keeping the core concept intact. Here are practical tips to tailor Loaded Brownie Cheesecake to different diets and tastes:
- Gluten-free adaptation: use gluten-free brownie mix or a recipe built with almond flour or a gluten-free blend, and ensure the cheesecake portion uses a gluten-free crumb base if you incorporate any crust-like elements.
- Vegan option: swap dairy-friendly ingredients for dairy-free alternatives—use vegan cream cheese, plant-based butter, and dairy-free dark chocolate; check that any toppings (like caramel or ganache) are vegan if needed.
- Lower-sugar or alternative-sweetener path: use a natural sweetener that suits your preferred profile, keeping in mind that texture may shift slightly; you can also balance sweetness with a touch more tang in the cheese layer.
- Nutty twists: fold finely chopped toasted nuts into the brownie layer or sprinkle lightly on top for crunch and aroma, or press into the base for extra texture.
- Cookie-crumble variation: incorporate a thin layer of crushed cookies between brownie and cheesecake for a dessert-within-a-dessert effect that adds a surprising crunch.
- Flavor twists: for a deeper vanilla aroma, bump up the vanilla extract; for a mocha edge, add a small amount of espresso powder to the brownie batter and cheesecake filling.
- Caramel or peanut butter swirls: ripple caramel or peanut butter through the cheesecake layer before it sets to create ribbons of molten happiness in every slice.
- Salted caramel top: replace the ganache with a salted caramel drizzle on top for a more decadent, restaurant-style finish.
- Make-ahead adjustments: if you’re planning a big gathering, you can prepare the brownie and cheesecake layers separately a day ahead, then assemble and chill before serving for maximum ease.
Storage & Make-Ahead Ideas
Make-ahead desserts are the unsung heroes of entertaining, and Loaded Brownie Cheesecake lends itself beautifully to planning. Here are practical storage and make-ahead strategies that preserve texture and flavor:
- Refrigeration: once fully set and sliced, store the dessert in an airtight container or tightly wrap individual pieces in plastic wrap. It will stay fresh for up to 4–5 days in the refrigerator.
- Freezing: for longer storage, wrap slices individually and freeze in an airtight container. They’ll hold well for up to 2–3 months. Thaw them in the fridge overnight before serving for best texture.
- Make-ahead timing: bake the brownie layer and prepare the cheesecake layer in advance, then assemble the dessert a few hours before serving and chill until the surface gleams with the chocolate glaze.
- Glaze stability: if you’re glazing with ganache, consider finishing with glaze close to serving time to ensure a glossy, fresh look; a light re-warm may be needed if ganache firms in the fridge.
- Transport tips: keep slices on a sturdy tray or in a slice-friendly pan with a lid; carry cold to maintain set and prevent smearing of the top chocolate glaze.
Fun Facts & Trivia
Delightful little tidbits can deepen your appreciation for this dessert. Here are some morsels to share with guests or tuck away for trivia night:
- Brownies have a storied history dating back to the late 19th century, with the first official recipe appearing in 1897. They evolved from cake and fudge traditions and quickly became a pantry staple in American kitchens.
- Cheesecake’s long lineage stretches across many cultures, with variations appearing in ancient Greek feasts and later evolving in European and American culinary scenes. The creamy, tangy texture many love today is a modern favorite that pairs beautifully with chocolate.
- The term “loaded” in desserts often signals extra mix-ins, layers, or a more generous, indulgent presentation. It’s a contemporary shorthand for “more to love” and resonates with today’s craving for both comfort and wow-factor.
- Chocolate and cream cheese make a classic pairing because fat from the cream cheese softens the chocolate’s bitterness while the cocoa’s natural intensity is balanced by a hint of salt and vanilla.
- When you present a dessert that layers textures—crisp edges, fudgy core, airy center, and glossy top—you’re delivering a multisensory experience that’s as satisfying to the eye as it is to the palate.
Ingredients
Brownie Base
- 1/2 cup unsalted butter, melted
→ Provides fat that yields fudgy texture in the brownie base. It helps blend the dry ingredients and adds moisture. Let the butter cool slightly after melting so it does not start cooking the eggs when you mix it in. Use unsalted butter to control salt level; if you use salted butter, omit additional salt from the recipe. - 1 1/4 cups granulated sugar
→ Sweetness and helps create a slight crust on top as the batter bakes. Dissolve the sugar into the melted butter before adding eggs to ensure a smooth batter and even texture. Let ingredients come closer to room temperature for best incorporation. - 2 large eggs
→ Provide binding and moisture; eggs also contribute to the brownie’s structure. Add them one at a time after the sugar-butter mixture has cooled slightly to avoid scrambling. - 2 teaspoons vanilla extract
→ Adds aromatic vanilla flavor that enhances the chocolate. Use pure vanilla extract for the most pronounced aroma; if using vanilla bean paste, you can reduce slightly. - 1/3 cup unsweetened cocoa powder
→ Delivers the deep chocolate flavor of the brownie. Sift the cocoa to remove lumps and whisk it with the sugar and flour to evenly distribute color and flavor. You can whisk in a pinch of espresso powder for a more intense chocolaty note. - 1/2 cup all-purpose flour
→ Provides structure and body to the brownie; avoid overmixing once the wet and dry ingredients come together to keep the texture fudgy. Use all-purpose flour for a traditional brownie crumb. - 1/4 teaspoon salt
→ Enhances chocolate flavor by balancing sweetness; adjust if using salted butter or higher-salt toppings. - 1/4 teaspoon baking powder
→ Gives a touch of lift to prevent a too-dense brownie, helping the top stay slightly crackly and the interior moist. Do not over-measure; level the spoon for consistency. - 1/2 cup semisweet chocolate chips (optional)
→ Add pockets of melted chocolate for extra richness. Fold chips in gently to distribute evenly and prevent sinking; you can toss chips with a teaspoon of flour to help suspend them in the batter.
Cheesecake Filling
- 24 oz cream cheese, softened
→ The creamy base for the cheesecake layer. Softened cream cheese blends smoothly with sugar and eggs, creating a velvety filling. Let the cream cheese sit at room temperature for 1-2 hours before mixing to avoid lumps; beat until completely smooth. - 1 cup granulated sugar
→ Sweetens and helps set the filling when baked with eggs. You can adjust to taste, but keep in mind sugar also contributes to texture; use medium granulated sugar for best dissolution. - 1/2 cup sour cream or heavy cream
→ Adds moisture, tang, and silkiness. Sour cream yields a classic tangy cheesecake; heavy cream increases richness. Use at room temperature for better incorporation. - 2 large eggs
→ Provide structure and help the cheesecake set. Add eggs one at a time just after mixing in sugar to avoid overbeating and cracking; overmixing can incorporate too much air. - 1 teaspoon vanilla extract
→ Enhances the cheesecake flavor; use pure vanilla for a clean, aromatic profile. If you prefer, swap with vanilla bean paste for a stronger vanilla presence. - Pinch of salt
→ balances sweetness and enhances the cream cheese tang. If using salted cream cheese, reduce or omit this, then taste before baking.
Swirl & Add-ins
- 1 cup brownie chunks or crumbled brownie (optional)
→ Creates delightful brownie pockets within the cheesecake for a true “loaded brownie cheesecake” experience. Ensure chunks are cooled completely so they don’t melt the cheesecake; distribute evenly by sprinkling as you layer and gently swirl with a toothpick to minimize streaking. - 1/2 cup chocolate chips (optional)
→ Adds extra chocolate texture and flavor; choose mini or regular chips and fold gently to avoid overworking the batter. If you want more uniform distribution, toss chips in a little flour before adding. - 1/4 cup caramel sauce (optional)
→ Creates ribbons of caramel through the cheesecake for additional sweetness and a gooey contrast. Drizzle in thin lines and swirl with a toothpick; don’t overdo it to keep the swirl distinct during baking.
Toppings
- 1/2 cup heavy cream
→ Used to make a glossy chocolate ganache topping or whipped cream garnish. For ganache, heat until steaming and pour over chopped chocolate; use a spatula to spread for a smooth finish. If you prefer whipped cream, whip cold cream with a touch of sugar and vanilla. - 8 oz semisweet chocolate, chopped
→ Base for a rich chocolate ganache topping. Chop evenly so the pieces melt quickly and smoothly when combined with hot cream; use high-quality chocolate for the best shine and flavor. - 1 teaspoon vanilla extract
→ Enhances the ganache’s aroma if you choose to flavor the ganache; optional but recommended for a more fragrant topping. Add sparingly to taste. - Pinch of salt
→ Elevates chocolate ganache by balancing sweetness and enriching flavor; a tiny pinch is usually enough.
Instructions
- Preheat your oven to 350°F (175°C) and line a 9×13-inch baking pan with parchment paper, leaving an overhang on the long sides for easy lifting, then lightly grease the parchment with a thin coat of nonstick spray.
→ This guarantees the brownie-cheesecake layer releases cleanly and prevents sticking that could tear the edges when you cut it later. - Whisk the dry brownie ingredients together in a medium bowl: 1/3 cup unsweetened cocoa powder, 1/2 cup all-purpose flour, 1/4 teaspoon salt, and 1/4 teaspoon baking powder until fully combined and lump-free.
→ Sifting and whisking create an even distribution of cocoa and leavening, which yields a uniform crust and prevents cocoa lumps from causing streaks in color or texture. - Melt 1/2 cup unsalted butter in a small saucepan or in a microwave until just melted, then whisk in 1 1/4 cups granulated sugar until fully integrated and glossy; allow the mixture to cool slightly for 5 to 7 minutes to prevent cooking the eggs.
→ The warm fat dissolves the sugar for a smooth batter, and cooling prevents the eggs from scrambling when combined. - Beat in 2 large eggs, one at a time, into the cooled sugar-butter mixture on medium speed until each is fully incorporated and the batter looks thick and shiny; this builds emulsification for a fudgy texture.
→ Adding eggs one by one while the mixture is not too hot avoids curdling and helps set a tender structure. - Stir in 2 teaspoons vanilla extract, mixing until evenly distributed to impart aromatic vanilla notes that brighten the chocolate flavor.
→ Pure vanilla provides a clean, pronounced aroma that enhances chocolate depth; avoid overmixing once vanilla is added to prevent excessive air incorporation. - Gradually fold the sifted dry ingredients into the butter-sugar-egg mixture just until no dry streaks remain, then stop to preserve a fudgy crumb; do not overmix.
→ Gentle folding keeps gluten development limited, yielding a dense, fudgy brownie base with a glossy surface. - If using 1/2 cup semisweet chocolate chips, toss them with 1 teaspoon all-purpose flour in a small bowl to coat, then fold them into the batter.
→ Dusting chips helps suspend them in the batter so they don’t sink to the bottom during baking, ensuring even pockets of chocolate. - Spread the brownie batter in an even layer in the prepared pan with a flexible spatula, nudging it to the edges and creating a smooth top; tap the pan firmly on the counter to settle any air bubbles.
→ A uniform base browns evenly and forms a stable foundation for the cheesecake layer above. - Bake the brownie base for 16 to 22 minutes, until the edges are set and begin to pull away from the pan while the center looks slightly undercooked; a toothpick inserted should come out with a few moist crumbs.
→ This partial bake creates a chewy, fudgy bottom that supports the cheesecake without becoming overcooked when the top is added later. - Cool the brownie base completely in the pan on a wire rack, at least 60 minutes, before adding the cheesecake filling; refrigerate for 15 to 30 minutes if you are short on time.
→ A fully cooled base prevents the hot cheesecake from melting into the brownie, which would blur the layers and impair clean slicing. - Meanwhile, prepare the cheesecake filling by beating 24 oz softened cream cheese with 1 cup granulated sugar on medium speed until completely smooth and free of lumps, about 2 to 3 minutes; scrape down the bowl as needed.
→ A smooth cream cheese base ensures a velvety texture without gritty pockets, essential for a professional-looking cheesecake layer. - Beat in 1/2 cup sour cream or heavy cream until incorporated, to add moisture and silkiness; then beat in 2 large eggs one at a time on low speed, allowing each to blend before adding the next.
→ Adding eggs one by one prevents overmixing and air incorporation that can cause cracks during baking; the dairy helps the filling stay creamy and cohesive. - Stir in 1 teaspoon vanilla extract and a pinch of salt until evenly distributed; taste and adjust salt if using salted dairy products to maintain balance.
→ Vanilla depths the flavor, while salt sharpens sweetness and enhances the cream cheese tang; accurate seasoning prevents an overly sweet or bland filling. - Pour the cheesecake filling over the cooled brownie base in an even layer; if using add-ins, sprinkle 1 cup brownie chunks and 1/2 cup chocolate chips over the surface, drizzle 1/4 cup caramel sauce in thin lines, then gently swirl with a toothpick to create marbled patterns.
→ Layering adds texture and flavor bursts; swirling distributes add-ins without creating large white streaks, ensuring a cohesive bite with pockets of extra richness. - Carefully place the pan into a larger baking dish or roasting pan and pour hot water halfway up the sides to create a water bath, then bake at 325°F (163°C) for 45 to 55 minutes, or until the center jiggles slightly when the pan is nudged.
→ The water bath provides gentle, even heat that minimizes cracking and yields a creamy cheesecake with a smooth surface. - Turn off the oven and leave the door slightly ajar; let the cheesecake rest in the oven for 60 minutes to gradually come to room temperature and prevent sudden temperature changes that can cause cracking. Then remove from the water bath and refrigerate the cheesecake in the pan for at least 4 hours or overnight for best flavor and easier slicing.
→ Gradual cooling preserves a silky surface and helps the filling set more evenly across the brownie base. - Make the chocolate ganache topping by heating 1/2 cup heavy cream just to steaming and pouring it over 8 oz chopped semisweet chocolate; let stand 5 minutes, then whisk until smooth and glossy, adding 1 teaspoon vanilla and a pinch of salt.
→ Gentle heat extraction ensures a glossy, satin ganache; vanilla heightens aroma while salt balances sweetness. - Pour the ganache over the chilled cheesecake, spreading it with an offset spatula to a smooth, even layer; allow the ganache to set at room temperature for about 20 minutes, then refrigerate briefly if you prefer a firmer finish.
→ A glossy, even ganache top finishes the Dessert professionally; chilling helps it cut cleanly with a sharp edge. - Slice the Loaded Brownie Cheesecake into squares with a clean, warm knife (warming the blade between cuts prevents tearing the ganache); serve promptly or refrigerate leftovers for up to 3 days.
→ A properly warmed blade yields precise slices and a neat presentation, while refrigeration slows moisture migration and keeps layers intact.
Notes
Loaded Brownie Cheesecake is an indulgent two-layer dessert that pairs a fudgy brownie base with a creamy cheesecake swirl and optional caramel ribbons for extra decadence. For the best texture, have all ingredients at room temperature and mix only until just combined to keep both layers tender and sliceable.
Brownie base tips: melt the butter and let it cool slightly before whisking in the sugar and eggs so you don’t scramble them. Sift the cocoa powder to remove lumps and whisk with the flour to ensure even color and texture; dissolve the sugar into the melted butter to help create a smooth batter and a fine crust on top as it bakes. Fold in the chocolate chips gently so they stay distributed and don’t sink to the bottom.
Cheesecake filling tips: beat the softened cream cheese with sugar until completely smooth before adding the wet ingredients. Add sour cream or heavy cream to achieve a silky texture, then add eggs one at a time after mixing to minimize air and cracking. Use vanilla and a pinch of salt to enhance depth and balance.
Swirl and add-ins: if using brownie chunks, ensure they are cooled completely and layer evenly so they don’t melt into the filling. Drizzle caramel in thin lines and swirl lightly with a toothpick for a pretty marbled effect. You can also fold in a handful of chocolate chips or reserve extra chips for topping.
Baking and finishing: bake until the center is just set with a slight jiggle; the top should be glossy and crackly. To minimize cracking, you can bake the cheesecake portion in a water bath and wrap the pan tightly in foil. Let the cake cool completely, then refrigerate for several hours or overnight for clean slicing. Finish with a glossy ganache or a whipped cream topping if desired.
Storage: refrigerate leftovers in an airtight container for 3-4 days; freeze wrapped slices for longer storage. Always ensure your ingredients are high quality and fresh for the best flavor and texture.
Tips
Tips for a perfect Loaded Brownie Cheesecake
Brownie base tips
- Cool melted butter slightly before adding sugar and eggs to prevent cooking the eggs and to help achieve a smooth, fudgy batter.
- Sift the cocoa powder to remove lumps and whisk it with sugar and flour for even color and flavor distribution.
- Measure flour accurately and avoid overmixing once wet and dry ingredients meet—stir just until combined for a fudgy texture rather than a dense, cakey crumb.
- Use room-temperature ingredients whenever possible; this helps emulsify the batter and creates a uniform texture.
- If you crave extra depth, whisk a pinch of espresso powder with the cocoa for a subtle mocha note that enhances chocolate flavor.
- For extra richness and chocolate pockets, fold in the semisweet chips gently—tossing them with a teaspoon of flour helps suspend them rather than sinking to the bottom.
Cheesecake filling tips
- Let the cream cheese soften completely at room temperature (1–2 hours) for a silky, lump-free filling—banishes streaks and ensures creamy texture.
- Beat the cream cheese with sugar on low speed to minimize air incorporation; overbeating can cause cracking in the baked cheesecake.
- Temper eggs by adding them one at a time after the sugar is fully incorporated to avoid curdling.
- Keep ingredients at room temperature for best incorporation; if sour cream or heavy cream is cold, it can shock the batter and create lumps.
- Adding a gentle amount of vanilla and a pinch of salt enhances the creamy tang of the cheesecake; adjust to taste if your cream cheese is very salty.
- Consider baking the cheesecake in a water bath (foil-wrapped pan set inside a larger pan with hot water) to reduce cracking and keep the surface smooth.
Swirl & add-ins tips
- Let brownie chunks cool completely before folding into the cheesecake layer to prevent them from melting into the filling.
- Distribute brownie chunks evenly by sprinkling as you layer, then gently swirl with a toothpick to create attractive ribbon patterns without over-swirl.
- If using caramel, drizzle in thin lines and swirl lightly to achieve distinct ribbons rather than a uniform smear.
- Chocolate chips should be folded in softly to maintain texture and prevent too much sinking of chips during baking.
Toppings tips
- For a glossy ganache, heat heavy cream until steaming (not boiling) and pour over chopped chocolate; stir until smooth and glossy, then spread evenly for a sleek top.
- Chopped chocolate should be distributed evenly in the ganache to prevent clumps or uneven shine.
- Flavor the ganache with a small amount of vanilla extract or a pinch of salt to balance sweetness if desired.
- If you prefer whipped cream, chill the bowl and whiskers well and whip with a touch of sugar and vanilla just before serving.
Assembly, chilling, and serving tips
- Line the baking pan with parchment or nonstick paper for easy removal and clean slicing of the cheesecake bars.
- Allow the baked cheesecake to cool gradually at room temperature, then refrigerate for at least 4 hours, preferably overnight, to ensure clean, even slices.
- Run a warmed knife under hot water, then dry it before slicing to get clean edges through the dense cheesecake layer.
- Store leftovers covered in the refrigerator for up to 4–5 days; slices can also be frozen for longer storage (wrap tightly).
FAQ
What is Loaded Brownie Cheesecake?
A decadent dessert that combines rich fudgy brownies with a creamy cheesecake swirl, finished with indulgent toppings like chocolate chips, caramel, and optional nuts. It’s a two-layer treat with a chewy brownie base and a smooth cheesecake center.
What ingredients do I need?
For the brownie layer:
- Unsalted butter
- Sugar
- Eggs
- Cocoa powder
- All-purpose flour
- Salt
- Semi-sweet chocolate chips (optional)
For the cheesecake layer:
- Cream cheese (softened)
- Granulated sugar
- Eggs
- Vanilla extract
- Sour cream or heavy cream (optional, for extra creaminess)
Toppings (optional): chocolate chips, caramel sauce, chopped nuts, sea salt, or additional swirls of caramel or chocolate.
Can I customize the crust or make it gluten-free?
Yes. You can use a traditional brownie crust as-is, or swap in 1:1 gluten-free flour blends for the brownie batter. For a crustless option, skip any crumb crust and bake the batter directly in a lined pan. If you prefer a crunchy bottom, lightly press extra chocolate chips into the brownie batter before baking.
How do I make the brownie layer?
Steps:
- Preheat oven to 350°F (175°C). Line a 9×13-inch pan with parchment.
- Melt butter and chocolate together, then whisk in sugar.
- Beat in eggs one at a time, then stir in cocoa powder, flour, and salt until just combined.
- Fold in chocolate chips if using. Pour the batter into the prepared pan and spread evenly.
How do I prepare the cheesecake layer?
Steps:
- In a mixing bowl, beat softened cream cheese with sugar until smooth and creamy.
- Add eggs one at a time, then mix in vanilla and optional sour cream or heavy cream until fully incorporated.
- Pour the cheesecake batter over the brownie batter in an even layer.
How do I swirl the layers together?
Gently drop spoonfuls of the cheesecake batter over the brownie batter. Use a knife or skewer to swirl the two batters together in a few large, soft swirls—don’t overmix. If you want extra toppings, sprinkle them on top after swirling.
What are the baking and chilling times?
Bake at 350°F (175°C) for about 40–50 minutes, or until the edges are set and the center still looks slightly jiggly. Remove from oven and let cool completely, then refrigerate for at least 4 hours or overnight to let the cheesecake set and flavors meld.
Can I make this ahead or freeze it?
Yes. You can bake and chill it up to 3–4 days in advance in the refrigerator. For longer storage, wrap well and freeze the uncut pan covered for up to 2–3 months. Thaw in the fridge before slicing. NOTE: Freezing may slightly alter the texture of the cheesecake portion.
How should I store leftovers and how long do they keep?
Store sliced portions in an airtight container in the refrigerator for up to 4 days. For longer storage, freeze individual slices wrapped tightly in plastic and foil for up to 2–3 months. Bring to room temperature or warm slightly before serving for best texture.
What are some popular variations or toppings?
Try these variations:
- Swirl peanut butter or cookie dough into the cheesecake layer.
- Drizzle caramel sauce or fudge over the finished bars.
- Add chopped nuts, pretzels, or sea salt on top for a sweet-salty contrast.
- Use dark chocolate for a richer flavor or white chocolate for a lighter contrast.

