Introduction / Hook
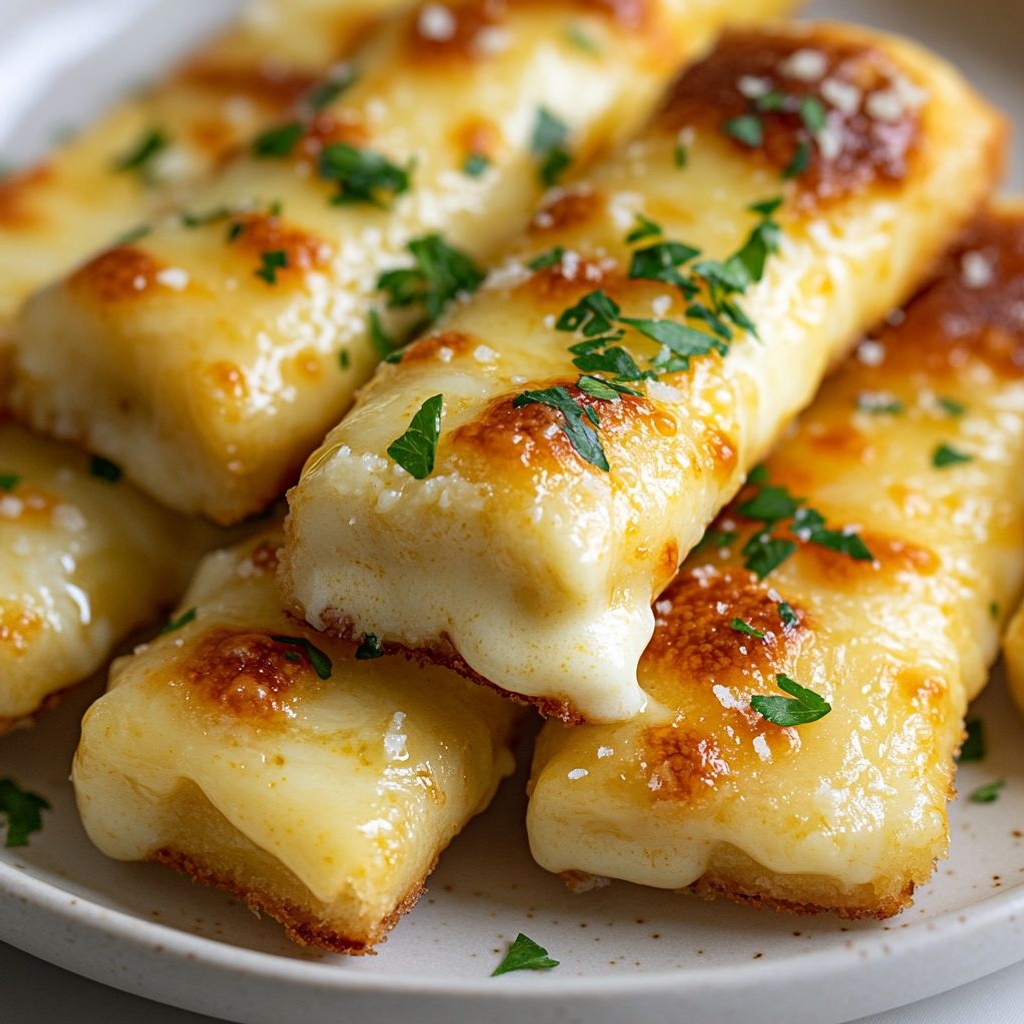
Picture a tray of warm, steam-soft breadsticks coaxed into golden perfection, each one a little pocket of comfort. The scent hits your nose first: roasted garlic sweetness, the buttery aroma drifting through the air like a welcome home. Then comes the taste—garlic’s punch is mellowed by butter, the bread’s soft interior twined with a generous melt of cheese that stretches invitingly when you pull one apart. This is garlic and cheese sticks, a simple, magical snack that feels like a cozy family gathering in every bite. They’re the kind of treat that turns a casual weeknight into a celebration, the perfect companion to a lively conversation, a cracking movie night, or a carefree party platter. What makes these sticks special isn’t just their irresistible flavor; it’s how reliably comforting they are, how easy they are to share, and how quickly they disappear when friends and family gather around the table. It’s the little moment of delight when you tear off a piece and the cheese-y chorus stretches as far as your eyes can see. Welcome to a recipe that’s both timeless and modern—garlic butter kissing dough, cheese melting into a gooey center, and the unmistakable vibe of “smell this and you’re instantly hungry.”
The Story Behind the Dish
Garlic and cheese sticks sit at the delicious crossroads of Italian bread traditions and American comfort-food innovation. Breadsticks have long held a place in Italian cuisine as a simple, versatile accompaniment to meals, often brushed with olive oil and a whisper of salt. In the United States, regional diners and pizzerias transformed those humble sticks into something bold and crowd-pleasing: garlicky, cheesy, and endlessly dunkable. The fusion happened gradually—think warm, chewy doughs slung with garlic butter, then crowned with mozzarella or provolone until the tops gleam with molten, stringy cheese. The result is essentially a love letter to the universal human pleasure of warm bread and melted cheese, a snack that works for casual family dinners and for bigger celebrations alike. The story continues in kitchens around the world where people take the same idea and make it their own: sometimes adding herbs, sometimes swapping in different cheeses, sometimes pairing with a tangy marinara or a creamy dip. In my own kitchen, these sticks became a rite of passage for new cooks—an approachable project that invites experimentation, a dish that rewards patience and a sense of play. The dough yields to hands, the garlic butter dazzles the senses, and a trayful of gooey, golden sticks becomes a stage for conversation, laughter, and the joy of sharing something comforting with people you love.
Why You’ll Love This Recipe
- Quick and forgiving: versatile enough for busy weeknights or last-minute gatherings, with room to improvise based on what you have on hand.
- Family-friendly and kid-approved: gooey cheese, warm bread, and a gentle garlic flavor that doesn’t overwhelm younger palates.
- Sociable and shareable: perfect for dipping into marinara, ranch, garlic aioli, or a tangy pepper sauce—great for parties or movie nights.
- Customizable: a blank canvas for your favorite cheeses, herbs, and add-ins, from parmesan and mozzarella to provolone or a hint of oregano.
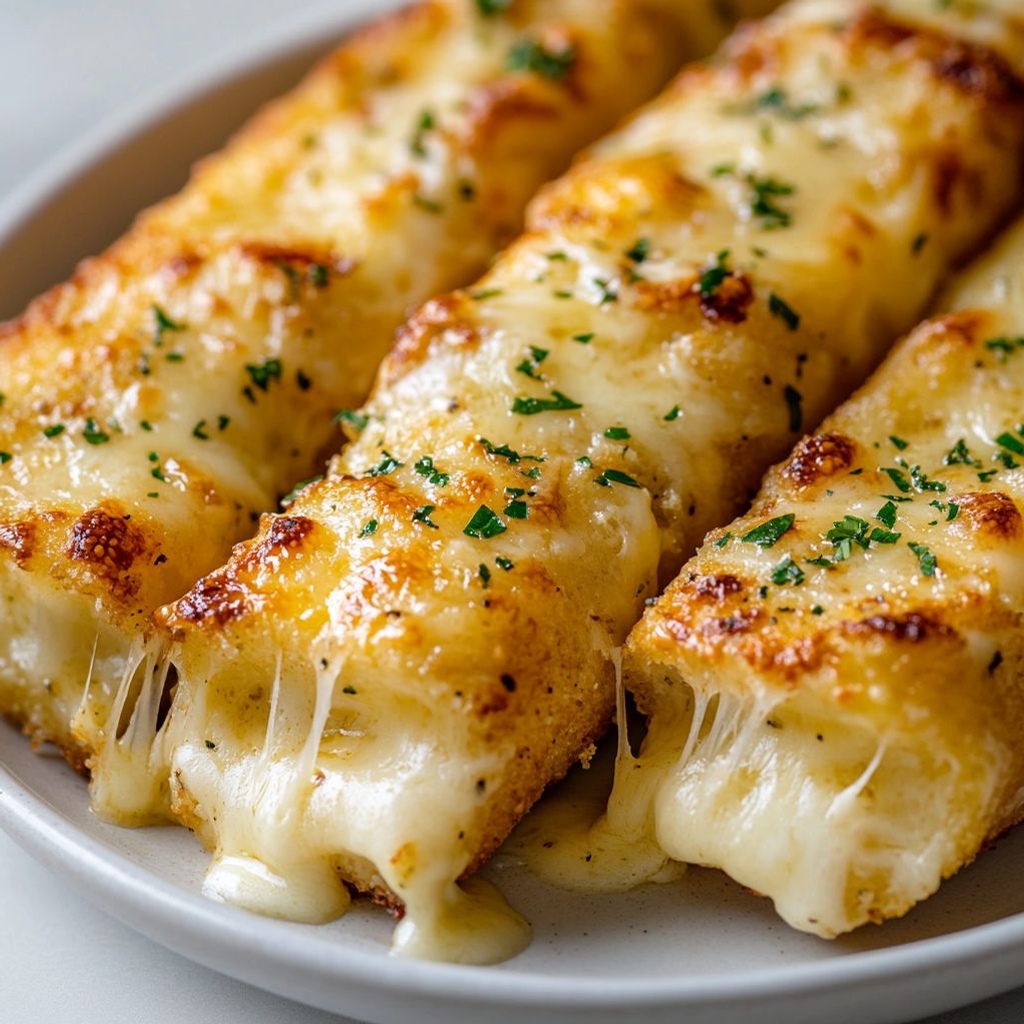
- Comforting aroma and texture: a crisp golden exterior that gives way to a soft, pillowy center with melted cheese that pulls apart in long, satisfying strings.
- Make-ahead potential: adaptable for prep ahead of time, so you can bake fresh sticks when your guests arrive without stress.
Flavor Profile & Texture
The flavor starts with garlic: a toasty, sweet warmth that awakens the senses without becoming sharp. Butter adds a luxurious richness, a velvety backdrop that carries the garlic into every bite. The dough itself offers a gentle yeast-driven richness—soft, pliable, and just enough chew to keep things interesting. When the cheese is introduced, it doesn’t just melt; it becomes a radiant strings-and-silliness moment, a delightful pull that makes you smile and reach for another piece. The surface carries a light, savory crust with a whisper of salt, often enhanced by a kiss of olive oil or a sprinkle of parmesan that crisples in the oven. Herbs—such as parsley, oregano, or chives—are optional but highly recommended, adding a fresh hit of brightness that counterpoints the garlic’s depth. Each bite pairs well with a bright tomato marinara or a creamy dip, balancing acidity, saltiness, and a touch of tang. The result is a symphony of textures: a lightly crisp exterior with a tender, almost bread-cake interior, a molten pocket of cheese in the center, and aromatic garlic that lingers on the palate long after the last bite.
Occasions & Pairings
This dish shines in moments where comfort and conviviality take center stage. Consider these occasions and pairing ideas to make the most of garlic and cheese sticks:
- Weeknight dinners: serve as a side or starter to a simple pasta dish, a green salad, or a hearty soup.
- Game nights and movie marathons: the perfect shareable snack that’s easy to pass around the couch or around a table.
- Parties and potlucks: a crowd-pleasing appetizer that travels well and requires minimal fuss to keep warm in a chafing dish or slow cooker.
- Celebrations and holidays: elevate with a few garlands of herbs or a light dusting of gourmet cheese for a more refined version.
- Kids’ lunchbox or after-school snacks: cut into bite-sized sticks for fun, easy-to-handle portions.
Pairing ideas to enhance the experience:
- Marinara, pomodoro, or a spicy tomato dip for classic dipping goodness.
- Garlic aioli or ranch for a creamy contrast that highlights the garlic and cheese.
- Fresh salads with zesty vinaigrette or a light Caesar to balance the richness.
- Warm pasta dishes, such as penne a la vodka or creamy Alfredo, where the sticks can act as a bread-like accompaniment.
- A crisp white wine or a light, fruity red for adults, or sparkling lemonade for a refreshing non-alcoholic pairing.
Tips, Variations & Substitutions
Vegan Version
To make a vegan-friendly take, swap in a plant-based butter and a dairy-free cheese that melts well. Use a neutral-flavored olive oil to help the dough achieve a tender crumb, and consider adding nutritional yeast for a cheesy note without dairy. Fresh herbs like parsley or chives brighten the mix and keep the flavor lively.
Gluten-Free Version
Choose a reliable gluten-free bread flour blend or a prepared gluten-free pizza dough base. The goal is a dough that relaxes well and bakes up with a soft, chewy interior. Monitor bake times closely since gluten-free doughs can brown more quickly; you may need a slightly lower oven temperature or a shorter bake to prevent excessive browning while ensuring the center cooks through.
Herb & Cheese Variations
Add chopped fresh herbs such as parsley, oregano, or rosemary to the dough or brush the finished sticks with a garlic-herb butter for an extra layer of aroma. Mix in a blend of cheeses—mozzarella with a touch of provolone or fontina—for a more complex melt and a deeper savory note. A light dusting of grated Parmesan on top before baking adds a sharp, nutty finish that complements the garlic.
Spice & Heat Options
For those who like a little kick, fold in a pinch of red pepper flakes into the butter, or finish with a drizzle of hot honey to pair with the cheese’s richness. A smoky paprika swirl in the butter can introduce a subtle barbecue edge that works surprisingly well with the bread’s airy texture.
Regional Twists
From a Mexican-inspired riff with cotija cheese and a cilantro-lime brush to a Mediterranean version with feta and oregano, you can adapt the concept to reflect regional flavors. The core idea remains the same: a soft, yeasty stick swirled with garlic and cheese, transformed by the herbs and cheese you choose.
Storage & Make-Ahead Ideas
Garlic and cheese sticks are friendly to advance prep, making them a practical choice for entertaining. Here are dependable strategies to keep them fresh and tasty:
- Storing baked sticks: Cool completely, then store in an airtight container at room temperature for up to 2 days. For longer storage, refrigerate for up to 4 days. Reheat in a 350°F (175°C) oven for about 5-8 minutes, or until the cheese is melty and the exterior re-crisps.
- Freezing baked sticks: Freeze on a tray first to set, then transfer to a zip-top bag or airtight container. Reheat from frozen at 350°F (175°C) for 10-12 minutes, or until heated through and crisp.
- Freezing dough (make-ahead): Prepare the dough up to the point you would shape the sticks, then refrigerate rather than allowing it to proof fully. Shape the sticks the next day and bake as directed for a fresh-out-of-the-oven result.
- Make-ahead assembly: If you’re hosting, you can assemble the sticks on a baking sheet, cover tightly, and refrigerate for up to 12 hours. Bring to room temperature before baking to ensure even rise and a soft interior.
Fun Facts & Trivia (Optional)
- Cheese pulls are a universal crowd-pleaser: the longer the string, the more applause you’ll hear around the table.
- Garlic, beyond its flavor, has a long history in traditional medicine and culinary lore, often associated with warmth and hospitality in many cultures.
- Breadsticks as a concept have existed in some form across various cuisines for centuries, evolving in modern kitchens into the beloved dip-friendly snack we know today.
- Pairing these sticks with a bright marinara sauce echoes classic antipasto traditions while giving you a comforting, dip-ready foundation for experimentation.
- The joy of these sticks is their simplicity: a few quality ingredients, a hot oven, and the magic of cheese stretching into the air as you pull them apart.
Ingredients
Garlic and Cheese Sticks
Dough Base
-
– 3 1/2 cups all-purpose flour (or bread flour for extra chew)
→ Flour provides the gluten structure that gives the sticks their loaf-like strength and crumb. If using bread flour, expect a chewier texture and better gluten development; all-purpose will yield a softer bite. Spoon-and-sweep the flour to measure and avoid packing, which can make the dough too stiff.
– 2 teaspoons instant yeast
→ Yeast is the leavening agent that creates air pockets in the dough for a light, bread-like texture. Instant yeast can be mixed directly with dry ingredients; if using active dry yeast, proof in 1/4 cup warm water with a pinch of sugar until foamy, about 5-10 minutes.
– 1 1/2 cups warm water (about 110°F/43°C)
→ The water temperature is critical for activating yeast without killing it. Too hot and the yeast will die; too cool and the dough will not rise well. Add gradually and adjust if the dough seems too sticky or dry.
– 1 tablespoon granulated sugar (or honey)
→ Food for the yeast and a hint of sweetness that helps browning. If you need to reduce sugar, you can cut back to 1/2 tablespoon; for dairy-free, consider using a small amount of maple syrup for flavor.
– 1 1/2 teaspoons salt
→ Salt flavors the dough and tightens the gluten structure, helping control the dough’s expansion and flavor balance with the cheese. Add to the flour before mixing to ensure even distribution.
– 2 tablespoons olive oil (plus more for brushing)
→ Fat tenderizes the dough, improves extensibility for rolling, and contributes fullness of flavor. High-quality extra-virgin olive oil adds aroma; brushing the surface with oil later helps develop a crisp, golden crust.
– 1 large egg, room temperature (optional)
→ Enriches the dough for a softer crumb and better browning; if avoiding eggs, substitute with 1/4 cup additional warm water and 1 tablespoon olive oil, though the texture may be a touch different. Ensure the egg is thoroughly beaten before adding to the dough.
– 1 tablespoon melted butter (optional)
→ Adds richness and helps create a silkier dough; can be used in the dough or reserved for brushing the surface before baking. If dairy-free, substitute with an additional 1 tablespoon olive oil or dairy-free butter substitute.
Garlic Butter Filling
-
– 4 tablespoons unsalted butter, melted
→ The base for the garlic spread that flavors and cushions the cheese inside the sticks. Use melted butter to ensure an even coating; let it cool slightly to avoid cooking garlic when mixed with parsley. If dairy-free, substitute with olive oil or a dairy-free butter substitute with the same amount.
– 3 cloves garlic, finely minced
→ Garlic provides the characteristic aroma and sharpness; finely mincing ensures even distribution throughout the dough and prevents large chunks that may burn during baking. To mellow raw bite, gently bloom in the warm butter for about 30 seconds before mixing with parsley.
– 2 tablespoons fresh parsley, finely chopped
→ Adds a bright herbal note and color that remains visible after baking. Fresh parsley is preferred; if using dried, reduce to 1 teaspoon and rehydrate briefly in the melted butter before mixing.
– 1/2 teaspoon salt (adjust to taste)
→ Balances the garlic butter and helps draw out moisture from the garlic while cooking. Taste the butter mixture before assembling and adjust if cheeses added will impart saltiness.
Cheese Filling
-
– 1 cup shredded mozzarella cheese (low-moisture recommended)
→ Provides a creamy, stretchy melt that forms the inner cheese core of each stick. Low-moisture mozzarella helps prevent soggy filling; use part-skim if desired to reduce fat.
– 1/2 cup grated parmesan cheese (freshly grated)
→ Adds a sharp, nutty bite and helps create a flavorful crust around the cheese; freshly grate for best aroma and texture. Do not use pre-grated for best melt and flavor.
– 1/2 cup shredded provolone or fontina (optional)
→ For extra melt and depth of flavor; provolone adds a mild smoky note, fontina offers a creamier texture. Include if you want a more pronounced stretch when biting into a stick.
Finish and Toppings
-
– 1 tablespoon melted butter, for brushing before and after baking (optional)
→ Brushing with melted butter helps achieve a glossy, flavorful finish and helps the cheese adhere to the dough edges. Apply before baking for color and after baking for extra richness while it’s still warm.
– Sesame seeds or poppy seeds (optional)
→ Adds texture and visual appeal; press seeds gently into the dough before baking so they adhere well and don’t fall off during the rise. Sesame provides a toasty note; poppy seeds add crunch and a slight nuttiness.
– Coarse sea salt flakes, for finishing (optional)
→ Finishing salt enhances the overall flavor and accents the garlic and cheese. Lightly sprinkle after baking to avoid drawing moisture from the crust.
– Chopped fresh parsley, for garnish (optional)
→ A final pop of green and fresh aroma that complements the garlic and cheese. Sprinkle after baking just before slicing to retain color and aroma.
Instructions
- Whisk together the dry dough ingredients: 3 1/2 cups all-purpose flour (or bread flour for extra chew), 2 teaspoons instant yeast, 1 1/2 teaspoons salt, and 1 tablespoon granulated sugar in a large mixing bowl until evenly distributed.
→ Even distribution ensures uniform fermentation, even salt dissemination prevents uneven rise, and sugar feeds the yeast to promote a steady, controlled rise. Flour choice influences gluten development and final texture; bread flour yields more chew. - Pour in the liquids and mix to form a shaggy dough: 1 1/2 cups warm water (about 110°F/43°C), 2 tablespoons olive oil, and 1 large egg (optional); combine with the dry ingredients until a rough mass forms.
→ Temperature of water activates the yeast without killing it; adding oil and egg (optional) enriches the dough for tenderness and browning. Do not rush mixing; you want a cohesive structure before kneading. - Knead the dough until smooth and elastic: turn the dough out onto a lightly floured surface (or knead in a mixer with a dough hook on low) for 6–8 minutes, using a push, fold, and roll motion; test with the windowpane method by stretching a small piece until translucent.
→ Proper kneading develops gluten to trap gas for rise and gives the dough strength to enclose the cheese without tearing; a windowpane shows sufficient gluten development. - Oil a large bowl and lightly coat the dough, then cover with plastic wrap or a damp towel and let rise in a warm place until doubled, about 60–90 minutes.
→ An adequate first rise ensures volume and a tender crumb; avoid drafts and cold spots that stall fermentation. - Prepare the garlic butter filling by melting 4 tablespoons unsalted butter over low heat, adding 3 minced garlic cloves and cooking just 20–30 seconds until fragrant; remove from heat, stir in 2 tablespoons finely chopped fresh parsley and 1/2 teaspoon salt, and let cool to room temperature.
→ Gentle heating releases garlic aroma without browning, and cooling prevents the garlic mixture from cooking the dough or burning when spread. - Mix the cheese filling by combining 1 cup shredded mozzarella (low-moisture preferred), 1/2 cup freshly grated Parmesan, and 1/2 cup shredded provolone or fontina in a bowl; toss to distribute evenly.
→ Using low-moisture mozzarella minimizes moisture that can sog the dough, while Parmesan adds sharpness and provolone/fontina adds melt and creaminess. - Line a baking sheet with parchment or a silicone mat and keep it ready for the assembled sticks.
→ Lining prevents sticking and makes clean-up easier; parchment also helps with even browning and easy removal. - Gently punch down the risen dough and turn it onto a lightly floured surface; roll into a rectangle about 16 by 8 inches and to a thickness of ~1/4 inch.
→ A uniform thickness ensures the filling distributes evenly and the sticks bake at a consistent rate; irregular thickness can lead to undercooked centers or overly brown edges. - Brush the entire dough rectangle with the cooled garlic butter, keeping a small margin at the edges to prevent overflow when sealed; avoid pooling heavily in any one area.
→ A thin, even layer ensures every bite is seasoned and flavorful without leaking melted butter during rolling and baking. - Spread the cheese filling along the center third of the dough length, leaving margins on both long edges for sealing; distribute evenly to avoid clumping and to ensure a consistent melt.
→ Centering the cheese creates a visible inner core when cut and keeps the filling from spilling out of the sides during baking. - Fold the two side edges over the cheese as if sealing a burrito, pinch the seam well, and rotate the dough so the seam rests on the bottom; gently press to seal and form a snug log.
→ Sealing prevents the cheese from oozing during baking and creates a uniform radius for clean slicing later. - Roll the filled log lightly to even its thickness and wrap it in plastic wrap; refrigerate for 15–20 minutes to firm up, which allows for cleaner, neater slicing.
→ Chilling firms the structure for precise cuts and easier handling, reducing cheese leakage and drift during bake. - While the log chills, preheat your oven to 375°F (190°C) and prepare the rack in the middle position; line a second sheet pan with parchment if desired.
→ A stable, moderate baking temperature promotes golden crusts and fully melted cheese without scorching; middle rack ensures even heat distribution. - Unwrap the log and cut it into 12–16 even sticks with a sharp knife or a serrated blade; space the sticks about 1 inch apart on the prepared sheet to allow for expansion.
→ Even spacing prevents sticking and ensures uniform browning and cheese melt across all sticks. - Optionally twist each stick lightly or place them straight on the sheet to achieve an appealing shape; twisting encourages more surface area for browning and color.
→ A gentle twist creates an attractive, rustic appearance and promotes even heat exposure for a crisp crust. - Brush the tops of the sticks with an additional 1 tablespoon melted butter and press sesame seeds or poppy seeds onto the surface if using; finish with a light sprinkle of coarse sea salt.
→ Butter adds shine and flavor while seeds provide texture; salt enhances pronunciation of garlic and cheese flavors in the crust. - Bake on the middle rack until the sticks are golden brown and the cheese is melted, about 12–15 minutes; rotate the sheet halfway through to ensure even browning.
→ Mid-bake rotation prevents hot spots and results in uniform color and doneness; keep an eye on the cheese to avoid browning beyond the crust. - Remove from the oven and brush the hot surface with a little more melted butter for a glossy finish and richer aroma; let the sticks rest 5–7 minutes before serving to encourage cheese to set.
→ Resting helps the filling firm up so the sticks hold together when cut and dipped, and butter enhances flavor and sheen. - Garnish with chopped fresh parsley if desired and serve warm; store leftovers tightly wrapped once cooled for up to 2 days or reheat in a 350°F (175°C) oven for 5–7 minutes.
→ Parsley adds color and a fresh aroma; proper storage maintains texture and prevents sogginess from residual steam.

Notes
These garlic and cheese sticks are a savory, pull-apart treat built from a soft yeasted dough that envelops a garlicky butter and cheese core. You can customize them by using different cheeses (mozzarella, parmesan, provolone, or fontina) and by adding fresh parsley or other herbs for color and brightness; for dairy-free, swap dairy ingredients with olive-oil-based alternatives and dairy-free cheese substitutes. An optional egg enriches the dough for a softer crumb and deeper browning; if you skip the egg, substitute with 1/4 cup warm water plus 1 tablespoon olive oil and expect a slightly different texture. Ensure the water is around 110°F/43°C to activate the yeast, and let the dough rise until doubled for a light, bread-like chew. Brush the formed sticks with melted butter before baking for gloss and flavor, and again after they come out for extra richness; you can sprinkle sesame or poppy seeds and a touch of flaky finishing salt for extra crunch and aroma. These sticks freeze well once cooled and reheat beautifully in a hot oven or toaster oven; for best results, bake on a preheated sheet to promote a crisp crust. If you need a gluten-free version, use certified gluten-free flour and gluten-free yeast blend, and monitor rising time as gluten-free doughs can behave differently.
Tips
Tips for Garlic and Cheese Sticks
Dough and rising tips
- For a chewier, more bread-like crumb, use bread flour. All-purpose flour yields a softer bite.
- Instant yeast can be mixed directly with dry ingredients. If you use active dry yeast, dissolve it in about 1/4 cup warm water with a pinch of sugar and let it foam 5–10 minutes before adding to the rest of the ingredients.
- Water should be warm to the touch (about 110°F/43°C). Too hot kills the yeast; too cool slows the rise. If the dough feels too sticky or dry, adjust with small amounts of warm water or flour.
- Oil tenderizes the dough and improves extensibility. The extra brush of olive oil on the surface helps promote a crisp, golden crust.
- If you’re including the egg, ensure it’s room temperature and well beaten before adding. Eggs enrich the crumb and improve browning; without egg, the dough will be a touch softer and closer to a standard bread dough.
- After mixing, give the dough a short knead until smooth and elastic (about 6–8 minutes by hand, 3–5 minutes in a mixer on low). A windowpane test helps: stretch a small piece of dough; it should become translucent without tearing.
- Proof the dough in a warm, draft-free spot until doubled in size. If your kitchen is cool, you can pre-warm your oven to the lowest setting, then turn it off and place the dough inside to rise.
Flavor and filling preparation
- Bloom the garlic in warm melted butter for about 30 seconds to mellow its sharp edge before mixing with parsley. Do not let it burn.
- Fresh parsley yields the best vibrant color; if using dried parsley, rehydrate briefly in the melted butter before mixing.
- Season the garlic butter lightly with salt and taste before assembling, because cheese will add saltiness later. Adjust if you’re using a salty cheese blend.
- Use softened melted butter or olive oil for even coating of the dough and to prevent spots of garlic from cooking unevenly.
Cheese filling tips
- Low-moisture mozzarella helps prevent soggy centers. If using higher-moisture mozzarella, pat the shreds dry with paper towels to reduce excess moisture.
- Freshly grated parmesan offers a sharp, nutty bite and a better aroma than pre-grated. Do not substitute with very aged cheeses that don’t melt as well.
- Provolone or fontina adds extra melt and depth of flavor; use them if you want a stretchier bite. Keep the cheese filling balanced—too much cheese can leak out during baking.
- Grate or shred cheeses just before use for the best melt and texture; avoid pre-shredded blends that include anti-caking agents that affect melt.
Shaping, assembling, and layering
- Roll the dough into a rectangle so you can evenly spread the garlic butter and cheese filling. A uniform thickness helps the sticks bake evenly.
- Spread the garlic butter mixture evenly, then sprinkle the cheese filling in a narrow strip along the length. Roll the dough from the long edge into a log, pinch to seal, and cut into evenly sized sticks. Seal the edges well to prevent the filling from leaking out.
- For extra flavor and visual appeal, brush the surface with a light coat of melted butter before baking, and press optional sesame or poppy seeds gently into the dough so they adhere.
Baking, finishing, and serving tips
- Preheat the oven to a hot 375–400°F (190–205°C). Bake until the sticks are deep golden and the cheese is bubbling, typically 15–20 minutes depending on thickness.
- Rotate the tray halfway through baking for even browning. If the tops brown too quickly, loosely tent with foil.
- Brush with melted butter after baking for extra gloss and richness. A final sprinkle of coarse sea salt or flaky salt enhances garlic and cheese flavors.
- Garnish with chopped fresh parsley just before slicing to keep the color bright and aroma fresh.
Make-ahead, storage, and troubleshooting
- Unbaked sticks can be assembled on a parchment-lined tray, frozen until solid, then transferred to a bag. Bake from frozen, adding a few extra minutes to the bake time.
- Baked sticks store well in an airtight container at room temperature for 1–2 days, or refrigerate up to 3–4 days. Reheat in a 350°F (175°C) oven until warm and lightly crisp, about 5–8 minutes.
- If dough is too sticky, let it rest covered for 10–15 minutes; then knead in small increments of flour until manageable. If too dry, splash in a tablespoon of warm water at a time until the dough comes together.
- Common issues: dough not rising properly—check yeast viability, water temperature, and proofing conditions; cheese leaking during baking—try a bit less cheese or pat mozzarella dry; overly greasy finishing—reduce oil in the filling or brush sparingly with oil only on the surface.
FAQ
What are Garlic and Cheese Sticks?
Garlic and Cheese Sticks are soft, pull-apart breadsticks flavored with garlic and melted cheese. They’re brushed with a fragrant garlic butter glaze after baking and are perfect as an appetizer or snack.
What ingredients do I need to make Garlic and Cheese Sticks?
Use the following basic ingredients (adjust amounts to taste):
- 2 cups all-purpose flour
- 1 packet (2 1/4 tsp) instant yeast
- 1 tsp sugar
- 1/2 tsp salt
- 3/4 cup warm water (about 110°F/43°C)
- 2 tablespoons olive oil
- 1 cup shredded mozzarella cheese
- 1/3 cup grated Parmesan cheese
- 2–3 cloves garlic, minced
- 2 tablespoons melted butter (for brushing)
- Optional: chopped parsley or dried oregano for sprinkled flavor
Can I make Garlic and Cheese Sticks gluten-free?
Yes. Use a gluten-free all-purpose flour blend or a store-bought gluten-free pizza dough. The texture may differ slightly, but you can still achieve tasty, cheesy sticks. If using a dough mix with no yeast instructions, follow the package’s guidance or use a quick-rise gluten-free dough method.
Can I customize the cheese or add extras?
Absolutely. Classic combos are mozzarella and Parmesan, but you can mix in shredded cheddar, Monterey Jack, or cream cheese for extra creaminess. For more flavor, add chopped parsley, basil, or oregano. You can also sprinkle extra Parmesan on top before baking for a crisp cheesy crust.
How do I bake Garlic and Cheese Sticks?
Steps:
- Mix flour, yeast, sugar, salt, warm water, and olive oil to form a soft dough.
- Let dough rise until doubled, about 1 hour.
- Roll or stretch the dough into a rectangle, sprinkle cheeses, then roll up and cut into sticks or twist into sticks.
- Place on a parchment-lined baking sheet and bake at 425°F (220°C) for 12–15 minutes, until golden and cheese is melted.
- Brush with garlic butter while hot and garnish with parsley if desired.
How do I make the garlic butter glaze?
Stir together 2 tablespoons melted butter with 2–3 minced garlic cloves (adjust to taste) and a pinch of salt. Optional: add a pinch of chopped parsley for color. Brush this over the sticks right after they come out of the oven for maximum aroma.
How can I prevent the sticks from sticking or getting soggy?
Tips: use parchment paper or a silicone baking mat, avoid overcrowding the pan, bake on a preheated sheet or pan, and ensure dough isn’t overfilled with cheese. Let baked sticks rest on a rack briefly before brushing with garlic butter to maintain crisp edges.
How long do Garlic and Cheese Sticks stay fresh, and how should I store them?
Best eaten the same day. At room temperature, store in an airtight container for up to 1–2 days. For longer storage, refrigerate for up to 3–4 days, and reheat in the oven or air fryer to restore some crispness.
Can I freeze the dough or baked sticks?
Yes. You can freeze shaped, unbaked sticks (before the second rise) for up to 1–2 months; wrap well and thaw before baking. You can also freeze baked sticks; reheat from frozen in a 350°F (175°C) oven for 6–8 minutes until warmed through. For best texture, reheat in the oven rather than the microwave.
What can I serve Garlic and Cheese Sticks with?
Classic pairings include marinara sauce or a creamy Alfredo sauce. You can also serve them with ranch dip, garlic aioli, or a tangy tomato salsa. They’re great as an appetizer, party snack, or alongside pasta dishes.