Introduction / Hook
Imagine a slice that seduces with the glossy sheen of a lacquered chocolate finish, then softens into a tender, cloud-light bite that carries the intimate whisper of coffee and cream. Chocolate tiramisu cake is not merely a dessert; it is an immersion into contrasts: the deep, almost night-black richness of cocoa balanced by a delicate, silky filling that feels like velvet on the tongue. Each forkful invites a little drama and a lot of comfort—the kind of moment that turns a simple dessert into a memory. The aroma alone can transform a kitchen into a cozy cafe, drawing people in with the intoxicating scent of roasted cocoa and coffee-infused sweetness. It is the kind of cake that looks stunning on a celebratory platter, yet remains forgiving enough to bake for a weeknight treat, offering a sense of indulgence without a heavy aftertaste. If you crave a dessert that feels both luxurious and approachable, this chocolate tiramisu cake is your invitation to a sensory celebration: the crack of a perfectly set crust, the sigh of creamy layers, and the lingering finish of bittersweet chocolate that lingers like a fond farewell at the end of a meal.
The Story Behind the Dish
To understand chocolate tiramisu cake, we begin with a story that threads together two beloved Italian traditions: the timeless allure of tiramisu and the universal appeal of a chocolate cake. Tiramisù, in its classic form, is a dessert born of layering and balance. Its name, often translated as “lift me up” or “pull me up,” hints at the uplifting combination of caffeine-tinged cream and cocoa-dusted elegance. The dish became a symbol of conviviality across northern Italy and then across the globe, evolving with each family’s touch and each chef’s flair. The cake adaptation takes that same spirit—a celebration rendered in layers, textures, and a glossy finish that invites the eye before it tempts the palate. In many kitchens, cooks blend memories of childhood desserts with the sophistication of a dessert that can be plated with the precision of a pastry showpiece. The chocolate tiramisu cake is a nod to those memories, built on the idea that a dessert can be both a ceremony and a comfort, a finale that gathers people close with its shared sweetness and familiar scents. It’s a modern homage to classics: the elegance of a refined cake, the warmth of coffee-kissed cream, and the universal love of chocolate, all brought together in a way that feels both nostalgic and novel.
Over the years, bakers and home cooks have embraced this concept and expanded it beyond tradition—layering moist chocolate cake with creamy fillings, adding a hint of espresso for depth, and finishing with a polished glaze or a dusting of cocoa that gleams with a quiet confidence. The result is a dessert that respects its roots while inviting new interpretations: more pronounced chocolate, lighter or denser fillings, dairy-rich or dairy-free twists, and textures that range from fluffy to fudgy. The chocolate tiramisu cake embodies that evolution—a tribute to a timeless favorite that still manages to surprise with its elegance, making it a crowd-pleaser for birthdays, anniversaries, holidays, and any moment you want to mark with something a little extraordinary.
In many households, this cake becomes a storytelling dish, passed from kitchen to kitchen with small adaptations: a friend’s favorite coffee note, a grandmother’s quiet insistence on a specific texture, or a local ingredient that turns the classic into something uniquely regional. It is a dessert that invites conversation as much as it invites savoring—an edible centerpiece that can tell a story of tradition, craft, and shared joy. Whether you’re baking for a festive gathering or a quiet Sunday evening with loved ones, chocolate tiramisu cake offers a bridge between the homey comfort of a beloved recipe and the thrill of a dessert that looks as stunning as it tastes. As you read on, you’ll discover how this cake can be a canvas for your own memories and your own creative twists, while remaining rooted in the irresistible charm of a chocolate-laced tiramisu-inspired experience.
Why You’ll Love This Recipe
- Impressive presentation without being intimidating to bake. A glossy, professional-looking finish makes it a showstopper, yet the flavor is familiar and comforting enough to feel like home.
- Balanced sweetness with a deep chocolate backbone. The cake’s richness is tempered by creamy layers and a whisper of coffee, so every bite feels indulgent but never cloying.
- Couples two beloved textures in one slice: the softness of a well-moistened cake with the creamy, airy richness of a tiramisu-inspired filling, yielding an irresistible mouthfeel.
- Make-ahead friendly. This dessert improves with time as the flavors mingle, making it ideal for parties, potlucks, or holiday menus where advance preparation is a virtue.
- Versatile for dietary preferences. With thoughtful substitutions, it can be adapted to be dairy-free, gluten-free, or vegan, without sacrificing the essence of chocolate, coffee, and cream.
- Customization opportunities abound. From finishing touches to flavor accents, you can tailor the dessert to celebrate a season, a theme, or a personal favorite twist.
- Great for sharing. Its generous slices encourage conversation and connection, turning dessert into a moment of conviviality and joy.
Flavor Profile & Texture
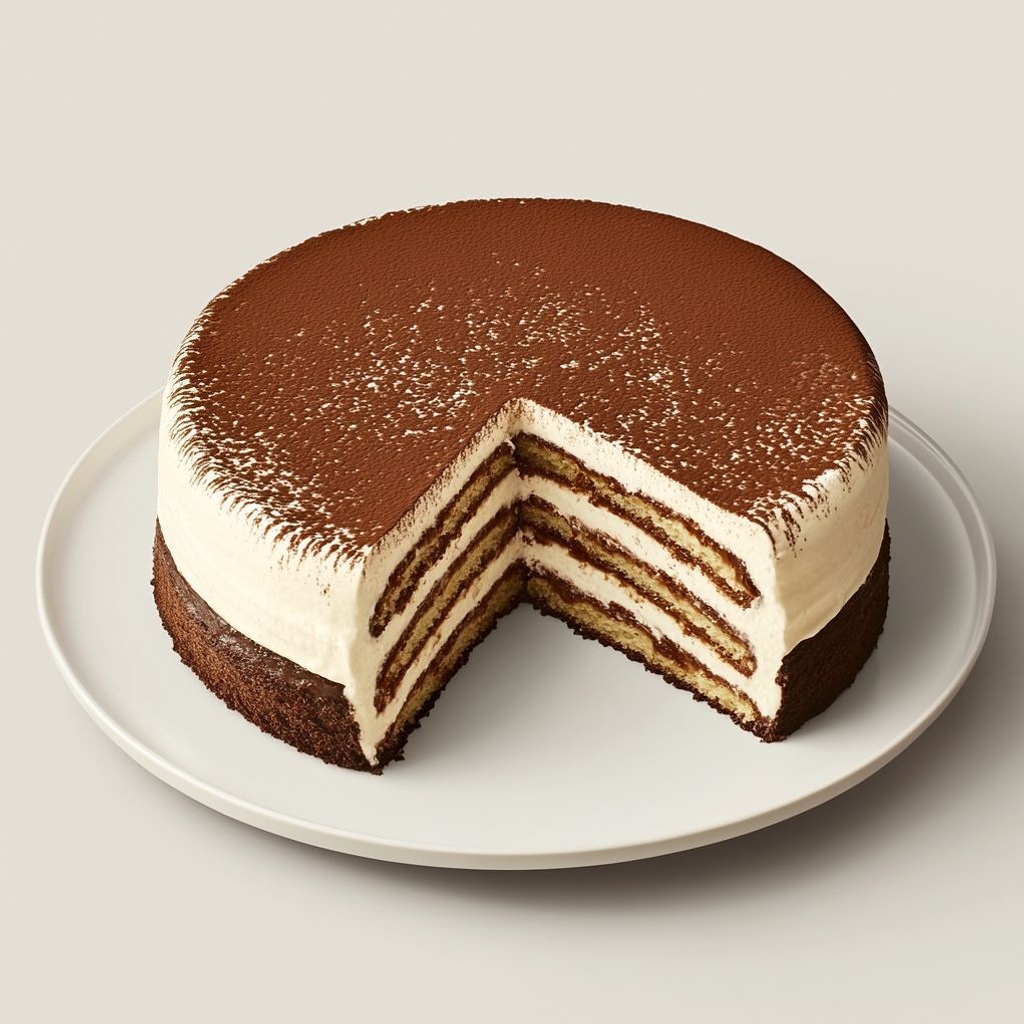
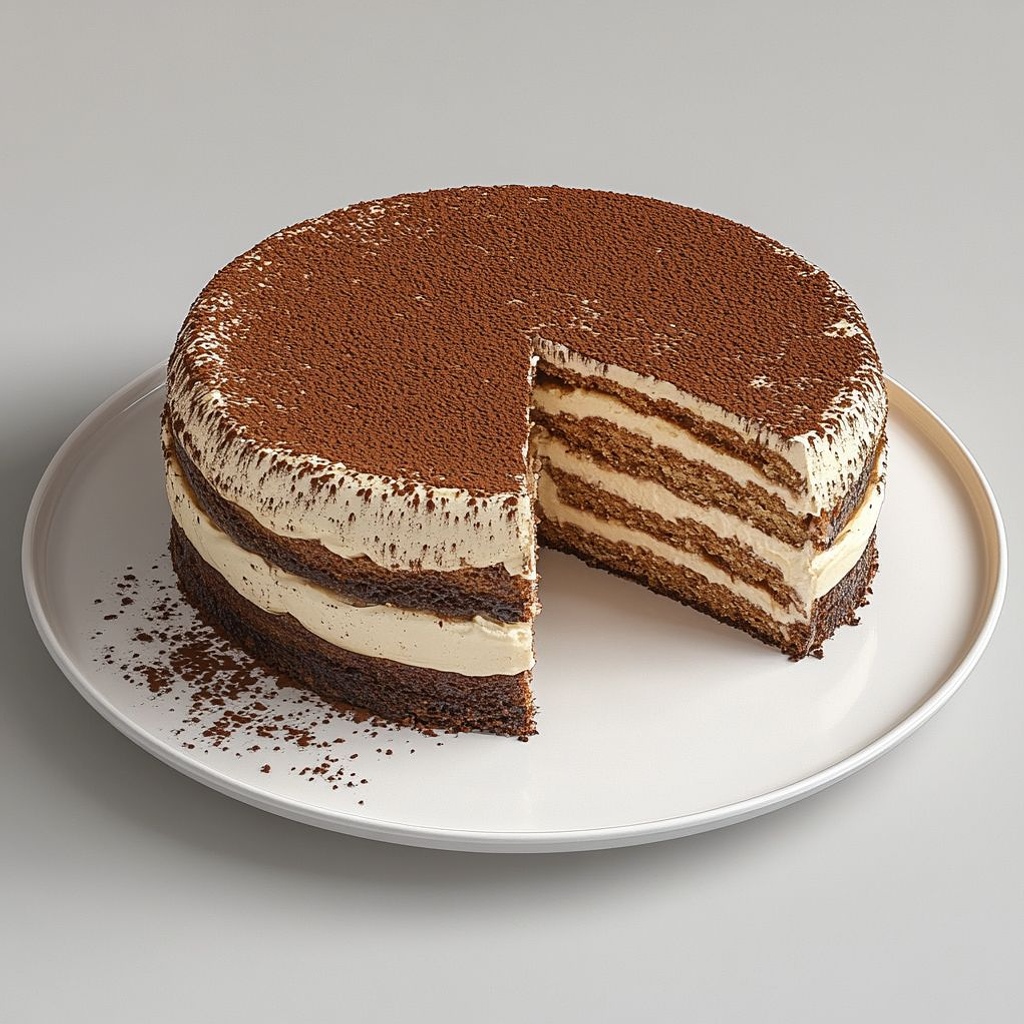
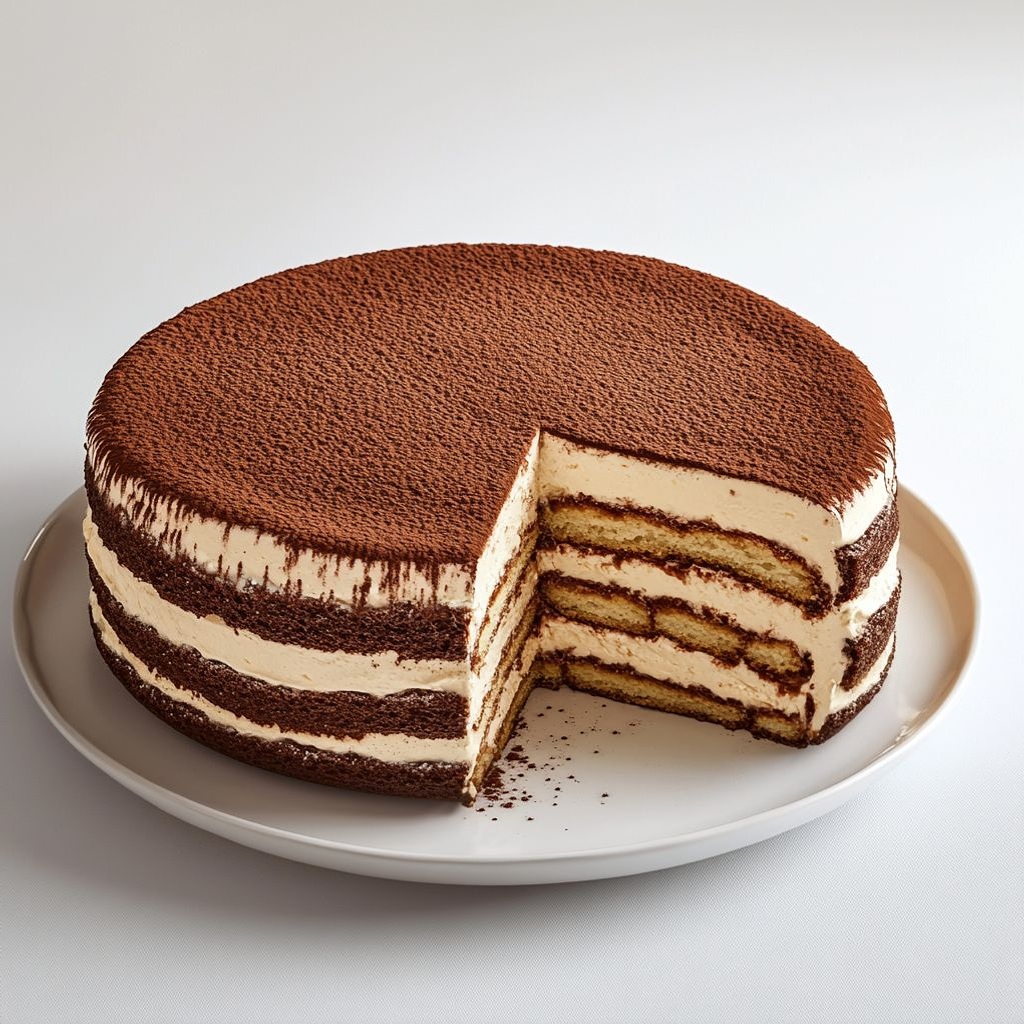
The centerpiece of chocolate tiramisu cake is its interplay of flavors and textures. The cake layers themselves bring a confident, cocoa-forward presence—rich, slightly roasted notes that remind you of the night air after a bakery oven door closes. When you bite through, you encounter a soft, almost ganache-like tenderness that echoes the luscious core of a tiramisu, but within the structure of a cake. The creamy filling or filling-like layer adds a seductively smooth contrast: it melts on the tongue, carrying hints of sweetness, a whisper of bitterness, and a gentle aroma that lingers pleasantly without overwhelming the palate. If you close your eyes, you might sense the scent of a coffeehouse blended with a café au lait essence—enough to conjure a sense of warmth and invitation, without the immediate heaviness of a spoonful of cream alone. The final touch—often a glaze or a dusting of cocoa—provides a glossy finish that glints under light and offers a final, delicate snap before the first bite dissolves into the next layer of luxury.
Texture-wise, this dessert plays with contrasts. The outer “crust” or outer layer offers a slight resistance and a satisfying sheen, giving way to a moist, tender interior that stays moist without feeling heavy. The interplay of airy and luxurious is part of its appeal: a cake that feels light when you bite in, yet leaves you with a lasting impression of depth and richness. The cocoa’s intensity can range from a mellow, milk-chocolate whisper to a more assertive, bittersweet edge, depending on the cocoa or chocolate you choose for your bake. If you enjoy a nuanced finish, this dessert rewards careful balance: enough sweetness to lift the flavors, enough coffee or chocolate bitterness to anchor them, and a creaminess that ties every bite together without overwhelming the flavor palette. The overall sensation is indulgence with a kind of elegance—a dessert that feels like a celebration, but remains inviting enough to enjoy any day of the week.
Occasions & Pairings
Chocolate tiramisu cake is a versatile companion for many moments. It suits grander occasions—the kind of cake you bring to a birthday party, a holiday dinner, or a milestone celebration, where a dessert should feel worthy of the guest of honor. Yet it also comfortably fits intimate gatherings: a cozy dinner for two, a dessert course after a long week, or a weekend brunch where guests linger over coffee and conversation. Its substantial presence makes it a natural centerpiece for a table, while its refined flavor profile ensures it won’t overwhelm lighter courses. For finishing touches, consider pairing with beverages that echo its cocoa-coffee fusion: a robust, dark coffee or a dessert wine with chocolatey notes can enhance the overall experience. For a non-alcoholic option, a rich, well-steeped cappuccino or a cappuccino-style latte can echo the dessert’s flavors without adding a separate palate-altering note. If you want to offer a lighter contrast, serve alongside fresh berries or lightly whipped cream on the side so guests can tailor each bite to their taste.
Suggested occasions and settings:
– Holiday entertaining: a standout finale that feels festive and indulgent.
– Birthday celebrations: a cake that doubles as a centerpiece and a treat.
– Weeknight special: a delicious reward after a busy day, quickly becoming a family favorite.
– Tea-time or coffee-hour gatherings: a sophisticated option that pairs beautifully with warm beverages.
– Dinner parties: an elegant dessert that invites slow enjoyment and conversation about flavors and textures.
Tips, Variations & Substitutions
- Make it dairy-friendly or dairy-free: Use a plant-based cream or mousse-like filling and a vegan-friendly ganache for the glaze. Choose a dairy-free chocolate with a strong flavor to maintain depth, and consider coconut milk or almond milk-based creams to achieve a similar mouthfeel.
- Gluten-free options: Start with a gluten-free cake base or a flourless chocolate cake approach for the layers. Texture can stay rich and moist by incorporating some finely ground nut meal or gluten-free flours that enhance moisture retention.
- Vary the chocolate intensity: A combination of dark and milk chocolate can yield a more nuanced finish. If you prefer a purer chocolate profile, lean toward a higher percentage cocoa in the bake and in the glossy finish.
- Flavor twists: Add a hint of spice (like cinnamon or a trace of chili) or an citrus zest (orange or espresso orange) to brighten the finish while keeping the dessert balanced. A touch of liqueur is another classic option for depth—choose one you love and adjust to taste.
- Texture tweaks: For a lighter bite, incorporate a whipped cream-like layer that folds softly into the filling. For a denser, fudgier experience, increase the richness of the filling while keeping the overall structure intact.
- Health-forward variations: Use a reduced-sugar glaze and a lighter filling, or substitute a portion of the fat with avocado puree or a neutral-tavored oil to maintain creaminess with fewer calories per serving.
- Regional twists: In some regions, a hint of almond or hazelnut flavor can complement the coffee-chocolate profile beautifully. Consider a light dusting of toasted nuts for added crunch and aroma.
Storage & Make-Ahead Ideas
One of the most appealing traits of chocolate tiramisu cake is its excellent make-ahead potential. Because the flavors mingle and the layers tend to set over time, you can assemble and refrigerate the cake a day or two before you plan to serve it. A well-chilled cake often tastes more cohesive, with the layers harmonizing as the filling settles and the top glaze firming up just enough to give a satisfying snap when sliced. If you need to store leftovers, tightly wrap or cover the cake and refrigerate for up to several days. For longer storage, you can freeze individual slices or the whole cake, ensuring it is well wrapped to protect against freezer burn and the absorption of other odors. When ready to serve, thaw in the refrigerator for several hours or overnight to restore a clean, neat slice with the filling at its best texture. A gently warmed slice can also reveal a satisfying melty contrast between the cake and the filling, enhancing the overall sensation of indulgence.
Make-ahead strategies:
– Prepare the cake a day ahead, chill overnight, and glaze just before serving for a pristine finish.
– If you’re short on time, bake the cake layers in advance, wrap, and refrigerate; assemble and finish with the filling and glaze on the day you plan to serve.
Fun Facts & Trivia
- The name tiramisu translates to “pick me up,” a playful nod to the dessert’s coffee-forward character and its uplifting effect when enjoyed after a meal.
- While tiramisu originated in the Veneto region of Italy, many households have their own signature twists—some with extra layers, others with unique finishes—that make each version feel like a personal stamp.
- Chocolate, coffee, and cream are a timeless triumvirate that appears in many classic desserts; combining them into a layered cake is a modern reinterpretation that honors the best of both worlds: the bakery’s precision and the home kitchen’s warmth.
- The glossy finish on many chocolate tiramisu cakes owes its gloss to a well-made ganache or glaze, which not only looks stunning but also seals in moisture, ensuring the cake stays luscious from first slice to last.
- Texture and temperature play a crucial role in how this dessert is perceived. A slightly chilled slice tends to feel firmer and more defined, while a slightly warmer slice reveals the creamy interior more vividly, highlighting the contrast that makes this dessert so beloved.
- In some traditions, a dusting of cocoa is used as a final flourish—not just for flavor, but to evoke the visual cue of a freshly minted dessert—reminding guests to savor not only the taste but the artistry of the dish.
Ingredients
Chocolate tiramisu cake
- 1 3/4 cups all-purpose flour (220 g)
→ Provides the main structure and crumb of the cake. Sift with the cocoa powder to distribute evenly and prevent lumps; spoon the flour into the cup and level off for accurate measurement. If you need a gluten-free version, substitute with a 1:1 gluten-free baking blend designed for cake making (check the blend’s xanthan gum content). For best results, avoid over-mixing once the wet and dry ingredients come together to keep the crumb tender. - 3/4 cup unsweetened cocoa powder (75 g)
→ Imparts rich chocolate flavor and color to the batter. Dutch-processed cocoa gives a smoother, less acidic flavor and darker color, while natural cocoa can yield a livelier chocolate taste; both work, but may affect leavening slightly. Sift with the flour to prevent lumps and ensure even distribution. If you want an extra intense chocolate note, you can replace a portion with melted chocolate added to the wet ingredients. - 1 cup granulated sugar (200 g)
→ Acts as the primary sweetener and, in combination with fat, helps create a tender crumb. When using melted butter in the batter, there is no butter creaming step, so whisk the sugar with the eggs (and the cooled butter) to help with emulsification and to promote a lighter texture. If you prefer, you can substitute part of the sugar with brown sugar for a deeper flavor. - 2 large eggs
→ Provide moisture, structure, and stability to the batter through emulsification. Bring eggs to room temperature to help them blend smoothly with the melted butter and other ingredients. Beat them briefly to blend, then add to the wet mixture just until combined to avoid toughness in the crumb. - 1/2 cup unsalted butter, melted and cooled (115 g)
→ Adds richness and tenderness to the cake crumb. Use melted butter for a fudgy, moist texture; ensure it is cooled to lukewarm before mixing to prevent scrambling the eggs. If you prefer oil, you can substitute with a neutral oil at the same amount, which can yield a more tender, moister crumb. - 1/2 cup milk (120 ml)
→ Contributes moisture and tenderness; whole milk yields a richer crumb, while skim works but may produce a drier result. If you’re avoiding dairy, use almond milk or soy milk with 1 teaspoon additional oil per cup to mimic fat content. Ensure the milk is at room temperature or only slightly warm to keep the eggs from seizing. - 1/2 cup strong espresso or coffee, cooled (120 ml)
→ Intensifies chocolate flavor and adds a subtle bitter balance to the sweetness. Use cooled espresso to prevent cooking the eggs or compromising the batter chemistry. For a non-coffee version, substitute with hot water plus an extra tablespoon of cocoa powder for depth, but you’ll lose the tiramisu signature aroma. - 2 tsp vanilla extract (10 ml)
→ Enhances overall aroma and depth of flavor. Real vanilla (madagascar vanilla) is preferred for a pronounced fragrance; if using imitation vanilla, the taste will be milder. Add with the wet ingredients so it can mingle evenly throughout the batter. - 2 tsp baking powder (8 g)
→ Primary leavening agent that helps the cake rise and stay tender. Ensure the powder is fresh for maximum lift. Sift together with the dry ingredients to evenly distribute and prevent uneven pockets of leavening in the batter. - 1/2 tsp baking soda (2.5 g)
→ Works with the cocoa’s acidity to help the batter rise and contribute to a lighter crumb. If you use natural cocoa, baking soda can help balance the acidity; if you switch to all Dutch-processed cocoa you may omit this or use a smaller amount. Be careful not to overmeasure, as too much soda can give a metallic aftertaste. - 1/4 tsp salt (1.4 g)
→ Enhances the sweetness and intensifies chocolate flavor by balancing the humectants and acids in the batter. Even a small amount helps the other flavors pop. Use fine grain salt for even distribution.
Coffee soak
- 1 cup strong espresso or coffee, cooled (240 ml)
→ Soaks the cake layers to keep them moist and infuse a concentrated coffee flavor characteristic of tiramisu. Always use cooled coffee to avoid mixing issues with the mascarpone filling. If you want a milder finish, dilute with a small amount of water; for a stronger kick, use a touch of coffee liqueur in place of part of the liquid. - 2 tbsp granulated sugar (25 g)
→ Sweetens the soak to balance the coffee’s bitterness. You can adjust up or down depending on how sweet you like the final cake, and you can substitute with superfine sugar for quicker dissolution if you’re using coarse-grained coffee. - 1-2 tbsp coffee liqueur or dark rum, optional (15-30 ml)
→ Adds depth and the classic tiramisu aroma. The alcohol helps carry the coffee flavor into the cream while keeping the cake moist. Omit for a non-alcoholic version, or replace with an additional teaspoon vanilla and a pinch of instant espresso powder for aroma.
Mascarpone cream
- 1 1/2 cups mascarpone cheese, softened (340 g)
→ The creamy, indulgent base of the tiramisu filling. Let mascarpone come to room temperature so it blends smoothly with the whipped cream and sugar, avoiding lumps. If mascarpone is very stiff, whisk briefly to loosen before mixing with other ingredients. - 1 cup heavy cream, cold (240 ml)
→ Whips into light, airy peaks to fold into the mascarpone for a fluffy filling. Keep the cream very cold and whisk just to soft or medium peaks to avoid overbeating. Fold gently into the mascarpone to maintain volume without curdling. - 1/2 cup granulated sugar (100 g)
→ Sweetens the mascarpone mixture and helps balance the bitterness of the coffee. Dissolve completely into the mascarpone with the whipped cream to prevent gritty texture. If you prefer a less sweet filling, reduce by 1–2 tablespoons. - 2 tsp vanilla extract (10 ml)
→ Adds depth of flavor to the cream. Use pure vanilla extract for best aroma; if you’re using vanilla paste, reduce to taste to avoid masking chocolate notes. Stir in with the mascarpone and cream mixture before folding in the whipped cream. - 1-2 tbsp coffee liqueur or brandy, optional (15-30 ml)
→ Extra coffee aroma and a hint of warmth that complements the cake and soak. This is optional; if you omit, you can add an extra 1/4 teaspoon espresso powder to the cream for coffee depth instead.
Optional chocolate ganache
- 1/2 cup heavy cream (120 ml)
→ Heats up to create a smooth, glossy ganache that coats the cake for a luscious finish. Warm the cream gently until just steaming; avoid boiling to prevent scorching the chocolate. A pourable ganache will yield a sleek top, while a thicker ganache will create a more prominent layer. - 3/4 cup dark chocolate chips or chopped chocolate (120 g)
→ Provides rich chocolate flavor and a silky texture when melted with the cream. Finely chop chips to speed melting and ensure a smoother ganache. For a more pronounced chocolate flavor, use a higher percentage cocoa chocolate. - 1 tbsp unsalted butter (optional) (14 g)
→ Adds shine and a velvety texture to the ganache. Butter is optional; omit if you prefer a vegan or dairy-free ganache. If using, whisk the butter in at the end until glossy and smooth.
Toppings
- Cocoa powder for dusting, to taste
→ Classic tiramisu finish. Dust lightly to avoid overpowering the chocolate, and wipe off any excess from the plate edges for a clean presentation. Use a small fine-mesh sieve for an even layer. - Chocolate shavings or curls for topping (optional)
→ Finishing touch for visual appeal and extra chocolate flavor. Store chocolate in a cool, dry place and shave with a vegetable peeler just before serving to keep them crisp. If you’re serving the cake soon after assembly, small curls hold their shape best.
Instructions
- Preheat your oven to 350°F (175°C) and prepare two 9-inch (23 cm) round cake pans by greasing the sides and lining the bottoms with parchment rounds; set pans on a rack to maintain even heat.
→ This ensures the cakes rise evenly, release cleanly, and build flat, level layers for stacking the tiramisu cake. - Sift together 1 3/4 cups all-purpose flour and 3/4 cup unsweetened cocoa powder with 2 teaspoons baking powder, 1/2 teaspoon baking soda, and 1/4 teaspoon salt in a medium bowl; whisk until the dry ingredients are uniform.
→ Sifting breaks up cocoa and flour lumps, distributes leavening evenly, and prevents streaks that can cause uneven crumb. - In a separate large bowl, whisk 2 large eggs with 1 cup granulated sugar until the mixture is pale, thick, and ribbons slowly when the whisk is lifted.
→ This aerates the batter, helping tender crumb and easier emulsification later. - Whisk in 1/2 cup melted and cooled unsalted butter, 1/2 cup milk, 1/2 cup strong espresso or coffee, and 2 teaspoons vanilla extract until the mixture is smooth and fully integrated.
→ The cooled fat prevents cooking the eggs and helps create a cohesive emulsion for moisture and structure. - Add the dry ingredients to the wet mixture in three additions, folding gently with a spatula after each addition until the batter is just combined with no visible flour pockets.
→ Overmixing develops gluten and makes the crumb tough; stopping as soon as the batter comes together yields a tender, light texture. - Divide the batter evenly between the prepared pans and tap each pan firmly on the counter a few times to release trapped air, then bake for 25–30 minutes, rotating pans halfway through.
→ Even distribution of heat and air release ensures uniform rise; test doneness with a wooden skewer or toothpick inserted in the center—it should emerge with a few moist crumbs, not wet batter. - Cool the cakes in their pans for 10 minutes, then invert onto a wire rack and allow to cool completely before assembling.
→ This prevents steam from moistening the crust, helps maintain level tops, and makes the cakes easier to soak and fill. - Prepare the coffee soak by whisking together 1 cup cooled espresso or strong coffee with 2 tablespoons granulated sugar and, if using, 1–2 tablespoons coffee liqueur or dark rum; set aside and let the sugar dissolve.
→ Dissolved sugar ensures even sweetness and avoids gritty texture; cooled coffee prevents softening the mascarpone later. - Make the mascarpone cream by beating 1 1/2 cups mascarpone cheese with 1/2 cup granulated sugar and 2 teaspoons vanilla extract until the mixture is smooth and creamy.
→ This forms the strongly flavored base; softening the mascarpone beforehand prevents lumps and ensures a luxurious texture. - Whip 1 cup heavy cream to soft peaks in a chilled bowl, then fold the whipped cream into the mascarpone mixture until just combined; if desired, fold in 1–2 tablespoons coffee liqueur or brandy after the cream is incorporated.
→ Folding preserves the airiness from the whipped cream for a light, mousse-like filling; avoid overfolding to prevent deflation. - Once the mascarpone and whipped cream are united, briefly whip again if necessary to ensure a smooth, even consistency, then refrigerate the mixture while you finish assembly.
→ Keeping the filling cold helps it set quicker when layered and makes it easier to spread evenly. - If you choose ganache, heat 1/2 cup heavy cream until it just begins to steam, pour over 3/4 cup dark chocolate chips or chopped chocolate, and whisk until smooth; whisk in 1 tablespoon butter if using for shine, then set aside to cool to pourable but not thick.
→ Do not let the cream boil, as overheating can cause a greasy ganache and scald the chocolate; finely chopped chocolate melts faster for a glossy finish. - To assemble, place one cake layer on a serving plate, brush generously with the coffee soak using a pastry brush, then spread an even layer of mascarpone cream over the surface.
→ The soak hydrates the cake and infuses coffee flavor; a generous but even layer of cream creates the classic tiramisu texture between layers. - Place the second cake layer on top, press gently to seat, then brush the top surface with more coffee soak and spread the remaining mascarpone cream over the top and sides with an offset spatula for a smooth finish.
→ Proper alignment and gentle pressure prevent shifting; a clean edge helps achieve neat presentation after chilling. - If using ganache, pour the cooled ganache over the top, letting it flow to the edges and smooth it with a spatula to cover the top and sides; allow the glaze to set at cool room temperature or refrigerate briefly.
→ A thin, even coat provides a glossy finish and helps the surface stay intact as the cake is sliced. - Chill the assembled cake for at least 2 hours, or overnight for deeper flavor and easier slicing, loosely covered; this helps the layers set and flavors meld.
→ Chilling firms the mascarpone filling and stiffens the ganache if used, resulting in clean, neat slices. - Before serving, dust the top lightly with cocoa powder and, if desired, scatter chocolate shavings or curls for visual appeal and extra chocolate aroma.
→ Cocoa dusting recalls traditional tiramisu; chocolate curls add texture and a crisp bite when cutting.
Notes
This chocolate tiramisu cake is a rich, multi-layer dessert featuring espresso-soaked chocolate sponge and a dreamy mascarpone cream. The batter relies on melted butter for a fudgy crumb, dark cocoa for depth, and a hint of vanilla for warmth, while the coffee soak keeps every slice moist and aromatic.
You can customize it by adjusting the coffee intensity: increase the espresso in the soak for a stronger tiramisu aroma or dilute with water for a milder finish. Add a splash of coffee liqueur or brandy to the mascarpone cream for extra depth, or skip the alcohol for a family-friendly version.
For a glossy finish, make a simple ganache by warming heavy cream and pouring it over chopped dark chocolate, then whisking in a little butter at the end. Alternatively, dust the top with cocoa powder and scatter chocolate shavings or curls for a classic look.
Make-ahead and storage: Bake the sponge, assemble with the soaked layers and mascarpone filling, and refrigerate for several hours or overnight to allow flavors to meld. The assembled cake freezes well wrapped tightly; thaw in the fridge before serving.
Gluten-free option: If needed, substitute the all-purpose flour with a 1:1 gluten-free cake blend designed for cakes (check xanthan gum content) and ensure all other ingredients are certified gluten-free.
Tips
Tips for Chocolate Tiramisu Cake
Cake batter and baking tips
Coffee soak tips
Mascarpone cream tips
Optional chocolate ganache tips
Toppings and finishing tips
FAQ
Chocolate tiramisu cake — FAQ
What is chocolate tiramisu cake?
Chocolate tiramisu cake is a layered dessert inspired by classic tiramisu. It typically features chocolate sponge or cake layers, espresso-soaked layers, and a rich mascarpone cream, finished with a dusting of cocoa and chocolate shavings.
What ingredients do I need for the classic version?
Key components include:
- Chocolate sponge or cake layers (or ladyfingers if you prefer)
- Espresso or strong coffee (cooled)
- Mascarpone cheese
- Heavy cream (or dairy-free whipped cream)
- Powdered sugar and vanilla
- Optional liqueur (Marsala, coffee liqueur, or rum)
- Cocoa powder and dark chocolate for dusting/shavings
Can I make this without alcohol?
Yes. Omit the liqueur entirely or replace it with extra espresso/strong coffee or a splash of vanilla extract for flavor. The dessert will still be rich and flavorful.
Do I need to bake a sponge or can I use store-bought components?
Both options work. You can bake a chocolate sponge and layer it, or use store-bought ladyfingers or a pre-made chocolate cake as the base. If using ladyfingers, dip briefly in coffee to moisten them.
How do I assemble the cake?
1) Prepare espresso soak and mascarpone cream. 2) Layer sponge or biscuits in your pan, brush with coffee. 3) Spread mascarpone cream over the layer. 4) Repeat layering and finish with a thick cream layer. 5) Sift cocoa on top and add chocolate shavings. 6) Chill until set.
How long does it need to chill and set?
For best results, chill for at least 4–6 hours, or overnight. This helps the layers firm up and makes slicing neat.
Can I make this ahead for a party?
Yes. You can prepare the components 1–2 days in advance and assemble the cake the day you plan to serve it. Keep it refrigerated, tightly covered.
Is there a gluten-free version?
Absolutely. Use a gluten-free chocolate sponge or gluten-free ladyfingers, and ensure all added ingredients (like cocoa) are certified gluten-free. Check labels on mascarpone and chocolate as well.
Can I make a vegan version?
Yes. Use a dairy-free mascarpone substitute (such as blended silken tofu with cocoa or store-bought vegan cream cheese), dairy-free whipped cream, and a vegan chocolate. For the soak, use almond milk or coconut milk with coffee; you can also use aquafaba to replace eggs if needed.
How should I store leftovers?
Store covered in the refrigerator. Consume within 2–3 days for best texture and flavor. Keep the cake well-wrapped to prevent the top from drying out.
Can I freeze the cake or its components?
You can freeze unassembled components or the fully assembled cake. Wrap well and freeze for up to 1–2 months. Thaw in the refrigerator overnight before serving; dust with cocoa again if needed.