Introduction / Hook
Imagine a dawn-kissed kitchen, the stovetop warming with the soft, butter-scented sigh of pastry. A tray of Brown Sugar Pop Tarts slides from the oven, their edges crisping to a delicate golden lace while the center remains tender and melt-in-your-mouth. The air is perfumed with caramel-brown sugar, a whisper of vanilla, and just a hint of cinnamon that sparks anticipation with a single inhalation. These homemade toaster pastries are not merely a breakfast treat; they’re a warm invitation to slower mornings, a memory remix that takes the familiar and elevates it into comfort on demand. With a flaky, buttery crust and a cinnamon-kissed brown sugar filling that crackles softly at the first bite, these Pop Tarts deliver both nostalgia and novelty in every mouthful. They’re the kind of pastry that makes coffee taste better, conversation flow easier, and the day feel a touch brighter before it has even begun.
Brown Sugar Pop Tarts are a celebration of contrast—crisp, lightly toasted edges meeting a soft, chewy center; a sweet, caramelized center balancing with a touch of warmth; a homemade treasure that tastes indulgent yet approachable. They invite you to take pride in a classic concept reimagined with simple pantry ingredients, patience, and a little bit of whimsy. Whether you’re planning a weekend brunch, packing a nostalgic lunch, or simply craving a comforting treat to pair with a mug of coffee, these pastries offer a portable, family-friendly indulgence that is as satisfying to make as it is to eat.
In the pages that follow, you’ll discover the story behind this beloved pastry, why it resonates across kitchens and generations, and how this brown sugar twist turns everyday mornings into a tiny, delicious celebration. You’ll also find ideas for flavor explorations, substitutions for dietary needs, and practical tips for make-ahead magic. The goal is not only to guide you to a perfect batch but to inspire you to embrace the ritual of baking something comforting and delicious from scratch—starting with a sheet of shyly glowing pastry and a center that tastes like sunshine and caramel at the same time.
The Story Behind the Dish
Pop-Tarts, in their modern form, arrived on American breakfast tables in the 1960s, a marriage of convenience and whimsy that turned the ordinary morning into a tiny, portable treat. They were born from a desire to bring a toaster-friendly pastry to busy households—a snack that could travel, reheat, and still feel special. The original fillings leaned toward fruit preserves, cocoa, and other crowd-pleasers, but the concept quickly evolved into a canvas for countless flavors and riffs. Among these riffs, brown sugar emerged as a timeless favorite—crowned by cinnamon and softly vanilla-tinged edges—creating a filling that feels at once familiar and indulgent.
The brown sugar filling has deep roots in comfort cooking, where the simple magic of sugar, butter, and warm spices conjures an aroma that invites lingering in the kitchen. When you take that filling and pair it with a flaky pastry crust, you’re tapping into a sensory memory that most people carry: mornings spent with a warm pastry, a favorite mug, and the slow, satisfying rhythm of breakfast beginning to the day. This recipe for Brown Sugar Pop Tarts is a modern homage to that nostalgia—an homage that honors the practicality of toaster pastries while elevating them with a homemade crust, a richer, more complex filling, and a touch more care in each layer.
Personal anecdotes abound in kitchens around the world where sweet breakfasts meet a dash of improvisation. Some families remember a grandmother’s brown-sugared glaze brushed over pastry, others recall a Saturday morning when friends gathered, trading stories as the oven hummed. The beauty of this dish lies in its ability to bring people together through a shared bite—whether that bite is the first of many on a weekend morning or a single, treasured treat to brighten a busy weekday. The Brown Sugar Pop Tart becomes a vehicle for connection: a ritual, a memory, and a small celebration of home that travels as smoothly as the pastry itself.
Why You’ll Love This Recipe
- Quick, reliable comfort: This recipe is designed for home cooks who crave something comforting yet doable within a morning timetable.
- Homemade with a premium feel: From-scratch pastry elevates the experience beyond store-bought toaster pastries.
- Sweet, caramelized center: A brown sugar filling with hints of cinnamon offers a warm, luscious bite that feels like a hug in pastry form.
- Textural contrast: Flaky, lightly crisped edges surround a soft, chewy center, creating a satisfying mouthfeel in every bite.
- Customizable to suit diets and preferences: Vegan, gluten-free, or dairy-free adaptations are easily incorporate-able without sacrificing flavor.
- Make-ahead possibilities: Freeze components or assembled pastries for quick future breakfasts or snacks.
- Perfect for gatherings: A tray of Brown Sugar Pop Tarts makes a visually appealing, shareable treat for brunches or informal celebrations.
- Kid-friendly and adult-approved: Nostalgia meets versatility, making it a hit across ages and tastes.
Beyond the surface sweetness, this recipe encourages you to savor the process—the rolling, the filling, the gentle patience of a low oven that allows caramel to develop and the crust to achieve that delicate balance between flakiness and tenderness. The result is not merely a pastry; it’s an invitation to slow down, breathe in the comforting aroma, and savor the little moments of home that breakfast can offer.
Flavor Profile & Texture
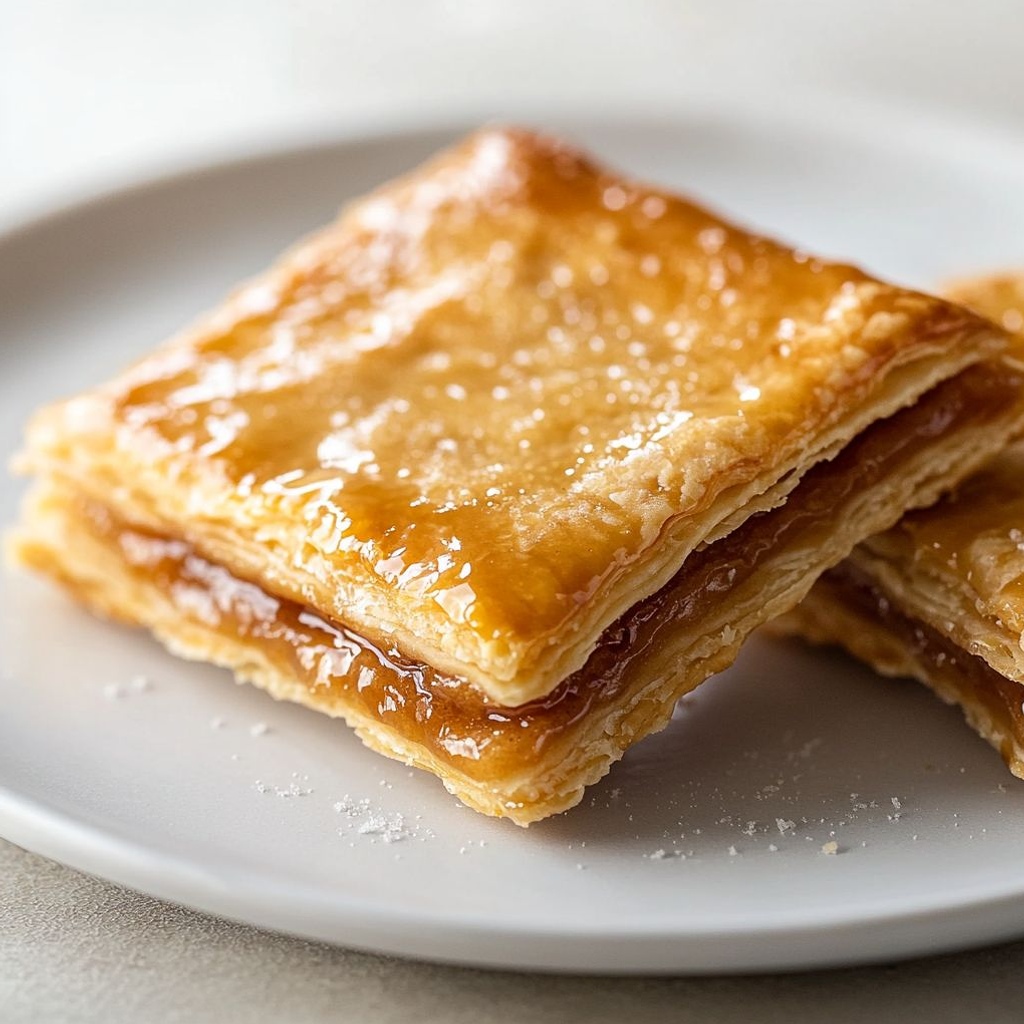
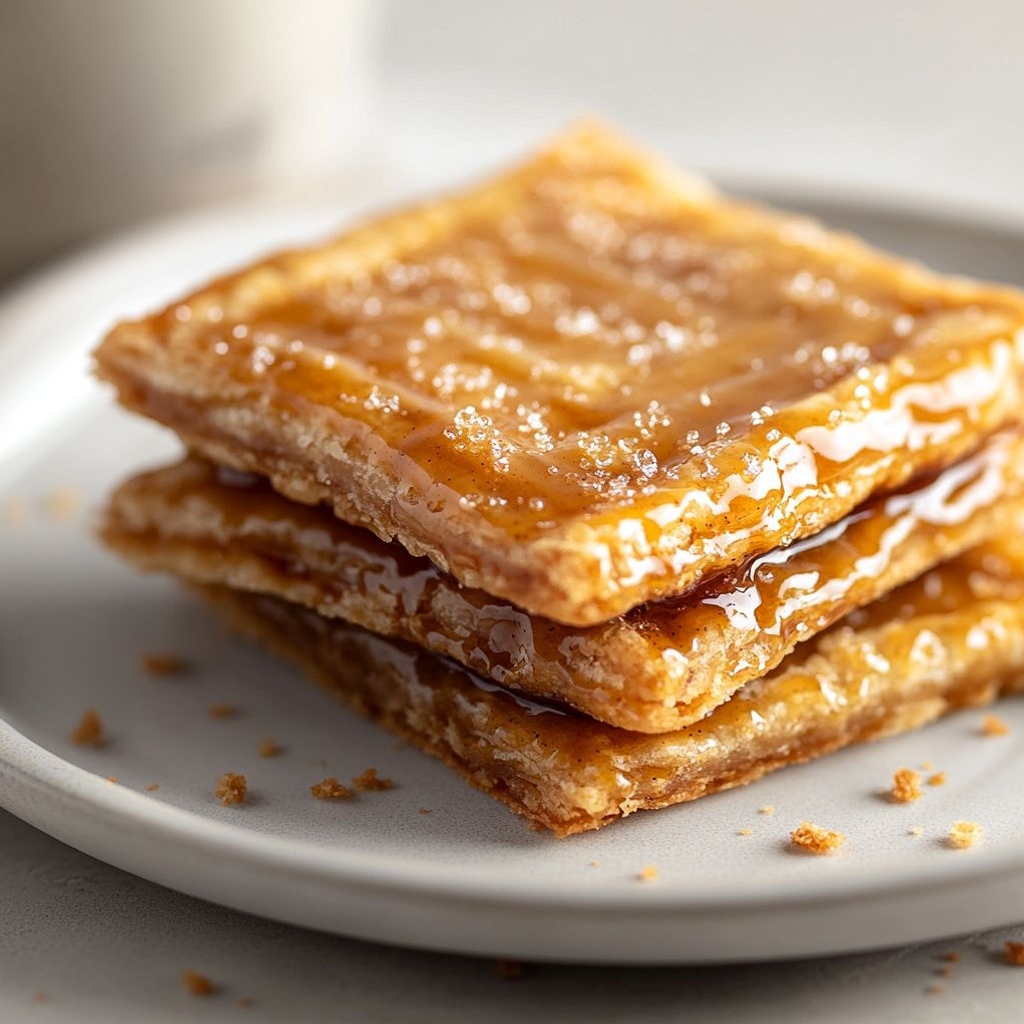
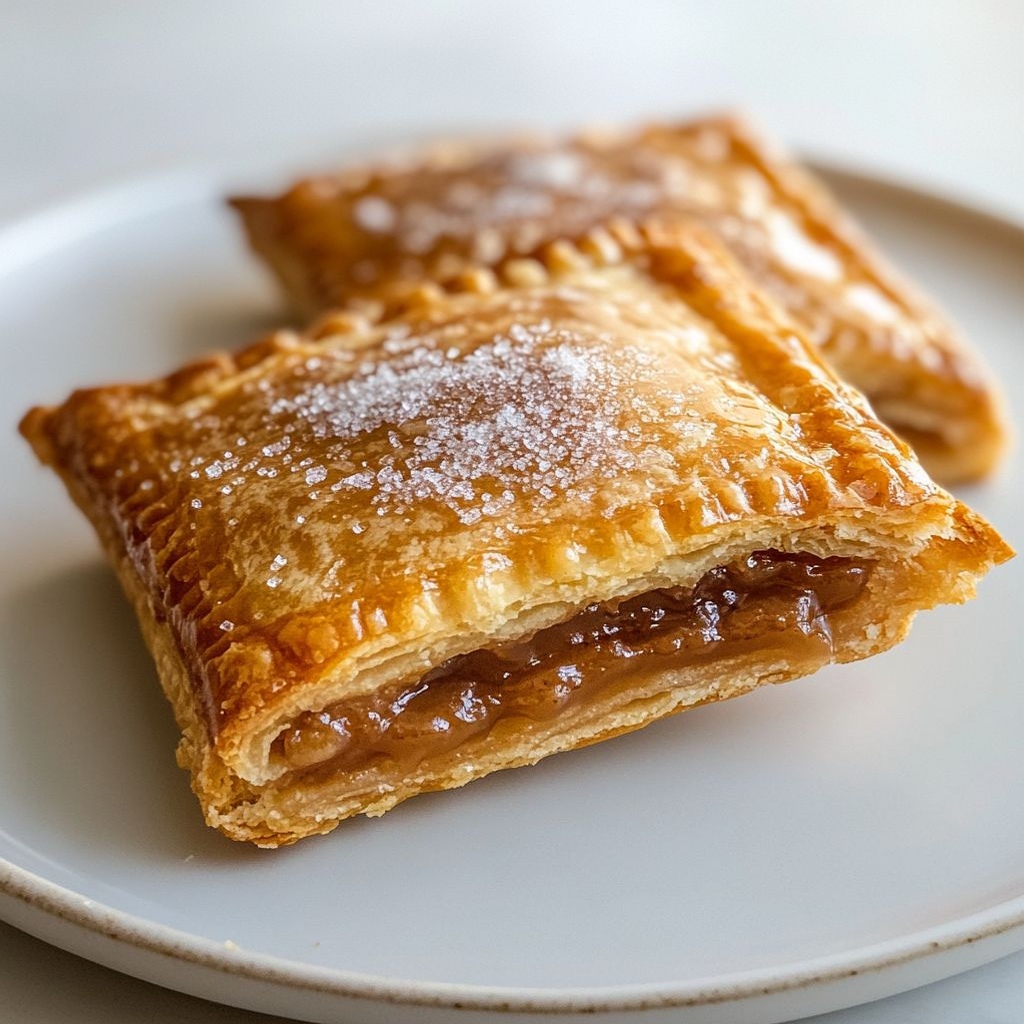
The star of Brown Sugar Pop Tarts is the interplay between a crisp, golden crust and a soft, pillowy interior. The crust carries a whisper of vanilla and a light dusting of sugar that gives a faint crackle when you bite into it. As you bite deeper, the filling reveals itself: a luscious, buttery brown sugar mixture infused with cinnamon that coats the tongue with warmth and a delicate molasses-like depth. The taste is reminiscent of caramel apples and molasses cookies—comforting, caramel-forward, and just a touch toasty from the oven.
Texturally, you experience several layers at once. The outer crust is crisp and pleasantly firm, providing a sturdy vehicle for the filling. The interior pastry remains tender, almost sandwich-like, with enough structure to hold its shape when warmed. The brown sugar center is gooey but not runny, offering a satisfying chew that contrasts with the flaky crust. The subtle vanilla notes weave through the filling, brightening the caramel sweetness and giving the overall flavor a polished, confection-like finish without being overly sweet.
The aroma during baking is an essential part of the experience. As the sugar begins to melt and mingle with butter, the kitchen fills with scents of toasted pastry, caramelized sugar, and a hint of cinnamon that promises warmth. It’s the kind of fragrance that lingers long after the pastries are plated, turning morning rituals into a sensory celebration. When served warm, a gentle steam rises, releasing the toasty perfume and inviting you to dive in with a eager, contented bite.
Occasions & Pairings
Brown Sugar Pop Tarts are incredibly versatile, ideal for a range of occasions and pairings that make them suitable for both casual mornings and special moments.
- Weekday mornings: A comforting, quick-to-heat option that pairs beautifully with a mug of coffee, a glass of cold milk, or a warm chai.
- Brunch gatherings: Arrange on a platter with fresh fruit and a light yogurt dip for a crowd-pleasing center stage.
- Weekend treats: Bake a batch to share with family or friends, turning a simple morning into a small celebration.
- School or work lunches: A nostalgic, interesting option that travels well when kept in an airtight container.
- Holiday breakfasts: Pair with cinnamon-spiced beverages and holiday jams for a seasonal twist.
Pairings to consider:
- Cavorite—hot coffee with a touch of cream, for a classic balance of bitter and sweet.
- Cold milk or a vanilla milk latte, which complements the pastry’s sweetness and cuts through the richness.
- Autumnal beverages like spiced apple cider or a warm almond milk with nutmeg for a cozy pairing.
- Fruit compotes or whipped yogurt as a side to brighten the plate and add a tangy contrast.
- A light sprinkle of flaky salt on the pastry for a subtle, savory counterpoint that elevates the brown sugar complexity.
Tips, Variations & Substitutions
The beauty of this Brown Sugar Pop Tart recipe lies in its adaptability. Here are ideas to tailor the treat to your pantry, dietary needs, or creative mood.
Vegan & Dairy-Free Version
Swap in plant-based butter and dairy-free milk, and choose a vegan-friendly crust fat that yields a similarly flaky finish. Ensure the sugar remains granulated and avoid any milk-based glaze to keep the texture and sweetness in harmony.
Gluten-Free Option
Use a gluten-free all-purpose flour blend designed for pastries, paired with a touch more butter or a shortcrust binder if needed to help the dough hold together. Look for a blend that includes xanthan gum or add a small amount to mimic the elasticity of gluten.
Brown Sugar Filling Variations
For depth, add a splash of vanilla extract or a pinch of salt to the filling. A teaspoon of maple syrup can give extra warmth and a touch of complexity. If you crave a nuttier bite, fold in finely chopped toasted pecans or walnuts.
Regional Twists
Give the filling a local flair by adding a pinch of cardamom in place of cinnamon for a warm-spiced profile, or incorporate espresso powder for a coffee-kissed variation. In the southern United States, a hint of pecan or brown butter glaze can bring a deliciously indulgent finish.
Make-Ahead & Freezing Tips
Assemble the pastries, but do not bake. Freeze on a parchment-lined tray until solid, then wrap individually and store in a freezer-safe bag. When ready to bake, add a few extra minutes to the baking time and bake from frozen. If you prefer, bake the pastries first, cool completely, and freeze for quick reheating in the toaster or oven.
Storage & Make-Ahead Ideas
To enjoy these Brown Sugar Pop Tarts across busy weeks, consider the following storage and make-ahead strategies. The key is to protect the pastries from moisture and air, preserving their crisp edges and soft centers.
- Room temperature storage: Keep baked pastries in an airtight container for up to 2 days. For best texture, reheat gently in a toaster oven to restore the crisp edge.
- Refrigeration: If you must refrigerate, wrap individually and use within 3 days. Reheat thoroughly to revive the flaky crust.
- Freezing baked pastries: Freeze in a single layer on a sheet pan, then transfer to a freezer bag. Reheat directly from frozen in a toaster oven or conventional oven until warm and toasty.
- Make-ahead dough: Prepare the dough in advance, chill, and roll as needed for a quicker baking routine when you’re ready to fill and bake.
Storage and reheating tips can help you balance the desire for a fresh-baked experience with the realities of a busy schedule. The pastries maintain their charm even after cooling, but a quick reheat will revive that irresistible contrast of crust and filling.
Fun Facts & Trivia
– The concept of a toaster pastry exploded in popularity during the mid-20th century as households adopted fast, convenient breakfasts that could be prepared with minimal effort. The appeal of a warm, handheld treat that could be enjoyed on the go contributed to the enduring love for toasty pastries like Pop Tarts across generations.
– Brown sugar as a filling ingredient is beloved not only for its sweetness but for its caramel-like depth, which pairs especially well with cinnamon and vanilla. This combination conjures memories of holiday cookies, warm deserts, and the comforting aroma of a kitchen welcoming a new day.
– While the classic toaster pastry is often associated with bright fruit fillings, the brown sugar version taps into a different tradition—one that celebrates the richness of pantry staples and the joy of turning simple ingredients into something luxurious.
– Making pastries from scratch allows you to control sweetness, texture, and ingredients, turning a nostalgic item into a personalized dessert or breakfast that aligns with your dietary choices and flavor preferences.
Ingredients
Brown Sugar Pop Tarts
Dough
- 2 1/2 cups all-purpose flour (plus extra for rolling)
→ This is the base structure of the crust. Keeping the flour amount precise helps create a tender, flaky pastry when the butter is kept cold. Add a touch more flour if the dough is too sticky during rolling, but avoid overworking it to prevent toughness. - 1 teaspoon fine salt
→ Enhances the overall flavor by balancing sweetness and sharpening the savory notes in the crust. Fine salt disperses more evenly than coarse salt, ensuring consistent seasoning throughout the dough. - 2 tablespoons granulated sugar
→ A hint of sweetness in the crust that also aids in browning for a golden finish. You can reduce or omit if you prefer a more neutral crust, but a small amount helps with flavor and color. - 1 cup cold unsalted butter, cut into 1/2-inch cubes
→ Cold butter is essential for creating flaky, layered pastry. When the butter melts during baking, its steam creates pockets. Keep the butter cold by chilling the cubed pieces and working quickly with a pastry cutter or food processor to blend into sandy crumbs without fully incorporating the fat. - 1/4 to 1/2 cup ice water, plus more as needed
→ Hydrates the dough to bring it together without warming the butter. Add gradually; the dough should just come together and form a cohesive ball. Avoid adding too much water to prevent a sticky, tough crust. - 1 tablespoon white vinegar or lemon juice (optional, helps tenderize)
→ A small amount of acid helps relax the gluten slightly, producing a more tender crust. If using, mix with the ice water. This is optional but can improve texture when making pastry dough.
Filling
- 1 cup light brown sugar, packed
→ The primary sweet component of the filling, offering a rich caramel-like flavor. Packing the sugar ensures a strong, even sweetness. If you prefer a milder flavor, you can use a mix of brown and white sugar. - 2 tablespoons cornstarch
→ Thickens the filling as it bakes, preventing leaking through the seams and giving a glossy, jam-like texture. Cornstarch yields a smoother finish than flour; whisk it into the sugar before adding liquids for even distribution. - 1 teaspoon ground cinnamon
→ Classic pairing with brown sugar, adding warmth and complexity. Freshly ground cinnamon has a stronger aroma; use a high-quality spice for best flavor. Increase to 1 1/2 teaspoons if you love a stronger cinnamon note. - 1/4 teaspoon salt
→ Balances sweetness and enhances the depth of the spice and brown sugar. A pinch is enough to boost overall flavor without making the filling taste salty. - 2 tablespoons unsalted butter, melted and cooled
→ Adds richness and helps create a cohesive filling that clings to the crust. Ensure the butter is cooled to avoid cooking the sugar or cinnamon and altering the texture of the filling. - 1 teaspoon vanilla extract
→ Deepens the flavor and helps harmonize the brown sugar and cinnamon. Use pure vanilla for the cleanest, most pronounced aroma. If you prefer, you can substitute a pinch of almond extract for a subtle nutty note. - 2-3 tablespoons milk or water (to loosen, if needed)
→ Adjusts the filling consistency so it’s spreadable yet not runny. Add gradually and mix until the mixture looks cohesive and glossy, then test by spreading a little on a spoon to judge thickness.
Glaze and Finish
- 1 cup powdered sugar
→ Provides a smooth, sweet glaze that seals and decorates the tarts. Powdered sugar dissolves evenly and yields a shiny finish as it sets. If you like a thicker glaze, use a little less liquid; for a runnier glaze, add a touch more liquid. - 2–3 tablespoons milk or heavy cream
→ Controls the glaze consistency. Use milk for a lighter glaze or cream for a richer, velvety finish. Add gradually until you reach a coatable but not dripping consistency. - 1/2 teaspoon vanilla extract
→ Adds a subtle aroma to the glaze that pairs well with the brown sugar filling. If you used vanilla in the filling, this helps reinforce the vanilla note without overpowering the cinnamon. - Optional: a pinch of fine sea salt
→ A tiny amount can heighten the sweetness and give the glaze a balanced shine. Use only if you find the glaze tastes too sweet on its own. - Optional: melted dark or milk chocolate for drizzling
→ For an extra-decadent finish, drizzle chocolate over cooled tarts. Chocolate adds a glossy, candy-like shell and pairs beautifully with brown sugar and cinnamon. Let the glaze set fully before serving for clean slices.
Instructions
- Whisk together the dry dough ingredients: 2 1/2 cups all-purpose flour, 1 teaspoon fine salt, and 2 tablespoons granulated sugar in a large bowl until evenly distributed.
→ This ensures the salt and sweetness are evenly dispersed, preventing hotspots and contributing to a tender, uniform crust. - Cut in the cold butter: add 1 cup cold unsalted butter, cut into 1/2-inch cubes, and blend with a pastry cutter, two forks, or a food processor until the mixture resembles coarse crumbs with pea-sized pieces.
→ Cold butter creates flaky, laminated layers; avoid warming the butter as you work to maintain distinct pockets of steam during baking. - Drizzle in ice water and optional acid: add 1/4 to 1/2 cup ice water and 1 tablespoon white vinegar or lemon juice if using, then mix gently until the dough just starts to come together.
→ Water should be added gradually to prevent a gummy dough; the acid helps relax gluten for a more tender crust. - Turn and chill the dough: turn the mixture onto a lightly floured surface, gather into two rough disks, wrap tightly in plastic, and refrigerate at least 1 hour.
→ Chilling firms the fat, making the dough easier to roll and helping create crisp, defined layers when baked. - Prepare the filling base: whisk together 1 cup light brown sugar, 2 tablespoons cornstarch, 1 teaspoon ground cinnamon, and 1/4 teaspoon salt in a bowl until evenly combined.
→ Uniform mixing ensures consistent sweetness and thickening throughout the filling, preventing graininess or uneven viscosity. - Incorporate richness and aroma into the filling: stir in 2 tablespoons melted and cooled unsalted butter and 1 teaspoon vanilla extract, then add 2–3 tablespoons milk or water to loosen to a spreadable coherence.
→ The butter adds richness and helps the filling cling to the crust, while the liquid adjusts thickness so it spreads without running. - Roll one dough disk: on a lightly floured surface, roll the first disk to about 1/8 inch (3 mm) thickness, rotating the dough a quarter turn every few passes to maintain an even sheet.
→ A uniformly thin sheet ensures even baking and prevents undercooked centers or thick edges. - Cut dough into rectangles: trim and cut the rolled dough into even rectangles measuring roughly 3 by 5 inches; keep scraps cold for rerolling.
→ Consistent rectangle size guarantees uniform filling and sealing, which helps with even baking and presentation. - Assemble the tarts (bottom crust): spoon about 1 to 1.5 tablespoons of filling onto the bottom half of each rectangle, leaving a clean 1/4-inch border.
→ The border creates a seal, prevents leakage, and gives a neat edge once crimped. - Seal and enclose: brush a light ring of water around the border of each filled rectangle, top with a second rectangle, press the edges to seal, and crimp with a fork; trim any excess and ensure a tight seal.
→ A proper seal stops filling from oozing out during baking and helps maintain a crisp crust around the filling. - Chill the assembled tarts: place the formed tarts on a parchment-lined baking sheet and refrigerate for 15–20 minutes to set the fat and prevent spreading in the oven.
→ Chilling helps the crust hold its shape during baking, leading to crisper edges and well-defined tops. - Prepare to bake: while the tarts chill, preheat your oven to 350°F (175°C) and line a baking sheet with parchment for easy release.
→ Preheating ensures immediate heat application for even browning, while parchment prevents sticking and simplifies cleanup. - Bake the tarts: bake on the prepared sheet in the 350°F (175°C) oven for 22–28 minutes, rotating the sheet halfway, until the crust is golden brown and firm to the touch.
→ Proper browning signals a fully cooked crust; rotating ensures even oven heat distribution for uniform color. - Cool before glazing: transfer the baked tarts to a rack and let cool completely to room temperature, which prevents the glaze from melting off the surface.
→ Cooling firms the filling and crust, giving the glaze a smooth, glossy finish and easier handling. - Make the glaze: whisk together 1 cup powdered sugar with 2–3 tablespoons milk or heavy cream and 1/2 teaspoon vanilla extract, adding fine sea salt if desired for balance.
→ The glaze should be thick enough to coat without dripping, and the vanilla complements the brown sugar filling while the salt heightens the sweetness. - Glaze the tarts: brush a thin, even layer of glaze over the cooled tarts; let the glaze set completely before stacking or serving.
→ A thin glaze adheres well to the surface, dries to a smooth finish, and provides a sweet, appealing sheen. - Optional chocolate drizzle: melt dark or milk chocolate and drizzle in a slow, steady stream over the glazed tarts; allow the chocolate to set fully before serving.
→ The chocolate adds a candy-like finish, enhancing flavor contrast and visual appeal while the glaze underneath remains the primary sweetness. - Store or serve: once set, serve immediately or store in an airtight container at room temperature for up to 2 days, or refrigerate for longer shelf life.
→ Proper storage maintains crust crispness and prevents the filling from becoming soggy or the glaze from degrading.
Notes
These Brown Sugar Pop Tarts offer a flaky, buttery crust encasing a warm, cinnamon-spiked brown sugar filling for a comforting and nostalgic breakfast treat.
To maximize texture, keep all ingredients cold and handle the dough as little as possible; cut the cold butter into the flour until it resembles coarse crumbs, then add ice water just until the dough comes together.
Roll the dough between parchment sheets to about 1/8 inch thick and chill again before cutting into rectangles to preserve the layers during baking.
For the filling, whisk together light brown sugar, cornstarch, cinnamon, and salt, then stir in the cooled melted butter and vanilla with just enough milk or water to reach a spreadable, glossy consistency.
Assemble by placing a heaping teaspoon or more of filling on half of each dough rectangle, leaving a margin, brush the edges with a little water, seal with a fork, and poke small vents to prevent bursting.
Bake at a moderate temperature (about 375–400°F / 190–205°C) until the edges are golden, then let the pastries cool completely on a rack before glazing.
Make a glaze by whisking powdered sugar with milk or cream and vanilla; adjust with more sugar or liquid to reach a coating that is smooth but not runny.
Optional chocolate drizzle can be added once the glaze sets, for an extra-decadent finish.
Store cooled pastries in an airtight container for 2–3 days at room temperature, or freeze baked tarts for longer keeping; rewarm in a toaster oven for best texture.
If you want to customize, try adding a pinch of nutmeg or using almond extract in the filling or glaze, and consider using whole-grain pastry for a nuttier bite.
Tips
Tips for Preparing the Dough
- Keep the butter very cold and cut into 1/2-inch cubes. Cold butter creates flaky, laminated layers as it melts during baking. Work quickly and chill the dough if it begins to feel warm.
- Work the flour, salt, and sugar just until the mixture resembles coarse crumbs with pea-sized bits of butter. Overworking the dough can develop gluten and make the crust tougher.
- Hydrate the dough gradually with ice water. Start with 1/4 cup and add 1–2 tablespoons at a time until the dough just comes together. If the dough is sticky, dust with a little flour and chill for 20–30 minutes.
- Optionally add a small amount of white vinegar or lemon juice to the ice water to help tenderize the gluten. If used, mix it with the water before adding to the dough.
- Chill the dough well after mixing (at least 1 hour). A cold crust holds its shape during rolling and helps achieve clean edges when sealing the tarts.
- Roll between lightly floured surfaces or between parchment sheets to prevent sticking. Aim for an even thickness (about 1/8 inch / 3 mm) to ensure uniform baking.
- If the dough cracks or cracks at the edges, patch with a small piece of dough and press to seal. Keep a little water handy to help seal gaps.
Tips for the Filling
- Pack the light brown sugar well to ensure a rich, even filling. If you prefer a lighter filling, balance with a portion of white sugar.
- Whisk the cornstarch into the sugar before adding liquids to prevent lumps and achieve a glossy, jam-like texture.
- Freshly ground cinnamon has the strongest aroma. Use 1 teaspoon for a balanced warmth, or up to 1 1/2 teaspoons for a bolder cinnamon presence.
- Salt helps balance sweetness—just a pinch is enough to deepen flavor without making the filling taste salty.
- Use melted and cooled butter to add richness and help the filling cling to the crust without becoming greasy.
- Mix in the vanilla extract to enhance the harmony between brown sugar and cinnamon. If you like a nutty note, a tiny pinch of almond extract works well.
- To adjust consistency, mix in 2–3 tablespoons milk or water gradually. The filling should be spreadable but not runny; test by spooning a bit onto a cold plate to check thickness.
- Let the filling rest for a few minutes after mixing; this helps the cornstarch hydrate and the flavors bloom for a more cohesive texture.
Tips for the Glaze and Finish
- Sift the powdered sugar to remove lumps, giving you a smoother glaze that coats evenly.
- Begin with 2 tablespoons of milk or cream and add more as needed to reach a glaze that coats the back of a spoon but doesn’t run off the tart.
- Flavor the glaze with vanilla extract to echo the filling. A tiny pinch of finely grated citrus zest can brighten the glaze if you like a zing.
- For a balanced shine, consider a light pinch of fine sea salt in the glaze. It enhances sweetness without dulling the glaze’s sheen.
- Chocolate drizzle is a lovely finish. Drizzle only after the glaze sets completely for clean slices and a glossy finish.
Tips for Assembly, Baking, and Storage
- Chill the assembled tarts briefly before baking to help the pastry hold its shape and reduce butter leakage in the oven.
- Vent the tops (cut slits or small holes) to allow steam to escape and prevent bursting.
- Line your baking sheet with parchment or a silicone mat for easy release and cleanup.
- Rotate the baking sheet halfway through baking for even browning and to avoid hotspots.
- Let the tarts cool completely before applying glaze for a neat finish and to prevent the glaze from sliding off.
- Store baked tarts in an airtight container at room temperature for a couple of days, or freeze unfrosted for longer storage. Freeze on a tray first, then wrap tightly to maintain flakiness and prevent freezer burn.
Flavor Variations and Quick Tweaks
- For a more pronounced caramel flavor, add a pinch of molasses or use a darker brown sugar in the filling.
- To keep the crust extra tender, consider resting the dough in the refrigerator for 1–2 hours or overnight, then bring to room temperature briefly before rolling.
- If you prefer a stronger vanilla note, increase the vanilla extract in both the filling and the glaze by 1/4 teaspoon.
FAQ
Brown Sugar Pop Tarts — FAQ
What are Brown Sugar Pop Tarts?
Brown Sugar Pop Tarts are homemade handheld pastries with a flaky crust and a warm brown sugar cinnamon filling. They’re rolled, sealed, baked until golden, and often finished with a sweet glaze. They’re a from-scratch twist on the classic toaster pastry.
What ingredients do I need for the crust and filling?
For the crust (approximately 8 pastries):
- All-purpose flour
- Cold unsalted butter
- Granulated sugar
- Salt
- Ice-cold water
For the filling:
- Brown sugar
- C ground cinnamon
- Cornstarch (to help thicken)
- A pinch of salt (optional)
For the glaze (optional but classic):
- Powdered sugar
- Milk or dairy-free milk
- Vanilla extract
Can I use store-bought crust to speed things up?
Yes. You can use store-bought pie crust or puff pastry to save time. Roll or cut the dough into rectangles, then fill, seal, and bake as you would with homemade dough. Keep in mind store-bought crusts may have different thickness and sealing behavior, so you may need to adjust filling amount and sealing technique.
How do I assemble and seal the pastries?
Steps in brief:
- Roll out the crusts and cut into rectangles.
- Mix the brown sugar filling and place a line on half of each rectangle, leaving space at the edges.
- Brush the edges with water or an egg wash.
- Fold to seal and crimp the edges with a fork.
- Vent the tops with a couple of small slits and chill for 15–30 minutes if possible to help seal.
What baking temperature and time should I use?
Preheat to 375°F (190°C). Bake 18–22 minutes, or until the pastries are golden brown and the filling is bubbling slightly. Let them cool on a rack before glazing.
How do I make the glaze, and can I skip it?
Whisk together powdered sugar with a little milk and vanilla until you reach a pourable consistency. Drizzle over cooled pastries. If you skip the glaze, you can dust with cinnamon-sugar instead or leave them plain for a simpler look.
How should I store leftovers and can I freeze them?
Store at room temperature in an airtight container for 2–3 days. For longer storage, refrigerate for up to 5 days (note: refrigeration can alter texture). Freeze for up to 2–3 months. Wrap individually and place in a freezer-safe bag or container. Reheat in the oven or toaster oven until warm.
Can I freeze unbaked pastries?
Yes. Assemble the pastries on a parchment-lined tray and freeze until solid, then transfer to a freezer bag. You can bake them from frozen; add 3–5 extra minutes to the baking time and watch for a golden crust.
What are good substitutions or variations (gluten-free, vegan, etc.)?
Variations to try:
- Gluten-free: Use a 1:1 gluten-free flour mix with a little xanthan gum if needed; keep fat and moisture balanced for a tender crust.
- Vegan: Use vegan butter and non-dairy milk; ensure the glaze uses a dairy-free powdered sugar and milk option.
- Brown sugar substitutes: Lightly adjust cinnamon or add a pinch of nutmeg or cardamom for a different spice note.
- Add-ins: A sprinkle of chopped pecans or a thin line of cinnamon-sugar crumble in the filling.
What are common problems and how can I troubleshoot them?
Tips:
- Filling leaks: Use less filling, chill the dough before sealing, and ensure edges are well sealed.
- Dough cracking or tearing: Keep dough cold, handle as little as possible, and re-roll with light dusting of flour; if it tears, patch with a small piece of dough and seal.
- Crust too pale or underbaked: Ensure dough is cold, oven properly preheated, and bake a little longer at a lower temperature if necessary.
- Glaze too thick: Add a bit more milk; glaze too thin: add a touch more powdered sugar.
Can I bake these pastries ahead for a brunch or event?
Yes. Bake and cool completely, then store as directed. Reheat in a 350°F (175°C) oven for 5–8 minutes, or until warm and flaky. Glaze right before serving for best appearance.