Introduzione / Hook
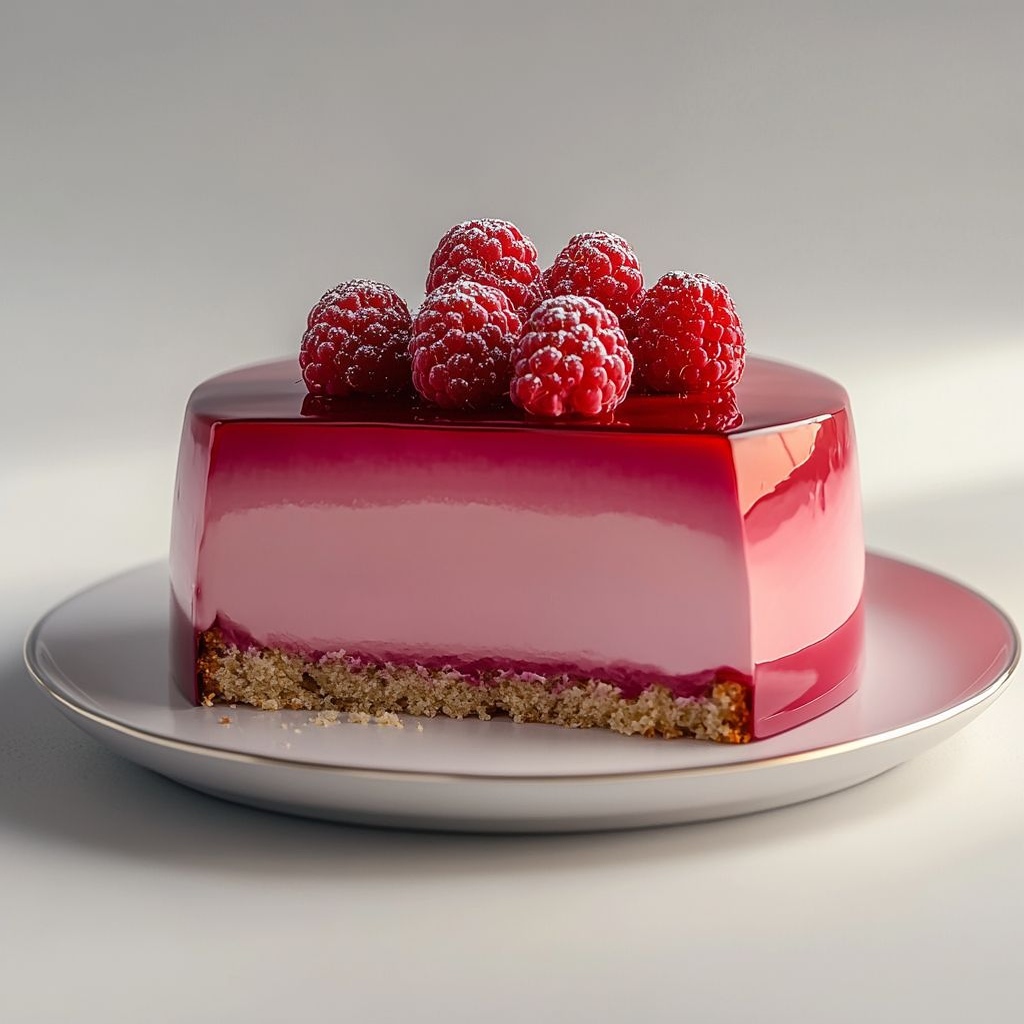
Immagina una fetta luminosa che sembra catturare la luce in mille riflessi di rubino: una torta che nasce dall’incontro tra la delicatezza di una mousse soffice e la freschezza pungente dei lamponi maturi. La Torta mousse ai lamponi è un viaggio sensoriale, una piccola fuga estiva che si avvolge di crema vellutata, di note agrumate e di una base che risuona di croccantezza sottile. Ogni morso è un equilibrio perfetto tra morbidezza e vivacità: la mousse si scioglie al contatto della lingua, lasciando una scia di profumo di frutti di bosco, mentre la base—leggera, friabile, quasi spumosa—ora ricorda una dolce memoria di biscotto, ora un abbraccio croccante. Se stai cercando qualcosa di capace di rendere speciale una merenda, una cena informale o un dessert di festa, questa torta è la risposta: raffinata quanto basta per impressionare, ma accogliente come una chiacchierata tra amici. E non è solo un dolce: è un racconto di contrasti che si completano, una piccola sinfonia di colori, aromi e consistenze che trasformano ogni boccone in un momento di gioia condivisa. Lasciati guidare dall’assaggio, e scopri perché questa torta mousse ai lamponi è diventata una presenza fissa sulle tavole estive, sulle occasioni speciali e sulle serate in cui vuoi offrire qualcosa di memorabile senza complicarti la vita in cucina.
La magia di questa torta inizia con gli occhi: una doratura leggera o una superficie lucida, a seconda della versione, e una tavolozza di rosso rubino che invita a prendere una fetta. Ma la vera gioia è nel profumo che sale dal tavolo: lamponi freschi o in parte purè che sprigionano un’energia vivace, accompagnati da note gentili di vaniglia, limone o scorza d’arancia, a seconda di come preferisci personalizzare il profilo aromatico. Il cucchiaio scivola senza fatica, e la consistenza è un invito al comfort: una mousse che sembra una nuvola, ma con una struttura sufficientemente ferma da tenere la forma, e una base che offre sostegno senza rubare la scena. È il dessert per chi ama la freschezza dei frutti rossi ma senza l’acidità pungente, per chi desidera una dolcezza elegante ma non stucchevole, per chi cerca l’equilibrio tra leggerezza e presenza. In breve: una torta che ha il potere di trasformare una semplice occasione in una memoria gustativa duratura.
La storia del piatto
Le mousse hanno origini che attraversano i confini tra cucine e culture: nate in ambienti di pasticceria raffinata, hanno saputo trasformarsi in piatti moderni che celebrano la leggerezza e la velocità. In Italia, la passione per il dolce al cucchiaio ha trovato espressioni eleganti, dove la mousse diventa spesso la cornice di una base delicatamente croccante o di una torta soffice, capace di accogliere frutti freschi o composte brillanti. La torta mousse ai lamponi incarna questa tradizione in chiave contemporanea: la frutta rossa, simbolo di freschezza, si sposa con una crema a base di panna o alternative vegetali, addolcita da una punta di vaniglia, dal succo di limone o da una leggera nota di liquore. Oltre all’eleganza, c’è la praticità: questa torta permette di preparare in anticipo un dessert di grande effetto, che resta stabile in frigorifero per ore, pronto a essere servito all’ultimo minuto con una presentazione impeccabile. In molte culture, i lamponi simboleggiano la gioia e la preservazione delle estati; quando li trasformi in una mousse e li compatti in una torta, tutto questo si traduce in una celebrazione di sapori che è contemporaneamente semplice e sofisticata. Per chi ama storie culinarie, questa torta racconta una fusione di tradizione italiana e freschezza internazionale: una celebrazione della frutta di stagione, trattata con maestria per offrire un dessert che sembra nato per l’occasione giusta, ma che è davvero adatto a ogni giorno.
Se ti piace l’idea di una torta che racconta una storia, questa è la tua scelta. Non si tratta solo di gusto: è una piccola esperienza sensoriale, un rituale di piacere che coinvolge vista, olfatto, gusto e persino la memoria. E se hai accanto persone care che amano i lamponi, la crema leggera e la croccantezza delicata, vedrai che questa torta diventa un punto di incontro, una scusa dolce per riunire chi vuoi bene intorno al tavolo. In fondo, la cucina è una forma di narrazione, e questa torta è una pagina scritta con fragranze, colori e consistenze che rimangono impresse come una citazione gustativa nel libro delle tue ricette di famiglia.
Perché amerai questa ricetta
- Freschezza assicurata: la combinazione di lamponi e crema leggera regala una sensazione di pulito al palato, perfetta anche dopo pasti ricchi.
- Versatilità: si adatta a diverse occasioni, dalle cene tra amici alle festività, senza perdere eleganza.
- Preparazione anticipata: grazie alla mousse e alla possibilità di raffreddare in frigorifero, puoi pianificare in anticipo senza rinunciare al gusto.
- Textural balance: la morbidezza della mousse contrasta con la croccantezza della base o della glassa leggera, creando una sinfonia di consistenze.
- Estetica irresistibile: la tonalità rosso lamponi è visivamente accattivante, rendendo la fetta perfetta per foto social e presentazioni.
- Adattabilità: è facile personalizzare aromi e intensità, con opzioni di latte o panna alternative per versioni vegan o allergen-free.
- Dolcezza controllata: si mette in risalto la frutta fresca senza essere dominata da zuccheri eccessivi, grazie all’equilibrio con crema e basi neutre.
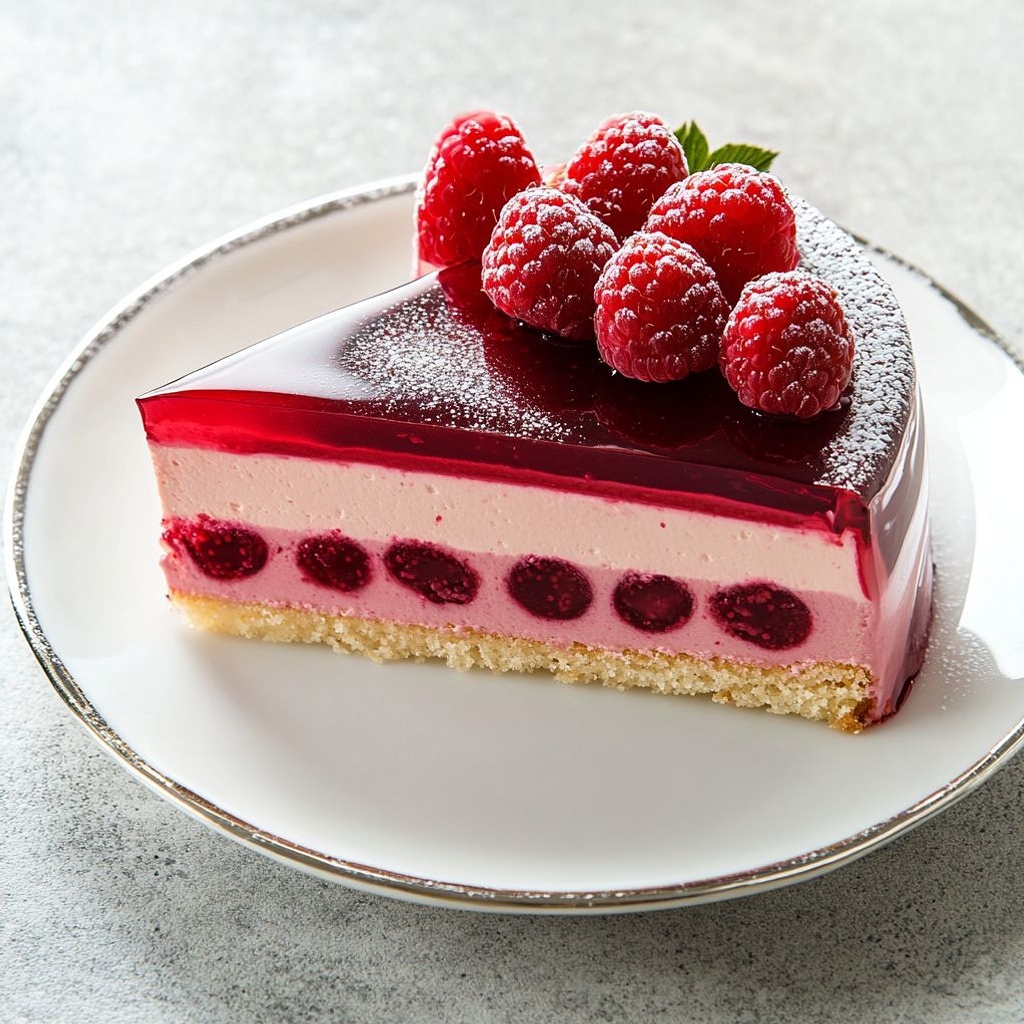
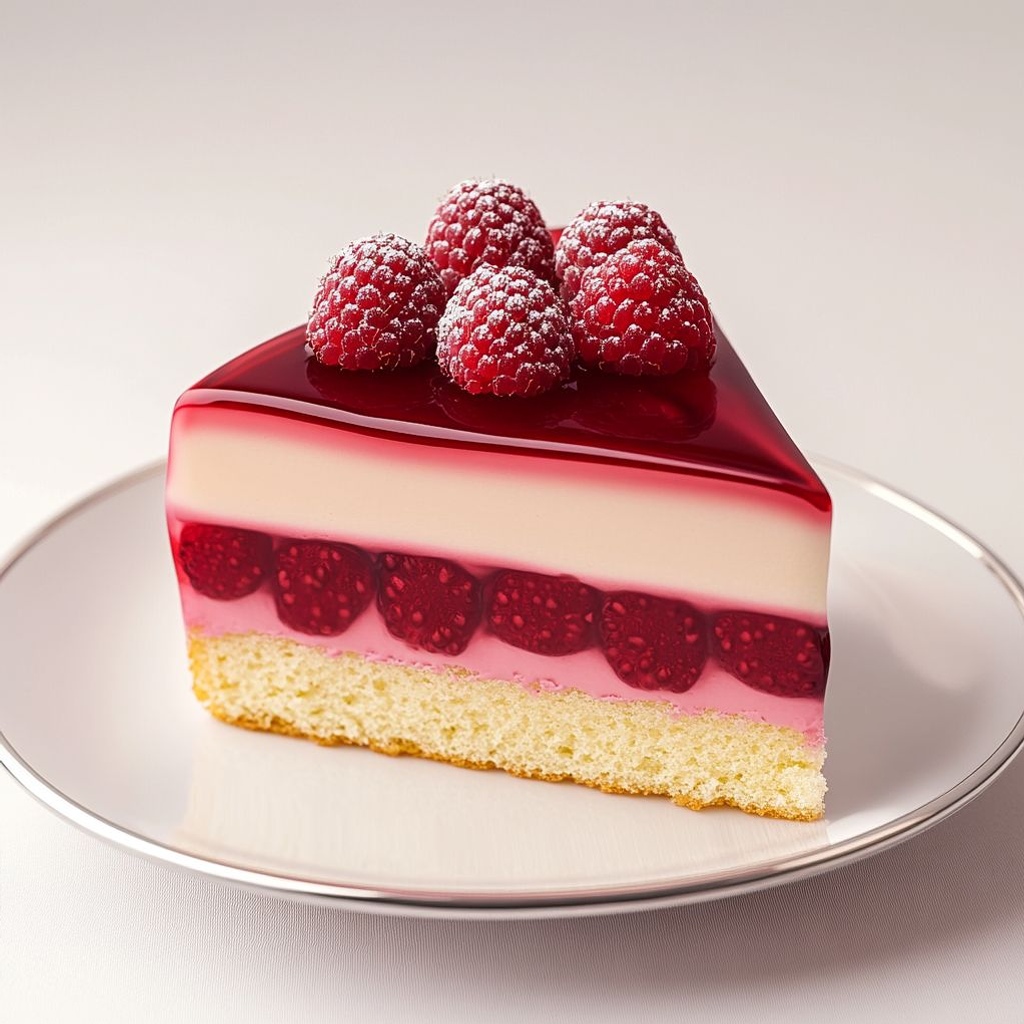
Profilo di sapore e texture
La Torta mousse ai lamponi è una sinfonia di contrasti armoniosi. All’assaggio, si apre con una nota dorata di vaniglia e una leggera freschezza agrumata che taglia la dolcezza, preparando il palato a una cascata di mousse morbida. Questa crema è leggerissima, quasi una nuvola che si scioglie al contatto con la lingua, e porta con sé l’essenza dei lamponi: una fragranza fruttata, intensa ma equilibrata, che non pretende la scena ma la concede all’insieme. Le qualità acide dei lamponi, bilanciate da un tocco di dolcezza e dalla cremosità avvolgente, offrono una sensazione vellutata ma vivace. A completare la degustazione, la base—che può essere una frolla friabile, un biscuit delicato o una nutty crust—fornisce una struttura leggera, mai pesante, capace di sostenere la mousse senza sovrastarla. La nota finale è quella di una leggera freschezza mentolata o di una leggera acidità di frutta rossa, a seconda delle varianti scelte, che richiama a sè il finale pulito tipico dei dessert estivi. Il risultato è un equilibrio di texture: croccantezza sottile contro spuma silenziosa, freschezza del frutto contro la cremosità indulgente, dolcezza avvolgente contro una leggera asprezza che fa risaltare ogni lamponcino. L’insieme è delicato ma presente, raffinato ma accogliente, capace di soddisfare sia chi desidera un dessert elegante sia chi cerca una dolce tentazione che non appesantisca.
Ogni elemento è pensato per rivelarsi gradualmente. La mousse si scioglie lentamente, rilasciando aromi di lamponi, vaniglia e, a volte, una punta di scorza di limone che taglia la dolcezza e rinfresca. La base, se scelta, dà una prima texturazione secca, quasi biscuitata, per poi cedere al morbido della crema. L’insieme è estremamente bilanciato: nessun ingrediente pretende di essere protagonista assoluto; si parla piuttosto di un dialogo dolce tra sfumature diverse, dove la morbidezza della mousse invita a un secondo assaggio, e la componente di base—quando presente—presta sostegno e carattere. In una parola: armonia. E proprio questa armonia rende la torta adatta anche a fine pasto con un espresso corto o un caffè filtrato, che ne esaltano la pulizia in bocca senza oscurarne la delicatezza.
Occasioni & abbinamenti
La bellezza di questa torta è la sua duttilità. Può essere presentata come dessert principale per una cena romantica, come chiusura di una cena familiare domenicale, o come protagonista di un buffet estivo. Nelle festività, aggiunge un tocco di giovinezza e raffinatezza senza richiedere decorazioni complesse. Per pranzi all’aperto, è ideale perché si mantiene fresca e non diventa pesante, offrendo un tocco di eleganza anche su tavole rustiche. Per quanto riguarda gli abbinamenti, pensa a:
- Bevande: prosecco brut, Moscato d’Asti, oppure un vino dolce leggero per un abbinamento dessert-wine che elevi la frutta rossa. Anche un tè nero agrumato o una tisana delicata si sposano bene.
- Contorni: un’insalata di agrumi, fettine di kiwi, o una mousse di yogurt per un contrasto di temperatura e consistenza. Se vuoi un tocco croccante, servi con una spolverata di granella di mandorle tostate.
- Decorazioni: una leggera glassa brillante a base di gelatina neutra o una coulis di lamponi leggermente ridotta può esaltare il rosso vivo e aggiungere un tocco di lucentezza. Foglie di menta o scorze sottili di limone regalano freschezza visiva e olfattiva.
- Occasioni speciali: per un matrimonio informale, una decorazione semplice ma curata con lamponi freschi e una spolverata di zucchero a velo rende la presentazione da fotografia.
Se vuoi pensare a versioni alternative, potresti adattare la torta a gusti diversi: una base al cacao per un contrasto ancora più marcato, una mousse al mango o al passion fruit per una versione tropicale, o una versione vegana sostituendo la panna con panna di cocco montata e utilizzando agar-agar per la solidificazione della mousse. Le possibilità sono molte, e la tua creatività è il miglior ingrediente di abbinamento.
Consigli, varianti e sostituzioni
Qui trovi una serie di suggerimenti pratici per personalizzare la Torta mousse ai lamponi, senza perdere l’eleganza e la leggerezza che la contraddistinguono.
- Versione vegana: sostituisci la panna con una crema a base di latte di mandorle o cocco montato, aggiungendo agar-agar o agar per far rapprendere la mousse. Usa una base senza burro o con una margarina vegetale resistente al freddo.
- Versione senza glutine: opta per una base di biscotti senza glutine o una base di noci frullate con un poco di olio di cocco per legare. Verifica che tutti gli ingredienti siano certificati senza glutine.
- Intensità di lamponi: se preferisci una mousse più intensa, aggiungi una piccola quantità di purè di lamponi o di concentrato di frutta; se vuoi una nuance più delicata, riduci la quantità e aggiungi una nota di vaniglia o di scorza di limone per accompagnare.
- Aromi alternativi: una punta di menta fresca o basilico può offrire una sorpresa rinfrescante. Una lieve nota di acqua di rose o di gelsomino può portare un tocco floreale interessante.
- Dolcezza: se vuoi ridurre zuccheri, scegli lamponi molto maturi, che hanno una dolcezza naturale maggiore, e bilancia con una crema meno dolce o yogurt greco non dolcificato.
- Varianti di base: puoi creare una base di biscotti tradizionali, una base di savoiardi per un effetto tiramisù-style, o una base di wafer sottili per una croccantezza leggera.
Conservazione & idee per preparare in anticipo
Una delle grandi virtù di una mousse ben bilanciata è la capacità di resistere al tempo. Se vuoi pianificare in anticipo, ecco alcune linee guida pratiche per ottenere risultati perfetti:
- Frigorifero: una volta assemblata, conserva la torta coperta in frigorifero per almeno 2-4 ore prima di servire, in modo che la mousse rassodi adecuatamente e le consistenze si amalgamino. Per dessert di festa, puoi prepararla il giorno prima e conservarla ben chiusa.
- Eventuale congelamento: se la mousse è vegana o se hai verificato che la versione scelta si congeli bene, puoi congelare la torta a blocchi o porzionata. Scongelala lentamente in frigorifero per preservarne la consistenza; evita scongelamenti rapidi che potrebbero alterare la texture.
- Decorazioni: aggiungi decorazioni fresche poco prima di servire per mantenere colore e sapore vividi. Le lamponi freschi, la scorza di agrumi o una spolverata di cacao leggero possono essere aggiunte al momento della presentazione.
- Trasporto: se porti la torta a un evento, porta una copertura o una scatola rigida per proteggerne la superficie durante il trasporto. Una breve raffreddatura in ghiaccio secco non è consigliata se non hai esperienza, per evitare sbalzi di temperatura che possano compromettere la mousse.
Aneddoti e curiosità
Curiosità affascinanti sul mondo delle mousse e dei lamponi: i lamponi sono stati celebrati fin dall’antichità per la loro intensità aromatica e per il colore che stimola l’appetito. In molte culture, i lamponi significano freschezza, passione e promesse di estate. Le mousse, nate come dessert di fantasia nelle cucine più raffinate, hanno poi trovato una diffusione capillare grazie alla loro facilità di preparazione e alla loro versatilità. Una mousse ben fatta è un’arte: temprare la consistenza, bilanciare i sapori e mantenere la leggerezza senza far perdere struttura. L’unione di una mousse ai lamponi con una base leggermente croccante è una combinazione molto amata perché permette di giocare con le temperature: un morso freddo, una crema morbida che si scioglie, una notevole freschezza che resta a lungo sul palato. Alcune culture hanno persino attribuito alle mousse funzioni conviviali: servire una mousse fredda è, in molte tradizioni, un modo per invitare a fermarsi, a gustare, a condividere un momento di dolcezza tra amici e familiari. Collaborazioni tra tradizione e innovazione hanno portato a versioni con cioccolato fondente, con basi di biscotto integrali o con topping di frutta secca: tutte scelte valide che arricchiscono il panorama di questo dessert. Ecco perché questa Torta mousse ai lamponi trova posto in molte ricette moderne: è elegante, ma non fredda; è ricca di carattere, ma sempre rassicurante; è un piatto che invita a tornare indietro, a raccontare una storia e a offrirne una seconda, ancora da scrivere.
Ingredients
Base (Crust)
-
– 200 g digestive biscuits, finely crushed to crumbs (about 2 cups)
→ The biscuit base provides the structure and flavor for the tart. Use plain, sweet biscuits; crushing to fine crumbs helps them bind with melted butter and press into a smooth, even layer. For a gluten-free version, substitute with gluten-free biscuits and ensure they are ground finely. Press the mixture firmly into a lined springform pan and refrigerate until set for a crisp, clean edge.
– 90 g unsalted butter, melted and cooled slightly
→ The melted butter binds the biscuit crumbs into a cohesive crust and adds richness. Let the butter cool just a bit so the crumbs stay dry enough to press; a warm mixture can cause the crust to become greasy. Spread and press evenly along the bottom of the pan, then chill to firm the base before filling.
– 1–2 tablespoons granulated sugar (optional)
→ Adds a touch of sweetness to the crust if your biscuits aren’t sweet enough. Omit if using very sweet biscuits. Mix the sugar with the crumbs before combining with butter, press evenly, and chill to maintain a neat, compact crust.
Raspberry Mousse
-
– 300 g fresh raspberries, plus extra for garnish (reserve a few for topping)
→ This is the primary flavor of the mousse. Purée and strain for a smooth texture; you may leave a few seeds for texture if you prefer. Reserve some whole berries for decoration after the mousse sets. If using frozen raspberries, thaw completely and drain excess liquid to avoid a watery mousse.
– 60–80 g granulated sugar (adjust to taste)
→ Sweetens the raspberry puree to balance tartness. Start with 60 g and increase if needed after tasting. Dissolve sugar completely in the raspberry puree to prevent graininess, and avoid scorching the mixture while heating if you warm it for gelatin activation.
– 2 tsp lemon juice (optional)
→ Brightens flavor and complements raspberries. Fresh lemon juice is best; avoid bottled juice if possible. Add to the puree during blending to enhance aroma and cut through fruit richness.
– 300 ml heavy cream, very cold
→ Whipped cream lightens the mousse and provides a creamy, airy texture. Chill the cream thoroughly and whip to soft peaks; fold gently to preserve volume. Do not overwhip, or the mousse may become grainy or butter-like.
– 3 leaves gelatin (gelatin sheets) totaling about 9 g, bloomed in cold water then melted
→ Gelatin sets the mousse so it holds its sliceable shape after chilling. Soak leaves in cold water for 5–10 minutes until softened, then squeeze out excess water and melt in a small amount of warm raspberry puree before whisking into the rest of the mixture. If avoiding gelatin, use 1–2 teaspoons agar-agar powder dissolved in hot liquid and allow extra setting time.
– 1 teaspoon vanilla extract (optional)
→ Adds depth and warmth to the raspberry flavor. Use pure vanilla for best aroma; add with the whipped cream during folding for even distribution without overworking the mixture.
– Pinch of salt (optional)
→ A tiny pinch balances sweetness and enhances fruit flavor. Add to the raspberry puree before folding into whipped cream or into the creme itself to subtly intensify taste.
Finish/Decoration
-
– 150 g fresh raspberries (for topping)
→ Create a visually appealing mosaic on top and add contrast to the pale mousse. Wash gently and pat dry; arrange in a decorative pattern after the mousse has set to a flawless finish. If possible, reserve berries from the set for an even distribution of color and texture.
– 4–6 fresh mint leaves (optional)
→ A touch of green and a refreshing aroma that complements the raspberry flavor. Rinse and pat dry; tuck leaves between berries or at the edge of the cake for a polished look without overpowering sweetness.
– 1–2 tablespoons powdered sugar for dusting (optional)
→ Adds a delicate, snowy finish and helps highlight the contrast between mousse and fruit. Sift lightly just before serving to avoid clumps; use sparingly to keep the mousse flavor prominent.
Instructions
- Line a 23 cm (9 inch) springform pan with a round parchment disc on the bottom and lightly grease the sides to ensure clean release.
→ This prevents the crust from sticking to the pan and yields a neat, professional edge when unmolding the tart after chilling. - If you have a food processor, process 200 g digestive biscuits until you have fine crumbs; or place them in a resealable bag and crush with a rolling pin until powdery, with no large chunks.
→ A fine crumb forms an even, cohesive crust that binds with butter without crumbly pockets. - Transfer the crumbs to a bowl and add 1–2 tablespoons granulated sugar if your biscuits are not quite sweet; whisk to distribute evenly.
→ Even sweetness ensures the crust complements the tart raspberry filling and prevents dull edges. - Pour in 90 g melted and cooled slightly unsalted butter; mix with a fork until the crumbs resemble wet sand and begin to clump.
→ Butter binds the crumbs into a cohesive crust that holds its shape when you cut the tart; cooling the butter prevents the crust from turning greasy. - Press the crumb mixture firmly into the prepared pan, spreading it evenly from the center to the edges with the flat bottom of a glass or measuring cup.
→ A compact, level crust creates clean edges and prevents gaps or air pockets that would crack or crumble during slicing. - Chill the crust in the refrigerator for at least 30 minutes, or until set and hard to the touch.
→ Chilling firms the fat and bonds the crust, making it stable to hold the mousse without sliding. - Purée 300 g fresh raspberries in a blender until smooth, then push the purée through a fine-mesh sieve to remove most seeds, pressing with a spatula to extract as much liquid as possible, and reserve a handful of whole berries for topping.
→ A silky mousse base without gritty seeds ensures a luxurious texture and a vibrant color that sets evenly. - In a bowl, combine the strained purée with 60–80 g granulated sugar and 2 tsp lemon juice if using, then stir until the sugar is fully dissolved.
→ Sweetens and brightens the fruit flavor; warming slightly helps the sugar dissolve, but keep the heat gentle to avoid cooking the puree. - Bloom 3 leaves gelatin (9 g) in cold water for 5–10 minutes until soft and pliable.
→ Blooming hydrates the sheets so they dissolve evenly, preventing lumps in the mousse. - Squeeze excess water from the gelatin and melt it with a small amount (about 2–3 tablespoons) of warm raspberry purée in a small saucepan until completely dissolved, then whisk the melted gelatin back into the rest of the raspberry purée.
→ Dissolving gelatin evenly ensures the mousse sets uniformly without sagging or gelatin pockets. - Whip 300 ml cold heavy cream to soft peaks in a chilled bowl using clean beaters, adding 1 teaspoon vanilla extract and a pinch of salt if desired, then set aside.
→ Properly whipped cream provides the mousse with lift and a creamy texture; do not overbeat to avoid graininess or butteriness. - Gently fold one-third of the whipped cream into the raspberry purée to loosen the mixture, then fold in the remaining whipped cream with a spatula until fully incorporated and uniform, being careful not to deflate the volume.
→ Gentle folding preserves airiness and keeps the mousse light and sliceable; stop as soon as the color is uniform. - Pour the raspberry mousse over the chilled crust and smooth the top with an offset spatula; gently tap the pan on the counter to release any trapped air, then refrigerate for at least 4 hours or until the mousse is fully set.
→ Sufficient chilling allows the gelatin to set the mousse into a firm, sliceable dessert and ensures clean edges when cut. - Arrange the 150 g fresh raspberries on top in a decorative pattern and scatter 4–6 mint leaves if using; dust lightly with powdered sugar just before serving for contrast.
→ The berries and mint provide color, aroma, and a fresh finish that enhances presentation and balance. - To serve, run a warm knife around the edge of the pan, release the springform ring, and slice with clean, even strokes; wipe the blade between cuts for pristine pieces.
→ Warmed blade helps the mousse cut smoothly without dragging, yielding professional-looking slices.
Notes
These raspberry mousse tart slices are a show-stopping dessert featuring a crisp biscuit crust and a light, airy raspberry mousse that chills into clean, sliceable portions. You can customize them by adding a splash of lemon juice to the raspberry puree or folding in a little vanilla or citrus zest for extra aroma. They can be made a day ahead; keep the assembled tart in the fridge for several hours or overnight to allow the mousse to set fully. For a gluten-free version, substitute the digestive biscuits with gluten-free biscuits and ensure all other ingredients (biscuits, gelatin or agar-agar, and cream) are certified gluten-free. If you prefer a lighter finish, replace part of the heavy cream with mascarpone or plain yogurt and reduce the sugar in the raspberry puree, tasting as you go. They decorate beautifully with extra raspberries and mint leaves, and a light dusting of powdered sugar just before serving. Leftovers can be covered and kept in the fridge for up to 2–3 days; the mousse holds its shape well, but the crust may soften slightly over time.
Tips
- Base crust handling: Grind the digestive biscuits to very fine crumbs for a smooth crust. If your biscuits aren’t very sweet, the optional sugar in the crust helps balance the flavor. Press the crumb mixture firmly into a lined springform pan using the back of a spoon or a flat glass to create an even surface. Chill until set before adding the mousse to prevent the crust from crumbling.
- Butter temperature matters: Melted butter should be warm but not hot. Let it cool slightly before mixing with the crumbs; too-hot butter can make the crust greasy and slick.
- Gluten-free option: For a gluten-free version, substitute with gluten-free digestive biscuits and grind to a fine crumb. Ensure the pressed crust is even and compact just as with regular biscuits.
- Raspberry puree texture: Purée the raspberries and strain if you want a silky mousse. Leaving a few seeds for texture is fine if you prefer a bit of bite. If using frozen raspberries, thaw completely and drain excess liquid to avoid a watery mousse.
- Sweetness and brightness: Start with 60 g of sugar and taste the raspberry puree before folding in the whipped cream. Add more sugar if needed. A small amount of lemon juice (1–2 tsp) brightens the flavor and helps balance tartness from the berries.
- Gelatin technique: Bloom the gelatin in cold water for 5–10 minutes, then squeeze out excess water and melt it gently in a small amount of warm raspberry puree before whisking into the rest of the mixture. Do not boil the gelatin. If you prefer a vegetarian setting agent, use 1–2 tsp agar-agar powder dissolved in hot liquid and allow extra setting time.
- Whipping the cream: Chill the heavy cream and the bowl well, whip to soft peaks, and fold gently to preserve volume. Overwhipping can make the texture grainy or butter-like, so stop at soft peaks and fold promptly.
- Folding technique: Fold the melted gelatin cocktail (raspberry puree with gelatin) into the whipped cream in two additions. Start with a light fold to combine, then finish with a broader fold to maintain airiness.
- Assembly and chilling: Spread the mousse evenly over the crust and tap the pan on the counter to release any trapped air. Refrigerate for at least 4 hours, preferably overnight, until the mousse is firm and sliceable. If possible, chill the unmolded cake briefly in the freezer for 10–15 minutes to help neat edges when slicing.
- Decoration tips: Reserve some whole raspberries for placing on top after the mousse has set. Add mint leaves just before serving for a fresh aroma and color contrast. Dust lightly with powdered sugar right before serving for a delicate finish, avoiding clumps that can overwhelm the mousse.
- Make-ahead and storage: This tart is best made 1 day ahead and kept refrigerated, loosely covered to prevent odors from seeping in. It will hold well for 2–3 days, but the texture and color of the raspberries may slowly change the longer it sits.
- Variations to try: For a citrus twist, add a teaspoon of zest (lemon or lime) to the raspberry puree. Swirl a thin layer of white chocolate into the mousse for a contrasting flavor, or top with shaved dark chocolate for a refined look. If dairy-free is needed, replace the whipped cream with whipped coconut cream and use a plant-based setting agent (agar-agar) with proper setting time.
- Knife and serving tip: Dip a knife in hot water and wipe clean between slices for clean divisions. Keep the knife warm for each cut to prevent tearing the mousse.
FAQ
Domande frequenti – Torta mousse ai lamponi
Quali ingredienti servono per la torta mousse ai lamponi?
Base: biscotti digestive tritati (circa 200 g) e burro fuso (80–100 g). Mousse: lamponi frullati (350–400 g), panna fresca montata (300 ml), zucchero (60–100 g a seconda della dolcezza), gelatina in fogli (6 g) ammollata. Decorazione: lamponi freschi. Opzionali: scorza di limone o vaniglia.
Come preparo la base di biscotti?
Sminuzza i biscotti fino a ottenere una granella fine, mescolala con burro fuso tiepido finché è omogenea. Premi il composto sul fondo di uno stampo a cerniera da 22–24 cm rivestito di carta forno, livellando con il dorso di un cucchiaio. Metti in frigorifero per 15–30 minuti a rassodare.
Come si monta la mousse ai lamponi?
Frulla i lamponi e, se vuoi, passa al setaccio per eliminare i semi. Monta la panna fresca. In una piccola quantità di purea riscaldata sciogli la gelatina ammollata, quindi aggiungi la gelatina sciolta al resto della purea. Lascia intiepidire, poi incorpora delicatamente la panna montata, mescolando dal basso verso l’alto. Versa la mousse sulla base, livella e lascia rassodare in frigorifero per almeno 4–6 ore (meglio una notte).
Serve gelatina? Come usarla?
Sì, serve per dare struttura alla mousse. Fogli: ammorbidisci 6 g di gelatina in acqua fredda per 5–10 minuti, strizza e sciogli a bagnomaria o al microonde, quindi aggiungi alla purea calda e prosegui come descritto. In alternativa, per una versione senza gelatina animale puoi usare agar-agar seguendo le dosi indicate sull’imballaggio (solitamente 2–3 g per 250 ml di purè) e far bollire per attivarlo.
Posso preparare la torta in anticipo?
Sì. Puoi preparare base e mousse in anticipo e assemblare poco prima di servire. La torta si conserva in frigorifero coperta per 2–3 giorni. Se vuoi, puoi anche mantenere la base pronta e montare la mousse il giorno stesso.
Quanto tempo va in frigorifero per rassodare?
Almeno 4–6 ore; preferibilmente tutta la notte per una consistenza più ferma e uniforme.
È possibile fare una versione senza lattosio o vegana?
Sì. Versione senza lattosio: usa biscotti senza burro o con burro senza lattosio, panna da montare senza lattosio e, se desideri, gelatina normale. Versione vegana: sostituisci la panna con panna vegetale montata e usa agar-agar per rassodare la mousse (seguendo le istruzioni del prodotto). Puoi anche utilizzare una base di biscotti senza lattosio e un fondo vegano.
Quale stampo è consigliato e che formato ottengo?
Uno stampo a cerniera rotondo da 22–24 cm è ideale; per una torta più alta usa uno stampo da 20 cm. Imburra leggermente e rivesti con carta forno. Se non hai lo stampo a cerniera, puoi usare una teglia rotonda, ma potrebbe essere più difficile rimuoverla intera.
Come decorare al momento di servire?
Decorala con lamponi freschi sparsi sulla superficie, scorza di limone grattugiata, foglioline di menta o cioccolato bianco in scaglie. Per un tocco di colore, qualche cucchiaio di coulis di lamponi può essere spennellato sulla superficie.
Come conservare la torta dopo averla tagliata?
Copri bene con pellicola alimentare e conserva in frigorifero. Consumala entro 2–3 giorni. Evita di lasciare a temperatura ambiente per troppo tempo per non perdere la textures della mousse.