Introduction / Hook
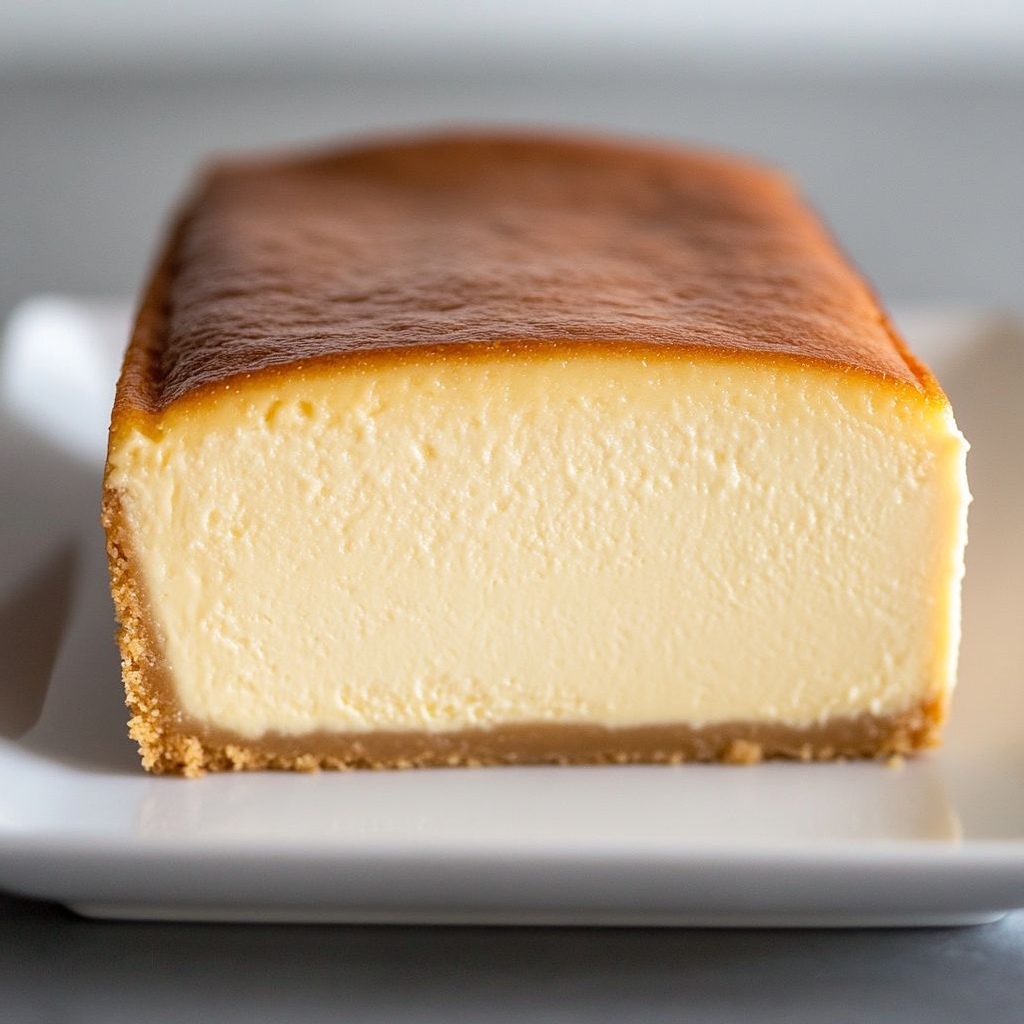
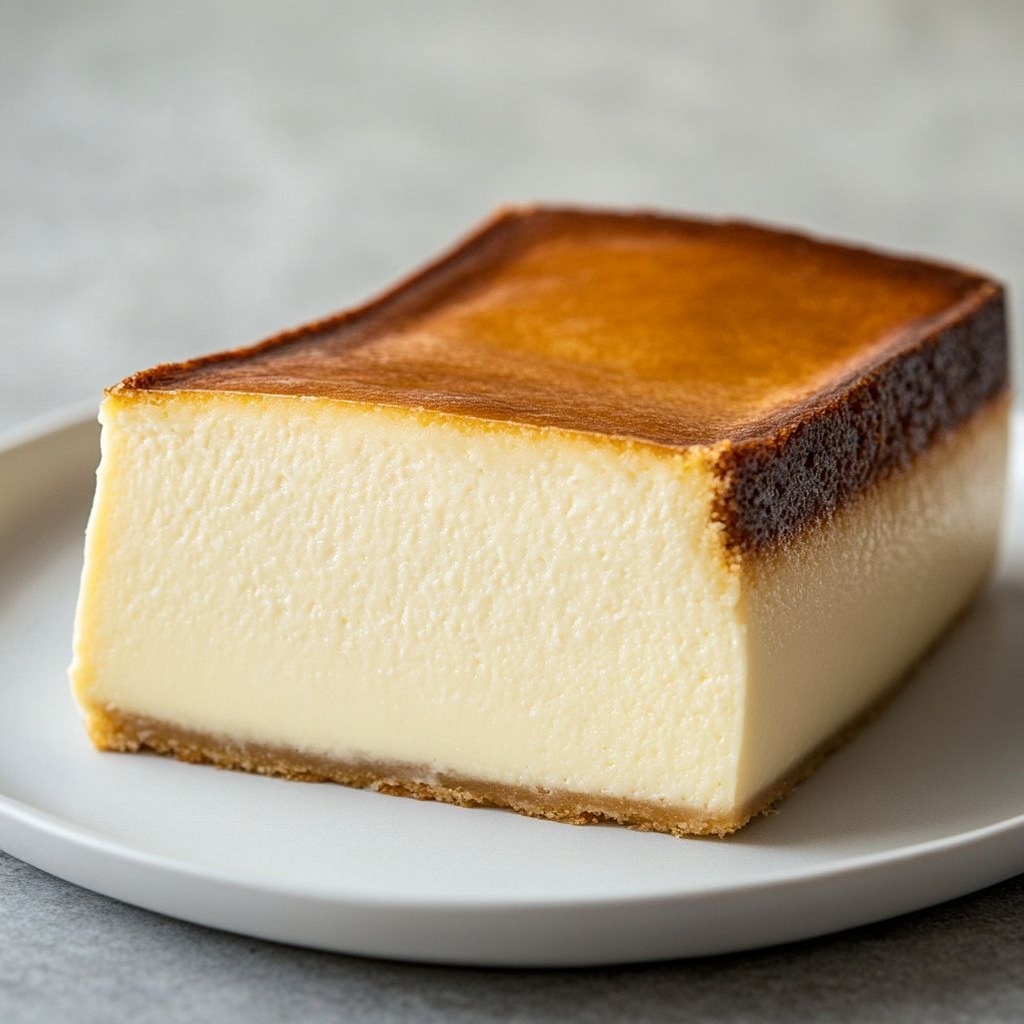
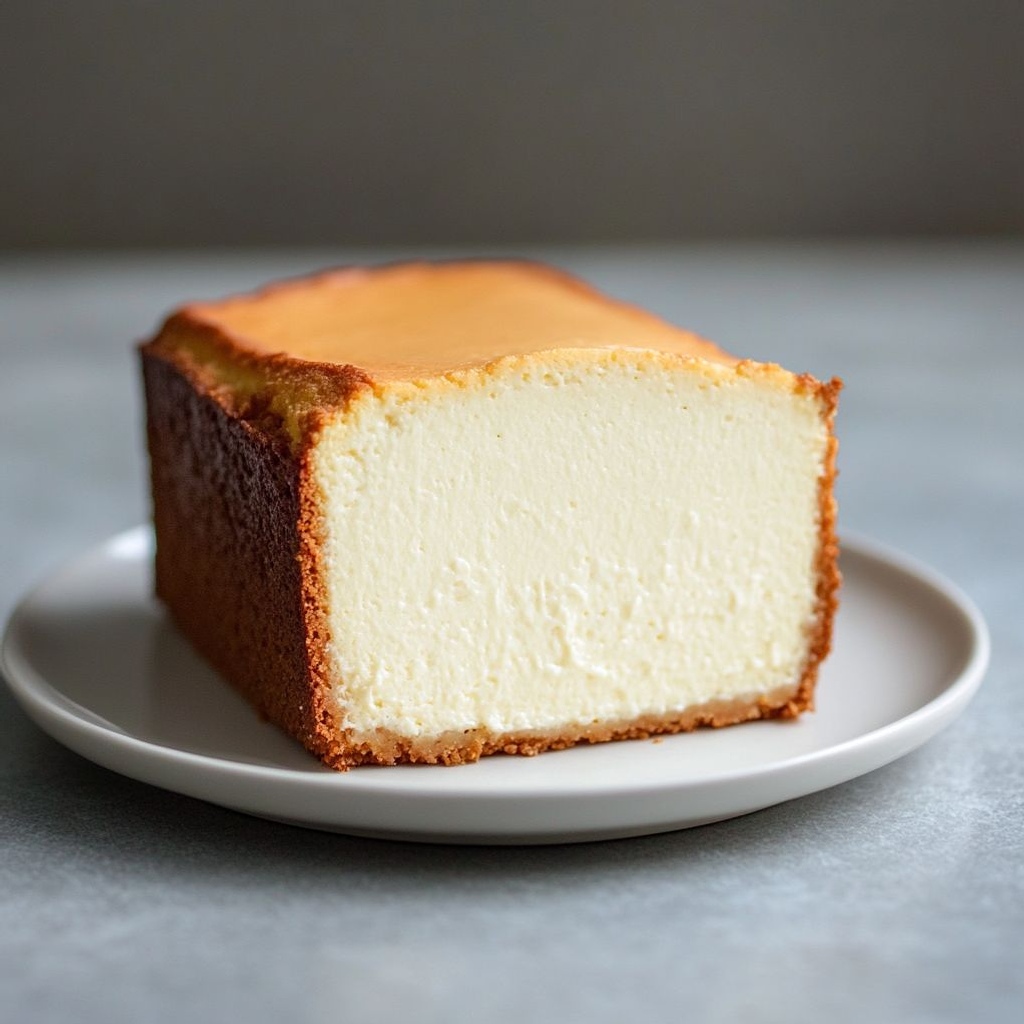
Imagine a cheesecake that feels at home on a weekday dinner table and still holds its own at a weekend gathering. Picture a loaf-shaped dessert with a glossy, pale surface that hints at a luscious, creamy interior. The aroma is softly vanilla with a whisper of citrus, the kind of scent that makes the dining room feel like a small bakery just opened up in the neighborhood. This Easy Loaf Cheesecake is exactly that: simple enough to make after a busy day, yet elegant enough to serve to guests without a single shy glance toward the fridge for last-minute help. It embraces the comfort of a classic cheesecake while offering the practicality of a loaf form—easy to slice, easy to portion, and wonderfully forgiving if you’re new to cheesecakes or pressed for time. In every bite, you’ll discover a balance of richness and lightness, a whisper of tang that keeps the sweetness in check, and a velvet finish that lingers with a soft, melted creaminess on your tongue. It’s dessert that respects your time, your appetite, and your kitchen space, delivering a moment of indulgence that feels celebratory without demanding a complicated ritual. The loaf shape makes it an approachable, shareable centerpiece—easy to portion for a dozen souls or a smaller circle of friends and family. It’s the kind of dessert you can prepare in advance, refrigerate overnight, and wake up to the quiet satisfaction of a dessert that’s practically ready to serve from the moment you set it on the counter. If you’ve ever wished for a cheesecake that doesn’t require an entire afternoon of precision, you’ve arrived at the right place. This version is built for real life—soft, creamy, subtly sweet, and reliably delicious every time you crave a slice of something special.
The Story Behind the Dish
Cheesecake has a storied past that spans centuries and crosses continents, morphing with each kitchen and culture it touches. The concept of a cheesecake—essentially a creamy, curd-like filling set upon some form of crust—appears in ancient times, with early recipes discovered in Greek and Roman texts. The modern American cheesecake, with its rich creaminess and tang from dairy, has nurtured a long love affair with bakers and home cooks alike. The loaf variation, in particular, is a nod to the practical wisdom that sometimes the simplest shapes carry the most charm. A loaf cheesecake is less fussy than its deeper, round counterparts; it’s easier to slice cleanly, easier to transport, and often quicker to chill properly. This handy form invites those who want a dessert that travels well—from potlucks to parties to family dinners—without sacrificing the experience of a traditional cheesecake. The idea behind an easy loaf cheesecake is almost a life philosophy for many cooks: take something delicious, simplify it without dulling its essence, and present it with warmth. There’s a quiet poetry to it. A loaf-shaped cheesecake says: you deserve something special, but it doesn’t have to be a storm of steps or a mountain of ingredients. It can be generous, comforting, and refined all at once. In many homes, a loaf cheesecake signals a gathering, a moment of celebration, or a quiet Sunday when you invite the people you care about to share something creamy and unforgettable. The beauty of this dish lies not only in its texture and taste but in its adaptability—the way it welcomes variations, adapts to what you have on hand, and still ends up feeling indulgent and impressive.
Why You’ll Love This Recipe
- Effortless elegance: A cheesecake that looks and tastes like a showpiece, but comes together with straightforward steps and common pantry ingredients.
- Loaf-friendly portions: Perfect for smaller gatherings or when you want to avoid waste; you can slice neatly and serve evenly without fuss.
- Make-ahead magic: The loaf sets beautifully in advance, letting you free up time on the day you plan to serve it—ideal for holidays, birthdays, or casual weekend feasts.
- Silky texture, restrained sweetness: A creamy, smooth filling with a gentle tang that keeps the dessert balanced and satisfying.
- Versatile flavor canvas: The base recipe invites gentle customization with toppings or flavors, from citrus zest to berry compotes, without overpowering the cake’s core charm.
- Low-stress bake: The loaf form is forgiving, distributing heat more evenly and often reducing the risk of cracks or uneven centers, making this a reliable success even for newer bakers.
- Kid-friendly, adult-approved: Rich and comforting enough for grown-ups, while the smooth texture and mild sweetness appeal to younger palates as well.
- Great for sharing: The loaf’s shape invites friends and family to gather around the dessert, encouraging conversation, slicing, and a sense of occasion without a formal setting.
Flavor Profile & Texture
This Easy Loaf Cheesecake delivers a well-rounded sensory experience that blends classic cheesecake allure with approachable texture. The filling is luxuriously creamy, with a velvety mouthfeel that glides across the palate. There’s a gentle tang that cuts through the richness, providing balance and preventing the dessert from feeling overly sweet. The flavor notes are clean and comforting: a hint of vanilla that rounds out the dairy richness, a delicate touch of citrus zest or a whisper of almond (depending on your preference) that adds brightness without shouting. The crust—while not the focus of every bite—offers a subtle, toasty contrast. It provides a light crunch and a buttery, crumbly edge that frames the creamy center in a satisfying way. As you slice into the loaf, you’ll notice how the texture easy slides, leaving clean lines and a glossy surface that gleams with a hint of glaze or simple topping. On the palate, the combination of a soft, air-light interior and a gentle crust creates a harmony of textures—silky, melt-in-your-mouth filling meeting a slightly firmer base that supports every bite. The balance between sweet and tangy is key: not so tart as to wake the palate harshly, not so sugary as to feel heavy. It’s a dessert that invites you to savor slowly, to relish the calm, creamy presence rather than rush through the moment. The loaf shape also plays a role in texture perception. Slicing into a portion reveals an even distribution of air and creamy filling, which helps the cake maintain its integrity as you serve it. The result is a dessert that feels indulgent yet approachable, rich without heaviness, and always ready to be plated with a flourish or a simple dusting of powdered sugar, a fresh berry, or a light fruit compote for a pop of color and acidity.
Occasions & Pairings
Where does a loaf cheesecake fit best? Pretty much anywhere there’s a reason to celebrate, plus some days that just deserve a touch of sweetness. It shines at casual weeknight dinners as a “little something” after a comforting meal, and it steps up to larger occasions with ease, becoming a reliable centerpiece that looks thoughtful on the dessert table. The loaf size makes it ideal for a small holiday dessert display, a brunch finale, or a weekend gathering with friends. If you’re serving a crowd, you can easily pre-slice the loaf and set portions on a platter for a no-fuss, no-made-mess presentation. The versatility also extends to pairings that elevate the experience without overpowering the cheesecake’s character. Consider these ideas to complement the flavors without fighting for attention:
- Fresh berries or a berry coulis: A bright, tart note from raspberries, strawberries, or blueberries adds a lively contrast that enhances the creamy sweetness.
- Citrus zest or a citrus glaze: A light lemon or orange zest finish can wake up the palate and introduce a cheerful aroma.
- Light fruit compotes: A gentle rhubarb, blueberry, or peach compote adds color and a fruity counterpoint.
- Vanilla cream or mascarpone dollop: A little richness on top can heighten the dessert’s indulgence without tipping into heaviness.
- Elegant beverages: A glass of sparkling wine, a late-harvest dessert wine, or a cup of black tea with a citrus twist pairs beautifully with the dessert’s texture and sweetness.
Tips, Variations & Substitutions
One of the joys of a forgiving loaf cheesecake is the space it provides for personalization. Here are practical ideas to tailor the dish to your pantry, dietary needs, or flavor preferences, all while preserving its core identity of easy, elegant decadence:
- Flavor twists: Swap or augment with a touch of lemon or orange zest in the filling to brighten the flavor profile. A hint of vanilla bean paste can deepen the aroma and complexity.
- Texture changes: For a lighter texture, you can fold in a small amount of whipped cream at the end of mixing. If you prefer a denser bite, reduce any optional airy components slightly and bake a tad longer.
- Dietary adaptations: Use a dairy-free cream cheese alternative and a plant-based butter for the crust. To maintain creaminess, consider a non-dairy yogurt or coconut cream trick to mimic the tang and body while keeping the loaf structure intact.
- Gluten-free option: If you’re avoiding gluten, substitute a gluten-free crumb mix for the crust or use ground almonds as the base. The rest of the filling remains quite adaptable to such changes.
- Regional twists: Add a touch of ground cinnamon with a pinch of nutmeg for a warm-spiced version; or fold in finely chopped candied ginger for a subtle zing that pairs beautifully with citrus notes.
- Vegan-friendly approach: Use a plant-based cream cheese and a coconut or almond milk-based cream to maintain creaminess, along with a vegan butter substitute for the crust.
- Make-ahead flavor enhances: Prepare the loaf a day in advance and let it chill thoroughly; the flavors often deepen overnight, giving you a more cohesive taste profile on day two.
Storage & Make-Ahead Ideas
Because this loaf cheesecake thrives with chilling, storage becomes an asset rather than an afterthought. The structure of the loaf makes it particularly amenable to make-ahead preparation, which is a boon for entertaining or simply keeping a ready-to-serve dessert in the fridge. Here are practical guidelines to maximize quality and convenience:
- Refrigeration: Store the loaf, tightly wrapped or in an airtight container, in the refrigerator for up to 3–4 days. The flavors mellow with time, often becoming more cohesive and refined the longer it rests.
- Freezing: For longer storage, you can freeze the loaf in slices or as a whole. Wrap portions snugly in plastic wrap, then place in an airtight container or heavy-duty freezer bag. Freeze for up to 2–3 months. Thaw slowly in the refrigerator for best texture, then allow to come to close-to-room temperature before serving for optimum creaminess.
- Make-ahead timing: To minimize last-minute prep, you can prepare the crust and filling components a day in advance (if applicable to your method) and assemble the loaf just before chilling. This approach preserves texture and ensures clean slicing when you’re ready to serve.
- Glaze and toppings: If you plan to add a glaze or fruit topping, consider adding it just before serving to preserve the glossiness and avoid a soggy crust. Alternatively, a light dusting of powdered sugar right before serving can be done even after chilling.
Fun Facts & Trivia (Optional)
Cheesecake has a surprising breadth of cultural variations and playful anecdotes. In ancient Greece, a form of cheesecake was offered to the gods at weddings and feasts, believed to bring vitality and celebration. The modern New York-style cheesecake—famous for its dense, velvety texture—owes much of its fame to the cream cheese era, which expanded in the 20th century as dairy products became more accessible. The loaf form, with its practical ease and easy portioning, has become a beloved option for home bakers who want the glamour of cheesecake without the intense, hour-long bake that some circular pies demand. Across continents and kitchens, people have shaped cheesecake to local ingredients—imagine citrus, berries, coffee, chocolate, and spices weaving into the filling—each variation telling a small, tasty story about the people who prepared it. Fun fact: the concept of a baked custard-like dessert in a loaf pan echoes centuries of humble home cooking, where shape and method evolved to fit everyday life, inviting more people to experience the joy of a creamy, comforting slice. A loaf cheesecake, in this sense, is both a nod to history and a modern celebration of convenience, flavor, and shared sweetness.
Final Thoughts
Easy Loaf Cheesecake is more than a dessert; it’s a thoughtful approach to dessert-making that honors simplicity, flavor, and the warmth of sharing. It invites you to slow down just enough to savor the moment—the aroma as it bakes, the soft crackle of a cooled surface, the smooth glide of a clean slice on a plate, and the first bite that confirms all the best parts of comfort food can exist in a single, unassuming loaf. Whether you’re feeding a bustling family after a long day or greeting guests with a poised, cafe-worthy finish, this loaf cheesecake promises satisfaction without drama. It’s a versatile canvas that welcomes your personal touches, a reliable friend in the kitchen, and a memorable treat that leaves everyone thinking about the next slice before the plates have even cleared. So when you’re ready to bake something that feels both celebratory and approachable, let this Easy Loaf Cheesecake be your guide—a testament to how good things can be when you choose simplicity, balance, and a little indulgence in equal measure.
Ingredients
Crust
- 1 1/2 cups graham cracker crumbs (or gluten-free graham crackers)
→ These crumbs form the base crust that supports the creamy filling. They should be finely crushed, measured after crushing, and mixed with a touch of sugar if using plain crackers. For a firmer crust, press the mixture firmly into a loaf pan lined with parchment paper, then optionally prebake for 8–10 minutes to set the crust before adding the filling. - 6 tablespoons unsalted butter, melted
→ The butter binds the crumb mixture and creates a cohesive crust with a crisp edge. Let the butter cool slightly after melting so it coats the crumbs evenly without making the crust soggy. Mix with the crumbs until evenly moistened, then press into the pan. - 2 tablespoons granulated sugar (optional for crust)
→ Adds gentle sweetness and helps promote browning. Omit if your crackers are already sweetened. Mix with the crumbs and melted butter before pressing into the pan for an even crust.
Cheesecake Filling
- 24 oz cream cheese, softened to room temperature
→ The creamy base of the cheesecake. Softened cream cheese prevents lumps and yields a smooth, velvety batter. Let the blocks sit at room temperature 30–60 minutes or cut into small pieces to speed softening. Beat on low at first to combine, then medium-high until completely smooth, scraping the sides as needed. Do not overbeat after eggs are added to avoid cracks. - 3/4 cup granulated sugar
→ Provides sweetness and helps create a creamy, stable texture. Add gradually with the cream cheese until fully incorporated. If you prefer a less sweet cake, reduce slightly, but maintain balance with the dairy and lemon. - 2 large eggs
→ Bind and set the filling during baking. Add one egg at a time, mixing on low just until combined. Overmixing after eggs are added can incorporate air that leads to cracks. Keep batter smooth and glossy. - 1 large egg yolk
→ Adds rich, lush texture and helps emulsify the batter. Incorporate after the whole eggs are mixed, ensuring a silky, cohesive mixture without overworking it. - 1/2 cup sour cream
→ Adds tang, moisture, and an exceptionally creamy mouthfeel. Use full-fat sour cream for best richness. Whisk until smooth and fold into the cheese mixture for a tender crumb and a slight glow on the surface when baked. - 1 teaspoon vanilla extract (pure)
→ Deepens flavor and rounds the sweetness. Use pure vanilla for best aroma; you can also scrape in the seeds from one vanilla bean for extra depth. - 1 tablespoon lemon juice
→ Brightens the filling and balances richness with a clean tang. Freshly squeezed lemon juice yields the best flavor. Start with 1 tablespoon and adjust to taste if your toppings are very tart. - 1/2 teaspoon lemon zest
→ Adds a fragrant citrus aroma without overpowering the filling. Zest finely with a microplane to release essential oils, then fold in with the wet ingredients for even distribution. - 1/4 teaspoon salt
→ Enhances overall flavor and helps balance sweetness. If using salted butter, reduce to a pinch or omit entirely. A small amount makes the filling taste more vibrant. - 1 tablespoon cornstarch (optional)
→ Helps stabilize the batter, improves structure, and reduces the chance of cracking. Dissolve in a few teaspoons of the sour cream before adding to the filling to avoid lumps, or whisk with the sugar before combining with the cheese. This is particularly helpful for a loaf-style cheesecake.
Optional Add-ins
- 1/2 cup mini chocolate chips (optional)
→ For pockets of melted chocolate throughout the cheesecake. Gently fold chips in after the batter is smooth. To help prevent sinking, lightly coat chips in a teaspoon of flour before adding. - 1/2 cup fresh berries (optional)
→ Adds bright, fruity bursts and color. If folding into the batter, toss berries with a small amount of flour to reduce color bleed and sinking. Alternatively, swirl a small amount of berry puree on top before baking for a marbled effect.
Instructions
- Preheat your oven to 325°F (165°C) and line a loaf pan (9×5 inches) with parchment paper or grease it well to prevent sticking and ensure clean removal.
→ This creates a smooth release and helps maintain the crust’s integrity when slicing the finished cheesecake. - Grind graham crackers into a fine, even crumb using a food processor or by sealing them in a bag and crushing with a rolling pin.
→ Finer crumbs pack more securely, giving a sturdy base that won’t crumble under the dense filling. - Transfer the crumbs to a bowl, stir in 2 tablespoons granulated sugar (optional for extra sweetness), and pour in 6 tablespoons melted unsalted butter that has cooled slightly.
→ The melted butter binds the crumbs into a cohesive crust; cooling prevents the butter from seeping too quickly and making the crust greasy. - Mix the crumb mixture until all the crumbs are evenly moistened and resemble damp sand.
→ Even moisture ensures a uniform crust that bakes evenly without dry pockets. - Press the crumb mixture into the bottom of the prepared loaf pan with the flat bottom of a measuring cup or glass to create an even layer about 1/4 inch thick, and gently press up the sides for gentle support.
→ A compact, uniform crust prevents wobble and contributes to clean cutting if you slice the cheesecake fully through. - If desired, prebake the crust in the preheated oven for 8–10 minutes on the center rack, then remove and let cool while you prepare the filling.
→ Prebaking sets the crust and reduces the chance of a soggy bottom once the filling is added. - In a large mixing bowl, beat 24 oz cream cheese that has been softened to room temperature on low until smooth, then increase to medium-high and beat until completely creamy and lump-free.
→ Softened cream cheese prevents lumps and yields a silky filling; avoid overbeating once eggs are added to prevent cracks. - Add 3/4 cup granulated sugar and continue beating on medium speed until fully incorporated and the mixture looks glossy and light.
→ Proper sugar incorporation helps stabilize the texture and ensures even sweetness throughout the batter. - With the mixer on low, add 2 large eggs one at a time, mixing just until each is incorporated before adding the next.
→ Adding eggs gradually helps prevent the batter from separating and reduces air incorporation that can cause cracks. - Beat in 1 large egg yolk until combined, then stop to prevent overworking the batter.
→ The extra yolk enriches the texture, yielding a luxuriously creamy filling without heaviness. - Beat in 1/2 cup sour cream, then scrape the bowl, add 1 teaspoon pure vanilla extract, 1 tablespoon lemon juice, 1/2 teaspoon lemon zest, and 1/4 teaspoon salt, mixing until the mixture is smooth and homogenous.
→ Sour cream adds moisture and tang; the lemon components balance richness and brighten the flavor profile with fresh aroma. - If using cornstarch, whisk 1 tablespoon cornstarch with 1–2 tablespoons sour cream or a small amount of the filling to dissolve fully, then fold it into the batter.
→ The starch helps stabilize the batter for a firmer slice and reduces the risk of cracking during cooling. - If adding optional mix-ins, gently fold in 1/2 cup mini chocolate chips or 1/2 cup fresh berries after the batter is smooth; lightly coat chips in a teaspoon of flour to reduce sinking.
→ Add-ins create delightful pockets or bursts of flavor, but flour coating helps them stay suspended rather than sinking to the bottom. - Pour the filling over the cooled crust, smoothing the top with a spatula and giving the pan a gentle tap on the counter to release any trapped air.
→ A level surface ensures even baking and clean slices; tapping reduces large air pockets that can cause cracks. - Place the loaf pan in a larger baking dish and fill the outer dish with hot water halfway up the sides to create a water bath, which minimizes cracking and promotes gentle, even cooking.
→ The humidity bath cushions the filling against temperature shock and helps maintain a creamy, dense texture. - Bake at 325°F (165°C) for 55–65 minutes, or until the edges are set and the center jiggles slightly when the pan is nudged; avoid overbaking for a tender interior.
→ The centre should just shiver; the residual heat will finish setting as it cools, preventing a dry, overcooked center. - Turn off the oven, crack the door about 2 inches, and let the cheesecake cool in the oven for 60 minutes to gradually reduce temperature and prevent cracking from rapid cooling.
→ Slow cooling minimizes stress on the structure, yielding a smoother surface and fewer cracks. - Carefully remove the loaf pan from the water bath, lift the outer dish, and transfer the cheesecake to a rack to cool completely at room temperature before chilling.
→ Cooling on a rack ensures air can circulate and the surface doesn’t become soggy from trapped condensation. - Once cool, cover and refrigerate for at least 4 hours, or preferably overnight, so the flavors meld and the cheesecake firms to a clean, sliceable texture.
→ Chilling firms the structure and intensifies the creamy mouthfeel, making slicing neater. - To serve, lift the cheesecake from the pan using the parchment overhang or slide a clean knife around the edges to loosen, then slice with a warm, sharp knife for clean cuts.
→ A warm blade prevents tearing and yields crisper edges for an elegant presentation. - Store any leftovers, covered, in the refrigerator for 3–4 days, or freeze individual slices wrapped tightly for up to 1–2 months; thaw in the refrigerator before serving.
→ Proper storage maintains creaminess and prevents drying or flavor loss over time.
Notes
These Easy Loaf Cheesecake slices are a crowd-pleasing dessert with a crisp graham cracker crust and a silky, lemon-kissed filling. To make them gluten-free, use gluten-free graham crackers and ensure any thickening ingredients (like cornstarch) are certified gluten-free; verify all components if you have gluten intolerance. For a firmer crust, press the crumb mixture firmly into a loaf pan lined with parchment and prebake for 8–10 minutes to set before adding the filling. Soften the cream cheese to room temperature and beat on low until smooth, then add sugar, vanilla, lemon juice, and zest; add the sour cream and mix until just combined. Add eggs one at a time, mixing on low after each addition and avoiding overmixing once eggs are incorporated to prevent cracks. If using cornstarch, whisk it with a small amount of sour cream before folding into the filling to help stabilise the batter. Bake until the center is just set, and consider a gentle water bath to minimize cracking. Chill the cheesecake thoroughly, preferably overnight, so it slices cleanly. Serve with fresh berries or a light fruit sauce, and store leftovers in the fridge, well covered, for up to 4–5 days or freeze slices for longer storage. For variation, swirl in berry puree, fold in mini chocolate chips, or swap lemon for vanilla or almond extract to suit your taste.
Tips
Tips for Easy Loaf Cheesecake
- Crust prep: Use finely crushed graham crackers (or gluten-free alternative) and mix with melted butter. If you like a sweeter crust, add 1–2 tablespoons of sugar to the crumbs. Press the mixture firmly into a loaf pan lined with parchment paper and prebake for 8–10 minutes to set the crust before filling for a firmer base.
- Butter handling: Let melted butter cool slightly before mixing with crumbs so it coats evenly without making the crust soggy.
- Pan prep: Line the loaf pan with parchment for easy removal. For a lighter pull, leave a parchment overhang; this makes slicing and lifting easier later.
- Cream cheese: Soften to room temperature (30–60 minutes) and cut into pieces to speed softening. Beat on low at first to combine, then medium-high until smooth. Scrape the sides often and avoid overmixing after eggs are added to prevent cracks.
- Sweetness and tang: Beat the sugar into the cream cheese until fully combined for a silky filling. Sour cream adds moisture and tang—use full-fat for best richness; if you substitute Greek yogurt, balance with a touch more sour cream or lemon.
- Egg addition: Add eggs one at a time on low speed, mixing just until combined. Overmixing after eggs go in can introduce air that leads to cracks; aim for a smooth, glossy batter.
- Flavor balance: Fresh lemon juice and zest brighten the filling. If you prefer a subtler lemon, start with 1 tablespoon juice and adjust to taste. Add zest with the wet ingredients for even distribution.
- Stability: Cornstarch is optional but helpful in loaf-style cheesecakes. Dissolve it in a few teaspoons of sour cream or whisk with a bit of sugar before adding to the filling to prevent lumps and improve structure.
- Add-ins tips: For mini chocolate chips, toss them in 1 teaspoon of flour before folding to reduce sinking. If using berries, toss with a little flour to minimize bleeding and sinking; you can also swirl a berry puree on top for a marbled look.
- Water bath (optional but recommended): To reduce cracking and promote even baking, bake the loaf in a water bath. Place the loaf pan in a larger baking dish, pour hot water halfway up the sides, and wrap the loaf pan tightly in foil to prevent leaks. Check water level partway through baking and add more hot water if needed.
- Baking cues: Bake until the center is just set with a slight jiggle; the cheesecake will continue to set as it cools. Avoid overbaking, which increases cracking risk.
- Cooling process: Cool gradually in the oven with the door ajar for 30–60 minutes, then transfer to a rack to finish cooling. Refrigerate for at least 4–6 hours, or preferably overnight, to ensure clean slicing and full set.
- Serving and storage: Use a warm knife for clean slices, wiping between cuts. Store leftovers tightly wrapped in the fridge for 3–4 days, or freeze individual portions for longer storage.
FAQ
What is Easy Loaf Cheesecake?
Easy Loaf Cheesecake is a compact, creamy cheesecake baked in a standard loaf pan, designed for simple, sliceable portions. It typically features a short crust (optional) and a smooth filling of cream cheese, sugar, eggs, vanilla, and a touch of dairy. It’s naturally easier to bake and portion than a large round cheesecake, making it perfect for gatherings or weeknight desserts.
What ingredients do I need for the crust and filling?
Crust (optional): 1 1/2 cups graham cracker crumbs (or digestive biscuits) mixed with 3 tablespoons melted butter and 1 tablespoon sugar. Filling: 16 oz (450 g) cream cheese, 1/2 cup granulated sugar, 2 large eggs, 1/2 cup sour cream (or Greek yogurt), 1 teaspoon vanilla extract, pinch of salt. Optional: 1 teaspoon lemon zest or a tablespoon of lemon juice for brightness; 1/4 cup heavy cream for extra creaminess.
What pan should I use and how should I prepare it?
Use a standard loaf pan, about 9×5 inches. Line it with parchment paper or spray lightly with nonstick spray. If you skip the crust, you can still line the pan for easy removal. If you’re worried about sticking, use parchment overhanging the ends for easy lifting.
Should I use a crust, and how do I make it?
A crust is optional but adds flavor and texture. For a quick crust, mix graham cracker crumbs with melted butter and sugar, press into the bottom of the pan, and bake for 6–8 minutes at 350°F (175°C) before adding the filling. If you prefer, you can simply skip the crust and pour the filling directly into a prepared pan.
Do I need a water bath when baking the cheesecake?
A water bath helps prevent cracks and ensures gentle heat. To use one, place the filled loaf pan inside a larger baking dish, then pour hot water into the outer dish until it comes halfway up the sides of the loaf pan. It’s optional but recommended for a smoother, crack-free cheesecake. If you skip it, bake at a slightly lower temperature and avoid overbaking.
How long should I bake it, and how do I know it’s done?
Bake at 325°F (165°C) for about 50–60 minutes, or until the edges are set and the center still has a gentle jiggle. The center will firm up as it cools. If using a water bath, follow the same time, but check for doneness after the recommended time. Avoid overbaking to prevent cracks and a dry texture.
How do I chill and set the cheesecake properly?
Allow the loaf to cool in the pan on a rack for about 1 hour, then refrigerate for at least 4 hours, preferably overnight, to fully set. For easier slicing, run a knife along the edges before lifting, or simply slice directly from the pan using parchment handles. Keep it refrigerated when not serving.
What flavors or variations can I try?
Variations are easy with a loaf cheesecake base. Try:
- Lemon Cheesecake: add 1–2 teaspoons lemon zest and a splash of lemon juice.
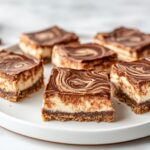
- Chocolate Swirl: fold in 2–3 tablespoons melted, cooled dark chocolate into the filling, or swirl it in after filling the pan.
- Berry Swirl: swirl in raspberry or strawberry sauce after adding the filling.
- Oreos or Cookies Crust: use crushed cookies in place of graham crackers for the crust and mix chopped cookies into the filling.
How should I store or freeze leftovers?
Store baked cheesecake covered in the refrigerator for up to 4 days. For longer storage, wrap tightly and freeze for up to 1–2 months. Thaw in the refrigerator overnight before serving. The flavor is best when consumed within a few days of baking.
What are common issues and how can I prevent them?
Common issues and fixes:
- Cracks: avoid overbaking, use a water bath, and let it cool gradually in the oven with the door ajar after baking.
- Center sinking or softness: don’t overmix the filling, bake at a steady low temp, and chill fully before slicing.
- Crumbling crust: ensure the crust is pressed firmly and pre-baked if using a longer bake time.
- Sticky or runny filling: make sure the cream cheese is at room temperature and mix until smooth, then add eggs one at a time.
Any tips for serving or presenting the Easy Loaf Cheesecake?
Tips include:
- Let the cheesecake sit at room temperature for 10–15 minutes before slicing for clean cuts.
- Dust with powdered sugar or top with fresh berries and a light glaze for a polished look.
- Slice with a hot knife (wipe between cuts) for neater portions.