Introduction / Hook
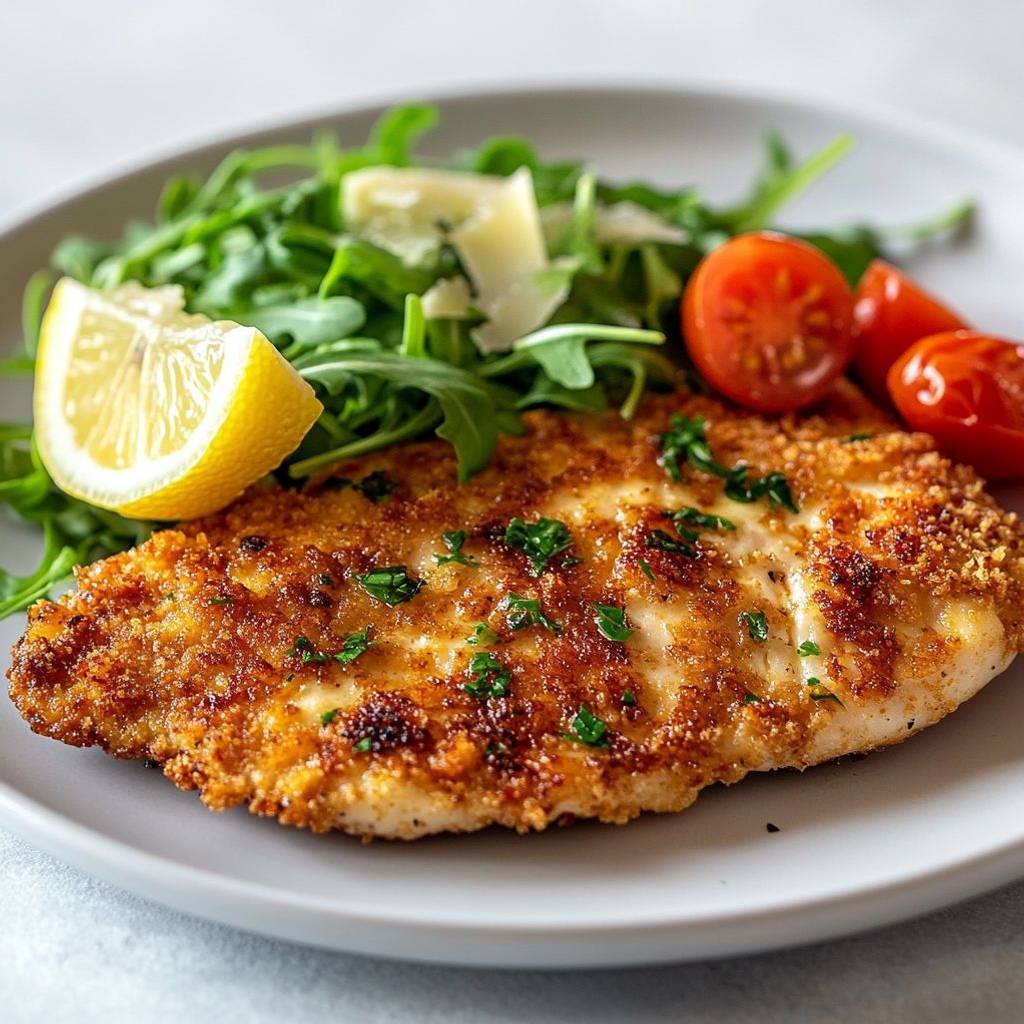
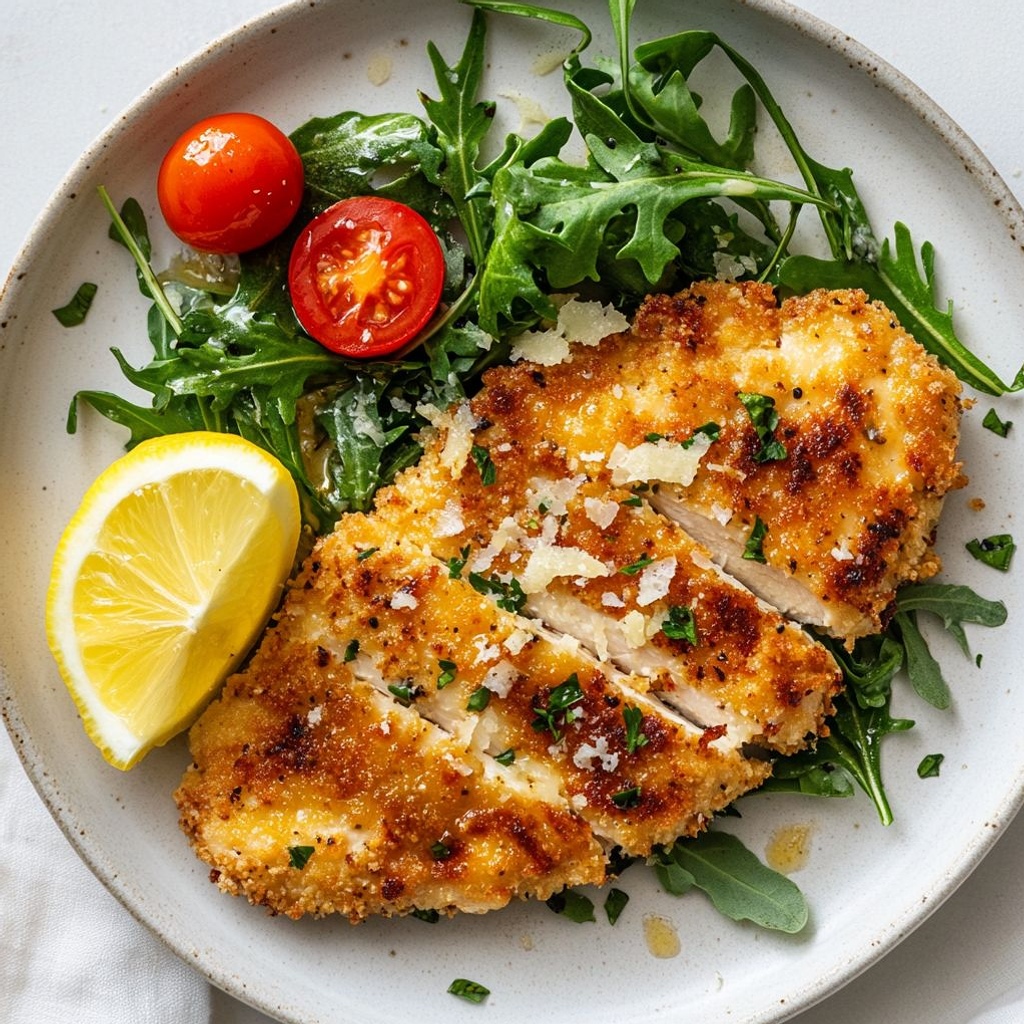
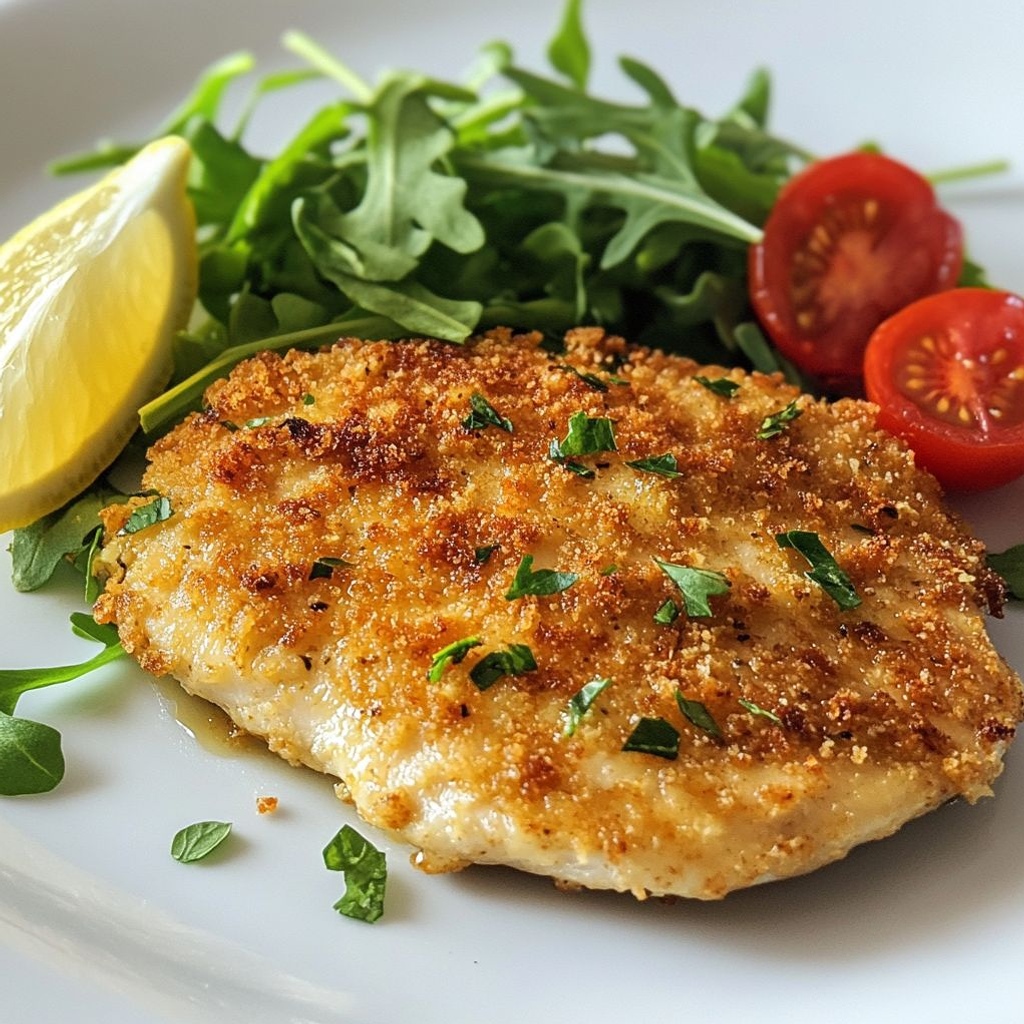
Picture a plate that gleams with a sunlit, golden crust, each edge crisp and whispering with the promise of a perfect bite. Beneath that crackling armor lies a tender, juicy fillet that sings with bright lemon, nutty parmesan, and a shy kiss of garlic and herbs. Italian Chicken Milanese is the kind of dish that makes a weeknight feel like a celebratory Sunday lunch, a meal that delivers comfort with a touch of elegance. The moment you bite in, you’re greeted by a symphony of textures: a delicate, wafer-thin crust that crackles on contact, a soft interior that almost flakes with moisture, and a fragrant lemon zest that lifts the whole plate to a sunny, Italian countryside feel. It’s familiar enough to feel like home, yet polished enough to serve to guests without stepping into culinary theater. And the best part? It comes together with a quick, confident rhythm—the kind of recipe you reach for when you want something spectacular without needing a long list of exotic ingredients or a marathon of steps.
This dish embodies the spirit of Italian home cooking: simplicity done well, where every component has a purpose and comes together to create something greater than the sum of its parts. The chicken is pounded to a uniform thickness so it cooks evenly and stays juicy; it travels briefly through a three-part crust of flour, egg, and a parmesan-forward breadcrumb mixture, then meets a hot skillet with a sizzle that promises a crusty exterior and a tender interior. A squeeze of lemon or a handful of fresh herbs at the end brightens the plate, turning a comforting classic into something luminous and crave-worthy. If you’ve ever wondered how to achieve that restaurant-crisp chicken at home, this Milanese approach offers a reliable pathway, every time you crave that quintessential, gilded bite.
The Story Behind the Dish
The name Milanese instantly evokes the crown jewel of Lombardy: cotoletta alla Milanese. Traditionally, this venerable dish was made with veal, a fine cut that cooks quickly and carries a delicate, almost velvet-like texture. In Italy—and across the globe—the Milanese tradition has evolved, giving us variations that suit modern kitchens and diverse palates. Chicken Milanese is one of the most beloved adaptations, turning a noble, century-old technique into a weeknight-friendly favorite without sacrificing the essence of the original: a light, crisp crust that embraces the meat without overpowering it, and a aroma of browned butter or olive oil that says “effortless premium.” The switch from veal to chicken is more than practical; it’s a delicious homage to the dish’s core identity—the art of transforming a simple protein into something bright, satisfying, and irresistibly crave-worthy.
In Milan and beyond, the method is classic: you season the meat, lightly dredge it in flour, dip it in egg, and coat it with breadcrumbs—often enriched with grated Parmigiano-Reggiano or Pecorino for depth. The pan is hot, the oil is abundant but not extravagant, and the goal is a crust that is both crisp and pliable, guarding a succulent center. Over the years, cooks have added their own touches—zest of lemon in the crust, a whisper of garlic in the egg wash, or a blanket of herb-infused butter at the finish—to honor the dish while making it sing for contemporary kitchens. Whether plated simply with a wedge of lemon and a peppery arugula salad or elevated with a silky potato purée or a shower of capers, Italian Chicken Milanese remains a testament to how few ingredients, treated with respect, can yield something truly memorable.
Why You’ll Love This Recipe
- Quick and reliable: You can prepare this comforting dish in under 30 minutes, making it a perfect weeknight hero or a fast answer for a casual dinner party.
- Crisp, juicy contrast: The three-layer dredge (flour, egg, breadcrumbs with parmesan) creates a satisfying crackle on the outside while preserving a moist, tender interior.
- Bright, vibrant finish: A fresh squeeze of lemon and a scatter of parsley or arugula brighten the dish, balancing the richness with a clean, citrusy lift.
- Versatile serving options: Serve it solo with a simple salad, pair it with a light pasta, or lay it atop a bed of creamy mashed potatoes for a comforting contrast.
- Family-friendly appeal: The familiar flavors of parmesan and lemon are welcoming to kids and adults alike, making it an easy crowd-pleaser for gatherings.
- Adaptable to dietary needs: You can customize the crust with gluten-free breadcrumbs, dairy-free cheese, or alternative coatings to suit different diets without losing the essence of the dish.
Flavor Profile & Texture
From the first bite, Italian Chicken Milanese unfolds in stages. The exterior crust—light, golden, and almost whisper-thin—offers a welcome crackle that yields to a soft, almost pillowy interior. The breadcrumbs, enriched with Parmigiano-Reggiano, give a nutty, savory backbone with a subtle saltiness that ties the dish together. If you’ve added lemon zest to the crust, you’ll enjoy a perfume of citrus that lingers pleasantly rather than turning sharp; the zest and a final squeeze of juice awaken the palate and prevent the richness from feeling heavy. The optional garlic in the egg wash adds a gentle warmth, but the dish remains balanced and not overpowering—the hallmark of Italian cooking that respects the meat’s inherent sweetness.
Milkiness or butteriness is not the centerpiece; rather, the dish shines through a chorus of textures: a crisp, almost wafer-thin crust that shatters with a delicate crack; a juicy, well-seasoned meat interior that stays tender; and a bright citrus note that keeps the flavors crisp and uplifting. The crust’s parmesan contributes a toasty, savory depth, while the light dusting of flour in the dredge helps create that first satisfying bite before the egg acts as the glue that seals the crust in place. When you pair the chicken with a peppery arugula salad or a simple squeeze of lemon, you introduce a balance of peppery greens and tangy brightness that refreshes the palate and turns a simple plate into a complete, satisfying meal. The aromas—the warm scent of browned crust in olive oil, the grassy perfume of fresh herbs, and the lemon’s citrusy zing—combine to evoke both rustic Italian kitchens and modern bistros, making this dish feel both timeless and current.
Occasions & Pairings
Italian Chicken Milanese is wonderfully versatile, lending itself to a variety of occasions and pairings. It’s equally at home as a weeknight main or the centerpiece of a relaxed dinner party. Here are ideas to tailor the dish to different moments:
- Weeknights: Pair with a simple green salad, roasted potatoes, or a light pasta with olive oil and garlic. The dish cooks in minutes, so you can have a satisfying dinner on the table fast.
- Sunday lunch or brunch: Serve with a bright citrus salad and a glass of chilled white wine for a leisurely, comforting meal that feels special but not fussy.
- Entertaining guests: Plate the chicken atop a bed of arugula or rocket, drizzle with lemon-dill or lemon-caperto oil, and present with a side of risotto or soft polenta for a refined yet approachable menu.
- Pairings: Light white wines such as Pinot Grigio, Verdicchio, or an unoaked Chardonnay work beautifully. For non-alcoholic options, a sparkling lemon water with a hint of basil or a citrusy iced tea complements the brightness of the dish.
When it comes to side dishes, a crisp salad with a tangy vinaigrette, blistered cherry tomatoes, or a simple herb-bathed potato purée can all shine next to the chicken. A few capers scattered on the greens can echo the crispy-savory notes in the crust, while a sprinkle of fresh parsley adds a burst of color and a clean finish. The chicken’s versatility makes it a reliable canvas for both minimalist and more elaborate pairings, depending on how you’re entertaining or what you’re craving that day.
Tips, Variations & Substitutions
Here are practical ideas to customize Italian Chicken Milanese while preserving its essence. Use them singly or mix-and-match to suit your pantry, dietary needs, or flavor preferences.
- Crunch level: For extra crunch, replace part or all of the breadcrumbs with panko breadcrumbs. You can also mix in a little finely grated parmesan for a nuttier bite.
- Parmesan variations: Combine Parmigiano-Reggiano with Pecorino Romano for a sharper, more complex savory note. If you’re avoiding dairy, use a dairy-free parmesan substitute or nutritional yeast to echo the cheesy vibe.
- Gluten-free option: Use gluten-free breadcrumbs or crushed gluten-free crackers in the crust. Ensure the flour you use is gluten-free if you’re avoiding gluten entirely.
- Herb and citrus boosts: Add lemon zest to the breadcrumb mix for a fragrant citrus glow. A pinch of finely chopped fresh thyme or flat-leaf parsley adds a fresh, green lift.
- Egg wash upgrades: A touch of milk or cream in the eggs can help the crust hold moisture more effectively; for dairy-free, consider almond milk with a bit of oil.
- Garlic and spice: A whisper of garlic powder or smoked paprika in the dredge adds warmth without overpowering the chicken.
- Pan-frying technique: Use a heavy skillet and sufficient oil to create a true sear; monitor the heat to avoid burning the crust. If the crust browns too quickly, lower the heat slightly and finish in the oven for 5–7 minutes at 350°F (175°C) to ensure the inside cooks through evenly.
- Air-fryer option: For a lighter crust, air-fry the breaded cutlets at 400°F (200°C) for 8–10 minutes, flipping halfway for a uniform crust. Finish with a tiny squeeze of lemon to brighten.
- Serving accompaniments: Try pairing with a simple olive oil and lemon-dressed greens, a warm potato purée, or a light tomato-basil salad for a brighter, more summery version.
- Make-ahead variations: The breaded cutlets can be prepared up to 2 hours in advance (covered and refrigerated). Bring to room temperature briefly before frying to ensure even cooking. For longer storage, you can freeze uncooked breaded cutlets on a baking sheet and transfer to a freezer bag; fry from frozen for best results, adding a minute or two to cooking time.
Storage & Make-Ahead Ideas
Leftovers, if any, should be treated with the same care you’d give to any prized lunch or dinner. The light, crisp crust is best enjoyed soon after cooking, but there are ways to extend the life of a graceful Milanese feast.
- Storing cooked Milanese: Refrigerate in an airtight container for up to 2 days. Reheat in a 350°F (175°C) oven for about 8–10 minutes, or in a skillet with a thin layer of oil to refresh the crust. Avoid microwaving, which can soften the crust and dampen the crust’s crispiness.
- Make-ahead crust: You can prepare the breading mixture and even the egg wash in advance and keep them refrigerated until you’re ready to bread the chicken. This can shave minutes off your prep time and keep the process organized for busy evenings.
- Freezing options: Freeze breaded, raw chicken cutlets arranged on a sheet pan until firm, then transfer to a freezer bag. Bake from frozen, adding a few extra minutes to ensure the interior is fully cooked and the crust is golden.
When storing any dish that benefits from a bright finish, you can hold a small lemon wedge or lemon zest to sprinkle just before serving. A handful of chopped fresh parsley or arugula added after reheating can revive color and aroma, making the dish feel fresh even on day two.
Fun Facts & Trivia
Delightful tidbits that celebrate the culture and history behind Milanese-inspired cooking:
- The traditional cotoletta alla milanese is most commonly made with veal, a nod to Lombardy’s culinary heritage. Chicken Milanese is a modern and beloved adaptation that preserves the essence of the technique—the breaded, fried cutlet with a crisp, flavorful crust.
- Parmesan or Pecorino added to the breadcrumbs is a hallmark of the dish, enriching the crust with a toasty, umami kiss that echoes the Italy’s love affair with cheese and bread.
- The dish often pairs with a light salad to maintain balance—arugula, bitter greens, or peppery herbs, which cut through the richness and invite a refreshing counterpoint to the fried crust.
- In Italy, simple, seasonal ingredients and careful technique are valued above heavy sauces. The Milanese approach honors that philosophy: minimal components, maximum flavor, and a crisp crust that makes the chicken sing on its own.
Ultimately, Italian Chicken Milanese is more than a recipe; it’s an invitation to celebrate the art of turning simple pantry staples into something special. It’s a dish that travels well—across Italian kitchens and into homes around the world—always inviting you to savor the moment, to breathe in the aroma of browned butter or olive oil, to hear the crack of the crust, and to taste a piece of Italy at its most approachable and comforting.
Ingredients
Italian Chicken Milanese
Chicken Milanese Base
- – 2 boneless, skinless chicken breasts (about 1 lb / 450 g total), trimmed and gently pounded to an even 1/4-inch thickness
→ Uniform thickness ensures quick, even cooking and a consistently crisp crust. Place the chicken between two sheets of plastic wrap and pound with a meat mallet or rolling pin until evenly thin. - – 1/2 teaspoon kosher salt
→ Salt seasons the chicken on both sides and helps draw out moisture for better browning and flavor. Sprinkle evenly on both sides before dredging. If time allows, salt 15–20 minutes ahead; otherwise salt right before breading. - – 1/4 teaspoon freshly ground black pepper
→ Adds a mild bite and aromatic depth to the chicken. Freshly ground pepper yields a brighter flavor than pre-ground. Adjust to taste.
Dredging Station
- – 1/2 cup all-purpose flour, lightly seasoned with a pinch of salt and pepper
→ The flour layer helps the egg adhere to the chicken and begins the browning process for a crisp crust. Sift to remove lumps for an even, smooth coating. - – 2 large eggs, lightly beaten with 1 tablespoon water
→ Provides the binding medium that traps the breadcrumbs to the meat, forming a cohesive crust. Beat until uniform; add a splash of water if the mixture seems very thick or stiff. - – 1 cup breadcrumbs (Italian-style or panko)
→ Forms the main crispy crust. Panko yields extra crunch, while traditional breadcrumbs provide a denser crust. For gluten-free, use gluten-free breadcrumbs. For balanced crunch and flavor, consider a 50/50 mix of fine breadcrumbs and panko. - – 1/4 cup finely grated Parmigiano-Reggiano cheese (optional)
→ Adds savory, nutty depth and helps with browning. Mix evenly into the breadcrumb mixture. If dairy-free, omit or substitute with nutritional yeast for a similar cheesy note. - – 1 teaspoon dried Italian seasoning or 1 tablespoon chopped fresh flat-leaf parsley (optional)
→ Imparts aromatics and herbal brightness to the crust. If using fresh herbs, pat dry before mixing to avoid soggy coating.
Frying
- – 1/4 cup extra-virgin olive oil for shallow frying (plus more as needed to maintain a thin layer)
→ Provides the fat necessary for browning and crisping the crust. Use enough oil to coat the bottom of a skillet in a thin layer; maintain medium-high heat and adjust as needed to prevent burning. Add more between batches if needed to keep a consistent crispness.
Serving
- – Lemon wedges (from 1 lemon)
→ A bright squeeze of fresh lemon over the hot cutlets lifts the flavors and cuts the richness of the fried crust. Serve wedges on the side for guests to apply to taste. - – Fresh arugula or mixed greens (optional)
→ A light bed of greens provides a peppery contrast and helps balance the dish. Toss with a touch of olive oil and a pinch of salt if desired or serve plain on the side. - – Fresh parsley leaves for garnish (optional)
→ Adds color and a fresh aroma. Sprinkle chopped parsley over the finished dish just before serving for a polished presentation.
Instructions
- Trim the chicken breasts and gently pound them to an even 1/4-inch thickness between two sheets of plastic wrap using a meat mallet or rolling pin; this prevents uneven cooking and ensures a uniformly crisp crust.
→ Uniform thickness ensures quick, even cooking and a consistently crisp crust. The gentle pounding prevents tearing and helps the meat stay tender during frying. - Season both sides with 1/2 teaspoon kosher salt and 1/4 teaspoon freshly ground black pepper to season the meat and initiate moisture extraction for better browning.
→ Salt flavors the chicken and aids browning by drawing out moisture; pepper adds aromatic depth. If possible, salt 15–20 minutes ahead; otherwise salt right before breading. - Set up the dredging station with three shallow dishes: one containing 1/2 cup all-purpose flour lightly seasoned with a pinch of salt and pepper; one with 2 large eggs lightly beaten with 1 tablespoon water; and one with 1 cup breadcrumbs (Italian-style or panko) with optional 1/4 cup finely grated Parmigiano-Reggiano and 1 teaspoon dried Italian seasoning or 1 tablespoon chopped fresh flat-leaf parsley.
→ This arrangement creates a classic breading ladder: flour helps the egg adhere and begins browning; eggs bind the crumbs; and breadcrumbs form the crisp crust with added flavor from cheese and herbs. - Beat 2 large eggs with 1 tablespoon water in a separate shallow dish until smooth and uniform.
→ A well-blended egg wash ensures even binding of crumbs and prevents irregular clumps on the crust. - In a third shallow dish, combine 1 cup breadcrumbs with 1/4 cup finely grated Parmigiano-Reggiano and 1 teaspoon dried Italian seasoning or 1 tablespoon chopped fresh flat-leaf parsley; mix until the cheese and herbs are evenly distributed.
→ Evenly seasoned crumbs yield a balanced, aromatic crust that browns uniformly. - Dredge each chicken cutlet by first coating in the seasoned flour, tapping off excess; then dip into the egg mixture, letting any excess drip back into the dish; finally press into the breadcrumb mixture, turning to coat evenly and pressing gently to ensure the crumbs adhere.
→ This sequence builds a sturdy, flavorful crust that clings to the meat during frying and stays intact. - Heat 1/4 cup extra-virgin olive oil in a heavy skillet over medium-high heat until it shimmers; maintain a thin, even layer to promote crisping without frittering the coating.
→ A hot, shallow oil layer browns the crust quickly and evenly while avoiding greasy outcomes; add more oil between batches to keep the crust consistent. - Fry the breaded cutlets in batches, placing them carefully into the hot oil without crowding the pan; cook 2–3 minutes per side until the crust is golden brown and crisp, adjusting heat to maintain steady browning.
→ Crowding lowers the pan temperature and yields pale crusts; turning when the edges set prevents crust damage and promotes even cooking. - Transfer the fried cutlets to a wire rack set over a sheet pan or to paper towels to drain; keep warm in a 200°F (93°C) oven if necessary to finish cooking or to serve later without sogginess.
→ Draining removes excess oil to preserve crispness; a low oven keeps the hot cutlets ready without softening the crust. - Repeat frying with the remaining cutlets, adding more oil as needed to maintain a thin layer and consistent browning throughout the process.
→ Fresh oil or a refreshed surface maintains crispness and prevents flavor carryover from previous batches. - Serve immediately with lemon wedges on the side to brighten the rich crust; optionally arrange on a bed of arugula or mixed greens and garnish with fresh parsley leaves for color and aroma.
→ The bright lemon cut cuts through the richness of the fried crust, and greens add a peppery balance while parsley provides a finished presentation.
Notes
These Italian Chicken Milanese are a quick weeknight classic featuring thin, pounded chicken cutlets that fry up to a tender center with a crisp, golden crust and a bright lemon finish. You can customize the crust by mixing in finely grated Parmigiano-Reggiano, a pinch of dried Italian seasoning or chopped fresh parsley, and a balanced blend of breadcrumbs for extra crunch. For gluten-free options, substitute gluten-free flour for dredging and use gluten-free breadcrumbs; for a dairy-free version, omit the cheese or replace it with a dairy-free alternative like nutritional yeast.
They fry best in a shallow pool of extra-virgin olive oil, kept at a steady medium-high heat until the crust is deeply golden and the chicken reaches 165°F (74°C). Let the cutlets rest a minute after frying to reabsorb juices before serving, and wipe the pan between batches to maintain consistent browning. If you prefer a lighter crust, use a 50/50 mix of fine breadcrumbs and panko; for extra richness, finish with a light squeeze of lemon while still hot.
To serve, arrange over fresh arugula or mixed greens and finish with lemon wedges and chopped parsley for color and aroma. Leftover Milanese can be refrigerated for 2–3 days and reheated in a hot skillet or a brief oven session to restore crispness. Always ensure your breading ingredients are gluten-free if you have gluten intolerance.
Tips
Tips for Italian Chicken Milanese
- Prepare and rest: After pounding, let the chicken rest 5–10 minutes to relax fibers; this helps the crust adhere and cook evenly.
- Seasoning timing: Salt the chicken 15–20 minutes ahead if you have time; otherwise season right before breading to prevent drawing moisture too early.
- Crust prep: For the crispiest crust, sift the flour to remove lumps, and consider a 50/50 mix of fine breadcrumbs and panko for a balanced crunch.
- Egg wash: Beat eggs with 1 tablespoon water until smooth; if the mixture seems thick, whisk in a touch more water to help it trap the crumbs.
- Cheese option: Parmigiano-Reggiano adds color and depth; dairy-free option: nutritional yeast or omit entirely.
- Herb boosts: Dried Italian seasoning or fresh parsley adds aromatics; if using fresh, pat the parsley dry to avoid soggy coating.
- Crust-setting tip: Chill the breaded cutlets 10–15 minutes on a rack or tray before frying to help the crust set and reduce sogginess.
- Pan-frying technique: Use a thin layer of olive oil to cover the bottom; keep heat medium-high and adjust as needed to avoid burning the crust. Add more oil between batches to maintain crispness.
- Temperature control: If the crust browns too quickly, lower the heat; if it browns slowly, increase slightly or preheat the pan longer before adding chicken.
- Drain and rest: Let fried cutlets drain on a rack or paper towels; rest 1–2 minutes before serving to keep the crust crisp.
- Serving idea: Finish with a squeeze of lemon and a bed of arugula; parsley garnish adds color and aroma.
Storage and reheating tips: Cool completely, refrigerate in an airtight container for 1–2 days; reheat in a hot oven (375°F/190°C) or toaster oven to preserve crispness. Avoid microwaving as it softens the crust.
FAQ
What is Italian Chicken Milanese?
A classic Italian dish of thin, pounded chicken cutlets that are dredged in flour, dipped in beaten eggs, and coated with seasoned breadcrumbs (often with grated Parmesan). The cutlets are pan-fried in olive oil until the crust is golden and crisp. It’s typically served with lemon wedges and a simple green salad or arugula.
What ingredients do I need?
Basic setup (serves 2–4):
- 2 boneless, skinless chicken breasts, pounded to 1/4 inch (6 mm) thickness
- Salt and pepper
- 1/2 cup all-purpose flour (or gluten-free flour)
- 2 large eggs, beaten
- 1 cup breadcrumbs (panko or regular; use gluten-free breadcrumbs if needed)
- 1/4 cup grated Parmesan cheese (optional but traditional)
- Finely grated zest of 1 lemon (optional, for brightness)
- 2–3 tablespoons olive oil or a light oil for frying
- Optional: chopped parsley or Italian seasoning for the crumb mix
- Lemon wedges for serving
Can I use chicken breast or thighs?
Traditional Milanese uses chicken breast. You can use thin-sliced chicken thighs for juicier meat; they’re more forgiving if slightly thicker. If using thighs, trim excess fat, pound to an even thickness, and adjust cooking time as needed. The internal temperature should reach 165°F (74°C).
How do I bread and fry for a crisp crust?
Set up a breading station: flour, beaten eggs, and the breadcrumb mixture (breadcrumbs + Parmesan + seasonings).
- Season the chicken with salt and pepper.
- Dredge in flour, shaking off excess.
- Dip in eggs, allowing excess to drain.
- Coat with breadcrumbs, pressing gently to help adherence.
- Let the coated cutlets rest 5–10 minutes to set the coating.
- Heat 1/4 inch of oil in a skillet over medium-high heat (about 350–375°F / 175–190°C).
- Pan-fry 2–4 minutes per side until the crust is golden and the chicken is cooked through. Drain on paper towels.
Can I bake or air-fry instead of pan-frying?
Yes. For a lighter option:
- Preheat oven to 425°F (220°C). Place breaded cutlets on a parchment-lined sheet; lightly spray or brush with oil.
- Bake 12–15 minutes on the first side, then flip and bake 6–8 minutes more, until crust is golden and the chicken reaches 165°F (74°C).
Air-frying works well too: cook at 400°F (205°C) for about 8–12 minutes, flipping halfway, until crisp.
How long does it take to cook?
Plan about 25–40 minutes total from start to finish. Pounding and breading take ~15–20 minutes, and pan-frying adds about 8–14 minutes depending on thickness. Larger batches will take longer; keep the crust crisp by not overcrowding the pan.
What should I serve Italian Chicken Milanese with?
Classic accompaniments include:
- Fresh lemon wedges to squeeze over the cutlet
- A simple arugula salad or mixed greens with a light vinaigrette
- Roasted or sautéed vegetables
- Mashed potatoes, roasted potatoes, or a simple pasta aglio e olio
How do I store leftovers and reheat?
Storage: refrigerate any leftovers in an airtight container for up to 3 days.
Reheating: to retain crispness, reheat in a 350°F (175°C) oven or toaster oven until warmed through and crust is crisp again (about 5–10 minutes). Microwave can soften the crust, so it’s best avoided if possible.
How can I make this gluten-free or dairy-free?
Gluten-free options:
- Use gluten-free flour for dredging and gluten-free breadcrumbs or crushed gluten-free crackers for the crust.
D dairy-free options:
- Omit Parmesan or replace with a dairy-free Parmesan substitute or nutritional yeast for a similar savory note.
Eggs remain the binding agent in both cases, but you can season the crumbs with extra herbs and lemon zest for flavor.
Tips for perfect results and common mistakes to avoid
Tips:
- Pat chicken very dry before breading to help coating adhere.
- Pound to an even thickness (about 1/4 inch) for uniform cooking.
- Keep oil at a steady medium-high temperature to avoid soggy crust or burnt coating (target around 350–375°F / 175–190°C).
- Don’t crowd the pan; cook in batches to maintain heat.
- Mix breadcrumbs with Parmesan and a pinch of salt for extra flavor and crispness.