Introduction / Hook
Imagine a tray of perfectly fried or baked bites that crackle at the touch, releasing a molten kiss of melted cheese with every bite. Crispy on the outside, invitingly soft and gooey on the inside, these bites turn an ordinary snack into a celebration. They’re the kind of morsels that disappear from a platter faster than you can say “more, please,” leaving a warm, lingering aroma of toasty cheese and comforting savory notes in their wake. The first crunch gives way to a luxuriously chewy center, a contrast that makes your mouth sing in delight. They’re effortless, irresistible, and incredibly versatile—the sort of dish you can whip up for movie nights, game days, casual appetizers, or a quick party starter that instantly elevates the mood. The magic lies not just in taste, but in texture: the sizzle as they come off the pan, the sun-warmed aroma that fills the kitchen, the way they pair with a simple dip or a bright herb-accented sauce. These crispy cheese bites are designed to be crave-worthy in the best possible way—small in size, big on personality, and perfectly suited for sharing with friends and family.
What makes them truly special is how forgiving and adaptable they are. They aren’t tied to one single flavor profile or culinary tradition; they can be tinted with herbs, spice, or a whisper of heat, and they welcome a variety of cheeses for different moods. One batch can be transformed into a weekend snack, a party platter centerpiece, or a comforting bite that rounds out a cozy weeknight meal. The aroma alone has a way of drawing people in, as if the kitchen itself were inviting everyone to gather around for something warm, satisfying, and a little bit nostalgic. If you’ve ever wished for a snack that checks all the boxes—crunch, cheesiness, speed, and crowd-pleasing charm—these crispy cheese bites are about to become your new go-to favorite.
Beyond taste and texture, they offer a playful sense of nostalgia. Think of childhood crackers turned into something a touch more grown-up, or a fancy cheese board element that can be enjoyed by all ages. The beauty is that you can tailor them to fit any occasion, whether you’re aiming for a sophisticated spread at a dinner party or a carefree plate that keeps a lively crowd satisfied during a late-afternoon game. They’re both familiar and surprising at once: familiar in their comforting cheesiness, surprising in how crisp and crackly the exterior becomes, and surprising again in how effortlessly they come together with minimal effort and maximum impact. Ready to learn how to make them shine? Let’s explore the story, the science of texture, and the delightful ways to savor these bites with any gathering in mind.
The Story Behind the Dish
The origins of crispy cheese bites trace a broad lineage of “cheese crisps” and molten-melt snacks that home cooks and professional kitchens alike have embraced for generations. The concept is simple: a cheese-rich mixture or a cheese-focused canvas is heated until the edges crisp into a delicate shell, while the interior remains malleable, inviting a luscious, lingering melt. Over the years, cooks have riffed on this idea, combining different cheeses, seasonings, and binding elements to craft versions that suit diverse appetites and dietary needs. What began as a playful riff on classic cheese snacks has evolved into a reliable method for turning humble pantry staples into something festive and crave-inducing.
In many homes, these bites became a fixture during late-night study sessions, holiday gatherings, or casual tastings with friends. They travel well: a tray can go from oven to table without losing their signature crunch, and their simple composition invites experimentation. The dish has a democratic charm—no need for elaborate techniques or specialized equipment. A hot skillet, a sheet pan, or a small air fryer can do the job, and the result remains consistently satisfying. The story behind crispy cheese bites is really a story about how a handful of pantry-friendly ingredients can become something that feels luxurious, comforting, and unexpectedly playful. It’s a reminder that good snacks don’t have to be fussy; sometimes they’re simply about letting textures sing and flavors mingle in a way that makes every bite feel like a small celebration of how good food can be in the moment you crave it most.
Personal anecdotes from countless kitchens add another layer to their charm. In one cozy kitchen, a busy parent found that a plate of these bites kept a crowd of curious kids enthralled between playtime and bedtime. In another, hosts discovered that a snack born from a chance combo of cheeses on the cheese tray could spark friendly debates about the “best bite” while still delivering comfort and satisfaction. Across cultures and kitchens, the idea remains the same: a crisp, cheese-forward bite that invites you to dip, nibble, and savor, all while sharing a moment around the table. The history of these bites mirrors a broader culinary truth—great snacks emerge when you combine simplicity with a touch of clever heat and a generous helping of cheese-loving joy.
Why You’ll Love This Recipe
- Quick and forgiving: whip up a batch in minutes, without fuss or waste. They’re perfect for last-minute entertaining or a speedy weeknight snack.
- Crowd-pleasing versatility: a blank canvas for flavor. Use seasonings, herbs, or dips to tailor them to your mood or the occasion.
- Texture contrast that delights: a crackly exterior gives way to a mellow, melty center for a satisfying bite every time.
- Minimal equipment, maximum impact: no special gear required—just a skillet, sheet pan, or air fryer—so you can cook wherever you are.
- Kid- and adult-friendly: familiar, comforting, and flexible enough to skip or embrace heat depending on the audience.
- Make-ahead potential: good for planning ahead for parties or busy days; they reheat beautifully and still deliver crunch.
Flavor Profile & Texture
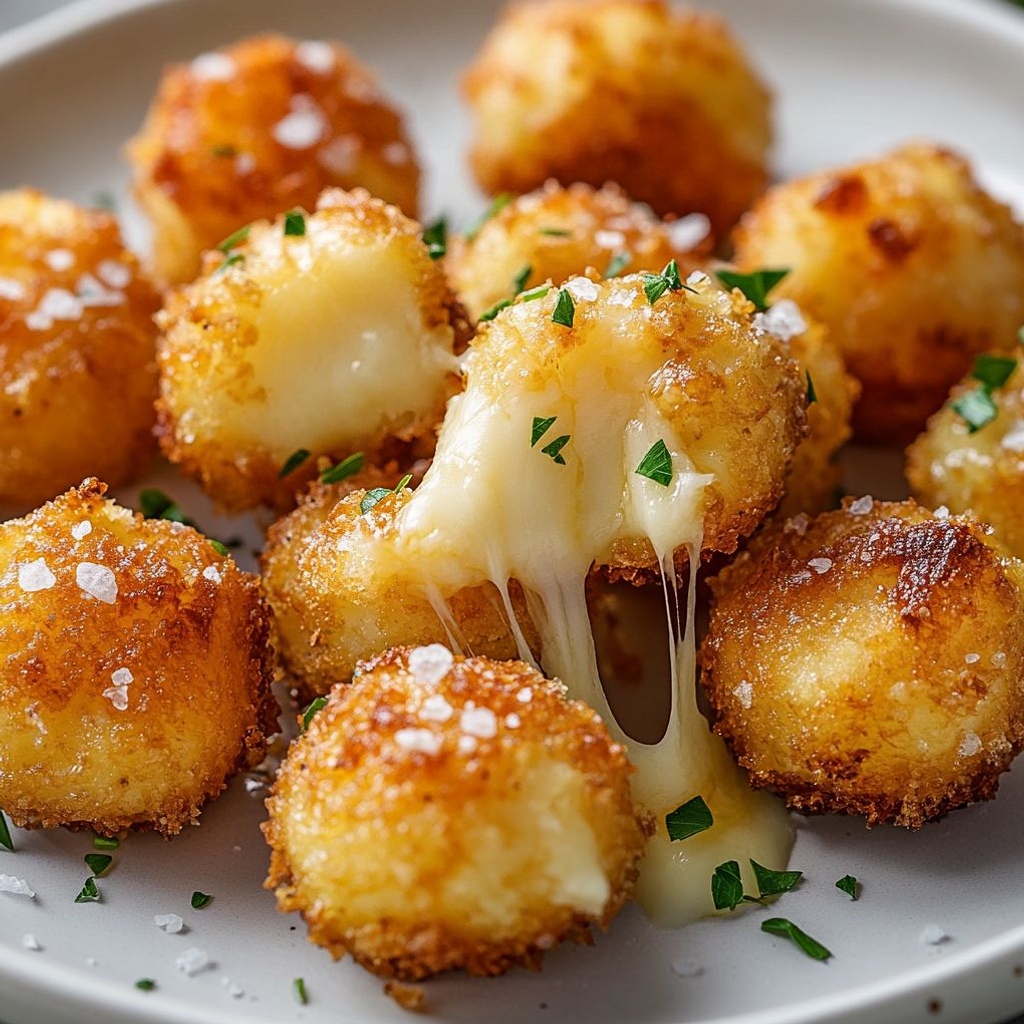
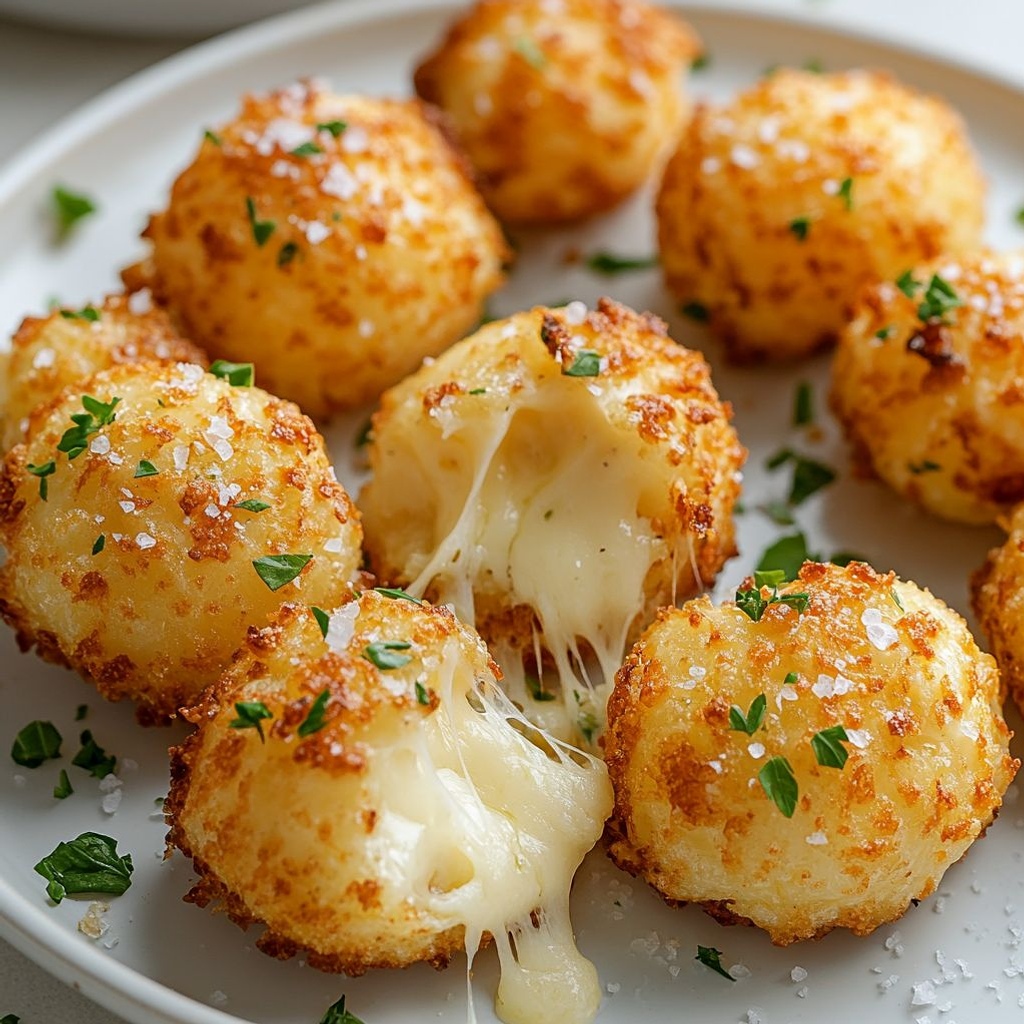
The essence of these bites lies in their interplay of savory, toasty, and slightly salty flavors with a texture that keeps you coming back for more. The exterior offers a crisp, almost brittle shell that provides that satisfying first bite. Inside, a gentle, warm melt—creamy and comforting—coexists with a savory backbone. The overall flavor is deeply cheese-forward, with a buoyant, nutty undertone if a certain mix of cheeses is chosen, and a more mellow, rounded profile if a softer cheese dominates. The balance between saltiness and umami is key: a touch of acidity or brightness from a supporting element can help lift the richness without overpowering it.
Texture-wise, the bites are a study in contrasts. The outer edge takes on a delicate crunch that crackles with a soft, chewing center. That contrast is what makes them so engaging: you hear the crisp bite, feel the melt in your mouth, and get a lingering dairy-savory finish that invites another dip, another bite. Depending on the cheese blend, you can steer the experience toward sharper, more pronounced cheese notes or toward a smoother, creamier finish. If you want a more robust bite, lean into sharper cheeses with a mineral bite; for a milder, approachable flavor, blend in a softer, creamier element. The texture also responds to temperature: serve warm to maximize gooey centers, or offer them slightly cooler for a firmer bite that still holds its shape and delivers the characteristic crunch. In any case, the result remains a harmonious dance of texture and taste that makes these bites feel special without demanding a long, complicated process.
Occasions & Pairings
These crispy cheese bites are incredibly flexible when it comes to occasions. They work beautifully as an amuse-bouche at a formal gathering, a playful addition to a casual game night, or a comforting snack on a snowy weekend. They pair well with a range of dips and sauces that can elevate their flavor profile in new directions—without stealing the show from the star ingredient: cheese. A simple tomato-based dip or a bright herb yogurt can provide a contrasting note, while a tangy honey-mustard or a garlicky aioli can amplify the savory depth. They also fit into a party spread as a high-appeal, low-effort option that keeps guests mingling rather than stuck at the snack table.
Pairing ideas:
– Dips: tomato-basil, garlic aioli, creamy herb dip, or a smoky paprika yogurt dip.
– Sides: light salads with citrus dressing, pickled vegetables for a tangy counterpoint, or a warm bruschetta topping that echoes Italian sensibilities.
– Beverages: a sparkling beverage to cut through richness, a crisp white wine with enough acidity to balance dairy, or a light beer with a clean finish.
– Desserts: a surprising but fun match with a small sweetness—think a touch of honey on the plate, or a short, bright fruit compote to cleanse the palate between bites.
For occasions, consider holiday gatherings where guests arrive with diverse tastes, weeknights when you want something quick yet impressive, or movie nights when you crave snackable, shareable comfort. They’re equally at home on a casual spread as they are on a more polished platter, where their golden exteriors shimmer under warm lighting and invite lingering conversations.
Tips, Variations & Substitutions
- Cheese combinations: experiment with a blend that suits your palate. A sharper, aged cheese can bring a bold bite, while a creamier cheese yields a silkier interior. A light touch of a salty, nutty cheese can heighten the overall savoriness.
- How to cook: you can achieve the signature crunch with different methods—pan-frying on a lightly oiled surface, baking on a parchment-lined sheet, or using an air fryer for a hands-off, even crispness. Each method yields a slightly different texture profile, so feel free to choose the one that matches your equipment and time budget.
- Seasoning play: add a whisper of herbs or spices to the exterior for fragrance and depth. A pinch of garlic powder, paprika, or dried Italian herbs can transform the flavor profile without introducing extra ingredients that complicate the dish.
- Vegan or dairy-free: substitute with vegan cheeses that melt well and a dairy-free binding option if needed. A base of a plant-based cheese with nutritional yeast can deliver that cheesy flavor while keeping the dish accessible to non-dairy eaters.
- Gluten considerations: the base concept is naturally gluten-free if you avoid breadcrumbs or flours that contain gluten. For a gluten-free version, rely on cheese alone or use gluten-free binders if you’re adding a crust or coating.
- Make it kid-friendly or grown-up: milder cheese blends work well for kids, while bolder cheeses and a touch of heat can appeal to adults who enjoy more intense flavors. You can always provide a dip or sauce with a little extra kick on the side for those who want it.
- Make-ahead ideas: you can shape the bites in advance and refrigerate them on a sheet pan before cooking, or freeze formed bites on a tray and then transfer to a bag for longer-term storage. They reheat well and stay crisp even after a short rest in the oven or air fryer.
- Creative twists: fold in a few finely chopped herbs, a drizzle of olive oil, or a light zest of citrus to brighten the flavor profile. A tiny amount of citrus zest can lift the richness with a fresh, aromatic lift.
Storage & Make-Ahead Ideas
The beauty of crispy cheese bites is that they forgive you for planning ahead. After cooking, store any leftovers in an airtight container at room temperature for a short period if you’re serving them immediately, or refrigerate for longer freshness. When refrigerated, they’ll still retain much of their crunch if reheated properly. To re-crisp, rewarm them in a hot oven or air fryer for just a few minutes, and you’ll hear that familiar crackle again. If you want to freeze them to keep for longer, freeze either before cooking (shaped on a parchment-lined tray) or after they’re fully cooked. Bake or reheat directly from the freezer in a hot oven or air fryer, adding a couple of minutes to the usual time. The texture will stay crisp on the outside and remain soft and melty on the inside, giving you a reliable party starter that’s almost as good as fresh.
Make-ahead strategies can be a lifesaver on busy days. If you know you’ll have guests or a large crowd, prepare the cheese mixture in advance and shape the bites ahead of time; refrigerate them on a tray, then finish with a quick cook when ready to serve. This approach minimizes stress on the day of your gathering while still delivering that irresistible, just-finished texture. You can also prepare a dipping sauce or two ahead of time and stash them in the fridge for a quick pairing that complements the bites perfectly. The key is to maintain the bite’s chance to become crisp as it hits the heat, so avoid stacking or overcrowding if you’re making a larger batch. Give each bite a little space so steam doesn’t dampen the exterior’s crunch.
Fun Facts & Trivia (Optional)
Cheese, in its many forms, has a long and varied history around the world. Crisps and fried cheese have echoes in several cuisines, where melted cheese tucked into crunchy skins is celebrated as a delightful contrast of textures. The simple act of crisping cheese—whether in a skillet, under a broiler, or in a hot oil bath—highlights a fundamental culinary principle: fats carry flavors, and heat transforms moisture and texture in a way that makes even familiar foods feel new and exciting. Some cheese varieties melt more readily than others, which is why many recipes lean toward blends that balance meltability with flavor intensity. If you ever wonder why something as humble as a cheese bite can feel so satisfying, you’re sensing the universal appeal of the crisp-cheese combo: a quick, comforting bite that embodies both tradition and playful modernity.
For those who love little-known culinary tidbits, consider this: the concept of cheese as a snack has parallels in many cultures—think of halloumi fried to a sizzle, or paneer cubes fried to a golden glaze. The appeal lies in the cheese’s ability to hold its shape while delivering a molten interior that melts on the tongue. The crispy cheese bites you’re about to enjoy tap into that shared love for cheese-based snacks with a crisp exterior and a melt-in-your-mouth interior. They’re a modern, approachable take on a centuries-old delight, designed to be shared, enjoyed, and recreated with ease in home kitchens across the globe.
Ingredients
- Crispy Cheese Bites
- 2 cups shredded cheese (sharp cheddar with a mozzarella blend for melt and texture)
→ The cheese is the star of these bites, providing rich flavor and the gooey, stretchy interior. Use a mix of sharp cheddar for bite and mozzarella for meltability. For best results, shred from block cheese just before mixing to maximize flavor and texture; pre-shredded cheese can contain anti-caking agents that affect how the mixture binds. - 1/4 cup cream cheese, softened
- 1 large egg, at room temperature, beaten
- 2 tablespoons all-purpose flour or gluten-free flour
- 1/2 teaspoon garlic powder
- 1/4 teaspoon onion powder
- 1/2 teaspoon smoked paprika (or sweet paprika)
- 1/2 teaspoon salt
- 1/4 teaspoon freshly ground black pepper
- Coating & Cooking
- 1 cup breadcrumbs (Panko or gluten-free breadcrumbs)
- 1/4 cup grated Parmesan cheese
- 2 tablespoons melted butter
- 1–2 tablespoons neutral oil (for frying or for brushing on the bites if baking)
- Dipping Sauce
- 1 cup marinara sauce or ranch dressing (for serving)
- Optional Add-ins
- 2 tablespoons finely chopped fresh parsley
- 1/4 teaspoon red pepper flakes (adjust to heat)
- 1 tablespoon chopped chives or green onions
→ Adds extra binding and a creamy undertone that helps the mixture stay cohesive during shaping and cooking. Soften at room temperature so it folds evenly into the cheese without clumping; if cold, cut into small chunks and mix gradually.
→ Acts as a binder that helps the cheese mixture hold its shape once formed. Room-temperature eggs incorporate more evenly and yield a smoother dough-like texture; whisk well to avoid streaks.
→ Transfers moisture into a stable structure, helping the bites set and hold together during baking or frying. If using gluten-free flour, choose one with good binding properties (like a blend) to mimic regular flour.
→ Provides savory depth and aroma; distribute evenly so every bite reads as cheese-forward with a subtle warmth. If you prefer fresh garlic, finely mince and add a quick sauté in a tiny amount of oil to mellow its bite before mixing.
→ Adds a gentle savory note that complements the cheese without introducing moisture or texture issues. It helps balance the richness and enhances overall flavor.
→ Adds color and a mild smoky or mellow sweetness that rounds out the cheese flavor. Adjust depending on how smoky you want the final bites to taste.
→ Essential to balance the natural saltiness of the cheese; cheeses vary, so start with a smaller amount and taste the mixture before shaping. You can omit if your cheese is very salty.
→ Provides a subtle zing that brightens the overall flavor; use freshly ground pepper for a more vibrant aroma.
→ Creates the crispy crust that defines these bites. For gluten-free diets, use gluten-free breadcrumbs or finely ground gluten-free crackers; for extra crunch, mix crumbs with 1–2 tablespoons grated Parmesan.
→ Adds a sharp, savory note to the crust and aids browning for a crisper exterior. Use freshly grated Parmesan for the best aroma and flavor; fold into the breadcrumbs before coating the bites.
→ Used to moisten the coating and promote browning, giving a richer, crisper crust. If dairy-free, substitute with olive oil or a neutral oil and adjust the amount to achieve similar coating consistency.
→ When frying, use enough oil to shallow-fry the bites; when baking, brush or spray lightly to promote even browning without making the crumbs soggy. Choose a high-smoke-point oil for best results.
→ Provides a contrasting or complementary flavor to cheese bites. Marinara yields a classic Italian vibe with tomato acidity, while ranch offers a creamy, herby coolness. Warming the marinara slightly can enhance dipping ease and aroma.
→ Adds bright color and a fresh herbal note. Fold into the cheese mixture for integrated flavor, or sprinkle on top after baking for a vibrant finish. Parsley also helps mask any slight onion or garlic bite in the cheese base.
→ Introduces a gentle, warming heat that cuts through the richness of the cheese. Start small and increase to your preferred spice level. Mix into the filling or into the coating for a consistent kick.
→ Adds a mild oniony brightness and a pop of color. Integrate into the filling for a subtle savory note, or finish with a sprinkle on top for a fresh, crisp bite.
Instructions
- Preheat your oven to 400°F (200°C) and line a large baking sheet with parchment paper or lightly grease it to prevent sticking.
→ A hot, dry surface promotes rapid moisture evaporation from the outer crust, giving you a crisp shell without sogginess. - In a large mixing bowl, combine the 2 cups shredded cheese (sharp cheddar with mozzarella blend for melt and texture) with the 1/4 cup softened cream cheese, 1 large egg, 2 tablespoons all-purpose flour, 1/2 teaspoon garlic powder, 1/4 teaspoon onion powder, 1/2 teaspoon smoked paprika, 1/2 teaspoon salt, and 1/4 teaspoon freshly ground black pepper; stir until the mixture is evenly cohesive and there are no streaks of cream cheese.
→ Use block-shredded cheese just before mixing to maximize flavor and binding; pre-shredded cheeses can clump or have anti-caking agents that hinder smooth binding. - Chill the cheese mixture for 15–20 minutes in the refrigerator to firm up, which makes shaping easier and helps the bites hold their form during roasting.
→ Chilling reduces temperature shock during shaping, so the formed bites stay intact and don’t spread before baking. - In a separate shallow dish, whisk together 1 cup breadcrumbs (Panko or gluten-free if needed) and 1/4 cup grated Parmesan cheese; drizzle 2 tablespoons melted butter over the crumb mixture and mix until every crumb is lightly moistened.
→ The butter adds fat for browning and flavor, while Parmesan boosts aroma and helps the crust crisp and brown more evenly. - If using optional add-ins, fold in 2 tablespoons finely chopped fresh parsley or 1 tablespoon chopped chives into the cheese mixture now to distribute color and freshness; alternatively, reserve them to sprinkle after baking.
→ Fresh herbs brighten the richness and create a visually appealing bite without altering texture. - Scoop and shape the filling into uniform balls about 1 inch in diameter; lightly dampen your hands to prevent sticking and to maintain a smooth surface on each bite.
→ Uniform sizing ensures even cooking; damp hands prevent the sticky cheese mixture from tearing or sticking excessively to your palms. - Roll each ball in the breadcrumb-Parmesan coating, pressing gently so the crust adheres evenly; place coated bites on the prepared baking sheet with 1 inch of space between each to allow heat circulation.
→ A tight crust helps the bites maintain their shape and yields a crisp exterior as the coating browns independently of the interior. - If desired, brush or spray the tops of the coated bites with a light coating of neutral oil (about 1–2 tablespoons total) to promote uniform browning, then bake on the middle rack.
→ Oil aids browning and crisping; too little oil can lead to pale crust, while too much may cause soggy shells. - Bake for 12–14 minutes, rotating the sheet halfway through to ensure even browning; the bites are done when the crust is deeply golden and the cheese interior is just set.
→ Rotating ensures even heat exposure and consistent texture across all bites; if you prefer a darker crust, extend by 1–2 minutes but watch closely to prevent burning. - For an extra crisp finish, optional: switch to broil for 1–2 minutes after baking, watching closely so the crust does not burn; remove as soon as surface is deeply caramelized.
→ A brief broil intensifies browning and enhances texture, but requires careful attention to avoid scorching the cheese. - Let the bites rest 2–3 minutes on the baking sheet before transferring to a platter; serve warm with marinara sauce or ranch for dipping.
→ Resting allows the melted cheese to re-align and the crust to finish setting; warm dip enhances contrasting textures and flavor. - Store any leftovers in an airtight container in the refrigerator for up to 2 days; reheat on a parchment-lined sheet at 350°F (175°C) for 5–7 minutes to re-crisp the crust.
→ Proper cooling and gentle reheating preserve texture and prevent the bites from becoming greasy or soggy upon reheating.
Notes
These crispy cheese bites are a fast, crowd-pleasing snack featuring a gooey cheese center wrapped in a golden, crunchy crust. The cheese is the star, so use a mix of sharp cheddar for bite and mozzarella for melt, bound with softened cream cheese and a beaten egg to help the filling hold its shape during cooking. For best flavor and texture, shred cheese from a block just before mixing to maximize taste and binding; pre-shredded cheese can contain anti-caking agents that affect the mixture.
Shape and coat carefully: keep the filling cold, scoop small portions, roll into bites, and coat in a mixture of breadcrumbs and grated Parmesan. The melted butter folded into the coating helps browning and crunch; brush or spray with neutral oil before baking or frying to ensure even browning without soggy crust. If you want a gluten-free version, use gluten-free breadcrumbs and gluten-free flour; adding a touch more Parmesan can help with crispness.
Cooking methods: the bites can be baked or shallow-fried. For baking, preheat to about 425°F (220°C) and bake on a parchment-lined sheet 10–14 minutes, turning once, until deeply golden and set. For frying, shallow-fry in 1/2 inch oil at about 350°F (175°C) until crisp and bubbling aroma fills your kitchen. Always drain on paper towels and serve warm for best texture.
Serving notes and storage: serve with marinara sauce or ranch dressing for dipping. Optional add-ins like finely chopped parsley, red pepper flakes, and chives can brighten the flavor and color. Leftovers can be refrigerated for 2–3 days or frozen before baking for longer storage; reheat in a hot oven until hot and crisp. If your cheese is very salty, reduce added salt in the recipe or adjust to taste.

Tips
Tips for Perfect Crispy Cheese Bites
- Shred cheese from blocks just before mixing to maximize flavor and melt. Freshly shredded cheese melts smoother and coats more evenly than pre-shredded versions, which can contain anti-caking agents.
- Let cream cheese warm to room temperature so it folds smoothly into the cheese mixture; if you’re short on time, grate or chop it small and mix gradually to avoid clumps.
- Use a chilling step: refrigerate the cheese mixture for 15–30 minutes before shaping. Cold dough holds its shape better during frying or baking and reduces spreading.
- Eggs at room temperature incorporate more evenly. If an egg is cold, whisk with a splash of water to help it blend without streaks.
- If you’re using gluten-free flour, choose a blend with good binding properties and consider adding 1 teaspoon of cornstarch to mimic gluten’s structure for a firmer bite.
- Portion bites with a small cookie scoop or oiled tablespoon for uniform size; roll briefly between palms to form a smooth, compact ball that won’t crack during cooking.
- Keep your hands slightly damp or lightly oiled to prevent the cheese mixture from sticking while shaping.
- When coating, mix breadcrumbs with grated Parmesan for extra crisp and browning. For an extra kick, add a pinch of garlic powder to the crust.
- Oil choice matters: use a neutral oil with a high smoke point for frying (such as canola, peanut, or light olive oil). For baking, lightly brush or spray the bites to promote browning without sogginess.
- Fry testing: heat oil to 350–360°F (175–180°C) and fry in small batches to avoid crowding, which lowers oil temperature and leads to greasy crust.
- Cook until the crust is deep golden and the interior is melty. If centers remain firm, finish with a brief bake at 425°F (220°C) for 3–5 minutes.
- Make-ahead tip: freeze formed bites on a sheet tray until solid, then transfer to a bag. Fry or bake from frozen; add 1–2 minutes to baking time or a few seconds more to fry.
- For a lighter version, bake at 425°F (220°C) for 12–15 minutes, turning once, until crust is golden and cheese is bubbling inside.
- Serving ideas: offer both marinara and ranch for dipping. You can also create a quick spicy mayo or herbed aioli for variety.
- Optional add-ins: fold in 2 tablespoons finely chopped fresh parsley for color, 1/4 teaspoon red pepper flakes for a warm kick, and 1 tablespoon chopped chives or green onions for brightness; adjust amounts to taste.
FAQ
Crispy cheese bites – FAQ
What are Crispy Cheese Bites?
They are small, savory snacks made from melted cheese that crisp up on the edges when baked or air-fried. They’re bite-sized, cheesy, and perfect for dipping or snacking.
What ingredients do I need?
Common pantry components include:
- 2 cups shredded cheese (a mix of cheddar and parmesan works well)
- 1–2 tablespoons breadcrumbs (optional, for extra crunch)
- Seasonings: garlic powder, paprika, a pinch of salt and pepper
- Herbs (optional): dried oregano or parsley
- Parchment paper and a light oil spray for the baking sheet
Are Crispy Cheese Bites gluten-free?
They can be gluten-free. If you use breadcrumbs, opt for gluten-free breadcrumbs or omit them altogether. Check seasoning labels to ensure no gluten-containing additives.
What cheese works best for these?
A blend of sharp- or aged cheeses (like cheddar or Parmesan) gives great flavor and crispness. High-fat cheeses melt nicely and form a crisp exterior. Avoid very wet cheeses on their own; mixing cheeses can yield the best texture.
How do I make them crispy without sticking?
Line your baking sheet with parchment or a silicone mat, preheat your oven, and space portions evenly. A light spray of oil helps crisp the edges. Let them cool briefly on a rack after baking to stay crisp.
What is the best cooking method: oven or air fryer?
Both work well:
- Oven: Preheat to about 400°F (200°C). Bake 6–10 minutes until golden and crisp, turning once if needed.
- Air fryer: Preheat to 375–400°F (190–200°C). Cook 5–7 minutes, shaking once halfway.
How long do they take to bake?
In an oven: typically 6–10 minutes, depending on cheese moisture and mound size. In an air fryer: about 5–7 minutes. They’re done when the edges are golden and the centers are melty.
How should I store leftovers?
Store cooled bites in an airtight container for up to 3 days in the fridge. Reheat in a 350°F (175°C) oven or a toaster oven for a few minutes to restore crispness.
Can I make them ahead or freeze them?
Yes. Shape the bites on a parchment-lined tray and freeze until solid, then transfer to a bag. Bake from frozen, adding 1–2 minutes to the bake time. You can also refrigerate unbaked portions and bake within 2–3 days.
How can I customize flavors?
Try these variations:
- Spice it up with chili powder or paprika
- Add dried herbs like oregano or thyme
- Stir in minced jalapeño or sun-dried tomato bits
- Use different cheese combos (pearl onions and rosemary, a touch of blue cheese, etc.)
What dipping sauces pair well?
Great options include marinara, ranch, garlic aioli, honey mustard, or a simple warm queso. A side of salsa can also be fun with a spicy kick.