Introduction / Hook
There’s something irresistibly comforting about a plate of caramel cookies waiting on the countertop, steam faintly rising from warm edges, and a ribbon of glossy caramel peeking through every bite. Imagine the first crack of a golden exterior giving way to a chewy, tender heart that glows with melted sweetness and a whisper of salt that somehow makes the sweetness seem brighter and more alive. Caramel cookies are not just dessert; they are a small ritual—an invitation to slow down, to sip a mug of coffee or milk, and to share a moment of deliriously cozy indulgence with family or friends. The aroma alone can transform a ordinary afternoon into a memory: toffee-like notes that carry through the kitchen, the satisfying snap as you bite into the edge, and the way the caramel lingers on the tongue, warm and luxurious. This is a cookie that welcomes you with a familiar hug, then keeps you coming back for another tale in a single, luminous bite. Whether you’re baking for a weekend treat, a gift, or a last-minute dessert for guests, caramel cookies deliver a timeless pleasure: simple ingredients, a little patience, and a lot of heart. In the pages that follow, you’ll discover a method that yields bakery-worthy cookies with caramel in every corner—soft centers, delicate crisp edges, and pockets of molten caramel that make each bite feel special. If you’ve ever wished for a cookie that feels both nostalgic and wonderfully modern, you’ve found it. Let this be your new cookie for comfort, your go-to for celebrations, and your favorite way to end a long day on a sweet and serene note.
The Story Behind the Dish
Caramel, as a flavor and technique, travels a long and delicious road—from the simple sugar syrups that caramelize into rich amber tones to the modern, indulgent riffs that turn dessert into an experience. The idea of a caramel cookie sits at the intersection of two beloved culinary traditions: the universal charm of a butter-based biscuit and the irresistible allure of caramel, a flavor that has fascinated cooks for centuries. The origin of caramel itself is humble and a touch mysterious, born from the simple act of heating sugar until it melts into a glossy, amber elixir. From there, chefs and home bakers discovered how to pair that liquid gold with everything from chocolate to sea salt to give dessert a new depth and a touch of drama.
In many households, cookies have always carried a story—a ritual of cooling on a rack, of sharing warm halves with a neighbor, of a favorite pair of glass of milk waiting nearby. Caramel cookies echo that tradition while inviting modern techniques: a dough that rests to develop flavor, a quick swirl of caramel or caramel chips folded in to ensure pockets of sweetness, and a finishing kiss of salt to highlight the caramel’s toasty notes. The salted caramel trend, which rose to global fame in the early 21st century, helped to launch countless delicious riffs, including caramel cookies that feel both luxurious and accessible. They are a testament to how a simple confection can carry nostalgia while remaining wonderfully current—an everyday treat that can feel like a small celebration in your own kitchen.
For many, the story of caramel cookies is also about shared moments. A grandmother’s recipe reimagined for modern ovens; a bake sale favorite that children adore; a thoughtful gift jar with a note that says, “these are the kind of cookies you share.” The cookies you’re about to explore carry that history in their crumb: a dough with a certain sturdiness that bakes into golden rims and a soft center; caramel that melts into the crumb; and through it all, a reminder that sweets can be comforting without being fussy. The dish has traveled across kitchens, drawn new lines of flavor, and proved that a well-executed caramel cookie can become a classic—one that remains relevant as tastes shift toward richer, more nuanced treats that still feel familiar and kind to the soul.
Why You’ll Love This Recipe
- Comforting, crowd-pleasing flavor that resonates with both kids and adults.
- Balanced texture: crisp edges with a chewy, fudgy center that hides pockets of caramel in every bite.
- Versatile and forgiving: adaptable to different flours, sugars, and add-ins without losing structure.
- Short on time but big on impact—gjittering with a minimal, approachable technique that yields bakery-worthy results.
- Potential for customization: play with caramel styles, salt levels, and complementary mix-ins to create your signature version.
- Makes an elegant gift or party treat that travels well when cooled properly and stored correctly.
- Pairs beautifully with a hot beverage or a scoop of vanilla ice cream for an indulgent dessert.
Flavor Profile & Texture
Caramel cookies balance a quartet of sensations that come together to create a memorable bite. The aroma is warm and inviting, a fusion of toasty butter, vanilla, and caramelized sugar that fills the room with a gentle sweetness. On tasting, you encounter a layered flavor: first the familiar richness of a buttery cookie, then the lush, almost toffee-like caramel that melts into the crumb, followed by a soft salt kiss that brightens and elevates the sweetness. The salt is not a mere afterthought; it is a crucial conductor that makes the caramel sing rather than disappear into the dough.
In terms of texture, you’ll experience a contrast that makes these cookies addictive. The outer rim achieves a delicate crispness, a light snap when you break through the edge. Inside, the cookie remains tender and chewy, so you get a satisfying resistance before the melt of caramel reveals itself. Caramel bits or ribbons create little pockets of ooey-gooey goo, which are especially delightful as they stretch slightly with the first bite. The overall mouthfeel is luxurious but balanced: not too heavy, with enough structure to hold shape but a soft center that invites careful savoring. The flavor lingers long enough to invite another bite without becoming cloying, a sign of well-integrated sweet and savory notes—the classic salt-caramel harmony people crave in modern desserts.
Occasions & Pairings
Caramel cookies shine across many settings, from everyday indulgence to festive occasions. Here are some ideas to make the most of them:
- Weeknight treat: bake a small batch to accompany a quiet evening, perhaps with a glass of cold milk or a robust cup of coffee.
- Gift idea: wrap cooled cookies in tissue paper and tuck into a decorative box or jar as a thoughtful, artisanal-present for birthdays or holidays.
- Potlucks and parties: these cookies travel well when cooled completely and stored in an airtight container; their universal appeal makes them a safe choice for mixed crowds.
- Dessert course: pair with vanilla ice cream, a quick chocolate sauce, or a warm caramel sauce drizzled atop for an indulgent finale.
- Tea party or brunch: these cookies offer a refined sweetness that complements afternoon tea and light pastries.
For beverage pairings, consider a rich cup of espresso, a smoky dark roast, or even a glass of dessert wine or aged sherry for a more celebratory pairing. If you want a dairy-free or vegan version, pair with almond milk or oat milk coffee for a complementary, balanced tasting experience.
Tips, Variations & Substitutions
Here are practical ideas to tailor this caramel cookie experience to your pantry, dietary needs, or flavor imagination. These are meant to inspire and guide rather than prescribe a rigid recipe.
- Caramel variations: use different caramel forms—soft caramel bits for gooey pockets, or a swirl of caramel sauce into the dough to create ribbons of sweetness that caramelize as the cookies bake. A light sprinkle of flaky sea salt just before baking enhances the caramel’s depth.
- Texture tweaks: if you crave more chew, underbake by a minute or two and let the cookies rest on the sheet after removal from the oven. For crisper edges, bake a touch longer and cool on a rack rather than on the sheet.
- Flour and gluten considerations: for gluten-friendly cookies, use a standard all-purpose flour. For gluten-free adaptations, choose a blend with xanthan gum and add a touch more moisture (like a splash of dairy or dairy-free milk) to maintain tenderness. The base concept remains the same—caramel sweetness tied to a buttery crumb.
- Vegan option: substitute plant-based butter and ensure your caramel is dairy-free. Use a vegan-friendly sugar and a dairy-free milk if you’re following a vegan approach.
- Brown sugar vs white sugar: using brown sugar deepens the caramel flavors and adds a hint of molasses, creating a richer cookie. White sugar yields a brighter sweetness and crisper edges.
- Flavor twists: incorporate a pinch of sea salt in the dough for a bolder contrast, or add a whisper of vanilla bean powder for a floral, bakery-like aroma. You could also fold in finely chopped toasted nuts for texture and a nutty complement to caramel.
- Regional twists: a touch of cinnamon or cardamom introduces warmth and spice that pairs beautifully with caramel. For a coastal twist, swap in dark chocolate chips or chunks for a chocolate-caramel medley.
Make-Ahead Variations
If you like to plan ahead, you can shape the dough into disks and refrigerate for up to 3 days, or freeze portions for longer storage. Bake directly from cold if you prefer a slightly thicker, chewier center. If you freeze the dough, portion it first and freeze flat on a tray before transferring to a bag; bake from frozen, adding a minute or two to the bake time. This makes it easy to stock up for gatherings or to keep a ready-to-bake treat on hand.
Storage & Make-Ahead Ideas
Proper storage keeps caramel cookies at their best for as long as possible. Once cooled completely, store in an airtight container away from heat or moisture. They will stay fresh for several days if kept in a cool, dry place. For longer-term freshness, you can freeze baked cookies: layer them between sheets of parchment in an airtight container, and rewarm in a low oven until warmed through. If you prefer, freeze unbaked portions shaped into disks; bake from frozen, just add a minute or two to the usual bake time. Properly stored and handled, these cookies retain their texture and aroma, so you can enjoy that bakery-worthy bite even days after you first baked them. A well-sealed jar in the pantry can turn into a staple gift or a quick dessert stockpile whenever life gets busy.
Fun Facts & Trivia (Optional)
Caramel has a history as rich as its flavor. Here are a few tidbits you might enjoy sharing with fellow bakers:
- Caramelization begins when sugar hits around 320°F (160°C). At this temperature, sugar molecules break down and recombine to form new, deeper flavors and a classic amber color.
- Salted caramel became a global sensation after chefs in France and later the United States started pairing the sweet richness with a crack of sea salt, creating a dramatic balance that highlighted the caramel’s nuances.
- Some of the most beloved caramel cookies owe their irresistibility to the contrast between a crisp edge and a soft, chewy center—achieved by a combination of butter, sugar, and a precise bake time that allows moisture to retreat slowly toward the crumb’s interior.
- The sound of a cookie cooling on a rack is almost a soundtrack to comfort: the slight crackling as the steam escapes signals a cookie that will stay tender and flavorful without becoming crumbly.
- Caramel itself has cultural variations across the globe—from the soft, buttery caramels of Europe to the chewy, toffee-like treats found in other regions—yet the caramel-cookie concept unites these flavors into a universally cherished treat.
- In many dessert menus, a caramel element signals a premium moment: it’s a small, accessible luxury that feels indulgent without being over-the-top.
- Beyond sweetness, salt in caramel is a culinary technique that activates taste receptors differently, heightening sweetness and giving the caramel a longer, linger-worthy finish.
With these sections, you’ve uncovered not just a recipe concept but a story of comfort, balance, and shared moments. Caramel cookies, in their elegant simplicity, offer a pathway to cozy afternoons, cheerful gatherings, and the small luxury of a treat that’s as timeless as it is modern. Whether you’re baking for a quiet night in or a lively gathering, these cookies promise a memorable bite—soft, soulful, and perfectly caramel-forward.
Ingredients
Cookie Dough Base
-
– 1 cup unsalted butter, softened
→ Butter provides tenderness, moisture, and a rich mouthfeel to the cookies. Creaming the softened butter with sugars traps air and helps form chewy edges with a softer center. Use unsalted butter and let it come to room temperature (about 65–70°F / 18–21°C) for even incorporation; melted or overly soft butter can cause excessive spreading. If measuring by weight, 1 cup is about 227 g. For best flavor, choose high-quality butter.
– 1 cup packed light brown sugar
→ Brown sugar contributes moisture and a chewy texture due to its molasses content, plus a deeper caramel note. Pack the sugar firmly into the measuring cup to ensure an accurate amount. Light brown sugar yields a milder caramel flavor, while dark brown sugar intensifies it and darkens the cookie color. If dough seems too dry, you can add a teaspoon of milk or water during mixing to reach the right consistency.
– 1/2 cup granulated sugar
→ Granulated sugar adds sweetness, aids browning, and helps create a crisp edge around the chewy center. It also assists in spreading the dough slightly during baking when creamed with butter. Keep it as part of the mix to maintain structure and even spread; replacing it with another sugar can alter texture and color.
– 2 large eggs, room temperature
→ Eggs provide moisture, structure, and binding, helping the cookies hold together and set properly as they bake. Room temperature eggs emulsify more evenly with the fat, yielding a smoother dough and uniform crumb. Allow eggs to come to room temperature (about 20 minutes) or warm gently in warm water before adding to the mixture to avoid a lumpy, separated dough.
– 2 tsp vanilla extract
→ Vanillin depth enhances the overall flavor profile of the cookies, balancing sweetness with a warm aroma. Use pure vanilla extract for the best flavor; imitation vanilla can taste flat in rich cookie dough. If possible, opt for a vanilla bean paste for more pronounced vanilla flavor and visible specks. Store in a cool, dark place to preserve aroma.
– 2 1/4 cups all-purpose flour
→ Provides the structure and body of the cookies. Measuring accurately is crucial: spoon the flour into the measuring cup and level off, rather than scooping. Too much flour yields cakier, drier cookies; too little can cause excessive spreading. For a softer crumb, you can replace a portion with cake flour, but this is optional. Mix flour with leaveners and salt before adding to the wet ingredients to ensure even distribution.
– 1 tsp baking soda
→ Primary leavening and a contributor to the cookies’ spread and chewy texture. Fresh baking soda ensures proper rise and browning. Sift with the dry ingredients to distribute evenly and help the dough rise evenly as it bakes.
– 1/2 tsp baking powder
→ Additional leavening that supports a bit more lift and a slightly lighter crumb. Helps cookies maintain a gentle puff rather than spreading too thin. Sift with dry ingredients for even distribution.
– 1/2 tsp kosher salt
→ Enhances flavor by balancing sweetness and sharpening the taste of caramel and chocolate. Distribute evenly by mixing with the dry ingredients. If using table salt, reduce to a pinch (about 1/4 teaspoon) due to finer grains.
Caramel Center (Optional)
-
– 12-16 soft caramel candies, unwrapped
→ Caramel centers create gooey pockets of melt-in-your-mouth caramel as the cookies bake. Choose soft, chewy caramels so they remain molten inside the cookie rather than seizing up. If using caramel bits instead of full candies, ensure they are small enough to fit inside the dough without breaking the dough apart. Unwrap all candies and, if needed, press one inside each dough ball before baking; chilling the dough slightly can help keep the centers intact during shaping.
Optional Add-ins
-
– 1/2 cup semisweet chocolate chips
→ Adds chocolate melt and a complementary contrast to the caramel. To keep chips evenly distributed and prevent sinking to the bottom, you can toss them with a tablespoon of flour before adding to the dough. Use high-quality chips for the best flavor; dark or bittersweet chocolate can provide a richer note.
– 1/2 cup chopped toasted nuts (pecans or walnuts)
→ Provides a toasty crunch and nutty depth that pairs well with caramel. Toast the nuts first to intensify flavor, then cool and chop to roughly uniform pieces so they distribute evenly. If you have a nut allergy, omit or substitute with toasted oats for texture.
Toppings
-
– 1/2 tsp flaky sea salt
→ Finishes with a bright salt bite that enhances caramel and chocolate flavors. Sprinkle a light pinch on top of the cookies just after shaping or while they are still warm from the oven to help the salt adhere. Use a high-quality flaky salt (like Maldon) for best texture and distribution; avoid oversalting to keep the cookie balanced.
Instructions
- Preheat your oven to 350°F (175°C) and line two baking sheets with parchment paper or silicone baking mats.
→ This ensures even heat distribution, prevents sticking, and makes transferring hot cookies to a rack safe and easy. - If you are using caramel centers, unwrap 12–16 soft caramel candies and set them on a small plate for easy access during shaping.
→ Having ready centers reduces handling and helps keep the centers intact as cookies bake. - In a large mixing bowl, cream the unsalted butter and both sugars on medium-high speed until the mixture is pale, fluffy, and free of obvious lumps, about 3–4 minutes.
→ Creaming traps air and yields a tender, chewy edge with a soft interior; scraping the bowl halfway ensures even incorporation. - Beat in the eggs one at a time, allowing each to fully incorporate before adding the next, then beat in the vanilla extract.
→ Eggs emulsify with fat to create a smoother dough and a uniform crumb; room-temperature eggs mix more evenly than cold ones. - Whisk together the all-purpose flour, baking soda, baking powder, and kosher salt in a separate bowl until evenly distributed.
→ Even distribution of leaveners and salt prevents uneven rise and concentrates flavor throughout the dough. - With the mixer on low speed, add the dry ingredients to the wet in three additions, mixing just until no streaks of flour remain and the dough comes together.
→ Do not overmix; overworking gluten creates tough cookies and reduces tenderness and chewiness. - Fold in the optional add-ins—1/2 cup semisweet chocolate chips and/or 1/2 cup chopped toasted nuts—using a spatula until evenly distributed without overworking the dough.
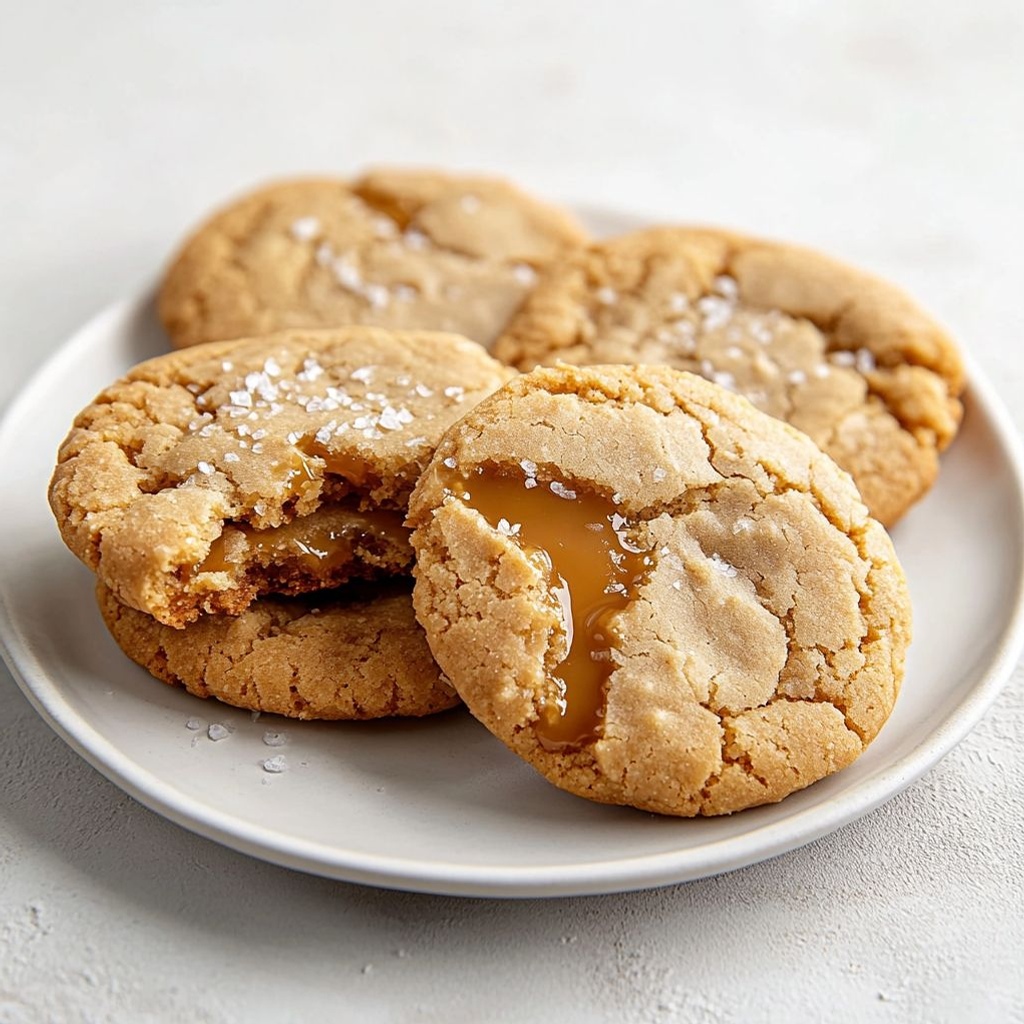
→ Even distribution prevents clumps and ensures consistent bite; keep chips from sinking by folding gently. - If you are using caramel centers, portion the dough into approximately 1.5–2 tablespoon mounds, flatten slightly, place one caramel in the center, fold the dough around to enclose completely, and roll into a smooth ball; chill the dough 15–30 minutes to help retain the center during baking.
→ Chilling (and enclosing the center) firms the fats and helps keep the caramel centered and molten; sealing the caramel prevents leakage during baking. - If you are not using caramel centers, scoop dough into rounded tablespoons (about 1.5 tablespoons per cookie) and space the dough balls on the prepared sheets at least 2 inches apart to allow spreading.
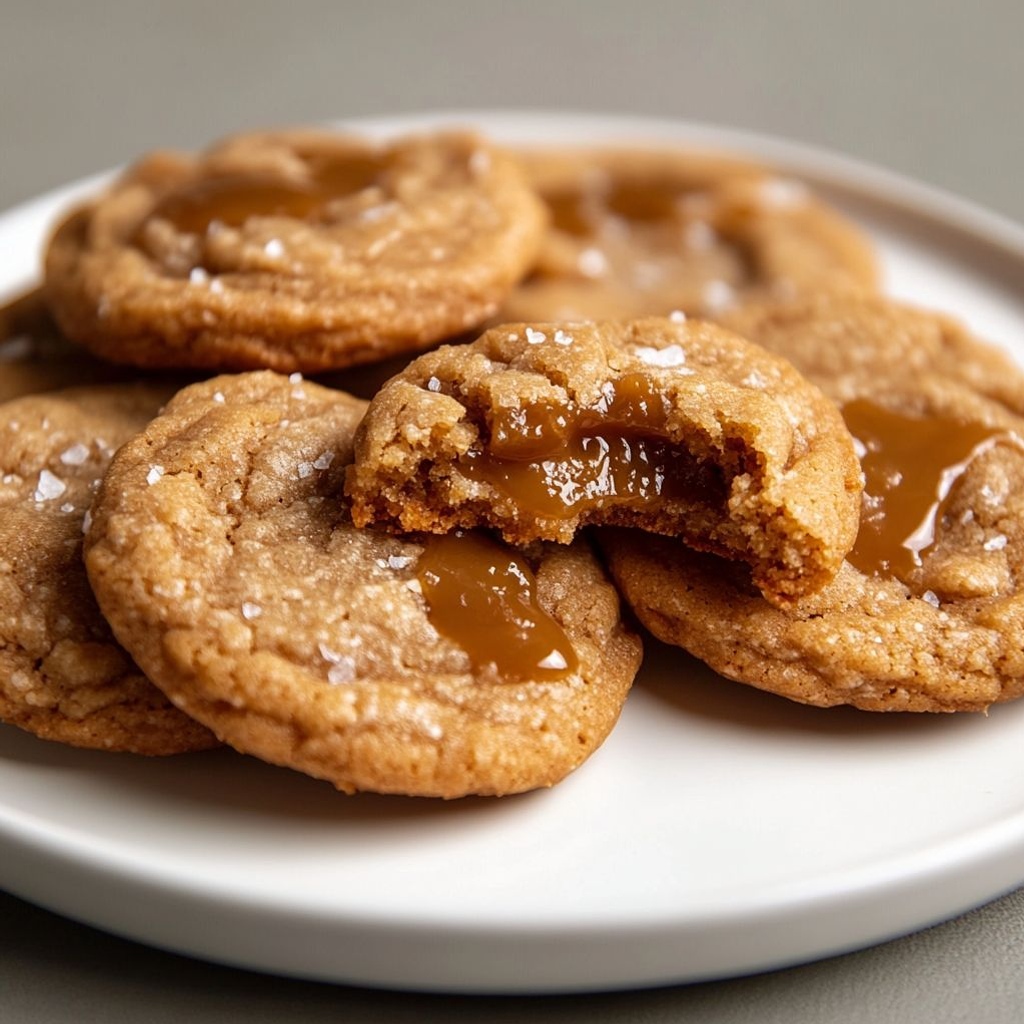
→ Adequate spacing ensures even spreading and uniform shape as cookies bake. - Bake the cookies in the preheated oven for 9–11 minutes, rotating the sheets halfway through, until the edges are lightly golden and the centers look just set but a touch soft.
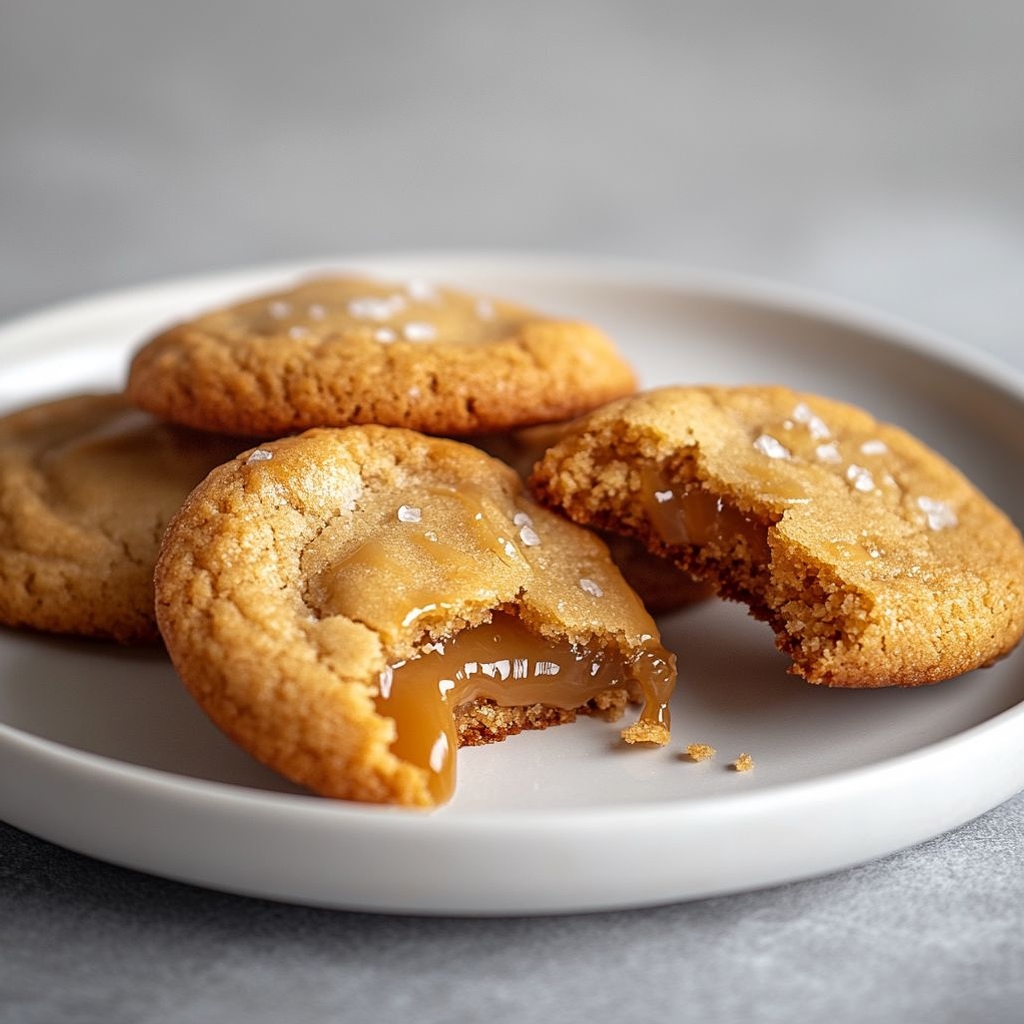
→ This timing yields a chewy center with a delicate crisp edge; ovens vary, so start checking at 9 minutes. - Remove the cookies from the oven and, while they are still warm, sprinkle flaky sea salt over the tops if using; the salt will adhere and enhance the caramel and chocolate flavors.
→ Salting warm cookies intensifies caramel notes and balances sweetness; use a light touch to avoid overpowering the cookies. - Let the cookies rest on the baking sheets for 5 minutes to finish setting, then transfer to a wire rack to cool completely; this prevents breakage and helps maintain a glossy surface.
→ Cooling on a rack prevents trapped steam from softening the bottoms and allows even cooling for optimal texture. - Store the cooled cookies in an airtight container at room temperature for up to 5 days, or freeze for longer storage; re-warm briefly in a low oven if you desire a warmer, softer center.
→ Proper storage preserves chewiness and caramel while preventing staling; warming revives softness.
Notes
These caramel cookies are rich, chewy, and have pockets of molten caramel when baked properly. They pair a buttery dough with a deep caramel sweetness and a hint of vanilla, finished with a delicate salt kiss. You can customize them by adding chopped toasted nuts or extra chocolate chips, and for a more intense caramel note, sprinkle a tiny pinch of flaky salt on top before baking. They freeze well and reheat beautifully, making them a great make-ahead treat. For an extra treat, sandwich two cookies with a swirl of caramel or serve warm with a scoop of vanilla ice cream. Always measure the flour accurately, keep the butter soft but not melted, and chill the dough briefly to help the centers stay gooey rather than runny during baking.
Tips
Tips for perfect Caramel Cookies
- Measure flour accurately. Spooning into the cup and leveling off yields a softer, more reliable cookie texture than scooping directly from the bag, which can pack the flour and make the dough dry or crumbly.
- Use softened, not melted, butter. Butter at 65–70°F (18–21°C) helps you cream with sugars to trap air for chewy edges and a tender center. If your kitchen is warm, chill the dough briefly between steps to control spreading.
- Cream butter and sugars properly. Beat on medium-high for 2–3 minutes until pale and fluffy, scraping the bowl a few times for even incorporation. This aeration helps with rise and texture.
- Balance the sugars. Brown sugar adds moisture and chew, while granulated sugar contributes browning and a crisp edge. If the dough looks very dry, add a teaspoon of milk or water to bring it together without loosening the structure.
- Eggs at room temperature mix more evenly. If you’re short on time, warm the eggs in warm water for a few minutes or leave them out to take the chill off before beating into the dough.
- Chill the dough for best shape. A short chill (30–60 minutes) helps prevent over-spreading and makes it easier to insert caramel centers later. For even stronger flavor and structural integrity, refrigerate overnight.
- Caramel centers: choose soft caramels so they melt into gooey pockets. Unwrap and press one into the center of each dough ball. If you’re using caramel bits, ensure they’re small enough to stay enclosed without tearing the dough.
- Keep centers intact. If the centers start to melt out during shaping, chill the dough slightly before baking or indent the dough after placing the centers to keep them centered.
- Distribute add-ins evenly. Coat chocolate chips in a little flour to prevent sinking, and toast nuts before chopping to maximize flavor. Cool nuts completely before mixing them in.
- Salt timing matters. A light sprinkle of flaky sea salt on warm cookies enhances caramel and chocolate. You can salt before or after baking, but do not overdo it—a light dust is enough.
- Portion and space properly. Use a cookie scoop for uniform sizing and space dough balls about 2 inches apart on a parchment-lined sheet to allow even spreading and even caramel distribution.
- Oven dynamics. Rotate sheets halfway through baking for even browning. If your oven runs hot or cold, consider using an oven thermometer to calibrate temperature for consistent results.
- Know doneness. Edges should be set and lightly browned; centers may look just shy of done. They will continue to firm as they cool on the baking sheet.
- Cooling matters. Let cookies rest on the sheet 5 minutes before transferring to a rack to finish setting. This prevents breakage and ensures a chewy center with a molten caramel core.
- Make-ahead and storage. Dough can be wrapped and chilled up to 3 days or frozen for longer storage. Bake from chilled or frozen, adding an extra minute or two to the bake time. Store baked cookies in an airtight container for up to 3–4 days; freeze for longer storage.
- Troubleshooting quick fixes. If cookies spread too much, chill the dough longer or check that your butter wasn’t too warm. If centers aren’t melting, slightly increase the bake time or gently rewarm the cookies for 10–15 seconds in a warm oven or microwave before tasting.
- Flavor variations. For a richer contrast, use dark brown sugar, a pinch more salt, or a mix of milk and dark chocolate chips. You can also add a touch of espresso powder to intensify the caramel and chocolate notes.
FAQ
What are caramel cookies?
Caramel cookies are soft, chewy cookies that incorporate melted caramel or caramel bits into the dough. They often have a buttery flavor with pockets of gooey caramel, sometimes finished with a pinch of sea salt for balance.
What ingredients do I need?
Typical ingredients (about 24 cookies):
- All-purpose flour
- Baking soda
- Salt
- Unsalted butter (softened or browned for extra flavor)
- Granulated sugar
- Light brown sugar
- Eggs and vanilla extract
- Caramel bits or soft caramels cut into small pieces (or dulce de leche for swirls)
- Optional: sea salt for topping
Note: You can swap in gluten-free or dairy-free options as needed.
Do I need to chill the dough?
Chilling is highly recommended. Resting the dough for 1–2 hours (or overnight) helps develop flavor, keeps cookies from spreading too much, and yields thicker, chewier cookies with better caramel pockets.
How do I bake them for chewy centers?
For chewier cookies: use a higher ratio of brown sugar, melt some butter or use room-temperature butter plus extra egg yolk, chill the dough, and bake at 350°F (175°C) for about 9–11 minutes. Edges should be set while the centers remain soft. Let them rest on the sheet for a couple minutes before transferring to a rack.
How do I get a gooey caramel center?
You can achieve a gooey center by one of these methods:
– Wrap a small caramel piece inside each dough scoop, encasing it completely before shaping.
– Make a shallow indentation in the dough, place a small caramel, then cover with dough and seal.
– Alternatively, swirl in a ribbon of dulce de leche or caramel sauce in the center of the dough before baking.
Bake just until the edges are set and the centers look slightly underdone for a gooier result.
How should I store baked cookies?
Store cooled cookies in an airtight container at room temperature. They stay best for 3–5 days. If you want longer storage, freeze them (see below) or refrigerate for up to 1 week, though refrigeration can soften texture.
Can I freeze the dough or baked cookies?
Yes. For dough, portion into balls, place on a baking sheet to freeze, then transfer to a freezer bag. Bake from frozen, adding 1–2 minutes to the bake time. For baked cookies, layer with parchment in a container and freeze for up to 2–3 months. Thaw at room temperature or rewarm in a low oven before serving for best texture.
Are there dairy-free or vegan options?
Yes, with substitutions: use vegan butter or coconut oil instead of dairy butter, and choose dairy-free caramel or caramels. If using eggs, you can substitute with flax eggs or other vegan binders, and ensure any chocolate or caramel you add is vegan. Caramel flavor may come from dairy in some products, so read labels carefully.
Can I make them gluten-free?
Yes. Use a 1:1 gluten-free flour blend that contains xanthan gum or guar gum, and consider adding an extra tablespoon of moisture (e.g., a little more butter or an extra egg) if the dough feels dry. Caramel pieces are typically gluten-free, but check packaging just in case.
What toppings or flavor variations can I try?
Try these variations for different twists:
- Finish with flaky sea salt for a sweet-salty balance
- Add chocolate chips or chunks (semi-sweet or dark)
- Swap caramel bits for crushed pretzels for texture
- Mix in toasted nuts (pecans or walnuts) for crunch
- Use a swirl of dulce de leche in the center for extra caramel flavor