Introduction / Hook
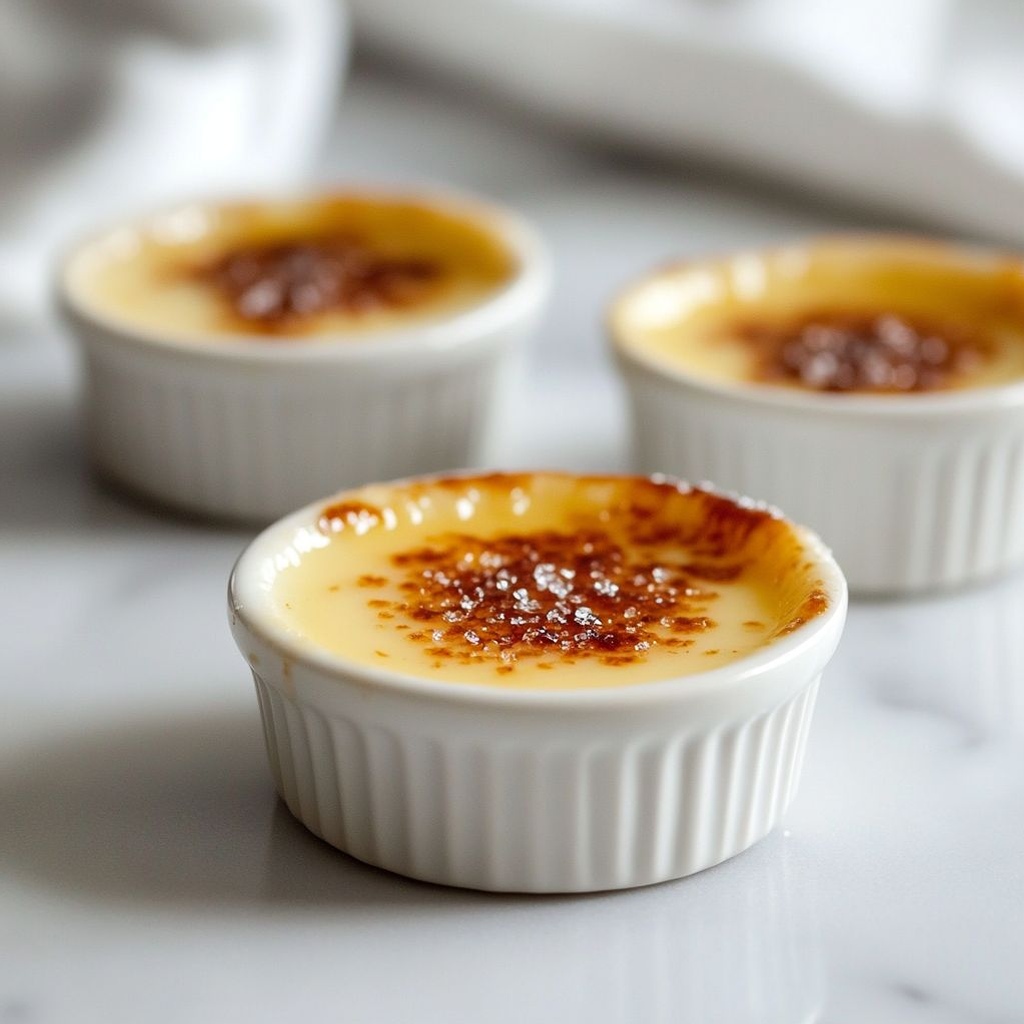
Imagine a dessert that feels both intimate and indulgent, a single bite shrinking the world to a cozy moment of pure delight. Mini crème brûlée does exactly that: a petite custard that glides across your tongue with creamy richness, crowned by a lacquer of caramel that shatters at the touch of a spoon. The aroma is a soft whisper of vanilla and cream, punctuated by a hint of sugar’s toasty warmth. When you crack that glossy sugar top, a chorus of crackling sweetness erupts, revealing a velvety vanilla heart that is cool, smooth, and luxurious. These little jars of dessert magic are the perfect balance between elegance and comfort—sophisticated enough to grace a special dinner, simple enough to make for a family weeknight treat, and charming enough to steal the spotlight at a party. Mini crème brûlée invites you to slow down, savor, and celebrate the small, luminous moments in life—the kind of dessert that lingers in memory long after the last spoonful has vanished.
In this form, the classic French custard is pared down to its most intimate size, making it approachable for home cooks who crave that restaurant-worthy wow without a complicated process. Each mini portion becomes its own little theater—a glossy caramel top, a pale ivory interior, and a texture that whispers of silky custard contrasted with a crisp, sun-kissed shell. It’s not merely a dessert; it’s an experience you can share—whether you’re treating a loved one to a candlelit end to a meal or inviting friends to gather around a table where conversation is as comforting as the dessert itself.
The Story Behind the Dish
Crème brûlée, literally “burnt cream” in French, is a classic that sits at the intersection of science, luxury, and gastronomy. Its origins spark a friendly debate among food historians. Some trace its lineage to medieval custards and the broader European tradition of custard desserts, while others place its direct antecedent in 17th-century French kitchens. The name crème brûlée appears in recipes dating to the late 1600s and early 1700s, with influential culinary writers such as François Massialot helping to popularize what would become a timeless standard of French patisserie. The ritual of finishing the dessert with a caramelized sugar crust—caramelizing sugar until it glows a deep amber, then chilling the custard beneath—emerged as a signature technique that celebrates contrasts: cool, creamy custard beneath a crackling top, a textural duel that feels almost magical in its simplicity.
Over centuries, crème brûlée traveled beyond French borders, evolving with regional touches and personal interpretations. In many households around the world, the dessert became a canvas for seasonal flavors, citrus notes, coffee, and chocolate, each iteration keeping the essence of the original: a smooth, luscious interior and a glossy, crackly top. The mini version is a modern darling—portioned for easier sharing, quicker chilling, and a more intimate, approachable presentation. It invites you to create a moment of refinement without the formality of a larger custard, making it a favorite for both intimate dinners and festive celebrations alike.
What makes the mini format so compelling is not just its cute size, but how it echoes the philosophy of great French patisserie: ultrasound-smooth texture, balance of sweetness and vanilla depth, and a finish that rewards patience and technique. The story of this dish—whether as a century-old tradition or a contemporary kitchen experiment—speaks to our shared love of texture, aroma, and the sheer joy of cracking something gloriously caramelized with a simple, honest spoonful.
Why You’ll Love This Recipe
- Portion-controlled elegance: These mini portions feel indulgent without being overwhelming, perfect for intimate dinners or a formal dessert lineup.
- Silky custard, dreamy texture: The interior is creamy and smooth, with a delicate egg-and-cream richness that melts on the palate.
- Caramel crackle that sings: The top’s caramelized sugar shell provides a crisp, shimmering contrast that crackles beautifully with every bite.
- Versatile flavor canvas: Start with classic vanilla and invite citrus, coffee, chocolate, or spice into the custard for effortless variations.
- Make-ahead-friendly: The custard base can be prepared in advance, chilling quietly in the fridge until you’re ready to finish with the brûléed top.
- Impressive presentation, everyday ease: The glossy tops and pale interiors look atelier-worthy, yet the technique remains accessible to home cooks.
- Kid-friendly options, adult twists: If you’re cooking for little ones or grown-up guests, you can tailor sweetness and add-ins to suit your crowd.
- Comforting, timeless dessert: It pairs beautifully with berries, espresso, and dessert wine, making it a perennial favorite for many menus.
The Flavor Profile & Texture
The essence of mini crème brûlée lies in its dual personality. The custard is a velvet river of creaminess, gently scented with vanilla and kissed by the egg yolk that lends depth and a faint, comforting richness. The flavor is clean, reminiscent of vanilla-flecked custard, with a whisper of caramelized sugar sweetness that lingers on the tongue. If you adorn the custard with a hint of citrus zest—orange or lemon—you invite a citrus glow that brightens the vanilla and adds a lively perfume to each bite.
Contrast is king in this dessert. The outer shell offers a thin, glassy glaze of caramelized sugar that, once cracked, reveals a cool, luscious interior. The shell is crisp and delicate, almost glass-like in its sheen, and it cracks into a clean line with a satisfying snap. Beneath that crackling top lies a custard that can be as silky as satin, a texture that glides across the mouth and coats it with richness. The temperature differential—hot or warm caramelized surface meeting a smoothly chilled center—creates a sensory moment that feels almost cinematic. The experience is enhanced by subtle notes: a faint vanilla orchid aroma, a whisper of sweetness that never tips into cloying, and a creamy finish that feels comforting after a long day.
As you experiment with variations, you can coax new flavors from the same elegant base. A touch of espresso can lend mocha-like depth, a ribbon of citrus zest can brighten the custard into a lively finish, and a dash of cinnamon or cardamom can evoke warmth reminiscent of holiday desserts. Each tweak preserves the essential harmony—the silky custard that dissolves on the palate, the caramel crown that provides the crunch and aroma of vanilla-sugar toffee, and the moment of balance where the two textures meet in perfect accord.
Occasions & Pairings
Mini crème brûlée shines across occasions, from intimate date nights to festive gatherings. Its presence signals refined taste without shouting; it’s a dessert that says you care, whether you’re celebrating an anniversary, a birthday, or simply the joy of a well-made meal. The small size makes it ideal for multi-course dinners where you want a dessert that feels special but won’t overwhelm the palate after a heavy main course.
Pairing suggestions elevate the experience:
- With berries: fresh raspberries, strawberries, or blackberries add a bright, tart counterpoint to the custard’s sweetness.
- With sparkling wines or dessert wines: a glass of Sauternes, Moscato, or a late-harvest Riesling complements the caramel notes and lifts the overall sweetness balance.
- With espresso or strong coffee: a small bite of coffee-infused custard or a shot of espresso helps cut through the richness and adds depth.
- With a light herb or citrus garnish: a fragrant curl of candied orange zest or a sprig of mint can refresh the palate between bites.
- With a simple fruit compote: a spoonful of berry compote or a drizzle of seasonal fruit coulis adds brightness and color to the plate.
In terms serving occasions, think of mini crème brûlée as a dessert that suits celebrations of all sizes. For Valentine’s Day, the petite portions feel especially romantic. For Christmas or New Year’s dinners, they offer a refined finish that doesn’t demand heavy seasonal flavors. For a summer dinner party, you can lighten the flavor with citrus zest or a dash of almond extract and pair with a cool vanilla-circling wine. The versatility is part of the charm: you can tailor the flavor to the season, the guest list, and the mood of the moment.
Tips, Variations & Substitutions
Tips for Perfection
To achieve that flawless crème brûlée experience in mini form, keep a few practical ideas in mind. Use high-fat dairy or a combination of cream and milk to ensure the custard remains rich and set, and temper the eggs carefully to prevent curdling. While the classic recipe relies on vanilla, you can explore flavors in a few controlled ways—just avoid overwhelming the custard with too many competing notes. If you’re making multiple mini portions, ensure they’re all uniform in size so they bake evenly and finish with a consistent crack of caramel across each top.
Texture is everything. The interior should be smooth and almost pudding-like in its silkiness, not grainy. If you notice any graininess, that’s a signal to check your custard base and ensure it’s gently handled, and that you’ve given it enough time to set fully. A slow, patient chill helps the custard firm properly and prevents the top from losing its delicate sheen.
Variations
- Classic vanilla: Keep it simple with a generous vanilla bean or extract to anchor the custard’s profile.
- Citrus twist: Add a strip of lemon or orange zest to the custard for a bright aroma and a clean finish.
- Espresso kick: A touch of finely ground coffee or espresso powder creates a mocha-inspired version that pairs beautifully with chocolate accents.
- Quietly nutty: A whisper of almond extract or a dusting of toasted almond meal in the custard adds warmth.
- Chocolate lover’s dream: Swirl in a small amount of melted dark chocolate into the custard for a marbled effect and a richer depth.
- Herbal hint: A delicate rosemary or lavender note (used sparingly) can transform the dessert into a modern, garden-inspired treat.
Substitutions & Dietary Alternatives
- Dairy-free option: Use full-fat coconut cream or a blend of coconut milk with almond milk for a dairy-free custard. Note that texture and aroma will differ slightly from dairy-based versions.
- Lower-sugar tweak: You can substitute part of the sugar with a natural sweetener that lends a softer caramel top; keep in mind the top’s ability to caramelize may vary with substitutes.
- Gluten-free approach: This dessert is naturally gluten-free, so no changes are required for a gluten-free menu—just ensure any add-ins or garnishes are also gluten-free.
Storage & Make-Ahead Ideas
One of the most appealing aspects of mini crème brûlée is its adaptability to a busy schedule. You can prepare the custard ahead of time and store it in the refrigerator until you’re ready to finish with the brûléed tops. The key is to keep the custards covered and well-chilled so they set evenly and retain their smooth texture. When you’re ready to serve, finish with a quick caramelization of the sugar top just before presenting them to your guests.
Leftovers can be stored in the fridge for a day or two, but for the best texture and flavor, it’s ideal to caramelize the tops and serve fresh. If you need to reheat, do so gently and briefly; the goal is to warm the custard without letting it shed its delicate structure, all while preserving that satisfying crack on the surface when you re-torched or re-brûlé the top (if you have a culinary torch handy) or simply replace the top with fresh sugar for a new crisp shell.
Make-ahead strategies include preparing the custard base a day or two in advance, chilling it thoroughly, and arranging the mini ramekins on the serving tray. When guests arrive, a quick caramelization brings the dessert to life, and you’ll have a dessert that feels freshly made without last-minute stress. You can also streamline the serving by lining up a few garnishes—fresh berries, citrus zest, or a light dusting of cocoa—so you can finish each mini crème brûlée with a polished, restaurant-worthy presentation in moments.
Fun Facts & Trivia
- Despite its strong association with France, crème brûlée has parallel traditions in other European desserts that feature a caramelized sugar topping across different bases and textures.
- The crack of the caramel top is a sensory ritual as much as a culinary technique; the sound signals the contrast between the crisp top and the creamy center that diners crave.
- The term brûlée comes from the French word brûler, meaning “to burn,” which captures the moment sugar is caramelized to a deep, glossy amber.
- Miniature versions of crème brûlée have become a beloved trend in modern patisserie and home culinary experiments, often used to showcase precise technique and elegant plating in a conversation-friendly format.
- Historically, vanilla was a luxury imported from distant lands; crème brûlée helped popularize vanilla’s aromatic profile in desserts, contributing to the widespread affection for the flavor today.
Ingredients
Custard Base
- Heavy cream (2 cups)
→ The backbone of crème brûlée. The high fat content yields a rich, velvety custard and helps it set with a silky mouthfeel. Gently heat the cream with the vanilla (if using a bean) until just steaming; do not boil. If you used a vanilla bean, remove the pod and scrape any seeds before pouring. Strain if necessary to remove bean fragments. - Egg yolks (4 large)
→ Egg yolks provide structure, creaminess, and the smooth texture that defines crème brûlée. Use yolks only, reserving whites for other uses. Bring yolks to room temperature, whisk lightly, and temper with hot cream to avoid curdling. - Granulated sugar (1/3 cup)
→ Sweetness helps the custard set and gives a hint of body to the mixture. Whisk the sugar with the yolks until pale and slightly thickened; dissolving sugar fully helps prevent a gritty texture when heated. - Vanilla extract (1 teaspoon)
→ Adds the characteristic warm aroma and depth. Use pure vanilla extract for best flavor. If you prefer vanilla bean, split and scrape one bean and add both seeds and pod to the cream, removing the pod before combining with the yolks. - Pinch of salt (to taste)
→ A small amount of salt enhances the sweetness and overall flavor, rounding the custard. Use fine salt or sea salt; a pinch is all that’s needed to avoid a salty aftertaste.
Caramel Topping & Water Bath
- Granulated sugar (for topping)
→ This sugar forms the iconic caramel crust when torched or briefly broiled. Use about 1–2 teaspoons per ramekin, sprinkled in an even, thin layer. Ensure the custard is fully set and cooled before applying the topping to prevent quick melting. If you use larger ramekins, adjust accordingly. - Hot water (for water bath)
→ A shallow hot-water bath ensures gentle, uniform cooking and reduces the risk of cracking or curdling. Place the filled ramekins in a larger baking dish and pour hot water halfway up the sides of the ramekins, then bake. Use hot water to maintain consistent temperature.
Serving (Optional)
- Fresh berries (optional, for serving)
→ Bright, acidic berries provide a fresh contrast to the rich custard. Pat dry if using thawed frozen berries to avoid water pooling on the surface. - Fresh mint leaves (optional, for garnish)
→ A small sprig of mint adds color and a hint of herbaceous aroma, enhancing the dessert’s presentation and balance.
Instructions
- Preheat your oven to 325°F (165°C) and arrange four to six 4-ounce ramekins in a shallow baking dish or low-sided roasting pan to form a stable water bath.
→ This setup ensures gentle, even heat around each custard and makes it easier to lift the ramekins in and out of the oven without tipping, while the water bath prevents scorching and curdling. - Warm the heavy cream with vanilla until just steaming, then remove from heat and let the vanilla steep for a few minutes if using a bean; otherwise, proceed once the cream is hot. Strain if you used vanilla bean to remove seeds and pod fragments.
→ Heating the cream intensifies the vanilla flavor and softens any solids; straining ensures a silky custard without gritty bits. - Whisk the egg yolks and granulated sugar together in a medium bowl until the mixture is pale, thick, and well combined, about 45–60 seconds; this builds the custard’s body and helps dissolve sugar for a smooth texture.
→ Properly whisking and whitening the yolks prevents a dense, grainy custard and promotes an even set. - Temper the yolk mixture by slowly pouring a thin stream of the hot cream into the yolks while whisking constantly to raise their temperature gradually and prevent curdling.
→ Gradual heating aligns the fat and protein in the yolks with the hot liquid, avoiding scrambled custard and ensuring a creamy final texture. - Return the tempered yolk mixture to the saucepan with the remaining cream (if any) or continue whisking in the bowl until fully combined, then stir in the vanilla extract and a pinch of salt; mix just until incorporated.
→ The final infusion of vanilla and a touch of salt enhances sweetness balance and depth of flavor without overpowering the custard. - Strain the custard through a fine-mesh sieve into a clean pourable vessel or measuring cup to remove any cooked bits or chalice from the vanilla pod, ensuring a silk-smooth mixture.
→ Straining guarantees an ultra-smooth custard free of lumps that could disrupt the caramel topping later. - Divide the strained custard evenly among the prepared ramekins, filling each about two-thirds full to leave room for setting during baking.
→ Filling to two-thirds ensures the centers set without overflowing and provides a uniform surface for the sugar crust later. - Carefully slide the filled ramekins into the baking dish and pour hot water into the dish until it comes halfway up the sides of the ramekins to form a proper water bath.
→ The hot water bath delivers gentle, even heat that prevents cracking and curdling, yielding a tender, custard-like texture. - Bake in the center of the oven until the custards are just set with a slight jiggle in the center, approximately 25–40 minutes depending on ramekin size; begin checking at 25 minutes and remove when the edges are set but the centers still wobble.
→ A gentle shake test confirms a proper doneness; overbaking results in a dry, rubbery custard, while underbaking leaves a soupy center. - Carefully remove the ramekins from the water bath and transfer to a rack to cool for 15–20 minutes; then cover loosely and refrigerate for at least 2 hours or up to overnight to fully set and chill the flavor.
→ Cooling at room temperature and then chilling solidifies the custard and improves texture, making the surface smooth for the sugar crust. - Evenly sprinkle 1–2 teaspoons of granulated sugar on top of each chilled custard in a thin, smooth layer to promote an even caramelization when torched or broiled.
→ A uniform sugar layer ensures a flawless, crackly crust and prevents uneven browning or soggy spots. - Caramelize the sugar using a culinary torch held about 2–3 inches from the surface, moving methodically in small, overlapping circles until the sugar melts evenly and becomes a deep amber crust; let the sugar harden for 1–2 minutes before serving.
→ Even torching produces a glossy, hard crack that contrasts beautifully with the creamy custard beneath; keep the flame moving to prevent scorching. - If you do not have a culinary torch, preheat your broiler and place the ramekins on a rimmed baking sheet, then broil for 1–3 minutes on high, watching constantly until the crust achieves a deep amber color, and remove promptly.
→ Broiling provides an alternative caramelization method, but the intense heat requires vigilant watching to avoid burning the crust. - Allow the caramel crust to rest for 1–2 minutes to finish hardening before serving the miniature crème brûlées, ensuring you retain the characteristic crack when tapped.
→ Resting prevents cracking or denting the crust under immediate serving pressure and helps maintain a crisp crack for contrast with the custard. - Garnish with fresh berries and mint leaves as desired to provide bright acidity and color contrast that balances the rich custard, serving promptly after the crust has set; pat berries dry if using thawed frozen berries.
→ Fresh accompaniments brighten the dish, add texture, and elevate presentation without overpowering the custard flavor.
Notes
Tips
Chef’s Tips for Perfect Mini Crème Brûlée
- Gently infuse the cream with vanilla. Heat the cream until just steaming; if using a vanilla bean, add the bean and seeds and let it steep for a few minutes, then remove the pod (and seeds) before combining with the yolks. Strain if needed to remove any fragments for an ultra-smooth custard.
- Temperature control is key. Keep the cream around 170–180°F (77–82°C) when heating. Do not boil, as boiling can make the custard tough and cause curdling when it meets the yolks.
- Temper the yolks to avoid curdling. Whisk the yolks to loosen them and bring to room temperature. Slowly stream hot cream into the yolks while whisking constantly, then whisk in the tempered mixture until smooth. Strain the mixture to remove any small clumps or foam before pouring into ramekins.
- Whisk sugar fully into the yolks. Dissolve the granulated sugar completely with the yolks; this helps avoid a gritty texture and ensures a velvety custard after cooking.
- Season thoughtfully. A pinch of salt enhances sweetness and flavor depth without making the custard salty. Use fine salt or sea salt in small amounts.
- Prep the custard for a silky finish. Strain the final custard through a fine-mine sieve to remove any air bubbles or chalaza, yielding a smoother set after baking.
- Ramekins and water bath setup. Choose ramekins that fit snugly in a baking dish and fill the water bath halfway up the sides of the ramekins. The water bath provides gentle, even heat and prevents cracking or curdling.
- Fill to the right level. Pour the custard into ramekins so they’re about three-quarters full. This gives a nice, even surface for the caramel topping once baked and cooled.
- Bake with care. Bake at a moderate temperature (around 325°F / 165°C) until the custems are just set with a slight jiggle in the center. If your oven runs hot, start checking a bit earlier to avoid overbaking.
- Cool properly before topping. Remove the ramekins from the water bath after baking and cool completely, then refrigerate for at least 2 hours (preferably overnight) to set the custard fully and simplify topping.
- Prepare the caramel topping correctly. Just before serving, sprinkle each custard with a thin, even layer of sugar (about 1–2 teaspoons per ramekin). A uniform layer ensures an even crack and crust when torched or broiled.
- Torching tips for a pristine crust. For a crisp caramel shell, move the torch in slow, small circles and keep it 2–3 inches from the surface. Don’t linger in one spot to avoid burning. If using broiler, watch closely and rotate the dish for an even crust, usually 1–2 minutes depending on your broiler.
- Finish and present stylishly. Let the caramel crust cool for a minute or two, then serve with optional fresh berries or mint. Pat berries dry before placing them on the plate to prevent extra moisture from softening the crust.
FAQ
Mini crème brûlée — Frequently Asked Questions
What is mini crème brûlée?
Mini crème brûlée is a small, single-serving custard dessert made with cream, egg yolks, vanilla, and sugar, topped with a crisp caramelized sugar shell just before serving. Each ramekin yields a creamy center with a crackly top.
What ingredients do I need?
For about 4 mini ramekins (4 oz each):
- 1 cup heavy cream (240 ml)
- 4 large egg yolks
- 1/4 cup granulated sugar (plus extra 2–3 teaspoons for topping)
- 1 teaspoon pure vanilla extract (or 1/2 vanilla bean, scraped)
- Pinch of salt
Note: You can scale the recipe for more or fewer portions by keeping the same yolk-to-cream ratio.
Can I make mini crème brûlée ahead of time?
Yes. Bake and chill the custards up to 1 day in advance:
- After baking, let them cool to room temperature, then refrigerate, loosely covered.
- Caramelize the sugar topping just before serving to keep it crisp.
What equipment do I need?
Essentials:
- 4 mini ramekins (about 4 oz each)
- Shallow baking dish or roasting pan for a water bath
- Mixing bowl and whisk, or a blender
- Fine-mesh sieve (optional, for a silky custard)
- Kettle to heat water
- Kitchen torch for caramelizing or a broiler/oven
What oven temperature and how do I set up the water bath?
Preheat to 325°F (165°C). Place the ramekins in a shallow baking dish, then carefully pour hot water into the dish until it comes halfway up the sides of the ramekins. Bake until the custards are set around the edges but the centers still jiggle slightly, about 25–30 minutes for mini ramekins. Remove from the water bath and chill for at least 2 hours (or overnight) before serving.
How do I caramelize the top without burning it?
After chilling, evenly sprinkle 1–2 teaspoons of granulated sugar on each custard. Use a kitchen torch to melt and caramelize until amber and shiny. If you don’t have a torch, place the ramekins under a hot broiler for 1–3 minutes, watching closely to prevent burning.
How can I prevent cracks or overcooking?
Cracks or a grainy texture usually come from overbaking or overheating. Bake in a water bath at a gentle temperature (325°F/165°C) until the outer edges are set but centers remain slightly jiggly. Let cool completely in the fridge to finish setting, then top with caramel just before serving.
Can I make dairy-free or low-fat mini crème brûlée?
Yes, with caveats. Dairy-free versions can be made with full-fat canned coconut milk (not light) blended with a dairy-free milk to reach about 1 cup total liquid. Use 4–5 egg yolks to help set the custard, and add vanilla. The texture may differ from dairy cream, but the result can still be delicious. Caramelize the topping with a torch or under a broiler as usual.
What are some serving or flavor variations?
Suggestions:
- Add a pinch of citrus zest (lemon or orange) to the custard for brightness.
- Swirl in a teaspoon of espresso for a mocha version.
- Top with fresh berries or a berry compote for contrast.
How many servings does this yield?
Typically 4 mini crème brûlée portions (4 oz ramekins). You can scale to 6 if using 3 oz ramekins, but keep the custard ratio the same.
What should I do if the custard is still watery in the center?
If the center remains too soft after chilling, re-bake the ramekins for 5–8 more minutes in a 325°F (165°C) water bath, checking every 2 minutes. If cracks appear, remove and chill immediately. For future batches, ensure the water bath is hot and bake time is not too short.