Introduction / Hook
There’s a dessert that feels like a warm embrace from a friend who loves chocolate just as much as you do. Chocolate heaven cake isn’t just a dessert; it’s a celebration of cacao in its most indulgent form. Picture this: a deeply glossy, almost velvet-dark crumb that gives way to a tender, melt-in-your-mouth softness with every slice. The aroma alone—where bitter cocoa tang meets sweet vanilla warmth and a hint of butter—is enough to coax a small sigh of happiness from anyone within smelling distance. When you cut into it, you reveal layers that throw back a sigh of chocolatey steam, a scent that seems to wrap around you like a cozy blanket on a cool evening. This isn’t merely cake; it’s an experience you want to share, from the first forkful to the final crumb. It’s the kind of dessert that becomes a ritual—one you’ll return to for birthdays, anniversaries, or simply when the mood calls for something truly decadent. If you’re a chocolate lover, you’ve found your new favorite indulgence, a recipe that turns a simple bake into a memory-in-the-making.
What makes Chocolate heaven cake special is its balance: a richness that never overwhelms, a texture that remains light enough to keep the slice graceful, and a finish that glistens with a luxurious sheen. It’s not merely sweet; it’s the kind of chocolate experience that feels opulent without being fussy. The cake carries a chorus of cocoa, a whisper of espresso or coffee, and a creamy, velvety filling that binds the layers with a finish that lingers. Each bite is a reminder that chocolate, when treated with care, can be both comforting and dazzling, a dessert that satisfies the deepest cravings while inviting yet more moments of delight. In short, Chocolate heaven cake invites you to slow down, savor the moment, and savor the flavor—one dreamy forkful at a time.
The Story Behind the Dish
Chocolate heaven cake grew from a kitchen’s memory of late-night dessert talks, where friends would trade stories and slice after slice of something rich and comforting. It’s the kind of recipe that starts with a craving and ends up as a tradition, a cake that carries the warmth of family gatherings, birthday celebrations, and the quiet joy of sharing something utterly irresistible. The genesis was simple: a desire to bottle the glow that comes from a perfectly made chocolate cake and to do so in a way that felt both timeless and modern. The result is a layered confection that nods to classic European chocolate cakes—dense and lush, yet buoyed by a cloudlike frosting and a sinfully glossy ganache glaze that makes the finish feel like a jewel-touched curtain. There’s a whisper of nostalgia in every bite, as if the cake holds stories of kitchens long gone but not forgotten, of grandmothers and aunts who stirred with the rhythm of a home’s heartbeat, and of friends gathering around a plate to celebrate the simple, beloved ritual of dessert shared with laughter and love.
As the cake traveled from its original test kitchen to family tables, it collected little touches that made it feel personal—vanilla bean flecks here, a dash of sea salt there, and a deliberate choice to keep the cake’s interior moist with a touch of moisture-locking ingredients rather than a heavy syrup. It’s a recipe that invites curiosity: what happens if you swap a dark chocolate with a milkier blend, or if you fold in a surprise crunch of toasted nuts or a layer of fruit compote? The story behind Chocolate heaven cake is a living one, evolving with kitchens, occasions, and the people who lift the first forkful to their lips. It’s a cake that holds memory, and in doing so, invites you to add your own chapters to its ongoing narrative.
Why You’ll Love This Recipe
- Deep, multi-layer chocolate flavor that feels indulgent without being cloying.
- Moist, tender crumb that stays luscious for days thanks to thoughtful moisture balance.
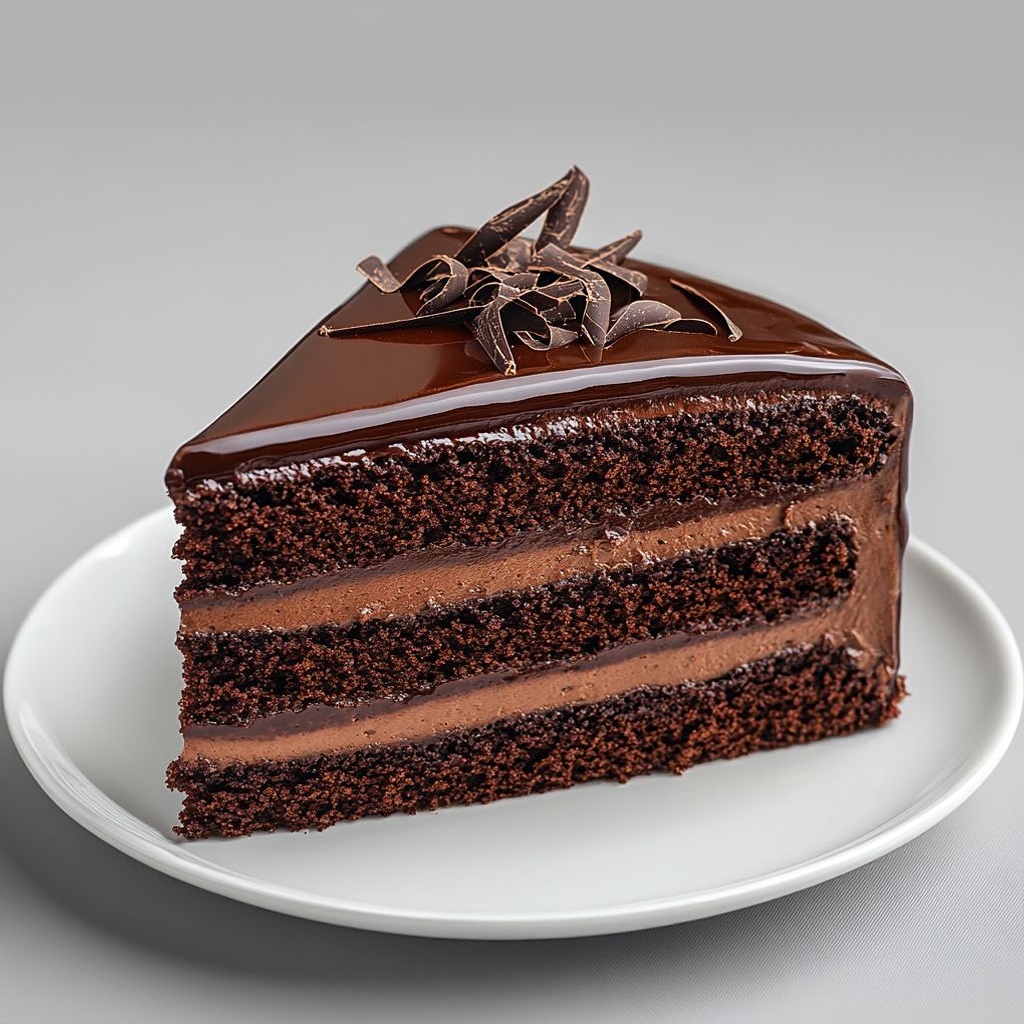
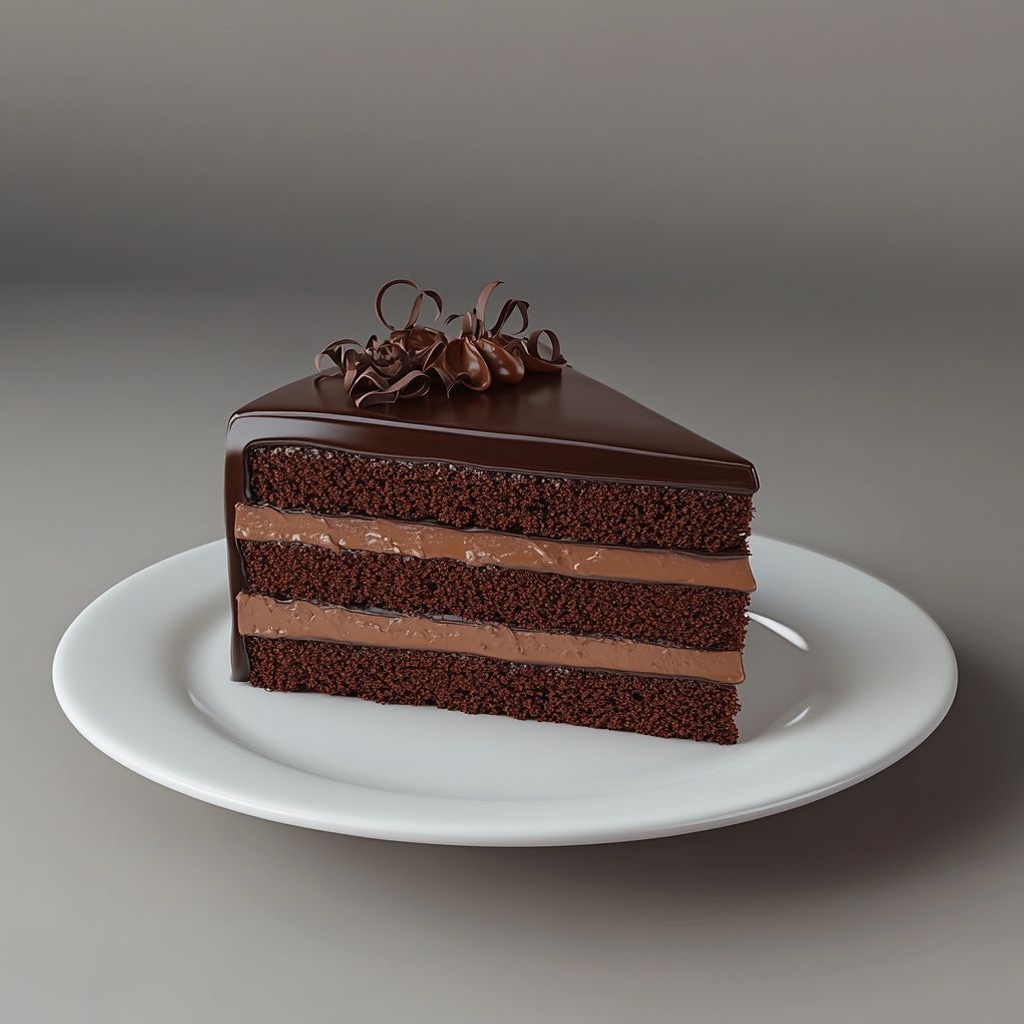
- Silky-smooth frosting and a glossy ganache that make the cake look as dreamy as it tastes.
- Adaptable to different dietary preferences with easy substitutions (vegetarian, gluten-lite, vegan options).
- Perfect for celebrations, intimate gatherings, or an elegant weeknight dessert when you deserve a treat.
- Impressive-looking yet surprisingly approachable—great for bakers of all levels who want a showstopper.
- Scales beautifully from a personal cake to a showpiece layered cake for larger crowds.
Flavor Profile & Texture
Chocolate heaven cake delivers a symphony of flavors that harmonize in the most satisfying way. The core is a rich, dark chocolate character that carries notes of roast and bitterness balanced by a touch of sweetness that never dominates. There’s a faint smokiness that lingers on the palate, like a cozy campfire after a day of snow. The cake’s crumb is exceptionally tender, almost crumbly in the most comforting sense, which makes it feel ultra-light despite its luxurious richness. As you cut through the layers, you’ll notice a moist interior that remains soft and springy, a testament to smart moisture management—enough fat, a whisper of acidity to keep it bright, and the perfect balance of cocoa to flour. The frosting brings everything together with a silken, almost creamy finish that melts on the tongue and yields to a second, more chocolate-saturated bite. The ganache glaze on top adds a sheen that glimmers like tempered chocolate in the light, giving the cake a restaurant-worthy finish that will have guests reaching for seconds before the first slice has even cooled. If you ever crave the feeling of luxury without a fuss, this is the profile you’re chasing: intense cocoa, a velvet texture, and a finish that glints with decadence while remaining approachable and cozy.
The flavor story is often elevated by subtle accent notes. A hint of espresso deepens the chocolate’s soul without tasting like coffee, while a touch of vanilla rounds the edges and adds warmth. A tiny pinch of salt can elevate the sweet, making the chocolate taste more vivid and balanced. Some bakers like to incorporate a delicate citrus zest to brighten the chocolate’s complexion briefly, while others lean into smoky or roasted-nut hints that add complexity without stealing the show from the chocolate itself. The frosting—usually a luscious buttercream or whipped ganache—plays a crucial role, providing a creamy contrast to the cake’s denser interior. It’s all about a balance: chocolate in its most satisfying form, with textures and accents that dance together to create a dessert that is virtuous in its richness but never oppressive to the palate.
Occasions & Pairings
This cake shines in many settings. It’s a natural for birthdays and anniversaries, where a dramatic, crowd-pleasing dessert elevates the celebration. It also works beautifully as a weekend treat to cap off a dinner party or a coffee-and-cchat afternoon with friends. Its elegance makes it suitable for more formal occasions, such as a bridal shower or holiday gathering, yet its comfort-food charm ensures it remains welcoming for casual family meals. The decadence invites luxurious pairings without requiring elaborate accompaniments. For beverages, consider a strong espresso or a glass of red wine with good berry or plum notes—both can complement the cake’s chocolatey depth. For a non-alcoholic route, a robust cold brew or a chai latte can echo the spice and caffeine notes that help highlight the flavor profile.
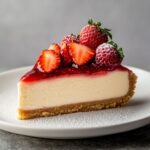
When it comes to sides, you can pair this cake with simple additions that enhance the experience without overshadowing the star. Fresh berries or a berry compote provide a bright contrast that cuts through chocolate’s richness. A scoop of vanilla bean ice cream or a dollop of lightly sweetened whipped cream creates a classic duo that never fails. For texture play, offer a light almond praline or chopped toasted hazelnuts to sprinkle on the side or between layers for a gentle crunch. If you’re serving a crowd, consider adding a few color accents—shaved chocolate curls, edible gold dust, or a few raspberries—to make the presentation feel as celebratory as the flavor promises. In sum, this cake pairs beautifully with simple, high-quality accompaniments that amplify its chocolate charisma without stealing the spotlight.
Tips, Variations & Substitutions
- Espresso or coffee amp: A splash of brewed espresso in a chocolate batter enhances depth without making the cake taste like coffee. If you’re avoiding caffeine, use a robust decaf and start with a small amount, tasting as you go.
- Gluten-friendly option: Swap conventional flour for a gluten-free blend that’s designed for baking. You’ll still want to keep an eye on moisture and crumb structure, as gluten-free flours behave differently, but the result can be wonderfully tender.
- Vegan/dairy-free version: Use vegan butter and a dairy-free milk in the batter, plus a dairy-free ganache or frosting. Ensure your cocoa is dairy-free as well for a clean vegan outcome.
- Nut-free flexibility: If you want to keep it nut-free, avoid added nut pastes or crushed nuts in fillings and use nut-free toppings like burnt sugar brittle or chocolate shavings.
- Flavor twists: Introduce a pinch of chili powder for a subtle heat, or orange zest for a bright citrus lift. A pinch of sea salt on top of the ganache intensifies the chocolate’s sweetness.
- Layer variations: For a more dramatic presentation, make three thinner layers with a lighter filling between them. Or keep it as a two-layer cake with a generous frosting layer for extra richness.
- Moisture management: Use buttermilk or a yogurt substitute in the batter to boost tenderness and keep the crumb moist longer. If you’re dairy-free, consider a plant-based yogurt with a similar fat content.
- Make-ahead ease: Bake the cake layers in advance and freeze them. Freeze unfrosted layers tightly wrapped, then thaw and frost when ready. This is a lifesaver for holiday hosting or big parties.
- Frosting options: If you prefer a lighter finish, opt for a whipped ganache or a mousselike chocolate frosting. For a more classic, buttercream finish, a rich buttercream with high-quality cocoa works beautifully.
- Texture accents: Add a layer of crushed toffee, cacao nibs, or toasted nuts between layers for a delightful crunch that contrasts with the soft cake.
- Presentation tips: A mirror glaze can turn this cake into a modern centerpiece, or keep it rustic with a dusting of cocoa powder and chocolate curls for a more homey look.
Storage & Make-Ahead Ideas
Chocolate heaven cake is remarkably forgiving when it comes to storage, which makes it a dependable choice for busy schedules. If you’re serving within a few days, wrap the cooled cake tightly in plastic wrap and keep it at room temperature in a cool, dry place. If your kitchen tends to be warm or humid, refrigerating the cake is a better option; just be sure to bring it to room temperature before slicing to regain that soft, melt-in-your-mouth texture. For longer storage, you can freeze the baked layers (well-wrapped) for up to two to three months. Thaw overnight in the refrigerator or at room temperature, then reassemble and frost as desired. The frosting itself stores well in the refrigerator for several days; let it come to room temperature and rewhip briefly to restore its creamy, spreadable texture. If you’ve got leftovers, store them in an airtight container in the fridge for up to five days, and bring slices back to room temperature before serving to maximize flavor and texture. If you freeze leftovers, you can reheat slices gently in the microwave or oven to awaken the chocolatey aromas and soften the crumb a touch, though you’ll ideally want to enjoy them cold or at room temperature as a contrast to the frosting’s chill or warmth.
Fun Facts & Trivia (Optional)
Chocolate has a long and luxurious history that mirrors the cake’s own story. The cacao bean, originally cultivated by ancient Mesoamerican civilizations, was once reserved for royalty and ceremonial use. It wasn’t until the 19th century that chocolate transformed into the sweet, versatile ingredient we know today, moving from a bitter drink to the versatile dessert base that can be baked into luscious cakes like this one. The term “ganache” hails from the French language and refers to a glossy chocolate cream that’s the perfect partner for a cake’s outer layer. The science behind a great chocolate cake lies in balance: fat tenderizes the crumb, acid (from yogurt, buttermilk, or sour cream) helps activate baking soda for lift, and sugar caramelizes during baking to deepen flavor and give a slight crust that yields to a soft interior. Sensory details aside, there’s a cultural memory baked into every slice—a shared moment of indulgence that makes chocolate heaven cake feel more than a dessert; it feels like a little celebration you can carry into your day, over and over again. As a fun culinary tidbit, many bakers like to finish the cake with a soft, barely warm glaze that makes the surface look satin-smooth and invites that first glorious forkful to melt into the mouth, an effect that has been perfected by generations of bakers who chase the perfect chocolate experience.
Ingredients
Chocolate Heaven Cake
Cake Base
- – 2 cups all-purpose flour (or 2 cups 1:1 gluten-free flour blend)
→ The flour provides the cake’s structure by forming a gluten network (or acting as the base of a gluten-free batter). If using a gluten-free blend, choose one designed for baking and consider adding 1/4 teaspoon xanthan gum per cup to mimic elasticity. Sift with the cocoa to ensure even distribution and measure by spoon-and-level to avoid overly dense results. Do not overmix once the wet ingredients are added to keep the crumb tender; resting the batter for 5–10 minutes helps hydrate the flour. - – 1 3/4 cups granulated sugar
→ Sugar tenderizes the crumb, contributes to browning, and helps retain moisture. It also influences the cake’s mouthfeel and sweetness. Measure by scooping into the cup and leveling with a knife for accuracy. If you want a moister, more deeply caramelized crust, you can substitute half of the sugar with light brown sugar for a touch of molasses flavor. - – 3/4 cup unsweetened cocoa powder (Dutch-processed or natural)
→ Cocoa provides the core chocolate flavor and color. Dutch-processed cocoa yields a smoother, milder chocolate, while natural cocoa is more acidic and can slightly aid leavening when paired with baking soda. Sift with the flour to break up lumps and distribute evenly. If using natural cocoa, ensure the leavening balance remains appropriate to achieve a good rise. - – 2 teaspoons baking powder
→ Acts as the primary chemical leavener, producing carbon dioxide bubbles that lift the batter for a light, airy crumb. Sift with dry ingredients to distribute evenly. If you use natural cocoa (acidic), the extra acidity helps with lift; otherwise, the baking powder keeps the crumb tender and risen. - – 1/2 teaspoon baking soda
→ Additional leavening helps create a balanced rise and a tender crumb. Reacts with acidic components in the batter to generate extra lift. It also softens the crumb; ensure it’s evenly dispersed and not lumped by whisking with the dry ingredients. If you use buttermilk or yogurt, this helps balance the acidity for better rise. - – 1/2 teaspoon salt
→ Enhances overall flavor and rounds out the sweetness, sharpening the chocolate profile. Salt also slightly strengthens gluten structure and helps suppress bitterness from cocoa. Use fine sea salt or kosher salt and distribute evenly by whisking into the dry mix. - – 2 large eggs, room temperature
→ Eggs provide moisture, structure, and emulsification. Room-temperature eggs blend more smoothly with the other liquids, producing a finer, more uniform crumb. If eggs are cold, they can seize with cocoa; warm them in warm water for 5–10 minutes or whisk separately to ensure even incorporation. - – 1 cup whole milk (or dairy-free milk with 1 tablespoon white vinegar)
→ Adds moisture and tenderness; fats in milk help create a soft crumb. Using room-temperature milk aids emulsification. For dairy-free, use a fortified milk and, if desired, add a splash of vinegar to mimic acidity. Combine milk with the hot coffee later to ensure even temperature in the batter. - – 1/2 cup neutral oil (such as canola or sunflower)
→ Provides rich moisture and a tender crumb that stays soft longer than butter at room temperature. Oils remain liquid, helping fat distribute evenly. If you prefer butter flavor, substitute half the oil with melted, cooled butter; avoid strongly flavored oils that may compete with chocolate. - – 2 teaspoons vanilla extract
→ Adds depth and warmth to the cake’s aroma. Use pure vanilla extract for best flavor; for extra intensity, add a small amount of vanilla bean paste or scraped vanilla bean seeds and whisk evenly into the liquids. - – 1 cup hot coffee or strong brewed coffee
→ Intensifies chocolate flavor and deepens color, helping balance sweetness. The hot liquid also helps dissolve sugars and hydrate dry ingredients quickly, yielding a smoother batter. If you prefer not to use coffee, substitute with hot water or decaf coffee; avoid boiling water that could scramble eggs. - – Optional: 1/4 cup melted dark chocolate (70% cacao or higher)
→ Extra depth of chocolate in the crumb and a richer overall flavor. Gently fold cooled, melted chocolate into the wet ingredients after the eggs to avoid re-cooking them. This is optional but enhances the cake’s decadence.
Frosting (Ganache)
- – 8 oz dark chocolate, finely chopped
→ The ganache base that coats the cake; chopped chocolate melts more evenly for a glossy, smooth finish. Use good-quality chocolate with at least 60% cacao for a rich, balanced chocolate flavor. Finely chopping helps it melt quickly and uniformly when hot cream is added. - – 1 cup heavy cream
→ The liquid portion of the ganache; heat just to a simmer to melt the chocolate into a silky glaze. The cream-to-chocolate ratio determines thickness: more cream yields a pourable glaze, less yields a thicker frost. For a stiffer frosting, slightly reduce the cream or add more chocolate. - – 2 tablespoons unsalted butter (optional)
→ Adds extra sheen and silkiness to the finished ganache; helps create a bakery-worthy gloss and smoother mouthfeel. Add after the ganache has melted and is homogeneous; do not overheat. This is optional but yields a more luxurious texture. - – Pinch of salt (optional)
→ Deepens chocolate flavor and balances sweetness. A tiny pinch mixed into the ganache enhances complexity; if using salted chocolate, adjust accordingly. - – 1 teaspoon vanilla extract (optional)
→ Adds aromatic warmth to the ganache. If using, stir in with the hot ganache just before pouring to distribute evenly; otherwise, skip for a purer chocolate finish.
Toppings
- – 1–2 tablespoons unsweetened cocoa powder for dusting (optional)
→ Finishes the cake with a delicate chocolate aroma and a matte surface. Lightly sift over the cooled cake using a fine-mesh sieve to avoid clumps and create an elegant, even finish. - – Chocolate curls or shavings (optional)
→ Adds decorative texture and extra chocolatey bites. Use a vegetable peeler on a block of good-quality chocolate and refrigerate the block briefly if it’s soft to keep curls intact. Arrange just before serving for best appearance. - – Sea salt flakes (optional)
→ A subtle salinity enhances sweetness and intensifies chocolate flavor. Sprinkle a few flakes over the finished cake or ganache for a quick, sophisticated contrast.
Instructions
- Preheat your oven to 350°F (175°C) and prepare two 9-inch round cake pans by greasing them with neutral oil and lining the bottoms with parchment circles; this ensures the cake releases evenly and minimizes sticking.
→ This setup prevents the batter from sticking and helps you remove the cakes cleanly for a smooth, even finish. - Whisk together the dry ingredients: 2 cups all-purpose flour (or 2 cups gluten-free flour blend with xanthan gum if using GF), 1 3/4 cups granulated sugar, 3/4 cup unsweetened cocoa powder, 2 teaspoons baking powder, 1/2 teaspoon baking soda, and 1/2 teaspoon salt in a large bowl until evenly distributed; lightly sift or whisk to break up lumps.
→ Uniform dry ingredients ensure even rise, consistent color, and a tender crumb by preventing pockets of flour or cocoa from forming. - Whisk the wet ingredients: 2 large eggs (room temperature), 1 cup whole milk (or dairy-free milk with 1 tablespoon white vinegar), 1/2 cup neutral oil, and 2 teaspoons vanilla extract in a separate bowl; add 1 cup hot coffee or strong brewed coffee last to intensify chocolate flavor and help dissolve sugars; ensure liquids are emulsified and smooth.
→ Room-temperature eggs emulsify better with liquids for a smoother batter, and hot coffee deepens the chocolate flavor and contributes to a moist crumb. - Make a well in the center of the dry mixture and pour in the wet mixture; stir gently with a spatula or wooden spoon until just combined and no large streaks of dry flour remain; avoid overmixing to keep a tender crumb, and let the batter rest for 5–10 minutes to hydrate the flour.
→ Resting relaxes the gluten (or hydrates gluten-free blends) for a finer crumb and more even rise in the oven. - If using the optional 1/4 cup melted dark chocolate, fold it in now with a light, figure-eight motion until evenly distributed but not overworked; use cooled melted chocolate to prevent re-cooking the eggs and to maintain a smooth, glossy batter.
→ The extra chocolate depth enriches the flavor and the smooth distribution prevents streaks in the baked crumb. - Divide the batter evenly between the prepared pans, tapping the pans lightly on the counter to release trapped air and level the surface; this promotes an even rise and flat tops for neat assembly.
→ Even distribution and gentle tapping minimize air pockets that can cause domed or uneven layers during baking. - Bake in the preheated oven at 350°F (175°C) for about 28–34 minutes, or until a toothpick inserted into the center comes out with a few moist crumbs; rotate the pans halfway through baking for even heat distribution.
→ The crumb should be set and springs back slightly; toothpicks with a few crumbs indicate doneness without overbaking. - Allow the cakes to cool in the pans for 10–15 minutes, then run a knife around the edges and invert onto a wire rack to cool completely before assembly; this prevents steam from condensing and making the layers soggy.
→ Proper cooling preserves structure for clean slicing and stable stacking with ganache.
- Chop 8 oz dark chocolate finely and place into a heatproof bowl; finely chopped chocolate melts more quickly and evenly for a glossy ganache because the surface area is increased, ensuring a smoother finish.
→ Uniform size pieces melt evenly when hot cream is added, avoiding lumps or graininess in the ganache. - Heat 1 cup heavy cream in a small saucepan over medium heat until it just begins to simmer; do not let it boil vigorously; pour the hot cream over the chopped chocolate and let it sit for 3–5 minutes to melt; then whisk until the ganache is smooth and glossy.
→ Allowing the chocolate to melt gradually with the hot cream yields a seamless, silk-like ganache without separation. - If using optional butter, add 2 tablespoons unsalted butter (cut into small pieces) and, optionally, a pinch of salt and 1 teaspoon vanilla extract after the ganache has melted; whisk gently until fully incorporated and glossy.
→ Butter enriches the mouthfeel and shine; salt and vanilla deepen and balance the chocolate flavor when emulsified into the warm ganache. - Let the ganache cool at room temperature until it reaches a pourable but thickened consistency; if it becomes too thick, warm it briefly over low heat or in short bursts in the microwave until smooth but not runny.
→ Temperature control ensures a glaze that flows smoothly over the cake without sliding off or setting too quickly. - Level the cooled cake layers with a long serrated knife or cake leveler to create flat, even surfaces; this facilitates even ganache coverage and stable layering.
→ An even top prevents gaps and uneven thickness when stacking, giving a professional finish. - Place the first cake layer on a serving plate and spread a generous, even layer of ganache over the top to form a middle filling; place the second layer atop and press gently to set; this creates a stable structure and balanced flavor between layers.
→ A defined filling anchors the layers and ensures clean slicing with a cohesive crumb. - Pour the remaining ganache over the top, using an offset spatula to spread it evenly over the surface and down the sides for a smooth, glossy finish; allow the ganache to cascade naturally for a bakery-worthy look.
→ Even coating yields a sleek appearance and seals in moisture for a luscious bite from edge to center. - Let the ganache set at room temperature, or refrigerate briefly if you prefer a firmer finish; if refrigerated, allow the cake to come back to room temperature before slicing to maintain a clean cut and avoid cracking.
→ Proper setting prevents cracking and ensures tidy slices with a polished presentation.
- Dust the cooled cake lightly with 1–2 tablespoons unsweetened cocoa powder using a fine-mesh sieve for a delicate aroma and matte finish; avoid clumps for an even, refined surface.
→ A subtle dusting enhances aroma and provides a sophisticated border against the glossy ganache. - Make chocolate curls or shavings by running a vegetable peeler along a block of good-quality chocolate; refrigerate the block briefly if it softens to help curls hold their shape, and arrange curls on top or along the sides just before serving for texture and visual interest.
→ Curls add contrast and a dynamic, appetizing finish, enhancing the chocolate-forward theme. - Finish with sea salt flakes sprinkled sparingly over the ganache to heighten sweetness and intensify chocolate flavor; consider a light touch to avoid overpowering the final bite.
→ A touch of salt sharpens flavor and deepens chocolate intensity, creating a more sophisticated finish.

Notes
These chocolate heaven cake slices are rich, moist, and deeply chocolatey, and they can be baked with either all-purpose flour or a 1:1 gluten-free flour blend for a gluten-free option.
If you’re using a gluten-free blend, sift the dry ingredients with the cocoa and add 1/4 teaspoon xanthan gum per cup to mimic elasticity. Measure by spoon-and-level to avoid dense results and avoid overmixing once the wet ingredients are added to keep the crumb tender.
You can customize the batter by folding in extra chopped dark chocolate or chocolate chips, and for a deeper flavor, a pinch of espresso powder can be whisked into the liquids. The optional 1/4 cup melted dark chocolate folded into the wet ingredients adds a fudgier, more decadent crumb.
The ganache topping creates a glossy, luxurious finish. For a dairy-free version, replace the heavy cream with coconut cream or a fortified plant-based cream and use dairy-free chocolate; whisk until smooth and pour over the cooled cake for a sleek glaze.
Tips
Tips for Chocolate Heaven Cake
- Dry ingredient readiness: Sift the flour with the cocoa and leaveners (baking powder and baking soda) to break up lumps and ensure even distribution. If using a gluten-free blend, add 1/4 teaspoon xanthan gum per cup of flour to mimic gluten structure and hydration.
- Temperature matters: Bring eggs and milk to room temperature to improve emulsification and crumb structure. If using cold eggs with hot coffee, briefly whisk the eggs separately or temper them to avoid streaks or curdling.
- Measuring liquids: Use hot coffee to bloom the chocolate flavor and help dissolve sugars for a smoother batter. If you skip coffee, use hot water or decaf, but avoid boiling water that could affect eggs.
- Mixing technique: Combine wet ingredients with dry just until incorporated to keep the crumb tender. Do not overmix. If you fold in optional melted chocolate, add it after the eggs to prevent cooking them.
- Oil vs butter: Neutral oil yields a very moist crumb that stays soft. If you crave a butter-forward note, substitute up to half the oil with melted, cooled butter, but avoid strong-flavored oils that may compete with chocolate.
- Even batter: Scrape the bowl and whisk briefly after adding wet to ensure no dry pockets remain. Rest the batter 5–10 minutes to hydrate flour and improve crumb texture.
- Pans and prep: Line pans with parchment rounds and grease the sides well to prevent sticking. Filling each pan to about 2/3 ensures a domed rise without overflow; rotating pans halfway through baking can help with even coloring.
- Baking doneness: Begin checking for doneness 5–10 minutes before the minimum time. Use a toothpick inserted in the center; it should come out with a few moist crumbs, not wet batter. If using GF flour, bake a minute or two longer if needed.
- Ganache tips: For a silky ganache, heat the cream just to a simmer and pour over finely chopped chocolate; let sit 5 minutes, then whisk until smooth. If you want extra gloss, stir in 1 teaspoon vanilla and/or 2 tablespoons unsalted butter after the ganache is smooth. If ganache seizes, rewarm gently over low heat or a warm water bath and whisk.
- Texture and shine: A thinner ganache yields a glossy glaze; for a thicker frosting, reduce cream slightly or increase chocolate. Chill briefly after pouring to set quickly for clean edges.
- Decorating options: Dust with 1–2 tablespoons cocoa powder just before serving for a cocoa aroma; add chocolate curls or shavings for texture. A few sea salt flakes can heighten the chocolate’s sweetness when used sparingly.
- Storage and plan ahead: Store the cake loosely covered at room temperature for 1–2 days or refrigerate up to 4–5 days. Bring to room temperature before serving for the best crumb and ganache gloss. If refrigerating, you may want to rewarm the cake slightly or gently reheat slices for a softer crumb.
- Gluten-free considerations: If using a gluten-free flour, scoop-and-level the flour rather than scoop-from-bag to avoid dense results; resting the batter helps hydration. The basic technique remains the same for a moist, tender cake.
FAQ
What is Chocolate Heaven Cake?
Chocolate Heaven Cake is a rich, moist chocolate cake layered with a luscious chocolate frosting. It’s deeply chocolatey, slightly fudgy, and perfect for celebrations or a dessert indulgence any time.
What ingredients do I need to make it?
Basic dry ingredients: flour, cocoa powder, baking powder, baking soda, salt, and sugar. Wet ingredients: eggs, milk (or dairy-free alternative), vegetable oil, vanilla extract. Then: boiling water or hot coffee to intensify the chocolate flavor. Optional: chocolate chips for extra fudginess. Frosting typically uses butter, powdered sugar, cocoa powder, milk, and vanilla.
What equipment will I need?
Typically you’ll need: two 9-inch round cake pans, parchment paper, a mixing bowl, a whisk or electric mixer, a rubber spatula, a cooling rack, a serrated knife for leveling, and a spatula for frosting. Optional: a parchment-lined pan for easier removal and a cake stand for serving.
How do I bake Chocolate Heaven Cake?
Preheat oven to 350°F (175°C). Grease and line the cake pans. Mix dry ingredients in one bowl; whisk wet ingredients in another. Combine wet and dry until just blended, then fold in boiling water or hot coffee until smooth. Pour into pans and bake for about 30–35 minutes, or until a toothpick inserted in the center comes out clean. Cool in pans for 10 minutes, then transfer to a rack to cool completely before frosting.
How long does it take from start to finish?
Approximately 1 hour for mixing and baking, plus about 1–2 hours for cooling and frosting. If you’re making a two-layer cake, factor in extra time for leveling and assembling.
How should I frost and decorate it?
A classic chocolate buttercream works beautifully: softened butter, powdered sugar, cocoa powder, a touch of milk, and vanilla. Beat until light and fluffy, then layer between the cooled cake layers and frost the outside. Garnish with chocolate shavings, cocoa powder dusting, or fresh berries for contrast. You can also pour a glossy ganache for a luxurious finish.
Can I make this cake vegan or dairy-free?
Yes. Use plant-based milk (almond, soy, oat, etc.), use a neutral oil or dairy-free butter substitute, and replace eggs with a flax egg, chia egg, or commercial egg replacer. For frosting, use a vegan butter or coconut oil-based frosting and dairy-free milk. Ensure cocoa powder is dairy-free if needed.
Is it gluten-free or can I substitute gluten-free flour?
You can adapt it to gluten-free by using a 1-to-1 gluten-free flour blend. Some blends require adjustments in liquid, so start with the same measurements and add a little more liquid if the batter seems too thick.
How should I store leftovers?
Store tightly covered at room temperature for 1–2 days, or refrigerate for up to 4–5 days. If frost is involved, keep refrigerated. For longer storage, wrap slices or the whole cake in plastic wrap and refrigerate or freeze.
Can I freeze Chocolate Heaven Cake?
Yes. Freeze unfrosted cake layers wrapped well in plastic wrap and aluminum foil for up to 2–3 months. Thaw overnight in the fridge, then frost. You can also freeze frosted cake, but it’s best to decorate after thawing to maintain the frosting’s texture.
What are common troubleshooting tips?
Tips:
– If the cake sinks in the middle, avoid opening the oven door during the first 20–25 minutes and make sure your baking powder/soda are fresh.
– If the crust cracks, it could be due to overly hot oven or overmixing; mix just until combined.
– If the cake is dry, check the baking time, add a bit more fat to the batter, or increase the fat or liquid slightly in your next batch.
– If frosting is too thick, add milk a teaspoon at a time until you reach the desired spreadable consistency.