Introduction & Hook
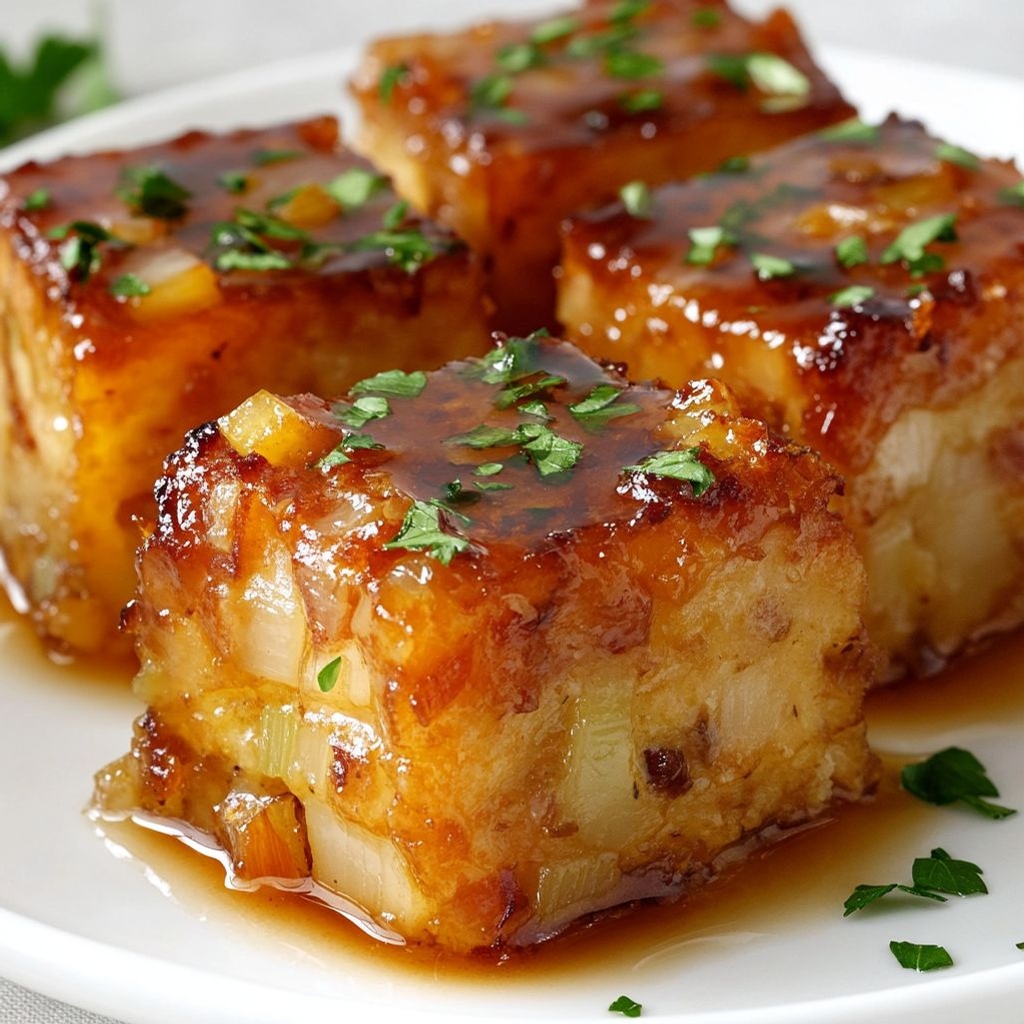
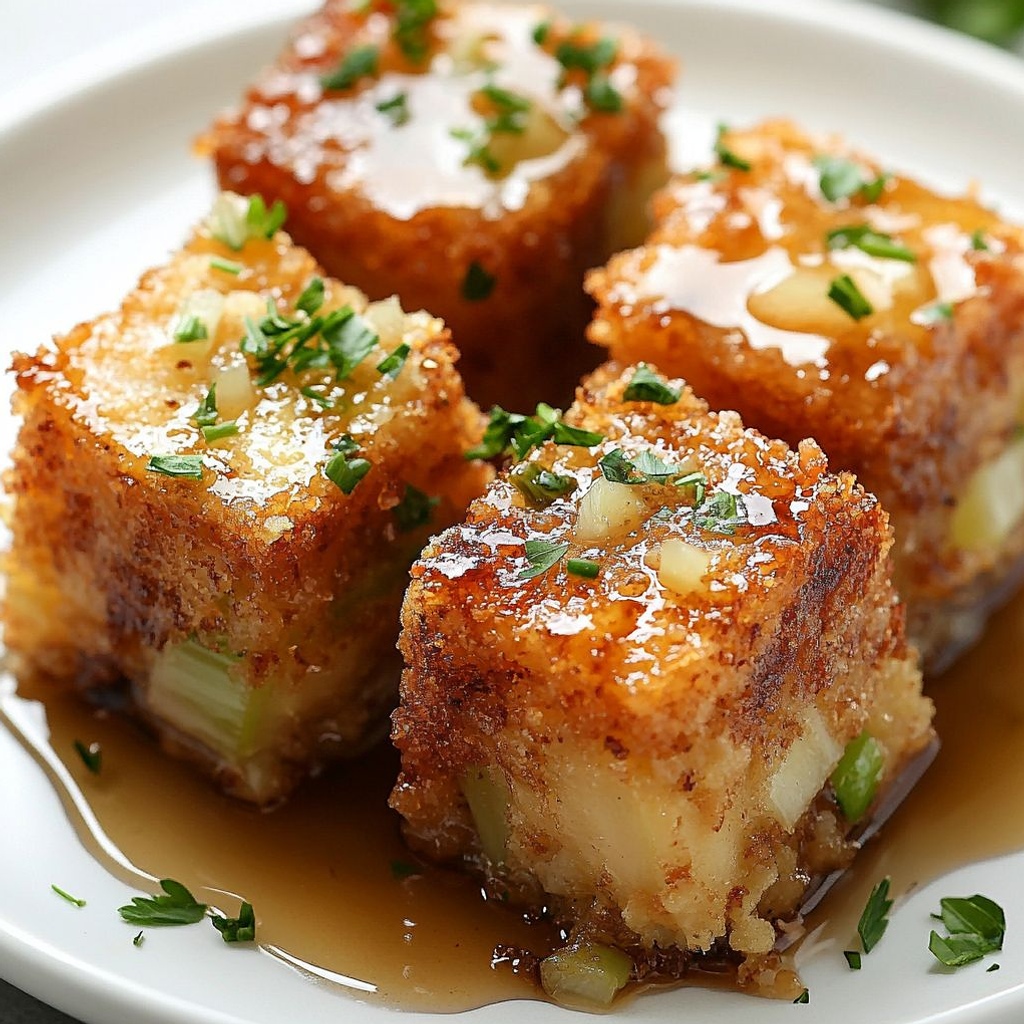
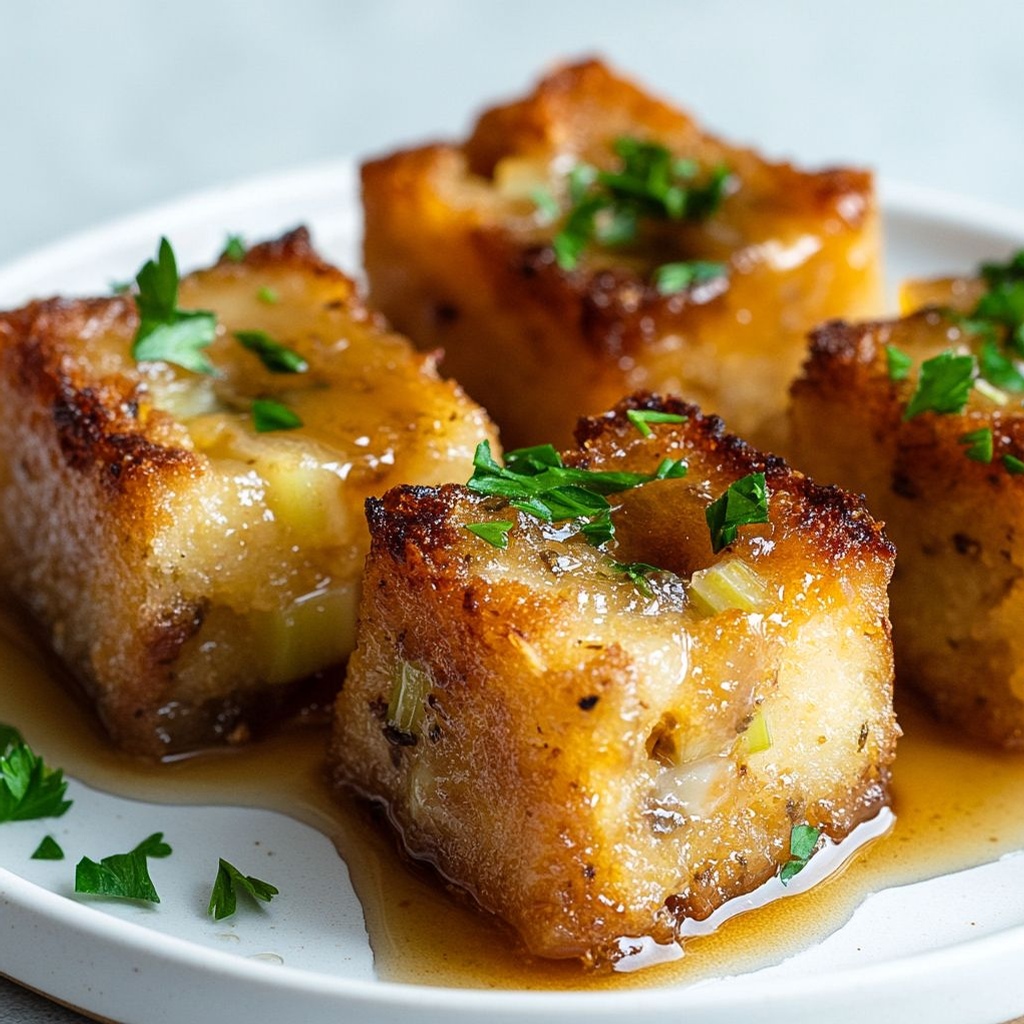
Imagine a bite-sized revelation where crispy edges crackle at the first bite, and a soft, savory center greets you with warmth. Syrup and Cubed Stuffing Bites transform everyday leftovers into a playful, crowd-pleasing appetizer that graces holiday tables and weeknight dinners with equal charm. This dish marries two familiar comfort-food personas: the homey, comforting allure of stuffing and a gleaming drizzle of sweetness that ties everything together in one irresistible mouthful. The moment these bites are set on the table, the room fills with a patchwork of scents: toasted, crumbly notes that speak of cozy kitchens, gentle herbaceous undertones that evoke Sunday suppers, and a lacquered glaze that hints at sweetness without clinging too much. It’s a sensory invitation—you’ll hear forks pause mid-air, see smiles light up, and feel the anticipation of a bite that’s both familiar and delightfully new. Welcome to a dish that takes cherished leftovers and reimagines them as something celebratory, snackable, and utterly irresistible.
The Story Behind the Dish
Every family has its own rituals around holiday feasts and weeknight comfort foods, and Syrup and Cubed Stuffing Bites grows from a simple, universal truth: leftovers deserve a second act. The origin of this idea is less about a precise recipe and more about a mood—a craving for something that feels both familiar and surprising, something that can bridge casual gatherings and festive celebrations. In many kitchens, stuffing is a testament to home—the soft bread fragments, the aroma of herbs and aromatics, the gentle warmth of a dish that has fed generations. When a handful of those prepared morsels is cubed, arranged, and given a glossy finish, they become something almost ceremonial: bites that honor the original dish while offering a new texture and balance of flavors.
The concept travels easily across cultures and occasions. It borrows the idea of transforming leftovers into shareable, portable bites, a common thread in many culinary traditions where no scrap goes to waste and every flavor is given room to shine. Picture a table where a bowl of stuffing has been cooling, a tray of cubes awaiting a kiss of sweetness, and a glaze that catches the light as it’s drizzled. In that moment, the bite-sized creation feels like a small celebration: a nod to the past with an eye toward the playful, the modern, and the comforting. The dish invites stories—of grandmothers who pressed bread into a pan, of friends who love a good finger food, and of cooks who enjoy the little rituals of turning leftovers into something new and shareable. It is in this spirit that Syrup and Cubed Stuffing Bites finds its voice: practical, affectionate, and a little mischievous in the best possible way.
Why You’ll Love This Recipe
- Easy, crowd-pleasing appetizer: You can prepare a few dozen bites that feel special without a lot of fuss, making them ideal for gatherings of any size.
- Texture contrast that delights: A crisp, lacquered exterior gives way to a tender, savory center in every bite, delivering both crunch and comfort in one mouthful.
- Versatile and adaptable: The concept works with a range of flavor profiles, so you can tailor it to your crowd’s preferences or dietary needs without reinventing the wheel.
- Make-ahead friendly: The components can be prepared in advance and assembled later, saving you time on busy days or before a party.
- Low-maintenance elegance: It feels sophisticated enough for a festive table while remaining approachable for weeknight entertaining.
- Great as a dipable option: Served with a light, complementary accompaniment, these bites become a hospitable starter or a playful addition to a grazing board.
Flavor Profile & Texture
The flavor of Syrup and Cubed Stuffing Bites is a careful study in balance. The core is inherently savory and comforting, carried by the soft, crumbly interior that evokes familiar stuffing textures. The exterior is where the magic happens: a gentle browning that creates a crisp edge and a sheen—an inviting gloss that suggests sweetness without overwhelming the palate. The glaze or syrup-like component provides a kiss of sweetness that rounds out savory notes, adding a subtle complexity that keeps the bites lively rather than one-note.
Sound, scent, and taste come together here. The first crunch releases a chorus of textures—the crackle of a well-rendered crust, the gentle give of a compact center, and the fleeting, almost caramel-like aroma that hints at a glaze. As you continue, you’re met with a cohesive blend where herbs or aromatics (introduced through the stuffing base) weave through the savoriness, while the sweetness from the glaze lingers on the palate with a delicate, almost nostalgic finish. The overall effect is comforting and familiar, yet undeniably fresh thanks to the light glaze and the bite-sized, portable format. It’s the kind of dish that feels both rustic and refined—a modern twist on a classic favorite that invites seconds, then thirds, and perhaps a quick re-order plate for leftovers the next day.
Occasions & Pairings
This bite-sized creation shines in a variety of settings, from casual weeknights to festive celebrations. Here are ideas to make the most of it:
- Holiday hors d’oeuvres: An easy, impressive starter that occupies minimal table space while delivering maximum impact.
- Brunch-friendly bites: Their mid-morning warmth pairs nicely with a light sparkling beverage or a mild coffee-based cocktail.
- Game-day appetizers: A crowd-pleasing, easy-to-share dish that travels well and can be prepped ahead.
- Family-style gatherings: A playful dish that invites guests to grab a few, socialize, and enjoy a common, comforting flavor.
Pairing ideas (in general terms) include light, bright accompaniments and beverages that complement the glaze’s sweetness without competing with the savory base. A crisp salad with citrus notes, a cool yogurt-based dip, or a simple vegetable side with a clean brightness can balance the richness. For drinks, options that offer a refreshing contrast—such as a lightly sparkling non-alcoholic beverage or a mild spirit on the rocks—allow the bites to stand at center stage without being overwhelmed. If you’re serving a cheese board, opt for milder cheeses that won’t overshadow the bites, letting the flavors harmonize rather than compete.
Tips, Variations & Substitutions
Here are ideas to customize, simplify, or adapt Syrup and Cubed Stuffing Bites to suit different diets, occasions, or taste preferences. Remember, the goal is flavor harmony and texture contrast, not a strict recipe—so feel free to improvise within the concept:
- Dietary adaptations: Create a vegan version by choosing plant-based components for the core and a glaze built from plant-based sweeteners. For gluten-free options, use a gluten-free base that still yields a similar texture and bite. The principle remains the same: a savory interior with a glossy, lightly sweet exterior.
- Glaze alternatives: Consider different glaze approaches that add sweetness and gloss without overpowering the savory base. A light syrup substitute, a honey-like glaze, or a balanced caramelized finish can all provide that finish your crowd loves.
- Flavor twists: Introduce subtle spice or warm aromatics to suit the season or mood. A gentle touch of heat, a hint of smokiness, or a bright herb lift can transform the profile while keeping it familiar.
- Texture variations: If you prefer an even crisper exterior, experiment with slightly thinner portions that crisp up more quickly or use a finishing technique that intensifies browning.
- Kids-friendly adjustments: Keep flavors mild, opt for a gentle glaze, and make portions extra small to balance approachability with fun.
- Regional twists: Infuse regional flavor elements that speak to place or tradition without complicating the concept. The core idea remains: savory interior + glossy, sweet finish + bite-sized form.
Storage & Make-Ahead Ideas
One of the strengths of Syrup and Cubed Stuffing Bites is their flexibility with timing. You can maximize flavor and convenience by planning ahead. Here are guidelines to help you store, reheat, and reuse efficiently:
- Make-ahead assembly: If you like, prepare the interior components in advance and complete the final glaze or finishing step closer to serving time. This allows you to assemble quickly when guests arrive.
- Proper storage: Store any assembled bites in an airtight container to keep their texture intact. For best results, keep them refrigerated and consume within a few days to preserve texture and flavor balance.
- Reheating approach: When reheating, aim to revive the exterior crispness while keeping the interior soft and warm. A gentle, moderate reheating method helps maintain texture without drying out the center.
- Freezing considerations: If you plan to freeze, freeze components separately or assemble in a way that allows for simple thawing and finishing. Freezing can affect texture, so plan to adjust finishing steps after thawing to regain the ideal crust.
Overall, the key is to keep the components and glaze as distinct elements until service time, then bring them together for that glossy, cohesive bite. This approach preserves texture, flavor balance, and visual appeal, ensuring leftovers feel thoughtfully repurposed rather than hurriedly assembled
Fun Facts & Trivia (Optional)
Delightful bites like these often come with little stories that add to the charm of serving them. Here are a few fun notes that can enrich your hosting or just deepen your appreciation for the concept:
- Leftover transformations: Many cultures have long traditions of repurposing stale or leftover bread into new dishes, turning potential waste into celebratory treats. The idea of cubing and reworking bread components speaks to a practical, resourceful culinary ethos that resonates in households around the world.
- Texture as memory: In comfort foods, the contrast between a crisp exterior and tender interior often evokes a sense of nostalgia. The crunchy bite against a soft core can trigger memories of family gatherings, late-night kitchen chats, and the comforting rituals of home cooking.
- Glaze psychology: A lacquered glaze does more than add sweetness; it creates a visual signal of flavor pairing. A glossy surface suggests cohesion and care, inviting the eater to anticipate a harmonious bite rather than a simple mouthful.
- Appetizer culture: Bite-sized appetizers like these lend themselves to communal eating and conversation. Their shareable nature makes them ideal for mingling during parties, where guests can sample several flavors and textures without committing to a full plate.
- Seasonal adaptability: Although the dish nods to a comforting, homey vibe, the concept can be adapted to reflect seasonal ingredients and celebrations, making it a versatile centerpiece for different festivities throughout the year.
Ingredients
Syrup and Cubed Stuffing Bites
Stuffing Base
-
– 4 cups bread stuffing cubes (stale or dried, preferably herb-seasoned)
→ This forms the main body of the bites. Use day-old stuffing so it crumbles slightly and soaks up liquids evenly without turning mushy. Break large pieces into uniform bite-sized chunks to ensure consistent cooking and texture throughout each bite.
– 1/2 cup finely chopped onion, sautéed in 1 tablespoon butter until translucent
→ Adds sweetness and depth; cooking onions first mellows their sharpness and integrates better with stuffing. Let the onions cool slightly before mixing to avoid scrambling the eggs later.
– 1/4 cup finely chopped celery
→ Provides subtle crunch and aromatic notes; soften briefly in a pan with a pinch of salt until tender, then cool before combining with stuffing.
– 1/2 cup shredded cheddar cheese (optional)
→ Contributes melty, savory richness and pairs well with maple sweetness. Shred finely for even distribution; omit for a dairy-free version or if you prefer a lighter bite.
Wet Ingredients
-
– 2 large eggs, lightly beaten
→ Acts as a binder and helps the mixture set during baking. Ensure eggs are at room temperature for smoother incorporation; avoid overbeating to keep the texture light.
– 1/3 cup pure maple syrup
→ Provides natural sweetness and moisture, enhancing browning and depth of flavor. Use 100% pure maple syrup for best flavor; adjust quantity to taste if you prefer a sweeter bite.
– 1/4 cup milk (dairy or plant-based)
→ Hydrates the stuffing and helps bind the mixture. Dairy milk yields a richer crumb; plant-based milks keep the recipe dairy-free. Warm milk slightly to help it blend without cooking the eggs.
– 2 tablespoons melted butter or neutral oil
→ Adds fat for moisture and tenderness; butter gives richer flavor while oil yields a lighter texture. If vegan, use melted coconut oil or other neutral oil and avoid high heat to prevent separation.
Seasonings
-
– 1 teaspoon dried sage (crushed)
→ Classic stuffing aroma; sage brings earthy, savory notes that balance the maple sweetness. Crushing releases essential oils for a more pronounced flavor.
– 1/2 teaspoon dried thyme
→ Bright herbal lift that complements sage; if using fresh thyme, increase to 1 teaspoon and chop finely to distribute evenly.
– 1/2 teaspoon garlic powder
→ Subtle savory depth; use powder for even distribution. If you prefer fresh garlic, use a small minced clove and reduce to 1/4 teaspoon to avoid overpowering the mix.
– Salt and black pepper to taste
→ Essential for balance. Start with a small pinch and adjust after mixing, especially if your stuffing cubes are already seasoned. Freshly ground pepper adds gentle warmth.
Syrup Glaze
-
– 1/4 cup pure maple syrup for brushing
→ Creates a glossy, lightly sweet exterior and helps keep bites moist as they bake. Brush during the last 5–7 minutes of baking or right after removing from the oven for a sticky finish; rewarm slightly if the glaze thickens.
– 1 tablespoon melted butter for glaze
→ Adds shine and helps the glaze adhere. Use unsalted butter; for dairy-free, substitute with coconut oil or another neutral oil and apply while warm.
Optional Add-ins
-
– 1/4 cup chopped apples (fresh or lightly sautéed)
→ Adds subtle sweetness and moisture; use uniform dice for even cooking. If using fresh apples, sauté briefly with a pinch of salt to soften; for dried apples, rehydrate in hot water until plump, then drain.
– 1/4 cup dried cranberries or chopped dried cherries
→ Provide bursts of tart sweetness and chewy texture; chop small for even distribution. If very dry, soak briefly in hot water and pat dry before mixing.
– 1/4 cup chopped walnuts or pecans (toasted)
→ Adds crunch and a toasty, nutty flavor. Toast nuts lightly to heighten aroma before chopping; smaller pieces distribute better through the bites.
Instructions
- Preheat your oven to 350°F (175°C) and line a 12-cup muffin tin with paper liners or grease it well.
→ This ensures the bites release cleanly and bake evenly, preventing sticking and making cleanup easier. - In a skillet over medium heat, sauté the finely chopped onion in 1 tablespoon butter until translucent and fragrant, about 4–5 minutes. Let cool slightly.
→ Cooling prevents the eggs from cooking when mixed, preserving a light, cohesive texture in the final bites. - In the same skillet, soften the finely chopped celery with a pinch of salt until tender, 3–4 minutes, then remove from heat and cool.
→ Soft celery provides gentle crunch and aromatic balance without releasing excess moisture into the mix. - If using cheddar cheese, finely shred 1/2 cup and set aside; evenly distributing cheese ensures melty pockets in every bite.
→ Shredding small creates uniform distribution and prevents clumps that could cause uneven melt or sogginess. - Crumble the 4 cups bread stuffing cubes into the bowl with the onions and celery, breaking any large chunks into uniform bite-sized pieces for even texture.
→ Uniform pieces ensure consistent absorption of liquids and uniform baking throughout each bite. - Evenly sprinkle the 1 teaspoon dried sage, 1/2 teaspoon thyme, 1/2 teaspoon garlic powder over the stuffing and toss to distribute the aromatics.
→ Crushing sage releases essential oils; distributed heat informs the fragrance in every bite and prevents concentration in one spot. - In a separate bowl, whisk 2 large eggs until just combined and lightly foamy; this binds the mixture without making it dense.
→ Eggs act as a binder and help the bites set; room-temperature eggs mix more smoothly and avoid clumps. - Whisk in 1/3 cup pure maple syrup, 1/4 cup milk, and 2 tablespoons melted butter or neutral oil until the mixture is uniform and glossy.
→ The maple adds depth and moisture; the milk hydrates; fat carries flavor and tenderness; whisking emulsifies for even distribution. - Add the wet mixture to the stuffing mixture and fold gently with a silicone spatula until just moistened and cohesive; do not overmix to keep light texture.
→ Proper moisture balance ensures the bites hold their shape while remaining tender inside; add a splash more milk if the mixture seems dry. - Gently fold in optional add-ins if using: diced apples, dried cranberries, and toasted nuts, ensuring they are evenly dispersed without overloading any single bite.
→ Uniform distribution avoids clumps and ensures every bite has a little sweetness, tartness, and crunch. - Spoon or scoop the mixture into the prepared muffin tin, forming compact mounds that fill each cup about 3/4 full and press lightly to compact; even compression helps them hold shape during baking.
→ Gentle pressing removes air pockets and ensures a uniform bake; overpacking can hinder even rising. - Bake at 350°F (175°C) for 20–25 minutes, or until the edges are golden and the centers set; test with a small toothpick—the center should come out clean or with a few moist crumbs.
→ This ensures the bites are cooked through and hold together when touched; avoid overbaking, which can dry them out. - During the last 5–7 minutes of bake time, brush the tops with 1/4 cup maple syrup whisked with 1 tablespoon melted butter to create a glossy glaze; rotate the pan for even coverage.
→ The glaze adds color and moisture, and helps the exterior set with a pleasant sheen as it bakes onto the surface. - Remove from the oven and let them rest in the pan for 5–10 minutes, then transfer to a rack to cool slightly; glaze any exposed tops again if desired while still warm.
→ Resting lets the bites set so they don’t crumble when moved; finishing the glaze while warm yields better adhesion and shine.
Notes
These maple-glazed syrup-and-cubed stuffing bites are a savory-sweet crowd-pleaser built from day-old herb stuffing, bound with eggs and maple syrup, and finished with a glossy glaze. For best texture, crumble the stuffing into uniform bite-sized pieces and let the mixture rest for 15–20 minutes before shaping so the eggs set evenly. If you need a dairy-free or lighter version, omit the cheddar or substitute with a vegan cheese or nutritional yeast. To keep bites cohesive, avoid overmixing the wet and dry ingredients, and chill the mixture for 15–20 minutes before baking. If you require a gluten-free option, use gluten-free stuffing cubes or gluten-free bread cubes. You can customize with add-ins like apples, dried cranberries or cherries, and nuts for added texture and brightness. For the glaze, brush with the maple glaze during the last 5–7 minutes of baking or brush again right after removing from the oven for a sticky finish. These bites can be assembled ahead: you can refrigerate the formed bites (before baking) for up to 24 hours or freeze baked bites for longer storage. Reheat in a 350°F (175°C) oven until heated through and the glaze is set, about 8–12 minutes. Store leftovers in an airtight container in the fridge for 2–3 days. Always ensure the egg-based mixture is cooked through and reaches a safe internal temperature before serving.
Tips
Tips for Syrup and Cubed Stuffing Bites
- Choose the right stuffing texture. Use day-old stuffing so it crumbles slightly and soaks up liquids evenly without turning mushy. Break larger pieces into uniform bite-sized chunks to ensure consistent cooking and texture throughout every bite.
- Prep aromatics properly. Sauté onion until translucent and allow it to cool before mixing with the stuffing. Softened celery should be tender but still have a little bite; cool it completely to avoid cooking the eggs when you fold everything together.
- Balance moisture and binding. Room-temperature eggs bind the mixture and help it set during baking. If your mixture seems too wet, fold in a few extra stuffing cubes or add a touch more shredded cheese to help with structure.
- Mind the maple sweetness. Pure maple syrup adds moisture and browning. Taste the base mixture before shaping; if you prefer a sweeter bite, you can add a touch more syrup, but avoid making the mixture too wet to hold its shape.
- Warm liquids for easy mixing. Slightly warm the milk to help it blend smoothly with the eggs and syrup. This prevents the eggs from scrambling and yields a softer crumb in the finished bites.
- Fat choice impacts texture. Melted butter yields richer flavor, while oil keeps the texture lighter. If using dairy-free, substitute with a neutral oil and note that the flavor will be lighter.
- Season generously but thoughtfully. Sage and thyme provide classic stuffing notes that balance maple sweetness. If using fresh herbs, increase the thyme to 1 teaspoon and finely chop to distribute evenly; remember to salt gradually, tasting as you go since stuffing cubes may already be seasoned.
- Shape and chill for best results. Lightly grease your hands or use a small scoop to portion the mixture, then gently pack into bite-sized rounds or mounds. Chill the formed bites for 15–30 minutes before baking to help them hold their shape during heat.
- Baking and glaze timing. Bake until the edges are golden and the centers are set. Brush the maple glaze on during the last 5–7 minutes of baking for a glossy finish, or brush after removing from the oven for a sticky, glossy crust. If glaze thickens, rewarm it slightly before brushing.
- Mix-ins for texture and contrast. Add-ins like apples, cranberries, and nuts bring sweetness, tartness, and crunch. Chop evenly and distribute through the stuffing in batches to avoid clustering of any one ingredient.
- Make ahead and storage. Assemble the bites and refrigerate up to 2 hours before baking, or freeze the formed, unbaked bites on a parchment-lined tray and transfer to a bag for longer storage. Bake from chilled or frozen; add 5–7 minutes if baking from frozen.
- Vegan and dairy-free options. To make vegan, replace eggs with a flax or chia egg (1 tablespoon ground flaxseed or chia meal + 3 tablespoons water per egg) and use plant-based milk and oil. For a dairy-free glaze, use melted coconut oil or another neutral oil and brush as needed.
- Storage and reheating tips. Store leftovers in an airtight container in the fridge for up to 2–3 days. Reheat in a 350°F (175°C) oven for 6–10 minutes, or in an air fryer at 350°F (175°C) for a crisper crust.
- Safety note. Ensure the bites reach a safe internal temperature and, if using eggs, avoid leaving them at room temperature for more than 2 hours. Use a thermometer if you’re unsure about doneness.
FAQ
What are Syrup and Cubed Stuffing Bites?
Syrup and Cubed Stuffing Bites are bite-sized snacks made by shaping seasoned stuffing into small cubes, then crisping them and coating them with a warm, sweet glaze. They combine a savory, herby interior with a sticky, maple- or corn-syrup exterior for a chewy-on-the-inside, crispy-on-the-outside texture.
What ingredients do I need?
Common ingredients include:
- Stuffing mix or cubed, stale bread
- Broth or water to moisten the stuffing
- Eggs (optional, for binding)
- Butter or oil for cooking
- Maple syrup or corn syrup for the glaze
- Salt and pepper
- Optional spices (cinnamon, nutmeg) and add-ins (dried cranberries, chopped apples, chopped nuts)
Can I use different stuffing or stale bread cubes?
Yes. You can use store-bought stuffing, homemade stuffing, or cubed stale bread. If using stale bread, lightly toast or dry it to remove excess moisture. Adjust the moisture with broth or water so the cubes hold together without crumbling.
What are the two recommended cooking methods?
You can bake or pan-fry the bites:
- Oven-baked: Crisp the cubes in the oven, then glaze with a warm syrup.
- Pan-fried: Pan-fry until golden, then toss with a warm syrup glaze for an immediate glaze.
How long does it take to cook?
Approximate times:
- Prep time: 10–15 minutes
- Oven method: 15–20 minutes baking + 2–3 minutes glaze
- Pan-fry method: 8–12 minutes total, plus 1–2 minutes to glaze
Total time is typically 25–35 minutes depending on method and batch size.
Can I make them ahead of time?
Yes. You can assemble the cubes up to a day in advance and refrigerate them on a baking sheet or plate. For the best texture, bake or fry shortly before serving. You can also glaze them just before serving for a fresh, glossy finish.
How should I store leftovers?
Store cooled bites in an airtight container in the refrigerator for up to 3–4 days. Reheat in a 350°F (175°C) oven for 6–10 minutes or until hot and crisp, or re-toast in a skillet for best texture.
Can I freeze the bites, and how?
Yes. Freeze them before glazing or after cooking. For best results:
- Uncooked: Arrange on a baking sheet to freeze individually, then transfer to a freezer bag. Bake from frozen when ready, adding a few extra minutes.
- Cooked: Freeze baked bites in an airtight container. Reheat in the oven at 350°F (175°C) until heated through and edges are crisp.
What substitutions or dietary options work well?
Options include:
- Gluten-free: Use gluten-free stuffing or gluten-free bread cubes and broth that are certified gluten-free.
- Dairy-free: Use dairy-free butter or oil and dairy-free broth.
- Vegan: Use plant-based butter, vegan broth, and check that any add-ins (like certain cranberries) are vegan.
- Sugar-free or reduced-sugar: Use a light maple-flavored syrup or a sugar-free glaze alternative.
Tips for best texture and glaze results?
For the crispiest exterior and best glaze adherence:
- Pat the stuffing cubes dry if they seem very moist.
- Make sure the cubes are evenly sized for uniform cooking.
- Let the glaze be warm but not boiling when tossing to prevent sogginess.
- If baking, give the cubes a quick flip halfway through to crisp all sides.
Serving suggestions and flavor pairings?
Serve these bites warm as an appetizer or party snack. Pair with:
- A light maple-dijon dipping sauce or a vanilla yogurt dip
- A cranberry or apple chutney for extra fruit sweetness
- Herb-infused butter or a dusting of cinnamon for added warmth