Introduction / Hook
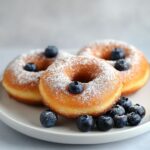
Imagine a warm, golden ring of comfort resting in your hand, its surface glowing with a delicate, glassy sheen of vanilla glaze. The moment you bite, a soft, tender crumb gives way to a cloud-light interior that seems to melt on the tongue. The scent is intoxicating—vanilla that seems to carry a whisper of caramelized sugar and a hint of butter—like a bakery has folded itself into your kitchen. Vanilla donuts are more than just a treat; they’re an invitation to slow down, to savor a moment of pure nostalgia, and to share a simple pleasure with anyone lucky enough to be near. They’re the kind of doughnut that greets you with a friendly, nostalgic smile on a Saturday morning, or accompanies a quiet cup of coffee as the world outside wakes up. In every bite, there’s a promise: comfort, warmth, and a touch of sweetness that feels like a hug you can eat.
What makes vanilla donuts truly special is their versatility. They can be everything from a refined, glossy bite that pairs beautifully with a hot latte to a casual, cozy treat that tastes like home with a cinnamon-flicked sip of cocoa. The beauty of vanilla is its quiet luxury—scented with the familiar, never overpowering, and capable of carrying a spectrum of flavors that bloom with every bite. In this description, you’ll discover not just a recipe, but a story of texture, aroma, and the way a single flavor can anchor a moment, a memory, and a morning routine. The goal here is to awaken your senses, spark your creativity, and give you a canvas that is both comforting and endlessly adaptable. If you’ve ever wished for a donut that feels gentle on the palate yet utterly satisfying, you’re in the right place. The vanilla donut is a classic for good reason: it speaks a universal language of sweetness, warmth, and shared smiles.
The Story Behind the Dish
Donuts have a long, winding tale that threads through markets, home kitchens, and bustling bakeries around the world. The concept of fried dough can trace its roots to ancient and medieval culinary traditions, but the modern donut—round, with a hole in the middle, and a glossy glaze—takes its most beloved form from a blend of European influences and American bakery culture. Vanilla, as a flavor cornerstone, traveled from far-flung lands to become a universal pantry staple. Vanilla beans, harvested from tropical orchid vines, carried with them a scent and sweetness that could transform humble dough into something memorable. In many home kitchens, vanilla was the first flavor that children learned to recognize and name, a gateway to the bigger, more adventurous flavors that would follow. The donut, with its satisfying bite and forgiving nature, became the perfect vessel for vanilla’s gentle magic.
The exact origin of the glazed vanilla donut as we know it is not tied to a single city or baker but to a tradition: soft, enriched dough fried until golden, then crowned with a glaze that sings of vanilla and sugar. In countless American breakfast tables, a vanilla-glazed donut accompanies coffee, acts as a celebratory sweet for birthdays, or makes a mundane Tuesday feel special. The beauty of this dish lies in how it bridges eras—grandmother’s kitchen where dough was kneaded by hand, a bustling bakery where morning rushes hum, and modern home kitchens where technology and tradition mingle to deliver something both timeless and fresh. Each batch tells a small, personal story: a quiet act of care, a moment of patience, and a finished product that invites sharing—the universal language of “I made this for you.”
Beyond its culinary lineage, the vanilla donut embodies a sense of possibility. You can keep the base recipe classic and faithful, or you can invite a parade of variations—zests of citrus for brightness, a glaze that glistens with a hint of brown butter, or a simple dusting of powdered sugar for a nostalgic finish. The donut, at its core, is a forgiving canvas. It welcomes experimentation while remaining comforting and familiar. It is in this balance—between tradition and adaptation—that vanilla donuts find their enduring appeal, offering a sense of home while inviting you to personalize the experience for your family, guests, or a quiet solo indulgence.
Why You’ll Love This Recipe
- Exceptional aroma: the moment you begin, the kitchen fills with warm vanilla and the gentle sweetness of fresh-baked bread, a scent that invites lingering at the counter.
- Soft, tender crumb: the texture is light enough to melt on the palate yet substantial enough to hold a kiss of glaze without collapsing.
- Versatile glaze options: a classic vanilla glaze is timeless, but the recipe welcomes variations—lemon, almond, cocoa, or a simple sugar dusting—to suit any mood or occasion.
- Family-friendly and approachable: simple, comforting flavors that appeal to both kids and adults, with a forgiving dough that’s easy to work with for bakers of all levels.
- Perfect for any moment: breakfast on a busy morning, a lazy weekend treat, a party dessert, or a luxe pairing with coffee or tea during an afternoon catch-up.
- Renews slowly: though best fresh, these donuts can be enjoyed for a day or two with proper storage and reheating, preserving their comforting bite and aroma.
- Customization playground: the base invites creative flourishes—citrus zest, a coffee-kissed glaze, or a drizzle of caramel—so you can tailor the experience to your palate and season.
- Make-ahead friendly: with planning, you can set up a dough to rest or a glaze to chill, transforming a bake into a gather-ready moment.
Flavor Profile & Texture
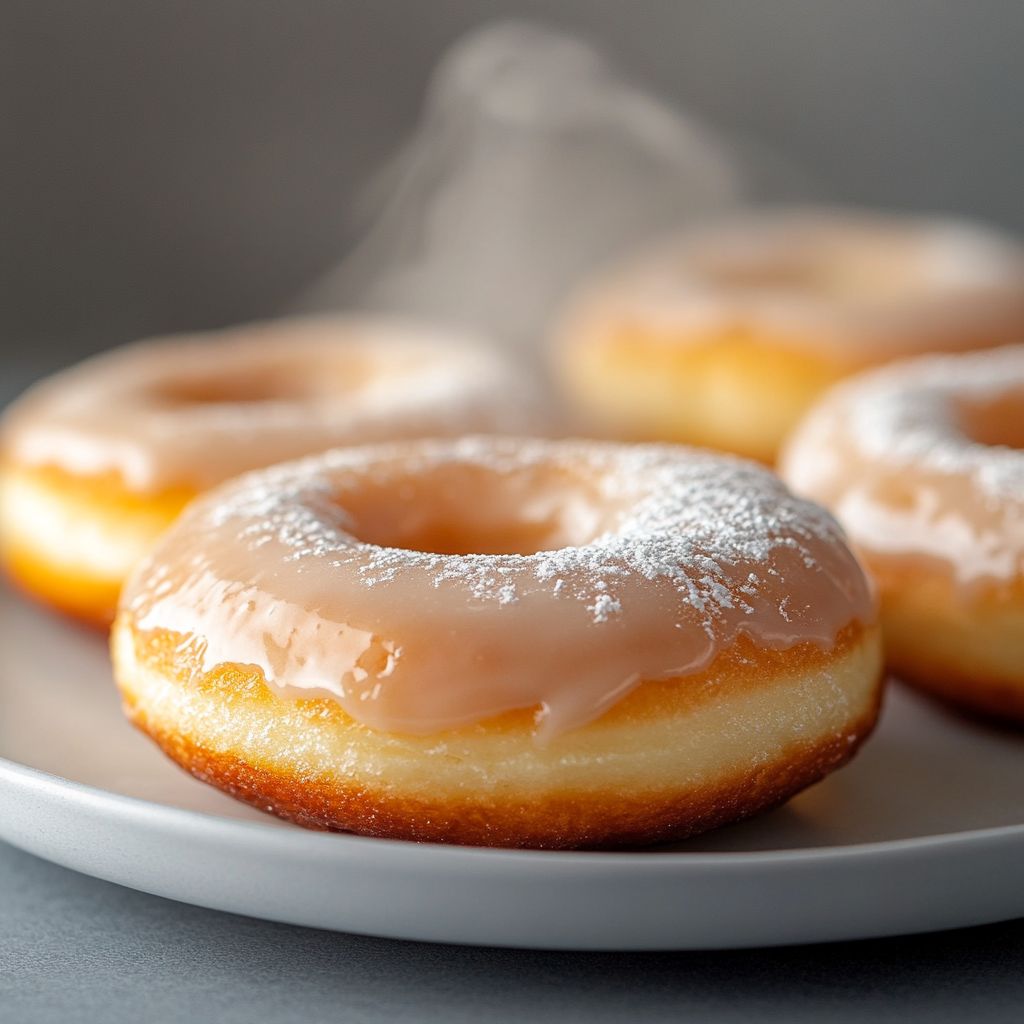
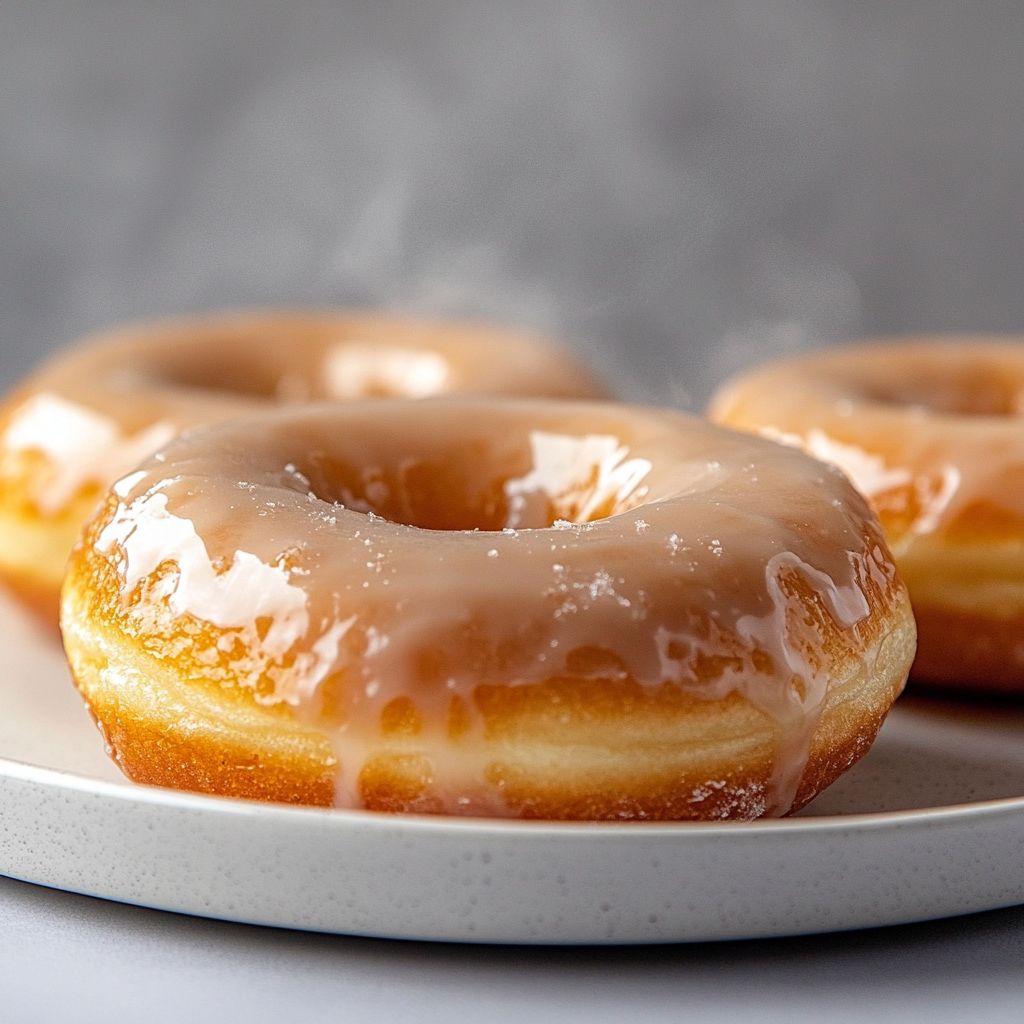
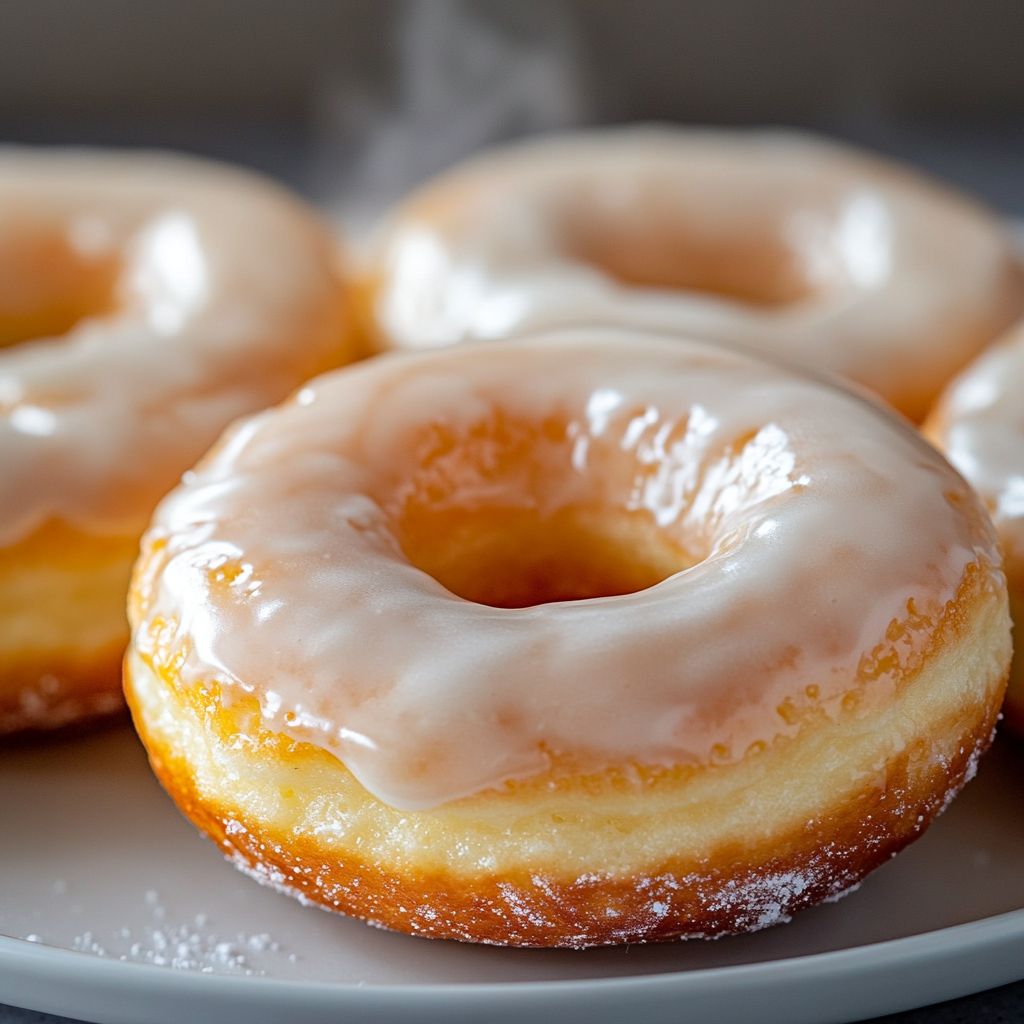
The vanilla donut presents a delicate symphony of flavors that warm the senses without overpowering them. The core is a softly enriched crumb, rich with dairy notes and a touch of sweetness that keeps the bite light rather than cloying. Vanilla itself is the star, offering a creamy, comforting aroma that blooms as the donut bakes or fries. Its sweet, almost floral depth is complemented by a gentle butteriness and a hint of bakery-crust caramelization around the edges, a natural byproduct of frying or baking that yields a light, satisfying crust. The glaze or topping is the finishing kiss, a thin, glossy veil that seals in moisture and adds a whisper of sweetness and sheen. When the glaze is vanilla-based, you get a reiteration of the core flavor, but with an amplified scent that lingers on the tongue and in the air as you bite again and again.
Textures are the heart of the experience. The exterior crackles softly in places where the dough meets heat, creating a subtle crispness that gives way to a pillowy, almost cloud-like interior. This contrast—crisp outside, tender inside—defines the donut’s charm. The interior crumb should be fine and even, with a delicate crumb structure that deforms gently under your bite rather than tearing or becoming dry. If you’re enjoying a glaze, the first skim of sweetness should be bright and clean, letting the vanilla notes carry through without becoming heaviness. Some enjoy a light dusting of superfine sugar or a gentle drizzle that forms a glassy line, echoing the glaze’s shine and adding a bit of texture and sparkle with each bite. Hygienically, the balance between the donut’s inherent richness and the glaze’s gloss should feel harmonious, not heavy—an everyday indulgence that tastes like a smile you can savor.
In the mouth, the aroma carries before the taste. Vanilla’s fragrance unfolds in layers: a top note of floral vanilla, a heart of creamy richness, and a lingering warmth that invites the next bite. The sweetness is refined, leaning toward comforting rather than dessert-candy level, so the donut remains suitable for breakfast or an afternoon treat. If you choose to incorporate citrus zest or a hint of almond in the glaze, you’ll notice an inviting brightness that lifts the vanilla’s depth, adding liveliness to the flavor profile without overwhelming the core experience. The balance is essential: the ultimate vanilla donut should feel indulgent but not heavy, luxurious yet easy to enjoy with a cup of coffee or a glass of milk.
Occasions & Pairings
Vanilla donuts are wonderfully adaptable for a wide range of moments. They shine on weekend brunch tables, alongside frothed cappuccinos and poured-over cortados, or as a simple dessert duo with a fruit compote and a light crumb topping. They also work beautifully for celebrations that call for a touch of sweetness without fuss—birthdays, baby showers, or casual get-togethers with friends and neighbors. For weekday mornings, they’re a comforting sight that turns a routine routine into a small celebration, offering a sense of luxury in a familiar form.
Pairings can elevate the experience. Try the following ideas to complement the vanilla profile:
- Hot coffee, especially a dark roast with a creamy finish, to contrast sweetness and highlight vanilla’s warmth.
- Espresso-based drinks for a bold, balanced pairing that can cut through the richness.
- A glass of cold milk to echo the creaminess and keep the flavor profile approachable for all ages.
- A light fruit compote or fresh berries to provide a bright counterpoint to the vanilla’s mellow sweetness.
- A citrus twist in the glaze, such as lemon or orange, for a refreshing lift that’s perfect for spring or summer celebrations.
- A spice kick in glaze or dusting—cinnamon, nutmeg, or cardamom—for a cozy, autumnal or holiday-inspired version.
Tips, Variations & Substitutions
The beauty of a vanilla donut lies in its adaptability. Here are some ideas to customize and tailor the recipe to your preferences or dietary needs, while preserving that classic vanilla hallmark:
- Texture tweaks: If you like a chewier bite, you can experiment with a slightly higher fat content in the dough, or opt for a cake-donut approach with a bit more density. For a lighter crumb, incorporate a touch of buttermilk or yogurt to introduce tenderness and moisture.
- Glaze variations: Classic vanilla glaze is timeless, but a few simple swaps expand the flavor universe. Add lemon zest and a splash of lemon juice for a bright citrus vanilla glaze. Mix in dark cocoa powder for a chocolate-vanilla glaze, or blend almond extract with a pinch of salt for a nutty, fragrant finish. You can also use a simple glaze of powdered sugar and milk, tinted with a drop of vanilla and a tiny dusting of cinnamon for warmth.
- Vegan option: Replace dairy with plant-based milk (almond, soy, or oat) and use a plant-based butter substitute. Ensure the leavening remains balanced to preserve tenderness, and consider a coconut-vanilla glaze for a tropical twist.
- Gluten-free option: Use a gluten-free all-purpose blend with a touch of xanthan gum if your blend doesn’t contain it. The texture can remain soft and light with careful handling and gentle mixing to avoid overdeveloped gluten.
- Other flours: A portion of almond or cake flour can add a delicate nutty note or a softer crumb; adjust liquids slightly to maintain the dough’s mobility.
- Flavor twists by zest: A subtle zest of orange, lemon, or even lime can brighten vanilla without masking it. A tiny pinch of cardamom or a whisper of ginger can evoke a spiced vanilla profile that’s perfect for seasonal gatherings.
- Decorative toppings: Finish with pearl sugar for a crunchy bite, or drizzle a contrasting glaze in a lattice pattern for an elegant presentation.
- Healthy-ish angles: If you want a lighter indulgence, bake the donuts instead of frying. The result is a gentler, drier crust with a tender interior, which can be glazed or lightly dusted with powdered sugar.
Storage & Make-Ahead Ideas
Vanilla donuts are best enjoyed fresh, but there are practical ways to store and even make them ahead so you can welcome guests or enjoy a quick treat later without sacrificing too much of their charm.
- Short-term storage: Keep freshly glazed donuts in an airtight container at room temperature for up to 1–2 days. If you layer them, place a sheet of parchment between layers to prevent sticking or glaze transfer.
- Reheating tips: To restore softness after refrigeration or a few hours on the counter, warm donuts briefly in a low oven (around 300°F / 150°C) for a few minutes, or microwave in short bursts until just warm. A quick re-glazing can revive the sheen.
- Make-ahead scoop: Prepare the dry mix and store in a jar; when ready, combine with liquids to form the batter. This works well for weekend mornings when you want to bake with minimal effort on the day-of.
- Freezing option: Freeze baked donuts—unfrosted or fully glazed—in a single layer on a tray, then transfer to a freezer bag. Thaw at room temperature and reheat gently for best texture. Glazes may need a light refresh or a new glaze layer after reheating for the best shine.
- Glaze efficiency: If you’re preparing multiple batches, keep the glaze warm and smooth, adding a touch of milk or water if it thickens too much. A glossy coat is easier to achieve when the glaze flows smoothly over a cooled donut.
Fun Facts & Trivia (Optional)
Did you know that vanilla is one of the most labor-intensive flavors to produce, which is why vanilla desserts often feel like premium experiences? The orchid from which vanilla flavor comes requires hand pollination and meticulous curing to reveal its aromatic oils, a process that is as much a science as an art. In the world of donuts, the glaze acts as a modern ritual—an almost ceremonial finish that crowns the dough with a shimmering surface, sealing in moisture and delivering that classic first bite each time. The donut itself is a universal symbol of sharing and hospitality: a round, accessible shape without a beginning or end, much like a friendly circle of friends gathering around a table. Vanilla, with its familiar, comforting presence, makes that circle feel even warmer. And in many cultures, the ritual of sharing a plate of donuts is a way to say, in the simplest terms, that happiness can be found in the small, beautifully ordinary things—like a perfectly glazed vanilla donut on a lazy Sunday morning.
Another delightful note: donuts have inspired countless regional variations—from cake donuts that stay soft longer to airy yeast donuts that pull apart in a cloud of steam. The vanilla flavor, though, remains a unifying thread, connecting tradition to modern variations. The glaze itself has its own lineage as a canvas for flavor experiments—sometimes a straightforward sugar-vanilla glaze that catches the light, other times a bold, glossy finish that invites you to drizzle again and again. In the end, a vanilla donut is more than a dessert; it’s a small ceremony of comfort, a ritual that signals a pause in the day to enjoy sweetness, warmth, and connection with whoever shares the moment with you.
Ingredients
Donut Base
-
– 2 1/2 cups all-purpose flour (plus extra for dusting)
→ This flour provides the structure and chew of the donuts through the gluten network. If you need a gluten-free version, use a 1:1 gluten-free all-purpose blend and consider adding 1/2 teaspoon xanthan gum per cup of flour to mimic the springiness of gluten. Handle: measure and whisk with a pinch of salt to ensure even distribution; dust lightly when rolling out to prevent sticking. Tip: avoid overworking the dough to keep a tender crumb.
– 1/4 cup granulated sugar
→ Sugar not only sweetens but also feeds the yeast, helping a steady rise. Prepare: mix with the warm milk so it dissolves before adding yeast. Tip: if your dough is a bit dry, you can increase by up to 1–2 tablespoons, but avoid oversweetening, which can dull the vanilla note.
– 2 1/4 teaspoons active dry yeast (about 1 packet)
→ Yeast is the leavening agent that creates the light, airy donut crumb. Prepare: proof the yeast in a small portion of warm milk with a pinch of sugar until bubbly to ensure it’s alive. Handle: keep temperature around 105–110°F (40–43°C). Tip: if your yeast is sluggish, the dough may not rise well—warm environment and fresh yeast help.
– 1 cup warm milk (110°F/43°C)
→ Provides moisture and activates the yeast; also helps dissolve the sugar and fat into the dough. Prepare: warm gently and not hotter than 110°F to avoid killing the yeast. Dairy or non-dairy alternatives work; if using dairy-free milk, ensure it is unsweetened. Tip: use full-fat dairy for richer flavor and softer crumb.
– 2 large eggs, room temperature
→ Eggs contribute structure, richness, and moisture; they also help emulsify the dough for a tender crumb. Prepare: beat slightly before mixing to ensure even distribution. Tip: room-temperature eggs combine more smoothly with the milk, promoting even dough consistency.
– 4 tablespoons unsalted butter, melted and cooled
→ Fat from butter adds tenderness and flavor, softening the gluten network for a melt-in-the-mouth crumb. Prepare: melt and cool to just a touch warmer than room temperature before adding to dough to avoid prematurely cooking the eggs. Tip: if you prefer a lighter dough, substitute with neutral oil in equal amount, but you’ll lose some butter flavor.
– 2 teaspoons vanilla extract
→ Provides the characteristic vanilla aroma that defines these donuts. Prepare: use pure vanilla extract for best flavor; for extra depth, you can scrape in vanilla bean seeds. Tip: add with the eggs for even distribution of flavor throughout the dough.
– 1/4 teaspoon fine sea salt
→ Enhances overall flavor and tightens the crumb by balancing sweetness. Prepare: distribute evenly by whisking into the flour. Tip: salt helps fermentation flavors develop and prevents the dough from tasting flat.
– 1/2 teaspoon ground cinnamon (optional)
→ Adds a warm, subtle spice note that complements vanilla. Prepare: whisk into the flour if using; tip: keep it optional to cater to purists who prefer plain vanilla.
Glaze
-
– 1 cup powdered sugar (confectioners’ sugar)
→ Forms the glaze that coats the donuts with a sweet, glossy finish. Prepare: sift to remove lumps; whisk with liquid gradually to reach a smooth consistency. Tip: if you want a thicker glaze, use less milk; for a thinner glaze, add a splash more milk.
– 2–3 tablespoons milk (dairy or non-dairy)
→ Adjusts glaze thickness. Prepare: begin with 2 tablespoons and add 1 tablespoon at a time until you reach your desired drizzle consistency. Tip: warm milk slightly to help the glaze flow more smoothly, but avoid hot liquid which can melt the donuts too quickly.
– 1/2 teaspoon vanilla extract
→ Subtle vanilla note in the glaze to harmonize with the donut flavor. Prepare: add with the sugar and milk after initial mixing to ensure an even distribution. Tip: for a chocolate glaze, omit vanilla and replace with a pinch of cocoa or melted chocolate.
Frying
-
– Neutral oil for frying (such as canola or peanut), enough to fill a heavy-bottom pot to about 2 inches depth
→ The oil is the medium that crisps the outside while keeping the inside soft. Prepare: heat to 350–375°F (175–190°C) and monitor with a thermometer. Maintain steady temperature during frying; too hot will burn the crust before the interior cooks, too cool will yield greasy donuts. Tip: fry in batches to keep the oil temperature stable, and let the donuts rest on a rack after frying to drain excess oil.
Optional Toppings and Finishes
-
– Cinnamon-sugar coating: 1/2 cup granulated sugar + 1–2 teaspoons ground cinnamon
→ Optional after-fry finish for a classic cinnamon-dusted look and flavor. Prepare: mix well and toss warm donuts gently to coat; the heat helps the sugar adhere. Tip: coat while donuts are still warm so the glaze or butter hasn’t set yet, which helps sugar stick better.
– Rainbow sprinkles (optional): 1/4 cup
→ Adds color and texture; sprinkle while glaze is still tacky so they adhere. Prepare: use nonpareils or tiny jimmies for a tidier finish. Tip: apply a light coat of glaze first or dip in the glaze then in sprinkles for a decorative effect.
– Finely chopped toasted nuts (optional): 1/4 cup
→ Provides crunchy contrast and nutty flavor. Prepare: toast nuts lightly to deepen flavor, cool, then chop finely. Tip: press into the glaze or simply sprinkle over the cinnamon-sugar finish for a sophisticated texture.
Instructions
- Proof the yeast by mixing 1/4 cup warm milk (105–110°F/40–43°C) with a pinch of granulated sugar, then sprinkling 2 1/4 teaspoons active dry yeast over the surface and letting it sit 5–10 minutes until foamy.
→ This ensures the yeast is active and capable of leavening; if it does not foam, discard and start with fresh yeast to avoid a dense dough. - Whisk the remaining 1 cup warm milk with the two large eggs, 4 tablespoons melted butter cooled to just warm, and 2 teaspoons vanilla extract until smooth and evenly combined.
→ This creates a cohesive, emulsified wet base that carries fat and flavor into the dough; using room-temperature eggs helps the mixture combine without clumping. - Whisk together 2 1/2 cups all-purpose flour, 1/4 cup granulated sugar, 1/4 teaspoon fine sea salt, and 1/2 teaspoon ground cinnamon (if using) until completely integrated.
→ Sifting or whisking distributes salt and cinnamon evenly, which prevents uneven flavor and crumb structure in the final donuts. - Pour the foamy yeast mixture into the wet mixture, then gradually incorporate the dry ingredients, stirring with a spatula or wooden spoon until a shaggy dough forms.
→ Merging gradually prevents flour from flying and ensures even hydration; a shaggy dough indicates sufficient moisture without overworking the gluten yet. - Turn the shaggy dough out onto a lightly floured work surface and knead by hand for 6–8 minutes until the dough is smooth, elastic, and only slightly tacky; perform the windowpane test by stretching a small piece until it becomes translucent without tearing.
→ Kneading develops gluten for structure and chew; the windowpane confirms the dough has sufficient elasticity for a tender crumb. - Lightly oil a large bowl and place the dough inside, turning once to coat, then cover with a clean towel or plastic wrap and let rise in a warm, draft-free spot until doubled in size, about 1 to 1 1/2 hours.
→ Proper bulk fermentation builds flavor and lightness; a warm environment accelerates fermentation without overproofing the dough. - Gently punch down the dough to release gas, then roll it on a lightly floured surface to about 1/2 inch (12–13 mm) thickness and dust with flour as needed to prevent sticking.
→ Rolling to a uniform thickness ensures even cooking; light flouring prevents sticking without weighing the dough down with excess starch. - Dip a 3-inch donut cutter (or a 3-inch circle with a 1-inch inner hole) into flour and cut out rounds, re-rolling scraps as necessary until all dough is used; place cut donuts and holes on a parchment-lined sheet.
→ Using a constant thickness and properly floured cutters yields consistent donut shapes and even frying; re-rolling dough multiple times can toughen it, so keep scraps to a minimum. - Cover the cut donuts and holes loosely with a towel and let them rise again for 20–30 minutes until puffy and just slightly spring back when touched.
→ A second, shorter proof helps the dough relax, expands the crumb, and improves the final texture after frying. - Meanwhile, set a heavy-bottomed pot or deep fryer on the stove and attach a thermometer; add neutral oil to a depth of about 2 inches and heat to 350–375°F (175–190°C), adjusting heat to maintain temperature.
→ Maintaining a steady frying temperature yields a crisp exterior and a tender interior; too hot and the crust will burn before the center cooks, too cool and the donuts will absorb excess oil. - Carefully fry the donuts in batches, turning once with tongs, for 1–2 minutes per side until they are deep golden and puffed; adjust the heat as needed to keep the oil within the target range.
→ Quick, even frying seals in moisture and creates the characteristic airy crumb; frequent temperature checks prevent greasy or undercooked centers. - Transfer the fried donuts to a rack set over a baking sheet to drain excess oil for 1–2 minutes, then let cool slightly before glazing.
→ Draining removes surface oil that would prevent the glaze from adhering properly and helps set the crust for a clean finish. - Whisk 1 cup powdered sugar with 2–3 tablespoons milk and 1/2 teaspoon vanilla extract until smooth and glossy, adjusting with more sugar or milk to reach a consistency suitable for dipping.
→ A smooth glaze coats evenly and sets to a pleasant sheen; warming the milk slightly can help the glaze flow more freely without making the donuts soggy. - Dip the top of each donut into the glaze to coat, allowing any excess glaze to drip back into the bowl, and place back on the rack for the glaze to set.
→ A thin, even coating provides a balanced vanilla sweetness that complements the donut crumb; dipping while still warm helps the glaze adhere. - Optionally, while the glaze is still tacky, toss the donuts in a cinnamon-sugar mixture (1/2 cup granulated sugar with 1–2 teaspoons ground cinnamon) for a classic finish.
→ The warmth of the donuts helps the sugar cling, creating a fragrant crust with additional texture and flavor. - Optionally, while the glaze remains tacky, sprinkle rainbow sprinkles (1/4 cup) or press finely chopped toasted nuts (1/4 cup) onto the surface for color and crunch.
→ Toppings add visual appeal and contrasting textures; apply promptly so they adhere to the glaze before it fully sets. - Allow the glazed and finished donuts to rest on the rack for 10–15 minutes to set the glaze completely before serving.
→ Resting ensures the glaze firms enough to handle without smearing and yields a cleaner finish when biting into the donut. - Serve the vanilla donuts fresh for best texture and aroma; store any leftovers in an airtight container at room temperature for up to 2 days or freeze for longer storage.
→ Freshness matters for tenderness and flavor; proper storage maintains crumb and sweetness over time.
Notes
These vanilla donuts are tender, fluffy, and lightly sweet with a rich vanilla aroma.
Key to a soft crumb is handling the enriched yeast dough gently: proof the yeast in warm milk with a pinch of sugar until foamy, keeping the mixture around 105–110°F (40–43°C). If there is no activity, discard and start again with fresh yeast.
Whisk the dry ingredients (all-purpose flour, granulated sugar, fine sea salt, and optional cinnamon) and whisk the wet ingredients (warm milk, eggs, melted cooled butter, and vanilla). Combine until just a cohesive dough forms; it will be soft and a bit sticky. Cover and let rise until doubled, about 60–90 minutes in a warm spot. Gently deflate, roll to about 1/2 inch to 3/4 inch thick, cut into donut rounds, and let them proof again 20–30 minutes until puffy.
Frying: heat neutral oil to 350–375°F (175–190°C) in a heavy pot. Fry donuts in batches, 45–60 seconds per side until lightly golden. Maintain steady temperature; too hot will brown the crust too quickly, too cool will yield greasy donuts. Drain on a rack and cool slightly before glazing.
Glaze: sift the confectioners’ sugar and whisk with 2–3 tablespoons milk and 1/2 teaspoon vanilla until smooth. Dip cooled donuts or drizzle glaze to coat; adjust thickness by adding more milk for a thinner glaze, or less milk for a thicker coating. For a glossy finish, allow the glaze to set for a few minutes before serving.
Optional finishes: a cinnamon-sugar coating (1/2 cup sugar + 1–2 teaspoons ground cinnamon), rainbow sprinkles, or finely chopped toasted nuts. Apply while the glaze is still tacky for best adhesion.
Make-ahead and storage: the dough can be prepared and refrigerated overnight after the first rise; roll, cut, and allow to rise before frying the next day. Fried donuts are best eaten fresh but can be stored in an airtight container at room temperature for 1–2 days. Unfried donut rounds can be frozen on a sheet, then transferred to a bag for freezing and fried directly from frozen after a short thaw and rise. Rewarm in a 350°F oven to refresh.
Substitutions and dairy-free options: for a gluten-free version, use a 1:1 gluten-free all-purpose blend with 1/2 teaspoon xanthan gum per cup of flour; ensure all ingredients (especially glaze) are certified gluten-free. For dairy-free donuts, substitute plant-based milk and a dairy-free butter or neutral oil; the texture remains tender though flavor may vary. For deeper vanilla, scrape the seeds from a vanilla bean into the dough or add a few extra drops of vanilla extract.
Tips
Tips for the Donut Base
- Measure the flour by weight when possible. If you must scoop, fluff the flour first, lightly spoon into the measuring cup, and level off for accuracy. This prevents a dense, heavy crumb.
- For gluten-free versions, use a 1:1 gluten-free all-purpose blend and add 1/2 teaspoon xanthan gum per cup of flour to mimic gluten’s elasticity. Handle the dough gently to keep it tender.
- Fully dissolve the sugar in the warm milk so the yeast has even feeding, which helps a consistent rise and a softer crumb.
- Proof the yeast in a small amount of warm milk with a pinch of sugar until bubbly. Maintain a temperature around 105–110°F (40–43°C). If there’s no foam, the yeast may be dead and you should start over with fresh yeast.
- Warm milk should be around 110°F (43°C); hotter will kill the yeast and colder slows fermentation. If using non-dairy milk, make sure it’s unsweetened and at a similar temperature.
- Room-temperature eggs emulsify better with the liquids, producing a smoother dough. If you forgot to plan, you can gently warm the eggs in a bowl of warm (not hot) water for a few minutes.
- Melted butter adds tenderness and flavor. Let it cool to just warmer than room temperature before mixing to avoid cooking the eggs or scrambling them.
- Pure vanilla extract gives a true vanilla aroma; scraping in vanilla bean seeds intensifies flavor. Add the vanilla with the eggs for even distribution.
- Distribute salt evenly in the flour to strengthen the crumb and prevent a flat-tasting dough. A quick whisk helps.
- The optional cinnamon is best whisked into the flour so the spice is evenly dispersed—omit if you prefer a pure vanilla profile.
- Avoid overworking the dough. Gentle mixing and a light hand yield a tender, airy crumb. Overhandling can develop gluten too much and result in denser donuts.
- If dough seems very sticky, chill it for 15–20 minutes to firm up, then roll and cut. If it’s dry, whisk in small increments of milk, a teaspoon at a time, until you reach a smooth, tacky consistency.
- Roll the dough to about 1/4 inch thickness for classic donut shape and airiness. Rolling thinner can cause holes to be fragile, while thicker dough may take longer to cook through.
- Use a sharp circular cutter and re-roll scraps gently—donuts baked from too-dry scraps can be tough. Let scraps rest briefly to relax the dough before re-cutting.
- Let shaped donuts rise on a parchment-lined tray or tray with a light dusting of flour; a second, short rise (about 20–30 minutes) helps them puff and hold their shape during frying.
Tips for the Glaze
- Sift powdered sugar to remove lumps; whisk gradually with the milk to reach a smooth, glossy glaze. Start with 2 tablespoons milk and add more as needed.
- Test the thickness by dipping a donut edge in the glaze. It should coat in a thin, even layer and set without running off the donut.
- Warm milk helps glaze flow more smoothly, but avoid hot liquid which can melt or deform freshly fried donuts.
- Vanilla in the glaze harmonizes with the donut flavor. If making a chocolate glaze, skip the vanilla or replace with a pinch of cocoa powder for a different profile.
- For flavor variations, consider citrus zest (lemon or orange) grated into the glaze for a bright finish.
Tips for Frying
- Use neutral oil with a high smoke point (canola or peanut). Fill a heavy-bottom pot to about 2 inches depth and heat to 350–375°F (175–190°C) with a candy/deep-fry thermometer for accuracy.
- Maintain a steady oil temperature; too hot gives burnt exteriors while the centers remain undercooked, too cool makes donuts greasy. Fry in batches to avoid temperature drop.
- Gently lower dough into the oil with tongs or a slotted spoon; flip halfway to promote even browning. Fry until golden and cooked through, about 1–2 minutes per side depending on thickness.
- Let fried donuts rest on a rack to drain excess oil; avoid stacking while hot, which can soften the crust.
- Reuse oil after straining; store oil in a cool, dark place and discard if it develops off-odors or becomes very dark.
- Safety tip: keep kids and pets away from hot oil, and never leave the stove unattended during frying.
Optional Toppings and Finishes
- Cinnamon-sugar coating: mix 1/2 cup granulated sugar with 1–2 teaspoons ground cinnamon. Coat warm donuts so the sugar adheres better to the surface.
- Rainbow sprinkles: apply while glaze is tacky so they stick. For a tidier finish, apply sprinkles after a light glaze layer or dip directly into sprinkles after glazing.
- Finely chopped toasted nuts: toast nuts to deepen flavor, cool, and chop finely. Press into glaze or dust over the cinnamon-sugar finish for added texture and aroma.
General Storage and Reheating Tips
- Fresh donuts are best the same day. Store in an airtight container at room temperature for up to 2 days; refrigerating can dry them out.
- To refresh, warm lightly in a 300–325°F (150–160°C) oven for 3–5 minutes or microwave just until warm (short pulses) to revive the tenderness.
- Freeze unglazed donuts for longer storage; thaw and glaze before serving for best texture.
FAQ
What are vanilla donuts?
Vanilla donuts are soft, ring-shaped pastries flavored with vanilla extract. They can be fried or baked and are often coated with a vanilla glaze or sprinkled with sugar for extra sweetness.
What ingredients do I need for classic vanilla donuts (fried or baked)?
For the batter, you’ll typically need:
- 2 cups all-purpose flour
- 1/2 cup granulated sugar
- 2 tsp baking powder
- 1/2 tsp salt
- 3/4 cup milk (dairy or non-dairy)
- 2 large eggs
- 2 tbsp melted butter or neutral oil
- 2 tsp vanilla extract
Optional glaze ingredients (for coating):
- 1 cup powdered sugar
- 1–2 tbsp milk
- 1 tsp vanilla extract
Do vanilla donuts require yeast or baking powder?
Vanilla donuts can be made with either yeast or baking powder. This common recipe uses baking powder for a quicker, cake-like texture, but yeast donuts are also popular and yield a chewier, airy crumb.
Can I bake vanilla donuts instead of frying them?
Yes. To bake them: preheat to 350°F (175°C). Lightly grease a donut pan, mix the batter, fill wells about 3/4 full, and bake 12–15 minutes until a toothpick comes out clean. Let cool and glaze if desired.
How do I make vanilla glaze for donuts?
For a simple vanilla glaze: whisk together 1 cup powdered sugar, 1–2 tbsp milk (adjust for desired thickness), and 1 tsp vanilla extract until smooth. Dip cooled donuts into the glaze or drizzle over them. Add sprinkles if you like.
How long do vanilla donuts stay fresh and how should I store them?
Store cooled donuts in an airtight container at room temperature for 1–2 days for best texture. Refrigeration can extend freshness to about 4–7 days but may dry them slightly. For longer storage, freeze donuts (unfrosted or glazed) for up to 1–2 months. Thaw at room temperature and re-glaze if desired.
Can I make gluten-free vanilla donuts?
Yes. Use a 1:1 gluten-free flour blend that contains xanthan gum or add 1/2 teaspoon xanthan gum per cup of flour if your blend doesn’t include it. You may need to adjust liquid slightly to achieve a batter that’s not too stiff or too loose. Start with the standard measurements and add small amounts of milk as needed.
What oil is best for frying vanilla donuts?
Use a neutral oil with a high smoke point, such as canola, vegetable, or peanut oil. Heat to about 350–365°F (175–185°C) and fry the donuts until golden, usually 1–2 minutes per side. Avoid strongly flavored oils that can overpower the vanilla flavor.
How should I decorate vanilla donuts?
Decoration ideas:
- Vanilla glaze with sprinkles or edible glitter
- Chocolate glaze drizzle
- Cinnamon sugar dusting
- Glazed with crushed nuts or coconut
Troubleshooting: my donuts are dense, greasy, or undercooked. What can I do?
Tips:
- Dense donuts: avoid overmixing the batter, measure flour correctly, and don’t overwork the dough. Ensure your leavening (baking powder) is fresh.
- Greasy donuts: maintain oil temperature around 350–365°F (175–185°C). If oil is too hot, the outside cooks too quickly while the inside stays doughy.
- Undercooked centers: fry longer at proper temperature or bake longer if using the oven method. For baked donuts, avoid overly thick batter.