Introduction / Hook
Imagine a bite that starts with a delicate crackle of a golden crust, gives way to a silken, velvety center, and finishes with the bright kiss of strawberry—all in one handheld, warm-from-the-fries moment. Fried Strawberry Cheesecakes Sandwiches are the unapologetic joy of dessert: a playful mashup that takes the beloved cream cheese cheesecake and folds it into a crispy, indulgent experience. The first bite offers the satisfying textural contrast you crave—a crackly, lightly sugared exterior that gives way to an airy, lush cheesecake core, then a ribbon of ruby strawberry goodness that brightens every mouthful. It’s the kind of treat that feels celebratory enough for a special occasion, yet approachable enough to make on a weeknight when you deserve a little extra sparkle. The aroma is immediately irresistible—cream cheese drifting into vanilla and lemon zest, mingling with warm butter and a whisper of cinnamon, while the fruit provides a fresh, juicy counterpoint. This recipe is less about precision and more about the happy accident of harmony: a sandwich that feels like dessert and dinner’s comfort all at once, perfected when shared with good friends or family around a sunlit kitchen counter. If you’ve ever wished for a dessert that’s both nostalgic and novel, elegant and easy, this is it. Gather the ingredients, roll up your sleeves, and prepare for a dessert moment that turns ordinary evenings into small, delicious celebrations.
The Story Behind the Dish
Desserts that marry fruit and dairy have long cherished a place in kitchens across the world, and fried treats—especially in fairgrounds, street carts, and family gatherings—have a magical way of turning simple ingredients into memorable experiences. The idea of foiling a creamy cheesecake inside a crisp shell isn’t exactly traditional, yet it taps into a long lineage of clever fried confections that celebrate contrasts: hot vs. cold, crispy vs. smooth, plain vs. bright. The strawberry, with its sweet-tart bite, has always been a signal of sunlit days and summer markets, making it the perfect counterpart to the velvet richness of cream cheese. The concept of “sandwiching” fillings between two surfaces—whether bread, pastry, or crisp batter—has roots in countless cuisines: think melty grilled cheeses, flaky pastries with fruit centers, or puff pastry turnovers. In this particular dish, the sandwich evolves into a portable dessert that’s easy to share and even easier to adore. It’s the kind of treat that seems to appear in cozy kitchens during late-night chat sessions or at festive gatherings where a tray of warm sweets invites everyone to take a moment, pause, and smile. The origin story here is less about a single inventor and more about a fusion of comforting techniques: use of a rich cheesecake filling, a light, airy batter that fries to a delicate crunch, and a fruit-driven brightness that makes each bite feel fresh rather than heavy. It’s a celebration of contrasts, a tribute to nostalgic flavors, and a gentle nod to food memories that linger long after the plate is cleared.
Why You’ll Love This Recipe
- Fast to assemble: you can prepare the cheesecake filling in advance and bring it together quickly when you’re ready to fry.
- Show-stopping flavor with minimal effort: the creamy, tangy richness of the cheesecake plays against a crisp, caramelized exterior and a vibrant strawberry note.
- Textural bliss: a responsive bite that starts with a crackly crust, gives way to a fluffy interior, and ends with a juicy fruit finish.
- Versatile for many occasions: ideal for brunchy weekend gatherings, Valentine’s Day treats, kid-friendly parties, or a memorable dessert at a weeknight dinner.
- Make-ahead potential: the components can be prepped in advance, then fried to order for a near-fresh-out-of-the-kitchen experience.
- Customizable: easily adapted for vegan or gluten-free diets with thoughtful ingredient swaps, without sacrificing the indulgent feel.
Flavor Profile & Texture
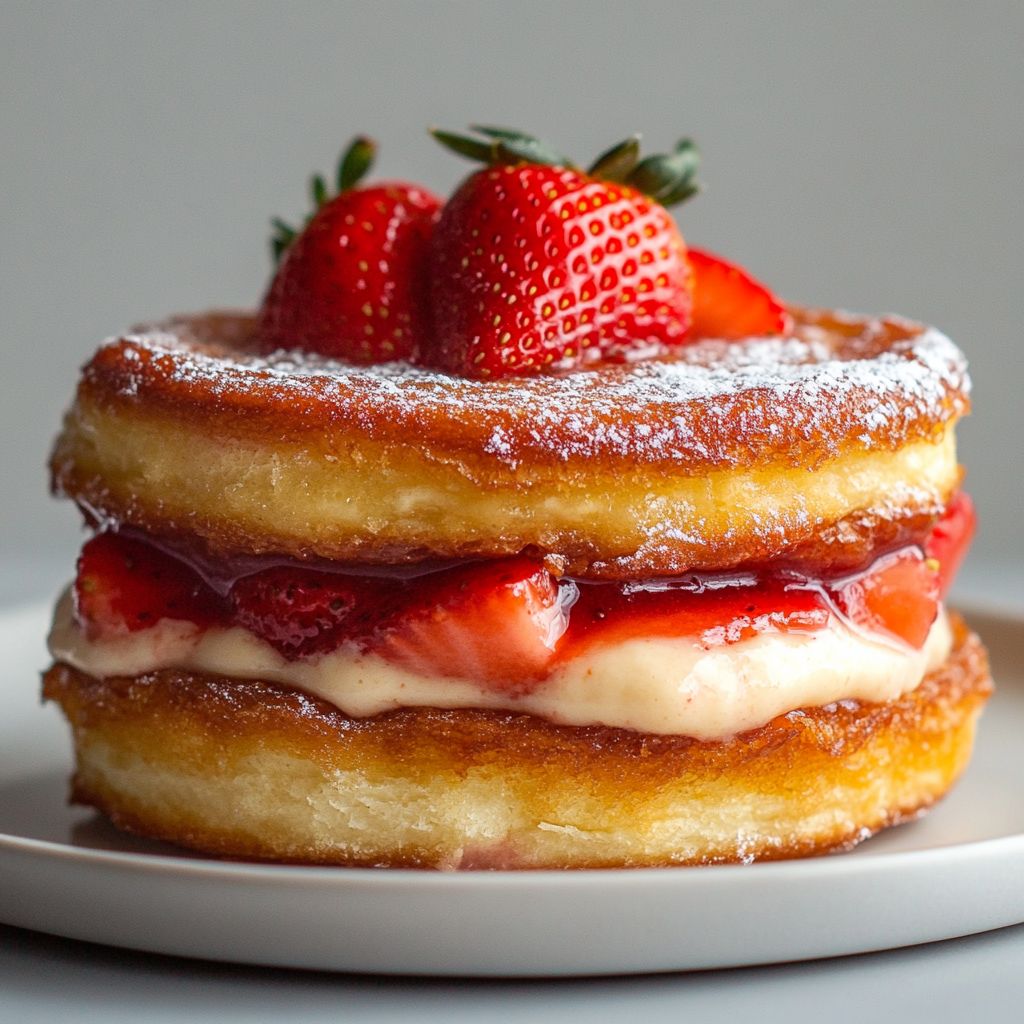
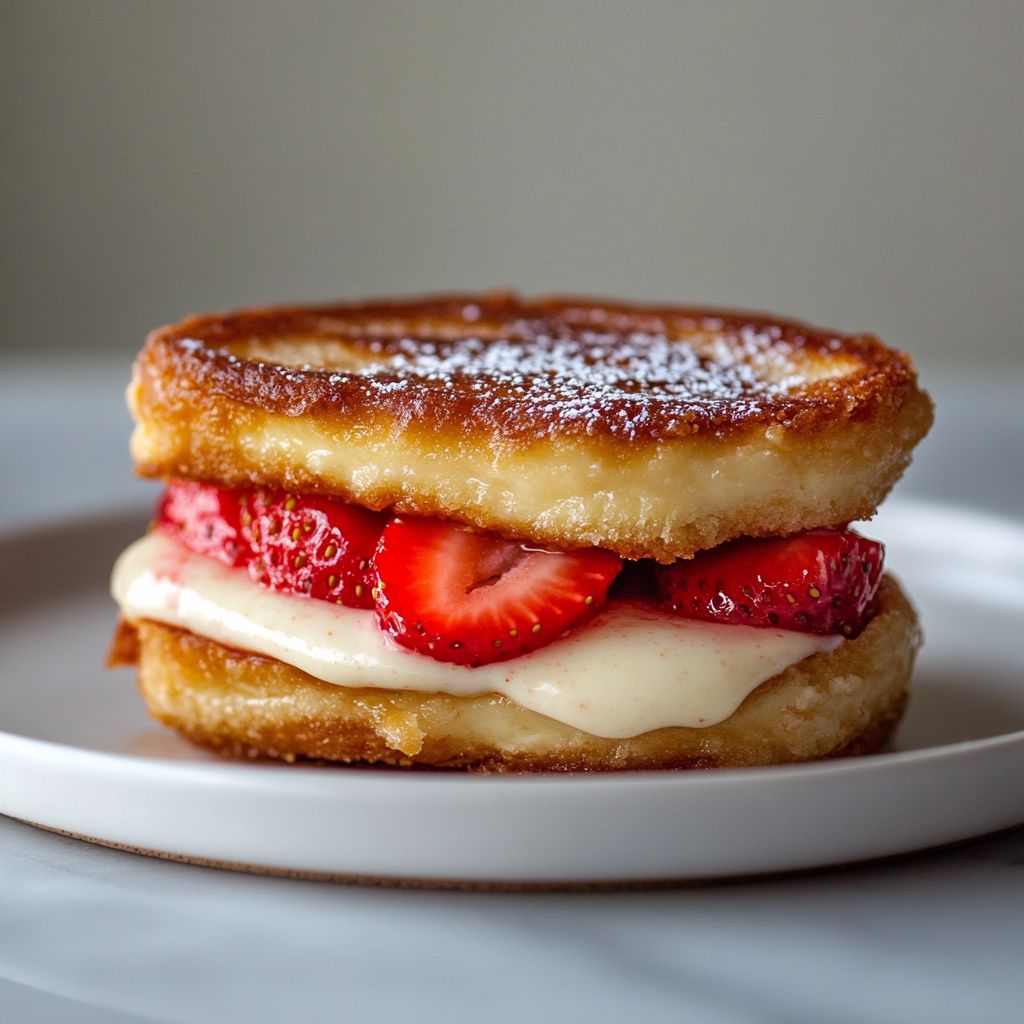
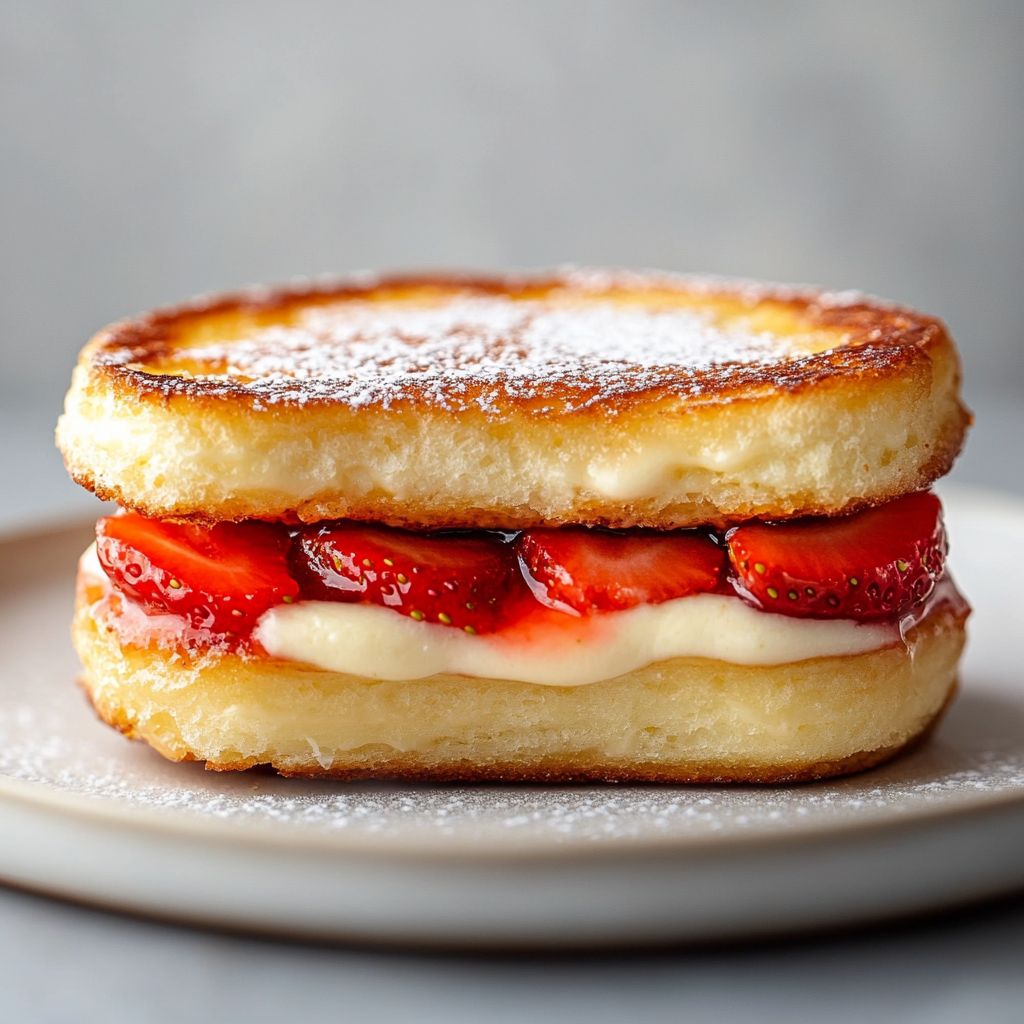
At first glance, Fried Strawberry Cheesecakes Sandwiches offer visual warmth: a light, golden shell that hints at sweetness, dusted with a whisper of powdered sugar or cinnamon. When you bite in, the exterior yields to a soft, creamy center—the cheesecake filling that’s luxuriously smooth, tangy, and subtly lemony, with hints of vanilla and creaminess from the dairy. The strawberry component enters as a bright, fruity contrast: a ripple of strawberry jam or a fresh, lightly macerated strawberry layer that provides both juiciness and a tart note to balance the richness. The textures come together in an irresistibly harmonious way: initial crispness from the fried exterior, followed by the cloud-soft cheesecake core, then a fruity, jammy finish that lingers on the palate. The overall experience is comforting yet joyful, like a dessert you’d coax out on a chilly evening to share with someone you love. Aromas drift from the kitchen—the butter and sugar caramelizing, vanilla warming through, the fruity fragrance brightening the air—and by the time the first bite arrives, you’ll be savoring how each component echoes the others without overpowering them. The balance is key: not too sweet, not too heavy, with enough brightness to keep it lively and delicious from bite to bite.
Occasions & Pairings
These fried strawberry cheesecakes sandwiches fit a surprising range of occasions, from casual family dinners to celebratory gatherings. They shine as a crowd-pleasing dessert for summer cookouts or backyard parties, where their handheld form makes them easy to pass around while you chat over drinks. They also work beautifully as a show-stopping finale for a celebratory meal—think anniversaries, birthdays, or a romantic date night at home focused on indulgent, thoughtful comfort food. For brunch-friendly settings, pair them with a sparkling beverage like prosecco or a lightly sweet iced tea to cleanse the palate between bites. If you’re looking for a dessert with a nostalgic feel, serve them alongside a scoop of vanilla bean ice cream or a dollop of whipped cream and a drizzle of strawberry sauce for an extra layer of decadence. For beverage pairings, consider a light rosé, a fruity white, or even a bold cold brew for a contrast that highlights the creamy richness of the filling. In terms of sides, a small fruit salad or citrus zest-touched greens can add a refreshing balance if you’re serving them as part of a larger menu. These sandwiches also hold appeal for holiday parties—strewn with a dusting of powdered sugar or a light glaze, they become festive bites that delight both kids and adults alike.
Tips, Variations & Substitutions
Here are ideas to tailor Fried Strawberry Cheesecakes Sandwiches to your kitchen, dietary needs, and flavor preferences, without losing the essence of their charm.
- Make-ahead components: prepare the cheesecake filling and chill it in the fridge. Assemble the sandwiches with the filling and a chosen fruit layer, then freeze them briefly before frying to help them hold shape for a clean, even fry.
- Crust alternatives: for a crisper bite, try a light pop of air-fryer technique with a dusting of cinnamon-sugar on the exterior. If you prefer classic fried pastry, use thin slices of pound cake or even soft, sturdy cookies as the outer shell.
- Cheesecake variations: use lemon or orange zest in the filling to brighten the flavor, or a touch of almond extract for a warm, nutty profile. If you want a tangier profile, increase the cream cheese ratio slightly and use a tangier berry jam.
- Fruit variations: while strawberries are perfect, you can swap in other berries when in season—raspberries, blueberries, or a mixed berry compote. A hint of balsamic glaze can showcase the fruit in a sophisticated way.
- Vegan option: use a plant-based cream cheese and a dairy-free butter substitute. Ensure the coating is fried to a crisp with a vegan batter that yields a similar texture.
- Gluten-free option: use gluten-free cookies or a gluten-free batter mix for the outer shell. Check that the fruit filling is gluten-free as well, especially if using any thickeners or syrups.
- Flavor twists: add a pinch of cardamom or cinnamon to the filling for warmth; a splash of vanilla bean paste or a touch of orange blossom water can elevate the aroma.
- Texture plays: if you want more crunch, add a tiny amount of finely chopped toasted nuts into the crust or batter. For a silkier interior, whip the filling a touch longer to achieve a lighter texture.
- Portion control: make mini versions using small round cookies or cookie cutters. Mini sandwiches are ideal for parties and make it easier to portion sizes.
Storage & Make-Ahead Ideas
To keep these treats at their best, consider the following storage and make-ahead strategies. If you’ve prepared the filling in advance, store it in an airtight container in the refrigerator for up to 3 days. For best results, assemble the sandwiches just before frying to maintain crispness. If you need to prepare ahead, you can portion the filling into flat discs, layer them between parchment sheets, and freeze. When you’re ready to serve, thaw slightly and shape into rounds for easier sandwich assembly. Leftover fried sandwiches can be stored in the refrigerator for 1–2 days, but the texture will soften as they sit. To re-crisp, reheat in a preheated oven or air fryer at a moderate temperature for a few minutes until the crust resumes its crunchy edge. Freezing fried items is generally not ideal for texture, but if you must, freeze after assembly and reheat quickly in a hot oven to minimize sogginess. For best results, fry small batches at a time and serve immediately to preserve the contrast of textures that define this dish.
Fun Facts & Trivia (Optional)
Delightful desserts like Fried Strawberry Cheesecakes Sandwiches carry little pockets of culinary history within their sweet folds. The strawberry has long been celebrated in many cultures for its juicy brightness and seasonal nostalgia, featuring prominently in desserts from shortcakes to t crushed-frozen delicacies. Cream cheese, a staple in many cheesecakes, was popularized in the United States in the 19th century, with brands and regional recipes contributing to a rich tapestry of styles that range from dense New York cheesecakes to lighter European-inspired versions. Frying as a technique has a universal appeal—crisp exteriors encasing soft centers—and has found its way into modern reinterpretations that maintain the essence of the ingredient while delivering a novel texture. This dish is a playful homage to that tradition: a nod to the comfort and warmth of fried desserts, yet a contemporary, fun presentation that invites interactive enjoyment. Fun fact: handheld desserts that resemble “sandwiches” have a long history in many cuisines, from fried dough sandwiches at fairgrounds to pastry-based sandwich sweets found in bakeries around the world. The beauty of this recipe lies in its fusion of familiar flavors with a surprising method, turning a common craving into a delightful, social moment. As you plate them, you’re not just serving a dessert—you’re inviting conversation, laughter, and the warm memory of sharing something delicious with people you care about.
Ingredients
- 8 oz cream cheese, softened
→ The creamy core of the cheesecake filling. Soften at room temperature to ensure smooth, lump-free blending with sugar and vanilla. Use block-style cream cheese for best texture when fried. - 2 tbsp granulated sugar
→ Adds sweetness and helps create a balanced filling. Beat with the cheese until light and fluffy; adjust to taste if the strawberries are very sweet. - 1 tsp vanilla extract
→ Adds depth to the filling; use real vanilla for best aroma. If you have vanilla bean paste, substitute 1/2 teaspoon. - 1 large egg, room temperature
→ Provides structure and helps the filling set when fried. Whisk into the cheese mixture until just combined to avoid overmixing. - Pinch of salt
→ Enhances overall flavor and balances sweetness; a tiny pinch is all that’s needed. - 1 cup fresh strawberries, hulled and chopped
→ Base for the strawberry layer; choose ripe, fragrant berries and chop finely for even distribution. For a smoother sauce, mash partially. - 2 tbsp granulated sugar
→ Draws out juices and sweetens the strawberries; macerate with the berries for 5–10 minutes to intensify flavor. Adjust to taste based on berry sweetness. - 1 tsp lemon juice
→ Brightens the fruit and helps balance sweetness; use freshly squeezed juice for the best acidity and flavor. - 1 tsp cornstarch (optional)
→ If you want a thicker, glossy strawberry sauce, whisk in a small amount of water to make a slurry and cook gently until thickened. Omit if you prefer a looser sauce. - 4 slices thick-cut bread (brioche or white)
→ Provides the sandwich structure. Brioche adds richness and softness; white bread yields a crisper crust when fried. Trim crusts if desired and pat dry to remove excess moisture. - 1 cup all-purpose flour
→ Part of the batter base that coats the sandwich; sift to remove lumps for a smoother crust. This forms the first layer of the fried shell. - 1/2 cup cornstarch
→ Adds crispness and a tender crumb to the batter; helps the coating clings to the filling. Substitute with gluten-free starch if needed. - 2 tsp baking powder
→ Leavening for the batter to create a light, puffed crust. Do not overmix; whisk just until combined to keep batter airy. - 1 cup milk (or sparkling water)
→ Liquid for the batter; milk provides flavor and structure, while sparkling water yields a lighter, crisper crust. Adjust to achieve a coating that coats evenly without pooling. - 1 large egg, for batter
→ Binds and enriches the batter; whisk with the milk to form a smooth, cohesive coating that adheres to the bread. - 1/2 tsp salt
→ Flavor enhancer in the batter; balances sweetness and promotes browning of the crust. - 1 tsp sugar (optional)
→ Helps browning and adds a touch of sweetness to the batter. If your batter browns too quickly, omit. - 1 cup breadcrumbs or panko
→ Coating for extra crunch and texture. Choose plain breadcrumbs for a subtler crust or panko for a more robust crackle. Gluten-free breadcrumbs can be used if needed. - Vegetable oil for frying (about 2 inches deep)
→ For deep-frying the sandwich; maintain oil temperature around 350–360°F (175–182°C). Use a neutral oil like canola or sunflower and avoid water in the oil to prevent splatter. - Powdered sugar for dusting
→ Finishing touch after frying; a light dusting adds a subtle sweetness and a photogenic finish. Sift evenly just before serving. - Fresh strawberry slices for garnish (optional)
→ Adds color and a fresh bite to contrast with the fried sandwich. Slice just before serving to avoid sogginess. - Whipped cream (optional)
→ Light, creamy topping that pairs beautifully with the warm fried sandwich and strawberry filling. Chill and sweeten lightly if desired.
Instructions
- Prepare the cheesecake filling by beating the softened cream cheese with granulated sugar until very smooth and pale, then fold in vanilla extract, the large egg, and a pinch of salt until just combined. This creates a cohesive, luscious filling that sets smoothly when fried and minimizes lumps.
→ Room-temperature cheese blends evenly; avoid overmixing after the egg is added to prevent air pockets or cracking during frying. - Macerate the strawberries: in a medium bowl, combine the hulled and chopped strawberries with 2 tablespoons granulated sugar and 1 teaspoon lemon juice. Toss to evenly coat and let them rest 5–10 minutes so the sugar draws out juices and concentrates the flavor.
→ Maceration creates a juicy, vibrant strawberry layer; if you want a smoother texture, mash a portion lightly with a fork after resting. - If desired, trim the crusts from the bread slices and pat them dry with a clean towel to remove surface moisture; this ensures the batter adheres evenly and helps prevent soggy interiors during frying. Cut each slice in half to form evenly sized rectangles for two sandwiches from the four slices.
→ A dry surface and uniform thickness promote consistent coating and browning; removing crusts can yield a neater bite if you prefer. - Assemble two strawberry cheesecake sandwiches by spreading a generous layer of the cheesecake filling on the cut side of each bottom bread slice, layering a spoonful of the macerated strawberries on top, then topping with the remaining slice and pressing gently to seal so the filling does not escape during frying.
→ A well-sealed sandwich prevents the filling from leaking into the oil and ensures a uniform crust around the center. - Whisk together 1 cup all-purpose flour, 1/2 cup cornstarch, 2 teaspoons baking powder, 1/2 teaspoon salt, and 1 teaspoon granulated sugar (optional) in a large bowl until evenly combined and free of lumps. This forms a light, crisp base for the coating that browns evenly.
→ Sifting removes lumps and creates a smoother batter; cornstarch adds tenderness and helps the crust cling to the filling. - In a separate bowl, whisk 1 cup milk with 1 large egg until smooth and homogeneous, ensuring there are no streaks of yolk or flour; this liquid supports a cohesive batter that clings to the sandwich.
→ The egg enriches the batter and the milk provides moisture and structure; whisk until just combined for a light crust. - Pour the wet mixture into the bowl with the dry ingredients and stir just until combined; stop when you see a few small lumps and the batter reaches a thick, coatable consistency. Do not overmix, or the batter may become tough and heavy.
→ A lightly lumpy batter adheres better and yields a lighter crust. - Set up the coating stations: place the flour for dredging in one shallow dish, the prepared batter in another, and the breadcrumbs or panko in a third; having them organized helps maintain a steady workflow and ensures even coating.
→ A clean, segmented station reduces cross-contamination and speeds up the coating process. - Dust each assembled sandwich lightly in the flour, tapping off excess to create a dry surface that will grip the batter evenly. This step helps the coating adhere and prevents flaking during frying.
→ Flouring creates a rough surface that the batter can cling to, resulting in a uniform crust. - Dip the floured sandwiches into the batter, turning to coat all sides and allowing any excess to drip back into the bowl; a thorough, even coating ensures a crisp, uniform crust when fried.
→ Letting excess batter drain prevents heavy blobs that can create soggy spots and uneven browning. - Roll the battered sandwiches in the breadcrumbs or panko, pressing gently to help the crumbs adhere all around; a thorough crust yields extra crunch and a dramatic golden color when fried.
→ Pressing ensures an even shell; panko delivers the most pronounced crunch. - Pour vegetable oil into a deep, heavy skillet or Dutch oven to a depth of about 2 inches and heat to 350–360°F (175–182°C) on a thermometer; maintaining this temperature is essential for a fast fry that yields a crisp crust without absorbing excess oil.
→ A precise temperature ensures browning happens quickly while the filling remains heated through without becoming greasy. - Carefully slide the coated sandwiches into the hot oil in batches, lowering them gently to avoid splatters, and fry until the crust is deep golden brown and crisp on all sides, about 3–4 minutes per sandwich, turning once to brown evenly.
→ Fry in batches so the oil temperature stays consistent; turning ensures even color and texture around every edge. - Transfer the fried sandwiches to a rack or lined paper towels to drain excess oil; while they are still hot, dust with powdered sugar for a light, photogenic finish that also adds a touch of sweetness.
→ Draining immediately prevents sogginess, and dusting while warm helps the sugar adhere. - Serve the fried strawberry cheesecake sandwiches immediately, optionally garnishing with fresh strawberry slices and a dollop of whipped cream to contrast the warm crust with bright fruit and creamy filling.
→ Fresh garnishes provide color and a refreshing contrast; whipped cream adds a luxurious complement to the warm sandwich. - If not serving right away, keep the fried sandwiches on a baking sheet in a low oven (about 200°F) to stay warm and crisp without steaming, and re-crisp briefly before serving.
→ Gentle warming helps preserve texture and prevents the filling from cooling too quickly.
Notes
These fried strawberry cheesecake sandwiches are a decadent treat with a creamy vanilla cheesecake center enclosed between slices of bread and enveloped in a crisp, seasoned batter and breadcrumbs. For best results, ensure the cream cheese is fully softened and beat with granulated sugar, vanilla, egg, and a pinch of salt until smooth and fluffy; you can fold in a portion of the chopped strawberries for a more integrated filling or reserve them for a bright strawberry center. Macerate the remaining strawberries with sugar and lemon juice for 5–10 minutes to draw out juices; a cornstarch slurry can be added for a glossy, thicker sauce if desired. Prepare the batter by whisking the dry ingredients—flour, cornstarch, baking powder, salt (and optional sugar)—then whisk in the milk and one egg until the batter is smooth; let rest 15 minutes. Assemble the sandwiches by placing a thick layer of cheesecake filling on bread, spoon a little strawberry mixture, then top with the second slice; press to seal and trim edges if needed. For crisper crust, dredge the assembled sandwich in batter and then coat with breadcrumbs or panko; you can skip the second coating if you prefer a lighter crust. Fry in neutral oil heated to 350–360°F (175–182°C) until deep golden and crisp, about 2–3 minutes per side; drain on a rack. Dust with powdered sugar and serve with fresh strawberry slices and a dollop of whipped cream if desired. To accommodate gluten-free diets, substitute gluten-free flour and gluten-free breadcrumbs, and verify that the baking powder is gluten-free. These fried strawberry cheesecake sandwiches are best enjoyed warm, when the creamy filling contrasts with the crunchy crust.
Tips
Tips for Fried Strawberry Cheesecake Sandwiches
- Prepare fillings at room temperature: Let the cream cheese, butter (if used), and eggs sit out for about 30 minutes so they blend smoothly without lumps. This helps create a silkier cheesecake filling that won’t separate when fried.
- Lighten the filling without overmixing: Beat the cream cheese with sugar until fluffy, then add vanilla and the egg. Mix just until combined to avoid incorporating too much air, which can cause filling to crack during frying.
- Optimize the strawberry layer: Macerate chopped strawberries with 2 tablespoons sugar and lemon juice for 5–10 minutes to draw out juice and intensify flavor. For a glossy finish, briefly simmer the macerated berries with a touch of water or cornstarch until thickened, then cool before spreading.
- Control moisture to prevent soggy bread: After macerating, pat strawberries dry lightly to remove excess juice. If the berries are very juicy, cook down a portion to a jam-like consistency and combine with fresh pieces for even distribution.
- Bread handling for best crust: Use brioche for a richer sandwich or white bread for a crisper outside. Trim crusts if desired and pat dry with a towel to remove surface moisture which can hinder crisping.
- Chill the assembled sandwich: Once the filling is spread and the sandwich is formed, refrigerate 10–15 minutes. This helps the filling set slightly and minimizes oozing when the sandwich hits the hot oil.
- Batter preparation for a light, crisp crust: Sift flour and cornstarch to remove lumps, whisk in baking powder and salt. Add milk (or sparkling water) and the egg; whisk just until smooth. If you want an extra airy crust, use sparkling water and don’t overmix the batter.
- Coating technique for crunch and adhesion: Dredge the assembled sandwich in flour, dip in the batter, then roll in breadcrumbs or panko for a crunchy exterior. Press lightly to ensure the coating adheres evenly without thick layers that can burn before the interior cooks.
- Oil and frying guidelines: Maintain oil temperature at 350–360°F (175–182°C). Use a deep pot or fryer and avoid overcrowding to keep temperature stable. Fry until golden brown, flipping once for even color, then drain on a rack or paper towels.
- Post-fry care: Let fried sandwiches rest 1–2 minutes to finish setting and to reduce steam that can soggy the crust. Lightly dust with powdered sugar just before serving for a photogenic finish.
- Serving suggestions: Serve warm with a dollop of whipped cream or a scoop of vanilla ice cream. Garnish with fresh strawberry slices for color and a fresh bite.
- Make-ahead and storage tips: The filling can be prepared ahead and kept refrigerated. Assemble the sandwich just before frying to maintain the ideal texture. Fried sandwiches are best eaten the day they’re made.
- Allergen and variation notes: For gluten-free options, use gluten-free breadcrumbs and ensure the bread is gluten-free. For a lighter version, substitute half of the breading with crushed crispy cereal or oats certified gluten-free, and use dairy-free cream cheese if needed.
FAQ
What are Fried Strawberry Cheesecake Sandwiches?
They’re a dessert treat made by sandwiching a creamy strawberry cheesecake filling between two thick slices of bread, then coating and frying until the exterior is golden and crisp. Serve warm with strawberry sauce or a dusting of powdered sugar for a decadent finish.
What ingredients do I need?
For the filling:
- 8 oz (225 g) cream cheese, softened
- ¼ cup powdered sugar
- 1 teaspoon vanilla extract
- 1 tablespoon lemon juice (optional, for brightness)
- 1 cup fresh strawberries, finely chopped
For the sandwiches:
- 6 slices thick bread (brioche or challah recommended)
For the batter and frying:
- ½ cup all-purpose flour
- ½ cup milk
- 1 large egg
- 1 teaspoon vanilla extract
- Pinch of salt
- Vegetable oil (for frying)
For serving:
- Powdered sugar
- Extra strawberries or strawberry sauce
- Whipped cream (optional)
How do I make the strawberry cheesecake filling?
Beat the softened cream cheese with the powdered sugar and vanilla until smooth. Mix in the lemon juice (if using), then fold in the finely chopped strawberries. Chill the filling in the refrigerator for about 30 minutes to firm up.
What bread works best for the sandwich?
Choose thick, sturdy bread that can hold the filling without falling apart. Good options include brioche, challah, Texas toast, or other enriched breads. If your bread is a day or two old, it browns nicely and holds up during frying.
How should I assemble and chill the sandwiches before frying?
Spread a generous amount of filling on one slice, top with another slice to form a sandwich, and press gently to seal. Wrap loosely in plastic wrap and chill for 15–30 minutes so the filling firms up and the sandwich holds together during frying.
How do I fry these to perfection?
Heat oil in a deep skillet or fryer to 350–365°F (175–185°C). Dip the assembled sandwich in the batter until evenly coated, allow a light excess to drip off, then fry 2–3 minutes per side until deep golden and crisp. Remove to a wire rack or paper towel and let drain briefly before serving.
How should I serve fried strawberry cheesecake sandwiches?
Dust with powdered sugar and serve warm. A drizzle of strawberry sauce or a dollop of whipped cream complements the flavors nicely. Fresh berries on the side add a bright, juicy contrast.
Can I make this ahead or freeze it?
You can prepare the filling and chill it in advance. Assemble the sandwiches and refrigerate for up to 1–2 hours before frying. Freezing is not ideal, as moisture changes can affect the texture of both the filling and the bread. For best results, fry freshly prepared sandwiches.
What are some variations or substitutions I can try?
Variations and substitutions:
- Use raspberries or blueberries in place of strawberries, or mix berries for a medley.
- Try different breads like cinnamon loaf or pumpkin bread for seasonal flavor.
- Swap in light cream cheese or add a touch of mascarpone for creaminess.
- Add a pinch of almond extract or orange zest to the filling for new aroma notes.
Can I bake these instead of frying?
Yes, you can bake them as a lighter alternative. Preheat to 400°F (200°C). After dipping in batter, place the sandwiches on a parchment-lined sheet and bake for 12–15 minutes, turning halfway, until the coating is lightly golden. The texture will be crisper on the outside, but it won’t be as rich as frying.