Introduction / Hook
Picture a dessert that feels both indulgent and effortless—the kind of treat that wears its charm lightly and still leaves you with a lingering sense of celebration. Eclair Cake is that glorious paradox: a no-fuss, no-oven-needed creation that tastes like a confection born of a bakery window and a friendly kitchen counter. As you cut into it, a glossy surface catches the light, inviting you to pause, breathe in the scent of chocolate and something creamy, and imagine the moment when every forkful yields a whisper of sweetness and a sigh of satisfaction. This is the dessert you bring to a gathering and watch as it disappears, leaving behind smiles, stories, and a chorus of “one more slice, please.” Its magic lies not in complicated technique but in the alchemy of simple textures coming together—crisp edges giving way to a pale, velvety center, all crowned with a lacquered sheen that glistens like a crafted chocolate glaze. It’s comfort with a twist, tradition dressed in a modern, no-bake form, and a reminder that the best desserts often arrive with less effort than you think and more memory than you expect.
As you consider making this treat, you’ll notice how it plays with anticipation. The anticipation begins with the first layer you see—an orderly, inviting structure that hints at familiarity, then unfolds into layers that tempt the palate with contrast: a lightly firm base that yields to a creamy interior, a cool finish that lingers, and a finish that is both rich and surprisingly balanced. There’s a sense of nostalgia here—perhaps you remember a grandmother’s kitchen after a long day, or a potluck table where a similarly elegant, approachable dessert disappeared faster than the coffee was poured. Yet the experience remains distinctly contemporary: a dessert that feels grown-up enough for dinner parties, but friendly enough for weeknights when you want to treat yourself without spending hours in the kitchen. The flavors are quiet and confident—chocolate that isn’t cloying, a creamy element that never becomes heavy, and a finish that feels glossy, smooth, and utterly inviting. It’s the kind of dish that gives you a moment of pause before the first bite, a moment to appreciate how something so simple can be so deeply satisfying.
The Story Behind the Dish
Origins and Evolution
The word “eclair” evokes a French pastry that is elegant, elongated, and filled with a light, custard-like center, finished with a glossy chocolate coat. The traditional eclair is a labor of technique: puff pastry baked to airy perfection, piped with a delicate filling, and topped with a rich glaze. The American version that many of us grew up with—often called Eclair Cake—takes the essence of that dessert and translates it into a stunning, no-bake confection made for sharing. It’s a clever fusion: the sophistication of éclair flavors married to the ease of a layered cake assembled in a single pan. By reimagining the structure with layers that mimic the soft bite of a filled éclair and a final chocolate glaze that gleams like a ribbon, bakers and home cooks alike created a dessert that is universally approachable yet undeniably special.
In the mid-to-late 20th century, as kitchens grew busier and entertaining shifted toward make-ahead desserts, versions of Eclair Cake began to pop up in community cookbooks, church fundraisers, and family dessert tables. The appeal was clear: assemble ahead of time, let the layers mingle and soften, and pull out a showstopper that requires little hands-on active time. The cake’s “assembly line” nature—layer, layer, glaze—handed the baton to home cooks who wanted to deliver something with the elegance of a pastry shop without needing a pastry chef’s precision. Over the decades, creative families and cooking clubs added personal touches: a deeper chocolate finish, a hint of espresso, a sprinkle of texture on top, or a swap in the base to accommodate dietary preferences. What remains constant is the sense of a shared moment: a dessert that travels well, serves many, and carries with it a whisper of indulgence that doesn’t intimidate.
A Cultural Snapshot
While the éclair itself traces its origins to French patisserie classicism, the American adaptation captures something universal about dessert culture: the joy of layering flavors and textures to coax delight from simple ingredients. It’s emblematic of a kitchen philosophy that values memory as much as taste—the idea that a dessert can be a vessel for stories: the family picnic, the school bake sale, the neighbor’s generosity during holiday gatherings. Eclair Cake sits comfortably at the crossroads of tradition and practicality, a testament to how centuries-old flavor profiles can evolve into modern, accessible confections that still feel luxurious when sliced and served on a sunlit afternoon or after a comforting weeknight meal.
Why You’ll Love This Recipe
- No-bake brilliance: You don’t need to heat up the oven or master complex pastry techniques to achieve a dessert that feels luxurious and polished.
- Make-ahead practicality: This dessert benefits from a little time in the chill chamber, giving you room to plan and still deliver something memorable.
- Crowd-pleasing charm: The layers, the light creaminess, and the glossy finish appeal to a wide range of tastes, making it an ideal showpiece for entertaining.
- Texture magic: A contrast-driven dessert that combines a gentle snap or crispness at the edges with a silky, almost cloud-like interior, finished with a lush, glossy top.
- Adaptable to preferences: The concept translates across dietary needs with widely adaptable base textures and finishes—without compromising the overall experience.
- Retro appeal with modern ease: It channels a nostalgic vibe while remaining practical for today’s schedules, gatherings, and sharing culture.
- Kid-friendly and indulgent in balance: It provides that celebratory treat without feeling overly heavy, making it perfect for family occasions.
Flavor Profile & Texture
This dessert is a study in balance. The top layer offers a lacquered sheen that speaks of chocolate richness without heaviness, a surface that yields to the fork with a soft resistance, inviting the first bite. Underneath, the interior presents a contrast that keeps every slice interesting: a creamy, smooth middle that glides on the tongue, tempered by a gentler sweetness that never overwhelms. The base, depending on how you assemble it, can deliver a light, biscuit-like crunch or a more tender, compact bite. The overall flavor is familiar and comforting—think signals of chocolate and vanilla in a rounded, dessert-dish harmony—yet the exact composition feels refined, polished, and almost revelatory in how approachable it is to replicate at home.
Chemistry aside, texture is king here. The crispness of the base or the slight bite of the layer beneath adds structure, preventing the dessert from feeling overly soft or cloying. The center’s airiness is a reminder of classic custard-like desserts, but with a cooling, shoulder-of-chocolate finish that lingers pleasantly. The final gloss on top acts like a mirror to the flavors beneath: a polished, inviting surface that catches the light and invites a second, third, and fourth slice with a smile. Sensory notes include a subtle, rounded sweetness that evolves with each bite, a gentle chocolate aroma that’s never sharp, and a veil of creaminess that coats the palate without heaviness. When served slightly chilled, the dessert refrains from becoming too firm, maintaining that effortless, elegant mouthfeel that makes it suitable for serving to guests and family alike.
Think of the flavor journey as a conversation between two familiar companions: the comforting, mellow sweetness that speaks of nostalgia, and the glossy chocolate finish that makes the entire piece feel refined and celebratory. The harmony is purposeful—neither component dominates, allowing the balance to be felt with the first bite and appreciated more deeply with subsequent ones. As the layers mingle over time, the flavors meld in appealing ways: the creaminess becomes smoother, the chocolate finish softens into a celestial glaze, and the overall sensation is one of indulgence that doesn’t overwhelm the senses. It’s dessert storytelling in edible form: each bite reveals a little more of the character you’ve crafted, leaving you with a sense of arrival and satisfaction long after the last crumb has disappeared from the plate.
Occasions & Pairings
When to Serve This Dessert
This Eclair Cake shines in a variety of settings, from casual weeknight dinners to special-occasion gatherings. It’s perfect for potlucks where you want something that travels well, looks impressive on the dessert table, and can be prepared ahead of time. It also fits nicely into holiday menus as a lighter, crowd-pleasing finale that requires minimal last-minute fuss. For birthdays or celebratory moments, it offers a nostalgic, accessible elegance that both adults and younger guests appreciate. And because it’s inherently shareable, it’s a natural choice for family reunions, church suppers, and neighborhood get-togethers where the focus is on connection as much as on taste.
Suggested Pairings
Pair this dessert with beverages and accompaniments that enhance its flavors without competing with them. A simple cup of coffee or a mild tea provides a warm counterpoint that rounds out the chocolate and cream. For gatherings, a light, sparkling beverage can refresh the palate between slices. Fresh berries or a light fruit compote can add a bright counterpoint if you want a contrasting note on the plate. If you’re serving a more substantial dessert spread, consider a light, neutral dessert wine or a smooth, medium-bodied beverage that won’t overwhelm the dessert’s delicate balance. On the table, a dollop of softly whipped topping can provide an extra layer of creaminess for those who crave it, while citrus zests or a faint sprinkle of flaky salt can offer tiny bursts of brightness that lift the overall profile without masking the dessert’s signature harmony.
Tips, Variations & Substitutions
- Texture experiments: Depending on your base choice, you can tailor the final mouthfeel. A crisper base yields a more pronounced bite, while a softer base creates a more unified, melt-in-your-mouth experience. Consider how the base interacts with the creamy interior and adjust accordingly for your preferred balance.
- Vegan and dairy-free options: The concept translates well to dairy-free or vegan adaptations by swapping the base materials and the finishing glaze with plant-based equivalents. The key is to maintain the contrast between a structured base, a smooth center, and a glossy top while preserving the overall sweetness and mouthfeel.
- Gluten considerations: If gluten is a concern, explore base options that provide a similar texture and crunch without gluten-containing components. The goal is to keep the dessert’s architecture intact while accommodating dietary needs.
- Flavor twists: You can introduce subtle accents that echo traditional éclair flavors without adding complexity. A hint of coffee, a touch of vanilla, or a dash of almond can deepen the profile. Use these ideas to tailor the dessert to a particular theme or season without altering the core concept.
- Seasonal variations: For a warm-weather twist, consider a lighter, fruit-forward topping or a citrus-inflected finish. In cooler months, a richer, darker glaze can amplify the dessert’s comforting vibe.
- Make-ahead strategies: Assemble and refrigerate the dessert well in advance of serving. The chilling not only helps the layers meld but also improves sliceability. If you’re tight on time, you can prepare components a day ahead and complete assembly the day of serving.
- Serving presentation: Think about the display. A neatly leveled top and clean, even slices make a striking table presentation. Dusting with a light decorative finish or cutting the dessert with a hot knife can yield pristine, restaurant-like slices.
Storage & Make-Ahead Ideas
The beauty of this dessert is that it’s designed for make-ahead success. Once assembled, it benefits from resting in the refrigerator, where the layers have a chance to harmonize and the texture becomes more cohesive. For best results, cover it loosely to protect the surface from drying and to prevent it from absorbing odors from other foods. When stored properly, the dessert typically maintains its texture and flavor for several days, which makes it ideal for events that require advance preparation. If you need to freeze a version for longer-term storage, approach with care: ensure the surface is protected from ice crystals and that the texture remains pleasant after thawing. While freezing can alter the exact mouthfeel, many people still enjoy the dessert after a well-managed freeze-thaw cycle, especially when it’s allowed to come to a comfortable, cool serving temperature before slicing.
Make-ahead strategies can also help when you’re feeding a crowd. You can portion the dessert into a tray or pan, label slices by day, and keep it chilled until time to serve. If you want to add a dramatic reveal for guests, you can add a final, polished finish just before serving—lightly warmed chocolate or a fresh gloss—so the top gleams anew as you cut the first slice. For holiday menus or family celebrations, consider preparing a few seasonal garnishes that complement the dessert’s texture and balance. A gentle sprinkle of something texturally interesting on top—such as a hint of crunch, a fine dusting, or a contrasting color—can elevate the presentation and make the experience feel extra special without complicating the recipe itself.
Fun Facts & Trivia (Optional)
Did you know that the allure of layered, no-bake desserts has roots in a long tradition of convenience-foods that emerged as home cooks sought to maximize flavor with minimal time in the kitchen? The idea behind Eclair Cake embodies a pantry-friendly magic: take a few reliable, everyday components, arrange them with care, and allow them to mingle in a cool, quiet setting. The result is a dessert that feels luxurious, yet remains approachable for bakers of all skill levels. The glossy top, reminiscent of the classic éclair glaze, is often the final touch that makes this dessert feel like a bakery creation in a home kitchen. And because the layers absorb flavors as they rest, patience truly pays off—an elegant reminder that good desserts aren’t merely about immediate impact but about the evolving harmony that unfolds as the dish sits and settles.
Historically, potlucks and community gatherings across many cultures have favored dishes that can be prepared in advance and shared in generous portions. Eclair Cake exemplifies that ethos: a recipe that travels well, stays a crowd favorite, and offers a sense of celebration with minimal last-minute effort. Its enduring popularity speaks to how kitchens across generations have embraced the idea that dessert can be both simple and spectacular—a sweet moment that brings people together without demanding a chef’s touch.
In the end, what makes Eclair Cake so enduring is its ability to feel timeless and fresh at once. It nods to classic pâtisserie while inviting home cooks to make it their own. It rewards patience, celebrates sharing, and delivers a final plate that invites compliments, memories, and perhaps the best part of any dessert: the conversation that begins as the first slice meets the mouth and continues long after the last bite is gone.
Ingredients
Graham Crackers & Cream Filling
- – Graham crackers (plain, original) 2 boxes
→ Base layers: aim for whole sheets to create a smooth, uniform surface. Arrange in a single layer on the bottom of a 9×13-inch pan; if needed, break crackers to fill gaps. Using standard crackers yields even soaking of the filling. For gluten-free versions, choose certified GF graham crackers and ensure no cross-contamination. - – Instant vanilla pudding mix (two 3.4 oz boxes)
→ Forms the creamy custard-like filling between the cracker layers. Prepare according to package instructions using 4 cups cold milk for both boxes combined; refrigerate the pudding until set before layering. For a lighter texture, you can fold in whipped cream after the pudding sets, but this is optional. - – Cold milk (4 cups)
→ Hydrates the pudding mix; use cold milk to help the pudding set faster and achieve a smoother texture. If dairy-free is required, you can substitute with almond milk or oat milk, but expect a thinner consistency. Keep milk chilled until ready to mix. - – Heavy cream (2 cups)
→ Whipped into soft peaks and folded into the pudding to create a rich, mousse-like filling. Chill the bowl and beaters; whip to medium peaks, then fold gently to retain volume. Do not overwhip into butter; if you do, start over with a fresh bowl. - – Powdered sugar (1/4 cup)
→ Sweetens the whipped cream component and helps create a balanced sweetness in the filling. Sift before adding to prevent graininess and adjust to your taste if you prefer a sweeter or lighter filling. - – Pure vanilla extract (1 teaspoon)
→ Enhances flavor in the whipped cream and pudding filling. Use pure vanilla for the most fragrant aroma; avoid imitation vanilla that can taste artificial when combined with chocolate glaze.
Chocolate Ganache Topping
- – Semisweet chocolate chips (1 cup)
→ The base of the glossy, thick ganache that coats the cake. Good chocolate yields a smooth glaze; choose high-quality chips and chop any larger pieces if needed for even melting. For a darker glaze, use 60–70% cacao chips. - – Heavy cream (1/3 cup)
→ Melted with chocolate to make a luxuriously smooth glaze. Heat gently or melt in short bursts, then stir until completely smooth. The ratio should yield a pourable glaze that coats but does not pool excessively on top. - – Unsalted butter (1 tablespoon)
→ Stirred into the ganache for shine and a velvety finish. Add at the end after the ganache is smooth; it helps the glaze spread evenly and adds richness. If you prefer a vegan version, substitute with a plant-based butter substitute.
Optional Add-ins
- – Chopped nuts (optional) 1/2 cup
→ Adds crunch and a nutty contrast to the creamy layers. Toast nuts in a dry skillet until fragrant to intensify flavor, then cool and sprinkle between layers or on top. If serving to kids, you may want to chop finer for easier bites. - – Whipped topping or extra whipped cream for topping (optional) 8 oz container
→ Use stabilized whipped topping for a lighter, fluffier finish or simply top with extra whipped cream for a classic look. If using regular whipped cream, whip until stiff peaks for a stable top that holds under the glaze.
Instructions
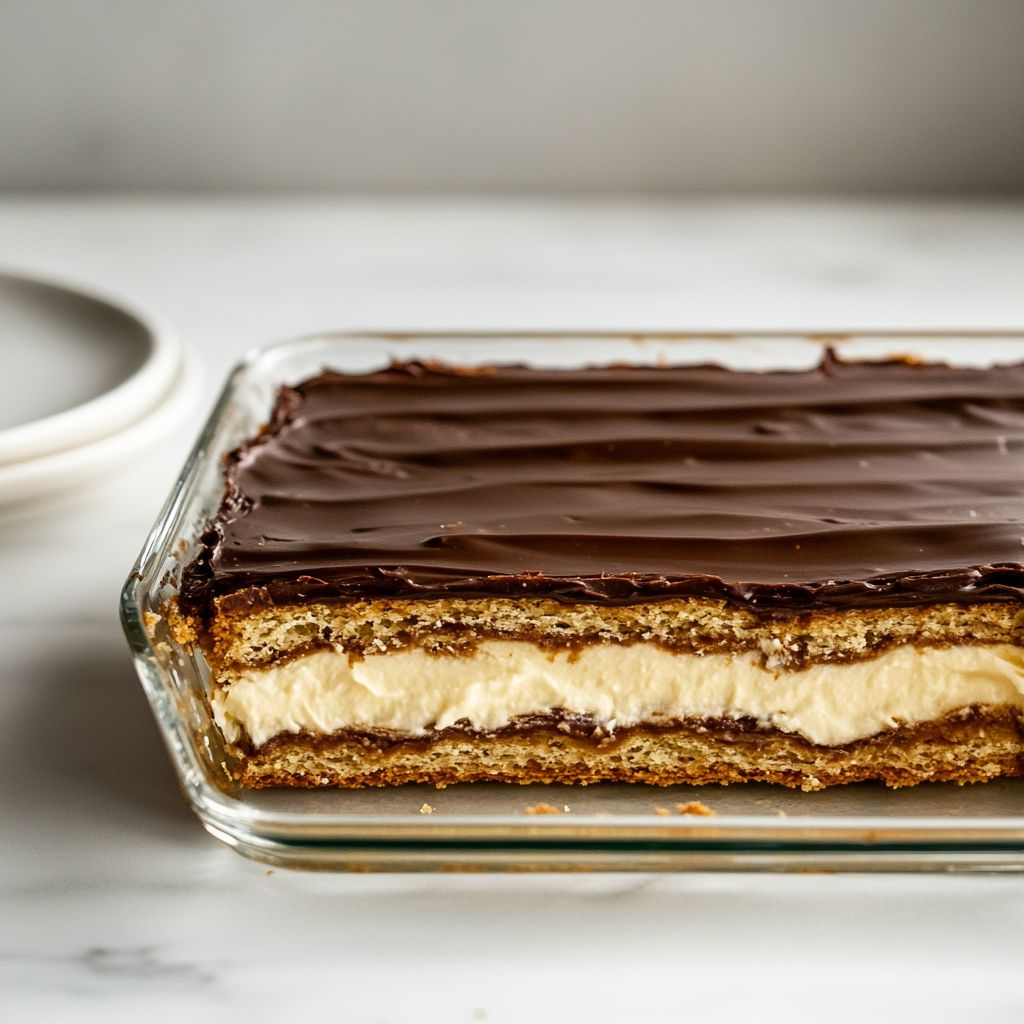
- Line a 9×13-inch pan with a single, seamless layer of graham crackers, covering the bottom completely and pressing gently to create a flat surface.
→ This establishes a stable foundation that absorbs the filling evenly and prevents gaps that would show through in the final cake. - Prepare the instant vanilla pudding by whisking the two boxes with 4 cups of cold milk until the mixture thickens to a smooth custard-like consistency, then refrigerate until fully set.
→ Chilling allows the pudding to firm so it can layer cleanly and hold its shape when combined with whipped cream, avoiding a runny filling. - Whip the heavy cream (2 cups) to soft-to-medium peaks with an electric mixer, adding powdered sugar and pure vanilla extract during the process until the cream holds gentle peaks.
→ Whipped cream provides light volume and sweetness; beating to the correct peaks ensures it folds into the pudding without deflating. - Fold the whipped cream into the set pudding using a large silicone spatula, incorporating in a gentle folding motion until the mixture is pale, airy, and uniform.
→ This creates a mousse-like filling with structure, maximizing creaminess while preserving airiness for a luscious texture. - Spoon a generous layer of the pudding-cream filling over the first cracker base and spread it evenly with an offset spatula, reaching the edges without tearing the crackers.
→ Even coverage ensures every bite is balanced and prevents thick pockets that could cause uneven slicing or soggy patches. - Place a second layer of graham crackers over the filling, aligning them to cover the surface and filling any minor gaps with broken crackers as needed.
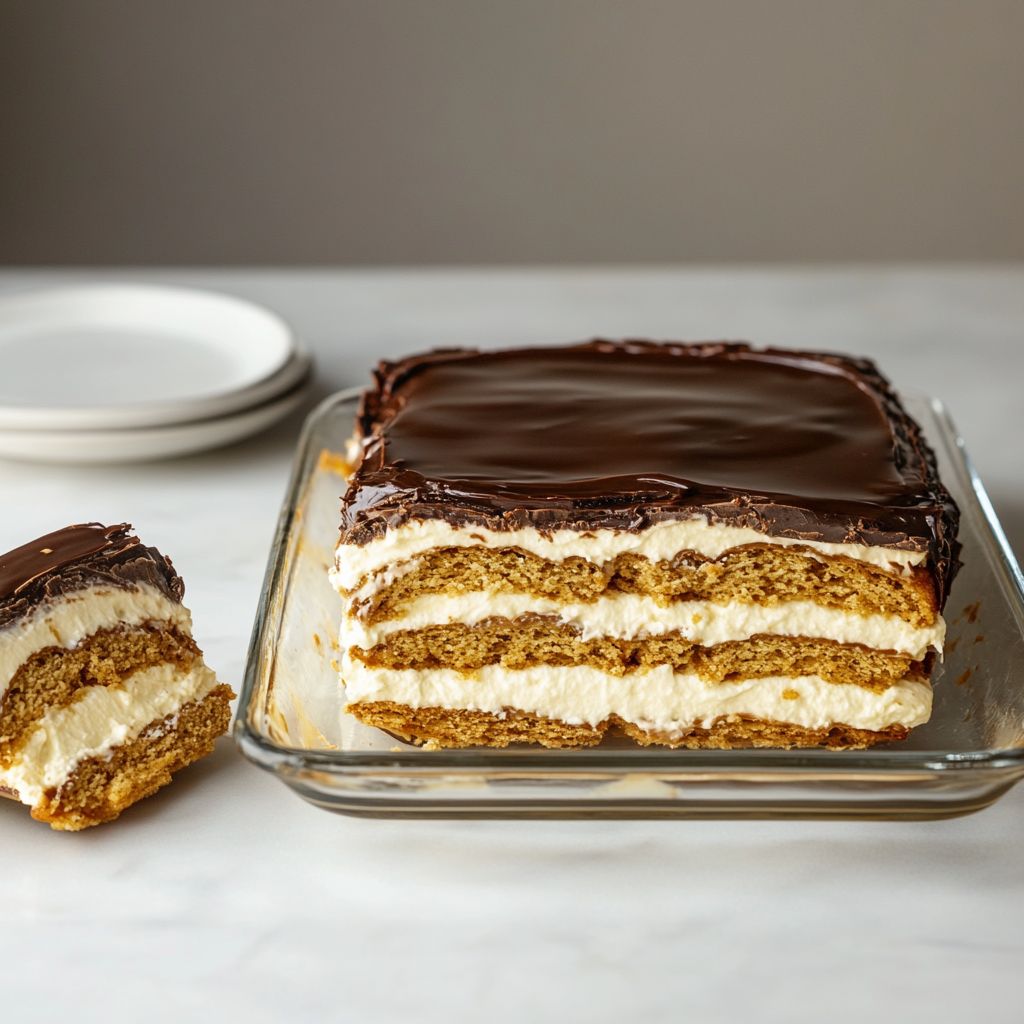
→ A second cracker layer adds the classic multilayer effect and helps modulate moisture absorption for a softer final texture. - Repeat the process by adding another layer of filling and then another layer of crackers, continuing until you approach the top of the pan, finishing with a final top layer of filling for a smooth surface.
→ Multiple alternating layers maximize flavor distribution and ensure the cake has a cohesive, dessert-like bite with even moisture. - Cover the pan and refrigerate for at least 4 hours or preferably overnight to allow the crackers to soften and the flavors to meld into a cohesive, sliceable cake.
→ The resting time lets the texture become tender and uniform, making it easier to cut neat slices and improves flavor integration. - Prepare the chocolate ganache by heating the heavy cream (1/3 cup) just to a simmer, then pouring it over the semisweet chocolate chips (1 cup) in a heatproof bowl and letting it sit for 1–2 minutes before whisking until completely smooth.
→ Gentle heating prevents scorching and ensures the ganache emulsifies fully, yielding a glossy, pourable glaze that coats evenly. - Stir in the unsalted butter (1 tablespoon) into the ganache off the heat until it is fully melted and the glaze shines, then set aside to cool slightly to a pourable but not runny consistency.
→ Butter heightens gloss and adds a slightly velvety finish; cooling prevents the glaze from sliding off the cake too quickly. - When the pudding cake is thoroughly chilled, pour the ganache over the top, using a spatula to spread it in a thin, even layer that drapes slightly over the edges. Let it set until glossy and firm to the touch.
→ A well-set ganache seals the top with a smooth, dessert-like finish and provides a contrasting chocolate sheen against the pale filling. - If using optional add-ins, sprinkle toasted chopped nuts between layers or on top after the ganache has begun to set, and gently press them into the surface for even distribution.
→ Toasting enhances nut flavor and crunch, while even distribution prevents clumps that could cause uneven bites. - Optionally top with stabilized whipped topping or extra whipped cream for a lighter finish, piping or dolloping as desired, and refrigerate briefly to set before slicing.
→ The topping adds a classic éclair-cake look and a soft contrast to the glossy glaze, while stabilization helps it hold its shape under the ganache. - To serve, run a warm knife blade under hot water, wipe dry, and slice cleanly into squares, wiping the blade between cuts for neater portions.
→ A warmed knife minimizes crackling and tearing through the chilled layers, producing neat, restaurant-style portions.

Notes
These eclair cake notes guide you through layering graham crackers with a creamy vanilla filling and a glossy chocolate ganache to create a classic, no-bake dessert. Start by lining a 9×13-inch pan with whole sheets of plain graham crackers in a single layer, breaking as needed to fill gaps for a smooth base. Prepare two boxes of instant vanilla pudding with 4 cups cold milk; refrigerate the pudding until set, then, if you like a lighter texture, fold in whipped cream after it firms. Whip 2 cups heavy cream with 1/4 cup powdered sugar and 1 teaspoon pure vanilla to soft or medium peaks, then fold gently into the cooled pudding to make a mousse-like filling. Layer a portion of the pudding over the cracker base, then add another layer of graham crackers, then more pudding; repeat until you reach the top, finishing with a final cracker layer. Chill the assembled cake for at least 4 hours or overnight to allow the crackers to absorb the filling and soften to a cake-like texture. For the ganache, melt 1 cup semisweet chocolate chips with 1/3 cup heavy cream in short bursts until smooth, then whisk in 1 tablespoon unsalted butter until glossy. Pour and spread the ganache over the top, letting it drip slightly over the edges for a finished look. Optional: sprinkle chopped nuts between layers or top with whipped topping for extra height and texture. If you need gluten-free options, use certified gluten-free graham crackers and ensure all mix-ins come from gluten-free sources to avoid cross-contamination. To make dairy-free versions, substitute almond or oat milk for the milk in the pudding, use a dairy-free whipped topping or coconut cream, and use a dairy-free butter substitute in the ganache. Always store leftovers in the refrigerator, tightly covered, and bring to room temperature for a creamier texture before serving.
Tips
Base layers and pan prep
- Use whole graham crackers to create a smooth, even surface. Arrange in a single layer on the bottom of a 9×13-inch pan; if needed, break crackers to fit along the edges and fill gaps for a uniform base.
- For gluten-free versions, choose certified GF graham crackers and ensure no cross-contamination with gluten-containing products.
- Lightly grease or line the pan with parchment to make removing the cake easier after chilling.
Preparing the pudding and filling
- Mix the two boxes of instant vanilla pudding with 4 cups of cold milk total. Use a whisk or mixer to blend until smooth, then refrigerate until set before layering to avoid soggy crackers.
- For a lighter texture, fold in whipped cream after the pudding has set. This adds lift without weighing down the layers.
- Keep the milk and glass bowl chilled while whipping to help the mixture set more firmly.
Whipped cream and folding technique
- Whip the heavy cream with the powdered sugar and vanilla until you reach soft to medium peaks. Chill the bowl and beaters for best volume.
- Fold the whipped cream into the set pudding gently to maintain airy texture. Do not overmix or you may deflate the cream.
Powdered sugar, vanilla, and flavor balance
- Sift powdered sugar before adding to the whipped cream to prevent grittiness and ensure a smooth filling.
- Use pure vanilla extract for the best aroma; avoid imitation vanilla which can taste artificial when paired with chocolate.
Ganache topping tips
- Chop semisweet chocolate chips if they’re large to ensure even melting. For a darker glaze, use chips with 60–70% cacao.
- Warm the heavy cream just until it’s steaming, then pour over the chopped chocolate or add the cream to the bowl and whisk until smooth. You want a pourable but not watery glaze.
- Stir in the unsalted butter at the end after the ganache is smooth for a glossy finish. If you’re making a vegan version, use a plant-based butter substitute.
Assembly and chilling guidance
- Layer the cake by alternating crackers and pudding, finishing with a final layer of crackers. Pour the ganache over the top and let it set before slicing.
- Chill the cake for at least 2–4 hours, or overnight if possible, to allow the layers to meld and the ganache to firm up. Longer chilling enhances flavor and cutting cleanly.
- To prevent soggy edges, ensure even thickness of each layer and avoid letting crackers soak too long in the pudding mixture.
Optional add-ins and toppings
- Chopped nuts (1/2 cup) add crunch and a nutty contrast. Toast them in a dry skillet to intensify flavor, then sprinkle between layers or on top. For kids, chop nuts finer.
- Whipped topping or extra whipped cream (8 oz) can be used for topping. Stabilized whipped topping holds up longer under the ganache; if using regular whipped cream, whip to stiff peaks for a stable top.
Make-ahead, storage, and variations
- Store leftovers in the refrigerator, covered, for up to 2–3 days. Texture may soften as the crackers absorb more filling over time.
- Gluten-free and dairy-free adaptations: use certified GF graham crackers, dairy-free milk for the pudding, and dairy-free butter substitutes if desired. Always check labels for cross-contamination and vegan suitability if needed.
FAQ
What is Eclair Cake?
Eclair Cake is a no-bake dessert that recreates the flavors of classic cream-filled éclairs using layers of graham crackers, a creamy pudding filling, and a glossy chocolate glaze. It’s refrigerated to set, and the flavors meld together overnight for a soft, sliceable treat.
What ingredients do I need to make Eclair Cake?
Common ingredients include:
- Graham crackers (regular or honey) to form the layers
- Instant vanilla pudding mix (2 boxes) with cold milk (about 4 cups)
- Whipped topping (8 oz, thawed)
- Chocolate glaze: semisweet chocolate chips, butter, and a little milk or cream
- Optional flavor boosts: vanilla extract, a pinch of salt, or a teaspoon of espresso powder for mocha flavor
How do I assemble Eclair Cake?
Basic steps:
- Prepare pudding according to package directions using the cold milk; let it thicken.
- Fold in whipped topping until smooth.
- Spread a thin layer of pudding over the bottom layer of graham crackers, then top with another layer of crackers.
- Repeat the layering (pudding then crackers) until you run out, finishing with a top layer of crackers.
- Prepare the chocolate glaze and spread it evenly over the top layer.
- Refrigerate for at least 4–6 hours, preferably overnight, before slicing.
How long should I chill the cake?
Chill for at least 4–6 hours, but overnight is best. This allows the crackers to soften and the flavors to meld, making clean, sliceable pieces.
Can I make Eclair Cake ahead of time?
Yes. You can assemble up to a day before serving. Keep it covered in the refrigerator. If you expect to hold it longer than 24 hours, you may want to check the texture and top glaze before serving.
Can I customize or make variations of this cake?
Absolutely. Some popular variations:
- Use chocolate pudding instead of vanilla for a richer flavor
- Add a thin layer of coffee or espresso mixed into the pudding for a mocha twist
- Swirl in lemon zest with vanilla pudding for a bright citrus note
- Drizzle caramel or add a sprinkle of sea salt on the glaze for a salted chocolate version
- Use dairy-free whipped topping and almond or coconut milk for a dairy-free version
Can I use different crackers or a different crust?
Graham crackers are traditional, but you can experiment with vanilla wafers or gluten-free crackers. Some people use a buttered shortbread crust for a richer base, though this changes the texture and flavor slightly. If you switch to a crust, adjust the layering so the crackers don’t crumble.
How should I store leftovers?
Keep Eclair Cake refrigerated in an airtight container or tightly covered. It will stay good for 2–4 days; the texture will continue to soften as it sits, which some people prefer.
Can I freeze Eclair Cake?
Freezing is not ideal for texture, especially for the top chocolate glaze and the crust. If you must, freeze unfrosted slices individually and glaze after thawing in the refrigerator, but expect some texture changes.
How do I make the chocolate glaze shine and set well?
Tips for a glossy glaze:
- Gently melt chocolate with butter and a splash of milk or cream; stir until smooth
- Avoid overheating the chocolate to prevent seizing
- If the glaze is too thick, whisk in a teaspoon of milk at a time until you reach a pourable consistency
- Spread while warm for a smooth, even finish; refrigerate to set